Guidelines OLE Forms6i
35
Oracle Forms Developer and Reports Developer Release 6i: Guidelines for Building Applications A73073-01 Library Solution Area Contents Index 6 Taking Advantage of Open Architecture This chapter offers guidelines to help you take advantage of the open and extensible development environment available in both Forms Developer and Reports Developer. Section Description Section 6.1, "Working with OLE Objects and ActiveX Controls" Describes support for component technologies and provides steps and guidelines for creating applications that include OLE objects and ActiveX controls. Section 6.2, "Using Foreign Functions to Customize Your Applications" Describes how to customize and extend your applications with 3GL foreign functions. Section 6.3, "Using the Open API to Build and Modify Form Builder Applications" Introduces the Open API and explains how to use the Open API to build and modify Form Builder applications. Section 6.4, "Designing Applications to Run against ODBC Datasources" Discusses ODBC support and provides detailed steps and guidelines that describe how to run applications against ODBC datasources. 6.1 Working with OLE Objects and ActiveX Controls This section describes what OLE and ActiveX are, and how you can exploit this technology. This section includes these topics: Section 6.1.1, "What is OLE?" Section 6.1.1.1, "When should I use OLE?" Section 6.1.1.9, "Adding an OLE object to your application" Section 6.1.1.10, "Manipulating OLE objects" Section 6.1.1.11, "OLE examples" Section 6.1.2, "What are ActiveX controls?" Section 6.1.2.1, "When should I use ActiveX controls?" Section 6.1.2.2, "Manipulating ActiveX controls" Section 6.1.2.7, "Adding an ActiveX control to your application" Section 6.1.2.8, "ActiveX examples" Note: Support for OLE and ActiveX is limited to the Windows platform. 6.1.1 What is OLE? Object Linking and Embedding (OLE) is a Microsoft standard that allows you to integrate and reuse different software components within a single application. Integrating an application with a Microsoft Excel document, for example, enables you to offer both Forms Developer (or Reports Developer) and Microsoft Excel features. Your users can format a Microsoft Excel document with any of the text processing features provided by Microsoft Excel, while using Forms Developer or Reports Developer features for displaying and manipulating data from the database. By incorporating OLE objects within your application, you can seamlessly integrate a diverse group of specialized components to build full-fledged applications. You no longer have to build entire applications from the ground up. You can deliver applications in a shorter amount of time and at a lower cost. 6.1.1.1 When should I use OLE? Use OLE when: You want to leverage an existing OLE-compliant application within your application. For example, you can enhance your application's capabilities with word processor documents, spreadsheet documents, knob controls, video clips, sound, and so on. You want to provide your application users with a familiar interface.
-
Upload
adelino-gomes-vieira-junior -
Category
Documents
-
view
606 -
download
19
Transcript of Guidelines OLE Forms6i

Oracle Forms Developer and Reports Developer Release 6i:
Guidelines for Building Applications
A73073-01
Library Solution
Area
Contents Index
6
Taking Advantage of Open Architecture
This chapter offers guidelines to help you take advantage of the open and extensible development environment available in both Forms Developer and Reports
Developer.
Section Description
Section 6.1, "Working with OLE Objects and ActiveX
Controls"
Describes support for component technologies and provides steps and guidelines for creating applications
that include OLE objects and ActiveX controls.
Section 6.2, "Using Foreign Functions to Customize Your
Applications"
Describes how to customize and extend your applications with 3GL foreign functions.
Section 6.3, "Using the Open API to Build and Modify
Form Builder Applications"
Introduces the Open API and explains how to use the Open API to build and modify Form Builder
applications.
Section 6.4, "Designing Applications to Run against
ODBC Datasources"
Discusses ODBC support and provides detailed steps and guidelines that describe how to run applications
against ODBC datasources.
6.1 Working with OLE Objects and ActiveX Controls
This section describes what OLE and ActiveX are, and how you can exploit this technology. This section includes these topics:
Section 6.1.1, "What is OLE?"
Section 6.1.1.1, "When should I use OLE?"
Section 6.1.1.9, "Adding an OLE object to your application"
Section 6.1.1.10, "Manipulating OLE objects"
Section 6.1.1.11, "OLE examples"
Section 6.1.2, "What are ActiveX controls?"
Section 6.1.2.1, "When should I use ActiveX controls?"
Section 6.1.2.2, "Manipulating ActiveX controls"
Section 6.1.2.7, "Adding an ActiveX control to your application"
Section 6.1.2.8, "ActiveX examples"
Note: Support for OLE and ActiveX is limited to the Windows platform.
6.1.1 What is OLE?
Object Linking and Embedding (OLE) is a Microsoft standard that allows you to integrate and reuse different software components within a single application.
Integrating an application with a Microsoft Excel document, for example, enables you to offer both Forms Developer (or Reports Developer) and Microsoft Excel
features. Your users can format a Microsoft Excel document with any of the text processing features provided by Microsoft Excel, while using Forms Developer or
Reports Developer features for displaying and manipulating data from the database.
By incorporating OLE objects within your application, you can seamlessly integrate a diverse group of specialized components to build full-fledged applications. You
no longer have to build entire applications from the ground up. You can deliver applications in a shorter amount of time and at a lower cost.
6.1.1.1 When should I use OLE?
Use OLE when:
You want to leverage an existing OLE-compliant application within your application.
For example, you can enhance your application's capabilities with word processor documents, spreadsheet documents, knob controls, video clips, sound, and
so on.
You want to provide your application users with a familiar interface.

On Microsoft Windows, most users are familiar with Microsoft Word and Microsoft Excel. Rather than creating word processing or spreadsheet functionality to
your application, you could leverage and embed a Word or Excel document within your application.
Your applications are primarily deployed on the Windows platform.
6.1.1.2 About OLE servers and containers
OLE uses the concept of client and server. The client is an application that requests and uses the services of another application. The server is the one that provides
these services.
OLE Server Application
An OLE server application creates OLE objects that are embedded or linked in OLE containers. The server application is responsible for the creation, storage,
and manipulation of OLE objects. For example, the server decides how to repaint the object when certain portions are exposed.
Graphics Builder and Microsoft Word are examples of OLE servers.
OLE Container Application
Unlike OLE server applications, OLE container applications do not create documents for embedding and linking. Instead, OLE container applications provide a
place to store and display objects that are created by OLE server applications.
Form Builder and Report Builder are examples of OLE container applications.
6.1.1.3 About embedded and linked objects
You can link or embed OLE objects within your application.
Embedded Object. An embedded object has both its presentation and native data stored within your application, or as a LONG RAW column in the
database.
Linked Object. A linked object only contains presentation information and a reference to its native data. The content of the linked object is not stored within
your application or as a LONG RAW column in a database; it is stored in a separate, linked file.
There is no functional difference between linking and embedding. The OLE container treats the objects equally, by executing the same code, whether they are linked or
embedded. The only difference is that embedding an OLE object increases the size of your application. This could eventually lead to performance considerations
(particularly on a file server), because the larger the application, the longer it will take to open and load into memory.
6.1.1.4 About the registration database
Each client machine contains an OLE registration database. The registration database stores a set of classes that categorize OLE objects. The information in the
registration database determines the object classes that are available for embedding and linking in OLE containers.
OLE server applications export a set of classes that become members of the registration database. Each computer has a single registration database. If the registration
database does not already exist when an OLE server application is installed, one is created.
A single OLE server application can add many OLE classes to the registration database. The process of adding classes to the registration database is transparent and
occurs during the installation of an OLE server application. For example, when you install Microsoft Excel, several classes are added to the registration database;
some of the classes that are installed in the registration database include Excel Application, Excel Application 5, Excel Chart, Excel Sheet, ExcelMacrosheet, and
ExcelWorkSheet.
6.1.1.5 About OLE activation styles
Activating an OLE object enables you to access features from the OLE server application. There are two ways to activate an OLE object: in-place activation or
external activation.
In-place Activation. In-place activation enables your users to manipulate the OLE object within your application without switching to a different window.
During in-place activation, the activated object appears within a hatched border, and the toolbar, menu and other controls of the activated object temporarily
replace standard menu options. The replacement menu options and toolbars provide access to features that are available from the OLE server application.
Standard menu options and toolbars re-appear when you deactivate in-place activation. To deactivate in-place activation, you click anywhere outside the
hatched border.
Note: In-place activation is available for embedded objects, but it is not available for linked objects.
External Activation. External activation enables your users to manipulate the OLE object in a separate window. When an OLE object is activated, the
object's OLE server application is launched, and the OLE object appears in a separate OLE server application window. The separate window has the menu
options and toolbars of the OLE server application. To deactivate external activation, you must explicitly exit the OLE server application.
External activation is available for both embedded and linked objects.
When the contents of a linked source file is modified with external activation, a linked object can be updated manually or automatically. Manual updates require
an explicit instruction for an object to reflect changes from a linked source file. Automatic updates occur as soon as you modify a linked source file.
Note: Both in-place activation and external activation are dependent on the OLE activation property settings of the OLE container. If the OLE server
application is accessible, the activation property settings of the OLE container determine whether in-place activation or external activation occurs when an
embedded OLE object is activated. Linked objects can only be activated with external activation; in-place activation does not apply to linked objects, even if

the in-place activation property is set to Yes.
6.1.1.6 About OLE automation
Occasionally, you may want to interact with or manipulate the data within an OLE object. To do so, you use PL/SQL and OLE automation.
OLE automation enables the server application to expose a set of commands and functions that can be invoked from an OLE container application. By using these
commands and functions, you can manipulate OLE objects from the OLE container environment.
In both Forms Developer and Reports Developer, you use PL/SQL to access any command or function that is exposed by an OLE server application. Built-ins
provide a PL/SQL Application Programming Interface for creating, manipulating, and accessing OLE commands and functions.
Note: Many of the options available for manipulating an OLE object in an OLE container application are determined by the OLE server application. For instance,
options from the OLE popup menu, also known as OLE verbs, are exposed by the OLE server application. The information contained in the registration database,
such as object classes, is also dependent on the OLE server application.
6.1.1.7 OLE support
Both Forms Developer and Reports Developer provide OLE server and container support as well as support for OLE automation.
Component Container Server Application OLE2 Automation
Form Builder Yes No Yes
Graphics Builder No Yes Yes
Procedure Builder No No No
Project Builder No No No
Query Builder No No No
Report Builder Yes No Yes
Schema Builder No No No
Translation Builder No No No
6.1.1.7.1 OLE container support
As OLE container applications, Form Builder and Report Builder support the following:
Embedding and linking of OLE server objects into OLE containers.
In-place activation of embedded contents in OLE containers (Form Builder only).
In-place activation enables you to access menus and toolbars from OLE server applications to edit embedded OLE objects while you are in Form Builder.
Programmatic access to OLE objects, properties, and methods through OLE automation support from PL/SQL.
Using PL/SQL, you can invoke commands and functions that are exposed by OLE servers.
Seamless storage of OLE objects in a database in LONG RAW columns.
You can save OLE objects to a database, as well as query OLE objects from a database. When linked objects are saved, only the image and the link
information are retained in the database. The contents of a linked object remains in a linked source file. Saving an embedded object retains all the contents of an
embedded object in the database.
6.1.1.7.2 OLE server support
Graphics Builder is an OLE server application. You can embed or link Graphics Builder displays within your Forms Developer or Reports Developer application.
Recommendation: If you want to add a Graphics Builder display to your application, don't embed or link it as an OLE object. Instead, use the Chart Wizard to add
graphical displays to your applications.
6.1.1.7.3 OLE container properties
OLE container properties determine OLE display attributes, OLE container interaction with the server, container storage, and so on.
Note: In addition to container properties, you can also set OLE object properties. Each OLE object can expose several properties. You access OLE object
properties by clicking the right mouse button to display the popup menu.
This section lists the OLE container properties supported by both Forms Developer and Reports Developer.
Component Property Description
Form Builder OLE
Activation
Style
Specifies the event that will activate the OLE containing item, either double-click, focus-in, or manual.
OLE Determines what class of OLE objects can reside in an OLE container.
OLE
Class
Determines what class of OLE objects can reside in an OLE container.
OLE In-
place
Activation
Specifies if OLE in-place activation is used for editing embedded OLE objects.
OLE
Inside-
Out
Support
Specifies if the OLE server of the embedded object enables inside-out object support during in-place activation. Inside-out
activation enables for more than one embedded object to have an active editing window within an OLE container.
OLE
Popup
Menu
Items
Determines which OLE popup menu commands are displayed and enabled when the mouse cursor is on the OLE object and the
right mouse button is pressed. The OLE popup menu commands manipulate OLE objects.
OLE
Resize
Style
Determines how an OLE object is displayed in an OLE container.
OLE
Tenant
Aspect
Determines how an OLE object appears in an OLE container, either content, icon, or thumbnail.
OLE
Tenant
Types
Specifies the type of OLE objects that can be tenants of the OLE container, either embedded, linked, any, static, or none.
Show
OLE
Popup
Menu
Determines whether the right mouse button displays a popup menu of commands for interacting with the OLE object.
Show
OLE
Tenant
Type
Determines whether a border defining the OLE object type surrounds the OLE container.
Report Builder Create New Specifies that you want to embed your OLE object within your report application.
Create from File Specifies that you want to link your OLE object within your report application.
Display as Icon Specifies whether the OLE object should appear as an icon. By default, the OLE object appears as an empty container.
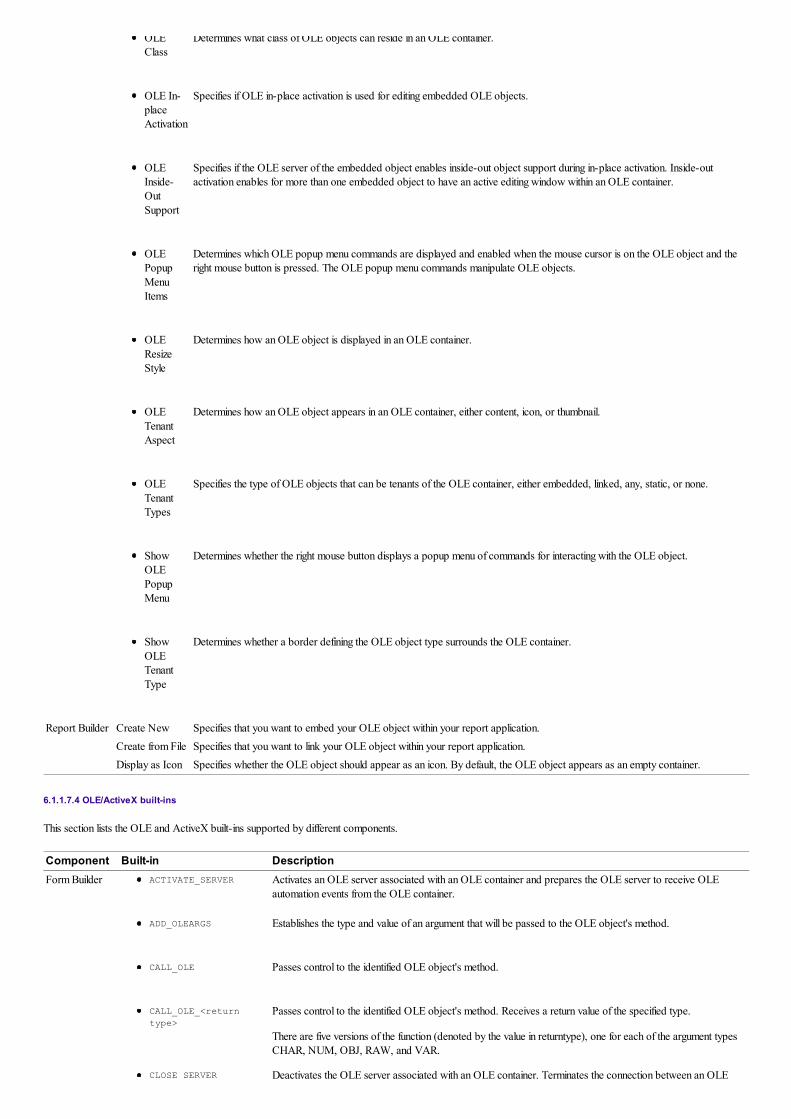
6.1.1.7.4 OLE/ActiveX built-ins
This section lists the OLE and ActiveX built-ins supported by different components.
Component Built-in Description
Form Builder ACTIVATE_SERVER
Activates an OLE server associated with an OLE container and prepares the OLE server to receive OLE
automation events from the OLE container.
ADD_OLEARGS
Establishes the type and value of an argument that will be passed to the OLE object's method.
CALL_OLE
Passes control to the identified OLE object's method.
CALL_OLE_<return
type>
Passes control to the identified OLE object's method. Receives a return value of the specified type.
There are five versions of the function (denoted by the value in returntype), one for each of the argument types
CHAR, NUM, OBJ, RAW, and VAR.
CLOSE_SERVER Deactivates the OLE server associated with an OLE container. Terminates the connection between an OLE

CLOSE_SERVER
Deactivates the OLE server associated with an OLE container. Terminates the connection between an OLE
server and the OLE container.
CREATE_OLEOBJ
In its first form, creates an OLE object, and establishes the object's persistence. In its second form, alters the
persistence of a previously-instantiated OLE object.
CREATE_VAR
Creates an empty, unnamed variant.
There are two versions of the function, one for scalars and the other for arrays.
DESTROY_VARIANT
Destroys a variant that was created by the CREATE_VAR function.
EXEC_VERB
Causes the OLE server to execute the verb identified by the verb name or the verb index. An OLE verb
specifies the action that you can perform on an OLE object.
FIND_OLE_VERB
Returns an OLE verb index. An OLE verb specifies the action that you can perform on an OLE object, and
each OLE verb has a corresponding OLE verb index.
GET_INTERFACE_POINTER
Returns a handle to an OLE2 automation object.
GET_OLEARG_<type>
Obtains the nth argument from the OLE argument stack.
There are five versions of the function (denoted by the value in type), one for each of the argument types
CHAR, NUM, OBJ, RAW, and VAR.
GET_OLE_MEMBERID
Obtains the member ID of a named method or property of an OLE object.
GET_VAR_BOUNDS
Obtains the bounds of an OLE variant's array.
GET_VAR_DIMS
Determines if an OLE variant is an array, and if so, obtains the number of dimensions in that array.
GET_VAR_TYPE
Obtains the type of an OLE variant.
GET_VERB_COUNT
Returns the number of verbs that an OLE server recognizes. An OLE verb specifies the action that you can
perform on an OLE object, and the number of verbs available depends on the OLE server.
GET_VERB_NAME
Returns the name of the verb that is associated with the given verb index.
INITIALIZE_CONTAINER
Inserts an OLE object from a server-compatible file into an OLE container.
INIT_OLE_ARGS
Establishes how many arguments are going to be defined and passed to the OLE object's method.
LAST_OLE_ERROR
Returns the identifying number of the most recent OLE error condition.
LAST_OLE_EXCEPTION
Returns the identifying number of the most recent OLE exception that occurred in the called object.
OLEVAR_EMPTY
An OLE variant of type VT_EMPTY.
PTR_TO_VAR
First, creates an OLE variant of type VT_PTR that contains the supplied address. Then, passes that variant and
type through the function VARPTR_TO_VAR.
RELEASE_OBJ
Shuts down the connection to the OLE object.
SERVER_ACTIVE
Indicates whether or not the server associated with a given container is running.
SET_OLE
Changes the value of an OLE property.
There are three versions of the procedure, one for each of the new-value types: NUMBER, VARCHAR, and
OLEVAR.
SET_VAR Sets a newly-created OLE variant to its initial value. Or, resets an existing OLE variant to a new value.

SET_VAR
Sets a newly-created OLE variant to its initial value. Or, resets an existing OLE variant to a new value.
There are four versions of the procedure, one for each of the new value types CHAR, NUMBER, OLEVAR,
and table.
TABLE_FROM_BLOCK
Populates a table from a block.
TO_VARIANT
Creates an OLE variant and assigns it a value.
There are four versions of the function.
VARPTR_TO_VAR
Changes a variant pointer into a simple variant.
VAR_TO_TABLE
Reads an OLE array variant and populates a PL/SQL table from it.
VAR_TO_<type>
Reads an OLE variant and transforms its value into an equivalent PL/SQL type.
There are six versions of the function (denoted by the value in type), one for each for of the types CHAR,
NUM, OBJ, RAW, TABLE, and VARPTR.
VAR_TO_VARPTR
Creates an OLE variant that points to an existing variant.
Developer
OLE2 Package
ADD_ARG
Adds an argument to a given argument list.
CREATE_ARGLIST
Creates an argument list to be passed to an OLE server.
CREATE_OBJ
Returns a handle to a newly created OLE object. This is usually used for OLE objects that do not have a user
interface, such as a spell-checker.
DESTROY_ARGLIST
Destroys the specified argument list.
GET_CHAR_PROPERTY
Returns a character property of the OLE object.
GET_NUM_PROPERTY
Returns a number property of the OLE object.
GET_OBJ_PROPERTY
Returns an object type property of the OLE object.
INVOKE
Executes the specified OLE server procedure.
INVOKE_CHAR
Executes the specified OLE server function. This function returns a character value.
INVOKE_NUM
Executes the specified OLE server function. This function returns a number value.
INVOKE_OBJ
Executes the specified OLE server function. This function returns an object type value.
LAST_EXCEPTION
Returns an OLE error.
SET_PROPERTY
Sets the OLE property with the specified value.
RELEASE_OBJ
Deallocates all resources for the specified OLE object.
6.1.1.8 OLE guidelines
Item Recommendation
Embedding or Linking
an OLE object
You should link an OLE object when:
Your users prefer to work with the OLE object within the OLE server environment (your users prefer external activation). You link

Your users prefer to work with the OLE object within the OLE server environment (your users prefer external activation). You link
your OLE object when your users are more comfortable editing a spreadsheet, for example, within Microsoft Excel, rather than within
your application.
The OLE object is used in multiple applications.
The size of your application is a concern.
You should embed an OLE object when:
Your users can work with OLE objects within your application; your users prefer in-place activation.
You prefer to maintain a single application, rather than maintaining an application with multiple OLE source files.
You are not concerned about the size of your application.
OLE Activation Style You should use external activation. Linked objects can only be activated with external activation.
Display Style for optimum performance, set the Display Style property for your OLE object to Icon.
Creating OLE objects
at design-time or
runtime?
You should create your OLE objects at design-time.
When you create an OLE container in a Form, Form Builder automatically initializes the OLE object.
In contrast, if you insert an OLE object at runtime, you must initialize the OLE object manually.
Note: If you manually insert an OLE object during Forms Runtime, the OLE object appears in the OLE container until the next record query.
For any subsequent record queries, the OLE container appears in a state as defined in the Form Builder or populated with an OLE object
from the database.
Portability OLE objects are only supported on Microsoft Windows. If portability is an issue, you should not incorporate OLE objects within your
application. Instead, consider developing the features within Forms Developer (or Reports Developer), or consider developing a 3GL foreign
function.
Setting OLE
properties within
Report Builder
Report Builder OLE container properties are only available in the Create OLE Object dialog; Report Builder does not expose OLE container
properties within the Property Palette. When working within Report Builder, set OLE properties within the Create OLE Object dialog.
When working with OLE objects, consider these guidelines:
6.1.1.9 Adding an OLE object to your application
For detailed steps about how to add an OLE object to your application, refer to the online help.
6.1.1.10 Manipulating OLE objects
OLE server applications expose a set of commands that allow you to manipulate an OLE object programmatically.
You can manipulate OLE objects by:
Getting and setting OLE properties.
Calling OLE methods to perform special commands.
Note: Before you can call an OLE method, you must first import the OLE object's methods and properties into Forms Developer or Reports Developer.
Importing OLE methods and properties enables you to interact with the OLE object within the native environment.
You can access OLE methods from your application by using the STANDARD (Form Builder only) and OLE2 built-in packages.
6.1.1.11 OLE examples
This section provides several examples to help you get started with OLE.
6.1.1.11.1 Example 1: setting an OLE property using bind variable syntax
Within your form applications, you can use the :item('item_name').ocx.server_name.property bind variable syntax to assign or retrieve property values.
For example:
:item('OLEitem').OCX.SpreadSheet.CellForeGroundColor:=
:item('OLEitem').OCX.SpreadSheet.CellForeGroundColor + 1;
OLEitem is the name of the item, SpreadSheet is the name of the OLE control server, and CellForeGroundColor is the name of the property.
6.1.1.11.2 Example 2: setting an OLE property using property assessors
Within your form applications, you can also use property assessor functions and procedures to get and set property values.
For example:
Variant OleVar;
Variant := EXCEL_WORKSHEET.ole_Range(:CTRL.interface,
To_variant('A1'));
EXCEL_WORKSHEET is the name of the program unit created from the OLE Importer. OLE_RANGE is the name of the property accessor.
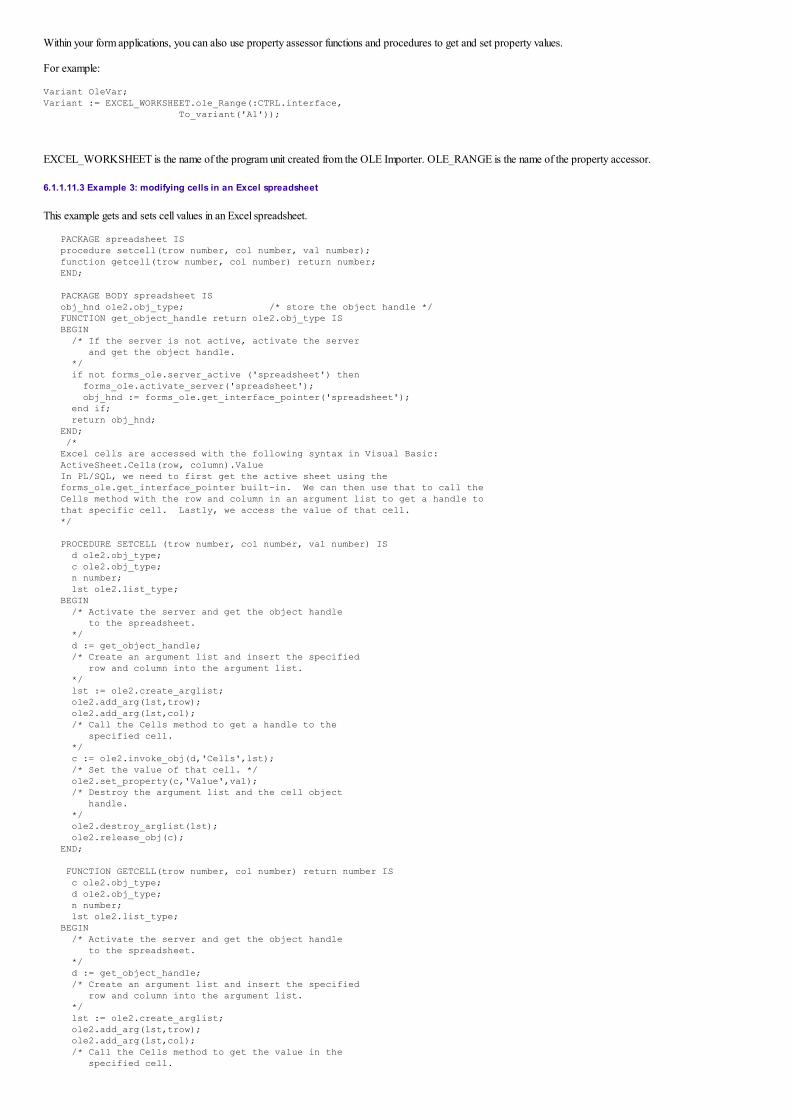
6.1.1.11.3 Example 3: modifying cells in an Excel spreadsheet
This example gets and sets cell values in an Excel spreadsheet.
PACKAGE spreadsheet IS
procedure setcell(trow number, col number, val number);
function getcell(trow number, col number) return number;
END;
PACKAGE BODY spreadsheet IS
obj_hnd ole2.obj_type; /* store the object handle */
FUNCTION get_object_handle return ole2.obj_type IS
BEGIN
/* If the server is not active, activate the server
and get the object handle.
*/
if not forms_ole.server_active ('spreadsheet') then
forms_ole.activate_server('spreadsheet');
obj_hnd := forms_ole.get_interface_pointer('spreadsheet');
end if;
return obj_hnd;
END;
/*
Excel cells are accessed with the following syntax in Visual Basic:
ActiveSheet.Cells(row, column).Value
In PL/SQL, we need to first get the active sheet using the
forms_ole.get_interface_pointer built-in. We can then use that to call the
Cells method with the row and column in an argument list to get a handle to
that specific cell. Lastly, we access the value of that cell.
*/
PROCEDURE SETCELL (trow number, col number, val number) IS
d ole2.obj_type;
c ole2.obj_type;
n number;
lst ole2.list_type;
BEGIN
/* Activate the server and get the object handle
to the spreadsheet.
*/
d := get_object_handle;
/* Create an argument list and insert the specified
row and column into the argument list.
*/
lst := ole2.create_arglist;
ole2.add_arg(lst,trow);
ole2.add_arg(lst,col);
/* Call the Cells method to get a handle to the
specified cell.
*/
c := ole2.invoke_obj(d,'Cells',lst);
/* Set the value of that cell. */
ole2.set_property(c,'Value',val);
/* Destroy the argument list and the cell object
handle.
*/
ole2.destroy_arglist(lst);
ole2.release_obj(c);
END;
FUNCTION GETCELL(trow number, col number) return number IS
c ole2.obj_type;
d ole2.obj_type;
n number;
lst ole2.list_type;
BEGIN
/* Activate the server and get the object handle
to the spreadsheet.
*/
d := get_object_handle;
/* Create an argument list and insert the specified
row and column into the argument list.
*/
lst := ole2.create_arglist;
ole2.add_arg(lst,trow);
ole2.add_arg(lst,col);
/* Call the Cells method to get the value in the
specified cell.

*/
c := ole2.invoke_obj (d,'Cells',lst);
n := ole2.get_num_property (c, 'Value');
/* Destroy the argument list. */
ole2.destroy_arglist(lst);
ole2.release_obj(c);
return n;
END;
END;
To access a cell, use the following code:
spreadsheet.setcell(3, 5, 91.73);
:block1.item1 := spreadsheet.getcell(2, 4);
6.1.2 What are ActiveX controls?
ActiveX controls (originally known as OLE or OCX controls) are stand-alone software components that you embed within your application to provide light-weight
user interface controls.
ActiveX controls differ from OLE objects in several ways:
An ActiveX control is not a separate application, but a server that plugs into an ActiveX container--ActiveX controls are self-contained.
Each ActiveX control exposes a set of properties, methods, and events. Properties define the ActiveX control's physical and logical attributes, methods define
actions that the ActiveX control can perform, and events denote some change in status in the ActiveX control.
ActiveX controls must be deployed and installed with your applications.
6.1.2.1 When should I use ActiveX controls?
ActiveX controls are typically used to enhance an application by providing some additional, self-contained functionality.
For example, you can enhance your application with a tabbed property sheet, a spin control, a calendar control, a help control, and so on.
A significant amount of effort is required to develop your own ActiveX controls or OLE servers. It is recommended that you use ActiveX controls and OLE servers
developed and distributed by third party vendors.
6.1.2.2 Manipulating ActiveX controls
Each ActiveX control exposes a set of properties, methods, and events. Properties define the ActiveX control's physical and logical attributes, methods define actions
that the ActiveX control can perform, and events denote some change in status in the ActiveX control.
You can manipulate an ActiveX control by:
Setting and getting ActiveX control properties.
Calling ActiveX control methods.
Note: Before you can invoke an ActiveX control method, you must first import its methods and events into Forms Developer. Importing ActiveX
methods and events enables you to interact with the ActiveX control within the native Forms Developer environment.
Responding to ActiveX control events.
To manipulate an ActiveX control, you use the STANDARD and OLE2 (both within Forms Developer) built-in packages.
6.1.2.3 Responding to ActiveX events
You can respond to an ActiveX event by writing your own code within an ActiveX event package or within the On-Dispatch-Event trigger.
Each ActiveX event is associated with a PL/SQL procedure defined in the events' package. When the control fires an event, the code in the procedure is automatically
executed.
Procedure names are determined by an internal number that represents the corresponding event. The restricted procedure produced by an event has an application
programming interface similar to the following:
PROCEDURE /*Click*/ event4294966696(interface OleObj);
Note: ActiveX procedures run in restricted mode. When calling the event procedure within an On-Dispatch-Event trigger, you can explicitly define whether the
procedure is run in restricted or unrestricted mode by using the FORMS4W.DISPATCH_EVENT call. When defining a restricted procedure, OUT parameters are
not observed.
6.1.2.4 Deploying your ActiveX control
Deploying an application that contains an ActiveX control requires that you deploy the ActiveX control.
To deploy an ActiveX control, you must:
Register the ActiveX control on the client-machine.

If you install an ActiveX control by using the installation program supplied with the ActiveX control, registration occurs automatically.
For manual registration, use regActiveX32.exe or regsvr32.exe; both are available with Microsoft development tools and from ActiveX control vendors.
Copy ActiveX DLLs to the client-machine (for example, C:\WINDOWS\SYSTEM).
Most ActiveX controls require a supporting DLL, such as the Microsoft Foundation Class runtime library (MFC40.DLL). The DLL must be in the
\WINDOWS\SYSTEM directory or in the search path. If the DLL is out of date or missing, your ActiveX control will not register properly.
Note: ActiveX controls, whether distributed by third party ActiveX control vendors or bundled with application development tools, may require that you pay
additional fees or obtain additional licenses prior to distributing the ActiveX control.
6.1.2.5 ActiveX support
Support means the ability to create, manipulate, and communicate with ActiveX controls.
Component Container
Form Builder Yes
Graphics Builder No
Procedure Builder No
Project Builder No
Query Builder No
Report Builder No
Schema Builder No
Translation Builder No
6.1.2.5.1 ActiveX properties
This section lists the ActiveX properties supported by Forms Developer.
Component Property Description
Form Builder OLE Class Determines what class of OLE objects can reside in an OLE container.
Control
Properties
Allows you to set ActiveX control properties.
You can access the ActiveX properties dialog through the Property Palette or by clicking the ActiveX control, then clicking the
right mouse button.
About Control Displays information about the ActiveX control
Control Help Displays control-specific help (if available).
6.1.2.5.2 ActiveX/OLE built-ins
Refer to Section 6.1.1.7.4 for a list of the ActiveX and OLE built-ins supported by different components.
6.1.2.6 ActiveX guidelines
Item Recommendation
Creating
your own
ActiveX
Control
A significant amount of effort is required to develop your own ActiveX controls or OLE servers. It is recommended that you use ActiveX controls and
OLE servers developed and distributed by third party vendors.
Initializing
an ActiveX
Control
Use ActiveX controls in blocks with the Single Record property set to Yes, because single records are immediately initialized when Forms Runtime
starts up.
For multiple records, each record is not initialized until you navigate to the record.
Without initialization, the ActiveX control item is empty, giving the impression that no ActiveX control is available.
Managing
OLE
Variant
Types
Some OLE servers such as Microsoft Excel use variant types. Use the STANDARD built-in package to do the necessary conversion to and from
variant types.
The lifetime and scope of a variant type is limited to a trigger (variant memory space is released when a trigger exits). To extend the lifetime and
scope of a variant type, set the persistent parameter in To_Variant() to TRUE and assign the results to a global variable.
Note: Global variants must be explicitly destroyed using Destroy_Variant(). Similarly, OLE objects created with Create_OleObj() are global in scope
(the persistent parameter defaults to TRUE). You must explicitly call Release_Obj() to release global objects.
Moving
ActiveX
Files
You should maintain your ActiveX files within the "install" directory; do not move your ActiveX files to a different directory.
At installation, the directories in which the ActiveX control is installed are registered in the Windows Registration Database in Windows 95 and
Windows NT, making the ActiveX Control visible to your development environment.

When you move an ActiveX Control to a different directory, or rename the directory, you invalidate the information in the registry.
If you find it necessary to move the ActiveX Control or rename its directory, use regsrv32.exe or regActiveX32.exe utilities provided with most
Microsoft development products to re-register the ActiveX in its new location.
Portability
Issues
We support ActiveX on the Windows platform only. ActiveX controls cannot be used on the Web or on UNIX. If portability is an issue, do not use an
ActiveX control.
Debugging
ActiveX
Calls
Given that object types cannot be checked at compile time, it is possible to call a function on an object which is not defined for the class of that object.
Because the functions are bound by ID rather than by name, a different function may be called than expected, leading to unusual errors.
One way to guarantee that you are calling the correct method is to change the generated function, replacing the hardcoded constant with a call to
GET_OLE_MEMBERID. For example:
Procedure Ole_Add(interface OleObj, TimeBegin VARCHAR2, TimeEnd VARCHAR2, Text VARCHAR2, BackColor OleVar := OleVar_Null) IS
BEGIN
Init_OleArgs (4);
Add_OleArg (TimeBegin);
Add_OleArg (TimeEnd);
Add_Olearg (Text);
Add_OleArg (BackColor);
Call_Ole (interface, 2);
END;
Replace the Call_ole() with: Call_Ole (interface, Get_Ole_MemberID(interface, `Add'));
You can check for FORM_SUCCESS after the GET_OLE_MEMBERID call.
Restrictions ActiveX event procedures are restricted. In general, GO_ITEM cannot be called within ActiveX procedure code, unless the same event applies
to multiple items and a GO_ITEM is necessary. In this case, you can use the GO_ITEM built-in by doing the following: in the On-Dispatch-
Trigger (block or form level), call DISPATCH_EVENT(RESTRICTED_ALLOWED). Note: You do not have to explicitly call the event
procedure because it will automatically be called following the On-Dispatch trigger code.
Initialization events for ActiveX controls do not fire in Forms Runtime. These initialization events are intentionally disabled. Instead, you can use
When-New-Item-Instance or When-New-Record-Instance in place of the control's native initialization events.
This section provides guidelines for working with ActiveX controls.
6.1.2.7 Adding an ActiveX control to your application
For information about how to add an ActiveX control to your application, refer to the online help.
6.1.2.8 ActiveX examples
This section provides several examples to help you get started with ActiveX controls.
6.1.2.8.1 Example 1: setting ActiveX control properties
In Form Builder, you can use the :item('item_name').ocx.server_name.property bind variable syntax to assign or retrieve ActiveX property values.
For example:
:item('ActXitem').OCX.Spindial.spindialctrl.1.Needleposition:=
:item('ActXitem').OCX.Spindial.spindialctrl.1.Needleposition + 1;
ActXitem is the name of the item, Spindial.spindialctrl.1 is the name of the ActiveX control server, and Needleposition is the name of the property.
The following code also works if your system.cursor_item is an ActiveX control:
:form.cursor_item.OCX.spindial.spindialctrl.1.Needlposition :=
:form.cursor_item.OCX.spindial.spindialctrl.1.Needlposition + 1;
6.1.2.8.2 Example 2: getting ActiveX control properties
In Form Builder, you can use the property accessor functions and procedures to get and set ActiveX properties.
For example:

tblname varchar2;
tblname := table_pkg.TableName(:item('Oblk.Oitm').interface);
Table_pkg is the name of the program unit created from the OLE Importer. TableName is the name of the property accessor. Oblk is the name of the block and Oitm
is the name of the item.
6.1.2.8.3 Example 3: calling ActiveX control methods
This example gets a cell value from a Spread Table ActiveX control by using the GetCellByColRow method, which is provided in the SpreadTable package.
DECLARE
Cur_Row number;
Cur_Col number;
The_OLE_Obj OleObj;
BEGIN
Cur_Row:=SpreadTable.CurrentRow(:ITEM('BLK.ITM').interface);
Cur_Col:=SpreadTable.CurrentCol(:ITEM('BLK.ITM').interface);
The_OLE_Obj:=SpreadTable.GetCellByColRow(:ITEM('BLK.ITM').interface,
Cur_Col, Cur_Row);
END;
6.2 Using Foreign Functions to Customize Your Applications
You can customize and supplement your applications with foreign functions.
This section addresses:
Section 6.2.1, "What are foreign functions?"
Section 6.2.2, "The foreign function interface"
Section 6.2.3, "Foreign function guidelines"
Section 6.2.4, "Creating a foreign function"
Section 6.2.5, "Foreign function examples"
6.2.1 What are foreign functions?
Foreign functions are subprograms written in a 3GL programming language that allow you to customize your applications to meet the unique requirements of your
users.
Foreign functions can interact with Oracle databases, and both Forms Developer and Reports Developer variables, items, columns, and parameters. You can also call
any external function, such as Windows DLLs or APIs.
6.2.1.1 When should I use a foreign function?
Foreign functions are often used to perform the following tasks:
Perform complex data manipulation.
Pass data to Forms Developer or Reports Developer from operating system text files.
Manipulate LONG RAW data.
Pass entire PL/SQL blocks for processing by the server.
Set font and color attributes for applications.
Send mail directly from an application.
Display Windows help as part of your application.
Access the Microsoft Windows SDK.
Leverage low-level system services, such as pipes.
Control real time devices, such as a printer or a robot.
6.2.1.2 Foreign function types
You can develop three types of foreign functions:
6.2.1.2.1 Oracle Precompiler foreign functions
An Oracle Precompiler foreign function is the most common foreign function. Using the Oracle Precompiler, you can create foreign functions that access Oracle
databases as well as Forms Developer or Reports Developer variables, items, columns, and parameters.

An Oracle Precompiler foreign function incorporates the Oracle Precompiler interface. This interface enables you to write a subprogram in one of the following
supported host languages with embedded SQL commands: Ada, C, COBOL, FORTRAN, Pascal, and PL/I.
An Oracle Precompiler foreign function source file includes host programming language statements and Oracle Precompiler statements with embedded SQL
statements. Precompiling an Oracle Precompiler foreign function replaces the embedded SQL statements with equivalent host programming language statements. After
precompiling, you have a source file that you can compile with a host language compiler.
6.2.1.2.2 Oracle Call Interface (OCI) foreign functions
An OCI foreign function incorporates the Oracle Call Interface. This interface enables you to write a subprogram that contains calls to Oracle databases. A foreign
function that incorporates only the OCI (and not the Oracle Precompiler interface) cannot access Forms Developer or Reports Developer variables, items, columns,
and parameters.
Note: You can also develop foreign functions that combine both the ORACLE Precompiler interface and the OCI.
6.2.1.2.3 Non-Oracle foreign functions
A non-Oracle foreign function does not incorporate either the Oracle Precompiler interface or the OCI. For example, a non-Oracle foreign function might be written
entirely in the C language. A non-Oracle foreign function cannot access Oracle databases, or Forms Developer or Reports Developer variables, items, columns, and
parameters.
6.2.2 The foreign function interface
Both Forms Developer and Reports Developer use PL/SQL as their programming language. In order to call a foreign function, such as a C function in a Windows
DLL, PL/SQL must have an interface to communicate with the foreign function.
You can communicate with your foreign function through two distinct interfaces, either the Oracle Foreign Function Interface (ORA_FFI) or the user exit interface.
6.2.2.1 The Oracle Foreign Function Interface (ORA_FFI)
ORA_FFI is a portable and generic mechanism for enabling Forms Developer or Reports Developer to call 3GL routines from PL/SQL subprograms.
Foreign functions that are invoked from a PL/SQL interface must be contained in a dynamic library. Examples of dynamic libraries include dynamic link libraries on
Microsoft Windows and shared libraries on UNIX systems.
6.2.2.2 User exit interface to foreign functions
The user exit interface is a platform-specific mechanism for enabling Forms Developer or Reports Developer to call 3GL routines from PL/SQL subprograms.
The foreign functions that you invoke from a user exit interface must be contained in a dynamic link library (.DLL) or linked with an application executable.
6.2.2.3 Comparing ORA_FFI and user exits
This section describes the advantages and disadvantages of using ORA_FFI and user exits.
Foreign
Function Advantage Disadvantage
User Exit User exits are linked to an executable. This "tight binding" allows you to use and
take advantage of the current database connection.
The most significant disadvantage to using user exits is
the maintenance burden. You must relink your user exit
whenever you modify your user exit or upgrade Forms
Developer or Reports Developer.
User exits are not generic; they are platform-specific.
ORA_FFI ORA_FFI is a pure PL/SQL specification. The ORA_FFI specification exists
within a library (.PLL file), not within a component of Forms or Reports. When
you upgrade to a higher version of Forms or Reports or modify the foreign
function, you don't have to modify or regenerate the PLL file.
ORA_FFI is generic.
Both Forms and Reports provide several ORA_FFI packages
(D2KWUTIL.PLL) that allow you to access libraries that are already available
(Windows API functions).
If you are using ORA_FFI and you are writing your
own external code modules with Pro*C, you cannot
use the current open database connection. You must
open a second connection.
You cannot pass complex datatypes, such as
structures or arrays. For example, you cannot use
EXEC TOOLS GET or EXEC TOOLS PUT to
interface with Forms Developer or Reports Developer.
6.2.3 Foreign function guidelines
This section provides guidelines for working with foreign functions.
Item Recommendation
Which foreign function interface should I Use the Oracle Foreign Function Interface (ORA_FFI). ORA_FFI is a portable, generic, and requires only minor or no

Which foreign function interface should I
use?
Use the Oracle Foreign Function Interface (ORA_FFI). ORA_FFI is a portable, generic, and requires only minor or no
maintenance
Can I perform screen I/O from a foreign
function?
You should not perform host language screen I/O from a foreign function. This restriction exists because the runtime
routines that a host language uses to perform screen I/O conflict with the routines that Forms Developer and Reports
Developer use to perform screen I/O. However, you can perform host language file I/O from a foreign function.
Which host language should I use to write
my user exit?
Your host language is a matter of preference. However, C is the recommended language.
Note: Some C runtime functions are not available in .DLL files. For more information, refer to your compiler
documentation.
Which precompiler should I use to
precompile my user exit?
You should use Pro*C version 2.2.4 and 8.0.4.
When precompiling, be sure to specify the following MSVC compiler flags:
Large, Segment Setup: SS != DS, DSloads on function entry
Assume `extern' and Uninitialized Data `far' is checked Yes
In Windows Prolog/Epilogue, Generate prolog/Epilogue for None
Do I have to recompile my user exit when
I upgrade from a previous version of
Forms Developer or Reports Developer?
Yes. User exits can create a maintenance burden especially if you maintain several different executables, each with a
different set of user exits.
When you modify a user exit or upgrade to a higher version of Forms or Reports, you must relink the user exit with the
Forms or Reports executables.
Can I deploy a foreign function on the
Web?
ORA_FFI and user exits do not function on the Web. On web deployments, foreign functions interface with the DLLs on
the server-side, not on the browser-side.
For more information about foreign functions, refer to the following publications:
ORACLE Precompiler interface Programmer's Guide to the ORACLE Precompilers
Supported host languages The Oracle Installation Guide for your operating system
Operating system-specific requirements when working with foreign functions Online help
OCI Oracle Call Interface Programmer's Guide
Building DLLs Online help and your compiler documentation
ORA_FFI Online help
User Exits Online help
PL/SQL PL/SQL User's Guide or online help
6.2.4 Creating a foreign function
This section provides detailed steps that describe how to create a foreign function interface:
Creating an ORA_FFI interface to a foreign function
Creating a user exit interface to a foreign function
6.2.4.1 Creating an ORA_FFI interface to a foreign function
The following example creates a PL/SQL package called WinSample. The WinSample package includes interfaces to the foreign function GetPrivateProfileString in
the dynamic library KRNL386.EXE.
Note: When you create an ORA_FFI interface to a foreign function, you perform two basic steps. First, you create and associate a subprogram with a foreign
function (the dispatcher function). By associating a PL/SQL subprogram with a foreign function, you can invoke the foreign function each time you call the associated
PL/SQL subprogram. Associating a foreign function with a PL/SQL subprogram is necessary because both Forms Developer and Reports Developer use PL/SQL
constructs. Second, you create a PL/SQL function which passes the arguments to the dispatcher function. The dispatcher function invokes the foreign function.
1. Create a package specification.
Your package spec must represent the library. It must also define the PL/SQL function that you want to invoke.
For example:
PACKAGE WinSample IS
FUNCTION GetPrivateProfileString
(Section IN VARCHAR2,
Entry IN VARCHAR2,
DefaultStr IN VARCHAR2,
ReturnBuf IN OUT VARCHAR2,
BufLen IN PLS_INTEGER,
Filename IN VARCHAR2)
RETURN PLS_INTEGER;
END;
In this example, you call the WinSample.GetPrivateProfileString PL/SQL function to invoke the GetPrivateProfileString foreign function in the dynamic library
KRNL386.EXE.
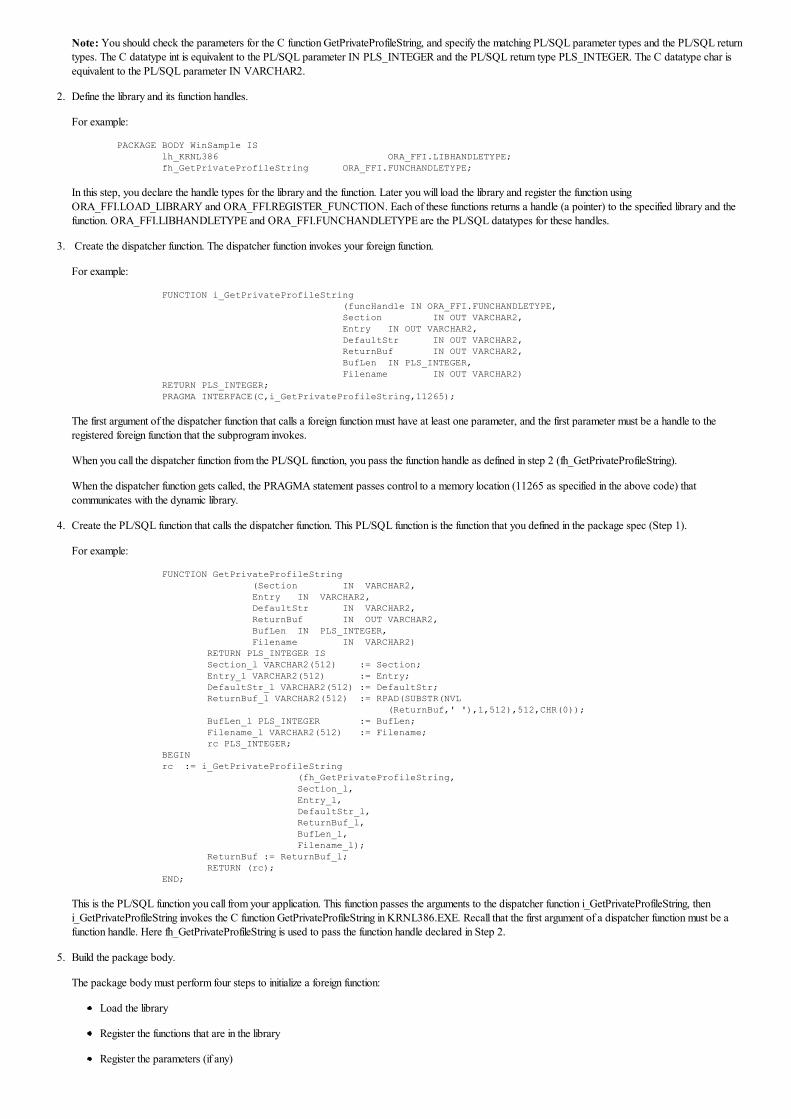
Note: You should check the parameters for the C function GetPrivateProfileString, and specify the matching PL/SQL parameter types and the PL/SQL return
types. The C datatype int is equivalent to the PL/SQL parameter IN PLS_INTEGER and the PL/SQL return type PLS_INTEGER. The C datatype char is
equivalent to the PL/SQL parameter IN VARCHAR2.
2. Define the library and its function handles.
For example:
PACKAGE BODY WinSample IS
lh_KRNL386 ORA_FFI.LIBHANDLETYPE;
fh_GetPrivateProfileString ORA_FFI.FUNCHANDLETYPE;
In this step, you declare the handle types for the library and the function. Later you will load the library and register the function using
ORA_FFI.LOAD_LIBRARY and ORA_FFI.REGISTER_FUNCTION. Each of these functions returns a handle (a pointer) to the specified library and the
function. ORA_FFI.LIBHANDLETYPE and ORA_FFI.FUNCHANDLETYPE are the PL/SQL datatypes for these handles.
3. Create the dispatcher function. The dispatcher function invokes your foreign function.
For example:
FUNCTION i_GetPrivateProfileString
(funcHandle IN ORA_FFI.FUNCHANDLETYPE,
Section IN OUT VARCHAR2,
Entry IN OUT VARCHAR2,
DefaultStr IN OUT VARCHAR2,
ReturnBuf IN OUT VARCHAR2,
BufLen IN PLS_INTEGER,
Filename IN OUT VARCHAR2)
RETURN PLS_INTEGER;
PRAGMA INTERFACE(C,i_GetPrivateProfileString,11265);
The first argument of the dispatcher function that calls a foreign function must have at least one parameter, and the first parameter must be a handle to the
registered foreign function that the subprogram invokes.
When you call the dispatcher function from the PL/SQL function, you pass the function handle as defined in step 2 (fh_GetPrivateProfileString).
When the dispatcher function gets called, the PRAGMA statement passes control to a memory location (11265 as specified in the above code) that
communicates with the dynamic library.
4. Create the PL/SQL function that calls the dispatcher function. This PL/SQL function is the function that you defined in the package spec (Step 1).
For example:
FUNCTION GetPrivateProfileString
(Section IN VARCHAR2,
Entry IN VARCHAR2,
DefaultStr IN VARCHAR2,
ReturnBuf IN OUT VARCHAR2,
BufLen IN PLS_INTEGER,
Filename IN VARCHAR2)
RETURN PLS_INTEGER IS
Section_l VARCHAR2(512) := Section;
Entry_l VARCHAR2(512) := Entry;
DefaultStr_l VARCHAR2(512) := DefaultStr;
ReturnBuf_l VARCHAR2(512) := RPAD(SUBSTR(NVL
(ReturnBuf,' '),1,512),512,CHR(0));
BufLen_l PLS_INTEGER := BufLen;
Filename_l VARCHAR2(512) := Filename;
rc PLS_INTEGER;
BEGIN
rc := i_GetPrivateProfileString
(fh_GetPrivateProfileString,
Section_l,
Entry_l,
DefaultStr_l,
ReturnBuf_l,
BufLen_l,
Filename_l);
ReturnBuf := ReturnBuf_l;
RETURN (rc);
END;
This is the PL/SQL function you call from your application. This function passes the arguments to the dispatcher function i_GetPrivateProfileString, then
i_GetPrivateProfileString invokes the C function GetPrivateProfileString in KRNL386.EXE. Recall that the first argument of a dispatcher function must be a
function handle. Here fh_GetPrivateProfileString is used to pass the function handle declared in Step 2.
5. Build the package body.
The package body must perform four steps to initialize a foreign function:
Load the library
Register the functions that are in the library
Register the parameters (if any)

Register the return type (if any)
For example:
BEGIN
/* Load the library .*/
lh_KRNL386 := ORA_FFI.LOAD_LIBRARY
('location of the DLL here','KRNL386.EXE');
/* Register the foreign function. */
fh_GetPrivateProfileString := ORA_FFI.REGISTER_FUNCTION (lh_
KRNL386,'GetPrivateProfileString',ORA_FFI.PASCAL_STD);
/* Register the parameters. */
ORA_FFI.REGISTER_PARAMETER
(fh_GetPrivateProfileString,ORA_FFI.C_CHAR_PTR); ORA_FFI.REGISTER_
PARAMETER
(fh_GetPrivateProfileString,ORA_FFI.C_CHAR_PTR); ORA_FFI.REGISTER_
PARAMETER
(fh_GetPrivateProfileString,ORA_FFI.C_CHAR_PTR); ORA_FFI.REGISTER_
PARAMETER
(fh_GetPrivateProfileString,ORA_FFI.C_CHAR_PTR);
ORA_FFI.REGISTER_PARAMETER
(fh_GetPrivateProfileString,ORA_FFI.C_INT); ORA_FFI.REGISTER_PARAMETER
(fh_GetPrivateProfileString,ORA_FFI.C_CHAR_PTR);
/* Register the return type. */
ORA_FFI.REGISTER_RETURN(fh_GetPrivateProfileString,ORA_FFI.C_INT);
END WinSample;
Recall that you declared two handles for the library and the function in Step 2. In this step, you assign values to the handles by using the
ORA_FFI.LOAD_LIBRARY and ORA_FFI.REGISTER_FUNCTION functions.
ORA_FFI.LOAD_LIBRARY takes two arguments: the location and the name of the dynamic library. ORA_FFI.REGISTER_FUNCTION takes three
arguments: the library handle for the library where the function resides, the function name, and the calling standard. The calling standard can be either C_STD
(for the C calling standard) or PASCAL_STD (for the Pascal calling standard).
After you load the library and register the function, you must register the parameters and return types (if there are any).
ORA_FFI.REGISTER_PARAMETER and ORA_FFI.REGISTER_RETURN take two arguments each: the function handle and the argument type.
6. Within Forms Developer or Reports Developer, create a library file (.PLL) that includes your package, then attach it to your application.
7. Call the foreign function from your application.
For example:
x := Winsample.GetPrivateProfileString
('Oracle', 'ORACLE_HOME', '<Not Set>', 'Value', 100, 'oracle.ini');
6.2.4.2 Creating a user exit interface to a foreign function
User exits are not generic; they are platform-specific. Some details of implementing user exits are specific to each operating system. The following example describes
how to create a user exit on Windows 95.
On Microsoft Windows, a foreign function that can be invoked from a user exit is contained in a dynamic link library (.DLL). A DLL is a library that loads into
memory only when the contained code is invoked.
6.2.4.2.1 Example: creating a user exit on Windows 95
The following example creates a foreign function that adds an ID column to the EMP table.
This example uses several sample files, including:
UE_SAMP.MAK is a project file that includes the IAPXTB control structure. Building this project generates UE_SAMP.DLL.
IFXTB60.DLL is the default file containing foreign functions that can be invoked from a user exit interface. This file is a DLL that ships with Form Builder, and
does not initially contain user-defined foreign functions. This file is placed in the ORACLE_HOME\BIN directory during installation. When you create new
foreign functions, replace the existing IFXTB60.DLL file with a new IFXTB60.DLL.
UE_XTB.C is a template source file for creating an IAPXTB control structure. UE_XTB.C contains an example of an entry for the IAPXTB control structure.
Modify this file and add your foreign function entries.
UE.H is a sample header file that is used to define the IAPXTB control structure.
IFXTB60.DEF contains definitions you need to build your own DLL. Use IFXTB60.DEF to export foreign functions. IFXTB60.DEF contains several export
statements. You should not modify these export statements as they are used by Form Builder to access the user exit interface.
UEZ.OBJ is an .OBJ file that you link to your own .OBJ files.
The user exit sample files are located in your ORACLE_HOME directory (for example, C:\ORAWIN95\FORMS60\USEREXIT).
1. Write a foreign function.
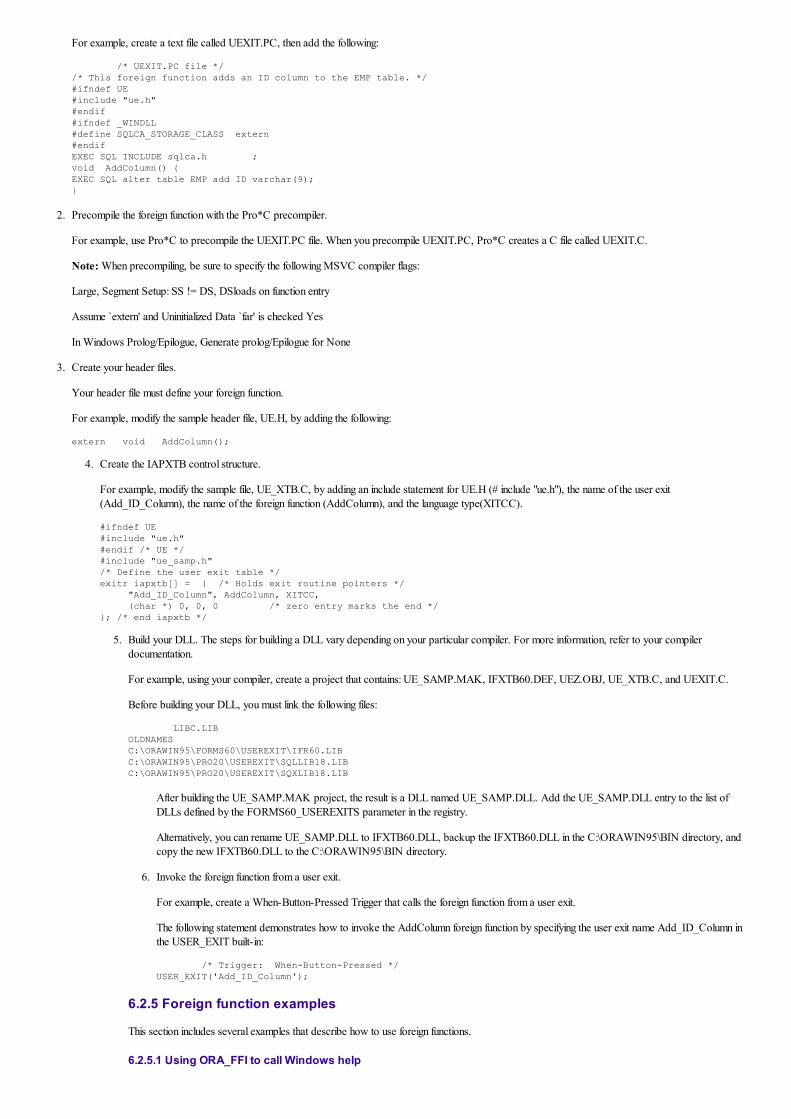
For example, create a text file called UEXIT.PC, then add the following:
/* UEXIT.PC file */
/* This foreign function adds an ID column to the EMP table. */
#ifndef UE
#include "ue.h"
#endif
#ifndef _WINDLL
#define SQLCA_STORAGE_CLASS extern
#endif
EXEC SQL INCLUDE sqlca.h ;
void AddColumn() {
EXEC SQL alter table EMP add ID varchar(9);
}
2. Precompile the foreign function with the Pro*C precompiler.
For example, use Pro*C to precompile the UEXIT.PC file. When you precompile UEXIT.PC, Pro*C creates a C file called UEXIT.C.
Note: When precompiling, be sure to specify the following MSVC compiler flags:
Large, Segment Setup: SS != DS, DSloads on function entry
Assume `extern' and Uninitialized Data `far' is checked Yes
In Windows Prolog/Epilogue, Generate prolog/Epilogue for None
3. Create your header files.
Your header file must define your foreign function.
For example, modify the sample header file, UE.H, by adding the following:
extern void AddColumn();
4. Create the IAPXTB control structure.
For example, modify the sample file, UE_XTB.C, by adding an include statement for UE.H (# include "ue.h"), the name of the user exit
(Add_ID_Column), the name of the foreign function (AddColumn), and the language type(XITCC).
#ifndef UE
#include "ue.h"
#endif /* UE */
#include "ue_samp.h"
/* Define the user exit table */
exitr iapxtb[] = { /* Holds exit routine pointers */
"Add_ID_Column", AddColumn, XITCC,
(char *) 0, 0, 0 /* zero entry marks the end */
}; /* end iapxtb */
5. Build your DLL. The steps for building a DLL vary depending on your particular compiler. For more information, refer to your compiler
documentation.
For example, using your compiler, create a project that contains: UE_SAMP.MAK, IFXTB60.DEF, UEZ.OBJ, UE_XTB.C, and UEXIT.C.
Before building your DLL, you must link the following files:
LIBC.LIB
OLDNAMES
C:\ORAWIN95\FORMS60\USEREXIT\IFR60.LIB
C:\ORAWIN95\PRO20\USEREXIT\SQLLIB18.LIB
C:\ORAWIN95\PRO20\USEREXIT\SQXLIB18.LIB
After building the UE_SAMP.MAK project, the result is a DLL named UE_SAMP.DLL. Add the UE_SAMP.DLL entry to the list of
DLLs defined by the FORMS60_USEREXITS parameter in the registry.
Alternatively, you can rename UE_SAMP.DLL to IFXTB60.DLL, backup the IFXTB60.DLL in the C:\ORAWIN95\BIN directory, and
copy the new IFXTB60.DLL to the C:\ORAWIN95\BIN directory.
6. Invoke the foreign function from a user exit.
For example, create a When-Button-Pressed Trigger that calls the foreign function from a user exit.
The following statement demonstrates how to invoke the AddColumn foreign function by specifying the user exit name Add_ID_Column in
the USER_EXIT built-in:
/* Trigger: When-Button-Pressed */
USER_EXIT('Add_ID_Column');
6.2.5 Foreign function examples
This section includes several examples that describe how to use foreign functions.
6.2.5.1 Using ORA_FFI to call Windows help

/* WinHelp ORA_FFI. */
/* */
/* */
/* Usage: WinHelp.WinHelp(helpfile VARCHAR2, */
/* command VARCHAR2, */
/* data {VARCHAR2/PLS_INTEGER See Below}) */
/* */
/* command can be one of the following: */
/* */
/* 'HELP_INDEX' Help Contents */
/* 'HELP_CONTENTS' " */
/* 'HELP_CONTEXT' Context Key (See below) */
/* 'HELP_KEY' Key Search */
/* 'HELP_PARTIALKEY' Partial Key Search */
/* 'HELP_QUIT' Quit */
/* */
/* data contains a string for the key search or a numeric context */
/* value if using topics. */
/* */
/* Winhelp.Winhelp('C:\ORAWIN95\TOOLS\DOC60\US\IF60.HLP', */
/* 'HELP_PARTIALKEY', */
/* 'ORA_FFI'); */
/* */
/* The commented sections replace the line below if using HELP_CONTEXT keys */
PACKAGE WinHelp IS
FUNCTION WinHelp(helpfile IN VARCHAR2,
command IN VARCHAR2,
data IN VARCHAR2)
RETURN PLS_INTEGER;
END;
PACKAGE BODY WinHelp IS
lh_USER ora_ffi.libHandleType;
fh_WinHelp ora_ffi.funcHandleType;
FUNCTION i_WinHelp(funcHandle IN ora_ffi.funcHandleType,
hwnd IN PLS_INTEGER,
helpfile IN OUT VARCHAR2,
command IN PLS_INTEGER,
data IN OUT VARCHAR2)
RETURN PLS_INTEGER;
PRAGMA INTERFACE(C,i_WinHelp,11265);
FUNCTION WinHelp(helpfile IN VARCHAR2,
command IN VARCHAR2,
data IN VARCHAR2)
RETURN PLS_INTEGER
IS
hwnd_l PLS_INTEGER;
helpfile_l VARCHAR2(512) := helpfile;
command_l PLS_INTEGER;
data_l VARCHAR2(512) := data;
rc PLS_INTEGER;
FUNCTION Help_Convert(command IN VARCHAR2)
RETURN PLS_INTEGER
IS
BEGIN
/* The windows.h definitions for command */
/* HELP_CONTEXT 0x0001 */
/* HELP_QUIT 0x0002 */
/* HELP_INDEX 0x0003 */
/* HELP_CONTENTS 0x0003 */
/* HELP_HELPONHELP 0x0004 */
/* HELP_SETINDEX 0x0005 */
/* HELP_SETCONTENTS 0x0005 */
/* HELP_CONTEXTPOPUP 0x0008 */
/* HELP_FORCEFILE 0x0009 */
/* HELP_KEY 0x0101 */
/* HELP_COMMAND 0x0102 */
/* HELP_PARTIALKEY 0x0105 */
/* HELP_MULTIKEY 0x0201 */
/* HELP_SETWINPOS 0x0203 */
if command = 'HELP_CONTEXT' then return(1); end if;
if command = 'HELP_KEY' then return(257); end if;
if command = 'HELP_PARTIALKEY' then return(261); end if;
if command = 'HELP_QUIT' then return(2); end if;
/* If nothing else go to the contents page */
return(3);
END;
BEGIN
hwnd_l :=
TO_PLS_INTEGER(Get_Item_Property(name_in('SYSTEM.CURSOR_ITEM'),WINDOW_
HANDLE));
command_l := Help_Convert(command);

rc := i_WinHelp(fh_WinHelp,
hwnd_l,
helpfile_l,
command_l,
data_l);
RETURN (rc);
END ;
BEGIN
BEGIN
lh_USER := ora_ffi.find_library('USER.EXE');
EXCEPTION WHEN ora_ffi.FFI_ERROR THEN
lh_USER := ora_ffi.load_library(NULL,'USER.EXE');
END ;
fh_WinHelp :=
ora_ffi.register_function(lh_USER,'WinHelp',ora_ffi.PASCAL_STD);
ora_ffi.register_parameter(fh_WinHelp,ORA_FFI.C_INT); /* HWND */
ora_ffi.register_parameter(fh_WinHelp,ORA_FFI.C_CHAR_PTR); /* LPCSTR */
ora_ffi.register_parameter(fh_WinHelp,ORA_FFI.C_INT); /* UINT */
ora_ffi.register_parameter(fh_WinHelp,ORA_FFI.C_CHAR_PTR); /* DWORD */
ora_ffi.register_return(fh_WinHelp,ORA_FFI.C_INT); /* BOOL */
END WinHelp;
6.2.5.2 Using ORA_FFI to open the File Open dialog on Windows
PACKAGE OraDlg IS
FUNCTION OraMultiFileDlg
(Title IN VARCHAR2,
Filter IN VARCHAR2,
Dir IN VARCHAR2,
FileString IN OUT VARCHAR2)
RETURN PLS_INTEGER;
FUNCTION OraSingleFileDlg
(Title IN VARCHAR2,
Filter IN VARCHAR2,
Dir IN VARCHAR2,
FileString IN OUT VARCHAR2)
RETURN PLS_INTEGER;
END OraDlg;
PACKAGE BODY OraDlg IS
lh_ORADLG ora_ffi.libHandleType;
fh_OraMultiFileDlg ora_ffi.funcHandleType;
fh_OraSingleFileDlg ora_ffi.funcHandleType;
FUNCTION i_OraMultiFileDlg
(funcHandle IN ora_ffi.funcHandleType,
Title IN OUT VARCHAR2,
Filter IN OUT VARCHAR2,
Dir IN OUT VARCHAR2,
FileString IN OUT VARCHAR2)
RETURN PLS_INTEGER;
PRAGMA INTERFACE(C,i_OraMultiFileDlg,11265);
FUNCTION OraMultiFileDlg
(Title IN VARCHAR2,
Filter IN VARCHAR2,
Dir IN VARCHAR2,
FileString IN OUT VARCHAR2)
RETURN PLS_INTEGER IS
Title_l VARCHAR2(128) := RPAD(SUBSTR(NVL(Title,'Open'),1,128),128,CHR(0));
Filter_l VARCHAR2(128) := RPAD(SUBSTR(NVL
(Filter,'All Files (*.*)|*.*|'),1,128),128,CHR(0));
Dir_l VARCHAR2(256) := RPAD(SUBSTR(NVL(Dir,' '),1,256),256,CHR(0));
FileString_l VARCHAR2(2000) := RPAD(SUBSTR(NVL(FileString,'
'),1,2000),2000,CHR(0));
rc PLS_INTEGER;
BEGIN
rc := i_OraMultiFileDlg(fh_OraMultiFileDlg,
Title_l,
Filter_l,
Dir_l,
FileString_l);
FileString := FileString_l;
RETURN (rc);
END ;
FUNCTION i_OraSingleFileDlg
(funcHandle IN ora_ffi.funcHandleType,
Title IN OUT VARCHAR2,
Filter IN OUT VARCHAR2,
Dir IN OUT VARCHAR2,
FileString IN OUT VARCHAR2)
RETURN PLS_INTEGER;
PRAGMA INTERFACE(C,i_OraSingleFileDlg,11265);
FUNCTION OraSingleFileDlg
(Title IN VARCHAR2,
Filter IN VARCHAR2,
Dir IN VARCHAR2,

FileString IN OUT VARCHAR2)
RETURN PLS_INTEGER IS
Title_l VARCHAR2(128) := RPAD(SUBSTR(NVL(Title,'Open'),1,128),128,CHR(0));
Filter_l VARCHAR2(128) := RPAD(SUBSTR(NVL
(Filter,'All Files (*.*)|*.*|'),1,128),128,CHR(0));
Dir_l VARCHAR2(256) := RPAD(SUBSTR(NVL(Dir,' '),1,256),256,CHR(0));
FileString_l VARCHAR2(2000) := RPAD(SUBSTR(NVL(FileString,'
'),1,2000),2000,CHR(0));
rc PLS_INTEGER;
BEGIN
rc := i_OraSingleFileDlg(fh_OraSingleFileDlg,
Title_l,
Filter_l,
Dir_l,
FileString_l);
FileString := FileString_l;
RETURN (rc);
END ;
BEGIN
BEGIN
lh_ORADLG := ora_ffi.find_library('ORADLG.DLL');
EXCEPTION WHEN ora_ffi.FFI_ERROR THEN
lh_ORADLG := ora_ffi.load_library(NULL,'ORADLG.DLL');
END ;
fh_OraMultiFileDlg := ora_ffi.register_function
(lh_ORADLG,'OraMultiFileDlg',ora_ffi.PASCAL_STD);
ora_ffi.register_parameter(fh_OraMultiFileDlg,ORA_FFI.C_CHAR_PTR);
ora_ffi.register_parameter(fh_OraMultiFileDlg,ORA_FFI.C_CHAR_PTR);
ora_ffi.register_parameter(fh_OraMultiFileDlg,ORA_FFI.C_CHAR_PTR);
ora_ffi.register_parameter(fh_OraMultiFileDlg,ORA_FFI.C_CHAR_PTR);
ora_ffi.register_return(fh_OraMultiFileDlg,ORA_FFI.C_LONG);
fh_OraSingleFileDlg := ora_ffi.register_function
(lh_ORADLG,'OraSingleFileDlg',ora_ffi.PASCAL_STD);
ora_ffi.register_parameter(fh_OraSingleFileDlg,ORA_FFI.C_CHAR_PTR);
ora_ffi.register_parameter(fh_OraSingleFileDlg,ORA_FFI.C_CHAR_PTR);
ora_ffi.register_parameter(fh_OraSingleFileDlg,ORA_FFI.C_CHAR_PTR);
ora_ffi.register_parameter(fh_OraSingleFileDlg,ORA_FFI.C_CHAR_PTR);
ora_ffi.register_return(fh_OraSingleFileDlg,ORA_FFI.C_LONG);
END OraDlg;
6.2.5.3 Using ORA_FFI to call Unix(SUN) executables with a STDIN/STDOUT type interface
/* Copyright (c) 1997 by Oracle Corporation */
/*
NAME
ora_pipe_io_spec.sql - Specification for access to Unix Pipe mechanism
DESCRIPTION
Demonstration of how to use the ORA_FFI Package to provide access to the
Unix Pipe C functions.
PUBLIC FUNCTION(S)
popen - Open the Pipe command
get_line - Get a line of Text from a Pipe
put_line - Put a line of Text into a Pipe
pclose - Close the Pipe
is_open - Determine whether the Pipe descriptor is open.
NOTES
In Order to use these routines you could write the following
PL/SQL Code:
-- Example of Calls to ora_pipe_io functions
DECLARE
stream ora_pipe_io.PIPE;
buffer VARCHAR2(240);
BEGIN
stream := ora_pipe_io.popen('ls -l', ora_pipe_io.READ_MODE);
loop
exit when not ora_pipe_io.get_line(stream, buffer, 240);
:directory.file := buffer;
down;
end loop;
ora_pipe_io.pclose(stream);
END;
MODIFIED (MM/DD/YY)
smclark 08/05/94 - Creation
*/
PACKAGE ora_pipe_io is
/*
** Arguments to popen.
*/
READ_MODE constant VARCHAR2(1) := 'r';
WRITE_MODE constant VARCHAR2(1) := 'w';
/* ------------- TYPE PIPE ----------- */
/*
** Public Type PIPE - Handle to a Un*x pipe

**
** Do not modify the private members of this type
*/
TYPE PIPE is RECORD
(file_handle ORA_FFI.POINTERTYPE,
is_open boolean,
read_write_mode VARCHAR2(1));
/* ------------ FUNCTION POPEN ----------- */
/*
** Function POPEN -- Open a Un*x pipe command
**
** Given a Unix command to execute and a Pipe read/write mode in which
** to execute the instruction this Function will execute the Command
** and return a handle, of type PIPE, to the resulting Input/Output
** stream.
**
** The command to be executed is limited to 1024 characters.
*/
FUNCTION popen(command in VARCHAR2,
ctype in VARCHAR2)
RETURN PIPE;
/* ------------ PROCEDURE PCLOSE ----------- */
/*
** Procedure PCLOSE -- Close a pipe
**
** Close a previously opened pipe.
**
** Raises a VALUE_ERROR exception if incorrect arguments are passed.
*/
PROCEDURE pclose(stream in out PIPE);
/* ------------ FUNCTION GET_LINE ----------- */
/*
** Function GET_LINE
** -- Get a line of text into a buffer from the read mode pipe.
**
** Get a line of text from a previously opened pipe.
**
** Raises a VALUE_ERROR exception if incorrect arguments are passed.
** For example
** if you pass a pipe which has never been opened (using popen)
*/
FUNCTION get_line(stream in out PIPE,
s in out VARCHAR2,
n in PLS_INTEGER)
RETURN BOOLEAN;
/* ------------ PROCEDURE PUT_LINE ----------- */
/*
** Procedure PUT_LINE -- Put a line of text into a a write mode pipe.
**
** Put a line of text into a previously opened pipe.
**
** Raises a VALUE_ERROR exception if incorrect arguments are passed.
** For example
** if you pass a pipe which has never been opened (using popen)
**
** The Internal buffer for the string to write is limited to 2048 bytes
*/
PROCEDURE put_line(stream in out PIPE,
s in VARCHAR2);
/* ------------ FUNCTION IS_OPEN ----------- */
/*
** Function IS_OPEN -- Determines whether a pipe is open.
**
** Returns TRUE if the pipe is open, FALSE if the pipe is closed.
*/
FUNCTION is_open(stream in PIPE)
RETURN BOOLEAN;
END;
/* ora_pipe_io_body.sql - Body of Package for access to Unix Pipe mechanism
DESCRIPTION
Demonstration of how to use the ORA_FFI Package to provide access to the
Unix Pipe C functions.
PUBLIC FUNCTION(S)
popen - Open the Pipe command
get_line - Get a line of Text from a Pipe
put_line - Put a line of Text into a Pipe
pclose - Close the Pipe
is_open - Determine whether the Pipe descriptor is open.
PRIVATE FUNCTION(S)
icd_popen, icd_fgets, icd_fputs, icd_pclose
NOTES

MODIFIED (MM/DD/YY)
smclark 11/02/94 - Modified for production release changes to ORA_FFI.
smclark 08/05/94 - Creation
*/
PACKAGE BODY ora_pipe_io is
lh_libc ora_ffi.libHandleType;
fh_popen ora_ffi.funcHandleType;
fh_pclose ora_ffi.funcHandleType;
fh_fgets ora_ffi.funcHandleType;
fh_fputs ora_ffi.funcHandleType;
/* ------------ FUNCTION ICD_POPEN ----------- */
/*
** Function ICD_POPEN -- Interface routine to C function popen
**
** This function acts as the interface to the popen function in
** libc.
*/
FUNCTION icd_popen(funcHandle in ora_ffi.funcHandleType,
command in out VARCHAR2,
ctype in out VARCHAR2)
return ORA_FFI.POINTERTYPE;
pragma interface(c, icd_popen, 11265);
/* ------------ PROCEDURE ICD_PCLOSE ----------- */
/*
** Function ICD_PCLOSE -- Interface routine to C function pclose
**
** This function acts as the interface to the pclose function in
** libc.
*/
PROCEDURE icd_pclose(funcHandle in ora_ffi.funcHandleType,
stream in out ORA_FFI.POINTERTYPE);
pragma interface(c, icd_pclose, 11265);
/* ------------ FUNCTION ICD_FGETS ----------- */
/*
** Function ICD_FGETS -- Interface routine to C function fgets
**
** This function acts as the interface to the fgets function in
** libc.
*/
FUNCTION icd_fgets(funcHandle in ora_ffi.funcHandleType,
s in out VARCHAR2, n in PLS_INTEGER,
stream in out ORA_FFI.POINTERTYPE)
RETURN ORA_FFI.POINTERTYPE;
pragma interface(c, icd_fgets, 11265);
/* ------------ FUNCTION ICD_FPUTS ----------- */
/*
** Function ICD_FPUTS -- Interface routine to C function fputs
**
** This function acts as the interface to the fputs function in
** libc.
*/
PROCEDURE icd_fputs(funcHandle in ora_ffi.funcHandleType,
s in out VARCHAR2,
stream in out ORA_FFI.POINTERTYPE);
pragma interface(c, icd_fputs, 11265);
/* ------------ FUNCTION POPEN ----------- */
/*
** Function POPEN -- Open a Un*x pipe command
*/
FUNCTION popen(command in VARCHAR2,
ctype in VARCHAR2)
RETURN PIPE is
/*
** Take a copy of the arguments because we need to pass them
** IN OUT to icd_popen, but we really don't want people to have
** to call our routines in the same way.
*/
cmd varchar2(1024) := command;
cmode varchar2(1) := ctype;
stream PIPE;
BEGIN
if (cmode not in (READ_MODE, WRITE_MODE))
or (cmode is NULL)
or (cmd is NULL)
then
raise VALUE_ERROR;

end if;
stream.file_handle := icd_popen(fh_popen, cmd, cmode);
stream.is_open := TRUE;
stream.read_write_mode := ctype;
return(stream);
END popen;
/* ------------ PROCEDURE PCLOSE ----------- */
/*
** Procedure PCLOSE -- Close a pipe
*/
PROCEDURE pclose(stream in out PIPE) is
BEGIN
icd_pclose(fh_pclose, stream.file_handle);
stream.is_open := FALSE;
END pclose;
/* ------------ FUNCTION GET_LINE ----------- */
/*
** Function GET_LINE -- Get a line of text into a buffer
** from the read mode pipe.
*/
FUNCTION get_line(stream in out PIPE,
s in out VARCHAR2, n in PLS_INTEGER)
RETURN BOOLEAN is
buffer ORA_FFI.POINTERTYPE;
BEGIN
if (n <= 0)
or (stream.is_open = FALSE)
or (stream.is_open is NULL)
or (stream.read_write_mode <> READ_MODE)
then
raise VALUE_ERROR;
end if;
/*
** Initialise the Buffer area to reserve the correct amount of space.
*/
s := rpad(' ', n);
buffer := icd_fgets(fh_fgets, s, n, stream.file_handle);
/*
** Determine whether a NULL pointer was returned.
*/
return (ora_ffi.is_null_ptr(buffer) = FALSE);
END get_line;
/* ------------ PROCEDURE PUT_LINE ----------- */
/*
** Procedure PUT_LINE -- Put a line of text into a a write mode pipe.
*/
PROCEDURE put_line(stream in out PIPE,
s in VARCHAR2) is
buffer varchar2(2048) := s;
BEGIN
if (stream.is_open = FALSE)
or (stream.is_open is NULL)
or (stream.read_write_mode <> WRITE_MODE)
then
raise VALUE_ERROR;
end if;
icd_fputs(fh_fputs, buffer, stream.file_handle);
buffer := chr(10);
icd_fputs(fh_fputs, buffer, stream.file_handle);
END put_line;
/* ------------ FUNCTION IS_OPEN ----------- */
/*
** Function IS_OPEN -- Determines whether a pipe is open.
*/
FUNCTION is_open(stream in PIPE)
RETURN BOOLEAN is
BEGIN
return(stream.is_open);
END is_open;
BEGIN
/*
** Declare a library handle as libc. (Internal so NULL,NULL)
*/
lh_libc := ora_ffi.load_library(NULL, NULL);
if ora_ffi.is_null_ptr(lh_libc) then
raise VALUE_ERROR;
end if;

/*
** Register the popen function, it's return type and arguments.
*/
fh_popen := ora_ffi.register_function(lh_libc, 'popen');
if ora_ffi.is_null_ptr(fh_popen) then
raise VALUE_ERROR;
end if;
ora_ffi.register_return(fh_popen, ORA_FFI.C_DVOID_PTR);
ora_ffi.register_parameter(fh_popen, ORA_FFI.C_CHAR_PTR);
ora_ffi.register_parameter(fh_popen, ORA_FFI.C_CHAR_PTR);
/*
** Register the pclose function, it's return type and arguments.
*/
fh_pclose := ora_ffi.register_function(lh_libc, 'pclose');
if ora_ffi.is_null_ptr(fh_pclose) then
raise VALUE_ERROR;
end if;
ora_ffi.register_return(fh_pclose, ORA_FFI.C_VOID);
ora_ffi.register_parameter(fh_pclose, ORA_FFI.C_DVOID_PTR);
/*
** Register the fgets function, it's return type and arguments.
*/
fh_fgets := ora_ffi.register_function(lh_libc, 'fgets');
if ora_ffi.is_null_ptr(fh_fgets) then
raise VALUE_ERROR;
end if;
ora_ffi.register_return(fh_fgets, ORA_FFI.C_DVOID_PTR);
ora_ffi.register_parameter(fh_fgets, ORA_FFI.C_CHAR_PTR);
ora_ffi.register_parameter(fh_fgets, ORA_FFI.C_INT);
ora_ffi.register_parameter(fh_fgets, ORA_FFI.C_DVOID_PTR);
/*
** Register the fputs function, it's return type and arguments.
*/
fh_fputs := ora_ffi.register_function(lh_libc, 'fputs');
if ora_ffi.is_null_ptr(fh_fputs) then
raise VALUE_ERROR;
end if;
ora_ffi.register_return(fh_fputs, ORA_FFI.C_VOID);
ora_ffi.register_parameter(fh_fputs, ORA_FFI.C_CHAR_PTR);
ora_ffi.register_parameter(fh_fputs, ORA_FFI.C_DVOID_PTR);
END ora_pipe_io;
6.3 Using the Open API to Build and Modify Form Builder Applications
This section describes the non-interactive, programmatic method for building and modifying Form Builder applications. It includes these topics:
Section 6.3.1, "What is the Open API?"
Section 6.3.2, "Guidelines for using the Open API"
Section 6.3.3, "Using the Open API"
Section 6.3.4, "Open API examples"
6.3.1 What is the Open API?
The Open API is an advanced Form Builder feature for C/C++ developers that want the power and flexibility to create or modify form modules in
a non-interactive environment.
Note: Before using the Open API, you should have a thorough understanding of Form Builder objects and their properties and relations.
6.3.1.1 When should I use the Open API?
Use the Open API when you want to quickly propagate development changes to a large number of form modules. You might, for example, use the
Open API to update your applications to the current corporate standards for look and feel. This could involve updating hundreds for form
modules.
You can also use the Open API to:
Compile a set of forms
Collect dependency information
Write your own documentation
6.3.1.2 Open API header files
The Open API consists of one C header file for each Form Builder object. There are 34 Form Builder objects (see the figure). These objects
correspond to the Form Builder objects that you are familiar with at design-time. Each header file contains several functions and macros that you

use to create and manipulate Form Builder objects.
6.3.1.3 Open API properties
Within the Open API, you manipulate Form Builder objects by setting object properties.
Open API properties have their own unique names, such as D2FP_FONT_NAM. These properties correspond to the Form Builder properties
that you are familiar with at design-time.
A property can be one of the following: Boolean, Text, Number, Object, or Blob.
The table below lists some common item properties with their corresponding Open API equivalents.
Open API Property Form Builder (design-time) Property
D2FP_ACCESS_KEY Access Key
D2FP_BEVEL_STY Bevel
D2FP_CNV_NAM Canvas
D2FP_ENABLED Enabled
D2FP_FONT_NAM Font Name
D2FP_HEIGHT Width/Height
D2FP_X_POS X Position
D2FP_Y_POS Y Position
6.3.1.4 Open API functions and macros
You use Open API functions and macros to create, destroy, duplicate, subclass, get, and set object properties.
For example, to determine an item's font size, use the D2FITMG_FONT_SIZ macro:
d2fitmg_font_siz(ctx, obj, val);
This macro returns the value of the Font Size property of the item object as type number.
To set a text item property, use the D2FITMST_SETTEXTPROP function:
d2fitmst_SetTextProp(d2fctx *pd2fctx, d2fitm *pd2fitm, ub2 pnum,text *prp );
This function sets the value of the specified item text property. You specify a pointer to the context in pd2fctx, the item in pd2fitm, the property
number in pnum, and a handle to the text value in prp.
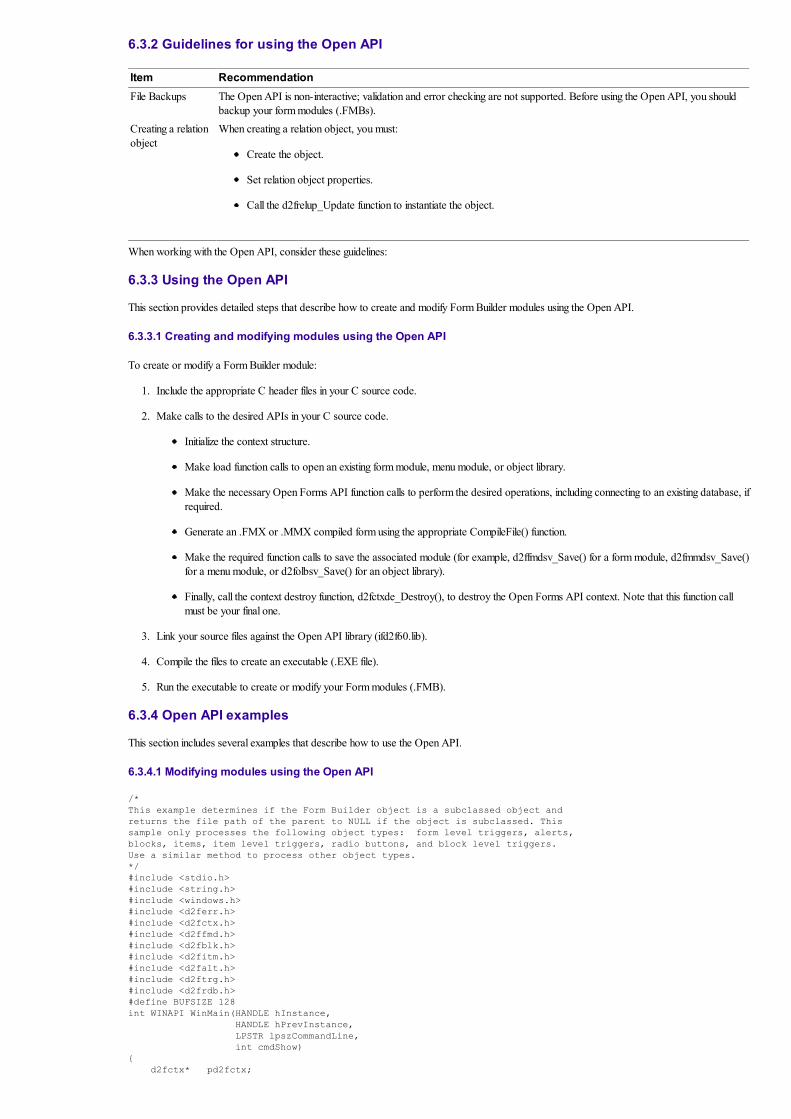
6.3.2 Guidelines for using the Open API
Item Recommendation
File Backups The Open API is non-interactive; validation and error checking are not supported. Before using the Open API, you should
backup your form modules (.FMBs).
Creating a relation
object
When creating a relation object, you must:
Create the object.
Set relation object properties.
Call the d2frelup_Update function to instantiate the object.
When working with the Open API, consider these guidelines:
6.3.3 Using the Open API
This section provides detailed steps that describe how to create and modify Form Builder modules using the Open API.
6.3.3.1 Creating and modifying modules using the Open API
To create or modify a Form Builder module:
1. Include the appropriate C header files in your C source code.
2. Make calls to the desired APIs in your C source code.
Initialize the context structure.
Make load function calls to open an existing form module, menu module, or object library.
Make the necessary Open Forms API function calls to perform the desired operations, including connecting to an existing database, if
required.
Generate an .FMX or .MMX compiled form using the appropriate CompileFile() function.
Make the required function calls to save the associated module (for example, d2ffmdsv_Save() for a form module, d2fmmdsv_Save()
for a menu module, or d2folbsv_Save() for an object library).
Finally, call the context destroy function, d2fctxde_Destroy(), to destroy the Open Forms API context. Note that this function call
must be your final one.
3. Link your source files against the Open API library (ifd2f60.lib).
4. Compile the files to create an executable (.EXE file).
5. Run the executable to create or modify your Form modules (.FMB).
6.3.4 Open API examples
This section includes several examples that describe how to use the Open API.
6.3.4.1 Modifying modules using the Open API
/*
This example determines if the Form Builder object is a subclassed object and
returns the file path of the parent to NULL if the object is subclassed. This
sample only processes the following object types: form level triggers, alerts,
blocks, items, item level triggers, radio buttons, and block level triggers.
Use a similar method to process other object types.
*/
#include <stdio.h>
#include <string.h>
#include <windows.h>
#include <d2ferr.h>
#include <d2fctx.h>
#include <d2ffmd.h>
#include <d2fblk.h>
#include <d2fitm.h>
#include <d2falt.h>
#include <d2ftrg.h>
#include <d2frdb.h>
#define BUFSIZE 128
int WINAPI WinMain(HANDLE hInstance,
HANDLE hPrevInstance,
LPSTR lpszCommandLine,
int cmdShow)
{
d2fctx* pd2fctx;

d2ffmd* pd2ffmd;
d2fblk* pd2fblk;
d2fitm* pd2fitm;
d2fctxa d2fctx_attr;
d2fstatus status;
d2falt* pd2falt;
d2ftrg* pd2ftrg;
d2frdb* pd2frdb;
int counter;
char buf[BUFSIZE];
char* form_name=(char*)0;
/* Get the form name from the command line */
strncpy(buf, lpszCommandLine, BUFSIZE);
form_name = strtok(buf, ".");
/* Initialize the attribute mask */
d2fctx_attr.mask_d2fctxa = 0;
/* for MS Windows-only attributes */
d2fctx_attr.d2fihnd_d2fctxa = hInstance;
d2fctx_attr.d2fphnd_d2fctxa = hPrevInstance;
d2fctx_attr.d2fcmsh_d2fctxa = cmdShow;
/* Create the API context */
status = d2fctxcr_Create(&pd2fctx, &d2fctx_attr);
/* Load the form */
status = d2ffmdld_Load(pd2fctx, &pd2ffmd, form_name, FALSE) ;
if (status == D2FS_D2FS_SUCCESS)
{
/*** Process Form Level Trigger Objects ***/
for(status = d2ffmdg_trigger(pd2fctx,pd2ffmd,&pd2ftrg);
pd2ftrg != NULL;
status = d2ftrgg_next(pd2fctx,pd2ftrg,&pd2ftrg))
{
if (d2ftrgis_IsSubclassed(pd2fctx,pd2ftrg) == D2FS_YES)
d2ftrgs_par_flpath(pd2fctx,pd2ftrg,NULL);
}
/*** Process Alert Objects ***/
for(status = d2ffmdg_alert(pd2fctx,pd2ffmd,&pd2falt);
pd2falt != NULL;
status = d2faltg_next(pd2fctx,pd2falt,&pd2falt))
{
if (d2faltis_IsSubclassed(pd2fctx,pd2falt) == D2FS_YES)
d2falts_par_flpath(pd2fctx,pd2falt,NULL);
}
/*** Process Block Objects ***/
for(status = d2ffmdg_block(pd2fctx,pd2ffmd,&pd2fblk);
pd2fblk != NULL;
status = d2fblkg_next(pd2fctx,pd2fblk,&pd2fblk))
{
if (d2fblkis_IsSubclassed(pd2fctx,pd2fblk) == D2FS_YES)
d2fblks_par_flpath(pd2fctx,pd2fblk,NULL);
}
/* Process Item Objects */
for(status = d2fblkg_item(pd2fctx,pd2fblk,&pd2fitm);
pd2fitm != NULL;
status = d2fitmg_next(pd2fctx,pd2fitm,&pd2fitm))
{
if (d2fitmis_IsSubclassed(pd2fctx,pd2fitm) == D2FS_YES)
d2fitms_par_flpath(pd2fctx,pd2fitm,NULL);
/* Process Item Level Trigger Objects */
for(status = d2fitmg_trigger(pd2fctx,pd2fitm,&pd2ftrg);
pd2ftrg != NULL;
status = d2ftrgg_next(pd2fctx,pd2ftrg,&pd2ftrg))
{
if (d2ftrgis_IsSubclassed(pd2fctx,pd2ftrg)==D2FS_YES)
{
d2ftrgs_par_flpath(pd2fctx,pd2ftrg,NULL);
printf("item trigger is Subclassed\n");
}
else if (d2ftrgis_IsSubclassed(pd2fctx,
pd2ftrg)==D2FS_NO)
printf("item trigger is NOT Subclassed\n");
}
/* Process Radio Button Objects *
for(status = d2fitmg_rad_but(pd2fctx,pd2fitm,&pd2frdb);
pd2frdb != NULL;
status = d2frdbs_next(pd2fctx,pd2frdb,&pd2frdb))
{
if (d2frdbis_IsSubclassed(pd2fctx,pd2frdb)==D2FS_YES
{
d2frdbs_par_flpath(pd2fctx,pd2frdb,NULL);
printf("radio button is Subclassed\n");
}
else if (d2frdbis_IsSubclassed(pd2fctx,
pd2frdb)==D2FS_NO)
printf("radio button is NOT Subclassed\n");
}
}
/* Process Block Level Trigger Objects */
for(status = d2fblkg_trigger(pd2fctx,pd2fblk,&pd2ftrg);
pd2ftrg != NULL;
status = d2ftrgg_next(pd2fctx,pd2ftrg,&pd2ftrg))
{
if (d2ftrgis_IsSubclassed(pd2fctx,pd2ftrg) == D2FS_YES)

{
d2ftrgs_par_flpath(pd2fctx,pd2ftrg,NULL);
printf("block trigger is Subclassed\n");
}
else if (d2ftrgis_IsSubclassed(pd2fctx,
pd2ftrg)==D2FS_NO)
printf("block trigger is NOT Subclassed\n");
}
/* Save out the form */
d2ffmdsv_Save(pd2fctx, pd2ffmd, (text *)0, FALSE) ;
/* Generate the forms executable (fmx) */
d2ffmdcf_CompileFile(pd2fctx, pd2ffmd ) ;
/* Destroy the API Context */
d2fctxde_Destroy(pd2fctx) ;
}
}
6.3.4.2 Creating modules using the Open API
/*
This example creates a master-detail form based on the dept and emp database
tables owned by the user scott. The master contains the following fields:
empno, ename, job, sal, and deptno. The detail contains the following fields
deptno, dname, and loc. The join condition is deptno.
*/
#include<stdio.h>
#include<string.h>
#include<windows.h>
#include<d2fctx.h>
#include<d2ffmd.h>
#include<d2ffpr.h>
#include<d2fob.h>
#include<d2fcnv.h>
#include<d2ftrg.h>
#include<d2blk.h>
#include<d2fitm.h>
#include<d2fwin.h>
#include<d2frel.h>
#define D2FS_SUCCESS 0
#define FAIL 1
#define BUFSIZE 128
#define WBP_TXT "null;\n"
int WINAPI WinMain(HANDLE hInstance,
HANDLE hPrevInstance,
LPSTR lpszCommandLine,
int cmdShow)
{
d2fctx *pd2fctx;
d2ffmd *pd2ffmd;
d2fcnv *pd2fcnv;
d2fwin *pd2fwin;
d2fblk *pempblk;
d2fblk *pdeptblk;
d2frel *pd2frel;
d2fitm *pEempnoitm;
d2fitm *pEenameitm;
d2fitm *pEjobitm;
d2fitm *pEsalitm;
d2fitm *pEdeptnoitm;
d2fitm *pDdeptnoitm;
d2fitm *pDdnameitm;
d2fitm *pDlocitm;
text *name = (text *)0;
text *form_name = (text *)0;
d2fctxa d2fctx_attr;
d2fstatus retval;
char buf[BUFSIZE];
/* Get form name */
strncpy(buf, "empdept", BUFSIZE);
form_name = (text*)strtok(buf, ".");
/* Initialize the attribute mask */
d2fctx_attr.mask_d2fctxa = 0;
/* for MS Windows-only attributes */
d2fctx_attr.d2fihnd_d2fctxa = hInstance;
d2fctx_attr.d2fphnd_d2fctxa = hPrevInstance;
d2fctx_attr.d2fcmsh_d2fctxa = cmdShow;
/* Create the API context */
status = d2fctxcr_Create(&pd2fctx, &d2fctx_attr);
/* Create the context */
d2fctxcn_Connect(pd2fctx, (text*)"scott/tiger@test");
/* Create the form */
d2ffmdcr_Create(pd2fctx, &pd2ffmd, form_name);
/* Create a window */
d2fwincr_Create(pd2fctx,pd2ffmd,&pd2fwin,(text*)"MYWIN");
/*** Create Canvas and set canvas-related properties ***/
/* Create a canvas */
d2fcnvcr_Create(pd2fctx, pd2ffmd, &pd2fcnv, (text*)"MYCANVAS");
/* Set viewport width */
d2fcnvs_vprt_wid(pd2fctx, pd2fcnv, 512);
/* Set viewport height */

d2fcnvs_vprt_hgt(pd2fctx, pd2fcnv, 403);
/* Set window */
dwfcnvs_wnd_obj(pd2fctx, pd2fcnv, pd2fwin);
/* Set viewport X-position */
d2fcnvs_vprt_x_pos(pd2fctx, pd2fcnv, 0);
/* Set viewport Y-position */
d2fcnvs_vprt_y_pos(pd2fctx, pd2fcnv, 0);
/* Set width */
d2fcnvs_width(pd2fctx, pd2fcnv, 538)
/* Set height */
d2fcnvs_height(pd2fctx, pd2fcnv, 403)
/*** Create Emp block and set block-related properties ***/
/* Create block */
d2fblkcr_Create(pd2fctx, pd2ffmd, &pempblk, (text*)"EMP");
/* Set to database block */
d2fblks_db_blk(pd2fctx, pempblk, TRUE);
/* Set query data source to Table */
d2fblks_qry_dat_src_typ(pd2fctx, pempblk, D2FC_QRDA_TABLE);
/* Set query data source name to EMP table */
d2fblks_qry_dat_src_nam(pd2fctx, pempblk, "EMP");
/* Set DML data source type to Table */
d2fblks_dml_dat_typ(Pd2fctx, pempblk, D2FC_DMDA_TABLE);
/* Set DML data source name to EMP table */
d2fblks_dml_dat_nam(pd2fctx, pempblk, (text*)"EMP");
/*** Create Dept block and set block-related properties ***/
/* Create block */
d2fblkcr_Create(pd2fctx, pd2ffmd, &pdeptblk, (text*)"DEPT");
/* Set to database block */
d2fblks_db_blk(pd2fctx, pdeptblk, TRUE);
/* Set query data source to Table */
d2fblks_qry_dat_src_typ(pd2fctx, pdeptblk, D2FC_QRDA_TABLE);
/* Set query data source name to EMP table */
d2fblks_qry_dat_src_nam(pd2fctx, pdeptblk, "DEPT");
/* Set DML data source type to Table */
d2fblks_dml_dat_typ(Pd2fctx, pdeptblk, D2FC_DMDA_TABLE);
/* Set DML data source name to EMP table */
d2fblks_dml_dat_nam(pd2fctx, pdeptblk, (text*)"DEPT");
/*** Create empno item and item-related properties ***/
/* Create item */
d2fitmcr_Create(pd2fctx, pempblk, &pEempnoitm, (text*)"EMPNO");
/* Set item type */
d2fitms_itm_type(pd2fctx, pEempnoitm, D2FC_ITTY_TI);
/* Set Enable property */
d2fitms_enabled(pd2fctx, pEempnoitm, TRUE);
/* Set item (keyboard) navigable property */
d2fitms_kbrd_navigable(pd2fctx, pEempnoitm, TRUE);
/* Set item Data Type property */
d2fitms_dat_typ(pd2fctx, pEempnoitm, D2FC_DATY_NUMBER);
/* Set item Max Length property */
d2fitms_max_len(pd2fctx, pEempnoitm, 6);
/* Set item Required property */
d2fitms_required(pd2fctx, pEempnoitm, TRUE);
/* Set Distance Between Records property */
d2fitms_dist_btwn_recs(pd2fctx, pEempnoitm, 0);
/* Set Database block(Database Item) property */
d2fitms_db_itm(pd2fctx, pEempnoitm, TRUE);
/* Set Query Allowed */
d2fitms_qry_allowed(pd2fctx, pEempnoitm, TRUE);
/* Set Query Length */
d2fitms_qry_len(pd2fctx, pEempnoitm, 6);
/* Set Update Allowed */
d2fitms_updt_allowed(pd2fctx, pEempnoitm, TRUE);
/* Set Item Displayed (Visible) */
d2fitms_visible(pd2fctx, pEempnoitm, TRUE);
/* Set Item Canvas property */
d2fitms_cnv_obj(pd2fctx, pEempnoitm, pd2fcnv);
/* Set Item X-position */
d2fitms_x_pos(pd2fctx, pEempnoitm, 32);
/* Set Item Y-position */
d2fitms_y_pos(pd2fctx, pEempnoitm, 50);
/* Set Item Width */
d2fitms_width(pd2fctx, pEempnoitm, 51);
/* Set Item Height */
d2fitms_height(pd2fctx, pEempnoitm, 17);
/* Set Item Bevel */
d2fitms_bevel(pd2fctx, pEempnoitm, D2FC_BEST_LOWERED);
/* Set item Hint */
d2fitms_hint(pd2fctx, PEempnoitm, (text*)"Enter value for :EMPNO");
/*** Create Ename item and item-related properties ***/
/* Create item */
d2fitmcr_Create(pd2fctx, pempblk, &pEenameitm, (text*)"ENAME");
/* Set item type */
d2fitms_itm_type(pd2fctx, pEenameitm, D2FC_ITTY_TI);
/* Set Enable property */
d2fitms_enabled(pd2fctx, pEenameitm, TRUE);
/* Set item (keyboard) navigable property */
d2fitms_kbrd_navigable(pd2fctx, pEenameitm, TRUE);
/* Set item Data Type property */
d2fitms_dat_typ(pd2fctx, pEenameitm, D2FC_DATY_CHAR);
/* Set item Max Length property */
d2fitms_max_len(pd2fctx, pEenameitm, 10);
/* Set Distance Between Records property */

d2fitms_dist_btwn_recs(pd2fctx, pEenameitm, 0);
/* Set Database block(Database Item) property */
d2fitms_db_itm(pd2fctx, pEenameitm, TRUE);
/* Set Query Allowed */
d2fitms_qry_allowed(pd2fctx, pEenameitm, TRUE);
/* Set Query Length */
d2fitms_qry_len(pd2fctx, pEenameitm, 10);
/* Set Update Allowed */
d2fitms_updt_allowed(pd2fctx, pEenameitm, TRUE);
/* Set Item Displayed (Visible) */
d2fitms_visible(pd2fctx, pEenameitm, TRUE);
/* Set Item Canvas property */
d2fitms_cnv_obj(pd2fctx, pEenameitm, pd2fcnv);
/* Set Item X-position */
d2fitms_x_pos(pd2fctx, pEenameitm, 83);
/* Set Item Y-position */
d2fitms_y_pos(pd2fctx, pEenameitm, 50);
/* Set Item Width */
d2fitms_width(pd2fctx, pEenameitm, 77);
/* Set Item Height */
d2fitms_height(pd2fctx, pEenameitm, 17);
/* Set Item Bevel */
d2fitms_bevel(pd2fctx, pEenameitm, D2FC_BEST_LOWERED);
/* Set item Hint */
d2fitms_hint(pd2fctx, PEenameitm, (text*)"Enter value for :ENAME");
/*** Create JOB item and item-related properties ***/
/* Create item */
d2fitmcr_Create(pd2fctx, pempblk, &pEjobitm, (text*)"JOB");
/* Set item type */
d2fitms_itm_type(pd2fctx, pEjobitm, D2FC_ITTY_TI);
/* Set Enable property */
d2fitms_enabled(pd2fctx, pEjobitm, TRUE);
/* Set item (keyboard) navigable property */
d2fitms_kbrd_navigable(pd2fctx, pEjobitm, TRUE);
/* Set item Data Type property */
d2fitms_dat_typ(pd2fctx, pEjobitm, D2FC_DATY_CHAR);
/* Set item Max Length property */
d2fitms_max_len(pd2fctx, pEjobitm, 9);
/* Set Distance Between Records property */
d2fitms_dist_btwn_recs(pd2fctx, pEjobitm, 0);
/* Set Database block(Database Item) property */
d2fitms_db_itm(pd2fctx, pEjobitm, TRUE);
/* Set Query Allowed */
d2fitms_qry_allowed(pd2fctx, pEjobitm, TRUE);
/* Set Query Length */
d2fitms_qry_len(pd2fctx, pEjobitm, 9);
/* Set Update Allowed */
d2fitms_updt_allowed(pd2fctx, pEjobitm, TRUE);
/* Set Item Displayed (Visible) */
d2fitms_visible(pd2fctx, pEjobitm, TRUE);
/* Set Item Canvas property */
d2fitms_cnv_obj(pd2fctx, pEjobitm, pd2fcnv);
/* Set Item X-position */
d2fitms_x_pos(pd2fctx, pEjobitm, 160);
/* Set Item Y-position */
d2fitms_y_pos(pd2fctx, pEjobitm, 50);
/* Set Item Width */
d2fitms_width(pd2fctx, pEjobitm, 70);
/* Set Item Height */
d2fitms_height(pd2fctx, pEjobitm, 17);
/* Set Item Bevel */
d2fitms_bevel(pd2fctx, pEjobitm, D2FC_BEST_LOWERED);
/* Set item Hint */
d2fitms_hint(pd2fctx, PEjobitm, (text*)"Enter value for :JOB");
/*** Create SALARY item and item-related properties ***/
/* Create item */
d2fitmcr_Create(pd2fctx, pempblk, &pEsalitm, (text*)"SAL");
/* Set item type */
d2fitms_itm_type(pd2fctx, pEsalitm, D2FC_ITTY_TI);
/* Set Enable property */
d2fitms_enabled(pd2fctx, pEsalitm, TRUE);
/* Set item (keyboard) navigable property */
d2fitms_kbrd_navigable(pd2fctx, pEsalitm, TRUE);
/* Set item Data Type property */
d2fitms_dat_typ(pd2fctx, pEsalitm, D2FC_DATY_NUMBER);
/* Set item Max Length property */
d2fitms_max_len(pd2fctx, pEsalitm, 9);
/* Set Distance Between Records property */
d2fitms_dist_btwn_recs(pd2fctx, pEsalitm, 0);
/* Set Database block(Database Item) property */
d2fitms_db_itm(pd2fctx, pEsalitm, TRUE);
/* Set Query Allowed */
d2fitms_qry_allowed(pd2fctx, pEsalitm, TRUE);
/* Set Query Length */
d2fitms_qry_len(pd2fctx, pEsalitm, 9);
/* Set Update Allowed */
d2fitms_updt_allowed(pd2fctx, pEsalitm, TRUE);
/* Set Item Displayed (Visible) */
d2fitms_visible(pd2fctx, pEsalitm, TRUE);
/* Set Item Canvas property */
d2fitms_cnv_obj(pd2fctx, pEsalitm, pd2fcnv);
/* Set Item X-position */

d2fitms_x_pos(pd2fctx, pEsalitm, 352);
/* Set Item Y-position */
d2fitms_y_pos(pd2fctx, pEsalitm, 50);
/* Set Item Width */
d2fitms_width(pd2fctx, pEsalitm, 70);
/* Set Item Height */
d2fitms_height(pd2fctx, pEsalitm, 17);
/* Set Item Bevel */
d2fitms_bevel(pd2fctx, pEsalitm, D2FC_BEST_LOWERED);
/* Set item Hint */
d2fitms_hint(pd2fctx, PEsalitm, (text*)"Enter value for :SAL");
/*** Create DEPTNO item and item-related properties ***/
/* Create item */
d2fitmcr_Create(pd2fctx, pempblk, &pEdeptnoitm, (text*)"DEPTNO");
/* Set item type */
d2fitms_itm_type(pd2fctx, pEdeptnoitm, D2FC_ITTY_TI);
/* Set Enable property */
d2fitms_enabled(pd2fctx, pEdeptnoitm, TRUE);
/* Set item (keyboard) navigable property */
d2fitms_kbrd_navigable(pd2fctx, pEdeptnoitm, TRUE);
/* Set item Data Type property */
d2fitms_dat_typ(pd2fctx, pEdeptnoitm, D2FC_DATY_NUMBER);
/* Set item Max Length property */
d2fitms_max_len(pd2fctx, pEdeptnoitm, 4);
/*Set item Required property */
d2fitms_required(pd2fctx, pEdeptnoitm, TRUE);
/* Set Distance Between Records property */
d2fitms_dist_btwn_recs(pd2fctx, pEdeptnoitm, 0);
/* Set Database block(Database Item) property */
d2fitms_db_itm(pd2fctx, pEdeptnoitm, TRUE);
/* Set Query Allowed */
d2fitms_qry_allowed(pd2fctx, pEdeptnoitm, TRUE);
/* Set Query Length */
d2fitms_qry_len(pd2fctx, pEdeptnoitm, 4);
/* Set Update Allowed */
d2fitms_updt_allowed(pd2fctx, pEdeptnoitm, TRUE);
/* Set Item Displayed (Visible) */
d2fitms_visible(pd2fctx, pEdeptnoitm, TRUE);
/* Set Item Canvas property */
d2fitms_cnv_obj(pd2fctx, pEdeptnoitm, pd2fcnv);
/* Set Item X-position */
d2fitms_x_pos(pd2fctx, pEdeptnoitm, 493);
/* Set Item Y-position */
d2fitms_y_pos(pd2fctx, pEdeptnoitm, 50);
/* Set Item Width */
d2fitms_width(pd2fctx, pEdeptnoitm, 30);
/* Set Item Height */
d2fitms_height(pd2fctx, pEdeptnoitm, 17);
/* Set Item Bevel */
d2fitms_bevel(pd2fctx, pEdeptnoitm, D2FC_BEST_LOWERED);
/* Set item Hint */
d2fitms_hint(pd2fctx, PEdeptnoitm, (text*)"Enter value for :DEPTNO");
/*** Create DEPTNO item and item-related properties ***/
/* Create item */
d2fitmcr_Create(pd2fctx, pdeptblk, &pDdeptnoitm, (text*)"DEPTNO");
/* Set item type */
d2fitms_itm_type(pd2fctx, pDdeptnoitm, D2FC_ITTY_TI);
/* Set Enable property */
d2fitms_enabled(pd2fctx, pDdeptnoitm, TRUE);
/* Set item (keyboard) navigable property */
d2fitms_kbrd_navigable(pd2fctx, pDdeptnoitm, TRUE);
/* Set item Data Type property */
d2fitms_dat_typ(pd2fctx, pDdeptnoitm, D2FC_DATY_NUMBER);
/* Set item Max Length property */
d2fitms_max_len(pd2fctx, pDdeptnoitm, 4);
/*Set item Required property */
d2fitms_required(pd2fctx, pDdeptnoitm, TRUE);
/* Set Distance Between Records property */
d2fitms_dist_btwn_recs(pd2fctx, pDdeptnoitm, 0);
/* Set Database block(Database Item) property */
d2fitms_db_itm(pd2fctx, pDdeptnoitm, TRUE);
/* Set Query Allowed */
d2fitms_qry_allowed(pd2fctx, pDdeptnoitm, TRUE);
/* Set Query Length */
d2fitms_qry_len(pd2fctx, pDdeptnoitm, 4);
/* Set Update Allowed */
d2fitms_updt_allowed(pd2fctx, pDdeptnoitm, TRUE);
/* Set Item Displayed (Visible) */
d2fitms_visible(pd2fctx, pDdeptnoitm, TRUE);
/* Set Item Canvas property */
d2fitms_cnv_obj(pd2fctx, pDdeptnoitm, pd2fcnv);
/* Set Item X-position */
d2fitms_x_pos(pd2fctx, pDdeptnoitm, 32);
/* Set Item Y-position */
d2fitms_y_pos(pd2fctx, pDdeptnoitm, 151);
/* Set Item Width */
d2fitms_width(pd2fctx, pDdeptnoitm, 38);
/* Set Item Height */
d2fitms_height(pd2fctx, pDdeptnoitm, 17);
/* Set Item Bevel */
d2fitms_bevel(pd2fctx, pDdeptnoitm, D2FC_BEST_LOWERED);
/* Set item Hint */

d2fitms_hint(pd2fctx, PDdeptnoitm, (text*)"Enter value for :DEPTNO");
/*** Create DNAME item and item-related properties ***/
/* Create item */
d2fitmcr_Create(pd2fctx, pdeptblk, &pDdnameitm, (text*)"DNAME");
/* Set item type */
d2fitms_itm_type(pd2fctx, pDdnameitm, D2FC_ITTY_TI);
/* Set Enable property */
d2fitms_enabled(pd2fctx, pDdnameitm, TRUE);
/* Set item (keyboard) navigable property */
d2fitms_kbrd_navigable(pd2fctx, pDdnameitm, TRUE);
/* Set item Data Type property */
d2fitms_dat_typ(pd2fctx, pDdnameitm, D2FC_DATY_CHAR);
/* Set item Max Length property */
d2fitms_max_len(pd2fctx, pDdnameitm, 14);
/* Set Distance Between Records property */
d2fitms_dist_btwn_recs(pd2fctx, pDdnameitm, 0);
/* Set Database block(Database Item) property */
d2fitms_db_itm(pd2fctx, pDdnameitm, TRUE);
/* Set Query Allowed */
d2fitms_qry_allowed(pd2fctx, pDdnameitm, TRUE);
/* Set Query Length */
d2fitms_qry_len(pd2fctx, pDdnameitm, 14);
/* Set Update Allowed */
d2fitms_updt_allowed(pd2fctx, pDdnameitm, TRUE);
/* Set Item Displayed (Visible) */
d2fitms_visible(pd2fctx, pDdnameitm, TRUE);
/* Set Item Canvas property */
d2fitms_cnv_obj(pd2fctx, pDdnameitm, pd2fcnv);
/* Set Item X-position */
d2fitms_x_pos(pd2fctx, pDdnameitm, 70);
/* Set Item Y-position */
d2fitms_y_pos(pd2fctx, pDdnameitm, 151);
/* Set Item Width */
d2fitms_width(pd2fctx, pDdnameitm, 102);
/* Set Item Height */
d2fitms_height(pd2fctx, pDdnameitm, 17);
/* Set Item Bevel */
d2fitms_bevel(pd2fctx, pDdnameitm, D2FC_BEST_LOWERED);
/* Set item Hint */
d2fitms_hint(pd2fctx, PDdnameitm, (text*)"Enter value for :DNAME");
/*** Create LOC item and item-related properties ***/
/* Create item */
d2fitmcr_Create(pd2fctx, pdeptblk, &pDlocitm, (text*)"LOC");
/* Set item type */
d2fitms_itm_type(pd2fctx, pDlocitm, D2FC_ITTY_TI);
/* Set Enable property */
d2fitms_enabled(pd2fctx, pDlocitm, TRUE);
/* Set item (keyboard) navigable property */
d2fitms_kbrd_navigable(pd2fctx, pDlocitm, TRUE);
/* Set item Data Type property */
d2fitms_dat_typ(pd2fctx, pDlocitm, D2FC_DATY_CHAR);
/* Set item Max Length property */
d2fitms_max_len(pd2fctx, pDlocitm, 13);
/* Set Distance Between Records property */
d2fitms_dist_btwn_recs(pd2fctx, pDlocitm, 0);
/* Set Database block(Database Item) property */
d2fitms_db_itm(pd2fctx, pDlocitm, TRUE);
/* Set Query Allowed */
d2fitms_qry_allowed(pd2fctx, pDlocitm, TRUE);
/* Set Query Length */
d2fitms_qry_len(pd2fctx, pDlocitm, 13);
/* Set Update Allowed */
d2fitms_updt_allowed(pd2fctx, pDlocitm, TRUE);
/* Set Item Displayed (Visible) */
d2fitms_visible(pd2fctx, pDlocitm, TRUE);
/* Set Item Canvas property */
d2fitms_cnv_obj(pd2fctx, pDlocitm, pd2fcnv);
/* Set Item X-position */
d2fitms_x_pos(pd2fctx, pDlocitm, 173);
/* Set Item Y-position */
d2fitms_y_pos(pd2fctx, pDlocitm, 151);
/* Set Item Width */
d2fitms_width(pd2fctx, pDlocitm, 96);
/* Set Item Height */
d2fitms_height(pd2fctx, pDlocitm, 17);
/* Set Item Bevel */
d2fitms_bevel(pd2fctx, pDlocitm, D2FC_BEST_LOWERED);
/* Set item Hint */
d2fitms_hint(pd2fctx, PDlocitm, (text*)"Enter value for :LOC");
/*** Create Relations and relations-related properties ***/
/* Create Relation */
d2frelcr_Create(pd2fctx, (d2fob *)pdeptblk, &pd2frel, (text*)"DEPT_EMP");
/* Set Relation Detail block */
d2frels_detail_blk(pd2fctx, pd2frel, (text *)"EMP");
/* Set Master Deletes property */
d2frels_del_rec([pd2fctx, pd2frel, D2FC_DERE_NON_ISOLATED);
/* Set Deferred property */
d2frels_deferred(pd2ctx, pd2frel, FALSE);
/* Set Auto Query property */
d2frels_auto_qry(pd2ctx, pd2frel, FALSE);
/* Set Prevent Masterless property */
d2frels_prvnt_mstrless_ops(pd2ctx, pd2frel, FALSE);

/* Set Join Condition property */
d2frels_join_cond(pd2ctx, pd2frel, (text*)"DEPTNO");
/* Instantiate Relation: creates master-detail triggers */
d2frelup_Update(pd2fctx, pd2frel);
/* Save Form */
d2ffmdsv_Save(pd2fctx, pd2ffmd, (text*)0, FALSE, TRUE);
/* Compile Form */
d2ffmdcf_CompileFile(pd2fctx, pd2ffmd);
/* Destroy Context */
d2fctxde_Destroy(pd2fctx);
}
6.4 Designing Applications to Run against ODBC Datasources
The data within your enterprise often resides within several heterogeneous datasources. Some portion of your data, for example, might be stored
within an Oracle database, while another portion is stored within an Informix database. Building a single application that can access each
datasource can be a difficult task.
However, by taking advantage of Forms Developer's and Reports Developer's open datasource support, you can build generic applications that
run transparently against any ODBC-compliant datasource.
This section describes open datasource support. It includes these topics:
Section 6.4.1, "What is the Oracle Open Client Adapter (OCA)?"
Section 6.4.2, "Open datasource guidelines"
Section 6.4.3, "Configuring your application to run against an ODBC datasource"
6.4.1 What is the Oracle Open Client Adapter (OCA)?
When you connect to an ODBC datasource, you use the Oracle Open Client Adapter (OCA). OCA is an ODBC level 2-compliant utility that
allows Forms Developer or Reports Developer on Microsoft Windows 95, Windows NT, and Windows 3.1 to access ODBC -compliant
datasources through ODBC drivers.
OCA is included with both Forms Developer and Reports Developer. You use the Oracle Installer to install OCA.
6.4.1.1 When should I use OCA?
You should use OCA whenever your application must access non-Oracle datasources. Your Form and Report applications can automatically
access any ODBC-compliant datasources. Refer to the online help for specific information about connecting to ODBC datasources.
6.4.1.2 OCA architecture
The Oracle Open Client Adapter consists of the following:
Component Description
Forms Developer or Reports
Developer Application
Performs processing and calls ODBC functions to submit SQL statements and retrieve results.
Oracle Open Client Adapter Translates Oracle database calls to ODBC calls.
Driver Manager Loads ODBC drivers for your application.
ODBC Drivers Process ODBC function calls, submits SQL requests to a specific datasource, and returns results to your
application.
Datasource Consists of the data that user wants to access and its associated operating system, DBMS, and network
platform (if any) used to access the DBMS.
6.4.1.3 Establishing an ODBC connection
To connect to an ODBC datasource, type the following connect string in the Connect dialog box:
[user[/password]]@ODBC:datasource[:dbname]
For example, to connect to Sybase System 10, type:
scott/tiger@ODBC:sybase_ds
6.4.1.4 ODBC drivers
When you connect to an ODBC datasource, you use an ODBC driver to communicate with the datasource. Both Forms Developer and Reports
Developer include prebundled ODBC drivers for each supported datasource. These drivers are ODBC level 1-compliant and, to some extent,
provide some level 2 functionality to achieve greater performance.
6.4.1.5 OPENDB.PLL

OPENDB.PLL is a PL/SQL library of functions that is included with OCA. You use OPENDB.PLL within applications to:
Automatically adjust form and data block properties at runtime to suit the datasource.
Open auxiliary connections to other datasources in addition to the application's main connection.
Execute arbitrary SQL statements and Stored Procedure calls on any connection.
Retrieve results sets from non-Oracle stored procedures.
Obtain the DBMS and ODBC driver names and versions for a given connection.
For more information about OPENDB.PLL, refer to OCA_INFO.PDF in the ORACLE_HOME\TOOLS\DOC20 directory.
6.4.2 Open datasource guidelines
Topic Recommendation
Optimizing your
application to run
against multiple
datasources
You do not have to optimize your application to run against multiple datasources unless you want to target a specific
datasource to take advantage of features particular to that system.
Writing PL/SQL for use
with ODBC
datasources
SQL statements embedded in PL/SQL program units must conform to both Oracle SQL and the SQL dialect of the
datasource that you connect against. Any statements that fail against Oracle will cause PL/SQL compilation failures.
Similarly, any statements that use unsupported syntax will fail at execution.
The SYSDATE and USER functions are the only exceptions to this restriction. These functions are Oracle-specific; and,
OCA translates these functions to the corresponding ODBC functions, allowing these functions to work against all
datasources.
If you want to issue SQL statements that are datasource-specific, but conflict with Oracle syntax, use the EXEC_SQL
package.
Referencing tables from
more than one
datasource
Many datasources allow you to access tables that are located in other datasources if you specify the database, owner,
and table (for example, database.owner.tablename).
PL/SQL does not recognize the three-part table syntax, and your client-side program unit or trigger will not compile.
To work around this restriction, enclose the three-part name in double quotes, after calling the appropriate OPENDB
function that removes double quotes.
Restrictions When working with a non-Oracle7 datasource, you must store your application modules (forms, reports, and
graphics) in the file system. Non-Oracle7 datasources cannot be used as a repository for storing application
modules.
Trigger information for columns cannot be accessed from the Object Navigator (Database Objects node).
You can view stored procedure text only for datasources that emulate the Oracle ALL_SOURCE table (e.g.,
Microsoft SQL Server). You cannot edit database stored procedure text.
You cannot drag and drop PL/SQL program units from the client to a non-Oracle7 datasource.
Neither Forms Developer nor Reports Developer can use primary and foreign key constraint information of OCA
datasources for default selection of master-detail relationships. These relationships must be identified directly
where required.
Optimizer hints (/*hint*/ style comments) are ignored by any datasource that you connect to through OCA.
Troubleshooting To view the SQL statements issued by OCA and the messages generated by the ODBC driver or the database:
1. Verify that the following entry is set in the ORACLE.INI file on Windows 3.1 or in the registry on Windows NT
and Windows 95:
UB=ORACLE_HOME\OCA20
2. If you are unable to resolve the error, call Oracle Customer Support.
3. Add the following entries to the ORACLE.INI file on Windows 3.1 or to the registry under
SOFTWARE\ORACLE on Windows NT and Windows 95:
OCA_DEBUG_SQL=TRUE
OCA_DEBUG_ERROR=TRUE
4. Run your application against the ODBC datasource to view SQL statements or error messages in the debug
window. Click OK to close the debug window and continue processing.
Debugging Tips You can display debug information by setting the OCA_DEBUG_SQL and OCA_DEBUG_ERROR environment

Debugging Tips You can display debug information by setting the OCA_DEBUG_SQL and OCA_DEBUG_ERROR environment
variables to TRUE.
Using these environment variables will help you identify SQL failures when using Forms Developer or Reports
Developer against OCA datasources.
When you set OCA_DEBUG to TRUE, any SQL statement that is sent to the ODBC driver is displayed before it is
transmitted.
When you set OCA_DEBUG_ERROR to TRUE, any errors that are returned by the ODBC driver are displayed in a
dialog before being passed back to Forms or Reports.
When working with multiple datasources, consider these guidelines:
6.4.3 Configuring your application to run against an ODBC datasource
To configure your application to run against an ODBC-compliant datasource, refer to the "Accessing non-Oracle datasources" topic in the online
help.
Copyright © 2000 Oracle Corporation. All Rights Reserved.
Library Solution
Area
Contents Index