Getting Started with nopCommerce - Packt · e-commerce storefront is an exciting adventure and...
26
Getting Started with nopCommerce Brandon Atkinson Chapter No. 2 "The Public-facing Storefront"
Transcript of Getting Started with nopCommerce - Packt · e-commerce storefront is an exciting adventure and...

Getting Started with nopCommerce
Brandon Atkinson
Chapter No. 2 "The Public-facing Storefront"

In this package, you will find: A Biography of the author of the book
A preview chapter from the book, Chapter NO.2 "The Public-facing Storefront"
A synopsis of the book’s content
Information on where to buy this book
About the Author Brandon Atkinson is an architect and developer for CapTech Consulting in Richmond, VA. He specializes in Microsoft technologies including ASP.NET and SharePoint, regularly contributing to the SharePoint forums on TechNet. Brandon has owned and operated several online stores over the years, and he has also helped many others with their e-commerce efforts. When he is not writing code, Brandon enjoys playing music, reading, and spending time with his wife.
This book is dedicated to my dad, Mike Atkinson. I'm sure he would be proud to see how far I've come and I miss him every day.
I thank my wife, Jennie Cook, who has always supported me in everything I do and has never told me any idea was too crazy to try; I love you.
Thanks to my brother, Brian Atkinson, who was my Sherpa guide for writing a book.
And thanks to my mom, Brenda Michaels, who taught me to have a firm hand shake, be polite, look people in the eye, and always hold doors for strangers. These skills have proven more valuable in my career than any bit of technical knowledge I can fit into my head.
For More Information: www.packtpub.com/getting-started-with-nopcommerce/book

Getting Started with nopCommerce You're reading this book because you've decided to open an online store and you've chosen nopCommerce as your e-commerce engine. Congratulations! Opening an e-commerce storefront is an exciting adventure and nopCommerce is a top-shelf product that will serve you well. nopCommerce is an open source e-commerce engine built with Microsoft's ASP.NET MVC framework and which uses Microsoft's SQL Server database. This engine is a complete solution that includes everything you need.
nopCommerce consists of two major areas:
• Public-facing storefront: This is where customers will browse your site, look at products, and place orders. It consists of product, category, and topic pages, as well as the shopping cart and checkout pages.
• Administration site: This is where you will manage all aspects of your storefront. This includes creating categories, adding/managing products, and creating/editing topic pages. You will also manage shipping options, tax settings, payment providers, and so on.
There are other areas in nopCommerce, including a blog and forums. However, these areas are outside the scope of this book, but you should be aware there is more to nopCommerce than just the e-commerce engine.
nopCommerce is licensed under the nopCommerce Public License v3. This license is the GPLv3 license with the additional requirement of having Powered by nopCommerce text on the bottom of each page. The GPLv3 license states that the software is free to use, change, share, and also that you are free to share your code changes with other users. Visit the GNU website (http://www.gnu.org/) for detailed information on the GPLv3 license.
The text requirement under the nopCommerce Public License v3 can be removed by purchasing a "nopCommerce copyright removal key" from the nopCommerce website.
This book was written using nopCommerce 2.80. All of the screenshots are from this version, which introduced a new theme that was not available in previous versions. However, the majority of the content is applicable to all versions of nopCommerce from 2.00 and above. To view all the versions of nopCommerce and to obtain details of the differences, visit the nopCommerce website.
For More Information: www.packtpub.com/getting-started-with-nopcommerce/book

What This Book Covers Chapter 1, Downloading and Installing nopCommerce, will explain the various flavors of nopCommerce and will show you how to download and install the engine to your hosting provider or development environment.
Chapter 2, The Public-facing Storefront, will guide you through the storefront your customers will be using, explaining the various components along the way.
Chapter 3, The Administration Site, will guide you through the backend of nopCommerce and will highlight key areas where you'll be building your store.
Chapter 4, Configuring the Store, gives you a walkthrough of how to configure the most important areas of your store to get up and running fast.
Chapter 5, Processing Orders, will explain how to process orders you receive via your storefront as well as how to manage shipments and impersonate your customers.
For More Information: www.packtpub.com/getting-started-with-nopcommerce/book

The Public-facing StorefrontThe public-facing storefront of nopCommerce is your e-commerce store. It is the site where customers will come from the Web to learn about your company, browse your products, place items in the shopping cart, an d if all goes well, buy stuff! The storefront is made up of many components. This chapter will cover the most important parts and, generally speaking, the most frequently used parts of your website. With any e-commerce site, there are certain pages and areas where customers will spend the majority of their time, namely product pages, the shopping cart, and the checkout. However, there are a lot of other pages that customers will use, and it's important that you, the store owner, are very familiar with all the pages in your site. Just as a ship captain will know every bolt and weld of their ship, you should know every page your customers may visit. Even though we may only be covering the most viewed pages in this chapter, you should plan to take the time to thoroughly navigate your site just as any customer would.
All examples in this chapter are taken from a base nopCommerce installation that used the Create sample data option during the install process.
For More Information: www.packtpub.com/getting-started-with-nopcommerce/book

The Public-facing Storefront
[ 24 ]
General site layout and overviewWhen customers navigate to your store, they will be presented with the homepage. The homepage is where we'll begin to review the site layout and structure.
1. Logo: This is your store logo. As with just about every e-commerce site, this serves as a link back to your homepage.
For More Information: www.packtpub.com/getting-started-with-nopcommerce/book

Chapter 2
[ 25 ]
2. Header links: The toolbar holds some of the most frequently used links, such as Shopping cart, Wishlist, and Account. These links are very customer focused, as this area will also show the customer's logged in status once they are registered with your site.
3. Header menu: The menu holds various links to other important pages, such as New products, Search, and Contact us. It also contains the link to the built-in blog site.
4. Left-side menu: The left-side menu serves as a primary navigation area. It contains the Categories and Manufacturers links as well as Tags and Polls.
5. Center: This area is the main content of the site. It will hold category and product information, as well as the main content of the homepage.
6. Right-side menu: The right-side menu holds links to other ancillary pages in your site, such as Contact us, About us, and News. It also holds the Newsletter signup widget.
7. Footer: The footer holds the copyright information and the Powered by nopCommerce license tag.
The naming conventions used for these areas are driven by the Cascading Style Sheet (CSS) defi nitions. For instance, if you look at the CSS for the Header links area, you will see a defi nition of header-links.
nopCommerce uses layouts to defi ne the overall site structure. A layout is a type of page used in ASP.NET MVC to defi ne a common site template, which is then inherited across all the other pages on your site. In nopCommerce, there are several different layout pages used throughout the site. There are two main layout pages that defi ne the core structure:
• Root head: This is the base layout page. It contains the header of the HTML that is generated and is responsible for loading all the CSS and JavaScript fi les needed for the site.
• Root: This layout is responsible for loading the header, footer, and contains the Master Wrapper, which contains all the other content of the page.
For More Information: www.packtpub.com/getting-started-with-nopcommerce/book

The Public-facing Storefront
[ 26 ]
These two layouts are common for all pages within nopCommerce, which means every page in the site will display the logo, header links, header menu, and footer. They form the foundation of the site structure. The site pages themselves will utilize one of three other layouts that determine the structure inside the Master Wrapper:
• Three-column: The three-column layout is what the nopCommerce homepage utilizes. It includes the right side, left side, and center areas. This layout is used primarily on the homepage.
• Two-column: This is the most common layout that customers will encounter. It includes the left side and center areas. This layout is used on all category and product pages as well as all the ancillary pages.
• One-column: This layout is used in the shopping cart and checkout pages. It includes the center area only.
Changing the layout page used by certain pages requires changing the code. For instance, if we open the product page in Visual Studio, we can see the layout page being used:
As you can see, the layout defi ned for this page is _ColumnsTwo.cshtml, the two-column layout. You can change the layout used by updating this property, for instance, to _ColumnsThree.cshtml, to use the three-column layout.
For More Information: www.packtpub.com/getting-started-with-nopcommerce/book

Chapter 2
[ 27 ]
Category and manufacturer pagesWhen adding new products to the site, you can specify their category and manufacturer. These groupings allow customers to search for products on your site more easily.
Category pages display a collection of products that you have grouped under that category. For instance, all books are grouped under the category Books. A customer can navigate to any category located in the left-side area. Once a customer navigates to a particular category, that category link will become bold to indicate to the customer where they currently are. The breadcrumb will also update with the current location.
For More Information: www.packtpub.com/getting-started-with-nopcommerce/book
The Public-facing Storefront
[ 28 ]
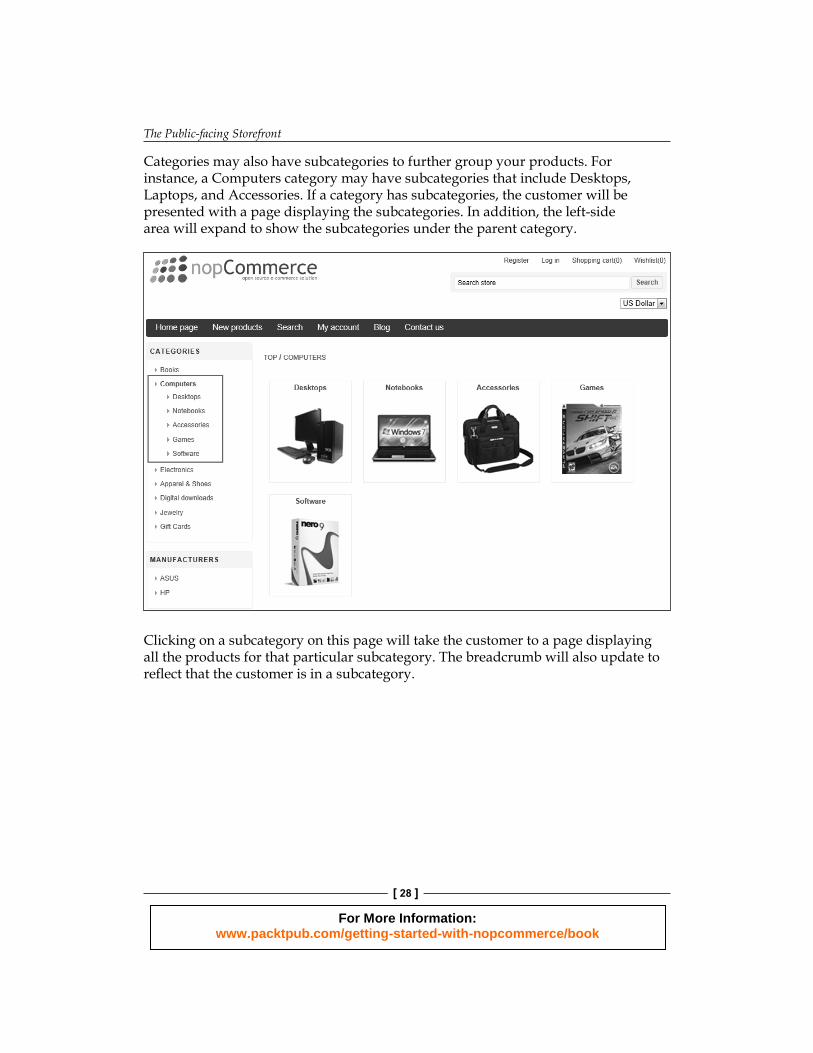
Categories may also have subcategories to further group your products. For instance, a Computers category may have subcategories that include Desktops, Laptops, and Accessories. If a category has subcategories, the customer will be presented with a page displaying the subcategories. In addition, the left-side area will expand to show the subcategories under the parent category.
Clicking on a subcategory on this page will take the customer to a page displaying all the products for that particular subcategory. The breadcrumb will also update to refl ect that the customer is in a subcategory.
For More Information: www.packtpub.com/getting-started-with-nopcommerce/book

Chapter 2
[ 29 ]
Manufacturer pages behave similarly. All products grouped under a certain manufacturer can be displayed together. Customers can navigate to a manufacturer page from the left-side area. Clicking on a particular manufacturer name will display all the products for that manufacturer. As with the category pages, the link will become bold, but there is no breadcrumb on these pages. This is replaced with the manufacturer name instead.
For More Information: www.packtpub.com/getting-started-with-nopcommerce/book

The Public-facing Storefront
[ 30 ]
Product pagesProduct pages are the heart and soul of your site. This is where the majority of a customer's time is spent. Your site will typically have more product pages than any other type of page. Because of this, product pages have a lot of components to them.
1. Product pictures: Product pictures make up a good portion of the product page. You can add multiple pictures to products, which show up as thumbnail images under the main picture. Clicking the thumbnail image will open a modal window allowing the customer to scroll through all the available images.
2. Product name: This is the name of the product and it is displayed on the product page, category pages, search results, and so on. It will be shown anywhere the product is referenced in the site.
For More Information: www.packtpub.com/getting-started-with-nopcommerce/book

Chapter 2
[ 31 ]
3. Short description: The product short description is shown on the product page directly underneath the product name. It's meant to be a quick description of the product that gives the most important information.
4. Display stock availability: You have the option to display stock availability of products when tracking their inventory, by their general availability or the actual stock count. You can also choose not to show this at all, for instance, for drop ship items. These settings can be managed in the administration site.
5. Review and rate link: Customers can review products on your site by clicking on this link. Customers will be directed to a review page where a written review and a rating can be given. The ratings range from 1 to 5 stars. By default, all reviews must be approved by a site administrator before they will appear on the product page. This can be changed in the administration site.
6. Price: This is the product price. You can also defi ne sale prices for your products. If you give a product a sale price, the old price will be shown in red with a strike through and the sale price will be displayed.
7. Quantity: Customers can enter the product quantity they wish to purchase using this textbox. The default value is 1. If the customer requests more quantity than is currently available, they will be notifi ed that the quantity exceeds the on-hand count, which will be displayed to them.
For More Information: www.packtpub.com/getting-started-with-nopcommerce/book

The Public-facing Storefront
[ 32 ]
8. Add to cart: Clicking on this button will add the product to the customer's shopping cart. Once customers click on the Add to Cart button, they will be presented with a spinning wheel notifi cation, after which they are notifi ed if the item was successfully added to their cart via the notifi cation bar that appears at the top of the product page.
9. Add to wishlist: Customers can add products to their wishlist by clicking on this button. The wishlist is simply a set of items the customer would like to keep track of but not purchased right away. Once products are placed in the wishlist, a customer can navigate to the Wishlist page by clicking the link in the Header Links area at the top of the page. The Wishlist page also includes the Email a friend functionality, as well as a public URL you can share with friends.
10. Email a Friend: Customers can e-mail a friend a link to any product on your site. Clicking on this button will direct customers to the Email a friend page where they can provide an e-mail address for their friend as well as a personal message. By default, only registered customers are allowed to use this feature. This can be changed in the administration site.
For More Information: www.packtpub.com/getting-started-with-nopcommerce/book

Chapter 2
[ 33 ]
11. Add to compare list: Clicking on this button will add the current product to the Compare products list and will then direct customers to that page. This allows customers to compare various attributes of products on a single page. To compare multiple products, customers must navigate to each product page and click on the Add to compare list button. Customers can also navigate directly to the Compare products page from the homepage by clicking on the Compare product list link in the information area.
12. Add this: This area allows customers to share the product page with customers via social media channels, such as Facebook, Twitter, and LinkedIn. This is powered by the Add this widget (http://www.addthis.com). This widget can be modifi ed in the administration site, as well as replaced with other social media widgets from other companies.
13. Full description: This is the full and complete product description. This description is generally longer and much more detailed. This area supports full HTML when editing in the administration site so that you can include styling such as bulleted lists using a WYSIWYG editor.
For More Information: www.packtpub.com/getting-started-with-nopcommerce/book

The Public-facing Storefront
[ 34 ]
14. Product tags: Each product can have tags associated with it. These tags show up on each product as well as in the Popular Tags area on the homepage. It's a way to further group certain products together based on their tags. For instance, you could group laptops together based on whether they offer a backlit keyboard. This feature is not enough to warrant a category or subcategory, but may be important to your customers. This way they could click on a backlit keyboard tag to see all the products that have been tagged with this word.
15. Related products: Related products could be considered as cross sells. However, do not confuse the two. Related products are specifi c products that you want to show with a particular product. You can add and edit these by product in the administration site. You can also add cross sells, but these products will show up in the shopping cart rather than on the product page.
The naming conventions used for these areas are driven by how these areas are defined in the administration site. For instance, when adding or editing a product, you will see the same naming conventions used, such as Short Description, Full Description, and so on.
Searching for productsCustomers can search your site in two ways—by either clicking the Search link in the header menu or by using the search textbox under the Header Links area.
The Search textbox features an auto-complete function, which will show up the product names that match with what the customer is typing. For instance, if we type canon into the search box, a list of product names that match canon will be shown in the drop-down list.
For More Information: www.packtpub.com/getting-started-with-nopcommerce/book

Chapter 2
[ 35 ]
Clicking on any of the results in the drop-down list will take you directly to the product page. Alternatively, the customer can click the Search button and will be directed to a search results page that will display more information about each product.
On the search results page, there is an Advanced Search checkbox. By clicking on this, the customer will be presented with further options to refi ne their search, such as Category, Manufacturer, Price Range, as well as the ability to search product descriptions in addition to the product names.
Shopping cartWhen a customer clicks on the Add to cart button on the product page, the site will add that product in the quantity selected to the shopping cart. nopCommerce technically has two shopping carts, namely the mini shopping cart and the shopping cart.
For More Information: www.packtpub.com/getting-started-with-nopcommerce/book

The Public-facing Storefront
[ 36 ]
The mini shopping cart is visible when a customer hovers over the Shopping cart link located in the Header Links area. It shows the customer items that are currently in the shopping cart, as well as the sub-total cost for those items. You can confi gure how many items to display in the mini shopping cart in the administration site. From the mini shopping cart, the customer can go to the shopping cart page or begin the checkout process.
The shopping cart on the other hand is a full page that basically kicks off the checkout process. As you'll see, it has quite a few more features than the mini shopping cart.
For More Information: www.packtpub.com/getting-started-with-nopcommerce/book
Chapter 2
[ 37 ]
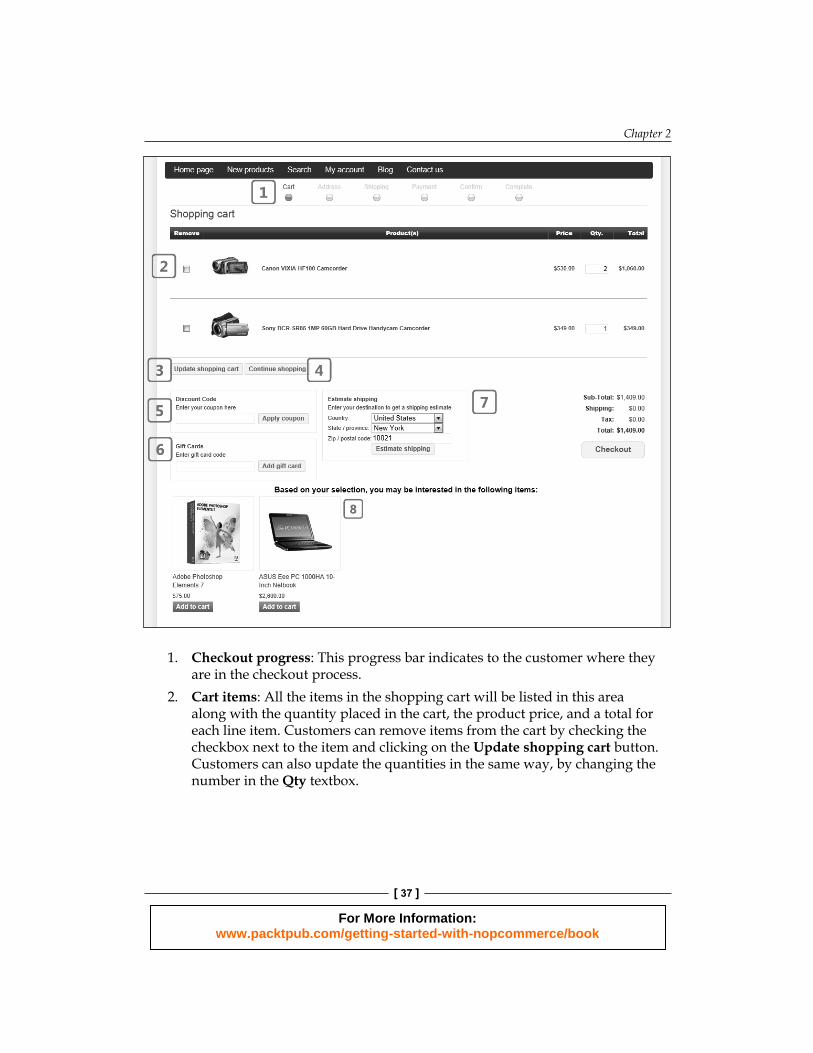
1. Checkout progress: This progress bar indicates to the customer where they are in the checkout process.
2. Cart items: All the items in the shopping cart will be listed in this area along with the quantity placed in the cart, the product price, and a total for each line item. Customers can remove items from the cart by checking the checkbox next to the item and clicking on the Update shopping cart button. Customers can also update the quantities in the same way, by changing the number in the Qty textbox.
For More Information: www.packtpub.com/getting-started-with-nopcommerce/book

The Public-facing Storefront
[ 38 ]
3. Update shopping cart: Clicking on this button will update the shopping cart with any changes entered in the Cart items area.
4. Continue shopping: Clicking on this button will direct customers back to the homepage of your site.
5. Discount Code: This is where customers can enter a coupon or discount codes that you have set up for your store.
6. Gift Cards: Gift cards can be redeemed in this area.7. Estimate Shipping: Customers can get estimated shipping rates using this
area. By default, this option is enabled, but this widget may not always show in the shopping cart. For instance, if you choose Fixed Rate shipping, the Estimate Shipping area will not display.
8. Cross sells: Individual products can have cross sells attached to them. If a product in the shopping cart has cross-sell products attached, they will be displayed here.
Checkout and order detailsBy default, nopCommerce utilizes a one-page checkout process. Basically, this means the customer will not leave the page during checkout, and the various sections of the checkout page will update as the customer completes them. This is a more modern checkout process, and nopCommerce handles it well.
For More Information: www.packtpub.com/getting-started-with-nopcommerce/book

Chapter 2
[ 39 ]
The Billing Address and Shipping Address sections in these examples show a drop-down list with addresses pre-fi lled. This is because this checkout is taking place with a registered customer who is logged in to the site. If no addresses exist for the current customer checking out, then the appropriate form fi elds will be displayed to capture address information.
If you prefer, you can change this in the administration site, and instead make the site use an individual page for each checkout step. However, this book will only cover the one page checkout process.
The checkout process is split into the following six sections:
• Billing Address: This is the billing address for the customer. This is typically the billing address for a credit card if one is being used during checkout.
• Shipping Address: This is the delivery address for the customer.
For More Information: www.packtpub.com/getting-started-with-nopcommerce/book

The Public-facing Storefront
[ 40 ]
• Shipping Method: Here customers can select the shipping method they wish to use. These methods are confi gurable in the administration site, including the methods you wish to offer and how much you wish to charge.
• Payment Method: Customers can select their preferred payment method in this step. By default, several payment options are available, but these are confi gurable in the administration site. In most cases, your site will offer credit card as the only payment option.
• Payment Information: This section is where your customer will enter their payment information. This section will change based on which payment method the customer chose. For instance, credit card fi elds will be displayed for a credit card payment method, whereas Purchase Order will show a textbox to capture a single PO number.
For More Information: www.packtpub.com/getting-started-with-nopcommerce/book

Chapter 2
[ 41 ]
• Confi rm Order: This section will display all the order details to the customer, including displaying the items they are ordering, shipping and billing information, and totals. At the bottom of this section is the Confi rm button. The order is processed after the customer clicks on the Confi rm button.
For More Information: www.packtpub.com/getting-started-with-nopcommerce/book

The Public-facing Storefront
[ 42 ]
• Order Details: Once the customer confi rms the order, it is processed by the site and the order details page is displayed.
• Order information: This is a very basic page that displays a confi rmation to the customer that the order was successfully processed. It also displays a link to view the order details, where the customer can also print a copy of their receipt. An e-mail receipt is also generated at this point and mailed to the customer.
When beginning the checkout process, the customer has the option to create an account or check out as a guest. If they create an account, customers can view all their past orders by logging in to your store.
For More Information: www.packtpub.com/getting-started-with-nopcommerce/book

Chapter 2
[ 43 ]
SummaryIn this chapter, you took a deep dive into the storefront and the customer experience. You got an overview of the general store layouts and how they are used throughout the site. You learned about category and manufacturer pages and got an in-depth view of the product pages. You also saw how customers will search for products on your site, as well as how they can add them to the shopping cart. Finally, you learned how the one-page checkout process works in nopCommerce and saw the order confi rmation details your customers will receive.
In the next chapter you'll learn about the administration site, where you'll confi gure your store and set up products.
For More Information: www.packtpub.com/getting-started-with-nopcommerce/book
Where to buy this book You can buy Getting Started with nopCommerce from the Packt Publishing website: http://www.packtpub.com/getting-started-with-nopcommerce/book. Free shipping to the US, UK, Europe and selected Asian countries. For more information, please read our shipping policy.
Alternatively, you can buy the book from Amazon, BN.com, Computer Manuals and most internet book retailers.
www.PacktPub.com
For More Information: www.packtpub.com/getting-started-with-nopcommerce/book


![StoreFront 3 - Citrix Docs · If the Citrix SCOM Management Pack Agent service is installed on the StoreFront server, StoreFront cannot upgrade. [#DNA-34792] On upgrade, StoreFront](https://static.fdocuments.us/doc/165x107/60ea15540160bf6e9274e47a/storefront-3-citrix-docs-if-the-citrix-scom-management-pack-agent-service-is-installed.jpg)