
GETTING STARTED Getting Started Getting Started to Success Session 1.

1Getting StartedGetting Started . . . . . . . . . . . . . . . . . . . . . . . . . . . . . . . . . . . . . . . 1-2Parts & Functions . . . . . . . . . . . . . . . . . . . . . . . . . . . . . . . . . . . . . 1-3
Handset . . . . . . . . . . . . . . . . . . . . . . . . . . . . . . . . . . . . . . . . . . . . . . . 1-3Display Indicators . . . . . . . . . . . . . . . . . . . . . . . . . . . . . . . . . . . . . . . . 1-4
USIM Card . . . . . . . . . . . . . . . . . . . . . . . . . . . . . . . . . . . . . . . . . . . 1-5Before Using USIM Card . . . . . . . . . . . . . . . . . . . . . . . . . . . . . . . . . . . 1-5Inserting & Removing USIM Card . . . . . . . . . . . . . . . . . . . . . . . . . . . . 1-6
Battery & Charger . . . . . . . . . . . . . . . . . . . . . . . . . . . . . . . . . . . . . 1-7Before Using Battery or Charger . . . . . . . . . . . . . . . . . . . . . . . . . . . . . 1-7Inserting & Removing Battery . . . . . . . . . . . . . . . . . . . . . . . . . . . . . . . 1-8Charging Battery . . . . . . . . . . . . . . . . . . . . . . . . . . . . . . . . . . . . . . . . 1-9
Power On/Off . . . . . . . . . . . . . . . . . . . . . . . . . . . . . . . . . . . . . . . . 1-12Power On . . . . . . . . . . . . . . . . . . . . . . . . . . . . . . . . . . . . . . . . . . . . . 1-12Power Off . . . . . . . . . . . . . . . . . . . . . . . . . . . . . . . . . . . . . . . . . . . . . 1-12
Account Details . . . . . . . . . . . . . . . . . . . . . . . . . . . . . . . . . . . . . . 1-13ConfirmingHandsetNumber. . . . . . . . . . . . . . . . . . . . . . . . . . . . . . . 1-13Editing Account Details . . . . . . . . . . . . . . . . . . . . . . . . . . . . . . . . . . . 1-13
Key Lock . . . . . . . . . . . . . . . . . . . . . . . . . . . . . . . . . . . . . . . . . . . 1-14Standby Window . . . . . . . . . . . . . . . . . . . . . . . . . . . . . . . . . . . . . 1-14Minding Mobile Manners . . . . . . . . . . . . . . . . . . . . . . . . . . . . . . 1-14
OfflineMode . . . . . . . . . . . . . . . . . . . . . . . . . . . . . . . . . . . . . . . . . . 1-14Manner Mode . . . . . . . . . . . . . . . . . . . . . . . . . . . . . . . . . . . . . . . . . 1-15Changing Mode Settings . . . . . . . . . . . . . . . . . . . . . . . . . . . . . . . . . 1-15Default Mode Settings . . . . . . . . . . . . . . . . . . . . . . . . . . . . . . . . . . . 1-15
Security Codes . . . . . . . . . . . . . . . . . . . . . . . . . . . . . . . . . . . . . . . 1-18Phone Password . . . . . . . . . . . . . . . . . . . . . . . . . . . . . . . . . . . . . . . . 1-18Center Access Code . . . . . . . . . . . . . . . . . . . . . . . . . . . . . . . . . . . . . 1-18Network Password . . . . . . . . . . . . . . . . . . . . . . . . . . . . . . . . . . . . . . 1-18PIN & PIN2 . . . . . . . . . . . . . . . . . . . . . . . . . . . . . . . . . . . . . . . . . . . . 1-19USIM Lock Password . . . . . . . . . . . . . . . . . . . . . . . . . . . . . . . . . . . . 1-19
Advanced SettingsAccount Details . . . . . . . . . . . . . . . . . . . . . . . . . . . . . . . . . . . . . . . . 1-19

1-2
Getting Started
1Getting Started
Learn basic information before using handset.
Parts & Functions
Use this guide to identify handset keys, functions, and Display indicators, etc. PIN CodeUse these codes for added handset security.
• Phone Password
• Center Access Code
• Network Password
• PIN
•USIMVerificationPassword
PIN can be changed on handset (fP.1-18).
Charging
Charge battery via USB Charging or AC Charger (fP.1-9).
Security Codes
Minding Mobile MannersPlease take care not to disturb others when using handset in public. Select from two manner-related modes and use appropriately (fP.1-14).Power off handset if required (fP.1-12).

1-3
Getting Started
1Parts & Functions
Handset
s
o
p
q
a Display
b udlr Multi SelectorSelect menu items, move cursor, scroll window, etc.
c w Mail Key/Left SoftkeyOpen Messaging menu. Also, execute Left Softkey command or function.
d e Music/Character KeyShow Music list. Toggle text entry modes in text entry window.
e t Start KeyMake and receive Voice Calls. In Standby, press to open Call Log (Dialed).
f 0 – 9 KeypadEnter numbers or characters. Also, select menu items.
g * KeyEnter Pictograms, etc. Press for 1+ seconds to open Manner Mode Settings.
h Earpiece
i c Main Menu Key/Center KeyOpen main menu. Execute Center Softkey command or function.
j o Yahoo! Keitai Key/Right SoftkeyOpen Yahoo! Keitai main menu. Execute Right Softkey command or function.

1-4
Getting Started
1k i Switch Bar Key
Open Switch Bar (fP.2-3).
l x Clear/Back KeyDelete entered text or return to the previous operation step.
m y Power/End KeyTurn power on/off or end operations.
n # #/Manner KeyEnter symbols, etc. Also, activate or cancel Manner mode (press for 1+ seconds).
o External LightFlashes for Missed Call or Incoming Call/Mail; illuminates in blue while charging.
p Microphone
q Charger/External Device PortConnect Charger, PC, etc.
r Earphone MicrophoneConnect Earphone Microphone (sold separately).
s Memory Card Port
t Internal Antenna
u Battery CoverRemove to access Battery or USIM.
v CameraCapture images.
w Speaker
x Strap Eyelet
y n Side KeyRaise ringer or Media Player volume.
z b Side KeyLower ringer or Media Player volume.
A Infrared PortUse for infrared data transmissions.
・ Internal Antenna Handset transmits and receives signals via Internal
Antenna. There is no external antenna. Voice quality may vary by where/how handset is used. Do not cover or place stickers, etc. over the area containing Internal Antenna.
Display Indicators
abc
fg
h
i
de
j
a Signal Strength (strong) Signal Strength (medium) Signal Strength (weak) Signal Strength (extremely weak) Out-of-Range (outside service area
or signal range/coverage) Out-of-Range (Language set to
other than 日本語 ) OfflineMode
b 3G Network Connected 3G Network Connected (Ready) 3G Network Connected (In Use) GSM Network Connected GSM Network Connected (Ready) GSM Network Connected (In Use) SSL Connected Packet Communication Unavailable VoiceCallinProgress(flasheswhen
dialing or receiving calls)

1-5
Getting Started
1c New Message Delivery Report Active Memory Full (S! Mail/SMS) Downloading Content Key
d Music Playing Music Paused
e Memory Card Inserted Read from Memory Card Software Update Required PC Site Browser Connected New S! Information Channel
f USB Connected (Yellow) USB Connection Infrared Data Transmission Active (Red) Infrared Data in Transmission Data Synchronized
g Manner Mode Drive Mode Meeting Mode Outdoor Mode
h Battery Strong Battery Moderate Battery Low Battery Weak (Charge Now) (Flashing) Battery Empty
i Ringer & Vibration active for calls Ringer active for calls Vibration active for calls Ringer & Vibration disabled for calls
j Roaming Active Answering Machine Active Unheard Answering Machine
Message Voice Mail/Call Forwarding (No
reply) Active Unheard Voicemail Alarm Set Schedule Schedule with Alarm Set Tasks Tasks with Alarm Set Secret Mode Active All Keys Locked Password Locked
・ When (Red) appears, only Packet Communications and Outgoing S! Mail are available.Calls,IncomingS!MailNotification,andSMS Service are all disabled.
USIM Card
Before Using USIM CardUniversal Subscriber Identity Module (USIM) Card is an IC card containing customer and authentication information, including handset number and limited storage for Phonebook entries and SMS. Install USIM Card to use handset; power off handset to insert/remove USIM Card.
IC
USIM Card
Insert USIM Card into another compatible handset to access SMS and Phonebook entries saved on USIM Card. Note the following precautions regarding USIM Card usage and care (see USIM Card User Guide for details):
・ Avoid using excessive force when inserting/removing USIM Card.
・ SoftBank is not liable for damage resulting from inserting USIM Card into IC card readers or other third party devices.
・ Always keep USIM Card IC chip clean.
・ Clean USIM Card IC chip with a soft, dry cloth.

1-6
Getting Started
1・ Do not attach labels to USIM Card; malfunction
may result.
Note
・ USIM Card is the property of SoftBank Mobile .
・ If USIM Card is lost or damaged, a charge will be applied for reissuing it .
・ Return USIM Card to SoftBank Mobile upon termination of subscription .
・ Returned USIM Cards are recycled .・ USIM Card specifications may change
without prior notice .・ If USIM Card or handset with USIM Card
inserted is lost or stolen in Japan or abroad, contact SoftBank Mobile Customer Center, General Information (fP .14-22) immediately to suspend service .
・ Handset/USIM Card repairs, replacement, or upgrades may deactivate Chaku-Uta®, Chaku-Uta Full® or video files on handset/Memory Card .
・ Back-up USIM Card files. SoftBank Mobile is not liable for lost files.
Inserting & Removing USIM CardAlways turn power off before opening handset to remove battery, or insert/remove USIM Card.
Inserting
a Remove battery (fP.1-9)
b With IC chip facing down, insert USIM Card into card slot as shown in the illustration
Notch
IC
c Push in USIM Card until it stops and locks
1-7
Getting Started
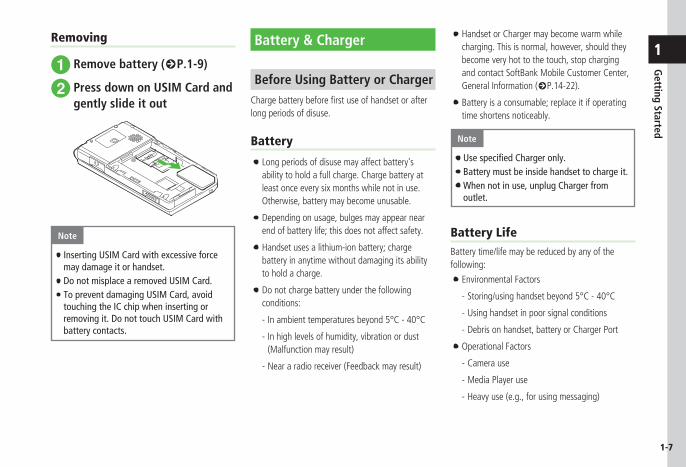
1Removing
a Remove battery (fP.1-9)
b Press down on USIM Card and gently slide it out
Note
・ Inserting USIM Card with excessive force may damage it or handset .
・ Do not misplace a removed USIM Card .・ To prevent damaging USIM Card, avoid
touching the IC chip when inserting or removing it . Do not touch USIM Card with battery contacts .
Battery & Charger
Before Using Battery or ChargerChargebatterybeforefirstuseofhandsetorafterlong periods of disuse.
Battery
・ Long periods of disuse may affect battery's ability to hold a full charge. Charge battery at least once every six months while not in use. Otherwise, battery may become unusable.
・ Depending on usage, bulges may appear near end of battery life; this does not affect safety.
・ Handset uses a lithium-ion battery; charge battery in anytime without damaging its ability to hold a charge.
・ Do not charge battery under the following conditions:
- In ambient temperatures beyond 5°C - 40°C
- In high levels of humidity, vibration or dust (Malfunction may result)
- Near a radio receiver (Feedback may result)
・ Handset or Charger may become warm while charging. This is normal, however, should they become very hot to the touch, stop charging and contact SoftBank Mobile Customer Center, General Information (fP.14-22).
・ Battery is a consumable; replace it if operating time shortens noticeably.
Note
・ Use specified Charger only.・ Battery must be inside handset to charge it .・ When not in use, unplug Charger from
outlet .
Battery LifeBattery time/life may be reduced by any of the following:
・ Environmental Factors
- Storing/using handset beyond 5°C - 40°C
- Using handset in poor signal conditions
- Debris on handset, battery or Charger Port
・ Operational Factors
- Camera use
- Media Player use
- Heavy use (e.g., for using messaging)

1-8
Getting Started
1・ Settings
- Increasing brightness/time in Backlight of Display settings
- Using Media Player with Backlight set to Always On
Battery DisposalDo not dispose of exhausted batteries with ordinary refuse. Tape over battery terminals before disposal or take to a SoftBank shop. Follow any and all local regulations regarding battery disposal.Lithium-ion batteries are recyclable.
When Battery Runs OutWhen battery is weak, a warning appears and handset beeps. Charge or replace battery; otherwise handset will automatically turn off.
Inserting & Removing Battery
Inserting
a Press and slide Battery Cover as shown
b Remove Battery Cover
c Fit battery slots into handset tabs as shown
Tabs
d Replace Battery Cover

1-9
Getting Started
1Note
・ Remove Battery Cover with care; stress on tabs may damage them .
・ Gently insert battery to avoid damaging handset tabs .
・ Without cover, battery may fall out . Attach Battery Cover before use .
・ Strong impacts may damage Battery Cover .
RemovingAlways turn handset off before removing battery. Never remove battery while AC Charger is connected.
a Press and slide Battery Cover as shown
b Remove Battery Cover
c Lift battery up and remove as shown
Charging Battery
・ If handset is on while Charger is connected, battery indicator shows charge level, charging as follows: → → . flasheswhenbattery is fully charged. If handset is off, Charging... appears while charging and when battery is charged, Battery full appears. External Light illuminates in blue while charging.
・ An empty battery requires approximately 120 minutes to charge with handset power off. Charging time may vary by ambient temperature.

1-10
Getting Started
1AC Charger
a Open Port Cover and insert AC Charger connector into External Device Port
External Device Port
Port Cover
AC Charger Connector
AC 100V Outlet
AC Charger plug
b Plug AC Charger into an AC 100V outlet
c When charging is complete, remove AC Charger connector from handset, close Port Cover and disconnect from AC 100V outlet
AC Charger plug
Port Cover
AC Charger Connector
AC 100V Outlet
External Device Port
USB ChargingConnect handset to PC via USB Cable to charge battery.
a Open Port Cover and insert USB Cable connector into External Device Port
b Insert USB Plug into a PC USB port
c When battery is charged, remove the connector, close Port Cover, and remove USB Plug・ USB charging takes longer; charging time
varies by PC. A weak battery may not charge via USB.

1-11
Getting Started
1In-Car Charger (Sold Separately)
a Open Port Cover and insert Charger Connector into External Device Port
External Device Port
Charger Connector Adapter
Port Cover
b Plug In-Car Charger into Car Cigarette Socket
In-Car Charger Car Cigarette Socket
Plug
c Start engine
d After battery is charged, disconnect handset, close Port Cover, and unplug In-Car Charger
External Device Port
Charger Connector Adapter
Port Cover
・See In-Car Charger user guide (Japanese) for operations. Use In-Car Holder (sold separately).
Note
・ Avoid charging handset in extreme heat (inside vehicles, etc .) .
・ In-Car Charger only for vehicles with negative ground (12V/24V vehicles) .

1-12
Getting Started
1Power On/Off
Power On
a Press y until Display illuminates
StandbyWindow
・Toconfirmhandsetphonenumber,pressc → 0. Your phone number appears in Account Details. Edit contents (fP.1-13).・ When handset is left open without operations,
Display automatically shuts down to conserve battery. Adjust Backlight Time (fP.13-13).・ When c, w or oispressedforthefirsttime
or a function requiring a network connection is activated, Retreive NW info appears. Choose Yes, then follow onscreen instructions to retrieve Network Information.- Retrieve NW infoconfirmationappearsafter
replacing USIM Card or executing All reset.- Retrieving Network Information sets date and
time. Network Services (Messaging and Yahoo! Keitai) are available.
- Retrieve Network Information manually (fP.13-21).- This guide describes operations with date and
time set unless noted otherwise.
Power Off
a Press y until Display goes dark・ SoftBank logo appears and handset powers
off.
Note
・ For proper shut down, press y until Display goes dark .

1-13
Getting Started
1Account Details
Confirmhandset(USIMCard)phonenumber;save name, e-mail address, etc. in Account Details.
Confirming Handset NumberConfirmyourownnumber,etc.inAccountDetails.
a c → 0
・ Only handset phone number appears by default.・ In Account Details, highlight target category and
press w (Edit) to edit information items.・ Alternatively, in Standby, press c → Phone →
Account detail to access items.
Editing Account DetailsExample: save Name, Phone Number, E-mail Address
・ See "Adding Information to Phonebook Entry" (fP.2-20) to save other information.
a c → 0
b a → w (Edit)
c Select Last name field → Enter last name
d Select First name field → Enter first name
e Select Reading last name field → Edit reading of last name as required
f Select Reading first name field → Edit reading of first name as required
g Select Phone number field → Enter phone number → Select icon
h Select E-mail address field → Enter mail address → Select icon
i w (Save)
・ See "Text Entry" (fP.2-7) to enter text.・ Handset phone number appears by default. This
phone number cannot be changed.
Advanced
brP.1-19
● Sending Account Details as vFile
● Resetting Account Details
● Creating vFile and Save in Data Folder
● Copying Item in Account Details

1-14
Getting Started
1Key Lock
Set to prevent accidental operation when carrying handset in a bag or pocket, etc.Set Key Lock in Standby.
a c (1+ seconds)・ Key Lock is activated.
・ When Key Lock is set, appears on top of Display. When any key is pressed, a guidance to cancel Key Lock appears.・ To cancel Key Lock, press c for 1+ seconds
while guidance appears on Display.
Standby Window
Access handset applications via Shortcut Bar or Switch Bar (fP.2-3). Set images saved in Data Folder as Wallpaper.
Minding Mobile Manners
Please take care not to disturb others when using your handset.
・ Turn your handset off in theaters, museums and other places where silence is the norm.
・ Keep your handset off aboard airplanes*, inside hospitals, or in other places where handset use is prohibited.* If handset use is permitted, follow airline
instructions for proper use.
・ Refrain from using your handset in quiet places such as restaurants, hotel lobbies or elevators.
・ Observe announcements or posted instructions regarding handset use aboard trains, etc.
・ Refrain from handset use that interrupts the flowofpedestrianorvehicletraffic.
Handset offers two manner-related modes.
・OfflineMode Temporarily suspends all handset
transmissions. Other functions may be used.
・ Manner Mode
Mute handset sounds and activate Vibration for all alerts, tones, and alarms. Use Manner Key to activate or cancel Manner mode. In addition, handset features Normal, Drive, Meeting and Outdoor modes for ringtone or operation sound.
・ActivatingOfflinemodeorMannermodemutesringer. Alternatively, set Ringtone volume or Vibration. (fP.13-11).
Offline Mode
a c → Settings → Call settings → Offline → On or Off
・IfhandsetpowersoffinOfflinemode,aconfirmationappearsthenexttimehandsetpowers on. Press o (No) for Normal mode.

1-15
Getting Started
1Manner Mode
Cancel settings for Manner Mode from current setting mode with easy operations.
a # (1+ seconds)
・ When Manner mode is active, appears.
・Even when Manner mode is active, shutter click sounds for Camera.・Press # for 1+ seconds to cancel Manner
mode. Canceling Manner mode, returns handset to mode set before it was activated.
Changing Mode SettingsHandsetfeaturesfivemodes,includingMannerMode.
a * (1+ seconds)
b Normal, Manner, Drive, Meeting or Outdoor
Select mode by usage; edit Normal Mode or Manner Mode settings as required (fP.1-15).
Mode Description
Normal Mode*All Sounds & Alerts settings apply
Manner ModeMutes handset system sounds
Drive Mode
Mutes ringers; plays Driving Message and activates Answering Machine for calls
Meeting ModeMutes Ringtones & System sound
Outdoor ModeMaximizes tone volume
* Normal mode indicator does not appear in Standby.
Default Mode SettingsDefault volume and ringtone settings vary by mode. Change incoming transmission response by mode. Available items vary by mode. See defaults below (fP.13-21).

1-16
Getting Started
1Mode
ItemNormal Manner Drive Meeting Outdoor
Volume
Voice call Level 3 N/A N/A Off Level 5
Message Level 3 N/A N/A Off Level 5
Missedcallnotification Level 3 N/A N/A Off Level 5
Delivery report Level 3 N/A N/A Off Level 5
Phone sounds Level 3 N/A N/A Off Level 5
Ringtone
Voice call Samsung Tune.mp4 N/A N/A Samsung Tune.mp4 Samsung Tune.mp4
MessageSamsung Tune.mp4
5 SecondsN/A N/A
Samsung Tune.mp45 Seconds
Samsung Tune.mp45 Seconds
MissedcallnotificationBusinessTone.mp4
5 SecondsN/A N/A
BusinessTone.mp45 Seconds
BusinessTone.mp45 Seconds
Delivery reportBusinessTone.mp4
5 SecondsN/A N/A
BusinessTone.mp45 Seconds
BusinessTone.mp45 Seconds
Vibration
Voice call Off Pattern 1 N/A Off Off
Message Off Pattern 1 N/A Off Off
Missedcallnotification Off Pattern 1 N/A Off Off
Delivery report Off Pattern 1 N/A Off Off
Phone sounds1
Keypad tones Off N/A N/A Off Off
System sounds Several tones on Alerts on call N/A Alerts on call Several tones on

1-17
Getting Started
1Mode
ItemNormal Manner Drive Meeting Outdoor
External light
Incoming
Voice call On On On On On
Message On On On On On
Missedcallnotification On On On On On
Delivery report On On On On On
Notification
Missed call On On On On On
Message On On On On On
Answering Machine On On On On On
Missedcallnotification On On On On On
Missed alarm2 On On On On On
Delivery report On On On On On
Answering Machine Off On N/A3 Off Off
1 In Manner mode, System sounds can be set; Phone sounds is not available.2 Setting for missed schedule (fP.9-3) or task (fP.9-7)notification(notforAlarm(fP.9-4) or alarm in Schedule or Tasks).3 Answering machine activates automatically in Drive mode.

1-18
Getting Started
1Security Codes
Phone Password, Center Access Code and Network Password are required to use handset.
Phone PasswordThe 4-digit number (9999 by default) is required to operate/change some handset functions.
・ Entered Phone Password digits are represented with *.
・ If incorrect, an error message appears. Input Phone Password again.
・ Phone Password can be changed on handset (fP.10-3).
Center Access Code4-digitnumberspecifiedatsubscription;requiredtochange service subscriptions or optional services to operate handset from landlines.
Network Password4-digitnumberspecifiedatsubscription,requiredto restrict handset services. Entering incorrect Network Password 3 consecutive times locks Call Barring settings. To resolve, Network Password and Center Access Code must be changed. For details, contact SoftBank Mobile Customer Center, General Information (fP.14-22).
・ Network Password can be changed on handset (fP.3-19).
Note
・Write down Phone Password, Center Access Code and Network Password . If you lose a code, contact Customer Service (fP .14-22) .
・ Do not reveal Phone Password, Center Access Code, or Network Password to others . SoftBank is not liable for damage caused by misuse of these codes by others .
Advanced
s
● Set Keypad tones (rP.13-11)
● Set system sounds (rP.13-11)
● Illuminate External Light for incoming transmissions etc. (rP.13-12)
● Illuminate External Light for missed call, etc. (rP.13-12)
● ActivateorcancelOfflinemode(rP.13-20)
● Switch Manner Mode (rP.13-21)

1-19
Getting Started
1PIN & PIN2
USIM Card features 2 security codes: PIN and PIN2.
PINUse PIN (4- to 8-digit) to prevent unauthorized use of handset by others.
・ Modify PIN (fP.10-3).
・ When PIN lock is activated, PIN entry is required each time handset is turned on or whenever USIM Card is re-inserted (fP.10-4).
PIN2PIN2 (4- to 8-digit) is required for Reset Call Cost or Edit Cost Limit, etc.
・ Modify PIN2 (fP.10-3).
Canceling PIN Lock (PUK/PUK2 Code)Incorrectly entering PIN or PIN2 three consecutive times activates PIN Lock and limits handset function access. Enter PUK (PIN Unlocking Key) Code to cancel PIN Lock.For more information, contact SoftBank Mobile Customer Center, General Information (fP.14-22).
Note
・ Entering PUK or PUK2 incorrectly ten consecutive times locks USIM Card and deactivates handset . Take a note of PUK and PUK2 .
・ A locked USIM Card cannot be unlocked . Contact SoftBank Mobile Customer Center, General Information (fP .14-22) .
USIM Lock PasswordUSIM Password is dedicated to USIM Card authentication. If USIM Password matches, another USIM Card can be used in handset. Change USIM Password each time USIM lock is set to On.
Advanced SettingsbAccount Details
Editing Account Detailsc → 0 → a → w (Edit) → (fP.2-15 Saving as A New Entry b)
Sending Account Details as vFilec → 0 → o → Send account details
■ To send via messageVia message → (fP.4-4 S! Mail b)
■ To send via InfraredVia infrared (fP.12-3)
Resetting Account Detailsc → 0 → o → Reset account details・ All Account details other than phone number saved
in USIM Card are reset.
Creating vFile and Save in Data Folderc → 0 → o → Save to Data Folder → Phone or Memory card → Yes・ The save location can be set to Memory card if
inserted.
Copying Item in Account Detailsc → 0 → Highlight an item to copy → o → Copy item
・ Copied item can be pasted in the text entry window.
1-20
Getting Started
1Sending Message to Mail Address in Account Detailsc → 0 → Highlight a mail address → c (Send) → (fP.4-4 S! Mail e)

![Skaffold - storage.googleapis.com · [getting-started getting-started] Hello world! [getting-started getting-started] Hello world! [getting-started getting-started] Hello world! 5.](https://static.fdocuments.us/doc/165x107/5ec939f2a76a033f091c5ac7/skaffold-getting-started-getting-started-hello-world-getting-started-getting-started.jpg)


