Get Ready to Take-Off With AutoCAD Civil 3D CV122-5
18
Get Ready to Take-Off With AutoCAD ® Civil 3D ® Thomas M. Inzinga - Autodesk CV122-5 AutoCAD Civil 3D 2010 includes comprehensive tools to compute point, linear, area, and volume take-off quantities. In this class, learn how to create pay item lists and categories, assign pay items to AutoCAD and Civil 3D model data, and perform quantity take-off to generate customizable QTO reports. About the Speaker: Thomas is a software architect for the Autodesk AEC Division. With 25 years of experience, he is an expert in the design, development, and implementation of civil-engineering applications. For the past 11 years, Tom has helped architect Civil 3D into the leading AutoCAD-based civil engineering application. He has degrees in mapping, and civil engineering and surveying. A recent project at Autodesk has been the implementation of the quantity take-off feature within AutoCAD Civil 3D.
Transcript of Get Ready to Take-Off With AutoCAD Civil 3D CV122-5
Get Ready to Take-Off With AutoCAD® Civil 3D
® Thomas M. Inzinga - Autodesk
CV122-5
AutoCAD Civil 3D 2010 includes comprehensive tools to compute point, linear, area, and volume take-off
quantities. In this class, learn how to create pay item lists and categories, assign pay items to AutoCAD
and Civil 3D model data, and perform quantity take-off to generate customizable QTO reports.
About the Speaker: Thomas is a software architect for the Autodesk AEC Division. With 25 years of
experience, he is an expert in the design, development, and implementation of civil-engineering
applications. For the past 11 years, Tom has helped architect Civil 3D into the leading AutoCAD-based
civil engineering application. He has degrees in mapping, and civil engineering and surveying. A recent
project at Autodesk has been the implementation of the quantity take-off feature within AutoCAD Civil
3D.

Get Ready to Take-Off with AutoCAD Civil 3D
2
Introduction
This class provides information on using AutoCAD Civil 3D 2010’s quantity take-off feature. The feature
is useful to firms that need to quantify counts, lengths, and areas of designs or as-built models for
estimating purposes. The feature offers a flexible method of importing pay item lists, assigning pay items
to entities, and generating reports of take-off quantities.
In this class we will about working with pay items, and generating take-off reports. The class will dive
deeper into the procedures and techniques you should follow to successfully implement the Civil 3D 2010
quantity take-off feature in your office or firm.
Where to find the Software Described in this Class
The quantity take-off feature described in this class is available in Autodesk’s AutoCAD Civil 3D 2010
(and later) versions.
Terminology
The following terms will be used extensively throughout this paper.
Pay Item: A single identifiable item or unit of work that is part of an infrastructure design to which
a cost could be assigned.
Cost Item: Another term for “Pay Item”.
Master Pay Item List: A collection of pay items that form a standard basis for quantity take-off
and estimation within a particular locale.
QTO: Quantity Take-Off.
Take-Off: An alias for Quantity Take-Off.
XML: Extensible Markup Language, or a description of data tagged with beginning and ending
markers identify the various components of the data.
XSL: Extensible Stylesheet Language, or a set of instructions that transforms an XML dataset
from its original, source format to a new, target format. The target format can be a variety of
formats including a different XML format, HTML, plain text, or any number of other formats.
CSV: Comma separated values. A set of values delimited most commonly by commas, but the
delimiter may vary depending on the locale.
AASHTO: American Association of State Highway Transportation Officials.
Get Ready to Take-Off with AutoCAD Civil 3D
3
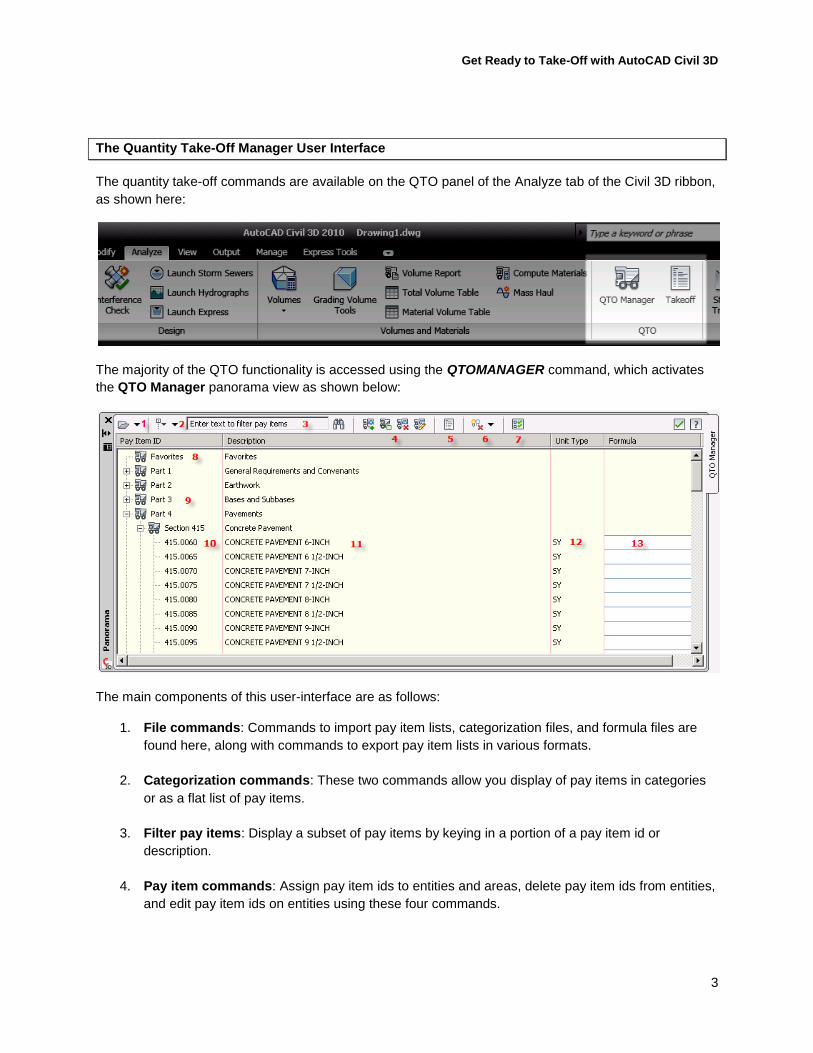
The Quantity Take-Off Manager User Interface
The quantity take-off commands are available on the QTO panel of the Analyze tab of the Civil 3D ribbon,
as shown here:
The majority of the QTO functionality is accessed using the QTOMANAGER command, which activates
the QTO Manager panorama view as shown below:
The main components of this user-interface are as follows:
1. File commands: Commands to import pay item lists, categorization files, and formula files are
found here, along with commands to export pay item lists in various formats.
2. Categorization commands: These two commands allow you display of pay items in categories
or as a flat list of pay items.
3. Filter pay items: Display a subset of pay items by keying in a portion of a pay item id or
description.
4. Pay item commands: Assign pay item ids to entities and areas, delete pay item ids from entities,
and edit pay item ids on entities using these four commands.
Get Ready to Take-Off with AutoCAD Civil 3D
4
5. Take-Off: This runs the take-off command which computes quantities of items with pay items
assigned.
6. Highlighting commands: Use these commands to highlight entities with pay items in various
ways, including: highlight objects with pay items, highlight objects without pay items, highlight
objects with selected pay items, and clear highlighted objects.
7. QTO Settings: There are several specific settings which affect the operation of the QTO feature
within Civil 3D. See the section Settings that Affect Quantity Take-Off which follows later in this
paper for details.
8. Favorites: Many master pay item lists contain a large quantity of pay items. You can selectively
add a subset of pay items to the Favorites portion of the QTO user-interface for quick access to
those pay items.
9. Categories: With categorization turned on and a categorization file loaded, the QTO user-
interface groups similar pay items into logical buckets.
10. Pay item id: Pay item ids are shown in the left column.
11. Pay item description: Pay item descriptions are shown in the middle column. This text also
appears as an entity tooltip when the pay item has been assigned to an entity.
12. Pay item units: The pay item units are shown in column three. See the next section for a valid
list of pay item units.
13. Pay item formula: An optional, custom pay item formula is shown in the fourth column. See the
section Using Formulas for more information on formulas.
Loading Master Pay Item Lists
In order to compute take-off quantities, entities within the drawing must have pay item values assigned to
them. Prior to assigning pay items, you must associate a list of pay items with the drawing.
Master pay item lists are files containing at least three important pieces of information that Civil 3D QTO
requires:
1. Pay item id: An alphanumeric string that uniquely identifies a particular pay item.
2. Pay item description: A textual description of the pay item.
3. Pay item units: The table below indicates the acceptable units for Civil 3D QTO:

Get Ready to Take-Off with AutoCAD Civil 3D
5
Unit Abbreviation
Unit Description
Applies To
Unit Abbreviation
Unit Description
Applies To
EA Each Count ST Each Count
EACH Each Count GK Gross Kilometer Length
GM Gross Mile Length KM Kilometer Length
LF Foot Length M Meter Length
M1 Meter Length MI Mile Length
LM Linear Mile Length NK Net Kilometer Length
NM Net Mile Length YD Yard Length
VF Vertical Foot Length ID Inch Diameter Length
STA Station
(imperial)
Length YDMI Yard Mile Length
LNFT Linear Foot Length AC Acre Area
ACRE Acre Area HA Hectare Area
M2 Square Meter Area SF Square Foot Area
SQFT Square Foot Area SY Square Yard Area
LOT Lot Count STYD Station Yard Area
SQYD Square Yard Area CF Cubic Foot Volume
CUFT Cubic Foot Volume CY Cubic Yard Volume
CYMI Cubic Yard
Mile
Volume M3 Cubic Meter Volume
MB Board
Measure/
Thousand Feet
Length MKFT Board Foot Length
MBM Board
Measure/
Thousand Feet
Length CUYD Cubic Yard Volume
BU Bushel Count GA Gallon Count
GAL Gallon Count KL Kiloliter Count
LI Liter Count MG Thousand
Gallons
Count
MGAL Thousand
Gallons
Count BBL Barrels Count
KG Kilogram Count OZ Ounce Count
LB Pound Count MT Metric Ton Count
TN Ton Count TON Ton Count
CWT Hundred
Weight
Count TM Ton Mile Count
HR Hour Count HRS Hour Count
DA Day Count DAY Day Count
WD Working Day Count WK Week Count
MO Month Count MON Month Count
AD Arrow Day Count BD Board Day Count
DD Drum Day Count SD Sign Day Count
TD Ton Day Count LU Luminaire Count
TH Therms Count AS Assembly Count
CO Cleanout Count PA Per Analysis Count
PB Per Building Count PI Per
Intersection
Count
PL Plant Count PM Per Mile Count
PS Per Set Count PW Per Well Count
FA Fuel Cost
Adjustments
Count MH Man-hour Count
PH Person Hour Count PD Person Day Count
PH Person Hour Count DOL Dollars Count
DD Dollars per
Day
Count ED Each Day Count
LO Location Count LS Lump Sum Count
LUMP SUM Lump Sum Count SACK Sack Count
LPSM Lump Sum Count

Get Ready to Take-Off with AutoCAD Civil 3D
6
There are no standard master pay item lists.
Typically, each state, province, municipality, or
locale will have designated their own pay item
lists and format. For example, the pay item list
used by Florida Department of Transportation
differs in both content and format from the one
used by Wisconsin Department of
Transportation.
Civil 3D provides a flexible mechanism to
handle several different pay item file formats,
include CSV, Florida DOT, and AASHTO
TransXML.
CSV: The Comma delimited format pay item file
consists of any number of comma delimited fields,
with the following two restrictions:
Columns 1, 2, and 3 must be the pay item
id, pay item description, and pay item units
in that order. Additional fields may be
present but Civil 3D does not utilize them.
The delimiter is the Windows operating
system regional list separator setting as
shown in the image to the right.
Florida DOT: The Florida DOT format is either the AecItem.xml or AecMerge.xml format files utilized by
Florida Department of Transportation. If your firm carries out designs for Florida DOT, you can request
these files directly from that agency.
AASHTO TransXML: The TransXML format is an early stage, emerging XML-based standard for the
definition of pay item lists. There are very few agencies that utilize this standard at this time.

Get Ready to Take-Off with AutoCAD Civil 3D
7
Loading Pay Item Categories
Master pay item list files supported by Civil 3D do not include any hierarchy to categorize pay items into
logical groups, such as pipes, asphalt, painting, and so on. However, you can load categorization files to
separate pay items into groups. Grouping pay items simplifies finding them within Civil 3D’s QTO
Manager user interface.
The Category On/Off buttons on the QTO Manager tool bar control the display of categories. The
following two images are a master pay item list in the categorized mode and uncategorized mode.
Pay item categories are defined through an XML-based categorization file. Because master pay item list
files differ from locale-to-locale, categorization files do too. The Civil 3D User’s Guide goes into detail on
how to create a categorization file.
Here is an image of a partial categorization file, with the key portions annotated:
Get Ready to Take-Off with AutoCAD Civil 3D
8
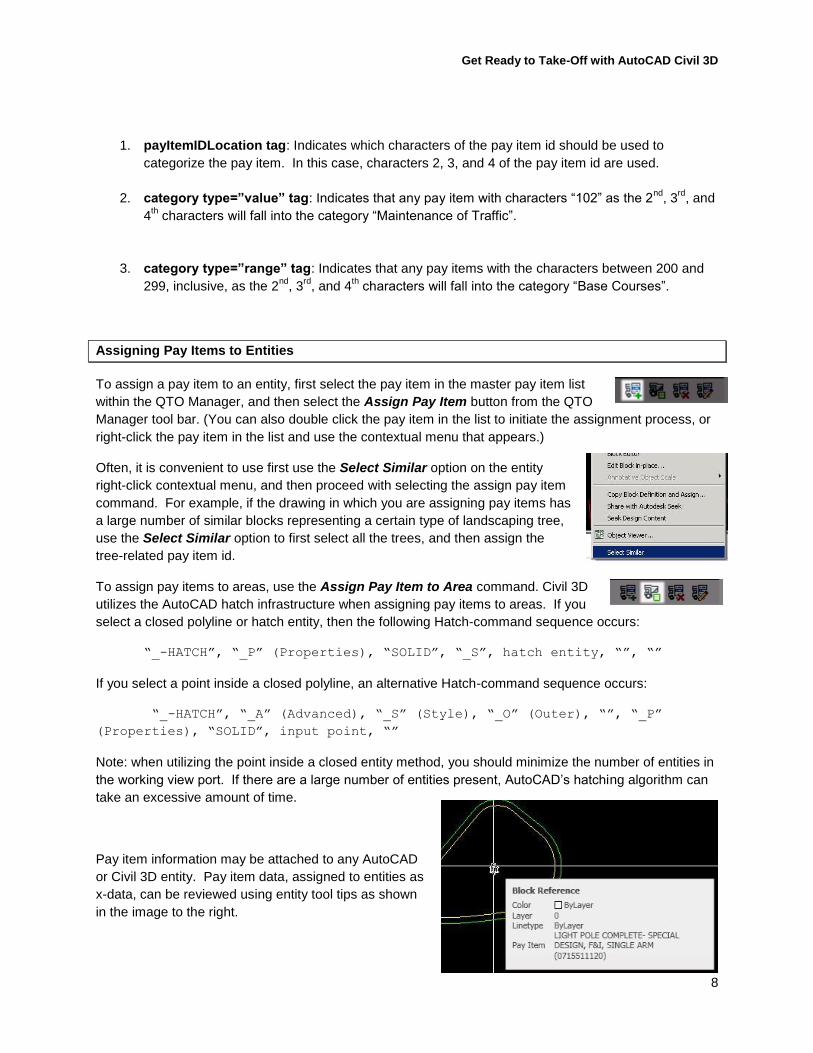
1. payItemIDLocation tag: Indicates which characters of the pay item id should be used to
categorize the pay item. In this case, characters 2, 3, and 4 of the pay item id are used.
2. category type=”value” tag: Indicates that any pay item with characters “102” as the 2nd
, 3rd
, and
4th characters will fall into the category “Maintenance of Traffic”.
3. category type=”range” tag: Indicates that any pay items with the characters between 200 and
299, inclusive, as the 2nd
, 3rd
, and 4th characters will fall into the category “Base Courses”.
Assigning Pay Items to Entities
To assign a pay item to an entity, first select the pay item in the master pay item list
within the QTO Manager, and then select the Assign Pay Item button from the QTO
Manager tool bar. (You can also double click the pay item in the list to initiate the assignment process, or
right-click the pay item in the list and use the contextual menu that appears.)
Often, it is convenient to use first use the Select Similar option on the entity
right-click contextual menu, and then proceed with selecting the assign pay item
command. For example, if the drawing in which you are assigning pay items has
a large number of similar blocks representing a certain type of landscaping tree,
use the Select Similar option to first select all the trees, and then assign the
tree-related pay item id.
To assign pay items to areas, use the Assign Pay Item to Area command. Civil 3D
utilizes the AutoCAD hatch infrastructure when assigning pay items to areas. If you
select a closed polyline or hatch entity, then the following Hatch-command sequence occurs:
“_-HATCH”, “_P” (Properties), “SOLID”, “_S”, hatch entity, “”, “”
If you select a point inside a closed polyline, an alternative Hatch-command sequence occurs:
“_-HATCH”, “_A” (Advanced), “_S” (Style), “_O” (Outer), “”, “_P”
(Properties), “SOLID”, input point, “”
Note: when utilizing the point inside a closed entity method, you should minimize the number of entities in
the working view port. If there are a large number of entities present, AutoCAD’s hatching algorithm can
take an excessive amount of time.
Pay item information may be attached to any AutoCAD
or Civil 3D entity. Pay item data, assigned to entities as
x-data, can be reviewed using entity tool tips as shown
in the image to the right.

Get Ready to Take-Off with AutoCAD Civil 3D
9
Editing and Deleting Pay Item Data on Entities
Using the Delete Pay Item command, you can remove all pay item data assigned to
one or more entities.
The Edit Pay Item Data command allows you to review, modify, or remove pay item
information on an entity, or to customize the computation formula for a pay item
assigned to an entity.
Additionally, you can
add notes to an entity
that has pay item
data. When detailed
quantity take-off
reports are
generated, the note
text will be included in
the report.
Assigning Pay Items to Pipes and Structures
As a convenience, you can optionally assign pay item ids to pipes and structures in Civil 3D pipe catalogs
prior to adding any entities to the drawing. Then, when a pipe or structure is placed in the drawing, it will
automatically have the appropriate pay item id tagged to it.
To assign pay item ids in catalogs, open the appropriate parts list using the Civil 3D Toolspace > Settings
> Drawing > Pipe Network > Parts List catalog. Then, on either the Pipes and/or Structures tabs of the
Network Parts List dialog, assign the pay item ids as needed. Here is an example of pay item ids
assigned to several pipes.

Get Ready to Take-Off with AutoCAD Civil 3D
10
Assigning Pay Items to Corridor Model Components
The Civil 3D corridor model is a very complex entity comprised of a variety of subcomponents. You can
assign pay item ids to corridor subassembly point codes or feature lines to compute guard-rail length, for
example. Additionally, pay item ids can be assigned to link codes, where they will then be utilized in the
computation of areas of various parts of the corridor model, such as pavement areas, grubbing areas,
and so on.)
Assigning pay items a-priori to
corridor components is very
similar to the network parts pay
item assignment. To assign pay
items to corridors, open the
appropriate code set style using
the Civil 3D Toolspace > Settings
> Drawing > General >
Multipurpose Styles > Code Set
Styles interface. Then, on the
Codes page, assign one or more
pay items to the desired point
and link codes.
Pay items assigned to point
codes will result in lengths of
things being computed from
corridor feature lines (such as
pavement striping length, guard
rail length, and so on.) Pay
items assigned to link code will
result in areas of things being
computed (pavement area, side
slope area, and so on.)
As a convenience after corridor
models are complete, you can
assign pay items to corridor
feature lines on the Corridor
Properties > Feature Lines tab.
These pay items will result in
computed lengths.

Get Ready to Take-Off with AutoCAD Civil 3D
11
Computing Summary and Detailed Take-Off Quantities
After pay items have been assigned to entities, use the TakeOff command to compute quantities and
generate reports. Two general types of reports can be created:
Summary: Summary reports sum the quantities for common pay items into a single line item and
report the sum total.
Detailed: Detailed reports report information about each instance of a pay item on each entity as
a separate line item. Using detailed reports, you can also include station and offset location of
each entity relative to a user-specified alignment.

Get Ready to Take-Off with AutoCAD Civil 3D
12
The following options are available on the Compute Quantity Takeoff dialog box:
1. Report type: Controls whether Summary or Detailed reports
are generated.
2. Report extents: This group of settings controls the geographic
extent that is used to gather entity data when generating a
report. (Note: any xref’ed drawings with entities containing pay
item ids will be included in the generated report data.)
a. Drawing: Uses the whole drawing.
b. Sheet: Uses the currently select layout sheet.
c. Selection set: Uses the currently selected entities.
3. Report quantity for sheet extents only: When the takeoff
command is issued in a drawing layout view, toggling this
parameter on limits the extents to the sheet extents. This
options is only available when Report extents is set to Sheet.
4. Limit extents to alignment station range: If toggled on,
entities used will be limited to those falling between the Start
station and End station of the specified Alignment.
5. Report output: Controls whether or not all pay items are used in the report, or to Report
selected pay items only.
6. Report station and offset relative to: Allows you to include station and offset information
relative to a user-defined baseline. This information is included in Detailed reports only.
When the Compute button is selected, the quantities are computed, and a secondary report window, the
Quantity Takeoff Report dialog box, is opened with the report shown. This second window has an
imbedded web browser window that displays the generated report. You can use the report style combo
box to control the format of the report to display. There are four general report formats:
1. HTML: Formats the report information using HTML syntax. This type of report is useful if you
want to include it in an online report, export the data to Excel, or for other situations where a
highly formatted report is required.
2. Text: Formats the report as a simple text file.
3. CSV: Format the report as comma delimited data. This format is useful if you want to perform
post-processing of the data with other software.
4. Raw XML: This is the raw, generated XML-format Civil 3D always uses when quantity take-offs
are computed. All other report formats (HTML, Text, and CSV) are generated from this raw
format using XSL transforms. If your firm were to build custom QTO reports, the XSL-transforms
you would write would be applied to the Raw XML quantity data.

Get Ready to Take-Off with AutoCAD Civil 3D
13
The Quantity Takeoff Report window has the following features available:
The user-interface items on this dialog include:
1. Browser window: Resizable window used to display the generated report.
2. XSL-Transform combo-box: Select from various (HTML/Text/CSV/Raw XML) style report
formats.
3. Draw: Use this button to draw the current report directly into the current DWG file at a user-
defined location.
4. Save As…: Save the current report to a file on disk.
Placing Tabular Take-Off Data into Drawings
Some agencies require QTO tabular reports to be included with plotted sheet sets. Use the Draw button
on the Compute Takeoff Report dialog to create a quantity table in the drawing.
When HTML-type reports are drawn an AutoCAD table entity is placed in the drawing. The currently
active AutoCAD table style is used when the table is generated.
When text-type reports are placed in the drawing, an AutoCAD MTEXT entity is created. Settings
available as described in the Settings That Affect Quantity Take-off section control the text style.

Get Ready to Take-Off with AutoCAD Civil 3D
14
Note: With Civil 3D 2010, QTO tables do not update dynamically when changes occur to entities
containing pay items. When changes to entities occur, you will need to manually update the QTO tables.
Using Take-Off Quantities Outside Civil 3D
The QTO feature within Civil 3D does not directly provide any cost information, but you can use the data
generated by Civil 3D in other software programs to generate cost estimates. Several different avenues
are available to share QTO data with other programs:
Export to Excel from HTML Reports: When HTML-type reports are generated, you can right-
click in the tabular portion of the report, and directly export the tabular data to Excel.
Get Ready to Take-Off with AutoCAD Civil 3D
15
CSV Reports: Generate comma delimited reports for use in a variety of external software
packages, including Excel.
TransXML Report to AASHTO’s Estimator: The TransXML-type report can be directly use
within AASHTO’s TRNS*PORT Estimator software as part of the bid estimation process.
Custom XSL-transform: Your firm can write custom XSL-transforms to reformat the raw QTO
XML data into a format suitable for use by other estimating software.
Export to Autodesk QTO: Autodesk offers a separate quantity take-off application, Autodesk
Quantity Take-Off, and the QTO feature within Civil 3D can generate pay item catalogs and DWF
files that can be directly used within the Autodesk QTO application.
Customizing Take-Off Reports
If your firm or agency has access to someone knowledgeable in creating XSL-transforms, custom Civil 3D
QTO reports can be created. The transforms all operate on the raw TransXML XML QTO data. If the
XSL-transform you create is placed in the folder,
C:\Documents and Settings\All Users\Application Data\Autodesk\C3D
2010\enu\Data\Takeoff Report Style Sheets
your report will be available for selection in the Report Style sheet user-interface combo-box on the
“Quantity Takeoff Report” dialog box.
Creating XSL-transforms is an in-depth topic that is not covered in this paper. However, starting from the
existing QTO XSL-transforms that ship with Civil 3D to create various Summary and Detailed reports, you
can customized reports that fit your project’s needs.
Using Formulas
By default, Civil 3D uses the following algorithms to compute quantities:
For count-type quantities, the software just sums the total number of instances of entities that the
pay item appears on.
For length-type quantities, the software computes the 2D- or 3D-length of the entity.
For area-type quantities, the software computes the area of the closed entity.
You can customize the results of these computed quantities through the use of QTO formulas. Formulas
are defined using the standard Civil 3D formula editor used in other parts of the product, and shown here.

Get Ready to Take-Off with AutoCAD Civil 3D
16
Currently, you can include {Item Count}, {Item Length}, and
{Item Area} in formulas, along with a large number of
standard math operators.
For example, if you wanted to compute the tonnage of
asphalt within a corridor model assuming that the pavement
thickness was four inches, the following general formula
might be used:
Asphalt tonnage = length times width times inches
thick divided by 160
In the formula editor, the equivalent expression would be “{Item Area} * 4 / 160”.
Formulas can be assigned at two levels:
1. Within the master pay item list: Defining a formula within the master pay item list within the
QTO Manager causes that formula to be utilized for all instances of the corresponding pay item.
This is the most common scenario for formula usage. These formulas are stored in a separate
formula file which is normally located in the same folder as the master pay item list file.
2. At the entity level: If you need to customize the formula for a single instance of an entity, you
can use the Edit Pay Item Data dialog box to enter a formula. The formula is stored directly on
that entity and does not affect other entities that have the same pay item assigned.
Settings That Affect Quantity Take-Off
There are several less frequently used settings
affecting the operation of the QTO feature within Civil
3D that you should be aware of. These settings, which
are accessed via the Settings button on the QTO Manager tool bar, are shown in the following dialog
box,

Get Ready to Take-Off with AutoCAD Civil 3D
17
and include the flowing items:
Report Type: Default report to generate.
Report Extents: Default report extents.
Report Selected Pay Item Only: Default setting for this parameter on Quantity Takeoff dialog
box.
Limit to Alignment Station: Default setting for this parameter on Quantity Takeoff dialog box.
Default Report Style: Default XSL-transform used when Quantity Takeoff Report window
appears.
Drawing-Based Report Table Font: Default font to use for reports placed in drawing.
Length Computation Type: If 3D, then slope distances of entities are computed; if 2D, then
distances in the XY-plane are computed.
Pipe Length Type: If Center-to-Center, then pipe lengths to the center of the structure are
computed. If To-Inside-Edges, then pipe length up to the structure connection are used.
Include Formulas in Reports: If true, then custom formulas are included in Detailed Reports
Remarks column.

Get Ready to Take-Off with AutoCAD Civil 3D
18
Use AutoCAD current layer and color: When assigning pay items to areas, generated hatches
will appear on the current layer and in the current color if this setting is true. If this setting is false,
then the following two settings are utilized.
Layer for hatch: Layer that generated hatch for area pay items should appear on.
Color for hatch: Color that generated solid fill hatch for area pay items should have.
Rarely Used Commands
One rarely used QTO command is available to detach QTO file information from a drawing. The
DetachQTOFiles command removes any association of master pay item list files, categorization files,
and formula files with the current drawing. You must key these commands in at the command line as no
menu option exists.
Future Directions for Civil 3D’s Quantity Take-Off Feature
The following items have been identified as highly probable improvements for the quantity take-off feature
within future versions of AutoCAD Civil 3D:
Dynamic Table Generation: Currently QTO tables placed in the drawing do not update when
entities with pay items attached are modified, requiring the table to be manually regenerated. It
has been identified as a highly desirable feature to have the QTO table automatically update.
Formulas with user-definable parameters: In Civil 3D 2010, only drawings using the Florida
DOT master pay item format may use formulas with parameters and, furthermore, the parameters
must be defined within the AecMerge.xml file prior to loading into Civil 3D. The ability to have
user-defined parameters specified at run-time may appear in a future Civil 3D release.
Formulas with parameter values obtained from entities: Customers have requested the ability
to obtain certain QTO formula parameter values directly from Civil 3D entities. For example, to
compute the quantity of asphalt, it would be desirable to obtain the pavement depth directly from
a corridor model. Similarly, to obtain the trenching depth of a pipe, it would be convenient to
obtain the pipe cover and pipe diameter values.
Associating pay items with material definition and volume calculations: Currently, the ability
to assign pay items to volume quantity material definitions and have those pay item ids flow
through during the end-area volume calculations. This functionality has been identified as highly
desirable.