Geocentrix Repute 2 2.5 User Manual.pdf10 Geocentrix Repute 2.5 User Manual To convert a Piglet 5.x...
58
Geocentrix Repute 2.5 User Manual Onshore pile design and analysis
Transcript of Geocentrix Repute 2 2.5 User Manual.pdf10 Geocentrix Repute 2.5 User Manual To convert a Piglet 5.x...
Geocentrix
Repute 25User Manual
Onshore pile design and analysis
2 Geocentrix Repute 25 User Manual
Information in this document is subject to change without notice and does not representa commitment on the part of Geocentrix Ltd The software described in this document isfurnished under a licence agreement or non-disclosure agreement and may be used orcopied only in accordance with the terms of that agreement It is against the law to copythe software except as specifically allowed in the licence or non-disclosure agreement Nopart of this manual may be reproduced or transmitted in any form or by any meanselectronic or mechanical including photocopying and recording for any purpose withoutthe express written permission of Geocentrix Ltd
copy2002-17 Geocentrix Ltd All rights reserved
Geocentrix and Repute are registered trademarks of Geocentrix Ltd Other brand orproduct names are trademarks or registered trademarks of their respective holders
PGroupN is used under exclusive licence from Geomarc Ltd PGROUP code used underlicence from TRL Ltd
Set in Optimum using Corelreg WordPerfectreg X7 Printed in the UK
Acknowledgments
Repute 20 was developed with the generous support of Corus Atkins and StentFoundations
Repute was designed and written by Dr Andrew Bond of Geocentrix with assistance fromIan Spencer of Honor Oak Systems
PGroupN was designed and written by Dr Francesco Basile of Geomarc Special recognitiongoes to the late Dr Ken Fleming of Cementation Foundations Skanska for his invaluableadvice and support during the development of PGroupN
The Repute 2 User Manual was written by Joe Bond and Andrew Bond
The following people and organizations assisted with the production of the program and itsdocumentation Francesco Basile Jenny Bond Joe Bond Tom Bond and Jack Offord
Revision history
Last revised 18th August 2017 (for version 251)
Table of contents 3
Table of contents
Acknowledgments 2Revision history 2Table of contents 3
Chapter 1Documentation 5
Chapter 2Overview 6
User interface 6Ribbon 6Desktop 7Status Bar 7
Chapter 3The Ribbon 9
File menu 9Tabs 10Home tab 11Insert tab 12Build tab 13Wizards tab 14Tools tab 14View tab 17Contextual tabs 20Title Bar 20Help button 20
Chapter 4The Drawing Board 21
Drawing Board tab 21Context menu 23Drawing Board status bar 24
Chapter 5The Project Manager 25
Context menu 25Home tab 26
Chapter 6The Stockyard 27
Context menu 27Drop-down menu 28
4 Geocentrix Repute 25 User Manual
Insert tab 29
Chapter 7The Property Inspector 30
Context menu 31
Chapter 8The Workbook 32
Column context menu 32Custom filter box 34Workbook context menu 35Workbook tab 35
Chapter 9The Graph Paper 36
Graph Paper tab 36Graph Options 37
Chapter 10The Message Board 38
Message Board tab 38Context menu 39
Chapter 11The Reporter 40
Reporter tab 40Reporter toolbar 41
Chapter 12The Browser 43
Browser tab 43Online help 45
Chapter 13Wizards 47
Wizards tab 47Project Wizard 47Borehole Wizard 49Pile Group Wizard 50Action Wizard 52Calculation Wizard 54Import Wizards 55
Chapter 14Program options 56
The Program Options box 56
Documentation 5
Chapter 1Documentation
Reputereg is supplied with a detailed Quick-start Guide comprehensive User Manual andauthoritative Reference Manual The latest versions of these manuals (including anycorrections andor additions since the programrsquos first release) are available in electronic(Adobereg Acrobatreg) format from the Geocentrix website Please visitwwwgeocentrixcoukrepute and follow the links to Reputersquos documentation
Quick-start guide
The Repute Quick-start Guide includes six tutorials that show you how to use the mainfeatures of Repute Each tutorial provides step-by-step instructions on how to drive theprogram There are three tutorials dealing with single pile design and three with pile groupdesign The tutorials increase in difficulty and are designed to be followed in order
User manual (this book)
The Repute User Manual explains how to use Repute It provides a detailed description ofthe programrsquos user interface which is being rolled out across all of Geocentrixrsquos softwareapplications The manual assumes you have a working knowledge of Microsoft Windowsbut otherwise provides detailed instructions for getting the most out of Repute
Reference manual
The Repute Reference Manual gives detailed information about the engineering theory thatunderpins Reputersquos calculations The manual assumes you have a working knowledge of thegeotechnical design of single piles and pile groups but provides appropriate references forfurther study if you do not
6 Geocentrix Repute 25 User Manual
Chapter 2Overview
This chapter gives an overview of the components of Reputersquos user interface
User interface
Reputersquos user interface comprises the Ribbon (see Chapter 3) the Desktop (displaying anynumber of panels such as the Workbook Graph Paper and Message Board shown above)and a Status bar
Ribbon
The Ribbon is based on Microsoftrsquos lsquoFluent user interfacersquo first introduced in MicrosoftOffice 2007 The features of the Ribbon as it appears in Repute are described in Chapter3
Overview 7
Desktop
At any one time the Desktop can display any number of the following panels
The Drawing Board (Chapter 4)
The Project Manager (Chapter 5)
The Stockyard (Chapter 6)
The Property Inspector (Chapter 7)
The Workbook (Chapter 8)
The Graph Paper (Chapter 9)
The Message Board (Chapter 10)
The Reporter (Chapter 11)
The Browser (Chapter 12)
Buttons on the Ribbons View tab allow you to select one of the pre-defined Desktoparrangements to change the panels being displayed
Each panel contains a caption bar which is located at the top of the panelrsquos window Thisdisplays the name of the panel and on the right-hand side it provides a button to minimizeor pin the panel in place and a buttonto close it
Status Bar
The status bar is located at the bottom of the programrsquos user interface
The Status Bar displays the name of the project you currently have opened the name of theitem currently selected in the Project Manager as well as a number of useful indicators anda sizing grip
Modified project indicator
The indicator on the far-left of the status bar turns from grey to yellow if you make unsavedchanges to the project When the project is saved this indicator will be reset to grey
8 Geocentrix Repute 25 User Manual
Progress bar
The progress bar gives an indication of how long a task takes to complete (eg calculation)
Message indicators
The four boxes in the middle of the status bar indicate whether there are unread messagesin the Message Board When a new message appears the indicators turn from grey to acolour depicting the type of message that has appeared From left to right the indicators turngreen yellow red and black representing Information Warnings Errors and Critical errorsrespectively
Left-click on the tick boxes in the lsquoReadrsquo column of the Message Board panel tomark messages as read and reset the indicators to grey
Keyboard indicators
The various letters on the right-hand side of the status bar indicate whether certain keys arein an on or off state by turning black or grey respectively From left to right the indicatorsrefer to the following keys Caps lock Number lock Scroll Lock and Insert
Sizing grip
The sizing grip allows you to resize the programrsquos main window which for example mightbe needed to see all the information given in one of its detailed reports To resize thewindow left-click on the sizing grip and drag the window to the desired size The sizing gripis only displayed if the program has been restored down (ie not maximized)
Chapter 3 The Ribbon 9
Chapter 3The Ribbon
The Ribbon is located at the top of the programrsquos user interface
The key components of the Ribbon are the Quick-access toolbar the Title bar and a rowof Tabs containing Groups
File menu
The File menu displays a list of commands that allow you to manipulate files
To create a new project click on New
To open an existing project click onOpen or select from the list of recentprojects you have worked on from theRecent projects panel
To import load or pile group data from aspreadsheet click on Import
To save the current project click on Save
To save the current project under adifferent name or in a different formatclick on Save As
To close the current project click onClose
To display product and licenceinformation about the program click onAbout Repute
To edit the programrsquos default settings click on the Program Options button at thebottom of the menu which will open the Program Options box (see Chapter 14Program Options)
To exit the program click on the Exit button at the bottom right of the menu
Importing data files from Piglet
10 Geocentrix Repute 25 User Manual
To convert a Piglet 5x data file
1 Click the Open button from the Application menu Home tab or Quick-accesstoolbar
2 Navigate to the folder where the file is located3 Click the drop-down arrow next to Files of type and select Piglet 5x spreadsheet
(xls)4 Select the file and click Open
Repute will read the data file and automatically convert it from xls to rpx format This willopen the Piglet data file as a new project in Repute
Quick-access toolbar
The Quick-access toolbar is a small customizable toolbar that displaysfrequently used commands The quick-access toolbar is locatedimmediately to the right of the Application button
To create a new project click the New button (1)
To open an existing project click the Open button (2)
To save the existing project click the Save button (3)
To customize the toolbar click on the down-arrow at its right-hand end (4)
Tabs
The row of tabs at the top of the Ribbon organizes commands into logical groups
The following tabs always appear on the Ribbon
Home
Insert
Scenario
Build
Wizards
Tools
Chapter 3 The Ribbon 11
Licence
View
Further lsquocontextualrsquo tabs appear after the View tabdepending on which panels are currently displayed(eg the Reporter and Message Board tabs)
To display a particular tab click on thecorresponding heading beneath the programrsquos titlebar
Home tab
The Home tab provides easy access to the programrsquos most frequently used commands
The commands on the Home tab are arranged into the following groups File Clipboardand Edit
File
Click the New button to create a new project This button is disabled if a project isalready open
Click the Open button to open a previously saved project If a project is alreadyopen then it automatically closes If the project has been modified then it asks youif you want to save it before closing
Click the Save button to save changes made to the project The button is disabledif the project is unmodified
Clipboard
The Clipboard buttons allow you to copy cut and paste items in the Project Manager If noitem is selected in the Project Manager then the Copy and Cut buttons are disabled If noitem is currently being copied then the Paste button is disabled
These buttons can be used to copy items to Windowsrsquo Clipboard for later inserting intoother external applications (eg Microsoft Excel and Word) If you are running two copiesof Repute on the same computer then these buttons can be used to copy and paste itemsfrom one project to another
12 Geocentrix Repute 25 User Manual
Edit
The Edit buttons allow you to duplicate and delete items in the Project Manager If no itemis selected in the Project Manager then these buttons are disabled When you click theDelete button a box appears asking if you want to delete the selected item Click Yes tocontinue
Insert tab
The Insert tab provides buttons for inserting new items into the project
The Stockyard is closely associated with the Insert tab Clicking buttons on the Insert tabautomatically opens the Stockyard to the corresponding group (eg the Section buttonopens the Stockyard to the Sections group of items)
Scenario tab
The Scenario tab provides buttons for viewing and transforming scenarios in the DrawingBoard
The commands on the Scenario tab are arranged into the following groups Scenario andTransform
Scenario
These buttons allow you to navigate through scenarios in the Project Manager (eg Stage1) As you select a scenario in the Project Manager the scenario that is displayed in theDrawing Board changes
Transform
These buttons allow you to transform aspects of the scenario
Click the rotation buttons to rotate the pile group within the Drawing Board
Chapter 3 The Ribbon 13
Click the Flip Cross-Section button to change the sign of the x co-ordinate of all thepiles in the Drawing Board (eg a pile at x = +3 m becomes x = 3 m)
Click the Flip Elevation button to change the y co-ordinate of all the piles in theDrawing Board (eg a pile at y = +3 m becomes y = 3 m)
Build tab
The Build tab provides buttons for validating and running calculations either individually orfor collectively for one or more scenarios
The buttons on the Build tab are arranged into the following groups Build Calculation BuildCurrent Scenario and Build All Scenarios
Buttons on the Build tab
If a scenario hasnrsquot been created yet then the buttons on the Build tab are disabled
The Status category in the Property Inspector shows the current status of a scenariorsquoscalculations This can be
Suspended
Scheduled
Running
Cancelled
Finished
The Build tabrsquos buttons affect the status of the calculations in either one or all the projectrsquosscenarios
Click the Validate button to check that all the data in the calculations is valid If thedata fails a validation then the calculation is suspended
Click the Run button to run scheduled calculations This automatically validates thedata before the calculations are run This either results in the calculations beingfinished (if successful) or cancelled (if unsuccessful)
Click the Schedule button to mark calculations as scheduled to be run the next timethe run button is pressed When calculations are created they are automaticallyscheduled Calculations that have already been run (whether successful or not) will
14 Geocentrix Repute 25 User Manual
need to be scheduled in order to be run again
Click the Re-run button to schedule calculations that have been run before(whether successful or not) and then instantly run scheduled calculations
Build Calculation
These buttons allow you to validate and run an individual calculations that is currentlyselected in the Project Manager The buttonsrsquo names indicate which calculation is selectedeg lsquoRun Calculation 1rsquo
Build Current Scenario
These buttons allow you to validate and run calculations linked to the scenario that iscurrently selected in the Project Manager The buttonsrsquo names indicate which scenario isselected eg lsquoRun Stage 2rsquo
Build All Scenarios
These buttons apply to all the calculations in the project regardless of which scenario isselected in the Project Manager
Wizards tab
The Wizards tab provides buttons to run various wizards
Greyed-out buttons indicate that a particular wizard cannot be run For more informationon the buttons that this tab provides see Chapter 13 Wizards
Tools tab
The Tools tab provides buttons for accessing various utilities provided by the program
The commands on the Tools tab are arranged into the following groupsManualsGuidesTutorials and Advanced
Chapter 3 The Ribbon 15
ManualsGuides
These commands provide a convenient way to open the programrsquos various manuals andguides in Adobe PDF format
Quick-Start Guide guides you through 6 different tutorials to help you becomefamiliar with the program
User Manual gives a detailed description of Reputersquos user interface
Reference Manual gives information regarding the programrsquos geotechnicalcapabilities
These manuals are located in the folder
CProgram Files (x86)GeocentrixRepute25Manuals
Tutorials
These commands provide a convenient way to open the programrsquos tutorials which aredescribed in details in the Quick-Start Guide
Tutorials 1-3 deals with single pile design
Tutorials 4-6 deals with pile group design
These tutorials are located in the folder
CUsersPublicDocumentsGeocentrixRepute25Tutorials
Advanced
The XML Project File command displays the project (RPX) file in XML format This featuremay be useful if you require technical support
The Clean Up Program Data command deletes any temporary files that exist in Reputersquosworking folder which is located at
CProgramDataGeocentrixRepute25Temp
Licence tab
The Licence tab provides facilities for managing your Repute licence
16 Geocentrix Repute 25 User Manual
The commands on the Licence tab are arranged into two groups Licence and Licence Key
Licence
The Licence Registration command displays a box that allows you to enter your licencedetails into the program Until you have entered a licence for Repute only those featuresincluded in the Trial Edition of the program are available
The easiest way to enter your licence details into the program is to click on Import andto select the LIC file provided by Geocentrix when you purchased or updated the program
Alternatively you can enter yourlicence details manually as follows
1 Select the Product youhave purchased fromthose listed
2 Enter your companyrsquosname in the CompanyName box
3 Enter the licence keyrsquos PIN4 Enter your Licence
Number5 If you have purchased a
network licence tick theNetwork Licence box andenter the IP Address ofthe computer to which thelicence key is attached
6 Select your country in theCountry Code box
7 Enter the expiry date of your ReAssurance agreement in the Valid Until Date box8 Enter your ReAssurance Passcode
If you have entered the information correctly a green tick mark will appear beside theLicence Number box and the OK button will be enabled If this does not occur pleasecontact Geocentrix for assistance
9 Click OK to register the program
Chapter 3 The Ribbon 17
The Retrieve Data From Licence Key command retrieves data from your locally-connectedlicence key and displays it in the Message Board
Licence Key
The Connect To Licence Key command attempts to establish a connection between Reputeand a Geocentrix-supplied licence key attached to your local computer (at IP address127001) This button is disabled if Repute is already connected to a licence key
The Connect To Licence Server command attempts to establish a connection betweenRepute and a Geocentrix-supplied licence key attached to a computer on your local or widearea network Repute looks for the key at the IP address specified in the Licence Registrationbox This button is disabled if Repute is already connected to a licence key
The Disconnect From Licence KeyServer command attempts to break the connectionbetween Repute and a connected licence key This is useful if you move your licence keyfrom your server to your local machine or vice versa This button is disabled if Repute is notconnected to a licence key
The Install Device Drivers command runs external setup program HASPUserSetupexe (akathe ldquoSentinel Runtime Installation Wizardrdquo) which is located in the folder CProgram Files(x86)Common FilesGeocentrix This Wizard installs the device drivers needed for Reputeto communicate with your licence key This button is disabled if the device drivers arealready installed on your computer
The Admin Control Centre command loads the Sentinel Admin Control Centre (ACC forshort) ndash if it is installed ndash into Reputersquos internal browser The ACC provides toolsforinspecting and managing Sentinel keys that are attached to your network You can also loadthe ACC into an external browser suhc as Firefox or Chrome by entering the followingaddress into the address bar httplocalhost1947 The ACC should only be used under thedirection of Geocentrix technical support
The Export C2V File command retrieves data from your locally-connected licence key andallows you to save it in a format (Customer-to-Vendor or lsquoC2Vrsquo) suitable for sending toGeocentrix Only use this command as instructed by Geocentrix Technical Support
The Import V2C File command re-writes the data stored in your locally-connected licencekey usually to upgrade or crossgrade your licence The new data will be provided byGeocentrix in a format (Vendor-to-Customer or lsquoV2Crsquo) suitable for updating the key Onlyuse this command as instructed by Geocentrix Technical Support
View tab
The View tab contains controls that allow you to change the display of the programrsquos userinterface
18 Geocentrix Repute 25 User Manual
The commands on the View tab are arranged into the following groups Desktops PanelsView and Visual Appearance
Desktops
The Desktops group contains buttons that allow you to change which of the programrsquos pre-defined Desktop arrangements appears on your screen
The table below summarizes which panels appear in each Desktop arrangement
Panel Desktop arrangement
Welcome Normal Construct Specify Check Review News
Drawing Board T T T
Project Manager T T T T
Stockyard T
PropertyInspector
T
Workbook T
Graph Paper T
Message Board
Reporter T
Browser T T
By default the Welcome Desktop arrangement is automatically displayed when Reputestarts up The program start-up Desktop arrangement can be changed in Program Options(accessed from the Application Menu)
The Normal Desktop arrangement is automatically displayed when a previously savedproject is opened
The Construct Desktop arrangement is automatically displayed when a new project iscreated
Chapter 3 The Ribbon 19
The Check Desktop arrangement is automatically displayed when a calculation has run
The Message Board panel is not included in any pre-defined Desktop arrangements butonce it is opened it remains open until the user closes it manually
Panels
The Panels group contains buttons thatallow you to select which panels appearon your screen
To open or close a particular panel clickits corresponding button
Buttons on the View tab are highlighted to indicate which panels are currently openeg in the picture above the Project Manager and Workbook are currently open
To open all the panels click on the Open All button
To close all the panels click on the Close All button
To toggle the appearance of a particular panel press Ctrl+Alt+letter on your
keyboard where ldquoletterrdquo corresponds to the letter that is underlined on the correspondingbutton eg D for Drawing Board P for Project Manager S for Stockyard etc
View
Click the CollapseExpand All button to collapse orexpand all controls in every panel (whether displayed ornot)
Click the Refresh All button to refresh all the panels(whether displayed or not)
Visual Appearance
The Visual Appearance group contains buttons that allow you to changethe programrsquos colour-scheme
Click the Blue button to apply a blue skin to the program
Click the Black button to apply a black skin to the program
Click the Silver button to apply a silver skin to the program
A blue skin is selected as the default visual appearance but this can be changed in ProgramOptions (see Chapter 14)
20 Geocentrix Repute 25 User Manual
Contextual tabs
The following panels have their own contextual tabs which are displayed only when thosepanels are open
Drawing Board
Graph Paper
Message Board
Reporter
Browser
For information on the buttons that these tabs provide see later chapters
Title Bar
The title bar runs across the top of the Ribbon
The title bar displays the programrsquos name version number and edition (eg Repute 25Enterprise Edition) plus ndash when a project has been opened or saved ndash the full path nameof the current project (eg CProgram FilesReputeProjectsTutorial 1rpx)
Double-click anywhere on the title bar to restore or maximize the programrsquos main window
The three buttons at the right-hand end of the title bar provide quick ways of minimizingrestoring or closing Repute
Help button
The Help button is located at the right-hand side of the row of tabs on Reputersquos Ribbon
Click on this button to open Reputersquos help file which has extensive information about howto use the program
Chapter 4 The Drawing Board 21
Chapter 4The Drawing Board
The Drawing Board provides a scaledrepresentation of the selected scenario
The Drawing Board consists of
1 The drawing
2 Vertical and horizontal rulers
3 A soil column
4 A scale indicator
5 A status bar
Drawing Board tab
When the Drawing Board is visible it has its own contextual tab which provides commandsthat control its appearance The commands on the Drawing Board tab are arranged into thefollowing groups SelectZoom Orientation Scale and ShowHide
The following paragraphs explain the functions available via the buttons on the DrawingBoard tab
The mouse cursor can be used to select an item on the drawing or alternatively you canselect an area to enlarge using the zoom key
By choosing the appropriate mode you can switch between one of three orientations
Cross-section
Plan
Elevation
22 Geocentrix Repute 25 User Manual
All these orientations follow the left-hand notation By switching orientation the directionof the x y and z axes change as shown in the table below
Orientation x y z
Cross-Section(Default) 6 Into screen 9Plan
6 8 Into screen
ElevationOut of screen 6 9
The scale can be adjusted on the tab from a ratio of 110 to 11000
By selecting the appropriate option you can show or hide a variety of drawing features
Origin ndash by selecting the Origin button you can display horizontal and vertical greylines whose intersection indicates the point of origin To turn off this feature left-click on the button again
Grid ndash by selecting the Grid button the program displays points on the drawingwhich form a grid
Mirror Image ndash the Mirror Image button reverses the direction of axes whosepositive direction points to the right (see table above) For example under Cross-Section orientation the x-axis would point positively to the left
Selecting an item
10 To select an item on the Drawing Board first make sure the Select mode is chosenunder the Drawing Board tab
11 Then move the mouse cursor over the item and left click (when the mouse is overthe item the cursor will change from a cross-hair to a hand)
12 This will automatically select the item in the Project Manager and display itsproperties in the Property Inspector (if open)
Repute synchronizes panels so that when an item is modified in the Property Inspector itis automatically updated on the Drawing Board
Chapter 6 The Project Manager 23
Zooming in (increasing scale)
To zoom in on the Drawing Board you can either choose the Zoom button or the IncreaseScale button on the Drawing Board tab
If you chose the Zoom button then left click and drag inside the drawing to formthe area which you would like to enlarge to the full screen
If you chose the Increase Scale button then continue to left click until the desiredscale is reached (alternatively you can select the scale size from the Drawing Boardtab eg 1100)
Right-clicking on the horizontal or vertical rulers will also give options of scale sizeto choose from
Moving the drawing
To move the drawing within the Drawing Board
1 Left-click anywhere in the Drawing Board2 Drag the mouse cursor to reposition the drawing3 The vertical and horizontal rulers will automatically adjust to match the origin on
the drawing
Context menu
For more options to select edit and arrange items right-click insidethe Drawing Board or directly on an item to display the panelrsquoscontext menu This will also give you shortcuts to change thedrawingrsquos orientation and display settings as well as options to printand save
Selecting items in the Soil Column
The Soil Column displays the Borehole that is currently present in the scenario shown in thedrawing
Left-click in the Soil Column to select the borehole in the Project Manager anddisplay its properties in the Property Inspector (if open)
Ctrl + left-click to select individual layers of the borehole
Shift + left-click to select the soil within the layer
24 Geocentrix Repute 25 User Manual
Drawing Board status bar
The Drawing Board status bar is located at the bottom of the panel and displays the currentorientation scale position of the mouse cursor from the origin and scenario selected in theProject Manager
Chapter 5 The Project Manager 25
Chapter 5The Project Manager
The Project Manager organizes the items already created in aproject It displays items in a hierarchical structure underseparate Groups (eg Materials)
Context menu
For options to edit and sort items right-click inside the panel Italso allows you to print the Project Manager
Clicking the Sort gt Into Groups button shows or hides thegroup names
Viewing an Itemrsquos properties
An items properties are displayed in the Property Inspector
If the Property Inspector is open
Left-click on an item in the Project Manager to display its properties
If the Property Inspector is not open
Right-click on an item and select Properties to open the Property Inspector to thatitems page
Or Double-click on that item
Or Select the item and press F12
26 Geocentrix Repute 25 User Manual
Creating Items
Items are created in the Stockyard panel To access this from the Project Manager
1 Right-click on the group name of the item type you want to create2 Click Create3 This opens the Stockyard displaying the panel corresponding to the itemrsquos group
from here items can be created (see Chapter 6 The Stockyard)
Editing Items
Either
1 Right-click on the name of the item you want to edit2 Click Edit to Cut Copy Paste Delete or Duplicate an item3 When you click the Cut or Delete button a box appears to check that you
want to delete the selected item click Yes to continue deleting
Or Type Ctrl+X to cut Ctrl+C to copy Ctrl+V to paste Ctrl+Del to delete orCtrl+D to duplicate the selected item
Or Select the Paste Cut Copy Duplicate or Delete button from the Home tabon Reputersquos Ribbon
Duplicating an item creates a carbon copy with identical properties but a different name
Renaming an Item
Right-click on an item and select Rename
Or Select the item and press F2
Or Select the Rename button from the Home tab on Reputersquos Ribbon
Home tab
The Project Manager is closely associated with the Home tab The Home tab provides anumber of buttons for modifying items in the Project Manager (see Home tab in Chapter3 The Ribbon)
Chapter 6 The Stockyard 27
Chapter 6The Stockyard
The Stockyard stores a wide range of pre-built items forinclusion in the project
Items available to be added are organized into groups eg Structural Elements Project Information GeotechnicalConstituents etc Above the divider is a list of all the itemsincluded in the currently expanded group
The group caption bar displays the name of the currentlyexpanded group This is also highlighted in the list ofgroups below the divider The Common group includesthe most frequently created items (all of which arerepeated in other groups)
Surplus groups go into the overflow bar at the bottom ofthe panel These can be selected by clicking on the imagerepresenting them Further commands are available via thedrop down arrow on the right hand side of the bar (seebelow)
Greyed-out items
If an item is greyed-out then it is not available in theedition of Repute that is running
To hide unavailable items
1 Click on the Application Button (program logo in the top left of the screen)2 Click on the Program Options button3 Select Stockyard4 Tick the box that says ldquoHide disabled itemsrdquo
Context menu
Right-clicking anywhere inside the panel reveals its context menu whichgives options to expand Stockyard groups create items and print thepanel
28 Geocentrix Repute 25 User Manual
Expanding Groups
To expand a group
Left-click on the group name from the list below the divider or on the group iconin the overflow bar at the bottom of the panel
Or Right-click and select the desired group name
Or Click on the relevant button on the Insert tab
Creating Items
To create an item
Left-click on the item name and drag it into the Project Manager (the mouse cursorpicture will change when in the Project Manager to illustrate the item beingcreated)
Or Right-click on the item name and select Create ltName of itemgt
Creating an item opens the Project Manager (if not already displayed) which automaticallyselects the new item The item is also selected in the Property Inspector (if open) so that itsproperties can be altered
Drop-down menu
The drop-down menu is shown by clicking on the drop-downarrow in the bottom right-hand corner of the panel
This menu allows you to see all available groups and adjustwhich are displayed in the panels list of groups
AddingRemoving groups from the panelrsquos list
To add or remove specific groups from the list displayed in the panel
1 Select Add or Remove Buttons from the drop-down menu to view a list of allavailable groups
2 Left-click on specific group names to add or remove them
Adjusting the number of groups in the panelrsquos list
Select Show More Buttons or Show Fewer Buttons from the drop-down menu
Or Left-click and drag the divider up or down
Surplus groups not displayed in the panelrsquos list go into the overflow bar at the bottom of thepanel and any remainder are shown at the bottom of the drop-down menu
Chapter 6 The Stockyard 29
Insert tab
The insert tab provides buttons for inserting new items into the project
The Stockyard is closely associated with the Insert tab Clicking buttons on the Insert tabautomatically opens the Stockyard and displays its corresponding group
30 Geocentrix Repute 25 User Manual
Chapter 7The Property Inspector
The Property Inspector allows you to inspect andchange the properties of items already created
Properties are split into groups eg DimensionsMaterial Properties etc When there is a lot ofinformation being displayed some groups arecollapsed by default To expand or collapse a grouppress the + and buttons respectively
The General group is common to all items Othergroups are item-specific
There are a variety of types of property value boxes
Numerical boxes
Tick boxes
Multiple choice lists
Paths (links to the internet)
Names (single line of text)
Notes (multiple lines of text)
Changing an itemrsquos properties
To change the numerical properties of an item
1 Left-click on the row of the desired property to change2 Type in the new value3 Press enter or tab
Left-clicking in the numerical box displays a drop down arrowon the right-hand side which can then be clicked on to reveala built-in calculator
For tick box properties simply click on the tick box to selector deselect that option Properties with a multiple choice boxcan be chosen via the drop down arrow
Chapter 7 The Property Inspector 31
To change the units of a numerical property
1 Click the + button on a property so that it expands to reveal its units2 Click on the drop down arrow in the units row to display available units3 Select the desired ImperialSI units
Repute synchronizes panels so that when an item is modified in the Property Inspector itis automatically updated on the Drawing Board
Context menu
Right-clicking anywhere inside the panel reveals the context menuwhich gives options to expand or collapse groups and to print thepanel
32 Geocentrix Repute 25 User Manual
Chapter 8The Workbook
The Workbook shows results fromcalculations in tabular format
The data is presented on separateworksheets (eg Longitudanal ULSRandolphrsquos Analysis etc) which can beselected by clicking on the worksheet tabsat the bottom of the Workbook Someworksheets have no data to display in whichcase the worksheet displays a message tothat effect
In a worksheet results are presented in atable where columns indicate properties andeach row depicts a different result
The default display only shows a smallproportion of the available results
Left-click on a column heading and drag itacross the worksheet to change the columnorder
Column context menu
Right-click on a column heading for more options to sort and groupthe data as well as to remove that column
Left-click on Alignment and select Align Left Right orCenter to adjust the positioning of the results values withintheir data cells
Left-click on Best Fit to re-size the column
Choose Best Fit (all columns) to re-size all the columns
Chapter 8 The Workbook 33
Displaying a different selection results
1 Left-click on the asterisk in the top left corner of the table tosee a drop-down list of all available columns
2 Left-click in the relevant tick boxes to show or hide the resultsyou want displayed
Or 1 On the column context menu choose Field Chooser to open
a Customization dialog box
2 Left-click and drag columns onto the worksheet to add themto the results table
Grouping results
To group identical values in a particular column
Drag the desired column into the Grouping bar found above the column headingsor choose Group By This Field in the column context menu
This sorts all the results in ascending order by value for that columnrsquos property It alsogroups results with the same numerical value for that property
Left-clicking on the + button on each row expands the group to show all resultswith that value
Left-clicking on the drop down arrow in the column that has been dragged onto theGrouping bar allows you to filter the grouped results (see Filtering results)
Sorting results
To sort the numerical values by a particular property
Left-click on the column heading that you want the data to be sorted by (dataascends from lowest value) or select Sort Ascending on the column context menu
Left-click on the column heading again to reverse the order (data descends fromhighest value)
By default data is sorted in ascending order by value in the furthest left column
34 Geocentrix Repute 25 User Manual
Filtering results
To filter results by their numerical values in a particular column
1 Left-click on the drop down arrow in the column heading of theproperty you want to filter by
2 Left-click to tick the boxes of the values that you want to keep or left-click on (Custom) for more advanced filtering options (see Customfilter box below)
This hides all results apart from those which have one of the ticked numericalvalues for that property
Left-click on the drop down arrow and select (All) to restore filtereddata
Deselecting current filters
Current filters are displayed at the bottom of the workbook (above worksheet tabs)
Left-click on the checked tick box to temporarily deselect the current filter
Left-click on the button to cancel the current filter
To the right-hand side of the line describing the current filter there is a drop down arrowwhich gives a list of previous filters so that they can be returned to easily
The Customize button in the bottom right corner of the Workbook links to the Customfilter box
Custom filter box
The custom filter box allows you toselect from a list of parameters to filterthe data by The list is accessible fromdrop down arrows in the left handboxes
Parameter values are entered in theright-hand boxes which have built-incalculators accessible from the dropdown arrows
Changing results
To change the values shown in the results
Left-click on the data cell you wish to change
Chapter 8 The Workbook 35
Type a new value and press Enter
You can left-click on a data cell and drag the mouse down to select multiple datacells to change to the same value
Note if data values are greyed out then they canrsquot be modified
Workbook context menu
Right click elsewhere on the Workbook to reveal a second context menu allowing youto print or export the worksheet
Workbook tab
When the Workbook is visible it has its own contextual tab which indicates whichworksheets have data to display and lets you switch between them It also enables you toExport Workbook so that the results can be saved on an external program (eg MicrosoftExcel) for future reference or printing
36 Geocentrix Repute 25 User Manual
Chapter 9The Graph Paper
The Graph Paper shows the calculationrsquos key results in graphical format
Graph Paper tab
When the Graph Paper is visible it has its own contextual tab which allows you to select thetype of graph you would like to see and change the graph settings When certain graph typesarenrsquot available the relevant buttons are greyed out on the Graph Paper tab
Chapter 9 The Graph Paper 37
The legend at the bottom of the panel labels the lines on the graph
Left-click on the appropriate tick box to hide or show the lines on the graph
Left-click on the Show All or Show None buttons on the Graph Paper tab to showor hide all the lines
By default all the available lines are displayed
Graph Options
Left-click the Options button on the GraphPaper tab to open a dialog box whichenables you to customize every aspect ofthe graph It also allows you to export thegraph to another program or to print it
38 Geocentrix Repute 25 User Manual
Chapter 10The Message Board
The Message Board shows all the messages that the program generates
Messages include information updates and warnings as well as errors and critical errors inyour data or calculation
The message board works in the background whilst minimized and automatically appearswhen errors occur To control the threshold for when the Message Board appears
1 Click on the Application Button (program logo in the top left of the screen)2 Click on the Program Options button3 Select Message Board4 Select the desired threshold (by default the Message Board will appear only when
an Error or Critical message is produced)
Message Board tab
When the Message Board is visible it has its own contextual tab which provides buttons tofilter through different types of message
You can also filter through different types of messages by clicking on the relevant tabs at thetop of the Message Board By default the All tab is selected showing every messageproduced While all message types are being shown the message type icon displayed beforethe message enables you to distinguish between them (eg for Warning messages)
Related messages are automatically grouped together Left-click on the + button (to the leftof the message type icon) to expand the group and view individual messages in more detail
Chapter 10 The Message Board 39
Sorting messages
Repute automatically records the date and time that messages are produced as well asjudging the severity of the message and displaying this in the relevant columns To sortmessages by time date or severity
Left-click on the column heading that you want the data to be sorted by (messagesare ordered chronologically and from least to most severe)
Left-click on the column heading again to reverse the order
Context menu
For more options to clear copy and arrange messages right-clickinside the panel to reveal the context menu This menu alsoallows you to print and save the Message Board
To reset the Message Board indicators in the status bar togrey select Mark All As Read on the right-click menu
Clearing Messages
To clear individual messages
1 Left-click in the tick boxes under the columnlsquoReadrsquo to select the messages you have read andno longer need
2 Right-click anywhere in the panel3 Left-click on Clear Read or press Ctrl+Del
To clear all messages
1 Right-click anywhere in the panel2 Left-click on Clear All or press Shift+Del
40 Geocentrix Repute 25 User Manual
Chapter 11The Reporter
The Reporter produces a page-based report of the inputoutput data of the scenariosuitable for printing
The Reporter panel is shown under the Review desktop arrangement (under theView tab)
Reporter tab
When the Reporter is visible it has its own contextual tab which provides buttonsto navigate through the report customize its content and also print it
To produce a report left-click on the Refresh button All reports start with referencedata including the Client name Project ID and date of the project This is followedby specific elements of the project
Chapter 11 The Reporter 41
Customizing the reportrsquos content
The Reporter tab shows a list of report elements To change the content of thereport
1 Left-click to select desired elements of the report and deselect undesiredones
2 You can select All or None of the elements by clicking the appropriatebutton
3 Left-click on the Refresh button
Reporter toolbar
The Reporter toolbar appears at the top of the panel window and repeats many ofthecommands available on the panels contextual tab This allows you to access thesebuttons when the Reporter tab isnt showing
It also includes the Show Thumbnails button (see below) and a drop-down box ontheright hand side which allows you to customize the buttons on the toolbar
Customizing buttons on the toolbar
1 Left-click on the drop-down arrow on the right-hand side ofthe Reporter toolbar
2 Select Add or Remove Buttons
3 Left-click to selectdeselect desired buttons to add or removethem from the toolbar
Select Reset Toolbar to restore the display to its default (allbuttons are displayed)
Select Customize for options to further modify the toolbar
Navigating through the report
The Reporter tab gives options to fit the height and width and zoom in and out ofthe report It also has Next Page and Last Page buttons to skip through the pages
42 Geocentrix Repute 25 User Manual
in the report Many of these buttons are also available when the Reporter tab isnrsquotin view via the toolbar in the Reporter
Left-click and drag the mouse cursor to move through the report slowly
In the left-hand margin of the Reporter there are thumbnails showing the reportspages so they can be quickly skipped between Left-click on the Show Thumbnailsbutton (on the Reporter toolbar) to show or hide this margin
Modifying the report (Enterprise edition only)
To modify the report left-click on the Modify button on the Reporter tab This willopen another window allowing you to customize the report Further informationon how to use this feature is given on the Repute hands-on training course
Chapter 12 The Browser 43
Chapter 12The Browser
The Browser allows you to view web pages within Repute instead of having to openup an external program It uses the same browsing engine as Microsoft InternetExplorer
The Browser panel is shown under the News desktop arrangement (under the Viewtab)
Browser tab
When the Browser is visible it has its own contextual tab which provides buttonsto navigate through the Internet similar to those provided by Internet Explorer (egBack Forward Refresh) There are also buttons providing direct links to theGeocentrix web site and the Repute home page
44 Geocentrix Repute 25 User Manual
Commands on the Browser tab are organized into two groups Navigation andBookmarks
Navigation
The Address bars allows you to specify the web address (URL) that you would likethe browser to display Press enter to navigate to your chosen address
The Back button allows you to navigate to the previous page in the browserrsquoshistory list
The Forward button allows you to navigate to the next page in the browserrsquos historylist
The Reload button requests the browser to reload the web page specifiedin theAddress box
The Stop button tells the browser to stop loading the specified web page Thiscommand is useful when the page takes a long time to load for example when youhave a poor connection to the Internet
The Connect To Licence Server command attempts to establish a connectionbetween Repute and a Geocentrix-supplied licence key attached to a computer onyour local or wide area network Repute looks for the key at the IP address specifiedin the Licence Registration box This button is disabled if Repute is alreadyconnected to a licence key
Bookmarks
The Geocentrix Website command instructs the browser to load the home pageof Geocentrixrsquos web site (wwwgeocenterixcoukindexhtml)
The Repute Home Page command instructs the browser to load Reputersquos homepage on Geocentrixrsquos web site (wwwgeocenterixcoukreputeindexhtml)
Chapter 12 The Browser 45
The Program Updates command instructs the browser to load the page onGeocentrixrsquos web site where the latest release of Repute can be found (wwwgeocenterixcoukreputeupdateindexhtml)
Online help
Repute has a comprehensive online help system that includes all the informationgiven in the programrsquos Quick Start Guide User Manual and Reference Manual
Opening Reputersquos online help
Click the Help button on Reputersquos Ribbon
Or Click the Help button in a dialog box
Or Press F1
Navigating Reputersquos online help
If the navigation panel is not showing click on the Show button on the helpwindowrsquos toolbar
Click on the Contents tab to see the help filersquos table-of-contents double-click a book to see more of the contents and then click on the topic youwant to display
46 Geocentrix Repute 25 User Manual
Click on the Index tab and then double-click on a keyword to display amatching topic
Click on the Search tab enter the keyword to find click the List Topicsbutton and then select the topic you want to display
Throughout the help system there are a number of words or phrases thatare underlined and shown in red These are hyperlinks which navigate youto related topics
Chapter 13 Wizards 47
Chapter 13Wizards
Reputersquos Wizards take you through a series of steps to help you perform varioustasks
Wizards tab
The Wizards tab can be accessed from Reputersquos ribbon and provides buttons to runeach of the wizards Greyed-out buttons indicate when a particular wizard canrsquot berun
The Project wizard is used to start a new project This is only available if there is noexisting project open If an existing project is open the Project Wizard button isdisabled on the Wizards tab
The next four wizards are used to create items within a project This is only possibleif an existing project is already open otherwise their buttons are disabled on theWizards tab Once created all of the items can be edited but the wizard is aconvenient way of performing several steps at once
The two Import wizards allow you to create a pile group (and the piles in it) orspecify multiple forces and moments from data contained ina spreadsheet This isalso only possible if an existing project is already open
To run a wizard simply click on the relevant button in the Wizards tab A box opensgiving instructions on how to perform the desired task
Project Wizard
The Project Wizard helps you create a new project via the following steps
1 Enter the administrative details for your project
2 Select the design standards you want to use in this project
48 Geocentrix Repute 25 User Manual
3 Define the scenarios to create in this project
Administrative details
Project name must be a validWindows file name (excluding thecharacters + and ) The Wizard createsa rpx file with whatever project nameyou enter e g Example1YExample1rpx
Path by default the Wizard places thefile in the folder where Repute wasinstalled under Projects
Description this text appears on the project report
Project ID any alphanumeric text This also appears on the project report
Design standards
The number of design standardsavailable depend on which edition ofthe program is running For access toall the design standards you need theEnterprise edition of Repute
Tick the relevant boxes to select thedesired design standards Click on theAll or None buttons to select ordeselect all the tick boxes respectively
Defining scenarios
No of construction stages enter thedesired number of construction stagesThe number of stages must bebetween 1 and 10 Longevity left-click in the cells in theright-hand column to access a dropdown list allowing you to change thelongevity of the stages The longevitycan either be Persistent Transient
Chapter 13 Wizards 49
Accidental or Seismic
You can navigate between the different stages you have created using the firstprevious next and last buttons ( ) located at the bottom left of the tablersquoswindow
Borehole Wizard
The Borehole Wizard helps you createa borehole This allows you to defineall of the ground conditions for yoursite in one simple procedure
The Borehole Wizard takes youthrough the following steps
1 How many layers do you wantto create
2 Please specify the thickness and soilrock type of each layer
3 Please enter the drainedproperties of each soilrock
4 Please enter the undrainedproperties of each fine soil
5 Please enter additionalproperties for rocks
6 Select the scenarios in whichyou want to use the borehole
Borehole layers
Enter the desired number of layersThe number of layers must bebetween 1 and 50
Soil type and thickness
Thickness Left-click on cells in thethickness column to access the built-incalculator via the drop down arrowand enter the correct value
50 Geocentrix Repute 25 User Manual
Soil type Select the soil type from thedrop down list
Drained soilrock properties
Left-click on relevant cells and enterthe correct properties You can usethe built-in calculators via the dropdown arrows
Undrained soil properties
If the borehole includes a fine soilthen enter properties as before Ifthere is no fine soil present then clickNext
Rock properties
If the borehole includes any rocksthen enter their unconfinedcompressive strengths and then clickNext
Selecting scenarios
Tick the relevant boxes to select thescenarios in which you want to usethe borehole
Click on the All or None buttons toselect or deselect all the tick boxesrespectively
Pile Group Wizard
The Pile Group Wizard generates piles on a grid layout that you specify via thefollowing steps
1 Specify the plan arrangement and number of piles
2 Select the pile type
3 Select the pile material and section
Chapter 13 Wizards 51
4 Enter the pile length and rake
5 Enter the location and rotation of the group centroid
6 Select the scenarios in which to place this pile group
Plan arrangement
Choose either a Predefined or Customplan arrangement
Total number of piles Select thedesired number of piles For apredefined arrangement this can bebetween 1 and 11 The image on theleft of the box illustrates the pilearrangement
For a custom arrangement the Wizardcreates a quadrilateral group with sides of length m x n piles Values m and n canbe between 1 and 100 The total no of piles is a product of these values and isdisplayed in the Wizard
Specify the dimensions Enter thedimensions for Spacing and CoverYou can use the built-in calculators viathe drop down arrows Click the +buttons to expand to reveal the unitsand select the desired ImperialSIunits from the drop down list
Pile type
Choose the pile type The Wizardsupports cast-in-place concrete boredand augered piles pre-cast concretesquare and spun piles micropiles andsteel H and pipe piles
Pile material and section
Choose the material select the classof concrete or grade of steel
52 Geocentrix Repute 25 User Manual
Choose the section select the DiameterBreadth H-section Pipe or Spun Pipe(asappropriate) from the drop down lists
Pile length and rake
Enter the dimensions for Embeddedlength and Upstand You can use thebuilt-in calculators via the drop downarrows Click the + buttons to expandto reveal the units and select thedesired ImperialSI units from thedrop down list
Group centroid
Enter the X and Y co-ordinates for thegroup centroidrsquos location and its angleof rotation As before you can usebuilt-in calculators and change theunits
The diagram within the Wizardillustrates what these values relate to
Selecting scenarios
Tick the relevant boxes to select thescenarios in which you want to placethe pile group
Click on the All or None buttons toselect or deselect all the tick boxesrespectively
Action Wizard
The Action Wizard creates forces andmoments for your project and brings them together in combinations via thefollowing steps
1 Define the forces to create in this project
2 Define the moments to create in this project
Chapter 13 Wizards 53
3 Define the combinations of actions to create in this project
Forces
No of forces Enter the desirednumber of forces The number offorces can be between 0 and 10 Youcan only have 0 forces if there is atleast one moment created
Left-click on relevant cells and enterthe correct properties You can usethe built-in calculators via the dropdown arrows
Variability left-click in the cells in the right-hand column to access a drop down listallowing you to change the variability of the forces The variability can either bePermanent Variable Accidental or Seismic
Moments
No of moments Enter the desirednumber of moments This number canbe between 0 and 10 You can onlyhave 0 moments if there is at least oneforce created
Enter the properties of the momentsand change their variability as before
Combinations
No of combinations Enter thedesired number of combinations Thisnumber can be between 0 and 10
Forces and Moments to include Left-click in the cells to access drop downarrows allowing you to select theforces and moments to include in acombination
Combinations can have any number of forces andor moments (restricted by the
54 Geocentrix Repute 25 User Manual
number of forces and moments created)
Calculation Wizard
To set up calculations in Repute makeuse of the Calculation wizard whichallows you to easily choose a specificcalculation and link it to designstandards and scenarios in yourproject The Calculation Wizard takesyou through the following steps
1 Select the calculations youwant to create
2 Select the design standard to apply
3 Select the scenarios to use in the calculations
Calculations
Tick the relevant boxes to select thecalculations you want to create
Click on the All or None buttons toselect or deselect all the tick boxesrespectively
You must have at least one calculationselected to continue
Design standards
Select the design standard to applyThe design standards displayed arethose that have been previouslycreated in this project
You can apply a maximum of onedesign standard To continue with nodesign standard applied select None
Chapter 13 Wizards 55
Selecting scenarios
Tick the relevant boxes to select the scenarios you want to use in the calculation
Click on the All or None buttons to select or deselect all the tick boxesrespectively
The best way to learn how to use the wizards is to follow Tutorials 1ndash6 whichmake extensive use of them to create projects and items in Repute
Import Wizards
The Import Pile Group Wizard and Import Loads Wizard allow you to use datastored in a spreadsheet to specify key properties of your piles pile group and anyloads applied to them
The following folder contains spreadsheets that show how you should arrange yourdata so that Repute can import it successfully
CProgram Files (x86)GeocentrixRepute25Templates
The relevant templates are called
lsquoTemplate for importing pile groupxlsrsquo
andlsquoTemplate for importing actionsxlsrsquo
56 Geocentrix Repute 25 User Manual
Chapter 14Program options
You can change the default settings for Reputersquos user interface projects andreports using the Program Options box This allows you to customize everythingfrom the visual appearance of the program to the file extension of the backup filesthat it produces
The Program Options box
To open the Program Options box
1 Left-click on the File menu2 Left-click on the Program Options button at the bottom of the menu
The tree control on the left-hand side allows you to select pages to be displayed on the right
Click the OK button to apply the changes made to Reputersquos default settings
Click the Cancel button to close the box and cancel any changes made
Click the Help button in the bottom right of the box to access the help file andview more details on how to use this box
The following paragraphs explain the pages available in the Program Options box and eachof the settings they allow you to modify
General
Show splash screen when program startsThis selects whether or not the splash screen is displayed during the programstart-up This window shows the program name and version number as well as containing
Chapter 14 Program options 57
a progress bar at the bottom indicating when the program has finished loading
Automatically show panel when themouse is over docking labelWhen a panel is minimized it is displayedon the edge of the main window as adockinglabel This selects whether the panel isautomatically maximized when the mousecursor moves over this label
Write a log of program activityThis tells Repute to keep a record of theprogram activity which can be accessedfrom the folder CDocumentsandSettingsAll UsersApplicationDataGeocentrixReputeThis may be useful if you have to contact Geocentrix technical support
Show this view at program startupThis lets you select from a drop down list which desktop arrangement is displayedat the program start-up By default this is the Welcome desktop
Visual appearanceThis lets you select from a drop down list which colour scheme to apply to the program Bydefault this is the Blue skin style
Automatically create a backupThis instructs Repute to create a backup ofyour project file whenever you save itwith the extension you specify By defaultthe extension is lsquobakrsquo
Browser
Use built in browserThis instructs Repute to use its built-inbrower to display web pages ratherthan your external (default) Windowsbrowser
Drawing Board
Drawing extentsThese options let you select the maximum dimensions of the drawing within theDrawing Board panel
58 Geocentrix Repute 25 User Manual
Graph Paper
The Graph Paper page currently has no options that can be set
Message Board
These options lets you control thethreshold for when the MessageBoard panel opens Select the boxapplying to the desired level ofseverity for when you want theMessage Board to open
Project Manager
The Project Manager page currently has no options that can be set
Reporter
The Reporter page currently has no options that can be set
Stockyard
These options allow you to specifywhich itemrs appearin the Stockyardwhen you next start the program Tickthe items that you want to appear anduntick those you donrsquot want toappear
Workbook
The Workbook page currently has nooptions that can be set
Reset
The reset button allows you to restorethe programrsquos settings back to theirfactory values
- Acknowledgments
-
- Revision history
- Table of contents
-
- Chapter 1 Documentation
-
- Quick-start guide
-
- User manual (this book)
- Reference manual
-
- Chapter 2 Overview
-
- User interface
- Ribbon
- Desktop
- Status Bar
-
- Modified project indicator
- Progress bar
- Message indicators
- Keyboard indicators
- Sizing grip
-
- Chapter 3 The Ribbon
-
- File menu
-
- Importing data files from Piglet
- Quick-access toolbar
-
- Tabs
- Home tab
-
- File
- Clipboard
- Edit
-
- Insert tab
-
- Scenario
- Transform
-
- Build tab
-
- Buttons on the Build tab
- Build Calculation These buttons allow you to validate and run an individual calculations that is currently selected in the Project Manager The buttonsrsquo names indicate which calculation is selected eg lsquoRun Calculation 1rsquo
- Build All Scenarios
-
- Wizards tab
- Tools tab
-
- ManualsGuides
- Tutorials These commands provide a convenient way to open the programrsquos tutorials which are described in details in the Quick-Start Guide Tutorials 1-3 deals with single pile design Tutorials 4-6 deals with pile group design These tutorials are located in the folder CUsersPublicDocumentsGeocentrixRepute25Tutorials Advanced The XML Project File command displays the project (RPX) file in XML format This feature may be useful if you require technical support The Clean Up Program Data command deletes any temporary files that exist in Reputersquos working folder which is located at CProgramDataGeocentrixRepute25Temp Licence tab The Licence tab provides facilities for managing your Repute licence The commands on the Licence tab are arranged into two groups Licence and Licence Key Licence
- Licence Key
-
- View tab
-
- Desktops
- Panels
- View
- Visual Appearance
-
- Contextual tabs
- Title Bar
- Help button
-
- Chapter 4 The Drawing Board
-
- Drawing Board tab
-
- Selecting an item
- Zooming in (increasing scale)
- Moving the drawing
-
- Context menu
-
- Selecting items in the Soil Column
-
- Drawing Board status bar
-
- Chapter 5 The Project Manager
-
- Context menu
-
- Viewing an Itemrsquos properties
- Creating Items
- Editing Items
- Renaming an Item
-
- Home tab
-
- Chapter 6 The Stockyard
-
- Greyed-out items
- Context menu
-
- Expanding Groups
- Creating Items
-
- Drop-down menu
-
- AddingRemoving groups from the panelrsquos list
- Adjusting the number of groups in the panelrsquos list
-
- Insert tab
-
- Chapter 7 The Property Inspector
-
- Changing an itemrsquos properties
- Context menu
-
- Chapter 8 The Workbook
-
- Column context menu
-
- Displaying a different selection results
- Grouping results
- Sorting results
- Filtering results
- Deselecting current filters
-
- Custom filter box
-
- Changing results
-
- Workbook context menu
- Workbook tab
-
- Chapter 9 The Graph Paper
-
- Graph Paper tab
- Graph Options
-
- Chapter 10 The Message Board
-
- Message Board tab
-
- Sorting messages
-
- Context menu
-
- Clearing Messages
-
- Chapter 11 The Reporter
-
- Reporter tab
-
- Customizing the reportrsquos content
-
- Reporter toolbar
-
- Customizing buttons on the toolbar
- Navigating through the report
- Modifying the report (Enterprise edition only)
-
- Chapter 12 The Browser
-
- Browser tab
-
- Navigation
- Bookmarks
-
- Online help
-
- Opening Reputersquos online help
- Navigating Reputersquos online help
-
- Chapter 13 Wizards
-
- Wizards tab
- Project Wizard
-
- Administrative details
- Design standards
- Defining scenarios
-
- Borehole Wizard
-
- Borehole layers
- Soil type and thickness
- Drained soilrock properties
- Undrained soil properties
- Rock properties
- Selecting scenarios
-
- Pile Group Wizard
-
- Plan arrangement
- Pile type
- Pile material and section
- Pile length and rake
- Group centroid
- Selecting scenarios
-
- Action Wizard
-
- Forces
- Moments
- Combinations
-
- Calculation Wizard
-
- Calculations
- Design standards
- Selecting scenarios
-
- Import Wizards
-
- Chapter 14 Program options
-
- The Program Options box
-
- General
- Browser
- Drawing Board
- Graph Paper
- Message Board
- Project Manager
- Reporter
- Stockyard
- Workbook
- Reset
-
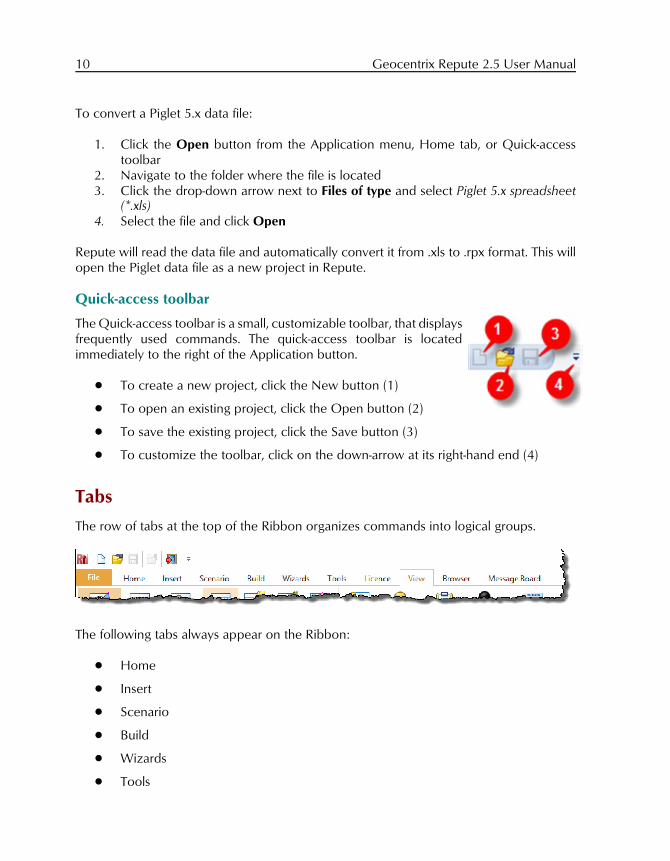
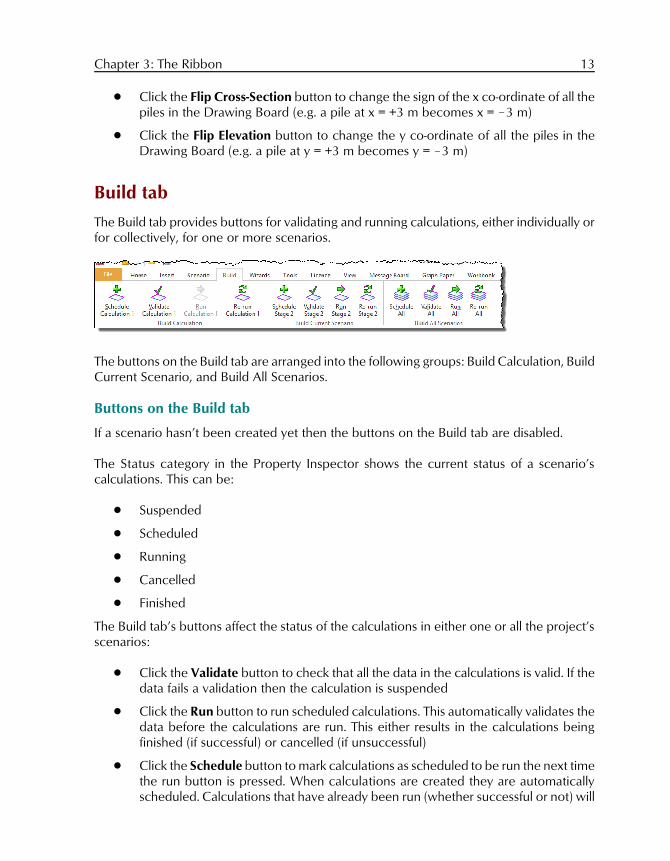
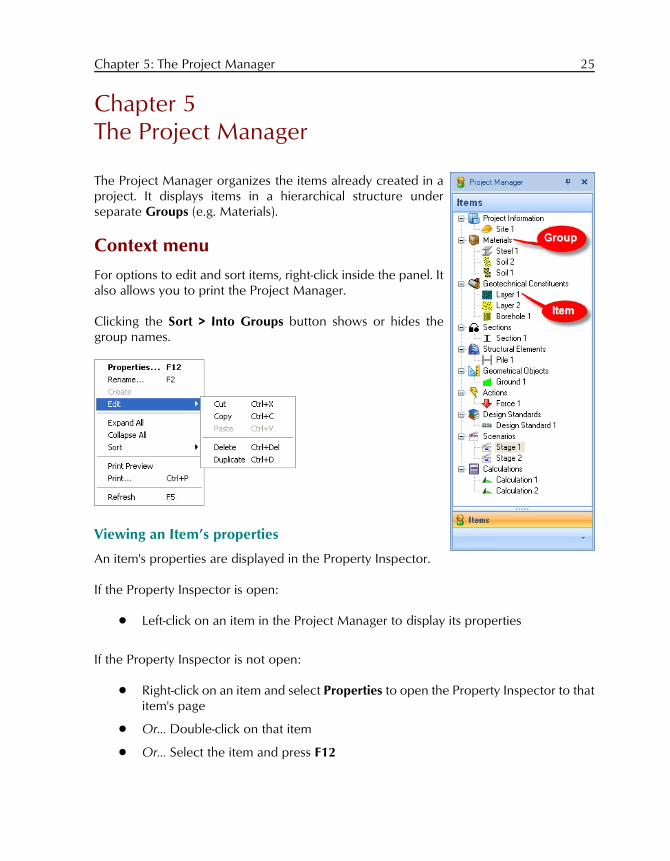
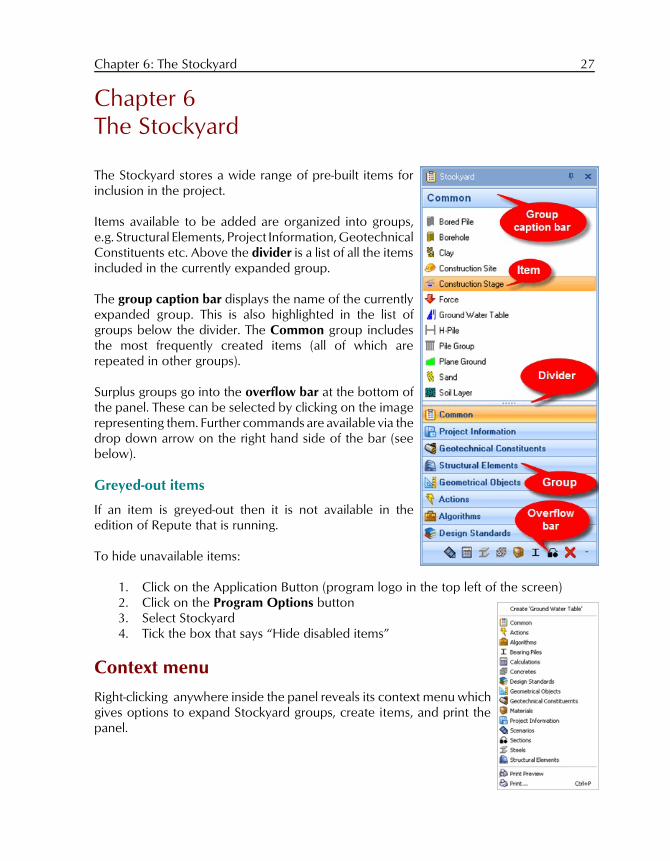
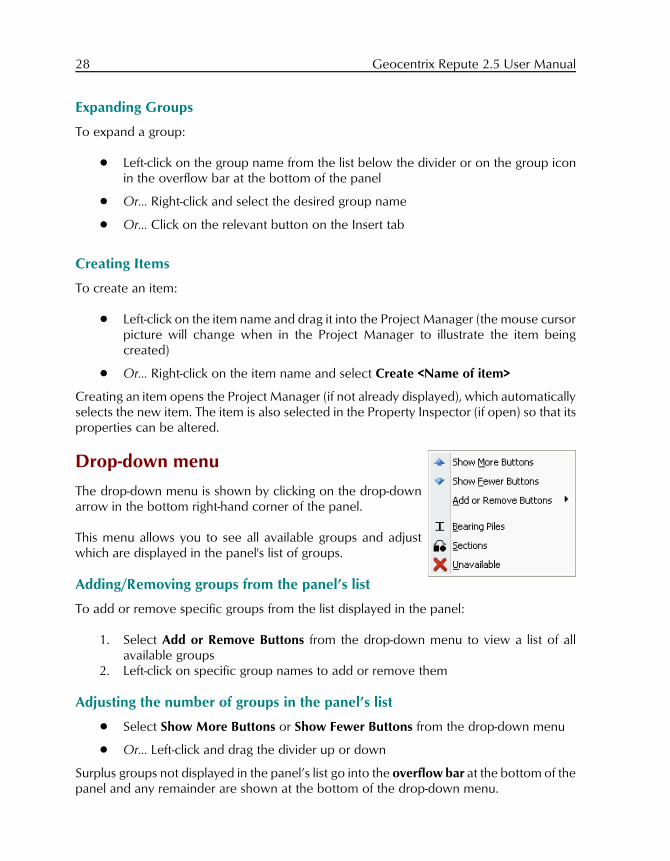
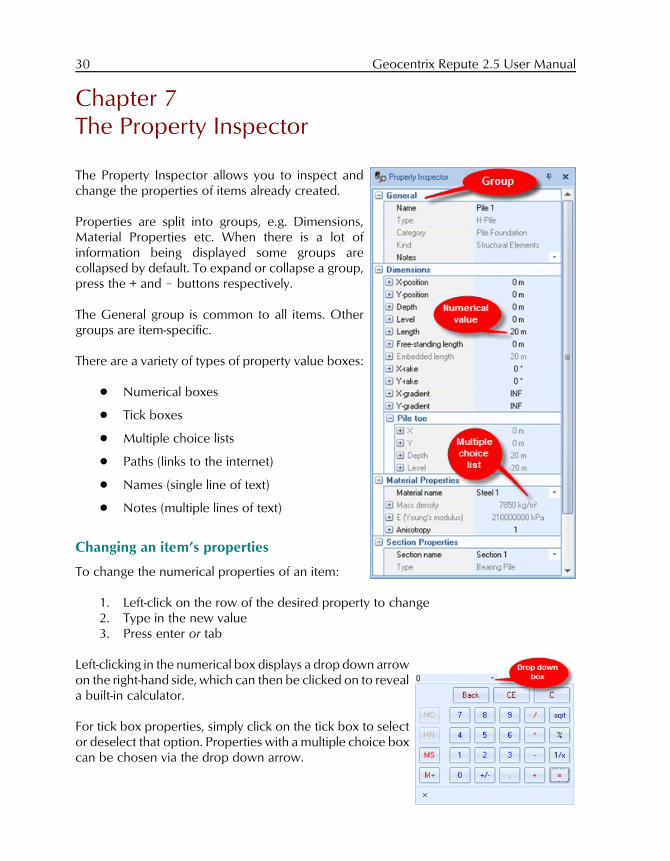
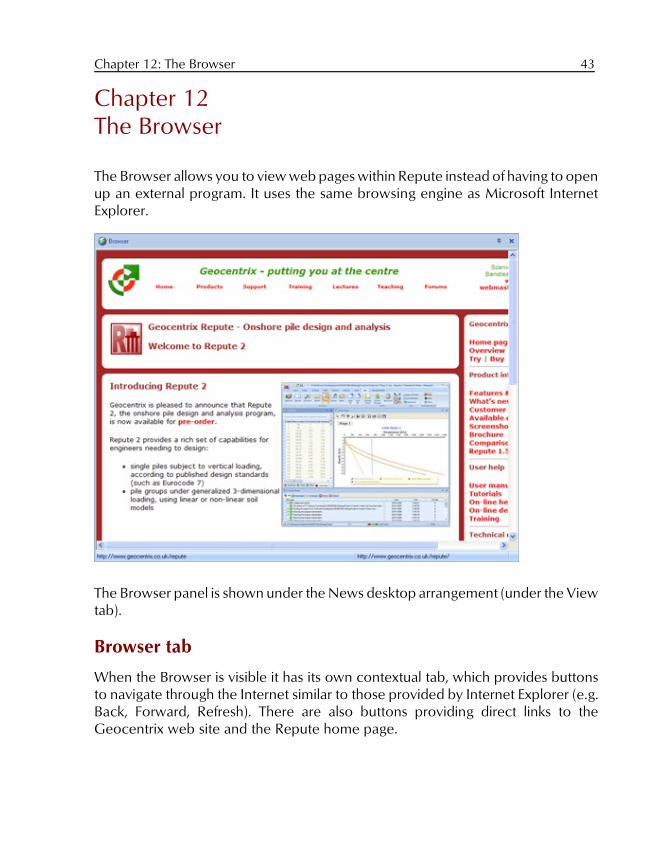
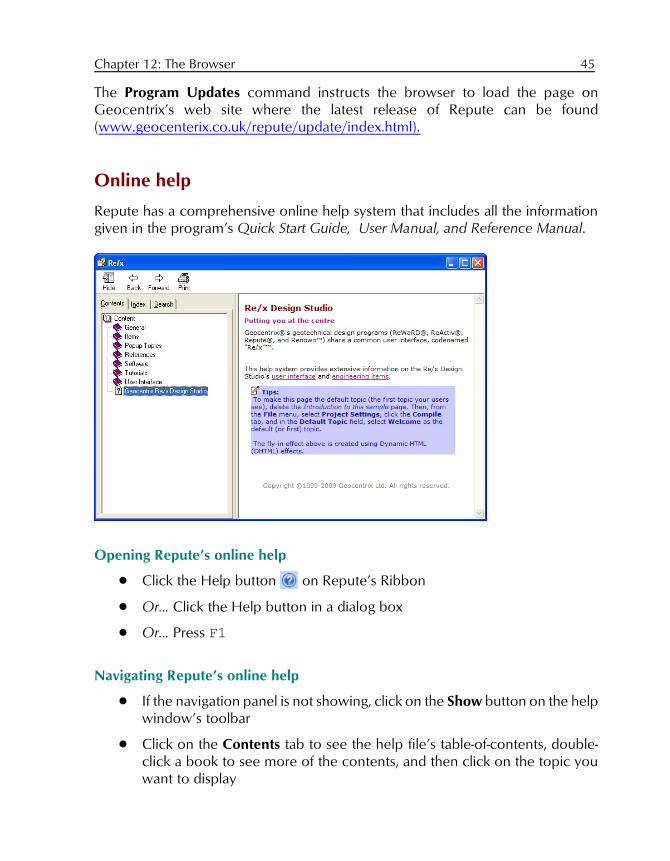
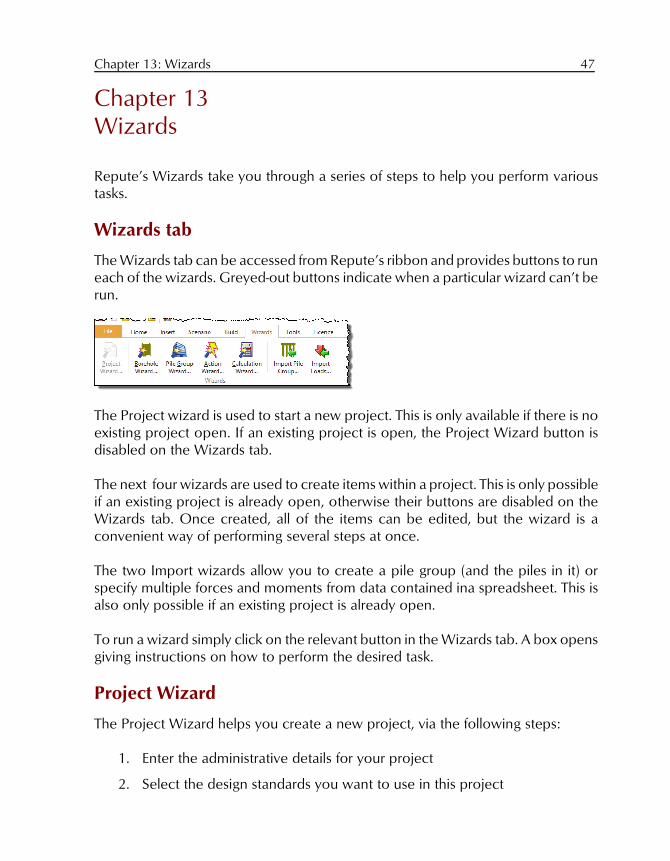
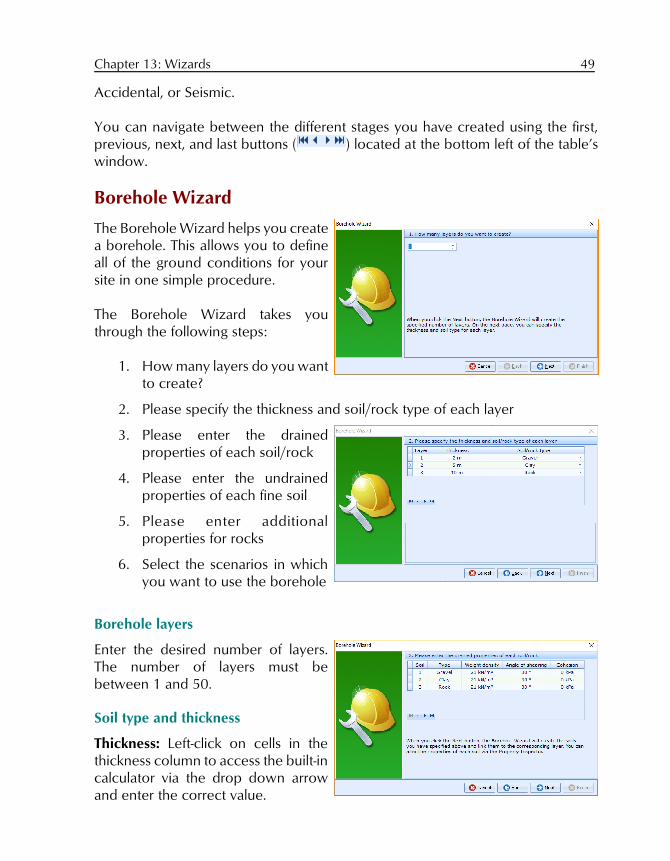
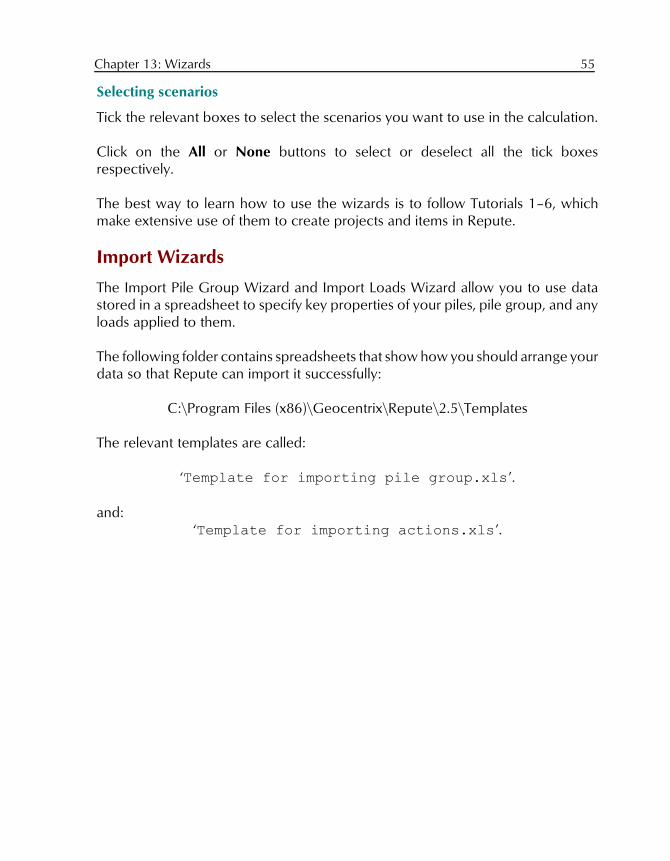