Friese Final Proof - SAGE Publications Inc | · PDF file · 2011-12-06Introduction...
22
Introduction ATLAS.ti belongs to the genre of CAQDAS programs. CAQDAS stands for computer-aided qualitative data analysis software. It is a somewhat lengthy acronym as compared to ‘QDA software’, which can also be found in the litera- ture. The latter stands for qualitative data analysis software and the apparent similarity may be responsible for some of the misunderstandings and mis- perceptions related to CAQDAS. 1 ATLAS.ti – like any other CAQDAS program – does not actually analyze data; it is simply a tool for supporting the process of qualitative data analysis. Computers are generally very good at find- ing things like strings of characters or coded data segments in a large variety of combinations, but the researcher first needs to tell the computer, by way of coding, which data segment has what kind of meaning (see also Konopásek, 2007). This prerequisite is used by some people as an argument against using software, asking: if the computer doesn’t do the coding, then what it is good for? And without ‘test driving’ a CAQDAS package, they judge the software to be inadequate in a qualitative research context and return to their manual methods of colored pencils and filing cabinets. Welsh (2002) describes two camps of researchers: those who see software as central to their way of analyz- ing data and those who feel that it is peripheral and fear that using it leads to a ‘wrong’ way of analyzing data. Smith and Hesse-Biber (1996) found that software is used mainly as an organizing tool. However, technology has advanced considerably since 1996 and I propose that software can be used for much more than just organizing data. Software frees you from all those tasks that a machine can do much more effectively, like modifying code words and coded segments, retrieving data based on various criteria, searching for words, integrating material in one place, attaching notes and finding them again, counting the numbers of coded inci- dences, offering overviews at various stages of a project, and so on. By using ATLAS.ti, it becomes much easier to analyze data systematically and to ask questions that you otherwise would not ask because the manual tasks involved would be too time consuming. Even large volumes of data and those of differ- ent media types can be structured and integrated very quickly with the aid of software. In addition, a carefully conducted computer-assisted qualitative data analysis also increases the validity of research results, especially at the concep- tual stage of an analysis. When using manual methods, it is easy to ‘forget’ the 1 The acronym CAQDAS was developed by the directors of the CAQDAS networking project at the University of Surrey, Guildford, UK (http://caqdas.soc.surrey.ac.uk/). 01-Friese-4323-Introduction.indd 1 22/11/2011 11:44:28 AM
Transcript of Friese Final Proof - SAGE Publications Inc | · PDF file · 2011-12-06Introduction...

Introduction
ATLAS.ti belongs to the genre of CAQDAS programs. CAQDAS stands for computer-aided qualitative data analysis software. It is a somewhat lengthy acronym as compared to ‘QDA software’, which can also be found in the litera-ture. The latter stands for qualitative data analysis software and the apparent similarity may be responsible for some of the misunderstandings and mis-perceptions related to CAQDAS.1 ATLAS.ti – like any other CAQDAS program – does not actually analyze data; it is simply a tool for supporting the process of qualitative data analysis. Computers are generally very good at find-ing things like strings of characters or coded data segments in a large variety of combinations, but the researcher first needs to tell the computer, by way of coding, which data segment has what kind of meaning (see also Konopásek, 2007). This prerequisite is used by some people as an argument against using software, asking: if the computer doesn’t do the coding, then what it is good for? And without ‘test driving’ a CAQDAS package, they judge the software to be inadequate in a qualitative research context and return to their manual methods of colored pencils and filing cabinets. Welsh (2002) describes two camps of researchers: those who see software as central to their way of analyz-ing data and those who feel that it is peripheral and fear that using it leads to a ‘wrong’ way of analyzing data. Smith and Hesse-Biber (1996) found that software is used mainly as an organizing tool. However, technology has advanced considerably since 1996 and I propose that software can be used for much more than just organizing data.
Software frees you from all those tasks that a machine can do much more effectively, like modifying code words and coded segments, retrieving data based on various criteria, searching for words, integrating material in one place, attaching notes and finding them again, counting the numbers of coded inci-dences, offering overviews at various stages of a project, and so on. By using ATLAS.ti, it becomes much easier to analyze data systematically and to ask questions that you otherwise would not ask because the manual tasks involved would be too time consuming. Even large volumes of data and those of differ-ent media types can be structured and integrated very quickly with the aid of software. In addition, a carefully conducted computer-assisted qualitative data analysis also increases the validity of research results, especially at the concep-tual stage of an analysis. When using manual methods, it is easy to ‘forget’ the
1 The acronym CAQDAS was developed by the directors of the CAQDAS networking project at the University of Surrey, Guildford, UK (http://caqdas.soc.surrey.ac.uk/).
01-Friese-4323-Introduction.indd 1 22/11/2011 11:44:28 AM

INTRODUCTION2
raw data behind the concepts as it is quite laborious to get back into the data. In a software-supported analysis, the raw data are only a few mouse clicks away and it is much easier to remind yourself about them and to verify or falsify your developing theoretical thoughts.
Your ideas about the data are likely to be different three or six months into the analysis as compared to the very early stages, and modification of codes and concepts is an innate part of qualitative data analysis. With the aid of comput-ers, this process can also easily be documented. The steps of analysis can be traced and the entire process is open to view. For a more extensive discussion on the advantages as well as the disadvantages of using computers for qualita-tive data analysis, see Fielding and Lee (1998).
Even if some of the information in this book applies to all CAQDAS pack-ages, you will learn in particular how to carry out a project with ATLAS.ti. Like a lot of other software, ATLAS.ti offers many functions and options but it does not explain what you actually need do to in order to conduct your analysis. Looking back at my own experience, when I started to use software to analyze qualitative data in 1992, I did what most novices probably do: I looked at the features, played around a bit, muddled my way through the software and the data, gained some insights and wrote a report. It worked – somehow. But it wasn’t very orderly or systematic.
Since then, my way of working with ATLAS.ti has gradually become much more systematic and – to a certain point – even standardized. This did not hap-pen overnight: it took many years of working with the software and teaching it, as well as involvement in many project consultations. As each qualitative research project is to an extent unique, this allowed me to test my ideas in dif-ferent contexts and to develop a method of computer-assisted analysis.2 Lewins and Silver (2007), in their book on using software in qualitative research, take a different stance. They are afraid that the use of software conventionalizes data and leads to expectations and assumptions about how the data should be ana-lyzed (p. 57); therefore they make suggestions but leave it up to the users to find their way through a software package.
However, I often see users struggling instead of finding their own way of working with a particular software package. They are overwhelmed by its many functions and sometimes don’t even know where to start. They appreciate very much having someone to guide them through the analytical process, advising them which function to use when and at which stage.
What is fundamentally lacking in the literature is a data analysis method for computer-assisted data. A number of books and articles have been written about the general use and usefulness of software for qualitative data analysis,
2 The term ‘method’ is used here in an epistemological sense as a set of steps and procedures by which to acquire knowledge, as distinct from the more encompassing term ‘methodology’ which includes the entire research process starting with ontological consideration of what there is that can be studied (Blumer, 1969; Hug, 2001; Strübing and Schnettler, 2004).
01-Friese-4323-Introduction.indd 2 22/11/2011 11:44:28 AM
INTRODUCTION 3
the early ones often expressing concern as well as enthusiasm about how soft-ware can help (Barry, 1998; Hinchliffe et al., 1997; Morrison and Moir, 1998; Richards and Richards, 1994; Seidel, 1991). At times, a chapter on computer-assisted analysis is included at the end of qualitative data analysis books (e.g. Silverman, 2000; Mayring, 2010), or you might find short descrip-tions and screenshots showing how certain analysis steps could be implemented (Corbin and Strauss, 2008). I was very surprised, however, to read descriptions of pile sorting and other manual methods of data analysis in a book first pub-lished in 2010 (Bernard and Ryan, 2010). The authors point out that the vari-ous procedures they describe can also be accomplished using a software package, but they do not explain how. Maybe the assumption is that it goes without saying: you simply load the software and it is immediately obvious how to adapt your old manual procedures.
I argue that (1) it is not and (2), more importantly, an exactly equivalent step-by-step process is not even desirable. Today, with the new possibilities available, we can approach data analysis in different ways. Therefore analysis methodology needs to be rewritten to exploit the benefits of a software- supported approach. Software changes the way we build up coding systems. The process becomes much more exploratory due to the ease of renaming and modifying codes. Computers also change the ways we ask questions about the data. Data analysis procedures have become much more sophisticated, because for a computer it is much easier to find things in the data and to output results. Also, CAQDAS makes it easier to combine qualitative and quantitative meth-ods, which of course does not preclude a purely qualitative approach. It allows qualitative researchers to move out of the black box of analysis and to make the entire analytic process more transparent. And it allows them to work in teams, even across geographical boundaries. This creates new opportunities and also new challenges.
This book, in addition to teaching you how to work with ATLAS.ti, proposes a method for computer-assisted data analysis. The method is called ‘computer-assisted NCT analysis’. This process of Noticing, Collecting and Thinking will be explained in more detail starting with Chapter 5. As the name indicates, the focus of the method is on data analysis and not on the entire research process. Thereby it is possible to integrate it into various methodolo-gies; you don’t need to subscribe to a particular world view in order to use it, and it doesn’t prescribe how you should tackle your analysis. If the overall methodological approach or the research questions require an inductive approach, you can work inductively; if it makes more sense to work deduc-tively, you can do that as well, or use a mixed approach. You can work purely qualitatively or, if applicable, quantify some of the findings. Whether you come from an ethnographic, a phenomenological or a grounded theory tradition, whether you have conducted action research, narrative interviews, focus groups or biographical research, whether you have structured or unstructured data, observational data or audio-visual material, I am interested in teaching you how to approach the analysis of your data in a systematic computer-assisted way.
01-Friese-4323-Introduction.indd 3 22/11/2011 11:44:28 AM
INTRODUCTION4
The book can be followed as a guide and I make specific suggestions about when to do what and why. If you find these suggestions useful for your pur-poses, you are welcome to follow the suggested methodological steps as well. If you view ATLAS.ti as a tool for managing your data, you can focus on the technical instructions. You will find both methodological and technical advice in this book.
Computer-assisted analysis is like exploring a data landscape
Computer-assisted analysis can be thought of as a journey. Think of your ATLAS.ti project as an excursion into unknown territory. The data material is the terrain that you want to study; the chosen analytic approach is your path-way through it. The tools and functions provided by ATLAS.ti tools are your equipment to examine what there is to discover. In Chapters 1 to 3 we prepare for the journey. The preparation of the data material can be compared to select-ing the right time of the year for the excursion. Ice and snow may hinder the success of our excursion, so can a careless transcription or wrongly chosen data file formats. A well-thought-out project setup is like planning your excursion carefully and not just running off up the first dirt track you see: that might turn out to be a dead end. Learning the technical aspects of coding in Chapter 4 is essential before you can make progress. With that knowledge, you will be well prepared to embark on the journey. Along the way you will improve your cod-ing skills and learn further skills, like developing a system for all the interesting things you observe; how to write notes on them (writing comments); how to write a diary that documents the excursion and your major insights and find-ings on the way (writing memos); and how to examine specific characteristics of certain objects and their relations to other objects in depth, using the query tool, the co-occurrence explorer and other helpful functions.
Let’s think of our data as a landscape that we want to explore (Figure I.1). The nature trail that I will take you on will take a couple of days and we will naturally take some breaks (e.g. to rest, to play games or to listen to a story around the camp fire in the evening), and I have more metaphors in store that will help you to understand better why some paths are dead ends or detours and why some tools should be used in particular ways to best achieve what we are aiming for – that is, a meaningful and comprehensible representation of the terrain we are examining.
As your tour guide, I will call a last preparatory team meeting before we embark on the journey. The aim of the meeting is to outline what lies ahead and explain to you the route I plan to take. In order to make this meeting more fun, we will play a game. As part of the game, you will learn about the NCT model of software-supported qualitative data analysis.
Then it will be time to gain your first hands-on experience. You will begin by observing the terrain, spotting things that might be interesting, collecting them and putting your coding skills into practice. The aim of this first day of the
01-Friese-4323-Introduction.indd 4 22/11/2011 11:44:28 AM

INTRODUCTION 5
journey is to become familiar with the terrain, to observe and then to write down notes and first coding ideas. We will meet up later to discuss what you have found. I will show you that other people found very similar things on their first day. You may already be starting to structure your thoughts about the things you have noticed, or at least wondering how to do so. I will explain it using the terrain of the example data provided, but I will also draw on other examples to show how their investigators managed to add more structure to their enquiries.
This calls for another day of skills training and some storytelling, where you will learn first how best to describe surface observations (developing subcate-gories) and secondly how to pull together very detailed observations by recog-nizing common characteristics (developing categories). Most people are likely to find examples of both when they look at their coding after the first day of the journey. A few will find that they have so far paid attention only to surface characteristics or the smallest details. Equipped with some new skills, you can move on to explore more of the data landscape until you feel that it is mapped out well and that you can describe what the terrain looks like. At this stage, the development of the coding system is more or less finished.
For some the journey will end here, as this is all they want to achieve. Maybe it was a first excursion into qualitative data analysis as part of a qualitative methodology course or a first independent project in the form of an under-graduate thesis. Others will want to continue the journey, to dig a bit deeper and find out how all the different observations relate to each other and whether some causal relations can be discovered – perhaps to develop a theory about
Figure I.1 Looking at data like a landscape to be explored
01-Friese-4323-Introduction.indd 5 22/11/2011 11:44:28 AM

INTRODUCTION6
what was discovered in the field. In order to do this, we will need to learn to handle new tools like the query tool, the co-occurrence explorer and the net-work views. Thus, the journey needs to be halted for a few days to acquire some new knowledge. With these new skills, you will no longer need a tour guide to accompany your journey. You can take it from there, gaining your own experi-ences and maybe becoming a tour guide yourself one day.
For whom did I write the book?
I wrote this book for new users as well as for more experienced users of ATLAS.ti who would like some guidance on how to work with the software. In it, I have answered a lot of questions that are asked again and again at the ATLAS.ti help desk. These are often questions that cannot be answered by a technically oriented software manual. They relate to project management issues, how to organize team work, methodological issues on how to build up a good coding system and what to do with the data once coded.
I also wrote the book for teachers of qualitative data analysis. My personal conviction is that, in the twenty-first century, qualitative data should be analyzed with the support of software. It is time that what has long been standard practice in quantitative statistical research is applied to qualitative data analysis as well.
As methodological training is quite diverse, the book can be used for under-graduate as well as postgraduate courses. It is suitable for undergraduates where method training comprises a large part of their study program. My aim for those students is to teach them descriptive-level analysis and thus they could work productively up to Chapter 5 in this book. The course can be continued in postgraduate study to include second-level conceptual analysis. At PhD level, the aim should be to go through the full cycle of the analytic process. From the book’s companion website (www.quarc.de/qualitative-analysis-with-atlasti.html), lecturers can download presentations and sample data for use in tutorials, etc. The samples contain raw as well as coded data, and projects which follow up the skills training sessions in the book.
Chapter overview
In Chapter 1, I introduce the ATLAS.ti interface and the terminology used by the software. There is unfortunately no common language when you look at the different CAQDAS packages. What is called a variable in one software package is an attribute in another. Codes might be referred to as keywords or as nodes. In ATLAS.ti, however, a node is a nodal point in a network view, and so on. Thus, it is first necessary to learn the language of the software. With time, this will enable you to sound like a pro, to become a member of the ATLAS.ti community where talk is about HUs, families, managers, P-Docs and
01-Friese-4323-Introduction.indd 6 22/11/2011 11:44:28 AM
INTRODUCTION 7
the like. If you already have some experience of working with ATLAS.ti, you will probably be familiar with the terminology and can skip Chapter 1 on get-ting to know the interface.
In Chapter 2, data preparation is discussed. You get to know the data file formats that ATLAS.ti supports, you learn when and for what purpose to choose which file format and how to prepare data transcripts so that you can best utilize software features later on. Miscellaneous settings like language sup-port are also discussed, as ATLAS.ti users are spread around the globe and speak and use a variety of languages.
In Chapter 3, we are ready to rock – and to begin an ATLAS.ti project. It is a very important chapter: data management issues are often dismissed as boring and thus get neglected, and this frequently leads to difficulties, time wasting and sometimes data loss further down the line. I therefore explain the basic principles of data management in ATLAS.ti; they are not difficult to under-stand but you need to know them. Then I explain various project setup sce-narios for single user and team situations. Here you can choose any scenario that applies to you. There is no need to read through all of them.
In Chapter 4 I explain the technical aspects of coding. You will find out about all the options for the variety of data file formats available. This is fol-lowed by a chapter on the methodological aspects of coding. Coding on the simplest level refers to the process of assigning a label to a data segment that the analyst deems to be relevant for some reason. Whether the code is mere description, just a paraphrase of the text or a concept or category on an abstract level makes no difference to the software. Software offers the option to code; what users do with this option is up to them. Starting with Chapter 5, the book moves away from considering only technical aspects and introduces a method of data analysis, namely computer-assisted NCT analysis.
In Chapter 6 the idea of second-level conceptual analysis is introduced. This chapter combines an explanation of the memo function with a description of the analysis tools offered by ATLAS.ti. The two topics are discussed side by side, because querying data and writing memos are related analytic procedures. Describing them as separate entities would not adequately reflect the meth-odological process of this stage of the analysis.
Chapter 7 is about visualizing ideas and findings in the form of network views and hyperlinks. These are tools that enable you to create links within and across data. If you don’t yet know what network views look like, think of them as concept maps. As in previous chapters, there is a mix of technical explana-tions and methodological considerations.
The aim of Chapter 8 is to summarize all methodological aspects presented throughout the various chapters and to provide a coherent picture of the pro-posed method of computer-assisted NCT analysis.
At the end of the book, you will find some addenda providing further infor-mation on data and project management. They include topics such as what you should know about editing documents, how to merge projects, how to create backups and what to do when in trouble.
01-Friese-4323-Introduction.indd 7 22/11/2011 11:44:28 AM

INTRODUCTION8
Background reading
Bourdon, Sylvain (2002). The integration of qualitative data analysis software in research strategies: resistances and possibilities [30 paragraphs]. Forum Qualitative Sozialforschung/Forum: Qualitative Social Research, 3(2), Art. 11, http://nbn-resolving.de/urn:nbn:de:0114-fqs0202118.
Fielding, Nigel G. and Raymond, M. Lee (1998). Computer Analysis and Qualitative Research. London: Sage.
Friese, Susanne (2005). Software and fieldwork, in R. Wright and D. Hobbs (eds.), Part Nine: Fieldwork, Science and Technology, Handbook of Fieldwork. London: Sage.
Gibbs, Graham R., Friese, Susanne and Mangabeira, Wilma C. (2002). The use of new technology in qualitative research. Introduction to Issue 3(2) of FQS [35 paragraphs]. Forum Qualitative Sozialforschung/Forum: Qualitative Social Research, 3(2), Art. 8, http://nbn-resolving.de/urn:nbn:de:0114-fqs020287.
Hahn, Christopher (2008). Doing Qualitative Research Using Your Computer. London: Sage.
Hesse-Biber, Sharlene (2003). Unleashing Frankenstein’s monster? The use of computers in qualitative research, in S. N. Hesse-Biber and P. Leavy (eds.), Approaches to Qualitative Research: A Reader on Theory and Practice. Oxford: Oxford University Press. Chapter 25.
Hinchliffe, Steve, Crang, Mike, Reimer, S.M. and Hudson, Alan (1997). Software for qualitative research: 2. Some thought on ‘aiding’ analysis. Environment and Planning A, 29, 1109–24.
Mangabeira, Wilma C., Lee, Raymond M. and Fielding, Nigel G. (2004). Computers and qualitative research: adoption, use and representation. Social Science Computer Review, 22(2), 167–78.
Morrison, Moya and Moir, Jim (1998). The role of computer software in the analysis of qualitative data: efficient clerk, research assistant or Trojan horse? Journal of Advanced Nursing, 28(1), 106–16.
Muhr, Thomas and Friese, Susanne (2001). Computerunterstütze qualitative Datenanalyse, in Wie kommt die Wissenschaft zu ihrem Wissen. Band 2: Einführung in die Forschungsmethodik und Forschungspraxis. Hohengehrenpp: Schneider Verlag. S. 380–99.
Seidel, John (1991). Methods and madness in the application of computer technology to qualitative data analysis, in Nigel G. Fielding and Raymond M. Lee (eds.), Using Computers in Qualitative Research London: Sage. pp. 107–116.
Silver, Christina and Fielding, Nigel G. (2008). Using computer packages in qualitative research, in C. Willig and W. Stainton-Rogers (eds.), The Sage Handbook of Qualitative Research in Psychology. London: Sage.
Tesch, Renata (1990). Qualitative Research: Analysis Types & Software Tools. New York: Falmer Press.
01-Friese-4323-Introduction.indd 8 22/11/2011 11:44:28 AM

ONEGetting to know ATLAS.ti
For this chapter, we will work with the ‘Jack the Ripper’ sample project that was copied to your computer when you installed ATLAS.ti. You can play around with the project material and explore as many functions and possibili-ties as you like – you don’t have to be afraid of causing any serious damage. It is just ‘dummy’ material!
Within this sample project you will get to know the main features of the user interface and the structure of the program as a whole. Please do not expect to learn about all the features and functions of the program at once. The aim is to give you a quick and easy insight into the possibilities of the software; to show you what a coded text or a network looks like; or how to use the context menus. The operational parts of the architecture are the same for all sorts of different functions, so having seen a few you will easily recognize others and find your way through the program.
This chapter also functions as an overview of what is to come. All subsequent chapters go into further detail regarding the various aspects and functions pre-viewed here.
Some basic terms and concepts
To understand how ATLAS.ti handles data, think of your entire project as an intelligent ‘container’ that keeps track of all of your data. This container is the ATLAS.ti project file, called the hermeneutic unit or HU for short. The HU contains the analysis you carry out in ATLAS.ti. The term follows the tradition of hermeneutic sciences. It reminds us of Hermes, the divine messenger in Greek mythology and the god of fortune-tellers (and thieves!). Derived from it is the term ‘hermeneutics’ referring to the art of fortune-telling and text interpretation.
The ATLAS.ti HU can be understood as a container which holds every-thing you need for interpreting your data. This includes objects such as the link to your primary documents or the documents themselves, quotes, code words, notes, memos, links, code families, stored query results, supercodes,
02-Friese-4323-Ch-01.indd 9 22/11/2011 11:46:10 AM

QUALITATIVE DATA ANALYSIS WITH ATLAS.TI10
etc. You will learn more about these object types below and throughout this book. Opening a HU automatically activates all associated materials, thus streamlining your data and enabling you to work with a single entity.
Your source data can comprise text documents (such as interviews, articles, reports), images (photos, screenshots, diagrams), audio recordings (interviews, broadcasts, music), video clips (audio-visual material), PDF files (papers, bro-chures, reports) and geo data (locative data using Google Earth). Once you assign a data file to your project, it becomes a primary document which repre-sents and contains additional information about its source counterpart (i.e. the assigned data file). Once your various documents are assigned and organized, your real work can begin.
Creating quotations and coding them is the basic activity you engage in when using ATLAS.ti and is the basis of everything else you will do. In practical terms, coding refers to the process of assigning categories, concepts or ‘codes’ (more generally speaking) to segments of information that are of interest to your research objectives. This function corresponds to the time-honored man-ual practice of marking (underlining or highlighting) and annotating text pas-sages in a book or other documents.
In its conceptual underpinnings, ATLAS.ti has drawn from what might be called an earlier ‘paper and pencil paradigm’. The user interface is designed accordingly and many of its processes are based on this analogy and thus can be better understood by it.
Because of this highly intuitive design principle, you will quickly come to appreciate the margin area as one of your most central and preferred workspaces – even though ATLAS.ti usually offers a variety of ways to accom-plish any given task.
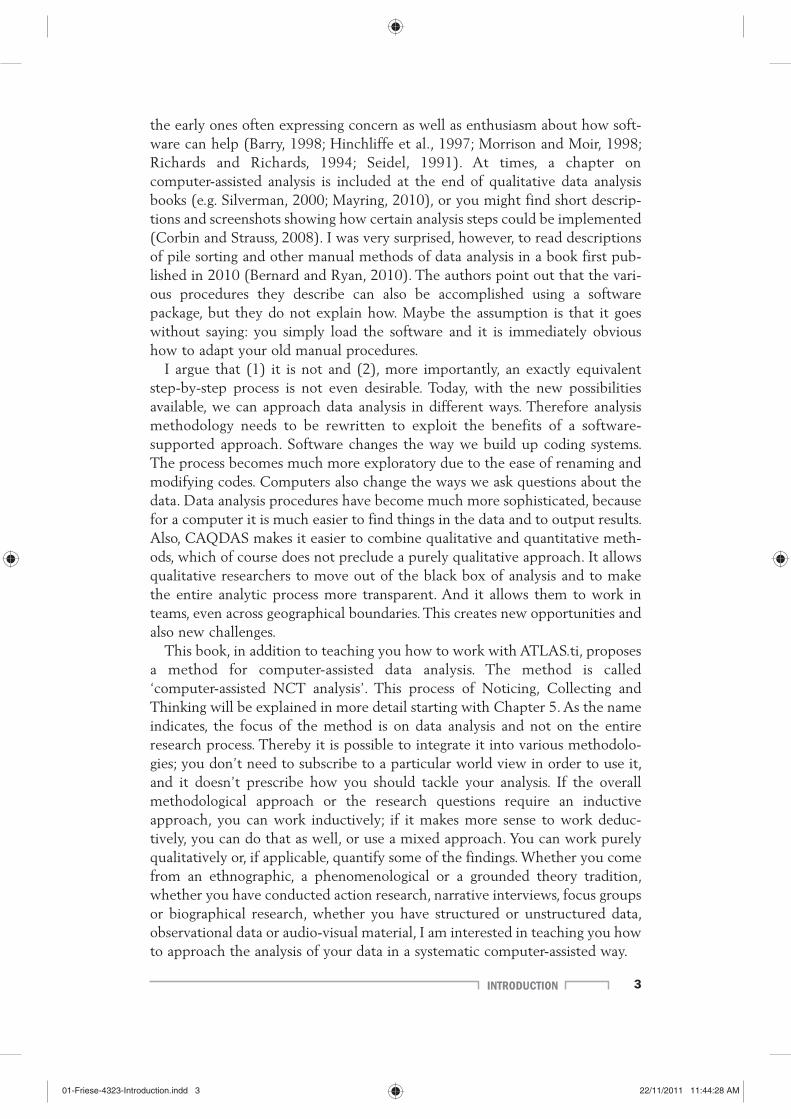
The ATLAS.ti user interface
At the top of the user interface (Figure 1.1) you have a title bar which displays the file name. Underneath you find the main menu, the toolbar and a number of drop-down menus. In addition, there is a vertical toolbar at the left margin. The rest of the screen is dedicated to displaying project data.
All materials for analysis must be available in digital format. In ATLAS.ti these become primary documents (P-Docs).
With progressive analysis, you code your primary documents, attach memos to data segments, link codes and other objects to each other, and so on. In con-trast to manual ways of analyzing qualitative data, ATLAS.ti does not alter the original material, so the document files are not affected by your analysis. Instead you work with a virtual copy of a document (e.g. a transcribed inter-view). It is displayed on the left-hand side of your workspace. When you load another document, only the copy is removed from the screen. All notes, code words, memos, etc. are stored in the HU. The HU thus holds all materials and the results of your analysis in an ‘electronic container’.
02-Friese-4323-Ch-01.indd 10 22/11/2011 11:46:10 AM
GETTING TO KNOW ATLAS.TI 11
Unlike confusing piles of paper with notes and references, the HU keeps growing but remains clearly arranged. Every step is documented according to strict rules so that the electronic HU means not only a tidier desk, but also a change from the art of fortune-telling to an understandable, verifiable tech-nique of text interpretation. Keeping this background information in mind, let’s now begin to work with the software.
Starting the program
When you open ATLAS.ti for the first time, click on the start button, then select All programs Scientific Software ATLAS.ti (Figure 1.2). To save a few clicks the next time you open it, drag the program icon to the desktop or right click on the program icon and select the option to attach it to the start menu or task bar.
When the program opens, you are greeted by the welcome wizard. You can continue to work with the wizard, or select the option ‘Just continue’ and ‘Don’t display this screen again’. Click on OK. Then you are offered the tip of the day. Select whether you want to see the tip every time you open the soft-ware; if not, deactivate the option.
If you have worked with ATLAS.ti on your computer before, the most recently used project is opened. Otherwise a new HU is loaded. Check the title bar to find out. Let’s now open the sample project.
Figure 1.1 The ATLAS.ti. interface
02-Friese-4323-Ch-01.indd 11 22/11/2011 11:46:11 AM

QUALITATIVE DATA ANALYSIS WITH ATLAS.TI12
Opening the sample project
The sample project was copied to your computer during the installation proc-ess of ATLAS.ti.
From the main menu select HELP / QUICK TOUR / LOAD “JACK THE RIPPER STAGE II”. This opens the coded version of the sample project.
Look at the title bar. The name of the project is displayed there.
Before we begin to examine the sample project, I would like to introduce one frequently used feature of ATLAS.ti – the context menus.
Context menus
In standard configuration, a context menu opens when you right click the mouse. The context menu offers options and commands that only apply to the area or object on which you click. Thus, when right clicking on the background (e.g. in the middle of the screen), a context menu pops up exclusively for the background.
As a very first exercise we want to change the background of the HU editor so that the codes of the currently loaded project are displayed:
Right click on the background. The context menu opens, offering a number of options. Click on the option DISPLAY WALLPAPER to deactivate it. The background turns
transparent. Right click again and click on the option DISPLAY CODES. You will now see the project
codes displayed in a spiral around the center of the screen (Figure 1.3).
The colors are dynamic and cannot be set by the user. You can tell that this screenshot was taken at a weekend as it displays two colors, violet and green (see companion website). On a weekday, you see one color and a light band, similar to the violet one above. This indicates the hour of the day. Thus, the
Figure 1.2 Starting the software
02-Friese-4323-Ch-01.indd 12 22/11/2011 11:46:12 AM

GETTING TO KNOW ATLAS.TI 13
screenshot was taken at around midday (in fact, at 12:50). This is somewhat irrelevant to our task – teaching you to conduct a computer-assisted qualitative data analysis – but knowing it adds a bit of fun and color to a working day. We will find more of this sort of thing throughout the software.
If you are less playful and want a more professional-looking background, then select the wallpaper option and the wallpaper DEFAULT (Figure 1.4).
The drop-down menus and object managers
After opening the sample project file you will find a number of new entries on the screen but you cannot see the data yet. First, we want to take a look at the four drop-down lists (Figure 1.5).
Figure 1.3 Background displaying project codes (see website for clear image)
Figure 1.4 Default wallpaper as background
02-Friese-4323-Ch-01.indd 13 22/11/2011 11:46:14 AM

QUALITATIVE DATA ANALYSIS WITH ATLAS.TI14
On the left-hand side is the list of all documents assigned or imported to an ATLAS.ti project. They are called primary documents or P-Docs. Next to it is the list of all coded segments, or quotations, followed by the list of codes and the list of memos.
The four drop-down menus can be moved by ‘drag and drop’ and their size can be adjusted by dragging the dotted line from right to left with the mouse. Try it!
If you click on the down arrow to the right of a list, the list of objects is displayed. Open the list for all four object types and take a look.
Open the list of documents (P-Docs) and select one document with a left click (e.g. P3: 1_Jack the Ripper_story.rtf). The selected primary document will be loaded and dis-played on the screen with all related codings, hyperlinks and memos.
The object lists are convenient for some tasks but not for others. Therefore ATLAS.ti offers the possibility of opening all objects in a separate browser called the Object Manager.
Open all four Object Managers by clicking on the icon to the left of the drop-down menu.
Arrange them on your screen so that you can view them next to each other (Figure 1.6).
Figure 1.5 Drop-down menus
Figure 1.6 All four Object Managers side by side
02-Friese-4323-Ch-01.indd 14 22/11/2011 11:46:15 AM

GETTING TO KNOW ATLAS.TI 15
In your everyday work with ATLAS.ti, you will probably not open all four managers at once. The purpose of this exercise is to show the commonalities of ATLAS.ti browsers that you will see throughout the program. Besides a mere list, the Object Managers also provide further information like author name, creation date or date of last modification. The different kinds of objects can be recognized by a specific symbol, as shown in Figure 1.7.
The first primary document P1 is an audio file. P2, the second one, is a memo assigned as a primary document. P3 and P4 are Word documents, P5 and P6 are PDF files, P7 is a video file, P15 a Google Earth document and P16 an image file. The symbols may vary depending on the multimedia software you have installed. The quotations also show the respective media format. Codes use a yellow diamond symbol and show a Post-it note when a definition has been entered. The memo symbol resembles a note booklet with a red cover.
Each Object Manager offers a menu and a toolbar. The menu options are the same as in the main and submenus. To spare you long treks with your mouse you can access them directly from here. In the space underneath the toolbar of the Object Manager you will find the objects and additional information in table format. The handling of this table is similar to other Windows programs such as Excel: every column has a header and the table can be sorted by a click on the column head; the width of the column can be adjusted by dragging the border (see figure 1.7).
Underneath the object list there are a screen splitter and a white area. The white area is a text editor in which you can write. By grabbing the splitter with your mouse you can adjust the size of the object list or editor respectively.
Figure 1.7 Symbols for the different kinds of objects: P-Docs, quotations, codes and memos
02-Friese-4323-Ch-01.indd 15 22/11/2011 11:46:15 AM

QUALITATIVE DATA ANALYSIS WITH ATLAS.TI16
To train yourself in the use of the Object Manager, please carry out the fol-lowing exercises:
Sort the entries in the table with a click on the column header. Adjust the width of a column. Grab the splitter and move it up and down. Select an object from the list and write a comment about this object in the text editor
(i.e. the white space). To save this new entry, click on another object in the list or open the context menu (right click) and click on Accept. Every entry for which you have cre-ated a comment carries a tilde symbol (~).
For more comfort, the comment editor can be opened in a separate window. To do this, click on the third icon from the left in the toolbar of the manager (the speech bubble).
To prepare the screen for the next exercise:
Close all object managers except the Code Manager. As in the Windows file manager, you can select different types of views. This applies to
all Object Managers, but right now we only want to change the view for the Code Manager. Select VIEW / SINGLE COLUMN. If you want, you can also try out the other options. Return to the single column view to finish this exercise.
You will now see only the code word and two numbers in brackets after them: e.g., *date of murder {13-0}. This is all you need to know when coding the data. This view allows you to resize the Code Manager to save space on your screen. The numbers in brackets are explained below.
Resize the Code Manager as shown in Figure 1.8 below, so that you see a long and narrow list of codes on the right-hand side of your screen. Your screen should be divided into three areas: the text of the loaded document on the left
Figure 1.8 Preparing your screen for coding
02-Friese-4323-Ch-01.indd 16 22/11/2011 11:46:15 AM

GETTING TO KNOW ATLAS.TI 17
side; the attached codes and possible other objects in the middle; and the Code Manager to the right of it.
ATLAS.ti remembers the views and position of its windows. This means that when you close and reopen the window or close and reopen ATLAS.ti, the Code Manager will be shown in the current view and in its current position.
Navigating the list of codes
For a regular project it is quite common to have between 120 and 200 codes. This is an average number based on experience that you can use as a rule of thumb. It can vary depending on the type of project and the type of analysis. This is discussed in more detail in Chapter 5 on the methodological aspects of coding.
For now the point is that code lists can become quite long and you won’t see all the codes at once on your screen. Thus, you either need to scroll through the list or, easier, jump to a specific code by typing the first letter(s) of a code word. Try it out:
The mouse pointer should be located somewhere within the Code Manager. Then click on the letter m on your keyboard. The focus of the code list moves to the code MODUS OPERANDI. Type the letters mu; you will then jump to the code word MURDER. Type the letter v; this bring you to the code word VICTIM and so on.
You may already be wondering what the numbers in brackets after the code words mean.
Click on the code *name of suspect: Cohen.
The first figure shows how many times the respective code has been used: in this case, six times. It gives you some information on the groundedness of a code (i.e. how relevant this code is in the data). The second figure displays the so-called density, which is the number of links to other codes. The code *name of suspect: Cohen is linked to six other codes.
First, we want to take a look at the frequency of usage:
Double click on the code. This opens a window showing the list of the six coded seg-ments, the quotations.
By left clicking on each quotation, it will be displayed or played in context. In this exam-ple, there are two text quotations and four audio quotations. The audio quotations show a loudspeaker symbol. View and listen to each quotation.
Next, we want to explore the second number and the term ‘density’.
02-Friese-4323-Ch-01.indd 17 22/11/2011 11:46:15 AM

QUALITATIVE DATA ANALYSIS WITH ATLAS.TI18
A preview of the network view function
Close the list of quotations. Then click on the network button in the Code Manager toolbar. The network view for this code opens, showing the six links with other codes that have been created.
If you only see symbols for the description of the relation between two codes, then you need to change the display:
Select DISPLAY / LINK DISPLAY / MENU LABEL. When the code labels are shown in black, you need to click on the colored circle in the
toolbar and select the option USE COLORED LABEL (more on this in Chapter 7 on the net-work view function).
Play around with the codes in the network view by dragging them to different positions (Figure 1.9).
By the way, the network views are not automatically created by the software; they are a result of the interpretation process and need to be created manually.
Then close the network view window. When you are asked whether you want to save it, select NO.
Figure 1.9 Focused network view on code *name of suspect: Cohen
A preview of the query tool
Here’s what we have done so far. We learned about the four object types in ATLAS.ti and how they can be accessed via the four drop-down lists or via a
02-Friese-4323-Ch-01.indd 18 22/11/2011 11:46:16 AM

GETTING TO KNOW ATLAS.TI 19
manager window. We took a closer look at the Code Manager and learned what the terms ‘groundedness’ and ‘density’ mean. Double clicking on a code opens the list of all segments that have been coded with it. This is also referred to as simple retrieval, simple because it is based on just one code. We can, however, also ask more complex questions based on multiple codes. This is done using the query tool.
To open the query tool (Figure 1.10), select the main menu option TOOLS / QUERY TOOL or click on the binoculars symbol in the main toolbar.
At this point we do not actually want to click a query, just to notice that there are 14 operators, organized into three groups (Boolean, semantic and proximity operators), which you can use to combine codes and groups of codes in order to ask questions about your data. In addition, you can use the query tool to restrict searches to particular subsets of data via the scope button. This allows you to set tasks like: ‘Find all data segments that I have coded with “friendship” within “childhood”, but only for married men between ages 31 to 40.’ Thus, retrievals can become quite complex. The query tool will be discussed in detail in Chapter 6.
‘Survival tips’ to find your way around the main menu
Figure 1.10 Previewing the query tool
Figure 1.11 The main menu
02-Friese-4323-Ch-01.indd 19 22/11/2011 11:46:16 AM

QUALITATIVE DATA ANALYSIS WITH ATLAS.TI20
There are 13 main menus (Figure 1.11) and each of them has submenus. At the time of writing, the total number of menus and submenus amounts to 443! This sounds frightening and you may think that you will never be able to learn each option. But there’s no reason to panic: some menus are repetitive and you can find the same option in different places. Furthermore, here is an easy rule to help you to find your way around.
We have already learned about the four main object types: P-Docs, quotes, codes and memos. Take a look at the main menu bar. You will find a main menu option for each of these object types. When you need an option related to pri-mary documents like assigning a new document or creating output, click on the main menu DOCUMENTS and your choices are already reduced.
When you want to do something related to codes, click on the main menu CODES and then you will find the option CODING with various suboptions. When you want to edit or rename a memo, click on the menu MEMOS. And when there is something to do involving a network view, click on the menu NETWORKS. To practice, find the following options. The solutions are provided at the end of this chapter.
You want to create a group of documents. This is called a document family in ATLAS.ti. Where do you find this option? (a)
Next, you want to create a group of codes. This is called a code family in ATLAS.ti. Where do you find the option? (b)
In case this should be of relevance at some point, where do you find the option for creating a memo family? (c)
Do you get the point? It is not as difficult as it appears at first. Did you notice that within each submenu for documents, codes and memos you find a sort option, a filter option, a miscellaneous option and an output option?
New users often ask whether it is possible to print the coded documents as they appear on the screen. Where would you look for this option? Just as a reminder, the part of the screen where the codes are displayed is called the margin area and what you are asked to do is to print documents. (d)
The toolbars
Many of the menu options can also be launched via the icons on the horizontal and vertical toolbars. When you move your mouse over the icon you will see a tool tip displaying a useful keyword or explanation (Figure 1.12).
Figure 1.12 Tool tip for icon ‘assigning documents’
02-Friese-4323-Ch-01.indd 20 22/11/2011 11:46:17 AM

GETTING TO KNOW ATLAS.TI 21
Of course, all these options can be launched via the text and context menus as explained above. Over time, you will develop your individual preferences about which ones you choose.
Summary
In this chapter you have learned about important terms and concepts used in ATLAS.ti, like the four main object types: primary documents, quotations, codes and memos. Then you previewed some of the major tools needed for a qualitative data analysis like the Code Manager, the query tool and the network view function; and you received some guidance on how to find menu options, even though you do not yet know all of them by heart.
Solutions to the ‘survival’ exercise
(a) DOCUMENTS / EDIT FAMILIES / OPEN FAMILY MANAGER
(b) CODES / EDIT FAMILIES / OPEN FAMILY MANAGER
(c) MEMOS / EDIT FAMILIES / OPEN FAMILY MANAGER
(d) DOCUMENTS / OUTPUT / PRINT WITH MARGIN …
REVIEW QUESTIONS
1 What are the four main object types in ATLAS.ti?2 What are Object Managers and what are they useful for?3 What is the optimal position of the Code Manager to allow for maximum space and to
have a free view of all relevant areas of the screen when coding or reviewing coding?4 How can you navigate through a long list of codes?5 What do the numbers mean that you see in brackets after the codes in the ‘single
column’ view?6 What is the query tool useful for?7 How do you find your way around the many menu options?
GLOSSARY OF TERMS
Codes: Keywords that are generally linked to quotations, but don’t have to be. You can also create free codes. When you link free codes to a number of different codes, then they are called abstract codes.
Hermeneutic unit (HU): A data file that stores everything you do to the data, but not the data themselves. An exception is when you work with internal text documents. Then the HU also contains your data. The HU data file has the file extension .hpr6 for version 6 files or .hpr5 for version 5 files. The file type is ‘Hermeneutic Unit’. The file does not have to be stored at a specific location; you can store it wherever you want. The best option is to save it in the same folder as the documents you want to analyze. As the HU file is just a regular file, you can copy it, move it, delete or rename it in the file manager, just like any other file.
02-Friese-4323-Ch-01.indd 21 22/11/2011 11:46:17 AM

QUALITATIVE DATA ANALYSIS WITH ATLAS.TI22
Memos: From a purely functional perspective, memos in ATLAS.ti consist of a title, a type and some text. They can be free or linked to other memos, to codes and to quota-tions. It is possible to attach a memo to a quotation as a means to comment on that quotation. In Chapter 6, however, I suggest a different way of using memos in ATLAS.ti. Memos are places to write down all sorts of ideas and thoughts. You can use them to remind you of things like what to do next week, what you wanted to ask your super-visor about, what you wanted to discuss with your team member. And you can use them as a place to write up your analysis and as building blocks for a later research report.
Network views: Network views offer a place for visualizing relations within your data. You can link almost all objects to each other; visualize your codings, visualize relation-ships between codes, relationships between quotations, relationships between memos and memos, relationships between memos and quotations, relationships between memos and codes, relationships between object families and their members. Network views can also contain unlinked objects, like thumbnail images of image PDs (for more detail, see Chapter 7).
Object Managers: The four main objects in ATLAS.ti are the primary documents, the quotations, the codes and the memos. The list of objects can be viewed by clicking on the down arrow to open the list field, or you can open a separate window for each object. These separate windows are called ‘Object Manager’. The Object Managers have their own main menu and a toolbar. The options available are repetitions from the main menu, but with one slight difference. When selecting an object in the Object Manager and then one of the menu options, the option only applies to the selected object. Selecting the same option from the main menu has a global effect.
Primary documents (P-Docs or PD): When you assign, import or embed a document in HU, then ATLAS.ti creates a primary document. The primary document then becomes the container for the source file you assign, import or embed. Each primary document has a name and stores information about the author and when it was created and last modified. In addition, it has some information (e.g. a path reference) about where to access the source file. Only when the source is available can the primary document display the content. The name of the primary document can be changed within ATLAS.ti without affecting document access. The default name is the name of the source file. See also Chapter 3 on project management.
Query tool: The query tool allows you to retrieve quotations based on a combination of codes. It offers four Boolean operators, three semantic operators and seven proximity operators. Further, it allows you to combine code queries with variables; that is, you can ask for information such as: ‘Find me all quotations that I have coded with code A and code B, but only for women between the age of 31 and 40.’
Quotations: Marked data segments that have a clearly defined start and end point. Often quotations are coded, but they don’t have to be. You can also create so-called free quotations. Free or coded quotations can be used as a source or target to link data segments to each other. Linked quotations are called hyperlinks.
A quotation has an ID and a name. The ID consists of the primary document number that it belongs to and a number that indicates the sequence of when it was created. The quotation name is based on either the first 30 characters of a text quotation or the name of the primary document. This automatically generated name can be modified. If the default number of characters is not sufficient, it can be increased under EXTRAS/ PREFERENCES/GENERAL PREFERENCES À LIST NAMES SIZE FOR QUOTES. The position where a quo-tation can be found within a primary document is indicated after the name.
02-Friese-4323-Ch-01.indd 22 22/11/2011 11:46:17 AM


![Delfi-C - PA3WEGAmsat-BB]Delfi-C3_Friese_Wouden_English.… · VERON Friese Wouden 11 The Delfi-C3 satellite ... VERON Friese Wouden 23 Phasing circuit ... • VHF / UHF / S-Band](https://static.fdocuments.us/doc/165x107/5ac147667f8b9ac6688d2bd6/delfi-c-amsat-bbdelfi-c3friesewoudenenglishveron-friese-wouden-11-the.jpg)