FortiGate Security 6.2 Lab Guide
232
FortiGate Security Lab Guide for FortiOS 6.2 DO NOT REPRINT © FORTINET
Transcript of FortiGate Security 6.2 Lab Guide

FortiGate Security LabGuide
for FortiOS 6.2
DO NOT REPRINT© FORTINET

Fortinet Training
http://www.fortinet.com/training
Fortinet Document Library
http://docs.fortinet.com
Fortinet Knowledge Base
http://kb.fortinet.com
Fortinet Forums
https://forum.fortinet.com
Fortinet Support
https://support.fortinet.com
FortiGuard Labs
http://www.fortiguard.com
Fortinet Network Security Expert Program (NSE)
https://www.fortinet.com/support-and-training/training/network-security-expert-program.html
Feedback
Email: [email protected]
5/15/2019
DO NOT REPRINT© FORTINET
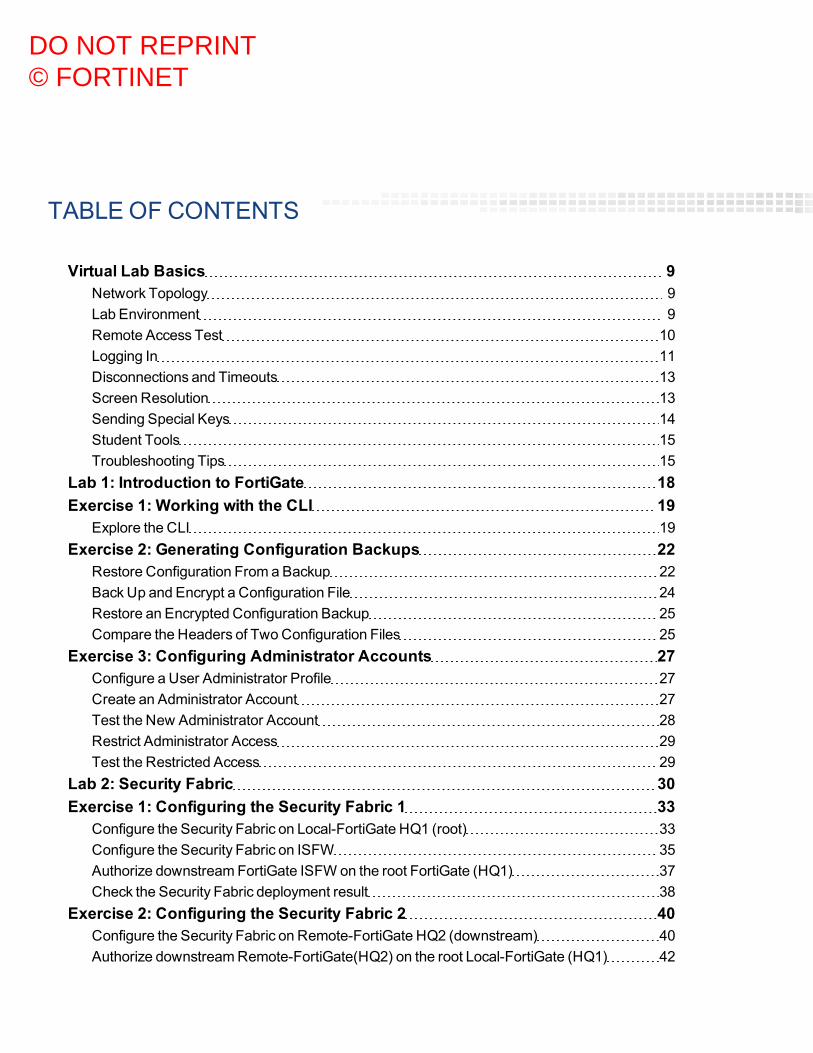
TABLE OF CONTENTS
Virtual Lab Basics 9Network Topology 9Lab Environment 9Remote Access Test 10Logging In 11Disconnections and Timeouts 13Screen Resolution 13Sending Special Keys 14Student Tools 15Troubleshooting Tips 15
Lab 1: Introduction to FortiGate 18Exercise 1: Working with the CLI 19
Explore the CLI 19Exercise 2: Generating Configuration Backups 22
Restore Configuration From a Backup 22BackUp and Encrypt a Configuration File 24Restore an Encrypted Configuration Backup 25Compare the Headers of TwoConfiguration Files 25
Exercise 3: Configuring Administrator Accounts 27Configure a User Administrator Profile 27Create an Administrator Account 27Test the New Administrator Account 28Restrict Administrator Access 29Test the Restricted Access 29
Lab 2: Security Fabric 30Exercise 1: Configuring the Security Fabric 1 33
Configure the Security Fabric on Local-FortiGate HQ1 (root) 33Configure the Security Fabric on ISFW 35Authorize downstreamFortiGate ISFW on the root FortiGate (HQ1) 37Check the Security Fabric deployment result 38
Exercise 2: Configuring the Security Fabric 2 40Configure the Security Fabric on Remote-FortiGate HQ2 (downstream) 40Authorize downstreamRemote-FortiGate(HQ2) on the root Local-FortiGate (HQ1) 42
DO NOT REPRINT© FORTINET
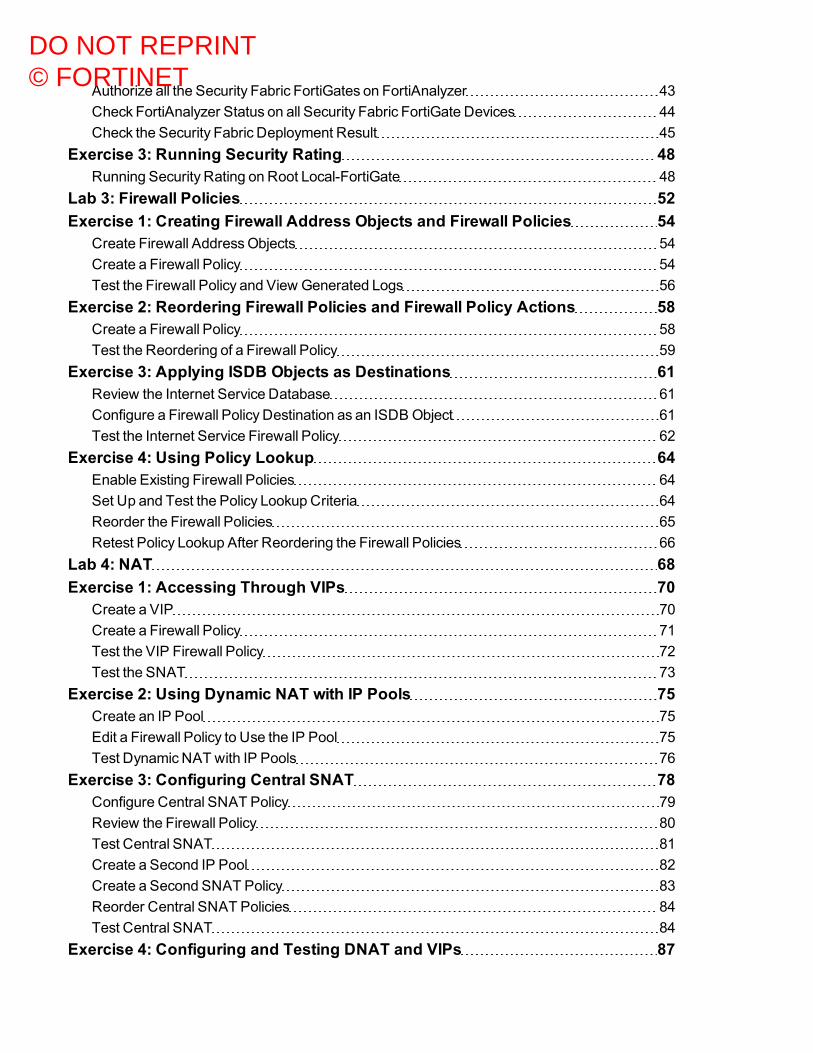
Authorize all the Security Fabric FortiGates on FortiAnalyzer 43Check FortiAnalyzer Status on all Security Fabric FortiGate Devices 44Check the Security Fabric Deployment Result 45
Exercise 3: Running Security Rating 48Running Security Rating on Root Local-FortiGate 48
Lab 3: Firewall Policies 52Exercise 1: Creating Firewall Address Objects and Firewall Policies 54
Create Firewall AddressObjects 54Create a Firewall Policy 54Test the Firewall Policy and View Generated Logs 56
Exercise 2: Reordering Firewall Policies and Firewall Policy Actions 58Create a Firewall Policy 58Test the Reordering of a Firewall Policy 59
Exercise 3: Applying ISDB Objects as Destinations 61Review the Internet Service Database 61Configure a Firewall Policy Destination as an ISDB Object 61Test the Internet Service Firewall Policy 62
Exercise 4: Using Policy Lookup 64Enable Existing Firewall Policies 64Set Up and Test the Policy Lookup Criteria 64Reorder the Firewall Policies 65Retest Policy Lookup After Reordering the Firewall Policies 66
Lab 4: NAT 68Exercise 1: Accessing Through VIPs 70
Create a VIP 70Create a Firewall Policy 71Test the VIP Firewall Policy 72Test the SNAT 73
Exercise 2: Using Dynamic NAT with IP Pools 75Create an IP Pool 75Edit a Firewall Policy to Use the IP Pool 75Test Dynamic NAT with IP Pools 76
Exercise 3: Configuring Central SNAT 78Configure Central SNAT Policy 79Review the Firewall Policy 80Test Central SNAT 81Create a Second IP Pool 82Create a Second SNAT Policy 83Reorder Central SNAT Policies 84Test Central SNAT 84
Exercise 4: Configuring and Testing DNAT and VIPs 87
DO NOT REPRINT© FORTINET

Create DNAT and VIPs 87Verify the Firewall Policy Settings 88Test DNAT and VIPs 88
Lab 5: Firewall Authentication 90Exercise 1: Configuring Remote Authentication 91
Configure an LDAP Server on FortiGate 91Assign an LDAP User to a Firewall Group 92Add the Remote User Group to Your Firewall Policy 93Authenticate andMonitor 94
Exercise 2: Configuring Captive Portal 98Create a User Group for Captive Portal 98Enable Captive Portal 98Enable the Disclaimer Message 99Authenticate andMonitor 99
Lab 6: Logging and Monitoring 102Exercise 1: Configuring Log Settings 104
Configure Log Settings 104Configure ThreatWeight 106
Exercise 2: Enabling Logging on Firewall Policies 107Enable Logging on a Firewall Policy 107
Exercise 3: Monitoring Logs Through Alert Email 110Configure Alert Emails 110Generate Traffic 110
Generate Traffic Through FIT 111Generate Traffic Through Nikto 112
View Alert Emails 114Exercise 4: Viewing Logs on the FortiGate GUI 116
View Logs from Log & Report Menu 116Forward Traffic 116Security Profile Logs 118
View and Filter IPS Logs 119View Logs in FortiView 120
Lab 7: Certificate Operations 122Exercise 1: Configuring SSL Deep Inspection on Outbound Traffic 124
Configure SSL Inspection 124Enable SSL Inspection on a Firewall Policy 125Install the Fortinet_CA_SSLCertificate 125Test Full SSL Inspection 128
Exercise 2: Configuring SSL Deep Inspection on Inbound Traffic 130Configure a Virtual IP and Firewall Policy 130Install the Training CA Certificate 131
DO NOT REPRINT© FORTINET

Configure Inbound SSLDeep Inspection 136Lab 8: Web Filtering 139Exercise 1: Configuring FortiGuard Web Filtering 141
Review the FortiGate Settings 141DetermineWeb Filter Categories 142Configure a FortiGuard Category-BasedWeb Filter 143Apply theWeb Filter Profile to a Firewall Policy 146Test theWeb Filter 147Create aWebRating Override 148Test theWebRating Override 149
Exercise 2: Setting Up Web Filtering Authentication 150Set Up the Authenticate Action 150Define Users andGroups 151Test the Authenticate Action 152
Exercise 3: Configuring and Testing Web Profile Overrides 154ConfigureWeb Profile Overrides 154Test theWeb Profile Override 154
Lab 9: Application Control 157Exercise 1: Controlling Application Traffic 158
Configure Filter Overrides 158Apply the Application Control Profile to the Firewall Policy 160Test the Application Control Profile 160Configure Application Overrides 161Test Application Overrides 162View Logs 163
Exercise 2: Controlling Application Bandwidth Usage 164Modify Application Overrides Action 164Configure a Traffic Shaping Policy 164Test Traffic Shaping 166
Lab 10: Antivirus 169Exercise 1: Using Antivirus Scanning in Flow-Based Inspection Mode 170
Configure the Antivirus Profile in Flow-Based InspectionMode 170Review the Flow-Based Antivirus Profile 171Enable the Antivirus Profile on a Firewall Policy 171Test the Antivirus Configuration 172Test an Alternate DownloadMethod 172View the Antivirus Logs 173Enable SSL Inspection on a Firewall Policy 175
Exercise 2: Configuring Proxy-Based Antivirus Scanning 177Change the FortiGate InspectionMode 177Review the Antivirus Profile in Proxy-Based InspectionMode 177
DO NOT REPRINT© FORTINET

Enable the Antivirus Profile on a Firewall Policy 178Test the Proxy-Based Antivirus Profile 179View the Antivirus Logs 180
Lab 11: Intrusion Prevention System (IPS) and Denial of Service (DoS) 182Exercise 1: Blocking Known Exploits 183
Configure IPS Inspection 183Apply an IPS Sensor to a VIP Firewall Policy 184Generate Attacks from the Linux Server 186Monitor the IPS 187
Exercise 2: Using Rate Based IPS Signatures 189Apply Rate Based Signatures 189Test the Rate Based Signature 189
Exercise 3: Mitigating a DoS Attack 192Create a DoS Policy 192Test the DoS Policy 193
Lab 12: SSL-VPN 195Exercise 1: Configuring Web Mode SSL-VPN 196
Configure the SSL-VPN Settings 196Create a Firewall Policy for SSL-VPN 197Test the SSL-VPN Access 198Add an Admin-Based Bookmark to the SSL-VPN Portal 200Test SSL-VPN AccessUsing the Predefined Bookmark 201Examine theWebModeMechanism (Reverse HTTP Proxy) 202Monitor an SSL-VPN User 202
Exercise 2: Configuring SSL-VPN Tunnel Mode 204Add Tunnel Mode 204Configure the Routing for Tunnel Mode 205Configure FortiClient for SSL-VPN connections 205Test SSL-VPN in Tunnel Mode 206Review VPN Events 208
Lab 13: Dialup IPsec VPN 210Exercise 1: Configuring a Dialup IPsec VPN Between Two FortiGate Devices 212
Create Phase 1 and Phase 2 on Local-FortiGate (Dialup Server) 212Create Firewall Policies for VPN Traffic on Local-FortiGate (Dialup server) 213Create Phase 1 and Phase 2 on Remote-FortiGate (Dialup Client) 215Create a Static Route for Route-Based VPN onRemote-FortiGate (Dialup Client) 217Create the Firewall Policies for VPN Traffic on Remote-FortiGate (Dialup Client) 217
Exercise 2: Testing and Monitoring the VPN 220Exercise 3: Creating an IPsec VPN Between FortiGate and FortiClient 222
Configure a Dialup VPN 223Configure FortiClient for Dialup VPN 226
DO NOT REPRINT© FORTINET
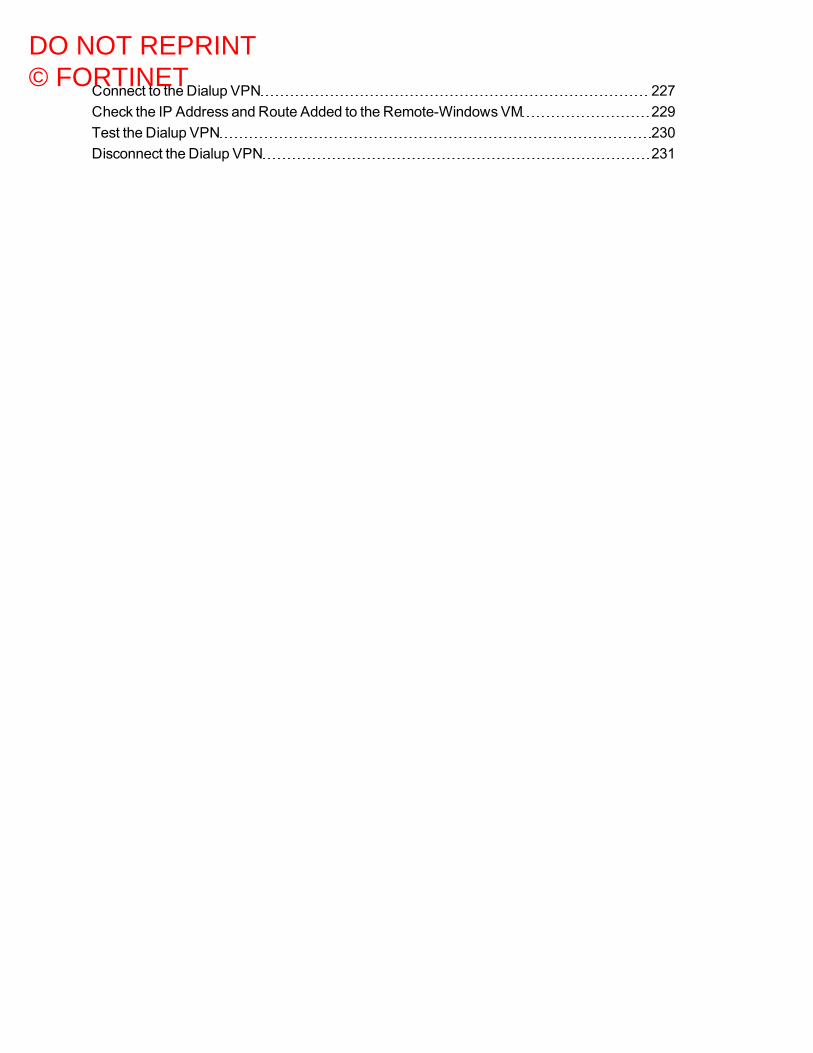
Connect to the Dialup VPN 227Check the IP Address and Route Added to the Remote-WindowsVM 229Test the Dialup VPN 230Disconnect the Dialup VPN 231
DO NOT REPRINT© FORTINET

Virtual Lab Basics Network Topology
Virtual Lab Basics
In this course, you will use a virtual lab for hands-on exercises. This section explains how to connect to the laband its virtual machines. It also shows the topology of the virtual machines in the lab.
If your trainer asks you to use a different lab, such as devices physically located in yourclassroom, then ignore this section. This section applies only to the virtual labaccessed through the Internet. If you do not know which lab to use, please ask yourtrainer.
Network Topology
Lab Environment
Fortinet's virtual lab for hands-on exercises is hosted on remote data centers that allow each student to have theirown training lab environment or point of deliveries (PoD).
FortiGate Security 6.2 Lab GuideFortinet Technologies Inc.
9
DO NOT REPRINT© FORTINET

Remote Access Test Virtual Lab Basics
Remote Access Test
Before starting any course, check if your computer can connect to the remote data center successfully. Theremote access test fully verifies if your network connection and your web browser can support a reliableconnection to the virtual lab.
You do not have to be logged in to the lab portal in order to run the remote access test.
To run the remote access test
1. From a browser, access the following URL:https://use.cloudshare.com/test.mvc
If your computer connects successfully to the virtual lab, you will see the message All tests passed!:
2. Inside the Speed Test box, clickRun.The speed test begins. Once complete, you will get an estimate for your bandwidth and latency. If thoseestimations are not within the recommended values, you will get any error message:
10 FortiGate Security 6.2 Lab GuideFortinet Technologies Inc.
DO NOT REPRINT© FORTINET

Virtual Lab Basics Logging In
Logging In
After you run the remote access test to confirm that your system can run the labs successfully, you can proceed tolog in.
You will receive an email from your trainer with an invitation to auto-enroll in the class. The email will contain alink and a passphrase.
To log in to the remote lab
1. Click the login link provided by your instructor over email.2. Enter your email address and the class passphrase provided by your trainer over email, and then click Login.
3. Enter your first and last name.4. ClickRegister and Login.
FortiGate Security 6.2 Lab GuideFortinet Technologies Inc.
11
DO NOT REPRINT© FORTINET

Logging In Virtual Lab Basics
Your system dashboard appears, listing the virtual machines (VMs) in your lab topology.
5. To open a VM from the dashboard, do one of the following:l From the top navigation bar, click a VM's tab.
l From the box of the VM you want to open, clickView VM.
Follow the same procedure to access any of your VMs.
When you open a VM, your browser uses HTML5 to connect to it. Depending on the VM you select, the webbrowser provides access to either the GUI of a Windows or Linux VM, or the CLI-based console access of aFortinet VM.
12 FortiGate Security 6.2 Lab GuideFortinet Technologies Inc.
DO NOT REPRINT© FORTINET

Virtual Lab Basics Disconnections and Timeouts
For most lab exercises, you will connect to a jumpbox VM, that could be either a Windows or a Linux VM.From the jumpbox VM, you will connect over HTTPS and SSH to all other Fortinet VMs in the labenvironment.
Disconnections and Timeouts
If your computer’s connection to the VM times out or closes, to regain access, return to the window or tab thatcontains the list of VMs for your session, and reopen the VM.
If that fails, see Troubleshooting Tips on page 15.
Screen Resolution
The GUIs of some Fortinet devices require a minimum screen size.
To configure screen resolution in the HTML5 client, use the Resolution drop-down list on the left. You can alsochange the color depth:
FortiGate Security 6.2 Lab GuideFortinet Technologies Inc.
13
DO NOT REPRINT© FORTINET

Sending Special Keys Virtual Lab Basics
Sending Special Keys
You can use the Virtual Keyboard panel to either send the Ctrl-Alt-Del combination, or the Windows key:
From the Virtual Keyboard panel, you can also copy text to the guest VM's clipboard:
14 FortiGate Security 6.2 Lab GuideFortinet Technologies Inc.
DO NOT REPRINT© FORTINET

Virtual Lab Basics Student Tools
Student Tools
There are three icons on the left for messaging the instructor, chatting with the class, and requesting assistance:
Troubleshooting Tips
l Do not connect to the virtual lab environment through Wi-Fi, 3G, VPN tunnels, or other low-bandwidth or high-latency connections.
l Prepare your computer's settings by disabling screen savers and changing the power saving scheme so that yourcomputer is always on, and does not go to sleep or hibernate.
l For best performance, use a stable broadband connection, such as a LAN.
FortiGate Security 6.2 Lab GuideFortinet Technologies Inc.
15
DO NOT REPRINT© FORTINET

Troubleshooting Tips Virtual Lab Basics
l You can run a remote access test from within your lab dashboard. It will measure your bandwidth, latency andgeneral performance:
l If the connection to any VM or the virtual lab portal closes unexpectedly, try to reconnect. If you can't reconnect,notify the instructor.
l If you can't connect to a VM, on the dashboard, open the VM action menu, and select Reset:
l If that does not solve the access problem, you can try to revert the VM back to its initial state. Open the VM actionmenu, and select Revert:
Reverting to the VM's initial state will undo all of your work. Try other solutions first.
16 FortiGate Security 6.2 Lab GuideFortinet Technologies Inc.
DO NOT REPRINT© FORTINET

Virtual Lab Basics Troubleshooting Tips
l During the labs, if the VM is waiting for a response from the authentication server, a license message similar to thefollowing example appears:
To expedite the response, enter the following command in the CLI:
execute update-now
FortiGate Security 6.2 Lab GuideFortinet Technologies Inc.
17
DO NOT REPRINT© FORTINET

Lab 1: Introduction to FortiGate
In this lab, you will learn about the FortiGate administration through the CLI and GUI. You will also back up andrestore a configuration file, as well as create a new administrator account and modify administrator accesspermissions.
Objectivesl Access the FortiGate CLIl Back up and restore configuration filesl Locate the FortiGate model and FortiOS firmware build in a configuration filel Create a new administrator userl Restrict administrator access
Time to CompleteEstimated: 25 minutes
18 FortiGate Security 6.2 Lab GuideFortinet Technologies Inc.
DO NOT REPRINT© FORTINET
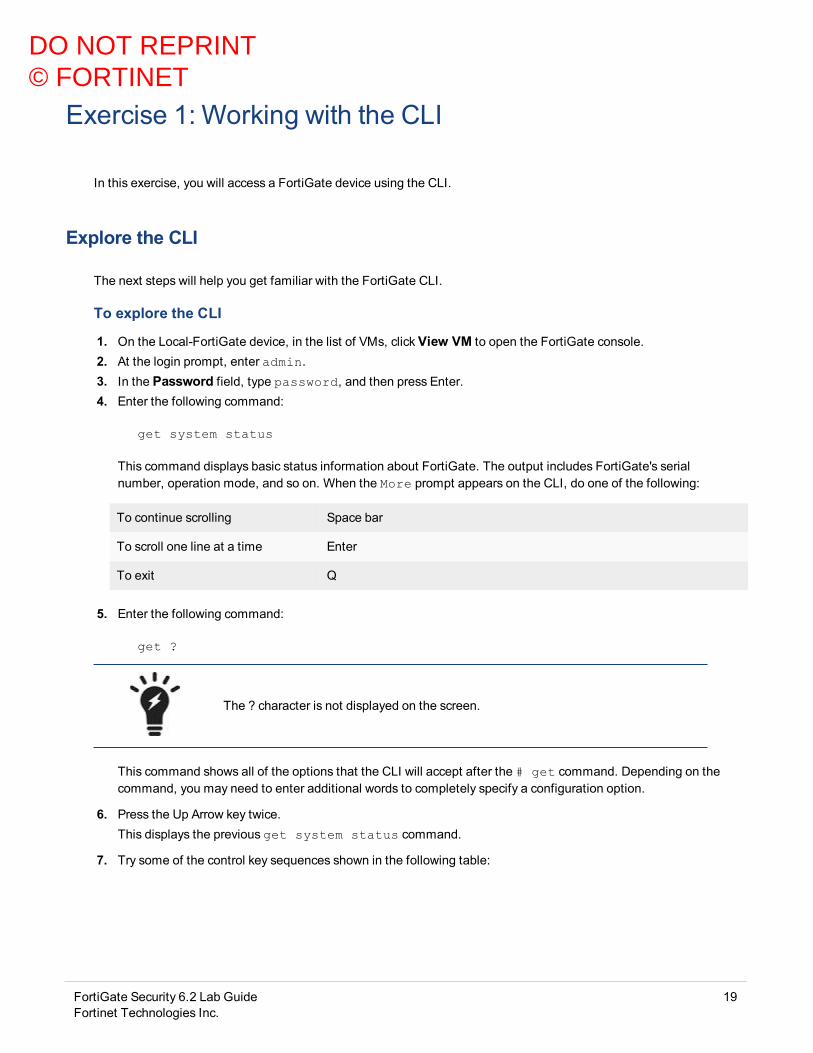
Exercise 1: Working with the CLI
In this exercise, you will access a FortiGate device using the CLI.
Explore the CLI
The next steps will help you get familiar with the FortiGate CLI.
To explore the CLI
1. On the Local-FortiGate device, in the list of VMs, clickView VM to open the FortiGate console.2. At the login prompt, enter admin.3. In the Password field, type password, and then press Enter.4. Enter the following command:
get system status
This command displays basic status information about FortiGate. The output includes FortiGate's serialnumber, operation mode, and so on. When the More prompt appears on the CLI, do one of the following:
To continue scrolling Space bar
To scroll one line at a time Enter
To exit Q
5. Enter the following command:
get ?
The ? character is not displayed on the screen.
This command shows all of the options that the CLI will accept after the # get command. Depending on thecommand, you may need to enter additional words to completely specify a configuration option.
6. Press the Up Arrow key twice.This displays the previous get system status command.
7. Try some of the control key sequences shown in the following table:
FortiGate Security 6.2 Lab GuideFortinet Technologies Inc.
19
DO NOT REPRINT© FORTINET

Explore the CLI Exercise 1: Working with the CLI
Action Command
Previous command Up Arrow
Next command Down Arrow
Beginning of line CTRL+A
End of line CTRL+E
Back one word CTRL+B
Forward one word CTRL+F
Delete current character CTRL+D
Clear screen CTRL+L
Abort command and exit CTRL+C
Auto repeat history CTRL+P
8. Enter the following command:
execute ?
This command lists all options that the CLI will accept after the execute command.
9. Type exe, and then press the Tab key.Notice that the CLI completes the current word.
10. Press the Space bar and then press the Tab key three times.Each time you press the Tab key, the CLI replaces the second word with the next possible option for theexecute command, in alphabetical order.
You can abbreviate most commands. In presentations and labs, many of thecommands that you see will be in abbreviated form. For example, instead of typingexecute, you can type exe.
Use this technique to reduce the number of keystrokes that are required to enter acommand. Often, experts can configure FortiGate faster using the CLI than the GUI.
If there are other commands that start with the same characters, your abbreviationmust be long enough to be specific, so that FortiGate can distinguish them.Otherwise, the CLI displays an error message about ambiguous commands.
11. On a newline, enter the following command to view the port3 interface configuration. (Hint: try using the shortcutsyou just learned about.):
show system interface port3
12. Enter the following command:
show full-configuration system interface port3
20 FortiGate Security 6.2 Lab GuideFortinet Technologies Inc.
DO NOT REPRINT© FORTINET
Exercise 1: Working with the CLI Explore the CLI
Stop and think!
Compare both outputs. How are they different?
The show full-configuration command displays all the configuration settings for the interface.The show command displays only those values that are different from the default values.
FortiGate Security 6.2 Lab GuideFortinet Technologies Inc.
21
DO NOT REPRINT© FORTINET

Exercise 2: Generating Configuration Backups
In this exercise, you will learn how to generate and restore clear-text and encrypted configuration backups. Theconfiguration files produced by backups, allow you to restore to an earlier FortiGate configuration.
Restore Configuration From a Backup
Now, you will restore a configuration from a backup.
To restore a configuration from a backup
1. On the Local-Windows device, in the list of VMs, clickView VM.2. Log in to the Local-Windows VM using the domain\username, TRAININGAD\Administrator and the
password password.3. On the Local-Windows VM, open a browser and log in to the Local-FortiGate GUI at 10.0.1.254 with the user
name admin and password password.
You can also access the Local-FortiGate GUI from the Firefox browser bookmarksbar.
All the lab exercises were tested running Mozilla Firefox on the Local-Windows andRemote-Windows VMs. To get consistent results, you should use Firefox to accessboth the Internet and the FortiGate GUIs in this virtual environment.
22 FortiGate Security 6.2 Lab GuideFortinet Technologies Inc.
DO NOT REPRINT© FORTINET

Exercise 2: Generating Configuration Backups Restore Configuration From a Backup
4. In the upper-right corner of the screen, click admin, and then clickConfiguration >Restore.
5. ClickUpload to select the backup configuration file from your local PC.
6. ClickDesktop >Resources > FortiGate-Security > Introduction > local-initial.conf, and then clickOpen.
7. ClickOK.8. ClickOKto reboot.
After your browser uploads the configuration, FortiGate reboots automatically. This takes approximately 30to 45 seconds.
9. When the Local-FortiGate GUI login page reappears after reboot, log in with the user name admin and passwordpassword.
10. ClickNetwork > Interfaces and verify that the network interface settings were restored.
11. ClickNetwork >Static Routes, click on the plus sign to expand IPv4 routes and verify that the default route wasrestored.
FortiGate Security 6.2 Lab GuideFortinet Technologies Inc.
23
DO NOT REPRINT© FORTINET

Back Up and Encrypt a Configuration File Exercise 2: Generating Configuration Backups
Back Up and Encrypt a Configuration File
Always back up the configuration file before making changes to FortiGate (even if the change seemsminor orunimportant). There is no undo. You should carefully consider the pros and cons of an encrypted backup beforeyou begin encrypting backups. While your configuration, including things like private keys, remains private, anencrypted file hampers troubleshooting because Fortinet support cannot read the file. Consider saving backups inplain-text and storing them in a secure place instead.
Now, you will create an encrypted file with the backup of the FortiGate's current configuration.
To save an encrypted configuration backup
1. Continuing on the Local-FortiGate GUI, in the upper-right corner, click admin, and then clickConfiguration >Backup.
2. On the Backup System Configuration page, enable Encryption.3. In the Password field, enter fortinet and repeat in the Confirm password field.
4. ClickOK.5. Select Save File and clickOK.
The Firefox browser saves the encrypted configuration file in the Downloads folder, by default.
You can access downloaded files by clicking the blue down arrow in the top right ofthe browser.
24 FortiGate Security 6.2 Lab GuideFortinet Technologies Inc.
DO NOT REPRINT© FORTINET

Exercise 2: Generating Configuration Backups Restore an Encrypted Configuration Backup
Restore an Encrypted Configuration Backup
Restoring from backup allows you to return to a previous configuration. As a word of caution, if you cannot recallthe password required to decrypt the backup, you will not be able to restore to this backup! Ensure that you recordthe password and store it in a secure place.
Now, you will restore the configuration backup that you created in the previous procedure.
Take the Expert Challenge!Restore the configuration from the encrypted backup.
If you require assistance, or to verify your work, use the step-by-step instructions that follow.
After you complete the challenge, see Compare the Headers of Two Configuration Files on page 25.
To restore an encrypted configuration backup
1. Continuing on the Local-FortiGate GUI, in the upper-right corner, click admin, and then clickConfiguration >Restore.
2. On the Restore System Configuration page, clickUpload.3. Browse to yourDownloads folder and select the configuration file that you created in the previous procedure.4. In the Password field, type fortinet, and then clickOK.5. ClickOK to confirm that you want to restore the configuration.
FortiGate reboots.
Compare the Headers of Two Configuration Files
When troubleshooting issues, or when restoring FortiGate to an earlier OS version or build, it is useful to knowwhere to find this information in a configuration file. This exercise will show you where to find the version andbuild number in a configuration file.
Now, you will open and compare two configuration files using Notepad++.
To compare the headers of two configuration files
1. On Local-Windows in the Windows task bar, click the Notepad++ icon.
2. Click File >Open and browse to the Downloads folder to open the encrypted configuration file.3. Click File >Open and browse to the initial configuration file:
Desktop\Resources\FortiGate-Security\Introduction\local-initial.conf
The configuration file opens in a second tab in Notepad++.
FortiGate Security 6.2 Lab GuideFortinet Technologies Inc.
25
DO NOT REPRINT© FORTINET
Compare the Headers of Two Configuration Files Exercise 2: Generating Configuration Backups
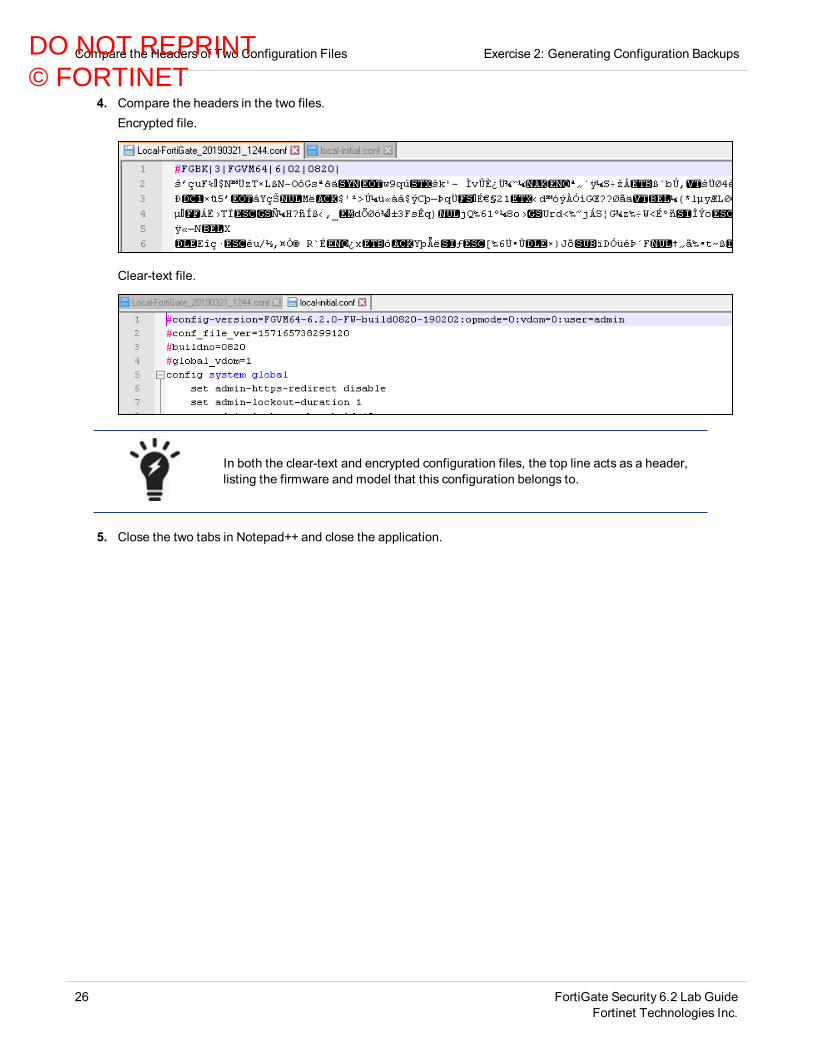
4. Compare the headers in the two files.Encrypted file.
Clear-text file.
In both the clear-text and encrypted configuration files, the top line acts as a header,listing the firmware and model that this configuration belongs to.
5. Close the two tabs in Notepad++ and close the application.
26 FortiGate Security 6.2 Lab GuideFortinet Technologies Inc.
DO NOT REPRINT© FORTINET
Exercise 3: Configuring Administrator Accounts
FortiGate offers many options for configuring administrator privileges. For example, you can specify the IPaddresses that administrators are allowed to connect from.
In this exercise, you will work with administrator profiles and administrator user accounts. An administrator profileis a role that is assigned to an administrator user that defines what the user is permitted to do on the FortiGateGUI and CLI.
Configure a User Administrator Profile
Now, you will create a new user administrator profile that has read-only access for most of the configurationsettings.
To configure a user administrator profile
1. On the Local-Windows VM, open a browser and log in to the Local-FortiGate GUI at 10.0.1.254 with the username admin and password password.
2. ClickSystem >Admin Profiles.3. ClickCreate New.4. In the Name field, type Security_Admin_Profile.5. In the permissions table, set Security Profile to Read-Write, but set all other permissions to Read.6. ClickOK to save the changes.
Create an Administrator Account
Now, you will create a new administrator account. You will assign the account to the administrator profile youcreated previously. The administrator will have read-only access to most of the configuration settings.
To create an administrator account
1. Continuing on the Local-FortiGate GUI, clickSystem >Administrators.2. ClickCreate New and then clickAdministrator to add a new administrator account.3. On the New Administrator page, configure the following settings:
Field Value
Username Security
Type Local User
Password fortinet
FortiGate Security 6.2 Lab GuideFortinet Technologies Inc.
27
DO NOT REPRINT© FORTINET
Test the New Administrator Account Exercise 3: Configuring Administrator Accounts
Field Value
Confirm Password fortinet
Administrator Profile Security_Admin_Profile
Administrator names and passwords are case sensitive. You can't include characterssuch as < > ( ) # " in an administrator account name.
4. ClickOK to save the changes.
Test the New Administrator Account
In this procedure, you will confirm that the new administrator account has read-write access to only the securityprofiles configuration.
To test the new administrator account
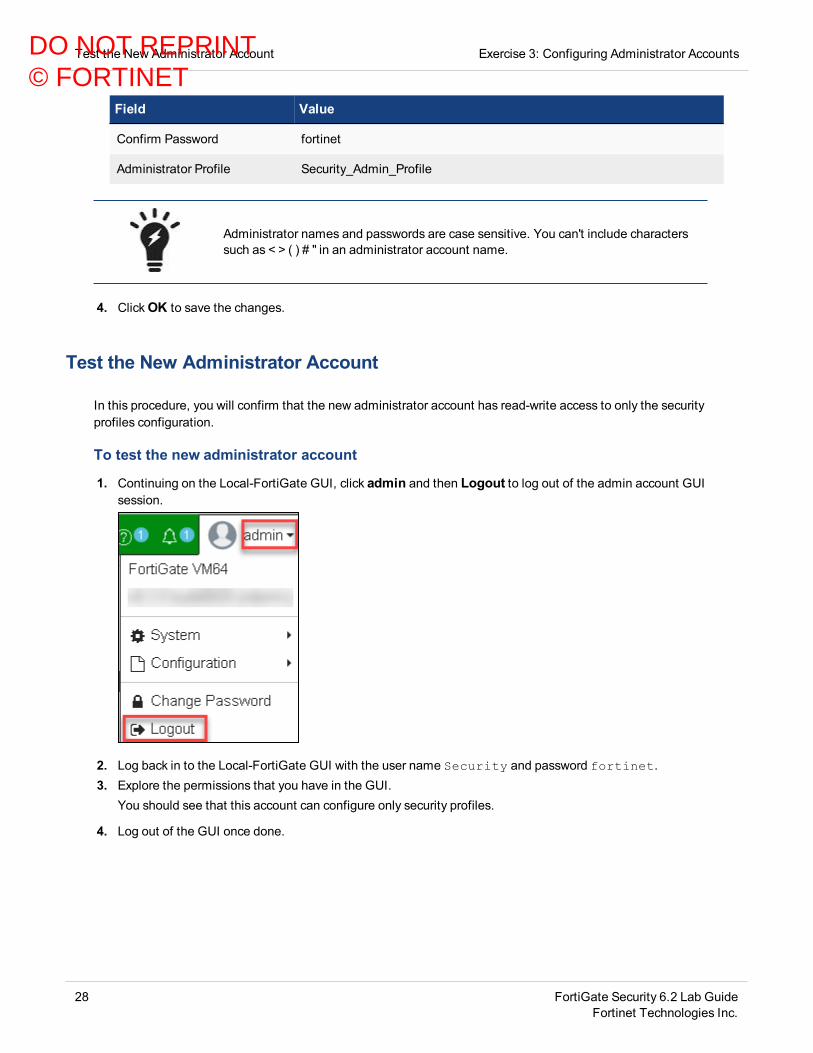
1. Continuing on the Local-FortiGate GUI, click admin and then Logout to log out of the admin account GUIsession.
2. Log back in to the Local-FortiGate GUI with the user name Security and password fortinet.3. Explore the permissions that you have in the GUI.
You should see that this account can configure only security profiles.
4. Log out of the GUI once done.
28 FortiGate Security 6.2 Lab GuideFortinet Technologies Inc.
DO NOT REPRINT© FORTINET
Exercise 3: Configuring Administrator Accounts Restrict Administrator Access
Restrict Administrator Access
Now, you will restrict access for FortiGate administrators. Only administrators connecting from a trusted subnetwill be allowed access. This is useful if you need to restrict the access points from which administrators connect toFortiGate.
To restrict administrator access
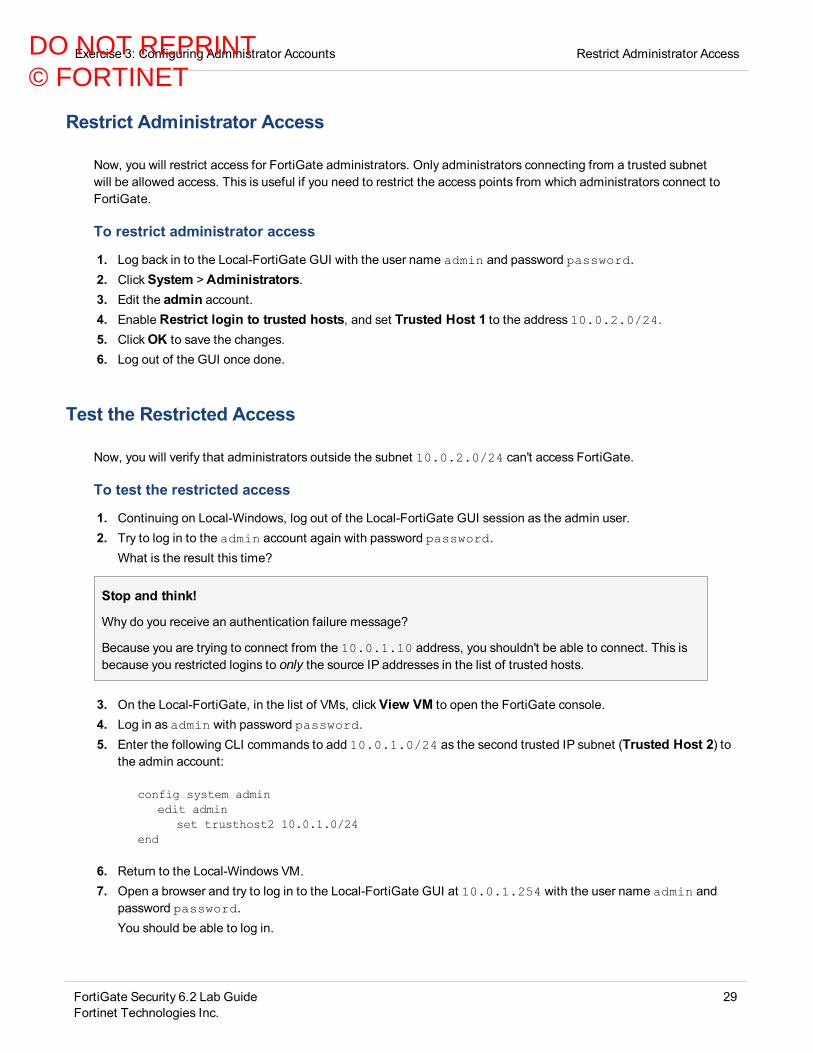
1. Log back in to the Local-FortiGate GUI with the user name admin and password password.2. ClickSystem >Administrators.3. Edit the admin account.4. Enable Restrict login to trusted hosts, and set Trusted Host 1 to the address 10.0.2.0/24.5. ClickOK to save the changes.6. Log out of the GUI once done.
Test the Restricted Access
Now, you will verify that administrators outside the subnet 10.0.2.0/24 can't access FortiGate.
To test the restricted access
1. Continuing on Local-Windows, log out of the Local-FortiGate GUI session as the admin user.2. Try to log in to the admin account again with password password.
What is the result this time?
Stop and think!
Why do you receive an authentication failure message?
Because you are trying to connect from the 10.0.1.10 address, you shouldn't be able to connect. This isbecause you restricted logins to only the source IP addresses in the list of trusted hosts.
3. On the Local-FortiGate, in the list of VMs, clickView VM to open the FortiGate console.4. Log in as admin with password password.5. Enter the following CLI commands to add 10.0.1.0/24 as the second trusted IP subnet (Trusted Host 2) to
the admin account:
config system adminedit admin
set trusthost2 10.0.1.0/24end
6. Return to the Local-Windows VM.7. Open a browser and try to log in to the Local-FortiGate GUI at 10.0.1.254 with the user name admin and
password password.You should be able to log in.
FortiGate Security 6.2 Lab GuideFortinet Technologies Inc.
29
DO NOT REPRINT© FORTINET
Lab 2: Security Fabric
In this lab, you will learn to configure the security fabric. After you configure the Security Fabric, you will accessthe physical and logical topology views.
Objectivesl Configure the Security Fabric on the Local-FortiGate (root) and ISFW FortiGatel Configure the Security Fabric on the Local-FortiGate (root) and Remote- FortiGatel Use the Security Fabric topology view to have a logical and physical view of your network topologyl Run the Security Fabric rating checks on the root FortiGate and apply a recommendation
Time to CompleteEstimated: 45 minutes
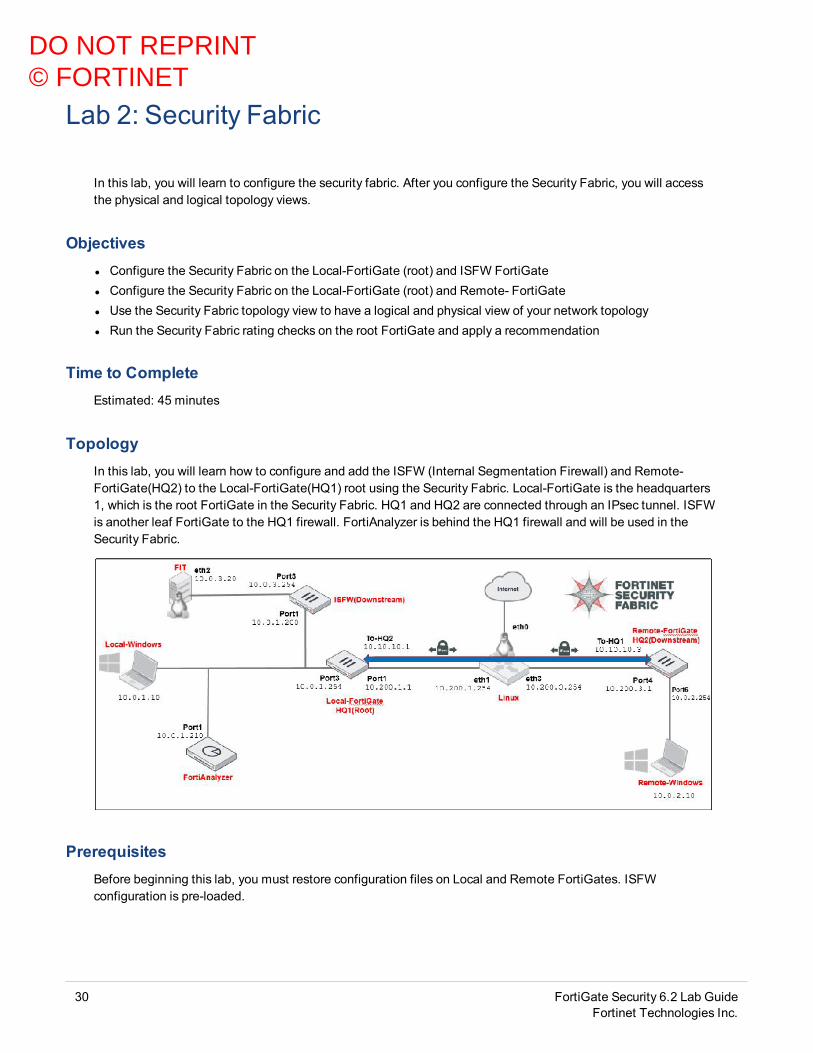
TopologyIn this lab, you will learn how to configure and add the ISFW (Internal Segmentation Firewall) and Remote-FortiGate(HQ2) to the Local-FortiGate(HQ1) root using the Security Fabric. Local-FortiGate is the headquarters1, which is the root FortiGate in the Security Fabric. HQ1 and HQ2 are connected through an IPsec tunnel. ISFWis another leaf FortiGate to the HQ1 firewall. FortiAnalyzer is behind the HQ1 firewall and will be used in theSecurity Fabric.
PrerequisitesBefore beginning this lab, you must restore configuration files on Local and Remote FortiGates. ISFWconfiguration is pre-loaded.
30 FortiGate Security 6.2 Lab GuideFortinet Technologies Inc.
DO NOT REPRINT© FORTINET

Lab 2: Security Fabric
Make sure to restore the correct configuration on each FortiGate using the followingsteps. Failure to restore the correct configuration on each FortiGate will prevent youfrom doing the lab exercise.
To restore the Remote-FortiGate configuration file
1. On the Local-Windows VM, open a browser and log in to the Remote-FortiGate GUI at 10.200.3.1 with theuser name admin and password password.
2. In the upper-right corner of the screen, click admin, and then clickConfiguration >Restore.
3. Click Local PC, and then clickUpload.4. ClickDesktop > Resources > FortiGate-Security >Security-Fabric > remote-VPN-initial.conf, and
then clickOpen.5. ClickOK.6. ClickOK to reboot.
To restore the Local-FortiGate configuration file
1. On the Local-Windows VM, open a browser and log in to the Local-FortiGate GUI at 10.0.1.254 with the username admin and password password.
2. In the upper-right corner of the screen, click admin, and then clickConfiguration >Restore.
FortiGate Security 6.2 Lab GuideFortinet Technologies Inc.
31
DO NOT REPRINT© FORTINET

Lab 2: Security Fabric
3. Click Local PC, and then clickUpload.4. ClickDesktop >Resources > FortiGate-Security >Security-Fabric > local-VPN-initial.conf, and
then clickOpen.5. ClickOK.6. ClickOK to reboot.
32 FortiGate Security 6.2 Lab GuideFortinet Technologies Inc.
DO NOT REPRINT© FORTINET
Exercise 1: Configuring the Security Fabric 1
In this exercise, you will configure the Security Fabric between Local-FortiGate HQ1(root) and the ISFW (leaf).
Configure the Security Fabric on Local-FortiGate HQ1 (root)
You will configure the root of the Security Fabric tree.
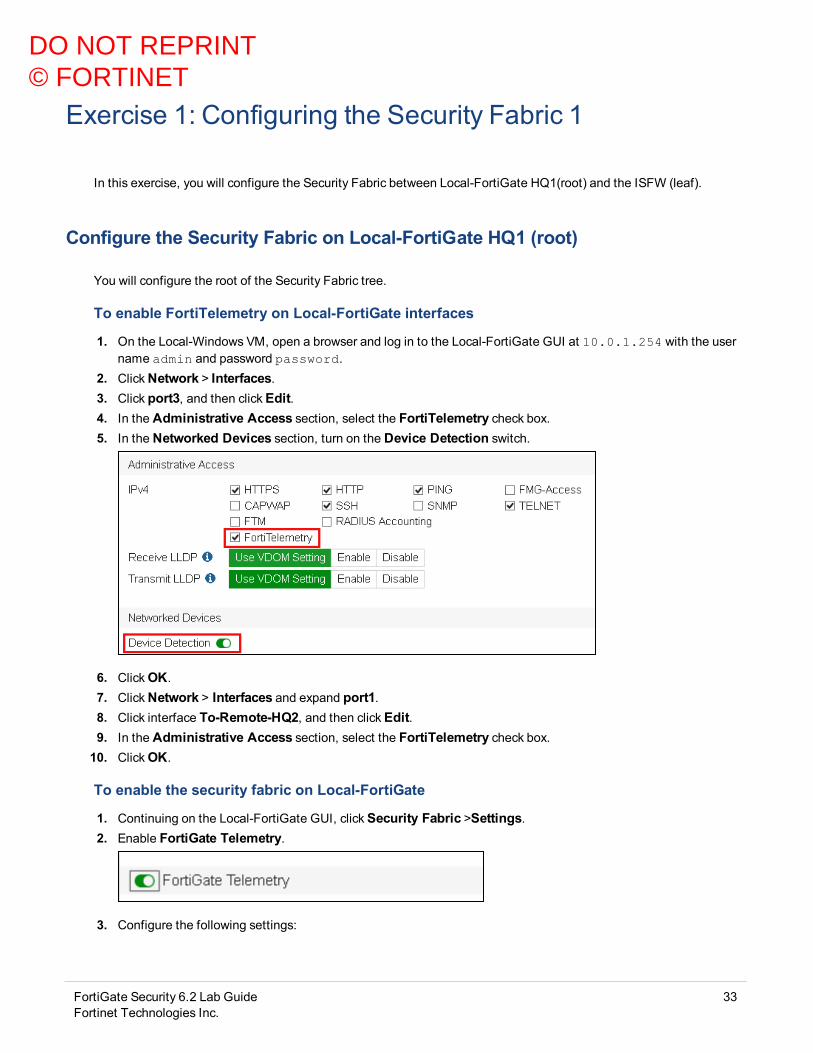
To enable FortiTelemetry on Local-FortiGate interfaces
1. On the Local-Windows VM, open a browser and log in to the Local-FortiGate GUI at 10.0.1.254 with the username admin and password password.
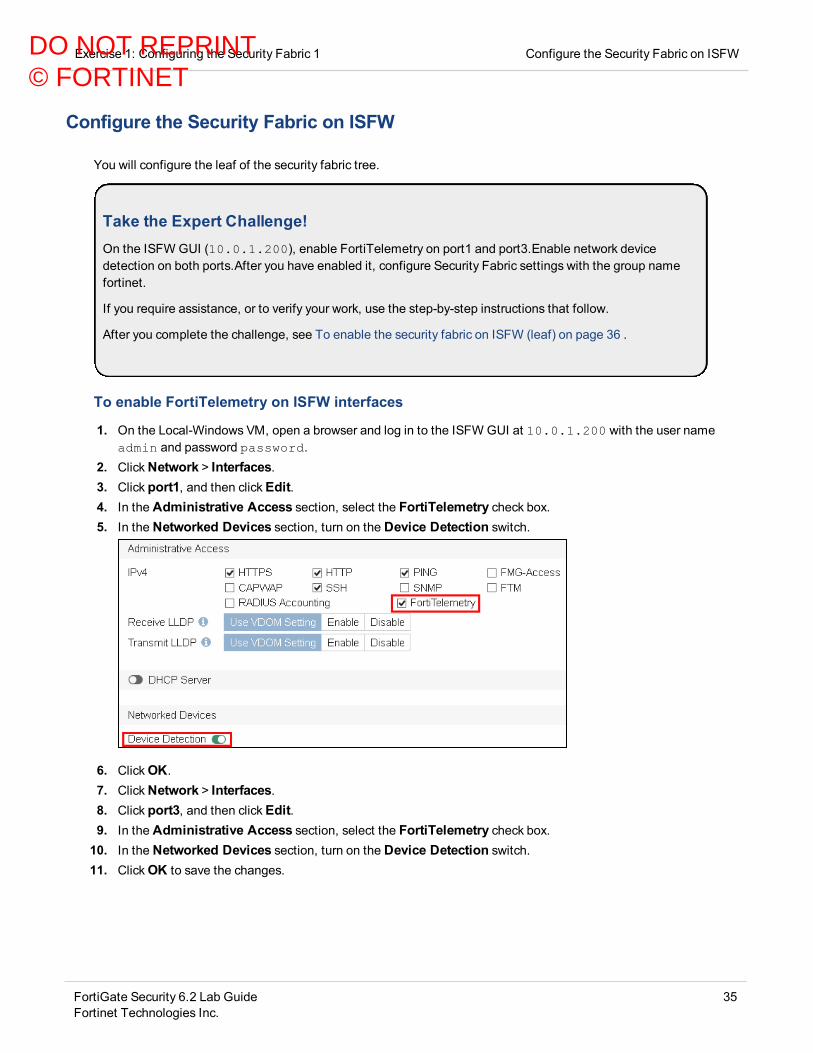
2. ClickNetwork > Interfaces.3. Click port3, and then clickEdit.4. In the Administrative Access section, select the FortiTelemetry check box.5. In the Networked Devices section, turn on the Device Detection switch.
6. ClickOK.7. ClickNetwork > Interfaces and expand port1.8. Click interface To-Remote-HQ2, and then clickEdit.9. In the Administrative Access section, select the FortiTelemetry check box.10. ClickOK.
To enable the security fabric on Local-FortiGate
1. Continuing on the Local-FortiGate GUI, clickSecurity Fabric >Settings.2. Enable FortiGate Telemetry.
3. Configure the following settings:
FortiGate Security 6.2 Lab GuideFortinet Technologies Inc.
33
DO NOT REPRINT© FORTINET
Configure the Security Fabric on Local-FortiGate HQ1 (root) Exercise 1: Configuring the Security Fabric 1
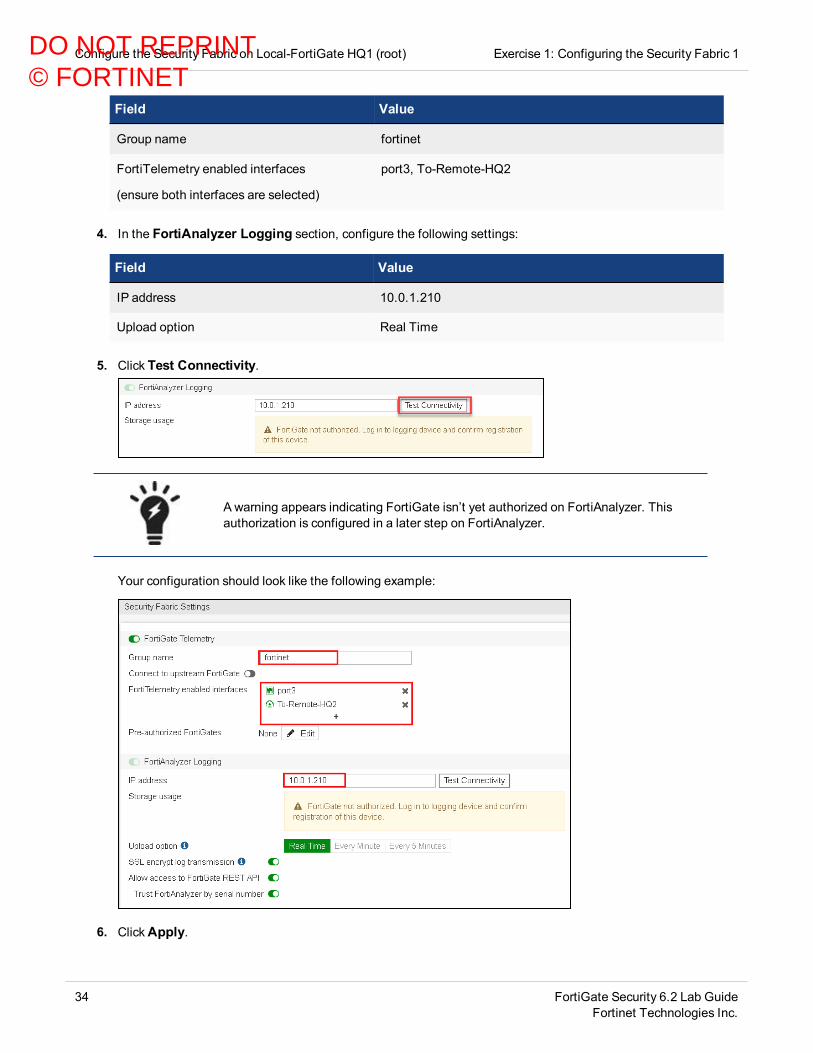
Field Value
Group name fortinet
FortiTelemetry enabled interfaces
(ensure both interfaces are selected)
port3, To-Remote-HQ2
4. In the FortiAnalyzer Logging section, configure the following settings:
Field Value
IP address 10.0.1.210
Upload option Real Time
5. Click Test Connectivity.
A warning appears indicating FortiGate isn’t yet authorized on FortiAnalyzer. Thisauthorization is configured in a later step on FortiAnalyzer.
Your configuration should look like the following example:
6. ClickApply.
34 FortiGate Security 6.2 Lab GuideFortinet Technologies Inc.
DO NOT REPRINT© FORTINET
Exercise 1: Configuring the Security Fabric 1 Configure the Security Fabric on ISFW
Configure the Security Fabric on ISFW
You will configure the leaf of the security fabric tree.
Take the Expert Challenge!On the ISFW GUI (10.0.1.200), enable FortiTelemetry on port1 and port3.Enable network devicedetection on both ports.After you have enabled it, configure Security Fabric settings with the group namefortinet.
If you require assistance, or to verify your work, use the step-by-step instructions that follow.
After you complete the challenge, see To enable the security fabric on ISFW (leaf) on page 36 .
To enable FortiTelemetry on ISFW interfaces
1. On the Local-Windows VM, open a browser and log in to the ISFW GUI at 10.0.1.200 with the user nameadmin and password password.
2. ClickNetwork > Interfaces.3. Click port1, and then clickEdit.4. In the Administrative Access section, select the FortiTelemetry check box.5. In the Networked Devices section, turn on the Device Detection switch.
6. ClickOK.7. ClickNetwork > Interfaces.8. Click port3, and then clickEdit.9. In the Administrative Access section, select the FortiTelemetry check box.10. In the Networked Devices section, turn on the Device Detection switch.11. ClickOK to save the changes.
FortiGate Security 6.2 Lab GuideFortinet Technologies Inc.
35
DO NOT REPRINT© FORTINET
Configure the Security Fabric on ISFW Exercise 1: Configuring the Security Fabric 1
To enable the security fabric on ISFW (leaf)
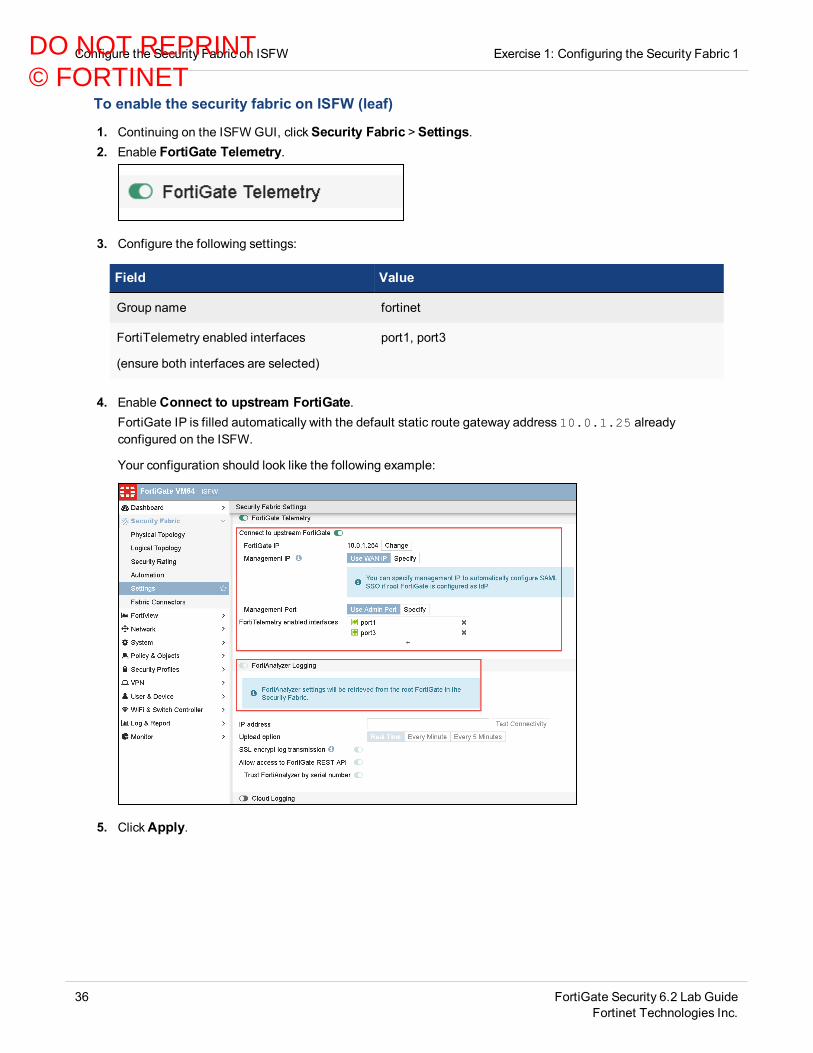
1. Continuing on the ISFW GUI, clickSecurity Fabric >Settings.2. Enable FortiGate Telemetry.
3. Configure the following settings:
Field Value
Group name fortinet
FortiTelemetry enabled interfaces
(ensure both interfaces are selected)
port1, port3
4. Enable Connect to upstream FortiGate.FortiGate IP is filled automatically with the default static route gateway address 10.0.1.25 alreadyconfigured on the ISFW.
Your configuration should look like the following example:
5. ClickApply.
36 FortiGate Security 6.2 Lab GuideFortinet Technologies Inc.
DO NOT REPRINT© FORTINET
Exercise 1: Configuring the Security Fabric 1 Authorize downstream FortiGate ISFW on the root FortiGate (HQ1)
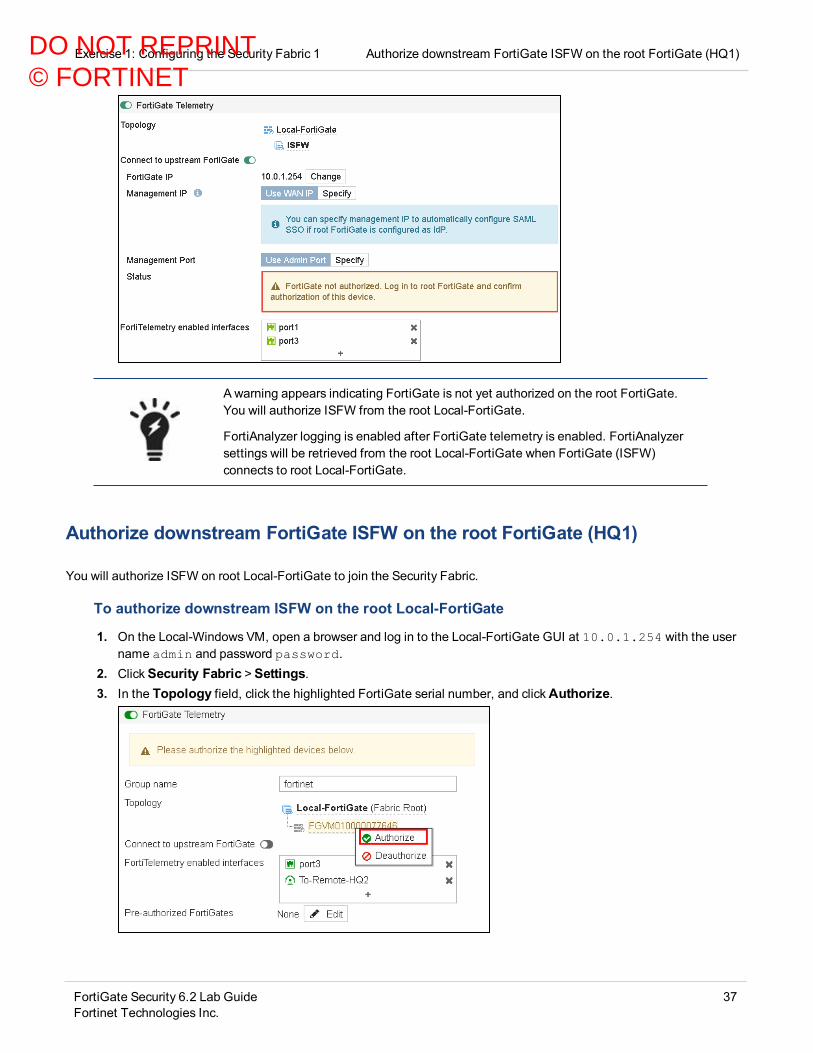
A warning appears indicating FortiGate is not yet authorized on the root FortiGate.You will authorize ISFW from the root Local-FortiGate.
FortiAnalyzer logging is enabled after FortiGate telemetry is enabled. FortiAnalyzersettings will be retrieved from the root Local-FortiGate when FortiGate (ISFW)connects to root Local-FortiGate.
Authorize downstream FortiGate ISFW on the root FortiGate (HQ1)
You will authorize ISFW on root Local-FortiGate to join the Security Fabric.
To authorize downstream ISFW on the root Local-FortiGate
1. On the Local-Windows VM, open a browser and log in to the Local-FortiGate GUI at 10.0.1.254 with the username admin and password password.
2. ClickSecurity Fabric >Settings.3. In the Topology field, click the highlighted FortiGate serial number, and clickAuthorize.
FortiGate Security 6.2 Lab GuideFortinet Technologies Inc.
37
DO NOT REPRINT© FORTINET

Check the Security Fabric deployment result Exercise 1: Configuring the Security Fabric 1
After authorization, downstream ISFW FortiGate shows up in the topology field of theSecurity Fabric >Settings page, which means downstream ISFW FortiGate joinsthe Security Fabric successfully.
A warning appears indicating FortiGate is not yet authorized on FortiAnalyzer. Thisauthorization is configured in a later step on FortiAnalyzer.
Your configuration should look like the following example:
Check the Security Fabric deployment result
Now, you will check the Security Fabric deployment result on the root Local-FortiGate.
To check the Security Fabric on Local-FortiGate
1. Continuing on the Local-Windows VM, open a new browser tab and go to https://www.fortinet.com.This is to generate some traffic on the Local-Window to view full topology in next steps.
2. On the Local-FortiGate GUI, clickDashboard >Status.The Security Fabric widget displays the FortiGates in the Security Fabric.
3. Continuing on the root Local-FortiGate GUI, clickSecurity Fabric >Physical Topology.
38 FortiGate Security 6.2 Lab GuideFortinet Technologies Inc.
DO NOT REPRINT© FORTINET

Exercise 1: Configuring the Security Fabric 1 Check the Security Fabric deployment result
This page shows a visualization of access layer devices in the Security Fabric.
4. Continuing on the root Local-FortiGate GUI, clickSecurity Fabric > Logical Topology.This dashboard displays information about the interfaces that each device in the Security Fabric connects.
In order to finish the Security Fabric configuration, you will authorize all the FortiGatedevices on the FortiAnalyzer. This authorization is configured in the next exercise.
FortiGate Security 6.2 Lab GuideFortinet Technologies Inc.
39
DO NOT REPRINT© FORTINET
Exercise 2: Configuring the Security Fabric 2
In this exercise, you will add another FortiGate to the Security Fabric tree. In this topology, downstream Remote-FortiGate (HQ2) is connected to the root Local-FortiGate (HQ1) over IPsec VPN, to join the Security Fabric.
Take the Expert Challenge!On the Remote-FortiGate GUI (10.200.3.1), enable FortiTelemetry on port6 and To-Local-HQ1 vpninterface. Enable network device detection on port6.Once FortiTelemetry is enabled, configure the SecurityFabric settings with the group name fortinet and use the tunnel IP address 10.10.10.1 to connectupstream root FortiGate.
If you require assistance, or to verify your work, use the step-by-step instructions that follow.
After you complete the challenge, see Authorize downstream Remote-FortiGate(HQ2) on the root Local-FortiGate (HQ1) on page 42.
Configure the Security Fabric on Remote-FortiGate HQ2 (downstream)
You will configure the Remote-FortiGate to join root Local-FortiGate through the Security Fabric.
To enable FortiTelemetry on Remote-FortiGate interfaces
1. On the Local-Windows VM, open a browser and log in to the Remote-FortiGate GUI at 10.200.3.1 with theuser name admin and password password.
2. ClickNetwork > Interfaces.3. Click port6, and then clickEdit.4. In the Administrative Access section, select the FortiTelemetry check box.5. In the Networked Devices section, ensure the Device Detection switch is turned on.6. ClickOK.7. Continuing on the Remote-FortiGate GUI, clickNetwork > Interfacesand expand port4.8. Click interface To-Local-HQ1, and then clickEdit.9. In the Administrative Access section, select the FortiTelemetry check box.10. ClickOK to save the changes.
To enable the Security Fabric on Remote-FortiGate
1. Continuing on the Remote-FortiGate GUI, clickSecurity Fabric >Settings.2. Enable FortiGate Telemetry.
3. Configure the following settings:
40 FortiGate Security 6.2 Lab GuideFortinet Technologies Inc.
DO NOT REPRINT© FORTINET
Exercise 2: Configuring the Security Fabric 2 Configure the Security Fabric on Remote-FortiGate HQ2 (downstream)
Field Value
Group name fortinet
FortiTelemetry enabled interfaces
(ensure both interfaces are selected)
port6, To-Local-HQ1
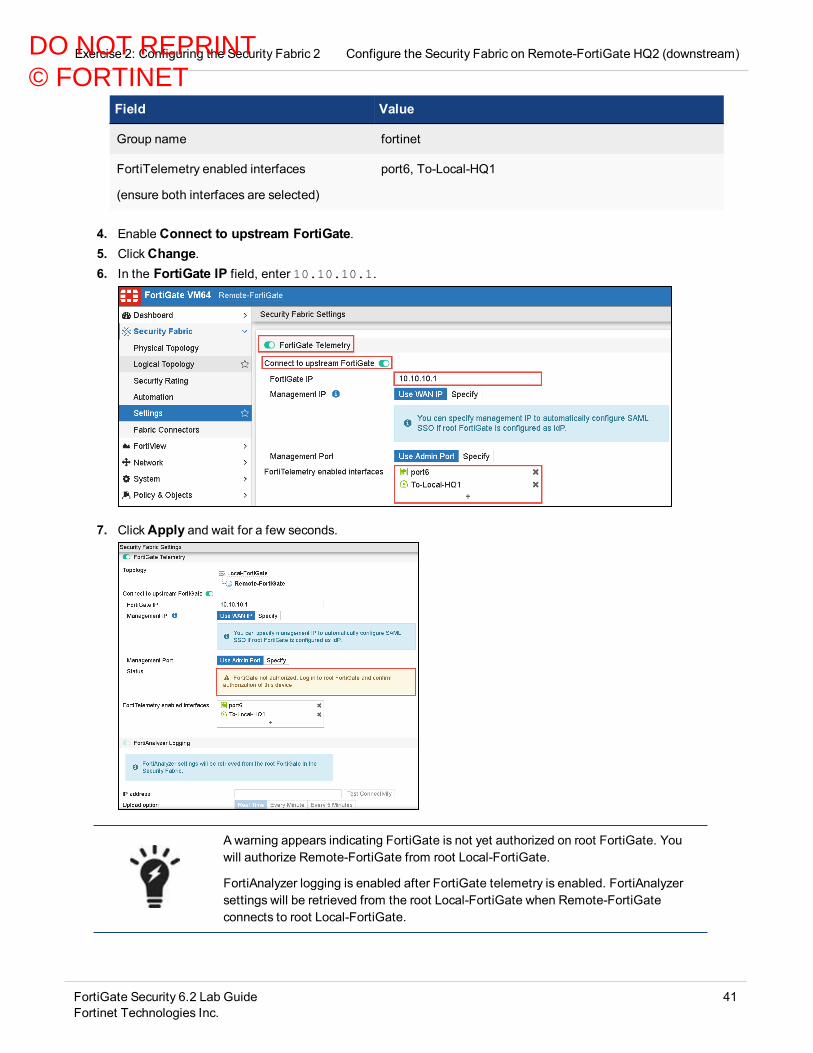
4. Enable Connect to upstream FortiGate.5. ClickChange.6. In the FortiGate IP field, enter 10.10.10.1.
7. ClickApply and wait for a few seconds.
A warning appears indicating FortiGate is not yet authorized on root FortiGate. Youwill authorize Remote-FortiGate from root Local-FortiGate.
FortiAnalyzer logging is enabled after FortiGate telemetry is enabled. FortiAnalyzersettings will be retrieved from the root Local-FortiGate when Remote-FortiGateconnects to root Local-FortiGate.
FortiGate Security 6.2 Lab GuideFortinet Technologies Inc.
41
DO NOT REPRINT© FORTINET

Authorize downstream Remote-FortiGate(HQ2) on the root Local-FortiGate(HQ1)
Exercise 2: Configuring the SecurityFabric 2
Authorize downstream Remote-FortiGate(HQ2) on the root Local-FortiGate(HQ1)
Now, you will authorize Remote-FortiGate on root Local-FortiGate to join the Security Fabric.
To authorize downstream Remote-FortiGate on the root Local-FortiGate
1. On the Local-Windows VM, open a browser and log in to the Local-FortiGate GUI at 10.0.1.254 with the username admin and password password.
2. ClickSecurity Fabric >Settings.3. In the Topology field, click the highlighted FortiGate serial number, and clickAuthorize.
After authorization, downstream Remote-FortiGate shows up in thetopology field. Now both ISFW and Remote-FortiGate are show up as twoleafs of root Local-FortiGate.
A warning appears indicating FortiGate is not yet authorized onFortiAnalyzer. You will authorize all FortiGates on FortiAnalyzer in next step.
Your configuration should look like the following example:
42 FortiGate Security 6.2 Lab GuideFortinet Technologies Inc.
DO NOT REPRINT© FORTINET

Exercise 2: Configuring the Security Fabric 2 Authorize all the Security Fabric FortiGates on FortiAnalyzer
Authorize all the Security Fabric FortiGates on FortiAnalyzer
Now, you will authorize all the Security Fabric devices on FortiAnalyzer.
To authorize Local-FortiGate, ISFW, and Remote-FortiGate on FortiAnalyzer
1. On the Local-Windows VM, open another browser tab, and log in to the FortiAnalyzer GUI at 10.0.1.210, usingthe username admin and the password password.
2. ClickDevice Manager.
3. ClickUnauthorized.
All three FortiGates appear as unauthorized devices.
FortiGate Security 6.2 Lab GuideFortinet Technologies Inc.
43
DO NOT REPRINT© FORTINET

Check FortiAnalyzer Status on all Security Fabric FortiGate Devices Exercise 2: Configuring the Security Fabric 2
4. Select the check boxes beside Local-FortiGate, ISFW, and Remote-FortiGate, and then clickAuthorize.
5. Leave all the Assign New Device Name as default in the Authorize Device wizard window, and clickOK.All three devices will be added to FortiAnalyzer root ADOM. Wait for a few seconds until the Logs status forall the FortiGates turns green.
Check FortiAnalyzer Status on all Security Fabric FortiGate Devices
Now, you will check FortiAnalyzer status on all three FortiGate devices.
To check the FortiAnalyzer status on Local-FortiGate
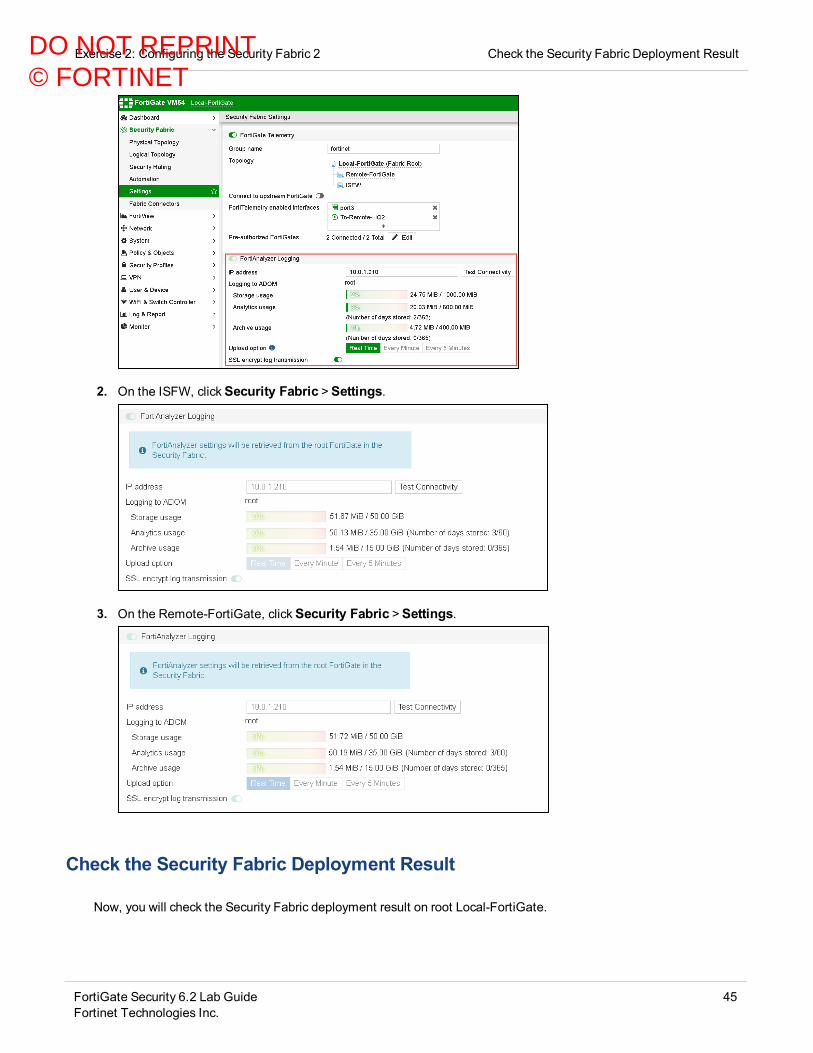
1. On the Local-FortiGate, clickSecurity Fabric >Settings.In the FortiAnalyzer Logging section, you can see storage usage information.
44 FortiGate Security 6.2 Lab GuideFortinet Technologies Inc.
DO NOT REPRINT© FORTINET
Exercise 2: Configuring the Security Fabric 2 Check the Security Fabric Deployment Result
2. On the ISFW, clickSecurity Fabric >Settings.
3. On the Remote-FortiGate, clickSecurity Fabric >Settings.
Check the Security Fabric Deployment Result
Now, you will check the Security Fabric deployment result on root Local-FortiGate.
FortiGate Security 6.2 Lab GuideFortinet Technologies Inc.
45
DO NOT REPRINT© FORTINET

Check the Security Fabric Deployment Result Exercise 2: Configuring the Security Fabric 2
To check the Security Fabric on Local-FortiGate
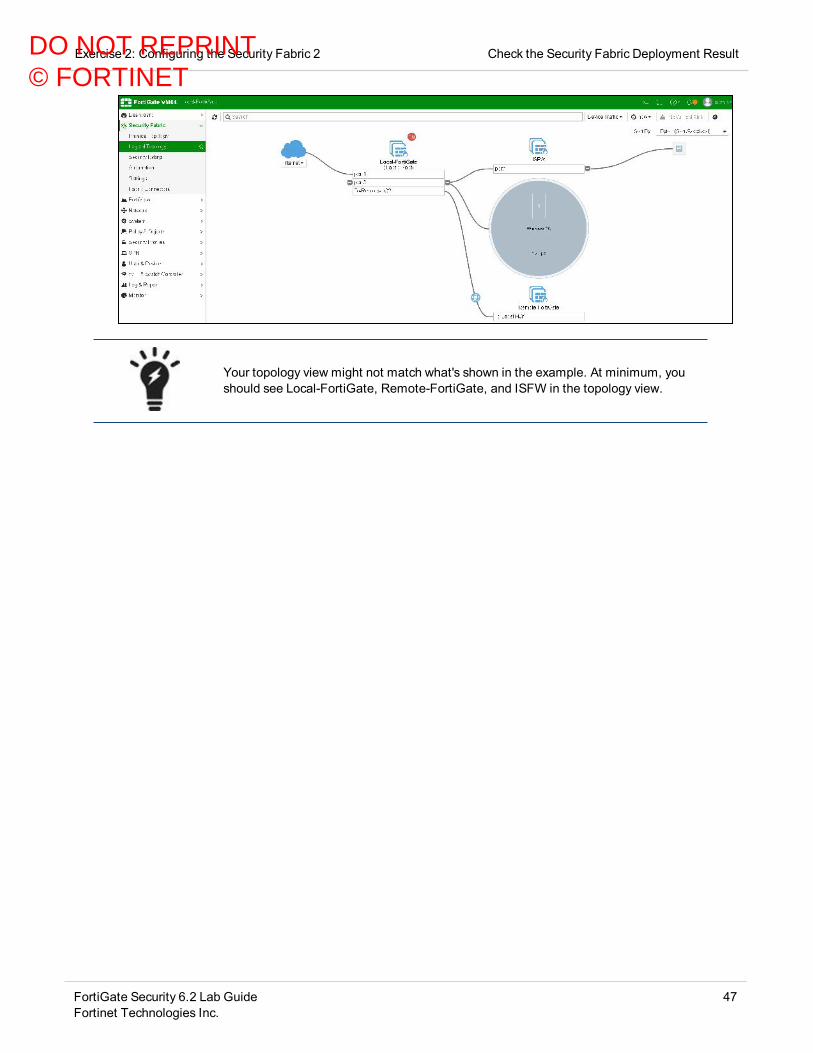
1. On the Local-FortiGate GUI, clickDashboard >Status.The Security Fabric widget displays all the FortiGates in the Security Fabric.
2. Continuing on the root Local-FortiGate GUI, clickSecurity Fabric >Physical Topology.This page shows a visualization of access layer devices in the Security Fabric.
3. Continuing on the root Local-FortiGate GUI, clickSecurity Fabric > Logical Topology.This dashboard displays information about the interfaces that each device in the Security Fabric connects.
46 FortiGate Security 6.2 Lab GuideFortinet Technologies Inc.
DO NOT REPRINT© FORTINET
Exercise 2: Configuring the Security Fabric 2 Check the Security Fabric Deployment Result
Your topology view might not match what's shown in the example. At minimum, youshould see Local-FortiGate, Remote-FortiGate, and ISFW in the topology view.
FortiGate Security 6.2 Lab GuideFortinet Technologies Inc.
47
DO NOT REPRINT© FORTINET
Exercise 3: Running Security Rating
The security rating feature includes new security checks that can help you make improvements to yourorganization’s network, such as enforce password security, apply recommended login attempt thresholds,encourage two factor authentication, and more. In this lab you will run security ratings to fix few recommendedsettings.
Running Security Rating on Root Local-FortiGate
In this exercise, you will run a Security Rating check, which analyzes the Fortinet Security Fabric deployment toidentify potential vulnerabilities and highlight best practices. You must run the Security Fabric rating on the rootFortiGate in the Security Fabric.
To review Security Rating widget
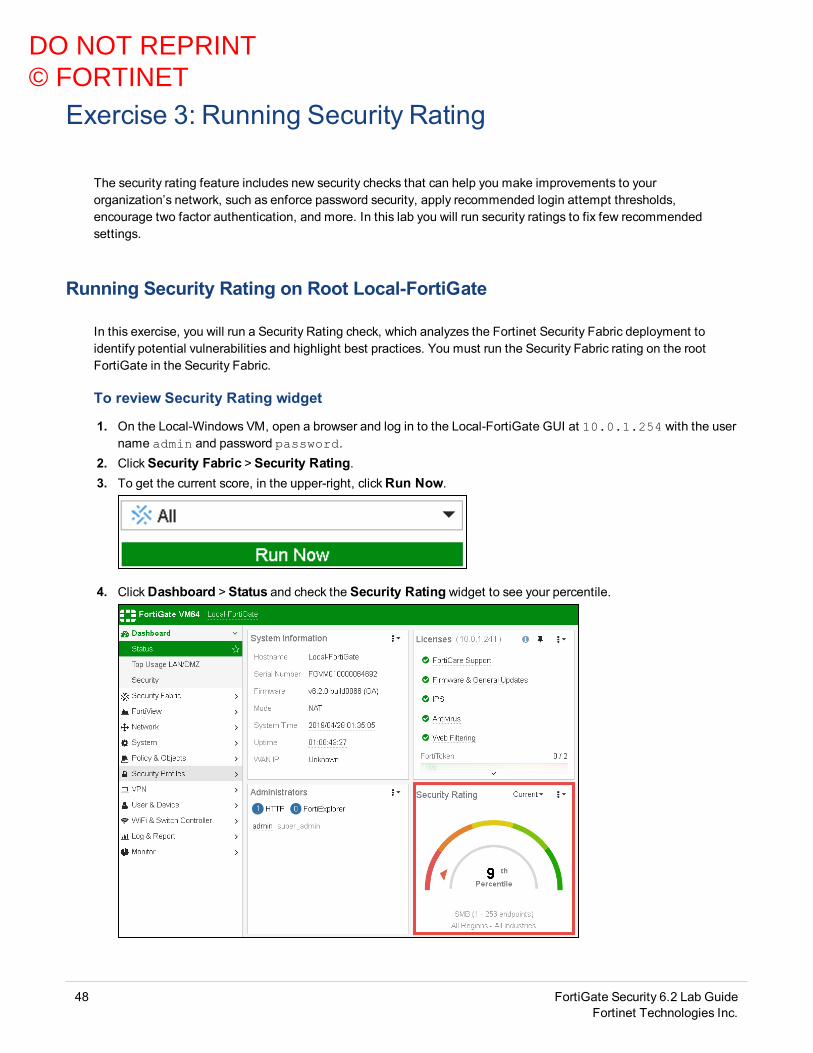
1. On the Local-Windows VM, open a browser and log in to the Local-FortiGate GUI at 10.0.1.254 with the username admin and password password.
2. ClickSecurity Fabric >Security Rating.3. To get the current score, in the upper-right, clickRun Now.
4. ClickDashboard >Status and check the Security Rating widget to see your percentile.
48 FortiGate Security 6.2 Lab GuideFortinet Technologies Inc.
DO NOT REPRINT© FORTINET

Exercise 3: Running Security Rating Running Security Rating on Root Local-FortiGate
Your Security Rating widget might not match what's shown in the example.
To generate new security rating scores on the root FortiGate
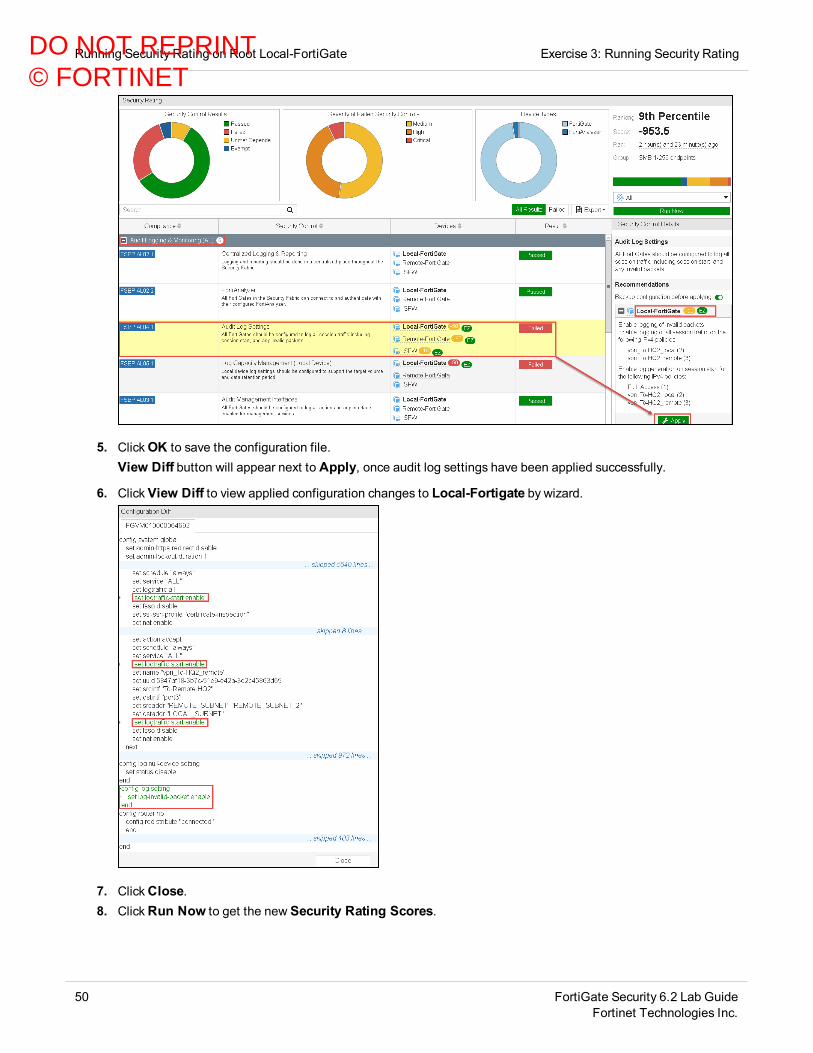
1. Continuing on the Local-FortiGate GUI, clickSecurity Fabric >Security Rating.
You can expand to view recommendations for each section and devices
2. To run the check, in the upper-right corner, clickRun Now.
The check will run. When it completes, it shows the following information:
l The Security Rating Score field shows the score for your Security Fabricl The page shows the overall count of how many checks passed or failed, with thefailed checks divided by severity
l Information about each failed check, including which FortiGate failed the check, theeffect of the check failure on the security score, and recommendations to fix theissue
l The Apply option appears with recommendations that can be applied by the wizardl Your Security Rating Scoresmight not match what's shown in the example
3. Select Audit Log Settings from Audit Logging & Monitoring (AL) section.The Apply option appears with recommendations that can be applied by the wizard.
4. In the right pane under Local-Fortigate, clickApply.
FortiGate Security 6.2 Lab GuideFortinet Technologies Inc.
49
DO NOT REPRINT© FORTINET
Running Security Rating on Root Local-FortiGate Exercise 3: Running Security Rating
5. ClickOK to save the configuration file.View Diff button will appear next to Apply, once audit log settings have been applied successfully.
6. ClickView Diff to view applied configuration changes to Local-Fortigate by wizard.
7. ClickClose.8. ClickRun Now to get the new Security Rating Scores.
50 FortiGate Security 6.2 Lab GuideFortinet Technologies Inc.
DO NOT REPRINT© FORTINET

Exercise 3: Running Security Rating Running Security Rating on Root Local-FortiGate
9. ClickDashboard >Status.10. Locate the Security Rating widget and notice the current rating.
You will notice the Security Rating widget displays information from the most recent security rating check.
When you run a Security Fabric rating, your organization's Security Fabric receives aSecurity Fabric score. The score will be positive or negative, and a higher scorerepresents a more secure network. The score is based on how many checks yournetwork passes and fails, as well as the severity level of these checks.
You can repeat steps 3 to 7 for all other sections and devices to applyrecommendations, this will improve Security Fabric score.
Your security rating scores might not match what's shown in the example.
FortiGate Security 6.2 Lab GuideFortinet Technologies Inc.
51
DO NOT REPRINT© FORTINET
Lab 3: Firewall Policies
In this lab, you will configure firewall policies on Local-FortiGate and perform various tests on the Local-WindowsVM, to confirm that traffic is matching the desired firewall policies based on the configuration.
Objectivesl Configure firewall objects and firewall policiesl Configure source and destination matching in firewall policiesl Apply service and schedule objects to a firewall policyl Configure firewall policy logging optionsl Reorder firewall policiesl Read and understand logsl Use policy lookup to find a matching policy
Time to CompleteEstimated: 25 minutes
PrerequisitesBefore beginning this lab, you must restore configuration files to the Remote-FortiGate,ISFW, and Local-FortiGate.
To restore the Remote-FortiGate configuration file
1. On the Local-Windows VM, open a browser and log in to the Remote-FortiGate GUI at 10.200.3.1 with theuser name admin and password password.
2. In the upper-right corner of the screen, click admin, and then clickConfiguration >Restore.
3. Click Local PC,and then clickUpload.4. ClickDesktop >Resources > FortiGate-Security > Firewall-Policies > remote-initial.conf, and then
clickOpen.5. ClickOK.6. ClickOK to reboot.
52 FortiGate Security 6.2 Lab GuideFortinet Technologies Inc.
DO NOT REPRINT© FORTINET

Lab 3: Firewall Policies
To restore the ISFW configuration file
1. On the Local-Windows VM, open a browser and log in to the ISFW GUI at 10.0.1.200 with the user nameadmin and password password.
2. In the upper-right corner of the screen, click admin, and then clickConfiguration >Restore.
3. Click Local PC,and then clickUpload.4. ClickDesktop >Resources > FortiGate-Security > Firewall-Policies > ISFW-initial.conf, and then
clickOpen.5. ClickOK.6. ClickOK to reboot.
To restore the Local-FortiGate configuration file
1. On the Local-Windows VM, open a browser and log in to the Local-FortiGate GUI at 10.0.1.254 with the username admin and password password.
2. In the upper-right corner of the screen, click admin, and then clickConfiguration >Restore.
3. Click Local PC,and then clickUpload.4. ClickDesktop >Resources > FortiGate-Security > Firewall-Policies > local-firewall-policy.conf,
and then clickOpen.5. ClickOK.6. ClickOK to reboot.
FortiGate Security 6.2 Lab GuideFortinet Technologies Inc.
53
DO NOT REPRINT© FORTINET

Exercise 1: Creating Firewall Address Objects and FirewallPolicies
In this exercise, you will configure firewall address objects. You will also configure an IPv4 firewall policy to whichyou will apply firewall address objects along with schedule, services, and log options. Then, you will test thefirewall policy by passing traffic through it and checking the logs for your traffic.
At its core, FortiGate is a firewall, so almost everything that it does to your traffic is related to your firewallpolicies.
Create Firewall Address Objects
By default, FortiGate has many preconfigured, well-known address objects in the factory default configuration.However, if those objects don’t meet the needs of your organization, you can configure more.
To create a firewall address object
1. On the Local-Windows VM, open a browser and log in to the Local-FortiGate GUI at 10.0.1.254 with the username admin and password password.
2. ClickPolicy & Objects >Addresses.3. ClickCreate New >Address.4. Configure the following settings:
Field Value
Name LOCAL_SUBNET
Type Subnet
Subnet / IP Range 10.0.1.0/24
Interface any
5. ClickOK.
Create a Firewall Policy
First, you will disable the existing firewall policy. Then, you will create a more specific firewall policy using thefirewall address object that you created in the previous procedure. You will also select specific services andconfigure log settings.
54 FortiGate Security 6.2 Lab GuideFortinet Technologies Inc.
DO NOT REPRINT© FORTINET

Exercise 1: Creating Firewall Address Objects and Firewall Policies Create a Firewall Policy
To disable an existing firewall policy
1. Continuing on the Local-FortiGate GUI, clickPolicy & Objects > IPv4 Policy.2. Right-click the Full_Access firewall policy from the ID column and clickEdit.3. Turn off the radio button for Enable this policy to disable the policy and clickOK.
To create a firewall policy
1. Continuing in the Policy & Objects > IPv4 Policy section, clickCreate New to add a new firewall policy.2. Configure the following settings:
Field Value
Name Internet_Access
Incoming Interface port3
Outgoing Interface port1
Source LOCAL_SUBNET
Destination all
Schedule always
Service ALL_ICMP, HTTP, HTTPS, DNS, SSH
Tip: On right side of the screen, type the name in the search box, andthen click on services to add.
Action ACCEPT
NAT <enable>
Log Allowed Traffic <enable> and select All Sessions
Generate Logs when SessionStarts
<enable>
Enable this policy <enable>
3. Leave all other settings at their default values and clickOK to save the changes.
When creating firewall policies, remember that FortiGate is a stateful firewall. As aresult, you need to create only one firewall policy that matches the direction of thetraffic that initiates the session.
FortiGate Security 6.2 Lab GuideFortinet Technologies Inc.
55
DO NOT REPRINT© FORTINET
Test the Firewall Policy and View Generated Logs Exercise 1: Creating Firewall Address Objects and Firewall Policies
Test the Firewall Policy and View Generated Logs
Now that you have configured the firewall policy, you will test it by passing traffic through it and viewing thegenerated logs.
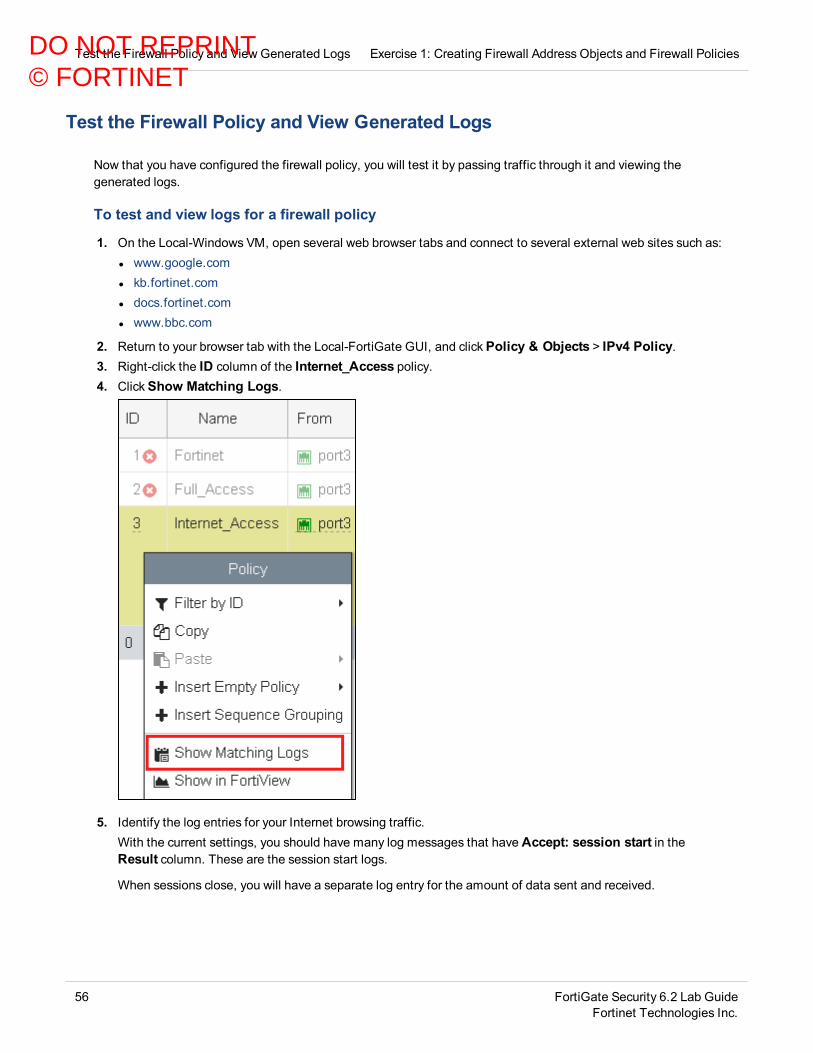
To test and view logs for a firewall policy
1. On the Local-Windows VM, open several web browser tabs and connect to several external web sites such as:l www.google.coml kb.fortinet.coml docs.fortinet.coml www.bbc.com
2. Return to your browser tab with the Local-FortiGate GUI, and clickPolicy & Objects > IPv4 Policy.3. Right-click the ID column of the Internet_Access policy.4. ClickShow Matching Logs.
5. Identify the log entries for your Internet browsing traffic.With the current settings, you should have many log messages that have Accept: session start in theResult column. These are the session start logs.
When sessions close, you will have a separate log entry for the amount of data sent and received.
56 FortiGate Security 6.2 Lab GuideFortinet Technologies Inc.
DO NOT REPRINT© FORTINET
Exercise 1: Creating Firewall Address Objects and Firewall Policies Test the Firewall Policy and View Generated Logs
EnablingGenerate Logs when Session Starts in the firewall policy will generatetwice the amount of log messages. You should use this option only when this level ofdetail is absolutely necessary.
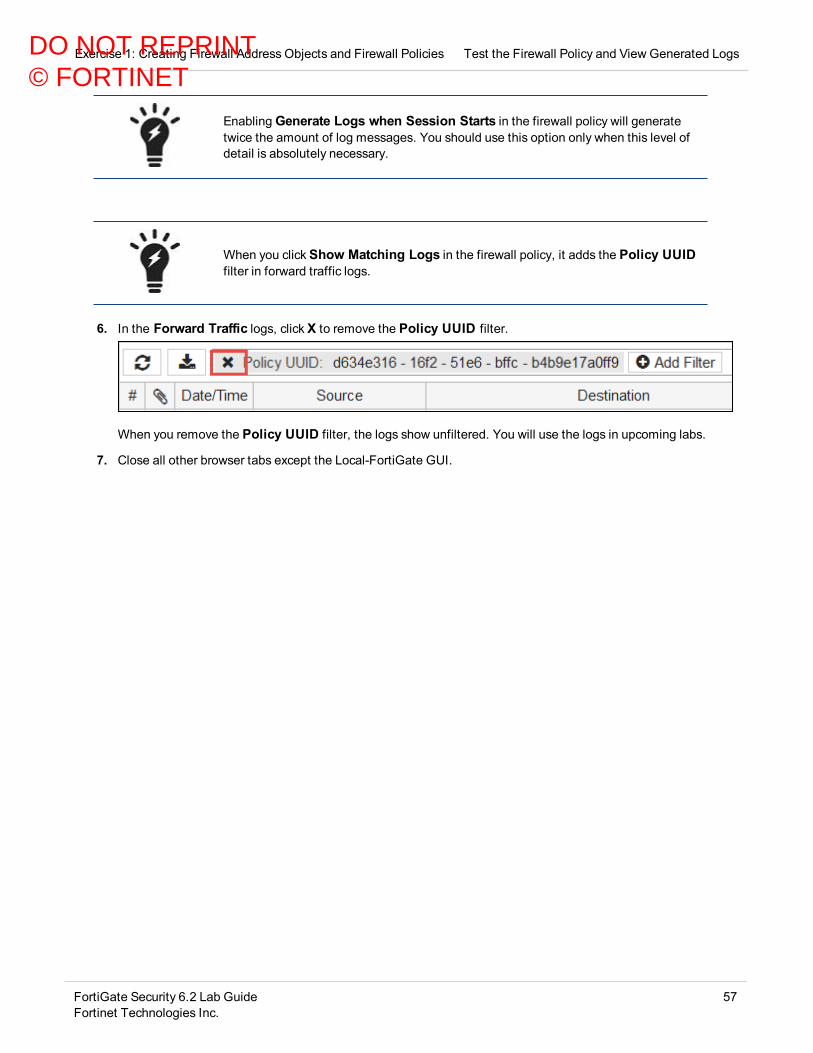
When you clickShow Matching Logs in the firewall policy, it adds the Policy UUIDfilter in forward traffic logs.
6. In the Forward Traffic logs, clickX to remove the Policy UUID filter.
When you remove the Policy UUID filter, the logs show unfiltered. You will use the logs in upcoming labs.
7. Close all other browser tabs except the Local-FortiGate GUI.
FortiGate Security 6.2 Lab GuideFortinet Technologies Inc.
57
DO NOT REPRINT© FORTINET

Exercise 2: Reordering Firewall Policies and FirewallPolicy Actions
In the applicable interface pair’s section, FortiGate will look for a matching policy, beginning at the top. Usually,you should put more specific policies at the top; otherwise, more general policies will match the traffic first, andyour more granular policies will never be applied.
In this exercise, you will create a new firewall policy with more specific settings such as source, destination,service, and action set to DENY. Then, you will move this firewall policy above the existing firewall policies andobserve the behavior created by the firewall policy reordering.
Create a Firewall Policy
You will create a new firewall policy to match a specific source, destination, service, and action set to DENY.
The firewall address LINUX_ETH1 with IP/Netmask 10.200.1.254/32 ispreconfigured for you, and you will use this address when you create the firewallpolicy.
Take the Expert Challenge!Configure a firewall policy on Local-FortiGate GUI using the following settings:
l Name the firewall policyBlock_Ping.l Incoming interface: port3, Outgoing interface: port1l Block all ping traffic from the 10.0.1.0/24 subnet destined for the 10.200.1.254 address. Use thepreconfigured address objects LOCAL_SUBNET and LINUX_ETH1.
l Enable log violation traffic.
If you require assistance, or to verify your work, use the step-by-step instructions that follow.
After you have performed these steps, see Test the Reordering of a Firewall Policy on page 59.
To create a firewall policy
1. On the Local-Windows VM, open a browser and log in to the Local-FortiGate GUI at 10.0.1.254 with the username admin and password password.
2. ClickPolicy & Objects > IPv4 Policy, and then clickCreate New.3. Configure the following settings:
58 FortiGate Security 6.2 Lab GuideFortinet Technologies Inc.
DO NOT REPRINT© FORTINET
Exercise 2: Reordering Firewall Policies and Firewall Policy Actions Test the Reordering of a Firewall Policy
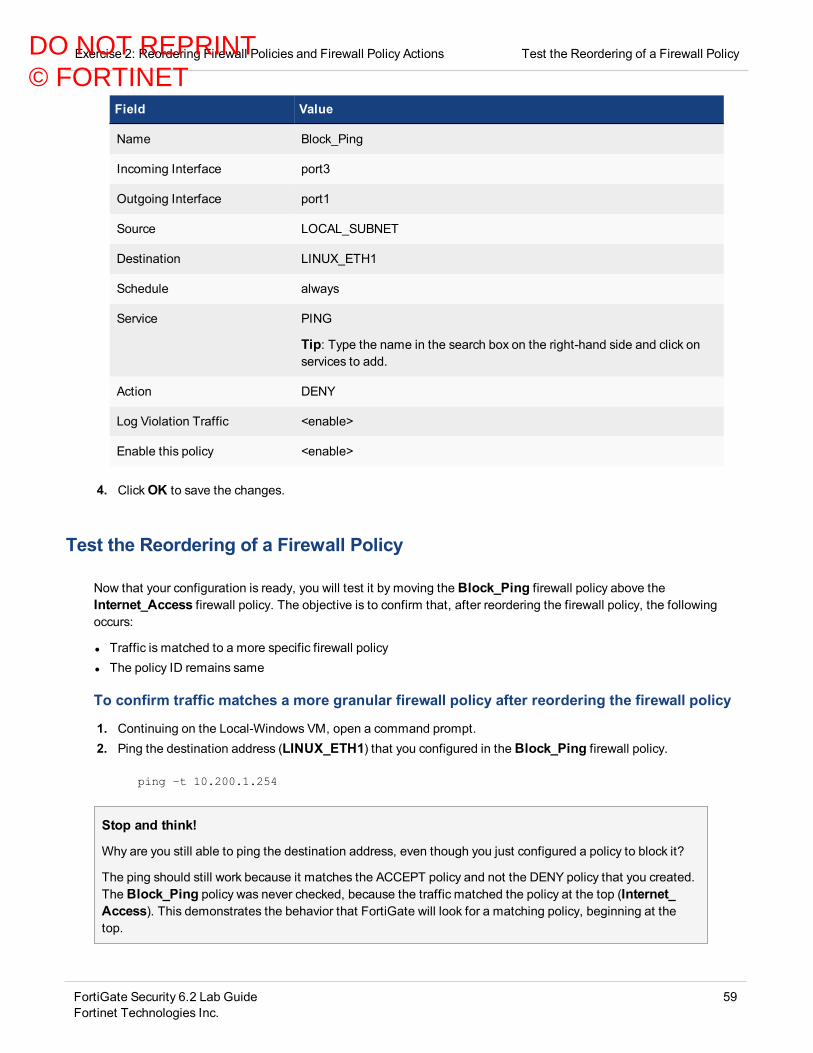
Field Value
Name Block_Ping
Incoming Interface port3
Outgoing Interface port1
Source LOCAL_SUBNET
Destination LINUX_ETH1
Schedule always
Service PING
Tip: Type the name in the search box on the right-hand side and click onservices to add.
Action DENY
Log Violation Traffic <enable>
Enable this policy <enable>
4. ClickOK to save the changes.
Test the Reordering of a Firewall Policy
Now that your configuration is ready, you will test it by moving the Block_Ping firewall policy above theInternet_Access firewall policy. The objective is to confirm that, after reordering the firewall policy, the followingoccurs:
l Traffic is matched to a more specific firewall policyl The policy ID remains same
To confirm traffic matches a more granular firewall policy after reordering the firewall policy
1. Continuing on the Local-Windows VM, open a command prompt.2. Ping the destination address (LINUX_ETH1) that you configured in the Block_Ping firewall policy.
ping –t 10.200.1.254
Stop and think!
Why are you still able to ping the destination address, even though you just configured a policy to block it?
The ping should still work because it matches the ACCEPT policy and not the DENY policy that you created.The Block_Ping policy was never checked, because the traffic matched the policy at the top (Internet_Access). This demonstrates the behavior that FortiGate will look for a matching policy, beginning at thetop.
FortiGate Security 6.2 Lab GuideFortinet Technologies Inc.
59
DO NOT REPRINT© FORTINET

Test the Reordering of a Firewall Policy Exercise 2: Reordering Firewall Policies and Firewall Policy Actions
3. Leave the command prompt window open and running.4. Return to your browser where you are logged in to the Local-FortiGate GUI.5. In Policy & Objects > IPv4 Policy, note the current ID values for both the Internet_Access and Block_Ping
firewall policies.6. From the ID column, drag the Block_Ping firewall policy and drop it above the Internet_Access firewall policy.
When you move the Block_Ping policy up, the ID value remains the same.
7. Return to the command prompt window that is running the continuous ping.You should see that the traffic is now blocked and the replies appear as Request timed out.
Stop and think!
Why is the traffic now blocked?
This demonstrates the outcome of the policy reordering. After moving the more granular policy above thegeneral access policy, the traffic is matched to the more granular policy and, based on the action DENY, thetraffic stops processing.
8. Close the command prompt window.
60 FortiGate Security 6.2 Lab GuideFortinet Technologies Inc.
DO NOT REPRINT© FORTINET
Exercise 3: Applying ISDB Objects as Destinations
FortiGate can match the traffic using address objects or Internet service database (ISDB) objects as destinations.ISDB objects are predefined entries that are regularly updated by FortiGuard and contains a database of IPaddresses, protocols, and port numbers used by the most common Internet services.
ISDB objects can be used to allow or deny traffic to well-known Internet destinations, without worrying aboutconfiguring IP addresses, protocols, or ports used by those destinations in the firewall policy.
In this lab, you will apply an ISDB object as a destination criteria on a firewall policy to block traffic to a well-knownInternet service.
Review the Internet Service Database
You will now review the entries in the Internet service database.
To review the Internet service database
1. On the Local-Windows VM, open a browser and log in to the Local-FortiGate GUI at 10.0.1.254 with the username admin and password password.
2. ClickPolicy & Objects > Internet Service Database.3. Double-click any entry.
You will see the corresponding IP addresses, ports, and protocols used by that Internet service.
4. ClickReturn.
Configure a Firewall Policy Destination as an ISDB Object
Now, you will now modify an existing firewall policy and use an ISDB object as a destination.
To configure a destination as an Internet service
1. Continuing on the Local-FortiGate GUI, clickPolicy & Objects > IPv4 Policy.2. Right-click the ID column for the Block_Ping firewall policy, and clickEdit.3. Change the Name to Block_Facebook.4. ClickDestination and in the right pane, click LINUX_EHT1 to clear it.5. Click Internet Service.6. Select Facebook.Web.
Type the name in the search box and click a service to add it.
Your configuration should look like the following example:
FortiGate Security 6.2 Lab GuideFortinet Technologies Inc.
61
DO NOT REPRINT© FORTINET

Test the Internet Service Firewall Policy Exercise 3: Applying ISDBObjects as Destinations
When Internet Service is selected as the Destination, you cannot:
l Use Address in the Destinationl Select Service in the firewall policy
7. ClickOK.
Test the Internet Service Firewall Policy
Now that you have configured the firewall policy, you will test it by passing traffic through it.
To test the Internet service firewall policy
1. Continuing on the Local-Windows VM, open few browser tabs and go to the following websites:l www.facebook.coml www.twitter.com
62 FortiGate Security 6.2 Lab GuideFortinet Technologies Inc.
DO NOT REPRINT© FORTINET

Exercise 3: Applying ISDBObjects as Destinations Test the Internet Service Firewall Policy
Stop and think!
Why is Facebook blocked but Twitter is allowed?
FortiGate checks for the matching policy from top to bottom. Facebook is blocked by ID 4 firewall policybecause the destination is set to Facebook-Web. Twitter is allowed by ID 3 firewall policy, which allowsInternet access.
2. Return to the browser where you are logged into the Local-FortiGate GUI, and right-click the ID column for theBlock_Facebook firewall policy and clickEdit.
3. Turn off the radio button for Enable this policy to disable the policy and clickOK.4. Close all browser tabs except for the Local-FortiGate GUI.
FortiGate Security 6.2 Lab GuideFortinet Technologies Inc.
63
DO NOT REPRINT© FORTINET
Exercise 4: Using Policy Lookup
FortiGate can find a matching firewall policy based on the policy lookup input criteria. The policy lookup featurebasically creates a packet flow over FortiGate without real traffic. From this packet flow, FortiGate can extract apolicy ID and highlight it on the GUI policy configuration page.
In this lab, you will use the policy lookup feature to find a matching firewall policy based on input criteria.
Enable Existing Firewall Policies
As required in the previous exercises, most of the configured firewall policies are currently disabled. Now, you willenable some of the existing firewall policies.
Take the Expert Challenge!On Local-FortiGate GUI, enable the Policy Status for the Fortinet and Full_Access firewall policies.
If you require assistance, or to verify your work, use the step-by-step instructions that follow.
After you have performed these steps, see Set Up and Test the Policy Lookup Criteria on page 64.
To enable existing firewall policies
1. On the Local-Windows VM, open a browser and log in to the Local-FortiGate GUI at 10.0.1.254 with the username admin and password password.
2. ClickPolicy & Objects > IPv4 Policy.3. Right-click the ID column for the Fortinet firewall policy and clickEdit.4. Turn on the radio button for Enable this policy to enable the policy and clickOK.5. Right-click the ID column for the Full_Access firewall policy and clickEdit.6. Turn on the radio button for Enable this policy to enable the policy and clickOK.
Set Up and Test the Policy Lookup Criteria
Now, you will set up the policy lookup criteria. FortiGate will search and highlight the matching firewall policybased on your input criteria.
To set up and test the policy lookup criteria
1. Continuing on the Local-FortiGate GUI clickPolicy & Objects > IPv4 Policy, and then clickPolicy Lookup.2. Configure the following settings:
64 FortiGate Security 6.2 Lab GuideFortinet Technologies Inc.
DO NOT REPRINT© FORTINET

Exercise 4: Using Policy Lookup Reorder the Firewall Policies
Field Value
Source Interface port3
Protocol TCP
Source 10.0.1.100
Source Port <Leave it empty>
Destination fortinet.com
Destination Port 443
3. ClickSearch.The search will match the Full_Access policy, but not the more specific firewall policy, Fortinet.
In the search criteria, the source address is set to 10.0.1.100. This source address is not a part of theFortinet firewall policy; therefore, the search does not match the Fortinet firewall policy.
When FortiGate is performing a policy lookup, it does a series of checks on ingress,stateful inspection, and egress for the matching firewall policy. It performs the checksfrom top to bottom, before providing results for the matching policy.
4. ClickPolicy Lookup, and then change the Source to 10.0.1.10.Make sure all the other settings match the settings you used in step 2.
5. ClickSearch.This time, the search matches the Fortinet firewall policy, in which the destination is set to FQDN.
Reorder the Firewall Policies
Now you will reorder the firewall policies. You will move the Block_Facebook firewall policy above the Full_Access policy.
Take the Expert Challenge!On Local-FortiGate GUI, move the Block_Facebook firewall policy above the Full_Access policy.
If you require assistance, or to verify your work, use the step-by-step instructions that follow.
After you have performed these steps, see Retest Policy Lookup After Reordering the Firewall Policies onpage 66.
FortiGate Security 6.2 Lab GuideFortinet Technologies Inc.
65
DO NOT REPRINT© FORTINET
Retest Policy Lookup After Reordering the Firewall Policies Exercise 4: Using Policy Lookup
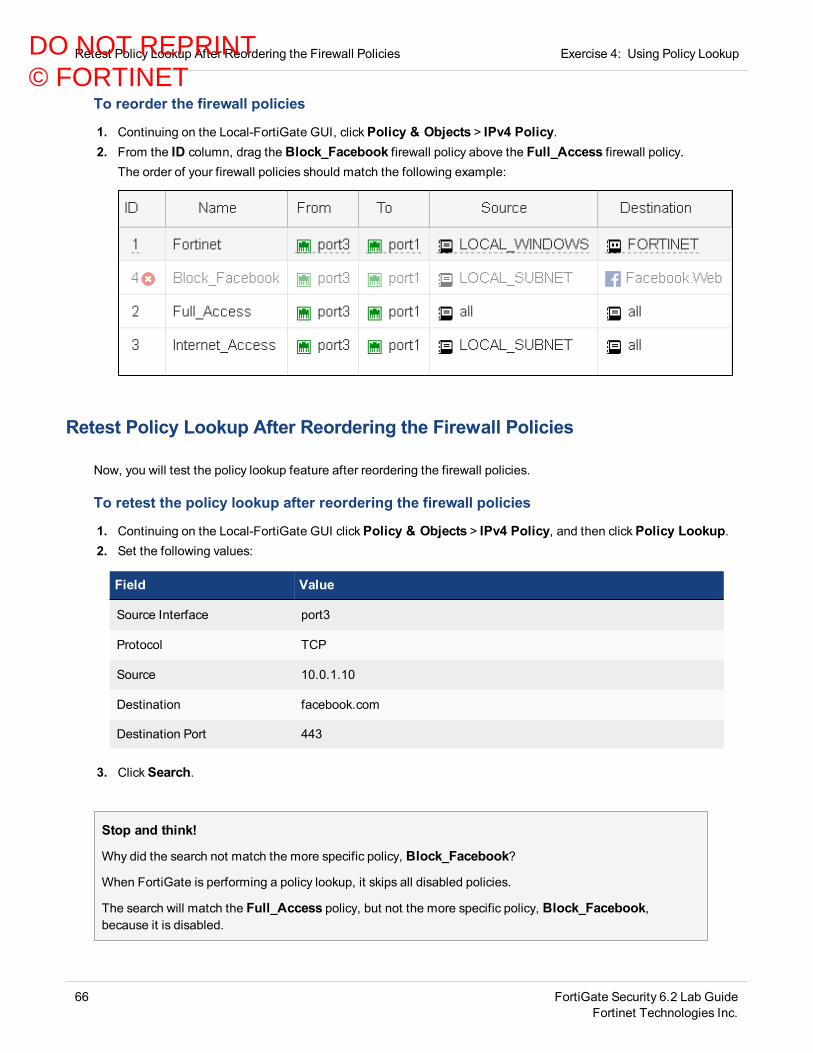
To reorder the firewall policies
1. Continuing on the Local-FortiGate GUI, clickPolicy & Objects > IPv4 Policy.2. From the ID column, drag the Block_Facebook firewall policy above the Full_Access firewall policy.
The order of your firewall policies should match the following example:
Retest Policy Lookup After Reordering the Firewall Policies
Now, you will test the policy lookup feature after reordering the firewall policies.
To retest the policy lookup after reordering the firewall policies
1. Continuing on the Local-FortiGate GUI clickPolicy & Objects > IPv4 Policy, and then clickPolicy Lookup.2. Set the following values:
Field Value
Source Interface port3
Protocol TCP
Source 10.0.1.10
Destination facebook.com
Destination Port 443
3. ClickSearch.
Stop and think!
Why did the search not match the more specific policy, Block_Facebook?
When FortiGate is performing a policy lookup, it skips all disabled policies.
The search will match the Full_Access policy, but not the more specific policy, Block_Facebook,because it is disabled.
66 FortiGate Security 6.2 Lab GuideFortinet Technologies Inc.
DO NOT REPRINT© FORTINET

Exercise 4: Using Policy Lookup Retest Policy Lookup After Reordering the Firewall Policies
4. Right-click the ID column of the Block_Facebook policy and clickEdit.5. Turn on the radio button for Enable this policy to enable the policy and clickOK.6. ClickPolicy Lookup.7. ClickSearch.
This time the search matches the more specific policy, Block_Facebook.
FortiGate Security 6.2 Lab GuideFortinet Technologies Inc.
67
DO NOT REPRINT© FORTINET
Lab 4: NAT
Network address translation (NAT) is used to perform source NAT (SNAT) and destination NAT (DNAT) for thetraffic passing through FortiGate. There are two ways to configure SNAT and DNAT:
l Firewall policy NATl Central NAT
In this lab, you will configure and test firewall policy NAT for SNAT using IP pool, and for DNAT using virtual IP(VIP).
You will configure and test SNAT using the central SNAT policy and DNAT using the DNAT policy and VIPs.
Objectivesl Configure destination NAT settings using a VIPl Configure the source NAT settings using overload IP poolsl Configure a central NAT policy for the source NATl Configure DNAT and VIPs for the destination NAT
Time to CompleteEstimated: 50 minutes
PrerequisitesBefore starting the procedures in this lab, you must restore a configuration file on each FortiGate.
Make sure to restore the correct configuration in each FortiGate using the followingsteps. Failure to restore the correct configuration on each FortiGate will prevent youfrom doing the lab exercise.
To restore the Remote-FortiGate configuration file
1. On the Local-Windows VM, open a browser and log in to the Remote-FortiGate GUI at 10.200.3.1 with theuser name admin and password password.
2. In the upper-right corner of the screen, click admin, and then clickConfiguration >Restore.
68 FortiGate Security 6.2 Lab GuideFortinet Technologies Inc.
DO NOT REPRINT© FORTINET

Lab 4: NAT
3. Click Local PC,and then clickUpload.4. ClickDesktop >Resources > FortiGate-Security >NAT > remote-nat.conf, and then clickOpen.5. ClickOK.6. ClickOK to reboot.
To restore the Local-FortiGate configuration file
1. On the Local-Windows VM, open a browser and log in to the Local-FortiGate GUI at 10.0.1.254 with the username admin and password password.
2. In the upper-right corner of the screen, click admin, and then clickConfiguration >Restore.
3. Click Local PC,and then clickUpload.4. ClickDesktop >Resources > FortiGate-Security >NAT > local-nat.conf, and then clickOpen.5. ClickOK.6. ClickOK to reboot.
FortiGate Security 6.2 Lab GuideFortinet Technologies Inc.
69
DO NOT REPRINT© FORTINET
Exercise 1: Accessing Through VIPs
VIP addresses are typically used to translate external or public IP addresses to internal or private IP addresses.
In this exercise, you will configure a VIP address for the Local-Windows VM. Then, you will create an egress-to-ingress firewall policy and apply a VIP address. This will allow Internet connections to the Local-Windows VM.You will also verify the DNAT and SNAT behavior using CLI commands.
Create a VIP
On FortiGate, a VIP is a DNAT, which you can select only in a firewall policy’s destination address field.
In this procedure, you will configure the VIP to map the Local-Windows VM (10.0.1.10) to 10.200.1.200,which is a part of the port1 subnet. You can refer to the lab Network Topology on page 9 diagram.
To create a VIP
1. On the Local-Windows VM, open a browser and log in to the Local-FortiGate GUI at 10.0.1.254 with the username admin and password password.
2. ClickPolicy & Objects >Virtual IPs.3. ClickCreate New, and then select Virtual IP.4. Configure the following settings:
Field Value
Name VIP-INTERNAL-HOST
Interface port1
(port1 is connected to the Internet with IP address 10.200.1.1/24.)
External IP address/range 10.200.1.200
(This is the IP address in the same range as the port1 subnet.)
Mapped IP address/range 10.0.1.10
70 FortiGate Security 6.2 Lab GuideFortinet Technologies Inc.
DO NOT REPRINT© FORTINET

Exercise 1: Accessing Through VIPs Create a Firewall Policy
5. ClickOK.
Create a Firewall Policy
You will configure a new firewall policy using the VIP that you just created as the destination address.
To create a firewall policy
1. Continuing on the Local-FortiGate GUI, clickPolicy & Objects > IPv4 Policy.2. ClickCreate New.3. Configure the following settings:
Field Value
Name Web-Server-Access
Incoming Interface port1
Outgoing Interface port3
Source all
Destination VIP-INTERNAL-HOST
Tip: Listed under the Virtual IP section
Schedule always
Service HTTP, HTTPS
Tip: In right pane, type the name in the search box, and then clickServices to add.
Action ACCEPT
FortiGate Security 6.2 Lab GuideFortinet Technologies Inc.
71
DO NOT REPRINT© FORTINET

Test the VIP Firewall Policy Exercise 1: Accessing Through VIPs
4. In the Firewall / Network Options section, turn off the NAT.5. In the Logging Options section, turn on Log Allowed Traffic , and then select All Sessions.6. ClickOK.
Test the VIP Firewall Policy
Now that you've configured a firewall policy with the VIP address as the destination, you can test your VIP byaccessing it from the Remote-Windows VM, which is behind the Remote-FortiGate internal network. Traffic isrouted from the Remote-FortiGate to the Local-FortiGate by a Linux machine, which acts as a router betweenthese two FortiGate devices. For more information, see Network Topology on page 9.
You will also test how the source address is translated by the VIP when traffic is leaving from the Local-WindowsVM.
To test VIPs (DNAT)
1. On the Remote-Windows VM, open a web browser and go to the following URL:http://10.200.1.200
If the VIP operation is successful, a simple web page opens.
72 FortiGate Security 6.2 Lab GuideFortinet Technologies Inc.
DO NOT REPRINT© FORTINET

Exercise 1: Accessing Through VIPs Test the SNAT
2. On the Local-Windows VM, open PuTTY and connect over SSH to the LOCAL-FORTIGATE saved session.3. At the login prompt, enter the user name admin and password password.4. Enter the following command to check the destination NAT entries in the session table:
get system session list
Sample output:
Local-FortiGate# get system session listPROTO EXPIRE SOURCE SOURCE-NAT DESTINATION DESTINATION-NATtcp 3594 10.200.3.1:49478 - 10.200.1.200:80 10.0.1.10:80
You will notice that the destination address 10.200.1.200 is translated to 10.0.1.10, which is themapping you configured in the VIP.
Test the SNAT
As a result of the VIP (which is a static NAT), all translated outgoing connections from the Local-Windows VM (IPaddress 10.0.1.10) will use the VIP address to SNAT for the ingress-to-egress firewall policy and not theegress interface IP address.
To test SNAT
1. Continuing on Local-Windows, return to the Local-FortiGate PuTTY session and run the following command toclear any existing sessions:
diagnose sys session clear
The CLI command diagnose sys session clear will clear all sessionsincluding SSH session you created using PuTTY. This is expected behavior.
FortiGate Security 6.2 Lab GuideFortinet Technologies Inc.
73
DO NOT REPRINT© FORTINET

Test the SNAT Exercise 1: Accessing Through VIPs
The firewall is stateful, so any existing sessions will not use this new firewall policyuntil they time out or are cleared for ingress-to-egress traffic.
This clears the session to the Local-FortiGate from the Local-Windows VM.
2. Close the PuTTYwindow.3. Open a web browser tab and connect to a few websites, for example:
l www.fortinet.coml www.yahoo.coml www.bbc.com
4. Open PuTTY, and connect over SSH to the LOCAL-FORTIGATE saved session.5. At the login prompt, enter the user name admin and password password.6. Run the following command to view the session information:
get system session list
Sample output:
The outgoing connections from the Local-Windows VM are now being translated withthe VIP address 10.200.1.200, instead of the firewall egress interface IP address(10.200.1.1).
This is a behavior of the SNAT VIP. That is, when you enable SNAT on a policy, a VIP static NAT takespriority over the destination interface IP address.
7. Close the PuTTY session.8. Close all browser tabs except the Local-FortiGate GUI.
74 FortiGate Security 6.2 Lab GuideFortinet Technologies Inc.
DO NOT REPRINT© FORTINET

Exercise 2: Using Dynamic NAT with IP Pools
IP pools are used to translate the source address to an address from that pool, rather than the egress interfaceaddress.
Currently, the Local-FortiGate translates the source IP address of all traffic generated from the Local-WindowsVM to 10.200.1.200 because of the SNAT translation in the VIP.
In this exercise, you will create an IP pool, apply it to the ingress-to-egress firewall policy, and verify the SNATaddress using CLI commands.
Create an IP Pool
In this procedure, you will create an IP pool from the range of public IP addresses available on the egress port(port1).
To create an IP pool
1. On the Local-Windows VM, open a browser and log in to the Local-FortiGate GUI at 10.0.1.254 with the username admin and password password.
2. ClickPolicy & Objects > IP Pools.3. ClickCreate New and configure the following settings:
Field Value
Name INTERNAL-HOST-EXT-IP
Type Overload
External IP Range/Subnet 10.200.1.100 - 10.200.1.100
4. ClickOK.
Edit a Firewall Policy to Use the IP Pool
Now, you will apply the IP pool to change the behavior from static NAT to dynamic NAT on the ingress-to-egressfirewall policy.
FortiGate Security 6.2 Lab GuideFortinet Technologies Inc.
75
DO NOT REPRINT© FORTINET

Test Dynamic NAT with IP Pools Exercise 2: Using Dynamic NAT with IP Pools
To edit the firewall policy
1. Continuing on the Local-FortiGate GUI, clickPolicy & Objects > IPv4 Policy.2. Right-click the ID column for the Full_Access firewall policy and clickEdit.3. In the Firewall / Network Options section, configure the following settings:
Field Value
NAT <enable>
IP Pool Configuration Use Dynamic IP Pool
4. Click the + that appeared when you clicked Use Dynamic IP Pool, and from the right pane, click INTERNAL-HOST-EXT-IP.Your configuration will look similar to the following example:
5. ClickOK.
Test Dynamic NAT with IP Pools
Now that your configuration is ready, you can test dynamic NAT with IP pools by browsing to a few external siteson the Internet. If successful, you will see that the Local-Windows VM IP address (10.0.1.10) is translated tothe IP pool address of 10.200.1.100.
To test dynamic NAT with IP pools
1. Continuing on the Local-Windows VM, open PuTTY and connect over SSH to the LOCAL-FORTIGATE savedsession.
2. At the login prompt, enter the user name admin and password password.3. Run the following command to clear any existing sessions:
76 FortiGate Security 6.2 Lab GuideFortinet Technologies Inc.
DO NOT REPRINT© FORTINET
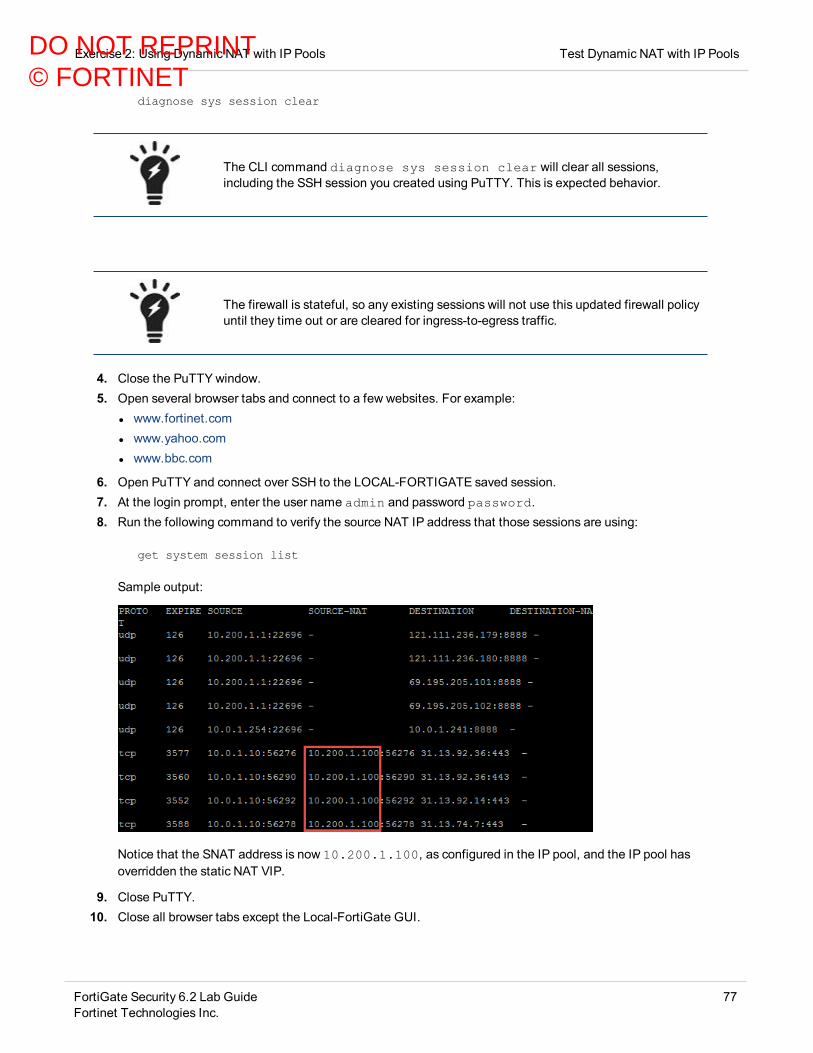
Exercise 2: Using Dynamic NAT with IP Pools Test Dynamic NAT with IP Pools
diagnose sys session clear
The CLI command diagnose sys session clear will clear all sessions,including the SSH session you created using PuTTY. This is expected behavior.
The firewall is stateful, so any existing sessions will not use this updated firewall policyuntil they time out or are cleared for ingress-to-egress traffic.
4. Close the PuTTYwindow.5. Open several browser tabs and connect to a few websites. For example:
l www.fortinet.coml www.yahoo.coml www.bbc.com
6. Open PuTTY and connect over SSH to the LOCAL-FORTIGATE saved session.7. At the login prompt, enter the user name admin and password password.8. Run the following command to verify the source NAT IP address that those sessions are using:
get system session list
Sample output:
Notice that the SNAT address is now 10.200.1.100, as configured in the IP pool, and the IP pool hasoverridden the static NAT VIP.
9. Close PuTTY.10. Close all browser tabs except the Local-FortiGate GUI.
FortiGate Security 6.2 Lab GuideFortinet Technologies Inc.
77
DO NOT REPRINT© FORTINET

Exercise 3: Configuring Central SNAT
A central SNAT policy is applied to multiple firewall policies, based on a configured central rule.
In this exercise, you will configure a central SNAT policy and test it.
PrerequisitesBefore beginning this lab, you must restore a configuration for central NAT to Local-FortiGate.
Make sure to restore the correct configuration for Local-FortiGate using the followingsteps. Failure to restore the correct configuration on Local-FortiGate will prevent youfrom doing the lab exercise.
To restore the Local-FortiGate configuration file
1. On the Local-Windows VM, open a browser and log in to the Local-FortiGate GUI at 10.0.1.254 with the username admin and password password.
2. In the upper-right corner of the screen, click admin, and then clickConfiguration >Restore.
3. Click Local PC,and then clickUpload.4. ClickDesktop >Resources > FortiGate-Security > NAT > local-central-nat.conf, and then click
Open.5. ClickOK.6. ClickOK to reboot.
78 FortiGate Security 6.2 Lab GuideFortinet Technologies Inc.
DO NOT REPRINT© FORTINET
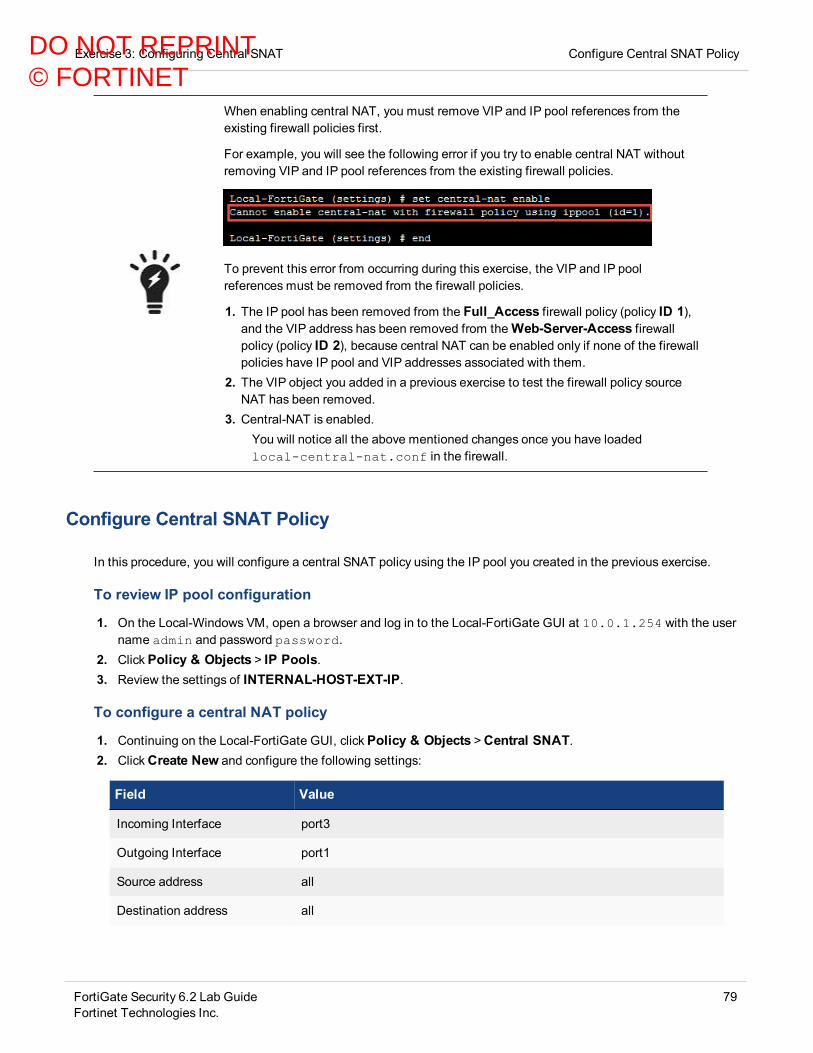
Exercise 3: Configuring Central SNAT Configure Central SNAT Policy
When enabling central NAT, you must remove VIP and IP pool references from theexisting firewall policies first.
For example, you will see the following error if you try to enable central NAT withoutremoving VIP and IP pool references from the existing firewall policies.
To prevent this error from occurring during this exercise, the VIP and IP poolreferences must be removed from the firewall policies.
1. The IP pool has been removed from the Full_Access firewall policy (policy ID 1),and the VIP address has been removed from theWeb-Server-Access firewallpolicy (policy ID 2), because central NAT can be enabled only if none of the firewallpolicies have IP pool and VIP addresses associated with them.
2. The VIP object you added in a previous exercise to test the firewall policy sourceNAT has been removed.
3. Central-NAT is enabled.You will notice all the above mentioned changes once you have loadedlocal-central-nat.conf in the firewall.
Configure Central SNAT Policy
In this procedure, you will configure a central SNAT policy using the IP pool you created in the previous exercise.
To review IP pool configuration
1. On the Local-Windows VM, open a browser and log in to the Local-FortiGate GUI at 10.0.1.254 with the username admin and password password.
2. ClickPolicy & Objects > IP Pools.3. Review the settings of INTERNAL-HOST-EXT-IP.
To configure a central NAT policy
1. Continuing on the Local-FortiGate GUI, clickPolicy & Objects >Central SNAT.2. ClickCreate New and configure the following settings:
Field Value
Incoming Interface port3
Outgoing Interface port1
Source address all
Destination address all
FortiGate Security 6.2 Lab GuideFortinet Technologies Inc.
79
DO NOT REPRINT© FORTINET

Review the Firewall Policy Exercise 3: Configuring Central SNAT
Field Value
NAT <enable>
IP Pool Configuration Use Dynamic IP Pool
Click + and select INTERNAL-HOST-EXT-IP
Protocol ANY
3. Keep the default values for the remaining settings and clickOK to save the changes.
NAT is enabled on the central SNAT policy.
If no central SNAT or matching central SNAT rule exists, FortiGate creates sessionusing the original source IP address and no NAT will be applied.
Review the Firewall Policy
In this procedure, you will review the firewall policy.
To verify that NAT is enabled on firewall policy
1. Continuing on the Local-FortiGate GUI, clickPolicy & Objects > IPv4 Policy.2. Right-click the ID column for the Full_Access firewall policy and clickEdit.3. Review the Firewall / Network Options of the Full_Access policy.
80 FortiGate Security 6.2 Lab GuideFortinet Technologies Inc.
DO NOT REPRINT© FORTINET

Exercise 3: Configuring Central SNAT Test Central SNAT
There is no option for enabling NATor using IP pools. In central SNAT, NAT on theSNAT policy controls whether the NAT is used or not.
4. ClickCancel.
Test Central SNAT
Now that your configuration is ready, you can test the behavior of the central SNAT policy.
To test central SNAT
1. On the Local-Windows VM, open PuTTY and connect over SSH to the LOCAL-FORTIGATE saved session.2. At the login prompt, enter the user name admin and password password.3. Run the following command to clear the existing sessions:
diagnose sys session clear
The CLI command diagnose sys session clear will clear all sessions,including the SSH session you created using PuTTY. This is expected behavior.
4. Close the PuTTYwindow.5. Open multiple browser tabs and connect to a few websites. For example:
FortiGate Security 6.2 Lab GuideFortinet Technologies Inc.
81
DO NOT REPRINT© FORTINET

Create a Second IP Pool Exercise 3: Configuring Central SNAT
l www.fortinet.coml www.yahoo.coml www.bbc.com
6. Open PuTTY and connect over SSH to the LOCAL-FORTIGATE saved session.7. At the login prompt, enter the user name admin and password password.8. Run the following command to verify the SNAT IP address that those sessions are using:
get system session list
Sample output:
Notice that the SNAT address is now 10.200.1.100, which matches the IP Pool configured in centralSNAT policy.
9. Close PuTTY.10. Close all browser tabs except the Local-FortiGate GUI.
Create a Second IP Pool
Now you will create a second IP Pool, which you will use later when creating a second central SNAT policy.
Take the Expert Challenge!On the Local-FortiGate GUI, create a second IP Pool named SNAT-Pool with IP range 10.200.1.50 -10.200.1.50 and the type asOverload.
If you require assistance, or to verify your work, use the step-by-step instructions that follow.
After you complete the challenge, see Create a Second SNAT Policy on page 83
82 FortiGate Security 6.2 Lab GuideFortinet Technologies Inc.
DO NOT REPRINT© FORTINET
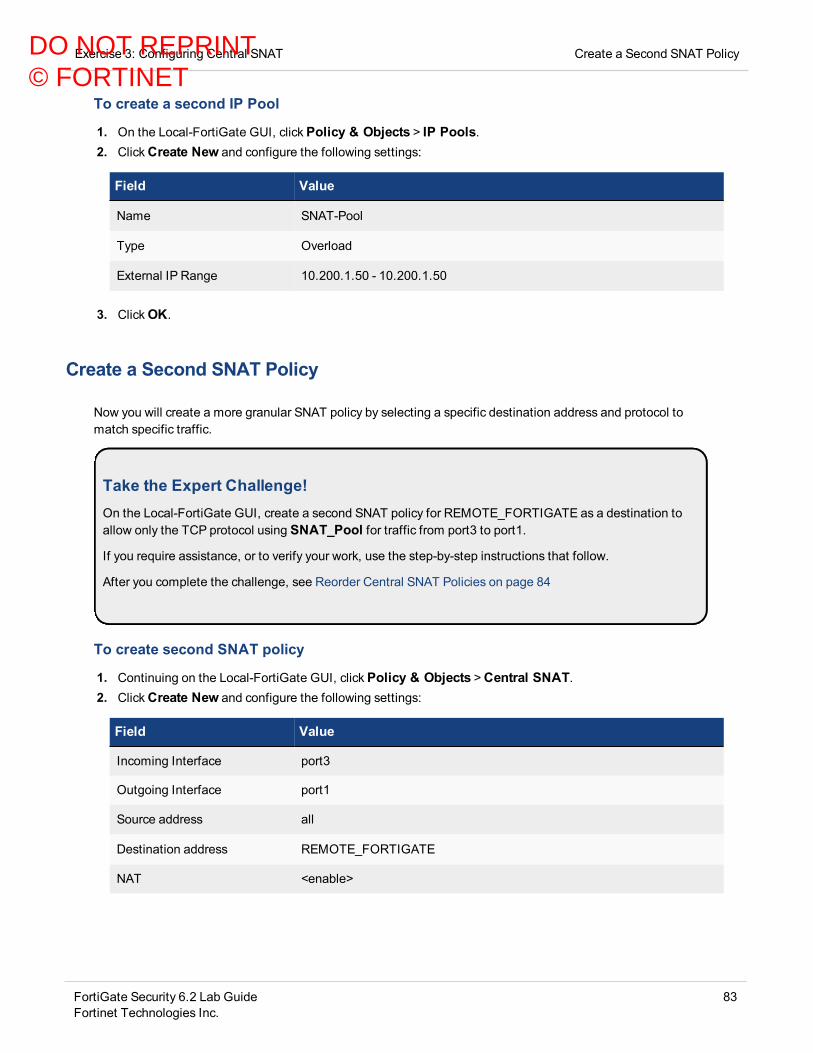
Exercise 3: Configuring Central SNAT Create a Second SNAT Policy
To create a second IP Pool
1. On the Local-FortiGate GUI, clickPolicy & Objects > IP Pools.2. ClickCreate New and configure the following settings:
Field Value
Name SNAT-Pool
Type Overload
External IP Range 10.200.1.50 - 10.200.1.50
3. ClickOK.
Create a Second SNAT Policy
Now you will create a more granular SNAT policy by selecting a specific destination address and protocol tomatch specific traffic.
Take the Expert Challenge!On the Local-FortiGate GUI, create a second SNAT policy for REMOTE_FORTIGATE as a destination toallow only the TCP protocol using SNAT_Pool for traffic from port3 to port1.
If you require assistance, or to verify your work, use the step-by-step instructions that follow.
After you complete the challenge, see Reorder Central SNAT Policies on page 84
To create second SNAT policy
1. Continuing on the Local-FortiGate GUI, clickPolicy & Objects >Central SNAT.2. ClickCreate New and configure the following settings:
Field Value
Incoming Interface port3
Outgoing Interface port1
Source address all
Destination address REMOTE_FORTIGATE
NAT <enable>
FortiGate Security 6.2 Lab GuideFortinet Technologies Inc.
83
DO NOT REPRINT© FORTINET

Reorder Central SNAT Policies Exercise 3: Configuring Central SNAT
Field Value
IP Pool Configuration Use Dynamic IP Pool
Click + and select SNAT-Pool
Protocol TCP
3. ClickOK.
Reorder Central SNAT Policies
Now you will reorder the central NAT policies to put the more granular rule at the top.
Similar to firewall policies, a central SNAT policy is processed from top to bottom and, if a match is found, thesource address and source port translate based on that central SNAT policy.
To reorder central SNAT policies
1. Continuing on the Local-FortiGate GUI, clickPolicy & Objects >Central SNAT.2. Click ID column to drag the newly created central SNAT policy above the previously created central SNAT policy.
Test Central SNAT
Now that your configuration is ready, you will test the central SNAT configuration.
84 FortiGate Security 6.2 Lab GuideFortinet Technologies Inc.
DO NOT REPRINT© FORTINET
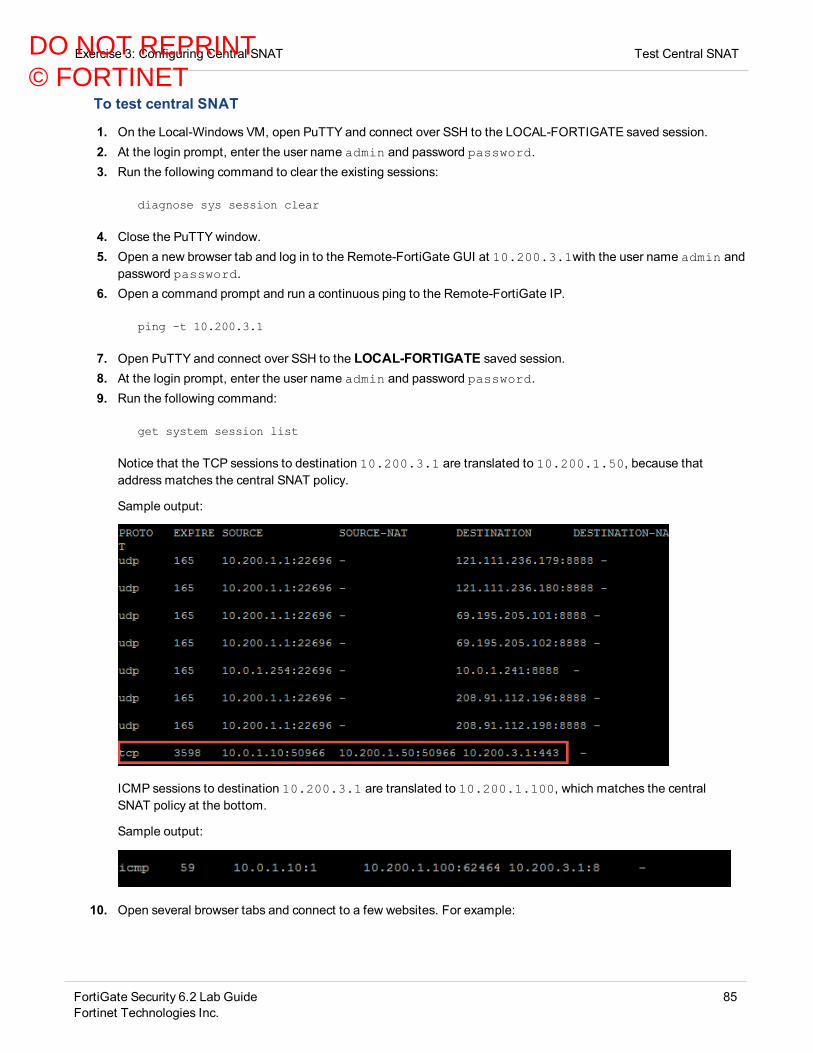
Exercise 3: Configuring Central SNAT Test Central SNAT
To test central SNAT
1. On the Local-Windows VM, open PuTTY and connect over SSH to the LOCAL-FORTIGATE saved session.2. At the login prompt, enter the user name admin and password password.3. Run the following command to clear the existing sessions:
diagnose sys session clear
4. Close the PuTTYwindow.5. Open a new browser tab and log in to the Remote-FortiGate GUI at 10.200.3.1with the user name admin and
password password.6. Open a command prompt and run a continuous ping to the Remote-FortiGate IP.
ping -t 10.200.3.1
7. Open PuTTY and connect over SSH to the LOCAL-FORTIGATE saved session.8. At the login prompt, enter the user name admin and password password.9. Run the following command:
get system session list
Notice that the TCP sessions to destination 10.200.3.1 are translated to 10.200.1.50, because thataddress matches the central SNAT policy.
Sample output:
ICMP sessions to destination 10.200.3.1 are translated to 10.200.1.100, which matches the centralSNAT policy at the bottom.
Sample output:
10. Open several browser tabs and connect to a few websites. For example:
FortiGate Security 6.2 Lab GuideFortinet Technologies Inc.
85
DO NOT REPRINT© FORTINET
Test Central SNAT Exercise 3: Configuring Central SNAT
l www.fortinet.coml www.yahoo.coml www.bbc.com
11. Return to LOCAL-FORTIGATE PuTTY session.12. Run the following command:
get system session list
Also, other TCP sessions to different destinations are translated to 10.200.1.100, based on the matchingcentral SNAT policy at the bottom.
A central SNAT policy is processed from top to bottom, similar to firewall policies.
13. Close the command prompt and PuTTY.14. Close all browser tabs except the Local-FortiGate GUI.
86 FortiGate Security 6.2 Lab GuideFortinet Technologies Inc.
DO NOT REPRINT© FORTINET
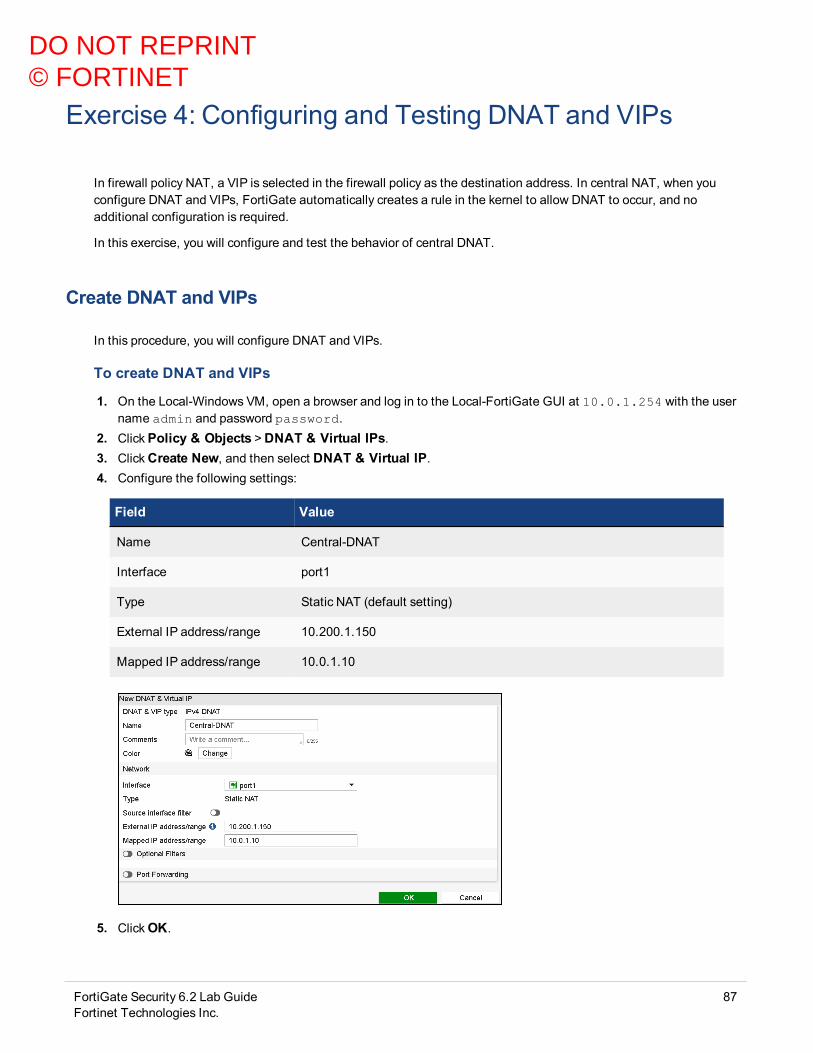
Exercise 4: Configuring and Testing DNAT and VIPs
In firewall policy NAT, a VIP is selected in the firewall policy as the destination address. In central NAT, when youconfigure DNAT and VIPs, FortiGate automatically creates a rule in the kernel to allow DNAT to occur, and noadditional configuration is required.
In this exercise, you will configure and test the behavior of central DNAT.
Create DNAT and VIPs
In this procedure, you will configure DNAT and VIPs.
To create DNAT and VIPs
1. On the Local-Windows VM, open a browser and log in to the Local-FortiGate GUI at 10.0.1.254 with the username admin and password password.
2. ClickPolicy & Objects >DNAT & Virtual IPs.3. ClickCreate New, and then select DNAT & Virtual IP.4. Configure the following settings:
Field Value
Name Central-DNAT
Interface port1
Type Static NAT (default setting)
External IP address/range 10.200.1.150
Mapped IP address/range 10.0.1.10
5. ClickOK.
FortiGate Security 6.2 Lab GuideFortinet Technologies Inc.
87
DO NOT REPRINT© FORTINET

Verify the Firewall Policy Settings Exercise 4: Configuring and Testing DNAT and VIPs
Verify the Firewall Policy Settings
Now, you will verify the firewall policy settings for the egress-to-ingress firewall policy.
To verify the firewall policy settings
1. Continuing on the Local-FortiGate GUI, clickPolicy & Objects > IPv4 Policy.2. Right click the ID column of theWeb-Server-Access firewall policy, and then clickEdit.3. Review the settings of the firewall policy.4. Try to select the DNAT & Virtual IPs address in the firewall destination address.
You will be not able to do so.
You can't select VIPs previously created in a firewall policy as a destination address.As soon as a VIP object is created, FortiGate automatically creates a rule in the kernelfor DNAT to occur.
5. Scroll to the bottom of the page and ensure that Enable this policy is enabled.
6. ClickOK.
Test DNAT and VIPs
In this procedure, you will test DNAT and VIPs by accessing the Local-Windows VM.
To test DNAT and VIPs
1. On the Remote-Windows VM, open a web browser and access the following URL:
http://10.200.1.150
If the VIP operation is successful, a simple web page opens.
2. Return to the Local-Windows VM.3. Open PuTTY and connect over SSH to the LOCAL-FORTIGATE saved session.4. At the login prompt, enter the user name admin and password password.5. Run the following command to check the destination NAT entries in the session table:
get system session list
Sample output:
88 FortiGate Security 6.2 Lab GuideFortinet Technologies Inc.
DO NOT REPRINT© FORTINET
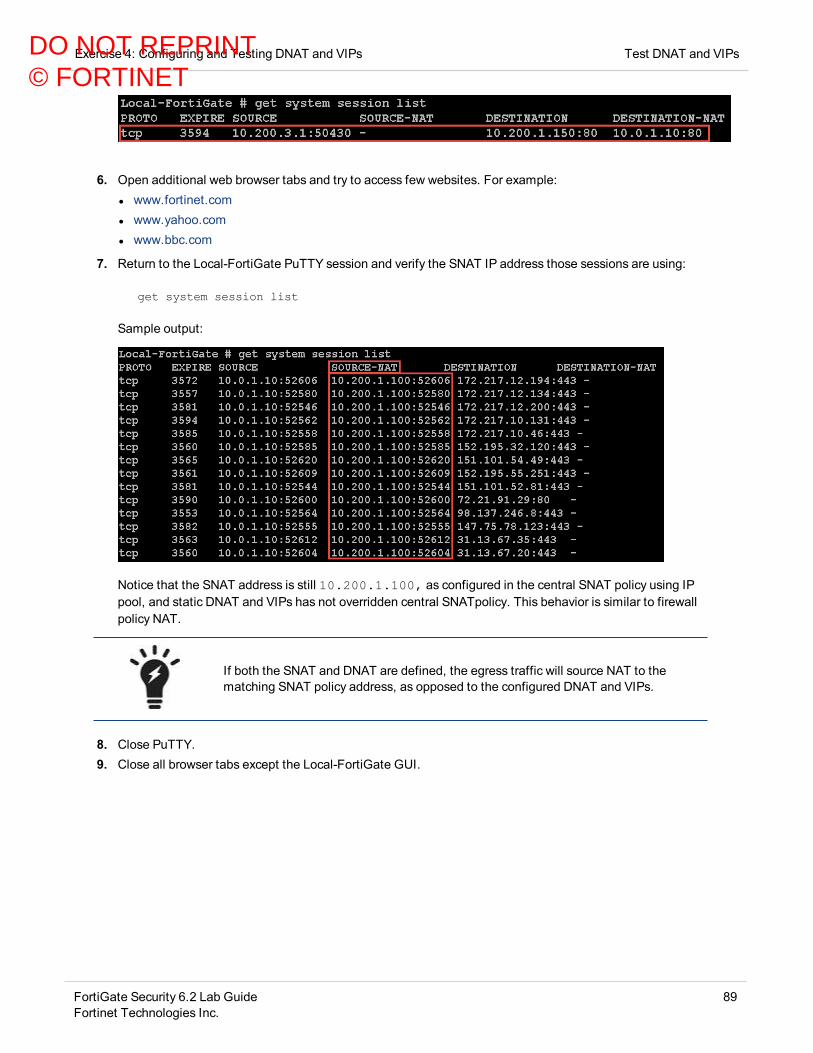
Exercise 4: Configuring and Testing DNAT and VIPs Test DNAT and VIPs
6. Open additional web browser tabs and try to access few websites. For example:l www.fortinet.coml www.yahoo.coml www.bbc.com
7. Return to the Local-FortiGate PuTTY session and verify the SNAT IP address those sessions are using:
get system session list
Sample output:
Notice that the SNAT address is still 10.200.1.100, as configured in the central SNAT policy using IPpool, and static DNAT and VIPs has not overridden central SNATpolicy. This behavior is similar to firewallpolicy NAT.
If both the SNAT and DNAT are defined, the egress traffic will source NAT to thematching SNAT policy address, as opposed to the configured DNAT and VIPs.
8. Close PuTTY.9. Close all browser tabs except the Local-FortiGate GUI.
FortiGate Security 6.2 Lab GuideFortinet Technologies Inc.
89
DO NOT REPRINT© FORTINET

Lab 5: Firewall Authentication
In this lab, you will configure FortiGate to communicate with a remote LDAP server for server-based passwordauthentication.
You will also configure captive portal, so that any user connecting to the network is prompted for their logincredentials (active authentication).
Objectivesl Configure server-based password authentication with an LDAP serverl Configure captive portal so users connecting to the network are forced to authenticate
Time to CompleteEstimated: 20 minutes
PrerequisitesBefore beginning this lab, you must restore a configuration file to Local-FortiGate.
To restore the Local-FortiGate configuration file
1. On the Local-Windows VM, open a browser and log in to the Local-FortiGate GUI at 10.0.1.254 with the username admin and password password.
2. In the upper-right corner of the screen, click admin, and then clickConfiguration >Restore.
3. Click Local PC,and then clickUpload.4. ClickDesktop >Resources >FortiGate-Security > Firewall-Authentication > local-firewall-
authentication.conf, and then clickOpen.5. ClickOK.6. ClickOK to reboot.
90 FortiGate Security 6.2 Lab GuideFortinet Technologies Inc.
DO NOT REPRINT© FORTINET

Exercise 1: Configuring Remote Authentication
In this exercise, you will configure an LDAP server on FortiGate for remote authentication, create a remoteauthentication group for remote users, and add that group as a source in a firewall policy.
Finally, you will authenticate as one of the remote users, and then monitor the login as the administrator.
Configure an LDAP Server on FortiGate
You can configure FortiGate to point to an LDAP server for server-based password authentication using thepreconfigured active directory (AD) service located on the Local-Windows VM. AD already has users available touse in this lab.
To configure an LDAP server on FortiGate
1. On the Local-Windows VM, open a browser and log in to the Local-FortiGate GUI at 10.0.1.254 with the username admin and password password.
2. ClickUser & Device > LDAP Servers, and then clickCreate New.3. Configure a server using the following settings:
Field Value
Name ADserver
Server IP/Name 10.0.1.10
This is the IP address of the Windows Server, Local-Windows VM. Formore information, see Network Topology on page 9.
Server Port 389
This is the default port for LDAP.
Common Name Identifier cn
This is the attribute name used to find the user name. AD calls this cn.
Distinguished Name ou=Training,dc=trainingAD,dc=training,dc=lab
This is the domain name for AD on the Windows Server. AD has alreadybeen preconfigured, with all users located in the Training organizationalunit (ou).
Bind Type Regular
Username ADadmin
We are using the credentials of an AD user called ADadmin toauthenticate to AD. ADadmin is located in the Users ou.
FortiGate Security 6.2 Lab GuideFortinet Technologies Inc.
91
DO NOT REPRINT© FORTINET
Assign an LDAPUser to a Firewall Group Exercise 1: Configuring Remote Authentication
Field Value
Password Training!
This is the password pre-configured for the ADadmin user. You must use itto be able to bind.
4. Click Test Connectivity.You should see a message indicating that the connection was successful.
5. ClickOK.
Assign an LDAP User to a Firewall Group
Now, you will assign an LDAP user group (AD-users) that includes two users (aduser1 and aduser2) to a firewalluser group called Remote-users on FortiGate. By doing this , you will be able to configure firewall policies to acton the firewall user group.
Usually, groups are used to more effectively manage individuals who have a shared relationship.
The Remote-users firewall group is preconfigured for you. However, you must modifyit to add the users from the remote LDAP server you configured in the previousprocedure.
Take the Expert Challenge!On Local-FortiGate (10.0.1.254), assign the Active Directory user group called AD-users to theFortiGate firewall user group called Remote-users.
If you require assistance, or to verify your work, use the step-by-step instructions that follow.
After you have completed this exercise, see Configuring Remote Authentication on page 91.
To assign a user to a user group
1. Continuing on the Local-FortiGate GUI, clickUser & Device >User Groups, and then edit the Remote-usersgroup.Notice that it's currently configured as a firewall group.
2. To add users from the remote LDAP server, in the Remote Groups table, clickAdd.
The Add Group Match dialog box opens.
92 FortiGate Security 6.2 Lab GuideFortinet Technologies Inc.
DO NOT REPRINT© FORTINET

Exercise 1: Configuring Remote Authentication Add the Remote User Group to Your Firewall Policy
3. In the Remote Server drop-down list, select ADserver.4. On theGroups tab, right-clickAD-users, and then clickAdd Selected.
The AD-users group is disabled and has a green checkmark beside it, indicating it has been added.
5. ClickOK.The users in this AD group are now included in your FortiGate Remote-users firewall user group. Only usersfrom the remote LDAP server that match this user group entry can authenticate.
6. ClickOK.
Add the Remote User Group to Your Firewall Policy
Now that the LDAP server is added to the Remote-users firewall user group, you can add the group to a firewallpolicy. This allows you to control access to network resources, because policy decisions are made for the group asa whole.
FortiGate Security 6.2 Lab GuideFortinet Technologies Inc.
93
DO NOT REPRINT© FORTINET
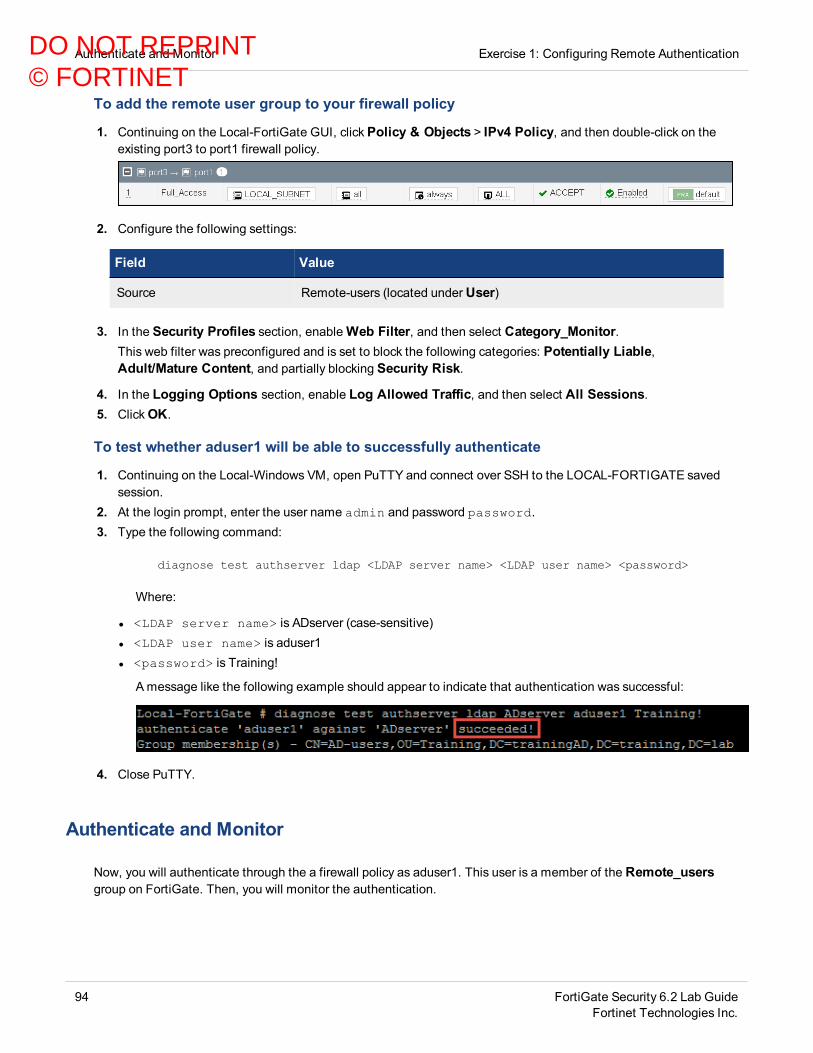
Authenticate and Monitor Exercise 1: Configuring Remote Authentication
To add the remote user group to your firewall policy
1. Continuing on the Local-FortiGate GUI, clickPolicy & Objects > IPv4 Policy, and then double-click on theexisting port3 to port1 firewall policy.
2. Configure the following settings:
Field Value
Source Remote-users (located underUser)
3. In the Security Profiles section, enableWeb Filter, and then select Category_Monitor.This web filter was preconfigured and is set to block the following categories: Potentially Liable,Adult/Mature Content, and partially blocking Security Risk.
4. In the Logging Options section, enable Log Allowed Traffic, and then select All Sessions.5. ClickOK.
To test whether aduser1 will be able to successfully authenticate
1. Continuing on the Local-Windows VM, open PuTTY and connect over SSH to the LOCAL-FORTIGATE savedsession.
2. At the login prompt, enter the user name admin and password password.3. Type the following command:
diagnose test authserver ldap <LDAP server name> <LDAP user name> <password>
Where:
l <LDAP server name> is ADserver (case-sensitive)l <LDAP user name> is aduser1l <password> is Training!
Amessage like the following example should appear to indicate that authentication was successful:
4. Close PuTTY.
Authenticate and Monitor
Now, you will authenticate through the a firewall policy as aduser1. This user is a member of the Remote_usersgroup on FortiGate. Then, you will monitor the authentication.
94 FortiGate Security 6.2 Lab GuideFortinet Technologies Inc.
DO NOT REPRINT© FORTINET
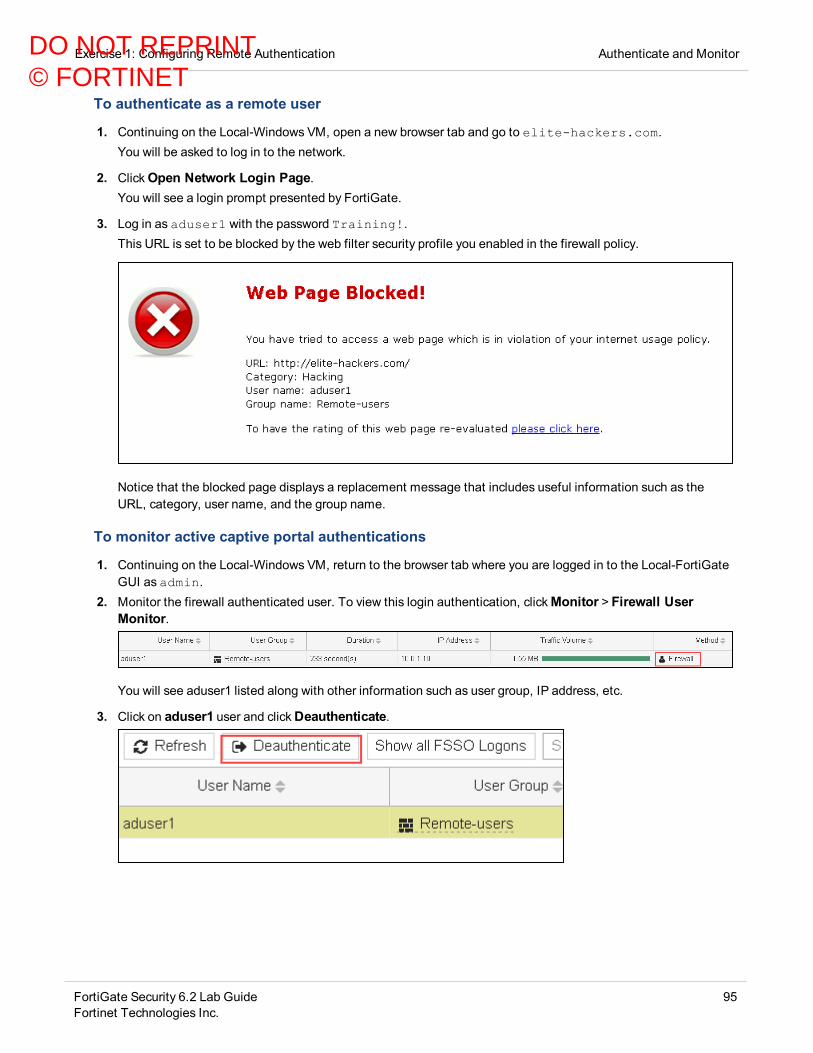
Exercise 1: Configuring Remote Authentication Authenticate and Monitor
To authenticate as a remote user
1. Continuing on the Local-Windows VM, open a new browser tab and go to elite-hackers.com.You will be asked to log in to the network.
2. ClickOpen Network Login Page.You will see a login prompt presented by FortiGate.
3. Log in as aduser1 with the password Training!.This URL is set to be blocked by the web filter security profile you enabled in the firewall policy.
Notice that the blocked page displays a replacement message that includes useful information such as theURL, category, user name, and the group name.
To monitor active captive portal authentications
1. Continuing on the Local-Windows VM, return to the browser tab where you are logged in to the Local-FortiGateGUI as admin.
2. Monitor the firewall authenticated user. To view this login authentication, clickMonitor > Firewall UserMonitor.
You will see aduser1 listed along with other information such as user group, IP address, etc.
3. Click on aduser1 user and clickDeauthenticate.
FortiGate Security 6.2 Lab GuideFortinet Technologies Inc.
95
DO NOT REPRINT© FORTINET

Authenticate and Monitor Exercise 1: Configuring Remote Authentication
While the CLI config user setting dictates how long a user authenticatingthrough captive portal can remain authenticated, you can choose to manually revoke acaptive portal user's authentication by selecting the user in the Firewall UserMonitor list and clicking Deauthenticate. Once deauthenticated, the user disappearsfrom the list, because it is reserved for active users only.
4. ClickOK in the confirm prompt.
This deauthenticates the user. The user must log in again to access the resources protected by the firewallpolicy.
Remove User Group from Firewall Policy
Now, you need to remove the user group assigned on the firewall policy for authentication.
To remove the remote user group from your firewall policy
1. Continuing on the Local-FortiGate GUI, clickPolicy & Objects > IPv4 Policy, and then double-click the existingport3 to port1 firewall policy.
2. Remove the user group from Source on the firewall policy.
96 FortiGate Security 6.2 Lab GuideFortinet Technologies Inc.
DO NOT REPRINT© FORTINET
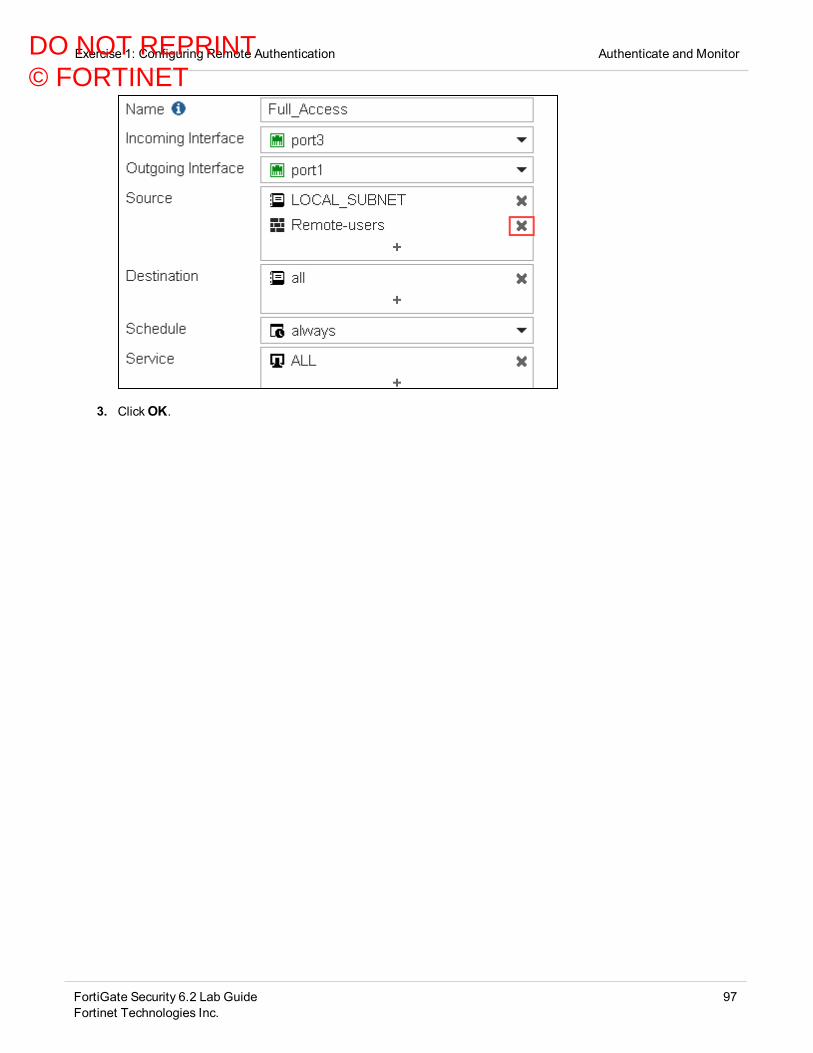
Exercise 1: Configuring Remote Authentication Authenticate and Monitor
3. ClickOK.
FortiGate Security 6.2 Lab GuideFortinet Technologies Inc.
97
DO NOT REPRINT© FORTINET
Exercise 2: Configuring Captive Portal
In this exercise, you will configure captive portal and restrict access to a specific user group. Captive portal is aconvenient way to authenticate web users on wired or WiFi networks using an HTML form that requests a username and password (active authentication).
This exercise involves creating a user group (and adding a user to it), enabling captive portal, restricting accessbased on the user group group associated with captive portal, and enabling the disclaimer message.
Finally, you will authenticate through captive portal and monitor the authentication.
Create a User Group for Captive Portal
Because the goal is to enable captive portal based on a specific group, you must first create a user group andthen add a user to the group. For the purposes of this exercise, you will add the user student to the group. Theuse student is a local user on FortiGate that was preconfigured.
To create a user group for captive portal
1. On the Local-Windows VM, open a browser and log in to the Local-FortiGate GUI at 10.0.1.254 with the username admin and password password.
2. ClickUser & Device >User Groups, and then clickCreate New.3. Create a captive portal user group using the following settings:
Field Value
Name CP-group
Type Firewall
Members student
4. ClickOK.
Enable Captive Portal
Now, you will enable captive portal on a wired network.
To enable captive portal
1. Continuing on the Local-FortiGate GUI, clickNetwork > Interfaces, and then edit port3.This port handles incoming traffic. For more information, see Network Topology on page 9.
2. In the Admission Control section, enable captive portal using the following settings:
98 FortiGate Security 6.2 Lab GuideFortinet Technologies Inc.
DO NOT REPRINT© FORTINET

Exercise 2: Configuring Captive Portal Enable the Disclaimer Message
Field Value
Security Mode Captive Portal
Authentication Portal Local
User Access Restricted to Groups
User Groups CP-group
3. ClickOK.
Enable the Disclaimer Message
To provide a disclaimer message to users who are logging in through captive portal, you must enable disclaimers.Because you are enabling captive portal through a wired interface, you can enable disclaimers only using the CLI.
If you enable captive portal using WiFi, you can enable disclaimers using the GUI(WiFi & Switch Controller >SSID). You are using a wired interface in this lab.
To enable the disclaimer message
1. Continuing on the Local-Windows VM, open PuTTY and connect over SSH to the LOCAL-FORTIGATE savedsession.
2. At the login prompt, enter the user name admin and password password.3. Type the following commands:
config firewall policyedit 1set disclaimer enableend
4. Close PuTTY.
Authenticate and Monitor
Now that captive portal is configured and the disclaimer is enabled, you can test the configuration byauthenticating through captive portal as the student user. Then, you will monitor the authentication as theadmin user.
To authenticate through captive portal
1. Continuing on the Local-Windows VM, open a new browser tab and go to a website, such as www.eicar.org.2. When prompted, log in with the username student and password fortinet.
FortiGate Security 6.2 Lab GuideFortinet Technologies Inc.
99
DO NOT REPRINT© FORTINET

Authenticate and Monitor Exercise 2: Configuring Captive Portal
The Terms and Disclaimer Agreement dialog opens.
3. ClickYes, I agree.After you agree to the terms, you are redirected to the website you originally requested.
4. Open additional browser tabs and access the website again websites through captive portal.5. Leave all browser tabs open and continue to the next procedure.
100 FortiGate Security 6.2 Lab GuideFortinet Technologies Inc.
DO NOT REPRINT© FORTINET

Exercise 2: Configuring Captive Portal Authenticate and Monitor
To monitor active captive portal authentications
1. Continuing on the Local-Windows VM, return to the browser tab where you are logged in to the Local-FortiGateGUI as admin.
2. Monitor the student user. To view this login authentication, clickMonitor > Firewall User Monitor.
While the CLI config user setting dictates how long a user authenticatingthrough captive portal can remain authenticated, you can choose to manually revoke acaptive portal user's authentication by selecting the user in the Firewall UserMonitor list and clicking Deauthenticate. Once deauthenticated, the user disappearsfrom the list, because it is reserved for active users only.
3. Select student and clickDeauthenticate to manually end the user's session.4. ClickOK.5. Close the browser.
FortiGate Security 6.2 Lab GuideFortinet Technologies Inc.
101
DO NOT REPRINT© FORTINET

Lab 6: Logging and Monitoring
In this lab, you will configure log settings on Local-FortiGate, configure alert email, and view logs.
Objectivesl Configure logging on FortiGate so FortiGate understands how to log trafficl Configure threat weightl Monitor logs through alert emailsl View logs on the Local-FortiGate GUI
Time to CompleteEstimated: 35 minutes
PrerequisitesBefore beginning this lab, you must restore a configuration file to Local-FortiGate. After the reboot, you must alsocheck your web filter license status, because you will be using web filtering in this lab and it must show aslicensed.
To restore the Local-FortiGate configuration file
1. On the Local-Windows VM, open a browser and log in to the Local-FortiGate GUI at 10.0.1.254 with the username admin and password password.
2. In the upper-right corner of the screen, click admin, and then clickConfiguration >Restore.
3. Click Local PC, and then clickUpload.4. ClickDesktop >Resources > FortiGate-Security > Logging > local-logging.conf, and then clickOpen.5. ClickOK.6. ClickOK to reboot.
102 FortiGate Security 6.2 Lab GuideFortinet Technologies Inc.
DO NOT REPRINT© FORTINET
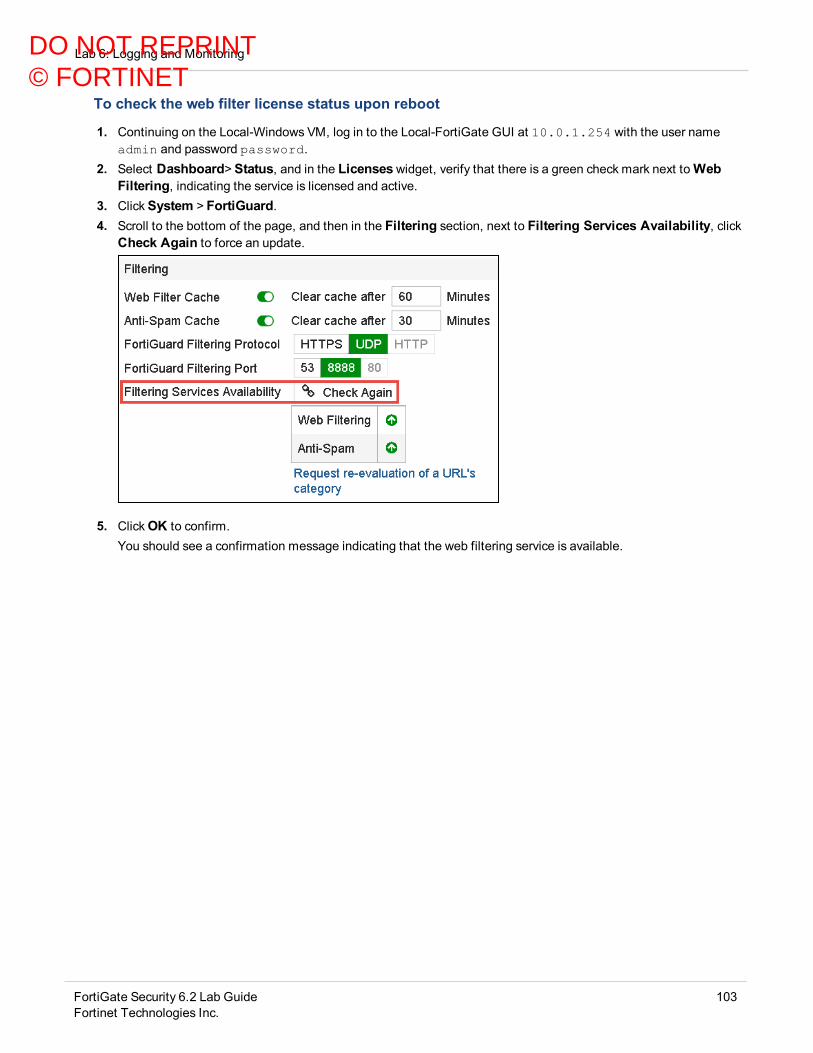
Lab 6: Logging and Monitoring
To check the web filter license status upon reboot
1. Continuing on the Local-Windows VM, log in to the Local-FortiGate GUI at 10.0.1.254 with the user nameadmin and password password.
2. Select Dashboard>Status, and in the Licenseswidget, verify that there is a green check mark next toWebFiltering, indicating the service is licensed and active.
3. ClickSystem > FortiGuard.4. Scroll to the bottom of the page, and then in the Filtering section, next to Filtering Services Availability, click
Check Again to force an update.
5. ClickOK to confirm.You should see a confirmation message indicating that the web filtering service is available.
FortiGate Security 6.2 Lab GuideFortinet Technologies Inc.
103
DO NOT REPRINT© FORTINET

Exercise 1: Configuring Log Settings
To record network activity, you must configure logging on FortiGate. In this exercise, you will configure the logsettings.
Configure Log Settings
Configuring log settings does not generate logs directly on FortiGate. Rather, log settings define if, where, andhow a log is stored.
The objective of this exercise is to prepare the log settings on Local-FortiGate. For the purposes of this lab, thisincludes:
l Enabling disk logging, so that logs are stored locally on FortiGatel Enabling Historical FortiView, so that more than just real-time information is captured in the FortiView
dashboardsl Configuring event logging for all activity, to track and monitor events that occur on FortiGatel Disabling Local Traffic logging, to prevent filling up your disk too quickly with traffic going directly to and from
FortiGatel Configuring FortiGate to resolve hostnames, so that FortiGate performs reverse DNS lookups for all the IPs and
makes searching logs easier
Take the Expert Challenge!Configure the log settings on Local-FortiGate (10.0.1.254 | admin / password) according to theobjective stated above.
If you require assistance, or to verify your work, use the step-by-step instructions that follow.
After you complete the challenge, see Configure Threat Weight on page 106.
To configure the log settings
1. On the Local-Windows VM, open a browser and log in to the Local-FortiGate GUI at 10.0.1.254 with the username admin and password password.
2. Click Log & Report > Log Settings.3. In the Local Log section, enable the following:
Field Value
Disk <enable>
Enable Historical FortiView <enable>
104 FortiGate Security 6.2 Lab GuideFortinet Technologies Inc.
DO NOT REPRINT© FORTINET
Exercise 1: Configuring Log Settings Configure Log Settings
4. In the Log Settings section, make sure the following settings are configured:
Field Value
Event Logging All
Event logs provide all of the system information generated by the FortiGatedevice (they are not caused by traffic passing through firewall policies).However, it is good practice to track and monitor events that occur onFortiGate.
Local Traffic Log Customize - with all traffic logging options cleared
These logs record traffic directly to and from FortiGate and can fill up your diskquickly if not properly managed and monitored. For the purposes of this lab,leave all checkboxes associated with local traffic log options, cleared.
5. In theGUI Preferences section, configure the following:
Field Value
Resolve Hostnames <enable>
Resolving hostnames requires FortiGate to perform reverse DNS lookups forall the IPs and makes searching logs easier.
6. ClickApply.
FortiGate Security 6.2 Lab GuideFortinet Technologies Inc.
105
DO NOT REPRINT© FORTINET
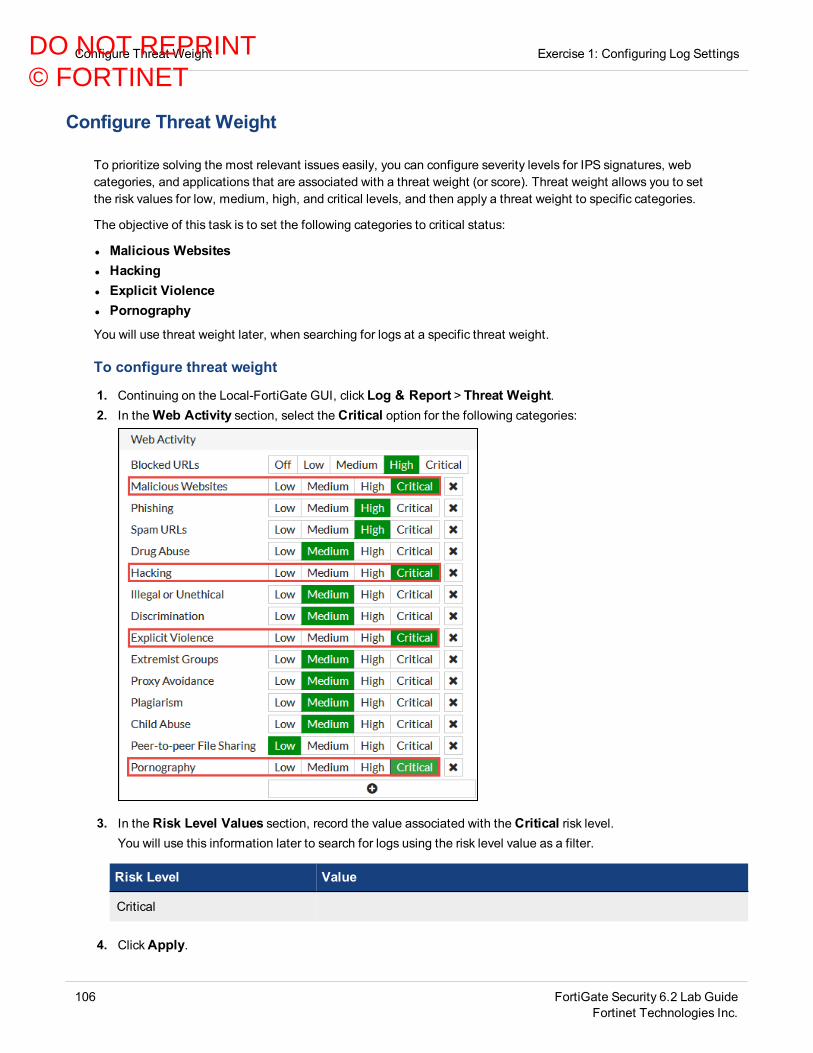
Configure Threat Weight Exercise 1: Configuring Log Settings
Configure Threat Weight
To prioritize solving the most relevant issues easily, you can configure severity levels for IPS signatures, webcategories, and applications that are associated with a threat weight (or score). Threat weight allows you to setthe risk values for low, medium, high, and critical levels, and then apply a threat weight to specific categories.
The objective of this task is to set the following categories to critical status:
l Malicious Websitesl Hackingl Explicit Violencel Pornography
You will use threat weight later, when searching for logs at a specific threat weight.
To configure threat weight
1. Continuing on the Local-FortiGate GUI, click Log & Report > Threat Weight.2. In theWeb Activity section, select the Critical option for the following categories:
3. In the Risk Level Values section, record the value associated with the Critical risk level.You will use this information later to search for logs using the risk level value as a filter.
Risk Level Value
Critical
4. ClickApply.
106 FortiGate Security 6.2 Lab GuideFortinet Technologies Inc.
DO NOT REPRINT© FORTINET

Exercise 2: Enabling Logging on Firewall Policies
Now that you've defined if, where, and how a log is stored using the FortiGate log settings, you must definewhether logs are generated. To accomplish this, you must enable logging on your firewall policy. A log messagecan generate only when logging is enabled on a firewall policy.
Enable Logging on a Firewall Policy
For the purposes of this lab, two firewall policies have been created for you. However, you will now need toconfigure these firewall polices for logging.
The two firewall policies are:
l IPS: You will use this firewall policy to capture IPS traffic.l Full Access: You will use this firewall policy to capture antivirus, web filter, DNS, and application control traffic.
Take the Expert Challenge!On the Local-FortiGate GUI (10.0.1.254 | admin/password), configure logging for all sessions onboth the IPS and Full Access firewall policies. Enable the following security profiles:
IPS
l IPS | default
Full Access
l AntiVirus | defaultl Web Filter | Category-block-and-warningl DNS Filter | defaultl Application Control | block-high-risk
If you require assistance, or to verify your work, use the step-by-step instructions that follow.
After you complete the challenge, see Monitoring Logs Through Alert Email on page 110.
To enable logging on the IPS firewall policy
1. On the Local-Windows VM, open a browser and log in to the Local-FortiGate GUI at 10.0.1.254 with the username admin and password password.
2. ClickPolicy & Objects > IPv4 Policy, and then edit the IPS firewall policy.
FortiGate Security 6.2 Lab GuideFortinet Technologies Inc.
107
DO NOT REPRINT© FORTINET

Enable Logging on a Firewall Policy Exercise 2: Enabling Logging on Firewall Policies
3. In the Security Profiles section, configure the following:
Security Profiles Profile
IPS default
SSL Inspection certificate-inspection
4. In the Logging Options section, enable Log Allowed Traffic, and then select All Sessions.Remember, you will not get logs of any kind if Log Allowed Traffic is not enabled.
5. ClickOK.You've successfully enabled logging on your firewall policy. Later in this lab, you will test these log settings.
To enable logging on the Full Access firewall policy
1. Continuing on the Local-FortiGate GUI, clickPolicy & Objects > IPv4 Policy, and then edit the Full Accessfirewall policy.
2. In the Security Profiles section, configure the following:
108 FortiGate Security 6.2 Lab GuideFortinet Technologies Inc.
DO NOT REPRINT© FORTINET
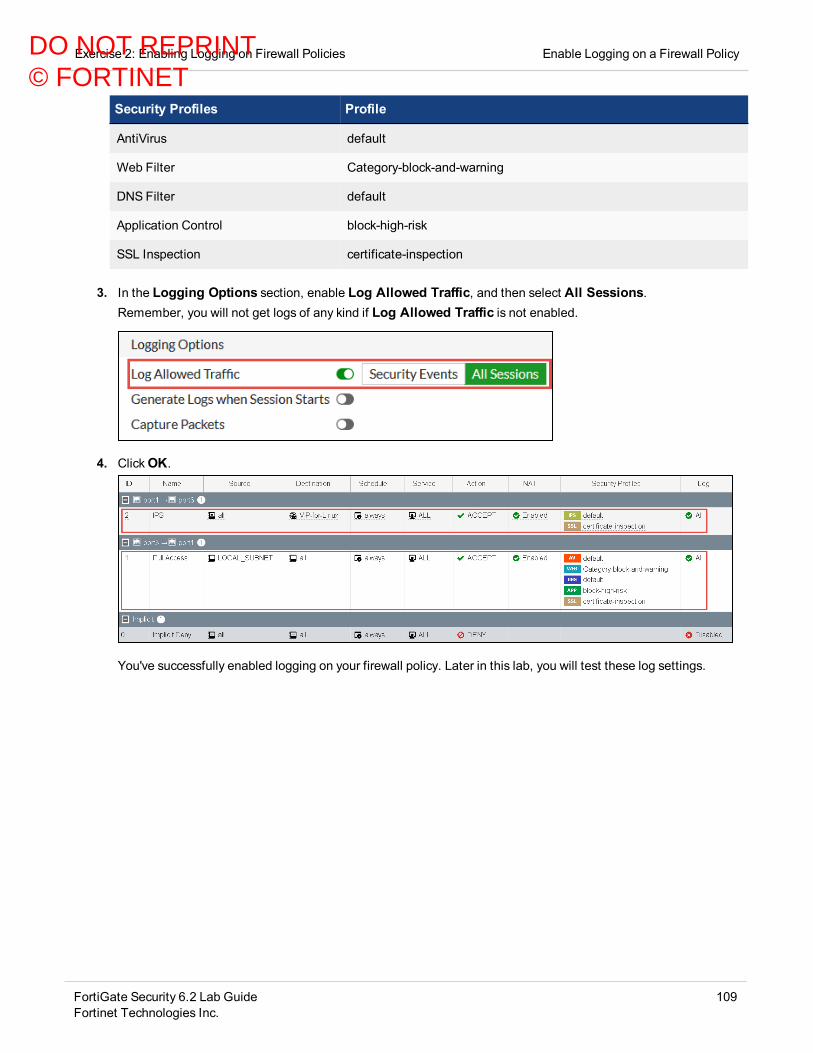
Exercise 2: Enabling Logging on Firewall Policies Enable Logging on a Firewall Policy
Security Profiles Profile
AntiVirus default
Web Filter Category-block-and-warning
DNS Filter default
Application Control block-high-risk
SSL Inspection certificate-inspection
3. In the Logging Options section, enable Log Allowed Traffic, and then select All Sessions.Remember, you will not get logs of any kind if Log Allowed Traffic is not enabled.
4. ClickOK.
You've successfully enabled logging on your firewall policy. Later in this lab, you will test these log settings.
FortiGate Security 6.2 Lab GuideFortinet Technologies Inc.
109
DO NOT REPRINT© FORTINET
Exercise 3: Monitoring Logs Through Alert Email
In this exercise, you will configure alert emails, run some traffic through Local-FortiGate, and view alert emails.
Configure Alert Emails
Because you can’t always be physically at the FortiGate device, you can monitor events by setting up alertemails. Alert emails provide an efficient and direct method of notifying an administrator of events.
An SMTPmail server is required for alert email to operate. Because configuring a mailserver is out of scope for this lab,one has already been configured for you. You canview the email service configuration on the Local-FortiGate GUI by clicking System >Advanced.
To configure email alerts
1. On the Local-Windows VM, open a browser and log in to the Local-FortiGate GUI at 10.0.1.254 with the username admin and password password.
2. Click Log & Report >Email Alert Settings.3. Turn on the Enabled switch.
The page loads with configuration options.
4. In the Email Alert Settings section, configure the following:
Field Value
From [email protected]
Alert parameter Events
Interval 1
5. In the Security section, enable the following:l Intrusion detectedl Web Filter blocked traffic
6. ClickApply.
Generate Traffic
For the purposes of this lab, you must generate traffic so you can see the logs collected by FortiGate.
110 FortiGate Security 6.2 Lab GuideFortinet Technologies Inc.
DO NOT REPRINT© FORTINET

Exercise 3: Monitoring Logs Through Alert Email Generate Traffic
The traffic you generate will go through Local-FortiGate. You have already enabledthe security policy on the IPS firewall policy and enabled logging for all sessions.
You will use two different tools to create different types of traffic.
Generate Traffic Through FITThe firewall inspection tester (FIT) program on the FIT VM generates web browsing traffic, application control,botnet IP hits, malware URLs, and malware downloads.
In this lab, you will direct FIT-generated traffic through Local-FortiGate. The FIT is behind port3 on Local-FortiGate. The traffic from FIT will go through the Full Access firewall policy. For more information, seeNetwork Topology on page 9.
You configured the Full Access firewall policy to include the following security policies and logging options:
Because FIT-generated traffic will originate from the IP of the FIT VM (10.0.1.20),all these logs will show the same source IP in the logs. This is a limitation of the labenvironment. In a real-world scenario, you will likely see many different source IPs foryour traffic.
To generate traffic through FIT
1. Continuing on the Local-Windows VM, open PuTTY and connect over SSH to the FIT saved session.2. At the login prompt, enter student with the password password.
FortiGate Security 6.2 Lab GuideFortinet Technologies Inc.
111
DO NOT REPRINT© FORTINET

Generate Traffic Exercise 3: Monitoring Logs Through Alert Email
3. Type the following commands:
cd FIT
./fit.py all --repeat
Traffic begins to generate and repeats the script each time it completes.
4. Leave the PuTTY session open (you can minimize it) so traffic continues to generate.This will run throughout for the remainder of this lab.
Do not close the FIT PuTTY session or traffic will stop generating.
Generate Traffic Through NiktoNikto generates intrusion prevention system (IPS) traffic.
You will direct the Nikto-generated traffic through Local-FortiGate. Nitko is running on the Linux VM, and thetraffic will go through the egress to ingress firewall policy named IPS. For more information, see NetworkTopology on page 9.
You configured the IPS firewall policy to include the following security policy and logging options:
112 FortiGate Security 6.2 Lab GuideFortinet Technologies Inc.
DO NOT REPRINT© FORTINET
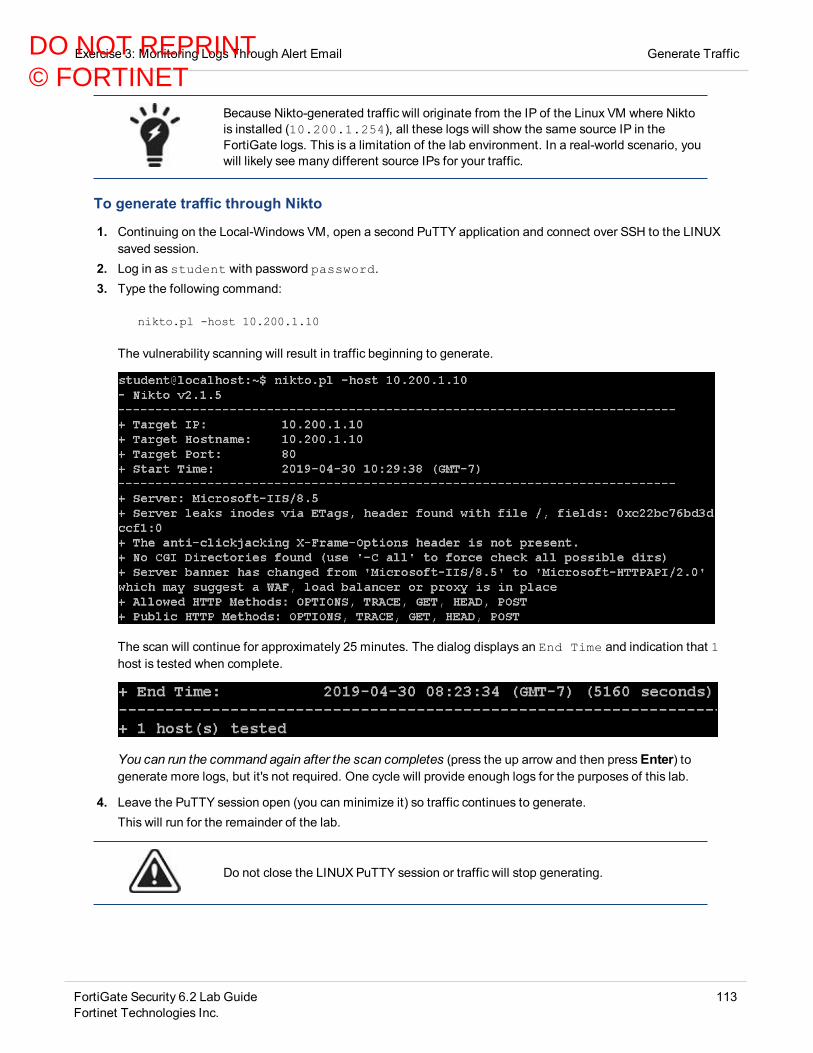
Exercise 3: Monitoring Logs Through Alert Email Generate Traffic
Because Nikto-generated traffic will originate from the IP of the Linux VM where Niktois installed (10.200.1.254), all these logs will show the same source IP in theFortiGate logs. This is a limitation of the lab environment. In a real-world scenario, youwill likely see many different source IPs for your traffic.
To generate traffic through Nikto
1. Continuing on the Local-Windows VM, open a second PuTTY application and connect over SSH to the LINUXsaved session.
2. Log in as student with password password.3. Type the following command:
nikto.pl -host 10.200.1.10
The vulnerability scanning will result in traffic beginning to generate.
The scan will continue for approximately 25 minutes. The dialog displays an End Time and indication that 1host is tested when complete.
You can run the command again after the scan completes (press the up arrow and then pressEnter) togenerate more logs, but it's not required. One cycle will provide enough logs for the purposes of this lab.
4. Leave the PuTTY session open (you can minimize it) so traffic continues to generate.This will run for the remainder of the lab.
Do not close the LINUX PuTTY session or traffic will stop generating.
FortiGate Security 6.2 Lab GuideFortinet Technologies Inc.
113
DO NOT REPRINT© FORTINET

View Alert Emails Exercise 3: Monitoring Logs Through Alert Email
View Alert Emails
Now that traffic is being sent through your FortiGate, you can check the [email protected] email to see if anyalerts have been generated based on that traffic. You configured the alert email to generate an alert every oneminute any time an intrusion is detected by the IPS security profile on the IPS firewall policy, and any time theweb filter security profile blocks traffic on the Full Access firewall policy.
The log message that accompanies an alert provides more details about the traffic that caused the alert.
To view your alert emails
1. Continuing on Local-Windows, on the desktop, open Mozilla Thunderbird.
2. Select the inbox of the [email protected] email account and clickGet Messages.You should see a message in the admin inbox with a subject of "Message meets Alert condition". If no emailappears in the inbox, wait 30 seconds, and then clickGet Messages again.
3. Open any alert email and review the log message.As you can see, the log message is in raw format. In the web filter example below (you may receive adifferent log message), the log message header provides the type (utm) and subtype (webfilter). Thelog message body provides information about the web filter security profile that was applied to the traffic(Category_block-and-warning), the action it took (blocked), and the category description of thetraffic (Malicious Websites).
4. Open another alert email and record the following information from a single web filter log:
Field Value
date
time
logid
subtype
level
sessionid
114 FortiGate Security 6.2 Lab GuideFortinet Technologies Inc.
DO NOT REPRINT© FORTINET

Exercise 3: Monitoring Logs Through Alert Email View Alert Emails
Field Value
profile
catdesc
crscore
You will locate this log on the Local-FortiGate GUI in the next exercise.
5. Select the email of the log you recorded by clicking the star icon to the left of the email subject.The star icon turns yellow.
If you would like to review more alert emails, clickGet Messages in your admin inboxagain. You configured your alert email to send messages that meet the alert conditionevery one minute.
6. Close the Thunderbird email client when you are finished.
FortiGate Security 6.2 Lab GuideFortinet Technologies Inc.
115
DO NOT REPRINT© FORTINET
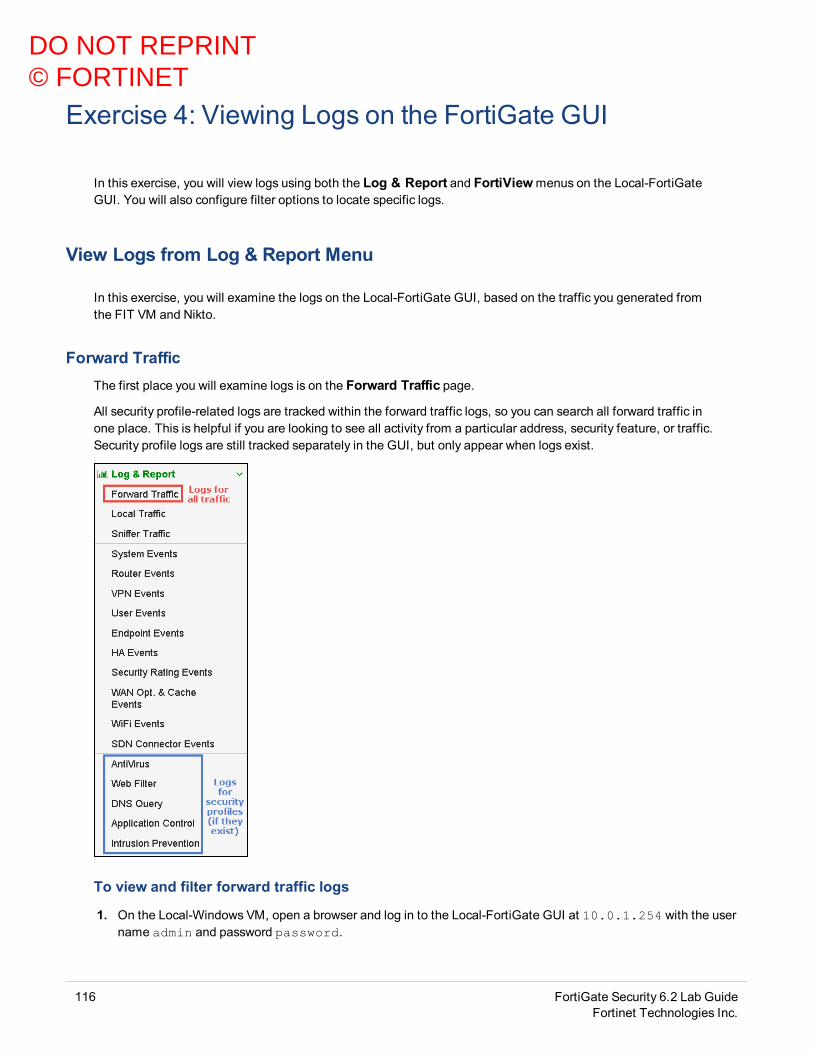
Exercise 4: Viewing Logs on the FortiGate GUI
In this exercise, you will view logs using both the Log & Report and FortiViewmenus on the Local-FortiGateGUI. You will also configure filter options to locate specific logs.
View Logs from Log & Report Menu
In this exercise, you will examine the logs on the Local-FortiGate GUI, based on the traffic you generated fromthe FIT VM and Nikto.
Forward TrafficThe first place you will examine logs is on the Forward Traffic page.
All security profile-related logs are tracked within the forward traffic logs, so you can search all forward traffic inone place. This is helpful if you are looking to see all activity from a particular address, security feature, or traffic.Security profile logs are still tracked separately in the GUI, but only appear when logs exist.
To view and filter forward traffic logs
1. On the Local-Windows VM, open a browser and log in to the Local-FortiGate GUI at 10.0.1.254 with the username admin and password password.
116 FortiGate Security 6.2 Lab GuideFortinet Technologies Inc.
DO NOT REPRINT© FORTINET

Exercise 4: Viewing Logs on the FortiGate GUI View Logs from Log & Report Menu
2. Click Log & Report > Forward Traffic.3. To narrow down the logs (results), on the search bar, clickAdd Filter, and then add some filters. For example:
Filter Value
Date/Time Last 5 Minutes
This filters on all logs from the last 5 minutes.
Result Deny (all)
This filters on all blocked traffic.
Threat Score >=50
This filters on all Web activity greater than or equal to the Critical (50) risklevel.
Remember, you set Malicious Websites, Hacking, Explicit Violence, andPornography to the critical risk level.
If the information on which you are filtering does not appear in the table, you mayneed to add the related column to the table. To do so, right-click any column in thetable and select the column you want to add. For example, to view the Threat Scorecolumn, add Threat Score. At the bottom of the list, clickApply to refresh the tablewith the new column.
4. Double-click the log you want to view.The Log Details pane appears on the right side of the page.
FortiGate Security 6.2 Lab GuideFortinet Technologies Inc.
117
DO NOT REPRINT© FORTINET
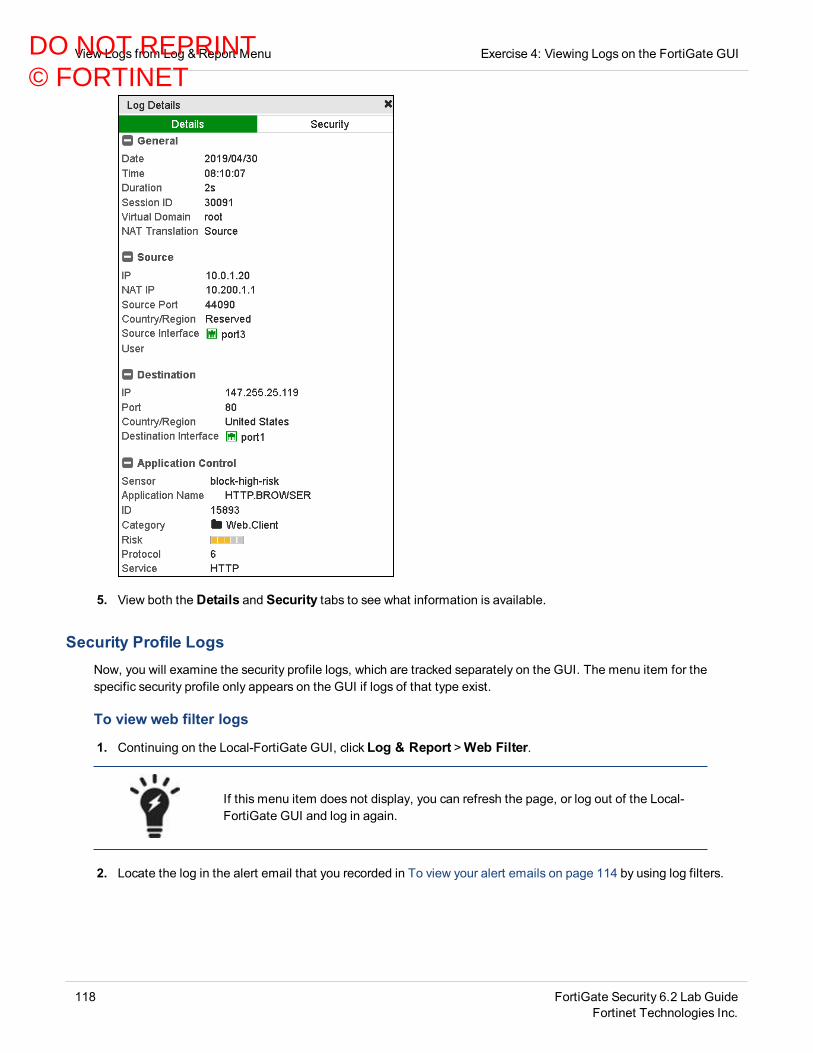
View Logs from Log & Report Menu Exercise 4: Viewing Logs on the FortiGate GUI
5. View both the Details and Security tabs to see what information is available.
Security Profile LogsNow, you will examine the security profile logs, which are tracked separately on the GUI. The menu item for thespecific security profile only appears on the GUI if logs of that type exist.
To view web filter logs
1. Continuing on the Local-FortiGate GUI, click Log & Report >Web Filter.
If this menu item does not display, you can refresh the page, or log out of the Local-FortiGate GUI and log in again.
2. Locate the log in the alert email that you recorded in To view your alert emails on page 114 by using log filters.
118 FortiGate Security 6.2 Lab GuideFortinet Technologies Inc.
DO NOT REPRINT© FORTINET

Exercise 4: Viewing Logs on the FortiGate GUI View and Filter IPS Logs
Stop and think!
Which filter would best return the specific log you are seeking? For example, filters based on log subtype orcrscore would most likely return too many logs, making the search inefficient.
Answer: Session ID.
3. After you locate the log, double-click the entry to view the log details.As you can see, the log details in the alert email are the same as the log details on the GUI. The onlydifference is the format. Alert emails provide the log detail information in raw format, while the GUI providesthe log detail information in a formatted view.
View and Filter IPS Logs
In this exercise, you will view and filter IPS logs.
Take the Expert Challenge!On the Local-FortiGate GUI (10.0.1.254), complete the following:
l View the GUI page that shows intrusion prevention logs onlyl Filter for a log with the attack nameWeb.Server.Password.Files.Accessl View information about the attack on FortiGuard
If you require assistance, or to verify your work, use the step-by-step instructions that follow.
After you complete the challenge, see View Logs in FortiView on page 120.
To view and filter IPS logs
1. Continuing on the Local-FortiGate GUI, click Log & Report > Intrusion Prevention.2. Double-click any IPS log to view more information about an attack.3. In the Log Details pane, under Intrusion Prevention, click the reference link.
FortiGate Security 6.2 Lab GuideFortinet Technologies Inc.
119
DO NOT REPRINT© FORTINET
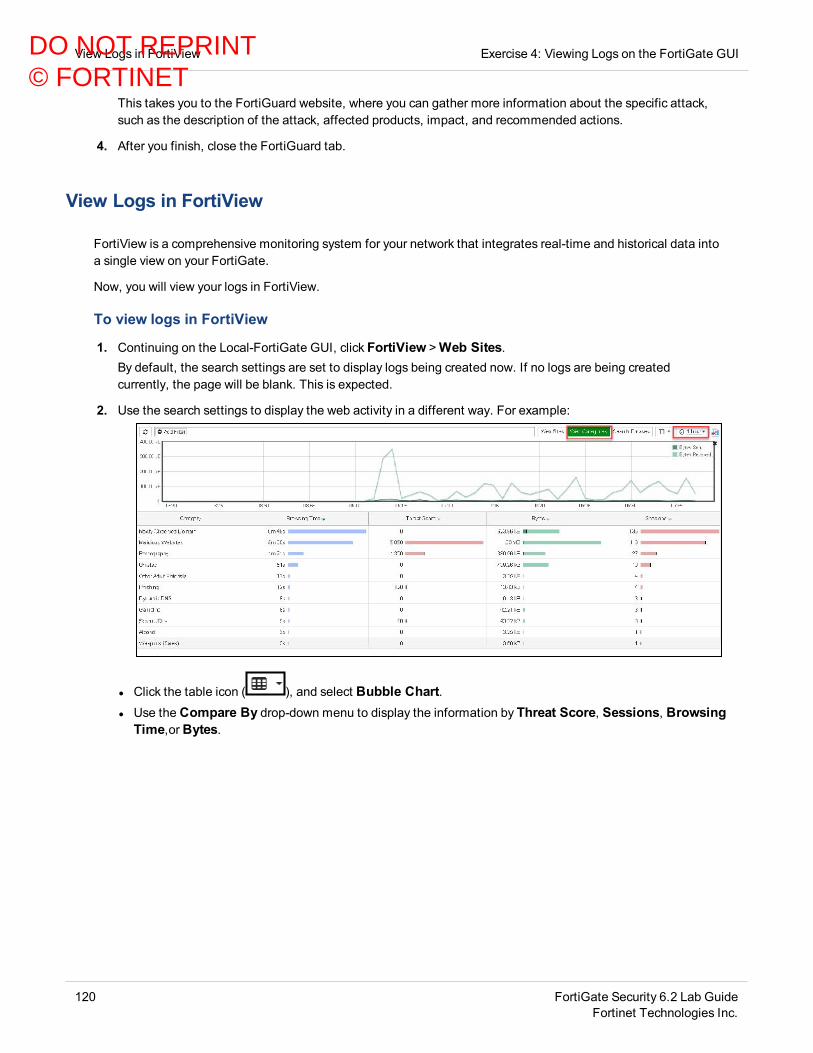
View Logs in FortiView Exercise 4: Viewing Logs on the FortiGate GUI
This takes you to the FortiGuard website, where you can gather more information about the specific attack,such as the description of the attack, affected products, impact, and recommended actions.
4. After you finish, close the FortiGuard tab.
View Logs in FortiView
FortiView is a comprehensive monitoring system for your network that integrates real-time and historical data intoa single view on your FortiGate.
Now, you will view your logs in FortiView.
To view logs in FortiView
1. Continuing on the Local-FortiGate GUI, click FortiView >Web Sites.By default, the search settings are set to display logs being created now. If no logs are being createdcurrently, the page will be blank. This is expected.
2. Use the search settings to display the web activity in a different way. For example:
l Click the table icon ( ), and select Bubble Chart.l Use the Compare By drop-down menu to display the information by Threat Score, Sessions, BrowsingTime,orBytes.
120 FortiGate Security 6.2 Lab GuideFortinet Technologies Inc.
DO NOT REPRINT© FORTINET

Exercise 4: Viewing Logs on the FortiGate GUI View Logs in FortiView
Close both the FIT and LINUX PuTTY sessions to stop log generation.
FortiGate Security 6.2 Lab GuideFortinet Technologies Inc.
121
DO NOT REPRINT© FORTINET

Lab 7: Certificate Operations
In this lab, you will configure SSL deep inspection using a self-signed SSL certificate on FortiGate to inspectoutbound traffic. You will also import a web server certificate on FortiGate and configure inbound SSL inspection.
Objectivesl Configure and enable SSL deep inspection on outbound trafficl Import an external web server certificatel Configure and enable SSL deep inspection on inbound traffic
Time to CompleteEstimated: 40 minutes
PrerequisitesBefore beginning this lab, you must restore a configuration file on each FortiGate.
Make sure to restore the correct configuration on each FortiGate using the followingsteps. Failure to restore the correct configuration on each FortiGate will prevent youfrom doing the lab exercise.
To restore the Remote-FortiGate configuration file
1. On the Local-Windows VM, open a browser and log in to the Remote-FortiGate GUI at 10.200.3.1 with theuser name admin and password password.
2. In the upper-right corner of the screen, click admin, and then clickConfiguration >Restore.
3. Click Local PC, and then clickUpload.4. ClickDesktop >Resources > FortiGate-Security >Certificate-Operations > remote-certificate-
operations.conf, and then clickOpen.
122 FortiGate Security 6.2 Lab GuideFortinet Technologies Inc.
DO NOT REPRINT© FORTINET

Lab 7: Certificate Operations
5. ClickOK.6. ClickOK to reboot.
To restore the Local-FortiGate configuration file
1. On the Local-Windows VM, open a browser and log in to the Local-FortiGate GUI at 10.0.1.254 with the username admin and password password.
2. In the upper-right corner of the screen, click admin, and then clickConfiguration >Restore.
3. Click Local PC, and then clickUpload.4. ClickDesktop >Resources > FortiGate-Security >Certificate-Operations > local-certificate-
operations.conf, and then clickOpen.5. ClickOK.6. ClickOK to reboot.
FortiGate Security 6.2 Lab GuideFortinet Technologies Inc.
123
DO NOT REPRINT© FORTINET
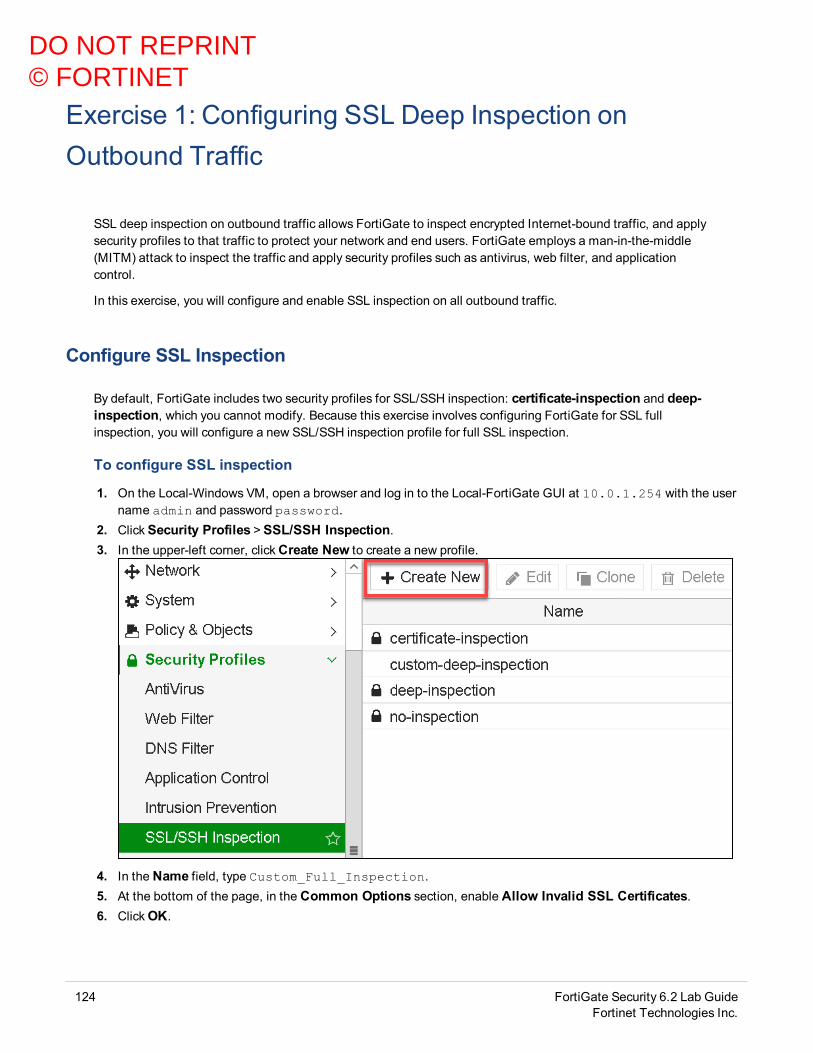
Exercise 1: Configuring SSL Deep Inspection onOutbound Traffic
SSL deep inspection on outbound traffic allows FortiGate to inspect encrypted Internet-bound traffic, and applysecurity profiles to that traffic to protect your network and end users. FortiGate employs a man-in-the-middle(MITM) attack to inspect the traffic and apply security profiles such as antivirus, web filter, and applicationcontrol.
In this exercise, you will configure and enable SSL inspection on all outbound traffic.
Configure SSL Inspection
By default, FortiGate includes two security profiles for SSL/SSH inspection: certificate-inspection and deep-inspection, which you cannot modify. Because this exercise involves configuring FortiGate for SSL fullinspection, you will configure a new SSL/SSH inspection profile for full SSL inspection.
To configure SSL inspection
1. On the Local-Windows VM, open a browser and log in to the Local-FortiGate GUI at 10.0.1.254 with the username admin and password password.
2. ClickSecurity Profiles >SSL/SSH Inspection.3. In the upper-left corner, clickCreate New to create a new profile.
4. In the Name field, type Custom_Full_Inspection.5. At the bottom of the page, in the Common Options section, enable Allow Invalid SSL Certificates.6. ClickOK.
124 FortiGate Security 6.2 Lab GuideFortinet Technologies Inc.
DO NOT REPRINT© FORTINET

Exercise 1: Configuring SSL Deep Inspection on Outbound Traffic Enable SSL Inspection on a Firewall Policy
Enable SSL Inspection on a Firewall Policy
You must enable SSL inspection on a firewall policy to start inspecting traffic. However, you cannot enable SSLinspection by itself. The firewall policy must have one or more other security profiles enabled, because enablingSSL inspection tells FortiGate only how to handle encrypted traffic—you still need to tell FortiGate which traffic toinspect. For the purposes of this lab, you will enable the default web filter security profile.
To enable SSL inspection on a firewall policy
1. Continuing on the Local-FortiGate GUI, clickPolicy & Objects > IPv4 Policy.2. Double-click the Full_Access firewall policy to edit it.3. In the Security Profiles section, enable the following security profiles:
Security Profile Value
Web Filter default
SSL Inspection Custom_Full_Inspection
This is the profile you created previously.
4. In the Logging Options section, enable Log Allowed Traffic, and select All Sessions.5. ClickOK.
Install the Fortinet_CA_SSL Certificate
FortiGate includes an SSL certificate, called Fortinet_CA_SSL, that you can use for full SSL inspection. It issigned by a certificate authority (CA) called FortiGate CA, which is not public. Because the CA is not public, yourbrowser will display a certificate warning each time a user connects to an HTTPS site. This is because thebrowser is receiving certificates signed by FortiGate, which is a CA it does not know and trust. You can avoid thiswarning by downloading the Fortinet_CA_SSL certificate and installing it on all the workstations as a publicauthority.
In this procedure, you will first test access to an HTTPS site without the Fortinet_CA_SSL certificate installed.Then, you will install the Fortinet_CA_SSL certificate and test again.
To test SSL deep inspection without a trusted CA
1. On the Local-Windows VM, open a new browser tab and go to an HTTPS site, such as:
https://salesforce.com
2. ClickAdvanced.Notice the certificate warning. This appears because the browser is receiving certificates signed by theFortiGate CA's private key, and the corresponding CA certificate is not in the Local-Windows certificate store.
FortiGate Security 6.2 Lab GuideFortinet Technologies Inc.
125
DO NOT REPRINT© FORTINET

Install the Fortinet_CA_SSL Certificate Exercise 1: Configuring SSL Deep Inspection on Outbound Traffic
3. Leave the browser tab open and continue to the next procedure. Do not add the exception.
To install the Fortinet_CA_SSL certificate in the browser
1. Return to the browser tab where you are logged in to the Local-FortiGate GUI, and clickSystem >Certificates.2. In the Local CA Certificates section, click Fortinet_CA_SSL, and then clickDownload.
3. ClickSave File.The certificate downloads to yourDownloads folder.
4. In Firefox, in the upper-right corner of the window, click theOpen menu icon, and then clickOptions.
126 FortiGate Security 6.2 Lab GuideFortinet Technologies Inc.
DO NOT REPRINT© FORTINET

Exercise 1: Configuring SSL Deep Inspection on Outbound Traffic Install the Fortinet_CA_SSL Certificate
5. ClickPrivacy & Security.
6. In the Certificates section, clickView Certificates.
7. In the Certificate Manager window, click the Authorities tab, and then click Import.
FortiGate Security 6.2 Lab GuideFortinet Technologies Inc.
127
DO NOT REPRINT© FORTINET

Test Full SSL Inspection Exercise 1: Configuring SSL Deep Inspection on Outbound Traffic
8. ClickDownloads> Fortinet_CA_SSL.cer, and then clickOpen.9. In the Downloading Certificatewindow, select Trust this CA to identify websites, and then clickOK.
The Fortinet_CA_SSL certificate is added to the FirefoxAuthorities certificate store.
10. ClickOK.11. Restart Firefox.
Test Full SSL Inspection
Now that you have added the Fortinet_CA_SSL certificate to your browser, you will not receive any certificatewarnings when accessing a secure site.
The CA that signed this certificate is not public, but the browser is aware of it because you added it as a trustedauthority in the previous exercise.
128 FortiGate Security 6.2 Lab GuideFortinet Technologies Inc.
DO NOT REPRINT© FORTINET
Exercise 1: Configuring SSL Deep Inspection on Outbound Traffic Test Full SSL Inspection
To test SSL full inspection
1. Continuing on the Local-Windows VM, open a new browser and go to a secure site, such as:
https://salesforce.com
This time you are passed through to the site without any certificate warnings.
2. Close the browser.
FortiGate Security 6.2 Lab GuideFortinet Technologies Inc.
129
DO NOT REPRINT© FORTINET

Exercise 2: Configuring SSL Deep Inspection on InboundTraffic
You can use SSL deep inspection on inbound traffic to protect internal resources, such as web servers, that userscan access on the Internet. Implementing inbound SSL deep inspection allows you to apply antivirus, IPS, andweb application firewall (WAF) on encrypted traffic destined for your web servers, to protect them from maliciousfiles and traffic.
In this exercise, you will import an external web server certificate to Local-FortiGate, and then configure SSLdeep inspection to protect a web server with an antivirus profile.
Configure a Virtual IP and Firewall Policy
First, you will configure a virtual IP to map an external IP address to the web server's internal IP address. Then,you will configure a firewall policy to allow access to the virtual IP.
Take the Expert Challenge!l On the Local-FortiGate GUI, configure a new virtual IP to map the external IP, 10.200.1.200, to theinternal IP, 10.0.1.10, using port1 as the external interface. Use VIP-WEB-SERVER as the name ofyour virtual IP.
l Create a new firewall policy to allow all inbound traffic to the virtual IP. Use Web_Server_Access as thename of the firewall policy.
If you require assistance, or to verify your work, use the step-by-step instructions that follow.
After you complete the challenge, see Install the Training CACertificate on page 131.
To configure a virtual IP
1. On the Local-Windows VM, open a browser and log in to the Local-FortiGate GUI at 10.0.1.254 with the username admin and password password.
2. ClickPolicy & Objects >Virtual IPs.3. ClickCreate New, and select Virtual IP.4. Configure the following settings:
Field Value
Name VIP-WEB-SERVER
Interface port1
130 FortiGate Security 6.2 Lab GuideFortinet Technologies Inc.
DO NOT REPRINT© FORTINET

Exercise 2: Configuring SSL Deep Inspection on Inbound Traffic Install the Training CACertificate
Field Value
External IP Address/Range 10.200.1.200
Mapped IP Address/Range 10.0.1.10
5. ClickOK.
To configure a firewall policy
1. Continuing on the Local-FortiGate GUI, clickPolicy & Objects > IPv4 Policy.2. ClickCreate New, and then create a new firewall policy using the following settings:
Field Value
Name Web_Server_Access
Incoming Interface port1
Outgoing Interface port3
Source all
Destination VIP-WEB-SERVER
Schedule always
Service ALL
Action ACCEPT
NAT <disable>
3. ClickOK.
Install the Training CA Certificate
Now, you will verify access to the web server URL, and then install the Training CA certificate on Firefox toeliminate certificate errors.
FortiGate Security 6.2 Lab GuideFortinet Technologies Inc.
131
DO NOT REPRINT© FORTINET
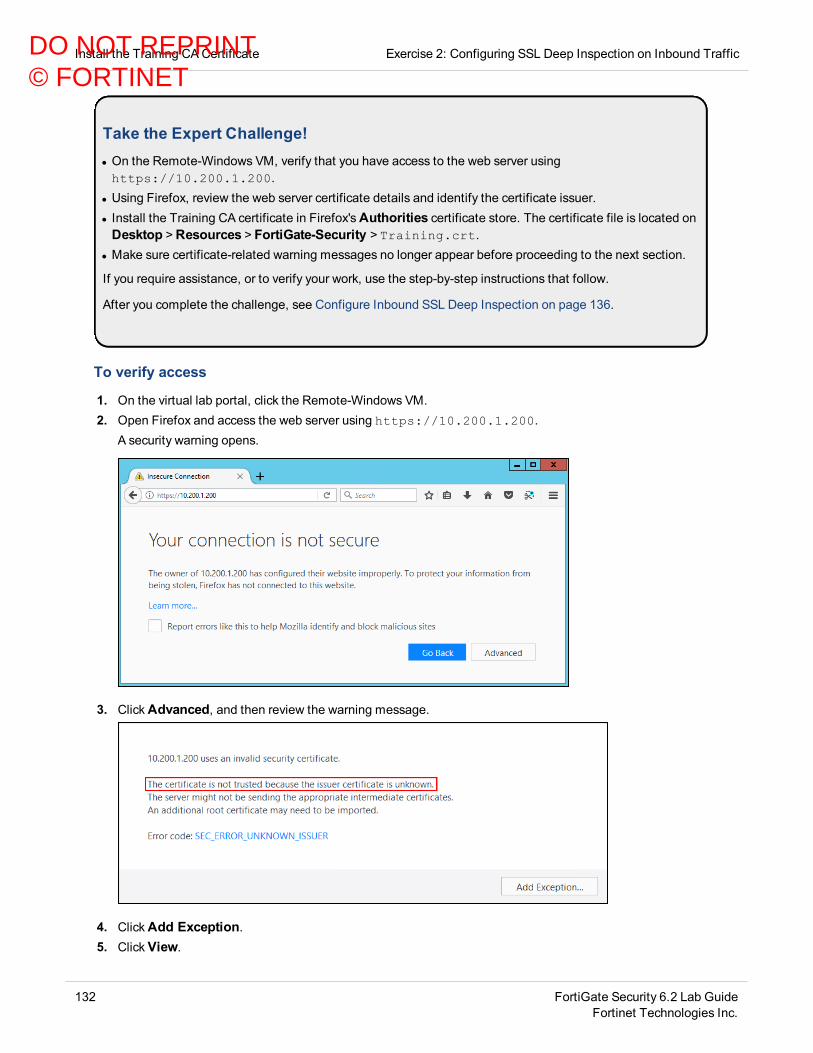
Install the Training CACertificate Exercise 2: Configuring SSL Deep Inspection on Inbound Traffic
Take the Expert Challenge!l On the Remote-Windows VM, verify that you have access to the web server usinghttps://10.200.1.200.
l Using Firefox, review the web server certificate details and identify the certificate issuer.l Install the Training CA certificate in Firefox'sAuthorities certificate store. The certificate file is located onDesktop >Resources > FortiGate-Security > Training.crt.
l Make sure certificate-related warning messages no longer appear before proceeding to the next section.
If you require assistance, or to verify your work, use the step-by-step instructions that follow.
After you complete the challenge, see Configure Inbound SSL Deep Inspection on page 136.
To verify access
1. On the virtual lab portal, click the Remote-Windows VM.2. Open Firefox and access the web server using https://10.200.1.200.
A security warning opens.
3. ClickAdvanced, and then review the warning message.
4. ClickAdd Exception.5. ClickView.
132 FortiGate Security 6.2 Lab GuideFortinet Technologies Inc.
DO NOT REPRINT© FORTINET

Exercise 2: Configuring SSL Deep Inspection on Inbound Traffic Install the Training CACertificate
6. In the Issued By section, review the information.
7. ClickClose.8. ClickCancel.
To install the Training CA certificate
1. Continuing on the Remote-Windows VM, in the upper-right corner of the Firefox browser, click theOpen menuicon, and then clickOptions.
FortiGate Security 6.2 Lab GuideFortinet Technologies Inc.
133
DO NOT REPRINT© FORTINET

Install the Training CACertificate Exercise 2: Configuring SSL Deep Inspection on Inbound Traffic
2. ClickPrivacy & Security.
3. In the Certificates section, clickView Certificates.
134 FortiGate Security 6.2 Lab GuideFortinet Technologies Inc.
DO NOT REPRINT© FORTINET
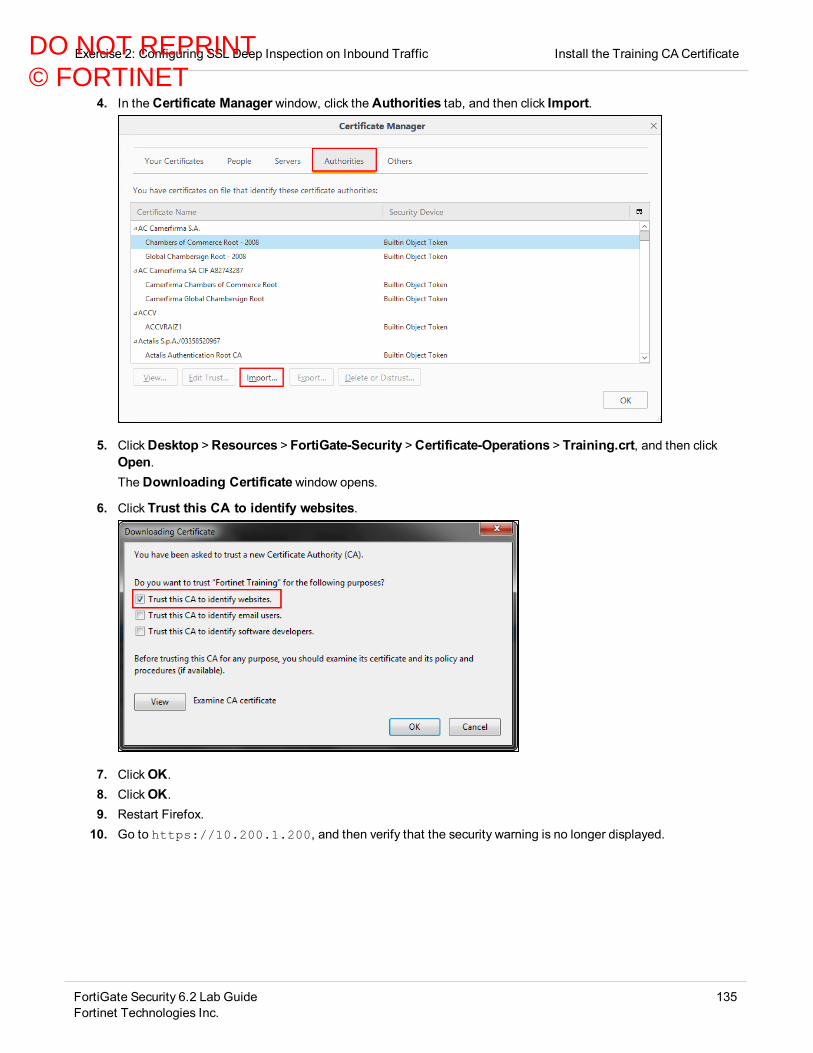
Exercise 2: Configuring SSL Deep Inspection on Inbound Traffic Install the Training CACertificate
4. In the Certificate Manager window, click the Authorities tab, and then click Import.
5. ClickDesktop >Resources > FortiGate-Security >Certificate-Operations > Training.crt, and then clickOpen.The Downloading Certificatewindow opens.
6. Click Trust this CA to identify websites.
7. ClickOK.8. ClickOK.9. Restart Firefox.10. Go to https://10.200.1.200, and then verify that the security warning is no longer displayed.
FortiGate Security 6.2 Lab GuideFortinet Technologies Inc.
135
DO NOT REPRINT© FORTINET
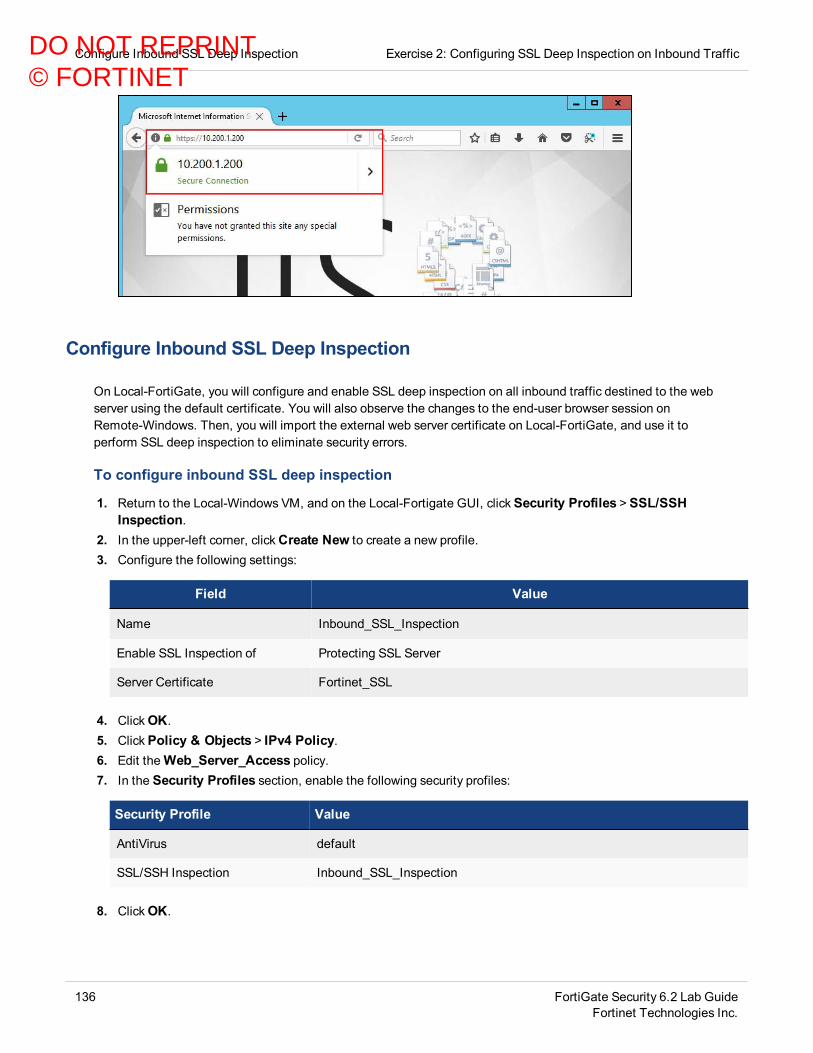
Configure Inbound SSL Deep Inspection Exercise 2: Configuring SSL Deep Inspection on Inbound Traffic
Configure Inbound SSL Deep Inspection
On Local-FortiGate, you will configure and enable SSL deep inspection on all inbound traffic destined to the webserver using the default certificate. You will also observe the changes to the end-user browser session onRemote-Windows. Then, you will import the external web server certificate on Local-FortiGate, and use it toperform SSL deep inspection to eliminate security errors.
To configure inbound SSL deep inspection
1. Return to the Local-Windows VM, and on the Local-Fortigate GUI, clickSecurity Profiles >SSL/SSHInspection.
2. In the upper-left corner, clickCreate New to create a new profile.3. Configure the following settings:
Field Value
Name Inbound_SSL_Inspection
Enable SSL Inspection of Protecting SSL Server
Server Certificate Fortinet_SSL
4. ClickOK.5. ClickPolicy & Objects > IPv4 Policy.6. Edit theWeb_Server_Access policy.7. In the Security Profiles section, enable the following security profiles:
Security Profile Value
AntiVirus default
SSL/SSH Inspection Inbound_SSL_Inspection
8. ClickOK.
136 FortiGate Security 6.2 Lab GuideFortinet Technologies Inc.
DO NOT REPRINT© FORTINET
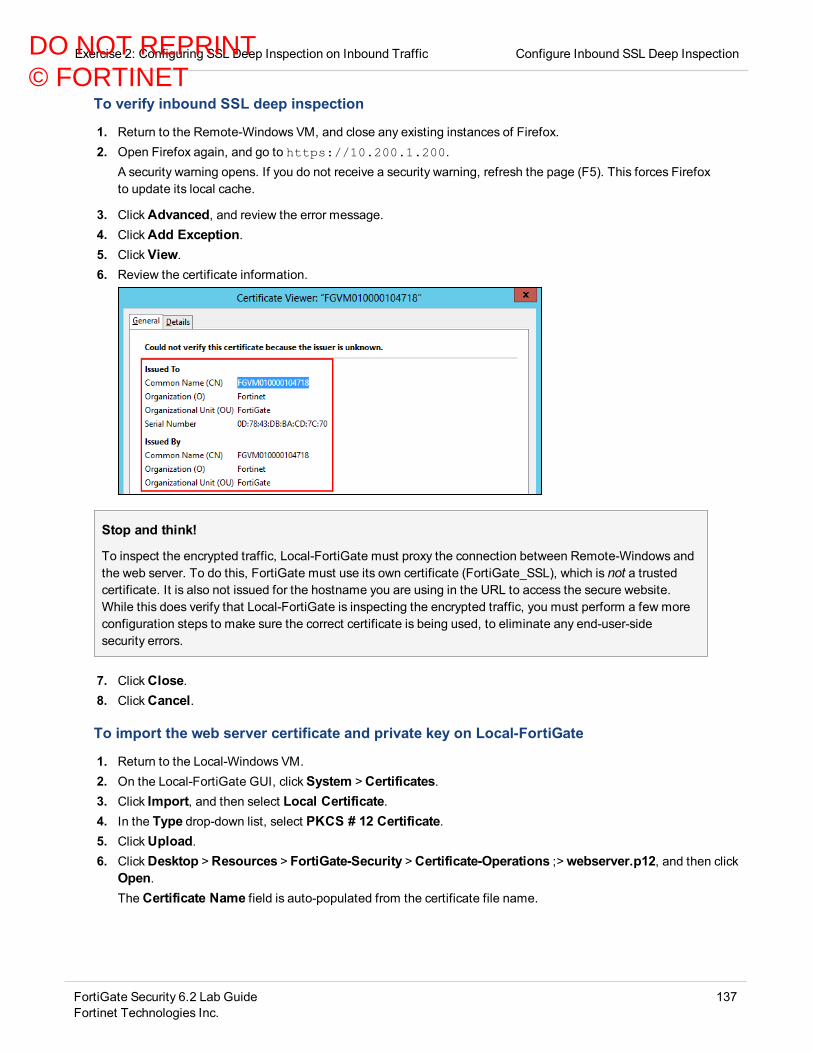
Exercise 2: Configuring SSL Deep Inspection on Inbound Traffic Configure Inbound SSL Deep Inspection
To verify inbound SSL deep inspection
1. Return to the Remote-Windows VM, and close any existing instances of Firefox.2. Open Firefox again, and go to https://10.200.1.200.
A security warning opens. If you do not receive a security warning, refresh the page (F5). This forces Firefoxto update its local cache.
3. ClickAdvanced, and review the error message.4. ClickAdd Exception.5. ClickView.6. Review the certificate information.
Stop and think!
To inspect the encrypted traffic, Local-FortiGate must proxy the connection between Remote-Windows andthe web server. To do this, FortiGate must use its own certificate (FortiGate_SSL), which is not a trustedcertificate. It is also not issued for the hostname you are using in the URL to access the secure website.While this does verify that Local-FortiGate is inspecting the encrypted traffic, you must perform a few moreconfiguration steps to make sure the correct certificate is being used, to eliminate any end-user-sidesecurity errors.
7. ClickClose.8. ClickCancel.
To import the web server certificate and private key on Local-FortiGate
1. Return to the Local-Windows VM.2. On the Local-FortiGate GUI, clickSystem >Certificates.3. Click Import, and then select Local Certificate.4. In the Type drop-down list, select PKCS # 12 Certificate.5. ClickUpload.6. ClickDesktop >Resources > FortiGate-Security >Certificate-Operations ;>webserver.p12, and then click
Open.The Certificate Name field is auto-populated from the certificate file name.
FortiGate Security 6.2 Lab GuideFortinet Technologies Inc.
137
DO NOT REPRINT© FORTINET
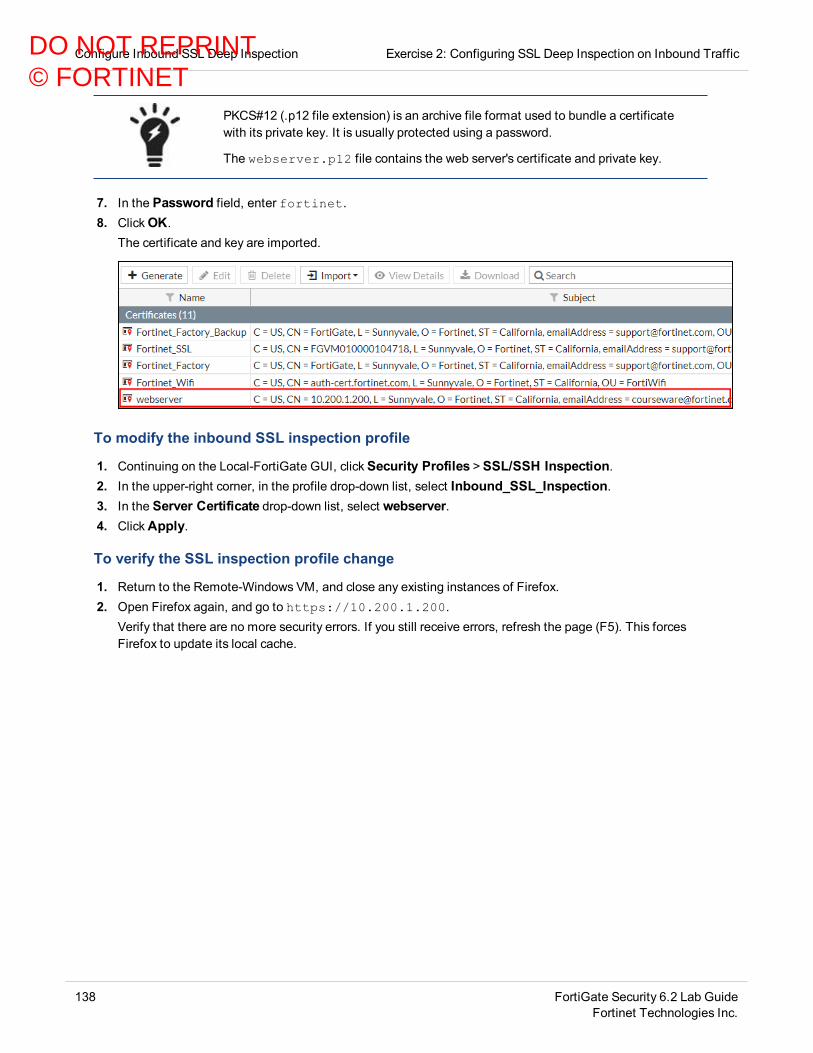
Configure Inbound SSL Deep Inspection Exercise 2: Configuring SSL Deep Inspection on Inbound Traffic
PKCS#12 (.p12 file extension) is an archive file format used to bundle a certificatewith its private key. It is usually protected using a password.
The webserver.p12 file contains the web server's certificate and private key.
7. In the Password field, enter fortinet.8. ClickOK.
The certificate and key are imported.
To modify the inbound SSL inspection profile
1. Continuing on the Local-FortiGate GUI, clickSecurity Profiles >SSL/SSH Inspection.2. In the upper-right corner, in the profile drop-down list, select Inbound_SSL_Inspection.3. In the Server Certificate drop-down list, select webserver.4. ClickApply.
To verify the SSL inspection profile change
1. Return to the Remote-Windows VM, and close any existing instances of Firefox.2. Open Firefox again, and go to https://10.200.1.200.
Verify that there are no more security errors. If you still receive errors, refresh the page (F5). This forcesFirefox to update its local cache.
138 FortiGate Security 6.2 Lab GuideFortinet Technologies Inc.
DO NOT REPRINT© FORTINET

Lab 8: Web Filtering
In this lab, you will configure one of the most used security profiles on FortiGate: web filter. This includesconfiguring a FortiGuard category-based filter, applying the web filter profile on a firewall policy, testing yourconfiguration, and basic troubleshooting.
You will also apply overrides to FortiGuard website categories and perform overrides on the web filtering profile.The web filtering overrides allow you to execute different actions, rather than the configured actions on the webfilter security profile.
Objectivesl Configure web filtering on FortiGatel Apply the FortiGuard category-based option for web filteringl Troubleshoot the web filterl Read and interpret web filter log entriesl Configure web rating overridesl Configure web profile overrides
Time to CompleteEstimated: 25 minutes
PrerequisitesBefore beginning this lab, you must clear your web browser history and restore a configuration file to the Local-FortiGate.
To clear the web browser history
1. On the Local-Windows VM, open the browser and click the menu icon in the upper-right corner.
2. ClickOptions >Privacy & Security.3. Scroll to History, click Clear History..., and ensure the time range to clear is set to Everything.4. ClickClear Now.
FortiGate Security 6.2 Lab GuideFortinet Technologies Inc.
139
DO NOT REPRINT© FORTINET

Lab 8: Web Filtering
To restore the FortiGate configuration file
1. On the Local-Windows VM, open a browser and log in to the Local-FortiGate GUI at 10.0.1.254 with the username admin and password password.
2. In the upper-right corner of the screen, click admin, and then select Configuration >Restore.
3. Select Restore from Local PC, and then clickUpload.4. Browse to Desktop >Resources > FortiGate-Security >Web-Filtering > local-web-filtering.conf,
and then clickOpen.5. ClickOK.6. ClickOK to reboot.
140 FortiGate Security 6.2 Lab GuideFortinet Technologies Inc.
DO NOT REPRINT© FORTINET

Exercise 1: Configuring FortiGuard Web Filtering
To configure FortiGate for web filtering based on FortiGuard categories, you must make sure that FortiGate hasa valid FortiGuard security subscription license. The license provides the web filtering capabilities necessary toprotect against inappropriate websites.
Then, you must configure a category-based web filter security profile on FortiGate and apply the security profileon a firewall policy to inspect the HTTP traffic.
Finally, you can test different actions taken by FortiGate according to the website rating.
Review the FortiGate Settings
You will review the inspection mode and the license status according to the uploaded settings. You will also listthe FortiGuard distribution servers (FDS) that your FortiGate will use to send the web filtering requests.
To review the restored settings on FortiGate
1. On the Local-Windows VM, open a browser and log in to the Local-FortiGate GUI at 10.0.1.254 with the username admin and password password.
2. On the Dashboard, locate the Licenseswidget and confirm that the FortiGuard Web Filtering service islicensed and active.A green check mark should appear besideWeb Filtering.
Because of the reboot following the restoration of the configuration file, the web filterlicense status may show "Unavailable". In this case, navigate to System >FortiGuard, clickCheck Again to force an update, andOK to confirm.
FortiGate Security 6.2 Lab GuideFortinet Technologies Inc.
141
DO NOT REPRINT© FORTINET

Determine Web Filter Categories Exercise 1: Configuring FortiGuard Web Filtering
3. ClickPolicy & Objects > IPv4 Policy.4. Double click the Full_Access policy to edit.5. Verify the Inspection Mode setting.
Notice that the default inspection mode is set to Flow-based.
6. Select Proxy-based under Inspection Mode.7. ClickOK.8. ClickPolicy & Objects > IPv4 Policy.9. Double click the Full_Access policy to edit. Verify that Inspection Mode is now set to Proxy-based.
Determine Web Filter Categories
In order to configure web filter categories, you must first identify how specific websites are categorized by theFortiGuard service.
To determine web filter categories
1. Continuing on the Local-Windows VM, open a new browser tab and go tohttps://www.fortiguard.com/webfilter.
2. Use theWeb Filter Lookup tool and search for the following URL:
www.youtube.com
142 FortiGate Security 6.2 Lab GuideFortinet Technologies Inc.
DO NOT REPRINT© FORTINET
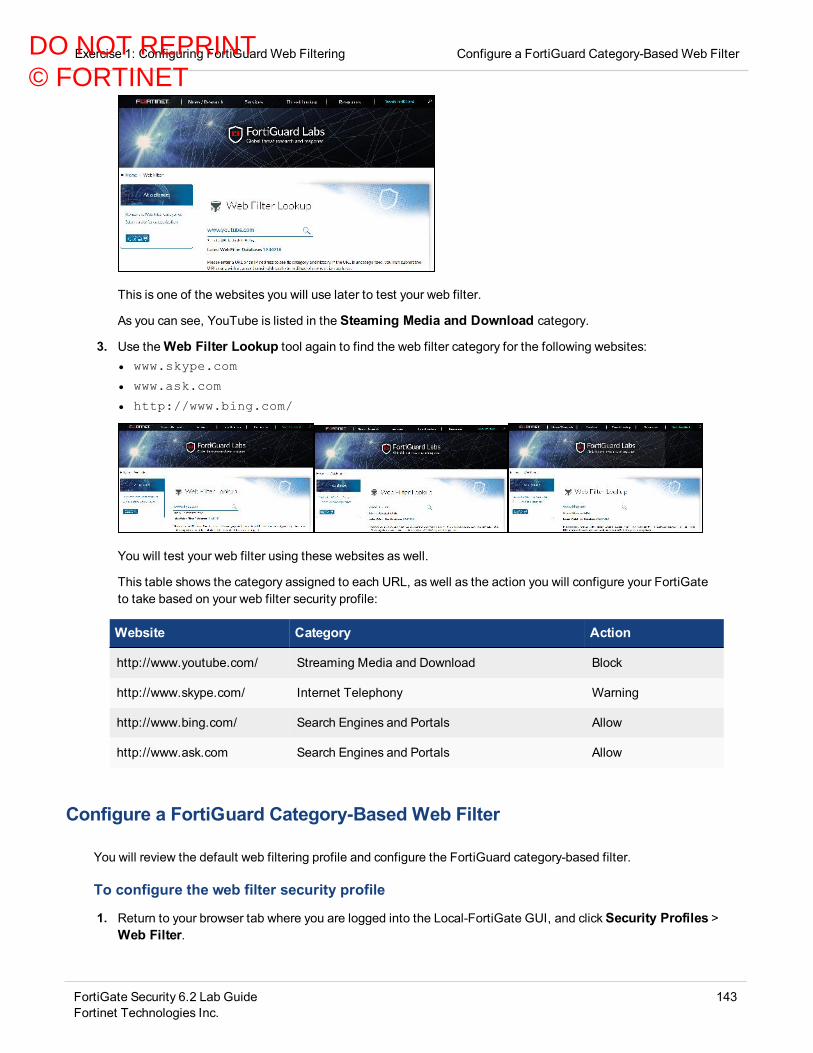
Exercise 1: Configuring FortiGuard Web Filtering Configure a FortiGuard Category-Based Web Filter
This is one of the websites you will use later to test your web filter.
As you can see, YouTube is listed in the Steaming Media and Download category.
3. Use theWeb Filter Lookup tool again to find the web filter category for the following websites:l www.skype.com
l www.ask.com
l http://www.bing.com/
You will test your web filter using these websites as well.
This table shows the category assigned to each URL, as well as the action you will configure your FortiGateto take based on your web filter security profile:
Website Category Action
http://www.youtube.com/ Streaming Media and Download Block
http://www.skype.com/ Internet Telephony Warning
http://www.bing.com/ Search Engines and Portals Allow
http://www.ask.com Search Engines and Portals Allow
Configure a FortiGuard Category-Based Web Filter
You will review the default web filtering profile and configure the FortiGuard category-based filter.
To configure the web filter security profile
1. Return to your browser tab where you are logged into the Local-FortiGate GUI, and clickSecurity Profiles >Web Filter.
FortiGate Security 6.2 Lab GuideFortinet Technologies Inc.
143
DO NOT REPRINT© FORTINET

Configure a FortiGuard Category-Based Web Filter Exercise 1: Configuring FortiGuard Web Filtering
2. Double click the defaultweb filter profile to edit it.
3. Verify that FortiGuard category based filter is enabled.
4. Review the default actions for each category.
Category Action
Local Categories Allow
Potentially Liable Block: Extremist Group
Allow: all other sub-categories
Tip: Expand Potentially Liable to view the subcategories
Adult/Mature Content Block
144 FortiGate Security 6.2 Lab GuideFortinet Technologies Inc.
DO NOT REPRINT© FORTINET
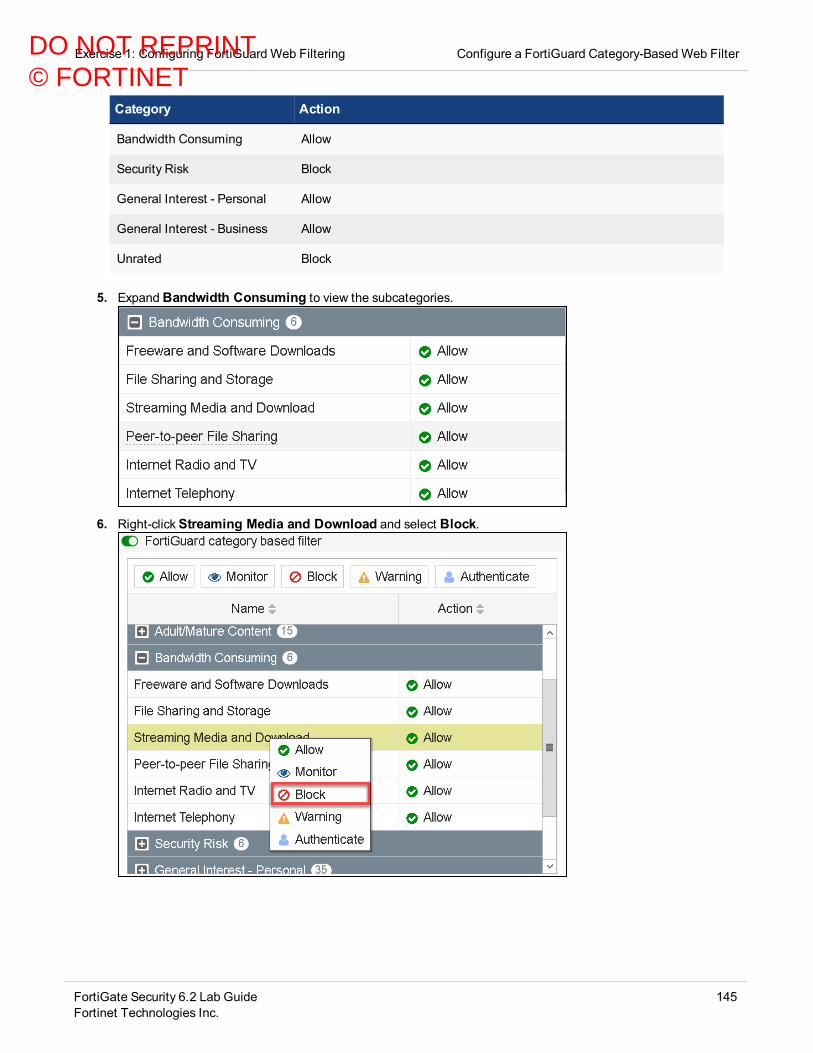
Exercise 1: Configuring FortiGuard Web Filtering Configure a FortiGuard Category-Based Web Filter
Category Action
Bandwidth Consuming Allow
Security Risk Block
General Interest - Personal Allow
General Interest - Business Allow
Unrated Block
5. Expand Bandwidth Consuming to view the subcategories.
6. Right-clickStreaming Media and Download and select Block.
FortiGate Security 6.2 Lab GuideFortinet Technologies Inc.
145
DO NOT REPRINT© FORTINET
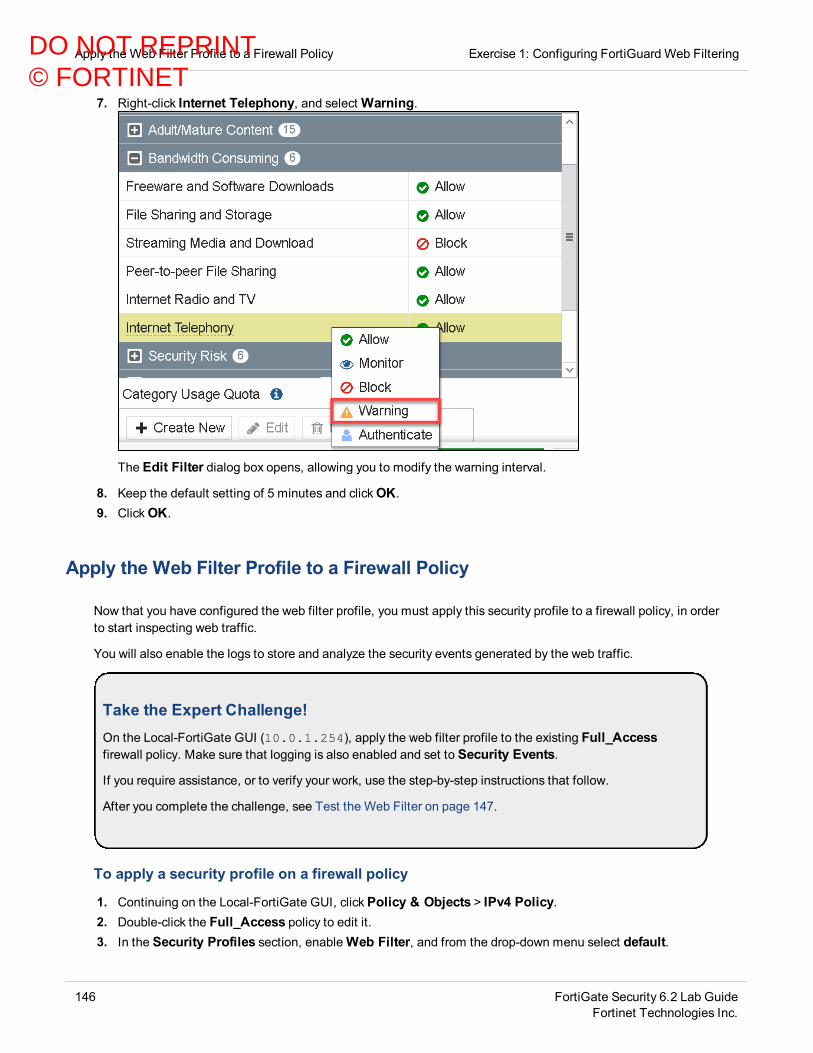
Apply the Web Filter Profile to a Firewall Policy Exercise 1: Configuring FortiGuard Web Filtering
7. Right-click Internet Telephony, and selectWarning.
The Edit Filter dialog box opens, allowing you to modify the warning interval.
8. Keep the default setting of 5 minutes and clickOK.9. ClickOK.
Apply the Web Filter Profile to a Firewall Policy
Now that you have configured the web filter profile, you must apply this security profile to a firewall policy, in orderto start inspecting web traffic.
You will also enable the logs to store and analyze the security events generated by the web traffic.
Take the Expert Challenge!On the Local-FortiGate GUI (10.0.1.254), apply the web filter profile to the existing Full_Accessfirewall policy. Make sure that logging is also enabled and set to Security Events.
If you require assistance, or to verify your work, use the step-by-step instructions that follow.
After you complete the challenge, see Test the Web Filter on page 147.
To apply a security profile on a firewall policy
1. Continuing on the Local-FortiGate GUI, clickPolicy & Objects > IPv4 Policy.2. Double-click the Full_Access policy to edit it.3. In the Security Profiles section, enableWeb Filter, and from the drop-down menu select default.
146 FortiGate Security 6.2 Lab GuideFortinet Technologies Inc.
DO NOT REPRINT© FORTINET
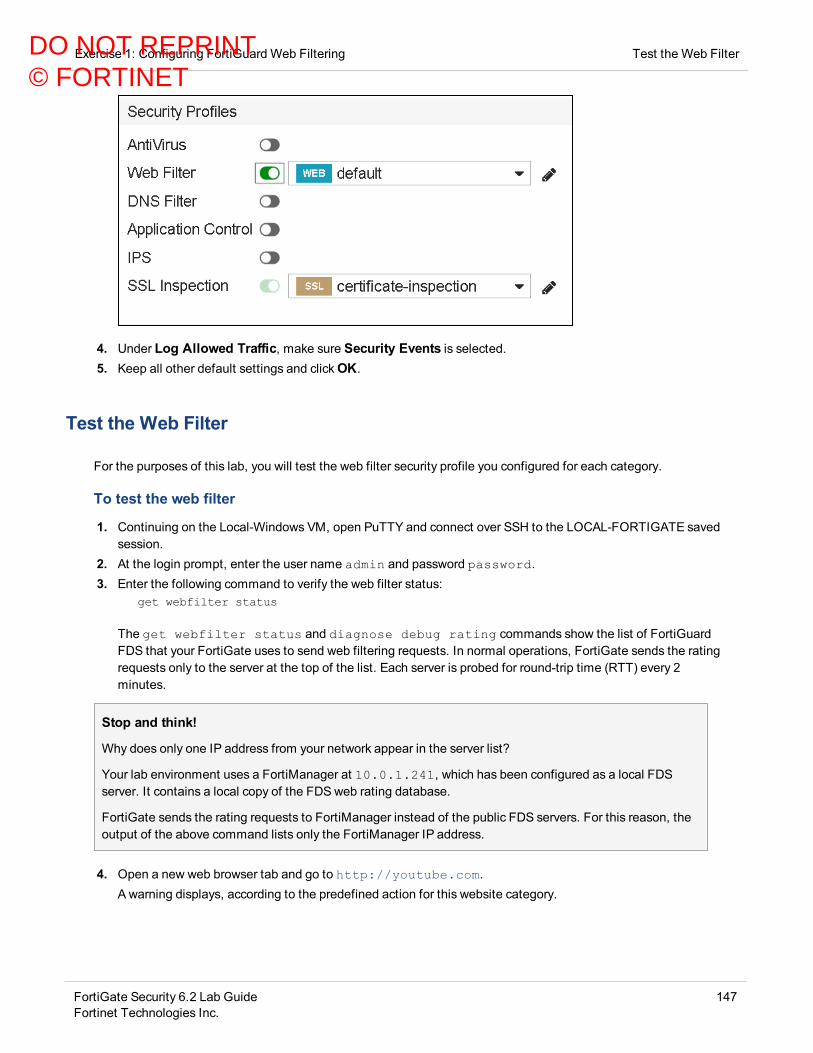
Exercise 1: Configuring FortiGuard Web Filtering Test the Web Filter
4. Under Log Allowed Traffic, make sure Security Events is selected.5. Keep all other default settings and clickOK.
Test the Web Filter
For the purposes of this lab, you will test the web filter security profile you configured for each category.
To test the web filter
1. Continuing on the Local-Windows VM, open PuTTY and connect over SSH to the LOCAL-FORTIGATE savedsession.
2. At the login prompt, enter the user name admin and password password.3. Enter the following command to verify the web filter status:
get webfilter status
The get webfilter status and diagnose debug rating commands show the list of FortiGuardFDS that your FortiGate uses to send web filtering requests. In normal operations, FortiGate sends the ratingrequests only to the server at the top of the list. Each server is probed for round-trip time (RTT) every 2minutes.
Stop and think!
Why does only one IP address from your network appear in the server list?
Your lab environment uses a FortiManager at 10.0.1.241, which has been configured as a local FDSserver. It contains a local copy of the FDSweb rating database.
FortiGate sends the rating requests to FortiManager instead of the public FDS servers. For this reason, theoutput of the above command lists only the FortiManager IP address.
4. Open a new web browser tab and go to http://youtube.com.A warning displays, according to the predefined action for this website category.
FortiGate Security 6.2 Lab GuideFortinet Technologies Inc.
147
DO NOT REPRINT© FORTINET

Create a Web Rating Override Exercise 1: Configuring FortiGuard Web Filtering
5. Open a new web browser tab and go to http://www.skype.com/.A warning displays, according to the predefined action for this website category.
6. ClickProceed to accept the warning and access the website.7. Open a new web browser tab and go to http://www.bing.com/.
This website appears because it belongs to the Search Engines and Portals category, which is set toAllow.
Create a Web Rating Override
In this procedure you will override the category for www.bing.com.
To create a web rating override
1. Return to your browser tab where you are logged in to the Local-FortiGate GUI, and clickSecurity Profiles >Web Rating Overrides.
2. ClickCreate New, and then configure the following settings:
148 FortiGate Security 6.2 Lab GuideFortinet Technologies Inc.
DO NOT REPRINT© FORTINET
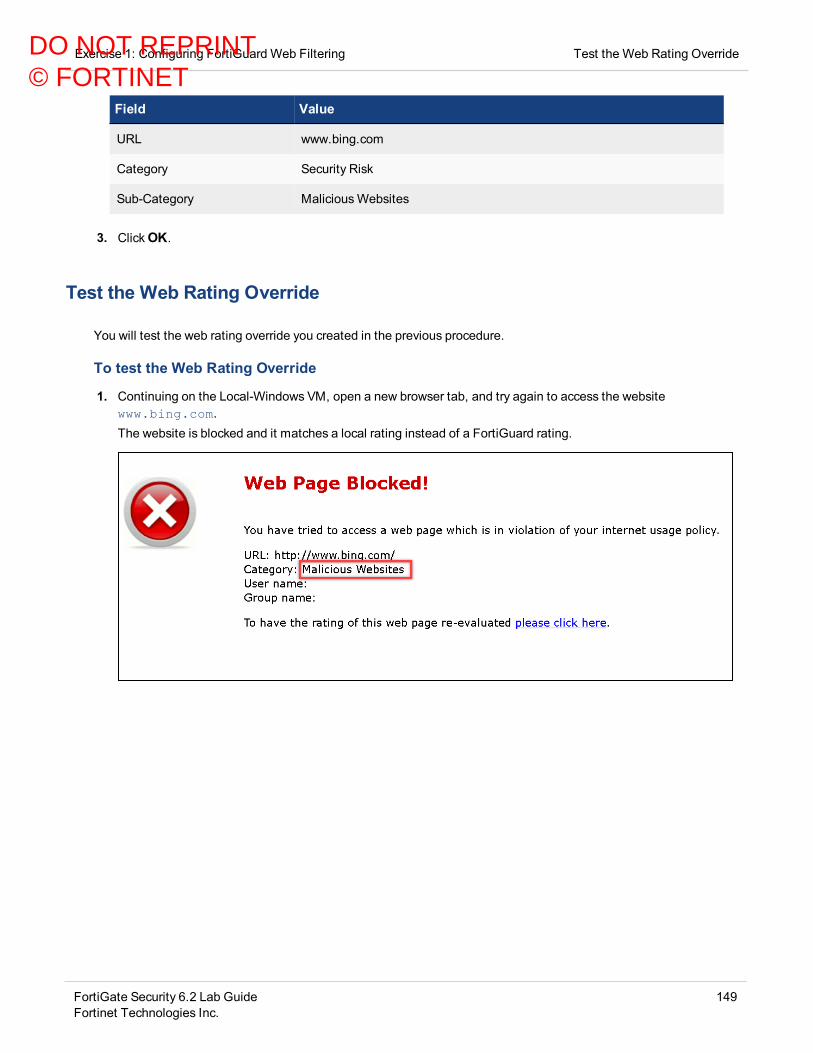
Exercise 1: Configuring FortiGuard Web Filtering Test the Web Rating Override
Field Value
URL www.bing.com
Category Security Risk
Sub-Category MaliciousWebsites
3. ClickOK.
Test the Web Rating Override
You will test the web rating override you created in the previous procedure.
To test the Web Rating Override
1. Continuing on the Local-Windows VM, open a new browser tab, and try again to access the websitewww.bing.com.The website is blocked and it matches a local rating instead of a FortiGuard rating.
FortiGate Security 6.2 Lab GuideFortinet Technologies Inc.
149
DO NOT REPRINT© FORTINET

Exercise 2: Setting Up Web Filtering Authentication
In this exercise, you will configure and test the authenticate action for web filtering categories.
Set Up the Authenticate Action
First, you will override the category for www.bing.com and change it to Proxy Avoidance. Then, you will setthe action for this FortiGuard category to Authenticate.
To override the category
1. On the Local-Windows VM, open a browser and log in to the Local-FortiGate GUI at 10.0.1.254 with the username admin and password password.
2. ClickSecurity Profiles >Web Rating Overrides.There is an entry for www.bing.com. The override category is set toMalicious Websites, which youshould have created in the previous exercises.
3. Double-click www.bing.com to verify the rating override and confirm the category and subcategory:
Field Value
Category Security Risk
Sub-Category MaliciousWebsites
By default, the Security Risk category is set to Block on your FortiGate.
4. ClickCancel.
To set up the authenticate action
1. Continuing on the Local-FortiGate GUI, clickSecurity Profiles >Web Filter.2. Double click the defaultweb filter profile to edit it.
150 FortiGate Security 6.2 Lab GuideFortinet Technologies Inc.
DO NOT REPRINT© FORTINET
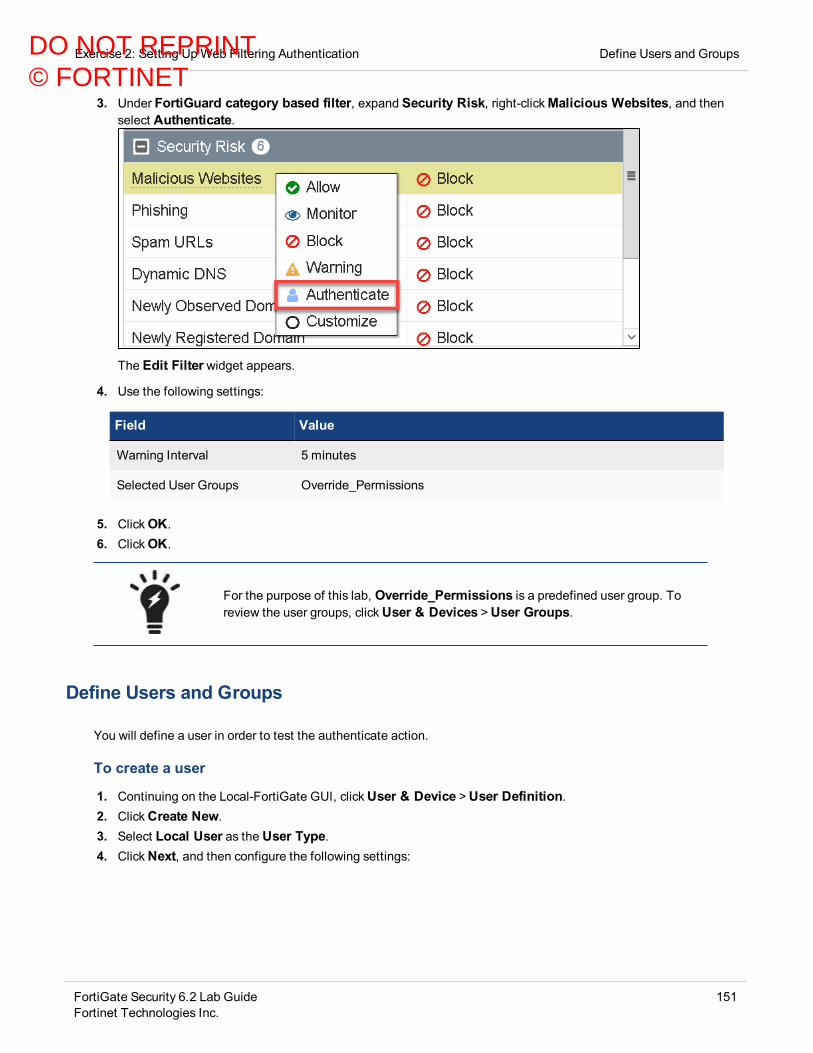
Exercise 2: Setting Up Web Filtering Authentication Define Users and Groups
3. Under FortiGuard category based filter, expand Security Risk, right-clickMalicious Websites, and thenselect Authenticate.
The Edit Filter widget appears.
4. Use the following settings:
Field Value
Warning Interval 5 minutes
Selected User Groups Override_Permissions
5. ClickOK.6. ClickOK.
For the purpose of this lab, Override_Permissions is a predefined user group. Toreview the user groups, clickUser & Devices >User Groups.
Define Users and Groups
You will define a user in order to test the authenticate action.
To create a user
1. Continuing on the Local-FortiGate GUI, clickUser & Device >User Definition.2. ClickCreate New.3. Select Local User as the User Type.4. ClickNext, and then configure the following settings:
FortiGate Security 6.2 Lab GuideFortinet Technologies Inc.
151
DO NOT REPRINT© FORTINET
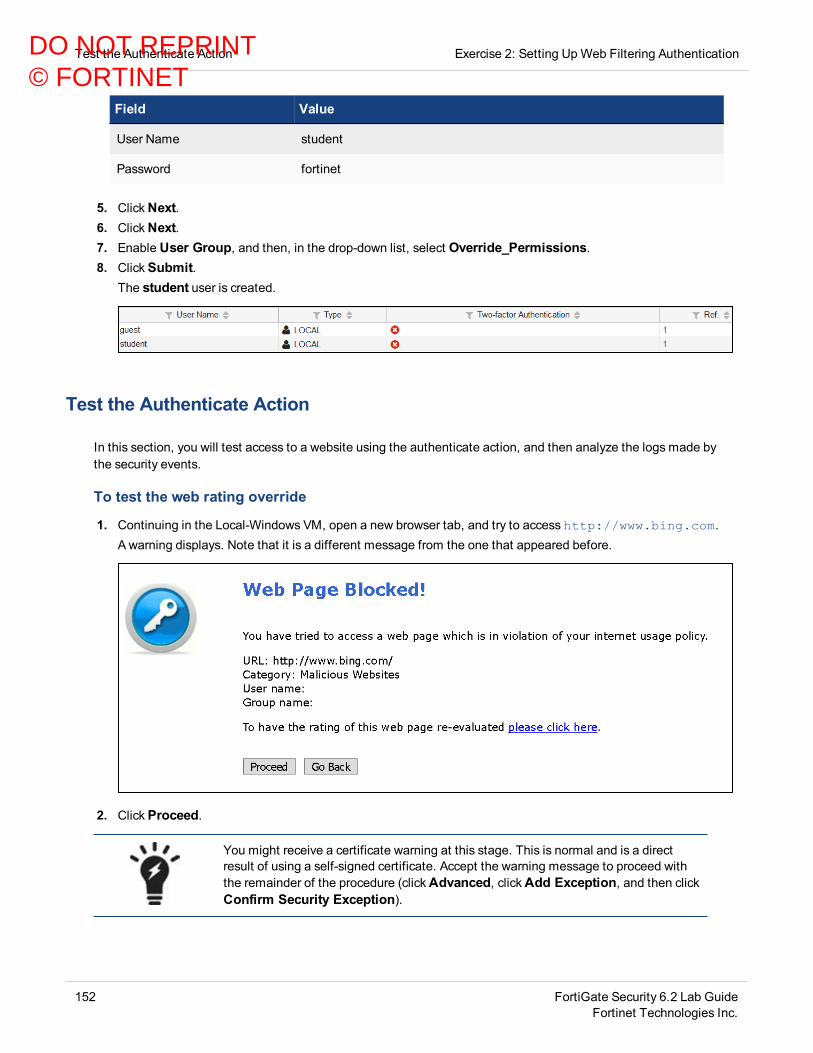
Test the Authenticate Action Exercise 2: Setting Up Web Filtering Authentication
Field Value
User Name student
Password fortinet
5. ClickNext.6. ClickNext.7. Enable User Group, and then, in the drop-down list, select Override_Permissions.8. ClickSubmit.
The student user is created.
Test the Authenticate Action
In this section, you will test access to a website using the authenticate action, and then analyze the logs made bythe security events.
To test the web rating override
1. Continuing in the Local-Windows VM, open a new browser tab, and try to access http://www.bing.com. A warning displays. Note that it is a different message from the one that appeared before.
2. ClickProceed.
You might receive a certificate warning at this stage. This is normal and is a directresult of using a self-signed certificate. Accept the warning message to proceed withthe remainder of the procedure (clickAdvanced, clickAdd Exception, and then clickConfirm Security Exception).
152 FortiGate Security 6.2 Lab GuideFortinet Technologies Inc.
DO NOT REPRINT© FORTINET
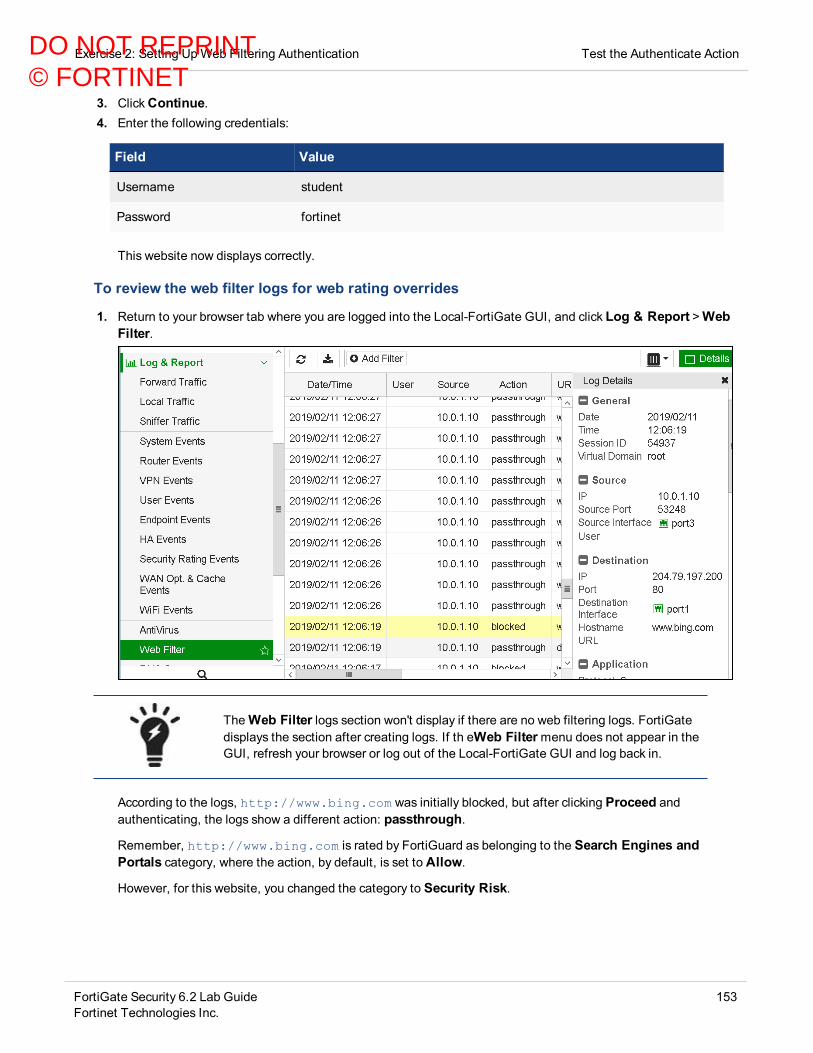
Exercise 2: Setting Up Web Filtering Authentication Test the Authenticate Action
3. ClickContinue.4. Enter the following credentials:
Field Value
Username student
Password fortinet
This website now displays correctly.
To review the web filter logs for web rating overrides
1. Return to your browser tab where you are logged into the Local-FortiGate GUI, and click Log & Report >WebFilter.
TheWeb Filter logs section won't display if there are no web filtering logs. FortiGatedisplays the section after creating logs. If th eWeb Filtermenu does not appear in theGUI, refresh your browser or log out of the Local-FortiGate GUI and log back in.
According to the logs, http://www.bing.com was initially blocked, but after clicking Proceed andauthenticating, the logs show a different action: passthrough.
Remember, http://www.bing.com is rated by FortiGuard as belonging to the Search Engines andPortals category, where the action, by default, is set to Allow.
However, for this website, you changed the category to Security Risk.
FortiGate Security 6.2 Lab GuideFortinet Technologies Inc.
153
DO NOT REPRINT© FORTINET
Exercise 3: Configuring and Testing Web Profile Overrides
As you have tested the web rating overrides, you will now test web profile overrides.
The web profile overrides feature changes the rules applied to inspected traffic. It authorizes some users, usergroups, or predefined source IPs, to use a different web filter profile.
Configure Web Profile Overrides
In this procedure, you will allow users to override blocked categories. Those users must authenticate in order toapply a different web filter profile.
To configure a web profile override
1. On the Local-Windows VM, open a browser and log in to the Local-FortiGate GUI at 10.0.1.254 with the username admin and password password.
2. ClickSecurity Profiles >Web Filter.3. Double click the defaultweb filter profile to edit it.4. Enable Allow users to override blocked categories, and then enter the following values:
Field Value
Group that can override Override_Permissions
Profile Name monitor-all
Switch applies to IP
Switch duration Predefined 0 Day(s) | 0 Hour(s) | 15 Minute(s)
5. ClickOK to save the changes.
Test the Web Profile Override
Finally, you will test the global access for a blocked category, and authenticate to apply a new web filter profile.You will also review the web filter logs to verify how actions change after the new web profile is applied.
To test the web profile override
1. Continuing on the Local-Windows VM, open a new browser tab, and try to access www.youtube.com.A warning displays according to the action for this website category. However, this warning is different fromthe one that appeared in To test the web filter on page 147. This warning includes an override link at thebottom.
154 FortiGate Security 6.2 Lab GuideFortinet Technologies Inc.
DO NOT REPRINT© FORTINET
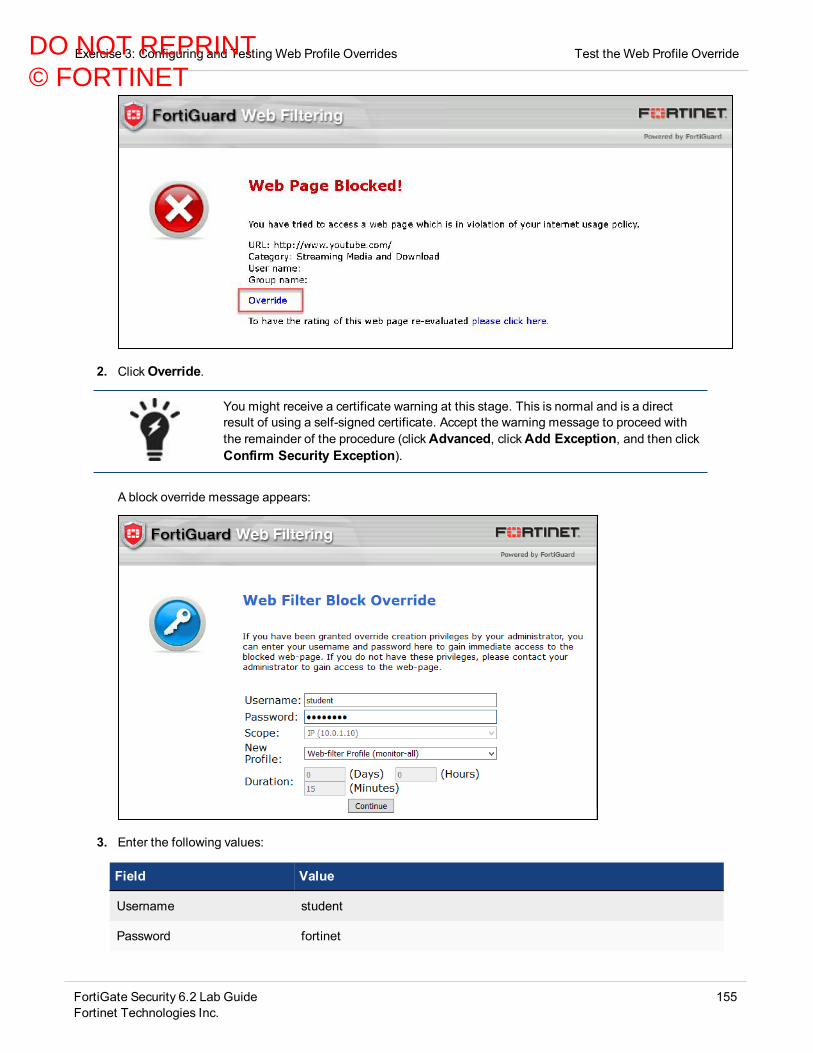
Exercise 3: Configuring and Testing Web Profile Overrides Test the Web Profile Override
2. ClickOverride.
You might receive a certificate warning at this stage. This is normal and is a directresult of using a self-signed certificate. Accept the warning message to proceed withthe remainder of the procedure (clickAdvanced, clickAdd Exception, and then clickConfirm Security Exception).
A block override message appears:
3. Enter the following values:
Field Value
Username student
Password fortinet
FortiGate Security 6.2 Lab GuideFortinet Technologies Inc.
155
DO NOT REPRINT© FORTINET

Test the Web Profile Override Exercise 3: Configuring and Testing Web Profile Overrides
4. ClickContinue.FortiGate overrides the default profile and allows you to access the website.
To review the web filter logs for web profile overrides
1. Return to your browser tab where you are logged in to the Local-FortiGate GUI, and click Log & Report >WebFilter.
2. Compare the current passthrough entries with the older blocked logs.
3. Select a blocked entry and in the upper-right corner of the screen, and clickDetails.4. Now, select a passthrough entry and clickDetails.
Notice that the web profile used is different.
156 FortiGate Security 6.2 Lab GuideFortinet Technologies Inc.
DO NOT REPRINT© FORTINET

Lab 9: Application Control
In this lab, you will configure and use the application control in policy-based mode, to apply an appropriate actionto specified application traffic. You will the view the generated logs.
Objectivesl Configure and test application control in NGFW policy-model Read and understand application control logs
Time to CompleteEstimated: 30 minutes
PrerequisitesBefore beginning this lab, you must restore a configuration file to Local-FortiGate.
To restore the FortiGate configuration file
1. On the Local-Windows VM, open a browser and log in to the Local-FortiGate GUI at 10.0.1.254 with the username admin and password password.
2. In the upper-right corner of the screen, click admin,and then clickConfiguration >Restore.
3. Click Local PC,and then clickUpload.4. ClickDesktop >Resources > FGT-Security >Application Control > Local-App-Control-
Profile.conf, and then clickOpen.5. ClickOK.6. ClickOK to reboot.
FortiGate Security 6.2 Lab GuideFortinet Technologies Inc.
157
DO NOT REPRINT© FORTINET

Exercise 1: Controlling Application Traffic
In this exercise, you will create a profile-based application control profile in flow-based inspection mode. Flow-based and proxy-based inspection modes share identical configuration steps for application control. TheFortiGate matches the traffic in this order:
1. Application and filter overrides2. CategoriesYou will also view the application control logs and applications from FortiView to confirm that the applications arelogged correctly.
Configure Filter Overrides
The configuration file for this exercise already has the application control categories set to monitor (exceptUnknown Applications). This allows the applications to pass, but also records a log message.
In this exercise, you will configure filter overrides.
To configure filter overrides
1. On the Local-Windows VM, open a browser and log in to the Local-FortiGate GUI at 10.0.1.254 with the username admin and password password.
2. ClickSecurity Profiles >Application Control.3. Double click the default application control profile and review the sensor.
158 FortiGate Security 6.2 Lab GuideFortinet Technologies Inc.
DO NOT REPRINT© FORTINET

Exercise 1: Controlling Application Traffic Configure Filter Overrides
There are 93 cloud-based application signatures available in the application controlsignatures database that require deep inspection. The number beside the cloud icon ineach category represents the number of cloud application signatures in a specificcategory. The number of cloud applications will keep increasing as new applicationsare added to this list.
4. In the Application and Filter Overrides section, clickCreate New to add a filter override.5. On the Add New Override page, in the Type field, select Filter.6. Click + to add a filter.7. UnderBehavior, clickExcessive-Bandwidth.
The Excessive-Bandwidth setting blocks many applications that are known to bebandwidth intensive. Applications can belong to different categories, but they may bepart of this behavior filter if they are bandwidth intensive.
8. ClickOk.Your configuration should look similar to below. The action for this should show asBlock.
9. ClickApply.
FortiGate Security 6.2 Lab GuideFortinet Technologies Inc.
159
DO NOT REPRINT© FORTINET

Apply the Application Control Profile to the Firewall Policy Exercise 1: Controlling Application Traffic
Apply the Application Control Profile to the Firewall Policy
Now that you have configured the application control profile, you will apply it to the firewall policy.
Take the Expert Challenge!On the Local-FortiGate GUI (10.0.1.254), edit the existing Application_Control firewall policy and dothe following:
l Enable the default application control profile.l Enable deep-inspection in the SSL/SSH inspection profile.
If you require assistance, or to verify your work, use the step-by-step instructions that follow.
After you complete the challenge, see Test the Application Control Profile on page 160.
To apply an application control profile to a firewall policy
1. Continuing on the Local-FortiGate GUI, clickPolicy & Objects > IPv4 Policy.2. Right click the ID column of the Application_Control firewall policy and clickEdit.3. In the Security Profiles section, enable Application Control and select default in the drop-down menu.4. Select deep-inspection from the drop-down menu for the SSL Inspection profile.
5. ClickOK to save the changes.
Test the Application Control Profile
Now that your configuration is complete, you will test the application control profile by going to the applicationthat you blocked in the application overrides configuration.
160 FortiGate Security 6.2 Lab GuideFortinet Technologies Inc.
DO NOT REPRINT© FORTINET

Exercise 1: Controlling Application Traffic Configure Application Overrides
To test the application control profile
1. Continuing on the Local-Windows VM, open a new web browser tab and go to the following URL:http://dailymotion.com.You should observe that you cannot connect to this site. It times out.
2. Return to the browser tab where you are logged in to the Local-FortiGate GUI, and clickSecurity Profiles >Application Control.
3. Edit the default application sensor again.4. In theOptions section at the bottom of the page, enable Replacement Messages for HTTP-based
Applications.5. ClickApply.6. Open a new web browser tab and go to the following URL: http://dailymotion.com.
FortiGate should display a block message. It can take up to 2 minutes for the block page to be displayedbecause of the change in configuration.
Configure Application Overrides
In this exercise, you will configure application overrides. The application overrides will take precedence over filteroverrides and application categories.
Take the Expert Challenge!On the Local-FortiGate GUI (10.0.1.254 | admin <blank password>), complete the following:
l Modify the default application control profile.l Add Application Overridesfor the Dailymontionapplication signature and set the action to Allow.
If you require assistance, or to verify your work, use the step-by-step instructions that follow.
After you complete the challenge, see Test Application Overrides on page 162.
FortiGate Security 6.2 Lab GuideFortinet Technologies Inc.
161
DO NOT REPRINT© FORTINET
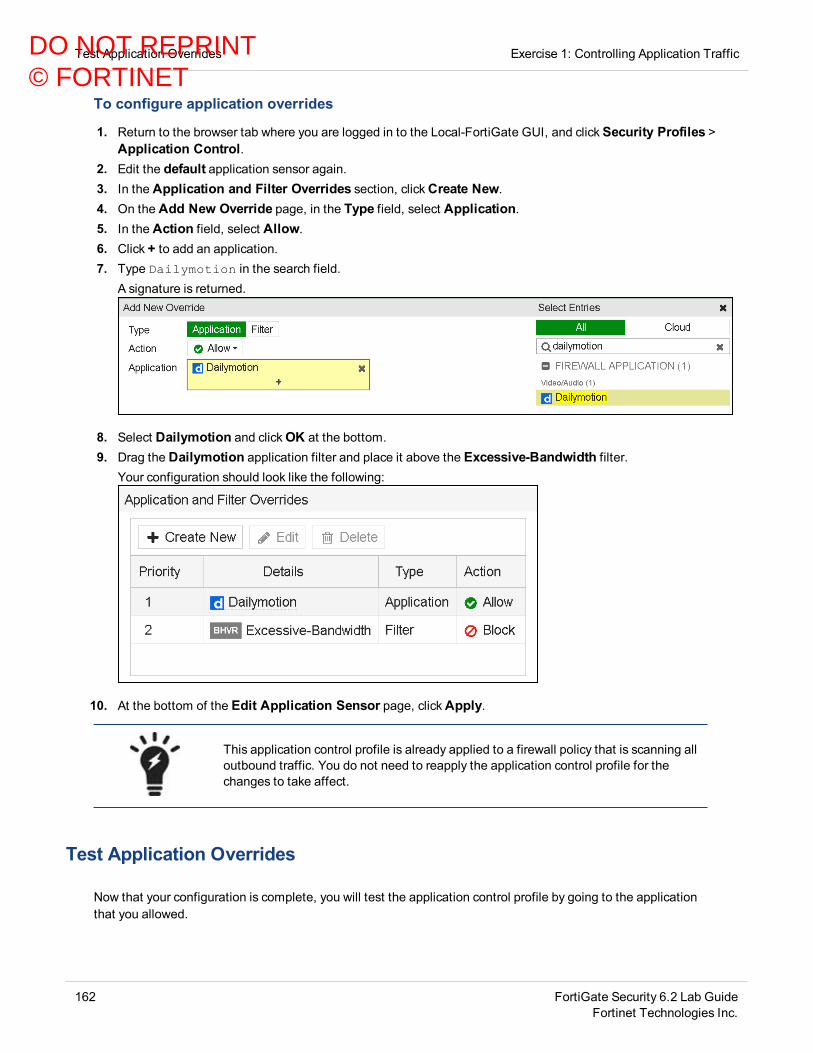
Test Application Overrides Exercise 1: Controlling Application Traffic
To configure application overrides
1. Return to the browser tab where you are logged in to the Local-FortiGate GUI, and clickSecurity Profiles >Application Control.
2. Edit the default application sensor again.3. In the Application and Filter Overrides section, clickCreate New.4. On the Add New Override page, in the Type field, select Application.5. In the Action field, select Allow.6. Click + to add an application.7. Type Dailymotion in the search field.
A signature is returned.
8. Select Dailymotion and clickOK at the bottom.9. Drag the Dailymotion application filter and place it above the Excessive-Bandwidth filter.
Your configuration should look like the following:
10. At the bottom of the Edit Application Sensor page, clickApply.
This application control profile is already applied to a firewall policy that is scanning alloutbound traffic. You do not need to reapply the application control profile for thechanges to take affect.
Test Application Overrides
Now that your configuration is complete, you will test the application control profile by going to the applicationthat you allowed.
162 FortiGate Security 6.2 Lab GuideFortinet Technologies Inc.
DO NOT REPRINT© FORTINET

Exercise 1: Controlling Application Traffic View Logs
To test the application control profile
1. Continuing on the Local-Windows VM, open a new web browser tab and go to the following URL:http://dailymotion.com.FortiGate allows the website to load properly.
View Logs
Now you will view the logs for the test you just performed.
To view logs
1. Return to your browser tab where you are logged in to the Local-FortiGate GUI, and click Log & Report >Application Control.
The Application Control logs section will not display if there are no applicationcontrol logs. FortiGate will show it after creating logs. If the Application Controlmenu item does not display in the GUI, refresh the browser or log out of the Local-FortiGate GUI and log in again.
2. Use the Application Name log filter and search forDailymotion.You will see log messages with the action set to block.
3. Double-click on a log to view more details.The details include application sensor name, application name, category, policy ID, and the action taken byFortiGate.
4. Click Log & Report > Forward Traffic and search and view the log information forDailymotion.You will see more details about the log, including translated IP, bytes sent, bytes received, action, andapplication.
FortiGate Security 6.2 Lab GuideFortinet Technologies Inc.
163
DO NOT REPRINT© FORTINET

Exercise 2: Controlling Application Bandwidth Usage
You can limit the bandwidth consumption of an application category, or of a specific application, by configuring atraffic shaping policy. You must ensure that the matching criteria aligns with the firewall policy or policies to whichyou want to apply shaping.
In this exercise, you will configure and apply traffic shaping to an application, to limit its bandwidth consumption.
Modify Application Overrides Action
You will be modifying the application override for the Dailymotion application to change the action from AllowtoMonitor. Then, you will apply traffic shaping in the next procedure.
To modify the application overrides action
1. On the Local-Windows VM, open a browser and log in to the Local-FortiGate GUI at 10.0.1.254 with the username admin and password password.
2. ClickSecurity Profiles >Application Control.3. Edit the application sensor named default.4. In the Application and Filter Overrides section, edit Dailymotion filter and set Action toMonitor.5. ClickOK.This changes the action forDailymotion from Allow toMonitor.6. ClickApply.
For the purposes of this lab, setting the action toMonitor ensures all applicationcontrol events are logged.
Configure a Traffic Shaping Policy
You will be configuring a traffic shaping policy using the preconfigured traffic shaper to limit the bandwidth use ofDailymotion.
164 FortiGate Security 6.2 Lab GuideFortinet Technologies Inc.
DO NOT REPRINT© FORTINET

Exercise 2: Controlling Application Bandwidth Usage Configure a Traffic Shaping Policy
Take the Expert Challenge!On the Local-FortiGate GUI (10.0.1.254 | admin <blank password>), complete the following:
l Create a traffic shaping policy for the Dailymotion application only from port1.l ApplyDAILYMOTION_Shaper as Reverse Shaper.
If you require assistance, or to verify your work, use the step-by-step instructions that follow.
After you complete the challenge, see Test Traffic Shaping on page 166.
To configure a Traffic Shaping Policy
1. Continuing on the Local-FortiGate GUI, clickPolicy & Objects > Traffic Shapers.2. For the DAILYMOTION_SHAPER, examine theMax Bandwidth column.
You will notice that maximum amount of allowed bandwidth is very low.
3. ClickPolicy & Objects > Traffic Shaping Policy, and then clickCreate New.4. Configure the following settings:
Field Value
Name Application_Traffic_Shaper_Policy
Source all
Destination all
Service ALL
Application Dailymotion
Tip: Type Dailymotion in the search box in the right pane to locate iteasily.
Outgoing Interface port1
This is FortiGate egress interface.
Reverse Shaper <enable> and apply DAILYMOTION_SHAPER
FortiGate Security 6.2 Lab GuideFortinet Technologies Inc.
165
DO NOT REPRINT© FORTINET
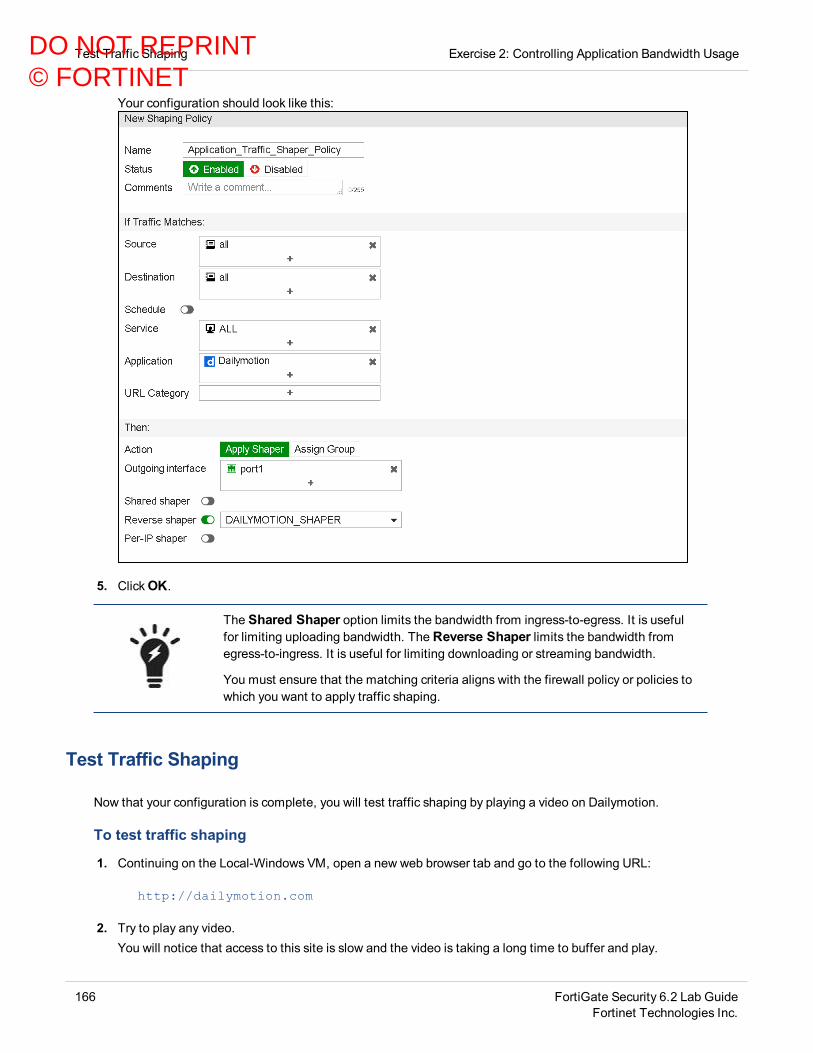
Test Traffic Shaping Exercise 2: Controlling Application Bandwidth Usage
Your configuration should look like this:
5. ClickOK.
The Shared Shaper option limits the bandwidth from ingress-to-egress. It is usefulfor limiting uploading bandwidth. The Reverse Shaper limits the bandwidth fromegress-to-ingress. It is useful for limiting downloading or streaming bandwidth.
You must ensure that the matching criteria aligns with the firewall policy or policies towhich you want to apply traffic shaping.
Test Traffic Shaping
Now that your configuration is complete, you will test traffic shaping by playing a video on Dailymotion.
To test traffic shaping
1. Continuing on the Local-Windows VM, open a new web browser tab and go to the following URL:
http://dailymotion.com
2. Try to play any video.You will notice that access to this site is slow and the video is taking a long time to buffer and play.
166 FortiGate Security 6.2 Lab GuideFortinet Technologies Inc.
DO NOT REPRINT© FORTINET

Exercise 2: Controlling Application Bandwidth Usage Test Traffic Shaping
If your classroom is using a virtual lab, the underlying hardware is shared, so theamount of available bandwidth for Internet access varies according to othersimultaneous use. The traffic shaper is set to a very low value in order to make surethat the difference in behavior is easily noticeable. In real networks, this setting wouldbe greater.
3. Return to your browser tab where you are logged in to the Local-FortiGate GUI, and click Policy & Objects >Traffic Shapers.
4. Review the Bandwidth Utilization and Dropped Bytes columns for the DAILYMOTION_SHAPER.You might need to refresh the FortiGate GUI to view the statistics on Traffic Shapers.
You will notice the bandwidth used by the Dailymotion application and FortiGate is dropping the packetsthat are in excess of the configured bandwidth in the traffic shaper.
Monitor statistics are current as of the time that you requested the GUI page, so makesure to view them while a video is downloading. Also, refresh the page few times toget the results.
5. Click Log & Report > Forward Traffic and clickConfigure Table. Scroll down to Shaping Policy ID and clickto enable it.See below image for details:
FortiGate Security 6.2 Lab GuideFortinet Technologies Inc.
167
DO NOT REPRINT© FORTINET

Test Traffic Shaping Exercise 2: Controlling Application Bandwidth Usage
6. Review the logs to display basic information regarding the Traffic Shaper policy.
168 FortiGate Security 6.2 Lab GuideFortinet Technologies Inc.
DO NOT REPRINT© FORTINET

Lab 10: Antivirus
In this lab, you will configure, use, and monitor antivirus scanning on Local-FortiGate in both flow-based andproxy-based inspection modes.
Objectivesl Configure antivirus scanning in both flow-based and proxy inspection modesl Understand FortiGate antivirus scanning behaviorl Scan multiple protocolsl Read and understand antivirus logs
Time to CompleteEstimated: 20 minutes
PrerequisitesBefore beginning this lab, you must restore a configuration file to Local-FortiGate.
To restore the FortiGate configuration file
1. On the Local-Windows VM, open a browser and log in to the Local-FortiGate GUI at 10.0.1.254 with the username admin and password password.
2. In the upper-right corner of the screen, click admin, and then clickConfiguration >Restore.
3. Click Local PC,and then clickUpload.4. ClickDesktop >Resources > FortiGate-Security > Antivirus > local-AV-flow-based.conf, and then
clickOpen.5. ClickOK.6. ClickOK to reboot.
FortiGate Security 6.2 Lab GuideFortinet Technologies Inc.
169
DO NOT REPRINT© FORTINET

Exercise 1: Using Antivirus Scanning in Flow-BasedInspection Mode
There are two antivirus scanning modes in flow-based inspection mode:
l Quick scan uses a compact antivirus database and performs faster scanning because it doesn’t buffer the file inmemory.
l Full scan uses the full antivirus database. It buffers the file locally, but transmits it simultaneously to the end client.Everything is transmitted except the last packet. The last packet is delayed, and the whole file is sent to theantivirus engine for scanning.
In this exercise, you will use antivirus in flow-based inspection mode to understand how FortiGate performsantivirus scanning. You will use full-scan mode with and without deep inspection. You will observe the behavior ofantivirus scanning, with and without deep inspection, to understand the importance of performing full-contentinspection.
Configure the Antivirus Profile in Flow-Based Inspection Mode
By default, FortiGate inspection mode is set to flow-based, so all the security profiles will also be set to flow-based inspection mode. In this procedure, you will verify the antivirus profile settings and apply the antivirusprofile to a firewall policy.
To set the current FortiGate inspection mode to flow based
1. On the Local-Windows VM, open a browser and log in to the Local-FortiGate GUI at 10.0.1.254 with the username admin and password password.
2. ClickSystem >Settings.3. At the bottom of the page, verify that NGFW Mode is set to Profile-based.
4. Open PuTTY and connect over SSH to the LOCAL-FORTIGATE saved session.5. At the login prompt, enter the user name admin and password password.6. Enter the following commands to set the firewall policy to flow-based.
config firewall policyedit 1
set utm-status enableset inspection-mode flow
nextend
170 FortiGate Security 6.2 Lab GuideFortinet Technologies Inc.
DO NOT REPRINT© FORTINET

Exercise 1: Using Antivirus Scanning in Flow-Based Inspection Mode Review the Flow-Based Antivirus Profile
Review the Flow-Based Antivirus Profile
Now that you've verified that the inspection mode is set to flow-based, you will review the antivirus profile to viewthe settings.
To review the flow-based antivirus profile
1. Continuing on the Local-FortiGate GUI, clickSecurity Profiles >AntiVirus.2. Review the default antivirus profile.
Because the inspection mode is set to flow-based, by default, all the security profileswill be set to flow-based as well.
Enable the Antivirus Profile on a Firewall Policy
Now that you have reviewed the antivirus profile, you must enable the antivirus profile on your firewall policy.After you enable the antivirus profile on a firewall policy, it can scan for viruses and generate logs (based onconfigured log settings).
Take the Expert Challenge!On the Local-FortiGate GUI (10.0.1.254),complete the following:
l Edit the Full_Access firewall policy and enable the default antivirus profile.l Use the certificate-inspection profile for SSL inspection.
If you require assistance, or to verify your work, use the step-by-step instructions that follow.
After you complete the challenge, see Test the Antivirus Configuration on page 172.
To enable the antivirus profile on a firewall policy
1. Continuing on the Local-FortiGate GUI, clickPolicy & Objects > IPv4 Policy.2. Right-click the ID column for the Full_Access firewall policy and clickEdit.3. In the Security Profiles section, enable AntiVirus, and select default from the drop-down menu.4. In the SSL/SSH Inspection drop-down menu, keep the default certificate-inspection profile.
When selecting an antivirus profile, SSL/SSH Inspection is enabled by default. Youcan't disable it, but you can select any preconfigured SSL/SSH inspection profile in theassociated drop-down menu. You will use the certificate-inspection profile for thissection of the lab.
5. Keep the default values for the remaining settings, and then clickOK to save the changes.
FortiGate Security 6.2 Lab GuideFortinet Technologies Inc.
171
DO NOT REPRINT© FORTINET

Test the Antivirus Configuration Exercise 1: Using Antivirus Scanning in Flow-Based Inspection Mode
Test the Antivirus Configuration
In this procedure, you will download the EICAR test file to your Local-Windows VM. The EICAR test file is anindustry-standard virus used to test antivirus detection without causing damage. The file contains the followingcharacters:
X5O!P%@AP[4\PZX54(P^)7CC)7}$EICAR-STANDARD-ANTIVIRUS-TEST-FILE!$H+H*
To test the antivirus configuration
1. Continuing on the Local-Windows VM, open a new web browser tab and access the following website:http://eicar.org
2. In the upper-right corner of the EICAR webpage, clickDOWNLOAD ANTI MALWARE TESTFILE.3. Click the Download link on the left.4. In the Download area using the standard protocol http section, download any EICAR sample file.
FortiGate should block the download attempt and insert a replacement message similar to the followingexample:
FortiGate shows the HTTP virus message when it blocks or quarantines infected files.
Test an Alternate Download Method
In this section, you will test the flow-based antivirus configuration using the Save Link Asmethod to downloadthe EICAR text file.
To test the antivirus configuration
1. Continuing on the Local-Windows VM, open a new web browser tab and go to the following website:http://eicar.org
172 FortiGate Security 6.2 Lab GuideFortinet Technologies Inc.
DO NOT REPRINT© FORTINET

Exercise 1: Using Antivirus Scanning in Flow-Based Inspection Mode View the Antivirus Logs
2. On the EICAR website, in the upper-right corner of the page, clickDOWNLOAD ANTI MALWARE TESTFILE.3. Click the Download link on the left.4. In the Download area using the standard protocol http section, right-click eicar.com.txt and select Save
Link As.
5. Change the download location to Desktop, and then clickSave.You should see the file you downloaded on the desktop. Why was the download allowed?
6. On your desktop, right-click the eicar.com downloaded file, and clickEdit with Notepad++ to open the file youdownloaded.Is the content of the file what it's supposed to be?
Stop and think!
Remember, you are using flow-based inspection mode. Using this method, the client sends a request andstarts receiving the packets immediately, but FortiGate is also buffering those packets at the same time.
When the last packet arrives, FortiGate buffers it and puts it on hold. Then, it sends the whole buffered fileto the IPS engine where rule match is checked and passed to the antivirus engine for scanning. If theantivirus scan does not detect any viruses, and the result comes back clean, the last buffered packet isregenerated and delivered to the client.
However, if a virus is found, the last packet is dropped. Even if the client has received most of the file, thefile will be truncated and the client will be not able to open a truncated file. FortiGate injects the blockmessage into the partially download file. The client can use Notepad to open and view the file.
7. Delete the downloaded eicar.com file from the Desktop.
View the Antivirus Logs
The purpose of logs is to help you monitor your network traffic, locate problems, establish baselines, and makeadjustments to network security, if necessary.
FortiGate Security 6.2 Lab GuideFortinet Technologies Inc.
173
DO NOT REPRINT© FORTINET

View the Antivirus Logs Exercise 1: Using Antivirus Scanning in Flow-Based Inspection Mode
To view the antivirus logs
1. Return to your browser where you are logged in to the Local-FortiGate GUI, and click Log & Report > ForwardTraffic. You may need to remove any log filters you have set.
2. Locate the antivirus log message and double-click it.The Details tab shows forward traffic log information along with the action taken.
3. Select the Security tab to view security logs, which provide information more specific to security events, such asfile name, virus or botnet, and reference.
4. To view antivirus security logs, click Log & Report >AntiVirus.
The AntiVirus section won't display if there are no antivirus logs. FortiGate displaysthe AntiVirus section after creating logs. If the AntiVirusmenu item does notdisplay in the GUI, refresh your browser or log out of the FortiGate GUI and log back inagain.
5. ClickDashboard >Status.6. Scroll to the bottom of the page, and in the bottom right, click the settings icon.7. ClickAdd Widget and add the Advanced Threat Protection Statisticswidget to view the summary statistics
of the antivirus activity.
8. ClickClose.The Advanced Threat Protection Statisticswidget provides statistics about the number of files submittedand the results of those scans.
174 FortiGate Security 6.2 Lab GuideFortinet Technologies Inc.
DO NOT REPRINT© FORTINET

Exercise 1: Using Antivirus Scanning in Flow-Based Inspection Mode Enable SSL Inspection on a Firewall Policy
The Advance Threat Protection Statisticswidget displays malware statisticsstored on the device by the antivirus process. Statistics on the widget can be clearedby formatting the log disk.
Enable SSL Inspection on a Firewall Policy
So far, you have tested unencrypted traffic for antivirus scanning. In order for FortiGate to inspect the encryptedtraffic, you must enable deep inspection on the firewall policy. After you enable this feature, FortiGate will filterfor traffic that is using the SSL encrypted protocol, which is very similar to a man-in-the-middle (MITM) attack.
Take the Expert Challenge!l On Local-Windows, test the configuration by downloading the eicar.com file using HTTPSwithoutenabling the deep-inspectionprofile on the Full Access firewall policy.
l Configure Local-FortiGate to scan secure protocols by enabling SSH/SSL Inspection using the deep-inspection profile on the Full Access firewall policy.
l Test the configuration by downloading the eicar.com file using HTTPS.
If you require assistance, or to verify your work, use the step-by-step instructions that follow.
To test antivirus scanning without SSL Inspection enabled on the firewall policy
1. Continuing on the Local-Windows VM, open a web browser and go to the following website:http://eicar.org
2. On the EICAR webpage, clickDOWNLOAD ANTI MALWARE TESTFILE.3. Click the Download link that appears on the left side.4. In the Download area using the secure, SSL enabled protocol https section, download eicar.com sample
file.
FortiGate Security 6.2 Lab GuideFortinet Technologies Inc.
175
DO NOT REPRINT© FORTINET

Enable SSL Inspection on a Firewall Policy Exercise 1: Using Antivirus Scanning in Flow-Based Inspection Mode
FortiGate should not block the file, because you have not enabled full SSL inspection.
To enable and test the SSL inspection profile on a firewall policy
1. Return to your browser tab where you are logged in to the Local-FortiGate GUI, and clickPolicy& Objects >IPv4Policy.
2. Right-click the ID column for the Full Access firewall policy and clickEdit.3. In the Security Profiles section, in the SSL/SSH Inspection drop-down menu, select deep-inspection.4. Keep the remaining default settings, and then clickOK to save the changes.5. On the EICAR web page, in the Download area using the secure, SSL enabled protocol httpssection, try to
download the same eicar.com file again.
If the FortiGate self-signed, full-inspection certificate is not installed on the browser,end users will see a certificate warning message. In this environment, the FortiGateself-signed SSL inspection certificate is installed on the browser.
FortiGate should block the download and replace it with a message. If it doesn't, you may need to clear yourcache. In Firefox, ClickOptions >Privacy & Security.Scroll to History and clickClear History..., andensure the time range to clear is set to Everything. ClickClear Now.
176 FortiGate Security 6.2 Lab GuideFortinet Technologies Inc.
DO NOT REPRINT© FORTINET
Exercise 2: Configuring Proxy-Based Antivirus Scanning
In proxy-based inspection mode, each protocol's proxy buffers the entire file (or waits for oversize limit) and scansit. The client must wait for the scan to finish.
In this exercise, you will configure antivirus scanning in proxy-based inspection mode, including associatedsecurity features, such as proxy options with deep-inspection. Then, you will apply antivirus scanning to thefirewall policy. Finally, you will view the logs and summary information for the antivirus activity.
Change the FortiGate Inspection Mode
By default, flow-based inspection mode is enabled on FortiGate firewall policy. You will change the inspectionmode from flow-based to proxy-based.
To change the FortiGate inspection mode
1. On the Local-Windows VM, open PuTTY and connect over SSH to the LOCAL-FORTIGATE saved session.2. At the login prompt, enter the user name admin and password password.3. Enter the following commands to change from flow-based to proxy inspection mode:
config firewall policyedit 1
set utm-status enableset inspection-mode proxy
nextend
4. Return to your browser where you are logged into the Local-FortiGate GUI and refresh the browser. (Alternatively,you can log out of the Local-FortiGate GUI and log back in.)
5. ClickPolicy & Objects > IPv4 Policy.6. Double click the Full_Access policy to edit.7. Verify that the Inspection Mode is Proxy-based.
Changing from one inspection mode to another will result in the conversion of profilesand removal or addition of security features, based on the selected mode.
Review the Antivirus Profile in Proxy-Based Inspection Mode
Now that you've changed the inspection mode to proxy-based, you will view the antivirus profile to see thechanges.
FortiGate Security 6.2 Lab GuideFortinet Technologies Inc.
177
DO NOT REPRINT© FORTINET

Enable the Antivirus Profile on a Firewall Policy Exercise 2: Configuring Proxy-Based Antivirus Scanning
To review the antivirus profile in proxy-based inspection mode
1. ClickSecurity Profiles >AntiVirus, and select the default antivirus profile.2. Verify that Detect Viruses is set to Block and, in the Inspected Protocols section, make sure the FTP switch is
turned on.This profile defines the behavior for virus scanning on the traffic that matches policies using that profile.
Enable the Antivirus Profile on a Firewall Policy
Now that the antivirus profile is configured, you must enable the antivirus profile on the firewall policy. After youenable the antivirus profile on a firewall policy, it can scan for viruses and generate logs (based on configured logsettings).
To enable an antivirus profile on a firewall policy
1. Continuing on the Local-FortiGate GUI, clickPolicy & Objects > IPv4 Policy.2. Right-click the ID column for the Full_Access firewall policy and clickEdit.3. In the Security Profiles section, verify that the default profile forAntiVirus is applied.
178 FortiGate Security 6.2 Lab GuideFortinet Technologies Inc.
DO NOT REPRINT© FORTINET

Exercise 2: Configuring Proxy-Based Antivirus Scanning Test the Proxy-Based Antivirus Profile
When selecting an antivirus profile, Protocol Options and SSL/SSH Inspection areautomatically enabled. You can't disable Protocol Options or SSL/SSHInspection, but you can select any preconfigured profiles in the Protocol Optionsand SSL/SSH Inspection drop-down menus.
4. Beside the Protocol Options profile, click the pencil icon to view the profile on the firewall policy tab.Alternatively, clickPolicy & Objects >Protocol Options to see the default proxy options profile selectedin the firewall policy.
This profile specifies how FortiGate’s proxies pick up protocols. For example, the FTP listening port is set toport 21.
Test the Proxy-Based Antivirus Profile
Now, you will test the proxy-based antivirus profile using FTP file transfer.
Take the Expert Challenge!l On the Local-Windows VM desktop, use the FileZilla FTP client to connect to the Linux preconfiguredprofile under Site Manager.
l Leave the username and password fields empty.l Download the eicar.com file from the FTP server.l View the relevant logs on the Local-FortiGate GUI, and identify the action taken as a result of thescanning.
If you require assistance, or to verify your work, the step-by-step instructions are provided below.
To test the antivirus configuration
1. Continuing on the Local-Windows VM, open the FileZilla FTP client software from the desktop.2. Click the Site Manager icon in the upper-left corner and select Linux.
3. On the Remote site side of the application (right), right-click the eicar.com file, and then select Download.
FortiGate Security 6.2 Lab GuideFortinet Technologies Inc.
179
DO NOT REPRINT© FORTINET
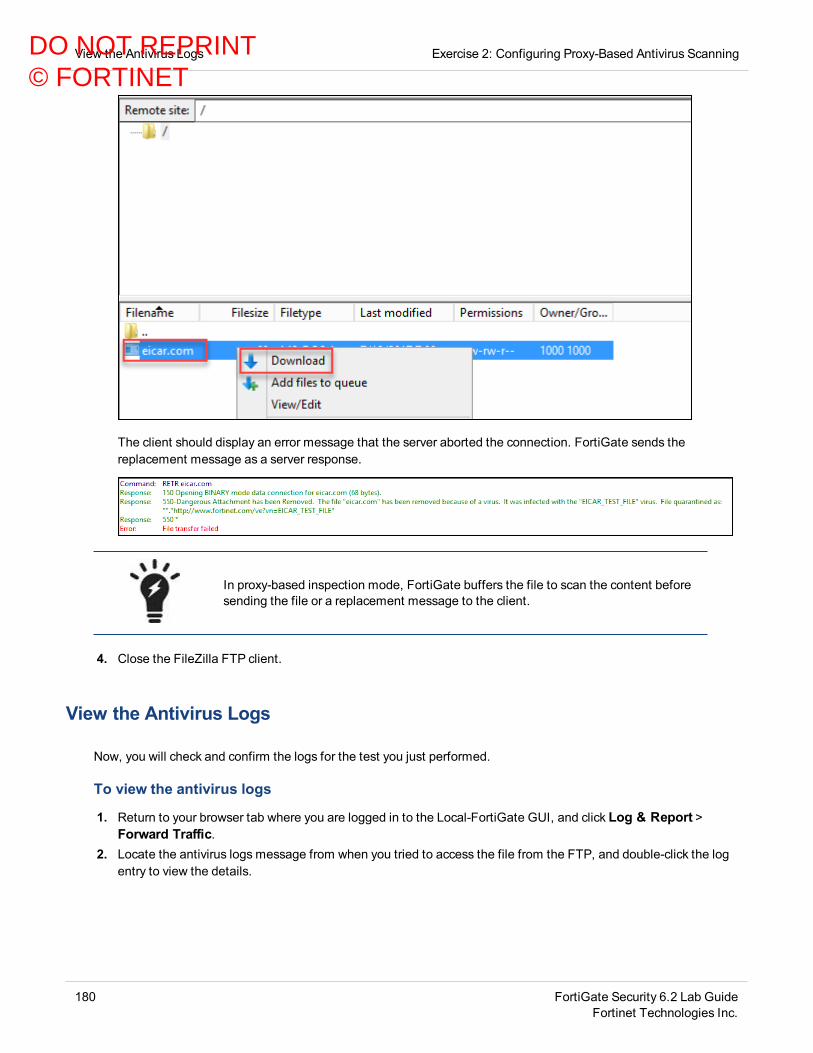
View the Antivirus Logs Exercise 2: Configuring Proxy-Based Antivirus Scanning
The client should display an error message that the server aborted the connection. FortiGate sends thereplacement message as a server response.
In proxy-based inspection mode, FortiGate buffers the file to scan the content beforesending the file or a replacement message to the client.
4. Close the FileZilla FTP client.
View the Antivirus Logs
Now, you will check and confirm the logs for the test you just performed.
To view the antivirus logs
1. Return to your browser tab where you are logged in to the Local-FortiGate GUI, and click Log & Report >Forward Traffic.
2. Locate the antivirus logs message from when you tried to access the file from the FTP, and double-click the logentry to view the details.
180 FortiGate Security 6.2 Lab GuideFortinet Technologies Inc.
DO NOT REPRINT© FORTINET

Exercise 2: Configuring Proxy-Based Antivirus Scanning View the Antivirus Logs
The Details tab shows forward traffic log information along with the action taken.
3. To view security log information, do one of the following:l Select the Security tab. This includes information more specific to the security event, such as file name,
virus/botnet, reference, and so on.l Click Log & Report >AntiVirus.
FortiGate Security 6.2 Lab GuideFortinet Technologies Inc.
181
DO NOT REPRINT© FORTINET
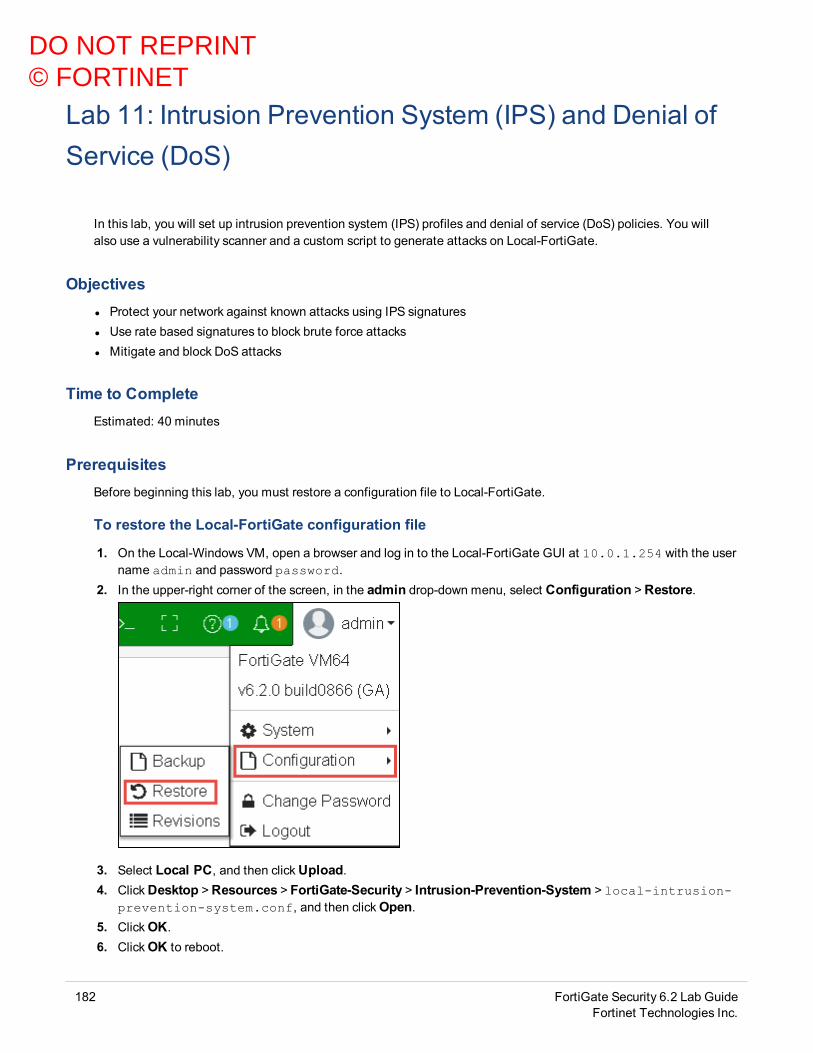
Lab 11: Intrusion Prevention System (IPS) and Denial ofService (DoS)
In this lab, you will set up intrusion prevention system (IPS) profiles and denial of service (DoS) policies. You willalso use a vulnerability scanner and a custom script to generate attacks on Local-FortiGate.
Objectivesl Protect your network against known attacks using IPS signaturesl Use rate based signatures to block brute force attacksl Mitigate and block DoS attacks
Time to CompleteEstimated: 40 minutes
PrerequisitesBefore beginning this lab, you must restore a configuration file to Local-FortiGate.
To restore the Local-FortiGate configuration file
1. On the Local-Windows VM, open a browser and log in to the Local-FortiGate GUI at 10.0.1.254 with the username admin and password password.
2. In the upper-right corner of the screen, in the admin drop-down menu, select Configuration >Restore.
3. Select Local PC, and then clickUpload.4. ClickDesktop >Resources > FortiGate-Security > Intrusion-Prevention-System > local-intrusion-
prevention-system.conf, and then clickOpen.5. ClickOK.6. ClickOK to reboot.
182 FortiGate Security 6.2 Lab GuideFortinet Technologies Inc.
DO NOT REPRINT© FORTINET
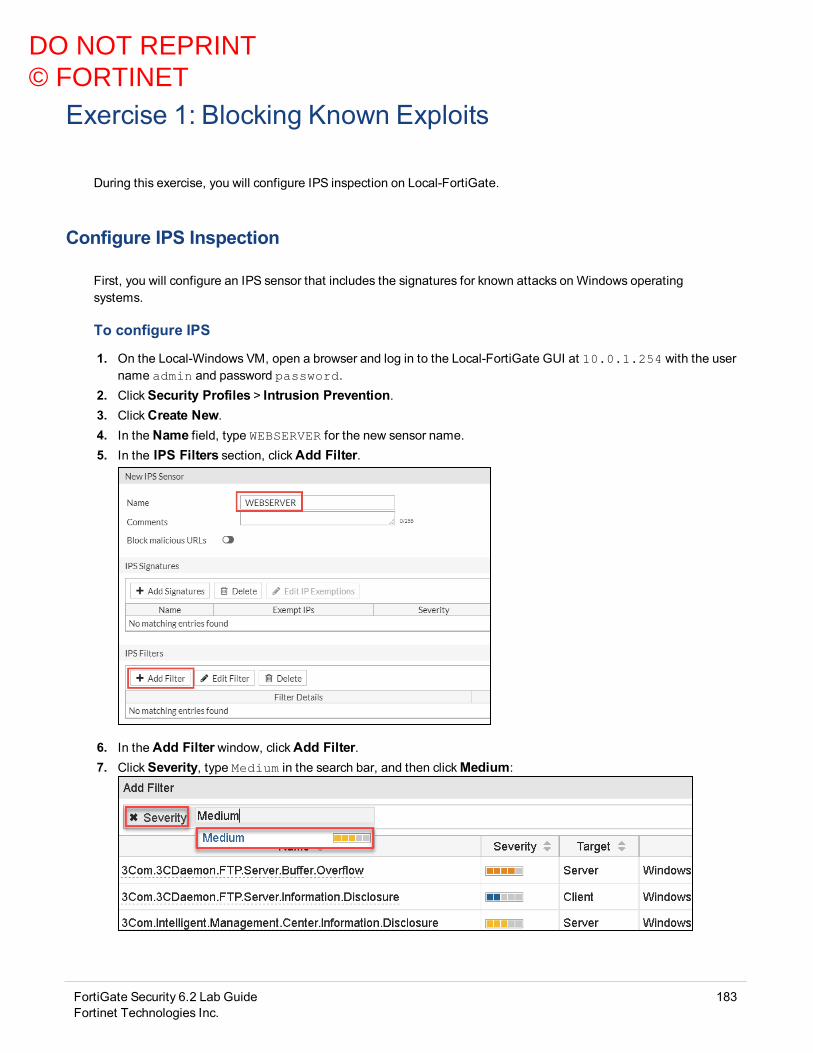
Exercise 1: Blocking Known Exploits
During this exercise, you will configure IPS inspection on Local-FortiGate.
Configure IPS Inspection
First, you will configure an IPS sensor that includes the signatures for known attacks on Windows operatingsystems.
To configure IPS
1. On the Local-Windows VM, open a browser and log in to the Local-FortiGate GUI at 10.0.1.254 with the username admin and password password.
2. ClickSecurity Profiles > Intrusion Prevention.3. ClickCreate New.4. In the Name field, type WEBSERVER for the new sensor name.5. In the IPS Filters section, clickAdd Filter.
6. In the Add Filter window, clickAdd Filter.7. ClickSeverity, type Medium in the search bar, and then clickMedium:
FortiGate Security 6.2 Lab GuideFortinet Technologies Inc.
183
DO NOT REPRINT© FORTINET

Apply an IPS Sensor to a VIP Firewall Policy Exercise 1: Blocking Known Exploits
8. ClickAdd Filter again.9. ClickSeverity, type High in the search bar and then clickHigh:
10. ClickAdd Filter one more time.11. ClickSeverity, type Critical and then clickCritical:
12. ClickUse Filters.All the signatures matching the filter are added to the IPS sensor and FortiGate will take the default action forthese signatures.
13. ClickOK.14. ClickApply.
Apply an IPS Sensor to a VIP Firewall Policy
You will apply the new IPS sensor to a firewall policy that allows external access to the web server running onLocal-Windows.
Take the Expert Challenge!On the Local-FortiGate GUI (10.0.1.254), do the following:
l Configure a new virtual IP to map the external IP 10.200.1.200 to the internal IP 10.0.1.10, usingport1 as the external interface. Name the virtual IP VIP-WEB-SERVER.
l Create a new firewall policy to allow all inbound traffic to the virtual IP and enable theWEBSERVER IPSsensor. Name the firewall policy Web_Server_Access_IPS.
If you require assistance, or to verify your work, use the step-by-step instructions that follow.
After you complete the challenge, see Generate Attacks from the Linux Server on page 186
184 FortiGate Security 6.2 Lab GuideFortinet Technologies Inc.
DO NOT REPRINT© FORTINET

Exercise 1: Blocking Known Exploits Apply an IPS Sensor to a VIP Firewall Policy
To create a virtual IP
1. Continuing on the Local-Fortigate GUI, clickPolicy & Objects >Virtual IPs.2. ClickCreate New >Virtual IP.3. Configure the following settings:
Field Value
Name VIP-WEB-SERVER
Interface port1
External IP Address/Range 10.200.1.200
Mapped IP Address/Range 10.0.1.10
4. ClickOK.
To configure a firewall policy
1. Continuing on the Local-FortiGate GUI, clickPolicy & Objects > IPv4 Policy.2. ClickCreate New and create a new firewall policy using the following settings:
Field Value
Name Web_Server_Access_IPS
Incoming Interface port1
Outgoing Interface port3
Source all
Destination VIP-WEB-SERVER
Schedule always
Service ALL
Action ACCEPT
Inspection Mode Flow-based
NAT disabled
3. In the Security Profiles section, enable IPS, and from the drop-down list, selectWEBSERVER.The policy should look like the following example:
FortiGate Security 6.2 Lab GuideFortinet Technologies Inc.
185
DO NOT REPRINT© FORTINET
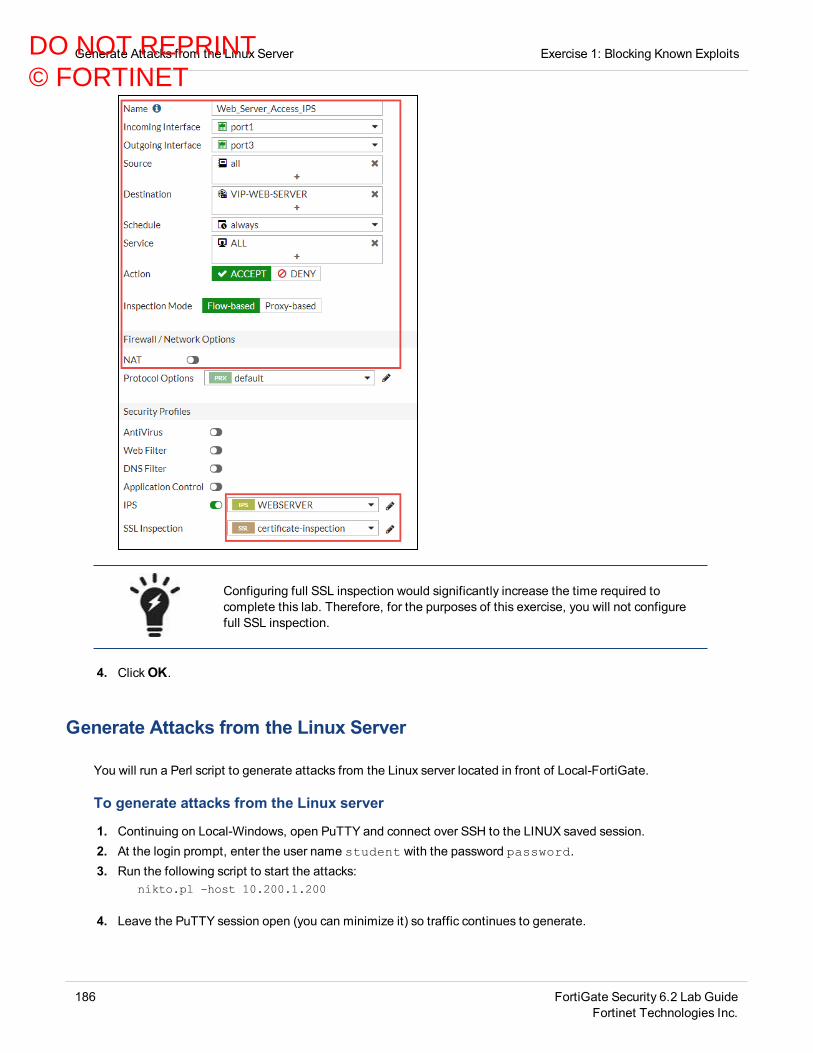
Generate Attacks from the Linux Server Exercise 1: Blocking Known Exploits
Configuring full SSL inspection would significantly increase the time required tocomplete this lab. Therefore, for the purposes of this exercise, you will not configurefull SSL inspection.
4. ClickOK.
Generate Attacks from the Linux Server
You will run a Perl script to generate attacks from the Linux server located in front of Local-FortiGate.
To generate attacks from the Linux server
1. Continuing on Local-Windows, open PuTTY and connect over SSH to the LINUX saved session.2. At the login prompt, enter the user name student with the password password.3. Run the following script to start the attacks:
nikto.pl -host 10.200.1.200
4. Leave the PuTTY session open (you can minimize it) so traffic continues to generate.
186 FortiGate Security 6.2 Lab GuideFortinet Technologies Inc.
DO NOT REPRINT© FORTINET

Exercise 1: Blocking Known Exploits Monitor the IPS
Do not close the LINUX PuTTY session or traffic will stop generating.
Monitor the IPS
You will check the IPS logs to monitor for known attacks being detected and dropped by Local-FortiGate.
Take the Expert Challenge!On the Local-FortiGate GUI (10.0.1.254), complete the following:
l Review the IPS logs for all detected and dropped attacks.l Review the FortiGuard encyclopedia pages.
If you require assistance, or to verify your work, use the step-by-step instructions that follow.
To monitor the IPS
1. Return to your browser tab where you are logged in to the Local-FortiGate GUI, and click Log & Report >Intrusion Prevention.
The IPS logs section will not display if there are no IPS logs. FortiGate displays thissection only after creating logs. After the attacks, if the Intrusion Preventionmenuitem does not display in the GUI, refresh your browser or log out of the Local-FortiGateGUI and log back in again.
2. Locate and review the relevant log entries for the detected and dropped attacks.
FortiGate will create an intrusion prevention log entry for each:
l Detected attack without blocking itl Dropped attack with blocking it
FortiGate Security 6.2 Lab GuideFortinet Technologies Inc.
187
DO NOT REPRINT© FORTINET

Monitor the IPS Exercise 1: Blocking Known Exploits
3. Click a log entry, and then clickDetails.4. Click the Attack Name link:
5. Review the FortiGuard encyclopedia pages for the signatures.The FortiGuard encyclopedia provides information about signatures, such as severity, coverage, affectedproducts, impact, and recommended actions that you can take.
None of the affected products are currently installed on Local-Windows. Thisinformation is important to make note of before you tune the WEBSERVER IPSsensor. If the affected products aren't installed, is it really necessary to inspect thosepackets?
6. Close the LINUX PuTTY.
188 FortiGate Security 6.2 Lab GuideFortinet Technologies Inc.
DO NOT REPRINT© FORTINET

Exercise 2: Using Rate Based IPS Signatures
In this exercise, you will configure a rate based signature to detect and block a brute force FTP attack.
Apply Rate Based Signatures
You will create a new IPS sensor, then enable and configure the appropriate signature to detect and block FTPbrute force attacks. You will then apply the IPS sensor to all outbound traffic on Local-FortiGate.
To create an IPS sensor
1. On the Local-Windows VM, open a browser and log in to the Local-FortiGate GUI at 10.0.1.254 with the username admin and password password.
2. ClickSecurity Profiles > Intrusion Prevention.3. ClickCreate New.4. In the Name field, type FTP_BRUTE_FORCE.5. In the Rate Based Signatures table, enable the FTP.Login.Brute.Force signature.6. Double click the FTP.Login.Brute.Force signature and configure the values given in the table below:
Field Value
Threshold 5
Duration (seconds) 10
Track By Source IP
Action Reset
7. ClickOK.
To apply IPS on outbound traffic
1. Continuing on the Local-FortiGate GUI, clickPolicy & Objects > IPv4 Policy.2. Double-click the existing Full_Access policy to edit it.3. In the Security Profiles section, enable IPS, and in the drop-down list, select FTP_BRUTE_FORCE.4. ClickOK.
Test the Rate Based Signature
You will use a custom Windows batch script to generate invalid login attempts to the FTP server located on theLinux VM. You will then verify your configuration using the IPS logs.
FortiGate Security 6.2 Lab GuideFortinet Technologies Inc.
189
DO NOT REPRINT© FORTINET
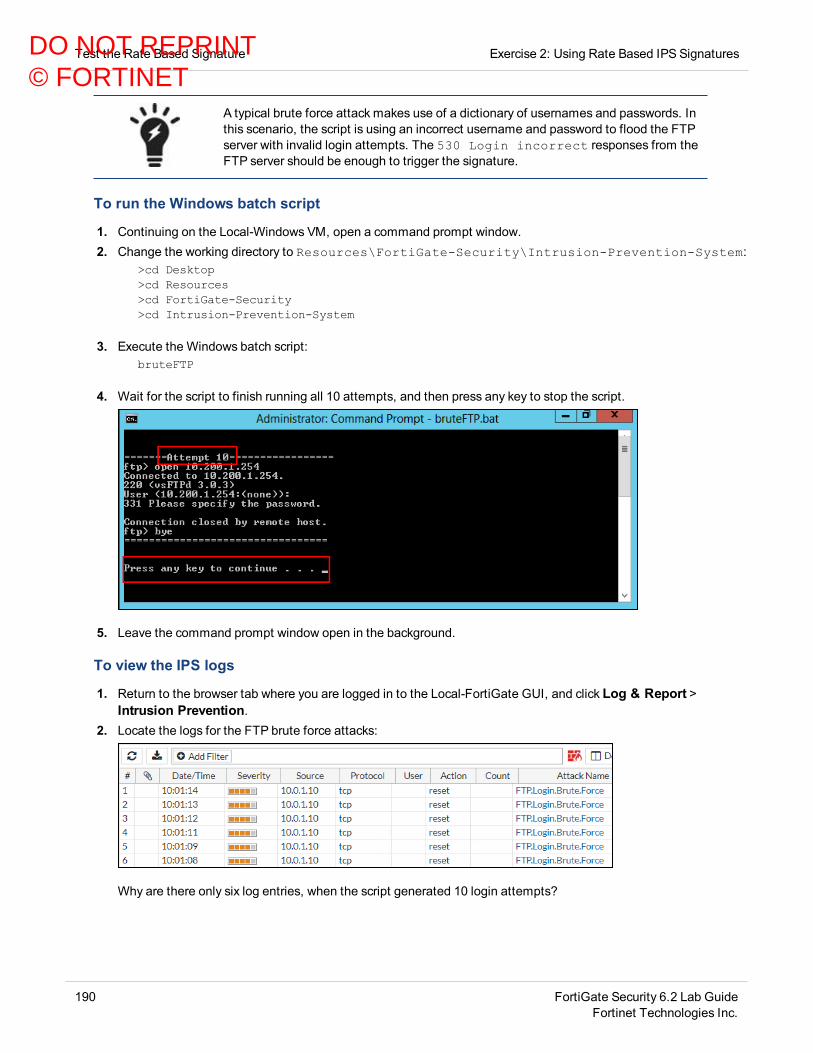
Test the Rate Based Signature Exercise 2: Using Rate Based IPS Signatures
A typical brute force attack makes use of a dictionary of usernames and passwords. Inthis scenario, the script is using an incorrect username and password to flood the FTPserver with invalid login attempts. The 530 Login incorrect responses from theFTP server should be enough to trigger the signature.
To run the Windows batch script
1. Continuing on the Local-Windows VM, open a command prompt window.2. Change the working directory to Resources\FortiGate-Security\Intrusion-Prevention-System:
>cd Desktop>cd Resources>cd FortiGate-Security>cd Intrusion-Prevention-System
3. Execute the Windows batch script:bruteFTP
4. Wait for the script to finish running all 10 attempts, and then press any key to stop the script.
5. Leave the command prompt window open in the background.
To view the IPS logs
1. Return to the browser tab where you are logged in to the Local-FortiGate GUI, and click Log & Report >Intrusion Prevention.
2. Locate the logs for the FTP brute force attacks:
Why are there only six log entries, when the script generated 10 login attempts?
190 FortiGate Security 6.2 Lab GuideFortinet Technologies Inc.
DO NOT REPRINT© FORTINET

Exercise 2: Using Rate Based IPS Signatures Test the Rate Based Signature
Stop and think!
The FTP.Login.Brute.Force rate based signature was configured with a threshold of five. The IPSsignature action only triggered after the threshold was met.
To verify the IPS signature action
1. Continuing on the Local-Windows VM, go back to the command prompt window.2. Scroll up and locate Attempt 4 and Attempt 5.
Note that for Attempt 4, the server response is 530 Login incorrect. However, for Attempt 5,the error message is Connection closed by remote host. This is where the rate based signature'saction triggers, and the FTP client's connections are reset. This Connection closed by remotehost message repeats until the script ends with Attempt 10.
3. Close the command prompt window.
FortiGate Security 6.2 Lab GuideFortinet Technologies Inc.
191
DO NOT REPRINT© FORTINET
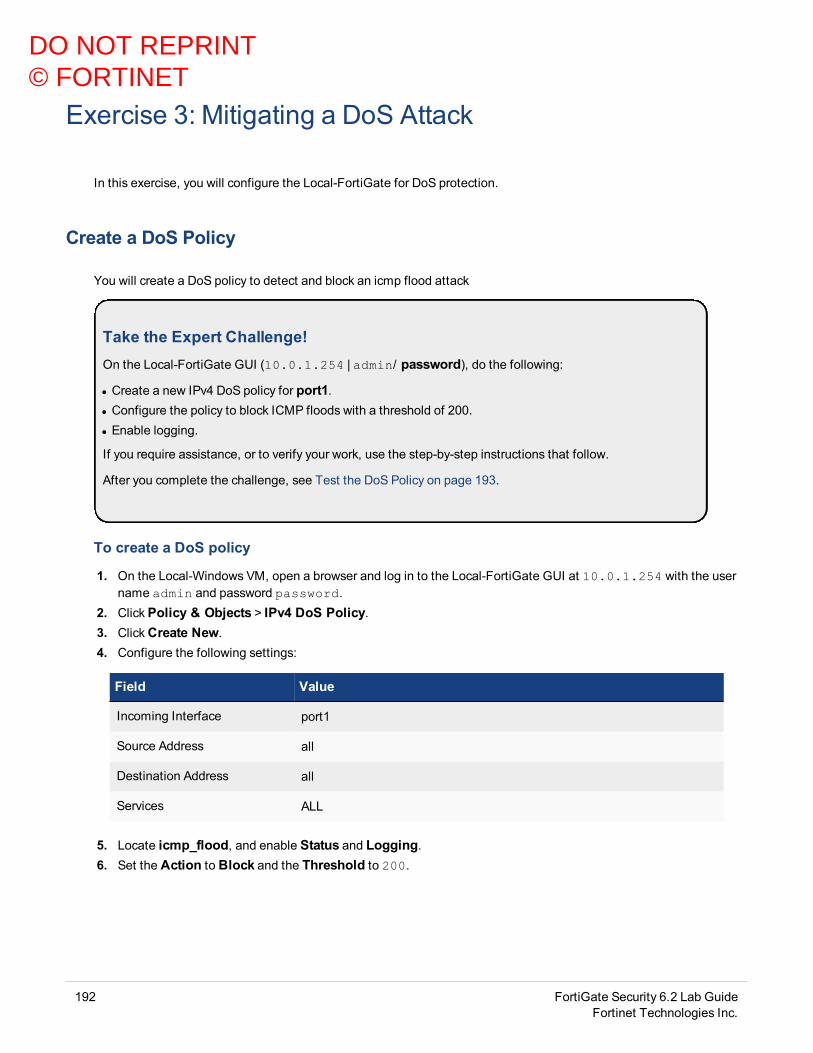
Exercise 3: Mitigating a DoS Attack
In this exercise, you will configure the Local-FortiGate for DoS protection.
Create a DoS Policy
You will create a DoS policy to detect and block an icmp flood attack
Take the Expert Challenge!On the Local-FortiGate GUI (10.0.1.254 | admin/ password), do the following:
l Create a new IPv4 DoS policy for port1.l Configure the policy to block ICMP floods with a threshold of 200.l Enable logging.
If you require assistance, or to verify your work, use the step-by-step instructions that follow.
After you complete the challenge, see Test the DoS Policy on page 193.
To create a DoS policy
1. On the Local-Windows VM, open a browser and log in to the Local-FortiGate GUI at 10.0.1.254 with the username admin and password password.
2. ClickPolicy & Objects > IPv4 DoS Policy.3. ClickCreate New.4. Configure the following settings:
Field Value
Incoming Interface port1
Source Address all
Destination Address all
Services ALL
5. Locate icmp_flood, and enable Status and Logging.6. Set the Action to Block and the Threshold to 200.
192 FortiGate Security 6.2 Lab GuideFortinet Technologies Inc.
DO NOT REPRINT© FORTINET
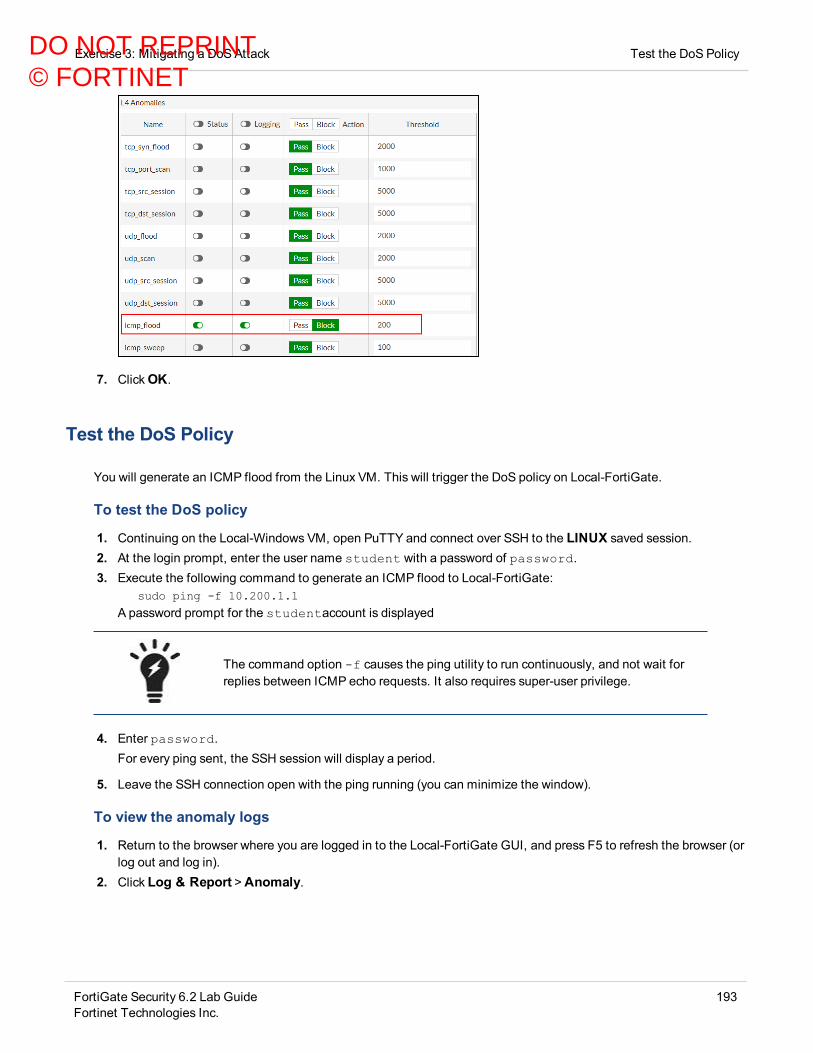
Exercise 3: Mitigating a DoS Attack Test the DoS Policy
7. ClickOK.
Test the DoS Policy
You will generate an ICMP flood from the Linux VM. This will trigger the DoS policy on Local-FortiGate.
To test the DoS policy
1. Continuing on the Local-Windows VM, open PuTTY and connect over SSH to the LINUX saved session.2. At the login prompt, enter the user name student with a password of password.3. Execute the following command to generate an ICMP flood to Local-FortiGate:
sudo ping -f 10.200.1.1
A password prompt for the studentaccount is displayed
The command option -f causes the ping utility to run continuously, and not wait forreplies between ICMP echo requests. It also requires super-user privilege.
4. Enter password.For every ping sent, the SSH session will display a period.
5. Leave the SSH connection open with the ping running (you can minimize the window).
To view the anomaly logs
1. Return to the browser where you are logged in to the Local-FortiGate GUI, and press F5 to refresh the browser (orlog out and log in).
2. Click Log & Report >Anomaly.
FortiGate Security 6.2 Lab GuideFortinet Technologies Inc.
193
DO NOT REPRINT© FORTINET

Test the DoS Policy Exercise 3: Mitigating a DoS Attack
The Anomaly logs section will not display if there are no anomaly logs. If theAnomalymenu item does not display in the GUI, refresh the browser or log out fromthe Local-FortiGate GUI and log back in again.
3. Examine the logs.Note that the ICMP flood has been blocked. This is indicated by the entry clear_session in the Action field.
4. Go back to the PuTTYwindow and press Ctrl+C to stop the ping.5. Close the PuTTY session.
194 FortiGate Security 6.2 Lab GuideFortinet Technologies Inc.
DO NOT REPRINT© FORTINET
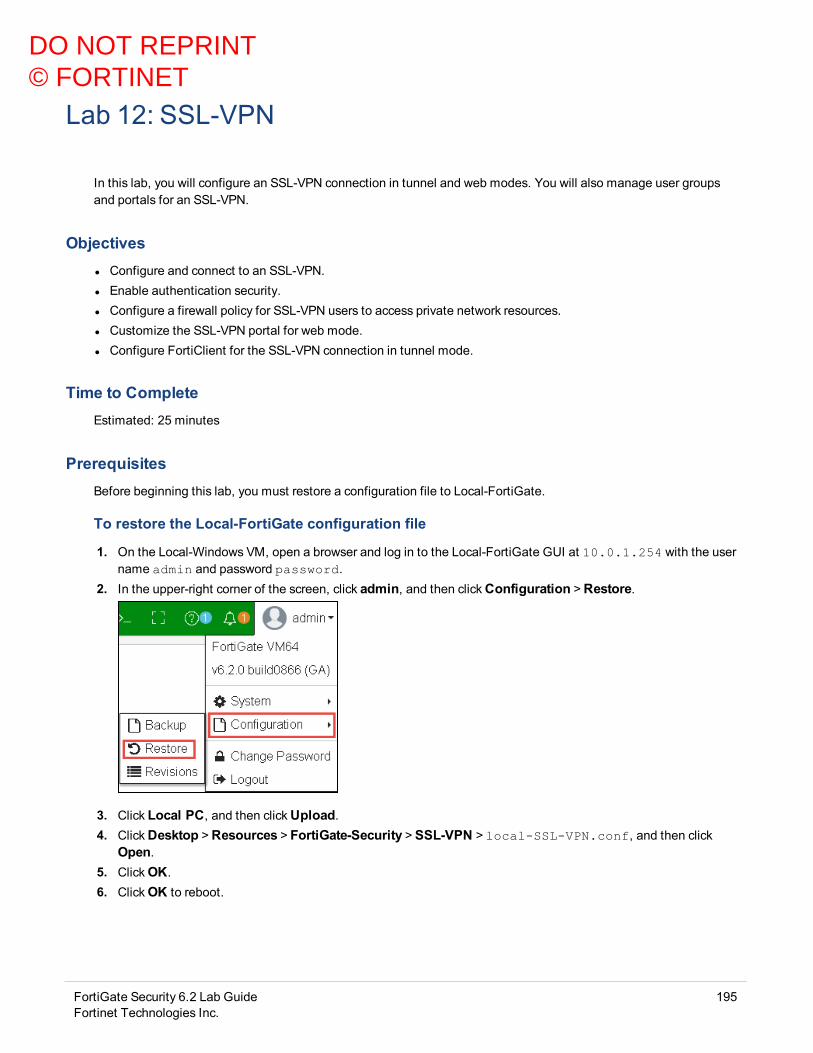
Lab 12: SSL-VPN
In this lab, you will configure an SSL-VPN connection in tunnel and web modes. You will also manage user groupsand portals for an SSL-VPN.
Objectivesl Configure and connect to an SSL-VPN.l Enable authentication security.l Configure a firewall policy for SSL-VPN users to access private network resources.l Customize the SSL-VPN portal for web mode.l Configure FortiClient for the SSL-VPN connection in tunnel mode.
Time to CompleteEstimated: 25 minutes
PrerequisitesBefore beginning this lab, you must restore a configuration file to Local-FortiGate.
To restore the Local-FortiGate configuration file
1. On the Local-Windows VM, open a browser and log in to the Local-FortiGate GUI at 10.0.1.254 with the username admin and password password.
2. In the upper-right corner of the screen, click admin, and then clickConfiguration >Restore.
3. Click Local PC, and then clickUpload.4. ClickDesktop >Resources > FortiGate-Security >SSL-VPN > local-SSL-VPN.conf, and then click
Open.5. ClickOK.6. ClickOK to reboot.
FortiGate Security 6.2 Lab GuideFortinet Technologies Inc.
195
DO NOT REPRINT© FORTINET
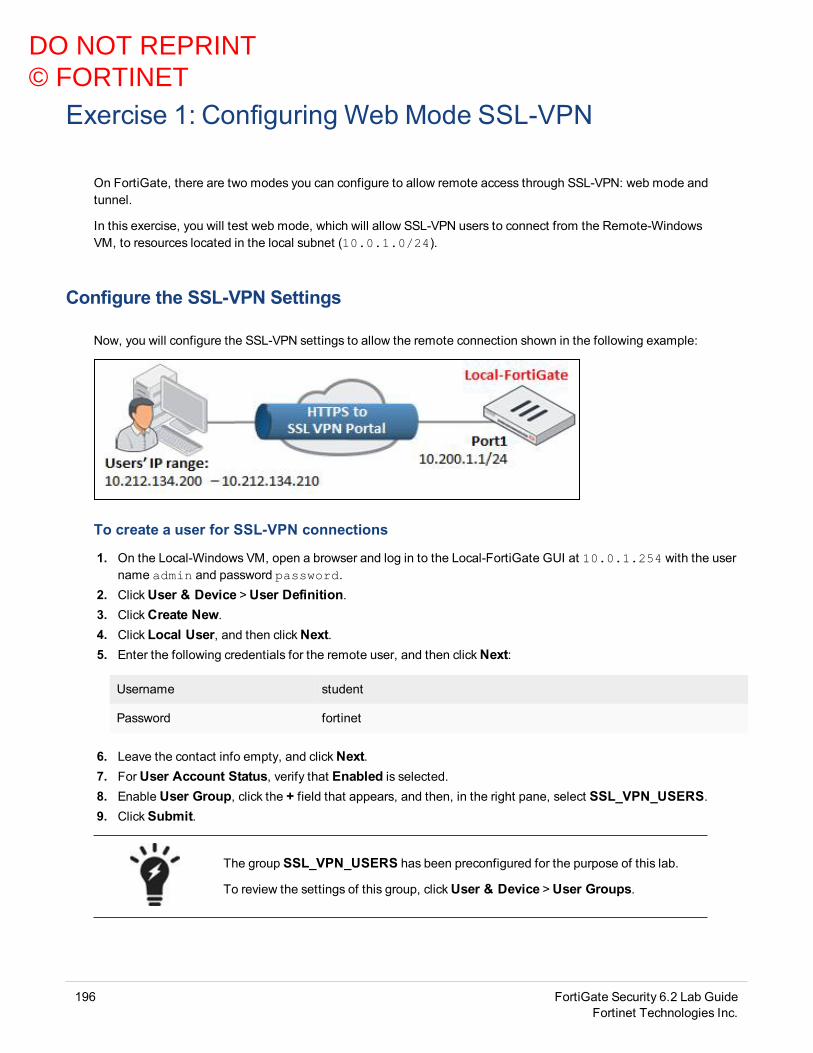
Exercise 1: Configuring Web Mode SSL-VPN
On FortiGate, there are two modes you can configure to allow remote access through SSL-VPN: web mode andtunnel.
In this exercise, you will test web mode, which will allow SSL-VPN users to connect from the Remote-WindowsVM, to resources located in the local subnet (10.0.1.0/24).
Configure the SSL-VPN Settings
Now, you will configure the SSL-VPN settings to allow the remote connection shown in the following example:
To create a user for SSL-VPN connections
1. On the Local-Windows VM, open a browser and log in to the Local-FortiGate GUI at 10.0.1.254 with the username admin and password password.
2. ClickUser & Device >User Definition.3. ClickCreate New.4. Click Local User, and then clickNext.5. Enter the following credentials for the remote user, and then clickNext:
Username student
Password fortinet
6. Leave the contact info empty, and clickNext.7. ForUser Account Status, verify that Enabled is selected.8. Enable User Group, click the + field that appears, and then, in the right pane, select SSL_VPN_USERS.9. ClickSubmit.
The group SSL_VPN_USERS has been preconfigured for the purpose of this lab.
To review the settings of this group, clickUser & Device >User Groups.
196 FortiGate Security 6.2 Lab GuideFortinet Technologies Inc.
DO NOT REPRINT© FORTINET

Exercise 1: Configuring Web Mode SSL-VPN Create a Firewall Policy for SSL-VPN
To configure the SSL-VPN settings for web access
1. Continuing on the Local-FortiGate GUI, clickVPN >SSL-VPN Settings.2. In the Connection Settings section, configure the following settings:
Field Value
Listen on Interface(s) port1
Listen on Port 10443
Restrict Access Allow access from any host
Inactive For 3000 seconds
Server Certificate Fortinet_Factory
3. In the Tunnel Mode Client Settings section, configure the following settings:
Field Value
Address Range Automatically assign addresses
4. In the Authentication/Portal Mapping section, select All Other Users/Groups, and then clickEdit.
5. In the Portal drop-down list, select web-access, and then clickOK.6. ClickApply to save the changes.7. ClickOK to confirm the use of the built-in certificate.
Notice the warning message displayed on the top of this page. It indicates that you need to create a firewallpolicy for SSL-VPN connections.
Create a Firewall Policy for SSL-VPN
Now, you will create a firewall policy that allows traffic to the local subnet (10.0.1.0/24) from remote usersconnected to the SSL-VPN portal.
FortiGate Security 6.2 Lab GuideFortinet Technologies Inc.
197
DO NOT REPRINT© FORTINET

Test the SSL-VPN Access Exercise 1: Configuring Web Mode SSL-VPN
To create a firewall policy for SSL-VPN
1. Continuing on the Local-FortiGate GUI, clickPolicy & Objects > IPv4 Policy.2. ClickCreate New, and then configure the following firewall policy settings:
Field Value
Name SSL-VPN-Access
Incoming Interface SSL-VPN tunnel interface (ssl.root)
Outgoing Interface port3
Source Address > SSLVPN_TUNNEL_ADDR1
User > SSL_VPN_USERS
Destination LOCAL_SUBNET
Schedule always
Service ALL
Action ACCEPT
Inspection mode Flow-based
NAT Disabled
3. ClickOK.4. ClickOK to confirm the use of the built-in certificate.
The SSL-VPN firewall policy will only allow traffic from users within the group SSL_VPN_Users.
Test the SSL-VPN Access
Now, you will test the SSL-VPN by accessing resources remotely within the local subnet (10.0.1.0/24) .
198 FortiGate Security 6.2 Lab GuideFortinet Technologies Inc.
DO NOT REPRINT© FORTINET

Exercise 1: Configuring Web Mode SSL-VPN Test the SSL-VPN Access
For this, you will connect to the SSL-VPN portal using the Remote-Windows VM, and then you'll perform an RDPconnection to the Local-Windows VM.
To access the SSL-VPN portal
1. In your lab environment, connect to the Remote-Windows VM.2. Open Firefox and connect to:
https://10.200.1.1:10443/
A security warning appears.
Stop and think!
Why do you receive a security warning?
For SSL connections, FortiGate is using a built-in certificate, which is signed by a certificate authority thatthe browser does not trust.
3. ClickAdvanced, clickAdd Exception, and then clickConfirm Security Exception.The remote login page opens.
4. Log in as student with the password fortinet.The SSL-VPN web portal opens. The portal is using default settings.
To test the SSL-VPN portal
1. Continuing on the SSL-VPN portal where you are logged in as student, clickQuick Connection.Notice all the available options the SSL-VPN portal allows for connections.
2. ClickRDP, and configure the following setting:
Field Value
Host 10.0.1.10
3. Keep the default values for the remaining settings, and then click Launch.4. Wait five seconds, and then click TRAININGAD\Administrator when it appears.5. Enter the password password.
You are now remotely connected to the Local-Windows VM.
6. Close the web browser that is running the RDP session.7. In the upper-right corner, click student > Logout to log out of the SSL VPN portal.
FortiGate Security 6.2 Lab GuideFortinet Technologies Inc.
199
DO NOT REPRINT© FORTINET

Add an Admin-Based Bookmark to the SSL-VPN Portal Exercise 1: Configuring Web Mode SSL-VPN
Add an Admin-Based Bookmark to the SSL-VPN Portal
In this exercise, you will customize the SSL-VPN portal with a new color and a predefined bookmark.
To customize the SSL-VPN Portal
1. Return to the Local-Windows VM.2. From the environment find and clickSend Ctrl-Alt-Del.3. Click theTRAININGAD\Administrator user account.4. Enter the password password.5. Open a browser and log in to the Local-FortiGate GUI at 10.0.1.254 with the user name admin and password
password.6. ClickVPN >SSL-VPN Portals.7. Select web-access, and then clickEdit.8. Configure the following settings:
Field Value
Portal Message My Portal
Theme Red
Show Connection Launcher <disable>
User Bookmarks <disable>
9. In the Predefined Bookmarks section, clickCreate New, and then configure the following settings:
Field Value
Name Local-Windows VM
Type HTTP/HTTPS
URL http://10.0.1.10
Single Sign-On Disabled
10. ClickOK.11. ClickOK again to save the portal's settings.
200 FortiGate Security 6.2 Lab GuideFortinet Technologies Inc.
DO NOT REPRINT© FORTINET
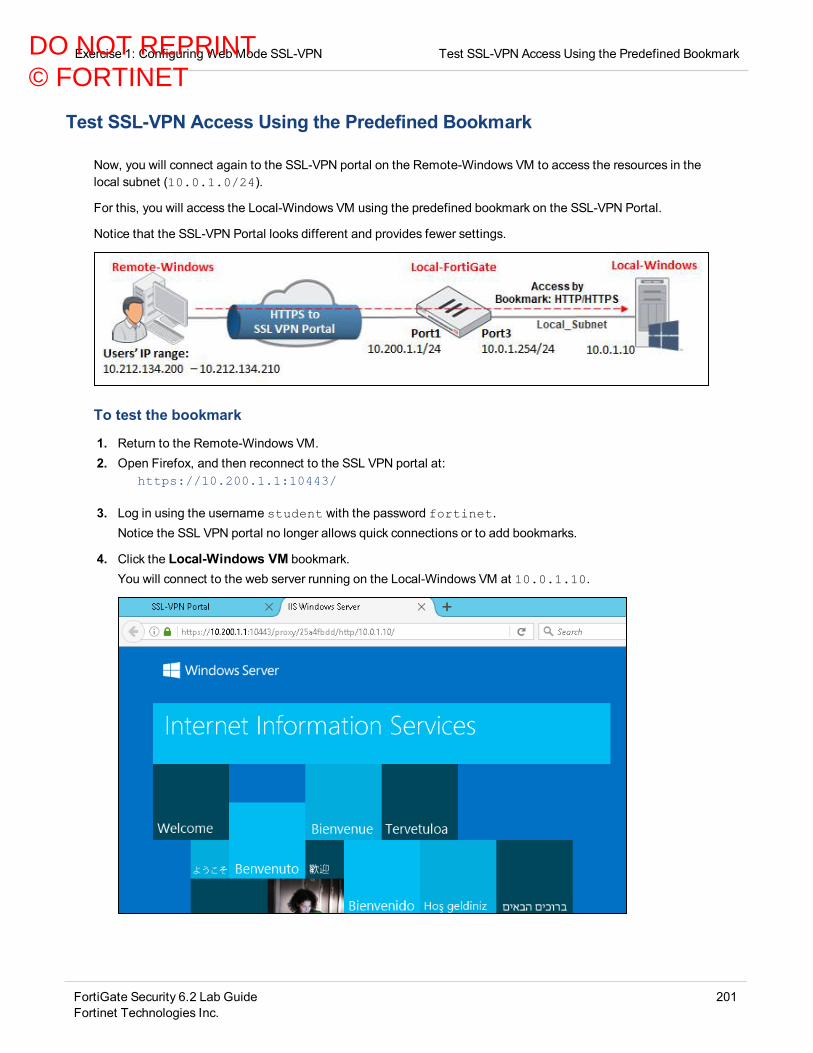
Exercise 1: Configuring Web Mode SSL-VPN Test SSL-VPN Access Using the Predefined Bookmark
Test SSL-VPN Access Using the Predefined Bookmark
Now, you will connect again to the SSL-VPN portal on the Remote-Windows VM to access the resources in thelocal subnet (10.0.1.0/24).
For this, you will access the Local-Windows VM using the predefined bookmark on the SSL-VPN Portal.
Notice that the SSL-VPN Portal looks different and provides fewer settings.
To test the bookmark
1. Return to the Remote-Windows VM.2. Open Firefox, and then reconnect to the SSL VPN portal at:
https://10.200.1.1:10443/
3. Log in using the username student with the password fortinet.Notice the SSL VPN portal no longer allows quick connections or to add bookmarks.
4. Click the Local-Windows VM bookmark.You will connect to the web server running on the Local-Windows VM at 10.0.1.10.
FortiGate Security 6.2 Lab GuideFortinet Technologies Inc.
201
DO NOT REPRINT© FORTINET
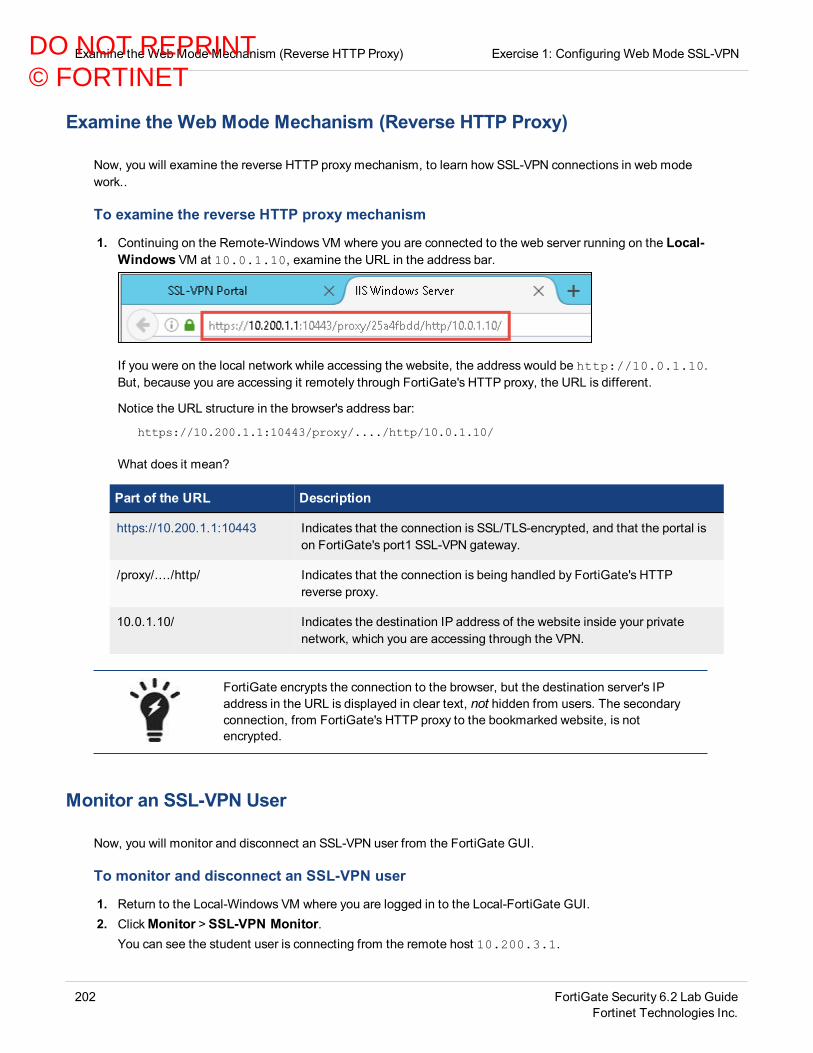
Examine the Web Mode Mechanism (Reverse HTTP Proxy) Exercise 1: Configuring Web Mode SSL-VPN
Examine the Web Mode Mechanism (Reverse HTTP Proxy)
Now, you will examine the reverse HTTP proxy mechanism, to learn how SSL-VPN connections in web modework..
To examine the reverse HTTP proxy mechanism
1. Continuing on the Remote-Windows VM where you are connected to the web server running on the Local-Windows VM at 10.0.1.10, examine the URL in the address bar.
If you were on the local network while accessing the website, the address would be http://10.0.1.10.But, because you are accessing it remotely through FortiGate's HTTP proxy, the URL is different.
Notice the URL structure in the browser's address bar:
https://10.200.1.1:10443/proxy/..../http/10.0.1.10/
What does it mean?
Part of the URL Description
https://10.200.1.1:10443 Indicates that the connection is SSL/TLS-encrypted, and that the portal ison FortiGate's port1 SSL-VPN gateway.
/proxy/..../http/ Indicates that the connection is being handled by FortiGate's HTTPreverse proxy.
10.0.1.10/ Indicates the destination IP address of the website inside your privatenetwork, which you are accessing through the VPN.
FortiGate encrypts the connection to the browser, but the destination server's IPaddress in the URL is displayed in clear text, not hidden from users. The secondaryconnection, from FortiGate's HTTP proxy to the bookmarked website, is notencrypted.
Monitor an SSL-VPN User
Now, you will monitor and disconnect an SSL-VPN user from the FortiGate GUI.
To monitor and disconnect an SSL-VPN user
1. Return to the Local-Windows VM where you are logged in to the Local-FortiGate GUI.2. ClickMonitor >SSL-VPN Monitor.
You can see the student user is connecting from the remote host 10.200.3.1.
202 FortiGate Security 6.2 Lab GuideFortinet Technologies Inc.
DO NOT REPRINT© FORTINET

Exercise 1: Configuring Web Mode SSL-VPN Monitor an SSL-VPN User
3. Right-click student, and select End Session.4. ClickOK.
The student user no longer appears in the SSL-VPNmonitor.
FortiGate Security 6.2 Lab GuideFortinet Technologies Inc.
203
DO NOT REPRINT© FORTINET
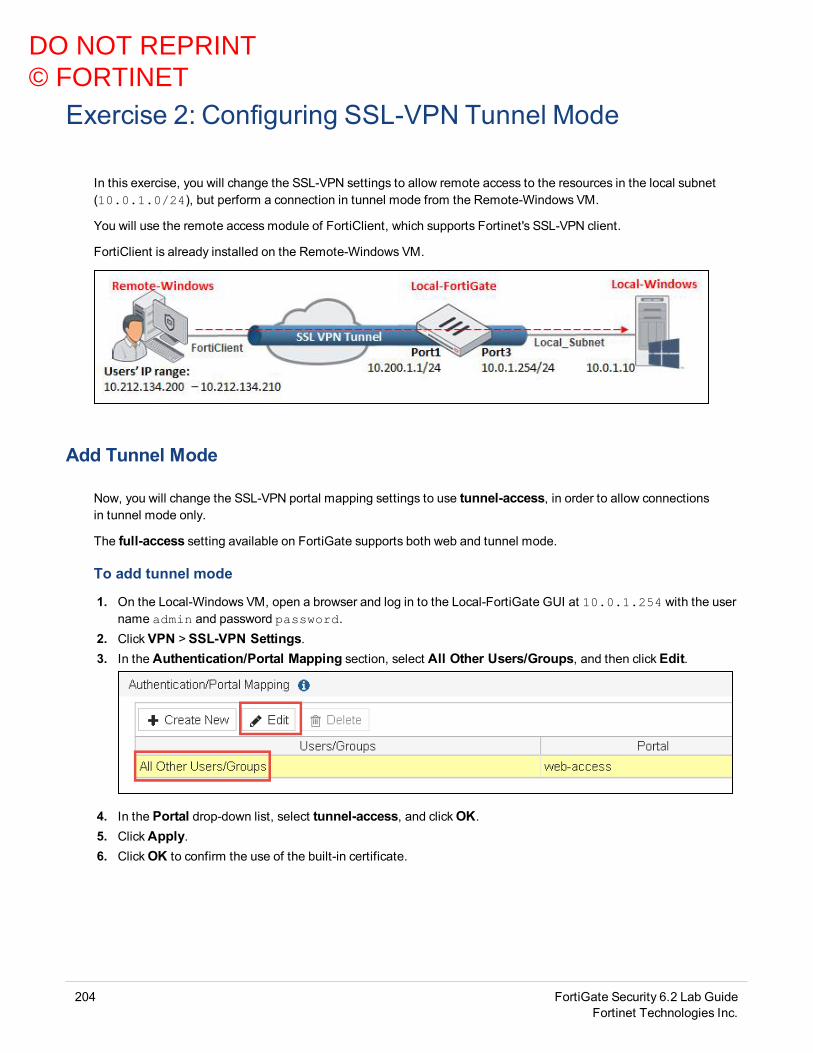
Exercise 2: Configuring SSL-VPN Tunnel Mode
In this exercise, you will change the SSL-VPN settings to allow remote access to the resources in the local subnet(10.0.1.0/24), but perform a connection in tunnel mode from the Remote-Windows VM.
You will use the remote access module of FortiClient, which supports Fortinet's SSL-VPN client.
FortiClient is already installed on the Remote-Windows VM.
Add Tunnel Mode
Now, you will change the SSL-VPN portal mapping settings to use tunnel-access, in order to allow connectionsin tunnel mode only.
The full-access setting available on FortiGate supports both web and tunnel mode.
To add tunnel mode
1. On the Local-Windows VM, open a browser and log in to the Local-FortiGate GUI at 10.0.1.254 with the username admin and password password.
2. ClickVPN >SSL-VPN Settings.3. In the Authentication/Portal Mapping section, select All Other Users/Groups, and then clickEdit.
4. In the Portal drop-down list, select tunnel-access, and clickOK.5. ClickApply.6. ClickOK to confirm the use of the built-in certificate.
204 FortiGate Security 6.2 Lab GuideFortinet Technologies Inc.
DO NOT REPRINT© FORTINET

Exercise 2: Configuring SSL-VPN Tunnel Mode Configure the Routing for Tunnel Mode
Configure the Routing for Tunnel Mode
Now, you will establish the routing address to use in tunnel mode.
Notice that in tunnel mode, the FortiClient establishes one or more routes in the SSL-VPN user's host after thetunnel is connected. Traffic destined to the internal subnets is correctly routed through the tunnel.
To configure the routing for tunnel mode
1. Continuing on the Local-FortiGate GUI, clickVPN >SSL-VPN Portals.2. Select the tunnel-access portal, and then clickEdit.3. In the Tunnel Mode section, set the Routing Address to LOCAL_SUBNET.
4. ClickOK.
Configure FortiClient for SSL-VPN connections
SSL-VPN connections in tunnel mode require FortiClient. You will use FortiClient that is installed on the Remote-Windows VM to test your configuration.
To configure FortiClient for SSL-VPN
1. Connect to the Remote-Windows VM.2. Start the FortiClient application located on the desktop.
FortiGate Security 6.2 Lab GuideFortinet Technologies Inc.
205
DO NOT REPRINT© FORTINET
Test SSL-VPN in Tunnel Mode Exercise 2: Configuring SSL-VPN Tunnel Mode
3. ClickREMOTE ACCESS, and then clickConfigure VPN.4. Select the SSL-VPN tab, and then configure the following settings:
Field Value
Connection Name Local-FortiGate
Remote Gateway 10.200.1.1
Customize port <enable> | 10443
5. ClickSave.
Test SSL-VPN in Tunnel Mode
Now, you will connect using the student account to test tunnel mode.
To connect in tunnel mode
1. Open FortiClient, and then clickREMOTE ACCESS.2. Enter the username student with the password fortinet.
206 FortiGate Security 6.2 Lab GuideFortinet Technologies Inc.
DO NOT REPRINT© FORTINET

Exercise 2: Configuring SSL-VPN Tunnel Mode Test SSL-VPN in Tunnel Mode
3. ClickConnect.4. ClickYes to accept the certificate.
The tunnel is connected.
To test the tunnel
1. Continuing on the Remote-Windows VM, open Firefox and access the following URL:
http://10.0.1.10
2. Look at the URL.You are connected to the web server URL as if you were based in the local subnet (10.0.1.0/24).
FortiGate Security 6.2 Lab GuideFortinet Technologies Inc.
207
DO NOT REPRINT© FORTINET

Review VPN Events Exercise 2: Configuring SSL-VPN Tunnel Mode
This time, you are not using the reverse HTTP proxy as in the case of web-access mode. The IP traffic isdirectly encapsulated over HTTPS and sent through the tunnel.
3. Return to FortiClient, and then clickDisconnect.
To attempt SSL-VPN access by web mode
1. Continuing on the Remote-Windows VM, open a web browser and log in to the SSL-VPN portal athttps://10.200.1.1:10443/ using the username student and the password fortinet.
2. View the warning message.The web access for SSL-VPN is not available because you set up the SSL-VPN settings for tunnel-access.
The full-access setting supports both web and tunnel modes.
3. Close the web browser.
Review VPN Events
Now, you'll review the VPN events for both of the SSL-VPN connections you performed in this lab (web and tunnelmodes).
To review VPN events for SSL-VPN connections
1. Return to the Local-Windows VM.2. Open a browser and log in to the Local-FortiGate GUI at 10.0.1.254 with the user name admin and password
password.3. Click Log & Report >VPN Events.4. Compare the log details of the tunnel-up logs you see.
Hint: Use your log filters to filter on Action = tunnel-up.
The most recent tunnel-up log shows one IP address underRemote IP. This log shows the recentconnection to the SSL-VPN portal. Even though the SSL-VPN portal presented a warning message and it didnot allow remote access to the local resources, FortiGate shows that an SSL-VPN connection wasestablished and the tunnel was up.
208 FortiGate Security 6.2 Lab GuideFortinet Technologies Inc.
DO NOT REPRINT© FORTINET

Exercise 2: Configuring SSL-VPN Tunnel Mode Review VPN Events
The second most recent tunnel-up log in the VPN event list, shows the SSL-VPN connection in tunnel modethrough FortiClient. Notice this log presents two IP addresses:
l Remote IP: IP address of the remote user's gateway (egress interface).l Tunnel IP: IP address FortiGate assigns to the virtual network adapter fortissl.
1.
Stop and think!
Aside from SSL-VPN connections in web mode showing one IP address and tunnel mode showingtwo IP addresses, what other indicator shows how SSL-VPN users are connected?
Notice the Tunnel Type indicator in the log details shown in the previous step.
l ssl-web for web mode.l ssl-tunnel for tunnel mode.
FortiGate Security 6.2 Lab GuideFortinet Technologies Inc.
209
DO NOT REPRINT© FORTINET

Lab 13: Dialup IPsec VPN
In this lab, you will configure a dialup VPN between two FortiGate devices. You will also create a dialup VPNbetween FortiGate and FortiClient.
Objectivesl Deploy a dialup VPN between two FortiGate devicesl Deploy a dialup VPN between FortiGate and FortiClient
Time to CompleteEstimated: 45 minutes
PrerequisitesBefore beginning this lab, you must restore a configuration file on Remote-FortiGate and Local-FortiGate .
Make sure to restore the correct configuration on each FortiGate using the followingsteps. Failure to restore the correct configuration on each FortiGate will prevent youfrom doing the lab exercise.
To restore the Remote-FortiGate configuration file
1. On the Local-Windows VM, open a browser and log in to the Remote-FortiGate GUI at 10.200.3.1 with theuser name admin and password password.
2. In the upper-right corner of the screen, click admin, and then clickConfiguration >Restore.
3. Click Local PC,and then clickUpload.4. ClickDesktop >Resources > FortiGate-Security >Dialup-IPsec >Dialup-IPsec-Two-FortiGates >
remote-dialup-IPsec-TwoFGT.conf, and then clickOpen.5. ClickOK.6. ClickOK to reboot.
210 FortiGate Security 6.2 Lab GuideFortinet Technologies Inc.
DO NOT REPRINT© FORTINET

Lab 13: Dialup IPsec VPN
To restore the Local-FortiGate configuration file
1. On the Local-Windows VM, open a browser and log in to the Local-FortiGate GUI at 10.0.1.254 with the username admin and password password.
2. In the upper-right corner of the screen, click admin, and then clickConfiguration >Restore.
3. Click Local PC,and then clickUpload.4. ClickDesktop >Resources > FortiGate-Security >Dialup-IPsec >Dialup-IPsec-Two-FortiGates > local-
dialup-IPsec-TwoFGT.conf, and then clickOpen.5. ClickOK.6. ClickOK to reboot.
FortiGate Security 6.2 Lab GuideFortinet Technologies Inc.
211
DO NOT REPRINT© FORTINET
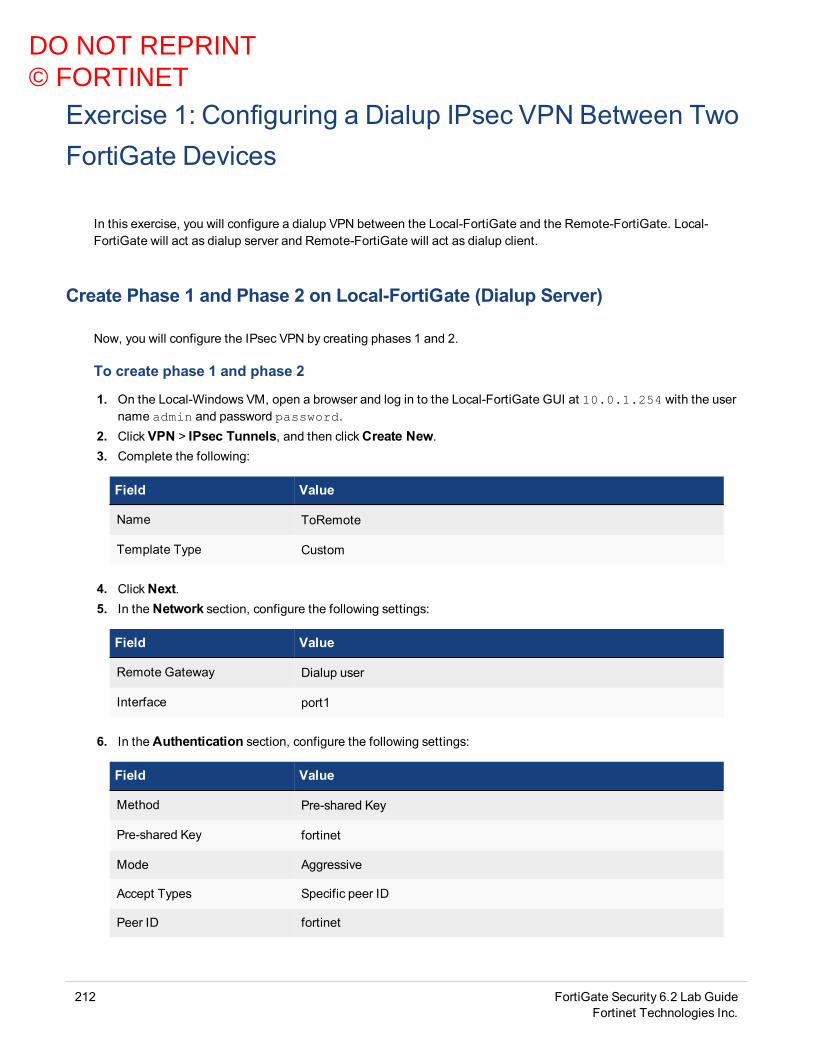
Exercise 1: Configuring a Dialup IPsec VPN Between TwoFortiGate Devices
In this exercise, you will configure a dialup VPN between the Local-FortiGate and the Remote-FortiGate. Local-FortiGate will act as dialup server and Remote-FortiGate will act as dialup client.
Create Phase 1 and Phase 2 on Local-FortiGate (Dialup Server)
Now, you will configure the IPsec VPN by creating phases 1 and 2.
To create phase 1 and phase 2
1. On the Local-Windows VM, open a browser and log in to the Local-FortiGate GUI at 10.0.1.254 with the username admin and password password.
2. ClickVPN > IPsec Tunnels, and then clickCreate New.3. Complete the following:
Field Value
Name ToRemote
Template Type Custom
4. ClickNext.5. In the Network section, configure the following settings:
Field Value
Remote Gateway Dialup user
Interface port1
6. In the Authentication section, configure the following settings:
Field Value
Method Pre-shared Key
Pre-shared Key fortinet
Mode Aggressive
Accept Types Specific peer ID
Peer ID fortinet
212 FortiGate Security 6.2 Lab GuideFortinet Technologies Inc.
DO NOT REPRINT© FORTINET
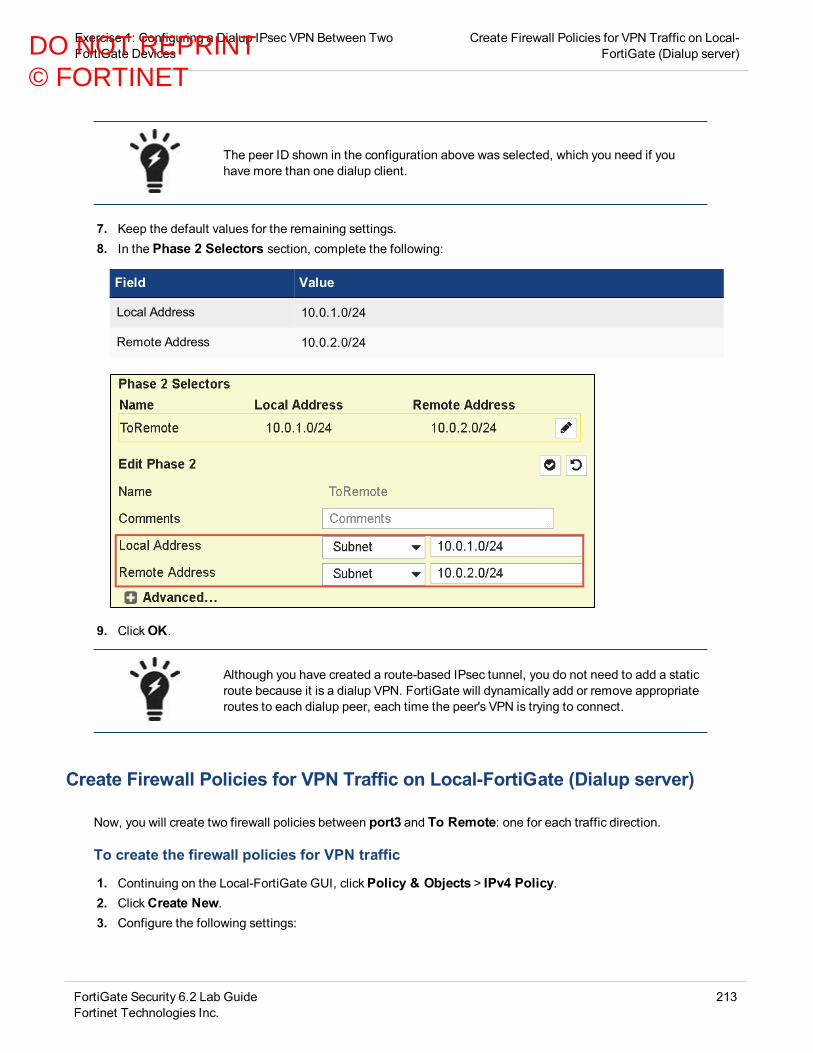
Exercise 1: Configuring a Dialup IPsec VPN Between TwoFortiGate Devices
Create Firewall Policies for VPN Traffic on Local-FortiGate (Dialup server)
The peer ID shown in the configuration above was selected, which you need if youhave more than one dialup client.
7. Keep the default values for the remaining settings.8. In the Phase 2 Selectors section, complete the following:
Field Value
Local Address 10.0.1.0/24
Remote Address 10.0.2.0/24
9. ClickOK.
Although you have created a route-based IPsec tunnel, you do not need to add a staticroute because it is a dialup VPN. FortiGate will dynamically add or remove appropriateroutes to each dialup peer, each time the peer's VPN is trying to connect.
Create Firewall Policies for VPN Traffic on Local-FortiGate (Dialup server)
Now, you will create two firewall policies between port3 and To Remote: one for each traffic direction.
To create the firewall policies for VPN traffic
1. Continuing on the Local-FortiGate GUI, clickPolicy & Objects > IPv4 Policy.2. ClickCreate New.3. Configure the following settings:
FortiGate Security 6.2 Lab GuideFortinet Technologies Inc.
213
DO NOT REPRINT© FORTINET
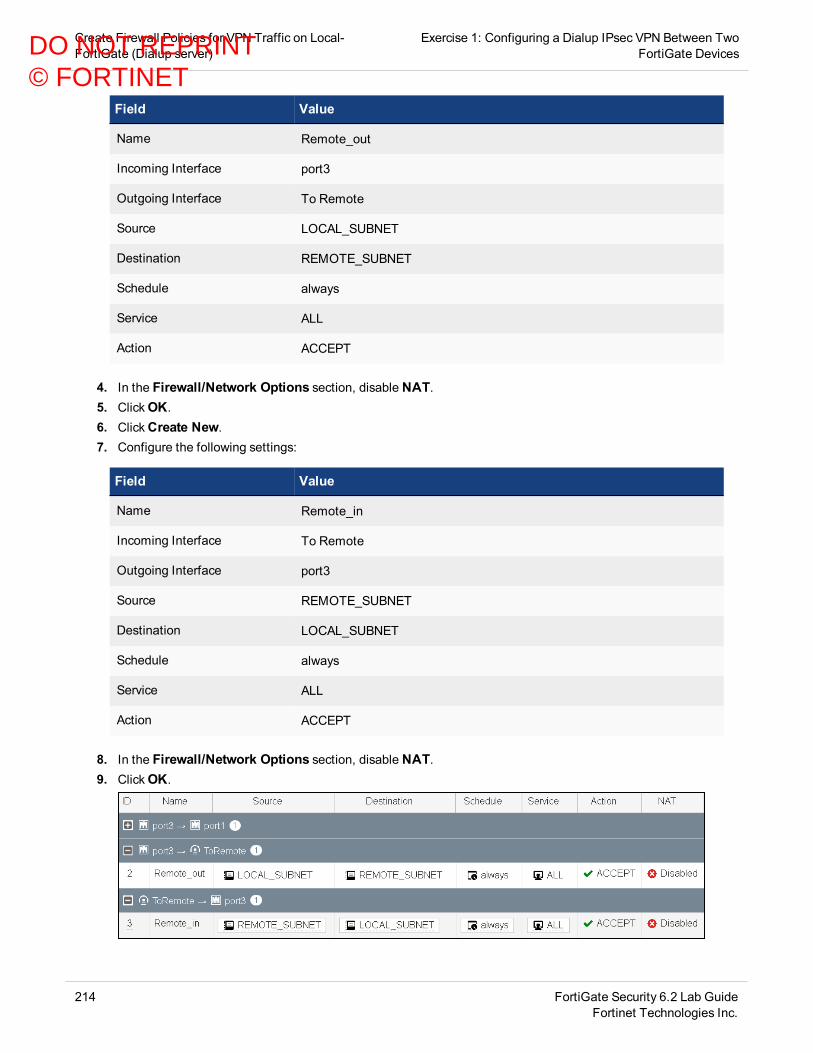
Create Firewall Policies for VPN Traffic on Local-FortiGate (Dialup server)
Exercise 1: Configuring a Dialup IPsec VPN Between TwoFortiGate Devices
Field Value
Name Remote_out
Incoming Interface port3
Outgoing Interface To Remote
Source LOCAL_SUBNET
Destination REMOTE_SUBNET
Schedule always
Service ALL
Action ACCEPT
4. In the Firewall/Network Options section, disable NAT.5. ClickOK.6. ClickCreate New.7. Configure the following settings:
Field Value
Name Remote_in
Incoming Interface To Remote
Outgoing Interface port3
Source REMOTE_SUBNET
Destination LOCAL_SUBNET
Schedule always
Service ALL
Action ACCEPT
8. In the Firewall/Network Options section, disable NAT.9. ClickOK.
214 FortiGate Security 6.2 Lab GuideFortinet Technologies Inc.
DO NOT REPRINT© FORTINET

Exercise 1: Configuring a Dialup IPsec VPN Between TwoFortiGate Devices
Create Phase 1 and Phase 2 on Remote-FortiGate(Dialup Client)
Create Phase 1 and Phase 2 on Remote-FortiGate (Dialup Client)
Now, you will add phases 1 and 2 on Remote-FortiGate.
To create phase 1 and phase 2
1. Continuing on the Local-Windows VM, open a browser and log in to the Remote-FortiGate GUI at 10.200.3.1with the user name admin and password password.
2. ClickVPN > IPsec Tunnels.3. ClickCreate New.4. Complete the following:
Field Value
Name ToLocal
Template Type Custom
5. ClickNext.6. In the Network section, configure the following settings:
Field Value
Remote Gateway Static IP Address
IP Address 10.200.1.1
Interface port4
7. In the Authentication section, configure the following settings:
Field Value
Method Pre-shared Key
Pre-shared Key fortinet
Mode Aggressive
Accept Types Any peer ID
8. In the Phase 1 Proposal section, configure the following settings:
Field Value
Local ID fortinet
FortiGate Security 6.2 Lab GuideFortinet Technologies Inc.
215
DO NOT REPRINT© FORTINET
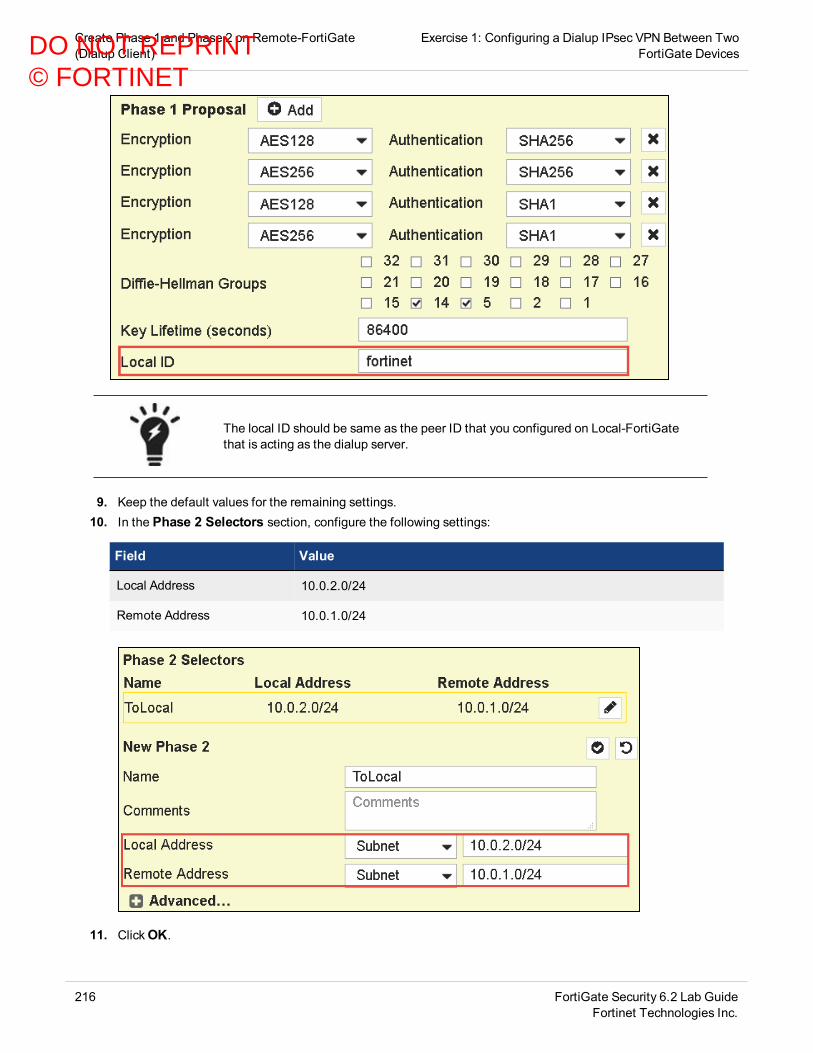
Create Phase 1 and Phase 2 on Remote-FortiGate(Dialup Client)
Exercise 1: Configuring a Dialup IPsec VPN Between TwoFortiGate Devices
The local ID should be same as the peer ID that you configured on Local-FortiGatethat is acting as the dialup server.
9. Keep the default values for the remaining settings.10. In the Phase 2 Selectors section, configure the following settings:
Field Value
Local Address 10.0.2.0/24
Remote Address 10.0.1.0/24
11. ClickOK.
216 FortiGate Security 6.2 Lab GuideFortinet Technologies Inc.
DO NOT REPRINT© FORTINET

Exercise 1: Configuring a Dialup IPsec VPN BetweenTwo FortiGate Devices
Create a Static Route for Route-Based VPN on Remote-FortiGate (Dialup Client)
Now the quick mode selectors in both sides mirror each other. If that is not the case,the tunnel will not come up.
Create a Static Route for Route-Based VPN on Remote-FortiGate (Dialup Client)
Now, you will create one static route, because the current VPN is route based.
To create a static route for a route-based VPN
1. Continuing on the Remote-FortiGate GUI, clickNetwork >Static Routes.2. ClickCreate New.3. Configure the following settings:
Feild Value
Destination Subnet
10.0.1.0/24
Interface ToLocal
4. ClickOK.
Create the Firewall Policies for VPN Traffic on Remote-FortiGate (Dialup Client)
Now, you will create two firewall policies between port6 and To Local: one for each traffic direction.
FortiGate Security 6.2 Lab GuideFortinet Technologies Inc.
217
DO NOT REPRINT© FORTINET
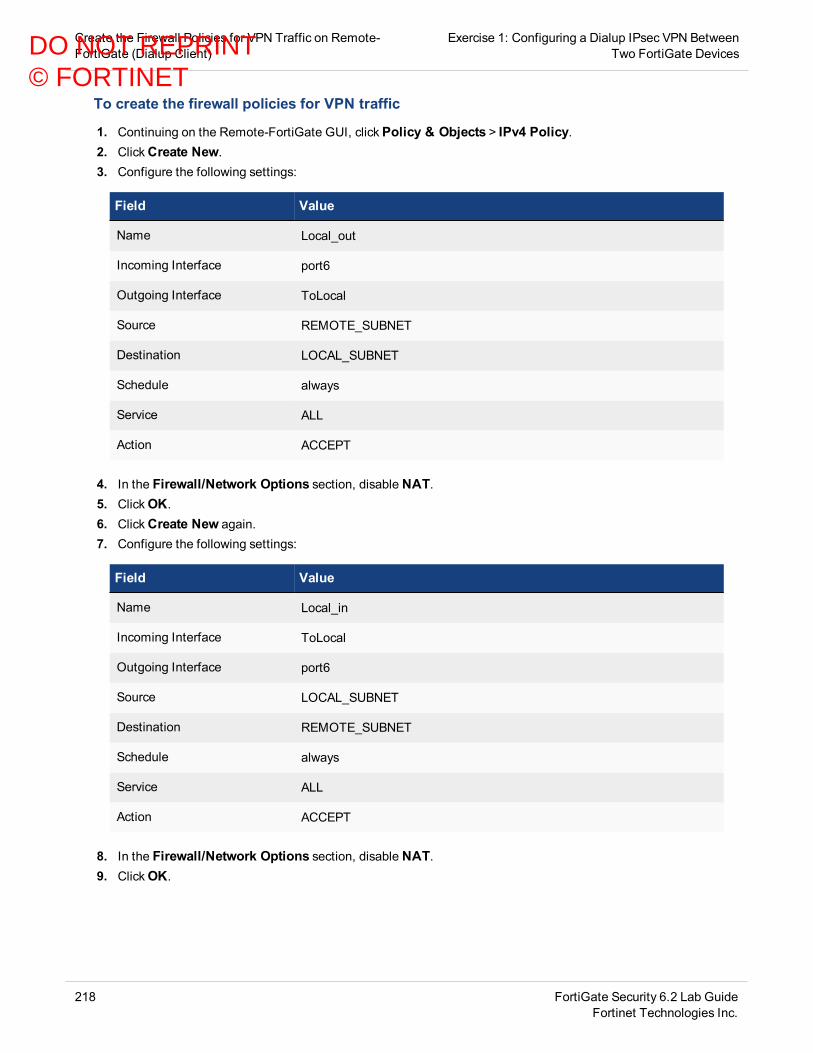
Create the Firewall Policies for VPN Traffic on Remote-FortiGate (Dialup Client)
Exercise 1: Configuring a Dialup IPsec VPN BetweenTwo FortiGate Devices
To create the firewall policies for VPN traffic
1. Continuing on the Remote-FortiGate GUI, clickPolicy & Objects > IPv4 Policy.2. ClickCreate New.3. Configure the following settings:
Field Value
Name Local_out
Incoming Interface port6
Outgoing Interface ToLocal
Source REMOTE_SUBNET
Destination LOCAL_SUBNET
Schedule always
Service ALL
Action ACCEPT
4. In the Firewall/Network Options section, disable NAT.5. ClickOK.6. ClickCreate New again.7. Configure the following settings:
Field Value
Name Local_in
Incoming Interface ToLocal
Outgoing Interface port6
Source LOCAL_SUBNET
Destination REMOTE_SUBNET
Schedule always
Service ALL
Action ACCEPT
8. In the Firewall/Network Options section, disable NAT.9. ClickOK.
218 FortiGate Security 6.2 Lab GuideFortinet Technologies Inc.
DO NOT REPRINT© FORTINET

Exercise 1: Configuring a Dialup IPsec VPN BetweenTwo FortiGate Devices
Create the Firewall Policies for VPN Traffic on Remote-FortiGate (Dialup Client)
FortiGate Security 6.2 Lab GuideFortinet Technologies Inc.
219
DO NOT REPRINT© FORTINET

Exercise 2: Testing and Monitoring the VPN
Now that you have configured the VPN on both FortiGate devices, you will test the VPN.
To test the VPN
1. On the Local-Windows VM, open a browser and log in to the Remote-FortiGate GUI at 10.200.3.1 with theuser name admin and password password.
2. ClickMonitor > IPsec Monitor.Notice that the VPN is currently down.
3. Right-click the VPN, and then clickBring Up >All Phase 2 Selectors.
The Name column of the VPN now contains a green up arrow, indicating that the tunnel is up.
Stop and think!
Do I always have to bring up the tunnel manually after creating it?
No. With the current configuration, the tunnel will stay down until you manually bring it up or there is trafficthat should be routed through the tunnel. Because you are not generating traffic between 10.0.2.0/24and 10.0.1.0/24 subnets yet, the tunnel is still down. If you had generated the required traffic while thetunnel was down, it would have come up automatically.
You can only initiate a tunnel from Remote-FortiGate because it is a dialup client .
4. Switch to the Remote-Windows VM.5. Open a command prompt window, and then run the following command to ping the Local-Windows VM:
ping 10.0.1.10
The ping should work.
6. Return to the Local-Windows VM.7. On the Remote-FortiGate GUI, clickMonitor > IPsec Monitor.8. ClickRefresh to refresh the screen.
You will notice that the counters for Incoming Data andOutgoing Data have increased. This indicates thatthe traffic between 10.0.1.10 is 10.0.2.10 is being encrypted successfully and routed through thetunnel.
220 FortiGate Security 6.2 Lab GuideFortinet Technologies Inc.
DO NOT REPRINT© FORTINET
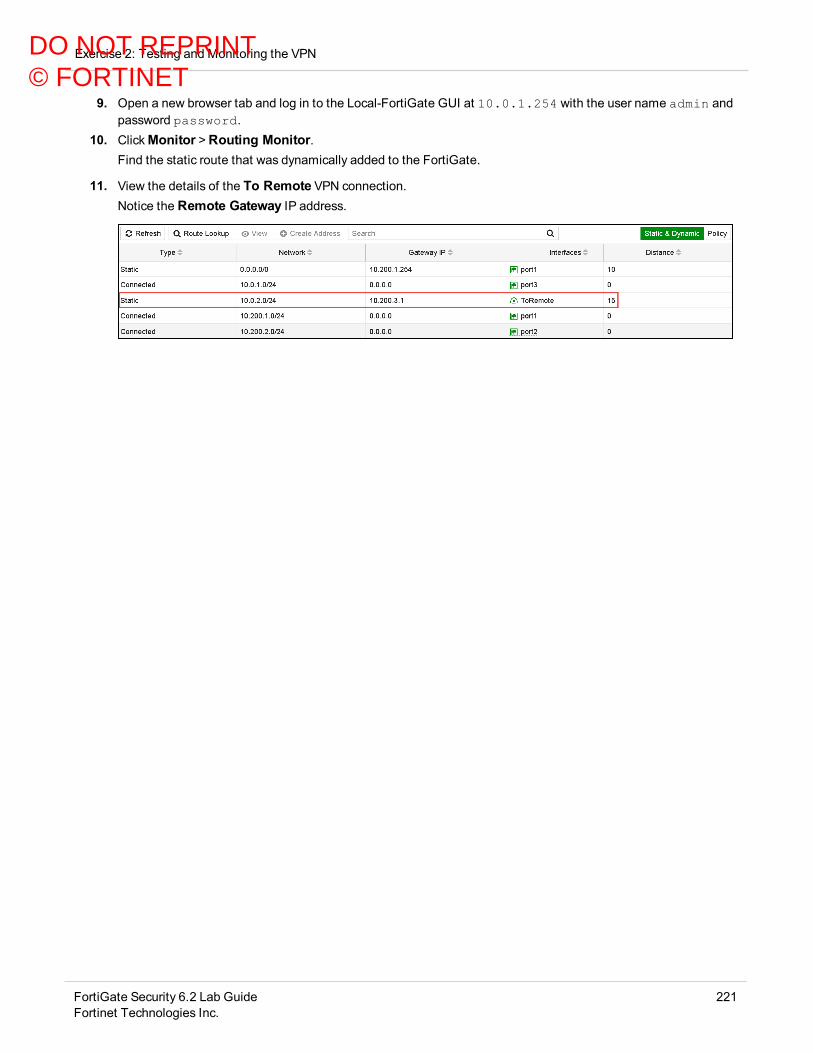
Exercise 2: Testing and Monitoring the VPN
9. Open a new browser tab and log in to the Local-FortiGate GUI at 10.0.1.254 with the user name admin andpassword password.
10. ClickMonitor >Routing Monitor.Find the static route that was dynamically added to the FortiGate.
11. View the details of the To Remote VPN connection.Notice the Remote Gateway IP address.
FortiGate Security 6.2 Lab GuideFortinet Technologies Inc.
221
DO NOT REPRINT© FORTINET
Exercise 3: Creating an IPsec VPN Between FortiGateand FortiClient
Now, you will now create a dial-up VPN between FortiGate and FortiClient.
PrerequisitesBefore beginning this lab, you must restore a configuration file on Remote-FortiGate and Local-FortiGate.
Make sure to restore the correct configuration on each FortiGate using the followingsteps. Failure to restore the correct configuration on each FortiGate will prevent youfrom doing the lab exercise.
To restore the Remote-FortiGate configuration file
1. On the Local-Windows VM, open a browser and log in to the Remote-FortiGate GUI at 10.200.3.1 with theuser name admin and password password.
2. In the upper-right corner of the screen, click admin, and then clickConfiguration >Restore.
3. Click Local PC, and then clickUpload.4. ClickDesktop >Resources > FortiGate-Security >Dialup-IPsec >Dialup-IPsec-Forticlient > remote-
dialup-IPsec-VPN.conf, and then clickOpen.5. ClickOK.6. ClickOK to reboot.
To restore the Local-FortiGate configuration file
1. On the Local-Windows VM, open a browser and log in to the Local-FortiGate GUI at 10.0.1.254 with the username admin and password password.
2. In the upper-right corner of the screen, click admin, and then clickConfiguration >Restore.
222 FortiGate Security 6.2 Lab GuideFortinet Technologies Inc.
DO NOT REPRINT© FORTINET

Exercise 3: Creating an IPsec VPN Between FortiGate and FortiClient Configure a Dialup VPN
3. Click Local PC, and then clickUpload.4. ClickDesktop >Resources > FortiGate-Security >Dialup-IPsec >Dialup-IPsec-Forticlient > local-
dialup-IPsec-VPN.conf>, and then clickOpen.5. ClickOK.6. ClickOK to reboot.
Configure a Dialup VPN
Now, you will create the dialup VPN on Local-FortiGate.
To create the dialup VPN
1. Continuing on the Local-Windows VM, open a browser and log in to the Local-FortiGate GUI at 10.0.1.254with the user name admin and password password.
2. ClickVPN > IPsec Tunnels, and then clickCreate New.3. Complete the following:
Field Value
Name FClient
Template Type Remote Access
Remote Device Type Client-based
FortiClient
FortiGate Security 6.2 Lab GuideFortinet Technologies Inc.
223
DO NOT REPRINT© FORTINET
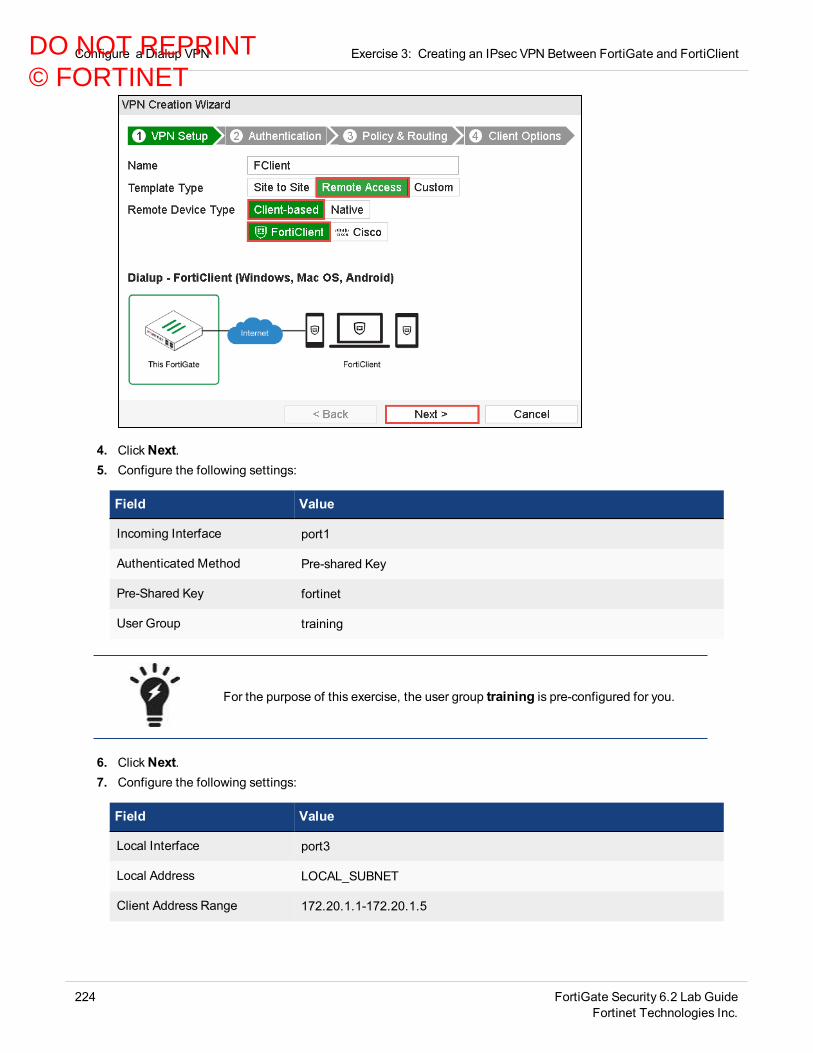
Configure a Dialup VPN Exercise 3: Creating an IPsec VPN Between FortiGate and FortiClient
4. ClickNext.5. Configure the following settings:
Field Value
Incoming Interface port1
Authenticated Method Pre-shared Key
Pre-Shared Key fortinet
User Group training
For the purpose of this exercise, the user group training is pre-configured for you.
6. ClickNext.7. Configure the following settings:
Field Value
Local Interface port3
Local Address LOCAL_SUBNET
Client Address Range 172.20.1.1-172.20.1.5
224 FortiGate Security 6.2 Lab GuideFortinet Technologies Inc.
DO NOT REPRINT© FORTINET
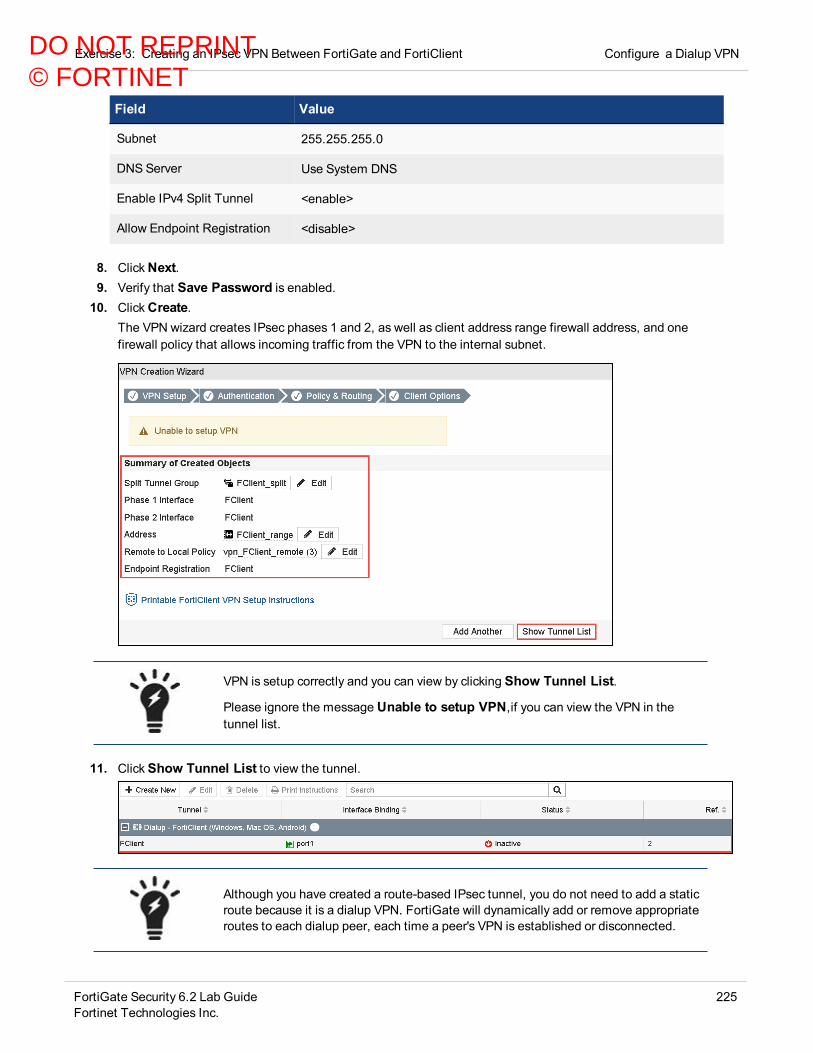
Exercise 3: Creating an IPsec VPN Between FortiGate and FortiClient Configure a Dialup VPN
Field Value
Subnet 255.255.255.0
DNS Server Use System DNS
Enable IPv4 Split Tunnel <enable>
Allow Endpoint Registration <disable>
8. ClickNext.9. Verify that Save Password is enabled.10. ClickCreate.
The VPN wizard creates IPsec phases 1 and 2, as well as client address range firewall address, and onefirewall policy that allows incoming traffic from the VPN to the internal subnet.
VPN is setup correctly and you can view by clicking Show Tunnel List.
Please ignore the message Unable to setup VPN,if you can view the VPN in thetunnel list.
11. ClickShow Tunnel List to view the tunnel.
Although you have created a route-based IPsec tunnel, you do not need to add a staticroute because it is a dialup VPN. FortiGate will dynamically add or remove appropriateroutes to each dialup peer, each time a peer's VPN is established or disconnected.
FortiGate Security 6.2 Lab GuideFortinet Technologies Inc.
225
DO NOT REPRINT© FORTINET

Configure FortiClient for Dialup VPN Exercise 3: Creating an IPsec VPN Between FortiGate and FortiClient
Configure FortiClient for Dialup VPN
Now, you will configure the FortiClient IPsec client to connect to Local-FortiGate. You will use the FortiClientinstalled on the Remote-Windows VM.
To configure FortiClient for dialup VPN
1. On the Remote-Windows VM, launch the FortiClient application from the desktop.2. ClickREMOTE ACCESS.3. Click theOption icon on the top right corner, and clickAdd a new connection.
New VPN Connection configuration settings will appear
4. Select IPsec VPN.
226 FortiGate Security 6.2 Lab GuideFortinet Technologies Inc.
DO NOT REPRINT© FORTINET
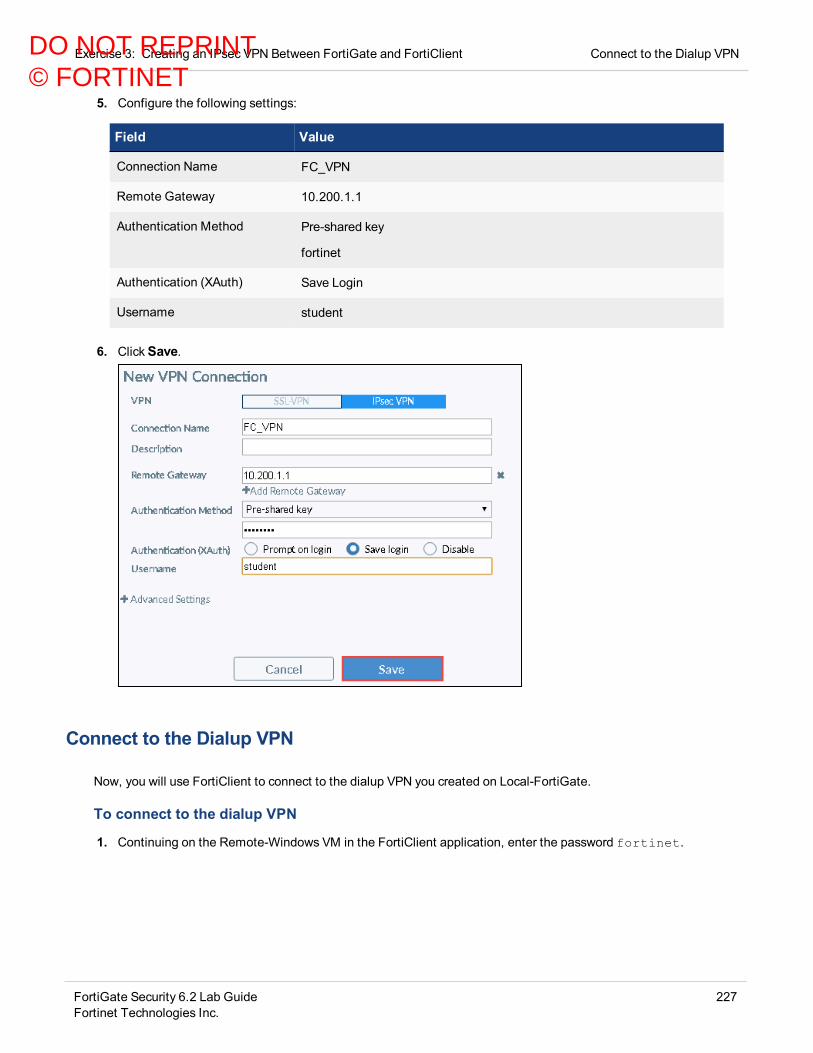
Exercise 3: Creating an IPsec VPN Between FortiGate and FortiClient Connect to the Dialup VPN
5. Configure the following settings:
Field Value
Connection Name FC_VPN
Remote Gateway 10.200.1.1
Authentication Method Pre-shared key
fortinet
Authentication (XAuth) Save Login
Username student
6. ClickSave.
Connect to the Dialup VPN
Now, you will use FortiClient to connect to the dialup VPN you created on Local-FortiGate.
To connect to the dialup VPN
1. Continuing on the Remote-Windows VM in the FortiClient application, enter the password fortinet.
FortiGate Security 6.2 Lab GuideFortinet Technologies Inc.
227
DO NOT REPRINT© FORTINET
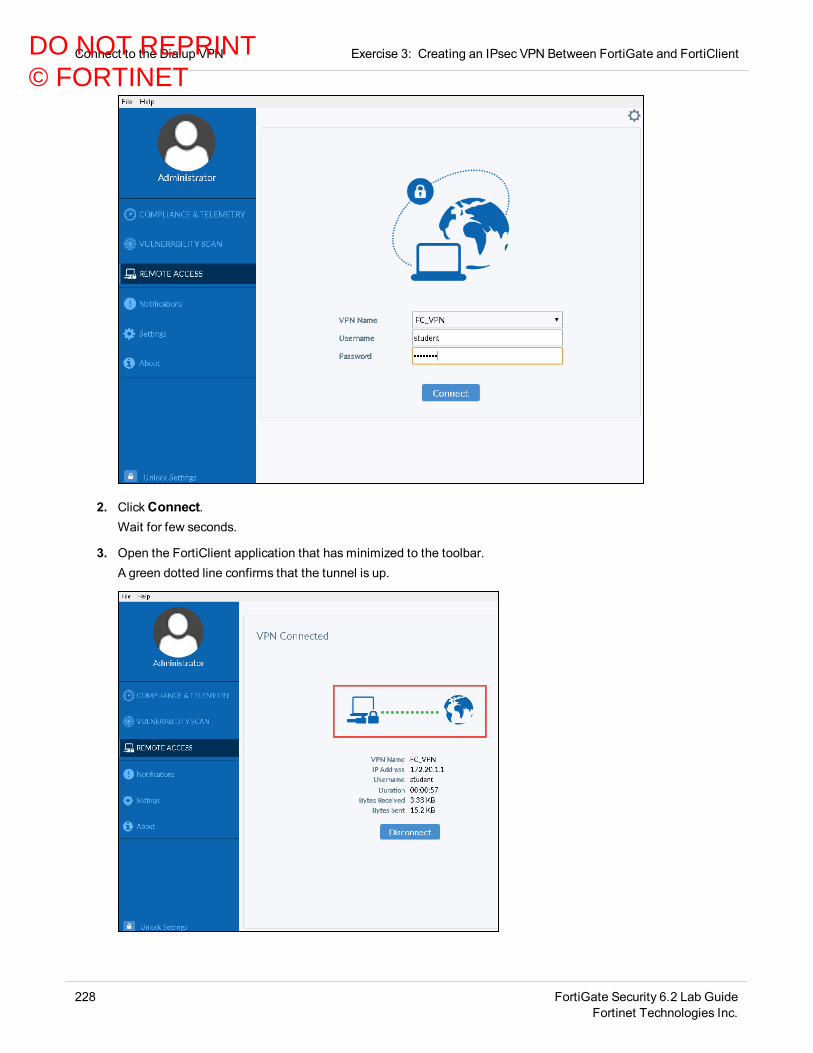
Connect to the Dialup VPN Exercise 3: Creating an IPsec VPN Between FortiGate and FortiClient
2. ClickConnect.Wait for few seconds.
3. Open the FortiClient application that has minimized to the toolbar.A green dotted line confirms that the tunnel is up.
228 FortiGate Security 6.2 Lab GuideFortinet Technologies Inc.
DO NOT REPRINT© FORTINET

Exercise 3: Creating an IPsec VPN Between FortiGate andFortiClient
Check the IP Address and Route Added to the Remote-Windows VM
Check the IP Address and Route Added to the Remote-Windows VM
While the dialup VPN is up, the Remote-Windows VM receives an IP address in the 172.20.1.1 -172.20.1.5 range. FortiGate also installs a route to the subnet 10.0.1.0/24.
To check the IP address and route added to the Remote-Windows VM
1. Continuing on the Remote-Windows VM, open a command prompt window and enter the following command:ipconfig /all
2. Analyze the output.You should observe a virtual ethernet adapter with an IP address in the 172.20.1.1 to 172.20.1.5range.
3. Enter the following command to display the routing table information:route print
4. Locate the 10.0.1.0/24 network entry in the output.
FortiGate Security 6.2 Lab GuideFortinet Technologies Inc.
229
DO NOT REPRINT© FORTINET
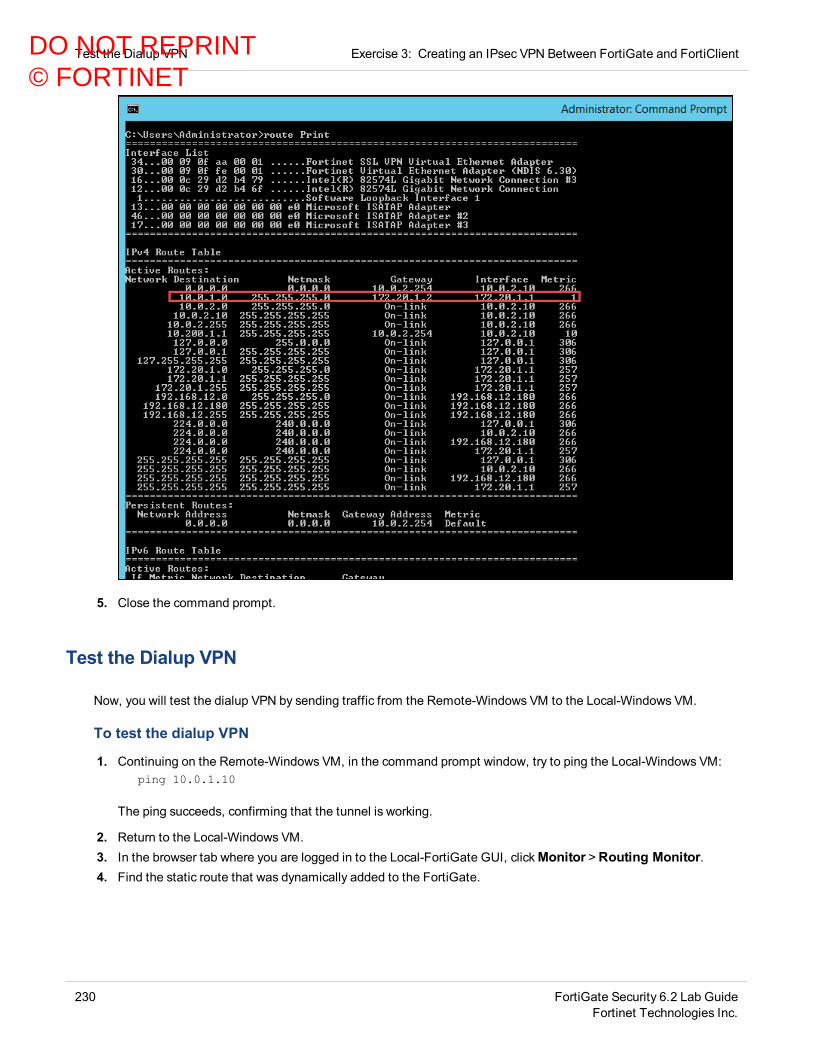
Test the Dialup VPN Exercise 3: Creating an IPsec VPN Between FortiGate and FortiClient
5. Close the command prompt.
Test the Dialup VPN
Now, you will test the dialup VPN by sending traffic from the Remote-Windows VM to the Local-Windows VM.
To test the dialup VPN
1. Continuing on the Remote-Windows VM, in the command prompt window, try to ping the Local-Windows VM:ping 10.0.1.10
The ping succeeds, confirming that the tunnel is working.
2. Return to the Local-Windows VM.3. In the browser tab where you are logged in to the Local-FortiGate GUI, clickMonitor >Routing Monitor.4. Find the static route that was dynamically added to the FortiGate.
230 FortiGate Security 6.2 Lab GuideFortinet Technologies Inc.
DO NOT REPRINT© FORTINET

Exercise 3: Creating an IPsec VPN Between FortiGate and FortiClient Disconnect the Dialup VPN
5. ClickMonitor > IPsec Monitor.6. View the details of the FClient_0 VPN connection.
Notice the Remote Gateway IP address.
Disconnect the Dialup VPN
Now, you will disconnect the Remote-Windows VM from the dialup VPN.
To disconnect the dialup VPN
1. On the Remote-Windows VM, open FortiClient.2. ClickDisconnect.
FortiGate Security 6.2 Lab GuideFortinet Technologies Inc.
231
DO NOT REPRINT© FORTINET

No part of this publication may be reproduced in any form or by any means or used to make anyderivative such as translation, transformation, or adaptation without permission from Fortinet Inc.,as stipulated by the United States Copyright Act of 1976.Copyright© 2019 Fortinet, Inc. All rights reserved. Fortinet®, FortiGate®, FortiCare® and FortiGuard®, and certain other marks are registered trademarks of Fortinet,Inc., in the U.S. and other jurisdictions, and other Fortinet names herein may also be registered and/or common law trademarks of Fortinet. All other product or companynames may be trademarks of their respective owners. Performance and other metrics contained herein were attained in internal lab tests under ideal conditions, andactual performance and other results may vary. Network variables, different network environments and other conditions may affect performance results. Nothing hereinrepresents any binding commitment by Fortinet, and Fortinet disclaims all warranties, whether express or implied, except to the extent Fortinet enters a binding writtencontract, signed by Fortinet’s General Counsel, with a purchaser that expressly warrants that the identified product will perform according to certain expressly-identifiedperformancemetrics and, in such event, only the specific performancemetrics expressly identified in such binding written contract shall be binding on Fortinet. Forabsolute clarity, any such warranty will be limited to performance in the same ideal conditions as in Fortinet’s internal lab tests. In no event does Fortinet make anycommitment related to future deliverables, features, or development, and circumstances may change such that any forward-looking statements herein are not accurate.Fortinet disclaims in full any covenants, representations,and guarantees pursuant hereto, whether express or implied. Fortinet reserves the right to change, modify,transfer, or otherwise revise this publication without notice, and themost current version of the publication shall be applicable.
DO NOT REPRINT© FORTINET