for Ableton Livekb.inmusicbrands.com/media/files/HC_Ableton_2009Aug24_EN01.pdfHyperControl for...
37
User Guide HyperControl for Ableton Live English
Transcript of for Ableton Livekb.inmusicbrands.com/media/files/HC_Ableton_2009Aug24_EN01.pdfHyperControl for...

User Guide
HyperControlfor Ableton Live
English
HyperControl for Ableton Live | User Guide
What Is HyperControl? 3
HyperControl Requirements 4
Ableton Live Software: 4
Axiom Pro Hardware: 4
HyperControl Installation 4
Controlling Live through Axiom Pro and HyperControl 4
Axiom Pro Hardware Controls 7
HyperControl Display and Soft-Keys 11
Live Device Mappings 12
Instrument Devices 12
Analog 12
Electric 13
Impulse 14
Operator 15
Simpler 16
Tension 17
Arpeggiator 18
Chord 19
Pitch & Random 20
Scale & Velocity 21
Auto Filter & Auto Pan 22
Beat Repeat 23
Chorus 24
Compressor I & Compressor II 25
EQ Four 26
EQ Three & Erosion 27
Filter Delay 28
Flanger 29
Gate & Grain Delay 30
Phaser 31
Ping Pong & Redux 32
Resonators 33
Reverb 34
Simple Delay & Utility 35
Vinyl Distortion 36

| 3HyperControl for Ableton Live | User Guide
What Is HyperControl?HyperControl is a powerful technology that automatically maps your Axiom Pro controls (i e , knobs, buttons, etc ) to the on-screen controls of Live This helps you make music more quickly since you no longer have to perform the tedious and time-consuming task of assigning MIDI controls
Furthermore, since HyperControl is a two-way communication protocol, your Axiom Pro hardware and Live software always remain synchronized to each other For example, if a knob is turned on Axiom Pro, its corresponding knob in Live will update Alternatively, if an on-screen knob is turned within Live (using the mouse), the corresponding knob position of Axiom Pro (as shown on the LCD display) updates as well If a new Live Device is selected (or a different Device within the same Chain), the parameter names and various button, knob, and slider 1 positions automatically update on the Axiom Pro display This makes Axiom Pro feel like a “dedicated” hardware controller since the knobs and LCD screen are tightly integrated with Live and always reflect what is currently happening within the application
Finally, the Axiom Pro controller can generate more than just MIDI commands–QWERTY key commands can also be sent, emulating Live keyboard shortcuts This allows the controller to have “deep” integration into Live, and allows menu functions like copy, undo and many other features to be controlled right from Axiom Pro This minimizes the amount of time you’ll spend using the mouse and computer keyboard to control your software
In short, these features let you use Live more intuitively and give you more “hands on” control of your software to inspire your creativity
1 Only available on Axiom Pro 49/61.

| 4HyperControl for Ableton Live | User Guide
HyperControl Requirements
Ableton Live Software:Please note that HyperControl requires Live version 7.0.15 or later. Earlier versions of Live do not support HyperControl technology.
Axiom Pro Hardware:HyperControl requires the presence of an Axiom Pro controller on your computer and this document assumes your Axiom Pro keyboard has already been installed and connected to your system. To learn more about this installation procedure, please see the Axiom Pro Quick Start Guide.
HyperControl Installation1. HyperControl is built into Live since version 7.0.15 and later. No additional driver or software installation is required.
2. To enable HyperControl in Live with Axiom Pro, choose Preferences from the Live menu (Mac) or Options menu (PC).
3. In the Control Surface column, choose “Axiom Pro” from an unused slot.
4. From the Input and Output columns, choose HyperControl 2 In and HyperControl Out 2 respectively.
5. Under MIDI Ports, turn on the Axiom Pro HyperControl and USB inputs for Track.
6. Close the Preferences window. You should now be able to control Live with HyperControl.
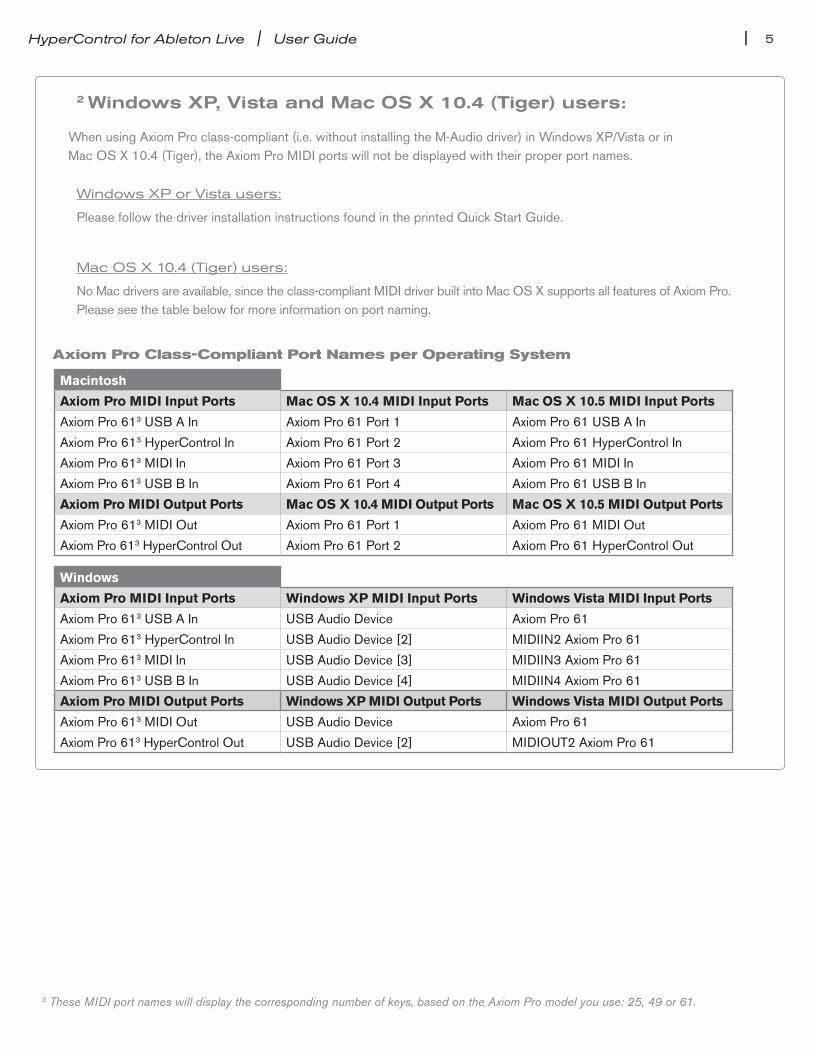
| 5HyperControl for Ableton Live | User Guide
2 Windows XP, Vista and Mac OS X 10.4 (Tiger) users:
When using Axiom Pro class-compliant (i e without installing the M-Audio driver) in Windows XP/Vista or in Mac OS X 10 4 (Tiger), the Axiom Pro MIDI ports will not be displayed with their proper port names
Windows XP or Vista users:
Please follow the driver installation instructions found in the printed Quick Start Guide
Mac OS X 10.4 (Tiger) users:
No Mac drivers are available, since the class-compliant MIDI driver built into Mac OS X supports all features of Axiom Pro Please see the table below for more information on port naming
Axiom Pro Class-Compliant Port Names per Operating System
Macintosh
Axiom Pro MIDI Input Ports Mac OS X 10.4 MIDI Input Ports Mac OS X 10.5 MIDI Input Ports
Axiom Pro 613 USB A In Axiom Pro 61 Port 1 Axiom Pro 61 USB A In
Axiom Pro 613 HyperControl In Axiom Pro 61 Port 2 Axiom Pro 61 HyperControl In
Axiom Pro 613 MIDI In Axiom Pro 61 Port 3 Axiom Pro 61 MIDI In
Axiom Pro 613 USB B In Axiom Pro 61 Port 4 Axiom Pro 61 USB B In
Axiom Pro MIDI Output Ports Mac OS X 10.4 MIDI Output Ports Mac OS X 10.5 MIDI Output Ports
Axiom Pro 613 MIDI Out Axiom Pro 61 Port 1 Axiom Pro 61 MIDI Out
Axiom Pro 613 HyperControl Out Axiom Pro 61 Port 2 Axiom Pro 61 HyperControl Out
Windows
Axiom Pro MIDI Input Ports Windows XP MIDI Input Ports Windows Vista MIDI Input Ports
Axiom Pro 613 USB A In USB Audio Device Axiom Pro 61
Axiom Pro 613 HyperControl In USB Audio Device [2] MIDIIN2 Axiom Pro 61
Axiom Pro 613 MIDI In USB Audio Device [3] MIDIIN3 Axiom Pro 61
Axiom Pro 613 USB B In USB Audio Device [4] MIDIIN4 Axiom Pro 61
Axiom Pro MIDI Output Ports Windows XP MIDI Output Ports Windows Vista MIDI Output Ports
Axiom Pro 613 MIDI Out USB Audio Device Axiom Pro 61
Axiom Pro 613 HyperControl Out USB Audio Device [2] MIDIOUT2 Axiom Pro 61
3 These MIDI port names will display the corresponding number of keys, based on the Axiom Pro model you use: 25, 49 or 61.
| 6HyperControl for Ableton Live | User Guide
Controll ing Live through Axiom Pro and HyperControlLive includes a variety of different “Devices” and “Racks” that can be created and added to each track in your session You can switch between controlling specific track Devices (and Devices within a Rack or “Chain” of effects) by using the Mode button on Axiom Pro The Mode button will toggle between Mixer control (which lets you adjust track volume, pan and send amounts) and Device control, which automatically maps Macro and Device-specific parameters to the Axiom Pro encoder knobs
In Mixer mode, the Axiom Pro sliders 4 and transport buttons will control track volume and Live’s transport, respectively The encoders will automatically map to track Pan and Send parameters 5 The track < and > buttons will allow you to select the previous and next tracks in your session
In Device mode, encoders are mapped to Rack Macro knobs by default For tracks that use single Devices that are not combined within a Rack, the Axiom Pro knobs are mapped to the Device’s parameters Additionally, the Axiom Pro knobs can automatically be linked to other Device parameters on a track simply by selecting the Device you wish to control from the Device pane below the Tracks in Session/Arrangement view For example, if you wish to use HyperControl to control a track that uses Filter Delay, simply select the Filter Delay from the track’s chain of effects The Axiom Pro controls will automatically map to the Filter Delay’s parameters
4 Only available on Axiom Pro 49/61
5 On Axiom Pro 25, the encoders default to control track volume. The four soft keys give access to the Volume, Pan, Send A and Send B parameters respectively.
| 7HyperControl for Ableton Live | User Guide
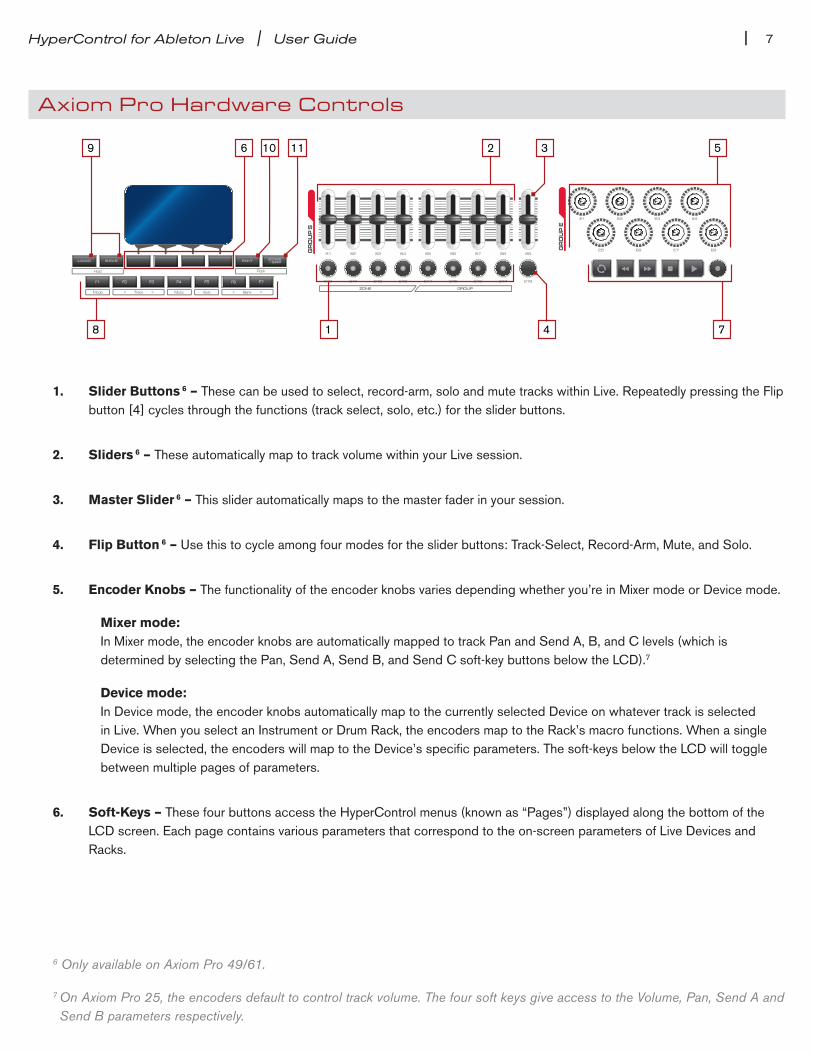
Axiom Pro Hardware Controls
9
8
10 11 2 536
1 4 7
1. Slider Buttons 6 – These can be used to select, record-arm, solo and mute tracks within Live Repeatedly pressing the Flip button [4] cycles through the functions (track select, solo, etc ) for the slider buttons
2. Sliders 6 – These automatically map to track volume within your Live session
3. Master Slider 6 – This slider automatically maps to the master fader in your session
4. Flip Button 6 – Use this to cycle among four modes for the slider buttons: Track-Select, Record-Arm, Mute, and Solo
5. Encoder Knobs – The functionality of the encoder knobs varies depending whether you’re in Mixer mode or Device mode
Mixer mode: In Mixer mode, the encoder knobs are automatically mapped to track Pan and Send A, B, and C levels (which is
determined by selecting the Pan, Send A, Send B, and Send C soft-key buttons below the LCD) 7
Device mode: In Device mode, the encoder knobs automatically map to the currently selected Device on whatever track is selected in Live When you select an Instrument or Drum Rack, the encoders map to the Rack’s macro functions When a single Device is selected, the encoders will map to the Device’s specific parameters The soft-keys below the LCD will toggle between multiple pages of parameters
6. Soft-Keys – These four buttons access the HyperControl menus (known as “Pages”) displayed along the bottom of the LCD screen Each page contains various parameters that correspond to the on-screen parameters of Live Devices and Racks
6 Only available on Axiom Pro 49/61.
7 On Axiom Pro 25, the encoders default to control track volume. The four soft keys give access to the Volume, Pan, Send A and Send B parameters respectively.
| 8HyperControl for Ableton Live | User Guide
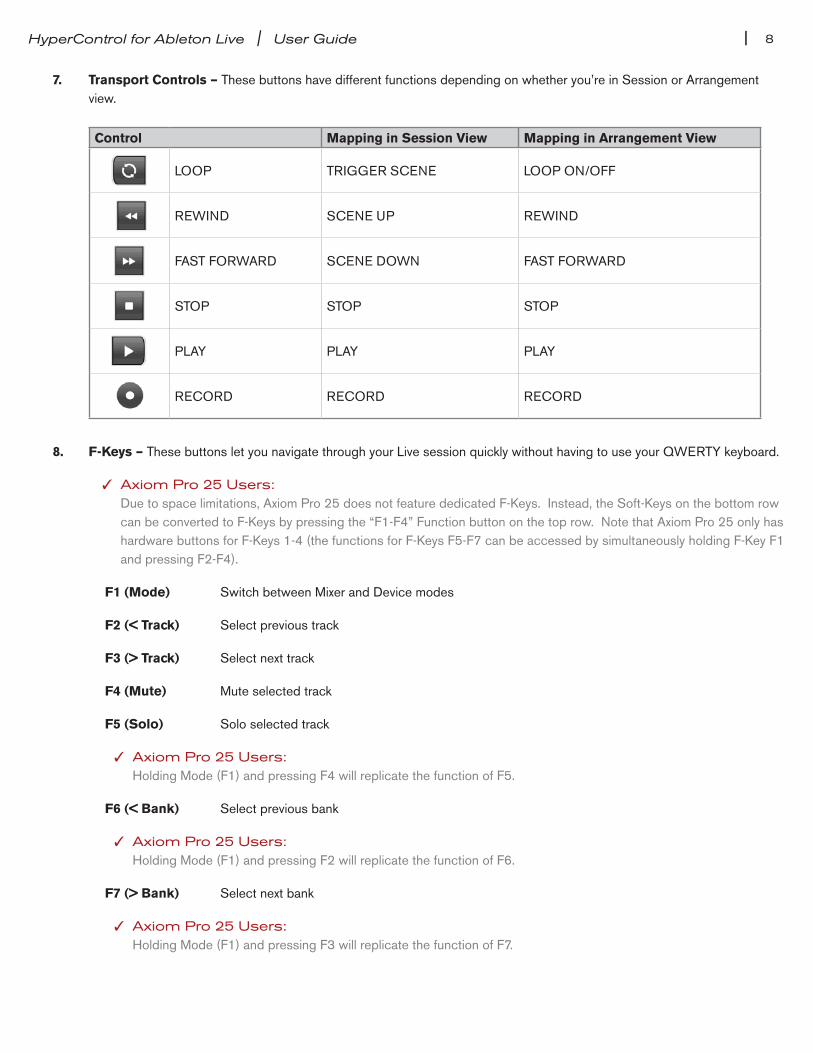
7. Transport Controls – These buttons have different functions depending on whether you’re in Session or Arrangement view
Control Mapping in Session View Mapping in Arrangement View
LOOP TRIGGER SCENE LOOP ON/OFF
REWIND SCENE UP REWIND
FAST FORWARD SCENE DOWN FAST FORWARD
STOP STOP STOP
PLAY PLAY PLAY
RECORD RECORD RECORD
8. F-Keys – These buttons let you navigate through your Live session quickly without having to use your QWERTY keyboard
✓�� Axiom Pro 25 Users: Due to space limitations, Axiom Pro 25 does not feature dedicated F-Keys Instead, the Soft-Keys on the bottom row can be converted to F-Keys by pressing the “F1-F4” Function button on the top row Note that Axiom Pro 25 only has hardware buttons for F-Keys 1-4 (the functions for F-Keys F5-F7 can be accessed by simultaneously holding F-Key F1 and pressing F2-F4)
F1 (Mode) Switch between Mixer and Device modes
F2 (< Track) Select previous track
F3 (> Track) Select next track
F4 (Mute) Mute selected track
F5 (Solo) Solo selected track
✓�� Axiom Pro 25 Users: Holding Mode (F1) and pressing F4 will replicate the function of F5
F6 (< Bank) Select previous bank
✓�� Axiom Pro 25 Users: Holding Mode (F1) and pressing F2 will replicate the function of F6
F7 (> Bank) Select next bank
✓�� Axiom Pro 25 Users: Holding Mode (F1) and pressing F3 will replicate the function of F7
| 9HyperControl for Ableton Live | User Guide
9. Load Button – This button brings up a prompt allowing you to load patches stored in Axiom Pro Loading of patches is covered in the “Function Buttons and Soft Keys” section of the Axiom Pro User Guide
Save Button – This button brings up a prompt allowing you to save the current settings of your Axiom Pro Saving of patches is covered in the “Function Buttons and Soft Keys” section of the Axiom Pro User Guide
Hold (Load + Save Buttons) – By default, the LCD screen displays the position and status of the last control that was moved For example, if the screen is displaying the status of the drum pad group and you turn an encoder knob, the LCD will immediately switch to the encoder group, highlight the encoder that was turned, and display that encoder’s associated parameter and value on the lower-left side of the screen
Whenever you change pages using the Soft-Keys, the LCD screen displays the parameter names assigned to each encoder knob In certain cases, you may wish to “hold” this information on the LCD screen, preventing the screen from changing to a graphical representation when a control is moved To do this, simultaneously press and hold the Save and Load buttons
When the display is locked, if you move a control outside the”locked” group, you will still see the control’s parameter name and value in the display, but the text on the LCD screen will remain in place
Pressing the Save and Load buttons again will disable the Hold feature
✓� Why do I need patches?
Doesn’t HyperControl assign controls
automatically?
HyperControl technology automatically
handles the assignment of most Axiom Pro
controls and in many cases, you will not
need to load or save any Axiom Pro patches
However, HyperControl technology does
not assign the performance controls (drum
pads, keyboard zones, sustain/expression
pedals, etc ) and the numerical keypad 8
The numerical keypad is not automatically
assigned, so that you can still customize
some of the Axiom Pro controls to your
preference even if HyperControl is in
use For example, you can assign Ableton
Live keyboard shortcuts to the buttons of
the Axiom Pro keypad Before you begin
customizing the keypad, note that Axiom
Pro ships from the factory with a number of
useful patches that may already assign the
numerical keypad to functions you wish to
use Please see Appendix A at the end of
the Axiom Pro User Guide to learn how each
factory patch is configured
The performance controls are not
automatically assigned by HyperControl
so that you can set note, zone, and other
assignments to your preference For
example, your virtual instrument may require
you to assign the pads to send specific
MIDI note or velocity values Alternatively,
you may wish to configure keyboard zones
in a specific way to help you accomplish a
specific task This can be done through Edit
mode on Axiom Pro Please see the Axiom
Pro User Guide to learn how to do this
8 Only available on Axiom Pro 49/61.
| 10HyperControl for Ableton Live | User Guide
10. Edit Button – This button lets you enter and exit Edit mode
When using HyperControl, many of the Axiom Pro controls (i e , buttons, knobs, transport controls, etc ) are automatically assigned to the on-screen controls of your software These automatic assignments cannot be edited However, you can customize the numerical keypad9 and performance controls (drum pads, keyboard zones, sustain/expression pedals, etc ) to you personal preference by using Edit mode
This mode is covered in greater detail in the “Edit Mode” section of the Axiom Pro User Guide
√ NOTE: It is possible to set HyperControl to only map the Axiom Pro transport controls to your software while allowing all other control groups (encoder knobs, buttons, etc.) to function like a conventional MIDI controller. This is useful for users who have created their own fully-customized Axiom Pro patches for their audio applications but would still like the Axiom Pro transport controls to automatically map to the software that they are using. To do this, enter Edit mode and change the “HyperControl” parameter (from the main menu) from “Normal” to “Transport.” For more information, see the “Edit Mode” section of the Axiom Pro User Guide. Note that HyperControl “Transport” and “Normal” modes can be toggled on the fly while HyperControl is active. This lets you switch between HyperControl’s automatic track and plug-in parameter mapping to your own custom controller assignments and MIDI mappings. This gives you even more hands-on control over Live features that you frequently use.
11. Zone/Group Button – This button switches the functionality of the buttons beneath the sliders (on Axiom Pro 49/61) or Transport control (on Axiom Pro 25) and allows you to select the Performance Groups and Zones When the button is not illuminated (i e , not pressed), the associated buttons send out HyperControl commands When the button is pressed, it becomes illuminated, and the associated buttons can then be used to activate/deactivate Zones and Groups The “Edit Mode > Zones” section of the Axiom Pro User Guide covers this subject in great detail
Peek (Edit + Zone/Grp Buttons) – You can return to view knob assignments at any time by simultaneously pressing the Edit and Zone/Grp buttons For example, if knob positions are being displayed on screen but you would like to return to the top level screen that shows the encoder assignments press the Edit and Zone/Grp buttons
The Peek function also lets you check the current value of a specific knob without changing its corresponding Live parameter To do this, press and hold the Edit and Zone/Grp buttons while moving the desired control This will display the control’s current value without causing any changes to your Live Devices or tracks
12. Numerical Keypad 5 – The numerical keypad buttons can be programmed to send MIDI commands as well as QWERTY keystrokes (just like a computer keyboard) These QWERTY keystrokes can correspond to your audio application’s “keyboard shortcuts” allowing you to access various functions of your software directly from Axiom Pro (i e , without having to touch your computer keyboard)
Axiom Pro ships with a variety of pre-programmed patches that map the numerical keypad buttons to popular DAWs (a detailed list of these patches can be found in Appendix A of the Axiom Pro User Guide) See the “Edit Mode > Control” section of the Axiom Pro User Guide to learn how to make customized patches for these buttons
9 Only available on Axiom Pro 49/61.

| 11HyperControl for Ableton Live | User Guide
HyperControl Display and Soft-KeysThe Axiom Pro display indicates what Device or Track is currently selected within Live and how the encoder knobs map to that Device’s or Track’s on-screen parameters Below is an example of how Tracks appear on the LCD
The name of the currently selected Live track is displayed at the top left of the screen.
The upper-right corner displays either the type of device or the active track parameters such as 1-8 Pan, 1-8 Send A, etc. When a page is selected using the Soft-keys, the name of the page will be displayed here.
The bottom row lists pages and options that can be accessed using Soft-Keys 1–4.
The center of the screen displays either the names of the tracks that are under the control of Axiom Pro or the current position of the encoders and other controls of Axiom Pro.
| 12HyperControl for Ableton Live | User Guide
Live Device Mappings
Instrument Devices
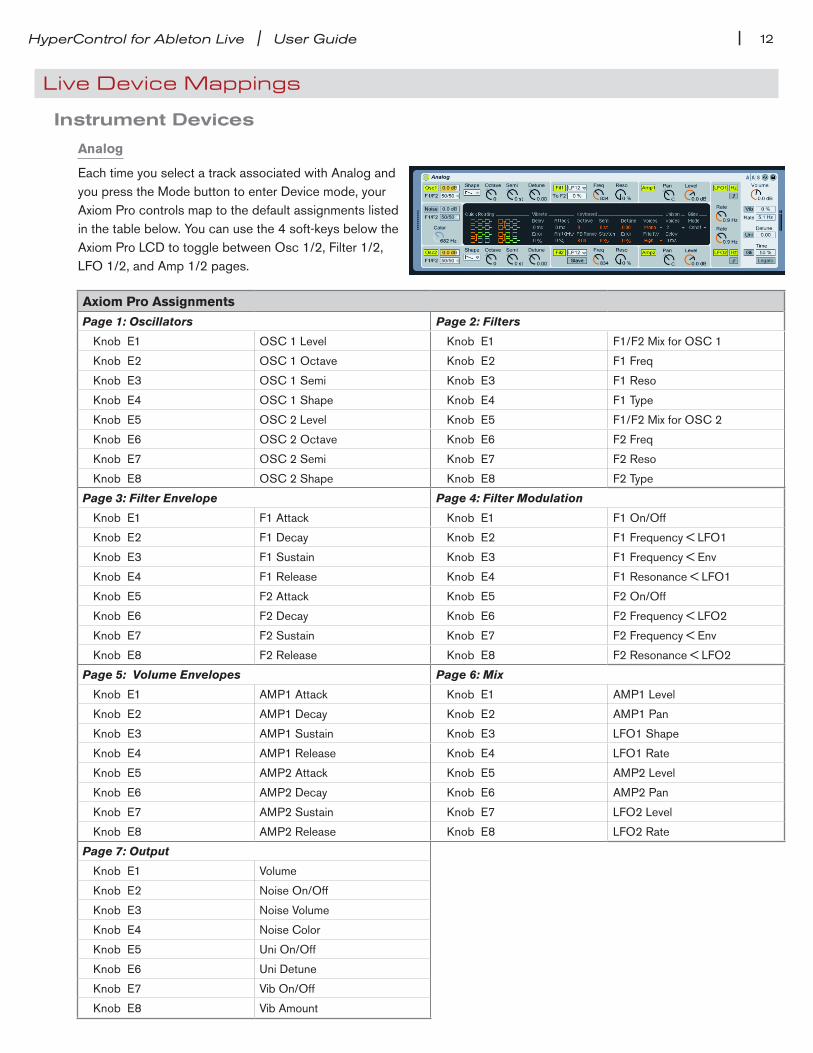
Analog
Each time you select a track associated with Analog and you press the Mode button to enter Device mode, your Axiom Pro controls map to the default assignments listed in the table below You can use the 4 soft-keys below the Axiom Pro LCD to toggle between Osc 1/2, Filter 1/2, LFO 1/2, and Amp 1/2 pages
Axiom Pro Assignments
Page 1: Oscillators Page 2: Filters
Knob E1 OSC 1 Level Knob E1 F1/F2 Mix for OSC 1
Knob E2 OSC 1 Octave Knob E2 F1 Freq
Knob E3 OSC 1 Semi Knob E3 F1 Reso
Knob E4 OSC 1 Shape Knob E4 F1 Type
Knob E5 OSC 2 Level Knob E5 F1/F2 Mix for OSC 2
Knob E6 OSC 2 Octave Knob E6 F2 Freq
Knob E7 OSC 2 Semi Knob E7 F2 Reso
Knob E8 OSC 2 Shape Knob E8 F2 Type
Page 3: Filter Envelope Page 4: Filter Modulation
Knob E1 F1 Attack Knob E1 F1 On/Off
Knob E2 F1 Decay Knob E2 F1 Frequency < LFO1
Knob E3 F1 Sustain Knob E3 F1 Frequency < Env
Knob E4 F1 Release Knob E4 F1 Resonance < LFO1
Knob E5 F2 Attack Knob E5 F2 On/Off
Knob E6 F2 Decay Knob E6 F2 Frequency < LFO2
Knob E7 F2 Sustain Knob E7 F2 Frequency < Env
Knob E8 F2 Release Knob E8 F2 Resonance < LFO2
Page 5: Volume Envelopes Page 6: Mix
Knob E1 AMP1 Attack Knob E1 AMP1 Level
Knob E2 AMP1 Decay Knob E2 AMP1 Pan
Knob E3 AMP1 Sustain Knob E3 LFO1 Shape
Knob E4 AMP1 Release Knob E4 LFO1 Rate
Knob E5 AMP2 Attack Knob E5 AMP2 Level
Knob E6 AMP2 Decay Knob E6 AMP2 Pan
Knob E7 AMP2 Sustain Knob E7 LFO2 Level
Knob E8 AMP2 Release Knob E8 LFO2 Rate
Page 7: Output
Knob E1 Volume
Knob E2 Noise On/Off
Knob E3 Noise Volume
Knob E4 Noise Color
Knob E5 Uni On/Off
Knob E6 Uni Detune
Knob E7 Vib On/Off
Knob E8 Vib Amount
| 13HyperControl for Ableton Live | User Guide
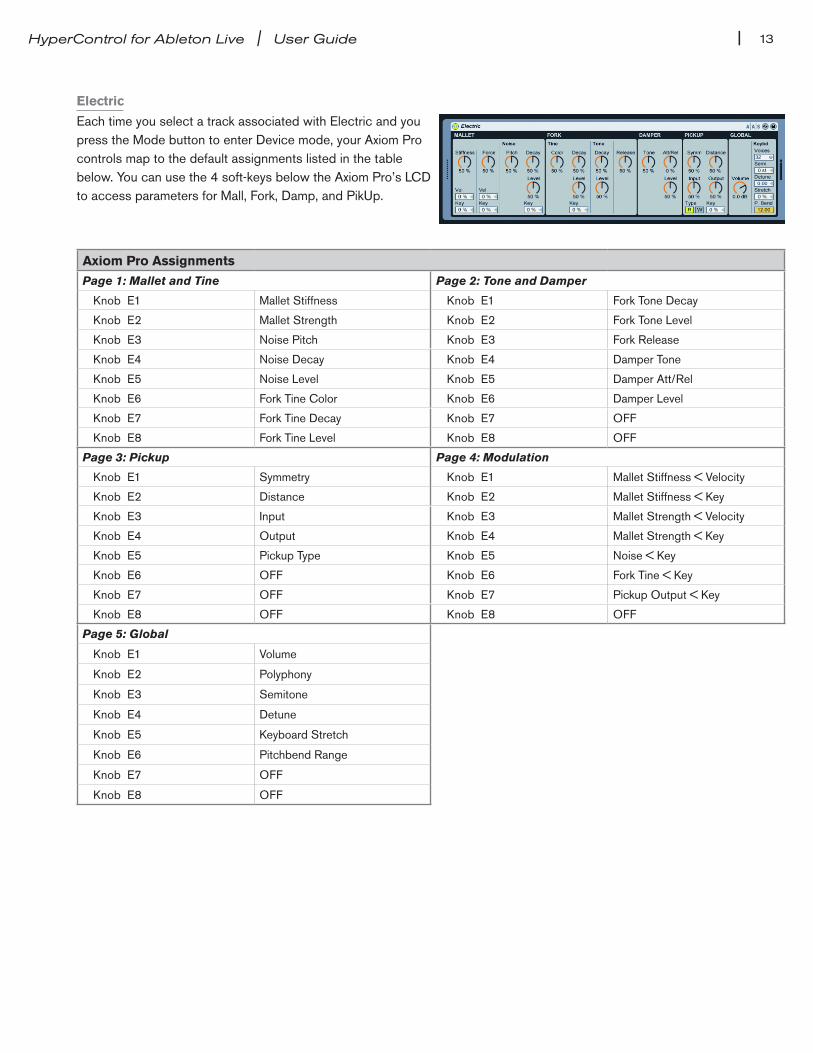
Electric
Each time you select a track associated with Electric and you press the Mode button to enter Device mode, your Axiom Pro controls map to the default assignments listed in the table below You can use the 4 soft-keys below the Axiom Pro’s LCD to access parameters for Mall, Fork, Damp, and PikUp
Axiom Pro Assignments
Page 1: Mallet and Tine Page 2: Tone and Damper
Knob E1 Mallet Stiffness Knob E1 Fork Tone Decay
Knob E2 Mallet Strength Knob E2 Fork Tone Level
Knob E3 Noise Pitch Knob E3 Fork Release
Knob E4 Noise Decay Knob E4 Damper Tone
Knob E5 Noise Level Knob E5 Damper Att/Rel
Knob E6 Fork Tine Color Knob E6 Damper Level
Knob E7 Fork Tine Decay Knob E7 OFF
Knob E8 Fork Tine Level Knob E8 OFF
Page 3: Pickup Page 4: Modulation
Knob E1 Symmetry Knob E1 Mallet Stiffness < Velocity
Knob E2 Distance Knob E2 Mallet Stiffness < Key
Knob E3 Input Knob E3 Mallet Strength < Velocity
Knob E4 Output Knob E4 Mallet Strength < Key
Knob E5 Pickup Type Knob E5 Noise < Key
Knob E6 OFF Knob E6 Fork Tine < Key
Knob E7 OFF Knob E7 Pickup Output < Key
Knob E8 OFF Knob E8 OFF
Page 5: Global
Knob E1 Volume
Knob E2 Polyphony
Knob E3 Semitone
Knob E4 Detune
Knob E5 Keyboard Stretch
Knob E6 Pitchbend Range
Knob E7 OFF
Knob E8 OFF
| 14HyperControl for Ableton Live | User Guide
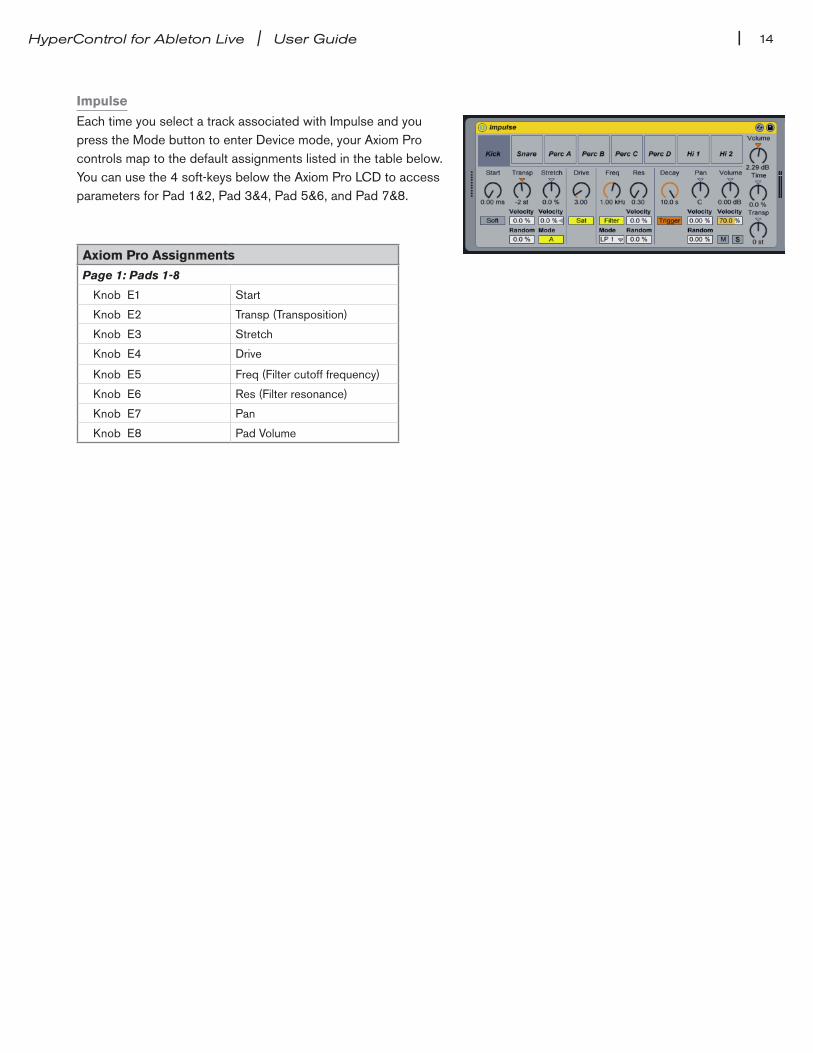
Impulse
Each time you select a track associated with Impulse and you press the Mode button to enter Device mode, your Axiom Pro controls map to the default assignments listed in the table below You can use the 4 soft-keys below the Axiom Pro LCD to access parameters for Pad 1&2, Pad 3&4, Pad 5&6, and Pad 7&8
Axiom Pro Assignments
Page 1: Pads 1-8
Knob E1 Start
Knob E2 Transp (Transposition)
Knob E3 Stretch
Knob E4 Drive
Knob E5 Freq (Filter cutoff frequency)
Knob E6 Res (Filter resonance)
Knob E7 Pan
Knob E8 Pad Volume
| 15HyperControl for Ableton Live | User Guide
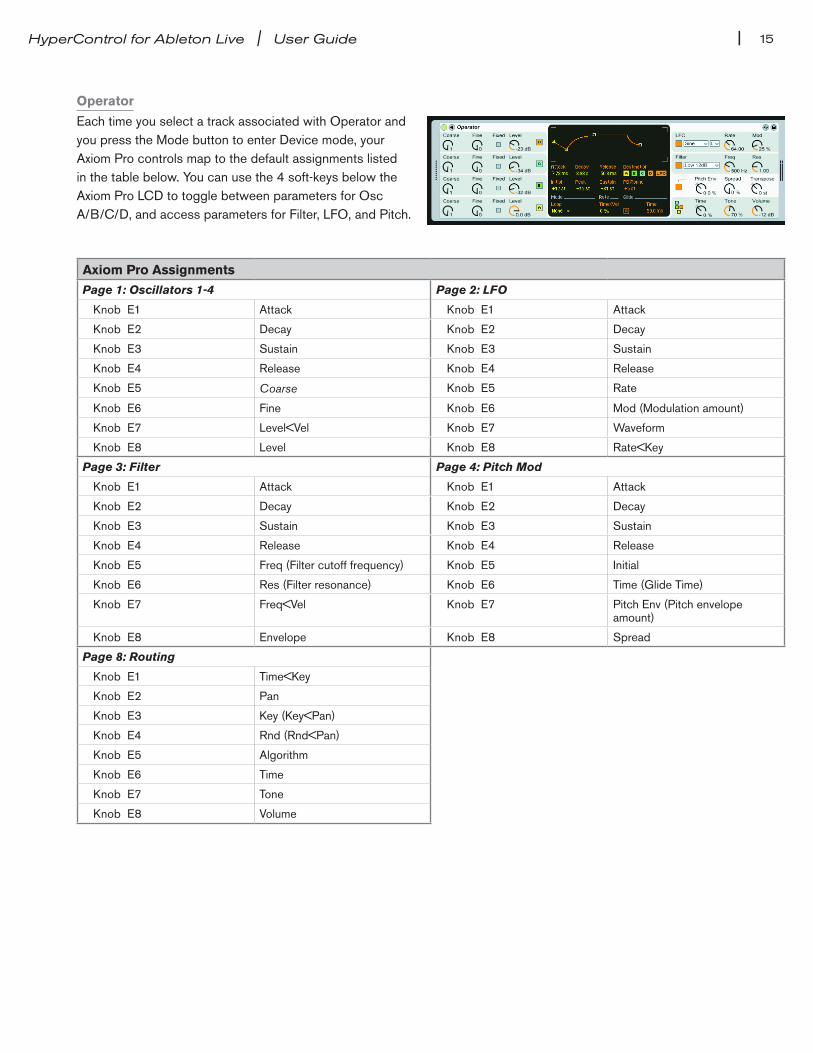
Operator
Each time you select a track associated with Operator and you press the Mode button to enter Device mode, your Axiom Pro controls map to the default assignments listed in the table below You can use the 4 soft-keys below the Axiom Pro LCD to toggle between parameters for Osc A/B/C/D, and access parameters for Filter, LFO, and Pitch
Axiom Pro Assignments
Page 1: Oscillators 1-4 Page 2: LFO
Knob E1 Attack Knob E1 Attack
Knob E2 Decay Knob E2 Decay
Knob E3 Sustain Knob E3 Sustain
Knob E4 Release Knob E4 Release
Knob E5 Coarse Knob E5 Rate
Knob E6 Fine Knob E6 Mod (Modulation amount)
Knob E7 Level<Vel Knob E7 Waveform
Knob E8 Level Knob E8 Rate<Key
Page 3: Filter Page 4: Pitch Mod
Knob E1 Attack Knob E1 Attack
Knob E2 Decay Knob E2 Decay
Knob E3 Sustain Knob E3 Sustain
Knob E4 Release Knob E4 Release
Knob E5 Freq (Filter cutoff frequency) Knob E5 Initial
Knob E6 Res (Filter resonance) Knob E6 Time (Glide Time)
Knob E7 Freq<Vel Knob E7 Pitch Env (Pitch envelope amount)
Knob E8 Envelope Knob E8 Spread
Page 8: Routing
Knob E1 Time<Key
Knob E2 Pan
Knob E3 Key (Key<Pan)
Knob E4 Rnd (Rnd<Pan)
Knob E5 Algorithm
Knob E6 Time
Knob E7 Tone
Knob E8 Volume

| 16HyperControl for Ableton Live | User Guide
Simpler
Each time you select a track associated with Simpler and you press the Mode button to enter Device mode, your Axiom Pro controls map to the default assignments listed in the table below You can use the 4 soft-keys below the Axiom Pro LCD to access parameters for Amp, Filt, LFO, and Pitch
Axiom Pro Assignments
Page 1: Volume Envelope | Loop Page 2: Filt
Knob E1 Attack Knob E1 Attack
Knob E2 Decay Knob E2 Decay
Knob E3 Sustain Knob E3 Sustain
Knob E4 Release Knob E4 Release
Knob E5 Start Knob E5 Freq
Knob E6 Loop Knob E6 Res
Knob E7 Length Knob E7 Vel
Knob E8 Fade Knob E8 Env
Page 3: LFO Page 4: Pitch Envelope | Global
Knob E1 Attack Knob E1 Attack
Knob E2 Rate Knob E2 Decay
Knob E3 Key Knob E3 Sustain
Knob E4 Type Knob E4 Release
Knob E5 Volume < LFO Knob E5 Glide Time
Knob E6 Filter cutoff < LFO Knob E6 Spread
Knob E7 Pitch < LFO Knob E7 Pan
Knob E8 Pan < LFO Knob E8 Volume

| 17HyperControl for Ableton Live | User Guide
Tension
Each time you select a track associated with Tension and you press the Mode button to enter Device mode, your Axiom Pro controls map to the default assignments listed in the table below You can use the 4 soft-keys below the Axiom Pro LCD to access parameters for String, Filt, LFO, and Env
Axiom Pro Assignments
Page 1: Excitator and String Page 2: Damper
Knob E1 Excitator Type Knob E1 Damper On/Of
Knob E2 String Decay Time Knob E2 Damper Mass
Knob E3 String Inharmonicity Knob E3 Damper Stiffness
Knob E4 String Damping Amount Knob E4 Damper Velocity
Knob E5 Mass/Protrusion/Force Knob E5 Damper Position
Knob E6 Friction/Stiffness Knob E6 Damper Damping
Knob E7 Excitator Velocity Knob E7 Damper Position < Velocity
Knob E8 Excitator Position Knob E8 Position On/off
Page 3: Termination and Pickup Page 4: Body
Knob E1 Termination On/Off Knob E1 Body On/Off
Knob E2 Finger Mass Knob E2 Body Type
Knob E3 Finger Stiffness Knob E3 Body Size
Knob E4 Fret Stiffness Knob E4 Body Decay
Knob E5 Pickup On/Off Knob E5 Body Low Cut
Knob E6 Pickup Position Knob E6 Body high Cut
Knob E7 Finger Mass < Vel Knob E7 String/Body Balance
Knob E8 Finger Mass < Key Knob E8 Global Vol
Page 5: Vibrato Page 6: Filter
Knob E1 Vibrato On/Off Knob E1 Filter On/Off
Knob E2 Vib Delay Knob E2 Filter Type
Knob E3 Vib Attack Knob E3 Freq
Knob E4 Vib Rate Knob E4 Reso
Knob E5 Vib Amount Knob E5 Env < Cutoff
Knob E6 Vib > Mod Wheel Amount Knob E6 Cutoff < LFO
Knob E7 Vib Error Knob E7 Env < Reso
Knob E8 Global Volume Knob E8 Reso < LFO
Page 7: Envelope and LFO Page 8: Global
Knob E1 Env On/Off Knob E1 Unison On/Off
Knob E2 Attack Knob E2 Fine Tuning (Detune)
Knob E3 Decay Knob E3 Portamento On/Off
Knob E4 Sustain Knob E4 Portamento Time
Knob E5 Release Knob E5 Voices (Polyphony)
Knob E6 LFO On/Off Knob E6 Keyboard Octave
Knob E7 LFO Type Knob E7 Keyboard Semitune
Knob E8 LFO Rate Knob E8 Volume
| 18HyperControl for Ableton Live | User Guide
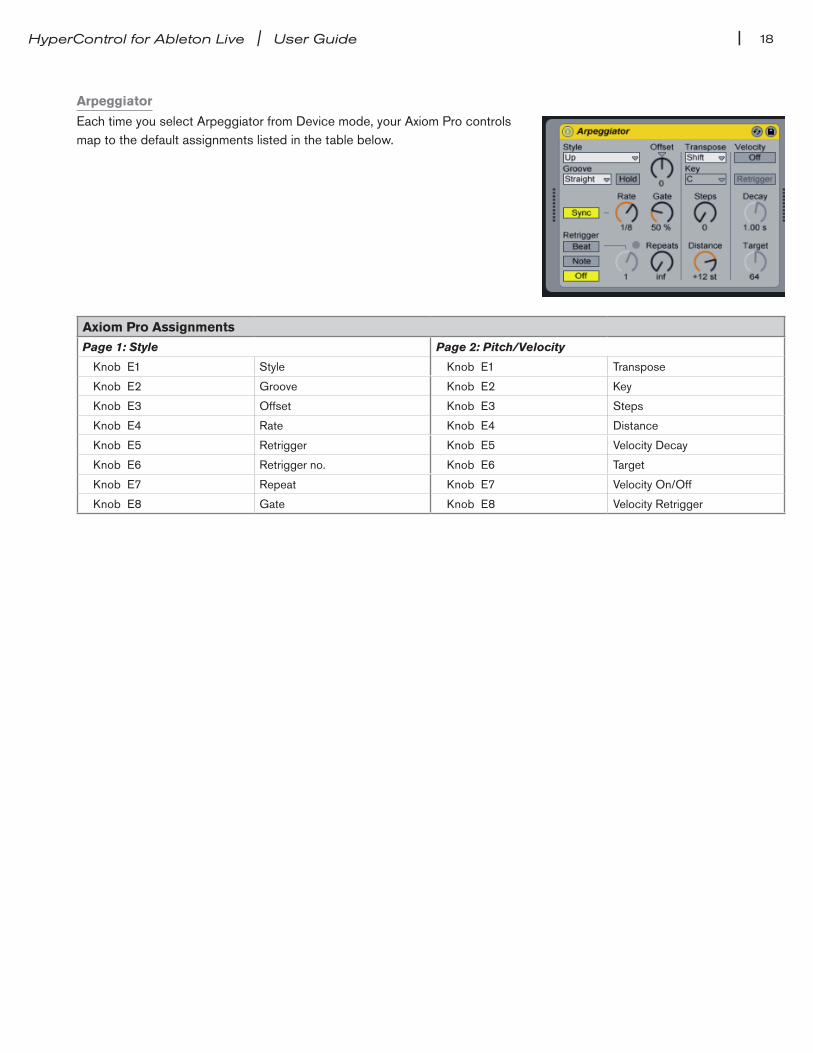
Arpeggiator
Each time you select Arpeggiator from Device mode, your Axiom Pro controls map to the default assignments listed in the table below
Axiom Pro Assignments
Page 1: Style Page 2: Pitch/Velocity
Knob E1 Style Knob E1 Transpose
Knob E2 Groove Knob E2 Key
Knob E3 Offset Knob E3 Steps
Knob E4 Rate Knob E4 Distance
Knob E5 Retrigger Knob E5 Velocity Decay
Knob E6 Retrigger no Knob E6 Target
Knob E7 Repeat Knob E7 Velocity On/Off
Knob E8 Gate Knob E8 Velocity Retrigger
| 19HyperControl for Ableton Live | User Guide
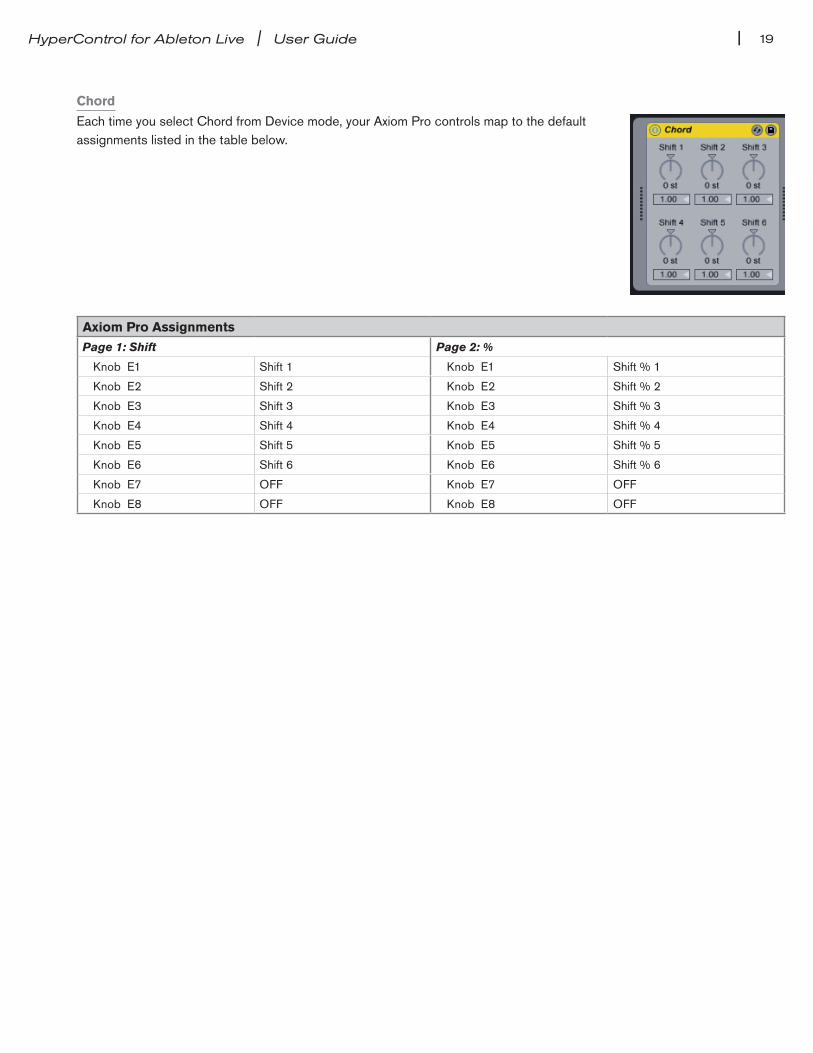
Chord
Each time you select Chord from Device mode, your Axiom Pro controls map to the default assignments listed in the table below
Axiom Pro Assignments
Page 1: Shift Page 2: %
Knob E1 Shift 1 Knob E1 Shift % 1
Knob E2 Shift 2 Knob E2 Shift % 2
Knob E3 Shift 3 Knob E3 Shift % 3
Knob E4 Shift 4 Knob E4 Shift % 4
Knob E5 Shift 5 Knob E5 Shift % 5
Knob E6 Shift 6 Knob E6 Shift % 6
Knob E7 OFF Knob E7 OFF
Knob E8 OFF Knob E8 OFF
| 20HyperControl for Ableton Live | User Guide
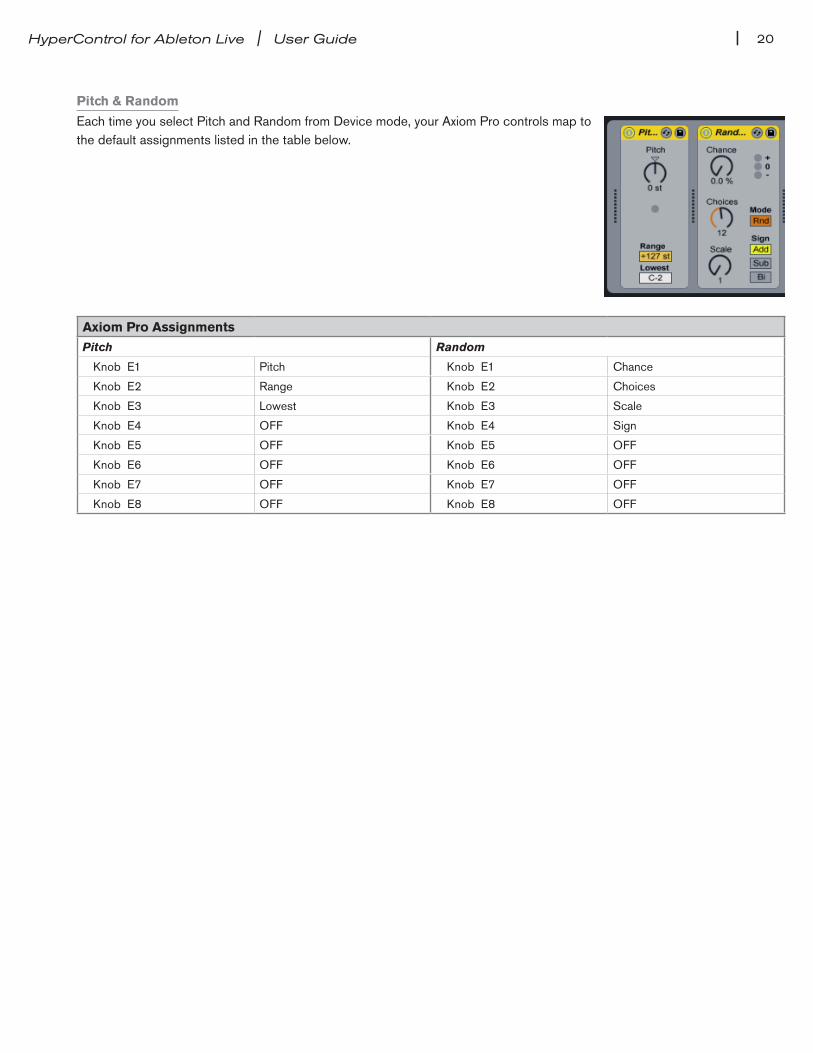
Pitch & Random
Each time you select Pitch and Random from Device mode, your Axiom Pro controls map to the default assignments listed in the table below
Axiom Pro Assignments
Pitch Random
Knob E1 Pitch Knob E1 Chance
Knob E2 Range Knob E2 Choices
Knob E3 Lowest Knob E3 Scale
Knob E4 OFF Knob E4 Sign
Knob E5 OFF Knob E5 OFF
Knob E6 OFF Knob E6 OFF
Knob E7 OFF Knob E7 OFF
Knob E8 OFF Knob E8 OFF

| 21HyperControl for Ableton Live | User Guide
Scale & Velocity
Each time you select Scale and Velocity from Device mode, your Axiom Pro controls map to the default assignments listed in the table below
Axiom Pro Assignments
Scale Velocity
Knob E1 Bass Knob E1 Drive
Knob E2 Transpose Knob E2 Comp
Knob E3 Range Knob E3 Random
Knob E4 Lowest Knob E4 Mode
Knob E5 OFF Knob E5 Out Hi
Knob E6 OFF Knob E6 Out Low
Knob E7 OFF Knob E7 Range
Knob E8 OFF Knob E8 Lowest

| 22HyperControl for Ableton Live | User Guide
Auto Filter & Auto Pan
Each time you select Auto Filter and Auto Pan from Device mode, your Axiom Pro controls map to the default assignments listed in the table below
Axiom Pro Assignments
Auto Filter Auto Pan
Knob E1 Freq Knob E1 Amount
Knob E2 Q Knob E2 Rate
Knob E3 Attack Knob E3 Phase
Knob E4 Release Knob E4 Shape
Knob E5 Env Amount Knob E5 Shape Select
Knob E6 LFO Amount Knob E6 Rate (Note)
Knob E7 Rate Knob E7 Offset
Knob E8 Phase Knob E8 Width
| 23HyperControl for Ableton Live | User Guide
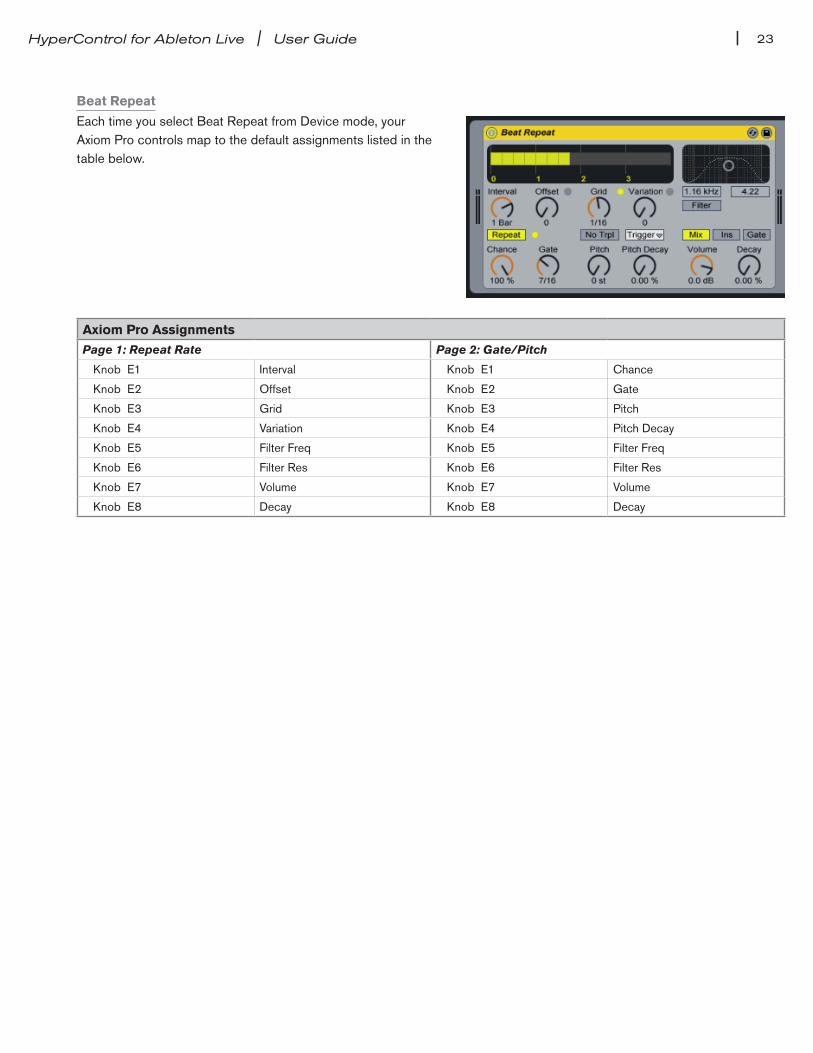
Beat Repeat
Each time you select Beat Repeat from Device mode, your Axiom Pro controls map to the default assignments listed in the table below
Axiom Pro Assignments
Page 1: Repeat Rate Page 2: Gate/Pitch
Knob E1 Interval Knob E1 Chance
Knob E2 Offset Knob E2 Gate
Knob E3 Grid Knob E3 Pitch
Knob E4 Variation Knob E4 Pitch Decay
Knob E5 Filter Freq Knob E5 Filter Freq
Knob E6 Filter Res Knob E6 Filter Res
Knob E7 Volume Knob E7 Volume
Knob E8 Decay Knob E8 Decay
| 24HyperControl for Ableton Live | User Guide
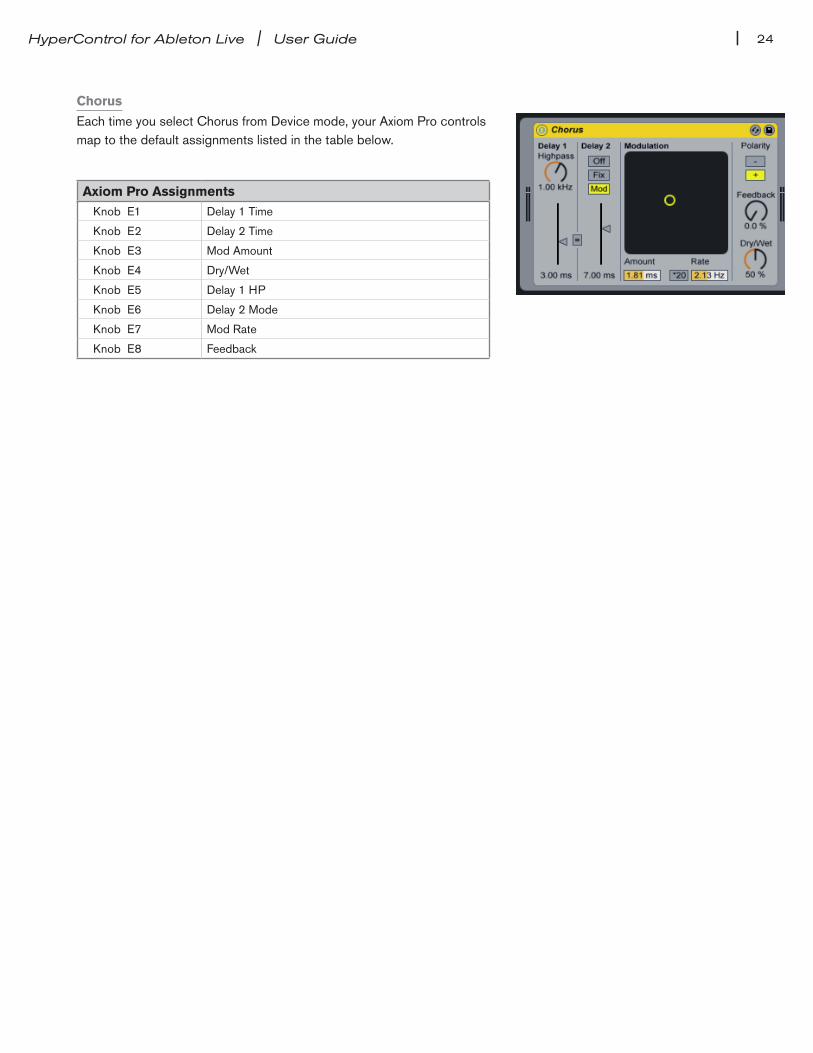
Chorus
Each time you select Chorus from Device mode, your Axiom Pro controls map to the default assignments listed in the table below
Axiom Pro Assignments
Knob E1 Delay 1 Time
Knob E2 Delay 2 Time
Knob E3 Mod Amount
Knob E4 Dry/Wet
Knob E5 Delay 1 HP
Knob E6 Delay 2 Mode
Knob E7 Mod Rate
Knob E8 Feedback
| 25HyperControl for Ableton Live | User Guide
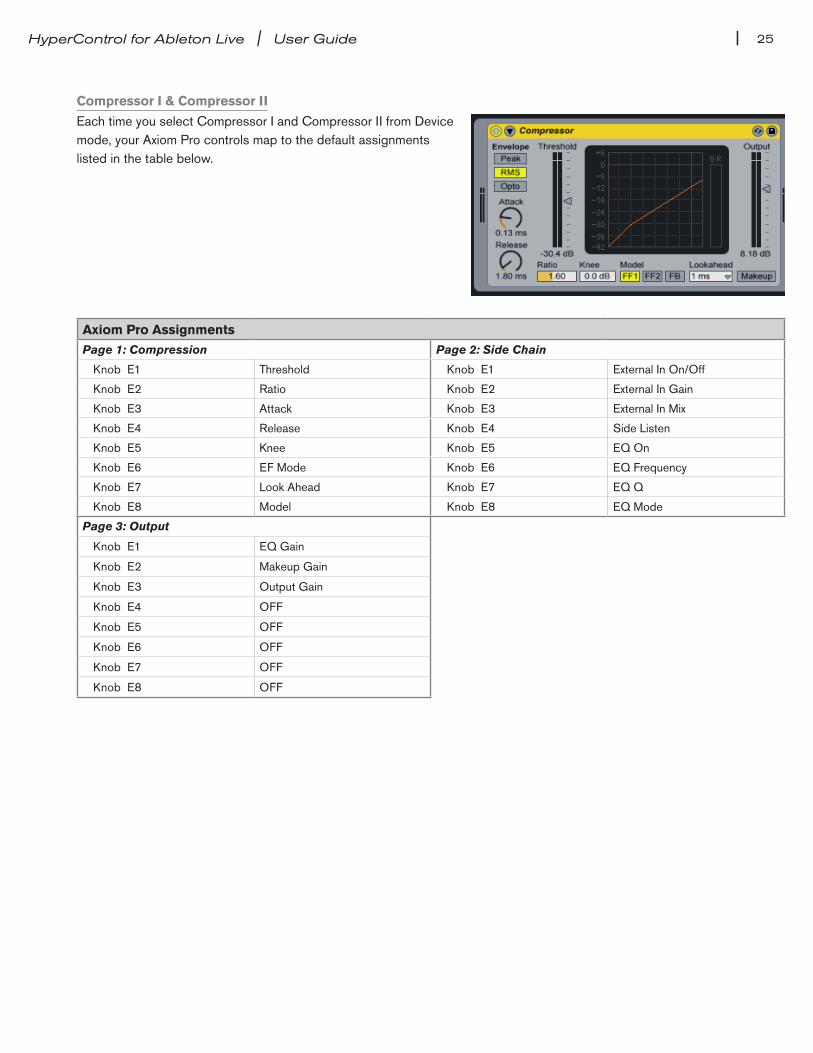
Compressor I & Compressor II
Each time you select Compressor I and Compressor II from Device mode, your Axiom Pro controls map to the default assignments listed in the table below
Axiom Pro Assignments
Page 1: Compression Page 2: Side Chain
Knob E1 Threshold Knob E1 External In On/Off
Knob E2 Ratio Knob E2 External In Gain
Knob E3 Attack Knob E3 External In Mix
Knob E4 Release Knob E4 Side Listen
Knob E5 Knee Knob E5 EQ On
Knob E6 EF Mode Knob E6 EQ Frequency
Knob E7 Look Ahead Knob E7 EQ Q
Knob E8 Model Knob E8 EQ Mode
Page 3: Output
Knob E1 EQ Gain
Knob E2 Makeup Gain
Knob E3 Output Gain
Knob E4 OFF
Knob E5 OFF
Knob E6 OFF
Knob E7 OFF
Knob E8 OFF
| 26HyperControl for Ableton Live | User Guide
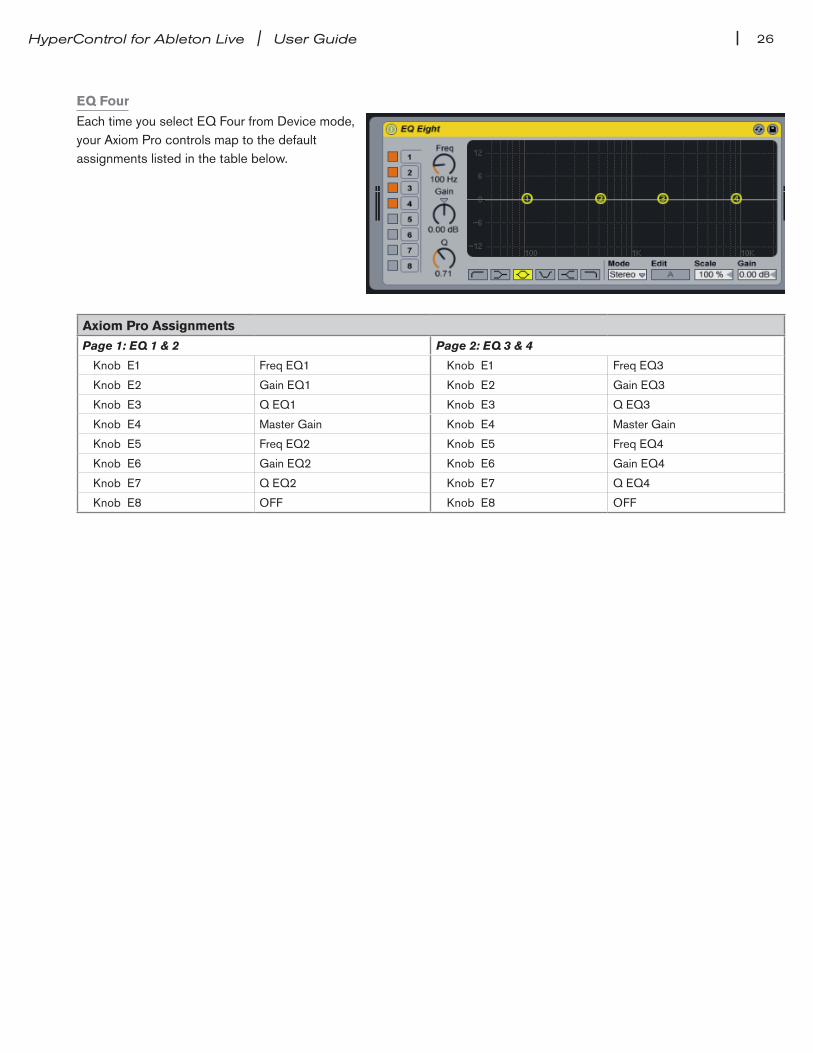
EQ Four
Each time you select EQ Four from Device mode, your Axiom Pro controls map to the default assignments listed in the table below
Axiom Pro Assignments
Page 1: EQ 1 & 2 Page 2: EQ 3 & 4
Knob E1 Freq EQ1 Knob E1 Freq EQ3
Knob E2 Gain EQ1 Knob E2 Gain EQ3
Knob E3 Q EQ1 Knob E3 Q EQ3
Knob E4 Master Gain Knob E4 Master Gain
Knob E5 Freq EQ2 Knob E5 Freq EQ4
Knob E6 Gain EQ2 Knob E6 Gain EQ4
Knob E7 Q EQ2 Knob E7 Q EQ4
Knob E8 OFF Knob E8 OFF
| 27HyperControl for Ableton Live | User Guide
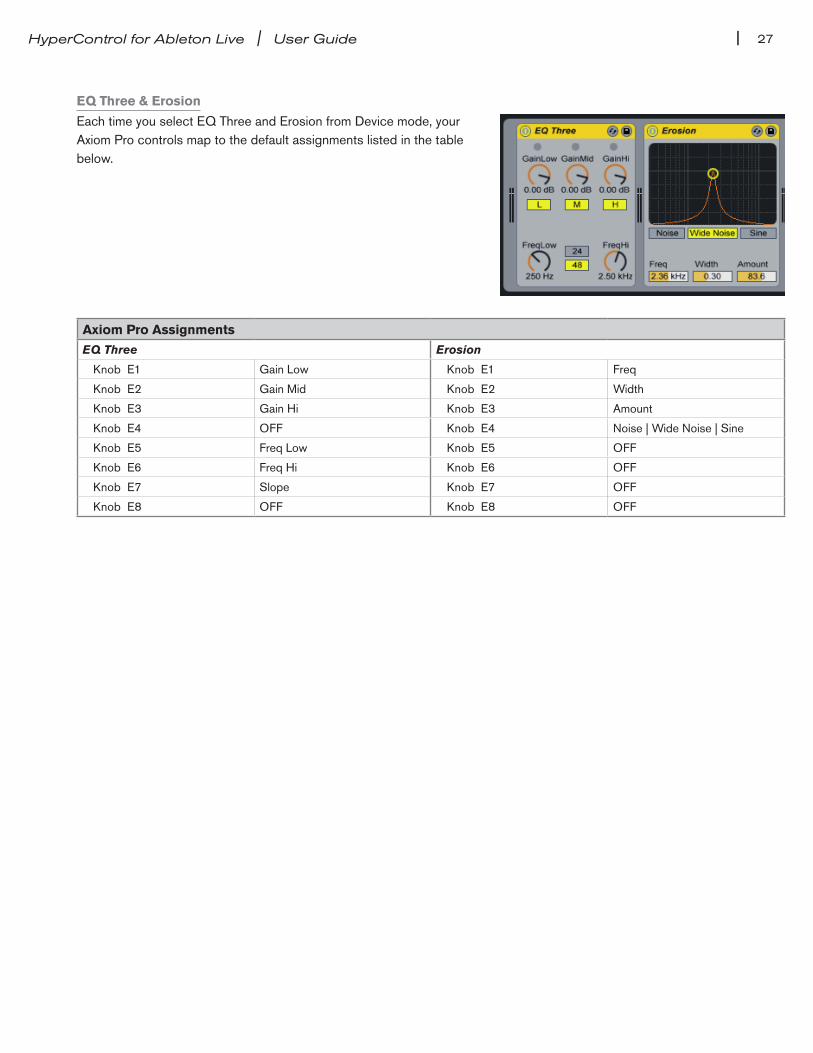
EQ Three & Erosion
Each time you select EQ Three and Erosion from Device mode, your Axiom Pro controls map to the default assignments listed in the table below
Axiom Pro Assignments
EQ Three Erosion
Knob E1 Gain Low Knob E1 Freq
Knob E2 Gain Mid Knob E2 Width
Knob E3 Gain Hi Knob E3 Amount
Knob E4 OFF Knob E4 Noise | Wide Noise | Sine
Knob E5 Freq Low Knob E5 OFF
Knob E6 Freq Hi Knob E6 OFF
Knob E7 Slope Knob E7 OFF
Knob E8 OFF Knob E8 OFF

| 28HyperControl for Ableton Live | User Guide
Filter Delay
Each time you select a track associated with Filter Delay from Device Mode, your Axiom Pro controls map to the default assignments listed in the table below
Axiom Pro Assignments
Page 1: Input L Filter Page 2: Input L+R Filter
Knob E1 Freq Knob E1 Freq
Knob E2 Res Knob E2 Res
Knob E3 Delay Time Knob E3 Delay Time
Knob E4 Sync % Knob E4 Sync %
Knob E5 Feedback Knob E5 Feedback
Knob E6 Pan Knob E6 Pan
Knob E7 Volume Knob E7 Volume
Knob E8 Overall Knob E8 Overall
Page 3: Input R Filter
Knob E1 Freq
Knob E2 Res
Knob E3 Delay Time
Knob E4 Sync %
Knob E5 Feedback
Knob E6 Pan
Knob E7 Volume
Knob E8 Overall

| 29HyperControl for Ableton Live | User Guide
Flanger
Each time you select Flanger from Device mode, your Axiom Pro controls map to the default assignments listed in the table below
Axiom Pro Assignments
Page 1: Frequency Controls Page 2: LFO/S&H
Knob E1 Hi Pass Knob E1 Amount
Knob E2 Dry/Wet Knob E2 Rate
Knob E3 Delay Time Knob E3 Phase
Knob E4 Feedback Knob E4 Hz/note
Knob E5 Envelope Knob E5 Offset
Knob E6 Attack Knob E6 Note Rate
Knob E7 Release Knob E7 Width
Knob E8 OFF Knob E8 Shape
| 30HyperControl for Ableton Live | User Guide
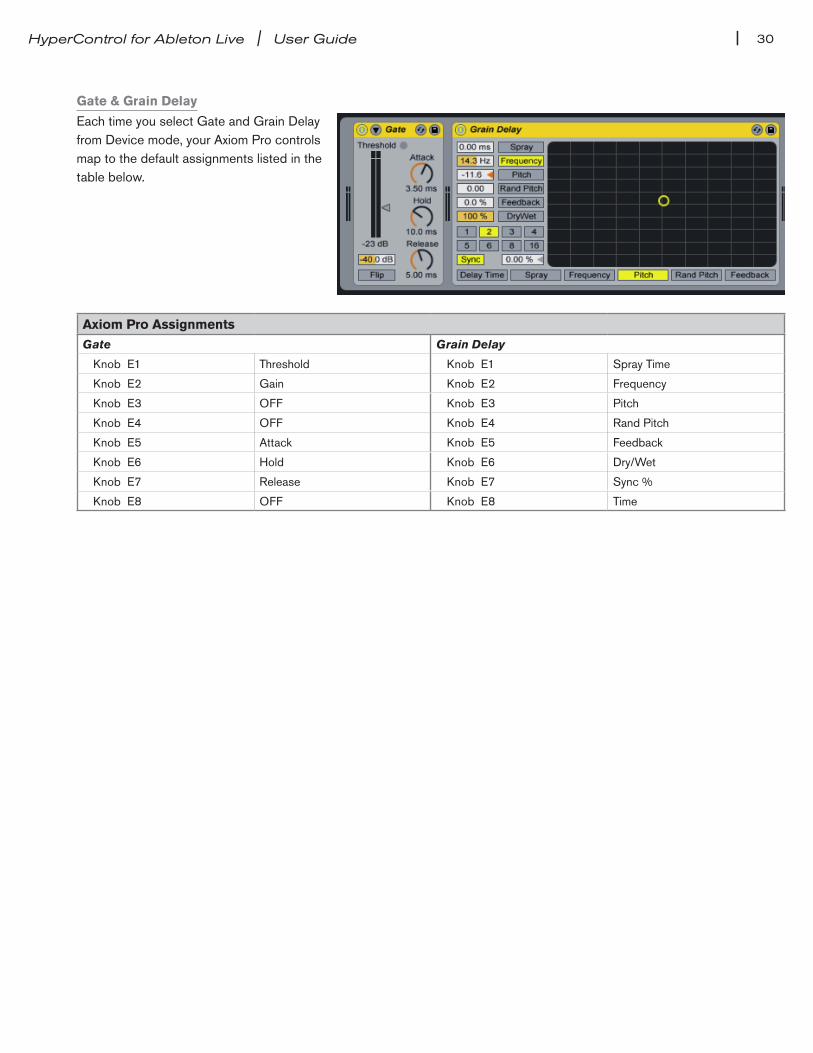
Gate & Grain Delay
Each time you select Gate and Grain Delay from Device mode, your Axiom Pro controls map to the default assignments listed in the table below
Axiom Pro Assignments
Gate Grain Delay
Knob E1 Threshold Knob E1 Spray Time
Knob E2 Gain Knob E2 Frequency
Knob E3 OFF Knob E3 Pitch
Knob E4 OFF Knob E4 Rand Pitch
Knob E5 Attack Knob E5 Feedback
Knob E6 Hold Knob E6 Dry/Wet
Knob E7 Release Knob E7 Sync %
Knob E8 OFF Knob E8 Time

| 31HyperControl for Ableton Live | User Guide
Phaser
Each time you select Phaser from Device mode, your Axiom Pro controls map to the default assignments listed in the table below
Axiom Pro Assignments
Page 1: Frequency Controls Page 2: LFO/S&H
Knob E1 Poles Knob E1 Amount
Knob E2 Color Knob E2 rate
Knob E3 Dry/Wet Knob E3 Phase
Knob E4 Frequency Knob E4 Hz/Beat-time
Knob E5 Env Amount Knob E5 Offset
Knob E6 Attack Knob E6 Rate (Beat-time)
Knob E7 Release Knob E7 Spin
Knob E8 Feedback Knob E8 Shape
| 32HyperControl for Ableton Live | User Guide
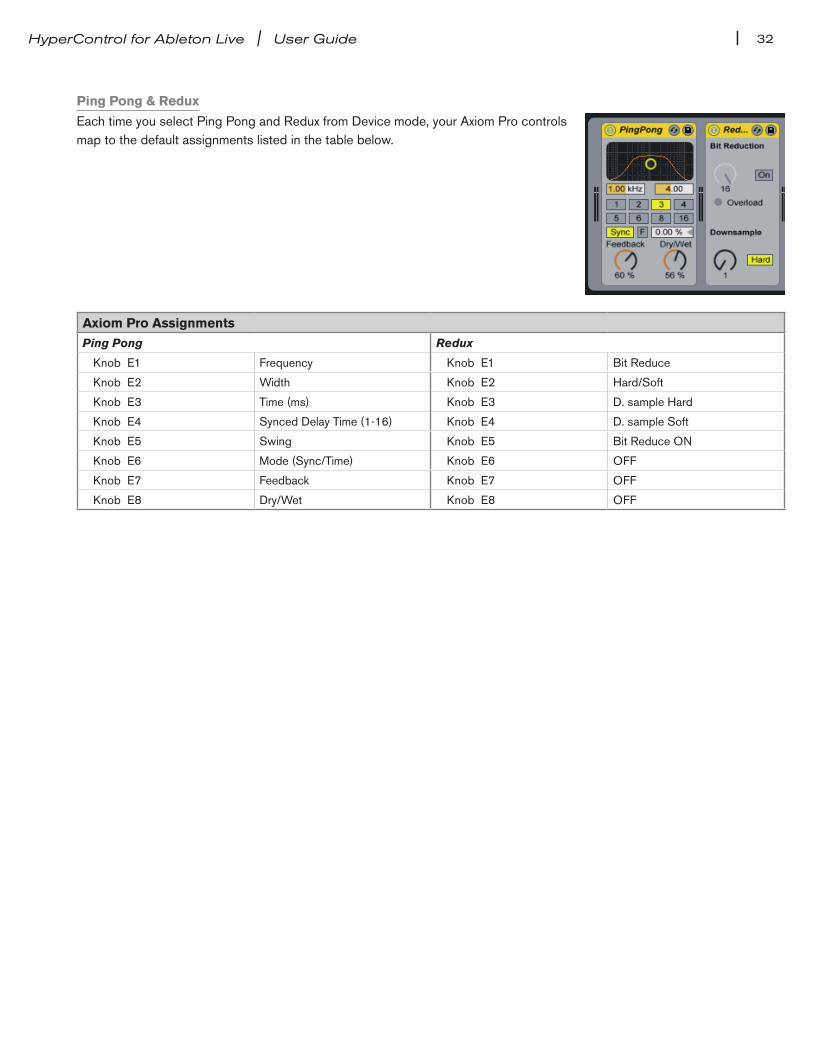
Ping Pong & Redux
Each time you select Ping Pong and Redux from Device mode, your Axiom Pro controls map to the default assignments listed in the table below
Axiom Pro Assignments
Ping Pong Redux
Knob E1 Frequency Knob E1 Bit Reduce
Knob E2 Width Knob E2 Hard/Soft
Knob E3 Time (ms) Knob E3 D sample Hard
Knob E4 Synced Delay Time (1-16) Knob E4 D sample Soft
Knob E5 Swing Knob E5 Bit Reduce ON
Knob E6 Mode (Sync/Time) Knob E6 OFF
Knob E7 Feedback Knob E7 OFF
Knob E8 Dry/Wet Knob E8 OFF
| 33HyperControl for Ableton Live | User Guide
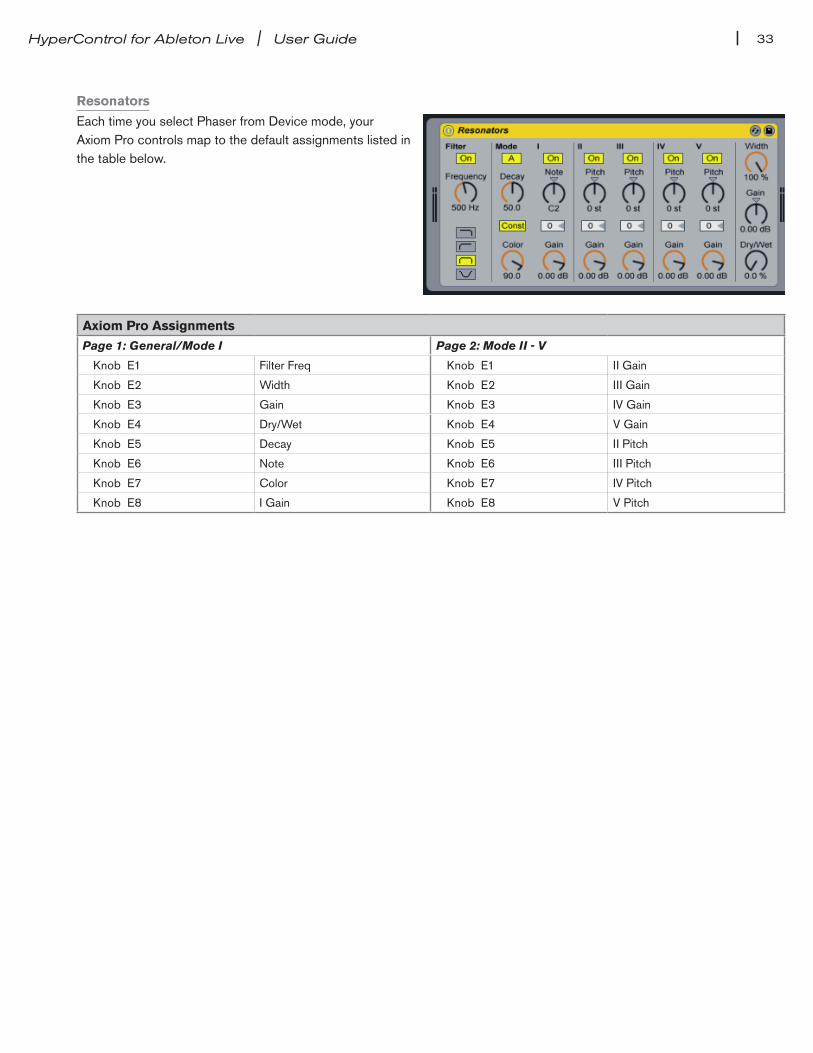
Resonators
Each time you select Phaser from Device mode, your Axiom Pro controls map to the default assignments listed in the table below
Axiom Pro Assignments
Page 1: General/Mode I Page 2: Mode II - V
Knob E1 Filter Freq Knob E1 II Gain
Knob E2 Width Knob E2 III Gain
Knob E3 Gain Knob E3 IV Gain
Knob E4 Dry/Wet Knob E4 V Gain
Knob E5 Decay Knob E5 II Pitch
Knob E6 Note Knob E6 III Pitch
Knob E7 Color Knob E7 IV Pitch
Knob E8 I Gain Knob E8 V Pitch

| 34HyperControl for Ableton Live | User Guide
Reverb
Each time you select a track associated with Reverb from Device Mode, your Axiom Pro controls map to the default assignments listed in the table below
Axiom Pro Assignments
Bank 1: Ref. Bank 2: Diff.
Knob E1 Filter Freq Knob E1 High Freq
Knob E2 Filter Res Knob E2 Low Freq
Knob E3 PreDelay Knob E3 Chorus Freq
Knob E4 Spin Knob E4 Density
Knob E5 ref Freq Knob E5 High Res
Knob E6 ref Res Knob E6 Low Res
Knob E7 ref Shape Knob E7 Chorus Res
Knob E8 Diff Decay Knob E8 Scale
Bank 3: Glob.
Knob E1 Decay Time
Knob E2 Freeze
Knob E3 Room Size
Knob E4 Stereo Image
Knob E5 Reflect Level
Knob E6 Diffuse Level
Knob E7 Dry/Wet
Knob E8 Global Select

| 35HyperControl for Ableton Live | User Guide
Simple Delay & Utility
Each time you select a track associated with Simple Delay and Utility from Device Mode, your Axiom Pro controls map to the default assignments listed in the table below
Axiom Pro Assignments
Simple Delay Utility
Knob E1 Delay Time L Knob E1 Width
Knob E2 Sync % Knob E2 Panorama
Knob E3 Time mS L Knob E3 Mute
Knob E4 Dry/Wet Knob E4 Block DC
Knob E5 Delay Time R Knob E5 Mode
Knob E6 Sync % R Knob E6 Gain
Knob E7 Time mS R Knob E7 Phz-L
Knob E8 Feedback Knob E8 Phz-R
| 36HyperControl for Ableton Live | User Guide
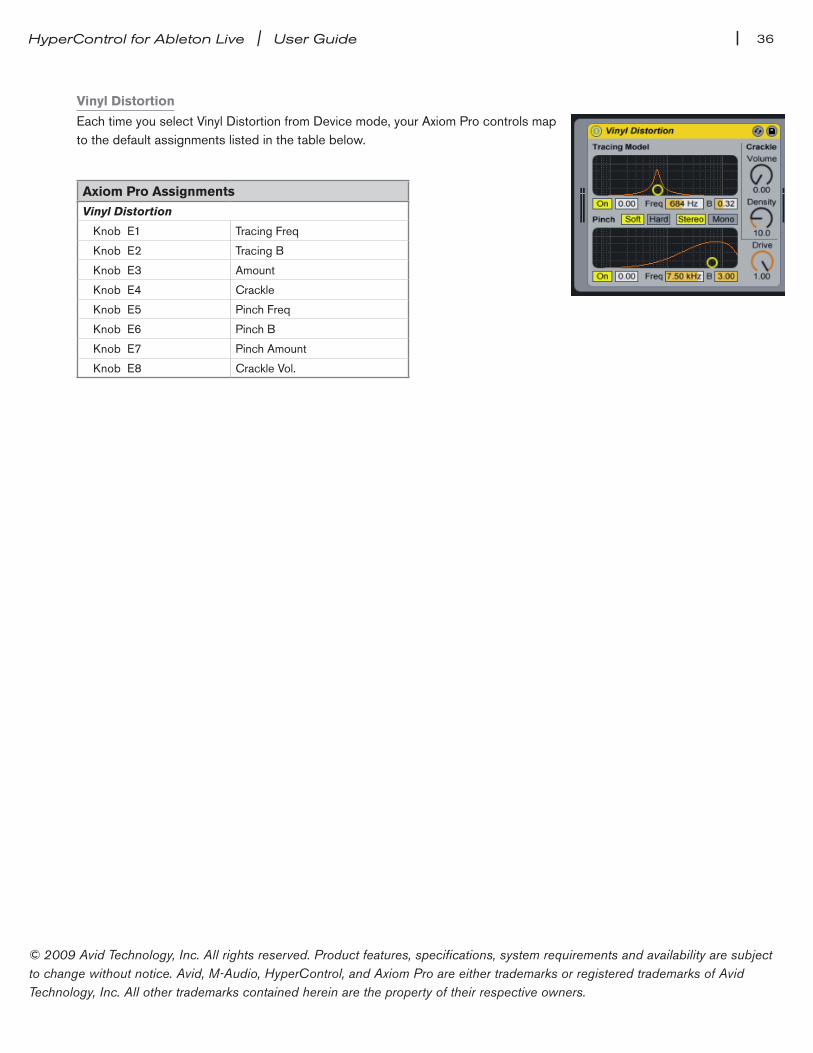
Vinyl Distortion
Each time you select Vinyl Distortion from Device mode, your Axiom Pro controls map to the default assignments listed in the table below
Axiom Pro Assignments
Vinyl Distortion
Knob E1 Tracing Freq
Knob E2 Tracing B
Knob E3 Amount
Knob E4 Crackle
Knob E5 Pinch Freq
Knob E6 Pinch B
Knob E7 Pinch Amount
Knob E8 Crackle Vol
© 2009 Avid Technology, Inc. All rights reserved. Product features, specifications, system requirements and availability are subject to change without notice. Avid, M-Audio, HyperControl, and Axiom Pro are either trademarks or registered trademarks of Avid Technology, Inc. All other trademarks contained herein are the property of their respective owners.

M-AUDIO5795 Martin Road
Irwindale, CA 91706, USA
TECHNICAL SUPPORTVisit the M-Audio Online Support Centerat www.m-audio.com/support
PRODUCT INFORMATIONFor company and product informationvisit us on the web at www.m-audio.com
www.m-audio.com