Ableton Live MacroPad Launcher - cdn-learn.adafruit.com
25
Ableton Live MacroPad Launcher Created by John Park https://learn.adafruit.com/ableton-live-macropad-launcher Last updated on 2022-01-27 05:37:11 PM EST ©Adafruit Industries Page 1 of 25
Transcript of Ableton Live MacroPad Launcher - cdn-learn.adafruit.com

Ableton Live MacroPad LauncherCreated by John Park
https://learn.adafruit.com/ableton-live-macropad-launcher
Last updated on 2022-01-27 05:37:11 PM EST
©Adafruit Industries Page 1 of 25

3
4
4
6
7
9
11
12
13
14
15
18
18
18
22
22
23
23
23
24
24
Table of Contents
Overview
• Sync with MIDI
• Parts
CircuitPython
• CircuitPython Quickstart
• Safe Mode
• Flash Resetting UF2
Build the MacroPad
• Optional Feet
• Insert Macropad
• Fasten Case and MacroPad
Code the Ableton MacroPad
• Text Editor
• Download the Project Bundle
• Use It
• Controller Setup
• Control Surface
• Input
• Output
• Track and Remote
• Clip Setup
©Adafruit Industries Page 2 of 25

Overview
Launch Ableton Live (https://adafru.it/Ctr) clips with the MacroPad RP2040!
Mechanical keyswitch clip launching is now a reality. Sync NeoPixel LEDs with your
Live session via USB MIDI.
All coded in CircuitPython and customizable to suit your needs. It's the tiny little
Launchpad or Push you've always dreamed of!
The basic code concept can be adapted to Pure Data (https://adafru.it/C-c) with r_cyc
le (https://adafru.it/TNA) or Max/MSP (https://adafru.it/TNB).
©Adafruit Industries Page 3 of 25

Sync with MIDI
One of the coolest things about this project is how you can keep the MacroPad and
Ableton in sync so that any clip launched in the software UI will light up the related
keyswitch LED. This is accomplished with bi-directional MIDI messages.
For example, when Ableton launches a clip, it sends a MIDI message to the MacroPad
to say "hey, turn the LED green, this clip is running!" It doesn't matter if the clip was
launched with the hardware or software, Ableton takes care of all the LED MIDI
message logic. In fact, it even encodes the LED color in the MIDI message. Clever!
Parts
Adafruit MacroPad RP2040 Starter Kit -
3x4 Keys + Encoder + OLED
Strap yourself in, we're launching in T-
minus 10 seconds...Destination? A new
Class M planet called MACROPAD! M here
stands for Microcontroller because this
3x4 keyboard...
https://www.adafruit.com/product/5128
-or-
©Adafruit Industries Page 4 of 25

Adafruit MACROPAD RP2040 Bare Bones
- 3x4 Keys + Encoder + OLED
Strap yourself in, we're launching in T-
minus 10 seconds...Destination? A new
Class M planet called MACROPAD! M
here, stands for Microcontroller because
this 3x4 keyboard...
https://www.adafruit.com/product/5100
Adafruit MacroPad RP2040 Enclosure +
Hardware Add-on Pack
Dress up your Adafruit Macropad with
PaintYourDragon's fabulous decorative
silkscreen enclosure and hardware kit.
You get the two custom PCBs that are cut
to act as a protective...
https://www.adafruit.com/product/5103
Kailh Mechanical Key Switches - Linear
Red - 12 Pack
For crafting your very own custom
keyboard, these Kailh Red Linear
mechanical key switches are deeee-luxe!
With smooth actuation and Cherry MX
compatibility,...
https://www.adafruit.com/product/5122
Clear Keycaps for MX Compatible
Switches - 12-pack
Here is a 12 pack of Clear DSA keycaps
for your next mechanical keyboard or
https://www.adafruit.com/product/5068
©Adafruit Industries Page 5 of 25

12 x Black Windowed Lamp R4 Keycap
for MX Compatible Switches
https://www.adafruit.com/product/5112
or
Pink and Purple Woven USB A to USB C
Cable - 1 meter long
This cable is not only super-fashionable,
with a woven pink and purple Blinka-like
pattern, it's also made for USB C for our
modernized breakout boards, Feathers,
and...
https://www.adafruit.com/product/5153
Optional for use with 3D Printed Case
Macropad RP2040 Case model
https://adafru.it/TND
Black Anodized Aluminum Bumper Feet -
Pack of 2
Keep your electronics from going
barefoot, and give them sleek cyberpunk
metal feet! These aluminum bumpers are
originally designed for keyboard
enclosures that are made of anodized...
https://www.adafruit.com/product/5051
CircuitPython
CircuitPython (https://adafru.it/tB7) is a derivative of MicroPython (https://adafru.it/BeZ)
designed to simplify experimentation and education on low-cost microcontrollers. It
makes it easier than ever to get prototyping by requiring no upfront desktop software
downloads. Simply copy and edit files on the CIRCUITPY drive to iterate.
©Adafruit Industries Page 6 of 25

CircuitPython Quickstart
Follow this step-by-step to quickly get CircuitPython running on your board.
Download the latest version of
CircuitPython for this board via
circuitpython.org
https://adafru.it/TB9
Click the link above to download the
latest CircuitPython UF2 file.
Save it wherever is convenient for you.
To enter the bootloader, hold down the BOOT/BOOTSEL button (highlighted in red
above), and while continuing to hold it (don't let go!), press and release the reset
The BOOT button is the button switch in the rotary encoder! To engage the
BOOT button, simply press down on the rotary encoder.
©Adafruit Industries Page 7 of 25

button (highlighted in blue above). Continue to hold the BOOT/BOOTSEL button until
the RPI-RP2 drive appears!
If the drive does not appear, release all the buttons, and then repeat the process
above.
You can also start with your board unplugged from USB, press and hold the BOOTSEL
button (highlighted in red above), continue to hold it while plugging it into USB, and
wait for the drive to appear before releasing the button.
A lot of people end up using charge-only USB cables and it is very frustrating! Make
sure you have a USB cable you know is good for data sync.
You will see a new disk drive appear
called RPI-RP2.
Drag the adafruit_circuitpython_etc.uf2
file to RPI-RP2.
©Adafruit Industries Page 8 of 25

The RPI-RP2 drive will disappear and a
new disk drive called CIRCUITPY will
appear.
That's it, you're done! :)
Safe Mode
You want to edit your code.py or modify the files on your CIRCUITPY drive, but find
that you can't. Perhaps your board has gotten into a state where CIRCUITPY is read-
only. You may have turned off the CIRCUITPY drive altogether. Whatever the reason,
safe mode can help.
Safe mode in CircuitPython does not run any user code on startup, and disables auto-
reload. This means a few things. First, safe mode bypasses any code in boot.py
(where you can set CIRCUITPY read-only or turn it off completely). Second, it does not
run the code in code.py. And finally, it does not automatically soft-reload when data is
written to the CIRCUITPY drive.
Therefore, whatever you may have done to put your board in a non-interactive state,
safe mode gives you the opportunity to correct it without losing all of the data on the
CIRCUITPY drive.
Entering Safe Mode in CircuitPython 6.x
This section explains entering safe mode on CircuitPython 6.x.
©Adafruit Industries Page 9 of 25

To enter safe mode when using CircuitPython 6.x, plug in your board or hit reset
(highlighted in red above). Immediately after the board starts up or resets, it waits
700ms. On some boards, the onboard status LED (highlighted in green above) will
turn solid yellow during this time. If you press reset during that 700ms, the board will
start up in safe mode. It can be difficult to react to the yellow LED, so you may want to
think of it simply as a slow double click of the reset button. (Remember, a fast double
click of reset enters the bootloader.)
Entering Safe Mode in CircuitPython 7.x
To enter safe mode when using CircuitPython 7.x, plug in your board or hit reset
(highlighted in red above). Immediately after the board starts up or resets, it waits
1000ms. On some boards, the onboard status LED (highlighted in green above) will
blink yellow during that time. If you press reset during that 1000ms, the board will
start up in safe mode. It can be difficult to react to the yellow LED, so you may want to
think of it simply as a slow double click of the reset button. (Remember, a fast double
click of reset enters the bootloader.)
In Safe Mode
Once you've entered safe mode successfully in CircuitPython 6.x, the LED will pulse
yellow.
This section explains entering safe mode on CircuitPython 7.x.
©Adafruit Industries Page 10 of 25

If you successfully enter safe mode on CircuitPython 7.x, the LED will intermittently
blink yellow three times.
If you connect to the serial console, you'll find the following message.
Auto-reload is off.
Running in safe mode! Not running saved code.
CircuitPython is in safe mode because you pressed the reset button during boot.
Press again to exit safe mode.
Press any key to enter the REPL. Use CTRL-D to reload.
You can now edit the contents of the CIRCUITPY drive. Remember, your code will not
run until you press the reset button, or unplug and plug in your board, to get out of
safe mode.
Flash Resetting UF2
If your board ever gets into a really weird state and doesn't even show up as a disk
drive when installing CircuitPython, try loading this 'nuke' UF2 which will do a 'deep
clean' on your Flash Memory. You will lose all the files on the board, but at least you'll
be able to revive it! After loading this UF2, follow the steps above to re-install
CircuitPython.
Download flash erasing "nuke" UF2
https://adafru.it/RLE
©Adafruit Industries Page 11 of 25
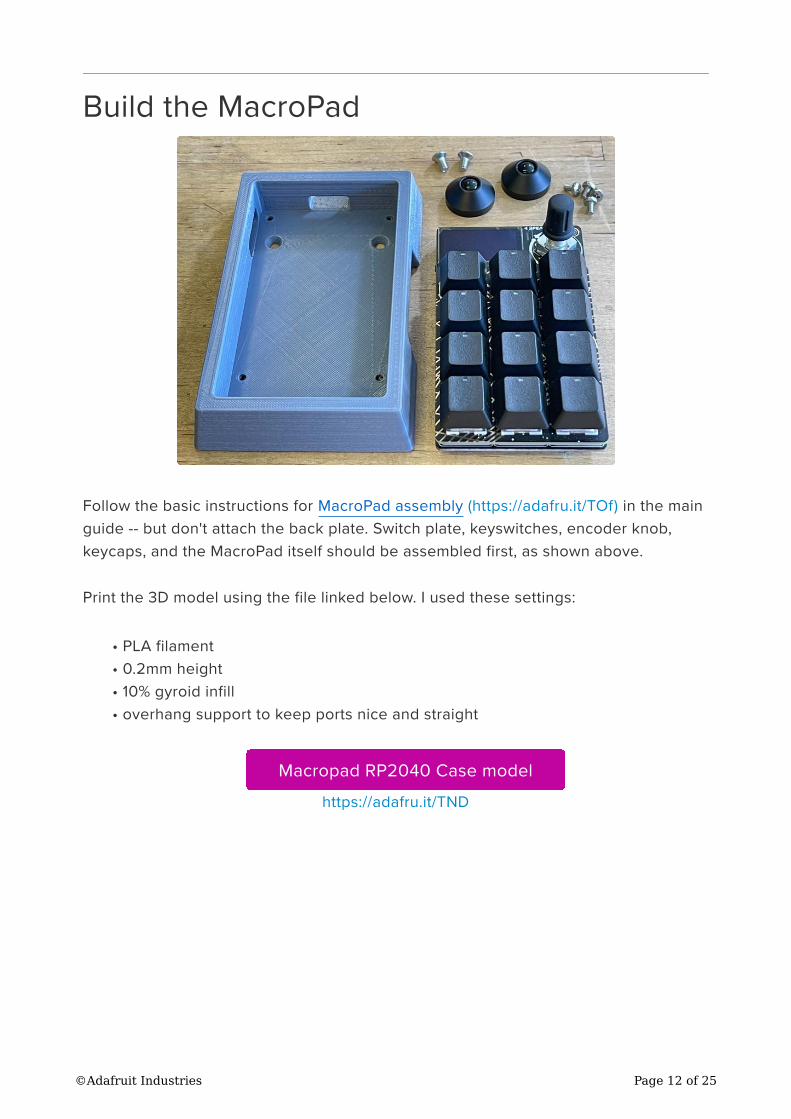
Build the MacroPad
Follow the basic instructions for MacroPad assembly (https://adafru.it/TOf) in the main
guide -- but don't attach the back plate. Switch plate, keyswitches, encoder knob,
keycaps, and the MacroPad itself should be assembled first, as shown above.
Print the 3D model using the file linked below. I used these settings:
PLA filament
0.2mm height
10% gyroid infill
overhang support to keep ports nice and straight
Macropad RP2040 Case model
https://adafru.it/TND
•
•
•
•
©Adafruit Industries Page 12 of 25

Optional FeetIf you'd like to use the optional keyboard
feet for that sweet angled action, start by
placing one of the foot screws into it's
hole from the topside of the case.
You'll see there are four of these
countersunk, M4 holes to choose from,
depending on your preferred board
orientation. We'll choose "screen on top"
orientation and screw in the feet at the
top.
Thread each foot onto its screw from the
bottom, and tighten it well, but not so
tight as to break anything!
©Adafruit Industries Page 13 of 25

Forgot to get a keyswitch plate? This community member shared a 3D printable
model (https://adafru.it/UD5) that works nicely and fits inside the case!
Insert MacropadInsert the Macropad into the case as
shown, tilting the USB port into place and
then pressing the board in snugly.
©Adafruit Industries Page 14 of 25

Fasten Case and MacroPadThread the four M3 screws into the case
and the MacroPad's threaded standoffs.
©Adafruit Industries Page 15 of 25

©Adafruit Industries Page 16 of 25

Plug in USB C cable through the top port.
Access the STEMMA QT I2C port and the reset button from the left side of the case.
©Adafruit Industries Page 17 of 25

Code the Ableton MacroPad
Text Editor
Adafruit recommends using the Mu editor for editing your CircuitPython code. You can
get more info in this guide (https://adafru.it/ANO).
Alternatively, you can use any text editor that saves simple text files.
Download the Project Bundle
Your project will use a specific set of CircuitPython libraries and the code.py file,
along with a folder full of key configuration files. To get everything you need, click on
the Download Project Bundle link below, and uncompress the .zip file.
Drag the contents of the uncompressed bundle directory onto your MACROPAD
board's CIRCUITPY drive, replacing any existing files or directories with the same
names, and adding any new ones that are necessary.
# SPDX-FileCopyrightText: 2021 John Park for Adafruit Industries
# SPDX-License-Identifier: MIT
# Ableton Live Macropad Launcher
# In Ableton, choose "Launchpad Mini Mk3" as controller with MacroPad 2040 as in
and out
# Use empty fifth scene to allow "unlaunching" of tracks with encoder modifier
import board
from adafruit_macropad import MacroPad
import displayio
import terminalio
from adafruit_simplemath import constrain
from adafruit_display_text import label
import usb_midi
import adafruit_midi
from adafruit_midi.control_change import ControlChange
from adafruit_midi.note_off import NoteOff
from adafruit_midi.note_on import NoteOn
from adafruit_midi.midi_message import MIDIUnknownEvent
macropad = MacroPad()
TITLE_TEXT = "Live Launcher 2040"
print(TITLE_TEXT)
TRACK_NAMES = ["DRUM", "BASS", "SYNTH"] # Customize these
LIVE_CC_NUMBER = 74 # CC number to send w encoder
FADER_TEXT = "cutoff" # change for intended CC name
# --- MIDI recieve is complex, so not using macropad.midi
midi = adafruit_midi.MIDI(
midi_in=usb_midi.ports[0],
in_channel=(0, 1, 2),
midi_out=usb_midi.ports[1],
out_channel=0
)
©Adafruit Industries Page 18 of 25

# ---Official Launchpad colors---
LP_COLORS = (
0x000000, 0x101010, 0x202020, 0x3f3f3f, 0x3f0f0f, 0x3f0000, 0x200000, 0x100000,
0x3f2e1a, 0x3f0f00, 0x200800, 0x100400, 0x3f2b0b, 0x3f3f00, 0x202000, 0x101000,
0x213f0c, 0x143f00, 0x0a2000, 0x051000, 0x123f12, 0x003f00, 0x002000, 0x001000,
0x123f17, 0x003f06, 0x002003, 0x001001, 0x123f16, 0x003f15, 0x00200b, 0x001006,
0x123f2d, 0x003f25, 0x002012, 0x001009, 0x12303f, 0x00293f, 0x001520, 0x000b10,
0x12213f, 0x00153f, 0x000b20, 0x000610, 0x0b093f, 0x00003f, 0x000020, 0x000010,
0x1a0d3e, 0x0b003f, 0x060020, 0x030010, 0x3f0f3f, 0x3f003f, 0x200020, 0x100010,
0x3f101b, 0x3f0014, 0x20000a, 0x100005, 0x3f0300, 0x250d00, 0x1d1400, 0x080d01,
0x000e00, 0x001206, 0x00051b, 0x00003f, 0x001113, 0x040032, 0x1f1f1f, 0x070707,
0x3f0000, 0x2e3f0b, 0x2b3a01, 0x183f02, 0x032200, 0x003f17, 0x00293f, 0x000a3f,
0x06003f, 0x16003f, 0x2b061e, 0x0a0400, 0x3f0c00, 0x213701, 0x1c3f05, 0x003f00,
0x0e3f09, 0x153f1b, 0x0d3f32, 0x16223f, 0x0c1430, 0x1a1439, 0x34073f, 0x3f0016,
0x3f1100, 0x2d2900, 0x233f00, 0x201601, 0x0e0a00, 0x001203, 0x031308, 0x05050a,
0x050716, 0x190e06, 0x200000, 0x36100a, 0x351204, 0x3f2f09, 0x27370b, 0x192c03,
0x05050b, 0x36341a, 0x1f3a22, 0x26253f, 0x23193f, 0x0f0f0f, 0x1c1c1c, 0x373f3f,
0x270000, 0x0d0000, 0x063300, 0x011000, 0x2d2b00, 0x0f0c00, 0x2c1400, 0x120500,
)
LP_PADS = {
81: 0, 82: 1, 83: 2,
71: 3, 72: 4, 73: 5,
61: 6, 62: 7, 63: 8,
51: 9, 52: 10, 53: 11
}
LIVE_NOTES = [81, 82, 83, 71, 72, 73, 61, 62, 63, 51, 52, 53]
CC_OFFSET = 20
modifier = False # use to add encoder switch modifier to keys for clip mute
MODIFIER_NOTES = [41, 42, 43, 41, 42, 43, 41, 42, 43, 41, 42, 43] # blank row in
Live
last_position = 0 # encoder position state
# ---NeoPixel setup---
BRIGHT = 0.125
DIM = 0.0625
macropad.pixels.brightness = BRIGHT
# ---Display setup---
display = board.DISPLAY
screen = displayio.Group()
display.show(screen)
WIDTH = 128
HEIGHT = 64
FONT = terminalio.FONT
# Draw a title label
title = TITLE_TEXT
title_area = label.Label(FONT, text=title, color=0xFFFFFF, x=6, y=3)
screen.append(title_area)
# --- create display strings and positions
x1 = 5
x2 = 35
x3 = 65
y1 = 17
y2 = 27
y3 = 37
y4 = 47
y5 = 57
# ---Push knob text setup
push_text_area = label.Label(FONT, text="[o]", color=0xffffff, x=WIDTH-22, y=y2)
screen.append(push_text_area)
# ---CC knob text setup
©Adafruit Industries Page 19 of 25

fader_text_area = label.Label(FONT, text=FADER_TEXT, color=0xffffff, x=WIDTH - 42,
y=y4)
screen.append(fader_text_area)
# --- cc value display
cc_val_text = str(CC_OFFSET)
cc_val_text_area = label.Label(FONT, text=cc_val_text, color=0xffffff, x=WIDTH - 20,
y=y5)
screen.append(cc_val_text_area)
label_data = (
# text, x, y
(TRACK_NAMES[0], x1, y1), (TRACK_NAMES[1], x2, y1), (TRACK_NAMES[2], x3, y1),
(".", x1, y2), (".", x2, y2), (".", x3, y2),
(".", x1, y3), (".", x2, y3), (".", x3, y3),
(".", x1, y4), (".", x2, y4), (".", x3, y4),
(".", x1, y5), (".", x2, y5), (".", x3, y5)
)
labels = []
for data in label_data:
text, x, y = data
label_area = label.Label(FONT, text=text, color=0xffffff)
group = displayio.Group(x=x, y=y)
group.append(label_area)
screen.append(group)
labels.append(label_area) # these are individually addressed later
num = 1
while True:
msg_in = midi.receive()
if isinstance(msg_in, NoteOn) and msg_in.velocity != 0:
print(
"received NoteOn",
"from channel",
msg_in.channel + 1,
"MIDI note",
msg_in.note,
"velocity",
msg_in.velocity,
"\n"
)
# send neopixel lightup code to key, text to display
if msg_in.note in LP_PADS:
macropad.pixels[LP_PADS[msg_in.note]] = LP_COLORS[msg_in.velocity]
macropad.pixels.show()
if msg_in.velocity == 21: # active pad is indicated by Live as vel 21
labels[LP_PADS[msg_in.note]+3].text = "o"
else:
labels[LP_PADS[msg_in.note]+3].text = "."
elif isinstance(msg_in, NoteOff):
print(
"received NoteOff",
"from channel",
msg_in.channel + 1,
"\n"
)
elif isinstance(msg_in, NoteOn) and msg_in.velocity == 0:
print(
"received NoteOff",
"from channel",
msg_in.channel + 1,
"MIDI note",
msg_in.note,
"velocity",
msg_in.velocity,
©Adafruit Industries Page 20 of 25

"\n"
)
elif isinstance(msg_in, ControlChange):
print(
"received CC",
"from channel",
msg_in.channel + 1,
"controller",
msg_in.control,
"value",
msg_in.value,
"\n"
)
elif isinstance(msg_in, MIDIUnknownEvent):
# Message are only known if they are imported
print("Unknown MIDI event status ", msg_in.status)
elif msg_in is not None:
midi.send(msg_in)
key_event = macropad.keys.events.get() # check for keypad events
if not key_event: # Event is None; no keypad event happened, do other stuff
position = macropad.encoder # store encoder position state
cc_position = int(constrain((position + CC_OFFSET), 0, 127)) # lock to cc
range
if last_position is None or position != last_position:
if position < last_position:
midi.send(ControlChange(LIVE_CC_NUMBER, cc_position))
print("CC", cc_position)
cc_val_text_area.text = str(cc_position)
elif position > last_position:
midi.send(ControlChange(LIVE_CC_NUMBER, cc_position))
print("CC", cc_position)
cc_val_text_area.text = str(cc_position)
last_position = position
macropad.encoder_switch_debounced.update() # check the encoder switch w
debouncer
if macropad.encoder_switch_debounced.pressed:
print("Mod")
push_text_area.text = "[.]"
modifier = True
macropad.pixels.brightness = DIM
if macropad.encoder_switch_debounced.released:
modifier = False
push_text_area.text = "[o]"
macropad.pixels.brightness = BRIGHT
continue
num = key_event.key_number
if key_event.pressed and not modifier:
midi.send(NoteOn(LIVE_NOTES[num], 127))
print("\nsent note", LIVE_NOTES[num], "\n")
if key_event.pressed and modifier:
midi.send(NoteOn(MODIFIER_NOTES[num], 127))
if key_event.released and not modifier:
midi.send(NoteOff(LIVE_NOTES[num], 0))
©Adafruit Industries Page 21 of 25
if key_event.released and modifier:
midi.send(NoteOff(MODIFIER_NOTES[num], 0))
macropad.pixels.show()
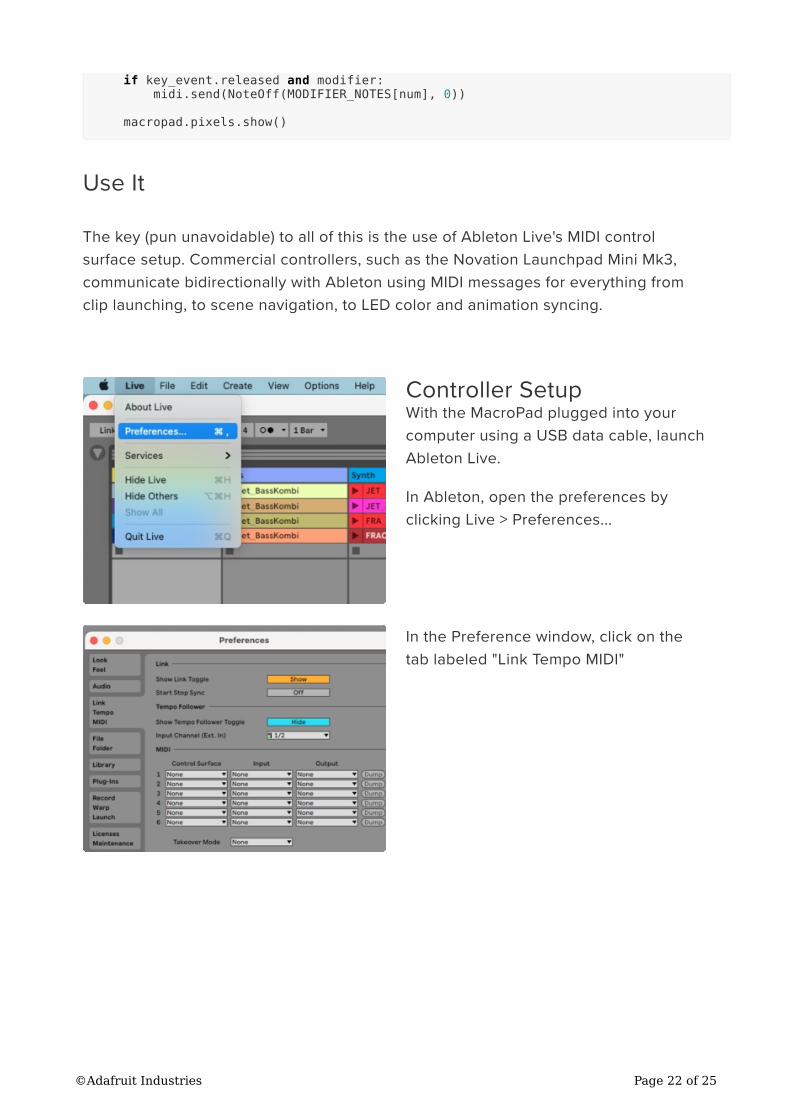
Use It
The key (pun unavoidable) to all of this is the use of Ableton Live's MIDI control
surface setup. Commercial controllers, such as the Novation Launchpad Mini Mk3,
communicate bidirectionally with Ableton using MIDI messages for everything from
clip launching, to scene navigation, to LED color and animation syncing.
Controller SetupWith the MacroPad plugged into your
computer using a USB data cable, launch
Ableton Live.
In Ableton, open the preferences by
clicking Live > Preferences...
In the Preference window, click on the
tab labeled "Link Tempo MIDI"
©Adafruit Industries Page 22 of 25

Control SurfaceIn the Control Surface list, select
Launchpad Mini Mk3. This is the scheme
used in the code we put on the
MacroPad.
NOTE: Be careful not to pick the similarly
named "Launchkey" item, this has a
different MIDI syncing scheme.
InputIn the Input list, select the MacroPad
RP2040 (CircuitPython usb midi.ports[0])
item.
This is the device that Ableton will be
listening to for MIDI messages.
OutputIn the Output list, select the MacroPad
RP2040 (CircuitPython usb midi.ports[0])
item.
This is the device to which Ableton will
send MIDI messages to keep things in
sync.
©Adafruit Industries Page 23 of 25

Track and Remote Ableton's Track, Sync, and Remote
switches are used to enable different
types of MIDI messages between devices
and the software. Read more details
here (https://adafru.it/TOa).
Turn on both the Track and Remote
switches for the Input port, and just the
Remote switch for the Output.
Sync is used for MIDI Clock and
Timecode, neither of which are needed
for this project.
Clip Setup
The MacroPad will launch clips in the first three tracks (columns) and four scenes
(rows) of your Ableton session. Load up some samples, loops, MIDI notes, etc. and
you'll see the Macropad LEDs match the colors of the clips!
Leave the fifth scene empty, as this is used for "stopping" clips in the MacroPad code
by using the encoder switch combined with any key in a column.
You can also use the rotary encoder knob to adjust CC #74 (customizable in code).
©Adafruit Industries Page 24 of 25
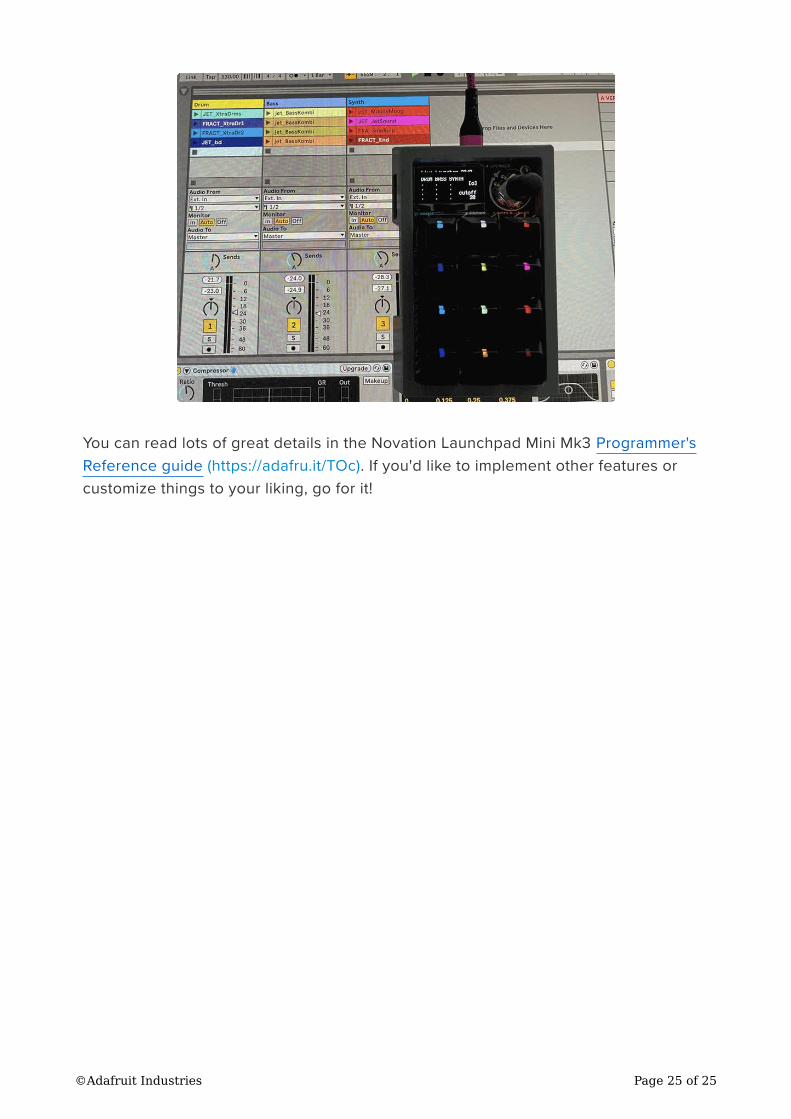
You can read lots of great details in the Novation Launchpad Mini Mk3 Programmer's
Reference guide (https://adafru.it/TOc). If you'd like to implement other features or
customize things to your liking, go for it!
©Adafruit Industries Page 25 of 25