FlipaQ Mac - Kayako
26
FlipaQ Mac Version 1.6 Overview Welcome to Flip-Q Mac, a powerful Teleprompter Application that offers must-have features including dual screen supp rt . Dual screen support means that the operator's display is non-reversed while the secondary VGA output from your laptop or PC is reversed as a mirror image. Both the operator and talent see exactly the same image without the need for expensive hardware. Flip-Q offers a full built ain RTF text edit r and users can select any font, color or style on an individual character basis. Flip-Q Mac offers many poweful features including : - Built-in RTF Text Edit r - * Support Font Color, Bold, Italic, Underline and Strikethrough * Change fonts for individual characters * Support Left, Centered, and Right Alignment * Support Margins and Variable Vertical Line Spacing * Support for Unicode allowing foreign language fonts * Full editing cut/copy/paste/select within application - File management and Imp rt - * Support RTF and plain TXT * Run lists for instantly selecting from a list of scripts (Pro Version) - Cust m Pr mpter Settings - * Custom scrolling speed (Speed Option) * Display Cue Marker (Pro Version) * Scroll From Selected Cursor (Pro Version) * Select any color background (Pro Version) * Available with wireless or wired controllers or use mouse/keyboard - C mplete a Easy Navigati n - * Spacebar to toggle scroll movement * KeyUp / KeyDown to control scrolling speed and direction * Shortcut Markers for pre-defined Text Positions (Pro Version) * Keypad Left / Right to Cycle Shortcuts * Customizable Navigation Shortcuts with Keyboard and Mouse support * Run List provided to open files with a double click (Pro Version) * Support Normal / Mirrored Text on Both Monitors * Support Quarter Size Window for primary monitor scrolling * Support Resizable Small Window on the upper left corner on primary monitor
Transcript of FlipaQ Mac - Kayako

FlipaQ Mac Version 1.6
Overview
Welcome to Flip-Q Mac, a powerful Teleprompter Application that offers must-have features including dual screen support. Dual screen support means that the operator's display is non-reversed while thesecondary VGA output from your laptop or PC is reversed as a mirror image. Both the operator and talentsee exactly the same image without the need for expensive hardware. Flip-Q offers a full builtain RTF texteditor and users can select any font, color or style on an individual character basis.
Flip-Q Mac offers many poweful features including :
- Built-in RTF Text Editor -
* Support Font Color, Bold, Italic, Underline and Strikethrough * Change fonts for individual characters * Support Left, Centered, and Right Alignment* Support Margins and Variable Vertical Line Spacing* Support for Unicode allowing foreign language fonts* Full editing cut/copy/paste/select within application
- File management and Import -
* Support RTF and plain TXT* Run lists for instantly selecting from a list of scripts (Pro Version)
- Custom Prompter Settings -
* Custom scrolling speed (Speed Option)* Display Cue Marker (Pro Version)* Scroll From Selected Cursor (Pro Version)* Select any color background (Pro Version)* Available with wireless or wired controllers or use mouse/keyboard
- Complete a Easy Navigation -
* Spacebar to toggle scroll movement* KeyUp / KeyDown to control scrolling speed and direction* Shortcut Markers for pre-defined Text Positions (Pro Version)* Keypad Left / Right to Cycle Shortcuts* Customizable Navigation Shortcuts with Keyboard and Mouse support* Run List provided to open files with a double click (Pro Version)* Support Normal / Mirrored Text on Both Monitors* Support Quarter Size Window for primary monitor scrolling* Support Resizable Small Window on the upper left corner on primary monitor

System Requirements
Processor : PowerPC/G4/G5 or Intel Macintosh 450 MHz or higher
Memory : 256 MB (minimum), 512 MB or higher (recommended)
Hard Disk : 5 MB (Installation files) and 100 MB or higher (cache operation)
VGA Card : 32 MB (minimum), 64 MB or higher (recommended)
Dual output VGA Card is optional (to use the Dual Monitor Output feature)
Operating System : Mac OS X Tiger (10.4.x), Mac OS X Leopard (10.5.x), Mac OS X Snow Leopard(10.6.x)

How to Install Locate the installation program and double click to run the program When the program starts, the welcome screen will appear :
Figure 1. Installation Welcome Screen
Press Continue button, and the Software License Agreement screen will appear :

Figure 2. Software License Agreement Screen
Press the Continue Button click the I Agree button, and the Select Destination screen will appear:
Figure 3. Select Destination Screen

You can change the Destination folder by clicking the Choose button. After you've finished clickthe Continue button, and the Confirmation screen will appear :
Figure 4. Confirmation Screen Press Install when you ready, or Press Go Back if you want to change the settings. Please waituntil the installation process has finished

Figure 5. Finish Up Screen
NOTE : Installation of Flip-Q Mac requires the administrative privileges (Administrator account)

How to Uninstall
Open the installation folder using Finder application, and locate the Flip-Q Mac application icon
Drag the icon into the Trash bin

Starting the application
You can start the Flip-Q Mac application by double clicking the application icon located in yourinstallation folder .
The Main Screen will appear like the following picture below :
Figure 6. Main Screen Window

Registering License
There are 3 different types of Licenses :
1. Demo Version License
The application will run with fully functional features, but as a restriction the program cannot open filesother than the default demo text file, cannot Cut and Paste text into the editing window, and cannottype text into the editing window.
2. Lite Version License
The application runs with the following restrictions :
Only allow black background and white text
Cannot edit text within the program
The Shortcut feature is disabled
The Run List feature is disabled
Run From the Selected Cursor feature is disabled
3. Pro Version License
The application runs with fully functional features without any restrictions.
To obtain the licenses, please refer to the Contact Us section at the end of this manual.
To enter your license for the application, click Help->Register, and the Register License window willappear :
Figure 7. Register License Window
Enter your User Name in the User Name text box
Enter your license in the Serial Number text box, and press Activate
After you have successfully entered the information, the program will contact the Flip-Q Mac server for

authentication and activate the application with features according to the version license that you havepurchased.
To use your license to run Flip-Q Mac on other computer, you must Deactivate your license first on thecurrent computer, and then you can Activate your license on the other computer.
For Limited Use Version of Flip-Q Mac (Lite or Pro), you can register your application offline :
Figure 8. Register License (Offline)
To obtain your license, please notify your Challenge Code to your vendor, and you will receive your UserName and Serial Number. Enter your User Name in the User Name text box and your Serial Number in theSerial Number text box and press OK. The system will remove the trial protection and you can continueusing your application.
Main Screen Description
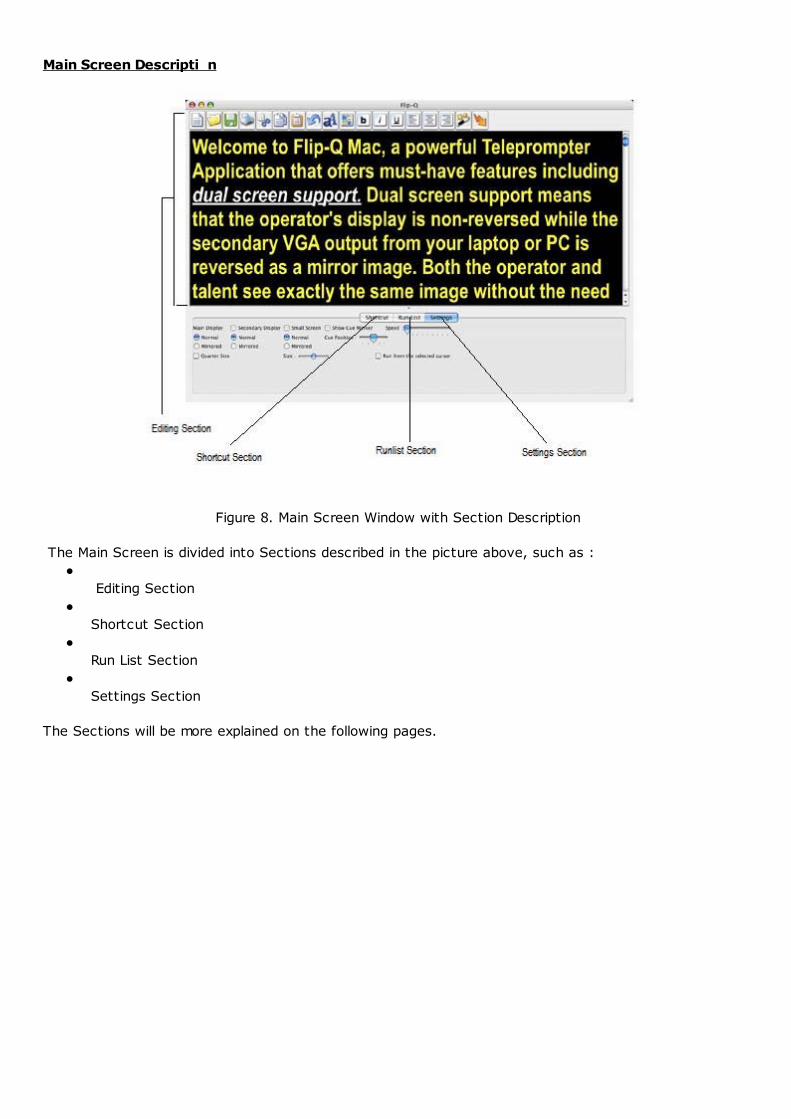
Figure 8. Main Screen Window with Section Description
The Main Screen is divided into Sections described in the picture above, such as :
Editing Section
Shortcut Section
Run List Section
Settings Section
The Sections will be more explained on the following pages.

Resizing Editing Section
The Editing Section on the Main Screen can be resized by following the procedure below :
Place the mouse cursor lower boundary of the Editing section
Left click the mouse and hold it while dragging the boundary to the desired position
Release the mouse button

Editing Section
The Editing Section is used for opening, saving and editing text files.
Figure 9. Editing Section
The following lists are the description of each buttons on the Tool bar and the items on the Menu bar.
New (Toolbar Button) or File->New (Menu bar) :
To create a new blank text file.
Open (Toolbar Button) or File->Open (Menu bar) :
To open existing text files. Supported file formats to be opened are plain text files (*.txt), RichText files(*.rtf), and Flip-Q Mac Document (*.fqdmac).
File->Open As White Text (Menu bar) :
To open existing text files like previous Open function, but the text color will be set to white on a blackbackground.
Save (Toolbar Button) or File->Save (Menu bar) :
To save texts to file. Currently supported file format to be saved are RichText files (*.rtf), and Flip-QMac Document (*.fqdmac).

Print(Toolbar Button) or File->Print (Menu bar) :
To print the texts to the default printer.
File->Settings (Menu bar) :
To change default Font name and Font size when opening a file as white text.
File->Action Assignment (Menu bar) :
To change default shortcuts in Prompter Navigation. Controllable Actions (with its default keys) are :Start / Stop Scrolling (Spacebar), Increase Scroll Speed (Up Arrow), Decrease Scroll Speed (DownArrow), Restart Scrolling (Home), Enter / Leave Scroll Mode (Escape), Next Shortcut (Right Arrow), andPrevious Shortcut (Left Arrow). You can change these actions using the provided mechanism, and assigneach of them with a single keystroke, multiple keystroke, mouse clicks, or mouse scroll wheel, dependingon your convenience. Multiple key sensitivity is provided for multiple keystroke detection. The higher thesensitivity, multiple keystrokes must be pressed quicker, and vice versa.
Format->Font->Bigger (Menu bar) :
This function will automatically increment 1 point font size for the currently edited text.
Format->Font->Smaller (Menu bar) :
This function will automatically decrement 1 point font size for the currently edited text.
Cut (Toolbar Button) or Edit->Cut (Menu bar) :
To cut selected text to clipboard.
Copy (Toolbar Button) or Edit->Copy (Menu bar) :
To copy selected text to clipboard.
Paste (Toolbar Button) or Edit->Paste (Menu bar) :
To paste the clipboard content on the screen.
Undo (Toolbar Button) or Edit-> Undo (Menu bar) :
To undo the last operation.
Edit->Select All (Menu bar) :
To select all texts from the screen.
Edit->Find (Menu bar) :
To open Find window to perform Find or Replace text operation.
Font (Toolbar Button) :

To open up Font window to select font types, styles (Bold, Italic, Underline), sizes, and text colors.
Back Color (Toolbar Button) :
To change the current screen's background color.
Bold (Toolbar Button) :
To toggle on / off Bold text style.
Italic (Toolbar Button) :
To toggle on / off Italic text style.
Underline (Toolbar Button) :
To toggle on / off Underline text style.
Left Alignment (Toolbar Button) :
To set the text to be left-aligned.
Centered (Toolbar Button) :
To set the text to be centered on the screen.
Right Alignment (Toolbar Button) :
To set the text to be right-aligned.
Note About Margin And Line Spacing Adjustment :
To set the left margins, right margins, and line spacing, click Format->Text->Show Ruler. This action willdisplay the standard Ruler section above the editing screen. In this Ruler section, you can change the leftmargin by dragging the left margin marker, or change the right margin by dragging the right marginmarker. For line spacing, you can select the desired line spacing from the Line Spacing dropdown box inthe Ruler section.
Load Demo (Toolbar Button) or press F7 (Keyboard shortcut) :
To open demo text file.
Go (Toolbar Button) or press F8 (Keyboard shortcut) :
To start the Prompter.
Help->Contents (Menu bar) :
To open up the User Manual Help File
Help->Register (Menu bar) :

To open up Register License window

Shortcut Section
The Shortcut Section is used to create, edit or delete shortcuts that can be used to jump to a specificline on the text while the Prompter is running.
Figure 10. Shortcut Section
To create a new shortcut :
Place the text cursor at the desired position on the line of the text that you wish to create theshortcut for
Press the Add button, and the Shortcut definition window will appear :
Figure 11. Shortcut Definition Window
Enter the name for this new shortcut
Enter the shortcut key that you want for this line (allowed keys are character A to Z, andnumbers 0 to 9)
Press OK to continue, or Cancel to cancel the operation
To edit an existing shortcut :
Select / highlight the shortcut that you wish to edit on the Shortcut List
Press the Edit button, and the Shortcut definition window will appear
Change the name or the Shortcut key
Press OK to continue, or Cancel to cancel the operation
To delete an existing shortcut :

Select / highlight the shortcut that you wish to delete on the the Shortcut List
Press the Delete button
Press Yes button to continue, or No button to cancel the operation
During prompting, you can press the shortcut keys that you have defined here to jump to the specifiedline of the text.

Run List Section
The Run List Section can be used to quickly open up multiple text files while in the Main Screen.
Figure 12. Run List Section
To add file to the Run List :
Press the Add button to open up Add Run List window
Figure 13. Add Run List Window
Browse and select the file that you wish to Add, and click OK to continue or click Cancel tocancel the operation
To edit an existing file on the Run List :
Select / highlight the file that you wish to change on the Run List
Press the Edit button, and the Run List Window will appear
Browse and select the file that you want to replace the slot that was occupied by the current file
Press Open to continue, or Cancel to cancel the operation
To remove a file from the Run List :
Select / Highlight the file that you wish to remove from the Run List
Press the Delete button
Press Yes to continue, or press No to cancel the operation
While in the Main Screen, you can double click a file from the Run List to quickly open the file to beedited or viewed on the Main Screen.


Settings Section
The Settings Sections can be used to customize Prompter settings such as speed, monitor settings, andother prompter settings.
Figure 14. General Area
Speed : can be used to change the speed of the scrolling text during prompting. Drag the slider to thedesired value to set the speed.
Show Cue Marker : checkmark this option if you want to show the text cue marker on the screen duringprompting. You can also set the marker position on the screen by dragging the position slider to thedesired value (High will set the marker on upper screen and Low on lower screen).
Run From the Selected Cursor : checkmark this option if you want to start scrolling from the textcursor position on the screen.
Main Display : Select the Normal Scroll option to scroll the text in normal mode, or select the MirrorScroll option to scroll the text in mirrored mode (the text is reversed)
Quarter Size : checkmark this option if you want to use a quarter sized screen on the main display.NOTE : This option can improve the prompter scrolling quality for slower machines.
Small Screen : checkmark this option if you want to use a small window located on the upper left corneron the primary display. The Small Screen size can be adjusted by dragging the Size slider, and the outputscroll can be adjusted to display Normal / Mirrored text by selecting Normal / Mirrored options.
Secondary Display : checkmark this option if you want to enable the secondary monitor as an outputto scroll the text during prompting. The system will warn you if it doesn't find the secondary monitorinstalled on the computer. Select the Normal Scroll option to scroll the text in normal mode, or select theMirror Scroll option to scroll the text in mirrored mode (the text is reversed)
NOTE : Secondary Display and Small Screen cannot be activated simultaneously.

Starting the Prompter
After all editing and configuration is finished, you can start the Prompter by pressing the Go button onthe Toolbar, or by pressing F8, or any key or mouse that has been assigned to Enter/Leave ScrollingMode with the Action Assignment feature (please see Action Assignment in Editing Section).

Navigation in Prompter
You can use the following keys or mouse clicks to navigate during prompting.
Key Up : Increase the speed downwards, or when scrolling upwards, it will decrease to a halt andcontinue to scroll downwards.
Key Down : Increase the speed upwards, or when scrolling downwards, it will decrease to a halt andcontinue to scroll upwards.
Key Left : Cycle to the previous shortcut.
Key Right : Cycle to the next shortcut.
Space Bar : Toggle the start or stop scrolling.
Keypad A to Z or 0 to 9 : Jump to the shortcut text lines (if Shortcuts defined)
Esc Key : Enter Scrolling Mode or Back to Main Screen.
To change the default shortcuts for navigationa please refer to Action Assignment Feature in Editing Section.
For more convenient navigation when scrollinga new navigation keys are recently addeda these are :
Command+Up : Jump to the beginning of the document
Command+Down : Jump to the end of the document
Command+Left : Jump to previous page
Command+Right : Jump to next page
Also, Multi-Touch Trackpad is supported for Two-Finger scrolling, place two finger on the trackpad andmove upwards to scroll up, or move downwards for scrolling down.

Closing the Application
To close the application, click File->Exit on the Menu bar, or click Close button on the Main Screenwindow.

Troubleshooting
Note : For best results set your resolution size to 640 x 480
Q : During prompting, why do I see wavy or rippling effect on the screen?
A : Please check that your computer specification has met the minimum requirements to run theapplication. If so and the problem still exists, try to increase your monitor Refresh Rate.
If your problems still exists, please contact us to obtain further assistance.