FIRST AID TO CULTURAL HERITAGE IN TIMES OF CRISIS · For coordinated emergency preparedness and...
103
2 Toolkit FIRST AID TO CULTURAL HERITAGE IN TIMES OF CRISIS International Centre for the Study of the Preservation and Restoration of Cultural Property
Transcript of FIRST AID TO CULTURAL HERITAGE IN TIMES OF CRISIS · For coordinated emergency preparedness and...

2Toolkit
FIRST AIDTO CULTURAL HERITAGE IN TIMES OF CRISIS
International Centre for the Study of the Preservation and Restoration of
Cultural Property

FIRST AID TO CULTURAL HERITAGE IN
TIMES OF CRISIS
2. Toolkit
For coordinated emergency preparedness and response to secure tangible and intangible heritage
Aparna Tandon
International Centre for the Study of the Preservation and Restoration of
Cultural Property

Published by the International Centre for the Study of the Preservation and Restoration of Cultural Property (ICCROM), Via di San Michele 13, 00153 Rome, Italy;
and by the Prince Claus Fund for Culture and Development, Herengracht 603, 1017 CE Amsterdam, the Netherlands;
in the framework of the ICCROM, Prince Claus Fund and Smithsonian Institution collaboration for developing capacity in emergency preparedness and response for cultural heritage.
© ICCROM 2018© Prince Claus Fund for Culture and Development 2018
ICCROM ISBN 978-92-9077-282-8Prince Claus Fund ISBN 978-90-822913-8-4
This publication is available in Open Access under the Attribution-NonCommercial-ShareAlike 4.0 International (CC BY-NC-SA 4.0) license (https://creativecommons.org/licenses/by-nc-sa/4.0/). By using the content of this publication, the users accept to be bound by the terms of use of any future ICCROM Open Access Repository.
The designations employed and the presentation of material throughout this publication do not imply the expression of any opinion whatsoever on the part of ICCROM and the Prince Claus Fund for Culture and Development concerning the legal status of any country, territory, city or area or of its authorities, or concerning the delimitation of its frontiers or boundaries.
The ideas and opinions expressed in this publication are those of the authors; they are not necessarily those of ICCROM and the Prince Claus Fund for Culture and Development and do not commit the Organizations.
CO-CREATIONPrincipal author and editor Aparna Tandon, ICCROM
SPECIFIC CONTENT CONTRIBUTIONSPost event, on-site damage Rohit Jigyasu, Eugénie Crété, and risk assessment Elke Selter Security and stabilisation Eugénie Crété, Xavier Romão, Esmeralda Paupério, Elke SelterCase examples María Cecilia Rodríguez Moreno, Eugénie Crété, Ihor Poshyvailo, Kyaw Myo Ko, Elke Selter, Valentina Spano, Layla SalihScientific review Jessica Doyle, Jonathan Eaton, Sonia GiovinazziResearch Jessica Doyle, Valentina SpanoInformation design Christopher Malapitan
COORDINATIONICCROM Catherine Antomarchi, Aparna Tandon, Jennifer Copithorne, Isabelle de Brisis & Isabelle VergerPrince Claus Fund Deborah Stolk
The printing of this publication has been made possible thanks to the generosity of the Principality of Monaco.

CONTENTS
Toolkit navigation 5
Post-event, on-site damage and risk assessment• Checklists 8 • Preparing a site plan and a base map 11• Characteristics of a useful assessment form 14 • Post-event damage and risk
assessment templates 15• Tips for collecting data on damage 26• Typical structural and non-structural damage 28 Security and stabilisation• Laying grids to map locations 39• Creating location codes 41• Assigning unique identification numbers 42• Documenting an evacuation 44 • Documenting a salvage operation 46• Tips for handling 48• Tips for packing 49• Common organic and inorganic materials 53• Triage and prioritising 55• Stabilisation of movable cultural heriatge 57• Materials and equipment for evacuation
and salvage 67• Temporary cover 73• Basic shoring 79• Tips for drying wet structures 92• Materials and equipment for the emergency
stabilisation of structures and buildings 93
References 97

5
Toolkit navigation
Please find below a few tips to help you navigate your way through this Toolkit.
BOOK TABSOn the top-right side of every page you will find interactive tabs which help you to jump to a desired section of the Toolkit.
HYPER LINKSBLUE and bold: Links to specific sections in the document.
TIPS: Experience-based advice.
CAUTION: Pay attention to avoid unforeseen threats or mistakes.
READ MORE: Further reading.

6 First Aid to Cultural Heritage in Times of Crisis | 2. Toolkit
CULTURAL HERITAGE FIRST AID ACTION FRAMEWORK
DOCUMENTATION RISK MANAGEMENT COMMUNICATION & COORDINATION
EARLYRECOVERY
SECURITY &STABILISATION
ON-SITEDAMAGE & RISKASSESSMENT
SITUATIONANALYSIS

DOCUMENTATION RISK MANAGEMENT COMMUNICATION & COORDINATION
EARLYRECOVERY
SECURITY &STABILISATION
ON-SITEDAMAGE & RISKASSESSMENT
SITUATIONANALYSIS
POST-EVENTON-SITE DAMAGE
ANDRISK ASSESSMENT
Youare
here

8 First Aid to Cultural Heritage in Times of Crisis | 2. Toolkit
On-site damage and risk assessment checklist
Personal safety should be the top priority when undertaking an on-site assessment in the affected area(s). Keep in mind the following tips before proceeding to the site:
Make sure that you have the necessary permissions to enter the site.
Make sure you have access to at least one means of communication, e.g. a mobile phone or VHF radio.
Keep a note of the phone numbers of the local police station, police control rooms, fire stations, ambulance services in case of an emergency.
Avoid dangerous situations and be aware that the aftermath of a disaster may include additional risks, such as aftershocks, landslides, lootings, etc.
Be aware of your surroundings and locate the nearest safe zone.
Keep calm and watch where you are walking.
Do not go on site without wearing the appropriate safety gear.
Do not wander around the site alone or without planning your route.
Road conditions may be very bad and access very limited. Plan your trip well and avoid driving after dark.

Post-event on-site damage and risk assessment 9
Prior to arrival on site, ensure you have the following equipment and supplies to commence on-site damage and risk assessment:
Personal protective equipment (see the complete list on the next page)
Damage and risk assessment forms
Camera, smartphone, or tablet to take photographs and record geo-coordinates, if permitted. In situations where neither camera nor cell phone are allowed, a sketchpad should be taken to the site to draw sketches and make notes.
Flashlight/torch with spare batteries
Measuring tape, range poles and dumpy level (if possible)
Navigational compass. There are also downloadable phone applications available that have a compass feature.
Crack-width gauge
Laser distance meter
Photo scale reference cards
Clipboards
Paper – blank and grid
Lead pencils and coloured pencils, to mark features on your maps. Avoid pens, as the ink will run if the forms get wet, and you will lose vital information.
Erasers, pencil sharpeners and rulers
Calculator (if possible)
Caution tape, ropes and signage
Bottled water and food
Telephone list of key personnel in charge during the emergency situation, e.g. security, fire station, ambulance, etc.
BC Housing. 2018. Rapid Damage Assessment. Burnaby, BC Housing. Available at: https://perma.cc/686P-5JFE

10 First Aid to Cultural Heritage in Times of Crisis | 2. Toolkit
Personal protective equipment checklist
Depending on the type of emergency and the site you are documenting, the following equipment should be obtained prior to arrival on site, to ensure the personal safety of all members of the team:
Hard hat
High-visibility jacket or vest
Full-length trousers and long-sleeved shirt
Closed footwear
Flashlight or torch with spare batteries
Whistle
Valved dust masks
Industrial safety gloves
Safety glasses
Personal first aid kit
Insect repellent (if available)
Hand sanitiser (if available)
Connecticut Technology Transfer Center. 2010. Protective Equipment for Workers in Hurricane Flood Response. Connecticut, School of Engineering, University of Connecticut. Available at: https://perma.cc/LG2T-FTDZ
Heritage Collections Council. 1998. reCollections: Caring for Collections Across Australia — Managing People. Canberra, Heritage Collections Council. Available at: https://perma.cc/RR45-BJDW

Post-event on-site damage and risk assessment 11
How to draw a site plan
Site and floor plans are useful for assessing and documenting damage. In case you do not have one of these, you can sketch a plan following these steps:
1 Walk around the affected site to get a sense of its proportions, axis of symmetry and global shape, in order to select a scale for your drawing. When determining the scale of your drawing, also consider including neighbouring elements on the map, such as relevant landmarks, areas of risk, etc.
2 Select a starting point (for example a corner of the structure) and mark it on grid paper.
3 You can now start to move around the building and to draw the plan wall by wall. You do not need to be very precise when drawing the plan, especially as you should not approach the damaged structure too closely at this stage of the assessment. If you do not have any measuring tools, you can use your foot stride as an approximate unit: one stride length is equal to approximately one metre.
4 Indicate the chosen scale and reference direction (for example, North or Qibla) on the map.
5 Indicate the access roads and the main entrances to the building or site. Indicate identified safe areas (if any) that could later be used for emergency stabilisation and storage, or to park a car for evacuation.
6 Do not forget to indicate surrounding elements that may endanger the building should those elements collapse.
7 In case of total collapse, involve people who work, or live, on the site. They may be able to help guide you if all other points of reference are unavailable.
Make sure that you mark damage and other observations on the site plan clearly enough so that you can still read them on a picture of your plan.

12 First Aid to Cultural Heritage in Times of Crisis | 2. Toolkit
Sample site map of City Palace, Udaipur, India, 2009. Photo: Rohit Jigyasu.

Post-event on-site damage and risk assessment 13
How to create a base map
A base map is needed when multiple sites are affected in an area. If there is no base map of the affected area available, a map can be prepared quickly, using a satellite image that shows the area/city/region, depending on the scale and nature of the event.
The base map should indicate north, and show the relevant structures, access roads and pathways, and jurisdiction boundaries.
If the disaster or crisis is widespread, affecting an entire region or city, a map at the appropriate scale should be created, indicating the location of all affected heritage sites. Each site should be allocated a unique identification number to be used for rapid assessment later.

14 First Aid to Cultural Heritage in Times of Crisis | 2. Toolkit
What are the most important characteristics for a useful post-event damage and
risk assessment form?
1 Concise and easy to complete. 2 Tailored to the local context and language.3 Standardised and suitable for movable, immovable and
intangible heritage in the affected area.
Discuss with the team the definitions of each category of damage and risk, so that the data recorded is consistent across the team. This is especially important for large teams, where multiple groups are recording data.
Although forms can be hazard- and heritage-specific, they should aid the carrying out of integrated damage and risk assessments. For example, if the primary hazard is an earthquake, related hazards such as fire and heavy rainfall (if applicable) should also be considered.
Include multiple-choice options, with the possibility to add qualitative data, where needed. Where relevant, collect information at various levels, which may also be subsets of each other, namely:1 Region/city/area level2 Site level3 Building level4 Collection/objects level
Building
Site
Region/city/area
Collection

Post-event on-site damage and risk assessment 15
On-site assessment and recording of damage and risks for immovable and movable cultural heritage
Template 1The following template outlines the levels and possible fields of information that may be considered when creating separate or integrated on-site damage and risk assessment forms for movable and immovable cultural heritage. In order to save time, some of the fields of information listed such as name, significance or ownership could be filled in off-site.You will need to tailor the information given to include typical heritage materials and techniques prevalent in your area. Moreover, as no two emergencies are alike, not all the information given in this template may be relevant to the effects of the particular hazard event that you are facing. For example, if in a given situation, heritage buildings have been damaged and the objects inside are intact, you could use this template to make an assessment form for heritage buildings and include only the most relevant levels and fields of information.If you choose to prepare integrated damage and risk assessment forms, ensure that the teams using such forms are multidisciplinary and have been given prior training to recognise damage and risks to both immovable and movable heritage.
1 Date(s) of assessment.2 Name(s) of assessor(s).3 Contact details of assessor(s).4 Where relevant, profession of assessor(s).
Level 1: Region/city/area (relevant in case of a region-wide disaster)1 Name of the city/area and its geo-coordinates.2 Description of the incident.3 Nature of the primary hazard (e.g. natural or man-made). Natural hazards: earthquake, hurricane, sandstorm, flood,
fire, etc. Man-made hazards: vandalism, arson, nuclear radiation, war/
military activity, etc.

16 First Aid to Cultural Heritage in Times of Crisis | 2. Toolkit
Level 2: Site (especially relevant if the affected area contains archaeological and other types of cultural heritage sites with various tangible and intangible elements)
1 Name of the site.2 Location of site with coordinates.3 Where relevant, use a key site map marked with location of
components in addition to the assessment form.4 Level of protection (e.g. international, national, local or
unprotected)?5 What is the degree of damage (e.g. minor, medium or severe)
at the site-level? Where is the damage located?6 Are there external debris and toxic waste on the site that
need to be cleared? 7 Does the site have safe and free work spaces for executing
security and stabilisation operations? Indicate their location on the site map. Also, record if there is a parking space available for medium and heavy duty vehicles on or next to the site.
8 Record losses.
Where possible and where data is available, record losses in terms of income, people, and/or infrastructure. Some aspects to consider:• Numbers of staff before and after the event.• Directly associated income-related activities, e.g. souvenir
vendors, craft industries, tourism-/hospitality-related businesses.
• Average number of visitors before and after event.

Post-event on-site damage and risk assessment 17
Level 3: Building Note: the questions and recommendations listed below are designed to assist the on-site assessment of a single building.
a Name of the building? b What is the building inventory number (if one already exists)? c If the building inventory number is not known, allocate a
reference number to the building.
2 Who owns the building (public, private or unknown)?3 What is it currently being used for, e.g. is it a commercial,
religious, or public (monument, library, museum, school, etc.) building?
4 What is the level of continuity of function: no disruption/total disruption/disruption at specific site, but continued elsewhere?
5 Have you gathered the following: a map of the site, pre-event photos, drawings and sketches of the building, in addition to the form?
6 Level of protection: international /national/local/unprotected?7 General information regarding the building:
a Do previous records of the building exist (e.g. floor plans, elevations, or records of previous interventions)?
b If yes, where are they located/who has the record(s)?c Does the previous documentation indicate the significance
(aesthetic, historical, cultural, religious, scientific and/or economic) of the damaged building?
d In the case of spiritual, religious or other intangible significance, are specific treatments, practices or actions required? If yes, please indicate which actions are required, and where the specific persons (religious leaders, community elders, etc.) who can carry out those actions can be found?
8 What is the level of damage: minor, moderate, severe or full collapse?
1

18 First Aid to Cultural Heritage in Times of Crisis | 2. Toolkit
9 Which materials have been used in the building, what construction system was used to build it, and where has the building suffered damage (e.g walls, roof, floor, or structural elements)?I WallII RoofIII Floor material IV Structural elements
10 Describe the critical non-structural damage that the building has suffered and mark the damage on the building floor plan.
Take photos of the different kinds of damage; note the relevant photo numbers on the floor plan.
11 List the immediate risks:
Primaryhazard
Secondary hazards
Immediate risk(potential impact on
safety/heritage values)
Vulnerability factors
(underlying causes)
Earthquake Aftershocks, fire 18th century wooden elements of the
building could catch fire;
displaced people living near the
building could lose their lives.
Poorly maintained electric wiring;
displaced people living close to the building are using electricity and gas.
12 Are there safe work spaces available next to the affected building(s), which could be used to implement emergency stabilisation of the building and store valuable objects and/or supplies?
13 Is there a need to clear debris from the site?14 Is there any space available for parking medium to heavy
duty vehicles next to affected building(s)?

Post-event on-site damage and risk assessment 19
15 List the immediate actions that need to be taken in order to secure and stabilise the building. If possible, also provide costs for the actions, in consultation with custodians and local experts.
Level 4: Objects/collections1 Where are the objects/collections located in the building?
Indicate floor and room numbers.2 Are the objects in their original or pre-event locations? If not,
indicate the new location on a floor plan or site map.3 General information regarding the collection:
a Do previous records of the collection exist (e.g. inventories, accession register, catalogues)? If yes, where are they located/who has the record(s)?
b Does the previous documentation indicate the significance (aesthetic, historical, cultural, religious, scientific and economic) of the damaged objects?
c In the case of spiritual, religious or other intangible significance of the objects, are specific treatments, practices or actions required? If yes, please indicate which actions are required and where specific persons (religious leaders, community elders, etc.) are required to execute those actions?
4 Record the types of damaged objects. Examples could include: paintings, coins, books, manuscripts, documents, photographs, audio tapes, video tapes, frescoes, mosaics, sculptures, etc.
5 How many objects do you estimate there to be? If the objects are piled up and it is difficult to estimate how many there are, take the dimensions of the pile (height, length and width); take a photo and note the reference number of the photo on the form, and on the floor plan or site map.

20 First Aid to Cultural Heritage in Times of Crisis | 2. Toolkit
6 a Record the type of damage:• Wet• Burned• Deformed• Broken • Torn • Cracks
• Mould • Pests • Soiled • Soot • Chemical deposit • Other (explain)
b Indicate the level of damage.
Level 1 (minor): the damage to the object is not increased when the object is handled (object can be moved and does not require careful handling). Level 2 (moderate): the damage to the object is not increased when it is calmly and carefully handled. However, if the object is subjected to handling or treatment that is too rough, there is a good chance that the damage will worsen. Level 3 (severe): even careful and painstaking handling of the object will result in aggravation of the existing damage. Take photos of the various kind of damage; note the reference numbers of the photos on the floor plan.
7 List immediate risks to objects/collections:
Primaryhazard
Secondary hazards
Immediate risk(potential impact on
safety/heritage values)
Vulnerability factors
(underlying causes)
Flood Mould Organic objects on the ground floor and in the
basement will be affected; mould
in the building will pose a threat to first responders
and staff.
Main access road to the site has
been damaged; the building is sealed: windows cannot
be opened,and there is no
electricity.

Post-event on-site damage and risk assessment 21
8 Are there safe spaces available nearby, which could be used to stabilise or store objects?
9 Is there a parking space available for medium and heavy duty vehicles on or next to the site containing affected objects?
10 List the immediate actions that need to be taken in order to secure and stabilise the collection/ objects. If possible, provide indicative costs for these actions; do this in discussion with custodians and local experts.

22 First Aid to Cultural Heritage in Times of Crisis | 2. Toolkit
On-site assessment and recording of damage and risks for intangible cultural heritage
Template 2
The following template outlines the levels and possible fields of information that must be considered when creating a form to undertake on-site and damage and risk assessment for intangible heritage. You may need to adapt the information given to include the typical intangible heritage prevalent in your area: this is to be done prior to a disaster. Nonetheless, as no two emergencies are alike, these templates may still need to be tailored to the nature of the particular hazard event that you are facing and its effects on intangible cultural heritage.
1 Date(s) of assessment. 2 Name(s) of assessor(s).3 Contact details of assessor(s).
Level 1: Region/city/area
1 Name of the city/area and its geo-coordinates.2 Description of the incident3 Nature of the primary hazard (e.g. natural or man-made). Natural hazards: earthquake, hurricane, sandstorm, flood, fire, etc. Man-made hazards: vandalism, arson, nuclear radiation, war/
military activity, etc.4 Location of site, with coordinates (where relevant).5 Key site map with location of components (where relevant).

Post-event on-site damage and risk assessment 23
Level 2: Element
1 Name/description of element.2 Type of element:
a. Oral traditions and expressions, including languageb. Performing artsc. Social practices, rituals and festive eventsd. Knowledge and practices concerning nature and the
universee. Traditional craftsmanship
The types of elements listed above comply with the 2003 UNESCO Convention for the Safeguarding of Intangible Heritage. While it may not always be easy to differentiate between these categories, it is recommended that, in the aftermath of an emergency, teams agree on their interpretation of the categories, and group the affected intangible cultural heritage accordingly. The main purpose of determining the type of element in question is to gain a better understanding of which kinds of intangible cultural heritage are (the most) affected. If relevant, teams may also wish to replace these categories with more locally relevant terms (e.g. festivals, masked dances, music, religious rituals).
3 Level of protection: international/national/local/unprotected?4 In the case of cultural industries, crafts, etc., please indicate
which of the following were affected: a. Raw materialsb. Production space, machinery, tools, stocks of products
or materialc. Staff, skilled labourd. Markets (sales and customers)e. Transmission of skills

24 First Aid to Cultural Heritage in Times of Crisis | 2. Toolkit
5 Description of effects: For each of the three levels, describe how the heritage has been affected. Please also consider elements of access and long-term transmission and continuation.a. Tangible assets: minor/moderate/severe?b. People: minor/moderate/severe?c. Knowledge and traditions: minor/moderate/severe?
Note on ‘damage levels’: The extent to which an element has been affected (minor, moderate or severe) will depend on the specific situation. Where possible, compare the severity level of the effects on different intangible cultural heritage of the same type (e.g. various festivals), or of intangible cultural heritage of different types (festivals, religious practices, crafts, etc.). The methodology should be agreed upon by the assessment team prior to undertaking the assessment, and may be further adjusted after the assessment, in discussion with the entire team. The main purpose of assessing damage levels is to gain an understanding of which types of intangible cultural heritage, or which specific intangible cultural heritage elements, have been more severely affected than others.
6 What is the level of continuity of function: no disruption/total disruption/disruption at specific site, but continued elsewhere?
7 Describe how the effects on the heritage element are affecting the community:Where possible (where data is available, or can be estimated), please add an estimated number or percentage of people/households (include relevant category) affected:a. Directly?b. Indirectly?

Post-event on-site damage and risk assessment 25
8 Which secondary hazards could affect the heritage element? List them, and also explain the likely impact they may have.
Primaryhazard
Secondary hazards
Immediate risk
(potential impact on safety/heritage
values)
Vulnerability factors
(underlying causes)
Earthquake Aftershocks, fire Lives of practitioners at risk; practice likely to be discontinued due to
social upheaval.
Inadequate housing; lack of insurance or indemnity coverage.

26 First Aid to Cultural Heritage in Times of Crisis | 2. Toolkit
Tips for collecting data on damage
• Only critical damage should be recorded during the emergency phase. Time should not be wasted recording slow and progressive deterioration processes and risks: this can wait until the situation is more suitable for conducting detailed assessments.
• When assessing damage and risks to intangible heritage, you could start by assessing associated tangible elements (buildings, tools, costumes, etc.) and people. For example, if handicrafts are affected, assess the damage to the craft products, the equipment and tools used, the raw materials needed, and the work places. At the same time, try to understand how the craftspeople themselves have been impacted.
• Avoid taking too many photographs of the same damage or location, as this complicates the compilation of data. Instead, make sure to have a few good quality wide-shot photographs and take associated detailed photographs, where relevant.
• Collect data as objectively as possible, based on visual observations and interviews.
• Try not to offer interpretations or analysis unless you have the necessary qualifications to do so.
• Be consistent in the way that you collect data, and collect data in a format that can easily be reproduced. Combine this data with interviews.
• Make sure that you collect more than just numbers. It is also important to talk to people – especially stakeholders, such as site managers, local communities and local authorities.
• Data should be easy to read and interpret.
• Look carefully: valuable information could be hidden in debris.
• In order to protect against data loss, collect data through multiple means, such as assessment forms, written notes, sketches and photographs, and technological tools.

Post-event on-site damage and risk assessment 27
• Data on cultural heritage damage can often be sensitive and, at times, a source of conflict. Take measures to secure the data that you collect (e.g. using an encrypted hard drive), and release it only to relevant authorities.

28 First Aid to Cultural Heritage in Times of Crisis | 2. Toolkit
Typical structural and non-structural damage caused to buildings and structures
Listed below are some typical structural and non-structural damage caused to heritage buildings and structures by various hazard events such as earthquakes, hurricanes, fire and flooding.
This note lists typical forms of damage caused by various hazards to the following types of structures and materials. It is however not an exhaustive list. Keep in mind that typical damage listed for a particular type of construction may also occur in another type of construction. This also depends on the path that the hazard follows. For example, fire damage in a building will depend on where the fire occurs.
• stone masonry structure with load-bearing walls and gable roof
• a timber frame structure• an adobe structure with load-bearing walls, vaults and domes
Damaged heritage structures that remain standing could collapse at any time. Therefore, seek the help of a structural engineer or an architect who has understanding of the collapse mechanisms for heritage buildings and construction types in your area.

Post-event on-site damage and risk assessment 29
Stone masonry structure with load-bearing walls, a timber frame and a gable roof Hazard: Earthquake, hurricane
1
4
3
2
5
6
78
9
10
1 Damage at connection between vertical and horizontal structures: displacement of the roof and/or wall could weaken connections between the two, resulting in cracks in the wall.
2 Roof damage: this happens when shingles or other roofing materials are not securely attached and cannot resist upward sucking forces such as those caused by hurricane. In extreme cases, the roof sheathing can be blown off.
3 Wall-bulging: when two leaves of a wall are not well-connected, the walls will bulge easily when submitted to out-of-plane lateral forces.
4 Diagonal cracks: these are typical cracks, caused by the low resistance of masonry walls to the shear stress induced by in-plane lateral forces. They usually occur at the least resistant part of a wall.
5 Wall bowing: when one wall is tightly fixed to another wall, it can bow when submitted to out-of-plane lateral forces.

30 First Aid to Cultural Heritage in Times of Crisis | 2. Toolkit
6 Corner cracks: these result from the concentration of stress, caused by the difference in rigidity between the wings of an L-, T-, or C-shaped building, when submitted to a lateral force.
7 Façade disconnection: this form of damage is normally evidenced by cracks in the building’s corners, which appear on each floor and increase from the bottom to the top of the building, or appear as cracks on internal walls and floors near the façade.
8 Collapse of a gable-end wall: a gable-end wall has the highest height-to-thickness ratio, and is usually only loosely connected to the roof. Gable-end walls collapse easily when submitted to out-of-plane lateral forces.
9 Doors coming off their hinges: wooden doors or shutters may come off their hinges, especially if they were open at the time of the disaster.
10 Soft storey collapse: when a level or storey has different rigidity / stiffness in comparison with the level just above, for example, when it has large openings in its façade, it can collapse easily when subjected to horizontal forces.

Post-event on-site damage and risk assessment 31
Adobe structure with load-bearing walls, vaults and domes
Hazard: Earthquake, hurricane
1 Partial arch collapse: uplift of an arch may dislodge key elements and break the continuity of the arch. As the remaining masonry elements are corbelled, they can easily collapse. This phenomenon is all the more dangerous as arches often also act as buttresses for other elements.
2 Vertical slight cracks at the base of a dome: due to the short duration of the hazard event, in which tension forces increase; these cracks are not dangerous, so long as the abutment walls are stable. Domes are usually very resistant to lateral forces.
3 Buttress collapse: if the connection between the wall and the buttress is not strong enough, the buttress will collapse and no longer prevent the wall from overturning.
4 Diagonal cracks without disconnections: these cracks weaken the structure, but are not dangerous as long as there is no disconnection between load-bearing elements.
5 Slight longitudinal vault crack: such cracks weaken the vault, but do not threaten the vault with immediate collapse, as long as the abutment walls, or adjacent vaults are stable.
6 Cracks in the vault: the collapse of an abutment wall induces tensions which cause longitudinal cracks in the vault, and eventually its collapse. Vaulted basements are usually very resistant to lateral forces as their abutment walls are strong.
6 1
34
2
5
7
8

32 First Aid to Cultural Heritage in Times of Crisis | 2. Toolkit
7 Collapse roof beams: when a load-bearing walls moves outwards, the roof beams resting on the wall can sag and collapse, as the area of wall on which the beams rest is reduced. It translates to loss of support for the roof beams.
8 Horizontal cracks: these appear at the interface between different materials. They are not critical unless a part of the wall shows out of plane movement.

Post-event on-site damage and risk assessment 33
Timber-framed structure
Hazard: Earthquake, hurricane
1 Roof uplift: when strong winds hit a façade, they can lift the roof above. Porch roofs are especially vulnerable, as the exposed surface of the roof is significant. Unattached elements become dangerous projectiles and the gaps they leave behind allow water to enter the building.
2 Chimney collapse: chimneys are especially vulnerable to major lateral forces, given their size, shape, position and number. This type of failure can also happen to a stone masonry structure.
3 Collapse of the infill wall: if the walls are well-braced, they should not be affected by lateral forces. However, the infill wall will collapse easily if it is not securely attached to the main structure.
4 Material projectiles: storm winds and bomb blasts cause elements (especially doors and windows) to break and move; they can transform into dangerous projectiles.
5 Liquefaction-induced settlement of foundation: a phenomenon in which the strength and stiffness of saturated soils are greatly reduced due to earthquake-shaking. The soil is therefore no longer able to support the building foundations and can cause significant damage.
6 Wrenching off of annex: major lateral forces may wrench a building from its foundations, especially in the case of a raised building on a cripple wall.
7 Collapse of surrounding tall elements: trees or poles in the vicinity of a heritage building could fall onto the building, causing damage to the roof or other parts.
1
2
34
5
6
7

34 First Aid to Cultural Heritage in Times of Crisis | 2. Toolkit
Stone masonry structure with load-bearing walls, a timber framework and a gable roof
Hazard: Flood, fire
1 Roof collapse: fire causes timber to lose its resistance to force. If the framework is damaged, the roof will collapse, and may also pull down that part of the wall on which it was resting.
2 Collapse of iron and steel lintel: iron and steel beams start to lose bearing capacity when exposed to intense heat (300°C). In the case of heavy loads, for example, where they act as lintel, they will distort and no longer be able to fulfil their structural role. This may result in partial collapse of the masonry above.
3 Wooden lintel collapse: the masonry above wooden lintels will slow down the burning rate of the wood, and this may allow enough of the wood to be preserved to withstand its burden. If not, it may result in the partial collapse of the masonry above it.
4 Walls overturning: if walls are no longer connected by means of the roof or floors, they can overturn more easily, and must therefore be considered weak in the face of lateral forces.
5 Partial collapse due to heavy floating debris: weak structural parts at the corners of the building are most likely to suffer from the impact of heavy floating debris, or fast-flowing water. The connections between walls are weakened and bracing must be restored. Overhanging masonry needs to be shored up.
1
23
4
5 6 7
8

Post-event on-site damage and risk assessment 35
6 Mud deposits: mud deposits delay drying and may create a health hazard, as the mud may support the growth of mould and bacteria. The mud is also likely to stain the stone walls. It must therefore be removed as soon as possible.
7 Expansion of iron and steel beams:in the event of a fire, iron and steel beams tend to expand substantially. This expansion causes cracks in the surrounding masonry, and can result in the bending of thin walls. As long as they are not heavily loaded, these beams usually return to their previous shape after cooling and recover most of their strength.
8 Fire and flood usually damage supply for electricity, water, and gas. Even if the supply is uninterrupted, it is highly recommended to switch off all gas and electrical appliances as they may have been damaged, and to not use water as it may be polluted.
36 First Aid to Cultural Heritage in Times of Crisis | 2. Toolkit
Adobe structure with load-bearing walls, vaults and domes
Hazard: Flood, fire
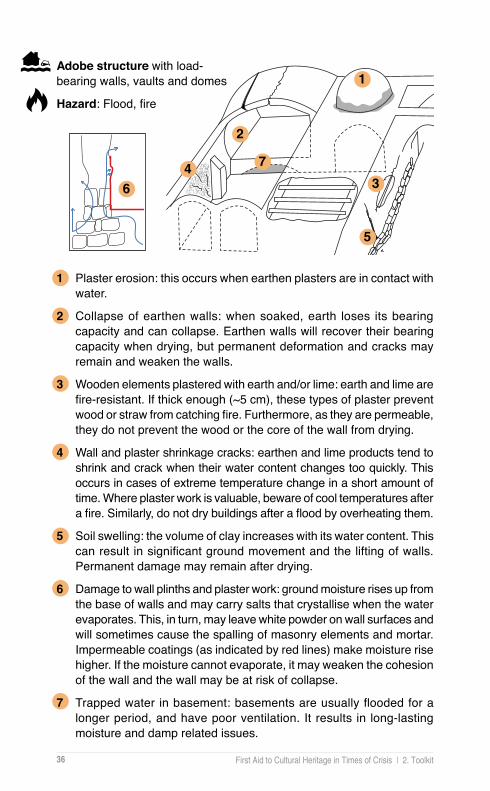
1 Plaster erosion: this occurs when earthen plasters are in contact with water.
2 Collapse of earthen walls: when soaked, earth loses its bearing capacity and can collapse. Earthen walls will recover their bearing capacity when drying, but permanent deformation and cracks may remain and weaken the walls.
3 Wooden elements plastered with earth and/or lime: earth and lime are fire-resistant. If thick enough (~5 cm), these types of plaster prevent wood or straw from catching fire. Furthermore, as they are permeable, they do not prevent the wood or the core of the wall from drying.
4 Wall and plaster shrinkage cracks: earthen and lime products tend to shrink and crack when their water content changes too quickly. This occurs in cases of extreme temperature change in a short amount of time. Where plaster work is valuable, beware of cool temperatures after a fire. Similarly, do not dry buildings after a flood by overheating them.
5 Soil swelling: the volume of clay increases with its water content. This can result in significant ground movement and the lifting of walls. Permanent damage may remain after drying.
6 Damage to wall plinths and plaster work: ground moisture rises up from the base of walls and may carry salts that crystallise when the water evaporates. This, in turn, may leave white powder on wall surfaces and will sometimes cause the spalling of masonry elements and mortar. Impermeable coatings (as indicated by red lines) make moisture rise higher. If the moisture cannot evaporate, it may weaken the cohesion of the wall and the wall may be at risk of collapse.
7 Trapped water in basement: basements are usually flooded for a longer period, and have poor ventilation. It results in long-lasting moisture and damp related issues.
6
1
2
34
5
7

Post-event on-site damage and risk assessment 37
Timber-framed structure
Hazard: Flood, fire
1 Destruction of thin timber pieces: thin timber pieces that have structural functions, for example outriggers used to fix roof sheathing, timber flooring, or cladding planks burn easily in the event of a fire.
2 Alligatoring of timber framework: when fire occurs, timber beams start to burn, their outer layers turn to charcoal and the surface develops a coarse checking pattern. This protects the beam core from damage. Traditional timber frameworks are usually oversized. The beam core can therefore usually continue to support the weight of the roof, even if fire has affected the beams. Joints burn faster than beams, however, as they have lower section surfaces and contain metal components.
3 Distortion of thin wooden elements: thin wooden elements, like floors, doors or panelling, may warp or twist when soaked. They should recover their shape when drying, except if they dry too quickly. Wood that dries within a few weeks is unlikely to rot.
4 Weakening of wooden floors: wooden elements are at risk of becoming seriously weakened in cases where they remain covered by wet carpets and/or mud for a few days or more.
5 Compaction and deep scouring of soil: some soils compact after floodwater recedes, causing irregular settlement. Furthermore, fast-flowing water may result in deep scouring that exposes or undermines foundations. It will cause major damage to timber-framed houses with foundations that are not deep or strong enough.
6 Collapse due to water force: this may happen if the building is resting on a cripple wall that is not well attached to strong foundations.
1
2
3
4
5
6

DOCUMENTATION RISK MANAGEMENT COMMUNICATION & COORDINATION
EARLYRECOVERY
SECURITY &STABILISATION
ON-SITEDAMAGE & RISKASSESSMENT
SITUATIONANALYSIS
SECURITY AND
STABILISATION
Youare
here

Security and stabilisation 39
How to lay grids to map the locations of objects and fragments
1 To create a grid, first take into account the size, shape and accessibility of the area from which you have to retrieve objects or historical building fragments. By laying a grid you can identify the precise location of each fragment, which helps in reintegrating original materials during full conservation.
2 Depending on the size of the area that you are preparing to salvage, create the grid by measuring the length and width of the area and dividing it into evenly-sized squares. In order to remove large fragments or bricks of a historic masonry structure, you can divide the area you need to clean into 5 x 5 m squares.
3 To retrieve highly-fragmented decorated surfaces, use smaller grids (see photograph).
4 A grid can be set up with thin ropes and secured using small metal or wooden stakes. Alternatively, use heavy stones to affix the ropes to the ground. Make sure the ropes are highly visible to prevent tripping.
5 Name each square alphanumerically and label them using sticky labels and waterproof markers.
Grid for retrieving small fragments of stucco decorations at a pagoda in Bagan, Maynmar, 2016. Photo: ICCROM.

40 First Aid to Cultural Heritage in Times of Crisis | 2. Toolkit
6 Once you have created your grids, locate and mark them on a floor map. Make sure you indicate a reference direction (such as North) and the main access points to the site. Indicate the location of each grid, its name, and the alphanumeric code of the cells.
If a site is flooded, or you have limited time on site, divide the site into broad sections such as A, B or 1, 2, and demarcate them on a site map indicating North and South.
An example of how to label a grid alphanumerically
A1 A2 A3
B1 B2 B3
C1 C2 C3
A sample sketch mapping the location of different grids, Myanmar, 2016. Photo: E. Crété.

Security and stabilisation 41
E D C B A
E D C B A
6
5
4
3
2
1
6
5
4
3
2
1Around1m
How to create relocation codes in a temporary storage
A simple way to prepare a consistent location code system in a temporary storage, which has no furniture, is to draw a grid on the floor with paint, adhesive tape or ropes.To begin with, divide the floor space into squares of a suitable unit length, e.g. 1 m x 1 m. Use letters and figures to differentiate between rows and columns. Use labels on the wall to record them.
Extracted from: Tandon, A. 2016. Endangered Heritage: Emergency Evacuation of Heritage Collections. Paris, UNESCO & Rome, ICCROM. Available at: https://perma.cc/7J4C-TJDK

42 First Aid to Cultural Heritage in Times of Crisis | 2. Toolkit
How to create location codes andidentification numbers?
To create a location code, use a combination of letters and numbers to identify grids/spaces at a site or rooms and floors in a building. For example, the location code of an object evacuated from Room 17 on the Ground floor of Building 1 of National Museum could be recorded as such:
NM1-G-17-2 NM - National Museum 1 - Building number G - Ground floor 17 - Room 17 2 - Cabinet number
Similarly, the location code of an object salvaged from section A1 of grid number 1 at a site called National Park could be recorded as:
NP-1-A1 NP- National Park 1- Grid number A1- Grid section
Generally, such numbering systems move from identifying the site where the object is located to pinpointing its specific location. Where relevant, assign numbers and letters to identify site, spaces/buildings, floors, rooms and display cases. It is important to ensure that the numbering system is consistent throughout and is understood by all personnel involved in an evacuation or a salvage operation.

Security and stabilisation 43
How to create a unique identification number andlink it with location code?
Before moving an object, give it a unique identification number so that you can track its movement during a salvage or an evacuation operation. The unique identification number together with the location code helps to identify the object and its original location during a salvage or an evacuation operation.The unique identification number is different from the location code, as it identifies each individual object within a given location. Ensure that the numbering system developed for evacuation or salvage purposes is simple, uniform and understood by all involved. It could be simply a system of numbers in ascending order (e.g. 01, 02), or a combination of letters and a number (e.g. A01, A02).
NM1-G-17-2_01 NM - National Museum 1 - Building number G - Ground floor 17 - Room 17 2 - Cabinet 01 - Unique object number
If salvaged from a grid, the unique object number with location code could be recorded as:
NP-1-A1-01 NP- National Park 1- Grid number A1- Grid section 01- Unique object number
If you have limited time at a site and previous documentation identifying rooms and shelves is not available, simplify the location code by dividing the building in broad sections e.g. A, B, C. Record the sections on a sketch plan of the building. If a building has multiple floors, add floor numbers to the individual letters, e.g. A0 for the ground floor and A1 for the first floor, etc.
Unique object IDLocation code
Unique Object IDLocation code

44 First Aid to Cultural Heritage in Times of Crisis | 2. Toolkit
Entry number
Previous number
Assigned
number
Type of object
MaterialsDimensions:
length, width, height
WeightOriginal
codeplan reference
numberplan reference
number
In ascending numerical order, from 1 to the last object moved, it indicates the number of objects evacuated.
to record the unique
number assigned to the object for the purpose
Object type: use
describe the object e.g. illustrated manuscript, sculpture, vessel, etc.
What the object is made of e.g. glass, ceramic, metal,
List the original
of the object.
All pictures
plans should have a reference number.
completed and objects are moved into their
Fill in the weight of the object. If a weighing scale is not available, use symbols such as + to indicate the weight. For example, if an object can be easily handled and moved by one person use +;
++ and +++, if special equipment is required for
Documenting evacuation
Use the template illustrated below to prepare an inventory for the purpose of evacuation. it will help you to number and track objects until they are moved to a safe temporary storage space.

Security and stabilisation 45
Entry number
Previous number
Assigned
number
Type of object
MaterialsDimensions:
length, width, height
WeightOriginal
codeplan reference
numberplan reference
number
In ascending numerical order, from 1 to the last object moved, it indicates the number of objects evacuated.
to record the unique
number assigned to the object for the purpose
Object type: use
describe the object e.g. illustrated manuscript, sculpture, vessel, etc.
What the object is made of e.g. glass, ceramic, metal,
List the original
of the object.
All pictures
plans should have a reference number.
completed and objects are moved into their
Fill in the weight of the object. If a weighing scale is not available, use symbols such as + to indicate the weight. For example, if an object can be easily handled and moved by one person use +;
++ and +++, if special equipment is required for

46 First Aid to Cultural Heritage in Times of Crisis | 2. Toolkit
Documenting salvage
llustrated below is a form that helps to record the original location of the objects salvaged, their unique identification numbers, their condition, treatment given for their stabilisation, and their final relocation code.
Entry number Original location Assigned identificationnumber
Owner/Institution Originallocation code
Type ofobject
Materials Weight Photo or drawingreference number
Type of damage Treatment given(to be filled in
duringstabilisation)
Stabilisationtreatmentgiven by
Moved by Date Relocation codeDimensions: length,width and height
Previousnumbers
In ascending numerical order, from the first to last object moved, it indicates the number of objects salvaged.
This field indicates the unique identification number assigned to the object.
This field indicates the original location code of the object salvaged. The original location code may refer to a grid number or a combination of shelf, room and floor numbers, depending on the system adopted for assigning location codes.
The 'Type of object' field is used to describe the object briefly.
What the object is made of, e.g. glass, ceramic, metal, textile, etc.
Fill in the weight of the object. If a weighing scale is not available, use symbols, e.g, use + to indicate one person can move the object, ++ to indicate two people are required to move the object, and +++ to indicate more than one person and specialised equipment will be required to move the object.
‘Photo or drawing reference number’ refers to the photo/drawing of the object. If there is not sufficient time to take photos of the individual objects at the site, take photos of a group of objects with their identification numbers. Record the number of the photo.This field can be filled in at the triage stage or at the site of temporary storage, depending on the amount of time available.
‘Type of damage’ briefly indicates the physical condition of the object and the type, as well as extent, of damage it has suffered.
This field describes the type of stabilsation treatment given to the object. For example, a wet and soiled object may have to be rinsed before transfer to the new temporary storage. Such treatments, have to be given by conservators and trained cultural first aiders.
This field indicates the relocation code assigned to an object once it is moved to the new temporary storage. This field is to be filled in once all the objects have been relocated.
1 RETRIEVAL 3 PACK AND RELOCATE2a TRIAGE & STABILISATION 2b TRIAGE & STABILISATION

Security and stabilisation 47
Entry number Original location Assigned identificationnumber
Owner/Institution Originallocation code
Type ofobject
Materials Weight Photo or drawingreference number
Type of damage Treatment given(to be filled in
duringstabilisation)
Stabilisationtreatmentgiven by
Moved by Date Relocation codeDimensions: length,width and height
Previousnumbers
In ascending numerical order, from the first to last object moved, it indicates the number of objects salvaged.
This field indicates the unique identification number assigned to the object.
This field indicates the original location code of the object salvaged. The original location code may refer to a grid number or a combination of shelf, room and floor numbers, depending on the system adopted for assigning location codes.
The 'Type of object' field is used to describe the object briefly.
What the object is made of, e.g. glass, ceramic, metal, textile, etc.
Fill in the weight of the object. If a weighing scale is not available, use symbols, e.g, use + to indicate one person can move the object, ++ to indicate two people are required to move the object, and +++ to indicate more than one person and specialised equipment will be required to move the object.
‘Photo or drawing reference number’ refers to the photo/drawing of the object. If there is not sufficient time to take photos of the individual objects at the site, take photos of a group of objects with their identification numbers. Record the number of the photo.This field can be filled in at the triage stage or at the site of temporary storage, depending on the amount of time available.
‘Type of damage’ briefly indicates the physical condition of the object and the type, as well as extent, of damage it has suffered.
This field describes the type of stabilsation treatment given to the object. For example, a wet and soiled object may have to be rinsed before transfer to the new temporary storage. Such treatments, have to be given by conservators and trained cultural first aiders.
This field indicates the relocation code assigned to an object once it is moved to the new temporary storage. This field is to be filled in once all the objects have been relocated.
1 RETRIEVAL 3 PACK AND RELOCATE2a TRIAGE & STABILISATION 2b TRIAGE & STABILISATION

48 First Aid to Cultural Heritage in Times of Crisis | 2. Toolkit
A guide to handling cultural heritage objects
1 Use nitrile or vinyl gloves to handle objects that are dusty or contaminated. Make sure your gloves are the right size and fit your hands; otherwise you may inadvertently drop or cause damage to the object.
2 Change your gloves when they get too dirty, to avoid cross-contamination of dirt.
3 Wear a dust mask if handling dusty or dirty objects.4 Remove jewellery and accessories that may become entangled
or scratch the object.5 Before transporting objects from one place to another, identify
a clear path and ensure there are no obstacles. 6 Always use two hands to hold an object. To ensure that the
weight of the object is balanced, place one hand underneath the object and use the other hand to support the body of the object.
7 Do not carry objects by their handles, spouts, or other fragile or protruding elements.
8 To avoid accidents or breakage, do not carry too many objects at the same time.
9 Where possible, use containers, boxes or trays to move objects. For transporting objects over a distance, use a trolley if available.
10 For heavy or oversized objects, at least two people are needed to transport the object safely.
Tandon, A. 2016. Endangered Heritage: Emergency Evacuation of Heritage Collections. Paris, UNESCO & Rome, ICCROM. Available at: https://perma.cc/7J4C-TJDK
Heritage Collections Council. 1998f. reCollections, Caring for Collections Across Australia — Handling, Transportation, Storage and Display. Canberra, Heritage Collections Council. Available at: https://perma.cc/5XRJ-U9R3

Security and stabilisation 49
A guide for packing cultural heritage objects
1 Incorrect packing can cause lasting physical damage to cultural objects, as they are normally fragile due to their age or past usage. For this reason, it is important to consider the following when packing such objects for an emergency evacuation:
Objects packed for relocation to a temporary storage at the National Museum of Nepal, Kathmandu, 2016. Photo: Aparna Tandon, 1CCROM.
• The packing materials used should protect the surface of the object and reduce exposure to shock, vibrations, dust and other pollutants, and to sudden fluctuations in the outside environment.
• To avoid strain or deformation, materials used for packing should conform to the shape and size of the object.
• It should be easy to identify the object within its package. This will help to minimise its handling.
2 To choose the right packing materials, it is important to identify the materials that the objects to be packed are made from. For example, when packing paper-based objects or textiles, ensure that they are not placed in a container that might release acidic vapours (e.g. anything made from fresh wood or plywood).
3 From the materials available, choose the best quality ones to place in direct contact with the object. Generally, unstarched cotton or undyed muslin can be safely used for wrapping most organic and inorganic materials.
4 While gathering materials for packing, try to choose materials that you can use for different purposes. This will help to cut costs and ensure the efficient use of resources.

50 First Aid to Cultural Heritage in Times of Crisis | 2. Toolkit
5 To pack objects, select boxes that have lids and are sturdy enough to be stacked under other boxes.
6 If you are using a second-hand box or container, ensure that no contaminants have been left inside, such as remnants of vegetables, pests or chemicals.
A wooden box lined with unstrached and non-dyed cotton in order to provide safe housing environment for textiles wrapped in muslin, Nepal, 2016. Photo: Aparna Tandon, ICCROM.
7 Pack objects made of similar materials together. Use partitions or cushioning materials to prevent contact between objects.
8 Do not put lightweight and heavy objects in the same carrying box/crate, as heavy objects can fall onto the light ones and cause stress or breakages.
9 Once you have placed the object(s) in a crate or a box, fill the voids with cushioning materials to prevent displacement of the object(s) and absorb shocks.
10 To pack valuable documents, or works of art on paper or papyrus, use flat boxes. Alternatively, wrap the object in good-quality paper, such as paper made from cotton rags, and then place it between two rigid supports.

Security and stabilisation 51
Uniforms and other garments laid flat on rigid supports, Nepal, 2016. Photo: Aparna Tandon, ICCROM.
11 To pack more than one paper-based item, use good-quality blank paper sheets to separate individual items. This will help to reduce the risk of ink or colour transfer from one object to another.
12 To retain the shape and structure of a book, wrap it in good-quality paper, and then place it with the spine facing the bottom of a container.
13 To pack a large and unframed work of art on paper or textile, use an archival-quality picture tube and roll the work of art face-out onto the tube. Finally, cover the roll with muslin or good-quality hand-made paper. If an archival-quality tube is not available, use a thick-walled cardboard tube and wrap muslin or good-quality paper around it before rolling the artwork onto it. Make sure that the diameter of the tube is large, as this will help to reduce the risk of damage due to creasing.
14 Pack fragile objects made of materials such as terracotta, glass or ceramic in separate plastic bags before placing them into one big container. Use cushioning and/or partition materials to prevent contact with other objects and avoid damage due to abrasion.
15 To ensure correct packing under emergency conditions, work in an assembly line. Assign one person to wrap, another to prepare the container, and another person to label the object with its unique identification number and place it in the prepared container.

52 First Aid to Cultural Heritage in Times of Crisis | 2. Toolkit
16 Ensure that all of the boxes have labels that indicate the number and type of objects contained inside them.
17 In order to avoid the incorrect handling of boxes containing heritage objects, mark them with the commonly-used signs: ‘fragile’, ‘top/bottom’, ‘handle with care’, ‘this way up’ and ‘keep dry’.
Extracted from: Tandon, A. 2016. Endangered Heritage: Emergency Evacuation of Heritage Collections. Paris and Rome, UNESCO and ICCROM.Available at: https://perma.cc/7J4C-TJDK

Security and stabilisation 53
Organic and inorganic materials
Materials are classified as either organic or inorganic. Organic materials are created through the life processes of plants and animals. Inorganic materials are materials which generally have not been created through the process of life. Another way of thinking about this is that materials originate from animal, vegetable (the organic) and mineral (inorganic) sources. Exceptions include shells and tooth enamel.
Organic materials include: skin, leather, hair, silk, horn ivory, tortoiseshell and bone, which originate from animal life; and wood, wood fibres (linen, bast fibres and cotton) paper and rubber, which originate from plant life. Plastics are generally considered organic materials.
They are manufactured from materials with their origins in both plant and animal life.Organic materials have all the following characteristics:• their chemical composition is based on carbon chains;• if heated, they burn at room temperature;• they are sensitive to light;• they are subject to attack by micro-organisms and insects;• they exchange (absorb and desorb) water vapour with the
atmosphere;
Inorganic materials include: metals, stone, glass, ceramics, shell (shell is an inorganic material, even though it is created through the process of life).Inorganic materials have all the following characteristics:• they are not made up of carbon chains;• they do not burn at normal ambient temperatures;• they are not usually sensitive to light;• they are not subject to attack by insects;• they cannot provide nourishment for micro-organisms;

54 First Aid to Cultural Heritage in Times of Crisis | 2. Toolkit
Generally, organic materials are warmer to the touch, more supple and less dense than inorganic materials, while inorganic materials tend to be harder and more brittle. Each of us has had many years of broad-ranging experience in recognising materials, from our interaction with them in our daily lives. By carefully examining and handling an object, we can usually recognise the basic material the object is made from. Each material has a distinctive combination of qualities, such as colour, lustre, rigidity (or flexibility), texture, smell and weight, which we recognise.
Extracted from: McCord, M., & Stone, T. 2002. Deterioration of Collections. Generation 2: Education and Support Materials. ICCROM unpublished material. Rome.
Canadian Conservation Institute. 2017. Care of Objects and Collections. Ottawa, Minister of Public Works and Government. Available at: https://perma.cc/ZDG8-Y4UU

Security and stabilisation 55
How to undertake triage or prioritise heritage objects when their significance is unknown and previous
documentation is unavailable?
When the value of a cultural heritage object cannot be identified through existing documentation, it is important to establish criteria in order to prioritise evacuation, stabilisation, storage, security, and the future treatment of cultural heritage materials effectively.
Consider the following:
• What is the importance of the cultural heritage to the local community? In consultation with the custodians and caretakers of the affected cultural heritage, try to establish the answers to evaluation criteria such as: what is the age of the object? What is the importance of the object to the collective memory or identity of the community?
• What is the type and severity of damage to the cultural heritage? For example, prioritise dry and intact objects over wet and broken objects. Pack and relocate undamaged objects first.
• What are the objects made from? Objects that are made from organic materials (paper, textiles, wood, animal products such as bone) should be prioritised over objects that are made from inorganic materials. Inorganic materials, such as stone, ceramic and metal are less likely to suffer further damage if treatment is delayed.
• What are the risks? What are the risks to an object if it is left in its current state of damage? Will damage increase if left untreated?
• What is the size and weight of the object? You may not have sufficient time or resources to move oversized objects or ones that are extremely heavy, e.g. lifted mosaics, or wall-size framed oil paintings. Remove lighter portable objects, and secure heavy or oversized objects in situ.

56 First Aid to Cultural Heritage in Times of Crisis | 2. Toolkit
Van Balen, K. 2008. The Nara Grid: An Evaluation Scheme Based on the Nara Document on Authenticity. APT Bulletin, 39(2/3): 39-45. Available at: https://perma.cc/DL8A-E32V
Russell, R. & Winkworth, K. 2009. Significance 2.0: A guide to assessing the significance of collections. Canberra, Collections Council of Australia Ltd. Available at: https://perma.cc/GJ8G-ERAN
Australia International Council on Monuments and Sites (ICOMOS). 2013. The Burra Charter: The Australia ICOMOS Charter for Places of Cultural Significance, 2013. Burwood, ICOMOS. Available at: https://perma.cc/ULL9-UY9U

Security and stabilisation 57
Stabilising damaged movable cultural heritage
Dry surface-cleaningWhen is dry surface-cleaning appropriate?
• Dry surface-cleaning is appropriate when there is sufficient dirt or dust that damage to the object itself, or to objects in close proximity, seems likely if left.
• The object must be structurally-sound, or well-supported. Do not clean objects or fragmented structural elements that are fragile. If you are concerned that an object will break during cleaning, do not attempt to clean it.
• Consider the fragility of decorative elements, such as paint or gilding. If it is likely that the original material will be removed while cleaning, reconsider whether it is necessary to carry out the cleaning.
• Be careful when cleaning archaeological material. Archaeological objects may have encrustations or dirt on their surfaces, or within the object, that are of scientific importance. To prevent over-cleaning, ask a conservator or an archaeologist for help, to ensure that you do not remove important scientific data. If there is no such expertise available, only brush off the loose dirt from the outside of the object. Never clean the interior.
Dry surface-cleaning of a painted box with a soft bristled brush, Haiti, 2010. Photo: Aparna Tandon, ICCROM.

58 First Aid to Cultural Heritage in Times of Crisis | 2. Toolkit
How to clean dry surfaces?
1 For loose surface dirt, or heavy dust, a soft brush or vacuum can be used to remove contaminants. Contaminants, such as dust, soot, dirt and other loose deposits can be removed with the use of soft bristled brushes and sponges. If you have access to an uninterrupted power supply and a vacuum cleaner with a HEPA (High-Efficiency Particulate Absorbing) filter, it can be used to remove loose surface mould and ingrained contaminants.
2 If using a vacuum cleaner, cover the nozzle with fine mesh or cheesecloth, so that you have greater control over the air pressure and you do not accidently vacuum up part of the object. If vacuuming dirt from a two-dimensional object, carefully hold the vacuum over the top of the object (without touching it), and gently brush the dirt towards the nozzle.
3 For soot or other very fine particulates, use a smoke sponge to remove the contaminants. Never use sponges on metallic objects. Use a brush or cheesecloth instead.
4 To clean the surface of a three-dimensional object, hold it securely before attempting to use a brush or sponge. If the object is large, heavy or awkward to hold, ask somebody to hold or stabilise the object for you.
5 To clean the surface of a two-dimensional object, such as a work of art on paper, or a painting on canvas, place the object on a clean, flat surface that has been covered by tarpaulin or plastic. Have a partner hold the object at the top and bottom corners simultaneously, and gently brush away the dust or contaminants.
6 When brushing away contaminants, look carefully to make sure you are not wearing away the surface of the object. To prevent abrasion, do not use too much pressure when brushing away the dirt and only brush in one direction.
7 When using a sponge to remove fine surface contaminants, such as soot, do not rub the sponge over the object. Lightly press the sponge on the affected area to lift the contaminant. When the surface of the sponge becomes too dirty, cut off the dirty part of the sponge with a pair of scissors and continue cleaning with the clean part of the sponge.

Security and stabilisation 59
Australian War Memorial. n.d. Conservation advice: Cleaning Soot Damaged Objects. Canberra, The Australian War Memorial. Available at: https://perma.cc/Q38H-G6KT
Canadian Conservation Institute. 2017. Care of Objects and Collections. Ottawa, Minister of Public Works and Government. Available at: https://perma.cc/ZDG8-Y4UU
Heritage Collections Council. 1998d. reCollections: Caring for Collections Across Australia – Managing Collections. Canberra, Heritage Collections Council.Available at: https://perma.cc/5NAY-J562
Scott, M. 2003. Bushfires…Protect Your Precious Possessions. Melbourne, University of Melbourne. Available at: https://perma.cc/8KVN-5YJQ
Wet surface-cleaning
When is wet surface-cleaning appropriate and what is needed?1 Cleaning should only be conducted on objects that are already
wet and contaminated with heavy deposits, such as mud. 2 Cleaning must be carried out under the supervision of
professional conservators, or experienced cultural first aiders.3 Ensure that you have secondary support materials prepared
for wet materials to be dried upon.4 You must have access to a supply of clean, running water.5 Ensure that you have a large area of space available for using
and removing dirty water. Keep this area separate from dry workstations to avoid contaminating other objects.
How to clean wet materials?• Place flat, shallow trays in a line and fill them with clean water.
The number of trays that you will need will depend on how dirty your objects are, and the quantity of objects that require cleaning. You should have at least three trays available for rinsing objects. If the objects are very dirty, you will require more trays for multiple rinses.

60 First Aid to Cultural Heritage in Times of Crisis | 2. Toolkit
• Place the wet object on a waterproof support, such as a rigid plastic sheet or polyester net (for objects such as paper, photographs and small flat textiles). Make sure your underlying support is slightly larger than the object.
• Gently place the object into the first tray. Use your hands to agitate the water and gently remove mud and other deposits. Do not use brushes or other tools to remove the dirt.
• Remove the object from the first tray and transfer it to the second tray of clean water. Repeat the rinsing process and move to the third tray. Continue the process until the last tray has been reached and the mud deposits have been removed.
For photographic materialSlides and photographic negatives can be rinsed and air-dried using the methodology above. However, photographs should be rinsed under supervision, as certain types of photograph may require specialised treatment.
Wet photographs with muddy surface deposits, supported with polyester sheets for rinsing in trays, Italy, 2017. Photo: ICCROM.
For booksA wet, closed book that has muddy deposits on the outside should be kept closed during rinsing. Use hand pressure to tightly press out excess water. Do not open the book, and do not use excessive force when applying pressure.

Security and stabilisation 61
For textilesDo not squeeze or twist textiles to remove excess water. Use thick sponges to absorb the water. Place the sponge on the wet textile and press it gently to absorb the water. When the sponge is full, remove it and squeeze out the dirty water into a bucket, and rinse before using again.
For oversized objects (requires two people)If the object is too large or heavy to be placed into a tray, where possible, place it near a supply of running water. One person can support the object, while another person rinses the object with a gentle stream of water. If a hose or pipe is unavailable, soak sponges in clean water and squeeze them out over the object, or use small containers to gently pour water over the surface. Once clean, lightly pat dry with sponges or an absorbent cloth.
Department of Homeland Security Federal Emergency Management Agency. 2018. Reclaiming Precious Heirlooms From Flood Waters. Washington, DC, U.S. Department of Homeland Security.Available at: https://perma.cc/XY64-GPM6
Levitan, A. 1993. Emergency Treatment for Water-Soaked Furniture and Wooden Objects. National Parks Service Conserve O Gram, 7(7). Washington, DC, U.S. Department of the Interior. Available at: https://perma.cc/4J9T-SFVZ
State Library of Queensland. 2014a. Caring for your collections: Salvaging water damaged collections. Brisbane, Queensland Government. Available at: https://perma.cc/8V9X-YFNS
Methods for drying objects
Air-drying wet objects
Cultural heritage objects are often made of composite materials and should thus be dried under controlled conditions, where possible. One of the simplest methods for drying out objects is to air-dry them.

62 First Aid to Cultural Heritage in Times of Crisis | 2. Toolkit
Conditions for air-drying objects:
• Find a cool and dry (not humid) area. If possible, obtain some heavy-duty exhaust fans and dehumidifiers to ensure that there is adequate air circulation, and low relative humidity in the room where you are working. If you are unable to obtain exhaust fans and dehumidifiers, at least make sure that the room is well-ventilated, or use small portable fans.
• Avoid exposing drying objects to direct sunlight. Avoidance of direct sunlight will prevent objects from becoming bleached, or changing shape during the drying process.
• If available, to save space, use drying screens and shelved trolleys to dry multiple, small objects.
How to air-dry objects?
For metalsMetals corrode if left wet or damp for too long. Dry metal objects as quickly as possible. Use soft towels and cotton sheets to absorb moisture and support objects as they dry. Use a portable fan to speed up the process, if required.
Air drying of metal objects during an emergency simulation, Dublin, 2017. Photo: ICCROM and the Irish National Committee for Blue Shield.

Security and stabilisation 63
For ceramics and glass Use soft towels and cotton sheets to absorb moisture and support fragile ceramics and glass objects as they dry. Change the drying materials when they are unable to absorb any more moisture.
For bone and ivory Use sponges to remove moisture from objects made of bone and ivory. Place polyester mesh or loose sheets of polyethylene over the top of the objects to slow down the drying process. Drying bone or ivory too quickly can cause it to crack and become brittle.
For textiles and leather Pad textiles and leather objects with absorbent undyed materials, such as blotting paper, or white towels and cotton sheets. Dry them in the form that you find them in, in a flat horizontal position. Do not try to reshape the object while it is drying.
For plant-based objects Use absorbent paper, such as butcher paper, to remove excess moisture from objects made from plant fibres, such as woven baskets. Place polyester mesh over the top of the objects to control the drying process. Do not try to separate parts or reshape the object while drying.
For booksIf a book is slightly wet and has a sturdy spine and cover, rest the spine on a clean and even surface, stand it up and fan it open to dry.
Air drying of a book standing up during an emergency simulation, Dublin, 2017. Photo: ICCROM and the Irish National Committee for Blue Shield.

64 First Aid to Cultural Heritage in Times of Crisis | 2. Toolkit
Books that are completely wet should be dried horizontally. Remove excess moisture by wrapping the book in absorbent non-dyed paper, such as blotting paper. To dry printed books, interleave absorbent paper between sections of the book to dry the pages more effectively. Ensure that the interleaving material is cut slightly larger than the book to absorb the moisture, and make sure it does not reach all the way to the spine. This will help to avoid distortion of the spine. When the interleaving material becomes too wet, change it. If the pages of the book are made from glossy coated paper, use polyester mesh as the interleaving material. For books where the cover has been dyed, insert freezer paper between the cover and the pages inside to prevent dye transfer and staining.
For painting, works of art on paper and photographic materials Where possible, separate damaged frames from paintings, artworks and photographs. If the artwork or photograph is stuck to the glass of the frame, do not attempt to peel it from the glass. Under supervision, carefully remove paintings, artworks and photographs from their stretchers or mounts. Only remove these objects from their supports under expert supervision.Dry photographs, paintings and artworks face up. Use polyester mesh or absorbent papers, such as blotting paper to support works of art on paper, canvas and textiles. In the case of artworks and photographs still attached to glass, dry face up in a horizontal position. Avoid direct sunlight.
Heritage Collections Council. 1998d. reCollections: Caring for Collections Across Australia – Managing Collections. Canberra, Heritage Collections Council. Available at: https://perma.cc/5NAY-J562

Security and stabilisation 65
Freezing and vacuum-freezing drying wet objects
When available, freeze-drying is the most effective way to stabilise large quantities of organic objects and library and archival materials that have been damaged by water. Freeze-drying removes ice from the material and turns it to vapour. Vacuum freeze-drying is even more efficient and speeds up the process of drying by removing air as well as water vapour from the material.
Freeze-drying and storing organic materials at low temperatures after a hazard event will allow more time to find funding and restore damaged infrastructure, in turn aiding the rehabilitation of recovered materials within a stable environment.
Composite objects made from materials, such as wood, ivory, bone and paper, may become distorted during freeze-drying. Distortion is caused by the different absorption properties of the material, often resulting in non-uniform drying.
Preparing objects for freezing• When you have organized a freezer storage space, note the
packing material specifications of the freezer. You should be able to find out this information from the company that is providing the service. In general, heavy-duty corrugated cardboard boxes, or plastic milk, bread or fruit crates are suitable for storing wet materials in freezers.
• Ensure that you have access to refrigerated trucks to transport the wet materials to the storage facility.
• Do not rinse or wash large quantities of fragile organic materials. • Pack books tightly, with their spines down, to avoid distortion
as they dry.• Use freezer paper or bags to separate special items, such as
leather-bound books. Indicate which objects are priority items, which need to be checked during the freeze-drying process.

66 First Aid to Cultural Heritage in Times of Crisis | 2. Toolkit
Damage and deterioration
Australian Institute for the Conservation of Cultural Material. 2017. Visual Glossary. Canberra, Australian Institute for the Conservation of Cultural Material. Available at: https://perma.cc/4P8N-5GBP
Canadian Conservation Institute. 2017. Agents of Deterioration. Ottawa, Minister of Public Works and Government Canada. Available at: https://perma.cc/S65F-KNA5
Caring for cultural heritage collections
Canadian Conservation Institute. 2017. Care of Objects and Collections. Ottawa, Minister of Public Works and Government. Available at: https://perma.cc/ZDG8-Y4UU
Heritage Collections Council. 1998a. reCollections: Caring for Collections Across Australia – Caring for Cultural Material 1. Canberra, Heritage Collections Council. Available at: https://perma.cc/9DS2-DRPA
Heritage Collections Council. 1998b. reCollections: Caring for Collections Across Australia – Caring for Cultural Material 2. Canberra, Heritage Collections Council. Available at: https://perma.cc/49CQ-QVUV

Security and stabilisation 67
Materials and equipment for evacuation
Depending on the type of emergency and the site you are recording, the following equipment should be obtained prior to arrival on site.
For documentation
Camera, with spare batteries, for photo documentation Sketch pads, grid paper and notepads/notebooks Clipboard Pencils and waterproof pens in multiple colours Measuring tapes 2 m range pole, for documenting large-scale objects and
providing a scale for context photos 10 cm scale, for documenting small objects or taking
close-up photographs Rigid cardboard and tape Twill and cotton string, to tie labels and packages Self-adhesive labels, to be used on packing supports,
to write down the identification numbers of the objects. Such labels should not be attached to the surface of the object.
For packing and transport
Unstarched, white muslin, or fine cotton: this can be safely used as cushioning material, or to wrap most objects. It is also widely available.
Pure rag paper: a good substitute for acid-free tissue and easily available, paper made from cotton and/or linen rags can be used to wrap paper and textile artworks.
Polyester film: a transparent and colourless plastic sheet used to store photographs, or other paper documents. It is normally sold as ‘Mylar’ or ‘Melinex’.

68 First Aid to Cultural Heritage in Times of Crisis | 2. Toolkit
‘Tyvek®’: a synthetic material made of high-density polyethylene fibres. ‘Tyvek’ can be used to make water resistant covers. It is commonly used to protect buildings during construction.
Tarpaulin Polyethylene foam: usually sold as ‘Ethafoam’, polyethylene
foam can be used as a cushioning material, as it can be easily cut to embed an object that is being packed into it, in order to absorb shocks.
Bubble wrap: a short-term solution, bubble wrap can be used as a shock-absorbing material. However, the bubbled surface should not be in direct contact with the object.
Cushions/pillows: ordinary cushions and pillows can be used to pack fragile objects.
Towels: white cotton towels can be used as cushioning material.
Polyethylene bags: food-grade polyethylene bags can be used to pack fragile or small objects.
Cardboard boxes: ordinary cardboard boxes can be used as containers for objects. However, as they age, they can give off acidic vapours, which can be harmful for objects. In order to safeguard the objects, it is recommended that the inside of the cardboard box be lined with with unstarched and undyed cotton, or pure rag paper.
Wooden fruit crates: usually made of poor-quality wood, such crates can be used to transport inorganic materials, such as stone or clay. However, they must be lined with paper or cotton. Use of such crates is essentially a short-term solution.
Plastic boxes: transparent containers made of plastic and ordinarily used to store food can serve as containers for fragile or small objects.
Plastic crates: often used to carry milk cartons, or fruit and vegetables, plastic crates are another short-term solution for storing and transporting objects.
Plastic trays: normally used in museums and archives, shallow plastic trays made of polyethylene can safely be used to store and transport objects.

Security and stabilisation 69
Rolling/poster tubes: wide diameter rolling tubes can be used to pack canvases and paper and textile artworks.
Pallets: plastic or wooden pallets can be used to store boxes containing objects and keep them on the ground. However, if using wooden pallets, make sure that they are insect-free and are covered with polyethylene sheets or tarpaulin to prevent direct contact with the boxes containing heritage objects.
Packing tape Scissors Box-cutter knives Self-adhesive stickers for labelling boxes and storage
Additional supplies Rope Rulers Buckets Ladders Trolleys Wheelbarrow

70 First Aid to Cultural Heritage in Times of Crisis | 2. Toolkit
Materials and equipment for salvageThese lists are not exhaustive. We have listed materials that are easily available. Do not hesitate to use more appropriate materials, if you are able to find them in large enough quantities, or to use locally-available materials, as long as you ensure that you can use them without risk to the objects or structures you are stabilising.
For securing a site Warning/caution tape to delimit unsafe areas, or areas with
restricted access. Wire mesh: basic or heavy-duty galvanised fencing. You can
use it to prevent access to specific areas. Safety signage with commonly-used signs to indicate dangerous
areas, or restricted access zones. Signage should be large, clearly visible, and easily recognisable by all personnel.
Strong sticking tape: water-resistant, scrim-backed and pressure-sensitive tape.
Wooden sticks to fix the safety signage and warning tape. Timber planks to secure weakened floors during the
assessment. A stepladder to reach overhanging objects that can be easily
handled.
For documentation Camera, with spare batteries, for photo documentation Sketch pads, grid paper and notepads/notebooks Clipboards Pencils and waterproof pens in multiple colours Measuring tapes
2 m range pole, for documenting large-scale objects and providing a scale for context photos
10 cm scale, for documenting small objects or taking close-up photographs

Security and stabilisation 71
Rigid cardboard and tape Twill and cotton string, to tie labels and packages Self-adhesive labels, to be used on packing supports, to write
down the identification numbers of the objects. Such labels should not be attached to the surface of the object.
For stabilisation of damaged objects Coloured rope or string for making a grid Tarpaulin ‘Post-it Notes’ and adhesive labels Pencils and waterproof markers for labelling Soft flat brushes in multiple sizes Toothbrushes to clean pottery and ceramics Sponges in multiple sizes Smoke sponges/erasers: these are available from
conservation suppliers and selected arts and craft stores. Paper towels ‘Ziplock’ plastic bags Shallow trays Polyester mesh or netting Vacuum cleaner, if available Buckets Shelved trolleys Clothes drying racks Heavy-duty cardboard and plastic boxes

72 First Aid to Cultural Heritage in Times of Crisis | 2. Toolkit
10 cm scale
Measuring tape
Bubble wrap
Step ladder
Rolling poster tubes Plastic milk crates
Range pole
Box-cutter knife
Brown packing tape
Polyethylene foam
Shelved trolley
Caution tape
Smoke sponges
Pure rag paper
Safety signage
Cotton string
Pallets
‘Tyvek’ roll
Plastic tray
Unstarched white muslin
Polyester film
Twill string

Security and stabilisation 73
How to provide temporary cover for exposed cultural heritage objects and collections?
1 Measure the length and width of the pile of debris.2 Obtain a water-resistant cover, such as a tarpaulin, with
dimensions larger than the pile of debris you have measured. If you cannot find material large enough to cover the surface area, join as much material as required together with strong, pressure sensitive tape to create the desired size.
3 Cover the debris and secure the cover to the ground by nailing it down with tent pegs, or by weighing it down using heavy objects. Alternatively, a tent can be erected, providing coverage on all sides, if resources permit.
How to build a temporary frame for a cover?Below are some tips for building a temporary frame. Do not try to build a frame without the expertise of an engineer, if the frame has to support a heavy roof.
Bracing a structureA frame is made up of vertical posts, horizontal beams and diagonal bracing to stiffen the frame. Rectangular frames distort quickly under horizontal loads. Triangular structures are much more resistant. Reinforcing a rectangular structure by bracing it with diagonal elements will prevent distortion.
OK OKNO
Drawing: E. Crété

74 First Aid to Cultural Heritage in Times of Crisis | 2. Toolkit
You can use timber, bamboo or wire to reinforce the structure by diagonally bracing it. If you use wire, you should twist it with a piece of wood or a large nail in order to increase its tension. Moreover, when using wire, you have to brace both diagonals of the wall (whereas when using bamboo or timber, bracing one diagonal is enough to reinforce it).
Drawing adapted from: International Federation of Red Cross and Red Crescent Societies (IFRC). n.d. The IFRC Shelter Kit. Geneva, IFRC.
If you use a rigid element, one diagonal element will suffice for the brace. If you use wire, make sure you brace both diagonal directions. You can brace the structure at its angles in order to use smaller timber pieces.
Connecting timber elements• Timber is most commonly jointed with nails, pegs, screws,
or bolts. You can use metal strapping or gang plates (metal plates nailed on either side of a joint) to reinforce joints.
• A single nail does not prevent a joint from twisting. It is better to use two angled nails, as the angle prevents the nails from being pulled out easily.
Drawing: E. Crété

Security and stabilisation 75
• In a highly-corrosive environment (for example, near the ocean), use pegs or wedges to join elements. You will need a carpenter to assist here.
• You can also use heavy-duty galvanised fencing wire or rope. When using natural fibres, wet them before using them as they will shrink while drying and tighten the joint.
Connecting bamboo elements• If you are using bamboo to build a frame, do not use nails.
Use heavy-duty galvanised fencing wire or rope. When using natural fibres, wet them before using them as they will shrink while drying and tighten the joint.
• Connections should be placed in between two nodes, as bamboo splits easily at its ends.
Anchoring the frame• You can fix the frame to the ground by anchoring it. Anchor
stability is provided by the strength and tension of the ropes used and also by the fixed element that the frame is anchored to, such as a stake, tree, or post.
• You can use a double clove hitch knot to tighten a rope to an anchoring post (left and centre drawings, below), or a slider to tighten it to an anchor (right drawing, below).
Drawing adapted from: International Federation of Red Cross and Red Crescent Societies (IFRC). n.d. The IFRC Shelter Kit. Geneva, IFRC.

76 First Aid to Cultural Heritage in Times of Crisis | 2. Toolkit
• Check for the resistance of the existing surrounding elements before anchoring the frame to them or making a new anchor.
• If you can dig the ground, you can use a peg, or bury any object offering resistance and link it to a rope, or wire strips sticking out of the ground.
• If you cannot dig the ground, you can use any object that is heavy enough, like sandbags or buckets filled with earth, sand, stones, lime or cement, to anchor the ropes.
Stabilising poles• You can stabilise a pole by digging a hole in the ground
that is approximately 50 cm deep. Bury the end of the pole by compacting around 10 cm of earth around it. Repeat the procedure until the hole is completely filled and the pole is standing firm. If available, add 5% lime or cement to the soil you are using to fill the hole.
• Wedges can be used to improve the stability of a pole. You can also add a wooden anchor at its base to increase its surface area and lower its centre of gravity.
Pole with wedges used for stability
Pole with an anchor attached
• If you cannot dig the ground, you can pile sandbags around the pole, or put the pole in big buckets filled with earth, sand, stones, lime, or cement.
Drawing adapted from: International Federation of Red Cross and Red Crescent Societies (IFRC). n.d. The IFRC Shelter Kit. Geneva, IFRC.

Security and stabilisation 77
How to fix a tarpaulin• If the tarpaulin does not have eyelets and you would like to fix it
onto a stake or peg using a rope, take one end of tarpaulin and make a knot. Thread the rope through the knot. Alternatively, wrap a small stone in the outer edge of the tarpaulin. Tie the rope around it and make a knot. To avoid tearing a tarpaulin when nailing it, you should roll it around a batten before nailing it, or use a plastic ring or bottle cap. Tarpaulin nailed without protection will tear quickly, especially if it is of low quality.
• Tarpaulins should be stretched tight, like a drum skin, onto a frame that has a slope of no more than 30 degrees, to avoid water pooling. Pay attention and ensure water is not drained onto a sensitive area, especially if you use large tarpaulins, as they may collect a large amount of water.
• You can fix the tarpaulin by digging a ditch, inserting the end of the tarpaulin and covering it with earth. You can also wrap stones in the tarpaulin before burying it. Stones should be larger than a fist to avoid tearing.
• If you would like to join tarpaulins by sewing them, fold the tarpaulin so that the thread passes through layers of plastic sheet.
• Make sure that tarpaulins are not in contact with decorated surfaces without a layer of protection inbetween. Note that, if not securely attached, tarpaulins may blow away in strong winds. In this situation, they are no longer efficient as a protection device and may scratch outdoor surface decorations.
GoodVery good OKPlastic ringor bottlecap
NO
Batten

78 First Aid to Cultural Heritage in Times of Crisis | 2. Toolkit
Fixing CGI/CGS sheetsIn order to achieve waterproofing with corrugated galvanised iron (CGI) or steel (CGS), you need to overlap two sheets by two corrugations in the lateral direction, and a minimum of 15 cm in the longitudinal direction, and fix the sheets together with large head nails at the top of the corrugation.
Drawing adapted from: International Federation of Red Cross and Red Crescent Societies (IFRC). n.d. The IFRC Shelter Kit. Geneva, IFRC.
International Federation of Red Cross and Red Crescent Societies (IFRC). n.d. The IFRC Shelter Kit. Geneva, IFRC. Available at: https://perma.cc/RY5Z-DEU3
International Federation of Red Cross and Red Crescent Societies (IFRC). 2015. IFRC bamboo frame for emergency shelters and emergency roofs: technical sheets. Geneva, IFRC. Available at: https://perma.cc/S7YY-78MG
Be sure not to prevent the ventilation of indoor spaces while covering them. First, because the lack of ventilation may affect protected elements, especially if they are damp. Second, because appropriate air vents will reduce the risk of the cover blowing away. It is important to position the air vents just under the temporary roof – for example, by leaving a 10 cm space between the walls and the temporary roof.

Security and stabilisation 79
A step-by-step guide on how to build basic timber shores
The following text provides general guidance for building different types of timber shores for the emergency stabilisation of heritage structures. However, in order to decide on the most suitable type of shore, consult with a structural engineer who understands the local heritage structures and their construction materials.
Do keep in mind that in an emergency, shoring is the technique of supporting built elements when a structure is in danger of collapse.
For more information on the workflow involved in implementing shoring and other emergency stabilistaion actions, refer to the Handbook, pages 108-115.
1 Wedges Wedges are used to fix wood-shoring tight to the structure that is being stabilised. They can help to fill small gaps between parts of the wood-shoring and make the shore easier to build. Here is a step-by-step guide on how to use them.
Tools needed: saw, hammer
Step 1: Take a piece of wood and cut it into two wedges:
Drawing: Nelson Vila Pouca
5 to 6 unite
1 un
ite

80 First Aid to Cultural Heritage in Times of Crisis | 2. Toolkit
Step 2: Place the first wedge in the gap that needs to be filled, then use nails to prevent the wedge from sliding. Place the other wedge in the gap and use a hammer to slide in the wedge until it is held tight between the other wood pieces.
Drawing : Nelson Vila Pouca
Step 3: Use nails to fix the second wedge.
Drawing: Nelson Vila Pouca
Wood post
Wood base
Wedge
WedgeNail
Wedge
Nailed connectionsTry to leave a minimum distance of approximately 3 cm between each nail and 5 cm between the nails and the end of the timber. Nails should be coated to prevent corrosion.

Security and stabilisation 81
2 Basic vertical shore type 1
Tools needed: saw, hammer
The “T” shore presented below is a temporary shore that can be installed rapidly, but can become unstable if not well-centred under the load. It should be built with the idea that it will be used temporarily, prior to building more stable shores such as a double “T” shore.
Drawing: Nelson Vila Pouca
Step 1: Prepare all of the timber pieces and clean the area where you want to place the sole plate.
header
Sole plate
gusset
gusset
post

82 First Aid to Cultural Heritage in Times of Crisis | 2. Toolkit
Step 2: Nail the header and post together using two gusset plates, one on each side.
Drawing: Nelson Vila Pouca
Step 3: Place the sole plate on the ground (you may need to place planks between the sole plate and the ground, if the ground is too soft) directly below the beam you want to stabilise, and place the first wedge on top of it. Place a nail in the sole plate to fix the wedge. Place the second wedge on top of the first and place the post/header piece on top of the second wedge. Hammer the second wedge into place until the header firmly contacts the beam you want to stabilise. Place a nail to prevent the second wedge from sliding.
Drawing: Nelson Vila Pouca
Step 4: Finish by placing a gusset to connect the post and sole plate
Drawing: Nelson Vila Pouca

Security and stabilisation 83
3 Basic vertical shore type 2The vertical shore presented below is also a temporary shore that can be installed rapidly, but can become unstable if not well- centered under the load. It should be built prior to constructing more stable shores.
Drawing: Nelson Vila Pouca
Step 1: Prepare all of the timber pieces and clean the area where you want to place the sole plate.

84 First Aid to Cultural Heritage in Times of Crisis | 2. Toolkit
Step 2: Nail the header and vertical post together. Nail two diagonal posts to the header and to the vertical post, one on each side.
Drawing: Nelson Vila Pouca
Step 3: Place the sole plate on the ground (you may need to place planks between the sole plate and the ground if the ground is too soft) directly below the beam you want to stabilise, and place the first wedge on top of it. Place a nail in the sole plate to fix the wedge. Place the second wedge on top of the first and place the post/header piece on top of the second wedge. Hammer the second wedge into place until the header firmly contacts the beam you want to stabilise. Place a nail to prevent the second wedge from sliding.
Drawing: Nelson Vila Pouca

Security and stabilisation 85
Step 4: Finish by placing two diagonal posts to connect the vertical post and sole plate
Drawing: Nelson Vila Pouca
Depending on the nature of the emergency, the type of damage and the available materials, other types of vertical shores can be used. The following drawing illustrates a variant.
Drawing: Nelson Vila Pouca

86 First Aid to Cultural Heritage in Times of Crisis | 2. Toolkit
4 Basic raker shore The raker shore shown below on the left is a flying shore: it
is temporary and to be used to enable safe removal of debris that has been piled next to the base of a wall.
The wall plate should be fixed to the wall with drill-ins (if it is a masonry wall), or with nails (if it is a timber wall). If the wall is decorated, make sure you have an isolating layer, as per page 114 of the Handbook.
The wall plate does not need to be fixed if the top of the wall plate can bear against a protrusion of the wall, but does not rely on friction.
If there are no obstacles next to the base of the wall, the raker shore shown on page 87 can also be used.
Drawing: Nelson Vila Pouca

Security and stabilisation 87
Tools needed: hammer, saw, and a drill if you plan to fix the raker shore to the wall with drill-in anchors or pickets to the sole anchor.
Drawing: Nelson Vila Pouca

88 First Aid to Cultural Heritage in Times of Crisis | 2. Toolkit
5 Window or door shore type 1 This shore is used to stabilise openings in cases where the
door or window frames are damaged.
Tools needed: saw, hammer
Drawing: Nelson Vila Pouca
Step 1: Prepare all of the timber pieces and clean the frame of the opening to be shored.
Step 2: Install the sole with a set of wedges at one end and tap them together simultaneously until the sole is tight. The sole should be as leveled as possible. Use shims as necessary under the sole plate.
Step 3: Install the header with a set of wedges at the opposite end of the sole and tap them together simultaneously until the header is tight. The header should be as leveled as possible. Use shims as necessary above the header.
Step 4: Install the left post under the wedge side of the header and against the side of the opening, with a set of wedges between the post and the sole.

Security and stabilisation 89
Step 5: Install the right post, with a set of wedges between the post and the sole.
Step 6: Install the middle post, with a set of wedges between the post and the sole.
Step 7: Tighten the set of wedges.
Step 8: Nail the two diagonal planks.
6 Window or door shore types 2 and 3 These shores are used to stabilise openings in cases where
the door or window frames are damaged, and it is necessary to access the interior.
Tools needed: saw, hammer
Drawing: Nelson Vila Pouca

90 First Aid to Cultural Heritage in Times of Crisis | 2. Toolkit
Tips for building shores
• Use timber with a length that is not more than 25 times its width, so that it is resistant to compression and the risk of buckling is lower.
• Wedges are sensitive pieces; use wood that does not contain any knots or faults and that is dry enough to prevent distortion.
• You should always fix the wall plate to the wall to prevent any sliding of the shore. Do not rely on mere friction.
• Wall plates should be extended as high as possible along the damaged wall, and, if possible, reach all the way down to the ground.
• You can place sandbags between the wall and the wall plate to improve contact between them, for example, if the wall surface is not flat.
• Whenever you can, avoid shoring a wall with a decorated surface. If you cannot avoid it, you can put muslin and foam between the wall and the wall plate. When defining the size of the wall plate, keep in mind that you have to fix the wall plate to the wall.
• In case of a local collapse at the base of a wall, you can use sandbags to fill in the hole and provide temporary support.

Security and stabilisation 91
Department of Homeland Security. 2011. Field guide for Building Stabilization and Shoring Techniques. Washington, DC, U.S. Department of Homeland Security. Available at: https://perma.cc/ZN3R-NRWU
Corpo Nazionale dei Vigili del Fuoco – Università degli Studi di Udine. 2011. Manuale Opere Provvisionali, l’intervento tecnico urgente in emergenza sismica. Rome, Ministero dell’Interno. Available (in Italian) at: https://perma.cc/AP8A-22L2
Grimaz, S., Cavriai, M., Mannino, E., Munaro, L., Bellizzi, M., Bolognese, C., Caciolai, M., D’Odorico, A., Maiolo, A., Ponticelli, L., Barazza, F., Malisan, P. & Moretti, A. 2010. Vademecum, STOP, Shoring Templates and Operating Procedures for the Support of Buildings damaged by Earthquakes. Rome, Ministry of Interior – Italian Fire Service. Available at: https://perma.cc/62JX-UGLP
United States Army Corps of Engineers. 2013. Urban Search & Rescue Shoring Operations Guide. Washington, DC, United States Department of Defence. Available at: https://perma.cc/H6NA-WBRY

92 First Aid to Cultural Heritage in Times of Crisis | 2. Toolkit
Tips for drying immovable and in situ cultural heritage
• Avoid using high-pressure water when cleaning surfaces. The pressure can cause additional damage to fragile materials and spread harmful micro-organisms. Use plastic tools and gently-running clean water to wash mud and debris off surfaces. Plastic tools cause less damage than metal ones.
• Mechanical fans can be used to speed up the drying process, but they are no replacement for the opening of door and windows, which is necessary to humidity from the building.
• Do not use gas heaters, as they produce water vapour. • Be mindful that temperatures above 18°C may encourage
mould growth.• Avoid using aggressive dehumidifiers in old buildings. Both
refrigerant and desiccant dehumidifiers can be controlled by a humidistat. If these controls are used properly, they can provide gentle drying conditions.
For decorated surfaces• Obtain advice from, or ensure the presence of a trained
murals- or mosaic-conservator before touching any decorated surfaces.
• Try to drain the water away from the decorated surface. Beware of impermeable floors that prevent water from draining through the floor and accelerate water transfer into the wall.
• If the wall is decorated on only one side, try to draw the water through the undecorated side. Slow down drying on the decorated side by using a tarpaulin. Prevent direct contact with the decorated surface by using unstarched non-dyed muslin, or a white cotton sheet.
• If you observe a fine, white powder developing on the surface, it is often a sign of salt migration. Document the locations and ask a conservator for their help to remove it. You can dry-brush the salts that crystallise on the surface, as doing so prevents the salts from being re-dissolved and absorbed back into the wall.

Security and stabilisation 93
Materials and equipment for emergency stabilisation of structures and in situ protection of
decorative elements
Timber poles or bamboo to build a temporary frame
Tarpaulins: thick, woven and coated tarpaulins hold up better in outdoor conditions. If possible, use white tarps to prevent excessive temperature rise, and tarps with pre-punched reinforcement bands to avoid tearing.
Corrugated galvanised iron or steel (CGI/CGS) sheets: beware of low-quality CGI/CGS sheets, as these deteriorate very quickly. Sheets of a minimum thickness of 0.3 mm usually last for a few years.
Nails, especially large-headed nails for attaching CGI/CGS sheets
Hammers, saws, screws, screwdrivers, wood chisels and, bolts
Measuring tapes, plumb lines and spirit levels
Wire: heavy-duty galvanised fencing wire can be used to fasten bamboo and tarpaulin, or to brace a frame.
Metal strapping or metal plates to bind timber pieces
Rope, made of natural fibres to fasten bamboo and tarpaulin, or to anchor a frame
Pegs and stakes for anchoring a frame or fastening a tarpaulin
Stones and sandbags: for anchoring a frame or fastening a tarpaulin
Shovels and picks: in case you need to dig a hole to anchor the frame or to fasten the tarpaulin
Buckets for anchoring poles, in case you cannot dig a hole
Cement or lime: these can help to anchor poles firmly
Timber wedges : these can help to stabilise a pole

94 First Aid to Cultural Heritage in Times of Crisis | 2. Toolkit
For drying wet structures Wire mesh or perforated panels to secure openings without
preventing airflow Shovels, brooms and wheelbarrows to remove mud and debris.
Choose plastic shovels and brooms, where possible, as they cause less damage than metal ones.
Pumps or buckets to remove trapped water Plastic brushes and gently-running clean water to wash mud
and debris from surfaces A moisture meter or multimeter to measure the humidity in the
walls Mechanical fans to speed up the drying process Heaters can be used, but never use gas heaters as they
produce water vapour. Keep in mind that temperatures above 18°C may also encourage mould growth.
Refrigerant and desiccant dehumidifiers that can be controlled by a humidistat to provide gentle drying conditions. Avoid using aggressive dehumidifiers in old buildings.
Tarpaulin can help to control the drying of a decorated surface. Prevent direct contact with the decorated surface by using unstarched muslin or a white sheet.
For basic shoring Hammers, saws, screws, screwdrivers, wood chisels and bolts Measuring tapes, plumb lines and spirit levels Timber poles and planks of good quality (for example Douglas
fir or Southern pine) Nails: 8d (diameter: 3.5 mm; length: 5 cm) and 16d (diameter:
3.7 mm; length: 8 cm)
Plastic rings, bottle caps and small timber planks to attach a tarpaulin to a frame
Sewing material (needles and string) or strong sticking tape (water-resistant, scrim-backed and pressure-sensitive) to join several tarpaulins together

Security and stabilisation 95
Standard metal adjustable height props Sandbags, rubber or foam (for example, polyethylene foam,
usually sold as ‘Ethafoam’) to protect surfaces, or to improve the contact between a wall plate and the wall.
Unstarched and unbleached muslin, or white cotton to protect surfaces from scratching
For tying a structure with confining belts Synthetic belts with ratchet handles (minimum 2 mm thick and
50 mm – 75 mm wide) Steel plates to place between the belt and the wall/column to
spread the loads Timber planks (approximately 3 cm thick) to place between
the steel plate and the wall/column Rubber or foam (for example polyethylene foam, usually sold
as ‘Ethafoam’) can further protect surfaces and improve the contact between the timber plank and the wall.
Unstarched and unbleached muslin, or white cotton to protect decorated surfaces from scratches
Supplies and equipment for in situ protection of decorated surfaces
Tarpaulin to protect surfaces from water Sandbags to backfill decorated surfaces and protect them
from shocks (make sure the sandbags do not trap humidity) Rubber or foam (for example polyethylene foam, usually sold
as ‘Ethafoam’) to improve the contact between the surface and timber, or steel plates, if necessary
Unstarched and unbleached muslin, or white cotton to protect decorated surfaces from scratching
Timber or steel plates to spread the loads, in case you need to shore/confine an element with decorated surfaces (floor, ceiling, wall, columns, etc.)

96 First Aid to Cultural Heritage in Times of Crisis | 2. Toolkit
Plumb line Timber planks
Timber poles Moisture meter Height props CGI/CGS sheets
Wire mesh (fine) Wire mesh (large) Timber wedges Pegs and stakes
Shovels & picks Spirit level Metal strapping Synthetic belts with ratchet handles

REFERENCES

98 First Aid to Cultural Heritage in Times of Crisis | 2. Toolkit
Step 2: Post event on-site damage and risk assessmentBC Housing. 2018. Rapid Damage Assessment. Burnaby, BC Housing. Available at: https://www.bchousing.org/about/rapid-damage-assessment [Accessed 18 February 2018].
Permanent link: https://perma.cc/686P-5JFE
Connecticut Technology Transfer Center. 2010. Protective Equipment for Workers in Hurricane Flood Response. Connecticut, School of Engineering, University of Connecticut. Available at: https://www.t2center.uconn.edu/pdfs/SAFETY%20BRIEF%202010-7.pdf [Accessed 9 February 2018].
Permanent link: https://perma.cc/LG2T-FTDZ
Heritage Collections Council. 1998e. reCollections: Caring for Collections Across Australia – Managing People. Canberra, Heritage Collections Council. Available at: https://aiccm.org.au/sites/default/files/docs/reCollections/5_managing_people.pdf [Accessed 18 February 2018].
Permanent link: https://perma.cc/RR45-BJDW
Step 3: Security and StabilisationAustralian Institute for the Conservation of Cultural Material. 2017. Visual Glossary. Canberra, Australian Institute for the Conservation of Cultural Material. Available at: https://aiccm.org.au/conservation/visual-glossary [Accessed 22 February 2018].
Permanent link: https://perma.cc/4P8N-5GBP
Australia International Council on Monuments and Sites (ICOMOS). 2013. The Burra Charter: The Australia ICOMOS Charter for Places of Cultural Significance, 2013. Burwood, ICOMOS. Available at: http://australia.icomos.org/wp-content/uploads/The-Burra-Charter-2013-Adopted-31.10.2013.pdf [Accessed 21 June 2017].
Permanent link: https://perma.cc/ULL9-UY9U
Australian War Memorial. n.d. Conservation advice: Cleaning Soot Damaged Objects. Canberra, The Australian War Memorial. Available at: https://www.awm.gov.au/about/our-work/projects/soot [Accessed 18 February 2018].
Permanent link: https://perma.cc/Q38H-G6KT

99
Canadian Conservation Institute. 2007. Vacuum Freeze-drying Archaeological Artifacts. Canadian Conservation Institute (CCI) Notes 4/2. Ottawa, Minister of Public Works and Government Canada. Available at: https://www.canada.ca/en/conservation-institute/services/conservation-preservation-publications/canadian-conservation-institute-notes/vacuum-freeze-drying-archaeological-artifacts.html [Accessed 12 October 2017].
Permanent link: https://perma.cc/QRP8-LYKA
Canadian Conservation Institute. 2017. Agents of Deterioration. Ottawa, Minister of Public Works and Government Canada, Ottawa. Available at: https://www.canada.ca/en/conservation-institute/services/agents-deterioration.html [Accessed 22 February 2018].
Permanent link: https://perma.cc/S65F-KNA5
Canadian Conservation Institute. 2017. Care of Objects and Collections. Ottawa, Minister of Public Works and Government. Available at: https://www.canada.ca/en/conservation-institute/services/care-objects.html [Accessed 22 February 2018].
Permanent link: https://perma.cc/ZDG8-Y4UU
Corpo Nazionale dei Vigili del Fuoco – Università degli Studi di Udine. 2011. Manuale Opere Provvisionali, l’intervento tecnico urgente in emergenza sismica. Rome, Ministero dell’Interno. Available (in Italian) at: http://www.vigilfuoco.it/allegati/STOP/ManualeSTOP.pdf [Accessed 24 October 2017].
Permanent link: https://perma.cc/AP8A-22L2
Department of Homeland Security Federal Emergency Management Agency (FEMA). 2009. FEMA National US&R Response System Structural Collapse Technician Module 2a Shoring Basics. Washington, DC, FEMA. Available at: https://www.fema.gov/pdf/emergency/usr/module2a.pdf [Accessed 29 April 2018].
Permanent link: https://perma.cc/WF28-Q5QU
Department of Homeland Security Federal Emergency Management Agency (FEMA). 2018. Reclaiming Precious Heirlooms From Flood Waters. Washington, DC, U.S. Department of Homeland Security. Available at: https://www.fema.gov/news-release/2003/09/23/reclaiming-precious-heirlooms-flood-waters [Accessed 18 February 2018].
Permanent link: https://perma.cc/XY64-GPM6

100 First Aid to Cultural Heritage in Times of Crisis | 2. Toolkit
Department of Homeland Security Science and Technology Directorate, Infrastructure Protection and Disaster Management Division. 2011. Field guide for Building Stabilization and Shoring Techniques. Washington, DC, U.S. Department of Homeland Security. Available at: https://www.dhs.gov/xlibrary/assets/st/st-120108-final-shoring-guidebook.pdf [Accessed 24 October 2017].
Permanent link: https://perma.cc/ZN3R-NRWU
Grimaz, S., Cavriai, M., Mannino, E., Munaro, L., Bellizzi, M., Bolognese, C., Caciolai, M., D'Odorico, A., Maiolo, A., Ponticelli, L., Barazza, F., Malisan, P. & Moretti, A. 2010. Vademecum, STOP, Shoring Templates and Operating Procedures for the Support of Buildings damaged by Earthquakes. Rome, Ministry of Interior – Italian Fire Service. Available at: http://sprint.uniud.it/sites/default/files/Vademecum_STOP_eng_0.pdf [Accessed 24 October 2017].
Permanent link: https://perma.cc/62JX-UGLP
Heritage Collections Council. 1998a. reCollections: Caring for Collections Across Australia – Caring for Cultural Material 1. Canberra, Heritage Collections Council. Available at: https://aiccm.org.au/sites/default/files/docs/reCollections/1_caring_for_cultural_material_1.pdf [Accessed 18 February 2018].
Permanent link: https://perma.cc/9DS2-DRPA
Heritage Collections Council. 1998b. reCollections: Caring for Collections Across Australia – Caring for Cultural Material 2. Canberra, Heritage Collections Council. Available at: https://aiccm.org.au/sites/default/files/docs/reCollections/2_caring_for_cultural_material_2.pdf [Accessed 18 February 2018].
Permanent link: https://perma.cc/49CQ-QVUV
Heritage Collections Council. 1998d. reCollections: Caring for Collections Across Australia – Managing Collections. Canberra, Heritage Collections Council. Available at: https://aiccm.org.au/sites/default/files/docs/reCollections/4_managing_collections.pdf [Accessed 18 February 2018].
Permanent link: https://perma.cc/5NAY-J562
Heritage Collections Council. 1998f. reCollections, Caring for Collections Across Australia – Handling, Transportation, Storage and Display. Canberra, Heritage Collections Council. Available at: https://aiccm.org.au/sites/default/files/docs/reCollections/6_htsd.pdf [Accessed 18 February 2018].
Permanent link: https://perma.cc/5XRJ-U9R3

101
Historic England. 2015. Flooding and Historic Buildings. Swindon, Historic England. Available at: https://content.historicengland.org.uk/images-books/publications/flooding-and-historic-buildings-2ednrev/heag017-flooding-and-historic-buildings.pdf/ [Accessed 18 February 2018].
Permanent link: https://perma.cc/M66M-3E8L
International Federation of Red Cross and Red Crescent Societies. n.d. The IFRC Shelter Kit. Geneva, International Federation of Red Cross and Red Crescent Societies. Available at: http://www.ifrc.org/PageFiles/95526/publications/D.03.a.07.%20IFRC%20shelter-kit-guidelines-EN-LR.pdf [Accessed 18 February 2018].
Permanent link: https://perma.cc/RY5Z-DEU3
International Federation of Red Cross and Red Crescent Societies. 2015. IFRC bamboo frame for emergency shelters and emergency roofs – Technical sheets. Geneva, International Federation of Red Cross and Red Crescent Societies. Available at: http://www.ifrc.org/Global/Documents/Secretariat/Shelter/IFRC-bamboo-frame-A4-FINAL-EN-2015.pdf [Accessed 18 February 2018].
Permanent link: https://perma.cc/S7YY-78MG
Levitan, A. 1993. Emergency Treatment for Water-Soaked Furniture and Wooden Objects. National Parks Service Conserve O Gram, 7(7). Washington, DC, U.S. Department of the Interior. Available at: https://www.nps.gov/museum/publications/conserveogram/07-07.pdf [Accessed 18 February 2018].
Permanent link: https://perma.cc/4J9T-SFVZ
McCord, M., & Stone, T. 2002. Deterioration of Collections. Generation 2: Education and Support Materials. ICCROM unpublished material. Rome.
Russell, R. & Winkworth, K. 2009. Significance 2.0: A guide to assessing the significance of collections. Canberra, Collections Council of Australia Ltd. Available at: https://www.arts.gov.au/sites/g/files/net1761/f/significance-2.0.pdf [Accessed 18 February 2018].
Permanent link: https://perma.cc/GJ8G-ERAN

102 First Aid to Cultural Heritage in Times of Crisis | 2. Toolkit
State Library of Queensland. 2014a. Caring for your collections: Salvaging water-damaged collections. Brisbane, Queensland Government. Available at: http://www.slq.qld.gov.au/__data/assets/pdf_file/0005/128984/Caring-for-your-collections-Salvaging-water-damaged-collections.pdf [Accessed 18 February 2018].
Permanent link: https://perma.cc/8V9X-YFNS
State Library of Queensland. 2014b. Caring for your collections: Freezing water-damaged and insect infested collections. Brisbane, Queensland Government. Available at: http://www.slq.qld.gov.au/__data/assets/pdf_file/0004/128983/Caring-for-your-collections-Freezing-water-damaged-and-insect-infested-collections.pdf [Accessed 18 February 2018].
Permanent link: https://perma.cc/V6KB-XKZL
Tandon, A. 2016. Endangered Heritage: Emergency Evacuation of Heritage Collections. Paris, UNESCO & Rome, ICCROM. Available at: https://www.iccrom.org/wp-content/uploads/Endangered-Heritage_INTERACTIVE.pdf [Accessed 14 February 2018].
Permanent link: https://perma.cc/7J4C-TJDK
United States Army Corps of Engineers. 2013. Urban Search & Rescue Shoring Operations Guide. Washington, DC, United States Department of Defence. Available at:http://www.disasterengineer.org/LinkCl ick.aspx?f i let icket=_qYQCrKHi2k%3D&tabid=57&mid=394 [Accessed 14 July 2018].
Permanent link: https://perma.cc/H6NA-WBRY
Van Balen, K. 2008. The Nara Grid: An evaluation Scheme Based on the Nara Document on Authenticity. APT Bulletin, 39(2/3): 39–45. Available at: http://orcp.hustoj.com/wp-content/uploads/2016/01/2008-The-Nara-Grid-An-Evaluation-Scheme-Based-on-the-Nara-Document-on-Authenticity.pdf [Accessed 17 January 2018].
Permanent link: https://perma.cc/DL8A-E32V

Via di San Michele 1300153 RomeItaly+39 06585531www.iccrom.org
Herengracht 6031017 CE AmsterdamNetherlands+31 20 3449 160www.princeclausfund.org
© ICCROM 2018© Prince Claus Fund for Culture and Development 2018
ICCROM ISBN 978-92-9077-282-8Prince Claus Fund ISBN 978-90-822913-8-4
Printed thanks to the generosity of the Principality of Monaco.
#culturecannotwait
9 789290 772828
ISBN 978-92-9077-282-8
FIRST AID TO CULTURAL HERITAGE IN TIMES OF CRISISToolkit I