FILE AND MEDIA STORAGE HIDDEN KEYBOARD TRAY PULL-OUT …
8
FILE AND MEDIA STORAGE HIDDEN KEYBOARD TRAY PULL-OUT WORK SURFACE 42 FINE WOODWORKING
Transcript of FILE AND MEDIA STORAGE HIDDEN KEYBOARD TRAY PULL-OUT …
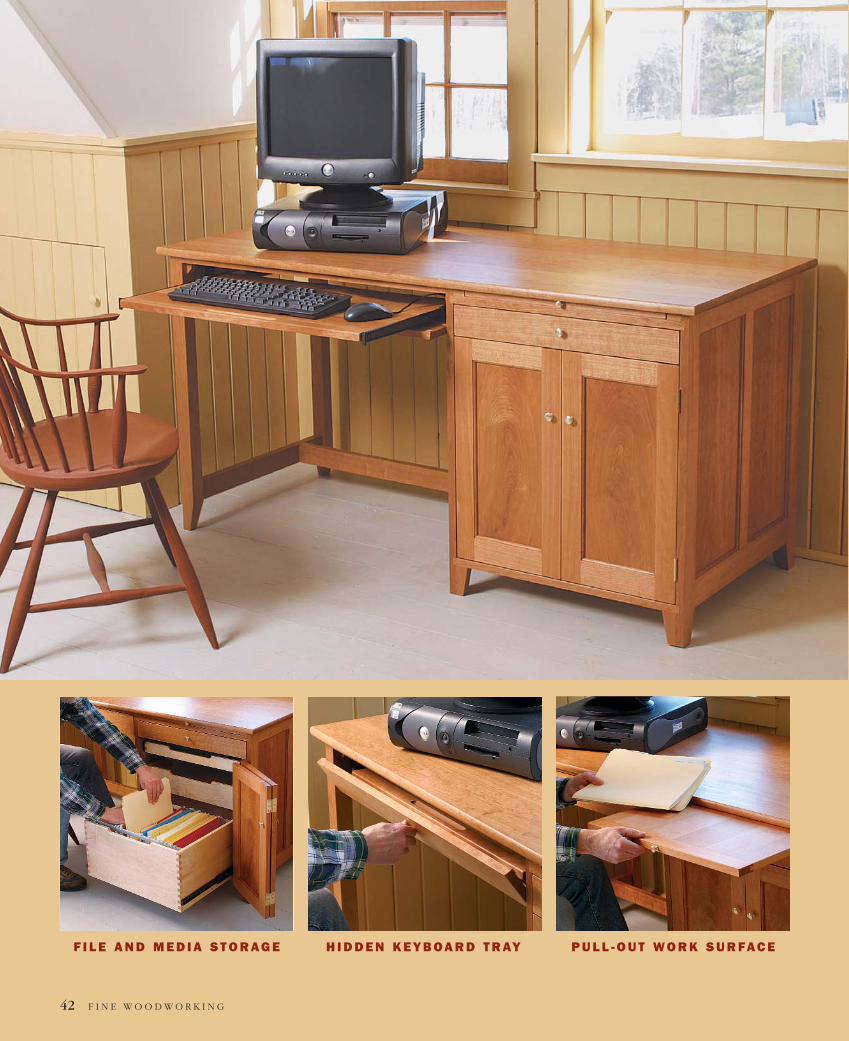
F I L E A N D M E D I A S T O R A G E H I D D E N K E Y B O A R D T R AY P U L L - O U T W O R K S U R FA C E
42 F I N E W O O D W O R K I N G
n my study at home stands a lovely, tallsecretary desk with bookcase, glowingbeautifully in its 20-year-old patina. For
the past several years it’s been piled highwith papers, notes, photos, stuff and morestuff. I make periodic assaults on the piles,but the fact of the matter is that I don’twork at the desk anymore. I now work—doing letters, bills, e-mail—about 8 ft. awayat a small table that holds the computer,with storage in a cabinet below. On someK-Mart-bought shelves lie a printer, scan-ner, files and books.
Whether you have made the plunge intoworking from a home office or just findyourself using the computer more often,maybe it’s time to give the computer a realplace in your home on a piece of furniturethat works well, is built to last and is a plea-sure to live with.
My original plan was for a cabinet similarto an entertainment center that couldhouse the whole system and be closed upwhen not in use. But I suspect that manypeople work with their computer in shortbursts throughout the day and week andwant it out and accessible. Also, today’scomputers look much more stylish thanthe gray boxes of a few years ago.
Another problem with a cabinet designthat closes everything away is that by ne-cessity it becomes quite large and ratherawkward-looking, especially if your com-puter has a large monitor.
That’s how I arrived at an unobstructedtabletop, with enough room for equipmentand workspace. An additional pull-outwork surface is handy. Add an adaptablestorage cabinet below and a keyboard traybehind a traditional drawer front, andpresto, I had my solution.
Major components—monitor, processorand printer—go on top. The processorcould also go on the floor, either in the
J U L Y / A U G U S T 2 0 0 3 43Drawings: Bob La Pointe; photos, facing page: Michael Pekovich
Build a Computer DeskWith plenty of work surface and efficient storage, this desk is not only functional but also enhances the home office
B Y C H A R L E S D U R F E E
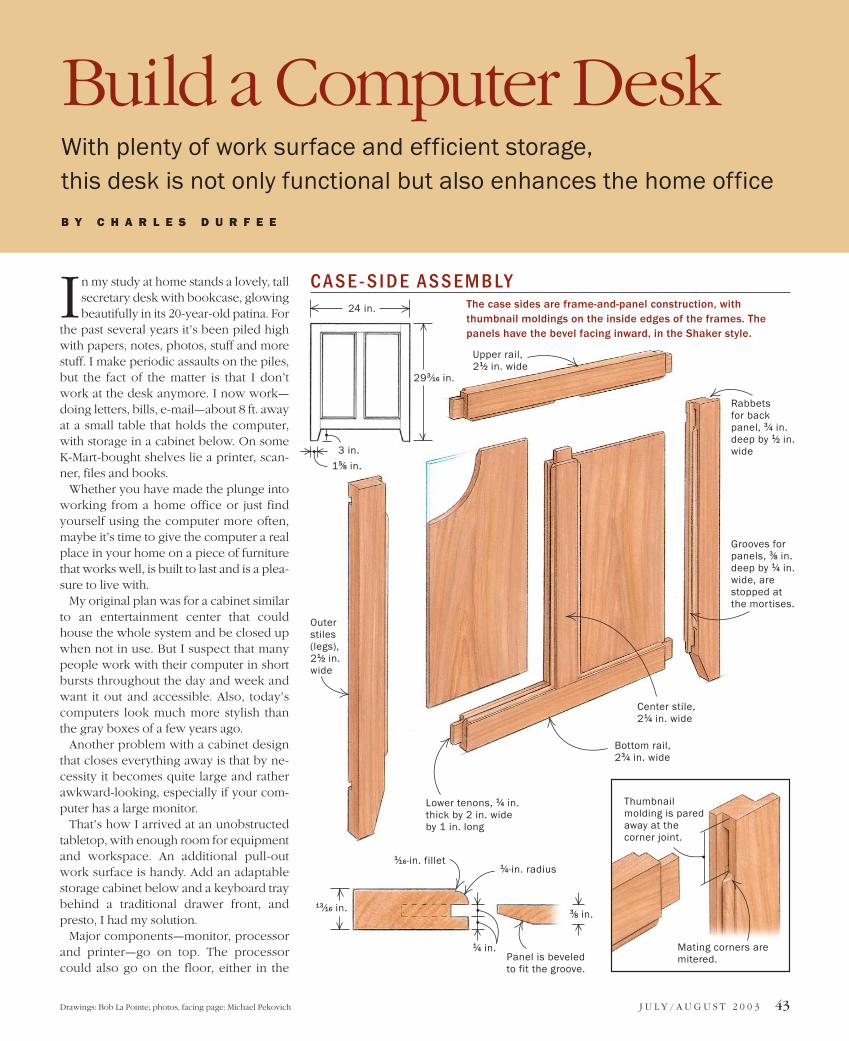
C A S E - S I D E A S S E M B LYThe case sides are frame-and-panel construction, withthumbnail moldings on the inside edges of the frames. Thepanels have the bevel facing inward, in the Shaker style.
1⁄16-in. fillet
Outerstiles(legs), 21⁄2 in.wide
Lower tenons, 1⁄4 in.thick by 2 in. wideby 1 in. long
Thumbnailmolding is paredaway at thecorner joint.
Mating corners aremitered.
3 in.
15⁄8 in.
293⁄16 in.
24 in.
Upper rail, 21⁄2 in. wide
Rabbets for backpanel, 3⁄4 in.deep by 1⁄2 in.wide
Center stile, 21⁄4 in. wide
Grooves forpanels, 3⁄8 in.deep by 1⁄4 in.wide, arestopped atthe mortises.
Bottom rail, 23⁄4 in. wide
1⁄4-in. radius
3⁄8 in.
Panel is beveledto fit the groove.
1⁄4 in.
13⁄16 in.
I

44 F I N E W O O D W O R K I N G Photos, except where noted: Asa Christiana
footwell or up on brackets. Wires are bun-dled and routed out of the way.
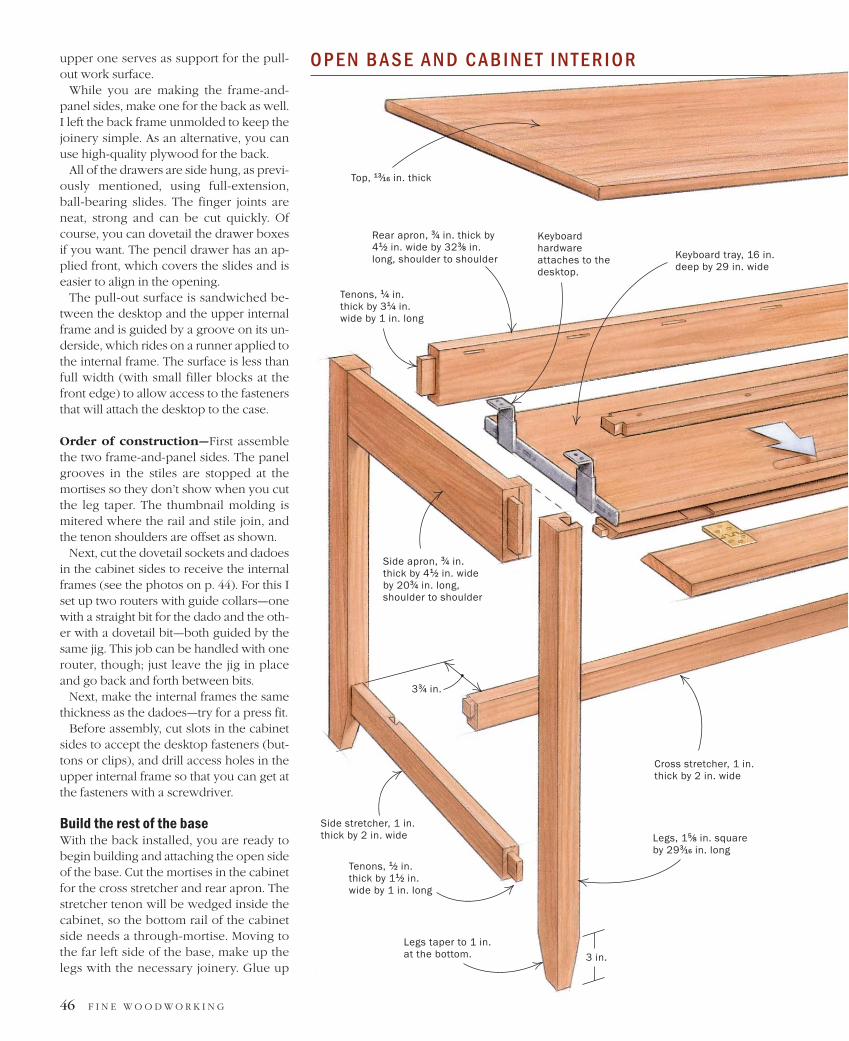
When it comes to computer desks, think function firstThis is a classic case of inside-out design:Begin with the function and work fromthere. The height is 30 in., though tall peo-ple may want to add an inch or two. Thekeyboard pulls out at approximately 26 in.,a comfortable height. The length of thedesk is 60 in. but could be extended.Stretchers support the legs at the open endand tie the design together by continuingthe lower line of the cabinet.
In keeping with a Shaker aesthetic, thecabinet and doors are of frame-and-panelconstruction with thumbnail molding (alsocalled sticking) on the inside edge of theframe. Classic Shaker style almost alwaysleft door panels flat (with the beveled sidefacing inward). The desktop edge gets aslight bullnose profile. In a departure fromthe Shaker style, I used brass knobs.
An additional work surface pulls out tothe right, closer at hand than the desktopwhen you are using the keyboard (leftiesmight want to reverse the entire desk). Thepencil drawer, not covered by the doors, iseasily accessible.
I chose bifold doors over single or dou-
ble doors. A single door would stick outtoo far when open, which it often will bewhen you are working at the desk. Anddouble doors would block access to thecabinet from a sitting position.
Behind the doors are two small drawersabove a file drawer. The top drawer holdspaper, print cartridges and the like, or evena flatbed scanner. The middle drawer canhold CDs and other supplies. The filedrawer is the lateral type, easier to accesswhile seated at the desk. Closing the doorscovers up all of this neatly. The drawers are hung on full-extension slides. Thesescrew-mounted commercial slides allowthe components to be moved easily in thefuture. I used finger joints in the drawers,which are easier to make than dovetailsand are in keeping with the utilitarian na-ture of this desk.
A wood keyboard tray is mounted onspecial pull-out hardware that’s attachedto the underside of the desktop. The trayis hidden behind a drawer front that folds down.
Construction starts with the cabinetThe basic structure is a table, with a cabinetfor one end instead of legs. Because thecabinet is the most complex part, it is agood place to begin construction.
The two side assemblies are joined to-gether by internal frames, top and bottom.The bottom one has dust panels, while the
C A B I N E T C O N S T R U C T I O N
Dovetails and dadoes with one jig. A routeroutfitted with a guide collar rides in a long jigplaced squarely across the cabinet side.
First, rout in from the front and back to cutthe dovetail sockets. Clamp a square of ply-wood to the jig to act as a stop.
Rout the long dado next. Use a straightbit to rout a shallow dado that stops at eachdovetail socket.
Dovetail the front and rear rails on therouter table. Set the depth first, then movethe fence gradually to creep up on a perfect fit.
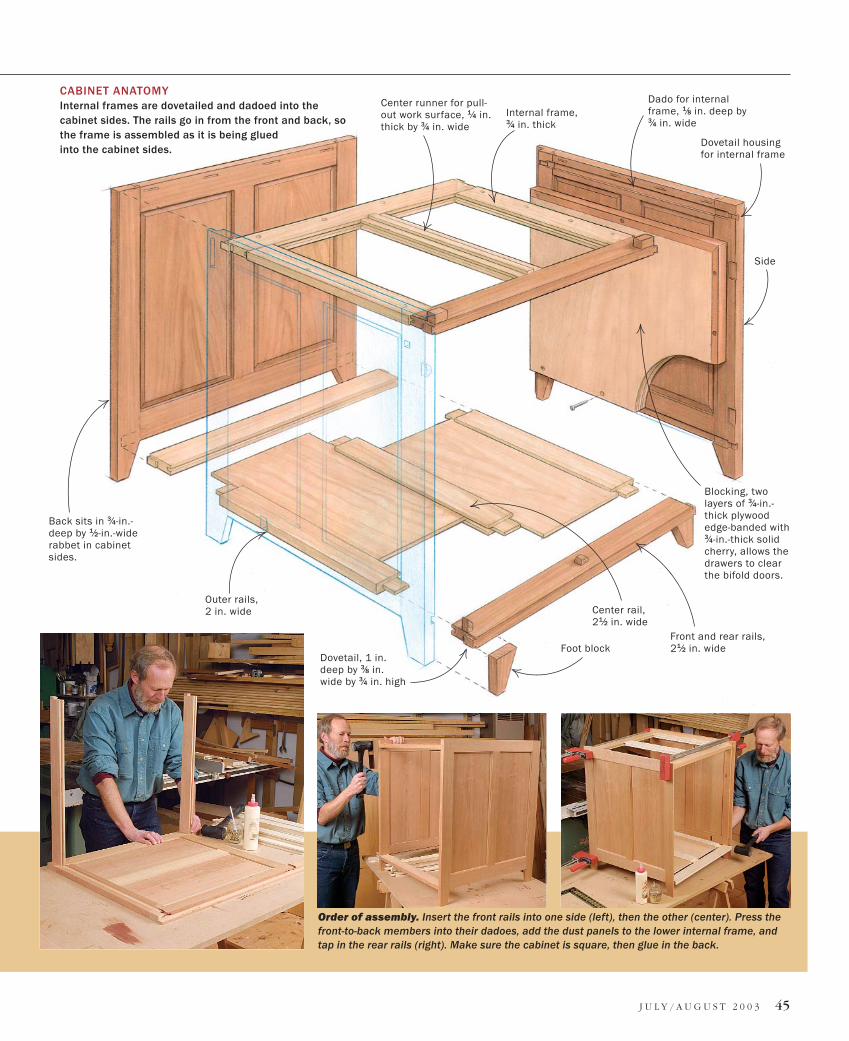
J U L Y / A U G U S T 2 0 0 3 45
Outer rails, 2 in. wide
Dovetail, 1 in.deep by 3⁄8 in.wide by 3⁄4 in. high
Center rail, 21⁄2 in. wide
Front and rear rails,21⁄2 in. wideFoot block
Center runner for pull-out work surface, 1⁄4 in.thick by 3⁄4 in. wide
Internal frame, 3⁄4 in. thick
Back sits in 3⁄4-in.-deep by 1⁄2-in.-widerabbet in cabinetsides.
Dovetail housingfor internal frame
Side
Dado for internalframe, 1⁄8 in. deep by3⁄4 in. wide
Blocking, twolayers of 3⁄4-in.-thick plywoodedge-banded with3⁄4-in.-thick solidcherry, allows thedrawers to clearthe bifold doors.
CABINET ANATOMYInternal frames are dovetailed and dadoed into thecabinet sides. The rails go in from the front and back, sothe frame is assembled as it is being glued into the cabinet sides.
Order of assembly. Insert the front rails into one side (left), then the other (center). Press thefront-to-back members into their dadoes, add the dust panels to the lower internal frame, andtap in the rear rails (right). Make sure the cabinet is square, then glue in the back.
upper one serves as support for the pull-out work surface.
While you are making the frame-and-panel sides, make one for the back as well.I left the back frame unmolded to keep thejoinery simple. As an alternative, you canuse high-quality plywood for the back.
All of the drawers are side hung, as previ-ously mentioned, using full-extension,ball-bearing slides. The finger joints areneat, strong and can be cut quickly. Ofcourse, you can dovetail the drawer boxesif you want. The pencil drawer has an ap-plied front, which covers the slides and iseasier to align in the opening.
The pull-out surface is sandwiched be-tween the desktop and the upper internalframe and is guided by a groove on its un-derside, which rides on a runner applied tothe internal frame. The surface is less thanfull width (with small filler blocks at thefront edge) to allow access to the fastenersthat will attach the desktop to the case.
Order of construction—First assemblethe two frame-and-panel sides. The panelgrooves in the stiles are stopped at themortises so they don’t show when you cutthe leg taper. The thumbnail molding ismitered where the rail and stile join, andthe tenon shoulders are offset as shown.
Next, cut the dovetail sockets and dadoesin the cabinet sides to receive the internalframes (see the photos on p. 44). For this Iset up two routers with guide collars—onewith a straight bit for the dado and the oth-er with a dovetail bit—both guided by thesame jig. This job can be handled with onerouter, though; just leave the jig in placeand go back and forth between bits.
Next, make the internal frames the samethickness as the dadoes—try for a press fit.
Before assembly, cut slots in the cabinetsides to accept the desktop fasteners (but-tons or clips), and drill access holes in theupper internal frame so that you can get atthe fasteners with a screwdriver.
Build the rest of the baseWith the back installed, you are ready tobegin building and attaching the open sideof the base. Cut the mortises in the cabinetfor the cross stretcher and rear apron. Thestretcher tenon will be wedged inside thecabinet, so the bottom rail of the cabinetside needs a through-mortise. Moving tothe far left side of the base, make up thelegs with the necessary joinery. Glue up
46 F I N E W O O D W O R K I N G
O P E N B A S E A N D C A B I N E T I N T E R I O R
Keyboard tray, 16 in.deep by 29 in. wide
Keyboardhardwareattaches to thedesktop.
Tenons, 1⁄4 in.thick by 31⁄4 in.wide by 1 in. long
Side apron, 3⁄4 in.thick by 41⁄2 in. wideby 203⁄4 in. long,shoulder to shoulder
Rear apron, 3⁄4 in. thick by41⁄2 in. wide by 323⁄8 in.long, shoulder to shoulder
Top, 13⁄16 in. thick
Legs, 15⁄8 in. squareby 293⁄16 in. long
Legs taper to 1 in.at the bottom.
Tenons, 1⁄2 in.thick by 11⁄2 in.wide by 1 in. long
3 in.
33⁄4 in.
Side stretcher, 1 in.thick by 2 in. wide
Cross stretcher, 1 in.thick by 2 in. wide

J U L Y / A U G U S T 2 0 0 3 47
Fold-down front,3⁄4 in. thick by33⁄4 in. wide by323⁄8 long
Lower rail, 3⁄4 in.thick by 13⁄4 in.wide (beveled tomate with fold-down front)
Top rail, 3⁄4 in.thick by 15⁄8 in.wide, is joined tothe top of the legand cabinet withlap dovetails.
Pull-out worksurface, 3⁄4 in. thickby 20 in. wide by22 in. long
Breadboard ends,2 in. wide, areattached withsliding dovetails.
Drawer boxes, 22 in.deep, are made of 1⁄2-in.-thick stock with1⁄2-in. finger joints.
Pencil drawer,21⁄4 in. deep
Drawer front, 223⁄8 in. wide by27⁄8 in. high, isscrewed to thepencil drawer.
Stiles and toprail, 3⁄4 in. thickby 21⁄4 in. wide
Bottom rail, 3⁄4 in. thick by 21⁄2 in. wide
Bifold doors,111⁄4 in. wide by21 in. high
293⁄16 in.30 in.
24 in.
26 in.60 in.
24 in.34 in.
10 in.
4 in.
2 in.Fold-downfront
Stopblock
Top rail
Lower rail
Desktop
Keyboard tray
DETAIL OF DESK FRONT

48 F I N E W O O D W O R K I N G
the two legs with their shared stretcherand apron.
Cut the joinery in the open-base assem-bly for the various cross members. Be-cause the lower rail—the one that will holdthe keyboard front—must be set back andbeveled, you will need to glue a block tothe front of the side apron to accommo-date its mortise. This rail is through-tenoned and wedged into the cabinet, likethe cross stretcher.
Before assembling the base, mortise andfit the drop-leaf hinges on the fold-downdrawer front and the lower rail. Now youare ready to put this whole piece together.You should work on a surface that is large
enough yet flat. I sometimes put a sheet ofmedium-density fiberboard (MDF) on thebench or floor for such a task. Before be-ginning, I also recommend unplugging thephone, turning off the radio and invokingthe appropriate spirits.
Lay the cabinet on its side. Insert the rearapron, the cross stretcher and the lowerfront rail into their mortises in the open-base assembly and then into their mortisesin the cabinet. Flip the entire base onto itsfeet, draw the joints home with clamps andsquare it all up. Use a straightedge to checkthat the cabinet front and the front rail arein the same plane. Wedge the two through-tenons from inside the cabinet.
Before assembly, install the drop-leafhinges in the lower rail. Extra clearance isneeded for the hinge barrel. Detach the fold-down front before installing the rail.
Attach the lower rail, stretcher and rearapron to the leg assembly first. The toprail goes in afterward.
Now attach the open-base assembly tothe cabinet. This is easiest to do with thecabinet on its side.
Last, scribe the joinery for the top rail. It has lap dovetails on both ends, which are let into thetop of the cabinet and the front leg.
O P E N - B A S E A S S E M B LY
J U L Y / A U G U S T 2 0 0 3 49
There still is one rail to be attached. Thetop rail is joined to the legs and cabinetwith lap dovetails. Make the rail, and thenuse it to scribe its dovetail sockets in thecabinet and legs. Chop out these sockets.Before gluing in the top rail, drill and coun-tersink holes in it for attaching the desktop.
I chose two methods to attach the top. Iused screws through the top rail, as justmentioned. I also used wood buttons ormetal S-clips inside the cabinet and theback and side table aprons. These are ac-cessed in the cabinet area through holes inthe upper internal frame.
Apply a finish and add final touchesHandplane surfaces, if possible, to cleanthem up. That, combined with a cabinetscraper, removes the machine marks. Asthe project progresses and parts are readyfor assembly, knock off edges with a blockplane, though not where that would leavea gap at a flush joint. After assembly, finishknocking off edges and do a final sandingwith 220-grit paper.
For this cherry piece, I chose an oil finish,which is excellent for bringing out cherry’srich, mellow tone. I prefer an oil-varnishmix, which gives a bit more surface dura-bility and is easy to wipe on and repair.You can mix your own, though for years Ihave used Minwax Antique Oil with satis-faction. If you want a more durable work
surface, use varnish. I have read that lac-quer and plastic will stick together overtime, making lacquer a poor choice for acomputer desk.
Wire management deserves attention.The wires that come out the back of com-ponents can go through a hole in the desk-top, or you can route them over the back.There are many gizmos on the market to-day to accomplish this: pop-up outlets,grommets and the like (Rockler Wood-working and Hardware is a good source forthis stuff). Then you can mount a powerstrip/surge protector in the footwell, highon the cabinet wall. Harness clips or wirechannels can keep the wires bundled andout of the way. If you keep a scanner orother component inside the cabinet, drill ahole in the cabinet side or bottom to runwires. Leave enough slack so that the traycan be pulled out easily. Bear in mind thatthe age of wireless connections is comingquickly, and we may soon outgrow thesebundles of wires.
I encourage you to think through this de-sign for yourself and adapt it to your ideasand needs. The aim here is to build a pieceof furniture that will serve your work habitsand adapt to changing technology whilebeing a pleasure to live with. �
Charles Durfee is a furniture maker in Woolwich,Maine.
DRAWER SLIDESFull extension, 22 in., ebony color,
Model KV 8400Woodworker’s Supply (800-645-9292;
www.woodworker.com)
KEYBOARD SLIDEVariable height, 16 in., black color,
Model KV 8150 Woodworker’s Supply
BUTT HINGES2 in. by 11⁄2 in., “standard” finish,
Part No. 142H5Whitechapel Ltd. (800-468-5534;
www.whitechapel-ltd.com)
DROP-LEAF TABLE HINGES3 in. by 11⁄2 in., “standard” finish,
Part No. 166H17Whitechapel Ltd.
KNOBSSold as desk interior knobs, 3⁄4 in. (except 5⁄8-in. size on pull-out surface), semibright
Horton Brasses (800-754-9127;www.horton-brasses.com)
HOME-OFFICE HARDWAREFile-drawer fittings, wrist rest, mediastorage, wire managers, grommets
Rockler Woodworking and Hardware (800-279-4441; www.rockler.com)
TABLETOP FASTENERSRockler Woodworking and Hardware
S O U R C E S F O R H A R D W A R E
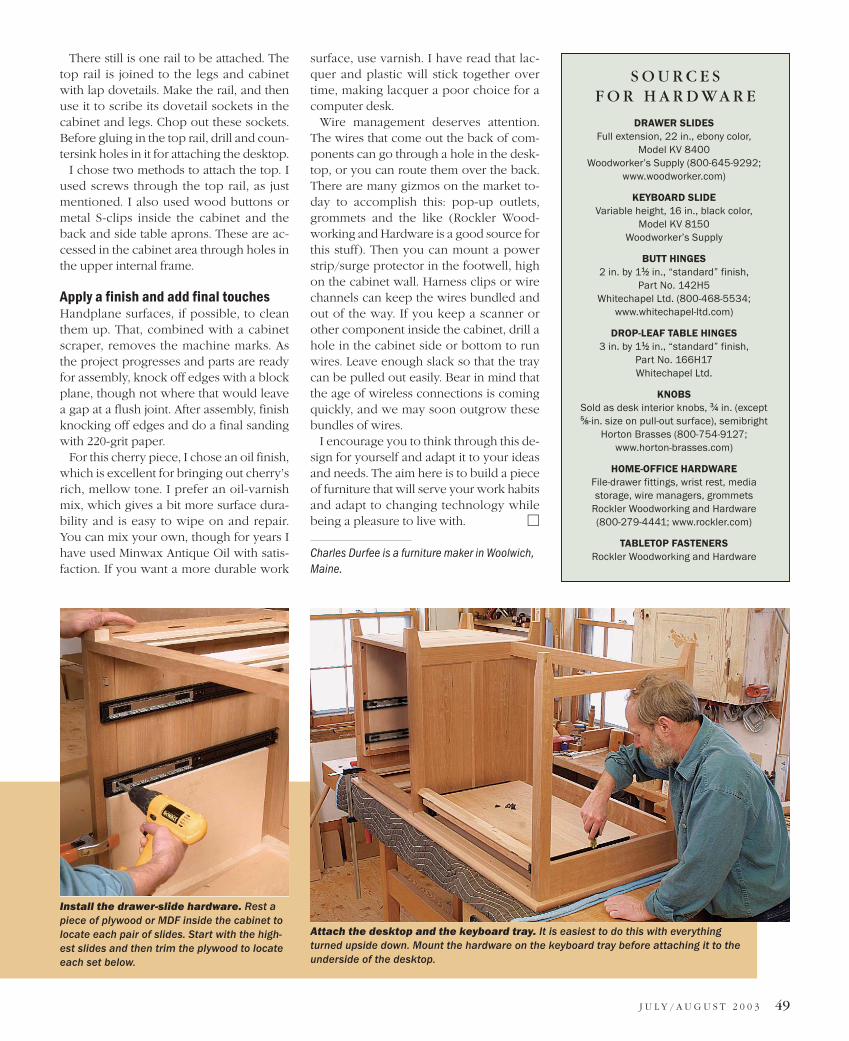
Install the drawer-slide hardware. Rest apiece of plywood or MDF inside the cabinet tolocate each pair of slides. Start with the high-est slides and then trim the plywood to locateeach set below.
Attach the desktop and the keyboard tray. It is easiest to do this with everythingturned upside down. Mount the hardware on the keyboard tray before attaching it to theunderside of the desktop.