
TLC Rules and Regulations for the FHV Industry (Vehicles and Bases)

1 | P a g e
This instruction manual is for FHV bases that are submitting their electronic trip records using the Excel spreadsheet provided by the TLC. You must
use the spreadsheet provided to submit your trip records. The spreadsheet is designed to allow a dispatcher to record a trip as they are taking the
call. You can use the spreadsheet to record, organize, and look up trips more easily than if you were to report trip records on paper. Please follow
the instructions provided for you in this guide to familiarize yourself with the process for submitting your base’s trip records.
Step 1: Download the main Trip Record Excel spreadsheet, at http://www.nyc.gov/triprecords and save it to your computer.
Step 2: Double click the main Trip Record Excel spreadsheet file that you just downloaded to open it. Your screen should now look like the image below.
The Trip Record template has two parts, a header and a trip log. The header tells you what information you are supposed to enter in each column and
the trip log is where you enter information about each trip that your base dispatched. You are only responsible for submitting records for trips that your
base dispatched. You do not have to record trips that other bases dispatched to your affiliated vehicles or that you farm out to other bases.
FHV TRIP RECORD EXCEL SPREADSHEETS INSTRUCTIONS
Header
Trip Log
2 | P a g e
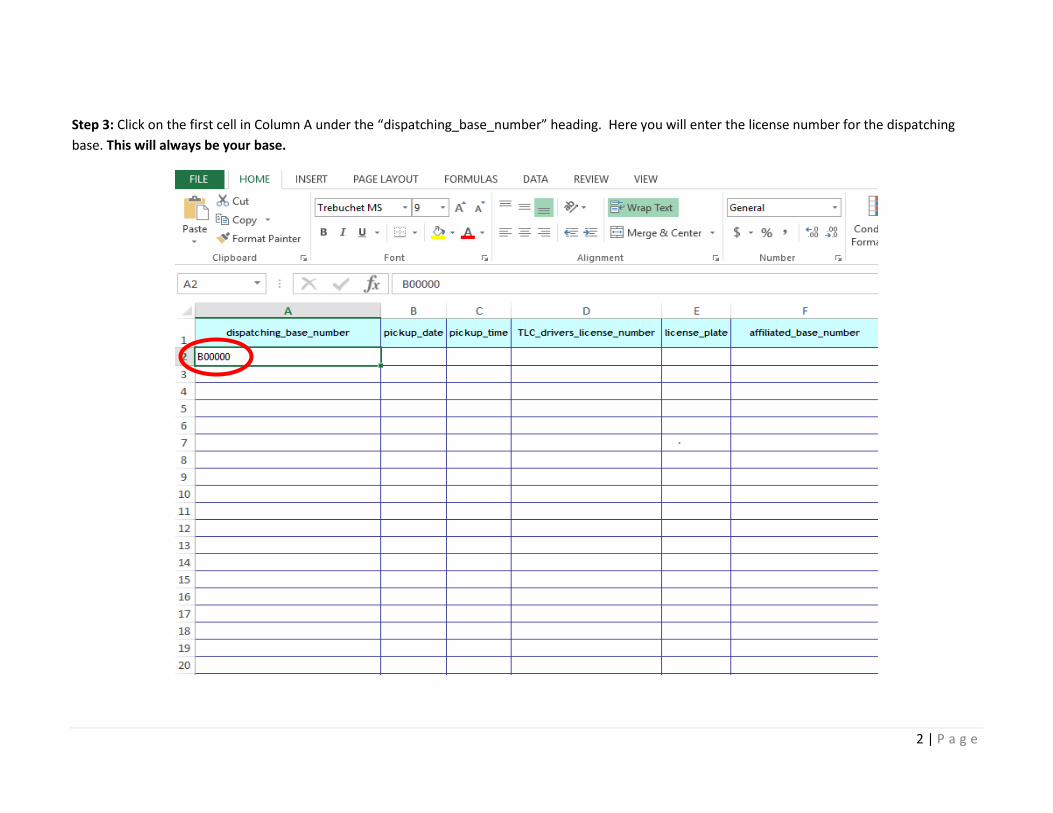
Step 3: Click on the first cell in Column A under the “dispatching_base_number” heading. Here you will enter the license number for the dispatching
base. This will always be your base.

3 | P a g e
Step 4: Click on the first cell in Column B under the “pickup_date” heading. Here you will enter the date that the customer was picked up. For
reservations where the customer called in advance, this is the date the customer wanted to be picked up, not the date the customer called. Enter the
date using the format: month number-day number-year. Example: If the pickup was requested on September 30, 2012, type 09-30-2012. An example of
what this looks like is shown in the spreadsheet below. In order to allow for this date setting, select “Custom” from the drop down menu (circled below).
Under Custom, click on “More Number Formats” and select “mm-dd-yyyy”.
4 | P a g e
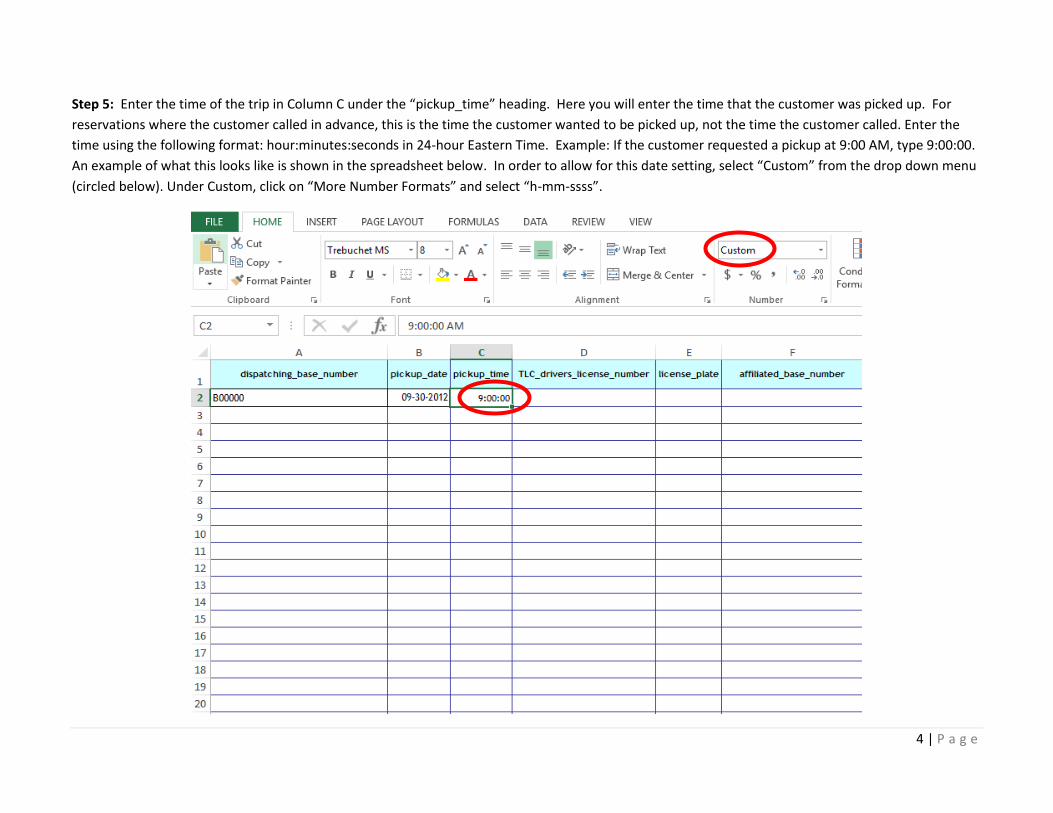
Step 5: Enter the time of the trip in Column C under the “pickup_time” heading. Here you will enter the time that the customer was picked up. For
reservations where the customer called in advance, this is the time the customer wanted to be picked up, not the time the customer called. Enter the
time using the following format: hour:minutes:seconds in 24-hour Eastern Time. Example: If the customer requested a pickup at 9:00 AM, type 9:00:00.
An example of what this looks like is shown in the spreadsheet below. In order to allow for this date setting, select “Custom” from the drop down menu
(circled below). Under Custom, click on “More Number Formats” and select “h-mm-ssss”.
5 | P a g e
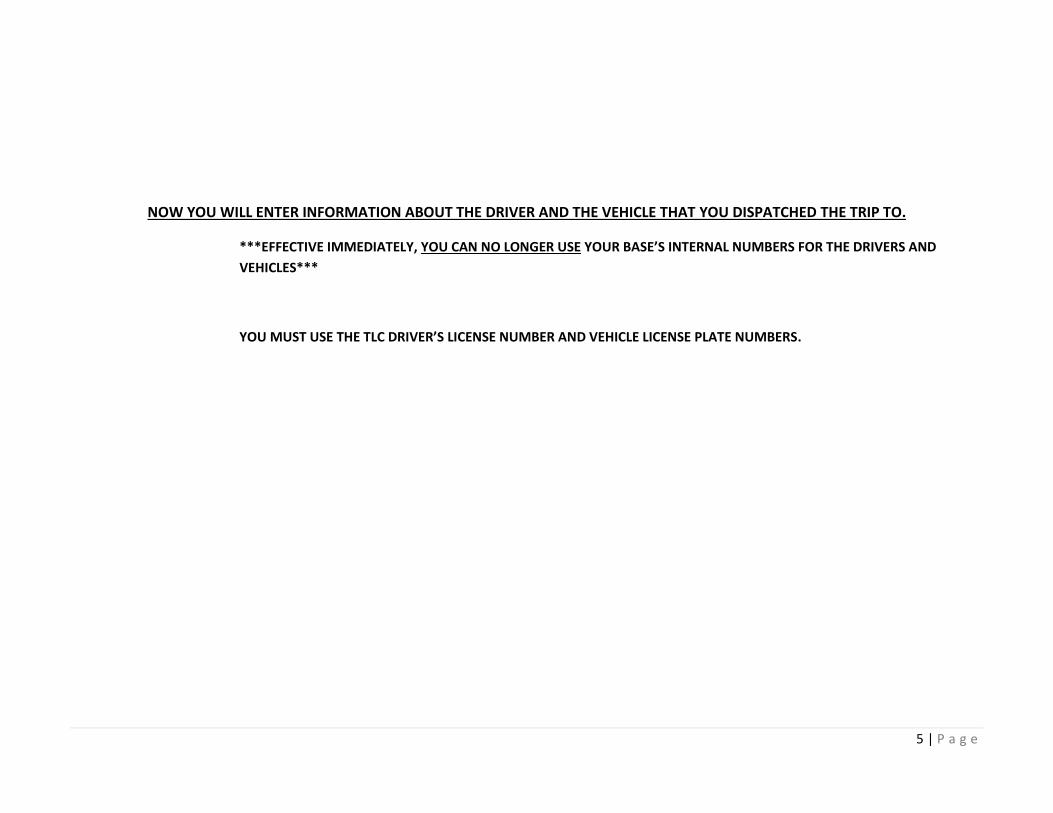
NOW YOU WILL ENTER INFORMATION ABOUT THE DRIVER AND THE VEHICLE THAT YOU DISPATCHED THE TRIP TO.
***EFFECTIVE IMMEDIATELY, YOU CAN NO LONGER USE YOUR BASE’S INTERNAL NUMBERS FOR THE DRIVERS AND
VEHICLES***
YOU MUST USE THE TLC DRIVER’S LICENSE NUMBER AND VEHICLE LICENSE PLATE NUMBERS.

6 | P a g e
Step 6: Enter the TLC driver’s license number of the driver who completed the trip in Column D under the “TLC_drivers_license_number” heading. Then,
enter the vehicle license plate number in Column E under the “license_plate” heading.
Example: If the driver with the TLC License number 234567 and the vehicle with the license plate T00000C was dispatched on September 30, 2012 at
9:00AM, enter 234567 and T00000C. An example of what this looks like is shown in the spreadsheet below.

7 | P a g e
Step 7: Enter the license number of the base that the dispatched vehicle is affiliated to in Column F under “affiliated_base_number” heading. If the
vehicle is affiliated with your base, you will enter your own base number. If the vehicle is affiliated with a different base, you will enter that base’s
license number here.
Example: If the vehicle your base dispatched was affiliated to a different base, Base B77777, enter B77777. An example of what this looks like is shown in
the spreadsheet below.

8 | P a g e
Step 8: Choose the type of pick-up address you have for this trip in Column G under the “pickup_location_type” heading. When you click on the cell in
Column G, you will notice a small arrow icon. Click on the arrow and a menu of options will appear. The options you will find are: “Exact Address”,
“Intersection of”, or “Airport”. Choose the option that best represents the type of address where the passenger requested the pickup. An example of
what this looks like is shown in the spreadsheet below.
Click there
Choose one

9 | P a g e
Step 9: Enter the location where the passenger requested to be picked up in Column H under the “pickup_location_name” heading.
If you selected “Exact Address” in Column G, enter the exact address of the passenger pick-up request in Column H. Please do NOT include any
of the following: name/phone of passenger, apartment numbers, or floor numbers. If you selected “Intersection Of” in Column G, enter the
cross streets of the passenger pick-up request in Column H. An example of this format is “33rd Street and 7th Ave, Manhattan.” If you selected
“Airport” in Column G, enter the abbreviated airport name of the passenger pick-up request in Column H. For John F. Kennedy Airport use “JFK”
and for LaGuardia Airport use “LGA”. An example of what the Exact Address format looks like is shown in the spreadsheet below.
10 | P a g e
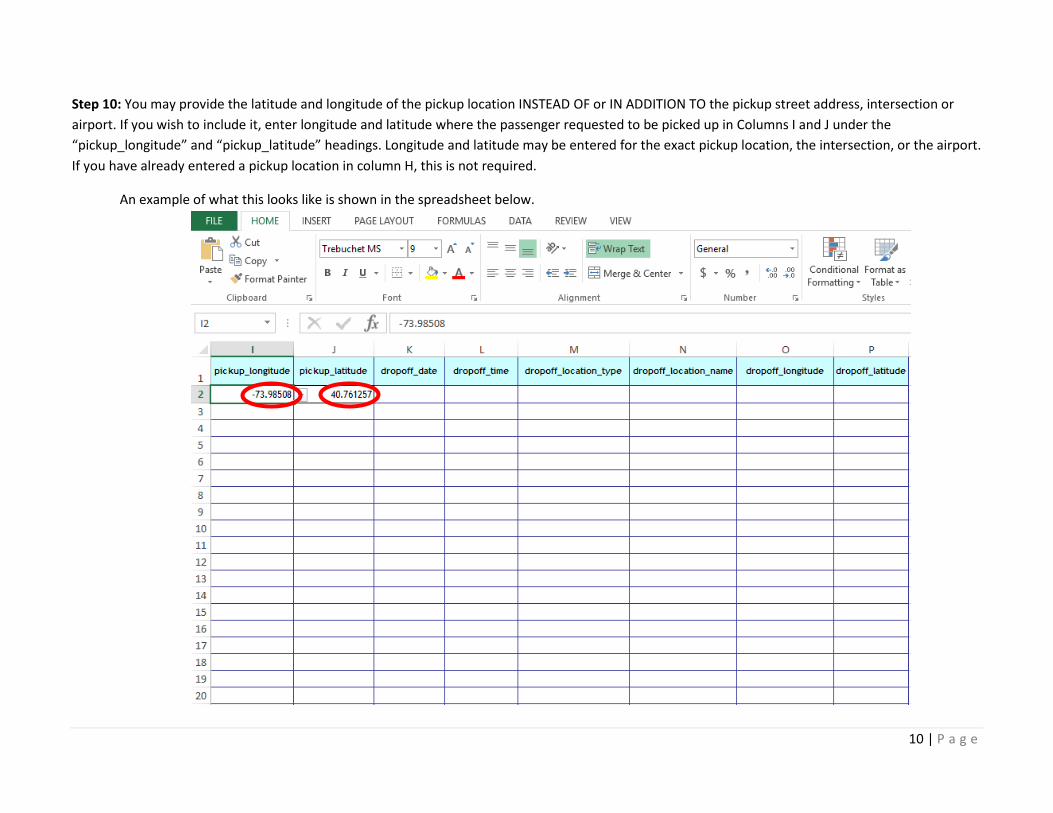
Step 10: You may provide the latitude and longitude of the pickup location INSTEAD OF or IN ADDITION TO the pickup street address, intersection or
airport. If you wish to include it, enter longitude and latitude where the passenger requested to be picked up in Columns I and J under the
“pickup_longitude” and “pickup_latitude” headings. Longitude and latitude may be entered for the exact pickup location, the intersection, or the airport.
If you have already entered a pickup location in column H, this is not required.
An example of what this looks like is shown in the spreadsheet below.

11 | P a g e
Step 11: THIS STEP IS NOW REQUIRED, YOU HAVE TO SUBMIT DROP-OFF INFORMATION. You must now submit drop-off information for EVERY trip.
You must do so in Columns K, L, M, N, O, and P under the respective headings “dropoff_date”, “dropoff_time”, “dropoff_location_type”,
“dropoff_location_name”, “dropoff_longitude”, and “dropoff_latitude”. You should enter the information in the same way you entered pick-up
information in Steps 8, 9, and 10. An example is shown in the spreadsheet below.
You may provide the latitude and longitude of the drop off location INSTEAD OF or IN ADDITION TO the drop off street address, intersection or airport. If
you wish to include it, enter longitude and latitude where the passenger requested to be dropped off in Columns O and P under the “dropoff_longitude”
and “dropoff_latitude” headings. Longitude and latitude may be entered for the exact drop-off location, the intersection, or the airport. If you have
already entered a drop off location in column N, this is not required.
12 | P a g e
Repeat Steps 3 through 11 for every trip that your base serviced. Each trip should go on its own row. For example, the first trip will go in
row 2, the second trip in row 3, and so on.
MAKE SURE YOU HAVE INCLUDED EVERY TRIP IN THE MAIN TRIP RECORD SPREADSHEET.
YOU HAVE REACHED THE END OF THE EXCEL INSTRUCTION GUIDE.
DOUBLE CHECK THAT YOU HAVE ENTERED ALL REQUIRED INFORMATION.