Faculty Portal Guide - cnsu.edu
25
Page 1 Faculty Portal Guide
Transcript of Faculty Portal Guide - cnsu.edu

Page 1
Faculty Portal Guide

Page 2
CNU Faculty Portal Guide
Table of Contents Faculty Portal.........................................................................................................................................................3
Logging In When You Are Off Campus ................................................................................................................ 3
Logging In When You Are On Campus ................................................................................................................ 4
Step-By-Step: Log In to the Faculty Portal ......................................................................................................... 5
Step-By-Step: Recovering Forgotten Passwords ............................................................................................... 7
Changing Theme and Font Size ............................................................................................................................ 8
Change Term ........................................................................................................................................................... 8
Edit Address............................................................................................................................................................. 9
Change Password ................................................................................................................................................... 9
Logout .................................................................................................................................................................... 10
My Students ........................................................................................................................................................... 11
Step-By-Step: View a Student’s Transcript ....................................................................................................... 11
Step-By-Step: View a Student’s Schedule ....................................................................................................... 12
Step-By-Step: View a Student’s Grades .......................................................................................................... 13
Student Risk (Academic Alert/Early Warning Tracking) ................................................................................... 14
Step-By-Step: Add a Student Risk Indicator .................................................................................................... 14
My Schedule ......................................................................................................................................................... 15
Registration ........................................................................................................................................................ 16
Academic ........................................................................................................................................................... 17
Class Roster ........................................................................................................................................................... 17
Step-By-Step: Access the Class Roster ............................................................................................................. 17
Step-By-Step: Printer-Friendly Class Roster ...................................................................................................... 18
Directory ................................................................................................................................................................ 19
Email Students ....................................................................................................................................................... 20
Faculty Contact ..................................................................................................................................................... 21
Course Management ......................................................................................................................................... 22
Submitting Grades ................................................................................................................................................ 22
Step-By-Step: Entering and Submitting Final Grades ..................................................................................... 22
Attendance Entry ................................................................................................................................................... 25
Step-By-Step: Entering and Submitting Attendance ........................................................................................ 25

Page 3
Faculty Portal
Logging In When You Are Off Campus
1. Go to https://cams.cnsu.edu/Faculty
For your log in, type the following: cnsu\”YOUR CNU Network Account” ”YOUR CNU Network Account” is the same account you use to access your work computer and Email services. Use your username and password to sign in to your network account
2. You will be automatically redirected to the log in screen for your faculty portal. Log in here with your Username and Password that was provided to you by the Office of the Registrar. Select the term you would like to view and click “Login.”

Page 4
Logging In When You Are On Campus
Access the portal via http://cams.cnsu.edu/faculty/login.asp.
If your institution is using Active Directory to authenticate, you may not be required to log in at this page.
Web Browsers supported for the Faculty Portal are:
Windows – Internet Explorer 8 & 9 and Firefox 5.x or greater
Mac – Safari 4 (or greater) and Firefox 5.x or greater
Note: When viewing non-English languages, users browsing the portals must set their browser to UTF-8
encoding. Internet Explorer’s Compatibility View should be turned off.
Page 5
Step-By-Step: Log In to the Faculty Portal
1. Upon accessing the Faculty Portal, if your browser is not set to allow pop-ups for this site, you will be
presented with a message indicating you need to allow pop-ups. This is necessary to allow you to
change an expired password. You will need to disable all pop-up blockers or allow pop-ups for this
site.
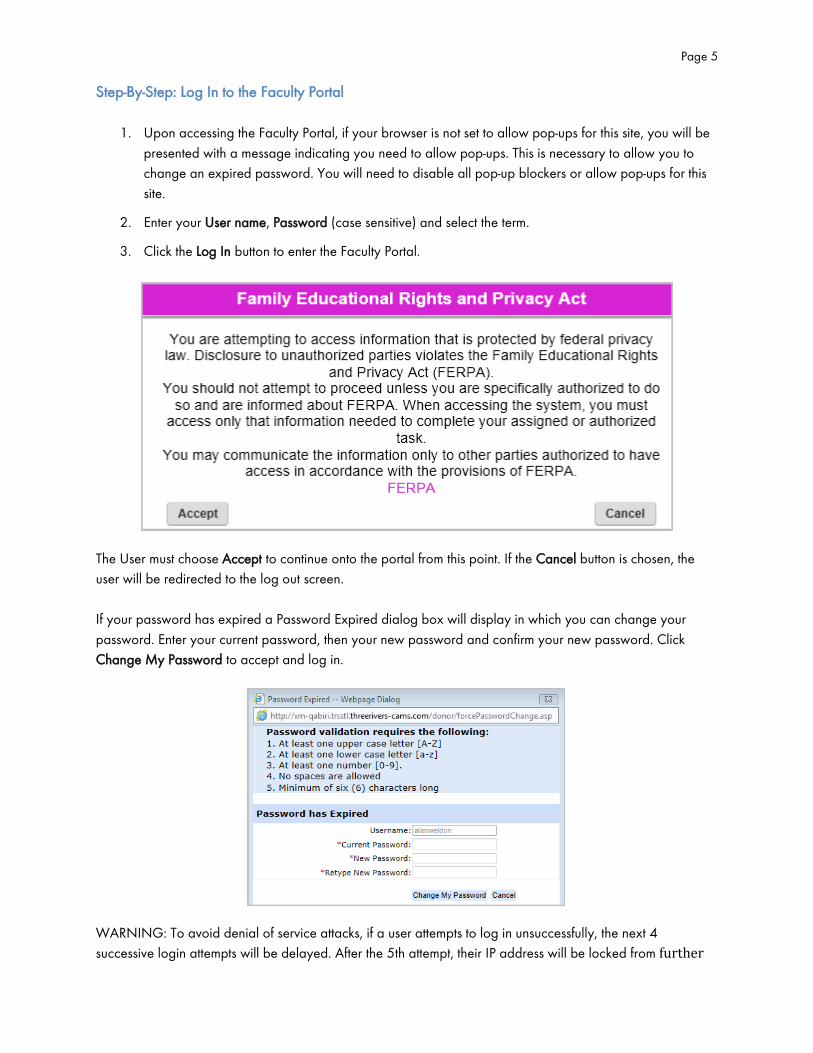
2. Enter your User name, Password (case sensitive) and select the term.
3. Click the Log In button to enter the Faculty Portal.
The User must choose Accept to continue onto the portal from this point. If the Cancel button is chosen, the
user will be redirected to the log out screen.
If your password has expired a Password Expired dialog box will display in which you can change your
password. Enter your current password, then your new password and confirm your new password. Click
Change My Password to accept and log in.
WARNING: To avoid denial of service attacks, if a user attempts to log in unsuccessfully, the next 4
successive login attempts will be delayed. After the 5th attempt, their IP address will be locked from further

Page 6
access. See the CAMS Manager document for instructions to enable/disable the IP lockout function. The
following pop up will display after the 5th failed attempt:
Upon closing the pop up, the portal will display the following:
If the user attempts to navigate away from the page and then returns, the following error will display until the
associated IP address is unlocked:
Please contact IT to unlock your IP address.

Page 7
Step-By-Step: Recovering Forgotten Passwords
1. From the Faculty Portal login page, click Forgot Password.
2. The user name and e-mail address and CAPTCHA validation will be requested.
3. Click the Reset Password button. This will then e-mail the user a link to reset their password. The
emailed link expires after one hour or after it is first used.

Page 8
Changing Theme and Font Size
Portal theme colors and font size can be easily changed by simply clicking one of the colored squares or one
of the letters "A" in the left side menu.
Change Term
Use the Current term’s Change link to select a different term. Every option on the navigation bar is based on
the current term displayed at the upper left corner.

Page 9
Edit Address
Use the Edit Address link to change address, email and phone number information. Click the Show on
Directory check box if you choose to allow other faculty members to view this information on the faculty
directory. This information is not visible from the student portal.
Change Password
Frequent password changes are recommended to protect sensitive information.
Note: If the institution uses Active Directory for automatic portal login then you will not use this feature.
Passwords for active directly will be changed at the network level.
Passwords are case sensitive and require at least one upper case letter [A-Z], one lower case letter [a-z], and
at least one number [0-9].

Page 10
Logout Use the Logout link to end the portal session.

Page 11
My Students
The My Student link displays the different options available for viewing advisee and student information. This
includes Transcript, Schedule, Degree Audit, and Grade Report. The student’s contact information is listed,
along with a photo, and any FERPA Restrictions.
Step-By-Step: View a Student’s Transcript
Unofficial student transcripts can be viewed to assist with the advising process. Faculty can only view
transcripts for students to which they are the advisor.
1. Click the My Students link in the navigation bar, and then select a student from the Advisee List or one
of your courses for the current term, which are displayed in the upper left corner of the Faculty Portal.
Click the Transcript link to view the student’s Unofficial Transcript.

Page 12
Step-By-Step: View a Student’s Schedule Easy access to a student’s schedule can be helpful during the advising process.
1. Click the My Students link in the navigation bar, and then select a student from the Advisee List or one
of your courses for the current term, which are displayed in the upper left corner of the Faculty Portal.
Click the Schedule link to view the student’s Matrix Schedule.
2. Click Select to view the student’s Matrix Schedule.
3. Click Show to see the student’s attendance for that particular course.

Page 13
Step-By-Step: View a Student’s Grades Final and Narrative grades can be viewed to assist with the advising process. Faculty can only view grades
for students to which they are the advisor.
1. Click the My Students link in the navigation bar, and then select a student from the Advisee List or one
of your courses for the current term, which are displayed in the upper left corner of the Faculty Portal.
2. Click the Grade Report link, and then choose Mid Term, Final, or Narrative Grades from the drop
down.

Page 14
Student Risk (Academic Alert/Early Warning Tracking)
Student Risk is utilized to track risk factors for students in the Faculty Portal. Faculty may view and add Student
Risk entries for students in their courses and for their advisees. At CNU, Student Risk is considered an
Academic Alert, Early Warning or whichever term the specific college chooses.
Note: Student Risk Indicators or Notes cannot be deleted from the Faculty Portal. Notes cannot be edited or
deleted from CAMS or the Faculty Portal. Student Risk Indicators with notes cannot be deleted from CAMS.
Step-By-Step: Add a Student Risk Indicator
1. Click the My Students link in the navigation bar, and then select a student from the Advisee List or one
of your courses for the current selected term.
2. Click the Student Risk link. Any existing entries will display. Notes for Student Risk Indicators display
immediately below each entry.
3. Click Edit to modify or click Add New Student Risk to open a new detail entry form.
4. The Date defaults to the current date.
5. Select the required Risk Category.
6. Once the Risk Category has been selected, the Risk Type drop-down will populate with the types
associated with that category. Select a Risk Type if desired.
7. Select the required Risk Status.
8. Click Add or Update Student Risk to save or click Cancel to exit the detail screen without saving.

Page 15
My Schedule The My Schedule link displays courses for which you are scheduled in the selected current term. Building,
room, meeting days, start time, end time, credits, and enrollment statistics are displayed. Waitlisted students, if
any, are shown for each course. Click the Printer Friendly link to display the printer-friendly schedule. The
page opens and is sent to your default printer. Close the printer-friendly page after printing or you can keep it
open while working in other areas of the portal. Click the Refresh link on the printer-friendly page to update
the page.

Page 16
Registration This section is not currently being used. We will update you in the future if and when this changes.

Page 17
Academic
Class Roster
Use the class roster to view a list of students in any class you are teaching. Once the roster displays, you can
use the Note icon to make a note for a student.
Step-By-Step: Access the Class Roster
1. Click Class Roster on the Navigation Bar. By default none of the instructor’s students display. A drop-
down menu displays which allows the instructor to select a course they are teaching this term, which
will display only those students in that class. All courses the instructor is teaching this term may be
selected to display all students in all courses.
2. Through the class roster, you can add notes to a student’s notepad in CAMS Enterprise. Only the
subject line of the notes you create will be visible to anyone other than the instructor. This note is
marked Private for the instructor.
Note: From the Faculty Portal, faculty can view notes they enter from the Faculty Portal and
public notes entered from within CAMS Enterprise. If the faculty has a CAMS user ID linked
to their faculty account in CAMS, private notes entered in CAMS by this user will be
viewable from the Faculty Portal and private notes entered from the portal can be viewed
from within CAMS.

Page 18
3. Click the Note icon to view or add notes to the record. A blank note form displays.
4. Enter the subject for the note. Anyone who can access student notes in CAMS Enterprise can view the
subject line of the note, so you may wish to refrain from placing confidential information in the Subject
field.
5. Enter the body of the note. You will be the only person who can view the text within the body of the
note.
6. Click the Submit button to save the note, or Cancel to discard.
7. Click the student name to view address information for the student.
8. Click the photo icon to view the student’s picture, if available.
Step-By-Step: Printer-Friendly Class Roster
Class Rosters may be printed with or without student photos.
1. Select All Courses for Term or an individual course from the Class Roster drop-down.
2. Check the box next to Show Photo In Printer Friendly Version if you wish to include student photos in
the printed roster.

Page 19
3. Click the Printer Friendly Version link to display the printer-friendly class roster. The page opens and is
sent to your default printer.
Directory
The Faculty Directory and Student Directory display a list of faculty or students, respectively, their addresses,
and email addresses. If a photo is available, you may view it by clicking the photo icon. Faculty and students
with a setting of No for Display on Directory in CAMS Enterprise (Student Admissions and Faculty
Information) will not display in the list. Faculty must also have a setting of Yes for Active in the Faculty
Information window. Directories display alphabetically by last name. Click a letter hyperlink to view
individuals whose last name begins with that letter. Click the email address link to open a blank email with the
To field populated with that email address.
Note: Faculty and Students must have an Address Type such as that set in the Portal’s global.asa file in the
Application.Value("strAddressType") line.

Page 20
Email Students You can email select students, an entire class, all students in all your classes, or just your advisees.
1. Click Email Students on the navigation bar. An email template page displays.
2. Select individual students or check Select All for every student. Students without an email address do
not have a checkbox.
3. Enter a Subject, Reply To and a Message (All required fields). Click Send.
The BCC field will only send BCC emails to email addresses entered into the field separated by a
semi-colon.
Note: An email goes out separately to each student so that they will not see any other student’s email address.
4. After the email has been sent if you click the Back button you will return to email screen and all
Subject, Reply To and Message fields will have retained what was sent previously. You can then
select a different set of students, modify the message, or change the reply to field and send the new
email. To send an email to all students in all your courses please refer to the Course Management
document for detailed instructions.

Page 21
Faculty Contact From this screen Faculty can update their personal contact information, as displayed in the Student Portal.
Click Faculty Contact in the menu bar to open the detail screen. Enter desired information then click Update
My Contact Info. After updating, click Preview My Contact Info to view the information as seen from the
Student Portal. (Please note that the Student Portal is not yet live.)
Page 22
Course Management
Submitting Grades Grades are to be entered into CAMS through the faculty & staff portal.
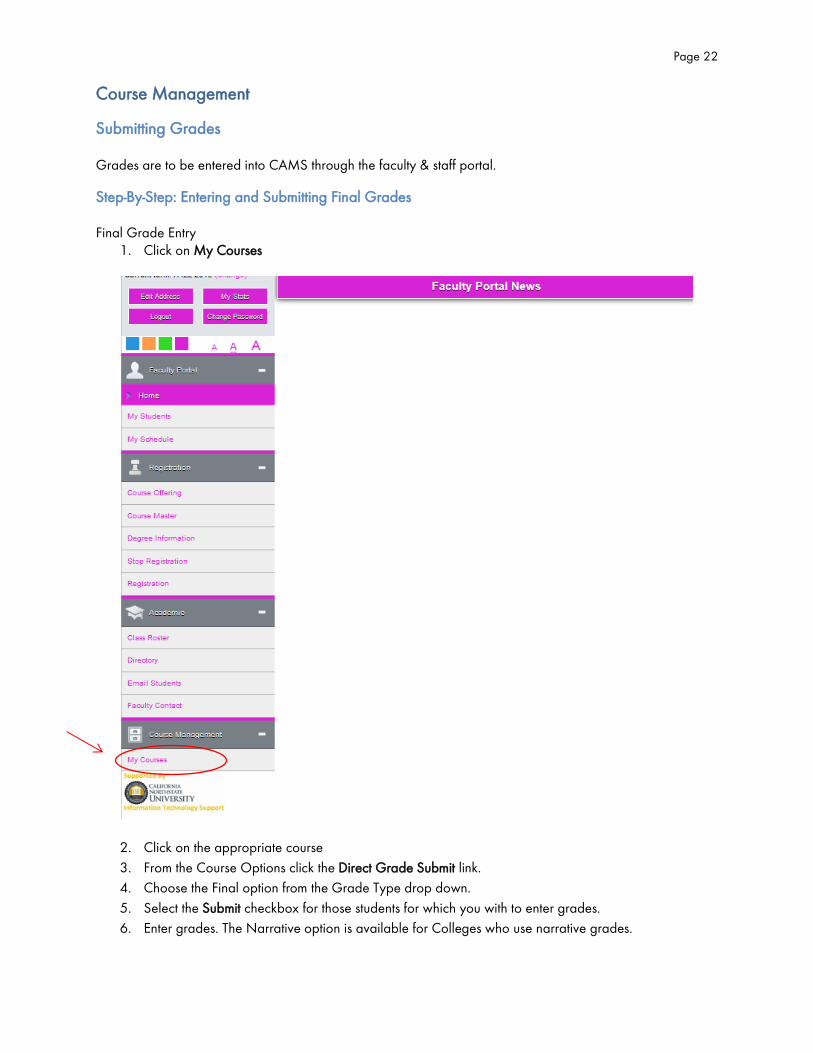
Step-By-Step: Entering and Submitting Final Grades Final Grade Entry
1. Click on My Courses
2. Click on the appropriate course
3. From the Course Options click the Direct Grade Submit link.
4. Choose the Final option from the Grade Type drop down.
5. Select the Submit checkbox for those students for which you with to enter grades.
6. Enter grades. The Narrative option is available for Colleges who use narrative grades.

Page 23
7. Click Submit Grades. Once grades or last day of attendance are submitted, the only way to change
them is clear the grade through Registration >Academic >Grades >Grade Entry.
Note: If the student list spans multiple pages, changing to a different page will submit grades already
selected.
8. Grade changes can be requested through the Faculty Portal Direct Grade Submit link.
9. Click the Change Request link, which will be displayed for grades that have already been submitted.

Page 24
10. Enter a reason for the change and click Send Request.
11. An email requesting a change to the grade and reason for the change will be sent to the Office of the
Registrar.
12. After the Registrar clears the requested grade, the Faculty may re-enter that grade for direct submittal
into the grade entry.
Note: Narrative grade information can be added through the Final grade entry screen, prior to the
submission of the Final grade. Once the Final grade has been entered, narrative grades cannot be
added or edited through the portal.

Page 25
Attendance Entry
Step-By-Step: Entering and Submitting Attendance Final grades are to be entered into CAMS through the faculty & staff portal. Final Grade Entry
1. Click on My Courses
2. Click on the appropriate course
3. Under Course Attendance, click Attendance Entry
4. Enter the appropriate Attendance Date
5. Click on Load Daily Attendance
6. Once you have marked all students as Present or Absent, click Save Daily Attendance. Attendance
will now be viewable by the Office of the Registrar staff.