Faculty 180 Navigation Guide Annual Activities … 8/4/2017 Faculty 180 Navigation Guide Annual...
20
Updated 8/4/2017 Faculty 180 Navigation Guide Annual Activities Reporting Table of Contents 1. General Tips for Faculty 180………………………………………………………………………………………….page 1 2. Logging In……………………………………………………………………………………………………………………..page 1 3. Home Page……………………………………………………………………………………………………………………page 2 4. Left Side Menu…………………………….……………………………………………………………………………….page 2 5. Profile Form………………………………………………………………………………………………………………….page 3 6. Overview of Entering Activities……………………………………………….…………………………………...page 4 7. Workload Summary………………………………………………………………………………………………………page 5 8. Courses Taught – Credit………………………………………………………………………….……………….pages 6-8 9. Additional Professional Activities – Tips and Pointers………………………………………………pages 9-10 10. Research, Scholarly & Creative Activities………………….…………………………………….………....page 11 11. Uploading Citations………………………………………………..……………………………………….....pages 12-13 12. Sponsored Projects / Commissions………………………………………..……………………………pages 14-15 13. Narrative Self-Evaluation…………………………………………………………………………………………..page 16 14. Curriculum Vitae…………………………………………………………………………………………………….….page 16 14. Previewing and Submitting Your Report……………………………………………………………….…….page 17 15. Viewing or printing past submitted reports……………………………………………………………….page 18 16. Faculty 180 campus contacts…………….………………………………………………………………………page 19
Transcript of Faculty 180 Navigation Guide Annual Activities … 8/4/2017 Faculty 180 Navigation Guide Annual...
Updated 8/4/2017
Faculty 180 Navigation Guide
Annual Activities Reporting
Table of Contents
1. General Tips for Faculty 180………………………………………………………………………………………….page 1
2. Logging In……………………………………………………………………………………………………………………..page 1
3. Home Page……………………………………………………………………………………………………………………page 2
4. Left Side Menu…………………………….……………………………………………………………………………….page 2
5. Profile Form………………………………………………………………………………………………………………….page 3
6. Overview of Entering Activities……………………………………………….…………………………………...page 4
7. Workload Summary………………………………………………………………………………………………………page 5
8. Courses Taught – Credit………………………………………………………………………….……………….pages 6-8
9. Additional Professional Activities – Tips and Pointers………………………………………………pages 9-10
10. Research, Scholarly & Creative Activities………………….…………………………………….………....page 11
11. Uploading Citations………………………………………………..……………………………………….....pages 12-13
12. Sponsored Projects / Commissions………………………………………..……………………………pages 14-15
13. Narrative Self-Evaluation…………………………………………………………………………………………..page 16
14. Curriculum Vitae…………………………………………………………………………………………………….….page 16
14. Previewing and Submitting Your Report……………………………………………………………….…….page 17
15. Viewing or printing past submitted reports……………………………………………………………….page 18
16. Faculty 180 campus contacts…………….………………………………………………………………………page 19

1
Faculty 180 Navigation Guide
Annual Activities Reporting
GENERAL NAVIGATION
Faculty 180 is best used in Firefox or Google Chrome. Internet Explorer has frequent issues interacting with
F180 and should not be used.
Do not use your browser’s back and forward buttons, they do not work well with the software. On the left side
of the screen, a navigation menu should help you easily move from one page to another, or from one section of
a particular form to another.
Question mark icons above report sections or next to questions indicate that more information or a
description is available.
An asterisk * next to a form field label indicates information that is required. Attachment tools are available in
many forms, but are not required.
Please note that your narrative self-evaluation may either be uploaded into Faculty 180 or submitted directly to
your dean or director under separate cover. The dean or director’s evaluation will be completed outside of the
Faculty 180 system.
Information, FAQs and other resources are available at www.uaf.edu/provost/faculty-180
LOGGING IN
Log in to Faculty 180 using your UA credentials (same as Google mail, UA Online, Blackboard, etc) at
www.data180.com/faculty180/uaf
If you receive a message regarding an incorrect username or password, you will need to contact the OIT Help Desk at
(907) 451-8300 for assistance. However, if you receive a message that you do not have an active Faculty 180 account,
contact the campus Faculty 180 support staff at (907) 474-2764.
2
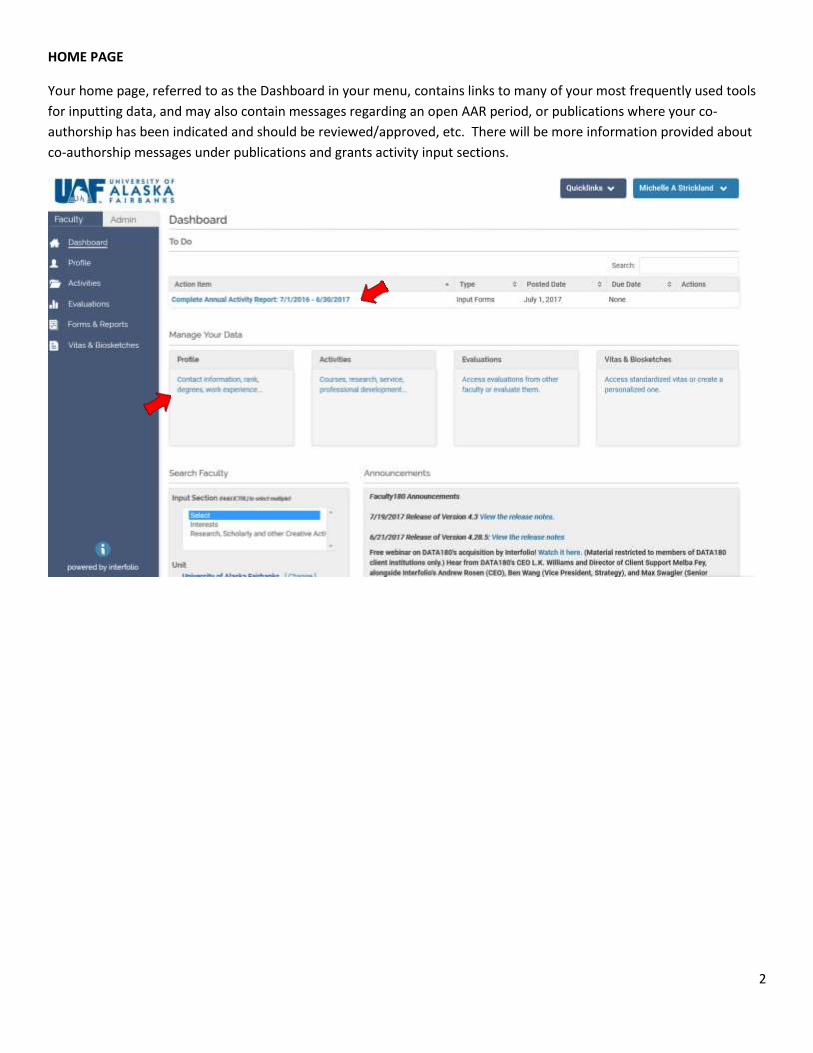
HOME PAGE
Your home page, referred to as the Dashboard in your menu, contains links to many of your most frequently used tools
for inputting data, and may also contain messages regarding an open AAR period, or publications where your co-
authorship has been indicated and should be reviewed/approved, etc. There will be more information provided about
co-authorship messages under publications and grants activity input sections.
3
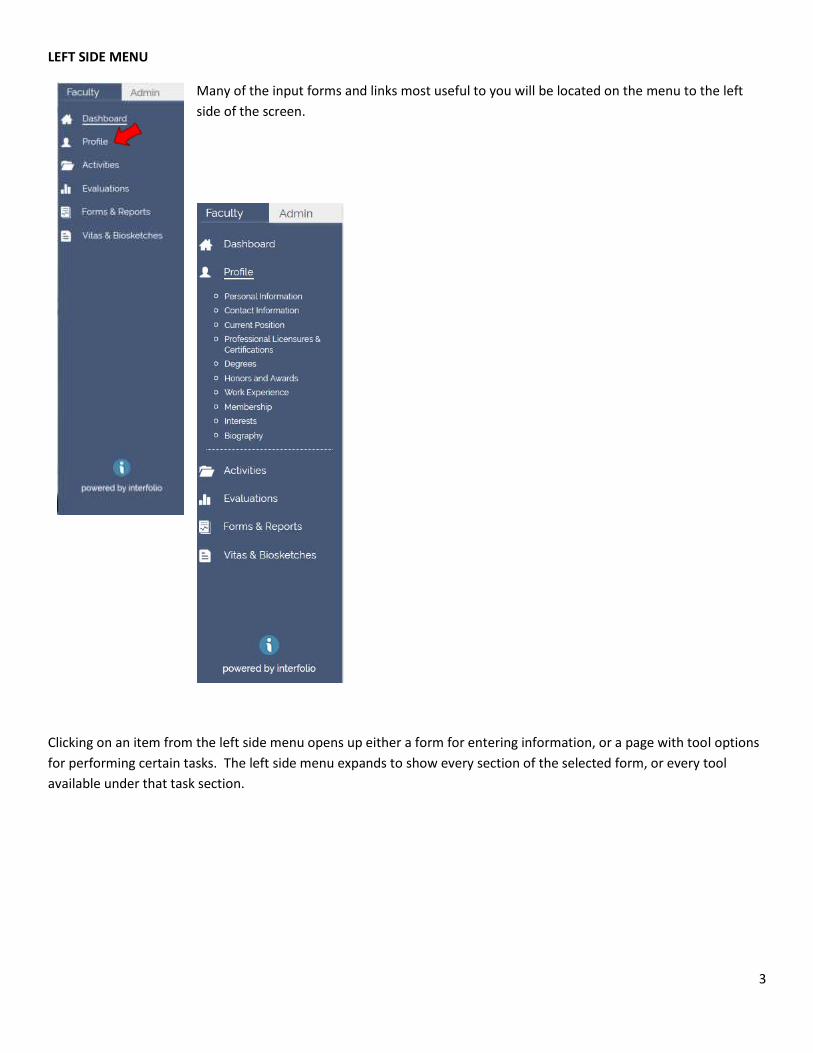
LEFT SIDE MENU
Many of the input forms and links most useful to you will be located on the menu to the left
side of the screen.
Clicking on an item from the left side menu opens up either a form for entering information, or a page with tool options
for performing certain tasks. The left side menu expands to show every section of the selected form, or every tool
available under that task section.

4
PROFILE FORM
If you have never logged in before, or if your basic contact or background information needs to be updated, complete
the Profile Form. Click on each section header of the form to expand and view the information contained in that
section. Use the edit buttons under each section to access and update your information.
Do not forget to click the Save button to save changes to each section of the profile form before returning to the main
form. Choosing Cancel will return you to the main form without saving any changes.
Many sections of the profile form are optional; you may be as complete or as spare as you wish.

5
ENTERING ACTIVITIES
With the profile form complete, you can now proceed into entering professional activities. There are two main links
available for entering and editing activities.
You may choose to utilize the standard Activities form at any time during the year to input most of your professional
activities, with the exception of an annual workload and courses taught. Those two sections are only available via a
specific reporting year’s AAR, known as an Initiated Activity Input Form.
The semester and year labels that you apply to each item entered into the standard Activity Input form tell the software
which reporting year those activities belong to. If labeled correctly, those same activities will automatically be fed into
the Initiated Activity Input Form for the applicable reporting year.
Activities entered as ongoing will appear in subsequent AAR forms until you select an end semester and date to indicate
that the activity has been completed.
For this navigation guide, we will cover all sections of the Initiated Activity Input Form for a specific reporting year during
the open reporting period.
Activities Form: Available at any time to enter ongoing
or completed professional activities. *Does not
include access to workload or courses taught sections.
Initiated Activity Input (AAR):
Available after a campus
administrator has initiated an
open reporting period for a
specific contract year. Includes
all sections previously reported
on AAR Word template.

6
WORKLOAD SUMMARY
(click on header to expand section)
Click on the Edit button to enter your workload units or parts, per your faculty workload for the year under review. The
system will automatically calculate the percentages for Teaching, Research, and Service, and the Academic Year Total at
the bottom. Don’t forget to add any additional assignments such as summer, Wintermester or Maymester workload in
the section indicated. When finished, click “Save and Go Back” to save changes and return to the main AAR form.
Administrative/management duties are reported under service. Sabbaticals or other affecting circumstances should be
explained in the available text box.
7
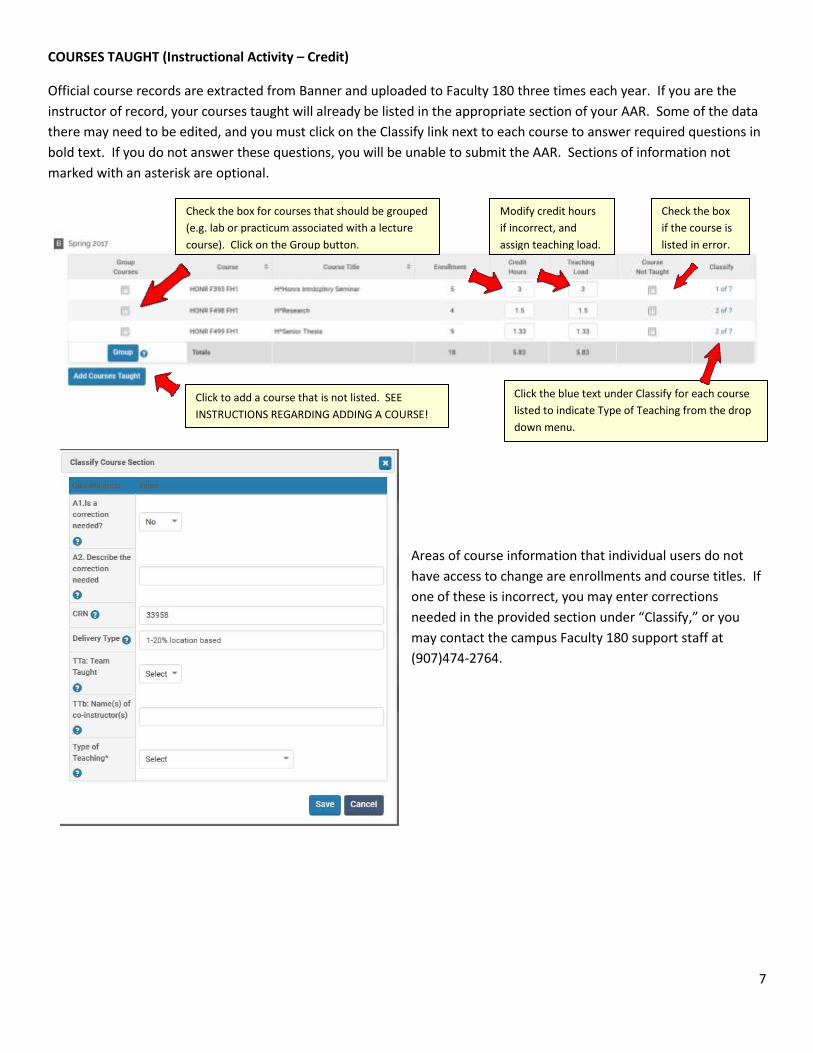
COURSES TAUGHT (Instructional Activity – Credit)
Official course records are extracted from Banner and uploaded to Faculty 180 three times each year. If you are the
instructor of record, your courses taught will already be listed in the appropriate section of your AAR. Some of the data
there may need to be edited, and you must click on the Classify link next to each course to answer required questions in
bold text. If you do not answer these questions, you will be unable to submit the AAR. Sections of information not
marked with an asterisk are optional.
Areas of course information that individual users do not
have access to change are enrollments and course titles. If
one of these is incorrect, you may enter corrections
needed in the provided section under “Classify,” or you
may contact the campus Faculty 180 support staff at
(907)474-2764.
Check the box for courses that should be grouped
(e.g. lab or practicum associated with a lecture
course). Click on the Group button.
Modify credit hours
if incorrect, and
assign teaching load.
Check the box
if the course is
listed in error.
Click to add a course that is not listed. SEE
INSTRUCTIONS REGARDING ADDING A COURSE!
Click the blue text under Classify for each course
listed to indicate Type of Teaching from the drop
down menu.
8
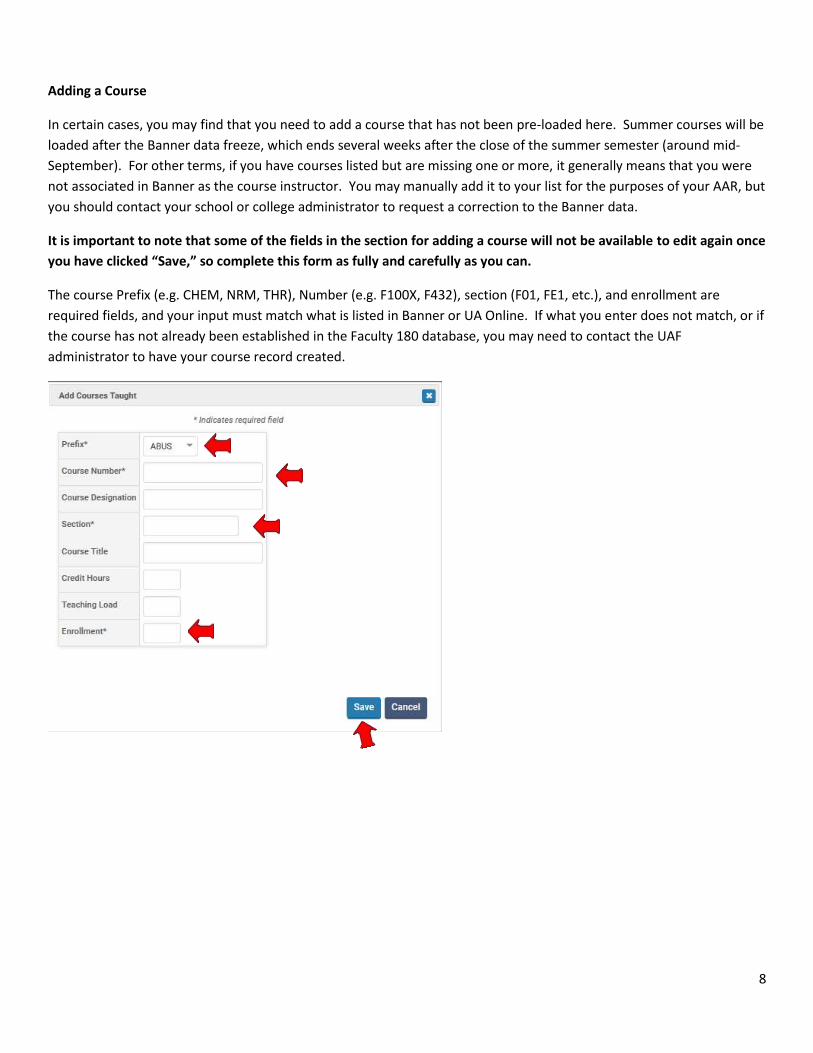
Adding a Course
In certain cases, you may find that you need to add a course that has not been pre-loaded here. Summer courses will be
loaded after the Banner data freeze, which ends several weeks after the close of the summer semester (around mid-
September). For other terms, if you have courses listed but are missing one or more, it generally means that you were
not associated in Banner as the course instructor. You may manually add it to your list for the purposes of your AAR, but
you should contact your school or college administrator to request a correction to the Banner data.
It is important to note that some of the fields in the section for adding a course will not be available to edit again once
you have clicked “Save,” so complete this form as fully and carefully as you can.
The course Prefix (e.g. CHEM, NRM, THR), Number (e.g. F100X, F432), section (F01, FE1, etc.), and enrollment are
required fields, and your input must match what is listed in Banner or UA Online. If what you enter does not match, or if
the course has not already been established in the Faculty 180 database, you may need to contact the UAF
administrator to have your course record created.
9
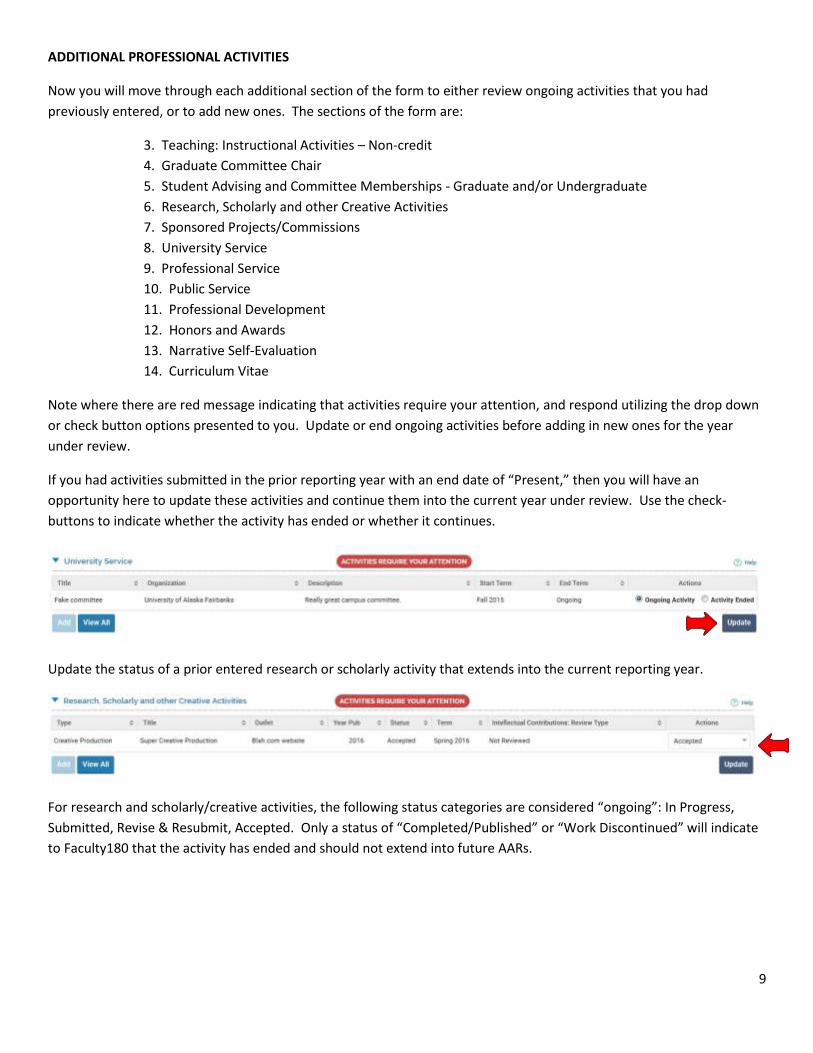
ADDITIONAL PROFESSIONAL ACTIVITIES
Now you will move through each additional section of the form to either review ongoing activities that you had
previously entered, or to add new ones. The sections of the form are:
3. Teaching: Instructional Activities – Non-credit
4. Graduate Committee Chair
5. Student Advising and Committee Memberships - Graduate and/or Undergraduate
6. Research, Scholarly and other Creative Activities
7. Sponsored Projects/Commissions
8. University Service
9. Professional Service
10. Public Service
11. Professional Development
12. Honors and Awards
13. Narrative Self-Evaluation
14. Curriculum Vitae
Note where there are red message indicating that activities require your attention, and respond utilizing the drop down
or check button options presented to you. Update or end ongoing activities before adding in new ones for the year
under review.
If you had activities submitted in the prior reporting year with an end date of “Present,” then you will have an
opportunity here to update these activities and continue them into the current year under review. Use the check-
buttons to indicate whether the activity has ended or whether it continues.
Update the status of a prior entered research or scholarly activity that extends into the current reporting year.
For research and scholarly/creative activities, the following status categories are considered “ongoing”: In Progress,
Submitted, Revise & Resubmit, Accepted. Only a status of “Completed/Published” or “Work Discontinued” will indicate
to Faculty180 that the activity has ended and should not extend into future AARs.
10
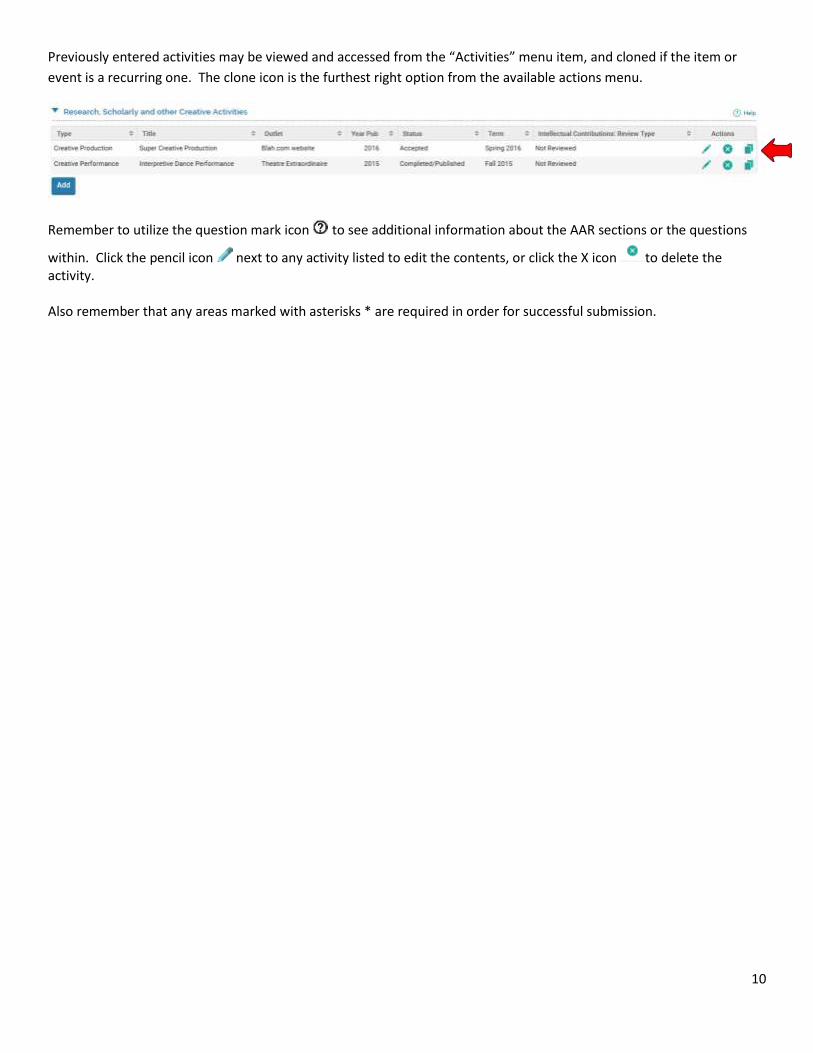
Previously entered activities may be viewed and accessed from the “Activities” menu item, and cloned if the item or
event is a recurring one. The clone icon is the furthest right option from the available actions menu.
Remember to utilize the question mark icon to see additional information about the AAR sections or the questions
within. Click the pencil icon next to any activity listed to edit the contents, or click the X icon to delete the activity. Also remember that any areas marked with asterisks * are required in order for successful submission.
11
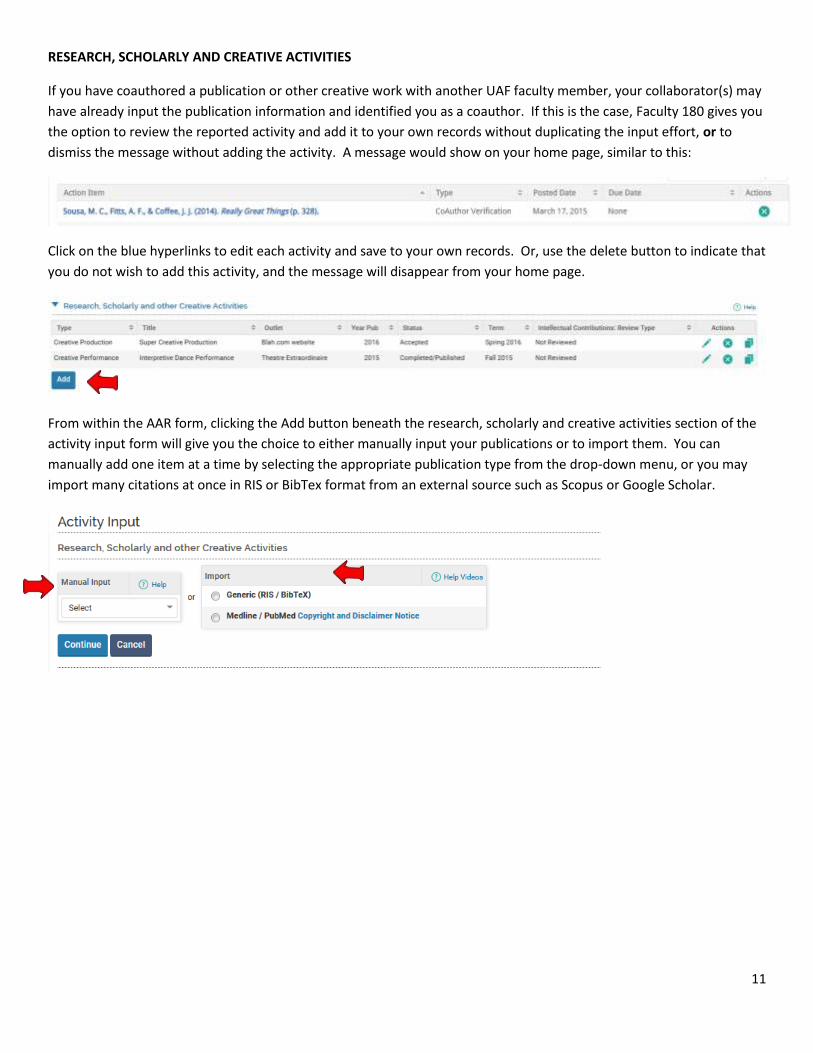
RESEARCH, SCHOLARLY AND CREATIVE ACTIVITIES
If you have coauthored a publication or other creative work with another UAF faculty member, your collaborator(s) may
have already input the publication information and identified you as a coauthor. If this is the case, Faculty 180 gives you
the option to review the reported activity and add it to your own records without duplicating the input effort, or to
dismiss the message without adding the activity. A message would show on your home page, similar to this:
Click on the blue hyperlinks to edit each activity and save to your own records. Or, use the delete button to indicate that
you do not wish to add this activity, and the message will disappear from your home page.
From within the AAR form, clicking the Add button beneath the research, scholarly and creative activities section of the
activity input form will give you the choice to either manually input your publications or to import them. You can
manually add one item at a time by selecting the appropriate publication type from the drop-down menu, or you may
import many citations at once in RIS or BibTex format from an external source such as Scopus or Google Scholar.
12
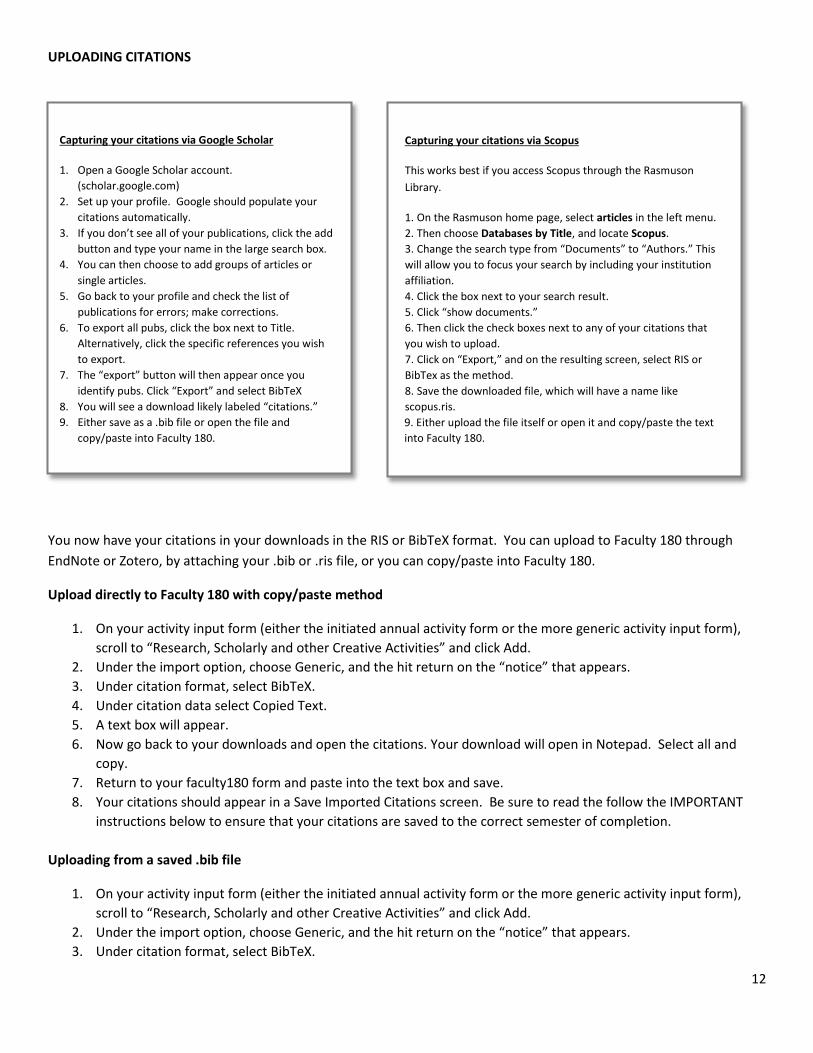
UPLOADING CITATIONS
You now have your citations in your downloads in the RIS or BibTeX format. You can upload to Faculty 180 through
EndNote or Zotero, by attaching your .bib or .ris file, or you can copy/paste into Faculty 180.
Upload directly to Faculty 180 with copy/paste method
1. On your activity input form (either the initiated annual activity form or the more generic activity input form),
scroll to “Research, Scholarly and other Creative Activities” and click Add.
2. Under the import option, choose Generic, and the hit return on the “notice” that appears.
3. Under citation format, select BibTeX.
4. Under citation data select Copied Text.
5. A text box will appear.
6. Now go back to your downloads and open the citations. Your download will open in Notepad. Select all and
copy.
7. Return to your faculty180 form and paste into the text box and save.
8. Your citations should appear in a Save Imported Citations screen. Be sure to read the follow the IMPORTANT
instructions below to ensure that your citations are saved to the correct semester of completion.
Uploading from a saved .bib file
1. On your activity input form (either the initiated annual activity form or the more generic activity input form),
scroll to “Research, Scholarly and other Creative Activities” and click Add.
2. Under the import option, choose Generic, and the hit return on the “notice” that appears.
3. Under citation format, select BibTeX.
Capturing your citations via Google Scholar
1. Open a Google Scholar account.
(scholar.google.com)
2. Set up your profile. Google should populate your
citations automatically.
3. If you don’t see all of your publications, click the add
button and type your name in the large search box.
4. You can then choose to add groups of articles or
single articles.
5. Go back to your profile and check the list of
publications for errors; make corrections.
6. To export all pubs, click the box next to Title.
Alternatively, click the specific references you wish
to export.
7. The “export” button will then appear once you
identify pubs. Click “Export” and select BibTeX
8. You will see a download likely labeled “citations.”
9. Either save as a .bib file or open the file and
copy/paste into Faculty 180.
Capturing your citations via Scopus
This works best if you access Scopus through the Rasmuson
Library.
1. On the Rasmuson home page, select articles in the left menu.
2. Then choose Databases by Title, and locate Scopus.
3. Change the search type from “Documents” to “Authors.” This
will allow you to focus your search by including your institution
affiliation.
4. Click the box next to your search result.
5. Click “show documents.”
6. Then click the check boxes next to any of your citations that
you wish to upload.
7. Click on “Export,” and on the resulting screen, select RIS or
BibTex as the method.
8. Save the downloaded file, which will have a name like
scopus.ris.
9. Either upload the file itself or open it and copy/paste the text
into Faculty 180.
13
4. In the Citation Data box choose file, and then browse your computer to locate the appropriate .bib file.
5. Save. Then follow the IMPORTANT instructions below to ensure that your citations are saved to the correct
semester of completion.
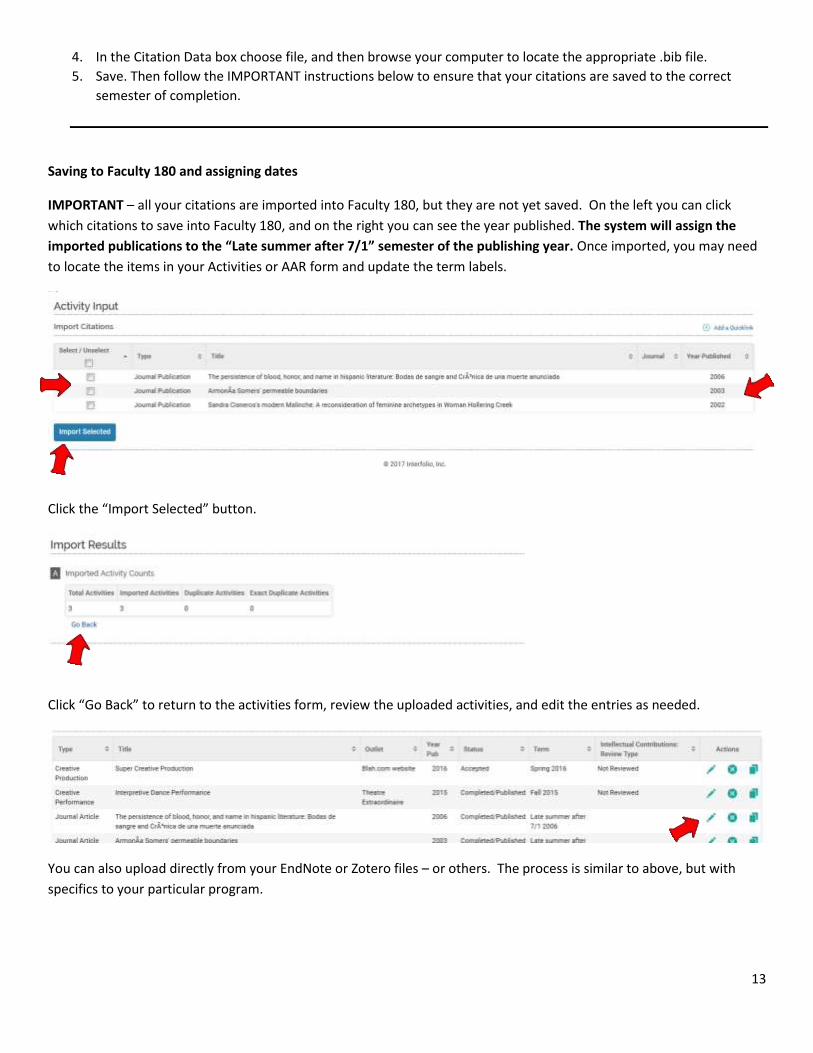
Saving to Faculty 180 and assigning dates
IMPORTANT – all your citations are imported into Faculty 180, but they are not yet saved. On the left you can click
which citations to save into Faculty 180, and on the right you can see the year published. The system will assign the
imported publications to the “Late summer after 7/1” semester of the publishing year. Once imported, you may need
to locate the items in your Activities or AAR form and update the term labels.
Click the “Import Selected” button.
Click “Go Back” to return to the activities form, review the uploaded activities, and edit the entries as needed.
You can also upload directly from your EndNote or Zotero files – or others. The process is similar to above, but with
specifics to your particular program.
14
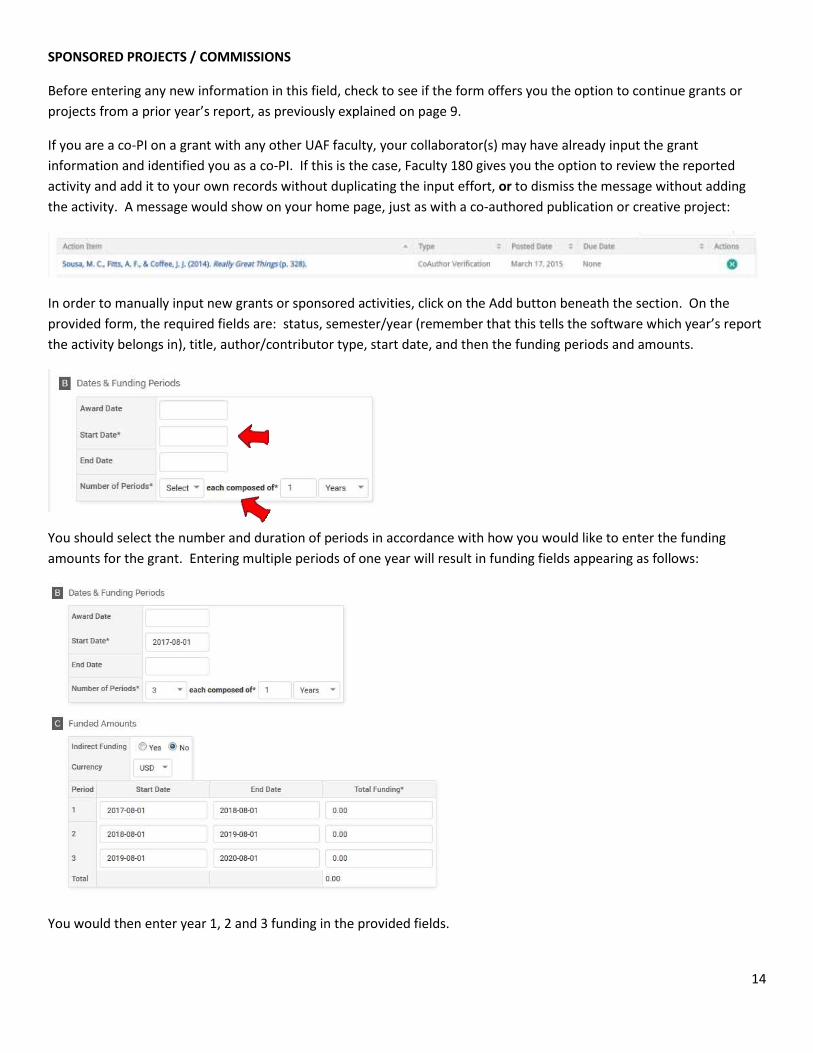
SPONSORED PROJECTS / COMMISSIONS
Before entering any new information in this field, check to see if the form offers you the option to continue grants or
projects from a prior year’s report, as previously explained on page 9.
If you are a co-PI on a grant with any other UAF faculty, your collaborator(s) may have already input the grant
information and identified you as a co-PI. If this is the case, Faculty 180 gives you the option to review the reported
activity and add it to your own records without duplicating the input effort, or to dismiss the message without adding
the activity. A message would show on your home page, just as with a co-authored publication or creative project:
In order to manually input new grants or sponsored activities, click on the Add button beneath the section. On the
provided form, the required fields are: status, semester/year (remember that this tells the software which year’s report
the activity belongs in), title, author/contributor type, start date, and then the funding periods and amounts.
You should select the number and duration of periods in accordance with how you would like to enter the funding
amounts for the grant. Entering multiple periods of one year will result in funding fields appearing as follows:
You would then enter year 1, 2 and 3 funding in the provided fields.

15
You could instead choose to enter the total awarded amount of grant funding for multiple years of activity, and the
funding fields will appear as follows:
Click “Save and Go Back” to save the entry and return to the AAR form.
16
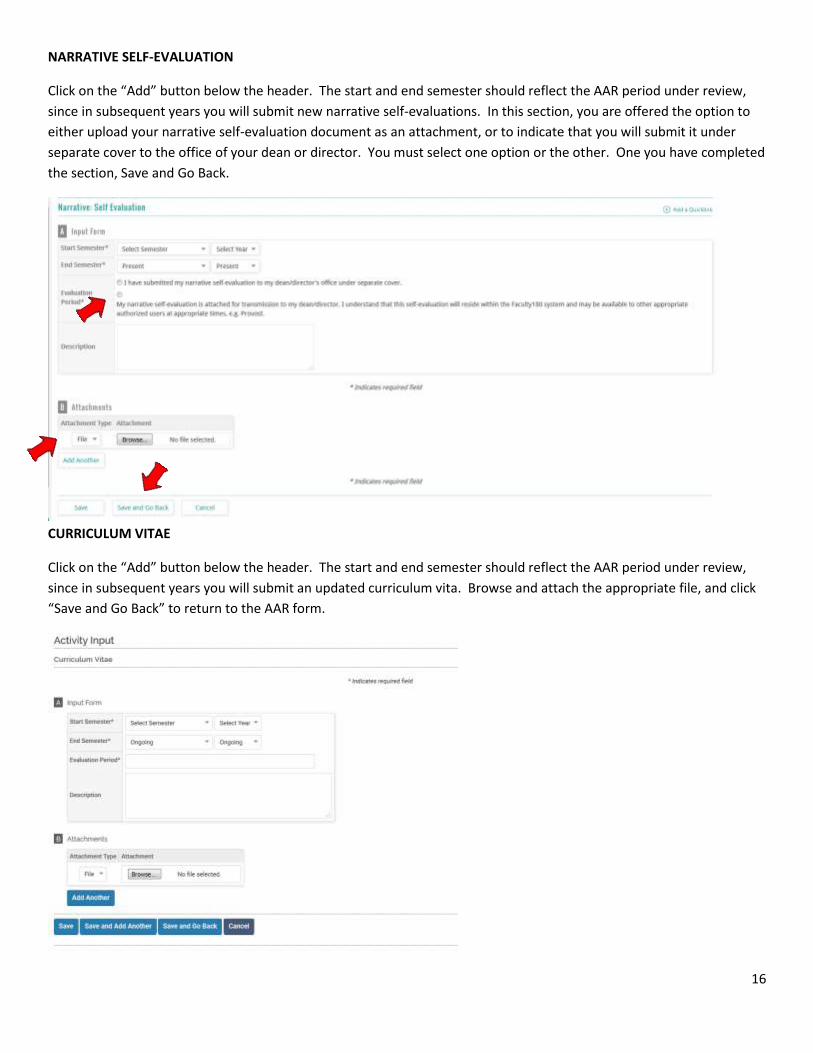
NARRATIVE SELF-EVALUATION
Click on the “Add” button below the header. The start and end semester should reflect the AAR period under review,
since in subsequent years you will submit new narrative self-evaluations. In this section, you are offered the option to
either upload your narrative self-evaluation document as an attachment, or to indicate that you will submit it under
separate cover to the office of your dean or director. You must select one option or the other. One you have completed
the section, Save and Go Back.
CURRICULUM VITAE
Click on the “Add” button below the header. The start and end semester should reflect the AAR period under review,
since in subsequent years you will submit an updated curriculum vita. Browse and attach the appropriate file, and click
“Save and Go Back” to return to the AAR form.
17
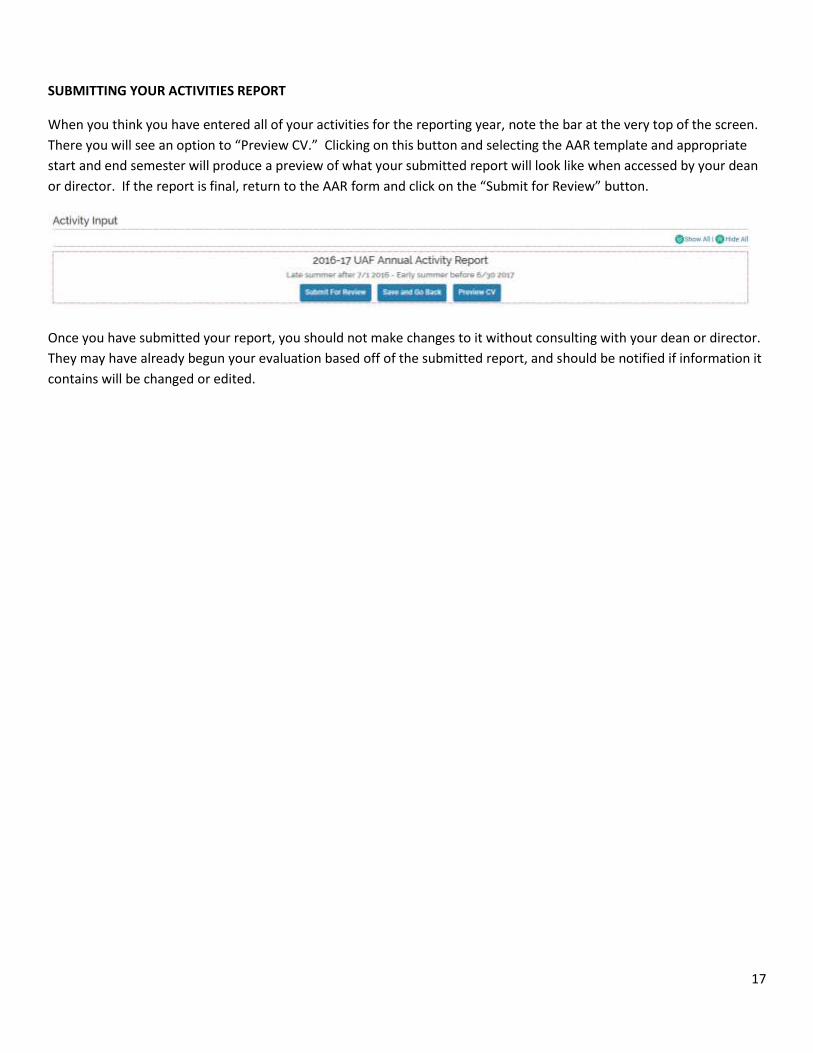
SUBMITTING YOUR ACTIVITIES REPORT
When you think you have entered all of your activities for the reporting year, note the bar at the very top of the screen.
There you will see an option to “Preview CV.” Clicking on this button and selecting the AAR template and appropriate
start and end semester will produce a preview of what your submitted report will look like when accessed by your dean
or director. If the report is final, return to the AAR form and click on the “Submit for Review” button.
Once you have submitted your report, you should not make changes to it without consulting with your dean or director.
They may have already begun your evaluation based off of the submitted report, and should be notified if information it
contains will be changed or edited.

18
ACCESSING AND PRINTING A PREVIOUSLY SUBMITTED AAR
Once submitted, your AAR can be accessed to view or print by going to the Forms & Reports link from the left-side
menu. If your dean has not yet digitally accepted the form, you will see it listed under “Initiated Activity Input Forms”
with a status label. Once accepted by the dean, the form will be filed away under “Prior Activity Input Forms” beneath
the “Reports” section of the menu.
After clicking on “Prior Activity Input Forms”, you will see a list of previously submitted reports, along with the date it
was submitted and (if applicable) the date it was accepted by your dean or director. Click on the eye icon button under
“Actions” to open the report and print it.
If you wish to print a copy for your files, note that you may need to use your advanced printer settings to change the
scale to 50-60% (depending on your browser) in order to fit the printed report to 8 ½ x 11” paper size and avoid anything
being cut off. Exporting the report first to Adobe PDF may result in a cleaner copy for printing and saving.
Another alternative is accessed through the “Vitas & Biosketches” option from the left-side menu. Select the eye icon next to "Annual Activities Report" under the View column. Enter the correct semester/year date range in the start and end date fields and click Refresh Report. Note that you can select to print a multi-year report if you are preparing comprehensive activities data for Promotion and Tenure Review.
Now the screen should show the Annual Activities Report form with all current information for the dates selected. Click on the printer, MS Word or Adobe PDF icon at the top of the screen. This will open the form in your selected program and/or allow you to print on an 8.5x11" sheet of paper. Please note that the layout formatting and tool options for these options differ; use your own tastes and preference to select the method that works best for you. You may also use the icon to share your AAR electronically using a hyperlink.

19
WHO TO CONTACT FOR MORE FACULTY 180 HELP
For questions about inputting activities and information in the software, uploading publication citations,
etc.
Alex Fitts at x6253 or [email protected]
For questions about account access, incorrect pre-loaded data, or general software functionality
Michelle Strickland at x2764 or [email protected]
For questions about workloads or reporting your activities within the right categories
Consult your dean’s or director’s office for guidance in your specific discipline