F-SECURE E-MAIL AND SERVER SECURITY · PDF fileF-SECURE E-MAIL AND SERVER SECURITY ff CLUSTER...
28
F-SECURE E-MAIL AND SERVER SECURITY Deploying the Product on a Cluster
Transcript of F-SECURE E-MAIL AND SERVER SECURITY · PDF fileF-SECURE E-MAIL AND SERVER SECURITY ff CLUSTER...

F-SECURE E-MAIL AND SERVER SECURITY | CLUSTER DEPLOYMENT GUIDE
1
F-SECURE E-MAIL AND SERVER
SECURITYDeploying the Product
on a Cluster

2
CONTENTS1.1 Installation Overview 3
1.2 Creating Quarantine Storage 4
1.2.1 Quarantine Storage in Active-Passive Cluster 4
1.2.2 Quarantine Storage in Active-Active Cluster 7
1.2.3 Creating the Quarantine Storage for a Single Copy Cluster Environment 9
1.2.4 Creating the Quarantine Storage for a Continuous Cluster Replication Environment 14
1.2.5 Creating the Quarantine Storage for a Database Availability Group Environment 16
1.3 Installing the Product 19
1.3.1 Installing on Clusters with Quarantine as Cluster Resource 19
1.3.2 Installing on Clusters with Quarantine on a Dedicated Computer 22
1.4 Administering the Cluster Installation with F-Secure Policy Manager 25
1.5 Using the Quarantine in the Cluster Installation 25
1.6 Using the Product with High Availability Architecture in Microsoft Exchange Server 2010 26
1.7 Uninstallation 26
1.8 Troubleshooting 26

F-SECURE E-MAIL AND SERVER SECURITY | CLUSTER DEPLOYMENT GUIDE
3
1.1 INSTALLATION OVERVIEWFollow these steps to deploy and usethe product on a cluster.
• Install F-Secure Policy Manager on a dedicated server. If you already have F-Secure Policy Manager installed in the network, you can use it to administer the product. For more information, see F-Secure Policy Manager Administrator’s Guide.
• Install Microsoft SQL Server 2000, 2005 or 2008 on a dedicated server. Microsoft SQL Server must be installed with the mixed authentication mode (Windows Authentication and SQL Server Authentication). After the installation, make sure that Named Pipes and TCP/IP protocols are enabled in SQL Server network configuration.
Create the quarantine storage where the product will place quarantined e-mail messages and attachments.
• In the active-passive cluster environment, continue to Quarantine Storage in Active-Passive Cluster.
• In the active-active cluster environment, continue to Quarantine Storage in Active-Active Cluster.
• In the Single Copy Cluster (SCC) environment, continue to Creating the Quarantine Storage for a Single Copy Cluster Environment.
• In the Continuous Cluster Replication (CCR) environment, continue to Creating the Quarantine Storage for a Continuous Cluster Replication Environment.
• In the Database Availability Group (DAG) environment continue to Creating the Quarantine Storage for a Database Availability Group Environment.
• Install the product locally on one node at the time in the centralized administration mode, starting from the active node. Make sure the product is fully up and running before starting the installation on the passive node.
Note: Do not move cluster resources to the passive node before you install all passive nodes first.
• In the environment with Quarantine ascluster resource, see more information on Installing on Clusters with Quarantine as Cluster Resource.
• In the environment with Quarantine ondedicated computer, see more information on Installing on Clusters with Quarantine on a Dedicated Computer.
• Create a policy domain for the cluster in F-Secure Policy Manager and import cluster nodes there. See Administering the Cluster Installation with F-Secure Policy Manager.
• Log on each node and configure the Web Console to accept connections from authorized hosts.

4
1.2 CREATING QUARANTINE STORAGEFollow instructions in this section to create the Quarantine Storage in the cluster environment.
1.2.1 QUARANTINE STORAGE IN ACTIVE-PASSIVE CLUSTER
For active-passive cluster, the Quarantine Storage can be created on a dedicatedcomputer or as a cluster resource. For more information on how to install the Quarantine Storage on a dedicated computer, see Quarantine Storage in Active-Active Cluster.
To install Quarantine as a cluster resource,follow these instructions:
1. Log on to the active node of the cluster with the domain administrator account.
2. Create a directory for the quarantine storage on the physical disk shared by the cluster nodes. You can create it on the same disk with Microsoft Exchange Server storage and log files. For example, create Quarantine directory on disk D:.
3. Go to Windows Start menu > All Programs > Administrative Tools and select Cluster Administrator.
4. Under Groups, right-click Exchange Virtual Server and select New > Resource.
Enter the following information:
• Name: F-Secure Quarantine Storage
• Resource Type: File Share
• Group: make sure that your ExchangeVirtual Server is selected.
• Click Next.

F-SECURE E-MAIL AND SERVER SECURITY | CLUSTER DEPLOYMENT GUIDE
5
5. Possible Owners dialog opens.
6. Verify that all nodes that are running Exchange Server are listed under Possible owners and click Next.
7. Dependencies dialog opens.
In Available resources, select the Exchange Server Network Name and the disk with the quarantine storage directory and click Add to add them toResource dependencies. Click Next.

6
8. File Share Parameters dialog opens.
• Type FSAVMSEQS$ as Share name. (Note:the dollar ($) character at the end of the share name makes the share hiddenwhen you view network resources of the cluster with Windows Explorer.)
• Enter the directory name you createdon step 2 as Path (for example,D:\Quarantine ).
• In the Comment box, type F-Secure Quarantine Storage.
• Make sure that User limit is set to Maximum allowed.
Click Permissions
9. Permissions dialog opens.

F-SECURE E-MAIL AND SERVER SECURITY | CLUSTER DEPLOYMENT GUIDE
7
Add Administrator, Exchange Domain Servers and SYSTEM to the Group or user names. Remove Everyone account. Grant Change and Read permissions for Exchange Domain Servers and SYSTEM, and Full Control, Change and Read permissions for Administrator account. Click OK.
10. In File Share Parameters dialog, click Advanced.
Make sure that Normal share is selected in Advanced File ShareProperties. Click OK.
11. In File Share Parameters dialog, click Finish to create F-Secure Quarantine Storage resource.
12. Right-click the F-Secure Quarantine Storage resource and click Bring Online.
1.2.2 QUARANTINE STORAGE IN ACTIVE-ACTIVE CLUSTER
For an active-active clusterinstallation, the quarantine storage must be set on a dedicated computer. This computer should be the member of the same domain as your Exchange Servers.
1. Log on to the server where you plan to create the quarantine storage (for example, APPSERVER ) with a domain administrator account.
2. Create a directory (for example, C:\Quarantine) for the quarantine storage on the local hard disk.
3. Right-click the directory in the Windows Explorer and select Sharing and Security.
4. The Sharing tab opens.
Type FSAVMSEQS$ as Share name and make sure that User limit is set to Maximum Allowed. Click Permissions

8
5. Permissions dialog opens.
Add Administrator, Exchange Domain Servers and SYSTEM to the Group or user names. Remove Everyone account.
Grant Change and Read permissions for Exchange Domain Servers and SYSTEM, and Full Control, Change and Read permissions for Administrator account. Click OK.
6. In the directory properties dialog, go to the Security tab.
Remove all existinggroups and users and add Administrator, Exchange Domain Servers and SYSTEM to the Group or user names. Grant all except Full Control permissions for Exchange Domain Servers and SYSTEM. Grant all permissionsfor Administrator. Click OK.
7. To verify that the quarantine storage is accessible, log on as the domain administrator to any node in the cluster and try to open \\<Server>\FSAVMSEQS$\ with Windows Explorer, where <Server> is the name of the server where you created the quarantine storage share.

F-SECURE E-MAIL AND SERVER SECURITY | CLUSTER DEPLOYMENT GUIDE
9
1.2.3 CREATING THE QUARANTINE STORAGE FOR A SINGLE COPY CLUSTER ENVIRONMENT
For singlecopy cluster, the Quarantine Storage can be created on a dedicated computer oras a cluster resource. For more information on how to install the Quarantine Storage on a dedicated computer, see Creating the Quarantine Storage for a Continuous Cluster Replication Environment.
To install Quarantine as a cluster resource, follow the instructions for either Windows 2003 Based Cluster,or Windows 2008 based cluster.
WINDOWS 2003 BASED CLUSTER
1. Log on to the active node of the cluster with the domain administrator account.
2. Create a directory for the quarantine storage on the physical disk shared by the cluster nodes.
You can create it on the same disk where the Exchange Server storage and logsare located. For example, create Quarantine directory on disk D:.
3. Go to Start menu > All Programs> Administrative Tools > Cluster Administrator.
4. Right-click the Exchange VirtualServer under the Groups and select New > Resource.
5. The New Resource wizard opens.
a. Type F-Secure Quarantine Storage as the name of the new resource.
b. In the Resource Type list, select File Share.
c. In the Group list, make sure that your Exchange Virtual Server is selected.
Click Next to continue.

10
6. Make sure that all nodes that are running Exchange Server are listed in the Possible owners list.
Click Next to continue.
7. Select the Exchange Server Network Name and the Physical Disk under Available resources and click Add to move them to the Resource dependencies list.
Click Next to continue.
8. Use the following settings as the File Share parameters.
a. Type FSAVMSEQS$ as the share name and F-Secure Quarantine Storage as comment.
Note: The dollar ($) character at the end of the share name makes the share hidden when you view the network resources of the cluster with Windows Explorer.

F-SECURE E-MAIL AND SERVER SECURITY | CLUSTER DEPLOYMENT GUIDE
11
b. Make sure that User Limit is set to Maximum allowed.
Click Permissions to change permissions.
9. Change permissions as follows:
a. Add Administrator, Exchange Domain Servers and SYSTEM to the Group or user names list.
b. Remove the Everyone account.
c. Grant Change and Read permissions for Exchange Domain Servers and SYSTEM.
d. Grant Full Control, Change and Read permissions for the Administrator account.
Click OK to continue.

12
10. Click Advanced to open Advanced File Share Properties.
Make sure that Normal share isselected.
Click OK to continue.
11. Click Finish to create the F-Secure Quarantine Storage resource.
12. Right-click the F-Secure Quarantine Storage resource and select Bring Online.

F-SECURE E-MAIL AND SERVER SECURITY | CLUSTER DEPLOYMENT GUIDE
13
WINDOWS 2008 BASED CLUSTER
1. Log on to the active node of the cluster with the domain administrator account.
2. Create a directory for the quarantine storage on the physical disk shared by the cluster nodes.
You can create it on the same disk where the Exchange Server storage and logs are located.
3. After the quarantine directory is created, it has to be shared. When you share the quarantine directory, it becomes visible in the Failover ClusterManager. To share the directory, right-click the quarantine folder and select Share.
Add Administrators, Exchange Servers and SYSTEM with Contributorpermission levels. Press Share to close the window and enable the share.
4. Check that everything is configured correctly. The Failover Cluster Manager view should look like this:

14
5. During the product installation, select the quarantine share you just created when the installation asks for the quarantine path. Use the UNC path in form of \\CLUSTERNAME\QUARANTINE. (In the example above, \\LHCLUMB\Quarantine.)
1.2.4 CREATING THE QUARANTINE STORAGE FOR A CONTINUOUS CLUSTER REPLICATION ENVIRONMENT
For a Continuous Cluster Replication (CCR) cluster installation, the quarantine storage must be set on a dedicated computer. This computer has to be a member in the same domain with Exchange Servers.
1. Log on to the server where you plan to create the quarantine storage (for example, APPSERVER) with the domain administrator account.
2. Open Windows Explorer and create a directory (for example, C:\Quarantine ) for the quarantine storage on the physical disk.
3. Right-click the directory and select Sharing and Security.
4. Go to the Sharing tab.
a. Type FSAVMSEQS$ as the share name and F-Secure Quarantine Storage as comment.
Note: The dollar ($) character at the end of the share name makes the share hidden when you view the network resources of the cluster with Windows Explorer.
b. Make sure that User Limit is set to Maximum allowed.
Click Permissions to set permissions.

F-SECURE E-MAIL AND SERVER SECURITY | CLUSTER DEPLOYMENT GUIDE
15
5. Change permissions as follows:
a. Remove all existing groups and users.
b. Add Administrator, Exchange Domain Servers and SYSTEM to the Group or user names list.
c. Grant Change and Read permissions for Exchange Domain Servers and SYSTEM.
d. Grant Full Control, Change and Read permissions for the Administrator account.
Click OK to continue.
6. Go to the Security tab.
a. Remove all existing groups and users.
b. Add Administrator, Exchange Domain Servers and SYSTEM to the Group or user names list.
c. Grant all except Full Controlpermissions for Exchange Domain Servers and SYSTEM.
d. Grant all permissions for the Administrator account.
Click OK to finish.

16
To make sure that the quarantine storage is accessible, follow these instructions:
1. Log on as the domain administrator to any node of the cluster.
2. Try to open \\<Server>\FSAVMSEQS$\ with Windows Explorer, where <Server> is the name of the server where you just created the quarantine storage share.
1.2.5 CREATING THE QUARANTINE STORAGE FOR A DATABASE AVAILABILITY GROUP ENVIRONMENT
For the Database Availability Group (DAG) installation, the quarantine storage must be set on a dedicated computer. This computer has to be a member in the same domain with Exchange Servers.
1. Log on to the server where you will create the quarantine storage (for example, APPSERVER) with the domain administrator account.
2. Open Windows Explorer and create a directory (for example, C:\Quarantine) for the quarantine storage.
3. Right-click the directory and select Properties from the menu.
4. Go to the Sharing tab.

F-SECURE E-MAIL AND SERVER SECURITY | CLUSTER DEPLOYMENT GUIDE
17
5. Click Advanced Sharing to share the directory.
6. Select Share this folder.
Type FSAVMSEQS$ as the share name and F-Secure Quarantine Storage as a comment.
Note: The dollar ($) character at the end of the share name hides the share when you view the network resources of the cluster with Windows Explorer.
e. Make sure that User Limit is set to Maximum that is allowed (16777216).
7. Click Permissions to set permissions for the share.
8. Change permissions as follows:
a. Remove all existing groups and users.
b. Add Administrator, Exchange Servers and SYSTEM to the Group or user names list.
c. Grant Change and Read permissions for Exchange Servers and SYSTEM.
d. Grant Full Control, Change and Read permissions for the Administrator account.
9. Click OK to continue.

18
10. Go to the Security tab and click Edit.
e. Remove all existing groups and users.
f. Add Administrator, Exchange Servers and SYSTEM to the Group or user names list.
g. Grant all except Full Control permissions for Exchange Servers and SYSTEM.
h. Grant all permissions for the Administrator account.
11. Click OK to continue.
After you have configured the quarantine storage, make sure that it is accessible. Follow these instructions:
1. Log on as the domain administrator to any node of the cluster.
2. Open \\<Server>\FSAVMSEQS$\ with Windows Explorer, where <Server> is the name of the server where you created the quarantine storage share.

F-SECURE E-MAIL AND SERVER SECURITY | CLUSTER DEPLOYMENT GUIDE
19
1.3 INSTALLING THE PRODUCTFollow the instructions in this section to install the product on the active-passive and active-active clusters, CCR, SCC and DAG installations.
1.3.1 INSTALLING ON CLUSTERS WITH QUARANTINE AS CLUSTER RESOURCE
This section describes how to install the product on clusters where Quarantine isconfigured as cluster resource in Exchange Virtual Server.
1. Log on to the active node of the cluster using a domain administrator account.
2. Run F-Secure E-mail and Server Security setup wizard.
a. Install the product in the centralized management mode.
b. Specify the IP address of F-Secure Policy Manager Server and admin.pub that you created during the F-Secure Policy Manager installation.
For more information, see the "Installing the product locally" section of the Deployment Guide.
3. The setup wizard asks for the location of the quarantine directory.
Specify the UNC path to the Quarantine Storage share that you created before the installation as the Quarantine Directory. For example, \\<EVSName>\FSAVMSEQS$, where <EVSName> is the network name of your Exchange Virtual Server.
Click Next to continue.

20
4. The setup program asks to specify the SQL Server to use for the quarantine database.
Select the server running Microsoft SQL Server and click Next to continue.
5. The setup program asks to specify the database name where quarantined items are stored.
Specify the name for the database and enter user name and password that will be used to access the database.
Click Next to continue.
6. Complete the installation on the active node.
7. Log on to the passive node of the cluster using a domain administrator account. Repeat steps 2-4.

F-SECURE E-MAIL AND SERVER SECURITY | CLUSTER DEPLOYMENT GUIDE
21
8. After you specify the SQL Server to use, the setup wizard asks you to specify the quarantine database.
Select Use the existing database and click Next to continue.
9. Complete the installation on the passive node.
22
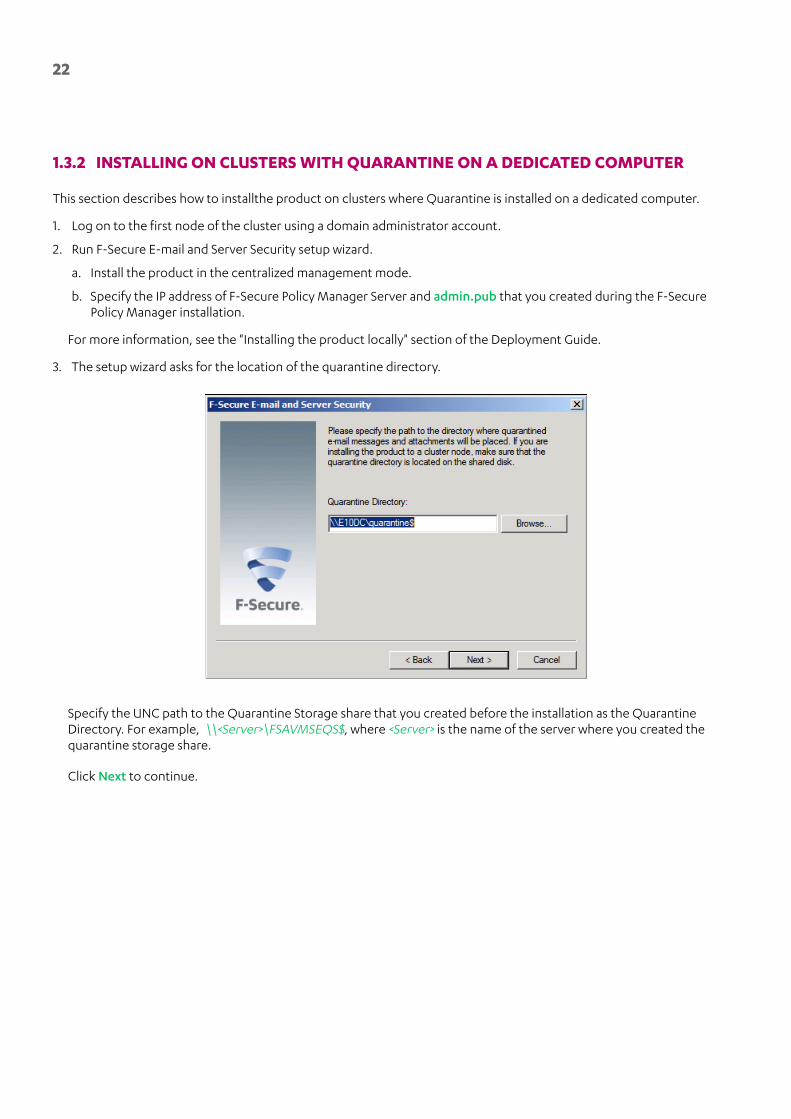
1.3.2 INSTALLING ON CLUSTERS WITH QUARANTINE ON A DEDICATED COMPUTER
This section describes how to installthe product on clusters where Quarantine is installed on a dedicated computer.
1. Log on to the first node of the cluster using a domain administrator account.
2. Run F-Secure E-mail and Server Security setup wizard.
a. Install the product in the centralized management mode.
b. Specify the IP address of F-Secure Policy Manager Server and admin.pub that you created during the F-Secure Policy Manager installation.
For more information, see the "Installing the product locally" section of the Deployment Guide.
3. The setup wizard asks for the location of the quarantine directory.
Specify the UNC path to the Quarantine Storage share that you created before the installation as the Quarantine Directory. For example, \\<Server>\FSAVMSEQS$, where <Server> is the name of the server where you created the quarantine storage share.
Click Next to continue.

F-SECURE E-MAIL AND SERVER SECURITY | CLUSTER DEPLOYMENT GUIDE
23
4. The setup program asks to specify the SQL Server to use for the quarantine database.
Select the server running Microsoft SQL Server and click Next to continue.
5. The setup program asks to specify the database name where quarantined items are stored.
Specify the name for the database and enter user name and password that will be used to access the database.
Click Next to continue.
6. Complete the installation on the first active node.
7. Log on to the second node of the cluster using a domain administrator account and repeat steps 2-4.

24
8. After you specify the SQL Server to use, the setup wizard asks you to specify the quarantine database.
Select Use the existing database and click Next to continue.
9. Complete the installation on the second node.

F-SECURE E-MAIL AND SERVER SECURITY | CLUSTER DEPLOYMENT GUIDE
25
Hub Transport Role Server:
1. Share the Pickup folder on the Exchange Hub Server. By default, the Pickup folder is located at %Program Files%\Microsoft\Exchange Server\TransportRoles\Pickup.
Use the default name (Pickup) for the share so that it can be accessed at \\HubServerName\Pickup.
2. Right-click the Pickup folder and select Properties > Sharing and click Permissions. Assign Read and Change permissions to the Pickup folder for the Exchange Servers group or for the Mailbox Role Servers directly.
3. Go to the Security tab and assign all the permissions except FullControl and Special for the Pickup Folder for the Exchange Servers group or directly for the Mailbox Role Servers.
Mailbox Role Server
1. Open the Windows Registry Editor and go to HKEY_LOCAL_MACHINE\SYSTEM\CurrentControlSet\Services\FSAVMSED\Parameters subkey.
If the Parameters subkey does not exist, create it.
2. Under the Parameters subkey, create PickupFolderPath string value that points to the Pickup Folder share of the hub server that has been created earlier (\\HubServerName\Pickup).
Note: The registry value has to be changed on all cluster nodes.
After these steps have been completed, the quarantine works properly on the Mailbox Role only servers as well.
Note: You do not have to reboot or restart the server, the product takes the new settings into use automatically.
Note: Even though the Exchange organization may contain more than one Hub Transport Role server, F-Secure Anti-Virus for Microsoft Exchange supports only one Pickup folder. After you have specified one Hub Transport Role Server with a Pickup folder, make sure that the folder is available or change Pickup folder path to another one if the current Hub Transport Role Server goes offline.
1.4 ADMINISTERING THE CLUSTER INSTALLATION WITH F-SECURE POLICY MANAGER
To administer the product installed on a cluster, create a new subdomain under your organization or network domain. Import all cluster nodes to this subdomain.
To change product configuration on all cluster nodes, follow these instructions:
1. Select the cluster subdomain in the Policy Domains tree.
2. Change required settings.
3. Distribute the policy.
4. All nodes receive new settings next time they poll the F-Secure Policy Manager Server.
If you need to change settings on a particular node, follow these instructions:
1. Select the corresponding host in the Policy Domains.
2. Change required settings.
3. Distribute the policy.
4. All nodes will receive new settings the next time they poll F-Secure Policy Manager Server.
1.5 USING THE QUARANTINE IN THE CLUSTER INSTALLATION
You can manage quarantined items with the Web Console by connecting to any node of the cluster.
Note: You need to configure the Web Console to accept connections from authorized hosts. By default, the Web Console accepts connections from the local host only.
You can release, reprocess and download quarantined messages and attachments when at least one node of the cluster is currently online.
CONFIGURING MAILBOX ROLE SERVERS
However, as the clustered Exchange 2007 can have the mailbox role only and not all members of Exchange 2010 Database Availability Group may have Hub Transport Role, you need to configure the hub transport role and mailbox role servers so that quarantined messages can be delivered:

26
1.6 USING THE PRODUCT WITH HIGH AVAILABILITY ARCHITECTURE IN MICROSOFT EXCHANGE SERVER 2010
New high-availability solutions in Microsoft Exchange Server 2010 support online mailbox moves. As it takes some time for the product to enumerate mailbox changes on nodes, manual and scheduled scans might not scan the moved mailbox but the mailbox copy on the former node instead, if the scan is started right after the move. However, the real-time scan works without these limitations.
To scan Public Folders manually or with scheduled scanning, you have to specify an administrator’s mailbox if the product settings. Manual and scheduled scans scan all Public Folders that the specified administrator account can access.
Once you start the manual scan of Public Folders on one node, the scan goes through all Public Folders the account can access, including those Public Folder Databases that are located on other nodes. To avoid collisions where one item would be edited by several on-demand scanners simultaneously, make sure that manual and scheduled Public Folders scans are started only on one node at a time.
The real-time Public Folder scan scans only Public Folders that are located together with the product on the same node.
If Public Folders in Microsoft Exchange 2010 are replicated, the attachment replacement text file is added only to the Public Folder Database replica that is located on the same node, but infections are detected and quarantined if needed from all replicas.
If an infected item was edited (an infection was disinfected or quarantined) during the manual or scheduled Public Folder scan, the edited item is marked as "read" for the administrator's mailbox which is specified in the product settings.
1.7 UNINSTALLATIONFollow these instructions to uninstall the product in the cluster environment.
1. Uninstall the product from the active node with Add/Remove Programs in Windows 2003 or Programs and Features in Windows 2008 and 2008 R2. The uninstallation removes the cluster resource automatically.
2. After the uninstallation in the active node is finished, uninstall the product from passive nodes.
3. After the product has been uninstalled from every node, reboot computers one at the time.
1.8 TROUBLESHOOTINGIf the product fails to quarantine a message or attachment or reports that the e-mail quarantine storage is not accessible, make sure that directory sharing and security permissions are set as follows: change, write and read operations are allowed for SYSTEM and Exchange Domain Servers, and full control is allowed for Administrator.
• To change the location of the e-mail quarantine storage from F-Secure Policy Manager Console, use the Final flag to override the setting set during product installation on the host.

F-SECURE E-MAIL AND SERVER SECURITY | CLUSTER DEPLOYMENT GUIDE
27

28
F-Secure is an online security and privacy company from Finland. We offer millions of people around the globe the power to surf
invisibly and store and share stuff, safe from online threats.
We are here to fight for digital freedom.
Join the movement and switch on freedom.
Founded in 1988, F-Secure is listed on NASDAQ OMX Helsinki Ltd.
SWITCH ON
FREEDOM