Hurricane Exercise Overview Texas 2008 Hurricane Exercise (HUREX 08)

Exercise Overview• Exercise 1: Namelist modification
Customize your history output
• Exercise 2: Namelist + Code modificationAdd a new output field to the code
• Exercise 3: Change a tuning parameter
• Don’t forget the quiz ! (You can complete the previous day quizzes too)

Exercise 1: Customizing history filesCreate a case called �b1850_high_freq� using the compset B1850 at f19_g17 resolution.
Set the run length to 1 month.
In addition to the monthly history file �h0�, output:- �h1� file with instantaneous values of T, Q, U and V every 24 hour.- �h2� file with time-average values of T, Q, U and V every 3 hour.
Set your namelist so that you output: - a single h1 file with all the daily output for the month. - multiple h2 file, one for every day of the month.It means you will have one h1 file with 31 timesteps and you will have thirty-one h2 files with 8 timesteps each).
(Hint: - Use namelist variables: nhtfrq, mfilt, fincl. Look at the online documentation for these variables)

Exercise 1: Check your solutionWhen your run is completed,
(1) Check that your archive directory contains the files:
(2) Compare the contents of the h1 and h2 files using �ncdump�.
ncdump –h b1850_high_freq.cam.h1.0001-01-01-00000.ncncdump –h b1850_high_freq.cam.h2.0001-01-01-00000.nc
Look at the variables attributes. What is the difference between the 2 files ?
(3) Check the number of timesteps in the h1 and the h2 files. Look at the sizes of the files.
h0 files b1850_high_freq.cam.h0.0001-01.nc
h1 files b1850_high_freq.cam.h0.0001-01.nc
h2 files b1850_high_freq.cam.h2.0001-01-01-00000.ncb1850_high_freq.cam.h2.0001-01-02-00000.nc...b1850_high_freq.cam.h2.0001-02-01-00000.nc

Exercise 2: Add an output fieldCreate a case called �b1850_T750� using the compset B1850 at f19_g17 resolution. Add an output field for the temperature at 750 mbar. Output daily values of T750 and T500 in the �h1� history file. Set the namelist to output a single h1 for the run. Make a 1-month run.
Hint:
- Use T500 as a template for your changes.- Find the subroutine containing T500 using grep –r T500 *
Check your solution
When the run is completed,
- check the field T750 and T500 are in the file h1
- create a file with the difference between T750-T500 (*)
- look at the difference with ncview.
(*) For instance, you can use ncap2 ncap2 -s �T750_minus_T500=T750-T500' b1850_T750.cam.h1.0001-01-01-00000.nc T750-T500.nc

Exercise 3: Modify a parameter, dcsIn the tuning lecture, we talked about the parameter dcs:http://www.cesm.ucar.edu/events/tutorials/2018/files/Specialized-hannay.pdf
Create a case called �b1850_dcs� using the compset B1850 at f19_g17 resolution. Locate the parameter Dcs and change from the default value:micro_mg_dcs = 500.D-6 to micro_mg_dcs = 250.D-6 Make a 1-month run.
Hint: The trick is going to locate where is micro_mg_dcs
Compare to the first run: b1850_high_freq.You can use ncdiff and ncview to look at the difference between the 2 runs.
ncdiff /glade/scratch/$user/archive/b1850_dcs/atm/hist/b1850_dcs.cam.h0.0001-01.nc /glade/scratch/$user/archive/b1850_high_freq/atm/hist/b1850_high_freq.cam.h0.0001-01.ncdiff.nc
ncview diff.nc
How does this affect the LWCF ?

QuizzesAt the end of the practical, please go to the online course and take the quiz. http://www.cesm.ucar.edu/events/tutorials/2018/quizzes.html
To answer the questions, you can use documentation, ask questions to others or to the helper. Indeed you are strongly encouraged to do all the above. This is the way you will use CESM in the future.
How are you graded ? You can take the quizzes as many times as you want, I only retain your highest score. But please try to understand your mistakes.
If you cannot complete the quiz by the end of the practical session, you have until August 17 to complete the quizzes. If you get a perfect score, you will get a certificate of awesomeness.
“Special prize” for those who get a perfect score before Friday morning!!!

Solutions to the exercisesAt the request of previous year students, I am providing the solution.
My own recommendation: DON’T LOOK AT THE SOLUTIONS DURING THE LAB !!!
I believe:- You will only learn if you try the exercises by yourself.- You will only learn if you do mistakes.- Copy/paste will teach you little, indeed. - Your best bet is to try, do mistakes, ask your neighbor, interact with each others,
look at the documentation, try to understand what is wrong...
But this is my own opinion, and I am too old to believe I know the Truth. So do what is best for you. Go to the next page at your own risk !

If you are sure you want to continue, click on the button...

Solution to exercise 1# Point to the prebuilt code (These instructions are for tcsh shell. If you use another shell, modify accordingly) setenv CESM_BLD_TEMPLATE /glade/p/cesm/tutorial/templates/cesm2.0.0_b1850/bld
## Create a new casecd /glade/p/cesm/tutorial/cesm2.0.0_tutorial/cime/scripts./create_newcase --case ~/cases/b1850_high_freq --compset B1850 --res f19_g17
## Case setupcd ~/cases/b1850_high_freq./case.setup
## Edit the user_nl_cam and add the lines:nhtfrq = 0, -24, -3mfilt = 1, 31, 8 fincl2 = 'T:I','Q:I','U:I','V:I'fincl3 = 'T','Q','U','V'
# Change run length./xmlchange STOP_N=1,STOP_OPTION=nmonths
## Build and submitqcmd -- ./case.build./case.submit

Solution to exercise 1When your run is completed
(1) Check that your archive directory: cd /glade/scratch/$user/archive/b1850_high_freq/atm/histls
(2) Compare the contents of the h1 and h2 files using “ncdump”.Look at the variables attributes. What is the difference between the 2 files ?
ncdump –h b1850_high_freq.cam.h1.0001-01-01-00000.nc ncdump –h b1850_high_freq.cam.h2.0001-01-01-00000.nc
time = UNLIMITED ; // (31 currently)
float Q(time, lev, lat, lon) ;Q:mdims = 1 ;Q:units = "kg/kg" ;Q:long_name = "Specific humidity" ;
float T(time, lev, lat, lon) ;T:mdims = 1 ;T:units = "K" ;T:long_name = "Temperature" ;
float U(time, lev, lat, lon) ;U:mdims = 1 ;U:units = "m/s" ;U:long_name = "Zonal wind" ;
float V(time, lev, lat, lon) ;V:mdims = 1 ;V:units = "m/s" ;V:long_name = "Meridional wind" ;
time = UNLIMITED ; // (8 currently)
float Q(time, lev, lat, lon) ;Q:mdims = 1 ;Q:units = "kg/kg" ;Q:long_name = "Specific humidity" ;Q:cell_methods = "time: mean" ;
float T(time, lev, lat, lon) ;T:mdims = 1 ;T:units = "K" ;T:long_name = "Temperature" ;T:cell_methods = "time: mean" ;
float U(time, lev, lat, lon) ;U:mdims = 1 ;U:units = "m/s" ;U:long_name = "Zonal wind" ;U:cell_methods = "time: mean" ;
float V(time, lev, lat, lon) ;V:mdims = 1 ;V:units = "m/s" ;V:long_name = "Meridional wind" ;V:cell_methods = "time: mean" ;

Solution to exercise 1(3) Check the number of timesteps in the h1 and the h2 files.
Look at the sizes of the files.
h1 => 31 timestep. In the netcdf file, time = UNLIMITED ; // (31 currently)
h2 => 8 timesteps. See in the netcdf file, time = UNLIMITED ; // (8 currently)
Check size of the files
du –ks –h /glade/scratch/$user/archive/b1850_high_freq/atm/hist
234M b1850_high_freq.cam.h0.0001-01.nc
210M b1850_high_freq.cam.h1.0001-01-01-00000.nc
7.0M b1850_high_freq.cam.h1.0001-02-01-00000.nc
55M b1850_high_freq.cam.h2.0001-01-01-00000.nc
55M b1850_high_freq.cam.h2.0001-01-02-00000.nc
...
55M b1850_high_freq.cam.h2.0001-01-31-00000.nc
7.0M b1850_high_freq.cam.h2.0001-02-01-00000.nc
The February files are smaller because there is only 1 timestep

Solution to exercise 2 # Point to the prebuilt code (These instructions are for tcsh shell. If you use another shell, modify accordingly) setenv CESM_BLD_TEMPLATE /glade/p/cesm/tutorial/templates/cesm2.0.0_b1850/bld
# Create a new casecd /glade/p/cesm/tutorial/cesm2.0.0_tutorial/cime/scripts
./create_newcase --case ~/cases/b1850_T750--compset B1850 --res f19_g17
# Case setupcd ~/cases/b1850_T750
./case.setup
# Locate the file where T500 is computed and copy it SourceMods/sccp /glade/p/cesm/tutorial/cesm2.0.0_tutorial/components/cam/src/physics/cam/cam_diagnostics.F90 SourceMods/src.cam
# Edit the file SourceMods/src.cam/cam_diagnostics.F90 and add the lines:!++ add a variable for T750
call addfld ('T750', horiz_only, 'A', 'K','Temperature at 750 mbar pressure surface')
!++ add a variable for T750
if (hist_fld_active('T750')) then
call vertinterp(ncol, pcols, pver, state%pmid, 75000._r8, state%t, p_surf, &
extrapolate='T', ps=state%ps, phis=state%phis)
call outfld('T750 ', p_surf, pcols, lchnk )
end if

Solution to exercise 2 # Change run length
./xmlchange STOP_N=1,STOP_OPTION=nmonths
## Build and submit
qcmd -- ./case.build./case.submit
Check your solution
When the run is completed,
- check the field T750 and T500 are in the file h1
cd /glade/scratch/$user/archive/b1850_T750/atm/hist/ ncdump -h b1850_T750.cam.h1.0001-01-01-00000.nc
float T500(time, lat, lon) ;
T500:units = "K" ;
T500:long_name = "Temperature at 500 mbar pressure surface" ;
T500:cell_methods = "time: mean" ;
float T750(time, lat, lon) ;
T750:units = "K" ;
T750:long_name = "Temperature at 750 mbar pressure surface" ;
T750:cell_methods = "time: mean" ;

Solution to exercise 2 # create a file with the difference between T750-T500
cd /glade/scratch/$user/archive/b1850_T750/atm/hist/ ncap2 -s �T750_minus_T500=T750-T500' b1850_T750.cam.h1.0001-01-01-00000.nc T750-T500.nc
# look at the difference between T750-T500 with ncview.
cd /glade/scratch/$user/archive/b1850_T750/atm/hist/ ncview T750-T500.nc

Solution to exercise 3 # Point to the prebuilt code (These instructions are for tcsh shell. If you use another shell, modify accordingly) setenv CESM_BLD_TEMPLATE /glade/p/cesm/tutorial/templates/cesm2.0.0_b1850/bld
# Create a new casecd /glade/p/cesm/tutorial/cesm2.0.0_tutorial/cime/scripts./create_newcase --case ~/cases/b1850_dcs --compset B1850 --res f19_g17
# Case setupcd ~/cases/b1850_dcs./case.setup
# Edit user_nl_camcd ~/cases/b1850_dcsReplace micro_mg_dcs = 500.D-6 by micro_mg_dcs = 200.D-6
# Change run length./xmlchange STOP_N=1,STOP_OPTION=nmonths
## Build and submitqcmd -- ./case.build./case.submit
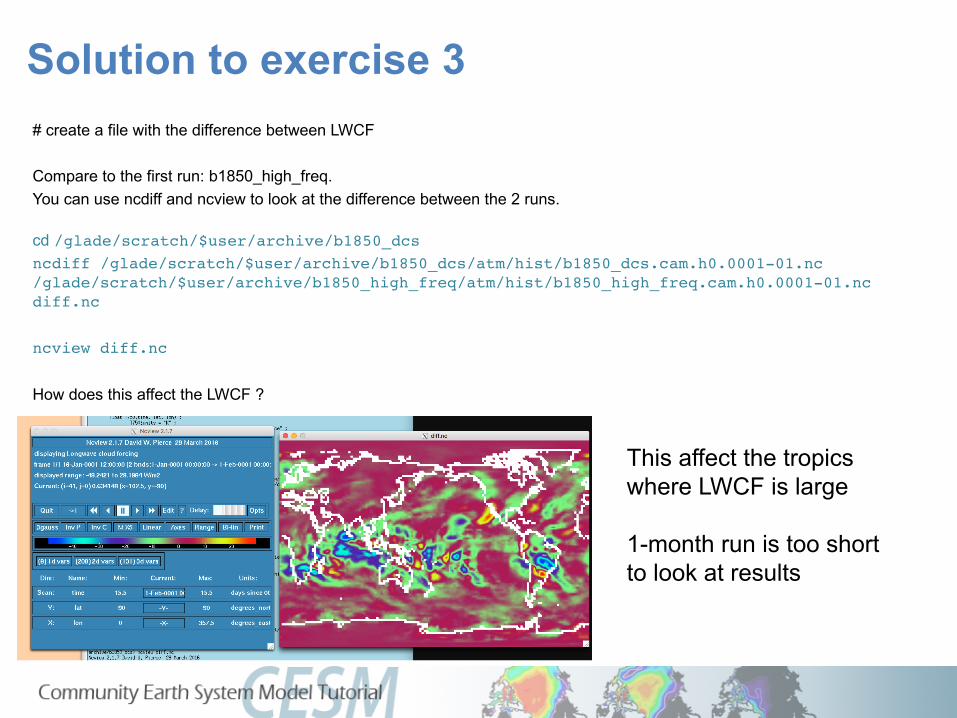
Solution to exercise 3 # create a file with the difference between LWCF
Compare to the first run: b1850_high_freq.You can use ncdiff and ncview to look at the difference between the 2 runs.
cd /glade/scratch/$user/archive/b1850_dcs ncdiff /glade/scratch/$user/archive/b1850_dcs/atm/hist/b1850_dcs.cam.h0.0001-01.nc /glade/scratch/$user/archive/b1850_high_freq/atm/hist/b1850_high_freq.cam.h0.0001-01.ncdiff.nc
ncview diff.nc
How does this affect the LWCF ?
How does this affect the LWCF ? This affect the tropics where LWCF is large
1-month run is too short to look at results

Namelist and Code Modifications
Part 1: Namelist ModificationsPart 2: Code ModificationsPart 3: Exercises and Quiz
Cecile Hannay, CAM Science LiaisonAtmospheric Modeling and Predictability Section Climate and Global Dynamics Division.

�I can only show you the door. You're the one that has to walk through it�
(The Matrix, 1999)

Part 1: Namelist Modifications
In this section, we will:
- review the �CESM flow� and how to make namelist changes,
- see where to find documentation for namelist variables
- as an illustration, we will customize the output history files to get high frequency output
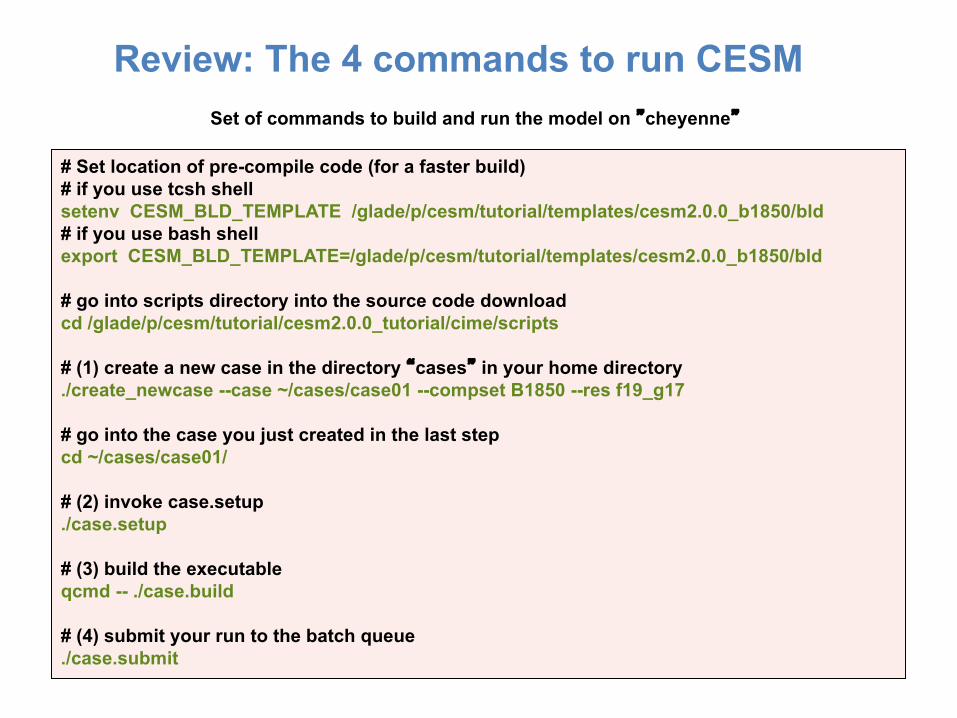
Review: The 4 commands to run CESM
# Set location of pre-compile code (for a faster build)
# if you use tcsh shell
setenv CESM_BLD_TEMPLATE /glade/p/cesm/tutorial/templates/cesm2.0.0_b1850/bld
# if you use bash shell
export CESM_BLD_TEMPLATE=/glade/p/cesm/tutorial/templates/cesm2.0.0_b1850/bld
# go into scripts directory into the source code download
cd /glade/p/cesm/tutorial/cesm2.0.0_tutorial/cime/scripts
# (1) create a new case in the directory �cases� in your home directory
./create_newcase --case ~/cases/case01 --compset B1850 --res f19_g17
# go into the case you just created in the last step
cd ~/cases/case01/
# (2) invoke case.setup
./case.setup
# (3) build the executable
qcmd -- ./case.build
# (4) submit your run to the batch queue
./case.submit
Set of commands to build and run the model on �cheyenne�
“qcmd” is for Cheyenne only
For tutorial only

Overview of CESM directoriesbefore create_newcase
atm lnd ocn ice glc wav
/glade/p/cesmdata/cseg/inputdata$DIN_LOC_ROOT
INPUTDATA Directory
rofshare cpl
# go into scripts directory into the source code downloadcd /glade/p/cesm/tutorial/cesm2.0.0_tutorial/cime/scripts
# (1) create a new case in the directory �cases� in your home directory./create_newcase --case ~/cases/case01 --compset B1850 --res f19_g17
# go into the case you just created in the last stepcd ~/cases/case01/
# (2) invoke case.setup./case.setup
# (3) build the executableqcmd -- ./case.build
# (4) submit your run to the batch queue./case.submit
components cime
/glade/.../cesm2.0.0_tutorial$SRCROOT
CESM Code
cam
cice
cism
clm
mosart
rtm
pop
ww3
scripts(1) create_newcase

Overview of CESM directoriesafter create_newcase
atm lnd ocn ice glc wav
/glade/p/cesmdata/cseg/inputdata$DIN_LOC_ROOT
INPUTDATA Directory
rofshare cpl
run$RUNDIR
/glade/scratch/userx/case01
Build/Run Directory
bld$EXEROOT
# go into scripts directory into the source code downloadcd /glade/p/cesm/tutorial/cesm2.0.0_tutorial/cime/scripts
# (1) create a new case in the directory �cases� in your home directory./create_newcase --case ~/cases/case01 --compset B1850 --res f19_g17
# go into the case you just created in the last stepcd ~/cases/case01/
# (2) invoke case.setup./case.setup
# (3) build the executableqcmd -- ./case.build
# (4) submit your run to the batch queue./case.submit
components cime
/glade/.../cesm2.0.0_tutorial$SRCROOT
CESM Code
cam
cice
cism
clm
mosart
rtm
pop
ww3
scripts(1) create_newcase
~/cases/case01(2) case.setup(3) case.build
(4) case.submit
SourceMods
CASE Directory
CaseDocs
…

Overview of CESM directories+ 4 CESM commands
atm lnd ocn ice glc wav
/glade/p/cesmdata/cseg/inputdata$DIN_LOC_ROOT
INPUTDATA Directory
rofshare cpl
run$RUNDIR
/glade/scratch/userx/case01
Build/Run Directory
bld$EXEROOT
# go into scripts directory into the source code downloadcd /glade/p/cesm/tutorial/cesm2.0.0_tutorial/cime/scripts
# (1) create a new case in the directory �cases� in your home directory./create_newcase --case ~/cases/case01 --compset B1850 --res f19_g17
# go into the case you just created in the last stepcd ~/cases/case01/
# (2) invoke case.setup./case.setup
# (3) build the executableqcmd -- ./case.build
# (4) submit your run to the batch queue./case.submit
components cime
/glade/.../cesm2.0.0_tutorial$SRCROOT
CESM Code
cam
cice
cism
clm
mosart
rtm
pop
ww3
scripts(1) create_newcase
~/cases/case01(2) case.setup(3) case.build
(4) case.submit
SourceMods
CASE Directory
CaseDocs
…
This is when you can modify the namelists

Overview of CESM directories+ 4 CESM commands
atm lnd ocn ice glc wav
/glade/p/cesmdata/cseg/inputdata$DIN_LOC_ROOT
INPUTDATA Directory
rofshare cpl
run$RUNDIR
atm_incism_in
drv_flds_indrv_inice_inlnd_in
mosart_inpop_inwav_in
/glade/scratch/userx/case01
Build/Run Directory
bld$EXEROOT
components cime
/glade/.../cesm2.0.0_tutorial$SRCROOT
CESM Code
cam
cice
cism
clm
mosart
rtm
pop
ww3
scripts(1) create_newcase
CASE Directory
~/cases/case01(2) case.setup(3) case.build
(4) case.submituser_nl_camuser_nl_ciceuser_nl_cismuser_nl_clmuser_nl_cpl
user_nl_mosartuser_nl_popuser_nl_ww
SourceMods
CaseDocsatm_incism_in
drv_flds_indrv_inice_inlnd_in
mosart_inpop_inwav_in
case.setup createsnamelist modification files user_nl_xxxthis is where you modify your namelists
CaseDocs contains copy of the namelistsfor reference only
(should notbe edited)
Here
The build script creates namelistsin the run directory
This is used by the model at runtime
(should notbe edited)
…

Part 1: Namelist Modifications
In this section, we will:
- review the �CESM flow� and how to make namelist changes,
- see where to find documentation for namelist variables
- as an illustration, we will customize the output history files to get high frequency output

Where to find info about namelists ?http://www.cesm.ucar.edu/models/cesm2.0/
In “Prognostic Components” or in “Components Configuration Settings”,you can find information about namelistvariables in: “Component Fortran Namelist settings”

Where to find info about namelists ?http://www.cesm.ucar.edu/models/cesm2.0/
Namelist definitionsfor every component

Where to find info about namelists ?http://www.cesm.ucar.edu/models/cesm2.0/
Browse variables namesShow details about variables

Part 1: Namelist Modifications
In this section, we will:
- review the �CESM flow� and how to make namelist changes,
- see where to find documentation for namelist variables
- as an illustration, we will customize the output history files to get high frequency output

Let’s change the output frequency in CAM**
By default, CESM outputs monthly average history files but you can output at other frequency.
For instance: to change the output frequency of a CAM history file from monthly average to daily average, we use the namelist variable: nhtfrq=-24
** In this tutorial, examples will be coming from the atmospheric. Concepts are transferable to other model components.

Customizing CAM history files
In this section, we will cover:• how to change the output frequency• how to output extra variables• how to output extra history files• how to control the number of time samples written to a history file
This can be achieved with 3 namelist variables:- nhtfrq: sets the output frequency- fincl: add variables to the history file- mfilt: maximum number of time samples written to a history file

Customizing CAM history files: nhtfrq, mfiltThe default history file from CAM is a monthly average.
We can change the output frequency with the namelist variable nhtfrqIf nhtfrq=0, the file will be a monthly averageIf nhtfrq>0, frequency is input as number of timesteps.If nhtfrq<0, frequency is input as number of hours.For instance to change the history file from monthly average to dailyaverage, we set the namelist variable:nhtfrq = -24
To control the number of timesteps in the history file, we can use the variable mfiltFor instance, to specify that we want one time sample on each history file, we set the namelist variable:mfilt = 1

Customizing CAM history files: finclYou can output up to 6 history files: �h0�, �h1�, …, �h5�.
For the files �h1� to �h5�, the user has to specify the variables to output.
The file �h0� contains the default variables (in the code: �call add_default�). This includes the variables necessary for the AMWG package.
h0 h1 … h5fincl1 fincl2 … fincl6
To control the list of fields in the history fileswe can use the namelist variables
For instance, the line:fincl1 = �PRECT�
is used to add the field �PRECT� to the file �h0�

Customizing CAM history files: fincl
Using a ":" following a field gives the averaging flag for the output field. Valid flags are: I for instantaneous, A for average, M for minimum, X for maximum.
For instance, the line:fincl1 = �PRECT:M’is used to add the minimum of ‘PREC’ to the file �h0�

Example of customizing history filesFor instance, in addition to the monthly history file �h0�, we want to output a file �h1� with instantaneous values of T, Q, U, V and OMEGA every 3 hour. We can use:
fincl2 = 'T:I','Q:I','U:I','V:I�,�OMEGA:I�nhtfrq = 0, -3
Notice that it is equivalent to:
fincl2 = 'T:I','Q:I','U:I','V:I�, �OMEGA:I�nhtfrq(1) = 0nhtfrq(2) = -3
NB: If you plan to run the AMWG diagnostic package, it is recommended to leave the �h0� file untouched and to add extra history files.

Outputting high frequency data in other components
Here is a few variables to control output frequency of land, ice and ocean
CLMhist_nhtfrq: output frequency of the history file hist_mfilt: number of samples on each history filehist_fincl: adding variables and auxiliary history files
Example user_nl_clm to output 4 extra history files with daily, six-hourly, hourly, and every time-step values of TG and TV (leaving the primary history files as monthly): hist_fincl2 = 'TG', 'TV’ hist_fincl3 = 'TG', 'TV' hist_fincl4 = 'TG', 'TV' hist_fincl5 = 'TG', 'TV' hist_nhtfrq = 0, -24, -6, -1, 1
http://www.cesm.ucar.edu/models/cesm2.0/namelists/clm_nml.html

Outputting high frequency data in other components
CICE histfreq: Frequency of output written to history files ('1', 'm', 'd', 'y', …)histfreq_n: Frequency history data is written to history fileshist_avg: if false => instantaneous values
if true => time-averages
Example user_nl_cice to output an extra history file with daily values (leaving the primary history file as monthly):
histfreq = 'm','d','x','x','x'histfreq_n = 1,1,1,1,1
See: http://www.cesm.ucar.edu/models/cesm2.0/namelists/cice_nml.html

Outputting high frequency data in other components
POP2tavg_freq = frequency at which the model fields are writtentavg_freq_opt = units of time for 'tavg_freq� ('nmonth�, 'nhour�, 'once�,…)tavg_file_freq = frequency at which the model files are writtentavg_file_freq_opt = units of time for 'tavg_file_freq� ('nmonth�, 'nhour�, …)
http://www.cesm.ucar.edu/models/cesm2.0/namelists/pop2_nml.html
Changing tavg_nml variables is non standard Do not modify these variables directly in user_nl_pop2Use the workaround explained in user_nl_pop2
For instance, to output a timeseries of daily averages bundled into a monthly file: tavg_freq_opt = 'nday' tavg_freq = 1 tavg_file_freq_opt = 'nmonth' tavg_file_freq = 1

Part 2: Code Modification
In this section, we will learn how to do simple code modificationssuch adding a new variable

Your choice: The Red Pill or the Blue Pill
The Matrix (1999): Neo, the main character is offered the choice between a red pill and a blue pill.
-The blue pill would allow him to remain in the Matrix(a fictional computer-generated world)
-The red pill would lead to his "escape" from the Matrix into the real world and embracing the sometimes painful truth of reality.
Courtesy: Andrew Gettelman

components cime
/glade/.../cesm2.0.0_tutorial
$SRCROOT
CESM Code
cam
cice
cism
clm
mosart
rtm
pop
ww3
scripts
(1) create_newcase
Principles for modifying the code
SourceMods
Tools
CaseDocs
Buildconf
LockedFiles
…
src.clm
src.pop2
src.cam
src.cice
atm lnd ocn ice glc wav
/glade/p/cesmdata/cseg/inputdata
$DIN_LOC_ROOT
INPUTDATA Directory
rofshare cpl
run
$RUNDIR
/glade/scratch/userx/case01
Build/Run Directory
bld
$EXEROOT
~/cases/case01
(2) case.setup
(3) case.build
(4) case.submit
CASE Directory
View of the CESM directories. Where to modify the code ?

components cime
/glade/.../cesm2.0.0_tutorial
$SRCROOT
CESM Code
cam
cice
cism
clm
mosart
rtm
pop
ww3
scripts
(1) create_newcase
Principles for modifying the code
SourceMods
Tools
CaseDocs
Buildconf
LockedFiles
…
src.clm
src.pop2
src.cam
src.cice
This is where you will put your modifications
These modifications only affect the current caseThese modifications affect all the cases built out of this SRCROOT.
atm lnd ocn ice glc wav
/glade/p/cesmdata/cseg/inputdata
$DIN_LOC_ROOT
INPUTDATA Directory
rofshare cpl
run
$RUNDIR
/glade/scratch/userx/case01
Build/Run Directory
bld
$EXEROOT
~/cases/case01
(2) case.setup
(3) case.build
(4) case.submit
CASE Directory
# go into scripts directorycd /glade/p/cesm/tutorial/cesm2.0.0_tutorial/cime/scripts
# (1) create a new case./create_newcase --case ~/cases/case01 --compsetB1850 --res f19_g17
# go into the case you just created in the last stepcd ~/cases/case01/
# (2) invoke case.setup./case.setup
# (3) build the executableqcmd -- ./case.build
# (4) submit your run to the batch queue./case.submit
Make your source mods

Modifying a subroutine
Steps to modify the code:
- Find the subroutine you want to modify
- Copy this subroutine in SourceMods
- Make your mods
- Compile and run the model

Output an extra variable • One common thing you may want to do is to add code to output a new variable
• For instance, CAM has a field to output the temperature at 500 mbar (T500) but not at 750mb. Let�s add a field to output the temperature at 750 mbar (T750)
This can be done by a succession of calls: call addfld (�T750�, …)call add_default (�T750�,…)call outfld(�T750�, … )
Add a field to master field listAdd this field to “h0” by default (optional)
Collect values for this field and write to history file

Syntax: addfldaddfld = Add a field to master field list
subroutine addfld (fname, units, numlev, avgflag, &long_name, decomp_type, [Optional arguments])
Example:call addfld ('T500',�K',1,'A','Temperature at 500 mbar pressure surface', phys_decomp)
Field name UnitsNumber of vertical levels:single level :1multi-level: pver or pverp
Averaging flag:A = averageI = instantaneous
Field full name Decomposition type (phys_decomp or dyn_decomp)
There are several optional arguments (not covered here. See documentation for more information about optional arguments)

Syntax: add_default add_default = Add a field to the list of default fields on history file
subroutine add_default (name, tindex, flag)
Example:call add_default ('CLOUD ', 1, ' ')
Field nameAveraging flag:A = average (default)I = instantaneous
history tape index

Syntax: outfldoutfld = accumulate (or take min, max, etc. as appropriate) input field into its history buffer for appropriate tapes
subroutine outfld (fname, field, idim, c)
Example:call outfld('CLOUD', cld, pcols, lchnk)
Field nameLongitude dimension of field array
Array containing field values chunk (physics) or latitude
(dynamics) index

Where to find help ?http://www.cesm.ucar.edu/models/cesm2.0/
CESM webpage is a gold mine for model documentation
If you cannot find an answer in the model documentation, post your question on the CESM Bulletin Board