Exercise Manual for Raspberry Pi and Python …...Part A - Introduction to RPi A-2 Learning...
22
Exercise Manual for Raspberry Pi and Python Programming by School of Computer Science and Engineering for Nanyang Science & Engineering Experience (seeNTU)
Transcript of Exercise Manual for Raspberry Pi and Python …...Part A - Introduction to RPi A-2 Learning...

Exercise Manual for
Raspberry Pi
and Python Programming
by School of Computer Science and Engineering
for Nanyang Science & Engineering Experience
(seeNTU)

Part A - Introduction to RPi
A-2
Learning Objectives
There are two parts in this exercise manual.
Part A - Introduce students to the Raspberry Pi (RPi) single-board computer, and how to use its text-based commands to explore the environment of the RPi.
Part B - Introduce students to coding programs in Python language to display messages and images using the add-on display module (Sense HAT board) on RPi board.
Equipment and accessories required
i) Raspberry Pi 3 Model B (RPi3) board with Sense HAT add-on display module/board. ii) HDMI monitor, USB keyboard and USB mouse. iii) A USB power source to power the RPi3 board (E.g. Power Bank, Adaptor or USB port of a
desktop computer).
iv) Optional – A computer (desktop PC or notebook) with Ethernet port and cable for remote access of RPi3. Software (open source) to be installed on the computer – PuTTy and VNC Viewer.
____________________________________________________________________________
1. Introduction
The Raspberry Pi (RPi) is a small single-board computer developed in UK by the Raspberry Pi Foundation to promote the teaching of basic computer science in schools. It is a low cost computer board (about S$50) but comes with powerful processor (that are also used in some of the latest smartphone).
Raspberry Pi 3 Model B (RPi3)
For the RPi3 model that is used in this exercise, the board also support wireless interfaces (i.e. connection), Wifi and Bluetooth which means that it can be also access using your wireless devices such as Notebook and Smartphone.

Part A - Introduction to RPi
A-3
The RPi can be set up as a standalone computer by connecting a monitor, keyboard and mouse through its various interfaces.
Standalone setup of RPi3 The operating system (OS) used on the RPi is the Raspbian, which is based on the open source Linux OS. (An OS is the software used to control and operate a computer, such as the Microsoft’s Windows OS and Apple’s macOS for their notebooks, and Google’s Android and Apple’s iOS for their smartphones) As an educational kit, you can add other devices to the RPi board, typically in the form of add-on modules. In this exercise, you will be using the Sense Hat add-on module on the RPi board, such that you can code programs to display messages and images on the module.
Sense Hat module and its interface on RPi3
Power Source
WiFi

Part A - Introduction to RPi
A-4
2 Familiarization of the RPi User Interface and its common commands You will now go through a sequence of tasks designed to get you familiarized with the operation of the RPi, in particular, certain commands that are frequently used on RPi. 2.1 Apply the power source to the RPi board (which in this case is by connect the USB
cable to one of the USB port desktop PC in the lab) you will see a series of messages appearing on the monitor, which eventually
leads to the a graphic based display screen – the Desktop screen
2.2 There are several ‘icons’ on the top left corner of the Desktop screen that you can use to access the various functions available on RPi.
Click on the Application Menu icon - you will be provided with a list of options - programs and functions available on RPi. Note that there is a Shutdown function which is used to properly turn off the RPi at the end of the exercise.
The Web Browser is normally used for surfing internet, but you will use it for the Python programming in part B of the exercises.
File Manager is used to explore the directories and files
stores on the RPi.
Terminal is a program that is usually used to enter text commands and run other programs, as will be seen later.
Application Web File Terminal Menu Browser Manager
Part A - Introduction to RPi
A-5
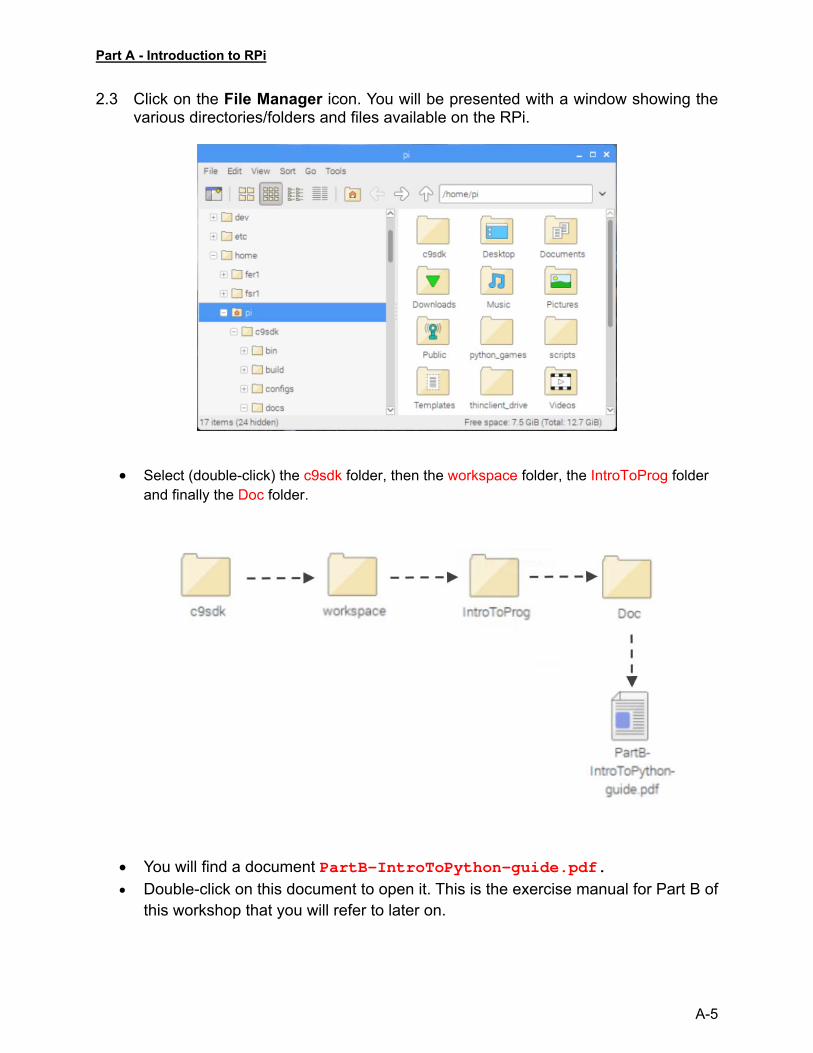
2.3 Click on the File Manager icon. You will be presented with a window showing the various directories/folders and files available on the RPi.
Select (double-click) the c9sdk folder, then the workspace folder, the IntroToProg folder and finally the Doc folder.
You will find a document PartB-IntroToPython-guide.pdf.
Double-click on this document to open it. This is the exercise manual for Part B of this workshop that you will refer to later on.

Part A - Introduction to RPi
A-6
3. Finding information using commands in Terminal mode
There are other things that we can do with RPi, many of which can only be accessed by typing text-based commands through the Terminal. In practice, using Terminal mode is the most ‘powerful’, flexible and quickest way to accomplish anything on RPi. 3.1 Click on the Terminal icon to open a terminal window.
Resize the terminal window so it's of a reasonable size for you to type into.
3.2 Type the following commands into the terminal and observe what is shown for each
of them. whoami date

Part A - Introduction to RPi
A-7
3.3 You can view the contents in the current directory by using the list command ls This will show the various files and folders available in the current directory.
3.4 You can change to a different directory, such as to the scripts directory using the command: cd scripts
View the contents of this directory (using the ls command again). There are two files in this directory, one of which will be used in Part B of the
exercise to start a program call cloud9. 3.5 You can view the content of the file by using the command more
Type the command more cloud9_startup.sh The content of this file is then shown on the screen.
Helpful tip: The <Tab> key is very useful when typing command in the terminal mode, such as to select a file in a directory without entering the full name of the file. For example you can execute the previous command by typing more c<Tab>. Try it.
There are many other commands and things you can do in terminal mode, but we will now move on to learn coding in Python language in Part B of this exercise.

* This is to acknowledge that the exercises in this manual are based on the materials developed by SCSE’s Mr Oh Hong Lye for his “Introduction to Computing” workshop.
Exercise Manual for
Raspberry Pi
and Python Programming
(Part B*)
by School of Computer Science and Engineering
for Nanyang Science & Engineering Experience
(seeNTU)

Part B - Introduction to Python Programming
B‐2
1. OBJECTIVES
• Communicate with the Sense HAT using Python • Access the outputs of the Sense HAT • Program the inputs of the Sense HAT • Use the Sense HAT library to display messages and images • Use variables to store sensor data • Use loops to repeat behaviours 2. INTRODUCTION Python is a language which is easy to learn and is thus a popular programming language used to introduce newbies into the world of computing. It is also one of the most popular language used in recent years for testing, scripting in many areas such as data analytics and building web servers. But learning the basics of programming can be a little boring at times, so the sense HAT board is used in this exercise to introduce real world sensing and movements into the various hands-on experiment you’ll be doing.
Sense Hat add-on board and its interface to RPi3
Sense HAT allows you to measure various environmental parameters such as temperature, pressure and humidity, it is also able to detect the orientation of the board and output display through a tri-colour LED display, all of which will be touched on in the hands-on.
The series of hands-on will bring you through various basic constructs of programming and at the end of the hands-on, you are going to build a game on RPI which will test you on how good your motor skills are and how fast you are in responding the instructions. The hands-on exercises for this part of the workshop is adapted from the excellent work done by the guys from raspberrypi.org.
3. Basic Python Programming on RPi through Terminal
Python is an ‘interpreted language’. You write the code and then run the program. Under the hood, it’s being translated and runs on the fly. (Some languages, such as C and Java, are compiled. You write the program, then compile it to get a build file (written in machine code), then you run the build.)
Open a terminal window in RPi and launch the Python interpreter by entering python3
You will see the prompt >>> display on screen
Key in the following code and press Enter print (“Hello world”)

Part B - Introduction to Python Programming
B‐3
Key in the following operation
1+2
and press Enter. Notice the operation is immediately executed and the result will be displayed. This is because the code is executed by the interpreter as soon as Enter is pressed. (Compare to other programming language like ‘C’, a compilation process is needed before the program can be executed.
You can assign ‘variable’ and use it as follows: name = “NTU” “Hello ” + name
You can repeat the code execution by using ‘looping’ as follows ( note the indentation before the ‘print’)
for i in range(5): print(“Hello”) print(“NTU”)
4. Python Programming for Sense Hat
Now you will learn how to write code to display messages on the Sense HAT module.
Type the following in the terminal and observe the display on the Sense HAT module.
from sense_hat import SenseHat sense = SenseHat() sense.show_message("Hello NTU")
Next try the following command:
sense.show_message("Hello NTU",text_colour=[255,255,0],back_colour=[0,0,255])
while True:
sense.show_message(“Hello”)
Terminate the running program by pressing the two keys CrtL+C

Part B - Introduction to Python Programming
B‐4
5. Python Programming through an IDE Instead of writing the python program in terminal, you can also use an IDE (integrated development environment) that combine a text editor with program-running functionality as well as features such as debugging. In here you’ll be using the Cloud9 IDE, which is a browser based IDE that can be accessed from any browser, even remotely through the network and internet. Follow the steps below to get it fired up. On the RPI desktop, open a Terminal window by clicking on the icon.
Key in the following command to start executong the cloud9 server program on the RPI.
./scripts/cloud9_startup.sh
If cloud9 starts up successfully, you should see a message similar to the following in the Terminal window.
Open a web browser on RPi Desktop, and key in the “localhost:8181” in its address bar.
Introduction to Computing – Part 1 Python Programming Basics
Page 5
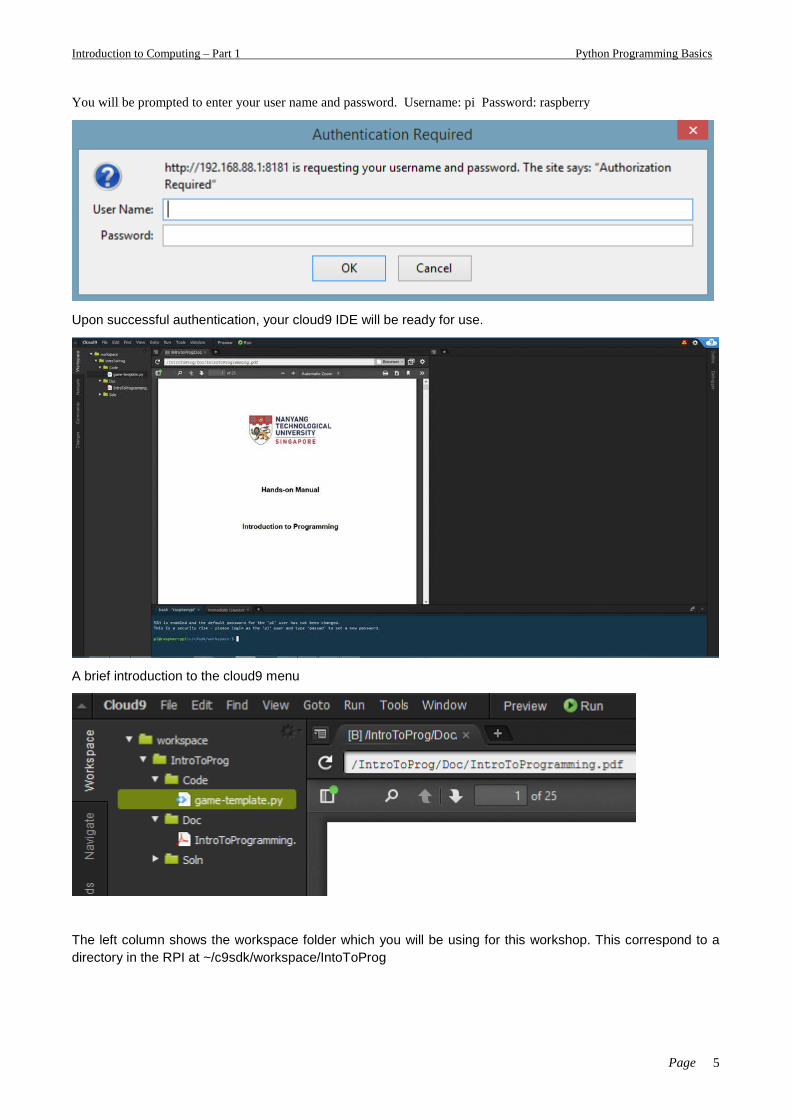
You will be prompted to enter your user name and password. Username: pi Password: raspberry
Upon successful authentication, your cloud9 IDE will be ready for use.
A brief introduction to the cloud9 menu
The left column shows the workspace folder which you will be using for this workshop. This correspond to a directory in the RPI at ~/c9sdk/workspace/IntoToProg

Introduction to Computing – Part 1 Python Programming Basics
Page 6
The ‘Code’ directory is where you will be storing the various python files you will be creating for this workshop. The ‘Doc’ directory contains the pdf file of the workshop guide. You can open the pdf file in cloud9 IDE. The ‘Soln’ directory contains the solution to the last challenge we are doing for this workshop. Well, try not to look at it else it will spoil all the fun, isn’t it?
Click on the File->New File option to open a new file for coding.
When you are done coding, save the file (FILE->SAVE). DO NOT have spaces in the filename and save the file under the Code folder. Below example save a helloworld.py file in the Code folder. Note that the file extension for a file containing Python code should be ‘.py’.

Introduction to Computing – Part 1 Python Programming Basics
Page 7
After saving, you can run the code by click on green RUN button. The output of the code is shown in the terminal window at the bottom of the IDE. This code print the sentence “hello world” to the output terminal.
OK. If you want reached this part without issue, you are ready to go!
Introduction to Computing – Part 1 Python Programming Basics
Page 8
5.1 Displaying Text
Make sure you have the following lines of code in your Python program to set up your connection with the Sense HAT. There is no need to add them more than once.
from sense_hat import SenseHat sense = SenseHat()
Add this code to display a message on the Sense HAT’s LED matrix.
sense.show_message("Hello world")
The message “Hello world” will now scroll across the LED screen.
Change the words in the quotes ("") to see a different message.
5.2 Creating a variable in Python
A variable allows you to store data within a program. Variables have a name and a value. This variable has the name animal and the value cat. Note that the ‘=’ sign here work more like an assignment symbol, so the statement below really reads like “cat” is being assigned to animal variable.
animal = "cat"
This variable has the name score and the value 30:
score = 30
To create a variable, give it a name and set it equal to a value. The name of the variable always goes on the left, so this code is wrong:
# This code is wrong 30 = score
Note that the ‘#’ sign means all the words to the right of it are ‘comments’, meaning they are not part of the application code.
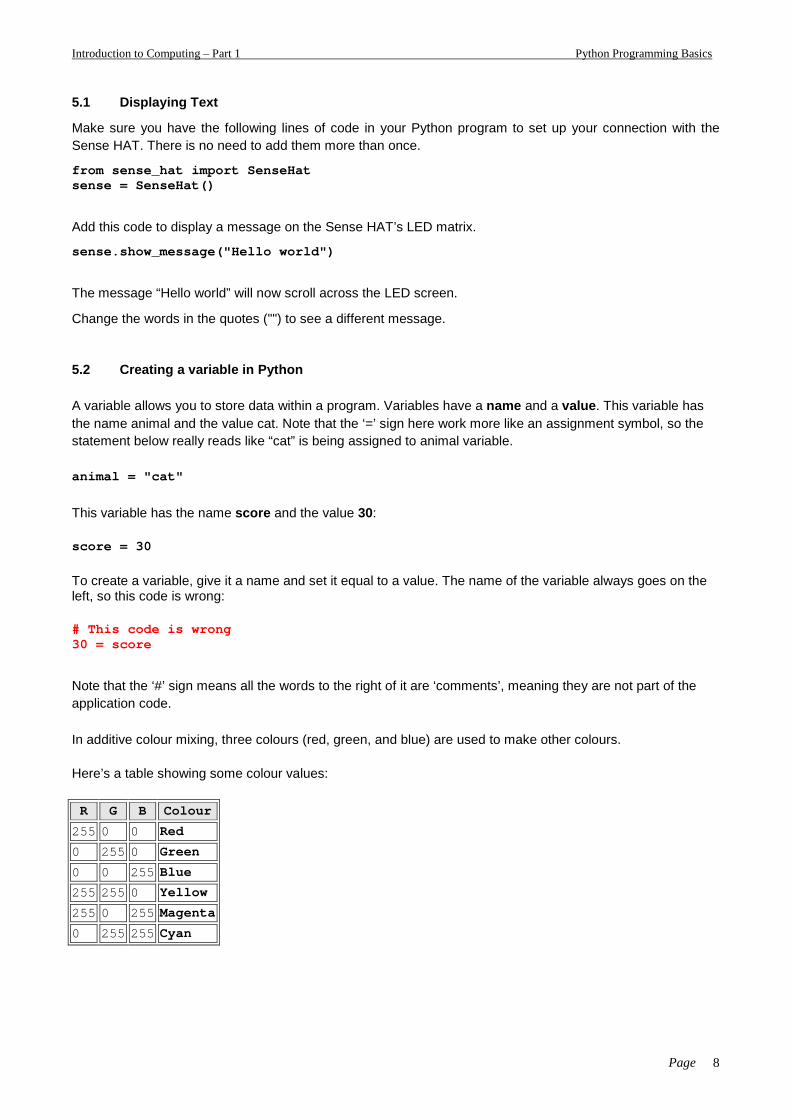
In additive colour mixing, three colours (red, green, and blue) are used to make other colours.
Here’s a table showing some colour values:
R G B Colour
255 0 0 Red
0 255 0 Green
0 0 255 Blue
255 255 0 Yellow
255 0 255 Magenta
0 255 255 Cyan

Introduction to Computing – Part 1 Python Programming Basics
Page 9
We can change how the message is displayed by adding some extra parameters to the show_message command.
• scroll_speed o Affects how quickly the text moves across the screen. o The default value is 0.1. The bigger the number, the lower the speed.
• text_colour o Alters the colour of the text and is defined via three values to specify red, green, and blue.
These are also called RGB values. • back_colour
o Alters the colour of the background and is defined via three values to specify red, green, and blue. These are also called RGB values.
The sample code below changes the text colour to yellow.
Problem: Add parameters to the show_message command to display the text in yellow with a blue background and set the scroll speed to 0.05.
What is colour of the screen after the message is done scrolling? How can we ‘clear’ this colour? Hint: try the command sense.clear(). What happen if you put a colour into the brackets? E.g. sense.clear(blue).
5.3 Repeating an operation
There are times when we need to repeat an operation for a number of times while a certain condition is true. For that, we will need to insert a “while loop” into our code. The purpose of a while loop is to repeat code over and over while a condition is True. The example below is a while loop that will run forever - an infinite loop. The loop will run forever because the condition is always True.
while True: print("Hello world")
Note: The while line states the loop condition. The print line of code below it is slightly further to the right. This is called indentation - the line is indented to show that it is inside the loop. Any code inside the loop will be repeated. You can insert an indentation with a TAB key.
Note: Notice ‘while’ and ‘True’ is coloured orange instead of black, and so do for many of the key or reserved words in Python. The Python editor is designed in this manner to enable user to quickly check if they made any typo. And remember to put a ‘:’ after ‘True’, else a syntax error will be flagged by the Python Interpreter.
An infinite loop is useful in situations where you want to perform the same actions over and over again, for example checking the value of a sensor. An infinite loop like this will block - this means that any lines of code written after the loop will never happen.
Put your scrolling message in a while loop to make it repeat continuously. Notice the screen never get cleared, meaning the command sense.clear() is never executed since you have created an infinite loop before it. Hmmm…. Now you have a problem, how do you stop an program that has gone into an infinite loop????

Introduction to Computing – Part 1 Python Programming Basics
Page 10
5.4 Sleep Command
You can use the sleep function to temporarily pause your Python program.
• Add this line of code at the top of your program to import the sleep function.
from time import sleep
• Whenever you want a pause in your program, call the sleep function. The number in the brackets indicates how many seconds you would like the pause to be.
sleep(2)
You can pause for fractions of a second as well.
sleep(0.5)
Other than scrolling text, we can also display single letter on the LED. If you run this code, the letter “Z” will appear on the screen. You can change which letter is displayed by altering the letter in the quote marks ("").
sense.show_letter("Z")
We can change how the letter is displayed by using two of the same parameters we used for the show_message command: text_colour and back_colour. Letters do not scroll, so there is no scroll_speed parameter.
Use the sleep function to display the letters of your name one at a time, each in a different colour, with a one-second pause between each.
5.5 Randomness in Python
One of the standard modules in Python is the random module. You can use it to create pseudo-random numbers in your code.
5.5.1 randint
You can generate random integers between two values using the randint function. For example, the following line of code will produce a random integer between 0 and 10 (inclusive).
from random import randint num = randint(0,10)
5.5.2 uniform
If you want a random floating-point number (also called float), you can use the uniform function. For example, the following line of code will produce a random float that’s equal to or greater than 0, but less than 10.
from random import uniform num = uniform(0,10)
5.5.3 choice
If you want to choose a random item from a list, you can use the choice function.
from random import choice

Introduction to Computing – Part 1 Python Programming Basics
Page 11
deck = ['Ace', 'King', 'Queen', 'Jack'] card = choice(deck)
Randomly generate a colour by using randint to choose a number between 0 and 255 for each of the three RGB values that make up a colour.
5.6 Displaying images
You can fill the whole LED matrix with a single colour by using the clear method with the colour you’ve picked.
from sense_hat import SenseHat
sense = SenseHat()
blue = (0, 0, 255)
yellow = (255, 255, 0)
sense.clear(blue)
5.6.1 Sense HAT LED Matrix Coordinates
The Sense HAT’s LED matrix uses a coordinate system with an x- and a y-axis. The numbering of both axes begins at 0 (not 1) in the top left-hand corner. Each LED can be used as one pixel of an image, and it can be addressed using an x, y notation.
The blue pixel is at coordinates (0, 2). The red pixel is at coordinates (7, 4).
You can set pixels (LEDs) individually using the set_pixel() method. Below code set the led colour at (0,0) to blue.
set_pixel(0, 0, blue)
Replicate the diagram above in your sense HAT LED

Introduction to Computing – Part 1 Python Programming Basics
Page 12
5.6.2 Setting Multiple pixel simultaneously
Setting pixels individually can work brilliantly, but it gets rather complex when you want to set multiple pixels. To change all the pixels in one go with the set_pixels command
from sense_hat import SenseHat
sense = SenseHat()
# Define some colours
g = (0, 255, 0) # Green
b = (0, 0, 0) # Black
# Set up where each colour will display
creeper_pixels = [
g, g, g, g, g, g, g, g,
g, g, g, g, g, g, g, g,
g, b, b, g, g, b, b, g,
g, b, b, g, g, b, b, g,
g, g, g, b, b, g, g, g,
g, g, b, b, b, b, g, g,
g, g, b, b, b, b, g, g,
g, g, b, g, g, b, g, g
]
# Display these colours on the LED matrix
sense.set_pixels(creeper_pixels)
Try running this code to see what you get on the LED display!
5.7 Setting Orientation
So far, all our text and images have appeared the same way up, with the HDMI port at the bottom. However, this may not always be the true orientation of the Sense HAT, so sometimes you might want to change the orientation of the LED matrix. One of the function that you can use is the sense.set_rotation() which rotates the image by 0, 90, 180, 270 degrees. Command below will rotate the original image by 90 degree
sense.set_pixels(image)
sense.set_rotation(90)
Rotate the image in 5.6.2 by 90 degrees repeatedly. Hint: you’ll need to use while loop and will find the following operation very handy
# code below is a modulo operation, i.e. it adds 90 to ‘angle’, divide the result by 360 and takes the remainder to store back to ‘angle’ variable.
angle=(angle+90)%360

Introduction to Computing – Part 1 Python Programming Basics
Page 13
5.8 Sensing the Environment
The Sense HAT has a set of environmental sensors for detecting the surrounding conditions; it can measure pressure, temperature, and humidity.
5.8.1 Pressure Sensing
The code to read one sample of the air pressure and print it to the terminal window on your desktop.
from sense_hat import SenseHat
sense = SenseHat()
sense.clear()
pressure = sense.get_pressure()
print(pressure)
Try to read the air pressure at one second interval using the code above. Use the while loop and sleep function to implement the one second interval reading.
5.8.2 Temperature Sensing
The function to read the ambience temperature is
temp = sense.get_temperature()
5.8.3 Humidity Sensing
The function to read the ambience temperature is
hum = sense.get_humidity()
Check out what is the current pressure, temperature and humidity detected by your sensor. Print them out to the Python Shell.
Are the readings what you have expected?
5.9 IF/ELSE conditions in Python
A standard if statement in Python checks for a single condition. For instance:
x = 5 if x > 0: print('x is greater than zero') But sometimes you might want to check for more than one condition. In such cases, you can use logical operators in your code. The and operator checks to see if two conditions have both been met. For instance:
x = 5 if x > 0 and x < 10:
print('x is between 0 and 10')
So long as x is any number within the group - 1,2,3,4,5,6,7,8,9, then the condition will be true. You can use the or operator to check if either of the conditions is true.
Introduction to Computing – Part 1 Python Programming Basics
Page 14
x = 5 if x > 0 or x < 10: print('x exists')
In this case, the condition will be true as long as x is greater than 0, or if it is less than 10.
If you have more than one decision path, then the ‘elif’ and ‘else:’ keyword can be used
x = 5 if x > 0 : print('x is positive') elif x < 0 : print(‘x is negative’) else : print(‘x is Zero’)
The above code inform user if x is positive, negative or zero…. So is Zero a positive or negative number anyway??
Use the if/else statement in your code to check the temperature and light the LED RED if temperature is greater or equal to 36, light the LED GREEN if the temperature is below 36 degrees Celsius.
5.10 Detecting Movement
The Sense HAT has an IMU (Inertial Measurement Unit) chip which includes a set of sensors that detect movement:
- A gyroscope (for detecting which way up the board is)
- An accelerometer (for detecting movement)
- A magnetometer (for detecting magnetic fields)
We will only be using the accelerometer for this workshop. It can be used to detect the board’s orientation. This is also how your smartphone know when to rotate your screen depending on whether the phone is in portrait or landscape mode.
The sense.get_accelerometer_raw() method tells you the amount of G-force acting on each axis (x, y, z). If any axis has ±1G, then you know that axis is pointing downwards. Notice the way accelerometer readings are stored, each component is indexed by a key and can be access separately: acceleration[‘x’], acceleration[‘y’] and acceleration[‘z’]. ‘acceleration’ is an example of a more complex data representation known as a ‘dictionary’ in Python. In this example, the amount of gravitational acceleration for each axis is extracted and is then rounded to the nearest whole number:
from sense_hat import SenseHat
sense = SenseHat()
while True:
acceleration = sense.get_accelerometer_raw()

Introduction to Computing – Part 1 Python Programming Basics
Page 15
x = acceleration['x']
y = acceleration['y']
z = acceleration['z']
x=round(x, 0)
y=round(y, 0)
z=round(z, 0)
print("x={0}, y={1}, z={2}".format(x, y, z))
Rotate the Sense HAT. You should see the values for x and y change between -1 and 1. If you place the Pi flat or turn it upside down, the value for the z axis will be 1 and then -1.
Use this information to set the orientation of the LED matrix.
Starting with the code above, add some code before the while loop to display the letter “J” on the LED matrix. Use the show_letter method you already learned about. After the code which displays the G-force values for the x, y and z axes , add an if statement to check which way up the Sense HAT is pointing. Update the orientation of the display using the set_rotation method you learned about earlier. Here is some pseudo-code to get you started: If the x axis has -1 G, rotate 90 degrees Else if the y axis has 1 G, rotate 0 degrees Else if the y axis has -1 G, rotate 180 degrees Else rotate 270 degrees
5.11 Integrating all to create a Game
The title says it all, now that you have a basic idea of what Python is about and how the sense HAT works, its time to put together all that you have learn to create a simple game.
The idea of this reaction game is as follows:
A white arrow will be displayed on the LED board. Rotate the board to make the arrow point up. If you match it in time, the arrow turns green and your score increases; if not, your arrow turns red and the game ends. The game keeps showing arrows in new orientations until you lose, and each turn gets faster.
This idea combines:
- Showing messages and images on the LED matrix - Setting and detecting the orientation - Use of variables, randomisation, iteration, and selection. Of these, variables, iteration and
selection are the basics of computational thinking common to all programming languages.
Since this is more complex than the small hands-on you have been doing (not much more complex actually), a template is created to guide you along. Open the file <game-template.py> in the workshop folder and follow the comments given in the template.
THE END. Hope you enjoyed this workshop and see you in the next one.