Excel Lesson 6
30
Microsoft Excel Lesson 6 Lexington Technology Center March 21, 2002 Bob Herring On the web at http://www.lexington1.net/adulted/computer/microsoft_excel.htm
-
Upload
faisal-qureshi -
Category
Documents
-
view
216 -
download
0
Transcript of Excel Lesson 6

7/28/2019 Excel Lesson 6
http://slidepdf.com/reader/full/excel-lesson-6 1/30
Microsoft ExcelLesson 6
Lexington Technology Center
March 21, 2002Bob Herring
On the web athttp://www.lexington1.net/adulted/computer/microsoft_excel.htm

7/28/2019 Excel Lesson 6
http://slidepdf.com/reader/full/excel-lesson-6 2/30
Excel Lesson 6
Review of Thursday’s Lesson
• Linking worksheets
• Conditional formatting• Sorting• Filtering• Pivot tables• Freezing panes
2

7/28/2019 Excel Lesson 6
http://slidepdf.com/reader/full/excel-lesson-6 3/30

7/28/2019 Excel Lesson 6
http://slidepdf.com/reader/full/excel-lesson-6 4/30
Excel Lesson 6Deleting Comments
• If you only want to delete comments, select Edit , then Clear ,and choose Comments
4

7/28/2019 Excel Lesson 6
http://slidepdf.com/reader/full/excel-lesson-6 5/30
Excel Lesson 6
• When you are concerned about which columns and rows get printed on which pages, use Page Break Preview
• Select Edit , then Page Break Preview
Page Break Preview
5

7/28/2019 Excel Lesson 6
http://slidepdf.com/reader/full/excel-lesson-6 6/30
Excel Lesson 6Page Break Preview
• This is the Preview. It shows how Excel would break the pages• To change it, click on the break lines with the mouse and drag
them to the desired location
6

7/28/2019 Excel Lesson 6
http://slidepdf.com/reader/full/excel-lesson-6 7/30
Excel Lesson 6Worksheet Protection
• If you need to ensure that data in your worksheet cannot be•changed without permission, you can “protect” it • Select Tools , then Protection , and choose Protect Sheet
7

7/28/2019 Excel Lesson 6
http://slidepdf.com/reader/full/excel-lesson-6 8/30
Excel Lesson 6Worksheet Protection
• The “Protect Sheet” dialog appears • The default is to protect all contents, but different levels can be selected• A password may be added for further protection
8

7/28/2019 Excel Lesson 6
http://slidepdf.com/reader/full/excel-lesson-6 9/30
Excel Lesson 6Data Validation
• To help users know what to enter in the worksheet (and to preventerrors), you can attach data validation rules to cells in the worksheet
• Select Data , then Validation
9

7/28/2019 Excel Lesson 6
http://slidepdf.com/reader/full/excel-lesson-6 10/30
Excel Lesson 6Data Validation
• The “Data Validation” dialog appears • Set up the validation rule under the “Settings” tab • Click on the down arrow in the box that says “Any value” and pick
“Whole number”
10

7/28/2019 Excel Lesson 6
http://slidepdf.com/reader/full/excel-lesson-6 11/30
Excel Lesson 6Data Validation, Continued
• Create an message for the user under the “Input Message” tab • Type a title and a message that tells the user what to do
11

7/28/2019 Excel Lesson 6
http://slidepdf.com/reader/full/excel-lesson-6 12/30
Excel Lesson 6Data Validation, Continued
• Create another message to warn of errors under the “Error Alert” tab • Pick a graphic from the combo box on the left, then type a title and
an error message
12

7/28/2019 Excel Lesson 6
http://slidepdf.com/reader/full/excel-lesson-6 13/30
Excel Lesson 6Data Validation, Continued
• Data validation in action• The input message appears, and when we try to enter an incorrect
value, Excel tells us the acceptable range
13

7/28/2019 Excel Lesson 6
http://slidepdf.com/reader/full/excel-lesson-6 14/30
Excel Lesson 6Tables
• Tables are a quick way to calculate a range of inputs to a formula• For example, if you were shopping for a mortgage, you might want
to calculate what the payment will be for various interest rates, whatthe total interest cost will be, and what payments would be for different repayment periods
• On a blank worksheet, enter the following:Mortgage Loan Analysis 1
Down Payment NoneInterest Rate 10%
Term (months) 360Loan Amount 80,000.00$
Payments Total Interest
9.00%9.25%
9.50%9.75%10.00%
Start in cell C2 D5
D6
D7
14

7/28/2019 Excel Lesson 6
http://slidepdf.com/reader/full/excel-lesson-6 15/30
Excel Lesson 6Tables
• In the cell beneath “Payments,” enter the following formula:
Mortgage Loan Analysis 1
Down Payment NoneInterest Rate 10%Term (months) 360Loan Amount 80,000.00$
Payments Total Interest
9.00%9.25%9.50%9.75%
10.00%
=PMT(D5/12,D6,-D7)
D5D6D7
15

7/28/2019 Excel Lesson 6
http://slidepdf.com/reader/full/excel-lesson-6 16/30
Excel Lesson 6Tables
• Highlight the cells outlined in red:
Mortgage Loan Analysis 1
Down Payment NoneInterest Rate 10%Term (months) 360Loan Amount 80,000.00$
Payments Total Interest$702.06
9.00%9.25%9.50%
9.75%10.00%
Highlight here
16
7/28/2019 Excel Lesson 6
http://slidepdf.com/reader/full/excel-lesson-6 17/30
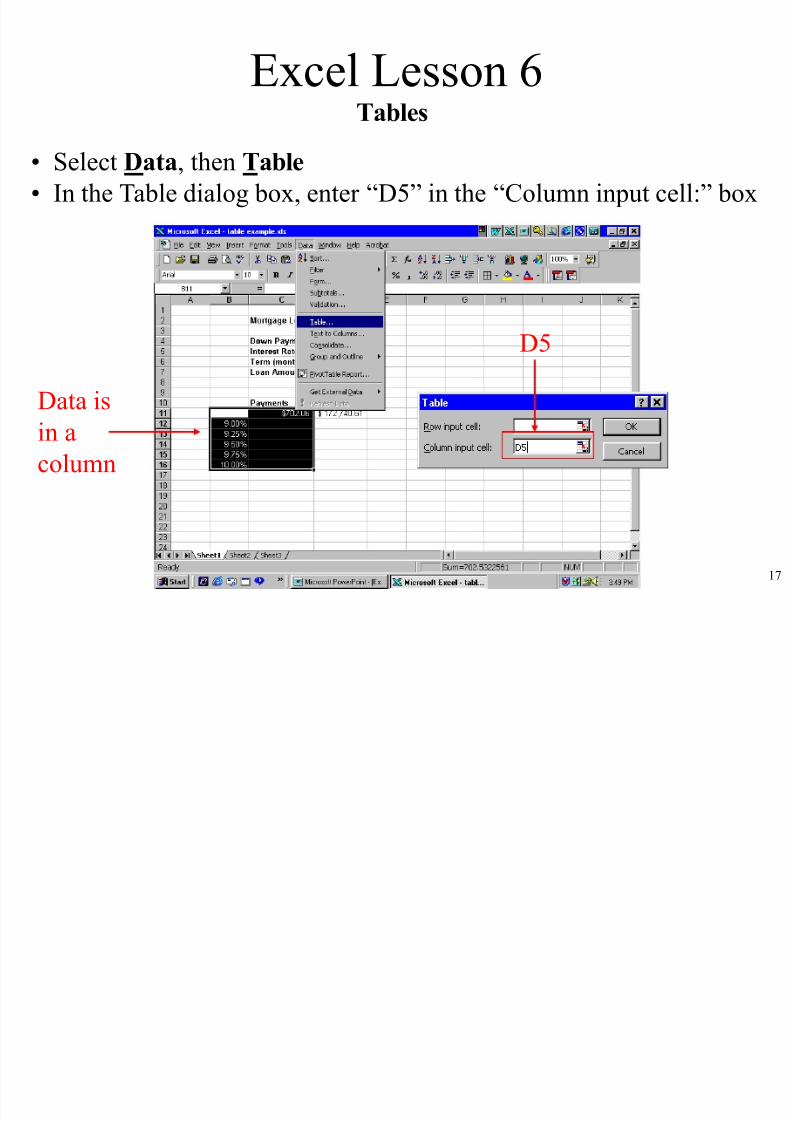
Excel Lesson 6Tables
• Select Data , then Table• In the Table dialog box, enter “D5” in the “Column input cell:” box
D5
Data isin acolumn
17

7/28/2019 Excel Lesson 6
http://slidepdf.com/reader/full/excel-lesson-6 18/30
Excel Lesson 6Tables
Mortgage Loan Analysis 1
Down Payment NoneInterest Rate 10%Term (months) 360Loan Amount 80,000.00$
Payments Total Interest$702.06 172,740.61$
9.00% 643.69809369.25% 658.14034049.50% 672.6833657
9.75% 687.323529610.00% 702.0572561
Table isfilled in
18

7/28/2019 Excel Lesson 6
http://slidepdf.com/reader/full/excel-lesson-6 19/30
Excel Lesson 6Tables
Mortgage Loan Analysis 1
Down Payment NoneInterest Rate 10%Term (months) 360
Loan Amount 80,000.00$
702.06$ 180 240 300 360 4209.00%9.25%9.50%9.75%
10.00%
• Tables can be calculated using two variables• In this example, the table will calculate payments based on both
the interest rate and the period of the loan• In the marked cell, enter this formula: =ABS(PMT(D5/12,D6,D7))
19

7/28/2019 Excel Lesson 6
http://slidepdf.com/reader/full/excel-lesson-6 20/30
Excel Lesson 6Tables
• Highlight the cells from the original formula through the fullrange of the table. (In the example, B11 through F16)
• Type “D6” in the “Row input cell:” box, as shown
• The row input cell refers to the payment periods (360 months)• Type “D5” in the “column input cell:” box, as shown • The column input cell refers to the interest rates (10%)
20
7/28/2019 Excel Lesson 6
http://slidepdf.com/reader/full/excel-lesson-6 21/30
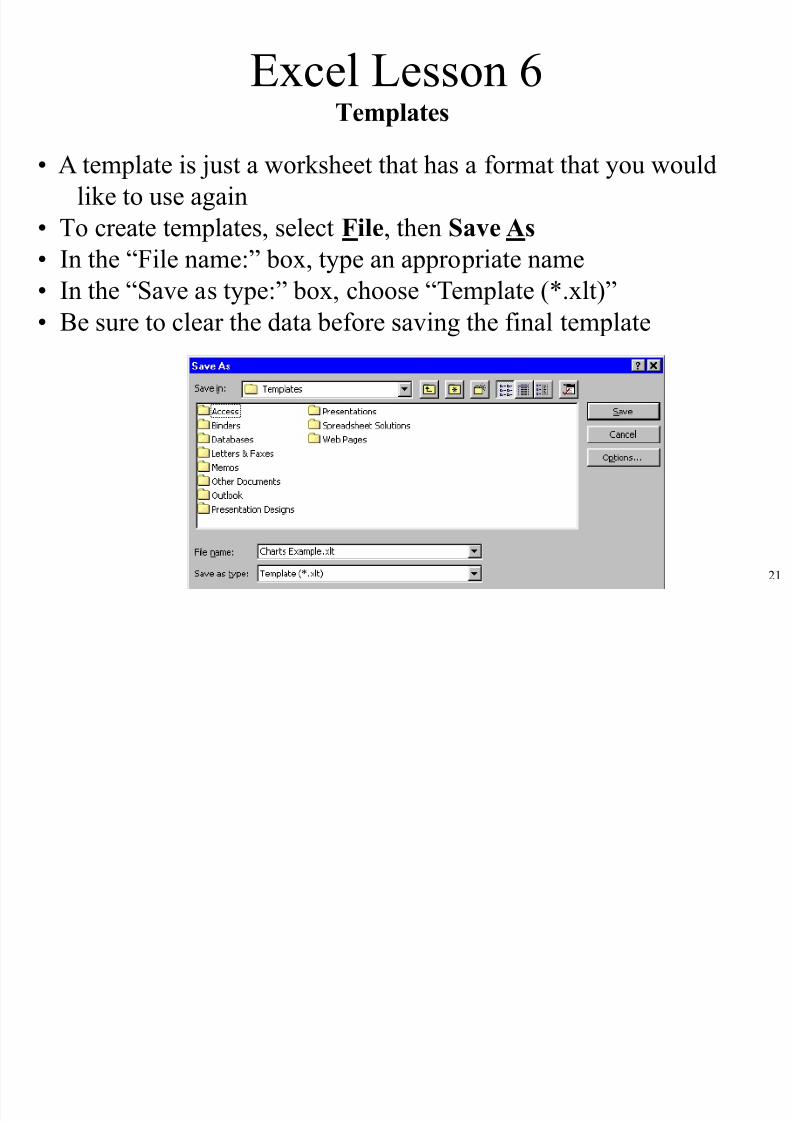
Excel Lesson 6Templates
• A template is just a worksheet that has a format that you wouldlike to use again
• To create templates, select File , then Save As• In the “File name:” box, type an appropriate name • In the “Save as type:” box, choose “Template (*.xlt)” • Be sure to clear the data before saving the final template
21

7/28/2019 Excel Lesson 6
http://slidepdf.com/reader/full/excel-lesson-6 22/30
Excel Lesson 6Text to Columns
• Excel has a way to break text data into columns on your worksheet• Open Word, and open the file “Text to Columns.doc” • Highlight the data and click “Copy” • Change to Excel, click in cell A2, and then click “Paste”
22

7/28/2019 Excel Lesson 6
http://slidepdf.com/reader/full/excel-lesson-6 23/30
Excel Lesson 6Text to Columns
• Select Data , then Text to Columns
23

7/28/2019 Excel Lesson 6
http://slidepdf.com/reader/full/excel-lesson-6 24/30
Excel Lesson 6Text to Columns
• The “Convert Text to Columns Wizard appears • Since our data is not in fixed width columns, choose the “Delimited”
radio button (the default)• Click the “Next” button
24

7/28/2019 Excel Lesson 6
http://slidepdf.com/reader/full/excel-lesson-6 25/30
Excel Lesson 6Text to Columns
• In Step 2 of the Wizard, pick the separators (delimiters) in your data• In this example, the data is separated by commas• Click the Comma check box and Excel shows you this result• Click on the “Next” button
25
7/28/2019 Excel Lesson 6
http://slidepdf.com/reader/full/excel-lesson-6 26/30
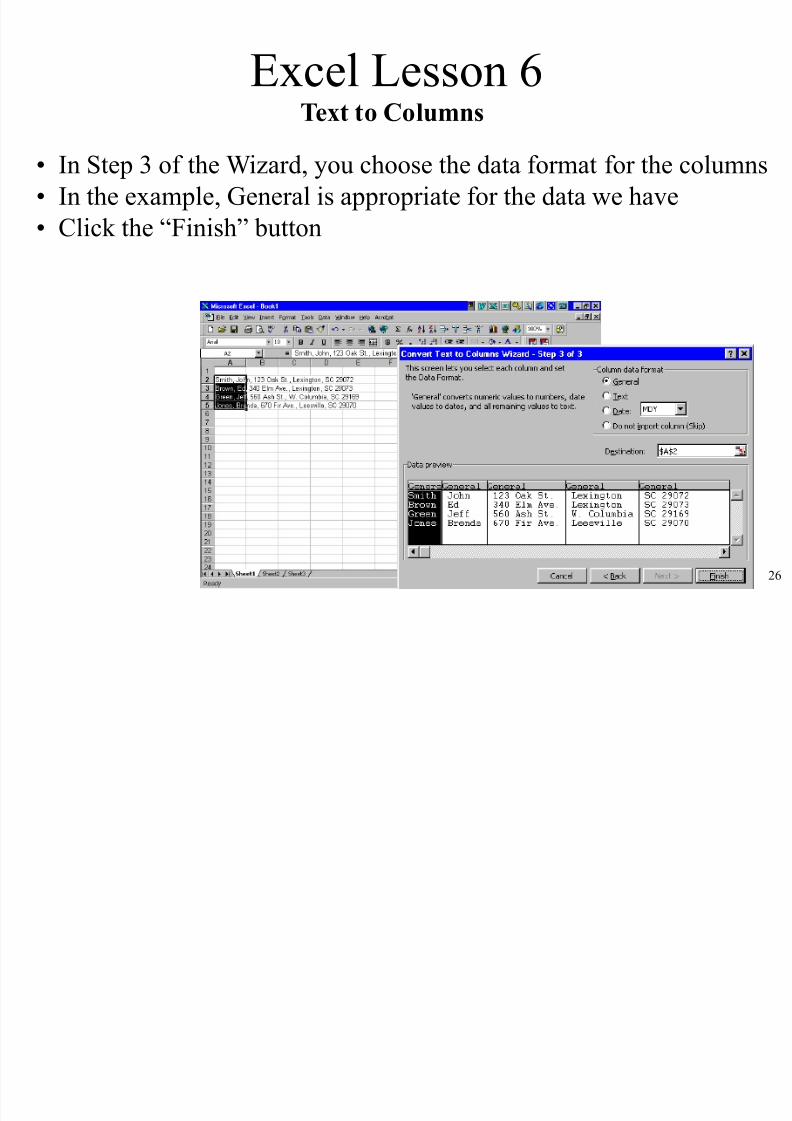
Excel Lesson 6
• In Step 3 of the Wizard, you choose the data format for the columns• In the example, General is appropriate for the data we have• Click the “Finish” button
Text to Columns
26

7/28/2019 Excel Lesson 6
http://slidepdf.com/reader/full/excel-lesson-6 27/30
Excel Lesson 6
• This is the final result• Double click in between columns C and D and D and E to expand
columns C and D to show all the data• Now highlight column E and separate the state and the zip code
Text to Columns
27

7/28/2019 Excel Lesson 6
http://slidepdf.com/reader/full/excel-lesson-6 28/30
Excel Lesson 6Course Review
Lesson 2
• Opening a workbook
• Basic formulas using operators (+, -, *, /, ^)• Using the Fill Handle• Copy and Paste formulas• Change Font sizes, weights, appearance• Using AutoFormat• Center across columns• Using the Name Box
Lesson 1
• Starting and Quitting Excel
• Worksheets• Menus and Toolbars• Worksheet Cells• How to Enter and Edit Text
and Numbers• Saving an Excel Workbook
28

7/28/2019 Excel Lesson 6
http://slidepdf.com/reader/full/excel-lesson-6 29/30
Excel Lesson 6Course Review
Lesson 3
• Copying cells using relative
and absolute cell addresses• Functions• Printing• Page Setup• Excel Options• Correcting Errors• Clearing Cells or Worksheets
Lesson 4
• Creating Charts
• Custom Formats• Design for Looks• Office Assistant and Help
29

7/28/2019 Excel Lesson 6
http://slidepdf.com/reader/full/excel-lesson-6 30/30
Excel Lesson 6Course Review
Lesson 5
• Linking worksheets
• Conditional formatting• Sorting• Filtering• Pivot tables• Freezing panes
Lesson 6
• Comments
• Page Break Preview• Worksheet Protection• Data Validation• Tables• Templates• Text to Columns