EUT Course - 140 BENEFITS...
45
EUT Course - 140 BENEFITS ADMINISTRATION PeopleSoft 9.2 July 2017
Transcript of EUT Course - 140 BENEFITS...
EUT Course - 140
BENEFITS ADMINISTRATION
PeopleSoft 9.2
July 2017
CAPPS HR/PAYROLL
EUT Course
Page ii
Table of Contents 140BEN_FMLA................................................................................................................. 1
140 Benefits Administration (Benefits and FMLA) ................................................................ 1 Section 1. Overview ............................................................................................................................... 1 Section 2. Benefits Coordinators ............................................................................................................ 1
Benefit Program Assignment .............................................................................................................................. 1 View an Employee's Plan(s) ............................................................................................................................... 3 Current Benefits Summary ................................................................................................................................. 9 Reports from CAPPS Interfaces ....................................................................................................................... 11
Section 3. Benefits - Reports ................................................................................................................ 17 TX Saver and ERS/CAPPS Processing/Reconciliation .................................................................................... 17
Section 4. FMLA ................................................................................................................................. 25 FMLA Query for Eligibility ............................................................................................................................. 26 FMLA Activity ................................................................................................................................................. 30 FMLA-related Reports in CAPPS Interfaces .................................................................................................... 35
Glossary ........................................................................................................................... 43
CAPPS HR/PAYROLL
EUT Course
Page 1
140BEN_FMLA
140 Benefits Administration (Benefits and FMLA)
Base Benefits is used to view employee benefits in the CAPPS HR/Payroll system.
CAPPS receives data from ERS OnLine through a daily interface. ERS is the system of record for an
employee's benefit plans and benefit selections. The choices made in ERS OnLine will appear in Base
Benefits in the CAPPS HR/Payroll system. Base Benefits integrates fully with CAPPS HR/Payroll.
In addition to Base Benefits, CAPPS HR/Payroll will track and maintain FMLA-related activity.
After finishing this course, you will be able to:
Describe the benefits process.
Maintain benefits enrollment.
Run reports and queries.
Create, approve, maintain, and track FMLA or Parental Leave event(s).
Section 1. Overview
Section 1. Overview
There are no exercises in Section 1.
Section 2. Benefits Coordinators
Section 2. Benefits Coordinators
Benefit Program Assignment
Section 2. Lesson 1. Benefit Program Assignment
Procedure
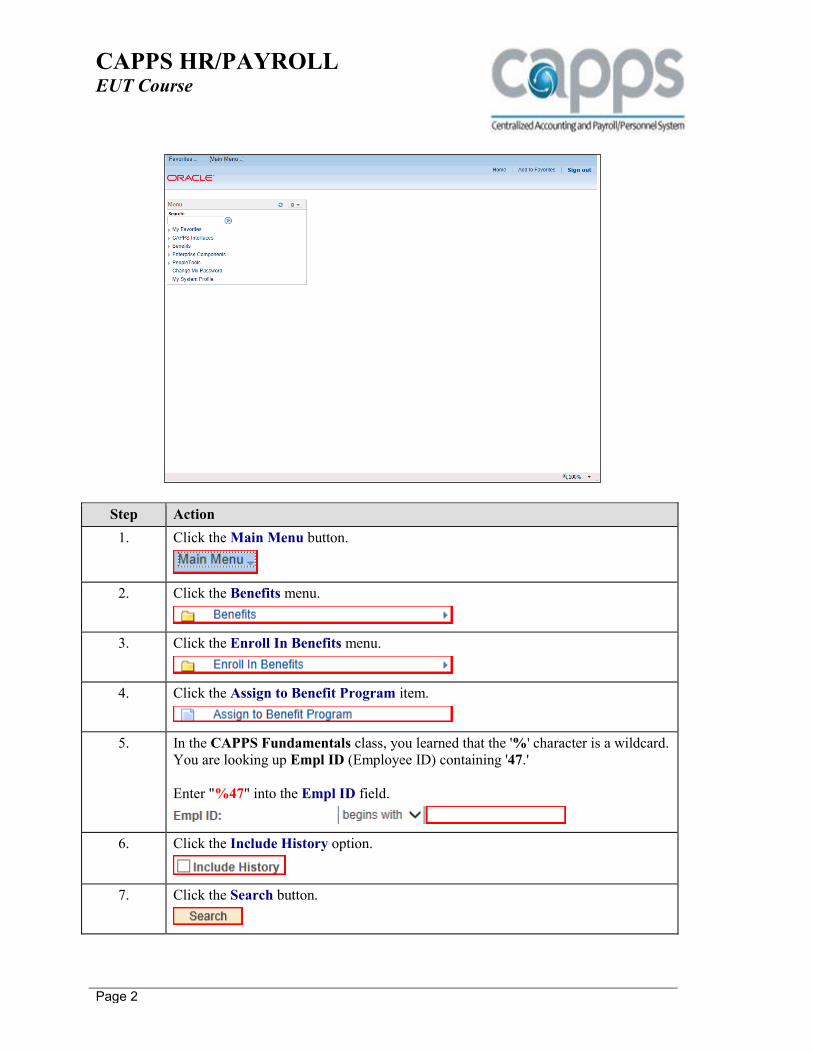
This lesson shows you how to view the Benefit Program Assignment page in CAPPS
HR/Payroll.
CAPPS HR/PAYROLL
EUT Course
Page 2
Step Action
1. Click the Main Menu button.
2. Click the Benefits menu.
3. Click the Enroll In Benefits menu.
4. Click the Assign to Benefit Program item.
5. In the CAPPS Fundamentals class, you learned that the '%' character is a wildcard.
You are looking up Empl ID (Employee ID) containing '47.'
Enter "%47" into the Empl ID field.
6. Click the Include History option.
7. Click the Search button.
CAPPS HR/PAYROLL
EUT Course
Page 3
Step Action
8. Click the Test Employee ZZ link.
9. On the Assign to Benefit Program page, you are able to view the Benefit Program
to which the employee is assigned. This data automatically populates when the
employee is hired (onboarded) into CAPPS.
10. Any changes after hire to the employee's FTE will automatically update the Benefit
Program in CAPPS.
Benefits Coordinators must ensure that ERS OnLine is updated to reflect any
changes after hire.
11. NOTE: Benefits Coordinators must manually update ERS OnLine for changes to
an employee's Benefit Program. The two systems (CAPPS HR/Payroll and ERS
OnLine) must remain in sync. This is so that premiums are appropriately reflected
in both systems. Certain benefit premiums are calculated based on the Benefit
Program established in ERS and CAPPS. Changes can affect the cost of those
premiums.
12. Click the Look up Benefit Program button.
13. Benefit Programs available to agency employees include EFT for Full Time
Benefits, or EPT for Part Time Benefits.
Please note that PSX is used for Board Members. EFN and EPN do not apply to
most agencies.
14. Typically, you would never make changes to the Benefit Program in Benefits, since
salary transactions processed in Job Data update the Benefits Program in the CAPPS
HR/Payroll system.
Note: A change to the Benefit Program in CAPPS must be manually updated in ERS
OnLine.
Click the Cancel button.
15. Click the Home link.
16. Congratulations! You have successfully completed this lesson.
End of Procedure.
View an Employee's Plan(s)
Section 2. Lesson 2. View an Employee's Plan(s)

CAPPS HR/PAYROLL
EUT Course
Page 4
Procedure
This lesson shows you how to view an employee's Benefit Plan(s). You can make changes, if
necessary.
Step Action
1. Click the Main Menu button.
2. Click the Benefits menu.
3. Click the Enroll In Benefits menu.
4. Click the Health Benefits item.
5. In the CAPPS Fundamentals class, you learned that the '%' character is a wildcard.
You are looking up Empl ID (Employee ID) that contains '20.'
Enter "%20" into the Empl ID field.
CAPPS HR/PAYROLL
EUT Course
Page 5
Step Action
6. Click the Include History option.
7. Click the Search button.
8. The system retrieves six (6) records, each of which has the characters '20'
somewhere in the Empl ID (Employee ID). You are looking up Test Employee Z.
Click the 00000000020 link.
9. This employee has 3 Health Benefits plans. This first row shows the Medical Plan
(Plan Type 10) information.
10. Click the Show next row button.
11. The second row shows Dental plan information (Plan Type 11).
Click the Show next row button.
12. The third row shows Plan Type 1T, Medical Tobacco Premium, which is for
smokers. Notice that the Coverage Election is Waived. This employee is not a
smoker.
13. Click the Enroll In Benefits button.
14. In a similar manner, you can look up other Benefit Plans for this employee.
Let's walk through these Plans.
15. Click the Life and AD/D Benefits item.
16. There are 4 rows of data for this employee's Life and AD/D (Accidental Death and
Dismemberment) Benefits.
Row 1 shows the employee's Basic Life coverage.
Click the Show next row button.
CAPPS HR/PAYROLL
EUT Course
Page 6
Step Action
17. Row 2 is the Supplemental Life coverage.
Click the Show next row button.
18. Row 3 is AD and D.
Click the Show next row button.
19. Row 4 is Dependent Life.
20. Click the Enroll In Benefits button.
21. Click the Disability Benefits item.
22. This employee has 2 rows of data for Disability Benefits.
Row 1 is Short-Term Disability.
Click the Show next row button.
23. Row 2 shows Long-Term Disability coverage, which has been waived.
Click the Enroll In Benefits button.
24. Click the Savings Plans item.
CAPPS HR/PAYROLL
EUT Course
Page 7
Step Action
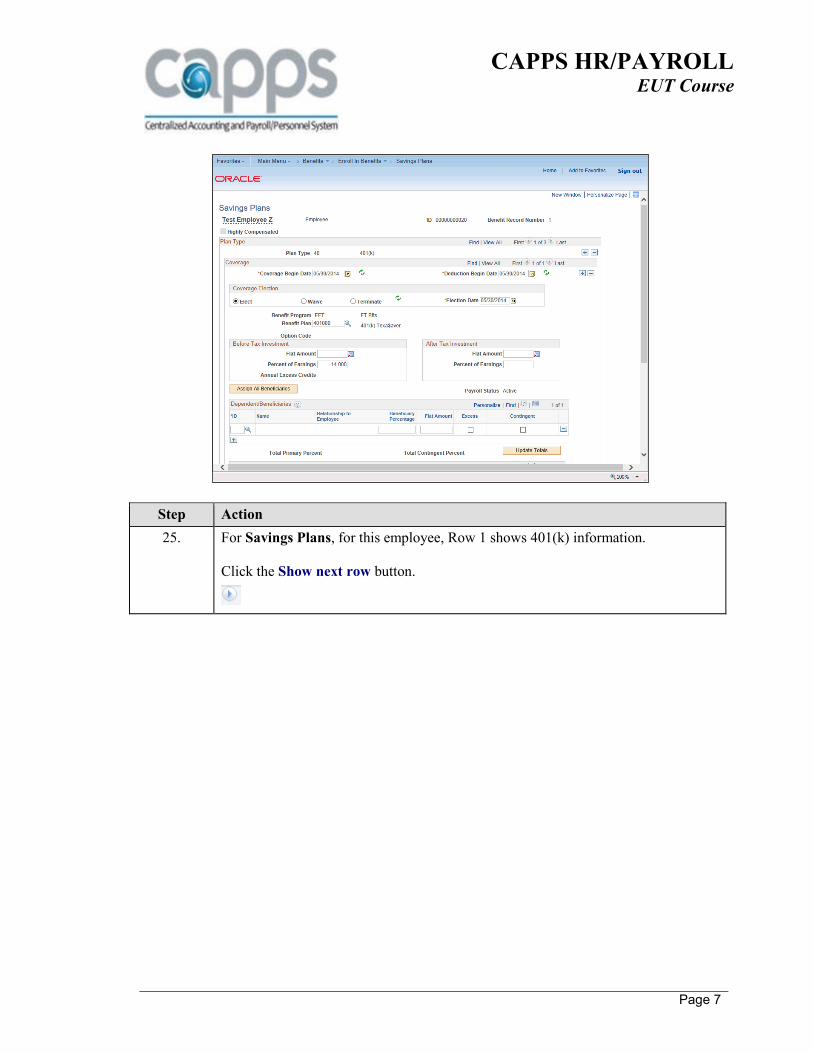
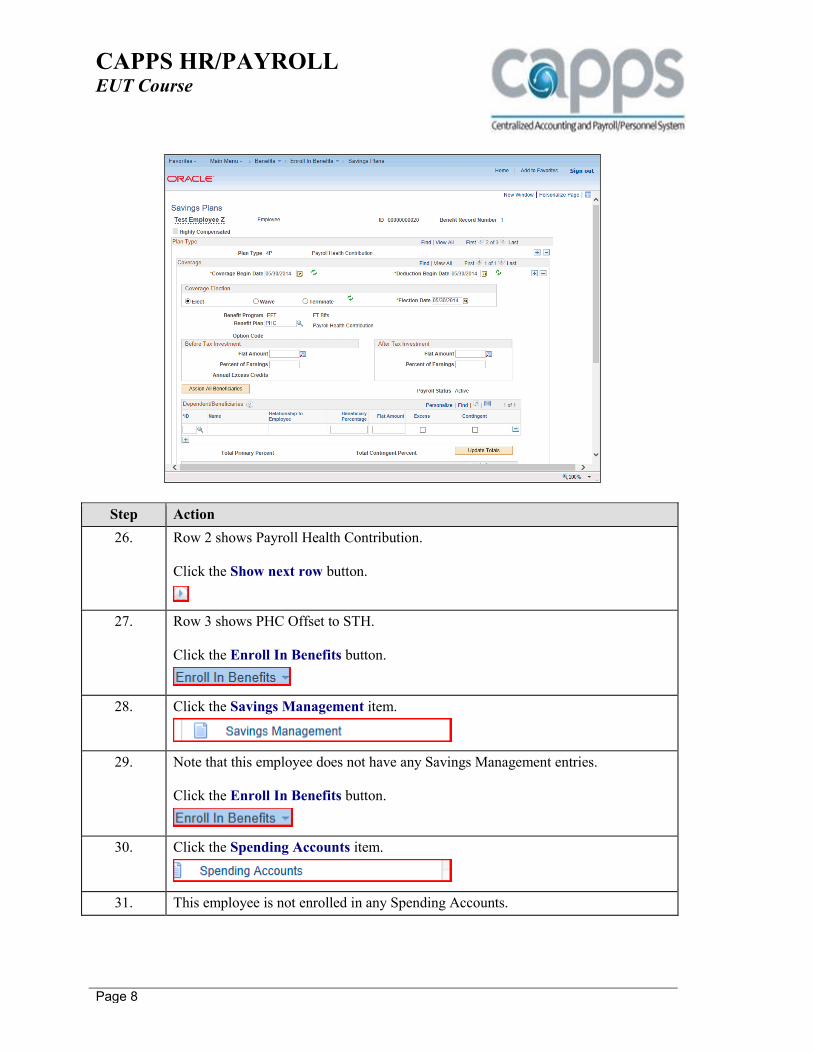
25. For Savings Plans, for this employee, Row 1 shows 401(k) information.
Click the Show next row button.
CAPPS HR/PAYROLL
EUT Course
Page 8
Step Action
26. Row 2 shows Payroll Health Contribution.
Click the Show next row button.
27. Row 3 shows PHC Offset to STH.
Click the Enroll In Benefits button.
28. Click the Savings Management item.
29. Note that this employee does not have any Savings Management entries.
Click the Enroll In Benefits button.
30. Click the Spending Accounts item.
31. This employee is not enrolled in any Spending Accounts.
CAPPS HR/PAYROLL
EUT Course
Page 9
Step Action
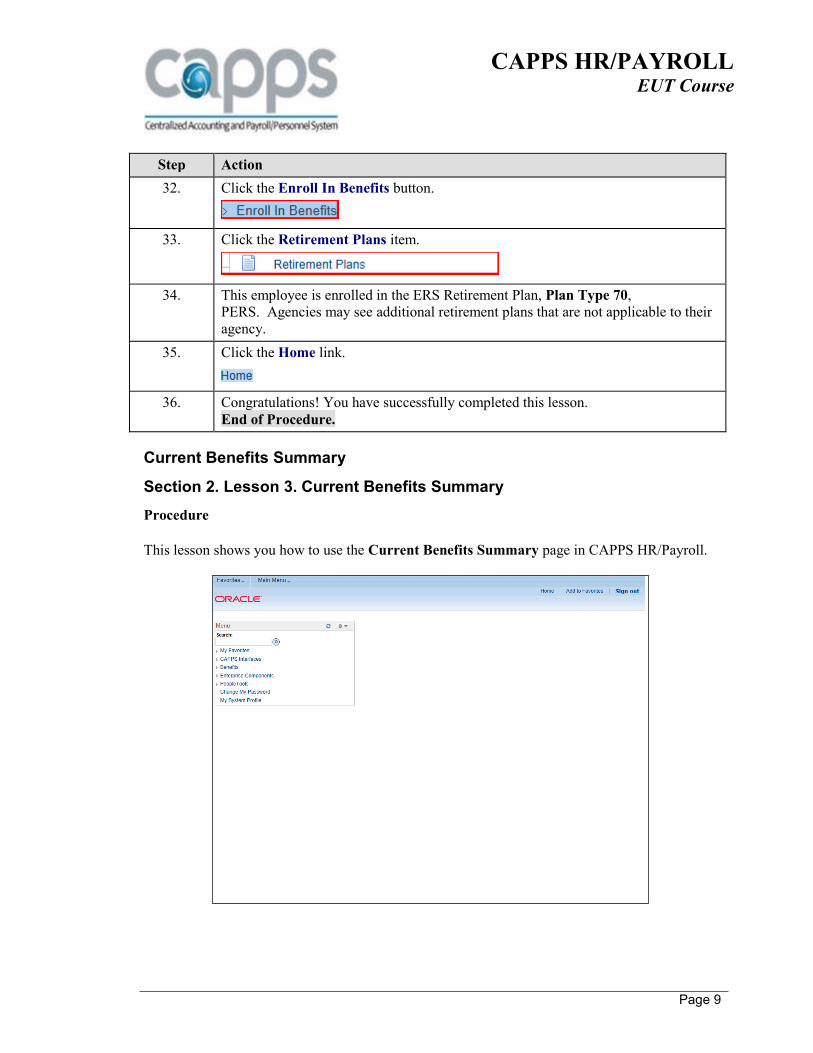
32. Click the Enroll In Benefits button.
33. Click the Retirement Plans item.
34. This employee is enrolled in the ERS Retirement Plan, Plan Type 70,
PERS. Agencies may see additional retirement plans that are not applicable to their
agency.
35. Click the Home link.
36. Congratulations! You have successfully completed this lesson.
End of Procedure.
Current Benefits Summary
Section 2. Lesson 3. Current Benefits Summary
Procedure
This lesson shows you how to use the Current Benefits Summary page in CAPPS HR/Payroll.
CAPPS HR/PAYROLL
EUT Course
Page 10
Step Action
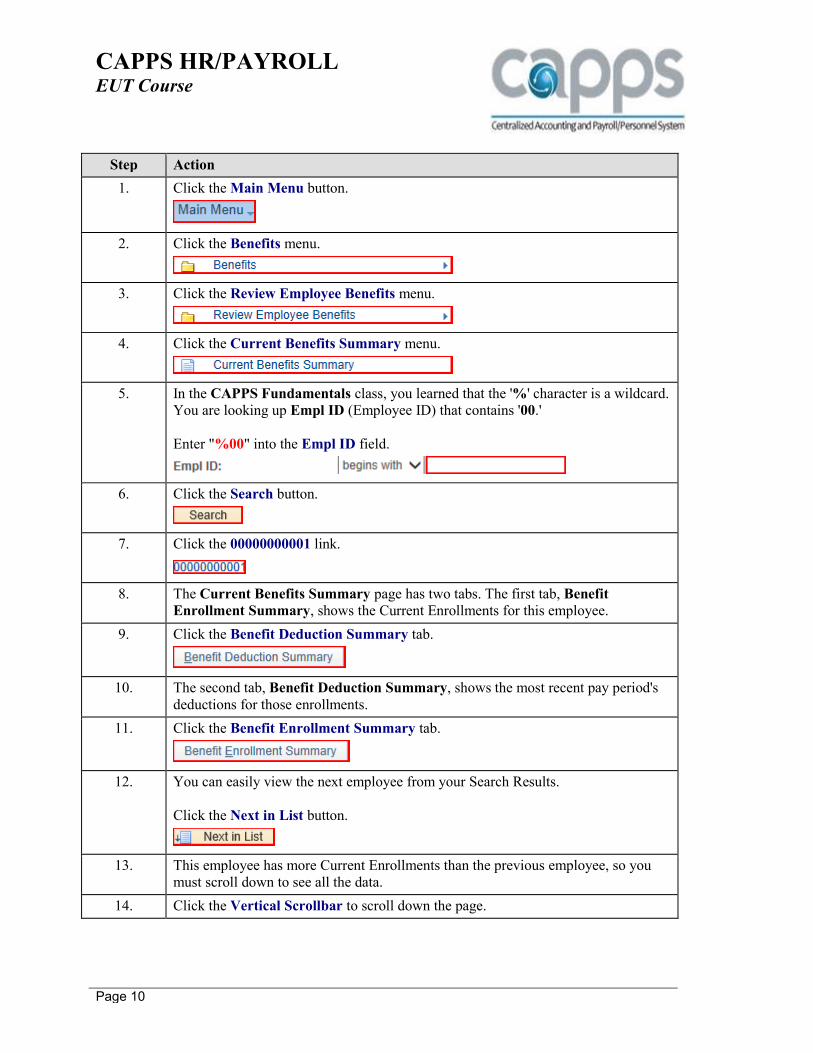
1. Click the Main Menu button.
2. Click the Benefits menu.
3. Click the Review Employee Benefits menu.
4. Click the Current Benefits Summary menu.
5. In the CAPPS Fundamentals class, you learned that the '%' character is a wildcard.
You are looking up Empl ID (Employee ID) that contains '00.'
Enter "%00" into the Empl ID field.
6. Click the Search button.
7. Click the 00000000001 link.
8. The Current Benefits Summary page has two tabs. The first tab, Benefit
Enrollment Summary, shows the Current Enrollments for this employee.
9. Click the Benefit Deduction Summary tab.
10. The second tab, Benefit Deduction Summary, shows the most recent pay period's
deductions for those enrollments.
11. Click the Benefit Enrollment Summary tab.
12. You can easily view the next employee from your Search Results.
Click the Next in List button.
13. This employee has more Current Enrollments than the previous employee, so you
must scroll down to see all the data.
14. Click the Vertical Scrollbar to scroll down the page.
CAPPS HR/PAYROLL
EUT Course
Page 11
Step Action
15. Payroll Health Contribution (PHC) is an agency funded contribution to the health
insurance fund and is required for all employees who have a state paid health
insurance contributions.
16. Click the Vertical Scrollbar to scroll up the page.
17. Click the Benefit Deduction Summary tab.
18. The Current Benefits Summary is an easy way to see all the benefits for an
employee, as well as the most recent pay period's deductions.
Click the Home link.
19. Congratulations! You have succesfully completed this lesson.
End of Procedure.
Reports from CAPPS Interfaces
Section 2. Lesson 4. Reports from CAPPS Interfaces
Procedure
This lesson shows you how to run reports from CAPPS Interfaces.
CAPPS HR/PAYROLL
EUT Course
Page 12
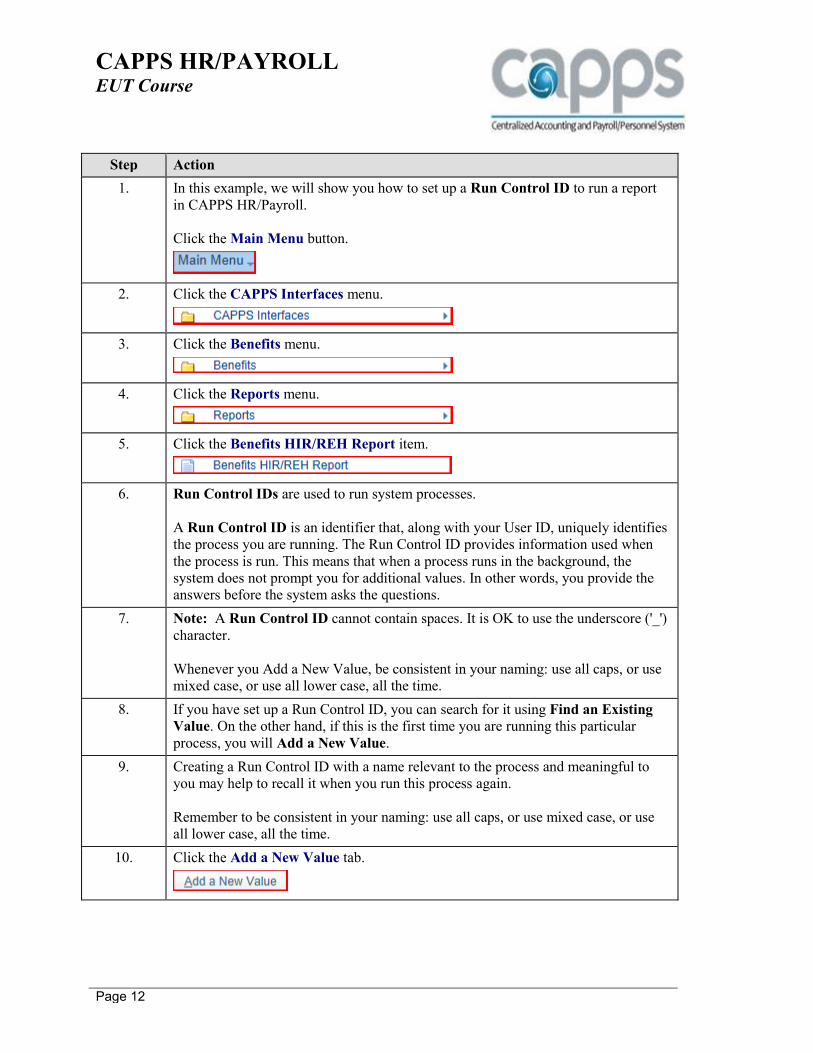
Step Action
1. In this example, we will show you how to set up a Run Control ID to run a report
in CAPPS HR/Payroll.
Click the Main Menu button.
2. Click the CAPPS Interfaces menu.
3. Click the Benefits menu.
4. Click the Reports menu.
5. Click the Benefits HIR/REH Report item.
6. Run Control IDs are used to run system processes.
A Run Control ID is an identifier that, along with your User ID, uniquely identifies
the process you are running. The Run Control ID provides information used when
the process is run. This means that when a process runs in the background, the
system does not prompt you for additional values. In other words, you provide the
answers before the system asks the questions.
7. Note: A Run Control ID cannot contain spaces. It is OK to use the underscore ('_')
character.
Whenever you Add a New Value, be consistent in your naming: use all caps, or use
mixed case, or use all lower case, all the time.
8. If you have set up a Run Control ID, you can search for it using Find an Existing
Value. On the other hand, if this is the first time you are running this particular
process, you will Add a New Value.
9. Creating a Run Control ID with a name relevant to the process and meaningful to
you may help to recall it when you run this process again.
Remember to be consistent in your naming: use all caps, or use mixed case, or use
all lower case, all the time.
10. Click the Add a New Value tab.
CAPPS HR/PAYROLL
EUT Course
Page 13
Step Action
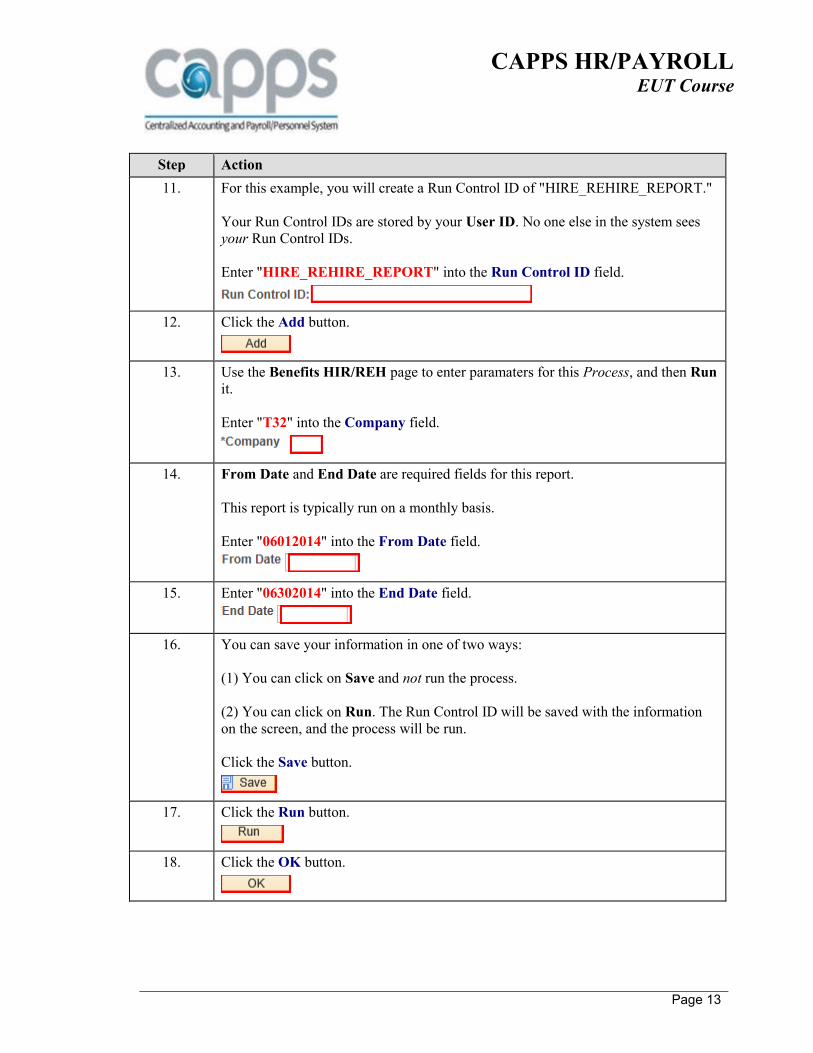
11. For this example, you will create a Run Control ID of "HIRE_REHIRE_REPORT."
Your Run Control IDs are stored by your User ID. No one else in the system sees
your Run Control IDs.
Enter "HIRE_REHIRE_REPORT" into the Run Control ID field.
12. Click the Add button.
13. Use the Benefits HIR/REH page to enter paramaters for this Process, and then Run
it.
Enter "T32" into the Company field.
14. From Date and End Date are required fields for this report.
This report is typically run on a monthly basis.
Enter "06012014" into the From Date field.
15. Enter "06302014" into the End Date field.
16. You can save your information in one of two ways:
(1) You can click on Save and not run the process.
(2) You can click on Run. The Run Control ID will be saved with the information
on the screen, and the process will be run.
Click the Save button.
17. Click the Run button.
18. Click the OK button.
CAPPS HR/PAYROLL
EUT Course
Page 14
Step Action
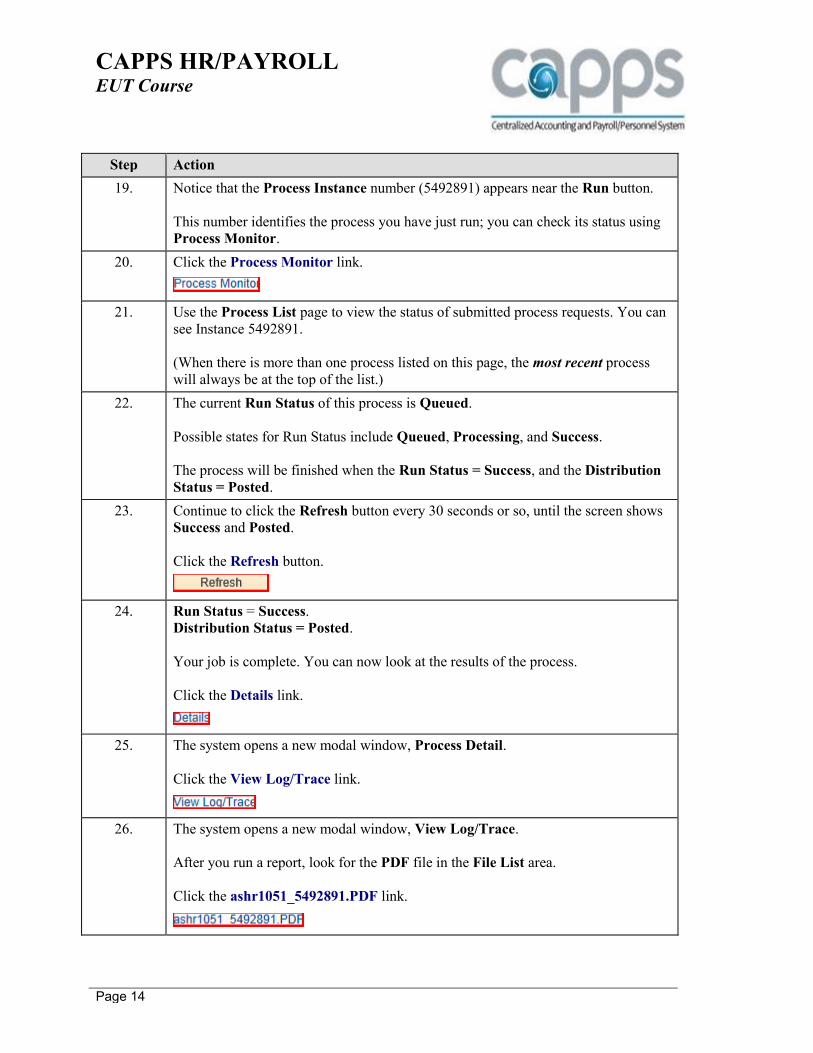
19. Notice that the Process Instance number (5492891) appears near the Run button.
This number identifies the process you have just run; you can check its status using
Process Monitor.
20. Click the Process Monitor link.
21. Use the Process List page to view the status of submitted process requests. You can
see Instance 5492891.
(When there is more than one process listed on this page, the most recent process
will always be at the top of the list.)
22. The current Run Status of this process is Queued.
Possible states for Run Status include Queued, Processing, and Success.
The process will be finished when the Run Status = Success, and the Distribution
Status = Posted.
23. Continue to click the Refresh button every 30 seconds or so, until the screen shows
Success and Posted.
Click the Refresh button.
24. Run Status = Success.
Distribution Status = Posted.
Your job is complete. You can now look at the results of the process.
Click the Details link.
25. The system opens a new modal window, Process Detail.
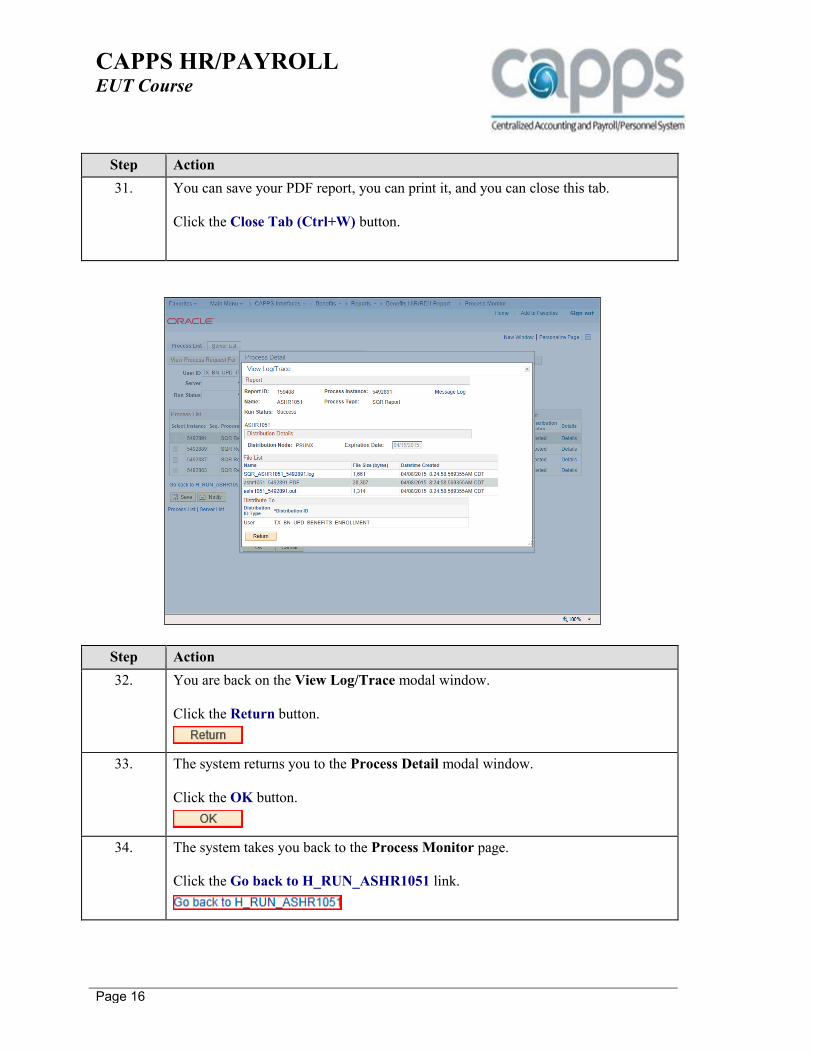
Click the View Log/Trace link.
26. The system opens a new modal window, View Log/Trace.
After you run a report, look for the PDF file in the File List area.
Click the ashr1051_5492891.PDF link.
CAPPS HR/PAYROLL
EUT Course
Page 15
Step Action
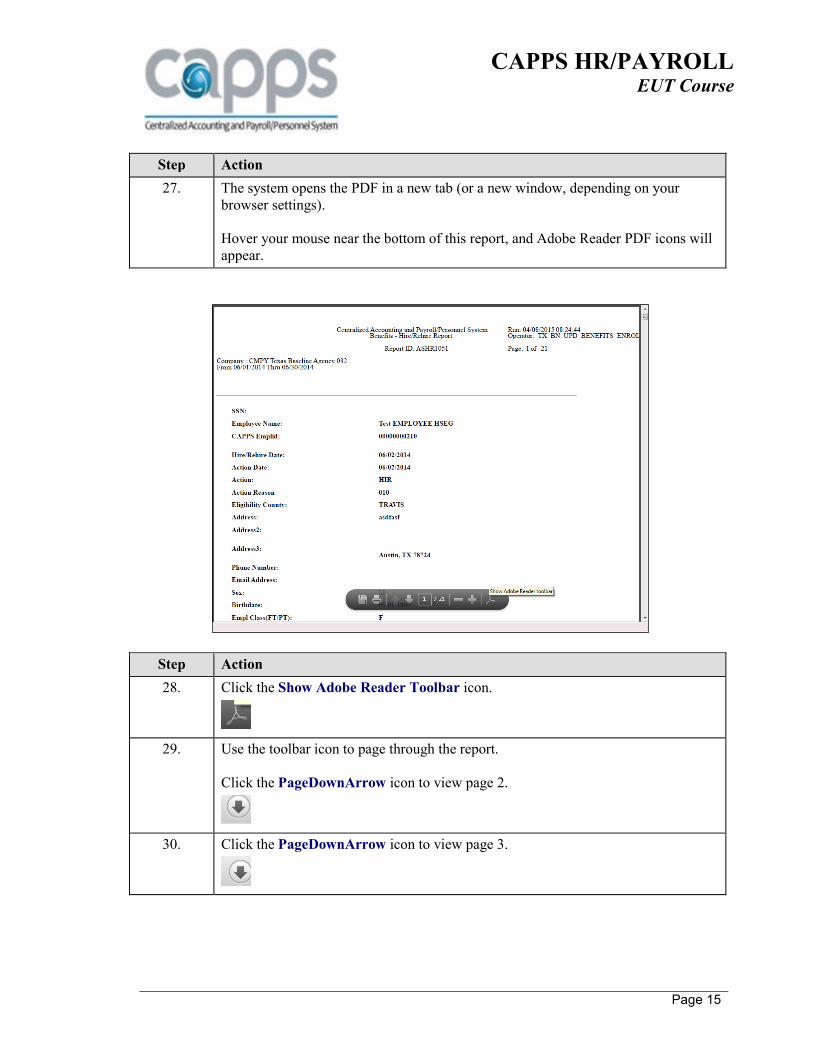
27. The system opens the PDF in a new tab (or a new window, depending on your
browser settings).
Hover your mouse near the bottom of this report, and Adobe Reader PDF icons will
appear.
Step Action
28. Click the Show Adobe Reader Toolbar icon.
29. Use the toolbar icon to page through the report.
Click the PageDownArrow icon to view page 2.
30. Click the PageDownArrow icon to view page 3.
CAPPS HR/PAYROLL
EUT Course
Page 16
Step Action
31. You can save your PDF report, you can print it, and you can close this tab.
Click the Close Tab (Ctrl+W) button.
Step Action
32. You are back on the View Log/Trace modal window.
Click the Return button.
33. The system returns you to the Process Detail modal window.
Click the OK button.
34. The system takes you back to the Process Monitor page.
Click the Go back to H_RUN_ASHR1051 link.
CAPPS HR/PAYROLL
EUT Course
Page 17
Step Action
35. You can run other reports in a similar fashion.
Click the Reports button.
36. Click the Pay Impacting forms for MON menu.
37. Enter "PAY_IMPACT_FORMS_MON" into the Run Control ID field.
38. Click the Add button.
39. This is the Monthly Pay Impacting Forms Report Run Control page.
This report should be run once your Monthly payroll has been completed.
Like the Hire / Rehire Report, you must fill in the required fields in order to run this
report.
This lesson does not include an example of this report.
40. This is the Semi Monthly Pay Impacting Forms Report Run Control page.
Note: The Semi Monthly Report only applies to agencies with Semi-Monthly
employees. This report should be run once your Semi-Monthly payroll has been
completed.
Like the Hire / Rehire Report, you must fill in the required fields in order to run this
report.
This lesson does not include an example of this report.
41. Click the Home link.
42. Congratulations! You have successfully completed this lesson.
End of Procedure.
Section 3. Benefits - Reports
Section 3. Benefits - Reports
TX Saver and ERS/CAPPS Processing/Reconciliation
Section 3. Lesson 1. TX Saver and ERS/CAPPS Processing/Reconcilation
CAPPS HR/PAYROLL
EUT Course
Page 18
Procedure
This lesson shows you how to view various benefits-related reports in CAPPS HR/Payroll.
Step Action
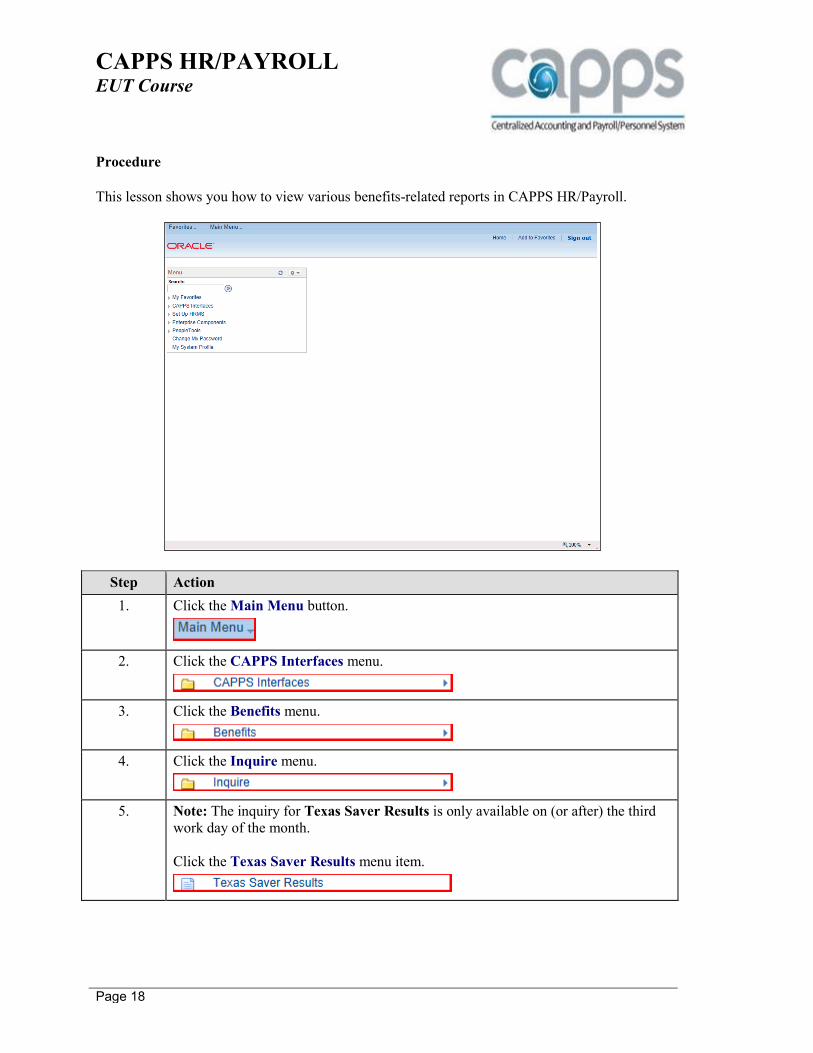
1. Click the Main Menu button.
2. Click the CAPPS Interfaces menu.
3. Click the Benefits menu.
4. Click the Inquire menu.
5. Note: The inquiry for Texas Saver Results is only available on (or after) the third
work day of the month.
Click the Texas Saver Results menu item.
CAPPS HR/PAYROLL
EUT Course
Page 19
Step Action
6. Texas Saver Results is an inquiry. An inquiry is different from a report because it
displays the results onscreen in real time.
Enter "032" into the Agency ID field.
7. Click the Search button.
8. Click the Vertical Scrollbar to scroll down the page.
9. Click the Details tab.
10. The Details tab shows changes for employees.
Legend for Texas Saver Results Details page:
A = Add
P = Participant change
C = Agency change
S = Stop
11. Click the Other Info tab.
12. Click the Vertical Scrollbar to scroll up the page.
13. Click the Errors tab.
14. Click the Details tab.
15. Click the Horizontal Scrollbar to scroll to the right across the page.
16. Click the Inquire button.
17. Similarly, you can view ERS Inbound Results directly onscreen. This, too, is an
Inquiry.
Click the ERS Inbound Results menu.
18. The page opens with Overall Results. More discrete presentations are available on
each of the tabs.
CAPPS HR/PAYROLL
EUT Course
Page 20
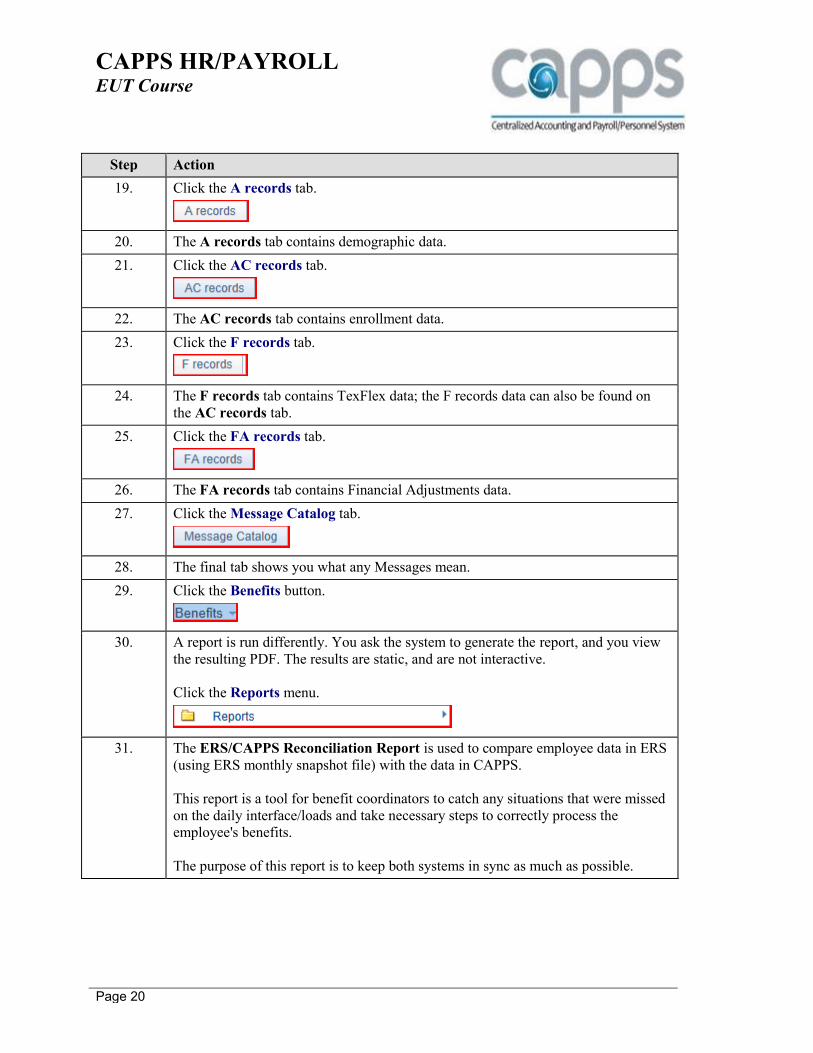
Step Action
19. Click the A records tab.
20. The A records tab contains demographic data.
21. Click the AC records tab.
22. The AC records tab contains enrollment data.
23. Click the F records tab.
24. The F records tab contains TexFlex data; the F records data can also be found on
the AC records tab.
25. Click the FA records tab.
26. The FA records tab contains Financial Adjustments data.
27. Click the Message Catalog tab.
28. The final tab shows you what any Messages mean.
29. Click the Benefits button.
30. A report is run differently. You ask the system to generate the report, and you view
the resulting PDF. The results are static, and are not interactive.
Click the Reports menu.
31. The ERS/CAPPS Reconciliation Report is used to compare employee data in ERS
(using ERS monthly snapshot file) with the data in CAPPS.
This report is a tool for benefit coordinators to catch any situations that were missed
on the daily interface/loads and take necessary steps to correctly process the
employee's benefits.
The purpose of this report is to keep both systems in sync as much as possible.
CAPPS HR/PAYROLL
EUT Course
Page 21
Step Action
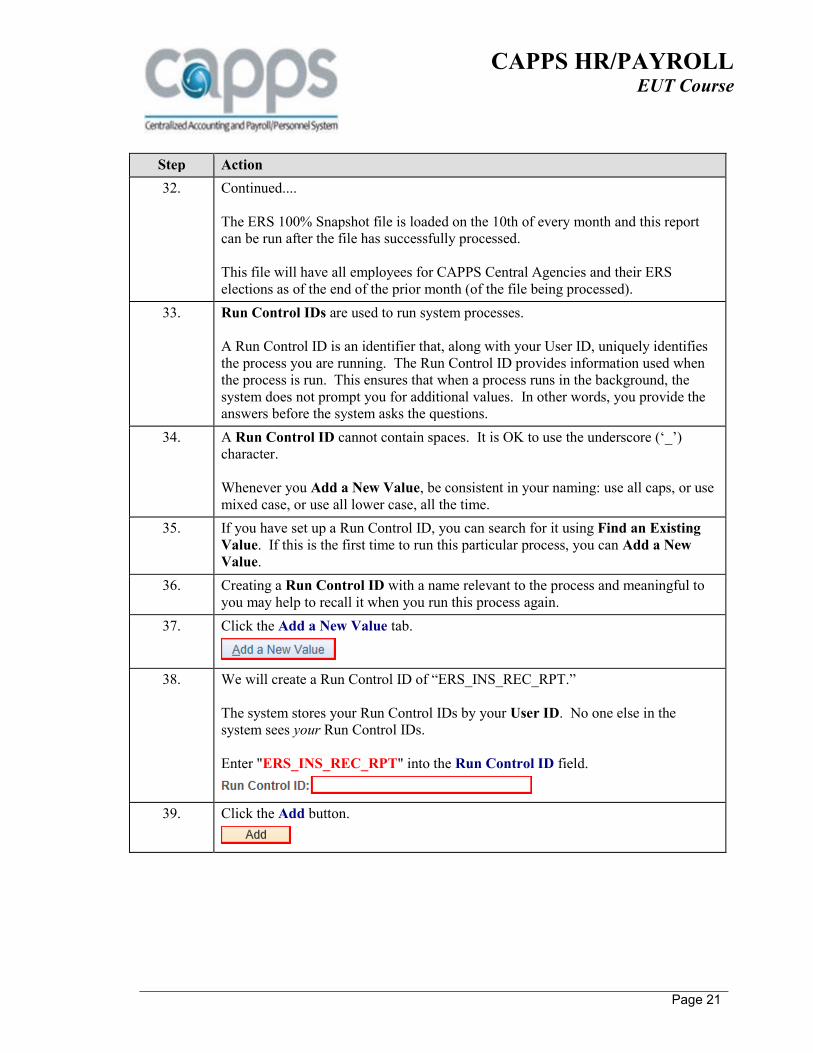
32. Continued....
The ERS 100% Snapshot file is loaded on the 10th of every month and this report
can be run after the file has successfully processed.
This file will have all employees for CAPPS Central Agencies and their ERS
elections as of the end of the prior month (of the file being processed).
33. Run Control IDs are used to run system processes.
A Run Control ID is an identifier that, along with your User ID, uniquely identifies
the process you are running. The Run Control ID provides information used when
the process is run. This ensures that when a process runs in the background, the
system does not prompt you for additional values. In other words, you provide the
answers before the system asks the questions.
34. A Run Control ID cannot contain spaces. It is OK to use the underscore (‘_’)
character.
Whenever you Add a New Value, be consistent in your naming: use all caps, or use
mixed case, or use all lower case, all the time.
35. If you have set up a Run Control ID, you can search for it using Find an Existing
Value. If this is the first time to run this particular process, you can Add a New
Value.
36. Creating a Run Control ID with a name relevant to the process and meaningful to
you may help to recall it when you run this process again.
37. Click the Add a New Value tab.
38. We will create a Run Control ID of “ERS_INS_REC_RPT.”
The system stores your Run Control IDs by your User ID. No one else in the
system sees your Run Control IDs.
Enter "ERS_INS_REC_RPT" into the Run Control ID field.
39. Click the Add button.
CAPPS HR/PAYROLL
EUT Course
Page 22
Step Action
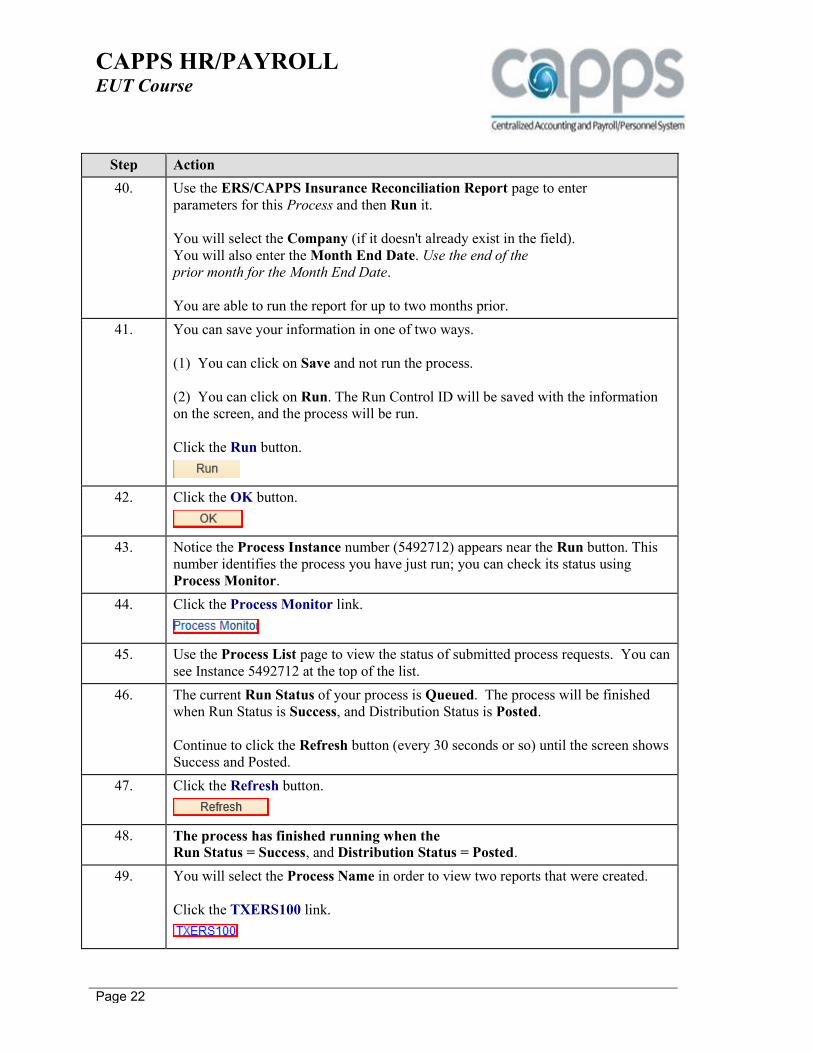
40. Use the ERS/CAPPS Insurance Reconciliation Report page to enter
parameters for this Process and then Run it.
You will select the Company (if it doesn't already exist in the field).
You will also enter the Month End Date. Use the end of the
prior month for the Month End Date.
You are able to run the report for up to two months prior.
41. You can save your information in one of two ways.
(1) You can click on Save and not run the process.
(2) You can click on Run. The Run Control ID will be saved with the information
on the screen, and the process will be run.
Click the Run button.
42. Click the OK button.
43. Notice the Process Instance number (5492712) appears near the Run button. This
number identifies the process you have just run; you can check its status using
Process Monitor.
44. Click the Process Monitor link.
45. Use the Process List page to view the status of submitted process requests. You can
see Instance 5492712 at the top of the list.
46. The current Run Status of your process is Queued. The process will be finished
when Run Status is Success, and Distribution Status is Posted.
Continue to click the Refresh button (every 30 seconds or so) until the screen shows
Success and Posted.
47. Click the Refresh button.
48. The process has finished running when the Run Status = Success, and Distribution Status = Posted.
49. You will select the Process Name in order to view two reports that were created.
Click the TXERS100 link.
CAPPS HR/PAYROLL
EUT Course
Page 23
Step Action
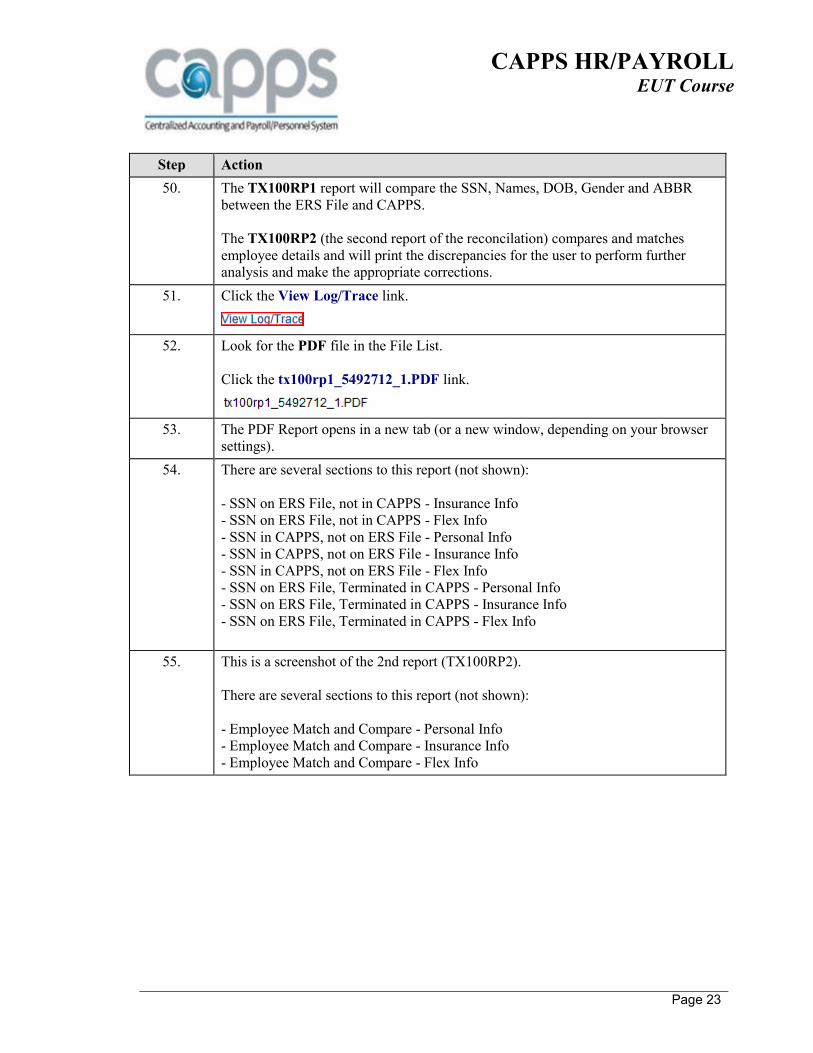
50. The TX100RP1 report will compare the SSN, Names, DOB, Gender and ABBR
between the ERS File and CAPPS.
The TX100RP2 (the second report of the reconcilation) compares and matches
employee details and will print the discrepancies for the user to perform further
analysis and make the appropriate corrections.
51. Click the View Log/Trace link.
52. Look for the PDF file in the File List.
Click the tx100rp1_5492712_1.PDF link.
53. The PDF Report opens in a new tab (or a new window, depending on your browser
settings).
54. There are several sections to this report (not shown):
- SSN on ERS File, not in CAPPS - Insurance Info
- SSN on ERS File, not in CAPPS - Flex Info
- SSN in CAPPS, not on ERS File - Personal Info
- SSN in CAPPS, not on ERS File - Insurance Info
- SSN in CAPPS, not on ERS File - Flex Info
- SSN on ERS File, Terminated in CAPPS - Personal Info
- SSN on ERS File, Terminated in CAPPS - Insurance Info
- SSN on ERS File, Terminated in CAPPS - Flex Info
55. This is a screenshot of the 2nd report (TX100RP2).
There are several sections to this report (not shown):
- Employee Match and Compare - Personal Info
- Employee Match and Compare - Insurance Info
- Employee Match and Compare - Flex Info
CAPPS HR/PAYROLL
EUT Course
Page 24
Step Action
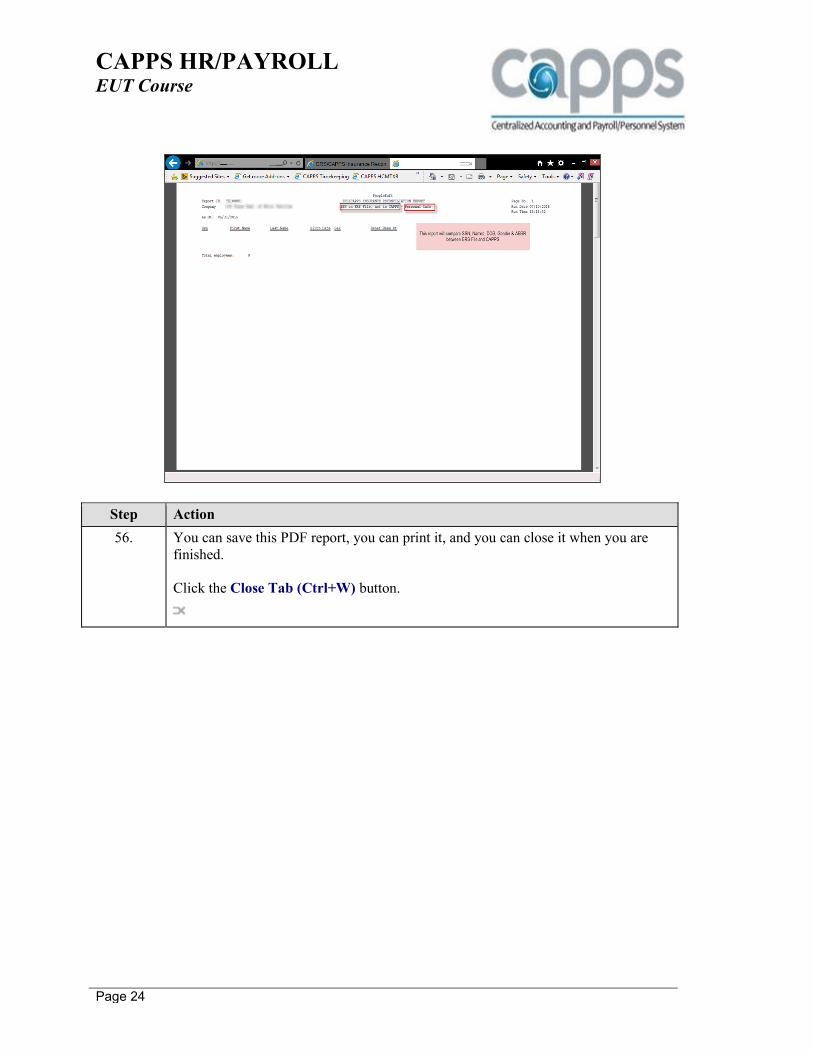
56. You can save this PDF report, you can print it, and you can close it when you are
finished.
Click the Close Tab (Ctrl+W) button.
CAPPS HR/PAYROLL
EUT Course
Page 25
Step Action
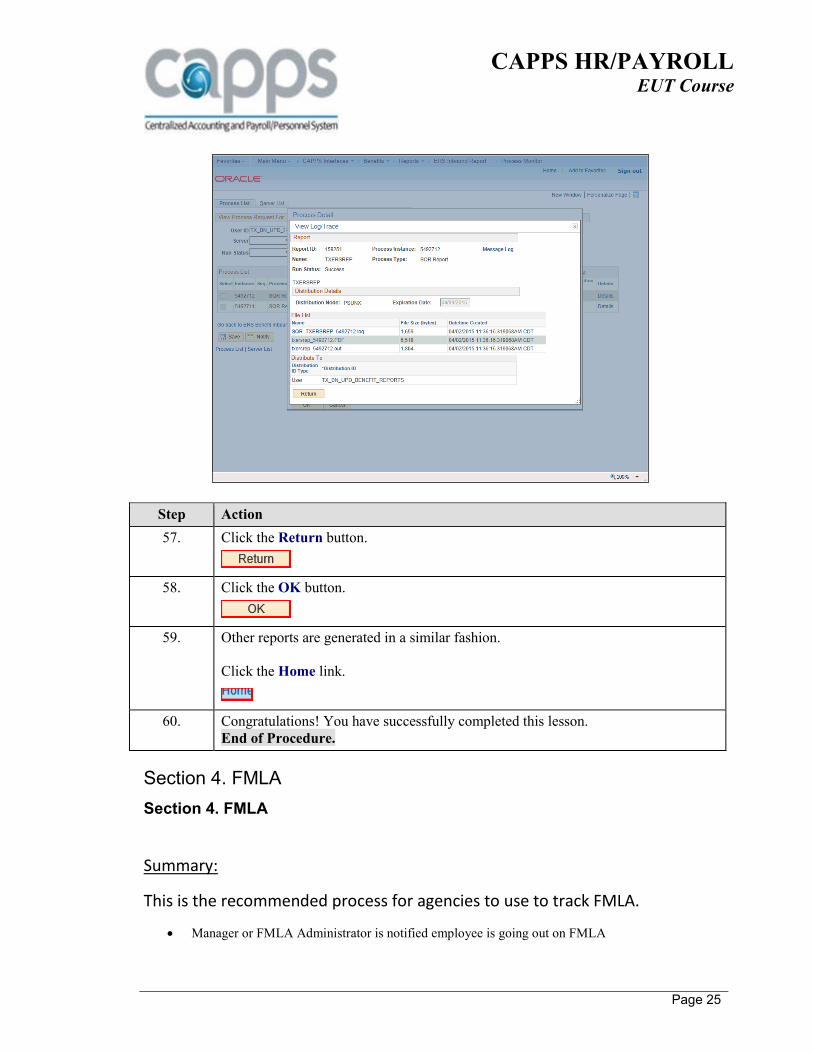
57. Click the Return button.
58. Click the OK button.
59. Other reports are generated in a similar fashion.
Click the Home link.
60. Congratulations! You have successfully completed this lesson.
End of Procedure.
Section 4. FMLA
Section 4. FMLA
Summary:
This is the recommended process for agencies to use to track FMLA.
Manager or FMLA Administrator is notified employee is going out on FMLA

CAPPS HR/PAYROLL
EUT Course
Page 26
Manager notifies agency FMLA administrator FMLA administrator enters FMLA event in CAPPS
NOTE: For dual employment the primary agency will administer the FMLA event.
FMLA Query for Eligibility
Section 4. Lesson 1. FMLA Query for Eligibility
This lesson shows how to check for eligibile FMLA hours.
Procedure
This lesson shows you how to run the FMLA Query for Eligibility.
Step Action
1. Click the Main Menu button.
2. Click the Reporting Tools menu.
3. Click the Query menu.
CAPPS HR/PAYROLL
EUT Course
Page 27
Step Action
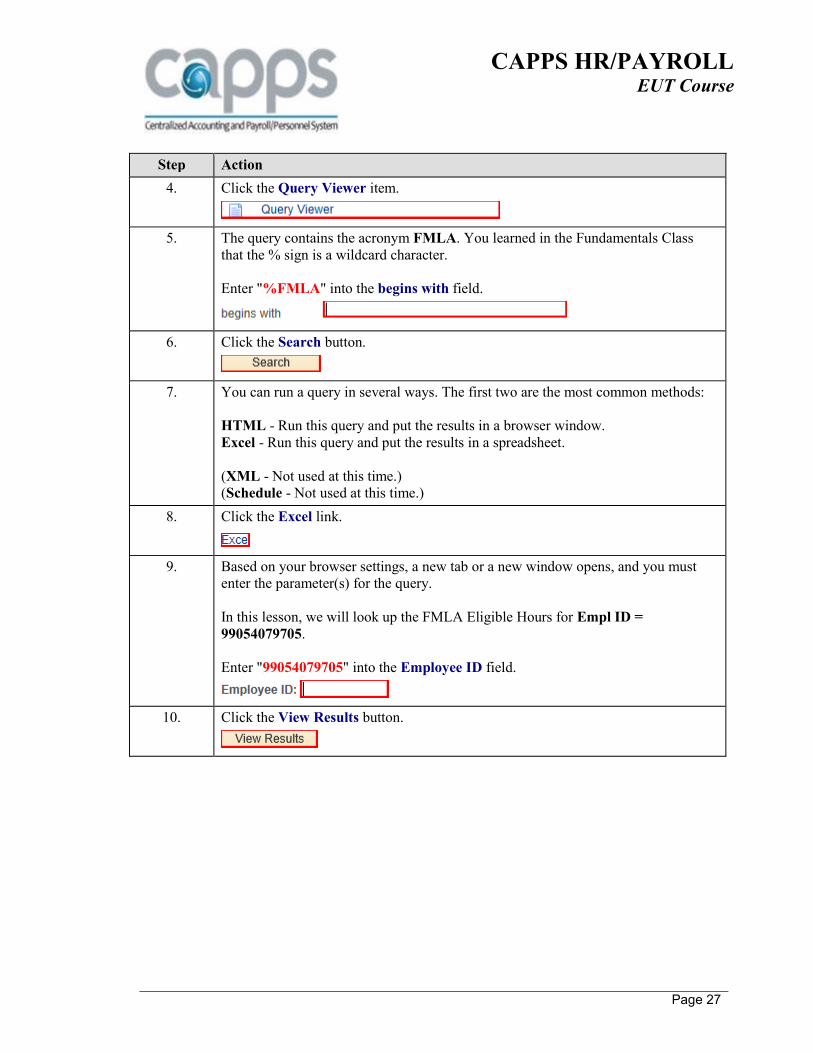
4. Click the Query Viewer item.
5. The query contains the acronym FMLA. You learned in the Fundamentals Class
that the % sign is a wildcard character.
Enter "%FMLA" into the begins with field.
6. Click the Search button.
7. You can run a query in several ways. The first two are the most common methods:
HTML - Run this query and put the results in a browser window.
Excel - Run this query and put the results in a spreadsheet.
(XML - Not used at this time.)
(Schedule - Not used at this time.)
8. Click the Excel link.
9. Based on your browser settings, a new tab or a new window opens, and you must
enter the parameter(s) for the query.
In this lesson, we will look up the FMLA Eligible Hours for Empl ID =
99054079705.
Enter "99054079705" into the Employee ID field.
10. Click the View Results button.
CAPPS HR/PAYROLL
EUT Course
Page 28
Step Action
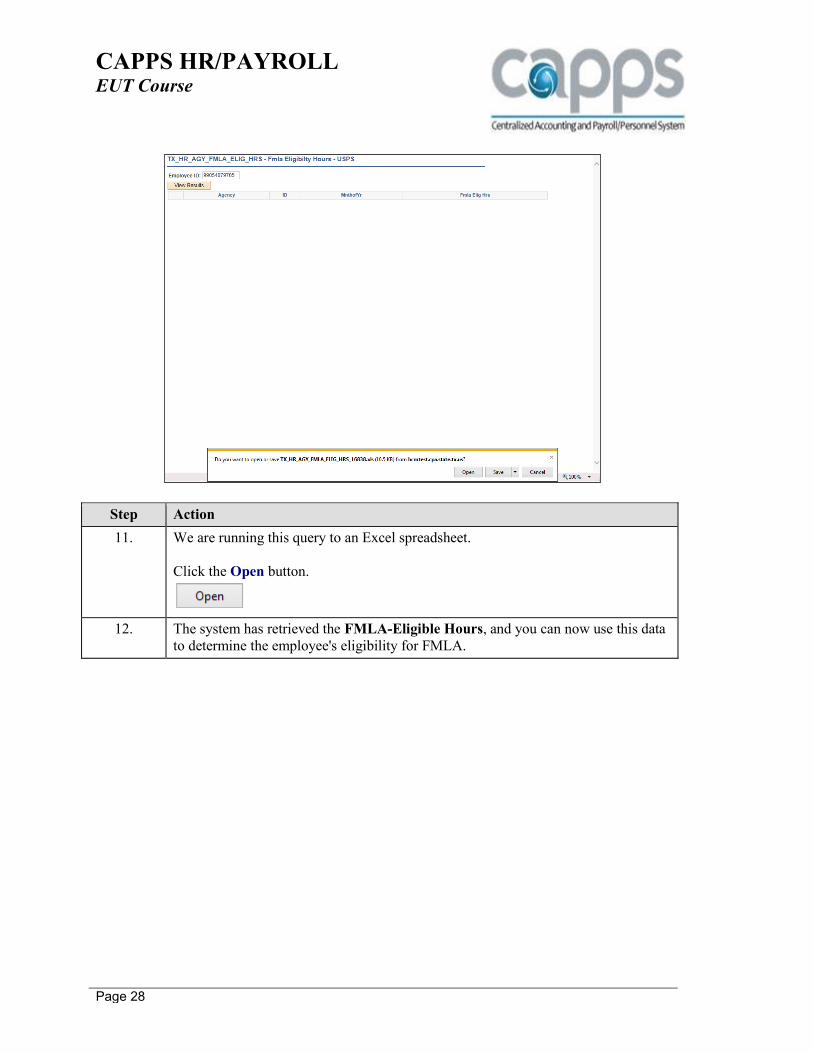
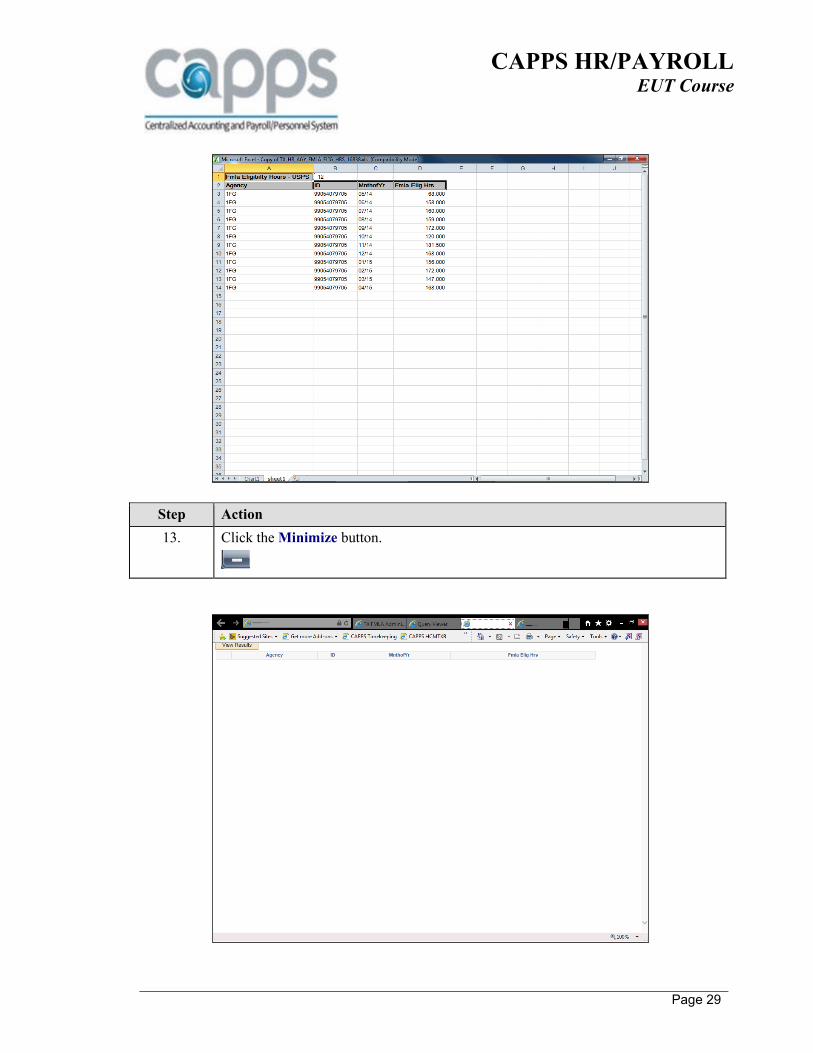
11. We are running this query to an Excel spreadsheet.
Click the Open button.
12. The system has retrieved the FMLA-Eligible Hours, and you can now use this data
to determine the employee's eligibility for FMLA.
CAPPS HR/PAYROLL
EUT Course
Page 29
Step Action
13. Click the Minimize button.
CAPPS HR/PAYROLL
EUT Course
Page 30
Step Action
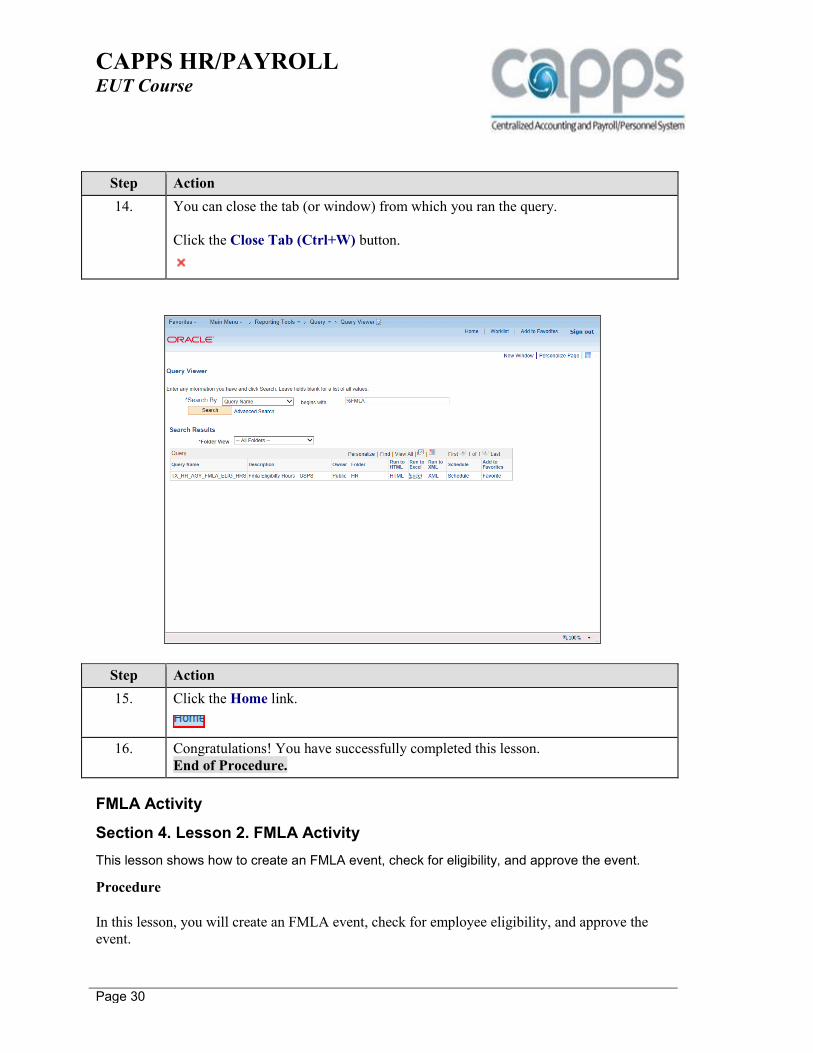
14. You can close the tab (or window) from which you ran the query.
Click the Close Tab (Ctrl+W) button.
Step Action
15. Click the Home link.
16. Congratulations! You have successfully completed this lesson.
End of Procedure.
FMLA Activity
Section 4. Lesson 2. FMLA Activity
This lesson shows how to create an FMLA event, check for eligibility, and approve the event.
Procedure
In this lesson, you will create an FMLA event, check for employee eligibility, and approve the
event.

CAPPS HR/PAYROLL
EUT Course
Page 31
Step Action
1. Navigate to the TX FMLA Administration page.
Click the Main Menu link.
2. Click the Benefits menu.
3. Click the Track FMLA (Family Medical Lv) menu.
4. Click the TX FMLA Administration menu item.
5. The system provides multiple ways to search for an employee.
You can search, for example, by Empl ID (Employee ID), Name or Last Name, or
any other search criteria listed on this page.
6. You will create an FMLA event for Employee ID 00000000047.
Enter "%00047" into the Empl ID field.
CAPPS HR/PAYROLL
EUT Course
Page 32
Step Action
7. Click the Search button.
8. Click the Test Employee ZZ link.
9. This page is used for both types of Leave:
* FMLA Event
* Parental Leave Event
This lesson shows you how to create an FMLA Event, but you will see the specific
entry needed to create a Parental Leave Event.
10. The *Request Date will default to the system date (current date). You can change
this value if necessary.
11. The Begin Date is the date on which the FMLA event begins. It can be a future date,
today's date, or in this example, a date in the past. The FMLA event began on March
9, 2015.
Enter "03092015" into the Begin Date field.
12. The Return Date is an optional field. Enter the expected date of return to work for
this employee. In this example, the employee will request 9 weeks of leave, and
expects to come back on May 11, 2015.
Note: this is an optional field.
Enter "05112015" into the Return Date field.
13. The system automatically provides an Expiration Date, in this case 08/31/2015.
This is because in this example, FMLA is tracked for this agency on a fiscal year
basis.
14. The next two fields are optional.
If you enter a number in the Time Requested field, you can select Days, Hours, or
Weeks in the Time Requested (Units) field.
15. Click the Leave Reason list.
16. Select the appropriate *Leave Reason from this list.
CAPPS HR/PAYROLL
EUT Course
Page 33
Step Action
17. Click the Care of Child list item.
18. Leave Type is an optional field. You can select from Continuous, Intermittent,
Irregular Intermittent, or make no entry at all.
The system defaults the value 'Continuous' when you first open this page.
19. Click the Save button.
20. When you Save this page, the system assigns an FMLA Request ID number to the
event.
In this example, FMLA Request ID = 001. This number will be used on the
employee's time sheet(s) to reflect time taken for the FMLA event, once this event
has been approved.
21. You must run the Eligibility checking process before you can Approve this event.
Click the CAPPS Eligibility tab.
22. On the CAPPS Eligibility page, you would enter the Non CAPPS FMLA Earned
Hours that you calculated based on the query you learned in Lesson 1.
23. If an employee does NOT qualify for FMLA Leave, but is eligible to take Parental
Leave, you would change the value in the *FMLA Plan ID field.
24. You would click the look up icon (the magnifying glass) to the right of this field to
see the possible choices for FMLA Plan ID.
This field should be changed when an employee is NOT eligible for FMLA, but can
take Parental Leave.
25. In this example, the employee has enough hours in the CAPPS system to be eligible
for FMLA, so there is no entry in the Non CAPPS FMLA Earned Hours field.
Click the Eligibility and Entitlement button.
26. This employee is entitled to receive FMLA time off.
Please note that the employee is entitled to 12.0 weeks of leave, but there are only
360.0 hours, because the employee works 30.0 Standard Hours per week.
CAPPS HR/PAYROLL
EUT Course
Page 34
Step Action
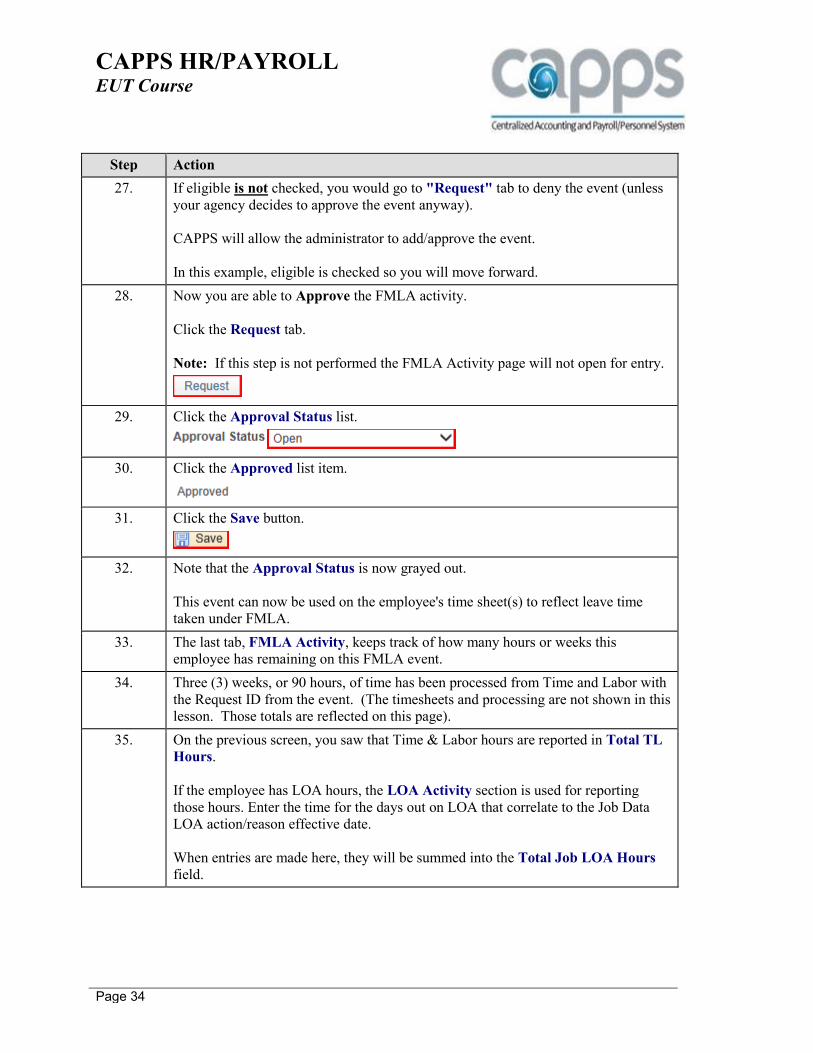
27. If eligible is not checked, you would go to "Request" tab to deny the event (unless
your agency decides to approve the event anyway).
CAPPS will allow the administrator to add/approve the event.
In this example, eligible is checked so you will move forward.
28. Now you are able to Approve the FMLA activity.
Click the Request tab.
Note: If this step is not performed the FMLA Activity page will not open for entry.
29. Click the Approval Status list.
30. Click the Approved list item.
31. Click the Save button.
32. Note that the Approval Status is now grayed out.
This event can now be used on the employee's time sheet(s) to reflect leave time
taken under FMLA.
33. The last tab, FMLA Activity, keeps track of how many hours or weeks this
employee has remaining on this FMLA event.
34. Three (3) weeks, or 90 hours, of time has been processed from Time and Labor with
the Request ID from the event. (The timesheets and processing are not shown in this
lesson. Those totals are reflected on this page).
35. On the previous screen, you saw that Time & Labor hours are reported in Total TL
Hours.
If the employee has LOA hours, the LOA Activity section is used for reporting
those hours. Enter the time for the days out on LOA that correlate to the Job Data
LOA action/reason effective date.
When entries are made here, they will be summed into the Total Job LOA Hours
field.
CAPPS HR/PAYROLL
EUT Course
Page 35
Step Action
36. Note: Entering LOA Activity hours is a manual step. If any of this time overlaps
with T&L time, then T&L time will be deleted.
In this way, the system will track the number of days used on FMLA, so that the
employee doesn’t take more than the law allows.
37. The Available FMLA Balance link displays when the status is Expected/Open.
38. The FLMA Open Events screen only displays OPEN EVENTS. It displays the
FMLA Request ID and the Date Range.
The FMLA administrator will need to let the manager and employee know the
Request ID (e.g. 001, 002...) to use when entering FMLA on the timesheet.
39. The Available Balance section displays the balance for FMLA and Military
Caregiver (MCL).
The Available Balance allows the agency to monitor concurrent or overlapping
FMLA or Military Caregiver events.
40. Congratulations! You have successfully completed this lesson.
End of Procedure.
FMLA-related Reports in CAPPS Interfaces
Section 4. Lesson 3. FMLA-related Reports in CAPPS Interfaces
Procedure
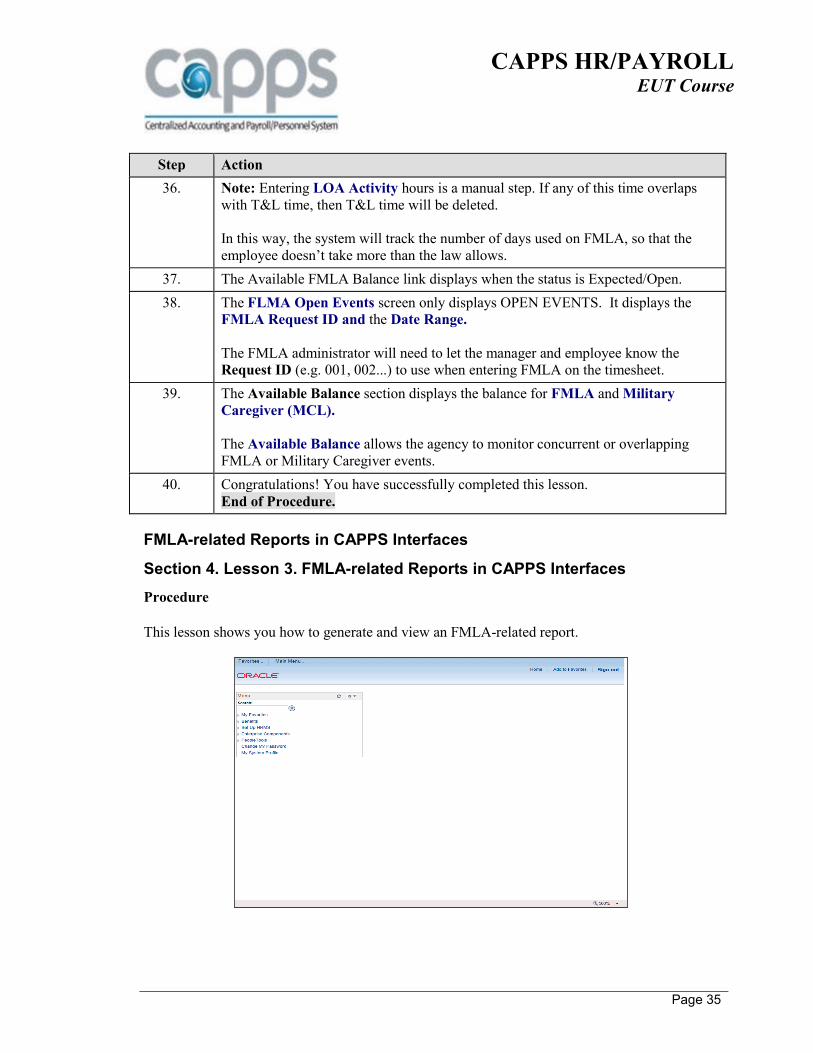
This lesson shows you how to generate and view an FMLA-related report.
CAPPS HR/PAYROLL
EUT Course
Page 36
Step Action
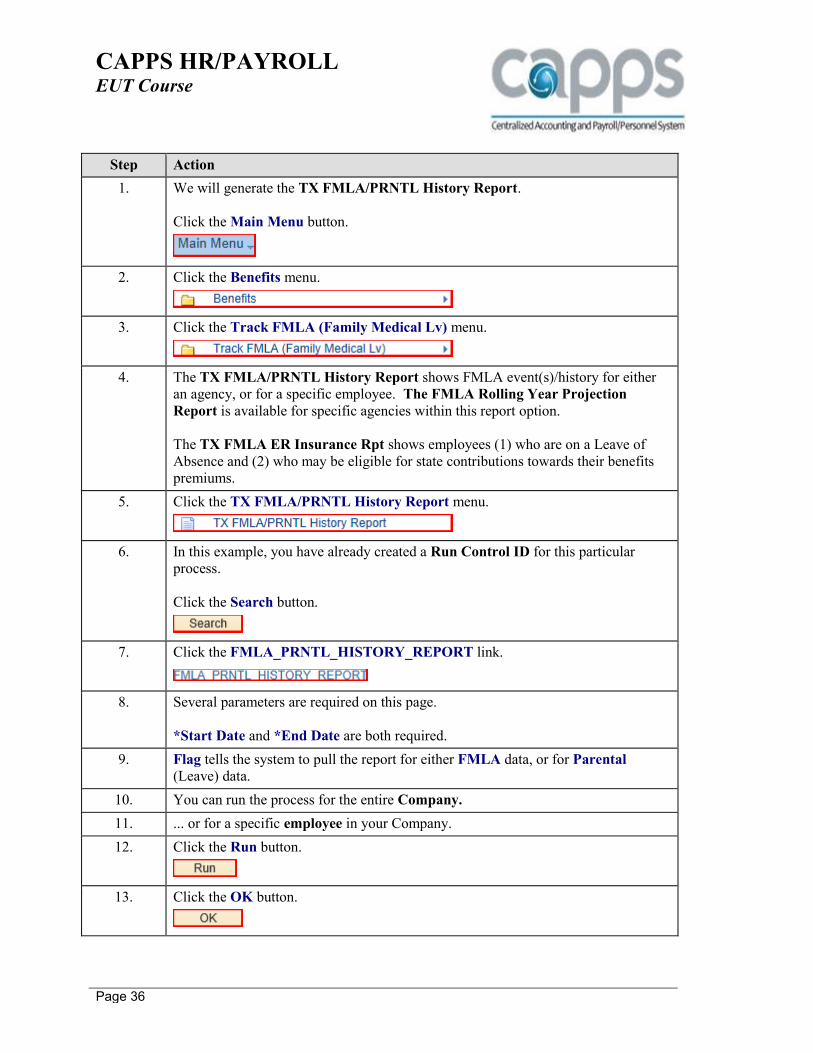
1. We will generate the TX FMLA/PRNTL History Report.
Click the Main Menu button.
2. Click the Benefits menu.
3. Click the Track FMLA (Family Medical Lv) menu.
4. The TX FMLA/PRNTL History Report shows FMLA event(s)/history for either
an agency, or for a specific employee. The FMLA Rolling Year Projection
Report is available for specific agencies within this report option.
The TX FMLA ER Insurance Rpt shows employees (1) who are on a Leave of
Absence and (2) who may be eligible for state contributions towards their benefits
premiums.
5. Click the TX FMLA/PRNTL History Report menu.
6. In this example, you have already created a Run Control ID for this particular
process.
Click the Search button.
7. Click the FMLA_PRNTL_HISTORY_REPORT link.
8. Several parameters are required on this page.
*Start Date and *End Date are both required.
9. Flag tells the system to pull the report for either FMLA data, or for Parental
(Leave) data.
10. You can run the process for the entire Company.
11. ... or for a specific employee in your Company.
12. Click the Run button.
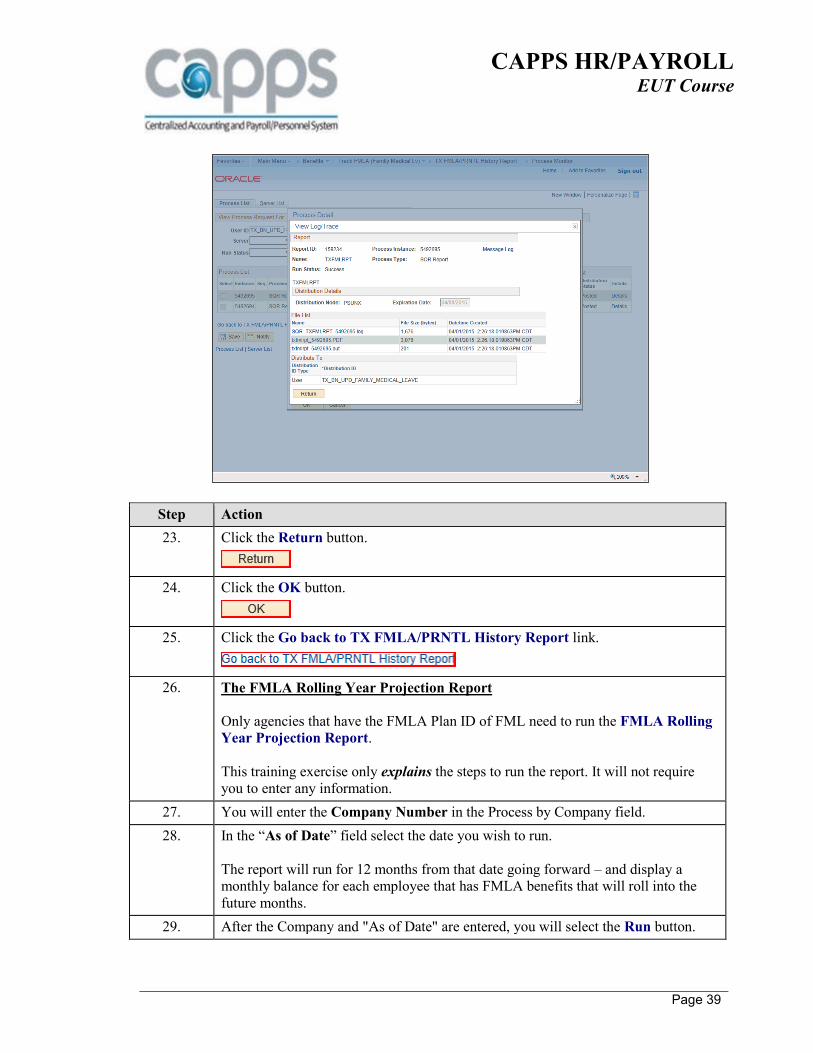
13. Click the OK button.
CAPPS HR/PAYROLL
EUT Course
Page 37
Step Action
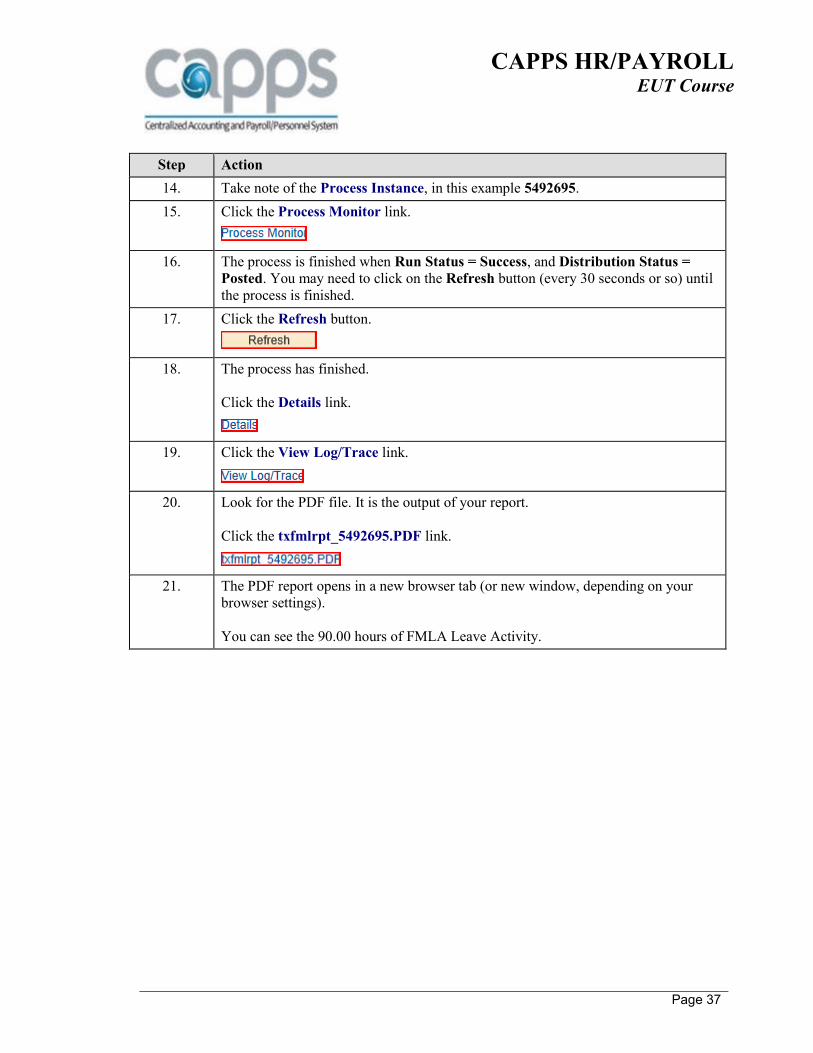
14. Take note of the Process Instance, in this example 5492695.
15. Click the Process Monitor link.
16. The process is finished when Run Status = Success, and Distribution Status =
Posted. You may need to click on the Refresh button (every 30 seconds or so) until
the process is finished.
17. Click the Refresh button.
18. The process has finished.
Click the Details link.
19. Click the View Log/Trace link.
20. Look for the PDF file. It is the output of your report.
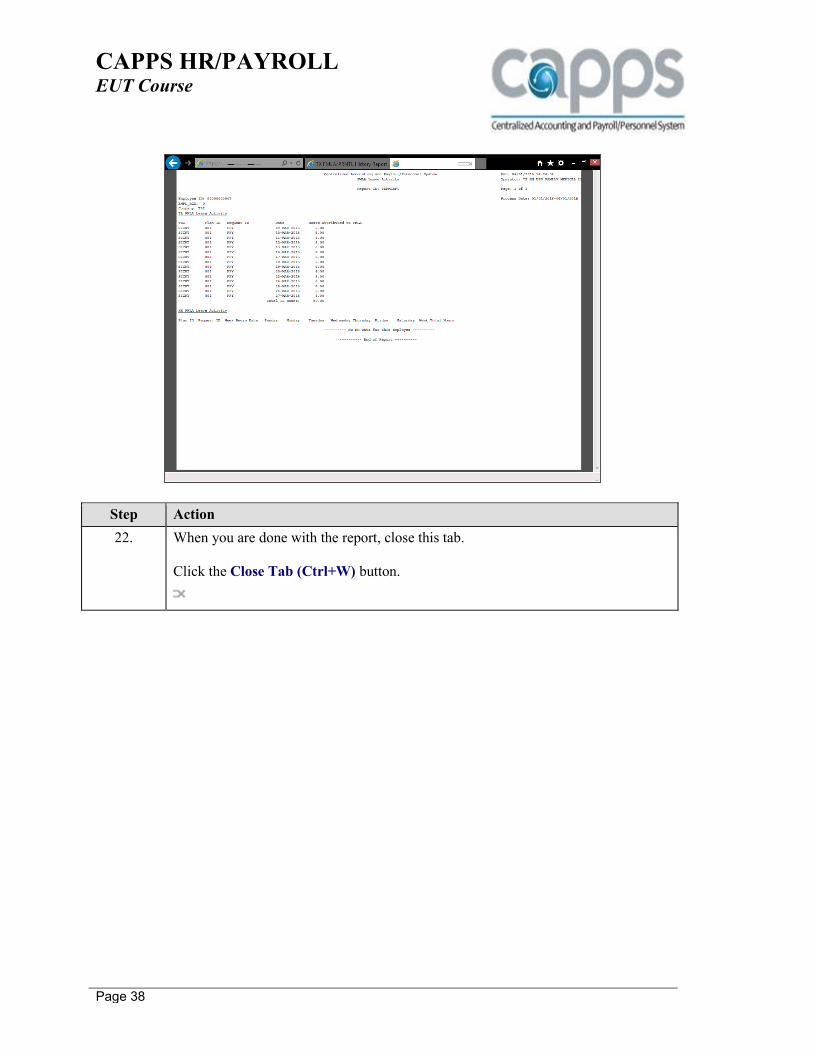
Click the txfmlrpt_5492695.PDF link.
21. The PDF report opens in a new browser tab (or new window, depending on your
browser settings).
You can see the 90.00 hours of FMLA Leave Activity.
CAPPS HR/PAYROLL
EUT Course
Page 38
Step Action
22. When you are done with the report, close this tab.
Click the Close Tab (Ctrl+W) button.
CAPPS HR/PAYROLL
EUT Course
Page 39
Step Action
23. Click the Return button.
24. Click the OK button.
25. Click the Go back to TX FMLA/PRNTL History Report link.
26. The FMLA Rolling Year Projection Report
Only agencies that have the FMLA Plan ID of FML need to run the FMLA Rolling
Year Projection Report.
This training exercise only explains the steps to run the report. It will not require
you to enter any information.
27. You will enter the Company Number in the Process by Company field.
28. In the “As of Date” field select the date you wish to run.
The report will run for 12 months from that date going forward – and display a
monthly balance for each employee that has FMLA benefits that will roll into the
future months.
29. After the Company and "As of Date" are entered, you will select the Run button.
CAPPS HR/PAYROLL
EUT Course
Page 40
Step Action
30. Select the checkbox next to the description - FMLA Rolling Yr Projection Rpt.
31. Select the OK button.
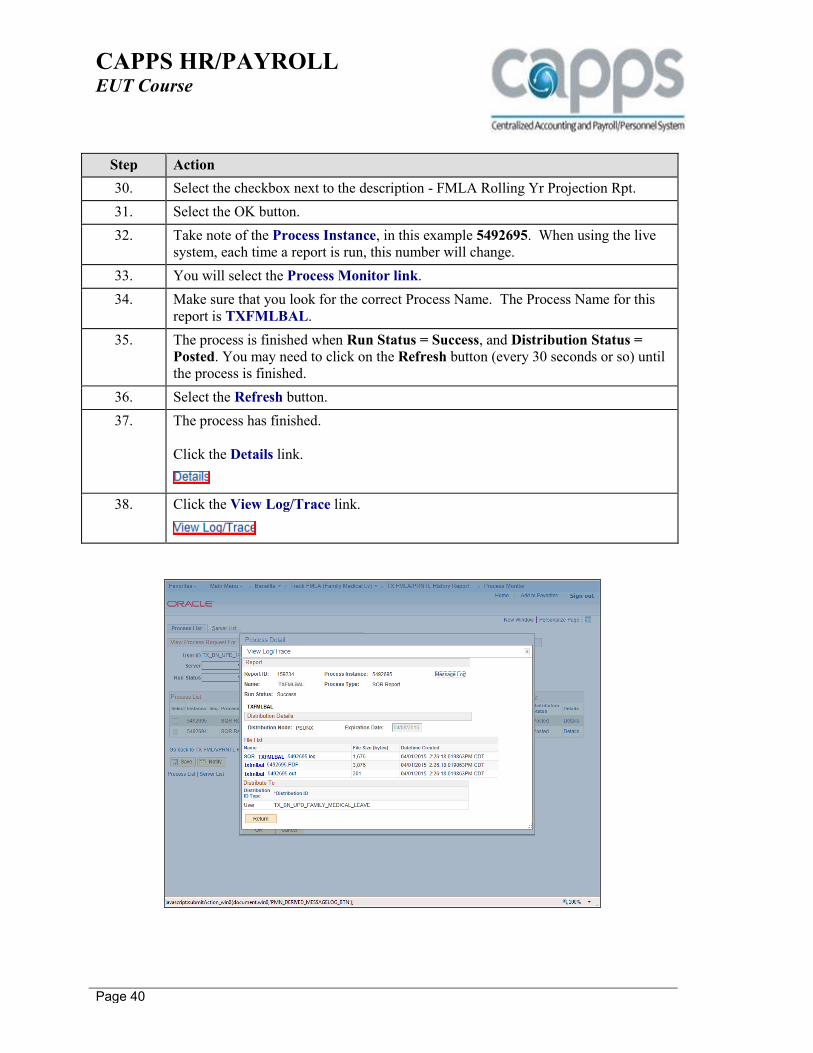
32. Take note of the Process Instance, in this example 5492695. When using the live
system, each time a report is run, this number will change.
33. You will select the Process Monitor link.
34. Make sure that you look for the correct Process Name. The Process Name for this
report is TXFMLBAL.
35. The process is finished when Run Status = Success, and Distribution Status =
Posted. You may need to click on the Refresh button (every 30 seconds or so) until
the process is finished.
36. Select the Refresh button.
37. The process has finished.
Click the Details link.
38. Click the View Log/Trace link.
CAPPS HR/PAYROLL
EUT Course
Page 41
Step Action
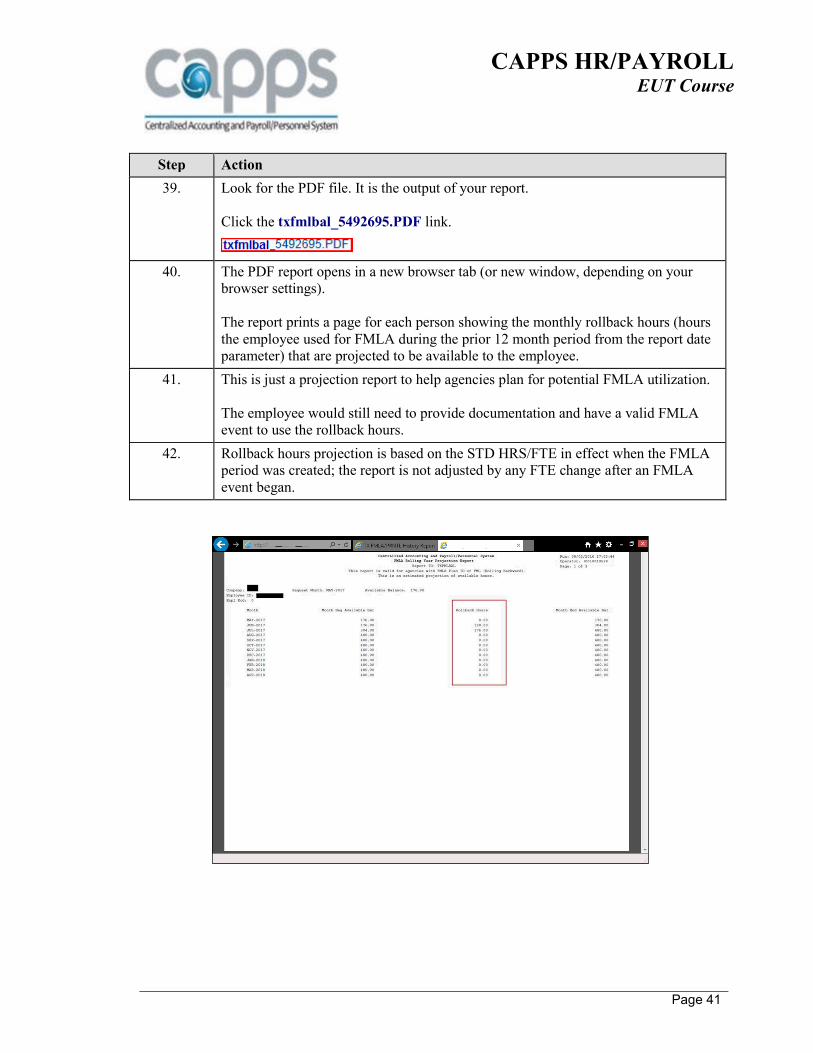
39. Look for the PDF file. It is the output of your report.
Click the txfmlbal_5492695.PDF link.
40. The PDF report opens in a new browser tab (or new window, depending on your
browser settings).
The report prints a page for each person showing the monthly rollback hours (hours
the employee used for FMLA during the prior 12 month period from the report date
parameter) that are projected to be available to the employee.
41. This is just a projection report to help agencies plan for potential FMLA utilization.
The employee would still need to provide documentation and have a valid FMLA
event to use the rollback hours.
42. Rollback hours projection is based on the STD HRS/FTE in effect when the FMLA
period was created; the report is not adjusted by any FTE change after an FMLA
event began.
CAPPS HR/PAYROLL
EUT Course
Page 42
Step Action
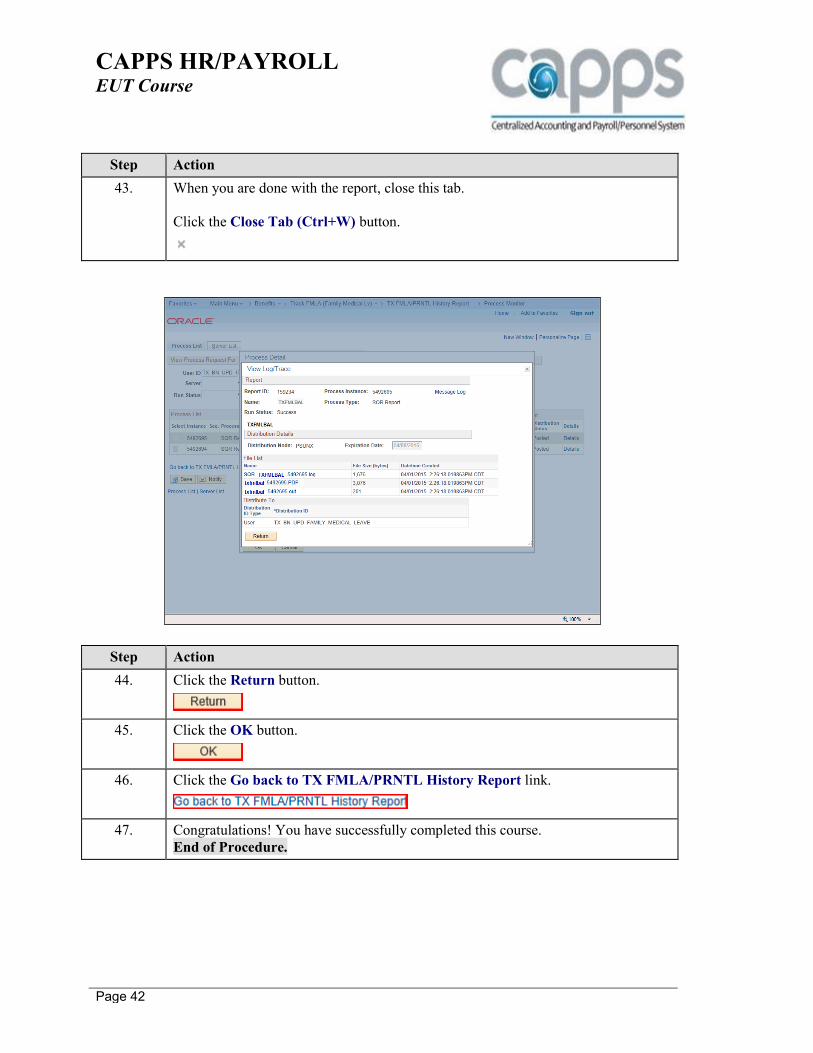
43. When you are done with the report, close this tab.
Click the Close Tab (Ctrl+W) button.
Step Action
44. Click the Return button.
45. Click the OK button.
46. Click the Go back to TX FMLA/PRNTL History Report link.
47. Congratulations! You have successfully completed this course.
End of Procedure.
CAPPS HR/PAYROLL
EUT Course
Page 43
Glossary Company
Company is a top-level designator. It is equivalent to Agency Number.
HTML
HTML stands for HyperText Markup Language. It is a text description language used for publishing content on an internet web site.
Query
A Query is an interactive tool used to gather information or data from the CAPPS system. Queries are already formulated, and you run them when you need them. The answers are shown in a browser window; alternatively, you can download the data into an Excel spreadsheet.
Run Control ID
A Run Control ID is an identifier that, when paired with a User ID, uniquely identifies a process that is running. The Run Control ID defines parameters or criteria that are used when running the process.
XML
XML stands for Extensible Markup Language. It is a text-based formatting language used to share data on internet and intranet web sites.