EstimatorPro Tutorial 2008
17
Tutorial
-
Upload
herman-mwakoi -
Category
Documents
-
view
22 -
download
1
description
Estimator pro
Transcript of EstimatorPro Tutorial 2008

Tutorial

INTRODUCTIONWelcome to the Masterbill EstimatorPro Self-Learn Tutorial. The tutorial is set up to be applicablewith EstimatorPro but in many instances will be suitable for the related entry-level ESTIMATOR.With the aid of the tutorial we hope to be able to guide you through the initial steps of using ourinnovative and flexible contractor’s estimating system.A word of advice to students: DO read ahead a little when following the advice given.It helps to get a full picture of what the tutorial is asking of you before you proceed.
EstimatorPro also has a comprehensive Help system and users should review this to familiarisethemselves with the programme as this tutorial does not cover all of the programme’s wide range offunctions.
The priced database or library used by EstimatorPro is the measured work section of Laxton’sSMM7 Price Book. The information is contained in a ‘structured’ library that follows the“Workgroup” format of the Standard Method of Measurement for Building Works 7th Edition (SMM7).Workgroups are the SMM7 method of grouping similar types of work, usually analogous totraditional ‘trades’. The resulting estimate report follows this grouping and is thus in the form of atraditional Bill of Quantities.Linked with this library of descriptions is another library of Resources which Laxton's use to arrive attheir prices.
WindowsSome advice for novice users of Microsoft Windows: Like most Windows applications EstimatorPro
is much more dependant on mouse operation than a DOS programme. So do make sure that theobject, button, menu item or cell actually selected by your mouse action is the one you intended.Do check whenever the programme asks an “are you sure?” question that the correct item has beenselected.
NOTE Normally when used in this tutorial –Click means click once with the left mouse buttonRight Click means click once with the right mouse buttonDouble Click means double click (click twice) with the left mouse buttonDrag means hold down the left mouse button and drag the cursor
(generally to select a list of items)
Good luck with the work and we hope you enjoy your first encounters with EstimatorPro.
Installation
Upon loading the EstimatorPro disk into the computer, thesetup should automatically begin. To Install EstimatorPro
onto your computer simply follow the instructions as theyappear on the screen firstly by clicking ‘Next’ to begin theinstallation process.
The first screen that will appear is the EstimatorPro
Licence agreement which you should read and acceptthe terms of use in order to continue.
2
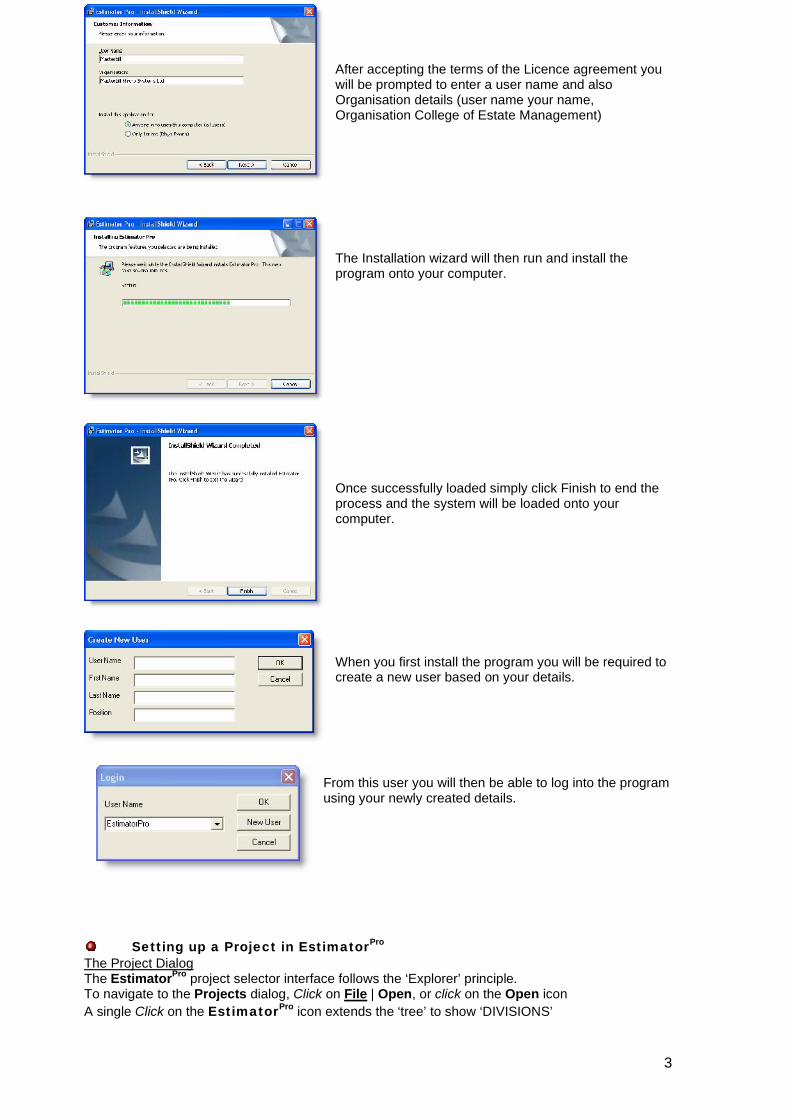
After accepting the terms of the Licence agreement youwill be prompted to enter a user name and alsoOrganisation details (user name your name,Organisation College of Estate Management)
3
The Installation wizard will then run and install theprogram onto your computer.
Once successfully loaded simply click Finish to end theprocess and the system will be loaded onto yourcomputer.
When you first install the program you will be required tocreate a new user based on your details.
From this user you will then be able to log into the programusing your newly created details.
Setting up a Project in EstimatorPro
The Project DialogThe EstimatorPro project selector interface follows the ‘Explorer’ principle.To navigate to the Projects dialog, Click on File | Open, or click on the Open iconA single Click on the EstimatorPro icon extends the ‘tree’ to show ‘DIVISIONS’

A Division is where like projects can be grouped together to make sorting and selecting themeasier.
Click on the New Division buttonType “Training” in the dialog and click OKClick on the EstimatorPro icon to extend the tree.Click once on the Training division to select it and thenClick on the New Project button.
Type “Woodlands Towers” as the project name in the dialogComplete the other details, as you require.
Click OK when complete.You will now be prompted to select a choice of database. EstimatorPro is supplied with Laxton’sMajor and Minor Works Libraries. These contain the measured works sections of the Laxton's PriceBook.
Click on Major WorksThe screen will now revert back to the Project Manager.
Click on the PLUS icons shown next to each level of the tree structure to navigate down to thenew project.
To open the projectClick once on the project to select it and thenClick the Open button
You will now be prompted to create a section for the estimate. The estimate can be subdivided upinto any number of user-defined sections. Fill this screen in as appropriate an example is givenbelow.
4

The main estimate and resource view screen (see earlier) is then displayed.
Every new project will open with a new copy of the database. If users wish to retain any changesthey have made to a database in a previous project they should use the Create From button ratherthan New Project. See the Help files.
The EstimatorPro InterfaceOnce a project is opened the screen displays the main Bill View screen
This interface is divided into two; a top and bottom half. Descriptions are displayed in the top halfand any associated resources are shown in the bottom half. The above screen shows the viewonce some information has been entered. The descriptions themselves can be selected from thesupplied Laxton's database.
One way to access this is to click on the Library button; this opens up a screen.
The left hand screen holds the structured database or library of descriptions.
Measurements can also be calculated here by clicking on the Calcs tab.
5
The right hand side of the screen contains the build-up of the selected description, which can betransferred to the estimate when complete.

As well as using the menu bar, Right Clicking in different parts of the screen will bring up short-cutmenus but additionally a button bar accesses the more popular actions.
1 2 3 4 5 6 7 8 9 10 11 12The functions of these buttons are summarised below:
1. Open / create new project2. New Section3. Add library Item4. Create a non-standard Bill Item5. Edit Quantities6. Search Library7. Show/ Hide Resources8. Print9. Print preview10. Import from QS Cad – See help topics on QS Cad (a separate Masterbill measurement
tool)11. Select Component12. Help Screens
Menus
As well as using the Button Bar,Right clicking with the mouse button can access the most important and frequently used functions,but many functions can also be accessed by the usual Windows menus found at the top of thescreen.
Creating items from the Library using the DimsheetLet us create an item of trench excavation. The quantities are for explanatory purposes only.
Item 1 – Trench ExcavationTo create description
Click the Select from Library Button,The Measurement Window (or ‘Dimsheet’) will appear. This contains two “tabbed” sheets on theleft of the screen, one to view the database (or ‘Library’) the other to enter calculations.
Make sure the Library tab is selected. And tick the Close on transfer box
this will close the sheet after each Dimsheet is saved.
Double-Click on D - GROUNDWORK to select the first level of your description.The next level of the library will now appear on the left and the selected level will transfer to theright.
6
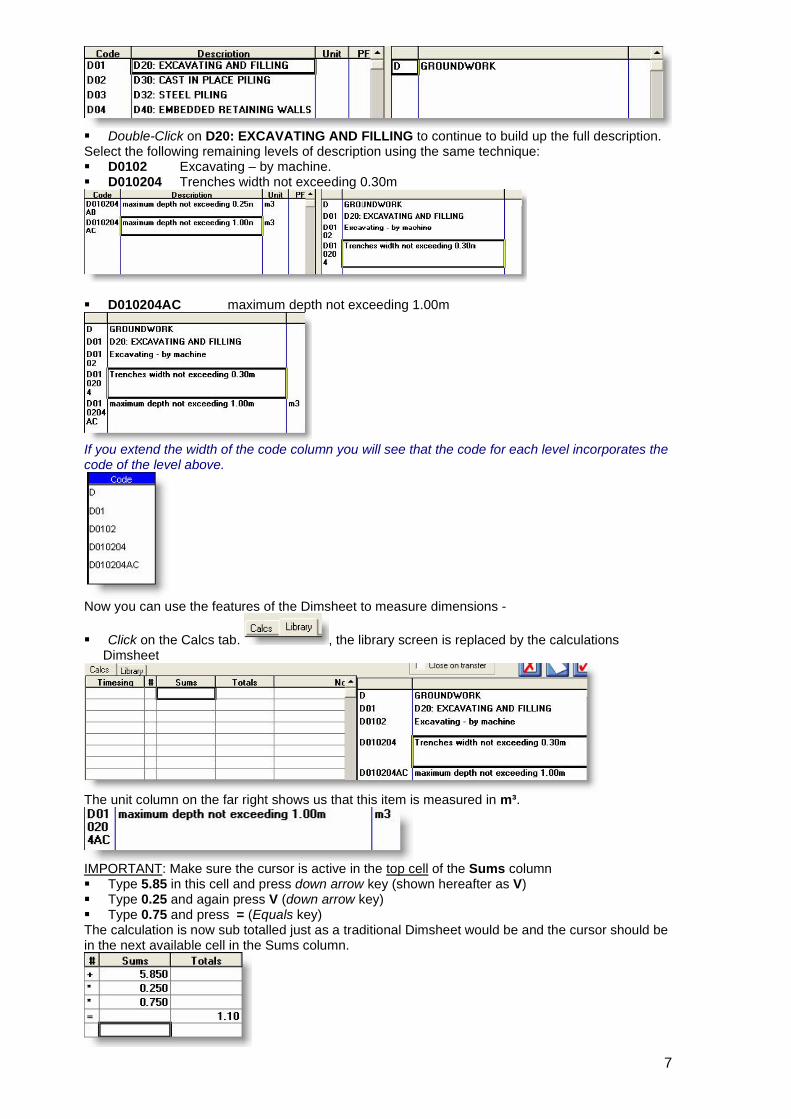
Double-Click on D20: EXCAVATING AND FILLING to continue to build up the full description.Select the following remaining levels of description using the same technique:
D0102 Excavating – by machine.D010204 Trenches width not exceeding 0.30m
D010204AC maximum depth not exceeding 1.00m
If you extend the width of the code column you will see that the code for each level incorporates thecode of the level above.
Now you can use the features of the Dimsheet to measure dimensions -
Click on the Calcs tab. , the library screen is replaced by the calculationsDimsheet
The unit column on the far right shows us that this item is measured in m³.
IMPORTANT: Make sure the cursor is active in the top cell of the Sums column Type 5.85 in this cell and press down arrow key (shown hereafter as V) Type 0.25 and again press V (down arrow key) Type 0.75 and press = (Equals key)
The calculation is now sub totalled just as a traditional Dimsheet would be and the cursor should bein the next available cell in the Sums column.
7

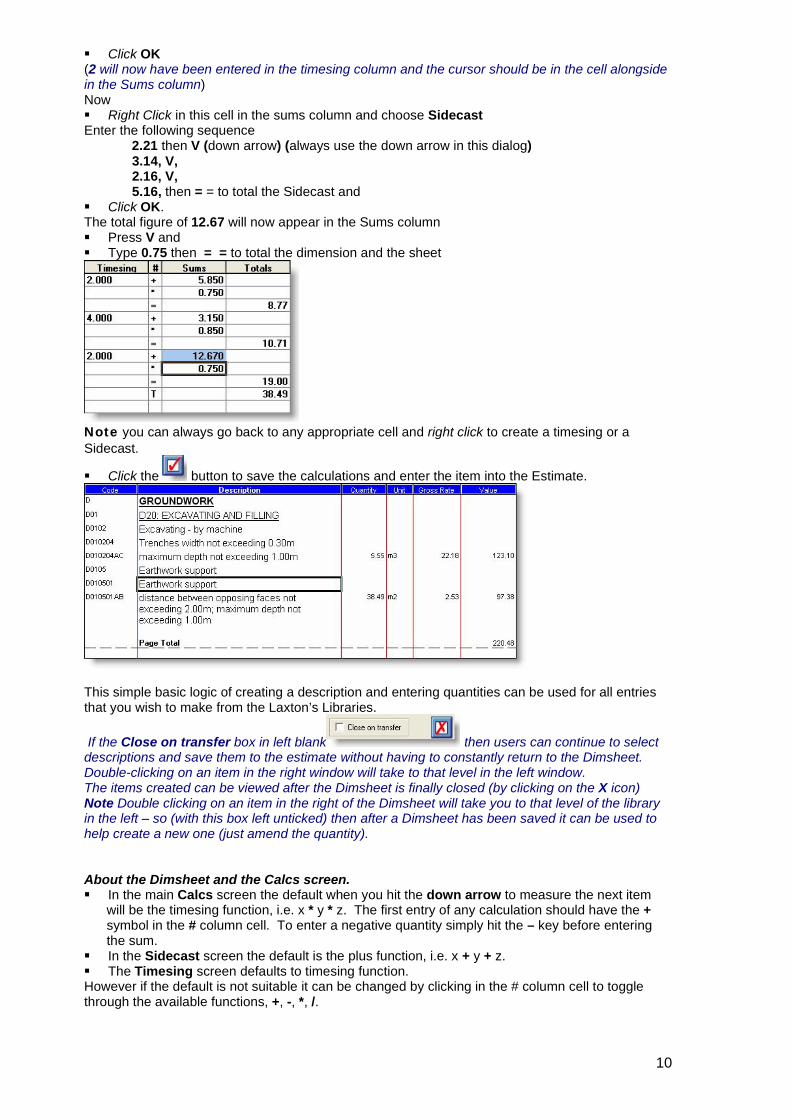
Right Mouse Button Click on this next cell down and choose Timesing from the Menu. A“Scratch Pad” dialog opens, ready to receive more calculations.
Enter 2 and then press = and = again to total the timesing.
AndClick OK
(2 will now have been entered in the timesing column)
Enter 3.15 in the Sums column along side this and press V (down arrow) then0.30 and press V0.85 and press = (this will total our second little sum)
Now, as beforeRight Click on the next cell down but choose Sidecast.
A “Scratch Pad” dialog opens, ready to receive more calculations. This time they will add up asyou hit the down arrow key. Enter
2.21V (down-arrow)3.14
V 2.16 V 5.16 = to total sum and then = again to total the Sidecast (note the T symbol) and
Click OKThe total figure of 12.67 will now appear in the Sums column with a blue background to show it hasa Sidecast behind it.This Sidecast can be seen again at any time by selecting Sidecast from the Right Mouse Menuwhilst in this cell.NowPress V (down arrow)Type 0.30 and press VType 0.75 and press = = to total the calculation and then the sheet.
Click the Red Tick button to save the dimensions and enter the item into the Estimate.Because the Close on transfer box has been ticked (see earlier) then the selected item willappear in the estimate (it is displayed in the default font)
8

An item resource breakdownis given on the hint line atthe bottom of the screen
together with the resources in the screen below.
and adjustments (for overheads and profit), as applied by Laxton’s giving the rate from the library
You have just created your first item in Estimator Pro.Of course if you wish, the total quantity can be simply entered into the Dimsheet (the top cell in theSums column) and then saved in the normal way.
Item 2 – Earthwork SupportDescription, all similar to above
Click the ButtonThe Measurement Window will appear.
Double-Click D - GROUNDWORK to select the first level of your description. The next level ofthe library will now appear on the left and the selected level will appear on the right.Double-Click on D20: EXCAVATING AND FILLING
Select the following remaining levels of description using the same technique: D0105 Earthwork support D010501 Earthwork support D010501AB distance between opposing faces not exceeding 2.00m; maximum depth
not exceeding 1.00m
Dimensions
Click on the Calcs tab.The unit column on the far right shows us that this item is measured in m².Now
Right Click in the top cell of the Sums column and choose Timesing Enter 2 and then press = = to total the timesing and
Click OK(2 will now have been entered in the timesing column)In the top cell of the Sums column type 5.85 and press Down Arrow key(V) type 0.75 and press =
The calculation is now sub totalled just as a traditional Dimsheet would be and the cursor should bein the next available cell in the Sums column.NowRight Click on this cell and choose Timesing Enter 2 Press V Enter another 2 and then Press = = to total the timesing
Click OK(4 will now have been entered in the timesing column) Enter 3.15 and Press V
Type 0.85 in the Sums column and Press =
NowRight Click on the next cell and choose Timesing.
Enter 2 and then Press = = to total the timesing and
9
Click OK(2 will now have been entered in the timesing column and the cursor should be in the cell alongsidein the Sums column)Now
Right Click in this cell in the sums column and choose SidecastEnter the following sequence
2.21 then V (down arrow) (always use the down arrow in this dialog)3.14, V,2.16, V,
5.16, then = = to total the Sidecast andClick OK.
The total figure of 12.67 will now appear in the Sums column Press V and Type 0.75 then = = to total the dimension and the sheet
Note you can always go back to any appropriate cell and right click to create a timesing or aSidecast.
Click the button to save the calculations and enter the item into the Estimate.
This simple basic logic of creating a description and entering quantities can be used for all entriesthat you wish to make from the Laxton’s Libraries.
If the Close on transfer box in left blank then users can continue to selectdescriptions and save them to the estimate without having to constantly return to the Dimsheet.Double-clicking on an item in the right window will take to that level in the left window.The items created can be viewed after the Dimsheet is finally closed (by clicking on the X icon)Note Double clicking on an item in the right of the Dimsheet will take you to that level of the libraryin the left – so (with this box left unticked) then after a Dimsheet has been saved it can be used tohelp create a new one (just amend the quantity).
About the Dimsheet and the Calcs screen.In the main Calcs screen the default when you hit the down arrow to measure the next itemwill be the timesing function, i.e. x * y * z. The first entry of any calculation should have the +symbol in the # column cell. To enter a negative quantity simply hit the – key before enteringthe sum.
In the Sidecast screen the default is the plus function, i.e. x + y + z. The Timesing screen defaults to timesing function.
However if the default is not suitable it can be changed by clicking in the # column cell to togglethrough the available functions, +, -, *, /.
10

To ensure the Calcs screen totals properly make sure the first entry is in the top cell of the Sumscolumn.It is possible, by selecting from the Right Mouse Button menu, to delete information and insert anddelete lines
There is further information about measurement routines in the Help files.
Creating items by searching the LibraryUsers can also create items by searching the library of descriptions. Quantities will need to beadded later. This method will allow a number of items to be added quickly into the estimate.
Click on the Search Library button.Fill in the resulting dialog as shown below
This choice will have the effect of selecting (amongst others) the lowest level of the GroundworkSection D
HINTJust take care with the ‘Results foundin Trade’ drop-down list box. If thecursor is active in there then it willscroll to a fresh element as you usethe mouse wheel to scroll down the listof descriptionsThis is a common ‘niggle regular usersof web pages may be familiar with.
Scroll down the list until you are able to select D020104AA. The full text and rate are shown atthe bottom of the dialog.Click the Transfer button to copy the whole of the description into the estimate.
This process can be repeated for as long as the current search criteria are valid.Click the Finish button to exit and review your selections.
Note that at any level of the search you can select a row and click the Library button. This will takethe user to that level of the library and you can continue to create the full description from there.You an also send items to the clipboard (see later).
You can repeat the exercise but this time, type the code, D020108AB, directly into the searchlibrary dialog. Select the row with the unit and transfer this item as before.
However, no quantities have been entered using this method. You have two options to createthem:Option 1
Click the row containing the unit (see above) say, D020104AARight click and select Calculate Bill Quant
11

Or…
Click on the Bill Quantity buttonIn each instance the Dimsheet will open to allow quantities to be entered.Enter a set of dimensions (anything you like) in the same way as previously explained, click on thetick icon and see the results in the estimate.
Option 2Double click on the appropriate row containing the unit, D020104AA
An Add New Item dialog appearsEnter a quantity directly into the appropriate field
Click OK and see the results in the estimate.
Double clicking on an item (top screen) or a resource (bottom screen) will allow details to becreated or edited “on the fly”, i.e. without using or changing the default database. If so doing
Enter a rate as Nett, so that the required adjustment can be applied.Set the appropriate Level so the correct font can be applied.
See the main help files.
Using the Masterbill ClipboardFirst create another section into which we can copy data.
Click on the New Section button (or select Add New from the drop down list in the CurrentSection text box). This is found in the panel between the top and bottom screen.
Create a new section as before
The screen will now switch to the new section, but for now revert back to Bill 1 by reselecting it fromthe drop down list in the Current Section box, (see above). Select Edit | Multi Item select
This mode will allow items to be selected for copying to the clipboard (you can recognise this modebecause you will be able to ‘block out’ a row by clicking on it).
Select Worksection D (Groundworks).
Click on the row containing the Groundworks heading.Click again to ‘block it out’ (this has activated the multi-item select mode)
12

Scroll down to the last item in the Groundwork section (this should be library item refD020108AB if you have been following the tutorial)Hold down the Shift key andClick on the row.
You can drag the mouse to select as well and / or hold down the Control key when makingselections (normal Windows rules apply).All the intervening rows will be selected (ie ‘blocked out’)
Right click and select Copy Bill Items
The clipboard dialog opens andthe data will be copied into theclipboard.
You will note that the clipboard has two options (in the form of Tabbed sheets), Bill Items andResources. Also you can clear or keep data in the clipboard after it has been pasted. The defaultis to Auto Clear.
Click in the Auto Clear box to ‘uncheck’ it (make it blank) and thus keep data in the clipboard.
Our data has been copied into the Bill Items tab. You can click on the Close button if you wish; thedata will still remain in the clipboard. However even if the clipboard does remain open thebackground screen does still remain active.
Return to the Bill 2 section and click on the top row
Right click and select Paste Bill Items
The items from the clipboard, together with their resources are now pasted into the new section.
In the same way just resources could be copied from the top window or a specific resource from thebottom window into the resources tab of the clipboard. If you examine the right click menu optionsyou will see that resources alone can be copied against a bill item.NOTE – you could create a ‘database’ bill and copy & paste with that rather than use the library.
This could be a viable alternative for some sizes and types of company and is worthserious consideration
ComponentsItems from the clipboard can be saved as a Component. A number of different items can be copiedto the clipboard to build up your chosen Component before it is saved.
Return to Section 1Make sure you are still in Multi-item select mode. You can close the clipboard but make sure youhave turned off Auto Clear (see above).Select another set of bill items, say the concrete work item
Copy it to the clipboard as before.13
The new item should be added to all the data currently in the clipboard. The data may not be sortedin the clipboard dialog itself but this does not matter.
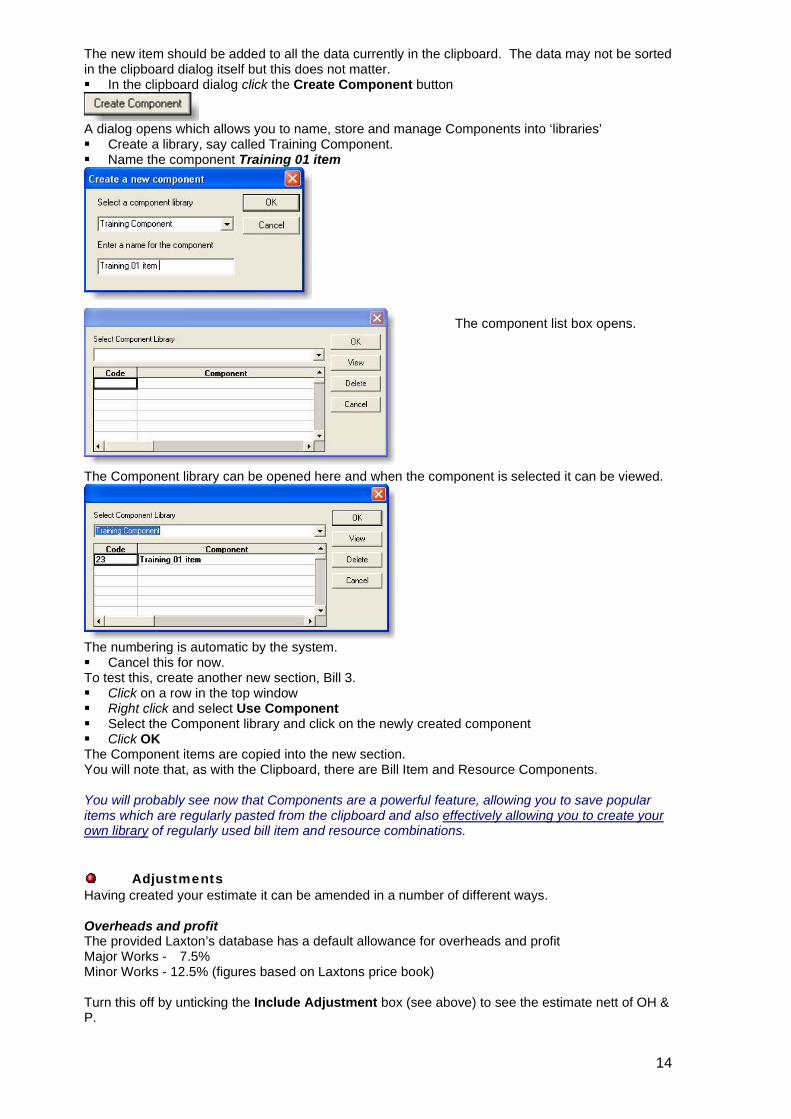
In the clipboard dialog click the Create Component button
A dialog opens which allows you to name, store and manage Components into ‘libraries’Create a library, say called Training Component.
Name the component Training 01 item
The component list box opens.
The Component library can be opened here and when the component is selected it can be viewed.
The numbering is automatic by the system.Cancel this for now.
To test this, create another new section, Bill 3.Click on a row in the top windowRight click and select Use ComponentSelect the Component library and click on the newly created componentClick OK
The Component items are copied into the new section.You will note that, as with the Clipboard, there are Bill Item and Resource Components.
You will probably see now that Components are a powerful feature, allowing you to save popularitems which are regularly pasted from the clipboard and also effectively allowing you to create yourown library of regularly used bill item and resource combinations.
AdjustmentsHaving created your estimate it can be amended in a number of different ways.
Overheads and profitThe provided Laxton’s database has a default allowance for overheads and profitMajor Works - 7.5%Minor Works - 12.5% (figures based on Laxtons price book)
Turn this off by unticking the Include Adjustment box (see above) to see the estimate nett of OH &P.
14
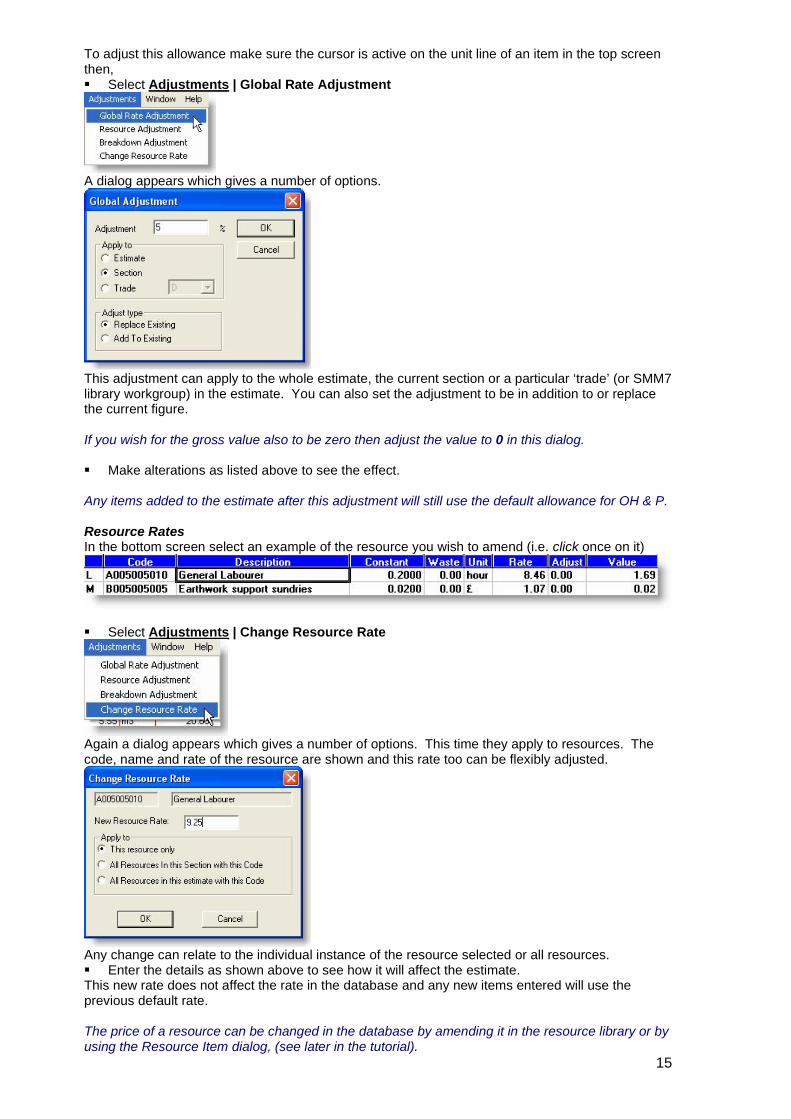
To adjust this allowance make sure the cursor is active on the unit line of an item in the top screenthen, Select Adjustments | Global Rate Adjustment
A dialog appears which gives a number of options.
This adjustment can apply to the whole estimate, the current section or a particular ‘trade’ (or SMM7library workgroup) in the estimate. You can also set the adjustment to be in addition to or replacethe current figure.
If you wish for the gross value also to be zero then adjust the value to 0 in this dialog.
Make alterations as listed above to see the effect.
Any items added to the estimate after this adjustment will still use the default allowance for OH & P.
Resource RatesIn the bottom screen select an example of the resource you wish to amend (i.e. click once on it)
Select Adjustments | Change Resource Rate
Again a dialog appears which gives a number of options. This time they apply to resources. Thecode, name and rate of the resource are shown and this rate too can be flexibly adjusted.
Any change can relate to the individual instance of the resource selected or all resources.Enter the details as shown above to see how it will affect the estimate.
This new rate does not affect the rate in the database and any new items entered will use theprevious default rate.
15
The price of a resource can be changed in the database by amending it in the resource library or byusing the Resource Item dialog, (see later in the tutorial).
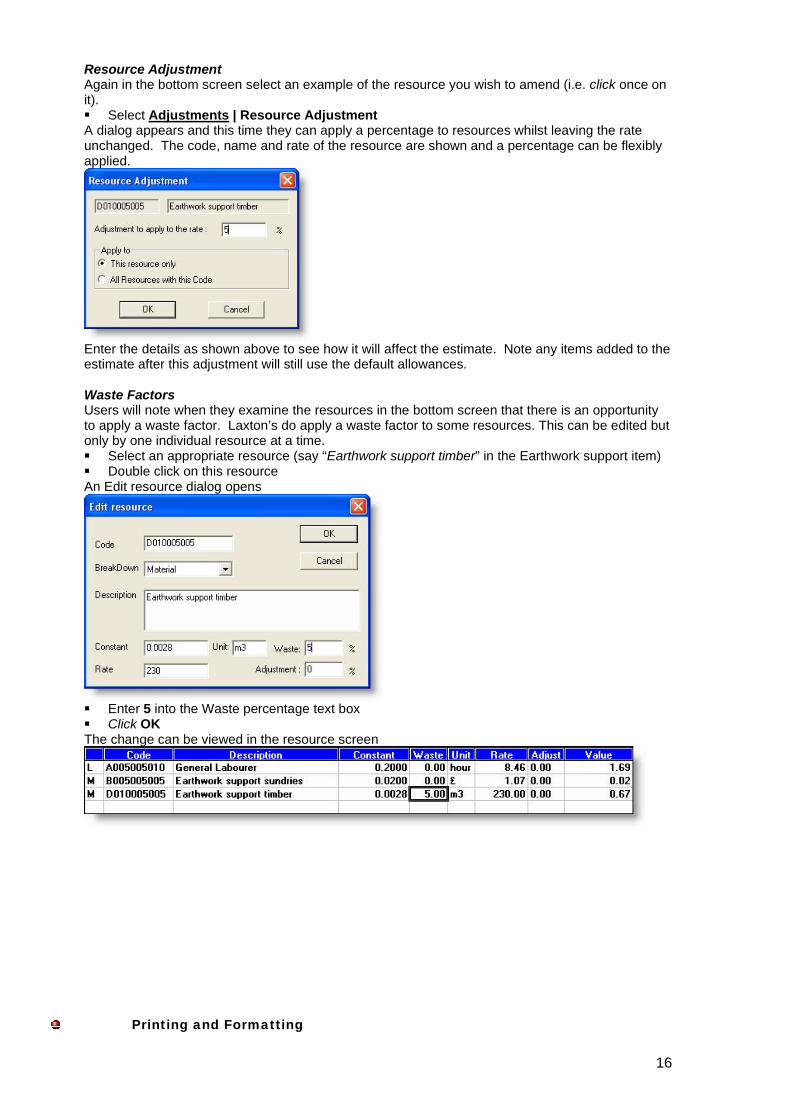
Resource AdjustmentAgain in the bottom screen select an example of the resource you wish to amend (i.e. click once onit). Select Adjustments | Resource Adjustment
A dialog appears and this time they can apply a percentage to resources whilst leaving the rateunchanged. The code, name and rate of the resource are shown and a percentage can be flexiblyapplied.
Enter the details as shown above to see how it will affect the estimate. Note any items added to theestimate after this adjustment will still use the default allowances.
Waste FactorsUsers will note when they examine the resources in the bottom screen that there is an opportunityto apply a waste factor. Laxton’s do apply a waste factor to some resources. This can be edited butonly by one individual resource at a time.
Select an appropriate resource (say “Earthwork support timber” in the Earthwork support item)Double click on this resource
An Edit resource dialog opens
Enter 5 into the Waste percentage text boxClick OK
The change can be viewed in the resource screen
Printing and Formatting
16

An estimate can be printed by using the Print button (a print preview button is also available)or Select File | Print
The estimate screen displays the chosen font and style but it is not itself a strict print previewscreen.
A dialog box appears which gives options for what to print Select Bill 1: Substructures from the dropdown list, to print just this section, and Untick the Show Resources box
A normal Windows print dialog appears and the estimate can be printed from the required printer.If users wish to view a print preview first then click on the Print Preview button or select File | PrintPreview.
The style for fonts can be set level by level Select File | Default Fonts
A dialog appears which allows the fonts for the description column to be set level by level. Thefonts for the other columns can be set globally, as can resource fonts.
Fonts for any level can also be changed throughout the estimate by right clicking with the mouse inthe Estimate View screen and selecting Edit | Font.Masterbill recommend that users stay with the default font for best results, but if users preferanother font we suggest they stay with Masterbill’s choice of style. However appearance is a matterof subjective judgement.
Taking advantage of ComponentsAre you a user (say a specialist user) who only has need of a restricted library? Do you wish ineffect to ignore the Laxton’s database and create you own library?
Well this can be done as outlined above. However according to circumstances it may be morepractical to create and resource a BQ “on the fly” as it were. That is by using the Edit boxes. Youare then using your resources, your expertise to build up your items. Once such a bill, containing allthe items and resources that you have need of, is complete then you can utilise copy and paste totransfer these to your working estimate.
Equally though a more user-friendly option may be to create components of groups of items orindividual items from this tailor-made bill and build up your future estimates using Components.
In any event if and when creating a Library ‘from scratch’ some careful thought is required beforehand to work out the best library structure and coding.
Additional FeaturesThe help files contain details of a number of additional features and options available toEstimatorPro users. Review the Help files and Help tutorial exercises to become fully familiar withall features.Resource AnalysisA resource breakdown can be opened and different classes of resources can be filtered and printedas required (see View | Resource Breakdown). Adjustments can be made based on thisbreakdown.Import / Export dataBills of Quantities can be directly imported in to the project using CITE or XML formats. (Rememberthat using Copy and Paste with resources and using resource components can facilitate pricing ablank BQ). Prices can be exported back to the source electronically.SubcontractorsItems can be selected from the estimate and transferred to subcontractor packages. These can beprinted or saved as an XML file. Estimator Pro allows you to create and manage lists ofsubcontractors and manage the process of subcontract tendering. This can all be doneelectronically.Backup and RestoreProjects can be saved elsewhere as individual files, then later transferred to other users or restored.SearchThe description library and the resource library can both be searched as an aid to selecting items.The estimate can be searched for bill items or resources as an aid to navigation of the final report.
17