Epson Stylus Photo R1800 Start Ink...
6
Unpack Unpack 1 Remove everything from the box. NOTE: For instructions on using special media accessories, see your User’s Guide. 2 Remove all the tape and packing material from the printer. CD position check paper Small CD insert Printer User’s Guide Printer Software CD-ROM 1 1 CD/DVD tray Ink cartridges Epson Stylus Photo R1800 Epson Stylus ® Photo R1800 Start Here Start Here Roll paper holders FireWire ® (IEEE 1394) cable Matte sheet support Single sheet guide *411016200* *411016200* CPD-19344R2 XXX Printed in XXXXXX XX.XX-XX
Transcript of Epson Stylus Photo R1800 Start Ink...

UnpackUnpack1 Removeeverythingfromthebox.
NOTE: For instructions on using special media accessories, see your User’sGuide.
2 Removeallthetapeandpackingmaterialfromtheprinter.
Turn On the PrinterTurn On the Printer221 Plugtheprinter’spowercordintoagroundedelectricaloutlet.
NOTE: Do not connect the printer to your computer yet. Wait until you are instructed to connect the printer cable in section 5, “Install Software.”
2 Pressthe Powerbuttontoturnontheprinter.
CAUTION: Never use an external switch, such as a wall switch or power strip switch, to turn the printer on or off.
CDpositioncheckpaper
SmallCDinsert
Printer
User’s Guide
Printer SoftwareCD-ROM
11
CD/DVDtray
Inkcartridges
1 Opentheprintercover.
2 Shaketheinkcartridgepackages4or5timesbeforeopeningthem.(Don’tshakethemafterthey’reunpacked.)
3 Unwraptheinkcartridges.
4 Openthecartridgecoverandremovethepaperinsert.
5 Lowereachcartridgeintoitsholderwiththegreencircuitboardfacingthefront.Thecolor ofthecartridgelabelshouldmatchthemarkerabovethecartridgeholder.Thengentlypusheachinkcartridgedownuntilitclicksintoplace.
Install Ink CartridgesInstall Ink Cartridges33
Epso
n St
ylus
Pho
to R
1800
Epson Stylus®
Photo R1800
Start HereStartHere
Rollpaperholders
Don’ttouchthegreencircuitboardorremoveanylabels
6 Closethecartridgecover.Pushitdownatthetopsoitclicksintoplace.
7 Pressthe Inkbuttonandclosetheprintercover.
Theinklightflashesasyourprinterchargesinkforabout21/2minutes.
CAUTION: Don’t turn off the printer or interrupt charging while the light is flashing or you’ll waste ink.
Load PaperLoad Paper441 Flipopenthepapersupportandpulluptheextensions.
2 Pressthebottomoftheoutputtray.Thetrayopensandmovesup.Pullouttheextension.
3 Fanafewsheetsofpaperandloadthemagainsttherightsideofthesheetfeeder.Slidetheleftedgeguideagainstthepaper.
NOTE: For instructions on loading and printing on CDs or DVDs, roll paper, matte paper, and other special media, see your User’sGuide.
FireWire®(IEEE1394)cable
Mattesheetsupport Singlesheetguide
Turn over
*411016200**411016200*
4x6 letter
CPD-19344R2XXX
PrintedinXXXXXXXX.XX-XX

Install SoftwareInstall Software
PrintPrintNowyou’rereadytoprint.Forinstructions,usetheseresources:
• YourUser’s Guide
Learnaboutloadingpaper,printing,maintainingyourprinter,solvingproblems,andcontactingEpson.
• Youron-screenReference Guide.Double-clicktheSPR1800 Reference Guideicononyourdesktoptoviewmoreinformationaboutyourprinter.
EpsonandEpsonStylusareregisteredtrademarksandExceedYourVisionisatrademarkofSeikoEpsonCorporation.EpsonPhotoCenterisaservicemarkofEpsonAmerica,Inc.
GeneralNotice:Otherproductnamesareforidentificationpurposesonlyandmaybetrademarksoftheirrespectiveowners.Epsondisclaimsanyandallrightsinthosemarks.
©2007EpsonAmerica,Inc.4/07
66
55 6 Click Photo Software.
7 Clickeachtitletolearnmoreaboutit.Ifyouwantto installthesoftware,followtheon-screeninstructions.
Whenyou’redone,closeanyopenwindowsandclickBackatthePhotoSoftwaremenu.
8 ClickColor Management Solutions.
9 Clickeachtitletolearnmoreaboutit.Ifyouwanttoinstallanyoptions,followtheon-screeninstructions.
Whenyou’redone,closeanyopenwindowsandclickBackattheColorManagementSolutionsmenu.
10 ClickEpson PhotoCenterLink. ClickAdd IcontoplacealinktotheEpsonPhotoCenterSMwebsiteonyourdesktop,then clickOK.
11 Whenyou’redoneinstallingsoftware,clickExit.Theregistrationscreenappears.
12 Followtheon-screeninstructionstoregisteryourprinter.
NOTE: Be sure to restart your computer to enable all of your printer software features.
You’rereadytoprint!Seesection6,“Print.”
Macintosh®
ThesoftwareworkswithMacOS®X10.2.8and10.3.9through10.4.x.
1 ConnectyourprintertoyourcomputerwitheitheraUSBcableoraFireWirecable.
USB ConnectthesquareendofyourUSBcabletothebackofyourprinterandtheflatendofthe
USBcabletoyourcomputer.(Youcanconnecttoanyopenport.)
FireWire ConnectoneendoftheFireWirecabletothebackofyourprinterandtheotherendtoyour
computer.
2 TurnonyourMacintosh.Waitforittostartup,theninserttheEpsonCD-ROMintoyourdrive.
3 Double-clicktheCD-ROMicon,ifnecessary,thendouble-click EPSON.
4 Readthelicenseagreementthatappearsand clickAGREE. YouseetheInstallMenu.
5 ClickPrinter Driverandfollowtheon-screeninstructions.
6 ClickPhoto Software.
7 Clickeachtitletolearnmoreaboutit.Ifyouwanttoinstallthesoftware,followtheon-screeninstructions.
Whenyou’redone,closeanyopenwindowsandclickBackatthePhotoSoftwaremenu.
Windows®
ThesoftwareworkswithWindows2000,XP,XPProfessionalx64Edition,andWindowsVista.™MakesureyourprinterisNOTconnectedtoyourcomputer,thenfollowthestepsbelow.
1 Turnonyourcomputer.Waitforthesystemtostartup,theninserttheEpson®CD-ROMinyourdrive.
WithWindowsVista,ifyouseetheAutoPlaywindow,clickRun Epsetup.exe.WhenyouseetheUserAccountControlscreen,clickContinue.
NOTE: If you see a screen like this, click Cancel and disconnect the printer from your computer. Then follow the steps below.
2 ReadthelicenseagreementthatappearsandclickAGREE.
3 Youseeamessagelikethis.ClickOKtobegininstallingyourprinterdriver.
4 Whenyouseeascreenlikethis,followthestepsbelowtoconnecteitheraUSBcableoraFireWirecable.
NOTE: Windows Vista supports only a USB connection.
USB ConnectthesquareendofyourUSBcabletothebackofyourprinterandtheflatendofthe
USBcabletoyourcomputer.(Youcanconnecttoanyopenport.)
NOTE: For Windows XP, if you don’t have USB 2.0, you see a message. Click the Close button to close the message.
FireWire ConnectoneendoftheFireWirecabletothebackofyourprinterandtheotherendto
yourcomputer.
NOTE: If your computer uses i.Link or another 4-pin FireWire connection, you will need to connect a 6-pin to 4-pin FireWire (IEEE 1394) cable.
5 Whenyouseethisscreen,clickNext.
8 ClickColor Management Solutions.
9 Clickeachtitletolearnmoreaboutit.Ifyouwanttoinstallanyoptions,followtheon-screeninstructions.
Whenyou’redone,closeanyopenwindowsandclickBackattheColorManagementSolutionsmenu.
10 ClickEpson Reference Guidetoinstalltheguide.
11 ClickEpson PhotoCenterLink. ClickAdd IcontoplacealinktotheEpsonPhotoCenterwebsiteonyourdesktop,then clickOK.
12 Whenyou’redoneinstallingsoftware,clickExit.Theregistrationscreenappears.
13 Followtheon-screeninstructionstoregisteryourprinter.
Gotothenextsectiontofinishsettingupyourprinter.
Finishing Printer Setup
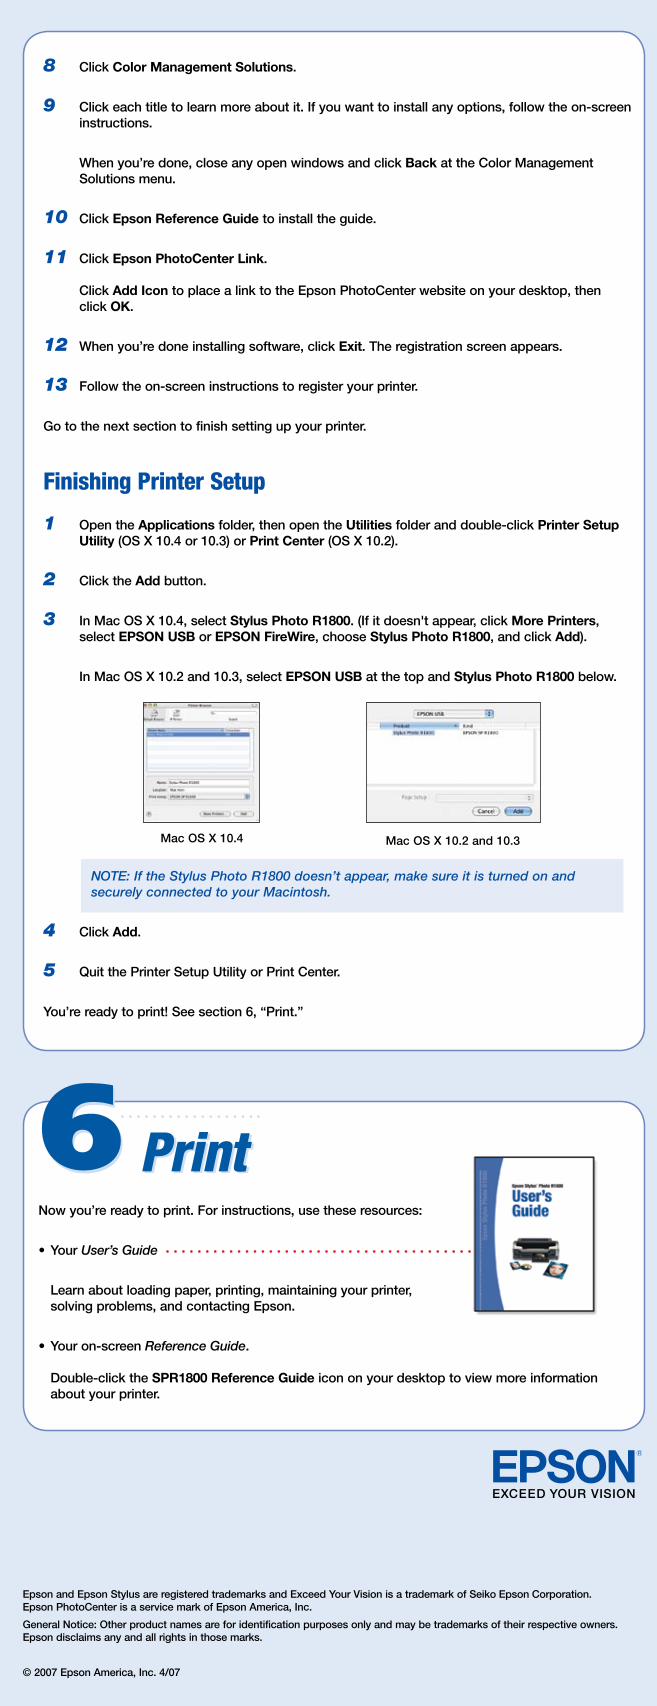
1 OpentheApplicationsfolder,thenopentheUtilitiesfolderanddouble-clickPrinter SetupUtility(OSX10.4or10.3)orPrint Center(OSX10.2).
2 ClicktheAdd button.
3 InMacOSX10.4,selectStylus Photo R1800.(Ifitdoesn'tappear,clickMore Printers,selectEPSON USB or EPSON FireWire,chooseStylus Photo R1800,andclickAdd).
InMacOSX10.2and10.3,selectEPSON USBatthetopandStylus Photo R1800below.
NOTE: If the Stylus Photo R1800 doesn’t appear, make sure it is turned on and securely connected to your Macintosh.
4 ClickAdd.
5 QuitthePrinterSetupUtilityorPrintCenter.
You’rereadytoprint!Seesection6,“Print.”
MacOSX10.4 MacOSX10.2and10.3

Install SoftwareInstall Software
PrintPrintNowyou’rereadytoprint.Forinstructions,usetheseresources:
• YourUser’s Guide
Learnaboutloadingpaper,printing,maintainingyourprinter,solvingproblems,andcontactingEpson.
• Youron-screenReference Guide.Double-clicktheSPR1800 Reference Guideicononyourdesktoptoviewmoreinformationaboutyourprinter.
EpsonandEpsonStylusareregisteredtrademarksandExceedYourVisionisatrademarkofSeikoEpsonCorporation.EpsonPhotoCenterisaservicemarkofEpsonAmerica,Inc.
GeneralNotice:Otherproductnamesareforidentificationpurposesonlyandmaybetrademarksoftheirrespectiveowners.Epsondisclaimsanyandallrightsinthosemarks.
©2007EpsonAmerica,Inc.4/07
66
55 6 Click Photo Software.
7 Clickeachtitletolearnmoreaboutit.Ifyouwantto installthesoftware,followtheon-screeninstructions.
Whenyou’redone,closeanyopenwindowsandclickBackatthePhotoSoftwaremenu.
8 ClickColor Management Solutions.
9 Clickeachtitletolearnmoreaboutit.Ifyouwanttoinstallanyoptions,followtheon-screeninstructions.
Whenyou’redone,closeanyopenwindowsandclickBackattheColorManagementSolutionsmenu.
10 ClickEpson PhotoCenterLink. ClickAdd IcontoplacealinktotheEpsonPhotoCenterSMwebsiteonyourdesktop,then clickOK.
11 Whenyou’redoneinstallingsoftware,clickExit.Theregistrationscreenappears.
12 Followtheon-screeninstructionstoregisteryourprinter.
NOTE: Be sure to restart your computer to enable all of your printer software features.
You’rereadytoprint!Seesection6,“Print.”
Macintosh®
ThesoftwareworkswithMacOS®X10.2.8and10.3.9through10.4.x.
1 ConnectyourprintertoyourcomputerwitheitheraUSBcableoraFireWirecable.
USB ConnectthesquareendofyourUSBcabletothebackofyourprinterandtheflatendofthe
USBcabletoyourcomputer.(Youcanconnecttoanyopenport.)
FireWire ConnectoneendoftheFireWirecabletothebackofyourprinterandtheotherendtoyour
computer.
2 TurnonyourMacintosh.Waitforittostartup,theninserttheEpsonCD-ROMintoyourdrive.
3 Double-clicktheCD-ROMicon,ifnecessary,thendouble-click EPSON.
4 Readthelicenseagreementthatappearsand clickAGREE. YouseetheInstallMenu.
5 ClickPrinter Driverandfollowtheon-screeninstructions.
6 ClickPhoto Software.
7 Clickeachtitletolearnmoreaboutit.Ifyouwanttoinstallthesoftware,followtheon-screeninstructions.
Whenyou’redone,closeanyopenwindowsandclickBackatthePhotoSoftwaremenu.
Windows®
ThesoftwareworkswithWindows2000,XP,XPProfessionalx64Edition,andWindowsVista.™MakesureyourprinterisNOTconnectedtoyourcomputer,thenfollowthestepsbelow.
1 Turnonyourcomputer.Waitforthesystemtostartup,theninserttheEpson®CD-ROMinyourdrive.
WithWindowsVista,ifyouseetheAutoPlaywindow,clickRun Epsetup.exe.WhenyouseetheUserAccountControlscreen,clickContinue.
NOTE: If you see a screen like this, click Cancel and disconnect the printer from your computer. Then follow the steps below.
2 ReadthelicenseagreementthatappearsandclickAGREE.
3 Youseeamessagelikethis.ClickOKtobegininstallingyourprinterdriver.
4 Whenyouseeascreenlikethis,followthestepsbelowtoconnecteitheraUSBcableoraFireWirecable.
NOTE: Windows Vista supports only a USB connection.
USB ConnectthesquareendofyourUSBcabletothebackofyourprinterandtheflatendofthe
USBcabletoyourcomputer.(Youcanconnecttoanyopenport.)
NOTE: For Windows XP, if you don’t have USB 2.0, you see a message. Click the Close button to close the message.
FireWire ConnectoneendoftheFireWirecabletothebackofyourprinterandtheotherendto
yourcomputer.
NOTE: If your computer uses i.Link or another 4-pin FireWire connection, you will need to connect a 6-pin to 4-pin FireWire (IEEE 1394) cable.
5 Whenyouseethisscreen,clickNext.
8 ClickColor Management Solutions.
9 Clickeachtitletolearnmoreaboutit.Ifyouwanttoinstallanyoptions,followtheon-screeninstructions.
Whenyou’redone,closeanyopenwindowsandclickBackattheColorManagementSolutionsmenu.
10 ClickEpson Reference Guidetoinstalltheguide.
11 ClickEpson PhotoCenterLink. ClickAdd IcontoplacealinktotheEpsonPhotoCenterwebsiteonyourdesktop,then clickOK.
12 Whenyou’redoneinstallingsoftware,clickExit.Theregistrationscreenappears.
13 Followtheon-screeninstructionstoregisteryourprinter.
Gotothenextsectiontofinishsettingupyourprinter.
Finishing Printer Setup
1 OpentheApplicationsfolder,thenopentheUtilitiesfolderanddouble-clickPrinter SetupUtility(OSX10.4or10.3)orPrint Center(OSX10.2).
2 ClicktheAdd button.
3 InMacOSX10.4,selectStylus Photo R1800.(Ifitdoesn'tappear,clickMore Printers,selectEPSON USB or EPSON FireWire,chooseStylus Photo R1800,andclickAdd).
InMacOSX10.2and10.3,selectEPSON USBatthetopandStylus Photo R1800below.
NOTE: If the Stylus Photo R1800 doesn’t appear, make sure it is turned on and securely connected to your Macintosh.
4 ClickAdd.
5 QuitthePrinterSetupUtilityorPrintCenter.
You’rereadytoprint!Seesection6,“Print.”
MacOSX10.4 MacOSX10.2and10.3