EnterpriseOne Global Solutions Italy 8.9 PeopleBook › cd › B28731_01 › jded › acrobat ›...
489
EnterpriseOne Global Solutions Italy 8.9 PeopleBook September 2003 1 of 2
Transcript of EnterpriseOne Global Solutions Italy 8.9 PeopleBook › cd › B28731_01 › jded › acrobat ›...

EnterpriseOneGlobal Solutions Italy 8.9 PeopleBook
September 2003
1 of 2


EnterpriseOne Global Solutions Italy 8.9 PeopleBook SKU REL9EIT0309V1 Copyright© 2003 PeopleSoft, Inc. All rights reserved. All material contained in this documentation is proprietary and confidential to PeopleSoft, Inc. ("PeopleSoft"), protected by copyright laws and subject to the nondisclosure provisions of the applicable PeopleSoft agreement. No part of this documentation may be reproduced, stored in a retrieval system, or transmitted in any form or by any means, including, but not limited to, electronic, graphic, mechanical, photocopying, recording, or otherwise without the prior written permission of PeopleSoft. This documentation is subject to change without notice, and PeopleSoft does not warrant that the material contained in this documentation is free of errors. Any errors found in this document should be reported to PeopleSoft in writing. The copyrighted software that accompanies this document is licensed for use only in strict accordance with the applicable license agreement which should be read carefully as it governs the terms of use of the software and this document, including the disclosure thereof. PeopleSoft, PeopleTools, PS/nVision, PeopleCode, PeopleBooks, PeopleTalk, and Vantive are registered trademarks, and Pure Internet Architecture, Intelligent Context Manager, and The Real-Time Enterprise are trademarks of PeopleSoft, Inc. All other company and product names may be trademarks of their respective owners. The information contained herein is subject to change without notice. Open Source Disclosure This product includes software developed by the Apache Software Foundation (http://www.apache.org/). Copyright (c) 1999-2000 The Apache Software Foundation. All rights reserved. THIS SOFTWARE IS PROVIDED “AS IS’’ AND ANY EXPRESSED OR IMPLIED WARRANTIES, INCLUDING, BUT NOT LIMITED TO, THE IMPLIED WARRANTIES OF MERCHANTABILITY AND FITNESS FOR A PARTICULAR PURPOSE ARE DISCLAIMED. IN NO EVENT SHALL THE APACHE SOFTWARE FOUNDATION OR ITS CONTRIBUTORS BE LIABLE FOR ANY DIRECT, INDIRECT, INCIDENTAL, SPECIAL, EXEMPLARY, OR CONSEQUENTIAL DAMAGES (INCLUDING, BUT NOT LIMITED TO, PROCUREMENT OF SUBSTITUTE GOODS OR SERVICES; LOSS OF USE, DATA, OR PROFITS; OR BUSINESS INTERRUPTION) HOWEVER CAUSED AND ON ANY THEORY OF LIABILITY, WHETHER IN CONTRACT, STRICT LIABILITY, OR TORT (INCLUDING NEGLIGENCE OR OTHERWISE) ARISING IN ANY WAY OUT OF THE USE OF THIS SOFTWARE, EVEN IF ADVISED OF THE POSSIBILITY OF SUCH DAMAGE. PeopleSoft takes no responsibility for its use or distribution of any open source or shareware software or documentation and disclaims any and all liability or damages resulting from use of said software or documentation.


Table of Contents
System Setup 1 Setting Up Your System for Localization........................................................1
Setting Up User Display Preferences ...................................................................... 1 Setting Up User Defined Codes - Italy..................................................................... 3 User Defined Codes for International Payment Instructions (IPI) ........................... 6 Setting Up User Defined Codes for Intrastat Reporting .......................................... 8 A/R Electronic Formats for the Euro........................................................................ 16 Tax Rates for Intra-Community VAT ....................................................................... 16 Tax Rates for Suspended VAT................................................................................ 18 Setting Up Tax Rate Areas...................................................................................... 19 Setting Up Your System for Date Validation ........................................................... 24 Setting Up an Alternate Chart of Accounts.............................................................. 25 Setting Up the Data Dictionary to Process Withholding Tax ................................... 27 Setting Up AAIs to Process Withholding Tax .......................................................... 27 Setting Up Withholding Tax Codes.......................................................................... 29 Setting Up Withholding Tax Information for Suppliers............................................. 31 Setting Up Commodity Code Information................................................................ 32 Entering Cross-References for Items and Suppliers ............................................... 33 Validating Tax ID Numbers...................................................................................... 34
Setting Up 30/60/90 End-of-Month Invoice Date ............................................37 Example: Due Date Rules ....................................................................................... 37 Example: Advanced Payment Terms ...................................................................... 38 Example: Installments.............................................................................................. 38
Additional Information ....................................................................................39 Periodic System Maintenance Activities.................................................................. 39 Data Integrity and the Chart of Accounts ................................................................ 39 Multiple Ledger Types ............................................................................................. 41 Translation Considerations for Multilingual Environments ...................................... 42 Translation Routines................................................................................................ 43 J.D. Edwards Multicurrency Solution Summary ...................................................... 44 International Bank Account Numbers ...................................................................... 46
Country-Server Exits - Italy 48 Tax ID Validation – Italy.................................................................................48 Bank ID Validation – Italy...............................................................................48 General Ledger Date Edit ..............................................................................49 Withholding Tax Processing ..........................................................................49
Withholding Tax Processing 53 INPS Withholding Tax....................................................................................54 Notula ............................................................................................................54 J.D. Edwards Status Codes for Withholding Tax............................................55 Entering Vouchers with Withholding Tax........................................................56 Processing Withholding Tax Payments..........................................................57
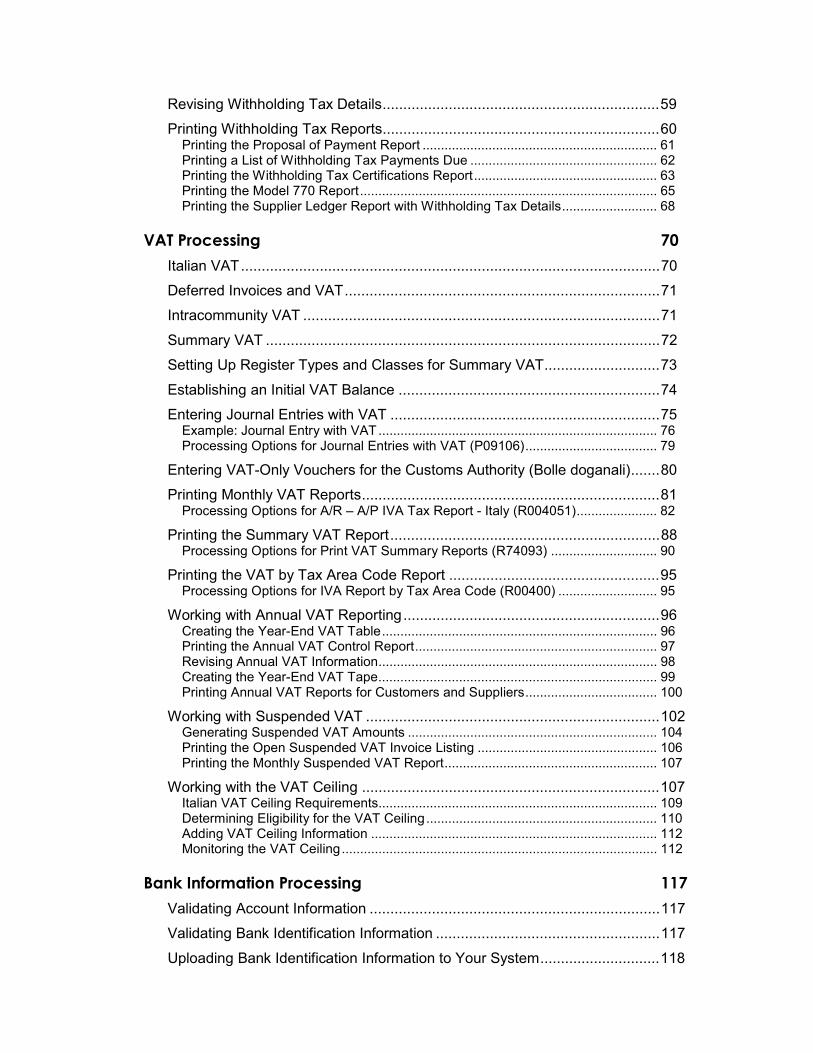
Revising Withholding Tax Details...................................................................59 Printing Withholding Tax Reports...................................................................60
Printing the Proposal of Payment Report ................................................................ 61 Printing a List of Withholding Tax Payments Due ................................................... 62 Printing the Withholding Tax Certifications Report.................................................. 63 Printing the Model 770 Report................................................................................. 65 Printing the Supplier Ledger Report with Withholding Tax Details.......................... 68
VAT Processing 70 Italian VAT.....................................................................................................70 Deferred Invoices and VAT............................................................................71 Intracommunity VAT ......................................................................................71 Summary VAT ...............................................................................................72 Setting Up Register Types and Classes for Summary VAT............................73 Establishing an Initial VAT Balance ...............................................................74 Entering Journal Entries with VAT .................................................................75
Example: Journal Entry with VAT ............................................................................ 76 Processing Options for Journal Entries with VAT (P09106).................................... 79
Entering VAT-Only Vouchers for the Customs Authority (Bolle doganali).......80 Printing Monthly VAT Reports........................................................................81
Processing Options for A/R – A/P IVA Tax Report - Italy (R004051)...................... 82 Printing the Summary VAT Report.................................................................88
Processing Options for Print VAT Summary Reports (R74093) ............................. 90 Printing the VAT by Tax Area Code Report ...................................................95
Processing Options for IVA Report by Tax Area Code (R00400) ........................... 95 Working with Annual VAT Reporting..............................................................96
Creating the Year-End VAT Table........................................................................... 96 Printing the Annual VAT Control Report.................................................................. 97 Revising Annual VAT Information............................................................................ 98 Creating the Year-End VAT Tape............................................................................ 99 Printing Annual VAT Reports for Customers and Suppliers.................................... 100
Working with Suspended VAT .......................................................................102 Generating Suspended VAT Amounts .................................................................... 104 Printing the Open Suspended VAT Invoice Listing ................................................. 106 Printing the Monthly Suspended VAT Report.......................................................... 107
Working with the VAT Ceiling ........................................................................107 Italian VAT Ceiling Requirements............................................................................ 109 Determining Eligibility for the VAT Ceiling............................................................... 110 Adding VAT Ceiling Information .............................................................................. 112 Monitoring the VAT Ceiling...................................................................................... 112
Bank Information Processing 117 Validating Account Information ......................................................................117 Validating Bank Identification Information ......................................................117 Uploading Bank Identification Information to Your System.............................118

Revising Bank Identification Information Manually .........................................118 Converting Bank Numbers.............................................................................119
Processing Options for Italian Bank Number Conversion (R74800) ....................... 119
Invoice Processing 120 Invoices for Free Goods.................................................................................120
Accounts Receivable Draft Processing 121 Types of Accounts Receivable Drafts ............................................................121 Steps for Processing Accounts Receivable Drafts .........................................121 Draft Origination ............................................................................................121
Draft Acceptance ..................................................................................................... 122 Draft Remittance (Optional) ..................................................................................... 122 Draft Collection ........................................................................................................ 123
Draft Processing and the General Ledger......................................................124 Setting Up the System to Process A/R Drafts ................................................125
Setting Up User Defined Codes for Accounts Receivable Drafts............................ 125 Payment Instrument Codes (00/PY) ..............................................................125
Setting Up AAIs for Accounts Receivable Drafts..................................................... 127 Standard Drafts .............................................................................................129
Setting Up Bank Account Information...................................................................... 130 Printing the Bank Account Exception Report for A/R Drafts.................................... 139 Setting Up the Default Payment Instrument for A/R Drafts ..................................... 140
Draft Origination ............................................................................................140 Printing Invoices with Draft Attachments ................................................................. 141 Printing Statements with Draft Attachments............................................................ 145
Draft Acceptance ...........................................................................................155 Entering Manual Drafts ............................................................................................ 155 Processing Preauthorized Drafts............................................................................. 226 Revising Drafts ........................................................................................................ 234
Approving and Posting Accounts Receivable Drafts ......................................235 Posting Accounts Receivable Drafts ....................................................................... 236 Deleting and Voiding Drafts..................................................................................... 242
Draft Remittance............................................................................................243 Creating and Revising Registers for Accounts Receivable Drafts .......................... 244 Remitting Drafts ....................................................................................................... 246 Italian Draft Remittance Formats............................................................................. 256
Returning a Draft to Prior Status ....................................................................261 Designating a Draft as Nonsufficient Funds (NSF).........................................262 Entering a Full NSF Draft...............................................................................262
Entering a Partial NSF Draft .................................................................................... 263 Creating a Renewal Draft ........................................................................................ 264
Designating a Draft as Nonsufficient Funds (NSF).........................................266 Entering a Full NSF Draft...............................................................................266

Entering a Partial NSF Draft .................................................................................... 267 Creating a Renewal Draft ........................................................................................ 268
Draft Collection ..............................................................................................270 Processing Options for Draft Collection with Status Update (R03B680)................. 271 Considerations for Draft Collection in Italy .............................................................. 277
Printing Invoices With an Attached International Payment Instruction (IPI) 278
Processing Options for Invoice Print with International Payment Instruction (R03B5053) ..............................................................................279

1
System Setup
Before you use J.D. Edwards software, you must set up and define certain information that the system uses during processing. You use this information to customize the system for your business needs.
Setting Up Your System for Localization
You must complete the system setup tasks that are included in the base guides, as well as country-specific tasks.
Setting Up User Display Preferences
Some of J.D. Edwards localized software uses country-server technology to isolate country-specific features from the base software. For example, if during normal transaction processing, you record additional information about a supplier or validate a tax identification number to meet country-specific requirements, you enter the additional information using a localized program; and the tax validation is performed by a localized program instead of by the base software. The country server indicates that this localized program should be included in the process.
To take full advantage of J.D. Edwards localized solutions for your business, you must set up your user display preferences to specify the country in which you are working. The country server uses this information to determine which localized programs should be run for the specified country.
You use localization country codes to specify the country in which you are working. J.D. Edwards supplies localization country codes in user defined code table 00/LC. This table stores both two-digit and three-digit localization country codes. In addition, the Description 02 field contains the localization tier for each country. The localization tier determines the level of support that J.D. Edwards provides for that country.
You can also set up user display preferences to use other features in J.D. Edwards software. For example, you can specify how the system displays dates (such as DDMMYY, the typical European format) or specify a language to override the base language.
See Also International Product Handbook for more information about J.D. Edwards localization
tier classifications and policies
► To set up user display preferences
From the System Administration Tools menu (GH9011), choose User Profiles.
1. On Work With User / Role Profiles, click Find to locate a user profile.
You can complete fields on the QBE line to limit your search.
2. Choose a record and click Select.

2
3. On User Profile Revisions, complete the following field:
• Localization Country Code
4. Complete the following optional fields:
• Language
• Date Format
• Date Separator Character
• Decimal Format Character
5. Click OK.
See Also User Profiles in the System Administration Guide
Processing Options for User Profiles (P0092)
A/B Validation
Enter a '1' to enable editing on address book number against the F0101.
3
Setting Up User Defined Codes - Italy
On the System Administration Tools menu (GH9011), choose User Defined Codes.
Many fields throughout J.D. Edwards software accept only user defined codes. You can customize your system by setting up and using user defined codes that meet the specific needs of your business environment.
Caution
User defined codes are central to J.D. Edwards systems. You should be thoroughly familiar with user defined codes before you change them.
See Also Customizing User Defined Codes in the Foundation Guide for more information about
user defined codes
Payment Instrument (00/PY) - Italy
Set up user defined codes to identify each payment method that you use. You can associate payment instruments with document types so that you can process similar documents together. For example, you might set up payment instruments for automatic debits and automatic receipts.
In addition, you can associate a payment instrument with a bank account and with a print program to generate a check or a bank file.
See Also Working with Payment Instruments in the Global Solutions Italy Guide
Produce Bank File (04/PP) - Italy
Set up a user defined code for each of the print or tape programs that you use to write payments. Use the following print and tape programs for Italy:
• P04572I1, diskette
• P04572I2, checks
European Union Members (00/EU) - Italy
Italian companies that use domestic electronic formats in Accounts Receivable must assign a currency value to the corresponding currency code on the UDC 00/EU to state amounts in the euro.
Assign a one-character currency value in the Description 02 field as follows:
• E (for the euro currency code, EUR)
• Blank or I (for the Italian lire currency code, ITL)
Leave the Description 02 field blank if the currency code is your domestic currency.

4
VAT Codes for Year-End Processes (00/IV) - Italy
Set up VAT codes to associate a tax rate to a transaction. For example, you might set up codes for the following:
• VAT rate 0 percent
• Excluded
• Non-recoverable 50 percent
• Non-recoverable 100 percent
• VAT 4 percent
• VAT 20 percent
VAT Register Class (74/01)
Set up register class codes to track and report VAT in a summarized format. For example, you might set up codes for the following register classes:
• Purchases
• Correspondent
• No deduction
• Sales
VAT Register Type (74/02)
Set up register type codes to track and report VAT in a summarized format. For example, you might set up codes for the following register types:
• Purchases (Tax Italy)
• Purchases (Tax CEE)
• Purchases (Tax extra CEE)
• Tax not deductible
• Sales (Tax Italy)
• Sales (Tax CEE)
• Sales (Tax extra CEE)
• Suspended VAT
Suspended VAT Document Types (74/DT)
Use UDC 74/DT to set up a cross-reference between the document type for suspended VAT and the document type for suspended VAT-recognized. For example, to cross-reference document type Q9 (suspended VAT) with document type Q7 (suspended VAT - recognized), enter Q9 in the Code field and Q7 in the Description 01 field.
The system uses the document type that you enter in the Code field (Q9 in this example) when you generate suspended VAT amounts. When you receive payment for the invoice for which VAT was suspended and run the Suspended IVA - Receipts/Rebate Control Reports program (R74076C), the system uses the document type that you enter in the Description 01 field (Q7 in this example) to record the VAT that is recognized when full or partial payment is received for the original suspended VAT (Q9) document.

5
You must also set up the codes for both the suspended VAT and the suspended VAT-recognized document types on user defined codes 00/DT and 00/DI.
Suspended VAT Rates (74/SP)
Set up codes to identify the tax rate at which the system calculates suspended VAT amounts and to cross-reference the tax rate for suspended VAT with the VAT payable tax rate. For example, to cross-reference the tax rate SOSP20 (for suspended VAT) with the tax rate IVA20 (for VAT payable), enter SOSP20 in the Code field and IVA20 in the Description 01 field.
The system uses the G/L Offset for the tax rate that you enter in the Code field (SOSP20 in this example) to post suspended VAT amounts to a suspense account. When you receive payment for the invoice for which VAT was suspended and run the Suspended IVA - Receipts/Rebate Control Reports program (R74076C), the system uses the offset for the tax rate that you enter in the Description 01 field (IVA20 in this example) to reclassify the recognized portion of the suspended VAT to a VAT payable account.
Section of 770 Form (74/RA)
Set up codes to identify the information that you want to use when you create your Model 770 form sections. For example, you might set up codes for the following information:
• INPS Withholding
• Self Employment Revenues
• Sales Commissions
Form 770 Information (74/70)
Set up codes to identify information for the 770 form. This code indicates whether the supplier is a resident of Italy and whether the supplier's revenue is partially, totally, or not subject to INPS withholding tax.
Set up the following codes:
• 0 - Resident
• 0A - Resident whose income is all subject to INPS
• 0B - Resident whose income is partially subject to INPS
• 0C - Resident whose income is not subject to INPS
• 1 - Nonresident whose income is all subject to INPS
• 1A - Nonresident whose income is partially subject to INPS
• 1B - Nonresident whose income is not subject to INPS
• 1C - Nonresident
Country Codes for 770 Form (74/CN)
Set up the numeric country codes that have been defined by the fiscal authority for use on the 770 form. The Codes field must contain the same country codes as user defined code table 00/CN. The Description 01 field must contain the corresponding numeric code as defined by the fiscal authority. The system uses user defined code list 74/CN with user defined code list 00/CN to convert country codes to the proper numeric format for the 770 form.

6
Withholding Tax Government (74/IM)
Set up user defined codes to further define withholding tax information for your suppliers. You specify the government withholding tax information for each code in the Special Handling Code field. The codes that you specify are for internal use to link the government information to withholding tax types (user defined codes table 74/WT).
Valid values for the Special Handling Code field include:
• 1 - Self-employed
• 2 - Sales commissions
Withholding Tax Fiscal Code (74/WF)
Set up codes to identify the withholding taxes that you process for your suppliers. For example, you might set up withholding tax fiscal codes as follows:
• 1038 - Fiscal Code 1038
• 1040 - Fiscal Code 1040
Specify a special handling code to indicate the conditions of the withholding tax. Valid values for the Special Handling Code field are as follows:
• A - Code applies to persons in receipt of sums subject to withholding tax as advanced payment.
• B - Code applies to persons in receipt of sums subject to withholding tax by way of tax advance.
Withholding Type (74/WT)
In Italy, suppliers can be eligible for different types of withholding tax. For reporting and processing purposes, set up user defined codes to identify the types of withholding tax that apply to your suppliers.
Set up the following codes:
• E - Sales commissions withholding (ENASARCO)
• I - Social security withholding (INPS)
• R - Standard withholding tax
Withholding type codes are linked to an internal withholding tax code, which you set up in the Withholding Tax Codes – Italy program (P740405).
User Defined Codes for International Payment Instructions (IPI)
Most of the values for the UDCs for International Payment Instructions are hard-coded. However, you must set up values for the IPI - Languages and Countries (00/IL) UDC table.
IPI – Languages and Countries (00/IL)
International Payment Instructions (IPIs) must be printed in English, but they can also contain a second language. You specify the secondary language by setting up a value in the IPI - Languages and Countries UDC table (00/IL). Some countries require that you print IPI forms with a secondary language; for some countries, the use of a secondary language is optional. The European Committee for Banking Standards publishes the requirements for IPIs.

7
When you set up the IPI – Languages and Countries UDC, you complete the Special Handling field with a value from the Language (01/LP) UDC table. The system uses the value in the Special Handling field to determine the secondary language that prints on the IPI form. If you do not want the system to print a secondary language on the IPI form, set the Special Handling code for a country to E (English). Generally, you use the language of the country where your customer’s bank is located.
You can set up only one language per country. For example, for banks in Belgium, you must specify a secondary language; but you can choose to use French, German, or Dutch. In the 00/IL UDC, you can set up only one of those languages for Belgium; you cannot set up a value for each language. The graphic below shows the secondary language preference for Belgium to be French.
The following table shows examples of the languages that you can set up for countries:
Codes Description 01 Description 02 Special Handling AT Austria O - German G
BE Belgium R – French, Dutch, or German
F
CH Switzerland O – German, French, or Italian
F
DE Germany R – German G
DK Denmark Unspecified – Danish DN
ES Spain R – Spanish S
FI Finland R – Finnish and Swedish FN
FR France R – French F
GB United Kingdom NA E
IPI – Address Line Sequencing (00/IA)
The IPI - Address Line Sequencing UDC table (00/IA) determines the combination of the values for the Postal Code, City, and Country that the system includes as the second address line of the ordering customer's address on the International Payment Instruction (IPI).
These values are hard-coded and consistent with the requirements for IPIs. The European Committee for Banking Standards publishes the requirements for IPIs.
IPI – Charges Paid By (00/IC)
The IPI – Charges Paid By UDC table (00/IC) contains values that specify the entity who is responsible for paying the bank charges that are associated with the International Payment Instruction (IPI). These values are hard-coded and consistent with the requirements for IPIs. The European Committee for Banking Standards publishes the requirements for IPIs.

8
IPI – Form Types (00/IF)
The IPI – Form Types UDC table (00/IF) contains hard-coded values that represent the types of pre-formatted International Payment Instruction (IPI) forms that are available to use. The values in this UDC are consistent with the requirements for IPIs. The European Committee for Banking Standards publishes the requirements for IPIs.
IPI – Details of Payment (00/IP)
The IPI – Details of Payment UDC table (00/IP) determines the data that appears in the Details of Payment section on the International Payment Instruction (IPI). These values are hard-coded and are consistent with the requirements for International Payment Instructions (IPI). The European Committee for Banking Standards publishes the requirements for IPIs.
Setting Up User Defined Codes for Intrastat Reporting
Many fields throughout J.D. Edwards systems accept user defined codes as valid values. You must set up several user defined codes to provide valid information for Intrastat reporting.
Caution
User defined codes are central to J.D. Edwards systems. You should be thoroughly familiar with user defined codes before you change them.
See Also User Defined Codes in the Foundation Guide for more information about setting up
and using user defined codes
Country Codes (00/CN)
You must specify a country code in the Address Book records for your branch/plants, customers, and suppliers.
The following table shows examples of country codes:
Codes Description 01 Special Handling AE United Arab Emirates (UAE) 784
AF Afghanistan 004
AG Antigua and Barbuda 028
AR Argentina 032
AT Austria 040
AU Australia 036
To find the country code for your branch/plants, the system searches for records based on the address number in the Inventory Constants table (F41001). If no address number is

9
specified, the system uses the address number that is specified in the Business Unit Master table (F0006).
Transaction eligibility for Intrastat reporting is based on the country of the customer or supplier, the country of origin of the goods, and the country of the declarant.
Caution
Do not use blank as your default country code. You must use a nonblank country code on your address book records for the country code to be included on Intrastat reports.
State and Province Codes (00/S)
For countries that require regional information, such as Germany, use the State field on the Address Book record to specify the region. Set up state and province codes to identify the region of origin for shipments or the region of destination for purchases.
The system searches for Address Book records based on the address number in the Inventory Constants table (F41001). If no address number is specified, the system uses the address number specified in the Business Unit Master table (F0006).
The following table shows examples of state and province codes:
Codes Description * All states
AB Alberta
AI Arctic Islands
AK Alaska
AL Alabama
AM Amazonas
AR Arkansas
European Community Members (74/EC)
Only transactions between European Union (EU) members are included in the Intrastat Revision table (F0018T). Verify that a one-to-one relationship exists between the country codes that you set up in UDC 00/CN and the country codes for all EU countries on user defined code table 74/EC. When you run the Intrastat update programs, the system cross-references the country codes that you specify for customers, suppliers, and branch/plants in user defined code table 00/CN to the codes in 74/EC.

10
The following table shows examples of EU country codes:
Codes Description 01 AT Austria
BE Belgium
BL Belgium and Luxembourg
DE Germany
DK Denmark
ES Spain
FI Finland
FR France
GB Great Britain
Nature of Transaction Codes
Use Nature of Transaction codes to identify the type of import and export rules to which an item is subject. The import and export rules depend on the way that a product is moved; whether it is for sales, purchases, leases; or other reasons.
You can set up nature of transaction codes specifically for EU reporting on user defined codes table 74/NT, or you can use the user defined codes tables from the Inventory systems (specifically, 41/P1–P5 and 41/S1–S5). You can also create your own user defined codes table to store nature of transaction codes.
When you update the Intrastat Revision table (F0018T), you use a processing option to specify the user defined codes table that you want the system to use to find the applicable information.
See Also Updating Intrastat Information in the Global Solutions Spain Guide
Nature of Transaction – EU (74/NT)
Use Nature of Transaction (74/NT) to set up nature of transaction codes specifically for EU reporting.
Set up user defined codes table 74/NT as follows:
• Use the Codes field to enter a concatenated value to identify the nature of transaction. Concatenate the following values in sequence without any separators, such as commas or spaces:
Company Number, Order Document Type, Line Type
• Enter the nature of transaction code in the Description 02 field.
• Enter the nature of VAT regime (statistical procedure) in the Special Handling field, if required.
The following table shows examples of nature of transaction codes:

11
Codes Description 01 Description 02 00100XIS Export to Customer 16
00100COC Credit to Customer 16
00100SOS Stock Inv Item 10
00100X2S Transfer from Branch 10
00200SOS Stock Inv Item 11
00200X1S Export to Customer 16
00200X2S Transfer from Branch 11
When you update the Intrastat Revision table (F0018T), you use a processing option to specify the user defined codes table that you want the system to use to find the applicable information.
Sales Reporting Codes 01 through 05 (41/S1 through 41/S5)
Use Sales Reporting Codes 01 through 05 (41/S1 through 41/S5) to set up nature of transaction codes specifically for sales order transactions. Using these UDC tables to indicate the nature of transaction for the item is an alternative to using UDC 74/NT to indicate the nature of transaction.
You can designate any one of the five sales reporting codes to specify the nature of transaction for individual items. You must indicate the reporting code that you are using for nature of transaction in the processing options for the Intrastat – Tax Update - Sales program (R0018I1). The reporting code that you specify in these processing options should correspond to the reporting code that you use to identify the nature of transaction for the item in the Item Master program (P4101). Enter 1 for table 41/S1, 2 for table 41/S2, and so on.
The following table shows examples of sales reporting codes:
Codes Description 01 APP Apparel Section
AVA Aviation
COM Commuter Bike Section
MNT Mountain Bike Section
SAF Safety Equipment Section
TRG Touring Bike Section
When you update the Intrastat Revision table (F0018T), you use a processing option to specify the UDC that you want the system to use to find the applicable information.
Purchasing Reporting Codes 01 through 05 (41/P1 through 41/P5)
Use Purchasing Reporting Codes 01 through 05 (41/P1 through 41/P5) to set up nature of transaction codes specifically for purchase order transactions. Using these UDC tables to indicate the nature of transaction for the item is an alternative to using UDC 74/NT to indicate the nature of transaction.

12
You can designate any one of the five purchasing reporting codes to specify the nature of transaction for individual items. You must indicate the reporting code that you are using for nature of transaction in the processing options for the Intrastats Tax Update - Purchasing program (R0018I2). The reporting code that you specify in these processing options should correspond to the reporting code that you use to identify the nature of transaction for the item in the Item Master program (P4101). Enter 1 for table 41/P1, 2 for table 41/P2, and so on.
The following table shows examples for purchase reporting codes:
Codes Description 01 Blank – Commodity Class 41/P1
A Aluminum
B Brass
C Copper
DRG Drugs-Pharmaceutical
ELC Electrical
When you update the Intrastat Revision table (F0018T), you use a processing option to specify the UDC you want the system to use to find the applicable information.
Intrastat Regime Code (00/NV)
Use the Intrastat Regime UDC to set up the Nature of VAT Regime codes. The Nature of VAT Regime code is similar to the nature of transaction code (NAT) and is applicable only to certain countries. Nature of VAT Regime is commonly used in France.
Caution
If the reporting requirements for your country do not include Nature of VAT Regime, you must add a blank code to UDC 00/NV to prevent errors in the Intrastat Revision table (F0018T).
The following table shows examples of Intrastat regime codes:
Codes Description 01 10 Permanent export
11 Permanent export after rework
21 Temporary export
22 Temporary export after rework
Shipping Commodity Class (41/E)
Use Shipping Commodity Class codes (41/E) to further identify the products that your company imports or exports.
To comply with Intrastat guidelines, commodity codes must have a corresponding commodity value.

13
For B73.3.1 and later releases, use the Intrastat Commodity Code form to set up commodity values and supplemental units of measure for commodity codes.
The following table shows examples of shipping commodity classes:
Codes Description 01 Blank – Shipping Comm Class 41/E
CSE Consumer Electronics
FPD Food Products
LST Livestock
Condition of Transport (00/TC)
You set up Condition of Transport codes (user defined code 00/TC) to indicate how goods are transported.
You must set up values in UDC 00/TC that correspond to the first three characters of the values that you set up in the Description 02 field in the Freight Handling Code UDC table (42/FR). For example, if you set up a value in UDC 42/FR for Carriage, Insurance, and Freight and use CIF as the value in the Description 02 field, you must set up a code of CIF in UDC 00/TC.
You can set up default conditions of transport using the Supplier Master program (P04012). Enter the condition of transport in the Freight Handling Code field. When you enter purchase orders, this information appears in the purchase order header fields.
The following table shows examples of condition of transport codes:
Codes Description 01 CIF Carriage, Insurance, Freight
DDP Delivered Duty Paid
DDU Delivered Duty Unpaid
EXW Ex Works
FOB Free on Board
Mode of Transport (00/TM)
You set up codes for the modes of transport on user defined codes table 00/TM (Mode of Transport). The first eight code values are predefined for EU trade reporting.
The following table shows examples of mode of transport codes:
Codes Description 01 1 Transport by sea
2 Transport by rail
3 Transport by road
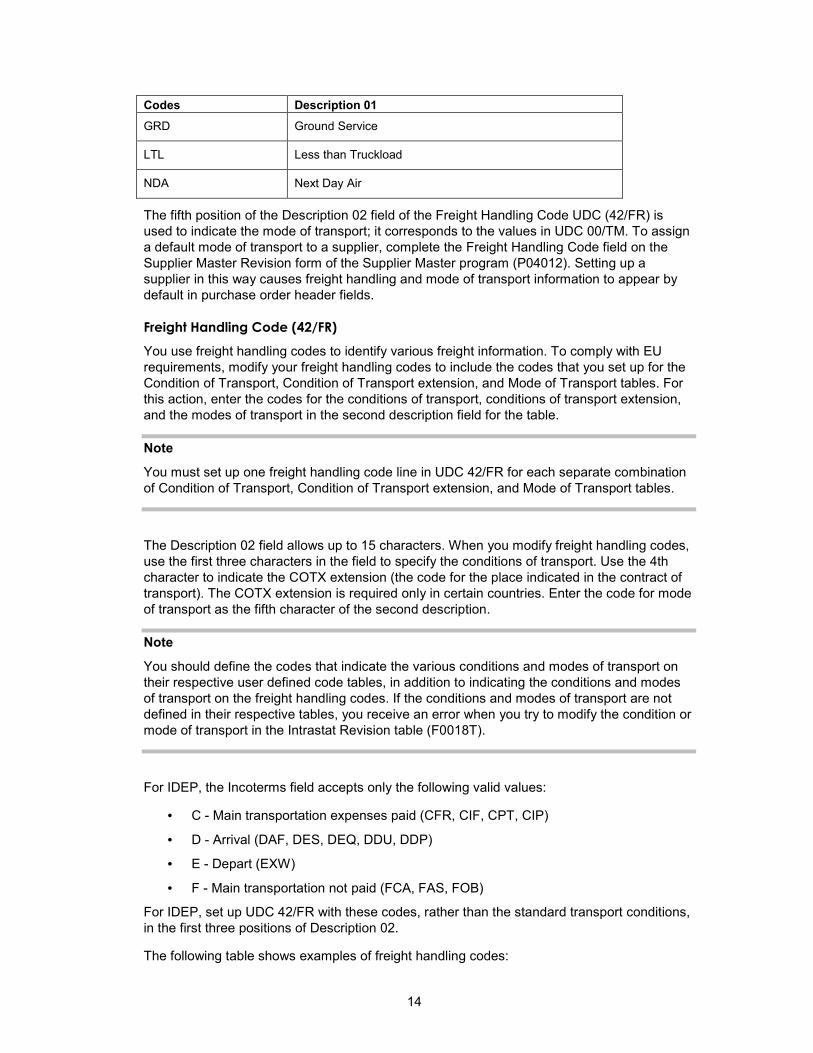
14
Codes Description 01 GRD Ground Service
LTL Less than Truckload
NDA Next Day Air
The fifth position of the Description 02 field of the Freight Handling Code UDC (42/FR) is used to indicate the mode of transport; it corresponds to the values in UDC 00/TM. To assign a default mode of transport to a supplier, complete the Freight Handling Code field on the Supplier Master Revision form of the Supplier Master program (P04012). Setting up a supplier in this way causes freight handling and mode of transport information to appear by default in purchase order header fields.
Freight Handling Code (42/FR)
You use freight handling codes to identify various freight information. To comply with EU requirements, modify your freight handling codes to include the codes that you set up for the Condition of Transport, Condition of Transport extension, and Mode of Transport tables. For this action, enter the codes for the conditions of transport, conditions of transport extension, and the modes of transport in the second description field for the table.
Note
You must set up one freight handling code line in UDC 42/FR for each separate combination of Condition of Transport, Condition of Transport extension, and Mode of Transport tables.
The Description 02 field allows up to 15 characters. When you modify freight handling codes, use the first three characters in the field to specify the conditions of transport. Use the 4th character to indicate the COTX extension (the code for the place indicated in the contract of transport). The COTX extension is required only in certain countries. Enter the code for mode of transport as the fifth character of the second description.
Note
You should define the codes that indicate the various conditions and modes of transport on their respective user defined code tables, in addition to indicating the conditions and modes of transport on the freight handling codes. If the conditions and modes of transport are not defined in their respective tables, you receive an error when you try to modify the condition or mode of transport in the Intrastat Revision table (F0018T).
For IDEP, the Incoterms field accepts only the following valid values:
• C - Main transportation expenses paid (CFR, CIF, CPT, CIP)
• D - Arrival (DAF, DES, DEQ, DDU, DDP)
• E - Depart (EXW)
• F - Main transportation not paid (FCA, FAS, FOB)
For IDEP, set up UDC 42/FR with these codes, rather than the standard transport conditions, in the first three positions of Description 02.
The following table shows examples of freight handling codes:

15
Codes Description 01 Description 02 Special Handling A Free Alongside Ship FAS
BRR Bypass Routing and Rating 9
C Freight Collect 1
D Delivered, Duty Paid DDP
F Freight On Board – Our Dock FOB
FP Freight Pre-pay and Add
Arrivals or Dispatchings (74/TD)
If you use the SEMDEC interface for Intrastat submissions, set up a user defined code for each document type that is used in Intrastat transactions to indicate whether the document type corresponds to the arrival (purchase) or dispatch (sale) of goods.
To set up user defined code list 74/TD, enter the same codes in the Codes field that you use for document types on user defined code list 00/DT. The Description 01 field must contain either "Arrival" or "Dispatch." The system uses user defined code list 74/TD, in conjunction with user defined code list 00/DT, to determine whether the transaction represents the arrival or dispatch of goods for Intrastat reporting purposes. You need to include only those document types that are used in sales or purchasing on user defined code list 74/TD.
Note
If you do not set up user defined code list 74/TD, the system assumes that all sales are dispatches and that all purchases are arrivals.
Intrastat Declaration Type (74/IT)
Set up user defined code 74/IT to specify whether your IDEP declaration is fiscal, statistical, or complete.
The following table shows examples of Intrastat declaration type codes:
Codes Description 01 Special Handling 1 Fiscal F
2 Statistical S
3 Complete C
You specify the character that the system uses to populate the Intrastat declaration in the special handling code for each value. The code specified in the special handling code is written to the text field in the Text Processor Detail Table (F007111) when you process the IDEP/IRIS Interface (R0018I3). This special handling code is also used to determine the VAT registration number for sales transactions. For statistical declarations, the system uses the Ship To - Address Number. For fiscal or complete declarations, the system uses the Sold To - Address Number.
The default value is 3 (complete).

16
Triangulation Tax Rates (00/VT)
If you use the VAT EC Sales List (R0018S), you must list the tax rates that are used for trade triangulation transactions. Transactions that use any of the tax rates that are listed on this UDC are flagged as trade triangulation transactions on the EC Sales List - A/R.
A/R Electronic Formats for the Euro
French and Italian companies that use domestic electronic formats in accounts receivable have a special setup requirement. This setup allows domestic formats, which state bank file amounts in the domestic currency, to also state amounts in an alternate currency. French and Italian companies can then state amounts in either the domestic currency or an alternate currency, regardless of the company's domestic currency.
To state domestic format amounts in A/R in the domestic currency or an alternate currency, French and Italian companies must assign a currency value to the corresponding currency code on the European Union Members UDC table (00/EU).
To set up A/R electronic formats for the euro, assign a one-character currency value in the Description 02 field as follows:
• E (for the euro currency code, EUR)
• Blank or F (for the French franc currency code, FRF)
• Blank or I (for the Italian lira currency code, ITL)
Assign the value of blank to your default domestic currency.
Tax Rates for Intra-Community VAT
Since the creation of the Single Market in 1993, goods sold from a taxable entity in one EU member state to a taxable entity in another EU member state are treated as exempt from VAT.
In most EU countries, you must submit various reports on VAT, including the VAT that has been exempted on intra-community transactions. To record the exempted VAT on transactions between EU members, you need to set up a tax rate for Intra-Community VAT.
Set up the Intra-Community VAT tax rate/area with two tax rates:
• The VAT rate that would be used if the transaction were not exempt.
• The second tax rate is the negative equivalent of the first tax rate.
For example, if the first tax rate is 16 percent, the second tax rate is -16 percent.
The two tax rates net to zero.
See Also Setting Up Tax Rate Areas in the Tax Reference Guide for information about setting
up tax rates and areas
Setting Up User Display Preferences in the Global Solutions Italy Guide for information about setting up a country preference code
Example: Intra-Community VAT for Italy
The following example shows an Intra-Community VAT tax rate for Italy:

17
For each type of tax rate code, you can set up specific G/L offsets. The system uses a G/L offset, which is defined in the PTxxxx AAI, to post your journal entries to different VAT accounts in your chart of accounts. For example, you might have a Domestic VAT account and an EU VAT account.

18
When you set up a tax rate/area for Intra-Community VAT, you must select Regional Info from the Form menu to display the Tax Area - EMEA - Revisions form, on which you can indicate that the tax rate is for Intra-Community VAT. This form is accessible from Regional Info only if you have set up your user preferences with a country preference code of IT (Italy).
Tax Rates for Suspended VAT
Italian law allows business that sell goods to certain government-owned or controlled institutions to defer the booking of VAT payable until receipt of complete or partial payment of the invoice. This deferment of VAT payable is called suspended VAT. To process suspended VAT, you must set up a tax rate with a special G/L Offset to post the suspended VAT amounts to a suspense account.
When you receive payment and run the Suspended IVA – Receipts/Rebate Control Reports program (R74076C), the system uses the tax rate for VAT payable to reclassify the suspended VAT amount and to post the recognized VAT to a VAT payable account.
For example, you could set up the following tax rate for suspended and payable VAT:
• Tax rate SOSP20 for suspended VAT with a G/L offset of SOSP and a tax rate of 20 percent
• Tax rate IVA20 for VAT payable with a G/L offset of VATB and a tax rate of 20 percent
You must set up the RTxxxx AAIs for the G/L offsets. For the current example, you could set up RTSOSP for object account 1241 (a suspended VAT account), and RTVATB for object account 4431 (a VAT payable account).

19
See Also Setting Up Tax Rate Areas in the Tax Reference Guide for information on setting up
tax rates and areas
Setting Up Tax Rate Areas
To calculate and track the different taxes that you pay to your suppliers or for your customers, you must set up tax rate areas. Each tax area is a physical, geographic area, such as a state, province, or county. Different tax authorities assess a variety of taxes for each geographic area. Additionally, each authority within a tax area can have a different tax rate.
When you set up tax rate areas, you must specify effective dates. The system does not check for duplicate tax rate and area information, which means that you can set up different tax rates and effective date ranges for the same tax rate and area. The system checks for overlapping effective date ranges. When an overlap exists, the system issues an error.
The Tax Rates/Areas program (P4008) also provides features for special situations. For example, you can specify whether tax is calculated as "tax-on-tax," whether a portion of the tax is nonrecoverable (available for input credits), and whether maximum unit cost is associated with a particular item.
The following diagram illustrates how some tax areas could be organized:
The three circles represent three tax authorities. The seven numbered areas represent tax areas.
Notice that tax authority jurisdiction can overlap and that a tax area can be assessed taxes by one or more tax authorities. The tax rate for a tax authority does not vary from one tax area to another. Tax authority A assesses a 3% tax in tax areas 2, 3, 5, and 6.
For each tax area, however, the total tax burden can vary. It is the cumulative effect of multiple tax authorities for a single tax area that causes the tax burden to vary from one tax area to another. For example, the businesses located in tax area 5 must remit tax to only one tax authority (Tax Authority A for 3%). Businesses in tax area 2 remit taxes to two tax authorities (Tax Authorities A for 3% and B for 2%), and businesses in tax area 3 remit taxes to all three tax authorities.

20
You can run a report to review all of the tax areas that are set up.
Tax Rate Areas for Items
You can specify tax information for an item or group of items. To specify tax information for an item, set the processing option to validate information against the Item Branch File table (F4102) and enter the item number in the tax rate area.
To specify a tax rate for an item group, enter one of the valid options in the Sales Taxable Y/N field on the Item Branch/Plant Info. form (W41026A). Options 3 through 8 are for grouping items together based on the tax rate. You set up the tax rate by area for one of the options and then specify the option for like items on the Item Branch/Plant Info. form.
Revising Tax Rate Areas
You can revise any of the information for the tax rate area except the expiration date. If you need to extend the expiration date of a tax rates area, you must enter a new tax rate area record.
See Also Setting Up a Base Pricing Structure in the Sales Order Management Guide for more
information about setting up item and customer price groups
Setting Up a Tax Rate for Intra-Community VAT in the Global Solutions Italy Guide
Nonrecoverable VAT
When they sell their goods, most countries that pay value added taxes (VAT) fully recover the amount of VAT that they paid. In other words, VAT paid in accounts payable is offset against any VAT collected in accounts receivable to reduce the amount owed to the government or, in some cases, to generate a tax rebate. Exceptions to this rule might include expenses such as meals and entertainment, which are only 50% recoverable.
When you cannot recover all of the VAT that you pay, you must set up the tax rate area to indicate the percentage of tax that is nonrecoverable (or not available for credit). When you use the tax rate area in a transaction, the system credits the VAT account for the amount that can be recovered only. The system does not create a separate entry to an account for the nonrecoverable amount; however, it does store the amount in the Accounts Payable Ledger (F0411) and Customer Ledger (F03B11) tables.
The system only recognizes nonrecoverable VAT when using type explanation codes V, B, and C.
Example: Using Nonrecoverable VAT
When you set up a tax rate area that has nonrecoverable VAT, you enter the percent of the nonrecoverable tax on a separate line. Although the system requires a tax authority, it does not use the tax authority for reporting. When you specify a nonrecoverable percent, such as 50, the percent applies to the total tax on the tax rate area. However, if you set up the tax rate area for multiple tax authorities, the system applies the nonrecoverable tax to the first tax authority defined.
For example, the following tax rate area has two tax authorities specified, as well as a nonrecoverable percent.

21
When you enter a voucher or invoice and use this tax rate area (ONT), the system will apply the entire 50% to the account associated with the G/L Offset GST.
In this example, the AAIs associated with the tax rate area point to the following accounts:
• 1.4444 for RTGST
• 1.4445 for RTPST
If you enter an invoice for a taxable amount of 1,000 USD, the system calculates the tax amount as 150 USD (1,000 x .15) and the gross amount as 1,150 (1,000 + 150). When you post the invoice, the system creates the following entries:
Doc Type
Account Account Description Debit Credit Calculation
RI 3.5010 Store Sales 1,075 Taxable + (Tax x 50%)
AE 1.1210 A/R Trade 1,150 Taxable + Tax
AE 1.4444 VAT Payable (GST) 5* (1,000 x 7%) – 75 = – 5
AE 1.4445 VAT Payable (PST) 80 1,000 x 8% = 80
*Normally, the entry to VAT Payable is a credit, but because the system calculates a – 5 (credit), it debits the account.
Before You Begin Set up the tax authorities in the address book.

22
Set up the necessary tax AAIs.
► To set up tax rate areas
From the Tax Processing and Reporting menu (G0021), choose Tax Rate/Areas.
1. On Work With Tax Rate/Areas, click Add.
2. On Tax Rate/Area Revisions, complete the following fields:
• Tax Rate/Area
• Description
• Effective Date
• Expiration Date
• Tax Auth 1
Enter the address number of the tax authority.
• G/L Offset
Only tax explanation code V uses the G/L Offset for the 2nd and subsequent tax authorities. The system ignores the field for all other tax explanation codes.
• Tax Rate

23
Note If you use tax explanation codes B (VAT + Use) or C (VAT + sales), you must enter the VAT tax authority and tax rate on the first line of the tax rate area.
3. To calculate tax on the previous tax rate entered, activate the following option:
• Compound Tax
The system calculates compound tax only when you use tax explanation codes B and C. To calculate compound taxes for tax explanation code V (VAT), use tax explanation code V+.
4. To calculate a nonrecoverable VAT percentage, complete steps 5 and 6; otherwise, proceed to step 7.
5. Turn on the following option:
• VAT Expense
6. Complete the following field to specify the nonrecoverable VAT percent:
• Tax Rate
The nonrecoverable percent applies to the first tax rate only when using tax explanation codes C and B. For other tax explanation codes, the system multiplies the nonrecoverable percent by the total tax, but applies it to the first tax authority only.
7. Verify the system-supplied information in the TOTAL TAX field:
8. To specify tax rate/area information for an inventory item, complete the following fields:
• Item Number
You can enter an item number or an item group (3–8). If you enter an item group, you must set the Validation processing option to 0; otherwise, the system validates the number specified for a group as an item.
• Maximum Unit Cost
These fields are used in the sales and procurement systems only. You can disable these fields by setting a processing option.
9. Click OK.
10. On Work With Tax Rate/Areas, to print the tax rates that are set up, choose Tax Area Report from the Report menu.
Processing Options for Tax Rate/Areas (P4008)
Display

24
Enter a value to either show or hide the Item Number and Maximum Unit Cost fields.
1 = show these fields
0 = hide these fields
Edits
Enter a value to validate Item Numbers
1 = Validate Item Numbers
0 = Do not validate Item Numbers
Setting Up Your System for Date Validation
From the Italian Reports menu (G093152), choose G/L Date Edit Processing Options.
Use J.D. Edwards localized software to validate the dates that you enter for original fiscal vouchers, invoices, and journal entries. This validation ensures that the G/L date that you enter for the document is the same or later than that of the document immediately preceding it.
You set the processing options on the Country Specific Processing Options – Italy program (P7400IT) to determine whether the system generates an error or a warning when you enter a voucher, invoice, or journal entry that has a G/L date that is less than the G/L date of the previously entered document.
You automatically access the following master business functions each time that you enter a voucher, invoice, or journal entry:
• Voucher Entry MBF Processing Options (P0400047)
• Invoice Entry MBF Processing Options (P03B0011)
• Journal Entry MBF Processing Options (P0900049)
If your user preferences are set with the country preference code of IT (Italy), the master business function calls the G/L Date Validation -Italy function (B7400200). That business function then uses the ZJDE0001 version of the Country Specific Processing Options – Italy program to determine how to validate G/L dates.
Before You Begin Set up your user display preferences with a country preference code for Italy (IT).
See Setting Up User Display Preferences in the Global Solutions Italy Guide.

25
Processing Options for County Specific Processing Options – Italy (P7400IT)
A/P
1. Enter a value to select G/L date validation. Values are as follows: Blank = No Validation; 1 = Warning; 2 = Hard Error.
G/L Date Validation
A/R
1. Enter a value to select G/L date validation. Values are as follows: Blank = No Validation; 1 = Warning; 2 = Hard Error.
G/L Date Validation
G/L
1. Enter a value to select G/L date validation. Values are as follows: Blank = No Validation; 1 = Warning; 2 = Hard Error.
G/L Date Validation
Setting Up an Alternate Chart of Accounts
You can set up an alternate chart of accounts if your corporate reporting requirements are different from the local reporting requirements of the country in which you are doing business. For example, if you set up the local chart of accounts by object and subsidiary, but you need to provide fiscal reports that reflect a different chart of accounts, you can set up and maintain an alternate chart of accounts in Category Codes 21, 22, and 23.
In the Account Master table (F0901), you can define the local chart of accounts by object and subsidiary, or in Category Codes 21, 22, and 23. The location that you choose might depend on the use of your corporate chart of accounts, especially if your company is multinational.
Whether you define the local chart of accounts by object and subsidiary, or in Category Codes 21, 22, and 23, the accounts that you set up in the category codes are referred to in J.D. Edwards software as alternate descriptions of your accounts.
The software identifies individual accounts in your chart of accounts based on a system-assigned number that is unique for each account. This number is called the Account Short ID. The Account Short ID is the key that the system uses to distinguish between accounts when you access, change, and delete the account information in any of J.D. Edwards tables. The system stores the short identification number in data item AID.

26
If you are using the Business Units program (P0006) to create a chart of accounts based on a model, the system copies any alternate chart of accounts that is associated with the model, in addition to copying the standard chart of accounts.
► To set up an alternate chart of accounts
From the Organization and Account Setup menu (G09411), choose Revise and Review Accounts.
1. On Work With Accounts, complete the following optional field and click Find:
• Company
You can customize the detail area by creating an alternate format to display the alternate chart of accounts (Category Codes 21, 22, or 23) next to the main chart of accounts (Object Account).
2. Click Add to access Revise Single Account.
3. On the Revise Single Account tab, complete the following fields:
• Business Unit/Object/Subsidiary
• Description
• Account Level of Detail
• Posting Edit
• Budget Pattern Code

27
• Currency Code
• Account ID
4. Click the Category Codes 21–23 tab.
5. On the Category Codes 21–23 tab, complete the following fields and click OK:
• Category Code 21
• Category Code 22
• Category Code 23
Note In China, use only Category Code 21.
See Also Data Integrity and the Chart of Accounts in the Global Solutions Spain Guide for
more information about maintaining an alternate chart of accounts
Setting Up the Data Dictionary to Process Withholding Tax
When you process withholding tax, the system uses the data item IRSA - Withholding Tax Status to track the status of the tax.
The following values are hard-coded for the data item IRSA:
• 0 - Voucher entered with withholding tax information.
• 1 - Payment for voucher entered (debt to fiscal authority).
• 2 - Withholding tax paid to fiscal authority.
• 9 - Withholding tax cancelled.
In addition, you can set up another user defined value to indicate that a Withholding Tax Certification report has been generated for the tax.
See Also INPS Withholding Tax in the Global Solutions Italy Guide for more information about
the status of withholding tax records during the withholding process
Foundation Guide for general information about setting up and implementing the data dictionary
Setting Up AAIs to Process Withholding Tax
To identify the Withholding Tax account in your chart of accounts, set up the PKD (Discounts Available) and PKL (Discounts Lost) automatic accounting instructions (AAIs) with the same object account.

28
Example: PKD Automatic Accounting Instruction
Example: PKL Automatic Accounting Instruction

29
See Also Working with AAIs in the General Accounting Guide for general information about
setting up and implementing AAIs
Setting Up Withholding Tax Codes
If your suppliers are subject to withholding tax, define withholding tax rates so that the system can calculate the withholding tax when you enter supplier vouchers. To do this task, you set up withholding tax codes.
When you set up codes for withholding tax, you specify, among other parameters, the withholding tax type, the percentage, and the base of computation for the tax. For example, the type of withholding tax to which a supplier is subject is Ritenuta d'acconto imposta. Based on this type of withholding tax, vouchers for the supplier are subject to a withholding tax rate that is 20 percent of the total taxable amount.
You can also establish links between different withholding taxes and the user defined codes that you set up for Model 770 reporting.
Before You Begin Set up the user defined codes for Model 770 reporting on user defined codes table
74/RA. See Setting Up User Defined Codes – Italy in the Global Solutions Italy Guide.
► To set up withholding tax codes
From the Italian Tax Processing menu (G002131), choose Setup Withholding Tax Codes.
1. On Work With Withholding Tax Codes - Italy, click Add.

30
2. On Withholding Tax Codes Revision - Italy, complete the following fields to define a withholding tax code:
• Withholding Tax Code
• Withholding Tax Description
• Withholding Tax Short Description
• W/T Code - Fiscal
• Withholding Type
• Include in Balance
3. To define the withholding tax percentage and base of computation for the withholding tax code, complete the following fields:
• Basis Percentage
• Withholding Tax Percentage
4. To establish a link between the withholding tax code and the 770 Model reporting code, complete the following field:
• Section of 770 Form
You must complete this field when you define a new withholding tax code.
5. Click OK.

31
Setting Up Withholding Tax Information for Suppliers
Businesses in Italy are required to set up the following information about any suppliers who are subject to withholding tax:
• Fiscal group code
• Withholding tax code
• Individual tax identification number
• Country
You are required to include this information in your withholding tax reports.
When you set up withholding tax information for your suppliers, you associate suppliers with specific withholding tax rates. When you enter vouchers for your suppliers, the system uses this default rate to calculate the withholding tax amounts. You can override default supplier information, if necessary.
The system displays the individual tax identification number and country of the supplier, based on the supplier's record in the Address Book Master table (F0101).
► To enter withholding tax information for suppliers
From the Additional Italian Tax Processing menu (G002131), choose Setup A/B Additional Info.
1. On Work with Italian Suppliers, click Add.
2. On Supplier Master Additional Information – Italy, complete the following field to identify a supplier:
• Address Number
• Last Name
3. To enter withholding tax information for the supplier, complete the following fields:
• Fiscal Group Code
• W/T Code - Internal
4. Complete the following optional fields:
• Individual (Y/N)
• Gender
• Date of Birth
• Place of Birth
• Province of Birth
5. Click OK.
6. Click Cancel to close the Supplier Master Additional Information – Italy form.

32
7. On Work with Italian Suppliers, locate the supplier for whom you just added additional information and click Select.
8. On Supplier Master Additional Information – Italy, verify the information in the following fields and click OK:
• Add'l Ind Tax ID
• Country
Setting Up Commodity Code Information
European Union requirements state that you must identify the products that are exported from or introduced to your country. You use commodity codes to comply with that requirement.
Commodity codes must have a corresponding commodity value. For release B73.3.1 and later releases, you set up this information on the Intrastat Commodity Code form.
Commodity code information is stored in the Intrastat Commodity Code Additional Information table (F744102).
Before You Begin Set up shipping commodity class codes on UDC 41/E. See Setting Up User Defined
Codes for Intrastat Reporting in the Global Solutions Spain Guide.
► To set up commodity code information
From the Set Up menu (G74STAT4), choose Commodity Codes.
1. On Work With Intrastat Commodity Code, click Add.
2. On Intrastat Commodity Code, complete the following fields:
• Shipping Commodity Class
• Commodity Code
• Description
3. Complete the following optional fields if they pertain to the commodity code:
• Supplementary UOM
• Volume Conversion Factor
Enter the density of the product in the Volume Conversion Factor field only if the product is typically measured in liquid volume but needs to be reported in kilograms. The system multiplies the volume of the product by the density that you enter to calculate the mass of the product.
The Include on VAT or Statistics field is for future use for the United Kingdom.
4. Click OK.

33
Entering Cross-References for Items and Suppliers
An important element of including purchases on Intrastat reports is tracking the country of origin of goods. In some countries, Intrastat reports must contain the country of origin and the original country of origin for each item.
For example, a German company might place a purchase order with a French supplier for goods manufactured in France. These goods are stored in a warehouse in Belgium, so the actual delivery comes from Belgium. The country of origin is Belgium, but the original country of origin is France.
Depending on your business and your suppliers, you might need to set up a more advanced relationship among the supplier, the item, and the country of origin. You can cross-reference the following information in the Intrastat Item/Supplier Cross Reference program (P744101):
• Supplier
• Item
• Country of origin
• Original country of origin
The Supplier and Item Cross Reference program stores information in the Intrastat Supplier/Item Cross Reference Table (F744101). The Intrastats – Update - Purchasing program (R0018I2) retrieves the cross-referenced information if you specify in the processing options to use table F744101.
Note
The system retrieves the country of origin from the address book record of the supplier. The supplier’s country of origin can be overridden when you update the Order Address Information table (F4006) for an individual order. If necessary, you can override the country of origin in the Country of Origin field (ORIG) in table F744101 and by specifying in the processing options of the Intrastats – Update - Purchasing program (R0018I2) to use table F744101.
The system uses the Country of Origin field (ORIG) to determine transaction eligibility for Intrastat reporting. The Original Country of Origin field (ORGO) is for information only.
Note also that in the United Kingdom, country of origin is called country of consignment and original country of origin is called country of origin.
► To enter a cross reference for items and suppliers
From the Set Up menu (G74STAT4), choose Supplier and Item Cross Reference.
1. On Work With Intrastat Cross Reference, click Add.
2. On Intrastat Cross Reference, complete the following fields, and then click OK:
• Item Number
You can enter *ALL in the Item Number field to indicate that all items for the supplier come from the specified country of origin and original country of origin.
34
• Address Number
You can enter *ALL in the Address Number field to indicate that the item always comes from the specified country of origin and original country of origin, regardless of supplier.
When the system searches for a specific record in the Intrastat Supplier/Item Cross Reference Table (F744101), it first searches for a record that matches the Item Number and Address Number. If no record is found, the system searches for a record that matches the Address Number with an Item Number of *ALL. If no record is found, the system then searches for a record that matches the Item Number with an Address Number of *ALL.
• Country of Origin
• Original Country of Origin
See Also Updating Intrastat Information in the Global Solutions Spain Guide for information
about building the Intrastat Revision table (F0018T)
Validating Tax ID Numbers
A tax ID is the identification number that you use when you report information to the various tax authorities. For every transaction that can occur with a company, a customer, or a supplier, you must enter an associated tax identification number. Tax IDs are also called VAT codes, VAT registration numbers, or fiscal codes.
To export goods free of value-added tax (VAT), you must have the tax ID or VAT registration number of your customers in other EU countries, and you must send your own tax ID or VAT registration numbers to your suppliers. The length and format of these numbers vary by country.
When you create an address book record for each company, customer, or supplier, enter the tax ID number in the Tax ID field on the Address Book Revision form. To ensure that the tax ID that you enter is checked for authenticity, enter a country code from UDC table 00/CN in the Country field on the Mailing tab on the Address Book Revision form. When a country code is on the Mailing tab, the system validates tax IDs for that country.
The system only validates the tax ID if the country code that you have specified is set up and activated for validation in UDC table 70/TI.
Activating Tax ID Validation
You activate tax ID validation routines for specific countries by setting up country codes in UDC table 70/TI.
The following table shows examples of country codes:
Codes Description 01 Description 02 Special Handling Default Country US 1
AU Austria AU 1

35
Codes Description 01 Description 02 Special Handling AUS Austria AU 1
BE Belgium BE 1
BEL Belgium BE 1
DE Germany DE 1
DEU Germany DE 1
To turn on tax ID validation for a specific country code, enter 1 in the Special Handling field for that country code. To turn off tax ID validation for a specific country code, remove the 1 from the Special Handling field.
To activate tax ID validation for a country code that is not listed in UDC table 70/TI or to change the meaning of an existing country code, complete the fields as follows:
1. Enter the country code in the Codes field.
2. Enter the standard two-digit ISO code for that country in the Description 02 field.
The two-digit ISO code is required in the Description 02 field to cross-reference the new country code with the country code that is hard-coded in the J.D. Edwards system.
For example, if you use DE for Denmark, enter DN (the two-digit ISO code for Denmark) in the Description 02 field for the DE country code. The system then validates tax IDs that are entered with the country code DE according to Danish, not German, specifications.
3. Enter 1 in the Special Handling field.
To activate tax ID validation for the default (blank) country code, complete the fields as described above, but leave the Codes field blank.
For example, if you use a blank country code to mean Denmark, enter DN (the two-2-digit ISO code for Denmark) in the Description 02 field for the blank country code.
Considerations for Validating Italian Corporate and Personal Tax IDs
To validate both corporate and personal tax IDs, enter the corporate tax ID and the personal tax ID in the Address Book record for the person or corporation. You enter the corporate tax ID in the Tax ID field (TAX) on the Address Book tab on the Address Book Revision form. You enter the personal tax ID in the Add’l Ind Tax ID field (TX2) on the Additional tab.
The corporate tax ID, the personal tax ID, or both, are validated for each Address Book record, depending on the value in the Person/Corporation Code field (TAXC) on the Additional tab. The following table explains the conditions for determining which tax ID the system validates:
Value in Person/Corporation Code field ID Validated by the system Blank
(corporate entity)
corporate tax ID
0 (neither) no validation

36
Value in Person/Corporation Code field ID Validated by the system 1
(individual)
personal tax ID
2
(corporate entity)
corporate tax ID
3
(both an individual and a corporate entity)
personal tax ID and corporate tax ID
Overriding Tax ID Validation
You activate tax ID validation routines for specific countries by setting up country codes in the Tax ID Validation UDC table (70/TI). When you set the Special Handling code to 1 for a specific country, the system validates the Tax ID for that country.
For France, Italy, and Spain, you can override the tax validation routine on a single customer/supplier basis. When you override the tax validation routine for a specific customer or supplier, the system does not validate the Tax ID for the specific customer or supplier, but continues to validate the Tax ID for all other customers and suppliers in the country.
You override the tax validation routine by entering 0 (zero) in the Person/Corp field for the supplier or customer. The Person/Corp field is in the Address Book program (P01012).
Example of Tax ID Numbers
The tax ID or VAT number in the following example appears in bold:
Example: Tax ID or VAT Registration Number for Italy
See Also Working with Address Book Records in the Address Book Guide

37
Setting Up 30/60/90 End-of-Month Invoice Date
In the following example, a payment is split into three installments. The first installment is due 30 days after the end of the month of the invoice date. The second installment is due after 60 days, and the third installment is due after 90 days. No matter what the day of the month when the invoice was created, the due dates are always calculated from the end of that month.
Invoice Amount 9.000,00 euros
Invoice Date 15 July
Based on Date End of month invoice date (31 July)
First Installment 3.000,00 due 30 August
Second Installment 3.000,00 due 29 September
Third Installment 3.000,00 due 29 October
To pay the invoice in this example, you must set up an installment payment term that is based on three equal payments. To determine the due dates of the payments, you must first set up the date range to calculate the end of the month of the invoice date. You then set up the first installment to be due 30 days after the calculated end of the month, the second installment to be due 30 days after the first installment, and the third installment to be due 30 days after that installment.
Example: Due Date Rules
Set up due date rules for the 30/60/90 end-of-month invoice date as shown in the following examples:
End of Month Rule Part 1
End of Month Rule Part 1 calculates the invoice date.
Due Date Rule EOM1
Description End of Month Rule Part 1
Based on Date 1 (Invoice Date)
Date Range for End of Month Rule Part 1
The system calculates the end of the month for the invoice date from the date range.

38
From Day 1
To Day 31
Days to Add 30
End of Month Rule Part 2
End of Month Rule Part 2 calculates a due date 30 days after the previous due date.
Due Date Rule
EOM2
Description End of Month Rule Part 2
Based on Date 1 (Invoice Date)
Days to Add 30
Example: Advanced Payment Terms
Set up the end-of-month payment term as shown in the following example:
Payment Term
EOM
Description End of Month Payment Term
Example: Installments
Set up the installment payments for the end-of-month payment term as shown in the following example:
Sequence Number
1.000
Percent of Installment 33.333
Net Due Date Rule EOM1
Sequence Number 2.000
Percent of Installment 33.333

39
Net Due Date Rule EOM2
Sequence Number 3.000
Percent of Installment 33.334
Net Due Date Rule EOM2
Additional Information
This section provides additional information about setup issues, technical considerations, and system use.
Periodic System Maintenance Activities
The following table lists periodic activities that J.D. Edwards recommends for daily operations. The table lists control reports and verification programs with a brief description of each and the frequency with which J.D. Edwards recommends that the procedures be executed.
Procedure Program Description Frequency
Clean control headers
R007031
Run the Batch to Detail/Out of Balance report to delete batch headers with no transactions from the Batch Control Records table (F0011).
Note If you do not want to erase the headers of certain types of batches even though no transaction details exist for the batch, enter X in the Description 02 field of the user defined codes table 98/IT for the batch type that should not be deleted.
The program also updates any batch header to D (posted) if the individual transactions in the batch have already been posted and indicates any out-of-balance batches.
Every night
Update Supplier Master Table
R04802
Run the Global Update A/P Records with A/B Information program to update the Accounts Payable Ledger, based on the information in the Supplier Master table (F0401).
The program updates the following data:
• First 10 category codes of the master table • Parent company • Alpha name
Every night
Data Integrity and the Chart of Accounts
In addition to the corporate chart of accounts that you set up in the Account Master table (F0901), you can define an alternate chart of accounts using category codes 21, 22, and 23.

40
Account Defined Only in the Account Master Table
You might create an account in the Account Master table (F0901) without defining a corresponding alternate account. If you do, when transactions are entered for the account in the F0901 table, any reporting measures that are based on the alternate chart of accounts are incomplete.
J.D. Edwards recommends that you establish an internal procedure to audit the integrity of the data entered. For example, you can run a Financial Enterprise Report Writer (Financial ERW) report that provides the following information to verify that the alternate accounts correspond to the accounts in table F0901:
Ledger Type (AA Actual Amounts) DR CR
Total Alternate Accounts (A) DR CR
Total Other or Corporate Accounts (B) DR CR
General Total (A + B) DR CR
Run the report on a daily or weekly basis, depending on the volume of your transactions.
Account Defined Only in the Alternate Chart of Accounts
You might create an alternate account using category codes 21, 22, and 23 without defining a corresponding account in the Account Master table (F0901).
In this case, no actual transactions can be entered for the account. In J.D. Edwards software, you cannot enter accounts with an alternate account number.
Security on the Alternate Chart of Accounts
You can secure both your local chart of accounts (defined by object and subsidiary) and your alternate chart of accounts (defined in category codes 21, 22, and 23) by using the processing options on any of the account master programs (P0901). If you secure your accounts in this way, you cannot change account numbers in the category code that you secured. For example, if you secure category code 21, you cannot change the value of category code 21 on any account.
Caution
You should secure your chart of accounts after the account structure is well defined. J.D. Edwards recommends that you then restrict access to the processing options so that the security is not compromised.
If you use the Change Account Information program (R09813) and want to maintain the integrity of your alternate chart of accounts, you should exclude the category code that contains your alternate account from the global update. To exclude a category code, verify that the processing option for that category code does not contain a 1. The processing options for category codes are located on the Account Info tab.

41
Account Deleted from the Category Code Tables
From the category code tables (UDCs 09/21 through 09/23), you might delete an alternate account that has active transactions and balances. When you take this action, the system does not display an error message to indicate that active transaction information is attached to the account.
Caution
J.D. Edwards recommends that you establish an internal procedure to restrict the access to user defined codes tables to a few individuals who are responsible for system setup. These individuals should understand how category codes and accounts are related.
See Also Setting Up an Alternate Chart of Accounts in the Global Solutions International Guide
Multiple Ledger Types
International businesses can use multiple ledgers to fulfill the reporting requirements of both the corporate entity and the local legal authorities.
During the first few days of January, your company reports the yearly results for the previous year. However, in France, for example, the law specifies that the company has until March to report fiscal activity to the authorities. From January 1 until the time that the French company reports fiscal activity, the year is closed from the standpoint of the company; but it is not yet closed from a local legal standpoint. The time difference means that the French company must make adjustments for three months to report transactions in the correct year. These adjustments do not have to appear in the corporate ledger. These adjustments are typically recorded in an alternate ledger type.
Currency Ledgers
A company might impose a fixed yearly exchange rate by management choice. In some countries, such as France, ignoring gains and losses in foreign currency is illegal. You can use the actual amounts (AA) ledger for foreign transactions that do not have any currency gains and losses, and use an alternate ledger type to record the currency gains and losses. In either case, the additional ledger is required to enter transactions that adjust either the local or the company's accounting system.
Depreciation Ledgers
Three ledger types are common when fixed assets depreciation is involved. In this case, you use one ledger to record the depreciation that is calculated with the corporate depreciation method in the corporate ledger. You use an alternate ledger to record the depreciation that is calculated using the depreciation method that is required by the local authorities. The difference between the two depreciation methods is recorded in a third ledger. For local legal reports, you sum the three ledger types to show the actual activity in the depreciation account.

42
User Defined Ledgers
To accommodate the need for multiple ledgers, J.D. Edwards software provides UDC 09/LT in which you can define all of the the ledgers that you use as the ledger types on which you must report.
The AA ledger is the company's standard ledger. The alternate ledgers contain the adjusting transactions that justify the differences between the company books and the local legal books. You can specify ledger types in the processing options for the reports. An inquiry or a report on the account shows the sum of the two ledger types, and displays the actual activity in that account.
Translation Considerations for Multilingual Environments
J.D. Edwards software can display menus, forms, and reports in different languages. All software is shipped with the base language of English. You can install other languages as needed. For example, if you have multiple languages installed in one environment to allow different users to display different languages, each user can work in his or her preferred language by setting up his or her user preferences accordingly.
In addition to the standard menus, forms, and reports, you might want to translate other parts of the software. For example, you might want to translate the names of the accounts that you set up for your company or translate the values in some UDCs.
You might want to translate the following common software elements if you use the software in a multinational environment:
Business Unit Descriptions You can translate the descriptions of the business units that you set up for your system.
The system stores translation information for business units in the Business Unit Alternate Description Master table (F0006D).
Print the Business Unit Translation Report (R00067) to review the description translations in the base language, and one or all of the additional languages that your business uses.
Account Descriptions You can translate the descriptions of your accounts into languages other than the base language.
After you translate your chart of accounts, you can print the Account Translation report. You can set a processing option to show account descriptions in both the base language, and one or all of the additional languages that your business uses.
Automatic Accounting Instruction (AAI) Descriptions
You can translate the descriptions of the automatic accounting instructions (AAIs) that you set up for your system.
UDC Descriptions You can translate the descriptions of the UDCs that you set up for your system.

43
Delinquency Notice Text Specify a language preference for each customer when you create customer master records. The language preference field on the Address Book - Additional Information form determines the language in which the delinquency notice and the text on the notice should appear when you use final mode. (In proof mode, the statements print in the language preference that is assigned to the client in the Address Book.)
J.D. Edwards base software includes the delinquency notice translated into German, French, and Italian. You should translate any text that you add to the bottom of the notice. To do this translation, follow the instructions for setting up text for delinquency notices, and verify that you have completed the Language field on the Letter Text Identification form.
The translations that you set up for your system also work with the language that is specified in the user profile for each person who uses the system. For example, when a French-speaking user accesses the chart of accounts, the system displays the account descriptions in French, rather than in the base language.
See Also Setting Up User Display Preferences in the Global Solutions China Guide for
information about setting up language preferences for users
Translating User Defined Codes into Alternate Languages in the Foundation Guide for information about translating user defined codes
Translating Business Units in the General Accounting Guide for information about translating business units
Translating Accounts in the General Accounting Guide for information about translating accounts
Setting Up Letter Text for Delinquency Notices and Statements in the Accounts Receivable Guide
Translation Routines
J.D. Edwards provides several translation routines to convert amounts to words. These translation routines are generally used by payment formats, draft formats, and check-writing programs that produce numerical output in both numeric and textual form. You specify the translation routine that you want to use in the processing options for these programs.
J.D. Edwards provides the following translation routines:
• X00500 - English
• X00500BR - Brazilian Portuguese
• X00500CH - Chinese
• X00500D - German (mark)
• X00500ED - German (euro)
• X00500FR - French (franc)
• X00500EF - French (euro)

44
• X00500I - Italian (lira)
• X00500EI - Italian (euro)
• X00500S1 - Spanish (female)
• X00500S2 - Spanish (male)
• X00500S3 - Spanish (female, no decimal)
• X00500S4 - Spanish (male, no decimal)
• X00500S5 - Spanish (euro)
• X00500U - United Kingdom
• X00500U1 - United Kingdom (words in boxes)
In some cases, the translation routine that you use depends on the currency that you are using. For example, if you are converting euro amounts to words, you should use a translation routine that has been set up to handle euro currencies. In Spanish, the gender of the currency determines the translation routine that you choose.
J.D. Edwards Multicurrency Solution Summary
Companies that do business internationally often have additional accounting needs. These needs arise from doing business in different currencies, and following different reporting and accounting requirements for each country in which they do business. To process and report on transactions in multiple currencies, a company that operates internationally can:
• Convert foreign currencies into the local currency
• Convert different local currencies into one currency for reporting and comparisons
• Adhere to regulations that are defined in the countries where the company operates
• Revaluate currencies due to changes in exchange rates
J.D. Edwards software performs the following multicurrency functions throughout most base applications:
• Converts from one currency to another
• Restates multiple currencies to consolidate into one currency
• Revaluates currencies due to changes in exchange rates
J.D. Edwards software stores each currency in a different ledger, as illustrated in the following table:
AA ledger Domestic transactions are posted to the AA ledger.
CA ledger Foreign transactions are posted to the CA ledger.
XA ledger Alternate currency transactions, if used, are posted to the XA ledger.
You can designate a specific currency for the following:
• Company
• Account
• Address book record

45
Data Entry in Foreign or Domestic Currency
You can enter all transactions in the original currency of the documents that you receive or send. You do not need to convert currencies before you enter transactions. For foreign entries, the system automatically converts foreign amounts to domestic amounts.
Setting Up Daily Transaction Rates
You can set up the Currency Exchange Rates table (F0015) to use the following multicurrency features:
Default exchange rates When you enter a transaction, the system supplies the exchange rate from table F0015.
Exchange rates for individual contracts
You can specify exchange rates for individual customers and suppliers.
Spot rates You can enter an exchange rate when you enter a transaction. The value that you enter overrides the exchange rate from tableF0015.
Intercompany Settlements
You can enter transactions that cross company and currency boundaries. The system automatically generates the multicurrency intercompany settlements.
Gain and Loss Recognition
Features of gain and loss recognition include:
Realized gains and losses
Entries that represent realized gains and losses for exchange rates are automatically created at the time of cash receipt or entry.
Unrealized gains and losses
You can print a report to analyze open receivables and payables to book unrealized gains and losses at the end of the month. Optionally, you can set up your system to create these entries automatically.
Detailed Currency Restatement
Detailed currency restatement enables you to do the following:
• Maintain a dual set of accounting books:
• One in the domestic (local) currency
• One in an alternate, stable currency
• Restate amounts at the transaction level for a specified range of accounts

46
Balance Currency Restatement
Use the Balance Currency Restatement feature to consolidate balances into a common currency. You can specify the ledger type in which the system creates the newly restated balances. In addition, you can set up an exchange table and conversion specifications according to standard restatement practices.
As If Currency Repost
Use the As If Currency Repost feature to restate all transactions to a new ledger type by using one exchange rate instead of the individual rates that were associated with each transaction over the course of time. The As If Currency Repost feature eliminates the exchange rate fluctuation for financial analysis.
See Also Multicurrency Overview in the Multicurrency Guide for more information about
multiple currencies
International Bank Account Numbers
The International Organization for Standardization (ISO) and the European Committee for Banking Standards (ECBS) developed the International Bank Account Number (IBAN) to assist companies with account identification. ISO standard 12616:1997defines the IBAN.
The IBAN is used internationally to uniquely identify the account of a customer at a participating financial institution. The IBAN allows for validation checks through the use of international 2-character country codes as established by ISO 3166. Additional validation is performed through the use of an algorithm/check-digit process. The account-administering bank is responsible for calculating the IBAN and providing it to its customers.
The IBAN format differs, depending on whether it is transmitted electronically or printed on paper. The variance is only in its presentation; the IBAN number remains the same whether in electronic or print format. The IBAN consists of the following:
Country code A two-letter country code as specified in ISO 3166. The country code used in the IBAN is the code of the county in which the bank or branch that is servicing the IBAN resides.
Check digits Two digits that are assigned according to an algorithm.
Basic Bank Account Number (BBAN)
An alphanumeric string of characters of up to 30 characters that includes 0-9 and A-Z in upper-case letters only. The electronic format cannot contain separators or county-specific characters.
The length of the BBAN is determined by the country of origin, and includes an explicit identification code of the bank or branch servicing the account at a fixed position within the BBAN.
When transmitted electronically, the IBAN is one string of characters. When printed, the IBAN is preceded by the text string “IBAN” and is split into groups of four characters that are separated by a space. The last group might contain fewer than four characters.

47
The following table shows examples of IBANs:
Belgium France
Account Number 510-0075470-61 20041 01005 0500013M026 06
Electronic IBAN format BE62510007547061 FR1420041010050500013M02606
Print IBAN format IBAN BE62 5100 0754 7061
IBAN FR14 2004 1010 0505 0001 3M02 606
The ECBS specifies that the IBAN appear on the International Payment Instruction (IPI) form in the print format but without the term IBAN. For example, the IBAN for the Belgian account number in the above table would appear on an IPI as BE62 5100 0754 7061.
You can link the IBAN number with a bank address in the Address Book application. When you link the IBAN with a bank address, the Auto Payment process can identify the correct country for suppliers and customers who have bank accounts in multiple countries. You enter the IBAN in the Bank Accounts by Address (P0030A) and the G/L Bank Accounts (P0030G) programs in the electronic format. J.D. Edwards stores the IBAN in the electronic format in the Bank Transit Master table (F0030)
See Also Setting Up Multiple Bank Accounts for Suppliers in the Accounts Payable Guide
Setting Up Bank Account Information in the Accounts Payable Guide or Accounts Receivable Guide

48
Country-Server Exits - Italy
J.D. Edwards solution for Italy includes country-server exits that facilitate country-specific functions without modifying or disrupting standard software functions or processes. Country-server exits make certain forms or business functions available to the appropriate users, and hidden from users for whom the forms or business functions are not pertinent.
The country-specific logic of these country-server exits for Italy is invoked if the localization country code in User Profile Revisions is IT (Italy). The business functions that run when you use these country-server exits are dependent on the steps that you perform while using an application. For example, if you access the A/P Standard Voucher Entry program (P0411) and choose Add, certain business functions run to invoke that process. If you access the A/P Standard Voucher Entry menu (P0411) and choose Payments Inquiry from the Form menu, different business functions run to invoke that process.
Tax ID Validation – Italy
The following programs invoke the country-server exit for tax ID validation:
• P03013 - Customer Master
• P04012 - Supplier Master
• P01012 - Address Book
The following business functions are called to run the country-server exit for tax ID validation within address book records for customers, suppliers, and so on. The business functions follow this order:
1. N7000030 - Validation Plug & Play - Tax ID
2. B7000030 - N0100041 - CS - Process Localization Requirements
3. B7400050 - Tax ID Validation - Italy
Bank ID Validation – Italy
The following programs invoke the country-server exit for bank ID validation:
• P0030G - G/L Bank Accounts
• P0030A - Bank Accounts By Address
• P7430IT - Bank Revision - Italy
• P03B602 - Draft Entry
The following business functions are called to run the country-server exit for bank ID validation. The business functions follow this order:
1. N7000040 - Validation Plug & Play - Bank ID 2. N7000041 – P0030A-CS-Process Localization Requirements
3. N7400010 - Bank ID Validation - Italy

49
General Ledger Date Edit
The country-specific logic for general ledger date edit for Italy is invoked if the localization country code in User Profile Revisions is IT (Italy).
Voucher Entry – General Ledger Date Edit
The following program invokes all of the applications that use the business functions for the country-server exit for the general ledger date edit during voucher entry:
• P0411 - A/P Standard Voucher Entry
The following business functions are called to run the country-server exit for the general ledger date edit during voucher entry:
1. B0400047 - Voucher Entry Master Business Function 2. N7000330 - B0400047 - Plug & Play
3. N7000331 - B0400047 - CS - Process Localization Requirements
Customer Ledger Inquiry – General Ledger Date Edit
The following program invokes all of the applications that use the business functions for the country-server exit for the general ledger date edit during customer ledger inquiry:
• P03B2002 - Customer Ledger Inquiry
The following business functions are called to run the country-server exit for the general ledger date edit during customer ledger inquiry. The business functions follow this order:
1. B03B0011 - Invoice Entry Master Business Function 2. N7000570 - B03B0011 - Plug & Play
3. N7000571 - B03B0011 - CS - Process Localization Requirements
Withholding Tax Processing
The following programs invoke the country-server exit for withholding tax processing when you perform the following processes:
Program Processes A/P Standard Voucher Entry (P0411) Entering vouchers, exiting vouchers, and deleting
vouchers
Voucher Match (P4314) Matching purchase order vouchers
Speed Status Change (P0411S) Entering A/P speed status releases
Create Payment Control Groups (R04570) Creating payment control groups
Auto Payment Detail (P04573) Creating automatic payment details and updating automatic payments
Supplier Master (P04012) Creating supplier master records

50
Program Processes A/P Manual Payments (P0413M) Entering payments manually and updating
payments manually
A/P Void Payment (P0413V) Voiding payments
Standard Voucher Entry - Withholding Tax Processing
The following program invokes the country-server exit for voucher entry:
• P0411 - A/P Standard Voucher Entry
The following business functions are called to run the country-server exit for voucher entry. The business functions follow this order:
1. B0400047 - Voucher Entry Master Business Function
2. N7000330 - B0400047 - Plug & Play
3. N7000331 - B0400047 - CS - Process Localization Requirements
Voucher Exit - Withholding Tax Processing
The following program invokes the country-server exit for voucher exit:
• P0411 - A/P Standard Voucher Entry
The following business functions are called to run the country-server exit for voucher exit. The business functions follow this order:
1. N7000340 - P0411 - Plug & Play
2. N7000341 - P0411 - CS - Process Localization Requirements
Delete Voucher - Withholding Tax Processing
The following program invokes the country-server exit for deleting a voucher:
• P0411 - A/P Standard Voucher Entry
The following business functions are called to run the country-server exit for deleting a voucher. The business functions follow this order:
1. B0400035 - Delete Voucher From Browse Screen
2. N7000700 - B0400035 - Plug & Play
3. N7000701 - B0400035 - CS - Process Localization Requirements
Purchase Order Voucher Match - Withholding Tax Processing
The following program invokes the country-server exit for withholding tax processing during purchase order voucher match:
• P4314 - Voucher Match
The following business functions are called to run the country-server exit for withholding tax processing during purchase order voucher match. The business functions follow this order:
• N7000400 - P4314 - Plug & Play
• N7000401 - P4314 - CS - Process Localization Requirements

51
A/P Speed Release - Withholding Tax Processing
The following program invokes the country-server exit for withholding tax processing during A/P speed release:
• P0411S - Speed Status Change
The following business functions are called to run the country-server exit for withholding tax processing during A/P speed release. The business functions follow this order:
1. N7000370 - P0411S - Plug & Play
2. N7000371 - P0411S - CS - Process Localization Requirements
Create Payment Control Groups - Withholding Tax Processing
The following program invokes the country-server exit for withholding tax processing when you create payment control groups:
• R04570 - Create Payment Control Groups
The following business functions are called to run the country-server exit for withholding tax processing when you create payment control groups. The business functions follow this order:
1. N7000250 - R04570 - Plug & Play
2. N7000251 - R04570 - CS - Process Localization Requirements
Automatic Payment Detail - Withholding Tax Processing
The following program invokes the country-server exit for withholding tax processing when you use automatic payment detail in all software versions:
• P04573 - Auto Payment Detail
The following business functions are called to run the country-server exit for withholding tax processing when you use automatic payment detail. The business functions follow this order:
1. N7000270 - P04573 - Plug & Play
2. N7000271 - P04573 - CS - Process Localization Requirements
Update Automatic Payment - Withholding Tax Processing
The following program invokes the country-server exit for withholding tax processing when you update automatic payments:
• P04573 - Auto Payment Detail
The following business functions are called to run the country-server exit for withholding tax processing when you update automatic payments. The business functions follow this order:
1. B0400394 - Update Automatic Payments
2. N7000260 - B0400394 - Plug & Play
3. N7000261 - B0400394 - CS - Process Localization Requirements
Supplier Master - Withholding Tax Processing
The following program invokes the country-server exit for withholding tax processing when you use supplier master records in all software versions:

52
• P04012 - Supplier Master
The following business functions are called to run the country-server exit for withholding tax processing when you use supplier master records. The business functions follow this order:
1. N7000150 - P01012 - Plug & Play
2. N7000151 - P01012 - CS - Process Localization Requirements
Manual Payments - Withholding Tax Processing
The following program invokes the country-server exit for withholding tax processing when you enter payments manually:
• P0413M - A/P Manual Payments
The following business functions are called to run the country-server exit for withholding tax processing when you enter payments manually. The business functions follow this order:
1. N7000360 - P0413M - Plug & Play
2. N7000361 - P0413M - CS - Process Localization Requirements
Update Voucher Record with Payment Information - Withholding Tax Processing
The following program invokes the country-server exit for withholding tax processing when you update voucher records with payment information:
• P0413M - A/P Manual Payments
The following business functions are called to run the country-server exit for withholding tax processing when you update voucher records with payment information. The business functions follow this order:
1. B0400076 - Update Voucher Record With Payment Information
2. N7000780 - B0400076 - Plug & Play
3. N7000781 - B0400076 - CS - Process Localization Requirements
Void Payments - Withholding Tax Processing
The following program invokes the country-server exit for withholding tax processing when you void payments:
• P0413V - A/P Void Payment
The following business functions are called to run the country-server exit for withholding tax processing when you void payments. The business functions follow this order:
1. N7000380 - P0413V - Plug & Play
2. N7000381 - P0413V - CS - Process Localization Requirements

53
Withholding Tax Processing
In Italy, businesses must withhold taxes from payments to certain types of suppliers, such as self-employed and contract suppliers. These withholding taxes are remitted directly to the government. Each year, businesses must submit the Modello 770 form to the tax authorities. The Modello 770 form contains information about the suppliers from whom withholding tax has been collected.
In some cases, businesses can defer the recognition of A/P VAT receivable (input) on vouchers for suppliers who are subject to withholding tax until the voucher is paid. The document used to defer the VAT is called Notula.
Businesses must also give a certification of all of the amounts paid for their services, including detail of the tax withheld, to all their suppliers who are subject to withholding tax.
The following steps explain the withholding tax process for Italy:
1. Voucher Entry
Type Document Number Date Amount Taxable W/H Tax W/H Code VAT PV 1230 30/06/05 119 100 10 AB 19
Status Code = 0
AP Trade 119–
Expense 100
VAT 19–
2. Voucher Payment
Type Document Number Date Amount Taxable W/H Tax W/H Code VAT PV 1230 30/06/05 119 100 10 AB 19
Payment Date = 01/10/05
Status Code = 1
AP Trade 119
Expense 109–
VAT 10–
3. Payment to Fiscal Authorities
Type Document Number Date Amount Taxable W/H Tax W/H Code VAT PV 1230 30/06/05 119 100 10 AB 19
Withholding Paid 15/10/05 Payment Number 1031
Status Code = 2
Cash 10–
W/H Payable 10

54
4. Fiscal Reports Annual Declaration of Withholding Tax Information by Supplier
File generated to interface to Official 770 Form
• Date of Birth
• Place of Birth
• Sex
• Tax Code
INPS Withholding Tax
In addition to the standard withholding tax, payment to certain types of contractors is subject to a social security (INPS) withholding tax. The INPS withholding tax is paid to the Italian social security office, Istituto Nazionale Previdenza Sociale (INPS).
The company must withhold 2/3 of the withholding tax amount that is due to the contractor and pay this amount by the 20th of every month. The supplier is liable for the remaining 1/3 of the ten percent.
The base amount for the calculation of INPS withholdings can be 95 percent or 100 percent, depending on the type of contractor.
The company is liable for the debt to INPS from the time of payment to the contractor.
Notula
Notula is the document that is used by a company to defer VAT recognition until payment of a voucher is made. Notula is used for suppliers who are subject to withholding tax. You should use the prepayment process in the base software to process Notula.
You can use the system to process Notula for specific stages in the prepayment process as follows:
Enter prepayment voucher
When you enter prepayment vouchers for Notula, you:
• Use a version of the Voucher Entry program for prepayments. • Use a special document type. • Enter a tax explanation code of E for exempt. • Enter a tax rate with a zero percent tax rate.
Record payment
To record the voucher as paid, you use manual payment with voucher match for the voucher without VAT.

55
Enter standard voucher
Enter a standard voucher with a normal tax explanation code and tax rate. When the system determines that the supplier for the voucher is subject to withholding, the system displays the withholding window.
Use the form to select the matching Notula document for the voucher. The system retrieves the VAT amount along with the withholding tax amount.
Distribute as usual. When you post the voucher, the system updates the tax table.
Close the amounts
Enter a second payment to close the amounts in the Accounts Payable Ledger table (F0411).
Note
The default document type for Notula is PF. You can set up a special document type for Notula in the processing options for Notula Browse - Italy (P7404074).
See Also Prepayment Vouchers in the Accounts Payable Guide
J.D. Edwards Status Codes for Withholding Tax
To track withholding tax records through the withholding tax process, refer to the Withholding Tax Status field. The system automatically updates this field for each tax record, based on the status of the record in the withholding tax process.
Status Description Update Programs
0 Withholding tax amounts generated.
A/P Standard Voucher Entry (P0411)
A/P Speed Voucher Entry (P0411SV)
Voucher Match (P4314)
Store and Forward Voucher Batch Processor (R04110Z2)
1 Voucher paid to supplier. A/P Manual Payments (P0413M)
Automatic Payments (P0457xx)
2 Withholding tax re-distributed. Distribute W/T Amount Report (R7404530)
3 Withholding tax paid to Withholding Tax Payments (R7404500)

56
government.
4 Certification printed. Withholding Tax Certification - Italy (R7404027)
5 770 form printed. 770 Model - Italy (R74094)
9 Record deleted.
Before You Begin Set up data dictionary values for withholding tax processing. See Setting Up the Data
Dictionary to Process Withholding Tax in the Global Solutions Italy Guide.
Set up the PKD and PKL automatic accounting instructions. See Setting Up AAIs to Process Withholding Tax in the Global Solutions Italy Guide.
Set up codes to identify the withholding tax rates that you use. See Setting Up Withholding Tax Codes in the Global Solutions Italy Guide.
Set up withholding tax information for your suppliers. See Setting Up Withholding Tax Information for Suppliers in the Global Solutions Italy Guide.
Entering Vouchers with Withholding Tax
You enter vouchers for suppliers who are subject to withholding tax just as you enter any other voucher. After you complete the account distribution for the voucher on the A/R and A/P Journal Entries forms, the system displays the Review Withholding Tax - Italy form (P740411) so that you can enter the withholding tax information for the voucher.
The system stores withholding tax information in the Withholding Tax Detail - Italy table (F74411).
Before You Begin Set up your user preferences with a country preference code of IT (Italy). See Setting
Up User Display Preferences in the Global Solutions Italy Guide.
Verify that you have set up withholding tax information for the supplier for whom you are entering vouchers. See Setting Up Withholding Tax Information for Suppliers in the Global Solutions Italy Guide.
► To enter vouchers with withholding tax
From the Supplier & Voucher Entry menu (G0411), choose Standard Voucher Entry.
1. On Supplier Ledger Inquiry, complete the steps for entering a standard voucher.
After you click OK on the G/L Distribution form, the system displays the Withholding Tax Detail – Italy form.

57
2. On Withholding Tax Detail - Italy, complete the following fields and click OK:
• Amount not Subject to Withholding Tax
• W/T Code
• Taxable Amount Subject to W/T
If the supplier is a foreign supplier, complete the Foreign Taxable Amount Subject to W/T field rather than the Taxable Amount Subject to W/T field.
See Also Entering Vouchers in the Accounts Payable Guide
Processing Withholding Tax Payments
The system calculates withholding tax amounts that are based on the information which you enter during the voucher entry process.
After the system processes withholding taxes, you can calculate and print withholding tax payments for the government.
Manual Payments
When you record a payment, the system determines whether the supplier is subject to withholding tax, based on the information that you set up for the supplier. If the supplier is subject to the tax, the system displays the voucher information and updates the Discount Taken field with the withholding tax amount.

58
Note
The Discount Taken field should be blank at the time that you record the payment. If the Discount Available field contains an amount, the system replaces this amount with the withholding tax amount that is calculated at payment entry time.
Caution
Italian companies that manage withholding tax within the J.D. Edwards system are not able to apply discounts on the invoice.
When you post the transaction for the payment, the system uses the PKD AAI that you set up to define the withholding tax account. The PKD AAI associates the accounting entry to the withholding tax payable account.
Automatic Payments
The system processes withholding tax at specific stages of the automatic payment process as follows:
Create payment control groups
When you create a payment control group that includes vouchers which are subject to withholding tax, the system updates the Discount Taken field in the A/P Payment Processing - Summary (F04572) and A/P Payment Processing - Detail (F04573) tables with the withholding tax amount from the Withholding Tax Detail - Italy table (F74411). The system calculates the payment amount by subtracting the withholding tax (discount) from the gross.
Work with payment control groups
When you reset or remove individual vouchers from the payment control group, the system removes the withholding tax amount from the Discount Taken field in the A/P Payment Processing - Summary (F04572) and A/P Payment Processing - Detail (F04573) tables. At this point in the process, the system does not update the Accounts Payable Ledger table (F0411) and does not impact the voucher records.
Update payment group
When you update the payment group, the system changes the payment status of the withholding tax to 1 (payment made to supplier) in the Withholding Tax Detail – Italy table (F74411). The system also updates the Accounts Payable Ledger table (F0411) with the amount in the Discount Taken field for the withholding tax amount.
Technical Considerations for Processing Withholding Tax Payments
Prompt payment discounts
You cannot use prompt payment discounts with withholding tax because the withholding tax amounts are stored in the prompt payment discount fields.
In Italy, A/P prompt payment discounts are not used.

59
Speed release
You cannot split vouchers for suppliers who are subject to withholding tax.
Split payment control groups
You cannot split a payment control group to exclude part of a voucher because this action creates a new pay item on the voucher.
Revising Withholding Tax Details
You can revise the withholding tax information that the system stores in the Withholding Tax Detail - Italy table (F74411) by using the Withholding Tax Revisions program. You can also use the Withholding Tax Revisions form to review all of the withholding tax information for a specific voucher.
Caution
The information that you revise by using the Withholding Tax Revisions form immediately updates table F74411). The system does not recalculate taxes and related amounts. You should revise withholding tax information only in exceptional cases, such as when you must adjust the withholding tax information manually.
If you are implementing J.D. Edwards Accounts Payable system for the first time, you can use the Withholding Tax Revisions form to load open withholding tax information from your previous system.
► To revise withholding tax details
From the Italian Tax Processing menu (G002131), choose Withholding Tax Revisions.
1. On Work With Withholding Tax - Italy, click Find.
2. Choose a row and click Select.

60
3. On Withholding Tax Detail - Italy, revise any of the following fields and click OK:
• W/T Code
• Status
• Taxable Amount Subject to W/T
• Withholding Tax Amount Paid
• Withholding Tax Foreign Amount Paid
• Payment Date
• Government Date
• Withholding Tax Payment Reference
Printing Withholding Tax Reports
You can print reports to review withholding tax information that the system stores in the Withholding Tax Detail - Italy table (F74411) and the A/B Vendor Information for Year-end IVA tape - Italy table (F0091).

61
Printing the Proposal of Payment Report
From the Italian Tax Processing menu (G002131), choose Print W/T Payment Proposal.
You can print a cash requirement report that includes details about withholding tax amounts, and Italian bank identification codes and descriptions. You can use this report to verify payment information before you write the actual payments for your suppliers. To do this verification, run the Proposal of Payment report (R7404430).
The report includes the following information:
• Payment due dates, from dates, and through dates
• Supplier number
• Legal name of supplier
• Document type and number
• Pay item
• Supplier invoice number and invoice date
• Net due date
• Open amount
• Withholding tax amount
• Payment status
• Payment instrument
• Bank identification number and description
• Currency code
• Foreign amount
Processing Options for Proposal of Payment (R7404430)
Date
1. Enter the From and Through Due Date below. Blank will use system date as the through date.
From Due Date
Through Due Date
2. Enter '1' to print the address of Supplier

62
Printing a List of Withholding Tax Payments Due
From the Italian Tax Processing menu (G002131), choose Generate Withholding Tax Pmts.
You can print a list of the withholding tax amounts that you owe the Italian Revenue Tax office. To find this information, print the Withholding Tax Payments report (R7404500). The report lists all of the vouchers that were paid to the suppliers who are subject to withholding tax. You can send the report to the Italian tax office as proof of amounts that were withheld from payments to suppliers.
You can run the report in proof or final mode. When you specify final mode and indicate the "paid" withholding tax status in the processing options, the system marks the withholding tax records as paid to the government. The system also updates the government payment reference and the government payment date for each record in the Withholding Tax Detail - Italy table (F74411).
The Generate Withholding Tax Payment report includes the following information:
• Withholding tax code
• Address Book number of the supplier
• Legal name of the supplier
• Supplier invoice number and payment date
• Withholding tax taxable amount
• Withholding tax amount
• Withholding tax progress status (specified in the report processing options)
• Government payment date (specified in the report processing options)
• Government Payment reference (specified in the report processing options)
You can run a version of the Generate Withholding Tax Payments report to change the status of withholding tax records after you print Withholding Tax Certifications for your suppliers. To do this procedure, create a version of the report in final mode and indicate your user defined withholding tax status as "certified" in the processing options. Do not specify a payment date.
See Also Setting Up the Data Dictionary to Process Withholding Tax in the Global Solutions
Italy Guide for more information about the data dictionary values that indicate withholding tax status
Processing Options for Withholding Tax Payments (R7404500)
Mode
1. Enter a '1' to run the report in Final Mode, if left blank, the report will run in Proof Mode.
63
Proof or Final
Final
1. Specify the date of payment to the tax office. If left blank, the withholding tax payment date will not be updated.
Payment Date
2. Enter the value to be used for the new W/T paid status. If left blank, the withholding tax status will not be updated.
Withholding Tax Status
3. Enter the number of the payment document. If left blank the payment reference will not be updated.
Payment Reference
Printing the Withholding Tax Certifications Report
From the Italian Tax Processing menu (G002131), choose Print W/T Certifications.
You can print a certification of withholding tax paid. You are required to give these withholding tax certificates to your suppliers. To do this procedure, print the Withholding Tax Certifications report (R7404027).
You can print the Withholding Tax Certifications report on A4 paper. The report looks like a certification letter and includes the following information:
• Date
• Supplier name and address
• REGISTERED (to indicate that the letter is sent through registered mail)
• Default report titles that you can revise
• Certification number (specified in the processing options for the report)
• Date
• Period for which the certification has been issued
• Amount of the tax withheld by the company
• INPS contribution
You can run the report in proof or final mode.

64
Processing Options for Withholding Tax Certification (R7404027)
Dates
1. Enter the date to be printed on the certifications.
Certification Date
2. Enter the dates to process.
From Date
Thru Date
Number
3. Enter the number to be printed on the first certificate. If no number is entered, certificates will be printed without a number.
Initial Number
Mode
4. Enter '1' to run the certifications print in final mode. If left blank the report will be run in proof mode.
Proof or Final Mode
Status
5. Enter the value which will update the W/T file with the progress status "CERTIFIED". If left blank, even if the process is run in final mode, NO updates will be done on the W/T.
Status
Company
6. Enter Company, Title and Name to print on the certifications.
Company
Title

65
Name
Printing the Model 770 Report
From the Italian Tax Processing (G002131) menu, choose Model 770 W/T Commission - Free Format.
In Italy, businesses are required to withhold taxes from payments to certain types of suppliers, such as self-employed and contract suppliers. Businesses remit the withheld taxes directly to the government. Once a year, businesses are required to submit the Model 770 form to the tax authorities. The Model 770 form contains information about suppliers from whom taxes have been withheld.
In 1999, the Italian Tax Authority began requiring that businesses file the Model 770 form electronically. Business can file the form directly, using software programs supplied by providers who are certified by the Italian Tax Authority; or submit the form to a third party, such as a bank or chartered accountant, who will file the form electronically.
The Model 770 - Free Format report produces the Model 770 report in Microsoft Excel format. You can reformat or revise the information as necessary and then import the file to one of the software programs that is certified by the Italian Tax Authority.
The Model 770 - Free Format report is based on the following tables:
• Withholding Tax Detail - Italy (F74411)
• Withholding Tax Codes - Italy (F74405)
The report provides the following information about the reporting company, qualifying suppliers, and transactions with those suppliers:
• Address Book Number
• Company Tax ID
• Tax ID of Supplier
• Surname or Company Name
• Supplier Name
• Gender
• Date of Birth
• City of Birth (or State if abroad)
• Province of Birth
• City Fiscal Address
• Province of Fiscal Address
• Street and Number of Fiscal Address
• Foreign State Code
• Line of Business - Government Code

66
• Amount Not Subject to Withholding Tax
• Taxable Amount Subject to Withholding Tax
• Withholding Tax Gross Amount
• Withholding Tax Amount Paid
• Foreign Tax ID
• Foreign City of Residence
• Foreight Street and Number
To group the data to match the sections of the Model 770 report, base your data selection on the Withholding Tax Code field. Set up withholding tax codes by using the Withholding Tax Codes - Italy program (P740405).
You can also run the report without data selection and then reformat the data in Microsoft Excel.
See Also Setting Up Withholding Tax Codes in the Global Solutions Italy Guide
Entering Vouchers with Withholding Tax in the Global Solutions Italy Guide
Date Format
The legal date format for the Model 770 form is dd/mm/yyyy. The Microsoft Excel spreadsheet that is produced by the Model 770 - Free Format report uses the date format from Regional Settings on the Windows Control Panel. To comply with the legal requirement, you can either change the date format in your Regional Settings or specify the correct column format in Microsoft Excel.
Before You Begin Set up numeric country codes on user defined code table 74/CN. See Setting Up
User Defined Codes – Italy in the Global Solutions Italy Guide for information about user defined code table 74/CN.
Processing Options for Model 770 - W/T Commission - Free Format (R74094D)
Defaults Tab
Use these processing options to identify the company that is submitting the Model 770 report and to specify the status that the system uses to update the Withholding Tax Detail – Italy table (F74411).
1. Fiscal ID
Use this processing option to specify the tax ID of the company who is submitting the Model 770 report.

67
2. Status
Use this processing option to specify the status the system will use to update the Withholding Tax Detail table (F74411) when the Model 770 report is run in final mode. If this processing option is blank, the system does not update the Withholding Tax Detail table, even if the process is run in final mode.
3. Amount Truncation
Use this processing option to specify whether you are reporting withholding amounts in euros or liras. The currency that you use determines the truncation method. Amounts specified in euros are reported in whole numbers (for example, euros 125.75 is reported as 125). Amounts specified in liras are truncated to 1000s (for example, liras 456,789 is reported as 456). Valid values are:
Blank
Report amounts in euros (truncate to whole number)
1
Report amounts in liras (truncate to 1000s)
Process Tab
Use this processing option to specify whether the report runs in proof or final mode.

68
1. Process Mode
Blank = Proof mode
1 = Final mode
Use this processing option to specify whether the system prints the 770 Form in proof or final mode. Valid values are:
Blank
The system will print the 770 Form in proof mode.
1
The system will print the 770 Form in final mode.
When you run the report in final mode, the system updates the Withholding Tax Detail - Italy table (F74411) with the status you entered in the Status processing option on the Defaults tab.
Printing the Supplier Ledger Report with Withholding Tax Details
From the Italian Tax Processing menu (G002131), choose Print Supplier W/T Ledger.
You can print a list of all of the transactions for a supplier that are subject to withholding tax. To do this procedure, run the Withholding Tax Ledger By Supplier report (R7404520).
Suppler information on the report includes:
• Address Book number
• First and last name
• Address (street and city)
• Province
• Fiscal ID
• Date of birth
• Place of birth
• Province of birth

69
• Gender
Transaction and withholding tax details on the report include:
• Supplier invoice date and invoice number
• Abbreviated description of the withholding tax
• Base of calculation for the withholding tax
• Amount not subject to withholding tax
• VAT amount
• Total amount paid
• Taxable amount that is subject to withholding tax
• Internal withholding tax code
• Fiscal withholding tax code
• Withholding tax percentage
• Withholding tax amount paid
• Net paid amount
• Supplier payment date
• Government payment date
• Payment reference

70
VAT Processing
Value added tax (VAT) is a noncumulative tax that tax authorities impose at each stage of the production and distribution cycle. If you work with VAT, you should understand the following terminology and principles:
Output VAT
Suppliers of goods and services must add VAT to their net prices. They must record output VAT for goods on the date that they issue invoices and for services on the date that they receive payment. The amount of VAT is determined by applying specific rates to the net selling prices of certain goods and services.
Output VAT is also called the following:
• A/P VAT Receivable • Recoverable VAT • Collectable VAT
Input VAT
Input VAT is the VAT paid by the purchaser of goods and services.
If the purchaser is subject to output VAT, the purchaser can recover input VAT by offsetting it against output VAT. When input VAT exceeds output VAT, the purchaser can forward the VAT balance as a credit toward the tax authority for the next reporting period; or receive a cash refund, depending on the policies of the tax authority.
Input VAT is also called the following:
• A/R VAT Payable • Deductible VAT
Nonrecoverable Input VAT
Input VAT cannot be recovered for:
• Goods and services that are not necessary for running the business • Expenses that are related to business entertainment • Transport of persons • Oil-based fuels and lubricants that are transformed and then resold • Goods that are provided free of charge or at a substantially reduced price • Purchase of cars • Services related to goods that are normally excluded from the right of
recovery
Italian VAT
If you work with Italian VAT, you should understand the following terminology and principles:
VAT returns
VAT returns must be completed for each month on a special form and filed with the local tax office on the 20th of the month.
You must pay any excess output VAT over input VAT at the time of filing.

71
VAT exemptions
To be exempt from VAT, your business must work within the following guidelines:
• Goods must be physically moved to another EU-member country. • Customers must have VAT identification codes. • Invoices must show applicable VAT numbers. • Goods cannot be of a special category, such as vehicles.
Deferred Invoices and VAT
A new VAT law (DL 29/9/97 n. 328) has been in effect in Italy since September, 1997. This law concerns deferred invoices in which the shipment date is prior to the invoice date. For deferred invoices, the VAT payable on sales should be declared with reference to the shipment date, not the invoice date. An example of deferred invoices is a product that is delivered daily and invoiced monthly.
The two types of deferred invoices are:
• The invoice date and shipment date are in the same reporting period, but the shipment date is prior to the invoice date.
• The invoice date and the shipment date are not in the same reporting period, and the shipment date is prior to the invoice date.
The second type of deferred invoice impacts summary VAT reporting. The VAT should be accounted for in the Print VAT Summary Reports (R74093) for the month of the shipment if that month is prior to the month of the invoice. To accomplish this task, the system evaluates the shipment date of a sales order to determine if it is prior to the invoice date. This evaluation is performed during the Sales Update process (R42800) through the use of a country server. If the shipment date is prior to the invoice date, the system updates the Service/Tax Date field in the Customer Ledger table (F03B11).
When you run the Print VAT Summary Reports and select transactions by tax rate, the system uses the service/tax date, rather than the G/L date, for deferred invoices.
Intracommunity VAT
Since the creation of the single market in 1993, goods sold from a taxable entity in one EU member state to a taxable entity in another EU member state are treated as exempt from VAT. The buyer is then subject to output VAT on the transaction in the buyer's own EU member state. In some cases, the buyer is entitled to recover the amount of the output VAT as input VAT.
In the J.D. Edwards Accounts Payable system, you record the VAT on these transactions by setting up a tax rate/area for intracommunity VAT. The VAT payable is compensated with the VAT receivable, and both amounts must be shown in the relevant reports. The reports must also show the transactions that were exempt from VAT.
To qualify for the intracommunity VAT exemption, the buyer's VAT registration number, including the European Union Member State National Identification Number, must be quoted on the supplier's invoice.

72
Reporting Considerations
You must print the information for sales and purchases that are subject to intracommunity VAT on separate VAT reports. To report on intracommunity VAT separately, use data selection to select transactions with the tax rate/area for intracommunity VAT.
See Also Tax Rates for Intra-Community VAT in the Global Solutions Italy Guide
Summary VAT
In Italy, the government requires businesses to report VAT on accounts receivable and accounts payable transactions. You can meet this reporting requirement by assigning a register type and class to each transaction.
Assigning register types and classes lets you group VAT information on the summary VAT report. The summary VAT report groups information based on register class, then register type, and then tax rate. For example, the information that is grouped under the registration class for sales might include register types for sales that are VAT-taxable and sales that are VAT-exempt. Information within those register types is summarized by tax rate.

73
The following graphic illustrates how you use J.D. Edwards software to process summary VAT:
Setting Up Register Types and Classes for Summary VAT
To report on summarized VAT, you must set up register types and classes to track and report VAT tax in a summarized format. Then create a link between the register types and classes, and the appropriate type of transaction (document type).
You specify different register classes for sales and purchases. Register types are subsets of register classes. For example, the register types for a sales register class might include:
• Sales within Italy
• Sales within the EU
• Sales outside the EU

74
When you link register types and classes to document types, you establish and maintain the relationships among document types, VAT rates, register types, and classes. You can use these relationships to create summarized VAT reports.
Before You Begin Set up user defined codes for register classes (system 74, type 01) and register
types (system 74, type 02). See Setting Up User Defined Codes in the Global Solutions Italy Guide.
► To set up register types and classes for summary VAT
From the Italian Tax Processing menu (G002131), choose Register Type & Class Setup.
1. On Work With Class/Register Types, click Add.
2. On Class/Register Type Revision, complete the following fields and click OK:
• Document Type
• IVA Rate
• Registration Class
• Register Type
Establishing an Initial VAT Balance
You can use VAT Balances Revisions to establish an initial VAT balance, or to review and revise the VAT balances that print on your summarized VAT report.
► To establish an initial VAT balance
From the Italian Tax Processing menu (G002131), choose VAT Balances Revisions.
1. On Work With IVA Balances History - Italy, click Add.
2. On IVA Balances History Revision - Italy, complete any of the following fields and click OK:
• Company
• Balance Date
• Credit Balance
• Debit Balance
• Description 1
• Description 2

75
Entering Journal Entries with VAT
If you do business in a country that assesses a recoverable value-added tax (VAT) or similar taxes, you might need to enter a journal entry with VAT.
You use the Journal Entries with VAT program (P09106) when you want to record a taxable entry without updating the Accounts Payable Ledger (F0411) or Customer Ledger (F03B11) tables. For example, you would do this if you wanted to enter bank charges.
The system provides a field for the address book number, which you can use to associate the entry with an employee, supplier, customer, or company. Depending on the setting of the processing option, the system might require an address book number for each detail line (general ledger distribution). You can enter a default address book number in the header area. The system uses this number for address book numbers that you leave blank on detail lines.
When you enter a journal entry with VAT, you can specify either the taxable or gross amount. The system calculates the tax and the amount that you did not specify (gross or taxable) based on the tax rate area. You must use a tax explanation code of V, V+ (tax on tax), or VT (tax only); the program does not accept any other tax explanation codes.
Because only one G/L distribution line might be specified for taxes, the system does not use the default tax rate area based on the business unit entered on the account; however, if the account is set up as taxable, the system will use the tax rate area that is set up for the account if the tax rate area is not specified on the form.
When you enter a journal entry with VAT, the system does the following:
• Automatically updates the Taxes table (F0018)
The system ignores the tax processing options when you post the journal entry.
• Creates Account Ledger records (F0911) for the tax account specified in the AAI item GTxxxx (where xxxx is the G/L offset from the tax rate area)
Note The system creates the offsetting tax entries when the journal entry with VAT transaction is entered, not when it is posted.
The additional entries that the system creates based on the GTxxxx AAIs cannot be reviewed from the Journal Entries with VAT program. You must use the standard Journal Entries program (P0911) to review these entries. The system differentiates entries that you enter from those that the system creates by updating the ALT5 field in the Account Ledger table (F0911) as follows:
• V
This code identifies the entry as the account entered in the Journal Entries with VAT program that has tax information specified.
• T
This code identifies the entry as the tax account that the system creates based on the AAI item GTxxxx.
• O

76
This code identifies the entry as the offset account entered in the Journal Entries with VAT program (P09106).
You can revise journal entries with VAT in the same way that you revise journal entries without VAT.
• If the journal entry is not posted, the system updates the existing record in the Taxes table.
• If the journal entry is posted, the system writes a revision record in the Taxes table.
You cannot create model or reversing journal entries using the Journal Entries with VAT program.
Example: Journal Entry with VAT
The following example shows a journal entry that was entered in order to record bank charges with VAT taxes using the Journal Entries with VAT program (P09106):
Because the offsetting entry (70.1110.BEAR) did not have taxes, the gross amount must equal the sum of the taxable and tax amounts entered for account 7001.8630; otherwise, the journal entry is not in balance and the system displays an error message.
The following example shows the same unposted transaction using the Journal Entry program (P0911). The system uses GTxxxx (where xxxx is the G/L offset entered for the tax rate area QUE) to locate the VAT tax account when you enter the journal entry, not when you post it. You cannot review these entries using the Journal Entries with VAT program; you must use program P0911.

77
Before You Begin Set up the tax AAIs for the General Accounting system.
► To enter journal entries with VAT
From the Tax Processing and Reporting menu (G0021), choose Journal Entries with VAT.
1. On Work with Journal Entries with VAT, click Add.
2. On Journal Entries with VAT, complete the following fields:
• G/L Date
• Explanation
3. Complete the following optional field in the header area:
• Address Number
The system copies the value that you enter to the corresponding field in each detail line that you enter.
4. Complete the following fields for each G/L distribution with tax:
• Account Number
• Tx Ex

78
You must use a tax explanation code that begins with V (V, VT, or V+). No other tax explanation codes are valid.
• Tax Area
5. Complete one of the following fields:
• Taxable Amount
If you enter the taxable amount, the system calculates the gross amount.
• Gross Amount
If you enter the gross amount, the system calculates the taxable amount.
6. To track taxes by G/L account, enter 1 in the following field:
• Track Taxes
The account must be set up as taxable in the Account Master table (F0901) to accept a value of 1.
7. If necessary, complete the following field in the detail area:
• Address Number
8. Review the calculated tax amount in the following field:
• Tax
If you change the tax amount, the system validates your change against the Tax Rules.
9. Repeat steps 4–8 for each G/L distribution line.
Note The system updates the Taxable Amount field even when you do not specify tax information. The system uses the gross amount as the taxable amount. The system does not update these journal entry lines in the Taxes table (F0018).
10. Click OK.
Use the Journal Entry program (P0911) to review the system-generated entries.
► To enter a tax-only journal entry
From the Tax Processing and Reporting menu (G0021), choose Journal Entries with VAT.
1. On Work with Journal Entries with VAT, click Add.
2. On Journal Entries with VAT, complete the following fields:
• G/L Date
• Explanation
3. Complete the following optional field in the header area:

79
• Address Number
4. Complete the following fields for the tax-only G/L distribution:
• Account Number
• Tx Ex
You must use VT.
• Tax Area
5. Complete one of the following fields. The system updates the other field based on the value specified.
• Gross Amount
• Tax
6. To track taxes by general ledger account, enter 1 in the following field:
• Track Taxes
7. Complete the G/L distribution for offsetting entries as needed and click OK.
Processing Options for Journal Entries with VAT (P09106)
Addr # Required
1. Enter a '1' if the address book number field is required to be filled in the grid. If left blank no error will be set.
Address Book Number
MBF Version
1. To override standard journal entry processing (version ZJDE0001 for application P0900049), enter an override version number. This should only be changed by persons responsible for system wide setup.
Version

80
Entering VAT-Only Vouchers for the Customs Authority (Bolle doganali)
In Italy, goods imported from outside the EU are subject to VAT. The Italian Customs Authority assesses VAT on goods imported from outside the EU at the relevant Italian domestic rate. To pay the required VAT, set up the Customs Authority as an address book record with a person/corporation code of 5 (customs authority). You can pay this type of VAT by creating VAT-only vouchers for the Customs Authority.
Normally in Italy, different document types are used for VAT-only vouchers and standard vouchers. The same next numbers are used for both types of vouchers, and both are printed sequentially on the A/R - A/P IVA Tax Report - Italy (R004051). Alternatively, you can print VAT-only vouchers separately on the A/R - A/P IVA Tax Report - Italy and with a separate numbering scheme. To do this procedure, set up next numbers by document type and print the A/R - A/P IVA Tax Report - Italy by document type.
Set up a special version of the A/P Standard Voucher Entry program (P0411) to process VAT-only vouchers. Use the processing options for the program to default a specific document type for VAT-only vouchers.
Note
You do not have to set up a special version of the Voucher Entry program if your company decides to use the same next number (Same As) for VAT-only vouchers and standard vouchers.
When you enter VAT-only vouchers for A/P, use the tax explanation code of VT. You can enter the tax amount with the gross amount that is equal to the tax amount for vouchers with a tax explanation code of VT.
You enter two types of VAT-only vouchers:
• Vouchers with VAT payment by Carrier/Customs Agency
• Vouchers with VAT payment directly to the Customs Authority
For VAT-only vouchers with VAT payment by carrier or customs agency, the entries are posted as follows:

81
VAT-only vouchers
DR - VAT Recoverable account
CR - Payable to VAT-only vouchers account
Customs agency voucher
DR - VAT Transit account
DR - VAT Recoverable account
CR - Debt to Customs Agency account
DR - Customs Expenses account
Close the VAT-only voucher
DR - Payable to VAT-only voucher account
CR - VAT Transit account
Note You create the entries to close the VAT-only voucher through the manual or automatic payment process. To do this procedure, replace the bank account with the VAT Transit account that was previously debited when the Customs Agency voucher was posted.
For VAT-only vouchers with VAT payment directly to the Customs Authority, the entries are posted as follows:
VAT-only vouchers DR - VAT Recoverable account
CR - Payable to VAT-only voucher account
Payment to the Customs Authority DR - Payable to VAT-only voucher account
CR - Bank account
Close the VAT-only voucher DR - Payable to VAT-only voucher account
CR - VAT Transit account
Printing Monthly VAT Reports
From the Italian VAT Processing menu (G00213), choose Monthly VAT Report.
In Italy, businesses are required to print monthly reports to document accounts payable and accounts receivable VAT. The report must be printed on a form following the guidelines of art. 27 of the DPR 26 ottobre 1972 n.633.
You use the processing options on the Monthly VAT Report to create both an Accounts Payable and an Accounts Receivable version of the report. You should run both reports monthly.
You also need to indicate which rate from your Intra-Community VAT tax rate/area is included on the report. On the Accounts Payable version, include the positive tax rate. On the Accounts Receivable version, include the negative tax rate.
To number the pages of the report progressively by calendar year, specify the year and number for the first page in the processing options. The pages are numbered on the report by

82
using the year and beginning with the number that you specify. For example, if you print two 1000-page reports during the year 2005, the pages should be numbered as follows:
• First report of 1000 pages – First page number 2005/1, last page number 2005/1000
• Second report of 1000 pages – First page number 2005/1001, last page number 2005/2000
In this example, you would specify a year of 05 and a first page number of 1 when you print the first report, and a year of 05 and a first page number of 1001 when you print the second report.
See Also Intra-Community VAT in the Global Solutions Italy Guide
Processing Options for A/R – A/P IVA Tax Report - Italy (R004051)
Default Tab
These processing options let you specify whether to generate the report in proof or final mode, whether to run the report for A/P or A/R, and whether to reverse the sign of transaction amounts on the report.
1. Processing Mode
Blank = Proof Mode
1 = Final Mode
Use this processing option to specify whether to run the report in proof or final mode. Valid values are:
Blank
Run the report in proof mode.
1
Run the report in final mode.
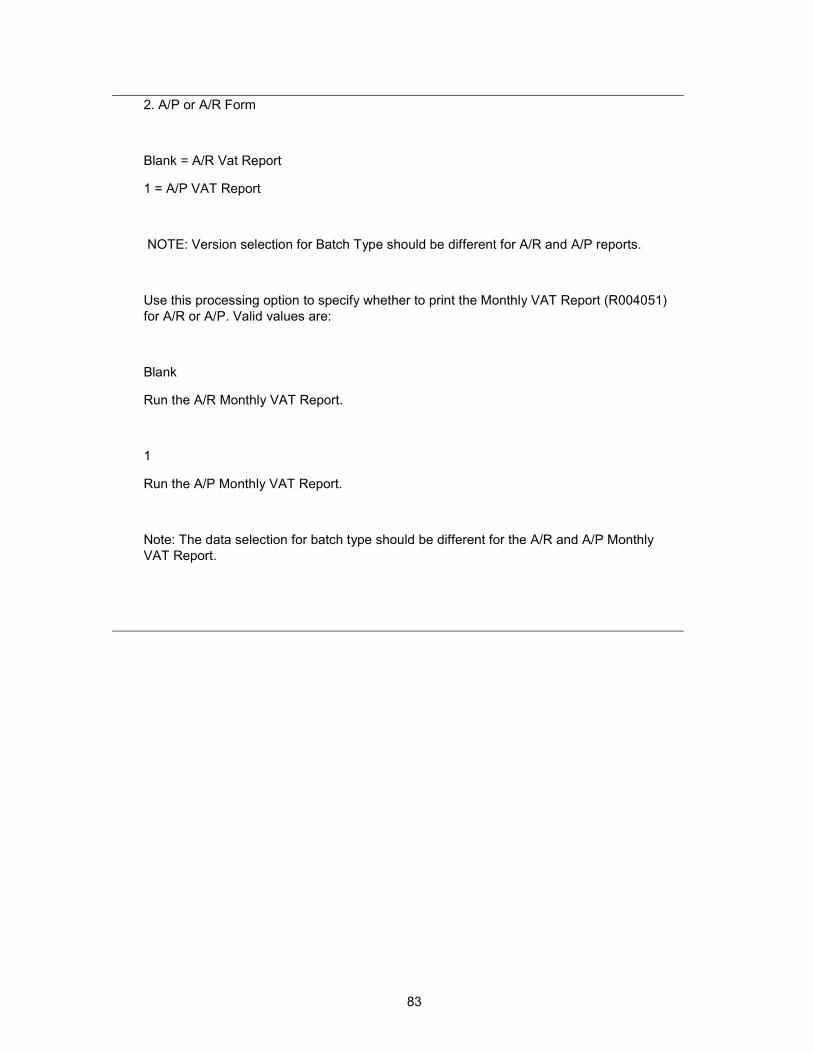
83
2. A/P or A/R Form
Blank = A/R Vat Report
1 = A/P VAT Report
NOTE: Version selection for Batch Type should be different for A/R and A/P reports.
Use this processing option to specify whether to print the Monthly VAT Report (R004051) for A/R or A/P. Valid values are:
Blank
Run the A/R Monthly VAT Report.
1
Run the A/P Monthly VAT Report.
Note: The data selection for batch type should be different for the A/R and A/P Monthly VAT Report.

84
3. Reverse Sign
Blank = Do not reverse the sign of the transaction
1 = Reverse the sign of the transaction
Select whether to reverse the sign for A/R or A/P in Processing Option 2
Use this processing option to specify whether to reverse the sign of the transaction amounts on the report. Valid values are:
Blank
Do not reverse the sign of the transaction amounts on the report.
1
Reverse the sign of the transaction amounts on the report.
Select Tab
These processing options let you specify the dates that the system uses to select transactions for the report as well as the tax rate for intra-community VAT.
1. From G/L Date
Use this processing option to specify a beginning G/L date for the system to use when it selects records for the report.

85
2. Through G/L Date
Blank = System Date
Use this processing option to specify an ending G/L date for the system to use when it selects records for the report. If you leave this processing option blank, the system uses the system date.
3. Tax Rate for Intra-community VAT
Blank = Tax Rate Line 1
1 = Tax Rate Line 2
Use this processing option to specify the tax rate for intra-community VAT that you want to print on the report. This depends on whether you are running the A/R version (Input VAT - minus sign) or the A/P version (Output VAT - plus sign). Valid values are:
Blank
Print the tax rate on line 1 of Tax Rate/Area Revision.
1
Print the tax rate on line 2 of Tax Rate/Area Revision.
Print Tab
These processing options let you specify how various elements print on the report.

86
1. Sequential Numbers and Dates
Blank = Do not skip 2 lines
1 = Skip 2 lines when document numbers are not sequential or when G/L dates are not sequential
Use this processing option to specify whether you want the system to skip lines on the report when document numbers or G/L dates are not sequential. Valid values are:
Blank
Do not skip lines on the report when document numbers or G/L dates are not sequential.
1
Skip lines on the report when document numbers or G/L dates are not sequential. If you choose this option, the system skips two lines.
2. Document Description
Blank = Print the document type description from invoice remark
1= Print the document type description from user defined codes instead of invoice remark
Use this processing option specify how you want the system to print the document type description. Valid values are:
Blank
Print the document type description from the invoice remark.
1
Print the document type description from the user defined codes.

87
3. Suppress Header
Blank = Print headings and page numbers
1 = Suppress headings and page numbers
Use this processing option to specify whether you want the system to suppress the printing of print headings and page numbers. Valid values are:
Blank
Print headings and page numbers.
1
Suppress headings and page numbers.
4. Enter the Year that should be printed with the page numbers of the report Blank = Print runtime page numbers if report heading is not suppressed Use this processing option to specify whether you want the system to print the year along with the page numbers on the report. Enter the last two digits of the fiscal year that you want to print on the report. If you leave this field blank and the report heading is not suppressed, the system prints runtime page numbers.
5. Enter the Number to be used as the first page number of the report Blank = Print runtime page numbers if report heading is not suppressed Use this processing option to specify the number from which you want to start the page

88
numbering for the report. If you leave this field blank and the report heading is not suppressed, the system prints runtime page numbers.
Currency Tab
These processing options let you set up as-if currency processing.
1. Enter the Currency Code for As-If currency reporting. Blank = Database Currency Use this processing option to specify the currency code for as-if currency reporting. This option allows you to print amounts in a currency other than the currency in which they are stored. Either enter a currency code or leave this option blank to print amounts in the currency in which they are stored.
2. Enter the As-Of date for processing the exchange rate for the as-if currency. Blank = System Date Use this processing option to specify the as-of date for processing the exchange rate for the as-if currency. If you leave this option blank, the system uses the exchange rate that is valid for the system date.
Printing the Summary VAT Report
From the Italian Tax Processing menu (G002131), choose Print VAT Summary Reports.
To review the total amount of VAT that is due to the Italian government, print the summary VAT report. The report prints VAT totals by:
• Register type
• Register class
• Previous balance

89
To number the pages of the report progressively by calendar year, specify the year and number for the first page in the processing options. The pages are numbered on the report by using the year and beginning with the number that you specify. For example, if you print two 1000-page reports during the year 2005, the pages should be numbered as follows:
• First report of 1000 pages – First page number 2005/1, last page number 2005/1000
• Second report of 1000 pages – First page number 2005/1001, last page number 2005/2000
In this example, you would specify a year of 05 and a first page number of 1 when you print the first report, and a year of 05 and a first page number of 1001 when you print the second report.
When you print the summary VAT report, the system:
• Creates a temporary workfile—Worktable for Printing IVA Summary - Italy (F74093)—that is based on the links that you establish for document type, register class, and register; and for the information in the Taxes table (F0018)
• Prints an error report that lists records from the Taxes table that do not include register type or register class information
• Prints the summary VAT report
See Also Intra-Community VAT in the Global Solutions Italy Guide
Rounding Considerations
Rounded lira amounts are reported in thousand lira increments. The rounding logic for the summary VAT report program is hardcoded as follows:
• If the last three digits of the total amount are greater than or equal to 500, then the rounding amount is the result of the subtraction of this value from the upper 1000 liras. For example, if the total is 1.154.750, the rounding amount is 250 and the total VAT to pay is 1.155.000.
• If the last three digits of the total amount are lower than or equal to 500, then the rounding amount is the difference between this value and the lower 1000 liras. For example, if the total is 1.154.350, the rounding amount is 350 and the total VAT to pay is 1.154.000.
Note
Italian laws state that the invoice must include the VAT amount. The VAT amount must be rounded to the lira if it includes fractions. Although the law does not identify the rounding method to use, the common and current interpretation of the law is that mathematical rounding should be used to round to the nearest lira. This interpretation is supported by the laws regarding the payment and collection of VAT, which state that the amount should be rounded to the nearest thousand lira, as described above. J.D. Edwards supports this method of rounding.

90
Date Ranges
The beginning date of the date range that is specified in the processing options for the Print VAT summary Reports (R74093) must be one day later than the most recent record in Worktable for Printing IVA Summary – Italy (F74093). If you are running the summary VAT report for the first time, the beginning date must be one day later than the date of the initial VAT balance.
Intra-Community VAT Summary Report
You must print the information for sales and purchases that are subject to intra-community VAT on separate sections of the Print VAT Summary Reports. To separate intracommunity VAT on the report, you must set up a register type and class for the intracommunity VAT tax rate/area and document type.
To report the offset intracommunity VAT, you need to indicate which rate from your Intra-Community VAT tax rate/area includes the negative tax rate.
Before You Begin Establish the relationships between your document types, and register types and
classes. See Setting Up Register Types and Classes for Summary VAT in the Global Solutions Italy Guide.
Establish an initial VAT balance. See Establishing an Initial VAT Balance in the Global Solutions Italy Guide.
Processing Options for Print VAT Summary Reports (R74093)
Default Tab
This processing option let you specify whether to generate the report in proof or final mode.
1. Processing Mode
Blank = Proof Mode
1 = Final Mode
Use this processing option to specify whether to run the report in proof or final mode. Valid values are:
Blank
Run the report in proof mode.
1
Run the report in final mode.

91
Select Tab
These processing options let you specify information that the system uses to select transactions for the report as well as information about intracommunity VAT.
1. From date Use this processing option to specify the beginning date for the system to use when it selects records for the report.
2. Thru date Use this processing option to specify the ending date for the system to use when it selects records for the report.
3. Company Use this processing option to specify the company for the system to include on the report.
4. Tax Rate for Payable Intra-Community Offset VAT. Blank = Tax Rate 1 1 = Tax Rate 2 Use this processing option to specify the tax rate for payable intracommunity offset VAT that you want to print on the report. Valid values are: Blank Print tax rate 1 on the report. 1 Print tax rate 2 on the report.
5. VAT Register Class for Payable Intra-Community Offset VAT.

92
Use this processing option to specify the VAT register class for payable intracommunity offset VAT. Choose a valid VAT register class from UDC table 74/01.
6. VAT Register Type for Payable Intra-Community Offset VAT. Use this processing option to specify the VAT register type for payable intracommunity offset VAT. Choose a valid register type from UDC table 74/02.
Print Tab
These processing options let you specify how various elements print on the report.
1. Print Header Option
Blank = Standard JDE report header will be printed
1 = Thru date header will be printed
Use this processing option to specify whether the system should print the standard J.D. Edwards report header or the through date header. Valid values are:
Blank
Print the standard report header.
1
Print the through date report header. If you choose this option, the system prints the words, "Payment Vat Report thru" and then prints the date that you entered in the Thru date processing option.
2. Enter the Year that should be printed with page numbers of the report.

93
Blank = Print runtime page numbers
Use this processing option to specify whether you want the system to print the year along with the page numbers on the report. Enter the last two digits of the fiscal year that you want to print on the report. If you leave this field blank, the system prints runtime page numbers.
3. Enter the Number to be used as the first page number of the report.
Blank = Print runtime page numbers
Use this processing option to specify the number from which you want to start the page numbering of the report. If you leave this option blank, the system prints runtime page numbers.
4. Suppress negative sign
Blank = Do not suppress the printing of the negative sign
1 = Suppress the printing of the negative sign
Use this processing option to specify whether to suppress the printing of the negative sign. Valid values are:
Blank
Do not suppress the negative sign.
1

94
Suppress the negative sign.
Currency Tab
These processing options let you set up as-if currency processing.
1. Enter the Currency Code for as-if currency reporting.
Blank = Database Currency
Use this processing option to enter the currency code for as-if currency reporting. This option allows you to print amounts in a currency other than the currency in which they are stored. Enter a valid currency code from the Designate Currency Codes program (P0013). The system converts and prints the amounts in this as-if currency. If you leave this processing option blank, the system prints amounts in the currency in which they are stored.
2. Enter the As-of date for processing the exchange rate for the as-if currency.
Blank = System Date
Use this processing option to enter the as-of date for processing the exchange rate for the as-if currency. If you leave this processing option blank, the system uses the exchange rate that is valid for the system date.

95
Printing the VAT by Tax Area Code Report
From the Italian VAT Processing menu (G00213), choose VAT Report by Tax Area Code.
In Italy, businesses are required to print a report of VAT by tax area code. The report must print the VAT for Accounts Payable and Accounts Receivable in two separate columns. In addition, the report must be printed on a special legal form that is prenumbered and approved by the tax authorities.
Processing Options for IVA Report by Tax Area Code (R00400)
G/L Date
Enter the From and Through G/L Dates:
From Date
Through Date
Print Option
Enter '1' to suppress report headings and page numbers. If left blank page headings will be printed.
Suppress page headings
Blank Line
Enter '1' to insert a blank line when Tax Area Codes are skipped.
Insert a Blank Line
Reverse Sign
Enter '1' to reverse the sign on A/R transactions.
Reverse the Sign Option
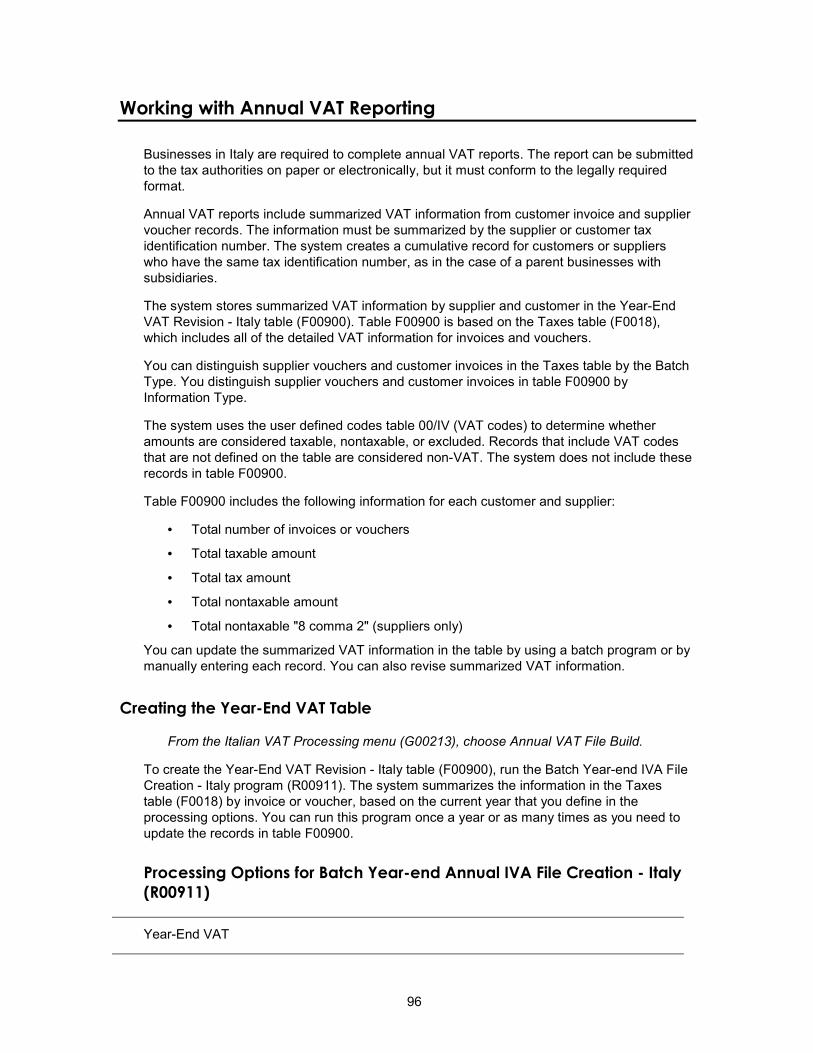
96
Working with Annual VAT Reporting
Businesses in Italy are required to complete annual VAT reports. The report can be submitted to the tax authorities on paper or electronically, but it must conform to the legally required format.
Annual VAT reports include summarized VAT information from customer invoice and supplier voucher records. The information must be summarized by the supplier or customer tax identification number. The system creates a cumulative record for customers or suppliers who have the same tax identification number, as in the case of a parent businesses with subsidiaries.
The system stores summarized VAT information by supplier and customer in the Year-End VAT Revision - Italy table (F00900). Table F00900 is based on the Taxes table (F0018), which includes all of the detailed VAT information for invoices and vouchers.
You can distinguish supplier vouchers and customer invoices in the Taxes table by the Batch Type. You distinguish supplier vouchers and customer invoices in table F00900 by Information Type.
The system uses the user defined codes table 00/IV (VAT codes) to determine whether amounts are considered taxable, nontaxable, or excluded. Records that include VAT codes that are not defined on the table are considered non-VAT. The system does not include these records in table F00900.
Table F00900 includes the following information for each customer and supplier:
• Total number of invoices or vouchers
• Total taxable amount
• Total tax amount
• Total nontaxable amount
• Total nontaxable "8 comma 2" (suppliers only)
You can update the summarized VAT information in the table by using a batch program or by manually entering each record. You can also revise summarized VAT information.
Creating the Year-End VAT Table
From the Italian VAT Processing menu (G00213), choose Annual VAT File Build.
To create the Year-End VAT Revision - Italy table (F00900), run the Batch Year-end IVA File Creation - Italy program (R00911). The system summarizes the information in the Taxes table (F0018) by invoice or voucher, based on the current year that you define in the processing options. You can run this program once a year or as many times as you need to update the records in table F00900.
Processing Options for Batch Year-end Annual IVA File Creation - Italy (R00911)
Year-End VAT

97
1. Enter a '1' to specify customers.
Enter a '2' to specify Suppliers and Custom Authorities.
Caution: Only '1' and '2' are valid entries.
Blank will default in a value of '1' for Customers.
2. Enter a '1' to clear the Annual IVA File (F00900). If left blank this file will be updated.
Caution: This processing option should be set to clear the file only once per year.
Currency
1. Enter the Currency Code for as-if currency reporting. This option allows for amounts to be translated and stored into F00900 in a currency other than the currency they are stored in. If left blank, amounts will be stored into F00900 in their database currency.
2. Enter the As-Of date for processing the current rate for the as-if currency. If left blank, the system date will be used.
Printing the Annual VAT Control Report
From the Italian VAT Processing menu (G00213), choose Annual VAT Control Reports.
Print the Annual VAT Control Report to review a paper copy of the information in the Year-End VAT Revision - Italy table (F00900) before you transfer the Annual VAT Report to tape or print the Annual VAT Report on special forms.
You can use the control report to simulate figures as they will be printed on the special form or on a tape. You can also use the report to verify that the amounts in table F00900 correspond to the amounts in the Taxes table (F0018).
Processing Options for Annual IVA Control Reports (R00910)
Scaling Factor
Enter a "1" if you want to use the scaling factor of 1000. Default of blank will not use a scaling factor.

98
Revising Annual VAT Information
In exceptional cases, you might need to revise existing records or create new records in the Year-End VAT Revision – Italy table (F00900).
► To revise annual VAT information
From the Italian VAT Processing menu (G00213), choose Annual VAT File Revision - Italy.
1. On Work With Yearly VAT Details, click Find.
2. Choose a record and click Select.
3. On VAT File Revision, choose a row in the detail area, and then choose VAT Revision from the Row menu.
4. On Yearly VAT Revision, revise the information in any of the following fields and click OK:
• Taxable Amount
• Tax
• Non-Taxable Amount
• Number of Documents

99
• Excluded Number of Documents
• Excluded Amount
• Non-Taxable Amount (8 comma 2)
Creating the Year-End VAT Tape
From the Italian VAT Processing menu (G00213), choose Year-end VAT Output File Generation - Italy.
Run the Year-End VAT Tape Creation program (R00918) to transfer the information from the Year-End VAT Revision - Italy (F00900) table to a file that you can copy to a tape in the format that is required by the tax authorities in Italy. If you decide to transfer the information to tape, you do not have to print the special form reports for suppliers and customers.
Processing Options for Year-end IVA Tape Creation - Italy (R00918)
R00918
1. Enter the year to process. This will determine the selection of records based on Invoice Date.
Century
Year
2. Enter the address book line to be used for continuation of the name.
3. Enter the address book line to be used for street information.
4. Enter the code to be used for Person/Corporation Tax Code.
5. Enter the appropriate number to designate the tape density.
'1' - 800 bpi
'2' - 1600 bpi
'3' - 6250 bpi

100
Printing Annual VAT Reports for Customers and Suppliers
Use one of the following navigations:
From the Italian VAT Processing menu (G00213), choose A/P Annual Rpt Supplier Format - Italy.
From the Italian VAT Processing menu (G00213), choose A/R Annual Report Customer Format – Italy.
You can submit print copies of the annual VAT reports for customers and suppliers. You do not have to print paper copies of the annual VAT reports if you submit the reports on tape. To print copies of the annual VAT reports, run the A/P Annual Rpt Supplier Format – Italy program (R00917) or the A/R Annual Report Customer Format – Italy program (R00916).
The annual VAT reports for suppliers and customers include the following information:
• Supplier or customer name
• Street
• Postal Code
• City
• Province
• Tax Identification Number
• Total taxable amount of vouchers or invoices for the current year
• Total taxable amount of vouchers or invoices for the previous year
• Total tax amount of voucher or invoices for the current year
• Total tax amount of voucher or invoices for the previous year
• Total nontaxable amount of vouchers or invoices for the current year
• Total nontaxable amount of vouchers or invoices for the previous year
Processing Options for A/R Annual Report Customer Format – Italy (R00916)
Dates
1. Enter the year to process. This will determine the selection of records based on invoice.
Century
Year
A/B

101
2. Enter the address book line number to be printed for continuation of the name.
3. Enter address book line to be used for street information.
Header
4. Enter the information to be printed at the top of the form.
Enter Person/Corporation Code
Enter Business Information
Enter Company Business
Processing Options for Annual IVA Special Form – Supplier–Italy (R00917)
Date
Century
Effective Year
Enter the year to process. This will determine the selection of records based on Invoice date.
Address
Enter the address book line to be used for continuation of the name. Blank will default to the current setup which means there is no additional line for continuation of the name.
Enter the address book line to be used for street information. Blank will default to the address line 1.
Tax Information

102
Enter the information to printed on the top of the form.
Personal/Corp. Code
Business Information
Company Business
Working with Suspended VAT
Italian law allows businesses that sell goods to certain government-owned or controlled institutions, such as hospitals and schools, to defer the booking of VAT payable until receipt of complete or partial payment for the invoice. Instead of booking VAT to an active VAT payable account at the time of the sale, the business must hold the VAT in suspense until payment is received. Typically, invoices that are subject to suspended VAT are for large amounts that are paid in installments over a long period of time.
In Italy, businesses report and remit VAT to the government on a periodic basis. The amount that a business owes is calculated as the difference between the VAT payable (generated in the Accounts Receivable system) and the VAT recoverable (generated in the Accounts Payable system) amounts.
You must report on suspended VAT, in addition to VAT payable and VAT recoverable. When the suspended VAT is realized, it becomes VAT payable and is reported as such.
You can use J.D. Edwards localized software for suspended VAT to:
• Identify which transactions are subject to suspended VAT.
• Calculate and print VAT payable at the time of invoicing.
• Hold the VAT payable in a suspense account until payment is received.
• Generate the appropriate accounting transactions when payment is received.
• Report on both VAT payable and suspended VAT.
To process suspended VAT for Italy:
1. Enter invoices that are subject to suspended VAT with a special tax rate/area (for example, SOSP20) and a special document type (for example, Q9) for suspended VAT.
2. Post the invoices. The tax amount is posted to a special suspended VAT account.
3. Enter receipts, selecting the invoices that are subject to suspended VAT and have received payment.
4. Post the receipts.

103
5. Run the Suspended IVA - Receipts/Rebates Control Reports program (R74076C) to create journal entries to reclassify the suspended VAT amount as a recognized VAT in a VAT payable account.
The following steps explain the suspended VAT process:
1. Setup
• User Defined Codes
• Document Type (00/DT) and Document Type – Invoices Only (00/DI)
Code Description Q9 Suspended VAT
Q7 Suspended VAT - Recognized
• Suspended VAT Document Types (74/DT)
Code Description Q9 Q7
• Suspended VAT Rates (74/SP)
Code Description SOSP20 IVA20
• Tax Rates/Areas (P4008)
Tax Rate/Area G/L Offset Tax Rate IVA20 VATB 20%
SOSP20 SOSP 20%
• Automatic Accounting Instructions (P0012)
Item Number
Object Account
RTVATB 4431 (VAT Payable)
RTSOSP 1241 (VAT Suspense)
2. Customer Ledger Inquiry (P03B2002)
Customer Document Type
Document Number
Date Invoice Amount
Tax Area Tax Explanation
4272 Q9 1234 06/15/05 10000 SOSP20 V
3. General Ledger Post Report (R09801)
• Set processing options to post VAT amounts.
• Verify that the VAT amount was posted to the object account designated in AAI RTSOSP.
4. Receipts of Payment
Customer Document Type
Document Number
Date Invoice Amount
Tax Area Tax Explanation
Receipt Amount
4272 Q9 1234 06/15/05 10000 SOSP20 V

104
4272 RC 502 07/15/05 5000
5. General Ledger Post Report (R09801)
6. Suspended IVA – Receipts/Rebate Control Report (R74076C)
• Identifies paid Q9 documents.
• Creates tax file records for paid Q9 documents.
• Creates accounting transactions for taxes payable on those documents.
Euro Considerations for Suspended VAT
The Taxes table (F0018) does not have its own euro conversion program. The records in table F0018 are converted when you run the euro conversion programs for the Customer Ledger (F03B11), the Accounts Payable Ledger (F0411), and the Account Ledger (F0911) tables.
When you run the euro conversion program for the Customer Ledger, the system converts related records for the suspended VAT document type (Q9) in the Taxes table as long as the tax amount field (RPSTAM) is populated in the Customer Ledger.
When you run the euro conversion program for the Account Ledger, the system converts related records for the suspended VAT-recognized document type (Q7) in the Taxes table.
Multicurrency Considerations for Suspended VAT
The Suspended IVA - Receipts/Rebate Control Reports program (R74076C) has been updated to create journal entries with the suspended VAT-recognized document type (Q7) in the CA ledger as well as in the AA ledger when payment is received for an invoice with the suspended VAT document type (Q9).
Generating Suspended VAT Amounts
From the Italian Tax Processing menu (G002131), choose Suspended VAT Generation.
You must identify and account for customer payments that are subject to suspended VAT. To do this procedure, run the Suspended VAT Generation program. When you run this program, the system:
• Selects only records in the Customer Ledger table (F03B11) that are subject to suspended VAT and that do not have corresponding records in the Suspended IVA Generation – Receipt/Rebate Control - Italy table (F743B14I). Records in table F03B11 that are subject to suspended VAT have a specific user-defined document type.
• Creates a record in the Suspended IVA Generation – Receipt/Rebate Control - Italy table (F743B14I).
• Creates an internal document in the Taxes table (F0018) with a specific user-defined document type for suspended VAT-recognized. The program uses the values in UDC 74/DT to determine the association between the suspended VAT document type and the suspended VAT-recognized document type. The new document uses the tax code to recognize VAT, based on the tax rates and areas that you set up for your system. The program uses the values in UDC 74/SP to determine the association between the suspended VAT code and the recognized VAT tax code.

105
• Creates journal entries in the Account Ledger table (F0911). The journal entries debit the VAT suspense account and credit the VAT payable account.
The system also prints an internal control document that you can use as an audit trail of the new, system-generated entries in the Taxes table (F0018). The control document includes the following information:
• Invoice header with supplier address
• Identifier of the internal document (type, number, and G/L date)
• Suspense invoice reference (type, number, and G/L date)
• Totals by VAT rate, taxable amount, and tax
• Internal document totals
Data Selection
Use data selection on the Suspended IVA Generation – Receipt/Rebate Control -Italy program to select only those documents with the suspended VAT document type.
Before You Begin Define suspended VAT and suspended VAT-recognized document types in UDC
00/DT and UDC 00/DI.
Cross-reference the suspended VAT and suspended VAT-recognized document types in UDC 74/DT.
Set up a tax rate/area for suspended VAT. See Tax Rates for Suspended VAT in the Global Solutions Italy Guide.
Cross-reference the suspended VAT and VAT payable tax rates on UDC 74/SP.
Set up automatic accounting instruction RTxxxx for the G/L offset on the suspended VAT tax rate.
Link your customers to the suspended VAT G/L Offset account by assigning the suspended VAT tax rate to them. See Entering Customer Master Information in the Accounts Receivable Guide.
Post all outstanding transactions.
Processing Options for Suspended IVA – Receipts/Rebate Control Reports (R74076C)
As Of Date
1. Enter the As OF G/L date. The receipts/rebates on vouchers with suspense IVA before this date will be included in the generation of new documents. If blank, the current system date will be used.
G/L Date
2. Enter the G/L Date to use to generate the documents with debit IVA. If blank, the receipt G/L date will be used.

106
Doc Generation
3. Enter '1' to run the document generation. If left blank only the controls will be performed with the relative notification.
4. Enter '1' if a new document number is to be assigned, based on document type. If blank the old document number will be maintained.
Ledger Type
5. Enter the Ledger Type to post new generated documents. If left blank 'AA' will be used.
Versions
6. Enter a '1' if you want to automatically post the newly generated documents. If blank the newly generated documents will not be posted.
7. Enter the version of the Posting UBE to be submitted. If blank ZJDE0001 version will be submitted.
8. Enter a '1' if you want to automatically submit the Internal Document print. If blank the Internal Document print will not be submitted.
9. Enter the version of the Internal Document print. If blank the ZJDE0001 version will be submitted.
Printing the Open Suspended VAT Invoice Listing
From the Italian Tax Processing menu (G002131), choose Invoice List Control Report.
You can print a list of suspended VAT invoices that still need to be paid by printing the Invoice List Control report (R74079). When you print the report, the system verifies that the invoice has not been paid on the "as of" date that you specify for the report. The system then calculates the open amount.
For each invoice, the report lists the following information:
• Identifying data (date, number, and pay item)
• VAT rate
• Original credit amounts (taxable, tax, and total)

107
• Advance receipts amounts and credit notes to be debited (taxable, tax, and total)
Processing Options for Invoice Control Report (R74079)
As Of Date
As of Date: Enter the As of Date. If Left Blank System Date Will Be Use.
Currency
1. Enter the Currency Code for as-if currency reporting. This option allows for amounts to print in a currency other than the currency they are stored in. Amounts will be translated and print in this as-if currency. If left blank, amounts will print in their database currency.
2. Enter the As-Of date for processing the current rate for the as-if currency. If left blank, the system date will be used.
Printing the Monthly Suspended VAT Report
From the Italian Tax Processing menu (G002131), choose Monthly VAT Report.
The Monthly VAT Report is the same monthly VAT report that you run to report on all types of VAT. To run the report for suspended VAT, use data selection to select only documents with the document type for suspended VAT. To run the report for non-suspended or recognized VAT, use data selection to select all documents except those with the document type for suspended VAT.
See Also Printing Monthly VAT Reports in the Global Solutions Italy Guide for more information
on the A/R - A/P IVA Tax Report - Italy (R004051), including the processing options for the report
Working with the VAT Ceiling
The VAT ceiling is an annual limit that exempts a company from VAT on the portion of their invoices that is below the limit. Companies that sell more than a specific percentage of their total produce outside of their own country are eligible for the VAT ceiling. Companies that are eligible for the VAT ceiling should notify suppliers not to include VAT on their invoices. Once the year-to-date total of the company's invoices reaches the VAT ceiling, the company should notify its suppliers to begin including VAT again.
In some countries, such as Italy, the VAT ceiling limit, as well as eligibility requirements, is set by the government.

108
You can use the J.D. Edwards localized solution for the VAT ceiling to:
• Determine eligibility for the VAT ceiling.
• Calculate the VAT ceiling annual limit.
• Monitor the use of the VAT ceiling during the year.
• Produce a monthly report. You can use this report to complete a legal register, if necessary
• Send a workflow message to the appropriate manager when the VAT ceiling amount that is available at the end of a month is within a threshold percentage that you define. The manager can then notify your suppliers to include VAT on their invoices.
Note
To use J.D. Edwards VAT ceiling features to meet legal requirements, you must use both the Accounts Payable and Purchasing systems. If you are not using the Purchasing system, you can use a processing option on the Monitor VAT Ceiling - Italy program (R74416) to bypass the Purchasing system. However, if you bypass the Purchasing system, the system gives only an estimate of the VAT ceiling use during the year. The amounts are not legally acceptable and should not be entered in a legal VAT ceiling register.
If your organization is divided into different companies within the J.D. Edwards system, you should consolidate those companies under a parent company for purposes of the VAT ceiling. You can use the Default Company processing option on the Calculate VAT Ceiling-Italy program (R74412) and the Company processing option on the Monitor VAT Ceiling-Italy program (R74416) to enter the name of the parent company. If you do not complete these processing options, the system does not consolidate companies and calculates the VAT ceiling for each company within the J.D. Edwards system.

109
The following graphic illustrates the VAT ceiling process:
Italian VAT Ceiling Requirements
Companies in Italy that sell more than 10 percent of their total produce outside of Italy can purchase goods and services from their suppliers without having to apply VAT within the limits of the VAT ceiling amount. The VAT ceiling amount is calculated on an annual basis and corresponds to the amount of export operations (goods and services) sold by the company during the previous year.

110
Legal Reporting Requirements
Italian legislation requires that you enter data in a legal register within the end of the second month following the month on which you are reporting. For example, you can obtain these data by running the Monitor VAT Ceiling-Italy report (R74416) for the month of May at the end of July, run it again for the month of June at the end of August, and so on.
A supplier can send you a voucher by the 20th of the month following the month in which the goods were delivered. For this reason, you should wait until the last days of the two-month-long grace period for registering VAT ceiling data to run the Monitor VAT Ceiling-Italy report in final mode so that you have the most accurate data that is possible. If you wait until this time to run the report in final mode, the "Received not vouchered" amount should equal zero.
Determining Eligibility for the VAT Ceiling
From the Italian VAT Processing menu (G00213), choose Calculate VAT Ceiling.
You can run the Calculate VAT Ceiling report at the beginning of each year to determine if you are eligible for the VAT ceiling, based on your previous year's sales, and to record the VAT ceiling limit for the coming year.
To determine your eligibility, the system uses the information in the Customer Ledger table (F03B11) to perform the following calculations:
• The gross amount for all of the invoices between the dates that you specified in the processing options
• The gross amount for all of the foreign invoices between the dates that you specified in the processing options
• The percentage of all of the foreign invoices
The system produces a report that indicates whether you are eligible for the VAT ceiling, based on the percentage of foreign invoices.
If you are eligible for the VAT ceiling, the system calculates the initial VAT ceiling limit. The initial VAT ceiling limit is the total amount of vouchers that will be exempt from VAT.
The system stores the initial VAT ceiling limit in the VAT Ceiling Limit-Italy table (F74413).
Processing Options for Calculate VAT Ceiling (R74412)
Display Tab
Use these processing options to specify the G/L date range of the invoice records to examine in determining VAT ceiling eligibility.

111
1. From GL Date
Use this processing option to specify the beginning G/L date for the records to be examined. The system examines invoices for the year preceding the year for which you are determining VAT ceiling eligibility. If you are determining eligibility for the current year, this date is the beginning date of the previous year.
2. Thru GL Date
Use this processing option to specify the ending G/L date for the records to be examined. The system examines invoices for the year preceding the year for which you are determining VAT ceiling eligibility. If you are determining eligibility for the current year, this date is the ending date of the previous year.
Default Tab
Use these processing options to specify default values to use in determining VAT ceiling eligibility.
1. Default Company Use this processing option to specify a company number to use for consolidating multiple companies. If this processing option is blank, the VAT ceiling will be calculated for each company processed.
2. Default Percentage Use this processing option to specify the percentage used to determine eligibility for the VAT ceiling. This is the ceiling percentage. For example, if the tax authority requires that at least 10 percent of your total produce must be sold abroad in order to qualify for the VAT ceiling, enter 10 in this option.
3. Vat Ceiling Fiscal Year (Required) Use this processing option to specify the fiscal year for which you are determining VAT

112
ceiling eligibility.
Adding VAT Ceiling Information
Rather than having J.D. Edwards software calculate your VAT ceiling automatically, you can manually add VAT ceiling information. For example, if you are converting to J.D. Edwards software mid-year and you know your VAT ceiling limit, you can enter it manually.
► To add the VAT ceiling
From the Italian VAT Processing menu (G00213), choose Review VAT Ceiling Limit.
1. On Work With VAT Ceiling, click Add.
2. On VAT Ceiling Revision, complete the following fields and click OK:
• Company
• Date Fiscal Year Begins
• Manager Notification
• Initial Vat Ceiling
• Current VAT Ceiling
Monitoring the VAT Ceiling
From the Italian VAT Processing menu (G00213), choose Monitor VAT Ceiling.
When you run the Monitor VAT Ceiling report (R74416), the system calculates the total amount of vouchers that has been processed during the period that is specified in the processing options. To determine whether you are still within the VAT ceiling limit, the system subtracts the total invoices from the initial VAT ceiling limit.
When the total amount of your invoices has reached the threshold percentage that you specified in the processing options, the system sends a workflow message to the person who is responsible for notifying suppliers to include VAT on their vouchers.
You should run the Monitor VAT Ceiling report frequently in proof mode to monitor the VAT ceiling. During any given month, the "Received not vouchered" amount should steadily decrease. The amounts that are obtained when you run the report in proof mode give an estimate of the use of the VAT ceiling during the specified period.
You run the Monitor VAT Ceiling report in final mode to record the month's progress toward the limit in the VAT Ceiling Limit - Italy table (F74413).
You can use the Review VAT Ceiling Limits-Italy program (P74413) to view the information that is provided by the Monitor VAT Ceiling report.

113
Caution
Because the VAT Ceiling Limits-Italy table is updated only when you run the Monitor VAT Ceiling report in final mode, you should run the Monitor VAT Ceiling report in proof mode rather than using the Review VAT Ceiling Limit program if you want to check VAT ceiling information at times other than when you have just run the Monitor VAT Ceiling report in final mode.
Manager Notification
You can use the processing options on the Monitor VAT Ceiling report to specify a threshold percentage. When the remaining VAT ceiling percentage reaches the threshold percentage, the system sends a message to a manager to inform him or her that the VAT ceiling that remains is nearing its limit. For example, if you enter 10, the manager is notified when 90 percent of the VAT ceiling has been used and only 10 percent remains. If you wait until the VAT ceiling is reached to inform your suppliers to begin to include VAT on invoices again, you might incur fines.
Processing Options for Monitor VAT Ceiling - Italy (R74416)
Process Tab
Use these processing options to specify the date range of the fiscal year for which you are monitoring the VAT ceiling, whether you are using the J.D. Edwards Purchasing module, and whether to run the report in proof or final mode.
Vat Ceiling Period
Use this processing option to specify the accounting period for which you are monitoring the VAT ceiling.
Beginning Date for Fiscal Year Being Monitored
Use this processing option to specify the beginning date of the fiscal year for which you are monitoring the VAT ceiling.
From Date

114
Use this processing option to specify the starting date of the month for which you are monitoring the VAT ceiling.
Thru Date
Use this processing option to specify the ending date of the month for which you are monitoring the VAT ceiling.
Purchasing Module
Use this processing option to specify whether you are using the Purchasing module. Valid values are:
Blank
The Purchasing module is installed.
1
The Purchasing module is not installed.
Proof / Final Mode
Use this processing option to specify whether the system runs the report in proof or final mode. Valid values are:
Blank
Proof mode

115
1
Final mode
When you run the report in final mode, the system updates the amount of VAT ceiling used with the total of the supplier invoices that were processed during the month that is being monitored. The amount of VAT ceiling used is stored in the VAT Ceiling Limit - Italy table (F74413).
Defaults Tab
Use these processing options to specify default information that is used during processing, such as the threshold percentage and the manager to be notified when the threshold percentage is reached.
Company Use this processing option to specify the company that you want to use to consolidate multiple companies for VAT ceiling calculations. If you leave this option blank, the VAT ceiling will be monitored separately for each company being processed.
Manager Notification Use this processing option to specify the Address Book number of the manager who will receive a workflow message. The system sends a message when the amount of VAT ceiling remaining reaches the threshold you specify in the Threshold Percentage processing option. If you leave this option blank, the threshold message will be sent to the person whose address book number you entered on the VAT Ceiling Revision form.
Threshold Percentage Use this processing option to specify a threshold percentage for the VAT ceiling. When the year-to-date total of your invoices reaches the VAT ceiling threshold, the system sends a workflow message to the manager who is listed in the Manager Notification processing option. The manager can then notify your company's suppliers to include VAT on their invoices. For example, if you enter 10, the manager will be notified when 90 percent of the VAT ceiling has been used and only 10 percent remains.
Currency Use this processing option to specify whether to display amounts in euros in addition to

116
the base currency. Blank Do not display amounts in euros. 1 Display amounts in the base currency and in euros. The system converts currency amounts at the current exchange rate from the Currency Exchange Rates table (F0015).
Currency Code - From Use this processing option to specify the base currency for the report, such as euro (EUR) or lira (ITL).

117
Bank Information Processing
J.D. Edwards country-specific processes for banking requirements in Italy include validating bank information. In Italy, businesses that remit incorrect or incomplete bank identification or account information to the bank are subject to fees. To avoid these charges, businesses must carefully validate bank identification and account information that is entered into the system during data entry.
You can use J.D. Edwards software to validate the following bank information:
• Bank identification numbers
• Account information
The system validates bank information based on the Bank ID - Italy (F74030).
Validating Account Information
You can set up your system to automatically validate account information when you use the following programs:
• Bank Accounts by Address (P0030A)
• G/L Bank Accounts (P0030G)
• Bank Revision – Italy (P7430IT)
• Enter Customer Drafts (P03B602)
The system validates bank information based on the Bank ID - Italy table (F74030).
Validating Bank Identification Information
Italian banks assess a service charge when invalid account or bank identification numbers are included in the customer information that businesses remit for processing accounts receivable drafts (RiBa) and automatic payments.
Italian bank identification information consists of a transit code, which includes two 5-character segments: the Bank Code (ABI) and the Bank Branch Code (CAB). The ABI segment identifies the bank (for example, Banco di Napoli) and is followed by the CAB segment, which identifies the branch (for example, Banco di Napoli – Positano).
The Banca d'Italia maintains and updates valid bank identification numbers. Individual banks can provide their clients with the updated information on tape or diskette.
J.D. Edwards supports the COMIT format and ships a preloaded bank identification information table with the localized software for Italy. The table includes all of the possible valid combinations of bank transit accounts and branches as provided by the Banca d'Italia. J.D. Edwards updates the bank identification information table with each release of the software. In addition, you can make your own revisions to update the bank table as needed.
If you use J.D. Edwards localized software to validate bank identification information, the system validates bank transit numbers and bank branch codes when you:
• Generate preauthorized accounts receivable drafts.

118
• Create the accounts receivable drafts remittance table.
During both processes, the system validates the customer bank information against the valid bank identification information in the Bank ID - Italy table (F74030). The system creates drafts for all of the customers, even if the bank information is invalid. The system identifies the customers whose bank information is invalid with a warning message. If the bank information for a customer is missing from table F74030, the system prints a list of these customers on an exception report (R03571E).
J. D. Edwards software validates account and bank identification information throughout the draft process as follows:
A/R Batch Draft Creation (R03B671)
The system prints an error report that lists customers with missing or invalid bank information. You can review the list to correct or update the bank information before you generate the drafts.
Draft Remittance (R03B672)
When you remit drafts, the system validates bank information again and includes the drafts for all of the specified customers in the electronic bank file. The system prints an error report that lists the customers with missing or invalid bank information.
Uploading Bank Identification Information to Your System
From the Italian Bank File Processing menu (G00215), choose Bank ID Table Upload - Italy.
You can automatically update bank identification information from a tape or diskette to your system. To do this procedure, run the Bank ID Table Upload - Italy program (R74301). This program is a template that is based on the COMIT record layout. You might need to customize the program to meet your specific needs.
Revising Bank Identification Information Manually
You can revise bank identification information manually on an as-needed basis.
► To revise bank identification information manually
From the Italian Bank File Processing menu (G00215), choose Bank Revision - Italy.
1. On Work With Bank - Italy, click Find.
2. Choose a bank code and click Select.
3. On Bank Revision – Italy, revise any of the following fields and click OK:
• Name
• Address
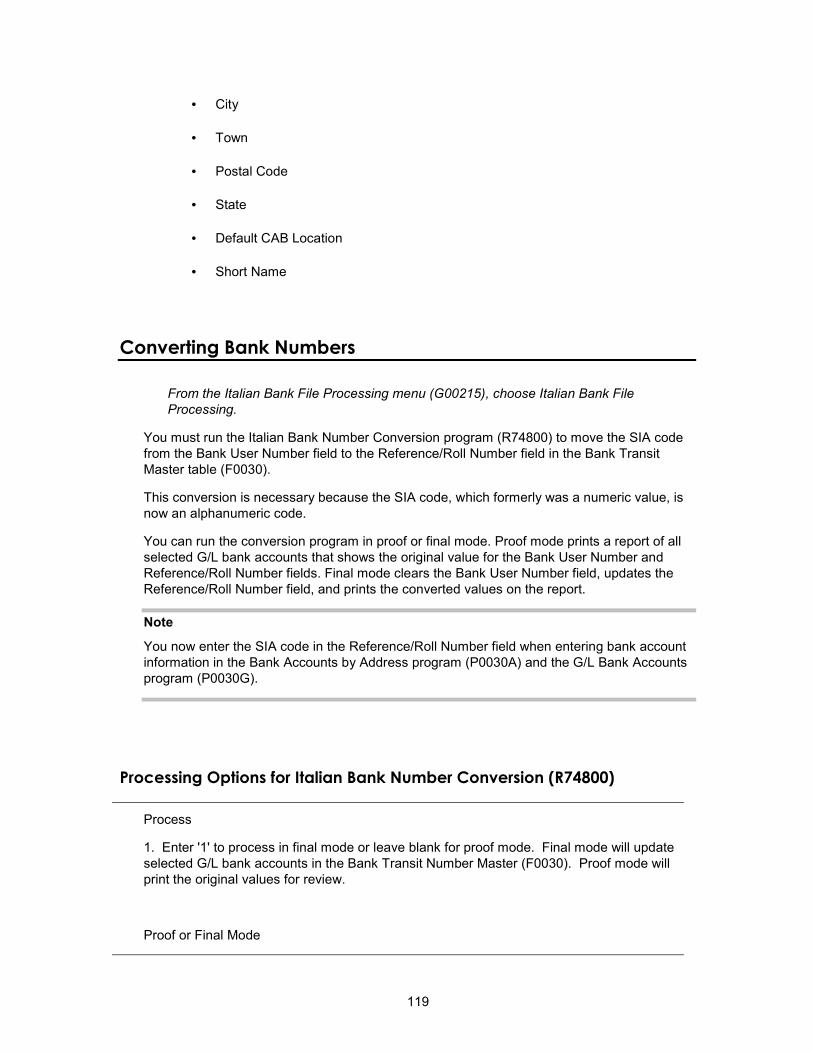
119
• City
• Town
• Postal Code
• State
• Default CAB Location
• Short Name
Converting Bank Numbers
From the Italian Bank File Processing menu (G00215), choose Italian Bank File Processing.
You must run the Italian Bank Number Conversion program (R74800) to move the SIA code from the Bank User Number field to the Reference/Roll Number field in the Bank Transit Master table (F0030).
This conversion is necessary because the SIA code, which formerly was a numeric value, is now an alphanumeric code.
You can run the conversion program in proof or final mode. Proof mode prints a report of all selected G/L bank accounts that shows the original value for the Bank User Number and Reference/Roll Number fields. Final mode clears the Bank User Number field, updates the Reference/Roll Number field, and prints the converted values on the report.
Note
You now enter the SIA code in the Reference/Roll Number field when entering bank account information in the Bank Accounts by Address program (P0030A) and the G/L Bank Accounts program (P0030G).
Processing Options for Italian Bank Number Conversion (R74800)
Process
1. Enter '1' to process in final mode or leave blank for proof mode. Final mode will update selected G/L bank accounts in the Bank Transit Number Master (F0030). Proof mode will print the original values for review.
Proof or Final Mode

120
Invoice Processing
Invoices for free goods are invoices that have a zero value. In Italy, invoices for free goods must be entered into the system for fiscal and VAT reporting purposes.
Invoices for Free Goods
Invoices for free goods have a zero value. In Italy, invoices for free goods must be entered into the system for fiscal and VAT reporting purposes.
When you enter invoices for free goods into the system, the first pay item represents the taxable amount with the relevant tax rate. You enter this pay item with a tax explanation code of V (VAT). The second pay item represents the gross amount (negative). To calculate the gross amount, add the first pay item taxable amount and the VAT amount. Enter the second pay item with a tax explanation code of E (exempt) with a tax rate of zero.
The following table is an example of an invoice for free goods:
Pay Item Gross Amount Taxable Amount Tax Amount Tax Rate Code Tax Explanation Code
001 1000 200 IT20 V
002 -1200 IT00 E
The total invoice value is zero, and the invoice can be posted to update the tax table. The G/L distribution debits the Cost of Goods Sold account and credits a specific expense account for free goods.
To close the invoice, record a cash receipt through the Standard Receipt Entry program (P03B102).

121
Accounts Receivable Draft Processing
In Italy, accounts receivable drafts can be remitted to the bank on paper or electronically.
Types of Accounts Receivable Drafts
Each type of draft corresponds to a particular payment instrument. The different types of draft are divided into two categories, as follows:
Manual drafts
Manual drafts are also called customer acceptance drafts because a customer must accept them before they can be remitted to the bank. The following types of manual drafts are available:
• The supplier prints the draft with bank account information. • The supplier prints the draft with the bank name only. • The customer prints the draft with bank account information. • The customer prints the draft with the bank name only.
The system can distinguish drafts with only a bank name from those with complete bank account information. This is helpful because banks generally assess an additional fee to collect drafts if you do not provide account information.
Automatic drafts
Automatic drafts are also called preauthorized drafts because they do not require customer acceptance. You and your customer agree in advance that the customer will pay with a draft.
Steps for Processing Accounts Receivable Drafts
A draft is a payment that passes through various steps of processing. During each step, the system creates either electronic or paper records, as well as accounting entries.
Draft Origination
The draft process begins when either you or your customer originates (prints) a draft. The draft shows the amount to be paid, the due date, banking information and, possibly, information about the underlying liabilities (invoices).
You can generate a draft by printing an invoice with a draft, or a statement with a draft. Some customers expect one draft per invoice. Other customers expect one draft for a statement of invoices. You can either send invoices with drafts attached or send statements with drafts attached.
The draft origination step updates the customer ledger with the draft number (statement number), but has no effect on the general ledger.
The following table shows the result of draft origination. In this case, the result is the invoice record as it appears in the Customer Ledger table (F03B11) after a statement has been generated. If the customer generates the draft, you bypass this step.

122
Customer Number 7001
Document Type Document Number Document Amount Statement Number
RI 1234 10,000 10005
Draft Acceptance
A draft has no legal force until the customer accepts it.
For manual drafts, your customer can accept the draft in any of the following ways:
• Signing the draft that you originated and returning it to you
• Changing the draft that you originated (date, amount, bank, and so on), and then signing it and returning it to you
• Originating, signing, and sending the customer's own draft to you
For automatic drafts, the draft is accepted by prior agreement, so each draft does not require customer acceptance.
Draft acceptance also includes entering the draft into the system. If you process drafts manually, you enter the draft to create the appropriate records. If you process drafts automatically, the system creates the appropriate draft records for you.
Regardless of whether you enter the draft manually or create the draft automatically, the system performs the following:
• Creates a record in the Receipts Header (F03B13) and Receipts Detail (F03B14) tables.
• Marks the invoice as paid by changing its pay status to P.
• Creates an invoice record (document type R1) in the Customer Ledger table (F03B11).
The following table shows the result of draft acceptance in the Customer Ledger table.
Customer Number 7001 Document Type Document Number Document Amount Pay Status Pay Instr
RI 1234 10,000 P 2
R1 10005 10,000 D 2
After you enter the draft, you must post it to the general ledger. When you post the draft, the system creates a journal entry to debit drafts receivable and credit an A/R trade account.
Draft Remittance (Optional)
Draft remittance consists of the following steps:
1. You remit (deposit) the draft to your bank so that it can collect the funds from your customer's bank. You can remit the draft either electronically or on paper in the form of a bank register. When you remit the draft for payment, the system updates the pay status of the R1 draft invoice record to G.

123
The following table shows the result of draft remittance on the draft invoice record in the F03B11 table.
Customer Number 7001
Document Type Document Number Document Amount Pay Status Pay Instr
R1 10005 10,000 G 2
2. The system creates the following journal entries, which you must post:
• The system debits the drafts remitted account and credits the drafts receivable account.
• If the draft is remitted with a discount, the system debits the drafts remitted with discount account and credits the drafts receivable account.
• If the draft is remitted with contingent liability, the system debits the drafts remitted with discount account and credits the drafts receivable account. The system also debits the bank account and credits the contingent liability account.
3. You arrange to collect funds from the draft in one of the following ways:
• Wait until the funds become available on the due date specified by the draft.
• Request an advance from your bank before the due date of the draft. Typically, banks charge a fee when they advance funds for a draft before its due date.
Note
Draft remittance is optional in certain countries.
Draft Collection
Draft collection consists of the following steps:
1. Your bank collects the funds for the draft from the customer's bank on the due date of the draft, or your bank informs you that it cannot collect the funds.
2. On or after the due date, both you and your customer recognize the transfer of cash. When you run the program that processes draft collection, the system updates the pay status of the draft invoice record to show that it has been collected.
The following table shows the result of the collection process on the draft invoice record in the F03B11 table.
Customer Number 7001
Doc Type Document Number Document Amount Pay Status Pay Instr
R1 10005 10,000 P 2
3. The system creates the following journal entries, which you must post:
• The system creates a journal entry to debit the bank account and credit drafts remitted.
• If the draft is remitted with a discount, the system debits the bank account and credits the drafts remitted with discount account.

124
• If the draft is remitted with contingent liability, the system debits the contingent liability account and credits the drafts remitted with discount account.
Draft Processing and the General Ledger
The following graphic illustrates the effect of each stage of the draft process on the general ledger:

125
Setting Up the System to Process A/R Drafts
When you process drafts, the system uses unique user defined codes and AAIs. Additionally, to avoid fees from the bank, most companies set up bank account information for their customers who process drafts. You use payment instruments to differentiate customers who process drafts from those who do not, as well as to identify those customers for whom you originate the draft from those who originate the draft themselves. You can also use payment instruments to identify those customers for whom you have bank account information from those for whom you do not.
Setting Up User Defined Codes for Accounts Receivable Drafts
User defined codes are used throughout the Accounts Receivable system. The following discussion of user defined codes for draft processing provides you with detailed information about whether new codes can be added and existing codes modified, as well as how the codes are used in the program.
Payment Instrument Codes (00/PY)
Using a payment instrument in draft processing is optional. You use payment instrument codes to categorize drafts for reporting and accounting purposes. For example, if you want to distinguish drafts that you originated from those your customer originated, or if you want to distinguish drafts for which you have bank account information from those for which you do not, you can assign the drafts different payment instruments. The payment instrument that you assign to a draft can also be used in conjunction with AAI items, such as RD1x, RD2x, RD3x, and RD4x (where x represents the payment instrument), to assign different accounts based on the payment instrument.
The following table provides examples of the payment instruments that are set up for you to use for draft processing. You can use these codes or set up additional codes.
Code Description of Code Suggested Use During Draft Processing
D Draft by invoice You might assign this payment instrument to invoices that you generate to use for data selection when you print drafts by invoice.
F Draft by statement You might assign this payment instrument to invoices that you generate to use for data selection when you print drafts by statement.
1 Draft that you originate with a bank account number
You might assign this payment instrument to the draft that you enter (using the Enter Our Drafts program, P03B602) to indicate that the draft, which you originated, has customer bank account information.

126
2 Draft customer originates with a bank account number
You might assign this payment instrument to the draft that you enter (using the Enter Customer Drafts program, P03B602) to indicate that the draft, which the customer originated, has bank account information.
3 Draft you originate without a bank account number
You might assign this payment instrument to the draft that you enter (using the Enter Our Drafts program) to indicate that the draft, which you originated, does not have customer bank account information.
4 Draft customer originates without a bank account number
You might assign this payment instrument to the draft that you enter (using the Enter Customer Drafts program) to indicate that the draft, which the customer originated, does not have bank account information.
Note
The description of the payment instrument code in this table might not be the same as the description in the UDC (00/PY) because these codes can be used in other systems.
Payment Status Codes (00/PS)
Pay status codes are hard-coded. The system updates invoice (document type RI) and draft invoice (document type R1) records in the Customer Ledger table (F03B11) with one of the following payment status codes, based on where the invoice is in the draft process:
Code Description of Code
Stage Used in Draft Processing
Description of Use
A Approved for payment
Invoice generation When you create an invoice and expect your customer to pay by draft, the system displays this pay status on the invoice.
P Paid in full Draft acceptance and draft collection
When you accept the draft, the system updates the pay status of the invoice to this status. The system also updates the draft invoice to this pay status when the draft is collected.
D Draft accepted Draft acceptance When you accept the draft, the system updates the pay status of the draft invoice to this status.
# Draft included in register
Draft registration When you register the draft, the system updates the pay status of the draft invoice to this status.

127
G Draft deposited not due
Draft remittance When you submit the draft to the bank and you update the draft with the remitted information, the system updates the draft invoice to this status.
Draft Status Codes (03B/DS)
Draft status codes are hard-coded. The system updates the draft record in the Receipts Header table (F03B13) with one of the following draft status codes, based on where the draft is in the draft process:
Code Description of Code Description of Use
4 Draft accepted When you enter the draft using either Enter Our Drafts or Enter Customer Drafts program, or when you create the draft by running the Pre-Authorized Drafts program (R03B671), the system updates the status of the draft to this status.
3 Draft remitted for cash or discount
When you run the Draft Remittance program (R03B672) and specify to remit the draft for cash or with a discount, the system updates the status of the draft to this status.
2 Draft remitted with contingent liability
When you run the Draft Remittance program and specify to remit the draft with contingent liability, the system updates the status of the draft to this status.
0 Draft collected When you run the Draft Collection with Status Update program (R03B680), the system updates the status of the draft to this status.
See Also User Defined Codes for Accounts Receivable in the Accounts Receivable Guide for
user defined codes that are not specific to draft processing
User Defined Codes in the Foundation Guide for information about adding and revising UDCs
Setting Up AAIs for Accounts Receivable Drafts
AAIs define rules for programs that automatically generate journal entries. You set up draft AAIs that are company specific only for companies that use a unique account number. You do not need to set up separate AAIs for companies that use the same account. If the system cannot find an AAI for a specific company, it uses the AAI for the default company, company 00000. You set up AAIs for draft processing the same way that you set up other AAIs for accounts receivable.
The system uses the following AAIs for draft processing, where x is the payment instrument:

128
Drafts Receivable (RD1x)
The RD1x AAI item defines the drafts receivable account to debit when you accept a draft. The system automatically debits the drafts receivable account (RD1x) unless you override it in the processing options, and it edits the A/R trade account (RC).
When you remit drafts, the system debits drafts remitted (RD2x, RD3x, or RD4x) and credits drafts receivable (RD1x).
Drafts Remitted (RD2x)
The RD2x AAI item defines the drafts remitted account to debit when you remit drafts for cash. The system automatically debits the drafts remitted account (RD2x) unless you override it in the processing options, and credits the drafts receivable account (RD1x).
When you collect drafts, the system debits a bank account (RB) and credits the drafts remitted account (RD2x).
Drafts Remitted for Discount (RD3x)
The RD3x AAI item defines the drafts remitted for discount account to debit when you remit drafts for a discount. During draft remittance, you use a processing option to choose the drafts remitted for discount account. The system debits the drafts remitted for discount account (RD3x) and credits the drafts receivable account (RD1x).
When you collect drafts, the system debits a bank account (RB) and credits the drafts remitted for discount account (RD3x).
Contingent Liability (RD4x)
The RD4x AAI item defines the draft contingent liability account to credit when you remit drafts for a discount if you are required to recognize a contingent liability until the maturity date of the draft. During draft remittance, you use a processing option to choose the draft contingent liability account. The system debits the draft remitted for discount account (RD3x), and credits the drafts receivable account (RD1x). The system also debits the bank account of the remittance, based on a processing option, or the bank account used during the preregister, and credits the draft contingent liability account (RD4x) unless you override it in the processing options.
When you collect drafts, the system debits the draft contingent liability account (RD4x) and credits the drafts remitted for discount account (RD3x).
Void/Non-Sufficient Funds (RD5)
The RD5 AAI item defines the draft receivable account for the new draft that the system creates when you void or specify a draft as NSF. Depending on the draft status at the time that you void or specify the draft as NSF, the system debits the account associated with AAI item RD5 and credits either the draft receivable account (RD1x) or the draft remittance account (RD2x or RD3x).
See Also
The following topics in the Accounts Receivable Guide:
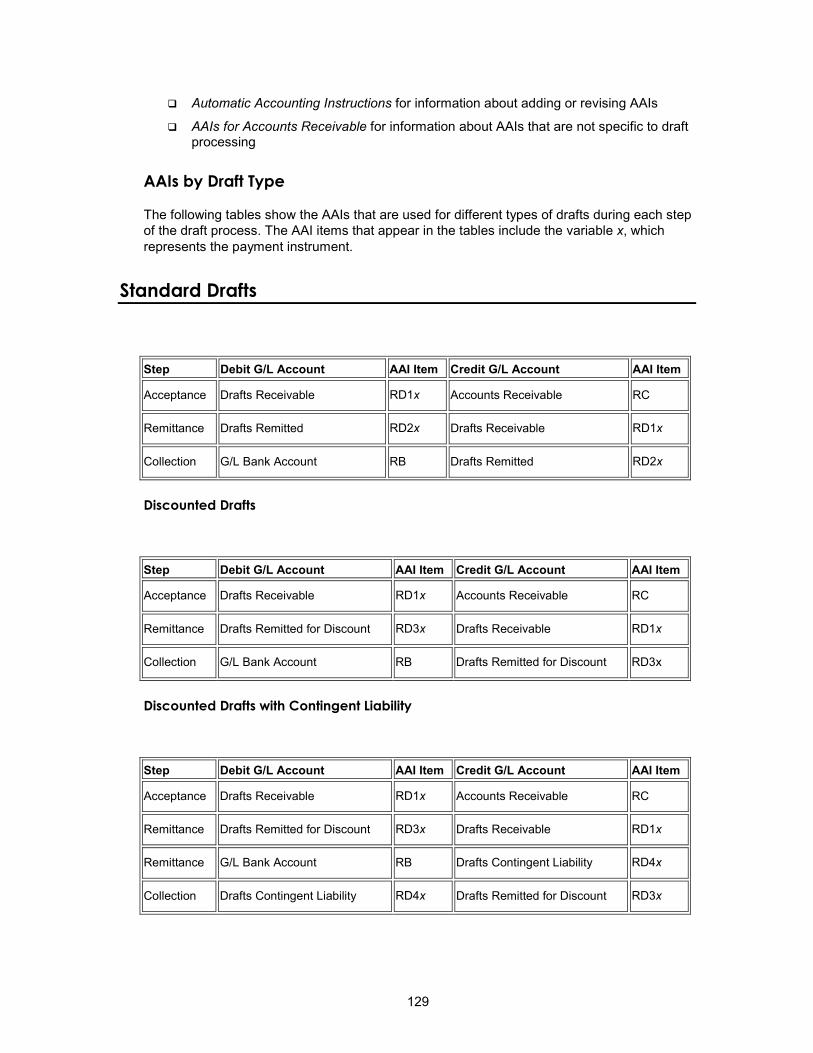
129
Automatic Accounting Instructions for information about adding or revising AAIs
AAIs for Accounts Receivable for information about AAIs that are not specific to draft processing
AAIs by Draft Type
The following tables show the AAIs that are used for different types of drafts during each step of the draft process. The AAI items that appear in the tables include the variable x, which represents the payment instrument.
Standard Drafts
Step Debit G/L Account AAI Item Credit G/L Account AAI Item
Acceptance Drafts Receivable RD1x Accounts Receivable RC
Remittance Drafts Remitted RD2x Drafts Receivable RD1x
Collection G/L Bank Account RB Drafts Remitted RD2x
Discounted Drafts
Step Debit G/L Account AAI Item Credit G/L Account AAI Item
Acceptance Drafts Receivable RD1x Accounts Receivable RC
Remittance Drafts Remitted for Discount RD3x Drafts Receivable RD1x
Collection G/L Bank Account RB Drafts Remitted for Discount RD3x
Discounted Drafts with Contingent Liability
Step Debit G/L Account AAI Item Credit G/L Account AAI Item
Acceptance Drafts Receivable RD1x Accounts Receivable RC
Remittance Drafts Remitted for Discount RD3x Drafts Receivable RD1x
Remittance G/L Bank Account RB Drafts Contingent Liability RD4x
Collection Drafts Contingent Liability RD4x Drafts Remitted for Discount RD3x

130
Draft Records Created by Draft Stage
As you process drafts, the system creates records in the Receipts Detail table (F03B14) for each status that you use. The system updates the G/L Credit Account ID field (AID2) with the account ID that it locates from the draft AAI item. The system creates a new record for each draft status. When you post the draft, the system uses the account ID in the AID2 field to create the journal entries to the corresponding accounts. The system updates the Receipt Type Code field (TYIN) with D for draft records that are created at each processing stage to differentiate them from F03B14 records that the system creates for each invoice that the draft pays.
For example, if you enter a draft that pays two invoices, the system creates three F03B14 records. Two of the records are used to record the payment of the invoice; the system uses the third record to record the draft acceptance stage. The system updates the TYIN field of this record with D and updates the AID2 field with the account ID that it locates from the AAI item RD1x.
When you remit this draft, the system creates the following two or three F03B14 records, depending on whether the draft was remitted with contingent liability:
• One record to close out the draft receivables account
• One record to update the draft remittance account
• One record to update the contingent liability account (if the draft was remitted with contingent liability)
The system updates the TYIN field to D for each record, and updates the AID2 field with the account ID that it locates from the AAI item RD3x.
When you collect this draft, the system performs the following tasks:
• Creates another F03B14 record
• Updates the TYIN field to D
• Updates the Bank Account Number field (GLBA) with the bank account number that is specified on the remittance record, or, if the draft was not remitted, from the AAI item RB
Setting Up Bank Account Information
You must set up bank account information if you process Accounts Payable payments or use specific Accounts Receivable applications, such as draft processing and auto debit processing. Depending on the type of information that you process, you must set up bank account information for your company’s bank accounts, as well as for your suppliers or customers.
The system provides the following programs for setting up bank account information:
• Bank Account Information (P0030G) – You use this program to set up your company’s bank accounts. If you process Accounts Payable payments or Accounts Receivable automatic debits, you must set up your company’s bank accounts.
• Bank Account Cross Reference (P0030A) – You use this program to set up bank account information for your suppliers and customers. If you process Accounts Payable payments using electronic funds transfer, you must set up bank account information for the supplier. If you process automatic receipts, Accounts Receivable drafts, or automatic debits, you must set up bank account information for the customer.

131
• Bank Account Addresses (P0030A) – You use this program if you want to associate a bank transit number with a bank address book record.
Although all the programs update and store bank account information in the Bank Transit Master table (F0030), the system differentiates each bank account record using a record type. The record type not only identifies whether the bank account is for a supplier or customer; it is also used to differentiate customers who process drafts and automatic debits from suppliers who process automatic payments.
The following table describes the available record types and how they are used:
Record Type
Description
B The system assigns this value to records created using the Bank Account Addresses program (P0030A). You use this program to associate bank transit numbers with the bank account address number.
C The system assigns this value when you set up bank account information and specify the option for Customer using the Bank Account Cross Reference program (P0030A).
D The system assigns this value when you set up bank account information and turn on the A/R Drafts, Auto Debit option using the Bank Account Cross Reference program (P0030A). You must turn on this option for customers who process drafts or auto debits.
G The system assigns this value when you set up G/L bank account information for your company using the Bank Account Information program (P0030G).
H The system assigns this value when you set up Dutch bank accounts using the Dutch Payments Bank Information program (P74030H).
M The system assigns this value when you set up bank account information by business unit using the Business Unit Information program (P0030B).
P The system assigns this value when you set up bank account information and turn on the Auto Receipts Payor option using the Bank Account Cross Reference program (P0030A).
V The system assigns this value when you set up bank account information and turn on the Supplier option using the Bank Account Cross Reference program (P0030A).
X, Y These codes are predefined for you to use if your supplier has multiple bank accounts. You do not need to use these specific codes (X or Y); you can set up and use any value in the UDC for bank type codes (00/BT) that are not listed above.
Note
Although the same program is used for the Bank Account Cross Reference and Bank Account Addresses applications, the system displays a different form for each application, as follows:

132
• If you choose Bank Account Cross Reference, the system displays the Work With Bank Accounts By Address form (W0030AD).
• If you choose Bank Account Addresses, the system displays the Work With Bank Transit Addresses form (W0030AE).
You can also access this form by choosing Bank Transit from the Form menu on Work With Bank Accounts by Address.
► To set up G/L bank account information
Use one of the following navigations:
From the Automatic Payment Setup menu (G04411), choose Bank Account Information.
From the Accounts Receivable Setup menu (G03B41), choose Bank Account Information.
From the Automatic Debiting menu (G03B131), choose G/L Bank Accounts
1. On Work With G/L Bank Accounts, click Find to display all bank account records.
2. To add a new bank account record, click Add.
3. On Set Up G/L Bank Account, complete the following fields:
• G/L Bank Account

133
• Description
4. Complete the following optional field for Accounts Payable payment processing:
• Next Payment Number
5. Complete the following optional field for the Accounts Receivable system:
• Next Autodebit Number
6. To set up default print options for Accounts Payable payments, complete the following fields:
• Number of Alignment Forms
• Detail Lines Per Stub
7. Click OK, and then click Cancel.
8. On Work With G/L Bank Accounts, to enter additional bank account information, locate and choose your bank account, and then choose Bank Info from the Row menu.
9. On Revise Bank Information, complete the following fields:
• Bank Address Number
This is the bank’s address book number.
• Bank Transit Number
You can leave this field blank.

134
• Bank Account Number
• Control Digit
• Checking or Savings Account
• SWIFT Code
10. To avoid the use of the pre-note code that is assigned to the supplier, verify that the following option is turned on:
• Override Supplier Pre-Note Code
Note Some payment instruments are hard-coded to produce a paper check if insufficient information is provided, regardless of whether this option is turned on.
11. Complete the following options if you use float days:
• Receivables
This field is used only in Accounts Receivable draft processing.
• Payables
12. Click OK.
13. On Work With G/L Bank Accounts, if you use A/P drafts or BACS, choose BACS Info from the Row menu.
14. On Revise BACS Information, complete the following fields and click OK:
• Bank User Number
• Reference/Roll Number
• Bank Reference Name
15. On Work With G/L Bank Accounts, to enter account information for CTX bank tapes used in A/P payment processing, choose X12 Info from the Form menu.
16. On Work With Bank Account X12 Information, click Add.
17. On Set Up Bank Account X12 Information, complete the following fields and click OK:
• Authorization Info Qualifier
• Authorization Information
• Security Info Qualifier
• Security Information
• Interchange Sender ID

135
• Interchange Receiver ID
• Application Sender's Code
• Application Receiver's Code
► To delete or revise G/L bank account information
Use one of the following navigations:
From the Automatic Payment Setup menu (G04411), choose Bank Account Information.
From the Accounts Receivable Setup menu (G03B41), choose Bank Account Information.
From the Automatic Debiting menu (G03B131), choose G/L Bank Accounts
1. On Work With G/L Bank Accounts, click Find to display all bank account records.
2. To delete a bank account record, choose the bank account record and click Delete.
3. On Confirm Delete, click OK.
4. To revise payment information or default print options, choose the bank account record and choose Revise from the Row menu.
5. On Set Up G/L Bank Account, revise any of the fields on the form and click OK.
6. To revise additional bank information, such as the bank transit or account numbers, on Work With G/L Bank Accounts, choose the bank account record and choose Bank Info from the Row menu.
7. On Revise Bank Information, revise any of the fields on the form and click OK.
8. To revise BACS information, on Work With G/L Bank Accounts, choose the bank account record and choose BACS Info from the Row menu.
9. On Revise BACS Information, revise any of the fields on the form and click OK.
10. To revise CTX information, on Work With G/L Bank Accounts, choose X12 Info from the Form menu.
11. On Work With Bank Account X12 Information, click Find, choose the bank account, and click Select.
12. On Set Up Bank Account X12 Information, revise any of the fields on the form and click OK.
► To set up supplier and customer bank account information
Use one of the following navigations:
From the Automatic Payment Setup menu (G04411), choose Bank Account Cross Reference.
From the Accounts Receivable Setup menu (G03B41), choose Bank Account Cross-Reference.
From the Automatic Debiting menu (G03B131), choose Customer Bank Account.

136
1. On Work With Bank Accounts by Address, click Find to display all bank account information, or complete the following field to limit the display and click Find:
• Address Number
Note The system displays records for suppliers and customers only. The system does not display records for record types B, G, or M.
2. To add a new bank account record, click Add.
3. On Set Up Bank Accounts By Address, complete the following field:
• Address Number
4. To specify the record type, choose one of the following options:
• Supplier
• Customer
• A/R Drafts, Auto Debit
• Auto Receipts Payor
5. Complete the following fields:
• Bank Transit Number

137
You can leave this field blank.
• Bank Account Number
• Control Digit
• IBAN
• Description
• Checking or Savings Account
• SWIFT Code
The system displays this field only when you choose the option for Supplier.
• Reference/Roll Number
The system displays this field only when you choose the option for Supplier.
Note Some of the fields are required for specific bank formats in specific countries. Your bank might not require all of this information.
• Bank Address Number
• Bank Country Code
6. Click OK.
► To delete or revise supplier or customer bank account information
Use one of the following navigations:
From the Automatic Payment Setup menu (G04411), choose Bank Account Cross Reference.
From the Accounts Receivable Setup menu (G03B41), choose Bank Account Cross-Reference.
From the Automatic Debiting menu (G03B131), choose Customer Bank Account.
1. On Work With Bank Accounts By Address, complete the following field and click Find:
• Address Number
Note The system displays all bank account records for suppliers and customers only. The system does not display bank account records for record types B, G, or M.
2. To delete a bank account record, choose the record and choose Delete from the toolbar.
3. On Confirm Delete, click OK.

138
4. To revise bank account information, choose the bank account that you want to revise and choose Revise from the Row menu.
The system displays either the Set Up Bank Accounts By Address or the Set Up Multiple Vendor Bank Accounts form depending on the record type of the bank account that you choose.
5. Revise any of the fields on the form and click OK.
► To set up bank transit numbers by bank address
You can associate a bank transit number with a bank's address book number.
From the Accounts Receivable Setup menu (G03B41), choose Bank Account Addresses.
Note
You can also access this form by choosing Bank Transit from the Form menu in the Bank Account Cross Reference program.
1. On Work With Bank Transit Addresses, click Add.
2. On Set Up Bank Transit Address, complete the following fields and click OK:
• Bank Transit
• Address Number

139
The system creates a record in the Bank Transit Master table (F0030) with the record type B.
Note
You can revise the address book number that is associated with the bank transit number by locating the bank transit record and choosing Revise from the Row menu. If you need to revise the bank transit number, choose the record and delete it, and then add it again.
Printing the Bank Account Exception Report for A/R Drafts
From the Draft Remittance and Collection menu (G03B162), choose Bank Account Exception Report.
You use the Bank Account Exception Report (R00314) to verify that you have valid bank transit numbers for each customer. The report prints information from the Bank Transit Master table (F0030).
Two versions of this report exist:
• Bank Validation – Country Specific – This version prints customer bank account records with a bank transit number that does not conform to country-specific rules
• Bank Validation – ‘B’ Type Bank – This version prints customer bank account records with a bank transit number that does not have an associated type B record.
This report bypasses bank account numbers that do not have address numbers.
This report does not update any information. If any records appear on this exception report, you must perform either of the following actions:
• To correct customer bank transit numbers, use the Bank Account Cross-Reference program (P0030A). See the task To delete or revise supplier or customer bank account information.
• To add missing B records, use the Bank Account by Addresses program (P0030A) to set up bank transit records. See the task To set up bank transit numbers by bank address.
Processing Options for the Bank Account Exception Report (R00314)
Validation
1. Enter a '1' to validate the bank transit number based on the 'B' bank type method. Default of blank will validate the transit number based on the available country specific validation rules (currently Italy, Japan and France).
Country or 'B' type

140
Setting Up the Default Payment Instrument for A/R Drafts
To distinguish invoice records to be paid by draft from other invoice records, you can set up a default payment instrument on the customer master record. The system updates invoice records for that customer with the payment instrument that is specified on the customer record, unless you change it on the invoice. For draft processing, you can use the payment instrument to differentiate customers for whom you might print invoices with a draft attachment from customers for whom you might print statements with a draft attachment.
You can also use the payment instrument to identify drafts entered with bank account information from those that do not have bank account information. Processing options for the draft entry programs allow you to set up payment instruments to use for this purpose. The system updates draft invoice records (document type R1) in the Customer Ledger table (F03B11) and draft receipt records in the Receipts Header (F03B13) table with the payment instrument specified in the processing options.
The draft payment instrument can be any valid payment instrument that exists in UDC 00/PY. Payment instruments are not hard-coded.
If you need to update the payment instrument for invoices that you previously entered, you can use the Speed Status Change program (P03B114) to update the payment instrument on all invoices for the customer or on an invoice-by-invoice basis.
See Also The following topics in the Accounts Receivable Guide:
To revise a customer record for the steps to update the payment instrument value on the customer master record
Updating Invoices Using Speed Status Change for information about updating the payment instrument on invoices
Draft Origination
The draft process begins when you or your customer originates (prints) a draft. The draft shows the amount to be paid, the due date, and information about the underlying liabilities (invoices).
When you originate a draft, you can print either a statement or an invoice to send to your customer. Some customers expect one draft per invoice. Other customers expect one draft for a statement of invoices. You can either send invoices with drafts attached or send statements with drafts attached.
Note
The default draft format conforms to the French Bank Association format. Users in other countries might need to modify the format for their specifications.

141
Before You Begin To print invoices with draft attachments, review the Invoices tab on the Customer
Master Revision form and verify that the Send Invoice to field (SITO) has the correct value for printing the billing name and address on invoices with draft attachments
To print statements with draft attachments, complete the following tasks:
On the Collection tab on the Customer Master Revision form, turn on the Print Statement option for each customer for whom you print statements with draft attachments
In the processing options for the Statement Notification Refresh program (R03B500X), turn on the Draft Flag processing option and specify the Statement Print with a Draft program (R03B506) in the Print Program processing option.
Printing Invoices with Draft Attachments
From the Draft Daily Operations menu (G03B161), choose Invoice Print with Draft.
To print an invoice or credit memo with an attached draft, use the Invoice Print with Draft program. You can select different versions of this report to print delinquency fees or chargebacks only.
When you print invoices with draft attachments, the system assigns a draft number to the invoice and uses it to update the Statement Number field (CTL) on the invoice record. The system also prints the customer's bank account number and the draft number on the draft attachment.
This program prints and updates records in the Customer Ledger table (F03B11).
Data Selection and Data Sequencing
If you assign payment instruments to your customer records, you can use data selection to choose only those invoice records with a specific payment instrument. For example, you can set Payment Instrument EQ (equal) to D (draft by invoice) so that the program selects only invoices for customers who typically pay by a draft.
The following data sequence is required:
1. Company
2. Address Number
3. Document (Voucher, Invoice, and so on)
4. Document Type
5. Document Company
6. Document Pay Item
If you change this sequence, the totals will be inaccurate.
Processing Options for Invoice Print with Draft (R03B5051)
Print Tab
Use these processing options to specify which dates to use and whether to include tax amounts on the printed invoice.

142
1. Invoice Print Date Blank = Current date Use this processing option to specify the date to print on the invoice. If you leave this processing option blank, the system date will be used.
2. Print Tax Amounts 1 = Print tax amounts Use this processing option to specify whether to print tax amounts on the invoices. Valid values are: Blank Do not print tax amounts. 1 Print tax amounts.
Currency Tab
Use this processing option to specify whether to print currency information on the invoice.
1. Print Currency 1 = Print invoices with currency Use this processing option to specify whether to print the domestic or foreign currency amount on the invoice. Valid values are: Blank Print the domestic amount without the currency code. 1 Print the foreign amount with the currency code.
Attachments Tab
Use this processing option to specify whether to print associated generic text on the invoice.

143
1. Print Attachments 1 = Print associated attachments Use this processing option to specify whether to print generic text (attachments) from the invoice record on the invoice. Valid values are: Blank Do not print generic text. 1 Print associated generic text.
Draft - City Tab
Use this processing option to specify the city of origin of the invoice.
1. Enter city of origin to print on draft Use this processing option to specify the city of origin to print on the draft. If you leave this processing option blank, the system does not print a city of origin on the draft.
Processing Options for Invoice Group by Draft (R03B5052)
Defaults Tab
This processing option specifies a default value for the pay status code on R1 draft records.
1. Pay Status Code Use this processing option to specify the Payment Status code (UDC 00/PS) that the system assigns to processed invoices.
Process Tab
These processing options specify how the system selects invoices for payment.

144
1. Process Mode Blank = Detail mode 1 = Group by customer (AN8) 2 = Group by payor (PYR) Use this processing option to specify how the system groups invoices and assigns draft numbers when it processes invoices. You can specify that the system process the invoices in detail mode, in which case the system assigns one draft number to each invoice or group of pay items with the same net due date. For example, for an invoice with two pay items whose net due dates differ, the system generates two drafts. For an invoice with two pay items whose net due dates are the same, the system generates only one draft. Alternatively, you can group invoices by customer and assign one draft number to all invoices that have the same company, currency code, net due date, and customer number. Finally, you can group invoices by payor and assign one draft number to all invoices that have the same company, currency code, net due date, and payor number. Valid values are: Blank Process invoices in detail mode. 1 Group invoices by customer (AN8). 2 Group by invoices payor (PYR).
2. Threshold Amount Use this processing option to specify the threshold amount that the system uses to suppress draft creation. If the total draft amount for the group of invoices is less than this threshold amount, no draft number is assigned to the invoices in the group. The system compares the threshold amount that you enter to the total domestic open amount, regardless of the currency code.
Versions Tab
These processing options specify the program number and version to use to print drafts.

145
1. Program ID Use this processing option to specify the program that the system uses to print the drafts that are generated by this program. If you leave this processing option blank, you must manually run a draft print program to print the drafts.
2. Version ID Blank = ZJDE0001 Use this processing option to specify the version of the program that you specified in the Program ID processing option that the system uses to print drafts. If you leave this processing option blank, the system runs version ZJDE0001. If the ZJDE0001 version does not exist, the report does not run. If the Program ID processing option is blank, the system disregards this processing option.
Printing Statements with Draft Attachments
From the Draft Daily Operations menu (G03B161), choose Statement Print with Draft.
To print a statement with one or more invoices combined into one draft, use the Statement Print with Draft program.
When you print invoices with draft attachments, the system assigns a draft number to the statement and uses it to update the Statement Number field (CTL) on the invoice record. The system also prints the customer's bank account number and the draft number on the draft attachment.
This program prints and updates records in the Customer Ledger table (F03B11).
Data Selection and Data Sequencing
If you assign payment instruments to your customer records, you can use data selection to choose only those invoice records with a specific payment instrument. For example, you can set Payment Instrument EQ (equal) to F (draft by statement) so that the program selects only invoices for customers who typically pay by a draft.
The following data sequence is required:
1. Address Number - Alternate Payee
2. Company
3. Currency Code - From
4. Address Number
5. Document (Voucher, Invoice, and so on)
6. Document Type

146
7. Document Company
8. Pay Item
If you change this sequence, the totals on the statement will not be accurate.
Processing Options for Statement Notification Refresh (R03B500X)
Consolidation Tab
This processing option specifies whether one statement is generated for the customer that includes records for all companies or a separate statement for the customer is generated for each company.
1. Company Use this processing option to enter the company that you want to use to locate the remit to address. The system generates one statement for each customer for the company that you specify, regardless of whether the company is specified on the invoice. If you choose to retrieve aging specifications from the company constants, the system uses the company number that you specify to locate the remit to address, based on the value in the Remit To processing option, and the aging specifications. If you leave this processing option blank, the system produces one statement for each customer by company. For example, if you enter invoices for the customer for companies 00001, 00020, and 00050, the system produces three statements, one for each company. If you leave this field blank, the system generates one statement for each customer for each company that
Aging Tab
These processing options are used to specify the aging criteria for statements.
1. Company Constants Blank = Use options 2 thru 10 1 = Use company constants Use this processing option to specify whether to retrieve the aging specifications and statement date from the Accounts Receivable constants. If you leave this field blank, the system uses the processing options for aging specifications (Statement Date, Date Types, and Aging Categories). Valid values are: Blank Use processing options 2 through 5. 1

147
Use the Accounts Receivable constants.
2. Statement Date Use this processing option to specify the date that you want to the system to use to determine the aging category to which to assign open invoices. The system compares the date that you enter to the date on the invoice, as specified by the Date Types processing option, to determine the number of days the invoice is past due. The system uses this date as the Statement Date that prints on the statement. If you leave this processing option blank, the system uses today's date to age open invoices.
3. Date Types D = Due date I = Invoice date G = G/L date S = Statement date Use this processing option to specify the date on the invoice that you want the system to use to determine the aging category. The system compares the date that you specify to the value in the Statement Date processing option to determine the number of days the invoice is past due. Valid values are: Blank Use the invoice due date. 1 Use the invoice date. 2 Use the G/L date. 3 Use the statement date.
4. Aging Categories 1 = Aging days 2 = Fiscal period 3 = Calendar

148
Use this processing option to specify which aging categories the system uses to assign invoices. The system uses the date specified in the Statement Date processing option and the value specified in the Date Type processing option to calculate the aging for each invoice, and then assigns them to the aging category specified by this code. Valid values are: 1 Aging days. The system assigns invoices to the aging categories specified in the Aging Category 1 through Aging Category 6 processing options. The aging categories are user defined. 2 Fiscal periods. The system uses the fiscal periods defined by the date pattern assigned to the company record as the aging categories. 3 Calendar. The system uses each calendar month as an aging category. If you leave this processing option blank, the system uses the default value 1 (aging days).
5. Aging Category 1 Use this processing option in conjunction with the value specified in the Aging Category 2 processing option to specify the interval that the system uses for the future and current aging categories. Note: The system does not print the future aging category on delinquency notices.
6. Aging Category 2 Use this processing option in conjunction with the values specified in the Aging Category 1 and Aging Category 3 processing options to determine the interval that the system uses for the current and first aging categories.
7. Aging Category 3 Use this processing option in conjunction with the values specified in the Aging Category 2 and Aging Category 4 processing options to determine the interval that the system uses for the first and second aging categories.

149
8. Aging Category 4 Use this processing option in conjunction with the values specified in the Aging Category 3 and Aging Category 5 processing options to determine the interval that the system uses for the second and third aging categories.
9. Aging Category 5
Use this processing option in conjunction with the values specified in the Aging Category 4 and Aging Category 6 processing options to determine the interval that the system uses for the third and fourth aging categories.
10. Aging Category 6
Use this processing option in conjunction with the value specified in the Aging Category 5 and Aging Category 7 processing options to determine the interval that the system uses for the fourth and fifth aging categories.
11. Credits
Blank = Age credits
1 = Apply to current balance
Use this processing option to specify whether to age credit memos according to the aging specifications, or to apply credits to the Current aging column that prints on the statement.
12. Exclude Future Amounts
Blank = Do not exclude

150
1 = Exclude
Use this processing option to specify whether to prevent future invoice amounts from printing on the statement. The system uses the aging specifiecations from the Accounts Receivable constants or the processing options to determine whether the invoice has a future amount. For example, if you age invoices based on the due date, and the statement date is 6/30/05, the system prevents all invoices with a due date after 6/30/05 from printing the statement.
13. Multi-Currency
Blank = Domestic
1 = Foreign
Use this processing option to specify whethe to print amounts in the foreign currency of the invoice. Valid values are:
Blank
Print domestic amounts only on the statement.
1
Print domestic and foreign amounts on the statement.
14. Draft Flag
Blank = Do not print with draft
1 = Print with draft
Use this processing option to produce statements with a draft. If you use this option, the system assigns a draft number to the statement, not a statement number.

151
Print Tab
These processing options are used to specify the Remit To address, print program and version, and letter to print.
1. Remit To Address
Blank = Company
A = 1st address number
B = 2nd address number
C = 3rd address number
D = 4th address number
E = Factor/special payee
F = 5th address number
Address = address number
Use this processing option to specify the remit to address that prints on the statement. The remit to address indicates where the customer should send their payments. The system retrieves this address based on the address book record that is set up for the company that is designated on the invoice in the Address Book Master table (F0101). Valid values are:
Blank
Use the address of the company designated in the Customer Ledger (F03B11), unless you specify a company in the Consolidation processing option. The system retrieves the company's address book number from the Company Constants table (F0010).
A
Use the value in the 1st Address Number field (AN81) of the company record.
B
Use the value in the 2nd Address Number field (AN82) of the company record.
C
Use the value in the 3rd Address Number field (AN83) of the company record.

152
D
Use the value in the 4th Address Number field (AN84) of the company record.
E
Use the value in the Factor/Special Payee field (AN85) of the company record.
F
Use the value in the 5th Address Number field (AN86) of the company record.
Address
Specify an address book number that you want the system to use instead of the company's address book number.
For example, if you generate statements for company 00001, and you want the receipts to be remitted to a lockbox address, you set up the lockbox address as a record in the Address Book system and assign the lockbox address book number to one of the address book number fields on the address book record for company 00001. In this processing option, you specify which of these address book numbers to use.
3. Summarize Invoices
Blank = Pay items only
1 = Summarized and pay items
Use this processing option to specify whether to include a summarized invoice record in addition to each invoice pay item record in the A/R Notification History Detail (F03B21) table. You use the Review Statement program (P03B202) to review the information in this table. Valid values are:
Blank
Include invoice pay item records only.
1
Include a summarized invoice record in addition to the invoice pay item records.

153
Note: If you want to print summarized invoice information on the statement, use the corresponding processing option in the statement print program that you are using (R03B5001, for example).
2. Print Program
Use this processing option to specify the statement print program to use to produce statements. Use the Search button for a list of valid statement print programs. If you leave this processing option blank, the system uses R03B5001. Each print statement program has processing options that control the type of information that the system prints on the statement. The data selection and data sequence of the print program controls the amount of detail that prints on the statement and the order in which it prints.
3. Version of Print Program
Use this processing option to specify the version of the statement print program to use. If you leave this processing option blank, the system uses ZJDE0001.
4. Letter Name
Use this processing option to specify a predefined letter for text that you want to print on the statement. If the letter was set up with a letter type, you must also specify the letter type.
Update Tab
These processing options are used to specify whether the system uses an “as of” date to calculate invoice open amounts, whether it updates the statement number on invoice records, and whether the system creates one A/R Notification History Detail (F03B21) record for each invoice or for each invoice pay item.

154
1. Date - As Of
Use this processing option to specify the date that you want to use to produce statements for a prior period. This date is useful if a customer requests a statement for a specific date or for a date that is different from the original date that you used to produce the statement.
For example, if you need to produce a statement from several months ago, you enter the date that you want to use for the statement date in this processing option, and the system compares it to the closed date on the invoice to determine whether the invoice was open as of that date. If the invoice was open, the system recalculates the open amount and includes it on the statement. The system recalculates the open amount by adding to the current open amount the receipts that were applied to the invoice and have a G/L date that is on or after the as of date.
If you want to reprint a statement that was previously generated for a prior period, use the Review Statements program (P03B202).
Caution: The system requires additional processing time to determine whether the invoice was open on the date that you specify; therefore, do not complete this field unless you want to use this feature. For the system to perform As Of processing, you must include paid invoices in the data selection of the Statement Notification Refresh program (R03B500X). You might also want to limit your data selection to the specific customer for whom you are generating the statement.
2. Statement Number Update
Blank = Always update
1 = Update blank fields only
Use this processing option to overwrite the statement number on invoices that are included on multiple statements. For example, if an open invoice is included on statement 123 and the invoice is still open when you run statements again, the system assigns the new statement number to the invoice and overwrites the previous value. Valid values are:
Blank
Update the statement number on all invoice records.

155
1
Update the statement number on only those invoice records that do not have a value in the Statement Number field (CTL).
Processing Options for Statement Print with Draft (R03B506)
City
1. Enter the city name where the draft is being originated to be printed on the draft.
City
Draft Acceptance
Regardless of whether you or the customer originates the draft, you must enter it into the Accounts Receivable system before you can process it. You enter a draft after your customer accepts it. The draft has no legal force until the customer accepts it. When a draft is accepted, the status of the invoice changes. In some countries this has legal ramifications.
For manual drafts, your customer can accept the draft by:
• Signing the draft that you originated and returning it to you
• Changing the draft that you originated (date, amount, bank, and so on), and then signing and returning it to you
• Originating, signing, and sending the draft to you
For automatic drafts, the draft is accepted by prior agreement, so each draft does not require customer acceptance.
See Also Processing Accounts Receivable Drafts in a Foreign Currency in the Multicurrency
Guide for currency considerations for draft processing
Entering Manual Drafts
Manual drafts are also called customer acceptance drafts because the customer must accept them before they can be remitted to the bank. The following types of manual drafts are available:

156
• The supplier prints the draft with bank account information
• The supplier prints the draft with the bank name only
• The customer prints the draft with bank account information
• The customer prints the draft with the bank name only
You use one of the following programs to enter a draft manually, depending on whether you or the customer originate the draft:
Enter Our Drafts (P03B602)
Use this program when your company originates a draft for the customer to sign and return.
Enter Customer Drafts (P03B602)
Use this program when the customer originates and accepts a draft, and then sends it to your company to be entered.
The fields that you complete on the Enter Our Drafts and Enter Customer Drafts programs are the same. You can enter drafts in a foreign currency (the transaction currency of the invoice), but not in an alternate currency.
You apply the draft to open invoices using the same type input codes that you use to enter receipts. These type invoice codes include the following:
• 10 – Invoice match
• 11 – Invoice match with chargeback discount
• 15 – Invoice match with write-off
• 16 – Invoice match with chargeback
• 17 – Invoice match with deduction
• 25 – Standalone write-off
• 26 – Standalone chargeback
• 27 – Standalone deduction
When you enter a draft, the system performs the following:
• Creates a batch header record in the Batch Control Records table (F0011) and assigns it the batch type DB (draft receipts).
• Creates a draft record in the Receipts Header table (F03B13) and assigns it a draft status of 4 (Accepted).
• If you use the Enter Our Drafts program, verifies that the draft number that you enter matches the draft number that is assigned to the invoices when you originated the draft using the Invoice Print with Draft (R03B5051) or Statement Print with Draft program (R03B506).
• Creates a draft record in the Receipts Detail table (F03B14) for each invoice pay item that the draft closes. The system updates the Receipt Type Code (TYIN) field to A (Applied) on these records.
• Creates a draft record in the F03B14 table for the total of the invoices paid and assigns it the draft status 4 (Accepted). The system updates the Receipt Type Code (TYIN) field to D (Draft) to differentiate this record from the applied records.
• Creates an invoice record with a document type of R1 in the Customer Ledger table (F03B11) with a pay status of D (draft accepted).

157
• If the draft is unapplied, creates an invoice record with a document type of RU in the F03B11 table with a pay status of A (draft approved for payment).
After you enter drafts, you can approve them and post them to the general ledger. If you post the draft at a Draft-Acceptance status, the system creates a journal entry to debit drafts receivable and credit an A/R trade account.
This program updates and creates records in the F03B11, F03B13, and F03B14 tables.
Fields Updated During Receipt or Draft Entry
When you enter a receipt or draft, the system updates specific fields with the account ID. The system locates the AAI based on the how the payment is applied to invoices. The system uses this account ID when you post the payment to create automatic entries. The following table lists the fields that the system updates based on the type of payment, and the AAI that the system uses to locate the account.
Account Type of Payment
Application
Type Input Code
Field Updated
Table Updated AAI Used
Bank Account*
All N/A GLBA Receipts Header (F03B13)
The system uses the bank account number entered on the receipt.
If the Bank Account field is blank, the system locates the account based on the following hierarchy:
• RB for the company entered on the payment
• RB for company 00000
A/R Trade Applied payment
10 AID Receipts Detail (F03B14)
The system does not use an AAI.
The system uses the account entered in the AID field of the invoice record in the F03B11 table.
A/R Trade Unapplied payment
N/A AID Receipts Header (F03B13)
The system locates the account using the following hierarchy, where xxxx is the value of the Unapplied G/L Offset field:
• RCxxxx for the company entered on the receipt or draft
• RCxxxx for

158
Account Type of Payment
Application
Type Input Code
Field Updated
Table Updated AAI Used
company 00000 • RCUC for the
company entered on the receipt or draft
• RCUC for company 00000
A/R Trade Payment that generates a chargeback
11 and 16
AIDC and AID
Receipts Detail (F03B14) and Customer Ledger (F03B11)
The system locates the account using the following hierarchy, where xxxx is the value of the Chargeback G/L Offset field:
• RCxxxx for the company entered on the invoice
• RCxxxx for company 00000
• RC for the company entered on the invoice
• RC for company 00000
A/R Trade Stand-alone chargeback
26 AIDC Receipts Detail (F03B14)
The system locates the account using the following hierarchy, where xxxx is the value of the Chargeback G/L Offset field:
• RCxxxx for the company entered on the receipt
• RCxxxx for company 00000
• RC for the company entered on the receipt
• RC for company 00000
Discount Taken
Payment with a discount
10 AIDD Receipts Detail (F03B14)
The system uses the following hierarchy, where xx is the discount reason code:
• RKDxx for the company entered on the receipt or

159
Account Type of Payment
Application
Type Input Code
Field Updated
Table Updated AAI Used
draft • RKDxx for
company 00000 • RKD for the
company entered on the receipt or draft
• RKD for company 00000
Write-off Payment with a write-off
10 and 15
AIDW Receipts Detail (F03B14)
The system uses the following hierarchy, where xx is the write-off reason code:
• RA xx for the company entered on the invoice
• RA xx for company 00000
Write-off Stand-alone write-off
25 AIDW Receipts Detail (F03B14)
The system uses the following hierarchy, where xx is the write-off reason code:
• RA xx for the company entered on the payment
• RA xx for company 00000
Deduction Suspense
Payment with a deduction
17 DAID Receipts Detail (F03B14)
The system uses the following hierarchy:
• RN that is set up for the company entered on the invoice
• RN for company 00000
Deduction Suspense
Stand-alone deduction
27 DAID Receipts Detail (F03B14)
The system uses the following hierarchy:
• RN that is set up for the company entered on the payment
• RN for company 00000
*The system updates the bank account field when you enter a receipt; however, it does not update the bank account field on the draft until you either remit or collect the draft.

160
Draft Processing Only
The following table illustrates how the system updates the AID2 field of the records in the F03B14 table when you accept, remit, or collect a draft. The system creates the records during each draft stage based on the AAI listed, where x is the payment instrument.
Draft Stage AAI
Acceptance RD1x
Remittance RD2x
Remittance for Discount RD3x
Remittance with Contingent Liability RD4x
See Also See the following topics in the Accounts Receivable Guide for information about the entries that the system creates:
Journal Entries Created by the Draft Post
Automatic Entries Created by the Draft Post
Entering Unapplied Drafts
You enter unapplied drafts when you do not know which invoice or group of invoices the draft pays. Until you collect the draft, an unapplied draft does not reduce a customer’s balance. When you enter an unapplied draft, the system creates records in the following tables:

161
Customer Ledger (F03B11)
The system creates the following two records:
• A record for the unapplied draft invoice (document type RU). The system creates an unapplied draft record as a placeholder until the draft is applied to invoices. If you do not post this record before you apply it to invoices, the system deletes it when invoices are paid.
• A record for the draft invoice (document type R1). The draft invoice records (RU and R1) have the following characteristics: • They establish an audit trail for the draft payment ID. • They have a batch type of DB. • They have a posting status of D (posted). The posted codes for the
draft records in the Receipts Header table (F03B13) and the Receipts Detail table (F03B14) remain blank until the draft is posted.
Receipts Header (F03B13)
The system creates a draft payment record.
Receipts Detail (F03B14) The system creates the following two records:
• A record for the unapplied draft invoice • A record for the draft invoice
The following invoice records generated by the draft application also have a corresponding detail record (F03B14) that is used for posting purposes:
• Drafts (R1) • Unapplied drafts (RU) • Deductions (R5)
The system uses a posting status of D when it creates the invoice records in the F03B11 table. To update the general ledger, you must post the receipt records in the F03B14 table.
The unapplied draft remains open until you apply it to the appropriate invoices.
After you enter unapplied drafts, you must post them. When you post unapplied drafts, the system debits the draft receivables account and credits the A/R trade account that is associated with the AAI item RCUC, unless you override the Unapplied G/L Offset field on the draft or specify to use the G/L offset that is set up in the customer master record.
See Also Applying Unapplied Payments to Invoices in the Accounts Receivable Guide for
information about selecting unapplied drafts to apply to invoices
Before You Begin Set up the draft AAIs.
Verify that the appropriate offset account is set up for the AAI RCxxxx, where xxxx is the unapplied G/L offset (for unapplied drafts) or the chargeback G/L offset (for drafts that generate a chargeback). If you enter unapplied drafts, the system uses the default RCUC unless you specify a different unapplied G/L offset value or set a processing option to use the value from the customer record.

162
► To enter an unapplied draft
From the Draft Daily Operations menu (G03B161), choose either Enter Our Drafts or Enter Customer Drafts.
1. On Work With Drafts, click Add.
2. On Draft Entry, complete the following fields:
• Payor
• Draft Number
• Draft Date
• Draft Due Date
• Draft Amount
• Payment Instrument
The system uses the payment instrument that is set up in the processing option. If the processing option is blank, the system uses the payment instrument from the customer master record.
• Company
• G/L Date

163
The system updates the following fields if bank account information for A/R drafts (record type D) is set up for the customer:
• Bank Name
• Customer Bank Acct No
• Bank Transit
If bank account information for the customer is not set up for record type D, you can activate the bank account for draft processing by completing steps 3 through 6.
If you do not have bank account information set up for the customer, proceed to step 7.
3. Choose Bank Information from the Form menu.
4. On Work With Bank Accounts By Address, complete the following field and click Find:
• Address Number
5. Choose the bank account record that is set up, and then choose Activate as Draft from the Row menu.
6. Click Close.
7. Complete the following required field, if it is not updated by the system:
• Bank Name
Note If the Bank Name field is not available for input, you must change the corresponding processing option to allow overrides to the Bank Name.
8. To specify more information, choose Additional Info from the Form menu.

164
9. On Additional Information, complete the following fields, if applicable, and click OK:
• Unapplied G/L Offset
The system uses UC as the offset and the associated AAI item RCUC to locate the A/R trade account, if you do not override this value.
You can also set a processing option for the system to use the default value of the G/L offset code from the customer master record.
• Reference
• Business Unit
If you leave this field blank, the system uses the business unit assigned to the payor’s address book record for unapplied draft (RU) and draft (R1) records that the system creates in the Customer Ledger table (F03B11).
10. On Draft Entry, click OK to create an unapplied draft or follow the steps to apply the draft to invoices or to enter remittance information.
Displaying Open Invoices
To specify the invoices that a receipt or draft pays, you must display them on the payment entry form. Regardless of the method that you use to locate open invoices, you specify search criteria on one form, and the system returns the invoices that meet the criteria specified on the receipt or draft entry form.
The system provides the following methods for displaying open invoices that you want to pay:

165
Load Invoices The system displays all the open invoices for the specified payor that meet the additional search criteria specified:
• Company You can specify one company or enter * for all companies.
• Currency Code You can specify one currency code or * for all currency codes.
The system displays the invoices in order by due date.
Select Invoices The system displays all the open invoices that meet the following search criteria that you enter:
• Payor or Customer • Company
You can specify one company or enter * for all companies.
• Currency Code You can specify one currency code or * for all currency codes.
Additionally, you can use the QBE row to specify additional search criteria, such as the document type or statement number.
The system displays the invoices that meet the criteria that you specified. You then select each invoice pay item that you want to pay. After invoices are selected, you can alter the search criteria and select more invoices. The system returns all the invoices selected in the order that you selected them on the payment entry form.
Select Invoices by Remittance
You use this method to enter the remittance information from your bank. You enter information about the invoice, such as the invoice number, in the Invoice Reference field, and the system indicates the number of invoices located that meet the criteria that you specified. You use a separate detail line to specify different search criteria.
Processing options allow you to set up a default search order that the system uses to locate the invoices based on the value entered in the Invoice Reference field. The system can locate open invoices by:
• Invoice number (DOC) • Sales order number (DOCO) • Customer reference number (VR01) • Statement number (CTL) • Shipment number (SHPN)
With the exception of statement number, the system uses the invoice reference to locate invoices from the Customer Ledger table (F03B11). The system locates invoices using the statement number from the A/R Notification History Detail table (F03B21).
Regardless of the method that you choose to display open invoices, the system does not retrieve the following types of invoices:
• RU - Unapplied receipt
• R1 - Drafts
• R5 – Deductions
• NP – Partial NSF

166
See Also Entering Remittance Information in the Accounts Receivable Guide for an alternative
method of displaying invoice information
Before You Begin If you select invoices by remittance, verify that the processing options on the Match
Priority tab are set up appropriately.
► To load all open invoices for a customer
The task to select open invoices is the same regardless of whether you choose Standard Receipts Entry or one of the draft entry programs. This task is illustrated using the Receipt Entry form only.
Use one of the following navigations depending on whether you are entering a receipt or draft:
From the Manual Receipts Processing menu (G03B12), choose Standard Receipts Entry.
From the Draft Daily Operations menu (G03B161), choose either Enter Our Drafts or Enter Customer Drafts.
1. Follow the steps to enter an unapplied receipt or an unapplied draft.
2. On Receipt Entry or Draft Entry, choose Load from the Form menu.
3. On Load Invoices, complete either of the following fields if necessary:
• Company

167
The system loads only those invoices for the company that you specify. Use * to load all invoices for all companies.
• Payor
4. Click OK.
Note In the detail area of the Receipt Entry or Draft Entry form, the system loads all open invoices in order by due date. You can continue to load invoices for other customers, if necessary.
If you set a processing option to use a default type input code, when the system loads invoices, it populates the TI field with the value that you specified in the processing option.
The system does not load RU (unapplied receipt), R5 (deduction), and R1 (draft) invoice records.
► To select specific open invoices for a customer
The task to select open invoices is the same regardless of whether you choose Standard Receipts Entry or one of the draft entry programs. This task is illustrated using the receipt entry form only.
Use one of the following navigations depending on whether you are entering a receipt or draft:
From the Manual Receipts Processing menu (G03B12), choose Standard Receipts Entry.
From the Draft Daily Operations menu (G03B161), choose either Enter Our Drafts or Enter Customer Drafts.
1. Follow the steps to enter an unapplied receipt or an unapplied draft.
2. On Receipt Entry or Draft Entry, choose Select from the Form menu.

168
3. On Select Invoices, complete the following field:
• Address Number
The system uses the customer number that you enter in the receipt header. You can select invoices for other customers by entering their address numbers in this field.
4. Click one of the following options to designate the type of address book number that you entered:
• Payor
• Customer
5. Complete the following optional fields to select specific invoices:
• Company
Enter * to display all open invoices for all companies.
6. Click Find to load the open items that meet your search criteria. Alternatively, you can use the QBE line to locate invoices.
Note The system does not display RU (unapplied receipt), R5 (deduction), and R1 (draft) invoice records. These records are not available for selection.
7. Choose the invoice or group of invoices and click Select.

169
The system marks the invoices that you select. Alternatively, you can choose Select/Deselect from the Row menu or double-click the Document Number field to select or deselect the invoices for payment.
You can select invoices from multiple customers. The system keeps track of the number of invoices that you select and the total amount of the selected invoices.
8. Click Close to load the selected invoices in the detail area of the Receipt Entry form.
Note The system displays the invoices in the order in which they were selected.
If you set a processing option to use a default type input code, when the system loads invoices, it updates the TI field with the value that you specified in the processing option.
► To select open invoices by remittance
The task to enter remittance information is the same regardless of whether you use the Standard Receipts Entry program (P03B102) or one of the draft entry programs. This task is presented using the Receipt Entry form only.
Use one of the following navigations depending on whether you are entering a receipt or a draft:
From the Manual Receipts Processing menu (G03B12), choose Standard Receipts Entry.
From the Draft Daily Operations menu (G03B161), choose either Enter Our Drafts or Enter Customer Drafts.
1. Follow the steps to enter an unapplied receipt or an unapplied draft.
2. On Receipt Entry or Draft Entry, choose Remittance from the Form menu.
3. On Select Invoices by Remittance, complete the following optional fields to narrow your search for the invoices:
• Payor
• Customer
• Parent
• Company
You can also use * to specify all values.
Note If the invoice does not contain the information that you entered in these fields, the system cannot locate it.
4. In the detail area, complete the following field for each item on the customer's remittance:

170
• Invoice Reference
Enter the invoice number, statement number, sales order number, customer reference number, or shipment number. The system searches the Customer Ledger table (F03B11) for invoices in the order that are specified in the Match Priority processing options, unless you complete the Override Type field.
Note The system searches the A/R Notification History Detail table (F03B21) to locate the statement number; therefore, you must use the Statement Notification Refresh program (R03B500X) to generate statements for the system to locate invoices by statement number.
5. Complete any of the following optional fields:
• T I
Enter the TI code to override the default value specified in the processing option, if desired. If you leave this field blank, the system uses the value in the processing option, if one is specified.
The system ignores any value that you enter, unless you specify a remittance amount for tracking purposes.
• Override Type
To reduce processing time, you can specify the search criteria for the system to use to locate the invoice based on the information entered. For example, if you enter an invoice number in the Invoice Reference field, you can enter 1 in this field and the system searches for the invoice by invoice number only and ignores the Match Priority processing options.
6. Click in the next detail line and review the following fields that the system completes:
• Items Found
• Amount Open
• Discount Available
• Discount Earnable
• Process Type
7. If you need to keep a running total of the remittance amounts, complete the Remittance Amount and Remittance Discount fields to update the totals on the bottom of the form.
Note The system does not use the remittance amounts entered as the payment and discount amounts on the receipt or draft entry form.

171
The system calculates the payment amount for you only if the type input code is provided (either as a default in the processing options or as an override on this form). Otherwise, you must specify the payment amount on the receipt or draft entry form.
8. Click OK.
The system displays the invoices on the entry form in the order that you entered them on the remittance form.
Applying a Receipt or Draft to Invoices (TI Code 10)
You use type input code 10 when the receipt or draft pays all or part of the invoice and you do not want to specify manual write-offs, chargebacks, or deductions. The system automatically takes any discount that is earned (the G/L date is on or before the discount due date). You indicate how much of the invoice the receipt or draft pays in the Payment Amount field. If you leave this field blank, the system pays the entire open amount of the invoice, up to the receipt or draft amount.
After you enter receipts and drafts, you must post them to the general ledger.
• When you post receipt records, the system debits the bank account for the amount of the receipt and credits the A/R trade account that was used when the invoice was posted.
• When you post draft records, the system debits the draft receivables account for the amount of the draft and credits the A/R trade account that was used when the invoice was posted.
See Also Applying a Receipt or Draft to Invoices with Discounts (TI Code 10) in the Accounts
Receivable Guide for information on overriding the discount amount
► To apply a receipt or draft to invoices (TI code 10)
The task to apply a payment to an invoice using type input code 10 is the same regardless of whether you choose Standard Receipts Entry or one of the draft entry programs. This task is illustrated using the Receipt Entry form only.
Use one of the following navigations depending on whether you are entering a receipt or draft:
From the Manual Receipts Processing menu (G03B12), choose Standard Receipts Entry.
From the Draft Daily Operations menu (G03B161), choose either Enter Our Drafts or Enter Customer Drafts.
1. Follow the steps to enter an unapplied receipt or an unapplied draft.
2. On Receipt Entry or Draft Entry, follow the steps to display the open invoices for the customer.

172
3. In the detail area, enter 10 in the following field next to the first invoice that you want to pay:
• T I
When you move the cursor out of this field, the system automatically completes the Payment Amount field with the amount of the invoice.
Note The system completes this field for you if you specify a type input code in the processing options. Override the value if necessary.
4. If necessary, override the value in the following fields:
• Payment Amount
If you specify a payment amount that is greater than the open amount of the invoice, the system displays the overpayment as a negative open amount.
Note Depending on the processing option settings, the system might automatically write off the difference between the open amount of the invoice and the payment amount that you enter. See Applying a Receipt or Draft to Invoices with Write-Offs (TI Codes 10 and 15) in the Global Solutions Spain Guide for more information.

173
• Remark
5. Verify that the following fields on the bottom of the form contain the correct information:
• Amount Applied
If you have fully applied the payment to invoices, the amount pending should equal the receipt or draft amount that appears in the header portion of the entry form.
• Amount Unapplied
The system creates an unapplied record for the amount in this field.
6. Click OK.
Applying a Receipt or Draft to Invoices with Discounts (TI Code 10)
When you apply a receipt or draft to an invoice or group of invoices, you can choose whether to allow the discount. If the customer pays the invoice in full on or before the discount due date, the discount is earned and the system automatically populates the Discount Taken field with the amount of the discount. If the discount is not earned (the G/L date of the payment is after the discount due date), the system does not automatically populate the Discount Taken field, but you can override it and apply a discount amount manually. If you do not allow the discount, the system leaves the invoice open in the amount of the discount.
You can set processing options to allow the amount of the discount taken to be more than the discount available, or to allow the discount taken to be more than the applied (payment amount). For example, you might issue a credit to a customer in the form of a discount for a disputed item. You can also specify grace days to add to the discount due date.
After you enter receipts and drafts, you must post them.
When you post payments with earned discounts, in addition to the bank account (or drafts receivable account) and A/R trade account, the system updates a discount taken account. The system uses the following hierarchy to locate the discount taken account:
1. The system searches for AAI item RKDxxx, where xxx is the discount reason code that you entered for the company that you entered on the receipt.
2. If the system does not locate this AAI, it uses RKDxxx for company 00000.
3. If the system does not locate this AAI, it returns an error.
Before You Begin Verify that the appropriate discount account is specified for the AAI item RKDxxx.
Verify that the processing options under the Discount tab are set up.
Verify that the valid values that you want to use for the discount reason code are set up in the user defined codes (00/DE).
► To apply a receipt or draft to invoices with discounts (TI code 10)
The task to apply a payment with discounts to an invoice using type input code 10 is the same regardless of whether you choose Standard Receipts Entry or one of the draft entry programs.

174
Use one of the following navigations depending on whether you are entering a receipt or draft:
From the Manual Receipts Processing menu (G03B12), choose Standard Receipts Entry.
From the Draft Daily Operations menu (G03B161), choose either Enter Our Drafts or Enter Customer Drafts.
1. Follow the steps to enter an unapplied receipt or an unapplied draft.
2. On Receipt Entry or Draft Entry, follow the steps to display the open invoices for the customer.
3. In the detail area, enter 10 in the following field next to the appropriate invoice:
• T I
When you move the cursor out of this field, the system automatically completes the Payment Amount field with the amount of the invoice and the Discount Taken field with the amount in the Discount Available field, if the discount is earned.
4. If necessary, override the value in the following fields:
• Payment Amount
Note Depending on the processing option settings, the system might automatically write off differences between the open amount of the invoice and the payment amount that you enter. See Applying a Receipt or Draft to Invoices with Write-Offs (TI Codes 10 and 15) in the Global Solutions Spain Guide for more information.
• Remark
• Discount Taken
If the discount is earned and the invoice is paid in full, the system completes this field with the amount of the discount available.
If the discount is not earned (the G/L date of the payment is after the discount due date, or the invoice is not paid in full), the system does not complete this field.
You can override the field to specify a different discount amount, including zero.
5. Complete the following optional field:
• DS CD
6. Verify that the following fields on the bottom of the form contain the correct information:
• Amount Applied
If you have fully applied the payment to invoices, the amount pending should equal the receipt or draft amount that appears in the header portion of the entry form.

175
• Amount Unapplied
The system creates an unapplied record for the amount in this field.
7. Click OK.
Applying a Receipt or Draft to Invoices with Chargebacks (TI Codes 11 and 16)
When applying a payment to an invoice, you might want to create a chargeback if the amount that you receive is less than the open amount for the invoice. For example, a customer might issue payment for an invoice, less the discount, even though the terms of the discount have expired, or they might refuse to pay freight charges.
You can use the following type input codes for generating a chargeback invoice:
TI Code 11 Use this type input code when you want the system to create a chargeback for an unearned discount. The system automatically populates the Chargeback Amount field with the discount available.
TI Code 16 Use this type input code when you want the system to generate a chargeback for a short payment that is not an unearned discount. The system automatically populates the Chargeback Amount field with the difference between the payment amount that you enter and the open amount of the invoice.
When you enter a receipt with a chargeback, the system generates the following three records:
Customer Ledger (F03B11) A chargeback invoice record, which takes the place of a specific invoice, for the disputed amount that you want to charge back to the customer. The system closes the original invoice and marks it as paid, and creates a new chargeback invoice record that it assigns a document type of RB.
The chargeback invoice record has the following characteristics:
• It establishes an audit trail to the receipt payment ID. • It establishes an audit trail to the original invoice, if the chargeback was
generated for a specific invoice. • It is expressed as a debit amount. • It has a batch type of either RB (if generated from a receipt application) or
DB (if generated from a draft application). • It contains a posting status of D (posted).
The posted codes for the payment records in the Receipts Header table (F03B13) and Receipts Detail table (F03B14) remain blank until the receipt or draft is posted.
Receipts Header (F03B13) The payment record.
Receipts Detail (F03B14) The detail record that pays the invoice from which the chargeback was generated.
Regardless of the type input code you use, if you specify a chargeback amount and reason code, the system creates a chargeback record.

176
After you enter receipts and drafts, you must post them. When you post payments with chargebacks, in addition to the bank account (or draft receivables account) and A/R trade account, the system might update a different A/R trade account for the chargeback amount, depending on whether you complete the Chargeback G/L Offset field on the payment record.
Before You Begin Verify that the account that you want to use for the chargeback A/R trade account is
set up for the AAI item RCxxxx, where xxxx is the chargeback G/L offset code.
Verify that the processing options on the chargeback tab are set up.
Verify that the valid values that you want to use for the chargeback reason code are set up in UDC (03B/CB).
► To apply a receipt or draft to invoices with chargebacks (TI codes 11 and 16)
The task to apply a payment with chargebacks to an invoice using type input codes 11 and 16 is the same regardless of whether you choose Standard Receipts Entry or one of the draft entry programs.
Use one of the following navigations depending on whether you are entering a receipt or draft:
From the Manual Receipts Processing menu (G03B12), choose Standard Receipts Entry.
From the Draft Daily Operations menu (G03B161), choose either Enter Our Drafts or Enter Customer Drafts.
1. Follow the steps to enter an unapplied receipt or an unapplied draft.
2. On Receipt Entry or Draft Entry, follow the steps to display the open invoices for the customer.
3. In the detail area, enter 11 or 16 in the following field next to the appropriate invoice:
• T I
If you enter 11, when you move the cursor out of this field, the system completes the Payment Amount field with the amount of the invoice and the Chargeback Amount field with the amount in the Discount Available field.
If you enter 16, when you move the cursor out of this field, the system completes the Payment Amount field with the amount of the invoice or the amount of the payment, depending on the number of invoices you pay.
Note The system completes this field for you if you specify a type input code in the processing options. Override the value if necessary.
4. If necessary, override the value in the following fields:
• Payment Amount
If the payment amount is greater than the open amount of the invoice, the system does not calculate the chargeback amount until you override the payment amount to be less than the open invoice amount.

177
• Remark
• Chargeback Amount
5. Complete the following required field:
• CB CD
The system does not accept blank as a valid value, even if it is set up in the user defined codes.
6. To direct the offset for the chargeback to a different A/R trade account, complete the following field:
• Chargeback G/L Offset
7. Verify that the following fields on the bottom of the form contain the correct information:
• Amount Applied
If you have fully applied the payment to invoices, the amount pending should equal the receipt or draft amount that appears in the header portion of the entry form.
• Amount Unapplied
The system creates an unapplied record for the amount in this field.
8. Click OK.
Applying a Receipt or Draft to Invoices with Write-Offs (TI Codes 10 and 15)
If the payment that you receive is not enough to pay the open amount of the invoice, or if you receive a small overpayment, you might want to write off the difference and close the invoice. For example, you might receive a payment from a customer that is slightly less than the invoice amount. To maintain a good relationship with your customer, you might choose to write off the minor amount instead of creating a chargeback invoice for the difference or leaving the amount open.
The following two options are available for performing write-offs:

178
Automatic write-off
(TI Code 10)
The system calculates the difference between the payment amount and the open amount of the invoice. If the difference is within the tolerance limits that are defined in the processing options, the system automatically performs the write-off.
For example, if you establish the maximum write-off amount as 10, the invoice open amount is 500, and you enter a receipt or draft for 490, the system automatically writes off 10, provided that you either enter 490 in the Payment Amount field or accept the system default. You do not need to calculate or specify a write-off amount.
Automatic write-offs require you to enter a default reason code in the processing options, which the system uses to determine the write-off account. When you enter the receipt or draft, you cannot override the write-off reason code for automatic write-offs.
When you apply the payment to invoices, the system displays a remaining open amount. After you enter the receipt or draft and review it, the system displays the write-off amount and write-off reason code. You can override the write-off reason code at this time.
Manual write-off
(TI Code 15)
You specify that you want the system to perform a write-off by using type input code 15, and the system calculates the write-off amount for you. If you exceed the maximum manual write-off amount specified in the processing options, the system issues an error when you click OK. You can then manually adjust the write-off amount.
You can set up a default reason code to use for manual write-offs, but it is not required, and you can override it when you enter the receipt or draft.
Regardless of the type input code you use, if you specify a write-off amount and reason code, the system generates a write-off.
For the write-off to occur on amounts that exceed the invoice open amount, such as overpayments, you must override the transaction payment amount with the receipt or draft amount. Otherwise, the system generates an unapplied payment record for the amount. For example, if the payment amount is 100.00 and the invoice amount is 95.00, and you wish to write off the 5.00 automatically, you must change the payment amount in the detail area from 95.00 to 100.00. Otherwise, the system generates an unapplied payment record for 5.00.
After you enter receipts and drafts, you must post them. When you post payments with write-offs, in addition to crediting the bank account (or draft receivables account) and debiting the A/R trade account, the system updates a write-off account that you specify for the AAI item RAxx, where xx is the write-off reason code. You must set up an AAI for each write-off reason code that you use.
Before You Begin Verify that the account that you want to use for the each write-off reason code is set
up for the AAI item RAxx, where xx is the write-off reason code.
Verify that the processing option on the Edits tab is set up to allow write-offs.
Verify that the processing options on the Auto Write Off and Mnl Write Off tabs are set up.
Verify that the valid values that you want to use for the write-off reason code are set up in UDC (03B/RC).
► To enter receipts and drafts with write-offs (TI code 15)
The task to apply a payment to an invoice using type input code 15 is the same regardless of whether you choose Standard Receipts Entry or one of the draft entry programs.

179
Use one of the following navigations depending on whether you are entering a receipt or draft:
From the Manual Receipts Processing menu (G03B12), choose Standard Receipts Entry.
From the Draft Daily Operations menu (G03B161), choose either Enter Our Drafts or Enter Customer Drafts.
1. Follow the steps to enter an unapplied receipt or an unapplied draft.
2. On Receipt Entry or Draft Entry, follow the steps to display the open invoices for the customer.
3. In the detail area, enter 15 in the following field next to the appropriate invoice:
• T I
When you move the cursor out of this field, if the receipt or draft amount is less than the open amount of the invoice, the system automatically calculates the write-off amount and completes the Payment Amount and Write-Off Amount fields.
Note The system completes this field for you if you specify a type input code in the processing options. Override the value if necessary.
4. If necessary, override the value in the following fields:
• Payment Amount
If the amount of the receipt or draft is greater than the open amount of the invoice, the system does not calculate the write-off amount until you override the payment amount.
• Remark
• Write-Off Amount
5. Complete the following required field:
• WO CD
The system does not accept blank as a valid value, even if it is set up in the user defined codes.
6. Verify that the following fields on the bottom of the form contain the correct information:
• Amount Applied
If you have fully applied the payment to invoices, the amount pending should equal the receipt or draft amount in the header portion of the entry form.
• Amount Unapplied
The system creates an unapplied record for the amount in this field.
7. Click OK.

180
Applying a Receipt or Draft to Invoices with Deductions (TI Code 17)
Entering receipts and drafts with deductions is a method of postponing a response to a short payment from your customer without delaying payment entry. You can enter the payment immediately while another person researches and resolves the deduction. Some common reasons that a customer might take a deduction are):
• Damaged or defective merchandise
• Unearned discounts
• Billing errors
• Refusal to pay shipping charges or tax
• Shortages in the shipment of merchandise
You specify that you want the system to calculate deductions by using type input code 17. If the amount applied to the invoice is less than the receipt amount, the system updates the Deduction Amount field for the difference automatically. The system also updates the deduction reason code with the default value that you specify in the processing options.
When you enter a receipt or draft with a deduction, the system generates the following three documents:
Customer Ledger (F03B11) A deduction invoice document, which takes the place of a specific invoice or group of invoices, for the disputed amount that you want to research and resolve. The system closes the invoice, marks it as paid, creates a new deduction invoice record, and assigns the document type R5 to it.
The deduction invoice record has the following characteristics:
• It establishes an audit trail to the receipt payment ID. • It establishes an audit trail to the original invoice (if the deduction was
generated for a specific invoice). • It is expressed as a debit amount. • It has a batch type of either RB (if generated from a receipt
application) or DB (if generated from a draft application). • It contains a posting status of D (posted).
The posted codes for the payment records in the Receipts Header table (F03B13) and Receipts Detail table (F03B14) remain blank until the receipt or draft is posted.
Receipts Header (F03B13) The payment record.
Receipts Detail (F03B14) The detail record that pays the invoice from which the deduction was generated.
Regardless of the type input code that you use, if you specify a deduction amount and reason code, the system creates a deduction record.
After you enter receipts and drafts, you must post them. When you post payments with deductions, in addition to the bank account (or draft receivables account) and A/R trade account, the system debits the deduction suspense account that is set up for the AAI item RN. The system also creates records in the A/R Deduction Management table (F03B40). The

181
deduction record enables you to research and resolve the reason for the deduction at a later time.
Note
If you need to change the deduction amount or void the payment after it is posted, you must first reverse or void the deduction record (F03B40) using the deduction application. You can, however, revise other non-deduction payment detail records.
See Also Deduction Processing in the Accounts Receivable Guide for information on
researching and resolving deductions
Before You Begin Verify that the account that you want to use for the deduction suspense account is
set up for the AAI item RN.
Determine whether you want to specify a default deduction reason code and, if so, enter the value in the processing options on the Defaults tab.
Verify that the valid values that you want to use for the deduction reason code are set up in UDC (03B/CR).
► To apply a receipt or draft to invoices with deductions (TI code 17)
The task to apply a payment to an invoice using type input code 17 is the same regardless of whether you choose Standard Receipts Entry or one of the draft entry programs.
Use one of the following navigations depending on whether you are entering a receipt or draft:
From the Manual Receipts Processing menu (G03B12), choose Standard Receipts Entry.
From the Draft Daily Operations menu (G03B161), choose either Enter Our Drafts or Enter Customer Drafts.
1. Follow the steps to enter an unapplied receipt or an unapplied draft.
2. On Receipt Entry or Draft Entry, follow the steps to display the open invoices for the customer.
3. In the detail area, enter 17 in the following field next to the appropriate invoice:
• T I
When you move the cursor out of this field, the system completes the Payment Amount field with the amount of the invoice or the amount of the receipt or draft, depending on the number of invoices you pay.
4. If necessary, override the value in the following fields:
• Payment Amount
If the amount of the receipt or draft is greater than the open amount of the invoice, the system does not calculate the deduction amount until you override the payment amount to be less than the open invoice amount.

182
• Remark
• Deduction Amount
5. Complete the following required field:
• DD CD
The system does not accept blank as a valid value, even if it is set up in the user defined codes.
6. Verify that the following fields on the bottom of the form contain the correct information:
• Amount Applied
If you have fully applied the payment to invoices, the amount pending should equal the receipt or draft amount that appears in the header of the entry form.
• Amount Unapplied
The system creates an unapplied record for the amount in this field.
7. Click OK.
Applying a Receipt or Draft to Invoices Using Multiple Type Input Codes
You can enter a receipt or draft and apply it simultaneously to a group of invoices that require individual treatment. For example, if you have three invoices, you might allow the discount on one invoice, charge back the discount amount on another invoice, and create a write-off for the shipping cost on the last invoice.
When you apply a receipt or draft to invoices using multiple type input codes, you can address each invoice individually by using the type input codes in any combination.
Note
The system uses the following criteria to determine the payment amount for each receipt detail line:
• Receipt or Draft Amount
• Open Invoice Amount
• Type Input Code
• Unapplied Amount
For example, if you neglect to complete the Receipt Amount or Draft Amount field, and you attempt to pay multiple invoices, the system attempts to compensate for the first payment amount you enter by populating the second detail line with a negative payment amount.

183
Applying Unapplied Payments to Invoices
After you enter an unapplied receipt or draft, you can apply it to the appropriate invoice or group of invoices using all of the available type input codes. To match an unapplied payment to invoices, you select the unapplied payment first and then display the open invoice records. You cannot use the Load or Select features to display unapplied payments along with the open invoices.
When you fully apply an unapplied payment to invoices, the system performs the following functions for each invoice to which the payment was applied:
• Creates a new batch record in the Batch Control Records table (F0011) for batch type RB (for receipts) or DB (for drafts), if the unapplied payment is posted when you apply it against invoices.
• Closes the RU invoice document in the Customer Ledger table (F03B11) by updating the pay status to P.
• Closes the RI invoice document in the Customer Ledger table (F03B11) by updating the pay status to P, if the invoice is fully paid.
• Creates RC documents in the Receipts Detail table (F03B14).
If you fully apply an unapplied payment to invoices before it is posted, the system deletes the RU record from the F03B11 and F03B14 tables.
Regardless of whether the unapplied payment is posted before you apply it to an invoice, you must post the payment after you apply it to invoices to update the appropriate accounts in the general ledger.
See Also The following topics in the Accounts Receivable Guide:
Journal Entries Created by the Receipt Post for more information about posting zero amount receipts
Journal Entries Created by the Draft Post for more information about posting zero amount drafts
► To apply an unapplied draft to invoices
From the Draft Daily Operations menu (G03B161), choose either Enter Our Drafts or Enter Customer Drafts.
1. On Work With Drafts, to locate unapplied drafts, enter UC in the following field of the QBE row and click Find:
• Unapplied G/L Offset
2. Choose the unapplied draft to which you want to apply invoices and click Select.
3. On Draft Entry, display the open items for the customer by choosing either Load or Select from the Form menu.
4. On Draft Entry, in the header area, complete the following optional field:
• G/L Date

184
Note The G/L date that you assign does not change the G/L date of the unapplied draft record in the Receipts Header table (F03B13). The system uses the G/L date for the draft detail record that it creates in the Receipts Detail table (F03B14) to pay the invoice.
5. In the detail area, complete the following field with the appropriate code:
• T I
6. If necessary, override the values in the following fields:
• Payment Amount
• Discount Taken
• Remark
• Write-Off Amount
If you enter a write-off amount, you must enter a write-off reason code.
• Chargeback Amount
If you enter a chargeback amount, you must enter a chargeback reason code.
• Deduction Amount
If you enter a deduction amount, you must enter a deduction reason code.
7. Verify that the following fields on the bottom of the form contain the correct information:
• Amount Pending
The amount pending should equal the draft amount specified in the header if you have fully applied the draft to invoices.
• Amount Unapplied
The system creates an unapplied draft record for the amount that appears in this field.
8. Click OK.
Applying Credit Memos to Invoices
When the customer has outstanding credit memos, you can apply them to outstanding invoices using the Standard Receipts Entry program (P03B102) or one of the draft entry programs (P03B602). Because you do not have a physical payment, you enter zero in the Receipt Amount or Draft Amount field. You can use the Load, Select, or Remittance feature to display the credit memo and invoice, and then you use the appropriate type input code to apply the credit memo to the invoice. If the credit memo does not fully pay the invoice, you can leave the invoice open for the amount that remains, or create a write-off, chargeback, or deduction record for the difference.

185
When you fully apply a credit memo to an invoice, the system does the following:
• Closes the RM credit memo document in the Customer Ledger table (F03B11) by updating the pay status to P.
• Closes the RI invoice document in the Customer Ledger table (F03B11) by updating the pay status to P, if the invoice is fully paid.
• Creates a record in the Receipts Header table (F03B13) for a zero amount.
• Creates RS receipt documents in the Receipts Detail table (F03B14) for both the credit memo and the invoice.
After you apply credit memos to invoices, you must post the batch to update the general ledger.
See Also The following topics in the Accounts Receivable Guide:
Journal Entries Created by the Receipt Post for more information about posting zero amount receipts
Journal Entries Created by the Draft Post for more information about posting zero amount drafts
► To apply a credit memo to an invoice
The task to apply a credit memo to an invoice is the same regardless of whether you choose Standard Receipts Entry program or one of the draft entry programs.
Use one of the following navigations depending on whether you are entering a receipt or draft:
From the Manual Receipts Processing menu (G03B12), choose Standard Receipts Entry.
From the Draft Daily Operations menu (G03B161), choose either Enter Our Drafts or Enter Customer Drafts.
1. Follow the steps to enter an unapplied receipt or an unapplied draft, but leave the Receipt Amount or Draft Amount field blank.
2. On Receipt Entry or Draft Entry, follow the steps to display the open invoices for the customer.
3. To fully apply a credit memo to an invoice, enter 10 in the following field next to the credit memo:
• T I
4. Using the appropriate code, complete the following field next to the invoice:
• T I
If the credit memo does not fully pay the invoice, you can leave the invoice open for the remaining amount or use a type input code to create a write-off, chargeback, or deduction record for the difference.
5. Click OK.

186
Creating Stand-Alone Records
Stand-alone records are write-offs, chargebacks, and deductions that are not associated with any known invoice. You create stand-alone records when the customer sends a payment for several invoices, but the payment amount does not equal the total amount of the invoices. You can also use the stand-alone feature when an unapplied payment is applied to several invoices and a small difference between the totals exists. In these scenarios, the system matches the payment to invoices, but the shortage is recorded without specifying a particular invoice.
You can also use the stand-alone feature without performing an invoice match. For example, you can create a deduction or write off a small duplicate payment. Additionally, to distribute an unapplied payment to several customer accounts, you can enter a stand-alone chargeback without invoice matching. When you use the stand-alone feature without invoice matching, you must enter the amount as a credit (negative); otherwise, the system creates an unapplied payment for twice the amount specified.
J.D. Edwards recommends that you use the stand-alone feature in conjunction with invoice match, whenever possible.
You use the following type input codes to create stand-alone transactions in the receipt and draft entry programs:
25 (Stand-alone write-off)
Use this code to create a write-off for a disputed amount, such as tax on a freight charge, that is not associated with a specific invoice.
26 (Stand-alone chargeback)
Use this code to create a chargeback invoice for an unpaid amount that is not associated with a specific invoice.
27 (Stand-alone deduction)
Use this code to create a deduction for an amount that is not associated with a specific invoice.
See Also Fields Updated During Receipt or Draft Entry in the Accounts Receivable Guide for
information about how the system locates the appropriate A/R accounts for stand-alone transactions
Creating Stand-Alone Write-Offs (TI Code 25)
A stand-alone write-off is a write-off for an amount that is not associated with any specific invoice. For example, when you receive a receipt or draft to pay multiple invoices, and the customer has not indicated which invoice should receive the short payment, you can write off this amount using a stand-alone entry. Additionally, you might use the stand-alone feature for write-offs that are not associated with any invoice. For example, you use a stand-alone write-off when you receive a duplicate payment for a small amount and want to write it off.
When you create a stand-alone write-off (type input code 25), the system reduces the customer's open balance by the amount of the write-off.
See Also Applying a Receipt or Draft to Invoices with Write-offs (TI Codes 10 and 15) in the
Accounts Receivable Guide

187
Before You Begin Ensure that you set the maximum amount in the Manual Write-Off processing option
high enough so that the system will accept the stand-alone entry.
Verify that the account that you want to use for the each write-off reason code is set up for the AAI item RAxx, where xx is the write-off reason code.
Verify that the processing option on the Edits tab is set up to allow write-offs.
Verify that the valid values that you want to use for the write-off reason code are set up in UDC (03B/RC).
► To create stand-alone write-offs with invoice match
The task to create stand-alone write-offs with invoice match is the same regardless of whether you choose the Standard Receipts Entry program (P03B102) or one of the draft entry programs. This task is illustrated using the Receipt Entry form only.
Use one of the following navigations depending on whether you are entering a receipt or draft:
From the Manual Receipts Processing menu (G03B12), choose Standard Receipts Entry.
From the Draft Daily Operations menu (G03B161), choose either Enter Our Drafts or Enter Customer Drafts.
1. Follow the steps to enter an unapplied receipt or an unapplied draft.
2. On Receipt Entry or Draft Entry, follow the steps to display the open invoices for the customer.
3. In the detail area, complete the following field with the appropriate value for each invoice:
• T I
4. From the Form menu, choose Stand-alone, and then choose Write-Off.

188
5. On Create Standalone Transaction, complete the following fields:
• Write-Off Amount
• Write-Off Reason Code
The system does not accept blank as a valid value, even if it is set up in the user defined codes. If you leave this field blank, the system does not use the default write-off reason code from the processing options.
6. Click OK.
On Receipt Entry or Draft Entry, the system adds a new detail line, creates a payment amount for the stand-alone write-off, and assigns a type input code of 25 to the payment. The system also shows the associated write-off amount and reason code.
7. Verify that the following fields on the bottom of the form contain the correct information:
• Amount Applied
If you have fully applied the payment to invoices, the amount pending should equal the receipt or draft amount that appears in the header portion of the entry form.
• Amount Unapplied
The system creates an unapplied record for the amount in this field.
8. Click OK.
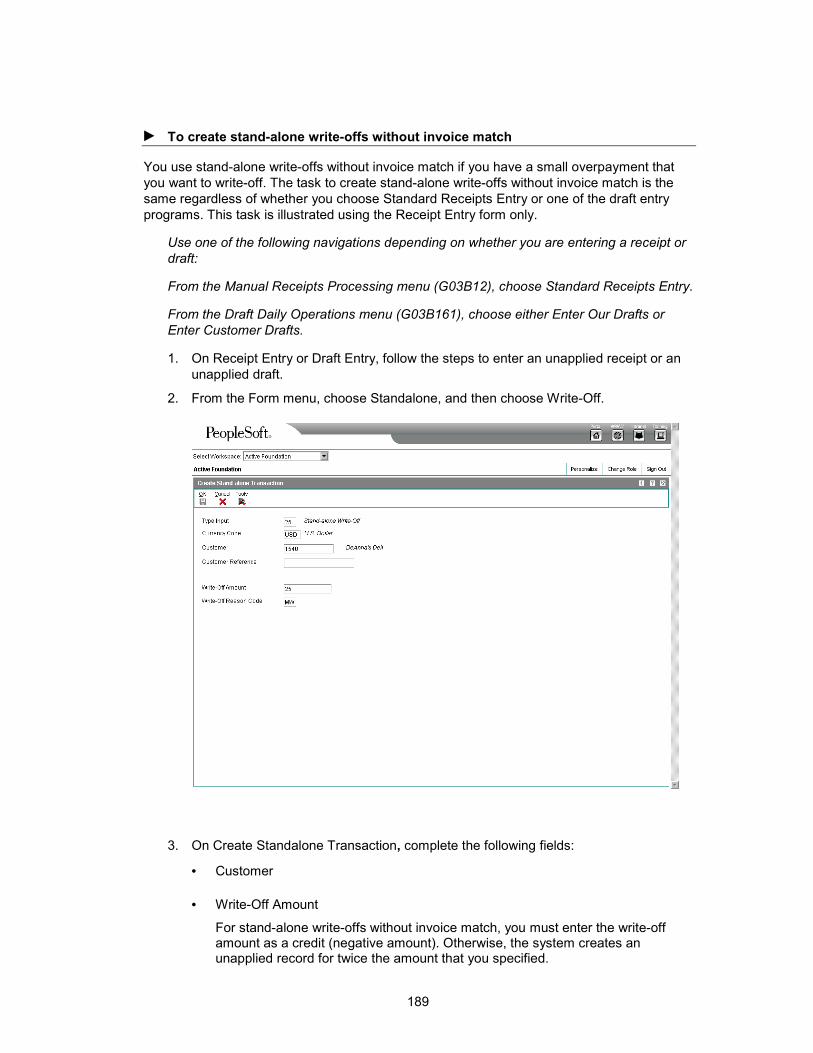
189
► To create stand-alone write-offs without invoice match
You use stand-alone write-offs without invoice match if you have a small overpayment that you want to write-off. The task to create stand-alone write-offs without invoice match is the same regardless of whether you choose Standard Receipts Entry or one of the draft entry programs. This task is illustrated using the Receipt Entry form only.
Use one of the following navigations depending on whether you are entering a receipt or draft:
From the Manual Receipts Processing menu (G03B12), choose Standard Receipts Entry.
From the Draft Daily Operations menu (G03B161), choose either Enter Our Drafts or Enter Customer Drafts.
1. On Receipt Entry or Draft Entry, follow the steps to enter an unapplied receipt or an unapplied draft.
2. From the Form menu, choose Standalone, and then choose Write-Off.
3. On Create Standalone Transaction, complete the following fields:
• Customer
• Write-Off Amount
For stand-alone write-offs without invoice match, you must enter the write-off amount as a credit (negative amount). Otherwise, the system creates an unapplied record for twice the amount that you specified.

190
• Write-Off Reason Code
The system does not accept blank as a valid value, even if it is set up in the user defined codes. If you leave this field blank, the system does not use the default write-off reason code from the processing options.
4. Click OK.
On the entry form, the system adds a new detail line, creates a positive payment amount for the stand-alone write-off and assigns a type input code of 25 to the payment amount. The system also shows the associated write-off amount and reason code.
5. Verify that the following fields on the bottom of the form contain the correct information:
• Amount Applied
If you have fully applied the payment to invoices, the amount pending should equal the receipt or draft amount that appears in the header portion of the entry form.
• Amount Unapplied
The system creates an unapplied record for the amount in this field.
6. Click OK.
Creating Stand-Alone Chargebacks (TI Code 26)
When an amount in dispute is not associated with a specific invoice, you can create a stand-alone chargeback for the amount. A stand-alone chargeback enables you to reinvoice the customer for the amount that is in dispute. Typically, you enter stand-alone chargebacks when the payment amount does not total the invoices being paid, and you want to charge back the difference to the customer. In this case, you enter a standalone chargeback with invoice match. The system increases the customer's open balance by the amount of the short-payment.
You enter a stand-alone chargeback without invoice match when you want to distribute an unapplied receipt or draft among multiple customer accounts. When you do this, the system creates a record in the Receipts Header table (F03B13) for the payor, and creates associated records in the Receipts Detail (F03B14) and Customer Ledger (F03B11) tables for the chargeback amount (as a credit) to each customer. This process simulates the creation of an unapplied payment for each customer.
See Also Applying a Receipt or Draft to Invoices with Chargebacks (TI Codes 11 and 16) in the
Accounts Receivable Guide
Before You Begin Verify that the account that you want to use for the chargeback A/R trade account is
set up for the AAI item RCxxxx, where xxxx is the chargeback G/L offset code.
Verify that the processing options under the Chargeback tab are set up.
Verify that the valid values that you want to use for the chargeback reason code are set up in UDC (03B/CB).

191
► To create a stand-alone chargeback with invoice match
The task to create stand-alone chargebacks with invoice match is the same regardless of whether you choose Standard Receipts Entry or one of the draft entry programs. This task is illustrated using the Receipt Entry form only.
Use one of the following navigations depending on whether you are entering a receipt or draft:
From the Manual Receipts Processing menu (G03B12), choose Standard Receipts Entry.
From the Draft Daily Operations menu (G03B161), choose either Enter Our Drafts or Enter Customer Drafts.
1. Follow the steps to enter an unapplied receipt or an unapplied draft.
2. On Receipt Entry or Draft Entry, follow the steps to display the open invoices for the customer.
3. In the detail area, complete the following field with the appropriate value for each invoice:
• T I
4. From the Form menu, choose Standalone, and then choose Chargeback.
5. On Create Standalone Transaction, complete the following fields:
• Chargeback G/L Offset
• Chargeback Amount

192
• Chargeback Reason Code
The system does not accept blank as a valid value, even if it is set up in the user defined codes. If you leave this field blank, the system does not use the default chargeback reason code from the processing options.
6. Click OK.
On the entry form, the system adds a new detail line, creates a negative payment amount for the stand-alone chargeback, and assigns a type input code of 26 to the payment amount. The system also shows the associated chargeback amount and reason code.
7. Verify that the following fields on the bottom of the form contain the correct information:
• Amount Applied
If you have fully applied the payment to invoices, the amount pending should equal the receipt or draft amount that appears in the header portion of the entry form.
• Amount Unapplied
The system creates an unapplied record for the amount in this field.
8. Click OK.
Example: Using Stand-Alone Chargebacks to Distribute an Unapplied Payment Among Multiple Customers
When you receive one payment to be distributed among multiple customers without applying it to invoices, you use the stand-alone chargeback feature.
For example, you receive a receipt for 15,000 from payor 3001 to be applied as follows:
• 5,000 to customer 3004
• 5,000 to customer 3333
• 5,000 to customer 3334
Using the stand-alone chargeback feature, you specify the customer and amount that you want to distribute. Enter the payment amount as a credit (negative amount). You repeat the process until the amount is fully distributed among the customers.
The system creates the following records:
Table Document Type
Gross Amount
Customer Number
Payment ID
F03B13 N/A 15,000 3001 521
F03B11 RB –5,000 3004 521
F03B11 RB –5,000 3333 521
F03B11 RB –5,000 3334 521
F03B14 RC* –5,000 3004 521

193
F03B14 RC* –5,000 3333 521
F03B14 RC* –5,000 3334 521
*This is the matching document type (DCTM).
The system uses the payment ID to provide an audit trail from the F03B11 and F03B14 records to the original F03B13 payment record.
Later, you must apply the negative chargeback invoices to invoices that you want to pay.
► To create a stand-alone chargeback without invoice match
You use stand-alone chargeback without invoice match when you want to enter and distribute an unapplied payment among multiple customer accounts. The task to create stand-alone chargebacks without invoice match is the same regardless of whether you choose Standard Receipts Entry or one of the draft entry programs. This task is illustrated using the Receipt Entry form only.
Use one of the following navigations depending on whether you are entering a receipt or draft:
From the Manual Receipts Processing menu (G03B12), choose Standard Receipts Entry.
From the Draft Daily Operations menu (G03B161), choose either Enter Our Drafts or Enter Customer Drafts.
1. On Receipt Entry or Draft Entry, follow the steps to enter an unapplied receipt or an unapplied draft.
2. From the Form menu, choose Standalone, and then choose Chargeback.

194
3. On Create Standalone Transaction, complete the following fields:
• Customer
Enter the customer number to whom you want to distribute the unapplied payment. The system creates credit (RB) records in the Customer Ledger table (F03B11) for the appropriate customers, which you can locate and apply against invoices at a later time.
• Chargeback G/L Offset
Use this field to specify a different A/R trade account.
• Chargeback Amount
Enter the amount that you want to distribute to the first customer as a credit (negative amount). Otherwise, the system creates an unapplied record for twice the amount specified.
• Chargeback Reason Code
The system does not accept Blank as a valid value, even if it is set up in the user defined codes. If you leave this field blank, the system does not use the default chargeback reason code from the processing options.
4. Click OK.
On the entry form, the system adds a new detail line, and creates a positive payment amount for the stand-alone chargeback and assigns it a type input code of 26. The system also shows the associated chargeback amount and reason code.
Repeat steps 2, 3, and 4 for each customer to whom you want to distribute an amount.
5. Verify that the following fields on the bottom of the form contain the correct information:
• Amount Applied
If you have fully applied the payment to invoices, the amount pending should equal the receipt or draft amount that appears in the header portion of the entry form.
• Amount Unapplied
The system creates an unapplied record for the amount in this field.
6. Click OK.
Creating Stand-Alone Deductions (TI Code 27)
When the amount of the payment does not equal the amount of the invoices that it pays, you can create a stand-alone deduction to postpone the research and resolution of the short-payment until a later date. Additionally, you might use the stand-alone feature for deductions that are not associated with any invoice. For example, you would use this feature if you receive a duplicate payment for a small amount and are unsure about how to process it.

195
When you create a stand-alone deduction (type input code 27), the system reduces the customer's account by the amount of the short-payment.
When you post the deduction, the system creates a record in the A/R Deduction Management table (F03B40) that you use to resolve the issue.
See Also The following topics in the Accounts Receivable Guide:
Applying a Receipt or Draft to Invoices with Deductions (TI Code 17)
Deduction Processing
Before You Begin Verify that the account that you want to use for the deduction suspense account is
set up for the AAI item RN.
Verify that the valid values that you want to use for the deduction reason code are set up in UDC (03B/CR).
► To create a stand-alone deduction with invoice match
The task to create stand-alone deductions with invoice match is the same regardless of whether you choose the Standard Receipts Entry program (P03B102) or one of the draft entry programs. This task is illustrated using the Receipt Entry form only.
Use one of the following navigations depending on whether you are entering a receipt or draft:
From the Manual Receipts Processing menu (G03B12), choose Standard Receipts Entry.
From the Draft Daily Operations menu (G03B161), choose either Enter Our Drafts or Enter Customer Drafts.
1. Follow the steps to enter an unapplied receipt or an unapplied draft.
2. On Receipt Entry or Draft Entry, follow the steps to display the open invoices for the customer.
3. In the detail area, complete the following field with the appropriate value for each invoice:
• T I
4. From the Form menu, choose Standalone, and then choose Deduction.
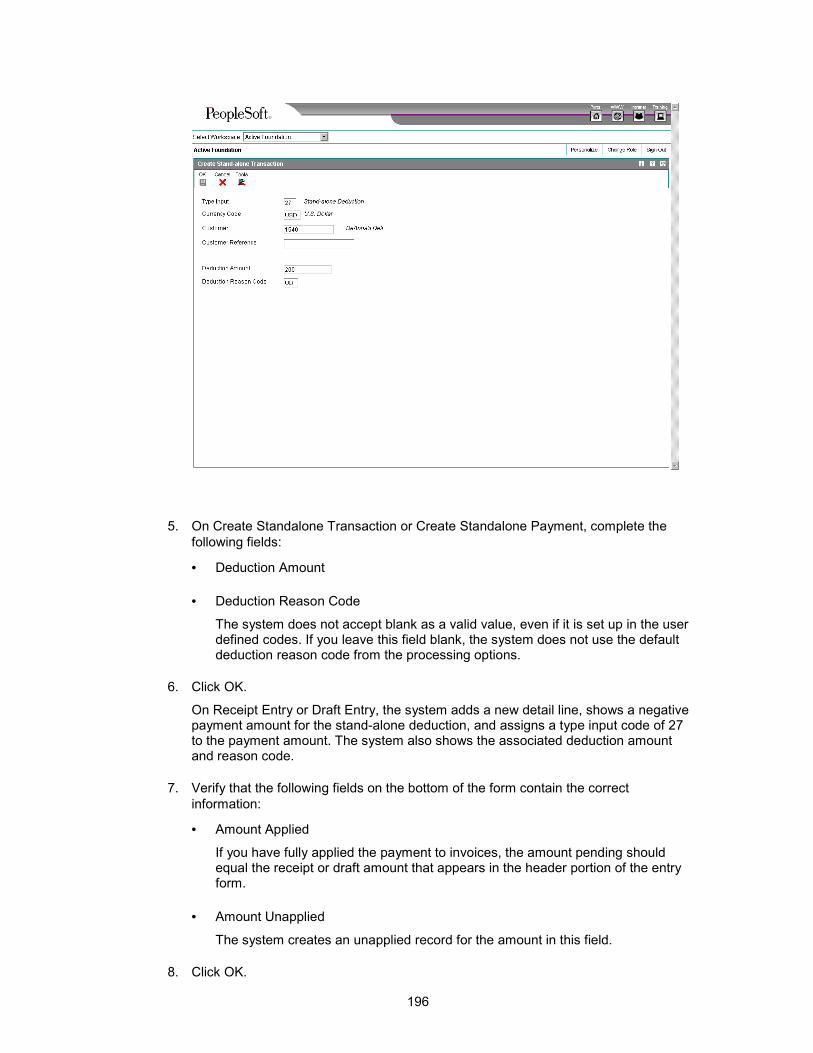
196
5. On Create Standalone Transaction or Create Standalone Payment, complete the following fields:
• Deduction Amount
• Deduction Reason Code
The system does not accept blank as a valid value, even if it is set up in the user defined codes. If you leave this field blank, the system does not use the default deduction reason code from the processing options.
6. Click OK.
On Receipt Entry or Draft Entry, the system adds a new detail line, shows a negative payment amount for the stand-alone deduction, and assigns a type input code of 27 to the payment amount. The system also shows the associated deduction amount and reason code.
7. Verify that the following fields on the bottom of the form contain the correct information:
• Amount Applied
If you have fully applied the payment to invoices, the amount pending should equal the receipt or draft amount that appears in the header portion of the entry form.
• Amount Unapplied
The system creates an unapplied record for the amount in this field.
8. Click OK.

197
► To create stand-alone deductions without invoice match
The task to create a stand-alone deduction without invoice match is the same regardless of whether you choose the Standard Receipts Entry program (P03B102) or one of the draft entry programs. This task is illustrated using the Receipt Entry form only.
Use one of the following navigations, depending on whether you are entering a receipt or draft:
From the Manual Receipts Processing menu (G03B12), choose Standard Receipts Entry.
From the Draft Daily Operations menu (G03B161), choose either Enter Our Drafts or Enter Customer Drafts.
1. On Receipt Entry or Draft Entry, follow the steps to enter an unapplied receipt or an unapplied draft.
2. From the Form menu, choose Standalone, and then choose Deduction.
3. On Create Standalone Transaction or Create Standalone Payment, complete the following fields:
• Deduction Amount
For stand-alone deductions without invoice match, you must enter the Deduction Amount as a credit (negative amount).
• Deduction Reason Code

198
The system does not accept Blank as a valid value, even if it is set up in the user defined codes. If you leave this field blank, the system does not use the default deduction reason code from the processing options.
4. Click OK.
On the Receipt Entry form or Draft Entry form, the system adds a new detail line, shows a positive payment amount for the stand-alone deduction, and assigns it a type input code of 27. The system also shows the associated deduction amount and reason code.
5. Verify that the following fields on the bottom of the form contain the correct information:
• Amount Applied
If you have fully applied the payment to invoices, the amount pending should equal the receipt or draft amount that appears in the header portion of the entry form.
• Amount Unapplied
The system creates an unapplied record for the amount in this field.
6. Click OK.
Processing Options for Draft Entry (P03B602)
Display Tab
These processing options specify whether to retain values that were previously entered on the Draft Entry form. If you are entering similar types of drafts, completing these processing options can reduce entry time.

199
1. Payor Number
Blank = Do not retain the payor number
1 = Retain the payor number
Use this processing option to specify whether to retain the payor number entered on the Draft Entry form after you enter the draft. Valid values are:
Blank
Do not retain the payor number.
1
Retain the payor number.
2. Draft Date
Blank = Do not retain the draft date
1 = Retain the draft date
Use this processing option to specify whether to retain the draft date entered on the Draft Entry form after you enter the draft. Valid values are:
Blank
Do not retain the draft date.
1
Retain the draft date.

200
3. Company
Blank = Do not retain the company number
1 = Retain the company number
Use this processing option to specify whether to retain the company number entered on the Draft Entry form after you enter the draft. Valid values are:
Blank
Do not retain the company number.
1
Retain the company number.
4. G/L Date
Blank = Do not retain the G/L date
1 = Retain the G/L date
Use this processing option to specify whether to retain the G/L date entered on the Draft Entry form after you enter the draft. Valid values are:
Blank
Do not retain the G/L date.
201
1
Retain the G/L date.
5. Draft Due Date
Blank = Do not retain the draft due date
1= Retain the draft due date
Use this processing option to specify whether to retain the draft due date entered on the Draft Entry form after you enter the draft. Valid values are:
Blank
Do not retain the draft due date.
1
Retain the draft due date.
6. Bank Name
Blank = Do not retain the bank name
1 = Retain the bank name
Use this processing option to specify whether to retain the customer bank name entered on the Draft Entry form after you enter the draft. Valid values are:
Blank

202
Do not retain the customer bank name.
1
Retain the customer bank name.
7. Customer Bank Account
Blank = Do not retain the bank account
1 = Retain the bank account
Use this processing option to specify whether to retain the customer bank account number entered on the Draft Entry form after you enter the draft. Valid values are:
Blank
Do not retain the customer bank account.
1
Retain the customer bank account.
8. Payment Instrument
Blank = Do not retain the pay instrument
1 = Retain the pay instrument
Use this processing option to specify whether to retain the payment instrument on the Draft Entry form after you enter the draft. Valid values are:

203
Blank
Do not retain the payment instrument.
1
Retain the payment instrument.
9. Bank Transit Number
Blank = Do not retain bank transit number
1 = Retain the bank transit number
Use this processing option to specify whether to retain the bank transit number entered on the Draft Entry form after you enter the draft. Valid values are:
Blank
Do not retain the bank transit number.
1
Retain the bank transit number.

204
10. Currency Blank = Do not retain the currency 1 = Retain the currency Use this processing option to specify whether the system retains the currency code entered on the Draft Entry form after you enter the draft. Valid values are: Blank Do not the retain the currency code. 1 Retain the currency code.
11. Exchange Rate Blank = Do not retain the exchange rate 1 = Retain the exchange rate Use this processing option to specify whether the system retains the exchange rate that is entered on the draft entry after you enter the draft. Valid values are: Blank Do not retain the exchange rate. 1 Retain the exchange rate.
Defaults Tab
These processing options specify default values to use on the Draft Entry and Additional Information forms. When you enter a draft, you can override any of the values entered in these processing options.

205
1. Type Input Code
10 = Simple invoice match
11 = Match auto chargeback discount
15 = Match with write-off
16 = Match with chargeback
17 = Match with deduction
Use this processing option to specify the default type input code for applying drafts to invoices. Valid values are:
Blank
The system does not default a value.
10
Simple invoice match
11
Match auto chargeback discount
15
Match with write-off
16
Match with chargeback
17
Match with deduction
If you enter 10, the system applies the draft to the oldest open invoice or group of invoices

206
in a customer's account, similar to the Balance Forward type input code (1) for the Speed Receipts application.
2. Deduction Reason Code
Blank = Manual entry
Use this processing option to specify the default deduction reason code for entering a deduction amount. If you leave this field blank, the deduction reason code must be entered manually in the detail area on the Receipt Entry form. Valid deduction reason codes are defined in UDC 03B/CR.
3. Payment Instrument With Bank Account
Use this processing option to specify the default payment instrument for processing drafts that have a bank account number.
4. Payment Instrument Without Bank Account
Use this processing option to specify the default payment instrument for processing drafts without a bank account number.
5. Drafts Receivable Account
Blank = RD1x AAI

207
Use this processing option to specify the drafts receivable account number to use when you post drafts to the general ledger. You enter the account number in the standard format (bu.obj.sub). If you leave this processing option blank, the system uses the account number associated with the AAI item RD1x, where x is the payment instrument on the customer record (F03012).
6. Default G/L Offset for Unapplied Draft
Blank = Do not default
1 = Default from G/L class code
Use this processing option to specify whether to use the value in the G/L Class Code field of the customer record as the default value for the Unapplied G/L Offset field when you enter unapplied drafts. The system locates the A/R trade account based on the G/L offset that you use. Valid values are:
Blank
Do not use default values.
1
Use values from the G/L Class Code.
If the customer record does not have a G/L class code defined, the system uses the default G/L offset (UC) for unapplied drafts.
7. Draft Numbering
Blank - Manual Entry
1 - Use Next Number

208
Use this processing option to specify whether to have Next Numbers assign the draft number. Valid values are:
Blank
Do not use Next Numbers
1
Use Next Numbers
Edits Tab
These processing options specify whether to allow the following:
• Write-offs
• The deletion of unposted drafts
• Charges to the draft status
They also specify whether the system notifies you of certain conditions, such as the entry of an overpayment.
1. Write-offs
Blank = Allow write-offs
1 = Do not allow write-offs
Use this processing option to specify whether to allow write-offs on drafts. Valid values are:
Blank
Allow write-offs.
1
Do not allow write-offs.

209
2. Delete/NSF Unposted Receipts
Blank = Allow delete and NSF operations
1 = Do not allow delete and NSF operations
Use this processing option to specify whether to allow the delete and NSF operations on unposted drafts. Valid values are:
Blank
Allow delete and NSF.
1
Do not allow delete and NSF.
3. Overpayment Edit
0 = No edit
1 = Warning
2 = Error
Use this processing option to specify the severity of the error message issued when an invoice has been overpaid. Valid values are:
0
No Edit

210
1
Warning
2
Error
When you overpay an invoice, the system displays it as a negative open amount.
4. Bank Name
Blank = Do not allow user to override bank name
1 = Allow user to override bank name
Use this processing option to specify whether to enable the Bank Name field on the Draft Entry form. Valid values are:
Blank
Do not enable the Bank Name field. The system uses the bank name that is set up in the Bank Transit Master table (F0030) for the customer or payor.
1
Enable the Bank Name field. The system allows you to override the value in the Bank Name field.
Note: If you do not specify the customer's bank name, you must specify the customer's bank account number and bank transit number.
5. Return To Prior Draft Status

211
Blank = Allow prior draft status operation
1 = Do not allow prior draft status operation
Use this processing option to specify whether to allow the status of drafts to be reset to the previous draft status. Valid values are:
Blank
Allow drafts to be reset to the previous draft status.
1
Do not allow drafts to be reset to the previous draft status.
6. Draft Number
Blank - No Edit
1 - Warning
2 - Error
Use this processing option to specify the severity of the message that the system issues when a draft number is not assigned. This processing option is valid only when the corresponding processing option for Draft Types (on the Process tab) is 1 (Customer generated drafts). Valid values are:
Blank
No Edit
1
Warning
2

212
Error
Process Tab
These processing options specify how the system applies drafts to invoices when you use a default type input code, and whether the system creates a summarized record in the Account Ledger table (F0911) for each batch of drafts that you enter or a detail record for each draft.
1. Drafts Type
Blank = Supplier generated drafts
1 = Customer generated drafts
Use this processing option to specify the type of drafts to process. Valid values are:
Blank
Process drafts that you generate.
1
Process customer generated drafts.
2. Open Amount
Blank = Create R1 with open amount
1 = Create R1 without open amount
Use this processing option to specify whether to create draft invoice records (document type R1) with an open amount in the Customer Ledger table (F03B11). This processing option controls whether you can select the draft for aging. When you create a draft without an open amount, you use that record as a placeholder only and you cannot select it for

213
payment or aging. Valid values are:
Blank
Create draft invoice records with an open amount.
1
Create draft invoice records without an open amount.
3. Journal Entry Creation Method
Blank = Summarize journal entries
1 = Detail journal entries
Use this processing option to specify whether the post program creates one summarized journal entry for the batch of drafts entered, or one journal entry for each draft. The system assigns the value that you enter in this processing option to the A/R Post field (ISTR) in the Receipts Header table (F03B13). The post program uses this value to create the journal entry records. Valid values are:
Blank
Create summarized journal entries. The system creates one journal entry with the document type RK for each batch of drafts that you post. The system assigns the draft batch number as the document number of the journal entry. To use this method, you must also ensure the following:
o The offset method in the A/R Constants is equal to B (batch mode)
o The batch does not contain any foreign transactions
Otherwise, the system creates journal entries in detail.
1
Create detailed journal entries. The system creates one journal entry with the document

214
type RC for each draft in the batch. The system uses Next Numbers for journal entry documents (system 09) to assign the document number to the receipt journal entry.
To provide an audit trail, the system updates the following fields in the Receipts Detail table (F03B14) with the journal entry information:
o JE document type (RZDCTG)
o JE document number (RZDOCG)
o JE document company (RZKCOG)
4. Display Invoices
Blank = Display all invoices
1 = Display only approved invoices
Use this processing option to specify whether to display only invoices with an approved pay status. Valid values are:
Blank
Display all invoices.
1
Display only approved invoices.
Currency Tab
When you are using multicurrency, this processing option specifies whether the system validates that the effective date that it uses to retrieve the exchange rate matches the G/L date entered on the draft.

215
1. Edit Effective Date
Blank = Do not edit effective date
1 = Edit effective date
Use this processing option to specify whether the system validates the effective date that it uses to retrieve the exchange rate against the G/L date that you enter on the draft. Valid values are:
Blank
Do not validate the effective date.
1
Validate the effective date. The system issues a warning when the effective date of the exchange rate retrieved from the Currency Exchange Rates table (F0015) is not in the same period as the G/L Date of the draft.
Chargeback Tab
These processing options specify values that you want the system to assign to chargeback records that it creates.
1. Pay Status
Blank = Data dictionary default
Use this processing option to specify the default pay status that you want the system to assign to chargebacks. If you leave this processing option blank, the system uses the value that is set up in the Data Dictionary for item PST. Valid values are defined in UDC 00/PS (Pay Status).

216
2. Date Option
Blank = Use the draft G/L date
1 = Use dates from the invoice
Use this processing option to specify the invoice date and net due date that you want the system to assign to chargebacks. Valid values are:
Blank
Use the draft G/L date.
1
Use the corresponding dates from the invoice.
3. Reason Code
Blank = Manual entry
Use this processing option to specify the default reason code that you want the system to assign when you enter a chargeback amount. If you leave this processing option blank, you must enter the chargeback reason code manually. Valid chargeback reason codes are defined in UDC 03B/CB.
Auto Write-off Tab
These processing options activate the automatic write-off feature and establish write-off limits for both under- and overpayments. When you activate the automatic write-off feature, you must specify the write-off reason code for the system to use.

217
1. Maximum Underpayment Amount
Use this processing option to specify the limit for the system to use to write off underpayments. If the difference between the payment amount and open amount of the invoice is equal to or less than the amount specified, the system automatically writes off the remaining amount when you enter the draft.
2. Underpayment Reason Code
Use this processing option to activate the automatic write-off process and to specify the default reason code that you want the system to assign when it automatically writes off an underpayment. Valid write-off reason codes are defined in UDC 03B/RC. You must also set up a corresponding AAI item (RAxx, where xx is the reason code) for the write-off reason code that you specify.
3. Maximum Overpayment Amount
Use this processing option to specify the maximum amount for which the system writes off overpayments. If the difference between the payment amount and the open amount of the invoice is equal to or less than the amount specified, the system automatically writes off the remaining amount when you enter the draft.
Enter the value as a negative amount.

218
4. Overpayment Reason Code
Use this processing option to activate the automatic write-off process and to specify the default reason code for the system to assign when it automatically writes off an overpayment. Valid write-off reason codes are defined in UDC 03B/RC. You must also set up a corresponding AAI item (RAxx, where xx is the reason code) for the write-off reason code that you specify.
Mnl Write-off Tab
These processing options specify write-off limits for both under- and overpayments, and specify a default value for the system to use for the write-off reason code.
1. Maximum Underpayment Amount
Use this processing option to specify the maximum amount for which you can write off an underpayments. If the difference between the payment amount and the open amount of the invoice is equal to or less than the amount specified, the system allows you to write off the remaining amount when you enter the draft.
2. Maximum Overpayment Amount
Use this processing option to specify the maximum amount for which you can write off an overpayment. If the difference between the payment amount and the open amount of the invoice is equal to or less than the amount specified, the system allows you to write off the remaining amount when you enter the draft. Enter the value as a negative amount.

219
3. Write-Off Reason Code
Blank = Manual entry
Use this processing option to specify the default reason code that you want the system to assign when you enter a write-off amount. Valid write-off reason codes are defined in UDC 03B/RC. You must also set up a corresponding AAI item (RAxx, where xx is the reason code) for each write-off reason code that you specify.
Discount Tab
These processing options define rules for processing discounts.
1. Discount Available
Blank = Do not allow taken > available
1 = Allow taken > available
Use this processing option to specify whether to allow the discount taken to be greater than the discount available. Valid values are:
Blank
Do not allow discounts taken to be greater than the discount available.
1
Allow discounts taken to be greater than the available discount.
2. Discount Applied

220
Blank = Do not allow taken > applied
1 = Allow taken > applied
Use this processing option to specify whether to allow the discount taken to be greater than the payment amount. Valid values are:
Blank
Do not allow the discount taken to be greater than the payment amount.
1
Allow the discount taken to be greater than the payment amount.
3. Grace Period Days
Use this processing option to specify the number of days to be added to the discount due date during which the discount can be taken. This processing option is used only when the system calculates the discount taken. You can also enter the discount amount manually.
4. Discount Reason Code
Use this processing option to specify the default discount reason code that you want the system to use when discounts are taken. You can override this code, if necessary, when you enter the draft. The discount reason code that you enter must exist in UDC 00/DE. You must also set up a corresponding AAI item (RKDxx where xx is the reason code) for each discount reason code that you specify.
Match Priority Tab
These processing options specify the order that you want the system to use to locate invoices on the Remittance Entry form.
221
1. Invoice Match
Use this processing option to specify the sequence of search methods that the system uses to select invoices on the Remittance Entry form. Valid search methods are:
o Invoice Number
o Sales Order Number
o Customer Reference
o Statement Number
o Shipment Number
Valid values are blank, 1, 2, 3, 4, and 5. If you leave a search method field blank, the system excludes that search method and uses only the other methods that you specify. If you leave all five fields blank, the system searches using all methods in the order listed above.
Sales Order Match
Use this processing option to specify the sequence of search methods that the system uses to select invoices on the Remittance Entry form. Valid search methods are:
o Invoice Number
o Sales Order Number
o Customer Reference

222
o Statement Number
o Shipment Number
Valid values are blank, 1, 2, 3, 4, and 5. If you leave a search method field blank, the system excludes that search method and uses only the other methods that you specify. If you leave all five fields blank, the system searches using all methods in the order listed above.
Customer Reference Match
Use this processing option to specify the sequence of search methods that the system uses to select invoices on the Remittance Entry form. Valid search methods are:
o Invoice Number
o Sales Order Number
o Customer Reference
o Statement Number
o Shipment Number
Valid values are blank, 1, 2, 3, 4, and 5. If you leave a search method field blank, the system excludes that search method and uses only the other methods that you specify. If you leave all five fields blank, the system searches using all methods in the order listed above.
Statement Match

223
Use this processing option to specify the sequence of search methods that the system uses to select invoices on the Remittance Entry form. Valid search methods are:
o Invoice Number
o Sales Order Number
o Customer Reference
o Statement Number
o Shipment Number
Valid values are blank, 1, 2, 3, 4, and 5. If you leave a search method field blank, the system excludes that search method and uses only the other methods that you specify. If you leave all five fields blank, the system searches using all methods in the order listed above.

224
Shipment Number Match
Use this processing option to specify the sequence of search methods that the system uses to select invoices on the Remittance Entry form. Valid search methods are:
o Invoice Number
o Sales Order Number
o Customer Reference
o Statement Number
o Shipment Number
Valid values are blank, 1, 2, 3, 4, and 5. If you leave a search method field blank, the system excludes that search method and uses only the other methods that you specify. If you leave all five fields blank, the system searches using all methods in the order listed above.
Void/NSF Tab
These processing options specify the values for the system to use when drafts are voided or designated as insufficient funds.
1. Update Payment Instrument
Blank = Do not update
1 = Update
Use this processing option to specify whether to update the payment instrument on the R1 draft invoice record in the Customer Ledger table (F03B11) if the draft is voided or

225
designated as NSF. Valid values are:
Blank
Do not update the payment instrument.
1
Update the payment instrument.
Note: You must enter a value for the Payment Instrument for Draft processing option if you enter 1 for this processing option.
2. Payment Instrument for Draft
Use this processing option to specify the payment instrument to assign to R1 draft records in the Customer Ledger table (F03B11) when a draft is voided or designated as NSF. Valid values are set up in UDC 00/PY.
Note: If the Update Payment Instrument processing option is blank, the system ignores this processing option.
3. Payment Instrument for Renewal Draft
Use this processing option to specify the payment instrument to assign to the new draft invoice record that the system creates in the Customer Ledger table (F03B11) when you void or designate the draft as NSF with the option to renew the draft. Valid values are set up in UDC 00/PY.

226
4. Draft Account
Blank = RD5 AAI
Use this processing option to specify the draft receivable account number to use when you post drafts that have been voided or designated as NSF using the renewal option. You enter the account number in the standard format (bu.obj.sub). If you leave this processing option blank, the system uses the account number associated with the AAI item RD5.
Processing Preauthorized Drafts
From the Draft Daily Operations menu (G03B161), choose Pre-Authorized Drafts.
Automatic drafts are also called preauthorized drafts because they do not require customer acceptance for each draft. You and your customer agree in advance that the customer will pay with a draft. You do not print and send a draft to the customer, but instead remit (deposit) the draft to your bank for collection.
You create automatic drafts by running the Pre-Authorized Drafts program (R03B671). You select the invoices to pay with each draft by using data selection. You can run this batch process in either proof or final mode:
Proof mode
You can choose to generate a detail or summary report of transactions:
• Detail – lists each invoice to be paid by draft • Summary – prints a summary of all invoices by customer or payor, due date, and
payment instrument to be paid by draft
Final mode
You can make the same selections as in proof mode. In final mode, the system:
• Creates drafts • Updates the pay status of drafts to D (draft accepted) • Generates a report
Whichever mode you choose, you can review the information and make necessary changes. You can use either Standard Invoice Entry or Speed Status Change to change the pay status.
The system processes drafts in the same way as receipts except that the system:
• Uses batch type DB (draft receipts)
• Applies draft receipts to open customer invoices

227
• Creates an invoice record with a document type of R1 in the Customer Ledger table (F03B11) for the total draft amount
• Updates the payment status of the draft invoice to D (draft accepted)
After you generate drafts, you must approve and post them to the general ledger to create the appropriate journal entries.
This program updates and creates records in the Customer Ledger (F03B11), Receipts Header (F03B13), and Receipts Detail (F03B14) tables.
Note
The report prints the abbreviated column heading PI, which indicates payment instrument.
Processing Options for Pre-Authorized Drafts (R03B671)
Defaults Tab
These processing options specify the default values for the system to use when it generates drafts.
1. Draft Date
Blank = System date
Use this processing option to specify the draft date to assign to Receipts Header (F03B13) and Receipts Detail (F03B14) records. If you leave this processing option blank, the system uses the system date.
2. Draft G/L Date
Blank = System date
Use this processing option to specify the draft G/L date to assign to Receipts Header (F03B13) and Receipts Detail (F03B14) records. If you leave this processing option blank, the system uses the system date.

228
3. Draft Due Date
Blank = Invoice due date
Use this processing option to specify the draft due date to assign to Customer Ledger (F03B11) invoice records (R1). If you leave this processing option blank, the system uses the invoice due date.
4. Draft Receivable Account Number
Blank = RD1x AAI
Use this processing option to specify the drafts receivable account number to use when you post drafts to the general ledger. You enter the account number in the standard format (bu.obj.sub). If you leave this processing option blank, the system uses the account number associated with the AAI item RD1x, where x is the payment instrument on the customer record (F03012).
5. Journal Entry
Blank = Create summary journal entry
1 = Create detail journal entry
Use this processing option to specify whether the post program creates one summarized journal entry for the batch of drafts entered or one journal entry for each draft. The system assigns the value that you specify to the A/R Post field in the Receipts Header table (F03B13). The post program uses this value to create the journal entry records. Valid values are:
Blank
Summarized journal entries. The system creates one journal entry with the document type
229
RK for each batch of drafts that you post. The system assigns the draft batch number as the document number of the journal entry. To use this method, you must also ensure that:
o The offset method in the A/R Constants is equal to B (batch mode)
o The batch does not contain any foreign transactions
Otherwise, the system creates journal entries in detail.
1
Detail journal entries. The system creates one journal entry with the document type RC for each draft in the batch. The system uses Next Numbers for journal entry documents (system 09) to assign the document number to the receipt journal entry.
To provide an audit trail, the system updates the following fields in the Receipts Detail table (F03B14) with the journal entry information:
o JE document type (RZDCTG)
o JE document number (RZDOCG)
o JE document company (RZKCOG)
6. Discount Reason Code
Use this processing option to specify the discount reason code that you want the system to use when discounts are taken. The discount reason code that you enter must exist in UDC 00/DE. You must also set up a corresponding AAI item (RKDxxx, where xxx is the reason code) for each discount reason code that you specify.
Select
These processing options provide information for selecting invoices to pay.
230
1. Pay Thru Date
Blank = System date
Use this processing option to select invoices from the Customer Ledger table (F03B11) that have a due date equal to or greater than the pay thru date that you specify.
2. Minimum Draft Amount
Use this processing option to specify the minimum amount required for the system to generate a draft. If you leave this processing option blank, the system generates drafts for all invoice amounts.
Process
These processing options specify guidelines for processing drafts, such as whether you want to process them in proof or final mode, whether you want the system to create journal entries in detail or in summary, how you want the system to assign the draft number, and so forth.
1. Process Mode
Blank = Proof mode
1 = Final mode
Use this processing option to specify whether to run the program in proof or final mode. In proof mode, the system generates a report of the drafts it will create when you run the program in final mode. In final mode, the system generates a report and updates the Receipts Header (F03B13), Receipts Detail (F03B14), and Customer Ledger (F03B11) tables with draft records. Valid values are:
Blank
Proof mode

231
1
Final mode
2. Summary/Detail
Blank = Detail draft
1 = Customer summary draft
2 = Payor summary draft
Use this processing option to specify whether the system generates one draft per invoice (detail) or one draft per customer or payor for each invoice due date (summary). Valid values are:
Blank
Detail drafts. The system creates one draft for each invoice.
1
Customer summary draft. The system creates one draft per customer for each group of invoices that have the same due date.
2
Payor summary draft. The system creates one draft per payor for each group of invoices that have the same due date.
3. Negative Draft
Blank = Regular draft
1 = Negative draft

232
Use this processing option to specify whether the system generates drafts for a negative (credit) amount. Valid values are:
Blank
Do not generate negative drafts.
1
Generate negative drafts.
4. Draft Number
Blank = Use the next number
1 = Use the statement number
Use this processing option to specify whether the system assigns the draft number from the Next Numbers system or uses the statement number as the draft number. Valid values are:
Blank
Use Next Numbers.
1
Use the statement number.
5. Open Amount
Blank = Create draft with open amount
1 = Create draft without open amount

233
Use this processing option to specify whether to create invoice draft documents (R1) with an open amount in the Customer Ledger table (F03B11). The setting of this processing option controls whether you can select the draft for aging. When you create a draft without an open amount, you use that record as a placeholder only, and you cannot select it for payment or aging. Valid values are:
Blank
Create draft invoices (R1) with an open amount.
1
Create draft invoices (R1) without an open amount.
Credit Card
These processing options specify whether you want to update the draft records in the Receipts Header table (F03B13) with credit card information from the sales order.
1. Credit Card Processing
Blank = Regular draft processing
1 = Credit card processing
Use this processing option to specify whether to update the Receipts Header records (F03B13) with the credit card and authorization numbers from the Prepayment Transaction Table (F004201) when you process sales orders with drafts and set up prepayments in the sales order cycle. Valid values are:
Blank
Prepayment processing was not used on the sales order.
01
Prepayment processing was used on the sales order.

234
2. Prepayment Origination Flag
Use this processing option to specify the system from which the prepayment originated, such as 01 for Sales Order Entry. Valid values are in UDC 00/PO.
Revising Drafts
After you enter drafts, you can review and revise them before you post them to the general ledger. You typically review drafts to:
• Verify information for a particular customer
• Revise draft information, such as the due date, payment instrument, or customer bank account
The following guidelines apply when you revise draft information:
• You cannot add invoices to a draft unless an unapplied amount exists.
• You can change the following fields when the draft has been accepted:
• Draft Due Date
You can also change this field after the draft has been remitted.
• Draft Amount
You cannot change this field if the draft is posted or if it is in a status other than Draft- Acceptance.
• Payment Instrument
• Bank Name
• Customer Bank Account Number
• Bank Transit
• You can never change the G/L date on a draft; however, you can assign a new G/L date to a posted draft when you perform additional tasks (such as applying the draft to invoices or voiding the draft). The system updates the Receipts Detail records (F03B14) with the G/L date that you enter. The system does not change the G/L date on the Receipts Header record (F03B13).
► To revise drafts
From the Draft Daily Operations menu (G03B161), choose Draft Inquiry.
1. On Work With Drafts, click Find to locate all drafts, or complete the following fields to limit your search, and then click Find:
• From

235
• Through
2. Choose the draft that you want to review and click Select.
3. On Draft Entry, change any of the following fields and click OK.
• Draft Due Date
• Draft Amount
You cannot change the draft amount if the draft is posted or is a status other than Draft - Acceptance.
• Payment Instrument
• Customer Bank Acct No
• Bank Transit
Approving and Posting Accounts Receivable Drafts
Use one of the following navigations:
From the Draft Daily Operations menu (G03B161), choose Draft Journal Review.
From the Draft Daily Operations menu (G03B161), choose Post Drafts to G/L.
After you enter drafts, you must post them to the general ledger to update the appropriate account information. Depending on your organization's policy, your batches might require management approval before you can post them. The process to review and approve batches is the same regardless of the batch type. The batch type for draft batches is DB.
Note
The status of the draft batch header remains In Use until you completely exit the draft entry program.
See Also The following topics in the Accounts Receivable Guide:
Using the Batch Review Program for information about reviewing and approving receipt batches
The Financial Post Process for detailed information about procedures, processing options, and the post reports
The following topics in the Multicurrency Guide:
Posting Foreign and Alternate Currency Receipts
Calculating Realized Gains and Losses for information about how the system manages gains and losses

236
Posting Accounts Receivable Drafts
From the Draft Daily Operations menu (G03B161), choose Post Drafts to G/L.
After you approve drafts, you can post them to the general ledger. Because the system creates all the entries to the Account Ledger table (F0911) when you post drafts, balancing errors occur only when the post program is interrupted. If the post program is aborted before it completes, run the post program again to delete the entries that the system created, and then run the post program a third time to create new entries.
During the post, the system does the following:
• Selects unposted receipt transactions from the following tables:
• Receipts Header (F03B13)
• Receipts Detail (F03B14)
• Edits and verifies each transaction
If no errors occur, the system does the following:
• Debits and credits the appropriate accounts in the Account Ledger table (F0911)
The account that the system debits depends on the draft status.
• Creates automatic offsets to the A/R trade account in the Account Ledger table (F0911)
• Creates automatic entries to the discount, write-off, chargeback, or deduction account, if applicable
• Updates balances in the Account Balances table (F0902)
• Marks the transactions as posted (P) in the Account Ledger table (F0911)
• Updates the Receipt Detail table (F03B14) with a D in the Posted Code field
Note The system does not update the Receipts Header record (F03B13) until the draft is collected and posted. If the draft is posted after acceptance and remittance, the system does not update the Posted Code field.
• Updates the status of the Batch Control Records table (F0011) to D.
You can also post drafts using the Draft Journal Review program (P0011).
Note
The system creates unapplied draft (RU), draft (R1), chargeback (RB), and deduction (R5) invoices with a posted status of D in the Customer Ledger table (F03B11). To determine whether these records are posted, you must locate and verify the posted status of the draft document from which they originated.

237
Journal Entries Created by the Draft Post
When you post drafts to the general ledger, the system creates the Account Ledger record (F0911) based on the journal entry creation method and the status of the draft when you post it.
The following tables list the journal entries that the system creates for standard drafts, drafts that are discounted, and drafts that are discounted with contingent liability. The system retrieves the account from the field listed in the table for the appropriate record. The field is updated based on an AAI at the time draft is entered, remitted, or collected.
Standard Drafts Draft Status JE
Doc Type
Field Based on AAI Account Debited
Account Credited
R1 AID2 RD1x Draft Receivable
Acceptance (4)
AE AID N/A
The system updates the field from the invoice paid
A/R Trade
R2 AID2 RD2x Draft Remitted
Remittance (3)
R1 AID2 from Acceptance record
RD1x Draft Receivable
RC* GLBA RB or processing option for R03B672
G/L Bank Collection (1)
R2 AID2 from Remittance record
RD2x Draft Remitted
Discounted Drafts Draft Status JE
Doc Type
Field Based on AAI Account Debited
Account Credited
R1 AID2 RD1x Draft Receivable
Acceptance (4)
AE AID N/A
The system updates the field from the invoice paid
A/R Trade

238
R2 AID2 RD3x Draft Remitted for Discount
Remittance (3)
R1 AID2 from Acceptance record
RD1x Draft Receivable
RC* GLBA RB or processing option for R03B672
G/L Bank Collection (1)
R2 AID2 from Remittance record
RD3x Draft Remitted for Discount
Discounted Drafts with Contingent Liability Draft Status JE
Doc Type
Field AAI Used Account Debited
Account Credited
R1 AID2 RD1x Drafts Receivable
Acceptance (4)
AE AID N/A
The system updates the field from the invoice paid
A/R Trade
R2 AID2 RD3x Drafts Remitted for Discount
R1 AID2 from Acceptance record
RD1x Drafts Receivable
RC* GLBA RB or processing option for R03B672
G/L Bank
Remittance (2)
R2 AID2 RD4x Drafts Contingent Liability
R2 AID2 RD4x Drafts Contingent Liability
Collection (1)
R2 AID2 from Remittance record
RD3x Drafts Remitted for Discount
* The document type might be RK depending on the journal entry creation method as explained below.

239
Journal Entry Creation Method
The difference between creating journal entries in detail or creating summarized journal entries is the number of entries that the system creates, and the document type and document number that the system assigns.
Regardless of the method you use to create journal entries, the system updates the following fields in the draft detail record (F03B14) from the journal entry that the system creates:
• RZDCTG (Document Type - JE)
• RZDOCG (Document Number - JE)
• RZKCOG (Document Company - JE)
Note
The system follows the same methodology for assigning document numbers for all stages in the draft process.
Detail Method
If you set the processing option to create detailed journal entries, when you enter the draft, the system updates the A/R Post Status (ISTR) field in the Receipts Header table (F03B13) to 1. When you post drafts, the system:
• Creates one document in the Account Ledger table (F0911) for each draft in the batch
• Assigns the document type RC to the entry for the bank account (either at collection or at remittance, if you remit discounted drafts with contingent liability)
• Assigns the document number from Next Numbers for system 03B, line 6 (Draft Number)
• Updates the record in the Receipts Detail table (F03B14) with the document number that is assigned to the journal entry for audit purposes
Summary Method
If you set the processing option to create summarized journal entries, when you enter the draft, the system does not update the A/R Post Status field (ISTR field in the Receipts Header table (F03B13). When you post drafts, the system:
• Creates one F0911 record for each batch of drafts posted.
• Assigns the document type of RK to the entry for the bank account (either at collection or at remittance, if you remit discounted drafts with contingent liability)
• Assigns the batch number as the document number
In order for the system to create summarized journal entries, you must also verify the following:
• The offset method in the Accounts Receivable Constants is set to a value of B (batch mode).
• The intercompany settlement option in the general accounting constants is set to a value other than 2 or 3.
Otherwise, the system generates detailed journal entries.

240
Key to Method Used
The following table shows the type of journal entry that the system creates according to the settings in the general accounting and accounts receivable constants.
Intercompany (G/A Constants)
Offset Method* (A/R Constants)
Journal Entry Creation Method (Summary or Detail)
Journal Entry Created (F0911)
1 (Hub) B D Detail
1 Y D Detail
1 S D Detail
2 (Detail) B D Detail
2 Y D Detail
2 S D Detail
3 (Configured Hub) B D Error (not allowed)
3 Y D Detail
3 S D Detail
1 B S Summary
1 Y S Detail
1 S S Detail
2 B S Summary
2 Y S Detail
2 S S Detail
3 B S Error (not allowed)
3 Y S Detail
3 S S Detail
* Offset Method
• Y = One automatic entry offset per document, regardless of the number line item • S = One automatic entry per pay item • B = One automatic entry per batch
The system creates additional records depending on whether a discount was taken, or the draft was applied with a write-off, chargeback, or deduction.

241
Posting Voided and NSF Drafts
The system also creates journal entries when you post a draft that has been voided or designated as insufficient funds (NSF). Regardless of the processing option setting for the journal entry creation method, the following occurs:
• When you post a voided draft, the system creates a journal entry with the document type RO.
• When you post a draft that is designated as NSF, the system creates a journal entry with the document type RV.
The system updates the DOCQ and DCTQ fields on the F03B13 record with the document number and document type that the system assigns to the journal entry.
Posting Zero Amount Drafts
When you apply unapplied drafts to invoices, the system does not generate any journal entries because the amount of the draft is zero.
Additionally, the system creates an automatic entry (document type AE) only when the A/R trade account to which the unapplied draft was posted is different from the A/R trade account to which the invoice was posted. If the trade accounts are the same for the unapplied draft and the invoice, the system does not generate any AE entries, nor does it produce a posting edit report.
See Also Fields Updated During Receipt or Draft Entry in the Accounts Receivable Guide for
more information about how the system retrieves the A/R trade account
See the following topics in the Multicurrency Guide:
Multicurrency Journal Entries Created by the Receipt and Draft Post
Multicurrency Automatic Entries Created by the Receipt and Draft Post
Multicurrency Fields Updated During Receipt and Draft Entry
Automatic Entries Created by the Draft Post
When you post drafts, the system creates automatic entries (document type AE) in the Account Ledger table (F0911). The system uses the account IDs from fields that the system updated when you entered the draft. The following table shows the field that the post uses to locate the account for the AE entry based on the type of draft that you entered.
Account Type of Draft Field Table
A/R Trade Applied Draft (TI Code 10) AID F03B14
Unapplied Drafts AID F03B13
Chargebacks (TI Codes 11, 16, and 26)
AIDC F03B14
Discount Taken Discounts (TI Code 10) AIDD F03B14
Write-off Write-offs (TI Codes 10, 15, and 25)
AIDW F03B14

242
Account Type of Draft Field Table
Deduction Suspense
Deduction (TI Codes 17 and 27)
DAID F03B14
Deleting and Voiding Drafts
If you enter a draft in error, you can delete or void it. When you delete or void a draft, the system reopens any invoices that the draft paid.
You can delete a draft only when:
• The draft is not posted
• The draft is at a draft-acceptance status (4)
Note
If the draft is at a remittance or collection status, you cannot delete it; you must post the draft and then void it.
When you delete a draft, the system removes the draft records from the following tables:
• Receipt Header (F03B13)
• Receipt Detail (F03B14)
• Customer Ledger (F03B11)
If the draft is posted, you must void the draft. When you void a draft, the system updates the following fields on the draft’s Receipt Header record (F03B13):
• Receipt NSF/Void Code field (NFVD)
The system updates this field to V.
• Void Date (VDGJ)
The system uses the G/L date that you enter when you void the draft.
• Void Reason Code (VRE)
The system uses the reason code that you enter when you void the draft.
The system also creates a new batch, which you must post to create the reversing journal entries. You can void the draft at any stage of draft processing.
Before You Begin Verify that the AAI item RD5x is set up. The system uses this AAI when you void or
designate drafts as NSF.
► To delete or void a draft
From the Draft Daily Operations menu (G03B161), choose either Enter Our Drafts or Enter Customer Drafts.
1. On Work With Drafts, click Find to locate all drafts, or complete the following fields to limit your search, and then click Find:

243
• From
• Through
2. Choose the draft that you want to delete or void, and then choose Void/Delete from the Row menu.
3. On Confirm Delete, click OK.
4. On Void/NSF Draft, complete the following fields and click OK:
• G/L Date
• Reason Code
You must complete both fields regardless of whether the draft is posted.
Draft Remittance
You remit (deposit) the draft to your bank so that it can collect the funds from your customer's bank. In certain countries, draft remittance is an optional step in the draft process. You can remit drafts to your bank for collection on either a tape or by printing a paper register. Generally, you must have complete bank account information for your customer in order to use an electronic format.
Before you remit the drafts to your bank, you can create a register to group drafts by bank account. The system updates the draft records with bank account information and assigns them a register number, which you can use as data selection when you run the Draft Remittance program (R03B672).

244
If you do not create a register, the system updates the draft records with the bank account information when you run the Draft Remittance program.
Creating and Revising Registers for Accounts Receivable Drafts
You can manually create an online register to use when remitting drafts to your bank. This is an optional step in the draft remittance process. When you create a register, you choose the drafts that you want to remit to your bank for collection. You must remit those drafts to the bank by running the Draft Remittance program (R03B672) before you can create another register for the same bank account; however, you can add and remove drafts from an existing register before you remit them.
The advantages of creating a register before remitting drafts are:
• Drafts are organized for collection by payment instrument and due date
• An online record of the drafts to be remitted is provided for you to review
• An easy method of selecting drafts when you run the Draft Remittance program is provided (you can select by draft register number)
• The draft status is updated so that the same drafts will not be remitted accidentally to the wrong bank for collection.
You can include either regular drafts or discounted drafts on the register, but all drafts must be in the same transaction currency.
When you create a register, the system:
• Creates a batch header record in the Batches table (F0011) with a batch type &B
• Changes the pay status of the selected draft invoice records (F03B11) from D (draft accepted) to # (selected for payment)
• Updates the G/L bank account on the selected draft receipt records (F03B13)
• Assigns a register number (DREG field) to the selected draft receipt records (F03B13) by concatenating a 5-digit number (starting with 00001) to the batch number
► To create a register for Accounts Receivable drafts
From the Draft Remittance and Collection menu (G03B162), choose Draft Register Creation & Review.
1. On Work With Draft Registers for Payment, to determine whether a register exists, complete the following field and click Find:
• G/L Bank Account
You cannot create a new register if one exists for the bank account specified.
2. Click Add to create a new register.

245
3. On Draft Register Details, complete the following fields:
• Account Number
This is the account number of your G/L bank.
• Currency Code
4. Complete the following optional field:
• Amount Requested
If you want to choose multiple drafts for remittance, you can verify that the amount of the drafts you choose equals the amount that you expected by completing this field.
5. From the Form menu, choose Drafts.
6. On Select All Drafts, use the fields in the QBE row to locate and choose the individual drafts that you want the bank to collect, and click Select.
7. On Draft Register Details, click OK.
► To review and revise registers Accounts Receivable drafts
From the Draft Remittance and Collection menu (G03B162), choose Draft Register Creation & Review.
1. On Work With Draft Registers for Payment, complete the following field and click Find:
• G/L Bank Account

246
2. Review the information in the following fields:
• Draft Amount
• Due Date
3. Choose the draft register and click Select.
4. On Draft Register Details, review the information in the following fields:
• Payor Number
• Pay Inst
• Co
• Bank Transit
• Cust Bank Acct #
5. To add a draft to the register, choose Drafts from the Form menu and follow the steps for creating a bank register.
6. To delete a draft from the register, on Draft Register Details, choose the draft that you want to delete and click Delete.
7. On Confirm Delete, click OK to delete the draft.
Remitting Drafts
From the Draft Remittance and Collection menu (G03B162), choose Draft Remittance.
You remit a draft to your bank so that it can collect the funds from your customer's bank. You can remit drafts either electronically or on paper in the form of a bank register. Generally, you must have complete bank account information for your customer in order to use an electronic format. When you do not have complete bank account information for your customer, you can print a bank register to send to your bank.
You can run this batch process in one of the follow modes:
Proof mode In proof mode, the system performs the following actions:
• Selects accepted drafts (Draft Status 4) from the Receipt Header table (F03B13)
• Verifies that the G/L date is within the company’s G/L fiscal period • Prints a report of the drafts to be remitted

247
Final mode -Paper (R03B672P)
In final mode for paper, the system performs the same actions that it does in proof mode, and it also performs the following actions:
• Creates a new batch header record in the Batch Control Records table (F0011) for the remittance batch
• Changes the payment status of the draft invoice records in the Customer Ledger table (F03B11) from D (or #, if the register was created previously) to G (draft deposited, not due)
• Changes the draft status of the records in the Receipt Header table (F03B13) and draft invoice records in the F03B11 table from 4 (Accepted) to 3 (Remitted – Cash or Discount) or 2 (Remitted - Contingent)
• Creates the following two records in the Receipts Detail table (F03B14), if the draft is remitted for cash or discount: • A record that reverses the acceptance status of the draft • A record that enters a remittance status of 3 (Remitted – Cash or Discount) for
the draft • Creates the following three records in the F03B14 table, if the draft was remitted
with contingent liability: • A record that reverses the acceptance status (draft status 4) of the draft • A record that enters One a remittance status or 2 (Remitted – Contingent) for
the draft • A record that accounts for the contingent liability
• Creates one record for each draft in the Draft Remittance table (F03B672) The system automatically removes records from the F03B672 table when it creates the .pdf file that you print.
Final mode - Tape (R03B672T)
In final mode for tape, the system performs the same actions that it does in final mode for paper, and it also performs the following actions:
• Updates the Text Processor Header table (F007101) • Updates the Text Processor Detail table (F007111)
The system assigns the batch number from Next Numbers 00/07.
Note You must run the Text File Processor program (P007101) to purge batches from the text processor tables (F007101 and F007111). When you purge draft remittance batches, the system also removes the records from the F03B672 table. See Purging a Text Batch in the Text File Processor in the Global Solutions Spain Guide.
J.D. Edwards recommends that you run this process in proof mode before you run it in final mode. This allows you to review and correct errors prior to updating records. If the system finds errors when you run the report in final mode, it prints an error message on the report.
After you remit drafts, you approve and post the remittance batch to the general ledger. The system creates the appropriate journal entries.
Data Selection and Processing Options for Draft Remittance
Multiple demonstration versions of this program are available to select drafts according to the following:

248
• Whether the draft has a bank account
If you do not register the draft, the draft records will not have a G/L bank account. Choose a version that is without register (w/o Reg.).
• Whether you are submitting the version in proof or final mode
• Whether you are remitting drafts on paper or using a tape format
You can add other selection criteria. For example, you can select drafts on the basis of the payment instrument.
Error Processing
If you encounter errors when running the Draft Remittance program (R03B672) do the following:
• Verify that you selected the correct version.
• Verify that the G/L date that you entered in the processing option is correct.
• Verify that the "as of" date that you entered in the processing option is the same as or subsequent to the latest draft due date.
• Verify that you have entered a paper or tape remittance program and version in the processing options
See Also The appropriate Global Solutions Guide for information about country-specific
formats that handle draft remittance
Journal Entries Created by the Draft Post in the Accounts Receivable Guide for specific information about the journal entries the system creates when you remit drafts
Discounted Drafts and Contingent Liability
You can request an advance from your bank before the due date of the draft. This is called discounting a draft. When a draft is discounted, you can collect part or all of the money in advance. Some countries require businesses to recognize a contingent liability until the maturity date of the draft, as follows:
• Before the due date of the draft, recognize the draft as cash and offset the amount as a contingent liability.
• On the due date of the draft, close the contingent liability by processing the collection.
When you remit a draft with contingent liability, you can collect 100 percent of the draft before the due date.
You must complete the appropriate processing options for the Draft Remittance program (R03B672) to remit drafts with discounts and contingent liability.
When you post the draft remittance, the system creates journal entries for both discounted drafts and drafts that are discounted with contingent liability, as follows:
249
Drafts Remitted for Discount If the draft is remitted for discount without contingent liability, the system debits the Draft Remitted for Discount account, based on the AAI item RD3x (where x is the payment instrument) and credits the drafts receivable account that you used.
When you collect the draft, the system debits a bank account (RB) and credits the Draft Remitted for Discount account (RD3x).
Drafts Remitted for Discount with Contingent Liability
If the draft is remitted for discount with contingent liability, the system creates journal entries to do the following:
• Debit the Draft Remitted For Discount account, based on the AAI item RD3x (where x is the payment instrument) and credit the drafts receivable account that you used
• Debit the bank account and credit the Contingency Liability account, based on the AAI item RD4x (where x is the payment instrument)
When you collect the draft, the system debits the Contingency Liability account and credits the Draft Remitted for Discount account.
Note
Do not confuse discounted drafts, which enable you to receive a cash advance from your bank, with discounted invoices.
You apply drafts to invoices with discounts and without discounts.
You remit drafts for the invoice amount and wait until the bank collects it from your customer, or you remit a discounted draft, which allows you to receive part of the payment in advance of the draft due date, or you remit a discounted draft and account for the contingent liability in your general ledger.
Processing Options for Draft Remittance (R03B672)
Proof/Final Tab
This processing option specifies whether to process draft remittances in proof or final mode.

250
1. Final Mode
Blank = Print report only
1 = Run in final mode
Use this processing option to specify whether to remit drafts in proof or final mode. In proof mode, the system generates a report only of the drafts that will be remitted when you run the program in final mode. In final mode, the system prints a report, changes the payment status of the draft to G (draft deposited not due), and creates journal entries in the Account Ledger table (F0911). Valid values are:
Blank
Proof mode
1
Final mode
As of Date Tab
This processing option specifies the date to use to choose draft records for remittance.
1. "As Of" Date
Blank = Use current system date
Use this processing option to specify the date on which to select draft records for remittance. The system selects all drafts with a due date on or before the date specified. If you leave this processing option blank, the system uses the system date.

251
Bank Tab
These processing options specify which draft records to select, based on whether they were previously printed on a draft register.
1. Register
Blank = Process without register
1 = Process with register
Use this processing option to specify whether to select draft records (F03B13) that were processed with a draft register. Draft records processed with a register have a value in the G/L Bank Account field. Draft records that were not processed with a draft register do not have a value in the G/L Bank Account field. Valid values are:
Blank
Select records that were not processed with a draft register.
1
Select records that were processed with a draft register.
2. Draft Remittance G/L Bank Account
Use this processing option to specify the G/L bank account to use for draft records processed without a register. Enter the account number in the standard format (bu.obj.sub).
Note: Leave this processing option blank if drafts have been processed with a register.
G/L Remittance Tab
These processing options specify account information and the exchange rate.

252
1. AAI for Draft G/L Account
Blank = Cashed (RD2x)
1 = Discounted (RD3x)
2 = Contingent (RD4x)
Use this processing option to specify the AAI to use when you post remitted drafts. Valid values are:
Blank
AAI item RD2x (cash), where x is the payment instrument.
1
AAI item RD3x (discount), where x is the payment instrument.
2
AAI item RD4x (contingent liability), where x is the payment instrument.

253
2. Override Account Number for RD2/RD3 AAI
Blank = Use RD2 or RD3 AAI's account number
Use this processing option to specify the G/L account to use when you post remitted drafts. The system uses this account instead of the account associated with the AAI item specified in the previous processing option. The system uses the G/L account that you specify only for cash and discounted drafts (AAI items RD2x and RD3x). Use the following processing option to override the G/L account for contingent liability drafts (AAI item RD4x). Enter the account number in the standard format (bu.obj.sub).
3. Override Account Number for RD4 AAI
Blank = Use RD4 AAI's account number
Use this processing option to specify the G/L account to use when you post remitted drafts. The system uses this account instead of the account associated with the AAI item specified in the previous processing option. The system uses the G/L account that you specify only for the contingent liability account (AAI items RD4x). Enter the account number in the standard format (bu.obj.sub).

254
4. Exchange Rate Override
(***Effective only for remittance with
Contingent Liability***)
Blank = Derive rate from exchange rate information
Use this processing option to specify the exchange rate to use for drafts that pay foreign invoices. The system applies the exchange rate that you specify to all drafts regardless of the invoice currency. If you leave this processing option blank, the system locates the exchange rate from the Currency Exchange Rates table (F0015).
Note: This processing option is applicable only to drafts remitted with contingent liability.
G/L Date Tab
This processing option specifies the G/L date to use for the journal entries that the system creates for draft remittance.
1. Journal Entry G/L Date
Blank = Use system date
Use this processing option to specify the G/L date to assign to the journal entry that the system generates for remitted drafts. If you leave this processing option blank, the system assigns the system date.
Maximum Tab
This processing option specifies the maximum amount for the sum of drafts that you remit.

255
1. Maximum Accumulated Drafts Amount
Use this processing option to specify the maximum amount allowed for the sum of the drafts that you remit. If the total amount of the drafts selected for processing exceeds the amount specified, the system does remit the draft records, and you must use data selection to limit the amount of drafts to be processed.
Minimum Tab
This processing option specifies the minimum amount for the sum of drafts that you remit.
1. Minimum Remittance Process Amount
Use this processing option to specify the minimum amount required to process drafts for remittance. If the total amount of the drafts selected for processing is less than or equal to the amount specified, the system does not remit the draft records.
Paper/Tape Tab
These processing options specify the draft remittance programs to use for the bank format.
1. Paper/Tape Remittance Program
Use this processing option to specify the remittance program for the system to use for the bank format. If you do not specify a program, the system does not process the remittance. The following remittance programs are available:
o R03B672AR - Remittance Date PO Template AGR
o R03B672IP - AR Magnetic RIBA Draft Remittance Paper Format
o R03B672IR - AR Magnetic RID Draft Remittance Tape Format
o R03B672IT - AR Magnetic RIBA Draft Remittance Tape Format
o R03B672P - A/R Draft Remittance Paper Format
o R03B672T - A/R Draft Remittance Magnetic Tape Format

256
2. Paper/Tape Remittance Version
Use this processing option to specify the version of the remittance program for the system to use. If you leave this processing option blank, the system uses version ZJDE0001.
Custom Report
These processing options specify a custom draft remittance report program.
1. Custom Remittance Report - Program ID
Use this processing option to specify the program to use to generate a custom report for the remittance. If you leave this processing option blank, the system does not generate a report.
2. Custom Remittance Report - Version ID
Use this processing option to specify the version of the custom remittance report program for the system to use. If you leave this processing option blank, the system does not generate a report.
Italian Draft Remittance Formats
J.D. Edwards provides several country-specific formats for electronic accounts receivable drafts remittance. You specify the country-specific format that you want to use on the Paper/Tape tab of the processing options for the Draft Remittance program (R03B672).
Specify one of the following formats for electronic accounts receivable drafts remittance for Italy:

257
R03B672IP
AR Magnetic RIBA Draft Remittance Paper Format
R03B672IT
A/R Magnetic RIBA Draft Remittance Tape Format
R03B672IR
A/R Magnetic RID Draft Remittance Tape Format
When you use the magnetic RIBAand RID remittance formats, the system creates text file processor batches that contain the remittance information.
See Also Copying Text in the Text File Processor in the Global Solutions Italy Guide for
information about converting each batch to a flat file
Processing Options for A/R Magnetic RIBA Draft Remittance Tape Format (R03B672IT)
Bank
1. Enter the bank tape sequence number. (Optional)
Sequence Number
2. Enter the Remittance Date. If left blank the system date will be used.
Remittance Date
3. Bank Search Type Code. Enter the Search Type code to identify the payor as a Bank.
Search Type
Italian Tape
4. Enter the following information regarding RiBa authorization:
Province
Number

258
Date
5. Enter line number from address book for client name continuation.
Client Name
6. Enter line number from address book for client street address.
Client Street Address
Create
7. Enter one of the following: ' ' = Create Tape Only (Final Mode) '1' = Print RiBa on pre-printed form '2' = Print RiBa AND Create Tape (Final Mode Only)
Create Option
Processing Options for A/R Magnetic RID Draft Remittance Tape Format (R03B672IR)
Tape Tab
1. Beginning Sequence Number of tape (Optional)
Use this processing option to specify the beginning sequence number of the RID (Rapporti Interbancari Diretti, or Direct Inter-Bank Relationship) tape file. You are not required to enter a value in this processing option.
2. Remittance Date
Use this processing option to specify the remittance date of the RID tape file.

259
3. Search Type Code
Use this processing option to specify the search type that identifies the payor as a bank. If the Address Book Search Type of the payor matches this code, the payor is a bank.
4. RID Type
Use this processing option to specify the type of RID tape format being created. Valid values are:
Blank
Commercial RID
1
Users RID
2
Speed RID
5. Client Address Line Number
Use this processing option to specify the Address Line Number in the Address Book that contains the street address of the debtor for Record 40.
Valid values are:
Blank or 1

260
Address Line 1
1
Address Line 1
2
Address Line 2
3
Address Line 3
4
Address Line 4
Create Tab
1. Creation Option
Use this processing option to specify the type of format being created.
Valid values are:
Blank
Create tape only (final mode only).
1
Print RID on pre-printed form.
2
Print RID and create tape (final mode only).

261
Returning a Draft to Prior Status
If you remit or collect a draft in error, you can return the draft to its prior status rather than completely processing the draft and then voiding it. You can select multiple drafts for this purpose. The system reverses any changes that were made to the drafts when each was moved to its current status.
Note
You cannot return a draft from the acceptance status to a prior status, or return a draft that is voided or designated as having insufficient funds (NSF) to a prior status.
In the processing options for the draft entry programs (P03B602), you can specify whether to prohibit users from using this feature.
When you return a draft to a previous status, the system:
• Issues a warning that the remittance paper or tape batch might have already been sent to the bank for processing.
• Removes the draft from the remittance register if the draft is included in the remittance register.
• Updates the draft invoice record (R1) in the Customer Ledger table (F03B11) to the prior pay status.
• Updates the Receipts Header table (F03B13) with the prior draft status and batch.
• Removes unposted records from the Receipts Detail table (F03B14) for the current status.
• Reverses posted records from the Receipts Detail table (F03B14) for the current status.
• Deletes the draft record from the Draft Remittance Work File table (F03B672) if it exists (remitted using a tape format), and marks the Text Processor Header record (F007101) with a status of 3 (Suspended/Outbound).
Note The system retrieves the status for the Text Processor Header record from the user defined code 00/TL.
► To return a draft to prior status
From the Draft Daily Operations menu (G03B161), choose either Enter Our Drafts or Enter Customer Drafts.
1. On Work With Drafts, click Find to locate all drafts, or complete the following fields to limit your search, and then click Find:
• From

262
• Through
2. Choose the draft that you want to return to a prior status, and then choose Prior Status from the Row menu.
3. On Return To Prior Draft Status, complete the following field and click OK:
• G/L Date
Designating a Draft as Nonsufficient Funds (NSF)
If your customer does not have sufficient funds to pay the draft, you can designate the draft as NSF. You can designate the entire draft amount or a portion of the draft amount as NSF.
Entering a Full NSF Draft
A full NSF draft is a draft for which you did not collect any money. You can use the NSF feature at any stage of draft processing to reopen the existing invoices and process the draft. When you designate a draft as NSF, the system:
• Removes the open amount from the draft record (R1) in the Customer Ledger table (F03B11)
• Assigns a pay status of P to the draft record (R1)

263
• Assigns the G/L date that you entered as the date closed on draft record (R1)
• Creates a new batch for the NSF record
You must post this batch to create the appropriate journal entries and update the Account Ledger (F0911) and Account Balances (F0902) tables.
You can also renew the draft using the draft renewal feature.
When you designate a draft as NSF, you can also create a new invoice or create a journal entry directly from the Void/NSF Draft form by turning on the appropriate option. This allows you to charge back your customer for any fees that the bank might have charged you, or to create a journal entry for the fees. If the fees are taxable, you can designate the tax on the invoice or turn on the Journal Entry with VAT option.
Entering a Partial NSF Draft
Rather than designate the entire draft amount as NSF, you can specify the amount of the draft that cannot be collected by using the Partial NSF option. Because the system cannot determine which invoices to reopen, the system keeps the original invoices closed (paid) and creates a standalone chargeback invoice (document type NP) for the amount of the NSF when you designate a partial NSF.
You can enter a partial NSF draft between remittance and collection stages or after the collection stage of draft processing, but not during the acceptance stage. For example, you might learn that the customer has insufficient funds for a payment after you have remitted the draft to the bank or after you have moved the draft to collection status.
You can create a renewal draft when you anticipate a future payment for the amount of the NSF draft. The gross amount of the renewal draft will equal the amount of the NSF draft.
When you create a partial NSF, the system:
• Creates a record in the Receipts Detail table (F03B14) with a type input code of 30 to designate a partial NSF. The system generates this record to adjust the amount to be collected from the customer’s bank.
• Creates a record in the Receipts Detail table with a type input code of 36 to designate a standalone chargeback record that the system created as a result of the partial NSF.
• Creates an invoice chargeback record in the Customer Ledger table (F03B11) with a document type of NP for the amount of the NSF.
Note
The system includes partial NSF drafts in the NSF calculation when you run the Statistics History Update program (R03B16). The system does not include standalone chargeback records for partial NSF drafts (document type NP) in the NSF calculation.

264
Creating a Renewal Draft
When you designate a draft as having nonsufficient funds (NSF drafts), you can specify that the draft should be renewed. When renewing drafts, the system creates a new draft for the insufficient amount. The system applies this new draft to the reopened invoices or to the chargeback, depending on how the Partial NSF option is set on the Void/NSF Draft form for the record.
If you renew the draft, the system:
• Creates a new draft in the Receipts Header (F03B13), Receipts Detail (F03B14), and Customer Ledger (F03B11) tables.
• Matches the newly created draft to the original invoices that were open, or to the chargeback invoice that the system created if the Partial NSF option was specified. You can revise, remove, or add invoice records as desired.
• Updates the G/L date of the original draft in the Receipts Header table (F03B13)
► To designate a draft as NSF (full and partial)
From the Draft Daily Operations menu (G03B161), choose either Enter Our Drafts or Enter Customer Drafts.
1. On Work With Drafts, click Find to locate all drafts, or complete the following fields to limit your search, and then click Find:
• From
• Through
2. Choose the draft, and then choose NSF from the Row menu.
3. On Confirm Delete, click OK.

265
4. On Void/NSF Draft, complete the following fields:
• G/L Date
• Reason Code
5. To specify a partial NSF, complete the following option and field; otherwise, proceed to step 6.
• Partial NSF
The system creates a chargeback invoice for the amount specified in the NSF Amount field.
• NSF Amount
You can enter an amount up to (but not including) the total amount of the draft. When you use a foreign currency, this field is displayed as Foreign NSF Amount.
6. To specify renewal information, complete the following fields.
• Renewal
• Draft Number
• Draft Date
• Draft Due Date
• Payment Instrument

266
• Exchange Rate
The system creates a new draft and applies it to the open invoices or to the newly created chargeback record, depending on whether you specified a partial NSF.
7. To create a journal entry for bank fees, click the following option:
• Journal Entry
8. To create a journal entry with VAT (value added tax), click the following option:
• Journal Entry With VAT
9. To create an invoice to charge the customer for bank fees, click the following option:
• Invoice Entry
10. Click OK.
11. If you specified a partial NSF, the system displays the Create Standalone Payment form. Complete the following fields and click OK:
• Customer
• Customer Reference
• Chargeback Reason Code
• Chargeback G/L Offset
12. If you specified draft renewal, the Draft Entry form displays the new draft that was created and the open invoice or chargeback. On Draft Entry, you can change invoice information as necessary.
See Also Entering Basic Journal Entries in the General Accounting Guide
Tracking Taxes on Journal Entries in the Tax Reference Guide
Entering Journal Entries with Tax in the Tax Reference Guide
Standard Invoice Entry in the Accounts Receivable Guide
Designating a Draft as Nonsufficient Funds (NSF)
If your customer does not have sufficient funds to pay the draft, you can designate the draft as NSF. You can designate the entire draft amount or a portion of the draft amount as NSF.
Entering a Full NSF Draft
A full NSF draft is a draft for which you did not collect any money. You can use the NSF feature at any stage of draft processing to reopen the existing invoices and process the draft. When you designate a draft as NSF, the system:

267
• Removes the open amount from the draft record (R1) in the Customer Ledger table (F03B11)
• Assigns a pay status of P to the draft record (R1)
• Assigns the G/L date that you entered as the date closed on draft record (R1)
• Creates a new batch for the NSF record
You must post this batch to create the appropriate journal entries and update the Account Ledger (F0911) and Account Balances (F0902) tables.
You can also renew the draft using the draft renewal feature.
When you designate a draft as NSF, you can also create a new invoice or create a journal entry directly from the Void/NSF Draft form by turning on the appropriate option. This allows you to charge back your customer for any fees that the bank might have charged you, or to create a journal entry for the fees. If the fees are taxable, you can designate the tax on the invoice or turn on the Journal Entry with VAT option.
Entering a Partial NSF Draft
Rather than designate the entire draft amount as NSF, you can specify the amount of the draft that cannot be collected by using the Partial NSF option. Because the system cannot determine which invoices to reopen, the system keeps the original invoices closed (paid) and creates a standalone chargeback invoice (document type NP) for the amount of the NSF when you designate a partial NSF.
You can enter a partial NSF draft between remittance and collection stages or after the collection stage of draft processing, but not during the acceptance stage. For example, you might learn that the customer has insufficient funds for a payment after you have remitted the draft to the bank or after you have moved the draft to collection status.
You can create a renewal draft when you anticipate a future payment for the amount of the NSF draft. The gross amount of the renewal draft will equal the amount of the NSF draft.
When you create a partial NSF, the system:
• Creates a record in the Receipts Detail table (F03B14) with a type input code of 30 to designate a partial NSF. The system generates this record to adjust the amount to be collected from the customer’s bank.
• Creates a record in the Receipts Detail table with a type input code of 36 to designate a standalone chargeback record that the system created as a result of the partial NSF.
• Creates an invoice chargeback record in the Customer Ledger table (F03B11) with a document type of NP for the amount of the NSF.
Note
The system includes partial NSF drafts in the NSF calculation when you run the Statistics History Update program (R03B16). The system does not include standalone chargeback records for partial NSF drafts (document type NP) in the NSF calculation.

268
Creating a Renewal Draft
When you designate a draft as having nonsufficient funds (NSF drafts), you can specify that the draft should be renewed. When renewing drafts, the system creates a new draft for the insufficient amount. The system applies this new draft to the reopened invoices or to the chargeback, depending on how the Partial NSF option is set on the Void/NSF Draft form for the record.
If you renew the draft, the system:
• Creates a new draft in the Receipts Header (F03B13), Receipts Detail (F03B14), and Customer Ledger (F03B11) tables.
• Matches the newly created draft to the original invoices that were open, or to the chargeback invoice that the system created if the Partial NSF option was specified. You can revise, remove, or add invoice records as desired.
• Updates the G/L date of the original draft in the Receipts Header table (F03B13)
► To designate a draft as NSF (full and partial)
From the Draft Daily Operations menu (G03B161), choose either Enter Our Drafts or Enter Customer Drafts.
1. On Work With Drafts, click Find to locate all drafts, or complete the following fields to limit your search, and then click Find:
• From
• Through
2. Choose the draft, and then choose NSF from the Row menu.
3. On Confirm Delete, click OK.

269
4. On Void/NSF Draft, complete the following fields:
• G/L Date
• Reason Code
5. To specify a partial NSF, complete the following option and field; otherwise, proceed to step 6.
• Partial NSF
The system creates a chargeback invoice for the amount specified in the NSF Amount field.
• NSF Amount
You can enter an amount up to (but not including) the total amount of the draft. When you use a foreign currency, this field is displayed as Foreign NSF Amount.
6. To specify renewal information, complete the following fields.
• Renewal
• Draft Number
• Draft Date
• Draft Due Date
• Payment Instrument

270
• Exchange Rate
The system creates a new draft and applies it to the open invoices or to the newly created chargeback record, depending on whether you specified a partial NSF.
7. To create a journal entry for bank fees, click the following option:
• Journal Entry
8. To create a journal entry with VAT (value added tax), click the following option:
• Journal Entry With VAT
9. To create an invoice to charge the customer for bank fees, click the following option:
• Invoice Entry
10. Click OK.
11. If you specified a partial NSF, the system displays the Create Standalone Payment form. Complete the following fields and click OK:
• Customer
• Customer Reference
• Chargeback Reason Code
• Chargeback G/L Offset
12. If you specified draft renewal, the Draft Entry form displays the new draft that was created and the open invoice or chargeback. On Draft Entry, you can change invoice information as necessary.
See Also Entering Basic Journal Entries in the General Accounting Guide
Tracking Taxes on Journal Entries in the Tax Reference Guide
Entering Journal Entries with Tax in the Tax Reference Guide
Standard Invoice Entry in the Accounts Receivable Guide
Draft Collection
From the Draft Remittance and Collection menu (G03B162), choose Draft Collection with Status Update.
You can arrange to collect funds for a draft in one of the following ways:
• Wait until the funds become available on the due date specified by the draft.
• Request an advance from your bank before the due date of the draft. This is called discounting the draft. Typically, banks charge a fee when they advance funds for a draft before its due date. You must account for this fee separately during draft collection.

271
Your bank collects the funds for the draft from the customer's bank on the due date of the draft. Your bank informs you if it cannot collect the funds. On or after the due date, both you and your customer recognize the transfer of funds. You update the status of the draft in your records to show that it has been collected.
Some companies prefer to close the draft on the draft due date, while others wait until the payment appears on their bank statement. Processing options control the pay status code that the system assigns to paid draft records (R1), as well as whether to close the draft. The system removes the open amount from the draft record and creates records in the Receipts Detail table (F03B14) when you close the draft. If you choose to leave the draft records open, you must run the Draft Collection with Status Update program (R03B680) again to select and update the draft records and to create matching records in the F03B14 table. After you collect the draft and close it, you must post the draft batch to create the appropriate journal entries.
Additionally, your bank might assess fees for draft collection. Typical fees include charges for incomplete bank information, discounted drafts, and commissions. In addition, the tax regulations in certain countries might require that VAT be assessed on these fees. You account for all fees by creating a separate journal entry using the Journal Entries with VAT program (P09106).
You can run the Draft Collection with Status Update program in either proof or final mode. The following table illustrates the differences between these two modes:
Proof mode In proof mode, the system performs the following actions:
• Selects drafts that are either accepted or remitted. • Prints a report that shows the drafts to be updated. It shows all drafts that have a
payment status of G (draft deposited, not due) with a due date that you specify in a processing option.
Final mode In final mode, the system performs the following actions:
• Creates a batch header record in the Batch Control Records table (F0011) for collected drafts. You must post this batch to create the appropriate journal entries.
• Changes the pay status of draft invoice records (R1) to P (paid) or to another value that you choose.
• Changes the draft status on the records in the Receipts Header table (F03B13) from either 2 (Remitted – Cash or Discount) or 3 (Remitted – Contingent) to 0 (Collected).
• Creates one or more records in the F03B14 table, depending on whether you remit drafts. If you remit drafts, the system creates a reversing draft remittance record in addition to the record the system creates for the collected draft.
This process updates records in the Customer Ledger (F03B11), F03B13, and F03B14 tables.
See Also Entering Journal Entries with VAT in the Tax Reference Guide for information about
entering journal entries with VAT tax
Processing Options for Draft Collection with Status Update (R03B680)
Proof/Final Tab
These processing options specify whether to process draft collections in proof or final mode.

272
1. Final Mode
Blank = Print report only
1 = Run in final mode
Use this processing option to specify whether to process drafts for collection in proof or final mode. In proof mode, the system generates a report of the drafts that are eligible for collection. In final mode, the system generates a report, changes the payment status of the draft from G (draft deposited not due) to P (paid in full), and creates journal entries. Valid values are:
Blank
Proof mode
1
Final mode
As Of Date Tab
This processing option specifies the date to use to select draft records for collection.
1. "As Of" Date
Blank = Use current system date
Use this processing option to specify the date for the system to use to process drafts for collection. The system selects all drafts with a due date on or before the date specified that are eligible for collection. If you leave this processing option blank, the system uses the system date.
G/L Date Tab
These processing options specify the date to assign as the G/L date on the journal entries that the system creates.

273
1. Journal Entry G/L Date
Blank = Use system date
Use this processing option to specify the G/L date for the system to assign to the journal entry it generates for collected drafts. If you leave this processing option blank, the system assigns the system date.
2. G/L Date From Bank Account Float Day
Blank = Use option 1
1 = Add Float Days of G/L bank account to Draft Due Date
Use this processing option to specify whether to add the float days specified for the G/L bank account in the Bank Transit Master table (F0030) to the draft due date used as the G/L date on the journal entry that the system generates for draft collection. Valid values are:
Blank
Use the date from the previous processing option.
1
Add the number of float days specified for the G/L bank account to the due date.
Note: The system generates a separate journal entry for each G/L date that the system calculates.

274
3. G/L Date from Float Day Entered
Blank = Use option 1 or 2
1 = Add Float Day in option 4 below to Draft Due Date and select drafts by Pay Instruments. Number of Float Day must be entered. Ignore options 1 and 2
Use this processing option to specify whether to use a different number of float days to add to the due date used as the G/L date, instead of the days specified for the bank account in the Bank Transit Master table (F0030). Valid values are:
Blank
Do not specify float days. Use one of the previous processing options to determine the G/L date.
1
Use the float days specified in the next processing option to determine the G/L date and to select draft records. If you do not specify the float days in the next processing option, the system uses one of the previous processing options or the system date.
5. Payment Instrument
Use this processing option to specify the payment instrument for the system to use to select draft records. Use this processing option only if you specified 1 in processing option 3 (G/L Date from Float Day Entered). Otherwise, the system does not select draft records by payment instrument. You are not required to complete this processing option.
Pay Status Tab
These processing options specify the pay status for collected draft invoice records and whether to remove the open amount, if one exists.

275
1. Pay Status Code
Blank = Update Draft Pay Status to "P" (Paid)
Use this processing option to specify the payment status code for the system to assign to collected drafts. The code that you specify must be set up in the Payment Status Codes UDC (00/PS). If you leave this processing option blank, the system assigns the payment status code P (Paid in Full).
Note: This processing option works in conjunction with the Close Draft processing option. If you choose to update the pay status to P, but do not close the draft, the system considers the draft open and:
o Does not create Receipts Detail records (F03B14) for the R1 draft records.
o Does not update the pay status of the R1 draft records to P; it updates the pay status to A.
o Creates an empty batch header record for batch type RB. You can either post the empty batch header record or run the Batch to Detail integrity report (R007031) to delete it.
2. Close Draft
Blank = Close the draft
1 = Leave draft open
Use this processing option to specify whether to remove the open amount from the R1 draft invoice record (F03B11) if one exists. Valid values are:
Blank
Remove the open amount from the R1 invoice draft records.

276
1
Do not remove the open amount.
Note: This processing option works in conjunction with the Pay Status Code processing option. If you choose to update the pay status to P, but do not close the draft, the system considers the draft open and:
o Does not create Receipts Detail records (F03B14) for the R1 draft records.
o Does not update the pay status of the R1 draft records to P; it updates the pay status to A.
o Creates an empty batch header record for batch type RB. You can either post the empty batch header record or run the Batch to Detail integrity report (R007031) to delete it.
Exchange Rate Tab
This processing option specifies the exchange rate to use to calculate gain or loss records for the collected draft records.

277
1. Exchange Rate Override
(*** Effective only if draft has been remitted
without Contingent Liability***)
Blank = Derive rate from exchage rate information
Use this processing option to specify the exchange rate to use for drafts that pay foreign invoices. The system applies the exchange rate that you specify to all drafts regardless of the invoice currency. If you leave this processing option blank, the system locates the exchange rate from the Currency Exchange Rates table (F0015).
Note: This processing option is applicable only to drafts remitted without contingent liability.
Considerations for Draft Collection in Italy
In Italy, companies typically do not consider a draft paid until the bank sends verification of the actual payment. In this case, the preferred practice for collecting a draft is to set the processing options for the Draft Collection with Status Update program (R03B680) so that the program does not automatically create journal entries. Instead, it updates the payment instrument for the draft to an intermediate status. The intermediate status indicates that payment for the draft has been requested from the bank, but it has not actually been received. When the bank verifies the payment of the draft, you can create and post a manual journal entry for the payment. Then you run the Draft Collection with Status Update program for the draft again to update the payment instrument for the draft to a "paid" status.

278
Printing Invoices With an Attached International Payment Instruction (IPI)
From the Statement Reminder Processing menu (G03B22), choose Invoice Print with International Payment Instruction.
You use International Payment Instructions (IPI) for cross-border invoice settlements. When you originate invoicing from the Accounts Receivable system, you can choose to print your invoices with an attached IPI form. To print invoices with attached IPI forms, you must use preformatted invoices that contain the IPI form. J.D. Edwards software processes and formats data from J.D. Edwards tables, and prints the information in the appropriate places on the IPI form.
IPIs must be printed in English, but they can also contain a second language. Some countries require that you print IPI forms with a secondary language; for some countries, the use of a secondary language is optional. The European Committee for Banking Standards publishes the requirements for IPIs. You specify the secondary language by choosing a value in the IPI - Languages and Countries UDC table (00/IL).
The IPI form contains the four sections described below:
• Ordering Customer
The Ordering Customer section contains the name, address, and account number of your customer. The system uses the name, address, and account number (CBNK) that are associated with the invoice to which the IPI is attached. Your customer sends the IPI to the bank for processing, and the bank credits your account with the specified amount.
• Beneficiary
The Beneficiary section contains your company name, and the bank name and account number that you specify in processing options.
• Amount to be paid
The Amount to be paid section contains the amount and currency of the transaction, as well as a code to indicate who is responsible for paying the bank fees that are associated with the transaction. You specify the code for the bank fees in a processing option; the system uses the amount and currency from the transaction.
• Signature
The J.D. Edwards system does not print the signature.
Data Selection
When you set your data selection for the Invoice Print with International Payment Instruction program (R03B5053), you should filter out credit memos and other non-positive invoices. You can filter out these invoices by specifying that the Amount Open (AAP) is greater than zero. You should also designate in the Payment Instrument UDC table (00/PY) the code to use for invoices with attached IPIs, and then choose that payment type in your data selection.
Note
The Invoice Print with International Payment Instruction program does not write error messages to the Work Center; however, you can view error messages in the UBE log if you

279
use UBE logging. If the Invoice Print with International Payment Instruction program encounters errors, it prints a blank invoice.
Before You Begin Set up the IPI – Languages and Countries UDC (00/IL). See IPI – Languages and
Countries (00/IL) in the Global Solutions Spain Guide for information about setting up this UDC table.
Processing Options for Invoice Print with International Payment Instruction (R03B5053)
Defaults Tab
1. Invoice Print Date Blank = Current date Use this processing option to specify the date that will appear on the invoices. If you leave this processing option blank, the system uses the current date.
2. Customer Bank Account Type Blank = D Use this processing option to specify the type of bank account of the ordering customer. The system uses this account type code to retrieve the bank account number of the ordering customer. The code you enter must exist in the Bank Type Code UDC (00/BT) table. If you leave this processing option blank, the system uses bank type D.
3. Customer Address Format Blank = 00 Use this processing option to specify the IPI - Address Line Sequencing code. This code determines the combination of the values for the Postal Code, City, and Country that the system includes as the second address line of the ordering customer's address on the

280
International Payment Instruction. The code that you enter must exist in the IPI - Address Line Sequencing (00/IA) UDC table. If you leave this processing option blank, the system uses 00 (Postal Code City).
4. Beneficiary Bank Account Blank = Use RBxxx AAI Use this processing option to specify the beneficiary's G/L bank account number on the International Payment Instruction. The system uses this account number to locate the corresponding bank account information from the Bank Transit Master table (F0030), including the IBAN and SWIFT bank identification code. If you leave this processing option blank, the system uses the account associated with the RB AAI.
5. Beneficiary Bank Account Format Blank = Use the International Bank Account Number (IBAN) 1 = Use the National Bank Account Number Use this processing option to define the beneficiary's bank account format on the International Payment Instruction (IPI). Typically, you use the International Bank Account Number format, (IBAN) from the Bank Transit Master table (F0030). In some cases you can use a national account number (CBNK) from the Bank Transit Master table instead of the IBAN. Valid values are: Blank Use the IBAN as the bank account format. 1 Use the CBNK as the bank account format.
6. Beneficiary Bank Name Blank = Use SWIFT Bank Identification Code (BIC) 1 = Use Bank Name Use this processing option to define the beneficiary's bank name on the International
281
Payment Instruction (IPI). The IPI allows you to present the bank name in one of two formats. You can either use the SWIFT Bank Identification Code (BIC), stored as SWFT in the Bank Transit Master table (F0030), or you can use the name of the bank. Valid values are: Blank Use the BIC code. 1 Use the bank name.
7. Details of Payment Blank = 00 Use this processing option to specify the data that appears in the Details of Payment section on the International Payment Instrument (IPI). You choose a hard-coded value from the IPI - Details of Payment UDC table (00/IP). If you leave this processing option blank, the system uses 00. Valid values are: 00 Unstructured - DOC. The system writes the value from the DOC field in the Customer Ledger (F03B11) table to the Details of Payment section of the IPI. 01 Unstructured - DOC, DCT, & CO. The system concatenates the values in the DOC, DCT, and CO fields in the Customer Ledger table and writes the concatenated string to the Details of Payment section of the IPI. 02 Unstructured - DOC & AN8. The system concatenates the values in the DOC and AN8 fields in the Customer Ledger table and writes the concatenated string to the Details of Payment section of the IPI.
8. Charges Paid By Blank = 0 Use this processing option to specify the entity responsible for paying the bank charges assoicated with the International Payment Instrument (IPI). The value that you enter must exist in the IPI - Charges Paid By UDC table (00/IC). If you leave this processing option blank, the system uses 0 (Ordering Customer). Valid values are:

282
0 Ordering Customer 1 Beneficiary 2 Shared/Both
9. IPI Form Type Blank = 03 Use this processing option to specify the type of preformated International Payment Instrument form to use. The value that you enter must exist in the IPI - Form Types UDC table (00/IF). If you leave this processing option blank, the system uses 03 (Black - Unstructured). Valid values are: 00 Blind Colour - Structured 01 Blind Colour - Unstructured 02 Black - Structured 03 Black - Unstructured 04 Drop Out - Structured 05 Drop Out - Unstructured
Print Tab
1. Tax Amounts

283
Blank = Do not print tax amounts. 1 = Print tax amounts. Use this processing option to specify whether tax amounts appear on the invoices. Valid values are: Blank Tax amounts do not appear on invoices. 1 Tax amounts appear on invoices. 2. Attachments Blank = Do not print attachments on the invoice. 1 = Print attachments on the invoice. Use this processing option to specify whether generic text that is associated with the invoice appears on the invoice. Valid values are: Blank Do not include generic text attachment. 1 Include generic text attachment. 3. Customer Bank Account Number Blank = Do not print the customer's bank account number. 1 = Print the customer's bank account number. Use this processing option to specify whether the customer's bank account number appears on the International Payment Instrument portion of the invoice. Valid values are: Blank Do not include the customer's bank account number. 1 Include the customer's bank account number. 4. Customer Name and Address

284
Blank = Do not print the customer's name and address. 1 = Print the customer's name and address. Use this processing option to specify whether the name and address of the customer appears on the International Payment Instrument portion of the invoice. Valid values are: Blank Do not include the customer's name and address. 1 Include the customer's name and address. 5. Details of Payment Blank = Do not print the details of payment. 1 = Print the details of payment. Use this processing option to specify whether the system completes the payment details section on the International Payment Instrument portion of the invoice. Valid values are: Blank Do not complete the payment details section. 1 Complete the payment details section. The system prints in the payment details section the data that you specified in the Details of Payment processing option on the Defaults tab. 6. Charges To Be Paid By Blank = Do not print the charges to be paid by information. 1 = Print the charges to be paid by information. Use this processing option to specify whether the system completes the charges to be paid section on the International Payment Instrument portion of the invoice. Valid values are: Blank Do not complete the charges to be paid section.

285
1 Complete the charges to be paid section. 7. IPI Currency and Currency Amounts Blank = Do not print the currency and related amount on the IPI. 1 = Print the currency and related amount on the IPI. Use this processing option to specify whether the currency and amount appear on the International Payment Instrument portion of the invoice. Valid values are: Blank Do not print the currency and amount. 1 Print the currency and amount.
Process Tab
1. Maximum IPI Amount Blank = 999999,99 Use this processing option to specify the maximum amount allowed for an International Payment Instrument (IPI). If the IPI is greater than this amount, the system will not generate an IPI. If you leave this field blank, the system uses 999,999.99 as the maximum IPI amount.

EnterpriseOneGlobal Solutions Italy 8.9 PeopleBook
September 2003
2 of 2


EnterpriseOne Global Solutions Italy 8.9 PeopleBook SKU REL9EIT0309V2 Copyright© 2003 PeopleSoft, Inc. All rights reserved. All material contained in this documentation is proprietary and confidential to PeopleSoft, Inc. ("PeopleSoft"), protected by copyright laws and subject to the nondisclosure provisions of the applicable PeopleSoft agreement. No part of this documentation may be reproduced, stored in a retrieval system, or transmitted in any form or by any means, including, but not limited to, electronic, graphic, mechanical, photocopying, recording, or otherwise without the prior written permission of PeopleSoft. This documentation is subject to change without notice, and PeopleSoft does not warrant that the material contained in this documentation is free of errors. Any errors found in this document should be reported to PeopleSoft in writing. The copyrighted software that accompanies this document is licensed for use only in strict accordance with the applicable license agreement which should be read carefully as it governs the terms of use of the software and this document, including the disclosure thereof. PeopleSoft, PeopleTools, PS/nVision, PeopleCode, PeopleBooks, PeopleTalk, and Vantive are registered trademarks, and Pure Internet Architecture, Intelligent Context Manager, and The Real-Time Enterprise are trademarks of PeopleSoft, Inc. All other company and product names may be trademarks of their respective owners. The information contained herein is subject to change without notice. Open Source Disclosure This product includes software developed by the Apache Software Foundation (http://www.apache.org/). Copyright (c) 1999-2000 The Apache Software Foundation. All rights reserved. THIS SOFTWARE IS PROVIDED “AS IS’’ AND ANY EXPRESSED OR IMPLIED WARRANTIES, INCLUDING, BUT NOT LIMITED TO, THE IMPLIED WARRANTIES OF MERCHANTABILITY AND FITNESS FOR A PARTICULAR PURPOSE ARE DISCLAIMED. IN NO EVENT SHALL THE APACHE SOFTWARE FOUNDATION OR ITS CONTRIBUTORS BE LIABLE FOR ANY DIRECT, INDIRECT, INCIDENTAL, SPECIAL, EXEMPLARY, OR CONSEQUENTIAL DAMAGES (INCLUDING, BUT NOT LIMITED TO, PROCUREMENT OF SUBSTITUTE GOODS OR SERVICES; LOSS OF USE, DATA, OR PROFITS; OR BUSINESS INTERRUPTION) HOWEVER CAUSED AND ON ANY THEORY OF LIABILITY, WHETHER IN CONTRACT, STRICT LIABILITY, OR TORT (INCLUDING NEGLIGENCE OR OTHERWISE) ARISING IN ANY WAY OUT OF THE USE OF THIS SOFTWARE, EVEN IF ADVISED OF THE POSSIBILITY OF SUCH DAMAGE. PeopleSoft takes no responsibility for its use or distribution of any open source or shareware software or documentation and disclaims any and all liability or damages resulting from use of said software or documentation.


Table of Contents
Automatic Payment Processing 287 Setting Up Bank Account Information ............................................................288 Working with Payment Instruments................................................................297
Working with Italian Payment Formats .................................................................... 298 Setting Up Payment Instruments............................................................................. 300
Creating Payment Control Groups .................................................................307 Next Numbers for Create Payment Control Groups................................................ 310 Processing Options for Create Payment Groups (R04570) .................................... 310 Data Sequence for Create Payment Control Groups .............................................. 325
Working with Payment Groups.......................................................................325 Printing the Payment Analysis Report ..................................................................... 328 Reviewing Payment Groups .................................................................................... 328 Reviewing Payments with a Write Status ................................................................ 329 Reviewing Payments with an Update Status........................................................... 332 Revising Unprocessed Payments............................................................................ 333
Working with Automatic Payments.................................................................337 Writing Payments..................................................................................................... 338 Record Reservation for Payments........................................................................... 339 Payment ID Using Next Numbers............................................................................ 339 Resetting Payment Processing ............................................................................... 343 Removing Processed Payments ............................................................................. 344 Copying Payments to Tape ..................................................................................... 345 Updating the Accounts Payable Ledger .................................................................. 351 Processing Options for Work with Payment Groups (P04571) ............................... 353
Accounting for Petrol Card Expense Reports 362
Working with the Annual Close 363 Automatic Accounting Instructions .................................................................364 User Defined Codes ......................................................................................364 Ledger Types.................................................................................................365 Document Types ...........................................................................................365 Chart of Accounts ..........................................................................................365
Reviewing Account Information 366 Verifying Account Balances ...........................................................................366 Reviewing Account Ledgers by Object Account.............................................368 Reviewing Account Ledgers by Category Code .............................................371
Processing Options for Account Inquiry by Category Code (P09202) .................... 372 Reviewing Alternate Account Information ......................................................374

Printing the Sequential Number Report 378 Processing Options for Sequential Number Reports (R74099A, R74099B,
and R74099C)............................................................................................379
Printing the G/L Registration Report 380 Printing Considerations for the G/L Registration Report.................................380 Registration Numbers for Adjusting Journal Entries .......................................381 Processing Options for G/L Registration Report-Italy (R09404) .....................382
Printing the Trial Balance Report 388 Final Annual Close.........................................................................................389 Processing Options for T/B by Object and Subsidiary (R7409C3)..................389 Processing Options for T/B by Category Code (R70472) ...............................394
Printing the General Ledger Report 399 Processing Options for General Ledger by Object and Subsidiary
(R7409C1) .................................................................................................400 Processing Options for G/L by Category Code (R70470)...............................406
Working with European Union Reporting 413 Intrastat Requirements ..................................................................................413 Intrastat Reporting and the Euro....................................................................415
Considerations for Creating Intrastat Reports ......................................................... 415 Updating Intrastat Information........................................................................415
Processing Options for Intrastat Workfile Generation – Sales (R0018I1) ............... 419 Processing Options for Intrastat Workfile Generation – Procurement (R0018I2) ... 422
Revising Intrastat Information ........................................................................424 Purging Records from the Intrastat Table ......................................................426
Processing Options for Intrastat Workfile Purge (R0018TP)................................... 427 Using the IDEP/IRIS Interface for Intrastat Reporting ....................................429
IDEP/CN8 - France, Italy, Spain, Austria, Belgium, Sweden, Denmark, Finland, Portugal, Greece, Ireland, and Luxembourg ....................................................... 429
CBS-IRIS - Holland.................................................................................................. 431 CBS-IRIS - Germany ............................................................................................... 431 Grouping Transactions ............................................................................................ 432 Electronic Format..................................................................................................... 432 Processing Options for IDEP CN8/IRIS Interface (R0018I3) .................................. 433
Working with the EC Sales List ......................................................................442 Printing the EC Sales List (R0018L)........................................................................ 443 Printing the EC Sales List - A/R (R0018S) .............................................................. 448
Working with the Text File Processor 453 Copying Text in the Text File Processor ........................................................453

Processing Options for Text File Processor (P007101) .......................................... 456 Resetting a Text Batch in the Text File Processor..........................................457 Purging a Text Batch in the Text File Processor ............................................457
Processing Options for Purge Processed Transactions (R007102)........................ 458
Reviewing Customer and Supplier Reports 459 Building the Customer/Supplier Balance Worktable .......................................459
Processing Options for Generate Customer Balance (R7403B001)....................... 461 Processing Options for Generate Supplier Balance (R7404001)............................ 463
Printing Customer and Supplier Balance Reports ..........................................465 Processing Options for Customer / Supplier Balance Report (R7404002) ............. 467
Printing Open Amount Reports for Customers ...............................................468 Processing Options for A/R Inventory Book (R7403B026)...................................... 468
Printing Open Amount Reports for Suppliers .................................................470 Processing Options for A/P Inventory Book (R7404026) ........................................ 471
Preparing the Fixed Assets Legal Report 473 Processing Options for Fixed Assets Legal Report – Italy (R7412100) ..........473


287
Automatic Payment Processing
Use automatic payment processing to pay vouchers during your usual payment cycle.
The following graphic illustrates the automatic payment process:

288
Before You Begin You must run the Italian Bank Number Conversion program (R74800). See
Converting Bank Numbers in the Global Solutions Italy Guide.
Setting Up Bank Account Information
You must set up bank account information if you process Accounts Payable payments or use specific Accounts Receivable applications, such as draft processing and auto debit processing. Depending on the type of information that you process, you must set up bank account information for your company’s bank accounts, as well as for your suppliers or customers.
The system provides the following programs for setting up bank account information:
• Bank Account Information (P0030G) – You use this program to set up your company’s bank accounts. If you process Accounts Payable payments or Accounts Receivable automatic debits, you must set up your company’s bank accounts.
• Bank Account Cross Reference (P0030A) – You use this program to set up bank account information for your suppliers and customers. If you process Accounts Payable payments using electronic funds transfer, you must set up bank account information for the supplier. If you process automatic receipts, Accounts Receivable drafts, or automatic debits, you must set up bank account information for the customer.
• Bank Account Addresses (P0030A) – You use this program if you want to associate a bank transit number with a bank address book record.
Although all the programs update and store bank account information in the Bank Transit Master table (F0030), the system differentiates each bank account record using a record type. The record type not only identifies whether the bank account is for a supplier or customer; it is also used to differentiate customers who process drafts and automatic debits from suppliers who process automatic payments.
The following table describes the available record types and how they are used:
Record Type
Description
B The system assigns this value to records created using the Bank Account Addresses program (P0030A). You use this program to associate bank transit numbers with the bank account address number.
C The system assigns this value when you set up bank account information and specify the option for Customer using the Bank Account Cross Reference program (P0030A).
D The system assigns this value when you set up bank account information and turn on the A/R Drafts, Auto Debit option using the Bank Account Cross Reference program (P0030A). You must turn on this option for customers who process drafts or auto debits.

289
Record Type
Description
G The system assigns this value when you set up G/L bank account information for your company using the Bank Account Information program (P0030G).
H The system assigns this value when you set up Dutch bank accounts using the Dutch Payments Bank Information program (P74030H).
M The system assigns this value when you set up bank account information by business unit using the Business Unit Information program (P0030B).
P The system assigns this value when you set up bank account information and turn on the Auto Receipts Payor option using the Bank Account Cross Reference program (P0030A).
V The system assigns this value when you set up bank account information and turn on the Supplier option using the Bank Account Cross Reference program (P0030A).
X, Y These codes are predefined for you to use if your supplier has multiple bank accounts. You do not need to use these specific codes (X or Y); you can set up and use any value in the UDC for bank type codes (00/BT) that are not listed above.
Note
Although the same program is used for the Bank Account Cross Reference and Bank Account Addresses applications, the system displays a different form for each application, as follows:
• If you choose Bank Account Cross Reference, the system displays the Work With Bank Accounts By Address form (W0030AD).
• If you choose Bank Account Addresses, the system displays the Work With Bank Transit Addresses form (W0030AE).
You can also access this form by choosing Bank Transit from the Form menu on Work With Bank Accounts by Address.
See Also Setting Up Multiple Bank Accounts for Suppliers in the Accounts Payable Guide for
detailed setup instructions
► To set up G/L bank account information
Use one of the following navigations:
From the Automatic Payment Setup menu (G04411), choose Bank Account Information.
From the Accounts Receivable Setup menu (G03B41), choose Bank Account Information.

290
From the Automatic Debiting menu (G03B131), choose G/L Bank Accounts
1. On Work With G/L Bank Accounts, click Find to display all bank account records.
2. To add a new bank account record, click Add.
3. On Set Up G/L Bank Account, complete the following fields:
• G/L Bank Account
• Description
4. Complete the following optional field for Accounts Payable payment processing:
• Next Payment Number
5. Complete the following optional field for the Accounts Receivable system:
• Next Autodebit Number
6. To set up default print options for Accounts Payable payments, complete the following fields:
• Number of Alignment Forms
• Detail Lines Per Stub
7. Click OK, and then click Cancel.
8. On Work With G/L Bank Accounts, to enter additional bank account information, locate and choose your bank account, and then choose Bank Info from the Row menu.

291
9. On Revise Bank Information, complete the following fields:
• Bank Address Number
This is the bank’s address book number.
• Bank Transit Number
You can leave this field blank.
• Bank Account Number
• Control Digit
• Checking or Savings Account
• SWIFT Code
10. To avoid the use of the pre-note code that is assigned to the supplier, verify that the following option is turned on:
• Override Supplier Pre-Note Code
Note Some payment instruments are hard-coded to produce a paper check if insufficient information is provided, regardless of whether this option is turned on.
11. Complete the following options if you use float days:

292
• Receivables
This field is used only in Accounts Receivable draft processing.
• Payables
12. Click OK.
13. On Work With G/L Bank Accounts, if you use A/P drafts or BACS, choose BACS Info from the Row menu.
14. On Revise BACS Information, complete the following fields and click OK:
• Bank User Number
• Reference/Roll Number
• Bank Reference Name
15. On Work With G/L Bank Accounts, to enter account information for CTX bank tapes used in A/P payment processing, choose X12 Info from the Form menu.
16. On Work With Bank Account X12 Information, click Add.
17. On Set Up Bank Account X12 Information, complete the following fields and click OK:
• Authorization Info Qualifier
• Authorization Information
• Security Info Qualifier
• Security Information
• Interchange Sender ID
• Interchange Receiver ID
• Application Sender's Code
• Application Receiver's Code
► To delete or revise G/L bank account information
Use one of the following navigations:
From the Automatic Payment Setup menu (G04411), choose Bank Account Information.
From the Accounts Receivable Setup menu (G03B41), choose Bank Account Information.
From the Automatic Debiting menu (G03B131), choose G/L Bank Accounts
1. On Work With G/L Bank Accounts, click Find to display all bank account records.
2. To delete a bank account record, choose the bank account record and click Delete.

293
3. On Confirm Delete, click OK.
4. To revise payment information or default print options, choose the bank account record and choose Revise from the Row menu.
5. On Set Up G/L Bank Account, revise any of the fields on the form and click OK.
6. To revise additional bank information, such as the bank transit or account numbers, on Work With G/L Bank Accounts, choose the bank account record and choose Bank Info from the Row menu.
7. On Revise Bank Information, revise any of the fields on the form and click OK.
8. To revise BACS information, on Work With G/L Bank Accounts, choose the bank account record and choose BACS Info from the Row menu.
9. On Revise BACS Information, revise any of the fields on the form and click OK.
10. To revise CTX information, on Work With G/L Bank Accounts, choose X12 Info from the Form menu.
11. On Work With Bank Account X12 Information, click Find, choose the bank account, and click Select.
12. On Set Up Bank Account X12 Information, revise any of the fields on the form and click OK.
► To set up supplier and customer bank account information
Use one of the following navigations:
From the Automatic Payment Setup menu (G04411), choose Bank Account Cross Reference.
From the Accounts Receivable Setup menu (G03B41), choose Bank Account Cross-Reference.
From the Automatic Debiting menu (G03B131), choose Customer Bank Account.
1. On Work With Bank Accounts by Address, click Find to display all bank account information, or complete the following field to limit the display and click Find:
• Address Number
Note The system displays records for suppliers and customers only. The system does not display records for record types B, G, or M.
2. To add a new bank account record, click Add.

294
3. On Set Up Bank Accounts By Address, complete the following field:
• Address Number
4. To specify the record type, choose one of the following options:
• Supplier
• Customer
• A/R Drafts, Auto Debit
• Auto Receipts Payor
5. Complete the following fields:
• Bank Transit Number
You can leave this field blank.
• Bank Account Number
• Control Digit
• IBAN
• Description
• Checking or Savings Account

295
• SWIFT Code
The system displays this field only when you choose the option for Supplier.
• Reference/Roll Number
The system displays this field only when you choose the option for Supplier.
Note Some of the fields are required for specific bank formats in specific countries. Your bank might not require all of this information.
• Bank Address Number
• Bank Country Code
6. Click OK.
► To delete or revise supplier or customer bank account information
Use one of the following navigations:
From the Automatic Payment Setup menu (G04411), choose Bank Account Cross Reference.
From the Accounts Receivable Setup menu (G03B41), choose Bank Account Cross-Reference.
From the Automatic Debiting menu (G03B131), choose Customer Bank Account.
1. On Work With Bank Accounts By Address, complete the following field and click Find:
• Address Number
Note The system displays all bank account records for suppliers and customers only. The system does not display bank account records for record types B, G, or M.
2. To delete a bank account record, choose the record and choose Delete from the toolbar.
3. On Confirm Delete, click OK.
4. To revise bank account information, choose the bank account that you want to revise and choose Revise from the Row menu.
The system displays either the Set Up Bank Accounts By Address or the Set Up Multiple Vendor Bank Accounts form depending on the record type of the bank account that you choose.
5. Revise any of the fields on the form and click OK.

296
► To set up bank transit numbers by bank address
You can associate a bank transit number with a bank's address book number.
From the Accounts Receivable Setup menu (G03B41), choose Bank Account Addresses.
Note
You can also access this form by choosing Bank Transit from the Form menu in the Bank Account Cross Reference program.
1. On Work With Bank Transit Addresses, click Add.
2. On Set Up Bank Transit Address, complete the following fields and click OK:
• Bank Transit
• Address Number
The system creates a record in the Bank Transit Master table (F0030) with the record type B.
Note
You can revise the address book number that is associated with the bank transit number by locating the bank transit record and choosing Revise from the Row menu. If you need to revise the bank transit number, choose the record and delete it, and then add it again.

297
Working with Payment Instruments
You can specify various output formats for automatic payments by assigning the programs that generate the formats to user-defined payment instruments. Payment formats can be printed or electronic; and can include checks, magnetic tapes, and drafts. You must set up a payment instrument for each payment format that you use.
The programs that you assign to your payment instruments determine the formats for payments and any additional output that the system generates when you process payment groups. The additional output components can include one or more of the following:
• Payment registers
A printed list of payments.
• Attachments
A printed report that contains the detail information which does not fit on a payment stub.
• Debit statements
A printed list of debit balances. This printed list is debit balances that indicates that you have overpaid a supplier. It shows net amounts that are either a credit or that zero out on a voucher.
To assign formats to payment instruments, you specify a format generation program for each component of a payment instrument. For example, you could assign the Auto Payment Detail program (P04573), which is for standard attachments, to the attachments component of your payment instrument for drafts. Then, when you generate drafts, the system accesses this program to produce the appropriate type of attachment.
You can also define the specific uses for a payment instrument by assigning a specific bank account to the instrument. For example, you can set up two types of payment instruments for drafts with each type of instrument drawn on a different bank account.
Payment Instrument Codes
You set up payment instrument codes in UDC 00/PY, and then use the Set Up Payment Instrument Defaults form to associate payment instruments with each payment instrument code.
Note
You can use any digit or letter as a payment instrument code except for the letters B, C, D, G, and M. These letters are hard-coded for use in the Bank Type Code field and might cause problems if you use them for payment instruments.
You designate a payment instrument code using the Supplier Master Information program (P04012). When you create payment groups, the system creates a different payment control group for each payment instrument.

298
If you assign a bank account to a payment instrument, the system uses the payment instrument default, or the combination of the payment instrument and the bank account, to produce payments in a specific default format.
Working with Italian Payment Formats
Assign the following programs to payment instruments for Italy:
Payment formats Specify the following programs to generate payment formats for Italy:
• P04572I1 for electronic fund transfer format (diskette) • P04572I2 for check format
Note The electronic funds transfer format for Italy accepts a maximum of five payment details because five is the maximum number of details that is allowed in a record 60 in the flat file. The P04572I1 format writes a detail record in each record 60 in the flat file. You must manually control the number of payments that you include in the payment control group.
Registers Specify A/P Auto Payment Register - Italy (R04576I) to generate the payment register for electronic fund transfer and check formats in Italy.
Before You Begin Set up a code in user defined codes table 00/PY for each payment instrument that
you use.
Set up your payment programs in user defined codes table 04/PP.
Processing Options for Create A/P Bank Tape – Italy (R04572I1)
Date
Enter a '1' to print value date.
Default = blank will print due date.
Due Date or Value Date
Tape
1. Enter the following defaults
Device Name

299
Tape Density
Label Name
Block Size
New Volume Name
Tape (more)
New Owner ID
File Name
Currency
Enter the currency code that is used in your system to identify the EURO.
Processing Options for Print Automatic Payments – Check – Italy (R04572I2)
Translation
1. Enter the program name to translate payment amounts from numbers to words. (See User Defined Codes system '98', record type 'CT' for program names.) If left blank, the translation program associated with the payment currency will be used.
Translation Program
Address
1. Enter an override address format to use for the payee and/or company addresses. If left blank, the country format will be used.
Address Format (FUTURE)
1. Enter the Forms Type for the payments spool file. If left blank the default is

300
'APCHECKS'
Form Type (FUTURE)
Setting Up Payment Instruments
Payment instruments can be checks, tapes, drafts, BACS (Bank Automated Clearing System), and so on. You must define the payment instruments that your business uses. Clients outside the U.S. must set up payment instruments that are country specific for their automatic payments. You control the format of each payment instrument by choosing programs and versions of the programs that produce each component of a payment. These components include the following:
• Payment. This is the printed copy or tape table for the payment.
• Payment register. This is the printed list of payments.
• Attachment. This is a printed report that contains the detail information that does not fit on a payment stub.
• Debit statement. This is a printed list of debit balances that indicates that you have overpaid a supplier. It shows net amounts that are either a credit or that zero out a voucher.
The Payment Instrument Defaults program (P0417) includes all of the default programs associated with each component. The default program information is stored in the A/P Payments - Default Print and Update table (F0417).
You assign a program number to each component of a payment instrument. For example, you might assign program P04573 (for print standard attachments) to the attachments component of a payment instrument. The system accesses this program and produces the appropriate type of attachment.
You are not limited to using the preassigned programs for each payment instrument. For example, if the default of blank for your company is to print a check that is in a Canadian format, you can change the payment print program from the Auto Payments Write/Reset program (P04572) to the Print Automatic Payments - Check - Canada report (R04572C).
You are able to narrow your selections for each component even further by selecting a version of each program that will write the components. The advantage of this is that you can use different processing options or data selection in the versions, based on your needs.
A debit statement is another type of payment instrument and is used to notify suppliers when you have overpaid them. By assigning a program to the debit statement component, you can print a separate debit statement form with a payment. A debit statement is automatically generated if debit memos and open vouchers for a supplier net to zero. The system assigns a debit statement number as the payment number for the payment record, clears the open amounts of all records, and changes the pay status to paid.
You can limit the use of a payment instrument by assigning it a specific bank account. For example, you can set up two types of payment instruments for drafts with each type drawn on a different bank account.

301
See Also Working with Payment Groups in the Accounts Payable Guide for more information
about the payment process
Before You Begin Determine what payment instruments you use.
Set up additional codes in UDC 00/PY for payment instruments, if necessary.
► To assign programs to a payment instrument
From the Automatic Payment Setup menu (G04411), choose Payment Instrument Defaults.
1. On Work With Payment Instrument Defaults, click Find to display payment instruments.
2. Choose the payment instrument and click Select.
3. On Set Up Payment Instrument Defaults, enter a program number in the following fields:
• Payments
• Payment Register
• Attachments
• Debit Statements

302
4. Enter a version number in any of the following optional fields for the corresponding print program:
• Print Version
• Register Version
• Attachment Version
• Debit Version
5. Click OK.
► To revise processing options for payment instrument formats
Some of the programs associated with a payment instrument have processing options that further define the format of each component of a payment instrument. Review and, if necessary, revise these processing options before using each program.
The payment instrument formats use the Rxxxx convention (where xxxx equals the program number), whereas the program format used in the payment instrument defaults is Pxxxx. For example, to access the format for P04572, the standard print payment format, you enter R04572 in the Batch Application field, and click Find.
From the System Administration Tools menu (GH9011), choose Batch Versions.
1. On Work With Batch Versions - Available Versions, enter the program number in the following field and click Find:
• Batch Application
2. Choose the version.
3. From the Row menu, choose Processing Options.
4. Revise the processing options, as necessary.
► To assign a payment instrument to a supplier
When you print payments, the system uses the payment instrument assigned to the voucher. Typically, you set up the most commonly used payment instrument as the default, so you do not have to define a payment instrument for each supplier. The system uses the payment instrument assigned to the supplier, unless you override it when you enter a voucher.
From the Supplier & Voucher Entry menu (G0411), choose Supplier Master Information.
1. On Work With Supplier Master, locate and choose the supplier.
2. Click Select.
3. On Supplier Master Revision, click the Vouchers tab and complete the following field:
• Payment Instrument
4. You can also select the following optional box:
• Pre-Note Code
5. Click OK.

303
To assign or change a payment instrument associated with vouchers entered previously, use Speed Status Change.
Processing Options for Payment Instruments
The following subsections include processing options for the payment instrument formats.
Processing Options for Print Automatic Payments – Standard Format (R04572)
Translation
1. Enter the program name to translate payment amounts from numbers to words. (See User Defined Codes system '98', record type 'CT' for program names.) If left blank, the translation program associated with the payment currency will be used.
Translation Program
Address
1. Enter an override address format to use for the payee and/or company addresses. If left blank, the country format will be used.
Address Format (FUTURE)
Payment
1. Enter a '1' if you would like to print the company name and address on the payment. If left blank, no company information will print.
Company Name
2. Enter a '1' if you would like the payee name and number printed on the stub. If left blank, no payee information will print on the stub.
Payee Name
3. Enter a '1' if you would like the purchase order number to print on the stub instead of the supplier invoice number.
Purchase Order
4. Choose one of the following to print on the stub: ' ' - Remark, '1' - Supplier Name (Useful if paying alternate payee for several vendors), '2' - Supplier Invoice Number.
Alternate Stub Information

304
1. Enter the Forms Type for the Payments Spool File. If left blank, the default is 'APCHECKS'.
Form Type (FUTURE)
Processing Options for Print Automatic Payments – Draft Format (R04572N)
Address
1. Enter an override address format. If left blank, the address number's country format will be used.
Address Format (FUTURE)
Payment
1. Choose one of the following to print on the stub: ' ' - Remark, '1' - Supplier Name (useful if paying alternate payee for several vendors), '2' - Supplier Invoice Number
Print Information
1. Enter the Forms Type for the Payments Spool File. If left blank, the default is 'APCHECKS'
Form Type (FUTURE)
Processing Options for Create A/P Bank Tape – CTX Format (R04572T2)
EFT
1. Enter the File ID modifier (1 pos.). This is used to distinguish between multiple files created on the same date. Default is '1'.
File ID Modifier
2. Enter the tape payment detail (10 pos.) description. For example, you may want to enter

305
EXP REIMB for expense reimbursements. This description may be used by th bank and printed on the supplier's bank account statement.
Tape Payment Detail Description
EFT(more)
1. Enter the Immediate Origin (10 positions). (Header Record 1, positions 14-23). If you provide only 9 characters/digits, we will right justify your information and place a blank in the first position of this field. If this option is blank, the Tax ID for the bank account's company will be used. NOTE: If this field is blank and no Tax ID is available, the tape will be rejected by the Clearing House.
Immediate Origin
2. Enter the Company ID Number.(10 positions).(Record 5, 41-50 and Record 8, 45-54). The ID Number MAY be preceeded by one of the following ID Code Designators (ICDs) or a value of your own.
'1' = IRS Employer ID No. (EIN)
'3' = Data Universal No. System(DUNS)
'9' = User Assigned Number
If this option is blank, the Tax ID for the bank account's company will be used. NOTE: If this field is blank and no Tax ID is available OR less than 10 characters, the tape will be rejected by the Clearing House
Identification Code Designator
3. Enter a value (20 character alpha) to be placed in the Discretionary Data field on the Company/Batch Header Record (Record 5, position 21-40) If left blank, the Discretionary Data field will be left blank
Discretionary Data
1. Enter the payment print program to use if the pre-note status is set to 'P', requiring a payment print.
Print Program
TAPE
1. Enter the following defaults values:

306
Device Name
Tape Density
Label Name
Block Size
New Volume Name
TAPE (more)
New Owner ID
File Name
Processing Options for Print Automatic Payments – Subcontract Processing (R04572J)
Translation
1. Enter the program name to translate payment amount from numbers to words. (See User Defined Codes system code '98', record type 'CT' for program names.) If left blank, the traslation program associated with the payment currency code will be used.
Translation Program
Address
2. Enter an override address format to use for the payee and/or company addresses. If left blank, the country format will be used.
Address
Payment
3. Enter a '1' if you would like to print the company name and address on the payment. If lelf blank, no company information will print.
Company Name

307
4. Enter the Forms Type for the Payments Spool File. If left blank, the defaul is ' SUBCHECKS'
Form Type
See Also Localization guides for country-specific payment formats
Creating Payment Control Groups
From the Automatic Payment Processing menu (G0413), choose Create Payment Control Groups.
After you have processed your vouchers, you can prepare to write your payments. Before you write payments, you must create payment groups to organize vouchers that can be paid together. For example, you can organize vouchers by bank account and payment instrument in separate groups. Then the vouchers can be paid with the proper check stock. You use the payment groups when you review and write payments.
Create Payment Control Groups is a batch process that you run once for each payment cycle. The program typically creates more than one payment group. Each payment group contains information that determines how the group will be processed, including:
• Bank account
• Payment instrument
Each payment group also contains control information that determines which program to use for:
• Payments
• Registers
• Attachments
• Debit statements
If you need to include additional vouchers in a payment group, you can undo the group, approve those vouchers for payment, and rerun the program. The system displays payment groups after you write them until you undo them or update them to the Accounts Payable ledger.
When you create payment groups, the system:
1. Selects vouchers with a pay status of A (approved) and a due date that is less than or equal to the specified pay through date.

308
2. Creates payment groups for all selected vouchers by grouping vouchers with the following common information:
• Vouchers summarized or unsummarized
• Bank account
• Payment instrument
• Business unit (optional)
• Company (optional)
Note To group vouchers for a supplier where the vouchers have different G/L bank accounts, use version XJDE0008, or a copy of it, to create the payment group. Be sure to enter the G/L Bank Account override on the Printing tab of the processing options. This version of P04570 does not include G/L Bank Account as a mandatory sequence, so will use the override G/L bank account processing option to determine the G/L bank account for the checks. If you do not enter a value in the processing option, this version will give unpredictable results.
After the system creates payment groups, each group also has the following information in common:
• Version ID
• User
• Creation date
• Output queue
3. Assigns each payment group a "next status" of WRT (write).
4. Changes the pay status of selected vouchers from A to # (payment in-process).
5. Creates the following worktables to use in writing payments:
• A/P Payment Processing - Header table (F04571). Contains a single header record for each payment group with information about that group of payments.
• A/P Payment Processing - Summary table (F04572). Contains a record for each payment within a group. These records are the actual payments that will be written and updated through the Work with Payment Groups program. This information is the basis for the Accounts Payable - Matching Document table (F0413).
• A/P Payment Processing - Detail table (F04573). Contains a record for each voucher pay item within a payment. This is the information that will be printed on the payment stub and used to update the Accounts Payable ledger. This information is the basis for the Accounts Payable Matching Document Detail table (F0414).
6. Prints a Create Payment Control Groups report that shows the vouchers that are selected for payment. It also shows pay items that were bypassed for payment and prints an error message next to each blank payment total. Examples of error messages include:
• Hold payment code active
• Supplier master information missing
• Amount under payment limit

309
The following graphic shows the process for creating payment groups:

310
See Also Multicurrency Payments in the Multicurrency Guide for more information about how to
create payment groups based on currency code
Before You Begin Verify that you set up suppliers with the correct payment instrument.
Make changes to vouchers, if necessary. In general, you cannot change vouchers in a payment group until you complete the automatic payment process or remove the voucher from the group.
Approve vouchers for payment.
Calculate withholding, or set the processing options for this program to automatically calculate withholding.
Next Numbers for Create Payment Control Groups
When the Create Payment Groups program (R04570) is run, the payment group is assigned a number that is used to identify the payment group in the three workfiles that are used in the payment process (F04571, F04572, and F04573). This number prevents payments in one payment group from being combined with payments in different payment groups.
The Accounts Payable system uses the Next Numbers table (F0002) to assign these payment group numbers. The F0002 table is locked during the time a number is being assigned to one payment group, and is released immediately after the payment group has been assigned its identifying number.
The F0002 table will increment until it reaches its maximum (a number greater than 99 million), then will reset the next number for payment control groups to 1.
Note
The next number for Create Payment Control Groups is the number assigned to a payment control group, not to the payments within a group. There can be many payments in a single payment control group. Only one number from the Next Numbers table (F0020) is assigned to each payment control group.
Processing Options for Create Payment Groups (R04570)
Dates Tab
These processing options allow you to customize payment and discount dates of payment groups. If you leave the Pay Through Date processing blank and the Displacement Days processing option is zero, the system date is used for the Pay Through Date.
1. Pay Through Date

311
Use this processing option to specify a due date through which you want to create a group of vouchers for payment. For example, if you want to create a payment group consisting of vouchers with due dates through March 15, 2005, enter 03/15/05. The system creates a payment group consisting of vouchers with due dates on or before March 15, 2005. Enter the date in this processing option, or leave the processing option blank to select vouchers by Displacement Days.
Note: If you leave the Pay Through Date field blank and the Displacement Days processing option as zero, the system date is used for the Pay Through Date.
2. Displacement Days
Use this processing option to specify the number of days from today's date through which you want to create a group of vouchers for payment. For example, if today's date is March 10, and you specify three displacement days, the system includes vouchers with due dates through March 13 in the payment group.
Enter the number of days in this processing option, or leave as zero to use the system date as the Pay Through Date.
3. Discount Cutoff Date
Use this processing option to enter the final date that you are allowed to take a discount. Pay items with a due date prior to the date you enter are not eligible for discounts, so the system sets the discount amounts of these pay items to zero. If this processing option is blank, the program takes all discounts currently available for the selected pay items.
Amounts Tab
These processing options specify payment ranges, currency, and payment range exceptions.
The minimum and maximum amounts here refer to payment amounts, not voucher amounts. Use data selection to control the maximum and minimum amounts of the vouchers to be selected.
1. Payment Amount Range

312
Maximum Use this processing option to enter a numeric value indicating a payment amount range for a group of vouchers. For example, you can select vouchers between 500 and 1000. NOTE: Do not enter symbols indicating a specific currency. Rather, specify the currency in the Currency Code processing option. o Maximum - Enter the maximum amount allowed for vouchers in the selection range.
Minimum Use this processing option to enter a non-zero numeric value indicating a payment amount range for a group of vouchers. For example, you can select vouchers between 500 and 1000. NOTE: Do not enter symbols indicating a specific currency. Rather, specify the currency in the Currency Code processing option. o Minimum - Enter the minimum amount allowed for vouchers in the selection range. To prevent the system from generating a debit statement (negative or zero payment totals) enter the lowest currency unit. For example, .01 for USD or CAD.
2. Currency Code for Range Amounts Use this processing option to enter a code that specifies the currency for the values you entered in the Payment Amount Range processing option fields. If necessary, the system converts these amounts to the payment currency of each payment control group. For example, if you enter ranges of 100 to 5000 in USD, the system converts those USD amounts to EUR for an EUR payment group, to GBP for a GBP payment group, and so on. The conversion allows for the correct minimum and maximum comparisons for all payment groups created each time you run this program.
3. Payment Instruments for Range Exceptions
Minimum Payment Instrument

313
Use this processing option to assign payment instruments to vouchers that are not included in the amount range you specify in the Payment Amount Range processing option. o Minimum Payment Instrument - A payment instrument that you want to assign to vouchers that have an amount less than the minimum amount range you specify in the Payment Amount Range processing option. NOTE: You set up payment instruments on user defined code table 00/PY. You must also set up payment instruments defaults. On the Automatic Payment Setup menu (G04411), choose Payment Instrument Defaults (P0417).
Maximum Payment Instrument Use this processing option to assign payment instruments to vouchers that are not included in the amount range you specify in the Payment Amount Range processing option. o Maximum Payment Instrument - A payment instrument that you want to assign to vouchers that have an amount more than the maximum amount range you specify in the Payment Amount Range processing option. NOTE: You set up payment instruments on user defined code table 00/PY. You must also set up payment instruments defaults. On the Automatic Payment Setup menu (G04411), choose Payment Instrument Defaults (P0417).
Printing Tab
These processing options allow you to customize various printing options for payment groups.
1. Sequence ID
Use this processing option to determine the order that the program processes and prints the A/P payments by entering a sequence ID.
Sequence IDs are user defined. To set up and define sequence IDs, choose Payment Sequence from the Automatic Payment Setup menu (G04411).
NOTE: You cannot leave this processing option blank.

314
2. Print Attachments
Use this processing option to specify whether to print attachments with the payment. For example, you might want to print an attachment when the payment detail information will not fit on the pay stub. Only 99 pay stubs can print per payment, and each pay stub can print 10 detail lines.
Valid values are:
Blank
Do not print attachments.
1
Print attachments.
Note: If you leave this option blank and you have more than 99 pay stubs, two or more payments will print. However, if you enter 1, a single payment will print with one pay stub referring to the attachment. The attachment will print all pay items.
Before using this processing option, you must assign an attachments program to your payment instrument. From the Automatic Payment Setup menu (G04411), choose Payment Instrument Defaults, and then choose the payment instrument and click Select. On Set Up Payment Instrument Defaults, you can enter a program number in the Attachments field to specify the attachment program you want the payment instrument to use. The default attachment program is R04573.
3. G/L Bank Account
Use this processing option to specify a bank account that you want the system to use instead of the bank account that is assigned to the voucher pay item when the voucher is entered.

315
To specify a G/L bank account, enter its short account ID. The short account ID is an eight-digit alphanumeric field that does not allow any special characters. Therefore, if you identify a short account ID in the General Accounting Constants by attaching a special character to it, you do not include the special character in this field.
If the short account ID does not use eight digits, whatever digits are unused must be filled with zeros. For example, if the short account ID for the bank account you want to use is 108, enter the number as 00000108. If you use the visual assist to choose the bank account, the system enters the number into the field correctly.
If the intercompany settlements constant is set to N, and you specify a G/L override bank account in this field, the system compares each voucher's company to the company of the override G/L bank account. If the voucher company is not the same as the company of the override G/L bank account, the system does not include that voucher in the payment group.
Before you can enter a G/L bank account in this field, you must set up the account on your system. To set up G/L bank accounts, choose Bank Account Information from the Automatic Payment Setup menu (G04411).
If you use multicurrency, consider the following guidelines when using this processing option:
o If the bank account is a monetary account, it must have the same currency as either the domestic or foreign currency of the voucher.
o If the bank account is a non-monetary account, its company currency must be the same as the domestic currency of the voucher.
4. Payment Currency
Use this processing option to specify the currency method that the program uses for payment.

316
Valid values are:
Blank
You pay in the currency of the G/L bank account. For monetary accounts, this is the currency assigned to the G/L bank account in the Account Master table (F0901). For nonmonetary accounts, this is the currency assigned to the company in which the business unit of the G/L bank account resides. For example, the currency associated with the G/L bank account 1.1110.BEAR is U.S. dollars (USD) because business unit 1 belongs to company 00001 whose currency is USD. If you enter vouchers in the euro (EUR) for company 00001, you can either pay the vouchers from the monetary bank account in EUR, or you can pay them from a bank account that belongs to a company whose base currency is USD.
1
You pay the domestic amount of the voucher in the domestic currency. For example, if you entered the voucher in FRF for company 00001, whose base currency is USD, the voucher is paid in USD.
2
You pay the foreign amount of the voucher in the foreign currency. For example, if you entered the voucher in EUR for company 00001, whose base currency is USD, the vouchers are paid in EUR. Vouchers that do not have a foreign currency are paid in the domestic currency.
3
You pay the current domestic amount of a foreign voucher in the domestic currency. For example, if you entered the voucher in EUR for company 00001, whose base currency is USD, the foreign amount is converted to the current domestic amount based on today's effective exchange rate, and the voucher is paid in USD.
4
You pay the voucher in an alternate currency that is neither the domestic amount nor foreign currency of the voucher. For example, if you entered the voucher in EUR for company 00001, whose base currency is USD, but you want to pay the voucher in Canadian dollars (CAD), the voucher is paid in the alternate currency. Designate the payment currency in processing option 5.
Exchange Rate Notes: When you make payments in the current domestic currency, the Create Payment Groups program calculates the domestic amounts being paid using the exchange rate effective that day. This may be different from the exchange rate effective when you actually make the payment.
317
Later in the automatic payment process, the system calculates a gain or loss if the exchange rate of the voucher is different from the exchange rate of the payment.
5. Alternate Currency Code
Use this processing option to enter the code for the alternate currency amount. You enter a value in this processing option only if you specified 4 in the Payment Currency processing option.
6. Prepayment Selection
Use this processing option to indicate whether you want to include negative prepayment items in the payment group.
Valid values are:
Blank Do not include negative prepayment items.
1 Include negative prepayment items.
Process By Tab
These processing options specify the categories by which the system groups payments.

318
1. Company
Use this processing option to specify whether to create separate payments based on company.
Valid values are:
Blank No
1 Yes
2. Due Date
Use this processing option to specify whether to create separate payments based on due date.
Valid values are:
Blank No
1 Yes
3. Payee
Use this processing option to specify whether to create payments based on payee, regardless of the supplier.

319
Valid values are:
Blank No
1 Yes
For example, the following table illustrates one possible voucher, supplier,and payee combination:
Voucher 1, Supplier 1001, Payee 1001
Voucher 2, Supplier 1001, Payee 1002
Voucher 3, Supplier 1001, Payee 1002
Voucher 4, Supplier 1002, Payee 1002
Voucher 5, Supplier 1003, Payee 1001
If you leave the Payee processing option blank, the system generates four payments, based on the payee, then supplier:
o Payee 1001: Supplier 1001, Voucher 1
o Payee 1001: Supplier 1003, Voucher 5
o Payee 1002: Supplier 1001, Vouchers 2 and 3
o Payee 1002: Supplier 1002, Voucher 4
If you set the Payee processing option to 1, you have two payments based only on the payee:

320
o Payee 1001: Supplier 1001, Voucher 1, and Supplier 1003, Voucher 5
o Payee 1002: Supplier 1001, Vouchers 2 and 3, and Supplier 1002, Voucher 4
4. Business Unit
Use this processing option to specify whether to create separate payment control groups by business unit.
Valid values are:
Blank No
1 Yes
Summarize Tab
These processing options allow you to customize the information that appears on the payment stub.
1. Summarized Pay Item
Use this processing option to specify whether to summarize pay items within a document on the pay stub or attachment. When you set the processing option to summarize pay items, the Due Date processing option on the Process By tab must have a value of 1. Valid values are:
Blank
Do not summarize pay items.
1

321
Summarize pay items.
2. Summary Description
Use this processing option to specify the information that appears in the Description field on the pay stub.
Valid values are:
Blank The generic description Invoice Summary appears on the pay stub.
1 The remark from the first pay item appears on the pay stub.
Report Tab
These processing options specify the information that will appear on the report. To produce separate payments by job, the Statement Number field (CTL) must be included in the sort sequence.
1. Print Mailing Address
Use this processing option to specify whether the mailing address for each payee appears on the report.
Valid values are:
Blank No
1 Yes

322
2. Print Contract Number
Use this processing option to specify whether the the contract number appears on the report.
Valid values are:
Blank No
1 Yes
NOTE: To produce separate payments by job, the Statement Number field (CTL) must be included in the sort sequence. See DEMO version XJDE0007 for an example of the sort sequence, or copy DEMO version XJDE0007 and use it as a basis for your report.
3. Print Job Number
Use this processing option to specify whether the job number appears on the report.
Valid values are:
Blank No
1 Yes
NOTE: To produce separate payments by job, the Statement Number field (CTL) must be included in the sort sequence. See DEMO version XJDE0007 for an example of the sort sequence, or copy DEMO version XJDE0007 and use it as a basis for your report.

323
Bank Tape Tab
These processing options specify the bank information that prints on the report.
1. Print Bank Tape Information
Use this processing option to specify whether bank tape information appears on the edit report.
Valid values are:
Blank No
1 Yes
2. Payee Bank Account Error
Use this processing option to specify whether the program issues an error when bank account information does not exist for the payee.
Valid values are:
Blank Do not issue an error.
1 Issue an error.
3. Bank Account X12 Information Error
Use this processing option to specify whether the program issues an error when X12 information does not exist for the G/L bank account.

324
Valid values are:
Blank Do not issue an error.
1 Issue an error.
If this processing option is populated, the system will generate a message whenever a payee does not have bank account information stored in Bank Information table (F0030). This will happen whether a bank tape is being processed or not. The system cannot distinguish between pay instruments when using this processing option.
Withholding Tab
These processing options specify whether to submit the Calculate Withholding program before you create payment control groups.
1. Calculate Withholding
Use this processing option to specify whether to submit the Calculate Withholding program prior to creating payment control groups.
Blank No
1 Yes
2. Program Version
Use this processing option to specify the version number of the Calculate Withholding program. You must specify a version number if you enter 1 in the Calculate Withholding processing option.
Blank Version number ZJDE0001 (default)
Or, enter the specific program version number

325
Data Sequence for Create Payment Control Groups
The data sequence for this program is set to create separate payments by payee. Any changes to this sequencing results in payments by voucher instead of payments by payee. Selecting the Multiple Payments option on the Supplier Master Revision form does not override the payee sequencing.
The sequence for Create Payment Control Groups must be as follows:
• G/L Bank Account
• Payment Instrument
• Check Routing Code
This sequence must be used to produce payments that are grouped properly.
Working with Payment Groups
After you create payment groups, you can work with them to review and change payments. You generally review payments twice:
• After you create payment groups but before you write payments. This allows you to identify payments and vouchers that you want to change or remove from the payment cycle. You can:
• Change information at the payment and voucher levels
• Remove payment groups, payments, and vouchers from the payment cycle
• Change control information for payment groups
• After you write payments but before you update the A/P ledger. This allows you to identify payments that you want to void or remove from the payment cycle. You can:
• Void the payments that were written and rewrite them
• Remove payment groups, payments, and vouchers from the payment cycle
When you work with payment groups, you work with pay items that are at one of the following statuses:
Write
The pay item is ready to be written.
Update
The payment has been written and is ready to be updated in the Accounts Payable Ledger table (F0411).
When pay items in a payment group are at a status of write or update, you might need to perform one of the following actions:

326
Undo
Undo means to remove a pay item from the payment group. You can undo pay items, regardless of whether they are at a status of write or update. In either case, the pay item will have an open amount other than 0, and will have a status of approved.
Reset
Reset means to return a pay item to the previous step in the payment process.
If the status of the pay item is update and you reset it, the pay item returns to a pay status of write.

327
The following graphic shows the process for working with payment groups:

328
Printing the Payment Analysis Report
From the Automatic Payment Processing menu (G0413), choose Payment Analysis Report.
You can print the Payment Analysis report at any time in the automatic payment process to ensure that payments are correct. This report shows whether payments are ready to be written or ready to be updated to the A/P ledger. It shows all payments in all payment groups.
Processing Options for Payment Analysis Report (R04578)
1. Enter a '1' if you would like to see the detail voucher information displayed. If left blank, only payment information will print.
Detail Voucher Information
2. Enter a '1' if processing payment control groups by Business Unit and would like to display the Business Unit on the report. If left blank, the Business Unit will not appear.
Business Unit
Reviewing Payment Groups
When you review payment groups, you can display groups based on a next status of write, update, or both. For example, you might want to review all payment groups that are ready to be written (next status of WRT). Optionally, you can review payments assigned to a specific bank account or payments that meet a number of additional search criteria.
This program displays information from the A/P Payment Processing - Header table (F04571).
► To review a payment group
From the Automatic Payment Processing menu (G0413), choose Work with Payment Groups.
1. On Work With Payment Groups, click one or both of the following options:
• Write Status
• Update Status
2. To further limit your search, complete the following field:

329
• Bank Account
3. Click Find.
For additional search criteria, you can preset a value in a processing option. For example, if you want to review only those vouchers for business unit 100, you can preset that value in a processing option. This is particularly useful if you routinely review vouchers that meet certain search criteria.
4. To view the detailed information for a single payment group, select the payment group on Work With Payment Groups.
5. Choose Detail from the Row menu.
The Payment Group Detail form shows the same detailed information for the single payment group that appears on Work With Payment Groups.
Reviewing Payments with a Write Status
Before you write payments, you can do the following:
• Review payment and voucher information (write status)
• Review payment summary information (write status)
The payment group programs display information from the following temporary worktables:
• A/P Payment Processing - Header table (F04571)
• A/P Payment Processing - Summary table (F04572)

330
► To review payment and voucher information (write status)
You can review the payment and voucher information for a specific payment group before you write a payment. For example, you might want to verify that the correct bank account was assigned to a payment group or that a specific voucher is included in a payment.
From the Automatic Payment Processing menu (G0413), choose Work with Payment Groups.
1. On Work With Payment Groups, click the following option and click Find:
• Write Status
2. Choose a payment group and click Select.
3. On Work With Payment Group - Write Status, choose a payee and click Select.

331
4. On Work With Payment Detail, choose a voucher and click Select to review voucher information associated with a payment.

332
The Payment Detail form shows the voucher information associated with a payment.
► To review payment summary information (write status)
When you review payments within a payment group, you can review the summary information for each payment before you actually write the payment.
From the Automatic Payment Processing menu (G0413), choose Work with Payment Groups.
1. On Work With Payment Groups, click the following option and click Find:
• Write Status
2. Choose a payment group and click Select.
3. On Work With Payment Group - Write Status, choose the payee that you want to review.
4. From the Row menu, choose Detail.
Reviewing Payments with an Update Status
Before you update the payments that you have written, you can review them. To do so, complete either of the following tasks:

333
• Review payment information (update status)
• Review payment summary information (update status)
You can reset a payment group that is at update status and rewrite your payments, if necessary. When you reset written payments in an update status (UPD), you return them to a status of write (WRT). The payment group programs display information from the following worktables:
• A/P Payment Processing - Header table (F04571)
• A/P Payment Processing - Summary table (F04572)
► To review payment information (update status)
You can review payment information for a specific payment group before you update the payment.
From the Automatic Payment Processing menu (G0413), choose Work with Payment Groups.
1. On Work With Payment Groups, click the following option and click Find:
• Update Status
2. Choose a payment group and click Select.
► To review payment summary information (update status)
When you review payments within a payment group, you can review the summary information associated with a specific payment.
From the Automatic Payment Processing menu (G0413), choose Work with Payment Groups.
1. On Work With Payment Groups, click the following option and click Find:
• Update Status
2. Choose a payment group and click Select.
3. On Work With Payment Group - Update Status, choose the payee that you want to review.
4. From the Row menu, choose Detail.
See Also Resetting Payment Processing in the Accounts Payable Guide for information about
changing values in payment processing
Revising Unprocessed Payments
You can make limited changes to payments, vouchers, and payment groups before you write them, including the following:
• Excluding debit memos (credit vouchers)
• Splitting payments
334
• Revising the value date of payments
• Removing voucher pay items
• Removing unprocessed payments
• Removing an entire payment group
• Revising control information for a payment group
See Also Setting Up Payment Instruments in the Accounts Payable Guide for information about
how to set up payment instruments
► To exclude a debit memo (credit voucher)
You can exclude a debit memo on any of the following forms:
• Work With Payment Groups (the steps in this procedure use this form)
• Work With Payment Group - Write Status
• Work With Payment Detail
• Work With Payment Group - Update Status
Debit memos occur when you have overpaid a supplier or have been issued credit from a supplier. You can exclude these debit memos from payment processing.
From the Automatic Payment Processing menu (G0413), choose Work with Payment Groups.
1. On Work With Payment Groups, choose a payment group, payment, or voucher.
2. From the Row menu, choose Undo.
3. On Undo Confirmation, click Yes.
4. On Reset Payments, click OK.
Related Tasks
Excluding all debit memos
To exclude all debit memos, set the processing option for Minimum Amount in Create Payment Control Groups to the smallest currency unit (for example, .01).
Reviewing debit memos
When you process debit memos for review purposes only, you can run the Payment Analysis Report or review them on Work With Payment Groups before you undo them.

335
► To split a payment
When you want to pay part of a voucher now and part later, you can split the payment. When you decrease the gross amount of a voucher, the system creates a new voucher pay item for the remaining balance. The new pay item is created using the default pay status, which is typically A (approved) for payment. The new pay item is not part of a payment group.
From the Automatic Payment Processing menu (G0413), choose Work with Payment Groups.
1. On Work With Payment Groups, choose a payment group and click Select.
2. On Work With Payment Group - Write Status or on Work With Payment Group - Update Status, depending on what options you selected on Work With Payment Groups, choose a record and choose Pay Items from the Row menu.
3. On Work With Payment Detail, choose a voucher.
4. From the Row menu, choose Split.
5. On Split Payment, complete the following fields and click OK:
• Gross Amount
• Discount Taken

336
► To revise the value date of a payment
Typically, payment value dates apply to draft processing and indicate the date that a payment reaches a bank.
From the Automatic Payment Processing menu (G0413), choose Work with Payment Groups.
1. On Work With Payment Groups, follow the steps for reviewing payments for a payment group with a next status of Write.
2. On Work With Payment Group - Write Status, choose ValueDate from the Form menu.
3. On Revise Payment Value Date, complete the following field to revise the value date of all payments in the group:
• Global Value Date
4. Click Load Date to update the value date for each payment.
5. To revise the value date of an individual payment, complete the following field:
• Value Date
6. Click OK.
► To remove a voucher pay item
When you do not want to pay a voucher, remove it from the payment group. The system resets the pay status of the voucher from payment in-process to approved.

337
From the Automatic Payment Processing menu (G0413), choose Work with Payment Groups.
1. On Work With Payment Groups, follow the steps for reviewing vouchers.
2. On Work With Payment Detail, choose a voucher.
3. From the Row menu, choose Undo.
4. On Undo Confirmation, click Yes.
5. On Reset Payments, click OK.
► To remove an unprocessed payment
If you do not want to make a payment, you can remove it from the payment group. The system removes the voucher pay items from the payment group and resets their pay status from payment in-process to approved.
From the Automatic Payment Processing menu (G0413), choose Work with Payment Groups.
1. On Work With Payment Groups, follow the steps for reviewing payments for a payment group with a next status of Write.
2. On Work With Payment Group - Write Status, choose a payment.
3. From the Row menu, choose Undo.
4. On Undo Confirmation, accept or reject undoing the selected payment.
► To remove an entire payment group
From the Automatic Payment Processing menu (G0413), choose Work with Payment Groups.
1. On Work With Payment Groups, choose a payment group.
2. From the Row menu, choose Undo.
3. On Undo Confirmation, click Yes.
See Also Reviewing Payments with a Write Status in the Accounts Payable Guide for more
information about how to review payments that are in a Write status
Reviewing Vouchers in the Accounts Payable Guide for information about how to review vouchers
Working with Automatic Payments
After you create payment groups, you must write payments. When you create payment groups, the system creates temporary payment records. You then use these records to print payments or copy them to a bank tape, depending on your setup.

338
Writing Payments
When you write payments, you can print the payments or copy them to a bank tape. You can perform either of the following actions:
• Write all payments in a payment group
• Write selected payments in a payment group
When you write payments, the system:
• Creates a matching document with a document type of PK (automatic payment). This payment closes the voucher.
• Creates a matching document with a document type of PT (electronic funds transfer).
• Assigns payment numbers.
• Changes the "next status" of the payment group from WRT (write) to UPD (update).
• Prints payments using control information for payment groups.
• Prints attachments if needed
Note Create Payment Control Groups (R04570) controls the printing of attachments. The J.D. Edwards standard payment processing is designed to print ten lines of detail on a payment stub.
If there are more than ten lines of detail to print, and the R04570 processing option to print attachments is set, the payment stub will print “See Attachment” and all detail will print on the attachment.
If the R04570 processing option for attachments is not set to print attachments and there are more than ten lines of detail for a single payment, the J.D. Edwards Auto Payments Write/Reset program (P04572) will print ten lines of detail on a stub, void the payment, print ten lines of detail on the next stub, void the payment, and so on until all lines of detail have been printed. The payment form following the last line of detail will print with the full payment amount. The P04572 will print up to 99 lines of detail on a single payment. If there are more than 99 lines of detail, the system will print multiple payments.
When you issue a payment, you issue it to the alternate payee. You choose whether the alternate payee is the supplier or the factor/special payee in the voucher entry processing options by specifying a version of the Voucher Entry Master Business Function. On the Defaults tab for the Voucher Entry MBF enter a “1” in the Alternate Payee option to populate the alternate payee with the factor/special payee. Leaving this option blank will populate the alternate payee with the supplier number. You can override the alternate payee default when you enter the voucher.
The system does not update the Accounts Payable Ledger table (F0411), the Accounts Payable Matching Document table (F0413), or the A/P Matching Document Detail table (F0414) until the update process. The payments remain in the temporary workfiles: A/P Payment Processing - Header table (F04571), A/P Payment Processing - Summary table (F04572), and A/P Payment Processing - Detail table (F04573).

339
Note
When you write a payment whose amount, in words, exceeds the number of characters provided in the print program, the system prints checks with digits for the payment amount instead of words.
Record Reservation for Payments
Record reservation for payments is a process in which the system determines, prior to writing payments, how many payment numbers to reserve for a payment cycle. The system adds that number to the next payment number in the Bank Transit Master table (F0030). The F0030 table has a record for each bank account in the system. Payment numbers are reserved by bank account.
The purpose of using the record reservation process is to prevent more than one payment from having the same payment number. This is especially useful when more than one user is making payments from one bank account at the same time.
To use record reservation, the F0030 table must be added to UDC 00/RR.with the Special Handling Code set to 1.
After the user defined code is set up, when you write payments, the system determines the number of payments to be used and increases the value in the Next Check Number field in the F0030 table by that number. Thus, if the next payment number in the F0030 table for the bank account being used in the payment cycle is 258, and the record reservation process determines that 30 payment numbers are going to be used, the system updates the next payment number to 288. When another person writes payments from the same bank account, the next payment number will begin at 288. Payment numbers between 258 and 287 will be used only by the payment cycle that reserved those numbers.
If two users access the write payments process at the same time, the system activates the record reservation process for the first user and sends an error message to the second user. When the first user completes the record reservation process, the second user will be able to access a payment number record and reserve the number of payments needed for that payment cycle.
Payment ID Using Next Numbers
When a write payment program is run (R04572 or one of its variations, such as R04572A, R04572C, and so on), each payment is assigned a number that identifies it throughout the payment process and after the process finishes. This number is the Payment ID (PKID), and is a key to both the Accounts Payable - Matching Document (F0413) and Accounts Payable Matching Document Detail (F0414) tables. The Payment ID prevents pay items in one payment from being mixed with pay items that are paid on a different payment.
The Accounts Payable system uses the Next Numbers - Automatic table (F0002) or the Next Numbers by Company/Fiscal Year – Automatic table (F00021) to assign Payment ID numbers. The table is locked while a number is being assigned to the pay items associated with one payment, and is unlocked immediately after the pay items have been assigned their identifying numbers.

340
Before You Begin Review payments and make any changes necessary.
Verify control information for payment groups.
► To write all payments in a payment group
From the Automatic Payment Processing menu (G0413), choose Work with Payment Groups.
1. On Work with Payment Groups, follow the steps for reviewing payment groups.
2. Choose one or more payment groups.
If some payments in a group have already been written, the payment group appears as two lines on the Work With Payment Groups form, with the appropriate totals for each line. One line is at a WRT (write) status and the other line is at a UPD (update) status.
3. From the Row menu, choose Controls.
4. On Revise Payment Group Controls, verify that the following fields show the correct programs and versions and click OK:
• Payment
• Print Version
• Register
• Register Version
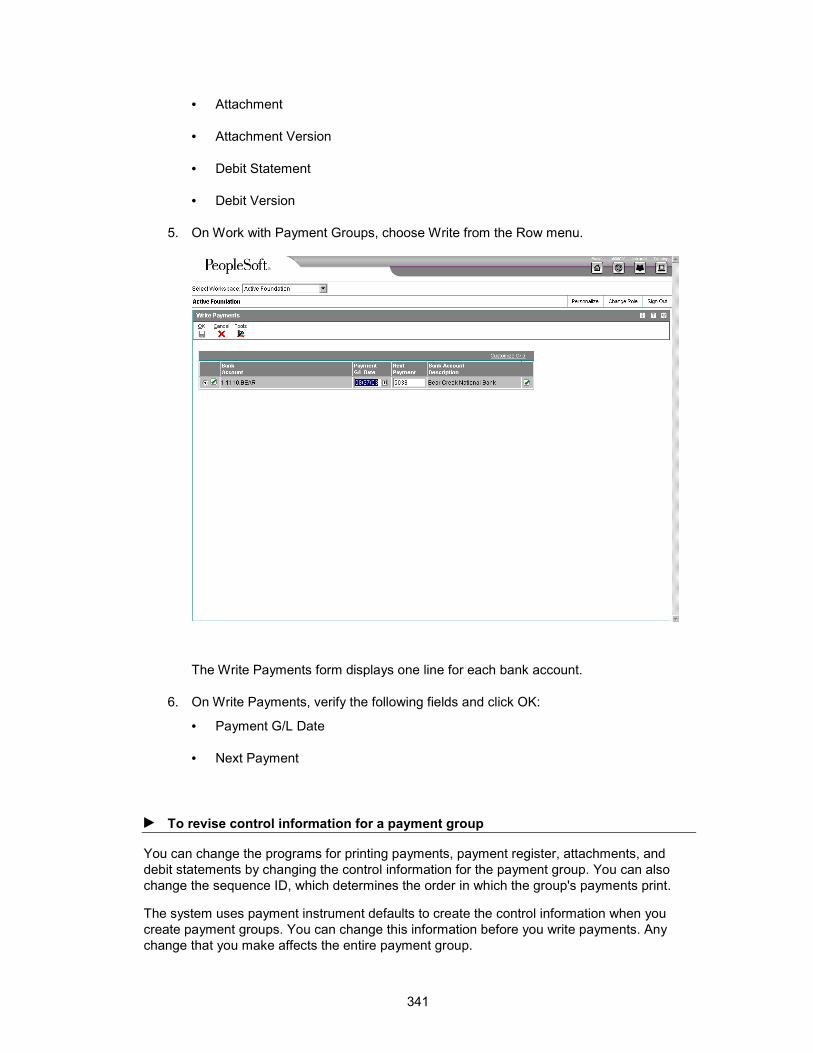
341
• Attachment
• Attachment Version
• Debit Statement
• Debit Version
5. On Work with Payment Groups, choose Write from the Row menu.
The Write Payments form displays one line for each bank account.
6. On Write Payments, verify the following fields and click OK:
• Payment G/L Date
• Next Payment
► To revise control information for a payment group
You can change the programs for printing payments, payment register, attachments, and debit statements by changing the control information for the payment group. You can also change the sequence ID, which determines the order in which the group's payments print.
The system uses payment instrument defaults to create the control information when you create payment groups. You can change this information before you write payments. Any change that you make affects the entire payment group.

342
From the Automatic Payment Processing menu (G0413), choose Work with Payment Groups.
1. On Work With Payment Groups, follow the steps for reviewing payment groups.
2. Choose a payment group.
3. From the Row menu, choose Controls.
4. On Revise Payment Group Controls, change the following field (optional):
• Sequence ID
5. Change any of the following print program fields:
• Payment
• Print Version
• Register
• Register Version
• Attachment
• Attachment Version
• Debit Statement
• Debit Version
6. Click OK.
► To write selected payments in a payment group
From the Automatic Payment Processing menu (G0413), choose Work with Payment Groups.
1. On Work with Payment Groups, follow the steps for reviewing payment groups.
2. On Work With Payment Group - Write Status, complete the following fields to limit your search and click Find:
• Amount From
• Through
3. Choose one or more payments.
4. From the Row menu, choose Write.
5. On Write Payments, verify the following fields and click OK:
• Payment G/L Date
• Next Payment

343
See Also Reviewing Payment Groups in the Accounts Payable Guide for information about
how to review payment groups after creating them
Resetting Payment Processing
After you write payments but before you update them, you might need to rewrite them. For example, you might need to rewrite payments because of an error, such as a paper jam, wrong payment number, or wrong payment date.
Before you can rewrite payments, you must reset them. Written payments have a next status of UPD (update). When you reset payments, you are returning them to a next status of WRT (write), so you can correct the problem and rewrite them.
If you need to undo or reset a payment, you can identify the tape affected on the Copy Bank Tape File to Tape program that you access from the Automatic Payment Processing menu (G0413). This program shows information, including the file ID and the member ID.
If you reset payments that were written to a bank tape, you must delete the bank tape record before you can rewrite the payments.
When you reset payments, you can either void payments or rewrite them with the same payment number:
• If you enter a new beginning payment number, the system voids any payments selected for reset that have a payment number less than the new beginning number, if that number was previously assigned.
• If you accept the next payment number (the default), the system voids payments by writing zero records.
The system processes voided payments when you update the A/P ledger. You see these records when you post payments to the general ledger.
You can set a processing option for Work with Payment Groups to process voided payments that are stored in the Account Ledger table (F0911).
► To reset payment processing
When you reset payment processing, the pay items return to open vouchers.
From the Automatic Payment Processing menu (G0413), choose Work with Payment Groups.
1. On Work with Payment Groups, follow the steps for reviewing payment groups.
2. To reset the payments for an entire payment group, choose that group (next status must be UPD) on Work With Payment Groups.
3. To reset single payments, choose the payment on Work With Payment Group-Update Status.
4. To limit your search when resetting single payments, complete the following fields:
• Beginning Payment
• Ending Payment

344
5. Click Find.
6. Choose the payments to reset.
7. From the Row menu, choose Reset.
8. On Reset Payments, change the following field, if necessary, and click OK:
• Next Payment
► To reset payment processing for a bank tape
From the Automatic Payment Processing menu (G0413), choose Copy Bank Tape File to Tape.
1. On Copy Bank Tape to Tape, click Find.
2. Choose the payment record you want to remove from the bank tape table and click Delete.
3. On Confirm Delete, click OK.
See Also Reviewing Payment Groups in the Accounts Payable Guide for information about
how to verify the information in payment groups
Removing Processed Payments

345
After you write payments but before you update them, you might need to remove one or all of them from the current payment cycle. To do so, you undo the payment. The system then:
• Voids the payment
• Removes the voucher pay items from the payment group
• Resets the pay status of the voucher from payment in-process to approved
You can then change vouchers and process them for payment at another time.
If you need to undo a payment, you can identify the tape affected on the Copy Bank Tape to Tape form that you access from the Automatic Payment Processing menu (G0413). This form shows information, including the file ID and the member ID.
If you undo one or all payments that were written to a bank tape, you must delete the bank tape record before you process them for payment.
► To remove processed payments
From the Automatic Payment Processing menu (G0413), choose Work with Payment Groups.
1. On Work with Payment Groups, follow the steps for reviewing payment groups.
2. Perform one of the following actions:
• Choose a payment group with a next status of UPD
• On Work With Payment Group - Update Status, choose a payment
3. From the Row menu, choose Undo.
4. On Undo Confirmation, click Yes.
5. On Reset Payments, complete the following optional field and click OK:
• Next Payment
If you do not reset the next payment number, the system creates void payments.
If you are resetting payments that were written to a bank tape, complete the following step to remove the payment record from the bank tape table.
6. On Copy Bank Tape to Tape, choose the payment record and click Delete.
7. On Confirm Delete, click OK.
See Also Reviewing Payment Groups in the Accounts Payable Guide for information about
how to verify the data contained in payment groups
Copying Payments to Tape
When you write payments, the payment instrument can be an electronic format. In this case, writing payments creates bank tape tables rather than printed payments. You must copy these tables to tape or diskette if you want to send the information to a financial institution.
Copying payments to tape consists of the following tasks:

346
• Reviewing and changing the status and detail for a tape table
• Copying a tape table to tape or diskette
Typically, your MIS department presets the detail for a tape table. You should not change this information unless instructed to do so. You can, however, change many format specifications prior to copying the table to tape.
You can recopy a bank table to tape as long as you have not deleted the table. This might be necessary if, for example, your financial institution loses the original tape.
When you create a new bank tape table, you do not overwrite an existing table. The A/P Payment Tape table (F04572OW) is a multimember table, which means that each version (payment group) is a separate table. The system does not automatically delete records in the table. Instead, you must delete the record using the Copy Bank Tape to Tape form. Do not do this until you verify that your bank has received the bank tape.
► To review and change the status and detail for a tape table
From the Automatic Payment Processing menu (G0413), choose Copy Bank Tape File to Tape.
1. On Copy Bank Tape to Tape, to locate a tape table, click Find, or limit your search by completing any of the fields in the QBE row, and then click Find.
2. Choose the table that you want to work with and click Select.
3. On Update Tape Information, change any of the information in the following fields as needed:
• File Name

347
• Record Length
• New Volume
• Block Size
• Device Name
• Tape Density
• New Owner ID
• Label Name
4. Click OK.
Processing Options for Copy Bank Tape File to Tape (P0457)
BACS
1. Enter a '1' to display the BACS format
Display BACS Format
PROGRAM
1. Enter the name of an alternate program to be used. If left blank, program J0457T will be used. NOTE: This processing option is ignored if BACS processing is turned on.
Alternate Processing Program (FUTURE)
Version
1. Copy Bank File to Diskette Version (P0457D)
Blank = ZJDE0001
► To copy a tape table to tape or diskette
From the Automatic Payment Processing menu (G0413), choose Copy Bank Tape File to Tape.
1. On Copy Bank Tape to Tape, to locate a tape table, click Find, or limit your search by completing any of the fields in the QBE row, and then click Find.

348
2. Choose the table that you want to work with, and then choose Diskette from the Row menu.
3. On Write Bank Diskette, enter the path and/or file name you want to generate.
4. Depending on how you want to use the tape table, select one of the following options:
• Generate New File
• Append Records
5. Click OK, and then click OK again when the “File created Successfully” message appears.
Processing Options for Copy Bank File to Diskette (P0457D)
Defaults Tab
These processing options specify default information for the system to use when it generates the text file.
1. Record Length
Use this processing option to specify the record length of the output file. The maximum length is 1000 characters. If you leave this processing option blank, the system creates the output table with the original record length.
2. Insert Carriage Return
Use this processing option to specify whether the system inserts a hard return at the end of each record. If you leave this processing option blank, the system formats the file into a long string instead of multiple separate records.

349
3. Default File Path/Name
Use this processing option to specify the default path and the default name for the output file. The path and file name should conform to the file structure and naming standard of the operating system of the computer where the file is stored.
For example:
If you store the output file on your local machine C drive, you would specify the directory path: C:\FolderName\FileName.txt. If you store the output file to a folder on a networked machine, you might specify the network path: \\MachineName\FolderName\FileName.
If you leave this processing option blank, the system uses the following for the path and name: A:\DTALSV.
Note: You should store the files only on a Windows client.
Data Tab
These processing options specify whether to use replacement characters and whether to capitalize all alpha characters.
1. Replace pre-defined characters (UDC 04/RC) in One-To-One mode
Use this processing option to specify whether the system replaces special characters. If you specify to replace special characters, the system reads the Replaced Character UDC (04/RC) and replaces single characters according to the values in the UDC. The system then reads the Special Characters UDC (04/SC) and replaces special characters according to the values in that UDC. Valid values are:
Blank
Do not replace special characters
1
Replace special characters
Note: For programs P0457 and P03B571, the system replaces only the first character in

350
the Description 01 field of UDC 04/RC with the first character in the Description 02 field. It does not replace more than one character, even if the UDC is mapped in a one-to-many mode. Other programs that use UDC 04/RC replace more than one character if the UDC is mapped in a one-to-many mode.
2. Capitalize all alpha characters
Use this processing option to specify whether the system capitalizes all alphabetic characters in the record. If you leave this processing option blank, the system does not capitalize characters.
3. Replacement Character (UDC 04/SC)
Use this processing option to specify whether the system replaces characters in fields and tables that match characters defined in UDC 04/SC with a specified character or with a blank. To replace the characters with a specified character, enter the character in the processing option. To replace the special characters with a blank, leave the processing option blank
Note: The system always replaces the character defined in UDC 04/SC with either the character that you specify or a blank. If you do not want to replace any characters, UDC 04/SC must be blank.
Additional Tape Copy Options
Three additional options for copying a tape table are available, which might be relevant to specific users.
• You can use IBM system commands to view the tape table. You must specify the table and member IDs, for example, table ID F04572T and member ID AP00000390.
• Information in tape tables is stored in a standard format. Instead of copying a tape table to tape or diskette, you can upload a tape table to a financial institution using a modem.
• Bank Automated Clearing System (BACS) clients can approve a bank tape before copying it to tape or diskette. On the Copy Bank Tape to Tape form, choose Approve

351
from the row menu. This menu selection is controlled by a BACS processing option for the Copy Bank Tape File to Tape program (P0457).
Updating the Accounts Payable Ledger
After you write payments, you must update the Accounts Payable ledger. Updating the accounts payable ledger creates transaction records of your payments and your payment register. You can update payments only if the next status of the payment group is UPD (update).
When you update the Accounts payable ledger, the system:
• Processes void payments.
• Changes the pay status of vouchers from payment in-process (#) to paid (P) and sets the open amount to zero.
• Prints a payment register.
• Copies payment information to the Accounts Payable Matching Document table (F0413) and the Accounts Payable Matching Document Detail table (F0414) from the following workfiles:
• A/P Payment Processing - Header table (F04571)
• A/P Payment Processing - Summary table (F04572)
• A/P Payment Processing - Detail table (F04573)
• Removes the records in the worktables that were created when you grouped vouchers for payment. Note that bank tape records remain in the table until they are deleted.

352
The following graphic illustrates what happens when the system updates the accounts payable ledger:
After you update the accounts payable ledger tables, you can post payments to the General Ledger. Alternatively, a processing option for Work With Payment Groups allows you to automatically submit payments for posting to the General Ledger after you update the accounts payable ledger. During the posting process, the system creates the journal entries that debit the A/P trade account and credit the payables bank account.
Before You Begin Verify that all payments printed correctly. After you update the A/P ledger, you cannot
reset payment processing. You must void the payments and begin the payment process again.
Review processed payments. See Reviewing Payment Groups in the Global Solutions Japan Guide.

353
► To update the Accounts Payable ledger
From the Automatic Payment Processing menu (G0413), choose Work with Payment Groups.
1. On Work With Payment Groups, follow the steps for reviewing payment groups.
2. Choose one or more payment groups with a next status of Update.
3. From the Row menu, choose Update.
4. On Report Output Destination, select the Report Destination and click OK.
Processing Options for Work with Payment Groups (P04571)
Print Tab
These processing options specify how the system prints payment groups.
1. Default Print Program Version
Use this processing option to specify the version the system uses for the print program. Enter a version number, or leave this processing option blank to use default version ZJDE0001.
2. Payment Control Group Output
Use this processing option to specify the output configuration for Payment Control Groups (PCG). You can send a spool file to a printer by PCG, by bank account, or you can send multiple PCGs to a printer simultaneously in one spool file.
Valid values are:
Blank Separate files by PCG.
1 Separate files by bank account.
2 Send multiple PCGs in one spool file.

354
Save Spool File (FUTURE)
Use this processing option to specify whether you want to save a copy of a spool file after it has printed. This option is not yet functional in OneWorld software.
Valid values are:
Blank Do not save spool file.
1 Save spool file.
Hold Spool File (FUTURE)
Use this processing option to specify whether you want to hold a spool file, which requires that you release it manually before it prints. This option is not yet functional in OneWorld software.
Valid values are:
Blank Do not hold spool file.
1 Hold spool file.
Update Tab
These processing options specify the register program version, how you want the system to post void payments to the general ledger, and whether you want the system to submit the A/P payment post after the payments are updated.

355
1. Default Register Program Version Use this processing option to specify the version number of the register program. You can enter a specific version number, or leave this processing option blank to use default version ZJDE0001.
2. Post Void Payments Use this processing option to specify whether you want the system to post void payments to the general ledger. Void payments include alignment checks and reset payments. Void payments also include checks that are printed as Void so that the stub can be used for additional information continued from the previous stub. Valid values are: Blank Do not post void payments to the general ledger. 1 Post void payments to the general ledger.
3. Submit Post Program Use this processing option to specify whether you want the system to automatically submit the A/P payment post after the payments are updated. Valid values are: Blank Do not automatically submit the A/P post. 1 Automatically submit the A/P post.
Display Tab
These processing options specify the way the system displays payment groups.
1. Display Business Units
Display Business Units

356
Use this processing option to specify whether you want to display the Business Unit assigned to the Payment Control Groups. If you enter 1, the Business Unit field appears on the Work With Payment Groups form. You can perform a search on a specific business unit by completing the Business Unit field in the Specify Preloaded Values processing option.
NOTE: This field is valid if the Create Payment Control Groups program (R04570) was set to process payment groups by business unit.
Valid values are:
Blank Do not display Business Units.
1 Display Business Units.
Write Status
Use this processing option to specify the initial selection of criteria for the Payment Control Group's Next Status. You can change the selection criteria on the Work With Payment Groups form.
Valid values are:
Blank Do not display payment control groups at Write Status.
1 Display payment control groups at Write Status.
Update Status
Use this processing option to specify the initial selection of criteria for the Payment Control Group's Next Status. You can change the selection criteria on the Work With Payment Groups form.

357
Valid values are:
Blank Do not display payment control groups at Update Status.
1 Display payment control groups at Update Status.
3. G/L Bank Account
Use this processing option to specify a preloaded value for the G/L Bank Account selection criteria. You can change the selection criteria on the Work With Payment Groups form. Enter a specific G/L bank account number, or leave this processing option blank to display all G/L bank accounts (default).
Originator
Use this processing option to specify a preloaded value for the Transaction Originator (data item TORG) that ran the Create Payment Control Groups program (R04570). If you specify a preloaded value for this field, you limit the initial inquiry to the PCGs that the Originator created. You can change the selection criteria on the Additional Selection Criteria form. Enter a specific User ID (TORG), or leave this processing option blank to search on all transaction originators (default).
Payment Control Group Version
Use this processing option to specify a version number that created the Payment Control Groups (R04570). If you specify a preloaded value for this field, you limit the initial inquiry to the PCGs with this version number. You can change the selection criteria on the Additional Selection Criteria form.
You can enter a specific version number, or leave this processing option blank to search

358
on all versions (default).
Payment Instrument
Use this processing option to specify the business unit that was originally assigned to the PCG by Create Payment Control Groups (R04570). If you specify a preloaded value for this field, you limit the initial inquiry to the PCGs with this business unit. You can change the selection criteria on the Additional Selection Criteria form. You can enter a specific business unit (data item MCU), or leave this processing option blank to search on all business units (default).
NOTE: This field is valid if the Create Payment Control Groups program (R04570) was set to process payment groups by business unit. Additionally, this field is valid only if you enter 1 in the Display Business Units processing option.
Currency Code
Use this processing option to specify the payment instrument that was originally assigned to the PCG by Create Payment Control Groups (R04570). If you specify a preloaded value for this field, you limit the initial inquiry to the PCGs with this payment instrument. You can change the selection criteria on the Additional Selection Criteria form. You can enter a specific payment instrument (data item PYIN), or leave this processing option blank to search on all payment instruments.
Currency Code
Use this processing option to specify the payment currency that was originally assigned to the PCG by Create Payment Control Groups (R04570). If you specify a preloaded value for this field, you limit the initial inquiry to the PCGs with this currency code. You can change the selection criteria on the Additional Selection Criteria form. You can enter a specific payment currency code (data item CRCD), or leave this processing option blank to search on all payment currencies (default).

359
Display Alternate Currency Amounts
Use this processing option to specify whether you want the system to display the payment control group (PCG) amounts in the alternate currency. This conversion is for display purposes only, affecting the amounts on the Work With Payment Groups form. For writing foreign payments, complete the processing options on the Currency tab.
Valid values are:
Blank Do not display PCG amounts in the alternate currency.
1 Display PCG amounts in the alternate currency.
Alternate Currency Effective Date
Use this processing option to specify the effective date for the alternate currency's exchange rate. Enter the effective date for the currency's exchange rate, or leave this processing option blank to use the system date (default).
Currency Tab
These processing options specify the effective date and exchange rate to use when your business transactions involve foreign currencies.
360
Effective Date
Use this processing option to specify the date to use to retrieve the exchange rate when you write foreign or alternate currency payments. If you leave this processing option blank, the system uses the payment G/L date.
If you create a payment group using the domestic amount of a voucher instead of the foreign amount, the system calculates a currency gain or loss based on the pay date exchange rate. The payment is not a foreign currency payment because it is made in the domestic currency.
Note: If you enter an effective date for which there is no corresponding exchange rate in the Currency Exchange Rates table (F0015), the system uses the exchange rate on the voucher and, therefore, does not create a gain or loss.
Use Voucher's Rate
Use this processing option to specify the voucher's exchange rate when you are writing foreign payments.
Blank Use the exchange rate for the specified effective date.
1 Use the voucher's exchange rate.
Process Tab
This processing option specifies how the system processes payment control groups.

361
1. Interactive Process
Use this processing option to specify how you want the system to process payment control groups.
NOTE: This processing option does not override the Object Configuration Manager (OCM) mapping for server batch jobs, but only affects batch jobs run locally.
Valid values are:
Blank Submit the print and update jobs for batch processing.
1 Process payments interactively.
BACS Tab
This processing option specifies whether the system allows the entry of Bank Automated Clearing System (BACS) processing dates. BACS is an electronic funds transfer method used in the United Kingdom.
1. BACS Processing
Use this processing option to indicate to the system whether you want to allow the entry of Bank Automated Clearing System (BACS) processing dates.
Valid values are:
Blank Do not allow the entry of BACS processing dates.
1 Allow the entry of BACS processing dates.
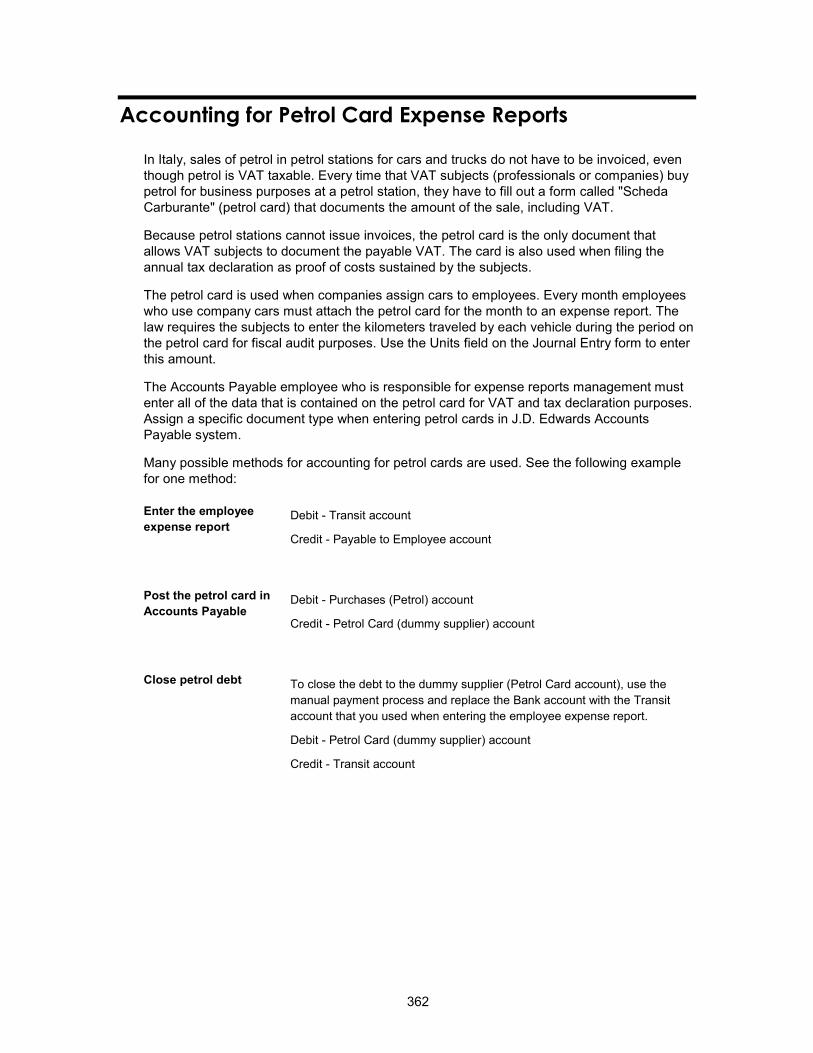
362
Accounting for Petrol Card Expense Reports
In Italy, sales of petrol in petrol stations for cars and trucks do not have to be invoiced, even though petrol is VAT taxable. Every time that VAT subjects (professionals or companies) buy petrol for business purposes at a petrol station, they have to fill out a form called "Scheda Carburante" (petrol card) that documents the amount of the sale, including VAT.
Because petrol stations cannot issue invoices, the petrol card is the only document that allows VAT subjects to document the payable VAT. The card is also used when filing the annual tax declaration as proof of costs sustained by the subjects.
The petrol card is used when companies assign cars to employees. Every month employees who use company cars must attach the petrol card for the month to an expense report. The law requires the subjects to enter the kilometers traveled by each vehicle during the period on the petrol card for fiscal audit purposes. Use the Units field on the Journal Entry form to enter this amount.
The Accounts Payable employee who is responsible for expense reports management must enter all of the data that is contained on the petrol card for VAT and tax declaration purposes. Assign a specific document type when entering petrol cards in J.D. Edwards Accounts Payable system.
Many possible methods for accounting for petrol cards are used. See the following example for one method:
Enter the employee expense report
Debit - Transit account
Credit - Payable to Employee account
Post the petrol card in Accounts Payable
Debit - Purchases (Petrol) account
Credit - Petrol Card (dummy supplier) account
Close petrol debt
To close the debt to the dummy supplier (Petrol Card account), use the manual payment process and replace the Bank account with the Transit account that you used when entering the employee expense report.
Debit - Petrol Card (dummy supplier) account
Credit - Transit account

363
Working with the Annual Close
You can use J.D. Edwards base software to complete the annual close for the fiscal year. When you close the fiscal year, you must:
• Close and calculate retained earnings.
• Make adjustments.
• Close profit and loss accounts.
• Record the profit and loss for the fiscal year.
• Close balance sheet accounts.
• Print the G/L Registration Report (R09404) with adjustments and closing entries.
• Re-open balance sheet accounts.
• Print the G/L Registration Report with re-opening journal entries.
• Print the G/L by Object and Subsidiary report (R7409C1) or the G/L by Category Code report (R70470).
During the beginning months of the new fiscal year, you can make adjustments to the transactions of the previous year. To identify journal entries for adjustments in the system, the adjustment entries must include the following information:
• The G/L date must equal the end of the previous fiscal year.
• The document type must be ## to indicate that the entry is an adjustment.
The system prevents you from recording journal entries in the previous year unless the entries have a document type of ##. In addition, when you update the beginning balance in the Account Balances table (F0902), the system includes journal entries with the document type of ##.
In Italy, businesses complete the following phases at the close of the fiscal year to prepare the year-end balance sheet:
• Adjust and integrate journal entries.
• Close profit and loss accounts for revenues and expenses that were recorded during the year without carrying over the balance.
• Calculate retained earnings.
• Close balance sheet accounts on a summary account "ending balance sheet" and reopen the same balance sheet accounts for the following fiscal year.
During the close of the fiscal year and the preparation of the balance sheet, Italian businesses complete the following control reports:
• Trial Balance
• General Ledger
All the journal entries that the system generates for the close of the fiscal year are recorded on the G/L Registration Report.
See Also Closing a Fiscal Year in the General Accounting Guide

364
Printing the G/L Registration Report in the Global Solutions Italy Guide for information about assigning sequential registration numbers to closing and adjusting entries
Automatic Accounting Instructions
The following table lists the AAIs that you must set up in preparation for the annual close:
GLG2 Identifies the first assets account.
GLG3 Identifies the first liabilities account.
GLG4 Identifies the account in which the financial year result is stored. You must set up this AAI for each company.
GLG5 Identifies the last balance sheet account. The last balance sheet account is a non-posting account.
GLG6 Identifies the first profit-and-loss account.
GLG12 Identifies the last profit-and-loss account.
User Defined Codes
The following table lists the user defined codes that you must set up in preparation for the annual close:
Ledger Types for Post Balancing (09/LP)
Set up codes to define ledger types that are different from the AA ledger and for which you want to calculate the profit and loss for the financial year.
For example, you might define a specific ledger type to record the financial year result for your Italian operation, including the entries that are required by local law and tax authorities. All of the adjustments that are related to the law and tax criteria are recorded in that specific ledger.
Ledger Types (09/LT)
Set up codes to define ledger types that you use for the opening and closing entries for accounts. You might even use separate ledger types for closing and re-opening entries.
Annual Close/Spread Ledger Types (00/LT)
Set up codes to define ledger types that the account closing program uses to update amounts for subsequent periods, according to the rules defined for each ledger. The first character that you enter in the Description 2 field determines the rules that the closing program uses for the ledger.

365
Ledger Types
The following table lists the ledger types that you must set up in preparation for the annual close. All user defined ledger types are identified with a U, followed by a digit or a letter.
UX
Set up the UX ledger type for closing assets and liabilities, and for profit and loss account entries. Although you can choose any client-reserved two-character code for the ledger type, set up the ledger type on the Ledger Types user defined codes table (09/LT).
UY
Set up the UY ledger type for re-opening assets and liabilities account entries. Although you can choose any client-reserved, two-character code for the ledger type, set up the ledger type on the Ledger Types user defined codes table (09/LT).
Document Types
The following table lists the document types that you must set up in preparation for the annual close. All user defined ledger types are identified by a U that is followed by a digit or a letter.
## Document type ## is system-defined. You can use the ## document type to post journal entries for adjustments in the previous fiscal year.
Journal entries with the document type ## automatically update the account balance for the previous year.
UX Document type UX is used for re-opening the assets and liabilities accounts.
Although you can choose any client-reserved, two-character code for this document type, you must set up the document type on the Document Type user defined codes table (00/DT).
Chart of Accounts
The following table lists the accounts that you must define in your chart of accounts in preparation for the annual close:
Final balance sheet account
Define the final balance sheet account for all of the closing entries that are related to assets and liabilities.
Beginning balance sheet account
Define the beginning balance sheet account for all of the opening entries that are related to assets and liabilities.
Profit and loss Define the profit and loss account for the sum of all of the closing entries that are related to assets and liabilities, and to the year's profit-and-loss entry.

366
Reviewing Account Information
You can review account information by object account or by category code.
Verifying Account Balances
The following table lists the standard procedures that should be used by companies before month-end reporting is completed. The table represents a series of control reports and balance verification programs with a brief description of each, and the frequency with which J.D. Edwards recommends that the procedures be executed.
Procedure Program Description Frequency
Verify that document numbers are in sequence.
R74099A R74099B R74099C R74099D
The Sequential Number report highlights any interruption in the document number sequence and general accounting registration date sequence.
Daily
Print a listing of all unposted accounting batches.
R007011 The Unposted Batches Integrity Test highlights any unposted batches. The posting of all accounting batches is a prerequisite for the subsequent balance verifications.
Weekly
Verify that batch detail and batch header information match.
R007021 The Transactions to Batch Headers Integrity Test highlights any mismatch between batch headers and the individual transactions within the batch. Mismatches might include transactions for which no batch header or posted transactions that belong to unposted batches exist.
Weekly
Balance A/R against G/L.
R03B701 Run the A/R to G/L by Batch Integrity Test to check the balance between the Accounts Receivable Ledger table (F0311) and the Account Ledger table (F0911) by batch number.
The program also highlights anomalous situations regarding the payment status, such as payment status P against open amounts.
If the A/R and General Ledgers are out of balance, the Supplier/Customer Totals by Account (R09450) can be used as an additional verification tool.
Weekly

367
Procedure Program Description Frequency
Balance A/R against G/L by accounting class.
R03B7001A Run the A/R to G/L by Accounting Class Integrity Test to match the Accounts Receivable Ledger table (F0311) to the Account Balances table (F0902) by accounting class.
Weekly
Balance A/P against G/L.
R04701 Run the A/P Original Documents to G/L by Batch Integrity Test to check the balance between the Accounts Payable Ledger table (F0411) and the Account Ledger (F0911) by batch number.
The program also highlights anomalous situations regarding the payment status, such as payment status P against open amounts.
If the A/P and General Ledgers are out of balance, the Supplier/Customer Totals by Account (R09450) can be used as an additional verification tool.
Note If the Bolle Doganali are entered as prepaid documents, the ledger and the Customs debit account might be out of balance.
Weekly
Balance A/P against G/L by accounting class.
R047001A Run the A/P Originals to G/L by Batch Integrity Test to match the Accounts Payable Ledger table (F0411) to the Account Balances table (F0902) by offset account.
Weekly
Print trial balance reports.
R7409C3
R70472
By object.subsidiary.
By category code 21, 22, 23.
Monthly
Print monthly VAT reports.
R004051 Run a version of the A/R - A/P IVA Tax Report – Italy (R004051) for EU VAT purchases to list the currency amounts of your invoices. Run other versions of the report to print the rest of your VAT ledgers.
Per tax regulations

368
Reviewing Account Ledgers by Object Account
Use the Account Inquiry by Object Account program (P09201) to review detailed transactions for an object account across all business units.
You can use all of the criteria that are available in the Account Ledger Inquiry program (P09200) to limit your search for transactions to review.
After you move the cursor to the row heading in the left column on the form, the system displays a paper clip icon to indicate when the transaction (for example, the journal entry) has additional text or another attachment.
Using the Second Ledger processing option, you can review amounts for two ledger types at the same time, such as actual and budget ledgers.
The system displays both posted and unposted transactions from the Account Ledger table (F0911).
► To review account ledgers by object account
From the Accounting Reports & Inquiries menu (G0912), choose Account Inquiry by Object Account.
1. On Work With Account Ledger by Object Account, complete the following field:
• Object/Sub

369
2. To review a ledger other than AA (actual amounts), replace the value in the following field:
• Ledger Type 1
3. If you set a second ledger type in the processing option, you can replace the value in the following field:
• Ledger Type 2
4. To display a range of companies, complete the following fields:
• From Company
• Thru Company
5. To display a range of transaction dates, complete the following fields:
• From Date
• Thru Date
6. To display one subledger, complete the following fields:
• Subledger/Type
7. Turn on one of the following options, if necessary:
• Posted
• Unposted
• All
8. To further limit your search for transactions, use the fields in the QBE row.
For example, you might want to search for a specific document type, document number, batch number, or G/L posted code.
9. Click Find.
10. To print the account ledger, from the Report menu, click Print Ledger.
Processing Options for Account Inquiry by Object Account (P09201)
Defaults
Any values entered in the following options will be loaded upon entry into the program:
Object/Subsidiary Account Number
From Date

370
Through Date
Ledger Type
Subledger - G/L
Subledger Type
Currency Code
Second Ledger
Enter a 1 to display a second ledger type to view two ledger types at one time. Leave blank to display one ledger type only.
Display Second Ledger Type
Enter a default value for the second ledger type if the second ledger type is activated above.
Ledger Type
Exits
For document type PK or PN: enter a 1 to exit to Journal Entries when going to the source document. Leave blank to go to Manual Payments.
Exit for PK or PN
As-If Currency
Enter the currency code for as-if currency display. This option allows for amounts to display in a currency other than the currency they are stored in. This as-if currency option is activated by the form exit As-If Currency. Amounts will be translated and displayed in this as-if currency. If left blank, amounts will display in their database currency. Only the amounts associated with Ledger Type 1 will be converted to the as-if currency.
As-If Currency
Enter the as of date for processing the current exchange rate for the as-if currency. If left blank the thru date will be used.
Exchange Rate Date

371
Reviewing Account Ledgers by Category Code
Use the Account Inquiry by Category Code program (P09202) to review detailed transactions for any of the category codes that are set up for an alternate (statutory) chart of accounts. You specify the category code (21, 22, or 23) in the Category Code processing option for this program.
You can use all of the criteria that are available in the Account Ledger Inquiry program (P09200) to limit your search for transactions to review.
After you move the cursor to the row heading in the left column on the form, the system displays a paper clip icon to indicate that the transaction (for example, the journal entry) has additional text or another attachment.
Using the Second Ledger processing option, you can review amounts for two ledger types, such as actual and budget ledgers, at the same time.
The system displays both posted and unposted transactions from the Account Ledger table (F0911).
► To review account ledgers by category code
From the Accounting Reports & Inquiries menu (G0912), choose Account Inquiry by Category Code.

372
1. On Work With Account Ledger By Category Code, complete the following field:
• Alternate Account
2. To review a ledger other than AA (actual amounts), replace the value in the following field:
• Ledger Type 1
3. If you set a second ledger type in the processing option, you can replace the value in the following field:
• Ledger Type 2
4. To display a range of companies, complete the following fields:
• From Company
• Thru Company
5. To display a range of transaction dates, complete the following fields:
• From Date
• Thru Date
6. To display one subledger, complete the following fields:
• Subledger
• Sub Type
7. Turn on one of the following options:
• Posted
• Unposted
• All
8. To display company subtotals, turn on the following option:
• Display Company Subtotals
9. To further limit your search for transactions, use the fields in the QBE row.
For example, you might want to search for a specific document type, document number, batch number, or G/L posted code.
10. Click Find.
11. To print the account ledger for an account, choose the account and then from the Row menu, choose Print Ledger.
Processing Options for Account Inquiry by Category Code (P09202)

373
Category Code
Enter the account category code (21-23) to inquire on. The default value of blank will use category code 21.
Category Code (21-23)
Defaults
Any values entered in the following options will be loaded upon entry into the program:
Alternate Account
From Date
Through Date
Ledger Type
Subledger - G/L
Subledger Type
Currency Code
Second Ledger
Enter a 1 to display a second ledger type to view two ledger types at one time. Leave blank to display one ledger type only.
Display Second Ledger Type
Enter a default value for the second ledger type if the second ledger type is activated above.
Ledger Type
Exits
For document type PK or PN: enter a 1 to exit to Journal Entries when going to the source document. Leave blank to go to Manual Payments.

374
Exit for PK or PN
As-If Currency
Enter the currency code for as-if currency display. This option allows for amounts to display in a currency other than the currency they are stored in. This as-if currency option is activated by the form exit As-If Currency. Amounts will be translated and displayed in this as-if currency. If left blank, amounts will display in their database currency. Only the amounts associated with Ledger Type 1 will be converted to the as-if currency.
As-If Currency
Enter the as of date for processing the current exchange rate for the as-if currency. If left blank the thru date will be used.
Exchange Rate Date
Reviewing Alternate Account Information
You can review alternate accounts and account ledgers for one category code at a time. You specify the category code in the processing options.
You can also review alternate accounts by company or organization structure, and you can review their balances online by company or organization structure. By doing this review, you can see several companies that together are one legal entity.
► To review alternate account information
You can review selected alternate accounts and the associated detailed information. You can also review account ledgers.
From the Accounting Reports & Inquiries menu (G0912), choose Statutory Account Inquiry.
1. On Statutory Account Inquiry, complete the following optional fields:
• Company
• Business Unit

375
2. To limit your search, complete the following fields:
• From Account
• Thru Account
3. To display amounts for a specific period, complete one of the following fields:
• Thru Date
• Period
If the Period option is selected, the system shows the through period in the Thru Period field. If the Period option is cleared, the system shows the through date in the Thru Date field.
4. To specify how many leading digits in the alternate account number to use for subtotaling, complete the following field:
• Digit To Use For Subtotal
5. To specify the digit of the category code to use for rollup, complete the following field:
• Level Of Rollup
6. To toggle between year-to-date and period totals, click the following option:
• Period/Cumulative
7. Click Find.
The processing time depends on the number of accounts that you are viewing.

376
8. To review account ledger information for the category code that you specified in the processing options, choose an account and choose Ledger Inquiry from the Row menu.
9. On Work With Account Ledger By Category Code, follow the steps for reviewing account ledgers by category code.
10. To display all of the accounts with the category code that you specified in the processing options, go back to Statutory Account Inquiry (if necessary) by clicking Close, and then choose Accounts from the Row menu.

377
11. On Accounts Within Statutory Account, choose an account to review.
12. From the Row menu, choose one of the following to review the detail:
• Account Ledger
• Account Balance
• TB by Object
See Also See the following topics in the General Accounting Guide:
Reviewing Account Ledgers by Category Code for more information about how to review ledgers by category code
Printing a Debit/Credit T/B by Category Code Report for more information about how to print a Debit/Credit Trial Balance report using category codes
Printing a G/L by Category Code Report for more information about how to print a General Ledger report using category codes

378
Printing the Sequential Number Report
Use one of the following navigations:
From the Italian Reports menu (G093152), choose a Sequential Number Report option.
From the French Reports menu (G093151), choose a Sequential Number Report option.
Businesses in France and Italy are required by law to number each original fiscal document both sequentially and chronologically. Fiscal documents include VAT taxes, such as accounts payable vouchers and accounts receivable invoices. Because each revenue and expense event must be documented in chronological order, businesses must include the numeric sequencing of each document number in the VAT registers.
Use the Sequential Number report to identify any document numbers that are out of sequence. When you print the report, the system checks the number for each document that includes a VAT amount in the following tables:
• Taxes (F0018)
• Accounts Payable Ledger (F0411)
• Accounts Receivable Ledger (F0311)
The report prints the appropriate error message for each document that meets the following conditions:
• The document number is not sequential.
• The general ledger date is lower than that of the previous document.
J.D. Edwards recommends that you print the Sequential Number Report daily; if not daily, at least before you change the G/L date.
You must manually correct any errors in the sequential numbering or justify the gap in the numbering of your documents. You can run one of the following sequential number reports to indicate which table you want to perform the sequential document number validation:

379
Taxes (F0018)
When you run the Sequential Number Report - Tax File (R74099A) to verify that document numbers are in sequential order without interruptions, the system prints a report based on the Taxes table (F0018).
Accounts Payable Ledger (F0411)
When you run the Sequential Number Report - A/P Ledger (R74099B) to verify that document numbers are in sequential order without interruptions, the system prints a report based on the Accounts Payable Ledger (F0411).
Accounts Receivable Ledger (F0311)
When you run the Sequential Number Report - A/R (R74099C) to verify that document numbers are in sequential order without interruptions, the system prints a report based on the Accounts Receivable Ledger (F0311).
Processing Options for Sequential Number Reports (R74099A, R74099B, and R74099C)
Select Tab
Use these processing options to enter the range of dates for which you want to examine transactions for sequential numbering. The system will examine all transactions with a G/L date that is within the range that you specify.
1. From Date
Use this processing option to enter the beginning of the range of G/L dates from which you want to select transactions.
2. Thru Date
Use this processing option to enter the end of the range of G/L dates from which you want to select transactions.

380
Printing the G/L Registration Report
From the Italian Reports menu (G093152), choose G/L Registration Report.
Businesses in Italy are required to print a general journal report that lists all of the general ledger transactions for each month in chronological and sequential order. To do this task, you can print a G/L Registration Report-Italy (R09404).
You can print the G/L Registration Report-Italy in proof or final mode. When you select final mode, the system assigns a chronological and sequential registration number to each general ledger transaction in the Account Ledger (F0911). The system stores the registration number for each transaction in a dedicated field (REG#). You can use a processing option to control whether the system assigns registration numbers to journal entries or to each individual journal entry line.
To ensure that the registration number for each transaction is sequential by date, run the G/L Registration Report program in final mode only after you perform the following tasks:
• Enter all of the transactions for the month.
• Review the G/L Registration report generated in proof mode.
Note
If your company implements J.D. Edwards software in the middle of a fiscal year, you need to indicate the continuing registration number from your previous numbering system (manual or automated). To do this task, access the Revise G/L Registration File form.
Printing Considerations for the G/L Registration Report
You can reprint the G/L Registration Report (F09404) in proof mode to review transactions for which registration numbers are already assigned.
You can also print the G/L Registration report for multicompany environments where general ledger transactions are entered for different document companies that belong to the same legal entity. To do this task, set the processing options so that you can enter the legal company that you want to print on the header of the report. Then use data selection to identify the document companies that belong to the legal company.
To number the pages of the report progressively by calendar year, specify the year and number for the first page in the processing options. The pages are numbered on the report by using the year and beginning with the number that you specify. For example, if you print two 1000-page reports during the year 2005, the pages should be numbered as follows:
• First report of 1000 pages – First page number 2005/1; last page number 2005/1000
• Second report of 1000 pages – First page number 2005/1001; last page number 2005/2000
In this example, you would specify a year of 05 and a first page number of 1 when you print the first report, and a year of 05 and a first page number of 1001 when you print the second report.

381
Registration Numbers for Adjusting Journal Entries
After the year end, you might need to enter general ledger transactions to record adjustments for the previous fiscal year. You can enter these adjusting journal entries with a special document type (##) and the general ledger date for the end of the fiscal year, such as 31/12/99.
Italian law requires that the date on which you actually enter the adjustment also be included in the journal entry record. To satisfy this requirement, the system records both the general ledger date that you specify for the end of the fiscal year and the actual date when you enter the adjusting entry. You can use a processing option to control the actual date of the adjustment entry that prints on the G/L Registration report. In addition, adjusting entries must include a chronological and sequential registration number, as would any other general ledger transaction.
Print the G/L Registration Report (R09404) to assign registration numbers to adjusting journal entries for the previous fiscal year. You can specify registration numbers for adjusting journal entries, based on the following numbering patterns:
• Start with the next available number for the previous fiscal year.
• Start with the next available number for the current fiscal year.
Caution
The practice of numbering adjustments by using the next available number for the previous fiscal year can be disputed by the Italian fiscal authority. The option of using the next available number for the current fiscal year is legally acceptable and should be adopted by all Italian customers. Use processing option 2 on the Adjustments tab for the G/L Registration Report to select a numbering pattern.
When you print the G/L Registration Report for the adjusting entries in final mode, the system:
• Updates the Adjustments Registration Date with the date that you specify in the processing option for adjusting entries
• Assigns chronological and sequential registration numbers to each transaction
See Also See the following topics in the Global Solutions Italy Guide:
Setting Up Your System for Date Validation for information about how to set up the system to edit vouchers and invoices for appropriate dates, and to assign sequential numbering
Working with the Annual Close for more information about printing the G/L Registration Report (R09404) as part of the annual close procedure
382
Processing Options for G/L Registration Report-Italy (R09404)
Default Tab
These processing options let you specify how the system assigns registration numbers and dates, and whether to generate the report in proof or final mode
1. Processing Mode
Blank = Proof mode
1 = Final mode without headings and titles
2 = Final mode with headings and titles
Use this processing option to specify the mode in which you want to run the report. Valid values are:
Blank
Run the report in proof mode.
1
Run the report in final mode without headings and titles.
2
Run the report in final mode with headings and titles.
2. Registration Number
Blank = Assign a registration number to each document
1 = Assign a registration number to each individual journal entry line

383
Use this processing option to specify how the system assigns registration numbers. Valid values are:
Blank
Assign a registration number to each document.
1
Assign a registration number to each individual journal entry line.
3. Adjustment Registration Date
Blank = Use adjustment's G/L date
Use this processing option to specify the adjustment registration date. Enter any specific registration date. If you leave this processing option blank, the system assigns the G/L date of the adjustment.
4. Next Available Registration Number for Adjustments
Blank = Use fiscal year from the registration date above
1 = Use fiscal year from the adjustment G/L date
(NOT RECOMMENDED)

384
Use this processing option to specify how the system assigns the next available registration number for adjustments entered in the prior year. Valid values are:
Blank
Use the next available registration number from the current fiscal year.
1
Use the next available registration number from the fiscal year of the adjustment G/L date, which would be for the previous fiscal year. J.D. Edwards does not recommend this option.
Select Tab
These processing options let you specify information that the system uses to select transactions for the report.
1. From Date Use this processing option to specify the beginning date for the system to use when selecting records for the report.
2. Thru Date Use this processing option to specify an ending date for the system to use when selecting records for the report.
3. Enter the company number to be used to store and retrieve G/L balance values. Blank = Company '00000'

385
Use this processing option to specify the company number for which the report is printed. If you leave this option blank, the system prints the report for company 00000.
Print Tab
These processing options let you specify the page numbering that prints on the report and the accounts number that prints on the report.
1. Enter the Year that should be printed with the page numbers of the report
Blank = Print runtime page numbers in proof mode. Do not print any page numbers in the final mode
Use this processing option to enter the Year you want to print with the page numbers of the report. If left blank, runtime page numbers are printed in proof mode and no page numbers are printed in the final mode.
2. Enter the Number to be used as the first page number of the report
Blank = Print runtime page numbers in proof mode. Do not print any page numbers in the final mode
Use this processing option to specify the number from which you want to start the page numbering for the report. If you leave this processing option blank, run-time page numbers are generated in proof mode and no page numbers are generated in final mode.
3. Enter the Account Number to print on the report

386
Blank = Account Number (BU.Obj.Sub)
21 = Category Code 21
22 = Category Code 22
23 = Category Code 23
Use this processing option to specify whether the system includes account numbers from the alternate chart of accounts on the report. Enter the category code that contains the alternate chart of accounts. Valid values are:
Blank
Do not include account numbers from the alternate chart of accounts. Use the regular account number (BU.Obj.Sub).
21
Include account numbers from the chart of accounts contained in Category code 21.
22
Include account numbers from the chart of accounts contained in Category code 22.
23
Include account numbers from the chart of accounts contained in Category code 23.
Currency Tab
These processing options let you set up “as if” currency processing.

387
1. Enter the Currency Code for as-if currency reporting.
Blank = Database Currency
Use this processing option to specify the currency for "as if" currency reporting. This option allows for amounts to print in a currency other than the currency in which they are stored. Enter a valid currency code from the Designate Currency Codes program (P0013). If you leave this processing option blank, the system prints amounts in the currency in which they are stored.
2. Enter the As-Of date for processing the exchange rate for the as-if currency.
Blank = System Date
Use this processing option to specify the "as of" date for processing the exchange rate for the "as if" currency. If you leave this processing option blank, the system uses the exchange rate that is valid for the system date.
388
Printing the Trial Balance Report
Use one of the following navigations:
From the French Reports menu (G093151), choose T/B by Object and Subsidiary, or T/B by Category Code.
From the Italian Reports menu (G093152), choose T/B by Object & Subsidiary, or T/B by Category Code.
Use the Trial Balance report to verify the accuracy of transactions in individual account ledgers. When all of the transactions are accurate, the totals in this report equal the totals in the General Ledger report and the General Ledger Registration report.
Businesses often print the Trial Balance report to facilitate internal audits by verifying one or more accounts. Businesses also use the Trial Balance report for external audits, as required by a fiscal authority or auditing firm.
You can print the Trial Balance report to review the total debit and credit amounts for each account in any given ledger. You can also find errors that cause the General Ledger to be out of balance. Possible errors might include incorrect entries or missing transactions.
The format and contents of the localized trial balance report differs from the trial balance reports that J.D. Edwards provides in the base software solution. For example, the localized trial balance reports include the following information that the base trial balance reports do not include:
• A total for each account and subtotals for account classes
• Transaction detail in debit and credit format
• Accumulation of different ledger types for the same account
• Information that is specific to a period (month and year) selection
Note
The T/B by Category Code report (R70472) includes balance forward amounts only for balance sheet accounts, not for profit and loss accounts.
You can run the French Trial Balance report by object and subsidiary, or by category code, depending on whether your accounts are defined in the object.subsidiary or in category codes 21, 22, or 23.
Note
If you print Trial Balance reports by object and subsidiary, you can review the accumulation of up to three ledger types for the same account. To do this review, specify which ledger types to include on the report in the processing options. The Ledger Type processing option replaces the user defined code 74/LT.

389
Final Annual Close
Businesses print the General Ledger report at least once a year for all accounts—typically, at the end of the fiscal year. The total debits and credits that print on the report should equal the total debits and credits of the following:
• Trial Balance by Object report (R7409C3) or T/B by Category Code (R70472)
• G/L Registration Report - Italy (R09404)
To perform a final annual close, you can run the Trial Balance report in final mode. You should run the report in final mode to prevent users from entering transactions after a year-end close. When you run the report in final mode, the records included in the report are flagged in the Account Ledger table (F0911) to indicate that they have been printed in final mode. This process prevents the records from being printed in final mode again. An error message is printed on the report if any records have been printed in a previous final mode report. New transactions are visible on the report because they are not flagged with the same date as older transactions, which have the date when the report was run in final mode for the closed year.
The word "Final" is printed on every page of a report that is run in final mode.
Note
Because running the Trial Balance report in final mode flags the records as having been printed, the Trial Balance report should be run before the General Ledger and General Journal reports.
See Also Setting Up an Alternate Chart of Account in the Global Solutions International Guide
Processing Options for T/B by Object and Subsidiary (R7409C3)
Select Tab
Use these processing options to define the fiscal year and period for which the trial balance will be printed. If you leave the Period Number and Fiscal Year fields blank, the program uses the current period and year that are defined for the General Accounting system on the Set Up Company form and recorded in the Company Constants table (F0010).
You also use these processing options to select the ledger type that the report uses. For example, you can select the BA (budget amounts) ledger type to print a report of budget amounts.
You can specify as many as three ledger types. If you specify more than one ledger type, the system combines the totals for these ledgers on the report. These totals are probably meaningless because they contain multiple currencies.
If you specify the CA (foreign currency) ledger type, and the CA ledger type includes amounts for multiple currencies, totals are also meaningless.
If you leave all three of the ledger types blank, the system reports only on ledger type AA.

390
1. Period Number
Use this processing option to specify the period for which the trial balance prints. If you complete this field, you must also specify the fiscal year for theperiod in the Fiscal Year field. If you leave this field blank, the program uses the current period defined on the Set Up Company form and recorded in the Company Constants table (F0010).
2. Fiscal Year
Use this processing option to specify the last two digits of the fiscal year for which the trial balance prints. For example, enter 05 for 2005. If you complete this field, you must also complete the Period Number field.
If you leave this field blank, the program uses the current fiscal year defined for the General Accounting system and recorded in the Company Constants table (F0010).
3. Ledger Type 1
Use this processing option to specify the first ledger type on which you want to report. Valid values are found in UDC table 09/LT.
4. Ledger Type 2
Use this processing option to specify the second ledger type on which you want to report. Valid values are found in UDC table 09/LT.

391
5. Ledger Type 3
Use this processing option to specify the third ledger type on which you want to report. Valid values are found in UDC table 09/LT.
Print Tab
Use these processing options to specify how accounts appear on the report. For example, you can specify which account descriptions are used, whether accounts with a zero balance are listed, whether subsidiary accounts are summarized, and what level of subtotaling you want to use.
1. Model Business Unit
Use this processing option to specify the model business unit that contains the account descriptions you want to use. If you leave this processing option blank, the transaction account descriptions will be used.
2. Accounts with Zero Balances
Blank = Include accounts with zero balances.
1 = Omit accounts with zero balances.
Use this processing option to specify whether the system omits accounts with zero balances in the selected period.

392
3. Summarize Subsidiary Accounts
Blank = Do not summarize subsidiary accounts.
1 = Summarize subsidiary accounts.
Use this processing option to specify whether the system summarizes all subsidiary accounts into one object account.
4. Class Total Level
1 = Classify by the first digit of the account number.
2 = Classify by the first two digits of the account number.
3 = Classify by the first three digits of the account number.
4 = Classify by all four digits of the account number.
Use this processing option to specify how the system classifies accounts for purposes of subtotaling. The report classifies accounts by account number. You can classify by one, two, three, or four digits of the account number. The report includes a class total for each classification.
For example, if you classify accounts by two digits, the report includes a class total for accounts 1000 through 1099, another class total for accounts 1100 through 1199, and so on. If you classify accounts by three digits, the report includes a class total for accounts 1100 through 1110,another class total for accounts 1111 through 1119, and so on.
If you classify accounts by all four digits, each object account has its own class total; subsidiary accounts to a single object are included in the class total.
The system includes class totals at the level that you specify and at lower levels. For example, if you classify accounts by two digits, the report includes a class total for accounts 1000 through 1999, in addition to the class totals for accounts 1000 through 1099, 1100 through 1199, and so on.

393
Process Tab
Use this processing option to determine whether you run this report in proof or final mode.
1. Mode Blank = Proof 1 = Final Use this processing option to specify the mode in which you want to run this report. Caution You can run this report in final mode only once for the selected period and fiscal year. The transactions that are printed in final mode do not appear if you run the report again.
Currency Tab
Use these processing options to show amounts in a currency other than the currency in which the amounts are stored on the system. These processing options allow you to view amounts in a different currency as a hypothetical scenario only; the amounts that appear in the different currency are not saved to the system.
1. As-If Currency Blank = The as-if currency grid column does not appear. Or, enter the code for As-if currency. Use this processing option to view domestic or foreign amounts in a currency other than the currency in which the amounts were originally entered. Specify the currency code in which to print the "as if" currency amounts. For example, to view domestic or foreign U.S. dollar amounts in the euro, specify EUR. If you leave this processing option blank, the "as if" currency column does not appear on the report. Note: "As if" currency amounts are stored in a temporary memory, and are not written to a table.
2. As-Of Date Blank = The system uses the system date. Or, enter the As-of date.

394
Use this processing option to specify an "as of" date for the As If Currency processing option. The system uses this date to retrieve the exchange rate from the Currency Exchange Rates table (F0015). If you specify a currency code in the As If Currency processing option and leave this processing option blank, the system uses the system date. Note: A valid exchange rate between the domestic or foreign currency and the "as if" currency must exist in the F0015 table, based on the "as of" date.
Processing Options for T/B by Category Code (R70472)
Select Tab
Use these processing options to specify the fiscal year and period for which the trial balance will be printed. If you leave the fields blank, the program uses the current period and year that are defined for the General Accounting system on the Set Up Company form and recorded in the Company Constants table (F0010).
You also use these processing options to specify the ledger type that the report uses. For example, you can specify the BA (budget amounts) ledger type to print a report of budget amounts.
You can specify as many as three ledger types. If you specify more than one ledger type, the system combines the totals for these ledgers on the report. These totals are probably meaningless because they contain multiple currencies.
If you specify the CA (foreign currency) ledger type, and the CA ledger type includes amounts for multiple currencies, totals are also meaningless.
If you leave all three of the ledger types blank, the system reports only on ledger type AA.
1. Period Number
Use this processing option to specify the period for which the trial balance is printed. If you complete this processing option, you must also specify the fiscal year for the period in the Fiscal Year field. If you leave this processing option blank, the program uses the current period that is defined for the General Accounting system on the Set Up Company form and recorded in the Company Constants table (F0010).

395
2. Fiscal Year
Use this processing option to specify the last two digits of the fiscal year for which the trial balance will be printed. For example, enter 05 for 2005.
If you complete this field, you must also complete the Period Number field.
If you leave this field blank, the program uses the current fiscal year defined for the General Accounting system on the Set Up Company form and recorded in the Company Constants table (F0010).
3. Ledger Type 1
Use this processing option to specify the first ledger type you want to report on. Valid values are found in UDC 09/LT.
4. Ledger Type 2
Use this processing option to specify the second ledger type you want to report on. Valid values are found in UDC 09/LT.
5. Ledger Type 3
Use this processing option to specify the third ledger type you want to report on. Valid values are found in UDC 09/LT.
396
Print Tab
Use these processing options to specify how accounts appear on the report. For example, you can specify which account numbers are used, whether accounts with a zero balance are listed, and what level of subtotaling you want to use.
1. Account Category Code R021 = Category code 21 R022 = Category code 22 R023 = Category code 23 Use this processing option if you want account numbers from an alternate chart of accounts to be included on the report. Specify the category code that contains the alternate chart of accounts. Valid values are: R021 Category Code 21 R022 Category Code 22 R023 Category Code 23
2. Accounts with Zero Balances Blank = Include accounts with zero balances. 1 = Omit accounts with zero balances. Use this processing option to specify whether the system should omit accounts with zero balances in the selected period. Valid values are: Blank Include accounts with zero balances. 1 Omit accounts with zero balances.
3. Class Total Level 1 = Classify by the first digit of the account number. 2 = Classify by the first two digits of the account number. 3 = Classify by the first three digits of the account number. 4 = Classify by all four digits of the account number. Use this processing option to specify how the system should classify accounts for

397
purposes of subtotaling. The report classifies accounts by account number. You can classify by one, two, three, or four digits of the account number. The report includes a class total for each classification. For example, if you classify accounts by two digits, the report will include a class total for accounts 1000 through 1099, and another class total for accounts 1100 through 1199, and so on. If you classify accounts by three digits, the report will include a class total for accounts 1100 through 1110,and another class total for accounts 1111 through 1119, and so on. If you classify accounts by all four digits, each object account will have its own class total; subsidiary accounts to a single object will be included in the class total. The system includes class totals at the level you specify and at lower levels. For example, if you classify accounts by two digits, the report will include a class total for accounts 1000 through 1999 in addition to the class totals for accounts 1000 through 1099, 1100 through 1199, and so on. Enter a number that corresponds to the number of account number digits you want to use to classify accounts. Valid values are: 1 Classify by the first digit of the account number. 2 Classify by the first two digits of the account number. 3 Classify by the first three digits of the account number. 4 Classify by all four digits of the account number. If you leave this processing option blank, the report will not include any class totals. You can use this processing option in conjunction with the Last Balance Sheet Account processing option to include subtotals for balance sheet and profit-and-loss accounts. If you do not specify a Class Total Level, the report will not include subtotals for balance sheet and profit-and-loss accounts.
4. Last Balance Sheet Account Use this processing option to specify where the balance sheet accounts end and the profit and loss accounts begin in the alternate chart of accounts. This processing option works in conjunction with the Class Total Level processing option. The system ends the balance sheet accounts and begins the profit and loss accounts at the end of the class that contains the account number you specify. For example, if you specify account number 622000 with Class Total Level 1, the system ends the balance sheet accounts with class 6 (the first digit of 622000). If you specify account number

398
622000 with Class Total Level 2, the system ends the balance sheet accounts with class 62 (the first two digits of 622000). If you do not specify a Class Total Level the report will not include subtotals for balance sheet and profit-and-loss accounts.
Process Tab
This processing option determines whether you run this report in proof or final mode.
1. Mode
Blank = Proof
1 = Final
Use this processing option to specify the mode in which you want to run this report. Valid values are:
0 Run the report in proof mode.
1 Run the report in final mode.
If you leave this processing option blank, the report will run in proof mode.
Caution: You can run this report in final mode only once for the selected period and fiscal year. The transactions that are printed in final mode will not appear if you run the report again.

399
Printing the General Ledger Report
Use one of the following navigations:
From the French Reports menu (G093151), choose G/L by Category Code, or G/L by Object and Subsidiary.
From the Italian Reports menu (G093152), choose G/L by Category Code, or G/L by Object and Subsidiary.
From the Spanish Reports menu (G74S09), choose G/L by Category Code, or G/L by Object and Subsidiary.
You can use the General Ledger report as a basis for internal auditing to validate information in legal reports. You can also use the General Ledger report as a basis for external auditing by a third party, such as a fiscal authority or auditing firm.
The General Ledger report includes detailed information about account transactions. You can use the report to:
• Review transactions within individual accounts.
• Research accounts that are out-of-balance.
• Verify account accuracy.
• Open and audit accounts with the same control totals as the journal report.
The General Ledger report includes the following information:
• All of the transactions that are printed on the General Journal report (R7409C5)
• A period debit and credit total for each account
• A total balance in debit and credit format
• Beginning and ending balances for each account
• A balance forward for each account
• Accumulation of amounts from different ledger types for the same account
• Transactions that are based on a period selection or a date range selection
• G/L registration numbers for each transaction
• Currency codes for each transaction
• Company codes and names on the header of the report
• Business units (optional)
• Accounts with zero balances (optional)
You can print the General Ledger report by object and subsidiary, or by category code, depending on whether your accounts are defined in the Account Master table by object and subsidiary, or in category codes 21, 22, or 23.
Note
If you print General Ledger reports by object and subsidiary, you can review the accumulation of up to three ledger types for the same account. You specify which ledger types to include

400
on the report in the processing options. The Ledger Type processing option replaces the user defined code 74/LT.
Processing Options for General Ledger by Object and Subsidiary (R7409C1)
Select Tab
Use these processing options to specify the time period for which the general ledger report will be printed. The Fiscal Dates processing options are required.
You also use these processing options to specify the ledger types to include on the report. For example, you can specify the BA (budget amounts) ledger type to print a report of budget amounts.
You can specify as many as three ledger types. If you specify more than one ledger type, the system lists transactions for all of these ledgers on the report. However, totals on a report that includes more than one ledger type are probably meaningless because they contain multiple currencies.
If you specify the CA (foreign currency) ledger type and the CA ledger type includes amounts for multiple currencies, totals are also meaningless.
If you leave all three ledger types blank, the system reports only on ledger type AA.
1. Fiscal Dates
Beginning Period Number
Use this processing option to specify the first period for which the general ledger report will be printed.
Beginning Fiscal Year
Use this processing option to specify the fiscal year of the first period for which the general journal report will be printed.

401
Ending Period Number
Use this processing option to specify the last period for which the general journal report will be printed.
Ending Fiscal Year
Use this processing option to specify the fiscal year of the last period for which the general journal report will be printed.
2. Ledger Type 1
Use this processing option to specify the first ledger type you want to report on. Valid values are found in UDC 09/LT.
3. Ledger Type 2
Use this processing option to specify the second ledger type you want to report on. Valid values are found in UDC 09/LT.
4. Ledger Type 3
Use this processing option to specify the third ledger type you want to report on. Valid values are found in UDC 09/LT.

402
Print Tab
Use these processing options to specify whether various elements print on the G/L by Object and Subsidiary report.
1. Subledger/Type
Blank = Do not include the subledger and subledger type columns.
1 = Include the subledger and subledger type columns.
Use this processing option to specify whether you want to print the subledger and subledger type columns on the report. Valid values are:
Blank Do not print the subledger and subledger type columns.
1 Print the subledger and subledger type columns.
2. Business Unit
Blank = Do not include the business unit column.
1 = Include the business unit column.
Use this processing option to specify whether the report should include a column that lists the business unit for each account. Valid values are:
Blank Do not include the business unit column.
1 Include the business unit column.

403
3. Level Break on Business Unit
Blank = Level break on Business Unit
1 = Do not level break on Business Unit
Use this processing option to specify the model business unit that contains the account descriptions you want to use. If you leave this processing option blank, the transaction account descriptions will be used.
4. Model Business Unit
Use this processing option to specify whether the system should omit accounts with zero balances in the selected period.
Valid values are:
Blank
Include accounts with zero balances.
1
Omit accounts with zero balances.
5. Accounts with Zero Balances
Blank = Omit accounts with zero balances.
1 = Include accounts with zero balances.

404
Use this processing option to soecuft whether the system should print unposted transactions on the report. Valid values are:
Blank Print posted transactions only.
1 Print posted and unposted transactions.
6. Unposted Transactions
Blank = Include posted transactions only.
1 = Include posted and unposted transactions.
Use this processing option to specify whether the system should print separate totals for posted and unposted transactions on the report. Valid values are:
Blank Do not print totals for posted and unposted transactions.
1 Print totals for posted and unposted transactions.
Note: You can print totals for posted and unposted transactions only if you have set the Unposted Transactions processing option to print both posted and unposted transactions.
Versions Tab
Use this processing option to specify which version of the report you want to run.

405
1. Version Blank = Print French report 1 = Print Italian report Use this processing option to specify either the French or Italian version of the G/L by Object and Subsidiary report. The French version of the report lists the batch number and batch type for each transaction. The Italian version of the report omits the batch number and batch type columns and lists instead the G/L registration number and currency code for each transaction. Valid values are: Blank French version 1 Italian version
Process Tab
This processing option specifies whether you run this report in proof or final mode.
1. Mode Blank = Proof 1 = Final Use this processing option to specify the mode in which you want to run this report. Valid values are: Blank Run the report in proof mode. 1 Run the report in final mode. If you leave this processing option blank, the report will run in proof mode. Note: When you run this report in final mode, only those records that have been printed in final mode on a trial balance report (R7409C3 or R70472) will be printed.
Currency Tab
These processing options allow you to show amounts in a currency other than the currency in which the amounts are stored on the system. These processing options allow you to view amounts in a different currency as a hypothetical scenario only; the amounts that appear in the different currency are not saved to the system.

406
1. As-If Currency Blank = The As-if currency grid column does not appear. Or, enter the code for As-if currency. Use this processing option to show amounts in a currency other than the currency in which the amounts are stored on the system. The system translates and shows domestic amounts in this as-if currency. For example, an amount in FRF can appear as if it is in EUR. Enter the code for as-if currency. If you leave this processing option blank,the as-if currency grid column does not appear. Note: This processing option allows you to view amounts in a different currency as a hypothetical scenario only. The amounts that appear in the different currency are not saved to the system.
2. As-Of Date Blank = The system uses the system date. Or, enter the As-of date. Use this processing option to specify an as-of date if you enter a currency code for the As-If Currency processing option. This option processes the exchange rate as of the date you specify. Enter the as-of date. If you leave this processing option blank, the system uses the system date. Note: A valid exchange rate must exist in the exchange rate table between the two currencies based on the as-of date.
Processing Options for G/L by Category Code (R70470)
Select Tab
Use these processing options to specify the beginning and ending dates, and ledger types for the report.
407
1. Fiscal Dates
Beginning Period Number
Use this processing option to specify the first period for which the general ledger report prints.
Beginning Fiscal Year
Use this processing option to specify the fiscal year of the first period for which the general journal report prints.
Ending Period Number
Use this processing option to specify the last period for which the general journal report prints.
Ending Fiscal Year
Use this processing option to specify the fiscal year of the last period for which the general journal report prints.
2. Ledger Types
408
Ledger Type 1
Use this processing option to specify the first ledger type on which you want to report. Valid values are found in UDC 09/LT.
Ledger Type 2
Use this processing option to specify the second ledger type on which you want to report. Valid values are found in UDC 09/LT.
Ledger Type 3
Use this processing option to specify the third ledger type on which you want to report. Valid values are found in UDC 09/LT.
Print Tab
Use these processing options to specify the information to appear on the report.

409
1. Account Category Code
R021 = Category code 21
R022 = Category code 22
R023 = Category code 23
Use this processing option if you want the system to include account numbers from an alternate chart of accounts on the report. Enter the category code that contains the alternate chart of accounts.
2. Subledger/Type
Blank = Do not include the subledgerand subledger type columns.
1 = Include the subledger and subledger type columns.
Use this processing option to specify whether you want to print the subledger and subledger type columns on the report.
3. Business Unit
Blank = Do not include the business unit column.
1 = Include the business unit column.
Use this processing option to specify whether you want the report to include a column that lists the business unit for each account.

410
4. Accounts with Zero Balances
Blank = Do not include accounts with zero balances.
1 = Include accounts with zero balances.
Use this processing option to specify whether you want the system to omit accounts with zero balances in the selected period.
Valid values are:
Blank = Do not include accounts with zero balances
1 = Include accounts with zero balances
5. Unposted Transcations
Blank = Include posted transactions only.
1 = Include posted and unposted transactions
Use this processing option to specify whether you want the system to print unposted transactions on the report.
6. Total for Posted and Unposted Transactions
Blank = Do not include totals for posted and unposted transactions.
1 = Include totals for posted and unposted transactions.
Use this processing option to specify whether separate totals for posted and unposted transactions should print on the report.

411
Note
You can print totals for posted and unposted transactions only if you have set the Unposted Transactions processing option to print both posted and unposted transactions.
7. First Profit and Loss Account
Use this processing option to specify where the balance sheet accounts end and the profit and loss accounts begin in the alternate chart of accounts.
If you complete this processing option, the report includes subtotals for balance sheet and profit and loss accounts.
8. Column Format
Blank = Include batch number and batch type columns.
1 = Include G/L registration number and currency code columns.
Use this processing option to specify which optional columns should be included on the report.
9. Report Sequence
Blank = Sequence by Next Number
1 = Sequence by Period
Use this processing option to specify the data sequencing for the system to use when

412
processing this report. All options include category code as the first item of sequencing. Valid values are:
Blank
Sequence by next number. If you sequence by next number, records are sorted in order of G/L date and assigned a next number for each Account ID. Records are printed on the report in the order of these next numbers. Period totals do not print on the report.
1
Sequence by period. If you sequence by period, records are printed on the report in ascending order by G/L date. Period totals and period end balances print on the report.
Process Tab
Use this processing option to specify whether to run the report in proof or final mode.
1. Mode
Blank = Proof
1 = Final
Use this processing option to specify the mode in which you want to run this report.
Note
When you run this report in final mode, only those records that have been printed in final mode on a trial balance report (R7409C3 or R70472) print.

413
Working with European Union Reporting
Countries that are members of the European Union (EU) observe the Single European Act of 1987. The Single European Act is an agreement that opens markets to an area without internal boundaries, where free movement of goods, persons, services, and capital is assured in accordance with the provisions of the Treaty of Rome.
Because of the Single European Act, businesses in EU countries must adhere to EU requirements. For example, to help monitor the trade among members of the EU, businesses that exceed the limit of intraunion trade must submit the following reports to the customs authorities:
• Intrastat Report
• EC Sales List
Detailed statistical information regarding merchandise trade between members of the EU is used for market research and sector analysis. To maintain the statistics on trade between EU members, the statistical office of the EU and the statistical departments of member countries developed the Intrastat system.
In compliance with the Intrastat system, information on intraunion trade is collected directly from businesses. If you do business in a country that belongs to the EU, and you use J.D. Edwards Sales Order Management and Procurement systems, you can set up your system to extract all of the necessary information to meet EU Intrastat reporting requirements.
Before You Begin
Before you can collect information in the J.D. Edwards system for European Union reporting, you must perform the following tasks:
Set up tax information for the Accounts Payable and Accounts Receivable systems. See Setting Up Tax Rates Area in the Tax Reference Guide.
Set up user defined codes for Intrastat reporting. See Setting Up User Defined Codes for Intrastat Reporting in the Global Solutions Spain Guide.
Intrastat Requirements
Customs formalities and controls at the internal borders between member states of the EU disappeared in 1993 with the creation of the single European market. With the elimination of custom formalities, the traditional systems for collecting statistics on trade between EU member states also disappeared.
Detailed statistical information regarding merchandise trade between members of the EU is important for market research and sector analysis. To maintain the statistics on trade between EU members, the statistical office of the EU and the statistical departments of member countries developed the Intrastat system.
In compliance with the Intrastat system, information on intraunion trade is collected directly from businesses. Periodically, businesses are required to send a statistical declaration or, in some member states, a combined statistical and fiscal declaration that gives detailed information regarding their intraunion trade operations of the previous period. The frequency with which you are required to submit these declarations depends on national requirements.

414
The major features of the Intrastat system are common in all member states, but the system can take national specifications into account. If you do business in a country that belongs to the EU and you use J.D. Edwards Sales Order Management and Procurement systems, you can extract all of the information that is necessary to meet Intrastat reporting requirements.
Note
The information that is tracked by the Intrastat system is based strictly on the actual physical movement of goods between member countries of the EU. Intrastat information does not apply to the movement of monetary amounts or the placement of orders between member countries.
The following graphic illustrates the J.D. Edwards Intrastat reporting process:

415
Intrastat Reporting and the Euro
With the introduction of the euro, the Statistical Office of the European Communities (Eurostat) and the national Statistical Offices of the Economic and Monetary Union (EMU) member nations have changed their Intrastat reporting requirements. Each EMU member nation, however, continues to determine its own Intrastat requirements.
Regardless of whether your company has converted its base currency to the euro, you can handle the Intrastat reporting requirements for the country in which you do business. The following examples describe situations that might apply to your company:
• Your company has not converted its base currency to the euro, but the Statistical Office of the EMU member nation in which you do business requires that you submit Intrastat reports in the euro.
• Your company has converted its base currency to the euro, but the Statistical Office of the EMU member nation in which you do business requires that you submit reports in an alternate currency.
For Intrastat reporting, the "as if" currency processing options in the Intrastat generation programs (R0018I1 and R0018I2) provide a simplified approach to reviewing and printing amounts in a currency that is different from your base currency.
Considerations for Creating Intrastat Reports
Before you create Intrastat reports, determine the following:
• The base currency of each of your companies
• The currency in which you must submit Intrastat reports for each of your companies
If your business has multiple companies with multiple currencies, you should approach your Intrastat reporting carefully. You should always be aware of each company's base currency, and whether Intrastat reports must be in the euro or an alternate. This information helps to ensure that you convert currencies for Intrastat reporting only if necessary.
Based on the Intrastat reporting requirements for your companies and the countries in which you do business, you can use the processing options and data selection to create different versions of Intrastats - Tax Update – Sales (R0018I1) and Intrastats – Tax Update – Purchasing (R0018I2).
See Also Updating Intrastat Information in the Global Solutions Spain Guide for information
about euro considerations when updating the Intrastat Revision table (F0018T)
Updating Intrastat Information
Use one or both of the following navigations:
From the Periodic Processing menu (G74STAT2), choose Intrastat Workfile Generation – Sales.

416
From the Periodic Processing menu (G74STAT2), choose Intrastat Workfile Generation – Purchase.
J.D. Edwards Intrastat reporting is based on the Intrastat Revision table (F0018T). This workfile is populated with information from the Sales Order Management, Procurement, and other systems. You run Intrastat reports based on your company's sales and procurement transactions for the reporting period. When you do this action, the update process writes all of the required information from the tables in the Sales Order and Procurement systems to the F0018T table.
Use the following programs to update the F0018T table:
Intrastat Workfile Generation - Sales
Updates the F0018T table with sales information based on the following tables:
• Sales Order Header File (F4201) • Sales Order Detail File (F4211)
Intrastat Workfile Generation - Purchase
Updates the F0018T table with purchase information based on the following tables:
• Purchase Order Header (F4301) • Purchase Order Detail File (F4311) • Purchase Order Receiver File (F43121)
In addition, the update programs collect information from the following tables:
• Intrastat Supplier/Item Cross Reference Table (F744101)
• Inventory Constants (F41001)
• Business Unit Master (F0006)
• Company Constants (F0010)
• Currency Codes (F0013)
• Currency Restatement Rates File (F1113)
• Item Master (F4101)
• Item Branch File (F4102)
• Address Book Master (F0101)
• Address by Date (F0116)
• Order Address Information (F4006)
• Item Units of Measure Conversion Factors (F41002)
• Unit of Measure standard conversion (F41003)
• User Defined Codes (F0005)
When you run the update programs, you use processing options and data selections to select transactions that are based on a number of different criteria in the sales and procurement tables. Depending on the structure of your company and country-specific reporting requirements, you can specify that the system write records at cost, cost plus markup, or at the taxable purchase price. If you want to report the quantity actually shipped rather than the quantity ordered, you can use data selection to select order lines from the sales and procurement tables that are based on the order activity rule which corresponds to the shipped status. The system verifies that the transactions meet your selection criteria and qualify for

417
Intrastat reporting before writing the required information from the sales and procurement tables, and any other applicable information from the additional tables, to the Intrastat Revision table.
To ensure that table F0018T contains the most current information, you should periodically update the information in table F0018T. The update program for sales accesses the detail for your sales transactions in table F4211. If you automatically purge the sales details to the Sales Order History File table (F42119) when you run the Sales Update program (R42800), run the Intrastat generation program for sales after you confirm shipments and before you update sales information. You should update table F0018T at least once per reporting period, after all sales order and purchase order transactions are entered and finalized.
Note
If you change sales order or purchase order information after you generate table F0018T, your changes are not reflected in the F0018T table unless you regenerate the table or manually edit the table using the Intrastat Revision program (P0018T). See Revising Intrastat Information in the Global Solutions Spain Guide for information about manually editing the Intrastat Revision table.
Transaction Eligibility Sales Order transactions are not eligible for Intrastat reporting if either the Sold To country or the Ship To country is the same as the Declarant country, or if any of these countries (Sold To, Ship To, or Declarant) is not in the European Union.
Procurement transactions are not eligible for Intrastat reporting if either the Supplier country or the Ship From country is the same as the Declarant country, or if any of these countries (Supplier, Ship From, or Declarant) is not in the European Union.
The system retrieves the Ship To country from the Order Address Information table (F4006), if a record exists. Otherwise, the system retrieves the Ship To country from the Sales Order Detail File table (F4211).
The system retrieves the Ship From country by searching the following tables in sequence:
7. Country (CTR) in the Address by Date table (F0116), using the supplier’s address book record
8. Country (CTR) in the Order Address Information table (F4006)
9. Country of Origin (ORIG) in the Intrastat Supplier/Item Cross Reference table (F744101)
In table F744101, the Country of Origin (ORIG) is used to determine transaction eligibility for Intrastat reporting. The Original Country of Origin (ORGO) is for information only. The Original Country of Origin field is populated by the Country of Origin (ORIG) field in the Item Branch File table (F4102) when you generate table F0018T.
Note
You must include codes for all European Union countries as valid values on UDC 74/EC (European Community Members).

418
Caution
Changes to transaction eligibility that occur after you generate table F0018T are not recognized when you regenerate table F0018T using the processing option to refresh it. J.D. Edwards recommends that you generate table F0018T only after you have completed all relevant changes to shipping and receiving information for the reporting period. If you must override addresses and change the transaction eligibility after generating table F0018T, you should clear and completely regenerate table F0018T.
Triangulation
The Intrastats – Tax Update - Sales program (R0018I1) includes processing options for triangulation. However, the program has no logic to identify triangulation. Rather, the processing options allow you to indicate how to process interbranch records. If you use the processing options, the header branch/plant from table F4211 is written to table F0018T as the declaring company. Using the processing options also affects the document type and the taxable amount. Three separate taxable amounts can be written to the TAXA field in the Intrastat Revision table:
• The amount extended price (AEXP)
• The amount original cost (ECST)
• The amount total extended cost (TCST)
The amounts are retrieved for the header or detail branch/plant, depending on the processing option fields that you choose.
If you do not use the triangulation processing options, the detail branch/plant from table F4211 is always written to table F0018T as the declaring company; and the document type is always the type that is entered on the sales order.
For the Intrastats - Tax Update - Purchase program, you can specify the actual Ship From in table F4006. For example, suppose that the purchase order specifies the branch/plant (declarant) as Italy, and the supplier as Switzerland. However, when the goods are received, the customs note indicates that the goods were shipped from France. You should specify the actual Ship From in the Order Address table as France to ensure that the transaction is included in the Intrastat Revision table correctly.
Multicurrency Environments
In multicurrency environments, the system creates records in table F0018T based on the base currency of the Sales branch/plant or the Purchasing branch/plant for each transaction.
You might need to restate the domestic amounts of foreign transactions at an official exchange rate or a monthly average exchange rate. To do this restatement, use the processing options on the Currency tab to indicate the exchange rate type and the date for the exchange rate. The system recalculates the domestic amount based on the rate and date that are indicated in the processing options. The exchange rate is taken from table F1113.
“As If” Currency Processing
To use "as if" currency processing for the Intrastats – Tax Update - Sales and Intrastats – Tax Update - Purchasing programs, you must set processing options. These programs, unlike other programs that use "as if" currency processing, write amounts to a table. Other programs display or print "as if" currency amounts, but do not write amounts to a table.

419
If you use "as if" currency processing, you lose the direct audit trail for the amount fields between table F0018T and the original tables in the Sales Order Management and Procurement systems.
Performance Considerations
Depending on your data selection and the number of transactions stored in the Sales Order and Procurement systems, the time that is required to run the Intrastat Generation programs varies. To minimize the impact that these programs have on system performance, do the following:
• Specify your data selection as carefully as possible so that only the necessary records are written to table F0018T.
• Update table F0018T as part of your nightly operations.
Before You Begin Set up the user defined code tables that are used in Intrastat reporting. See Setting
Up User Defined Codes for Intrastat Reporting in the Global Solutions Spain Guide.
Set up commodity codes. See Setting Up Commodity Code Information in the Global Solutions Spain Guide.
For Sales, set up country codes for the selling business unit (header business unit), shipping business unit (detail business unit), and customer in the Address Book. See Creating and Revising Address Book Records in the Address Book Guide.
For Procurement, set up country codes for the branch/plant and supplier in the Address Book, or enter countries of origin in the Intrastat Item/Supplier Cross Reference program (P744101). See Entering Cross-References for Items and Suppliers in the Global Solutions Spain Guide.
Processing Options for Intrastat Workfile Generation – Sales (R0018I1)
Transaction
1. To use the Reporting Code method, enter the Sales Reporting Code (1-5) which contains the Nature of Transaction.
-Or-
To use the User Defined Code method, enter the UDC table which contains the Nature of Transaction. If no values are entered in this option, table 74/NT will be used.
System Code
User Defined Codes
2. Enter '1' to refresh transactions that already exist in the Intrastat Work File (F0018T). If left blank, only new transactions will be written.

420
Defaults
1. Enter a value to update all records written during this execution for VAT Regime.
-Or-
Enter a User Defined Code table which contains the value to be used. If no values are entered in this option, the table 74/NT will be used.
System Code
User Defined Codes
2. Enter a value to indicate if the Statistical Value Calculation is required.
Blank = Not Required
1 = Required
3. Enter the constant value per Kg to be used for Statistical Value Calculation. (Statistical Amount = Constant * Net Mass in KG + Taxable Amount.
3. To use the percentage method, enter the percentage to be used. (for example, 105 = 105% of actual value). If no values are entered in these options, the statistical value will be equal to the actual value.
Currency
1. Enter the currency code for as-if currency reporting. This option allows for amounts to print in a currency other than the currency they are stored in. Amounts will be translated and print in this as-if currency. If left blank, amounts will print in their database currency.
2. Enter the As-Of date for processing the current rate for the as-if currency. If left blank, the system date will be used.
3. To restate domestic amounts of foreign transactions at an official or monthly average exchange rate enter the rate type and date here.

421
Rate Type
Date - Effective
Process
TRIANGULATION RECORDS:
For the following situations, specify the records to be created by entering the value to be used followed by the document type for the record. The possible values are:
' ' = Record not created
'1' = Price
'2' = Cost
'3' = Transfer Cost
Leave the document blank to use the original document type.
Examples:
"3SI" = Transfer Cost, Document Type SI
"2 " = Cost, Original Document Type
1. Header Branch and Customer in the same country, Detail Branch in a different country:
Export from Header to Customer
Export from Detail to Customer
Export from Detail to Header
Import from Header to Detail
2. Header Branch and Detail Branch in the same country, Customer in a different country:
Export from Header to Customer
Export from Detail to Customer
3. Header Branch, Detail Branch and Customer in different countries:

422
Export from Header to Customer
Export from Detail to Customer
Export from Detail to Header
Import to Header from Detail
Processing Options for Intrastat Workfile Generation – Procurement (R0018I2)
Process
1. Enter the Purchasing Report Code (1-5) which contains the Nature of Transaction;
- Or -
Enter the User Defined Code table which contains the Nature of the Transactionto. If no values are entered in this option, table 74/NT will be used.
System Code
User Defined Codes
2. Enter '1' to refresh transactions that already exist in the Intrastat Work File (F0018T). If left blank, only new transactions will be written.
3. Enter a '1' to use the Intrastat Supplier/Item Cross-Reference Table (F744101) for Country of Origin.
4. Enter a '1' to use the Intrastat Supplier/Item Cross-Reference Table (F744101) for Original Country of Origin.
Defaults

423
1. Enter a value to indicate if the Statistical Value Calculation is required.
Blank = Not Required 1 = Required
2. Enter a percent to use for calculating Statistical Value. (For example, 105 = 105% or actual value)
- Or -
Enter the constant value per KG to be used. (Statistical Amount = Constant * Net mass in Kg + Taxable Amount)
If no values are entered, the statistical value will be equal to the actual value.
3. Enter a value to Statistical Procedure to update all records with.
- Or -
Enter the User Defined Code table which contains the value to be used. If no values are entered in this option, the table 74/NT will be used.
System Code
User Defined Codes
Currency
1. Enter the currency code for as-if currency reporting. This option allows for amounts to print in a currency other than the currency stored in. Amounts will be converted and printed in this as-if currency.
2. Enter the As-Of date for processing the exchange rate for the As-If currency. If left blank, the system date will be used.
3. To restate domestic amounts of foreign transactions at an official or monthly average exchange rate enter the rate type and date here.

424
Exchange Rate Type
Date Exchange Rate Effective
Revising Intrastat Information
You can revise existing data in the Intrastat Revision table (F0018T). You might need to do this revision to correct missing or inaccurate information, to add a specific transaction, to update the process indicator, or to enter information in fields that are required by the authorities but are not populated by the J.D. Edwards system. You can also use the Intrastat Revision program (P0018T) to update sales order or purchase order information that has changed since you generated table F0018T.
Before You Begin Run the Intrastats – Tax Update - Sales (R0018I1) and Intrastats – Tax Update -
Purchasing (R0018I2) programs to build the Intrastat Revision table (F0018T). See Updating Intrastat Information in the Global Solutions Spain Guide.
► To revise Intrastat information
From the Periodic Processing menu (G74STAT2), choose Intrastat Workfile Revision.
1. On Work with Intrastat Tax File - 1993 EEC, locate and choose a record, and then click Select.

425
2. On Intrastat Tax File Revision, revise the information in any of the following fields on the Detail tab:
• Company
• Branch/Plant
• Ship To/From
• Document Company
• Document Number
• Document Type
• Line Type
• G/L Date
• Invoice Date
• Actual Ship
• Receipt Date
3. Click the Amounts tab and revise the information in any of the following fields:
• Net Mass in KG

426
• Base Currency
• Taxable Amount
• Statistical Value Amount
• Transaction Currency
• Foreign Taxable Amount
• Foreign Statistical Value
• Supplementary Units
4. Click the Codes tab, revise the information in any of the following fields, and then click OK:
• Country of Origin
• Original Country of Origin
• Region of Origin or Destination
• Mode of Transport
• Conditions of Transport
• Nature of Transaction
• Port of Entry or Exit
• Nature of VAT Regime
• Nature Code
• Process Indicator
• Commodity Code
Purging Records from the Intrastat Table
From the Periodic Processing menu (G74STAT2), choose Intrastat Workfile Purge.
The Intrastat Revision table (F0018T) is a temporary workfile that stores information that is used to generate monthly or quarterly Intrastat declarations. After the declarations have been accepted by the tax authority, the data in this file continues to accumulate. You do not need to store this data.
You can purge records from table F0018T. You can use data selection to purge all of the records in the file or purge only selected records. You can specify selection criteria based on

427
the invoice date, general ledger date, procurement date, or shipment date. For example, you might purge records with shipment dates between 3/1/1999 and 5/1/1999.
You can run Intrastat Workfile Purge (R0018TP) in proof mode or final mode. Run the program in proof mode to review which records will be deleted. No records are deleted until you run the report in final mode.
Processing Options for Intrastat Workfile Purge (R0018TP)
Defaults Tab
Use these processing options to specify whether to run the program in proof or final mode, and to specify the dates to use to select transactions.
1. Proof or Final Mode
Use this processing option to specify the mode in which you want to run this report. Final mode deletes all selected records from the Intrastat Revision table (F0018T).
Valid values are:
Blank
Run the report in proof mode.
1
Run the report in final mode.
2. From Date (Required)
Use this processing option to specify the beginning date of the records you want to purge. This date is used with the date specified for comparison. The system purges records whose comparison date is greater than or equal to the From Date and less than or equal to the Thru Date.

428
3. Thru Date (Required)
Use this processing option to specify the last date of the records you want to purge. This date is used with the date specified for comparison. The system purges records whose comparison date is greater than or equal to the From Date and less than or equal to the Thru Date.
4. Compare Date (Required)
Blank = Invoice date
1 = G/L date
2 = Receipt date
3 = Ship date
Use this processing option to specify which date to use for comparison.
Valid values are:
Blank
Invoice date
1
G/L date
2
Receipt date
3
Ship date
429
Using the IDEP/IRIS Interface for Intrastat Reporting
From the Statistical Reports menu (G74STAT3), choose IDEP CN8 / IRIS Interface.
IDEP/IRIS is an abbreviation for Intrastat Data Entry Package/Interactive Registration of the International Trade Statistics. Use IDEP CN8/IRIS Interface (R0018I3) to generate an electronic Intrastat declaration in any of the following formats, which are used in the specified countries:
IDEP/CN8 France, Italy, Spain, Austria, Belgium, Sweden, Denmark, Finland, Portugal, Greece, Ireland, and Luxembourg
CBS-IRIS Holland
CBS-IRIS Germany
Intrastat declarations are based on the information in the Intrastat Revision table (F0018T). Although the information that is required to appear on the Intrastat report is common for most EU members, reporting requirements vary by country.
Note
Neither the IDEP/CN8 format nor the CBS-IRIS format requires a specific file layout.
IDEP/CN8 - France, Italy, Spain, Austria, Belgium, Sweden, Denmark, Finland, Portugal, Greece, Ireland, and Luxembourg
IDEP/CN8 includes an option to import the data that is necessary for the statistical declaration from an external administrative and financial system. IDEP/CN8 does not require a fixed record layout for the import file. You need to define the format of the data to be imported in IDEP/CN8. IDEP/CN8 can automatically perform the required conversions and validations of the data, and produce the declaration.
In IDEP/CN8, you can import the following information:
• Detail lines
• Good codes for the provider of statistical information
• VAT registration numbers of trading partners
• Exchange rates
Although you can import all of the information above, the J.D. Edwards Interface with IDEP/CN8 provides the ability to import only the detail lines and the VAT registration numbers or the trading partners. For sales transactions, the VAT registration number of the customer is based on the declaration type. For statistical declarations, the system uses the value in the Ship To - Address Number field. For fiscal or complete declarations, the system uses the Sold To - Address Number. Because the default declaration type is complete, the VAT registration number uses the Sold To - Address Number by default. For procurement transactions, the system uses the VAT registration number of the supplier.

430
Note
For B73.3.2 and OneWorld Xe, the Sold To address number is stored in user-reserved field URAB of the Intrastat Revision table (F0018T).
Before importing this information from an external system, such as from J.D. Edwards to IDEP/CN8, you need to specify the format of the file to be imported. After you specify the format, you need to indicate the structure of the file to be imported (field sequence, field number, field size, and so forth) into IDEP/CN8.
The following table illustrates the structure that you must set up for an IDEP/CN8 file:
Field Position[Length] Declarant Reference Number 1-14[14] Partner VAT number 16-35[20] Original Country of Origin 37-39[3] Country of Origin 41-43[3] Nature of Transaction A 45-45[1] Nature of Transaction B 47-47[1] Statistical Procedure 49-53[5] Mode of Transport 55-55[1] Port of Entry 57-60[4] Region of Origin 62-63[2] Terms of Delivery 65-67[3] Related Location 1 Identity 69-69[1] Commodity Code 71-78[8] Goods Description 80-219[140] Supplementary Unit 221-233[13] Net Mass 235-248[12,2] Invoice Value 250-262[13] Foreign Invoice Value 264-276[13] Statistical Value 278-289[10,2] Foreign Statistical Value 291-302[10,2] Currency Code 304-306[3] Declaration Type 307-307[1]
Note
The comma in the Net Mass, Statistical Value, and Foreign Statistical Value field lengths listed above denotes that a decimal point can be used before the last two characters in those field lengths.

431
CBS-IRIS - Holland
The Dutch version of CBS-IRIS requires no fixed record layout for the import file. However, you must map the data coming from an import file in CBS-IRIS.
Note
The data to be imported must be in flat file format. Also, you must indicate the first position and the number of positions of each field to be imported from the flat file. The number of positions to import should not exceed the number of positions that is defined in CBS-IRIS for the field. The fields cannot overlap. You should end each field with a carriage return and a line feed.
In CBS-IRIS, the file containing the data to be imported should be a “blank-separated txt-file” (this type of file can be compared with a Microsoft Excel file that is saved as a text file with blanks as separation characters).
In CBS-IRIS, you can leave the fields blank, as long as the positions defined are correct (in other words, each blank stands for one position in the record).
The following table illustrates the structure that you must set up for an CBS-IRIS - Holland file:
Field Position[Length] Declarant Reference Number 1-10[10] Del VAT Number 12-23[12] Partner VAT Number 25-42[18] Original Country of Origin 44-46[3] Country of Origin 48-50[3] Nature of Transaction A 52-52[1] Statistical Procedure/Nature of VAT Regime 554-55[2] Mode of Transport 57-57[1] Port of Entry 59-60[2] Commodity Code 62-69[8] Tariff Code 71-72[2] Currency Code 74-74[1] Supplementary Unit 76-85[10] Net Mass 87-96[10] Invoice Value 98-107[10] Statistical Value 109-118[10] Commodity Flow 120-120[1] Reporting Period 122-127[6]
CBS-IRIS - Germany
The German version of CBS-IRIS requires no fixed record layout for the import file. However, you must map the data coming from an import file. For each field imported in the flat file

432
format, you need to set up the beginning position and the length of the field. The following table illustrates the structure that you must set up for a CBS-IRIS - Germany file:
Field Position[Length] Declarant VAT Number 1-16[16] Original Country of Origin 18-20[3] Country of Origin 22-24[3] Nature of Transaction 26-27[2] Statistical Procedure/Nature of VAT Regime 29-33[5] Mode of Transport 35-35[1] Port of Entry 37-40[4] Region of Origin 42-44[3] Commodity Code 46-53[8] Currency Code 55-55[1] Supplementary Unit 57-65[9] Net Mass 67-75[9] Invoice Value 77-85[9] Statistical Value 87-95[9] Commodity Flow 97-97[1] Reporting Period 99-104[6]
Grouping Transactions
To group transactions for sales, purchases, and adjustment declarations, set up versions of the IDEP/IRIS Interface program (R0018I3) that have data selection for sales orders, purchase orders, adjustments for sales orders, and adjustments for purchase orders based on document type.
Electronic Format
Use the IDEP/IRIS Interface program (R0018I3) to create a flat file in the IDEP/IRIS message format, which you can than submit to the proper tax authorities in an electronic format.
The IDEP/IRIS Interface program generates one record for each declaring company.
When you run the IDEP/IRIS Interface program, the system creates a batch for review by the Text File Processor program (P007101). The batch is stored in the following tables:
• F007101 - Text Processor Header
• F007111 - Text Processor Detail Table
You must run the Text File Processor program to convert the batch to a flat file that you can submit to the different countries' customs authorities, statistical offices, or both.
The Text File Processor program assigns the batch number and interchange from the seventh field of next numbers for system 00. The Text File Processor assigns the message number from the fifth field of next numbers for system 74.
See Also Setting Up System Next Numbers in the General Accounting Guide

433
Before You Begin Run the Intrastats – Tax Update - Sales (R0018I1) and Intrastats – Tax Update -
Purchasing (R0018I2) programs to build the Intrastat Revision table (F0018T). See Updating Intrastat Information in the Global Solutions Spain Guide.
Processing Options for IDEP CN8/IRIS Interface (R0018I3)
Defaults Tab
1. Tax ID
Blank = Tax ID
1 = Additional Tax ID
Use this processing option to specify which tax ID to use for the company and the customer. You can retrieve the tax ID from either the Additional Tax ID field (ABTX2) or the Tax ID field (ABTAX) in the Address Book Master table (F0101).
Valid values are:
Blank
Tax ID (ABTAX)
1
Additional Tax ID (ABTX2)
2. Country Code
Blank = ISO Code
1 = GEONOM Code

434
Use this processing option to specify which format to use for the country code.
Valid values are:
Blank
Two-character ISO code. You must enter a two-character ISO code that is defined in UDC 00/CN.
1
Three-digit GEONOM code. You must enter a three-digit GEONOM code that is defined in the special handling code field of UDC 00/CN.
3. Declaration Type (UDC 74/IT)
1 = Fiscal
2 = Statistical
3 = Complete
Use this processing option to specify the Intrastat declaration type (required for IDEP).
Valid values are:
1
Fiscal
2
Statistical

435
3
Complete
The codes that correspond to these declaration types are maintained in the Intrastat Declaration Type UDC (74/IT).
For IDEP, the code specified in the special handling code for the UDC is written to the text field in the Text Processor Detail table (F007111). This special handling code is also used to determine the VAT registration number for sales transactions. For statistical declarations, the system uses the Ship To - Address Number. For fiscal or complete declarations, the system uses the Sold To - Address Number.
Process Tab
1. Interface Type
Blank = IDEP
1 = IRIS Holland
2 = IRIS Germany
Use this processing option to specify the interface type for which the data should be formatted.
Valid values are:
Blank
IDEP
1
Dutch version of IRIS
2
German version of IRIS

436
2. Commodity Flow
Use this processing option to specify the direction of the movement of goods.
Valid values for Holland are:
6
Arrivals
7
Dispatches
For valid values for Germany, consult your CBS-IRIS documentation.
Note: This option is required only for the IRIS interface.
3. Level of Detail
Blank = No summary
1 = Summary
Use this processing option to specify whether the program should be run in detail or summary mode. In detail mode, the system reports on all transactions. In summary mode, the system summarizes the transactions according to the version you set up.
Valid values are:
Blank
Detail mode
1

437
Summary mode
Note: The level of summarization is determined by the version sequencing. If any sequenced field value changes, a level break occurs and a summarized record is written to the text file.
4. Proof or Final Mode
Blank = run IDEP/IRIS Interface in Proof mode
1 = run IDEP/IRIS Interface in Final mode
Use this processing option to specify the mode in which you want to process the IDEP/IRIS Interface. Final mode updates the Text Processor Header table (F007101) and the Text Processor Detail table (F007111).
Valid values are:
Blank
Run the IDEP/IRIS Interface in proof mode.
1
Run the IDEP/IRIS Interface in final mode.
Currency Tab
1. As-if Processing Blank = Base Currency 1 = As-if Currency Use this processing option to specify whether the invoice amount and statistical amount are reported to IRIS in the domestic currency or in the as-if currency. Valid values are: Blank Domestic currency

438
1 As-if currency Note: The as-if values can be used only if the Intrastat Revision table (F0018T) has been generated using as-if processing. If you generate the Intrastat Revision table using as-if currency, both the domestic and the as-if amounts are stored in the F0018T table. 2. Number of digits to truncate from monetary amounts Use this processing option to determine how many digits are truncated from monetary amounts. For example, if the value entered is 3, the monetary amount 123456 is truncated to 123. Valid values are 0 - 9.
1. Round Rules
Blank = No rounding
1 = Round to nearest whole amount
2 = Round down to whole amount
3 = Round up towhole amount
4 = Round to the nearest half
5 = Round to the nearest tenth
6 = Round to the nearest hundred
7 = Round to the nearest thousand
Rounding Tab
Taxable Amount Use this processing option to specify the method to round both domestic and foreign taxable amounts. Valid values are: Blank No rounding: 14.66=14.66 1

439
Round to the nearest whole amount: 14.66=15 (no decimals) 2 Round down to the nearest whole amount: 14.66=14 (no decimals) 3 Round up to the nearest whole amount: 14.66=15 (no decimals) 4 Round to the nearest half: 14.66=14.5 (one decimal place) 5 Round to the nearest tenth: 14.66=14.7 (one decimal place) 6 Divide by one hundred and then round: 1674=17 7 Divide by one thousand and then round: 1674=2 Statistical Amount Use this processing option to specify the method to round both domestic and foreign statistical amounts. Valid values are: Blank No rounding: 14.66=14.66 1 Round to the nearest whole amount: 14.66=15 (no decimals) 2 Round down to the nearest whole amount: 14.66=14 (no decimals) 3 Round up to the nearest whole amount: 14.66=15 (no decimals) 4 Round to the nearest half: 14.66=14.5 (one decimal place) 5 Round to the nearest tenth: 14.66=14.7 (one decimal place)
440
6 Divide by one hundred and then round: 1674=17 7 Divide by one thousand and then round: 1674=2 Supplementary UOM Use this processing option to specify the method to round the supplementary unit of measure. Valid values are: Blank No rounding: 14.66=14.66 1 Round to the nearest whole amount: 14.66=15 (no decimals) 2 Round down to the nearest whole amount: 14.66=14 (no decimals) 3 Round up to the nearest whole amount: 14.66=15 (no decimals) 4 Round to the nearest half: 14.66=14.5 (one decimal place) 5 Round to the nearest tenth: 14.66=14.7 (one decimal place) 6 Divide by one hundred and then round: 1674=17 7 Divide by one thousand and then round: 1674=2 Net Mass UOM Use this processing option to specify the method to round the net mass unit of measure. Valid values are:

441
Blank No rounding: 14.66=14.66 1 Round to the nearest whole amount: 14.66=15 (no decimals) 2 Round down to the nearest whole amount: 14.66=14 (no decimals) 3 Round up to the nearest whole amount: 14.66=15 (no decimals) 4 Round to the nearest half: 14.66=14.5 (one decimal place) 5 Round to the nearest tenth: 14.66=14.7 (one decimal place) 6 Divide by one hundred and then round: 1674=17 7 Divide by one thousand and then round: 1674=2
Print Tab
1. Reporting Period
Year (Required) Use this processing option to specify the reporting year. Period (Required) Use this processing option to specify the reporting period.

442
Working with the EC Sales List
If they perform the following functions, businesses in the EU that exceed the local limit of intra-union trade must submit the EC Sales List to their customs authorities on a quarterly basis:
• Supply goods to an entity that is registered for VAT in another EU-member country
• Send goods for processing to an entity that is registered for VAT in another EU-member country
• Return processed goods to an entity that is registered for VAT in another EU-member country
• Transfer goods from one EU-member country to another EU-member country in the course of business
Note
If a sales or purchase transaction is arranged between EU members, but the goods are not shipped, the transaction must still be reported to the government.
You can use either of two EC Sales List programs (R0018L or R0018S) to generate the EC Sales List. Refer to the following table to determine which EC Sales List program you should use:
R0018L
R0018S
Retrieves trade information from the Supply Chain system.
Retrieves trade information from the Financials system.
Bases results on information in the Intrastat Revision table (F0018T).
Bases results on information in the Taxes table (F0018).
Reports trade triangulation in summary and detail mode. You can report triangulation for interbranch transactions, direct ship transactions, or both.
Uses tax rates from the Triangulation Tax Rates UDC (00/VT) to identify trade triangulation.
Can exclude nonstock items. Use data selection on the Intrastat generation programs (R0018I1 and R0018I2) to exclude nonstock items.
Cannot distinguish between stock and nonstock items; use this report only if your business does not provide services.
Does not net trade amounts based on credit memos, discounts, and write-offs.
Nets trade amounts based on credit memos, discounts, and write-offs.
Trade Triangulation
Trade triangulation occurs when one EU member makes a sale or purchase with another EU member, but the goods represented by the transaction are physically shipped from a third EU member. Statistical reports that are submitted to EU authorities must identify trade

443
triangulation transactions. Both the R0018L and R0018S programs identify trade triangulation transactions.
Printing the EC Sales List (R0018L)
From the Statistical Reports menu (G74STAT3), choose EC Sales List.
You can print the EC Sales List (R0018L) in summary or detail mode. Detail mode provides information for auditing.
If you print in summary mode, the EC Sales List provides the following information about customers:
• VAT number
• Country of destination
• Total amount in reporting currency
• Triangulation
If you print in detail mode, the EC Sales List provides the following information about customers in addition to the information above:
• Company order number
• Order type
• Country of sale
• Country of shipment
Triangulation
Triangulation can be reported in summary and detail mode in two ways:
• Interbranch
• Direct ship
Interbranch Identifies as trade triangulation a transaction between two EU member countries in which the goods are shipped from a branch/plant of the supplier who is located in a third EU member country
Direct Ship Identifies as trade triangulation a transaction between two EU member countries in which the goods are shipped directly from a third company that is located in a third EU member country
Data Selection
You must run the EC Sales List separately for each VAT-registered company in your organization.
If you have interbranch shipments from branch/plants that are located in countries other than the country of your headquarters organization, you must submit the EC Sales List for each country within which you operate.
For example, if a German company has three branch/plants in Germany, one branch/plant in France, and one branch/plant in Denmark, that company must run the EC Sales List three times:

444
• For the three branch/plants in Germany
• For the branch/plant in France
• For the branch/plant in Denmark
To run the EC Sales List for the branch/plants in each country, set up data selection with Document Company (KCO) equal to the company number of the headquarters company, and Company (CO) equal to the companies that are associated with each branch/plant.
Note
The companies that are associated with the branch/plants must be set up with the country code that corresponds to the location of the branch/plant.
In the example above, you would run the EC Sales list with the following data selection:
For branch/plants in Germany:
• Document Company (KCO) = German company
• Company (CO) = company for German branch/plant 1
• Company (CO) = company for German branch/plant 2
• Company (CO) = company for German branch/plant 3
For the branch/plant in France:
• Document Company (KCO) = German company
• Company (CO) = company for French branch/plant
For the branch/plant in Denmark:
• Document Company (KCO) = German company
• Company (CO) = company for Danish branch/plant
Before You Begin Enter VAT registration numbers for each customer. See Validating Tax ID Numbers
in the Global Solutions Spain Guide.
Enter country codes for each customer. See Setting Up User Defined Codes for Intrastat Reporting in the Global Solutions Spain Guide.
Run the Intrastats – Tax Update – Sales (R0018I1) and Intrastats – Tax Update - Purchasing (R0018I2) programs to build the Intrastat Revisions table (F0018T). See Updating Intrastat Information in the Global Solutions Spain Guide.
Processing Options for VAT EC Sales List (R0018L)
Process Tab
Use these processing options to specify whether to print the report in summary or detail mode, and to specify the triangulation method to use.

445
1. Reporting Level
Blank = Summary
1 = Detail
Use this processing option to specify whether to run the program in summary or detail mode. If you run the program in detail mode, the report displays information that can be used for auditing.
Valid values are:
Blank
Summary
1
Detail
2. Triangulation
Blank = No Triangulation
1 = Direct Ship and Interbranch
2 = Direct Ship
3 = Interbranch
Use this processing option to specify which triangulation method to use. Trade triangulation occurs when one EU member makes a sale or purchase with another EU member but the goods are physically shipped from a third EU member. If the goods are not shipped from an EU member then the transaction is not required to be reported to the government. This terminology is used specifically in the EU for Intrastat.
Valid values are:

446
Blank
No triangulation
1
Direct Ship and Interbranch
2
Direct Ship
3
Interbranch
Print Tab
Use these processing options to specify the reporting period for the report.
1. Reporting Period
From month Use this processing option to specify the beginning month of the period for which you are submitting the VAT EC Sales List.
From year Use this processing option to specify the beginning year of the period for which you are submitting the VAT EC Sales List.
To month Use this processing option to specify the ending month of the period for which you are submitting the VAT EC Sales List.

447
To year Use this processing option to specify the ending year of the period for which you are submitting the VAT EC Sales List.
Currency Tab
Use this processing option to specify the currency code for “as –if” currency processing.
1. As-if Processing
Blank = Base Currency
1 = As-if Currency
Use this processing option to specify whether the invoice amount is reported in the domestic currency or in the as-if currency.
Valid values are:
Blank
Domestic currency
1
As-if currency
Note: The as-if values can be used only if the Intrastat Revision table (F0018T) has been generated using as-if processing. If you generate the Intrastat Revision table using as-if currency, both the domestic and the as-if amounts are stored in the F0018T table.
448
Printing the EC Sales List - A/R (R0018S)
From the Statistical Reports menu (G74STAT3), choose EC Sales List – A/R.
You can print the EC Sales List - A/R (R0018S) in summary or detail mode. If you print in summary mode, the EC Sales List - A/R provides the following information about customers:
• Country of destination
• Customer VAT registration number
• Total value of supplies
• Triangulation (yes or no)
• Customer name and address (optional)
If you print in detail mode, the EC Sales List - A/R also includes the document number.
The EC Sales List - A/R includes the following information in the report header:
• Reporting company VAT registration number
• Reporting company currency code
• Company name and address
The report header can also include the approval code of the EC authority to whom the report will be submitted.
Information on the report is sequenced by company, address book number, tax ID, and document number. Line numbering and page numbering restart for each reporting company.
Before You Begin Enter VAT registration numbers for each customer. See Validating Tax ID Numbers
in the Global Solutions Spain Guide.
Enter country codes for each customer. See Setting Up User Defined Codes for Intrastat Reporting in the Global Solutions Spain Guide.
Set up tax rules for both Accounts Receivable and Accounts Payable with the following options selected:
• Tax on Gross Including Discount
• Discount on Gross Including Tax
See Setting Up Tax Rules in the Tax Reference Guide.
Set the processing options in the General Ledger Post Report program (R09801) to automatically update the Taxes table (F0018).
Set up the user defined code for Triangulation Tax Rates (00/VT). See Setting Up User Defined Codes for Intrastat Reporting in the Global Solutions Spain Guide.

449
Processing Options for EC Sales List – A/R (R0018S)
Select Tab
Use these processing options to specify the branch ID and the date range for the report.
1. Branch ID
Use this processing option to specify the branch ID for the reporting company. The branch ID is displayed in the report heading; it is not used for data selection.
2. To and From Dates
From month (1-12):
Use this processing option to specify the first calendar month of the reporting period. This information is used for data selection.
From year (4 digits):
Use this processing option to specify the first four-digit calendar year of the reporting period (for example, 2001). This information is used for data selection.

450
To month (1-12):
Use this processing option to specify the last calendar month of the reporting period. This information is used for data selection.
To year (4 digits):
Use this processing option to specify the last four-digit calendar year of the reporting period (for example, 2001). This information is used for data selection.
Process Tab
Use this processing option to specify whether to print the report in detail or summary mode.
1. Report Mode Blank = Print in detail mode 1 = Print in summary mode Use this processing option to specify whether to run the report in summary mode or detail mode. If you choose detail mode, the document number of each transaction is displayed on the report. Valid values are: Blank Detail mode 1 Summary mode
Display Tab
Use this processing option to specify whether to display the name and address on the report.
1. Name and Address
Blank = Do not print name and address

451
1 = Print name and address
Use this processing option to include the name and address of each customer on the report.
Valid values are:
Blank
Do not print name and address.
1
Print name and address.
As-If-Currency Tab
Use these processing options to specify the “as – if” currency and the date to use to select the exchange rate.
1. As-If-Currency Code
Use this processing option to specify the currency code for as-if-currency reporting. This option lets you print amounts in a currency other than the currency in which they are stored. Amounts are converted and are displayed in the currency you specify. If you leave this processing option blank, amounts are displayed in the reporting company's base currency.

452
2. Exchange Rate Date
Use this processing option to enter the as-of date for determining the exchange rate for the as-if-currency conversion. If you leave this processing option blank, the system uses the current date.
Approval Code Tab
Use this processing option to specify the approval code for the reporting authority.
Reporting Authority Approval Code
Use this processing option to enter the Reporting Authority Approval Code. This code is displayed in the report heading. This code is required in Germany.

453
Working with the Text File Processor
The Text File Processor is a tool that is used to convert J.D. Edwards data to text files in the formats that are required by external entities, such as banks or government agencies.
To use the Text File Processor to create a text file, you must run one of the programs that has been set up to populate the Text Processor Header table (F007101) and Text Process Detail Table (F007111). For example, the following programs populate the text processor tables:
• IDEP/IRIS Interface (R0018I3)
• SEMDEC Interface - VAT EC Sales List (R0018I4)
• Draft Remittance File Format AEB 19 - Spain (R74S6729)
• Draft Remittance File Format AEB 32 - Spain (R74S6722)
• Draft Remittance File Format AEB 58 - Spain (R74S6728)
When you run any of these programs or any other programs that populate the text processor tables, the system creates a text batch in the text processor tables with the information that is generated by the program. For example, all of the information that is required for the IDEP/IRIS Intrastat declaration is stored as one text batch.
Text batches are stored in the following tables:
• Text Processor Header (F007101)
• Text Processor Detail Table (F007111)
The F007101 table stores information about the extract of information for an external system, such as information about the processes that populated the table and information about the creation of the text file. The F007111 table stores the text for the text file.
When you export or import text in the Text File Processor, the system uses the seventh field from Next Numbers System 00.
You use the Copy Text function in the Text File Processor to copy the information from the text batch to a flat file that can be copied to disk or other media, and then submitted to the appropriate entity. When you use the Copy Text function, you can specify the location and filename for the flat file that is created.
Copying Text in the Text File Processor
Use the Copy Text function to copy text from the Text Processor Detail Table (F007111) to a text file that can be submitted to an external agency or system. When you copy the text, specify the filename and location for the text file.
The system updates the Text Processor Header table (F007101) with the date when the text was copied. The system also updates table F007101 to indicate that the batch has been processed.

454
Note
If the text file is too large for the device that you selected, the system displays an error message. You should copy the text file to a larger device. You can then use a compression utility to reduce the size of the text file, if necessary.
Before You Begin Create a text batch by running a program that uses the Text File Processor.
► To copy text in the Text File Processor
From the Text File Processor menu (G0071), choose Text File Processor.
1. On Work With Text Batches, complete any of the following fields and click Find:
• User ID
• Batch Number
• Transaction Number
2. In the detail area, select the batch that you want to process.
3. Choose Process Batch from the Row menu, and then choose Copy Text.

455
4. On Copy To Text File, click either of the following options:
• New file/Override existing file
• Append to existing file
5. Complete the following field and click OK:
• Destination Text File Path and Name:
The system displays the Work With Text Batches form.

456
A value of 1 (Processed/Outbound) in the Status Flag field indicates that the batch has been processed successfully.
Processing Options for Text File Processor (P007101)
Process Tab
Use this processing option to specify the location of the Microsoft Word template to use during creation of the text file.
Path Microsoft Word Template
Use this processing option to override the location of the Microsoft Word template to be used during creation of the text file. The ActiveX copy text creates a Microsoft Word document based on the normal.dot template, which is normally located in c:\Program Files\Microsoft Office\Templates\normal.dot. If your Microsoft Office objects have been installed in a different path, you need to enter the correct path for the location of the normal.dot template.

457
Resetting a Text Batch in the Text File Processor
If you need to process a text batch a second time, you must first reset the batch. Resetting a batch updates the status flags in the Text Processor Header table (F007101). The system changes outbound statuses to blank (Unprocessed/Outbound) and changes inbound statuses to 5 (Unprocessed/Inbound).
► To reset a text batch in the Text File Processor
From the Text File Processor menu (G0071), choose Text File Processor.
1. On Work With Text Batches, complete either of the following fields and click Find:
• User ID
• Batch Number
2. In the detail area, choose the batch that you want to reset.
3. From the Row menu, choose Maintain Batch, and then choose Reset Batch.
Purging a Text Batch in the Text File Processor
You purge a text batch to remove it from the Text Processor Detail Table (F007111). You can purge only batches of processed transactions.
When you purge a batch from the Work With Text Batches form, the system calls version ZJDE0001 of the Purge Processed Transactions program (R007102). You can also run any version of this program from the Text File Processor menu (G0071).
You can use a processing option in the Purge Processed Transactions program to specify whether the system removes the records in the batch from the Text Processor Header table (F007101), as well as from table F007111.
If you do not remove records from table F007101 when you purge a batch, the processed flag for those records is changed from processed to purged.
When you purge a batch that was created through draft remittance, the system also runs the Purge Draft Remittance Records program (R03B673).
To set up an additional batch program to run when you purge a batch, enter the name of the additional batch program in the Additional Purge Process field (GPPR) in table F007101 . When you run the purge program on a batch that includes the name of a batch program in the Additional Purge Process field, the system runs version ZJDE0001 of that batch program.
► To purge a text batch in the Text File Processor
From the Text File Processor menu (G0071), choose Text File Processor.
1. On Work With Text Batches, complete either of the following fields and click Find:
• User ID
• Batch Number

458
2. In the detail area, choose the batch that you want to purge.
3. From the Row menu, choose Maintain Batch, and then choose Purge Batch.
Processing Options for Purge Processed Transactions (R007102)
Process Tab
Use this processing option to specify whether to delete header records.
1. Purge Header Records
Blank = Do not delete header records
1 = Delete header records
Use this processing option to determine whether to delete corresponding header records from the Text Processor Header table (F007101) along with detail records from the Text Processor Detail Table (F007101). Deleting only detail records updates the processed flag in the Text Processor Header file to 2 (purged/outbound) or 7 (purged/inbound). Records marked as purged cannot be reset to an unprocessed status. Valid values are:
1
Purge header and detail records
Blank
Purge only detail records

459
Reviewing Customer and Supplier Reports
You can print reports to show our customers’ and suppliers’ balances. Before you print these reports, you must first generate the Customer/Supplier Balance Worktable (A/P and A/R) (F74412). This table is populated with information about customer and supplier transactions.
You can also print open amounts reports for both customers and suppliers. You do not need to generate table F74412 before running these reports.
Building the Customer/Supplier Balance Worktable
Use one or both of the following navigations:
From the Accounts Payable Reports menu (G0414), choose Generate Supplier Balance.
From the Accounts Receivable Reports menu (G03B14), choose Generate Customer Balance.
Note
Generate Supplier Balance (R7404001) and Generate Customer Balance (R7403B001) are also available from the following menus:
• Spanish Reports (G74S09)
• French Reports (G093151)
• Italian Reports (G093152)
The Customer/Supplier Balance Worktable (A/P and A/R) (F74412) contains information about customer and supplier transactions. You build the F74412 table by running the Generate Supplier Balance program and the Generate Customer Balance program. The F74412 table supplies information for the Customer/Supplier Balance Report (R7404002).
The following illustration shows the process for building the F74412 table as it applies to the Customer and Supplier Balance reports:

460
The way you group information in the F74412 table determines how information is displayed on the Customer Balance Report and the Supplier Balance Report. You can group information in the F74412 table as follows:
• By G/L offset and customer or supplier number
• By G/L offset and customer parent or supplier parent number
• By trade account and customer or supplier number
• By trade account and customer parent or supplier parent number
• By customer or supplier number only
• By customer parent or supplier parent number only
To specify how information is grouped in the F74412 table, you set the processing options for the Generate Supplier Balance and Generate Customer Balance programs.
461
If you group information in the F74412 table by G/L offset, drafts and deductions are excluded from the customer and supplier balance reports. For other groupings, drafts are included.
The Generate Supplier Balance program retrieves information from the following tables:
• F0411 - Accounts Payable Ledger
• F0413 - Accounts Payable - Matching Document
• F0414 - Accounts Payable Matching Document Detail
• F0911 - Account Ledger
The Generate Customer Balance program retrieves information from the following tables:
• F03B11 - Customer Ledger
• F03B112 - Invoice Revisions
• F03B13 - Receipts Header
• F03B14 - Receipts Detail
The F74412 table is rebuilt each time you run the Generate Supplier Balance and Generate Customer Balance programs. The Generate Supplier Balance program rebuilds only Accounts Payable records, while the Generate Customer Balance program rebuilds only Accounts Receivable records.
Processing Options for Generate Customer Balance (R7403B001)
Select Tab
These processing options are used to specify the dates to use to select transactions.
1. Date From
Use this processing option to enter the beginning of the range of G/L dates from which you want to select detail transactions. If you leave this processing option blank, the system date is used.
Note: The initial balance is calculated based on one day prior to the date you enter.
2. Thru Date
Use this processing option to enter the end of the range of G/L dates from which you want to select detail transactions. If you leave this processing option blank, the system date is

462
used.
Process Tab
These processing options are used to specify how to group transactions.
1. Group Mode
Blank - No G/L Grouping
1 - Group by G/L Offset
2 - Group by Trade Account
Use this processing option to specify whether the process should group information by G/L offset, by trade account, or leave the information ungrouped.
Valid values are:
Blank
No G/L grouping.
1
Group by G/L Offset.
2
Group by Trade Account.
Note: Grouping by G/L Offset excludes drafts and deductions.

463
2. Process Mode
Blank - Group by Customer Number
1 - Group by Customer Parent Number
Use this processing option to specify whether the process should group information by parent Supplier Number or Supplier Number. Valid values are:
Blank
Group by Supplier Number.
1
Group by Parent Supplier Number.
Processing Options for Generate Supplier Balance (R7404001)
Select Tab
Use these processing options to specify the dates to use to select transactions.
1. Date From Use this processing option to enter the beginning of the range of G/L dates from which you want to select detail transactions. If you leave this processing option blank, the system date is used. Note: The initial balance is calculated based on one day prior to the date you enter.
2. Thru Date Use this processing option to enter the end of the range of G/L dates from which you want to select detail transactions. If you leave this processing option blank, the system date is used.

464
Process Tab
Use these processing options to specify how to group transactions and to specify whether withholding should be displayed on a separate line.
1. Group Mode Blank - No G/L Grouping 1 - Group by G/L Offset 2 - Group by Trade Account Use this processing option to specify whether the process should group information by G/L offset, by trade account, or leave the information ungrouped. Valid values are: Blank No G/L grouping. 1 Group by G/L Offset. 2 Group by Trade Account. Note: Grouping by G/L Offset excludes drafts and deductions.

465
2. Process Mode Blank - Group by Supplier Number 1 - Group by Supplier Parent Number Use this processing option to indicate whether the process should group information by Parent Supplier Number or Supplier Number. Valid values are: Blank Group by Supplier Number. 1 Group by Parent Supplier Number.
3. Withholding Tax Blank - Single line per document 1- Separate line for Withholding Tax Use this processing option to specify whether the process should create a separate line for withholding tax for each payment document. Valid values are: Blank Single line per document. 1 Separate line for Withholding Tax.
Printing Customer and Supplier Balance Reports
Use one of the following navigations:
From the Accounts Payable Reports menu (G0414), choose Supplier Balance Report.

466
From the Accounts Receivable Reports menu (G03B14), choose Customer Balance Report.
From the Spanish Reports menu (G74S09), choose Customer / Supplier Balance Report.
From the French Reports menu (G093151), choose Customer / Supplier Balance Report.
The Supplier Balance Report and Customer Balance Report are different versions of the same program (R7404002). Whether a specific version of the program produces a Supplier Balance Report or Customer Balance Report depends on the processing options.
You print the supplier and customer balance reports to review the detail of the transactions between your company and your customers or suppliers. The reports also show the following information for each customer or supplier for a given date range and selected companies:
• Initial balance
• Debit and credit balance
• Closing balance
The supplier and customer balance reports have the following additional features:
• Transactions are printed with debit and credit amounts in separate columns.
• You can print the report with transaction amounts, including draft amounts, displayed in euro or another currency.
• You can print the report in summary or detail mode.
• You can use the G/L Class (GLC) for data selection, sequencing, and subtotaling if you group by G/L Offset when you build the Customer/Supplier Balance Worktable (A/P and A/R) (F74412).
• You can determine your customer or supplier as of a certain date, based on the “from” and “thru” dates specified in the processing options of the Generate Supplier Balance program (R7404001) and Generate Customer Balance program (R7403B001).
• Transactions are printed within the period specified in the processing options of the Generate Supplier Balance and Generate Customer Balance programs.
• You can compare your customer and supplier balances by G/L offset or trade account with the account balances.
The supplier and customer balance reports are based on information in the Customer/Supplier Balance Worktable (A/P and A/R) table (F74412). You must build the table using the Generate Supplier Balance program (R7404001) and the Generate Customer Balance program (R7403B001) before you run the customer and supplier balance reports.
The initial balance is calculated as of one day prior to the date specified in the Date From processing options for the Generate Supplier Balance and Generate Customer Balance programs.
Note
When a voucher is paid for a supplier who is subject to withholding tax, the amount of withholding tax held can be printed on the line immediately after the payment on the supplier version of the report, depending on how the processing options are set for the Generate Supplier Balance program.

467
Processing Options for Customer / Supplier Balance Report (R7404002)
Select Tab
1. Balance from: Blank = Account Payable 1 = Account Receivable Use this processing option to indicate whether you want to print an Accounts Payable (supplier) balance report or an Accounts Receivable (customer) balance report. Valid values are: Blank Print an Accounts Payable report. 1 Print an Accounts Receivable report.
Print Tab
1. Print Mode: Blank - Detail Mode. 1 - Summary Mode. Use this processing option to specify the print mode. Valid values are: Blank Print detail including initial balance, closing balance, and all of the documents for the selected period. 1 Print only the closing balance.
Currency Tab
1. As-If Currency Use this processing option to show amounts in a currency other than the currency in which

468
the amounts are stored in the system. The system converts and shows domestic amounts in this As If currency. For example, an amount in FRF can appear as if it is in EUR. If you leave this processing option blank, the system prints the amounts in the domestic currency. Note: This processing option allows you to view amounts in a different currency as a hypothetical scenario only. The amounts that appear in the different currency are not saved to the system. 2. As-If Currency Date Use this processing option to specify an As-Of date if you enter a currency code for the As-If Currency processing option. This option processes the exchange rate as of the date you specify. If you leave this processing option blank, the system uses the system date. Note: A valid exchange rate must exist in the exchange rate table between the two currencies based on the As-Of date.
Printing Open Amount Reports for Customers
Use one of the following navigations:
From the French Reports menu (G093151), choose A/R Inventory Book.
From the Italian Reports menu (G093152), choose A/R Inventory Book.
The A/R Inventory Book report lists the total open amount for each customer by company. If a customer has open amounts in more than one company, the open amount for each company is listed separately.
You use a processing option to indicate whether the report lists customers with positive open amounts or customers with negative open amounts. The system prevents you from including both positive and negative open amounts on the same report. A customer with a positive open amount has unpaid invoices. A customer with a negative open amount has overpaid.
Note
In Italy, businesses are required to report customer and supplier open amounts at year end. To report this information, print open amount reports for your customers. You are required by Italian law to include these reports as attachments to the Balance Sheet.
Processing Options for A/R Inventory Book (R7403B026)
Print Tab
Use this processing option to include customers with a negative balance on the A/R Open Amounts report.

469
1. Balances
Blank = Include only customers with a positive balance.
1 = Include only customers with a negative balance.
Use this processing option to include customers with a negative balance on the A/R Open Amounts Report. If a customer has a negative balance, that customer has overpaid you. Valid values are:
Blank Include only customers with a positive balance.
1 Include only customers with a negative balance.
Currency Tab
Use these processing options to show amounts in a currency other than the currency in which the amounts are stored on the system.
1. As-If Currency
Blank = The As-if currency grid column does not appear.
Or, enter the code for As-if currency.
Use this processing option to show amounts in a currency other than the currency in which the amounts are stored on the system. The system translates and shows domestic amounts in this As-If currency. For example, an amount in FRF can appear as if it is in EUR.
Enter the code for As-If currency or leave this processing option blank if you do not want to show amounts in an alternate currency.
Note: This processing option allows you to view amounts in a different currency as a hypothetical scenario only. The amounts that appear in the different currency are not saved to the system.

470
2. As-Of Date
Blank = The system uses the system date.
Or, enter the As-of date.
Use this processing option to specify an As-Of date if you enter a currency code for the As-If Currency processing option. This option processes the exchange rate as of the date you specify.
Enter the As-Of date, or leave this processing option blank to use the system date.
Note: A valid exchange rate must exist in the exchange rate table between the two currencies based on the As-Of date.
Printing Open Amount Reports for Suppliers
Use one of the following navigations:
From the French Reports menu (G093151), choose French Reports.
From the Italian Reports menu (G093152), choose Italian Reports.
The Supplier Inventory Book report lists the total open amount for each supplier by company. If a supplier has open amounts in more than one company, the open amount for each company is listed separately.
You use a processing option to indicate whether the report lists suppliers with positive open amounts or suppliers with negative open amounts. The system prevents you from including both positive and negative open amounts on the same report. A supplier with a positive open amount has unpaid invoices. A supplier with a negative open amount has been overpaid.
You can use the processing options to display amounts in the euro.

471
Note
In Italy, businesses are required to report supplier open amounts at year end. To report this information, print the open amounts reports for your suppliers. You are required by Italian law to include these reports as attachments to the Balance Sheet.
Processing Options for A/P Inventory Book (R7404026)
Print Tab
Use this processing option to include suppliers with a negative balance on the A/P Open Amounts report.
1. Balances Blank = Include only customers with a positive balance. 1 = Include only customers with a negative balance. Use this processing option to include suppliers with a negative balance on the A/P Open Amounts Report. If you have a supplier has a negative balance, you have overpaid that supplier. Valid values are: Blank Include only suppliers with a positive balance. 1 Include only suppliers with a negative balance.
Currency Tab
Use these processing options to show amounts in a currency other than the currency in which the amounts are stored on the system.
1. As-If Currency Blank = The As-if currency grid column does not appear. Or, enter the code for As-if currency. Use this processing option to show amounts in a currency other than the currency in which the amounts are stored on the system. The system translates and shows domestic amounts in this As-If currency. For example, an amount in FRF can appear as if it is in EUR. Enter the code for As If currency, or leave this processing option blank if you do not want to show amounts in an alternate currency.

472
Note: This processing option allows you to view amounts in a different currency as a hypothetical scenario only. The amounts that appear in the different currency are not saved to the system.
2. As-Of Date Blank = The system uses the system date. Or, enter the As-of date. Use this processing option to specify an As-Of date if you enter a currency code for the As-If Currency processing option. This option processes the exchange rate as of the date you specify. Enter the As-Of date, or leave this processing option blank to use the system date. Note: A valid exchange rate must exist in the exchange rate table between the two currencies based on the As-Of date.

473
Preparing the Fixed Assets Legal Report
From the Italian Reports menu (G093152), choose Legal Fixed Assets Report.
Italian law requires that companies submit Fixed Assets Legal Report – Italy (R7412100) (Registro dei beni ammortizzabili) prior to the final date for filing the tax report (Dichirazione dei Redditi) with the Fiscal Authority. The Fixed Assets Legal Report - Italy must be printed on pre-numbered, stamped, and formatted paper.
The J.D. Edwards Fixed Assets Legal Report is a plain paper report that provides information which is needed to complete the official legal report. The Fixed Assets Legal Report does not comply with specific format requirements.
The Fixed Assets Legal Report includes the following information for depreciable assets (both material and non-material assets):
• Acquisition date
• Original cost
• Revaluation
• Devaluation
• Accumulated depreciation as of the end of the previous fiscal period
The anticipated accumulated depreciation (fondo ammortamento anticipato) is displayed separately from the standard accumulated depreciation, when applicable.
• The actual depreciation co-efficient applied during the fiscal period
• The depreciation expenses for the fiscal period
• The anticipated depreciation expenses for the fiscal period, when applicable
• Disposals (sale or other)
Processing Options for Fixed Assets Legal Report – Italy (R7412100)
Processing
Select the Processing Options
1. Enter the Legal Company
2. Enter the Ledger Type. The default value is 'AA'
Enter the final period and fiscal year. Leave blank to use the current period and fiscal year

474
3. Period
4.Fiscal Year
5. Enter the subledger type that indicates the appreciation of the fixed asset
Enter Object Account and Subsidiary for plus values
6. Object Account
7. Subsidiary
Enter Object Account and Subsidiary for minus values
8. Object Account
9. Subsidiary
Report by parent
10. Enter '1' for a report by parent fixed asset. '0' for a report by fixed asset code. The default value is '0'
Printing
Select the printing options
1. Enter the Fixed Asset code to print. 1=Fixed Asset Code, 2=Unit Number, 3=Lot/serial Number. The default value is '1'
2. Enter '1' if you do not want to print program name, print date and page numbers