
Enterprise Security Manager 9.3.0 Installation Guide€¦ · · 2014-12-22Identifying network...
49
Installation Guide McAfee Enterprise Security Manager 9.3.0
Transcript of Enterprise Security Manager 9.3.0 Installation Guide€¦ · · 2014-12-22Identifying network...
Installation Guide
McAfee Enterprise Security Manager9.3.0

COPYRIGHTCopyright © 2013 McAfee, Inc. Do not copy without permission.
TRADEMARK ATTRIBUTIONSMcAfee, the McAfee logo, McAfee Active Protection, McAfee CleanBoot, McAfee DeepSAFE, ePolicy Orchestrator, McAfee ePO, McAfee EMM, Foundscore,Foundstone, Policy Lab, McAfee QuickClean, Safe Eyes, McAfee SECURE, SecureOS, McAfee Shredder, SiteAdvisor, McAfee Stinger, McAfee TotalProtection, TrustedSource, VirusScan, WaveSecure are trademarks or registered trademarks of McAfee, Inc. or its subsidiaries in the United States andother countries. Other names and brands may be claimed as the property of others.
Product and feature names and descriptions are subject to change without notice. Please visit mcafee.com for the most current products and features.
LICENSE INFORMATION
License AgreementNOTICE TO ALL USERS: CAREFULLY READ THE APPROPRIATE LEGAL AGREEMENT CORRESPONDING TO THE LICENSE YOU PURCHASED, WHICH SETSFORTH THE GENERAL TERMS AND CONDITIONS FOR THE USE OF THE LICENSED SOFTWARE. IF YOU DO NOT KNOW WHICH TYPE OF LICENSE YOUHAVE ACQUIRED, PLEASE CONSULT THE SALES AND OTHER RELATED LICENSE GRANT OR PURCHASE ORDER DOCUMENTS THAT ACCOMPANY YOURSOFTWARE PACKAGING OR THAT YOU HAVE RECEIVED SEPARATELY AS PART OF THE PURCHASE (AS A BOOKLET, A FILE ON THE PRODUCT CD, OR AFILE AVAILABLE ON THE WEBSITE FROM WHICH YOU DOWNLOADED THE SOFTWARE PACKAGE). IF YOU DO NOT AGREE TO ALL OF THE TERMS SETFORTH IN THE AGREEMENT, DO NOT INSTALL THE SOFTWARE. IF APPLICABLE, YOU MAY RETURN THE PRODUCT TO MCAFEE OR THE PLACE OFPURCHASE FOR A FULL REFUND.
2 McAfee Enterprise Security Manager 9.3.0 Installation Guide

Contents
Preface 5About this guide . . . . . . . . . . . . . . . . . . . . . . . . . . . . . . . . . . 5
Audience . . . . . . . . . . . . . . . . . . . . . . . . . . . . . . . . . . 5Conventions . . . . . . . . . . . . . . . . . . . . . . . . . . . . . . . . . 5
Find product documentation . . . . . . . . . . . . . . . . . . . . . . . . . . . . . . 6
1 Introduction 7
2 Installing McAfee ESM devices 9Preparing to install McAfee ESM devices . . . . . . . . . . . . . . . . . . . . . . . . . 9
Hardware and software requirements . . . . . . . . . . . . . . . . . . . . . . . 9Inspect packaging and device . . . . . . . . . . . . . . . . . . . . . . . . . . 10Identifying a location for installation . . . . . . . . . . . . . . . . . . . . . . . 10
Connect and start the devices . . . . . . . . . . . . . . . . . . . . . . . . . . . . 11Identifying connector and equipment types . . . . . . . . . . . . . . . . . . . . 12Identifying network cables . . . . . . . . . . . . . . . . . . . . . . . . . . . 12Identifying network ports . . . . . . . . . . . . . . . . . . . . . . . . . . . 13
3 Setting up McAfee ESM devices 21Configure the network interface on the Nitro IPS . . . . . . . . . . . . . . . . . . . . . 21Configure the network interface on the Receiver, ELM, and ACE . . . . . . . . . . . . . . . 22Configure the network interface on the DEM and ADM . . . . . . . . . . . . . . . . . . . 22Configure the network interface on the ESM . . . . . . . . . . . . . . . . . . . . . . . 23Configure for IPv6 . . . . . . . . . . . . . . . . . . . . . . . . . . . . . . . . . 23Log on to McAfee ESM console . . . . . . . . . . . . . . . . . . . . . . . . . . . . 24
A About FIPS mode 27Select FIPS mode . . . . . . . . . . . . . . . . . . . . . . . . . . . . . . . . . 27
B VM requirements 29Stripe the storage drive . . . . . . . . . . . . . . . . . . . . . . . . . . . . . . . 29Install the virtual machine . . . . . . . . . . . . . . . . . . . . . . . . . . . . . . 30Configure the virtual machine . . . . . . . . . . . . . . . . . . . . . . . . . . . . . 30Key the VM device . . . . . . . . . . . . . . . . . . . . . . . . . . . . . . . . . 31
C Install the qLogic 2460 SAN adapter 33
D Install DAS 35
E Installing devices in a rack 37Install AXXVRAIL rail set . . . . . . . . . . . . . . . . . . . . . . . . . . . . . . . 38Remove the chassis . . . . . . . . . . . . . . . . . . . . . . . . . . . . . . . . . 41
F Regulatory notices 43
McAfee Enterprise Security Manager 9.3.0 Installation Guide 3

Index 47
Contents
4 McAfee Enterprise Security Manager 9.3.0 Installation Guide
Preface
Contents About this guide Find product documentation
About this guideThis information describes the guide's target audience, the typographical conventions and icons usedin this guide, and how the guide is organized.
AudienceMcAfee documentation is carefully researched and written for the target audience.
The information in this guide is intended primarily for:
• Administrators — People who implement and enforce the company's security program.
• Users — People who use the computer where the software is running and can access some or all ofits features.
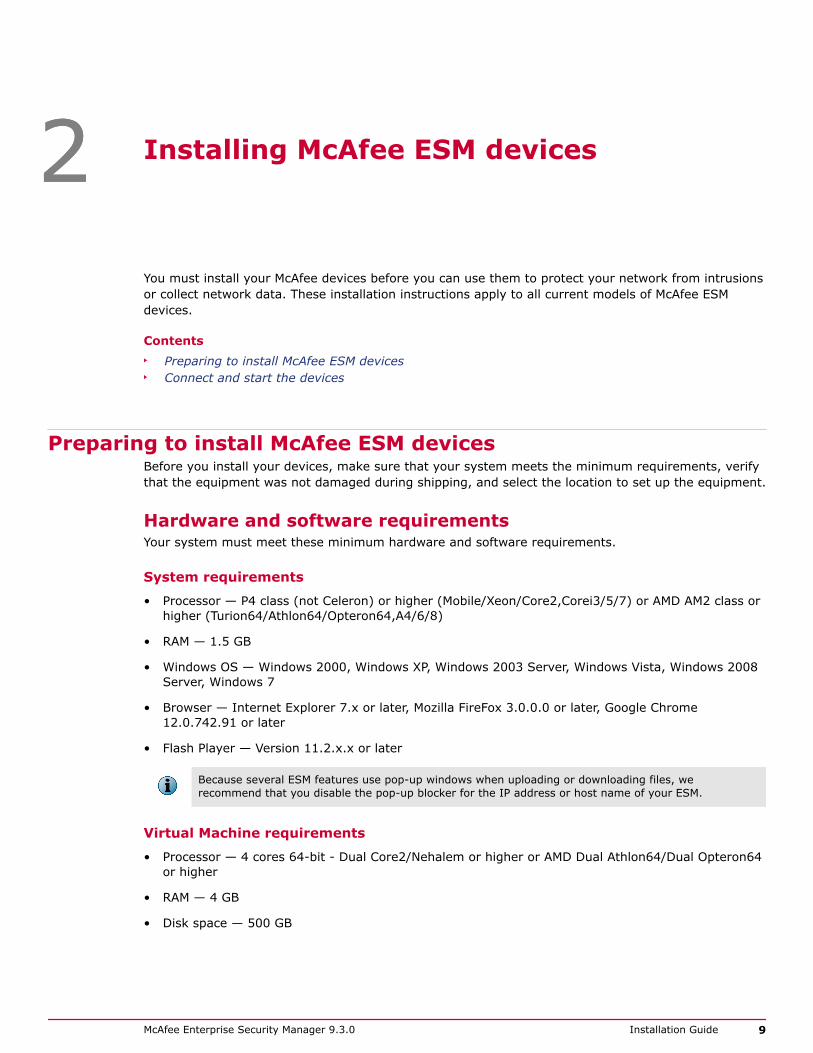
ConventionsThis guide uses these typographical conventions and icons.
Book title, term,emphasis
Title of a book, chapter, or topic; a new term; emphasis.
Bold Text that is strongly emphasized.
User input, code,message
Commands and other text that the user types; a code sample; a displayedmessage.
Interface text Words from the product interface like options, menus, buttons, and dialogboxes.
Hypertext blue A link to a topic or to an external website.
Note: Additional information, like an alternate method of accessing anoption.
Tip: Suggestions and recommendations.
Important/Caution: Valuable advice to protect your computer system,software installation, network, business, or data.
Warning: Critical advice to prevent bodily harm when using a hardwareproduct.
McAfee Enterprise Security Manager 9.3.0 Installation Guide 5

Find product documentationMcAfee provides the information you need during each phase of product implementation, frominstallation to daily use and troubleshooting. After a product is released, information about the productis entered into the McAfee online KnowledgeBase.
Task1 Go to the McAfee Technical Support ServicePortal at http://mysupport.mcafee.com.
2 Under Self Service, access the type of information you need:
To access... Do this...
User documentation 1 Click Product Documentation.
2 Select a product, then select a version.
3 Select a product document.
KnowledgeBase • Click Search the KnowledgeBase for answers to your product questions.
• Click Browse the KnowledgeBase for articles listed by product and version.
PrefaceFind product documentation
6 McAfee Enterprise Security Manager 9.3.0 Installation Guide

1 Introduction
This guide provides you with the information you need to install and set up these devices:
• McAfee® Nitro Intrusion Prevention System (IPS)
• McAfee Enterprise Security Manager (ESM)
• McAfee Event Receiver
• McAfee Enterprise Security Manager/Event Receiver (ESMREC)
• McAfee Database Event Monitor (DEM)
• McAfee Application Data Monitor (ADM)
• McAfee Enterprise Log Manager (ELM)
• McAfee Advanced Correlation Editor (ACE)
• McAfee Direct Attached Storage (DAS)
• McAfee Receiver/ELM (ELMERC)
• McAfee ESM/Receiver/ELM (ESMELM)
It is divided into two main sections:
• Installing a McAfee ESM device, which provides you with the steps to follow to inspect, mount,connect, and start the device.
• Setting up a McAfee ESM device, which describes how to configure the network interface for eachdevice type, configure for IPv6, log on to McAfee ESM console, and key the device.
1
McAfee Enterprise Security Manager 9.3.0 Installation Guide 7

1 Introduction
8 McAfee Enterprise Security Manager 9.3.0 Installation Guide
2 Installing McAfee ESM devices
You must install your McAfee devices before you can use them to protect your network from intrusionsor collect network data. These installation instructions apply to all current models of McAfee ESMdevices.
Contents Preparing to install McAfee ESM devices Connect and start the devices
Preparing to install McAfee ESM devicesBefore you install your devices, make sure that your system meets the minimum requirements, verifythat the equipment was not damaged during shipping, and select the location to set up the equipment.
Hardware and software requirementsYour system must meet these minimum hardware and software requirements.
System requirements
• Processor — P4 class (not Celeron) or higher (Mobile/Xeon/Core2,Corei3/5/7) or AMD AM2 class orhigher (Turion64/Athlon64/Opteron64,A4/6/8)
• RAM — 1.5 GB
• Windows OS — Windows 2000, Windows XP, Windows 2003 Server, Windows Vista, Windows 2008Server, Windows 7
• Browser — Internet Explorer 7.x or later, Mozilla FireFox 3.0.0.0 or later, Google Chrome12.0.742.91 or later
• Flash Player — Version 11.2.x.x or later
Because several ESM features use pop-up windows when uploading or downloading files, werecommend that you disable the pop-up blocker for the IP address or host name of your ESM.
Virtual Machine requirements
• Processor — 4 cores 64-bit - Dual Core2/Nehalem or higher or AMD Dual Athlon64/Dual Opteron64or higher
• RAM — 4 GB
• Disk space — 500 GB
2
McAfee Enterprise Security Manager 9.3.0 Installation Guide 9
• ESXi 5.0 or later
• Thick versus thin provisioning — You must decide the hard disk requirements needed for yourserver. The minimum requirement is 500 GB unless the VM purchased is a higher model. Pleaseconsult the specifications for your VM product.
The ENMELM VM uses many features that require CPU and RAM. If the ESXi environment shares theCPU/RAM requirements with other VMs, the performance of the ENMELM VM is impacted. Make sureyou plan CPU and RAM requirements within the requirements.
Inspect packaging and deviceBefore installing your equipment, make sure there is no sign of damage or tampering.
Task1 As soon as you receive your device, inspect the packaging and the device for signs of damage or
mishandling.
If you are performing a FIPS installation, inspect the tamper-evident packing tape that is securingthe shipping container. If there is evidence of tampering, contact McAfee Support immediately forinstructions, and do not install the product.
2 Verify that all the items listed on the packing slip are included in the package.
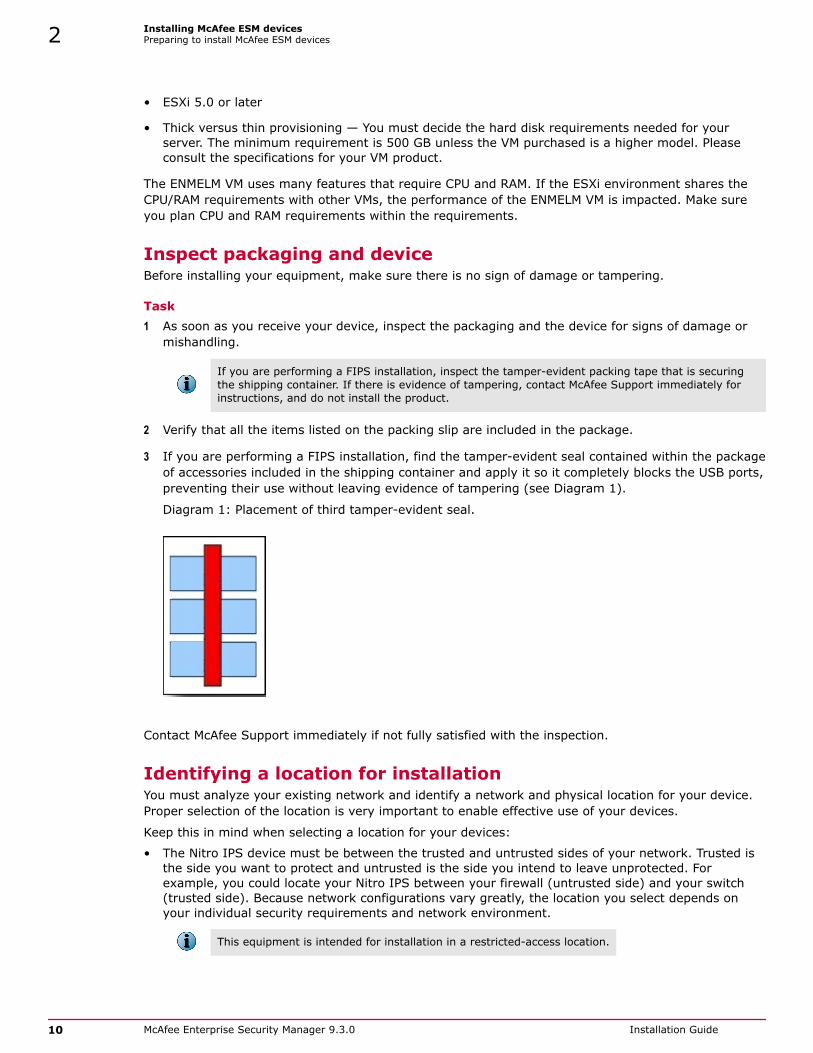
3 If you are performing a FIPS installation, find the tamper-evident seal contained within the packageof accessories included in the shipping container and apply it so it completely blocks the USB ports,preventing their use without leaving evidence of tampering (see Diagram 1).
Diagram 1: Placement of third tamper-evident seal.
Contact McAfee Support immediately if not fully satisfied with the inspection.
Identifying a location for installationYou must analyze your existing network and identify a network and physical location for your device.Proper selection of the location is very important to enable effective use of your devices.
Keep this in mind when selecting a location for your devices:
• The Nitro IPS device must be between the trusted and untrusted sides of your network. Trusted isthe side you want to protect and untrusted is the side you intend to leave unprotected. Forexample, you could locate your Nitro IPS between your firewall (untrusted side) and your switch(trusted side). Because network configurations vary greatly, the location you select depends onyour individual security requirements and network environment.
This equipment is intended for installation in a restricted-access location.
2 Installing McAfee ESM devicesPreparing to install McAfee ESM devices
10 McAfee Enterprise Security Manager 9.3.0 Installation Guide
• Your Receiver and DEM devices must be accessible to the devices they are monitoring. If directcommunication isn't possible, you must configure your network to allow proper routing of networktraffic between them.
• Your ESM device must be in a location on the network that can be accessed by any of the devices itis managing. It must also be accessible by any systems accessing the ESM. If direct communicationis not possible between the ESM and the devices it is managing or the systems running ESM, youmust configure your network to allow proper routing of network traffic between them.
Connect and start the devicesAfter inspecting the device and identifying the preferred location for installation, perform the steps inthis section to install it.
Task1 Mount the device.
We recommend that you mount the device in a rack to protect it and the cabling from accidentaldamage or disconnection (see Appendix F - Install AXXVRAIL rail set).
a Prepare a space for the device in the mounting location.
b Mount the device securely in the location you selected.
2 Connect the power supply to the device. Properly install and ground the equipment in accordancewith this instruction manual and national, state, and local codes.
We highly recommend connecting all ESM devices to an uninterruptible power supply (UPS). Asystem with redundant power cords and power modules operating at normal conditions balances theload share through its parallel design, which results in high reliability of the power system. Since theNitro IPS device is inline, it is critical that it be connected to a UPS.
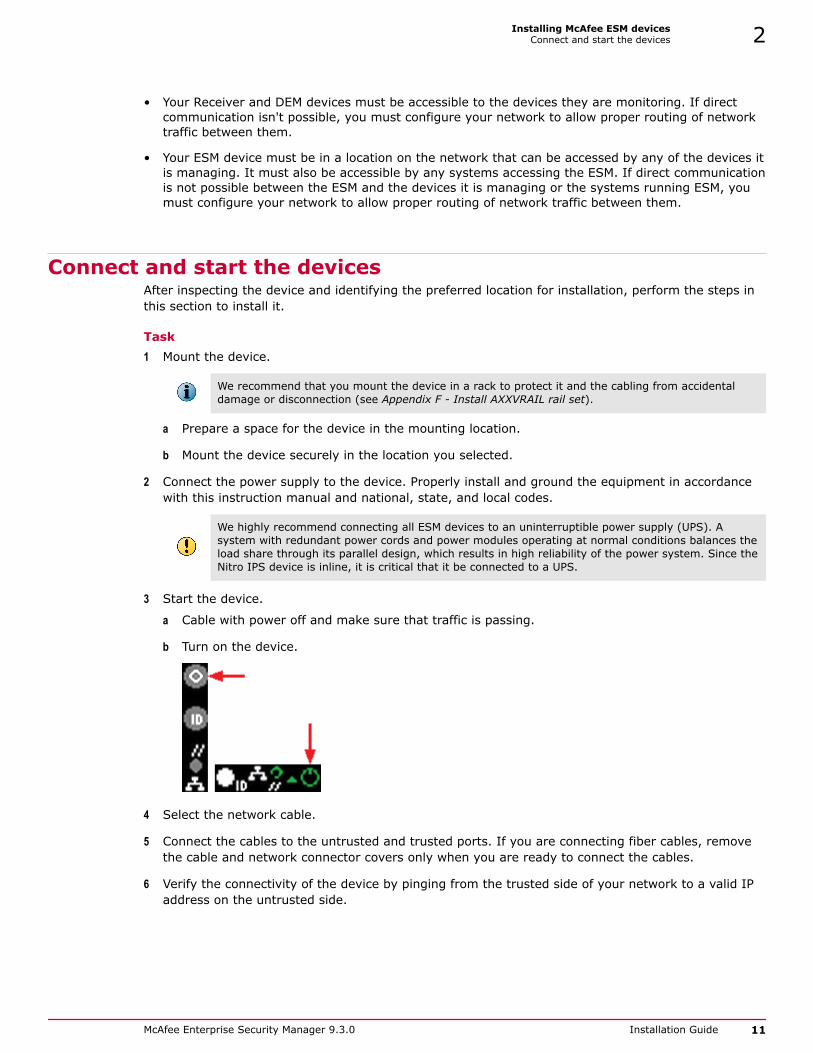
3 Start the device.
a Cable with power off and make sure that traffic is passing.
b Turn on the device.
4 Select the network cable.
5 Connect the cables to the untrusted and trusted ports. If you are connecting fiber cables, removethe cable and network connector covers only when you are ready to connect the cables.
6 Verify the connectivity of the device by pinging from the trusted side of your network to a valid IPaddress on the untrusted side.
Installing McAfee ESM devicesConnect and start the devices 2
McAfee Enterprise Security Manager 9.3.0 Installation Guide 11

See also Identifying connector and equipment types on page 12Identifying network cables on page 12Identifying network ports on page 13
Identifying connector and equipment typesYou can connect your Nitro IPS device to the network using either copper or fiber connectors,depending on the model of your device.
Table 2-1 Connection type per device
Nitro IPS model Connector type
TX RJ-45 (Copper)
SX LC-Multimode (Fiber)
LX LC-Singlemode (Fiber)
Connect your ESM, Receiver, and DEM devices to the network using copper connectors, and identifythe copper or fiber cables by looking at the connectors. The CAT5 copper cable has RJ-45 connectors(1) while LC fiber cable uses fiber connectors (2).
We recommend using CAT5 or higher for your copper connection. For gigabit connection, werecommend CAT5e.
Equipment type
There are two types of equipment you can connect your ESM devices to: Data Circuit-TerminatingEquipment (DCE) and Data Terminal Equipment (DTE). Firewall and routers are DTE and switches areDCE. The ESM devices are DTE.
Identifying network cablesIf your device uses a fiber connection, you must select the fiber cables and connect them to the ports.If your device uses a copper connection, use either a straight-through or a crossover copper cable.
To connect a ESM device RJ-45 port to DCE, use a straight-through cable. To connect to a DTE, use acrossover cable. To distinguish between a straight-through and crossover cable, hold the two ends ofthe cable like this:
2 Installing McAfee ESM devicesConnect and start the devices
12 McAfee Enterprise Security Manager 9.3.0 Installation Guide

On a straight-through cable, the colored wires are the same sequence at both ends. On a crossovercable, the first (far left) colored wire at one end is the same color as the third wire at the other end ofthe cable.
Identifying network portsAfter identifying the cables you need for your network, identify the ports in the McAfee device that youconnect these cables to.
Always turn off any laser sources before you inspect fiber connectors, optical components, orbulkheads. Fiber optic laser radiation might be emitted from connected fiber cables or connectors. Donot stare directly into fiber optic equipment. Always keep a protective cap on unplugged fiberconnectors.
The devices contain management ports so they can be managed from McAfee ESM. In addition, yourNitro IPS and ADM devices contain trusted and untrusted ports to connect the device to the trustedand untrusted sides of your network.
To identify the management ports and the trusted and untrusted ports on all your devices, see thistable.
Device type Model number Figure
ACE ACE-2600 or 3450 8
ADM APM-1250 1
APM-3450 3
DEM DSM-2600 or 3450 3
DSM-4600 4
ELM ELM-4600, 5600 or 6000 8
ELM/Receiver ELMERC-2600, 3450, or 4600 8
ESM/ELM ENMELM- 4600, 5600, or 6000 8
ESM or ESM/Receiver combo ETM-5600, 6000, X4, or X6 8
DAS-10, 25, 50, or 100 9
IPS NTP-1250 2
NTP-2600, 3450-4BTX 3
NTP-2600, 3450-8BTX 4
NTP-2600, 3450-4BSX 5
NTP-3450-2BSX 6
McAfee Reporter ERU-5600 8
Receiver ERC-1250 2
ERC-2600, 3450, or 4600 7
Receiver-HA ERC-1250-HA 10
ERC-2600 or 4600-HA 11
Installing McAfee ESM devicesConnect and start the devices 2
McAfee Enterprise Security Manager 9.3.0 Installation Guide 13
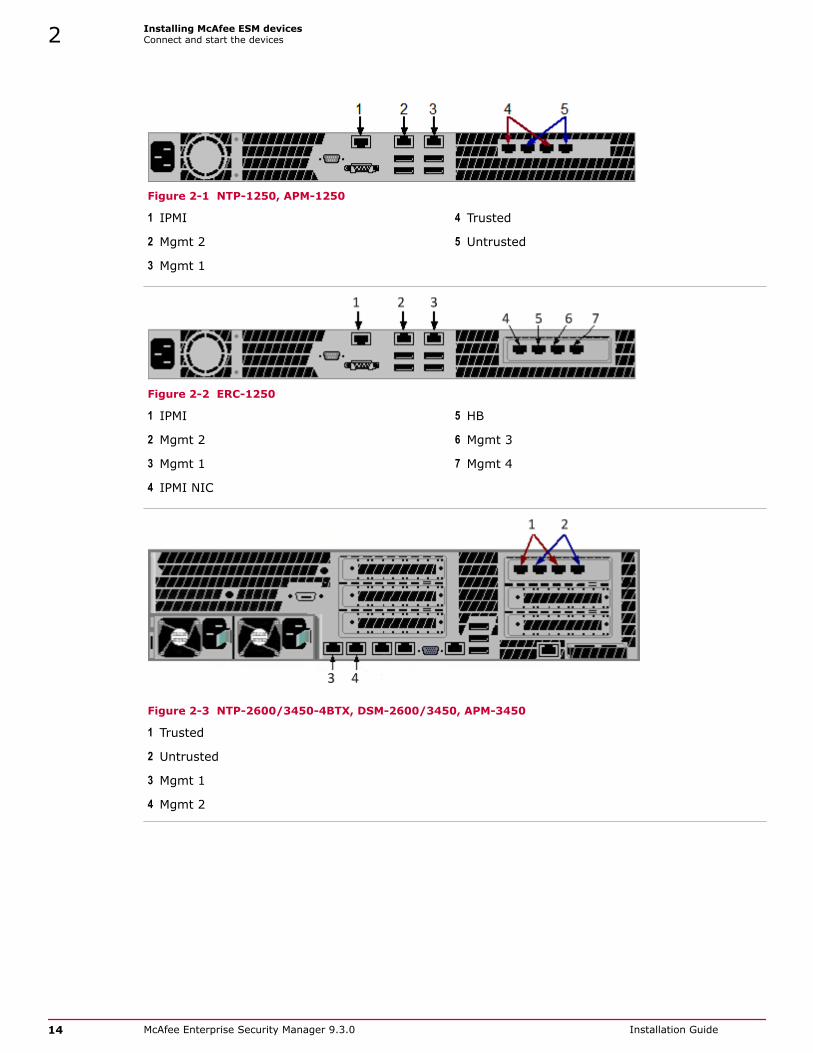
Figure 2-1 NTP-1250, APM-1250
1 IPMI 4 Trusted
2 Mgmt 2 5 Untrusted
3 Mgmt 1
Figure 2-2 ERC-1250
1 IPMI 5 HB
2 Mgmt 2 6 Mgmt 3
3 Mgmt 1 7 Mgmt 4
4 IPMI NIC
Figure 2-3 NTP-2600/3450-4BTX, DSM-2600/3450, APM-3450
1 Trusted
2 Untrusted
3 Mgmt 1
4 Mgmt 2
2 Installing McAfee ESM devicesConnect and start the devices
14 McAfee Enterprise Security Manager 9.3.0 Installation Guide

Figure 2-4 NTP-2600/3450-8BTX, DSM-4600
1 Trusted 4 Untrusted
2 Untrusted 5 Mgmt 1
3 Trusted 6 Mgmt 2
Figure 2-5 NTP-2600/3450-4BSX
1 Trusted
2 Untrusted
3 Mgmt 1
4 Mgmt 2
Installing McAfee ESM devicesConnect and start the devices 2
McAfee Enterprise Security Manager 9.3.0 Installation Guide 15
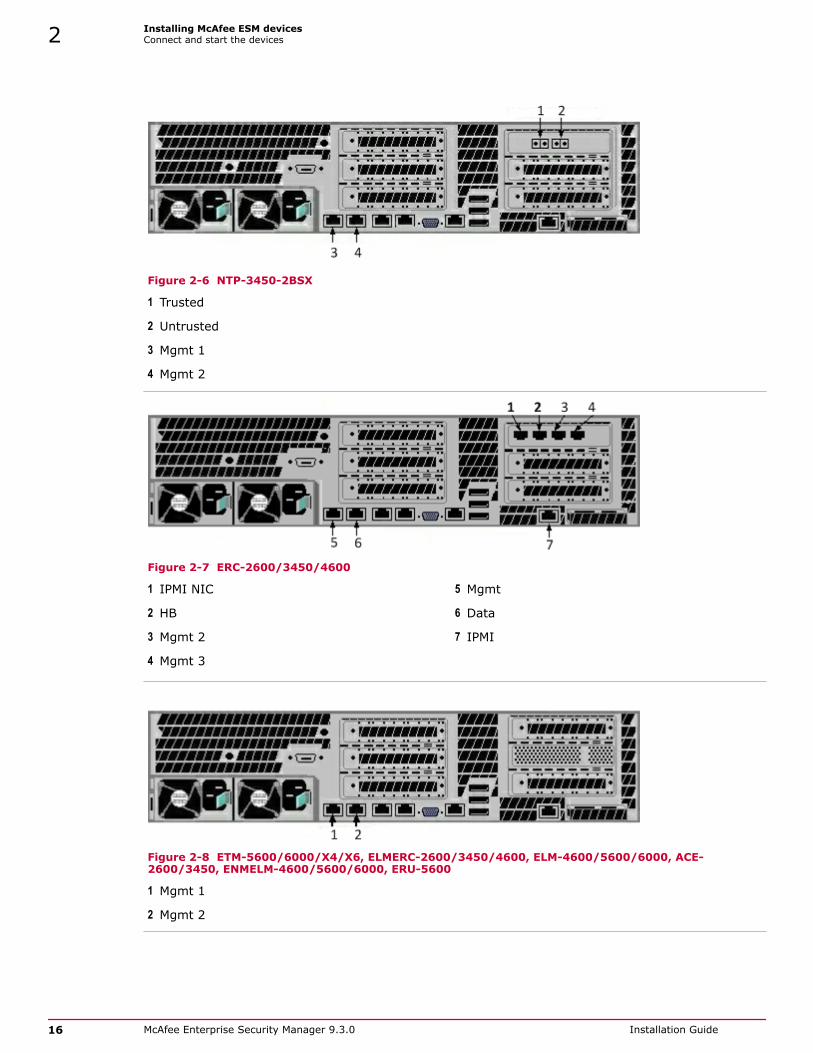
Figure 2-6 NTP-3450-2BSX
1 Trusted
2 Untrusted
3 Mgmt 1
4 Mgmt 2
Figure 2-7 ERC-2600/3450/4600
1 IPMI NIC 5 Mgmt
2 HB 6 Data
3 Mgmt 2 7 IPMI
4 Mgmt 3
Figure 2-8 ETM-5600/6000/X4/X6, ELMERC-2600/3450/4600, ELM-4600/5600/6000, ACE-2600/3450, ENMELM-4600/5600/6000, ERU-5600
1 Mgmt 1
2 Mgmt 2
2 Installing McAfee ESM devicesConnect and start the devices
16 McAfee Enterprise Security Manager 9.3.0 Installation Guide

Figure 2-9 DAS data cables
Installing McAfee ESM devicesConnect and start the devices 2
McAfee Enterprise Security Manager 9.3.0 Installation Guide 17

Figure 2-10 Connecting network ports on ERC-1250-HA
1 IPMI 6 Mgmt 2
2 Mgmt 2 7 Mgmt 3
3 Mgmt 1 8 Data feed
4 IPMI NIC 9 Mgt 1 IP
5 HB
Figure 2-11 Connecting network ports on ERC-2600/4600-HA
1 IPMI NIC 6 Data
2 HB 7 IPMI
3 Mgmt 2 8 Mgt 1
4 Mgmt 3 9 Data feed
2 Installing McAfee ESM devicesConnect and start the devices
18 McAfee Enterprise Security Manager 9.3.0 Installation Guide

5 Mgmt
See also Identifying a location for installation on page 10
Installing McAfee ESM devicesConnect and start the devices 2
McAfee Enterprise Security Manager 9.3.0 Installation Guide 19

2 Installing McAfee ESM devicesConnect and start the devices
20 McAfee Enterprise Security Manager 9.3.0 Installation Guide

3 Setting up McAfee ESM devices
Setting up the devices is essential for proper operation. To set them up, you must configure IPv6 andthe network interface for each device type, and log on to McAfee ESM.
Contents Configure the network interface on the Nitro IPS Configure the network interface on the Receiver, ELM, and ACE Configure the network interface on the DEM and ADM Configure the network interface on the ESM Configure for IPv6 Log on to McAfee ESM console
Configure the network interface on the Nitro IPSFollow these steps to configure your IP information.
Before you beginPower on the Nitro IPS and ensure the boot process is complete. Attach a monitor andkeyboard to the device.
Task
1 Press Alt + F1 to go to the LCD page, then press Esc twice.
2 Scroll down to MGT IP Conf and press Enter.
3 Select Mgt 1 and press Enter.
4 On the Active menu, select IP Address and press Enter.
5 Set the value and press Enter.
6 Scroll down to Netmask and set the value.
7 Scroll down to Done and press Enter.
8 Scroll down to Gateway and press Enter.
9 Set the gateway address, scroll down to Done and press Enter.
10 Scroll down to Port Number, set the value, and press Enter.
Make note of the new port number. You must enter it when keying the device. If the systemoperates in FIPS mode, do not change the communication port number.
11 Scroll down to Save Changes and press Enter.
3
McAfee Enterprise Security Manager 9.3.0 Installation Guide 21
Configure the network interface on the Receiver, ELM, and ACEFollow these steps to configure the network interface on a Receiver, ELM, or ACE device.
Before you beginAttach a monitor and keyboard to the device.
Task1 Press Alt + F1 to go to the LCD page, press Esc twice, then scroll down to MGT IP Conf and press Enter
2 Select Mgt 1 and press Enter, then select IP Address and press Enter.
3 Set the value and press Enter.
4 Scroll down to Netmask and set the value.
5 Scroll down to Done and press Enter.
6 Scroll down to Gateway and press Enter.
7 Set the gateway address, scroll down to Done and press Enter.
8 Scroll down to DNS 1, press Enter, and set the value.
9 Scroll down to Done and press Enter.
10 If in FIPS mode, scroll down to Port Number, change the value if needed, and press Enter.
Make note of the new port number. You must enter it when keying the device. Do not change theTCP communication port.
11 Scroll down to Save Changes and press Enter.
Configure the network interface on the DEM and ADMFollow these steps to configure the network interface on a DEM or ADM device.
Before you beginAttach a monitor and keyboard to the device.
Task1 Press Alt + F1 to go to the LCD page, then press Esc twice.
2 Scroll down to MGT IP Conf and press Enter.
3 Select Mgt 1 and press Enter.
4 On the Active menu, select IP Address and press Enter.
5 Set the value and press Enter.
6 Scroll down to Netmask and set the value.
7 Scroll down to Done and press Enter.
8 Scroll down to Gateway and press Enter.
9 Set the gateway address, scroll down to Done and press Enter.
3 Setting up McAfee ESM devicesConfigure the network interface on the Receiver, ELM, and ACE
22 McAfee Enterprise Security Manager 9.3.0 Installation Guide

10 If in FIPS mode, scroll down to Port Number, change the value if needed, and press Enter.
Make note of the new port number. You must enter it when keying the device. Do not change theTCP communication port.
11 Scroll down to Save Changes and press Enter.
Configure the network interface on the ESMFollow these steps to configure the network interface on an ESM.
Before you beginTurn on the ESM and make sure that the restart process is complete, then attach a monitorand keyboard to the device.
Task1 Press Alt + F1 to go to the LCD page, press Esc twice, then scroll down to MGT IP Conf and press Enter
2 Select Mgt 1 and press Enter, then select IP Address and press Enter.
3 Set the value and press Enter.
4 Scroll down to Netmask and set the value.
5 Scroll down to Done and press Enter.
6 Scroll down to Gateway and press Enter.
7 Set the gateway address, scroll down to Done, and press Enter.
8 Scroll down to DNS 1, press Enter, and set the value.
9 Scroll down to Done and press Enter.
10 Scroll down to Save Changes and press Enter.
Configure for IPv6If you want to use IPv6 on any of your devices and your network supports IPv6 stateless autoconfiguration, configure your system to manage IPv6.
Before you beginAttach a monitor and keyboard to the device.
To manually configure an address for the ESM, see the Network Settings section in the McAfeeEnterprise Security Manager Product Guide. To manually configure an address for each type of device,see the Interfaces section for the specific device.
Task1 Press Alt + F1 to go to the LCD page, then press Esc twice.
2 Scroll down to IPv6 Config and press Enter.
3 Select Mgt 1 and press Enter.
Setting up McAfee ESM devicesConfigure the network interface on the ESM 3
McAfee Enterprise Security Manager 9.3.0 Installation Guide 23

4 Scroll down to Save and press Enter.
5 To locate the automatically configured IPv6 address, do this:
a Start the device and wait for the menu to load.
b Scroll down to MGT IP Conf and press Enter.
c Scroll down to IPv6 Global and press Enter.
d Confirm the IPv6 address, then press Enter to return to the menu.
e Scroll down to Done and press Enter.
f Scroll down to Cancel Changes and press Enter.
Log on to McAfee ESM consoleWhen you have installed and set up ESM and devices, you can log on the console to begin configuringthe system and device settings.
Before you beginVerify whether or not you are required to operate the system in FIPS mode (see Step 5).
Task1 Open a web browser on your client computer and go to the IP address you set when you configured
the network interface.
2 Click Login, select the language for the console, then type the default user name and password.
• Default user name: NGCP
• Default password: security.4u
3 Click Login, read the End User License Agreement, then click Accept.
4 When prompted, change your user name and password, then click OK.
5 Select whether to enable FIPS mode.
If you are required to work in FIPS mode, you must enable it the first time you log on to the systemso all future communication with McAfee devices is in FIPS mode. Do not enable FIPS mode if youare not required to. For more information on FIPS, see Appendix A.
6 Follow the instructions that appear to obtain your user name and password, which are necessaryfor access to rule updates.
7 Perform initial ESM configuration:
a Select the language to be used for system logs.
b Select the time zone this ESM is in and the date format to be used with this account, then clickNext.
c Define the settings on the five Initial ESM Configuration wizard pages, clicking the Show Help icon oneach page for instructions.
8 Click OK, then click View the first page of the WebHelp for steps to get you started or View newfeatures to see the new features that are available in this version of McAfee ESM.
3 Setting up McAfee ESM devicesLog on to McAfee ESM console
24 McAfee Enterprise Security Manager 9.3.0 Installation Guide

You are ready to key and configure the devices. See the McAfee Enterprise Security Manager ProductGuide.
Setting up McAfee ESM devicesLog on to McAfee ESM console 3
McAfee Enterprise Security Manager 9.3.0 Installation Guide 25

3 Setting up McAfee ESM devicesLog on to McAfee ESM console
26 McAfee Enterprise Security Manager 9.3.0 Installation Guide
A About FIPS mode
The Federal Information Processing Standard (FIPS) consists of publicly announced standardsdeveloped by the United States Federal government. If you are required to meet these standards,operate this system in FIPS mode.
This mode must be selected the first time you log on to the system and can't be changed.
Select FIPS modeThe first time you log on to the system you are prompted to select whether or not you want thesystem to operate in FIPS mode. Once this selection is made, it can't be changed.
TaskFor option definitions, click ? in the interface.
1 Log on to the system for the first time (see Log on to McAfee ESM console) and click Yes on theEnable FIPS page.
2 On the Enable FIPS warning page, click Yes.
Your ESM operates in FIPS mode.
McAfee Enterprise Security Manager 9.3.0 Installation Guide 27

A About FIPS modeSelect FIPS mode
28 McAfee Enterprise Security Manager 9.3.0 Installation Guide

B VM requirements
These are the minimum requirements to run a VM.
• Processor — 4 cores 64-bit, Dual Core2/Nehalem or higher or AMD Dual Athlon64/Dual Opteron64or later
• RAM — 4GB (Receiver VM-25 required 2GB)
• Disk — 500 GB
The requirements are as stated above unless the VM is a higher model. Please consult thespecifications for your VM product.
• ESXI — 5.0 or later
The VM uses many features that require CPU and RAM. If the ESXi environment shares the CPU/RAMrequirements with another VM, the performance of the VM is impacted. Plan CPU and RAM withinthese requirements.
Contents Stripe the storage drive Install the virtual machine Configure the virtual machine Key the VM device
Stripe the storage driveYou must stripe the virtual machine's storage drive to use the 256MB to 2MB setting.
Task1 Select the ESX server, choose the Configuration tab, then click Storage in the Hardware section.
The VM uses many features that require CPU and RAM. If the ESXi environment shares the CPU/RAMrequirements with other VMs, the performance of the VM will be impacted. Please plan CPU and RAMwithin the requirements.
2 Choose Add Storage..., then select Disk/LUN.
McAfee Enterprise Security Manager 9.3.0 Installation Guide 29
3 Select an available disk, then select the correct option for your available disk space (Use 'Free space'for an existing drive or Use all available partitions for an available drive).
You will select the hard disk requirement needs for your server but the requirement for the VM is500GB. McAfee recommends setting the option to Thick provisioning. If you do not have 500GBavailable you will receive an error when deploying the VM.
4 Give the storage drive a name, then select 512GB, Block size: 2MB on the Maximum file size drop-down listto make sure the 500 GB drive space is available.
Install the virtual machineOnce you install and key a VM, it mimics normal ESM operation.
Before you beginVerify that your equipment meets minimum requirements.
Task1 Access the root of the CD drive (for CD install) or download the files provided by McAfee Support to
the local computer.
2 In vSphere Client, click the server IP in the device tree.
3 Click File and select Deploy OVF Template.
4 Designate the name, the folder to install the VM, the disk provisioning setting, and the VM Networkingoption.
5 Deploy the files to the ESXi server, select the VM and ensure the following are set on the Edit VirtualMachine setting.
6 Select the correct networking settings for your ESXi network switches/adapters, then click Play tolaunch the VM.
7 Using the VM menu, set MGT1 IP, netmask, gateway, and DNS addresses, then press Esc to activatethe menu.
8 Configure the network interface on the VM, save the changes before exiting the Menu window, thenkey the device.
Configure the virtual machineOnce you have installed the VM, configure the network interface.
Task1 Click Esc, then scroll down to MGT IP Conf on the LCD and click Enter twice.
2 Set the IP address using the arrows to change the value of the current digit and to switch betweendigits, then click Enter.
3 Scroll to Netmask and set it using the arrows.
4 Scroll to Done and click Enter, then scroll to Gateway and press Enter.
5 Set the gateway address using the arrows, then scroll down to Done and click Enter.
B VM requirementsInstall the virtual machine
30 McAfee Enterprise Security Manager 9.3.0 Installation Guide

6 Scroll down to DNS1, click Enter, then select the DNS server address using the arrows.
7 Scroll down to Done and press Enter.
8 If the system is operating in FIPS mode (see About FIPS Mode) and you need to change thecommunication port, press the down arrow twice, then press Enter.
Do not change the TCP communication port.
9 Change the port number, then press Enter.
Make note of the new port number. You need to enter it when keying the device.
10 Scroll to Save Changes and press Enter.
Key the VM deviceKey the device to establish a link between the device and the ESM.
Before you beginPhysically connect the device to your network
TaskFor option definitions, click ? in the interface.
1 On the system navigation tree, select an ADM or IPS device, then click the Add Virtual Device icon inthe actions pane.
2 Enter the information requested, then click OK.
VM requirementsKey the VM device B
McAfee Enterprise Security Manager 9.3.0 Installation Guide 31

B VM requirementsKey the VM device
32 McAfee Enterprise Security Manager 9.3.0 Installation Guide

C Install the qLogic 2460 SAN adapter
The qLogic QLE2460 is a single, Fibre Channel PCIe x4 adapter, rated at 4GB. It can connect directlyto the SAN device or through a SAN switch.
Before you begin• Make sure the SAN device or SAN switch you are attaching to auto-negotiates.
• Make sure the SAN administrator allocates and creates space on the SAN and assigns itto the channel where the qLogic adaptor is attached. Use the World Wide Port Name(WWPN) for the adaptor. The WWPN is located on the adapter's card, anti-static bag,and box.
For option definitions, click ? in the interface.
Task1 Turn off the device you are installing the SAN adapter on.
2 Insert the adapter, then place the device back on the rack and connect the cables.
For a 3U device, insert the adapter in the slot closest to the protective memory cover.
The adapter BIOS boot message informs you that the adapter is installed and functioning. If you donot see this message or if the card does not have red, yellow, or green lights, the card is notrecognized. If this is the case, make sure the card is seated correctly or insert it into a different PCIslot.
3 Start the device.
The operating environment detects it and loads the QLAXXX driver. The Mounting Storage Facilitiesmessage displays OK and continues starting.
4 Using the ESM console, key the device.
When the device is keyed, the Properties page includes the SAN Volumes option.
McAfee Enterprise Security Manager 9.3.0 Installation Guide 33

C Install the qLogic 2460 SAN adapter
34 McAfee Enterprise Security Manager 9.3.0 Installation Guide

D Install DAS
The DAS is an add-on device to a 4xxx/5xxx/6xxx series ESM or ELM.
The DAS unit ships with a very heavy chassis (100 lbs plus) and a LSI 9280-4e RAID card for:
ETM-5205
ETM-5510
ETM-5600
ETM-5750
ETM-6000
ETM-X3
ETM-X4
ETM-X5
ETM-X6
ESMREC-5205
ESMREC-5510
ENMELM-4600
ENMELM-5205
ENMELM-5510
ENMELM-5600
ENMELM-6000
ELM-4600
ELM-5205
ELM-5510
ELM-5600
ELM-5750
ELM-6000
McAfee Enterprise Security Manager 9.3.0 Installation Guide 35

TaskFor option definitions, click ? in the interface.
1 Turn off the ESM following a normal shutdown procedure.
2 Pull the device from the rack and open the top case (you might need to remove a small screw atthe front or rear of the top case).
3 Install the LSI 9280-8e RAID card in slot 4 of the ESM.
If the Areca or 3Ware RAID card is currently in slot 4, move the RAID card to slot 6. If the McAfeeESM device has an Areca or 3Ware RAID card and also has an SSD card installed, install the LSI9280-8e RAID card in slot 5.
4 After the cards are installed, replace the top on the McAfee ESM and reinsert it back in the rack.
5 Insert the cable connectors into slot 1 and slot 2 on the LSI 9280-8e RAID card external slots. Thecable clicks into place.
6 Verify that all drives are fully inserted in the DAS, then attach the inner rails to the DAS device andinsert it into the rack.
7 Before inserting power cables, insert the data cables into the first and third slots on the rear of theDAS device. The cables click into place.
8 Power on the DAS device.
A test light appears for all drives. The drive with the red light is the “hot spare” for the DAS.
9 Power on the McAfee ESM device and look for the LSI 9280-8e RAID card BIOS utility.
The DAS device is pre-formatted and doesn't require configuring a RAID set on the device. If yousee a RAID not present message, call McAfee Support to create the RAID.
10 Log on and run a df –h command to make sure you have a /das1_hd drive.
On the System Properties page of the ESM console, the Hardware field on the System Information page reflectsthe increased size of the hard drive labeled /data_hd.
D Install DAS
36 McAfee Enterprise Security Manager 9.3.0 Installation Guide

E Installing devices in a rack
We recommend installing devices in a rack to protect the devices and the cabling from accidentaldamage or getting disconnected.
Contents Install AXXVRAIL rail set Remove the chassis
McAfee Enterprise Security Manager 9.3.0 Installation Guide 37

Install AXXVRAIL rail setAn AXXVRAIL rail set is shipped with each device so you can install it in a rack.
Task1 Install rails in the rack.
a Pull the release button (F) to remove the inner member (D) from the slides.
ComponentsA - front bracket
B - outer member
C - rear bracket
D - inner member
E - safety locking pin
F - release button
E Installing devices in a rackInstall AXXVRAIL rail set
38 McAfee Enterprise Security Manager 9.3.0 Installation Guide

b Align the brackets to the desired vertical position on the rack, then insert the fasteners.
c Move the ball retainer to the front of the slides.
Installing devices in a rackInstall AXXVRAIL rail set E
McAfee Enterprise Security Manager 9.3.0 Installation Guide 39

2 Install the chassis.
a Align the inner member key holes to standoffs on the chassis.
b Move the inner member in the direction shown in the following picture.
c Install the chassis to the fixed slides by pulling the release button in the inner member torelease the lock and allow the chassis to close.
E Installing devices in a rackInstall AXXVRAIL rail set
40 McAfee Enterprise Security Manager 9.3.0 Installation Guide

Remove the chassisYou can remove the chassis from the rails.
Task1 Fully extend the slides until the slides are in a locked position.
2 Pull the release button to release the lock and disconnect the inner member from the slides.
3 Press the safety locking pin to release the inner member from the chassis.
Installing devices in a rackRemove the chassis E
McAfee Enterprise Security Manager 9.3.0 Installation Guide 41

E Installing devices in a rackRemove the chassis
42 McAfee Enterprise Security Manager 9.3.0 Installation Guide

F Regulatory notices
This is the regulatory information regarding the different platforms you might use.
Table F-1 SuperMicro-based Platforms
McAfee 1U McAfee 2U or 3U
Electromagnetic Emissions FCC Class B, EN 55022 Class B,
EN 61000-3-2/-3-3
CISPR 22 Class B
FCC Class B, EN 55022 Class B,
EN 61000-3-2/-3-3
CISPR 22 Class B
Electromagnetic Immunity EN 55024/CISPR 24,
(EN 61000-4-2, EN 61000-4-3,
EN 61000-4--4, EN 61000-4-5,
EN 61000-4-6, EN 61000-4-8,
EN 61000-4-11) 55024
EN 55024/CISPR 24,
(EN 61000-4-2, EN 61000-4-3,
EN 61000-4--4, EN 61000-4-5,
EN 61000-4-6, EN 61000-4-8,
EN 61000-4-11) 55024
Safety EN 60950/IEC 60950-Compliant,
UL Listed (USA)
CUL Listed (Canada)
TUV Certified (Germany)
CE Marking (Europe)
EN 60950/IEC 60950-Compliant,
UL Listed (USA)
CUL Listed (Canada)
TUV Certified (Germany)
CE Marking (Europe)
Table F-2 DAS-based Platforms
DAS-10, DAS-25, DAS-50, DAS-100
Input Voltage 100/240 VAC
Input Frequency 50/60 Hz
Power Supply 1400W X3
Power Consumption 472W@120VAC
461W@240VAC
Amps (Max) 9.4A
Altitude (Max) -45 to 9,500 feet
Temperature (Max) 10º to 35º C (operating)
-40º to 70º C (non-operating)
Altitude -45 to 9500 feet (operating) -45 to 25,000 feet (non-operating)
McAfee Enterprise Security Manager 9.3.0 Installation Guide 43
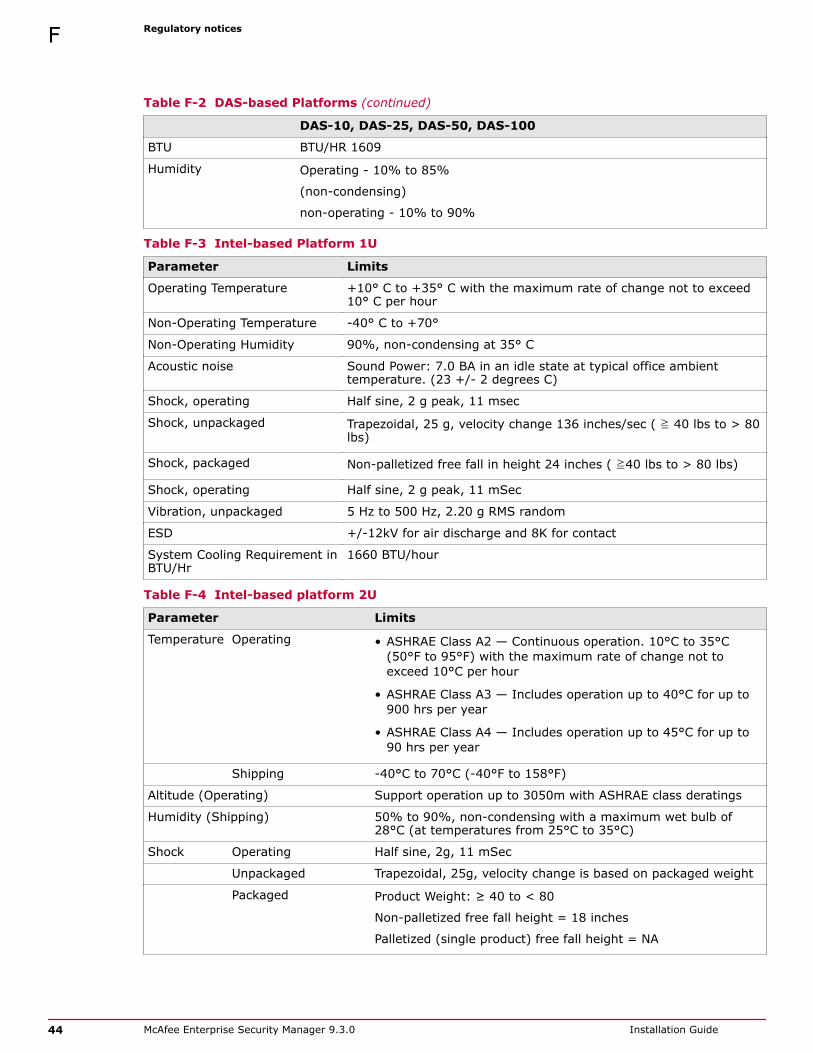
Table F-2 DAS-based Platforms (continued)
DAS-10, DAS-25, DAS-50, DAS-100
BTU BTU/HR 1609
Humidity Operating - 10% to 85%
(non-condensing)
non-operating - 10% to 90%
Table F-3 Intel-based Platform 1U
Parameter Limits
Operating Temperature +10° C to +35° C with the maximum rate of change not to exceed10° C per hour
Non-Operating Temperature -40° C to +70°
Non-Operating Humidity 90%, non-condensing at 35° C
Acoustic noise Sound Power: 7.0 BA in an idle state at typical office ambienttemperature. (23 +/- 2 degrees C)
Shock, operating Half sine, 2 g peak, 11 msec
Shock, unpackaged Trapezoidal, 25 g, velocity change 136 inches/sec ( ≧ 40 lbs to > 80lbs)
Shock, packaged Non-palletized free fall in height 24 inches ( ≧40 lbs to > 80 lbs)
Shock, operating Half sine, 2 g peak, 11 mSec
Vibration, unpackaged 5 Hz to 500 Hz, 2.20 g RMS random
ESD +/-12kV for air discharge and 8K for contact
System Cooling Requirement inBTU/Hr
1660 BTU/hour
Table F-4 Intel-based platform 2U
Parameter Limits
Temperature Operating • ASHRAE Class A2 — Continuous operation. 10°C to 35°C(50°F to 95°F) with the maximum rate of change not toexceed 10°C per hour
• ASHRAE Class A3 — Includes operation up to 40°C for up to900 hrs per year
• ASHRAE Class A4 — Includes operation up to 45°C for up to90 hrs per year
Shipping -40°C to 70°C (-40°F to 158°F)
Altitude (Operating) Support operation up to 3050m with ASHRAE class deratings
Humidity (Shipping) 50% to 90%, non-condensing with a maximum wet bulb of28°C (at temperatures from 25°C to 35°C)
Shock Operating Half sine, 2g, 11 mSec
Unpackaged Trapezoidal, 25g, velocity change is based on packaged weight
Packaged Product Weight: ≥ 40 to < 80
Non-palletized free fall height = 18 inches
Palletized (single product) free fall height = NA
F Regulatory notices
44 McAfee Enterprise Security Manager 9.3.0 Installation Guide
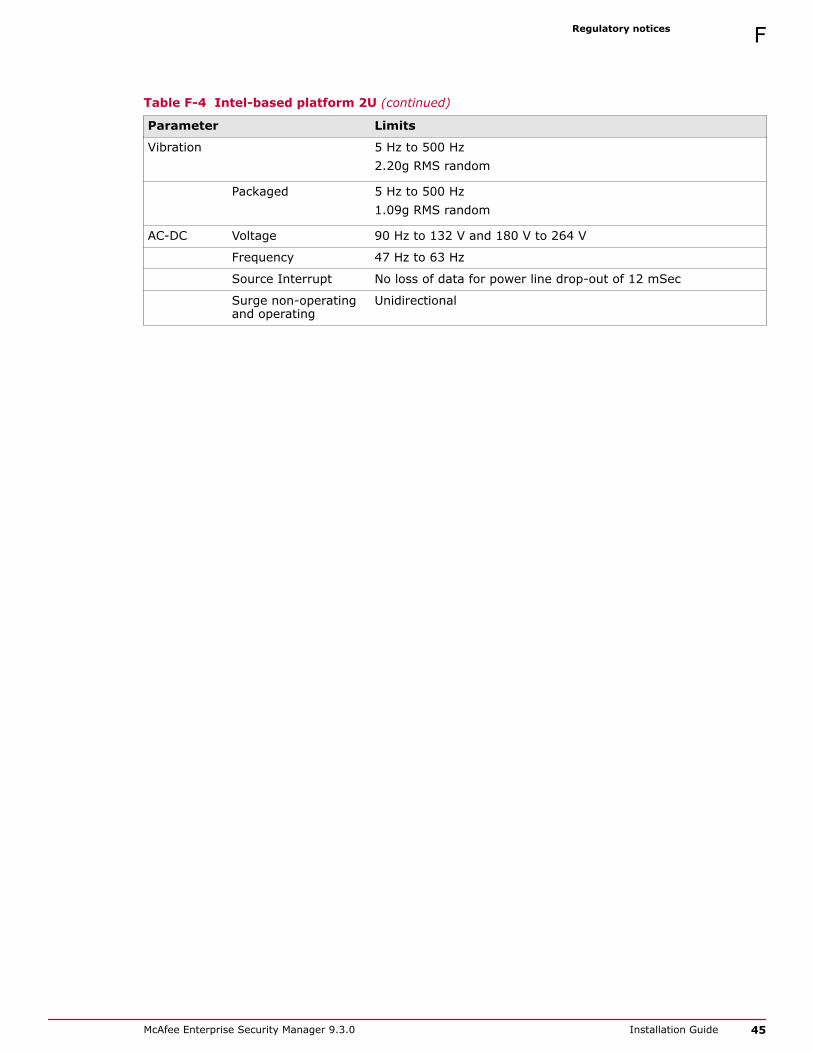
Table F-4 Intel-based platform 2U (continued)
Parameter Limits
Vibration 5 Hz to 500 Hz2.20g RMS random
Packaged 5 Hz to 500 Hz1.09g RMS random
AC-DC Voltage 90 Hz to 132 V and 180 V to 264 V
Frequency 47 Hz to 63 Hz
Source Interrupt No loss of data for power line drop-out of 12 mSec
Surge non-operatingand operating
Unidirectional
Regulatory notices F
McAfee Enterprise Security Manager 9.3.0 Installation Guide 45

F Regulatory notices
46 McAfee Enterprise Security Manager 9.3.0 Installation Guide
Index
Aabout this guide 5ACE, configure network interface 22
ADM, configure network interface 22
AXXVRAIL railsinstall 38
remove chassis 41
Ccables, identify network 12
connect device 11
connector type, identify 12
conventions and icons used in this guide 5
DDAS, install 35
DEM, configure network interface 22
device, inspect 10
devicesconnect 11
set up 21
start 11
devices, identify network ports 13
documentationaudience for this guide 5product-specific, finding 6typographical conventions and icons 5
EELM, configure network interface 22
equipment type, identify 12
ESM, configure network interface 23
FFIPS
enable 24
FIPS modeselect 27
Hhardware, minimum requirements 9
Iinspect packaging and device 10
installidentify location 10
install deviceprepare to 9
IPv6, configure 23
Llocation for installation 10
log on to ESM console 24
MMcAfee ServicePortal, accessing 6minimum requirements for hardware and software 9
Nnetwork cables, identify 12
network interfaceconfigure DEM and ADM 22
configure ESM 23
configure Nitro IPS 21
network interface, configureACE 22
ELM 22
Receiver 22
network ports, identify for each device 13
Nitro IPS, configure network interface 21
Ppackaging, inspect 10
password for ESM console 24
platforms, regulatory notices for 43
ports, identify network for each device 13
QqLogic 2460 SAN adapter, install 33
RReceiver, configure network interface 22
regulatory notices for platforms 43
McAfee Enterprise Security Manager 9.3.0 Installation Guide 47

SSAN adapter, install 33
ServicePortal, finding product documentation 6software, minimum requirements 9start device 11
TTechnical Support, finding product information 6
Uuser name for ESM console 24
Vvirtual machine
configure 30
install 30
key 31
requirements 29
strip storage drive 29
Index
48 McAfee Enterprise Security Manager 9.3.0 Installation Guide

0-00


![ESM [Final]](https://static.fdocuments.us/doc/165x107/5871aebd1a28abda6a8b62d9/esm-final-58be1bd4990bf.jpg)

