* Transferência de Instalações * Sem Surpresas * Sem Caos * Sem Custos Extras.
Security Guidelines
AudioCodes One Voice™ Operations Center Product Suite
EMS, SEM and IP Phone Manager Version 7.2


Security Guidelines Contents
Version 7.2 3 EMS, SEM and IP Phone Manager
Table of Contents
1 Introduction ......................................................................................................... 7
1.1 AudioCodes EMS / SEM Security Solution ............................................................ 7
Securing the OVOC Server Platform ....................................................................... 9
2 Step 1: Implementing Server Security Settings ............................................. 11
2.1 Changing the OS Password ................................................................................. 11 2.2 Changing Database Default Password ................................................................ 11 2.3 Provisioning SSH Options to access OVOC Server ............................................. 11 2.4 Integrity Testing ................................................................................................... 12
2.4.1 File Integrity Checker .............................................................................................. 12 2.4.2 Software Integrity Checker (AIDE) and Pre-linking ................................................. 13
2.5 Transferring Files Using SFTP / SCP ................................................................... 13 2.6 Advanced Security Options .................................................................................. 13
2.6.1 Auditd ...................................................................................................................... 13 2.6.2 Network Options ...................................................................................................... 14
Securing the Application ........................................................................................ 15
3 Step 2: Defining OVOC Users .......................................................................... 17
3.1 Implementing Centralized Identity Management (LDAP and RADIUS) ................. 17 3.1.1 Provisioning Administrator and Operator Security Levels ...................................... 17
3.2 Implementing Local EMS Based Identity Management ........................................ 17 3.2.1 Provisioning Administrator and Operator Security .................................................. 18
3.3 Multi-Tenancy ...................................................................................................... 19
Securing the Communication ................................................................................ 21
4 Step 3: Configuring Enterprise Firewall ......................................................... 23
5 Step 4: Securing SNMP Interface Access (EMS) ........................................... 31
5.1 Securing Trap Forwarding over SNMPv3 ............................................................. 31 5.1.1 Prefer SNMPv3 over SNMPv2 ................................................................................ 31
6 Step 5: Implementing X.509 Authentication ................................................... 33
6.1 Types of Certificates ............................................................................................ 34 6.2 Recommended Workflow ..................................................................................... 34
6.2.1 OVOC Client and Servers ....................................................................................... 34 6.2.2 AudioCodes Devices ............................................................................................... 35 6.2.3 Endpoints ................................................................................................................ 35 6.2.4 Third-Party Servers ................................................................................................. 35
6.3 HTTPS/SSL/TLS Security Implementation Diagram ............................................ 36 6.4 Step 5-1 Enabling HTTPS/SSL/TLS Connections ................................................ 37
Security Guidelines 4 Document #: LTRT-94043
AudioCodes One Voice Operations Center
6.4.1 EMS Client and Server Connections ...................................................................... 37 6.4.1.1 EMS Desktop PC Client .......................................................................... 37 6.4.1.2 EMS JAWS Client .................................................................................... 37 6.4.1.3 EMS for IP Phones Web Client ............................................................... 37 6.4.1.4 SEM Web Client ...................................................................................... 37 6.4.1.5 Endpoints REST Connection ................................................................... 38
6.4.2 AudioCodes Device Connections ........................................................................... 38 6.4.2.1 Single-Sign On to the AudioCodes Device .............................................. 38 6.4.2.2 Implementing Two-Way Authentication with X.509 Certificates .............. 38 6.4.2.3 SEM-AudioCodes Device Communication .............................................. 40
6.4.3 Third-Party Network Server Connections ............................................................... 40 6.4.3.1 EMS and Active Directory LDAP Server SSL Connection ...................... 40 6.4.3.2 SEM and Active Directory LDAP Server (Microsoft Lync Users) SSL Connection .............................................................................................................. 40 6.4.3.3 SEM and MS-SQL Lync Database SSL Connection ............................... 40
6.5 Step 5-2: Generating Custom EMS Server Certificates ........................................ 41 6.5.1 Updating Keystore File on EMS PC Client ............................................................. 42 6.5.2 Updating Keystore File on JAWS Client ................................................................. 42
6.6 Step 5-3: Implementing Custom Certificates for the Connections with AudioCodes Devices ......................................................................................................................... 43
6.6.1 Implementing SEM Tomcat Server and AudioCodes Device Authentication ......... 43
Version 7.2 5 EMS, SEM and IP Phone Manager
Security Guidelines Notices
Notice
Information contained in this document is believed to be accurate and reliable at the time of printing. However, due to ongoing product improvements and revisions, AudioCodes cannot guarantee accuracy of printed material after the Date Published nor can it accept responsibility for errors or omissions. Updates to this document and other documents as well as software files can be viewed by registered customers at http://www.audiocodes.com/downloads.
This document is subject to change without notice.
Date Published: May-11-2017
Trademarks
©2017 AudioCodes Ltd. All rights reserved. AudioCodes, AC, HD VoIP, HD VoIP Sounds Better, IPmedia, Mediant, MediaPack, What’s Inside Matters, OSN, SmartTAP, VMAS, VoIPerfect, VoIPerfectHD, Your Gateway To VoIP, 3GX, VocaNom, AudioCodes One Voice and CloudBond are trademarks or registered trademarks of AudioCodes Limited All other products or trademarks are property of their respective owners. Product specifications are subject to change without notice.
WEEE EU Directive
Pursuant to the WEEE EU Directive, electronic and electrical waste must not be disposed of with unsorted waste. Please contact your local recycling authority for disposal of this product.
Customer Support
Customer technical support and services are provided by AudioCodes or by an authorized AudioCodes Service Partner. For more information on how to buy technical support for AudioCodes products and for contact information, please visit our Web site at www.audiocodes.com/support.
Abbreviations and Terminology
Each abbreviation, unless widely used, is spelled out in full when first used.
Throughout this manual, unless otherwise specified, the term device refers to AudioCodes products.
Security Guidelines 6 Document #: LTRT-94043
AudioCodes One Voice Operations Center
Document Revision Record
LTRT Description
94040 Initial release of the document.
94041 Updating Java Web Start certificates after upgrade; correction to firewall table; updating Java security level on PC; enabling the 'QOEENABLETLS' parameter when working with MP-1xx devices.
94042 Updates for supporting SSL encrypted HTTPS connection between endpoints and EMS server.
94043 Updated Firewall Configuration Schema and OVOC Maximum Security Implementation diagrams.
Documentation Feedback
AudioCodes continually strives to produce high quality documentation. If you have any comments (suggestions or errors) regarding this document, please fill out the Documentation Feedback form on our Web site at http://www.audiocodes.com/downloads.
Version 7.2 7 EMS, SEM and IP Phone Manager
Security Guidelines 1. Introduction
1 Introduction This document provides security guidelines for safeguarding your network and your AudioCodes EMS & SEM Applications device against malicious attacks.
1.1 AudioCodes EMS / SEM Security Solution The AudioCodes EMS and SEM applications provide a comprehensive package of security features that handles the following main security areas:
Securing the OVOC Server Platform:
• Step 1: Implementing Server Security Settings (see Chapter 2)
Securing the Application (Identity Management):
• Step 2: Defining OVOC Users (see Chapter 3)
Securing the Communication:
• Step 3: Configuring the Enterprise Firewall (see Chapter 4)
• Step 4: Configuring SNMP (see Chapter 5)
• Step 5: Implementing X.509 Authentication (see Chapter 6)
♦ Step 5-1: Enabling HTTPS/SSL/TLS Connections (see Section 6.4)
♦ Step 5-2: Implementing Custom Certificates for OVOC Clients and Server Connections (see Section 6.5)
♦ Step 5-2: Implementing Custom Certificates for the Connections with AudioCodes Devices (see Section 6.6)

Security Guidelines 8 Document #: LTRT-94043
AudioCodes One Voice Operations Center
This page is intentionally left blank.

Part I
Securing the OVOC Server Platform


Version 7.2 11 EMS, SEM and IP Phone Manager
Security Guidelines 2. Step 1: Implementing Server Security Settings
2 Step 1: Implementing Server Security Settings This step describes enhanced security settings that can be implemented using the EMS Server Manager to prevent intrusion to the EMS Server platform. The EMS Server Manager tool has been designed to provide the ability to configure all the required security measures to prevent intruders from accessing and manipulating Operating System level files. The EMS Server Manager tool serves as an interface to the Operating System and therefore discourages users from running Linux commands directly from an OS shell; such actions can expose security vulnerabilities.
2.1 Changing the OS Password OS Password settings are comprised of the following:
General password settings: these settings enable you to change the 'Minimum Acceptable Password Length' and 'Enable User Block on Failed Login'. In addition, you can modify settings for a specific user, such as 'User’s Password' and 'Password Validity Max Period'.
Operating System Users Security Extensions: these settings enable you to change the default user password "acems" for accessing the EMS server platform over an SSH connection terminal. In addition you can configure this passwords validity period, the maximum allowed numbers of simultaneous open sessions and the inactivity time period (days) before the OS user is locked.
Note: The 'Security Event' is raised when a specific user is blocked after reaching the maximum number of login attempts.
To change these settings, refer to Section 'OS User Passwords' in the EMS Server IOM.
2.2 Changing Database Default Password You can change the Oracle Database password. The EMS server shuts down automatically before changing the Oracle Database password. Refer to Section 'DB Password' in the EMS Server IOM.
Note: It is not possible to restore these passwords or to enter the EMS Oracle Database without them.
2.3 Provisioning SSH Options to access OVOC Server You can configure the following options for connecting to the SSH terminal connection (for more information, refer to 'Section SSH' in the EMS Server IOM):
Configure SSH Log Level: You can configure the log level of the SSH daemon server. The log files are found at the location '/var/log/secure' (older records are stored in secure.1, secure.2 etc.)
Security Guidelines 12 Document #: LTRT-94043
AudioCodes One Voice Operations Center
Configure SSH Banner: The SSH Banner displays a pre-defined text message each time the user connects to the EMS server using an SSH connection. You can customize this message. By default this option is disabled
Configure SSH on Ethernet Interfaces: You can allow or deny SSH access separately for each network interface enabled on the EMS server.
Configure SSH Allowed Hosts: This option enables you to define which hosts are allowed to connect to the EMS server through SSH:
• Allow ALL Hosts
• Deny ALL Hosts
Note: When this action is performed, the EMS server is disconnected and you cannot reconnect through SSH. Before you disable SSH access, ensure that you have provisioned alternative connection methods, for example, serial management connection or KVM switch connection.
• Add Host/Subnet to Allowed Hosts
Note: When adding a Host Name, ensure to verify your remote host name appears in the DNS server database and your EMS server has an access to the DNS server.
• Remove Host/Subnet from Allowed Hosts
Note: When you remove either the only existing IP address, Subnet or Host Name in the Allowed Hosts list, there are no remote hosts with access (i.e. for each respective option) to connect to the OVOC server using SSH. When this action is performed, you are disconnected from the OVOC server and may not be able to reconnect through SSH. Therefore, prior to disabling SSH access, ensure that alternative connection methods have been provisioned, for example, serial management connection or KVM switch connection.
2.4 Integrity Testing Integrity testing is performed to verify whether system file attributes have been modified. You can activate the regular File Integrity tool or the Advanced Intrusion Detection tool as described below. Both these tools are by default enabled.
2.4.1 File Integrity Checker The File Integrity checker tool periodically verifies whether file attributes were changed (permissions/mode, inode #, number of links, user id, group id, size, access time, modification time, creation/inode modification time). File Integrity violation problems are reported through EMS Security Events. The File Integrity checker tool runs on the EMS server machine. See Section 'File Integrity Checker' in the EMS Server IOM.
Version 7.2 13 EMS, SEM and IP Phone Manager
Security Guidelines 2. Step 1: Implementing Server Security Settings
2.4.2 Software Integrity Checker (AIDE) and Pre-linking AIDE (Advanced Intrusion Detection Environment) is a file and directory integrity checker. This mechanism creates a database from the regular expression rules that it finds in its configuration file. Once this database is initialized, it can be used to verify the integrity of the files.
Pre-linking is designed to decrease process startup time by loading each shared library into an address for which the linking of needed symbols has already been performed. After a binary has been pre-linked, the address where the shared libraries are loaded will no longer be random on a per-process basis. This is undesirable because it provides a stable address for an attacker to use during an exploitation attempt. See Section 'Software Integrity Checker (AIDE) and Pre-linking' in the EMS Server IOM.
2.5 Transferring Files Using SFTP / SCP Files should be transferred to and from the EMS server using any SFTP/SCP file transfer application. Refer to the EMS Server IOM appendix for such instructions.
All EMS and device information available for the NMS and other Northbound interfaces including Topology, Performance and Backup data is located in the EMS server machine under the folder /ACEMS/NBIF. This folder can be accessed using HTTPS browsing by entering the URL https:// <EMS Server IP>/NBIF in your Web browser.
For more information, refer to the OAM Integration Guide.
2.6 Advanced Security Options
2.6.1 Auditd Auditd is the user space component to the Linux Auditing System that is responsible for writing audit records to the disk. This tool monitors what is happening in your system at the kernel level. For example, it monitors network traffic and access to files.
Using the Auditd option, you can change the auditd tool settings to comply with the Security Technical Information Guidelines (STIG) recommendations.
This option is by default disabled; however, it is highly recommended to enable it. When enabled, these records are saved in the /var/log/audit/ directory on the EMS Server platform. To enable this option, refer to Section 'Auditd Options' in the EMS Server IOM.
Security Guidelines 14 Document #: LTRT-94043
AudioCodes One Voice Operations Center
2.6.2 Network Options The following network security options provide protection against hackers and intruders. All these options are by default disabled; however it is highly recommended to enable all of these options. To enable these options, refer to Section 'Network Options' in the EMS Server IOM.
Ignore Internet Control Message Protocol (ICMP) Echo requests:
This option ensures that the EMS server does not respond to ICMP broadcasts, and therefore such replies are always discarded. This prevents attempts to discover the system using ping requests.
Ignore ICMP Echo and Timestamp requests:
This option ensures that the EMS server does not respond to an ICMP timestamp request to query for the current time. This reduces exposure to spoofing of the system time.
Disable ICMP Redirect Messages:
This option disables the sending of ICMP Redirect Messages, which are generally sent only by routers.
Block ICMP Redirect Messages:
This option ensures that the EMS server does not respond to ICMP Redirect broadcasts, and therefore such replies are always discarded. This prevents an intruder from executing a denial of service attack by attempting to redirect traffic from the EMS server to a different gateway.

Part II
Securing the Application This part describes the user management on the OVOC servers.

age

Security Guidelines 3. Step 2: Defining OVOC Users
Version 7.2 17 EMS, SEM and IP Phone Manager
3 Step 2: Defining OVOC Users OVOC users can be authenticated and authorized either locally on the EMS server or using a centralized third-party platform. By default, EMS users are managed locally in the EMS database.
3.1 Implementing Centralized Identity Management (LDAP and RADIUS) It is recommended to implement a third-party LDAP server or RADIUS server in your network for authenticating and authorizing the EMS/SEM management users (Web and CLI). This can be done, for example, by using an LDAP-compliant server such as Microsoft Active Directory (AD). When a user attempts to log in to the EMS, the EMS server verifies the login username and password with the AD server or RADIUS server.
You can also configure an HTTPS connection with the LDAP server for the LDAP user authentication (see Section 6.4.3).
Note: You must initially connect to the EMS using the default user 'acems'. Once you have successfully connected with the 'acems' user, you can then change the authentication and authorization for the EMS server installation settings to RADIUS or LDAP.
3.1.1 Provisioning Administrator and Operator Security Levels
The EMS determines the user's security level (privileges) based on the user's profile in the AD or RADIUS server. When the user properties custom attribute “Security Level” (specifically defined EMS attribute) has not been defined on the RADIUS or LDAP server and configured with one of the EMS Security levels (see Section 3.2.1), then the default security level "Operator" is assigned to the user (refer to Section "LDAP Server" and RADIUS Server" in the EMS User's manual). If you wish, you can deny user access or set a different security level to the user by configuring the 'Default Authorization Level on Radius Attribute Absence' or Default Authorization Level on LDAP Group Absence' parameter.
3.2 Implementing Local EMS Based Identity Management In case you don’t have an LDAP or RADIUS authentication server in your network, you can manage OVOC users in the EMS local database using the Users List.
Note: For RADIUS users only: the local users database can be automatically used as a backup if the connection to the RADIUS servers fails after a defined timeout ie. when the RADIUS connection fails, the user and password are replicated to the local users database and therefore the user can login to the EMS as a local user. This feature is configured by parameter 'Enable Local Authentication on Radius Timeout' (refer to Section 'Radius Server' in the EMS User's Manual). In addition, when the RADIUS connection fails, the 'Security Alarm' is raised; when all RADIUS servers cannot be reached, this alarm has the "Critical" status.

Security Guidelines 18 Document #: LTRT-94043
AudioCodes One Voice Operations Center
3.2.1 Provisioning Administrator and Operator Security The following security levels can be set for OVOC administrators and operators:
Not visible: this level is relevant only when defining different security levels per Region. When some Regions are defined as 'Not Visible' for the specific user, they will not be able to see these Regions and their devices in the EMS Tree.
Monitoring (viewing only).
Operation (viewing and all system provisioning operations on devices).
Administration (viewing, all system provisioning operations on devices, and operator security management described in this section). All the user operations in the EMS can be performed by the user with the "Administrator" security level. Operators with the Administrator security level control other operators' access to system resources. This ensures that sensitive system information cannot be accessed without appropriate authorization, and managed system elements cannot be disrupted by inexpert operators
Administrator Super User (viewing, all system provisioning operations on devices, operator security management described in this section and Administration users manipulations i.e. adding and removing administrators). This is the highest level of security.
Users with 'Super Administrator' or 'Administrator' permissions can perform the following actions:
Users Management: view, define, edit users and user permissions. Perform actions related to the Users.
View Users Actions Journal
Perform Software and / or Auxiliary Files definition in the Software Manager (while the download to the device can also be performed by Regional Users).
Add / Remove Region (device), move devices between regions.
Provision Trap Forwarding Rules
View system alarms in the Alarms Browser. For example, 'Disk Space' alarm, 'EMS Server Started' or 'Security Event' alarm.
Security Guidelines 3. Step 2: Defining OVOC Users
Version 7.2 19 EMS, SEM and IP Phone Manager
3.3 Multi-Tenancy In addition, the Administrator can set different user permissions for different regions i.e. "Monitoring" or "Operator" permissions. When such permissions are set, such operators can only perform restricted actions and can only view a subset of the sites. This is referred to as Multi-Tenancy where each region representing a tenant. Regional operators can be defined with the following security levels:
Operator (read-write): Perform any actions and/or provisioning changes on all the relevant devices, alarms actions, performance monitoring profiles/rules definition.
Monitoring (read-only): View all the data without option to perform any modifications
Not Visible: A user defined as 'Not Visible' for a specific region does not see this region displayed
Users with" Operator and Monitoring" security levels can view alarms for devices in their managed Region. For example, 'Topology event', 'Proxy Connection Lost' and 'GW Connection Alarm'.
You can also use the 'Set All Regions' option to replicate an identical permission for all the regions in a single click.
Note: Multi-tenancy is not supported when users are stored in the RADIUS or the LDAP AD server.

Security Guidelines 20 Document #: LTRT-94043
AudioCodes One Voice Operations Center
This page is intentionally left blank.

Part III
Securing the Communication This part describes how to secure the connections between the OVOC clients and servers.

r
Security Guidelines 4. Step 3: Configuring Enterprise Firewall
Version 7.2 23 EMS, SEM and IP Phone Manager
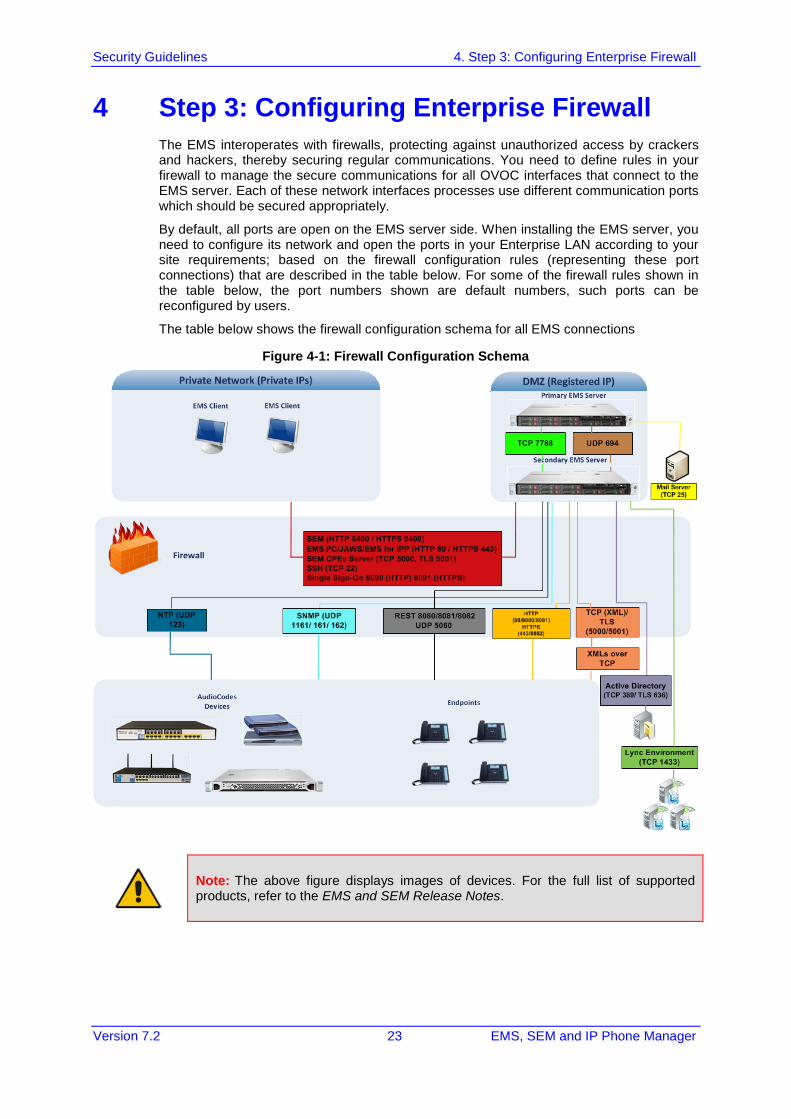
4 Step 3: Configuring Enterprise Firewall The EMS interoperates with firewalls, protecting against unauthorized access by crackers and hackers, thereby securing regular communications. You need to define rules in your firewall to manage the secure communications for all OVOC interfaces that connect to the EMS server. Each of these network interfaces processes use different communication ports which should be secured appropriately.
By default, all ports are open on the EMS server side. When installing the EMS server, you need to configure its network and open the ports in your Enterprise LAN according to your site requirements; based on the firewall configuration rules (representing these port connections) that are described in the table below. For some of the firewall rules shown in the table below, the port numbers shown are default numbers, such ports can be reconfigured by users.
The table below shows the firewall configuration schema for all EMS connections
Figure 4-1: Firewall Configuration Schema
Note: The above figure displays images of devices. For the full list of supported products, refer to the EMS and SEM Release Notes.
Security Guidelines 24 Document #: LTRT-94043
AudioCodes One Voice Operations Center
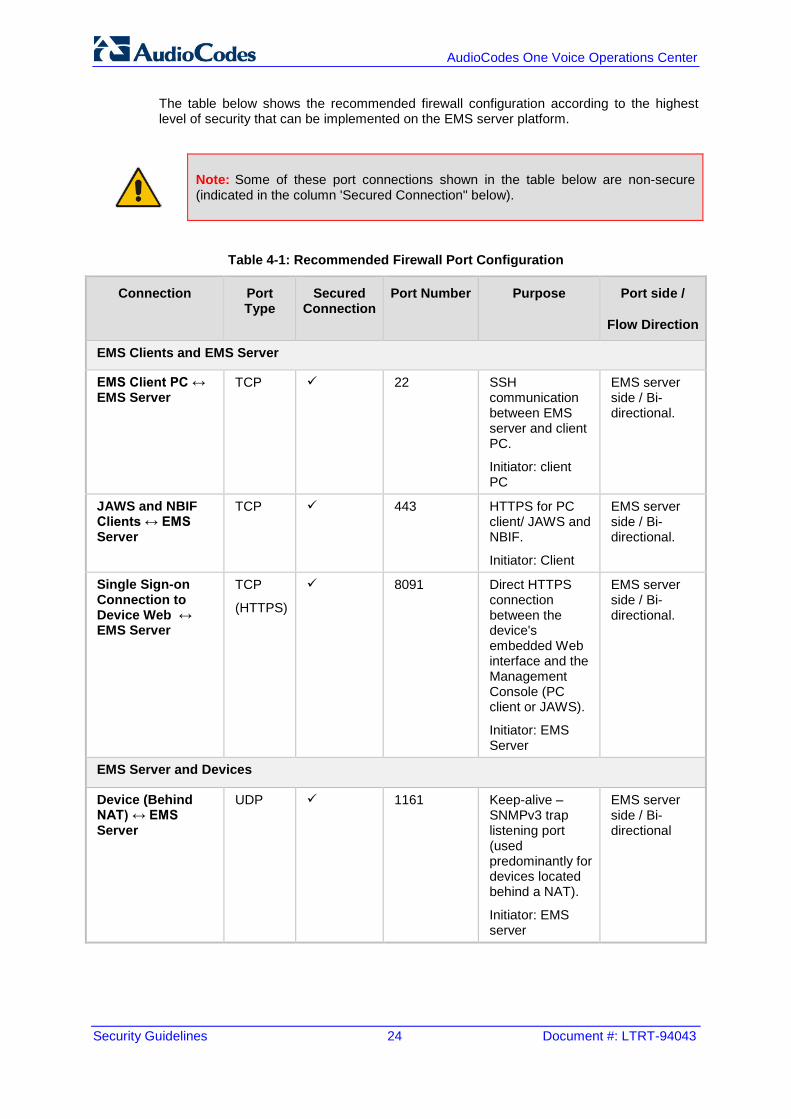
The table below shows the recommended firewall configuration according to the highest level of security that can be implemented on the EMS server platform.
Note: Some of these port connections shown in the table below are non-secure (indicated in the column 'Secured Connection" below).
Table 4-1: Recommended Firewall Port Configuration
Connection Port Type
Secured Connection
Port Number Purpose Port side /
Flow Direction
EMS Clients and EMS Server
EMS Client PC ↔ EMS Server
TCP 22 SSH communication between EMS server and client PC.
Initiator: client PC
EMS server side / Bi-directional.
JAWS and NBIF Clients ↔ EMS Server
TCP 443 HTTPS for PC client/ JAWS and NBIF.
Initiator: Client
EMS server side / Bi-directional.
Single Sign-on Connection to Device Web ↔ EMS Server
TCP
(HTTPS)
8091 Direct HTTPS connection between the device's embedded Web interface and the Management Console (PC client or JAWS).
Initiator: EMS Server
EMS server side / Bi-directional.
EMS Server and Devices
Device (Behind NAT) ↔ EMS Server
UDP 1161 Keep-alive – SNMPv3 trap listening port (used predominantly for devices located behind a NAT).
Initiator: EMS server
EMS server side / Bi-directional

Security Guidelines 4. Step 3: Configuring Enterprise Firewall
Version 7.2 25 EMS, SEM and IP Phone Manager
Connection Port Type
Secured Connection
Port Number Purpose Port side /
Flow Direction
Device (Not Behind NAT) ↔ EMS Server
UDP 162 SNMPv3 trap listening port on the EMS that is used when the device is not located behind a NAT.
Initiator: AudioCodes device
EMS server side / Receive only.
Device ↔ EMS Server (Trap Manager)
UDP 161 SNMPv3 Trap Manager port on the device that is used to send traps to the EMS.
Initiator: EMS server
MG side /
Bi-directional
Device↔ EMS Server (NTP Server)
UDP
(NTP server)
123 NTP server synchronization.
Initiator: MG (and EMS Server, if configured as NTP client)
Initiator: Both sides
Both sides /
Bi-directional
Device ↔ EMS Server (REST communication
/upload/download)
TCP (HTTPS)
443 HTTPS connection for files transfer (upload and download) and REST communication.
Initiator: EMS server
EMS server side / Bi-directional
Endpoints (IP Phones)
EMS Server ↔ IP Phone Management Serve
TCP
(HTTPS)
443 HTTPS connection between the EMS server and the IP Phone Management Server Web page.
Initiator: client browser
EMS server side / Bi-directional.

Security Guidelines 26 Document #: LTRT-94043
AudioCodes One Voice Operations Center
Connection Port Type
Secured Connection
Port Number Purpose Port side /
Flow Direction
HTTPS connection used by endpoints for downloading firmware and configuration files from the EMS server.
Initiator: Endpoints
EMS Server ↔ Endpoints (IP Phones)
TCP
(HTTP)
8080 HTTP connection that is used by Endpoints for downloading firmware and configuration files from the EMS server.
Initiator: Endpoint
EMS server side / Bi-directional
TCP
(HTTPS)
8082 HTTPS connection that is used for sending REST updates from the endpoints to the EMS server, such as alarms, and statuses (encryption only without SSL authentication).
Initiator: Endpoint
EMS server side / Bi-directional
SEM TLS
Media Gateways ↔ SEM server
TCP
(TLS)
5001 XML based SEM TLS secured communication.
Initiator: Media Gateway
EMS server side / Bi-directional
Security Guidelines 4. Step 3: Configuring Enterprise Firewall
Version 7.2 27 EMS, SEM and IP Phone Manager
Connection Port Type
Secured Connection
Port Number Purpose Port side /
Flow Direction
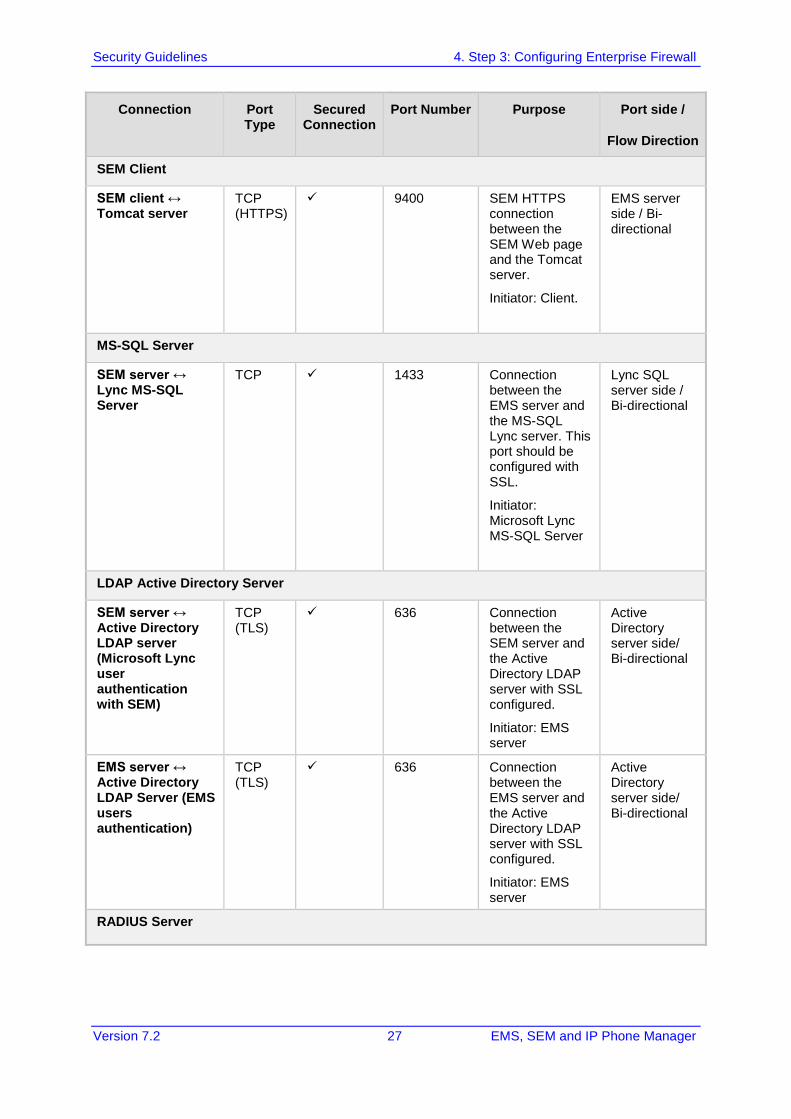
SEM Client
SEM client ↔ Tomcat server
TCP (HTTPS)
9400 SEM HTTPS connection between the SEM Web page and the Tomcat server.
Initiator: Client.
EMS server side / Bi-directional
MS-SQL Server
SEM server ↔ Lync MS-SQL Server
TCP 1433 Connection between the EMS server and the MS-SQL Lync server. This port should be configured with SSL.
Initiator: Microsoft Lync MS-SQL Server
Lync SQL server side / Bi-directional
LDAP Active Directory Server
SEM server ↔ Active Directory LDAP server (Microsoft Lync user authentication with SEM)
TCP (TLS)
636 Connection between the SEM server and the Active Directory LDAP server with SSL configured.
Initiator: EMS server
Active Directory server side/ Bi-directional
EMS server ↔ Active Directory LDAP Server (EMS users authentication)
TCP (TLS)
636 Connection between the EMS server and the Active Directory LDAP server with SSL configured.
Initiator: EMS server
Active Directory server side/ Bi-directional
RADIUS Server

Security Guidelines 28 Document #: LTRT-94043
AudioCodes One Voice Operations Center
Connection Port Type
Secured Connection
Port Number Purpose Port side /
Flow Direction
EMS server ↔ RADIUS server
UDP 1812 Direct connection between the EMS server and the RADIUS server (when EMS user is authenticated using RADIUS server).
Initiator: EMS server
EMS server side / Bi-directional
EMS HA
Primary EMS Server ↔ Secondary EMS Server (HA Setup)
TCP 7788 Database replication between the servers.
Initiator: Both servers
Both EMS servers /
Bi-directional
UDP 694 Heartbeat packets between the servers.
Initiator: Both servers
Mail and Syslog Servers
EMS server ↔ Mail Server
TCP 25 Trap Forwarding to Mail server
Initiator: EMS server
Mail server side / Bi-directional
EMS server ↔ Syslog Server
TCP 514 Trap Forwarding to Syslog server.
Initiator: EMS server
Syslog server side /Bi-directional
Security Guidelines 4. Step 3: Configuring Enterprise Firewall
Version 7.2 29 EMS, SEM and IP Phone Manager
Connection Port Type
Secured Connection
Port Number Purpose Port side /
Flow Direction
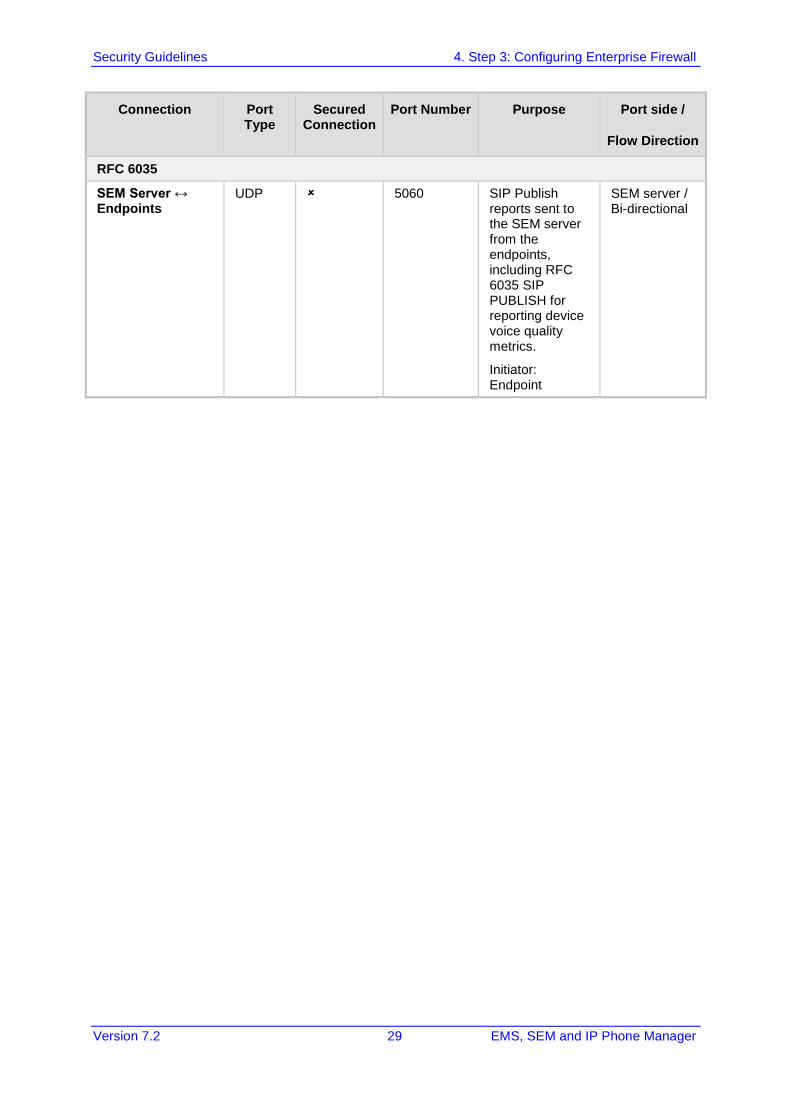
RFC 6035
SEM Server ↔ Endpoints
UDP 5060 SIP Publish reports sent to the SEM server from the endpoints, including RFC 6035 SIP PUBLISH for reporting device voice quality metrics.
Initiator: Endpoint
SEM server / Bi-directional

Security Guidelines 30 Document #: LTRT-94043
AudioCodes One Voice Operations Center
This page is intentionally left blank.

Security Guidelines 5. Step 4: Securing SNMP Interface Access (EMS)
Version 7.2 31 EMS, SEM and IP Phone Manager
5 Step 4: Securing SNMP Interface Access (EMS) This chapter describes the guidelines for implementing SNMP for the connection with AudioCodes devices.
5.1 Securing Trap Forwarding over SNMPv3 The SNMPv3 protocol can be used for securing traps that are generated on devices, IP Phones or by the SEM. The SNMP connection must be configured on both the EMS and on the devices/IP Phones.
For configuring SNMPv3 in the EMS, refer to Section SMNP Management in the EMS User's manual.
Note that when you add the device to the EMS, in the SNMPv3 settings, it is recommended to set the following for maximum security:
• Security Level parameter to 'Authentication and Privacy'
• Authentication Protocol parameter to 'SHA'
• Privacy protocol to 'AES_128'.
For configuring SNMPv3 on devices, refer to the EMS User's manual, Appendix Prepare Devices for Interoperability Automatic Provisioning.
5.1.1 Prefer SNMPv3 over SNMPv2 Use SNMP Version 3 (SNMPv3) (and not SNMPv1 and SNMPv2c), if possible. SNMPv3 provides secure access to the device using a combination of authentication (MD5 or SHA-1) and encryption (DES or AES-128) of packets over the network.

Security Guidelines 32 Document #: LTRT-94043
AudioCodes One Voice Operations Center
This page is intentionally left blank.

Security Guidelines 6. Step 5: Implementing X.509 Authentication
Version 7.2 33 EMS, SEM and IP Phone Manager
6 Step 5: Implementing X.509 Authentication X.509 certificates can be used to authenticate a connection between an OVOC client and the OVOC servers (EMS Apache and SEM Tomcat); between the OVOC server and third-party servers in the Enterprise network (Active Directory LDAP server and MS-SQL Monitoring server) and between the OVOC server and AudioCodes’ devices. The certificates may be implemented for one or more of the SSL connections described in the table below.
Note:
• The EMS Apache and Tomcat servers and their clients can use the same certificate files.
• The connection with the Active Directory server uses its own certificate.
• The connection with the MS-SQL Monitoring server uses its own certificate.
Table 6-1: OVOC SSL Connections
Connection Type Installed Files
EMS PC client ↔ EMS Apache server communication over HTTPS (see Section 6.4.1.1).
Client certificate installed on both the PC client and the EMS server.
EMS JAWS (Java Webstart) ↔ EMS Apache server (see Section 6.4.1.2).
Client certificate is installed in both the JAWS directory on the EMS server and is downloaded to the JAWS client directory on the PC.
SEM browser ↔ EMS Tomcat server (see Section 6.4.1.4).
Root CA certificate is installed on the EMS server.
EMS IP Phone Manager browser ↔ EMS Apache Server (see Section 6.4.1.3).
Root CA certificate is installed on the EMS server.
EMS Server ↔ Active Directory LDAP server- User authentication and authorization (see Section 6.4.3.1).
LDAP server root CA certificate is updated to the EMS keystore file.
Microsoft Active Directory LDAP Server ↔ SEM Microsoft Lync Server-Microsoft Lync user connection (see Section 6.4.3.2).
Microsoft Lync root CA certificate
Microsoft MS-SQL Server ↔ SEM Microsoft Lync Server- Microsoft MS-SQL user connection (see Section 6.4.3.3).
MS-SQL root CA certificate

Security Guidelines 34 Document #: LTRT-94043
AudioCodes One Voice Operations Center
Table 6-2: AudioCodes Device Connections
Connection Type Installed Files
AudioCodes device ↔ EMS Server Upload and Download connection (see Section 6.4.2)
Device certificate and root CA files are installed on the device.
AudioCodes device ↔ EMS Server Single-Sign On connection (see Section 6.4.2.1)
Device certificate and root CA files are installed on the device.
AudioCodes device ↔ SEM server TLS connection (see Section 6.4.2.3)
Device certificate and root CA files are installed on the device.
6.1 Types of Certificates The above connections can be implemented using the following types of certificates:
Default Certificates:
• AudioCodes self-signed server certificates are by default installed on the EMS server and on the EMS PC client and JAWS client installation directories.
• AudioCodes self-signed certificates are installed on the AudioCodes devices.
Custom Certificates:
Custom certificates can be generated and imported to the EMS server. These certificates are generally signed by the Enterprise's third-party CA. If Enterprises use their own organizational certificate Infrastructure (PKI) for enhanced security, then these certificates can be deployed using the EMS Server Manager utility menu option 'Server Certificate Updates'. This option enables you to generate the private keys, the Certificate Signing Requests and import the files received from the CA to the EMS server.
6.2 Recommended Workflow The section describes the recommended workflow for implementing X.509 authentication.
6.2.1 OVOC Client and Servers 1. Setup HTTPS connections using default certificates (see Section 6.4).
2. Implement custom server certificates (overriding default certificates) using the EMS Server Manager Server Certificates Update option (see Section 6.4.3).
Note: Before you replace the default certificates with custom certificates, it is recommended to setup all of the HTTPS connections with the default certificate deployment to verify that these connections are working as required.
Security Guidelines 6. Step 5: Implementing X.509 Authentication
Version 7.2 35 EMS, SEM and IP Phone Manager
6.2.2 AudioCodes Devices
1. Setup the HTTPS connection on the EMS server and the AudioCodes devices (see Section 6.4.2).
2. Implement custom certificates (overriding default certificates) using the AudioCodes device Web server tool (see Section 6.6).
Note: Before you replace the default certificates with custom certificates, it is recommended to setup all of the HTTPS connections with the default certificate deployment to verify that these connections are working as required.
6.2.3 Endpoints You can setup an HTTPS REST connection from the endpoints to the EMS server, for alarms and statuses (see Section 6.4.1.5). This connection is implemented over SSL; however only SSL encryption is implemented without certificate authentication, where the default AudioCodes certificates are used to encrypt the data.
If you replace the default AudioCodes server certificates on the EMS server with custom certificates, this does not affect the HTTPS connection between the endpoints and the EMS server i.e. data is still encrypted using the default certificates.
You can also download configuration and firmware files to the endpoints over HTTPS (over port 443) (see Section 6.4.1.3).
6.2.4 Third-Party Servers Setup the SSL connections with the Active Directory and MS-SQL Servers (see Section 6.4.3).
Security Guidelines 36 Document #: LTRT-94043
AudioCodes One Voice Operations Center
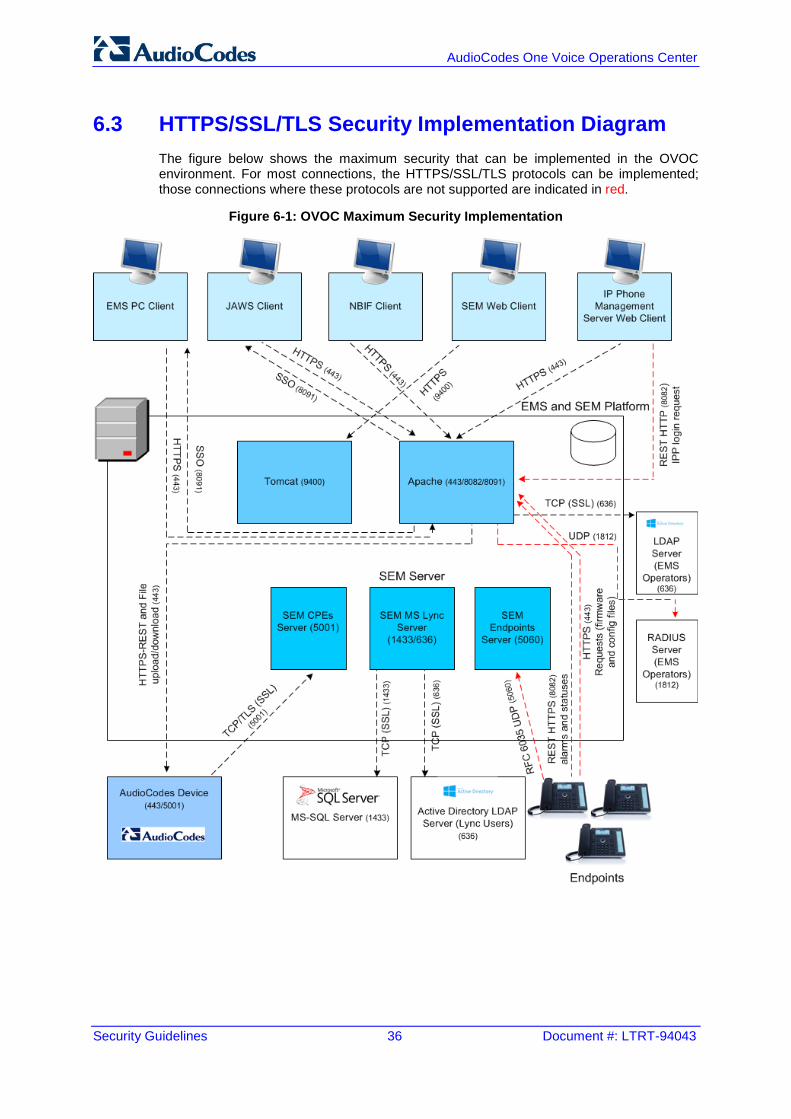
6.3 HTTPS/SSL/TLS Security Implementation Diagram The figure below shows the maximum security that can be implemented in the OVOC environment. For most connections, the HTTPS/SSL/TLS protocols can be implemented; those connections where these protocols are not supported are indicated in red.
Figure 6-1: OVOC Maximum Security Implementation

Security Guidelines 6. Step 5: Implementing X.509 Authentication
Version 7.2 37 EMS, SEM and IP Phone Manager
6.4 Step 5-1 Enabling HTTPS/SSL/TLS Connections The EMS installation and the AudioCodes device are installed with default certificates as described above. Apart from the EMS PC client connection, all other connections are by default over HTTP and therefore need to be enabled to run over HTTPS.
Note: For browser and Java version compatibility, refer to the EMS Server IOM.
6.4.1 EMS Client and Server Connections This section describes how to enable the EMS client connections to work over HTTPS through secure ports.
6.4.1.1 EMS Desktop PC Client
Connection between the EMS PC client and the EMS server is by default implemented over HTTPS using AudioCodes default self-signed certificate.
6.4.1.2 EMS JAWS Client
When you want to secure the JAWS Web page over HTTPS (secures Web page through port 443), you need to enable the option 'Enable IP Phone Manager Client JAWS and NBIF Secured Communication' in the EMS Server Manager (refer to Section 'Enable IP Phone Manager Client JAWS and NBIF Secured Communication' in the EMS Server IOM). This connection is then secured using the AudioCodes self-signed certificate.
You also need to update the Java Security level on your PC in order for the JAWS page to be accessible (relevant for both HTTP and HTTPS connections). Refer to Section 'Update the Java Security Level on PC' in the EMS Server IOM.
6.4.1.3 EMS for IP Phones Web Client
When you want to secure the IP Phone Manager Web page over HTTPS (secures Web page through port 443), you need to enable the option 'Enable IP Phone Manager Client JAWS and NBIF Secured Communication' in the EMS Server Manager (refer to Section 'Enable IP Phone Manager Client JAWS and NBIF Secured Communication' in the EMS Server IOM). This connection is then secured using the AudioCodes self-signed certificate.
6.4.1.4 SEM Web Client
When you want to secure the SEM Web page over HTTPS (secures Web page through port 9400), you need to enable the option 'Enable SEM Client Secured Connection' in the EMS Server Manager (refer to Section 'Enable SEM Client Secured Connection' in the EMS Server IOM). This connection is then secured using the AudioCodes self-signed certificate.

Security Guidelines 38 Document #: LTRT-94043
AudioCodes One Voice Operations Center
6.4.1.5 Endpoints REST Connection
When you want to secure the REST connection between the endpoints and the EMS over HTTPS, this connection is secured through port 8082 (by default open, refer to Section ‘Endpoint Connection Processes' in the EMS Server IOM). However to fully enable this connection, you need to enable the option “Send Secure HTTPS to the IPP” in the System Settings page in the IP Phone Management Server.
This connection is then secured (encryption only without SSL authentication) using the AudioCodes self-signed certificate.
6.4.2 AudioCodes Device Connections The EMS server and AudioCodes device connection should be secured over HTTPS for the purpose of files upload/download and for Single-Sign On to the device's Web server.
To secure the connection between the EMS server and the device over HTTPS:
Enable HTTPS when adding the device to the EMS (using the EMS GUI). Refer to Section "Pre-definition or Auto-definition" in the EMS User's Manual.
Configure HTTPS on the AudioCodes device (using the device's Web server). Refer to Section "Configuring HTTPS Parameters on the Device" in the EMS Server IOM.
6.4.2.1 Single-Sign On to the AudioCodes Device
The Single-Sign on mechanism enables you to automatically login to the devices embedded Web server tool from the device's status screen in the EMS. When you enable this connection (when adding the device to the EMS), it is by default secured using the AudioCodes Self-Signed certificate. When you wish to secure this connection using custom SSL certificate files, then you need to load these files using the “Certificate File” option in the Software Manager section at the EMS client GUI (refer to EMS User's Manual). When the certificate file is loaded using this method, the EMS server keystore is updated. In this scenario, the EMS authenticates the device before establishing the connection.
6.4.2.2 Implementing Two-Way Authentication with X.509 Certificates
You should use two-way authentication over HTTPS between the device and the EMS. This prevents unauthorized access to both the EMS and the device. Configuration is required on both the EMS and the AudioCodes device for the deployment of this setup.
To setup the two-way authentication on the AudioCodes device:
1. Load a device certificate on the managed device that is signed by the OVOC Trusted Root CA.
2. Load the OVOC Trusted Root CA server certificate to the device's Trusted Root CA Store.
Note: The OVOC Trusted Root CA server certificate is the same certificate used to secure the connection between the OVOC server and clients.
3. Configure additional parameters:
• For Media Gateway and SBC devices:
♦ Enable the AUPDVerifyCertificates parameter.

Security Guidelines 6. Step 5: Implementing X.509 Authentication
Version 7.2 39 EMS, SEM and IP Phone Manager
• For MP-1xx devices:
♦ Enable AUPDVerifyCertificates
♦ Set ServerRespondTimeout to 10000
♦ When working with SEM TLS, enable QOEENABLETLS
Refer to the Appendix Installing Custom Certificates on AudioCodes Device in the EMS Server IOM.
Figure 6-2: Mutual Authentication - Device Configuration
To setup the two-way authentication on the EMS server:
1. Ensure that HTTPS is enabled on the device when adding to the EMS.
2. Set the HTTPS Authentication option “Set Mutual Authentication” using the EMS Server Manager-refer to Section 'HTTPS Authentication' in the EMS Server IOM).
Figure 6-3: Mutual Authentication – EMS Server Configuration

Security Guidelines 40 Document #: LTRT-94043
AudioCodes One Voice Operations Center
6.4.2.3 SEM-AudioCodes Device Communication
The XML-based SEM communication with the AudioCodes device is by default non-secured. In case you want to secure this connection over TLS, you must configure the 'SEM – AudioCodes device communication' option in the EMS Server Manager. This setting secures the connection over port 5001 instead of port 5000 (you can also configure this option to open both ports 5000 and 5001, refer to Section "SEM - AudioCodes Devices Communication" in the EMS Server IOM). The connection is then secured using the AudioCodes self-signed certificate.
6.4.3 Third-Party Network Server Connections This section describes how to authenticate the connection with the following Third-party network servers’ SSL connections:
EMS and Active Directory LDAP Server (EMS users) (see Section 6.4.3.1
SEM and Active Directory LDAP Server (Microsoft Lync Users) (see Section 6.4.3.2)
SEM and MS-SQL Lync Database (see Section 6.4.3.3)
6.4.3.1 EMS and Active Directory LDAP Server SSL Connection
If you wish to secure the EMS server connection with an LDAP server (for EMS user authentication) over SSL with certificate authentication, then you must do the following:
Set the "SSL with Certificate" option in the "LDAP Authentication and Authorization" settings window in the EMS GUI (refer to the EMS User's Manual).
Load the root CA server certificate file used to authenticate this connection to the EMS server using the “Certificate File” option in the EMS Software Manager (refer to the EMS User's Manual).
6.4.3.2 SEM and Active Directory LDAP Server (Microsoft Lync Users) SSL Connection
If you wish to secure the connection between the SEM MS Lync server and the Active Directory LDAP server using certificates (for managing Lync users in SEM), you must set the SSL parameter to "Enable" for the Active Directory Settings. You can then load the Microsoft certificate to the EMS server using the SEM GUI (refer to Section 'Adding an AD Server' in the SEM User's Manual).
6.4.3.3 SEM and MS-SQL Lync Database SSL Connection
If you wish to secure the connection between the SEM MS Lync server and the MS SQL Monitoring server using certificates, you must set the SSL parameter to "Enable Certificate Verification" in the Network Device Definition for the MS-SQL connection. You can then load the Microsoft certificate to the EMS server using the SEM GUI. Note that you can also secure the SSL connection with the MS SQL server without loading a certificate; where the connection is SSL-encoded (Enable Trust Mode) (refer to Section 'Adding an Unprivileged User' in the SEM User's manual).
Security Guidelines 6. Step 5: Implementing X.509 Authentication
Version 7.2 41 EMS, SEM and IP Phone Manager
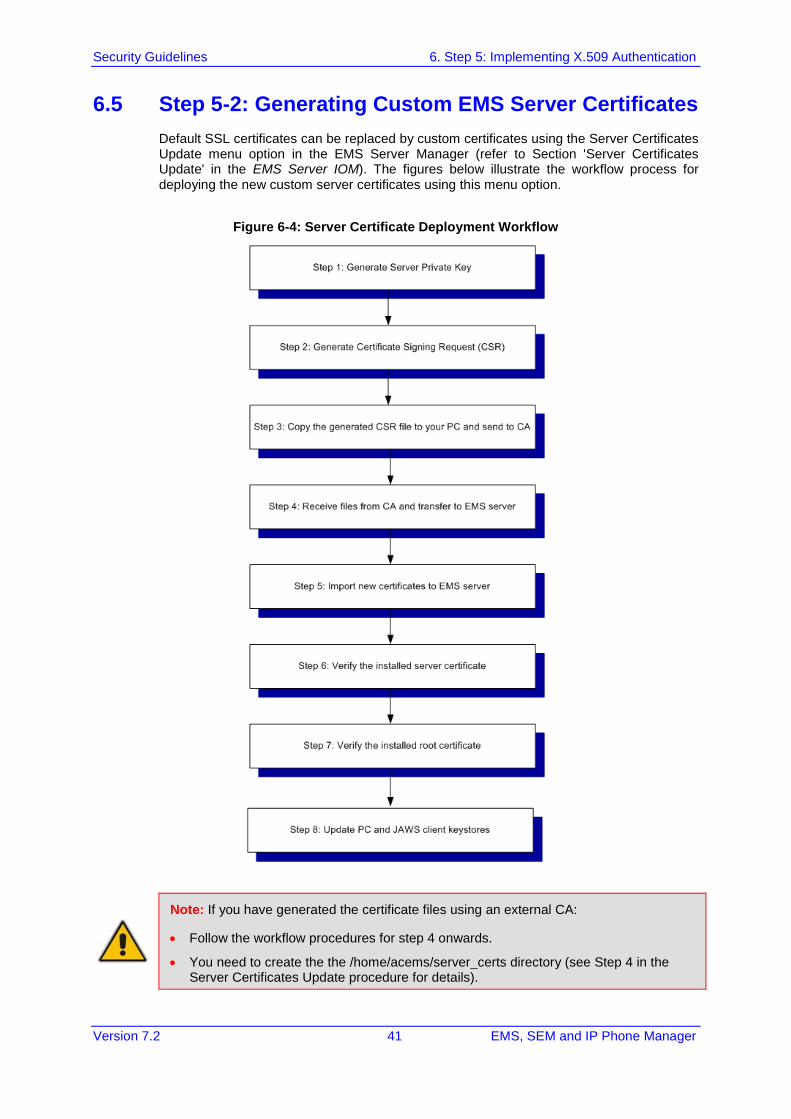
6.5 Step 5-2: Generating Custom EMS Server Certificates Default SSL certificates can be replaced by custom certificates using the Server Certificates Update menu option in the EMS Server Manager (refer to Section 'Server Certificates Update' in the EMS Server IOM). The figures below illustrate the workflow process for deploying the new custom server certificates using this menu option.
Figure 6-4: Server Certificate Deployment Workflow
Note: If you have generated the certificate files using an external CA:
• Follow the workflow procedures for step 4 onwards.
• You need to create the the /home/acems/server_certs directory (see Step 4 in the Server Certificates Update procedure for details).
Security Guidelines 42 Document #: LTRT-94043
AudioCodes One Voice Operations Center
6.5.1 Updating Keystore File on EMS PC Client When you install a new server certificate using the procedure described in Section 6.5 and you are using the EMS PC client, then you need to manually load the new keystore file to the EMS PC client. Refer to Section 'Load Keystore File to PC Client' in the EMS Server IOM.
6.5.2 Updating Keystore File on JAWS Client When you install a new server certificate using the procedure described in Section 6.5, and you are using the JAWS client, and have just performed an upgrade of the EMS server platform, you must update the Java keystore in the JAWS client directory using the EMS Server Manager 'Update Client (JAWS) Certificates' option. Refer to Step 8 in the 'Server Certificates Update' procedure in the EMS Server IOM.
Note: This procedure is only required following an upgrade of the EMS server platform.
Security Guidelines 6. Step 5: Implementing X.509 Authentication
Version 7.2 43 EMS, SEM and IP Phone Manager
6.6 Step 5-3: Implementing Custom Certificates for the Connections with AudioCodes Devices If you wish to implement custom certificates for the connections with AudioCodes devices, then you need to load these certificates to the EMS server and to the AudioCodes device. In case you have already loaded the custom certificate to the EMS server as described in Section 6.4.3, you only need to update the certificate on the AudioCodes device.
Refer to the Appendix Installing Custom Certificates on AudioCodes Device in the EMS Server IOM.
6.6.1 Implementing SEM Tomcat Server and AudioCodes Device Authentication The SEM Tomcat server uses the same certificate as the Apache server, therefore if you have already loaded a custom certificate to the EMS Apache server (using the 'Server Certificates' option in the EMS Server Manager Certificates Update menu), it will be used for the SEM Tomcat connection as well.
Note: The certificate loaded to the device must be signed by the same Root CA as the certificate that is loaded to the EMS server.

International Headquarters 1 Hayarden Street, Airport City Lod 7019900, Israel Tel: +972-3-976-4000 Fax: +972-3-976-4040 AudioCodes Inc. 27 World’s Fair Drive, Somerset, NJ 08873 Tel: +1-732-469-0880 Fax: +1-732-469-2298 Contact us: www.audiocodes.com/contact Website: www.audiocodes.com ©2017 AudioCodes Ltd. All rights reserved. AudioCodes, AC, HD VoIP, HD VoIP Sounds Better, IPmedia, Mediant, MediaPack, What’s Inside Matters, OSN, SmartTAP, User Management Pack, VMAS, VoIPerfect, VoIPerfectHD, Your Gateway To VoIP, 3GX, VocaNom, AudioCodes One Voice and CloudBond are trademarks or registered trademarks of AudioCodes Limited. All other products or trademarks are property of their respective owners. Product specifications are subject to change without notice.
Document #: LTRT-94043