edgerton how to create a moodle lesson activity - … · Moodle, the open source course management...
10
How to Create Captivate Quality Instruction with the Moodle Lesson Activity Thomas Edgerton, M.S., Corporate Training Consultant and Business Coach, USA, [email protected] ABSTRACT Moodle, the open source course management system (CMS), is a popular alternative for learning organizations, because it provides a stable, low cost environment for students to log in, access courses and interact. Moodle Lesson activities are used to develop online courses from Microsoft PowerPoint presentations. With a Lesson activity course developers can add rich features like branching, questions, custom formats, multimedia and interaction. However, these tasks are not well documented nor moodle intuitive. This paper fills this knowledge void by showing the tricks critical to preparing PowerPoint files and creating moodle Lessons. This paper covers areas critical to Lesson development such as how to add custom formats, menus, branching, media and questions. Using the Lesson activity, course developers can create courseware equivalent to media produced using more costly applications like Adobe Captivate and Articulate Presenter. This paper reveals how. Executive Summary The moodle Lesson activity provides a tool for building asynchronous courseware from Microsoft PowerPoint files. However, how this is down, the steps to take, and the critical features to invoke are neither centrally documented nor easy to find in anyone resource. This paper provides the critical information necessary to import ppt files into a Lesson activity. Additionally, this paper relates best practices for developers in making engaging and high quality courses with no additional software costs, because the Lesson activity is a standard moodle feature. While the Lesson activity is often an ignored moodle activity, because of its undocumented peculiarities, this paper’s intent is to assist with a higher proliferation of this instructionally powerful open source courseware development tool. Description: Lesson activities are useful for instructors starting with PowerPoint content. With a Lesson activity course developers can add branches, questions and custom formats. This paper instructs on how to: A. Create and Save a PowerPoint as Web Pages and Compress the Folder B. Add a Moodle Lesson Activity to a Course C. Add Formats, a Menu Branch and Questions to a Lesson Activity Learning Objective: Upon completion of this job aid course developers will be able to: • Prepare a PowerPoint file for upload to a moodle Lesson activity • Add a moodle Lesson activity to a course • Format Lesson activity pages • Add questions to a Lesson activity • Add menu branching to a Lesson activity Steps to take A. How to Prepare a PowerPoint Presentation for Moodle 1. Create instruction as a PowerPoint Presentation.
-
Upload
nguyenhuong -
Category
Documents
-
view
231 -
download
0
Transcript of edgerton how to create a moodle lesson activity - … · Moodle, the open source course management...

How to Create Captivate Quality Instruction with the Moodle Lesson Activity
Thomas Edgerton, M.S., Corporate Training Consultant and Business Coach, USA, [email protected] ABSTRACT
Moodle, the open source course management system (CMS), is a popular alternative for learning organizations, because it provides a stable, low cost environment for students to log in, access courses and interact. Moodle Lesson activities are used to develop online courses from Microsoft PowerPoint presentations. With a Lesson activity course developers can add rich features like branching, questions, custom formats, multimedia and interaction. However, these tasks are not well documented nor moodle intuitive. This paper fills this knowledge void by showing the tricks critical to preparing PowerPoint files and creating moodle Lessons. This paper covers areas critical to Lesson development such as how to add custom formats, menus, branching, media and questions. Using the Lesson activity, course developers can create courseware equivalent to media produced using more costly applications like Adobe Captivate and Articulate Presenter. This paper reveals how.
Executive Summary The moodle Lesson activity provides a tool for building asynchronous courseware from Microsoft PowerPoint files. However, how this is down, the steps to take, and the critical features to invoke are neither centrally documented nor easy to find in anyone resource. This paper provides the critical information necessary to import ppt files into a Lesson activity. Additionally, this paper relates best practices for developers in making engaging and high quality courses with no additional software costs, because the Lesson activity is a standard moodle feature. While the Lesson activity is often an ignored moodle activity, because of its undocumented peculiarities, this paper’s intent is to assist with a higher proliferation of this instructionally powerful open source courseware development tool. Description: Lesson activities are useful for instructors starting with PowerPoint content. With a Lesson activity course developers can add branches, questions and custom formats. This paper instructs on how to:
A. Create and Save a PowerPoint as Web Pages and Compress the Folder B. Add a Moodle Lesson Activity to a Course C. Add Formats, a Menu Branch and Questions to a Lesson Activity
Learning Objective: Upon completion of this job aid course developers will be able to:
• Prepare a PowerPoint file for upload to a moodle Lesson activity • Add a moodle Lesson activity to a course • Format Lesson activity pages • Add questions to a Lesson activity • Add menu branching to a Lesson activity
Steps to take A. How to Prepare a PowerPoint Presentation for Moodle
1. Create instruction as a PowerPoint Presentation.

2. Remove all background images from the slide Master.
3. Remove all bullets, formats and styles from the presentation. When the PowerPoint file is converted to HTML, bullets transfer as ANSI characters, i.e., a special character’s keyboard sequence. PowerPoint bullets left in a presentation need to be stripped out, because the bullet’s ANSI characters appear in the moodle HTML. For this reason, more PowerPoint bullets in a file, the more time spent in moodle removing their ANSI artifacts. Remove the PowerPoint bullets to streamline the moodle work.
4. Change all images created using the PowerPoint graphic tools to jpg, gif or other web suitable formats.
NOTE: A PowerPoint graphic with multiple elements separates into separate JPEG files that do not layer in html. For this reason, Copy/Paste PowerPoint graphics into a paint program like Photoshop and save it as JPEG. Then, return to the PowerPoint file, remove the PowerPoint graphic, and insert the jpg in its place.
5. Once ready, save the presentation as a web page, by selecting File / Save as Web Page.
6. When the Save As window appears, note the location where the file is saved. In this example, the file is saved to the Desktop. Give it a name and be sure to select Web Page as the Save as Type.

7. Go to the location of the file that was just created. Right mouse click on the saved folder and select Send To / Compressed (zipped) Folder.
8. Congratulations, the first part of the process is complete! Once a compressed folder is created, a moodle
Lesson activity can be added to a course.
B. How to Add a Lesson Activity to a Moodle Course
Now that a course is saved as Web Pages from PowerPoint, create a Lesson activity.
1. From the course homepage, click "Turn editing on". 2. In the moodle module where the activity is to be added, select Lesson from the "Add an activity" pick-list.
3. On the Adding new Lesson to a topic page, give the Lesson activity a descriptive name or title.
4. Enter a Maximum number of answers/branches. The number of branches must at least equal the number of sections in the activity. For instance, a Lesson with four modular sections that a student selects from a homepage needs four branches. The number of branches also relate to the number of responses appearing under a Lesson’s multiple choice question. As an example, suppose a course has four sections and a

multiple choice quiz with a possible five responses for each question. In this case, select five branches. A branch can always be left blank and the number of branches can be changed at anytime.
5.
6. Select Practice Lesson Yes so this activity will not be graded.
7. Student can re-take Yes so students can take the lesson multiple times.
8. Allow student Review Yes so students can return to pages and review.
9. Slide Show YES. This switch is critical to the process. It allows the compressed PowerPoint web pages to be converted to moodle Lesson pages.
10. Enter a Slide show width of 800 and Slide show height 600 pixels for most laptops.
11. Display Left Menu YES. This switch enables students to scroll and go to various pages in a lesson.
12. Scroll to the bottom of the page and select the Save and Display button.
13. On the Moodle Lesson Activity page, select the link Import PowerPoint.
14. Click the Browse button and locate the compressed PowerPoint file.
15. Click the Upload this file button.

16. Click the Continue button on the Import PowerPoint Page.
17. Congratulations for successfully adding a moodle Lesson activity and uploading a PowerPoint presentation.
The Preview confirms it! Note the left navigation menu indicates the pages in the lesson. The first page of content under the heading Moodle Resources and Activities.
C. How to Add Formats, a Menu Branch and Questions to a Lesson Activity After adding a PowerPoint presentation to a moodle Lesson activity, the final touches can be added. In completing a lesson activity, often the following elements are added:
• Font, style, content and format changes • Main Menu or lesson homepage which includes branches to the various sections • Questions for assessment
On the Edit tab, a Moodle Lesson Activity consists of pages. Each page correlates to a slide in the PowerPoint presentation. The title of each slide in the presentation is now the title of a page in the moodle lesson activity.
For each page, note the icons on the right allow a course developer to change the order, edit, preview and delete. NOTE: When Page title is clicked, page preview is invoked. At the bottom of the page, a Branch Table relates Description 1, Jump 1, Description 2, and Jump 2. This information relates to the behaviors of the Previous and Next buttons appearing on a Lesson page. When the Edit icon ( ) is clicked, the moodle Lesson Activity name appears above the Page title and Page contents. Note the HTML icons directly above the Page content. Similar to the moodle HTML editor, these icons allow a course developer to change styles, add tables, insert images and insert custom HTML.

Underneath the Page content, appears a Branch Table for the page. For this example, there are four possible branches for every page. This selection was made in Step 4 of Add a Moodle Lesson Activity to a Course. For the pages created from a PowerPoint slide the default is two branches per page. Each page contains a Next and Previous button. Next proceeds in a linear sequence through the PowerPoint presentation while Previous goes in reverse. In the page image below, note the first jump is Next page, the second jump Previous page and the third and fourth (not shown) jumps are empty. In most cases, leave these setting alone and use the defaults.
Before adding a main menu or ‘homepage’ to a Lesson, let’s look at how to add an assessment question. For the purpose of example, let’s add an assessment section or module to a Lesson activity. To add a question to a Lesson activity:
1. Click the Edit tab and scroll to see the very last page in a Lesson. Then, click the Add a page pick-list and select Question from the list.
2. The Add a Question page opens and allows a course developer to add multiple choice, true/false, short answer, numerical, matching and essay questions. This example uses the default Multiple Choice type.
3. Enter a Page title and a question in the Page contents.
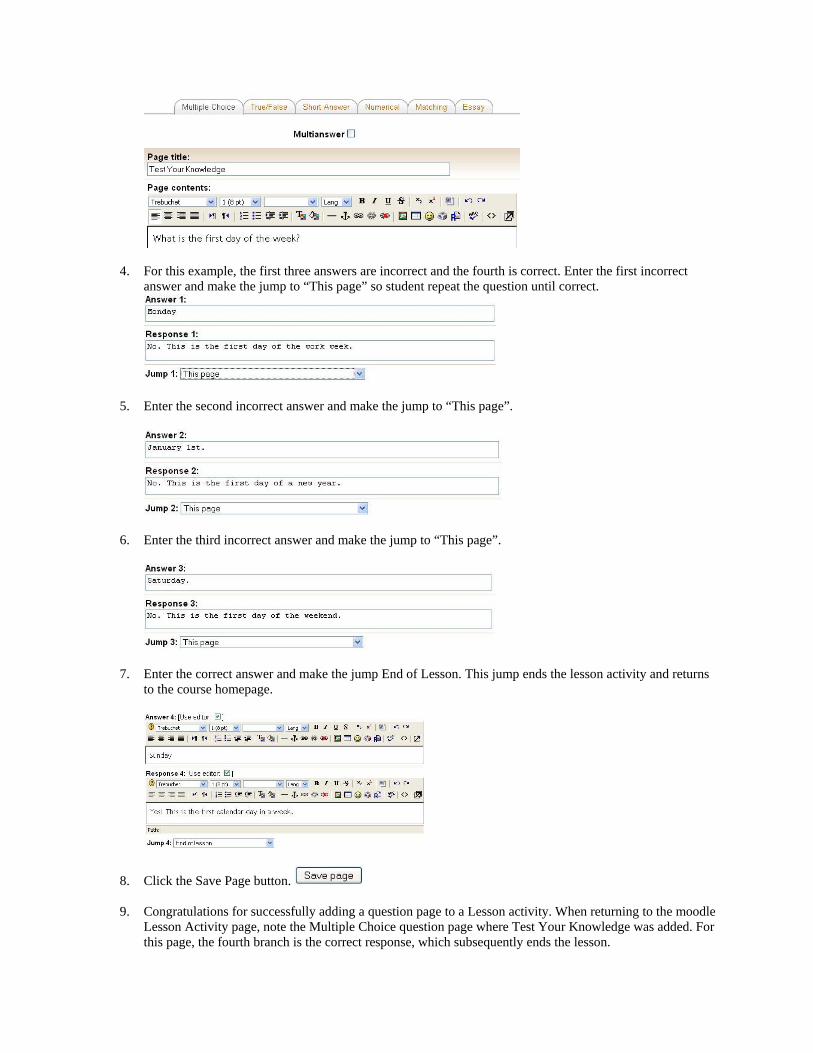
4. For this example, the first three answers are incorrect and the fourth is correct. Enter the first incorrect answer and make the jump to “This page” so student repeat the question until correct.
5. Enter the second incorrect answer and make the jump to “This page”.
6. Enter the third incorrect answer and make the jump to “This page”.
7. Enter the correct answer and make the jump End of Lesson. This jump ends the lesson activity and returns to the course homepage.
8. Click the Save Page button. 9. Congratulations for successfully adding a question page to a Lesson activity. When returning to the moodle
Lesson Activity page, note the Multiple Choice question page where Test Your Knowledge was added. For this page, the fourth branch is the correct response, which subsequently ends the lesson.

To add a main menu or homepage to a lesson activity: These steps show how to add a homepage or main menu to a Lesson activity. To add a main menu and branching, a Branch Table must be added.
1. To add a Branch Table, click the Edit tab and under Actions at the top of the page, select Branch Table from the Add a page pick-list...
2. Give the Branch Table page a name like Main Menu.
3. In the Page contents area enter the instruction, content and images to appear on the homepage.
4. Under Description 1, enter the title of the first page in a section. This is the page students go to once they click the button. Logically, a button title often matches a page title. At this time, check the Use editor checkbox for the moodle style, format, alignment and other features.
Next, click the Jump 1 pick-list and find the page to go to. Select the page to go to when the button is clicked. Click the Jump pick-list to see a list of all pages in the Lesson activity.
5. Under Description 2, enter the page title to go to and click the Use editor checkbox.
Next, click the Jump 2 pick-list and find the page to go to.
6. Under Description 3, enter the page title to go to and click the Use editor checkbox.

Next, click the Jump 3 pick-list and select the page to go to.
7. Under Description 4, enter the page title to go to and click the Use editor checkbox.
Next, click the Jump 4 pick-list and select the page to go to.
8. Scroll to the bottom of the page and select the Save page button. 9. Congratulations for successfully adding a branch table to a Lesson activity. At the Moodle Lesson Activity
Edit tab, a Branch Table with the newly entered jumps appears.
10. To preview a page, click its Preview or magnifying glass icon. 11. Preview the page to see the buttons with the Descriptions.
To Re-order Pages and Make Instruction Modular At the Edit tab page, the new created Main Menu page is not the Lesson’s first page. Additionally, for each section, on the last page when the Next button is clicked, the student goes to the next page in sequence, which happens to be the first page in the next section. Suppose instead, students returned to the Main Menu when they click Next? To reorder pages:
1. Click the Edit tab and note the icons on the left of the page. Click its’ Move icon ( ). 2. On the Moving page, click very top link “Move page to here”.
3. Congratulations for successfully reordering the pages. On the Edit tab, the page with the main menu should now be the first page in the Lesson activity.

As a final detail, let’s change the branching so the Next button on the last page in a section returns to the Main Menu. This method provides a more modular way to deliver the instruction. To return students to the main menu:
1. Click the Edit tab and go to the Moodle Lesson Activity page. 2. Scroll until last page of the first section appears (the page where Next returns a student to the main menu.)
Click the page’s Edit icon ( ). 3. Scroll until the Branch Table Description 1 ‘Next’ and Jump 1 ‘Next page’ appear. Click the Jump 1 pick-
list and select the page Main Menu.
4. Click the Save page button to return to the Edit tab page.
5. Note once at the Edit tab page, the information for the Branch Table reflects the change made in steps three and four.
6. For each section in a Lesson activity, repeat steps two through four. 7. Congratulations in developing a Lesson activity from a PowerPoint presentation with questions, branching,
and a main menu!
Conclusion As the proliferation of the open source moodle content management system (CMS) grows so should the use of the Lesson activity. Lesson activities are easy to create if you know the basic selections to make particularly in PowerPoint when you Save as Web Page and Send To / Compressed (zipped) Folder, and for the moodle Lesson activity to select Slide Show YES. Once the PowerPoint file is in moodle, the course’s basic structure is established and content can be further embellished. From the exercises provided in this document, a course developer can soon surmise that little work in PowerPoint is required outside of the slide titles themselves, which then provide a blank canvas for the integration of content. Quite quickly, adept course developers realize they can do most work in various applications such as HTML publishers like Adobe Dreamweaver or Microsoft FrontPage where they can easily incorporate columns, cascading style sheets and methods of rapid content development. For more advanced course developers, they may choose to use PowerPoint slides solely to establish titles and the number of HTML pages and then develop directly in Flash or their favorite application of choice that publishes to SWF. Regardless of the preferred course development method, the Lesson activity provides a robust platform for the development of highly interactive and engaging asynchronous courseware for PowerPoint novices to Flash experts. For more documents and media on the various moodle activities and course features, see http://www.skilledge.net/jvla/online_demonstrations.html.