Early Childhood Hearing Screening & Follow-upinfanthearing.org/earlychildhood/docs/PT Video...
23
Early Childhood Hearing Screening & Follow-up Implementing a Successful Pure Tone Hearing Screening Program Video Tutorial Companion Handbook
Transcript of Early Childhood Hearing Screening & Follow-upinfanthearing.org/earlychildhood/docs/PT Video...
Early Childhood Hearing
Screening & Follow-up
Implementing a Successful Pure Tone Hearing Screening Program
Video Tutorial
Companion Handbook
Video Tutorial Companion Handbook
1 ECHO Initiative -- KidsHearing.org
This handbook reflects the content of Video Tutorial Modules available at www.kidshearing.org
that provide instruction on successfully implementing Pure Tone hearing screening in early
childhood education and health care settings.
The development of this handbook was supported in part by the Administration for Children and Families (ACF), Office of Head Start (OHS) through an intra-agency agreement with the Health Resources and Services Administration (HRSA) of the U.S. Department of Health and Human Services (HHS) under Grant No. U52MC04391, Universal Newborn Hearing Screening – Cooperative Agreement to the National Center for Hearing Assessment and Management at Utah State University. Any recommendations included are those of the author and should not be construed as the official position or policy of, nor should any endorsements be inferred by HRSA, HHS, ACC, OHS or the U.S. Government.
© 2018 National Center for Hearing Assessment and Management (NCHAM)Utah State University, Logan, UT
Table of Contents
1. Introduction to Periodic Hearing Screening for Children 3 – 5
Years of Age
2. How Pure Tone Screening Works 3. Overview of the Pure Tone Screening & Follow-up Protocol 4. Plan Your Pure Tone Screening Program 5. Get to Know Your Equipment
6. a. Visual Inspection Before Pure Tone Screening b. Preparing (Conditioning) the Child for Pure Tone Screening c. Pure Tone Screening Step by Step 7. Develop Your Pure Tone Screening Skills 8. Get Ready to Screen Children 9. Strategies for Successful OAE Screening
10. Pure Tone Screening Protocol in Detail 11. Establish a Tracking and Monitoring System

Video Tutorial Companion Handbook
2 ECHO Initiative -- KidsHearing.org
Each day, young children who are deaf or hard of hearing are being served in early childhood education and health care settings. The question is. . .”How will we know who they are?” Hearing loss is an invisible condition, so how can we reliably identify which children have normal hearing. . . and which may not? The short answer to that question is that professionals who are serving children 3 - 5 years of age can learn to conduct evidence-based hearing screening.
Formal hearing screening is essential because as close as we might look, we can’t see a hearing loss. Permanent hearing loss is the most common birth defect in the U.S. and over 90% of babies with this condition are born to hearing parents. Most newborns are now screened for hearing loss, but not every baby gets this screening. Babies not passing the screening require further evaluation, but some are lost to follow-up and don't receive it. These are two of the reasons why periodic screening throughout early childhood is needed. Even when babies pass the newborn hearing screening, it is important to continue to screen throughout early childhood because...
§ Hearing loss can occur at any time in a child’s life as a result of illness, physical trauma, or environmental or genetic factors. For example, by 4 years of age, 10% of late-onset permanent hearing loss is caused by congenital cytomegalovirus.
§ Research suggests that the incidence of permanent hearing loss doubles between birth and
school age, from about 3 children in 1,000 at birth, to about 6 in a thousand by the time children enter school.
That’s why screening during this vulnerable period in a child’s life is so important. Language development is at the heart of cognitive and social-emotional development and school readiness. Hearing health is at the heart of typical language development. Young children who pass the screening are ready to take full advantage of rich, language-learning environments while those who do not pass can receive audiological assessment and intervention services. Screening and appropriate follow-up can dramatically improve options and outcomes for children who are deaf or hard of hearing.
While newborn hearing screening results are valid at the time of the screening, they do not necessarily reflect a child’s hearing status in the following years. And, although EPSDT specifies that health care providers are to incorporate hearing screenings into well-child visits at 4 years of age, evidence-based screening is not uniformly conducted. Routine examinations of ears by health care providers should not be mistaken as hearing screenings. Unless records include documentation of ear-specific results and the method used, we should not assume a valid and reliable hearing screening was completed.
So, how will we identify which children 3 – 5 years of age may be deaf or hard of hearing? Answer: Through the use of an evidence-based hearing screening method and follow-up audiological assessment.
Introduction to Periodic Hearing Screening for Children 3 - 5 Years of Age 1
Video Tutorial Companion Handbook
3 ECHO Initiative -- KidsHearing.org
Historically, Pure Tone screening has been the primary method for screening the hearing of children 3 to 5 years of age. Here’s a quick introduction to how the auditory system works and how Pure Tone screening is done.
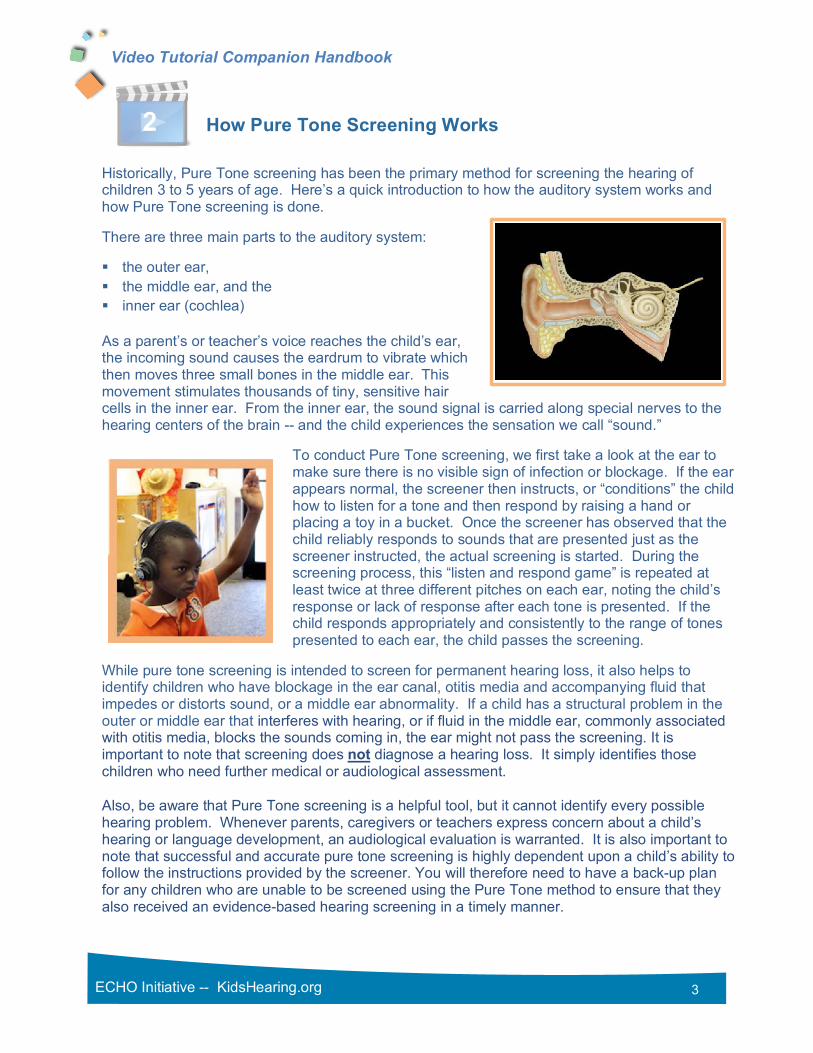
There are three main parts to the auditory system:
§ the outer ear, § the middle ear, and the § inner ear (cochlea)
As a parent’s or teacher’s voice reaches the child’s ear, the incoming sound causes the eardrum to vibrate which then moves three small bones in the middle ear. This movement stimulates thousands of tiny, sensitive hair cells in the inner ear. From the inner ear, the sound signal is carried along special nerves to the hearing centers of the brain -- and the child experiences the sensation we call “sound.”
To conduct Pure Tone screening, we first take a look at the ear to make sure there is no visible sign of infection or blockage. If the ear appears normal, the screener then instructs, or “conditions” the child how to listen for a tone and then respond by raising a hand or placing a toy in a bucket. Once the screener has observed that the child reliably responds to sounds that are presented just as the screener instructed, the actual screening is started. During the screening process, this “listen and respond game” is repeated at least twice at three different pitches on each ear, noting the child’s response or lack of response after each tone is presented. If the child responds appropriately and consistently to the range of tones presented to each ear, the child passes the screening.
While pure tone screening is intended to screen for permanent hearing loss, it also helps to identify children who have blockage in the ear canal, otitis media and accompanying fluid that impedes or distorts sound, or a middle ear abnormality. If a child has a structural problem in the outer or middle ear that interferes with hearing, or if fluid in the middle ear, commonly associated with otitis media, blocks the sounds coming in, the ear might not pass the screening. It is important to note that screening does not diagnose a hearing loss. It simply identifies those children who need further medical or audiological assessment. Also, be aware that Pure Tone screening is a helpful tool, but it cannot identify every possible hearing problem. Whenever parents, caregivers or teachers express concern about a child’s hearing or language development, an audiological evaluation is warranted. It is also important to note that successful and accurate pure tone screening is highly dependent upon a child’s ability to follow the instructions provided by the screener. You will therefore need to have a back-up plan for any children who are unable to be screened using the Pure Tone method to ensure that they also received an evidence-based hearing screening in a timely manner.
How Pure Tone Screening Works
2
Video Tutorial Companion Handbook
4 ECHO Initiative -- KidsHearing.org
As you undertake the development of a hearing screening program for children 3 to 5 years of age, it’s important to have an overview of what you might encounter when screening a diverse group of children.
Pure Tone screening has historically been the preferred screening method for children 3 to 5 years of age. Be forewarned, however--research suggests that up to 20% of the children in this age group cannot consistently engage in the listen and respond task required in Pure Tone screening and therefore cannot be screened with this method. The screening rate may also be affected negatively if screeners and children do not share a common language. So, as you develop a Pure Tone screening program plan, you will need to have a back-up plan for these children. According to the American Academy of Audiology and the American Speech Language Hearing Association, children 3 to 5
years of age who cannot be screened using the Pure Tone method should be screened using the Otoacoustic Emissions or OAE method. Be sure to check out the resources available on kidshearing.org for developing OAE screening practices. The alternative is to refer children who cannot engage in Pure Tone screening to a pediatric audiologist.
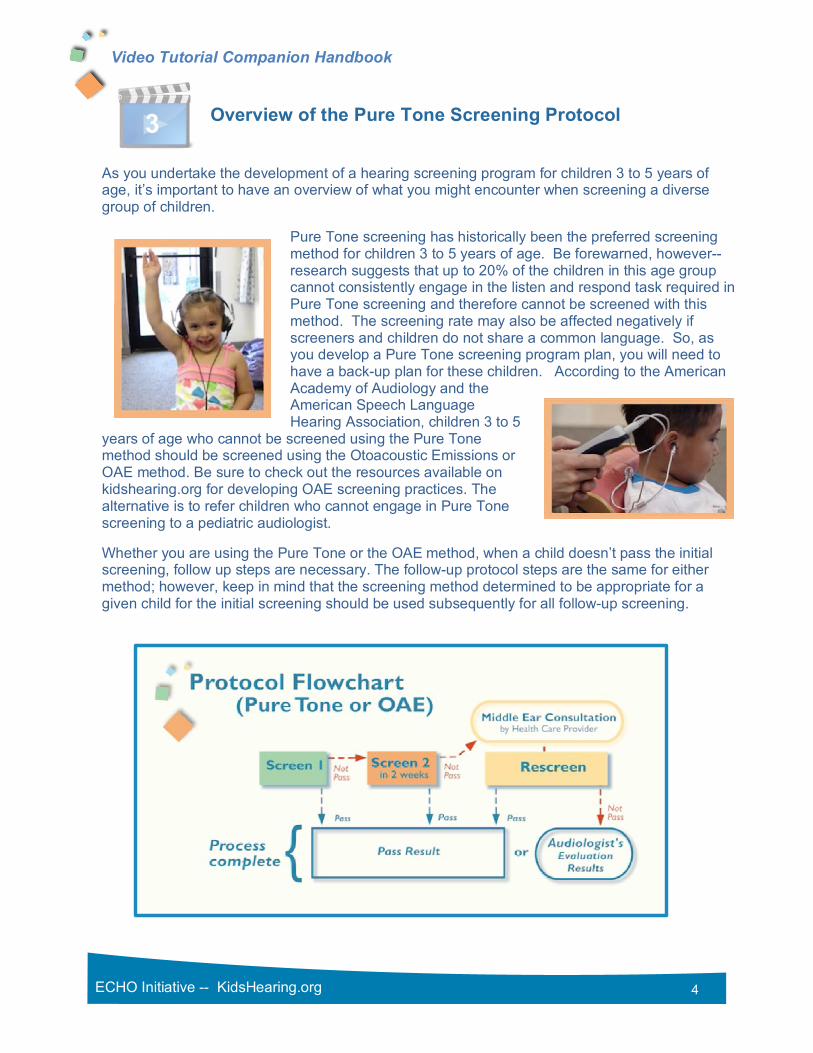
Whether you are using the Pure Tone or the OAE method, when a child doesn’t pass the initial screening, follow up steps are necessary. The follow-up protocol steps are the same for either method; however, keep in mind that the screening method determined to be appropriate for a given child for the initial screening should be used subsequently for all follow-up screening.
Overview of the Pure Tone Screening Protocol 3

Video Tutorial Companion Handbook
5 ECHO Initiative -- KidsHearing.org
Here’s a quick snapshot of the screening and follow-up protocol:
§ 100% of children for whom Pure Tone is the appropriate method will receive an initial Pure Tone screening on both ears. We expect that about 90% of children will pass on both ears and will not need any further follow-up;
§ Children who do not pass on both ears will need a second Pure Tone screening within 2 weeks.
§ A child who does not pass the second screening will need to be referred to a health care
provider for a middle ear consultation.
§ Once any middle ear problems have been resolved and medical clearance has been given, you will then conduct Pure Tone screening a third time.
§ We expect that less than 1% of the total number of children being screened will not pass
the third screening and will be referred to a pediatric audiologist for a complete audiological evaluation.
So, although a small subset of children will indeed need follow-up referral and further screening, this is a do-able protocol that helps children get the medical and audiological services they need while minimizing unnecessary referrals.
Video Tutorial Companion Handbook
6 ECHO Initiative -- KidsHearing.org
Planning an effective Pure Tone screening program includes:
1. Partnering with a pediatric audiologist
2. Selecting and purchasing appropriate Pure Tone screening equipment
3. Identifying and preparing all key participants
4. Having a back-up plan for OAE screening or referral to a pediatric audiologist when children are unable to be screened using the Pure Tone screening method.
Let’s talk about each of these elements:
A Pediatric Audiologist is a health care professional who specializes in the identification and non-medical treatment of hearing loss in children. If you need assistance finding a local pediatric audiologist, your local special education program may be able to help, or you may want to look at the resources on the KidsHearing.org website such as contact information for your state’s “Early Hearing Detection and Intervention” or “EHDI” program. The EHDI program Coordinator in your state should have contact information for pediatric audiologists in your area. Also on KidsHearing.org you will find a guide that will help a pediatric audiologist know how to help you. Whether as a volunteer to your program or as a contracted consultant, a partner audiologist can help you to:
§ Select appropriate hearing screening equipment
§ Learn how use that equipment under a variety of conditions
§ Implement an effective screening and follow-up protocol
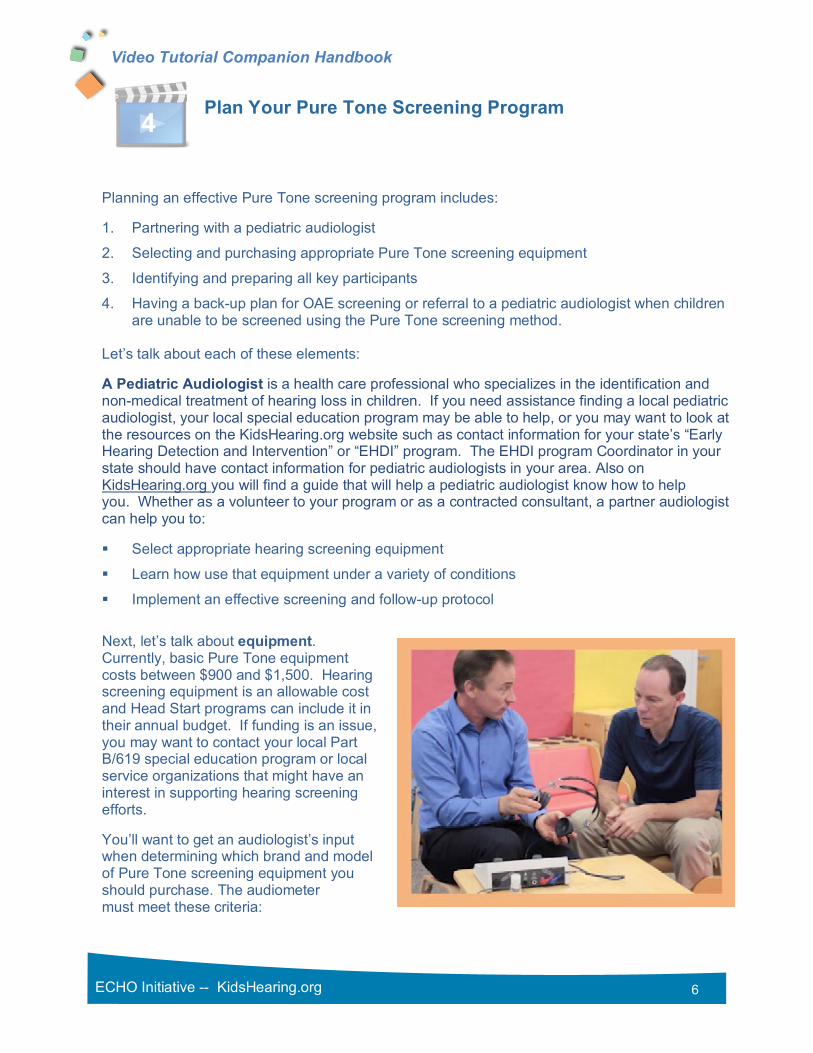
Next, let’s talk about equipment. Currently, basic Pure Tone equipment costs between $900 and $1,500. Hearing screening equipment is an allowable cost and Head Start programs can include it in their annual budget. If funding is an issue, you may want to contact your local Part B/619 special education program or local service organizations that might have an interest in supporting hearing screening efforts.
You’ll want to get an audiologist’s input when determining which brand and model of Pure Tone screening equipment you should purchase. The audiometer must meet these criteria:
Plan Your Pure Tone Screening Program 4

Video Tutorial Companion Handbook
7 ECHO Initiative -- KidsHearing.org
§ It must meet the American National Standards Institute (ANSI) S3.6 - 2010 specifications. This ensures that the equipment is made and calibrated for accuracy and safety.
§ The equipment must deliver frequency, or pitch-specific, pure tones. The pure tone stimulus may be continuous but having the option of either warble or pulse tones is recommended for this age group. An audiometer that can only provide speech sounds or words is not acceptable.
§ The frequency range must include 1,000, 2,000 and 4,000 Hertz.
§ The intensity range must include 20 dB (and go up to 60 dB for conditioning).
§ The audiometer must have circum-aural air conduction earphones. You do not need to have bone conduction capability with your audiometer.
§ The power source may be either the common 110/120 volt or it could be battery operated. § The equipment should also be portable, lightweight and durable.
Do not buy more testing options or capability than is necessary. For example, some equipment may have options to add bone conduction audiometry or speech testing. These are for diagnostic testing and would not be used in screening. You can usually save money by purchasing equipment that has only the features you will use.
If you already own equipment, you will need to have it calibrated annually by the manufacturer or distributor to make sure it is operating properly.
As you plan your screening program, make sure that everyone who will be involved in one way or another has the information they need. This includes:
§ Administrators
§ Individuals who will be doing the actual screening, and
§ Staff responsible for your program’s documentation and data tracking systems.
Be sure that each of these individuals take time to review the appropriate video modules and the accompanying implementation tools that have been designed to facilitate planning and implementation.
Finally, determine what your plan will be for completing hearing screenings on children who are unable to engage reliably in the listen and respond task required for Pure Tone screening. One option is to be prepared to conduct OAE screening with these children. Another option is to have a referral process to a pediatric audiologist in place that will allow the screenings to be completed in a timely way.
Each program does not need to start from scratch when developing Pure Tone screening practices. Before going on to other video modules take some time to look at existing planning and implementation tools on KidsHearing.org.

Video Tutorial Companion Handbook
8 ECHO Initiative -- KidsHearing.org
Let's get acquainted with the screening equipment by taking a look at some common features:
§ The Pure Tone audiometer. This is a sensitive piece of electronic equipment, so care for it as you would a computer. Don't drop it or leave it in a vehicle in extreme hot or cold temperatures.
§ The power source (battery or adaptor cord).
§ The headphones, cords and jacks and where they attach to the screening unit. Note any visual indicators that help you align the components, especially ensuring that the left and right jacks are inserted correctly into the audiometer. Never bend a cord sharply or crimp it.
§ The controls for:
1) Turning the equipment on and off
2) Selecting the screening tones, including location of a tone (left or right ear)
o intensity or “loudness” of a tone as measured in decibels (dB) o frequency or “pitch” of a tone as measured in Hertz (Hz) o type of tone--continuous/steady or intermittent (warble, frequency modulated
or pulse). We recommend using an intermittent type of tone.
3) Presenting the tone (stimulus button)
There are many different models of Pure Tone screening equipment and your particular brand may look different from the units shown here. You will need to get to know your specific equipment by referring to the manual that came with it as you locate the features and controls described above. You may want to ask your audiologist partner to help you learn where the basic controls are located and how to do a self-listening check.
Get to Know Your Equipment 5

Video Tutorial Companion Handbook
9 ECHO Initiative -- KidsHearing.org
Self-Listening Check
On any day that you plan to screen children, you will want to do a self-listening check first to confirm that the audiometer and all components are functioning as you would expect:
§ Review the condition of the cords, jacks, and headband. Clean the headphones in compliance with your program’s infection control or universal precautions guidelines and, as you do so, make sure they are not rough or cracked. You’ll need to clean the headphones prior to screening each individual.
§ Plug in the equipment, turn it on, and place the headphones over your own ears (red over right ear.)
Set the:
§ tone type to pulse, warble, or frequency
modulate
§ tone location to the right ear
§ intensity to a quiet 10 or 20 dB level (or the
quietest tone your ear can hear.)
§ frequency or “pitch” to 2000 Hz
Then,
§ Push the button to present a tone for one or two seconds. Listen for any crackling sounds or for the absence or distortion of the expected tone. These would indicate that your equipment has a problem.
§ Assuming everything sounds clear, change the frequency to 4000 Hz, present a tone, then change the frequency to 1000 Hz and present another tone, continuing to pay attention to the sound quality.
§ Change the tone location to the left ear and again present a series of tones at the 2000, 4000 and 1000 Hz levels.
§ Change the tone to a continuous/steady-state presentation. Hold down the tone presentation button with one hand as you move the cords with the other, listening for any crackle, sound break or distortions.
Repeat this self-listening check any day that you plan to screen children. Knowing how your equipment should sound and perform will help you detect any problems that would compromise your screening results. Also, remember to have your equipment calibrated annually by the manufacturer or distributor to keep it running properly.

Video Tutorial Companion Handbook
10 ECHO Initiative -- KidsHearing.org
We’ll now describe the visual inspection and the process of preparing a child for participating in Pure Tone screening. First, we’ll do a visual inspection of the ear:
• If you see that a child has a hearing aid or cochlear implant, it doesn't make sense to conduct a screening. Instead, make sure the child's hearing and amplification are being checked every 6 months, or more often, by a pediatric audiologist.
• If you see that a child has a significant ear malformation, don’t proceed with the screening. Bring the condition to the attention of the child’s health care provider and be sure the child’s hearing is assessed by a pediatric audiologist. If you notice only a minor malformation, such as a skin tag or pit, you'll want to bring this to the attention of the health care provider, but you can go ahead with the inspection and screening.
• Continue the visual inspection by placing a finger in front of the ear and pulling back gently on the ear to open the canal. Look into the canal and if you see drainage, which may be accompanied by a foul smell, don’t attempt to conduct screening. Instead, bring the condition to the attention of the child’s health care provider and screen when the condition has been resolved.
• If the ear canal appears to be totally blocked with wax, you may need to refer the child to a health care provider to remove it before you can conduct the screening. If some wax is present, but it is not completely blocking the canal, you can proceed with the screening.
• Finally, although you will not be able to see a pressure equalization (PE) tube, if the child’s health history indicates previous PE tube insertion, you can and should conduct a hearing screening.
In most cases, the child’s ears will pass the visual inspection, so the next activity is to teach the child to perform a simple task in response to hearing a sound.
Visual Inspection Before Pure Tone Screening 6 a

Video Tutorial Companion Handbook
11 ECHO Initiative -- KidsHearing.org
In becoming a skilled screener, it’s important to observe an expert, preferably a pediatric audiologist, performing the Pure Tone screening process. Also, get feedback on your skill level along with helpful hints on child management. An audiologist partner will be able to observe your techniques as you practice screening and help you to avoid common errors, such as providing subtle visual cues to a child that could compromise the screening results.
In most cases, the child’s ears will pass the visual inspection, so the next activity is to teach the child to perform a simple task in response to hearing a sound. Audiologists often refer to this as “conditioning” the child. Make it fun, by introducing the activity as a listening game rather than a hearing test. Based on your observation of a child’s developmental level and ability to follow instructions, you’ll determine what conditioned response to teach.
§ For an older child, the simplest response is a hand raise in response to sound. For younger children, playing a game where they listen for the tone and respond by placing a block in a bucket, for example, is a more engaging activity, but it can take a little more time.
§ As you tell the child that you’re going to place the headphones over their ears, remember that the red headphone goes on the child’s right ear and the blue on the left ear. Make sure the center of each side of the headphone is directly over the ear canal, then adjust the headband to create a good, comfortable seal. If necessary, remove large ear jewelry and smooth hair back behind the ear before placing the headphones.
§ Start by turning the equipment on, setting the volume level to 60 decibels and the frequency, or pitch, to 2000 Hertz for the right ear. This is louder than the volume that will be used during the screening, but is appropriate for the process of teaching the child how the screening will work.
§ Next, engage the child in a listen and respond “game” by presenting a tone and guiding the child’s hand to make the desired response. Repeat the process, until the child understands, then encourage the child to make the response without your assistance. Provide reinforcement for each correct response.
§ When the child is able to make the desired response several times, independently, at the 60 dB level, present a softer tone at the 40 dB level, watching for the response. Vary the time intervals between the tones so that the child learns to listen carefully and respond only after a tone is presented. If the child is able to respond independently several times at the 40 dB level, you can begin the actual screening process.
§ If you’re not able to condition the child to consistently provide the appropriate response at either the 60 dB or 40 dB level after 6 – 8 attempts, do not attempt to proceed with the Pure Tone screening. This is where your back-up plan will be needed. Either conduct an Otoacoustic Emissions (OAE) screening, which does not require a behavioral response from the child or make a referral to a pediatric audiologist. For children who are taught or conditioned to respond to the sound reliably, you are ready to begin the actual screening.
6 b Preparing (Conditioning) the Child for Pure Tone Screening

Video Tutorial Companion Handbook
12 ECHO Initiative -- KidsHearing.org
This module will take you step by step through the Pure Tone screening process. The screening will begin only after the child has been taught, or conditioned, to respond reliably to presented tones as described in the previous module. The goal of the screening process is to test the child’s hearing at three pitches or “frequencies” (2000, 4000 and 1000 Hertz, in that order). The volume level during the screening must be set, and remain at, the 20 dB level during all tone presentations. You’ll screen the right ear first and then the left.
§ First, be sure the child is positioned so that he or she cannot see your hand movements or facial expressions either directly or from a reflected surface.
§ Confirm that the audiometer tone location is set to the right ear, set the frequency to 2000 Hz and the decibel level to 60 dB. Remind the child how to listen for the tone and make the desired response. This reference tone does not count as part of the screening.
§ If the child is able to make the desired response, set the decibel level to 20 dB and start the screening by presenting the first tone for 1 – 2 seconds. Notice the child’s response or non-response. No matter what you observe, you will always need to present the tone again and watch for the response as a reliability check. Vary the length of the tone and the intervals between tone presentations to ensure that the child is actually responding to the sound and not just repeating the behavior. As soon as the child makes two correct responses, move on to the next frequency.
§ Set the frequency at 4000 Hertz. Present the tone, watching for the child’s response or non-response. Four is the maximum number of times you will present a tone at a particular frequency for each ear. Even if a child does not make 2 correct responses at a particular frequency, continue on with the screening at other frequencies.
§ Set the frequency to 1000 Hertz. Present the tone, watching for the response or non-response. The child needs to provide the response at least 2 times out of the 4 possible presentations.
Document the screening results at each pitch for the right ear. The child needs to provide the expected response 2 times out of 4 possible tone presentations, to pass on that pitch on that ear.
6 c Pure Tone Screening Step by Step

Video Tutorial Companion Handbook
13 ECHO Initiative -- KidsHearing.org
§ Now, change the tone location to the left ear, set the frequency to 2000 Hertz and raise the decibel level to 60 dB. Remind the child to listen and present a tone. It doesn’t matter whether the child makes a response using the right or left hand. This reference tone does not count as part of the screening—it simply prompts the child to listen for the tone in the left ear and to make the desired response.
§ If the child is able to make the desired response, set the decibel level back to 20 dB and start the screening on the left ear, following exactly the same sequence as for the right ear. Document the results at each frequency for the left ear when the process is complete.
If the child made 2 correct behavioral responses at each frequency for each ear, the child passed the screening. If the child made less than 2 correct responses at any frequency on either ear, the child did NOT pass. If a child does not pass and you need to conduct a rescreen at a future date, you’ll need to complete the entire screening sequence on the ear, or ears, that did not pass.

Video Tutorial Companion Handbook
14 ECHO Initiative -- KidsHearing.org
It is important to develop your Pure Tone screening skills by practicing on other adults before attempting to screen children and manage their behavior. This practice will help you to:
§ Understand what the children will experience during screening.
§ Avoid providing visual cues that would compromise the screening results.
§ Develop proficiency in presenting the designated tones in the appropriate sequence.
§ Document screening results accurately.
Print the Pure Tone Screening Form and follow it as you walk through the steps of the screening with your audiologist partner.
1. Visual inspection, headphone placement and conditioning
(Audiologist explains the process of learning how to screen while demonstrating the conditioning process on an adult.)
The first step is to do a visual inspection of the ear and most children will pass, so then we move directly to conditioning. Conditioning simply means teaching the child the response to sound that we need to observe to complete the screening process. For older children, the easiest response to sound is to raise a hand, but for younger children, we’ll often use a game or play task so we can get a consistent response.
Our next step is to place the headphones, but before we do so we want to be sure they are attached to our equipment correctly. The reference is red for the right and blue for the left. This is the same for most pieces of equipment you will be using. Then we want to be sure we place the headphones on the correct ear. Again, red for the right, blue for the left. We’ll want to open up the headphones and place the headband directly over the head and the headphones directly over the ear, then adjust the headband down.
Develop Your Pure Tone Screening Skills 7

Video Tutorial Companion Handbook
15 ECHO Initiative -- KidsHearing.org
Once that’s on, we’re ready to condition and we’re going to start at 2000 Hz and 60 dB, which is a sound loud enough to give a good reference to train a child to respond. I’m going to start in the right ear, so I have the equipment all set. To condition, I’m going to grab your hand and say, “I want you to listen for the sound and then I want you to raise your hand when you hear it.” Let’s practice. I’m going to do that a couple of times with you where I’m going to provide the tone and physically raise your hand. Then I’m going to ask you to “do it by yourself.” So listen, and then raise your hand all by yourself. Great. Now I’m going to move the sound level down to 40 dB and explain it is going to be a smaller sound, so listen and again watch for the hand raise. Once the responses are consistent, we can proceed with the screening process.
2. Screening
(Audiologist explains the process of learning how to screen while demonstrating the actual screening sequence on an adult.)
Now, turn around, and the reason I’m doing this is to remove all visual cues so that you can’t see me or the machine. So I’m adjusting the machine out of your vision and moving you so that you can’t see me. I’m going to go back to 60 dB, I’m going to start at 2000 Hz, in the right ear. Now I’m going to instruct you with the same task we used during conditioning. So, I’m going to give you the tone presentation and help you with the first hand raise. Then I’m going to ask you to listen and then do it all by yourself.
You’ve been consistent in responding, so I’m going to drop to 20 dB which is our screening level. I’m going to cue you to listen for a tiny sound. Good job. And sometimes I’m going to pause and present because I don’t want to get into a pattern that you’d recognize. Great!
Now that I’ve recorded the result at 2000 Hz I’m going to move to 4000 Hz, keeping the intensity level at 20 dB. Then I’m going to instruct you to listen again as I present a tone. I’ll vary the presentations and I might pause. Again, I want to get two responses out of a maximum of four. If I get that, I’m going to go ahead and record that as a pass at 4000 Hz for the right ear. Then I’ll adjust the machine to 1000 Hz, and I’m going to cue you again to listen for the tiny sound. Good job. And that’s a pass at 1000 Hz and I’ll record those resuts. So for this ear we would have consistent responses at 2000 Hz, 4000 Hz and 1000 Hz which would result in an overall ear result of a pass. Repeat the same process for the left ear.
3. Practice screening your Audiologist Partner and other adults
Practice screening adults until you feel confident in your ability to set up an appropriate screening environment, complete the visual inspection, the conditioning process, and the screening procedure.

Video Tutorial Companion Handbook
16 ECHO Initiative -- KidsHearing.org
Now that you have gained some basic skills using the Pure Tone equipment to screen other adults, it is time to get ready to screen children.
Screening supplies
Make sure that you have all of the supplies you need in advance of the day you intend to screen. These include: § Screening equipment and supplies to
clean the equipment § Documentation forms and a pen § Toys § Rewards such as stickers, if desired
As you consider toys, you’ll want to select ones that are easy for the child to manipulate, but that are not so interesting that the child becomes distracted by wanting to play independently. Have more than one set of toys available in case the child loses interest.
(Audiologist describes toys often used for Pure Tone screening.)
If we can’t get a child to raise their hand reliably during the conditioning process, then we want to go to some toys. I usually bring a variety of toys and I like toys that are going to be really simple such as this one where it is just a simple response (demonstrates putting a series of large plastic rings on a peg). This one, where you drop a block in a bucket, requires another choice to be made where you match the object with the shape on the lid. So even though for some kids that might be fine, with some kids it is simpler to have just one response (putting block in bucket without lid or putting ring on peg). Have them hold the ring, listen for the beep, put the ring on. I also look for the number of responses I can get out of a toy, so for this one, there are six and because it is the same task, I can switch to something that is similar but a little different (small wooden peg and rings). Or stacking (nested plastic) blocks—this one would have about 10 responses. This one is a fun one (wicker basket full of small, soft-fuzzy balls) where you’ve got a lot of responses here by the number of balls and you just train them to listen and put each one in the basket. That provides a lot of responses and I can probably get through most of the screening frequencies with these.
Some screeners have found that a portable tool or tackle box is helpful for keeping all the supplies together and within easy reach.
Get Ready to Screen Children 8

Video Tutorial Companion Handbook
17 ECHO Initiative -- KidsHearing.org
Screening environment
Pure tone hearing screening must be completed in a quiet environment. To do this, first find a quiet room or area that is free from visual distractions. Listen carefully for any consistent or intermittent background noise such as mechanical equipment running or noisy break times between classes. You may have to adjust screening times to when areas of a building are quiet enough. Minimize noise as much as possible.
Second, before performing screenings in any environment, perform a sound level check with an inexpensive sound level meter or one of the many available smart phone sound level meter apps. Your partner audiologist can help you learn how to check the sound level of a room.
(Audiologist describes use of sound level meter or app for checking the sound level.)
You can use a sound level meter, which is an instrument designed specifically to measure sound, or, more recently, we have apps that can also provide the same information directly on your cell phone or an ipad. With either device, we want to look at the sound levels that it provides and that it is under some certain levels. Most of the apps will look across the frequency range and you want to see where your highest peaks are and ensure that none of your highest peaks are above 50 dB. You want to ensure that all of the background noise stays below 50 dB, preferably in the 30’s if you can. So you can use an app like this that has a continuous measurement of the sound, you can also look at it and it will give you numbers. So, if I am quiet for just a moment, the ambient measure here (in this room) was about 45 dB when I was quiet. When I was talking, the volume goes up. We want to measure when it is quiet, so let’s do that again, and its staying right there at about 42 – 43 dB, so it’s under the 50 dB requirement, and you could screen in this room.
On occasion, an unexpected sound may increase the background noise level. Be sure to pause the screening if any distracting noise occurs and wait for it to become quiet again before resuming the screening. NEVER increase the sound level of the screening tone to compensate for noise.
Screening set up
As you are setting up the room, plan to seat the child where he or she will not have any competing distractions, such as a window where other children or adults will be visible. Create an environment where it is easy for the child to attend only to the screening task. You’ll want the child to be able to watch you during the conditioning process, but not during the screening. Be sure to note any reflective surfaces and arrange the seating so that the child will not be able to directly or indirectly watch your eye movements or your hands on the equipment during the screening.

Video Tutorial Companion Handbook
18 ECHO Initiative -- KidsHearing.org
Set up the equipment and do a self-listening check to make sure it is working properly as described in a previous module. Have any needed supplies available to comply with your program’s infection control or universal precautions guidelines. If possible, also have OAE equipment ready to screen those children who are not developmentally able to complete the Pure Tone screening.
Involving assistants and other adults
If an assistant is available to help, instruct the individual on how to maintain the child’s gaze and focus on the screening task. To the degree possible, seat any helper so that he or she will not see the button presses for the tone presentations. Explain that it is very important not to provide any visual cues to the child. Also explain to the helper, and any other adults in the room, that it is important not to talk or create any noise during the screening process. If adults familiar with the child are present, ask about any concerns related to hearing or language development and document these concerns. Children with PE tubes can, and should, be screened. Remember that young children generally have a limited attention span and are easily distracted. Making any necessary preparations BEFORE bringing a child into the room will help the screening process proceed smoothly. If you are combining hearing screening with other screenings, or health-related activities, you will want to conduct the Pure Tone screening before other activities that could tire or upset the child. Becoming a skilled screener also includes knowing how to elicit cooperation from children as described in the next module.
Video Tutorial Companion Handbook
19 ECHO Initiative -- KidsHearing.org
As you prepare to screen children, let’s review the four keys to successful Pure Tone screening.
§ Select quiet environment § Carefully position the child, equipment, supplies, and self § Teach (condition) the child to respond to tones making it fun! § Follow the Screening Form as you present tones and document results
First, be sure to select a quiet environment where noise will not distract children or compromise screening results. Position the child, the screening equipment and supplies, and your own seating in a way that will allow you to naturally direct the child’s behavior. You’ll want to have eye contact as you teach the child to respond to the tone presentations. You’ll then need to be able to easily reposition the child, and the equipment, for the actual screening.
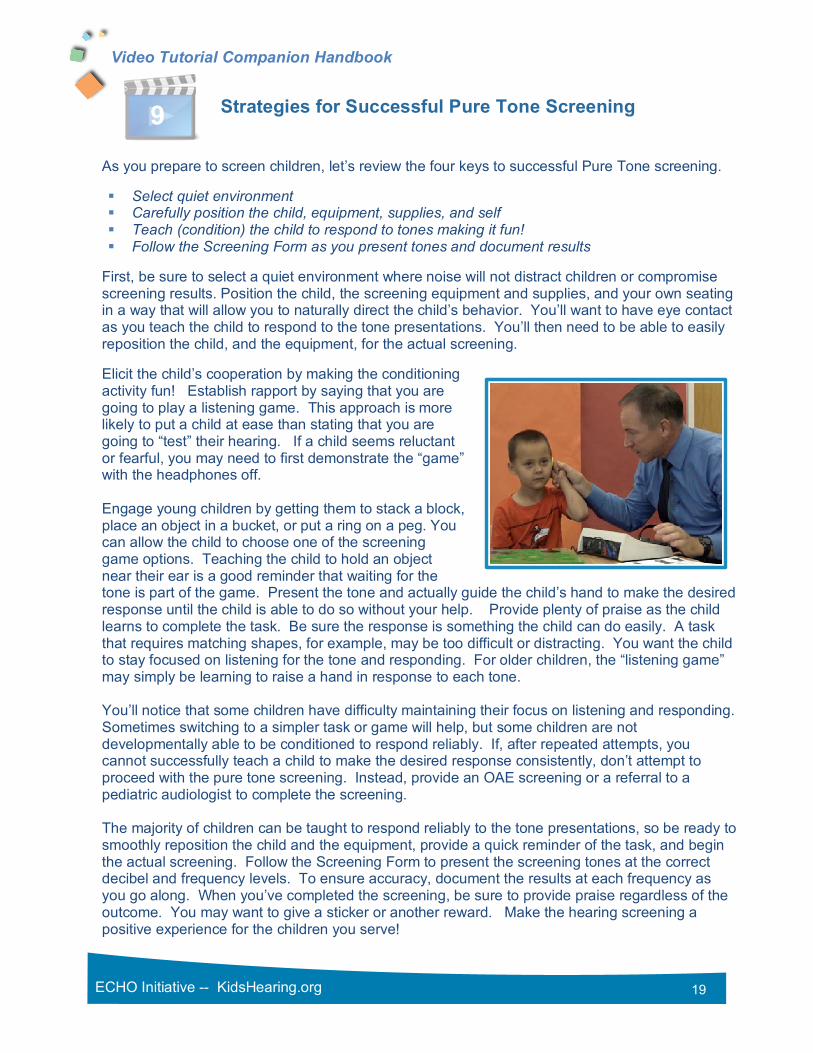
Elicit the child’s cooperation by making the conditioning activity fun! Establish rapport by saying that you are going to play a listening game. This approach is more likely to put a child at ease than stating that you are going to “test” their hearing. If a child seems reluctant or fearful, you may need to first demonstrate the “game” with the headphones off. Engage young children by getting them to stack a block, place an object in a bucket, or put a ring on a peg. You can allow the child to choose one of the screening game options. Teaching the child to hold an object near their ear is a good reminder that waiting for the tone is part of the game. Present the tone and actually guide the child’s hand to make the desired response until the child is able to do so without your help. Provide plenty of praise as the child learns to complete the task. Be sure the response is something the child can do easily. A task that requires matching shapes, for example, may be too difficult or distracting. You want the child to stay focused on listening for the tone and responding. For older children, the “listening game” may simply be learning to raise a hand in response to each tone. You’ll notice that some children have difficulty maintaining their focus on listening and responding. Sometimes switching to a simpler task or game will help, but some children are not developmentally able to be conditioned to respond reliably. If, after repeated attempts, you cannot successfully teach a child to make the desired response consistently, don’t attempt to proceed with the pure tone screening. Instead, provide an OAE screening or a referral to a pediatric audiologist to complete the screening. The majority of children can be taught to respond reliably to the tone presentations, so be ready to smoothly reposition the child and the equipment, provide a quick reminder of the task, and begin the actual screening. Follow the Screening Form to present the screening tones at the correct decibel and frequency levels. To ensure accuracy, document the results at each frequency as you go along. When you’ve completed the screening, be sure to provide praise regardless of the outcome. You may want to give a sticker or another reward. Make the hearing screening a positive experience for the children you serve!
Strategies for Successful Pure Tone Screening 9
Video Tutorial Companion Handbook
20 ECHO Initiative -- KidsHearing.org
The specific goal of Pure Tone screening is to identify children who may have permanent hearing loss. An added benefit is that we may also identify children who are experiencing temporary hearing loss due to conditions such as wax blockages, fluid or infection called otitis media.
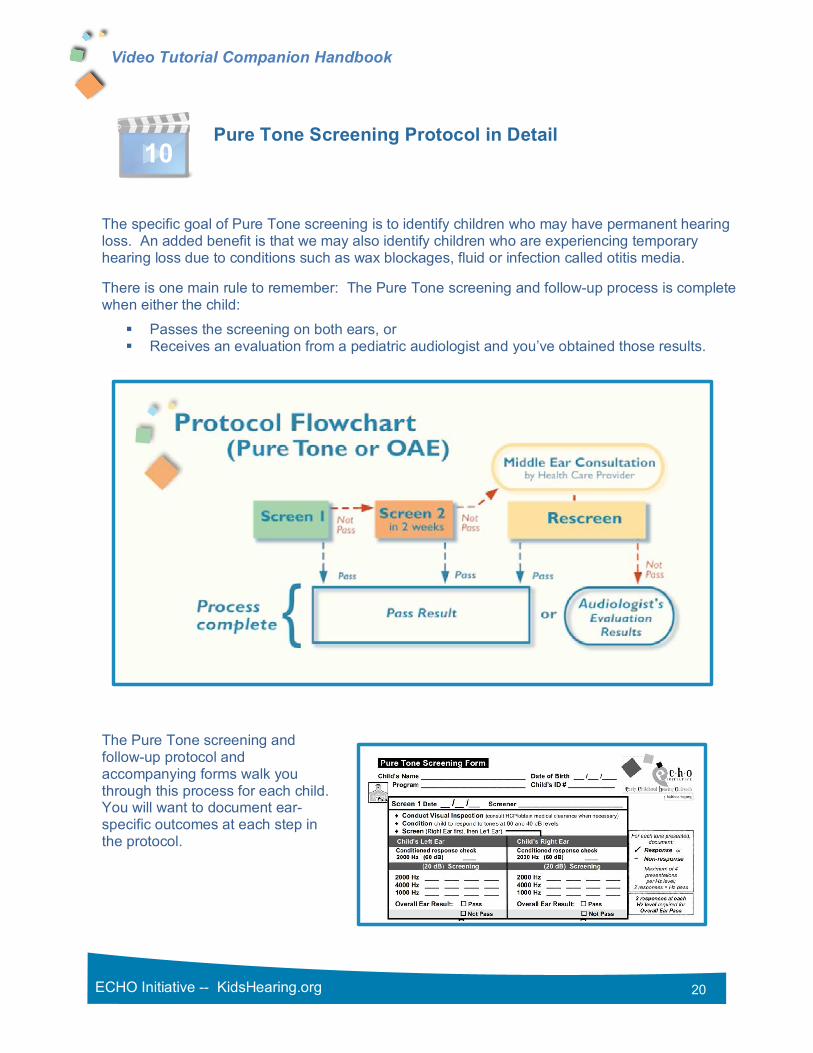
There is one main rule to remember: The Pure Tone screening and follow-up process is complete when either the child:
§ Passes the screening on both ears, or § Receives an evaluation from a pediatric audiologist and you’ve obtained those results.
The Pure Tone screening and follow-up protocol and accompanying forms walk you through this process for each child. You will want to document ear-specific outcomes at each step in the protocol.
Pure Tone Screening Protocol in Detail 10

Video Tutorial Companion Handbook
21 ECHO Initiative -- KidsHearing.org
§ If an ear passes the first Pure Tone screening, the process is complete for that ear.
§ If the ear does not pass, we can’t be sure why. Some children may become distracted and stop listening for the tone presentation or they may have a temporary condition like a head cold. It would not be practical for every child who doesn’t pass to be referred to a health care provider or audiologist.
§ Wait two weeks and screen again. Remember that you need to complete the entire
screening process on the ear, or ears, that did not pass the initial screening, including tone presentations at the 2000, 4000 and 1000 Hz levels. If the ear passes, the screening is complete for that ear.
§ If the ear still doesn’t pass the second screening, further evaluation is needed. These children will need to have their ears checked by a health care provider using tympanometry or pneumatic otoscopy. It is possible that a wax blockage, fluid or inflammation in the middle ear is interfering with screening the inner ear and auditory pathway to the brain. At this point you’ll want to intensify your monitoring of the child’s follow-up. Consult closely with the health care provider to find out the results of the middle ear consultation, and any treatment being provided.
§ Always document the results of the middle ear evaluation. Keep in mind that since the ear has not yet passed, we still don’t know if the inner ear and auditory pathway are functioning properly. Health care providers usually do not have screening equipment and trained staff available to complete the screening process. So, you’ll need to confer with the health care provider about when the ear should be rescreened.
§ After the middle ear evaluation and any treatment is completed, conduct a Pure Tone Rescreen. If the ear passes, the screening is complete. If the ear still does not pass, the child should be referred to a pediatric audiologist for evaluation. Very few children will need this step, but it will be helpful to inform health care providers involved in middle ear evaluations that they may need to make a referral to the audiologist should the ear not pass the Pure Tone Rescreen. Be sure to o support the parent in getting the audiological evaluation completed, o provide the audiologist with all screening and follow-up middle-ear evaluation
outcomes and o obtain a complete report of the audiologist’s evaluation.
Resources are available that make following the protocol easy:
§ Screening and Diagnostic documentation forms walk screeners through the protocol for each child.
§ Referral letters and suggested scripts help screeners to accurately communicate screening results to parents.
And remember, although Pure Tone screening can lead to the identification of the most common types of permanent hearing loss, it is only a screening. Any time a parent, caregiver or teacher has concerns about a child’s hearing or language development, referral for an audiological evaluation is warranted.

Video Tutorial Companion Handbook
22 ECHO Initiative -- KidsHearing.org
A Pure Tone screening program will only be effective if it helps children get the hearing health services they need. This requires documenting which children pass the screening and tracking those who do not through each step of the follow-up protocol. A tracking system should also help administrators monitor overall program quality.
At a minimum, a tracking system needs to:
§ Allow users to record child-specific Pure Tone screening and follow-up evaluation results. § Reflect each step in the Pure Tone screening and evaluation protocol. § Indicate which children have completed the process, which have not, and what the next step
is for those who need further screening or evaluation. § Make several calculations including
o pass and refer rates o the number of children in the follow-up process, and the o number of children diagnosed with permanent hearing loss.
The Track Outcomes tool accompanying this module has been designed specifically for use in educational settings and includes all of these functions.
As you develop a process for managing data and tracking children, establish policies and procedures for data sharing. This includes two-way sharing of screening and evaluation results with other educational and health care providers and audiologists. Having a program policy for data sharing that includes signed releases from parents prior to screening can significantly contribute to successful and timely follow-up.
As you develop your system for tracking and follow-up, be sure to carefully review the tracking tools accompanying this module. And remember, the video tutorials and other resources available here can continue to help you as you proceed in implementing hearing screening with the children you serve. Return to KidsHearing.org as often as needed.
11 Establish a Tracking and Monitoring System