DVD Toolkit Guide - Fujitsumanuals.ts.fujitsu.com/file/8093/bf200-400_dvd-toolkit-en.pdf · DVD...
331
For Authorized Service Personnel ONLY Copyright © 2008 Egenera, Inc. All rights reserved. Confidential DVD Toolkit Guide For BladeFrame ® BF400 S2 and BladeFrame ® BF200 October 2008 5.2.0
Transcript of DVD Toolkit Guide - Fujitsumanuals.ts.fujitsu.com/file/8093/bf200-400_dvd-toolkit-en.pdf · DVD...
For Authorized Service Personnel ONLY
DVD Toolkit GuideFor BladeFrame® BF400 S2 and BladeFrame® BF200
October 2008
5.2.0
Copyright © 2008 Egenera, Inc. All rights reserved. Confidential

DVD Toolkit Guide
ii For Authorized Service Personnel ONLY Confidential

Contents
Chapter 1: Introduction
Live Section Capabilities ......................................................................................... 1-1
Boot Section Capabilities ........................................................................................ 1-2
Organization of this document ................................................................................ 1-2
Procedure Format .................................................................................................... 1-3
Requirements .......................................................................................................... 1-4
Part 1: Live Section
Chapter 2: Live Section Basics
Getting Started ......................................................................................................... 2-1
The Toolkit Interface ............................................................................................... 2-8Action Buttons.................................................................................................. 2-9Menus ............................................................................................................. 2-10Notices ............................................................................................................ 2-11Forms.............................................................................................................. 2-12Reports............................................................................................................ 2-13Other Screens and Output............................................................................... 2-14
Exiting the Toolkit Live Section ........................................................................... 2-15
Confidential For Authorized Service Personnel ONLY iii

DVD Toolkit Guide
Chapter 3: Live Option 1: Upgrade PAN Manager
Upgrading to PAN Manager 5.2.0 ......................................................................... 3-11
Upgrading to PAN Manager 5.1.1 ......................................................................... 3-26
Chapter 4: Live Option 2: Apply a Patch
Selecting a Patch from an Alternate Location ....................................................... 4-18
Chapter 5: Live Option 3: Backup Frame
Chapter 6: Live Option 4: Firmware
Live Option 4.1: HBA (Serviceboot) ...................................................................... 6-4
Live Option 4.2: cBlade (BlastMe) ....................................................................... 6-12
Live Option 4.3: Both HBA and cBlade ............................................................... 6-20
Live Option 4.4: pBlade (MasterBlaster) .............................................................. 6-25
Live Option 4.5: Display Current Firmware Revisions ........................................ 6-38
Chapter 7: Live Option 5: pBlade IVP
Chapter 8: Live Option 6: Admin Tasks
Live Option 6.1: Check SAN setup ......................................................................... 8-3
Live Option 6.2: Check Network Configuration ..................................................... 8-8
Live Option 6.3: Pre-Upgrade Checks (SAN/Network/Disk) ............................... 8-10
iv For Authorized Service Personnel ONLY Confidential
Contents
Live Option 6.4: Obtain Save States ..................................................................... 8-14
Live Option 6.5: Generate a Shell Script Configuration of the PAN Manager (GenScript) .................................................................................................... 8-18
Live Option 6.6: Perform a Rolling Reboot .......................................................... 8-21
Live Option 6.8: Configure CIO ........................................................................... 8-29
Live Option 6.9: DumpHel Information ................................................................ 8-34Live Option 6.9.1: cBlade DumpHel procedure............................................. 8-36Live Option 6.9.3: pBlade DumpHel procedure ............................................ 8-38
Chapter 9: Live Option 7: HBA Diagnostics
Live Option 7.1: Display the system information ................................................... 9-5
Live Option 7.2: Display parameter settings for all HBAs ..................................... 9-7
Live Option 7.3: Display all HBAs general information ........................................ 9-9
Live Option 7.4: Display the target information on all HBAs .............................. 9-11
Live Option 7.5: Display LUN information for all HBAs .................................... 9-13
Live Option 7.6: Display statistics for all HBAs ................................................... 9-15
Live Option 7.7: Display link status for all HBAs ................................................ 9-17
Live Option 7.8: Run HBA diagnostic loopback test ............................................ 9-19
Chapter 10: Live Option 8: Check Physical Media
Confidential For Authorized Service Personnel ONLY v
DVD Toolkit Guide
Chapter 11: Live Section Common BladeFrame Diagnostics
Checking PAN Manager ....................................................................................... 11-2
Checking the SAN Setup ....................................................................................... 11-5
Checking the Disk ............................................................................................... 11-10
Checking the Network Configuration ................................................................. 11-14
Part 2: Boot Section
Chapter 12: Boot Section Basics
Getting Started ....................................................................................................... 12-1
Exiting the Toolkit Boot Section ........................................................................... 12-4
Chapter 13: Boot Option 1: Fresh Install
Installing the Base Media ...................................................................................... 13-2
Installing Patches ................................................................................................. 13-10
Flashing Firmware ............................................................................................... 13-14
Post-Installation Tasks ........................................................................................13-22
vi For Authorized Service Personnel ONLY Confidential
Contents
Chapter 14: Boot Option 2: Restore cBlade
Chapter 15: Boot Option 3: Recover Network Archive (Snapshot)
Chapter 16: Boot Option 4: Physical Media Check
Chapter 17: Boot Option 5: Install CBIVP Version
Part 3: Reference
Chapter 18: Troubleshooting
General Troubleshooting Notes ............................................................................. 18-1Log Files......................................................................................................... 18-2Toolkit Media Problems ................................................................................. 18-2
Boot Section Operations ........................................................................................ 18-2Installation and the cBlade Media .................................................................. 18-2Patching the Base Media ................................................................................ 18-3Flashing Firmware.......................................................................................... 18-4Restoring a Control Blade Using the restorecblade Tool ............................... 18-6Snapshot Recovery (Snapshot Restore).......................................................... 18-6
Live Section Operations ........................................................................................ 18-7Upgrading PAN Manager............................................................................... 18-7Applying a Patch .......................................................................................... 18-14
Common Diagnostics and Error Messages ......................................................... 18-17
Limitations and Restrictions ................................................................................ 18-17Incompatibility with DIACAP and DITSCAP Security............................... 18-17Known Bugs ................................................................................................. 18-17
Confidential For Authorized Service Personnel ONLY vii

DVD Toolkit Guide
Chapter 19: Toolkit Contents
DVD Directory Structure ...................................................................................... 19-1
Software ................................................................................................................. 19-3PAN Manager Base Releases and Patches ..................................................... 19-3PBIVP............................................................................................................. 19-3GenScript ........................................................................................................ 19-3CIO ................................................................................................................. 19-3
Firmware ............................................................................................................... 19-4cBlade ............................................................................................................. 19-4pBlade............................................................................................................. 19-4PIM-R ............................................................................................................. 19-4STS Units........................................................................................................ 19-4
Index
viii For Authorized Service Personnel ONLY Confidential

Chapter 1Introduction
The DVD Toolkit consolidates software and firmware components with a suite of tools that simplifies the deployment and administration of these components. The tools are organized into the Live Section and the Boot Section.
Live Section Capabilities
The Live Section tools run on a booted and active BladeFrame running PAN Manager 4.0.1.5 or higher. The major functions are as follows:
• Upgrading PAN Manager to a later release
• Applying a PAN Manager patch release
• Backing up cBlades using our Snapshot facility
• Managing firmware releases for HBAs, cBlades, and pBlades (there is no support for PIM-Rs)
• Running the pBlade Installation Verification Program (PBIVP)
Confidential For Authorized Service Personnel ONLY 1-1
DVD Toolkit Guide
• Performing common administrative tasks, including running non-intrusive diagnostics, installing and configuring the latest CIO agent (if applicable), and dumping hardware event logs
• Performing basic diagnostics on HBAs
Boot Section Capabilities
The Boot Section tools run on a cBlade that has been booted directly from the DVD. There are no restrictions the PAN Manager release currently installed on the cBlades, since the toolkit runs entirely from the DVD. The major functions are as follows:
• Performing an automated, fresh install of any of several PAN Manager releases, with options to apply an appropriate patch
• Restoring the local cBlade from the active, remote cBlade using the restorecblade tool
• Recovering the local cBlade from a previously created snapshot stored on a network server
• Installing the cBlade Installation Verification Program (CBIVP)
In addition, each of the above gives you the option to flash the HBA and cBlade firmware to an appropriate level at the end of the operation.
Organization of this document
This document consists of three major parts:
• Part 1: Live Section
1-2 For Authorized Service Personnel ONLY Confidential
Introduction
After an introductory chapter that describes the Live Section interface, this part describes the Live Section operations in the same order that they appear in the Main Menu. Each major operation appears in its own chapter, so the chapter length varies according to the complexity of the operation.
A separate chapter describes common diagnostics that the toolkit invokes automatically before major intrusive operations such as upgrading or patching PAN Manager, flashing firmware, or performing rolling reboots.
• Part 2: Boot Section
After an introductory chapter that describes the Boot Section interface, this part describes the Boot Section operations in the same order that they appear in the Main Menu. Each major operation appears in its own chapter.
• Part 3: Reference
This part contains background information about the toolkit. This includes a detailed description of the toolkit logic for major operations and an itemization of the DVD content.
Procedure Format
To assist new or infrequent DVD Toolkit users, this manual presents each procedure in a tabular format. In general, each row in the table describes a step in the procedure. You should note the following behavior:
• Some steps require a response or other input from you before the operation can continue. The rows for these steps contain a checkbox in the left column of the table.
• Other steps simply present significant output from the currently running tool, which generally denotes important progress. This output is read-only and appears on screen for a limited time. In this case, no checkbox appears to the left.
Confidential For Authorized Service Personnel ONLY 1-3

DVD Toolkit Guide
Requirements
This version of the DVD Toolkit supports individual BladeFrames that are currently running PAN Manager 4.0.1.5 and higher. BladeFarms are not supported.
The toolkit has been designed for and tested on BF200 and BF400 S2 (Clinton/Boxboro) control blades. Classics (Bolton) cBlades are not supported.
1-4 For Authorized Service Personnel ONLY Confidential

Part 1Live Section
Contents:
• Chapter 2, Live Section Basics
• Chapter 3, Live Option 1: Upgrade PAN Manager
• Chapter 4, Live Option 2: Apply a Patch
• Chapter 5, Live Option 3: Backup Frame
• Chapter 6, Live Option 4: Firmware
• Chapter 7, Live Option 5: pBlade IVP
• Chapter 8, Live Option 6: Admin Tasks
• Chapter 9, Live Option 7: HBA Diagnostics
• Chapter 10, Live Option 8: Check Physical Media
Confidential For Authorized Service Personnel ONLY

DVD Toolkit Guide
For Authorized Service Personnel ONLY Confidential

Chapter 2Live Section Basics
Getting Started
Use the following procedure to access the Live Section of the DVD Toolkit.
Important: Do not start a toolkit session if another session is already running on the same cBlade. Simultaneous toolkit sessions can cause severe damage to the software on the local cBlade.
For similar reasons, we recommend that you not start a toolkit session on the local cBlade if a session is already running on the remote cBlade.
Confidential For Authorized Service Personnel ONLY 2-1
DVD Toolkit Guide
Getting Started
Check Step
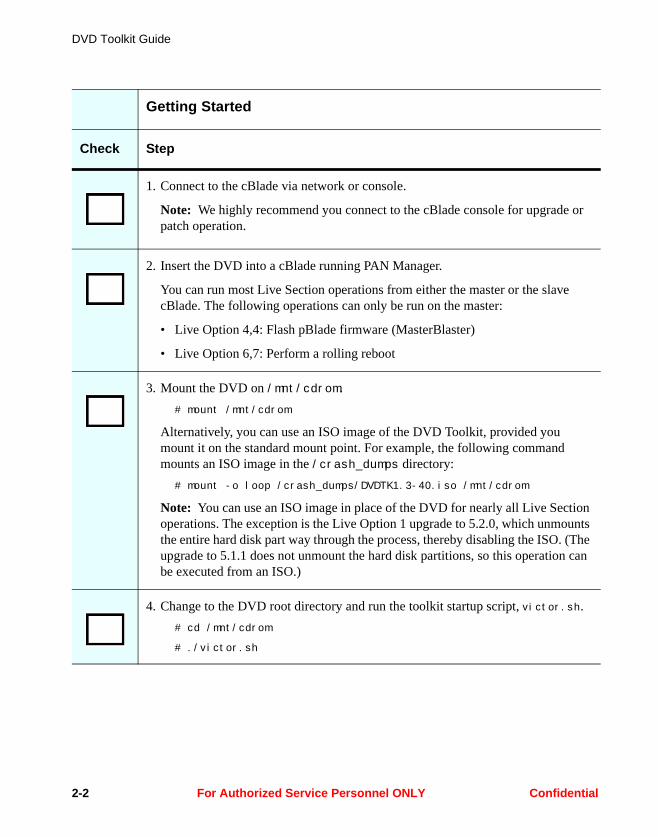
1. Connect to the cBlade via network or console.
Note: We highly recommend you connect to the cBlade console for upgrade or patch operation.
2. Insert the DVD into a cBlade running PAN Manager.
You can run most Live Section operations from either the master or the slave cBlade. The following operations can only be run on the master:
• Live Option 4,4: Flash pBlade firmware (MasterBlaster)
• Live Option 6,7: Perform a rolling reboot
3. Mount the DVD on /mnt/cdrom.# mount /mnt/cdrom
Alternatively, you can use an ISO image of the DVD Toolkit, provided you mount it on the standard mount point. For example, the following command mounts an ISO image in the /crash_dumps directory:
# mount -o loop /crash_dumps/DVDTK1.3-40.iso /mnt/cdrom
Note: You can use an ISO image in place of the DVD for nearly all Live Section operations. The exception is the Live Option 1 upgrade to 5.2.0, which unmounts the entire hard disk part way through the process, thereby disabling the ISO. (The upgrade to 5.1.1 does not unmount the hard disk partitions, so this operation can be executed from an ISO.)
4. Change to the DVD root directory and run the toolkit startup script, victor.sh.# cd /mnt/cdrom
# ./victor.sh
2-2 For Authorized Service Personnel ONLY Confidential
Live Section Basics
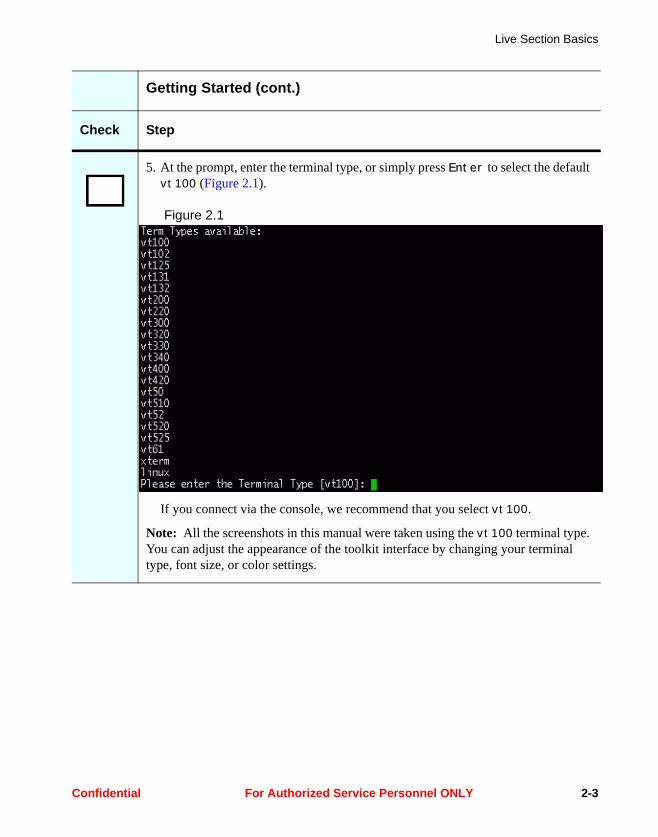
5. At the prompt, enter the terminal type, or simply press Enter to select the default vt100 (Figure 2.1).
Figure 2.1
If you connect via the console, we recommend that you select vt100.
Note: All the screenshots in this manual were taken using the vt100 terminal type. You can adjust the appearance of the toolkit interface by changing your terminal type, font size, or color settings.
Getting Started (cont.)
Check Step
Confidential For Authorized Service Personnel ONLY 2-3

DVD Toolkit Guide
6. The toolkit briefly displays the version number and then checks the current year and month (Figure 2.2).
Figure 2.2
This information appears for only a few seconds.
The toolkit will prompt you with a warning message if the current DVD is more than 6 months old. You can respond to the prompt to continue, but we recommend that you contact Fujitsu Siemens Computers customer support or your authorized support vendor for an updated DVD.
7. You may see a warning similar to the one in Figure 2.3.
Figure 2.3
At this point, the toolkit has exited to the shell. This situation can occur for either of the following reasons:
• Another user is running a toolkit session on the same cBlade.
• A previous toolkit session did not exit normally.
If you’re sure there are no other sessions running, you must delete the /var/lock/.vic.lm.lck lock file before you can use the toolkit. You can then return to Step 4 on page 2-2 to restart the toolkit session.
Getting Started (cont.)
Check Step
2-4 For Authorized Service Personnel ONLY Confidential
Live Section Basics
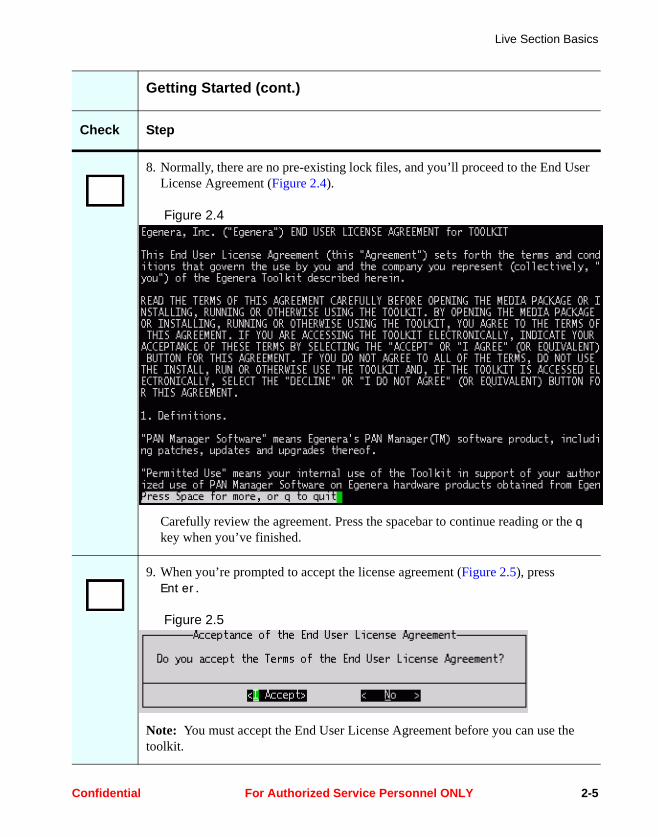
8. Normally, there are no pre-existing lock files, and you’ll proceed to the End User License Agreement (Figure 2.4).
Figure 2.4
Carefully review the agreement. Press the spacebar to continue reading or the q key when you’ve finished.
9. When you’re prompted to accept the license agreement (Figure 2.5), press Enter.
Figure 2.5
Note: You must accept the End User License Agreement before you can use the toolkit.
Getting Started (cont.)
Check Step
Confidential For Authorized Service Personnel ONLY 2-5
DVD Toolkit Guide
If you’re unfamiliar with the toolkit interface or the conventions in this manual, we recommend that you read “The Toolkit Interface” on page 2-8 before you proceed.
Otherwise, you can skip to the following chapters for descriptions of the procedures available in the Live Section Main Menu:
• Chapter 3, Live Option 1: Upgrade PAN Manager
• Chapter 4, Live Option 2: Apply a Patch
• Chapter 5, Live Option 3: Backup Frame
• Chapter 6, Live Option 4: Firmware
• Chapter 7, Live Option 5: pBlade IVP
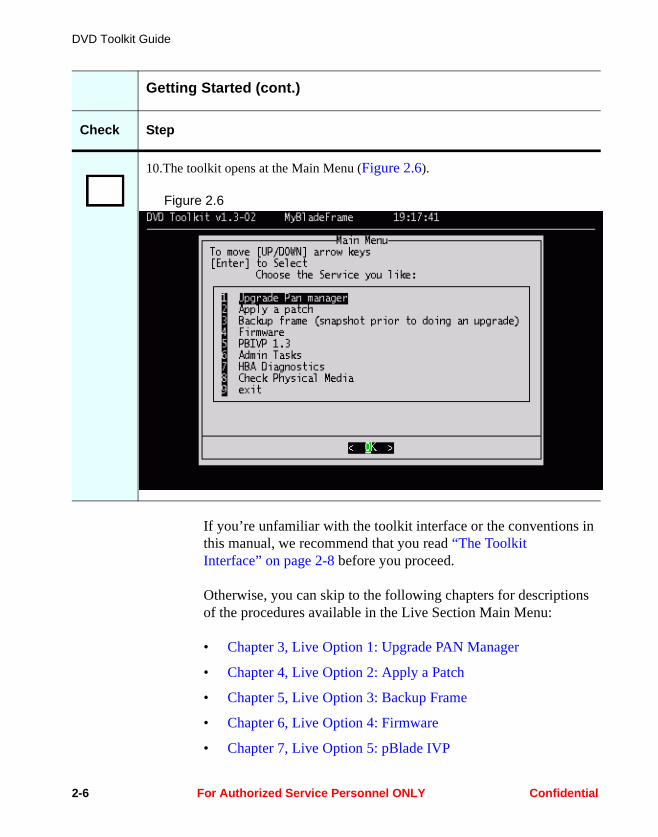
10.The toolkit opens at the Main Menu (Figure 2.6).
Figure 2.6
Getting Started (cont.)
Check Step
2-6 For Authorized Service Personnel ONLY Confidential

Live Section Basics
• Chapter 8, Live Option 6: Admin Tasks
• Chapter 9, Live Option 7: HBA Diagnostics
• Chapter 10, Live Option 8: Check Physical Media
Confidential For Authorized Service Personnel ONLY 2-7

DVD Toolkit Guide
The Toolkit Interface
The opening screen displays most of the elements you’ll encounter while using the toolkit (Figure 2.7).
Figure 2.7
The top line of the screen displays the toolkit version and other read-only information that changes according to where you are in the interface. In this example, the information line contains the BladeFrame name and the time the menu was opened.
The active part of the interface (the gray box in the figure above) appears in the center of the screen. This is usually a menu, a notice, or a report. A few of the toolkit operations produce a form or a file selection tree in this area. The subsections below describe each of these items in more detail.
2-8 For Authorized Service Personnel ONLY Confidential
Live Section Basics
This manual makes extensive use of screenshots to describe the toolkit procedures. At runtime, the information line at the top of the screen helps you determine where you are in the interface. However, the context is clear in the manual’s procedure descriptions, so the screenshots contain only the active area.
The screenshots were all created with the default vt100 terminal type. You can change the runtime appearance of the interface by configuring a different color scheme, terminal type, or font. For example, the xterm terminal type produces additional colors and more of a 3D appearance.
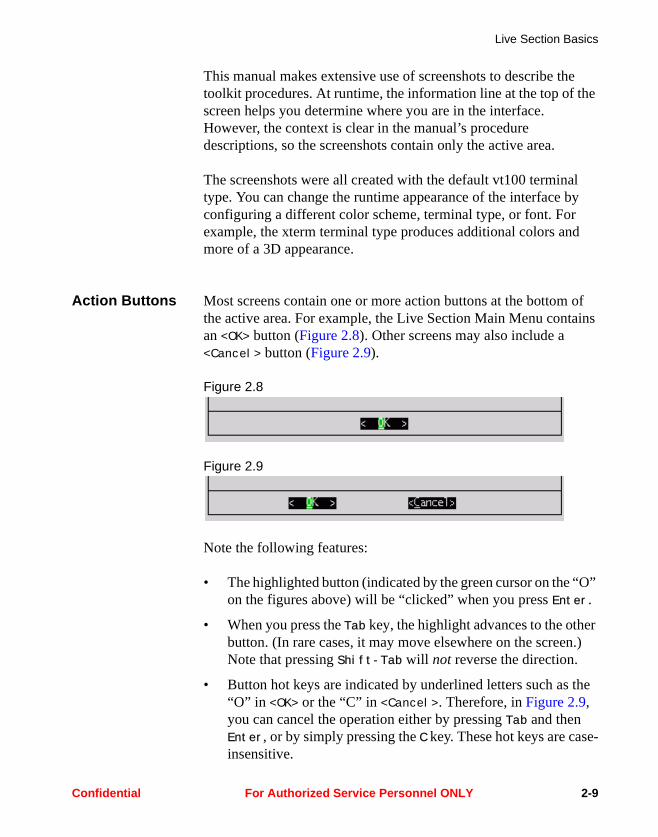
Action Buttons Most screens contain one or more action buttons at the bottom of the active area. For example, the Live Section Main Menu contains an <OK> button (Figure 2.8). Other screens may also include a <Cancel> button (Figure 2.9).
Figure 2.8
Figure 2.9
Note the following features:
• The highlighted button (indicated by the green cursor on the “O” on the figures above) will be “clicked” when you press Enter.
• When you press the Tab key, the highlight advances to the other button. (In rare cases, it may move elsewhere on the screen.) Note that pressing Shift-Tab will not reverse the direction.
• Button hot keys are indicated by underlined letters such as the “O” in <OK> or the “C” in <Cancel>. Therefore, in Figure 2.9, you can cancel the operation either by pressing Tab and then Enter, or by simply pressing the C key. These hot keys are case-insensitive.
Confidential For Authorized Service Personnel ONLY 2-9

DVD Toolkit Guide
You may also encounter <Yes> and <No> (Figure 2.10) and <Exit> (Figure 2.11) buttons.
Figure 2.10
Figure 2.11
Note that you’ve already encountered the <I Accept> button when you responded to the license agreement prompt (Figure 2.5).
Menus You will launch most toolkit operations from a menu similar to the one in Figure 2.12.
Figure 2.12
The highlighted entry indicates the operation that will be performed when you press Enter. To change the selection, use the up/down arrow keys or type the corresponding number. Only the first digit you type is recognized. If more than one entry begins with that digit, the highlight moves to the next available match. In the above example, pressing 1 repeatedly cycles to 10, 11, and then back to 1.
2-10 For Authorized Service Personnel ONLY Confidential
Live Section Basics
Some menu selections will take you to a screen with a submenu. For example, the Admin Menu in Figure 2.12 appears when you select “Option 6, Admin Tasks” from the Main Menu in Figure 2.7.
The last entry on every submenu will return you to its parent menu. The last entry on the Live Toolkit Main Menu will exit the toolkit (see “Exiting the Toolkit Live Section” on page 2-15).
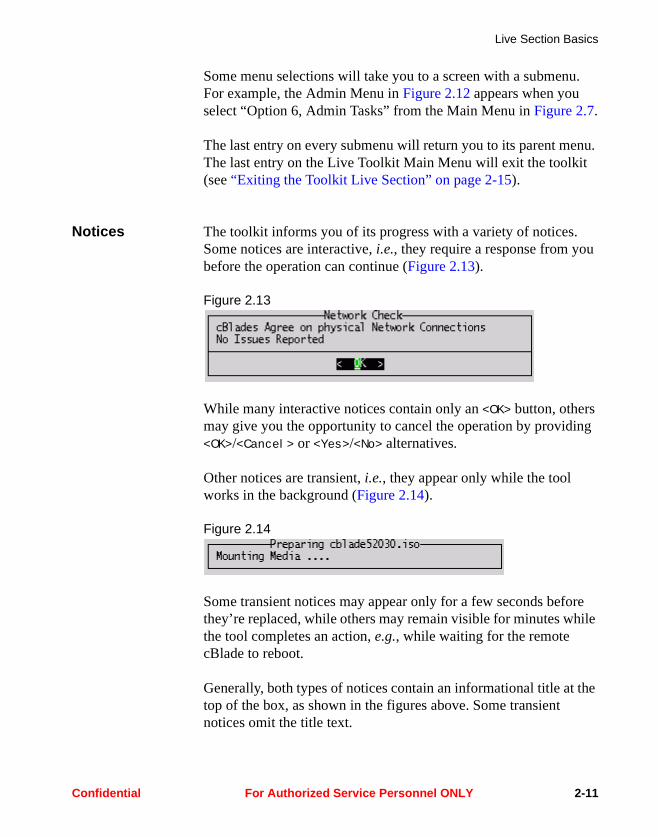
Notices The toolkit informs you of its progress with a variety of notices. Some notices are interactive, i.e., they require a response from you before the operation can continue (Figure 2.13).
Figure 2.13
While many interactive notices contain only an <OK> button, others may give you the opportunity to cancel the operation by providing <OK>/<Cancel> or <Yes>/<No> alternatives.
Other notices are transient, i.e., they appear only while the tool works in the background (Figure 2.14).
Figure 2.14
Some transient notices may appear only for a few seconds before they’re replaced, while others may remain visible for minutes while the tool completes an action, e.g., while waiting for the remote cBlade to reboot.
Generally, both types of notices contain an informational title at the top of the box, as shown in the figures above. Some transient notices omit the title text.
Confidential For Authorized Service Personnel ONLY 2-11
DVD Toolkit Guide
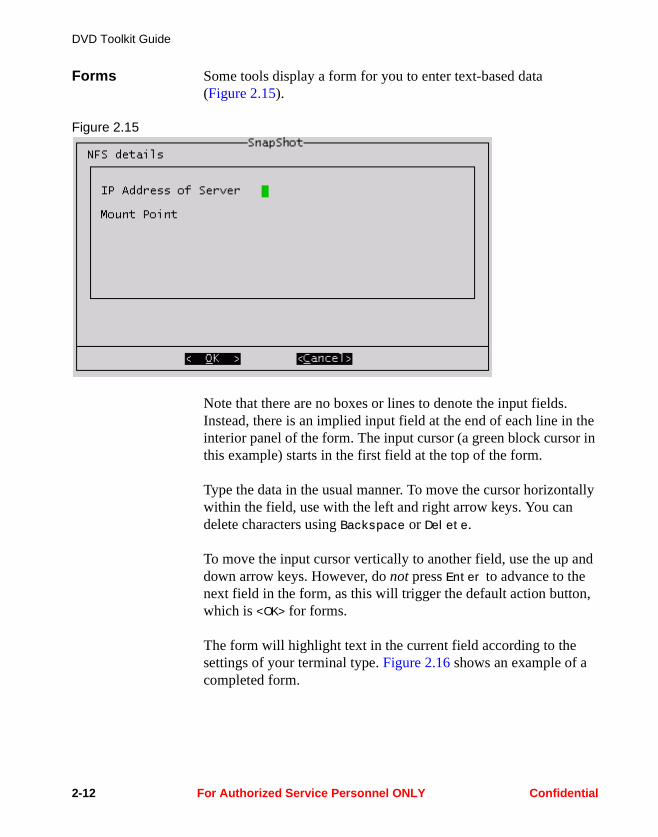
Forms Some tools display a form for you to enter text-based data (Figure 2.15).
Figure 2.15
Note that there are no boxes or lines to denote the input fields. Instead, there is an implied input field at the end of each line in the interior panel of the form. The input cursor (a green block cursor in this example) starts in the first field at the top of the form.
Type the data in the usual manner. To move the cursor horizontally within the field, use with the left and right arrow keys. You can delete characters using Backspace or Delete.
To move the input cursor vertically to another field, use the up and down arrow keys. However, do not press Enter to advance to the next field in the form, as this will trigger the default action button, which is <OK> for forms.
The form will highlight text in the current field according to the settings of your terminal type. Figure 2.16 shows an example of a completed form.
2-12 For Authorized Service Personnel ONLY Confidential

Live Section Basics
Figure 2.16
After you enter the required data, use the Tab key to highlight <OK> or <Cancel> and then press Enter to continue.
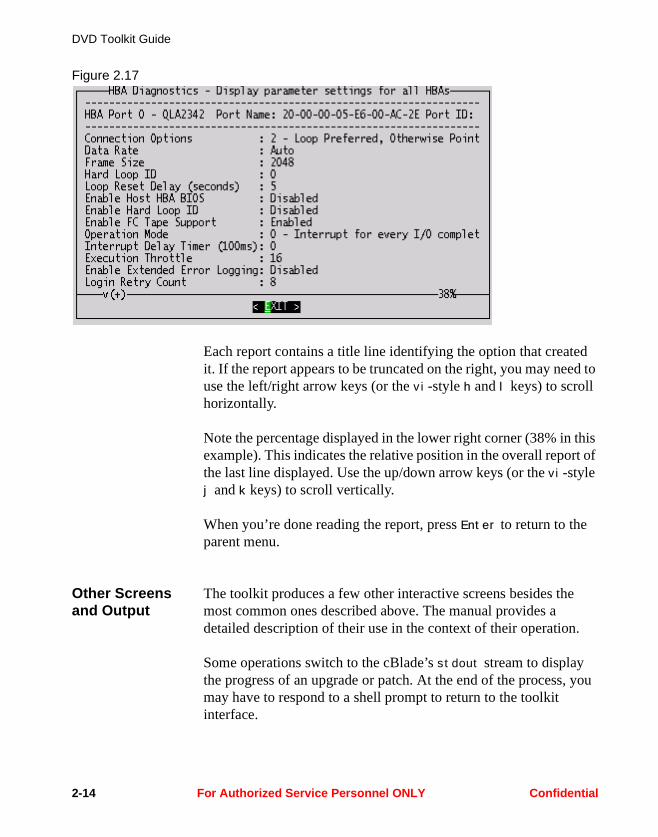
Reports Diagnostic tools may produce extensive reports, such as the one in Figure 2.17.
Confidential For Authorized Service Personnel ONLY 2-13
DVD Toolkit Guide
Figure 2.17
Each report contains a title line identifying the option that created it. If the report appears to be truncated on the right, you may need to use the left/right arrow keys (or the vi-style h and l keys) to scroll horizontally.
Note the percentage displayed in the lower right corner (38% in this example). This indicates the relative position in the overall report of the last line displayed. Use the up/down arrow keys (or the vi-style j and k keys) to scroll vertically.
When you’re done reading the report, press Enter to return to the parent menu.
Other Screens and Output
The toolkit produces a few other interactive screens besides the most common ones described above. The manual provides a detailed description of their use in the context of their operation.
Some operations switch to the cBlade’s stdout stream to display the progress of an upgrade or patch. At the end of the process, you may have to respond to a shell prompt to return to the toolkit interface.
2-14 For Authorized Service Personnel ONLY Confidential
Live Section Basics
Certain administrative tasks will transfer control to an external tool such as PBIVP or CIO. When you exit that tool’s interface, you’ll return to the toolkit.
Finally, any operation that involves a local reboot, such as a firmware flash or rolling reboot, will exit the toolkit gracefully before turning control over to the OS. If you’re on the console, you’ll see the output as the reboot proceeds.
Exiting the Toolkit Live Section
As mentioned earlier in the general description of menu operation, the last line (Option 9) of the Live Section Main Menu will exit the toolkit gracefully and return you to the shell.
While you’re in the toolkit interface, you can also press Ctrl-C to abort the current operation and terminate the toolkit immediately. In this case, the toolkit’s lock file will remain behind, and you’ll have to delete it as described in Step 7 on page 2-4 before you can use the toolkit again.
In either of the above cases, you’ll return to the shell in the /mnt/cdrom directory.
Confidential For Authorized Service Personnel ONLY 2-15

DVD Toolkit Guide
2-16 For Authorized Service Personnel ONLY Confidential

Chapter 3Live Option 1: Upgrade
PAN Manager
This option allows you to upgrade PAN Manager to one of the following base media versions:
• 5.1.1
• 5.2.0
The major restriction is that the currently installed PAN Manager version (including patches) must be earlier than the target upgrade version. For example, if the current PAN Manager is 4.0.1.x, 5.0.x, or 5.1.0.x, the upgrade tool will offer an upgrade to either 5.1.1 or 5.2.0. However, if the current PAN Manager is 5.1.1, the tool will offer an upgrade only to 5.2.0.
The upgrade tool also extends the upgrade process by incorporating some or all of the following operations:
• Applies a patch
• Flashes the HBA firmware
Confidential For Authorized Service Personnel ONLY 3-1
DVD Toolkit Guide
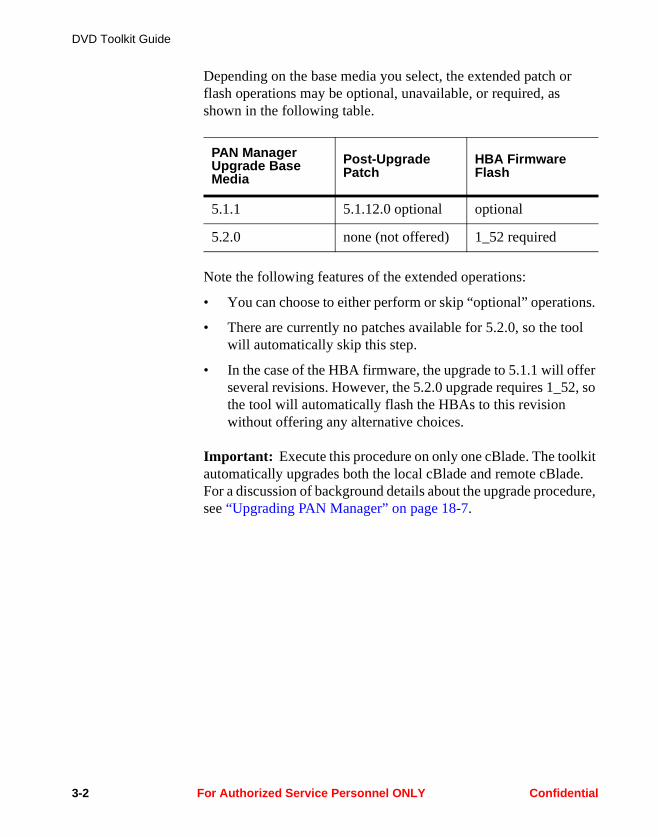
Depending on the base media you select, the extended patch or flash operations may be optional, unavailable, or required, as shown in the following table.
Note the following features of the extended operations:
• You can choose to either perform or skip “optional” operations.
• There are currently no patches available for 5.2.0, so the tool will automatically skip this step.
• In the case of the HBA firmware, the upgrade to 5.1.1 will offer several revisions. However, the 5.2.0 upgrade requires 1_52, so the tool will automatically flash the HBAs to this revision without offering any alternative choices.
Important: Execute this procedure on only one cBlade. The toolkit automatically upgrades both the local cBlade and remote cBlade. For a discussion of background details about the upgrade procedure, see “Upgrading PAN Manager” on page 18-7.
PAN Manager Upgrade Base Media
Post-Upgrade Patch
HBA Firmware Flash
5.1.1 5.1.12.0 optional optional
5.2.0 none (not offered) 1_52 required
3-2 For Authorized Service Personnel ONLY Confidential
Live Option 1: Upgrade PAN Manager
Live Option 1: Upgrade PAN Manager
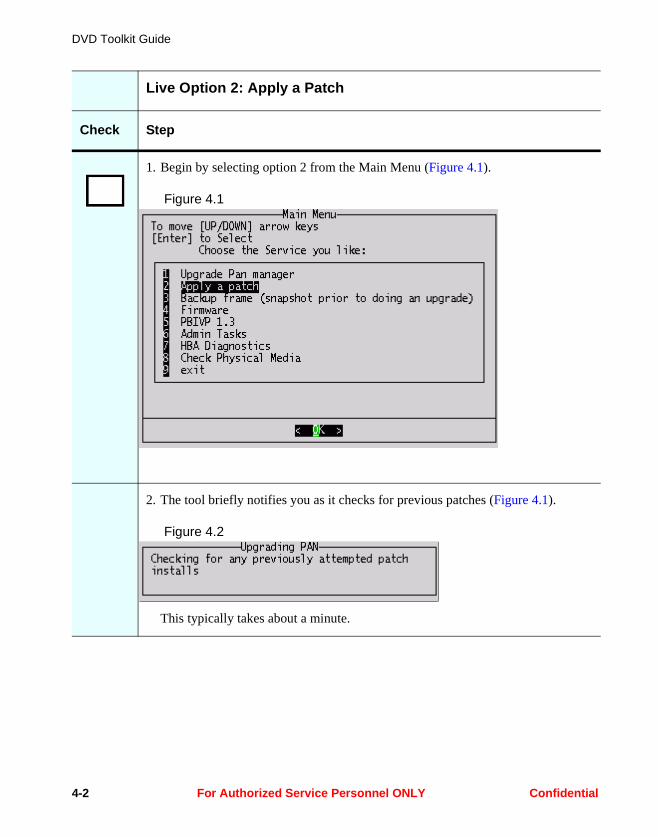
Check Step
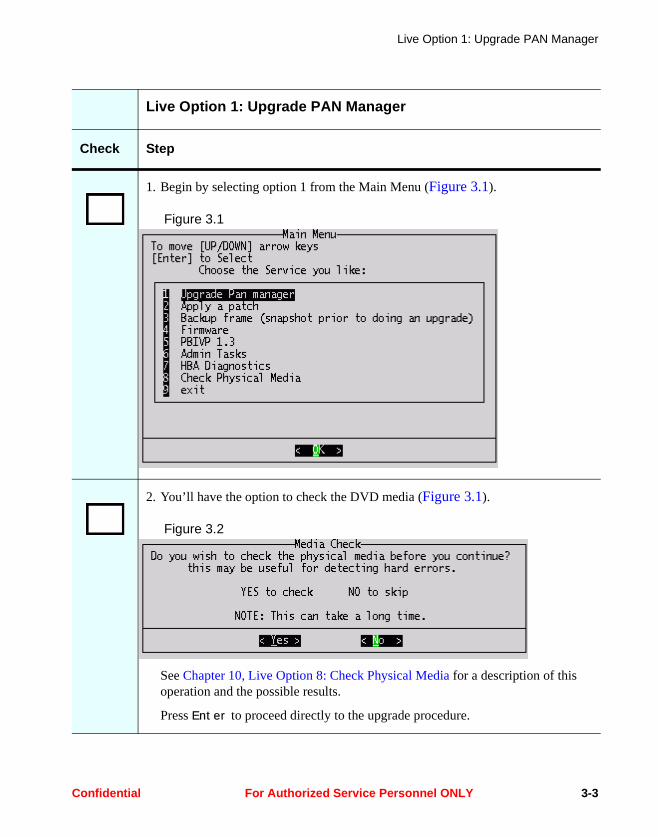
1. Begin by selecting option 1 from the Main Menu (Figure 3.1).
Figure 3.1
2. You’ll have the option to check the DVD media (Figure 3.1).
Figure 3.2
See Chapter 10, Live Option 8: Check Physical Media for a description of this operation and the possible results.
Press Enter to proceed directly to the upgrade procedure.
Confidential For Authorized Service Personnel ONLY 3-3
DVD Toolkit Guide
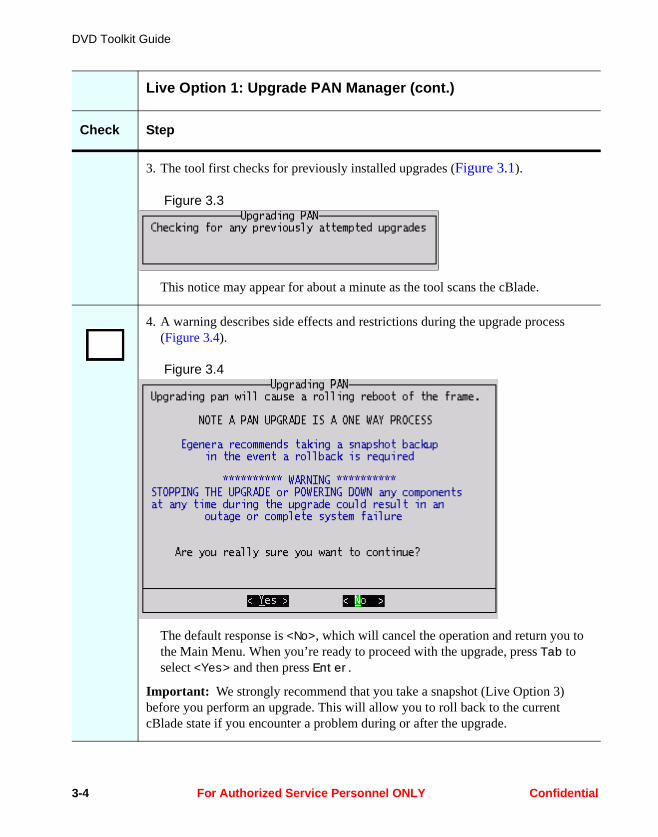
3. The tool first checks for previously installed upgrades (Figure 3.1).
Figure 3.3
This notice may appear for about a minute as the tool scans the cBlade.
4. A warning describes side effects and restrictions during the upgrade process (Figure 3.4).
Figure 3.4
The default response is <No>, which will cancel the operation and return you to the Main Menu. When you’re ready to proceed with the upgrade, press Tab to select <Yes> and then press Enter.
Important: We strongly recommend that you take a snapshot (Live Option 3) before you perform an upgrade. This will allow you to roll back to the current cBlade state if you encounter a problem during or after the upgrade.
Live Option 1: Upgrade PAN Manager (cont.)
Check Step
3-4 For Authorized Service Personnel ONLY Confidential

Live Option 1: Upgrade PAN Manager
5. A notice appears briefly on the screen before the tool proceeds (Figure 3.5).
Figure 3.5
6. Next, the tool will ask for confirmation that a rolling reboot has been performed (Figure 3.6).
Figure 3.6
We strongly recommend that you perform a rolling reboot before an upgrade, because this can highlight a variety of problems. Addressing any detected problems beforehand will help to ensure a successful upgrade.
The default response is <No>, which will cancel the operation and return you to the Main Menu. To continue, press the y key, or press Tab and then Enter.
Live Option 1: Upgrade PAN Manager (cont.)
Check Step
Confidential For Authorized Service Personnel ONLY 3-5

DVD Toolkit Guide
7. The tool displays the current PAN Manager version in the title line. The menu lists the available upgrades for that version (Figure 3.7).
Figure 3.7
The versions available in the menu depend on the version currently installed. In this example, the current version is 5.1.1, and the only higher version on the DVD is 5.2.0. Select the desired version and press Enter to continue.
Live Option 1: Upgrade PAN Manager (cont.)
Check Step
3-6 For Authorized Service Personnel ONLY Confidential

Live Option 1: Upgrade PAN Manager
8. If you are upgrading to 5.2.0, you must respond to the tool’s prompt describing the major effects of the upgrade (Figure 3.8).
Figure 3.8
Note: The upgrade tool does not erase the /crash_dumps file system.
Note: This prompt does not appear before the upgrade to 5.1.1, because it does not make major changes to the file systems.
Press Tab to select <Yes> and then press Enter to continue.
9. If there is no upgrade available for the current release, a notice similar to Figure 3.9 appears.
Figure 3.9
During the upgrade procedure, each cBlade will be taken out of service to apply the changes, leaving the other cBlade to control the PAN. Therefore, to detect misconfigurations that could cause an outage or performance loss, the tool performs a series of pre-upgrade checks.
Live Option 1: Upgrade PAN Manager (cont.)
Check Step
Confidential For Authorized Service Personnel ONLY 3-7
DVD Toolkit Guide
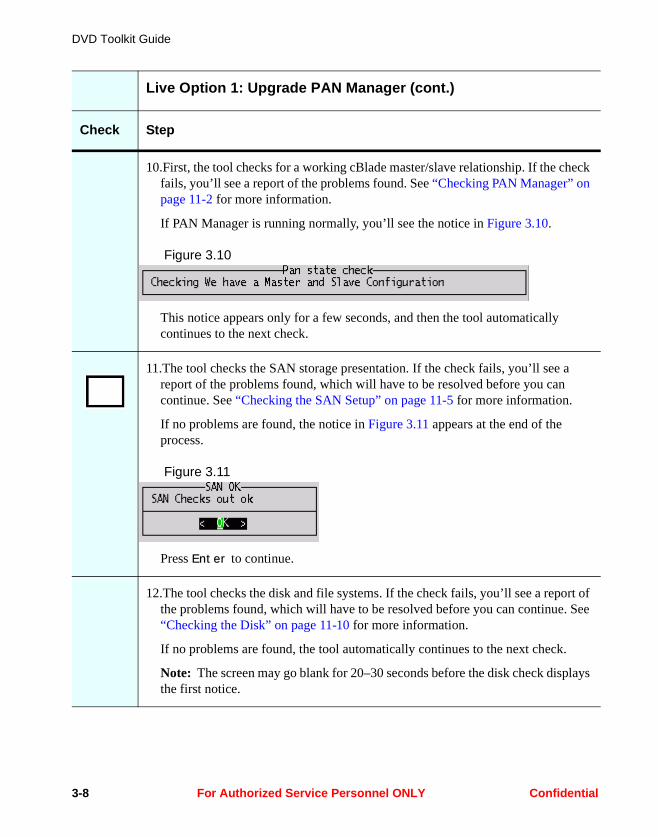
10.First, the tool checks for a working cBlade master/slave relationship. If the check fails, you’ll see a report of the problems found. See “Checking PAN Manager” on page 11-2 for more information.
If PAN Manager is running normally, you’ll see the notice in Figure 3.10.
Figure 3.10
This notice appears only for a few seconds, and then the tool automatically continues to the next check.
11.The tool checks the SAN storage presentation. If the check fails, you’ll see a report of the problems found, which will have to be resolved before you can continue. See “Checking the SAN Setup” on page 11-5 for more information.
If no problems are found, the notice in Figure 3.11 appears at the end of the process.
Figure 3.11
Press Enter to continue.
12.The tool checks the disk and file systems. If the check fails, you’ll see a report of the problems found, which will have to be resolved before you can continue. See “Checking the Disk” on page 11-10 for more information.
If no problems are found, the tool automatically continues to the next check.
Note: The screen may go blank for 20–30 seconds before the disk check displays the first notice.
Live Option 1: Upgrade PAN Manager (cont.)
Check Step
3-8 For Authorized Service Personnel ONLY Confidential
Live Option 1: Upgrade PAN Manager
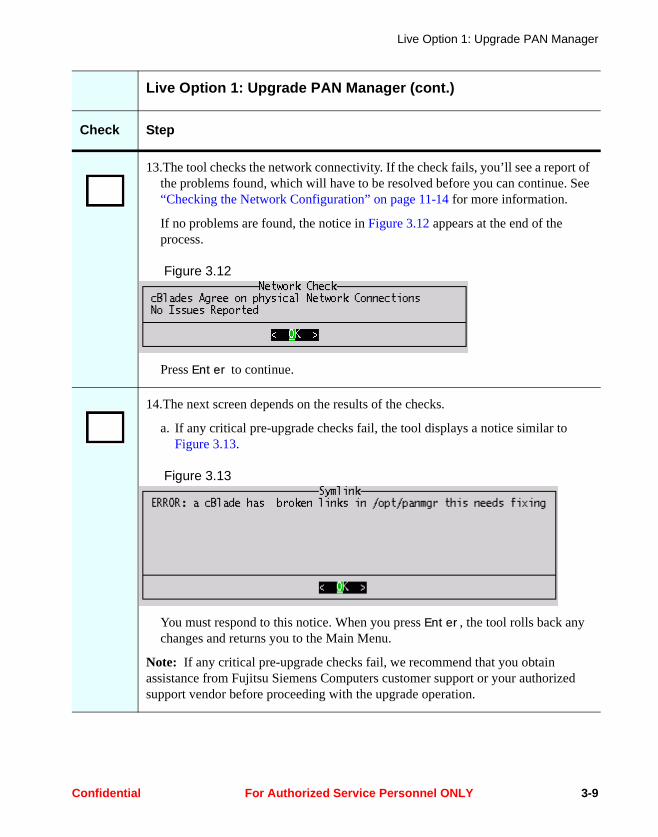
13.The tool checks the network connectivity. If the check fails, you’ll see a report of the problems found, which will have to be resolved before you can continue. See “Checking the Network Configuration” on page 11-14 for more information.
If no problems are found, the notice in Figure 3.12 appears at the end of the process.
Figure 3.12
Press Enter to continue.
14.The next screen depends on the results of the checks.
a. If any critical pre-upgrade checks fail, the tool displays a notice similar to Figure 3.13.
Figure 3.13
You must respond to this notice. When you press Enter, the tool rolls back any changes and returns you to the Main Menu.
Note: If any critical pre-upgrade checks fail, we recommend that you obtain assistance from Fujitsu Siemens Computers customer support or your authorized support vendor before proceeding with the upgrade operation.
Live Option 1: Upgrade PAN Manager (cont.)
Check Step
Confidential For Authorized Service Personnel ONLY 3-9
DVD Toolkit Guide
At this point, the action depends on the upgrade you selected. For the remainder of the description, proceed to one of the following sections:
• “Upgrading to PAN Manager 5.2.0” on page 3-11
• “Upgrading to PAN Manager 5.1.1” on page 3-26
b. If any non-critical pre-upgrade checks fail, the tool will warn you and give you the option to continue in spite of the condition. The warning may appear during the diagnostic operation, or it may appear here, in the diagnostic summary. In either case, if you accept the warning and decide to proceed, the tool will advance to the next step and begin the actual upgrade process.
Otherwise, if you decide not to proceed, the tool will roll back any changes and return you to the Main Menu.
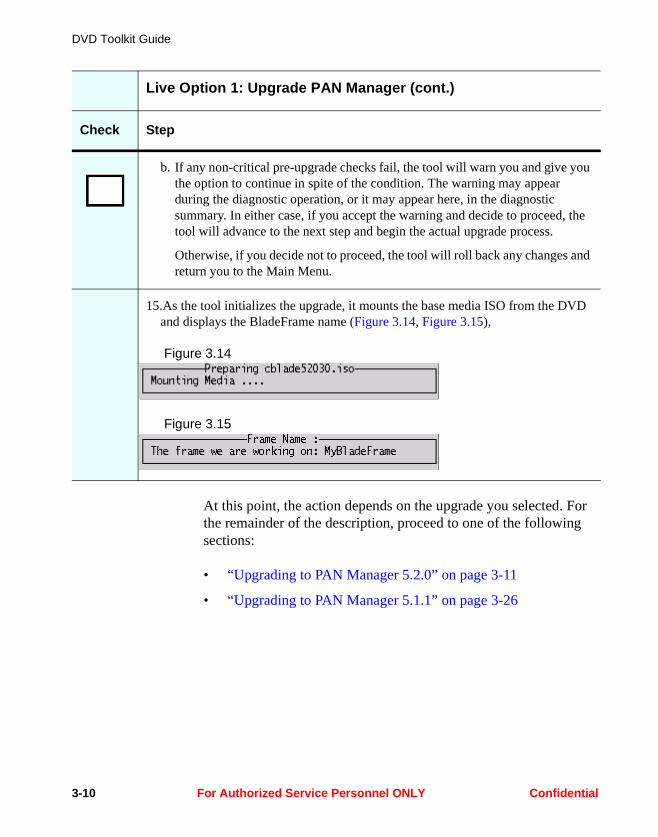
15.As the tool initializes the upgrade, it mounts the base media ISO from the DVD and displays the BladeFrame name (Figure 3.14, Figure 3.15),
Figure 3.14
Figure 3.15
Live Option 1: Upgrade PAN Manager (cont.)
Check Step
3-10 For Authorized Service Personnel ONLY Confidential
Live Option 1: Upgrade PAN Manager
Upgrading to PAN Manager 5.2.0
Note the following significant features about the upgrade to 5.2.0:
• This version of the toolkit does not include a patch for 5.2.0, so you will not be given the option to install a patch as part of the upgrade process.
• The tool performs the PAN Manager upgrade before the first reboot on each cBlade. The kernel and remaining utility upgrades occur after the first reboot on each blade.
• The tool detects the current revision of the HBA firmware. If this is older than the required 1_52 revision, it will automatically flash the HBAs, which will require an additional reboot.
To illustrate the details, the procedure below describes an upgrade from 5.1.1 to 5.2.0.
Confidential For Authorized Service Personnel ONLY 3-11
DVD Toolkit Guide
Upgrading to PAN Manager 5.2.0
Check Step
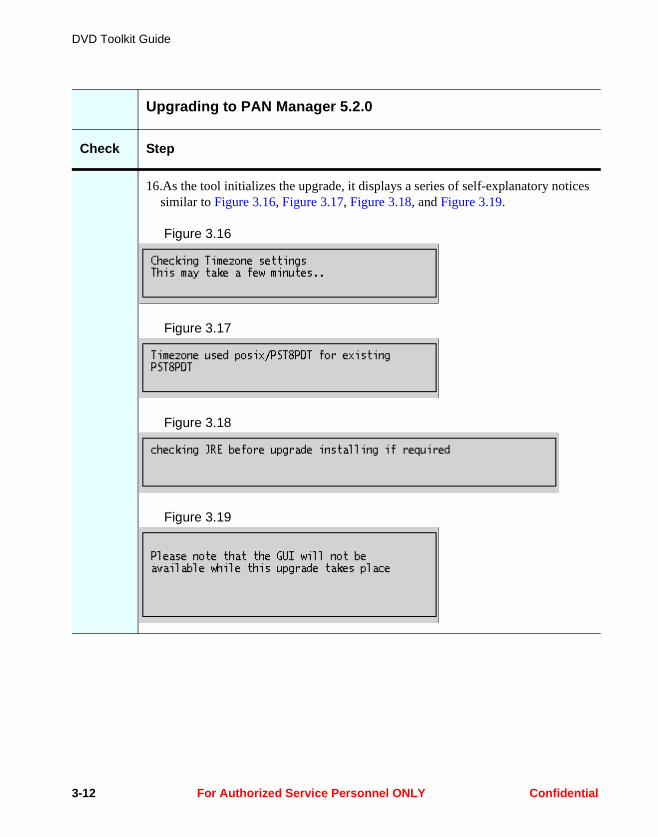
16.As the tool initializes the upgrade, it displays a series of self-explanatory notices similar to Figure 3.16, Figure 3.17, Figure 3.18, and Figure 3.19.
Figure 3.16
Figure 3.17
Figure 3.18
Figure 3.19
3-12 For Authorized Service Personnel ONLY Confidential
Live Option 1: Upgrade PAN Manager
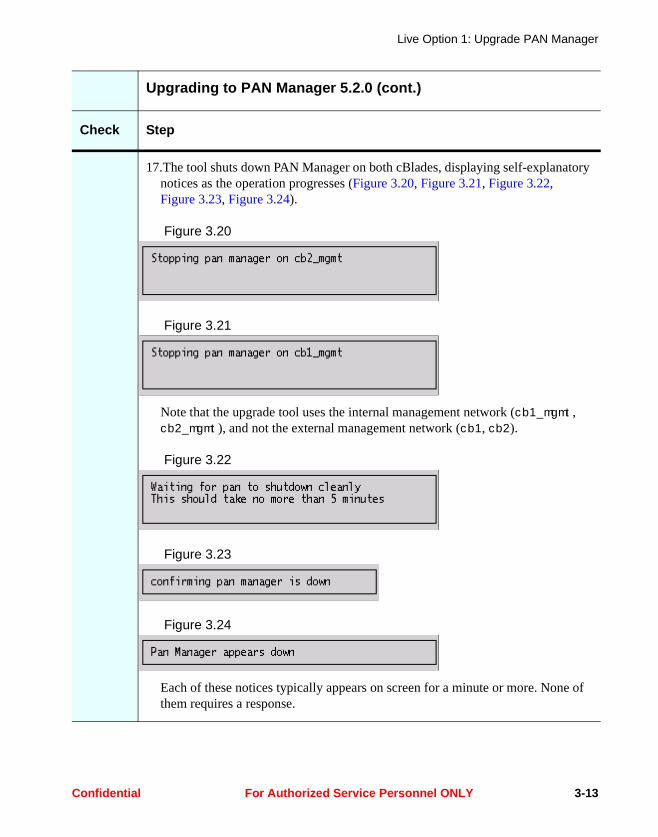
17.The tool shuts down PAN Manager on both cBlades, displaying self-explanatory notices as the operation progresses (Figure 3.20, Figure 3.21, Figure 3.22, Figure 3.23, Figure 3.24).
Figure 3.20
Figure 3.21
Note that the upgrade tool uses the internal management network (cb1_mgmt, cb2_mgmt), and not the external management network (cb1, cb2).
Figure 3.22
Figure 3.23
Figure 3.24
Each of these notices typically appears on screen for a minute or more. None of them requires a response.
Upgrading to PAN Manager 5.2.0 (cont.)
Check Step
Confidential For Authorized Service Personnel ONLY 3-13

DVD Toolkit Guide
18. The PAN Manager upgrade begins only after it’s safely shut down everywhere.
a. PAN Manager components on the remote cBlade are upgraded first (Figure 3.25, Figure 3.26).
Figure 3.25
Figure 3.26
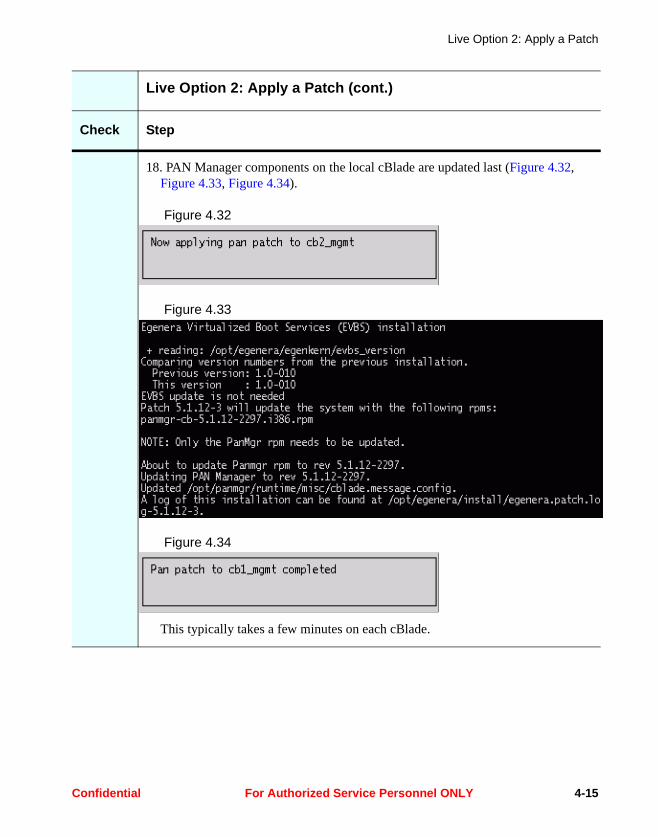
b. PAN Manager components on the local cBlade are upgraded last (Figure 3.27, Figure 3.28).
Figure 3.27
Figure 3.28
This typically takes a few minutes on each cBlade.
Note: You can ignore the line that begins, “To Complete upgrade, boot up from DVD....” The tool performs this automatically later in the procedure.
Upgrading to PAN Manager 5.2.0 (cont.)
Check Step
3-14 For Authorized Service Personnel ONLY Confidential
Live Option 1: Upgrade PAN Manager
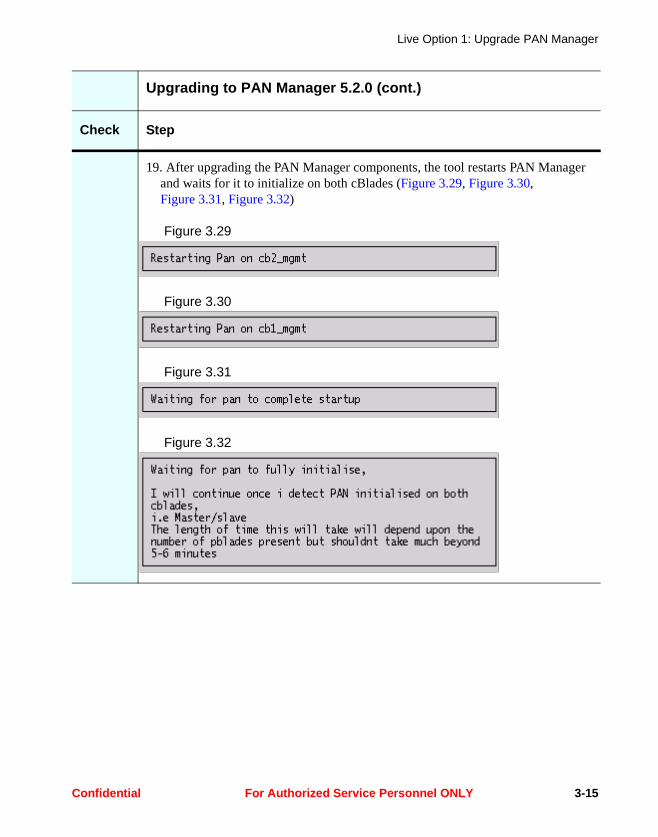
19. After upgrading the PAN Manager components, the tool restarts PAN Manager and waits for it to initialize on both cBlades (Figure 3.29, Figure 3.30, Figure 3.31, Figure 3.32)
Figure 3.29
Figure 3.30
Figure 3.31
Figure 3.32
Upgrading to PAN Manager 5.2.0 (cont.)
Check Step
Confidential For Authorized Service Personnel ONLY 3-15
DVD Toolkit Guide
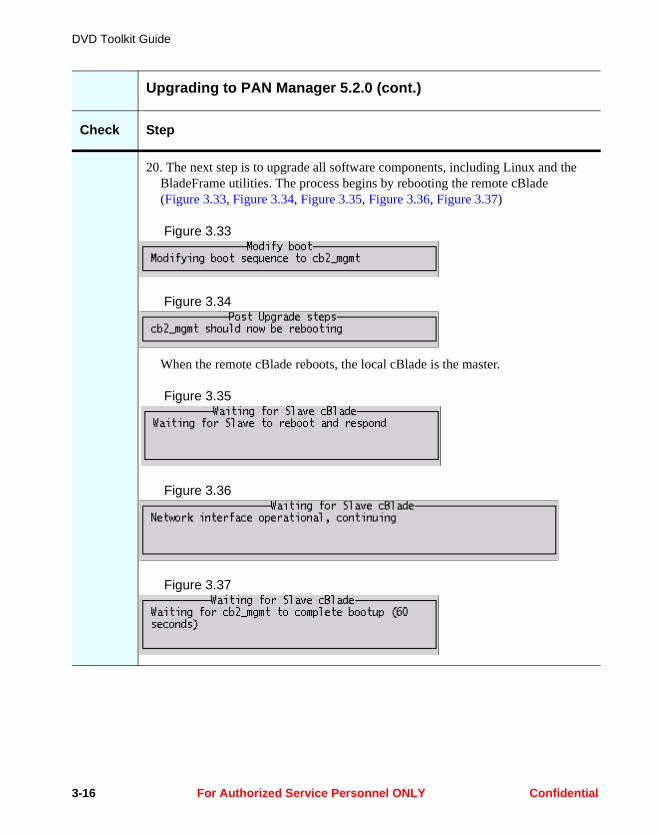
20. The next step is to upgrade all software components, including Linux and the BladeFrame utilities. The process begins by rebooting the remote cBlade (Figure 3.33, Figure 3.34, Figure 3.35, Figure 3.36, Figure 3.37)
Figure 3.33
Figure 3.34
When the remote cBlade reboots, the local cBlade is the master.
Figure 3.35
Figure 3.36
Figure 3.37
Upgrading to PAN Manager 5.2.0 (cont.)
Check Step
3-16 For Authorized Service Personnel ONLY Confidential
Live Option 1: Upgrade PAN Manager
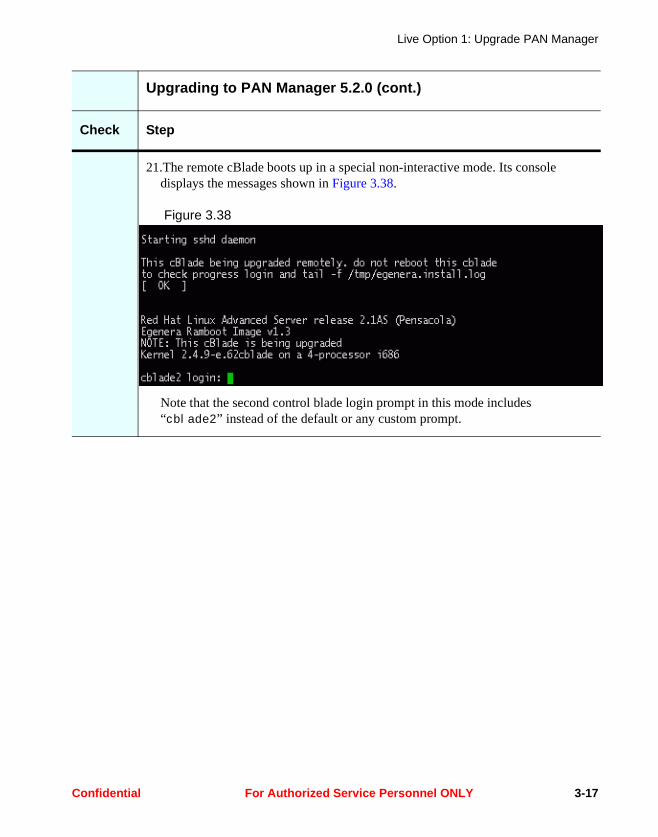
21.The remote cBlade boots up in a special non-interactive mode. Its console displays the messages shown in Figure 3.38.
Figure 3.38
Note that the second control blade login prompt in this mode includes “cblade2” instead of the default or any custom prompt.
Upgrading to PAN Manager 5.2.0 (cont.)
Check Step
Confidential For Authorized Service Personnel ONLY 3-17
DVD Toolkit Guide
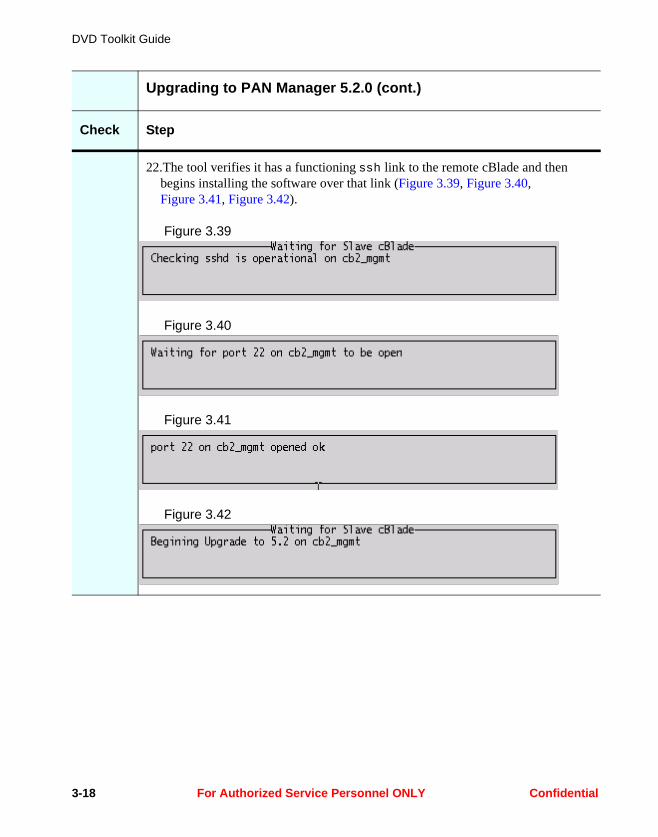
22.The tool verifies it has a functioning ssh link to the remote cBlade and then begins installing the software over that link (Figure 3.39, Figure 3.40, Figure 3.41, Figure 3.42).
Figure 3.39
Figure 3.40
Figure 3.41
Figure 3.42
Upgrading to PAN Manager 5.2.0 (cont.)
Check Step
3-18 For Authorized Service Personnel ONLY Confidential

Live Option 1: Upgrade PAN Manager
23.The remote upgrade progress is logged to the local screen. The first phase of the upgrade makes major changes to the file systems (Figure 3.43).
Figure 3.43
Note that the tool begins the upgrade with the following operations:
a. It backs up the current PAN configuration in the /crash_dumps/backup_data_files directory. Typically, the data backup occupies about 6 MB.
b. It unmounts all /dev/hda file systems. This also unmounts any mount points in these file systems, e.g., /mnt/cdrom.
c. It re-creates the /dev/hda2, /dev/hda5, and /dev/hda6 (/boot, root, and /opt, respectively) file systems. This deletes everything in those file systems.
Important: You are responsible for the backup and re-installation of all third-party applications and configuration data on the control blades. The tool saves and restores all critical OS and PAN Manager configuration information, but it makes no attempt to detect or save anything else.
Note: The tool does not erase the /crash_dumps directory (/dev/hda12). However, make sure this file system has adequate space before you store any third-party data there.
Upgrading to PAN Manager 5.2.0 (cont.)
Check Step
Confidential For Authorized Service Personnel ONLY 3-19
DVD Toolkit Guide
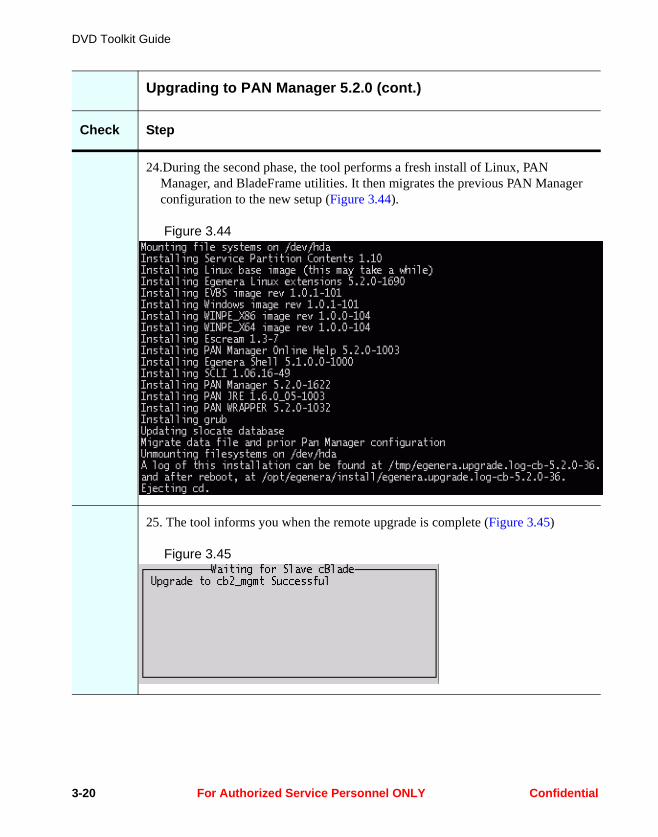
24.During the second phase, the tool performs a fresh install of Linux, PAN Manager, and BladeFrame utilities. It then migrates the previous PAN Manager configuration to the new setup (Figure 3.44).
Figure 3.44
25. The tool informs you when the remote upgrade is complete (Figure 3.45)
Figure 3.45
Upgrading to PAN Manager 5.2.0 (cont.)
Check Step
3-20 For Authorized Service Personnel ONLY Confidential

Live Option 1: Upgrade PAN Manager
26.Before rebooting the remote cBlade, the tool checks its firmware (Figure 3.46).
Figure 3.46
PAN Manager 5.2.0 requires HBA firmware version 1_52. If the tool detects an older version on the remote cBlade, it will insert an extra reboot to perform an update (Figure 3.47).
Figure 3.47
27.As the remote cBlade reboots, the tool waits for it to come back up and initialize its PAN (Figure 3.48).
Figure 3.48
The tool notifies you when it contacts the remote PAN Manager (Figure 3.49).
Figure 3.49
This process may take about 5 minutes.
Upgrading to PAN Manager 5.2.0 (cont.)
Check Step
Confidential For Authorized Service Personnel ONLY 3-21

DVD Toolkit Guide
28.The tool checks the status of the remote cBlade a final time (Figure 3.50, Figure 3.51, Figure 3.52)
Figure 3.50
Figure 3.51
Figure 3.52
If the final checks are successful, the tool reboots the local cBlade without further notification.
At this point, the remote cBlade takes over the master role.
Upgrading to PAN Manager 5.2.0 (cont.)
Check Step
3-22 For Authorized Service Personnel ONLY Confidential

Live Option 1: Upgrade PAN Manager
29.Finally, the local cBlade reboots itself. Like the remote cBlade, it initially enters a non-interactive mode, and the messages in Figure 3.53 appear on the local console.
Figure 3.53
Note that the upgrade script attempts to remount the DVD before it upgrades the local cBlade.
Upgrading to PAN Manager 5.2.0 (cont.)
Check Step
Confidential For Authorized Service Personnel ONLY 3-23
DVD Toolkit Guide
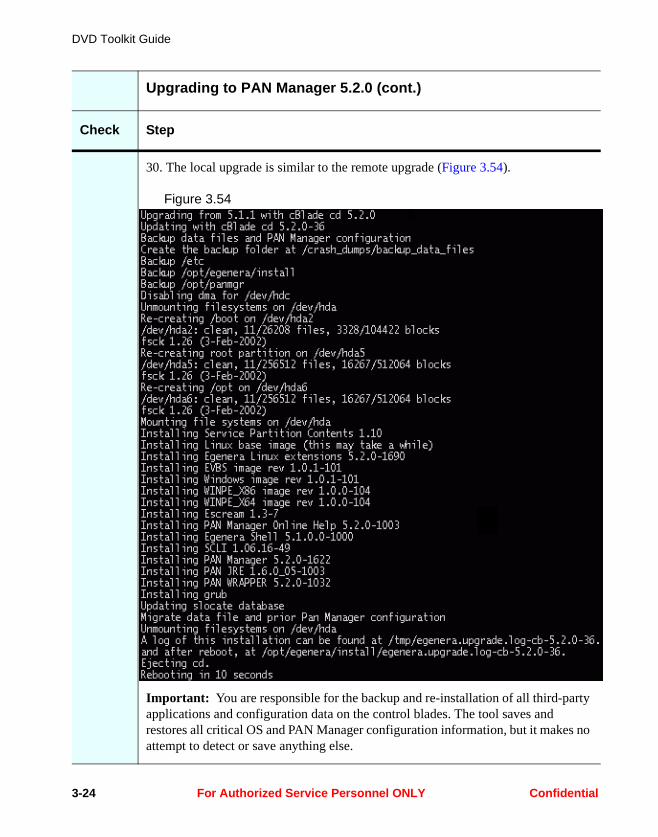
30. The local upgrade is similar to the remote upgrade (Figure 3.54).
Figure 3.54
Important: You are responsible for the backup and re-installation of all third-party applications and configuration data on the control blades. The tool saves and restores all critical OS and PAN Manager configuration information, but it makes no attempt to detect or save anything else.
Upgrading to PAN Manager 5.2.0 (cont.)
Check Step
3-24 For Authorized Service Personnel ONLY Confidential

Live Option 1: Upgrade PAN Manager
After the final reboot of the local cBlade, the upgrade is complete.
31.Be fore the reboot, the tool probed the local HBA firmware to determine the installed version. If it found an older revision than the required 1_52, an additional reboot to flash the HBAs will occur at this point.
Upgrading to PAN Manager 5.2.0 (cont.)
Check Step
Confidential For Authorized Service Personnel ONLY 3-25
DVD Toolkit Guide
Upgrading to PAN Manager 5.1.1
Note the following significant features about the upgrade to PAN Manager 5.1.1:
• After the upgrade operation, you can specify a patch.
• The tool reboots both control blades only once.
• The upgrade and patch operations all occur before the first reboot.
To illustrate the process, the following procedure describes an upgrade from 4.0.1.5 to 5.1.1
3-26 For Authorized Service Personnel ONLY Confidential
Live Option 1: Upgrade PAN Manager
Upgrading to PAN Manager 5.1.1
Check Step
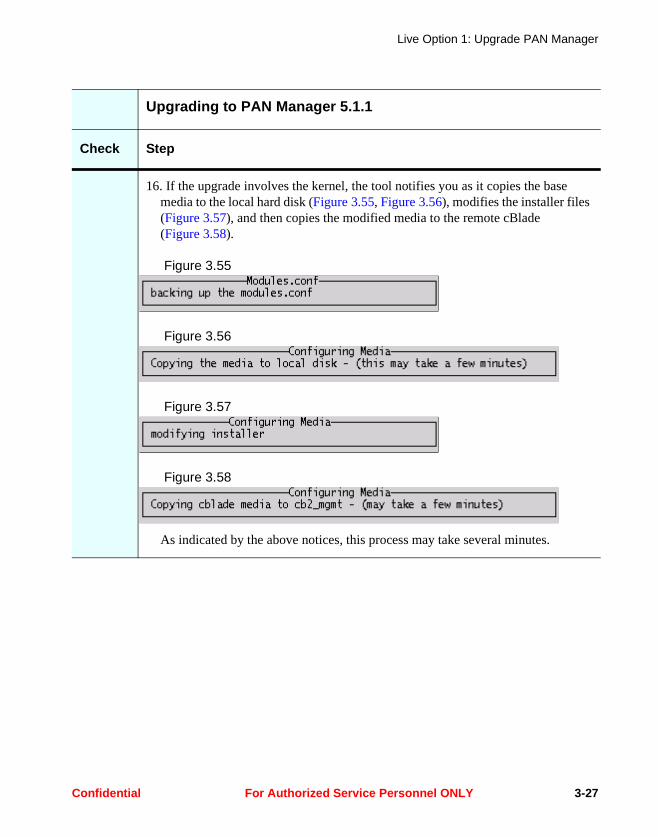
16. If the upgrade involves the kernel, the tool notifies you as it copies the base media to the local hard disk (Figure 3.55, Figure 3.56), modifies the installer files (Figure 3.57), and then copies the modified media to the remote cBlade (Figure 3.58).
Figure 3.55
Figure 3.56
Figure 3.57
Figure 3.58
As indicated by the above notices, this process may take several minutes.
Confidential For Authorized Service Personnel ONLY 3-27
DVD Toolkit Guide
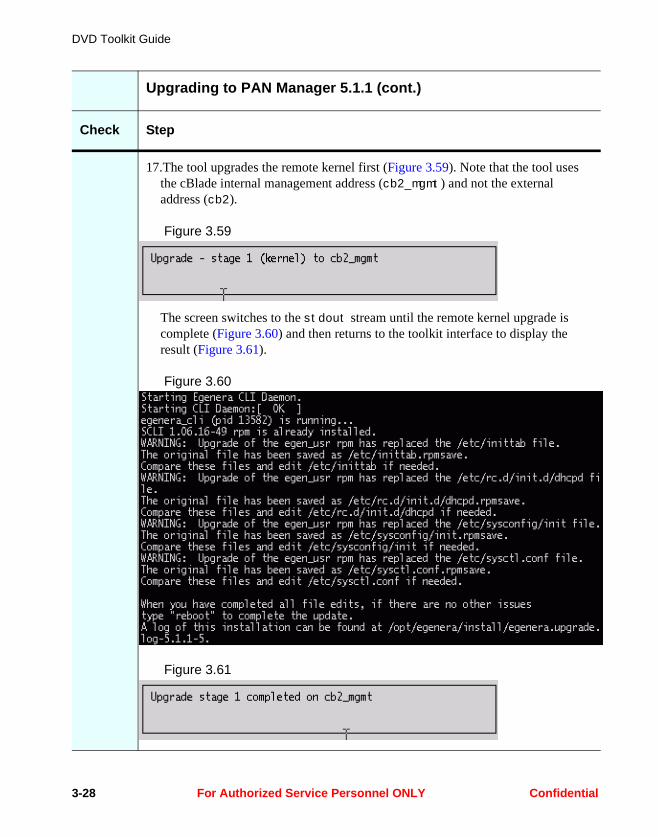
17.The tool upgrades the remote kernel first (Figure 3.59). Note that the tool uses the cBlade internal management address (cb2_mgmt) and not the external address (cb2).
Figure 3.59
The screen switches to the stdout stream until the remote kernel upgrade is complete (Figure 3.60) and then returns to the toolkit interface to display the result (Figure 3.61).
Figure 3.60
Figure 3.61
Upgrading to PAN Manager 5.1.1 (cont.)
Check Step
3-28 For Authorized Service Personnel ONLY Confidential
Live Option 1: Upgrade PAN Manager
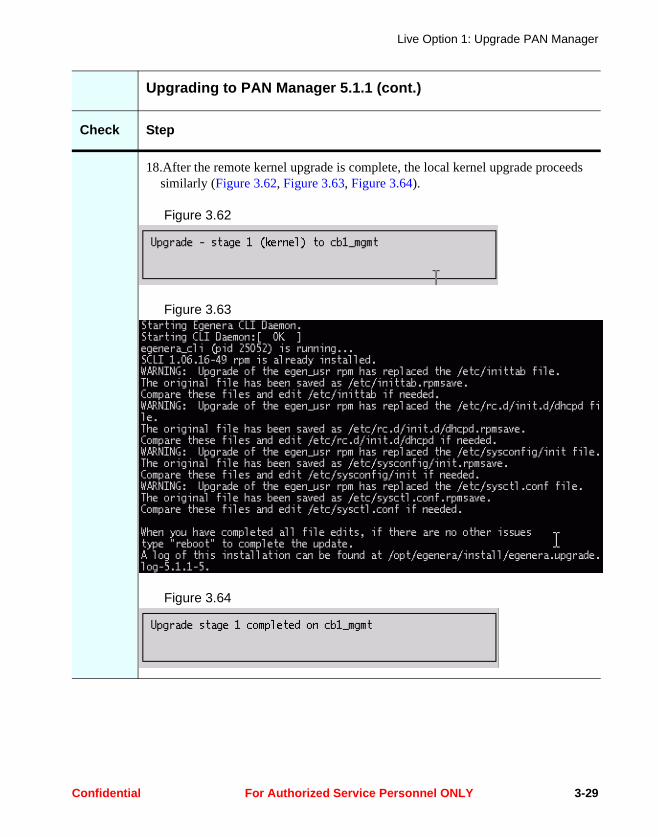
18.After the remote kernel upgrade is complete, the local kernel upgrade proceeds similarly (Figure 3.62, Figure 3.63, Figure 3.64).
Figure 3.62
Figure 3.63
Figure 3.64
Upgrading to PAN Manager 5.1.1 (cont.)
Check Step
Confidential For Authorized Service Personnel ONLY 3-29
DVD Toolkit Guide
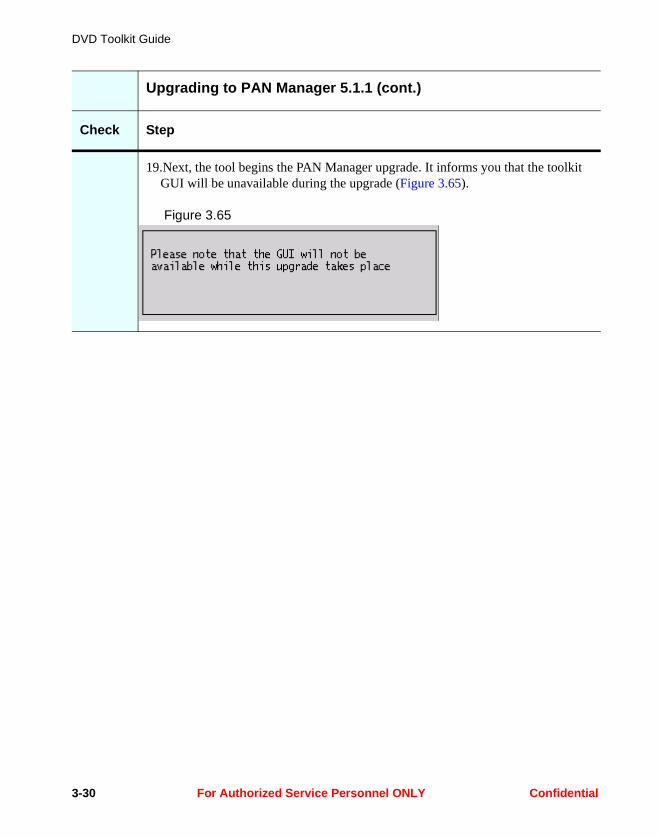
19.Next, the tool begins the PAN Manager upgrade. It informs you that the toolkit GUI will be unavailable during the upgrade (Figure 3.65).
Figure 3.65
Upgrading to PAN Manager 5.1.1 (cont.)
Check Step
3-30 For Authorized Service Personnel ONLY Confidential

Live Option 1: Upgrade PAN Manager
20.The tool shuts down PAN Manager on both cBlades, displaying self-explanatory notices as the operation progresses (Figure 3.66, Figure 3.67, Figure 3.68, Figure 3.69, Figure 3.70).
Figure 3.66
Figure 3.67
Note that the upgrade tool uses the internal management network (cb1_mgmt, cb2_mgmt), and not the external management network (cb1, cb2).
Figure 3.68
Figure 3.69
Figure 3.70
Each of these notices typically appears on screen for a minute or more. None of them requires a response.
Upgrading to PAN Manager 5.1.1 (cont.)
Check Step
Confidential For Authorized Service Personnel ONLY 3-31
DVD Toolkit Guide
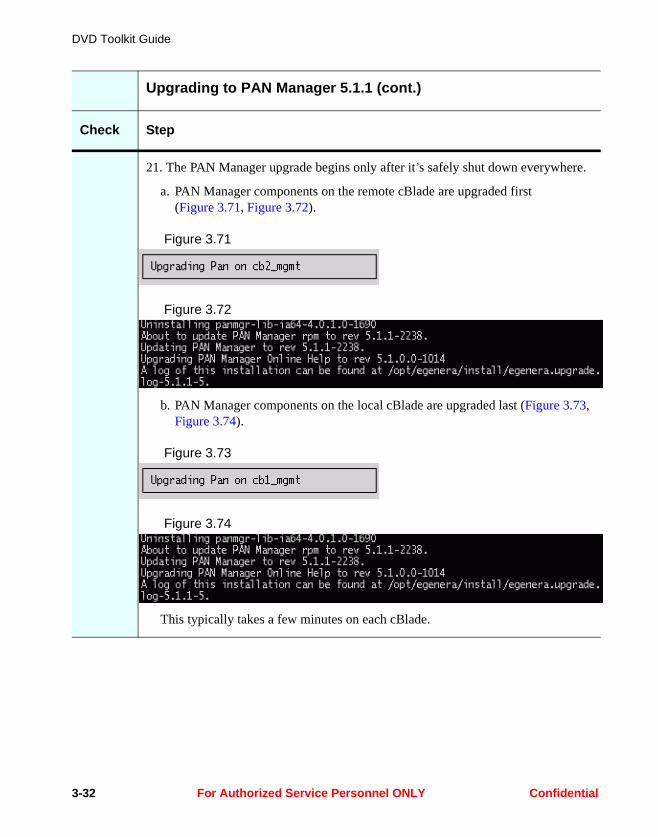
21. The PAN Manager upgrade begins only after it’s safely shut down everywhere.
a. PAN Manager components on the remote cBlade are upgraded first (Figure 3.71, Figure 3.72).
Figure 3.71
Figure 3.72
b. PAN Manager components on the local cBlade are upgraded last (Figure 3.73, Figure 3.74).
Figure 3.73
Figure 3.74
This typically takes a few minutes on each cBlade.
Upgrading to PAN Manager 5.1.1 (cont.)
Check Step
3-32 For Authorized Service Personnel ONLY Confidential
Live Option 1: Upgrade PAN Manager
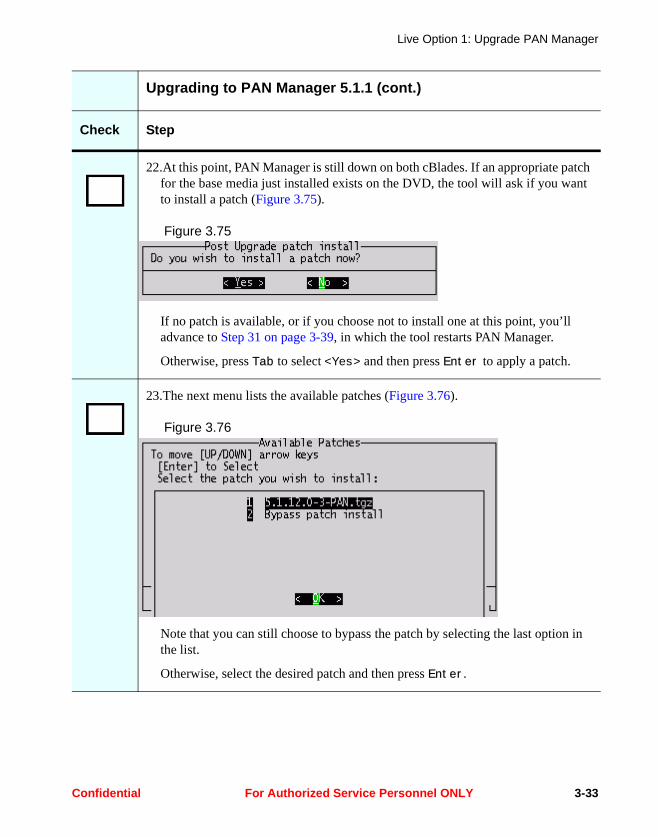
22.At this point, PAN Manager is still down on both cBlades. If an appropriate patch for the base media just installed exists on the DVD, the tool will ask if you want to install a patch (Figure 3.75).
Figure 3.75
If no patch is available, or if you choose not to install one at this point, you’ll advance to Step 31 on page 3-39, in which the tool restarts PAN Manager.
Otherwise, press Tab to select <Yes> and then press Enter to apply a patch.
23.The next menu lists the available patches (Figure 3.76).
Figure 3.76
Note that you can still choose to bypass the patch by selecting the last option in the list.
Otherwise, select the desired patch and then press Enter.
Upgrading to PAN Manager 5.1.1 (cont.)
Check Step
Confidential For Authorized Service Personnel ONLY 3-33
DVD Toolkit Guide
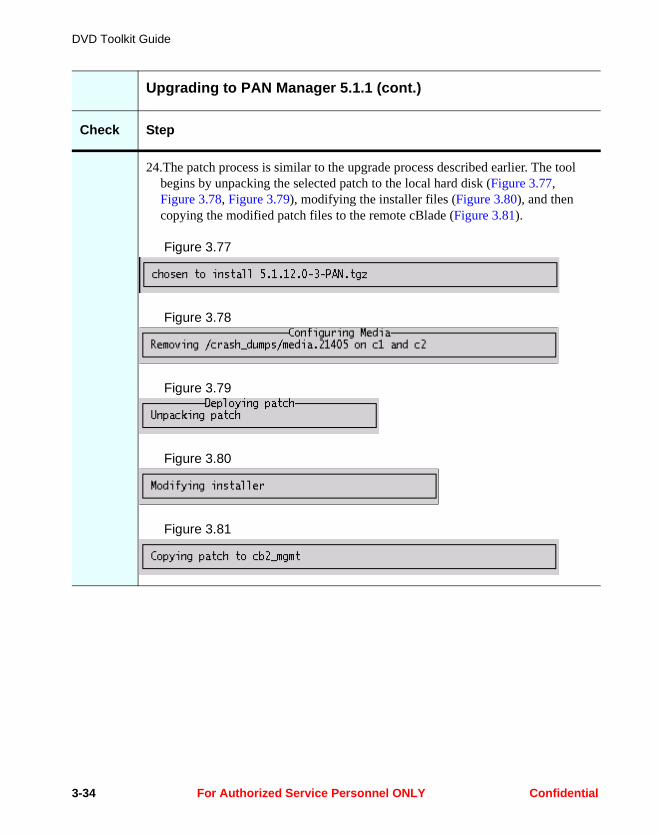
24.The patch process is similar to the upgrade process described earlier. The tool begins by unpacking the selected patch to the local hard disk (Figure 3.77, Figure 3.78, Figure 3.79), modifying the installer files (Figure 3.80), and then copying the modified patch files to the remote cBlade (Figure 3.81).
Figure 3.77
Figure 3.78
Figure 3.79
Figure 3.80
Figure 3.81
Upgrading to PAN Manager 5.1.1 (cont.)
Check Step
3-34 For Authorized Service Personnel ONLY Confidential
Live Option 1: Upgrade PAN Manager
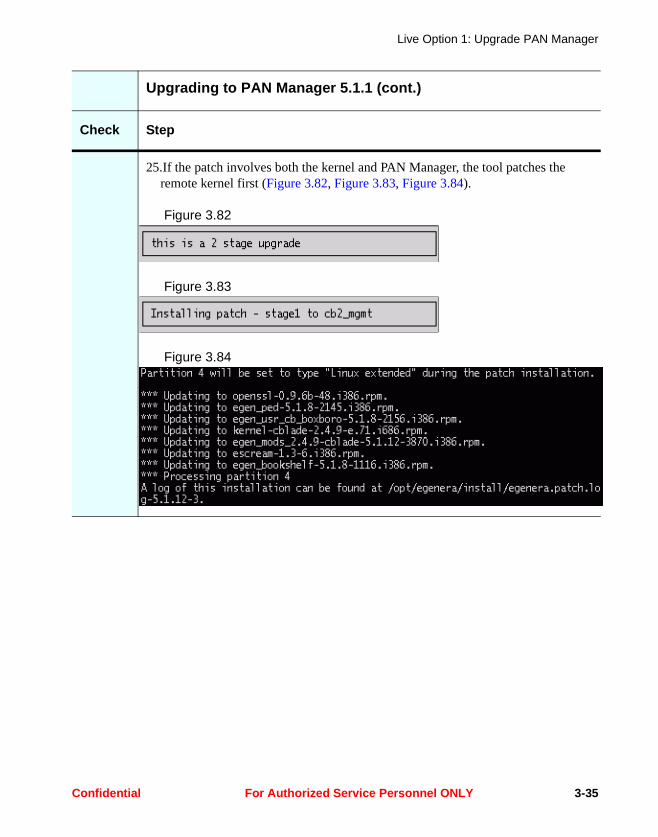
25.If the patch involves both the kernel and PAN Manager, the tool patches the remote kernel first (Figure 3.82, Figure 3.83, Figure 3.84).
Figure 3.82
Figure 3.83
Figure 3.84
Upgrading to PAN Manager 5.1.1 (cont.)
Check Step
Confidential For Authorized Service Personnel ONLY 3-35

DVD Toolkit Guide
26.After the remote kernel patch is complete, the tool patches the local kernel (Figure 3.85, Figure 3.86).
Figure 3.85
Figure 3.86
27.Next, the tool begins the PAN Manager patch (Figure 3.87)
Figure 3.87
Upgrading to PAN Manager 5.1.1 (cont.)
Check Step
3-36 For Authorized Service Personnel ONLY Confidential
Live Option 1: Upgrade PAN Manager
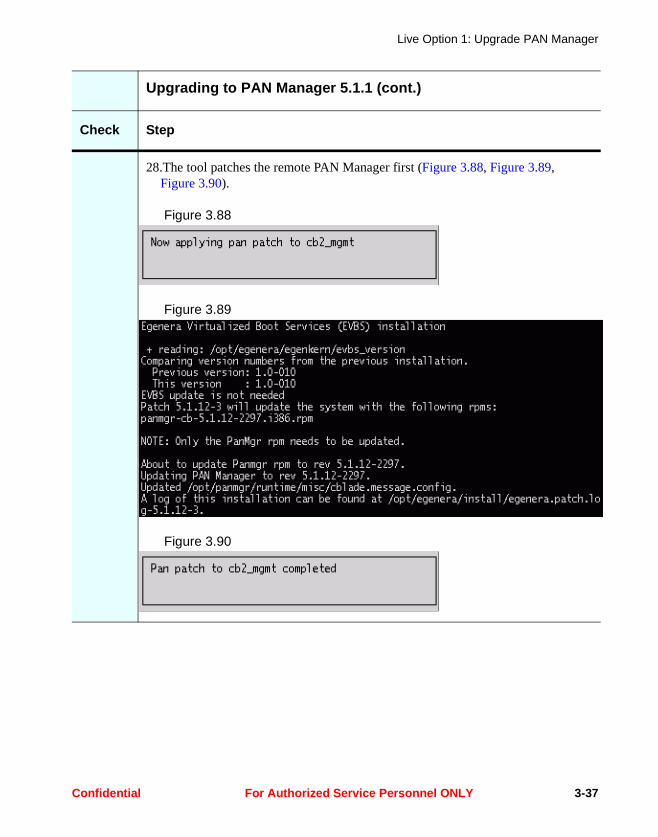
28.The tool patches the remote PAN Manager first (Figure 3.88, Figure 3.89, Figure 3.90).
Figure 3.88
Figure 3.89
Figure 3.90
Upgrading to PAN Manager 5.1.1 (cont.)
Check Step
Confidential For Authorized Service Personnel ONLY 3-37
DVD Toolkit Guide
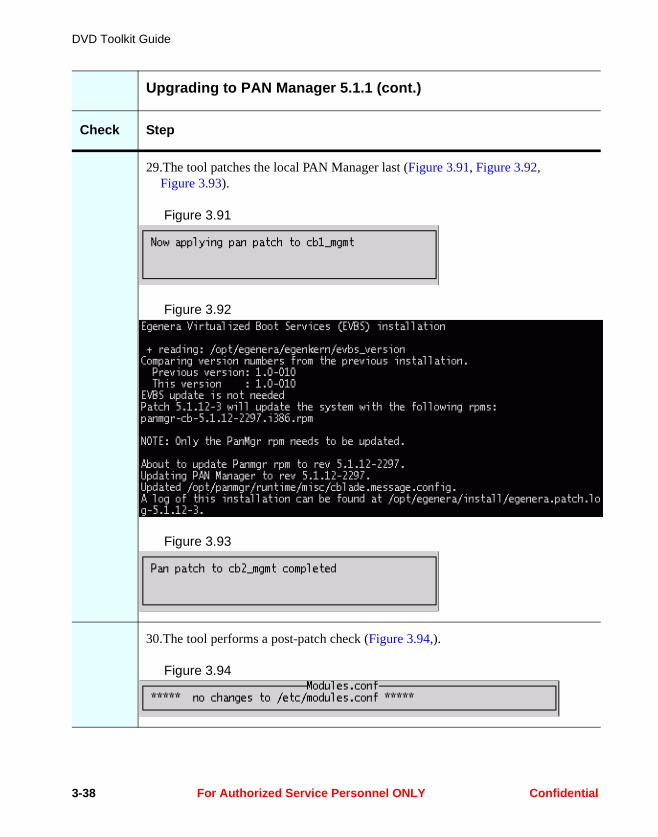
29.The tool patches the local PAN Manager last (Figure 3.91, Figure 3.92, Figure 3.93).
Figure 3.91
Figure 3.92
Figure 3.93
30.The tool performs a post-patch check (Figure 3.94,).
Figure 3.94
Upgrading to PAN Manager 5.1.1 (cont.)
Check Step
3-38 For Authorized Service Personnel ONLY Confidential

Live Option 1: Upgrade PAN Manager
31. After all upgrade and patch procedures are complete, the tool restarts PAN Manager and waits for it to initialize on both cBlades (Figure 3.95, Figure 3.96, Figure 3.97, Figure 3.98, Figure 3.99)
Figure 3.95
Figure 3.96
Figure 3.97
Figure 3.98
Figure 3.99
Note that the cBlades have not yet been rebooted. Ensuring that PAN Manager will restart successfully on both cBlades at this point avoids a BladeFrame outage when the tool performs a rolling reboot.
Upgrading to PAN Manager 5.1.1 (cont.)
Check Step
Confidential For Authorized Service Personnel ONLY 3-39
DVD Toolkit Guide
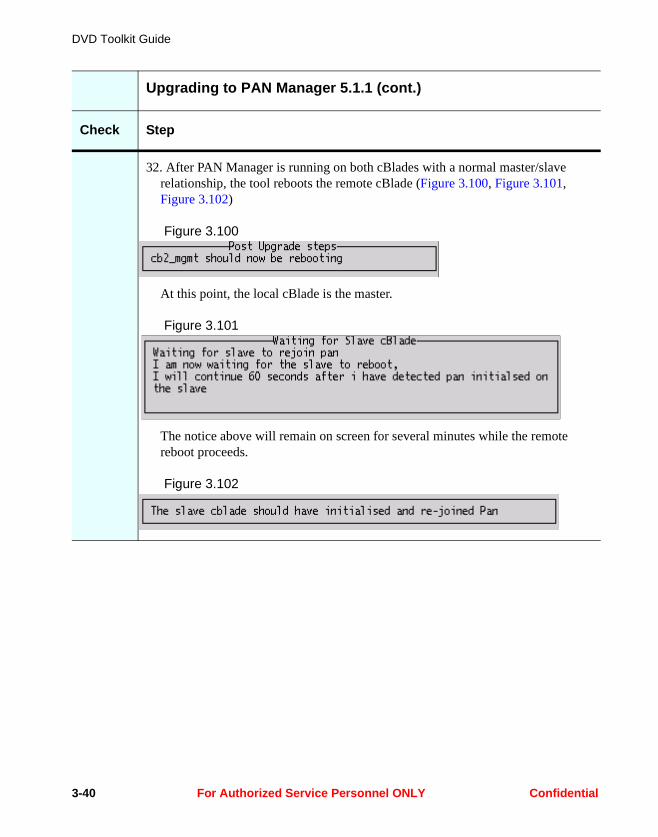
32. After PAN Manager is running on both cBlades with a normal master/slave relationship, the tool reboots the remote cBlade (Figure 3.100, Figure 3.101, Figure 3.102)
Figure 3.100
At this point, the local cBlade is the master.
Figure 3.101
The notice above will remain on screen for several minutes while the remote reboot proceeds.
Figure 3.102
Upgrading to PAN Manager 5.1.1 (cont.)
Check Step
3-40 For Authorized Service Personnel ONLY Confidential
Live Option 1: Upgrade PAN Manager
After the local cBlade reboots, the upgrade is complete.
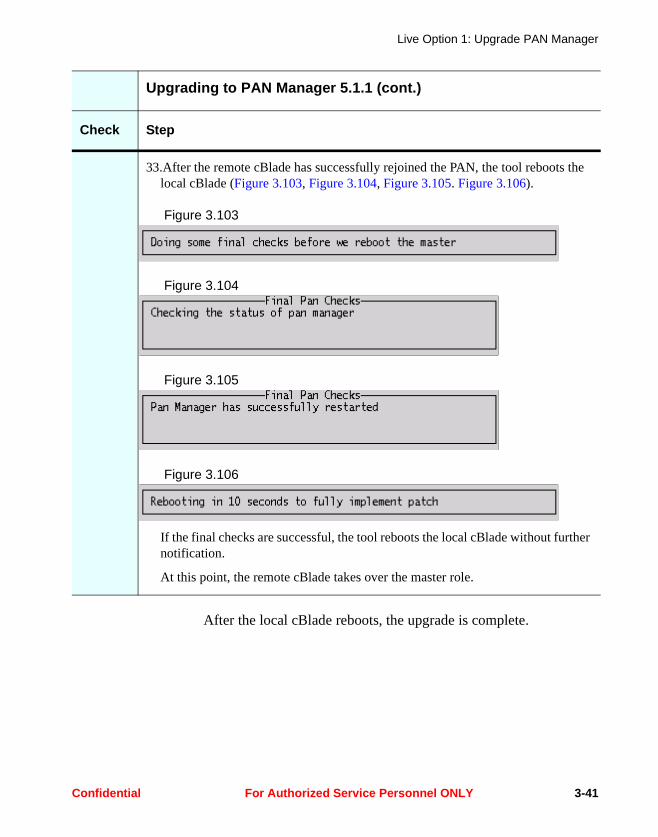
33.After the remote cBlade has successfully rejoined the PAN, the tool reboots the local cBlade (Figure 3.103, Figure 3.104, Figure 3.105. Figure 3.106).
Figure 3.103
Figure 3.104
Figure 3.105
Figure 3.106
If the final checks are successful, the tool reboots the local cBlade without further notification.
At this point, the remote cBlade takes over the master role.
Upgrading to PAN Manager 5.1.1 (cont.)
Check Step
Confidential For Authorized Service Personnel ONLY 3-41

DVD Toolkit Guide
3-42 For Authorized Service Personnel ONLY Confidential
Chapter 4Live Option 2: Apply a
Patch
This option allows you patch the currently installed PAN Manager according to the following table:
Important: Execute this procedure on only one cBlade. The toolkit automatically applies the patch to both the local cBlade and remote cBlade. For details about the procedure, see “Applying a Patch” on page 18-14.
To illustrate some of the details, we’ll describe the procedure to patch PAN Manager 5.1.1 on a BF200 BladeFrame.
PAN Manager Family Available Patch
4.0.1 4.0.1.10
5.0.0 5.0.0.6
5.1.0 5.1.12.0
5.1.1 5.1.12.0
Confidential For Authorized Service Personnel ONLY 4-1
DVD Toolkit Guide
Live Option 2: Apply a Patch
Check Step
1. Begin by selecting option 2 from the Main Menu (Figure 4.1).
Figure 4.1
2. The tool briefly notifies you as it checks for previous patches (Figure 4.1).
Figure 4.2
This typically takes about a minute.
4-2 For Authorized Service Personnel ONLY Confidential
Live Option 2: Apply a Patch
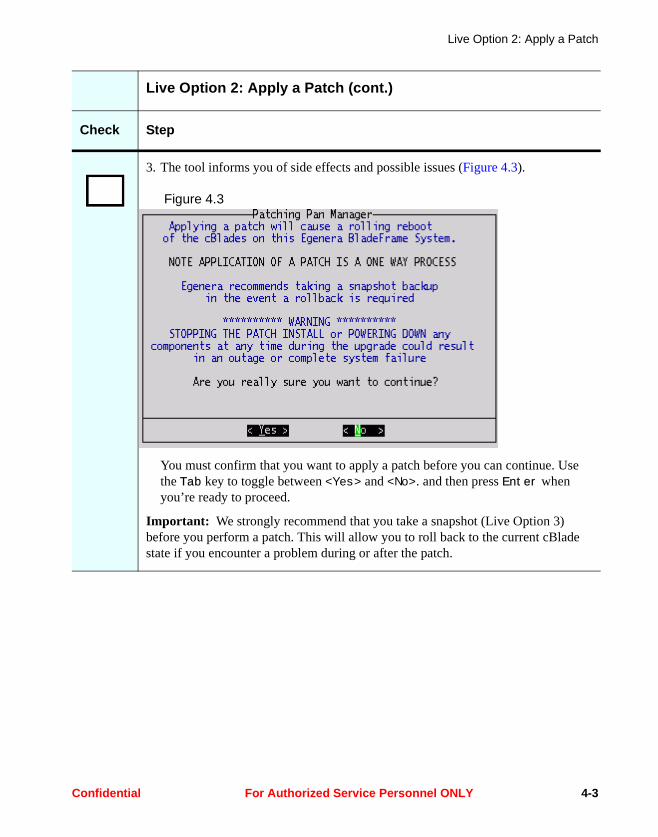
3. The tool informs you of side effects and possible issues (Figure 4.3).
Figure 4.3
You must confirm that you want to apply a patch before you can continue. Use the Tab key to toggle between <Yes> and <No>. and then press Enter when you’re ready to proceed.
Important: We strongly recommend that you take a snapshot (Live Option 3) before you perform a patch. This will allow you to roll back to the current cBlade state if you encounter a problem during or after the patch.
Live Option 2: Apply a Patch (cont.)
Check Step
Confidential For Authorized Service Personnel ONLY 4-3

DVD Toolkit Guide
4. Depending on the PAN Manager version (and subsequent patches) installed, there may be no appropriate patches on the DVD for your current configuration (Figure 4.5).
Figure 4.4
In this case, use option 1 to return to the Main Menu.
You can use option 2 if you want to select a patch file from an alternate location on the cBlade. See “Selecting a Patch from an Alternate Location” on page 4-18 for a description of the navigation procedure.
Live Option 2: Apply a Patch (cont.)
Check Step
4-4 For Authorized Service Personnel ONLY Confidential
Live Option 2: Apply a Patch
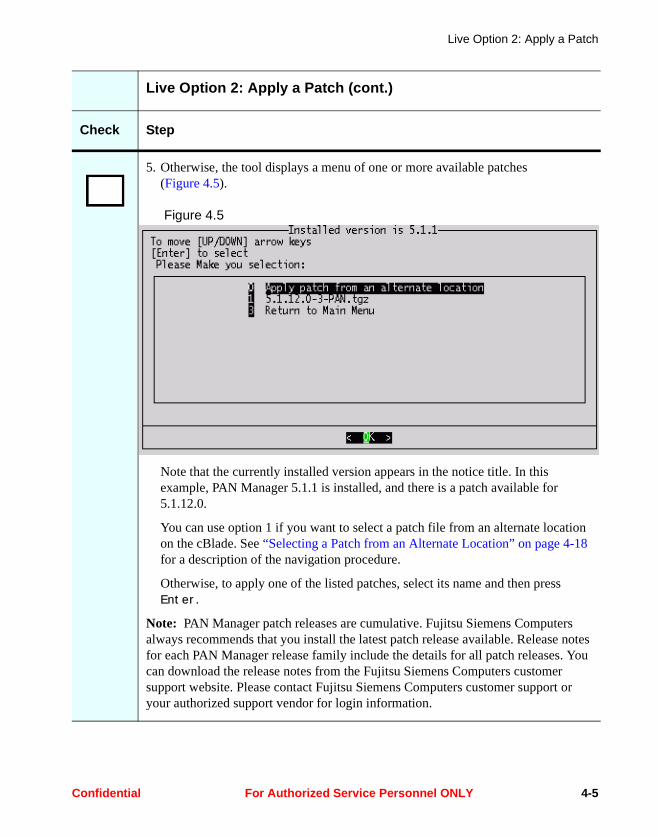
5. Otherwise, the tool displays a menu of one or more available patches (Figure 4.5).
Figure 4.5
Note that the currently installed version appears in the notice title. In this example, PAN Manager 5.1.1 is installed, and there is a patch available for 5.1.12.0.
You can use option 1 if you want to select a patch file from an alternate location on the cBlade. See “Selecting a Patch from an Alternate Location” on page 4-18 for a description of the navigation procedure.
Otherwise, to apply one of the listed patches, select its name and then press Enter.
Note: PAN Manager patch releases are cumulative. Fujitsu Siemens Computers always recommends that you install the latest patch release available. Release notes for each PAN Manager release family include the details for all patch releases. You can download the release notes from the Fujitsu Siemens Computers customer support website. Please contact Fujitsu Siemens Computers customer support or your authorized support vendor for login information.
Live Option 2: Apply a Patch (cont.)
Check Step
Confidential For Authorized Service Personnel ONLY 4-5

DVD Toolkit Guide
During the patch procedure, each cBlade will be taken out of service to apply the changes, leaving the other cBlade to control the PAN. Therefore, to detect misconfigurations that could cause an outage or performance loss, the tool performs a series of pre-patch checks.
6. First, the tool checks for a working cBlade master/slave relationship. If the check fails, you’ll see a report of the problems found. See “Checking PAN Manager” on page 11-2 for more information.
If PAN Manager is running normally, you’ll see the notice in Figure 4.6.
Figure 4.6
This notice appears only for a few seconds, and then the tool automatically continues to the next check.
7. The tool checks the SAN storage presentation. If the check fails, you’ll see a report of the problems found, which will have to be resolved before you can continue. See “Checking the SAN Setup” on page 11-5 for more information.
If no problems are found, the notice in Figure 4.7 appears at the end of the process.
Figure 4.7
Press Enter to continue.
Live Option 2: Apply a Patch (cont.)
Check Step
4-6 For Authorized Service Personnel ONLY Confidential
Live Option 2: Apply a Patch
8. The tool checks the disk and file systems. If the check fails, you’ll see a report of the problems found, which will have to be resolved before you can continue. See “Checking the Disk” on page 11-10 for more information.
If no problems are found, the tool automatically continues to the next check.
Note: The screen may go blank for 20–30 seconds before the disk check displays the first notice.
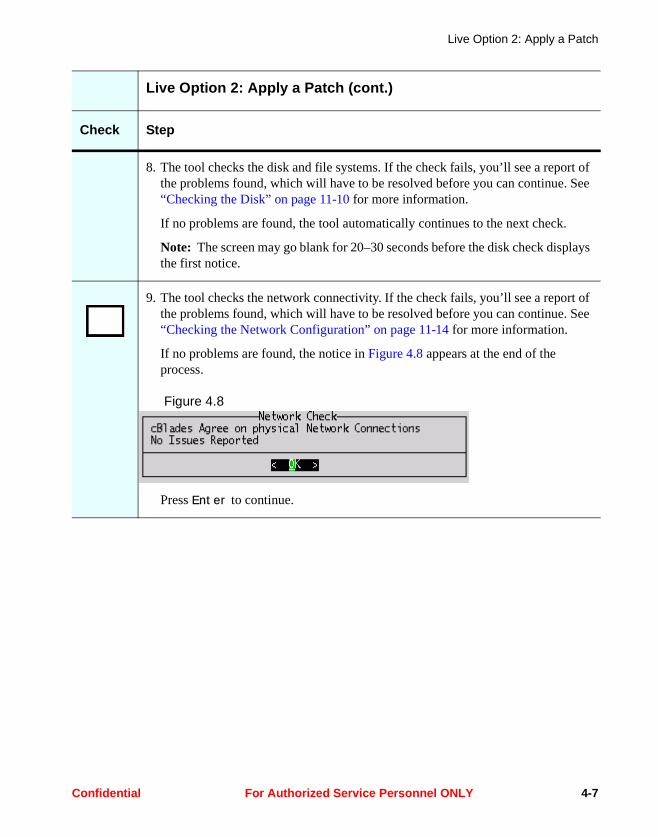
9. The tool checks the network connectivity. If the check fails, you’ll see a report of the problems found, which will have to be resolved before you can continue. See “Checking the Network Configuration” on page 11-14 for more information.
If no problems are found, the notice in Figure 4.8 appears at the end of the process.
Figure 4.8
Press Enter to continue.
Live Option 2: Apply a Patch (cont.)
Check Step
Confidential For Authorized Service Personnel ONLY 4-7
DVD Toolkit Guide
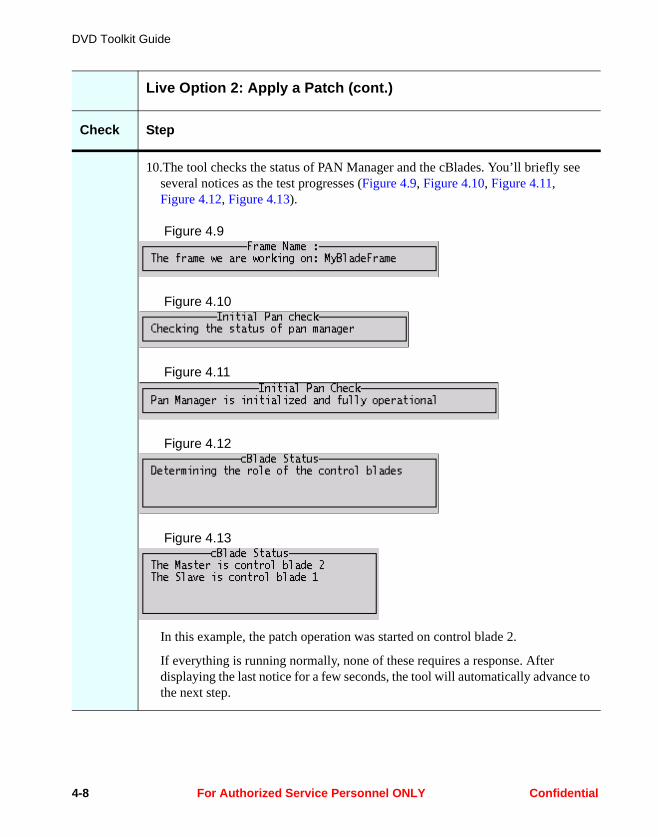
10.The tool checks the status of PAN Manager and the cBlades. You’ll briefly see several notices as the test progresses (Figure 4.9, Figure 4.10, Figure 4.11, Figure 4.12, Figure 4.13).
Figure 4.9
Figure 4.10
Figure 4.11
Figure 4.12
Figure 4.13
In this example, the patch operation was started on control blade 2.
If everything is running normally, none of these requires a response. After displaying the last notice for a few seconds, the tool will automatically advance to the next step.
Live Option 2: Apply a Patch (cont.)
Check Step
4-8 For Authorized Service Personnel ONLY Confidential
Live Option 2: Apply a Patch
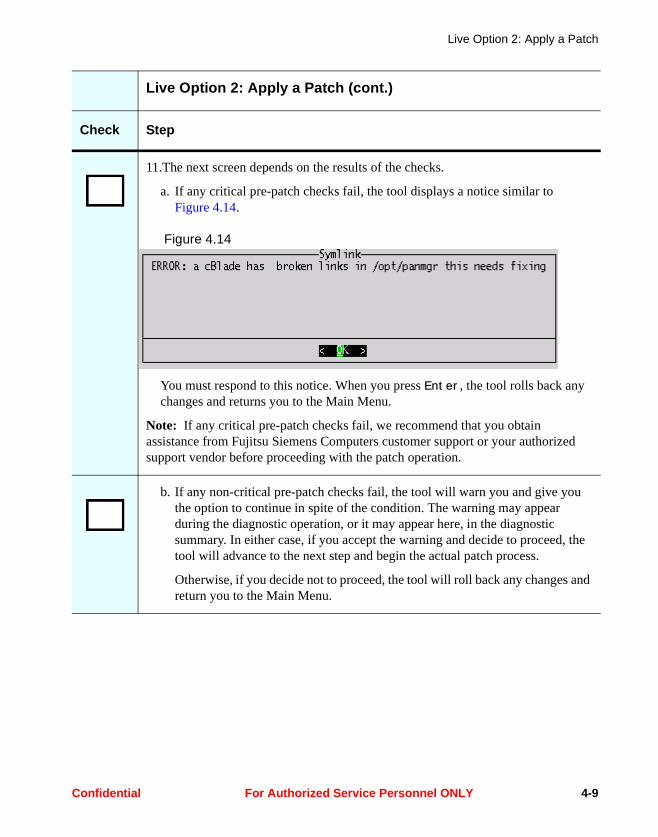
11.The next screen depends on the results of the checks.
a. If any critical pre-patch checks fail, the tool displays a notice similar to Figure 4.14.
Figure 4.14
You must respond to this notice. When you press Enter, the tool rolls back any changes and returns you to the Main Menu.
Note: If any critical pre-patch checks fail, we recommend that you obtain assistance from Fujitsu Siemens Computers customer support or your authorized support vendor before proceeding with the patch operation.
b. If any non-critical pre-patch checks fail, the tool will warn you and give you the option to continue in spite of the condition. The warning may appear during the diagnostic operation, or it may appear here, in the diagnostic summary. In either case, if you accept the warning and decide to proceed, the tool will advance to the next step and begin the actual patch process.
Otherwise, if you decide not to proceed, the tool will roll back any changes and return you to the Main Menu.
Live Option 2: Apply a Patch (cont.)
Check Step
Confidential For Authorized Service Personnel ONLY 4-9
DVD Toolkit Guide
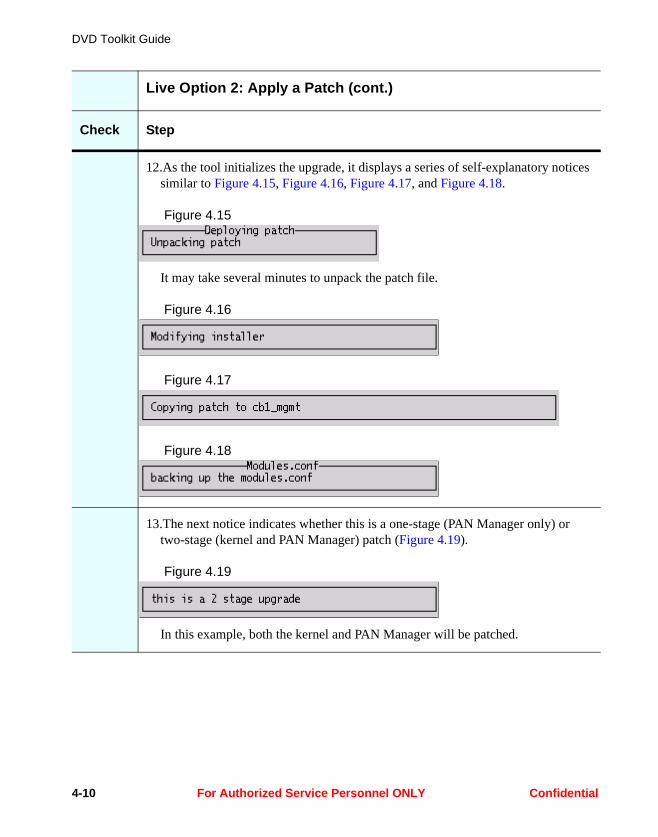
12.As the tool initializes the upgrade, it displays a series of self-explanatory notices similar to Figure 4.15, Figure 4.16, Figure 4.17, and Figure 4.18.
Figure 4.15
It may take several minutes to unpack the patch file.
Figure 4.16
Figure 4.17
Figure 4.18
13.The next notice indicates whether this is a one-stage (PAN Manager only) or two-stage (kernel and PAN Manager) patch (Figure 4.19).
Figure 4.19
In this example, both the kernel and PAN Manager will be patched.
Live Option 2: Apply a Patch (cont.)
Check Step
4-10 For Authorized Service Personnel ONLY Confidential

Live Option 2: Apply a Patch
14.The kernel on the remote cBlade (control blade 1 in this example) is patched first (Figure 4.20, Figure 4.21).
Figure 4.20
Figure 4.21
Live Option 2: Apply a Patch (cont.)
Check Step
Confidential For Authorized Service Personnel ONLY 4-11
DVD Toolkit Guide
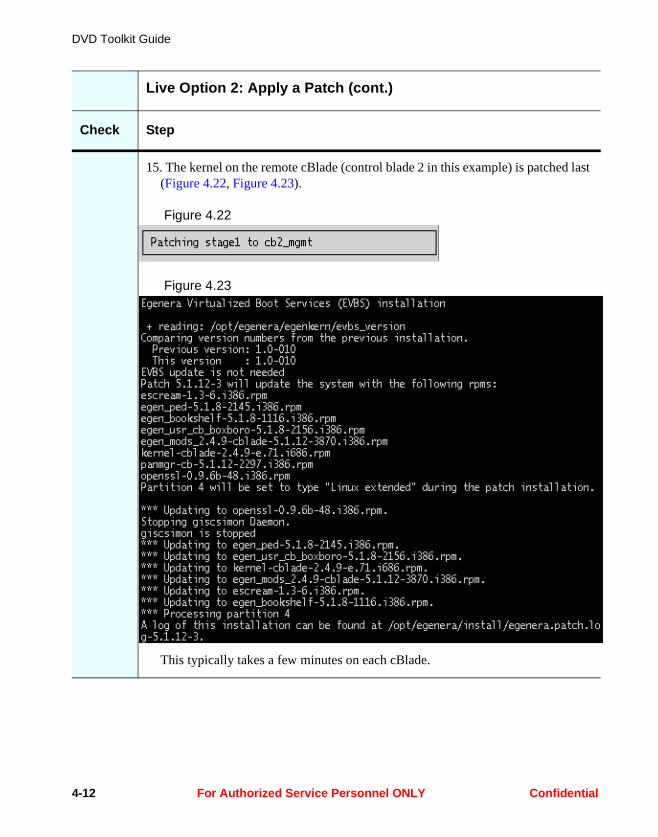
15. The kernel on the remote cBlade (control blade 2 in this example) is patched last (Figure 4.22, Figure 4.23).
Figure 4.22
Figure 4.23
This typically takes a few minutes on each cBlade.
Live Option 2: Apply a Patch (cont.)
Check Step
4-12 For Authorized Service Personnel ONLY Confidential
Live Option 2: Apply a Patch
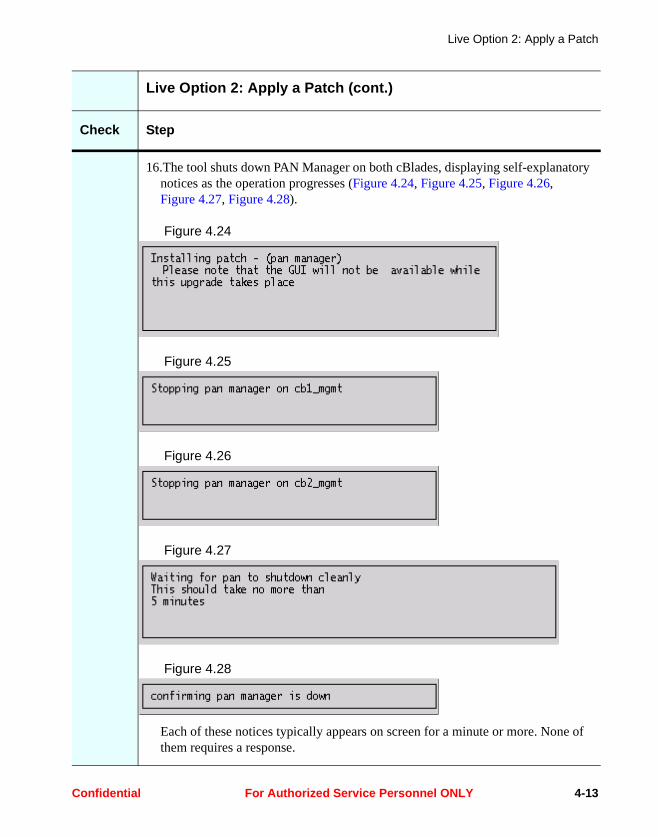
16.The tool shuts down PAN Manager on both cBlades, displaying self-explanatory notices as the operation progresses (Figure 4.24, Figure 4.25, Figure 4.26, Figure 4.27, Figure 4.28).
Figure 4.24
Figure 4.25
Figure 4.26
Figure 4.27
Figure 4.28
Each of these notices typically appears on screen for a minute or more. None of them requires a response.
Live Option 2: Apply a Patch (cont.)
Check Step
Confidential For Authorized Service Personnel ONLY 4-13
DVD Toolkit Guide
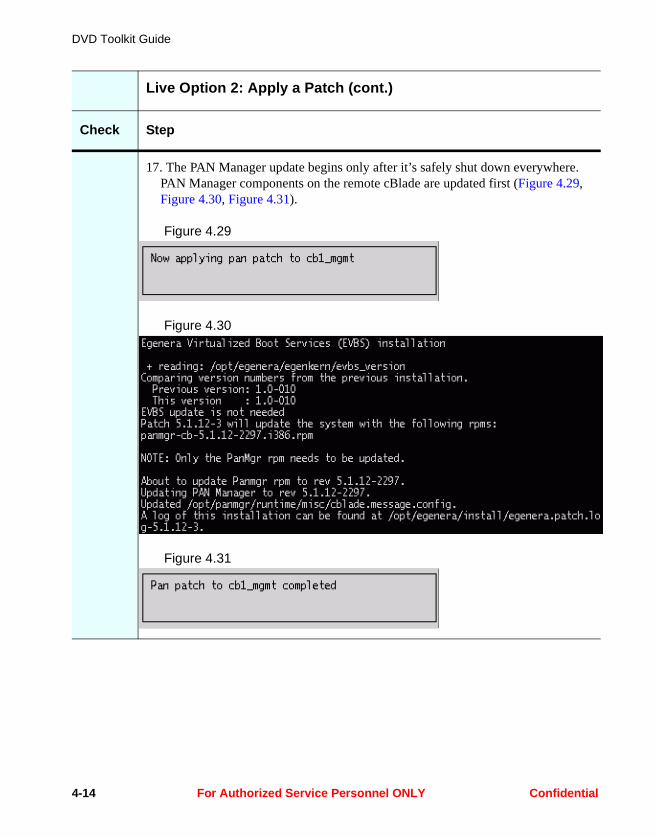
17. The PAN Manager update begins only after it’s safely shut down everywhere. PAN Manager components on the remote cBlade are updated first (Figure 4.29, Figure 4.30, Figure 4.31).
Figure 4.29
Figure 4.30
Figure 4.31
Live Option 2: Apply a Patch (cont.)
Check Step
4-14 For Authorized Service Personnel ONLY Confidential
Live Option 2: Apply a Patch
18. PAN Manager components on the local cBlade are updated last (Figure 4.32, Figure 4.33, Figure 4.34).
Figure 4.32
Figure 4.33
Figure 4.34
This typically takes a few minutes on each cBlade.
Live Option 2: Apply a Patch (cont.)
Check Step
Confidential For Authorized Service Personnel ONLY 4-15
DVD Toolkit Guide
19.The tool notifies you if it needs to modify /etc/modules.conf (Figure 4.35) (/etc/modprobe.conf for PAN Manager 5.2 and higher).
Figure 4.35
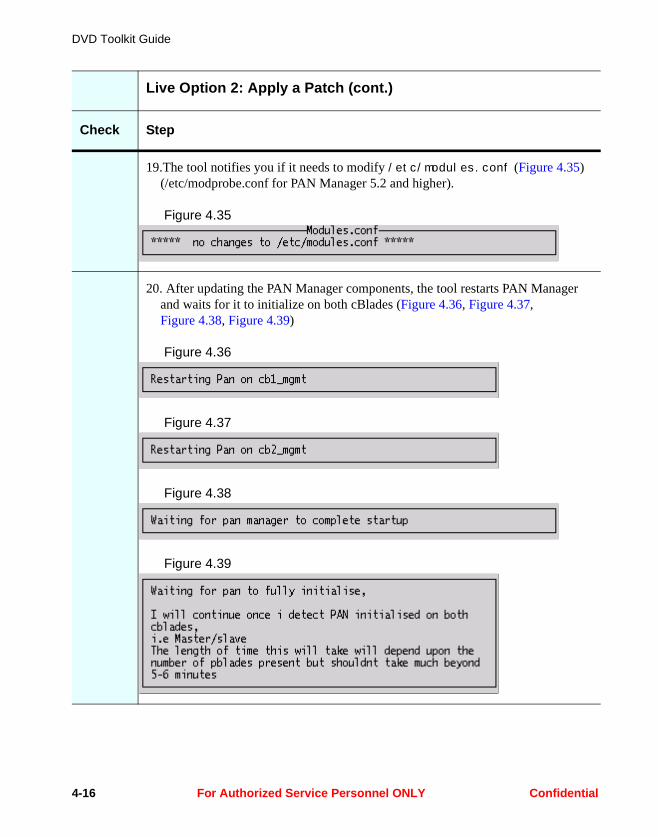
20. After updating the PAN Manager components, the tool restarts PAN Manager and waits for it to initialize on both cBlades (Figure 4.36, Figure 4.37, Figure 4.38, Figure 4.39)
Figure 4.36
Figure 4.37
Figure 4.38
Figure 4.39
Live Option 2: Apply a Patch (cont.)
Check Step
4-16 For Authorized Service Personnel ONLY Confidential
Live Option 2: Apply a Patch
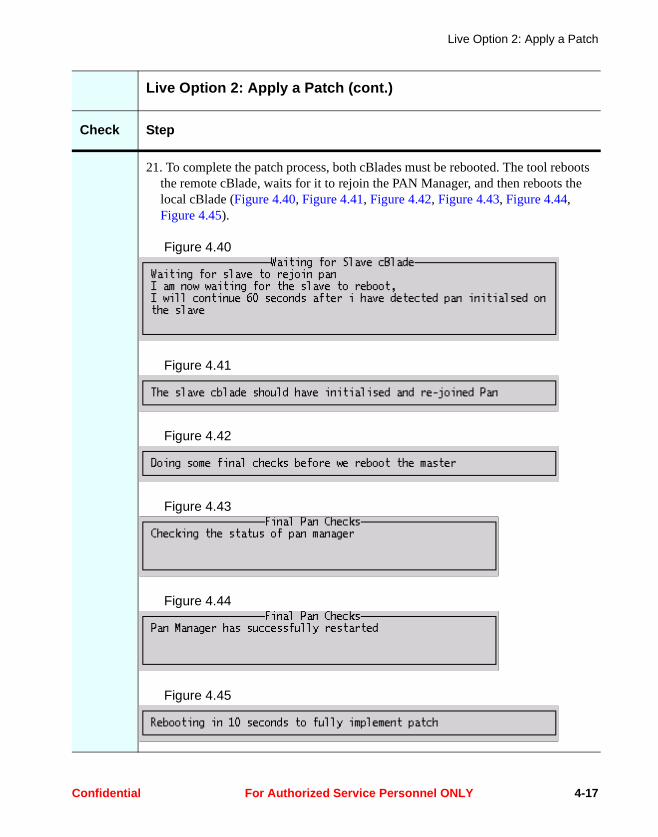
21. To complete the patch process, both cBlades must be rebooted. The tool reboots the remote cBlade, waits for it to rejoin the PAN Manager, and then reboots the local cBlade (Figure 4.40, Figure 4.41, Figure 4.42, Figure 4.43, Figure 4.44, Figure 4.45).
Figure 4.40
Figure 4.41
Figure 4.42
Figure 4.43
Figure 4.44
Figure 4.45
Live Option 2: Apply a Patch (cont.)
Check Step
Confidential For Authorized Service Personnel ONLY 4-17

DVD Toolkit Guide
Selecting a Patch from an Alternate Location
You may have obtained a patch that is newer than any of those on the DVD. This option allows you to select a patch file residing anywhere on the cBlade.
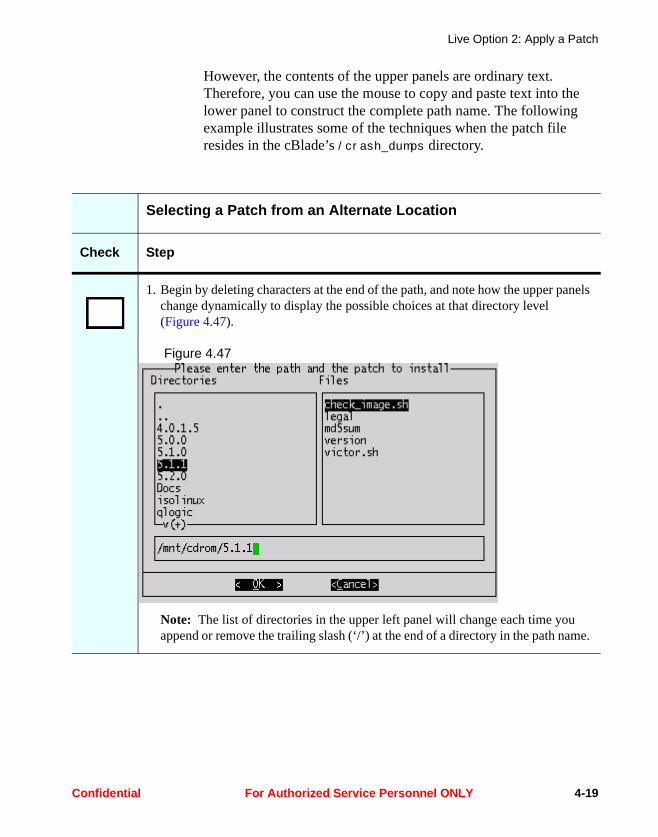
The tool begins in the patch directory of the DVD (Figure 4.46).
Figure 4.46
In this example, the base media just installed was PAN Manager 5.1.1, so the initial directory is /mnt/cdrom/5.1.1/patches/, as indicated in the lower panel (just above the action buttons).
The input cursor is at the end of the path in the lower panel. To specify a patch, you must enter the file’s complete path name in this panel and then press Enter.
In the figure above, the file name is absent. Even though a file name is highlighted in the upper right panel, it will not be automatically appended to the current path when you press Enter. In addition, the directory names in the upper left panel are not “live” links—you cannot use them to navigate the file system as you might expect.
4-18 For Authorized Service Personnel ONLY Confidential
Live Option 2: Apply a Patch
However, the contents of the upper panels are ordinary text. Therefore, you can use the mouse to copy and paste text into the lower panel to construct the complete path name. The following example illustrates some of the techniques when the patch file resides in the cBlade’s /crash_dumps directory.
Selecting a Patch from an Alternate Location
Check Step
1. Begin by deleting characters at the end of the path, and note how the upper panels change dynamically to display the possible choices at that directory level (Figure 4.47).
Figure 4.47
Note: The list of directories in the upper left panel will change each time you append or remove the trailing slash (‘/’) at the end of a directory in the path name.
Confidential For Authorized Service Personnel ONLY 4-19
DVD Toolkit Guide
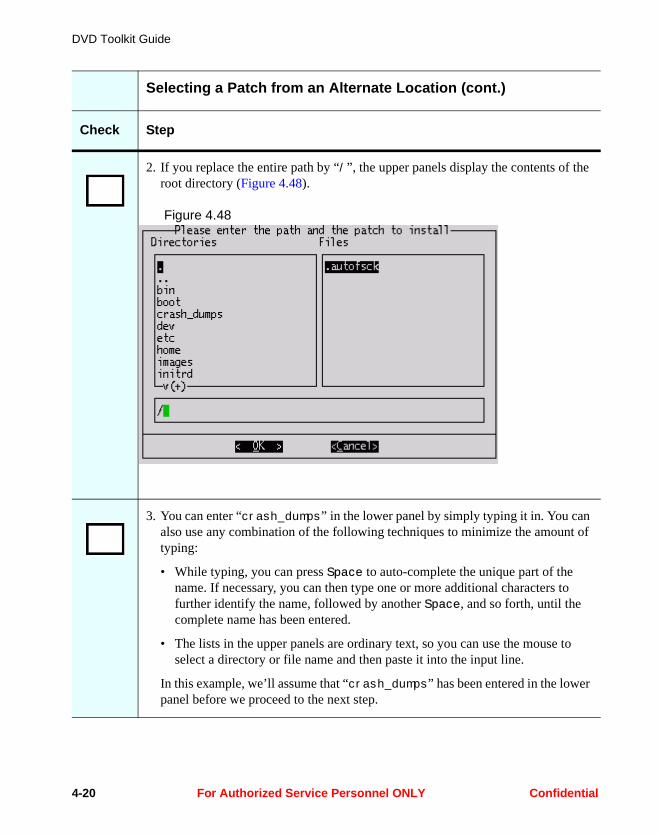
2. If you replace the entire path by “/”, the upper panels display the contents of the root directory (Figure 4.48).
Figure 4.48
3. You can enter “crash_dumps” in the lower panel by simply typing it in. You can also use any combination of the following techniques to minimize the amount of typing:
• While typing, you can press Space to auto-complete the unique part of the name. If necessary, you can then type one or more additional characters to further identify the name, followed by another Space, and so forth, until the complete name has been entered.
• The lists in the upper panels are ordinary text, so you can use the mouse to select a directory or file name and then paste it into the input line.
In this example, we’ll assume that “crash_dumps” has been entered in the lower panel before we proceed to the next step.
Selecting a Patch from an Alternate Location (cont.)
Check Step
4-20 For Authorized Service Personnel ONLY Confidential

Live Option 2: Apply a Patch
4. Type another slash to complete the directory name. This will display the contents of the /crash_dumps/ directory in the upper panels (Figure 4.49).
Figure 4.49
5. Again, you can type the patch file name directly into the input line, but it’s probably easier and less error-prone to copy and paste it from the upper right panel using the mouse (Figure 4.50).
Figure 4.50
Note that the input cursor is still at the end of the input line in the lower panel.
Selecting a Patch from an Alternate Location (cont.)
Check Step
Confidential For Authorized Service Personnel ONLY 4-21
DVD Toolkit Guide
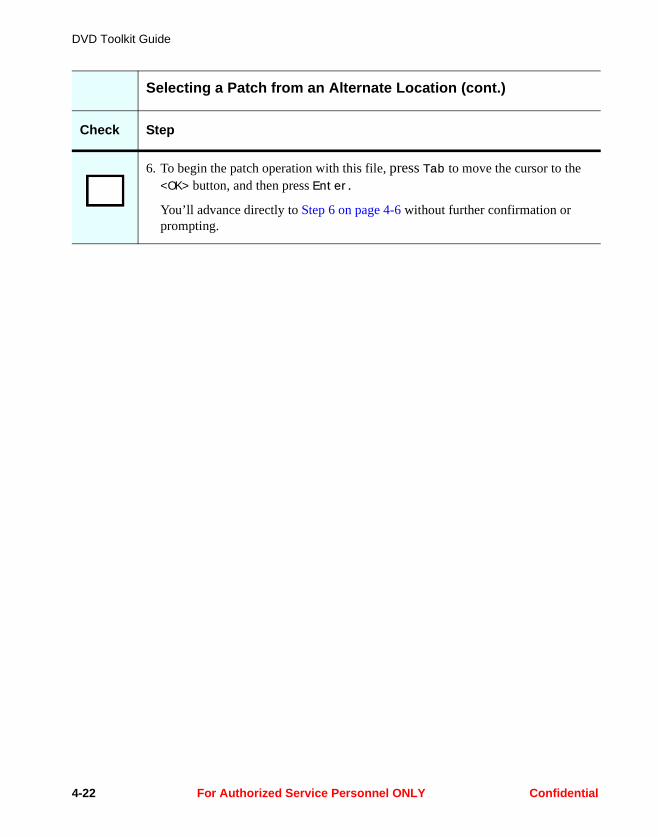
6. To begin the patch operation with this file, press Tab to move the cursor to the <OK> button, and then press Enter.
You’ll advance directly to Step 6 on page 4-6 without further confirmation or prompting.
Selecting a Patch from an Alternate Location (cont.)
Check Step
4-22 For Authorized Service Personnel ONLY Confidential
Chapter 5Live Option 3: Backup
Frame
The Backup Frame operation takes a snapshot image of a running cBlade. The snapshot can be used to restore the cBlades in case you encounter problems with a later upgrade or patch, or it can be deployed to a new BladeFrame of the same type.
Important: This operation backs up only the local cBlade. Normally, both cBlades are identical. However, if data exists only on the remote cBlade, it will not be included in the snapshot. It will therefore be lost if the remote cBlade is restored from the snapshot. This should not affect PAN Manager, but it could affect the deployment of pServers if the contents of /images (or wherever pbroot images are stored) are not identical on both cBlades. You may have to check these directories manually for earlier PAN Manager releases. You can also try running a disk check, which will attempt to resolve pbroot image problems. See “Live Option 6.3: Pre-Upgrade Checks (SAN/Network/Disk)” on page 8-10 and “Checking the Disk” on page 11-10.
Important: This operation does not back up pBlades or pServers. To back up and restore pServers, you must use separate procedures that are typically provided by your SAN vendor.
Confidential For Authorized Service Personnel ONLY 5-1
DVD Toolkit Guide
Note: The snapshot image can only be restored to a cBlade of the same type. We do not support restoring onto a different cBlade architecture.
Note: If you want to use the snapshot to clone the BladeFrame, you must have a valid PAN portability license.
Live Option 3: Backup Frame
Check Step
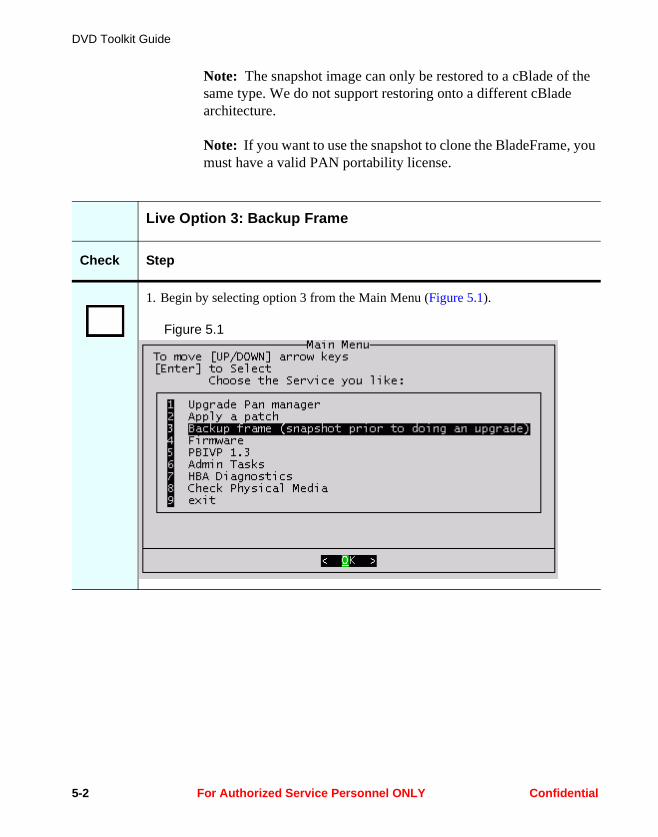
1. Begin by selecting option 3 from the Main Menu (Figure 5.1).
Figure 5.1
5-2 For Authorized Service Personnel ONLY Confidential
Live Option 3: Backup Frame
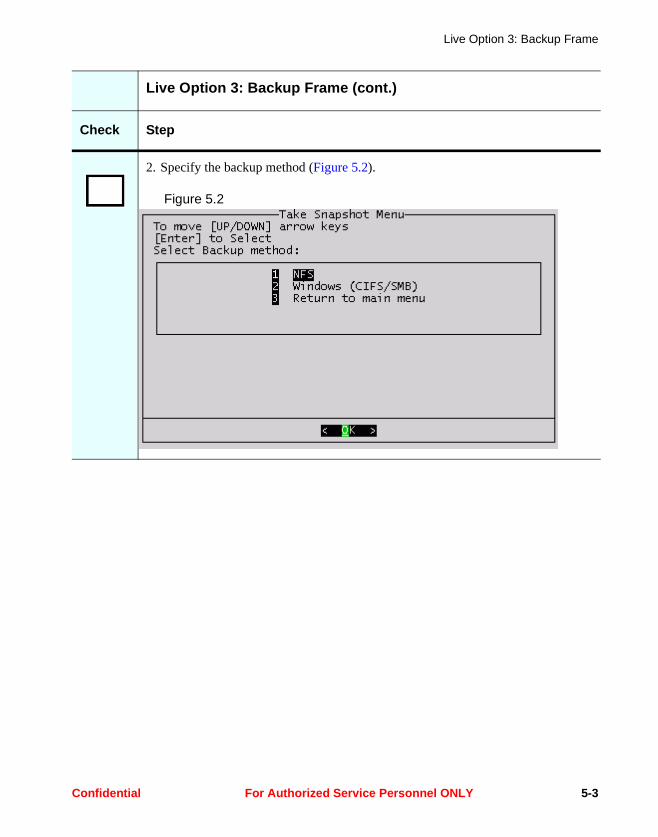
2. Specify the backup method (Figure 5.2).
Figure 5.2
Live Option 3: Backup Frame (cont.)
Check Step
Confidential For Authorized Service Personnel ONLY 5-3

DVD Toolkit Guide
3. The next screen depends on whether you are using an NFS server or a Windows CIFS/SMB server.
a. For an NFS server, specify the IP address and the remote directory name (Figure 5.3).
Figure 5.3
Use the up/down arrow keys to move the cursor vertically from one field to another. Use the left/right arrow keys and Backspace/Delete to edit the text in a field.
After you enter the required data, use the Tab key to highlight <OK> or <Cancel> and then press Enter to continue.
Note: The remote directory must have read/write permissions for root.
Live Option 3: Backup Frame (cont.)
Check Step
5-4 For Authorized Service Personnel ONLY Confidential

Live Option 3: Backup Frame
b. For a Windows CIFS/SMB server, specify the IP address, the remote share, a user name with read/write permission, and the user’s password (Figure 5.4).
Figure 5.4
Use the up/down arrow keys to move the cursor vertically from one field to another. Use the left/right arrow keys and Backspace/Delete to edit the text in a field.
After you enter the required data, use the Tab key to highlight <OK> or <Cancel> and then press Enter to continue.
Live Option 3: Backup Frame (cont.)
Check Step
Confidential For Authorized Service Personnel ONLY 5-5

DVD Toolkit Guide
Figure 5.5 and Figure 5.6 show examples of completed NFS and SMBFS forms.
Figure 5.5
Figure 5.6
Press Tab to advance to the <OK> button and then press Enter to continue.
Live Option 3: Backup Frame (cont.)
Check Step
5-6 For Authorized Service Personnel ONLY Confidential

Live Option 3: Backup Frame
4. The tool will briefly display the notices in Figure 5.7, Figure 5.8, and Figure 5.9.
Figure 5.7
Figure 5.8
Figure 5.9
Live Option 3: Backup Frame (cont.)
Check Step
Confidential For Authorized Service Personnel ONLY 5-7
DVD Toolkit Guide
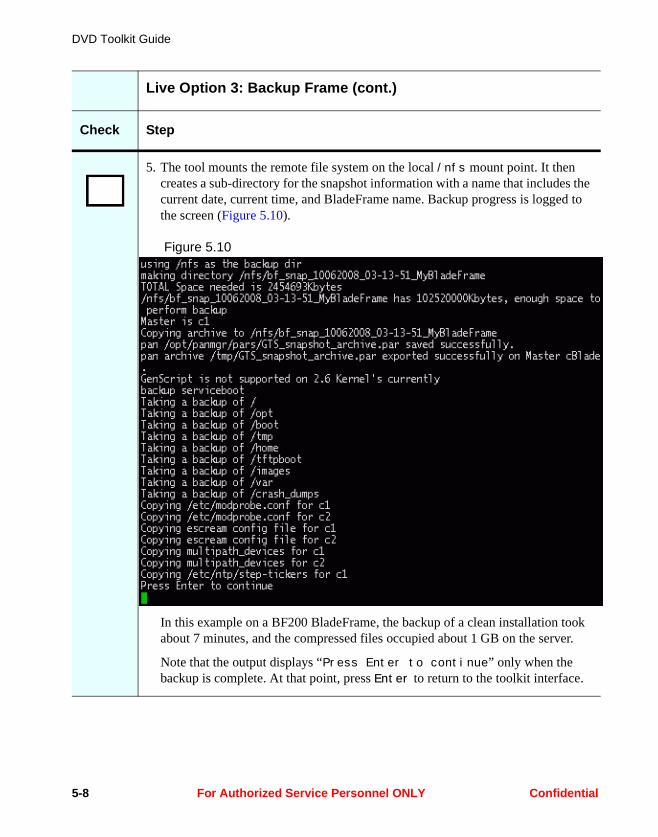
5. The tool mounts the remote file system on the local /nfs mount point. It then creates a sub-directory for the snapshot information with a name that includes the current date, current time, and BladeFrame name. Backup progress is logged to the screen (Figure 5.10).
Figure 5.10
In this example on a BF200 BladeFrame, the backup of a clean installation took about 7 minutes, and the compressed files occupied about 1 GB on the server.
Note that the output displays “Press Enter to continue” only when the backup is complete. At that point, press Enter to return to the toolkit interface.
Live Option 3: Backup Frame (cont.)
Check Step
5-8 For Authorized Service Personnel ONLY Confidential
Live Option 3: Backup Frame
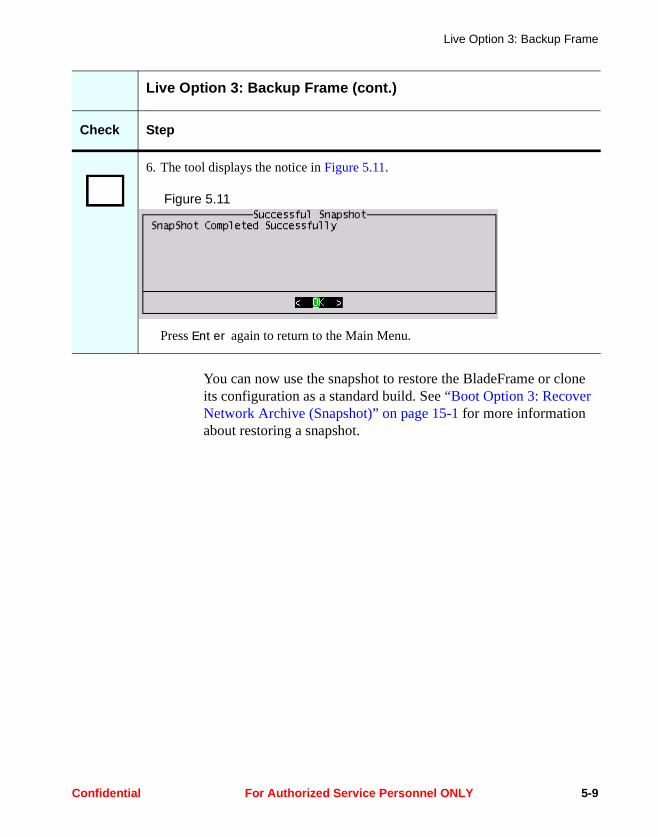
You can now use the snapshot to restore the BladeFrame or clone its configuration as a standard build. See “Boot Option 3: Recover Network Archive (Snapshot)” on page 15-1 for more information about restoring a snapshot.
6. The tool displays the notice in Figure 5.11.
Figure 5.11
Press Enter again to return to the Main Menu.
Live Option 3: Backup Frame (cont.)
Check Step
Confidential For Authorized Service Personnel ONLY 5-9

DVD Toolkit Guide
5-10 For Authorized Service Personnel ONLY Confidential

Chapter 6Live Option 4: Firmware
The Firmware option opens a sub-menu that allows you to flash the firmware of the following items:
• local HBAs using the Qlogic tool
• local cBlade using BlastMe
• one or more pBlades using MasterBlaster
You can also display the current firmware revision level of the cBlades and pBlades.
Confidential For Authorized Service Personnel ONLY 6-1
DVD Toolkit Guide
Live Option 4: Firmware
Check Step
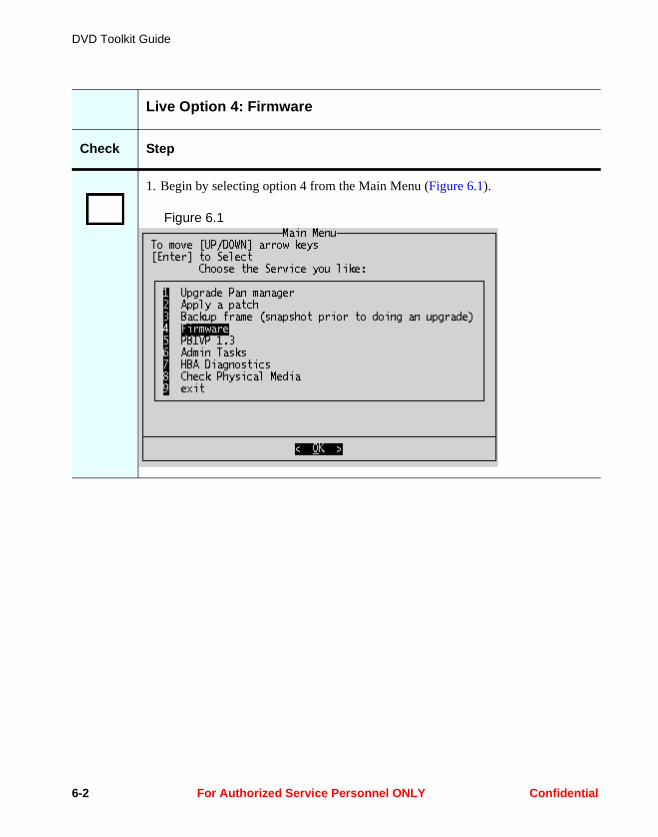
1. Begin by selecting option 4 from the Main Menu (Figure 6.1).
Figure 6.1
6-2 For Authorized Service Personnel ONLY Confidential
Live Option 4: Firmware
The following sections describe the firmware operations:
• “Live Option 4.1: HBA (Serviceboot)” on page 6-4
• “Live Option 4.2: cBlade (BlastMe)” on page 6-12
• “Live Option 4.3: Both HBA and cBlade” on page 6-20
• “Live Option 4.4: pBlade (MasterBlaster)” on page 6-25
• “Live Option 4.5: Display Current Firmware Revisions” on page 6-38
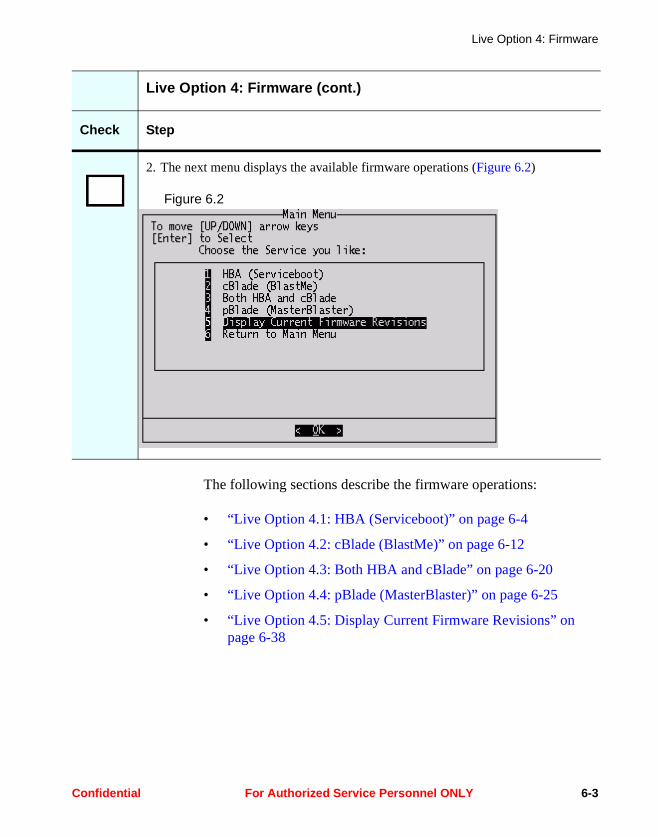
2. The next menu displays the available firmware operations (Figure 6.2)
Figure 6.2
Live Option 4: Firmware (cont.)
Check Step
Confidential For Authorized Service Personnel ONLY 6-3
DVD Toolkit Guide
Live Option 4.1: HBA (Serviceboot)
Use this option to upgrade the HBA Qlogic firmware by rebooting from the serviceboot partition on a cBlade.
Important: This operation flashes the firmware only on the local cBlade. To complete the process for the BladeFrame, you must perform this operation on both cBlades.
Live Option 4.1: HBA (Serviceboot)
Check Step
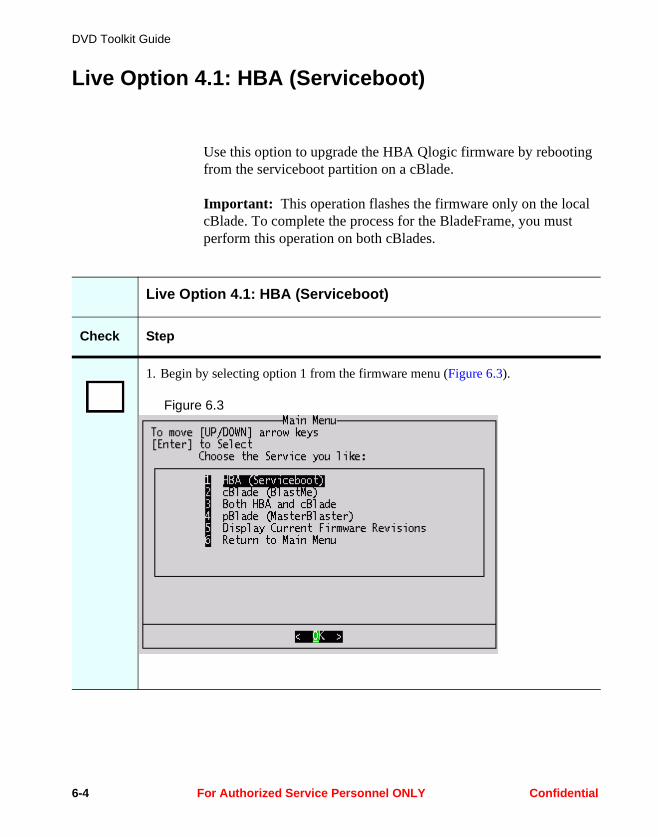
1. Begin by selecting option 1 from the firmware menu (Figure 6.3).
Figure 6.3
6-4 For Authorized Service Personnel ONLY Confidential
Live Option 4: Firmware
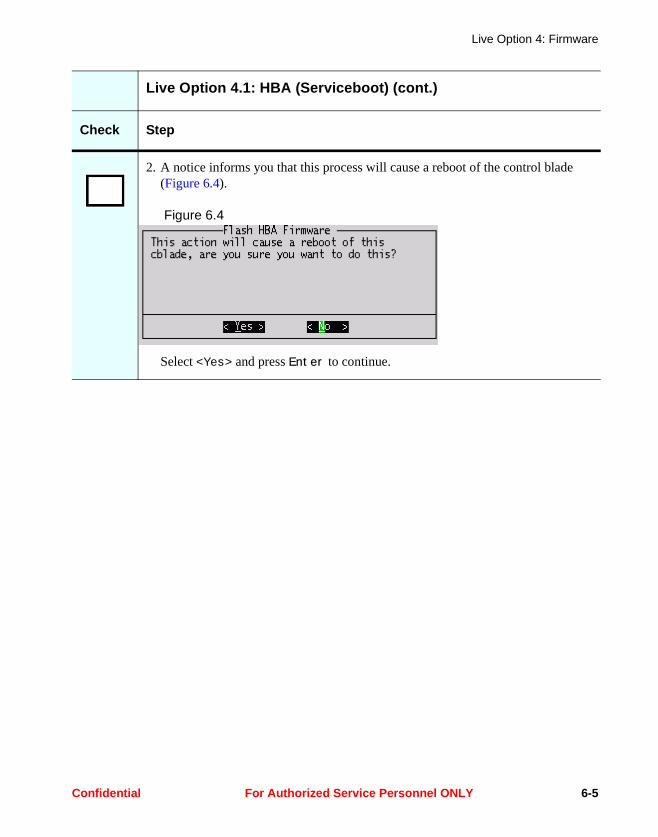
2. A notice informs you that this process will cause a reboot of the control blade (Figure 6.4).
Figure 6.4
Select <Yes> and press Enter to continue.
Live Option 4.1: HBA (Serviceboot) (cont.)
Check Step
Confidential For Authorized Service Personnel ONLY 6-5
DVD Toolkit Guide
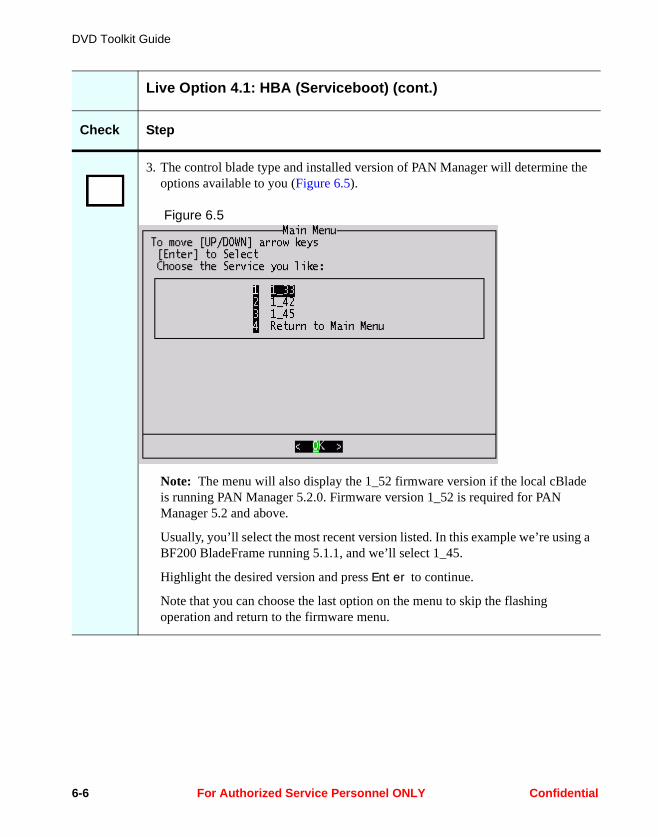
3. The control blade type and installed version of PAN Manager will determine the options available to you (Figure 6.5).
Figure 6.5
Note: The menu will also display the 1_52 firmware version if the local cBlade is running PAN Manager 5.2.0. Firmware version 1_52 is required for PAN Manager 5.2 and above.
Usually, you’ll select the most recent version listed. In this example we’re using a BF200 BladeFrame running 5.1.1, and we’ll select 1_45.
Highlight the desired version and press Enter to continue.
Note that you can choose the last option on the menu to skip the flashing operation and return to the firmware menu.
Live Option 4.1: HBA (Serviceboot) (cont.)
Check Step
6-6 For Authorized Service Personnel ONLY Confidential

Live Option 4: Firmware
4. After you’ve selected the upgrade version, the tool briefly informs you that it’s checking the BladeFrame status before rebooting the blade (Figure 6.6).
Figure 6.6
During the flash procedure, each cBlade will be taken out of service to apply the changes, leaving the other cBlade to control the PAN. Therefore, to detect misconfigurations that could cause an outage or performance loss, the tool performs a series of pre-flash checks.
5. First, the tool checks for a working cBlade master/slave relationship. If the check fails, you’ll see a report of the problems found. See “Checking PAN Manager” on page 11-2 for more information.
If PAN Manager is running normally, you’ll see the notice in Figure 6.7.
Figure 6.7
This notice appears only for a few seconds, and then the tool automatically continues to the next check.
Live Option 4.1: HBA (Serviceboot) (cont.)
Check Step
Confidential For Authorized Service Personnel ONLY 6-7
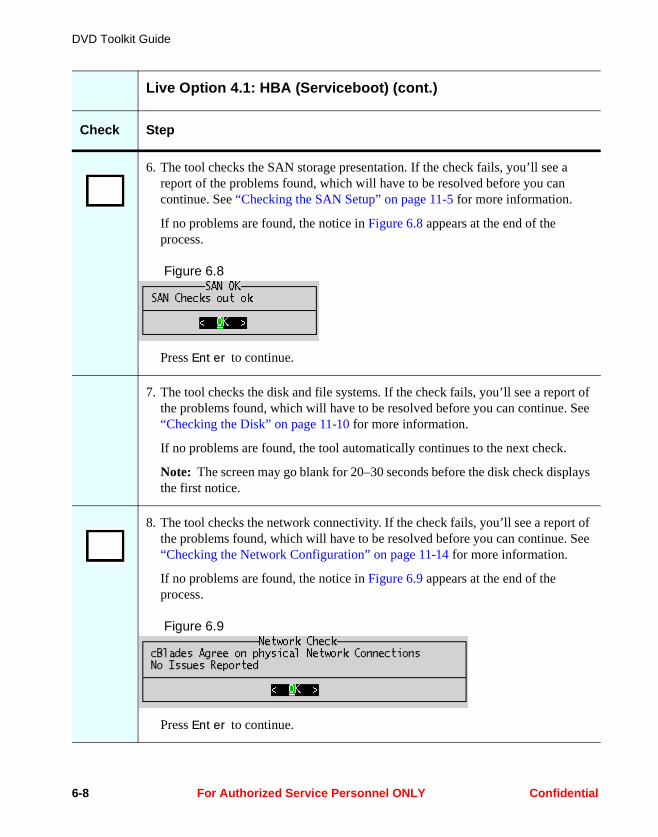
DVD Toolkit Guide
6. The tool checks the SAN storage presentation. If the check fails, you’ll see a report of the problems found, which will have to be resolved before you can continue. See “Checking the SAN Setup” on page 11-5 for more information.
If no problems are found, the notice in Figure 6.8 appears at the end of the process.
Figure 6.8
Press Enter to continue.
7. The tool checks the disk and file systems. If the check fails, you’ll see a report of the problems found, which will have to be resolved before you can continue. See “Checking the Disk” on page 11-10 for more information.
If no problems are found, the tool automatically continues to the next check.
Note: The screen may go blank for 20–30 seconds before the disk check displays the first notice.
8. The tool checks the network connectivity. If the check fails, you’ll see a report of the problems found, which will have to be resolved before you can continue. See “Checking the Network Configuration” on page 11-14 for more information.
If no problems are found, the notice in Figure 6.9 appears at the end of the process.
Figure 6.9
Press Enter to continue.
Live Option 4.1: HBA (Serviceboot) (cont.)
Check Step
6-8 For Authorized Service Personnel ONLY Confidential

Live Option 4: Firmware
9. To avoid problems when booting from the serviceboot partition, the tool checks its extended partition type (Figure 6.10).
Figure 6.10
If it’s marked as a DOS extended partition, the tool converts it to a Linux extended partition (Figure 6.11).
Figure 6.11
10.The next screen depends on the results of the checks.
a. If any critical pre-flash checks fail, the tool displays a notice similar to Figure 6.12.
Figure 6.12
You must respond to this notice. When you press Enter, the tool rolls back any changes and returns you to the firmware menu.
Note: If any critical pre-flash checks fail, we recommend that you obtain assistance from Fujitsu Siemens Computers customer support or your authorized support vendor before proceeding with the flash operation.
Live Option 4.1: HBA (Serviceboot) (cont.)
Check Step
Confidential For Authorized Service Personnel ONLY 6-9
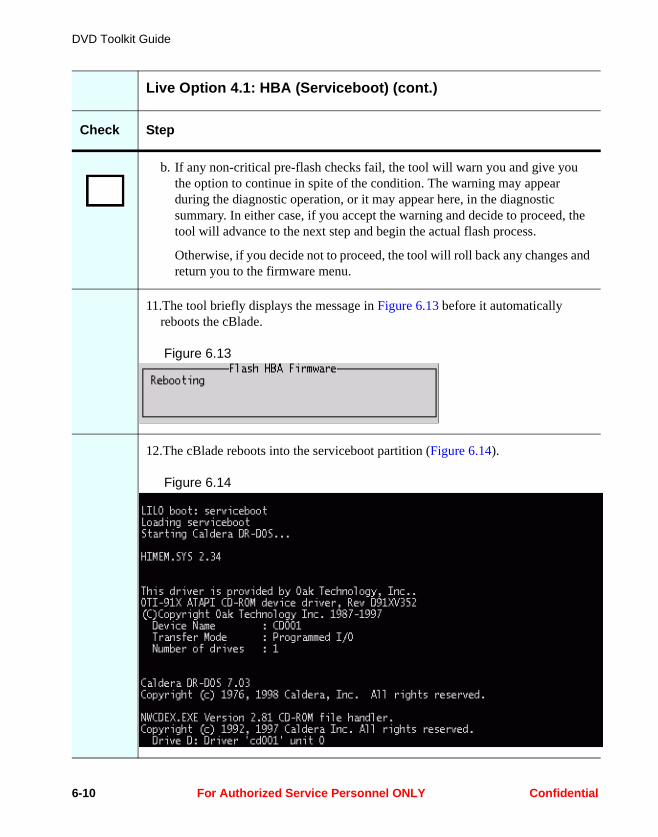
DVD Toolkit Guide
b. If any non-critical pre-flash checks fail, the tool will warn you and give you the option to continue in spite of the condition. The warning may appear during the diagnostic operation, or it may appear here, in the diagnostic summary. In either case, if you accept the warning and decide to proceed, the tool will advance to the next step and begin the actual flash process.
Otherwise, if you decide not to proceed, the tool will roll back any changes and return you to the firmware menu.
11.The tool briefly displays the message in Figure 6.13 before it automatically reboots the cBlade.
Figure 6.13
12.The cBlade reboots into the serviceboot partition (Figure 6.14).
Figure 6.14
Live Option 4.1: HBA (Serviceboot) (cont.)
Check Step
6-10 For Authorized Service Personnel ONLY Confidential
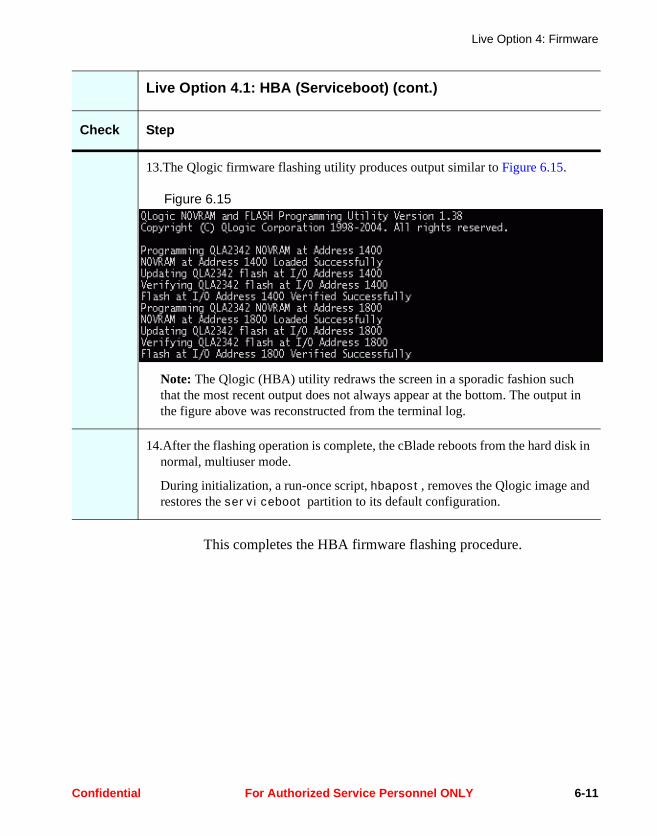
Live Option 4: Firmware
This completes the HBA firmware flashing procedure.
13.The Qlogic firmware flashing utility produces output similar to Figure 6.15.
Figure 6.15
Note: The Qlogic (HBA) utility redraws the screen in a sporadic fashion such that the most recent output does not always appear at the bottom. The output in the figure above was reconstructed from the terminal log.
14.After the flashing operation is complete, the cBlade reboots from the hard disk in normal, multiuser mode.
During initialization, a run-once script, hbapost, removes the Qlogic image and restores the serviceboot partition to its default configuration.
Live Option 4.1: HBA (Serviceboot) (cont.)
Check Step
Confidential For Authorized Service Personnel ONLY 6-11
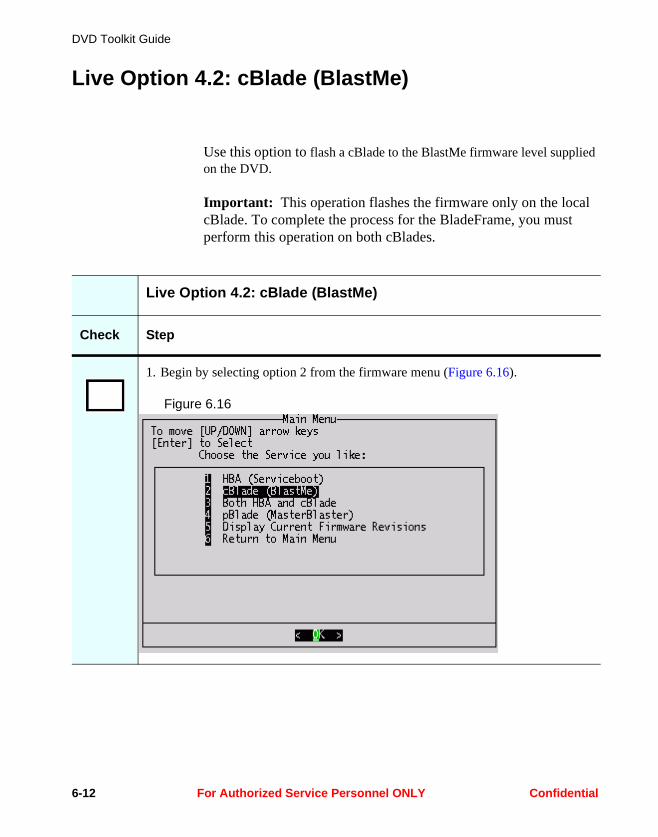
DVD Toolkit Guide
Live Option 4.2: cBlade (BlastMe)
Use this option to flash a cBlade to the BlastMe firmware level supplied on the DVD.
Important: This operation flashes the firmware only on the local cBlade. To complete the process for the BladeFrame, you must perform this operation on both cBlades.
Live Option 4.2: cBlade (BlastMe)
Check Step
1. Begin by selecting option 2 from the firmware menu (Figure 6.16).
Figure 6.16
6-12 For Authorized Service Personnel ONLY Confidential
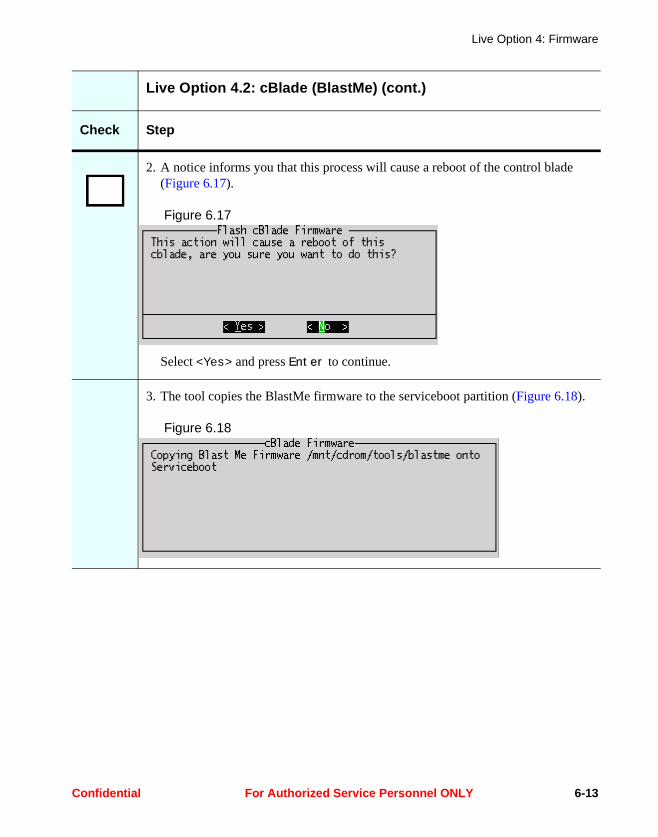
Live Option 4: Firmware
2. A notice informs you that this process will cause a reboot of the control blade (Figure 6.17).
Figure 6.17
Select <Yes> and press Enter to continue.
3. The tool copies the BlastMe firmware to the serviceboot partition (Figure 6.18).
Figure 6.18
Live Option 4.2: cBlade (BlastMe) (cont.)
Check Step
Confidential For Authorized Service Personnel ONLY 6-13
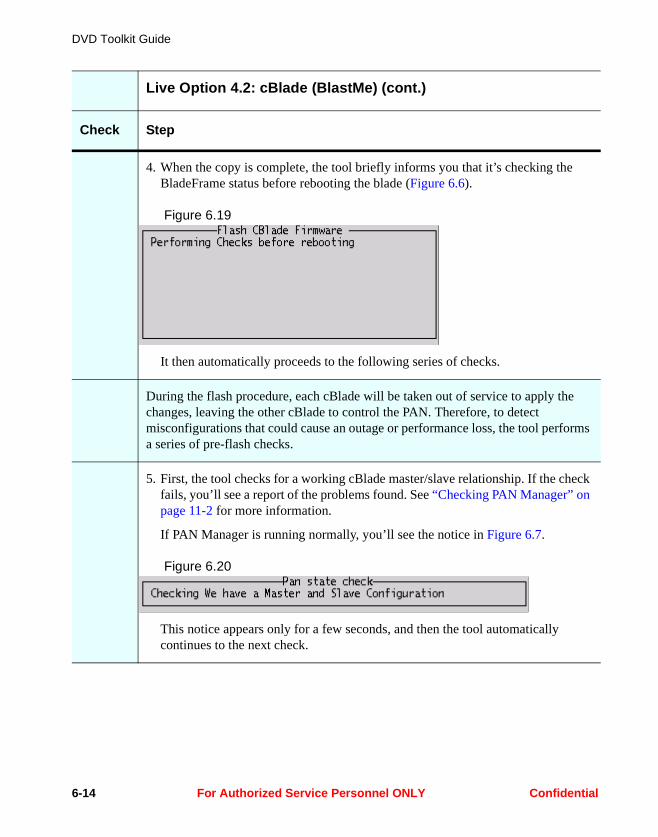
DVD Toolkit Guide
4. When the copy is complete, the tool briefly informs you that it’s checking the BladeFrame status before rebooting the blade (Figure 6.6).
Figure 6.19
It then automatically proceeds to the following series of checks.
During the flash procedure, each cBlade will be taken out of service to apply the changes, leaving the other cBlade to control the PAN. Therefore, to detect misconfigurations that could cause an outage or performance loss, the tool performs a series of pre-flash checks.
5. First, the tool checks for a working cBlade master/slave relationship. If the check fails, you’ll see a report of the problems found. See “Checking PAN Manager” on page 11-2 for more information.
If PAN Manager is running normally, you’ll see the notice in Figure 6.7.
Figure 6.20
This notice appears only for a few seconds, and then the tool automatically continues to the next check.
Live Option 4.2: cBlade (BlastMe) (cont.)
Check Step
6-14 For Authorized Service Personnel ONLY Confidential
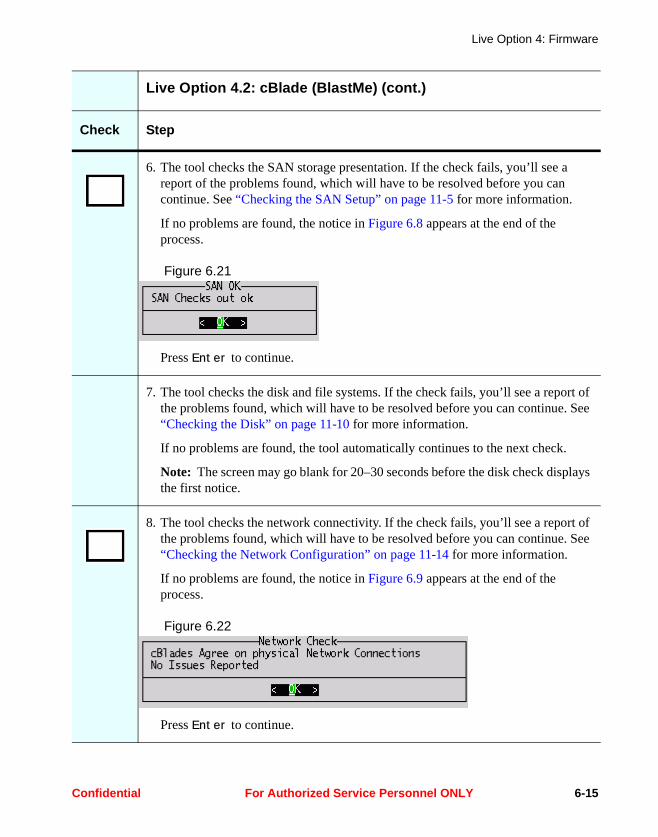
Live Option 4: Firmware
6. The tool checks the SAN storage presentation. If the check fails, you’ll see a report of the problems found, which will have to be resolved before you can continue. See “Checking the SAN Setup” on page 11-5 for more information.
If no problems are found, the notice in Figure 6.8 appears at the end of the process.
Figure 6.21
Press Enter to continue.
7. The tool checks the disk and file systems. If the check fails, you’ll see a report of the problems found, which will have to be resolved before you can continue. See “Checking the Disk” on page 11-10 for more information.
If no problems are found, the tool automatically continues to the next check.
Note: The screen may go blank for 20–30 seconds before the disk check displays the first notice.
8. The tool checks the network connectivity. If the check fails, you’ll see a report of the problems found, which will have to be resolved before you can continue. See “Checking the Network Configuration” on page 11-14 for more information.
If no problems are found, the notice in Figure 6.9 appears at the end of the process.
Figure 6.22
Press Enter to continue.
Live Option 4.2: cBlade (BlastMe) (cont.)
Check Step
Confidential For Authorized Service Personnel ONLY 6-15
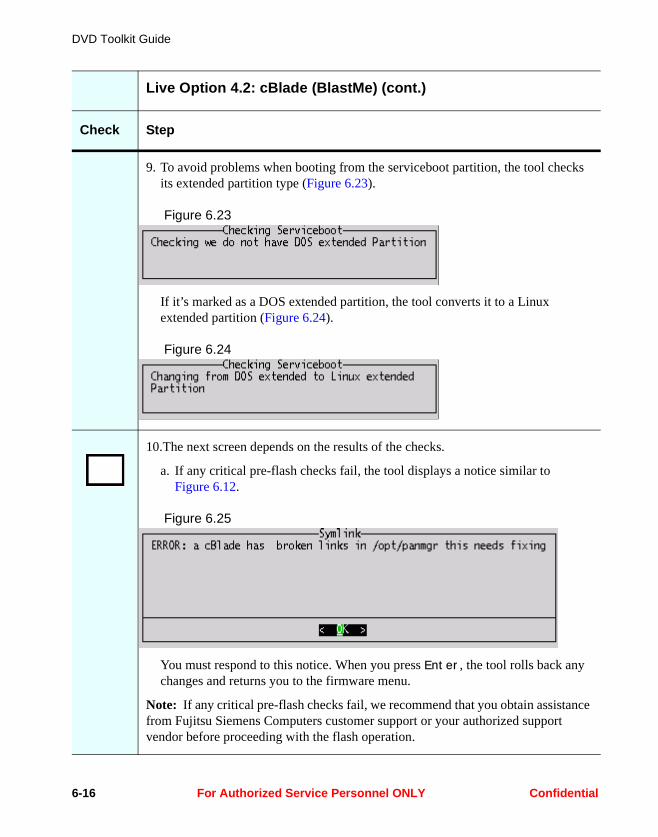
DVD Toolkit Guide
9. To avoid problems when booting from the serviceboot partition, the tool checks its extended partition type (Figure 6.23).
Figure 6.23
If it’s marked as a DOS extended partition, the tool converts it to a Linux extended partition (Figure 6.24).
Figure 6.24
10.The next screen depends on the results of the checks.
a. If any critical pre-flash checks fail, the tool displays a notice similar to Figure 6.12.
Figure 6.25
You must respond to this notice. When you press Enter, the tool rolls back any changes and returns you to the firmware menu.
Note: If any critical pre-flash checks fail, we recommend that you obtain assistance from Fujitsu Siemens Computers customer support or your authorized support vendor before proceeding with the flash operation.
Live Option 4.2: cBlade (BlastMe) (cont.)
Check Step
6-16 For Authorized Service Personnel ONLY Confidential
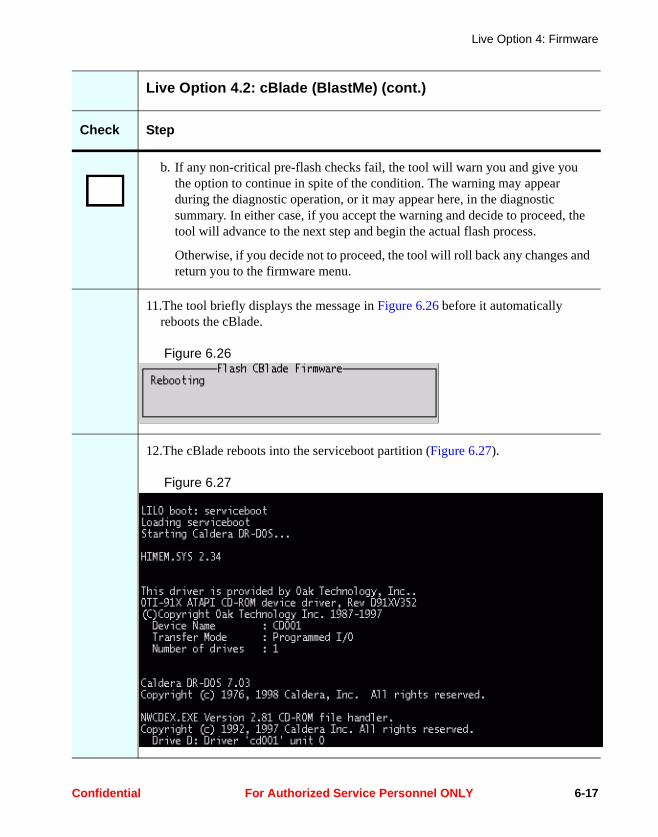
Live Option 4: Firmware
b. If any non-critical pre-flash checks fail, the tool will warn you and give you the option to continue in spite of the condition. The warning may appear during the diagnostic operation, or it may appear here, in the diagnostic summary. In either case, if you accept the warning and decide to proceed, the tool will advance to the next step and begin the actual flash process.
Otherwise, if you decide not to proceed, the tool will roll back any changes and return you to the firmware menu.
11.The tool briefly displays the message in Figure 6.26 before it automatically reboots the cBlade.
Figure 6.26
12.The cBlade reboots into the serviceboot partition (Figure 6.27).
Figure 6.27
Live Option 4.2: cBlade (BlastMe) (cont.)
Check Step
Confidential For Authorized Service Personnel ONLY 6-17
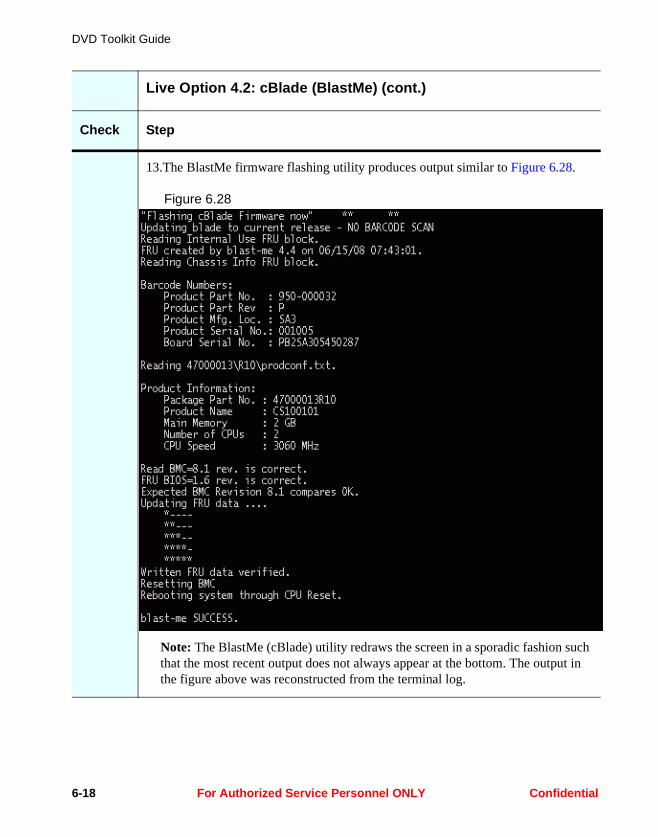
DVD Toolkit Guide
13.The BlastMe firmware flashing utility produces output similar to Figure 6.28.
Figure 6.28
Note: The BlastMe (cBlade) utility redraws the screen in a sporadic fashion such that the most recent output does not always appear at the bottom. The output in the figure above was reconstructed from the terminal log.
Live Option 4.2: cBlade (BlastMe) (cont.)
Check Step
6-18 For Authorized Service Personnel ONLY Confidential
Live Option 4: Firmware
This completes the cBlade firmware flashing procedure.
14.After the flashing operation is complete, the cBlade reboots from the hard disk in normal, multiuser mode.
During initialization, a run-once script, hbapost, removes the BlastMe image and restores the serviceboot partition to its default configuration.
Live Option 4.2: cBlade (BlastMe) (cont.)
Check Step
Confidential For Authorized Service Personnel ONLY 6-19
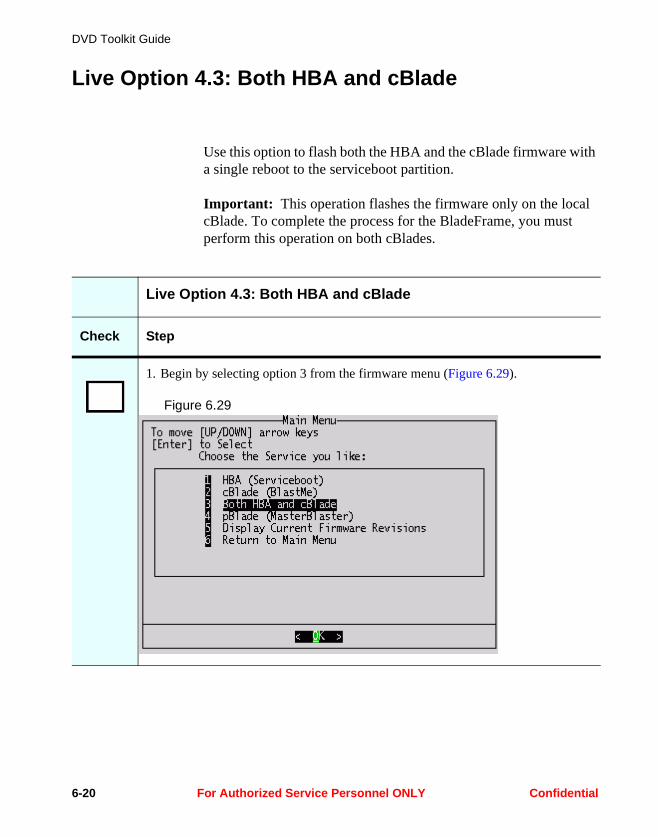
DVD Toolkit Guide
Live Option 4.3: Both HBA and cBlade
Use this option to flash both the HBA and the cBlade firmware with a single reboot to the serviceboot partition.
Important: This operation flashes the firmware only on the local cBlade. To complete the process for the BladeFrame, you must perform this operation on both cBlades.
Live Option 4.3: Both HBA and cBlade
Check Step
1. Begin by selecting option 3 from the firmware menu (Figure 6.29).
Figure 6.29
6-20 For Authorized Service Personnel ONLY Confidential
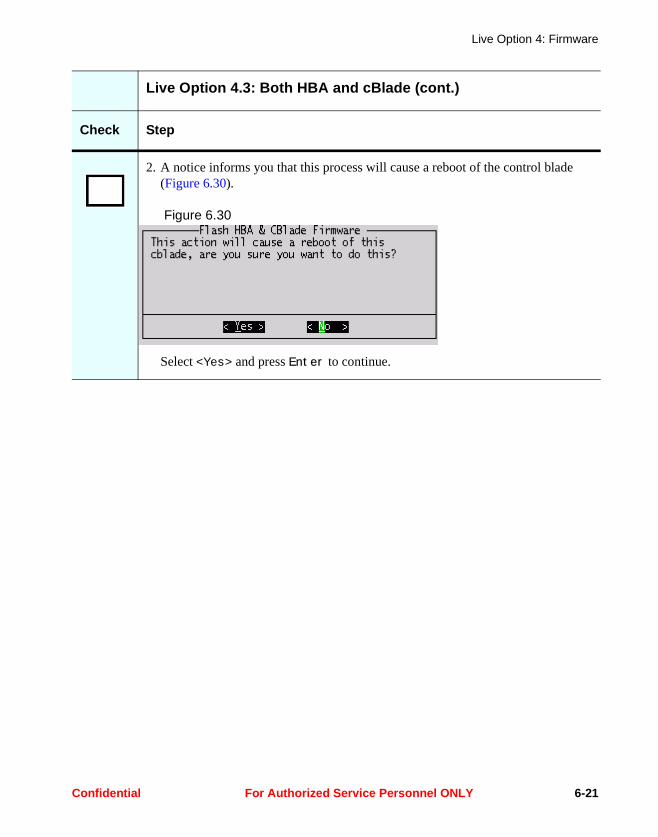
Live Option 4: Firmware
2. A notice informs you that this process will cause a reboot of the control blade (Figure 6.30).
Figure 6.30
Select <Yes> and press Enter to continue.
Live Option 4.3: Both HBA and cBlade (cont.)
Check Step
Confidential For Authorized Service Personnel ONLY 6-21
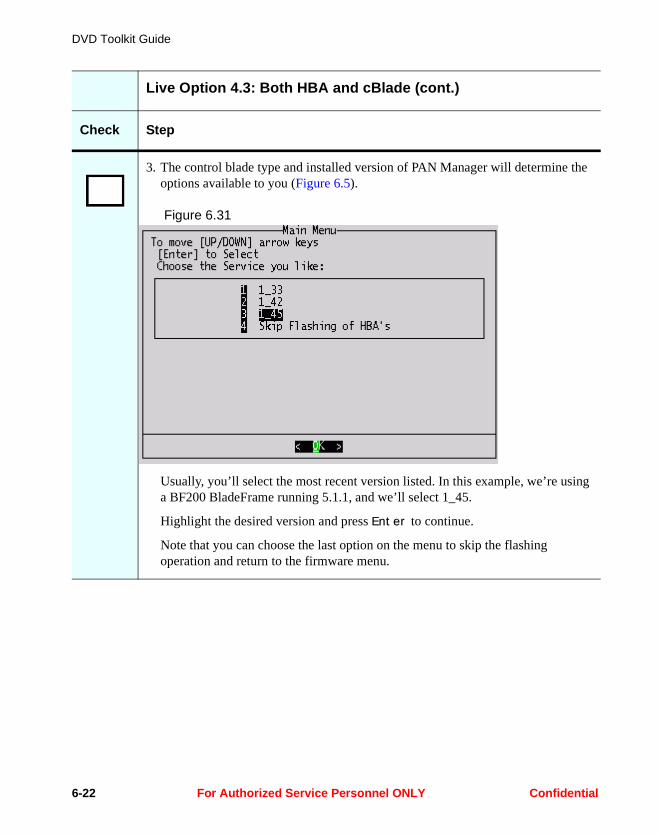
DVD Toolkit Guide
3. The control blade type and installed version of PAN Manager will determine the options available to you (Figure 6.5).
Figure 6.31
Usually, you’ll select the most recent version listed. In this example, we’re using a BF200 BladeFrame running 5.1.1, and we’ll select 1_45.
Highlight the desired version and press Enter to continue.
Note that you can choose the last option on the menu to skip the flashing operation and return to the firmware menu.
Live Option 4.3: Both HBA and cBlade (cont.)
Check Step
6-22 For Authorized Service Personnel ONLY Confidential
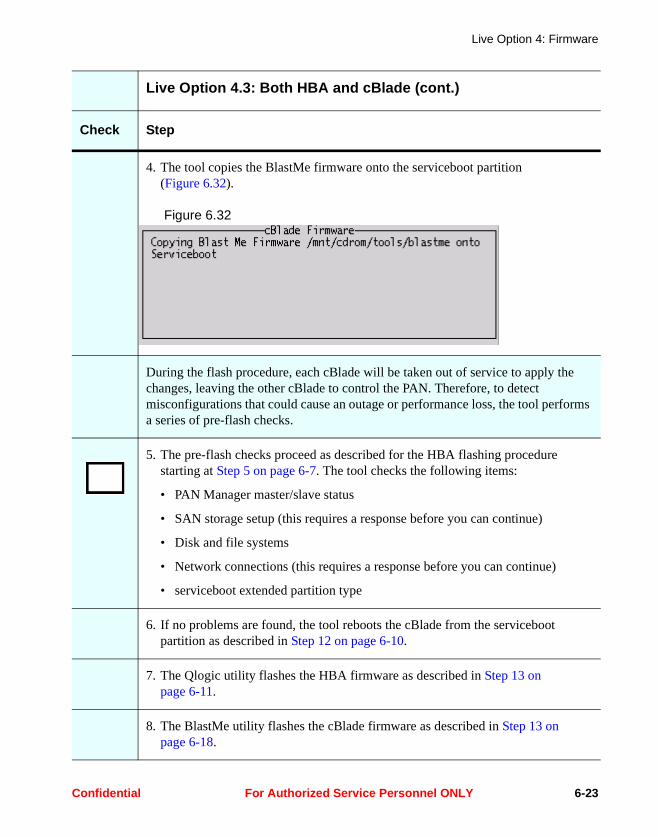
Live Option 4: Firmware
4. The tool copies the BlastMe firmware onto the serviceboot partition (Figure 6.32).
Figure 6.32
During the flash procedure, each cBlade will be taken out of service to apply the changes, leaving the other cBlade to control the PAN. Therefore, to detect misconfigurations that could cause an outage or performance loss, the tool performs a series of pre-flash checks.
5. The pre-flash checks proceed as described for the HBA flashing procedure starting at Step 5 on page 6-7. The tool checks the following items:
• PAN Manager master/slave status
• SAN storage setup (this requires a response before you can continue)
• Disk and file systems
• Network connections (this requires a response before you can continue)
• serviceboot extended partition type
6. If no problems are found, the tool reboots the cBlade from the serviceboot partition as described in Step 12 on page 6-10.
7. The Qlogic utility flashes the HBA firmware as described in Step 13 on page 6-11.
8. The BlastMe utility flashes the cBlade firmware as described in Step 13 on page 6-18.
Live Option 4.3: Both HBA and cBlade (cont.)
Check Step
Confidential For Authorized Service Personnel ONLY 6-23
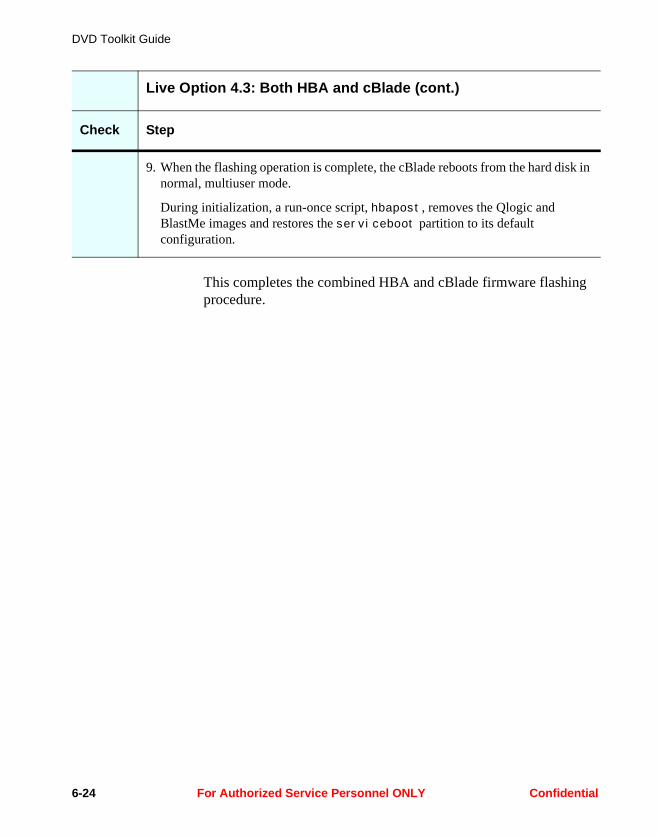
DVD Toolkit Guide
This completes the combined HBA and cBlade firmware flashing procedure.
9. When the flashing operation is complete, the cBlade reboots from the hard disk in normal, multiuser mode.
During initialization, a run-once script, hbapost, removes the Qlogic and BlastMe images and restores the serviceboot partition to its default configuration.
Live Option 4.3: Both HBA and cBlade (cont.)
Check Step
6-24 For Authorized Service Personnel ONLY Confidential
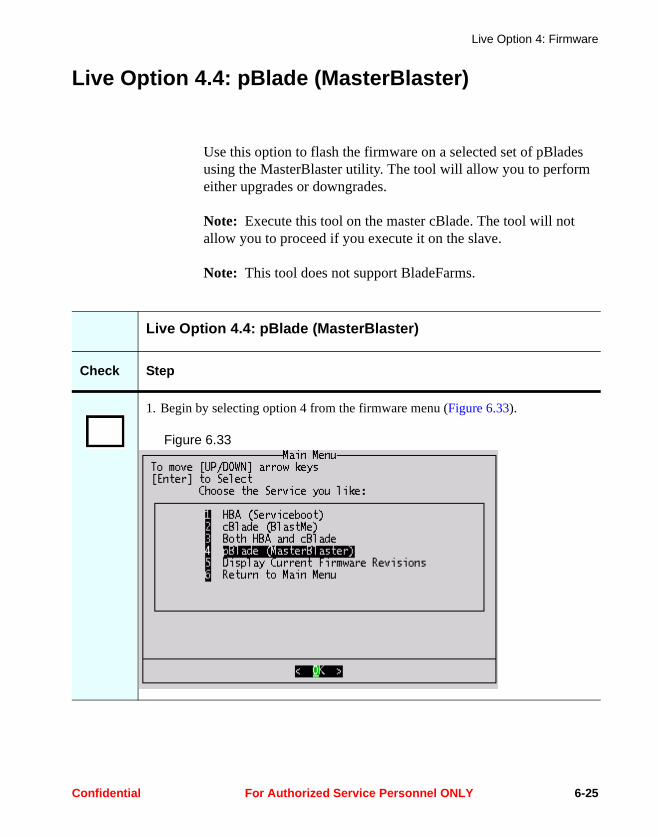
Live Option 4: Firmware
Live Option 4.4: pBlade (MasterBlaster)
Use this option to flash the firmware on a selected set of pBlades using the MasterBlaster utility. The tool will allow you to perform either upgrades or downgrades.
Note: Execute this tool on the master cBlade. The tool will not allow you to proceed if you execute it on the slave.
Note: This tool does not support BladeFarms.
Live Option 4.4: pBlade (MasterBlaster)
Check Step
1. Begin by selecting option 4 from the firmware menu (Figure 6.33).
Figure 6.33
Confidential For Authorized Service Personnel ONLY 6-25
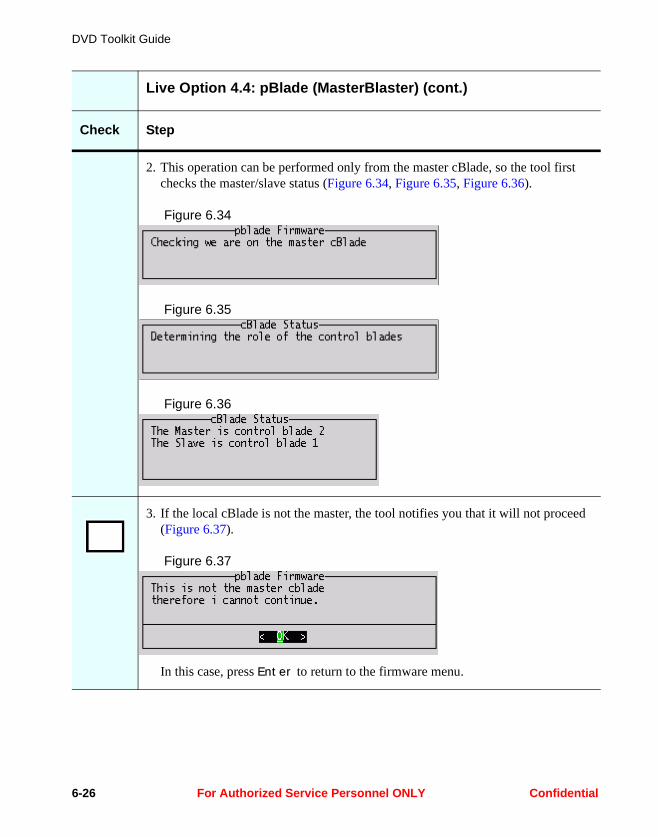
DVD Toolkit Guide
2. This operation can be performed only from the master cBlade, so the tool first checks the master/slave status (Figure 6.34, Figure 6.35, Figure 6.36).
Figure 6.34
Figure 6.35
Figure 6.36
3. If the local cBlade is not the master, the tool notifies you that it will not proceed (Figure 6.37).
Figure 6.37
In this case, press Enter to return to the firmware menu.
Live Option 4.4: pBlade (MasterBlaster) (cont.)
Check Step
6-26 For Authorized Service Personnel ONLY Confidential

Live Option 4: Firmware
4. Otherwise, the tool determines which pBlades are shut down (Figure 6.38, Figure 6.39, Figure 6.40).
Figure 6.38
Figure 6.39
Figure 6.40
Live Option 4.4: pBlade (MasterBlaster) (cont.)
Check Step
Confidential For Authorized Service Personnel ONLY 6-27
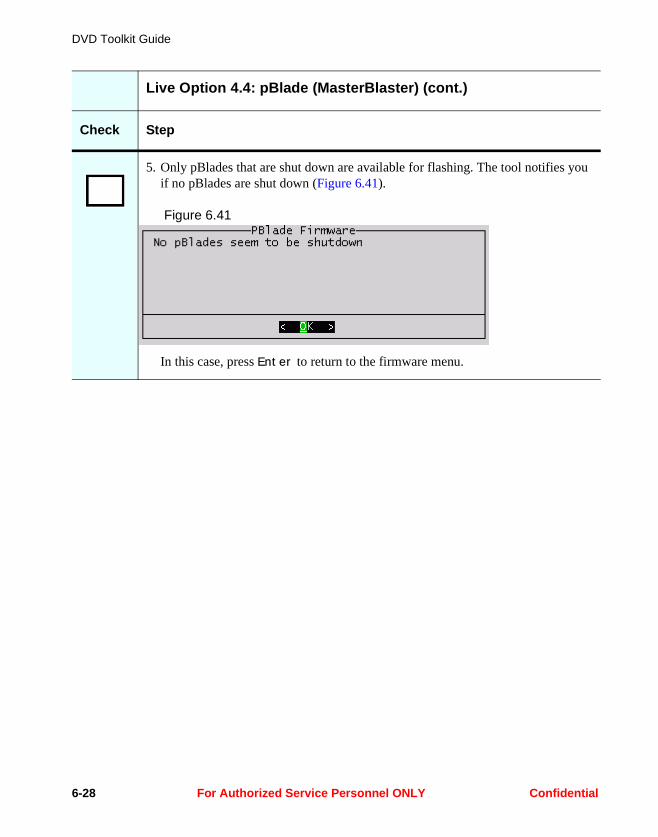
DVD Toolkit Guide
5. Only pBlades that are shut down are available for flashing. The tool notifies you if no pBlades are shut down (Figure 6.41).
Figure 6.41
In this case, press Enter to return to the firmware menu.
Live Option 4.4: pBlade (MasterBlaster) (cont.)
Check Step
6-28 For Authorized Service Personnel ONLY Confidential

Live Option 4: Firmware
6. Otherwise, the tool displays all pBlades that are currently shut down. The list includes the firmware currently installed on each pBlade (Figure 6.42).
Figure 6.42
Use the right and left arrow keys to scroll horizontally. Use the up and down arrow keys to change the highlighted row.
Press the space bar to select or deselect the highlighted blade. Selected blades are indicated by an asterisk (‘*’) in the brackets to the left.
Live Option 4.4: pBlade (MasterBlaster) (cont.)
Check Step
Confidential For Authorized Service Personnel ONLY 6-29

DVD Toolkit Guide
7. In this example, we’ll select blades p5 and p6 (Figure 6.43).
Figure 6.43
After you select the blades you want to flash, press Enter to continue.
Live Option 4.4: pBlade (MasterBlaster) (cont.)
Check Step
6-30 For Authorized Service Personnel ONLY Confidential
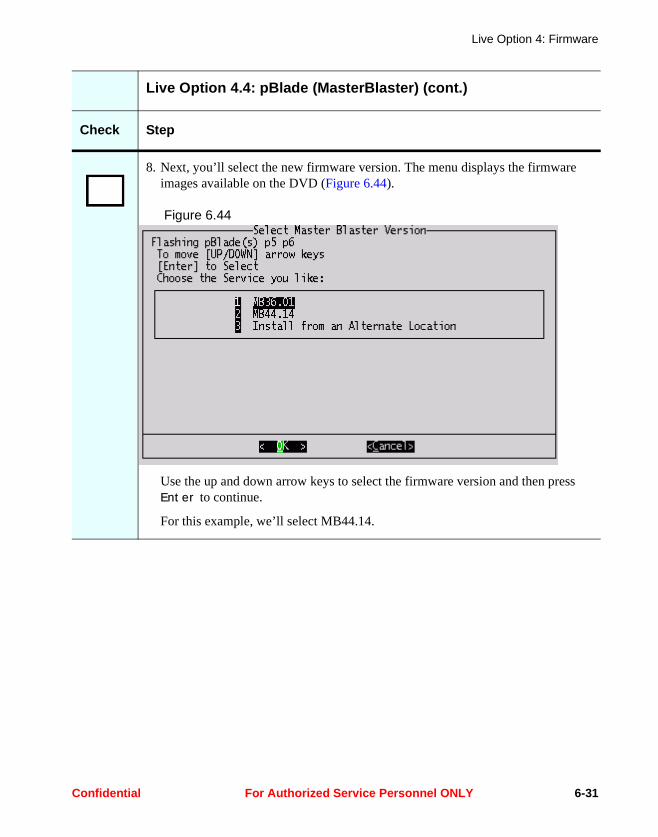
Live Option 4: Firmware
8. Next, you’ll select the new firmware version. The menu displays the firmware images available on the DVD (Figure 6.44).
Figure 6.44
Use the up and down arrow keys to select the firmware version and then press Enter to continue.
For this example, we’ll select MB44.14.
Live Option 4.4: pBlade (MasterBlaster) (cont.)
Check Step
Confidential For Authorized Service Personnel ONLY 6-31
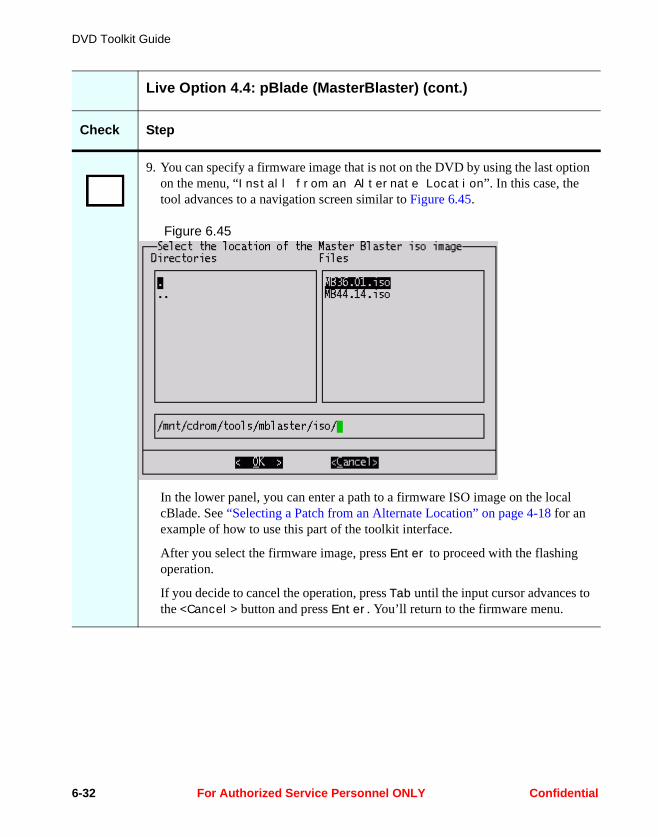
DVD Toolkit Guide
9. You can specify a firmware image that is not on the DVD by using the last option on the menu, “Install from an Alternate Location”. In this case, the tool advances to a navigation screen similar to Figure 6.45.
Figure 6.45
In the lower panel, you can enter a path to a firmware ISO image on the local cBlade. See “Selecting a Patch from an Alternate Location” on page 4-18 for an example of how to use this part of the toolkit interface.
After you select the firmware image, press Enter to proceed with the flashing operation.
If you decide to cancel the operation, press Tab until the input cursor advances to the <Cancel> button and press Enter. You’ll return to the firmware menu.
Live Option 4.4: pBlade (MasterBlaster) (cont.)
Check Step
6-32 For Authorized Service Personnel ONLY Confidential
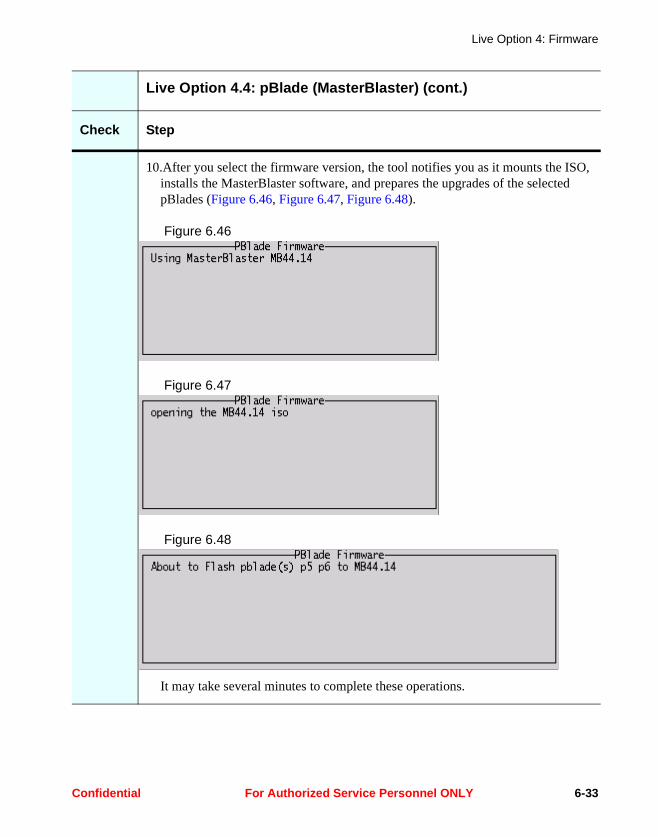
Live Option 4: Firmware
10.After you select the firmware version, the tool notifies you as it mounts the ISO, installs the MasterBlaster software, and prepares the upgrades of the selected pBlades (Figure 6.46, Figure 6.47, Figure 6.48).
Figure 6.46
Figure 6.47
Figure 6.48
It may take several minutes to complete these operations.
Live Option 4.4: pBlade (MasterBlaster) (cont.)
Check Step
Confidential For Authorized Service Personnel ONLY 6-33
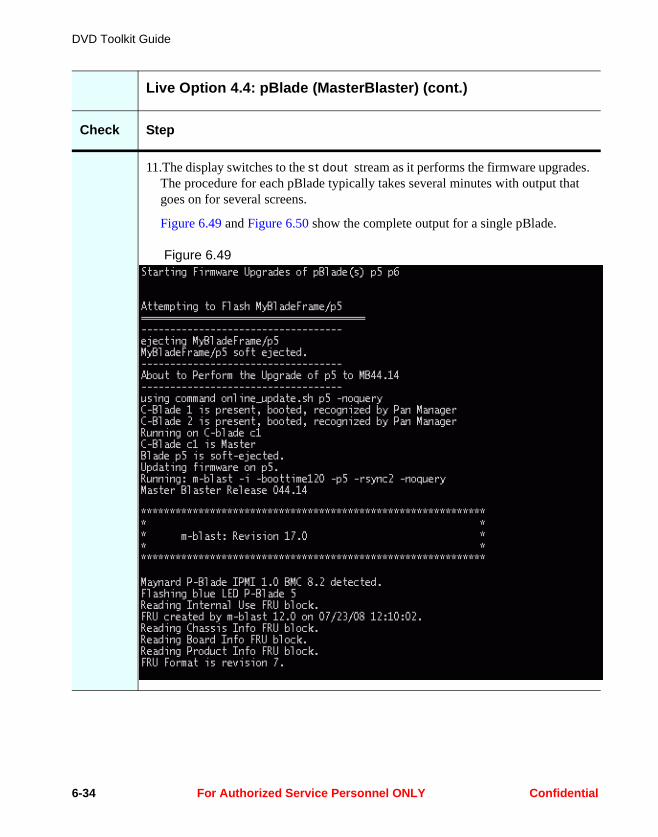
DVD Toolkit Guide
11.The display switches to the stdout stream as it performs the firmware upgrades. The procedure for each pBlade typically takes several minutes with output that goes on for several screens.
Figure 6.49 and Figure 6.50 show the complete output for a single pBlade.
Figure 6.49
Live Option 4.4: pBlade (MasterBlaster) (cont.)
Check Step
6-34 For Authorized Service Personnel ONLY Confidential

Live Option 4: Firmware
Figure 6.50
Live Option 4.4: pBlade (MasterBlaster) (cont.)
Check Step
Confidential For Authorized Service Personnel ONLY 6-35

DVD Toolkit Guide
12.At the end of the flashing process, the tool returns to the toolkit interface and displays a report that captures all the output from the operation (Figure 6.51).
Figure 6.51
As with all reports, you can use the up, down, right, and left arrow keys to scroll through the displayed information.
Press Enter to continue.
Live Option 4.4: pBlade (MasterBlaster) (cont.)
Check Step
6-36 For Authorized Service Personnel ONLY Confidential
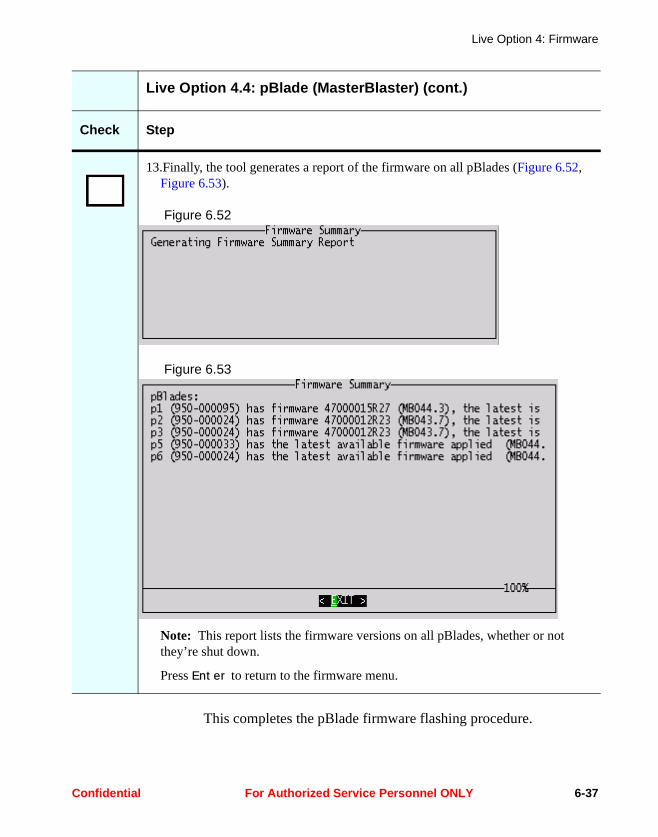
Live Option 4: Firmware
This completes the pBlade firmware flashing procedure.
13.Finally, the tool generates a report of the firmware on all pBlades (Figure 6.52, Figure 6.53).
Figure 6.52
Figure 6.53
Note: This report lists the firmware versions on all pBlades, whether or not they’re shut down.
Press Enter to return to the firmware menu.
Live Option 4.4: pBlade (MasterBlaster) (cont.)
Check Step
Confidential For Authorized Service Personnel ONLY 6-37
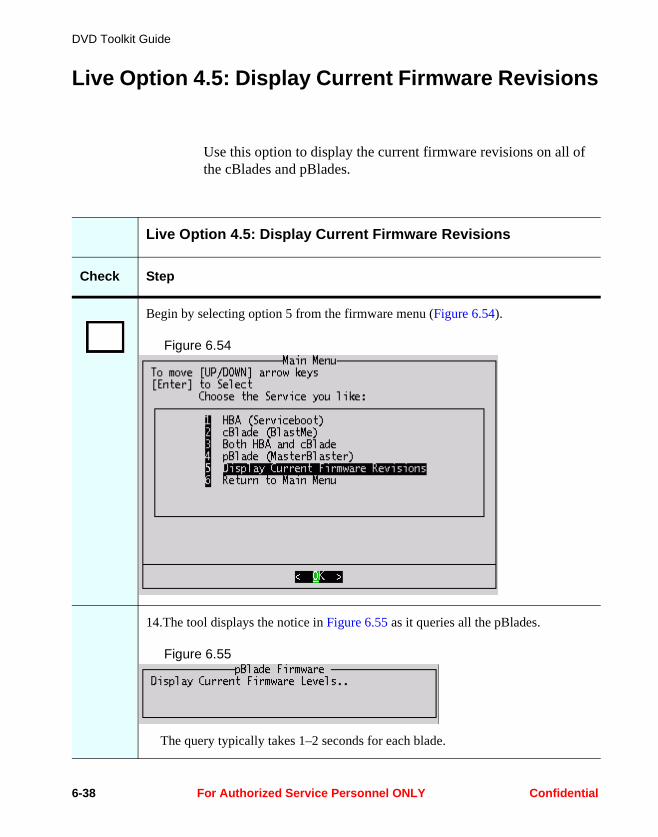
DVD Toolkit Guide
Live Option 4.5: Display Current Firmware Revisions
Use this option to display the current firmware revisions on all of the cBlades and pBlades.
Live Option 4.5: Display Current Firmware Revisions
Check Step
Begin by selecting option 5 from the firmware menu (Figure 6.54).
Figure 6.54
14.The tool displays the notice in Figure 6.55 as it queries all the pBlades.
Figure 6.55
The query typically takes 1–2 seconds for each blade.
6-38 For Authorized Service Personnel ONLY Confidential

Live Option 4: Firmware
15.Figure 6.56 shows the initial view of a typical report.
Figure 6.56
Live Option 4.5: Display Current Firmware Revisions (cont.)
Check Step
Confidential For Authorized Service Personnel ONLY 6-39

DVD Toolkit Guide
16.To see data that isn’t visible in the initial view, use the arrow keys to scroll vertically or horizontally. Figure 6.57 shows the right side of the report in Figure 6.56.
Figure 6.57
Press Enter to return to the firmware menu.
Live Option 4.5: Display Current Firmware Revisions (cont.)
Check Step
6-40 For Authorized Service Personnel ONLY Confidential
Chapter 7Live Option 5: pBlade IVP
The pBlade Installation Verification Program (PBIVP) is a system exercise utility that you run from a cBlade to verify the hardware integrity of a replacement or add-on pBlade after it has been installed. It should be uninstalled from the platform after use. For more information, see Using PBIVP, which is available from Fujitsu Siemens Computers customer support or your authorized support vendor.
Confidential For Authorized Service Personnel ONLY 7-1
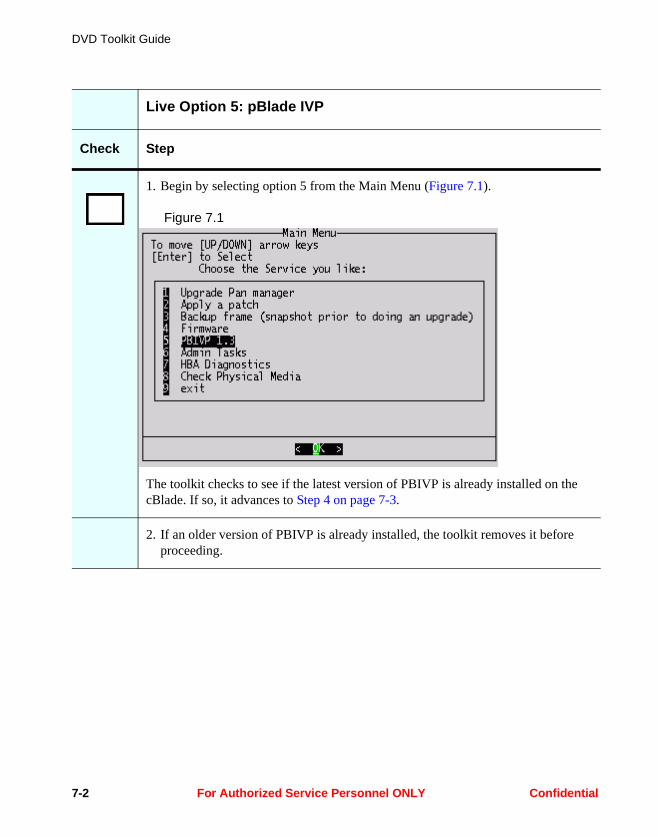
DVD Toolkit Guide
Live Option 5: pBlade IVP
Check Step
1. Begin by selecting option 5 from the Main Menu (Figure 7.1).
Figure 7.1
The toolkit checks to see if the latest version of PBIVP is already installed on the cBlade. If so, it advances to Step 4 on page 7-3.
2. If an older version of PBIVP is already installed, the toolkit removes it before proceeding.
7-2 For Authorized Service Personnel ONLY Confidential

Live Option 5: pBlade IVP
3. The toolkit installs the latest version of PBIVP from the DVD (Figure 7.2).
Figure 7.2
4. After ensuring that the latest version of PBIVP is installed, the toolkit asks if you want to run it now (Figure 7.3).
Figure 7.3
Press Y and Enter to run PBIVP. Otherwise, press N and Enter to return to the Main Menu.
Live Option 5: pBlade IVP (cont.)
Check Step
Confidential For Authorized Service Personnel ONLY 7-3

DVD Toolkit Guide
5. If you choose to run PBIVP after installation, its main menu appears (Figure 7.4).
Figure 7.4
See Using PBIVP for a complete description of PBIVP operation.
6. When you’re finished, you can use PBIVP option 9 to uninstall the software, which is the recommended action (Figure 7.5).
Figure 7.5
You’ll automatically return to the Main Menu after the uninstallation is complete.
You can also choose X from the PBIVP menu to exit without uninstalling PBIVP.
Live Option 5: pBlade IVP (cont.)
Check Step
7-4 For Authorized Service Personnel ONLY Confidential

Chapter 8Live Option 6: Admin
Tasks
This option allows you perform a variety of administrative tasks.
Live Option 6: Admin Tasks
Check Step
1. Begin by selecting option 6 from the Main Menu (Figure 8.1).
Figure 8.1
Confidential For Authorized Service Personnel ONLY 8-1
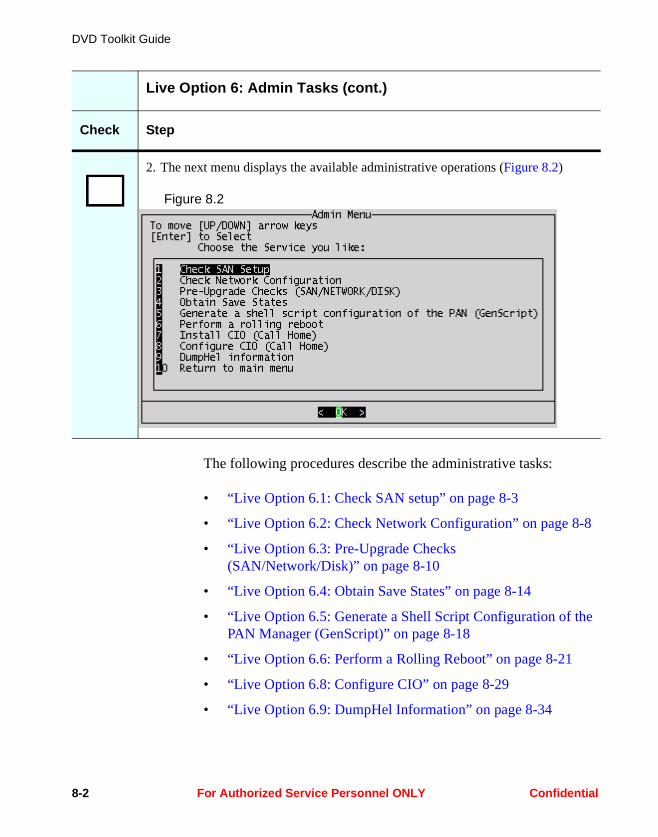
DVD Toolkit Guide
The following procedures describe the administrative tasks:
• “Live Option 6.1: Check SAN setup” on page 8-3
• “Live Option 6.2: Check Network Configuration” on page 8-8
• “Live Option 6.3: Pre-Upgrade Checks (SAN/Network/Disk)” on page 8-10
• “Live Option 6.4: Obtain Save States” on page 8-14
• “Live Option 6.5: Generate a Shell Script Configuration of the PAN Manager (GenScript)” on page 8-18
• “Live Option 6.6: Perform a Rolling Reboot” on page 8-21
• “Live Option 6.8: Configure CIO” on page 8-29
• “Live Option 6.9: DumpHel Information” on page 8-34
2. The next menu displays the available administrative operations (Figure 8.2)
Figure 8.2
Live Option 6: Admin Tasks (cont.)
Check Step
8-2 For Authorized Service Personnel ONLY Confidential
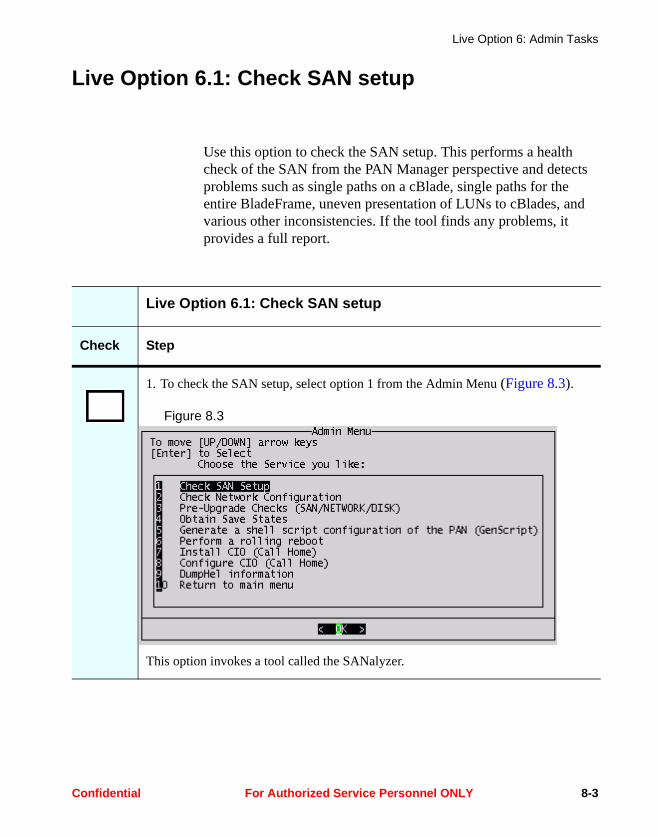
Live Option 6: Admin Tasks
Live Option 6.1: Check SAN setup
Use this option to check the SAN setup. This performs a health check of the SAN from the PAN Manager perspective and detects problems such as single paths on a cBlade, single paths for the entire BladeFrame, uneven presentation of LUNs to cBlades, and various other inconsistencies. If the tool finds any problems, it provides a full report.
Live Option 6.1: Check SAN setup
Check Step
1. To check the SAN setup, select option 1 from the Admin Menu (Figure 8.3).
Figure 8.3
This option invokes a tool called the SANalyzer.
Confidential For Authorized Service Personnel ONLY 8-3

DVD Toolkit Guide
2. The tool briefly displays a notice when it starts the check (Figure 8.4).
Figure 8.4
It then displays another notice while the check proceeds (Figure 8.5).
Figure 8.5
The time required for the diagnosis depends on the complexity of your SAN setup, but it’s typically no more than a few minutes.
3. A final notice appears when the check is complete (Figure 8.6).
Figure 8.6
This message is on-screen for only a few seconds before the next screen displays the results.
Live Option 6.1: Check SAN setup (cont.)
Check Step
8-4 For Authorized Service Personnel ONLY Confidential
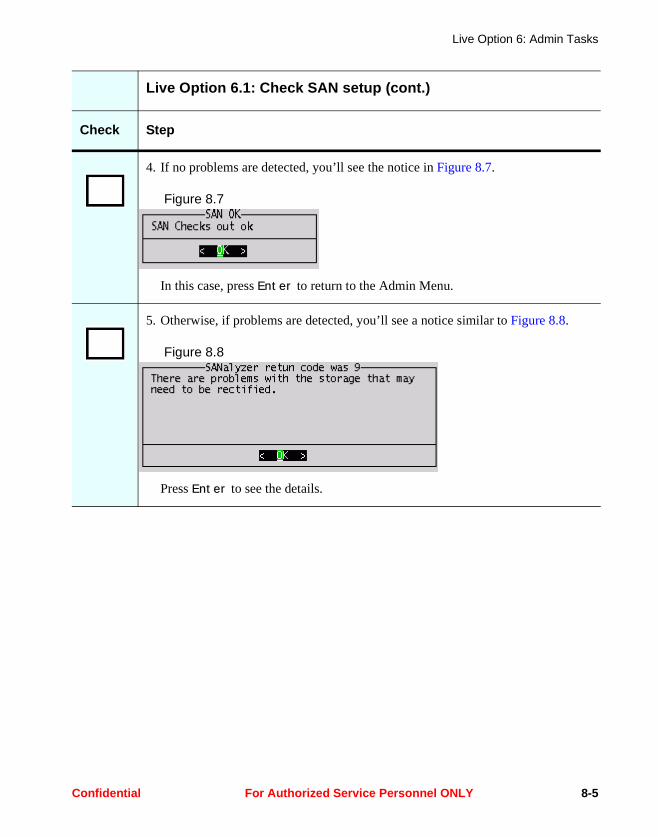
Live Option 6: Admin Tasks
4. If no problems are detected, you’ll see the notice in Figure 8.7.
Figure 8.7
In this case, press Enter to return to the Admin Menu.
5. Otherwise, if problems are detected, you’ll see a notice similar to Figure 8.8.
Figure 8.8
Press Enter to see the details.
Live Option 6.1: Check SAN setup (cont.)
Check Step
Confidential For Authorized Service Personnel ONLY 8-5
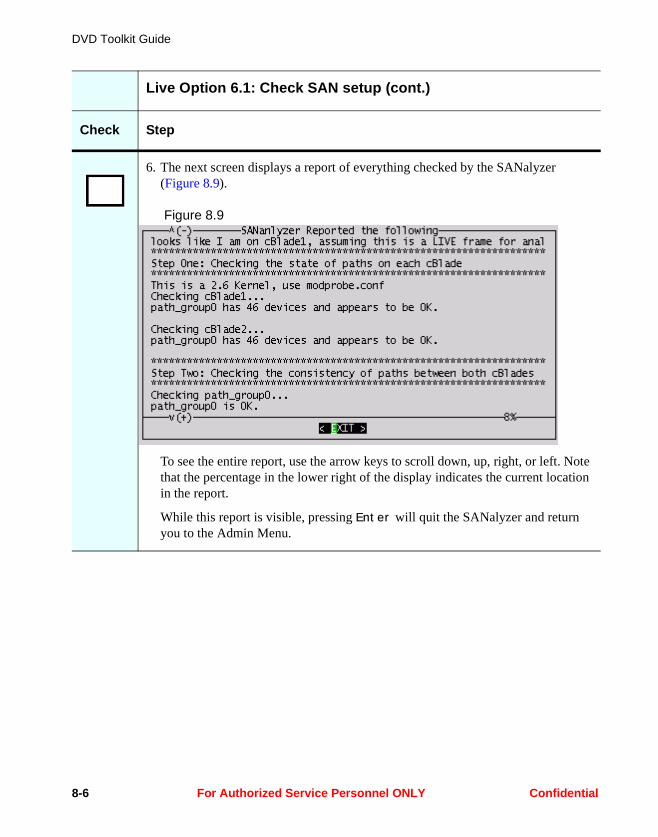
DVD Toolkit Guide
6. The next screen displays a report of everything checked by the SANalyzer (Figure 8.9).
Figure 8.9
To see the entire report, use the arrow keys to scroll down, up, right, or left. Note that the percentage in the lower right of the display indicates the current location in the report.
While this report is visible, pressing Enter will quit the SANalyzer and return you to the Admin Menu.
Live Option 6.1: Check SAN setup (cont.)
Check Step
8-6 For Authorized Service Personnel ONLY Confidential

Live Option 6: Admin Tasks
7. In this example, the only problems detected were in the cBlade multipath connections (Figure 8.10).
Figure 8.10
We recommend that you obtain assistance from Fujitsu Siemens Computers customer support or your authorized support vendor to resolve problems detected by the SANalyzer.
Live Option 6.1: Check SAN setup (cont.)
Check Step
Confidential For Authorized Service Personnel ONLY 8-7
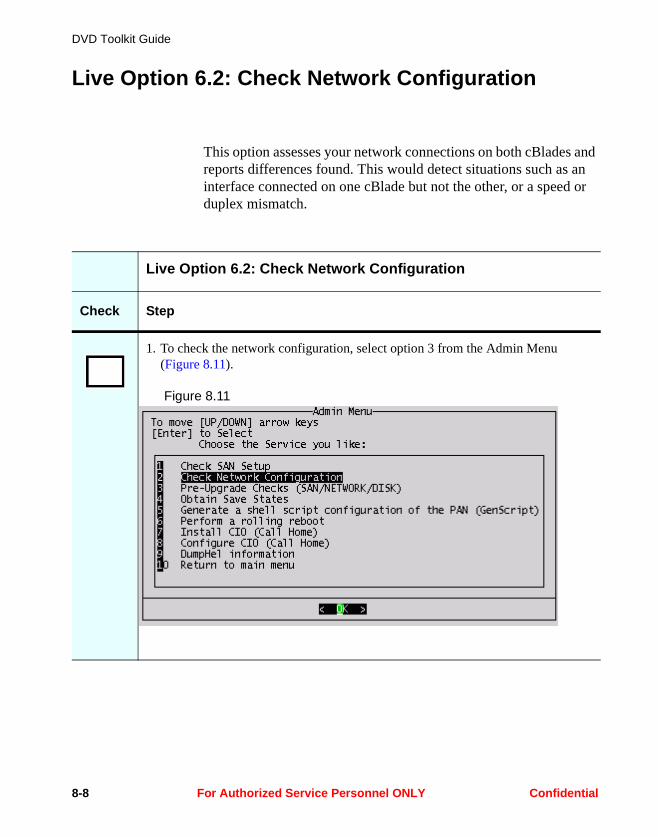
DVD Toolkit Guide
Live Option 6.2: Check Network Configuration
This option assesses your network connections on both cBlades and reports differences found. This would detect situations such as an interface connected on one cBlade but not the other, or a speed or duplex mismatch.
Live Option 6.2: Check Network Configuration
Check Step
1. To check the network configuration, select option 3 from the Admin Menu (Figure 8.11).
Figure 8.11
8-8 For Authorized Service Personnel ONLY Confidential
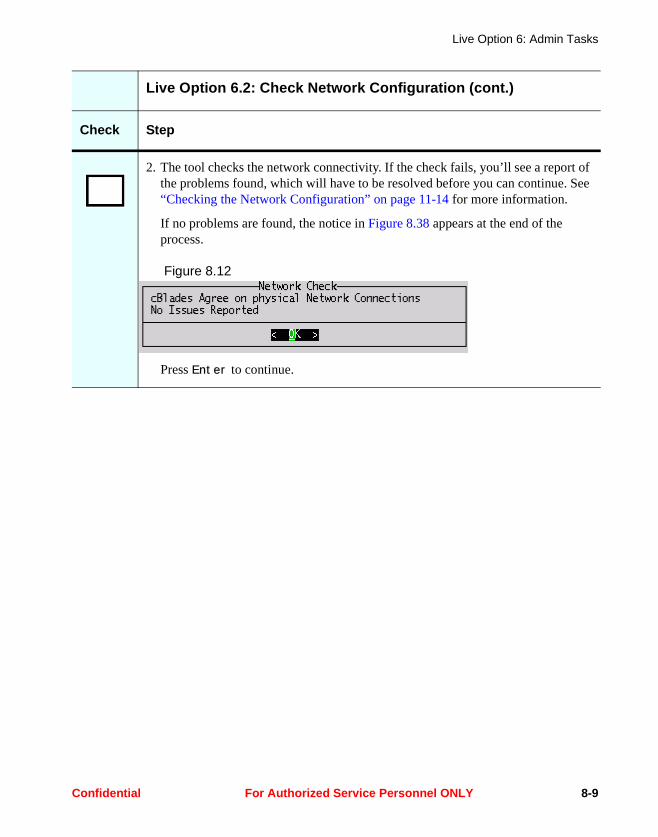
Live Option 6: Admin Tasks
2. The tool checks the network connectivity. If the check fails, you’ll see a report of the problems found, which will have to be resolved before you can continue. See “Checking the Network Configuration” on page 11-14 for more information.
If no problems are found, the notice in Figure 8.38 appears at the end of the process.
Figure 8.12
Press Enter to continue.
Live Option 6.2: Check Network Configuration (cont.)
Check Step
Confidential For Authorized Service Personnel ONLY 8-9

DVD Toolkit Guide
Live Option 6.3: Pre-Upgrade Checks (SAN/Network/Disk)
This option combines options 1 and 3 above with an assessment of your cBlade file systems.
Live Option 6.3: Pre-Upgrade Checks (SAN/Network/Disk)
Check Step
1. Select option 3 from the Admin Menu (Figure 8.11).
Figure 8.13
8-10 For Authorized Service Personnel ONLY Confidential
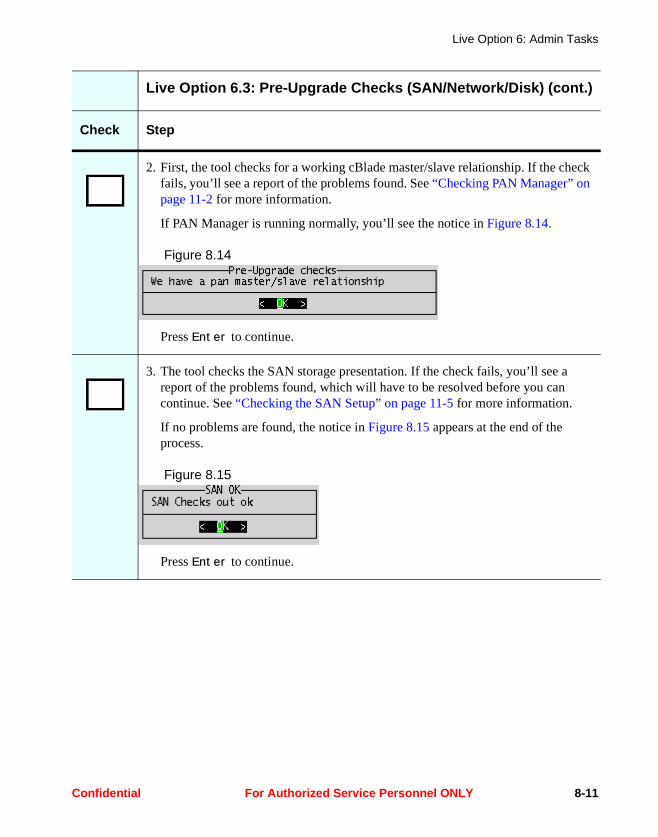
Live Option 6: Admin Tasks
2. First, the tool checks for a working cBlade master/slave relationship. If the check fails, you’ll see a report of the problems found. See “Checking PAN Manager” on page 11-2 for more information.
If PAN Manager is running normally, you’ll see the notice in Figure 8.14.
Figure 8.14
Press Enter to continue.
3. The tool checks the SAN storage presentation. If the check fails, you’ll see a report of the problems found, which will have to be resolved before you can continue. See “Checking the SAN Setup” on page 11-5 for more information.
If no problems are found, the notice in Figure 8.15 appears at the end of the process.
Figure 8.15
Press Enter to continue.
Live Option 6.3: Pre-Upgrade Checks (SAN/Network/Disk) (cont.)
Check Step
Confidential For Authorized Service Personnel ONLY 8-11

DVD Toolkit Guide
4. The tool checks the network connectivity. If the check fails, you’ll see a report of the problems found, which will have to be resolved before you can continue. See “Checking the Network Configuration” on page 11-14 for more information.
If no problems are found, the notice in Figure 8.38 appears at the end of the process.
Figure 8.16
Press Enter to continue.
5. The tool checks the disk and file systems. If the check fails, you’ll see a report of the problems found, which will have to be resolved before you can continue. See “Checking the Disk” on page 11-10 for more information.
If no problems are found, the tool automatically continues to the next step.
Note: The screen may go blank for 20–30 seconds before the disk check displays the first notice.
6. If all pre-upgrade checks are successful, the tool displays the message in Figure 8.17.
Figure 8.17
Press Enter to return to the Admin Menu.
Live Option 6.3: Pre-Upgrade Checks (SAN/Network/Disk) (cont.)
Check Step
8-12 For Authorized Service Personnel ONLY Confidential
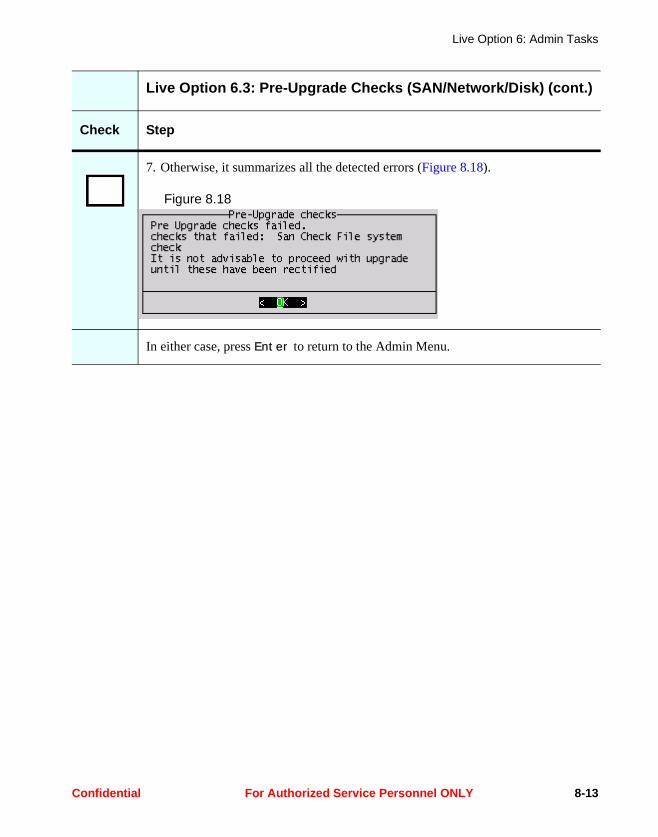
Live Option 6: Admin Tasks
7. Otherwise, it summarizes all the detected errors (Figure 8.18).
Figure 8.18
In either case, press Enter to return to the Admin Menu.
Live Option 6.3: Pre-Upgrade Checks (SAN/Network/Disk) (cont.)
Check Step
Confidential For Authorized Service Personnel ONLY 8-13

DVD Toolkit Guide
Live Option 6.4: Obtain Save States
This option obtains save states from both cBlades and stores them in the /crash_dumps directory on the local cBlade.
Live Option 6.4: Obtain Save States
Check Step
1. Select option 5 from the Admin Menu (Figure 8.19).
Figure 8.19
8-14 For Authorized Service Personnel ONLY Confidential
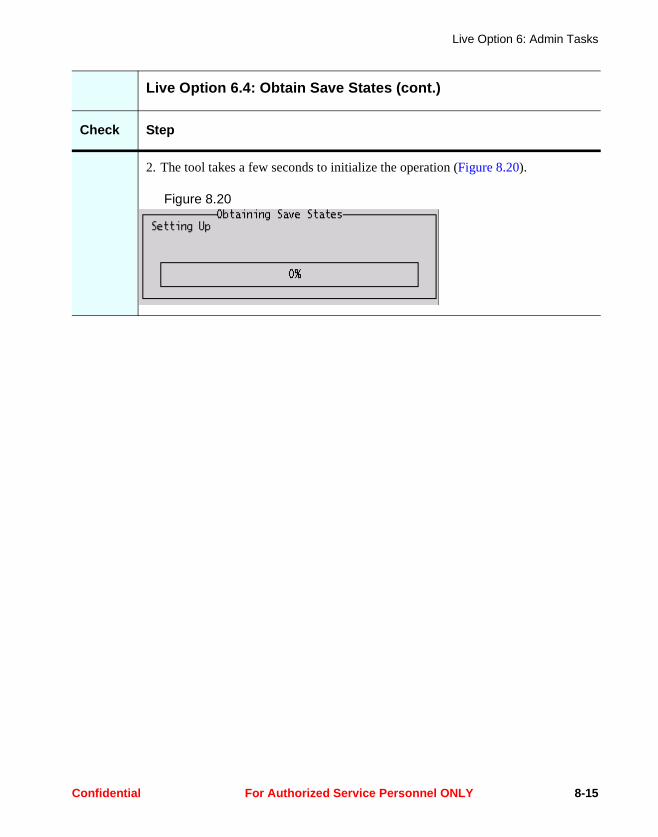
Live Option 6: Admin Tasks
2. The tool takes a few seconds to initialize the operation (Figure 8.20).
Figure 8.20
Live Option 6.4: Obtain Save States (cont.)
Check Step
Confidential For Authorized Service Personnel ONLY 8-15
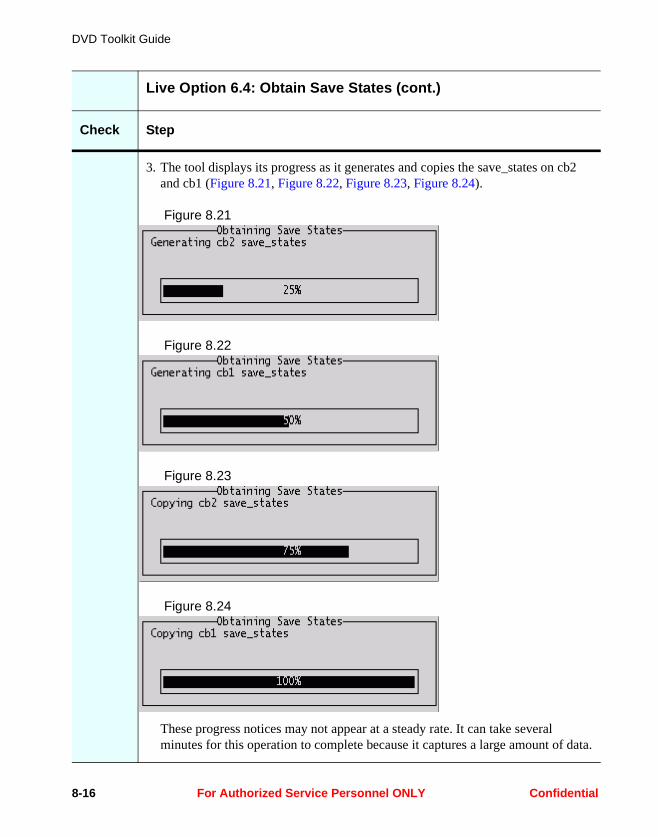
DVD Toolkit Guide
3. The tool displays its progress as it generates and copies the save_states on cb2 and cb1 (Figure 8.21, Figure 8.22, Figure 8.23, Figure 8.24).
Figure 8.21
Figure 8.22
Figure 8.23
Figure 8.24
These progress notices may not appear at a steady rate. It can take several minutes for this operation to complete because it captures a large amount of data.
Live Option 6.4: Obtain Save States (cont.)
Check Step
8-16 For Authorized Service Personnel ONLY Confidential
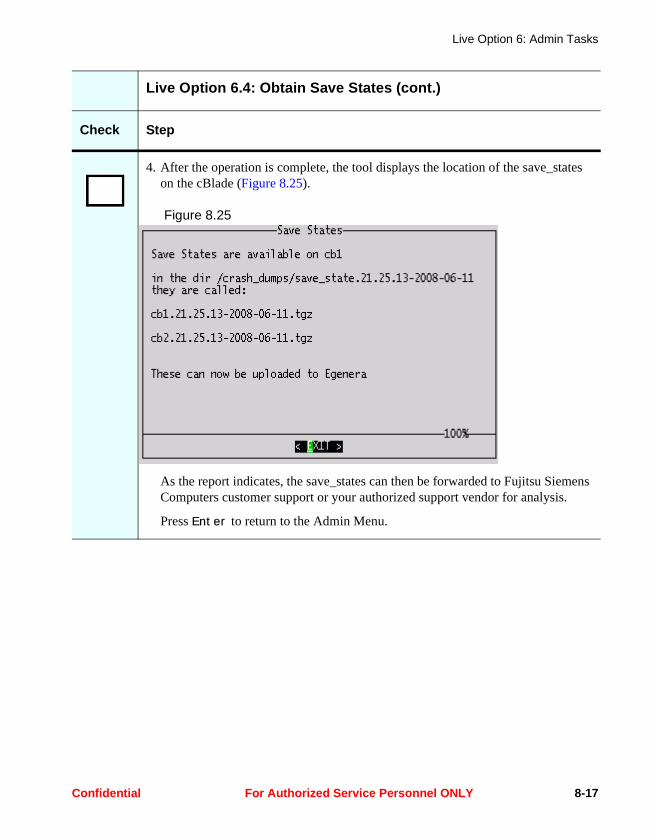
Live Option 6: Admin Tasks
4. After the operation is complete, the tool displays the location of the save_states on the cBlade (Figure 8.25).
Figure 8.25
As the report indicates, the save_states can then be forwarded to Fujitsu Siemens Computers customer support or your authorized support vendor for analysis.
Press Enter to return to the Admin Menu.
Live Option 6.4: Obtain Save States (cont.)
Check Step
Confidential For Authorized Service Personnel ONLY 8-17

DVD Toolkit Guide
Live Option 6.5: Generate a Shell Script Configuration of the PAN Manager (GenScript)
Use this option to generate a shell script with PAN Manager commands that can be used to re-create all or part of your environment on another BladeFrame (a GenScript).
Note: GenScript is not supported for Linux kernel 2.6, which is required for PAN Manager 5.2.0. When the tool detects this configuration, it will notify you and then return to the Admin Menu.
Live Option 6.5: Generate a Shell Script Configuration of the PAN Manager (GenScript)
Check Step
1. Select option 6 from the Admin Menu (Figure 8.26).
Figure 8.26
8-18 For Authorized Service Personnel ONLY Confidential
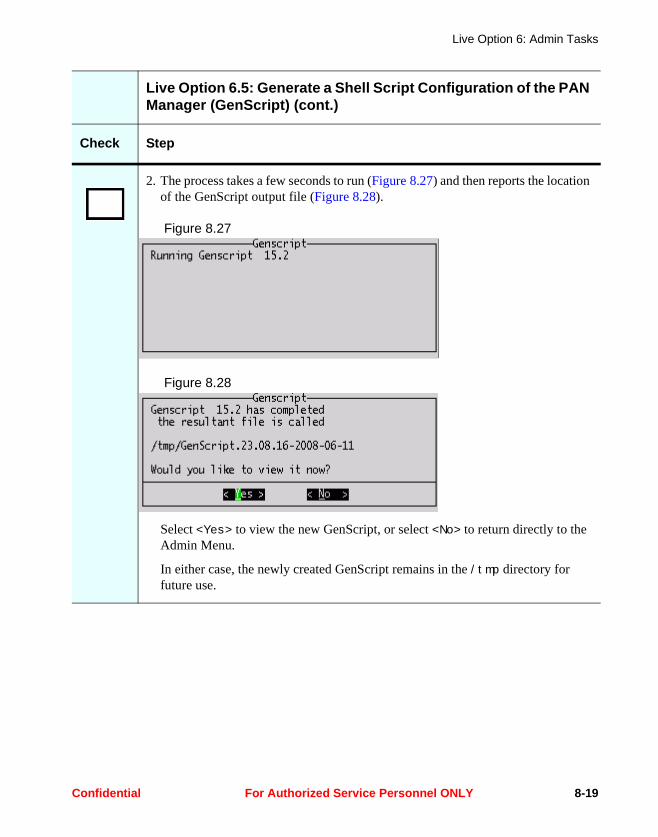
Live Option 6: Admin Tasks
2. The process takes a few seconds to run (Figure 8.27) and then reports the location of the GenScript output file (Figure 8.28).
Figure 8.27
Figure 8.28
Select <Yes> to view the new GenScript, or select <No> to return directly to the Admin Menu.
In either case, the newly created GenScript remains in the /tmp directory for future use.
Live Option 6.5: Generate a Shell Script Configuration of the PAN Manager (GenScript) (cont.)
Check Step
Confidential For Authorized Service Personnel ONLY 8-19
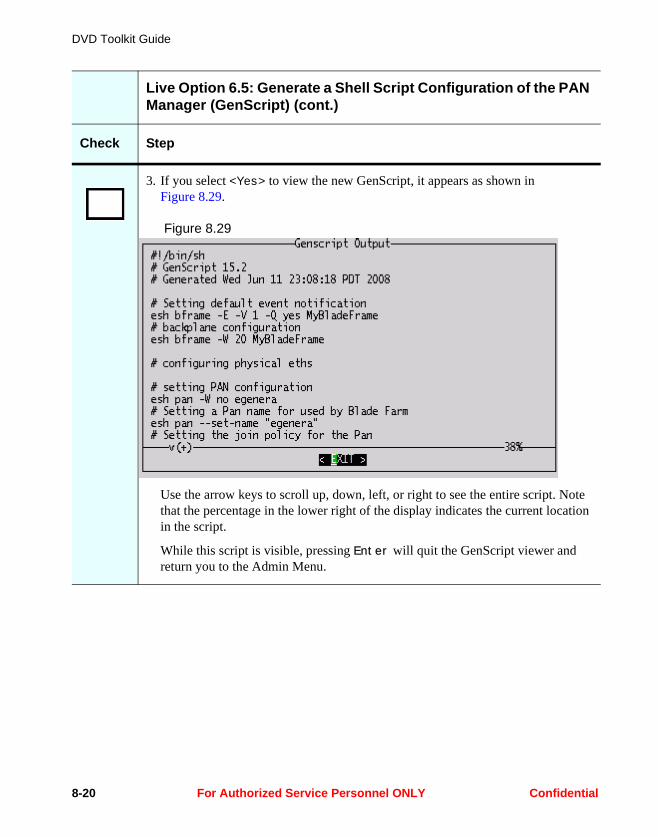
DVD Toolkit Guide
3. If you select <Yes> to view the new GenScript, it appears as shown in Figure 8.29.
Figure 8.29
Use the arrow keys to scroll up, down, left, or right to see the entire script. Note that the percentage in the lower right of the display indicates the current location in the script.
While this script is visible, pressing Enter will quit the GenScript viewer and return you to the Admin Menu.
Live Option 6.5: Generate a Shell Script Configuration of the PAN Manager (GenScript) (cont.)
Check Step
8-20 For Authorized Service Personnel ONLY Confidential

Live Option 6: Admin Tasks
Live Option 6.6: Perform a Rolling Reboot
Use this option to perform a rolling reboot. The tool reboots the remote cBlade first and waits for it to resume normal operation and rejoin the PAN Manager. Only then does it reboot the local cBlade. This re-initializes both cBlades without losing the PAN Manager functionality. It may also reveal some issues that were not apparent beforehand.
Live Option 6.6: Perform a Rolling Reboot
Check Step
1. To perform a controlled rolling reboot of the cBlades, select option 6 from the Admin Menu (Figure 8.30).
Figure 8.30
Note: You can only run this option from the master cBlade, and not the Slave.
Confidential For Authorized Service Personnel ONLY 8-21
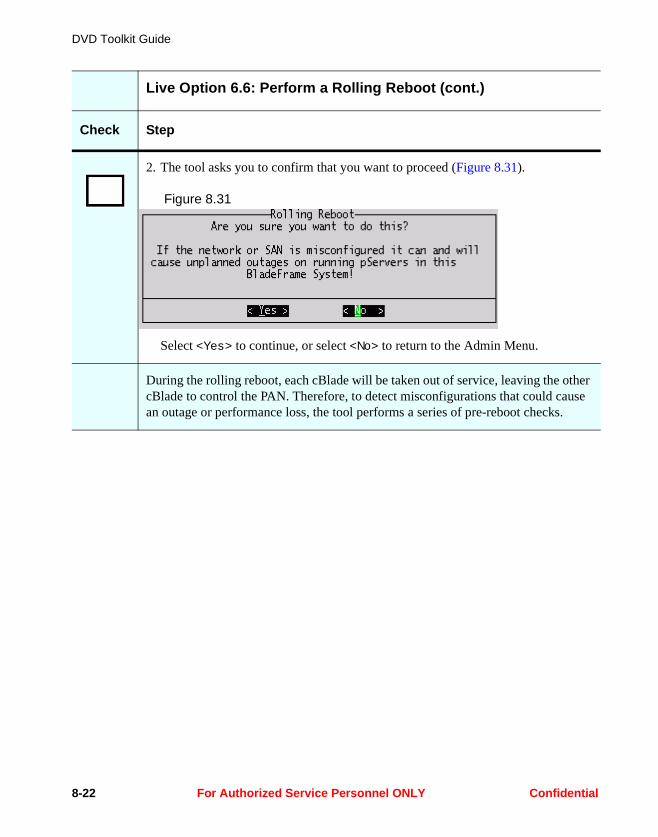
DVD Toolkit Guide
2. The tool asks you to confirm that you want to proceed (Figure 8.31).
Figure 8.31
Select <Yes> to continue, or select <No> to return to the Admin Menu.
During the rolling reboot, each cBlade will be taken out of service, leaving the other cBlade to control the PAN. Therefore, to detect misconfigurations that could cause an outage or performance loss, the tool performs a series of pre-reboot checks.
Live Option 6.6: Perform a Rolling Reboot (cont.)
Check Step
8-22 For Authorized Service Personnel ONLY Confidential
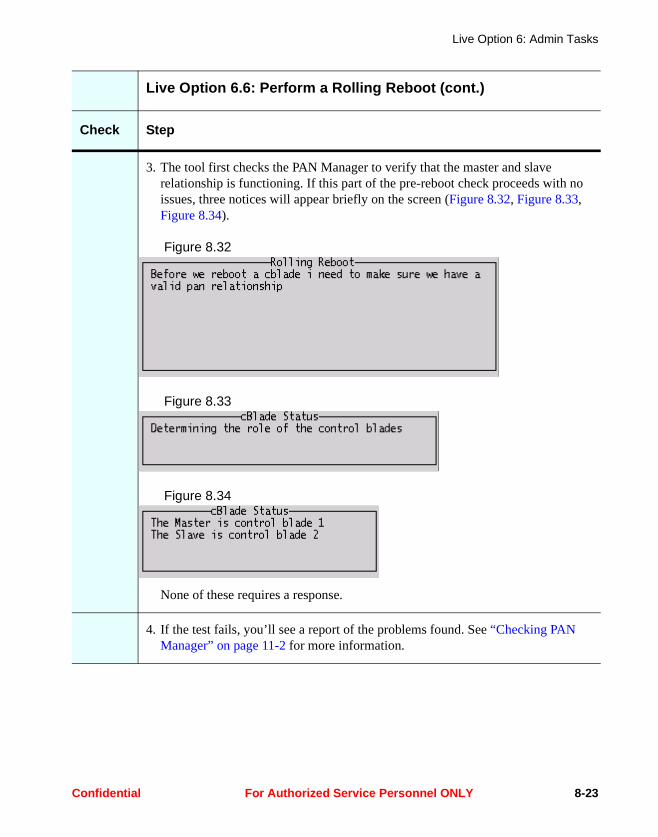
Live Option 6: Admin Tasks
3. The tool first checks the PAN Manager to verify that the master and slave relationship is functioning. If this part of the pre-reboot check proceeds with no issues, three notices will appear briefly on the screen (Figure 8.32, Figure 8.33, Figure 8.34).
Figure 8.32
Figure 8.33
Figure 8.34
None of these requires a response.
4. If the test fails, you’ll see a report of the problems found. See “Checking PAN Manager” on page 11-2 for more information.
Live Option 6.6: Perform a Rolling Reboot (cont.)
Check Step
Confidential For Authorized Service Personnel ONLY 8-23
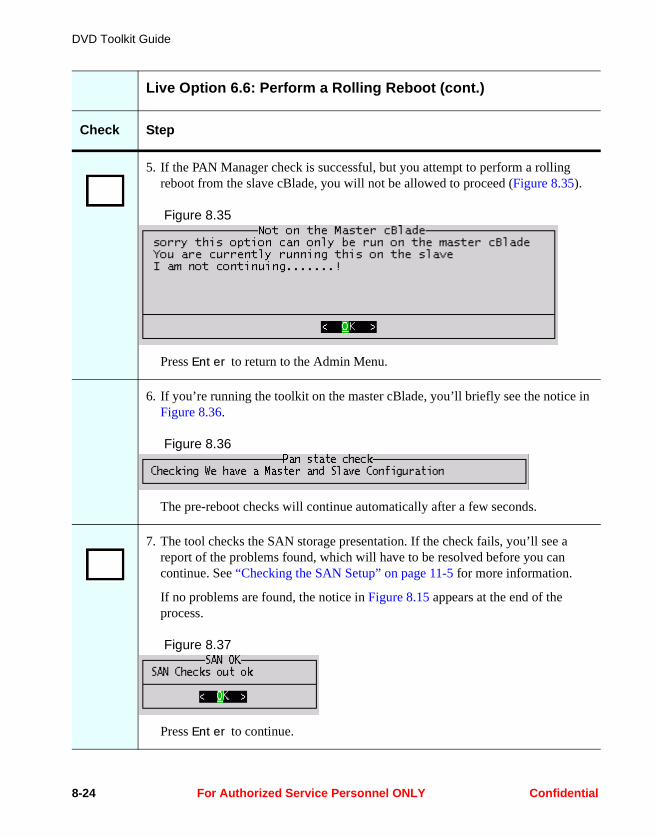
DVD Toolkit Guide
5. If the PAN Manager check is successful, but you attempt to perform a rolling reboot from the slave cBlade, you will not be allowed to proceed (Figure 8.35).
Figure 8.35
Press Enter to return to the Admin Menu.
6. If you’re running the toolkit on the master cBlade, you’ll briefly see the notice in Figure 8.36.
Figure 8.36
The pre-reboot checks will continue automatically after a few seconds.
7. The tool checks the SAN storage presentation. If the check fails, you’ll see a report of the problems found, which will have to be resolved before you can continue. See “Checking the SAN Setup” on page 11-5 for more information.
If no problems are found, the notice in Figure 8.15 appears at the end of the process.
Figure 8.37
Press Enter to continue.
Live Option 6.6: Perform a Rolling Reboot (cont.)
Check Step
8-24 For Authorized Service Personnel ONLY Confidential
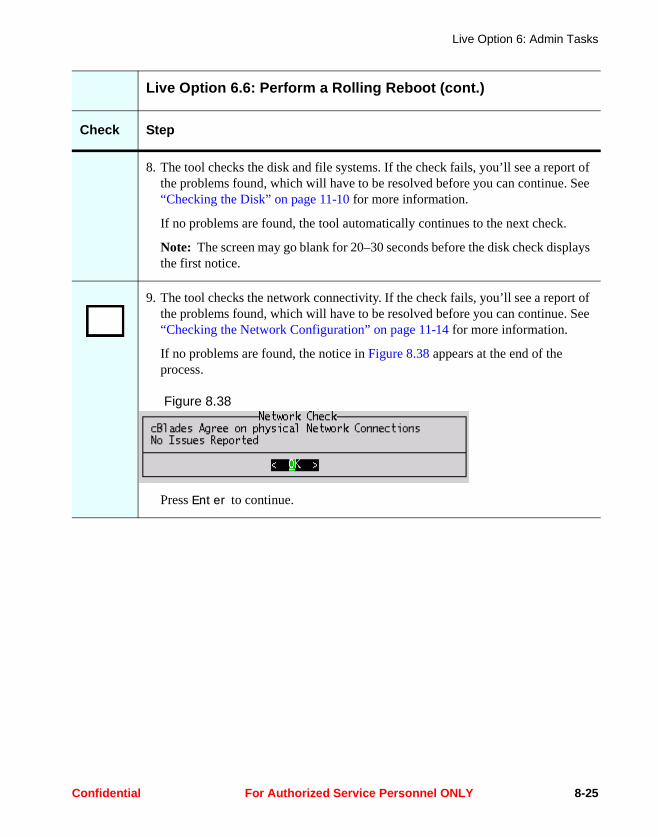
Live Option 6: Admin Tasks
8. The tool checks the disk and file systems. If the check fails, you’ll see a report of the problems found, which will have to be resolved before you can continue. See “Checking the Disk” on page 11-10 for more information.
If no problems are found, the tool automatically continues to the next check.
Note: The screen may go blank for 20–30 seconds before the disk check displays the first notice.
9. The tool checks the network connectivity. If the check fails, you’ll see a report of the problems found, which will have to be resolved before you can continue. See “Checking the Network Configuration” on page 11-14 for more information.
If no problems are found, the notice in Figure 8.38 appears at the end of the process.
Figure 8.38
Press Enter to continue.
Live Option 6.6: Perform a Rolling Reboot (cont.)
Check Step
Confidential For Authorized Service Personnel ONLY 8-25

DVD Toolkit Guide
10.If any of these standard diagnostics detects problems, the tool reports them. You’ll be asked if you want to proceed with the reboot in spite of the issues. For example, if the diagnostics detect network configuration problems, you’ll see the notice in Figure 8.39.
Figure 8.39
The default selection is <No>, which will abandon the reboot operation and return you to the Admin Menu.
If you select <Yes>, the reboot operation will continue as if no network problems had been found.
Note: When one or more diagnostics fail, we recommend that you obtain assistance from Fujitsu Siemens Computers customer support or your authorized support vendor before proceeding with the reboot operation.
Live Option 6.6: Perform a Rolling Reboot (cont.)
Check Step
8-26 For Authorized Service Personnel ONLY Confidential
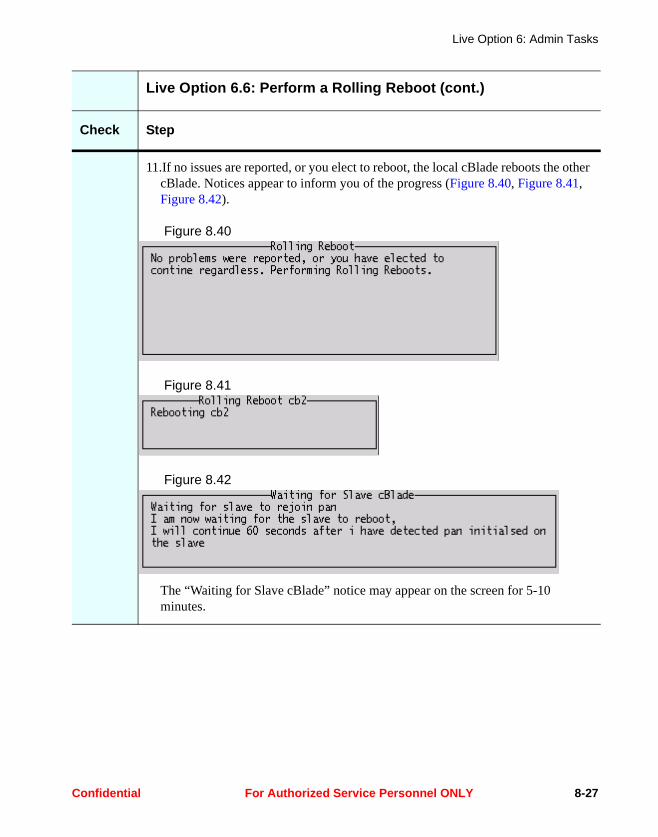
Live Option 6: Admin Tasks
11.If no issues are reported, or you elect to reboot, the local cBlade reboots the other cBlade. Notices appear to inform you of the progress (Figure 8.40, Figure 8.41, Figure 8.42).
Figure 8.40
Figure 8.41
Figure 8.42
The “Waiting for Slave cBlade” notice may appear on the screen for 5-10 minutes.
Live Option 6.6: Perform a Rolling Reboot (cont.)
Check Step
Confidential For Authorized Service Personnel ONLY 8-27
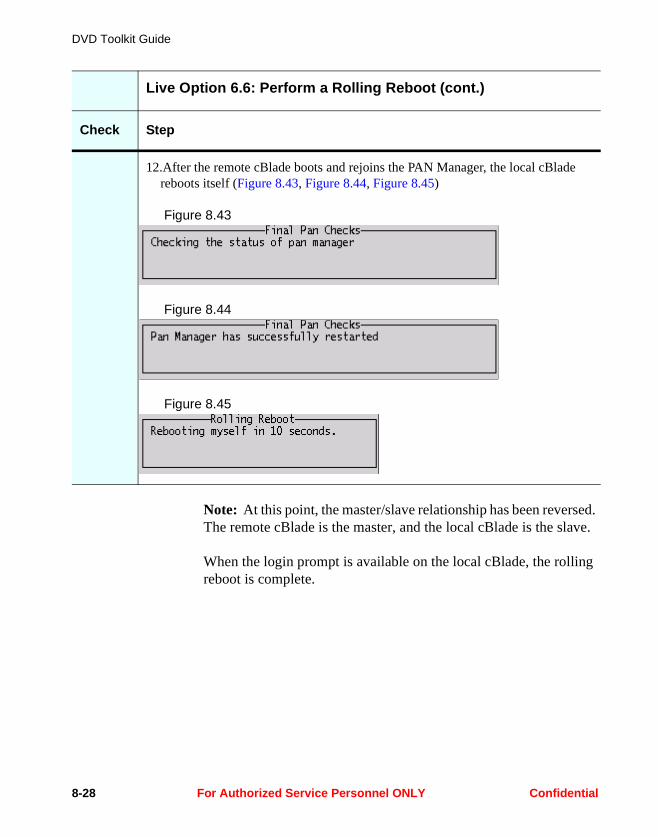
DVD Toolkit Guide
Note: At this point, the master/slave relationship has been reversed. The remote cBlade is the master, and the local cBlade is the slave.
When the login prompt is available on the local cBlade, the rolling reboot is complete.
12.After the remote cBlade boots and rejoins the PAN Manager, the local cBlade reboots itself (Figure 8.43, Figure 8.44, Figure 8.45)
Figure 8.43
Figure 8.44
Figure 8.45
Live Option 6.6: Perform a Rolling Reboot (cont.)
Check Step
8-28 For Authorized Service Personnel ONLY Confidential
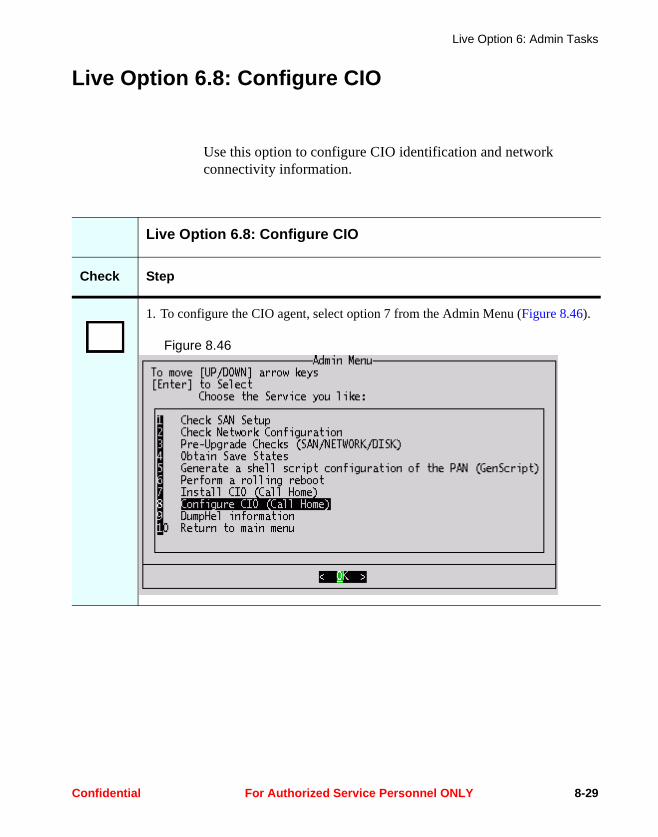
Live Option 6: Admin Tasks
Live Option 6.8: Configure CIO
Use this option to configure CIO identification and network connectivity information.
Live Option 6.8: Configure CIO
Check Step
1. To configure the CIO agent, select option 7 from the Admin Menu (Figure 8.46).
Figure 8.46
Confidential For Authorized Service Personnel ONLY 8-29
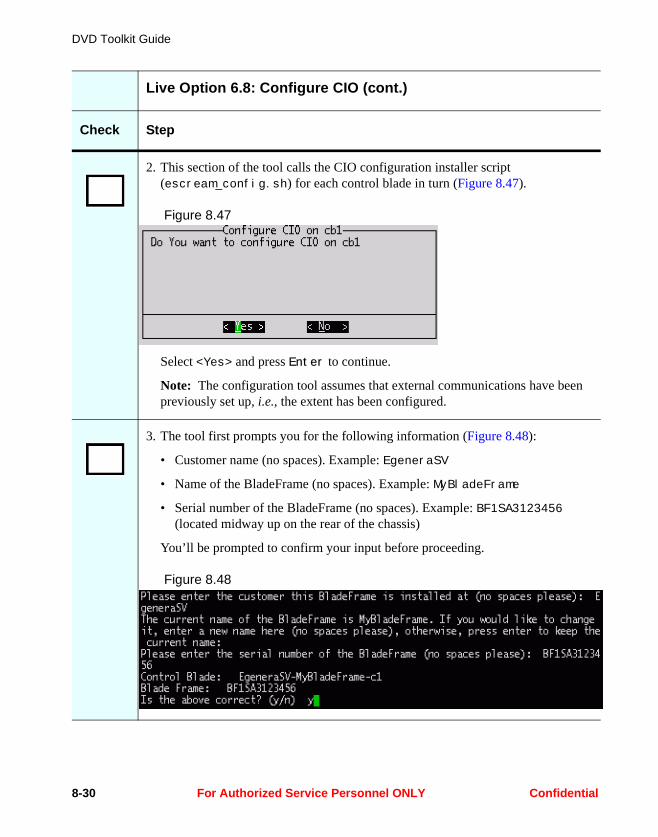
DVD Toolkit Guide
2. This section of the tool calls the CIO configuration installer script (escream_config.sh) for each control blade in turn (Figure 8.47).
Figure 8.47
Select <Yes> and press Enter to continue.
Note: The configuration tool assumes that external communications have been previously set up, i.e., the extent has been configured.
3. The tool first prompts you for the following information (Figure 8.48):
• Customer name (no spaces). Example: EgeneraSV
• Name of the BladeFrame (no spaces). Example: MyBladeFrame
• Serial number of the BladeFrame (no spaces). Example: BF1SA3123456 (located midway up on the rear of the chassis)
You’ll be prompted to confirm your input before proceeding.
Figure 8.48
Live Option 6.8: Configure CIO (cont.)
Check Step
8-30 For Authorized Service Personnel ONLY Confidential
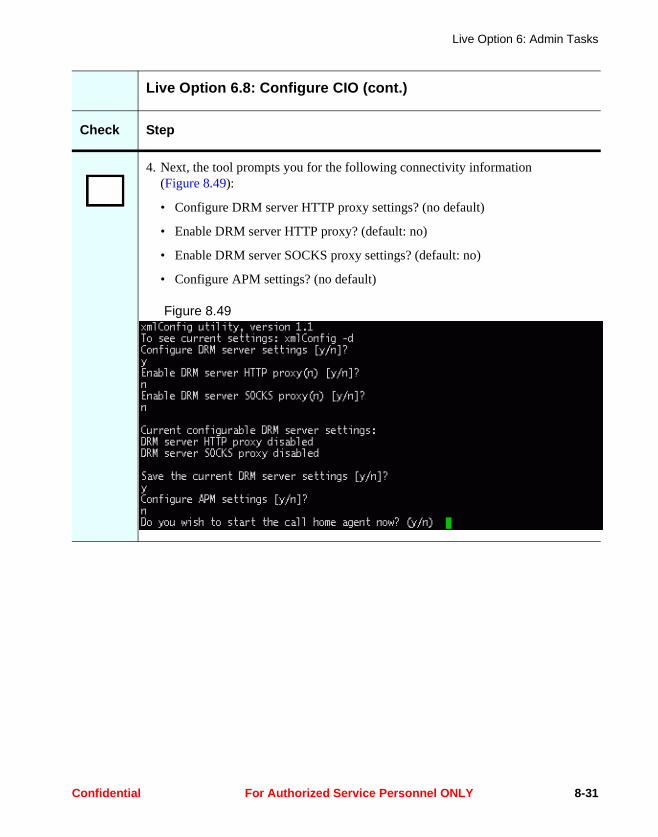
Live Option 6: Admin Tasks
4. Next, the tool prompts you for the following connectivity information (Figure 8.49):
• Configure DRM server HTTP proxy settings? (no default)
• Enable DRM server HTTP proxy? (default: no)
• Enable DRM server SOCKS proxy settings? (default: no)
• Configure APM settings? (no default)
Figure 8.49
Live Option 6.8: Configure CIO (cont.)
Check Step
Confidential For Authorized Service Personnel ONLY 8-31
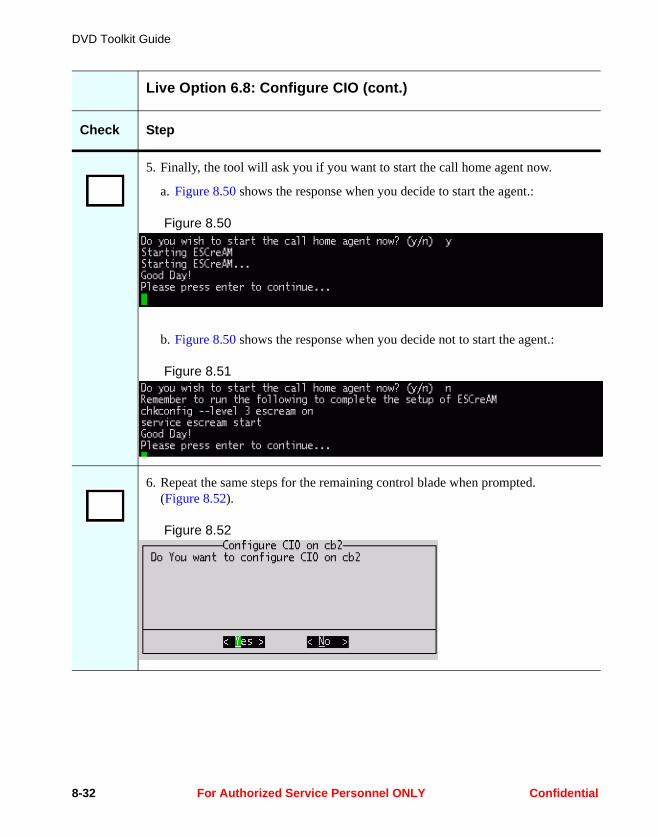
DVD Toolkit Guide
5. Finally, the tool will ask you if you want to start the call home agent now.
a. Figure 8.50 shows the response when you decide to start the agent.:
Figure 8.50
b. Figure 8.50 shows the response when you decide not to start the agent.:
Figure 8.51
6. Repeat the same steps for the remaining control blade when prompted. (Figure 8.52).
Figure 8.52
Live Option 6.8: Configure CIO (cont.)
Check Step
8-32 For Authorized Service Personnel ONLY Confidential
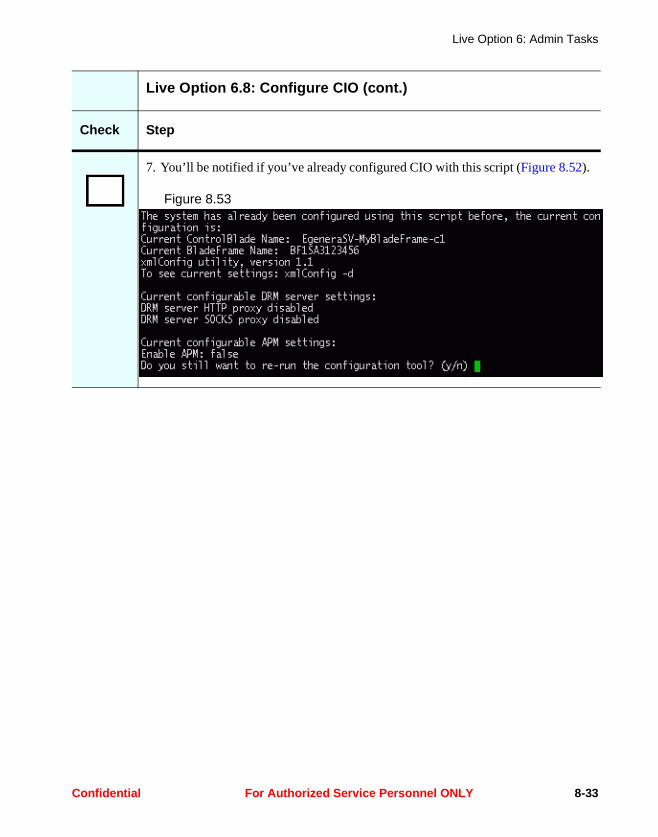
Live Option 6: Admin Tasks
7. You’ll be notified if you’ve already configured CIO with this script (Figure 8.52).
Figure 8.53
Live Option 6.8: Configure CIO (cont.)
Check Step
Confidential For Authorized Service Personnel ONLY 8-33

DVD Toolkit Guide
Live Option 6.9: DumpHel Information
Use this option to dump the hardware event log (HEL) for cBlades, sBlades, pBlades, and PIMs.
Live Option 6.9: DumpHel Information
Check Step
1. Select option 9 from the Admin Menu (Figure 8.54).
Figure 8.54
8-34 For Authorized Service Personnel ONLY Confidential
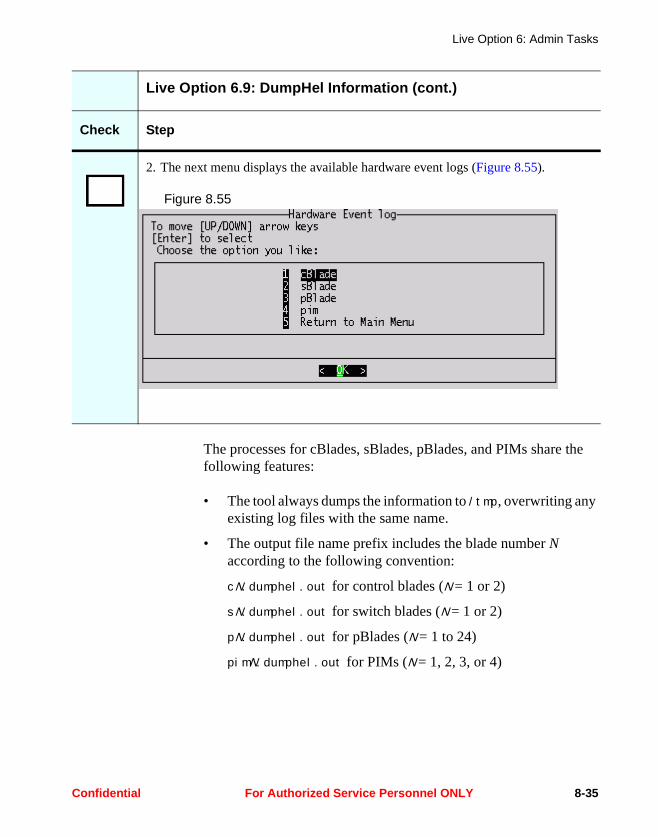
Live Option 6: Admin Tasks
The processes for cBlades, sBlades, pBlades, and PIMs share the following features:
• The tool always dumps the information to /tmp, overwriting any existing log files with the same name.
• The output file name prefix includes the blade number N according to the following convention:
cN.dumphel.out for control blades (N = 1 or 2)
sN.dumphel.out for switch blades (N = 1 or 2)
pN.dumphel.out for pBlades (N = 1 to 24)
pimN.dumphel.out for PIMs (N = 1, 2, 3, or 4)
2. The next menu displays the available hardware event logs (Figure 8.55).
Figure 8.55
Live Option 6.9: DumpHel Information (cont.)
Check Step
Confidential For Authorized Service Personnel ONLY 8-35
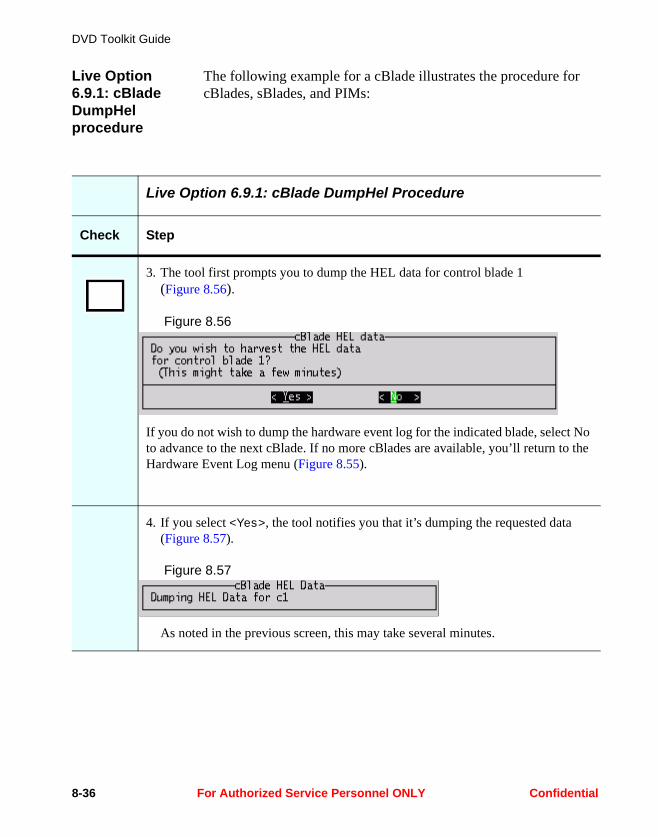
DVD Toolkit Guide
Live Option 6.9.1: cBlade DumpHel procedure
The following example for a cBlade illustrates the procedure for cBlades, sBlades, and PIMs:
Live Option 6.9.1: cBlade DumpHel Procedure
Check Step
3. The tool first prompts you to dump the HEL data for control blade 1 (Figure 8.56).
Figure 8.56
If you do not wish to dump the hardware event log for the indicated blade, select No to advance to the next cBlade. If no more cBlades are available, you’ll return to the Hardware Event Log menu (Figure 8.55).
4. If you select <Yes>, the tool notifies you that it’s dumping the requested data (Figure 8.57).
Figure 8.57
As noted in the previous screen, this may take several minutes.
8-36 For Authorized Service Personnel ONLY Confidential
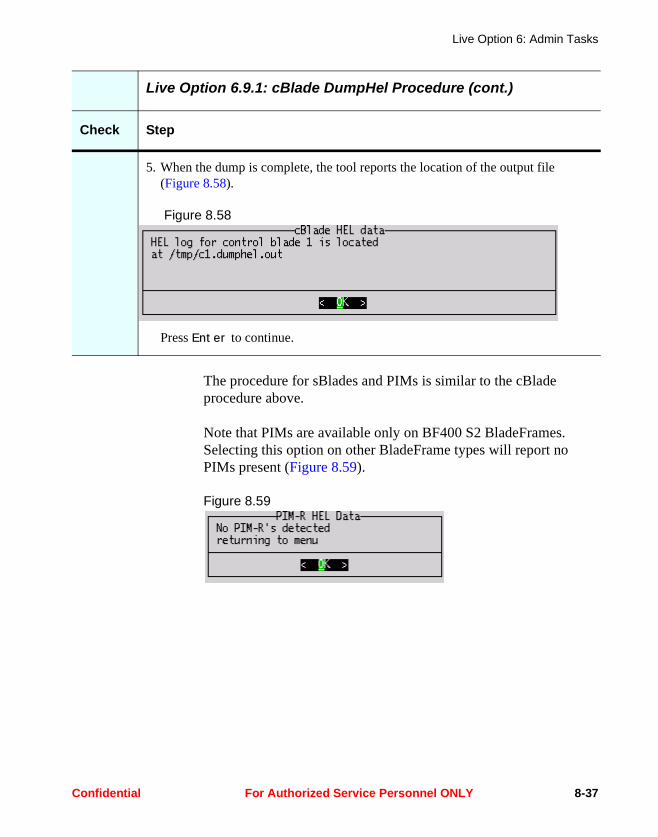
Live Option 6: Admin Tasks
The procedure for sBlades and PIMs is similar to the cBlade procedure above.
Note that PIMs are available only on BF400 S2 BladeFrames. Selecting this option on other BladeFrame types will report no PIMs present (Figure 8.59).
Figure 8.59
5. When the dump is complete, the tool reports the location of the output file (Figure 8.58).
Figure 8.58
Press Enter to continue.
Live Option 6.9.1: cBlade DumpHel Procedure (cont.)
Check Step
Confidential For Authorized Service Personnel ONLY 8-37
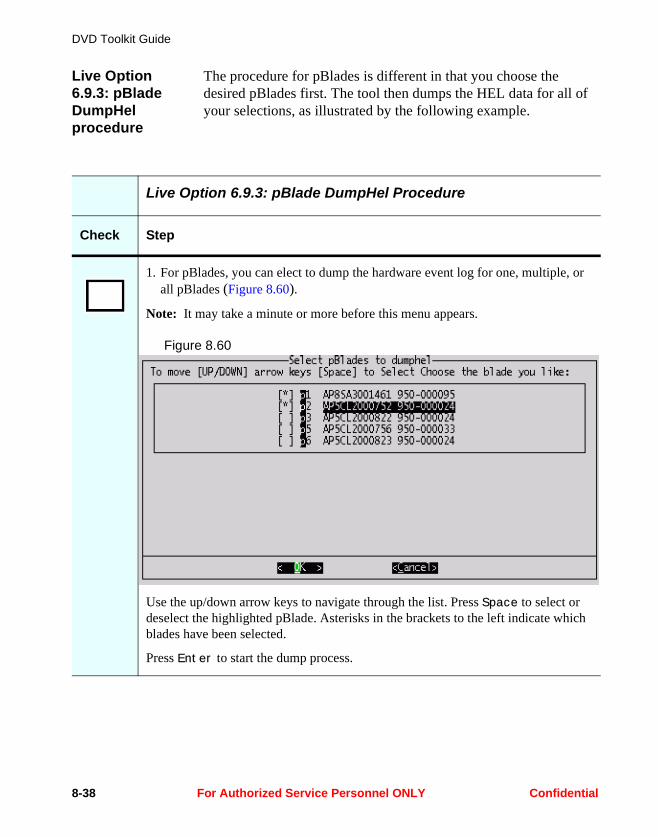
DVD Toolkit Guide
Live Option 6.9.3: pBlade DumpHel procedure
The procedure for pBlades is different in that you choose the desired pBlades first. The tool then dumps the HEL data for all of your selections, as illustrated by the following example.
Live Option 6.9.3: pBlade DumpHel Procedure
Check Step
1. For pBlades, you can elect to dump the hardware event log for one, multiple, or all pBlades (Figure 8.60).
Note: It may take a minute or more before this menu appears.
Figure 8.60
Use the up/down arrow keys to navigate through the list. Press Space to select or deselect the highlighted pBlade. Asterisks in the brackets to the left indicate which blades have been selected.
Press Enter to start the dump process.
8-38 For Authorized Service Personnel ONLY Confidential

Live Option 6: Admin Tasks
2. In this example, two pBlades have been selected. The tool will dump their hardware event logs in order of their slot number (Figure 8.61).
Figure 8.61
The tool requires several minutes to dump the data for one pBlade. After the first dump is complete, the tool displays the location of the output (Figure 8.62).
Figure 8.62
Press Enter to advance to the next selected pBlade (Figure 8.63, Figure 8.64).
Figure 8.63
Figure 8.64
Continue this process until all the selected pBlades have been dumped.
Live Option 6.9.3: pBlade DumpHel Procedure (cont.)
Check Step
Confidential For Authorized Service Personnel ONLY 8-39
DVD Toolkit Guide
3. When all the HEL data has been dumped, you’ll return to the Hardware Event Log menu.
Live Option 6.9.3: pBlade DumpHel Procedure (cont.)
Check Step
8-40 For Authorized Service Personnel ONLY Confidential
Chapter 9Live Option 7: HBA
Diagnostics
This option provides a submenu that allows you run a variety of tests and reports for all the HBAs on the local cBlade.
Important: These diagnostics use techniques that may impact the performance of the HBA subsystem. We strongly recommend that you obtain assistance from Fujitsu Siemens Computers customer support or your authorized support personnel before you use any of the HBA diagnostic tools described here.
Confidential For Authorized Service Personnel ONLY 9-1
DVD Toolkit Guide
Live Option 7: HBA Diagnostics
Check Step
1. Begin by selecting option 8 from the Main Menu (Figure 9.1).
Figure 9.1
2. The toolkit first checks for the presence of the Qlogic SANSurfer package (Figure 9.2)
Figure 9.2
SANSurfer has been bundled with PAN Manager since the 4.0.1.8 release. If SANSurfer is not present, the toolkit will automatically install it from the DVD’s /qlogic directory.
9-2 For Authorized Service Personnel ONLY Confidential

Live Option 7: HBA Diagnostics
Select the diagnostic you want to run and then press Enter to proceed.
When the diagnostic is complete, it displays a report that may take up more than one screen. In this case, use the up/down and right/left arrow keys to navigate through the report to see all the data.
The following examples were generated on a BladeFrame BF200 to illustrate the available HBA diagnostics:
• “Live Option 7.1: Display the system information” on page 9-5
• “Live Option 7.2: Display parameter settings for all HBAs” on page 9-7
3. If the SANSurfer check is successful, the “HBA Diagnostics Menu” appears (Figure 9.3).
Figure 9.3
Live Option 7: HBA Diagnostics (cont.)
Check Step
Confidential For Authorized Service Personnel ONLY 9-3
DVD Toolkit Guide
• “Live Option 7.3: Display all HBAs general information” on page 9-9
• “Live Option 7.4: Display the target information on all HBAs” on page 9-11
• “Live Option 7.5: Display LUN information for all HBAs” on page 9-13
• “Live Option 7.6: Display statistics for all HBAs” on page 9-15
• “Live Option 7.7: Display link status for all HBAs” on page 9-17
• “Live Option 7.8: Run HBA diagnostic loopback test” on page 9-19
Note: When an HBA diagnostic initializes, it momentarily displays a notice similar to Figure 9.5. These notices remain on screen for only a second or so, and they are not documented in this chapter.
Figure 9.4
9-4 For Authorized Service Personnel ONLY Confidential

Live Option 7: HBA Diagnostics
Live Option 7.1: Display the system information
Use this option to display system information and the HBA model numbers.
Live Option 7.1: Display the system information
Check Step
1. Select option 1 from the HBA Diagnostics Menu (Figure 9.5).
Figure 9.5
Confidential For Authorized Service Personnel ONLY 9-5
DVD Toolkit Guide
2. The tool displays the requested information (Figure 9.6).
Figure 9.6
Press Enter to return to the HBA Diagnostics Menu.
Live Option 7.1: Display the system information (cont.)
Check Step
9-6 For Authorized Service Personnel ONLY Confidential
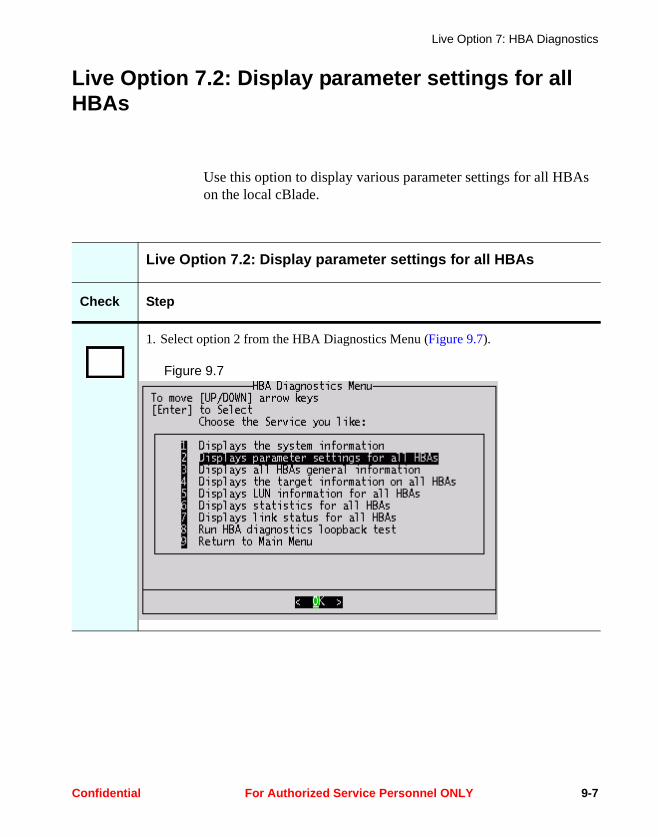
Live Option 7: HBA Diagnostics
Live Option 7.2: Display parameter settings for all HBAs
Use this option to display various parameter settings for all HBAs on the local cBlade.
Live Option 7.2: Display parameter settings for all HBAs
Check Step
1. Select option 2 from the HBA Diagnostics Menu (Figure 9.7).
Figure 9.7
Confidential For Authorized Service Personnel ONLY 9-7

DVD Toolkit Guide
2. The tool displays the requested information (Figure 9.8).
Figure 9.8
Press Enter to return to the HBA Diagnostics Menu.
Live Option 7.2: Display parameter settings for all HBAs (cont.)
Check Step
9-8 For Authorized Service Personnel ONLY Confidential
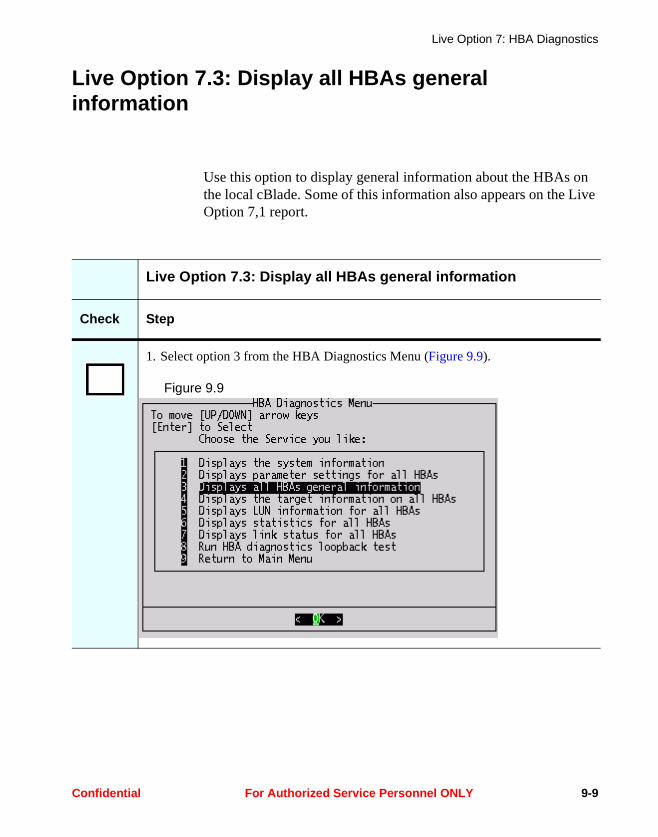
Live Option 7: HBA Diagnostics
Live Option 7.3: Display all HBAs general information
Use this option to display general information about the HBAs on the local cBlade. Some of this information also appears on the Live Option 7,1 report.
Live Option 7.3: Display all HBAs general information
Check Step
1. Select option 3 from the HBA Diagnostics Menu (Figure 9.9).
Figure 9.9
Confidential For Authorized Service Personnel ONLY 9-9
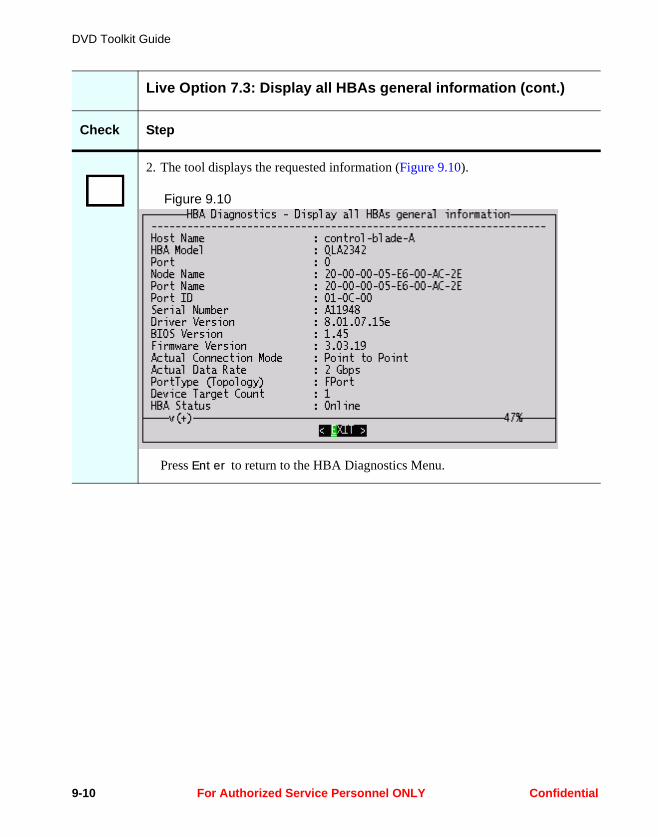
DVD Toolkit Guide
2. The tool displays the requested information (Figure 9.10).
Figure 9.10
Press Enter to return to the HBA Diagnostics Menu.
Live Option 7.3: Display all HBAs general information (cont.)
Check Step
9-10 For Authorized Service Personnel ONLY Confidential
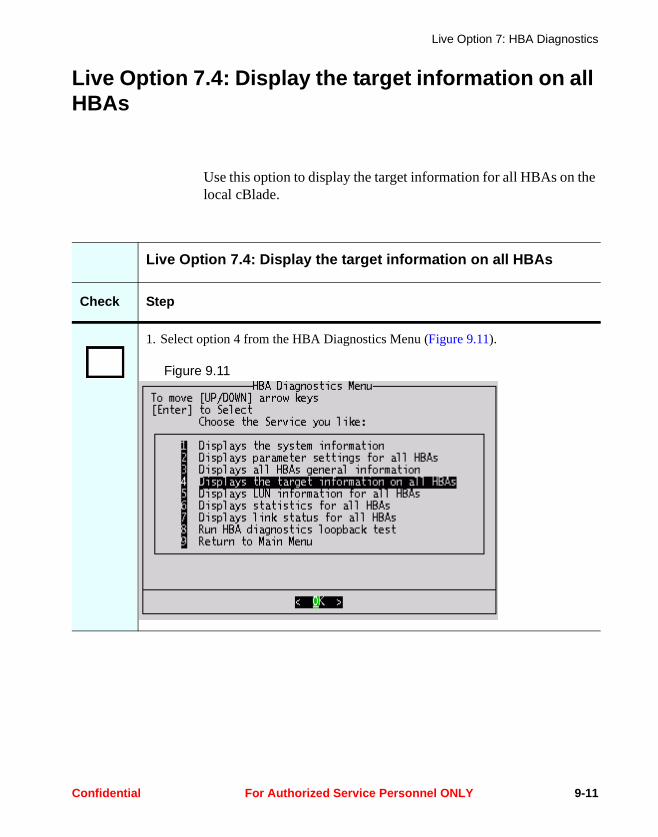
Live Option 7: HBA Diagnostics
Live Option 7.4: Display the target information on all HBAs
Use this option to display the target information for all HBAs on the local cBlade.
Live Option 7.4: Display the target information on all HBAs
Check Step
1. Select option 4 from the HBA Diagnostics Menu (Figure 9.11).
Figure 9.11
Confidential For Authorized Service Personnel ONLY 9-11
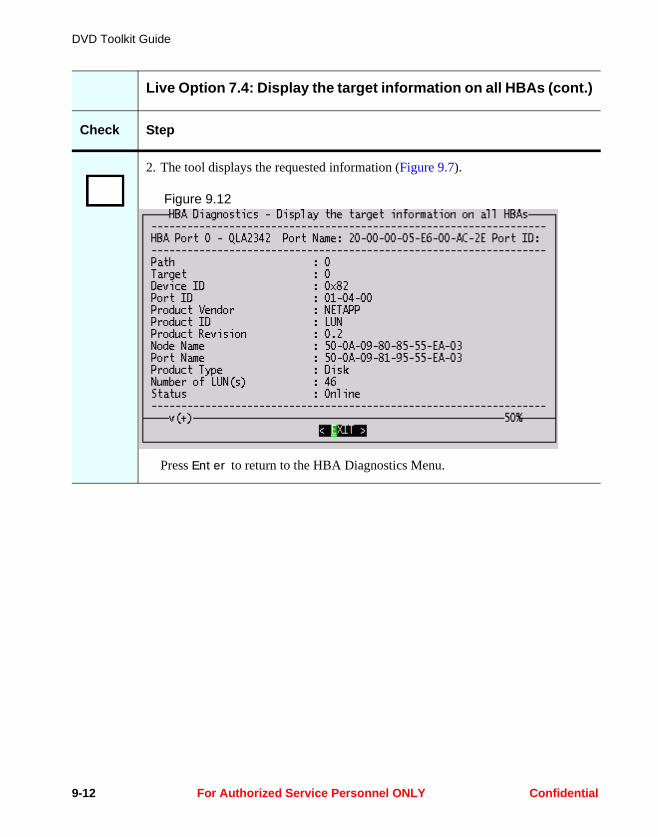
DVD Toolkit Guide
2. The tool displays the requested information (Figure 9.7).
Figure 9.12
Press Enter to return to the HBA Diagnostics Menu.
Live Option 7.4: Display the target information on all HBAs (cont.)
Check Step
9-12 For Authorized Service Personnel ONLY Confidential

Live Option 7: HBA Diagnostics
Live Option 7.5: Display LUN information for all HBAs
Use this option to display the LUN information for all HBAs on the local cBlade.
Live Option 7.5: Display LUN information for all HBAs
Check Step
1. Select option 5 from the HBA Diagnostics Menu (Figure 9.13).
Figure 9.13
Confidential For Authorized Service Personnel ONLY 9-13
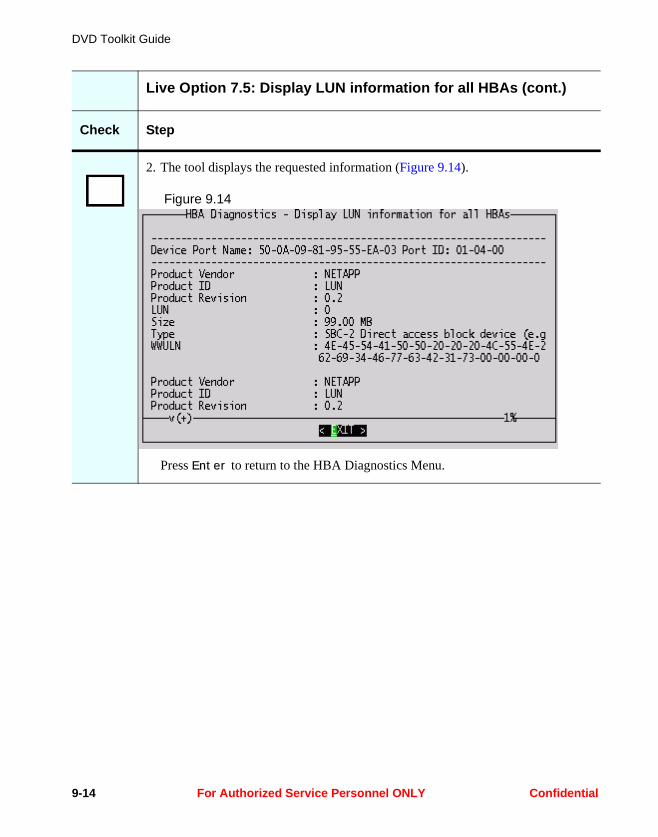
DVD Toolkit Guide
2. The tool displays the requested information (Figure 9.14).
Figure 9.14
Press Enter to return to the HBA Diagnostics Menu.
Live Option 7.5: Display LUN information for all HBAs (cont.)
Check Step
9-14 For Authorized Service Personnel ONLY Confidential

Live Option 7: HBA Diagnostics
Live Option 7.6: Display statistics for all HBAs
Use this option to display port statistics for all HBAs on the local cBlade.
Live Option 7.6: Display statistics for all HBAs
Check Step
1. Select option 6 from the HBA Diagnostics Menu (Figure 9.15).
Figure 9.15
Confidential For Authorized Service Personnel ONLY 9-15
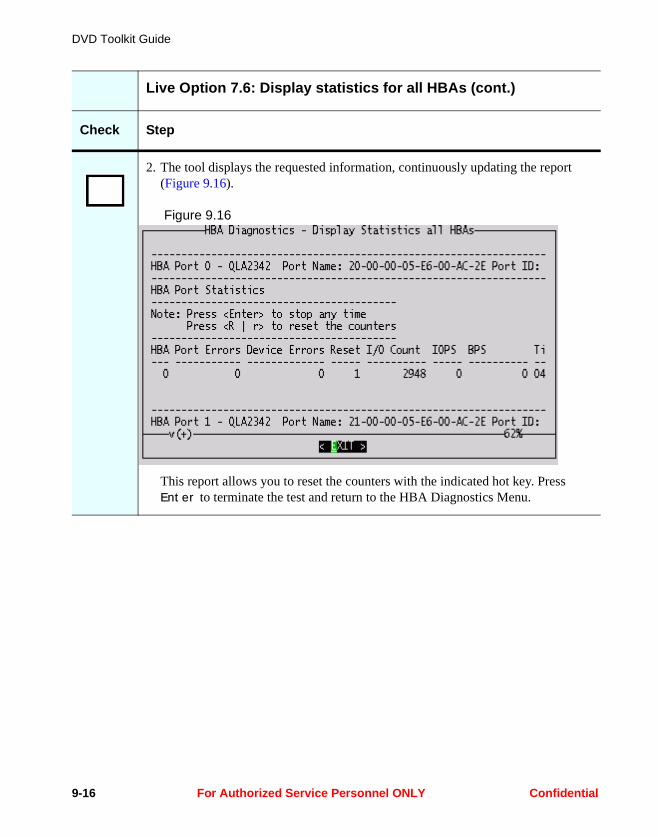
DVD Toolkit Guide
2. The tool displays the requested information, continuously updating the report (Figure 9.16).
Figure 9.16
This report allows you to reset the counters with the indicated hot key. Press Enter to terminate the test and return to the HBA Diagnostics Menu.
Live Option 7.6: Display statistics for all HBAs (cont.)
Check Step
9-16 For Authorized Service Personnel ONLY Confidential
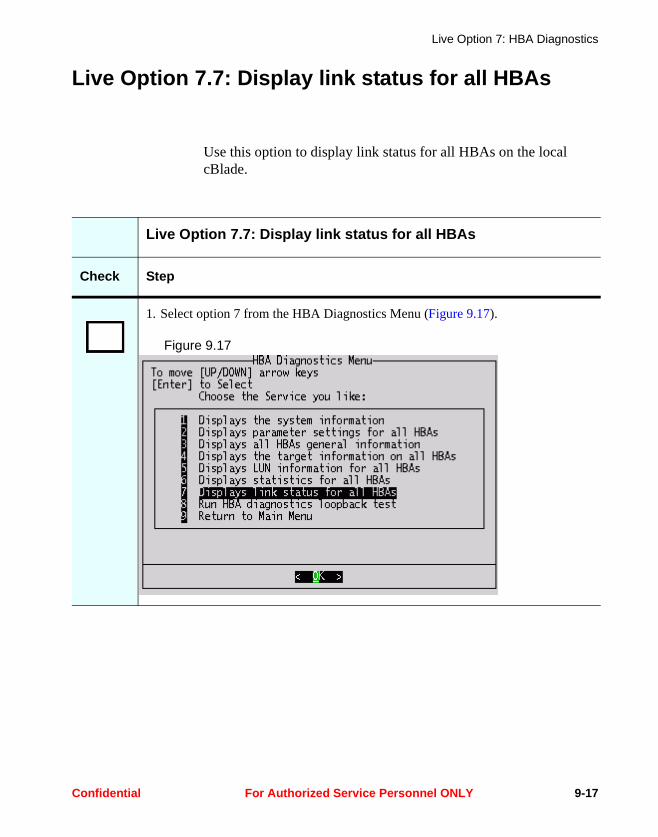
Live Option 7: HBA Diagnostics
Live Option 7.7: Display link status for all HBAs
Use this option to display link status for all HBAs on the local cBlade.
Live Option 7.7: Display link status for all HBAs
Check Step
1. Select option 7 from the HBA Diagnostics Menu (Figure 9.17).
Figure 9.17
Confidential For Authorized Service Personnel ONLY 9-17
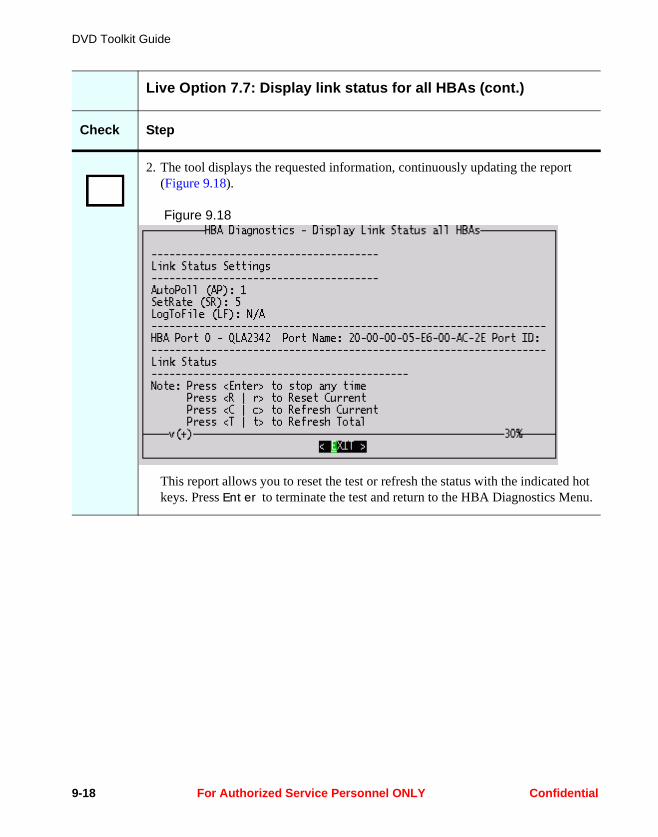
DVD Toolkit Guide
2. The tool displays the requested information, continuously updating the report (Figure 9.18).
Figure 9.18
This report allows you to reset the test or refresh the status with the indicated hot keys. Press Enter to terminate the test and return to the HBA Diagnostics Menu.
Live Option 7.7: Display link status for all HBAs (cont.)
Check Step
9-18 For Authorized Service Personnel ONLY Confidential
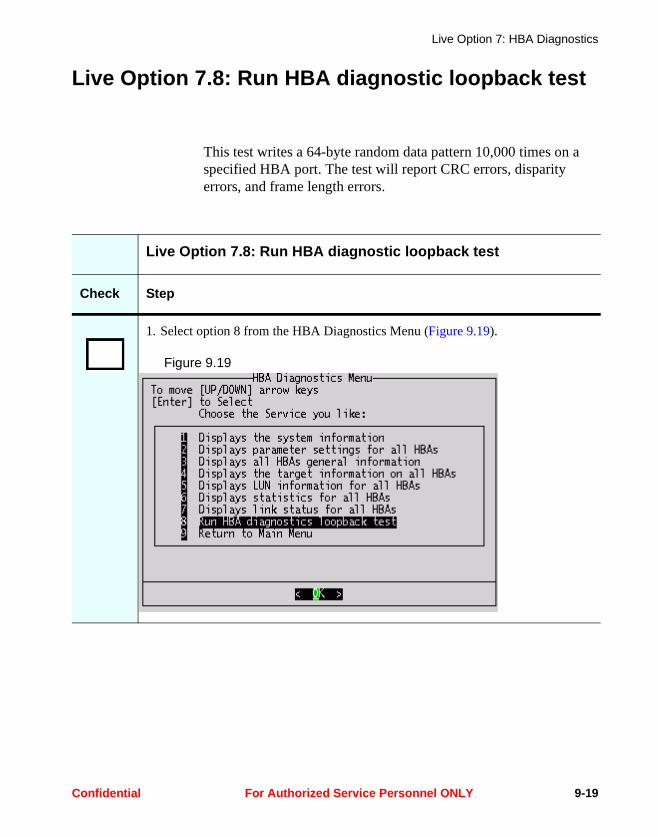
Live Option 7: HBA Diagnostics
Live Option 7.8: Run HBA diagnostic loopback test
This test writes a 64-byte random data pattern 10,000 times on a specified HBA port. The test will report CRC errors, disparity errors, and frame length errors.
Live Option 7.8: Run HBA diagnostic loopback test
Check Step
1. Select option 8 from the HBA Diagnostics Menu (Figure 9.19).
Figure 9.19
Confidential For Authorized Service Personnel ONLY 9-19
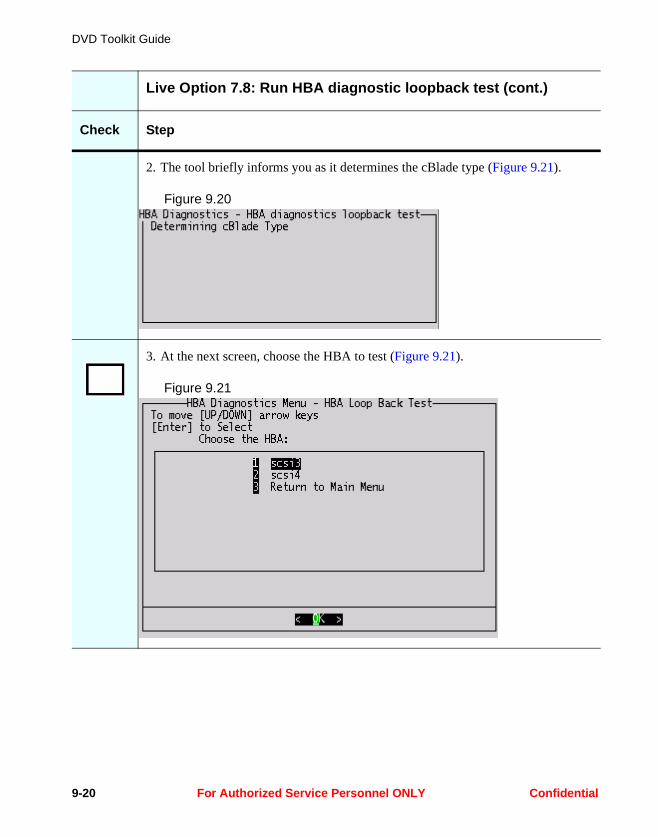
DVD Toolkit Guide
2. The tool briefly informs you as it determines the cBlade type (Figure 9.21).
Figure 9.20
3. At the next screen, choose the HBA to test (Figure 9.21).
Figure 9.21
Live Option 7.8: Run HBA diagnostic loopback test (cont.)
Check Step
9-20 For Authorized Service Personnel ONLY Confidential
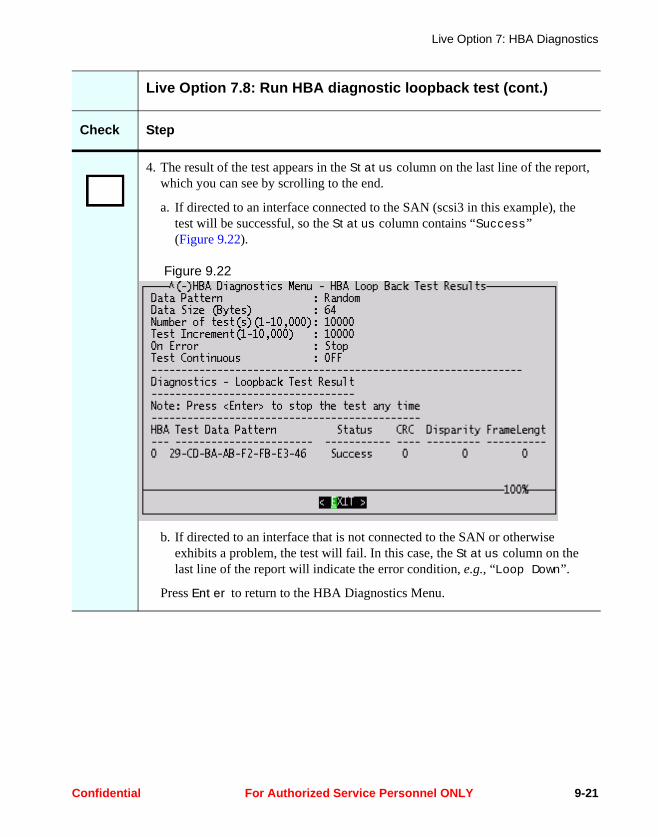
Live Option 7: HBA Diagnostics
4. The result of the test appears in the Status column on the last line of the report, which you can see by scrolling to the end.
a. If directed to an interface connected to the SAN (scsi3 in this example), the test will be successful, so the Status column contains “Success” (Figure 9.22).
Figure 9.22
b. If directed to an interface that is not connected to the SAN or otherwise exhibits a problem, the test will fail. In this case, the Status column on the last line of the report will indicate the error condition, e.g., “Loop Down”.
Press Enter to return to the HBA Diagnostics Menu.
Live Option 7.8: Run HBA diagnostic loopback test (cont.)
Check Step
Confidential For Authorized Service Personnel ONLY 9-21

DVD Toolkit Guide
9-22 For Authorized Service Personnel ONLY Confidential

Chapter 10Live Option 8: Check
Physical Media
This option checks the contents of the media by calculating the md5sum checksum of every file and then comparing the results to pre-calculated values stored on the DVD.
Confidential For Authorized Service Personnel ONLY 10-1
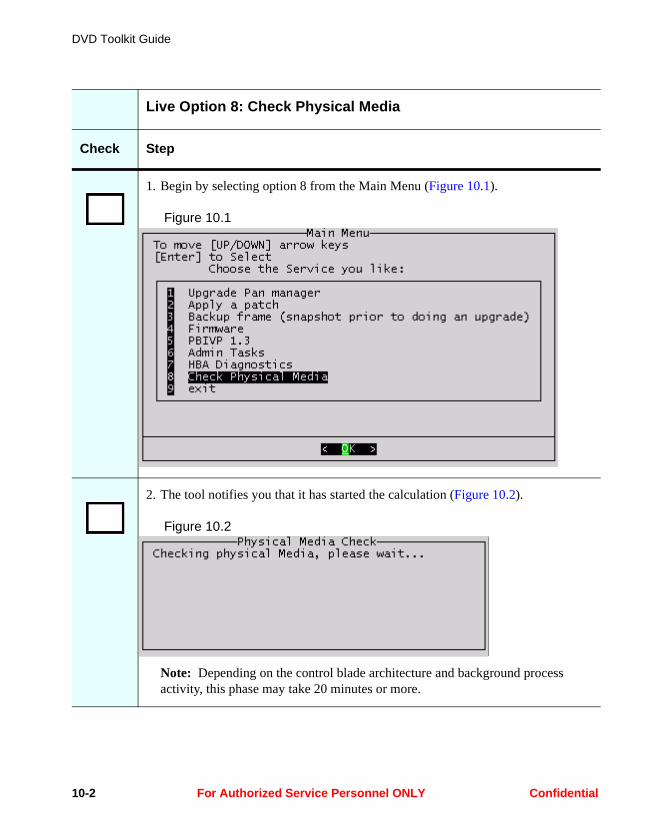
DVD Toolkit Guide
Live Option 8: Check Physical Media
Check Step
1. Begin by selecting option 8 from the Main Menu (Figure 10.1).
Figure 10.1
2. The tool notifies you that it has started the calculation (Figure 10.2).
Figure 10.2
Note: Depending on the control blade architecture and background process activity, this phase may take 20 minutes or more.
10-2 For Authorized Service Personnel ONLY Confidential
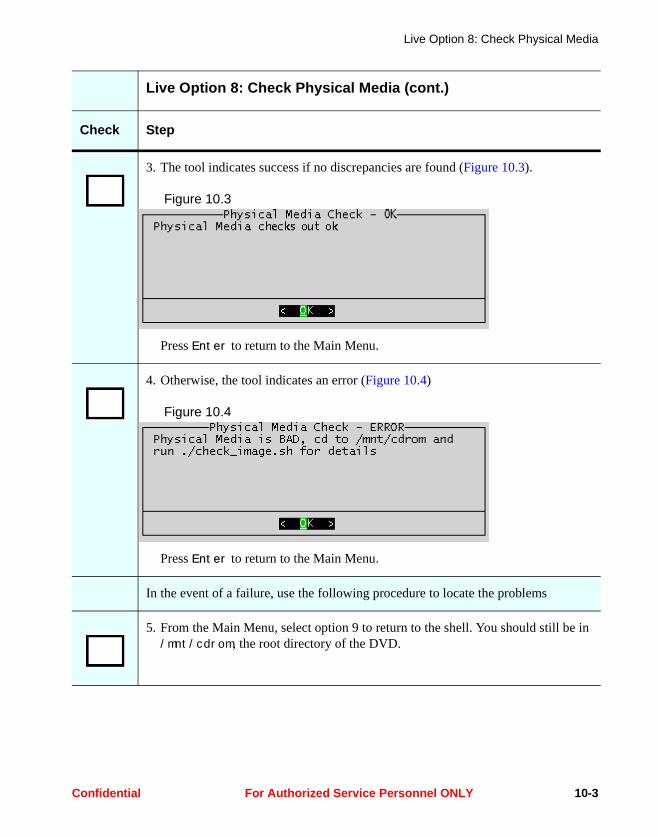
Live Option 8: Check Physical Media
3. The tool indicates success if no discrepancies are found (Figure 10.3).
Figure 10.3
Press Enter to return to the Main Menu.
4. Otherwise, the tool indicates an error (Figure 10.4)
Figure 10.4
Press Enter to return to the Main Menu.
In the event of a failure, use the following procedure to locate the problems
5. From the Main Menu, select option 9 to return to the shell. You should still be in /mnt/cdrom, the root directory of the DVD.
Live Option 8: Check Physical Media (cont.)
Check Step
Confidential For Authorized Service Personnel ONLY 10-3

DVD Toolkit Guide
This completes the physical media check.
6. Run ./check_image.sh to obtain a detailed list of checksum differences. This process may take 10-15 minutes.
Figure 10.5 shows a partial listing of what you may see.
Figure 10.5
When the media check fails, contact Fujitsu Siemens Computers customer support or your authorized support vendor for a replacement DVD.
Live Option 8: Check Physical Media (cont.)
Check Step
10-4 For Authorized Service Personnel ONLY Confidential

Chapter 11Live Section Common
BladeFrame Diagnostics
This chapter provides detailed descriptions of common BladeFrame diagnostics, which may be initiated explicitly via options in the Admin Menu (Live Option 6), or implicitly by intrusive Live Section operations such as upgrading or patching PAN Manager, flashing firmware, or performing rolling reboots.
Each diagnostic described here produces essentially the same output and reports regardless of how it was initiated. The major operational differences, if any, typically occur at the end of the diagnostic when no problems were found. In many cases, control returns automatically to the tool that initiated the diagnostic. In some cases, however, you’ll be required to respond to a prompt before continuing to the next process. Each description notes the differences, if any.
Contents:
• “Checking PAN Manager” on page 11-2
• “Checking the SAN Setup” on page 11-5
• “Checking the Disk” on page 11-10
• “Checking the Network Configuration” on page 11-14
Confidential For Authorized Service Personnel ONLY 11-1
DVD Toolkit Guide
Checking PAN Manager
Some tools check the PAN Manager to confirm that a normal master/slave relationship exists between the cBlades before proceeding. This is usually done because one of the cBlades will be temporarily taken offline or rebooted as a result of the tool’s operation. A functioning master/slave relationship ensures that BladeFrame management processes will failover to the remaining cBlade if one of them is taken offline.
A PAN Manager check occurs in the following procedures:
• Chapter 3, Live Option 1: Upgrade PAN Manager (Step 10 on page 3-8)
• Chapter 4, Live Option 2: Apply a Patch (Step 6 on page 4-6)
• Chapter 6, Live Option 4: Firmware in the following sections:
• “Live Option 4.1: HBA (Serviceboot)” (Step 5 on page 6-7)
• “Live Option 4.2: cBlade (BlastMe)” (Step 5 on page 6-14)
• “Live Option 4.3: Both HBA and cBlade” (Step 5 on page 6-23)
• Chapter 8, Live Option 6: Admin Tasks in the following sections:
• “Live Option 6.3: Pre-Upgrade Checks (SAN/Network/Disk)” (Step 2 on page 8-11)
• “Live Option 6.6: Perform a Rolling Reboot” (Step 3 on page 8-23)
This section describes the possible behavior when the toolkit checks the PAN Manager status.
11-2 For Authorized Service Personnel ONLY Confidential
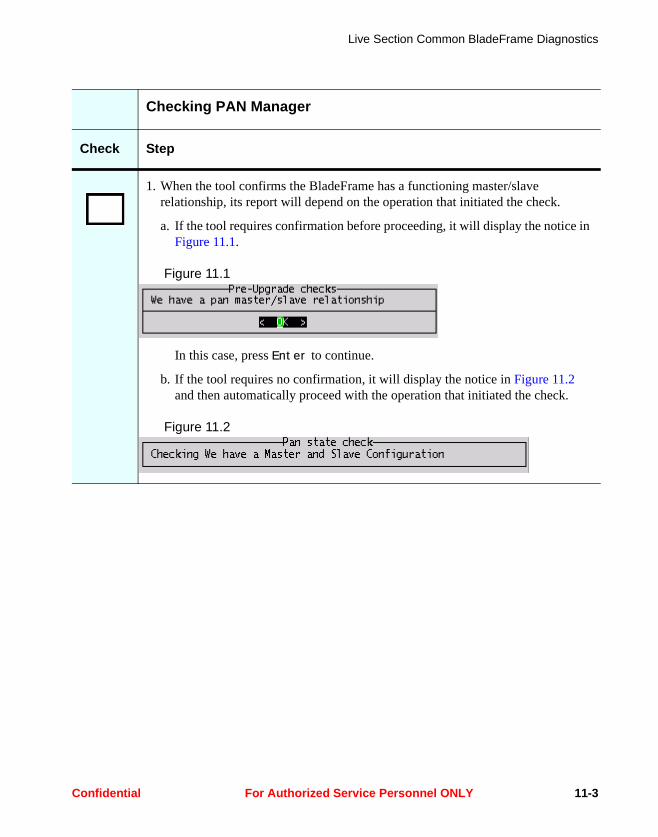
Live Section Common BladeFrame Diagnostics
Checking PAN Manager
Check Step
1. When the tool confirms the BladeFrame has a functioning master/slave relationship, its report will depend on the operation that initiated the check.
a. If the tool requires confirmation before proceeding, it will display the notice in Figure 11.1.
Figure 11.1
In this case, press Enter to continue.
b. If the tool requires no confirmation, it will display the notice in Figure 11.2 and then automatically proceed with the operation that initiated the check.
Figure 11.2
Confidential For Authorized Service Personnel ONLY 11-3

DVD Toolkit Guide
2. If the normal master/slave relationship cannot be verified, e.g., when the remote blade is down, the tool will display the notice in Figure 11.2.
Figure 11.3
In this case, the default is <No>, which will return you to the parent menu. You can, however, select <Yes> if you want to proceed anyway.
Checking PAN Manager (cont.)
Check Step
11-4 For Authorized Service Personnel ONLY Confidential
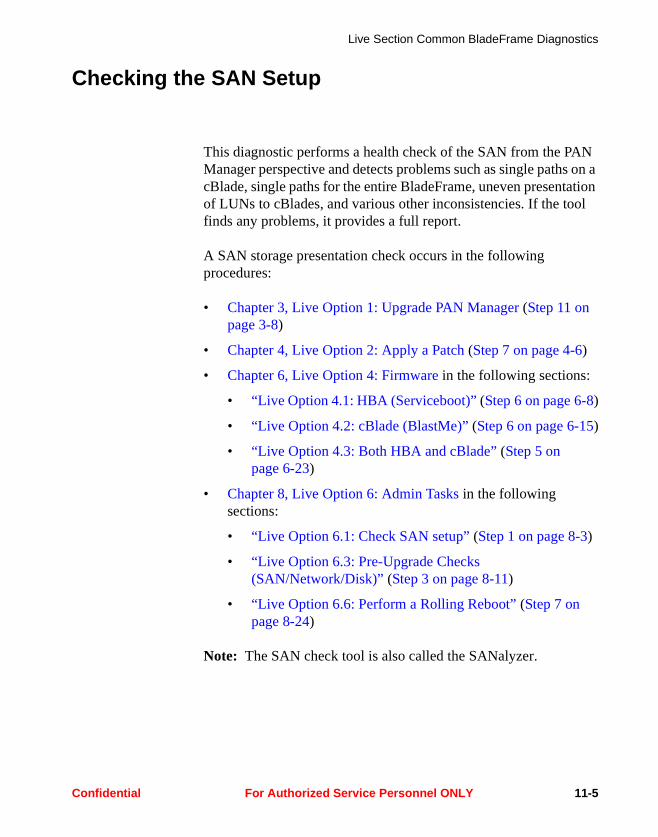
Live Section Common BladeFrame Diagnostics
Checking the SAN Setup
This diagnostic performs a health check of the SAN from the PAN Manager perspective and detects problems such as single paths on a cBlade, single paths for the entire BladeFrame, uneven presentation of LUNs to cBlades, and various other inconsistencies. If the tool finds any problems, it provides a full report.
A SAN storage presentation check occurs in the following procedures:
• Chapter 3, Live Option 1: Upgrade PAN Manager (Step 11 on page 3-8)
• Chapter 4, Live Option 2: Apply a Patch (Step 7 on page 4-6)
• Chapter 6, Live Option 4: Firmware in the following sections:
• “Live Option 4.1: HBA (Serviceboot)” (Step 6 on page 6-8)
• “Live Option 4.2: cBlade (BlastMe)” (Step 6 on page 6-15)
• “Live Option 4.3: Both HBA and cBlade” (Step 5 on page 6-23)
• Chapter 8, Live Option 6: Admin Tasks in the following sections:
• “Live Option 6.1: Check SAN setup” (Step 1 on page 8-3)
• “Live Option 6.3: Pre-Upgrade Checks (SAN/Network/Disk)” (Step 3 on page 8-11)
• “Live Option 6.6: Perform a Rolling Reboot” (Step 7 on page 8-24)
Note: The SAN check tool is also called the SANalyzer.
Confidential For Authorized Service Personnel ONLY 11-5
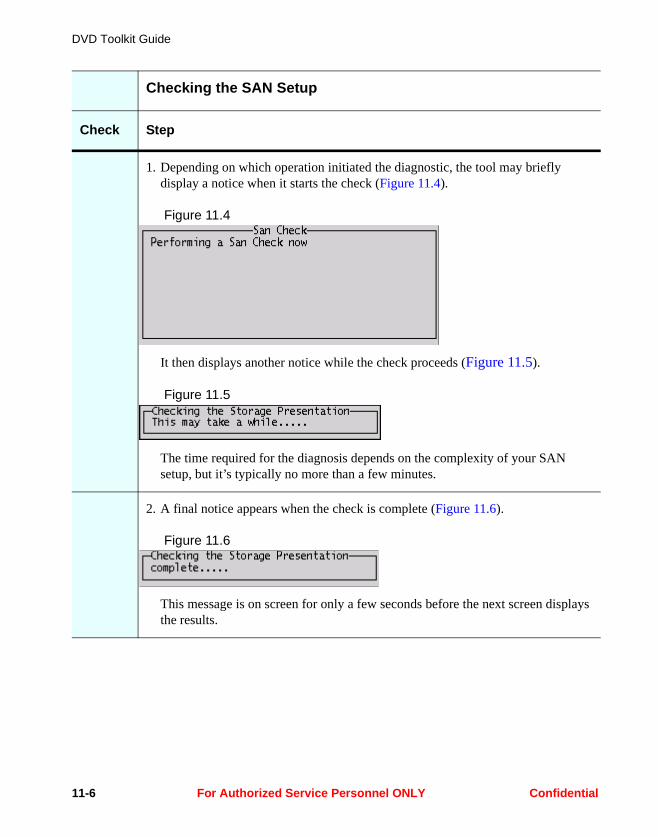
DVD Toolkit Guide
Checking the SAN Setup
Check Step
1. Depending on which operation initiated the diagnostic, the tool may briefly display a notice when it starts the check (Figure 11.4).
Figure 11.4
It then displays another notice while the check proceeds (Figure 11.5).
Figure 11.5
The time required for the diagnosis depends on the complexity of your SAN setup, but it’s typically no more than a few minutes.
2. A final notice appears when the check is complete (Figure 11.6).
Figure 11.6
This message is on screen for only a few seconds before the next screen displays the results.
11-6 For Authorized Service Personnel ONLY Confidential

Live Section Common BladeFrame Diagnostics
3. If no problems are detected, you’ll see the notice in Figure 11.7.
Figure 11.7
Press Enter to return control to the operation that initiated the SAN check.
4. Otherwise, if problems are detected, you’ll see a notice similar to Figure 11.8.
Figure 11.8
Press Enter to see the details.
Checking the SAN Setup (cont.)
Check Step
Confidential For Authorized Service Personnel ONLY 11-7
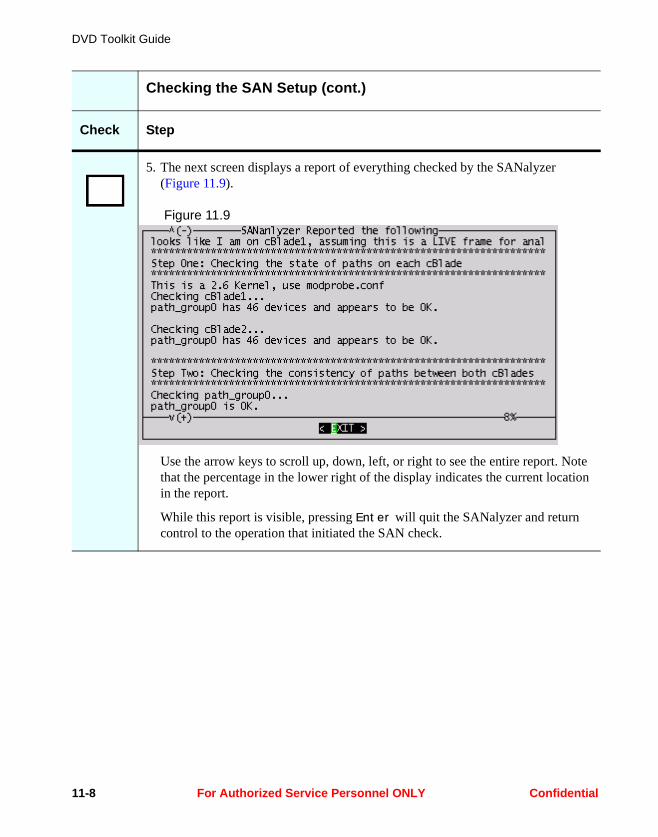
DVD Toolkit Guide
5. The next screen displays a report of everything checked by the SANalyzer (Figure 11.9).
Figure 11.9
Use the arrow keys to scroll up, down, left, or right to see the entire report. Note that the percentage in the lower right of the display indicates the current location in the report.
While this report is visible, pressing Enter will quit the SANalyzer and return control to the operation that initiated the SAN check.
Checking the SAN Setup (cont.)
Check Step
11-8 For Authorized Service Personnel ONLY Confidential
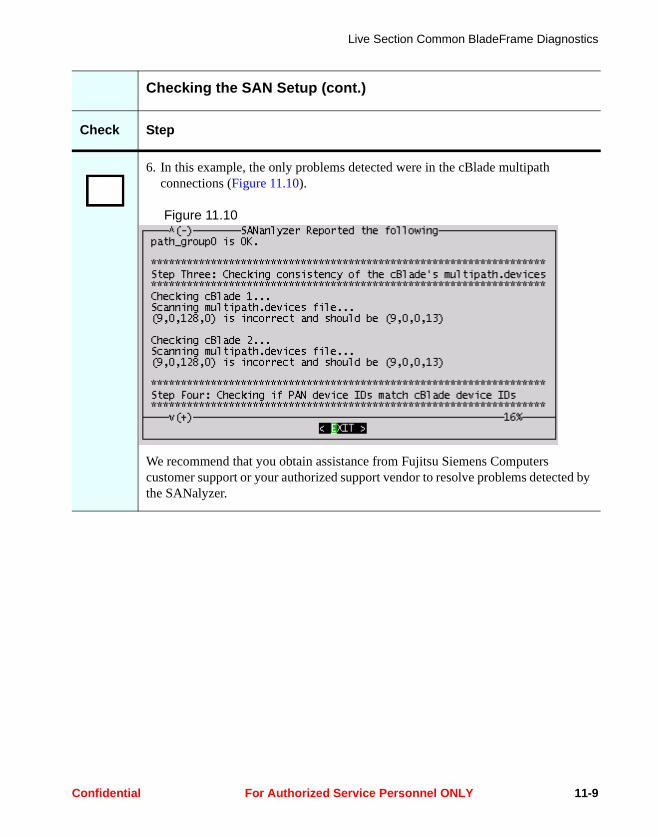
Live Section Common BladeFrame Diagnostics
6. In this example, the only problems detected were in the cBlade multipath connections (Figure 11.10).
Figure 11.10
We recommend that you obtain assistance from Fujitsu Siemens Computers customer support or your authorized support vendor to resolve problems detected by the SANalyzer.
Checking the SAN Setup (cont.)
Check Step
Confidential For Authorized Service Personnel ONLY 11-9
DVD Toolkit Guide
Checking the Disk
This diagnostic checks disk space, symbolic links (symlinks), and image storage on both cBlade file systems.
A disk check occurs in the following procedures:
• Chapter 3, Live Option 1: Upgrade PAN Manager (Step 12 on page 3-8)
• Chapter 4, Live Option 2: Apply a Patch (Step 8 on page 4-7)
• Chapter 6, Live Option 4: Firmware in the following sections:
• “Live Option 4.1: HBA (Serviceboot)” (Step 7 on page 6-8)
• “Live Option 4.2: cBlade (BlastMe)” (Step 7 on page 6-15)
• “Live Option 4.3: Both HBA and cBlade” (Step 5 on page 6-23)
• Chapter 8, Live Option 6: Admin Tasks in the following sections:
• “Live Option 6.3: Pre-Upgrade Checks (SAN/Network/Disk)” (Step 5 on page 8-12)
• “Live Option 6.6: Perform a Rolling Reboot” (Step 8 on page 8-25)
Because this diagnostic produces so many notices, and none of them requires interactive input, this section presents only the text in each notice instead of the complete screenshot. The text of each notice was extracted from a terminal session log.
The table below groups the notices into general categories (numbered steps 1–4). The notices (bullet items) appear in the same order as the original diagnostic output. The notice titles that appeared on screen are not included here, but they suggested the category names in the table.
11-10 For Authorized Service Personnel ONLY Confidential
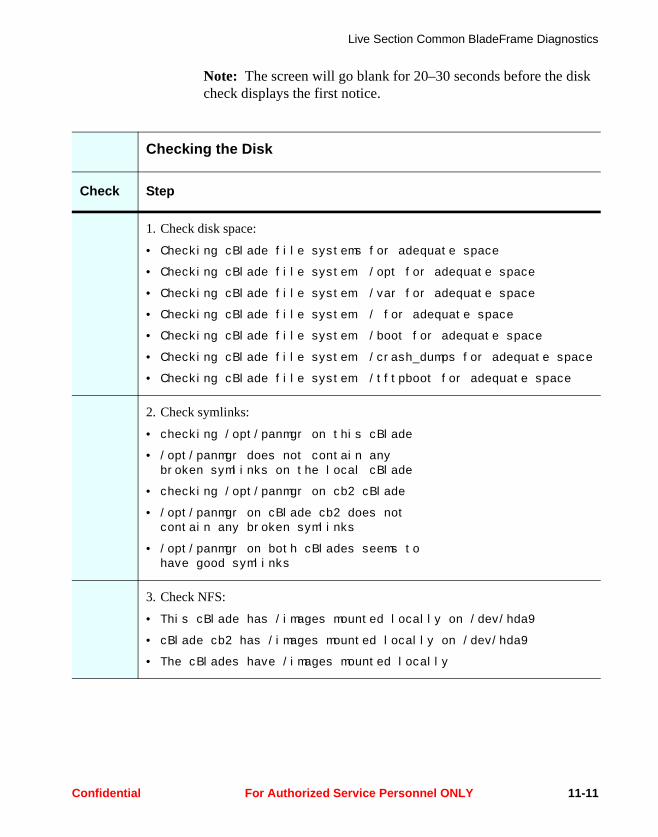
Live Section Common BladeFrame Diagnostics
Note: The screen will go blank for 20–30 seconds before the disk check displays the first notice.
Checking the Disk
Check Step
1. Check disk space:• Checking cBlade file systems for adequate space
• Checking cBlade file system /opt for adequate space
• Checking cBlade file system /var for adequate space
• Checking cBlade file system / for adequate space
• Checking cBlade file system /boot for adequate space
• Checking cBlade file system /crash_dumps for adequate space
• Checking cBlade file system /tftpboot for adequate space
2. Check symlinks:• checking /opt/panmgr on this cBlade
• /opt/panmgr does not contain any broken symlinks on the local cBlade
• checking /opt/panmgr on cb2 cBlade
• /opt/panmgr on cBlade cb2 does notcontain any broken symlinks
• /opt/panmgr on both cBlades seems tohave good symlinks
3. Check NFS:• This cBlade has /images mounted locally on /dev/hda9
• cBlade cb2 has /images mounted locally on /dev/hda9
• The cBlades have /images mounted locally
Confidential For Authorized Service Personnel ONLY 11-11
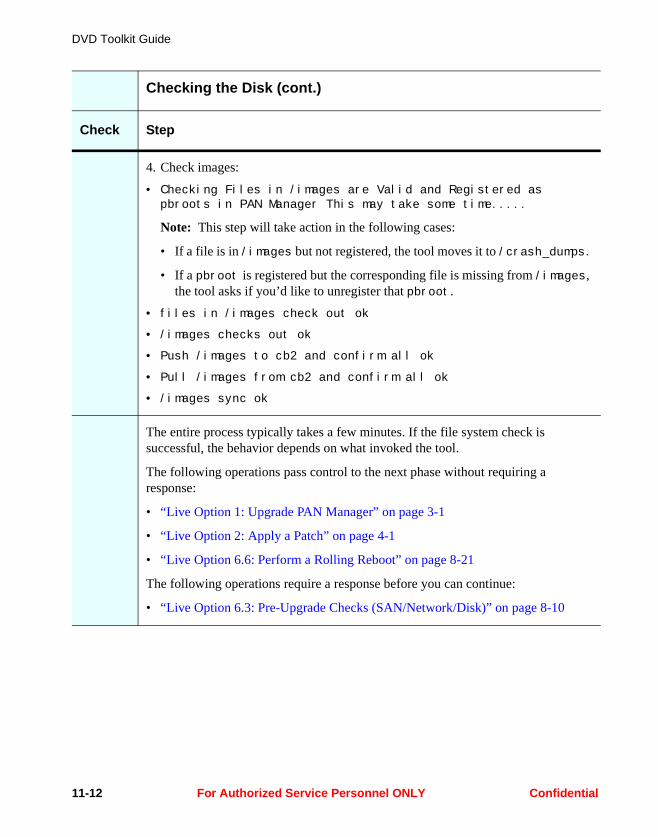
DVD Toolkit Guide
4. Check images:
• Checking Files in /images are Valid and Registered as pbroots in PAN Manager This may take some time.....
Note: This step will take action in the following cases:
• If a file is in /images but not registered, the tool moves it to /crash_dumps.
• If a pbroot is registered but the corresponding file is missing from /images, the tool asks if you’d like to unregister that pbroot.
• files in /images check out ok
• /images checks out ok
• Push /images to cb2 and confirm all ok
• Pull /images from cb2 and confirm all ok
• /images sync ok
The entire process typically takes a few minutes. If the file system check is successful, the behavior depends on what invoked the tool.
The following operations pass control to the next phase without requiring a response:
• “Live Option 1: Upgrade PAN Manager” on page 3-1
• “Live Option 2: Apply a Patch” on page 4-1
• “Live Option 6.6: Perform a Rolling Reboot” on page 8-21
The following operations require a response before you can continue:
• “Live Option 6.3: Pre-Upgrade Checks (SAN/Network/Disk)” on page 8-10
Checking the Disk (cont.)
Check Step
11-12 For Authorized Service Personnel ONLY Confidential
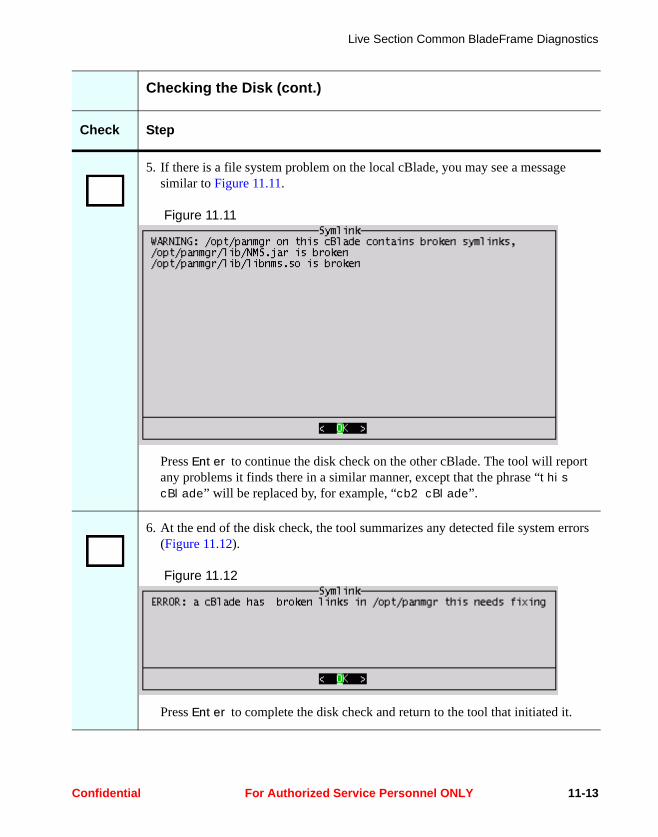
Live Section Common BladeFrame Diagnostics
5. If there is a file system problem on the local cBlade, you may see a message similar to Figure 11.11.
Figure 11.11
Press Enter to continue the disk check on the other cBlade. The tool will report any problems it finds there in a similar manner, except that the phrase “this cBlade” will be replaced by, for example, “cb2 cBlade”.
6. At the end of the disk check, the tool summarizes any detected file system errors (Figure 11.12).
Figure 11.12
Press Enter to complete the disk check and return to the tool that initiated it.
Checking the Disk (cont.)
Check Step
Confidential For Authorized Service Personnel ONLY 11-13
DVD Toolkit Guide
Checking the Network Configuration
This diagnostic makes an assessment of your network connections on both cBlades and reports any differences found. This includes scenarios such as an interface connected on one cBlade but not on the other, or mismatched speed or duplex settings.
A network check occurs in the following procedures:
• Chapter 3, Live Option 1: Upgrade PAN Manager (Step 13 on page 3-9)
• Chapter 4, Live Option 2: Apply a Patch (Step 9 on page 4-7)
• Chapter 6, Live Option 4: Firmware in the following sections:
• “Live Option 4.1: HBA (Serviceboot)” (Step 8 on page 6-8)
• “Live Option 4.2: cBlade (BlastMe)” (Step 8 on page 6-15)
• “Live Option 4.3: Both HBA and cBlade” (Step 5 on page 6-23)
• Chapter 8, Live Option 6: Admin Tasks in the following sections:
• “Live Option 6.2: Check Network Configuration” (Step 2 on page 8-9)
• “Live Option 6.3: Pre-Upgrade Checks (SAN/Network/Disk)” (Step 4 on page 8-12)
• “Live Option 6.6: Perform a Rolling Reboot” (Step 9 on page 8-25)
11-14 For Authorized Service Personnel ONLY Confidential

Live Section Common BladeFrame Diagnostics
Checking the Network Configuration
Check Step
1. The notice in Figure 11.13 briefly appears as the network analysis begins.
Figure 11.13
2. If the network is all okay, you'll see the report in Figure 11.14.
Figure 11.14
Press Enter to return control to the tool that initiated the network check.
3. If there is a problem you’ll see a message similar to Figure 11.15.
Figure 11.15
Press Enter to view the error reports.
Confidential For Authorized Service Personnel ONLY 11-15
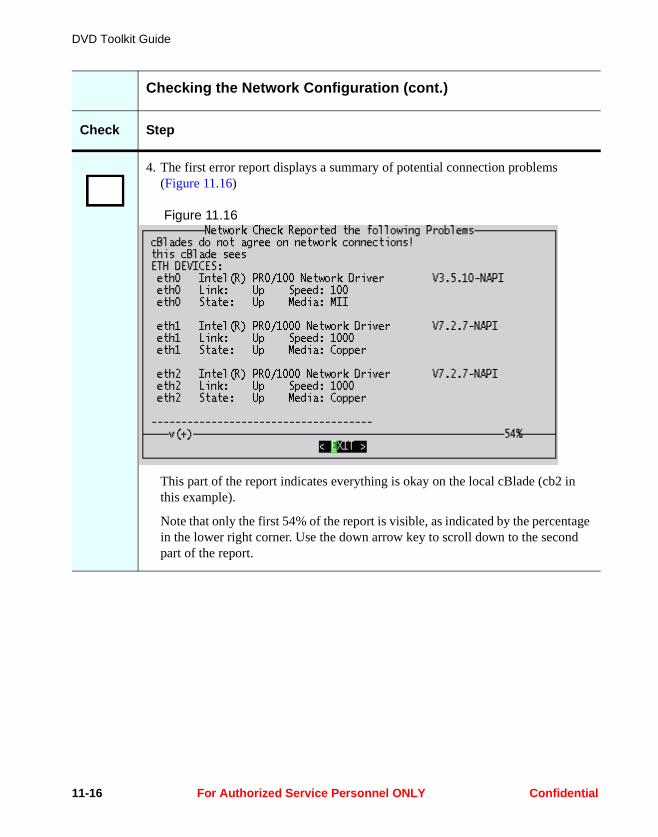
DVD Toolkit Guide
4. The first error report displays a summary of potential connection problems (Figure 11.16)
Figure 11.16
This part of the report indicates everything is okay on the local cBlade (cb2 in this example).
Note that only the first 54% of the report is visible, as indicated by the percentage in the lower right corner. Use the down arrow key to scroll down to the second part of the report.
Checking the Network Configuration (cont.)
Check Step
11-16 For Authorized Service Personnel ONLY Confidential
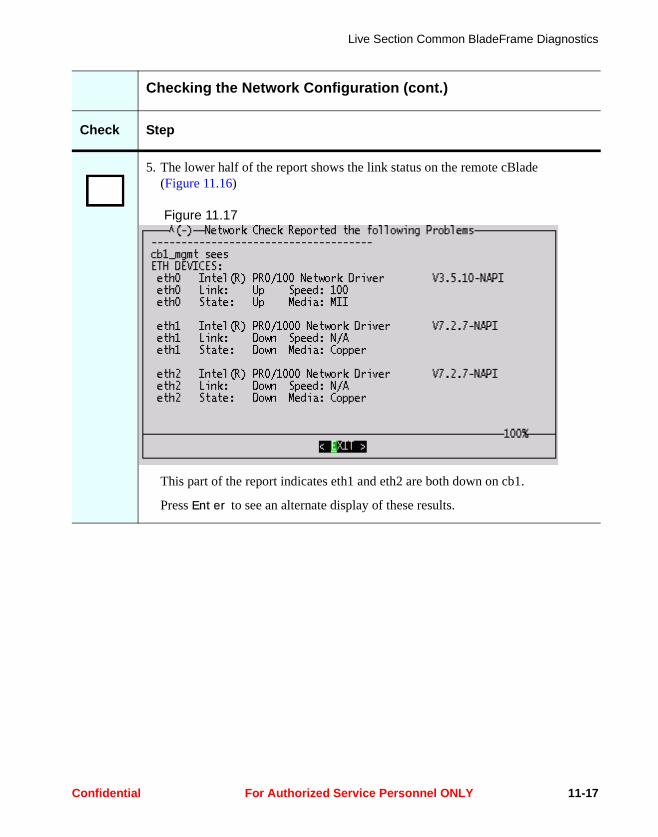
Live Section Common BladeFrame Diagnostics
5. The lower half of the report shows the link status on the remote cBlade (Figure 11.16)
Figure 11.17
This part of the report indicates eth1 and eth2 are both down on cb1.
Press Enter to see an alternate display of these results.
Checking the Network Configuration (cont.)
Check Step
Confidential For Authorized Service Personnel ONLY 11-17
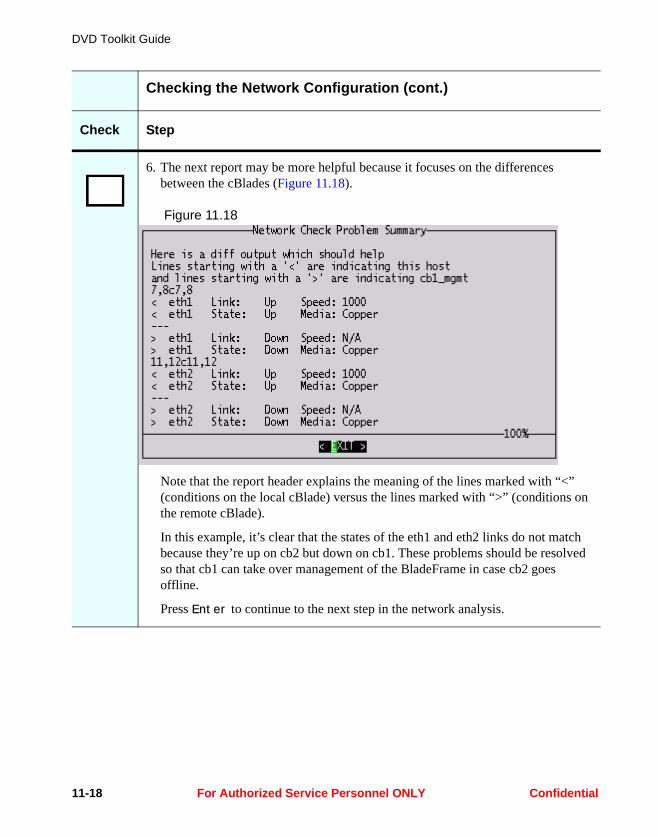
DVD Toolkit Guide
6. The next report may be more helpful because it focuses on the differences between the cBlades (Figure 11.18).
Figure 11.18
Note that the report header explains the meaning of the lines marked with “<” (conditions on the local cBlade) versus the lines marked with “>” (conditions on the remote cBlade).
In this example, it’s clear that the states of the eth1 and eth2 links do not match because they’re up on cb2 but down on cb1. These problems should be resolved so that cb1 can take over management of the BladeFrame in case cb2 goes offline.
Press Enter to continue to the next step in the network analysis.
Checking the Network Configuration (cont.)
Check Step
11-18 For Authorized Service Personnel ONLY Confidential
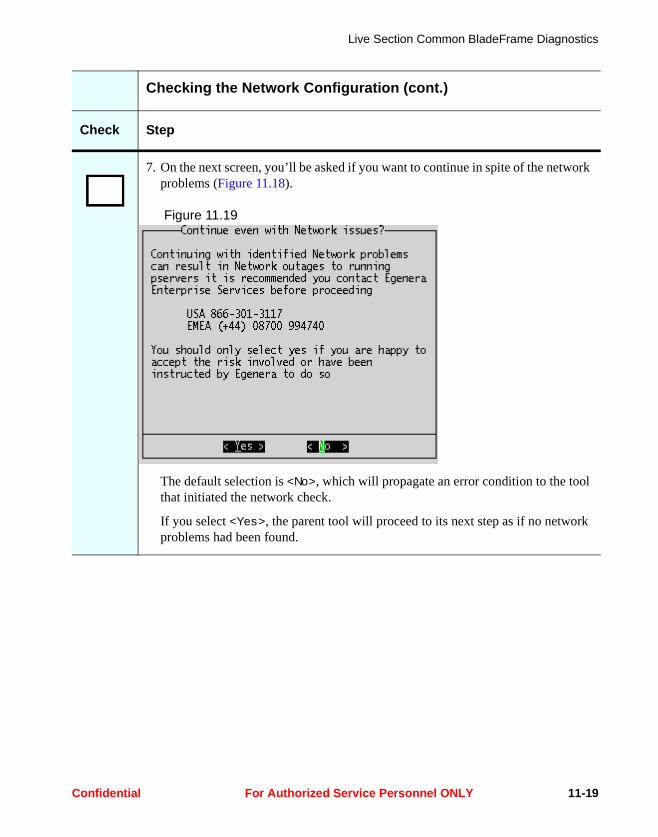
Live Section Common BladeFrame Diagnostics
7. On the next screen, you’ll be asked if you want to continue in spite of the network problems (Figure 11.18).
Figure 11.19
The default selection is <No>, which will propagate an error condition to the tool that initiated the network check.
If you select <Yes>, the parent tool will proceed to its next step as if no network problems had been found.
Checking the Network Configuration (cont.)
Check Step
Confidential For Authorized Service Personnel ONLY 11-19

DVD Toolkit Guide
11-20 For Authorized Service Personnel ONLY Confidential
Part 2Boot Section
Contents:
• Chapter 12, Boot Section Basics
• Chapter 13, Boot Option 1: Fresh Install
• Chapter 14, Boot Option 2: Restore cBlade
• Chapter 15, Boot Option 3: Recover Network Archive (Snapshot)
• Chapter 16, Boot Option 4: Physical Media Check
Confidential For Authorized Service Personnel ONLY

DVD Toolkit Guide
For Authorized Service Personnel ONLY Confidential
Chapter 12Boot Section Basics
Getting Started
Use the following procedure to access the Boot Section of the DVD Toolkit:
Getting Started
Check Step
1. Insert the DVD into a cBlade and boot from that in the usual way.
2. Connect to the cBlade console using a terminal type of vt100.
Confidential For Authorized Service Personnel ONLY 12-1
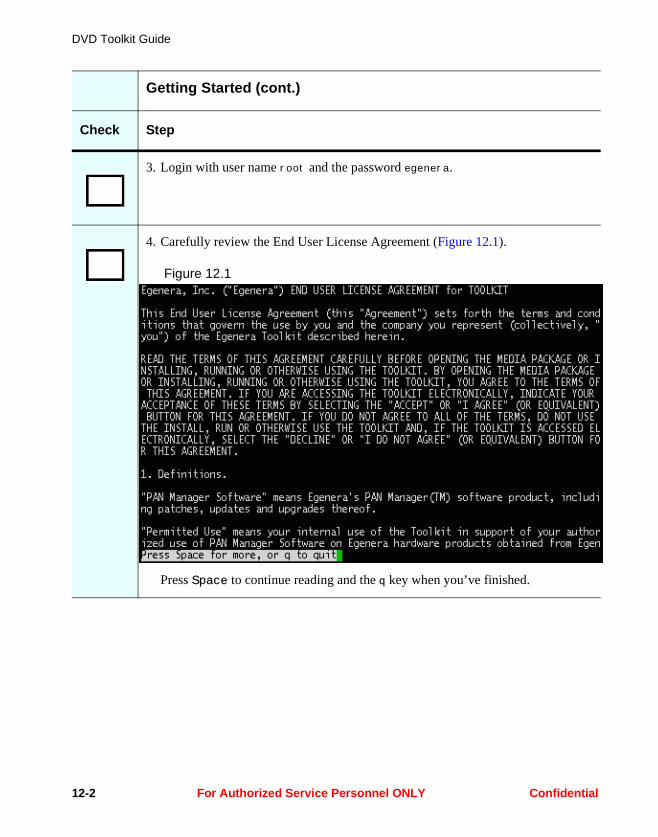
DVD Toolkit Guide
3. Login with user name root and the password egenera.
4. Carefully review the End User License Agreement (Figure 12.1).
Figure 12.1
Press Space to continue reading and the q key when you’ve finished.
Getting Started (cont.)
Check Step
12-2 For Authorized Service Personnel ONLY Confidential
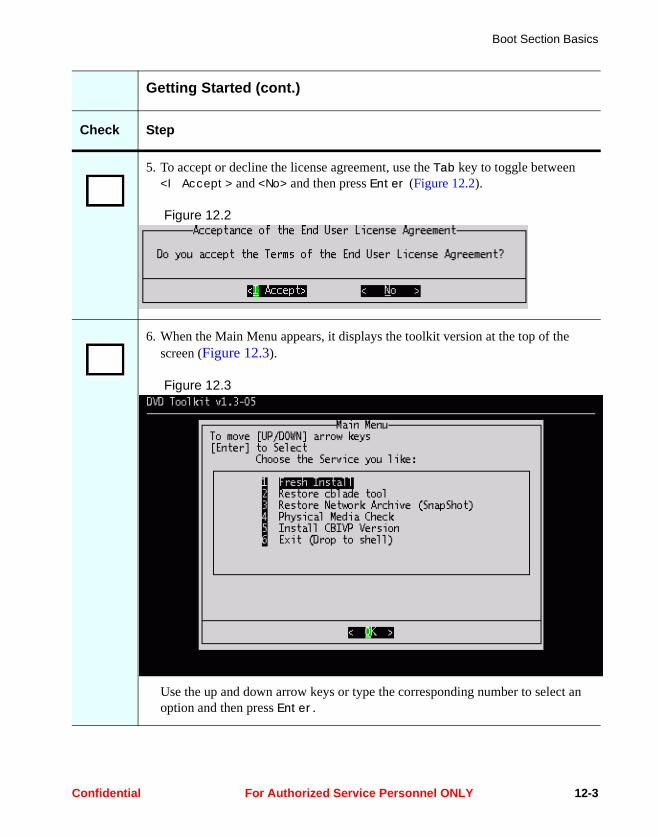
Boot Section Basics
5. To accept or decline the license agreement, use the Tab key to toggle between <I Accept> and <No> and then press Enter (Figure 12.2).
Figure 12.2
6. When the Main Menu appears, it displays the toolkit version at the top of the screen (Figure 12.3).
Figure 12.3
Use the up and down arrow keys or type the corresponding number to select an option and then press Enter.
Getting Started (cont.)
Check Step
Confidential For Authorized Service Personnel ONLY 12-3
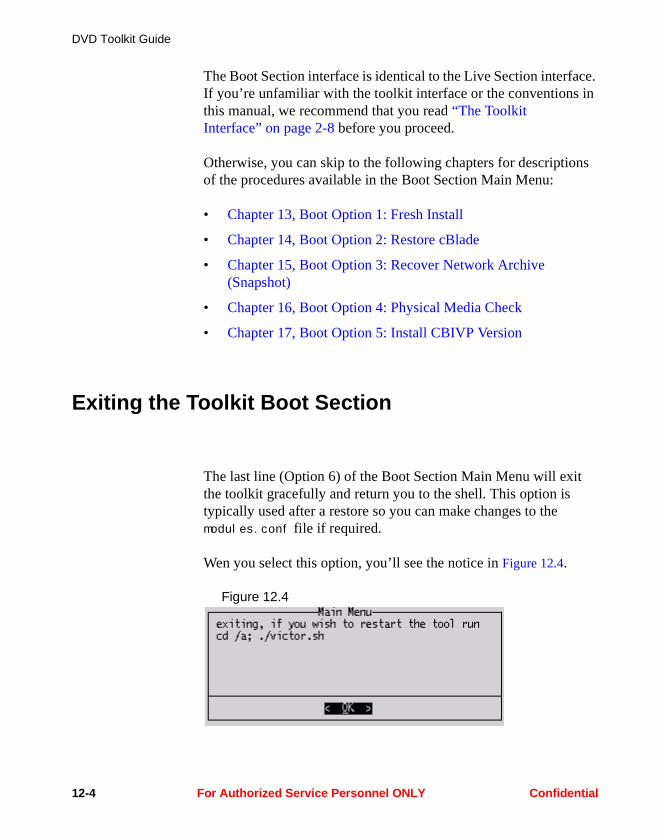
DVD Toolkit Guide
The Boot Section interface is identical to the Live Section interface. If you’re unfamiliar with the toolkit interface or the conventions in this manual, we recommend that you read “The Toolkit Interface” on page 2-8 before you proceed.
Otherwise, you can skip to the following chapters for descriptions of the procedures available in the Boot Section Main Menu:
• Chapter 13, Boot Option 1: Fresh Install
• Chapter 14, Boot Option 2: Restore cBlade
• Chapter 15, Boot Option 3: Recover Network Archive (Snapshot)
• Chapter 16, Boot Option 4: Physical Media Check
• Chapter 17, Boot Option 5: Install CBIVP Version
Exiting the Toolkit Boot Section
The last line (Option 6) of the Boot Section Main Menu will exit the toolkit gracefully and return you to the shell. This option is typically used after a restore so you can make changes to the modules.conf file if required.
Wen you select this option, you’ll see the notice in Figure 12.4.
Figure 12.4
12-4 For Authorized Service Personnel ONLY Confidential

Boot Section Basics
Note that the mount point for the DVD is /a. As the notice indicates, you can return to the DVD Boot Section by entering the following commands:
# cd /a# ./victor.sh
Confidential For Authorized Service Personnel ONLY 12-5

DVD Toolkit Guide
12-6 For Authorized Service Personnel ONLY Confidential
Chapter 13Boot Option 1: Fresh
Install
This option will delete all existing data on both cBlades and then do a complete, fresh installation of one of the following PAN Manager versions from the DVD:
You can choose to apply the available patch to the base media as a step during the installation process. You’ll also have the option to flash the HBA firmware, the cBlade firmware, or both.
Note: To ensure proper synchronization, you should complete the fresh installation on both cBlades before you attempt to reboot either one in multiuser mode from the hard drive. You can use either of the following methods:
• Use two copies of the DVD to perform the installations in parallel on both blades at the same time.
PAN Manager Base Media Available Patch HBA and cBlade
Firmware Flash
4.0.1.5 4.0.1.10 optional
5.1.1 5.1.12.0 optional
5.2.0 none automatic
Confidential For Authorized Service Personnel ONLY 13-1
DVD Toolkit Guide
• Complete all the user tasks through flashing the firmware on one blade, but do not allow that blade to reboot off the new installation on the hard drive.
For example, when the first blade reboots after its firmware flashing is complete, you could enter the BIOS setup and allow the blade to remain there.
You would then perform the same setup on the second blade. When it reboots after its firmware flashing is complete, you would exit the BIOS setup allow the first blade to boot at that time.
Installing the Base Media
This phase of the installation will repartition the hard drive and delete all existing data before loading the software, which includes Linux, PAN Manager, and various BladeFrame utilities.
13-2 For Authorized Service Personnel ONLY Confidential
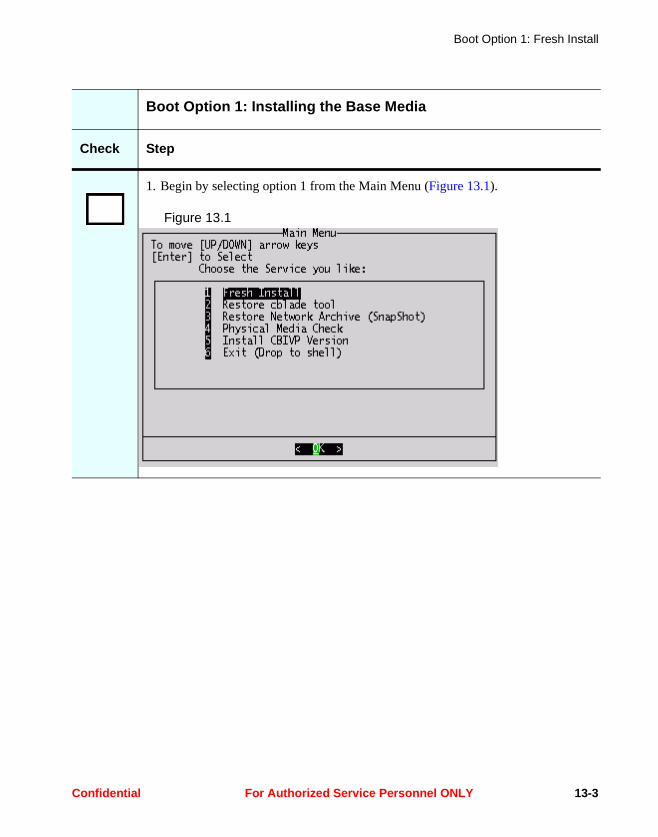
Boot Option 1: Fresh Install
Boot Option 1: Installing the Base Media
Check Step
1. Begin by selecting option 1 from the Main Menu (Figure 13.1).
Figure 13.1
Confidential For Authorized Service Personnel ONLY 13-3

DVD Toolkit Guide
2. The tool will list the versions available on the DVD (Figure 13.2).
Figure 13.2
In this example, we’ll install 5.2.0.
3. The tool prompts you to confirm your choice (Figure 13.3).
Figure 13.3
Press Enter to continue.
4. The tool briefly notifies you as the process begins (Figure 13.4).
Figure 13.4
Boot Option 1: Installing the Base Media (cont.)
Check Step
13-4 For Authorized Service Personnel ONLY Confidential

Boot Option 1: Fresh Install
5. Before the installation proceeds, you’ll be warned that the process will delete all existing data (Figure 13.4).
Figure 13.5
Press y and then Enter to continue.
After a few seconds, the tool logs its progress to the terminal (Figure 13.6).
Figure 13.6
This phase of the installation may take 15-20 minutes.
You’ll next be asked to set the hardware clock, time zone, and local date and time. The interface depends on the PAN Manager version.
Boot Option 1: Installing the Base Media (cont.)
Check Step
Confidential For Authorized Service Personnel ONLY 13-5
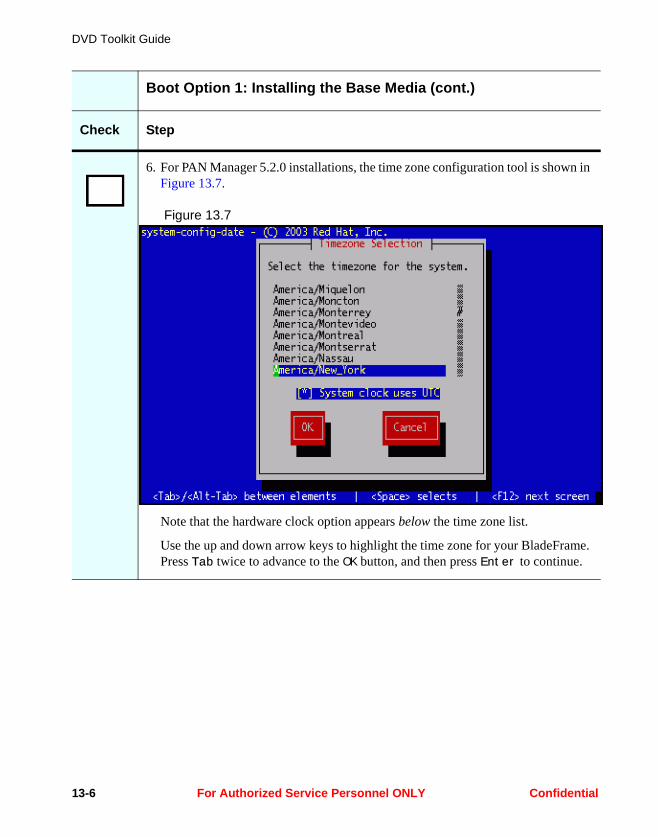
DVD Toolkit Guide
6. For PAN Manager 5.2.0 installations, the time zone configuration tool is shown in Figure 13.7.
Figure 13.7
Note that the hardware clock option appears below the time zone list.
Use the up and down arrow keys to highlight the time zone for your BladeFrame. Press Tab twice to advance to the OK button, and then press Enter to continue.
Boot Option 1: Installing the Base Media (cont.)
Check Step
13-6 For Authorized Service Personnel ONLY Confidential
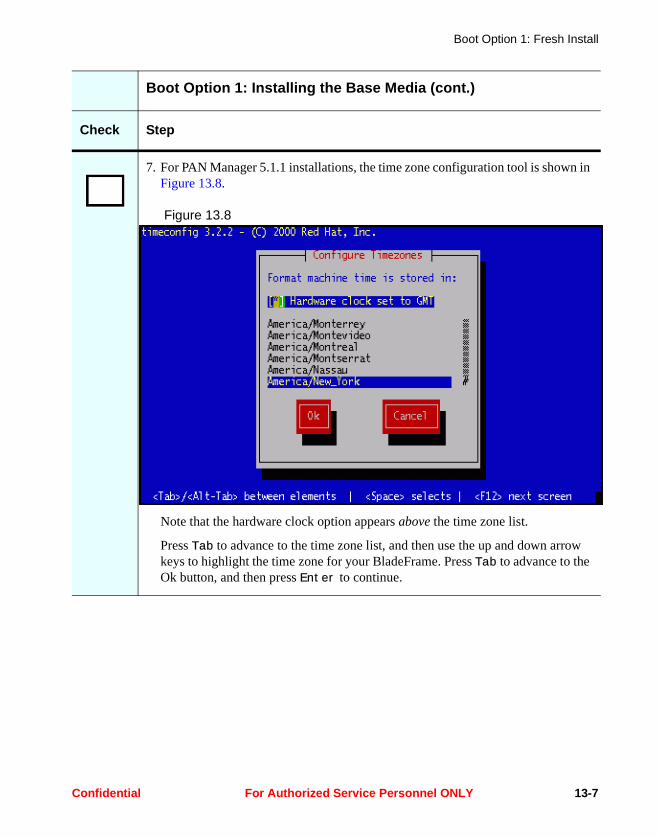
Boot Option 1: Fresh Install
7. For PAN Manager 5.1.1 installations, the time zone configuration tool is shown in Figure 13.8.
Figure 13.8
Note that the hardware clock option appears above the time zone list.
Press Tab to advance to the time zone list, and then use the up and down arrow keys to highlight the time zone for your BladeFrame. Press Tab to advance to the Ok button, and then press Enter to continue.
Boot Option 1: Installing the Base Media (cont.)
Check Step
Confidential For Authorized Service Personnel ONLY 13-7

DVD Toolkit Guide
8. For PAN Manager 4.0.1.5 installations, you select the time zone from a menu displayed in the output stream (Figure 13.9).
Figure 13.9
Note that there is no option to control the hardware clock.
Type the number of the time zone in the menu, and then press Enter.
9. For all versions, after you select the time zone, you’ll be asked to confirm your choice.
For 5.x PAN Manager versions, the prompt appears as shown in Figure 13.10.
Figure 13.10
For 4.0.1.x PAN Manager versions, the prompt appears as shown in Figure 13.11.
Figure 13.11
Press y and Enter to continue.
Boot Option 1: Installing the Base Media (cont.)
Check Step
13-8 For Authorized Service Personnel ONLY Confidential
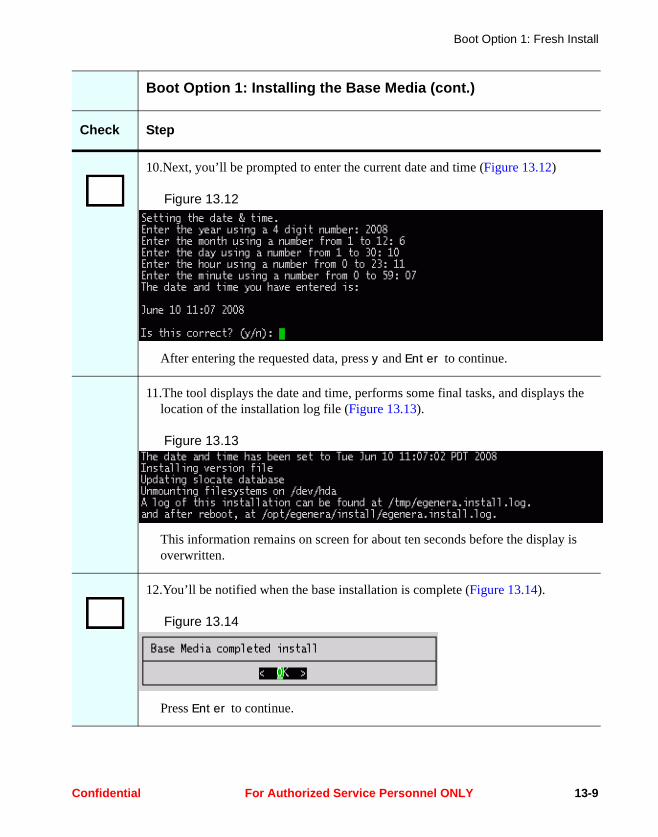
Boot Option 1: Fresh Install
10.Next, you’ll be prompted to enter the current date and time (Figure 13.12)
Figure 13.12
After entering the requested data, press y and Enter to continue.
11.The tool displays the date and time, performs some final tasks, and displays the location of the installation log file (Figure 13.13).
Figure 13.13
This information remains on screen for about ten seconds before the display is overwritten.
12.You’ll be notified when the base installation is complete (Figure 13.14).
Figure 13.14
Press Enter to continue.
Boot Option 1: Installing the Base Media (cont.)
Check Step
Confidential For Authorized Service Personnel ONLY 13-9

DVD Toolkit Guide
Installing Patches
In the next phase, the tool checks for available patches and gives you the option to install them.
Boot Option 1: Installing Patches
Check Step
13.The tool checks the contents of the DVD to see if there are any patches available for the version you just installed.
a. You’ll be notified if no patches are available (Figure 13.15).
Figure 13.15
In this case, press Enter to advance to the firmware phase.
b. Otherwise, if there are one or more patches available, you’ll be asked if you want to proceed (Figure 13.16).
Figure 13.16
To see the available patches, press Tab to highlight < Yes > and then press Enter to continue.
13-10 For Authorized Service Personnel ONLY Confidential
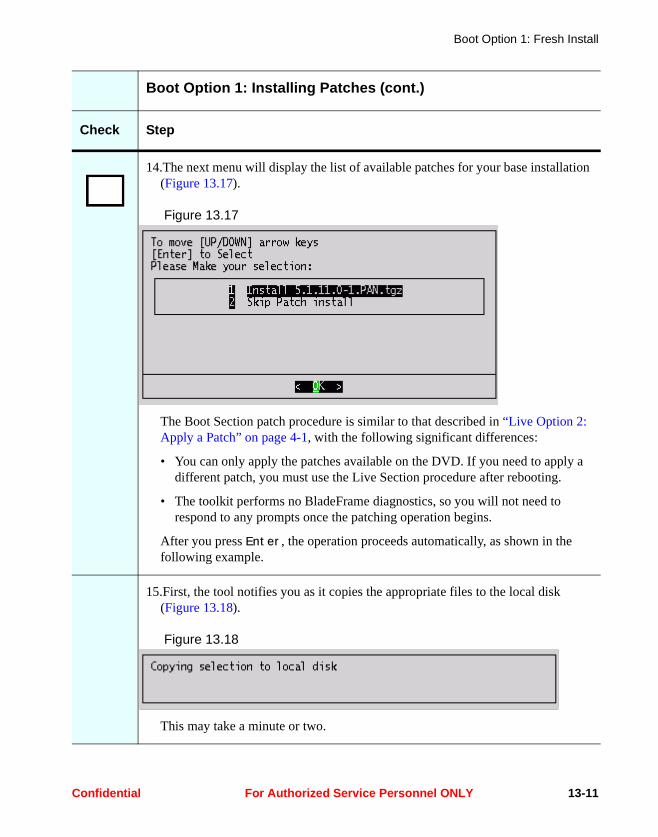
Boot Option 1: Fresh Install
14.The next menu will display the list of available patches for your base installation (Figure 13.17).
Figure 13.17
The Boot Section patch procedure is similar to that described in “Live Option 2: Apply a Patch” on page 4-1, with the following significant differences:
• You can only apply the patches available on the DVD. If you need to apply a different patch, you must use the Live Section procedure after rebooting.
• The toolkit performs no BladeFrame diagnostics, so you will not need to respond to any prompts once the patching operation begins.
After you press Enter, the operation proceeds automatically, as shown in the following example.
15.First, the tool notifies you as it copies the appropriate files to the local disk (Figure 13.18).
Figure 13.18
This may take a minute or two.
Boot Option 1: Installing Patches (cont.)
Check Step
Confidential For Authorized Service Personnel ONLY 13-11
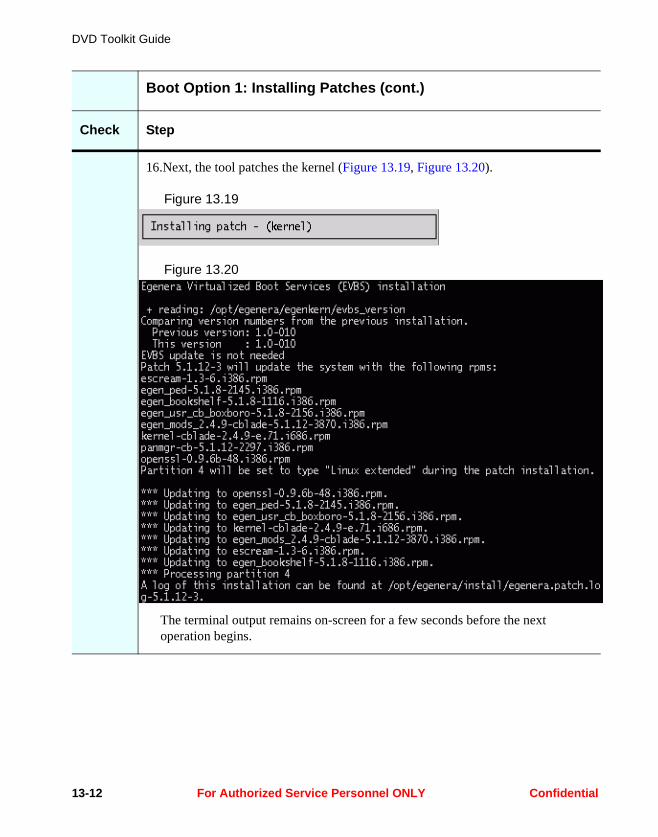
DVD Toolkit Guide
16.Next, the tool patches the kernel (Figure 13.19, Figure 13.20).
Figure 13.19
Figure 13.20
The terminal output remains on-screen for a few seconds before the next operation begins.
Boot Option 1: Installing Patches (cont.)
Check Step
13-12 For Authorized Service Personnel ONLY Confidential
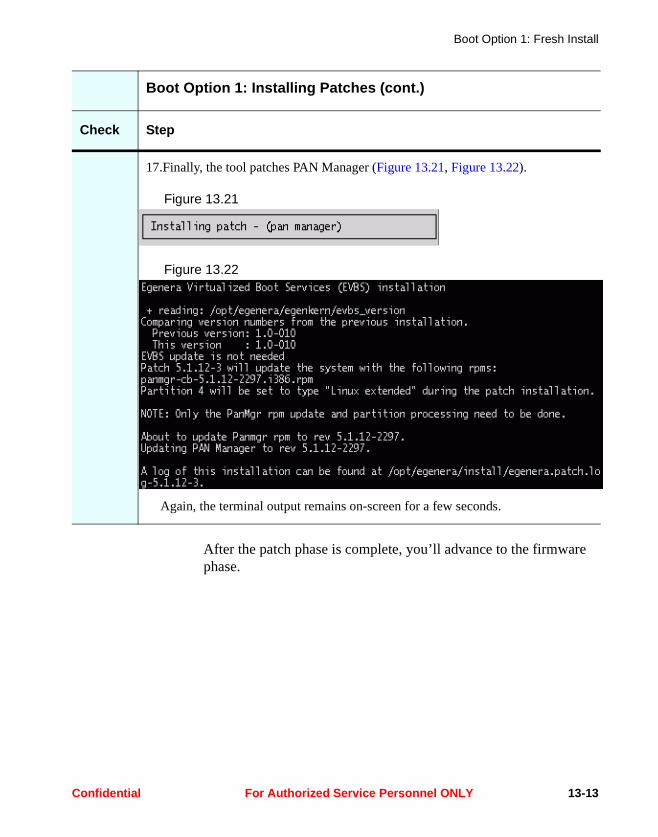
Boot Option 1: Fresh Install
After the patch phase is complete, you’ll advance to the firmware phase.
17.Finally, the tool patches PAN Manager (Figure 13.21, Figure 13.22).
Figure 13.21
Figure 13.22
Again, the terminal output remains on-screen for a few seconds.
Boot Option 1: Installing Patches (cont.)
Check Step
Confidential For Authorized Service Personnel ONLY 13-13
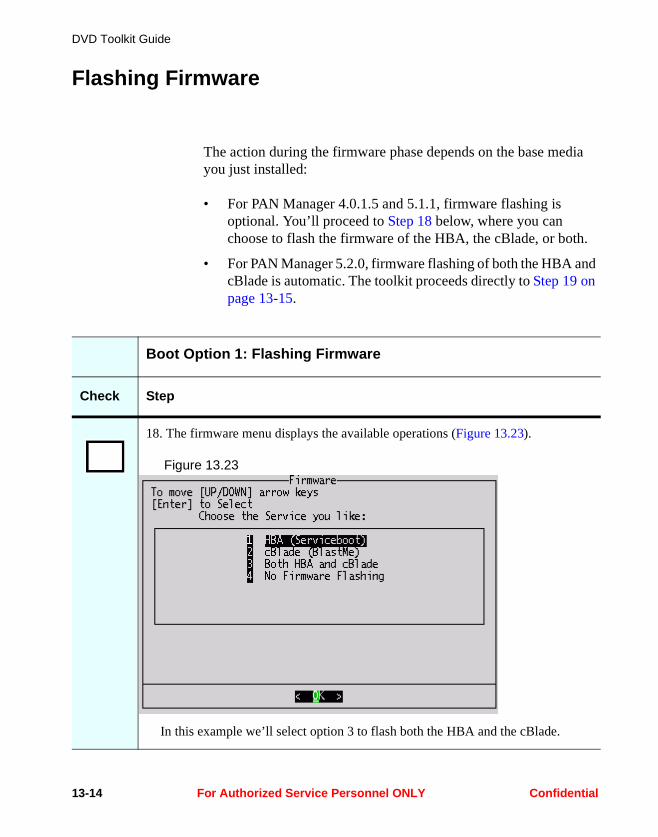
DVD Toolkit Guide
Flashing Firmware
The action during the firmware phase depends on the base media you just installed:
• For PAN Manager 4.0.1.5 and 5.1.1, firmware flashing is optional. You’ll proceed to Step 18 below, where you can choose to flash the firmware of the HBA, the cBlade, or both.
• For PAN Manager 5.2.0, firmware flashing of both the HBA and cBlade is automatic. The toolkit proceeds directly to Step 19 on page 13-15.
Boot Option 1: Flashing Firmware
Check Step
18. The firmware menu displays the available operations (Figure 13.23).
Figure 13.23
In this example we’ll select option 3 to flash both the HBA and the cBlade.
13-14 For Authorized Service Personnel ONLY Confidential

Boot Option 1: Fresh Install
19.To avoid problems when booting from the serviceboot partition, the tool checks its extended partition type (Figure 13.24).
Figure 13.24
If it’s marked as a DOS extended partition, the tool converts it to a Linux extended partition (Figure 13.25).
Figure 13.25
Boot Option 1: Flashing Firmware (cont.)
Check Step
Confidential For Authorized Service Personnel ONLY 13-15
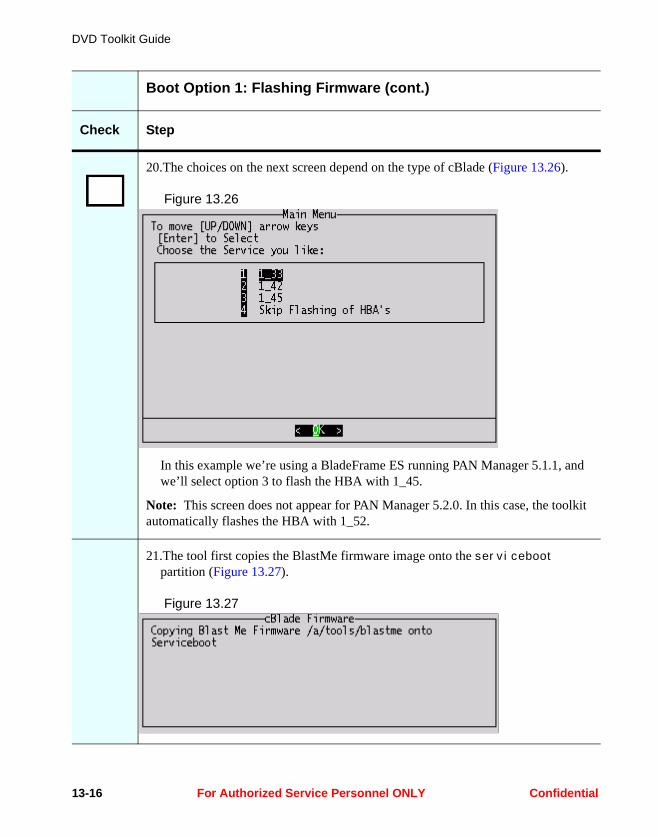
DVD Toolkit Guide
20.The choices on the next screen depend on the type of cBlade (Figure 13.26).
Figure 13.26
In this example we’re using a BladeFrame ES running PAN Manager 5.1.1, and we’ll select option 3 to flash the HBA with 1_45.
Note: This screen does not appear for PAN Manager 5.2.0. In this case, the toolkit automatically flashes the HBA with 1_52.
21.The tool first copies the BlastMe firmware image onto the serviceboot partition (Figure 13.27).
Figure 13.27
Boot Option 1: Flashing Firmware (cont.)
Check Step
13-16 For Authorized Service Personnel ONLY Confidential

Boot Option 1: Fresh Install
22. The cBlade then prepares to reboot into the serviceboot partition (Figure 13.28, Figure 13.29).
Figure 13.28
Figure 13.29
Boot Option 1: Flashing Firmware (cont.)
Check Step
Confidential For Authorized Service Personnel ONLY 13-17

DVD Toolkit Guide
23.The blade reboots from the serviceboot partition (Figure 13.30).
Figure 13.30
Note: Both the Qlogic (HBA) and BlastMe (cBlade) firmware flashing utilities redraw the screen in a sporadic fashion such that the most recent output does not always appear at the bottom. The following output was reconstructed from the terminal log.
Boot Option 1: Flashing Firmware (cont.)
Check Step
13-18 For Authorized Service Personnel ONLY Confidential
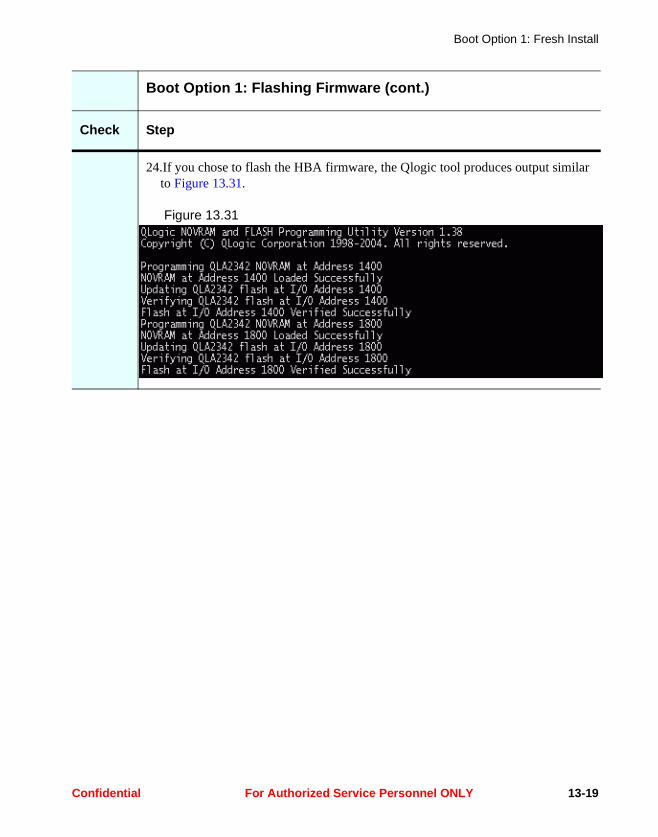
Boot Option 1: Fresh Install
24.If you chose to flash the HBA firmware, the Qlogic tool produces output similar to Figure 13.31.
Figure 13.31
Boot Option 1: Flashing Firmware (cont.)
Check Step
Confidential For Authorized Service Personnel ONLY 13-19
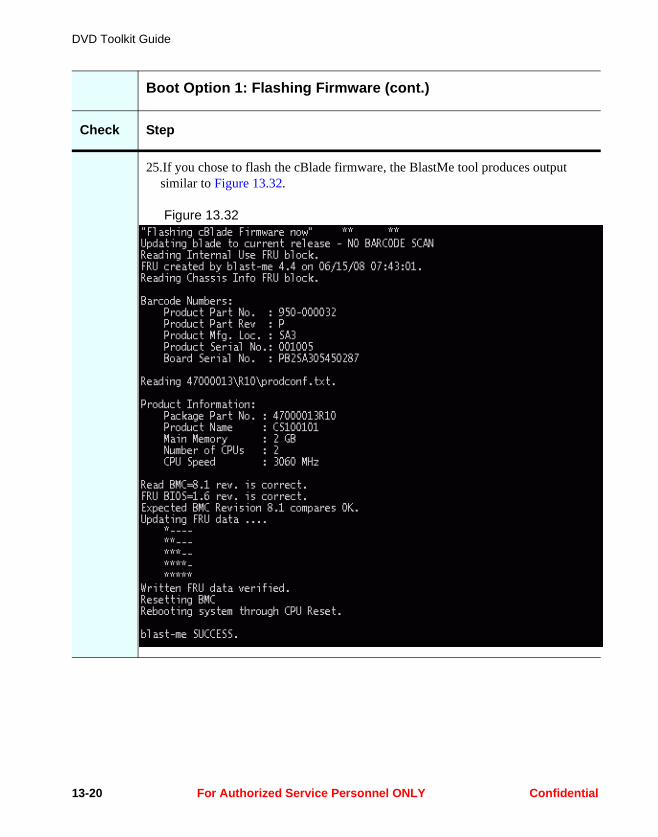
DVD Toolkit Guide
25.If you chose to flash the cBlade firmware, the BlastMe tool produces output similar to Figure 13.32.
Figure 13.32
Boot Option 1: Flashing Firmware (cont.)
Check Step
13-20 For Authorized Service Personnel ONLY Confidential

Boot Option 1: Fresh Install
This complete the fresh install procedure in the toolkit.
26.After the firmware phase, the blade reboots off the hard drive and runs the newly installed software (Figure 13.33).
Figure 13.33
Note that this first boot will require some extra time to initialize various Linux and PAN Manager configuration data.
Also note that hbapost is the last script run before the Linux signon. This is run only once after the firmware flashing operation to reset the serviceboot partition to its defaults. It will not be present on subsequent boots.
Boot Option 1: Flashing Firmware (cont.)
Check Step
Confidential For Authorized Service Personnel ONLY 13-21
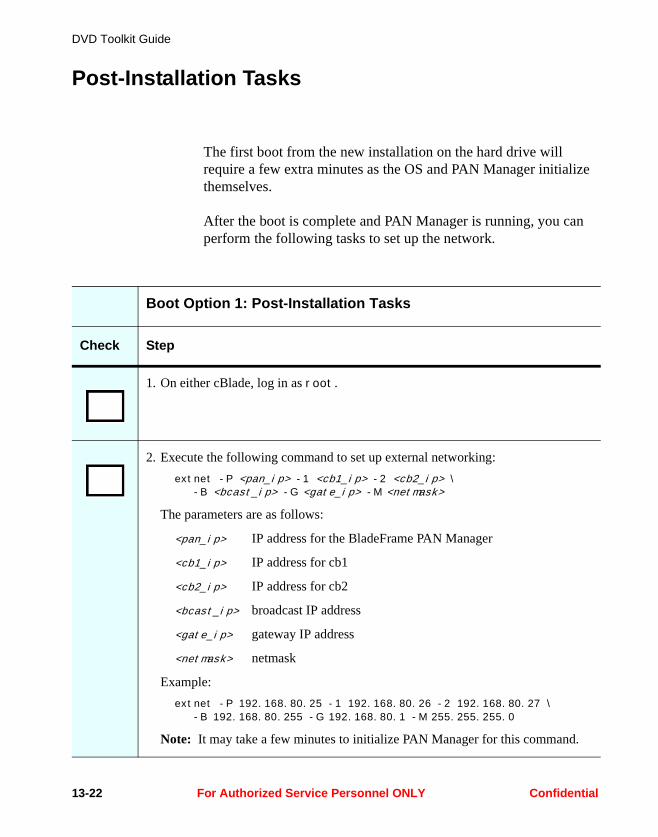
DVD Toolkit Guide
Post-Installation Tasks
The first boot from the new installation on the hard drive will require a few extra minutes as the OS and PAN Manager initialize themselves.
After the boot is complete and PAN Manager is running, you can perform the following tasks to set up the network.
Boot Option 1: Post-Installation Tasks
Check Step
1. On either cBlade, log in as root.
2. Execute the following command to set up external networking:extnet -P <pan_ip> -1 <cb1_ip> -2 <cb2_ip> \
-B <bcast_ip> -G <gate_ip> -M <netmask>
The parameters are as follows:
<pan_ip> IP address for the BladeFrame PAN Manager
<cb1_ip> IP address for cb1
<cb2_ip> IP address for cb2
<bcast_ip> broadcast IP address
<gate_ip> gateway IP address
<netmask> netmask
Example:extnet -P 192.168.80.25 -1 192.168.80.26 -2 192.168.80.27 \
-B 192.168.80.255 -G 192.168.80.1 -M 255.255.255.0
Note: It may take a few minutes to initialize PAN Manager for this command.
13-22 For Authorized Service Personnel ONLY Confidential
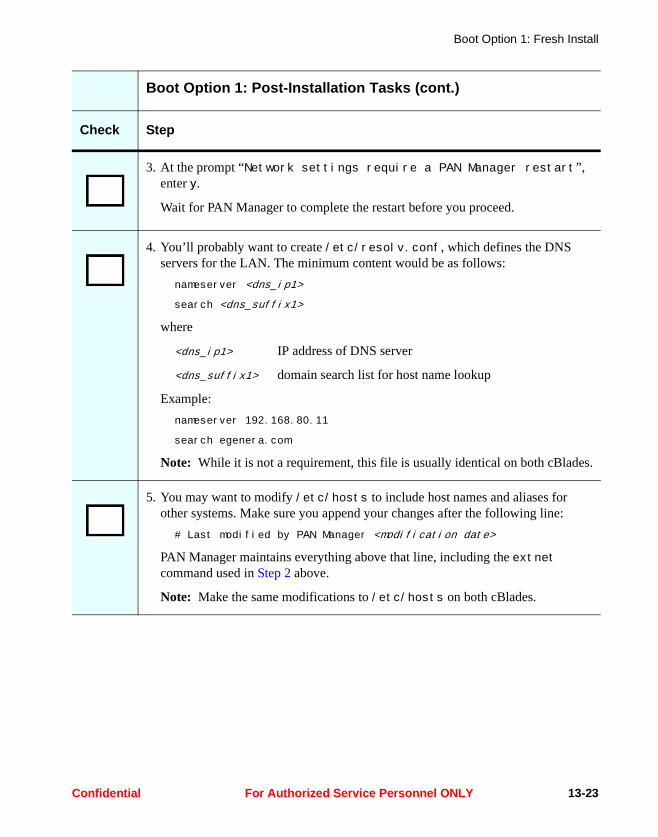
Boot Option 1: Fresh Install
3. At the prompt “Network settings require a PAN Manager restart”, enter y.
Wait for PAN Manager to complete the restart before you proceed.
4. You’ll probably want to create /etc/resolv.conf, which defines the DNS servers for the LAN. The minimum content would be as follows:
nameserver <dns_ip1>
search <dns_suffix1>
where
<dns_ip1> IP address of DNS server
<dns_suffix1> domain search list for host name lookup
Example:nameserver 192.168.80.11
search egenera.com
Note: While it is not a requirement, this file is usually identical on both cBlades.
5. You may want to modify /etc/hosts to include host names and aliases for other systems. Make sure you append your changes after the following line:
# Last modified by PAN Manager <modification date>
PAN Manager maintains everything above that line, including the extnet command used in Step 2 above.
Note: Make the same modifications to /etc/hosts on both cBlades.
Boot Option 1: Post-Installation Tasks (cont.)
Check Step
Confidential For Authorized Service Personnel ONLY 13-23
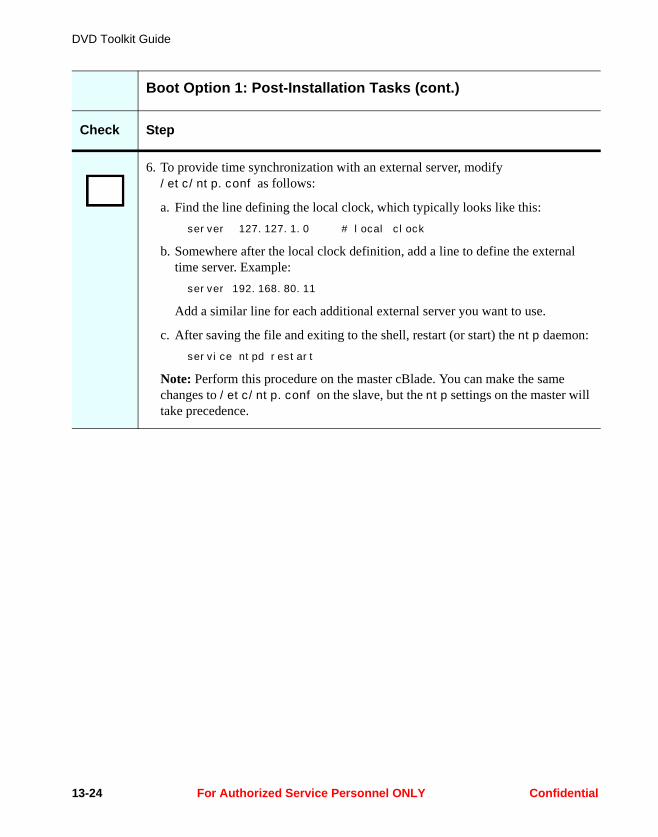
DVD Toolkit Guide
6. To provide time synchronization with an external server, modify /etc/ntp.conf as follows:
a. Find the line defining the local clock, which typically looks like this:server 127.127.1.0 # local clock
b. Somewhere after the local clock definition, add a line to define the external time server. Example:
server 192.168.80.11
Add a similar line for each additional external server you want to use.
c. After saving the file and exiting to the shell, restart (or start) the ntp daemon:service ntpd restart
Note: Perform this procedure on the master cBlade. You can make the same changes to /etc/ntp.conf on the slave, but the ntp settings on the master will take precedence.
Boot Option 1: Post-Installation Tasks (cont.)
Check Step
13-24 For Authorized Service Personnel ONLY Confidential
Chapter 14Boot Option 2: Restore
cBlade
This option allows you to restore the local cBlade from the running remote cBlade in the same BladeFrame. Its operation is based on the standard restorecblade tool available from Fujitsu Siemens Computers customer support or your authorized support vendor. The toolkit version offers the additional options to flash the cBlade and HBA firmware after the restore is complete. Note that the HBAs must be re-flashed if RMAing a BF400 S2 or BF200 cBlade.
Important: The operation of this tool requires that the remote cBlade is fully booted and allows root logins via ssh connections.
Confidential For Authorized Service Personnel ONLY 14-1
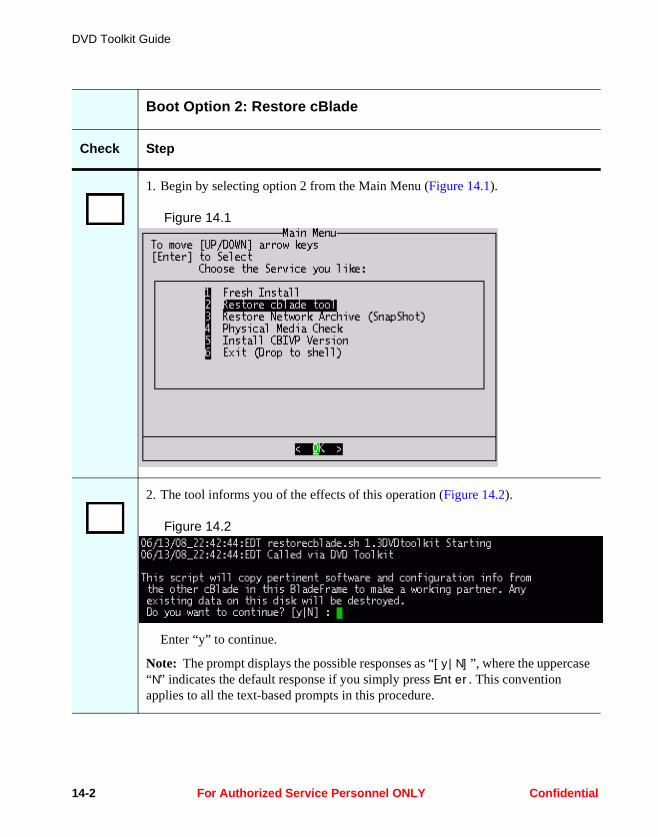
DVD Toolkit Guide
Boot Option 2: Restore cBlade
Check Step
1. Begin by selecting option 2 from the Main Menu (Figure 14.1).
Figure 14.1
2. The tool informs you of the effects of this operation (Figure 14.2).
Figure 14.2
Enter “y” to continue.
Note: The prompt displays the possible responses as “[y|N]”, where the uppercase “N” indicates the default response if you simply press Enter. This convention applies to all the text-based prompts in this procedure.
14-2 For Authorized Service Personnel ONLY Confidential
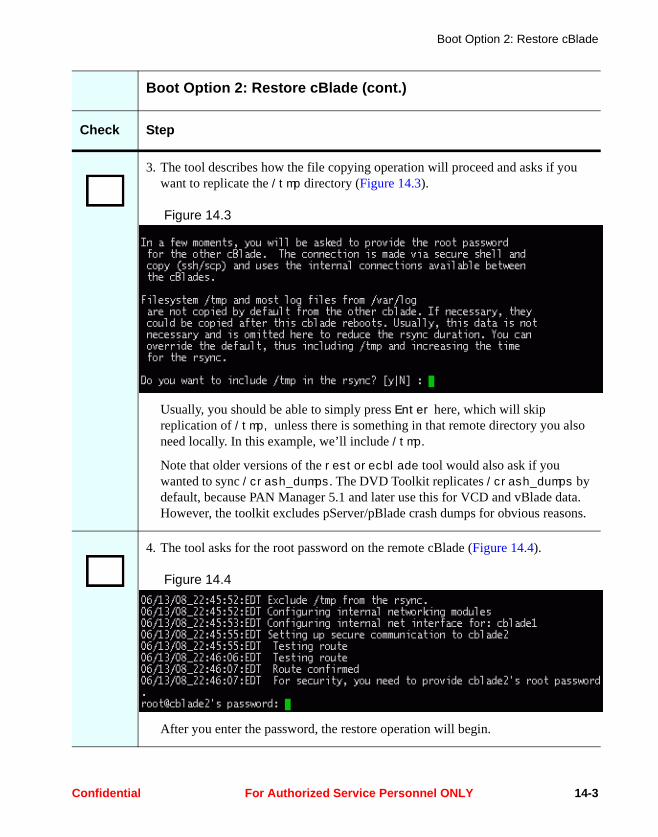
Boot Option 2: Restore cBlade
3. The tool describes how the file copying operation will proceed and asks if you want to replicate the /tmp directory (Figure 14.3).
Figure 14.3
Usually, you should be able to simply press Enter here, which will skip replication of /tmp, unless there is something in that remote directory you also need locally. In this example, we’ll include /tmp.
Note that older versions of the restorecblade tool would also ask if you wanted to sync /crash_dumps. The DVD Toolkit replicates /crash_dumps by default, because PAN Manager 5.1 and later use this for VCD and vBlade data. However, the toolkit excludes pServer/pBlade crash dumps for obvious reasons.
4. The tool asks for the root password on the remote cBlade (Figure 14.4).
Figure 14.4
After you enter the password, the restore operation will begin.
Boot Option 2: Restore cBlade (cont.)
Check Step
Confidential For Authorized Service Personnel ONLY 14-3

DVD Toolkit Guide
5. The tool logs its operations to the console. It begins by duplicating the partition setup from the remote cBlade (Figure 14.5).
Figure 14.5
Boot Option 2: Restore cBlade (cont.)
Check Step
14-4 For Authorized Service Personnel ONLY Confidential
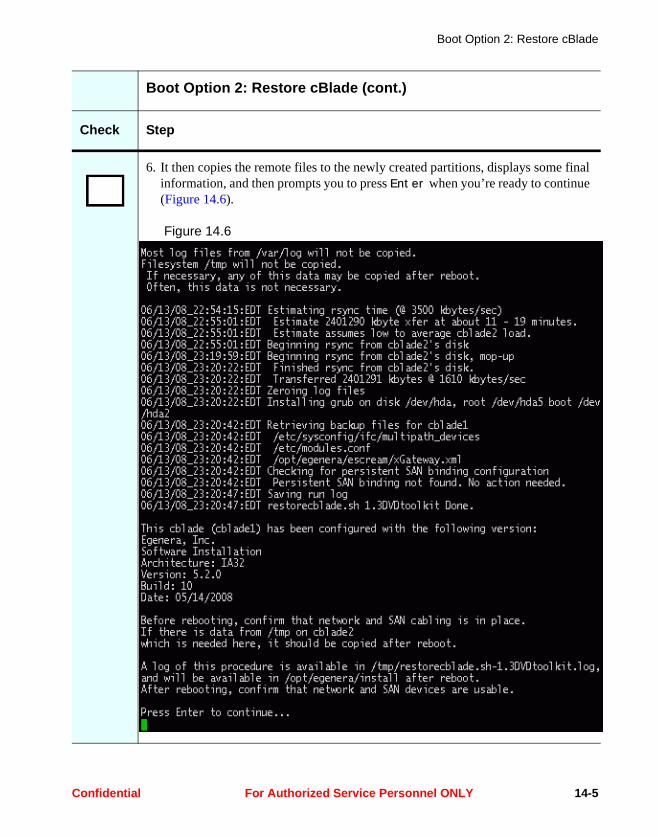
Boot Option 2: Restore cBlade
6. It then copies the remote files to the newly created partitions, displays some final information, and then prompts you to press Enter when you’re ready to continue (Figure 14.6).
Figure 14.6
Boot Option 2: Restore cBlade (cont.)
Check Step
Confidential For Authorized Service Personnel ONLY 14-5
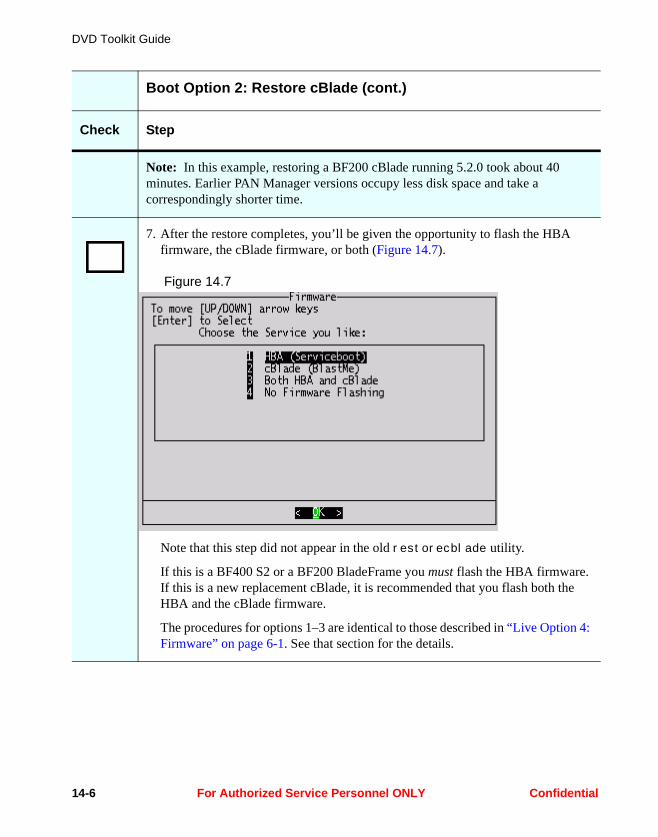
DVD Toolkit Guide
Note: In this example, restoring a BF200 cBlade running 5.2.0 took about 40 minutes. Earlier PAN Manager versions occupy less disk space and take a correspondingly shorter time.
7. After the restore completes, you’ll be given the opportunity to flash the HBA firmware, the cBlade firmware, or both (Figure 14.7).
Figure 14.7
Note that this step did not appear in the old restorecblade utility.
If this is a BF400 S2 or a BF200 BladeFrame you must flash the HBA firmware. If this is a new replacement cBlade, it is recommended that you flash both the HBA and the cBlade firmware.
The procedures for options 1–3 are identical to those described in “Live Option 4: Firmware” on page 6-1. See that section for the details.
Boot Option 2: Restore cBlade (cont.)
Check Step
14-6 For Authorized Service Personnel ONLY Confidential
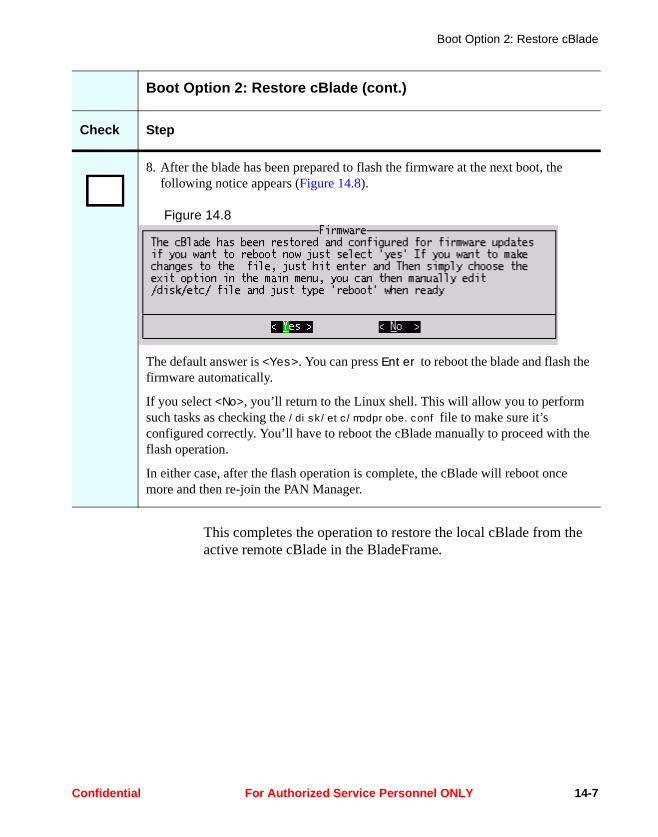
Boot Option 2: Restore cBlade
This completes the operation to restore the local cBlade from the active remote cBlade in the BladeFrame.
8. After the blade has been prepared to flash the firmware at the next boot, the following notice appears (Figure 14.8).
Figure 14.8
The default answer is <Yes>. You can press Enter to reboot the blade and flash the firmware automatically.
If you select <No>, you’ll return to the Linux shell. This will allow you to perform such tasks as checking the /disk/etc/modprobe.conf file to make sure it’s configured correctly. You’ll have to reboot the cBlade manually to proceed with the flash operation.
In either case, after the flash operation is complete, the cBlade will reboot once more and then re-join the PAN Manager.
Boot Option 2: Restore cBlade (cont.)
Check Step
Confidential For Authorized Service Personnel ONLY 14-7

DVD Toolkit Guide
14-8 For Authorized Service Personnel ONLY Confidential

Chapter 15Boot Option 3: Recover
Network Archive(Snapshot)
Restoring a snapshot allows you to perform any of the following tasks:
• Roll back from a PAN Manager fresh install, upgrade, or patch
• Restore the image after a cBlade failure
• Clone a BladeFrame at your DR site (this requires a valid PAN portability license)
Important: A snapshot image can only be restored to a cBlade of the same type. We do not support restoring onto a different cBlade architecture.
Important: A snapshot restore must be performed on both cBlades at the same time to ensure proper synchronization.
Important: This operation does not restore pBlades or pServers. To back up and restore pServers, you must use separate procedures that are typically provided by your SAN vendor.
Confidential For Authorized Service Personnel ONLY 15-1
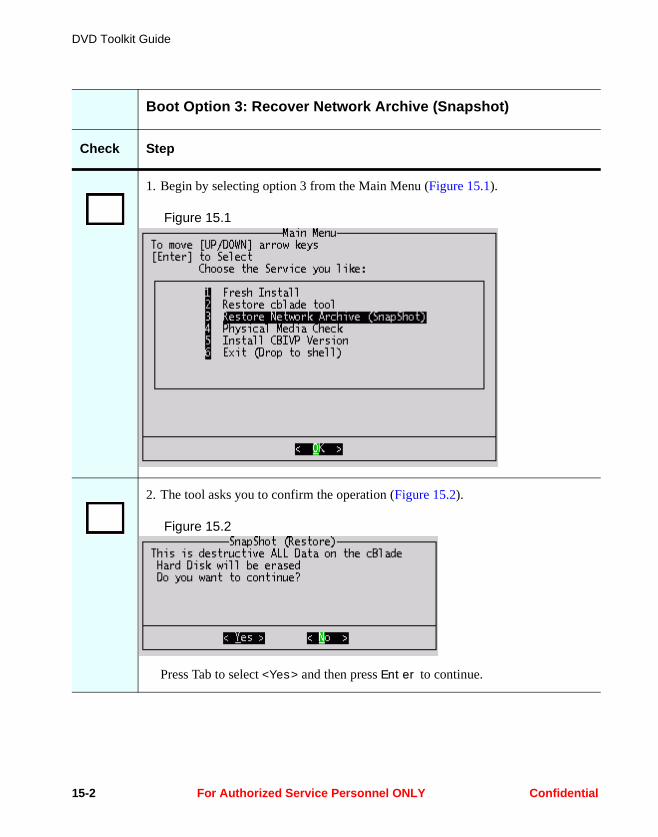
DVD Toolkit Guide
Boot Option 3: Recover Network Archive (Snapshot)
Check Step
1. Begin by selecting option 3 from the Main Menu (Figure 15.1).
Figure 15.1
2. The tool asks you to confirm the operation (Figure 15.2).
Figure 15.2
Press Tab to select <Yes> and then press Enter to continue.
15-2 For Authorized Service Personnel ONLY Confidential
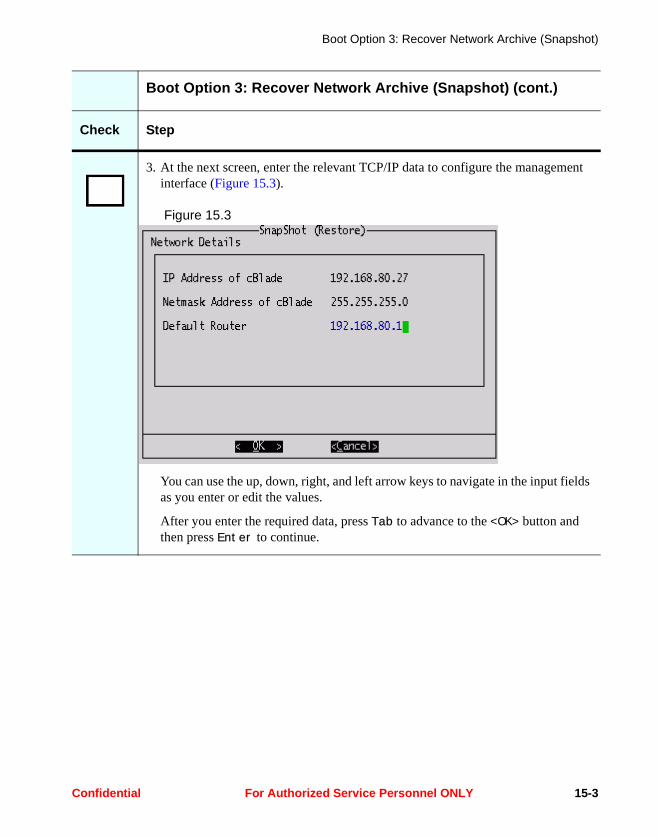
Boot Option 3: Recover Network Archive (Snapshot)
3. At the next screen, enter the relevant TCP/IP data to configure the management interface (Figure 15.3).
Figure 15.3
You can use the up, down, right, and left arrow keys to navigate in the input fields as you enter or edit the values.
After you enter the required data, press Tab to advance to the <OK> button and then press Enter to continue.
Boot Option 3: Recover Network Archive (Snapshot) (cont.)
Check Step
Confidential For Authorized Service Personnel ONLY 15-3

DVD Toolkit Guide
4. As the tool configures eth0 on the cBlade, it briefly displays the progress (Figure 15.4, Figure 15.5).
Figure 15.4
Figure 15.5
If the tool detects any errors, it reports them in one or more interactive notices. After you respond to these notices, you’ll return to the Main Menu. You must resolve the reported problems before you can recover the snapshot.
Otherwise, if no errors occur, you’ll advance to the next screen.
Boot Option 3: Recover Network Archive (Snapshot) (cont.)
Check Step
15-4 For Authorized Service Personnel ONLY Confidential
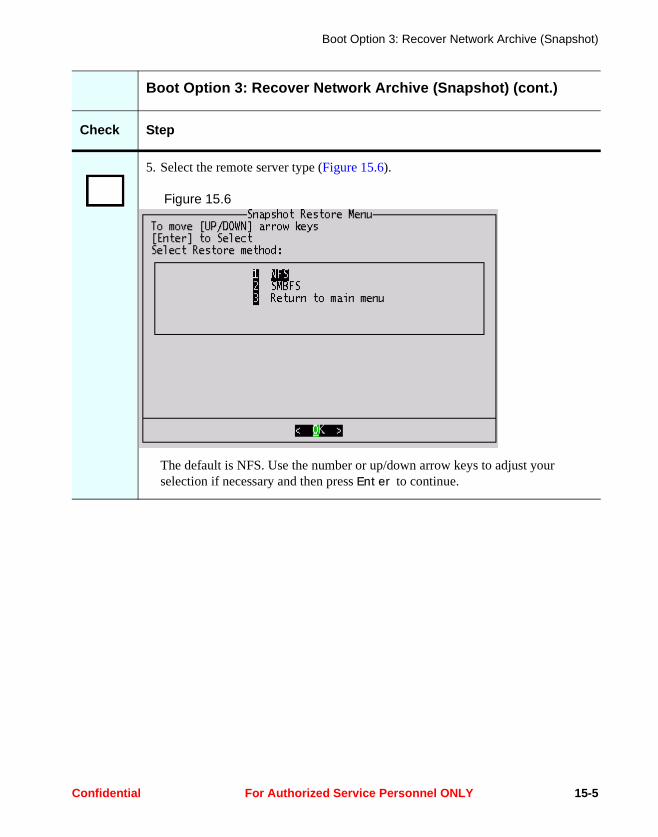
Boot Option 3: Recover Network Archive (Snapshot)
5. Select the remote server type (Figure 15.6).
Figure 15.6
The default is NFS. Use the number or up/down arrow keys to adjust your selection if necessary and then press Enter to continue.
Boot Option 3: Recover Network Archive (Snapshot) (cont.)
Check Step
Confidential For Authorized Service Personnel ONLY 15-5
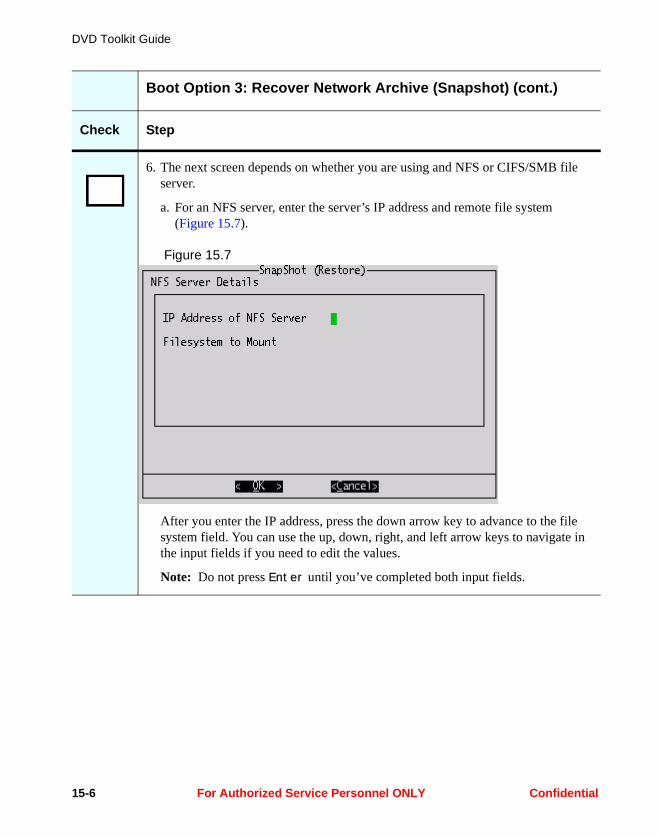
DVD Toolkit Guide
6. The next screen depends on whether you are using and NFS or CIFS/SMB file server.
a. For an NFS server, enter the server’s IP address and remote file system (Figure 15.7).
Figure 15.7
After you enter the IP address, press the down arrow key to advance to the file system field. You can use the up, down, right, and left arrow keys to navigate in the input fields if you need to edit the values.
Note: Do not press Enter until you’ve completed both input fields.
Boot Option 3: Recover Network Archive (Snapshot) (cont.)
Check Step
15-6 For Authorized Service Personnel ONLY Confidential
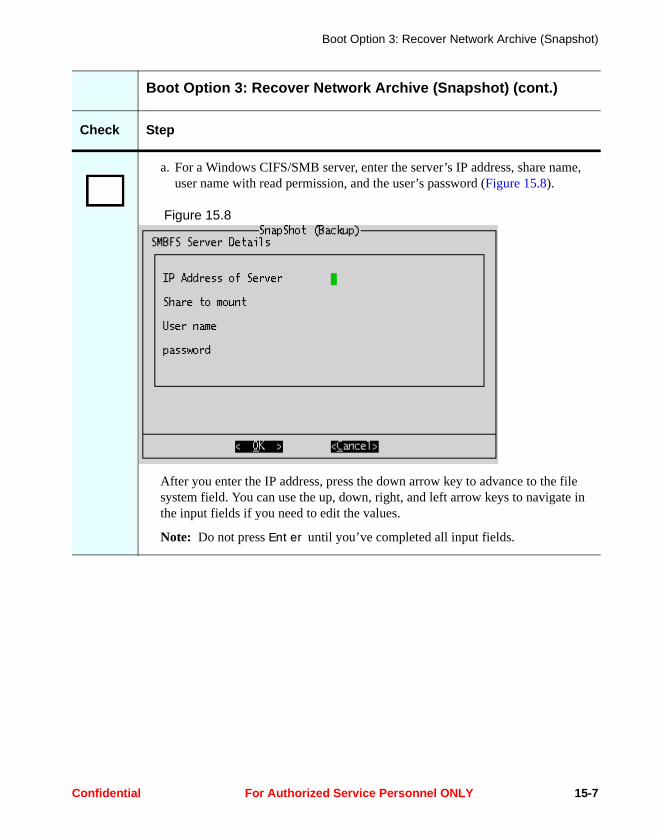
Boot Option 3: Recover Network Archive (Snapshot)
a. For a Windows CIFS/SMB server, enter the server’s IP address, share name, user name with read permission, and the user’s password (Figure 15.8).
Figure 15.8
After you enter the IP address, press the down arrow key to advance to the file system field. You can use the up, down, right, and left arrow keys to navigate in the input fields if you need to edit the values.
Note: Do not press Enter until you’ve completed all input fields.
Boot Option 3: Recover Network Archive (Snapshot) (cont.)
Check Step
Confidential For Authorized Service Personnel ONLY 15-7
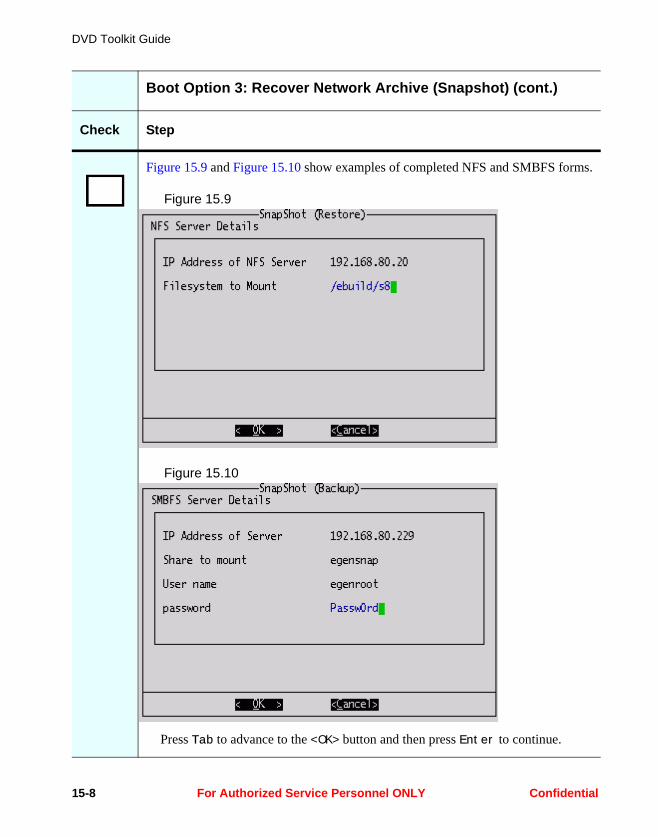
DVD Toolkit Guide
Figure 15.9 and Figure 15.10 show examples of completed NFS and SMBFS forms.
Figure 15.9
Figure 15.10
Press Tab to advance to the <OK> button and then press Enter to continue.
Boot Option 3: Recover Network Archive (Snapshot) (cont.)
Check Step
15-8 For Authorized Service Personnel ONLY Confidential
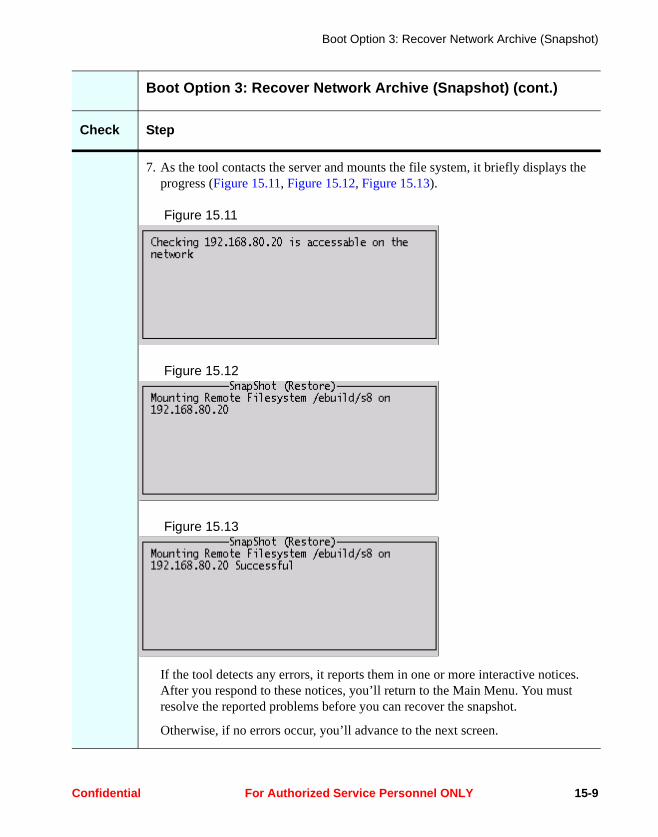
Boot Option 3: Recover Network Archive (Snapshot)
7. As the tool contacts the server and mounts the file system, it briefly displays the progress (Figure 15.11, Figure 15.12, Figure 15.13).
Figure 15.11
Figure 15.12
Figure 15.13
If the tool detects any errors, it reports them in one or more interactive notices. After you respond to these notices, you’ll return to the Main Menu. You must resolve the reported problems before you can recover the snapshot.
Otherwise, if no errors occur, you’ll advance to the next screen.
Boot Option 3: Recover Network Archive (Snapshot) (cont.)
Check Step
Confidential For Authorized Service Personnel ONLY 15-9

DVD Toolkit Guide
8. When the list of available images appears, use the number keys or the up/down arrow keys to highlight the one you want to restore (Figure 15.14).
Figure 15.14
If the image you want to restore does not appear, you can press Tab to highlight the <Cancel> button and then press Enter to return to the Main Menu.
After you make your selection, press Enter to proceed.
9. A summary similar to Figure 15.14 will briefly appear before the recovery begins.
Figure 15.15
Boot Option 3: Recover Network Archive (Snapshot) (cont.)
Check Step
15-10 For Authorized Service Personnel ONLY Confidential
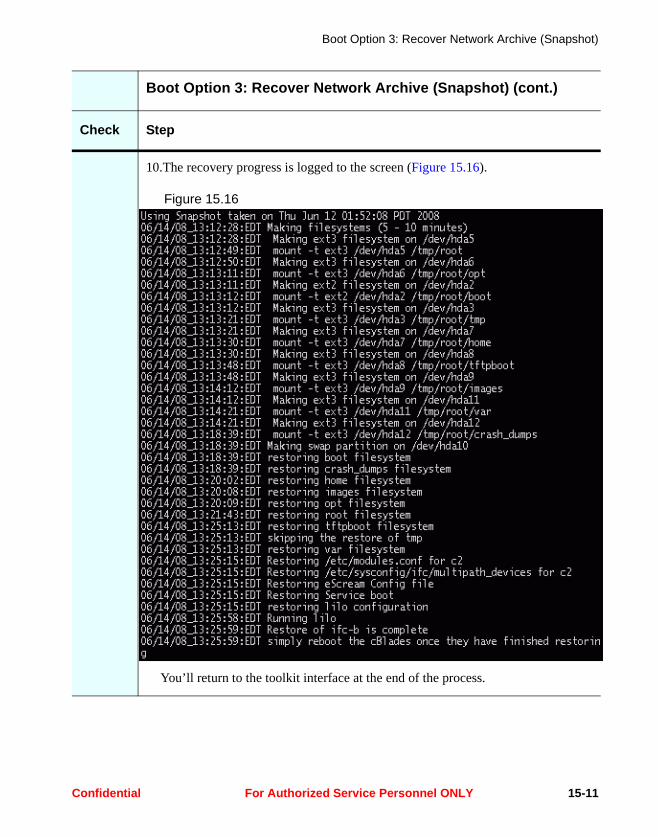
Boot Option 3: Recover Network Archive (Snapshot)
10.The recovery progress is logged to the screen (Figure 15.16).
Figure 15.16
You’ll return to the toolkit interface at the end of the process.
Boot Option 3: Recover Network Archive (Snapshot) (cont.)
Check Step
Confidential For Authorized Service Personnel ONLY 15-11

DVD Toolkit Guide
11.You’ll have the option to delete the cBlade’s virtual MAC addresses (Figure 15.17).
Figure 15.17
If the snapshot was taken from the local BladeFrame, you can press Enter to continue. In this case, the tool briefly displays the notice in Figure 15.17.
Figure 15.18
12.After the file system data has been restored, the tool displays the notice in Figure 15.19.
Figure 15.19
Press Enter to continue.
Boot Option 3: Recover Network Archive (Snapshot) (cont.)
Check Step
15-12 For Authorized Service Personnel ONLY Confidential
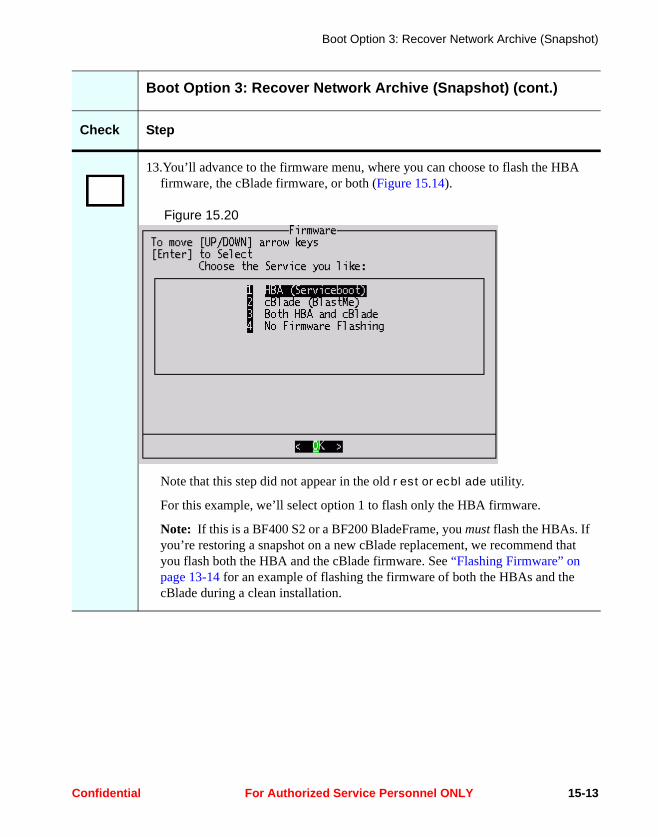
Boot Option 3: Recover Network Archive (Snapshot)
13.You’ll advance to the firmware menu, where you can choose to flash the HBA firmware, the cBlade firmware, or both (Figure 15.14).
Figure 15.20
Note that this step did not appear in the old restorecblade utility.
For this example, we’ll select option 1 to flash only the HBA firmware.
Note: If this is a BF400 S2 or a BF200 BladeFrame, you must flash the HBAs. If you’re restoring a snapshot on a new cBlade replacement, we recommend that you flash both the HBA and the cBlade firmware. See “Flashing Firmware” on page 13-14 for an example of flashing the firmware of both the HBAs and the cBlade during a clean installation.
Boot Option 3: Recover Network Archive (Snapshot) (cont.)
Check Step
Confidential For Authorized Service Personnel ONLY 15-13

DVD Toolkit Guide
14.To avoid problems when booting from the serviceboot partition, the tool checks its extended partition type (Figure 15.21).
Figure 15.21
If it’s marked as a DOS extended partition, the tool converts it to a Linux extended partition (Figure 15.22).
Figure 15.22
Boot Option 3: Recover Network Archive (Snapshot) (cont.)
Check Step
15-14 For Authorized Service Personnel ONLY Confidential

Boot Option 3: Recover Network Archive (Snapshot)
15.On the next screen, select the firmware version for the HBAs (Figure 15.16).
Figure 15.23
Note: The menu will also display the 1_52 firmware version if the local cBlade is running PAN Manager 5.2.0.
Generally, you should select the most recent version available. In this case, we’ll select 1_45.
16.Finally, you'll see the following screen (Figure 15.24).
Figure 15.24
If you press Enter, the cBlade will reboot and flash the firmware automatically.
Boot Option 3: Recover Network Archive (Snapshot) (cont.)
Check Step
Confidential For Authorized Service Personnel ONLY 15-15

DVD Toolkit Guide
This completes the recovery of one cBlade from a snapshot.
17.If you instead select <No>, the notice in Figure 15.25 briefly appears.
Figure 15.25
You might choose this response so you can use the Main Menu to exit to the Linux shell, where you can check the /mnt/hda/etc/modules.conf file. You’ll have to reboot the cBlade manually to complete the flash operation.
18.After the cBlade reboots, startup commands in the serviceboot partition perform the flash operation. The cBlade will then reboot from the hard disk in multiuser mode and attempt to start or re-join the PAN Manager.
Boot Option 3: Recover Network Archive (Snapshot) (cont.)
Check Step
15-16 For Authorized Service Personnel ONLY Confidential

Chapter 16Boot Option 4: Physical
Media Check
This option checks the contents of the DVD media by calculating the checksum of every file with md5sum and then comparing the results to pre-calculated values stored on the DVD.
Confidential For Authorized Service Personnel ONLY 16-1
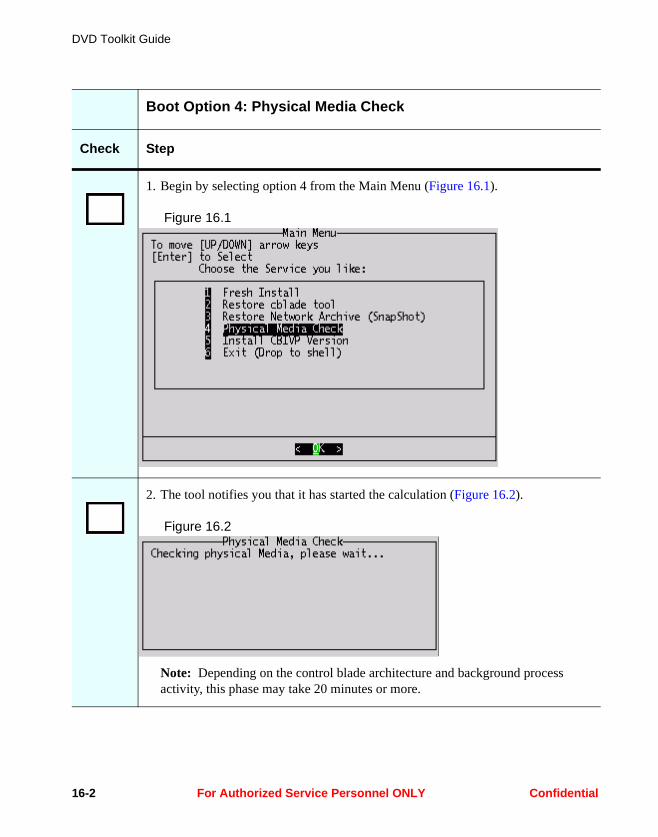
DVD Toolkit Guide
Boot Option 4: Physical Media Check
Check Step
1. Begin by selecting option 4 from the Main Menu (Figure 16.1).
Figure 16.1
2. The tool notifies you that it has started the calculation (Figure 16.2).
Figure 16.2
Note: Depending on the control blade architecture and background process activity, this phase may take 20 minutes or more.
16-2 For Authorized Service Personnel ONLY Confidential

Boot Option 4: Physical Media Check
3. The tool indicates success if no discrepancies are found (Figure 16.3).
Figure 16.3
Press Enter to return to the Main Menu.
4. Otherwise, the tool indicates an error (Figure 16.4)
Figure 16.4
Press Enter to return to the Main Menu.
In the event of a failure, use the following procedure to locate the problems
5. From the Main Menu, select option 5 to return to the shell. You should still be in /a, the root directory of the DVD.
Boot Option 4: Physical Media Check (cont.)
Check Step
Confidential For Authorized Service Personnel ONLY 16-3
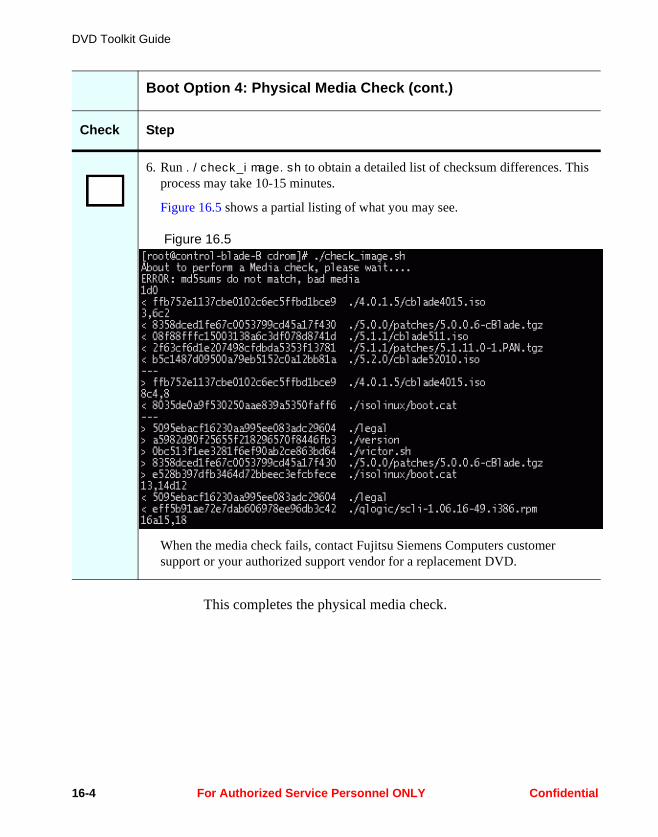
DVD Toolkit Guide
This completes the physical media check.
6. Run ./check_image.sh to obtain a detailed list of checksum differences. This process may take 10-15 minutes.
Figure 16.5 shows a partial listing of what you may see.
Figure 16.5
When the media check fails, contact Fujitsu Siemens Computers customer support or your authorized support vendor for a replacement DVD.
Boot Option 4: Physical Media Check (cont.)
Check Step
16-4 For Authorized Service Personnel ONLY Confidential
Chapter 17Boot Option 5: Install
CBIVP Version
This option allows you to select and install a version of the Installation Verification Program (IVP) for the control blades. IVP assesses the hardware integrity of a newly installed hardware platform by testing the CPU, memory, internal network connections, and internal cBlade disks. For more information, see Using the Installation Verification Program (IVP), which is available from Fujitsu Siemens Computers customer support or your authorized support vendor.
Caution: Because IVP places a disruptive load on the hardware platform and its internal network, IVP must not be used as a diagnostic tool on a production platform.
Important: Before you install CBIVP, you must know the bladeplane amperage and voltage. See “IVP Usage Prerequisites” in Using the Installation Verification Program (IVP) for the location of this information.
Confidential For Authorized Service Personnel ONLY 17-1

DVD Toolkit Guide
Boot Option 5: Install CBIVP Version
Check Step
1. Begin by selecting option 5 from the Main Menu (Figure 17.1).
Figure 17.1
17-2 For Authorized Service Personnel ONLY Confidential
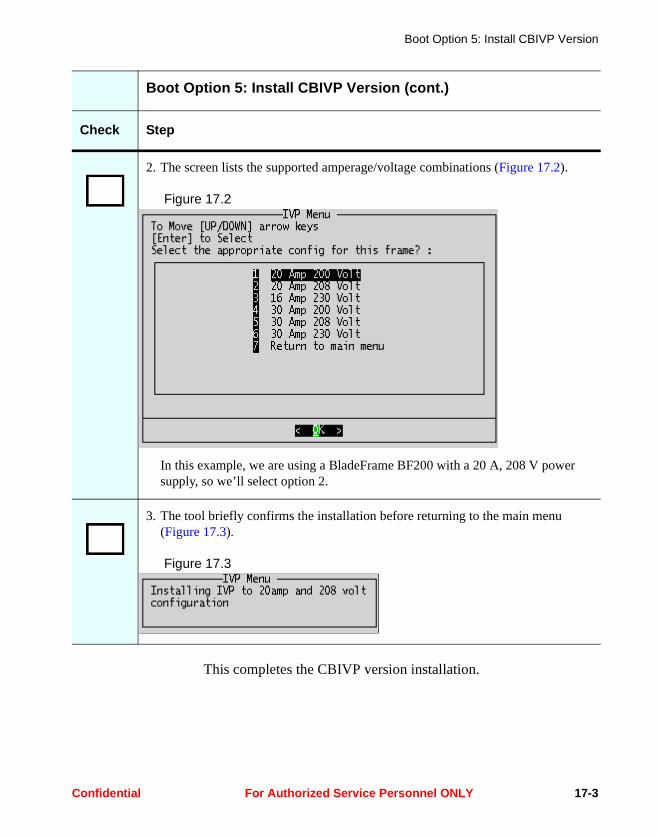
Boot Option 5: Install CBIVP Version
This completes the CBIVP version installation.
2. The screen lists the supported amperage/voltage combinations (Figure 17.2).
Figure 17.2
In this example, we are using a BladeFrame BF200 with a 20 A, 208 V power supply, so we’ll select option 2.
3. The tool briefly confirms the installation before returning to the main menu (Figure 17.3).
Figure 17.3
Boot Option 5: Install CBIVP Version (cont.)
Check Step
Confidential For Authorized Service Personnel ONLY 17-3

DVD Toolkit Guide
17-4 For Authorized Service Personnel ONLY Confidential

Part 3Reference
Contents:
• Chapter 18, Troubleshooting
• Chapter 19, Toolkit Contents
Confidential For Authorized Service Personnel ONLY

DVD Toolkit Guide
For Authorized Service Personnel ONLY Confidential
Chapter 18Troubleshooting
This chapter presents technical background information that may be helpful if you encounter problems during any of the toolkit operations.
General Troubleshooting Notes
Resolving problems in the toolkit should be relatively easy. The tools employ existing scripts and programs that support personnel use frequently.
Follow normal support procedures. Try to document the problems encountered along with any associated symptoms and forward the data to Fujitsu Siemens Computers customer support or your authorized support vendor. Remember to be as specific as possible. The information you gather may lead to a fix that can be included in a later release.
Confidential For Authorized Service Personnel ONLY 18-1

DVD Toolkit Guide
Log Files In general, the tools generate log files for installations, upgrades, and patches in the standard locations, and these remain intact at the end of the operation. The DVD Toolkit creates it own log file on the local cBlade in the following locations:
/var/log/DVD_toolkit.log/crash_dumps/DVD_toolkit.log
These two files are duplicates of each other. The toolkit appends new entries from the current session to any existing entries from previous sessions.
Note that the corresponding toolkit log files on the other cBlade will be completely different, since their content depends on the operations that were performed there.
Using the script and toolkit log files, you can follow normal troubleshooting procedures to resolve most issues.
Toolkit Media Problems
I/O errors while reading from the DVD or repeated script runtime errors are most likely due to either surface media errors or a bad DVD burn. Perform a media check from the Live Section or the Boot Section. If any errors are detected, try burning another DVD from the ISO image.
Boot Section Operations
Installation and the cBlade Media
The tool mounts the cBlade media (the tool refers to this as the “base media”) as an ISO on the loopback interface and then runs the standard install.sh installer script from within the ISO. The fresh installation is done only on the local cBlade.
18-2 For Authorized Service Personnel ONLY Confidential
Troubleshooting
Log Files
All log files are left in their standard locations. The log file for the local cBlade is at the following location:
/opt/egenera/install/egenera.install.log
Specific troubleshooting information
If you encounter problems during the installation, follow the same troubleshooting methods you would use for a manual installation.
Patching the Base Media
The ability to apply a patch automatically after the base media installation is unique to the toolkit. Here is an outline of the steps performed by the toolkit:
1. Mount the hard disk’s /crash_dumps directory and copy the selected patch from the DVD to /crash_dumps/<patch_name>.
2. Execute sed statements to alter the install.sh and install.ftn files supplied with the patch.
Most of these changes suppress unneeded output. The major change is to stop the automatic reboot of the cBlade at the end of the kernel upgrade.
3. Un-mount /crash_dumps and mount the hard disk’s / (root) partition.
4. Copy the /proc/pci file to the hard disk to provide the tools needed by the installer to identify the cBlade type. Also, create the /proc/egenera directory so that it exists when the cBlade boots from its own disk.
5. Execute chroot to the hard disk root partition so that subsequent operations are performed in the context of the installed base media. Execute ‘mount -a’ to mount all the local file systems.
6. Run the installer that was provided with the patch.
Confidential For Authorized Service Personnel ONLY 18-3
DVD Toolkit Guide
Note that this installer could be run twice if the patch applies to both the kernel and PAN Manager, i.e., if it’s a two-stage patch. In this case, as noted in Step 2 above, the tool has already modified the installer script to prevent a reboot after the kernel patch is complete.
7. After the installer processes are complete, check for a cBlade.message.config.orig file in the patch. If present, copy it to the appropriate location on the hard disk.
If this file exists in the patch, it must be the same as or newer than the one installed with the base media, so it’s safe to overwriting the existing file on the cBlade.
Log Files
The toolkit patch operation creates log files in their standard locations on the hard disk. The patch log file is at:
/opt/egenera/install/egenera.patch.log-<version>
Specific troubleshooting information
If the operation fails, you’ll still be in the DVD boot environment. You may find it easier to chroot to the hard disk’s root partition to locate and view the log files.
Flashing Firmware
The ability to apply a flash the HBA and cBlade firmware automatically after the base media installation is unique to the toolkit. This section gives the user the ability to flash the HBAs and or cBlades automatically.
Note: Bolton cBlades use Intel firmware, so they cannot be flashed with the BlastMe tool on the DVD. You must flash this firmware manually.
18-4 For Authorized Service Personnel ONLY Confidential
Troubleshooting
Here is an outline of the steps performed by the toolkit:
1. After creating a backup of lilo.conf, modify it to remove the password prompt, and then run ‘lilo -v -v’ to save this back to disk.
2. Mount the serviceboot partition (/svcboot) to a mount point on the hard disk.
3. If the cBlade option has been selected, copy the BlastMe utility to the serviceboot partition.
4. Check the partition entry tag for the extended partition type. If it’s DOS extended (type 5), change it to Linux extended (type 85).
This avoids potential problems when later booting from serviceboot.
5. Back up the exiting autoexec.bat and then modify it to include the HBA (Qlogic) flashing commands, the cBlade (BlastMe) flashing commands, or both, according to the user options selected.
6. Create a one time run script, S99hbapost, that will run on the next reboot to restore the serviceboot partition back to defaults, i.e. password prompting for entering serviceboot, lilo.conf restored, etc.
7. Run ‘lilo -R svcboot’.
This causes the control blade to automatically reboot from the serviceboot partition. Statements in autoexec.bat flash the selected firmware.
Finally, the control blade reboots from the hard disk in normal, multiuser mode.
Log Files
The firmware flashing operation does not create a log file.
Confidential For Authorized Service Personnel ONLY 18-5

DVD Toolkit Guide
Specific troubleshooting information
If this process fails at any point, repeat the procedure using the manual method. If that fails, then follow standard troubleshooting procedures.
If the manual process worked but the automated version didn’t, try to capture as much data as possible and forward it to Fujitsu Siemens Computers customer support or your authorized support vendor.
Restoring a Control Blade Using the restorecblade Tool
This tool restores a cBlade from the other, working cBlade in the same BladeFrame. It makes use of the restorecblade tool, which has been available for some time now.
Log Files
The restore operation does not create a log file.
Specific troubleshooting information
If this tool fails for any reason, follow normal support procedures.
Snapshot Recovery (Snapshot Restore)
This unique toolkit feature allows you to restore a cBlade from a previous snapshot stored on a remote server. This is a variation of the restorecblade tool mentioned above.
At this time the tool supports NFS and CIFS/SMBFS remote file systems. To restore a cBlade, you must specify the following items:
• Local IP address of the Ethernet interface (this is the eth0 interface or management NIC), including the netmask and default router on its network segment
• Remote server IP address, file system type, and file system name
All snapshots must have the prefix ‘bf_snap’ in the name in order for the tool to detect it. Here are examples of valid snapshot names:
18-6 For Authorized Service Personnel ONLY Confidential
Troubleshooting
• bf_snap_16112007_18-35-07_MyBladeFrame
• bf_snap_4018_HatfieldES
• bf_snap_510_vBlade1.0_with_configured_vblades_HatfieldES
Here is an example of an invalid name:
• vBlade1.0_with_configured_vblades_HatfieldES
The tool relies heavily on the network, so network problems may impact both the time to restore and the integrity of the data.
Log Files
The recovery operation does not create a log file.
Specific troubleshooting information
Follow normal support procedures.
Live Section Operations
Upgrading PAN Manager
Script: /cdrom/tools/upgrade/gts-upgrade-pm.sh
This tool operates like the Boot Section clean installation in that it modifies the standard installer script. However, unlike the clean installation, which only takes place on the local cBlade, the Live Section upgrade tool also transfers the media and modified scripts to the remote cBlade. It then manages the upgrade procedure on both cBlades as described later in this section.
Before the upgrade, the tool performs a series of diagnostics:
Confidential For Authorized Service Personnel ONLY 18-7
DVD Toolkit Guide
• PAN Manager manager master/slave status. A normal master/slave relationship must exist before starting the upgrade. You will not be allowed to continue if the toolkit detects any errors.
• SAN presentation. The SAN presentation will report all issues that differ from both cBlades and again will report this to the screen. Acknowledging the messages will confirm acceptance of the risks and move on. Otherwise, if you refuse to accept the risks, the tool will return you to the Main Menu.
• Network connectivity. If the network connections differ, the tool will report these and prompt you to accept the risks associated before continuing. Otherwise, if you refuse to accept the risks, the tool will return you to the Main Menu.
• File system health and space. The local file systems must have adequate storage to allow the upgrade to complete. They must also be free of errors such as broken symlinks. You will not be allowed to continue if the toolkit detects any errors.
Chapter 11, Live Section Common BladeFrame Diagnostics contains detailed information about each of the above diagnostics.
The upgrade begins only after all the diagnostics complete successfully. The remaining sequence of steps depends on whether the upgrade is to 5.2.0 or 5.1.1. The major differences are as follows:
• For 5.1.1, the tool upgrades the kernel before it upgrades PAN Manager. None of the file systems are erased.
• For 5.2.0, the tool upgrades PAN Manager components first, and then restarts the PAN on both cBlades. (Upgrading the kernel before PAN Manager as in the 5.1.1 sequence causes a panic.) Most of the software upgrade occurs after both cBlades rejoin the PAN running the new components.
The tool saves critical configuration files before it re-creates /dev/hda2, /dev/hda5, and /dev/hda6 (/boot, root, and /opt, respectively), erasing any data in those file systems. After that,
18-8 For Authorized Service Personnel ONLY Confidential
Troubleshooting
the upgrade procedure resembles a fresh installation, except that the tool restores the backed-up configuration files before the final reboot of each cBlade.
The next two sections outline the upgrade process for 5.2.0 and 5.1.1, respectively. Both sections describe a two-stage upgrade, i.e., an upgrade to both the kernel and PAN Manager.
Upgrading to 5.2.0
1. Mount the selected base media ISO on the loopback interface, and then copy its contents to the local disk. The tool stores the media contents in /crash_dumps/media.$$ where $$ is the PID of the process.
The tool needs a local, writable copy of the base media contents so it can modify the installer files in subsequent steps.
The tool upgrades PAN Manager. Note that the kernel has not yet been upgraded.
2. Execute sed statements to alter the installer files supplied with the base media.
Most of these changes suppress unneeded output.
3. Execute rsync to transfer /crash_dumps/media.$$ directory to the remote cBlade.
4. Stop PAN Manager on the remote cBlade and then on the local cBlade. Wait 60 seconds to make sure PAN Manager is down everywhere.
This is necessary because the tool cannot upgrade PAN Manager while it’s still running. The tool performs the same actions as ‘/opt/egenera/bin/pandaemons stop’ both remotely and locally.
5. On the remote cBlade, execute the modified installer script to upgrade PAN Manager.
The tool initially creates the upgrade log file in /tmp and later moves it to /opt/egenera/install.
Confidential For Authorized Service Personnel ONLY 18-9

DVD Toolkit Guide
6. When the remote upgrade is complete, execute the modified installer script to upgrade PAN Manager on the local cBlade.
Again, the tool initially creates the upgrade log file in /tmp and later moves it to /opt/egenera/install.
7. Restart PAN Manager both remotely and locally.
This step guarantees there will not be a BladeFrame outage after the cBlades reboot. The tool preforms the same actions as ‘/opt/egenera/bin/pandaemons start’.
8. Wait for PAN Manager to initialize on both cBlades.
The tool uses the following methods to ensure that PAN Manager has started successfully:
a. Continually check the output of the bframe command, searching for a report of a functioning master/slave relationship, and looping until this condition is satisfied. The upgrade cannot proceed until this requirement is met.
b. After the master/slave relationship is present, check the console log. For PAN Manager 5.x, the last 10 lines should contain the string “completed initialization.”
c. When this succeeds, wait an additional 30 seconds before proceeding to the next step.
In the next phase, the tool upgrades the remote cBlade using uses ssh over the internal management network to execute the scripts on the remote blade. Most of the procedure behaves like a fresh installation.
9. Reboot the remote cBlade in a special, non-interactive mode.
10. Back up critical data to the remote /crash_dumps/backup_data_files directory.
11. Unmount /dev/hda and re-create the remote /dev/hda2, /dev/hda5, and /dev/hda6 (/boot, root, and /opt) file systems.
Note that this erases the Linux partition along with any third-party applications or data. The /dev/hda12 (/crash_dumps) file system is left intact.
18-10 For Authorized Service Personnel ONLY Confidential
Troubleshooting
12. Remount the /dev/hda file systems and perform a fresh install of Linux with a 2.6 kernel.
13. Install Egenera extensions and remaining PAN Manager components.
14. Restore the critical data from /crash_dumps/backup_data_files, migrating the PAN configuration to the 5.2.0 setup.
15. Probe the BIOS to detect the installed revision of the HBA firmware. If the firmware is earlier than 1_52, which is required for 5.2.0, reconfigure the serviceboot partition to flash the HBAs on the next reboot.
Note that the firmware update, if required, will require an extra reboot of the cBlade.
16. Reboot the remote cBlade and wait for it to rejoin the PAN using the same methods described in Step 8 above.
17. Reboot the local cBlade.
In the final phase, the installer script on the local cBlade performs the same sequence as Step 10 through Step 16 above. During the local upgrade, the PAN is under control of the remote cBlade, which is now the master.
When the local upgrade is complete, the local cBlade reboots and rejoins the PAN as the slave.
Upgrading to 5.1.1
1. Mount the selected base media ISO on the loopback interface, and then copy its contents to the local disk. The tool stores the media contents in /crash_dumps/media.$$ where $$ is the PID of the process.
The tool needs a local, writable copy of the base media contents so it can modify the installer files in subsequent steps.
The next four steps occur if the upgrade includes the kernel.
Confidential For Authorized Service Personnel ONLY 18-11

DVD Toolkit Guide
2. Execute sed statements to alter the install.sh and install.ftn files supplied with the base media.
Most of these changes suppress unneeded output. The major change is to stop the automatic reboot of the cBlade at the end of the kernel upgrade.
3. Execute rsync to transfer /crash_dumps/media.$$ directory to the remote cBlade.
4. On the remote cBlade, execute /crash_dumps/media.$$/install.sh to upgrade the kernel.
This proceeds like a manual upgrade. All log files are left in the usual locations.
5. When the remote upgrade is complete, execute /crash_dumps/media.$$/install.sh to upgrade the kernel on the local cBlade.
Again, this proceeds like a manual upgrade. All log files are left in the usual locations.
After the kernel upgrades, the tool upgrades PAN Manager. Note that the cBlades have not yet been rebooted.
6. Execute sed statements to alter the install.sh and install.ftn files supplied with the patch.
Most of these changes suppress unneeded output. The major change is to stop the automatic reboot of the cBlade at the end of the kernel upgrade.
7. Execute rsync to transfer /crash_dumps/media.$$ directory to the remote cBlade.
8. Stop PAN Manager on the remote cBlade and then on the local cBlade. Wait 60 seconds to make sure PAN Manager is down everywhere.
This is necessary because the tool cannot upgrade PAN Manager while it’s still running. The tool performs the same actions as ‘/opt/egenera/bin/pandaemons stop’ both remotely and locally.
18-12 For Authorized Service Personnel ONLY Confidential
Troubleshooting
9. On the remote cBlade, execute /crash_dumps/media.$$/install.sh to upgrade PAN Manager.
This proceeds like a manual upgrade. All log files are left in the usual locations.
10. When the remote upgrade is complete, execute /crash_dumps/media.$$/install.sh to upgrade PAN Manager on the local cBlade.
Again, this proceeds like a manual upgrade. All log files are left in the usual locations.
11. Check to see if a patch was specified during the upgrade dialog (the toolkit presents this option only if the DVD contains an appropriate patch for the selected upgrade). If so, perform the following steps:
a. Patch the remote kernel
b. Patch the local kernel
c. Patch remote PAN Manager
d. Patch local PAN Manager
The complete Live Section patch operation is outlined in “Applying a Patch” on page 18-14. Since PAN Manager is already stopped at this point, the upgrade operation executes Step 1, Step 2, Step 5, and Step 6 of that process and then returns to the next step in this sequence.
12. Restart PAN Manager both remotely and locally.
This step guarantees there will not be a BladeFrame outage after the cBlades reboot. The tool preforms the same actions as ‘/opt/egenera/bin/pandaemons start’.
13. Wait for PAN Manager to initialize on both cBlades.
Confidential For Authorized Service Personnel ONLY 18-13

DVD Toolkit Guide
The tool uses the following methods to ensure that PAN Manager has started successfully:
a. Continually check the output of the bframe command, searching for a report of a functioning master/slave relationship, and looping until this condition is satisfied. The upgrade cannot proceed until this requirement is met.
b. After the master/slave relationship is present, check the console log. For PAN Manager 5.x, the last 10 lines should contain the string “completed initialization.”
c. When this succeeds, wait an additional 30 seconds before proceeding to the next step.
14. Reboot the remote cBlade and wait for it to rejoin the PAN using the same methods described in Step 13 above.
15. When the remote cBlade successfully joins the PAN, reboot the local cBlade.
Log Files
All log files are left in their standard locations. The upgrade log file on each cBlade is at the following location:
/opt/egenera/install/egenera.upgrade.log-<version>
All previous upgrade log files are left intact.
Specific troubleshooting information
If the upgrade fails, then follow standard troubleshooting processes.
If the tool appears to be stuck in a loop, check the status of the remote cBlade. The most likely cause for the local hangup is that the remote PAN Manager has not yet reported itself to be up and running. As noted above, in order to avoid BladeFrame outages, the tool requires a functioning master/slave relationship before it allows either cBlade to reboot.
Applying a Patch Script: /cdrom/tools/upgrade/gts-install.sh
18-14 For Authorized Service Personnel ONLY Confidential

Troubleshooting
The Live Section patch operation is very similar to the upgrade operation. Again, the tool modifies the installer files before each stage (kernel and PAN Manager). Each stage then proceeds much like a manual patch operation.
Before the patch operation, the tool performs the same series of diagnostics used for the upgrade:
• PAN Manager manager master/slave status. You will not be allowed to continue if the toolkit detects any errors.
• SAN presentation. If the toolkit detects problems and you refuse to accept the risks, the tool will return you to the Main Menu.
• Network connectivity. If the toolkit detects problems and you refuse to accept the risks, the tool will return you to the Main Menu.
• File system health and space. You will not be allowed to continue if the toolkit detects any errors.
Chapter 11, Live Section Common BladeFrame Diagnostics contains detailed information about each of the above diagnostics.
Like the upgrade, the DVD media is read-only, so the tool copies the patch file into a local directory /crash_dumps/autopatch.$$, modifies the install.ftn script using a number of sed statements, and then uses rsync to copy it to the same location on the other cBlade.
The next phase depends on whether this patch applies to the kernel, PAN Manager, or both. The patch process follows the same logic as the upgrade process:
1. Patch the remote kernel
2. Patch the local kernel
3. Stop remote PAN Manager
4. Stop local PAN Manager
5. Patch remote PAN Manager
Confidential For Authorized Service Personnel ONLY 18-15
DVD Toolkit Guide
6. Patch local PAN Manager
7. Start local PAN Manager
8. Start remote PAN Manager
9. Wait until PAN Manager is up and running with normal master/slave relationship
10. Reboot the remote (slave) cBlade
11. Wait until the remote cBlade is functioning normally
12. Reboot the local cBlade
Note that steps 1–2 above occur only if the patch applies to the kernel. Stage 2 steps 3–9 occur only if the patch applies to PAN Manager. In all cases, the tool displays a series of notices that track the steps as they occur.
Log Files
All log files are left in their standard locations. The patch log file on each cBlade is at the following location:
/opt/egenera/install/egenera.patch.log-<version>
All previous patch log files are left intact.
Specific troubleshooting information
Refer to these if the actual patch installation failed. If the problem is with the toolkit, document as much as possible in the event that a fix may be required.
18-16 For Authorized Service Personnel ONLY Confidential

Troubleshooting
Common Diagnostics and Error Messages
Most of the common diagnostics and possible error messages have been collected in Chapter 11, Live Section Common BladeFrame Diagnostics.
Limitations and Restrictions
Incompatibility with DIACAP and DITSCAP Security
The DVD Toolkit is incompatible with security features specified by the DoD Information Assurance Certification and Accreditation Process (DIACAP) or the earlier DoD Information Technology Security Certification and Accreditation Process (DITSCAP). In general, all intrusive procedures must be performed manually in this environment.
Known Bugs The snapshot backup/restore facility doesn't preserve the ssh public keys for each cBlade
Confidential For Authorized Service Personnel ONLY 18-17

DVD Toolkit Guide
18-18 For Authorized Service Personnel ONLY Confidential
Chapter 19Toolkit Contents
DVD Directory Structure
Items in the DVD root directory:
Item Type Description
4.0.1.5 directory cBlade media and patches for 4.0.1.x
5.0.0 directory patches for 5.0.0
5.1.0 directory patches for 5.1.0
5.1.1 directory cBlade media and patches for 5.1.1
5.2.0 directory cBlade media and patches for 5.2.0
Docs directory contains this document
isolinux directory image and support files allowing this DVD to be bootable.
qlogic directory Qlogic HBA simple command-line interface (scli*.rpm)
restore directory restorecblade.sh tool
sieivp directory System Integration Exerciser (SIE) Installation Verification program (IVP) (see sieivp/docs.d/README.ivp)
Confidential For Authorized Service Personnel ONLY 19-1
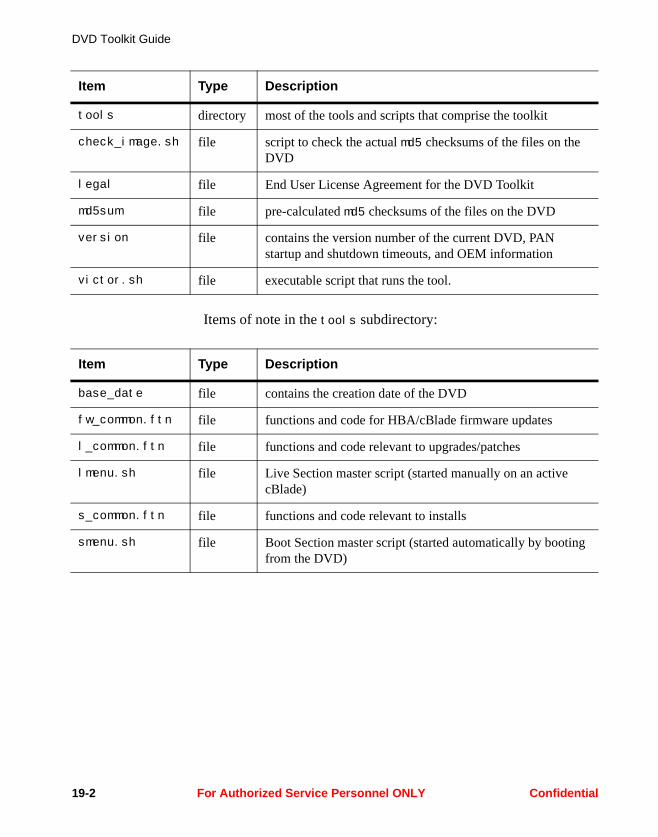
DVD Toolkit Guide
Items of note in the tools subdirectory:
tools directory most of the tools and scripts that comprise the toolkit
check_image.sh file script to check the actual md5 checksums of the files on the DVD
legal file End User License Agreement for the DVD Toolkit
md5sum file pre-calculated md5 checksums of the files on the DVD
version file contains the version number of the current DVD, PAN startup and shutdown timeouts, and OEM information
victor.sh file executable script that runs the tool.
Item Type Description
Item Type Description
base_date file contains the creation date of the DVD
fw_common.ftn file functions and code for HBA/cBlade firmware updates
l_common.ftn file functions and code relevant to upgrades/patches
lmenu.sh file Live Section master script (started manually on an active cBlade)
s_common.ftn file functions and code relevant to installs
smenu.sh file Boot Section master script (started automatically by booting from the DVD)
19-2 For Authorized Service Personnel ONLY Confidential
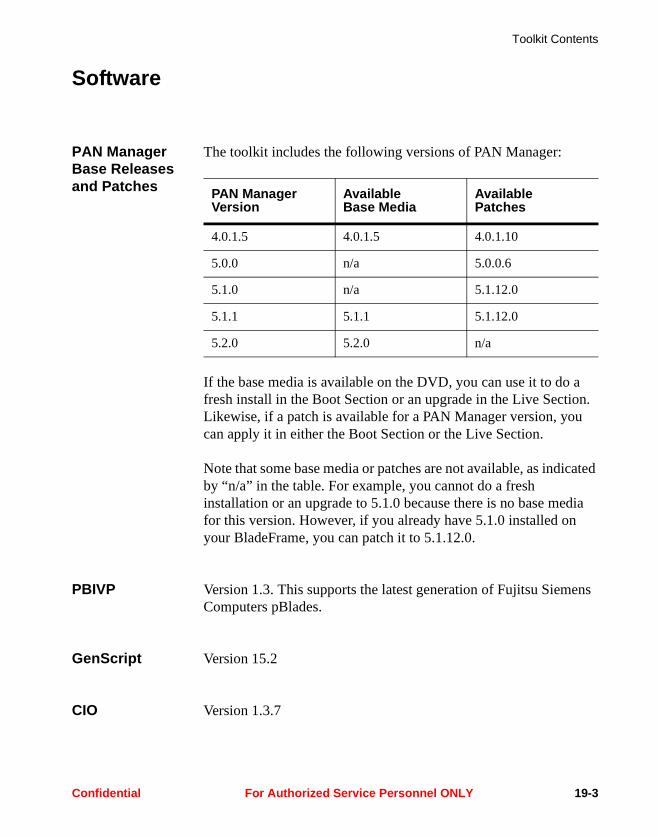
Toolkit Contents
Software
PAN Manager Base Releases and Patches
The toolkit includes the following versions of PAN Manager:
If the base media is available on the DVD, you can use it to do a fresh install in the Boot Section or an upgrade in the Live Section. Likewise, if a patch is available for a PAN Manager version, you can apply it in either the Boot Section or the Live Section.
Note that some base media or patches are not available, as indicated by “n/a” in the table. For example, you cannot do a fresh installation or an upgrade to 5.1.0 because there is no base media for this version. However, if you already have 5.1.0 installed on your BladeFrame, you can patch it to 5.1.12.0.
PBIVP Version 1.3. This supports the latest generation of Fujitsu Siemens Computers pBlades.
GenScript Version 15.2
CIO Version 1.3.7
PAN Manager Version
Available Base Media
Available Patches
4.0.1.5 4.0.1.5 4.0.1.10
5.0.0 n/a 5.0.0.6
5.1.0 n/a 5.1.12.0
5.1.1 5.1.1 5.1.12.0
5.2.0 5.2.0 n/a
Confidential For Authorized Service Personnel ONLY 19-3
DVD Toolkit Guide
Firmware
cBlade The DVD toolkit has only the BlastMe 17.1 cBlade firmware, which is the recommended release for all current Fujitsu Siemens Computers cBlades.
Note: The toolkit contains no firmware for Bolton cBlades.
pBlade The toolkit includes the following versions of MasterBlaster pBlade firmware. These appear as choices in the MasterBlaster firmware menu.
• MB36.01 (included to support older generations of pBlades)
• MB44.14 (latest version)
PIM-R The toolkit currently does not support firmware flashing of PIM-Rs.
STS Units There are no plans to add support for STS units.
19-4 For Authorized Service Personnel ONLY Confidential
IndexIndex
Symbols
/ (root) file system, re-created during 5.2.0 upgrade 3-19
/a Boot Section DVD mount point 12-5/boot file system, re-created during
5.2.0 upgrade 3-19/crash_dumps
not erased during upgrade 3-7, 3-19save states output 8-14synchronization 14-3
/crash_dumps/backup_data_files, bak-kup storage during 5.2.0 upgra-de 3-19
/crash_dumps/DVD_toolkit.log 18-2/dev/hda, unmounting during 5.2.0 up-
grade 3-19/dev/hda12 see /crash_dumps/dev/hda2 see /boot/dev/hda6 see / (root)/dev/hda6 see /opt/etc/hosts 13-23/etc/modprobe.conf
restoring cBlade 14-7/etc/ntp.conf 13-24/etc/resolv.conf 13-23/images, cBlade backup 5-1
/isolinux DVD directory 19-1/mnt/cdrom
exiting Live Section 10-3Live Section DVD mount point 2-2unmounted during 5.2.0 upgrade
3-19/nfs, mount point, snapshot 5-8/opt file system, re-created during 5.2.0
upgrade 3-19/qlogic DVD directory 9-2, 19-1/tmp directory
dumping HEL data 8-35GenScript output 8-19replicating during restore 14-3
/var/lock/.vic.lm.lck toolkit lock file 2-4
/var/log/DVD_toolkit.log 18-2
Numerics
1_52 firmware version 3-2, 3-11, 6-6, 13-16, 15-15
Confidential For Authorized Service Personnel ONLY Index-1
DVD Toolkit Guide
A
action buttons, described 2-9Admin Menu, Live Section 8-2alternate location, selecting patch file
4-18amperage, BladeFrame, CBIVP 17-3APM settings, CIO 8-31
B
backuplocal cBlade 5-1PAN configuration during 5.2.0 up-
grade 3-19pBlades and pServers 5-1third-party applications 3-24
base mediaavailable on DVD 19-3fresh install 13-1, 13-2upgrading 3-1
BF400 S2 BladeFrames, PIMs 8-37BladeFarms
unsupported by toolkit 1-4unsupported, flashing pBlades 6-25
BladeFrame 8-30active, required for Live Section 1-1amperage and voltage, CBIVP 17-3backup, snapshot 5-1checking, pre-patch 4-6checking, pre-reboot 8-22checking, pre-upgrade 3-7cloning 15-1common diagnostics 11-1EX, and PIMs 8-37failover, and master/slave relati-
onship 11-2IP address, extnet command 13-22
name, for CIO 8-30name, in snapshot output 5-8name, on toolkit screen 2-8name, on upgrade notice 3-10re-creating setup with GenScript
8-18SAN setup 8-3serial number, CIO 8-30
BlastMeBolton cBlades unsupported 18-4firmware version on DVD 19-4flashing cBlade manually 6-1, 6-12flashing cBlade, fresh install 13-16screen output 6-18
Bolton cBlades, unsupported 1-4Boot Section
/a, DVD mount point 12-5general description 1-2
C
CBIVP, installing 17-1cBlades
backup, snapshot 5-1dumping HEL data 8-34, 8-36firmware version on DVD 19-4restoring from active cBlade 14-1type, restoring snapshot 5-2, 15-1
check_image.sh 10-4, 16-4, 19-2checkboxes, in procedure description
1-3checking
BladeFrame, pre-patch 4-6BladeFrame, pre-reboot 8-22BladeFrame, pre-upgrade 3-7disk and file systems 8-12, 11-10disk space 11-11
Index-2 For Authorized Service Personnel ONLY Confidential
Index
DVD media, before upgrade 3-3DVD media, manually 10-1, 16-1DVD media, troubleshooting 18-2master/slave relationship 8-11,
11-2, 11-3network 8-8, 8-12, 11-14NFS mounted /images 11-11PAN Manager 11-2pbroot images 11-12pre-upgrade 8-10SAN 8-3, 8-11, 11-5serviceboot partition type 18-5symbolic links (symlinks) 11-11
CIFS server, see Windows serverCIO
configuring 8-29starting 8-32version on DVD 19-3
cloning, BladeFrame 5-2, 15-1configuring
CIO 8-29ntpd 13-24
creating, GenScript 8-18
D
DIACAP and DITSCAP incompatibili-ty 18-17
diagnostics, BladeFrame, common 11-1disk space, checking 11-11disk, checking 8-12, 11-10DNS servers, setting, post-installation
13-23DOS extended partition, serviceboot
18-5downgrading, pBlade firmware 6-25DRM server, CIO 8-31
dumping, HEL data 8-34DVD mount point
/a Boot Section 12-5/mnt/cdrom, Live Section 2-2
E
End User License Agreement (EULA) 2-5, 12-2
escream_config.sh 8-30exiting
Boot Section 12-4Live Section 2-15
extended partition type, serviceboot 18-5
extnet command, post-installation 13-22
F
file systems, checking 11-10flashing
1_52 firmware version 3-2, 3-11, 6-6, 13-16, 15-15
after restoring cBlade 14-6after snapshot restore 15-13cBlades, during fresh install 13-1common diagnostics 11-1during upgrade 3-2HBAs, during 5.2.0 upgrade 3-21HBAs, during fresh install 13-1manually, Live Section 6-1pBlades 6-25troubleshooting 18-4
forms, described 2-12
Confidential For Authorized Service Personnel ONLY Index-3
DVD Toolkit Guide
fresh installationBoot Section 13-1during 5.2.0 upgrade 3-20
G
general information, HBAs 9-9GenScript
creating 8-18version on DVD 19-3
H
hardware event log, see HELhbapost script 6-11, 6-19, 6-24, 13-21HBAs
diagnostics 9-1general information 9-9link status 9-17loopback test 9-19LUN information 9-13parameter settings 9-7port statistics 9-15system information 9-5target information 9-11
HEL, dumping 8-34HTTP proxy, CIO 8-31
I
images, checking, pbroot 11-12Installation Verification Program
(IVP), pBlade, installing 7-1installing
base media 13-2CBIVP 17-1
PAN Manager 13-1PBIVP 7-1
intrusive operations, Live Section 1-3IP address
NFS server for snapshot 5-4Windows server for snapshot 5-5
ISO image, DVD Toolkit 2-2IVP
CBIVP 17-1PBIVP 7-1
K
kernelLinux 2.6, and GenScript 8-18patching 4-10upgrading 3-20, 3-28
keys, ssh 18-17
L
link status, HBAs 9-17Linux
2.6 kernel, and GenScript 8-18Live Section
/mnt/cdrom, DVD mount point 2-2general description 1-1
lock file, toolkit 2-4log files
installation 18-3patch 18-4, 18-16toolkit 18-2upgrade 18-14
loopback test, HBAs 9-19LUNs
checking SAN 11-5HBA information 9-13
Index-4 For Authorized Service Personnel ONLY Confidential
Index
M
MAC addresses, virtual 15-12Main Menu, Boot Section 12-3Main Menu, Live Section 2-6master cBlade required
pBlade firmware (MasterBlaster) 6-25
rolling reboot 8-21master cBlade, rolling reboots 8-24master/slave relationship
checking 8-11, 11-2, 11-3reversing, and rolling reboot 8-28
MasterBlasterfirmware versions on DVD 19-4flashing pBlade manually 6-1flashing pBlades manually 6-25installing 6-33run from master cBlade 2-2
menus, described 2-10mount point
/a, DVD Boot Section 12-5/mnt/cdrom, DVD Live Section 2-2/nfs, snapshot 5-8
N
namesHEL dump files 8-35snapshots, valid 5-8, 18-6
networkchecking 8-8, 8-12, 11-14CIO configuration 8-31
NFS server, storing snapshot 5-4NFS, checking mounted /images 11-11non-interactive mode, during upgrade
3-17notices, described 2-11
ntpd, configuring 13-24
P
PAN Managerbase media on DVD 19-3checking 11-2fresh install 13-1patches on DVD 19-3patching during 5.1.1 upgrade 3-33patching during fresh install 13-1upgrading to 5.1.1 3-26upgrading to 5.2.0 3-11
PAN portability license 5-2, 15-1parameter settings, HBAs 9-7partitions, duplicating 14-4password
creating snapshots on Windows ser-ver 5-5
restoring cBlade 14-3toolkit login 12-2
patches, available on DVD 19-3patching PAN Manager
available patches 4-1common diagnostics 11-1during 5.1.1 upgrade 3-33during fresh install 13-1during upgrade 3-2output stream 2-14selecting patch from alternate loca-
tion 4-18troubleshooting 18-3, 18-15
PBIVPinstalling 7-1uninstalling 7-4version on DVD 19-3
Confidential For Authorized Service Personnel ONLY Index-5
DVD Toolkit Guide
pBladesbackup 5-1crash dumps 14-3dumping HEL data 8-34, 8-38firmware versions on DVD 19-4restoring 15-1
pbroot imageschecking 11-12in snapshots 5-1
performance, and HBA diagnostics 9-1physical media, checking 10-1, 16-1,
18-2PIM-Rs, no firmware on DVD 19-4PIMs
dumping HEL data 8-34, 8-36only on EX BladeFrames 8-37
port statistics, HBAs 9-15portability license, PAN 5-2, 15-1procedures, tabular format 1-3pServers
backup 5-1crash dumps 14-3restoring 15-1
Q
QlogicSANSurfer 9-2
R
recovering, see restoringrelease notes, PAN Manager patches
4-5replicating, /tmp directory during resto-
re 14-3
reportschecking network 11-16described 2-13GenScript 8-20HBA diagnostics 9-1SAN check results 11-8SANalyzer 8-6
requirementsCIO configuration 8-30hardware, for toolkit 1-4installing CBIVP 17-1master cBlade, for flashing pBlades
6-25master cBlade, for rolling reboot
8-21restoring from active cBlade 14-1
restartingBoot Section 12-5ntpd 13-24PAN Manager, 5.1.1 upgrade 3-39PAN Manager, 5.2.0 upgrade 3-15PAN Manager, after extnet com-
mand 13-23PAN Manager, after patch 4-16toolkit Live Section 2-4
restorecblade tool 14-1, 15-13restoring
cBlade, from active cBlade 14-1different cBlade type 5-2pBlades and pServers 15-1snapshot 15-1
restrictions, upgrade 3-4rolling reboot
before upgrade 3-5common diagnostics 11-1performing 8-21run from master cBlade 2-2
Index-6 For Authorized Service Personnel ONLY Confidential

Index
root file system see / (root) file systemroot user, restoring from active cBlade
14-1
S
SANchecking 8-3, 8-11, 11-5interface test 9-21
SANalyzer 8-3, 11-5SANSurfer, Qlogic 9-2save states, storing 8-14sBlades, dumping HEL data 8-34, 8-36screens, toolkit, described 2-8selecting
patch file from alternate location 4-18
patch file from DVD 4-5serial number, BladeFrame, CIO 8-30serviceboot
extended partition 18-5flashing both HBAs and cBlade
6-20, 13-17flashing cBlade 6-17flashing HBAs 6-4, 6-10flashing HBAs and cBlade, resto-
ring snapshot 15-16resetting configuration 6-11, 6-19,
6-24, 13-21setting
DNS servers, post-installation 13-23
time, after installation 13-24time, during installation 13-5
shell scripts, GenScript, creating 8-18slave cBlade, rolling reboots 8-24SMB server, see Windows server
snapshotbefore patching 4-3before upgrade 3-4creating 5-1restoring 15-1
SOCKS proxy, CIO 8-31ssh
keys, lost during snapshot backup/restore 18-17
login, restoring from active cBlade 14-1
login, upgrading remote cBlade 3-18
startingCIO 8-32Live Section 2-1
stdout stream, and toolkit interface 2-14storage presentation, SAN, checking
11-5storing, save states 8-14STS units, unsupported 19-4symbolic links (symlinks), checking
11-10, 11-11synchronizing
cBlades after fresh install 13-1cBlades after restore 15-1
system information, HBAs 9-5
T
tabular format, procedures 1-3target information, HBAs 9-11terminal type
Boot Section 12-1Live Section 2-3
time settingafter installation 13-24
Confidential For Authorized Service Personnel ONLY Index-7
DVD Toolkit Guide
during installation 13-5time, on toolkit screen 2-8toolkit interface
and stdout stream 2-14general description 2-8
U
uninstalling, PBIVP 7-4unmounting
/dev/hda, during 5.2.0 upgrade 3-19/mnt/cdrom during 5.2.0 upgrade
3-19unsupported
BladeFarms 1-4Bolton cBlades 1-4flashing pBlades in BladeFarms
6-25restoring to different cBlade type
5-2STS units 19-4
upgrading firmware see flashingupgrading PAN Manager
available base media 3-1common diagnostics 11-1differences between 5.2.0 and 5.1.1
18-8erasing data in /dev/hda 18-8output stream 2-14to 5.1.1, procedure 3-26
to 5.2.0, procedure 3-11troubleshooting 18-7
user namecreating snapshots on Windows ser-
ver 5-5NFS server for snapshots 5-4toolkit login 12-2
V
vBlade 14-3VCD 14-3victor.sh 2-2, 19-2viewing
GenScript 8-20network check results 11-16SAN check results 11-8
virtual MAC addresses 15-12voltage, BladeFrame, CBIVP 17-3vt100
default terminal type, Live Section 2-3
required terminal type, Boot Sec-tion 12-1
W
Windows server, storing snapshot 5-5
Index-8 For Authorized Service Personnel ONLY Confidential
Information on this document On April 1, 2009, Fujitsu became the sole owner of Fujitsu Siemens Compu-ters. This new subsidiary of Fujitsu has been renamed Fujitsu Technology So-lutions.
This document from the document archive refers to a product version which was released a considerable time ago or which is no longer marketed.
Please note that all company references and copyrights in this document have been legally transferred to Fujitsu Technology Solutions.
Contact and support addresses will now be offered by Fujitsu Technology So-lutions and have the format …@ts.fujitsu.com.
The Internet pages of Fujitsu Technology Solutions are available at http://ts.fujitsu.com/... and the user documentation at http://manuals.ts.fujitsu.com.
Copyright Fujitsu Technology Solutions, 2009
Hinweise zum vorliegenden Dokument Zum 1. April 2009 ist Fujitsu Siemens Computers in den alleinigen Besitz von Fujitsu übergegangen. Diese neue Tochtergesellschaft von Fujitsu trägt seit-dem den Namen Fujitsu Technology Solutions.
Das vorliegende Dokument aus dem Dokumentenarchiv bezieht sich auf eine bereits vor längerer Zeit freigegebene oder nicht mehr im Vertrieb befindliche Produktversion.
Bitte beachten Sie, dass alle Firmenbezüge und Copyrights im vorliegenden Dokument rechtlich auf Fujitsu Technology Solutions übergegangen sind.
Kontakt- und Supportadressen werden nun von Fujitsu Technology Solutions angeboten und haben die Form …@ts.fujitsu.com.
Die Internetseiten von Fujitsu Technology Solutions finden Sie unter http://de.ts.fujitsu.com/..., und unter http://manuals.ts.fujitsu.com finden Sie die Benutzerdokumentation.
Copyright Fujitsu Technology Solutions, 2009