
DPW463 Summit Basic ST-FINAL - synthes.vo.llnwd.net
28
SURGICAL TECHNIQUE CEMENTED & PRESS-FIT UNIFIED INSTRUMENTATION INTRAOPERATIVE FLEXIBILITY PROVEN BIOMECHANICS
Transcript of DPW463 Summit Basic ST-FINAL - synthes.vo.llnwd.net

SURGICAL
TECHNIQUE
CEMENTED &
PRESS-FIT
UNIFIED INSTRUMENTATION
INTRAOPERATIVE FLEXIBILITY
PROVEN BIOMECHANICS

INTRODUCTION
SUMMIT BASICPRESS-FIT STEM
SUMMIT BASICCEMENTED STEM
SUMMITBROACH
The Summit™ Tapered Hip System’s comprehensiveset of implants and instruments treat a wide rangeof patients with differing needs. The Summit systemfeatures premium cementless and cemented stems,as well as stems that are specifically designed to meetthe challenges of today’s healthcare environment.
All Summit stems utilize common instrumentation,so there is no need to learn a new technique toimplant a different stem within the system.
The streamlined surgical technique for the SummitBasic Cemented and Press-Fit stems maximizesefficiency in the operating room, while still providingintraoperative flexibility.
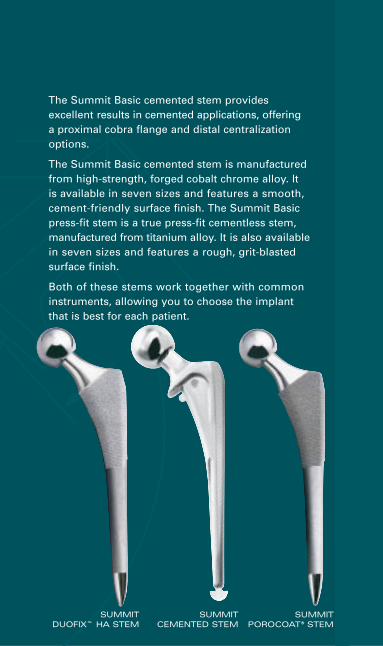
SUMMIT DUOFIX™ HA STEM
SUMMITCEMENTED STEM
SUMMITPOROCOAT® STEM
The Summit Basic cemented stem provides excellent results in cemented applications, offering a proximal cobra flange and distal centralizationoptions.
The Summit Basic cemented stem is manufacturedfrom high-strength, forged cobalt chrome alloy. It is available in seven sizes and features a smooth,cement-friendly surface finish. The Summit Basicpress-fit stem is a true press-fit cementless stem,manufactured from titanium alloy. It is also availablein seven sizes and features a rough, grit-blastedsurface finish.
Both of these stems work together with common instruments, allowing you to choose the implantthat is best for each patient.

UNIFIEDINSTRUMENTATION
One set of broaches for the entireSummit Tapered Hip System.
The Summit Basic Hip is part of the integrated SummitTapered Hip System. This advanced systems approachprovides the following advantages:
• The same instrumentation is used for all implantsin the system, dramatically lowering the learningcurve.
• Any implant within the Summit system may beused without altering your surgical technique.
• Patients with varying needs, such as bone typesand fixation, may be treated with the sameinstrument set.

Figure 1
NECK RESECTION LEVEL
• Perform the preliminary resection of the femoralneck using the neck resection guide to establish theresection level (Figure 1). The neck resection guideshould be aligned with the long axis of the femur.It can be used to reference the tip of the greatertrochanter or the lesser trochanter.
FEMORAL NECK OSTEOTOMY
FE
MO
RA
L N
EC
KO
ST
EO
TO
MY

• Ream the acetabulum until healthy subchondralbone is reached and a hemispherical dome isachieved (Figure 2).
• Insert a trial acetabular cup into the acetabulumand assess bony contact and cup orientation(Figure 3).
• Alternatively, the appropriate acetabular cupimplant may be implanted at this time with a trial liner.
ACETABULAR PREPARATION
ACETABULAR PREPARATION
AC
ET
AB
UL
AR
PR
EP
AR
AT
ION
Figure 2

AC
ET
AB
UL
AR
PR
EP
AR
AT
ION
CUP TRIAL AND POSITION
Figure 3

ES
TA
BL
ISH
TH
E
ME
DU
LL
AR
Y C
AN
AL
ESTABLISH THEMEDULLARY CANAL
• Use the IM Initiator to create a pilot hole in theproximal femur. Place the IM initiator at the posterior margin of the neck resection, lateral near the piriformis fossa (Figure 4).
Figure 4
CANAL INITIATOR

ES
TA
BL
ISH
TH
EM
ED
UL
LA
RY
CA
NA
L
• Enter the femoral canal using the box osteotome at the junction of the femoral neck and the greatertrochanter. The box osteotome should be used tohelp orient the broaches for correct stem anteversion(Figure 5).
CANAL OPENING
Figure 5

ES
TA
BL
ISH
TH
E
ME
DU
LL
AR
Y C
AN
AL
ESTABLISH THEMEDULLARY CANAL cont.
Figure 6a
• Fully insert the canal probe, a tapered reamer, toestablish a direct pathway to the medullary canal. The canal probe should pass easily if properalignment has been achieved (Figure 6a and 6b).
CORRECT ALIGNMENT

Figure 6b
INCORRECT ALIGNMENT
The path established by the canal probe will dictate the route for the broaches and the optional tapered reamers. Take cautionto ensure neutral alignment of the canal probe (Figure 6b).

FEMORAL BROACHING
• Broaching should begin two to three sizes smallerthan the preoperatively templated size.
• Attach the broach to the broach handle in the orientation indicated by the icon etched on theside of the handle (Figure 7).
• Sequentially broach the femoral canal until thebroach is seated. Countersink the final broach by 1 to 2 mm so that the upper margin is slightlybelow the osteotomized femoral neck.
• Direct the broach laterally as it advances to ensure proper alignment.
• Once the appropriately sized broach is seated,remove the broach handle.
Broach Sizing Chart (mm)
Press-fit stem size 2 3 4 5 6 7 8
Broach 2 3 4 5 6 7 8
Cemented stem size 2 3 4 5 6 7 8
The final broach size indicates the correct implant size, press-fitor cemented. There is no need to undersize the cemented stemto create a cement mantle.

Figure 7
BROACH IMPACTION
FE
MO
RA
L B
RO
AC
HIN
G
Tapered reamers are available for femoral preparation. Pleasesee your DePuy Orthopaedics, Inc. representative for details.

BROACH EXTRACTION
Figure 8a
BROACH EXTRACTION
• Due to the self-locking nature of the taperedbroach, occasionally it may be difficult to remove a broach from the femoral canal. Use the broachextractor to remove broaches that cannot be easilyremoved using the broach handle.
BR
OA
CH
EX
TR
AC
TIO
N

BROACH EXTRACTION
Figure 8b
• Insert the tip of the extractor into the slot on thelateral shoulder of the broach. Rotate the extractor90 degrees and use a mallet to extract the broach(Figures 8a and 8b).
BR
OA
CH
EX
TR
AC
TIO
N

• Select either the large or small calcar miller and attach it to the power reamer.
• Place the miller over the trunnion of the countersunkbroach and mill the calcar to the broach face(Figure 9).
CALCAR MILLING
Figure 9
CALCAR MILLER
CA
LC
AR
MIL
LIN
G
Make certain the miller is rotating before contacting the bone to prevent binding on the calcar.

• Place the trial neck onto the broach trunnion(Figure 10). The Summit Basic cemented andpress-fit stems feature common neck geometry forall sizes, therefore only one trial neck is required.This is the only neck trial available in the SummitQuick Kit. If you are using the standard Summitinstrumentation, select the size 0/1 high offset trialneck segment.
• Perform a trial reduction by placing an Articul/eze®
trial head directly onto the trial neck segment.
• Perform the trial reduction using a +5.0 mmArticul/eze trial head, to allow for one size up ordown without having to use a skirted femoral head.Articul/eze trial heads may be used for trial reduction with trial liners or with the final liner in place.
TRIAL REDUCTION
Figure 10
NECK TRIAL
Note: When using the complete Summit Tapered Hip Systeminstrumentation, choose the 0/1 high trial neck for trial reduction.
TR
IAL
RE
DU
CT
ION

ST
EM
IN
SE
RT
ION
STEM INSERTION
• The Summit Basic instrument set does not requireyou to change your surgical technique when usinga cemented or a press-fit implant. The final broachsize indicates the correct implant size, whethercemented or press-fit. For example, if the finalbroach is size 6, then the size 6 implant, eithercemented or press-fit, should be utilized.
• Summit Basic cemented implants feature a 1.5 mm average cement mantle. Summit Basic press-fitimplants feature a .25 mm press-fit value.

• Prepare the femoral canalusing advanced cementtechniques, includingthorough cleaning anddrying of the femoralcanal. A cement restric-tor and a cement gun arerecommended to ensureproper pressurization of the cement. Attachthe appropriate distalCementralizer™ centralizerto the Summit Basiccemented stem andinsert it into the femoralcanal (Figure 11).
Recommended Distal Cementralizer Chart (mm)
Cemented stem size 2 3 4 5 6 7 8
Cementralizer 8.5 8.5 9.25 10.5 11.0 12.0 13.0
Figure 11
CEMENTED STEM INSERTION
CEMENTED STEM INSERTION
CE
ME
NT
ED
ST
EM
INS
ER
TIO
N

Figure 12
PRESS-FIT STEM INSERTION
PRESS-FIT STEM INSERTION
PR
ES
S-F
IT S
TE
M I
NS
ER
TIO
N
• Insert the implant by hand, noting stem orientationand version. The implant should advance to within1 in. of the collar.
• Insert the non-threaded stem inserter and advancethe implant into position using light mallet blows(Figure 12).
• Final seating position hasbeen achieved when thecollar contacts the bone,or when the implant nolonger advances withlight mallet blows.
The Summit Basic press-fit implant may achieve stability up to 5 mmbefore the collar contacts the bone. If the implant appears to be stable and the collar is more than 5 mm above the bone, remove the implant and ensure that the stem is not in a varus position.

Figure 13
FEMORAL HEAD SELECTION
• Perform the trial reduction using a +5.0 mmArticul/eze trial head, to allow for one size up ordown without having to use a skirted femoral head.
• When the appropriate range of motion and stabilityhave been achieved, note the size of the trial headso that the correct implant can be opened (Figure 13).
FEMORAL HEAD SELECTION
FE
MO
RA
L H
EA
D S
EL
EC
TIO
N

• After trial reduction is complete, open and preparethe final implants.
• Remove all trial components.
• If you have not already done so, insert the appropriate acetabular cup and liner implants.
• Thoroughly clean and dry the neck taper of theSummit Basic stem prior to implanting a femoralhead or unipolar sleeve implant.
• Impact the femoral head implant using the femoral head impactor.
FINAL IMPLANTATION
FIN
AL
IM
PL
AN
TA
TIO
N
Figure 14
FINAL IMPLANTATION:PRESS-FIT STEM

PINNACLE ACETABULAR CUP SYSTEM
MODULAR CATHCART UNIPOLAR
SELF-CENTERINGBIPOLAR
The Summit Basic hip features the Articul/eze taper, and is compatible with a wide range of DePuyacetabular components, including the PinnacleAcetabular Cup System, the Self-Centering™ Bipolarand the Modular Cathcart Unipolar.
ACETABULAR OPTIONS
AC
ET
AB
UL
AR
OP
TIO
NS

DIMENSIONS
CEMENTED DIMENSIONS
PRESS-FIT DIMENSIONS
DIM
EN
SIO
NS

A B C D E
LegStem Base Neck Length
Stem Length Offset Length Adj. Neck BroachSize (mm) (mm) (mm) (mm) Angle Size
2 96 42 35 27 130º 23 107 42 35 27 130º 34 114 42 35 27 130º 45 121 42 35 27 130º 56 128 42 35 27 130º 67 133 42 35 27 130º 78 140 42 35 27 130º 8
2 130 42 35 27 130º 23 135 42 35 27 130º 34 140 42 35 27 130º 45 145 42 35 27 130º 56 150 42 35 27 130º 67 155 42 35 27 130º 78 160 42 35 27 130º 8
Note: All measurements are based on a 28 mm +5.0 Articul/eze head,which is the middle length of non-skirted femoral heads.
Pre
ss
-Fit
Ce
me
nte
d

ORDERING INFORMATION
Cemented Stem
1570-06-080 2 1570-06-090 3 1570-06-100 4 1570-06-110 5 1570-06-120 6 1570-06-135 7 1570-06-150 8
Cat. No. SizePress-fit Stem
1570-05-080 2 1570-05-090 3 1570-05-100 4 1570-05-110 5 1570-05-120 6 1570-05-135 7 1570-05-150 8
Cat. No. Size
Distal Centralizers
1376-46-000 8.51376-47-000 9.251376-48-000 10.01376-38-000 10.51376-20-000 11.01376-21-000 12.01376-22-000 13.01376-36-000 14.01376-37-000 15.01376-26-000 16.01376-27-000 17.01376-29-000 18.01376-30-000 19.0
Cat. No. Size (mm)Cement Restrictors
5460-10-000 1
5460-12-000 2
5460-14-000 3
5460-16-000 4
5460-18-000 5
5460-20-000 6
5460-22-000 7
5461-10-000 SmallSOLD IN MULTIPLES OF 10
5461-12-000 LargeSOLD IN MULTIPLES OF 10
Cat. No. Size
Articul/eze FemoralHeads – 28 mm
1365-11-000 +1.51365-12-000 +5.01365-13-000 +8.51365-14-000 +12.01365-15-000 +15.5
Cat. No. Size

Instruments
2001-42-000 T-Handle2001-80-501 IM Initiator 2570-00-000 Summit Universal Broach Handle 2570-04-100 Summit Calcar Planer – Small2570-04-200 Summit Calcar Planer – Large2001-65-000 Femoral Head Impactor2570-13-050 Summit Basic Neck Trial 0/1 High2570-10-500 Summit Basic Quick Kit Instrument Set2570-00-002 Summit Broach Extractor 2570-05-100 Summit Standard Implant Inserter2570-01-600 Summit Universal Neck Resection Guide2354-10-000 Muller Awl Reamer w/Hudson End2002-31-000 Anteversion Osteotome, SM
Cat. No. Description
Articul/eze Trial Head
2530-81-000 28 mm +1.5 2530-82-000 28 mm +5 2530-83-000 28 mm +8.5 2530-84-000 28 mm +12 2530-85-000 28 mm +15.5
Cat. No. SizeSummit Broach
2570-00-070 1 2570-00-080 2 2570-00-090 3 2570-00-100 4 2570-00-110 5 2570-00-120 6 2570-00-135 72570-00-150 8
Cat. No. Size
Cat. No. Size
OptionalSummit Tapered Reamer
2570-02-000 0/1 2570-02-100 2/32570-02-200 4/52570-02-300 6/72570-02-400 8/9

3M02060612-02-500 (Rev. 1)
Printed in USA. ©2003 DePuy Orthopaedics, Inc. All rights reserved.
For more information about DePuy products, visit our web site at www.jnjgateway.com/summithip.
Total Hip Prostheses, Self-Centering™ Hip Prostheses and Hemi-Hip Prostheses IMPORTANT:This essential product information sheet does not include all of the information necessary for selection
and use of a device. Please see full labeling for all necessary information.
INDICATIONS:Total Hip Arthroplasty (THA) is intended to provide increased patient mobility and reduce pain by
replacing the damaged hip joint articulation in patients where there is evidence of sufficient sound bone
to seat and support the components. THA is indicated for a severely painful and/or disabled joint from
osteoarthritis, traumatic arthritis, rheumatoid arthritis or congenital hip dysplasia; avascular necrosis of
the femoral head; acute traumatic fracture of the femoral head or neck; failed previous hip surgery; and
certain cases of ankylosis. Hemi-hip arthroplasty is indicated in these conditions where there is evidence of
a satisfactory natural acetabulum and sufficient femoral bone to seat and support the femoral stem.
Hemi-hip arthroplasty is indicated in the following conditions: Acute fracture of the femoral head or
neck that cannot be reduced and treated with internal fixation; fracture dislocation of the hip that cannot
be appropriately reduced and treated with internal fixation; avascular necrosis of the femoral head;
non-union of femoral neck fractures; certain high subcapital and femoral neck fractures in the elderly;
degenerative arthritis involving only the femoral head in which the acetabulum does not require
replacement; and pathology involving only the femoral head/neck and/or proximal femur that can be
adequately treated by hemi-hip arthroplasty.
CONTRAINDICATIONS:THA and hemi-hip arthroplasty are contraindicated in cases of: active local or systemic infection; loss of
musculature, neuromuscular compromise or vascular deficiency in the affected limb, rendering the
procedure unjustifiable; poor bone quality; Charcot’s or Paget’s disease; for hemi-hip arthroplasty –
pathological conditions of the acetabulum that preclude the use of the natural acetabulum as an
appropriate articular surface. Ceramic heads are contraindicated in revision surgery when the femoral
stem is not being replaced or for use with any other than a polyethylene or metal-backed polyethylene cup.
In the USA, ceramic heads are contraindicated for use with any other than UHMWPE cup or metal backed
UHMWPE cup.
CAUTION: Ceramic liners are not approved for use in the United States.
WARNINGS and PRECAUTIONS:Ceramic coated femoral stem prostheses are indicated for uncemented press fit fixation.
CAUTION: DO NOT USE BONE CEMENT FOR FIXATION OF A CERAMIC COATED PROSTHESIS.Components labeled for “Cemented Use Only” are to be implanted only with bone cement. The following
conditions tend to adversely affect hip replacement implants: excessive patient weight, high levels of
patient activity, likelihood of falls, poor bone stock, metabolic disorders, history of infections, severe
deformities leading to impaired fixation or improper positioning, tumors of the supporting bone
structures, allergic reactions to materials, tissue reactions, and disabilities of other joints.
ADVERSE EVENTS:The following are the most frequent adverse events after hip arthroplasty: change in position of the
components, loosening of components, fracture of components, dislocation, infection, peripheral
neuropathies, tissue reaction.