DIDACTIC...
51
19 DIDACTIC EDUCATION Emergency Medical Technician-Basic Table 2: Fundamentals of EMT-Basic: The Education Parameters of the Didactic Component Units Titles Number of Tasks 1.0 Preparing to Become an EMT-Basic 349 2.0 Airway 104 3.0 Patient Assessment 147 4.0 Medical/Behavioral and Obstetrics/Gynecology 456 5.0 Trauma 612 6.0 Infants and Children 211 7.0 Operations 144 Total 2023
Transcript of DIDACTIC...

19
DIDACTIC EDUCATION
Emergency Medical Technician-Basic Table 2: Fundamentals of EMT-Basic: The Education Parameters of the Didactic Component
Units Titles Number of Tasks1.0 Preparing to Become an EMT-Basic 349 2.0 Airway 104 3.0 Patient Assessment 147 4.0 Medical/Behavioral and Obstetrics/Gynecology 456 5.0 Trauma 612 6.0 Infants and Children 211 7.0 Operations 144
Total 2023

20
Preparing to become an EMT-Basic
I. Number of tasks to master = 349.
II. Intended Outcome: Given sufficient information about the EMS System, EMT-Basic, and Body Substance Isolation, the student will perform the following tasks with 85% accuracy on the didactic examination.
III. Tasks:
1.01 The Emergency Medical Services System
A. Identify the 10 components of the Emergency Medical Services System according to the National Highway Traffic Safety Administration Technical Assistance Program Assessment Standards.
1. Regulation and Policy. 2. Resource management. 3. Human Resources and Training. 4. Transportation. 5. Facilities. 6. Communications. 7. Public Information and Education. 8. Medical Direction. 9. Trauma Systems. 10. Evaluation.
B. Explain the two ways for accessing the EMS System.
1. In an enhanced 911 system, the address of the phone from which the call is made is displayed on a screen.
2. Non-911-In some areas, a different published emergency number may be used to call EMS.
C. List the five Idaho EMS certification levels of EMS providers in Idaho.
1. First Responders. 2. EMT Basic. 3. AED-A (Advanced EMT). 4. EMT Intermediate. 5. EMT Paramedic.
D. Define the purpose of a Hospital Emergency Department.
1. A Hospital Emergency Department is specifically designed to receive and treat patients in need of urgent care for both medical and trauma related incidents.

21
E. List nine types of specialty centers.
1. Trauma Center. 2. Burn Center. 3. Pediatric Center. 4. Poison Center. 5. Psychiatric Center. 6. Nursing Home. 7. Cardio/Pulmonary Center. 8. Infectious Disease Center. 9. Veterans Hospital.
F. Identify nine primary health care personnel that an EMT Basic may encounter in the health care facility.
1. Physician. 2. Nurse (R.N., L.P.N., or C.N.A.). 3. E.R. Technician. 4. Respiratory Technician. 5. Radiographer. 6. Social Services Representative. 7. Clergy. 8. Environmental Service Personnel. 9. Clerical Staff.
G. Identify the four types of EMS services in Idaho.
1. Quick Response Unit: May have personnel certified at any level but does not transport (rare, life threatening situations may dictate transport to rendezvous with another agency).
2. Basic Service: May be staffed by First Responders and Basic EMTs (At least one EMT-B required).
3. Intermediate Service: May be staffed by First Responders, Basic EMTs and Intermediate EMTs.
4. Advanced Life Support (ground and air transport) may have basic EMTs as part of the crew configuration, but must have an ALS provider on each call.
H. Identify three public safety services that an EMT-Basic may encounter in their duties.
1. Law Enforcement (local, county, state, and federal). 2. Fire/Rescue. 3. Public Utilities.

22
I. Define quality improvement:
1. A system of internal/external reviews and audits of all aspects of an EMS system so as to identify those aspects needing improvement to assure that the public receives the highest quality of pre-hospital care.
J. List six tools used in EMS quality assurance/improvement.
1. Documentation. 2. Run Reviews. 3. Gathering feedback from patients and ER staff. 4. Conducting preventative maintenance. 5. Continuing education. 6. Skill maintenance and improvement.
K. List two responsibilities of the medical director.
A medical director is desirable but not required for EMT-Basics in Idaho. Duties would include: 1. Authorizes the EMTs in the service to provide medical care in the
field. 2. Written standing orders for appropriate care for each illness,
injury, or condition encountered in the field.
L. List and explain two types of Medical Direction.
1. Online. Direct medical control: The medical director can be reached by radio or phone for medical direction while EMTs are on a call.
2. Off line. The medical director provides the ongoing working liaison between the hospitals, EMTs, and the medical community. They provide or participate in writing protocols and standing orders.
M. Identify the 12 responsibilities of the EMT-B.
1. Personal Safety. 2. Safety of crew. 3. Safety of bystanders. 4. Patient care based on assessment findings. 5. Lifting and moving patients safely. 6. Transport/transfer of care. 7. Record keeping/data collection. 8. Patient advocacy (patient rights) and the patient as a whole. 9. Check each key piece of equipment before going on duty to ensure
that it is operable and in its assigned place.

23
10. Check to be sure adequate amounts of disposable supplies are stocked on the ambulance.
11. Assure that the ambulance fuel tank is full and check all essential fluid levels and conditions of tires.
12. Check all lights (emergency and non-emergency) --Report or repair any non-working lights.
N. List the six attributes of an EMT-B.
1. Put patient needs as a priority without endangering self. 2. Professional appearance and manner. 3. Expected to perform under pressure with composure and self
confidence. 4. Treats patients and their families with understanding, respect and
compassion. 5. Non-judgmental. 6. Respects patient confidentiality.
1.02 Well-being of the EMT-Basic
A. Identify the five stages of death and dying.
1. Denial. 2. Anger. 3. Bargaining. 4. Depression. 5. Acceptance.
B. Identify six steps the EMT-Basic can do when dealing with the dying patient and family members.
1. Listen empathetically. 2. Do not falsely reassure. 3. Use a gentle tone of voice. 4. Let the patient know everything that can be done to help will be
done. 5. Use a reassuring touch, if appropriate. 6. Comfort the family.
C. List five examples of situations that may produce a stress response in the EMT-Basic.
1. Mass casualty situations. 2. Infant and child trauma. 3. Amputations. 4. Infant/child/elder/spouse abuse. 5. Death or injury of co-worker or other public safety personnel.

24
D. List 10 warnings signs of stress in the EMT-Basic.
1. Irritability to co-workers, family and friends. 2. Inability to concentrate. 3. Difficulty sleeping or nightmares. 4. Anxiety. 5. Indecisiveness. 6. Guilt. 7. Loss of appetite. 8. Loss of interest in sexual activities. 9. Isolation. 10. Loss of interest in work.
E. List four examples of lifestyle changes the EMT-Basic may do to manage stress.
1. Change diet. 2. Exercise. 3. Practice relaxation techniques. 4. Balance work, recreation, family and health.
F. Identify two work environment changes that may help the EMT-Basic deal with stress.
1. Request work shift changes to allow more family time. 2. Request a rotation of duty assignment to a less busy area.
G. Define critical incident stress debriefing (CISD)
1. CISD is made up of a team of peer counselors and mental health professionals who help emergency care workers deal with critical incident stress. A meeting is held 24-72 hours after a major incident. It is designed to accelerate the normal recovery process after experiencing a critical incident. (In Idaho access to the CISD system is through state communications.)
H. Define body substance isolations (BSI)
1. BSI is an infection control concept and practice designed to approach all body fluids as being potentially infectious.

25
I. List the five ways an EMT-Basic can protect themselves from infection.
1. Hand washing. 2. Use of eye protection. 3. Use of gloves (latex, vinyl, utility). 4. Use of gowns. 5. Use of masks (surgical or hepa).
J. List five modes of transmission.
1. Blood or body fluid splash. 2. Surface contamination. 3. Needle stick exposure. 4. Oral contamination due to lack of proper hand washing. 5. Inhalation.
K. List and explain six safety precautions for EMT-B and patient.
1. Hand washing is one of the simplest and most effective ways to control disease transmission.
a. Always wash your hands before and after contacts, regardless of whether you wear gloves.
b. Wash your hands before performing a procedure, after glove removal and between patients.
c. If no running water is available, use waterless hand washing substitutes.
d. If you use a waterless substitute, wash your hands as soon as you reach the hospital or other source of running water.
2. Gloves.
a. Needed for contact with blood or bloody bodily fluid. b. Wear double gloves if you will be exposed to large amounts of
bodily fluids. c. Should be changed between contact with different patients. d. For cleaning and disinfecting the unit, use heavy duty utility
gloves.
3. Eye protection.
a. If blood splatter is a possibility, wear goggles. b. If you wear glasses, add removable side shields when on duty.
4. Masks.
a. Surgical type for possible blood splatter. b. Surgical type worn by patient and EMT-B for airborne disease.

26
c. High-efficiency particulate air respirator mask (HEPA) of patient is suspected for or diagnosed with tuberculosis (worn by care provider).
5. Other considerations.
a. Outside surfaces of these items are considered contaminated after they have been exposed to the patient. Do not touch facial area.
b. Make sure that gloves, masks, gowns and all other items exposed to infectious processes are disposed of according to local guidelines.
c. In the even that a needle sticks you, blood gets in your eyes, or you have any contact with patient body fluid, immediately report to your supervisor of infection control.
6. Occupational Safety and Health Administration (OSHA) requires all EMT-Bs to be trained in handling blood born pathogens.
L. List the four CDC’s suggested immunizations needed for the EMT-Basic.
1. Tetanus prophylaxis. 2. Hepatitis A vaccine. 3. Hepatitis B vaccine. 4. Tuberculin purified protein derivative (PPD) testing.
M. Identify three other situations in which the EMT-Basic must be aware of personal protection.
1. Hazardous materials situations. 2. Rescue situations. 3. Violent situations.
N. Define the EMT-Basic’s role in a hazardous materials incident.
1. EMT-Basics provide emergency care only after the scene is safe and patient contamination limited. Hazardous materials scenes are controlled by specialized hazardous material teams.
1.03 Medical, legal and ethical issues.
A. Define scope of practice.
1. Usually defined by the state law that authorizes the EMT to function to provide patient care under the supervision of a physician.

27
B. List the 22 functions that the EMT-Basic may perform according to the Idaho Board of Medicine.
1. Obtain vital signs. 2. Obtain a medical history. 3. Assess mechanism of injury. 4. Assess nature of illness. 5. Perform an initial patient assessment. 6. Perform a detailed physical examination. 7. Perform patient’s reassessments. 8. Perform manual techniques to assure a patent airway. 9. Insert airway adjuncts in the oral and nasal cavity. 10. Provide ventilatory support for a patient. 11. Attempt to resuscitate a patient in cardiac arrest and provide post-
resuscitative care. 12. Use of oxygen delivery system components. 13. Provide care for external and internal discomfort. 14. Provide treatment for a patient in respiratory distress or
experiencing chest pain bleeding, hypoperfusion, a penetrating chest injury, soft tissue injury, open abdominal injury, impaled object, or an acute amputation.
15. Provide care to a patient with an altered mental status, a history of diabetes, experiencing a seizure, having an allergic reaction, possibly exposed to a poisoning, suspected of overdosing on a substance, experiencing a behavioral problem, or has been exposed to cold or heat.
16. Provide care to a patient who is involved in a near-drowning incident, has been bitten or stung by an animal or insect, sustained a burn injury, has a suspected head or spinal injury, and has a painful, swollen, deformed extremity.
17. Provide care for the obstetric and the gynecological patient and assist with the delivery of an infant.
18. Cardiac defibrillation utilizing a semi-automated external defibrillator.
19. Extricate a patient from entrapment. 20. Use of the pneumatic anti-shock garment. 21. Assist patients with administration of prescribed medications. 22. Assist patients with the administration of over-the-counter
medications for poisoning and hypoglycemia.

28
C. List the five ethical responsibilities of the EMT-Basic.
1. Makes the physical and emotional needs of the patient a priority. 2. Practice of skills to the point of mastery. 3. Attend continuing education and refresher programs. 4. Critically review performances. 5. Maintain honesty in reporting.
D. Define seven general considerations for Idaho’s (Comfort One) DNR protocol.
1. A patient with a comfort one/DNR order shall be provided appropriate comfort care and treatment by EMS personnel.
2. The original comfort one/DNR form or bracelet shall be apparent and immediately available.
3. If there is a misunderstanding with family members or others at the scene, or other questions concerning the comfort one/DNR form or bracelet, EMS personnel should utilize on-line medical control for guidance.
4. If there is any question about the validity of a comfort one/DNR form or bracelet or the identity of the patient, resuscitation shall be initiated.
5. Comfort the family and bystanders when the patient has expired. 6. Follow your local medical program director’s or coroner’s
protocols for patients who have expired. Actions may include contact of the local coroner’s office, the Idaho EMS Patient Care Report form or approved pre-hospital documentation must still be completed.
7. Under Idaho state law, all DNR orders issued by other states shall also be honored in Idaho.
E. Define expressed consent.
1. Consent from a patient of legal age and able to make rational decisions. Patient must be informed of all procedures and related risks. This must be done before rendering treatment and obtained from every conscious, mentally competent adult.
F. Define implied consent.
1. Consent assumed from the unconscious patient requiring emergency care. This is based on the assumption that the patient would consent to life saving interventions.

29
G. Define the EMT-Basics responsibility for consent of children and mentally incompetent adults.
1. Consent for treatment must be obtained from the parent or legal guardian. When life threatening situation exist and the parent or guardian is not available for consent, care can be rendered based on implied consent.
H. Define assault.
1. Putting the patient in fear of bodily harm.
I. Define battery.
1. Unlawfully touching a patient without consent.
J. List four rules for patients when refusing care.
1. The patient always has the right to refuse treatment. 2. The patient may withdraw consent at anytime. 3. Refusals must be made by mentally competent adults. 4. The patient must be informed and fully understand all of the risks
and consequences associated with refusal and sign a “release of liability” form.
K. Define abandonment.
1. Termination of care of the patient without assuming the continuation of care at the same level or higher.
L. Define negligence.
1. The accepted standard of care resulting with further injury to the patient.
M. List the four components of negligence.
1. Duty to act. 2. Breach of the duty. 3. Injury or damages were inflicted. 4. The actions of the EMT-Basic caused the injury or damage.
N. List three types of information considered confidential.
1. Patient history gained through interview. 2. Assessment findings. 3. Treatment rendered.

30
O. Identify the three roles of the EMT-Basic in organ donor harvesting.
1. Identify the patient as a potential donor. 2. Establish communication with medical direction. 3. Provide care to maintain usable organs.
1.04 The human body
A. Define the anatomical position.
1. Person standing facing forward with palms facing forward.
B. List the two anatomical planes.
1. Midline. 2. Mid-axillary.
C. List the 22 descriptive anatomical terms.
1. Torso. 2. Medial. 3. Lateral. 4. Proximal. 5. Distal. 6. Superior. 7. Inferior. 8. Anterior. 9. Posterior. 10. Right. 11. Left. 12. Mid-clavicular. 13. Bilaterally. 14. Dorsal. 15. Ventral. 16. Plantar. 17. Palmer. 18. Prone. 19. Supine. 20. Fowlers. 21. Trendelenburg. 22. Shock position.
D. List the three functions of the skeletal system.
1. Gives the body shape. 2. Protects vital internal organs. 3. Provides for body movement.

31
E. List the seven components of the skeletal system.
1. Skull. 2. Face. 3. Spinal column. 4. Thorax. 5. Pelvis. 6. Lower extremities. 7. Upper extremities.
F. List two types of joints.
1. Ball and socket. 2. Hinged.
G. List the 10 structures of the respiratory system.
1. Nose. 2. Mouth. 3. Pharynx. 4. Epiglottis. 5. Trachea. 6. Cricoid cartilage. 7. Larynx. 8. Bronchi. 9. Lungs. 10. Diaphragm.
H. Define alveolar/capillary exchange.
1. Oxygen rich air enters the alveoli during each inspiration. Oxygen poor blood in the capillaries passes into the alveoli.
I. List the four characteristics of breathing.
1. Normal rate. 2. Rhythm. 3. Quality. 4. Depth.
J. Define the normal breathing rate for adults.
1. 12-20 per minute.
K. Define the normal breathing rate for a child.
1. 15-30 per minute.

32
L. Define the normal breathing rate for infants.
1. 25-50 per minute.
M. Identify the six body structures that are different in infant and child anatomy to consider.
1. Mouth. 2. Nose. 3. Pharynx. 4. Trachea. 5. Cricoid cartilage. 6. Diaphragm.
N. Identify the two structures of the heart.
1. Atrium. 2. Ventricle.
O. List the nine major arteries.
1. Coronary. 2. Aorta. 3. Pulmonary. 4. Carotid. 5. Femoral. 6. Radial. 7. Brachial. 8. Posterior tibial. 9. Dorsalis pedis.
P. Identify the four components of blood.
1. Red blood cells. 2. White blood cells. 3. Plasma. 4. Platelets.
Q. Define pulse.
1. Felt when left ventricle contracts sending a wave of blood through the arteries. It can be palpitated anywhere an artery simultaneously passes near the skin surface over a bone.
R. Define systolic blood pressure.
1. The pressure exerted against the walls of the artery when the left ventricle contracts.

33
S. Define diastolic blood presser.
1. The pressure exerted against the walls of the artery when the left ventricle is at rest.
T. List the three types of muscles.
1. Voluntary (skeletal). 2. Involuntary (smooth). 3. Cardiac.
U. List the two components of the nervous system.
1. Central nervous system. 2. Peripheral nervous system.
V. List the three functions of the skin.
1. Protects the body from the environment, bacteria and other organisms.
2. Helps regulate the temperature of the body. 3. Senses heat, cold, touch, pressure and pain; transmits this
information to the brain and spinal cord.
1.05 Baseline vital signs and sample history.
A. Identify the five types of vital signs.
1. Breathing. 2. Pulse. 3. Skin perfusion. 4. Pupils. 5. Blood pressure.
B. Identify the four qualities of breathing.
1. Normal. 2. Shallow. 3. Labored. 4. Noisy.
C. Identify the four characteristics of the quality of a pulse.
1. Strong. 2. Weak. 3. Regular. 4. Irregular.

34
D. Identify the four abnormal skin colors.
1. Pale. 2. Cyanotic. 3. Flushed. 4. Jaundice.
E. Identify the three abnormal skin temperatures.
1. Hot. 2. Cool. 3. Cold.
F. Identify the three ways of assessing the pupils.
1. Size (dilated, normal, constricted). 2. Equality (equal or unequal). 3. Reactivity to light.
G. List the two methods of testing blood pressure.
1. Auscultation. 2. Palpation.
H. List the six steps of the sample history.
1. Signs/symptoms. 2. Allergies. 3. Medications. 4. Pertinent past history. 5. Last oral intake. 6. Events leading to the injury or illness.
1.06 Lifting and moving patients.
A. List five guidelines used for proper lifting.
1. Consider weight of patient and need for additional help. 2. Know physical ability and limitations. 3. Lift without twisting. 4. Have feet positioned properly. 5. Communicate clearly and frequently with partner.

35
B. List eight guidelines when lifting cots or stretchers.
1. Know or find out weight. 2. Use at least two people. 3. Ensure enough help is available. 4. Use power lift. 5. Use power grip. 6. Lift while back is in locked position. 7. When lowering reverse steps. 8. Avoid bending at the waist.
C. List seven guidelines for carrying.
1. Know of find out the weight to be lifted. 2. Know limitations of the crew’s abilities. 3. Work in a coordinated manner and communicate with partners. 4. Keep the weight as close to the body as possible. 5. Keep back in a locked-in position and refrain from twisting. 6. Flex at the hips not the waist; bend at the knees. 7. Do not hyperextend the back (do not lean back from the waist).
D. List three guidelines for reaching.
1. Keep back in locked-in position. 2. When reaching overhead, avoid hyper-extended position. 3. Avoid twisting the back while reaching.
E. List eight guidelines for pushing and pulling.
1. Push, rather than pull, whenever possible. 2. Keep back locked-in. 3. Keep line of pull through center of body by bending knees. 4. Keep weight close to the body. 5. Push from the area between the waist and shoulder. 6. If weight is below waist level, use kneeling position. 7. Avoid pushing or pulling from an overhead position if possible. 8. Keep elbows bent with arms close to the sides.
F. List the three patient moves used by the EMT-Basic.
1. Emergency. 2. Urgent. 3. Non-urgent.

36
G. List the two reasons used for an emergency move.
1. There is immediate danger to the patient if not moved. 2. Life saving care cannot be given because of the patient’s position.
H. Identify three conditions when a patient should receive an urgent move.
1. Altered mental status. 2. Inadequate breathing. 3. Shock.
I. List the six types of equipment used for moving patients.
1. Wheeled stretcher. 2. Portable stretcher. 3. Stair chair. 4. Backboards. 5. Scoop or orthopedic stretcher. 6. Flexible stretcher.

37
2.0 Airway
I. Number of tasks to master = 104
II. Intended Outcome:
III. Given the information in this module about the airway, the student will perform following tasks with 85% accuracy on the didactic examination.
IV. Tasks:
2.01 Anatomy Review
A. Identify the 11 major structures of the respiratory system.
1. Nose. 2. Mouth. 3. Oropharynx. 4. Nasopharynx. 5. Epiglottis. 6. Trachea. 7. Cricoid cartilage. 8. Larynx. 9. Bronchi. 10. Lungs. 11. Diaphragm.
B. List the four characteristics assessed during breathing.
1. Rate. 2. Rhythm. 3. Quality. 4. Depth.
C. Identify the normal rate for adult breathing.
1. 12-20 per minute.
D. Identify the normal rate for child breathing.
1. 15-30 per minute.
E. Identify the normal rate for infant breathing.
1. 25-50 per minute.
38
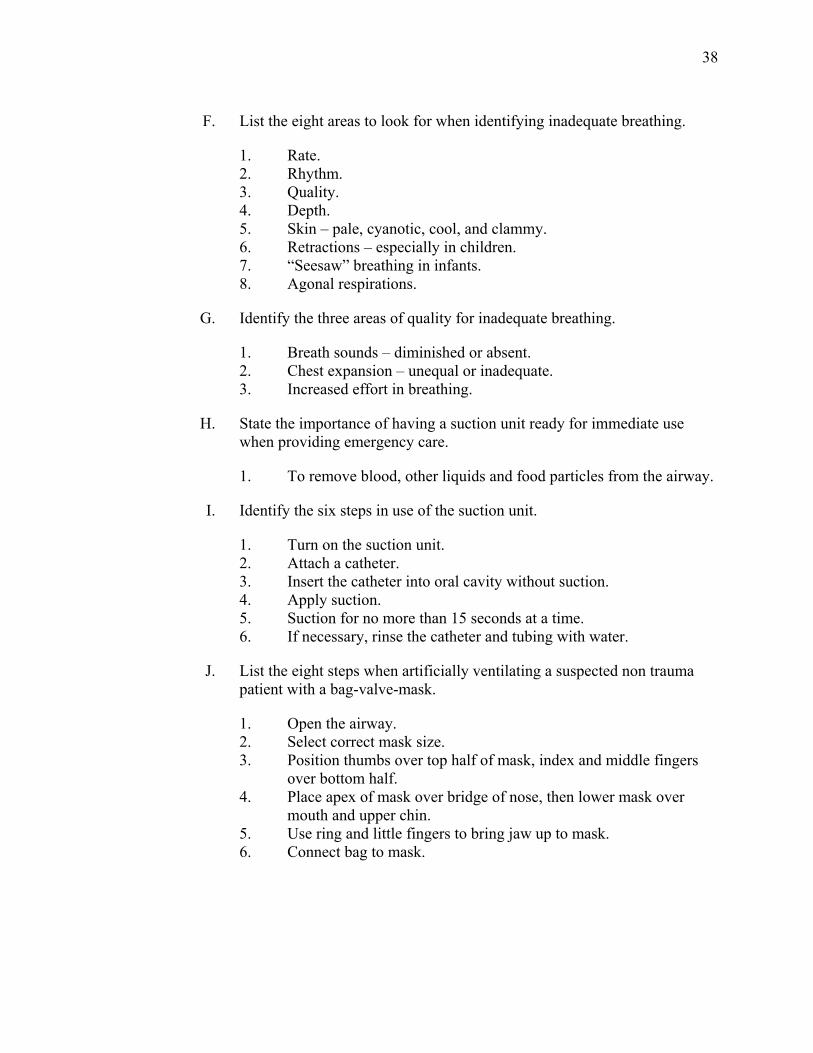
F. List the eight areas to look for when identifying inadequate breathing.
1. Rate. 2. Rhythm. 3. Quality. 4. Depth. 5. Skin – pale, cyanotic, cool, and clammy. 6. Retractions – especially in children. 7. “Seesaw” breathing in infants. 8. Agonal respirations.
G. Identify the three areas of quality for inadequate breathing.
1. Breath sounds – diminished or absent. 2. Chest expansion – unequal or inadequate. 3. Increased effort in breathing.
H. State the importance of having a suction unit ready for immediate use when providing emergency care.
1. To remove blood, other liquids and food particles from the airway.
I. Identify the six steps in use of the suction unit.
1. Turn on the suction unit. 2. Attach a catheter. 3. Insert the catheter into oral cavity without suction. 4. Apply suction. 5. Suction for no more than 15 seconds at a time. 6. If necessary, rinse the catheter and tubing with water.
J. List the eight steps when artificially ventilating a suspected non trauma patient with a bag-valve-mask.
1. Open the airway. 2. Select correct mask size. 3. Position thumbs over top half of mask, index and middle fingers
over bottom half. 4. Place apex of mask over bridge of nose, then lower mask over
mouth and upper chin. 5. Use ring and little fingers to bring jaw up to mask. 6. Connect bag to mask.

39
7. Have assistant squeeze bag with two hands until chest rises. If alone, form a “C” around the ventilation port with thumb and index finger, use middle, ring and little finger under jaw to maintain chin lift and complete the seal.
8. Repeat a minimum of every 5 seconds for adults and every 3 seconds for children.
K. List the nine steps when artificially ventilating a suspected trauma patient with a bag-valve-mask.
1. Open the airway. 2. Select correct mask size. 3. Immobilize head and neck, ex. Have an assistant hold head
manually or use your knees to prevent movement. 4. Position thumbs over top half of mask, index and middle fingers
over bottom half. 5. Place apex of mask over bridge of nose, then lower mask over
mouth and upper chin. If mask has large round cuff surrounding a ventilation port, center port over mouth.
6. Use ring and little fingers to bring jaw up to mask without tilting head or neck.
7. Connect bag to mask if not already done. 8. Have assistant squeeze bag with two hands until chest rises. 9. Repeat every 5 seconds for adults and every 3 seconds for children
and infants, continuing to hold jaw up without moving head or neck.
L. List the four parts of a bag-valve mask system.
1. Self-inflating bag. 2. One-way-valve. 3. Face mask. 4. Oxygen reservoir.
M. Describe the three signs of adequate ventilation, when using bag-valve-mask.
1. The chest rises and falls with each artificial ventilation. 2. The rate is sufficient, approximately 12 times per minute for adults
and 20 times per minute for children and infants. 3. Heart rate returns to normal with successful artificial ventilation.
N. Describe the three signs of adequate ventilation, when using a bag-valve-mask.
1. The chest does not rise and fall with artificial ventilation. 2. The rate is too slow or too fast. 3. Heart rate does not return to normal with artificial ventilation.

40
O. Describe the nine steps in artificially ventilating a patient with a flow restricted, oxygen-powered ventilation device, and no neck injury is suspected.
1. Open airway. 2. Insert correct oral or nasal airway. 3. Attach adult mask. 4. Position thumbs over top half of mask, index and middle fingers
over bottom half. 5. Place apex of mask over bridge of nose, then lower mask over
mouth and upper chin. 6. Use ring and little fingers to bring jaw up to mask. 7. Connect flow restricted, oxygen-powered ventilation device to
mask if not already done. 8. Trigger the flow restricted, oxygen-powered ventilation device
until chest rises. 9. Repeat every 5 seconds.
P. Describe the eight steps in artificially ventilating a patient with a flow restricted, oxygen-powered ventilation device, when there is a suspected neck injury.
1. Open the airway. 2. Attach adult mask. 3. Immobilize the head and neck, ex. Have an assistant hold head
manually or use your knees to prevent movement. 4. Position thumbs over top half of mask, index and middle fingers
over bottom half. 5. Place apex of mask over bridge of nose, then lower mask over
mouth and upper chin. 6. Use ring and little fingers to bring jaw up to mask without tilting
head or neck. 7. Connect flow restricted, oxygen-powered ventilation device until
chest rises. 8. Repeat every 5 seconds.
Q. Explain the two steps when performing the actions taken when providing mouth-to-mouth and mouth-to-stoma artificial ventilation.
1. If unable to artificially ventilate, try suction, then artificial ventilation through mouth and nose; sealing stoma may improve ability to artificially ventilate from above or may clear obstruction.
2. Need to seal the mouth and nose when air is escaping when artificially ventilating at the stoma.

41
R. Describe the four steps used in measuring and inserting an oropharyngeal airway.
1. Select the proper size: Measure from corner of patient’s lips to the bottom of the earlobe.
2. Open the patient’s mouth. 3. In adults, to avoid tongue obstructing the airway, insert the airway
upside down, with tip facing toward roof of the patients mouth. 4. Advance the airway gently until resistance is encountered. Turn
the airway 180 degrees so that it comes to rest with the flange on the patient’s teeth.
S. Explain the alternate method of inserting an oral airway.
1. Use a tongue depressor to press the tongue down and forward to avoid obstructing the airway. This is the preferred method for airway insertion in an infant and child.
T. Describe the three steps used in measuring and inserting a nasopharyngeal airway.
1. Select the proper size: Measure from the tip of the nose to the tip of the patient’s ear. Also consider diameter of airway in nostril.
2. Lubricate the airway with a water soluble lubricant. 3. Insert it posteriorly. Bevel should be toward the base of the nostril
or toward the septum.
U. Identify the five different size oxygen cylinders.
1. D cylinder has 350 liters. 2. E cylinder has 625 liters. 3. M cylinder has 3,000 liters. 4. G cylinder has 5,300 liters. 5. H cylinder has 6,900 liters.
V. Describe the seven steps in operating an oxygen cylinder.
1. Remove protective seal. 2. Quickly open, and then shut the valve. 3. Attach regulator-flowmeter to tank. 4. Attach oxygen device to flowmeter. 5. Open flowmeter to desired setting. 6. Apply oxygen device to patient. 7. When complete, remove device from patient, then turn off valve
and remove pressure from the regulator.

42
W. Identify the oxygen flow requirements for a non-rebreather face mask.
1. Flow rate should be adjusted so that when patient inhales, bag does not collapse (151pm).
X. Describe the indications for using a nasal cannula versus a non-rebreather face-mask.
1. Should be used only when patients will not tolerate a non-rebreather mask, despite coaching from the EMT-Basic.

43
3.0 Patient Assessment.
I. Number of tasks to master = 147
II. Intended outcome: Given the information in this module about patient assessment, the student will perform the following tasks with 85% accuracy on the didactic exam.
III. Tasks:
3.01 Scene size-up.
A. Define scene size-up.
1. An assessment of the scene and surroundings that will provide valuable information to the EMT-Basic.
B. List four examples where the EMT-Basic must consider personal protection of the scene.
1. Crash/rescue. 2. Toxic substances. 3. Crime scenes. 4. Unstable surfaces.
C. Define mechanism of injury.
1. The manner in which injuries occur: Important in determining whether aeromedical support is needed.
D. Define nature of illness.
1. Generally describes the medical condition that prompts an individual to be sick and subsequently request EMS.
3.02 Initial assessment.
A. List the six steps of the initial assessment.
1. Form general impression of the patient. 2. Assess patient’s mental status. 3. Assess the patient’s airway status. 4. Assess the patients breathing. 5. Assess the patient’s circulation. 6. Identify priority patients.

44
B. Define general impression of the patient.
1. Formed to determine priority of care and is based on the EMT-Basic’s immediate assessment of the environment and the patient’s chief complaint.
C. List the four levels of mental status (AVPU)
1. Alert. 2. Responds to verbal stimuli. 3. Responds to painful stimuli. 4. Unresponsive.
D. List the three steps in assessing the patient’s circulation.
1. Assess the patients pulse. 2. Assess if major bleeding is present. If present, control bleeding. 3. Assess the patient’s perfusion by evaluation skin color and
temperature.
E. Identify the three locations for obtaining a pulse.
1. Radial. 2. Brachial. 3. Carotid.
F. Identify the three characteristics of checking the perfusion of the skin.
1. Color. 2. Temperature. 3. Condition.
3.03 Focused history and physical exam – Trauma patients.
A. List the 10 reasons for re-considering mechanism of injury.
1. Ejection from vehicle. 2. Death in same passenger compartment. 3. Falls greater than 20 feet. 4. Roll-over of vehicle. 5. High-speed vehicle collision. 6. Vehicle-pedestrian collision. 7. Motorcycle crash. 8. Unresponsive or altered mental status. 9. Penetrations of the head, chest, or abdomen. 10. Hidden injuries.
45
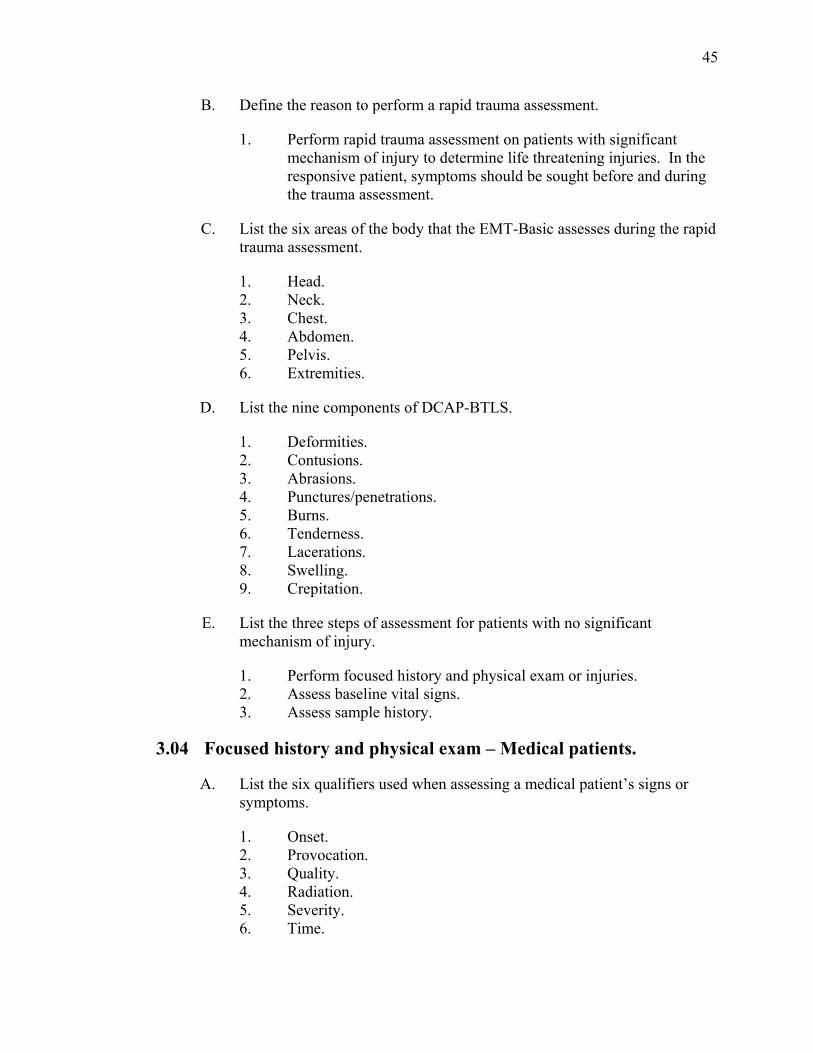
B. Define the reason to perform a rapid trauma assessment.
1. Perform rapid trauma assessment on patients with significant mechanism of injury to determine life threatening injuries. In the responsive patient, symptoms should be sought before and during the trauma assessment.
C. List the six areas of the body that the EMT-Basic assesses during the rapid trauma assessment.
1. Head. 2. Neck. 3. Chest. 4. Abdomen. 5. Pelvis. 6. Extremities.
D. List the nine components of DCAP-BTLS.
1. Deformities. 2. Contusions. 3. Abrasions. 4. Punctures/penetrations. 5. Burns. 6. Tenderness. 7. Lacerations. 8. Swelling. 9. Crepitation.
E. List the three steps of assessment for patients with no significant mechanism of injury.
1. Perform focused history and physical exam or injuries. 2. Assess baseline vital signs. 3. Assess sample history.
3.04 Focused history and physical exam – Medical patients.
A. List the six qualifiers used when assessing a medical patient’s signs or symptoms.
1. Onset. 2. Provocation. 3. Quality. 4. Radiation. 5. Severity. 6. Time.

46
B. List the four steps when assessing an unresponsive medical patient.
1. Perform rapid assessment. 2. Assess baseline vital signs. 3. Position patient to protect airway. 4. Obtain sample history from bystanders, family and friends prior to
leaving.
3.05 Detailed physical exam.
A. Identify the 12 areas of the body where the EMT-Basic assesses during the detailed physical exam.
1. Head. 2. Face. 3. Ears. 4. Eyes. 5. Nose. 6. Mouth. 7. Neck. 8. Chest. 9. Abdomen. 10. Pelvis. 11. Four extremities. 12. Posterior.
B. List the eight signs and symptoms assessed for doing the detailed physical exam.
1. Deformities. 2. Contusions. 3. Abrasions. 4. Punctures/penetrations. 5. Burns. 6. Tenderness. 7. Lacerations. 8. Swelling.
3.06 Ongoing assessment.
A. List the four steps of the on-going assessment.
1. Repeat vital assessment. 2. Reassess and record vital signs. 3. Repeat focused assessment regarding patient complaint or injuries. 4. Check interventions.

47
B. List the six steps of repeating the initial assessment.
1. Reassess mental status. 2. Maintain open airway. 3. Monitor breathing for rate and quality. 4. Reassess pulse for rate and quality. 5. Monitor skin color and temperature. 6. Re-establish patient priorities.
3.07 Communications.
A. List the six components of a communication system.
1. Base station. 2. Mobile two-way radios. 3. Portable radios. 4. Repeater/base station. 5. Digital radio equipment. 6. Cellular telephones.
B. List the 11 elements of a verbal report given to medical direction or the receiving facility.
1. Identify unit and level of provider (who and what). 2. Estimated time of arrival. 3. Patient’s age and sex. 4. Chief complaint. 5. Brief, pertinent history of the present illness. 6. Major past illness. 7. Mental status. 8. Baseline vital signs. 9. Pertinent findings of the physical exam. 10. Emergency medical care given. 11. Response to emergency medical care.
C. List the four elements in the verbal report given to the staff after arrival at the hospital.
1. Chief complaint. 2. History that was not given previously. 3. Additional treatment given en route. 4. Additional vital signs taken en route.
D. Identify the 10 guidelines to interpersonal communications.
1. Make and keep eye contact with patient. 2. When practical, position yourself as a level lower than the patient. 3. Be honest with the patient.

48
4. Use language the patient can understand. 5. Be aware of your own body language. 6. Speak clearly, slowly and distinctly. 7. Use the patient’s proper name, either first or last, depending on the
circumstances. Ask the patient what he wishes to be called. 8. If a patient has difficulty hearing, speak clearly with lips visible. 9. Allow the patient enough time to answer a question before asking
the next one. 10. Act and speak in a calm, confident manner.
3.08 Documentation.
A. List the six components of the minimum data set used for administrations purposes.
1. Time incident reported. 2. Time unit notified. 3. Time of arrival at patient. 4. Time unit left scene. 5. Time of arrival at destination. 6. Time of transfer of care.
B. List the six functions of the pre-hospital care report.
1. Continuity of care. 2. Legal document. 3. Educational. 4. Administrative. 5. Research. 6. Evaluation.
C. List the five sections of the pre-hospital care report.
1. Run data (date, times, service, unit, names of crew). 2. Patient data. 3. Check boxes. 4. Narrative section. 5. Other state or local requirements.
D. List three examples of who the EMT-Basic may have sign a patient refusal form as a witness.
1. Family member. 2. Police officer. 3. Bystander.

49
E. Define a special situation report.
1. Used to document events that should be reported to local authorities, or to amplify and supplement primary report.

50
4.0 Medical/Behavioral and Obstetrics/Gynecology
I. Number of tasks to master = 456
II. Intended Outcome: Given the information in this module about medical/behavioral and obstetrics/gynecology, the student will perform the following tasks with 85% accuracy on the didactic exam.
III. Tasks:
4.01 General Pharmacology.
A. List the four medications carried on the EMT unit in Idaho.
1. Oxygen. 2. Activated charcoal. 3. Oral glucose. 4. Syrup of ipecac.
B. List three the medications that are patient prescribed and may be assisted by the EMT-Basic.
1. Prescribe inhaler. 2. Nitroglycerin. 3. Epinephrine.
C. Define the term “generic.”
1. A government publication listing all drugs in the U.S. The name assigned to a drug before it becomes officially listed. Usually a simple form of the chemical name.
D. Define the term “trade” name.
1. The name a manufacturer uses in marketing a drug.
E. Define drug “indications.”
1. Situations in which a drug should not be used because it may cause harm to the patient or offer no effect in improving the patient’s condition or illness.
F. Define drug “contradictions.”
1. Situations in which a drug should not be used because it may cause harm to the patient or offer no effect in improving the patient’s condition or illness.

51
G. List the five medication forms that the EMT-Basic will administer or help administer.
1. Compressed powders or tablets. 2. Liquids for injection. 3. Gels. 4. Suspensions. 5. Fine powder or inhalation.
H. Define “dose.”
1. How much of a drug should be given.
I. Define “administration” of a drug.
1. The route by which the medication is administered such as oral, sublingual, injectable, or intramuscular.
J. Define “actions” of a drug.
1. The desired effects a drug has on a patient and on his body systems.
K. Define “side effects” of the drug.
1. Any actions of a drug other than those desired. Some may be predictable.
4.02 Respiratory emergencies.
A. List the 10 structures of the respiratory system.
1. Nose. 2. Mouth. 3. Pharynx. 4. Epiglottis. 5. Trachea. 6. Cricoid cartilage. 7. Larynx. 8. Bronchi. 9. Lungs. 10. Diaphragm.
B. Define the normal adult breathing rate.
1. 12-20/minute.

52
C. Define the normal child breathing rate.
1. 15-30/minute.
D. Define the normal infant breathing rate.
1. 25-50/minute.
E. List the four characteristics of breathing.
1. Rate. 2. Rhythm. 3. Quality. 4. Depth.
F. Explain the three indications that the EMT-Basic is adequately ventilating a patient.
1. The chest rises and falls with teach artificial ventilation. 2. The rate is sufficient, approximately 12 per minute for adults and
20 times per minute for children and infants. 3. Heart rate returns to normal with successful artificial ventilation.
G. List 15 signs and symptoms of breathing difficulty.
1. Shortness of breath. 2. Restlessness. 3. Increased pulse rate. 4. Increased breathing rate. 5. Decreased breathing rate. 6. Skin color changes. 7. Noisy breathing. 8. Inability to speak due to breathing efforts. 9. Retractions—use of accessory muscles. 10. Shallow or slow breathing may lead to altered mental status. 11. Abdominal breathing. 12. Coughing. 13. Irregular breathing rhythm. 14. Patient position. 15. Unusual anatomy.

53
H. List five signs of noisy breathing.
1. Crowing. 2. Audible wheezing. 3. Gurgling. 4. Snoring. 5. Stridor.
I. Explain the seven important questions to ask in the focused history and physical exam.
1. Onset. 2. Provocation. 3. Quality. 4. Radiation. 5. Severity. 6. Time. 7. Interventions.
J. Give three examples of generic names used in the prescribed inhaler.
1. Albuterol. 2. Isoetharine. 3. Metaproteranol.
K. Give six examples of trade names used in prescribed inhalers.
1. Proventil. 2. Ventolin. 3. Bronkosol. 4. Bronkometer. 5. Alupent. 6. Metaprel.
L. List three indications for use of the prescribed inhaler.
1. Exhibits signs and symptoms of respiratory emergency. 2. Has physician prescribed handheld inhaler. 3. Specific authorization by medical direction.
M. List four contradictions for use of the prescribed inhaler.
1. Inability of patient to use device. 2. Inhaler is not prescribed for the patient. 3. No permission from medical direction. 4. Patient has already met maximum prescribed dose prior to EMT-
Basic arrival.

54
N. Define the action of the prescribed inhaler.
1. Dilates bronchioles reducing airway resistance.
O. List the three side effects of the prescribed inhaler.
1. Increased pulse rate. 2. Tremors. 3. Nervousness.
P. List the five special considerations for use of the inhaler with infants and children.
1. Use of handheld inhalers is very common in children. 2. Retractions are more commonly seen in children than adults. 3. Cyanosis is a late finding in children. 4. Very frequent coughing may be present rather than wheezing in
some children. 5. Emergency care with usage of handheld inhalers is the same if the
indications for usage of inhalers are met by the ill child.
4.03 Cardiovascular Emergencies.
A. List the two structures of the heart.
1. Atrium. 2. Ventricle.
B. List the 9 major arteries.
1. Coronary arteries. 2. Aorta. 3. Pulmonary. 4. Carotid. 5. Femoral. 6. Radial. 7. Brachial. 8. Posterior tibial. 9. Dorsalis pedis.
C. Define pulse.
1. Left ventricle contracts sending a wave of blood through the arteries. It can be palpated anywhere an artery simultaneously passes near the skin’s surface and over a bone.

55
D. List the four places to take a peripheral pulse.
1. Radial. 2. Brachial. 3. Posterior tibial. 4. Dorsalis pedis.
E. List the nine signs and symptoms of cardiac compromise.
1. Squeezing, dull pressure, chest pain commonly radiating down the arms or to the jaw.
2. Sudden onset of sweating. 3. Difficulty breathing. 4. Anxiety, irritability. 5. Feeling of impending doom. 6. Abnormal pulse rate. 7. Abnormal blood pressure. 8. Epigastric pain. 9. Nausea/vomiting.
F. List the four chains of the American Heart Association’s chain of survival.
1. Early access. 2. Early CPR. 3. Early defibrillation. 4. Early ACLS.
G. List the two types of automated external defibrillators.
1. Fully automated. 2. Semi-automated.
H. List four advantages of AED’s.
1. Initial training and continuing education. 2. Speed of operation. 3. Remote defibrillation through adhesive pads. 4. Rhythm monitoring.

56
I. List the seven operational steps when using an automated external defibrillator as a single rescuer.
1. Perform initial assessment. 2. Assure pulselessness, apnea. 3. Turn on AED power. 4. Attach device. 5. Initiate analysis of rhythm. 6. Deliver shock if necessary. 7. Follow protocol.
J. List four special considerations when using an AED.
1. Water. 2. Metal. 3. Transdermal medication patches. 4. Pacemakers or implanted defibrillators.
K. List three indications for use of nitroglycerin.
1. Exhibits signs and symptoms of chest pain. 2. Has physician prescribed sublingual tablets. 3. Has specific authorization by medical direction.
L. List three contraindications for using nitroglycerin.
1. Hypotension or blood pressure below 100 mmHg systolic. 2. Head injury. 3. Infants and children.
M. List the 12 steps of administration of nitroglycerin.
1. Obtain order from medical direction either on-line or off-line. 2. Perform focused assessment for cardiac patient. 3. Take blood pressure. 4. Contact medical control if no standing orders. 5. Assure right medication, right patient, right route, patient alert. 6. Check expiration date of nitroglycerin. 7. Question patient on last dose administration, effects, and assures
understanding of route of administration. 8. Ask patient to lift tongue and place tablet or spray dose under
tongue. 9. Have patient keep mouth closed with tablet under tongue until
dissolved and absorbed. 10. Recheck blood pressure within two minutes. 11. Record activity and time. 12. Perform reassessment.

57
N. List three side effects of nitroglycerin.
1. Hypotension. 2. Headache. 3. Pulse rate changes.
4.04 Diabetes/Altered Mental Status
A. List the 10 signs and symptoms associated with a patient with altered mental status and a history of diabetes.
1. Rapid onset of altered mental status. 2. Intoxicated appearance. 3. Elevated heart rate. 4. Cold, clammy skin. 5. Hunger. 6. Seizures. 7. Insulin in refrigerator. 8. Uncommon behavior. 9. Anxious. 10. Combative.
B. List five steps of emergency care for seizures.
1. Assure patency of airway. 2. Position patient on side if no possibility of cervical spine trauma. 3. Have suction ready. 4. If cyanotic, assure airway and artificially ventilate. 5. Transport.
C. List seven causes of altered mental status.
1. Hypoglycemia. 2. Poisoning. 3. Post seizure. 4. Infection. 5. Head trauma. 6. Decreased oxygen levels. 7. Alcohol/drugs.

58
D. List the seven steps of emergency care for altered mental status with a history of diabetes.
1. Perform initial assessment. 2. Perform focused history and physical exam. 3. Performs baseline vital signs and SAMPLE history. 4. Assure known history of diabetes. 5. Determine last meal, last medication dose, and related illness. 6. Determine if patient can swallow. 7. Administer oral glucose in accordance with local or state medical
direction or protocol.
E. Identify two contraindications for oral glucose.
1. Unresponsive. 2. Unable to swallow.
F. List the five steps of administration of oral glucose.
1. Obtain order from medical direction either on-line or off-line. 2. Assure signs and symptoms of altered mental status with a known
history of diabetes. 3. Assure patient is conscious and can swallow and protect their
airway. 4. Administer glucose. 5. Perform ongoing assessment.
4.05 Allergies
A. Define allergic reactions.
1. An exaggerated immune response to any substance.
B. List five assessment findings of the skin for allergic reactions.
1. Patient may state he has a warm tingling feeling in the face, chest, feet, and hands.
2. Itching. 3. Hives. 4. Red skin (flushing). 5. Swelling to face, hands, feet and/or tongue.
C. List eight assessment findings of the respiratory system for allergic reactions.
1. Patient may state he feels tightness in his throat/chest. 2. Cough.

59
3. Rapid breathing. 4. Labored breathing. 5. Noisy breathing. 6. Hoarseness (losing the voice). 7. Stridor. 8. Wheezing (audible without stethoscope).
D. List two cardiac assessment findings for allergic reactions.
1. Increased heart rate. 2. Decreased blood pressure.
E. List the 10 steps of emergency care for a patient suffering from an allergic reaction.
1. Perform initial assessment. 2. Perform focused history and physical exam. 3. Assess baseline vital signs. 4. Obtain SAMPLE history. 5. Administer oxygen if not already done. 6. Determine if patient has prescribed preloaded epinephrine
available. Facilitate administration of preloaded epinephrine. 7. Contact medical direction. 8. Record and reassess in two minutes. 9. Record reassessment findings. 10. If patient does not have epinephrine auto-injector available,
transport immediately.
F. List three indications for use with the epinephrine auto-injector.
1. Emergency medical care for the treatment of the patient exhibiting the assessment findings of an allergic reaction.
2. Medication is prescribed for this patient by a physician. 3. Medical direction authorizes use for this patient.
G. List the eight steps of administration of the epinephrine auto-injector.
1. Obtain order from medical direction either on-line or off-line. 2. Obtain patient’s prescribed auto-injector. 3. Remove safety cap from the auto-injector. 4. Place tip of auto-injector against the patient’s thigh. 5. Push the injector firmly against the thigh until the injector
activates. 6. Hold the injector in place until the medication is injected. 7. Record activity and time. 8. Dispose of injector in biohazard container.

60
H. List the eight side effects of epinephrine.
1. Increases heart rate. 2. Pallor. 3. Dizziness. 4. Chest pain. 5. Headache. 6. Nausea. 7. Vomiting. 8. Excitability, anxiousness.
4.06 Poisoning/Overdose
A. List the four routes of poisons into the body.
1. Ingested. 2. Inhaled. 3. Injection. 4. Absorbed.
B. List four examples of trade names for activated charcoal.
1. SuperChar. 2. InstaChar. 3. Actidose. 4. LiquiChar
C. List the six steps of administering activated charcoal.
1. Obtain order from medical direction either on-line or off-line. 2. Container must be shaken thoroughly. 3. Since medication looks like mud, patient may need to be persuaded
to drink it. 4. A covered container and a straw may improve patient compliance
since the patient cannot see the medical this way. 5. If the patient takes a long time to drink the medication, the
charcoal will settle and will need to be shaken or stirred again. 6. Record activity and time.
D. List three contraindications for activated charcoal.
1. Altered mental status. 2. Ingestion of acids or alkalis. 3. Unable to swallow.

61
E. List the two side effects of activated charcoal.
1. Black stools. 2. Vomiting.
4.07 Environmental Emergencies.
A. List the five ways a patient loses heat.
1. Radiation. 2. Convection. 3. Conduction. 4. Evaporation. 5. Breathing.
B. List the four pre-disposing factors for generalized hypothermia.
1. Cold environment. 2. Age. 3. Medical conditions. 4. Drugs/poisons.
C. List the 13 signs and symptoms of hypothermia.
1. Environmental conditions of cold exposure. 2. Cool/cold skin temperature. 3. Decreasing mental status or motor function. 4. Stiff or rigid posture. 5. Muscular rigidity. 6. Shivering may be present or absent. 7. Breathing variations. 8. Slowly responding pupils. 9. Pulse—rapid or slow. 10. Low to absent blood pressure. 11. Poor judgment. 12. Complaints of joint/muscle stiffness. 13. Skin: Red, pale, cyanotic, or hard.
D. List the four signs and symptoms of early on superficial local cold injury.
1. Blanching of the skin. 2. Loss of feeling and sensation in the injured area. 3. Skin remains soft. 4. If rewarmed, ti ngling sensation.

62
E. List five signs and symptoms of late deep local cold injury.
1. White, waxy skin. 2. Firm to frozen feeling upon palpation. 3. Swelling may be present. 4. Blisters may be present. 5. If thawed or partially thawed, the skin may appear flushed with
areas of purple and blanching or mottled and cyanotic.
F. List five predisposing factors for heat related injuries.
1. Climate. 2. Exercise and activity. 3. Age. 4. Pre-existing illness and/or conditions. 5. Drugs/medications.
G. List six signs and symptoms of heat exposure.
1. Muscular cramps. 2. Weakness or exhaustion. 3. Dizziness or faintness. 4. Skin—moist, pale, or hot and dry. 5. Rapid heart rate. 6. Altered mental status to unresponsive.
H. List seven steps of emergency care for patient with moist, pale, or normal to cool temperature skin.
1. Remove the patient from the hot environment and place in a cool environment.
2. Administer oxygen if not already done during the initial assessment.
3. Loosen or remove clothing. 4. Cool patient by fanning. 5. Put in supine position with legs elevated. 6. If patient is responsive and is not nauseated, have the patient drink
water. 7. If the patient is unresponsive or is vomiting, transport to the
hospital with patient on his left side.
I. List five steps of emergency care for near drowning or drowning victims.
1. In-line immobilization and removal from water with backboard if spine injury is suspected and patient is responsive.
2. If there is not suspected spine injury, place patient on left side to allow water, vomitus and secretions to drain from upper airway.

63
3. Suction as needed. 4. Administer oxygen if not already done during the initial
assessment. 5. If gastric distention interferes with artificial ventilation, the patient
should be placed on his left side. With suction immediately available, the EMT-Basic should place his/her hand over the epigastric area of the abdomen and apply firm pressure to relieve the distention. This procedure should only be done if the gastric distension interferes with the ability of the EMT-Basic to artificially ventilate the patient effectively.
J. List seven steps of emergency care for a patient with hot, dry or moist skin.
1. Remove the patient from the hot environment and place in a cool environment.
2. Remove clothing. 3. Administer oxygen if not already done during the initial
assessment. 4. Apply cool packs to neck, groin and armpits. 5. Keep the skin wet by applying water by sponge or wet towels. 6. Fan aggressively. 7. Transport immediately.
K. List the 12 signs and symptoms of bites or stings.
1. History of bite or sting. 2. Pain. 3. Redness. 4. Swelling. 5. Weakness. 6. Dizziness. 7. Chills. 8. Fever. 9. Nausea. 10. Vomiting. 11. Bite marks. 12. Stinger.

64
L. List the seven steps of emergency care for bites and stings.
1. If stinger present, remove it. 2. Wash area gently. 3. Remove jewelry from injured area before swelling begins, if
possible. 4. Place injection site slightly below the level of the patient’s heart. 5. Do not apply cold to snakebites. 6. Consult medical direction regarding constricting band for
snakebite. 7. Observe for development of signs and symptoms of an allergic
reaction; treat as needed.
4.08 Behavioral emergencies
A. List the eight general factors that may alter a patient’s behavior.
1. Low blood sugar. 2. Lack of oxygen. 3. Inadequate blood flow to the brain. 4. Head trauma. 5. Mind altering substances. 6. Psychogenic. 7. Excessive cold. 8. Excessive heat.
B. List five psychologic crises.
1. Panic. 2. Agitation. 3. Bizarre thinking and behavior. 4. Danger to self. 5. Danger to others.
C. List seven risk factors for suicide.
1. Individuals over 40, single, widowed or divorced, alcoholic, depressed.
2. A defined lethal plan of action which has been verbalized. 3. Unusual gathering of articles which can cause death such as
purchase of gun, large volumes of pills, etc. 4. Previous history of self-destructive behavior. 5. Recent diagnosis of serious illness. 6. Recent loss of significant loved one. 7. Arrest, imprisonment, loss of job.
65
D. List five steps of emergency care for patients at risk of suicide.
1. Scene size-up, personal safety. 2. Patient assessment. 3. Calm the patient-do not leave patient alone. 4. Restrain if necessary. 5. Transport.
E. List the seven procedures for assessing behavioral emergency patients.
1. Identify yourself and let the person know you are there to help. 2. Inform him of what you are doing. 3. Ask questions in a calm, reassuring voice. 4. Allow the patient to tell what happened without being judgmental. 5. Show you are listening by rephrasing or repeating part of what is
said. 6. Acknowledge the patient’s feelings. 7. Assess the patient’s mental status.
F. List the five steps of assessing a potential violent victim.
1. Scene size-up. 2. History. 3. Posture. 4. Vocal activity. 5. Physical activity.
G. List 14 methods to calm behavioral emergency patients.
1. Acknowledge that the person seems upset and restate that you are there to help.
2. Inform him of what you are doing. 3. Ask questions in a calm, reassuring voice. 4. Maintain a comfortable distance. 5. Encourage the patient to state what is troubling him. 6. Do not make quick moves. 7. Respond honestly to patient’s questions. 8. Do not threaten, challenge or argue with disturbed patients. 9. Tell the truth; do not lie to the patient. 10. DO not “play along” with visual or auditory disturbances of the
patient. 11. Involve trusted family members or friends. 12. Be prepared to stay at scene for a long time. Always remain with
the patient. 13. Avoid unnecessary physical contact. Call additional help if
needed. 14. Use good eye contact.

66
H. List the 14 considerations when restraints must be used.
1. Be sure to have adequate help. 2. Plan your activities. 3. Use only the force necessary for restraint. 4. Estimate range of motion of patient’s arms and legs and stay
beyond range until ready. 5. Once decision has been made—act quickly. 6. Have one EMT-Basic talk to patient throughout restraining. 7. Approach with four persons, one assigned to each limb all at the
same time. 8. Secure limbs together with equipment approved by medical
direction. 9. Turn patient face down on stretcher. 10. Secure to stretcher with multiple straps. 11. Cover face with surgical mask if spitting on EMT-Basics. 12. Reassess circulation frequently. 13. Document indication for restraining patients and technique of
restraint. 14. Avoid unnecessary force.
4.09 Obstetrics/Gynecology
A. Define “fetus”.
1. Developing unborn baby.
B. Define “uterus”
1. Organ in which a fetus grows, responsible for labor and expulsion of infant.
C. Define “birth canal”
1. Vagina and lower part of the uterus.
D. Define “placenta”
1. Fetal organ through which fetus exchanges nourishment and waste products during pregnancy.
E. Define “umbilical cord”
1. A cord which is an extension of the placenta through which fetus receives nourishment while in the uterus.

67
F. Define “amniotic sac”
1. The sac that surrounds the fetus inside the uterus.
G. Define “vagina”.
1. Lower part of the birth canal.
H. Define “perineum”
1. Skin area between vagina and anus, commonly torn during delivery.
I. Define “crowning”
1. The bulging out of the vagina which is opening as the fetus’ head or presenting part presses against it.
J. Define “bloody show”
1. Mucus and blood that may come out of the vagina as labor begins.
K. Define “labor”
1. The time and process beginning with the first uterine muscle contraction until delivery of the placenta.
L. Define the “presenting part”
1. The part of the infant/fetus that comes first, usually they head.
M. Define “abortion/miscarriage”
1. Delivery of products of conception early in pregnancy.
N. List the 10 contents of a childbirth delivery kit.
1. Surgical scissors. 2. Hemostats or cord clamps. 3. Umbilical tape or sterilized cord. 4. Bulb syringe. 5. Towels. 6. 10 gauze sponges. 7. Sterile gloves. 8. One baby blanket. 9. Sanitary napkins. 10. Plastic bag.

68
O. List the four pre-delivery emergencies.
1. Miscarriage. 2. Seizure during pregnancy. 3. Vaginal bleeding. 4. Trauma.
P. List the 19 steps of a normal delivery.
1. Apply gloves, mask, gown, and eye protection for infection control precautions.
2. Have mother lie with knees drawn up and spread apart. 3. Elevate buttocks with blankets or pillow. 4. Create sterile field around vaginal opening with sterile towels or
paper barriers. 5. When the infant’s head appears during crowning, place fingers on
bony part of skull and exert very gentle pressure to prevent explosive delivery. Use caution to avoid fontanelle.
6. If the amniotic sac does not break, or has not broken, use a clamp to puncture the sac and push it away from the infant’s head and mouth as they appear.
7. As the infant’s head is being born, determine if the umbilical cord is around the infant’s neck; slip over the shoulder or clamp, cut and unwrap.
8. After the infant’s head is born, support the head, suction the mouth two or three times and the nostrils. Use caution to avoid contact with the back of the mouth.
9. As the torso and full body are born, support the infant with both hands.
10. As the feet are born, grasp the feet. 11. Wipe blood and mucus from mouth and nose with sterile gauze,
suction mouth and nose again. 12. Wrap infant in a warm blanket and place on its side, head slightly
lower than trunk. 13. Keep infant level with vagina until the umbilical cord is cut. 14. Assign partner to monitor infant and complete initial care of the
newborn. 15. Clamp, tie and cut umbilical cord (between the clamps) as
pulsations cease approximately 4 fingers width from infant. 16. Observe for delivery of placenta while preparing mother and infant
for transport. 17. When delivered, wrap placenta in towel and put in plastic bag;
transport placenta to hospital with mother. 18. Place sterile pad over vaginal opening, lower mother’s legs, help
her hold them together. 19. Record time of delivery and transport mother, infant and placenta
to hospital.

69
Q. List the six types of abnormal deliveries.
1. Prolapsed cord. 2. Breech birth presentation. 3. Limb presentation. 4. Multiple births. 5. Meconium. 6. Premature.