DeviceOn on Azure Start Guide · 2020-04-15 · either located in a public cloud (ex. MS Azure) or...
24
1 DeviceOn on Azure Start Guide
Transcript of DeviceOn on Azure Start Guide · 2020-04-15 · either located in a public cloud (ex. MS Azure) or...

1
DeviceOn on Azure Start Guide

2
Table of Contents
Create Azure DeviceOn VM ........................................... 3
DeviceOn Server Installation & Device Onboarding ... 10

3
Create Azure DeviceOn VM
Step
1. Enter to Azure Marketplace DeviceOn page
https://azuremarketplace.microsoft.com/en-
us/marketplace/apps/advantech.deviecon_on_windows_vm_v1?tab=Overview
Click “GET IT NOW”
Sign in your account
2. You will enter to Azure portal and please click on “Start with pre-set configuration” to be
quick deployment.

4
3. This page includes our recommended configuration for DeviceOn Server, you can just
click on” Continue to create VM”, following the default setting.
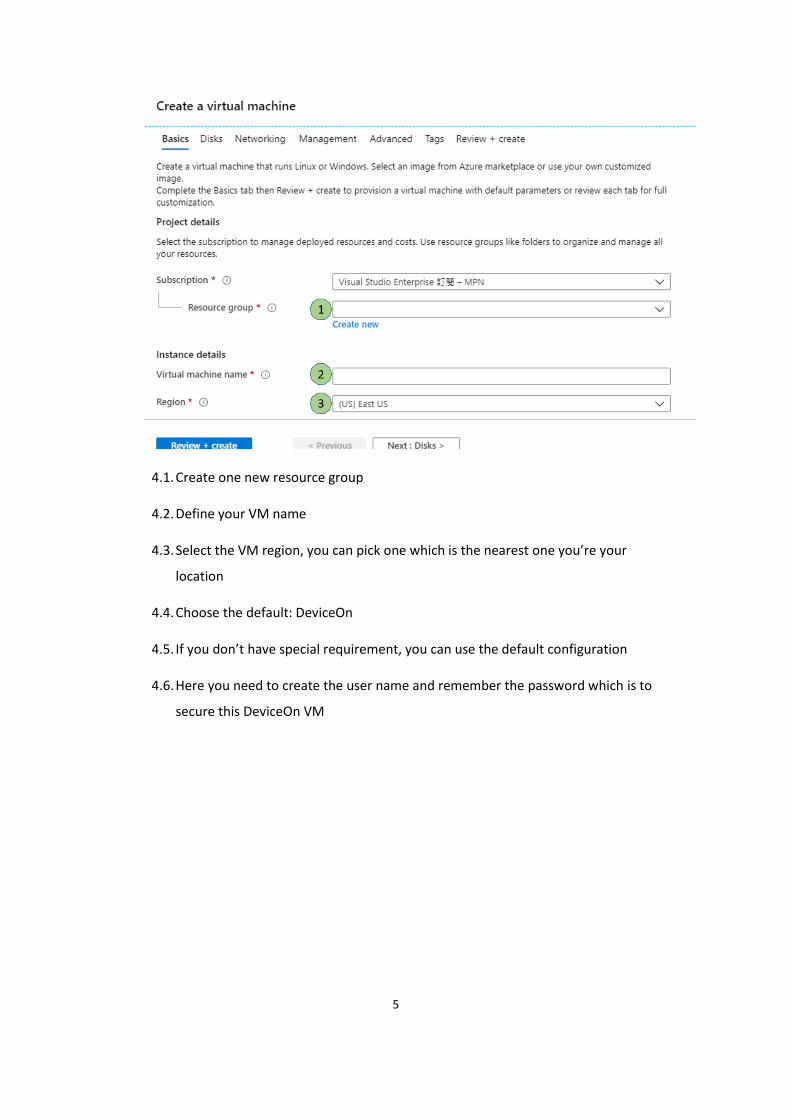
4. In this page, please note that the red star parts info are MUST.
5
4.1. Create one new resource group
4.2. Define your VM name
4.3. Select the VM region, you can pick one which is the nearest one you’re your
location
4.4. Choose the default: DeviceOn
4.5. If you don’t have special requirement, you can use the default configuration
4.6. Here you need to create the user name and remember the password which is to
secure this DeviceOn VM

6
Then click Next to move on.
5. By using the default disk Premium SSD
Then click Next to move on.

7
6. Set the network interface.
6.1. Select the one you just defined in previous grouping or create new
6.2. Select the one you just defined in previous grouping or create new
Then click Next to move on.
7. In this page, you can schedule the power management of VM for reducing the
unnecessary cost
7.1. Auto shut-down schedule (please make sure the time zone is correct)
7.2. Email account

8
Basically, you can click “Review + Create” if you don’t need advanced setting. VM will be
validating and creating within 5 minutes.
8. A few minutes later, you can see below picture that VM has been created.

9
Click “Go to resource” to review more detail.
Next chapter is going to tell you how to start DeviceOn and deploy your target devices.
10
DeviceOn Server Installation & Device Onboarding
Step
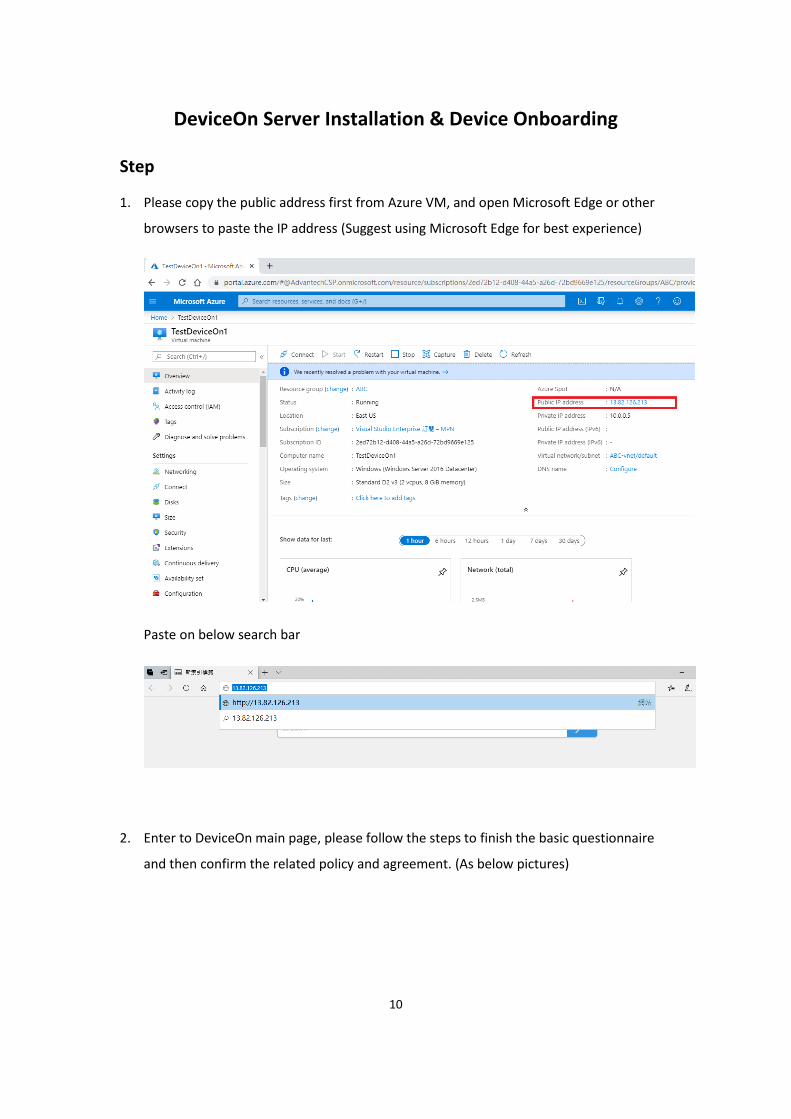
1. Please copy the public address first from Azure VM, and open Microsoft Edge or other
browsers to paste the IP address (Suggest using Microsoft Edge for best experience)
Paste on below search bar
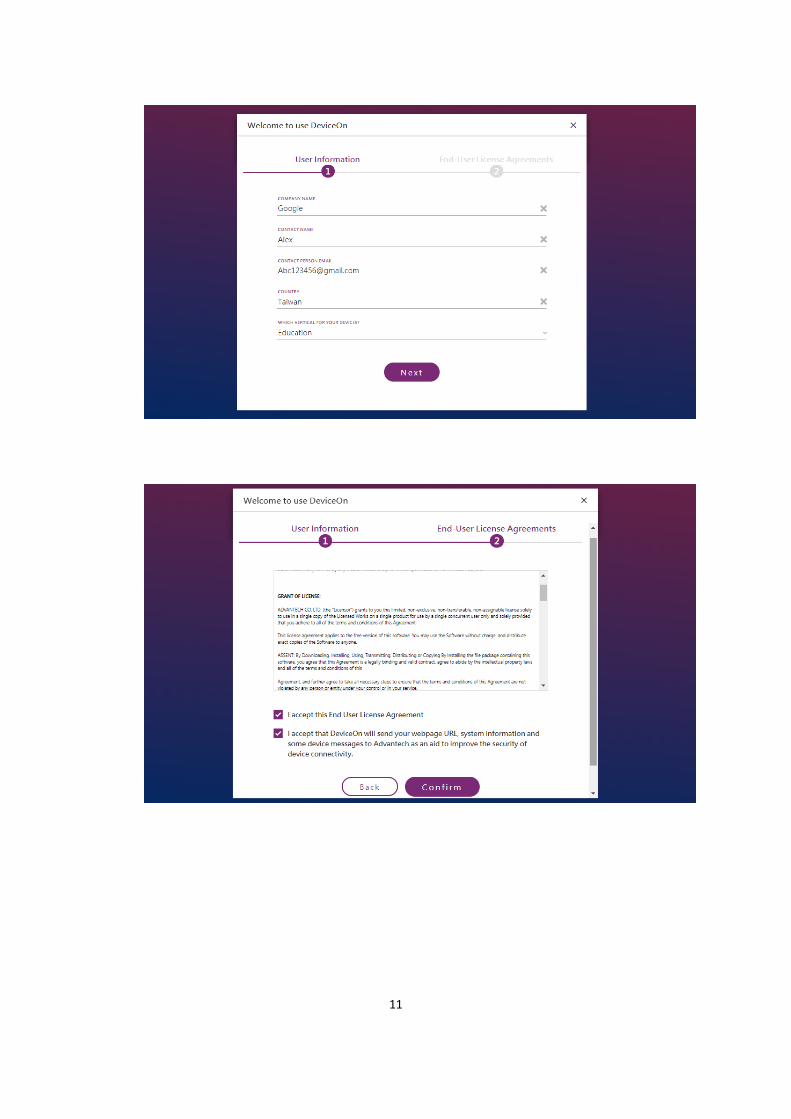
2. Enter to DeviceOn main page, please follow the steps to finish the basic questionnaire
and then confirm the related policy and agreement. (As below pictures)
11
12
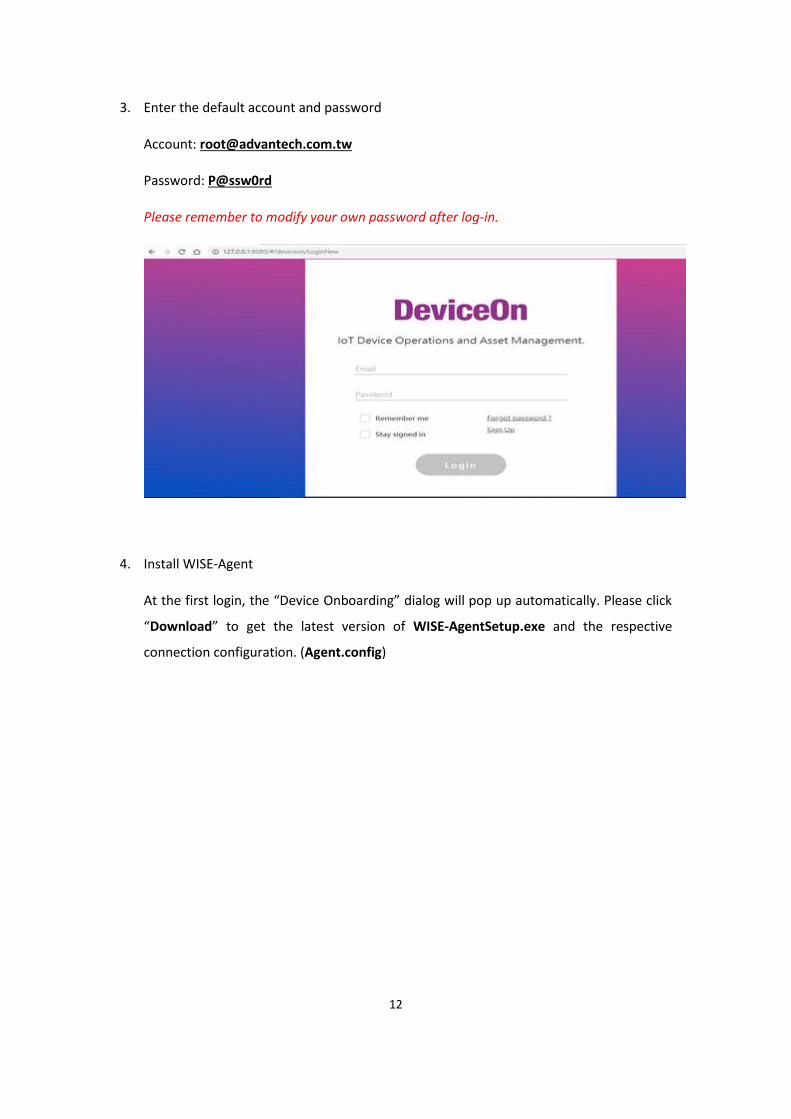
3. Enter the default account and password
Account: [email protected]
Password: P@ssw0rd
Please remember to modify your own password after log-in.
4. Install WISE-Agent
At the first login, the “Device Onboarding” dialog will pop up automatically. Please click
“Download” to get the latest version of WISE-AgentSetup.exe and the respective
connection configuration. (Agent.config)

13
Click “Next” to wait for connecting devices.
And now let’s start to set the device side
5. Set up Your Local Device
Copy those two files (WISE-AgentSetup_1.x.x.exe and Agent.config) to the target device and
launch “WISE-AgentSetup_1.x.x.exe” as administrator. (Suggest you putting this two files in
folder together)

14
Click “Next” to set up the WISE-Agent program.
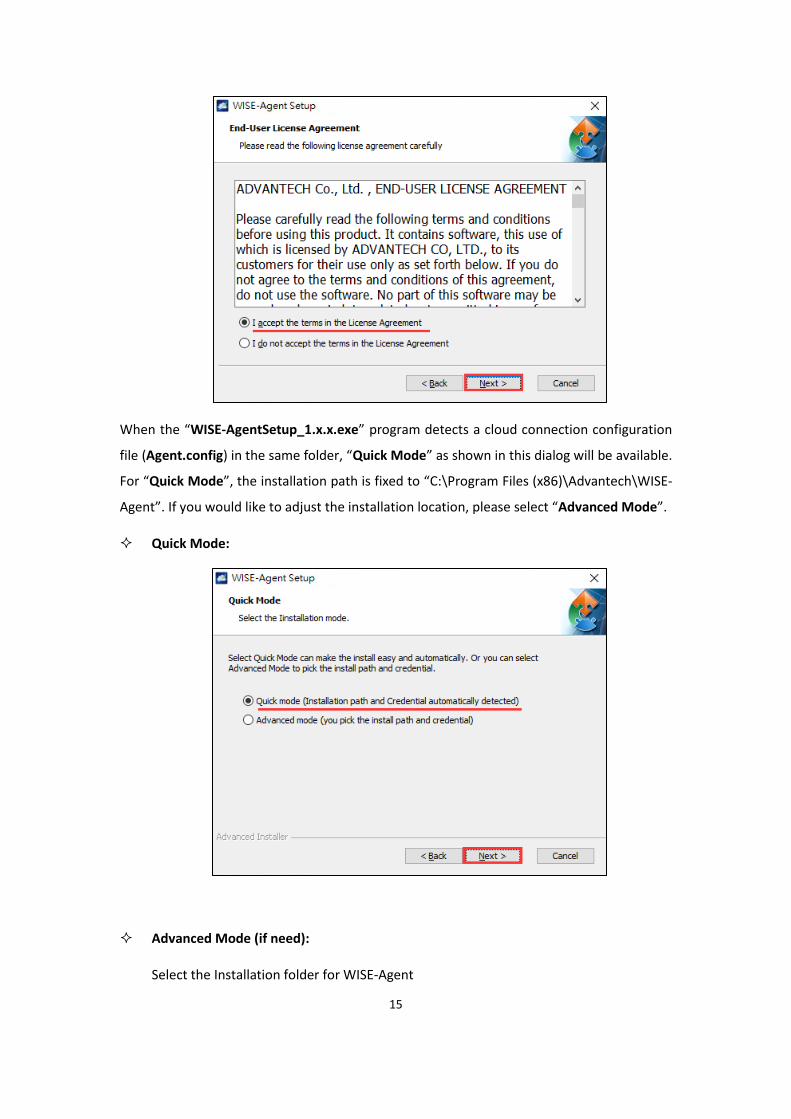
Select “I Accept the terms in the License Agreement” and click “Next”
15
When the “WISE-AgentSetup_1.x.x.exe” program detects a cloud connection configuration
file (Agent.config) in the same folder, “Quick Mode” as shown in this dialog will be available.
For “Quick Mode”, the installation path is fixed to “C:\Program Files (x86)\Advantech\WISE-
Agent”. If you would like to adjust the installation location, please select “Advanced Mode”.
Quick Mode:
Advanced Mode (if need):
Select the Installation folder for WISE-Agent

16
Set up the cloud connection configuration (Credential URL & IoTKey). This information
can be retrieved from the DeviceOn web portal, and click “Next”.
“Zero-touch onboarding”: Only supported on Advantech platforms with SUSI Driver
and pre-configuration on the provisioning server
“Assign to User Account”: Each account has its own connection IoTKey. If checked,
the device will be assigned to this account automatically.
“Enable SSL”: The communication between WISE-Agent and DeviceOn Cloud is
MQTT. If checked (default setting), all the messages and content are SSL encrypted
(MQTT SSL port: 8883). Otherwise, port 1883 is used for MQTT without SSL.

17
WISE-Agent supports remote desktop through built-in UltraVNC. You can manually
specific the location of your own UltraVNC installation if preferred. If you do not want
the remote desktop feature to be available, please select “Disable KVM Connection”.
WISE-Agent integrates Intel AMT (Intel Active Management Technology) for remote
power management (Power Up, Down, Cycle and Reset) as well as remote desktop
access, even in case the operating system has crashed. However, this feature requires
hardware support (Intel Core i5, i7) and the target device needs to be on the same local
network as the DeviceOn server. Please pre-configure iAMT, enable it in the device’s

18
BIOS and provide the account and password information in this dialog if you would like
to enable iAMT based remote control features.
Click “Install” to begin the installation.
WISE-Agent requires the Microsoft Visual C++ Redistributable 2008, 2013, 2015 x86
packages, which will be downloaded from the Internet and set up during the installation
process. If you are in an environment with limited or no Internet access, please download

19
the “Agent Dependency Package” through an Internet connected device and install this
package first.
Click “Finish” to exit the program.
6. Launch WISE-Agent
Click on the “WISE-Agent” icon on the Windows Desktop to open the WISE-Agent user
interface.

20
At the first time login, there is information pop-up like below
As long as you put the configuration file which just downloaded along with WISE-Agent
folder, system will catch the configuration so that you don’t have to modify the
Credential URL and IoTKey manually.

21
Of course, you can click “no” and start to configure the parameter specifically
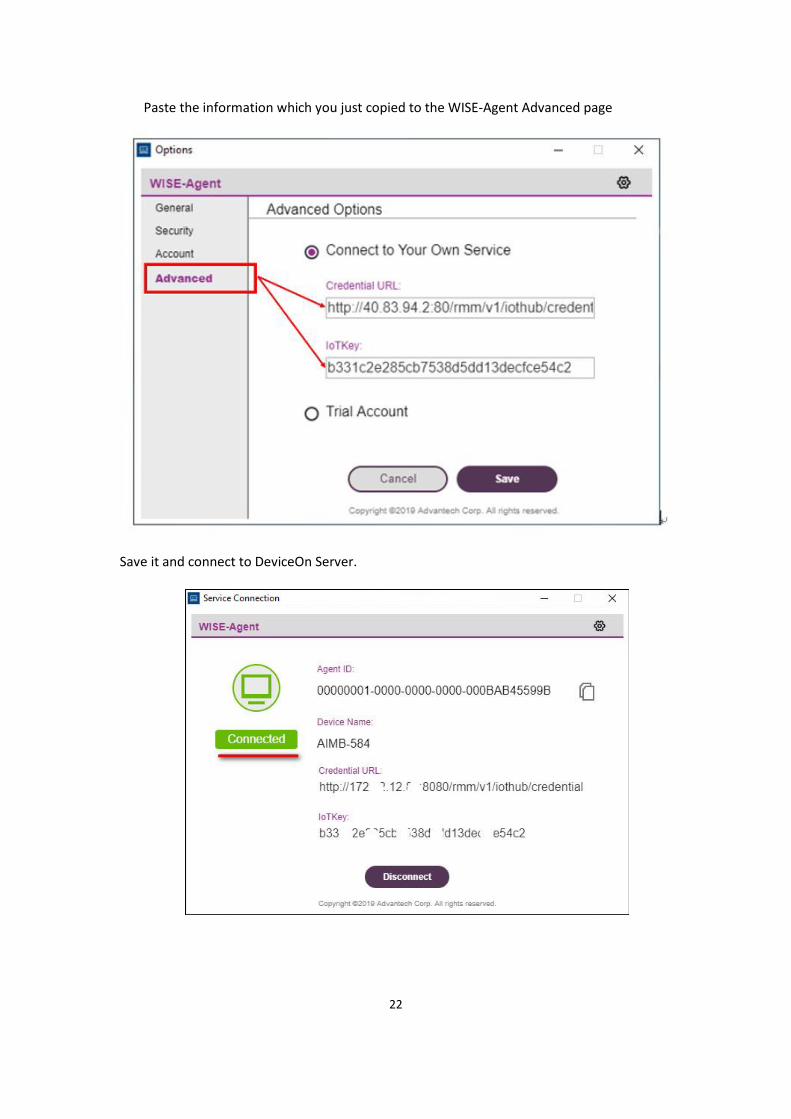
Click on “Options” from WISE-Agent interface, then search for the Credential URL and
IoTKey from DeviceOn server. Copy these two data and go back to WISE-Agent.
22
Paste the information which you just copied to the WISE-Agent Advanced page
Save it and connect to DeviceOn Server.
23
If the status keep showing “Disconnected”, please make sure your network settings are
configured correctly and that you have access to the DeviceOn server-side application,
either located in a public cloud (ex. MS Azure) or on premise (standalone server version)
depending on deployment scenario. Then, please click the “Connect” button to try to
reconnect.
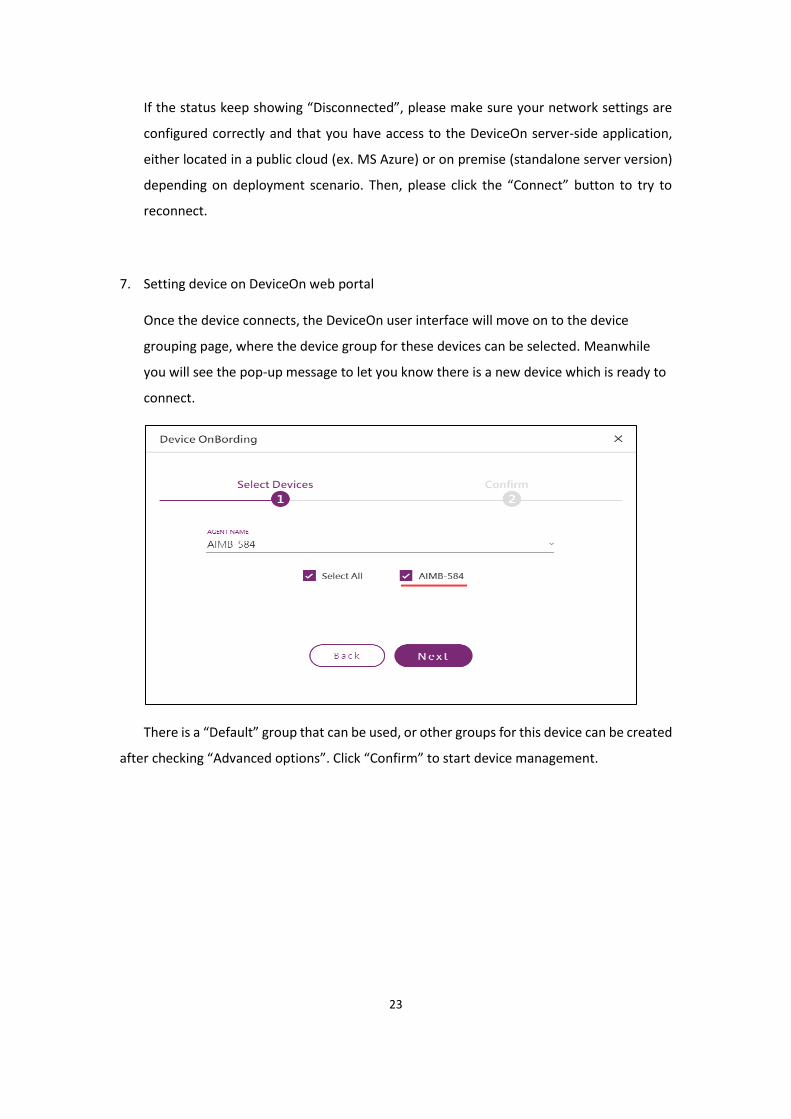
7. Setting device on DeviceOn web portal
Once the device connects, the DeviceOn user interface will move on to the device
grouping page, where the device group for these devices can be selected. Meanwhile
you will see the pop-up message to let you know there is a new device which is ready to
connect.
There is a “Default” group that can be used, or other groups for this device can be created
after checking “Advanced options”. Click “Confirm” to start device management.

24
8. Enjoy the new device online
Click on “Device” to control your device.
9. Copy above steps to add more devices in DeviceOn console.
Useful Link
• Azure Marketplace Link
• On-Premises Download Link
– DeviceOn Server
– WISE-Agent