Developing learners’ skills -...
33
© The Quality Improvement Agency for Lifelong Learning (QIA) 2008 1 Developing learners’ skills Establishing ground rules Introduction Case study activities frequently require learners to work in groups and to explore and consider other people’s viewpoints. Agreeing a shared set of ground rules can: • start learners thinking about how groups operate and what is and what is not acceptable behaviour • act as a team-building exercise • provide a standard by which to judge how well the group and its individual members are operating. Four possible methods of establishing ground rules follow. The learning objectives for each activity are the same. In order explicitly to address the second objective we suggest you spend some time, as part of the introduction or de-briefing, exploring or reinforcing why ground rules are important. Learning objectives For learners to: • establish an agreed set of ground rules for the team • explore the value of having ground rules. Activity 1 Materials required • Flip chart paper. • Flip chart pen. Start from the learners’ previous experiences. 1. Ask the learners to think about the best groups or teams they have been involved in. What happened that made these groups or teams so satisfying? 2. Next, ask the learners to think about the worst groups or teams they have been involved in. What happened that made these so unsatisfactory? 3. For each of the characteristics, ask the learners to suggest up to three things they might do to ensure these characteristics are present or not present, as the case may be. 4. Use the suggestions to draft a set of ground rules which you all agree with.
Transcript of Developing learners’ skills -...

© The Quality Improvement Agency for Lifelong Learning (QIA) 2008 1
Developing learners’ skills Establishing ground rules Introduction Case study activities frequently require learners to work in groups and to explore and consider other people’s viewpoints. Agreeing a shared set of ground rules can: • start learners thinking about how groups operate and what is and what is not
acceptable behaviour • act as a team-building exercise • provide a standard by which to judge how well the group and its individual members
are operating. Four possible methods of establishing ground rules follow. The learning objectives for each activity are the same. In order explicitly to address the second objective we suggest you spend some time, as part of the introduction or de-briefing, exploring or reinforcing why ground rules are important. Learning objectives For learners to: • establish an agreed set of ground rules for the team • explore the value of having ground rules. Activity 1 Materials required • Flip chart paper. • Flip chart pen. Start from the learners’ previous experiences. 1. Ask the learners to think about the best groups or teams they have been involved in.
What happened that made these groups or teams so satisfying? 2. Next, ask the learners to think about the worst groups or teams they have been
involved in. What happened that made these so unsatisfactory? 3. For each of the characteristics, ask the learners to suggest up to three things they
might do to ensure these characteristics are present or not present, as the case may be.
4. Use the suggestions to draft a set of ground rules which you all agree with.

© The Quality Improvement Agency for Lifelong Learning (QIA) 2008 2
Activity 2 Materials required • Sticky notes. • Sheets of flip chart paper. • Sticky putty. • Flip chart pens. Collaboratively writing rules. 1. Invite learners to work in small groups. Each group discusses possible ground rules
and writes them on separate sticky notes. 2. The sticky notes from each group are put onto a large sheet of paper or blank area of
wall. Similar ideas are grouped together. 3. Each group takes one or two of the groups of sticky notes and selects or formulates
suggested wording for ground rules. 4. The suggested final wordings are displayed and discussed until there is a consensus
about the final ground rules. Activity 3 Materials required • Prepared ground rules on slips of paper. • Sheets of flip chart paper. • Sticky putty. • Flip chart pens. Agree or disagree format. 1. Prepare slips of paper with possible ground rules on them. Some are draconian or just
plain silly, others might be ambiguous. 2. Distribute the slips to the group. There should be enough for everyone to have at least
one slip each. 3. Learners take turns to read out a possible ground rule and say whether they agree or
disagree with it and why. The rest of the group can say whether they agree with the person’s decision to accept or reject the rule. The slips are posted up on a large sheet of paper or blank wall under the headings ‘agree’ and ‘disagree’.
4. Once all the slips have been dealt with, invite learners to add any rules they think have been missed out.

© The Quality Improvement Agency for Lifelong Learning (QIA) 2008 3
Activity 4 Materials required • Sheets of flip chart paper. • Sticky putty. • Different coloured flip chart pens. Variation on the agree or disagree format. 1. Learners divide into four groups of four or five. Each group has flip chart paper and a
different coloured pen. 2. Each group brainstorms and notes a set of ground rules on a sheet of flip chart paper. 3. Learners pin up their flip charts and move round to the other flip charts in turn, taking
their flip chart pen with them. 4. Learners discuss the points noted on each of the other groups’ flip charts and put a
tick, cross or question mark against each point to show whether they agree, disagree, or are undecided about it. Learners can add points that occur to them as they circulate. Using different colour pens allows each group’s contribution to be easily identified.
5. Use the annotated flip charts to identify the key points and negotiate an overall set of ground rules.
© The Quality Improvement Agency for Lifelong Learning (QIA) 2008 4
Active listening Introduction Listening skills are essential to any form of group work. By listening to others we show respect for their views and we learn from their contributions. This does not mean we always have to agree with others. It is perfectly acceptable to question or challenge their views but only if we have first listened to and considered what they have to say. Some of these materials and activities have been adapted from resources included in the Teaching and Learning Programme for Subject Learning Coaches (SLCs). Learning objectives For learners to: • consider the value of listening to others • appreciate the impact of poor listening practice • identify good and bad listening practice • practise their listening skills in a range of situations. Links to other activities in the Case study toolkit As part of preparing for case study activities, you may have already worked with the learners to agree a set of ground rules for the group. It is likely that listening to each other is one of those rules. If so, you may want to point out that the activities that follow are to help them practise their listening skills but that their development will not end there. They will be expected to put into practice and further develop their listening skills in all their group activities. Activity 1 Materials required • Green and pink sticky notes. • Pens/ • Checklist of good listening behaviours (optional). • Video clips. In small groups Think about group conversations or discussions you have been part of – with friends, at college, at home or at work. How do you know when someone is really listening and thinking about what you have to say? Note down on green sticky notes any signals you might get from the way they behave.

© The Quality Improvement Agency for Lifelong Learning (QIA) 2008 5
How do you know when someone is not listening? Note down on pink sticky notes any signals you get have from the way they behave. As a whole group Compare findings and group the sticky notes to compile a list of ‘good listening’ behaviours and ‘bad listening’ behaviours. You may want to take the activity a step further by prioritising the good listening behaviours. Alternative or additional activities Show the video clip of Kamala, Louis and Maya. Ask learners to note down all the good listening practices that Louis demonstrates. If they have already completed the earlier task they can compare their initial ideas with their notes on this video clip. Show the video clip of Kamala and Jean. Ask learners to note down all the bad listening practices that Jean demonstrates. If they have already completed the earlier task they can compare their initial ideas with their notes on this video clip. Teacher’s note A suggested list of good listening behaviours is given at the end of this set of activities. You may want to use this when reviewing this activity. The ideas emerging from the bad listening behaviours identified can be used as a link to the next activity. Individual reflection • When you were doing the group task which of the good and bad listening behaviours
did you demonstrate? • Note these down as strengths and areas for development. These are confidential to
you and you do not need to share them but keep them safe as you will be asked to re-visit them later.
Teacher’s notes You can ask learners to re-visit their strengths and areas for development after any of the activities that follow, or at the end of a series of activities. Learners should reflect and identify where they feel they have built on their strengths or improved their practice. You may choose to invite them to share a significant improvement in pairs or with the group. You may want to link this to more formal individual target setting. Developing reflective learners is dealt with in more detail later in this toolkit.

© The Quality Improvement Agency for Lifelong Learning (QIA) 2008 6
Activity 2 Materials required • Six ‘bad listener’ cards. • Three scenario cards (you can add to these as appropriate). The purpose of this activity is to get learners to experience different types of bad listening and to be able to recognise them. Bad listener cards Each of the cards below has a description of a type of bad listener. Not all cards will be appropriate to all groups. You can select from them or add your own. You may want to produce them as a handout too, which can be given out to learners after the activity. After introducing and discussing the different types of bad listener, ask learners to undertake the activity that follows or you can devise your own follow-up activity. The faker All the outward signs of listening are there, nodding, making eye contact, the occasional ‘huh huh’ but the mind is somewhere else.
The interrupter Doesn’t allow the speaker to finish, doesn’t ask clarifying questions, too anxious to have their own say, little concern for the speaker.
The logical listener Always trying to interpret what the speaker is saying and why. Trying to fit the words into a logical box. Not interested in underlying emotion.
The scene stealer Uses the speaker’s words as a way of getting to their message. When the speaker says anything, this person steals the focus. Favourite lines are ‘Oh that’s nothing; I remember when I was …’

© The Quality Improvement Agency for Lifelong Learning (QIA) 2008 7
The arguer Listens only long enough to use the speaker’s words against them. At their worst they are argumentative and out to prove the speaker wrong. They always want to impose their point of view
The advice giver Giving advice is sometimes helpful but at other times it interferes with good listening, doesn’t allow the speaker to articulate their thoughts and can rush to a quick and possibly inappropriate solution.
Scenario cards You arrive at college feeling worried. You have had a bit of a crisis at home and have not been able to complete an assignment that was due for today. You have a reputation with your teachers for being disorganised and not handing work in on time but this time you have a genuine reason. You are quite upset about the family crisis and don’t want the teachers to know all the details. You tell your friend about it.
You are really pleased as you have been asked by your teacher to give a short talk to a group of pupils from local schools who are coming to college to find out about the … course. You are quite shy and are not usually asked to take on this sort of responsibility. You can’t wait to tell your friend about it and to talk through the sorts of things you could say.
You have made an appointment to talk with your teacher or work-based supervisor about your individual learning plan (ILP). You are confident about the work you are doing and pleased with the progress you are making. However, there is one bit that you are stuck on. You are not particularly worried about it and are sure that if you can go back over that one bit you will be fine. You don’t want to give the impression that you are struggling with the whole of the course or to be treated like an idiot.
Put learners in pairs. Give each pair a bad listener card or let each pair choose a card. They should not share this with others. Ask them to prepare a short role play to demonstrate the type of bad listening on the card, with one learner acting as the speaker and the other as the bad listener. To provide a context for the role play, give each pair a scenario card selected from those above or that you have devised, or you can ask learners to invent their own scenarios. Combine pairs into groups of four and ask each pair in turn to act out the role play they have prepared. The other pair has to identify the type of bad listener.
© The Quality Improvement Agency for Lifelong Learning (QIA) 2008 8
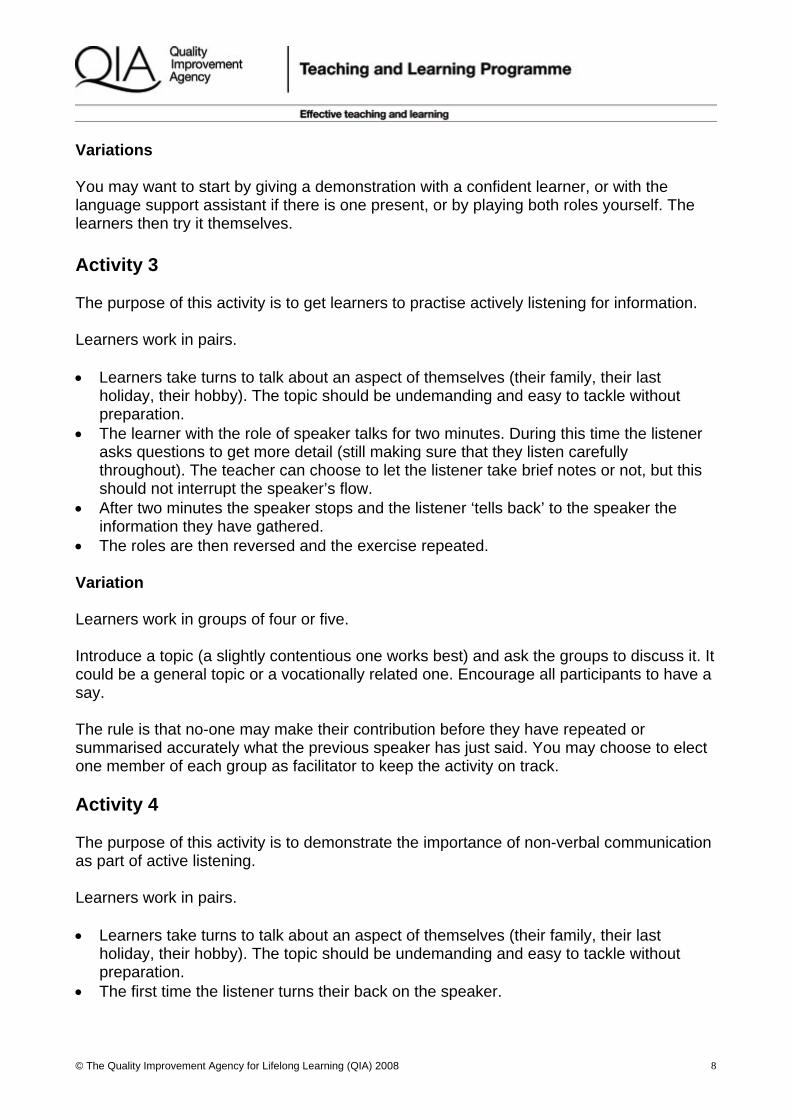
Variations You may want to start by giving a demonstration with a confident learner, or with the language support assistant if there is one present, or by playing both roles yourself. The learners then try it themselves. Activity 3 The purpose of this activity is to get learners to practise actively listening for information. Learners work in pairs. • Learners take turns to talk about an aspect of themselves (their family, their last
holiday, their hobby). The topic should be undemanding and easy to tackle without preparation.
• The learner with the role of speaker talks for two minutes. During this time the listener asks questions to get more detail (still making sure that they listen carefully throughout). The teacher can choose to let the listener take brief notes or not, but this should not interrupt the speaker’s flow.
• After two minutes the speaker stops and the listener ‘tells back’ to the speaker the information they have gathered.
• The roles are then reversed and the exercise repeated. Variation Learners work in groups of four or five. Introduce a topic (a slightly contentious one works best) and ask the groups to discuss it. It could be a general topic or a vocationally related one. Encourage all participants to have a say. The rule is that no-one may make their contribution before they have repeated or summarised accurately what the previous speaker has just said. You may choose to elect one member of each group as facilitator to keep the activity on track. Activity 4 The purpose of this activity is to demonstrate the importance of non-verbal communication as part of active listening. Learners work in pairs. • Learners take turns to talk about an aspect of themselves (their family, their last
holiday, their hobby). The topic should be undemanding and easy to tackle without preparation.
• The first time the listener turns their back on the speaker.

© The Quality Improvement Agency for Lifelong Learning (QIA) 2008 9
• The second time the listener stares into the speaker’s eyes with no expression or movement.
• The learners compare how they felt in the role of speaker. • Learners then take turns to listen ‘normally’, making eye contact, nodding and so on. • The learners discuss how that felt compared with their first experience. Activity 5 Materials required • A work-related scenario devised by the teacher. • Video clip (optional). If you have not already used the video clip of Kamala, Louis and Maya you may want to start by showing this and asking learners to identify the good listening practices that Louis demonstrates. Now do it right and for real! The purpose of this activity is to gain further practice at using ‘good’ listening techniques – this time in a work-related setting. Devise a work-related scenario appropriate to your curriculum line. This could be a small group meeting or a one to one conversation, for example: • a team meeting where you are discussing a proposal to change the duty rota
arrangements • a case conference where you have to make a decision whether to … or … • a colleague has a problem … • a client complains about … Ask learners to participate in a group or one to one discussion. The objective is to demonstrate good listening skills. You could organise this activity in a number of different ways. You could organise a group discussion as a ‘goldfish bowl’ activity, or two or three learners could be appointed as observers. A one to one conversation could include a third person in the role of observer. Roles could rotate. Whichever method you choose, observers could use the following checklist to structure their notes and feedback.

© The Quality Improvement Agency for Lifelong Learning (QIA) 2008 10
Checklist of good listening practice Good listening • Be interested and attentive. Forget about your mobile phone or other distractions. • Maintain eye contact and give non-verbal signals to show that you really are listening
to the person. • Listen patiently. Give the impression you have plenty of time. • Hear the speaker out. Avoid cutting them off before they have finished speaking.
Avoid finishing their sentences. • Encourage talking. Avoid dead-end (closed) questions. Pick up on comments and
ask for more detail. • Respond to what you hear but without taking over or jumping to conclusions. • Check out the message you think you are hearing by re-stating or re-phrasing what
has been said. • Respect the speaker’s right to have and express their opinions. • Listen to nonverbal messages.

© The Quality Improvement Agency for Lifelong Learning (QIA) 2008 11
Developing reflective learners and practice Introduction The resources and activities below are designed to introduce learners to the process of reflection. Learners can begin to see how reflecting on specific incidents can help them improve their learning and performance. Reflection can sometimes be seen as a mechanistic process associated with filling in review sheets or logbooks rather than with the learning that is a result of reflection. . Teachers may want to think about different ways in which they can build reflection into activities so that it is seen as part of the learning process rather than a bolt on. At the end of this section there is a list of prompt questions that can be used to encourage reflection after any activity. The first two activities are suggested as ‘warm-up’ activities to introduce the idea of reflection – why we reflect and how we go about it. Activity 1: Why reflect? Learning objectives For learners to: • understand what is meant by reflection • consider why we reflect. Materials required • Sticky notes. • Flip chart paper. • Pens. Learners work in pairs, then in groups. • Working in pairs, learners discuss why they reflect and note down as many reasons as
they can think of using one sticky note for each reason. • Learners move into groups of four and compare notes, grouping them into common
themes. • Depending on the group size learners can move into groups of eight and repeat the
previous stage. • Learners present their findings (verbally or on flip chart) and the teacher pulls together
key points.

© The Quality Improvement Agency for Lifelong Learning (QIA) 2008 12
Teacher’s notes Before starting this activity it is important to check that learners understand the term ‘reflection’. Give a short explanation or ask the learners to suggest or find out a definition. One of the key messages that should emerge when reviewing learners’ ideas is that reflection is an important part of learning. Activity 2 – How do we reflect? Learning objective • For learners to think about how they reflect. Materials required • Flip chart paper. • Flip chart pens. People reflect in different ways and in different places. Some of us need to focus intently on an experience as soon as it happens, others find it easier to return to it after the event when the pressure is off*. Some people find certain settings help them reflect, such as listening to music or travelling on the train. • Get learners to spend a few minutes thinking about the settings and circumstances in
which they reflect most productively**. • Ask them to share their thoughts with a partner. • Move the learners into groups of four and share again. • Ask the groups to note on a flip chart the range of answers they came up with. Which
were the most and which the least popular? • In plenary, share the flip charts. Teacher’s notes * Reflection-in-action and reflection-on-action could be explored if appropriate to the group. ** The facilitator may want to provide more structure to the activity by prompting learners to think about when they reflect, where or under what circumstances, and how they record their reflections. One of the key messages that should emerge when reviewing learners’ ideas is that there is no right way to reflect. We reflect in many different ways, some formal and some informal, some structured and some unstructured.

© The Quality Improvement Agency for Lifelong Learning (QIA) 2008 13
Possible responses When? • Immediately after a lesson or experience. • At the end of the day. • First thing in the morning. • During the lunch break. • At my review, tutorial or appraisal. • When I’m told to. Where and in what circumstances? • In my room. • In the garden. • In the shower or bath. • In the car, on the train or walking home. • At college or work. • Listening to music. How to record? • On the computer. • In my learning log or ILP. • Using sticky notes. • In my diary. • In my head. Additional activity You may want to show the video clips of learners at South Downs College reflecting on their experiences. One learner has just done a mock interview which was recorded on video. She reflects on what she has learned from seeing the video of the interview and from considering how she prepared for it. Two other learners identify what they have learned and how they have changed. Ask your learners to consider: “How does reflecting on your learning help you to learn better?”

© The Quality Improvement Agency for Lifelong Learning (QIA) 2008 14
Activity 3: The reflective cycle Learning objectives: To enable learners to: • understand key terms • describe the reflective cycle • give examples of how the cycle might be used in practice • co-develop additional scenarios from their own experience. Materials required • Sheet 1: Gibb’s Cycle of Reflection. • A scenario demonstrating the cycle in practice. • Sheet 2: Reflective cycle cards:
− cards in black type show the stages of the reflective cycle − cards in blue type explain the terminology used for the different stages in the cycle. − Sheet 3: Scenario cards illustrating the reflective cycle. − Each card contains a description of what happened to the learner in the scenario at
the different stages in the cycle. − If wanted these can be backed with the stage in the cycle that matches what
happened on each card. Using the cards and the scenario The cards and scenario can be used in different ways, depending on the experience, needs and abilities of your learners. However they are used, it will be important to spend time discussing the outcomes of activities with learners and reviewing what they have learned. a. Understanding the terminology The reflective cycle cards can be used for a matching exercise so that learners understand the terms used in the cycle. (The cards in blue type provide the explanation or definition.) b. Understanding the cycle Learners can be placed in small groups and asked to use the cards and arrows to build the reflective cycle. c. The cycle in practice Once the cycle has been discussed and clarified, the activity can be extended using the scenario cards. Learners can again match each scenario card to the appropriate stage in the cycle. The diagram of the reflective cycle and the case study can be given out at the end of the activities.

© The Quality Improvement Agency for Lifelong Learning (QIA) 2008 15
d. Relating the cycle to learners’ own experience The activities above can be built on in a number of ways. • Learners co-create scenarios from their own experience. • Learners use the cycle to examine other case study scenarios provided by the teacher.
Not all stages of the scenario need to be given to the learners. For example, they could be given just the first one or two stages and asked to discuss what happened next. Or they could be given the first four stages and asked to discuss just the conclusion stage.
• Learners use the cycle to reflect on their own experience at work, work experience or other setting: − individually and confidentially − in pairs − individually then in pairs.
Activity 4 suggests one way of doing this.

© The Quality Improvement Agency for Lifelong Learning (QIA) 2008 16
Sheet 1: Gibbs Cycle of Reflection
DescriptionWhat happened?
FeelingsWhat were you thinking
and feeling?
EvaluationWhat was good and bad about the experience?
AnalysisWhat sense can you
make of the situation?
Conclusion What else could you
have done?
Action PlanIf it arose again, what
else would you do?
Gibbs’ Cycle of Reflection (1988)
From Gibbs, G. (1988) Learning by Doing: A Guide to Teaching and Learning Methods, Cheltenham: The Geography Discipline Network. Available to download from: www2.glos.ac.uk/gdn/gibbs/

© The Quality Improvement Agency for Lifelong Learning (QIA) 2008 17
A scenario based on the Gibbs reflective cycle Description – what happened? As part of an assignment I had to interview a client who had been in hospital. This was the first time I’d interviewed someone I didn’t know very well and I had to ask them some personal questions. Feelings – what were your feelings and thoughts at the time? I found this interview quite difficult. I felt embarrassed asking the personal questions and I began to get flustered. I think the client might have felt embarrassed tooI also felt frustrated because the client didn’t seem to grasp what I was asking and I had to keep repeating the questions. I just wanted to get the whole thing over with in the end. Evaluation – what was good and bad about the experience? What was good? Well not a lot really, but I suppose I’ve got the first time over, so hopefully it won’t be so bad next time. I did also manage to get the information I needed although it took a long time. Analysis – what sense can you make of the experience? I suppose the other person was wondering why she was being interviewed and why I was asking these questions. I get easily flustered and I was not being very clear. My embarrassment made the situation even worse. Conclusion – what could you have done differently or in addition? Next time I have to interview a client I’ll think about making the purpose of the interview clear. It would probably be a good idea to get their agreement to the interview. I could also give some examples with my questions so that the client has some idea of how to answer them. This was something we discussed during our group reflections in class the other day and might be useful to try. Something else we discussed was using ‘open’ questions. These begin with ‘how’ ‘what’ or ‘why’. It’s impossible to answer yes or no to them so I’ll definitely have a go at these. I’ve realised through writing this account that I’ve focused on my questioning technique and not my feelings of embarrassment. Maybe my embarrassment was caused by not knowing how to ask the questions rather than anything else. Action plan – if it happened again what would you do? For next time, I’m ready to try out my newly acquired interviewing and questioning skills. I hope they will make a difference to how I feel and therefore how the client responds to me. Now I know what I’m going to do, I’m looking forward to it!

© The Quality Improvement Agency for Lifelong Learning (QIA) 2008 18
Sheet 2: Reflective cycle cards cle cards
Description
Feelings and thoughts
Evaluation
Analysis
Conclusion
Action plan
What happened
What my feelings and thoughts were at the time
What was good and bad about the experience
What sense I can make of the experience
What I could have done differently or in addition
What I would do if it happened again

© The Quality Improvement Agency for Lifelong Learning (QIA) 2008 19
Sheet 3: Scenario cards – illustrating the reflective cycle
I had to interview a client who had been in hospital. This was the first
time I’d interviewed someone I didn’t know very well and I had to ask them
some personal questions.
I found this interview quite difficult. I felt
embarrassed asking the personal questions and I began to get flustered. I think the
client might have felt embarrassed too. I also felt frustrated because the client didn’t seem to grasp what I was asking and I had
to keep repeating the questions. I just wanted to get the whole thing over with in
the end.
What was good? Well not a lot really, but I suppose I’ve got the first time over, so hopefully it won’t be so bad next time. I did also manage to get the information I
needed although it took a long time.
I suppose the other person was wondering why she was being interviewed and why I was asking these questions. I get easily
flustered and I was not being very clear. My embarrassment made the situation even
worse.

© The Quality Improvement Agency for Lifelong Learning (QIA) 2008 20
Next time I have to interview a client I’ll think about making the purpose of the interview clear. It would
probably be a good idea to get their agreement to the interview. I could also give some examples with my questions so that the client has some idea of how to
answer them. This was something we discussed during our group reflections in class the other day and might be
useful to try. Something else we discussed was using ‘open’ questions. These begin with ‘how’ ‘what’ or ‘why’.
It’s impossible to answer yes or no to them so I’ll definitely have a go at these. I’ve realised through writing
this account that I’ve focused on my questioning technique and not my feelings of embarrassment. Maybe my embarrassment was caused by not knowing how to
ask the questions rather than anything else.
For next time, I’m ready to try out my newly acquired questioning skills. I hope they will
make a difference to how I feel and therefore how the client responds to me.
Now I know what I’m going to do, I’m looking forward to it!

© The Quality Improvement Agency for Lifelong Learning (QIA) 2008 21
These cards can be backed with the definitions below if wanted.
Description – what happened
Feelings and thoughts at the time
Evaluation – what was good and bad
about the experience
Analysis – what sense I can make of the experience

© The Quality Improvement Agency for Lifelong Learning (QIA) 2008 22
Conclusion – what I could have done
differently or in addition
Action plan – what I would do if it happened again

© The Quality Improvement Agency for Lifelong Learning (QIA) 2008 23
Activity 4: Reflection in practice Learning objectives For learners to: • gain experience of reflecting using the Gibbs reflective cycle • identify what they have learned from the experience • consider how they might use that learning in other situations. Materials required: • Sets of cards showing the stages in the Gibbs reflective cycle. • Flip chart paper and pens or mini whiteboards. Each learner comes to the session with an incident from work, their course or some other setting which they are prepared to talk about. Alternatively, learners could be asked to spend a few minutes at the beginning of the session identifying an incident to talk about and jotting down some brief notes. The incident does not need to be very complicated or dramatic but it needs to have been challenging. The learner may have handled the incident well or badly, or a bit of both. The objective is for learners to think about what they have learned from the incident. Give a few examples to get learners started. Some suggestions are given below but you may want to devise others. You had just finished your assignment for college and had spent a lot of time on it. Your friend asked if she could borrow it to give her a few ideas, as she was really stuck with one part of the assignment. You agreed but asked her not to copy it or to use any of the examples that were clearly the result of your research. When you got your assignments back you saw that the teacher had praised both of you for your use of examples. All the examples were yours. You had a big row with your friend and said you wouldn’t lend her your work ever again.
You were waiting in the local shop to buy a magazine and someone pushed in front of you. You pointed out that you were next but they said in quite a friendly way: ‘Don’t worry, I’m just buying a packet of cigarettes and will only be a moment’, then got served. You let it go but were annoyed about it. You hadn’t been in a particular hurry but it was a matter of principle.

© The Quality Improvement Agency for Lifelong Learning (QIA) 2008 24
You were at your part-time job at the supermarket on Saturday when one of the customers fainted in the middle of the store. You had no idea what to do but told all the other customers to move away then asked a colleague to call a supervisor or someone who knew about first aid. When the incident was over and the woman had been taken care of your supervisor congratulated you on your handling of the situation. You were pleased but felt that you had only handled things well by luck. You were still not sure what the correct way of handling the situation was, or if you would do it right if it happened again.
You play drums in a rock band with two friends. You had a gig last weekend where another band was playing. One member of your band, without asking you, told the other band you would let them use your drum kit. Your band’s spot was at the beginning of the evening and you had intended to leave after playing but this meant you had to hang around for the rest of the evening. You didn’t say anything but were really angry with your friend about it.
As an alternative, or as a preparatory activity, pairs of learners could be given the above examples or other incidents devised by the teacher. However, it is more meaningful for learners to reflect on a real incident, rather than a simulation, as the feelings they experienced and the way they responded will be authentic.

© The Quality Improvement Agency for Lifelong Learning (QIA) 2008 25
Learners work in pairs Give each pair a set of cards representing the six stages in the Gibbs reflective cycle. Depending on the level or experience of the learners you could use the first set of cards from the last activity, or you could combine the information on the two sets of cards to give a few more prompts for the learners as shown on the cards below.
1
Description
What happened?
2
Feelings and thoughts
What were your feelings and thoughts at the time?
3
Evaluation
What was good and bad about the experience?
4
Analysis
What sense can you make of the experience?
5
Conclusion
What could you have done differently or in
addition?
6
Action plan
What would you do if it happened again?
Learners take in turns, one using the cards as prompts, the other talking about their incident. The purpose of using the cards is to: • structure the conversation, with each card providing a focus and prompt for the speaker • remind learners of the Gibbs reflective cycle and its stages (consolidating the previous
activity). The card holder places the first card on the table and prompts the speaker to describe their incident. When the speaker has described what happened the card holder places the second card on the table, and reads the prompt and so on. Each conversation should take no more than 10 minutes. Remind learners that the purpose of the activity is for the speaker to reflect on their incident and think about what they have learned from it. The role of the learner with the cards is to listen and prompt. The card holder may find it helpful to offer suggestions, particularly in the later stages of the cycle, or to come up with ideas if asked, but they are not there to give advice or tell the speaker what to do. Point out to learners that the cards are not intended to be a straightjacket. Often the stages in the cycle overlap. For example, the speaker may start evaluating their response

© The Quality Improvement Agency for Lifelong Learning (QIA) 2008 26
to the incident while they are talking about their feelings and thoughts. This does not matter but it is important to move the conversation on to the final two stages. If the conversation feels as if it is drifting the card holder may want to stop and ask the question: ‘Where do you think we’ve got to in the cycle?’ or say ‘I think we’ve got to the … stage. . Shall we move on to…?’ Modelling the activity You may choose to model the activity for your learners first. . You could do this by: • talking through an incident of your own • placing each of the cards on the table at the appropriate point – possibly asking one of
the learners to read the prompt • inviting learners to come up with further prompts, questions or suggestions at critical
points in the cycle – particularly as you get to stages four, five or six of the cycle. Note: You may also want to do some preliminary work with learners on active listening and on questioning techniques to prepare them for their role as card holder, or to remind them of these skills if they have already done work on developing them. Activities on active listening are included in this pack. Activities on questioning can be found in the Questioning toolkit. De-briefing in pairs After both learners have acted as card holder and speaker they should discuss the activity and identify: • one or two key things they learned from doing the activity (not what they learned about
the incident itself but about the process of reflection) • how that process could help them in their learning in the future. These could be recorded on flip chart paper or on mini whiteboards, or be prepared ready for oral feedback to the whole group. Debriefing with the whole group You may want to start with a brief general discussion about how the activity felt for the learners. Then ask each pair to feed back their key learning points and how they feel the process could help them in their learning in the future. Draw together key messages from the activity.
© The Quality Improvement Agency for Lifelong Learning (QIA) 2008 27
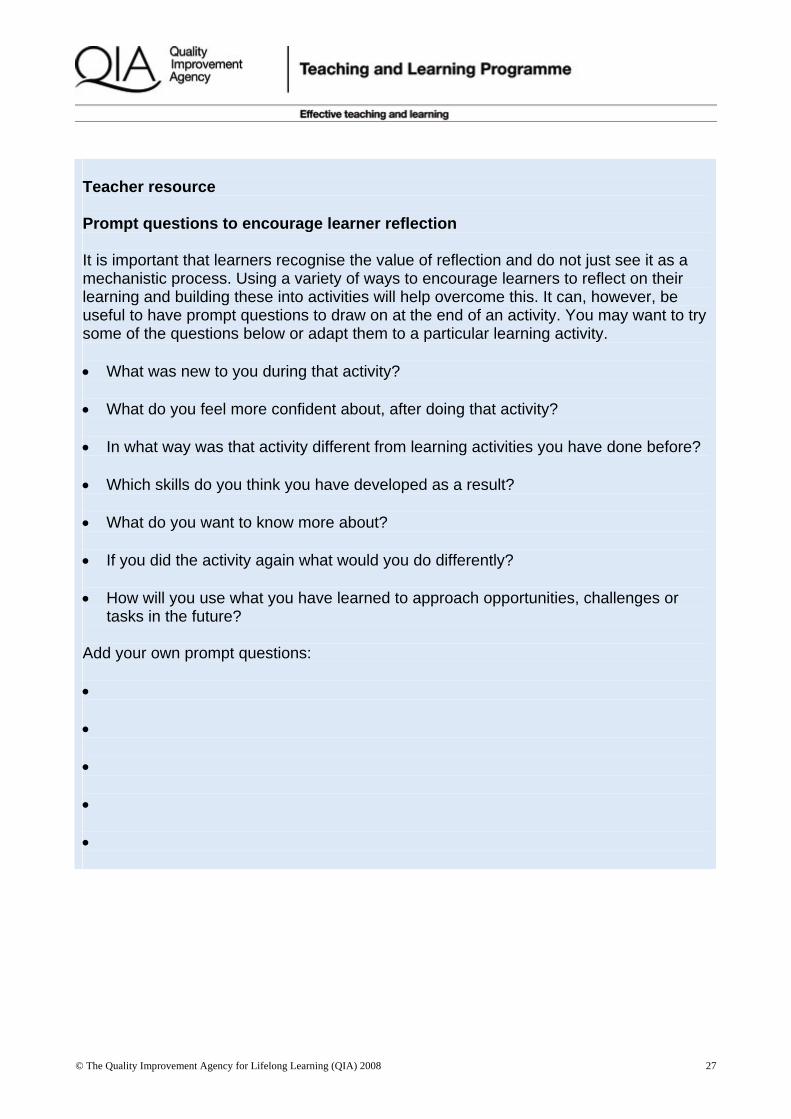
Teacher resource Prompt questions to encourage learner reflection It is important that learners recognise the value of reflection and do not just see it as a mechanistic process. Using a variety of ways to encourage learners to reflect on their learning and building these into activities will help overcome this. It can, however, be useful to have prompt questions to draw on at the end of an activity. You may want to try some of the questions below or adapt them to a particular learning activity. • What was new to you during that activity? • What do you feel more confident about, after doing that activity? • In what way was that activity different from learning activities you have done before? • Which skills do you think you have developed as a result? • What do you want to know more about? • If you did the activity again what would you do differently? • How will you use what you have learned to approach opportunities, challenges or
tasks in the future? Add your own prompt questions: • • • • •

© The Quality Improvement Agency for Lifelong Learning (QIA) 2008 28
Using role play Introduction Role play provides an opportunity for learners to practise and develop skills in a simulated setting, before deploying the skills in real-life situations. It can also expose learners to the feelings and emotions that may accompany those situations and encourage them to consider the implications for how they act. Many teachers avoid role play because they fear that learners will not take it seriously or will find it too threatening. The activities below introduce role play to learners in a managed way. The warm-up activities allow learners to explore their feelings about role play and think about the value of this method of learning before embarking on a role play activity. That said, role play by its very nature involves ‘doing’, and talking about it is no substitute for the real thing. The more we practise the better we get. The Active listening activities included in this toolkit have some simple non-threatening role plays which your learners may already have carried out. You may want to refer to these. Learning objectives • To introduce learners to role play and its purpose. • For learners to practise role play. • For learners to develop skills appropriate to selected role play scenarios. Materials required • Flip chart paper. • Flip chart pens. • Prepared role cards (for Activities 4 and 5). Some warm-up activities Activity 1: Role play – love it or hate it? This activity provides learners with an opportunity to discuss their likes, dislikes and fears about role play. It may be that none of the learners has strong feelings either way, in which case move on to another activity. • Ask learners if they have already had experience of doing role plays at school, college
or elsewhere? Collect some examples. • Ask learners to put themselves into one of three groups:
− Group 1: love role play − Group 2: hate role play − Group 3: don’t have strong feelings.
Group 1 – take 30 seconds to list all the things they love about role play.

© The Quality Improvement Agency for Lifelong Learning (QIA) 2008 29
Group 2 – take 30 seconds to list all the things they hate about role play. Group 3 – looking at the two lists, summarise the main things that their fellow learners love or hate about role play. Do they notice any patterns? Teachers may want to ask learners to re-visit their feelings at a later date when they have become more accustomed to doing role plays. Activity 2: True, false or maybe Ask learners to categorise the following comments into three groups: true, false or maybe. To do a good role play you have to: • be able to act • have a lot of imagination • learn your lines • take the situation seriously • think of your own experience • be prepared to take a risk • be a good observer • be a good listener • put yourself in someone else’s shoes • be able to think on your feet. You may want to put the comments onto cards and ask learners to sort them, You can add further items or ask learners to add their own. Activity 3: Why use role play? Ask learners, in small groups, to brainstorm a list of the skills they think they might develop through role play and note these on a sheet of flip chart paper. Compare the groups’ findings. Possible responses • Listening skills. • Making appropriate judgements. • Making verbal responses. • Keeping calm. • Using appropriate language. • Working collaboratively. • Giving and receiving feedback. • Prompting, encouraging, building the other person’s confidence. • Asking questions to find out information. • Using appropriate body language. Point out that role play can develop many different skills – its real benefit is that you have to ‘do’ something rather than just talk about it. Role play can provide a safe way of

© The Quality Improvement Agency for Lifelong Learning (QIA) 2008 30
rehearsing skills and situations that may well arise in real life. The more you practise, the better you get. Now ask the learners to consider what else role play might help us to learn. The purpose of this part of the activity is to try to draw out the affective learning that takes place through role play. Responses might include: • makes us see how other people feel (puts us in their shoes) • makes us think about how we might feel in a particular situation • lets us see how people react in different situations – maybe in ways we wouldn’t
expect. Additional activity Play the video clip of learners at Cardinal Newman College taking part in role play and discussing what they have learned from the experience. Ask the learners to compare their own answers to the views of learners at Cardinal Newman College. Role play in action Activity 4: Watch someone else Modelling is a good way of introducing learners to a process and may be a less threatening starting point than asking the learners to carry out a role play themselves. . If learners are asked to watch and comment they can see a role play in action while carrying out an important role themselves – that of observer. The process can be modelled in a number of ways: • video clip of a role play • teacher models role play; this could be done by:
− playing both roles − working with another teacher or the learning support assistant − working with a more confident learner.
Choose a scenario that learners will recognise (for example, a professional interacting with a client in a typical situation) and that demonstrates skills and behaviours that learners have already discussed. Give the learners a bit of background to the scenario so that they understand what is going on. Devise questions for the learners when watching the role play. The questions should focus on the skills and behaviours that are being demonstrated by those in the role play. The questions can be quite simple, for example: • What did the professional do well? • Which particular skills did they demonstrate? • Did they use any inappropriate behaviour?

© The Quality Improvement Agency for Lifelong Learning (QIA) 2008 31
It might be appropriate to tell learners that the role play is not intended to demonstrate the ‘perfect’ performance. After the role play get learners to share their observations and draw out any key messages. Activity 5: Have a go a. How did it feel? Put learners in pairs. If you have done the first warm-up activity you may want to mix those who liked and hated role play. Choose a simple role play that is not too prescriptive and give each pair role play cards. Examples: • At the travel agency: finding out information for a holiday. • In a shop: returning an article and asking for a refund. Tell the learners not to worry about the skills or behaviours they should be adopting – just get into the spirit of it and see how it feels. Ask them how it felt. Note down their responses. b. How did it go? Put learners in groups of three. If you have done the first warm-up activity you may want to include a mix of those who liked, hated or were indifferent to role play. Introduce the idea of triads where two people carry out a role play and a third is the observer who provides feedback. (Refer to the modelling or video activity if appropriate, where the learners were in the role of the observer.) For those who have said they really dislike role play the role of observer can feel safer first time round. Point out, however, that the observer’s role is an important and a skilled one – not an easy ride. Devise some simple role plays but be clear about what the objective of the role play is. You may want to start by using a general every-day scenario then move on to work-related scenarios.

© The Quality Improvement Agency for Lifelong Learning (QIA) 2008 32
Example: Role 1 Someone stops you at the station and asks you the way to the college, supermarket, library or some such. From the way they speak it is clear that English is not their first language. The objective is to: • give clear directions • use language that is easy to follow • check that the person has understood and feels confident that they can find their
way.
Role 2 You have got off the train at … station. You need to get to the college, supermarket, library or some such, and stop someone to ask the way. English is not your first language and you hope you will understand the directions.
Role 3 You observe the role play and pick out examples of good practice shown by the person giving directions. You should be looking for the following things: • simple language • clear directions that are easy to follow • that the person listening has understood and feels confident they can find their way. Note down examples as you observe the role play.
Teacher’s notes If learners have good writing and note-taking skills you could ask the observer to divide a sheet of paper in two and use one side to note down what was effective about the person’s practice (in this case how they gave directions) and the other to give a precise example to illustrate this, for example:

© The Quality Improvement Agency for Lifelong Learning (QIA) 2008 33
Effective practice
Example
You used landmarks that the person would recognise and would let them know they were on the right track. You used short sentences. You re-phrased a sentence when the person said they didn’t understand. You checked that the person had understood.
‘Then you’ll see the police station.’ ‘Turn right. Go straight on.’ ‘At the florist … at the flower shop.’ ‘Is that clear? Do you want me to repeat anything?’
De-briefing For each triad: • The learner in Role 1 says how it felt. . You may also want to ask them what they did
that they were pleased with and/or less pleased with. • The learner in Role 2 identifies something they found helpful. • The learner in Role 3 gives more detailed feedback based on their observation – but
the feedback must be constructive. (The teacher may want to agree some rules for this and the language to use.)
Each group discusses the experience as a whole and identifies one or two learning points to share with the whole group. The teacher draws together their feedback and key messages, making links if appropriate to earlier activities.


![VIP 하반기 남북관계 전망 전문가 설문조사 140804 - HRIhri.co.kr/upload/publication/20141013164733[1].pdf · 2016-09-23 · 14-28 (통권 579호) 2014. 08. 04 하반기](https://static.fdocuments.us/doc/165x107/5f6d1d30eb277d06231860f7/vip-ee-eeee-e-ee-e-140804-1pdf-2016-09-23.jpg)