Deutsches Handbuch - radioddity.s3.amazonaws.com English & Germany Manual.pdf · The Radioddity...
28
FRS/PMR Radio FS-T1/PR-T1 www.radioddity.com Deutsches Handbuch
Transcript of Deutsches Handbuch - radioddity.s3.amazonaws.com English & Germany Manual.pdf · The Radioddity...

FRS/PMR RadioFS-T1/PR-T1www.radioddity.com
Deutsches Handbuch

About Radioddity“You, our friend and customer, are at the forefront of what we do.”Nothing is more important than your time, and your money. When buying radios online, you face a dilemma:Save time and purchase from a reputable website at a high price, or try to save money by purchasing from anunreputable dealer at the cost of your time spent dealing with quality and service issues. At Radioddity.com,you don’t have to choose between low prices and a safe shopping experience. Whether you’re a first time buyeror a seasoned HAM, we hope you’ll find our products, prices, content and resources to be just what you need.
In the past several years, Radioddity has been better serving the needs of two-way radio buyers by creating asafe shopping experience. We do this by providing the highest quality products, at an affordable price, andbacking that up with superior quality service. It sounds simple to us
That is our promise: to improve your buying experience.Through strong partnerships which allow us to bring you the latest technology from our own brand Radioddityand on behalf of our caring and responsive Customer Support team, we strive to fulfill that promise and bettermeet your needs every day.
Along with this promise, we hope to give you more value. Be that by offering you the latest and greatest inDMR and analog radios, accessories and related products, by providing superior technical support, or byworking with thought leaders in the Amateur Radio Industry to develop enriching content to entertain andassist you in your buying process including our Blog, FAQ, and Newsletter. Your concerns are our concerns.
We do all of this to help you find the highest quality of radios, for low prices, with as little headache to theconsumer as possible. If we are failing you in this promise in any way, let us know via email: [email protected]
Über uns“Als Antrieb unseres Handelns stehen Sie, unser Kunde und Freund, an erster Stelle.”Nichts ist Ihnen wichtiger als Ihre Zeit und Ihr Geld. Beim Onlinekauf steht man oft vor einer schwierigenEntscheidung: Gute, renommierte Onlineshops mit kurzen Lieferzeiten sind oft teuer, wohingegen man beigünstigen Onlinehändlern oftmals lange Lieferzeiten und Serviceprobleme in Kauf nehmen muss . AufRadioddity.com stellt sich diese Frage dahingegen erst gar nicht. Egal, ob Sie Einsteiger oder schon ein"alter Hase" sind, wir hoffen, dass Sie unser Angebot mit seinen Produkten, Preisen und Service ansprichtund genau das ist, was Sie suchen.
In den vergangenen Jahren war es uns möglich, unser Angebot weiter zu verbessern und Ihnen ein sicheresund angenehmes Einkaufserlebnis zu bieten. Dies gelingt, indem wir Ihnen ausschließlich beste Produktqualitätzu günstigen Preisen anbieten und das Ganze mit einem erstklassigen Service abrunden.
Unser Versprechen: Ihnen jederzeit ein angenehmes Einkaufserlebnis zu bietenDurch enge Zusammenarbeit mit den Anbietern aktuellster Technologie können wir Ihnen diese in Form vonGeräten unserer eigenen Marke Radioddity anbieten. Zusammen mit unserem erstklassigen Kundendienst-Team streben wir danach, dieses Versprechen stets einzulösen, um Ihren Anforderungen und Wünschenjederzeit gerecht werden zu können. Doch auch der Nutzen steht bei uns ganz oben. Sei es, indem wir Ihnendie aktuellsten Geräte des Digital- und Analogfunks, Zubehör, verwandte Produkte und einen erstklassigenService anbieten, oder indem wir Ihnen in Zusammenarbeit mit führenden Köpfen der Funkindustrie wertvolleund gleichsam unterhaltsame Informationen in unseren Blogs, FAQ und Newslettern zur Verfügung stellen. IhreAnliegen sind auch unsere Anliegen.
All dies soll Ihnen helfen, jederzeit das Produkt bei uns zu finden, welches Ihren hohen Ansprüchen bezüglichhöchster Qualität und größtmöglichem Nutzen zu günstigen Preisen gerecht wird. Sollten wir Sie dennocheinmal enttäuschen, zögern Sie nicht, uns zu schreiben. Die Email-Adresse lautet wie folgt:[email protected]

Chapter 1. Initial setup
Safety Information
Features and functions
What’s in the box
Chapter 2. Getting to know your radio
Radio Overview
[FM] key
[LAMP] key
[MONI] key
[ ] key
Key combination operation
The main display
Chapter 3. Basic operation
RX code
TX code
08
08
09
10
13
14
14
14
15
15
15
16
17
17
18
Table of Contents SQUELCH LEVEL
LIGHT
BEEP
VOX
POWER
TDR
SAVE
TOT
BCLO
RING
WEATHER FORECAST
VOICE PROMPT
Chapter 4.Computer Programming
Appendix A. Troubleshooting
Appendix B. Technical specifications
Appendix C. PMR/FRS frequency table
----------------------------------------------------------------
-----------------------------------------------------------------
-----------------------------------------------------------
---------------------------------------------
--------------------------------------------------------------------
------------------------------------------------------------------
------------------------------------------------------------------------------
--------------------------------------------------------------------------
---------------------------------------------------------------------------
-----------------------------------------------------------------------------
------------------------------------------------------
-------------------------------------------------------------------
----------------------------------------------------------
18
19
19
20
21
21
22
22
23
24
24
25
26
26
27
29-----------------------------------------------------------------------------
-----------------------------------------------------------------
-------------------------------------------------------------------------------
--------------------------------------------------------------------------------
---------------------------------------------------------------------------------
-----------------------------------------------------------------------------
---------------------------------------------------------------------------------
--------------------------------------------------------------------------------
--------------------------------------------------------------------------------
-------------------------------------------------------------------------------
--------------------------------------------------------------------------------
----------------------------------------------------------
-------------------------------------------------------------------
-----------------------------------------------
--------------------------------------------------
----------------------------------------
--------------------------------------------------------------------------------------------------------------------
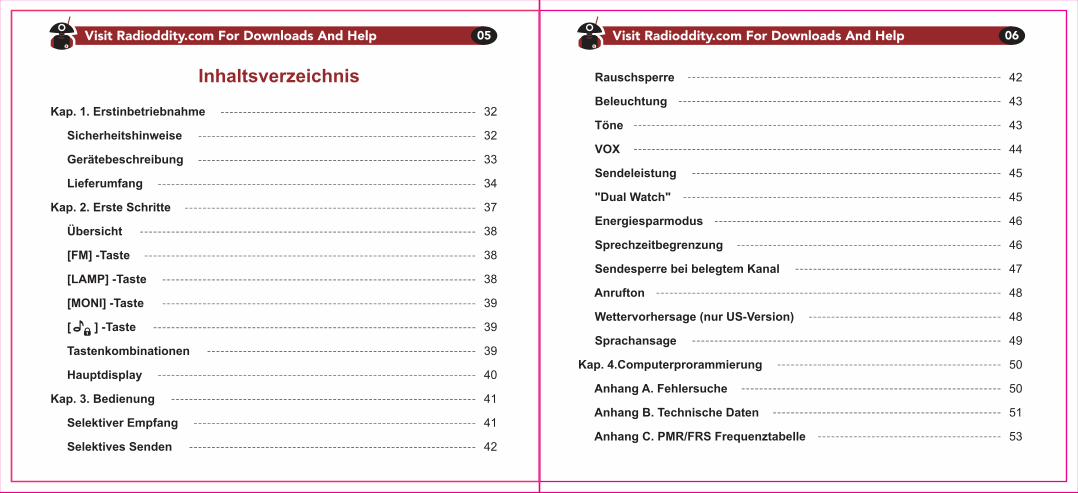
Kap. 1. Erstinbetriebnahme
Sicherheitshinweise
Gerätebeschreibung
Lieferumfang
Kap. 2. Erste Schritte
Übersicht
[FM] -Taste
[LAMP] -Taste
[MONI] -Taste
[ ] -Taste
Tastenkombinationen
Hauptdisplay
Kap. 3. Bedienung
Selektiver Empfang
Selektives Senden
32
32
33
34
37
38
38
38
39
39
39
40
41
41
42
Inhaltsverzeichnis Rauschsperre
Beleuchtung
Töne
VOX
Sendeleistung
"Dual Watch"
Energiesparmodus
Sprechzeitbegrenzung
Sendesperre bei belegtem Kanal
Anrufton
Wettervorhersage (nur US-Version)
Sprachansage
Kap. 4.Computerprorammierung
Anhang A. Fehlersuche
Anhang B. Technische Daten
Anhang C. PMR/FRS Frequenztabelle
---------------------------------------------------------
--------------------------------------------------------------
--------------------------------------------------------------
-----------------------------------------------------------------
---------------------------------------------------------------------------
-----------------------------------------------------------------------
--------------------------------------------------------------------------
----------------------------------------------------------------------
----------------------------------------------------------------------
------------------------------------------------------------------------
------------------------------------------------------------
-----------------------------------------------------------------------
--------------------------------------------------------------------
42
43
43
44
45
45
46
46
47
48
48
49
50
50
51
53----------------------------------------------------------------
----------------------------------------------------------------------
------------------------------------------------------------------------
----------------------------------------------------------------------------------
----------------------------------------------------------------------------------
---------------------------------------------------------------------
-----------------------------------------------------------------------
-----------------------------------------------------------
----------------------------------------------------------------
----------------------------------------------
-----------------------------------------------------------------------------
-------------------------------------------
---------------------------------------------------------------------
--------------------------------------------------
----------------------------------------------------------
---------------------------------------------------
--------------------------------------------------------------------------------------------------------

Chapter 1 - Initial Setup
Safety InformationPlease read the following brief instructions, non-compliance with these rules may cause dangeror violate the law.1. Refer to local government regulations before using this radio, improper use may violate the law.2. Turn off the radio before getting close to flammable or explosive areas. 3. Turn off the radio before you get near explosive or ignition zones.4. Do not use a radio with a damaged antenna, contact with a damaged antenna will cause burns5. Do not attempt to open the radio; the maintenance work should be done by technical expert only.6. To avoid troubles caused by electromagnetic interference or electromagnetic compatibility, please turn off the radio in places that advise against wireless transmissions, example "Do not use wireless equipment", such as hospitals or other healthcare facilities.7. In vehicles equipped with airbags, do not put the radio within the scope of the airbag deployment.8. Do not store the radio in direct sunlight or in hot areas. 9. When transmitting maintain 5cm of distance from the antenna.10. If the radio has an odor of smoke, please shut off its power immediately, remove the battery and contact your local dealer.
English

Features and Functions
50 CTCSS tones and 104 DCS codes.
Transmission time-out timer
VOX (voice activated transmit).
Backlight on/off/key
Battery saving function.
Dual channel standby
Keypad tone
Keypad Lock
Broadcast FM radio receiver 87-108MHz
LED flashlight
USB charging function
PC programmable
Weather forecast function
Ten calling tones, selectable
11. Limit transmissions to no longer than necessary to prevent possible heat build up. When transmitting with a portable radio, hold the radio in a vertical position with the microphone 3 to 4 centimeters away from your mouth; also make sure the antenna stays at least 5 centimeters away from your body when transmitting.
What’s in the box
Thanks for choosing Radioddity two way radio. We recommend you to check the items listed in the following table before discarding the package box.2 PCS FS-T1/PR-T1 Radio Body2 PCS 1500mAh Battery Pack2 PCS Belt Clip2 PCS Earpiece1 PCS USB Charging Cable1 PCS USB Adaptor1 PCS English manual
Note: The Radio is compatible with other accessories which are available on: https://www.radioddity.com/
Belt clip
then push down firmly on the top of the clip.
Battery
Fully charge the battery before initial use. Optimum battery efficiency will be achieved after the three full battery charge and discharge cycles.

Charging and battery maintenance
- ChargingBattery should be fully charged before initial use. Optimum battery efficiency will be achievedafter three times of battery fully charge and discharge cycles.How to hook up and use the charger correctly:1. Plug the USB cable into the power adapter.2. Plug the AC adapter of the power adapter into the main AC outlet.3. The other end of the USB is connected to the USB port of the radio.
Note: Radio should be turned OFF during charging.
- Battery MaintenanceThe battery for your radio comes uncharged from the factory; please let it charge for at least fourto five hours before using your radio.• Use only batteries approved by the original manufacturer.• Never attempt to disassemble your battery pack.• Do not expose your batteries to fire or intense heat• Dispose of batteries in accordance with local recycling regulations. Batteries do not belong in your trashcan!
- Prolonging your battery’s life• Only charging batteries in normal room temperatures.• When charging a battery attached to the radio, power off the radio for a faster charge.• Do not unplug the charger or remote control until charging is complete.
• Never charge or use a wet battery.• Batteries wear out over time. When the radio is operated in a shorter time, please consider purchasing a new battery to replace.• Battery’s performance will be reduced in temperatures below zero. When working in cold environments, it is suggested to prepare a spare battery. Preferably inside your jacket or in a similar location in order to keep the battery warm.• Dust may interfere with the connection between the battery and the radio. Wipe the contacts with a clean cloth if necessary to ensure proper contact with the radio and charger.
Note: If your battery has become wet, take it down from the radio, wipe it dry with a towel or softtissue, and put it in a plastic bag with a handful of dry rice. Tie the bag up and leave there overnight.
The rice will absorb any remaining moisture in the battery.
This method is only effective against minor splashes (light rain for instance). A soaked radio maypossibly be defective to use.
- StorageIn order to prevent damaging from over discharge, the battery must be left with partial power.This radio uses a lithium-based battery and a 40% charge is recommended. This level minimizesage-related capacity loss while keeping the battery in operating condition and allowing self-discharge.
To avoid severe capacity degradation of your battery while in long-term storage, please chargethe battery at least every six(6) months.
Store your batteries in a cool and dry place, never above normal room temperatures.

Chapter 2 - Getting to know your radio
12
3
6
7
8
9
10
4
5
Figure 2.1 Radioddity FS-T1/PM-T1,overview LED flashlight
Power/Volume knob
Antenna
PTT Key
USB jack
Headphone jack
LCD
Microphone
Speaker
LED switch
[FM] Key
Short press [FM] to start the broadcast FM receiver. Another short press turns the broadcast FMreceiver off.
[LAMP] KeyShort press [LAMP] to turn on the LED flashlight. Short press again will flash the LED. Anothershort press turns the flashlight off.
1
2
3
4
5
6
7
8
9
10

[MONI] KeyPress and hold [M] to monitor the signal. This will open up the squelch so you can listen to theunfiltered signal. In addition, after entering the operation menu, short press this button to exit
[ ] KeyThe Radioddity FS-T1/PR-T1 has ringtone calling function, there are ten kinds of calling soundsfor you to choose; short press this button for ringing callThe Radioddity FS-T1/PR-T1 features a keypad lock that locks out all keys except for thefunction key and PTT key.To enable or disable the keypad lock, press and hold the key for about two seconds.
Key combination operationAudio call: PTT key and [MONI] key: 1750Hz PTT key and [FM] key: 1450Hz PTT key and key: 2100Hz
The main display
Table 2.1. LCD icon summary
Icon IconDescription Description
Battery level indicator
Channel indication (01-99)
CTCSS enabled
DCS enabled
Keypad lock
CT
S
N
L
VOX
DCS
Dual watch enabled
Narrowband enabled
VOX enabled
Transmit power level indicator
Receive: signal strength;transmit: low power display thefirst five grids; high power displayfull grid
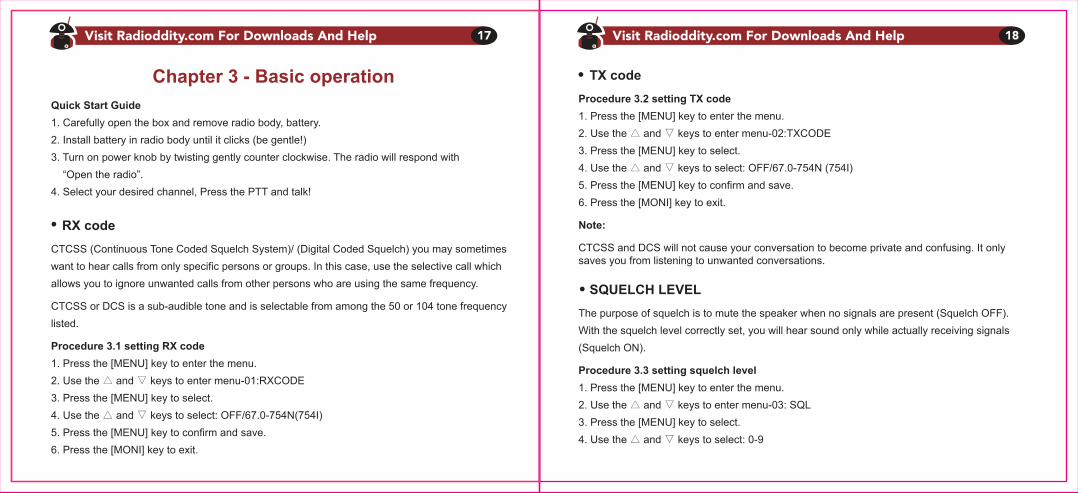
Chapter 3 - Basic operationQuick Start Guide1. Carefully open the box and remove radio body, battery.2. Install battery in radio body until it clicks (be gentle!) 3. Turn on power knob by twisting gently counter clockwise. The radio will respond with “Open the radio”.4. Select your desired channel, Press the PTT and talk!
RX codeCTCSS (Continuous Tone Coded Squelch System)/ (Digital Coded Squelch) you may sometimeswant to hear calls from only specific persons or groups. In this case, use the selective call whichallows you to ignore unwanted calls from other persons who are using the same frequency.
CTCSS or DCS is a sub-audible tone and is selectable from among the 50 or 104 tone frequencylisted.
Procedure 3.1 setting RX code1. Press the [MENU] key to enter the menu.2. Use the △ and ▽ keys to enter menu-01:RXCODE3. Press the [MENU] key to select.4. Use the △ and ▽ keys to select: OFF/67.0-754N(754I)5. Press the [MENU] key to confirm and save.6. Press the [MONI] key to exit.
TX codeProcedure 3.2 setting TX code1. Press the [MENU] key to enter the menu.2. Use the △ and ▽ keys to enter menu-02:TXCODE3. Press the [MENU] key to select.4. Use the △ and ▽ keys to select: OFF/67.0-754N (754I)5. Press the [MENU] key to confirm and save.6. Press the [MONI] key to exit.
Note:
CTCSS and DCS will not cause your conversation to become private and confusing. It onlysaves you from listening to unwanted conversations. SQUELCH LEVELThe purpose of squelch is to mute the speaker when no signals are present (Squelch OFF).With the squelch level correctly set, you will hear sound only while actually receiving signals(Squelch ON).
Procedure 3.3 setting squelch level1. Press the [MENU] key to enter the menu.2. Use the △ and ▽ keys to enter menu-03: SQL3. Press the [MENU] key to select.4. Use the △ and ▽ keys to select: 0-9
5. Press the [MENU] key to confirm and save.6. Press the [MONI] key to exit.
LIGHTProcedure 3.4 setting light1. Press the [MENU] key to enter the menu.2. Use the △ and ▽ keys to enter menu-04:LIGHT3. Press the [MENU] key to select.4. Use the △ and ▽ keys to select:ON/OFF/KEY5. Press the [MENU] key to confirm and save.6. Press the [MONI] key to exit.
Note: ON: the backlight is long bright;OFF: the backlight is off.KEY: the backlight is turned on by the button, and the button will automatically turn off for a while.
BEEPAllows audible confirmation of a key press, if you want to turn off the beep tone via following thesteps.
Procedure 3.5 setting BEEP1. Press the [MENU] key to enter the menu.2. Use the △ and ▽ keys to enter menu-05: BEEP3. Press the [MENU] key to select.4. Use the △ and ▽ keys to select: ON/OFF5. Press the [MENU] key to confirm and save.6. Press the [MONI] key to exit.
VOX (Voice Operated Transmission)VOX eliminates the need to manually switch to transmission mode each time you want to transmit. When the VOX circuit detects that you have started speaking into the microphone,the transceiver automatically switches to transmission mode.
1. When operating the VOX function, be sure to set the VOX gain level which allows the transceiver to recognize the sound levels.2. If the microphone is too sensitive, the transceiver will begin transmitting when there is noise in the background.
If it is not sensitive enough, it will not pick up your voice when you begin speaking. Be sure toadjust the VOX gain level to an appropriate sensitivity to allow smooth transmission.
Procedure 3.6 setting VOX1. Press the [MENU] key to enter the menu.2. Use the △ and ▽ keys to enter menu-06: VOX
3. Press the [MENU] key to select.4. Use the △ and ▽ keys to select: 0/1/2/3/4/55. Press the [MENU] key to confirm and save.6. Press the [MONI] key to exit.
HIGH/LOW POWER (This feature is only available in the US version)Procedure 3.7 setting transmission power1. Press the [MENU] key to enter the menu.2. Use the △ and ▽ keys to enter menu-07:PWR3. Press the [MENU] key to select.4. Use the △ and ▽ keys to select: HIGH/LOW5. Press the [MENU] key to confirm and save.6. Press the [MONI] key to exit.
TDRSimultaneously monitor A and B. The display with the most recent activity (A or B) becomes theselected display TDR.
Procedure 3.8 setting TDR1. Press the [MENU] key to enter the menu.2. Use the △ and ▽ keys to enter menu-08:TDR3. Press the [MENU] key to select.
4. Use the △ and ▽ keys to select: OFF/ON.5. Press the [MENU] key to confirm and save.6. Press the [MONI] key to exit.
SAVEIn the power saving mode, the communication range will be reduced, but the cruising ability willbe extended by 2-3 times. In the non-power saving mode, the communication range can reachthe maximum, but the cruising ability will be reduced.
Procedure 3.9 setting SAVE1. Press the [MENU] key to enter the menu.2. Use the △ and ▽ keys to enter menu-10:SAVE.3. Press the [MENU] key to select.4. Use the △ and ▽ keys to select: ON/OFF5. Press the [MENU] key to confirm and save.6. Press the [MONI] key to exit.
TOTThis feature provides a safety switch, which limits transmission time to the programmed value.
This will promote battery conservation by not allowing you to make excessively longtransmissions, and in the event of a struck PTT switch, it can prevent interference to otherusers as well as battery depletion.

Procedure 3.10 setting TOT1. Press the [MENU] key to enter the menu.2. Use the △ and ▽ keys to enter menu-11:TOT.3. Press the [MENU] key to select.4. Use the △ and ▽ keys to select: OFF/30S/60S/90S/120S/150S/180S.5. Press the [MENU] key to confirm and save.6. Press the [MONI] key to exit.
BCLODisable the [PTT] button on the channel you are already using. If you press the [PTT] buttonwhile using the channel, the transceiver will beep and will not be sent.
Procedure 3.11 setting BCLO1. Press the [MENU] key to enter the menu.2. Use the △ and ▽ keys to enter menu-12:BCLO.3. Press the [MENU] key to select.4. Use the △ and ▽ keys to select: ON/OFF5. Press the [MENU] key to confirm and save.6. Press the [MONI] key to exit.
RING (Incoming call tone)There are ten types of incoming call tones on the radio. You can select the call tone by shortpress button.
Procedure 3.12 setting transmission power1. Press the [MENU] key to enter the menu.2. Use the △ and ▽ keys to enter menu-13:RING.3. Press the [MENU] key to select.4. Use the △ and ▽ keys to select: 1/2/3/4/5/6/7/8/9/10.5. Press the [MENU] key to confirm and save.6. Press the [MONI] key to exit.
WEATHER FORECAST This feature is only available in the US version1. This feature sets the weather switch selection for you.
Procedure 3.13 setting WEATHER FORECAST1. Press the [MENU] key to enter the menu.2. Use the △ and ▽ keys to enter menu-14:WEATHE3. Press the [MENU] key to select.4. Use the △ and ▽ keys to select: ON/OFF.5. Press the [MENU] key to confirm and save.6. Press the [MONI] key to exit. If the menu option is ON, enter the weather forecast mode, otherwise return to normal operation mode.

Chapter 4 - Computer Programming2. Weather forecast channel setting modeIn the weather forecast receiving mode, press the △ and ▽ keys to select weather forecastchannel: CH1-CH10
CH1:162.550MHz CH2:162.400MHz CH2:162.475MHz CH4:162.425MHz CH5:162.450MHz
CH6:162.550MHz CH7:162.525MHz CH8:161.650MHz CH9:161.775MHz CH10:163.275MHz
VOICE PROMPTSThis function sets the voice prompt switch and voice switch for you.
Procedure 3.14 setting VOICE PROMPTS1. Press the [MENU] key to enter the menu.2. Use the △ and ▽ keys to enter menu-15:VOICE PROMPTS3. Press the [MENU] key to select.4. Use the △ and ▽ keys to select: OFF/CHI/ENG.5. Press the [MENU] key to confirm and save.6. Press the [MONI] key to exit.
If you have computer programming needs, download programming software athttps://www.radioddity.com/support/.
Appendix A. Troubleshooting
possiblesymptom
The radiodoesn’t start
The batterydies quickly
The LED indicatesreception, but thespeaker is silent.
Others can’t hearmy transmission.
The radio transmitswithout touching thePTT.
The battery is too low.The battery isn't correctly installed.
The battery is dead.The battery isn't fully charged.
Volume is too low.CTCSS or DCS enabled
Their CTCSS or DCS settingsdon’t match yours.You're too far apart.
The VOX is enabled.VOX sensitivity is too high.
Change or recharge the battery.Remove the battery and reinstall it.
Purchase a new battery.Recharge the battery.
Turn up the volume.Change your CTCSS or DCS tomatch those you're trying tocommunicate with.Turn CTCSS or DCS off.
Change your CTCSS or DCS Setting to match your peers.Move in closer.
Turn VOX off.Turn down VOX sensitivity.
solution
Appendix B. Technical specificationsGeneral
General specifications
Specification
Model FS-T1/PR-T1
Frequency Range (MHz) US: FRS; EU: PMR
Memory channels 99
Frequency stability 2.5ppm
Antenna impedance 50 Ohm
Operating temperature -10℃ to +50℃
Mode of operation same frequency simplex
Dimensions (mm) 170X50X28
Weight (g) 120g
Transmitter
Transmitter specifications
Specification
RF power (W) US: 0.5/2W ; EU: 0.5W
Type of modulation FM
Maximum deviation(kHz) ≤±5.0
Spurious emissions (dB) <-60dB
Emission current(mA) ≤1000
Receiver
Receiver specifications
Specification
Receiver sensitivity <0.16μV (12dB SINAD)
Intermodulation ≥65dB
Audio Output ≥380mW
Squelch sensitivity <0.2μV
Receiver Current ≤380mA

Appendix C. PMR/FRS frequency table
FRS
Channel No.
1
2
3
4
5
6
7
8
Frequency
462.5625
462.5875
462.6125
462.6375
462.6625
462.6875
462.7125
467.5625
Channel No.
9
10
11
12
13
14
15
16
Frequency
467.5875
467.6125
467.6375
467.6625
467.6875
467.7125
462.5500
462.5750
Channel No.
17
18
19
20
21
22
Frequency
462.6000
462.6250
462.6500
462.6750
462.7000
462.7250
PMR
Channel No.
1
2
3
4
5
6
7
8
Frequency (MHz)
446.00625
446.01875
446.03125
446.04275
446.05625
446.08125
446.08125
446.09375
Channel No.
9
10
11
12
13
14
15
16
Frequency (MHz)
446.10625
446.11875
446.13125
446.14375
446.15625
446.16875
446.18125
446.19375
German
Kapitel 1 - Erstinbetriebnahme
SicherheitshinweiseBitte lesen Sie die nachfolgenden Informationen aufmerksam durch, Nichtbeachtungkann zu Gefahr führen oder gegen Vorschriften verstoßen.1. Stellen Sie sicher, dass die Nutzung des Gerätes nicht gegen Gesetze in Ihrem Land verstößt.2. Nutzen Sie das Gerät nicht in explosionsgefährdeten Bereichen.3. Nutzen Sie das Gerät nicht in der Nähe von Sprengungen oder Sprengstoff.4. Niemals mit beschädigter Antenne senden, offenliegende Teile können Verbrennungen verursachen oder das Gerät beschädigen.5. Öffnen Sie das Gerät nicht, die Wartung und Reparatur sollte ausschließlich autorisiertem Personal überlassen werden.6. Zur Vermeidung von elektromagnetischen Unverträglichkeiten benutzen Sie das Gerät nicht in entsprechend gekennzeichneten Bereichen, wie z.B. in Krankenhäusern oder anderen medizinischen Einrichtungen.7. Platzieren Sie das Gerät im Auto nicht im Entfaltungsbereich eines Airbags.8. Lagern Sie das Gerät nicht in direkter Sonneneinstrahlung oder heissen Bereichen.9. Immer ca. 5cm Abstand von der Antenne beim Senden halten.10. Sollte aus dem Gerät während des Betriebes Schmorgeruch nach außen dringen, schalten Sie es sofort aus, entnehmen den Akku und geben es in umgehend in Reparatur.

Gerätebeschreibung
50 CTCSS und 104 DCS-Codes
einstellbare Sendezeitbeschränkung
VOX
Displaybeleuchtung deaktivierbar
Energiesparfunktion
Dual watch-Funktion
Tastentöne
Tastensperre
UKW-Radiofunktion
LED-Taschenlampe
USB-Ladefunktion
PC-Programmierung möglich
Wettervorhersage (nur US-Version)
Zehn wählbare Anruftöne
11. Begrenzen Sie die Dauer einer Aussendung auf das notwendige Maß, um einer Überhitzung entgegenzuwirken. Während Sie senden, halten Sie das Gerät aufrecht und das Mikrofon ca.4cm vom Mund entfernt. Stellen Sie während des Sendens sicher, dass die Antenne jederzeit ca.5cm vom Körper entfernt gehalten wird.
Lieferumfang
Vielen Dank, dass Sie sich für ein Funkgerät von Radioddity entschieden haben. Bitte prüfenSie, ob sich folgende Teile in der Packung befinden:2 Stk. FS-T1/PR-T1 Funkgerät2 Stk. 1500mAh Akkupack2 Stk. Gürtelclip2 Stk. Sprechgarnitur1 Stk. USB-Ladekabel1 Stk. USB-Ladegerät1 Stk. Bedienungsanleitung
Hinweis: Die Funkgeräte sind kompatibel mit weiterem Zubehör, dies finden Sie unter:https://www.radioddity.com/
Gürtelclips
Die Gürtelclips werden an der Rückseite der Funkgeräte befestigt, dazu setzen Sie den Clipin die Führung ein und drücken Sie den Clip sanft nach unten bis er einrastet.
Akkupack
Laden Sie die Akkus vor Benutzung komplett auf. Die optimale Leistung erreichen die Akkusnach ca.3 vollständigen Lade - und Entladezyklen.
Laden und Akkuwartung
- AufladenDie Akkus sollten vor Benutzung voll geladen werden. Die optimale Leistung erreichen dieAkkus nach ca. 3 vollständigen Lade- und Entladezyklen.Korrekte Nutzung des USB-Laders:1. Stecken Sie das USB-Kabel in das Netzgerät.2. Stecken Sie das USB-Ladegerät nun in eine Netz-Steckdose.3. Das andere Ende des USB-Kabels wird nun mit dem Funkgerät verbunden.
Hinweis: Schalten Sie das Funkgerät während des Aufladens ab.
- AkkuwartungDer Akku ist im Lieferzustand nur teilweise geladen. Laden Sie ihn daher mindestens vier bisfünf Stunden vor der ersten Benutzung auf.• Nur vom Hersteller zugelassene Akkus verwenden.• Niemals versuchen, das Akkupack zu öffnen!• Die Akkus niemals großer Hitze aussetzen, Explosionsgefahr!• Verbrauchte Akkus bitte der Umwelt zuliebe gemäß den geltenden Richtlinien entsorgen. Akkus gehören NICHT in den Hausmüll!
- Tips für eine lange Akku-Lebensdauer• Akkus nur bei normalen Raumtemperaturen aufladen.• Das Gerät während des Ladens abschalten, sodass der Akku schneller geladen wird.• Ladevorgänge nicht unterbrechen, Ladegeräte erst nach vollständigem Laden entfernen.
• Niemals einen nassen Akku aufladen.• Akkus verlieren trotz allem beständig an Kapazität. Bei verkürzter Laufzeit der Funkgeräte schaffen Sie frühzeitig neue Akkus als Ersatz an.• Die Akkuleistung läßt bei Kälte stark nach. Wenn Sie die Funkgeräte in einer sehr kalten Umgebung betreiben möchten, halten Sie bitte einen Ersatzakku an einem wärmeren Ort, z.B. in Ihrer Jackentasche, bereit.• Staub beeinflusst den Kontakt zwischen Akku und Gerät u.U. negativ. Reinigen Sie daher von Zeit zu Zeit die Kontakte des Akkus und des Gerätes mit einem trockenen Tuch.
TIPP: Wenn der Akku nass geworden ist, entnehmen Sie diesen vom Gerät, trocknen ihn so gutwie möglich ab und stecken ihn zusammen mit einer Handvoll trockenen Reis in einenPlastikbeutel, verschließen diesen und lassen dies über Nacht so liegen. Der Reis nimmt dieFeuchtigkeit auf und hilft so beim Trocknen.Allerdings hilft dieses Vorgehen nur bei leichterNässe, wie z.B. nach einem Regenschauer. Ein komplett eingetaucht gewesenes Gerät undsein Akku ist u.U. defekt und die weitere Nutzung könnte potentiell gefährlich sein. Im Zweifelkontaktieren Sie bitte ihren Händler!
- LagerungUm eine Tiefentladung bei Lagerung zu vermeiden, müssen Akkus geladen gelagert werden.Diese Akkus nutzen die Lithium-Ionen-Technik und benötigen mind. 40% Ladezustand beiLagerung. Dies vermeidet altersbedingten Kapazitätsverlust und Tiefentladung.Um schwere Schäden durch Tiefentladung zu vermeiden, laden Sie den Akku mindestens allesechs (6) Monate einmal komplett wieder auf.Lagern Sie die Akkus an einem kühlen und dunklen Ort und niemals in großer Hitze.
Kap. 2 - Erste Schritte
12
3
6
7
8
9
10
4
5
Abb. 2.1 Radioddity FS-T1/PM-T1, Übersicht LED-Taschenlampe
Ein-Aus/Lautstärkeregler
Antenne
Sendetaste
USB-Buchse
Headset-Anschluss
Display
Mikrofon
Lautsprecher
Taschenlampe an/aus
[FM]-TasteKurzer Druck auf [FM] startet das UKW-Radio. Nochmaliger kurzer Druck auf diese Taste schaltetdas UKW-Radio wieder ab.
[LAMP]-TasteKurzer Druck auf [LAMP] schaltet die Taschenlampe an, nochmaliger kurzer Druck läßt die LEDblinken und nochmaliger kurzer Druck schaltet die Taschenlampe wieder ab.
1
2
3
4
5
6
7
8
9
10
[MONI]-TasteDrücken und halten Sie [M] ,um die Rauschsperre zu öffnen, sodass Sie das Rauschen undandere schwache Signale hören können. Im Menu bewirkt ein kurzer Druck auf diese Tasteden Ausstieg aus dem Menu und die Rückkehr zur Grundanzeige.
[ ]-TasteDas Radioddity FS-T1/PR-T1 verfügt über bis zu zehn Anruftöne; drücken Sie diese Taste kurzum einen Anrufton auszuwählen.Das Radioddity FS-T1/PR-T1 verfügt über eine Tastensperre für alle Tasten mit Ausnahme derSendetaste und dieser Funktionstaste.Um die Tastensperre zu ativieren oder zu deaktivieren, drücken und halten Sie diese Taste fürmindestens 2 Sekunden.
TastenkombinationenRufton : Sendetaste und [MONI]: 1750Hz Sendetaste und [FM]: 1450Hz Sendetaste und "Notentaste": 2100Hz
Das Hauptdisplay
Tabelle 2.1. LCD Symbole
Icon IconDescription Description
Akkuladestand
Kanalanzeige (01-99)
CTCSS aktiv
DCS aktiv
Tastensperre
CT
S
N
L
VOX
DCS
Dual watch aktiv
Schmalband aktiv
VOX aktiv
Sendeleistungsanzeige
Empfang: SignalstärkeanzeigeSenden: Sendeleist. niedrig:erste 5 Segmente an; hoheSendeleist.: Alle Segmente an
TIPP: Beim Senden wird der Empfänger stumm geschaltet. Das bedeutet, Sie können während Sie senden,den Gesprächspartner nicht hören. Umgekehrt ist es auch so, d.h. Sie können Ihrem Gegenüber nicht "insWort fallen", Sie müssen warten, bis er seine Sendung ("Durchgang") beendet hat. Senden Sie trotzdem, kanner nicht hören, was Sie sagen, bis er seine Aussendung beendet hat. Dies ist kein Gerätefehler, sonderntechnisch bedingt, es nennt sich "Wechselsprechen auf einer Frequenz". Sie müssen sich aber keine Sorgenmachen. Wenn sich Ihre Aussendung aus welchen Gründen auch immer mit einer anderen überschneidet,geht nichts kaputt dadurch.

Kap. 3 - BedienungSchnellstartanweisung1. Gerät und Akku aus der Packung nehmen.2. Akku einsetzen und vorsichtig nach oben schieben bis es klickt.3. Am Lautstärkeregler gegen den Uhrzeigersinn drehend das Gerät einschalten. Unter Umständen ertönt ein Begrüßungstext oder ein Quittungston.4. Gewünschten Kanal auswählen, Sendetaste drücken und sprechen
Selektiver Empfang mit CTCSS/DCSManchmal ist es von Vorteil, nur Rufe von speziellen Personen oder - gruppen zu empfangen.In diesem Fall können Sie den selektiven Empfang mit CTCSS/DCS nutzen, um unerwünschteRufe von Personen, die die gleiche Frequenz belegen, auszublenden. CTCSS oder DCS ist einunhörbarer Subton, der aus 50 oder 104 Tonfrequenzen ausgewählt werden kann (siehe Anhang).Bei allen Teilnehmern einer Gruppe muss der gleiche Subton ausgewählt sein, sonst kommt keineVerbindung zustande!
Vorgang 3.1 Selektiven Empfang einstellen.1. Mit [MENU] das Menu öffnen.2. Mit den △ und ▽ Tasten zu 01:RXCODE navigieren.3. Nochmals [MENU] drücken zum Auswählen.4. Mit den △ und ▽ Tasten: OFF/67.0-754N(754I) wählen.5. Mit [MENU] bestätigen und speichern.
6. Mit [MONI] das Menu verlassen.
Selektives SendenVorgang 3.2 Einstellung selektives Senden1. Mit [MENU] das Menu öffnen.2. Mit den △ und ▽ Tasten zu 02: TXCODE navigieren.3. Nochmals [MENU] drücken zum Auswählen.4. Mit den △ und ▽ Tasten: OFF/67.0-754N(754I) wählen.5. Mit [MENU] bestätigen und speichern.6. Mit [MONI] das Menu verlassen.
Hinweis: CTCSS and DCS will not cause your conversation to become private and confusing. It only saves you from listening to unwanted conversations. Rauschsperre (Squelch)Der Zweck einer Rauschsperre ist, nerviges Rauschen und schwache, verrauschte Signaleauszublenden, indem der Lautsprecher stummgeschaltet wird. Bei korrekter Einstellung derRauschsperre ("Squelch ON") schaltet der Lautsprecher nur ein, wenn ausreichend starkeSignale empfangen werden.
Vorgang 3.3 Rauschsperre einstellen1. Mit [MENU] das Menu öffnen.2. Mit den △ und ▽ Tasten zu 03: SQL navigieren.
3. Nochmals [MENU] drücken zum Auswählen.4. Mit den △ und ▽ Tasten: 0-9 auswählen.5. Mit [MENU] bestätigen und speichern.6. Mit [MONI] das Menu verlassen.
DisplaybeleuchtungVorgang 3.4 Beleuchtung einstellen1. Mit [MENU] das Menu öffnen.2. Mit den △ und ▽ Tasten zu 04: LIGHT navigieren.3. Nochmals [MENU] drücken zum Auswählen.4. Mit den △ und ▽ Tasten: ON/OFF/KEY wählen.5. Mit [MENU] bestätigen und speichern.6. Mit [MONI] das Menu verlassen.
Note: ON: die Displaybeleuchtung ist dauerhaft eingeschaltet.OFF: die Displaybeleuchtung ist abgeschaltet.KEY: die Displaybeleuchtung schaltet sich bei einem Tastendruck für kurze Zeit ein.
TastentöneJeder Tastendruck erzeugt einen kurzen Ton. Zum Ein- oder Abschalten der Tastentöne wienachfolgend beschrieben vorgehen:
Vorgang 3.5 Tastenton einstellen1. Mit [MENU] das Menu öffnen.2. Mit den △ und ▽ Tasten zu 05: BEEP navigieren.3. Nochmals [MENU] drücken zum Auswählen.4. Mit den △ und ▽ Tasten: ON/OFF wählen.5. Mit [MENU] bestätigen und speichern.6. Mit [MONI] das Menu verlassen.
VOX (stimmaktivierter Sendebetrieb)Die VOX-Funktion sorgt dafür, dass Sie nicht jedesmal die Sendetaste drücken müssen, um aufSendung zu gehen. Sobald die VOX-Schaltung feststellt, dass Sie zu sprechen begonnen haben,schaltet sie das Gerät auf Sendebetrieb, solange Sie sprechen.
1. Stellen Sie bei VOX-Betrieb sicher, dass die Empfindlichkeit ausreichend hoch ist und das Gerät sicher auf Sendung schaltet, sobald Sie sprechen.2. Aber Achtung, bei zu großer Empfindlichkeit spricht die VOX-Schaltung auch schon auf Hintergrundgeräusche an und schaltet möglicherweise ungewollt auf Sendung.
Hinweis: Bei zu geringer Empfindlichkeit schaltet das Gerät u.U. nicht auf Sendung, sobald Sie zu sprechenbeginnen. Die korrekte Einstellung muss durch Probieren ermittelt werden. Standardwerte gibt es nicht, dajede Stimme in Ihrer Ausprägung anders und einmalig ist.
Vorgang 3.6 VOX einstellen1. Mit [MENU] das Menu öffnen.
2. Mit den △ und ▽ Tasten zu 06: VOX navigieren.3. Nochmals [MENU] drücken zum Auswählen.4. Mit den △ und ▽ Tasten: 0/1/2/3/4/5 wählen.5. Mit [MENU] bestätigen und speichern.6. Mit [MONI] das Menu verlassen.
Sendeleistung (Nur in der US-Version)Vorgang 3.7 Sendeleistung einstellen1. Mit [MENU] das Menu öffnen.2. Mit den △ und ▽ Tasten zu 07: PWR navigieren.3. Nochmals [MENU] drücken zum Auswählen.4. Mit den △ und ▽ Tasten: HIGH/LOW wählen.5. Mit [MENU] bestätigen und speichern.6. Mit [MONI] das Menu verlassen.
"Dual-Watch"-Funktion (TDR)Überwacht gleichzeitig die oben und unten im Display eingestellte Frequenz . Die Frequenz, aufder zuerst Aktivität festgestellt wird, wird als aktiv ausgewählt.
Vorgang 3.8 Dual-Watch einstellen1. Mit [MENU] das Menu öffnen.2. Mit den △ und ▽ Tasten zu 08: TDR navigieren.
3. Nochmals [MENU] drücken zum Auswählen.4. Mit den △ und ▽ Tasten: OFF/ON wählen.5. Mit [MENU] bestätigen und speichern.6. Mit [MONI] das Menu verlassen.
Energiesparmodus (SAVE)Im Energiesparmodus verringert sich die Reichweite des Gerätes spürbar, doch die Akkulaufzeitverlängert um das 2-3fache. Ohne Energiesparmodus ist die Reichweite des Gerätes zwarmaximal, jedoch verringert sich die Laufzeit um den Faktor 2-3.
Vorgang 3.9 Energiesparmodus einstellen1. Mit [MENU] das Menu öffnen.2. Mit den △ und ▽ Tasten zu 10: SAVE navigieren.3. Nochmals [MENU] drücken zum Auswählen.4. Mit den △ und ▽ Tasten: ON/OFF wählen.5. Mit [MENU] bestätigen und speichern.6. Mit [MONI] das Menu verlassen.
Sendezeitbegrenzer (TOT -> Time Out Timer)Es handelt sich um eine Sicherheitseinstellung, mit der die Sendezeit auf einen einstellbarenWert reduziert wird. Zum einen sorgt diese Einstellung dafür, dass Sie keine unendlich langenSendungen tätigen können, was der Akkulaufzeit zuträglich ist. Zum anderen, im Falle einer
klemmenden oder ungewollt gedrückten Sendetaste (z.B. in einer Tasche), sorgt die Einstellungdafür, dass andere Frequenznutzer nicht unnötig gestört werden und beugt somit auch einervorzeitigen Akkuentleerung vor.
Vorgang 3.10 Sendezeitbegrenzer einstellen1. Mit [MENU] das Menu öffnen.2. Mit den △ und ▽ Tasten zu 11: TOT navigieren.3. Nochmals [MENU] drücken zum Auswählen.4. Mit den △ und ▽ Tasten: OFF/30s/60s/90s/120s/150s/180s wählen.5. Mit [MENU] bestätigen und speichern.6. Mit [MONI] das Menu verlassen.
Sendesperre bei belegtem Kanal (BCLO-> Busy Channel Lock Out)Deaktiviert die Sendetaste, solange jemand anderes auf dem eingestellten Kanal sendet.Versucht man dennoch zu senden, gibt das Gerät einen Warnton aus und sendet nicht.
Vorgang 3.11 BCLO einstellen1. Mit [MENU] das Menu öffnen.2. Mit den △ und ▽ Tasten zu 12: BCLO navigieren.3. Nochmals [MENU] drücken zum Auswählen.4. Mit den △ und ▽ Tasten: ON/OFF wählen.5. Mit [MENU] bestätigen und speichern.6. Mit [MONI] das Menu verlassen.
Anrufton (für eingehende Rufe)Es gibt insgesamt zehn verschiendene Töne, die eingehende Anrufe signalisieren. Durch die
Taste lassen sich die verschiedenen Töne auch einstellen.
Vorgang 3.12 Anrufton einstellen1. Mit [MENU] das Menu öffnen.2. Mit den △ und ▽ Tasten zu 13: RING navigieren.3. Nochmals [MENU] drücken zum Auswählen.4. Mit den △ und ▽ Tasten: 1/2/3/4/5/6/7/8/9/10 wählen.5. Mit [MENU] bestätigen und speichern.6. Mit [MONI] das Menu verlassen.
Wettervorhersage Nur in der US-Version verfügbar!In diesem Feature können Sie die Wettervorhersage einstellen.
Vorgang 3.13 Wettervorhersage einstellen1. Mit [MENU] das Menu öffnen.2. Mit den △ und ▽ Tasten zu 14: WEATHER navigieren.3. Nochmals [MENU] drücken zum Auswählen.4. Mit den△ und ▽ Tasten: ON/OFF wählen.5. Mit [MENU] bestätigen und speichern.

Kap. 4 - Computerprogrammierung6. Mit [MONI] das Menu verlassen. Wenn Option auf "ON", wird automatisch in denWettervorhersage modus geschaltet, ansonsten in den normalen Betriebsmodus zurück.
Kanal für Wettervorhersage einstellenIm Wettervorhersage modus die △ und ▽ Tasten drücken, um den Vorhersagekanalauszuwählen: CH1-CH10
CH1:162.550MHz CH2:162.400MHz CH2:162.475MHz CH4:162.425MHz CH5:162.450MHz
CH6:162.550MHz CH7:162.525MHz CH8:161.650MHz CH9:161.775MHz CH10:163.275MHz
SprachansageDiese Funktion aktiviert oder deaktiviert die Sprachansage.
Vorgang 3.14 Sprachansage einstellen1. Mit [MENU] das Menu öffnen.2. Mit den △ und ▽ Tasten zu 15: VOICE PROMPTS navigieren.3. Nochmals [MENU] drücken zum Auswählen.4. Mit den △ und ▽ Tasten: CHI/ENG/OFF wählen.5. Mit [MENU] bestätigen und speichern.6. Mit [MONI] das Menu verlassen.
Wenn Sie Ihr Gerät mit dem Computer programmieren wollen, gehen Sie bitte auf:https://www.radioddity.com/support/.
Anhang A. Fehlersuche
UrsacheSymptom Lösung
Das Gerät schaltet nichtein
Der Akku entläd sichschnell
Die LED zeigt Empfang,aber der Lautsprecherbleibt stumm.
Meine Sendung wirdnicht gehört.
Gerät sendet ohne dassdie PTT gedrückt wird.
Akku leer oder nicht richtiginstalliert.
Der Akku ist verbraucht.Der Akku ist nicht geladen.
Lautstärke zu leise.CTCSS oder DCS aktiv.
Unterschiedliche CTCSS/DCS-Einstellungen.Außerhalb der Reichweite.
VOX ist aktiv. VOXEmpfindlichkeit zu hoch.
Akku tauschen oder aufladen.Akku nochmals installieren.
Neuen Akku erwerben.Akku laden.
Lautstärke erhöhen.Korrekte CTCSS/DCSEinstellungen wählen.CTCSS/DCS ausschalten.
Korrekte CTCSS/DCSEinstellungenwählen.Wieder näher kommen.
VOX abschalten.Empfindlichkeit anpassen.

Anhang B. Technische DatenAllgemeine Spezifikation
Spezifikation
Modell
Frequenzbereich (MHz)
Speicherkanäle
Stabilität
Antennenimpedanz
Temperaturbereich
Betriebsart
Abmessungen (mm)
Gewicht (g)
FS-T1/PR-T1
US: FRS; EU: PMR
99
2.5ppm
50 Ohm
-10℃ to +50℃
Wechselsprechen auf einer Frequenz
170X50X28
120g
Sender
Sender spezifikation
Spezifikation
Sendeleistung (W) US: 0.5/2W; EU: 0.5W
Modulationsart FM
Maximaler Hub (kHz) ≤±5.0
Nebenaussendungen (dB) <-60dB
Strombedarf(mA) ≤1000
Empfänger
Empfänger spezifikation
Spezifikation
Empfindlichkeit <0.16μV (12dB SINAD)
Intermodulation ≥65dB
Audioleistung ≥380mW
Squelchempfindlichkeit <0.2μV
Strombedarf ≤380mA

Anhang C. PMR Frequenztabelle
Wir danken Ingo Bünnemeyer, DB4BIN, recht herzlich für die Mithilfe bei derErstellung (Übertragung und Bearbeitung) dieser deutschen Bedienugsanleitung!
PMR
Kanalnummer
1
2
3
4
5
6
7
8
Frequenz (MHz)
446.00625
446.01875
446.03125
446.04275
446.05625
446.08125
446.08125
446.09375
Kanalnummer
9
10
11
12
13
14
15
16
Frequenz (MHz)
446.10625
446.11875
446.13125
446.14375
446.15625
446.16875
446.18125
446.19375