Designing Stellar Publications with Microsoft Publisher 2007 · PDF fileThe range of...
30
Designing Stellar Publications Designing Stellar Publications Designing Stellar Publications with with with Microsoft Publisher Microsoft Publisher Microsoft Publisher 2007 2007 2007 Workbook Workbook Instructor: David Newbold Information Commons Biomedical Library 05/30/2008
Transcript of Designing Stellar Publications with Microsoft Publisher 2007 · PDF fileThe range of...

Page
Designing Stellar Publications Designing Stellar Publications Designing Stellar Publications
with with with Microsoft PublisherMicrosoft PublisherMicrosoft Publisher
200720072007
WorkbookWorkbook
Instructor: David Newbold
Information Commons Biomedical Library
05/30/2008
Page 2 Mastering Microsoft Publisher
Introduction to Microsoft Publisher Microsoft Publisher is a desktop publishing program that can be used for creating a wide range of publish-able materials including newsletters, brochures, flyers, posters, booklets menus, banners, etc. The pro-gram comes with templates that can be customized in many ways including content, color and layout. This program is very user friendly, incorporating a system of independent text and graphic boxes which can be moved, adjusted and attached for maximum flexibility. People who do not have a graphic design background will enjoy the simplicity of the program while being able to showcase their individual creativ-ity at the same time.
Mastering Microsoft Publisher Page 3
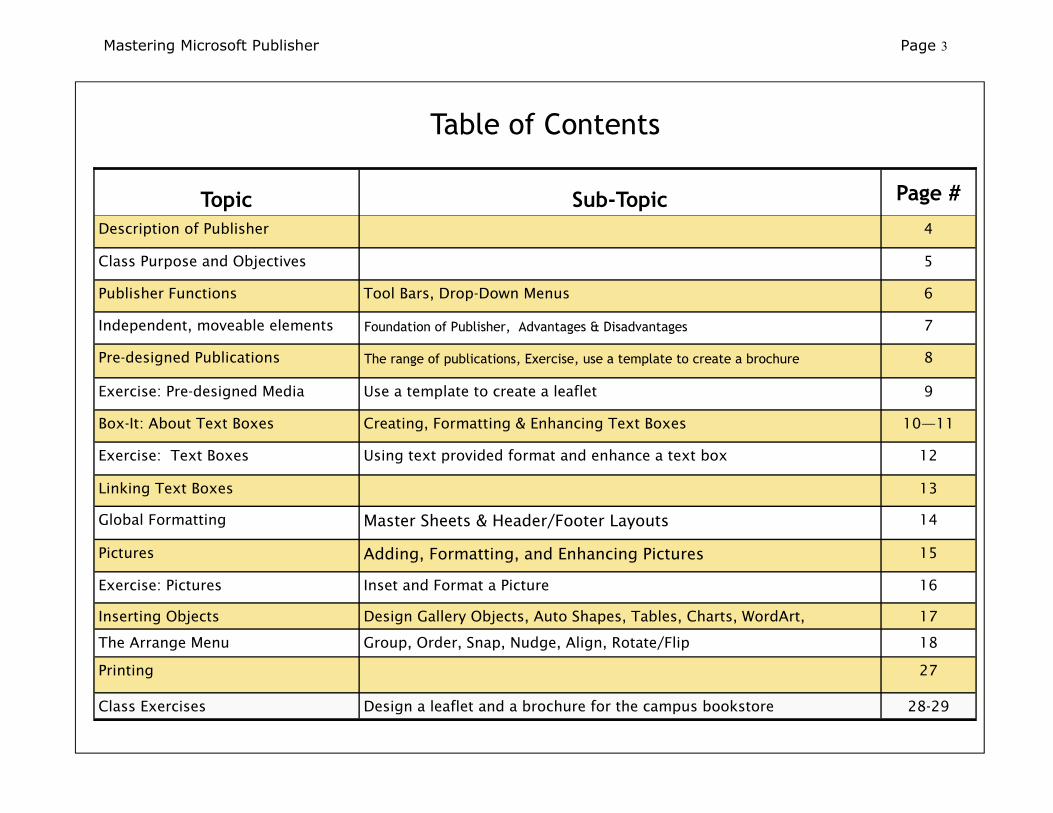
Table of Contents
Topic Page #
Description of Publisher 4
Class Purpose and Objectives 5
Publisher Functions 6
Independent, moveable elements 7
Pre-designed Publications 8
Exercise: Pre-designed Media 9
Box-It: About Text Boxes 10—11
Exercise: Text Boxes 12
Linking Text Boxes 13
Sub-Topic
Tool Bars, Drop-Down Menus
Foundation of Publisher, Advantages & Disadvantages
The range of publications, Exercise, use a template to create a brochure
Use a template to create a leaflet
Creating, Formatting & Enhancing Text Boxes
Using text provided format and enhance a text box
Global Formatting Master Sheets & Header/Footer Layouts 14
Pictures Adding, Formatting, and Enhancing Pictures 15
Exercise: Pictures Inset and Format a Picture 16
Inserting Objects Design Gallery Objects, Auto Shapes, Tables, Charts, WordArt, 17
The Arrange Menu Group, Order, Snap, Nudge, Align, Rotate/Flip 18
Printing 27
Class Exercises Design a leaflet and a brochure for the campus bookstore 28-29

Page 4 Mastering Microsoft Publisher
Description of the Publisher Class
Microsoft® Publisher 2007 (included in the Microsoft Office Suite) is an easy to use, flexi-
ble program for creating newsletters, brochures, business cards, postcards, flyers, and a wide range of other media, for print, email, and the Web.
In this course, you will learn how to create a publication from scratch and use one of the
hundreds of business and personal designs available in Publisher. This program is very user friendly and provides powerful tools for creating a wide range of sophisticated documents while keeping the mechanics simple and easy to learn.

Mastering Microsoft Publisher Page 5
Class Goals
As a result of this class, you will -
• Be able to use Publisher to create a wide range of printed materials
• Gain a basic understanding of desktop publishing
• Enjoy using Publisher both for work and personal applications
• Become confident in your ability to create printed materials • Enhance the quality of the work you perform using Publisher

Page 6 Mastering Microsoft Publisher
The Publisher Work Area
Objects Toolbar
Standard Toolbar
Format Toolbar
Task Pane
Menu Bar

Mastering Microsoft Publisher Page 7
Tool Bars Menu Bar
Standard Toolbar
Formatting Toolbar
Picture Toolbar
WordArt Toolbar Shadow Toolbar
Page 8 Mastering Microsoft Publisher
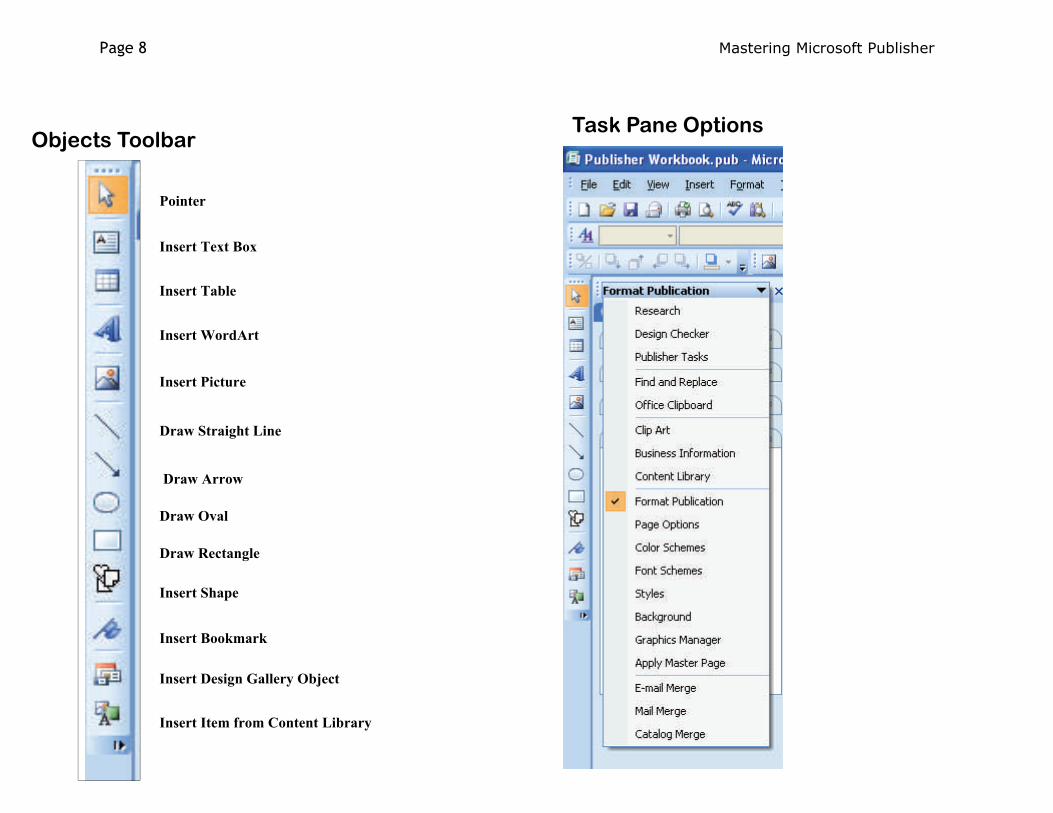
Objects Toolbar
Pointer
Insert Text Box
Insert Table
Insert WordArt
Insert Picture
Draw Straight Line
Draw Arrow
Draw Oval
Draw Rectangle
Insert Shape
Insert Bookmark
Insert Design Gallery Object
Insert Item from Content Library
Task Pane Options

Mastering Microsoft Publisher Page 9
Independent Elements You may be pleasantly surprised by just how much control you have over text in Publisher. Text doesn't just fill up all the space between the margins and flow from one page to the next, as it does in a word-processing program. Instead, each block of text lives in a container called a text box, and you build publications by arranging text boxes on your pages.
You can place a text box anywhere you want on a page, make it any size you want, and divide it into col‐umns; you can also connect one text box to another so text flows be‐tween them — even if the text boxes are on different pages. You have a lot of control over both the placement of text boxes and the ap‐pearance of the text within the text boxes.
Independent, Moveable Elements The Foundation of Publisher
Select, modify, move and reshape the elements below so that they fit together as a
cohesive whole.
Page 10 Mastering Microsoft Publisher
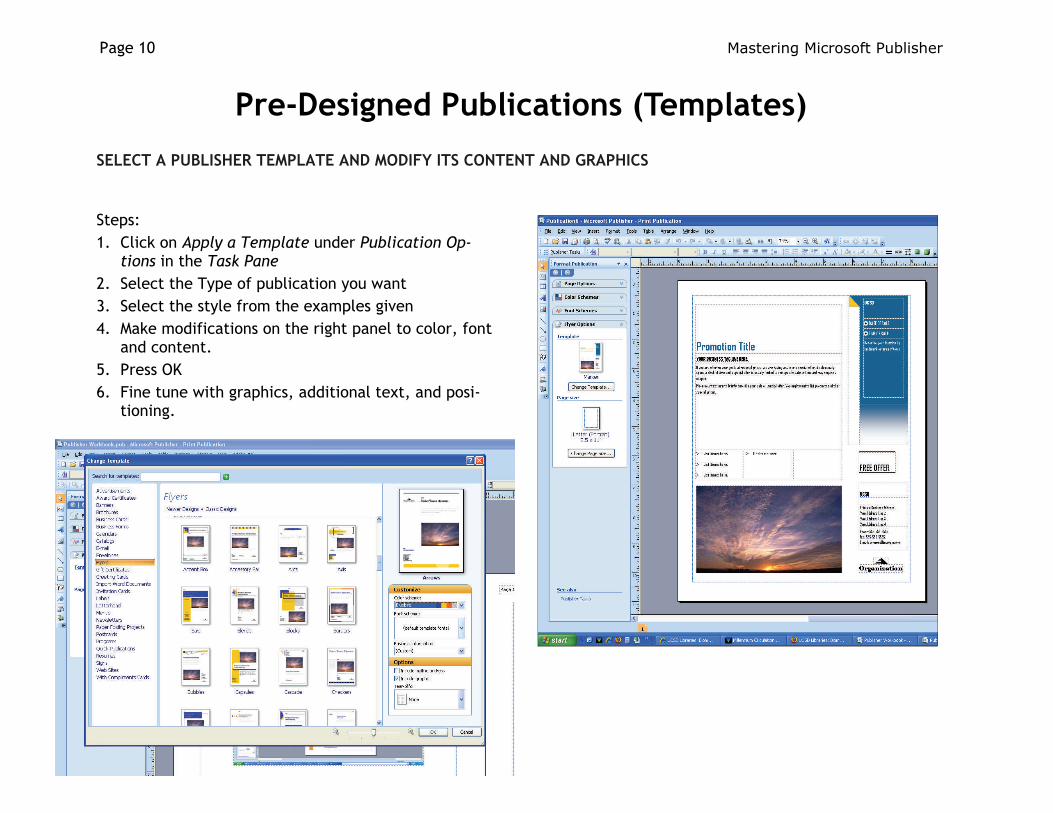
Pre-Designed Publications (Templates)
SELECT A PUBLISHER TEMPLATE AND MODIFY ITS CONTENT AND GRAPHICS
Steps: 1. Click on Apply a Template under Publication Op-
tions in the Task Pane 2. Select the Type of publication you want 3. Select the style from the examples given 4. Make modifications on the right panel to color, font
and content. 5. Press OK 6. Fine tune with graphics, additional text, and posi-
tioning.

Mastering Microsoft Publisher Page 11
Text Boxes CREATE A TEXT BOX
1. From the Objects Toolbar (or Insert menu), select the Textbox tool
2. The pointer turns into a cross-hair
3. Position the cross-hair over the place where you want the text box to be situated.
4. Press down and hold your left mouse button as you draw the cross-hair toward the bottom right corner of your document.
5. When the box is sufficiently large (you can always enlarge or diminish it later on), release the mouse button.
6. A blank text box now appears on the page
7. To insert text, you can either start typing, or copy text from another source and paste it into the text box.
8. Once the text has been entered, you can adjust the size of the box, using any of the 8 handles that sur-round it.
9. See the next lesson to format the color, size, font, type, and paragraph structure to the text using the buttons on your formatting tool bar.
You can place a text box anywhere you want on a page, make it any size you want, and divide it into columns; you can also connect one text box to an-other so text flows between them — even if the text boxes are on different pages. You have a lot of con-trol over both the placement of text boxes and the appearance of the text within the text boxes.
Page 12 Mastering Microsoft Publisher
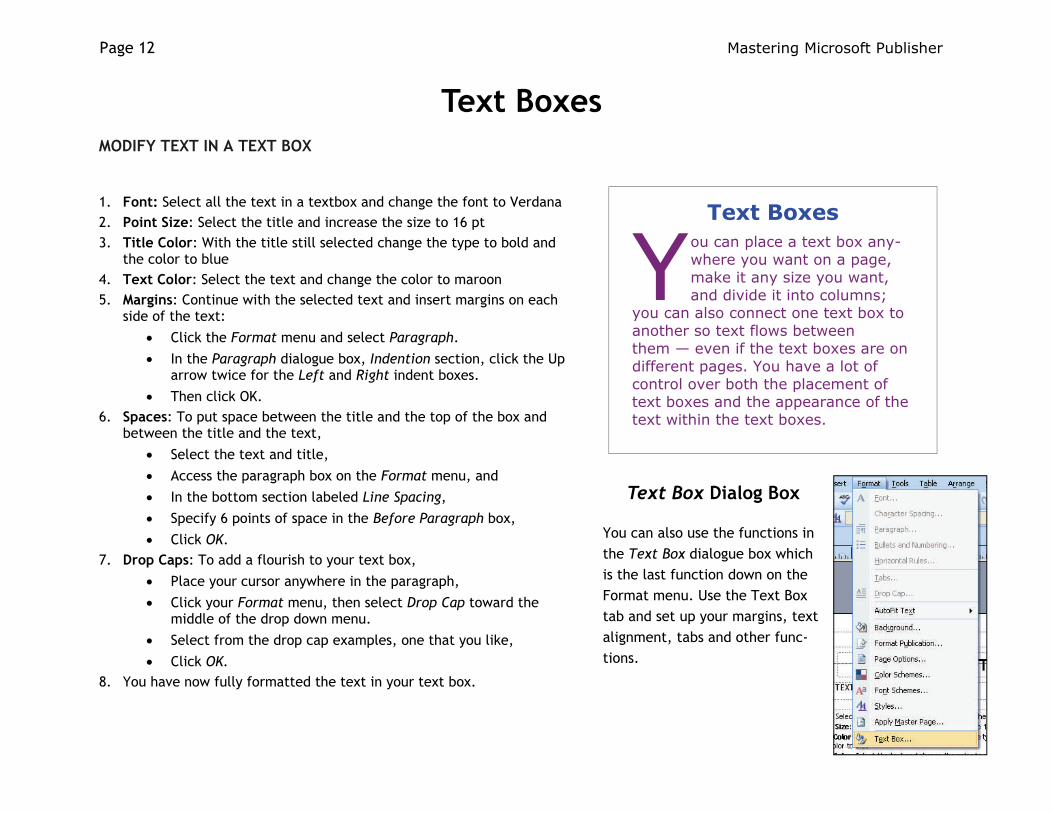
Text Boxes MODIFY TEXT IN A TEXT BOX
Text Boxes
Y ou can place a text box any-where you want on a page, make it any size you want, and divide it into columns;
you can also connect one text box to another so text flows between them — even if the text boxes are on different pages. You have a lot of control over both the placement of text boxes and the appearance of the text within the text boxes.
1. Font: Select all the text in a textbox and change the font to Verdana 2. Point Size: Select the title and increase the size to 16 pt 3. Title Color: With the title still selected change the type to bold and
the color to blue 4. Text Color: Select the text and change the color to maroon 5. Margins: Continue with the selected text and insert margins on each
side of the text:
• Click the Format menu and select Paragraph.
• In the Paragraph dialogue box, Indention section, click the Up arrow twice for the Left and Right indent boxes.
• Then click OK. 6. Spaces: To put space between the title and the top of the box and
between the title and the text,
• Select the text and title,
• Access the paragraph box on the Format menu, and
• In the bottom section labeled Line Spacing, • Specify 6 points of space in the Before Paragraph box,
• Click OK. 7. Drop Caps: To add a flourish to your text box,
• Place your cursor anywhere in the paragraph,
• Click your Format menu, then select Drop Cap toward the middle of the drop down menu.
• Select from the drop cap examples, one that you like,
• Click OK. 8. You have now fully formatted the text in your text box.
Text Box Dialog Box
You can also use the functions in the Text Box dialogue box which is the last function down on the Format menu. Use the Text Box tab and set up your margins, text alignment, tabs and other func-tions.

Mastering Microsoft Publisher Page 13
Text Boxes MODIFY A TEXT BOX
Text Boxes
Y ou can place a text box anywhere you want on a page, make it any size you want, and divide it into columns; you can also connect one
text box to another so text flows between them — even if the text boxes are on dif-ferent pages. You have a lot of control over both the placement of text boxes and the appearance of the text within the text boxes.
There are many ways in which we can format a text box; in this exercise we’ll try some of the more common ones: • Background: Select the text box by clicking on the border
• From the Format menu select Text Box at the very bottom • The Text Box dialog box appears • In the Fill Color section, click on the down arrow and select Fill Effects • Click on the Picture tab and choose a picture file and press OK • Use the Transparency slider to fade the picture so it doesn’t compete
with the type. • Press OK
• Border: From the Line section, • Select a line color for the border • Then select a line weight, either from the drop down Style box or from
the line Weight box. • Border Art: You can also use Border Art from this menu, providing your text box
is sufficiently large to accommodate the border images and your text. • AutoFit Text: To make your text fit into a specific sized box, you can use the
Auto Fit feature in the Text Box tab (see below).

Page 14 Mastering Microsoft Publisher
1. The Bullets and Numbering toolbar buttons are lo-cated on the Formatting tool bar.
2. For additional formatting of bullets and numbering, go to the Bullets and Numbering dialog box in the Format menu.
3. There is a tab for bullets and a tab for numbering
BULLETS & NUMBERING
Text Boxes
In Publisher, it's easy to turn any text box into equally spaced columns of the same size.
When you add text to columns that you create by dividing a text box, the text automatically flows from one column into the next.
1. To divide a text box into columns,
• Click Text Box on the Format menu
• Click the Text Box tab, and then
• Click Columns.
• You can then choose the number of columns you want to divide the text box into, and you can control the spacing between the text and the column boundary.
2. You can also make columns by creating a separate text box for each column. In this case, text will not flow automatically from one column to the next unless you link the text boxes. We'll cover linking in the next lesson.
DIVIDING TEXT BOXES INTO COLUMNS
Divide Text Box into columns
In Publisher, it's easy to turn any text box into equally spaced col-umns of the same size.
When you add text to columns that you create by dividing a text box, the text automatically flows from one column into the next.
• To divide a text box into col-umns, click Text Box on the Format menu, click the Text Box tab, and then click Col-umns. You can then choose the
number of columns you want to divide the text box into, and you can control the spacing between the text and the col-umn boundary.
• You can also make columns by creating a separate text box for each column. In this case, text will not flow automatically from one column to the next unless you link the text boxes. We'll cover that in the next lesson.

Mastering Microsoft Publisher Page 15
In publications such as newsletters or brochures, you often start a story on one page and continue it on another. In Publisher, you can easily continue a story by:
• Linking the text box where the story starts to the text box where it continues.
• Adding "Continued" notices that update auto-matically if you move text boxes around.
1. To link one text box to another, first click the text box that you want to link from,
2. then click the Create Text Box Link tool .
3. The cursor becomes a little pitcher . When you click the empty text box that you want to link to, any overflow text pours into the text box.
To add a "Continued" notice to a text box,
• click the text box.
• On the Format menu, click Text Box,
• Click the Text Box tab. You can choose to in-clude either "Continued on page…" or "Continued from page…".
CONTINUE A STORY IN ANOTHER TEXT BOX
Linking Text Boxes
Independent Elements You may be pleasantly surprised by just how much control you have over text in Publisher. Text doesn't just fill up all the space between the margins and flow from one page to the next, as it does in a word-processing program. Instead, each block of text lives in a container called a text box, and you build pub-lications by arranging text boxes on your pages.
You can place a text box anywhere you want on a page, make it any size you want, and divide it into columns; you can also connect one text box to another so text flows between them — even if the text boxes are on different pages. You have a lot of control over both the placement of text boxes and the appearance of the text within the text boxes.

Page 16 Mastering Microsoft Publisher
Master pages contain the design and layout elements that you want to repeat on multiple pages in a publication. Using master pages for these common elements gives your publication a more consistent appearance. It also lets you create and update these elements in one place, rather than changing them on each publi-cation page.
A master page can contain anything that you can put on a publi-cation page, as well as some elements (such as headers, footers, and layout guides) that can only be set up on a master page.
To set up a master page,
• In the View menu Click on Master Page
• Set Up one or more Master pages
• Click on “Close Master Page” when you are done
The Task Pane will default to the Apply Master Page enabling you to apply your master page(s) to whichever of your publication pages you choose.
Master pages can be a single-page master or a two-page master (as for facing pages in a book). Master pages can be applied to a single page, to both pages in a two-page spread, to separate pages in a two-page spread, or to a range of pages
MASTER PAGES AND HEADERS & FOOTERS
Global Formatting

Mastering Microsoft Publisher Page 17
FORMAT PICTURES ~ PART 1
Frame it
Insert a Picture Into a Page 1. From the Insert menu, select Picture 2. Select From File 3. From the Insert Picture dialog box select the image you wish to insert 4. The picture appears on the page of your publication Move & Resize Pictures 1. Select the picture you just inserted 2. Move it to the approximate area on the page it will occupy 3. Adjust the size of the picture using any of the six handles appearing on the picture’s
border 4. When it’s in the approximate size you want it, you can hold down the Alt key and use your ar-
rows to make minor adjustments to the picture’s position. The Picture Tool Bar (See example below) 1. A picture’s color can be changed from full color to gray scale, black & white or washout, us-
ing the “Color/B&W toolbar button 2. Contrast may be increased or decreased using the Contrast buttons 3. A picture may be lightened or darkened using the lighter & darker button 4. You can crop out parts of a picture using the Crop tool 5. You can add a border using the Border tool 6. You can compress a picture and reduce the number of pixels using the Compress tool. 7. You can control how your text wraps around a picture using the Text Wrap tool. 8. The Set Transparent tool allows you to delete superfluous elements of a picture. 9. The Reset button will restore a picture to its original state. 10. The Format Picture button is a dialog box with several tabs relating to colors, size, and lay-
out, as well as functions described above.
Color/ Lighter Darker Compress Format Reset B&W Picture
Insert Scanned Contrast Text Set Picture Picture More Less Crop Border Wrap Transparent

Page 18 Mastering Microsoft Publisher
FORMAT PICTURES ~ PART 2
Frame it
Text Wrapping There are several ways to wrap text around a picture • Square: The text leaves a square space around the picture
• Tight: Text flows tightly around the picture’s features
• Through: Text flows tightly around picture’s edges
• Top & Bottom: Text is situated around a picture’s top and bottom edges, but not in the middle
• None: Text flows in back of or in front of picture
• Edit Wrap Points: Allows minute adjustments to a picture’s text flow
To Wrap text around a picture ~
• Select the picture.
• From the Format menu, select Picture.
• The Format Picture dialog opens.
• Select the Layout tab.
• Select a wrapping style.
• Adjust the distance of the picture from the text as neces-sary.
• Click OK
Square Master pages contain the design and layout elements that you want to repeat on multiple pages in a publication. Using master pages for these common elements gives your publication a more consistent appearance. It also lets you cre-ate and update these elements in one place, rather than changing them on each publication page.
A master page can contain anything that you can put on a publication page, as well as some elements (such as headers, footers, and layout guides) that can only be set up on a master page.
Top & Bottom Master pages contain the design and layout elements that you want to repeat on multiple pages in a publication. Using master pages for these common elements gives your publi-
cation a more consistent appearance. It also lets you create and update these elements in one place, rather than changing them on each publication page.
Edit Master pages contain the design and layout elements that you want to repeat on multiple pages in a publication. Using master pages for these common elements gives your publication a more consistent appearance. It also lets you create and update these elements in one place, rather than changing them on each publication page.
A master page can contain anything that you can put on a publication page, as well as some elements (such as headers, footers, and layout guides) that can only be set up on a master page.

Mastering Microsoft Publisher Page 19
FORMAT PICTURES ~ PART 3
Frame it
Formatting a Picture in a Shape 1. Select a shape from the Auto Shape menu on the Object toolbar 2. Double click the shape to bring up the Auto Shape toolbar 3. In the Colors and Lines tab, in the Fill section, click on the drop-
down menu 4. Select “Fill Effects” 5. Click on the Picture tab 6. Click the Select button 7. Select the picture you want to insert 8. Click ok and ok again 9. The photo appears in the shape
Formatting a Picture as a Watermark 1. Insert your picture into a page 2. Select the picture 3. Select the Format Picture function on the Picture Toolbar 4. On the Picture tab under Image Control click the Color dropdown menu 5. Select “Washout” 6. Click “OK” 7. Your picture will appear like the one to the right. You can also adjust the degree of lightness or contrast applied to the water-mark by using the brightness and contrast sliders below the “Washout” drop-down menu.

Page 20 Mastering Microsoft Publisher
FORMAT PICTURES ~ PART 4
Frame it
Insert a picture from Clipart
1. From the Insert menu select Picture>Clipart
2. The Task Pane converts to the Clip Art format
3. Type a word into the Search for field
4. From the “Search In” menu, click Everywhere
5. In the Results dhould be menu click the type of media you want to access (Clip art, Photographs, Movies and/or Sounds)
6. Click on the one you want
7. Move it and adjust the size accordingly
Create a Shadow effect
1. Insert a picture from file or clip art
2. Select the picture
3. From the Shadow tool on the formatting tool bar either select the direction and depth of shadow, or select Shadow Settings at the bottom of the menu to bring up the Shadow toolbar.
4. The Shadow toolbar lets you make fine adjustment to the size and color of the shadow.

Mastering Microsoft Publisher Page 21
FORMAT PICTURES ~ PART 5
Frame it
Graphic File Formats: There are many different graphic file formats; here are a few of the most commons ones with their extensions and primary uses:
• Graphics Interchange Format (GIF) for line art
• Joint Photographic Experts Group (JPEG) for photographs
• Bitmap (BMP) for line art
• Windows Metafile Format (WMF) for line art
• Tagged Image File Format (TIFF) for photos and line art

Page 22 Mastering Microsoft Publisher
INSERTING OBJECTS
Objects
Design Gallery Objects
Use Design Gallery objects to supplement and add graphic elements and color to your Publisher creations, e.g. advertisement formats, calendars, accent boxes, accessory bars, barbells, etc.
To add a Design Gallery object click on the Insert menu and select Design Gallery Object, or click the second from the bottom button on the Object toolbar on the left side of the work area
Select the category, then the object that best fits your design.
Press the Insert button at the bottom right corner
Move, size, and/or recolor the object as necessary.
Attention Grabber
Newsletter Title Volume 1, Issue 1
Newsletter Date
U C S D
“To catch the
reader's attention,
place an interesting
sentence or quote
from the story
here.”
Special points of interest: ● Briefly highlight your point of
interest here.
● Briefly highlight your point of interest here.
● Briefly highlight your point of interest here.
● Briefly highlight your point of interest here.

Mastering Microsoft Publisher Page 23
INSERTING OBJECTS
Objects
Auto Shapes
Use Auto Shapes to provide graphic expression to your document, to frame a picture or to describe a process, highlight an advertisement or create a focal point
• On the Task Pane, click on the fourth button from the bottom
• Choose one of the categories
• Select a shape or object
• The cursor changes to a cross hair
• Using your mouse and depressing your left mouse button, drag the cross hair in the po-sition and to the size you want it.
• Release the mouse button and make adjustments to size and position.

Page 24 Mastering Microsoft Publisher
THE GROUP COMMAND
The Arrange Menu
If you have several objects, like a text box, a picture and a shape, and want to keep them all together, you can use the Group Command on the Arrange menu to make sure that when you move one, you will move them all. To use the Group command
1. Select all the objects you want to group, clicking on each object while holding down the Control key.
(You can also “lasso” the elements by dragging your cursor over them)
1. On the Arrange menu, click the Group command (4th from the top)
2. Your elements have all be linked together in a group so that when you move one, you move them all
3. To ungroup the items, make sure that the group is selected, click the Ungroup command on the Arrange menu, and the objects will become independent elements once again.

Mastering Microsoft Publisher Page 25
THE ORDER COMMAND
The Arrange Menu
In those instances where you have several layers of text, background and objects you will need to use the Order command to work with each element separately. There are four options: Bring to Front; Bring Forward, Send to Back, Send Backward.
In the example below, we have three objects: a shape that is forming the background, a textbox and a picture.
To work on the background,
• Select the background shape,
• Go to the Arrange Menu and select the Order command
• Select Bring to Front
• The background shape comes before the text and picture
Text Boxes
Y ou can place a text box anywhere you want on a page, make it any size you want, and divide it into columns; you can also
connect one text box to another so text flows between them — even if the text boxes are on different pages. You have a lot of control over both the placement of text boxes and the appearance of the text within the text
Text Boxes
Y ou can place a text box anywhere you want on a page, make it any size you want, and divide it into columns; you can also connect one
text box to another so text flows between them — even if the text boxes are on dif-ferent pages. You have a lot of control over both the placement of text boxes and the appearance of the text within the text boxes.

Page 26 Mastering Micro-
THE SNAP COMMAND
The Arrange Menu
To align objects to a specific grid, use the Snap command, once it is turned on, it causes objects to attach them-selves to invisible lines like metal to a magnet. The Snap command is active by default. Also available from the same sub-menu are “Snap to Ruler Marks” and “Snap to Objects.” To turn it off the Snap commands, in the Ar-range menu click on Snap, then the relevant Snap command
THE NUDGE COMMAND
Use the Nudge Command to move an object by a very small amount. The Nudge command has a sub-menu for each of four directions. To nudge an object:
Select the object
In the Arrange menu select Nudge, then the direction in which you want to object to move
You can also achieve the same result by holding the Alt key and pressing keyboard arrows.
THE ALIGN & DISTRIBUTE COMMAND
As the name of the Command indicates, the Align & Distribute Command helps you to align and distribute objects on a page relative to other objects and to the page itself. To use the command,
• Select the objects you want to align
• From the Arrange menu, select Align & Distribute
• From the sub-menu, select one of the nine options
• Be sure to try several different options at first in order to understand how each option works

Mastering Microsoft Publisher Page 27
Printing a Standard Document
Printing
• From the File menu , select Print... The Print dialog box appears.
• From the Printer name pull-down list, select the de-sired printer
• To set more printing options, click Properties
• In the Print range and Copies sections, make the necessary changes
• Click OK The document is printed.
Page 28 Mastering Microsoft Publisher
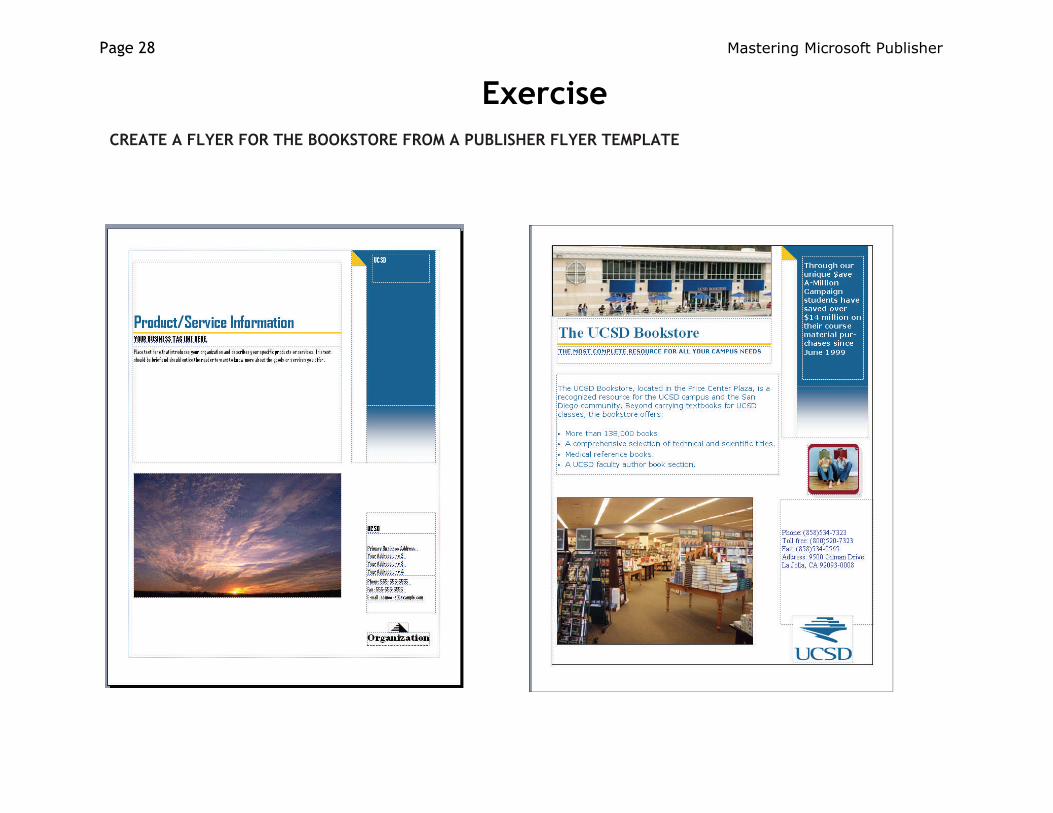
CREATE A FLYER FOR THE BOOKSTORE FROM A PUBLISHER FLYER TEMPLATE
Exercise

Mastering Microsoft Publisher Page 29
CREATE A BROCHURE FOR THE BOOKSTORE FROM A PUBLISHER BROCHURE TEMPLATE
Exercise

Page 30 Mastering Microsoft Publisher
For additional information, support or consultation, please contact:
David Newbold
Biomedical Library 858-534-3746