Designed by Lucy A. Fazely for Blank...
17
-
Upload
nguyendang -
Category
Documents
-
view
213 -
download
0
Transcript of Designed by Lucy A. Fazely for Blank...

Fabric Requirements:Fabric A: 1/2 yd 3504 SiennaFabric B: 1/4 yd 3504 CinnamonFabric C: Fat Eighth 3504 IceFabric D: Fat Eighth 3504 GreenFabric E: Fat Eighth 3504 MeadowFabric F: 2" x 2" 3504 LollipopFabric G: 1/2 yard 3504 LipstickFabric H: Fat Eighth 3504 BlushFabric I: Fat Eighth 3504 GlowFabric J: Fat Eighth 3504 Flamingo
Fabric Requirements:Fabric K: Fat Eighth 3504 MintFabric L: Fat Eighth 3504 NectarFabric M: Fat Eighth 3504 PetalFabric N: Fat Eighth 3504 WisteriaFabric O: Fat Eighth 3504 CloudYou will also need: 1 yard 12" wide fusible web1/2 yard 20" wide tear away stabilizerThreads to match and clear nylon threadBatting: (1) 12" x 14" and (2) 10" x 10" pieces1 yd 12" wide Insul-Bright, or 12" x 36" heat resistant fabric
Cutting Directions:From Fabric A:
Cut (1) 12" x WOF strip, recut into (1) 12" x 14" for trivet backing and (1) 7" x 10-1/2" for Gingerbread house front
From Fabric B:Cut (1) 2-1/2" x WOF strips for binding
From Fabric G:Cut (1) 10" x WOF strip, recut into (4) 10" squares for potholders
Designed by Lucy A. Fazely for Blank Quilting
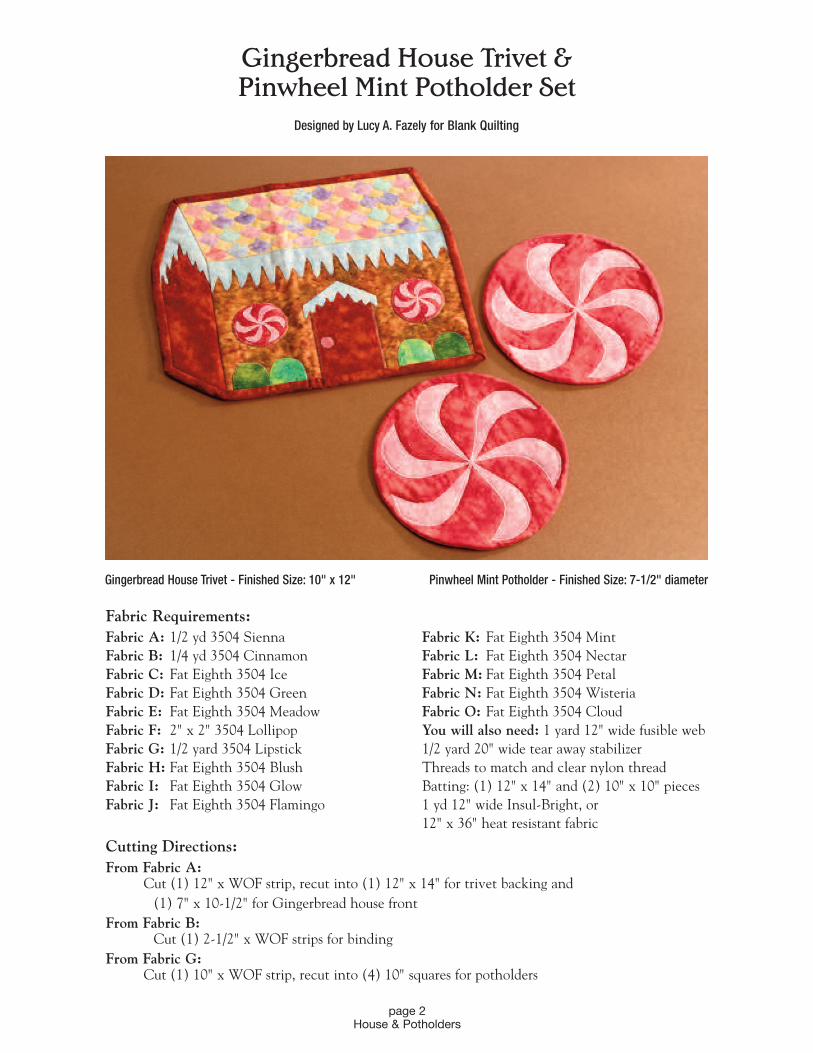
Gingerbread House Trivet - Finished Size: 10" x 12" Pinwheel Mint Potholder - Finished Size: 7-1/2" diameter
page 2House & Potholders
Gingerbread House Trivet &Pinwheel Mint Potholder Set

page 3House & Potholders
Sewing Instructions:1. Using templates right side up on right side of fabrics, cut House Side from Fabric B
and Roof from Fabric I.
2. Place appliqué templates (not the Pinwheel Mint Potholder Template, House SideTemplate or Roof Template) face down on paper side of fusible web, trace the num-ber of each template indicated on the template. Leave about 1/2" between eachtracing.
3. Roughly cut out each shape, leaving about 1/4" around each tracing.
4. Lay each tracing, web side down on wrong side of the fabrics indicated on templatesbetween square brackets [ ]. Lightly fuse in place.
5. Cut out each appliqué piece along marked lines.
6. Place the Fabric C Roof Icicles long edge of the 7" x 10-1/2" Fabric A piece, matching raw edges. Place the Side Icicles Fabric C appliqué on top edge of theFabric B House Side Piece. Press icicles in place.
7. Matching seam points, sew Fabric I Roof to long side of 7" x 10-1/2" Fabric A piece.Press seam to Roof. Diagram 1
8. Matching seam points, stitch Fabric B House Side to Fabric A 7" x 10-1/2" piece,stopping with needle in fabric at roof seam. Diagram 2 Turn House Side so theremaining side is flush with the side of the roof. Stitch remaining seam. Diagram 3Press seam to roof and house. Diagram 4
9. Arrange the remaining appliqué pieces (except Potholder Swirls) on piecedGingerbread House background.
10. Permanently fuse appliqués in place according to the web manufacturer’s directions.
11. Hand or machine stitch around the raw edges of appliqués, except along outsideedges of Gingerbread House background. If sewing by machine, set to a short, narrowzigzag stitch and layer tear-away stabilizer under the piece you're working on. Use aclear nylon thread through the needle. A matching or contrasting all-purpose threadcan also be used through the needle. Use a neutral all-purpose thread in the bobbin.Do not use nylon thread in the bobbin. Remove stabilizer when done.
12. To finish trivet, layer from bottom up: 12" x 14" backing face down, 12" x 14" batting, 12" x 14" Insul-Bright shiny side up with Gingerbread House top face up.Baste layers together. Quilt or tie as desired. Trim batting and backing even with top.
13. Fold (1) 2-1/2" Fabric B strip in half lengthwise and use to bind trivet.
14. To make potholders, center and trace the outside line from the Pinwheel MintPotholder Template on wrong side of (2) 10" Fabric G pieces. Layer each potholderfrom bottom up: 10" square batting, 10" square Insul-Bright shiny side up, 10"unmarked square of Fabric G face up, then the marked 10" Fabric G square facedown. Pin baste layers together. Stitch around the marked circle. Trim excess tobetween 1/8" to 1/4". Using the Pinwheel Mint Potholder Template as a guide, cut a2" slit in only the top layer of Fabric G – placing slit where a Potholder Swirl willcover the slit. Turn potholder right sides out, push seams out and press edges flat.Using template as a guide, place the Potholder Swirls on the Fabric G side with theslit, being sure to completely cover the slit with a swirl. Press swirls in place. Stitchedges of appliqué in the same manner as the pieces in Gingerbread House Trivet,except there will be no need for tear-away stabilizer since there are multiple layers offabric and batting.
Gingerbread House Trivet & Pinwheel Mint Potholder Set
Diagram 4
Diagram 3
Diagram 2
Diagram 1
(Gingerbread House Trivet & Pinwheel Mint Potholder templates are on pages 4-7)

Downloads from the internetare not always consistent.Check your print out to verifysize accuracy of templatesbefore cutting.
page 4House Templates

Downloads from the internetare not always consistent.Check your print out to verifysize accuracy of templatesbefore cutting.
page 5House Templates

Downloads from the internetare not always consistent.Check your print out to verifysize accuracy of templatesbefore cutting.
page 6House & Potholder Templates

page 7Potholder Template
Downloads from the internet are not always consistent.Check your print out to verify size accuracy of templates before cutting.

Fabric Requirements:Fabric A: 1 yd 3504 DanubeFabric B: 6" sq 3504 GlowFabric C: Fat Eighth 3504 GoldFabric D: 6" sq 3504 MelonFabric E: 3" sq 3504 IceFabric F: 5" sq 3504 BlackFabric G: 5" sq 3504 BuffFabric H: 4" x 8" pc 3504 CocoaFabric I: 3" sq 3504 CinnamonFabric J: 3" x 7" pc 3504 SiennaFabric K: 5" x 8" pc 3504 NutmegFabric L: 3" x 8" pc 3504 CedarFabric M: 5" sq 3504 Cardinal
Fabric Requirements:Fabric N: 5" sq 3504 SkyFabric O: 5" sq 3504 PoolFabric P: 5" sq 3504 GreenFabric Q: 5" sq 3504 MeadowFabric R: 5" sq 3504 LipstickFabric S: 5" sq 3504 CherryFabric T: 5" sq 3504 WisteriaFabric U: 5" sq 3504 EggplantYou will also need:Threads to match and clear nylon threadBatting: (4) 7-1/2" x 11" pieces and
(1) 11" x 11" square
Cutting Directions:From Fabric A:
Cut (2) 10-1/2" x WOF strip, recut into (2) 10-1/2" x 10-1/2" and (8) 6-3/4" x 10-1/2"
Cut (2) 2-1/2" x WOF strip for binding
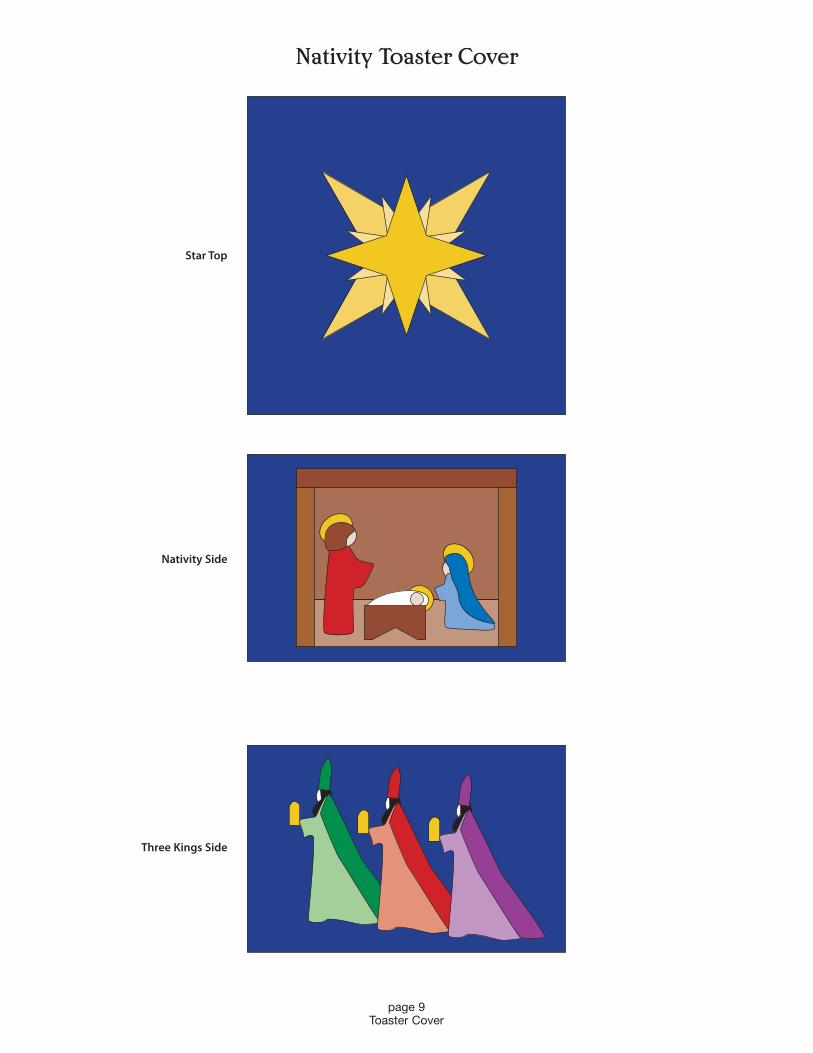
Designed by Lucy A. Fazely for Blank QuiltingNativity Four-slice Toaster Cover - Finished Size: 10" x 10" x 6-1/2"
page 8Toaster Cover
Nativity Toaster Cover
Star Top
Nativity SideAll faces – Fabric G
Three Kings SideAll faces – Fabric GAll beards – Fabric F
page 9Toaster Cover
Nativity Toaster Cover
Star Top
Nativity Side
Three Kings Side

page 10Toaster Cover
Construction Notes: Use a 1/4" seam throughout. Back stitch 1/4" away start and stop of each seam. TemplatesNOT reversed. Template sizes given to nearest 1/8". Dashed lines on templates show placement in relation to over-lapping appliqué pieces.
Sewing Instructions:1. Cut a 4-1/2" x 7" piece of fusible web. Lightly press it to wrong side of Fabric K and trim to 4" x 6-1/2" piece.
Cut a 1-1/2" x 7" piece of fusible web, lightly press to wrong side of Fabric L and trim to 1-1/2" x 6-1/2" piece.Cut a 1-1/2" x 6" piece of fusible web, lightly press to wrong side of Fabric J and cut (2) 1/2" x 5-1/4" pieces.Cut a 1-1/2" x 7-1/2" piece of fusible web, lightly press to wrong side of Fabric H and cut a 3/4" x 7" piece.
2. Arrange stable pieces on (1) 6-3/4" x 10-1/2" piece of Fabric A. The Fabric L piece over laps the Fabric Kpiece by 1/4". Lay the Fabric J pieces on sides, overlapping the L/K pieces by 1/4" Top with the Fabric H piece,covering the lower part of stable by 1/4" The stable should be about 1/2" from top and 1/2" from bottom of thelong edges of the Fabric A background. Permanently press stable in place following manufacturer's instructions.
3. Place appliqué templates face down on paper side of fusible web, trace the number of each template indicatedon the template. Leave about 1/2" between each tracing.
4. Roughly cut out each shape, leaving about 1/4" around each tracing.
5. Lay each tracing, web side down on wrong side of the fabrics indicated on templates between square brackets [ ]. Lightly fuse in place.
6. Cut out each appliqué piece along marked lines.
7. Arrange appliqué pieces on (1) 10-1/2" square Fabric A (star) and (2) 6-3/4" x 10-1/2" Fabric A pieces (stable scene and three kings).
8. Permanently fuse appliqués in place according to the web manufacturer’s directions.
9. Layer the star piece on the 11" square of batting. Lay the stable and three king appliqués each on a 7-1/2" x 11" piece of batting.
10. Hand or machine stitch around the raw edges of appliqués. If sewing by machine, set to a short, narrow zigzagstitch. Use a clear nylon thread through the needle. A matching or contrasting all-purpose thread can also be used through the needle. Use a neutral all-purpose thread in the bobbin. Do not use nylon thread in thebobbin.
11. Layer a 6-3/4" plain Fabric A rectangle right side up on a 7-1/2" x 11" piece of batting. Quilt layers enough tohold them together. Repeat with a second unit.
12. Trim batting even with fabric on all units.
Nativity Toaster Cover
(Nativity Toaster Cover sewing instructions continued on page 11)

page 11Toaster Cover
Sewing Instructions (continued):13. With right sides together sew the stable and
three king sides together. DIAGRAM 1 Sewthe two quilted units together, along a shortside, right sides together. DIAGRAM 2 Pressseams open. Lay the sections right sidestogether and join along short edges creating aloop. DIAGRAM 3
14. Pull out threads in top 1/4" of seams aroundloop. Right sides together, sew the star unit totwo opposite sides, then to the other two sides,creating the shape of the toaster cover.
15. Make lining with the remaining (4) 6-3/4" x10-1/2" and (1) 10-1/2" Fabric A pieces in thesame manner as the quilted outer shell waspieced.
16. Slide the lining into the toaster cover, with lining right sides in and toaster cover right sides out. DIAGRAM 4 Pin layers togetheralong bottom edge. Tack the lining to the toaster cover along the top edges.
17. Stitch 2-1/2" x WOF strips together end-to-endforming one long strip. Sew the strip in halflengthwise and add to the bottom as binding.
Nativity Toaster Cover
Diagram 1
Diagram 2
Diagram 3
Diagram 4
(Nativity Toaster Cover templates on pages 12-14)

Large Star
Template5-1/4" wide x 5-1/4" tall
Trace 1 [1 Fabric C]
Small Star
Template5" wide x 5" tall
Trace 1 [1 Fabric D]
page 12Toaster Cover Template
Downloads from theinternet are not alwaysconsistent.Check your print out toverify size accuracy oftemplates before cutting.
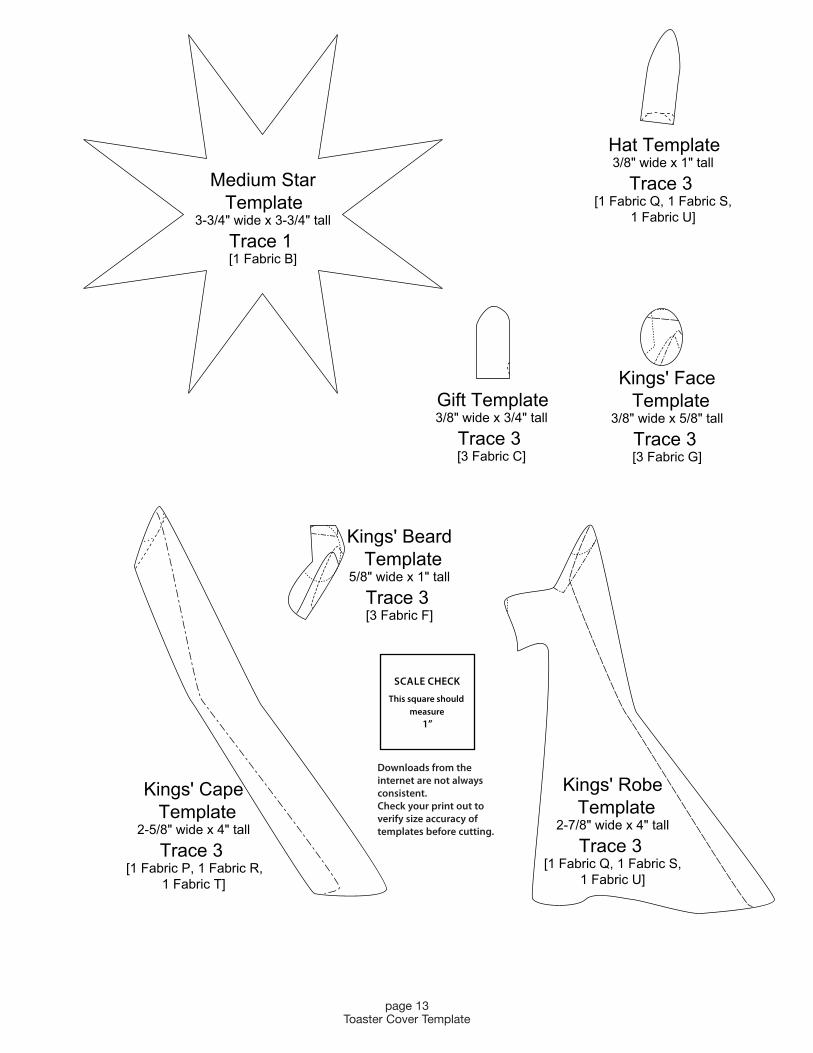
Medium Star
Template3-3/4" wide x 3-3/4" tall
Trace 1 [1 Fabric B]
Gift Template3/8" wide x 3/4" tall
Trace 3 [3 Fabric C]
Hat Template3/8" wide x 1" tall
Trace 3 [1 Fabric Q, 1 Fabric S,
1 Fabric U]
Kings' Robe
Template2-7/8" wide x 4" tall
Trace 3 [1 Fabric Q, 1 Fabric S,
1 Fabric U]
Kings' Cape
Template2-5/8" wide x 4" tall
Trace 3 [1 Fabric P, 1 Fabric R,
1 Fabric T]
Kings' Beard
Template5/8" wide x 1" tall
Trace 3 [3 Fabric F]
Kings' Face
Template3/8" wide x 5/8" tall
Trace 3 [3 Fabric G]
page 13Toaster Cover Template
Downloads from theinternet are not alwaysconsistent.Check your print out toverify size accuracy oftemplates before cutting.

page 14Toaster Cover Template
Downloads from the internet are not always consistent.Check your print out to verify size accuracy of templates before cutting.

Fabric Requirements:Fabric A: 6" x 12" pcFabric B: 6" x 12" pcYou will also need:1-3/4" x 2-1/2" stick-on magnetic sheet
Cutting Directions: Fold Fabrics A and B right sides together so they each form a 6" square. Use Stocking Template to cut stocking from Fabric A – with fabric folded right sides togetherit will yield two pieces, one the reverse of the other. In the same manner cut from the two layers of Fabric B the Toe, Heel and then the Cuff twice (for a total of four cuff pieces).
Designed by Lucy A. Fazely for Blank Quilting
Samples in color combos (A/B) of Splash fabrics (style #3504): Cardinal/Flamingo, Glow/Gold, Nectar/Blush, Pansy/Wisteria, Violet/Cloud, Green/Hunter, Cardinal/Blush
page 15Stocking Fridge Magnet
Stocking Fridge Magnet

page 16Stocking Fridge Magnet
All seams are 1/4".
Making the Cuff:1. Stitch two cuff pieces right sides together across the top edge.
DIAGRAM 1 Repeat with remaining two cuff pieces. Press seams open.
2. Lay cuff sections right sides together and then stitch along both sides. DIAGRAM 2
3. Fold the piece in half, wrong sides together. DIAGRAM 3
Making the Stocking Body:1. With right sides together, stitch the heel pieces together along the left/upper
curve. With right sides together, stitch the toe pieces together along theright/bottom curve. Trim seams, turn right sides out and press. DIAGRAM 4
2. Lay toe and heel units on stocking front. Top stitch in place. DIAGRAM 5
3. Place stocking pieces right sides together. Stitch along all edges, except thetop. Clip inner corner and clip curves. Turn right sides out. Push out seamsand press flat. DIAGRAM 6
Finishing:1. With stocking right sides out, insert cuff in the top until the raw edges are
even. Pin together. DIAGRAM 7
2. Stitch cuff and stocking together. This is a tight fit under the sewingmachine presser foot, so take your time and adjust fabric frequently. DIAGRAM 8
3. Pull cuff out and finger press seam down. Fold cuff down about 1-1/4". DIAGRAM 9
4. Peel paper from magnet and press firmly to back of stocking. If the magnet isnot self-sticking, use Krazy Glue to adhere it – insert a piece of plastic insidethe stocking to keep the glue from bleeding through to the fabric on thefront.
5. Place stocking on fridge or other metal surface such as a filing cabinet. Useto hold pens, pencils, candy canes, cinnamon sticks, etc.
Stocking Fridge Magnet
Diagram 1
Diagram 5
Diagram 8 Diagram 9
Diagram 6 Diagram 7
Diagram 2
Diagram 3
Diagram 4

Downloads from the internetare not always consistent.
Check your print out to verifysize accuracy of templates
before cutting.
BLK 2780-001
While all possible care has been taken to ensure the accuracy of this pattern, we are not responsible for printing errors or the way in which individual work varies.
© 2011 Blank Quilting • All rights reserved2 Bridge Street, Suite 220, Irvington, NY 10533 • Toll Free: 888-442-5265 • Fax 914-478-4278 • www.BlankQuilting.com