CELICA GT-FOUR€¦ · 1986 Title: CELICA GT-FOUR Created Date: 4/24/2020 6:57:32 PM

1999-2000 ACCESSORIES & EQUIPMENT
Wiper/Washer Systems
DESCRIPTION & OPERATION
All models are equipped with 2-speed wiper motors. An intermittent wiper system is optional. Front wiper motors are protected by an internal circuit breaker. Celica, Land Cruiser, RAV4, Sienna and 4Runner are equipped with rear wipers.
ADJUSTMENTS
Adjust wiper blades as specified. See WIPER BLADE ADJUSTMENTS table.
WIPER BLADE ADJUSTMENTS
NOTE: This article also applies to Lexus LX470. Refer to Land Cruiser, unless otherwise indicated.
WARNING: Deactivate air bag system before performing any service operation. See AIR BAG RESTRAINT SYSTEMS. DO NOT apply electrical power to any component on steering column without first deactivating air bag system. Air bag may deploy.
Adjustment (1) In. (mm)Avalon
"A" 1.6 (40)"B" 2.6 (65)
Camry & Camry Solara"A" & "B" 1.4 (35)
CelicaFront
"A" 1.42 (36)"B" .81 (20.5)
Rear (2)
Corolla"A" .98 (25)"B" .59 (15)
Land Cruiser & Lexus LX470Front
"A" 1.57 (40)"B" 1.02 (26)
Rear (3) .39-1.5 (28-48)
1999 Toyota RAV4
1999-2000 ACCESSORIES & EQUIPMENT Wiper/Washer Systems
1999 Toyota RAV4
1999-2000 ACCESSORIES & EQUIPMENT Wiper/Washer Systems
Microsoft
Sunday, November 22, 2009 11:01:19 AM Page 1 © 2005 Mitchell Repair Information Company, LLC.
Microsoft
Sunday, November 22, 2009 11:01:24 AM Page 1 © 2005 Mitchell Repair Information Company, LLC.
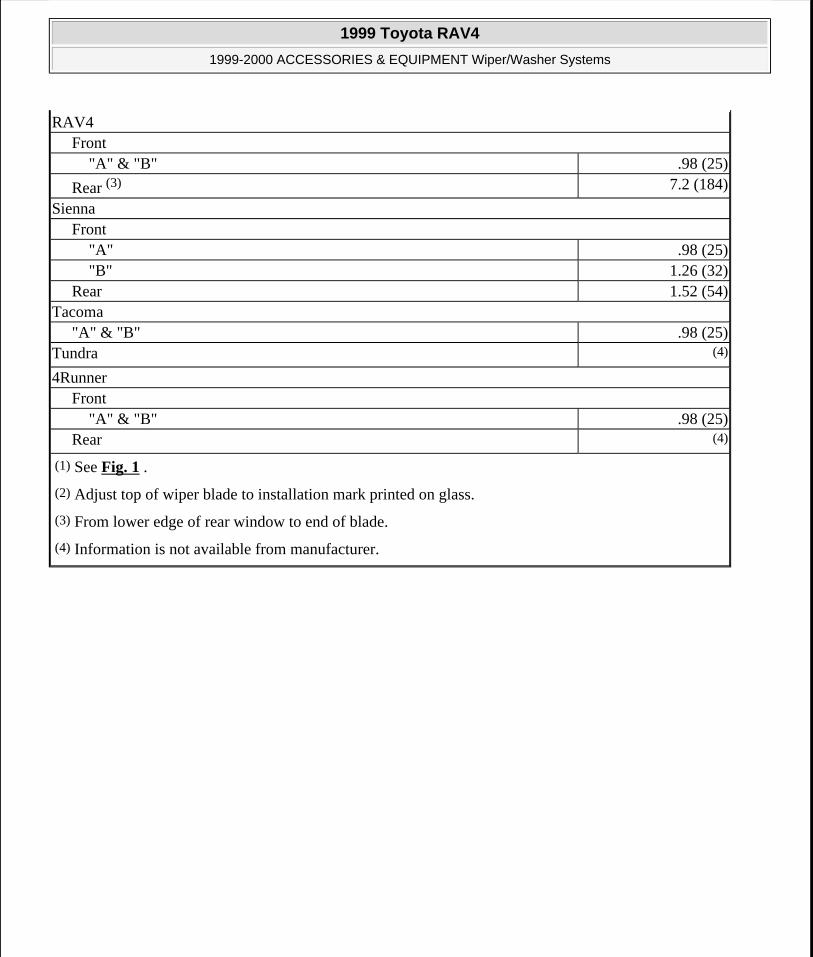
RAV4Front
"A" & "B" .98 (25)
Rear (3) 7.2 (184)
SiennaFront
"A" .98 (25)"B" 1.26 (32)
Rear 1.52 (54)Tacoma
"A" & "B" .98 (25)Tundra (4)
4RunnerFront
"A" & "B" .98 (25)Rear (4)
(1) See Fig. 1 .
(2) Adjust top of wiper blade to installation mark printed on glass.
(3) From lower edge of rear window to end of blade.
(4) Information is not available from manufacturer.
1999 Toyota RAV4
1999-2000 ACCESSORIES & EQUIPMENT Wiper/Washer Systems
Microsoft
Sunday, November 22, 2009 11:01:19 AM Page 2 © 2005 Mitchell Repair Information Company, LLC.

Fig. 1: Adjusting Front Wiper Blades Courtesy of TOYOTA MOTOR SALES, U.S.A., INC.
COMPONENT TESTS
FRONT WIPER MOTOR TEST
Avalon
1. Using a 12-volt battery, connect jumper wire from positive battery terminal to wiper motor terminal No. 3. See Fig. 2 . Connect another jumper wire between negative battery terminal and wiper motor terminal No. 1. Motor should operate at low speed.
2. Remove jumper wire from terminal No. 3. Reconnect positive battery terminal jumper wire to wiper motor terminal No. 2. Motor should operate at high speed.
3. Remove jumper wire from terminal No. 2 and reconnect jumper wire to wiper motor terminal No. 3. With motor running at low speed, stop motor at any position except PARK position by disconnecting jumper wire from terminal No. 3. Install another jumper wire between wiper motor terminals No. 1 and 3.
4. Connect positive battery terminal jumper wire to wiper motor terminal No. 2. Connect negative jumper to terminal No. 5. Motor should start running and then stop at PARK position. Replace motor if operation is not as specified. See FRONT WIPER MOTOR under REMOVAL & INSTALLATION.
Celica, Corolla & RAV4
1. Using a 12-volt battery, connect jumper wire from positive battery terminal to wiper motor terminal No.
1999 Toyota RAV4
1999-2000 ACCESSORIES & EQUIPMENT Wiper/Washer Systems
Microsoft
Sunday, November 22, 2009 11:01:19 AM Page 3 © 2005 Mitchell Repair Information Company, LLC.

3. See Fig. 2 . Connect another jumper wire between negative battery terminal and wiper motor terminal No. 1. Motor should operate at low speed.
2. Remove jumper wire from terminal No. 3. Reconnect positive battery terminal jumper wire to wiper motor terminal No. 2. Motor should operate at high speed.
3. Remove jumper wire from terminal No. 2 and reconnect jumper wire to wiper motor terminal No. 3. With motor running at low speed, stop motor at any position except PARK position by disconnecting jumper wire from terminal No. 3. Install another jumper wire between wiper motor terminals No. 3 and 5.
4. Connect positive battery terminal jumper wire to wiper motor terminal No. 6. Connect negative jumper to terminal No. 1. Motor should start running and then stop at PARK position. Replace motor if operation is not as specified. See FRONT WIPER MOTOR under REMOVAL & INSTALLATION.
Camry, Camry Solara, Tacoma & Tundra
1. Using a 12-volt battery, connect jumper wire from positive battery terminal to wiper motor terminal No. 5. See Fig. 3 . Connect another jumper wire from negative battery terminal to wiper motor terminal No. 4. Motor should operate at low speed.
2. Remove jumper wire from terminal No. 5. Reconnect jumper wire to wiper motor terminal No. 3. Motor should operate at high speed. Remove jumper wire from terminal No. 3 and reconnect jumper wire to wiper motor terminal No. 5. With motor running at low speed, stop motor at any position except PARK position by disconnecting jumper wire from terminal No. 5. On Camry and Camry Solara, install jumper wire between wiper motor terminals No. 3 and 5. On Tacoma and Tundra, install jumper wire between wiper motor terminals No. 1 and 5.
3. On all models, connect positive battery terminal jumper wire to wiper motor terminal No. 2. Connect negative battery terminal jumper wire to wiper motor terminal No. 4. Motor should start running and then stop at PARK position. Replace motor if operation is not as specified. See FRONT WIPER MOTOR under REMOVAL & INSTALLATION.
Land Cruiser & Lexus LX470
1. Using a 12-volt battery, connect jumper wire from positive battery terminal to wiper motor terminal No. 1. See Fig. 3 . Connect another jumper wire between negative battery terminal and wiper motor terminal No. 5. Wiper motor should operate at low speed.
2. Remove jumper wire from terminal No. 1. Reconnect jumper wire to wiper motor terminal No. 4. Motor should operate at high speed. Remove jumper wire from terminal No. 4 and reconnect jumper wire to wiper motor terminal No. 1. With motor running at low speed, stop motor at any position except PARK position by disconnecting jumper wire from terminal No. 1. Install another jumper wire between wiper motor terminals No. 1 and 3.
3. Ensure ground is still connected to terminal No. 5. Connect positive battery terminal jumper wire to wiper motor terminal No. 2. Motor should start running and then stop at PARK position. Replace motor if operation is not as specified. See FRONT WIPER MOTOR under REMOVAL & INSTALLATION.
Sienna
1. Using a 12-volt battery, connect jumper wire from positive battery terminal to wiper motor terminal No. 5. See Fig. 4 . Connect another jumper wire between negative battery terminal and wiper motor terminal No. 1. Wiper motor should operate at low speed.
1999 Toyota RAV4
1999-2000 ACCESSORIES & EQUIPMENT Wiper/Washer Systems
Microsoft
Sunday, November 22, 2009 11:01:20 AM Page 4 © 2005 Mitchell Repair Information Company, LLC.

2. Remove jumper wire from terminal No. 5. Reconnect jumper wire to wiper motor terminal No. 4. Motor should operate at high speed. Remove jumper wire from terminal No. 4 and reconnect jumper wire to wiper motor terminal No. 5. With motor running at low speed, stop motor at any position except PARK position by disconnecting jumper wire from terminal No. 5. Install another jumper wire between wiper motor terminals No. 2 and 5.
3. Ensure ground is still connected to terminal No. 1. Connect positive battery terminal jumper wire to wiper motor terminal No. 3. Motor should start running and then stop at PARK position. Replace motor if operation is not as specified. See FRONT WIPER MOTOR under REMOVAL & INSTALLATION.
4Runner
1. Using a 12-volt battery, connect jumper wire from positive battery terminal to wiper motor terminal No. 3. See Fig. 2 or Fig. 5 . Connect another jumper wire between negative battery terminal and wiper motor body. Motor should operate at low speed.
2. Remove jumper wire from terminal No. 3. Reconnect positive battery terminal jumper wire to wiper motor terminal No. 2. Motor should operate at high speed.
3. Remove jumper wire from terminal No. 2 and reconnect jumper wire to wiper motor terminal No. 3. With motor running at low speed, stop motor at any position except PARK position by disconnecting jumper wire from terminal No. 3. Install another jumper wire between wiper motor terminals No. 2 and 3.
4. Ensure wiper motor body is still connected to battery negative terminal. Connect positive battery terminal jumper wire to wiper motor terminal No. 4. Motor should start running and then stop at PARK position. Replace motor if operation is not as specified. See FRONT WIPER MOTOR under REMOVAL & INSTALLATION.
1999 Toyota RAV4
1999-2000 ACCESSORIES & EQUIPMENT Wiper/Washer Systems
Microsoft
Sunday, November 22, 2009 11:01:20 AM Page 5 © 2005 Mitchell Repair Information Company, LLC.

Fig. 2: Front Wiper Motor Terminals (Avalon, Celica, Corolla & RAV4) Courtesy of TOYOTA MOTOR SALES, U.S.A., INC.
1999 Toyota RAV4
1999-2000 ACCESSORIES & EQUIPMENT Wiper/Washer Systems
Microsoft
Sunday, November 22, 2009 11:01:20 AM Page 6 © 2005 Mitchell Repair Information Company, LLC.

Fig. 3: Front Wiper Motor Terminals (Camry, Camry Solara, Land Cruiser, Lexus LX470, Tacoma & Tundra) Courtesy of TOYOTA MOTOR SALES, U.S.A., INC.
1999 Toyota RAV4
1999-2000 ACCESSORIES & EQUIPMENT Wiper/Washer Systems
Microsoft
Sunday, November 22, 2009 11:01:20 AM Page 7 © 2005 Mitchell Repair Information Company, LLC.

Fig. 4: Front Wiper Motor Terminals (Sienna) Courtesy of TOYOTA MOTOR SALES, U.S.A., INC.
1999 Toyota RAV4
1999-2000 ACCESSORIES & EQUIPMENT Wiper/Washer Systems
Microsoft
Sunday, November 22, 2009 11:01:20 AM Page 8 © 2005 Mitchell Repair Information Company, LLC.

Fig. 5: Front Wiper Motor Terminals (4Runner)Courtesy of TOYOTA MOTOR SALES, U.S.A., INC.
FRONT WIPER/WASHER SWITCH TEST
With wiper switch in specified position, ensure continuity exists between specified terminals. See WIPER/WASHER SWITCH CONTINUITY TEST table. See Fig. 6 . Replace wiper switch assembly if continuity is not as specified.
WIPER/WASHER SWITCH CONTINUITY TEST
Switch Position (1) Terminals No.Avalon, Camry, Camry Solara, Celica, RAV4 & Sienna
Off 7 & 16Intermittent 7 & 16Low 7 & 17High 8 & 17Washer On 2 & 11
CorollaWith Mist Wiper
Off 7 & 16Mist 3 & 11Low 7 & 17High 8 & 17Washer On 2 & 11
With Intermittent WiperOff 7 & 16Intermittent 7 & 16Low 7 & 17High 8 & 17Washer On 2 & 11
Land Cruiser & Lexus LX470Off 7 & 16Intermittent 7 & 16Low 7 & 17High 8 & 17Washer OFF NoneWasher ON 2 & 11
Tacoma, Tundra & 4RunnerWith Mist Wiper
Off 7 & 16Mist 7 & 17Low 7 & 17
1999 Toyota RAV4
1999-2000 ACCESSORIES & EQUIPMENT Wiper/Washer Systems
Microsoft
Sunday, November 22, 2009 11:01:20 AM Page 9 © 2005 Mitchell Repair Information Company, LLC.

Fig. 6: Identifying Combination Switch Connectors For Wipers/Washers Courtesy of TOYOTA MOTOR SALES, U.S.A., INC.
FRONT/REAR WASHER MOTOR TEST
Except Celica & 4Runner
High 8 & 17Washer On 2 & 11
With Intermittent WiperOff 7 & 16Intermittent 7 & 16Low 7 & 17High 8 & 17Washer On 2 & 11
(1) See Fig. 6 .
1999 Toyota RAV4
1999-2000 ACCESSORIES & EQUIPMENT Wiper/Washer Systems
Microsoft
Sunday, November 22, 2009 11:01:20 AM Page 10 © 2005 Mitchell Repair Information Company, LLC.

Disconnect washer motor. Connect fused jumper between battery voltage and terminal No. 2. Connect jumper wire between ground and terminal No. 1. See WIRING DIAGRAMS . Motor should operate. If motor does not operate as specified, replace washer motor.
Celica
Disconnect washer motor. Connect fused jumper between battery voltage and terminal No. 2. Connect jumper wire between ground and terminal No. 1 (terminal No. 3 on rear washer motor). See WIRING DIAGRAMS . Motor should operate. If motor does not operate as specified, replace washer motor.
4Runner
Disconnect washer motor. Connect fused jumper between battery voltage and terminal No. 2 (terminal No. 3 on rear washer motor). Connect jumper wire between ground and terminal No. 1 (terminal No. 4 on rear washer motor). See WIRING DIAGRAMS . Motor should operate. If motor does not operate as specified, replace washer motor.
REAR WIPER MOTOR TEST
Celica
1. Disconnect wiring connector from wiper motor. Using a 12-volt battery, connect jumper wire from positive battery terminal to wiper motor terminal No. 1. See Fig. 7 . Using another jumper wire, connect wiper motor terminal No. 3 and motor body to negative battery terminal. Motor should operate.
2. To check automatic PARK operation, with motor running, motor should stop by disconnecting jumper wire from terminal No. 3. Replace motor and relay as a complete assembly if operation is not as specified. See REAR WIPER MOTOR under REMOVAL & INSTALLATION.
Land Cruiser & Lexus LX470
1. Disconnect wiring connector from wiper motor. Using a 12-volt battery, connect jumper wire from positive battery terminal to wiper motor terminal No. 3. See Fig. 8 . Using another jumper wire, connect wiper motor terminal No. 2 to negative battery terminal. Motor should operate.
2. To check automatic PARK operation with motor running, stop motor operation anywhere except PARK position by removing power from terminal No. 3. Install another jumper wire between terminals No. 3 and 4. Connect jumper wire from positive battery terminal to wiper motor terminal No. 1. Ensure motor operates and stops at PARK position. Replace motor if operation is not as specified. See REAR WIPER MOTOR under REMOVAL & INSTALLATION.
RAV4
1. Disconnect wiring connector from wiper motor. Using a 12-volt battery, connect jumper wire from positive battery terminal to wiper motor terminal No. 4. See Fig. 8 . Using another jumper wire, connect wiper motor body (ground) to negative battery terminal. Motor should operate.
2. To check automatic PARK operation with motor running, stop motor operation anywhere except PARK
NOTE: On Sienna, testing information is not available from manufacturer.
1999 Toyota RAV4
1999-2000 ACCESSORIES & EQUIPMENT Wiper/Washer Systems
Microsoft
Sunday, November 22, 2009 11:01:20 AM Page 11 © 2005 Mitchell Repair Information Company, LLC.

position by removing power from terminal No. 4. Install another jumper wire between terminals No. 2 and 4. Connect jumper wire from positive battery terminal to wiper motor terminal No. 1. Ensure motor operates and stops at PARK position. Replace motor if operation is not as specified. See REAR WIPER MOTOR under REMOVAL & INSTALLATION.
4Runner
Disconnect wiring connector from wiper motor. Using a 12-volt battery, connect fused jumper from negative battery terminal to wiper motor terminal No. 1. See Fig. 9 . Using another jumper wire, connect wiper motor terminal No. 3 to positive battery terminal. Motor should operate in clockwise direction. Reverse jumper wires. Motor should operate in counterclockwise direction. Replace motor if operation is not as specified. See REAR WIPER MOTOR under REMOVAL & INSTALLATION.
Fig. 7: Rear Wiper Motor Terminals (Celica) Courtesy of TOYOTA MOTOR SALES, U.S.A., INC.
1999 Toyota RAV4
1999-2000 ACCESSORIES & EQUIPMENT Wiper/Washer Systems
Microsoft
Sunday, November 22, 2009 11:01:20 AM Page 12 © 2005 Mitchell Repair Information Company, LLC.

Fig. 8: Rear Wiper Motor Terminals (Land Cruiser, Lexus LX470 & RAV4) Courtesy of TOYOTA MOTOR SALES, U.S.A., INC.
Fig. 9: Rear Wiper Motor Terminals (4Runner) Courtesy of TOYOTA MOTOR SALES, U.S.A., INC.
REAR WIPER RELAY TEST
1999 Toyota RAV4
1999-2000 ACCESSORIES & EQUIPMENT Wiper/Washer Systems
Microsoft
Sunday, November 22, 2009 11:01:20 AM Page 13 © 2005 Mitchell Repair Information Company, LLC.

Celica (Intermittent Operation Check)
Connect fused jumper between battery voltage and terminal No. 1. Connect jumper wire from negative battery terminal to wiper motor terminal No. 2 and motor body. See Fig. 10 . Motor should operate intermittently for about 9-15 seconds. Replace motor and relay as a complete assembly if operation is not as specified.
Land Cruiser & Lexus LX470 (Continuity Check)
Remove rear wiper relay. Use DVOM and ensure continuity does exist between terminals No. 1 and 5, and 3 and 4. Connect fused jumper to terminal No. 3 and connect jumper wire between ground and terminal No. 4. Check that continuity does exist between terminals No. 2 and 5. See Fig. 11 . If continuity is not as specified, replace rear wiper relay.
RAV4 (Relay Operation Check)
Disconnect rear wiper relay. Connect fused jumper between battery voltage and relay terminal No. 3. Connect another jumper wire between ground and terminal No. 6. See Fig. 11 . Connect positive lead of DVOM to relay terminal No. 5 and negative lead to terminal No. 6. Voltage should be zero. Move DVOM positive lead from terminal No. 5 to terminal No. 4. Observe DVOM. Reading should change from zero volts to battery voltage. If voltage readings are not as specified, replace relay.
RAV4 & Sienna (Continuity Check)
Remove rear wiper relay. Use DVOM and ensure continuity does not exist between terminals No. 3 and 4. See Fig. 11 . Check that continuity does exist between terminals No. 4 and 5. If continuity is not as specified, replace rear wiper relay.
RAV4 & Sienna (Intermittent Operation Check)
Remove rear wiper relay. Connect fused jumper between battery voltage and relay terminal No. 5 and connect jumper wire between ground and terminal No. 2 for longer than 2 seconds. See Fig. 11 . Connect positive lead of analog voltmeter to relay terminal No. 4 and negative lead to terminal No. 2. Move battery voltage lead from terminal No. 5 to terminal No. 3. Observe meter. Reading should change from zero volts to battery voltage within 9 to 15 seconds. If readings are not as indicated, replace relay.
Sienna (Relay Operation Check)
Remove rear wiper relay. Connect fused jumper between battery voltage and relay terminal No. 3 and connect jumper wire between ground and terminal No. 6. See Fig. 11 . Connect DVOM positive lead to relay terminal No. 3 and negative lead to terminal No. 6. Zero volts should be indicated. Connect DVOM positive lead to relay terminal No. 4 and negative lead to terminal No. 6. Battery voltage should be indicated. If readings are not as specified, replace rear wiper relay.
REAR WIPER RELAY LOCATION
NOTE: On 4Runner, testing information is not available. For relay locations, see REAR WIPER RELAY LOCATION table.
1999 Toyota RAV4
1999-2000 ACCESSORIES & EQUIPMENT Wiper/Washer Systems
Microsoft
Sunday, November 22, 2009 11:01:20 AM Page 14 © 2005 Mitchell Repair Information Company, LLC.

Fig. 10: Rear Wiper Relay Terminals (Celica) Courtesy of TOYOTA MOTOR SALES, U.S.A., INC.
Model LocationCelica Inside Back Door, At Rear Wiper MotorLand Cruiser, Lexus LX470 & 4Runner
Inside Back Door, To Left Of Motor
Sienna Under Passenger Front SeatRAV4 Instrument Panel Fuse Block
1999 Toyota RAV4
1999-2000 ACCESSORIES & EQUIPMENT Wiper/Washer Systems
Microsoft
Sunday, November 22, 2009 11:01:20 AM Page 15 © 2005 Mitchell Repair Information Company, LLC.

Fig. 11: Rear Wiper Relay Terminals (Land Cruiser, Lexus LX470, Sienna & RAV4) Courtesy of TOYOTA MOTOR SALES, U.S.A., INC.
REAR WIPER SWITCH TEST
With wiper switch in specified position, ensure continuity exists between specified terminals. See REAR WIPER SWITCH CONTINUITY TEST table. See Fig. 6 . Replace complete wiper switch if continuity is not as specified. See FRONT WIPER SWITCH under REMOVAL & INSTALLATION.
REAR WIPER SWITCH CONTINUITY TEST
Switch Position (1) Terminals ContinuityCelica
OFF None NoINT 2 & 13 YesON 2 & 10 YesWasher 2 & 12 Yes
Land Cruiser, Lexus LX470, Sienna & 4RunnerWasher 1 2 & 12 YesOFF None NoINT 2 & 13 YesON 2 & 10 YesWasher 2 2, 10 & 12 Yes
1999 Toyota RAV4
1999-2000 ACCESSORIES & EQUIPMENT Wiper/Washer Systems
Microsoft
Sunday, November 22, 2009 11:01:20 AM Page 16 © 2005 Mitchell Repair Information Company, LLC.

SYSTEM TESTS
FRONT WIPER/WASHER SWITCH INTERMITTENT OPERATION
Except Celica & RAV4
1. Disconnect combination switch connector. Turn wiper/washer switch to INT position. Rotate intermittent time control to FAST position. Connect fused jumper between battery voltage and terminal No. 16. Connect jumper wire between ground and terminal No. 2. See Fig. 6 . Connect DVOM positive lead to terminal No. 7 and negative lead to terminal No. 2. For Avalon, go to next step. For Camry, Camry Solara, Sienna, Tacoma, Tundra and 4Runner, go to step 3 . For Corolla, Land Cruiser and Lexus LX470, go to step 4 .
2. DVOM should indicate battery voltage. With DVOM connected, momentarily connect terminals No. 16 and 17 with a fused jumper. With jumper still connected to terminal No. 16, move jumper from terminal No. 17 to terminal No. 2. DVOM reading should change from zero volts to battery voltage in about 3 seconds. If operation is not as specified, replace wiper/washer switch. See FRONT WIPER SWITCH under REMOVAL & INSTALLATION.
3. DVOM should indicate battery voltage. Monitor DVOM reading while rotating intermittent time control from SLOW to FAST positions. In SLOW position, voltage will change from zero to battery voltage in 10-15 seconds. In FAST position, voltage will change from zero to battery voltage in 1-3 seconds. If operation is not as specified, replace wiper/washer switch. See FRONT WIPER SWITCH under REMOVAL & INSTALLATION.
4. DVOM should indicate battery voltage. With DVOM connected, momentarily connect terminals No. 16 and 17 with a fused jumper. With jumper still connected to terminal No. 16, move jumper from terminal No. 17 to terminal No. 2. See Fig. 6 . Monitor DVOM reading while rotating intermittent time control from SLOW to FAST positions. In SLOW position, voltage will change from zero to battery voltage within 10-15 seconds (6-16 seconds on Land Cruiser and Lexus LX470). In FAST position, voltage will change from zero to battery voltage in 1-3 seconds. If operation is not as specified, replace wiper/washer switch. See FRONT WIPER SWITCH under REMOVAL & INSTALLATION.
Celica & RAV4
1. Disconnect combination switch connector. Turn wiper/washer switch to INT position. Rotate intermittent time control to FAST position. Connect fused jumper between battery voltage and terminal No. 17. Connect jumper wire between ground and terminal No. 16. See Fig. 6 . Connect DVOM positive lead to terminal No. 7 and negative lead to terminal No. 16. DVOM should indicate battery voltage.
RAV4Washer 1 2 & 16 YesOFF None NoINT 10 & 16 YesON 1 & 16 YesWasher 2 1, 2 & 16 Yes
(1) See Fig. 6 .
1999 Toyota RAV4
1999-2000 ACCESSORIES & EQUIPMENT Wiper/Washer Systems
Microsoft
Sunday, November 22, 2009 11:01:20 AM Page 17 © 2005 Mitchell Repair Information Company, LLC.

2. With DVOM connected, momentarily connect terminals No. 16 and 2 with a fused jumper. With jumper connected to terminal No. 2, move jumper from terminal No. 16 to terminal No. 17. Monitor DVOM reading while rotating intermittent time control from SLOW to FAST positions. In SLOW position, voltage will change from zero to battery voltage in 10-15 seconds. In FAST position, voltage will change from zero to battery voltage in 1-3 seconds. If operation is not as specified, replace wiper/washer switch. See FRONT WIPER SWITCH under REMOVAL & INSTALLATION.
FRONT WIPER SWITCH OPERATION TEST
Avalon, Camry, Camry Solara, Corolla, Sienna, Tacoma, Tundra & 4Runner
1. Disconnect combination switch connector. Connect fused jumper between battery voltage and terminal No. 16 (switch-side). Connect jumper wire between ground and terminal No. 2. See Fig. 6 . Connect DVOM positive lead to terminal No. 7 and negative lead to terminal No. 2.
2. Depress washer switch and monitor DVOM voltage readings. On Camry, Camry Solara, Sienna, Tacoma and Tundra, readings should change from zero volts to battery voltage within one second of depressing washer switch. After switch is released, readings should change from battery voltage to zero volts in about 25 seconds (3 seconds on Tacoma, Tundra and 4Runner). If readings are not as specified, replace wiper/washer switch. See FRONT WIPER SWITCH under REMOVAL & INSTALLATION.
INSTRUMENT PANEL JUNCTION BLOCK CIRCUIT TESTS (REAR WIPER)
RAV4 (Circuit Test)
Remove instrument panel junction block located under driver's side of instrument panel. Inspect 23-pin connector "A" terminals with DVOM by backprobing specified terminals. Disconnect junction block 15-pin "B" connector. Test specified terminal. See JUNCTION BLOCK CONNECTOR CIRCUIT TEST table. If circuits are okay, replace relay. If circuits are not okay, repair as necessary. See WIRING DIAGRAMS .
RAV4 (Rear Wiper Switch In INT Position)
Disconnect 22-pin connector "A" from junction block. Connect positive lead of DVOM to junction block terminal C9 and negative lead to ground. Connect jumper wire between 22-pin connector (connector "A") cavity terminal A21 and ground. See Fig. 12 . If continuity is not indicated, replace junction block.
RAV4 (Rear Wiper Switch In LO Position)
Disconnect 22-pin connector "A" from junction block. Connect positive lead of DVOM to junction block terminal C10 and negative lead to ground. Connect jumper wire between 22-pin connector "A" cavity terminal A22 and ground. See Fig. 12 . If continuity is not indicated, replace junction block.
JUNCTION BLOCK CONNECTOR CIRCUIT TEST Connections Switch Position SpecificationA21-Ground INT ContinuityA22-Ground ON ContinuityB10-Ground All Positions Battery Voltage
1999 Toyota RAV4
1999-2000 ACCESSORIES & EQUIPMENT Wiper/Washer Systems
Microsoft
Sunday, November 22, 2009 11:01:20 AM Page 18 © 2005 Mitchell Repair Information Company, LLC.

Fig. 12: Identifying Junction Block Connector Terminals (RAV4) Courtesy of TOYOTA MOTOR SALES, U.S.A., INC.
REMOVAL & INSTALLATION
1999 Toyota RAV4
1999-2000 ACCESSORIES & EQUIPMENT Wiper/Washer Systems
Microsoft
Sunday, November 22, 2009 11:01:20 AM Page 19 © 2005 Mitchell Repair Information Company, LLC.

FRONT WIPER MOTOR
Removal (Except Sienna)
Remove wiper arm caps, nuts and arms. Remove cowl louver cover. Disconnect wiper motor electrical connector. Remove 6 bolts and remove wiper linkage assembly. Disconnect wiper link from wiper motor. Remove 4 screws and wiper motor from firewall.
Removal (Sienna)
1. Remove wiper arm caps, nuts and arms. Remove cowl top panel cap. Remove driver's and passenger's side ventilator covers. Remove both washer nozzles from ventilator covers. See Fig. 13 . Disconnect drain hose and remove 11 bolts from cowl top panel. Disconnect wiper motor electrical connector. Remove cowl top panel. Remove 4 bolts and remove wiper motor and linkage assembly.
2. Disconnect wiper link from wiper motor. Remove 3 screws and wiper motor from linkage assembly. Remove both cowl drain hoses.
Installation (All Models)
To install, reverse removal procedure. Adjust wiper blades to appropriate position. See ADJUSTMENTS .
WARNING: Deactivate air bag system before performing any service operation. See AIR BAG RESTRAINT SYSTEMS. DO NOT apply electrical power to any component on steering column without first deactivating air bag system. Air bag may deploy.
CAUTION: When battery is disconnected, vehicle computer and memory systems may lose memory data. Driveability problems may exist until computer systems have completed a relearn cycle. See COMPUTER RELEARN PROCEDURES article in GENERAL INFORMATION before disconnecting battery.
1999 Toyota RAV4
1999-2000 ACCESSORIES & EQUIPMENT Wiper/Washer Systems
Microsoft
Sunday, November 22, 2009 11:01:20 AM Page 20 © 2005 Mitchell Repair Information Company, LLC.

Fig. 13: Exploded View Of Wiper Components (Sienna) Courtesy of TOYOTA MOTOR SALES, U.S.A., INC.
FRONT WIPER SWITCH
Removal & Installation
Disconnect negative battery cable. To access wiper switch, remove steering column upper and lower covers. Remove wiper/washer switch retaining screws. Disconnect wiper/washer switch from combination switch body. See Fig. 14 . To install, reverse removal procedure. When installing wiper switch wire terminals to harness connector, push inward on wire terminal until terminal clicks into place.
NOTE: Wiper switch is component of combination switch, mounted to steering column. For further information on combination switch removal procedure, see appropriate STEERING COLUMN SWITCHES article.
1999 Toyota RAV4
1999-2000 ACCESSORIES & EQUIPMENT Wiper/Washer Systems
Microsoft
Sunday, November 22, 2009 11:01:20 AM Page 21 © 2005 Mitchell Repair Information Company, LLC.

Fig. 14: Identifying Combination Switch Components Courtesy of TOYOTA MOTOR SALES, U.S.A., INC.
REAR WIPER MOTOR
Removal (Celica)
Remove rear wiper arm. Pry off back hatch trim panel. Disconnect electrical connector, remove 3 bolts and wiper motor.
Removal (Land Cruiser & Lexus LX470)
Remove assist grip and inside handle bezel. Remove back door window garnish (around window) and back door trim panel. Remove plastic protector cover. Remove wiper arm assembly and disconnect rear wiper motor electrical connector. Remove 3 bolts for motor and 2 bolts for linkage assembly. Remove rear wiper motor and linkage assembly.
Removal (RAV4)
Remove back door upper cover (below window) and back door trim panel. Remove plastic protector cover. Remove wiper arm assembly and disconnect rear wiper motor electrical connector. Remove 3 bolts and remove rear wiper motor assembly.
Removal (Sienna)
1999 Toyota RAV4
1999-2000 ACCESSORIES & EQUIPMENT Wiper/Washer Systems
Microsoft
Sunday, November 22, 2009 11:01:20 AM Page 22 © 2005 Mitchell Repair Information Company, LLC.

Remove wiper arm. Remove back door assist grip. Remove pull strap. Remove center garnish above rear door window by prying along window edge. Remove side garnish on each side of window by pulling inward to release clips. Pull rear door trim panel outward and remove. Disconnect rear wiper motor connector and remove bolts attaching rear wiper motor and linkage to rear door.
Removal (4Runner)
Remove back door trim panel. Remove plate and back door glass run channel. Remove outer weatherstrip and remove rear window. Remove wiper arm and wiper shaft nut on outside of door. Disconnect electrical connector, remove 3 bolts and remove wiper motor assembly.
Installation (All Models)
To install, reverse removal procedure. Adjust wiper blades to appropriate position. See ADJUSTMENTS .
REAR WIPER SWITCH
Removal & Installation
Switch is integral part of wiper switch mounted to combination switch on steering column. See FRONT WIPER SWITCH .
STEERING WHEEL
Removal
1. Ensure front wheels are in straight-ahead position. Place ignition switch in LOCK position and remove key. Disconnect negative battery cable. Remove 2 screw covers from outer sides of steering wheel. Using Torx Wrench (T30), loosen air bag pad retaining Torx screws until screw heads are snug against screw case. See Fig. 15 .
2. Carefully pull air bag pad away from steering wheel enough to unlock and disconnect air bag electrical connector. DO NOT pull on electrical connector or wiring. Store air bag pad aside with pad facing upward.
3. Remove steering wheel lock nut and washer from steering shaft. Make alignment mark on steering shaft and steering wheel for installation reference. Using appropriate steering wheel puller, pull steering wheel from shaft while guiding spiral cable wire through steering wheel opening.
Installation
1. Ensure front wheels are in straight-ahead position. Connect and install spiral cable to combination switch. Turn spiral cable counterclockwise by hand until it is hard to turn. Turn spiral cable clockwise about 2 1/2-3 turns and align Red mark at bottom with opening.
2. Guide spiral cable through steering wheel opening while installing steering wheel to shaft. Align reference marks on steering shaft and steering wheel. Install steering wheel lock nut and washer. Tighten steering wheel lock nut to 25 ft. lbs. (34 N.m).
3. Connect air bag electrical connector and snap down connector lock. Before installing air bag pad, ensure Torx screws are retracted and snug against screw case. See Fig. 15 .
1999 Toyota RAV4
1999-2000 ACCESSORIES & EQUIPMENT Wiper/Washer Systems
Microsoft
Sunday, November 22, 2009 11:01:20 AM Page 23 © 2005 Mitchell Repair Information Company, LLC.

4. Install air bag pad to steering wheel ensuring all wiring is NOT pinched and DOES NOT interfere with moving parts. Tighten 4 Torx screws to 78 INCH lbs. (8.8 N.m). Install screw covers. Connect negative battery cable.
Fig. 15: Removing Air Bag From Steering Wheel (Typical) Courtesy of TOYOTA MOTOR SALES, U.S.A., INC.
WIRING DIAGRAMS
1999 Toyota RAV4
1999-2000 ACCESSORIES & EQUIPMENT Wiper/Washer Systems
Microsoft
Sunday, November 22, 2009 11:01:20 AM Page 24 © 2005 Mitchell Repair Information Company, LLC.

1999 Toyota RAV4
1999-2000 ACCESSORIES & EQUIPMENT Wiper/Washer Systems
Microsoft
Sunday, November 22, 2009 11:01:20 AM Page 25 © 2005 Mitchell Repair Information Company, LLC.

Fig. 16: Wiper/Washer System Wiring Diagram (Avalon)
1999 Toyota RAV4
1999-2000 ACCESSORIES & EQUIPMENT Wiper/Washer Systems
Microsoft
Sunday, November 22, 2009 11:01:20 AM Page 26 © 2005 Mitchell Repair Information Company, LLC.

1999 Toyota RAV4
1999-2000 ACCESSORIES & EQUIPMENT Wiper/Washer Systems
Microsoft
Sunday, November 22, 2009 11:01:20 AM Page 27 © 2005 Mitchell Repair Information Company, LLC.

Fig. 17: Wiper/Washer System Wiring Diagram (Camry)
1999 Toyota RAV4
1999-2000 ACCESSORIES & EQUIPMENT Wiper/Washer Systems
Microsoft
Sunday, November 22, 2009 11:01:20 AM Page 28 © 2005 Mitchell Repair Information Company, LLC.

1999 Toyota RAV4
1999-2000 ACCESSORIES & EQUIPMENT Wiper/Washer Systems
Microsoft
Sunday, November 22, 2009 11:01:20 AM Page 29 © 2005 Mitchell Repair Information Company, LLC.

Fig. 18: Wiper/Washer System Wiring Diagram (Camry Solara)
1999 Toyota RAV4
1999-2000 ACCESSORIES & EQUIPMENT Wiper/Washer Systems
Microsoft
Sunday, November 22, 2009 11:01:20 AM Page 30 © 2005 Mitchell Repair Information Company, LLC.

1999 Toyota RAV4
1999-2000 ACCESSORIES & EQUIPMENT Wiper/Washer Systems
Microsoft
Sunday, November 22, 2009 11:01:20 AM Page 31 © 2005 Mitchell Repair Information Company, LLC.

Fig. 19: Wiper/Washer System Wiring Diagram (Celica - Front)
1999 Toyota RAV4
1999-2000 ACCESSORIES & EQUIPMENT Wiper/Washer Systems
Microsoft
Sunday, November 22, 2009 11:01:20 AM Page 32 © 2005 Mitchell Repair Information Company, LLC.

1999 Toyota RAV4
1999-2000 ACCESSORIES & EQUIPMENT Wiper/Washer Systems
Microsoft
Sunday, November 22, 2009 11:01:20 AM Page 33 © 2005 Mitchell Repair Information Company, LLC.

Fig. 20: Wiper/Washer System Wiring Diagram (Celica - Rear)
1999 Toyota RAV4
1999-2000 ACCESSORIES & EQUIPMENT Wiper/Washer Systems
Microsoft
Sunday, November 22, 2009 11:01:20 AM Page 34 © 2005 Mitchell Repair Information Company, LLC.

1999 Toyota RAV4
1999-2000 ACCESSORIES & EQUIPMENT Wiper/Washer Systems
Microsoft
Sunday, November 22, 2009 11:01:20 AM Page 35 © 2005 Mitchell Repair Information Company, LLC.

Fig. 21: Wiper/Washer System Wiring Diagram (Corolla)
1999 Toyota RAV4
1999-2000 ACCESSORIES & EQUIPMENT Wiper/Washer Systems
Microsoft
Sunday, November 22, 2009 11:01:20 AM Page 36 © 2005 Mitchell Repair Information Company, LLC.

1999 Toyota RAV4
1999-2000 ACCESSORIES & EQUIPMENT Wiper/Washer Systems
Microsoft
Sunday, November 22, 2009 11:01:20 AM Page 37 © 2005 Mitchell Repair Information Company, LLC.

Fig. 22: Wiper/Washer System Wiring Diagram (Land Cruiser - Front)
1999 Toyota RAV4
1999-2000 ACCESSORIES & EQUIPMENT Wiper/Washer Systems
Microsoft
Sunday, November 22, 2009 11:01:20 AM Page 38 © 2005 Mitchell Repair Information Company, LLC.

1999 Toyota RAV4
1999-2000 ACCESSORIES & EQUIPMENT Wiper/Washer Systems
Microsoft
Sunday, November 22, 2009 11:01:20 AM Page 39 © 2005 Mitchell Repair Information Company, LLC.

Fig. 23: Wiper/Washer System Wiring Diagram (Land Cruiser - Rear)
1999 Toyota RAV4
1999-2000 ACCESSORIES & EQUIPMENT Wiper/Washer Systems
Microsoft
Sunday, November 22, 2009 11:01:20 AM Page 40 © 2005 Mitchell Repair Information Company, LLC.

1999 Toyota RAV4
1999-2000 ACCESSORIES & EQUIPMENT Wiper/Washer Systems
Microsoft
Sunday, November 22, 2009 11:01:20 AM Page 41 © 2005 Mitchell Repair Information Company, LLC.

Fig. 24: Wiper/Washer System Wiring Diagram (Lexus LX470 - Front)
1999 Toyota RAV4
1999-2000 ACCESSORIES & EQUIPMENT Wiper/Washer Systems
Microsoft
Sunday, November 22, 2009 11:01:20 AM Page 42 © 2005 Mitchell Repair Information Company, LLC.

1999 Toyota RAV4
1999-2000 ACCESSORIES & EQUIPMENT Wiper/Washer Systems
Microsoft
Sunday, November 22, 2009 11:01:20 AM Page 43 © 2005 Mitchell Repair Information Company, LLC.

Fig. 25: Wiper/Washer System Wiring Diagram (Lexus LX470 - Rear)
1999 Toyota RAV4
1999-2000 ACCESSORIES & EQUIPMENT Wiper/Washer Systems
Microsoft
Sunday, November 22, 2009 11:01:20 AM Page 44 © 2005 Mitchell Repair Information Company, LLC.

1999 Toyota RAV4
1999-2000 ACCESSORIES & EQUIPMENT Wiper/Washer Systems
Microsoft
Sunday, November 22, 2009 11:01:20 AM Page 45 © 2005 Mitchell Repair Information Company, LLC.

Fig. 26: Wiper/Washer System Wiring Diagram (RAV4 - Front)
1999 Toyota RAV4
1999-2000 ACCESSORIES & EQUIPMENT Wiper/Washer Systems
Microsoft
Sunday, November 22, 2009 11:01:20 AM Page 46 © 2005 Mitchell Repair Information Company, LLC.

1999 Toyota RAV4
1999-2000 ACCESSORIES & EQUIPMENT Wiper/Washer Systems
Microsoft
Sunday, November 22, 2009 11:01:20 AM Page 47 © 2005 Mitchell Repair Information Company, LLC.

Fig. 27: Wiper/Washer System Wiring Diagram (RAV4 - Rear)
1999 Toyota RAV4
1999-2000 ACCESSORIES & EQUIPMENT Wiper/Washer Systems
Microsoft
Sunday, November 22, 2009 11:01:20 AM Page 48 © 2005 Mitchell Repair Information Company, LLC.

1999 Toyota RAV4
1999-2000 ACCESSORIES & EQUIPMENT Wiper/Washer Systems
Microsoft
Sunday, November 22, 2009 11:01:20 AM Page 49 © 2005 Mitchell Repair Information Company, LLC.

Fig. 28: Wiper/Washer System Wiring Diagram (Sienna - Front)
1999 Toyota RAV4
1999-2000 ACCESSORIES & EQUIPMENT Wiper/Washer Systems
Microsoft
Sunday, November 22, 2009 11:01:20 AM Page 50 © 2005 Mitchell Repair Information Company, LLC.

1999 Toyota RAV4
1999-2000 ACCESSORIES & EQUIPMENT Wiper/Washer Systems
Microsoft
Sunday, November 22, 2009 11:01:20 AM Page 51 © 2005 Mitchell Repair Information Company, LLC.

Fig. 29: Wiper/Washer System Wiring Diagram (Sienna - Rear)
1999 Toyota RAV4
1999-2000 ACCESSORIES & EQUIPMENT Wiper/Washer Systems
Microsoft
Sunday, November 22, 2009 11:01:20 AM Page 52 © 2005 Mitchell Repair Information Company, LLC.

1999 Toyota RAV4
1999-2000 ACCESSORIES & EQUIPMENT Wiper/Washer Systems
Microsoft
Sunday, November 22, 2009 11:01:20 AM Page 53 © 2005 Mitchell Repair Information Company, LLC.

Fig. 30: Wiper/Washer System Wiring Diagram (Tacoma)
1999 Toyota RAV4
1999-2000 ACCESSORIES & EQUIPMENT Wiper/Washer Systems
Microsoft
Sunday, November 22, 2009 11:01:20 AM Page 54 © 2005 Mitchell Repair Information Company, LLC.

1999 Toyota RAV4
1999-2000 ACCESSORIES & EQUIPMENT Wiper/Washer Systems
Microsoft
Sunday, November 22, 2009 11:01:20 AM Page 55 © 2005 Mitchell Repair Information Company, LLC.

Fig. 31: Wiper/Washer System Wiring Diagram (2000 Tundra - With Intermittent Wiper)
1999 Toyota RAV4
1999-2000 ACCESSORIES & EQUIPMENT Wiper/Washer Systems
Microsoft
Sunday, November 22, 2009 11:01:20 AM Page 56 © 2005 Mitchell Repair Information Company, LLC.

1999 Toyota RAV4
1999-2000 ACCESSORIES & EQUIPMENT Wiper/Washer Systems
Microsoft
Sunday, November 22, 2009 11:01:20 AM Page 57 © 2005 Mitchell Repair Information Company, LLC.

Fig. 32: Wiper/Washer System Wiring Diagram (2000 Tundra - Without Intermittent Wiper)
1999 Toyota RAV4
1999-2000 ACCESSORIES & EQUIPMENT Wiper/Washer Systems
Microsoft
Sunday, November 22, 2009 11:01:20 AM Page 58 © 2005 Mitchell Repair Information Company, LLC.

1999 Toyota RAV4
1999-2000 ACCESSORIES & EQUIPMENT Wiper/Washer Systems
Microsoft
Sunday, November 22, 2009 11:01:20 AM Page 59 © 2005 Mitchell Repair Information Company, LLC.

Fig. 33: Wiper/Washer System Wiring Diagram (4Runner - Front)
1999 Toyota RAV4
1999-2000 ACCESSORIES & EQUIPMENT Wiper/Washer Systems
Microsoft
Sunday, November 22, 2009 11:01:20 AM Page 60 © 2005 Mitchell Repair Information Company, LLC.

1999 Toyota RAV4
1999-2000 ACCESSORIES & EQUIPMENT Wiper/Washer Systems
Microsoft
Sunday, November 22, 2009 11:01:20 AM Page 61 © 2005 Mitchell Repair Information Company, LLC.

Fig. 34: Wiper/Washer System Wiring Diagram (4Runner - Rear)
1999 Toyota RAV4
1999-2000 ACCESSORIES & EQUIPMENT Wiper/Washer Systems
Microsoft
Sunday, November 22, 2009 11:01:20 AM Page 62 © 2005 Mitchell Repair Information Company, LLC.