Deployment and User Guide Gold v14.4/04...either existing on the secondary system or separately as...
95
Deployment and User Guide Installing and Configuring WhatsUp Gold Failover Manager for WhatsUp Gold Distributed Edition This guide provides information about installing and configuring WhatsUp Gold Failover Manager for use with WhatsUp Gold Distributed Edition.
Transcript of Deployment and User Guide Gold v14.4/04...either existing on the secondary system or separately as...

Deployment and User GuideInstalling and ConfiguringWhatsUp Gold Failover Manager forWhatsUp Gold Distributed EditionThis guide provides information about installing and configuring WhatsUp Gold Failover Manager for usewith WhatsUp Gold Distributed Edition.

Contents
CHAPTER 1 Using the WhatsUp Gold Failover Manager
About this guide............................................................................................................................................................ 1 About the WhatsUp Gold Failover Manager....................................................................................................... 1 System Requirements ................................................................................................................................................. 4 Finding more information and updates .............................................................................................................10
CHAPTER 2 Installing your Failover Solution
About Failover Scenarios .........................................................................................................................................12 Step 1 - Install Scenario 1 on the Central secondary machine .......................................................14 Step 2 - Install Scenario 1 on the Central primary machine ............................................................21 Step 3 - Configure Failover Settings for the Central Site..................................................................24 Step 4 - Configure the firewall for Central and Remote Site connections .................................24 Step 5 - Install Scenario 1 on the Remote secondary machine......................................................25 Step 6 - Install Scenario 1 on the remote primary machine............................................................33 Step 7 - Configure Failover Settings for the Remote Site.................................................................36
Installing Failover Scenario 2 ..................................................................................................................................37 Step 1 - Install Scenario 2 on the central database machine..........................................................39 Step 2 - Install Scenario 2 on the central secondary machine........................................................42 Step 3 - Install Scenario 2 on the central primary machine.............................................................45 Step 4 - Configure Failover Settings for the Central Site..................................................................48 Step 5 - Configure the firewall for Central and Remote Site connections .................................49 Step 6 - Install Scenario 2 on the remote database machine .........................................................50 Step 7 - Installing Scenario 2 on the remote secondary machine ................................................53 Step 8 - Install Scenario 2 on the remote primary machine............................................................57 Step 9 - Configure Failover Settings for the Remote Site.................................................................61
i
CHAPTER 3 Upgrading and Restoring
Upgrading a non-Failover edition of WhatsUp Gold that is using a local database...........................62 Upgrading a non-Failover WhatsUp Distributed Edition (Central Site) using a local database ............................................................................................................................................................64 Upgrading a non-Failover WhatsUp Distributed Edition (Remote Site) using a local database ............................................................................................................................................................66
Upgrading a non-Failover version of WhatsUp Gold Distributed Edition that is using a remote database.........................................................................................................................................................................69
Upgrading a non-Failover WhatsUp Distributed Edition (Central/Primary) using a remote database ............................................................................................................................................................69 Upgrading a non-Failover WhatsUp Distributed Edition (Central/Secondary) using a remote database.............................................................................................................................................71 Upgrading a non-Failover WhatsUp Distributed Edition (Remote/Primary) using a remote database ............................................................................................................................................................74 Upgrading a non-Failover WhatsUp Distributed Edition (Remote/Secondary) using a remote database.............................................................................................................................................77
Upgrading an edition of WhatsUp Gold Failover ............................................................................................80 Backing up the WhatsUp databases ....................................................................................................................80 Restoring databases to Failover Scenario 1.......................................................................................................81 Creating and restoring databases for use in WhatsUp Gold Failover Scenario 2 ................................82
CHAPTER 4 Configuring your Failover Solution
Configuring WhatsUp Gold Failover ....................................................................................................................85 Configuring the Failover Service ...........................................................................................................................86 Configuring Advanced Settings ............................................................................................................................87 Configuring Windows credentials ........................................................................................................................88
CHAPTER 5 Viewing Failover Data
About the Failover Console.....................................................................................................................................89 About the Alert Center Failover Threshold report ..........................................................................................91
ii

1
CHAPTER 1
Using the WhatsUp Gold Failover Manager
In This Chapter
About this guide ................................................................................................... 1
About the WhatsUp Gold Failover Manager............................................... 1
System Requirements ......................................................................................... 3
Finding more information and updates.....................................................10
About this guide
Deploying and Using the WhatsUp Gold Failover Manager for WhatsUp Distrubuted Edition steps you through the process of installing, configuring, and using WhatsUp Gold Failover for WhatsUp Distributed Edition. The installation and upgrade scenarios are specifc to WhatsUp Gold Failover for WhatsUp Distributed Edition. For installation and upgrade information for WhatsUp Gold Failover for non-Distributed editions of WhatsUp Gold, see Deploying and Using the WhatsUp Gold Failover Manager on the WhatsUp Gold web site (http://www.whatsupgold.com/Failover144Deployment).
About the WhatsUp Gold Failover Manager
Failover is a mechanism with the capacity to automatically switch from a primary installation of WhatsUp Gold to a standby WhatsUp system when the primary system is not functioning normally. Failover differs from switchover, because it is an automatic switch, whereas switchover requires that a network administrator manually make the switch. The WhatsUp Gold Failover Manager reduces costly downtime by automatically taking action in the event of a primary system failure.
The Failover Manager utilizes user-configurable criteria to determine a failed state. You can choose to have the primary system go down if all services are disabled, or if any specified service is disabled. For example, if you select all services, the services used by WhatsUp Gold must go down on the primary service for the secondary system to take over. If you select only the Polling Engine and Web Server, and both are disabled on the primary system for any reason, the secondary system takes over WhatsUp Gold network management duties until the primary system has been restored.
Failover Deployment and User Guide for WhatsUp Gold Distributed
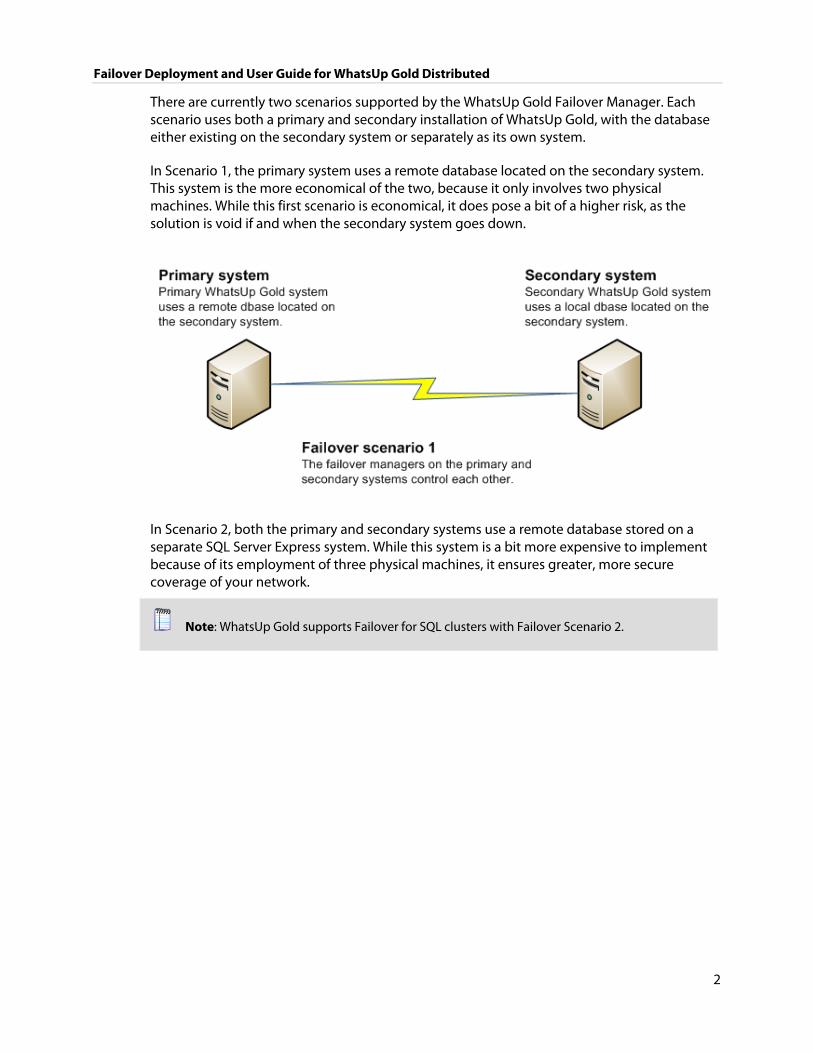
There are currently two scenarios supported by the WhatsUp Gold Failover Manager. Each scenario uses both a primary and secondary installation of WhatsUp Gold, with the database either existing on the secondary system or separately as its own system.
In Scenario 1, the primary system uses a remote database located on the secondary system. This system is the more economical of the two, because it only involves two physical machines. While this first scenario is economical, it does pose a bit of a higher risk, as the solution is void if and when the secondary system goes down.
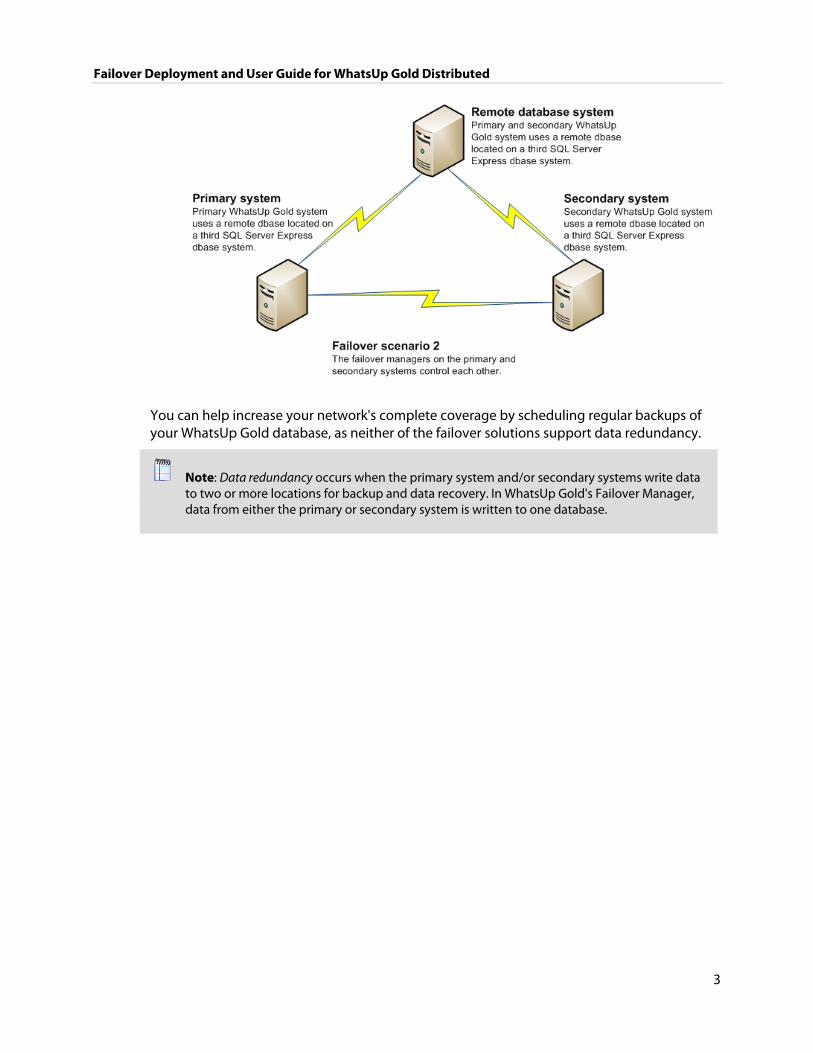
In Scenario 2, both the primary and secondary systems use a remote database stored on a separate SQL Server Express system. While this system is a bit more expensive to implement because of its employment of three physical machines, it ensures greater, more secure coverage of your network.
Note: WhatsUp Gold supports Failover for SQL clusters with Failover Scenario 2.
2
Failover Deployment and User Guide for WhatsUp Gold Distributed
You can help increase your network's complete coverage by scheduling regular backups of your WhatsUp Gold database, as neither of the failover solutions support data redundancy.
Note: Data redundancy occurs when the primary system and/or secondary systems write data to two or more locations for backup and data recovery. In WhatsUp Gold's Failover Manager, data from either the primary or secondary system is written to one database.
3
Failover Deployment and User Guide for WhatsUp Gold Distributed
System Requirements
Operating systems and virtual environments Ipswitch supports WhatsUp Gold operating on the following Windows operating systems:
Microsoft Windows 7 Ultimate edition (32-bit and 64-bit)
Microsoft Windows Vista Ultimate edition with Service Pack 2 (32-bit and 64-bit)
Microsoft Windows Vista Business edition with Service Pack 2 (32-bit and 64-bit)
Microsoft Windows XP Professional edition with Service Pack 3 (64-bit)
Microsoft Windows XP Professional (32-bit)
Note: Microsoft Windows XP Professional (32-bit) is supported only when using the WhatsUp Gold web server to provide web services.
Note: Ipswitch will no longer support WhatsUp Gold operating on the Microsoft Windows XP Professional (32-bit and 64-bit) operating systems in future releases.
Ipswitch supports WhatsUp Gold operating on the following Windows Server platforms:
Microsoft Windows Server 2008 R2
Microsoft Windows Server 2008
Microsoft Windows Server 2003
WhatsUp Gold will operate on any supported operating system on the following hypervisor architectures:
VMware ESX versions 3.5 and 4.x
VMware ESXi 3.5 and 4.x, and Microsoft Hyper-V Server 2008 R2
Important: If WhatsUp Gold is hosted on VMWare ESX, ESXi or Microsoft Hyper-V Server 2008, to avoid licensing issues, make sure that you assign a static MAC address to the virtual machine that WhatsUp Gold is operating on.
4
Failover Deployment and User Guide for WhatsUp Gold Distributed
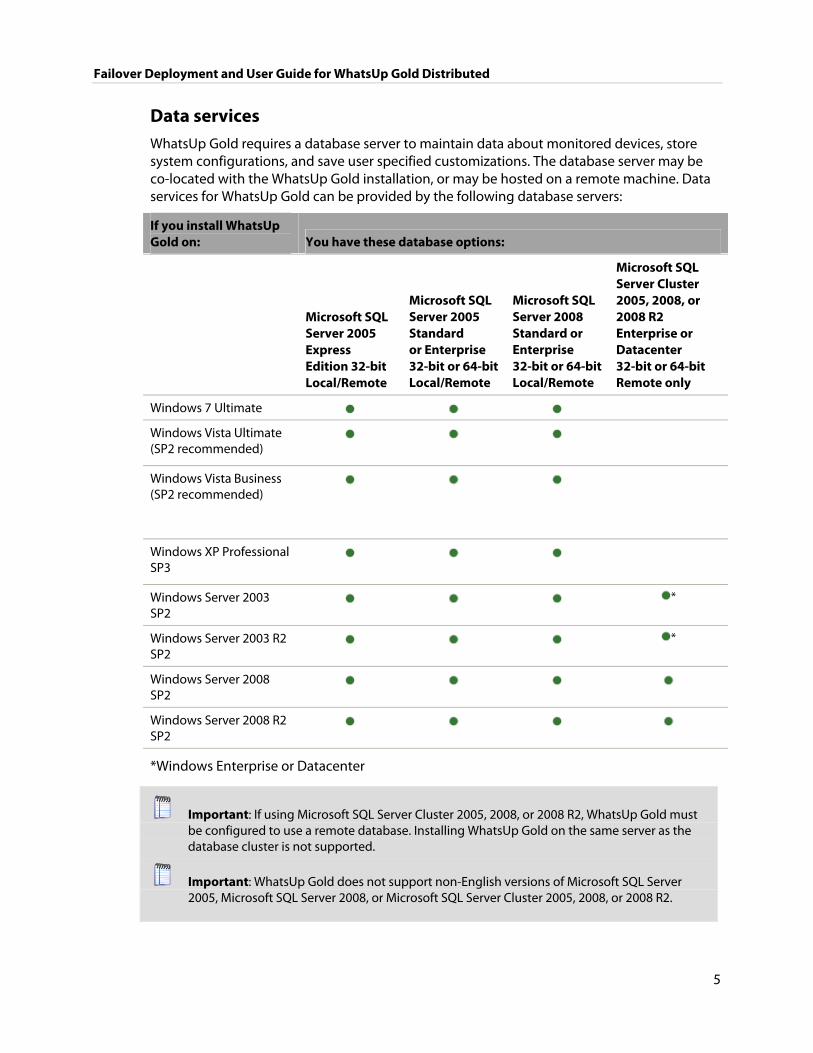
Data services WhatsUp Gold requires a database server to maintain data about monitored devices, store system configurations, and save user specified customizations. The database server may be co-located with the WhatsUp Gold installation, or may be hosted on a remote machine. Data services for WhatsUp Gold can be provided by the following database servers:
If you install WhatsUp Gold on: You have these database options:
Microsoft SQL Server 2005 Express Edition 32-bit Local/Remote
Microsoft SQL Server 2005 Standard or Enterprise 32-bit or 64-bitLocal/Remote
Microsoft SQL Server 2008 Standard or Enterprise 32-bit or 64-bit Local/Remote
Microsoft SQL Server Cluster 2005, 2008, or 2008 R2 Enterprise or Datacenter 32-bit or 64-bit Remote only
Windows 7 Ultimate
Windows Vista Ultimate (SP2 recommended)
Windows Vista Business (SP2 recommended)
Windows XP Professional SP3
Windows Server 2003 SP2
*
Windows Server 2003 R2 SP2
*
Windows Server 2008 SP2
Windows Server 2008 R2 SP2
*Windows Enterprise or Datacenter
Important: If using Microsoft SQL Server Cluster 2005, 2008, or 2008 R2, WhatsUp Gold must be configured to use a remote database. Installing WhatsUp Gold on the same server as the database cluster is not supported.
Important: WhatsUp Gold does not support non-English versions of Microsoft SQL Server 2005, Microsoft SQL Server 2008, or Microsoft SQL Server Cluster 2005, 2008, or 2008 R2.
5

Failover Deployment and User Guide for WhatsUp Gold Distributed
Web services Web services are required for the web-enabled functionality and reporting provided by WhatsUp Gold. These services are provided by one of the following web servers:
If you install WhatsUp Gold on: You have these web server options:
IIS version 7 IIS version 6 WhatsUp Gold Web server
Windows 7 Ultimate *
Windows Vista Ultimate (SP2 recommended)
*
Windows Vista Business (SP2 recommended)
*
Windows XP Professional SP3 (32-bit only)
Windows XP Professional SP3 (64-bit only)
*
Windows Server 2003 SP2 *
Windows Server 2003 R2 SP2 *
Windows Server 2008 SP2 *
Windows Server 2008 R2 SP2 *
*The WhatsUp Gold web server is available as a fall-back option.
Note: The WhatsUp Gold Web server is available as an option only in the case that Microsoft IIS is not available. It is recommended that Microsoft IIS be used where possible as it provides a more robust and feature rich web platform for WhatsUp Gold.
6

Failover Deployment and User Guide for WhatsUp Gold Distributed
The following is a list of the supported web servers and specific requirements for each version:
Microsoft Internet Information Services (IIS) version 7 (Use with WhatsUp Gold on Windows Server 2008 R2, Windows Server 2008, Windows 7, or Windows Vista). WhatsUp Gold requires the following Web Server (IIS) Role Services at a minimum:
Web Server
ASP
Static Content
HTTP Redirection
Default Document
Note: The installation program will automatically install IIS 7 on platforms where it is supported, you can then verify that IIS 7 is installed and properly configured from the Turn Windows Features on or off dialog. (Control Panel > Programs and Features > Turn Windows Features on or off) Verify that Web Server, ASP, Static Content, HTTP Redirection, and Default Document Web Server (IIS) Roles Services have been installed and are enabled.
Microsoft IIS version 6 (Use with WhatsUp Gold on Windows XP or Windows Server 2003). WhatsUp Gold requires the following web server extensions:
ASP
Note: You must manually install IIS 6, using instructions provided in the Microsoft Windows documentation included with your operating system or the Installing and Configuring WhatsUp Gold guide.
Note: The WhatsUp Gold Web server is available as an option only in the case that Microsoft IIS is not available. It is recommended that Microsoft IIS be used where possible as it provides a more robust and feature rich web platform for WhatsUp Gold.
WhatsUp Gold Web server
7
Failover Deployment and User Guide for WhatsUp Gold Distributed
Framework and accessibility WhatsUp Gold requires the Microsoft .NET Framework and other Microsoft packages in support of scripting and software accessibility. The following is a list of the required software framework and support packages:
Microsoft .NET Framework 4.0, included in installation program
Microsoft .NET Framework 3.5 and Microsoft .NET Framework 2.0, required by the installation program.
Important: Microsoft .NET Framework 3.5 and Microsoft .NET Framework 2.0 must be installed prior to running the installation program.
Microsoft Windows Scripting Host v5.7 (or later)
Microsoft SAPI 5.1 (required for Text-to-Speech actions)
Web and mobile interface The following web clients and mobile device interfaces are supported for use by WhatsUp Gold:
WhatsUp Gold Web interface: Microsoft Internet Explorer 7.0, Microsoft Internet Explorer 8.0, or Firefox 3.0
WhatsUp Gold Mobile interface: Mobile Safari 2.2, Microsoft Internet Explorer Mobile 6.1, or Opera Mini 4.2
WhatsVirtual supported virtual environments The WhatsVirtual plug-in supports virtual hosts and virtual machines running on the following virtual environments:
VMware vCenter Server 4.0
VMware ESX 3.5 and 4.0
VMware ESXi 3.5 and 4.0
8
Failover Deployment and User Guide for WhatsUp Gold Distributed
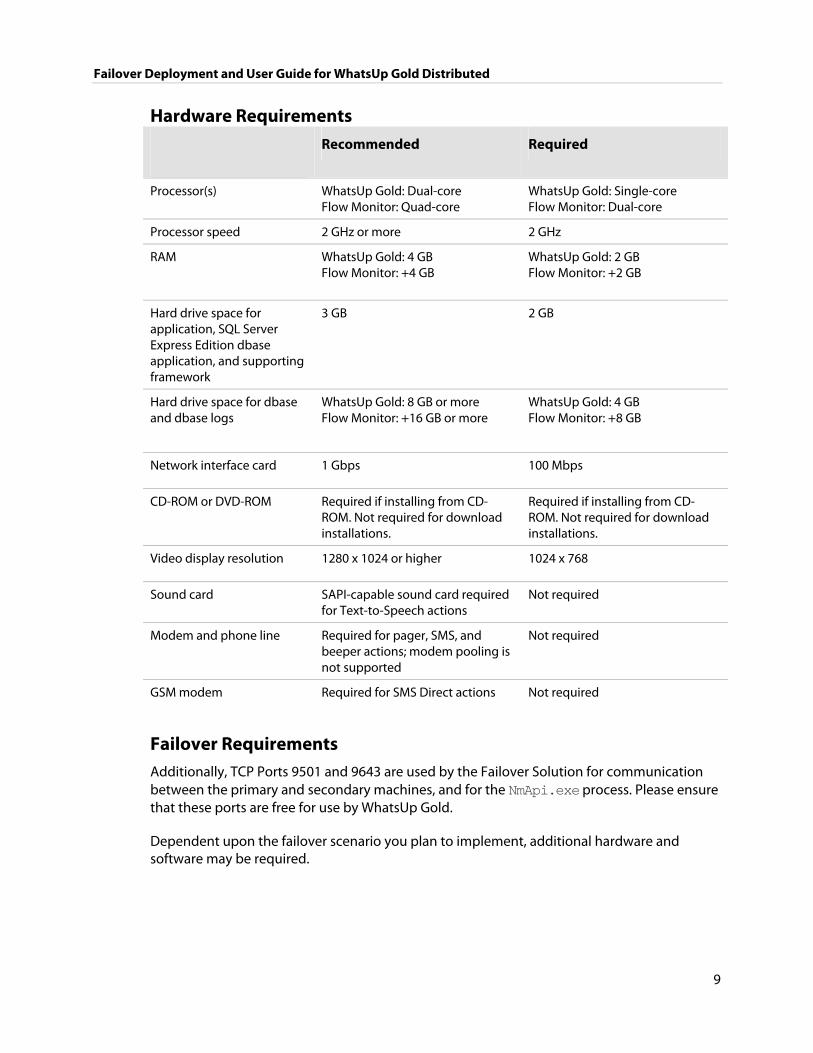
Hardware Requirements Recommended Required
Processor(s) WhatsUp Gold: Dual-core Flow Monitor: Quad-core
WhatsUp Gold: Single-core Flow Monitor: Dual-core
Processor speed 2 GHz or more 2 GHz
RAM WhatsUp Gold: 4 GB Flow Monitor: +4 GB
WhatsUp Gold: 2 GB Flow Monitor: +2 GB
Hard drive space for application, SQL Server Express Edition dbase application, and supporting framework
3 GB 2 GB
Hard drive space for dbase and dbase logs
WhatsUp Gold: 8 GB or more Flow Monitor: +16 GB or more
WhatsUp Gold: 4 GB Flow Monitor: +8 GB
Network interface card 1 Gbps 100 Mbps
CD-ROM or DVD-ROM Required if installing from CD-ROM. Not required for download installations.
Required if installing from CD-ROM. Not required for download installations.
Video display resolution 1280 x 1024 or higher 1024 x 768
Sound card SAPI-capable sound card required for Text-to-Speech actions
Not required
Modem and phone line Required for pager, SMS, and beeper actions; modem pooling is not supported
Not required
GSM modem Required for SMS Direct actions Not required
Failover Requirements Additionally, TCP Ports 9501 and 9643 are used by the Failover Solution for communication between the primary and secondary machines, and for the NmApi.exe process. Please ensure that these ports are free for use by WhatsUp Gold.
Dependent upon the failover scenario you plan to implement, additional hardware and software may be required.
9

Failover Deployment and User Guide for WhatsUp Gold Distributed
Scenario 1 hardware requirements:
A primary WhatsUp Gold machine that meets all of the software and hardware requirements listed in the WhatsUp Gold system requirements.
A secondary WhatsUp Gold machine that meets all of the software and hardware requirements listed in the WhatsUp Gold system requirements.
Scenario 2 hardware requirements:
A primary WhatsUp Gold machine that meets all of the software and hardware requirements listed in the WhatsUp Gold system requirements.
A secondary WhatsUp Gold machine that meets all of the software and hardware requirements listed in the WhatsUp Gold system requirements.
A third machine that meets the disk space requirements listed the WhatsUp Gold system requirements. This machine will run a SQL Server Express database for remote use by both the primary and secondary WhatsUp Gold machines.
Important: We recommend that all machines in either scenario be on the same network subnet.
Finding more information and updates
The following are information resources for WhatsUp Gold. This information may be periodically updated and available on the WhatsUp Gold web site (http://www.whatsupgold.com/wugtechsupport).
Release Notes. The release notes provide an overview of changes, known issues, and bug fixes for the current release. The release notes are available on the WhatsUp Gold web site (http://www.whatsupgold.com/WUG144relnotes).
Application Help for the console and web interface. The console and web help contain dialog assistance, general configuration information, and how-to's that explain how to use the features. The Table of Contents is organized by functional area, and can be accessed from the main menu or by clicking Help in the console, or the ? icon in the web interface.
Additional WhatsUp Gold resources. For a listing of current and previous guides and help available for WhatsUp Gold products, see the WhatsUp Gold web site (http://www.whatsupgold.com/support/guides.aspx).
WhatsUp Gold optional plug-ins. You can extend the core features of WhatsUp Gold by installing plug-ins. For information on available plug-ins and to see release notes for each plug-in, see WhatsUp Gold plug-ins documentation (http://www.whatsupgold.com/support/guides.aspx).
Licensing Information. Licensing and support information is available on the MyIpswitch licensing portal (http://www.myipswitch.com/). The web portal provides enhanced web-based capabilities to view and manage Ipswitch product licenses.
10

Failover Deployment and User Guide for WhatsUp Gold Distributed
Technical Support. Use the WhatsUp Gold Support Site for a variety of WhatsUp Gold product help resources. From here you can view product documentation, search Knowledge Base articles, access the community site for help from other users, and get other Technical Support information. The Support Site is available on the WhatsUp Gold web site (http://www.whatsupgold.com/wugtechsupport).
11

CHAPTER 2
Installing your Failover Solution
12
In This Chapter
About Failover Scenarios .................................................................................12
Installing Failover Scenario 2..........................................................................37
About Failover Scenarios
There are two possible scenarios available for implementation as your Failover Solution with WhatsUp Distributed Edition.
Scenario 1 includes a primary and a secondary machine for the central site, and a primary and secondary machine for any remote sites.
Scenario 2 includes a primary, a secondary, and a database machine for the central site, and a primary, a secondary, and a database machine for any remote sites.
Failover Deployment and User Guide for WhatsUp Gold Distributed
Scenario 1 includes:
A primary WhatsUp Gold Central Site system that uses a remote database on the Central Site secondary system. This system is responsible for running WhatsUp Gold and monitoring the network day-to-day.
A secondary WhatsUp Gold Central Site system that uses the local database. This system is placed on stand-by, and in the event that the primary system goes down, takes over WhatsUp Gold duties for the network.
A primary WhatsUp Gold Remote Site sytem that uses a remote database on the Remote Site secondary system. This system is responsible for running WhatsUp Gold on the Remote system.
A secondary WhatsUp Gold Remote Site system that uses the local database. This system in placed on stand-by, and in the event that the primary Remote Site system goes down, takes over WhatsUp Gold duties for the Remote system.
Because Scenario 1 uses a remote database on the secondary machines, you must install WhatsUp Gold on the Central Site and Remote Site secondary machines first. After a successful installation on the secondary WhatsUp Gold machine, you then install WhatsUp Gold on the primary machines.
Important: Failover Scenario 1 requires there to be a local SQL database on the secondary machine; you cannot specify a remote database for use in Scenario 1. If you want to use a remote SQL database, you must use Failover Scenario 2.
A successful installation of Failover Scenario 1 for WhatsUp Gold Distributed Edition requires that you complete the following steps in sequential order.
To install Failover Scenario 1 for WhatsUp Gold Distributed Edition: 1 Install Failover Scenario 1 on the Central site secondary machine 2 Install Failover Scenario 1 on the Central site primary machine 3 Configure Central Failover settings 4 Configure the firewall for Central and Remote Site connections 5 Install Failover Scenario 1 on the Remote site secondary machine 6 Install Failover Scenario 1 on the Remote site primary machine 7 Configure Remote Failover settings 8 Repeat steps 4 through 6 as needed for additional remote sites.
13
Failover Deployment and User Guide for WhatsUp Gold Distributed
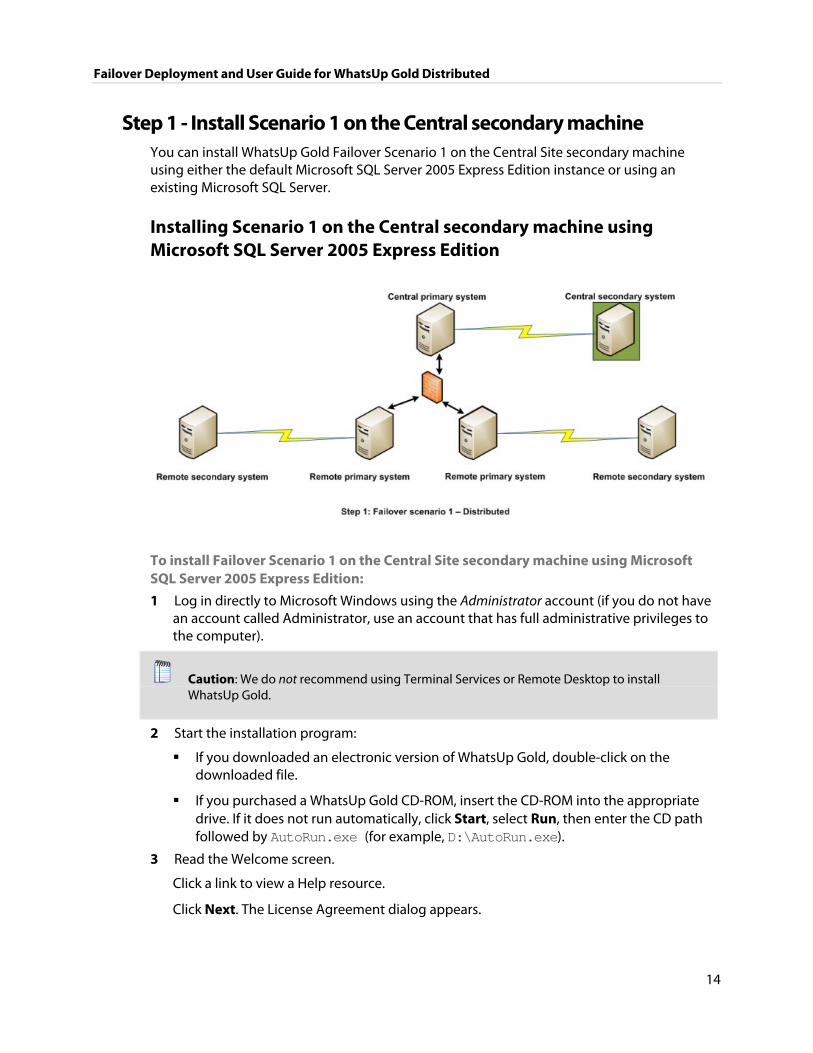
Step 1 - Install Scenario 1 on the Central secondary machine You can install WhatsUp Gold Failover Scenario 1 on the Central Site secondary machine using either the default Microsoft SQL Server 2005 Express Edition instance or using an existing Microsoft SQL Server.
Installing Scenario 1 on the Central secondary machine using Microsoft SQL Server 2005 Express Edition
To install Failover Scenario 1 on the Central Site secondary machine using Microsoft SQL Server 2005 Express Edition: 1 Log in directly to Microsoft Windows using the Administrator account (if you do not have
an account called Administrator, use an account that has full administrative privileges to the computer).
Caution: We do not recommend using Terminal Services or Remote Desktop to install WhatsUp Gold.
2 Start the installation program:
If you downloaded an electronic version of WhatsUp Gold, double-click on the downloaded file.
If you purchased a WhatsUp Gold CD-ROM, insert the CD-ROM into the appropriate drive. If it does not run automatically, click Start, select Run, then enter the CD path followed by AutoRun.exe (for example, D:\AutoRun.exe).
3 Read the Welcome screen.
Click a link to view a Help resource.
Click Next. The License Agreement dialog appears.
14

Failover Deployment and User Guide for WhatsUp Gold Distributed
4 Read the license agreement. If you accept the terms of the license agreement, select I accept the terms of the license agreement.
To print a copy of the license agreement, click Print. The license agreement is sent to the default printer.
If you do not accept the terms of the license agreement, click Cancel to exit the installation program.
Click Next to continue. The Failover Scenario dialog appears.
5 Select Failover Scenario 1.
Click Next to continue. The Failover Machine dialog appears.
6 Select Secondary.
Click Next to continue. The Microsoft SQL Server Installation Options dialog appears.
7 Select Install Microsoft SQL Server 2005 Express Edition on this machine.
Click Next to continue.
8 Select the install directories for Microsoft SQL Server 2005 Express Edition. The application and data files are installed in default directories. To change the locations, click Browse to find and select a different directory for the application files or the data files.
Important: Make sure that you have a large capacity drive selected for data storage. The data files for WhatsUp Gold can reach a maximum size of 22 GB.
Important: During the initial installation, databases are created for WhatsUp Gold Flow Monitor. These initial databases are limited in size, but are increased the first time the Flow Monitor collector initializes. If at least 16 GB of disk space are available when the collector initializes, the maximum size of the Flow Monitor databases is increased to 4 GB each (16 GB total including transaction logs). If less than 16 GB is available, the maximum size of the Flow Monitor databases is limited proportionately to the amount of free disk space. If your license includes WhatsUp Gold Flow Monitor, we strongly recommend that you verify that you have at least 16 GB of free disk space before installing.
Click Next. The Specify the SQL "sa" Account Password dialog appears.
Important: If you want to change the SQL Server user account, the account you want to use must have the same permissions as the 'sa' account.
9 Specify a User Name for the account and enter and confirm a Password. You also have the option to Keep the default password.
Click Next.
15
Failover Deployment and User Guide for WhatsUp Gold Distributed
10 Select the installation directory for the WhatsUp Gold application files.
The default path is C:\Program Files\Ipswitch\WhatsUp. We recommend that you use the default path. After you select the installation directory, click Next.
Tip: The Program Files directory name may vary if on a 64 bit system (for example, Program Files (x86)). You can install WhatsUp Gold to a different location. To select a different location, click Change.
Note: If the installation program detects data from a previous installation of WhatsUp Gold, the Backup Web and Report Files dialog appears. We recommend that you select Back up the existing Web and report files, then click Next.
11 Select the IIS web site to use for the WhatsUp Web Interface. After you have selected the IIS web site, click Next.
12 Either select to Keep the default Admin password, or enter and confirm a new password.
Click Next to configure the Central Site.
13 Enter the information that Remote Sites will use to connect to this Central Site.
Enter the TCP Port that the Remote Sites will use to connect to the Central Site (default port is 9394).
Enter a User Name and Password that the Remote Sites will use to access this Central Site
Click Next. The Ready to Install the Program dialog appears.
Note: Make note of this information. You will need the TCP port and User Name and Password information for each Remote Site installation.
Click Next to install WhatsUp Gold.
14 Click Install to install WhatsUp Gold. The setup program installs and configures WhatsUp Gold.
15 When installation completes, the InstallShield Wizard Complete dialog appears.
To view the steps required to configure WhatsUp Gold Failover, click View Failover Configuration Requirements.
Click Finish. The Setup program closes.
16

Failover Deployment and User Guide for WhatsUp Gold Distributed
About Microsoft SQL Server with WhatsUp Gold Failover for Distributed Edition You can use an existing Microsoft SQL Server 2005 or Microsoft SQL Server 2008 to store data collected by WhatsUp Gold Failover. To do this, these requirements must be met:
Microsoft SQL Server 2005 or Microsoft SQL Server 2008 must be installed on the Central Site and/or Remote Site secondary machine in Failover Scenario 1 and on a remote machine for Failover Scenario 2.
Important: Make sure that the "master" database for the existing SQL Server database instance that is hosting the WhatsUp database is configured to use case-insensitive collation.
Important: WhatsUp Gold does not support non-English versions of Microsoft SQL Server 2005 or Microsoft SQL Server 2008.
Microsoft SQL Server 2005 or Microsoft SQL Server 2008 must be configured to allow WhatsUp Gold to authenticate.
If Microsoft SQL Server is installed on a remote computer (as in the case of Failover Scenario 2), remote connections must be allowed. For more information, see How to configure Microsoft SQL Server to allow remote connections (http://support.microsoft.com/kb/914277) on the Microsoft Web site.
Use a Microsoft SQL Server user account to connect to the database.
Microsoft SQL Server must be configured to have a user account that meets the following requirements:
Full administrator privileges to Microsoft SQL Server, not just the WhatsUp Gold databases. WhatsUp Gold only supports accessing the database via an account with full administrator rights. WhatsUp Gold does not support using a limited access database user account.
User's language is set to (United States) English. This can be set in the properties for the login used by WhatsUp Gold.
If you need assistance configuring or verifying these prerequisites, contact your database administrator or refer to the Microsoft SQL Server documentation (http://support.microsoft.com/ph/2855).
17
Failover Deployment and User Guide for WhatsUp Gold Distributed
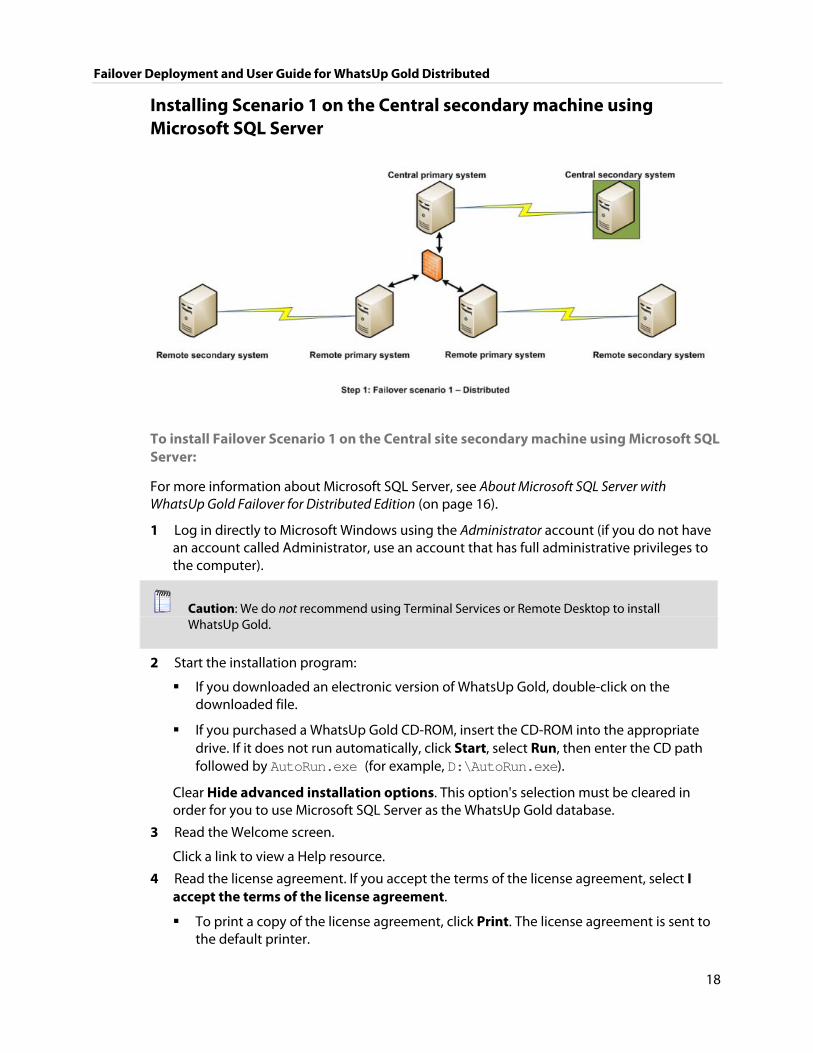
Installing Scenario 1 on the Central secondary machine using Microsoft SQL Server
To install Failover Scenario 1 on the Central site secondary machine using Microsoft SQL Server:
For more information about Microsoft SQL Server, see About Microsoft SQL Server with WhatsUp Gold Failover for Distributed Edition (on page 16).
1 Log in directly to Microsoft Windows using the Administrator account (if you do not have an account called Administrator, use an account that has full administrative privileges to the computer).
Caution: We do not recommend using Terminal Services or Remote Desktop to install WhatsUp Gold.
2 Start the installation program:
If you downloaded an electronic version of WhatsUp Gold, double-click on the downloaded file.
If you purchased a WhatsUp Gold CD-ROM, insert the CD-ROM into the appropriate drive. If it does not run automatically, click Start, select Run, then enter the CD path followed by AutoRun.exe (for example, D:\AutoRun.exe).
Clear Hide advanced installation options. This option's selection must be cleared in order for you to use Microsoft SQL Server as the WhatsUp Gold database.
3 Read the Welcome screen.
Click a link to view a Help resource.
4 Read the license agreement. If you accept the terms of the license agreement, select I accept the terms of the license agreement.
To print a copy of the license agreement, click Print. The license agreement is sent to the default printer.
18

Failover Deployment and User Guide for WhatsUp Gold Distributed
If you do not accept the terms of the license agreement, click Cancel to exit the installation program.
Click Next to continue. The Failover Scenario dialog appears.
5 Select Failover Scenario 1.
Click Next to continue. The Failover Machine dialog appears.
6 Select Secondary.
Click Next to continue. The Microsoft SQL Server Installation Options dialog appears.
7 Select Use an existing installation of Microsoft SQL Server, then click Next. The Database Server Login dialog appears.
Important: Make sure that the "master" database for the existing SQL Server database instance that is hosting the WhatsUp database is configured to use case-insensitive collation.
Tip: If you cannot remember your database server's hostname, click Browse to see a list of all database servers detected on the domain. Database servers to which you can connect but which are not configured on the same domain as the computer where you are installing WhatsUp Gold are not shown. The Browse dialog scans your entire domain, so it may take some time before showing you a list of database servers.
a) In Database server that you are installing to, enter the hostname, or hostname and instance of your database server.
Note: If you are using a database instance other than the default instance, you must include the instance name using the format <Server_Name>\<Instance_Name>.
b) In SQL Server Authentication, enter the correct Login ID and Password.
Important: If you want to change the SQL Server user account, the account you want to use must have the same permissions as the 'sa' account.
c) Click Next. The installation program attempts to validate the credentials you entered and checks for the existence of WhatsUp Gold databases on the database server. If WhatsUp Gold databases are found on the database server, the setup program alerts you and asks if you want to continue.
Select Yes to upgrade the databases and continue the installation.
Select No to select another Microsoft SQL Server. After the credentials are validated, the Enter Microsoft SQL Server 2005 Express Edition Paths dialog appears.
8 This dialog lists the third-party resources that the installation program installs, including Microsoft SQL Server 2005 Express Edition client tools (required for installations of WhatsUp Gold that use Microsoft SQL Server databases) and Microsoft .NET Framework 3.5.
19
Failover Deployment and User Guide for WhatsUp Gold Distributed
Click Next. The Choose Destination Location dialog appears.
9 Select the installation directory for the WhatsUp Gold application files.
The default path is C:\Program Files\Ipswitch\WhatsUp. We recommend that you use the default path. After you select the installation directory, click Next.
Tip: The Program Files directory name may vary if on a 64 bit system (for example, Program Files (x86)). You can install WhatsUp Gold to a different location. To select a different location, click Change.
Note: If the installation program detects data from a previous installation of WhatsUp Gold, the Backup Web and Report Files dialog appears. We recommend that you select Back up the existing Web and report files, then click Next.
10 Select the IIS web site to use for the WhatsUp Web Interface. After you have selected the IIS web site, click Next.
11 Either select to Keep the default Admin password, or enter and confirm a new password.
Click Next to configure the Central Site.
12 Enter the information that Remote Sites will use to connect to this Central Site.
Enter the TCP Port that the Remote Sites will use to connect to the Central Site (default port is 9394).
Enter a User Name and Password that the Remote Sites will use to access this Central Site
Click Next. The Ready to Install the Program dialog appears.
Note: Make note of this information. You will need the TCP port and User Name and Password information for each Remote Site installation.
13 Click Install to install WhatsUp Gold. The setup program installs and configures WhatsUp Gold.
14 When installation completes, the InstallShield Wizard Complete dialog appears.
To view the steps required to configure WhatsUp Gold Failover, click View Failover Configuration Requirements.
Click Finish. The Setup program closes.
20
Failover Deployment and User Guide for WhatsUp Gold Distributed
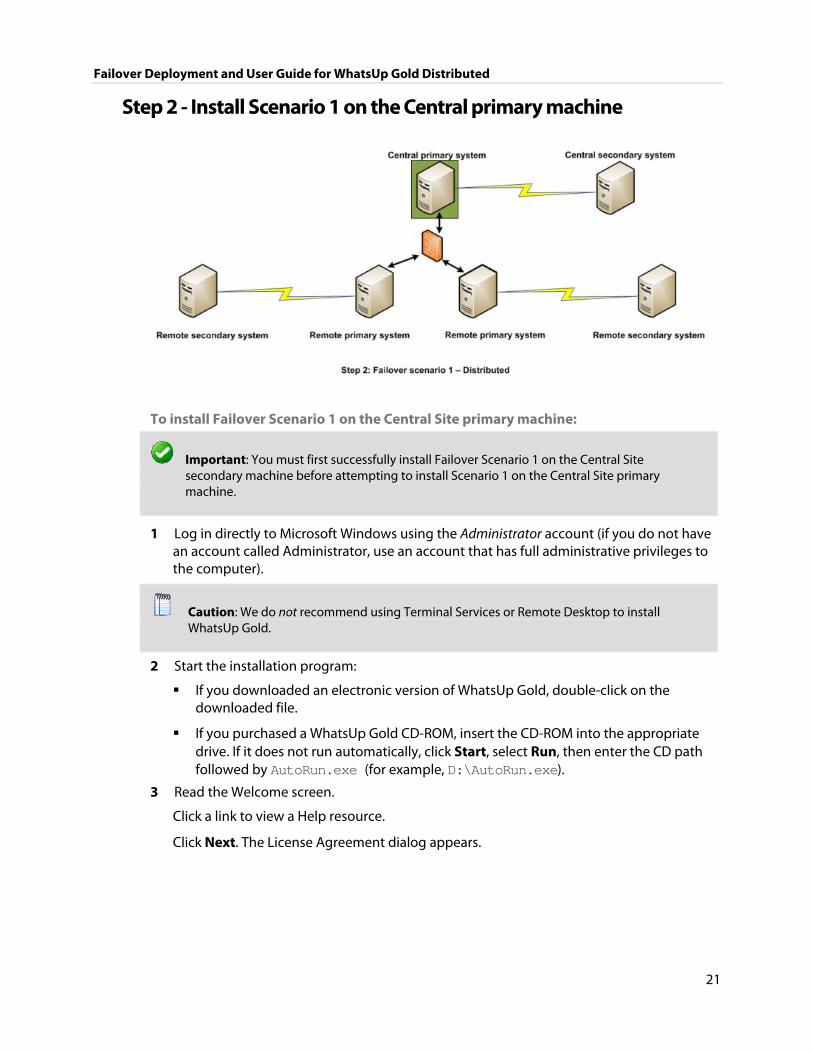
Step 2 - Install Scenario 1 on the Central primary machine
To install Failover Scenario 1 on the Central Site primary machine:
Important: You must first successfully install Failover Scenario 1 on the Central Site secondary machine before attempting to install Scenario 1 on the Central Site primary machine.
1 Log in directly to Microsoft Windows using the Administrator account (if you do not have an account called Administrator, use an account that has full administrative privileges to the computer).
Caution: We do not recommend using Terminal Services or Remote Desktop to install WhatsUp Gold.
2 Start the installation program:
If you downloaded an electronic version of WhatsUp Gold, double-click on the downloaded file.
If you purchased a WhatsUp Gold CD-ROM, insert the CD-ROM into the appropriate drive. If it does not run automatically, click Start, select Run, then enter the CD path followed by AutoRun.exe (for example, D:\AutoRun.exe).
3 Read the Welcome screen.
Click a link to view a Help resource.
Click Next. The License Agreement dialog appears.
21
Failover Deployment and User Guide for WhatsUp Gold Distributed
4 Read the license agreement. If you accept the terms of the license agreement, select I accept the terms of the license agreement.
To print a copy of the license agreement, click Print. The license agreement is sent to the default printer.
If you do not accept the terms of the license agreement, click Cancel to exit the installation program.
Click Next to continue. The Failover Scenario dialog appears.
5 Select Failover Scenario 1.
Click Next to continue. The Failover Machine dialog appears.
6 Select Primary.
Click Next to continue. The Database Server Login dialog appears.
Important: Make sure that the "master" database for the existing SQL Server database instance that is hosting the WhatsUp database is configured to use case-insensitive collation.
Tip: If you cannot remember your database server's hostname, click Browse to see a list of all database servers detected on the domain. Database servers to which you can connect but which are not configured on the same domain as the computer where you are installing WhatsUp Gold are not shown. The Browse dialog scans your entire domain, so it may take some time before showing you a list of database servers.
a) In Database server that you are installing to, enter the hostname, or hostname and instance of your database server.
Note: If you are using a database instance other than the default instance, you must include the instance name using the format <Server_Name>\<Instance_Name>.
b) In SQL Server Authentication, enter the correct Login ID and Password.
Important: If you want to change the SQL Server user account, the account you want to use must have the same permissions as the 'sa' account.
c) Click Next. The installation program attempts to validate the credentials you entered and checks for the existence of WhatsUp Gold databases on the database server. If WhatsUp Gold databases are found on the database server, the setup program alerts you and asks if you want to continue.
Select Yes to upgrade the databases and continue the installation.
Select No to select another Microsoft SQL Server. After the credentials are validated, the Enter Microsoft SQL Server 2005 Express Edition Paths dialog appears.
22

Failover Deployment and User Guide for WhatsUp Gold Distributed
7 This dialog lists the third-party resources that the installation program installs, including Microsoft SQL Server 2005 Express Edition client tools (required for installations of WhatsUp Gold that use Microsoft SQL Server databases) and Microsoft .NET Framework 3.5.
Click Next to continue. The install directory dialog appears.
8 Select the installation directory for the WhatsUp Gold application files.
The default path is C:\Program Files\Ipswitch\WhatsUp. We recommend that you use the default path. After you select the installation directory, click Next.
Tip: The Program Files directory name may vary if on a 64 bit system (for example, Program Files (x86)). You can install WhatsUp Gold to a different location. To select a different location, click Change.
Note: If the installation program detects data from a previous installation of WhatsUp Gold, the Backup Web and Report Files dialog appears. We recommend that you select Back up the existing Web and report files, then click Next.
9 Select the IIS web site to use for the WhatsUp Web Interface. After you have selected the IIS web site, click Next.
10 Either select to Keep the default Admin password, or enter and confirm a new password.
Click Next to configure the Central Site.
11 Enter the information that Remote Sites will use to connect to this Central Site.
Enter the TCP Port that the Remote Sites will use to connect to the Central Site (default port is 9394).
Enter a User Name and Password that the Remote Sites will use to access this Central Site
Click Next. The Ready to Install the Program dialog appears.
Note: Make note of this information. You will need the TCP port and User Name and Password information for each Remote Site installation.
Click Next to install WhatsUp Gold.
Click Install to install WhatsUp Gold. The setup program installs and configures WhatsUp Gold.
12 When installation completes, the InstallShield Wizard Complete dialog appears.
To view the steps required to configure WhatsUp Gold Failover, click View Failover Configuration Requirements.
Click Finish. The Setup program closes.
23
Failover Deployment and User Guide for WhatsUp Gold Distributed
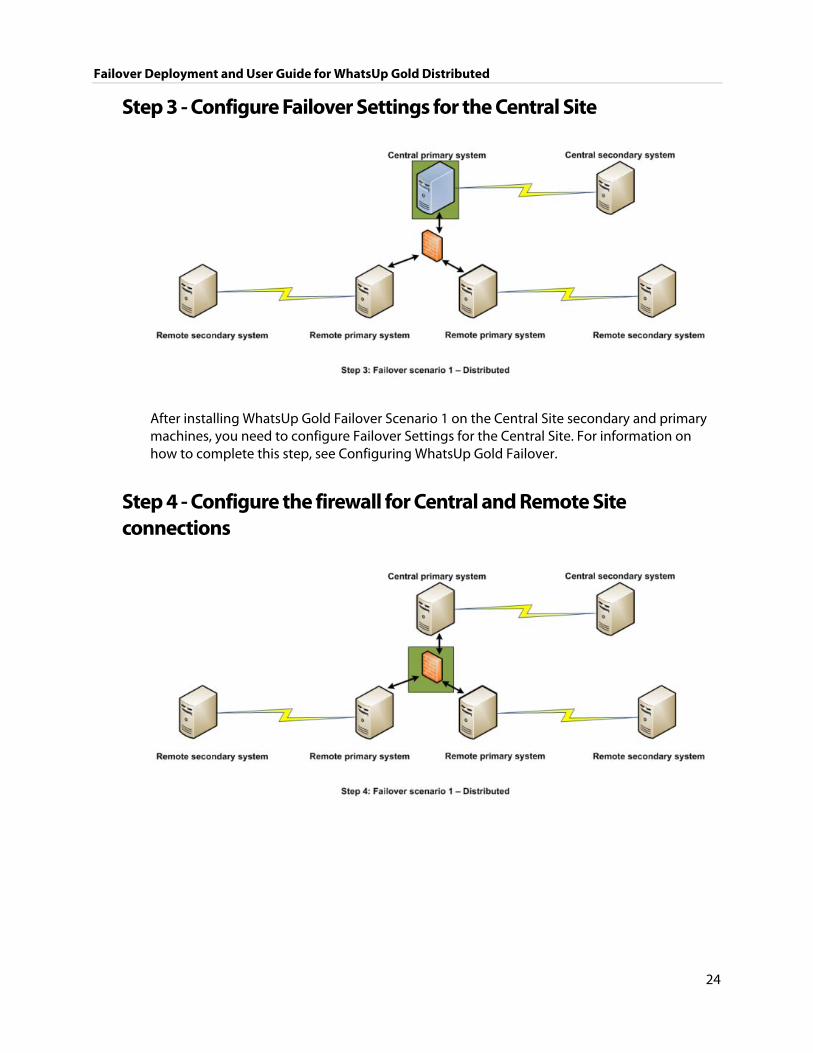
Step 3 - Configure Failover Settings for the Central Site
After installing WhatsUp Gold Failover Scenario 1 on the Central Site secondary and primary machines, you need to configure Failover Settings for the Central Site. For information on how to complete this step, see Configuring WhatsUp Gold Failover.
Step 4 - Configure the firewall for Central and Remote Site connections
24

Failover Deployment and User Guide for WhatsUp Gold Distributed
Accessing the Central Site The WhatsUp Gold Distributed Edition is designed to simplify firewall connections. Communications are outbound from each Remote Site back to the Central Site, so only one configuration is required for all Remote Sites to communicate back to the Central Site.
After you have set up the WhatsUp Gold Central Site, you need to determine what is required for the Remote Sites to connect across WANs, firewalls, routers, and other network security measures to communicate back to the Central Site. This information will be required as you install and configure each WhatsUp Gold Remote Site.
If you are not responsible for these network security configurations, contact the appropriate network administrator to help you identify the requirements to allow the connections in to the Central Site.
Accessing Remote Sites Additionally, it is not required, but you can also configure the Remote Sites to be accessible via their Web interfaces. By doing so, users can drill-down from the Central Site to specific reports and data on a specific Remote Site. You can control access from the Central Site to the Remote Site by providing varying levels of user privileges to data on each Remote Site. For more information, see Creating and modifying user accounts.
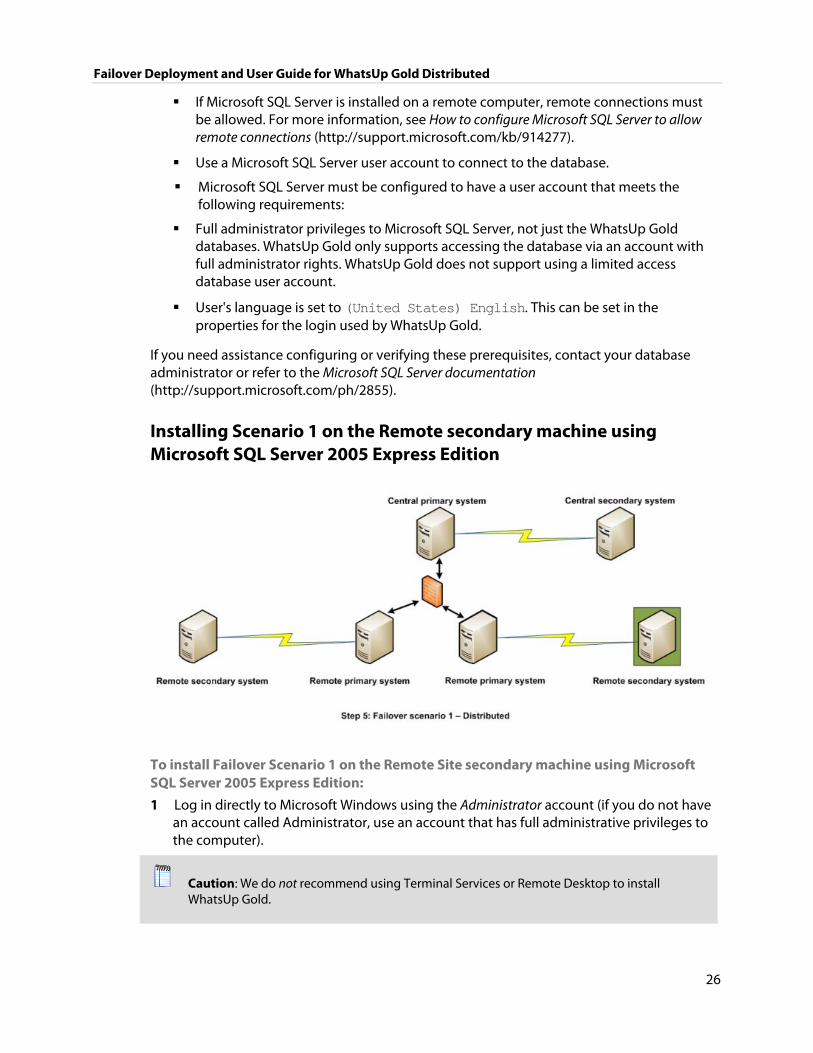
Step 5 - Install Scenario 1 on the Remote secondary machine You can install WhatsUp Gold Failover Scenario 1 on the Remote Site secondary machine using either the default Microsoft SQL Server 2005 Express Edition instance or using an existing Microsoft SQL Server (on page 29).
About Microsoft SQL Server
You can use an existing Microsoft SQL Server 2005, Microsoft SQL Server 2008, or Microsoft SQL Server Cluster 2005, 2008, or 2008 R2 to store the data collected by WhatsUp Gold. To do this, these requirements must be met:
Microsoft SQL Server 2005, Microsoft SQL Server 2008, or Microsoft SQL Server Cluster 2005, 2008, or 2008 R2 English must be installed on the WhatsUp Gold host computer or another computer.
Important: Make sure that the "master" database for the existing SQL Server database instance that is hosting the WhatsUp database is configured to use case-insensitive collation.
Important: WhatsUp Gold does not support non-English versions of Microsoft SQL Server 2005, Microsoft SQL Server 2008, or Microsoft SQL Server Cluster 2005, 2008, or 2008 R2.
Microsoft SQL Server 2005, Microsoft SQL Server 2008, or Microsoft SQL Server Cluster 2005, 2008, or 2008 R2 must be configured to allow WhatsUp Gold to authenticate.
25
Failover Deployment and User Guide for WhatsUp Gold Distributed
If Microsoft SQL Server is installed on a remote computer, remote connections must be allowed. For more information, see How to configure Microsoft SQL Server to allow remote connections (http://support.microsoft.com/kb/914277).
Use a Microsoft SQL Server user account to connect to the database.
Microsoft SQL Server must be configured to have a user account that meets the following requirements:
Full administrator privileges to Microsoft SQL Server, not just the WhatsUp Gold databases. WhatsUp Gold only supports accessing the database via an account with full administrator rights. WhatsUp Gold does not support using a limited access database user account.
User's language is set to (United States) English. This can be set in the properties for the login used by WhatsUp Gold.
If you need assistance configuring or verifying these prerequisites, contact your database administrator or refer to the Microsoft SQL Server documentation (http://support.microsoft.com/ph/2855).
Installing Scenario 1 on the Remote secondary machine using Microsoft SQL Server 2005 Express Edition
To install Failover Scenario 1 on the Remote Site secondary machine using Microsoft SQL Server 2005 Express Edition: 1 Log in directly to Microsoft Windows using the Administrator account (if you do not have
an account called Administrator, use an account that has full administrative privileges to the computer).
Caution: We do not recommend using Terminal Services or Remote Desktop to install WhatsUp Gold.
26
Failover Deployment and User Guide for WhatsUp Gold Distributed
2 Start the installation program:
If you downloaded an electronic version of WhatsUp Gold, double-click on the downloaded file.
If you purchased a WhatsUp Gold CD-ROM, insert the CD-ROM into the appropriate drive. If it does not run automatically, click Start, select Run, then enter the CD path followed by AutoRun.exe (for example, D:\AutoRun.exe).
3 Read the Welcome screen.
Click a link to view a Help resource.
Click Next. The License Agreement dialog appears.
4 Read the license agreement. If you accept the terms of the license agreement, select I accept the terms of the license agreement.
To print a copy of the license agreement, click Print. The license agreement is sent to the default printer.
If you do not accept the terms of the license agreement, click Cancel to exit the installation program.
Click Next to continue. The Failover Scenario dialog appears.
5 Select Failover Scenario 1.
Click Next to continue. The Failover Machine dialog appears.
6 Select Secondary.
Click Next to continue. The Microsoft SQL Server Installation Options dialog appears.
7 Select Install Microsoft SQL Server 2005 Express Edition on this machine.
Click Next to continue.
8 Select the install directories for Microsoft SQL Server 2005 Express Edition. The application and data files are installed in default directories. To change the locations, click Browse to find and select a different directory for the application files or the data files.
Important: Make sure that you have a large capacity drive selected for data storage. The data files for WhatsUp Gold can reach a maximum size of 22 GB.
Important: During the initial installation, databases are created for WhatsUp Gold Flow Monitor. These initial databases are limited in size, but are increased the first time the Flow Monitor collector initializes. If at least 16 GB of disk space are available when the collector initializes, the maximum size of the Flow Monitor databases is increased to 4 GB each (16 GB total including transaction logs). If less than 16 GB is available, the maximum size of the Flow Monitor databases is limited proportionately to the amount of free disk space. If your license includes WhatsUp Gold Flow Monitor, we strongly recommend that you verify that you have at least 16 GB of free disk space before installing.
27
Failover Deployment and User Guide for WhatsUp Gold Distributed
Click Next. The Specify the SQL "sa" Account Password dialog appears.
Important: If you want to change the SQL Server user account, the account you want to use must have the same permissions as the 'sa' account.
9 Specify a User Name for the account and enter and confirm a Password. You also have the option to Keep the default password.
Click Next.
10 Select the installation directory for the WhatsUp Gold application files.
The default path is C:\Program Files\Ipswitch\WhatsUp. We recommend that you use the default path. After you select the installation directory, click Next.
Tip: The Program Files directory name may vary if on a 64 bit system (for example, Program Files (x86)). You can install WhatsUp Gold to a different location. To select a different location, click Change.
Note: If the installation program detects data from a previous installation of WhatsUp Gold, the Backup Web and Report Files dialog appears. We recommend that you select Back up the existing Web and report files, then click Next.
11 Select the IIS web site to use for the WhatsUp Web Interface. After you have selected the IIS web site, click Next.
12 Either select to Keep the default Admin password, or enter and confirm a new password.
Click Next to configure the Remote Site.
13 Enter the information required to connect to the Central Site.
In Address, enter the IP address of the Central Site.
In TCP Port, enter the port over which the Central Site is listening for connections from the Remote Sites (default port is 9394).
Tip: After you have entered this information, you can click Test to validate the connection to the Central Site.
Enter the User Name and Password that the Remote Site uses to access the Central Site.
Note: This is the User Name and Password that you set in the Central Site installation program.
Click Next.
28
Failover Deployment and User Guide for WhatsUp Gold Distributed
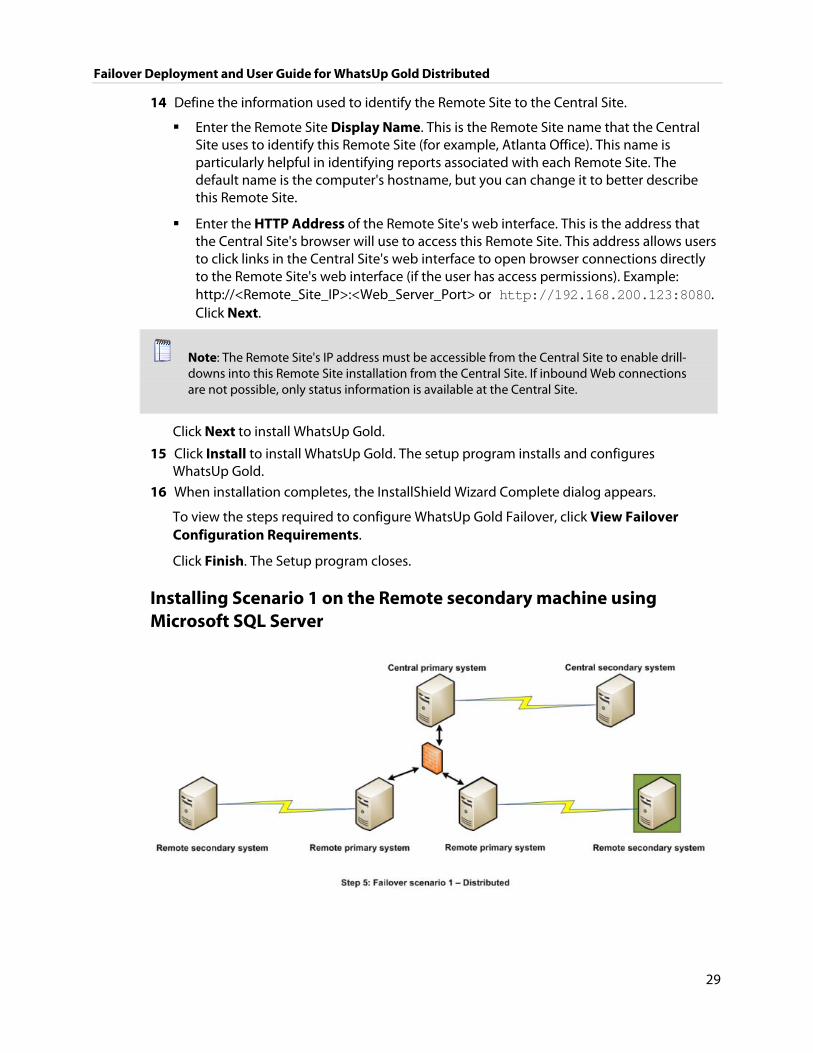
14 Define the information used to identify the Remote Site to the Central Site.
Enter the Remote Site Display Name. This is the Remote Site name that the Central Site uses to identify this Remote Site (for example, Atlanta Office). This name is particularly helpful in identifying reports associated with each Remote Site. The default name is the computer's hostname, but you can change it to better describe this Remote Site.
Enter the HTTP Address of the Remote Site's web interface. This is the address that the Central Site's browser will use to access this Remote Site. This address allows users to click links in the Central Site's web interface to open browser connections directly to the Remote Site's web interface (if the user has access permissions). Example: http://<Remote_Site_IP>:<Web_Server_Port> or http://192.168.200.123:8080. Click Next.
Note: The Remote Site's IP address must be accessible from the Central Site to enable drill-downs into this Remote Site installation from the Central Site. If inbound Web connections are not possible, only status information is available at the Central Site.
Click Next to install WhatsUp Gold.
15 Click Install to install WhatsUp Gold. The setup program installs and configures WhatsUp Gold.
16 When installation completes, the InstallShield Wizard Complete dialog appears.
To view the steps required to configure WhatsUp Gold Failover, click View Failover Configuration Requirements.
Click Finish. The Setup program closes.
Installing Scenario 1 on the Remote secondary machine using Microsoft SQL Server
29

Failover Deployment and User Guide for WhatsUp Gold Distributed
To install Failover Scenario 1 on the Remote Site secondary machine using Microsoft SQL Server:
For more information about Microsoft SQL Server, see About Microsoft SQL Server with WhatsUp Gold Failover for Distributed Edition (on page 16).
1 Log in directly to Microsoft Windows using the Administrator account (if you do not have an account called Administrator, use an account that has full administrative privileges to the computer).
Caution: We do not recommend using Terminal Services or Remote Desktop to install WhatsUp Gold.
2 Start the installation program:
If you downloaded an electronic version of WhatsUp Gold, double-click on the downloaded file.
If you purchased a WhatsUp Gold CD-ROM, insert the CD-ROM into the appropriate drive. If it does not run automatically, click Start, select Run, then enter the CD path followed by AutoRun.exe (for example, D:\AutoRun.exe).
Clear Hide advanced installation options. This option's selection must be cleared in order for you to use Microsoft SQL Server as the WhatsUp Gold database.
3 Read the Welcome screen.
Click a link to view a Help resource.
Click Next. The License Agreement dialog appears.
4 Read the license agreement. If you accept the terms of the license agreement, select I accept the terms of the license agreement.
To print a copy of the license agreement, click Print. The license agreement is sent to the default printer.
If you do not accept the terms of the license agreement, click Cancel to exit the installation program.
Click Next to Continue. The Failover Scenario dialog appears.
5 Select Failover Scenario 1.
Click Next to continue. The Failover Machine dialog appears.
6 Select Secondary.
Click Next to continue. The Microsoft SQL Server Installation Options dialog appears.
7 Select Use an existing installation of Microsoft SQL Server, then click Next. The Database Server Login dialog appears.
Important: Make sure that the "master" database for the existing SQL Server database instance that is hosting the WhatsUp database is configured to use case-insensitive collation.
30

Failover Deployment and User Guide for WhatsUp Gold Distributed
Tip: If you cannot remember your database server's hostname, click Browse to see a list of all database servers detected on the domain. Database servers to which you can connect but which are not configured on the same domain as the computer where you are installing WhatsUp Gold are not shown. The Browse dialog scans your entire domain, so it may take some time before showing you a list of database servers.
a) In Database server that you are installing to, enter the hostname, or hostname and instance of your database server.
Note: If you are using a database instance other than the default instance, you must include the instance name using the format <Server_Name>\<Instance_Name>.
b) In SQL Server Authentication, enter the correct Login ID and Password.
Important: If you want to change the SQL Server user account, the account you want to use must have the same permissions as the 'sa' account.
c) Click Next. The installation program attempts to validate the credentials you entered and checks for the existence of WhatsUp Gold databases on the database server. If WhatsUp Gold databases are found on the database server, the setup program alerts you and asks if you want to continue.
Select Yes to upgrade the databases and continue the installation.
Select No to select another Microsoft SQL Server. After the credentials are validated, the Enter Microsoft SQL Server 2005 Express Edition Paths dialog appears.
8 This dialog lists the third-party resources that the installation program installs, including Microsoft SQL Server 2005 Express Edition client tools (required for installations of WhatsUp Gold that use Microsoft SQL Server databases) and Microsoft .NET Framework 3.5.
Click Next. The Choose Destination Location dialog appears.
9 Select the installation directory for the WhatsUp Gold application files.
The default path is C:\Program Files\Ipswitch\WhatsUp. We recommend that you use the default path. After you select the installation directory, click Next.
Tip: The Program Files directory name may vary if on a 64 bit system (for example, Program Files (x86)). You can install WhatsUp Gold to a different location. To select a different location, click Change.
Note: If the installation program detects data from a previous installation of WhatsUp Gold, the Backup Web and Report Files dialog appears. We recommend that you select Back up the existing Web and report files, then click Next.
31

Failover Deployment and User Guide for WhatsUp Gold Distributed
10 Select the IIS web site to use for the WhatsUp Web Interface. After you have selected the IIS web site, click Next.
11 Either select to Keep the default Admin password, or enter and confirm a new password.
Click Next to configure the Remote Site.
12 Enter the information required to connect to the Central Site.
In Address, enter the IP address of the Central Site.
In TCP Port, enter the port over which the Central Site is listening for connections from the Remote Sites (default port is 9394).
Tip: After you have entered this information, you can click Test to validate the connection to the Central Site.
Enter the User Name and Password that the Remote Site uses to access the Central Site.
Note: This is the User Name and Password that you set in the Central Site installation program.
Click Next.
13 Define the information used to identify the Remote Site to the Central Site.
Enter the Remote Site Display Name. This is the Remote Site name that the Central Site uses to identify this Remote Site (for example, Atlanta Office). This name is particularly helpful in identifying reports associated with each Remote Site. The default name is the computer's hostname, but you can change it to better describe this Remote Site.
Enter the HTTP Address of the Remote Site's web interface. This is the address that the Central Site's browser will use to access this Remote Site. This address allows users to click links in the Central Site's web interface to open browser connections directly to the Remote Site's web interface (if the user has access permissions). Example: http://<Remote_Site_IP>:<Web_Server_Port> or http://192.168.200.123:8080. Click Next.
Note: The Remote Site's IP address must be accessible from the Central Site to enable drill-downs into this Remote Site installation from the Central Site. If inbound Web connections are not possible, only status information is available at the Central Site.
14 Click Install to install WhatsUp Gold. The setup program installs and configures WhatsUp Gold.
32
Failover Deployment and User Guide for WhatsUp Gold Distributed
15 When installation completes, the InstallShield Wizard Complete dialog appears.
To view the steps required to configure WhatsUp Gold Failover, click View Failover Configuration Requirements.
Click Finish. The Setup program closes.
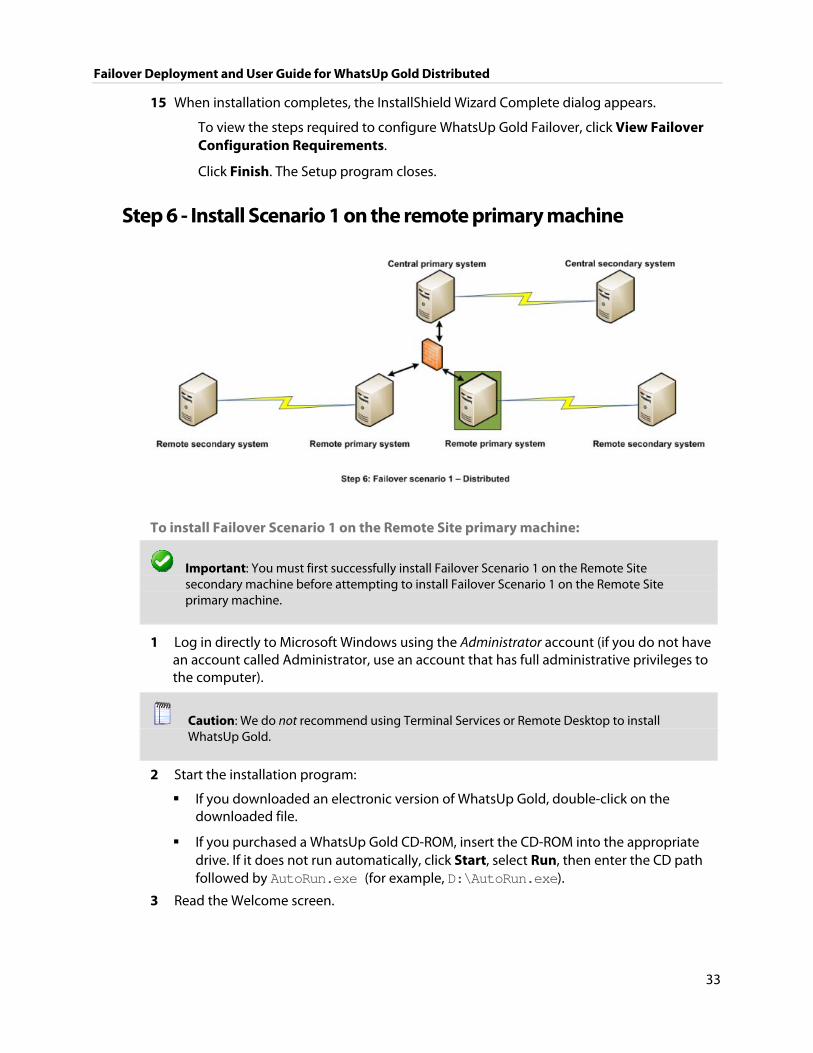
Step 6 - Install Scenario 1 on the remote primary machine
To install Failover Scenario 1 on the Remote Site primary machine:
Important: You must first successfully install Failover Scenario 1 on the Remote Site secondary machine before attempting to install Failover Scenario 1 on the Remote Site primary machine.
1 Log in directly to Microsoft Windows using the Administrator account (if you do not have an account called Administrator, use an account that has full administrative privileges to the computer).
Caution: We do not recommend using Terminal Services or Remote Desktop to install WhatsUp Gold.
2 Start the installation program:
If you downloaded an electronic version of WhatsUp Gold, double-click on the downloaded file.
If you purchased a WhatsUp Gold CD-ROM, insert the CD-ROM into the appropriate drive. If it does not run automatically, click Start, select Run, then enter the CD path followed by AutoRun.exe (for example, D:\AutoRun.exe).
3 Read the Welcome screen.
33

Failover Deployment and User Guide for WhatsUp Gold Distributed
Click a link to view a Help resource.
Click Next. The License Agreement dialog appears.
4 Read the license agreement. If you accept the terms of the license agreement, select I accept the terms of the license agreement.
To print a copy of the license agreement, click Print. The license agreement is sent to the default printer.
If you do not accept the terms of the license agreement, click Cancel to exit the installation program.
Click Next. The Failover Scenario dialog appears.
5 Select Failover Scenario 1.
Click Next to continue. The Failover Machine dialog appears.
6 Select Primary.
Click Next to continue. The Database Server Login dialog appears.
Important: Make sure that the "master" database for the existing SQL Server database instance that is hosting the WhatsUp database is configured to use case-insensitive collation.
Tip: If you cannot remember your database server's hostname, click Browse to see a list of all database servers detected on the domain. Database servers to which you can connect but which are not configured on the same domain as the computer where you are installing WhatsUp Gold are not shown. The Browse dialog scans your entire domain, so it may take some time before showing you a list of database servers.
a) In Database server that you are installing to, enter the hostname, or hostname and instance of your database server.
Note: If you are using a database instance other than the default instance, you must include the instance name using the format <Server_Name>\<Instance_Name>.
b) In SQL Server Authentication, enter the correct Login ID and Password.
Important: If you want to change the SQL Server user account, the account you want to use must have the same permissions as the 'sa' account.
c) Click Next. The installation program attempts to validate the credentials you entered and checks for the existence of WhatsUp Gold databases on the database server. If WhatsUp Gold databases are found on the database server, the setup program alerts you and asks if you want to continue.
Select Yes to upgrade the databases and continue the installation.
Select No to select another Microsoft SQL Server. After the credentials are validated, the Enter Microsoft SQL Server 2005 Express Edition Paths dialog appears.
34

Failover Deployment and User Guide for WhatsUp Gold Distributed
7 This dialog lists the third-party resources that the installation program installs, including Microsoft SQL Server 2005 Express Edition client tools (required for installations of WhatsUp Gold that use Microsoft SQL Server databases) and Microsoft .NET Framework 3.5.
8 Select the installation directory for the WhatsUp Gold application files.
The default path is C:\Program Files\Ipswitch\WhatsUp. We recommend that you use the default path. After you select the installation directory, click Next.
Tip: The Program Files directory name may vary if on a 64 bit system (for example, Program Files (x86)). You can install WhatsUp Gold to a different location. To select a different location, click Change.
Note: If the installation program detects data from a previous installation of WhatsUp Gold, the Backup Web and Report Files dialog appears. We recommend that you select Back up the existing Web and report files, then click Next.
9 Select the IIS web site to use for the WhatsUp Web Interface. After you have selected the IIS web site, click Next.
10 Enter the information required to connect to the Central Site.
In Address, enter the IP address of the Central Site.
In TCP Port, enter the port over which the Central Site is listening for connections from the Remote Sites (default port is 9394).
Tip: After you have entered this information, you can click Test to validate the connection to the Central Site.
Enter the User Name and Password that the Remote Site uses to access the Central Site.
Note: This is the User Name and Password that you set in the Central Site installation program.
Click Next.
11 Define the information used to identify the Remote Site to the Central Site.
Enter the Remote Site Display Name. This is the Remote Site name that the Central Site uses to identify this Remote Site (for example, Atlanta Office). This name is particularly helpful in identifying reports associated with each Remote Site. The default name is the computer's hostname, but you can change it to better describe this Remote Site.
Enter the HTTP Address of the Remote Site's web interface. This is the address that the Central Site's browser will use to access this Remote Site. This address allows users to click links in the Central Site's web interface to open browser connections directly to the Remote Site's web interface (if the user has access permissions). Example:
35
Failover Deployment and User Guide for WhatsUp Gold Distributed
http://<Remote_Site_IP>:<Web_Server_Port> or http://192.168.200.123:8080. Click Next.
Note: The Remote Site's IP address must be accessible from the Central Site to enable drill-downs into this Remote Site installation from the Central Site. If inbound Web connections are not possible, only status information is available at the Central Site.
Click Next to install WhatsUp Gold.
12 Click Install to install WhatsUp Gold. The setup program installs and configures WhatsUp Gold.
13 When installation completes, the InstallShield Wizard Complete dialog appears.
To view the steps required to configure WhatsUp Gold Failover, click View Failover Configuration Requirements.
Click Finish. The Setup program closes.
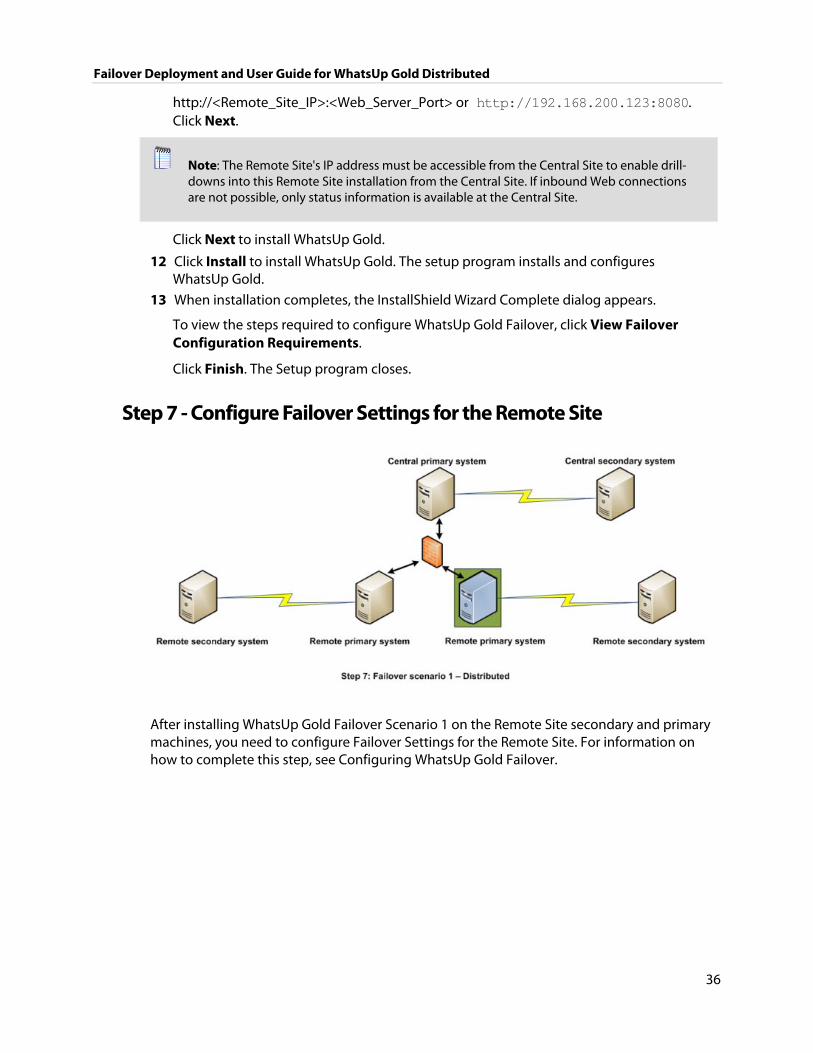
Step 7 - Configure Failover Settings for the Remote Site
After installing WhatsUp Gold Failover Scenario 1 on the Remote Site secondary and primary machines, you need to configure Failover Settings for the Remote Site. For information on how to complete this step, see Configuring WhatsUp Gold Failover.
36

Failover Deployment and User Guide for WhatsUp Gold Distributed
Installing Failover Scenario 2
A successful installation of Failover Scenario 2 requires that you take the following steps in sequential order.
Scenario 2 includes:
Central Site systems
A primary Central Site system that uses a remote database on the Central Site SQL Server Express system. This system is responsible for running WhatsUp Gold Distributed Edition and monitoring the network day-to-day.
A secondary Central Site system that uses a remote database on the Central Site SQL Server Express system. This system is placed on stand-by, and in the event that the primary Central Site system goes down, takes over WhatsUp Gold <Distributed> duties for the network.
A Central Site database system that houses the remote SQL database used by both the primary and secondary Central Site systems.
Note: WhatsUp Gold supports Failover with SQL clusters.
37
Failover Deployment and User Guide for WhatsUp Gold Distributed
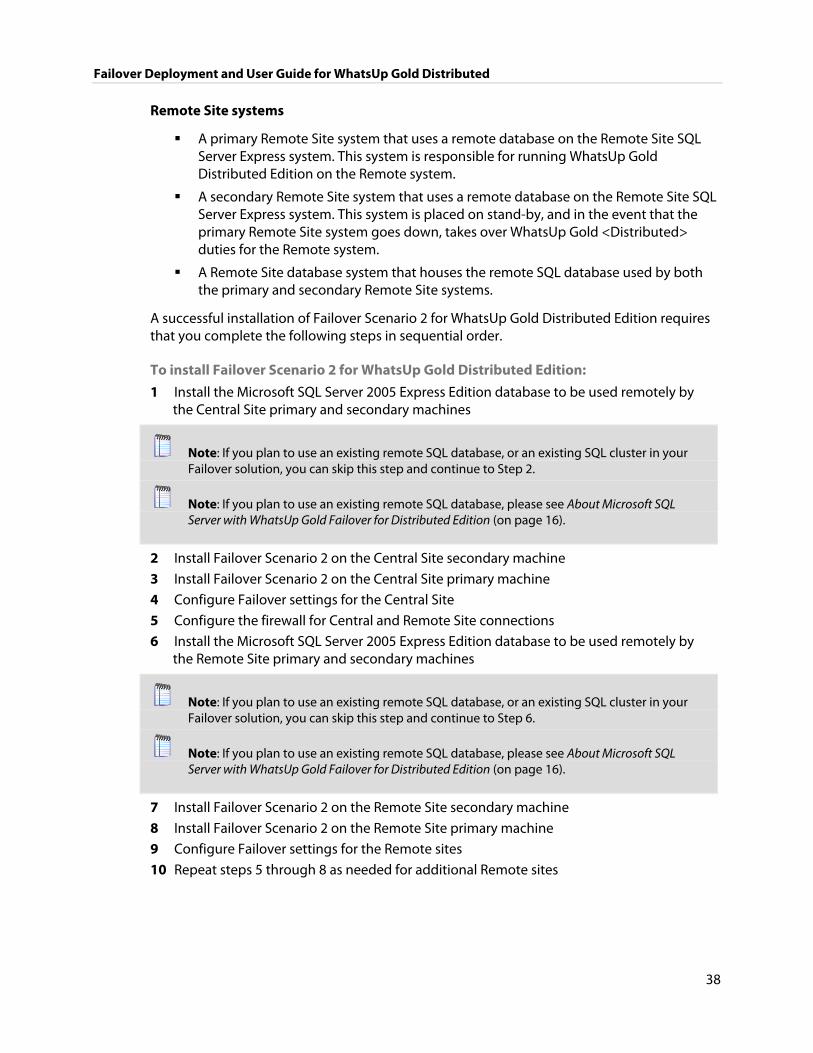
Remote Site systems
A primary Remote Site system that uses a remote database on the Remote Site SQL Server Express system. This system is responsible for running WhatsUp Gold Distributed Edition on the Remote system.
A secondary Remote Site system that uses a remote database on the Remote Site SQL Server Express system. This system is placed on stand-by, and in the event that the primary Remote Site system goes down, takes over WhatsUp Gold <Distributed> duties for the Remote system.
A Remote Site database system that houses the remote SQL database used by both the primary and secondary Remote Site systems.
A successful installation of Failover Scenario 2 for WhatsUp Gold Distributed Edition requires that you complete the following steps in sequential order.
To install Failover Scenario 2 for WhatsUp Gold Distributed Edition: 1 Install the Microsoft SQL Server 2005 Express Edition database to be used remotely by
the Central Site primary and secondary machines
Note: If you plan to use an existing remote SQL database, or an existing SQL cluster in your Failover solution, you can skip this step and continue to Step 2.
Note: If you plan to use an existing remote SQL database, please see About Microsoft SQL Server with WhatsUp Gold Failover for Distributed Edition (on page 16).
2 Install Failover Scenario 2 on the Central Site secondary machine 3 Install Failover Scenario 2 on the Central Site primary machine 4 Configure Failover settings for the Central Site 5 Configure the firewall for Central and Remote Site connections 6 Install the Microsoft SQL Server 2005 Express Edition database to be used remotely by
the Remote Site primary and secondary machines
Note: If you plan to use an existing remote SQL database, or an existing SQL cluster in your Failover solution, you can skip this step and continue to Step 6.
Note: If you plan to use an existing remote SQL database, please see About Microsoft SQL Server with WhatsUp Gold Failover for Distributed Edition (on page 16).
7 Install Failover Scenario 2 on the Remote Site secondary machine 8 Install Failover Scenario 2 on the Remote Site primary machine 9 Configure Failover settings for the Remote sites 10 Repeat steps 5 through 8 as needed for additional Remote sites
38
Failover Deployment and User Guide for WhatsUp Gold Distributed
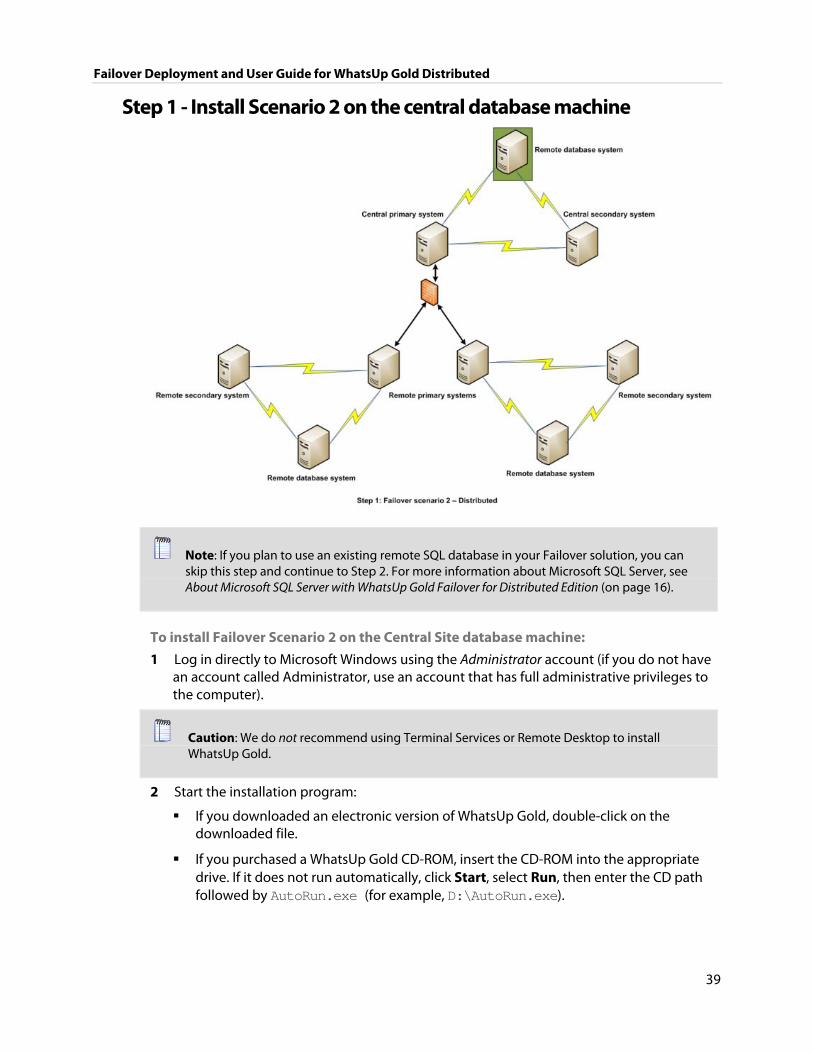
Step 1 - Install Scenario 2 on the central database machine
Note: If you plan to use an existing remote SQL database in your Failover solution, you can skip this step and continue to Step 2. For more information about Microsoft SQL Server, see About Microsoft SQL Server with WhatsUp Gold Failover for Distributed Edition (on page 16).
To install Failover Scenario 2 on the Central Site database machine: 1 Log in directly to Microsoft Windows using the Administrator account (if you do not have
an account called Administrator, use an account that has full administrative privileges to the computer).
Caution: We do not recommend using Terminal Services or Remote Desktop to install WhatsUp Gold.
2 Start the installation program:
If you downloaded an electronic version of WhatsUp Gold, double-click on the downloaded file.
If you purchased a WhatsUp Gold CD-ROM, insert the CD-ROM into the appropriate drive. If it does not run automatically, click Start, select Run, then enter the CD path followed by AutoRun.exe (for example, D:\AutoRun.exe).
39
Failover Deployment and User Guide for WhatsUp Gold Distributed
3 Read the Welcome screen.
Click a link to view a Help resource.
Click Next. The License Agreement dialog appears.
4 Read the license agreement. If you accept the terms of the license agreement, select I accept the terms of the license agreement.
To print a copy of the license agreement, click Print. The license agreement is sent to the default printer.
If you do not accept the terms of the license agreement, click Cancel to exit the installation program.
Click Next to continue. The Failover Scenario dialog appears.
5 Select Failover Scenario 2.
Click Next to continue. The Failover Machine dialog appears.
6 Select Database.
Click Next to continue.
7 Select Install Microsoft SQL Server 2005 Express Edition on this machine.
Click Next to continue.
8 Select the install directories for Microsoft SQL Server 2005 Express Edition. The application and data files are installed in default directories. To change the locations, click Browse to find and select a different directory for the application files or the data files.
Important: Make sure that you have a large capacity drive selected for data storage. The data files for WhatsUp Gold can reach a maximum size of 22 GB.
Important: During the initial installation, databases are created for WhatsUp Gold Flow Monitor. These initial databases are limited in size, but are increased the first time the Flow Monitor collector initializes. If at least 16 GB of disk space are available when the collector initializes, the maximum size of the Flow Monitor databases is increased to 4 GB each (16 GB total including transaction logs). If less than 16 GB is available, the maximum size of the Flow Monitor databases is limited proportionately to the amount of free disk space. If your license includes WhatsUp Gold Flow Monitor, we strongly recommend that you verify that you have at least 16 GB of free disk space before installing.
Click Next. The Specify the SQL "sa" Account Password dialog appears.
Important: If you want to change the SQL Server user account, the account you want to use must have the same permissions as the 'sa' account.
40

Failover Deployment and User Guide for WhatsUp Gold Distributed
9 Specify a User Name for the account and enter and confirm a Password. You also have the option to Keep the default password.
Click Next.
10 Select the IIS web site to use for the WhatsUp Web Interface. After you have selected the IIS web site, click Next.
11 Enter the information that Remote Sites will use to connect to this Central Site.
Enter the TCP Port that the Remote Sites will use to connect to the Central Site (default port is 9394).
Enter a User Name and Password that the Remote Sites will use to access this Central Site
Click Next. The Ready to Install the Program dialog appears.
Note: Make note of this information. You will need the TCP port and User Name and Password information for each Remote Site installation.
12 Click Install to install WhatsUp Gold. The setup program installs and configures WhatsUp Gold.
13 When installation completes, the InstallShield Wizard Complete dialog appears.
To view the steps required to configure WhatsUp Gold Failover, click View Failover Configuration Requirements.
Click Finish. The Setup program closes.
41

Failover Deployment and User Guide for WhatsUp Gold Distributed
Step 2 - Install Scenario 2 on the central secondary machine
To install Failover Scenario 2 on the Central Site secondary machine: 1 Log in directly to Microsoft Windows using the Administrator account (if you do not have
an account called Administrator, use an account that has full administrative privileges to the computer).
Caution: We do not recommend using Terminal Services or Remote Desktop to install WhatsUp Gold.
2 Start the installation program:
If you downloaded an electronic version of WhatsUp Gold, double-click on the downloaded file.
If you purchased a WhatsUp Gold CD-ROM, insert the CD-ROM into the appropriate drive. If it does not run automatically, click Start, select Run, then enter the CD path followed by AutoRun.exe (for example, D:\AutoRun.exe).
3 Read the Welcome screen.
Click a link to view a Help resource.
Click Next. The License Agreement dialog appears.
4 Read the license agreement. If you accept the terms of the license agreement, select I accept the terms of the license agreement.
42
Failover Deployment and User Guide for WhatsUp Gold Distributed
To print a copy of the license agreement, click Print. The license agreement is sent to the default printer.
If you do not accept the terms of the license agreement, click Cancel to exit the installation program.
Click Next to continue. The Failover Scenario dialog appears.
5 Select Failover Scenario 2.
Click Next to continue. The Failover Machine dialog appears.
6 Select Secondary.
Click Next to continue. The Database Server Login dialog appears.
Important: Make sure that the "master" database for the existing SQL Server database instance that is hosting the WhatsUp database is configured to use case-insensitive collation.
Tip: If you cannot remember your database server's hostname, click Browse to see a list of all database servers detected on the domain. Database servers to which you can connect but which are not configured on the same domain as the computer where you are installing WhatsUp Gold are not shown. The Browse dialog scans your entire domain, so it may take some time before showing you a list of database servers.
a) In Database server that you are installing to, enter the hostname, or hostname and instance of your database server.
Note: If you are using a database instance other than the default instance, you must include the instance name using the format <Server_Name>\<Instance_Name>.
b) In SQL Server Authentication, enter the correct Login ID and Password.
Important: If you want to change the SQL Server user account, the account you want to use must have the same permissions as the 'sa' account.
c) Click Next. The installation program attempts to validate the credentials you entered and checks for the existence of WhatsUp Gold databases on the database server. If WhatsUp Gold databases are found on the database server, the setup program alerts you and asks if you want to continue.
Select Yes to upgrade the databases and continue the installation.
Select No to select another Microsoft SQL Server. After the credentials are validated, the Enter Microsoft SQL Server 2005 Express Edition Paths dialog appears.
7 This dialog lists the third-party resources that the installation program installs, including Microsoft SQL Server 2005 Express Edition client tools (required for installations of WhatsUp Gold that use Microsoft SQL Server databases) and Microsoft .NET Framework 3.5.
43
Failover Deployment and User Guide for WhatsUp Gold Distributed
8 Select the installation directory for the WhatsUp Gold application files.
The default path is C:\Program Files\Ipswitch\WhatsUp. We recommend that you use the default path. After you select the installation directory, click Next.
Tip: The Program Files directory name may vary if on a 64 bit system (for example, Program Files (x86)). You can install WhatsUp Gold to a different location. To select a different location, click Change.
Note: If the installation program detects data from a previous installation of WhatsUp Gold, the Backup Web and Report Files dialog appears. We recommend that you select Back up the existing Web and report files, then click Next.
9 Either select to Keep the default Admin password, or enter and confirm a new password.
10 Select the IIS web site to use for the WhatsUp Web Interface. After you have selected the IIS web site, click Next.
11 Enter the information that Remote Sites will use to connect to this Central Site.
Enter the TCP Port that the Remote Sites will use to connect to the Central Site (default port is 9394).
Enter a User Name and Password that the Remote Sites will use to access this Central Site
Click Next. The Ready to Install the Program dialog appears.
Note: Make note of this information. You will need the TCP port and User Name and Password information for each Remote Site installation.
Click Next to install WhatsUp Gold.
12 Click Install to install WhatsUp Gold. The setup program installs and configures WhatsUp Gold.
13 When installation completes, the InstallShield Wizard Complete dialog appears.
To view the steps required to configure WhatsUp Gold Failover, click View Failover Configuration Requirements.
Click Finish. The Setup program closes.
44
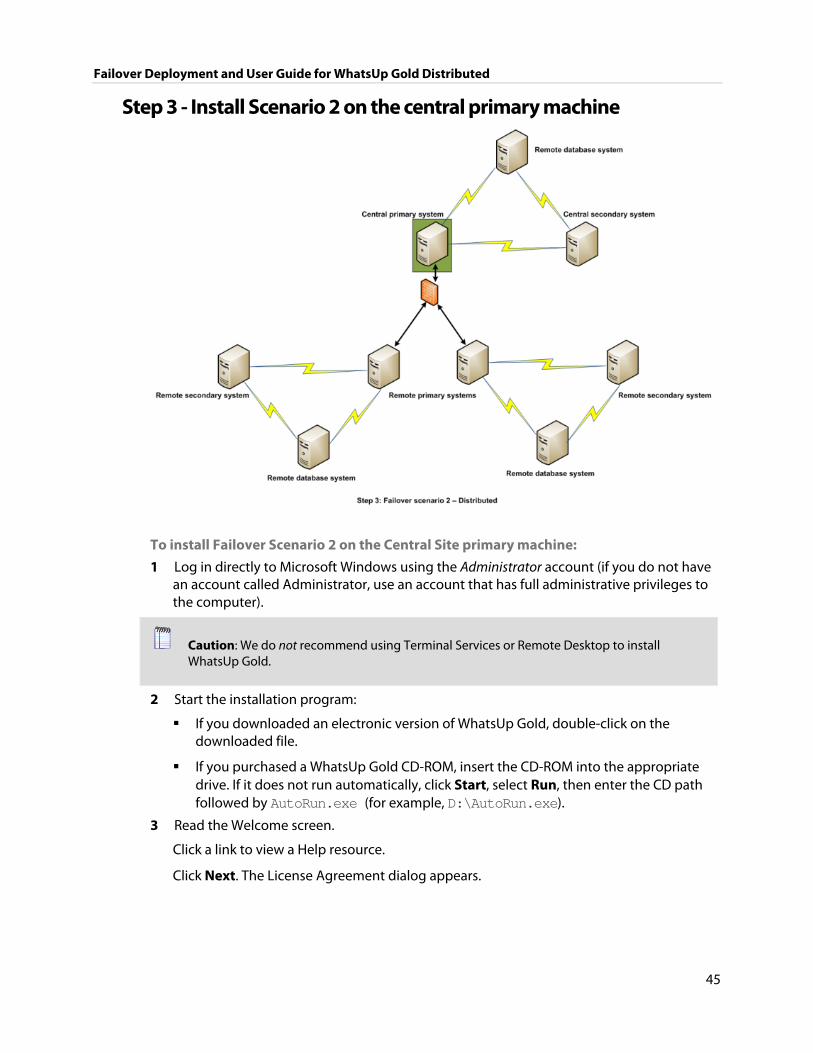
Failover Deployment and User Guide for WhatsUp Gold Distributed
Step 3 - Install Scenario 2 on the central primary machine
To install Failover Scenario 2 on the Central Site primary machine: 1 Log in directly to Microsoft Windows using the Administrator account (if you do not have
an account called Administrator, use an account that has full administrative privileges to the computer).
Caution: We do not recommend using Terminal Services or Remote Desktop to install WhatsUp Gold.
2 Start the installation program:
If you downloaded an electronic version of WhatsUp Gold, double-click on the downloaded file.
If you purchased a WhatsUp Gold CD-ROM, insert the CD-ROM into the appropriate drive. If it does not run automatically, click Start, select Run, then enter the CD path followed by AutoRun.exe (for example, D:\AutoRun.exe).
3 Read the Welcome screen.
Click a link to view a Help resource.
Click Next. The License Agreement dialog appears.
45

Failover Deployment and User Guide for WhatsUp Gold Distributed
4 Read the license agreement. If you accept the terms of the license agreement, select I accept the terms of the license agreement.
To print a copy of the license agreement, click Print. The license agreement is sent to the default printer.
If you do not accept the terms of the license agreement, click Cancel to exit the installation program.
Click Next to continue. The Failover Scenario dialog appears.
5 Select Failover Scenario 2.
Click Next to continue. The Failover Machine dialog appears.
6 Select Primary.
Click Next to continue. The Database Server Login dialog appears.
Important: Make sure that the "master" database for the existing SQL Server database instance that is hosting the WhatsUp database is configured to use case-insensitive collation.
Tip: If you cannot remember your database server's hostname, click Browse to see a list of all database servers detected on the domain. Database servers to which you can connect but which are not configured on the same domain as the computer where you are installing WhatsUp Gold are not shown. The Browse dialog scans your entire domain, so it may take some time before showing you a list of database servers.
a) In Database server that you are installing to, enter the hostname, or hostname and instance of your database server.
Note: If you are using a database instance other than the default instance, you must include the instance name using the format <Server_Name>\<Instance_Name>.
b) In SQL Server Authentication, enter the correct Login ID and Password.
Important: If you want to change the SQL Server user account, the account you want to use must have the same permissions as the 'sa' account.
c) Click Next. The installation program attempts to validate the credentials you entered and checks for the existence of WhatsUp Gold databases on the database server. If WhatsUp Gold databases are found on the database server, the setup program alerts you and asks if you want to continue.
Select Yes to upgrade the databases and continue the installation.
Select No to select another Microsoft SQL Server. After the credentials are validated, the Enter Microsoft SQL Server 2005 Express Edition Paths dialog appears.
7 This dialog lists the third-party resources that the installation program installs, including Microsoft SQL Server 2005 Express Edition client tools (required for installations of
46
Failover Deployment and User Guide for WhatsUp Gold Distributed
WhatsUp Gold that use Microsoft SQL Server databases) and Microsoft .NET Framework 3.5.
8 Select the installation directory for the WhatsUp Gold application files.
The default path is C:\Program Files\Ipswitch\WhatsUp. We recommend that you use the default path. After you select the installation directory, click Next.
Tip: The Program Files directory name may vary if on a 64 bit system (for example, Program Files (x86)). You can install WhatsUp Gold to a different location. To select a different location, click Change.
Note: If the installation program detects data from a previous installation of WhatsUp Gold, the Backup Web and Report Files dialog appears. We recommend that you select Back up the existing Web and report files, then click Next.
9 Either select to Keep the default Admin password, or enter and confirm a new password.
10 Select the IIS web site to use for the WhatsUp Web Interface. After you have selected the IIS web site, click Next.
11 Click Next to configure the Central Site. 12 Enter the information that Remote Sites will use to connect to this Central Site.
Enter the TCP Port that the Remote Sites will use to connect to the Central Site (default port is 9394).
Enter a User Name and Password that the Remote Sites will use to access this Central Site
Click Next. The Ready to Install the Program dialog appears.
Note: Make note of this information. You will need the TCP port and User Name and Password information for each Remote Site installation.
Click Next to install WhatsUp Gold.
13 Click Install to install WhatsUp Gold. The setup program installs and configures WhatsUp Gold.
14 When installation completes, the InstallShield Wizard Complete dialog appears.
To view the steps required to configure WhatsUp Gold Failover, click View Failover Configuration Requirements.
Click Finish. The Setup program closes.
47

Failover Deployment and User Guide for WhatsUp Gold Distributed
Step 4 - Configure Failover Settings for the Central Site
After installing WhatsUp Gold Failover Scenario 2 on the Central Site database, secondary, and primary machines, you need to configure Failover Settings for the Central Site. For information on how to complete this step, see Configuring WhatsUp Gold Failover.
48

Failover Deployment and User Guide for WhatsUp Gold Distributed
Step 5 - Configure the firewall for Central and Remote Site connections
Accessing the Central Site The WhatsUp Gold Distributed Edition is designed to simplify firewall connections. Communications are outbound from each Remote Site back to the Central Site, so only one configuration is required for all Remote Sites to communicate back to the Central Site.
After you have set up the WhatsUp Gold Central Site, you need to determine what is required for the Remote Sites to connect across WANs, firewalls, routers, and other network security measures to communicate back to the Central Site. This information will be required as you install and configure each WhatsUp Gold Remote Site.
If you are not responsible for these network security configurations, contact the appropriate network administrator to help you identify the requirements to allow the connections in to the Central Site.
Accessing Remote Sites Additionally, it is not required, but you can also configure the Remote Sites to be accessible via their Web interfaces. By doing so, users can drill-down from the Central Site to specific reports and data on a specific Remote Site. You can control access from the Central Site to the Remote Site by providing varying levels of user privileges to data on each Remote Site. For more information, see Creating and modifying user accounts.
49

Failover Deployment and User Guide for WhatsUp Gold Distributed
Step 6 - Install Scenario 2 on the remote database machine
Note: If you plan to use an existing remote SQL database in your Failover solution, you can skip this step and continue to Step 6. For more information about Microsoft SQL Server, see About Microsoft SQL Server with WhatsUp Gold Failover for Distributed Edition (on page 16).
To install Failover Scenario 2 on the Remote Site database machine: 1 Log in directly to Microsoft Windows using the Administrator account (if you do not have
an account called Administrator, use an account that has full administrative privileges to the computer).
Caution: We do not recommend using Terminal Services or Remote Desktop to install WhatsUp Gold.
2 Start the installation program:
If you downloaded an electronic version of WhatsUp Gold, double-click on the downloaded file.
If you purchased a WhatsUp Gold CD-ROM, insert the CD-ROM into the appropriate drive. If it does not run automatically, click Start, select Run, then enter the CD path followed by AutoRun.exe (for example, D:\AutoRun.exe).
50

Failover Deployment and User Guide for WhatsUp Gold Distributed
3 Read the Welcome screen.
Click a link to view a Help resource.
Click Next. The License Agreement dialog appears.
4 Read the license agreement. If you accept the terms of the license agreement, select I accept the terms of the license agreement.
To print a copy of the license agreement, click Print. The license agreement is sent to the default printer.
If you do not accept the terms of the license agreement, click Cancel to exit the installation program.
Click Next to continue. The Failover Scenario dialog appears.
5 Select Failover Scenario 2.
Click Next to continue. The Failover Machine dialog appears.
6 Select Database.
Click Next to continue.
7 Select Install Microsoft SQL Server 2005 Express Edition on this machine.
Click Next to continue.
8 Select the install directories for Microsoft SQL Server 2005 Express Edition. The application and data files are installed in default directories. To change the locations, click Browse to find and select a different directory for the application files or the data files.
Important: Make sure that you have a large capacity drive selected for data storage. The data files for WhatsUp Gold can reach a maximum size of 22 GB.
Important: During the initial installation, databases are created for WhatsUp Gold Flow Monitor. These initial databases are limited in size, but are increased the first time the Flow Monitor collector initializes. If at least 16 GB of disk space are available when the collector initializes, the maximum size of the Flow Monitor databases is increased to 4 GB each (16 GB total including transaction logs). If less than 16 GB is available, the maximum size of the Flow Monitor databases is limited proportionately to the amount of free disk space. If your license includes WhatsUp Gold Flow Monitor, we strongly recommend that you verify that you have at least 16 GB of free disk space before installing.
Click Next. The Specify the SQL "sa" Account Password dialog appears.
Important: If you want to change the SQL Server user account, the account you want to use must have the same permissions as the 'sa' account.
51
Failover Deployment and User Guide for WhatsUp Gold Distributed
9 Specify a User Name for the account and enter and confirm a Password. You also have the option to Keep the default password.
Click Next.
10 Select the IIS web site to use for the WhatsUp Web Interface. After you have selected the IIS web site, click Next.
11 Enter the information required to connect to the Central Site.
In Address, enter the IP address of the Central Site.
In TCP Port, enter the port over which the Central Site is listening for connections from the Remote Sites (default port is 9394).
Tip: After you have entered this information, you can click Test to validate the connection to the Central Site.
Enter the User Name and Password that the Remote Site uses to access the Central Site.
Note: This is the User Name and Password that you set in the Central Site installation program.
Click Next.
12 Define the information used to identify the Remote Site to the Central Site.
Enter the Remote Site Display Name. This is the Remote Site name that the Central Site uses to identify this Remote Site (for example, Atlanta Office). This name is particularly helpful in identifying reports associated with each Remote Site. The default name is the computer's hostname, but you can change it to better describe this Remote Site.
Enter the HTTP Address of the Remote Site's web interface. This is the address that the Central Site's browser will use to access this Remote Site. This address allows users to click links in the Central Site's web interface to open browser connections directly to the Remote Site's web interface (if the user has access permissions). Example: http://<Remote_Site_IP>:<Web_Server_Port> or http://192.168.200.123:8080. Click Next.
Note: The Remote Site's IP address must be accessible from the Central Site to enable drill-downs into this Remote Site installation from the Central Site. If inbound Web connections are not possible, only status information is available at the Central Site.
Click Next to install WhatsUp Gold.
13 Click Install to install WhatsUp Gold. The setup program installs and configures WhatsUp Gold.
52

Failover Deployment and User Guide for WhatsUp Gold Distributed
14 When installation completes, the InstallShield Wizard Complete dialog appears.
To view the steps required to configure WhatsUp Gold Failover, click View Failover Configuration Requirements.
Click Finish. The Setup program closes.
Step 7 - Installing Scenario 2 on the remote secondary machine
To install Failover Scenario 2 on the Remote Site secondary machine: 1 Log in directly to Microsoft Windows using the Administrator account (if you do not have
an account called Administrator, use an account that has full administrative privileges to the computer).
Caution: We do not recommend using Terminal Services or Remote Desktop to install WhatsUp Gold.
2 Start the installation program:
If you downloaded an electronic version of WhatsUp Gold, double-click on the downloaded file.
If you purchased a WhatsUp Gold CD-ROM, insert the CD-ROM into the appropriate drive. If it does not run automatically, click Start, select Run, then enter the CD path followed by AutoRun.exe (for example, D:\AutoRun.exe).
53

Failover Deployment and User Guide for WhatsUp Gold Distributed
3 Read the Welcome screen.
Click a link to view a Help resource.
Click Next. The License Agreement dialog appears.
4 Read the license agreement. If you accept the terms of the license agreement, select I accept the terms of the license agreement.
To print a copy of the license agreement, click Print. The license agreement is sent to the default printer.
If you do not accept the terms of the license agreement, click Cancel to exit the installation program.
Click Next to continue. The Failover Scenario dialog appears.
5 Select Failover Scenario 2.
Click Next to continue. The Failover Machine dialog appears.
6 Select Secondary.
Click Next to continue. The Database Server Login dialog appears.
Important: Make sure that the "master" database for the existing SQL Server database instance that is hosting the WhatsUp database is configured to use case-insensitive collation.
Tip: If you cannot remember your database server's hostname, click Browse to see a list of all database servers detected on the domain. Database servers to which you can connect but which are not configured on the same domain as the computer where you are installing WhatsUp Gold are not shown. The Browse dialog scans your entire domain, so it may take some time before showing you a list of database servers.
a) In Database server that you are installing to, enter the hostname, or hostname and instance of your database server.
Note: If you are using a database instance other than the default instance, you must include the instance name using the format <Server_Name>\<Instance_Name>.
b) In SQL Server Authentication, enter the correct Login ID and Password.
Important: If you want to change the SQL Server user account, the account you want to use must have the same permissions as the 'sa' account.
c) Click Next. The installation program attempts to validate the credentials you entered and checks for the existence of WhatsUp Gold databases on the database server. If WhatsUp Gold databases are found on the database server, the setup program alerts you and asks if you want to continue.
Select Yes to upgrade the databases and continue the installation.
54
Failover Deployment and User Guide for WhatsUp Gold Distributed
Select No to select another Microsoft SQL Server. After the credentials are validated, the Enter Microsoft SQL Server 2005 Express Edition Paths dialog appears.
7 This dialog lists the third-party resources that the installation program installs, including Microsoft SQL Server 2005 Express Edition client tools (required for installations of WhatsUp Gold that use Microsoft SQL Server databases) and Microsoft .NET Framework 3.5.
8 Select the installation directory for the WhatsUp Gold application files.
The default path is C:\Program Files\Ipswitch\WhatsUp. We recommend that you use the default path. After you select the installation directory, click Next.
Tip: The Program Files directory name may vary if on a 64 bit system (for example, Program Files (x86)). You can install WhatsUp Gold to a different location. To select a different location, click Change.
Note: If the installation program detects data from a previous installation of WhatsUp Gold, the Backup Web and Report Files dialog appears. We recommend that you select Back up the existing Web and report files, then click Next.
Either select to Keep the default Admin password, or enter and confirm a new password.
Click Next to configure the Remote Site.
9 Enter the information required to connect to the Central Site.
In Address, enter the IP address of the Central Site.
In TCP Port, enter the port over which the Central Site is listening for connections from the Remote Sites (default port is 9394).
Tip: After you have entered this information, you can click Test to validate the connection to the Central Site.
Enter the User Name and Password that the Remote Site uses to access the Central Site.
Note: This is the User Name and Password that you set in the Central Site installation program.
Click Next.
55

Failover Deployment and User Guide for WhatsUp Gold Distributed
10 Define the information used to identify the Remote Site to the Central Site.
Enter the Remote Site Display Name. This is the Remote Site name that the Central Site uses to identify this Remote Site (for example, Atlanta Office). This name is particularly helpful in identifying reports associated with each Remote Site. The default name is the computer's hostname, but you can change it to better describe this Remote Site.
Enter the HTTP Address of the Remote Site's web interface. This is the address that the Central Site's browser will use to access this Remote Site. This address allows users to click links in the Central Site's web interface to open browser connections directly to the Remote Site's web interface (if the user has access permissions). Example: http://<Remote_Site_IP>:<Web_Server_Port> or http://192.168.200.123:8080. Click Next.
Note: The Remote Site's IP address must be accessible from the Central Site to enable drill-downs into this Remote Site installation from the Central Site. If inbound Web connections are not possible, only status information is available at the Central Site.
Select the IIS web site to use for the WhatsUp Web Interface. After you have selected the IIS web site, click Next.
11 Click Install to install WhatsUp Gold. The setup program installs and configures WhatsUp Gold.
12 When installation completes, the InstallShield Wizard Complete dialog appears.
To view the steps required to configure WhatsUp Gold Failover, click View Failover Configuration Requirements.
Click Finish. The Setup program closes.
56

Failover Deployment and User Guide for WhatsUp Gold Distributed
Step 8 - Install Scenario 2 on the remote primary machine
To install Failover Scenario 2 on the Remote Site primary machine: 1 Log in directly to Microsoft Windows using the Administrator account (if you do not have
an account called Administrator, use an account that has full administrative privileges to the computer).
Caution: We do not recommend using Terminal Services or Remote Desktop to install WhatsUp Gold.
2 Start the installation program:
If you downloaded an electronic version of WhatsUp Gold, double-click on the downloaded file.
If you purchased a WhatsUp Gold CD-ROM, insert the CD-ROM into the appropriate drive. If it does not run automatically, click Start, select Run, then enter the CD path followed by AutoRun.exe (for example, D:\AutoRun.exe).
3 Read the Welcome screen.
Click a link to view a Help resource.
Click Next. The License Agreement dialog appears.
4 Read the license agreement. If you accept the terms of the license agreement, select I accept the terms of the license agreement.
57

Failover Deployment and User Guide for WhatsUp Gold Distributed
To print a copy of the license agreement, click Print. The license agreement is sent to the default printer.
If you do not accept the terms of the license agreement, click Cancel to exit the installation program.
Click Next to continue. The Failover Scenario dialog appears.
5 Select Failover Scenario 2.
Click Next to continue. The Failover Machine dialog appears.
6 Select Primary.
Click Next to continue. The Database Server Login dialog appears.
Important: Make sure that the "master" database for the existing SQL Server database instance that is hosting the WhatsUp database is configured to use case-insensitive collation.
Tip: If you cannot remember your database server's hostname, click Browse to see a list of all database servers detected on the domain. Database servers to which you can connect but which are not configured on the same domain as the computer where you are installing WhatsUp Gold are not shown. The Browse dialog scans your entire domain, so it may take some time before showing you a list of database servers.
a) In Database server that you are installing to, enter the hostname, or hostname and instance of your database server.
Note: If you are using a database instance other than the default instance, you must include the instance name using the format <Server_Name>\<Instance_Name>.
b) In SQL Server Authentication, enter the correct Login ID and Password.
Important: If you want to change the SQL Server user account, the account you want to use must have the same permissions as the 'sa' account.
c) Click Next. The installation program attempts to validate the credentials you entered and checks for the existence of WhatsUp Gold databases on the database server. If WhatsUp Gold databases are found on the database server, the setup program alerts you and asks if you want to continue.
Select Yes to upgrade the databases and continue the installation.
Select No to select another Microsoft SQL Server. After the credentials are validated, the Enter Microsoft SQL Server 2005 Express Edition Paths dialog appears.
7 This dialog lists the third-party resources that the installation program installs, including Microsoft SQL Server 2005 Express Edition client tools (required for installations of WhatsUp Gold that use Microsoft SQL Server databases) and Microsoft .NET Framework 3.5.
58

Failover Deployment and User Guide for WhatsUp Gold Distributed
8 Select the installation directory for the WhatsUp Gold application files.
The default path is C:\Program Files\Ipswitch\WhatsUp. We recommend that you use the default path. After you select the installation directory, click Next.
Tip: The Program Files directory name may vary if on a 64 bit system (for example, Program Files (x86)). You can install WhatsUp Gold to a different location. To select a different location, click Change.
Note: If the installation program detects data from a previous installation of WhatsUp Gold, the Backup Web and Report Files dialog appears. We recommend that you select Back up the existing Web and report files, then click Next.
9 Determine if you want to enable the WhatsUp web server.
To enable the WhatsUp web server, select Yes and enter a port. The default port is 80.
Important: You must select a port that is not already in use. If the port you enter is in use, you must enter a different port or stop the service using the entered port before you can continue installing WhatsUp Gold. If you choose to stop the service running on the port you want to use, you must disable it permanently. If you only disable it temporarily, a port conflict will occur the next time the disabled service is started.
To use Microsoft Internet Information Services, select No, then see the Configuring the web server section of the Installing and Configuring WhatsUp Gold (http://www.whatsupgold.com/wugiis_144) guide.
After making a selection, click Next. The Specify Web interface Admin account Password dialog appears.
Note: If the Windows firewall is enabled when WhatsUp Gold is installed, the port you specify is opened in the Windows Firewall. This allows other computers on the network to log on to the WhatsUp Gold web interface.
10 Either select to Keep the default Admin password, or enter and confirm a new password.
Click Next to install the Remote Site.
11 Enter the information required to connect to the Central Site.
In Address, enter the IP address of the Central Site.
In TCP Port, enter the port over which the Central Site is listening for connections from the Remote Sites (default port is 9394).
Tip: After you have entered this information, you can click Test to validate the connection to the Central Site.
Enter the User Name and Password that the Remote Site uses to access the Central Site.
59

Failover Deployment and User Guide for WhatsUp Gold Distributed
Note: This is the User Name and Password that you set in the Central Site installation program.
Click Next.
12 Define the information used to identify the Remote Site to the Central Site.
Enter the Remote Site Display Name. This is the Remote Site name that the Central Site uses to identify this Remote Site (for example, Atlanta Office). This name is particularly helpful in identifying reports associated with each Remote Site. The default name is the computer's hostname, but you can change it to better describe this Remote Site.
Enter the HTTP Address of the Remote Site's web interface. This is the address that the Central Site's browser will use to access this Remote Site. This address allows users to click links in the Central Site's web interface to open browser connections directly to the Remote Site's web interface (if the user has access permissions). Example: http://<Remote_Site_IP>:<Web_Server_Port> or http://192.168.200.123:8080. Click Next.
Note: The Remote Site's IP address must be accessible from the Central Site to enable drill-downs into this Remote Site installation from the Central Site. If inbound Web connections are not possible, only status information is available at the Central Site.
13 Select the IIS web site to use for the WhatsUp Web Interface. After you have selected the IIS web site, click Next.
14 Click Install to install WhatsUp Gold. The setup program installs and configures WhatsUp Gold.
15 When installation completes, the InstallShield Wizard Complete dialog appears.
To view the steps required to configure WhatsUp Gold Failover, click View Failover Configuration Requirements.
Click Finish. The Setup program closes.
60
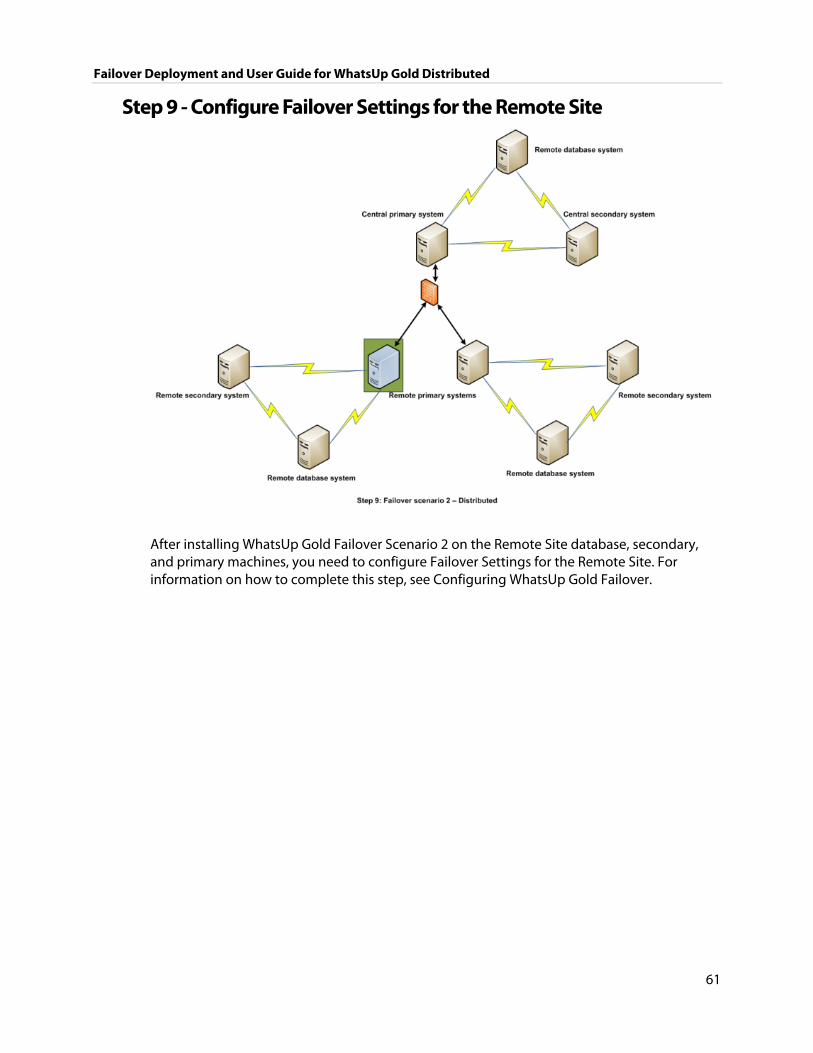
Failover Deployment and User Guide for WhatsUp Gold Distributed
Step 9 - Configure Failover Settings for the Remote Site
After installing WhatsUp Gold Failover Scenario 2 on the Remote Site database, secondary, and primary machines, you need to configure Failover Settings for the Remote Site. For information on how to complete this step, see Configuring WhatsUp Gold Failover.
61
CHAPTER 3
Upgrading and Restoring
62
In This Chapter
Upgrading a non-Failover edition of WhatsUp Gold that is using a local database 62
Upgrading a non-Failover version of WhatsUp Gold Distributed Edition that is using a remote
database.................................................................................................................68
Upgrading an edition of WhatsUp Gold Failover....................................80
Backing up the WhatsUp databases ............................................................80
Restoring databases to Failover Scenario 1 ..............................................81
Creating and restoring databases for use in WhatsUp Gold Failover Scenario 2 82
Upgrading a non-Failover edition of WhatsUp Gold that is using a local database
If the machine you want as either your Central Site or Remote Site primary machine in Scenario 1 is currently using a local SQL database, you need to:
1 Backup the WhatsUp databases and any custom data files (such as sound files, etc.) (see Backing up the WhatsUp databases (on page 80))
2 Completely uninstall the previous version of WhatsUp Gold
Note: During the unistall process, you have the choice to remove WhatsUp Gold, but keep the configuration data; to remove configuration data and uninstall WhatsUp Gold; and to remove the WhatsUp instance of Microsoft SQL Server 2005 Express Edition. In this situation, select the Remove my configuration data and unistall WhatsUp Gold and Also remove the WhatsUp instance of Microsoft SQL Server 2005 Express Edition options.
3 Install WhatsUp Gold Failover on the secondary machine
4 Restore the secondary machine to the previously backedup database (see Restoring databases to Failover Scenario 1 (on page 81))
5 Install WhatsUp Gold Failover on the primary machine

Failover Deployment and User Guide for WhatsUp Gold Distributed
6 Copy over the previously backedup custom data files
If the machine you want as your either your Central Site or Remote Site database machine in Scenario 2 is currently using WhatsUp Gold with a local SQL database, you need to:
1 Backup the WhatsUp databases and any custom data files (such as sound files, etc.) (see Backing up the WhatsUp databases (on page 80))
2 Uninstall WhatsUp Gold, but leave Microsoft SQL Server 2005 Express Edition as well as any data collected by WhatsUp Gold
Note: During the unistall process, you have the choice to remove WhatsUp Gold, but keep the configuration data; to remove configuration data and uninstall WhatsUp Gold; and to remove the WhatsUp instance of Microsoft SQL Server 2005 Express Edition. In this situation, select the Keep my configuration data, but unistall WhatsUp Gold option.
3 Install WhatsUp Gold Failover on the Central or Remote Site secondary machine
4 Copy over the previously backed up custom data files
5 Install WhatsUp Gold Failover on the Central or Remote Site primary machine
6 Copy over the previously backedup custom data files
If the machine you want as either your Central or Remote Site primary or secondary machine in Scenario 2 is currently using WhatsUp Gold with a local SQL database, and you want to keep the database data for use on the database machine, you need to:
1 Backup the WhatsUp databases and any custom data files (such as sound files, etc.) (see Backing up the WhatsUp databases (on page 80))
2 Completely uninstall the previous version of WhatsUp Gold
Note: During the unistall process, you have the choice to remove WhatsUp Gold, but keep the configuration data; to remove configuration data and uninstall WhatsUp Gold; and to remove the WhatsUp instance of Microsoft SQL Server 2005 Express Edition. In this situation, select the Remove my configuration data and unistall WhatsUp Gold and Also remove the WhatsUp instance of Microsoft SQL Server 2005 Express Edition options.
3 Install WhatsUp Gold Failover on the Central or Remote Site database machine
4 Create the databases using CMD line (see Creating and restoring databases (on page 82))
5 Restore the database backups to the database machine (see Creating and restoring databases (on page 82))
63
Failover Deployment and User Guide for WhatsUp Gold Distributed
6 Install WhatsUp Gold Failover on either the Central or Remote Site primary or secondary machine
7 Copy over the previously backed up custom data files
Upgrading a non-Failover WhatsUp Distributed Edition (Central Site) using a local database
Important: Because Scenario 1 is the only Failover Scenario that uses a local database, and because the local database must exist on the secondary machine in Scenario 1, if you plan to upgrade a non-Failover version of WhatsUp Gold that is using a local database, it can only be upgraded to a Central Site or Remote Site secondary machine for Failover Scenario 1.
Important: We recommend that you backup any custom data files prior to upgrading the machine to WhatsUp Gold Failover.
To upgrade a non-Failover version of WhatsUp Gold Distributed Edition using a local SQL database to a Central Site secondary machine for Failover Scenario 1: 1 Log in directly to Microsoft Windows using the Administrator account (if you do not have
an account called Administrator, use an account that has full administrative privileges to the computer).
Caution: We do not recommend using Terminal Services or Remote Desktop to install WhatsUp Gold.
2 Start the installation program:
If you downloaded an electronic version of WhatsUp Gold, double-click on the downloaded file.
If you purchased a WhatsUp Gold CD-ROM, insert the CD-ROM into the appropriate drive. If it does not run automatically, click Start, select Run, then enter the CD path followed by AutoRun.exe (for example, D:\AutoRun.exe).
3 Read the notice about device limit enforcement.
Select Yes to continue the upgrade.
Select No to abort the upgrade.
Note: If you upgrade and you are currently managing more devices than your license allows, WhatsUp Gold will not poll your devices after the upgrade until you take additional action. To find out more about how device limits work and to determine if you are affected, see Are you managing more devices than your license allows? (http://www.whatsupgold.com/devicecount.htm).
64

Failover Deployment and User Guide for WhatsUp Gold Distributed
4 Read the Welcome screen.
Click a link to view a Help resource.
Click Next. The License Agreement dialog appears.
5 Read the license agreement. If you accept the terms of the license agreement, select I accept the terms of the license agreement.
To print a copy of the license agreement, click Print. The license agreement is sent to the default printer.
If you do not accept the terms of the license agreement, click Cancel to exit the installation program.
Click Next. The Back Up Existing Database dialog appears.
Important: At this point in the upgrade, the installation program displays a warning box that states because the machine on which you are installing the WhatsUp Gold upgrade is using a local SQL database, WhatsUp Gold is automatically upgrading the machine to a Secondary machine in Failover Scenario 1. Click OK to proceed.
6 Since the installation program makes changes to the WhatsUp Gold database, we strongly recommend that you select Yes, back up the existing database.
Note: If you are upgrading from an installation of WhatsUp Gold 11.x that uses Microsoft SQL Server Desktop Edition as its database, you can select the location where you want to store the backup. For all other upgrades, the backup is made in the default backup location for the database server.
Click Next.The Back Up Web and Report Files dialog appears.
7 If you have modified any of the Web or Report files, select Back up the existing Web and report files. If this option is selected, the existing Web and report files are copied to a backup folder before the upgrade begins. We recommend that you select this option.
Click Next to configure the Central Site.
8 Enter the information that Remote Sites will use to connect to this Central Site.
Enter the TCP Port that the Remote Sites will use to connect to the Central Site (default port is 9394).
Enter a User Name and Password that the Remote Sites will use to access this Central Site
Click Next. The Ready to Install the Program dialog appears.
Note: Make note of this information. You will need the TCP port and User Name and Password information for each Remote Site installation.
Click Next to upgrade WhatsUp Gold.
9 Click Install. The installation program begins upgrading WhatsUp Gold.
65
Failover Deployment and User Guide for WhatsUp Gold Distributed
10 When installation completes, the InstallShield Wizard Complete dialog appears.
To view the steps required to configure WhatsUp Gold Failover, click View Failover Configuration Requirements.
Click Finish. The Setup program closes.
Upgrading a non-Failover WhatsUp Distributed Edition (Remote Site) using a local database
Important: Because Scenario 1 is the only Failover Scenario that uses a local database, and because the local database must exist on the secondary machine in Scenario 1, if you plan to upgrade a non-Failover version of WhatsUp Gold that is using a local database, it can only be upgraded to a Central Site or Remote Site secondary machine for Failover Scenario 1.
Important: We recommend that you backup any custom data files prior to upgrading the machine to WhatsUp Gold Failover.
To upgrade a non-Failover version of WhatsUp Gold Distributed Edition using a local SQL database to a Remote Site secondary machine for Failover Scenario 1: 1 Log in directly to Microsoft Windows using the Administrator account (if you do not have
an account called Administrator, use an account that has full administrative privileges to the computer).
Caution: We do not recommend using Terminal Services or Remote Desktop to install WhatsUp Gold.
2 Start the installation program:
If you downloaded an electronic version of WhatsUp Gold, double-click on the downloaded file.
If you purchased a WhatsUp Gold CD-ROM, insert the CD-ROM into the appropriate drive. If it does not run automatically, click Start, select Run, then enter the CD path followed by AutoRun.exe (for example, D:\AutoRun.exe).
3 Read the notice about device limit enforcement.
Select Yes to continue the upgrade.
Select No to abort the upgrade.
Note: If you upgrade and you are currently managing more devices than your license allows, WhatsUp Gold will not poll your devices after the upgrade until you take additional action. To find out more about how device limits work and to determine if you are affected, see Are you managing more devices than your license allows? (http://www.whatsupgold.com/devicecount.htm).
66

Failover Deployment and User Guide for WhatsUp Gold Distributed
4 Read the Welcome screen.
Click a link to view a Help resource.
Click Next. The License Agreement dialog appears.
5 Read the license agreement. If you accept the terms of the license agreement, select I accept the terms of the license agreement.
To print a copy of the license agreement, click Print. The license agreement is sent to the default printer.
If you do not accept the terms of the license agreement, click Cancel to exit the installation program.
Click Next. The Back Up Existing Database dialog appears.
Important: At this point in the upgrade, the installation program displays a warning box that states because the machine on which you are installing the WhatsUp Gold upgrade is using a local SQL database, WhatsUp Gold is automatically upgrading the machine to a Secondary machine in Failover Scenario 1. Click OK to proceed.
6 Since the installation program makes changes to the WhatsUp Gold database, we strongly recommend that you select Yes, back up the existing database.
Note: If you are upgrading from an installation of WhatsUp Gold 11.x that uses Microsoft SQL Server Desktop Edition as its database, you can select the location where you want to store the backup. For all other upgrades, the backup is made in the default backup location for the database server.
Click Next.The Back Up Web and Report Files dialog appears.
7 If you have modified any of the Web or Report files, select Back up the existing Web and report files. If this option is selected, the existing Web and report files are copied to a backup folder before the upgrade begins. We recommend that you select this option.
Click Next to configure the Remote Site.
8 Enter the information required to connect to the Central Site.
In Address, enter the IP address of the Central Site.
In TCP Port, enter the port over which the Central Site is listening for connections from the Remote Sites (default port is 9394).
Tip: After you have entered this information, you can click Test to validate the connection to the Central Site.
67

Failover Deployment and User Guide for WhatsUp Gold Distributed
Enter the User Name and Password that the Remote Site uses to access the Central Site.
Note: This is the User Name and Password that you set in the Central Site installation program.
Click Next.
9 Define the information used to identify the Remote Site to the Central Site.
Enter the Remote Site Display Name. This is the Remote Site name that the Central Site uses to identify this Remote Site (for example, Atlanta Office). This name is particularly helpful in identifying reports associated with each Remote Site. The default name is the computer's hostname, but you can change it to better describe this Remote Site.
Enter the HTTP Address of the Remote Site's web interface. This is the address that the Central Site's browser will use to access this Remote Site. This address allows users to click links in the Central Site's web interface to open browser connections directly to the Remote Site's web interface (if the user has access permissions). Example: http://<Remote_Site_IP>:<Web_Server_Port> or http://192.168.200.123:8080. Click Next.
Note: The Remote Site's IP address must be accessible from the Central Site to enable drill-downs into this Remote Site installation from the Central Site. If inbound Web connections are not possible, only status information is available at the Central Site.
Click Next to upgrade WhatsUp Gold.
10 Click Install. The installation program begins upgrading WhatsUp Gold. 11 When installation completes, the InstallShield Wizard Complete dialog appears.
To view the steps required to configure WhatsUp Gold Failover, click View Failover Configuration Requirements.
Click Finish. The Setup program closes.
68
Failover Deployment and User Guide for WhatsUp Gold Distributed
Upgrading a non-Failover version of WhatsUp Gold Distributed Edition that is using a remote database
Both the primary and the secondary machines in Failover Scenario 2 use a remote SQL database, so you can upgrade any non-Failover edition of WhatsUp Gold to either the Central or Remote Site primary or secondary machine in Failover Scenario 2 for WhatsUp Gold Distributed Edition. In this situation, you need to upgrade the machine to either the primary or secondary machine and do a clean install for the other machine. For example, if you upgraded to the primary machine, you need to do a clean install for the secondary machine on another computer.
Upgrading a non-Failover WhatsUp Distributed Edition (Central/Primary) using a remote database
To upgrade a non-Failover edition of WhatsUp Gold Distributed Edition using an existing remote database to a Central Site primary machine for Failover Scenario 2: 1 Log in directly to Microsoft Windows using the Administrator account (if you do not have
an account called Administrator, use an account that has full administrative privileges to the computer).
Caution: We do not recommend using Terminal Services or Remote Desktop to install WhatsUp Gold.
2 Start the installation program:
If you downloaded an electronic version of WhatsUp Gold, double-click on the downloaded file.
If you purchased a WhatsUp Gold CD-ROM, insert the CD-ROM into the appropriate drive. If it does not run automatically, click Start, select Run, then enter the CD path followed by AutoRun.exe (for example, D:\AutoRun.exe).
3 Read the notice about device limit enforcement.
Select Yes to continue the upgrade.
Select No to abort the upgrade.
Note: If you upgrade and you are currently managing more devices than your license allows, WhatsUp Gold will not poll your devices after the upgrade until you take additional action. To find out more about how device limits work and to determine if you are affected, see Are you managing more devices than your license allows? (http://www.whatsupgold.com/devicecount.htm).
69
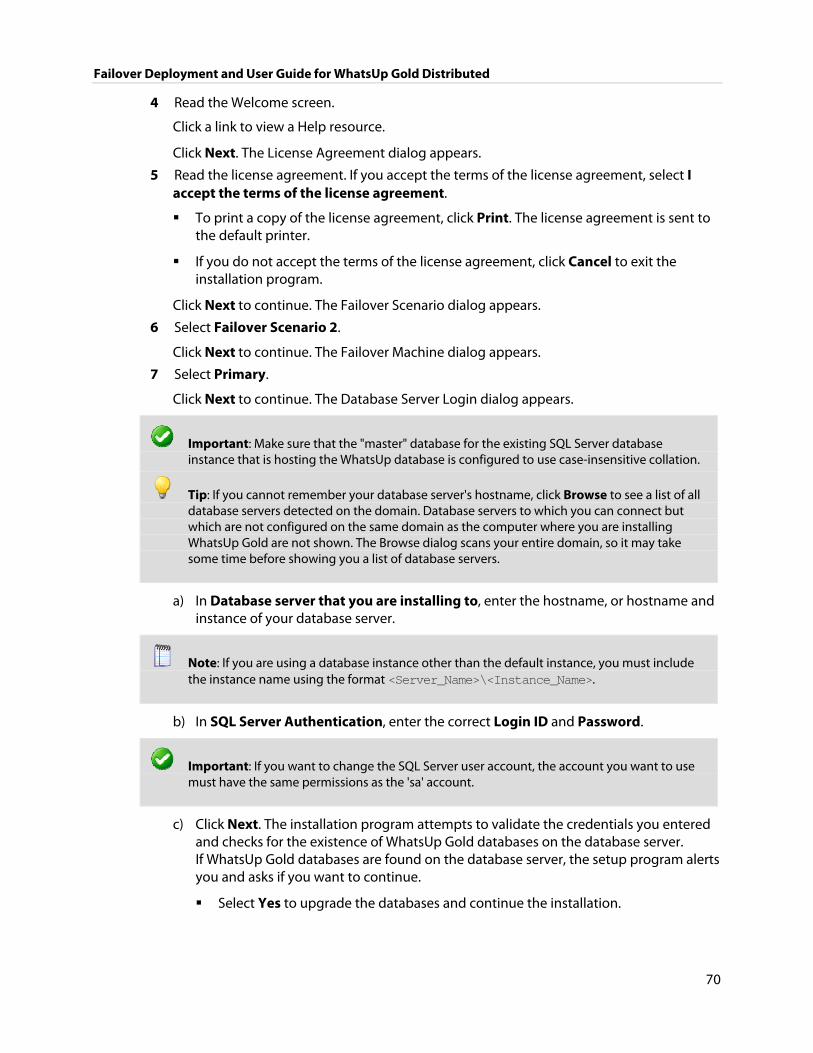
Failover Deployment and User Guide for WhatsUp Gold Distributed
4 Read the Welcome screen.
Click a link to view a Help resource.
Click Next. The License Agreement dialog appears.
5 Read the license agreement. If you accept the terms of the license agreement, select I accept the terms of the license agreement.
To print a copy of the license agreement, click Print. The license agreement is sent to the default printer.
If you do not accept the terms of the license agreement, click Cancel to exit the installation program.
Click Next to continue. The Failover Scenario dialog appears.
6 Select Failover Scenario 2.
Click Next to continue. The Failover Machine dialog appears.
7 Select Primary.
Click Next to continue. The Database Server Login dialog appears.
Important: Make sure that the "master" database for the existing SQL Server database instance that is hosting the WhatsUp database is configured to use case-insensitive collation.
Tip: If you cannot remember your database server's hostname, click Browse to see a list of all database servers detected on the domain. Database servers to which you can connect but which are not configured on the same domain as the computer where you are installing WhatsUp Gold are not shown. The Browse dialog scans your entire domain, so it may take some time before showing you a list of database servers.
a) In Database server that you are installing to, enter the hostname, or hostname and instance of your database server.
Note: If you are using a database instance other than the default instance, you must include the instance name using the format <Server_Name>\<Instance_Name>.
b) In SQL Server Authentication, enter the correct Login ID and Password.
Important: If you want to change the SQL Server user account, the account you want to use must have the same permissions as the 'sa' account.
c) Click Next. The installation program attempts to validate the credentials you entered and checks for the existence of WhatsUp Gold databases on the database server. If WhatsUp Gold databases are found on the database server, the setup program alerts you and asks if you want to continue.
Select Yes to upgrade the databases and continue the installation.
70
Failover Deployment and User Guide for WhatsUp Gold Distributed
Select No to select another Microsoft SQL Server. After the credentials are validated, the Enter Microsoft SQL Server 2005 Express Edition Paths dialog appears.
8 This dialog lists the third-party resources that the installation program installs, including Microsoft SQL Server 2005 Express Edition client tools (required for installations of WhatsUp Gold that use Microsoft SQL Server databases) and Microsoft .NET Framework 3.5.
Click Next to configure the Central Site.
9 Enter the information that Remote Sites will use to connect to this Central Site.
Enter the TCP Port that the Remote Sites will use to connect to the Central Site (default port is 9394).
Enter a User Name and Password that the Remote Sites will use to access this Central Site
Click Next. The Ready to Install the Program dialog appears.
Note: Make note of this information. You will need the TCP port and User Name and Password information for each Remote Site installation.
Click Next to upgrade WhatsUp Gold.
10 Click Install to install WhatsUp Gold. The setup program installs and configures WhatsUp Gold.
11 When installation completes, the InstallShield Wizard Complete dialog appears.
To view the steps required to configure WhatsUp Gold Failover, click View Failover Configuration Requirements.
Click Finish. The Setup program closes.
Upgrading a non-Failover WhatsUp Distributed Edition (Central/Secondary) using a remote database
To upgrade a non-Failover edition of WhatsUp Gold Distributed Edition using an existing remote database to a Central Site secondary machine for Failover Scenario 2: 1 Log in directly to Microsoft Windows using the Administrator account (if you do not have
an account called Administrator, use an account that has full administrative privileges to the computer).
Caution: We do not recommend using Terminal Services or Remote Desktop to install WhatsUp Gold.
2 Start the installation program:
If you downloaded an electronic version of WhatsUp Gold, double-click on the downloaded file.
71
Failover Deployment and User Guide for WhatsUp Gold Distributed
If you purchased a WhatsUp Gold CD-ROM, insert the CD-ROM into the appropriate drive. If it does not run automatically, click Start, select Run, then enter the CD path followed by AutoRun.exe (for example, D:\AutoRun.exe).
3 Read the notice about device limit enforcement.
Select Yes to continue the upgrade.
Select No to abort the upgrade.
Note: If you upgrade and you are currently managing more devices than your license allows, WhatsUp Gold will not poll your devices after the upgrade until you take additional action. To find out more about how device limits work and to determine if you are affected, see Are you managing more devices than your license allows? (http://www.whatsupgold.com/devicecount.htm).
4 Read the Welcome screen.
Click a link to view a Help resource.
Click Next. The License Agreement dialog appears.
5 Read the license agreement. If you accept the terms of the license agreement, select I accept the terms of the license agreement.
To print a copy of the license agreement, click Print. The license agreement is sent to the default printer.
If you do not accept the terms of the license agreement, click Cancel to exit the installation program.
Click Next to continue. The Failover Scenario dialog appears.
6 Select Failover Scenario 2.
Click Next to continue. The Failover Machine dialog appears.
7 Select Secondary.
Click Next to continue. The Database Server Login dialog appears.
Important: Make sure that the "master" database for the existing SQL Server database instance that is hosting the WhatsUp database is configured to use case-insensitive collation.
Tip: If you cannot remember your database server's hostname, click Browse to see a list of all database servers detected on the domain. Database servers to which you can connect but which are not configured on the same domain as the computer where you are installing WhatsUp Gold are not shown. The Browse dialog scans your entire domain, so it may take some time before showing you a list of database servers.
a) In Database server that you are installing to, enter the hostname, or hostname and instance of your database server.
Note: If you are using a database instance other than the default instance, you must include the instance name using the format <Server_Name>\<Instance_Name>.
72
Failover Deployment and User Guide for WhatsUp Gold Distributed
b) In SQL Server Authentication, enter the correct Login ID and Password.
Important: If you want to change the SQL Server user account, the account you want to use must have the same permissions as the 'sa' account.
c) Click Next. The installation program attempts to validate the credentials you entered and checks for the existence of WhatsUp Gold databases on the database server. If WhatsUp Gold databases are found on the database server, the setup program alerts you and asks if you want to continue.
Select Yes to upgrade the databases and continue the installation.
Select No to select another Microsoft SQL Server. After the credentials are validated, the Enter Microsoft SQL Server 2005 Express Edition Paths dialog appears.
8 This dialog lists the third-party resources that the installation program installs, including Microsoft SQL Server 2005 Express Edition client tools (required for installations of WhatsUp Gold that use Microsoft SQL Server databases) and Microsoft .NET Framework 3.5.
Click Next to configure the Central Site.
9 Enter the information that Remote Sites will use to connect to this Central Site.
Enter the TCP Port that the Remote Sites will use to connect to the Central Site (default port is 9394).
Enter a User Name and Password that the Remote Sites will use to access this Central Site
Click Next. The Ready to Install the Program dialog appears.
Note: Make note of this information. You will need the TCP port and User Name and Password information for each Remote Site installation.
Click Next to upgrade WhatsUp Gold.
10 Click Install to install WhatsUp Gold. The setup program installs and configures WhatsUp Gold.
11 When installation completes, the InstallShield Wizard Complete dialog appears.
To view the steps required to configure WhatsUp Gold Failover, click View Failover Configuration Requirements.
Click Finish. The Setup program closes.
73

Failover Deployment and User Guide for WhatsUp Gold Distributed
Upgrading a non-Failover WhatsUp Distributed Edition (Remote/Primary) using a remote database
To upgrade a non-Failover edition of WhatsUp Gold Distributed Edition using an existing remote database to a Remote Site primary machine for Failover Scenario 2: 1 Log in directly to Microsoft Windows using the Administrator account (if you do not have
an account called Administrator, use an account that has full administrative privileges to the computer).
Caution: We do not recommend using Terminal Services or Remote Desktop to install WhatsUp Gold.
2 Start the installation program:
If you downloaded an electronic version of WhatsUp Gold, double-click on the downloaded file.
If you purchased a WhatsUp Gold CD-ROM, insert the CD-ROM into the appropriate drive. If it does not run automatically, click Start, select Run, then enter the CD path followed by AutoRun.exe (for example, D:\AutoRun.exe).
3 Read the notice about device limit enforcement.
Select Yes to continue the upgrade.
Select No to abort the upgrade.
Note: If you upgrade and you are currently managing more devices than your license allows, WhatsUp Gold will not poll your devices after the upgrade until you take additional action. To find out more about how device limits work and to determine if you are affected, see Are you managing more devices than your license allows? (http://www.whatsupgold.com/devicecount.htm).
4 Read the license agreement. If you accept the terms of the license agreement, select I accept the terms of the license agreement.
To print a copy of the license agreement, click Print. The license agreement is sent to the default printer.
If you do not accept the terms of the license agreement, click Cancel to exit the installation program.
Click Next. The License Agreement dialog appears.
5 Read the license agreement. If you accept the terms of the license agreement, select I accept the terms of the license agreement.
To print a copy of the license agreement, click Print. The license agreement is sent to the default printer.
If you do not accept the terms of the license agreement, click Cancel to exit the installation program.
74

Failover Deployment and User Guide for WhatsUp Gold Distributed
Click Next to continue. The Failover Scenario dialog appears.
6 Select Failover Scenario 2.
Click Next to continue. The Failover Machine dialog appears.
7 Select Primary.
Click Next to continue. The Database Server Login dialog appears.
Important: Make sure that the "master" database for the existing SQL Server database instance that is hosting the WhatsUp database is configured to use case-insensitive collation.
Tip: If you cannot remember your database server's hostname, click Browse to see a list of all database servers detected on the domain. Database servers to which you can connect but which are not configured on the same domain as the computer where you are installing WhatsUp Gold are not shown. The Browse dialog scans your entire domain, so it may take some time before showing you a list of database servers.
a) In Database server that you are installing to, enter the hostname, or hostname and instance of your database server.
Note: If you are using a database instance other than the default instance, you must include the instance name using the format <Server_Name>\<Instance_Name>.
b) In SQL Server Authentication, enter the correct Login ID and Password.
Important: If you want to change the SQL Server user account, the account you want to use must have the same permissions as the 'sa' account.
c) Click Next. The installation program attempts to validate the credentials you entered and checks for the existence of WhatsUp Gold databases on the database server. If WhatsUp Gold databases are found on the database server, the setup program alerts you and asks if you want to continue.
Select Yes to upgrade the databases and continue the installation.
Select No to select another Microsoft SQL Server. After the credentials are validated, the Enter Microsoft SQL Server 2005 Express Edition Paths dialog appears.
8 This dialog lists the third-party resources that the installation program installs, including Microsoft SQL Server 2005 Express Edition client tools (required for installations of WhatsUp Gold that use Microsoft SQL Server databases) and Microsoft .NET Framework 3.5.
Click Next to configure the Remote Site.
75
Failover Deployment and User Guide for WhatsUp Gold Distributed
9 Enter the information required to connect to the Central Site.
In Address, enter the IP address of the Central Site.
In TCP Port, enter the port over which the Central Site is listening for connections from the Remote Sites (default port is 9394).
Tip: After you have entered this information, you can click Test to validate the connection to the Central Site.
Enter the User Name and Password that the Remote Site uses to access the Central Site.
Note: This is the User Name and Password that you set in the Central Site installation program.
Click Next.
10 Define the information used to identify the Remote Site to the Central Site.
Enter the Remote Site Display Name. This is the Remote Site name that the Central Site uses to identify this Remote Site (for example, Atlanta Office). This name is particularly helpful in identifying reports associated with each Remote Site. The default name is the computer's hostname, but you can change it to better describe this Remote Site.
Enter the HTTP Address of the Remote Site's web interface. This is the address that the Central Site's browser will use to access this Remote Site. This address allows users to click links in the Central Site's web interface to open browser connections directly to the Remote Site's web interface (if the user has access permissions). Example: http://<Remote_Site_IP>:<Web_Server_Port> or http://192.168.200.123:8080. Click Next.
Note: The Remote Site's IP address must be accessible from the Central Site to enable drill-downs into this Remote Site installation from the Central Site. If inbound Web connections are not possible, only status information is available at the Central Site.
Click Next to upgrade WhatsUp Gold.
11 Click Install to install WhatsUp Gold. The setup program installs and configures WhatsUp Gold.
12 When installation completes, the InstallShield Wizard Complete dialog appears.
To view the steps required to configure WhatsUp Gold Failover, click View Failover Configuration Requirements.
Click Finish. The Setup program closes.
76
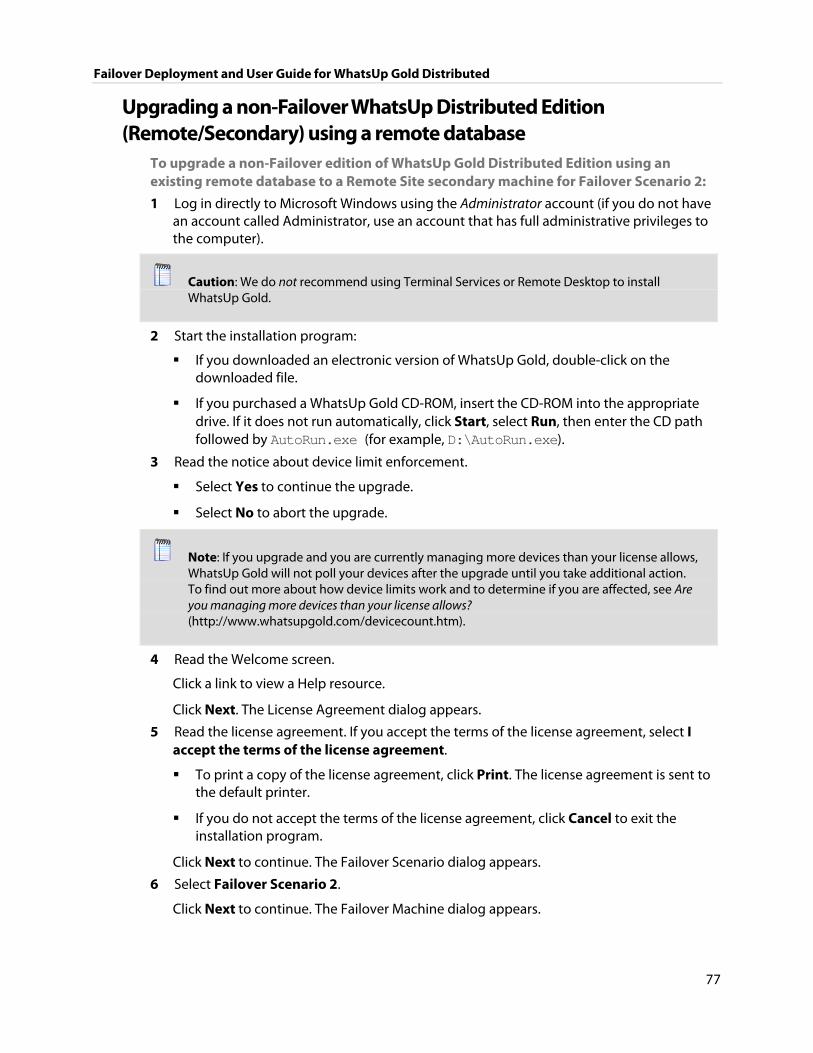
Failover Deployment and User Guide for WhatsUp Gold Distributed
Upgrading a non-Failover WhatsUp Distributed Edition (Remote/Secondary) using a remote database
To upgrade a non-Failover edition of WhatsUp Gold Distributed Edition using an existing remote database to a Remote Site secondary machine for Failover Scenario 2: 1 Log in directly to Microsoft Windows using the Administrator account (if you do not have
an account called Administrator, use an account that has full administrative privileges to the computer).
Caution: We do not recommend using Terminal Services or Remote Desktop to install WhatsUp Gold.
2 Start the installation program:
If you downloaded an electronic version of WhatsUp Gold, double-click on the downloaded file.
If you purchased a WhatsUp Gold CD-ROM, insert the CD-ROM into the appropriate drive. If it does not run automatically, click Start, select Run, then enter the CD path followed by AutoRun.exe (for example, D:\AutoRun.exe).
3 Read the notice about device limit enforcement.
Select Yes to continue the upgrade.
Select No to abort the upgrade.
Note: If you upgrade and you are currently managing more devices than your license allows, WhatsUp Gold will not poll your devices after the upgrade until you take additional action. To find out more about how device limits work and to determine if you are affected, see Are you managing more devices than your license allows? (http://www.whatsupgold.com/devicecount.htm).
4 Read the Welcome screen.
Click a link to view a Help resource.
Click Next. The License Agreement dialog appears.
5 Read the license agreement. If you accept the terms of the license agreement, select I accept the terms of the license agreement.
To print a copy of the license agreement, click Print. The license agreement is sent to the default printer.
If you do not accept the terms of the license agreement, click Cancel to exit the installation program.
Click Next to continue. The Failover Scenario dialog appears.
6 Select Failover Scenario 2.
Click Next to continue. The Failover Machine dialog appears.
77
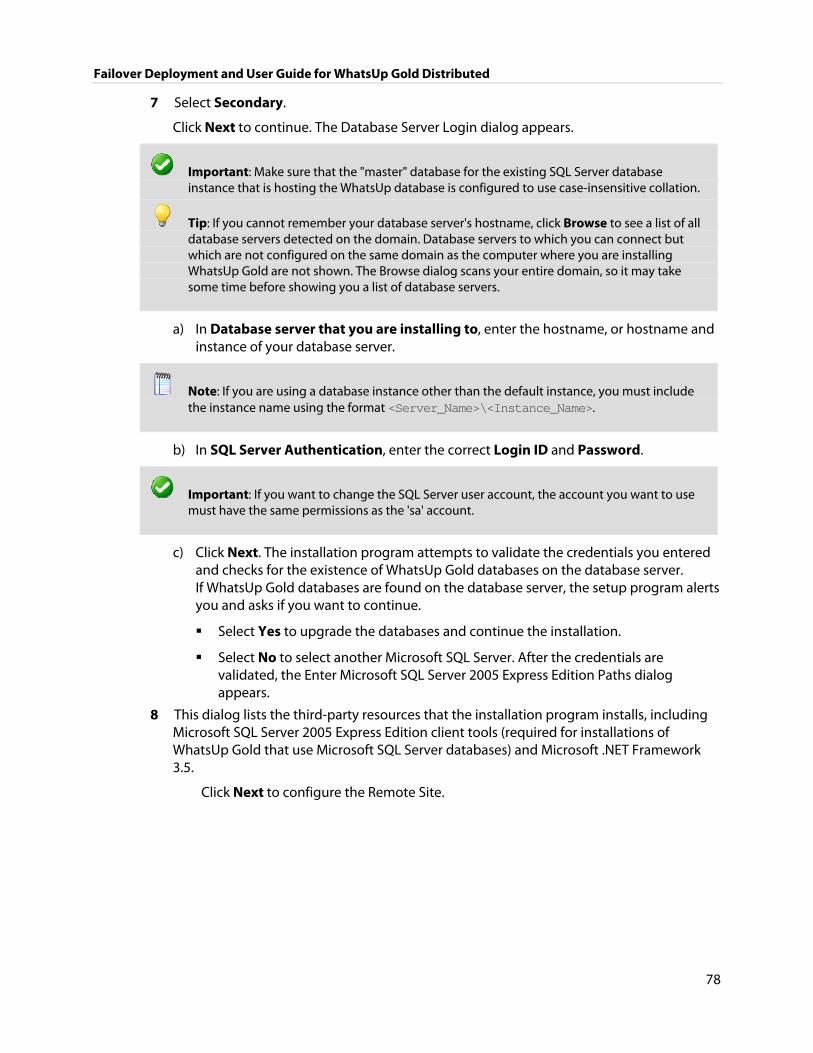
Failover Deployment and User Guide for WhatsUp Gold Distributed
7 Select Secondary.
Click Next to continue. The Database Server Login dialog appears.
Important: Make sure that the "master" database for the existing SQL Server database instance that is hosting the WhatsUp database is configured to use case-insensitive collation.
Tip: If you cannot remember your database server's hostname, click Browse to see a list of all database servers detected on the domain. Database servers to which you can connect but which are not configured on the same domain as the computer where you are installing WhatsUp Gold are not shown. The Browse dialog scans your entire domain, so it may take some time before showing you a list of database servers.
a) In Database server that you are installing to, enter the hostname, or hostname and instance of your database server.
Note: If you are using a database instance other than the default instance, you must include the instance name using the format <Server_Name>\<Instance_Name>.
b) In SQL Server Authentication, enter the correct Login ID and Password.
Important: If you want to change the SQL Server user account, the account you want to use must have the same permissions as the 'sa' account.
c) Click Next. The installation program attempts to validate the credentials you entered and checks for the existence of WhatsUp Gold databases on the database server. If WhatsUp Gold databases are found on the database server, the setup program alerts you and asks if you want to continue.
Select Yes to upgrade the databases and continue the installation.
Select No to select another Microsoft SQL Server. After the credentials are validated, the Enter Microsoft SQL Server 2005 Express Edition Paths dialog appears.
8 This dialog lists the third-party resources that the installation program installs, including Microsoft SQL Server 2005 Express Edition client tools (required for installations of WhatsUp Gold that use Microsoft SQL Server databases) and Microsoft .NET Framework 3.5.
Click Next to configure the Remote Site.
78

Failover Deployment and User Guide for WhatsUp Gold Distributed
9 Enter the information required to connect to the Central Site.
In Address, enter the IP address of the Central Site.
In TCP Port, enter the port over which the Central Site is listening for connections from the Remote Sites (default port is 9394).
Tip: After you have entered this information, you can click Test to validate the connection to the Central Site.
Enter the User Name and Password that the Remote Site uses to access the Central Site.
Note: This is the User Name and Password that you set in the Central Site installation program.
Click Next.
10 Define the information used to identify the Remote Site to the Central Site.
Enter the Remote Site Display Name. This is the Remote Site name that the Central Site uses to identify this Remote Site (for example, Atlanta Office). This name is particularly helpful in identifying reports associated with each Remote Site. The default name is the computer's hostname, but you can change it to better describe this Remote Site.
Enter the HTTP Address of the Remote Site's web interface. This is the address that the Central Site's browser will use to access this Remote Site. This address allows users to click links in the Central Site's web interface to open browser connections directly to the Remote Site's web interface (if the user has access permissions). Example: http://<Remote_Site_IP>:<Web_Server_Port> or http://192.168.200.123:8080. Click Next.
Note: The Remote Site's IP address must be accessible from the Central Site to enable drill-downs into this Remote Site installation from the Central Site. If inbound Web connections are not possible, only status information is available at the Central Site.
Click Next to upgrade WhatsUp Gold.
11 Click Install to install WhatsUp Gold. The setup program installs and configures WhatsUp Gold.
12 When installation completes, the InstallShield Wizard Complete dialog appears.
To view the steps required to configure WhatsUp Gold Failover, click View Failover Configuration Requirements.
Click Finish. The Setup program closes.
79

Failover Deployment and User Guide for WhatsUp Gold Distributed
Upgrading an edition of WhatsUp Gold Failover
When you upgrade from a previous version of WhatsUp Gold Failover for WhatsUp Distributed Edition, the upgrade respects the current Failover scenario specifications. For example, if you upgrade a Central Site primary machine for Failover Scenario 1, the machine remains the Central Site primary machine for Failover Scenario 1 after the upgrade.
Important: When you repair an existing edition of WhatsUp Gold Failover, the remote machine remains completely stopped after the repair and you must manually restart its Failover Service. For example, if you repair a Secondary installation of WhatsUp Gold Failover, the Primary installation's Failover Service remains stopped after the Secondary repair completes. In this situation, the Secondary installation takes over polling duties until you manually restart the Primary installation's Failover Service (Start > Services Manager).
Backing up the WhatsUp databases
To back up the databases:
Caution: Any data collected from the time you back up the databases to when you restore them on the new server will be lost. We recommend executing these steps during non-peak times, when minimal downtime can be tolerated.
To back up the databases: 1 Back up the WhatsUp Gold database.
a) From the WhatsUp Gold console, select Tools> Database Utilities > Back Up WhatsUp SQL Database. The Save Database As dialog appears.
b) Enter a name for the database backup file, such as whatsup_backup.bak, then click Save.
2 Back up the Flow Monitor database.
a) From the WhatsUp Gold console, select Tools> Database Utilities > Back Up Flow Monitor SQL Databases > Back Up Flow Monitor Current Database. The Save Database As dialog appears.
b) Enter a name for the database backup file, such as nf_backup.bak, then click Save.
3 Back up the Flow Monitor archive database.
a) From the WhatsUp Gold console, select Tools> Database Utilities > Back Up Flow Monitor SQL Databases > Back Up Flow Monitor Archive Database. The Save Database As dialog appears.
b) Enter a name for the database backup file, such as nfarchive_backup.bak, then click Save.
80
Failover Deployment and User Guide for WhatsUp Gold Distributed
4 Close the WhatsUp Gold console.
Note: These operations may take some time depending on the size of your database.
Note: Even if you do not use the WhatsUp Gold Flow Monitor plug-in, you need to back up the Flow Monitor databases.
Restoring databases to Failover Scenario 1
Note: You can only restore the database from a local drive; you cannot restore a database from a network drive.
To restore the backed-up databases over the new server's default databases: 1 Restore the WhatsUp Gold database.
a) From the WhatsUp Gold console, select Tools> Database Utilities > Restore WhatsUp SQL Database. The Restore Database From dialog appears.
b) Locate and select the database backup file that you moved from the existing WhatsUp Gold server, then click Open.
Note: If a dialog appears informing you that the WhatsUp service must be stopped and restarted during a database restore, click Yes.
2 Restore the Flow Monitor database.
a) From the WhatsUp Gold console, select Tools> Database Utilities > Restore Flow Monitor SQL Databases > Restore Flow Monitor Current Database. The Restore Database From dialog appears.
b) Locate and select the database backup file that you moved from the existing WhatsUp Gold server, then click Open.
Note: If a dialog appears informing you that the Flow Monitor service must be stopped and restarted during a database restore, click Yes.
3 Restore the Flow Monitor Archive database.
a) From the WhatsUp Gold console, select Tools> Database Utilities > Restore Flow Monitor SQL Databases > Restore Flow Monitor Archive Database. The Restore Database From dialog appears.
81
Failover Deployment and User Guide for WhatsUp Gold Distributed
b) Locate and select the database backup file that you moved from the existing WhatsUp Gold server, then click Open.
Note: If a dialog appears informing you that the Flow Monitor service must be stopped and restarted during a database restore, click Yes.
Creating and restoring databases for use in WhatsUp Gold Failover Scenario 2
To restore a previously backedup database, execute this procedure on the computer on which you have installed the database machine for Failover Scenario 2:
1 Open a command prompt. 2 Create the three databases into which you will restore the backups from your previous
non-Failover installation of WhatsUp Gold. To create these databases, execute the following case-sensitive commands:
To create the WhatsUp database:
sqlcmd -E -S "(local)\whatsup" -Q "CREATE DATABASE WhatsUp"
To create the Flow Monitor database:
sqlcmd -E -S "(local)\whatsup" -Q "CREATE DATABASE NetFlow"
To create the NFArchive datbase:
sqlcmd -E -S "(local)\whatsup" -Q "CREATE DATABASE NFArchive"
Important: The database names must exactly match the database names from the backups you made of your previous installation of WhatsUp Gold. By default, these names are: WhatsUp, NetFlow, and NFArchive.
3 For each of the three databases, import the backup file into the new database. Use this case-sensitive command:
Important: The entire command should be entered on a single line in the command prompt.
sqlcmd -E -S "<SQL server name>" - Q "RESTORE DATABASE <database name> FROM DISK='<location of .dat file>' WITH REPLACE, MOVE '<database name>' TO '<location of data file for SQL database>', MOVE '<database log>' TO '<location of log file for SQL database>'"
82
Note: The value of <database name> for the WhatsUp database is usually WhatsUp. However, if you are upgrading a database created by WhatsUp Gold v12.0.2 or earlier, use WhatsUp_dat. For <database log>, always use WhatsUp_log.
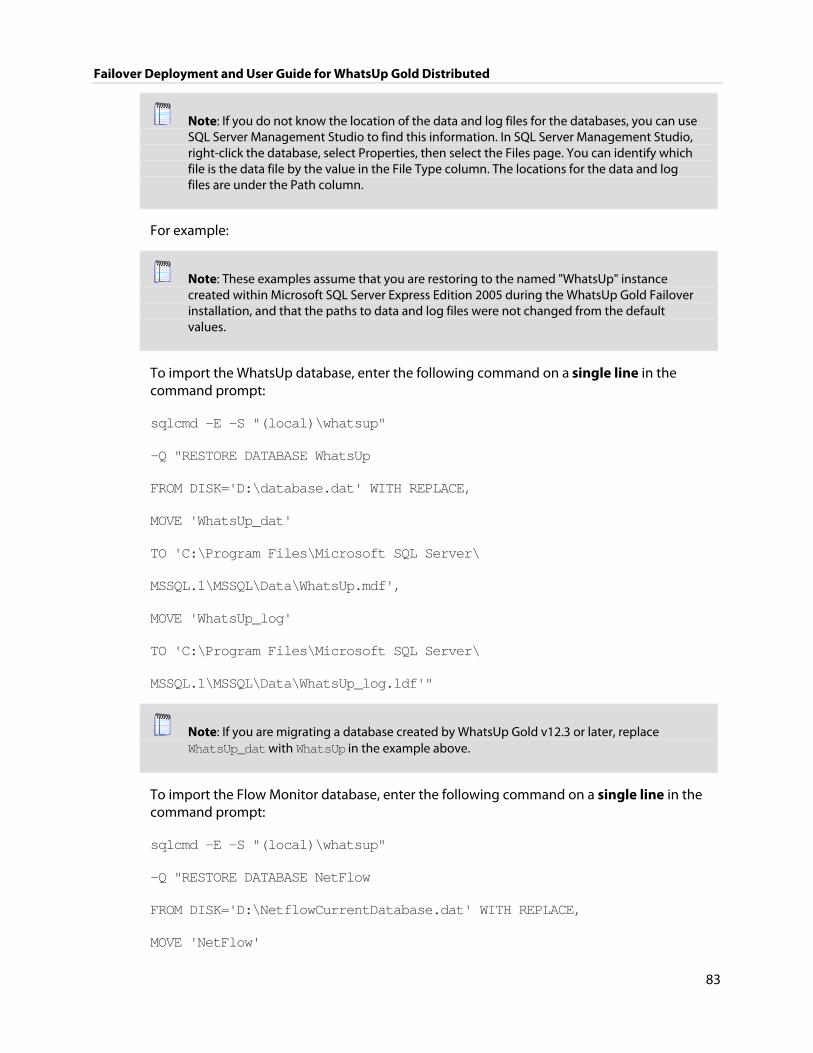
Failover Deployment and User Guide for WhatsUp Gold Distributed
Note: If you do not know the location of the data and log files for the databases, you can use SQL Server Management Studio to find this information. In SQL Server Management Studio, right-click the database, select Properties, then select the Files page. You can identify which file is the data file by the value in the File Type column. The locations for the data and log files are under the Path column.
For example:
Note: These examples assume that you are restoring to the named "WhatsUp" instance created within Microsoft SQL Server Express Edition 2005 during the WhatsUp Gold Failover installation, and that the paths to data and log files were not changed from the default values.
To import the WhatsUp database, enter the following command on a single line in the command prompt:
sqlcmd -E -S "(local)\whatsup"
-Q "RESTORE DATABASE WhatsUp
FROM DISK='D:\database.dat' WITH REPLACE,
MOVE 'WhatsUp_dat'
TO 'C:\Program Files\Microsoft SQL Server\
MSSQL.1\MSSQL\Data\WhatsUp.mdf',
MOVE 'WhatsUp_log'
TO 'C:\Program Files\Microsoft SQL Server\
MSSQL.1\MSSQL\Data\WhatsUp_log.ldf'"
Note: If you are migrating a database created by WhatsUp Gold v12.3 or later, replace WhatsUp_dat with WhatsUp in the example above.
To import the Flow Monitor database, enter the following command on a single line in the command prompt:
sqlcmd -E -S "(local)\whatsup"
-Q "RESTORE DATABASE NetFlow
FROM DISK='D:\NetflowCurrentDatabase.dat' WITH REPLACE,
MOVE 'NetFlow'
83
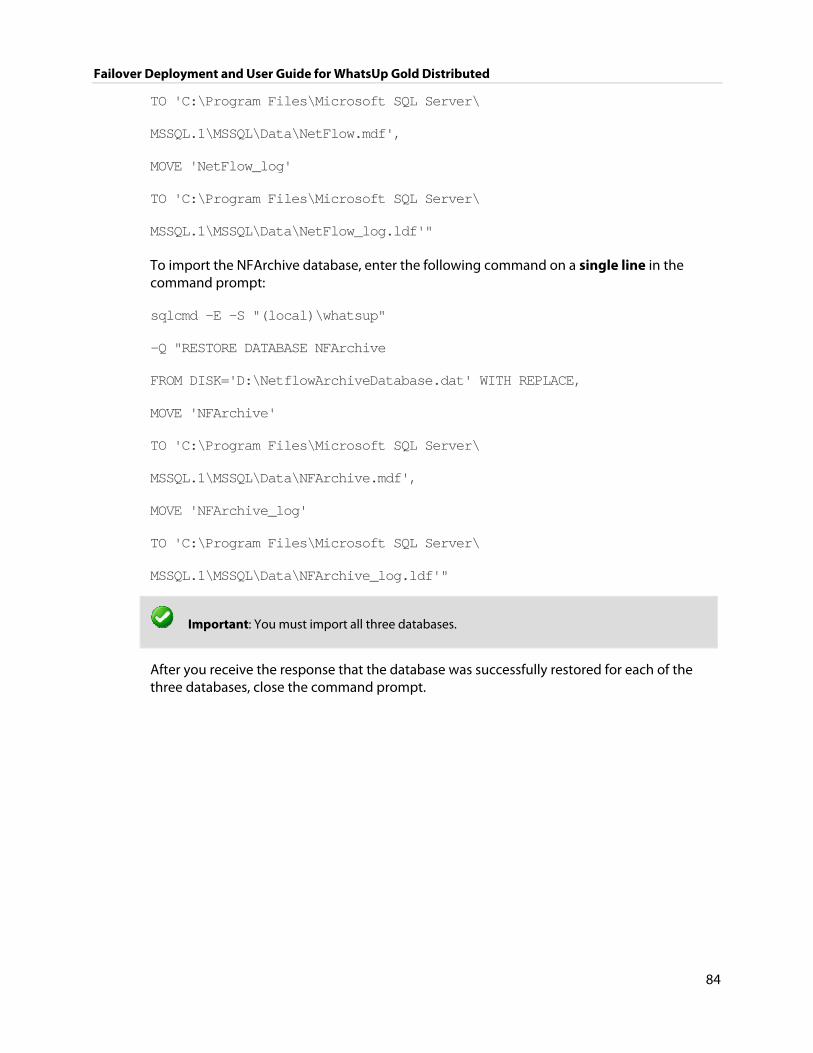
Failover Deployment and User Guide for WhatsUp Gold Distributed
TO 'C:\Program Files\Microsoft SQL Server\
MSSQL.1\MSSQL\Data\NetFlow.mdf',
MOVE 'NetFlow_log'
TO 'C:\Program Files\Microsoft SQL Server\
MSSQL.1\MSSQL\Data\NetFlow_log.ldf'"
To import the NFArchive database, enter the following command on a single line in the command prompt:
sqlcmd -E -S "(local)\whatsup"
-Q "RESTORE DATABASE NFArchive
FROM DISK='D:\NetflowArchiveDatabase.dat' WITH REPLACE,
MOVE 'NFArchive'
TO 'C:\Program Files\Microsoft SQL Server\
MSSQL.1\MSSQL\Data\NFArchive.mdf',
MOVE 'NFArchive_log'
TO 'C:\Program Files\Microsoft SQL Server\
MSSQL.1\MSSQL\Data\NFArchive_log.ldf'"
Important: You must import all three databases.
After you receive the response that the database was successfully restored for each of the three databases, close the command prompt.
84
CHAPTER 4
Configuring your Failover Solution
85
In This Chapter
Configuring WhatsUp Gold Failover............................................................85
Configuring the Failover Service...................................................................86
Configuring Advanced Settings ....................................................................87
Configuring Windows credentials ................................................................88
Configuring WhatsUp Gold Failover
WhatsUp Gold Failover edition differs from non-Failover editions in the way that it delivers the app.config file to the Ipswitch Services Controller. In non-Failover editions of WhatsUp Gold, all services are set to automatically start after installation and activation. In WhatsUp Gold Failover edition, all services except for the Failover Service are set to be manually started. The Failover Service is set to automatically start because it is the mechanism responsible for setting the active machine in your Failover solution. When the Failover Service sets a machine to active, it manually turns on the services you specify as necessary for the machine to successfully poll and manage your network.
In order for WhatsUp Gold Failover to begin polling and verifying the up state of the Primary machine, you must:
1 Configure the Failover Service for the Primary machine 2 Verify and/or modify WhatsUp Gold Failover's advanced settings 3 Create and apply the Windows Credentials that are used for communication between
the Primary and Secondary machines
After you have completed all three requirements, the primary machine becomes active, with necessary WhatsUp services started and available for use. Subsequently, any time the primary machine is rebooted, the Failover Service again considers if the machine should be active, and has the ability to start the required WhatsUp services automatically.
Note: In order for the required WhatsUp services to be started automatically, you must select the Primary Automatic Restart option on the Failover Advanced Configuration dialog.

Failover Deployment and User Guide for WhatsUp Gold Distributed
Configuring the Failover Service
The Failover Service watches over the services running on the Primary WhatsUp Gold machine. If any of the services that you include in the Failover Service fails unexpectedly, the Primary WhatsUp Gold machine is considered to be in a failed state and Failover is initiated. You can set the active WhatsUp Gold installation from the WhatsUp Gold console (Start > Ipswitch WhatsUp Gold > WhatsUp Gold) using the Failover Console dialog (Tools > Failover Console).To configure the Failover Service:
1 Enter or select the appropriate information in the following fields.
Use ALL selected services. Selecting this option tells Failover that unless all of the services selected go down, the primary Whats Up Gold machine continues to perform network polling duties. In the event that all of the selected services go down, the primary WhatsUp Gold machine is considered to be in a failed state and the secondary WhatsUp gold machine takes over network polling duties.
Use ANY selected services. Selecting this option tells Failover that if any one of the selected services goes down, the primary WhatsUp Gold machine is considered to be in a failed state and the secondary WhatsUp Gold machine takes over network polling duties.
2 Select the service(s) that you want to apply to the Failover Service.
Note: If you use IIS to provide web services for WhatsUp Gold and the IIS web services fail, Failover Service will not automatically failover. You will need to manually set the alternate WhatsUp Gold installation as the active WhatsUp Gold installation. When you have recovered the failed IIS web service, you will need to manually set the restored installation as the active WhatsUp Gold installation.
WhatsUp Gold services:
Polling Engine (nmservice.exe)
Flow Collector (bwcollector.net.exe)
Alert Center (alertcenterservice.exe)
Trivial File Transfer Protocol Server (TFTPservice.exe)
Whats Configured (networkconfigservice.exe)
Discovery (discoveryservice.exe)
Web Server (nmwebservice.exe)
Failover Manager (nmfailover.exe)
API (nmapi.exe)
Whats Connected Data Service (networkviewerdataservice.exe)
Whats Virtual Service (whatsvirtualservice.exe)
86

Failover Deployment and User Guide for WhatsUp Gold Distributed
Note: The Flow Collector, WhatsConnected, WhatConfigured, and WhatsVirtual services only appear if you have a license for the Flow Monitor, WhatsUp Gold WhatsConnected, WhatsUp Gold WhatsConfigured, or WhatsVirtual plug-in.
The description at the bottom of the dialog explains how the services you choose relate to your configuration of WhatsUp Gold Failover.
Important: Click Advanced to configure the Failover Service's advanced settings, including whether the primary machine is automatically restarted when it returns to a normal state.
3 Click OK to save changes.
Configuring Advanced Settings
To configure Advanced Failover Settings: 1 Enter or select the appropriate information in the following fields.
Primary Automatic Restart. When this option is selected and the primary machine returns to a normal state after a previous failed state, WhatsUp Gold starts the required WhatsUp services and the primary machine automatically resumes network polling duties. If this option is not selected and polling switches to the secondary machine, when the primary machine returns to a normal state, you must manually enable the Primary machine with the Set Active option, located on the Failover Console's main dialog.
Failure duration (minutes). Enter the amount of time in minutes that the Primary WhatsUp machine should be considered in a failed state before Failover switches network polling duties to the Secondary machine.
Status Query Interval (minutes): Specify the amount of time in minutes that indicates how often the Primary and Secondary WhatsUp Gold machines ping one another for a heartbeat status.
Primary Credentials. Select the set of Windows credentials the secondary machine will use to communicate with the primary WhatsUp Gold machine. If you do not see the appropriate credentials, browse (...) to the Windows Credentials Library to configure a set of Windows credentials.
Secondary Credentials. Select the set of Windows credentials the primary machine will use to communicate with the secondary WhatsUp Gold machine. If you do not see the appropriate credentials, browse (...) to the Windows Credentials Library to configure a set of Windows credentials.
2 Click OK to save changes.
87

Failover Deployment and User Guide for WhatsUp Gold Distributed
Configuring Windows credentials
The Windows Credential Library stores login information necessary for heartbeat communications between the primary and secondary Failover machines. You need to configure appropriate Windows credentials for both the primary and secondary machines in order for WhatsUp Gold Failover to successfully implement your Failover solution.
To configure Windows Credentials: 1 Open the Windows Credentials Library:
From the main menu of the WhatsUp Gold console, select Tools > Failover Console. The WhatsUp Gold Failover Console appears.
Click Configure. The Failover Service Configuration dialog appears.
Click Advanced. The Advanced Failover Settings dialog appears.
Next to Primary credentials, click the browse (...) button. The Windows Credentials Library appears.
2 Click New to create a new Windows credential to add to the library. The Windows Credential dialog appears.
3 Enter or select the appropriate information in the following fields.
Name. Enter a name for the set of credentials. This name appears in the Windows Credentials Library.
Description. Enter a short description for the set of credentials. This description is displayed next to the credential name to help you differeniate credential sets.
Domain\User ID. Enter the domain or user ID associated with the machine to which you want to connect.
Password. Enter the password associated with the domain or user ID listed above.
Confirm Password. Re-enter the password.
4 Click OK to save changes.
88

CHAPTER 5
Viewing Failover Data
89
In This Chapter
About the Failover Console ............................................................................89
About the Alert Center Failover Threshold report..................................91
About the Failover Console
The main dialog of the Failover Console displays important status information for both the primary and secondary WhatsUp Gold machines.

Failover Deployment and User Guide for WhatsUp Gold Distributed
The dialog displays the following information for the primary and secondary WhatsUp Gold machines:
Host. The machine's host address.
Status. The machine's current status. Can either be:
Active - currently polling the network.
Standby - ready to assume network polling duties if/when the active machine goes down.
Down - unable to perform network polling duties.
Unknown - status is not known to Failover.
Communication State. The communication state is listed from the point of view from the other machine. For example, if the primary machine has attempted to communicate with the secondary machine and is unable to for some reason, the communcation state is listed as Unknown. Can either be:
Unknown - a machine is unable to communicate with the other machine for an unknown reason.
Connection failed - a machine is unable to communcate with the other machine because the other machine is not known to exist from the machine's standpoint (no known host, etc.).
Service running - a machine has communicated with the other machine and finds that the Failover service is running.
Good credential - a machine has communicated with the other machine and finds a good credential for further heartbeat communication.
Bad credential - a machine has communicated with the other machine and while the machine does in fact exist, the credentials provided for communication are bad.
Last Active. The last time the machine successfully sent a heartbeat message to the other machine.
Tip: In addition to viewing status information, you can use the Failover Console's main dialog to access Failover Service configuration dialogs and to set the active WhatsUp Gold machine.
90

Failover Deployment and User Guide for WhatsUp Gold Distributed
About the Alert Center Failover Threshold report
The Alert Center includes a default Failover Threshold that notifies you of any Failover Service events that occurr. A workspace report for the threshold is displayed on the Alert Center Home page.
The report includes the following Failover event data:
Source. The machine on which the failover event took place.
Tip: Click a source to view the Alert Center Item Details for that device.
Category. The category of activity and message; either information or error.
Message. The message generated as a result of the failover event.
Tip: Hover over a message with your mouse to view the message in its entirety.
Tip: Click an entry in the Message column to view the General Error Log.
Time Alerted. The time the Alert Center discovered the failover event.
Note: While WhatsUp Gold Failover includes a default Alert Center threshold, it does not include a default notification policy. If you would like to receive notifications for this threshold, you will need to configure and/or associate a notification policy with the threshold from the New/Edit Failover Threshold dialog.
91
Failover Deployment and User Guide for WhatsUp Gold Distributed
Copyright notice ©1991-2010 Ipswitch, Inc. All rights reserved.
This document, as well as the software described in it, is furnished under license and may be used or copied only in accordance with the terms of such license. Except as permitted by such license, no part of this publication may be reproduced, photocopied, stored on a retrieval system, or transmitted, in any form or by any means, electronic, mechanical, recording, or otherwise, without the expressed prior written consent of Ipswitch, Inc.
The content of this document is furnished for informational use only, is subject to change without notice, and should not be construed as a commitment by Ipswitch, Inc. While every effort has been made to assure the accuracy of the information contained herein, Ipswitch, Inc. assumes no responsibility for errors or omissions. Ipswitch, Inc., also assumes no liability for damages resulting from the use of the information contained in this document.
IMail, the IMail logo, WhatsUp, the WhatsUp Gold logo, WS_FTP, the WS_FTP logos, Ipswitch, and the Ipswitch logo are trademarks of Ipswitch, Inc. Other products and their brands or company names, are or may be trademarks or registered trademarks, and are the property of their respective companies.
This document was published on Tuesday, January 11, 2011 at 16:03.
92