Dcm4chee-Ref
40
dcm4chee Reference Documentation Version: 2.9.1
description
Dcm4chee manual
Transcript of Dcm4chee-Ref

dcm4chee Reference Documentation
Version: 2.9.1

Table of ContentsPreface ............................................................................................................................................ iv1. Installation Instructions .............................................................................................................. 1
1.1. Minimum System Requirements and Supporting Software .................................................... 11.2. Installation Steps ................................................................................................................ 11.3. Verify the Installation ......................................................................................................... 4
2. dcm4chee Services ....................................................................................................................... 72.1. Overview ........................................................................................................................... 72.2. Service Reference .............................................................................................................. 7
2.2.1. Core Archive Services ............................................................................................. 72.2.1.1. AE Title Configuration Service ...................................................................... 72.2.1.2. Audit Logger ................................................................................................ 72.2.1.3. Compression Service .................................................................................... 72.2.1.4. Consistency Check Service ............................................................................ 72.2.1.5. Content Edit service ...................................................................................... 72.2.1.6. DICOM Server ............................................................................................. 82.2.1.7. Device Service ............................................................................................. 82.2.1.8. Echo Service ................................................................................................ 82.2.1.9. Teaching File and Clinical Trial Export Manager ............................................ 82.2.1.10. File Copy Service ....................................................................................... 82.2.1.11. FixPatientAttributes Service ........................................................................ 82.2.1.12. DICOM Forward Service ............................................................................ 82.2.1.13. File System Management Service ................................................................ 82.2.1.14. DICOM GPWL Feed Service ...................................................................... 82.2.1.15. DICOM GPWL Service Class Providers ....................................................... 82.2.1.16. DICOM GPWL SCU Service ...................................................................... 82.2.1.17. DICOM Hanging Protocol SCP ................................................................... 82.2.1.18. DICOM IAN/SCN SCU Service .................................................................. 82.2.1.19. DICOM Key Object Generation Service ....................................................... 92.2.1.20. DICOM Media Creation Management SCU .................................................. 92.2.1.21. MD5 Check Service .................................................................................... 92.2.1.22. Move SCU Service ..................................................................................... 92.2.1.23. MPPS Emulator .......................................................................................... 92.2.1.24. DICOM Modality Performed Procedure Step (MPPS) SCP ........................... 92.2.1.25. DICOM Modality Performed Procedure Step (MPPS) SCU ........................... 92.2.1.26. DICOM Modality Worklist SCP .................................................................. 92.2.1.27. Modality Worklist SCU ............................................................................... 92.2.1.28. Performed Procedure Step (PPS) Exception Managment ............................... 92.2.1.29. PPS SCU Service ........................................................................................ 92.2.1.30. DICOM Query/Retrieve SCP ....................................................................... 92.2.1.31. Simple SMTP Mail Sender .......................................................................... 92.2.1.32. DICOM Storage Commitment SCU/SCP ...................................................... 92.2.1.33. DICOM Storage SCP ................................................................................ 102.2.1.34. Study Information Service ......................................................................... 102.2.1.35. Study Reconciliation Service ..................................................................... 102.2.1.36. Study Status Service ................................................................................. 102.2.1.37. Private Study Management Service SCP ..................................................... 102.2.1.38. DICOM Modality Worklist SCU ............................................................... 102.2.1.39. Check File Status Service .......................................................................... 10
dcm4chee 2.9.1 ii

2.2.1.40. TLS Configuration .................................................................................... 102.2.1.41. XDS-I Service .......................................................................................... 10
3. User Interface Guide ................................................................................................................. 113.1. Introduction ..................................................................................................................... 113.2. User Login ....................................................................................................................... 113.3. Archive Content Administration ........................................................................................ 12
3.3.1. Study List ............................................................................................................. 123.3.2. Search Filter .......................................................................................................... 133.3.3. Function Buttons ................................................................................................... 14
3.3.3.1. Functions Buttons in the header section ........................................................ 143.3.3.2. Function buttons next to the entities in the folder .......................................... 18
3.4. Application Entity (AE) Management ................................................................................ 213.5. Offline Storage ................................................................................................................ 23
3.5.1. Manual Offline Archiving ...................................................................................... 243.5.2. Automatic Offline Archiving .................................................................................. 24
3.6. Worklist Console ............................................................................................................. 253.7. MPPS Console ................................................................................................................. 273.8. User Administration ......................................................................................................... 28
3.8.1. Create a new user .................................................................................................. 293.8.2. Edit/Update a User Profile ..................................................................................... 303.8.3. Delete a user ......................................................................................................... 31
3.9. Audit Repository .............................................................................................................. 313.9.1. List Section ........................................................................................................... 313.9.2. Search Section ....................................................................................................... 323.9.3. The selection section ............................................................................................. 323.9.4. Audit Record Detail View ...................................................................................... 33
A. Building from Source Code ........................................................................................................ 35A.1. Building the dcm4chee Archive ........................................................................................ 35
dcm4chee Open Source Image Manager/Archive
dcm4chee 2.9.1 iii

PrefaceWe need a better introduction than the following.
dcm4chee is an implementation of an IHE (Integrating the Healthcare Enterprise) compliant Image Archive andReport Repository. This includes the capabilities
• to store and retrieve various kinds of DICOM Objects such as:
1. Images from multiple modalities,
2. Grayscale Presentation States [GSPS], which specifies the presentations of images as grayscaling,zoom, text and graphical annotations,
3. Key Objects [KO], which specifies a particular selection of images for a specified reason and with anattached note,
4. Structured Reports [SR].
• to process HL7 notification messages from the Order Filler, about Procedure Scheduling, Procedure Up-dates and Patient Information Updates,
• to process DICOM Modality Performed Procedure Step [MPPS] messages from modalities and forwardthem to the Order Filler.
dcm4chee is a server application. Its Web-based User Interface is intended for system configuration and monit-oring by system adminstrators.
dcm4chee 2.9.1 iv

Chapter 1. Installation Instructions
1.1. Minimum System Requirements and Supporting Software
dcm4chee is a Java-based application for the management of digital clinical objects. As such, it should be rununder the best hardware available for production systems. The minimal system configuration is as follows:
• 512 MB RAM
• 100 MB hard disk space (in addition to archive disk space for object storage and caching)
• 400 MHz CPU or better
dcm4chee requires a database to store transient and permanent information from the clinical workflow and ob-jects. The authors of dcm4chee realize that database expertise varies from site to site, and has included supportfor several different databases for deployment with the archive. The list of supported databases is:
• PostgreSQL 8.1.x
• MySQL 4.1+
• Oracle 9i/10g
• SQL Server
• DB2 8.1+
Additional Software Notes
dcm4chee is a Java-based application. It requires the installation of the JDK version 1.4.2 or higher. JDK ver-sion 5 is recommended for the best performance and stability.
For image compression/decompression, dcm4chee 2.8.x utilizes Sun's Java Advanced Imaging (JAI) Image I/OTools 1.0_01. The binary distribution packages of dcm4chee 2.8.x already includes the necessary JARs andnative libraries for Windows and Linux i586. For Solaris support, you need to download the software packagefrom Sun at http://java.sun.com/products/java-media/jai/downloads/download-iio-1_0_01.html andreplace the Linux version of libclib_jiio.so in DCM4CHEE_DIST/bin/ with the file of the same name from theSolaris JAI Image IO distribution.
dcm4chee depends heavily on the JBoss (http://www.jboss.org) application server for its infrastructure. It isnot necessary to download JBoss (as dcm4chee is pre-packaged within JBoss), but viewing the online (ordownloaded) JBoss documentation will assist a great deal in learning the dcm4chee directory structure, andhow the product operates under the covers. JBoss services such as XMBeans, JBossMQ (JMS), and EJB(Session and Entity beans) are utilized by dcm4chee.
1.2. Installation Steps
Installing dcm4chee is fairly easy:
1. Download the binary distribution of dcm4chee for the database of your choice from the Files page of the
dcm4chee 2.9.1 1
dcm4che project page on SourceForge (http://sourceforge.net/projects/dcm4che/). If you do not seea distribution for your database, you will have to build dcm4chee from the source code. See Appendix A,Building from Source Code for instructions on doing so.
2. Once downloaded, extract the distribution package into your desired destination directory. Avoid using adirectory path that contains spaces though, as that may cause problems when running the application fromthe command line.
3. Install the database software of your choice (keeping in mind the supported database systems) if you havenot already done so. Keep in mind that the database software that you install (or have installed) mustmatch the version of dcm4chee that you downloaded. For example, if you want to use PostgreSQL withdcm4chee then you should download the dcm4chee-standalone-psql-2.8.2.zip file from SourceForge.
4. If using a database other than MySQL or PostgreSQL you will need to copy an apropriate JDBC Driverfor the database to DCM4CHEE_DIST/server/default/lib/. This is not necessary for MySQL or Postgr-eSQL because the binary distribution of dcm4chee already contains the correct JDBC drivers for thesedatabase systems.
5. Verify that your database installation has TCP/IP socket access available.
For example, with PostgreSQL you can check the pg_hba.conf file for your database:
$PGDATA/pg_hba.conf:# IPv4 local connections:host all all 127.0.0.1/32 trust
With Oracle, you can verify that the TNS Listener is enabled:
C:\>netstat -b -p TCPActive Connections
TCP localhost:1284 host.domain.com:1521 ESTABLISHED 1788[ORACLE.EXE]
TCP localhost:1521 host.domain.com:1284 ESTABLISHED 1816[TNSLSNR.exe]
6. Initiate the archive database instance (named pacsdb) using the create DDL script located inDCM4CHEE_DIST/sql/create.xxx.
For example, with PostgreSQL on a Unix-based system:
> export PGUSER=postgres> createdb pacsdb> psql pacsdb -f DCM4CHEE_DIST/sql/create.psql
To initialize a MySQL database on a Unix-based system:
> mysql -urootmysql> create database pacsdb;mysql> grant all on pacsdb.* to 'pacs'@'localhost' identified by 'pacs';mysql> \q> mysql -upacs -ppacs < DCM4CHEE_DIST/sql/create.mysql
Installation Instructions
dcm4chee 2.9.1 2
Note: If you wish to take advantage of specific features of your RDBMS such as tablespaces, partitioning,etc. you will need to implement them on your own. This can sometimes be done with the tools that comewith the database, or by modifying the DDL script before running it. If you make changes to the DDLscript that you think might be useful to the wider audience, please submit them to the dcm4che-users list-serv.
7. Adjust the dcm4chee database connection pool settings inDCM4CHEE_DIST/server/default/deploy/xxxx-ds.xml to suit your environment. This includes the username and password that the application should use when obtaining connections. In addition, JBoss allowsfor the configuration of other aspects of the connection pool. Although the default settings are fine for ba-sic deployment scenarios, the following may be added to the XML file in order to tune the connectionpool:
<!--example of how to specify class that determines if exception means connection should be destroyed--><!--exception-sorter-class-name>org.jboss.resource.adapter.jdbc.vendor.DummyExceptionSorter</exception-sorter-class-name-->
<!-- this will be run before a managed connection is removed from the pool for use by a client--><!--<check-valid-connection-sql>select * from something</check-valid-connection-sql> -->
<!-- The minimum connections in a pool/sub-pool. Pools are lazily constructed on first use --><min-pool-size>5</min-pool-size>
<!-- The maximum connections in a pool/sub-pool --><max-pool-size>20</max-pool-size>
<!-- The time before an unused connection is destroyed --><!-- NOTE: This is the check period. It will be destroyed somewhere between 1x and 2x this timeout after last use --><idle-timeout-minutes>0</idle-timeout-minutes>
<!-- sql to call when connection is created<new-connection-sql>some arbitrary sql</new-connection-sql>-->
<!-- sql to call on an existing pooled connection when it is obtained from pool<check-valid-connection-sql>some arbitrary sql</check-valid-connection-sql>-->
<!-- example of how to specify a class that determines a connection is valid before it is handed out from the pool<valid-connection-checker-class-name>fully qualified name of class to use</valid-connection-checker-class-name>-->
<!-- Whether to check all statements are closed when the connection is returned to the pool,this is a debugging feature that should be turned off in production
<track-statements/>-->
8. Set the JAVA_HOME environment variable to your JDK installation directory.
9. Adjust the Java heap settings for the application
[Windows]: DCM4CHEE_DIST/bin/run.bat:
rem Sun JVM memory allocation pool parameters. Modify as appropriate.set JAVA_OPTS=%JAVA_OPTS% -Xms128m -Xmx512m
[Linux/Unix]: DCM4CHEE_DIST/bin/run.conf
# Specify options to pass to the Java VM.JAVA_OPTS="-server -Xms64m -Xmx200m -Djava.awt.headless=true ..
Installation Instructions
dcm4chee 2.9.1 3

Keep in mind the available RAM and memory requirements of other processes running on the hardware.For example, iif only 512 MB RAM is available on the machine, you should decrease the default valuefrom -Xmx512m (on Windows to) -Xmx300.
10. Optional: Upon installation, all DICOM services are pre-configured with DCM4CHEE as the Application En-tity Title (AE Title, or AET). Although it is possible to modify this default configuration at a later datethrough the Web-based administrative console, it is more efficient to replace DCM4CHEE with YOUR_AET inDCM4CHEE_DIST/server/default/conf/xmdesc/*.xml using utilities provided by your platform.
For example, on GNU Linux:
> find DCM4CHEE_DIST/server/default/conf/xmdesc -exec \ sed -i s/DCM4CHEE_DIST/YOUR_AET/g
'{}' ';'
11. You're all done and ready to verify the installation.
After verifying that the application is installed and running correctly, you may want to install it as a Win-dows service or Unix daemon.
a. Stop the application (type ctrl-c in the console window).
b. Windows: install dcm4chee as a Windows service executingDCM4CHEE_DIST/bin/install_service.bat.
c. Redhat Linux: copy the init script DCM4CHEE_DIST/bin/dcm4chee_init_redhat.sh to /etc/init.d/
and adjust it according to the dcm4chee installation location, the JDK installation location, and whichuser the dcm4chee should run under.
1.3. Verify the Installation
Navigate to the DCM4CHEE_DIST/bin directory, and execute the run.bat or run.sh script, as appropriate for youroperating system. Your output should look like the following and contain no error or exception messages:
===============================================================================.
JBoss Bootstrap Environment.
JBOSS_HOME: C:\apps\dcm4chee-standalone-psql-2.8.2\bin\\...
JAVA: C:\jdk1.5.0_06\bin\java.
JAVA_OPTS: -Dprogram.name=run.bat -Xms128m -Xmx512m.
CLASSPATH: C:\jdk1.5.0_06\lib\tools.jar;C:\apps\dcm4chee-standalone-psql-2.8.2\bin\\run.jar
.===============================================================================.14:46:16,046 INFO [Server] Starting JBoss (MX MicroKernel)...14:46:16,046 INFO [Server] Release ID: JBoss [Zion] 4.0.3SP1 (build:
CVSTag=JBoss_4_0_3_SP1 date=200510231054).........14:46:50,626 INFO -> [JkMain] Jk running ID=0 time=0/60 config=null14:46:50,636 INFO -> [Server] JBoss (MX MicroKernel) [4.0.3SP1 (build:
CVSTag=JBoss_4_0_3_SP1 date=200510231054)] Started in 34s:580ms
Installation Instructions
dcm4chee 2.9.1 4

1. Connect to the Web-based User Interface (default URL is http://localhost:8080/dcm4chee-web/) ofthe archive using any Web Browser (most tested are Mozilla Firefox and Microsoft Internet Explorerv6.x). You should get the User Login Screen. Login in using the default Administrator account admin,with password admin.
2. Connect to the JBoss JMX Console (default URL is http://localhost:8080/jmx-console/) and login inusing the default Administrator account admin, with password admin.
Follow the link service=FileSystemMgt to the File System Management service configuration page underthe dcm4chee.archive heading.
Invoke the operation addOnlineFileSystem(), with a directory path argument specifying where the archiveshall store received objects/images.
Note: If no Storage File System is configured, the archive will auto-configureDCM4CHEE_DIST/server/default/archive as the Storage File System when the the first object/image isreceived.
3. Optional: In the default configuration, received images are stored 'as is' - meaning that no compression isperformed. Lossless (or other types of) compression of received uncompressed images can be activated bythe CompressionRules attribute in the Storage SCP Service (service=StoreScp) configuration page. Forexample, set it to JLSL, to compress all types of images received from any Storage SCU with JPEG-LSLossless codec.
4. Optional: The directory used for caching generated JPEG representations of archived images requested byWeb Access to DICOM Persistent Objects (WADO) can be specified by the CacheRoot attribute in the theWADO Service (service=WADOService) configuration page. Default:DCM4CHEE_DIST/server/default/wadocache.
The directory used for caching generated PDF representations of archived Structured Report Documentsrequested by IHE Retrieve Information for Display (RID) Services can be specified with the CacheRoot at-tribute in the RID Service (service=RIDService) configuration page. Default:DCM4CHEE_DIST/server/default/ihe_rid_cache.
5. Send some objects/images to the archive's Storage SCP, using the send utility of the dcm4che14 package,the dcm4che2 package, or another Storage SCU of your choice.
Refresh the Web Interface (http://localhost:8080/dcm4chee-web/), which should now show the thelist of received studies.
Expand a study row to show contained series. Expand one of these series to show contained instances. Inthe case of images, you can follow the image icon on the right to invoke an HTTP WADO request for aJPEG presentation of this image which will be displayed in a separate browser window.
6. To test object retrieval, you will need an external Storage SCP acting as the Destination using the DICOMReceiver utility of the dcm4che14 package, the dcm4che2 package, or another Storage SCP of yourchoice.
Before initiating the retrieve, you will need to configure an additional Application Entity (AE) Title identi-fying your Move Destination using the "AE Management" function of the Web User Interface. For ex-ample:
Installation Instructions
dcm4chee 2.9.1 5

AE Title: DCMRCVHostname: localhostPort: 11112
7. Switch back to the Study List (the Folder view) and mark studies to retrieve using the check box on theright. Select "DCMRCV" as the send destination in the combo box above and click on the send button leftfrom it.
Alternatively, you could initiate a C-MOVE with the utility of your choice with DCMRCV as the destina-tion AE Title.
If everything worked, you are ready to start using dcm4chee. If not, post your questions to the dcm4che-userslistserv.
Installation Instructions
dcm4chee 2.9.1 6

Chapter 2. dcm4chee Services
2.1. Overview
dcm4chee contains a number of services... XMBean and EJB infrastructure... diagram...
2.2. Service Reference
2.2.1. Core Archive Services
The core archive services are implemented as EJBs and JBoss XMBeans. They provide services to the user in-terface, DICOM server, HL7 server, etc. They are implemented within the dcm4chee-sar and dcm4chee-ejb
code modules, and are configured by manipulating their XML descriptor files.
AE Title Configuration Service
Used to list/add/remove AE configuration entities - alternatively to more convenient AE Management Page ofthe Administration Web Application [hliteralp://localhost:8080/dcm4chee-web/]. Used/Required by variousDICOM services (Query/Retrieve SCP, Storage Commitment SCU/SCP, DICOM Hanging Protocol SCP) to'guess' the port number of DICOM peer Application Entities, if no AE configuration entry for a given AE Titlematches.
Audit Logger
Compression Service
Consistency Check Service
Sets up a schedule to automatically check the consistency of compressed images. You can set image compres-sion rules in the Compression Service. You can also use it directly via JMX to manually check the consistencyof images.
Content Edit service
Identifies where patient information and study information updates are sent and received.
Use the values in ReceivingApplication and ReceivingFacility aliteralributes or the SendingApplication
or SendingFacility aliteralributes to configure specific forwarding rules in the HL7SendService for patient in-formation updates received from this Content Edit Service.
Use the values in the CalledAETitle and the CallingAETitle aliteralributes to configure specific forwardingrules in the StudyMgtScu Service for study information updates received from this Content Edit Service.
The Content Edit Service sends also PatientUpdated and SeriesUpdated JMX Notifications. This allows toforward instances to systems not supporting either StudyMgtScu or HL7 ADT patient updates.
In this case the receiver must use the received instances for updating! Use the ForwardService to configure this
dcm4chee 2.9.1 7

forward option.
DICOM Server
Sends incoming service reqest to registered DICOM services. When configuring, select the TCP port listeningport, the security protocol for communication, timeouts, and the maximum number of connected DICOM cli-ents.
Device Service
Use the commands in this service to import device mapping files, delete device mappings, delete a specificdevice, get a list of all devices for a specific protocol, and add the scheduled station name AE title, the name,and the modality to the given SPS items.
Echo Service
Use this service to test the AE configurations (host and port and protocol) you defined with the AE Configura-tion Service. First, you must set the CallingAETitle used in echo associations used to test those AE configura-tions.
Teaching File and Clinical Trial Export Manager
File Copy Service
FixPatientAttributes Service
DICOM Forward Service
File System Management Service
Specifies the location of file systems in which DICOM objects received from the Store SCP Server are stored.You can also set up rules to delete the most infrequently accessed studies.
DICOM GPWL Feed Service
Used to add entries to the General Purpose Worklist, triggered by received MPPS N-Set messages.
DICOM GPWL Service Class Providers
DICOM GPWL SCU Service
DICOM Hanging Protocol SCP
DICOM IAN/SCN SCU Service
Used to notify DICOM peers about available instances via Instance Available Notifications and Study Content
dcm4chee Services
dcm4chee 2.9.1 8

Notifications.
DICOM Key Object Generation Service
DICOM Media Creation Management SCU
MD5 Check Service
Used to check if the MD5 sum of the new object differs from the MD5 sum of the existing file. If the MD5 sumdoes not match, the files may be corrupted.
Move SCU Service
rocess move orders. Invokes DICOM Retrieve requests, typically from the archive's own DICOM Query/Re-trieve Service (SCP).
MPPS Emulator
DICOM Modality Performed Procedure Step (MPPS) SCP
Used to define the calling and called AE titles for receiving MPPS messages.
DICOM Modality Performed Procedure Step (MPPS) SCU
Used to forward MPPS messages received by the MPPS SCP Service.
DICOM Modality Worklist SCP
Modality Worklist SCU
Performed Procedure Step (PPS) Exception Managment
PPS SCU Service
Forwards GP-PPS messages received by the PPS SCP Service.
DICOM Query/Retrieve SCP
Simple SMTP Mail Sender
Used to send email messages through SMTP.
DICOM Storage Commitment SCU/SCP
Provides a DICOM Storage Commitment Service in the Service Class Provider (SCP) and the Service Class
dcm4chee Services
dcm4chee 2.9.1 9

User (SCU) Role. When acting as the SCP, the service handles storage commitment requests that it receivesfrom modalities or evidence creators (workstations). When acting as the SCU, it may request storage commit-ment for objects for itself that were retrieved from the archive to a remote application. Typically this applica-tion is a further archive instance acting as a long-term or central archive.
DICOM Storage SCP
Study Information Service
Used to retrieve information about a study, or about a series of image in a study.
Study Reconciliation Service
Study Status Service
used to update Study Status triggered by receive of General Purpose Performed Procedure Step N-CRE-ATE-RQ with particular Performed Work Item Code by General Purpose Performed Procedure Step SCP.
Private Study Management Service SCP
DICOM Modality Worklist SCU
used to forward messages received by private Study Management Service SCP Service. You must use the Con-tent edit service to identify where study information updates are sent and received. Use the values in theCalledAETitle and the CallingAETitle attributesto configure specific forwarding rules in this StudyMgtScuService for study information updates received from the Content Edit Service
Check File Status Service
TLS Configuration
XDS-I Service
Cross-enterprise Document Sharing for Imaging. (Imaging Document Source actor)
dcm4chee Services
dcm4chee 2.9.1 10

Chapter 3. User Interface Guide
3.1. Introduction
The dcm4chee User Interface Guide was written for system administrators responsible for the adminstration ofdcm4chee archive application. The unser interface consists of several dynamic web pages, and is nameddcm4chee-web. dcm4chee-web contains the following functionality: in:
• Archive Content Administration
• AE Management
• Offline Storage
• Worklist Console
• MPPS Console
• User admin
• Audit Repository
3.2. User Login
The default login page for dcm4chee-web is http://hostname:8080/dcm4chee-web/. Upon browsing to thislocation, you will be presented with a login screen. if this is your first time logging into the application, youmay use the username/password combination admin/admin.
After logging in, the user will remain logged in until the web browser is closed. It is recommended that you logout of the application whenever dcm4chee-web is not in use. This will avoid the security issue of having an act-ive, idle session.
dcm4chee 2.9.1 11

3.3. Archive Content Administration
To administer the archive content (patient, study, and other clinical information) click on Folder in the headerline of dcm4chee-web.
The folder window can be divided into three logical parts:
Study ListInformation regarding patients, studies, series, and images.
Search FilterSpecifies matching criteria for listed studies.
Function buttonsInvoke operations on selected list entires.
3.3.1. Study List
The study list contains information on four levels:
• Patient - marked with green.
• Study - marked with light green.
• Series - marked with grey.
• Instance – marked with light grey.
• File – marked with white.
To expand the hierarchy of a line item, click on the + sign. To hide the hierarchy beneath a line item, click onthe - sign.
In the figure above the patient AAPM Test Pattern has four studies containing several OT series. The secondseries has its instance-level hierarchy expanded, and contains three DICOM instances.
The label for a column can be seen at the top of each column. The information that is displayed at the Patientlevel:
User Interface Guide
dcm4chee 2.9.1 12

Note: Patient-level information is always shown in bold type.
• Name
• Patient ID
• Birthdate
• Sex
At the Study level the information that is displayed:
• Date/Time
• Study ID
• Modalities
• Study Description/IUID (Instance Unique Identifier)
Clicking either Study Description or IUID allows teh user to toggle between Study Description and IUIDinformation within the column. If Study Instance UID becomes active, the Study ID search field willchange to Study IUID, and vice versa.
• Accession Number
• Referring Physician
• Number of Series
• Number of Instances
The information at the Series level is:
• Data/Time
• Series Number
• Modality
• Series Description/Body Part/IUID (Series Instance Unique Identifier)
Clicking either Series Description/Body Part or IUID will between the display of Series Description/BodyPart and IUID information within the column.
• Vendor/Model
• Number of Images
3.3.2. Search Filter
To filter the records in the study list, search criteria can be specified above the columns labels. It is possible tosearch for Patient Name, Patient ID, Study ID, Study Data, Accession Number, Modality, or a combinationthereof. To perform a search just press "Return" on the keyboard or click the New Search button. The result of
User Interface Guide
dcm4chee 2.9.1 13

the search will be displayed in the list. If the list contains more than ten studies (records), the first ten recordswill be shown. To show the next ten records press the Next Search Result button or go back using the PreviousSearch Result button. Information regarding what is displayed, and the total amount of matching records can beseen in the status line – ex.:
"Displaying studies 1 to 10 of 29 matching studies"
The search can include a specific entry or part of an entry truncated with a question mark (?) or an asterisk (*).A search including a question mark will only search for one character where it is placed, opposite a search withan asterisk will include an unlimited amount of characters. It is possible to combine question marks and asteriskin the same search.
All fields are case sensitive – except the Patient Name Field.
3.3.3. Function Buttons
The buttons for functions in dcm4chee-web can be divided into two – the buttons placed in the header sectionof the window, and the buttons placed next to the entities in the folder.
3.3.3.1. Functions Buttons in the header section
3.3.3.1.1. New Search
After typing in the search string in the related fields, a click on this button will perform a search in the database.As an alternative, the "Return" button on the keyboard will also perform a search. For a more detailed descrip-tion of the search field see Section 3.3.2, “Search Filter”.
3.3.3.1.2. Previous Search Results
A click on this button will show the previous page in the search. If the first page or the one and only page in asearch are shown, no activity is related to the button.
3.3.3.1.3. Next Search Results
A click on this button will show the next page of records in the search (if the total amount of records is largerthan one page). If the last page or the one and only page in a search are shown, no activity is related to the but-ton.
3.3.3.1.4. Add New Patient
To add a new patient, click this button and fill out the fields in the window. The fields are:
Patient IDThe ID of the patient – typically a person number, social security number, or another unique patient identi-fier generated or handled by a Hospital Information System, Patient Administration System, or a Radiology
User Interface Guide
dcm4chee 2.9.1 14

Information System.
Issuer of Patient IDIdentifier of the assigning authority (system, organization, agency or department) that issued the Patient ID.
Patient NameThe name of the patient.
SexChoose sex between Female, Male, and Other (unknown) clicking on the arrow.
Birth DateThe birth date of the patient in the format yyyy/mm/dd
3.3.3.1.5. Merge Selected Patient
To merge two (or more) patients in dcm4chee-web, the patients must be marked (selected) by clicking thecheckbox next to the patients. The boxes will now contain a checkmark. It is not possible to merge patients by acheckmark at the study or series level.
After the patients have been marked in the folder list, click on the button "Merge Selected Patients". This showsthe list of patients that will be merged. In the column Patient ID click the checkbox to mark which patientshould be the remaining patient. Click Merge to merge the patients or Cancel to cancel the operation.
User Interface Guide
dcm4chee 2.9.1 15

3.3.3.1.6. Move Selected Items
To move one or several items, the source and the destination must be selected. To select a source or a destina-tion just mark it in the checkbox next to the entity.
There are some selection rules for source and destination:
• The destination is always at the highest selected level in the hierarchic patient, study, series and instance.
• The source will always be the entity (or entities) at the lowest level in the hierarchic patient, study, series,and instance.
• Only one destination is allowed.
• The sources have to be only one hierarchic level under the destination.
• The destination must not be the parent of the sources.
3.3.3.1.6.1. To Move a Study to another Patient
1. Click the checkbox next to the study (or studies) to mark it.
2. Click the checkbox next to the patient (destination) to mark it.
3. Click the "Move Selected Items" button to perform the move.
3.3.3.1.6.2. To Move a Series to another Study
1. Click the checkbox next to the one (or several) series to mark it.
2. Click the checkbox next to the study (destination) to mark it.
3. Click the button "Move Selected Items" to perform the move.
3.3.3.1.6.3. To Move an Instance to another Series
1. Select the instance (or instances) by clicking on its checkbox.
2. Select the destination series (destination) by clicking on its checkbox.
3. Click the button "Move Selected Items" to perform the move.
3.3.3.1.7. Export Teaching Files
To export an entity or several entities (patient, study, series, or instance/image), click the checkbox next to theline or lines to mark the entity/entities.
Click the button "Export selected instances to Teaching File Sytem" to export the entity or entities marked.
In the next window you can select different export options and define optional included additional TeachingFile Information.
User Interface Guide
dcm4chee 2.9.1 16

3.3.3.1.8. Provide and Register Imaging Document Set to an XDS-I Re-
gistry/Repository
To register an image document set click the checkbox next to the line or lines to mark the entity/entities.
In the next window you can edit your XDS-I metadata, which will be exported with selected entities as KeyObjects.
3.3.3.1.9. Move Selected Entities into the Trash
To delete an entity or several entities (patient, study, series, or instance/image) click the checkbox next to theline or lines to mark the entity/entities.
User Interface Guide
dcm4chee 2.9.1 17

Click the button "Delete Selected Entities" to delete the entity or entities marked. Confirm or cancel the opera-tion by clicking the appropriate button in the ensuing confirmation pop-up window.
3.3.3.1.10. Permanently Delete Selected Entities
If you want to permanently delete the entities, you have to select the Trash folder and select the entities, whichyou want to delete. then press the "Delete selected Entities" button to permanently delete the entities.
3.3.3.1.11. Undelete Selected Entities
To undelete entities in the Trash folder you have to press the "Undelete" button.
3.3.3.1.12. Send Selected Entities to Specified Destination
To send an entity or several entities (patient, study, series, or instance/image) to a DICOM destination click thecheckbox next to the line or lines to mark the entity/entities.
From the drop-down menu choose which AE Title to send the entity or entities to.
Click the "Send Selected Entities to Specified Destination" button to send the entity or entities marked. Con-firm or cancel the operation by clicking the appropriate button in the ensuing confirmation pop-up window.
3.3.3.2. Function buttons next to the entities in the folder
3.3.3.2.1. Edit Patient Attributes
Click the "Edit Patients Attributes" button to edit patient information.
Click the "Update" button to update the patient attributes or "Cancel" to quit without updating the attributes.
3.3.3.2.2. Edit Study Attributes
User Interface Guide
dcm4chee 2.9.1 18

Click the "Edit Study Attributes" button to edit study information.
Click the "Update" button to update the study attributes or "Cancel" to quit without updating the attributes.
3.3.3.2.3. Edit Series Attributes
Click the "Edit Series Attributes" button to edit series information.
Click the "Update" button to update the series attributes or "Cancel" to quit without updating the attributes.
User Interface Guide
dcm4chee 2.9.1 19

3.3.3.2.4. Add New Study
To add a new study click the "Add New Study" button, and fill out the fields with the appropriate information.Due to the fact, that dcm4chee-web creates a Study Instance UID itself, no fields are mandatory.
All fields can contain alphanumeric characters, except the Date/Time field, where the format yyyy/mm/dd
should be used.
Click the "Add Study" button to add the new study or "Cancel" to quit without adding a new study.
3.3.3.2.5. Add New Series
To add a new series click the "Add New Series" button, and fill out the fields with the appropriate information.Due to the fact, that dcm4chee-web creates a Series Instance UID itself, only the modality field is mandatory.
All fields can contain alphanumeric characters, except the Date/Time field, where the format yyyy/mm/dd
should be used.
User Interface Guide
dcm4chee 2.9.1 20

Click the "Add Series" button to add the new series or "Cancel" to quit without adding a new series.
3.3.3.2.6. View Image
Click the "View Image" button to show the image. Icon appearances are dependent on the instance type/state.
3.3.3.2.7. View Report as HTML
Click the "View Report as HTML" button to show the structured report as HTML document. Icon appearancesare dependent on the instance type/state.
3.3.3.2.8. View Report as PDF
Click the "View Report as PDF" button to show the structured report as pdf document. Icon appearances are de-pendent on the instance type/state.
3.3.3.2.9. View Waveform object
Click the "View WaveForm" button to show the WaveForm object as PDF. Icon appearances are dependent onthe instance type/state.
3.3.3.2.10. Offline
Indicates that the instance is offline. Icon appearances are dependent on the instance type/state.
3.4. Application Entity (AE) Management
The AE Title, host names and port numbers of remote applications, to which the archive shall be able to con-nect, must be configured by the AE Management web page.
After clicking on AE Management, the following window will be shown:
User Interface Guide
dcm4chee 2.9.1 21
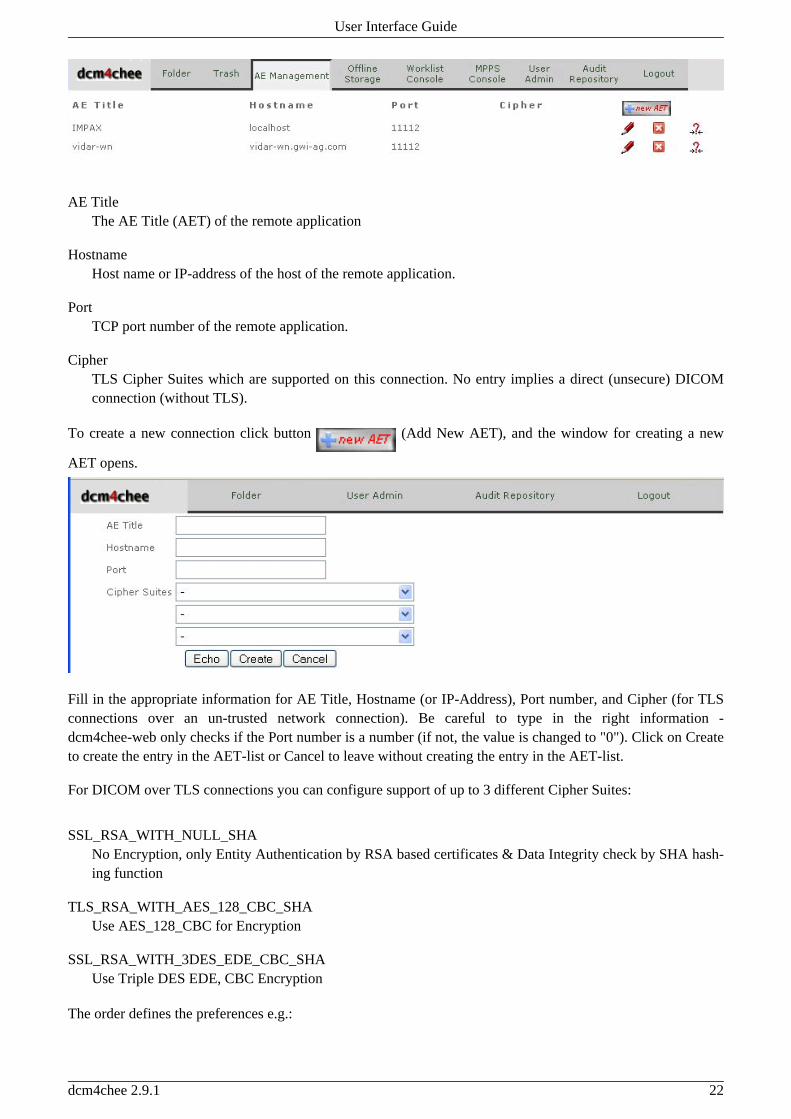
AE TitleThe AE Title (AET) of the remote application
HostnameHost name or IP-address of the host of the remote application.
PortTCP port number of the remote application.
CipherTLS Cipher Suites which are supported on this connection. No entry implies a direct (unsecure) DICOMconnection (without TLS).
To create a new connection click button (Add New AET), and the window for creating a new
AET opens.
Fill in the appropriate information for AE Title, Hostname (or IP-Address), Port number, and Cipher (for TLSconnections over an un-trusted network connection). Be careful to type in the right information -dcm4chee-web only checks if the Port number is a number (if not, the value is changed to "0"). Click on Createto create the entry in the AET-list or Cancel to leave without creating the entry in the AET-list.
For DICOM over TLS connections you can configure support of up to 3 different Cipher Suites:
SSL_RSA_WITH_NULL_SHANo Encryption, only Entity Authentication by RSA based certificates & Data Integrity check by SHA hash-ing function
TLS_RSA_WITH_AES_128_CBC_SHAUse AES_128_CBC for Encryption
SSL_RSA_WITH_3DES_EDE_CBC_SHAUse Triple DES EDE, CBC Encryption
The order defines the preferences e.g.:
User Interface Guide
dcm4chee 2.9.1 22

1. TLS_RSA_WITH_AES_128_CBC_SHA
2. SSL_RSA_WITH_3DES_EDE_CBC_SHA
3. ...
Prefer AES Encryption, with Triple DES EDE, CBC Encryption being acceptable alternatives. Try to avoidus-ing no Encryption (SSL_RSA_WITH_NULL_SHA ).
To change an entry in the AET-list click on the (Edit), and the information for this entry is shown.
After changing the information click "Apply Changes" to apply the new information to the AET list or Cancelto leave without changing the information.
To delete an entry, click the (Delete) icon and click OK in the ensuing confirmation pop-up window. To
cancel the deletion click the Cancel button.
3.5. Offline Storage
This page shows the information of the off-line storage filesets (media).
There are several search parameters to choose between or combine.
In the Media Status pull down list it is possible to choose one or more (using SHIFT of CTRL keys on the key-board together with a click on the left mouse button) of the following statuses:
allList all File Sets.
OPENSearch for open file set – file set that are not scheduled for media creation, and therefore new studies can beadded for offline storage
FAILED
User Interface Guide
dcm4chee 2.9.1 23

Search for filesets, that failed for one or another reason during media creation.
QUEUEDSearch for filesets, that are queued – scheduled for media creation.
TRANSFERRINGSearch for filesets, that are transferring – transfer files to media creation server.
CREATINGSearch for filesets, that are during creation for the time being.
COMPLETEDSearch for filesets, that are completed
It is also possible to search for items in a specific time interval. The search can be for all activities, for mediainitialization dates, or for media modification dates. The time interval should be in the format: yyyy/mm/ddhh:mm:ss.
The six columns in the window show:
Fileset IDThe ID of the fileset
InitializedThe date and time where the media content was scheduled
ModifiedThe last date and time where the scheduled media content was modified
UsageThe usage of the media (in KB, MB, or GB)
StatusShows status of the file set:
open, queued, transferring, creating, completed, failed.
ActionSchedule open file set for media creation.
Delete file set - so associated files will be reassigned to another file set for media storage.
A new search is performed by either pressing the (New Search) or the Enter key at the keyboard.
3.5.1. Manual Offline Archiving
If dcm4chee's Media Creation Service is configured to manual actitvation of the burning process, the adminis-trator will receive an e-mail with information about the media. The administrator can see the status at the web-page and start the burning process by activating the start button .
3.5.2. Automatic Offline Archiving
User Interface Guide
dcm4chee 2.9.1 24

If dcm4chee's Media Creation Service is configured to automatic actitvation of the burning process, the admin-istrator will only have to check the job status occasionally.
If a media has a status of failed you may try a manual restart of the burning process by activating the
start button .
3.6. Worklist Console
This console is the tool to administrate the modality worklist information.
By use of one or several search fields it is possible to search for specific information in the database. Thesearch fields are:
PatientThe patient name
DateThe date and time (format: yyyy/mm/dd hh:mm) where the search should begin.
User Interface Guide
dcm4chee 2.9.1 25

toThe date and time (format: yyyy/mm/dd hh:mm) where the search should end
ModalityType of modality (e.g. MR, CT, CR, and US)
Station AETThe specific Application Entity Title of the modality
Accession NoThe specific accession number for a study
The available functions are the (New Search) button that will perform the search (alternative: press the
Enter key) and the (Delete) button next to the records in the folder information. Pressing will delete the
record.
The modality worklist (MWL) information is shown in the table. The columns of the table are:
IDScheduled Procedure Step ID
Study IUIDStudy Instance Unique Identifier
Req. Proc. IDRequested Procedure ID
Acc. No.Accession Number
Filler/Placer OrderFiller Order Number and the Placer Order Number.
Proc. Desc.Requested Procedure Description.
SPS Desc.Scheduled Procedure Step Description.
Start DateScheduled Start Date/Time for this Procedure Step.
Ref. PhysicianName of the Referring Physician
StationName of scheduled device (modality) for this Procedure Step.
Adm. IDAdmission ID (Visit Number)
PatientThe name (and ID) of the patient
User Interface Guide
dcm4chee 2.9.1 26

BirthdateThe date of birth for the patient
SexThe sex of the patient
3.7. MPPS Console
This console is the tool to administrate the modality performed procedure step worklist information. The win-dow is divided into three logical parts. The content of each part will be described below the figure.
By using one or several search fields it is possible to search for specific information in the database. The searchfields are:
PatientThe patient name.
DateThe date and time (format: yyyy/mm/dd hh:mm) when the search should begin.
toThe date and time (format: yyyy/mm/dd hh:mm) where the search should end.
ModalityType of modality (e.g. MR, CT, CR, and US).
Station AETThe specific Application Entity Title of the modality.
Accession No.The specific accession number for a study. If box is checked the search will include unscheduled examina-tions.
Status[ANY]: Will include all types in the search.
IN PROGRESS: Will only include procedures, that are in progress, in the search.
COMPLETED: Will only include procedures, that are completed, in the search.
DISCONTINUED: Will only include procedures, that are discontinued, in the search.
The available functions are the (New Search) button that will perform the search (alternative: press the
User Interface Guide
dcm4chee 2.9.1 27

Enter key) and the (Next Search Results) button, which will show the next page of records in the search
result.
The information regarding the modality performed procedure step worklist (MPPS) are shown in the table. Thecolumns in the table are:
Acc. No.The accession number of the study.
StatusIN PROGRESS: Will only include procedures, that are in progress, in the search.
COMPLETED: Will only include procedures, that are completed, in the search.
DISCONTINUED: Will only include procedures, that are discontinued, in the search.
Study IUIDThe Study Instance UID.
Proc. Desc.Description of the performed procedure.
Start DateThe date and time, when the procedure step started.
StationName of device (modality) on which this Procedure Step was performed.
NoIThe number of instances.
PatientThe patient name.
3.8. User Administration
To create, change or delete a user click on User Admin.
The first window gives a list of users defined in the system.
User Interface Guide
dcm4chee 2.9.1 28
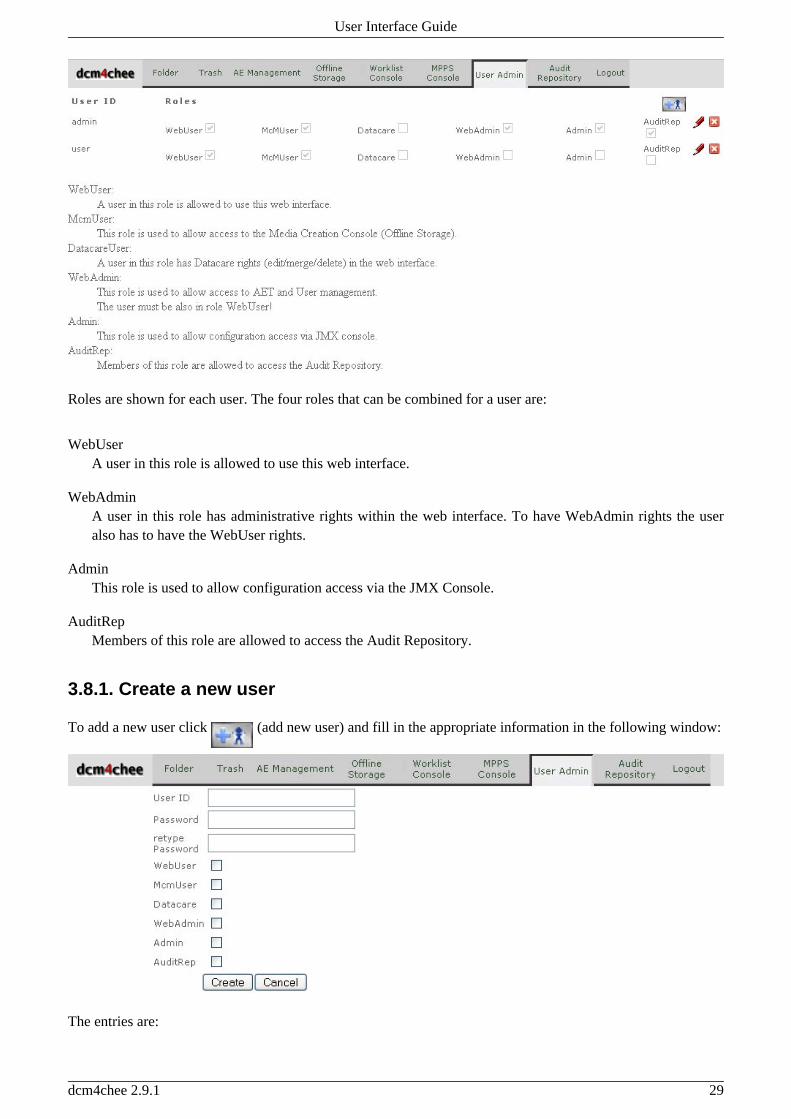
Roles are shown for each user. The four roles that can be combined for a user are:
WebUserA user in this role is allowed to use this web interface.
WebAdminA user in this role has administrative rights within the web interface. To have WebAdmin rights the useralso has to have the WebUser rights.
AdminThis role is used to allow configuration access via the JMX Console.
AuditRepMembers of this role are allowed to access the Audit Repository.
3.8.1. Create a new user
To add a new user click (add new user) and fill in the appropriate information in the following window:
The entries are:
User Interface Guide
dcm4chee 2.9.1 29
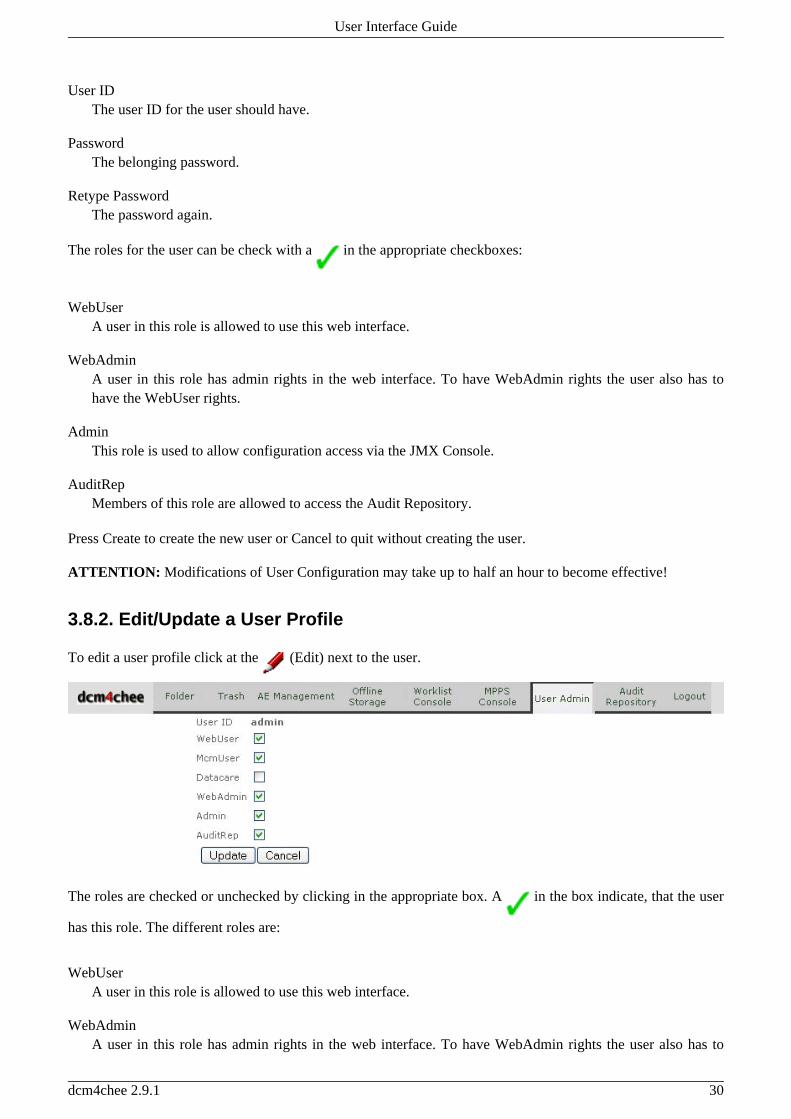
User IDThe user ID for the user should have.
PasswordThe belonging password.
Retype PasswordThe password again.
The roles for the user can be check with a in the appropriate checkboxes:
WebUserA user in this role is allowed to use this web interface.
WebAdminA user in this role has admin rights in the web interface. To have WebAdmin rights the user also has tohave the WebUser rights.
AdminThis role is used to allow configuration access via the JMX Console.
AuditRepMembers of this role are allowed to access the Audit Repository.
Press Create to create the new user or Cancel to quit without creating the user.
ATTENTION: Modifications of User Configuration may take up to half an hour to become effective!
3.8.2. Edit/Update a User Profile
To edit a user profile click at the (Edit) next to the user.
The roles are checked or unchecked by clicking in the appropriate box. A in the box indicate, that the user
has this role. The different roles are:
WebUserA user in this role is allowed to use this web interface.
WebAdminA user in this role has admin rights in the web interface. To have WebAdmin rights the user also has to
User Interface Guide
dcm4chee 2.9.1 30

have the WebUser rights.
AdminThis role is used to allow configuration access via the JMX Console.
AuditRepMembers of this role are allowed to access the Audit Repository.
To update the user profile press Update or Cancel to quit without changing the roles for the user.
ATTENTION: Modifications of the User Configuration may take up to half an hour to become effective!
3.8.3. Delete a user
To delete a user from dcm4chee-web click the (Delete) next to the user.
A confirmation pop-up window will appear. Press OK to delete the user or Cancel to quit without deleting theuser.
ATTENTION: Modifications of the User Configuration may take up to half an hour to become effective!
3.9. Audit Repository
The "Audit Record Repository List View" is divided into three logical parts:
• The Search Section
• The List Section
• The Selection Section
3.9.1. List Section
The list section shows the result from the search and selection done in the left side of the window. The columns
User Interface Guide
dcm4chee 2.9.1 31

in the list are:
Audit EventThe type of the event logged in the audit repository and shown in the list.
HostThe name of the host that sent the audit message.
TimestampThe timestamp of the event. The format is: yyyy-mm-dd hh:mm:ss.sss
InformationA short description of the event.
3.9.2. Search Section
In the search section it is possible to search for one of the following values, or for a combination of the follow-ing values. It is not possible to type in part of a search value or to truncate a value in the search fields. If a valueis unknown, it is possible to use the search facility in the folder part to find the exact value to use in this sec-tion.
Results to returnTyping in a figure in this field indicates how many results that should be shown on one page in the list.
Patient NameThe exact name of the patient that should be used in the search.
Patient IDThe exact patient ID that should be used in the search.
AE TitleThe exact AE Title that should be used in the search.
UsernameThe exact username that should be used in the search.
HostThe hostname that should be used in the search.
TimeStampThe two values (from and to) for exact time stamp, should be used in the search. The format is "yyyy-mm-dd hh:mm:ss.sss" – only whole values can be typed in (no truncation).
3.9.3. The selection section
In this section you can filter your results by choosing (one or several) audit log event types:
ActorConfigGenerated for any configuration changes related to the actor.
ActorStartStopStart-up and shutdown of any actor. Is distinct from hardware power-up and shutdown.
User Interface Guide
dcm4chee 2.9.1 32

AuditLogUsedThe audit trail repository has been accessed or modified by something other than the arrival of audit trailmessages.
BeginStoringInstancesBegin storing SOP Instances for a study. This may be a mix of instances.
DICOMInstancesDeletedSOP Instances are deleted from a specific study.
DICOMInstancesUsedStudy is created, modified, or accessed. This report on addition of new instances to existing studies as wellas creation of new studies.
DicomQueryA query has been received.
ExportAny export of PHI on media, either removable physical media such as CD-ROM or electronic transfer offiles such as email. Any printing activity, paper or film, local or remote, that prints PHI.
ImportAny import of PHI on media, either removable physical media such as CD-ROM or electronic transfers offiles such as email.
InstancesStoredInstances for a particular study have been stored on this system.
NetworkEntryMobile machine joins or leaves secure domain.
OrderRecordOrder record created, accessed, modified or deleted.
PatientRecordPatient record created, modified, or accessed.
ProcedureRecordProcedure record created, modified, accessed or deleted.
SecurityAlertA secure node authentication failure has occurred during TLS negotiation, e.g. invalid certificate.
StudyDeletedShows events that have deleted studies.
UserAuthenticatedShows events related to user authentication.
3.9.4. Audit Record Detail View
To se the detailed information from the list section click one of the events in the first column (Audit Event) orthe XML-hyperlink.
User Interface Guide
dcm4chee 2.9.1 33

The Audit Record Detailed View shows the host name, time and parameters for the event. The parameters willbe different for different types of events.
The information can also be shown in XML format.
User Interface Guide
dcm4chee 2.9.1 34

Appendix A. Building from Source Code
A.1. Building the dcm4chee Archive
In order to build all components of the dcm4chee archive application you will need to download and install:
1. Ant 1.6.x [http://ant.apache.org]
2. XDoclet 1.2.3 [http://xdoclet.sourceforge.net]
3. JBoss 4.0.3SP1 [http://labs.jboss.com/jbossas/download] (you have to fetch a binary package (e.g jboss-4.0.3SP1.zip) and unpack it, running the installer does not work!)
4. Apache FOP 0.20.5 [http://xmlgraphics.apache.org/fop/]
5. Jakarta Cactus 1.7 for J2EE 1.3 [http://jakarta.apache.org/cactus/] (only needed to build test suite fordcm4jboss-ejb - not need to build application)
6. [Only Windows] Patch utility for Windows [e.g. http://gnuwin32.sourceforge.net/packages/patch.htm](needed in PATH for build of Oracle and DB2 version)
Create an environment variable pointing to the Ant home directory (ANT_HOME) and add the$ANT_HOME/bin directory to your PATH.
The build scripts (dcm4jboss-all/dcm4jboss-xxx/build.xml) assumes following locations of XDoclet, JBoss,Apache FOP and Jakarta Cactus:
xdoclet.home=${user.home}/xdoclet-1.2.3
jboss.home=${user.home}/jboss-4.0.3SP1
fop.home=${user.home}/fop-0.20.5
cactus.home=${user.home}/jakarta-cactus-13-1.7
Instead of modifying the build script directly, you may adjust these values to your build environment by renam-ing the file dcm4jboss-all/dcm4jboss-xxx/build.properties.default todcm4jboss-all/dcm4jboss-xxx/build.properties and modify the values in it.
if no patch utility is available [Windows] you have also to disable Oracle and DB2 build by setting or-
acle.nobuild=true and db2.nobuild=true in dcm4jboss-all/dcm4jboss-arr/build.properties anddcm4jboss-all/dcm4jboss-ejb/build.properties.
Change the working directory:
cd dcm4jboss-all/dcm4jboss-build
and invoke:
ant dist
to build all components and pack them in binary distribution packages:
dcm4chee 2.9.1 35

target/dcm4chee-standalone-db2-%version%.zip
target/dcm4chee-standalone-hsql-%version%.zip
target/dcm4chee-standalone-mssql-%version%.zip
target/dcm4chee-standalone-mysql-%version%.zip
target/dcm4chee-standalone-oracle-%version%.zip
target/dcm4chee-standalone-psql-%version%.zip
Building from Source Code
dcm4chee 2.9.1 36