Curriculum 2 new
57
Curriculum 2 lecture 1 Paramedian approach to mid thoracic epidural Landmark based technique Anatomy, cross-sections and procedure TEC-thoracic epidural catheter, TEA-thoracic epidural anesthesia/analgesia
Transcript of Curriculum 2 new

Curriculum 2lecture 1
Paramedian approach to mid thoracic epidural
Landmark based technique
Anatomy, cross-sections and procedure
TEC-thoracic epidural catheter, TEA-thoracic epidural anesthesia/analgesia

Surface landmarks for estimating the vertebral level.Division of thoracic spine on 3 parts
Thoracic vertebrae could be divided into upper, mid, and lower portions
T1-T4 upperT5-T8 mid T9-T12 lower

Basic anatomy overview
Each vertebrae has body and arch. Arch has 2 pedicles, laminae, spinous process, 2 transverse process and 2 articular process (AP). Superior AP of vertebrae below and inferior AP of vertebrae above form facet joints. Spinal cord is surrounded by CSF and is inside the dural sack. Dural sack is inside the spinal canal. Space between dural sack and bony ring of spinal canal is an epidural space. Epidural space is divided into posterior, lateral, and anterior. The best way to get to posterior epidural space is through interlaminal space (space between two laminae of adjacent vertebrae). Interlaminar space (ILS) is covered by ligamentum flavum. Another important space for us is the interspinouse space-ISS (space between to adjacent SPs) . Anatomy is slightly different in upper (T1-4), mid (T5-8) and lower (T9-12) thoracic spine. The main difference is in projection of SP, size of ISS, and the size and especially accessibility of ILS. In upper and lower thorax SPs project posteriorly with only slight angulation down and both ISS and ILS spaces are relatively large. In mid thorax it is different. See next slides
1. spinous process (SP), 2. transverse process (TP), 3. laminae, 4. facet joint, 5. inferior and 6. superior articular processes(SAP and IAP), 7. interspinous space, 8. interlaminar space, 9. intervertebral foramina, 10. spinal canal, 11. dural sack, 12. posterior epidural space, 13. anterior epidural space
T4 T4
1 23
4
56
7
8
9
12
1311
10

Upper thorax T1-T4
Pay attention to position of interlaminar space (let’s say T3/T4) in relation to upper edge of SP above the interspace (SP of T3 at T3/T4)In upper thorax it is at or only slightly above upper edge of SP of upper vertebrae.So if one wants to land on the mid lamina below, he or she should insert needle about 1-1.5 cm lateral and 1.5 cm below the upper edge of SP above
T4
1.5
cm
*
T3
T4

Mid thorax T5-T8
Pay attention to the position of interlaminar space-ILS (let’s say T7/T8- blue dash line represents its projection) in relation to upper edge of SP above (SP of T7)In mid thorax ILS is always quite above the upper edge of SP of upper vertebrae (here T7)Mid lamina is about at the same level as upper edge of SP above (one only need move about 1-1.5 cm lateral of upper edge of SP of upper vertebrae) Also note that base of SP could be significantly wider than tip of SP
1-1.5 cm*

Lower thorax T9-T12
Relationship between interlaminar space and SP of vertebrae above as well as relationship between SP and lamina below, the same as in upper thorax.At T10/T11 for example interlaminar space is at the level of T10 SP and mid lamina of T11 is 1.5 cm lateral and below the upper edge of SP T10
12T12
*

Basic anatomy for mid thoracic spine (Most challenging for TEC placement )
The interlaminar space (projection of it marked within the black dash oval) is our gate into the epidural space. In this image it is only partially seen between T6 and 7 (only its lateral part) but the interlaminar space between T7 and T8 is completely overlapped by the base of SP7, as is the T8/T9 interlaminar space overlapped by the base of SP8.
Note the relationship between SP of vertebrae above with the lamina and interlaminar space below it (We can palpate SP most of the time and infer the position of lamina or even interlaminar space based on that relationship). Unfortunately, this is not consistent at different levels (compare T6 and T7 here for example) and may even change at the same level with a change in position (imagine more vs less flexion of the spine ).
SP tip
SP 7 base
lam
ina
lam
inaTP
Facet joints
The transverse process (TP) is another structure that could be used as a surrogate marker to help identify the mid lamina. The medial projection of the lower border of TP should land on mid lamina. Additionally, the medial projection of the upper border or TP should align with the interlaminar space. TP is usually well seen with US. Another surrogate marker of mid lamina is a midpoint between 2 facet joints (above and below). Again facet joints are visible with US. The facet joint line is also decent surrogate marker of interlaminar space level.On the next 3 slides, note the angulation of SPs, their relationship to the lamina of the vertebrae below, and the size and location of the interlaminar space at 3 different levels of the thoracic spinal column (upper, mid, and lower thorax).

Basic anatomy (ligaments)
• Note the interspinous ligament and ligamentum flavum (LF). Note the shape of LF (very robust midline and much thinner laterally) and the fact that it may not completely cover interlaminar space at its lateral parts (this is important clinically).
• According to many dissections, LF frequently has gaps in the middle but this is unlikely clinically relevant if one starts checking for loss of resistance (LOR) as soon as needle is engaged in interspinous ligament that does not have gaps
• As needle is advanced through the interspinous ligament to LF, resistance to needle advancement and to injection may increase. When the needle is advanced through LF, LF can feel “elastic”. However, at other times, proceduralist may note a “crunchy sensation”. Once LF is penetrated, there is a feeling of ‘give’ as resistance to needle advancement abruptly ceases. At this point, one also notes minimal resistance with injection.
• It is more ideal to penetrate LF in the middle for successful catheter placement (avoid lateral and anterior catheter migration, much higher risk of intravascular placement, and unilateral block if catheter or needle is significantly off posterior epidural space).

Epidural space anatomy
• Epidural space contains fat, blood vessels and nerve roots. In thoracic regions, posterior epidural space is smaller than in the lumbar area (3-5mm vs 5-7 mm). Advancing the needle beyond the epidural space will not only will cause wet tap with risk of PDPH (post dural puncture headache) but may cause spinal cord (SC) injury compared to a lumbar epidural that is usually done below SC.
• Posterior epidural space is most important for us. Ideally we want our needle and catheter to be here. In the midline posterior epidural space is the largest. There is higher risk of wet tap (accidental penetration of dural sack ) if the needle is several mm off midline (may not be much space between LF and dura there).
• If the needle tip ends up away from midline, there is alsoa theoretically higher chance for catheter to go away from the posterior epidural space (come out from the spinal canal via intervertebral foramina, enter lateral or anterior epidural space). There is a much higher risk of accidental intravascular needle or catheter placement when it is in the lateral or anterior compartment where most vessels are.
• All of this also explains why it is important to not over thread the catheter (4-5 cm) and our preference for soft tip catheters.

So that we speak the same language, let us review of the basic anatomy again
1. LF covering interlaminal space
2. Lateral edge of interlaminal space
3. Lateral edge of the lamina
4. Base of SP (dash line shows the outer border)
5. Tip of SP
6. Proximal part of the neck of the rib
7. Head of the rib
8. Medial TPVS
9. Inferior articular process (IAP) of the facet joint
10. Superior articular process (SAP)
11. Facet joint line
12. mid lamina
3
8

Review questions• Name important surface landmarks to help finding the required level of block.
• Name 4 vertebrae that belong to mid thoracic spine.
• What are the differences in anatomy of the spine in the midthorax compared to low and upper thorax.
• What are the relationships between the upper edge of SP of the vertebrae above the and ILS? What about the relationship with mid lamina below the interspace? Describe these relationships in all 3 thoracic segments (upper, mid, and low thorax)?
• What could be used as a surrogate marker for horizontal level of mid lamina?What about markers for the level of ILS?
• What is the clinical difference or chance of complications when needle tip ends up in a lateral part of the posterior epidural space compare to the center of epidural space?

2 major approaches to interlaminar T-epidural (access to epidural space via neuroforamina is used for chronic pain management and is outside the scope of this lecture)
• a) midline • b) paramedian
Needle advancement midline between 2 adjacent SPs all the way from skin to epidural space. Needle travels through supraspinous, interspinousligament, and LF.
Needle starts lateral, and ends in interlaminar space between bases of adjacent SPs only at the very end of needle pass, commonly bypassing the interspinous ligament and entering to epidural space through LF only

Midline epidural approach: indications and advantages
• Advocated for T1-T4 and T10-T12 levels where spinous processes are angulated close to perpendicular to the skin surface (similar to lumbar levels)
• Advantages of midline approach1. Simplicity The needle is manipulated in only 2
dimensions: depth and cephalad-caudad angulation (as long as one stays midline and there is a bone-free window)
2. Very robust LOR if needle is truly centered (due to thicker LF at the midline)
3. Highest likelihood to end up in the center of the epidural space (less chance of wet tap, easier catheter placement with lower likelihood of anterior/lateral catheter migration, which usually increases the risk of inadvertent intravascular placement or gross unilateral block or exit of catheter from the epidural space through the neuroforamina)
• Technique will be covered in bonus lecture

Challenges of midline approach for TEC placement in mid-thorax (T5-T9)
• Steep downward angles of SPs, which result in overlapping bone, require at least 45 degree cephalad needle angulation with the midline approach (as opposed to a perpendicular needle advancement to the skin for the lumbar epidural approach or low thoracic epidural)
• This angle can be acute enough that the needle impacts the underside of the upper SP
• It is not easy for many patients to flex spine in this area to open up those spaces for easier access

More challenges with the midline approach to epidural space at T5-T9
Longer path with poor ability to predict the depth to epidural space due to the steep needle angle required (as opposed to the paramedian approach-see later-when the depth can be more or less reliably estimated from the depth from skin to lamina)
Undulating midline (spinous processes with variable lateral deviations of their tips from midline) with high chance of the needle coming off the interspinous ligament (next slide)

False LOR due to needle tip coming off interspinous ligament before reaching epidural space.
Probably the biggest problem of midline approach

Paramedian approach could be a solution for mid-thoracic epidurals (T4/5-T9/10)
• Paramedian epidural placement permits approach with significantly fewer problems with a “bone free window”
• It is also a less angled approach, so epidural space will be encountered at a more predictable depth (close to the depth from skin to lamina)
• Lateral to midline entry with mild inward and upward needle angulation “opens up” the interlaminar space for the needle (see next slide)
• It is also a great technique for all other levels when a patient is on the side and when we can not position patient optimally so interspinous space is obliterated and midline is crooked

.
Illustration of how lateral to midline entry with some upward and inward angulation “open up” the interlaminar space (targeted space here is T7/8)
Imagine there is a small “eye or camera” on the needle tip that will give us a view of the target (7/8 interlaminar space from needle tip perspective). First, one places a needle on the skin perpendicular to all planes at the point that is about 1 cm lateral to midline at the level of upper edge of SP 7 . Imagine that skin and other tissues up to the bone are transparent. On the left image we do not see intralaminal space at all. On the middle image, one lowers the hub of the needle a cm down to set about 60 degree upward angulation and on the right image also move the hub of the needle about 5 mm laterally (to set 15 degree inward angulation), all this hub manipulations done while anchoring needle tip on skin. Note howthe interlaminar space between T7 and T8 progressively “opens up” to the “eye of the needle”. Now we can advance the needle to touch the lamina first and then walk on the lamina toward interlaminar space to get into epidural space.
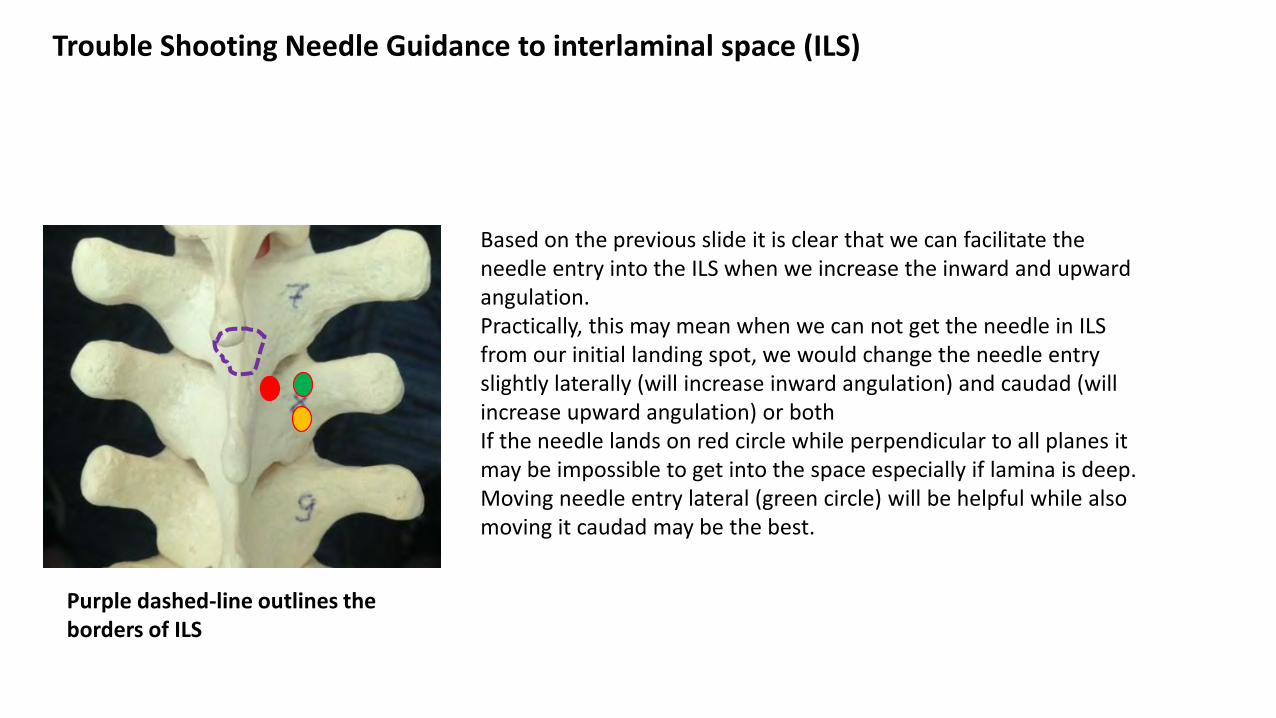
Trouble Shooting Needle Guidance to interlaminal space (ILS)
Based on the previous slide it is clear that we can facilitate the needle entry into the ILS when we increase the inward and upward angulation.Practically, this may mean when we can not get the needle in ILS from our initial landing spot, we would change the needle entry slightly laterally (will increase inward angulation) and caudad (will increase upward angulation) or both If the needle lands on red circle while perpendicular to all planes it may be impossible to get into the space especially if lamina is deep.Moving needle entry lateral (green circle) will be helpful while also moving it caudad may be the best.
Purple dashed-line outlines the borders of ILS

Review questions
• What are the main strengths of midline epidural approach and when is it recommended?
• Why is the steep angulation of SP is a problem?
• Why is deviation of the SP tips from midline a problem?
• Name the ligaments that are pierced by the needle during midline approach and then compare this to paramedian approach.
• How does inward and upward angulation affect the access to interlaminar space in mid thorax? How this affect the needle entry point?
• What are the advantages of paramedian approach in mid thorax?

Version of paramedian approach based on preset entry point and preset inward/upward angles
There are several references with slightly different numbers. Remember the ball park numbers of 15 degrees inward/60 degrees upward angulationRealize the optimal needle angle will depend on a few factors:• How far is skin entry from the midline and from the lower edge of
the interlaminar space • How deep is lamina from the skin• What is the level (T5 vs T8) • Patient positioning (good spine flexion with maximal opening of
those interlaminar spaces vs suboptimal)People in general are not good with estimating and setting angles (see next slide)We believe that it would be difficult to have an intelligent strategy for redirecting the needle after the first or second unsuccessful pass if we just somewhat randomly set the entry point and the angles.
It is still reasonable to remember these angles. As an idea for the final needle position- if your final angles after walking on lamina are too far off from those mentioned, you are likely doing something wrong.

Imagine a clock face. If 9 o'clock is 90 degree to the skin then angle between 9 and 8 is 60 degree (commonly sited angle for upward angulation for paramedian approach in midthorax)15 degree is the commonly sited angle for inward angulation for the same paramedian approach and this will be close to one half the distance between 6 and 5 o'clock (for the right sided approach)
A little trick to help with setting and estimating needle angles

Comparison of entry point, average angles and depth for midline vs paramedian approaches
Entry point: midline approach: midline, in the interspace between 2 SP closer to caudad edge of SP above paramedian approach: 1-1.5 cm lateral and 0.5-1.5 cm caudad from the upper edge of the SP above
Angulation: midline approach: at least 45 degree upward or steeperparamedian approach: 55-60 degree upward and 10-25 degree inward)
Depth: midline approach: usually few cm deeper than paramedian approachparamedian approach: about 4-5 cm on average

This approach is less dependent on anatomical variations and other factors that will affect the preset angulations of the needle and allows the logical changes of the needle angles based on feedback from bony palpation with the needle.It has consistent series of steps:
1. Land the needle tip somewhat close to the mid lamina (dot on the picture represent first bony contact- so called “safe landing spot”)
2. Walk the needle off the lamina in specific pattern (see later) towards interlaminar space
3. After specific “walk”, at expected depth and angle from landing spot, engage in LF
4. Start advancing with LOR checks towards epidural space and get a distinct LOR within expected depth
5. Catheter should be advanced with little resistanceWhen all those steps occur reliably one after the other–the proceduralist can be highly confident about correct TEC placement
.Landing spot
Our preferred version of paramedian approach is the one that requires contact with the lamina and a systematic walk over the lamina into
interlaminar space

Some will use just one diagonal walk up and medially instead of illustrated 2 separate walks above. See next slide
(medially about 5-7 mm)
(about 1-1.5 cm up)
Safe landing (SL) on mid lamina with specific walk into interlaminar space
....

Diagonal walk vs 2 separate medial and then vertical walks. Compare 1.5 cm lateral and down from midline of upper edge of SP with following diagonal walk at 2 adjacent levels (Compare A and B on illustration below)
A. Walking with needle diagonally up and medially will work even with relatively large steps.
B. Same large diagonal steps in this case may result in missing correct interalaminal space with potential for later crossing over with potential for false LOR when penetrating interspinous ligament.
In most cases it is better to make small steps starting from “medial walk” and then continue walking up cranially.US assisted approach may be an exception due to more predictable landing spot
A
B

The paramedian approach could be easier at T5-9 than midline approach, but it still is not very easy
• We are still somewhat guessing the optimal needle entry point and we may make errors setting required angulation. Remember that those “optimal” entry points and “optimal” angles are not consistent across patients and T-levels.
• We manipulate the needle in a more complex way: “3D“ compared to 2D needle movement with midline techniques (more room for errors).
• Most importantly, occasionally when we deal with really tight interspaces at T5-T9 levels, we only decrease the length of the challenging needle path from skin to the interlaminar space. We still commonly have to maneuver between the bases of the two SPs that are close to each other on our final stretch of the needle advancement to access the interlaminar space.

Illustration of some problems with the paramedian approach that come from adding inward angulation to the technique
Adding medial (inward angulation adds difficulty to guiding the needle. One can over or under shoot this angle and miss the “bull’s eye” (in the middle of the epidural space).
Black trajectory is perfect but blue and green are not so much
It is also likely for the novice to completely undershoot medially or overshoot (like here)and end up with the needle tip on the other side of the epidural space.

Review questions• What are the 2 types of paramedian techniques?
• What are the ball park numbers for preset angles and entry spot for the midthoracic epidural?
• How can the image of a clock face help you in setting a required angle?
• What are the problems with preset angles and why do we still need to know those angles?
• What are advantages of the technique that require walking the needle over the lamina?
• Should we walk just medially, cranially, or diagonally?
• What are the challenges of the paramedian approach?

The good news
• Good understanding of anatomy and technique along with sufficient practice with the simulator will significantly decrease the number of “really difficult” cases.
• We also developed an US assisted technique that makes a routine paramedian thoracic epidural even easier.
• Fluoroscopy may be needed for more complex cases (see Nagaro approach).
Try to visualize the deep structures when you feel surface landmarks with your fingers

Now we will focus on the technique that we recommend for paramedian approach for midthoracic epidural (see bonus material for midline techniques)
• We will cover landmark based technique first
• We will also cover US assisted technique at the next lecture

The steps for paramedian landmark based technique(lets imagine we need an epidural at T 7/8 level) See video as well
1. Mark surgery site and correct level. Palpate and outline (middle of the upper edge) of SP T7 for T7/8 epidural. It may also help to imagine the most probable location of T7/T8 interlaminar space in relation to the upper edge of SP7 that you just outlined (at this level it should be about 1-1.5 cm above SP7. In the upper thorax it will be close to the upper edge of marked SP).
2. Choose the skin entry point based on SP outline for future safe landing on the mid lamina of T8 (About 1.5 cm lateral and slightly caudad from the middle of upper edge of T7 would be a reasonable start).
3. Enter the skin with numbing/search needle perpendicular to all planes and advance it until it hits the lamina - “safe landing”(in upper levels some caudad angulation of the needle during the first pass may be useful).
4. Palpate lamina with the needle (first do a medial and then vertical walk on the lamina) and deduce the landing spot as well as optimal direction towards the interlaminar space (utilizing knowledge of vertebrae 3D anatomy in axial and sagittal cross-sections).
5. After finding interlaminar space with the search needle, repeat “safe landing” and “lamina walks” with a block needle based on the information obtained with search needle.
6. Walk off the lamina, engage in LF, remove stylet, connect LOR syringe and check for resistance, start advancement with LOR checks until in the epidural space. Aim to end up in the epidural space at its center.
7. If you have difficulty finding interlaminar space (keep hitting bone), adjust both inward and upward angulation one at a time or consider adjusting the entry spot (usually a bit lateral and down).
Review questions• Name the steps of the landmark based technique (memorize them and
understand details) Finish the starting thought
1. Mark surgery site and correct level. …...
2. Choose the skin entry point based on SP outline …..
3. Enter the skin with numbing/search needle …....
4. Palpate lamina with the search needle ….
5. Repeat “safe landing” and “lamina walks” with a block needle …
6. If you have difficulty finding interlaminar space, adjust ….
• If you keep hitting bone and can not find an entry into ILS most commonly you should move needle needle entry point….
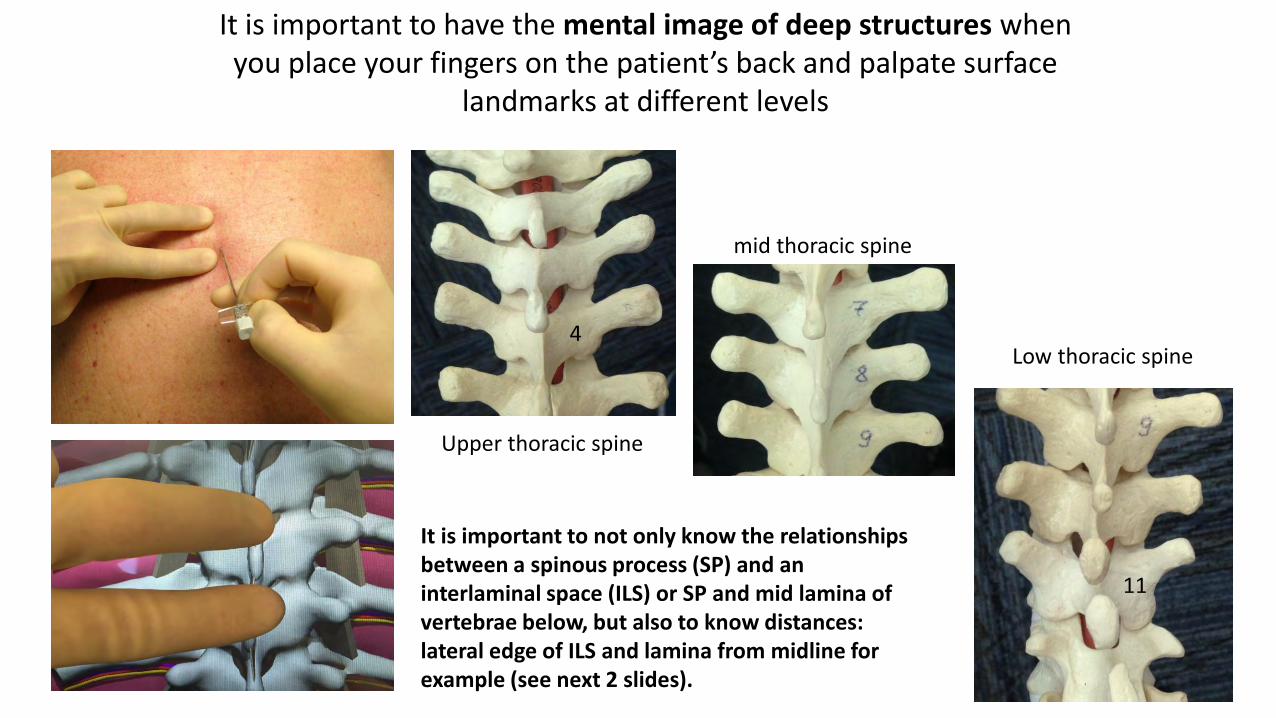
It is important to have the mental image of deep structures when you place your fingers on the patient’s back and palpate surface
landmarks at different levels
4
11
Upper thoracic spine
mid thoracic spine
Low thoracic spine
It is important to not only know the relationships between a spinous process (SP) and an interlaminal space (ILS) or SP and mid lamina of vertebrae below, but also to know distances: lateral edge of ILS and lamina from midline for example (see next 2 slides).

Applied Anatomy exercise (marking projection for safe landing-SL at different levels)-”caudad and lateral distances”
Determining how caudad we should go from the upper edge of SP to mark the projection of the SL spot for landmark based technique depends on the level of the required epidural. SPs have different angulation at different levels, patient positioning will also affect those relationships. Examine the pictures above for T3, T7 and T5 (dot is a SL projection on the skin)Left image at T3 SP: You have to go 1.5 cm caudad; Middle image at T7 SP: 0 cm down; Right image at T5 SP: 1 cm caudad. If we know the optimal horizontal level (below the ILS) then about 1cm from midline is a good lateral distance. Sometimes it is safer to increase the lateral distance to 1.5 cm from midline in case our horizontal level is slightly off (see next)
.3
7
.
5
.

Applied Anatomy exercise on the simulator (details regarding the lateral distance and more)
1. Place the needle with the distance markings horizontally and mark 1 and 2cm skin marks from midline 2. Place the needle vertically over 1cm from the midline (note that it is close to lateral edge of ILS)3. Place the needle vertically over 2cm from the midline (note that it is close to lateral edge of the lamina)Note the space between 2 needles/vertical lines (closer to the first one) is the most ideal lateral marking spot for safe landing regardless of the the level and relation to ILS. So about 1.2-1.5 cm from midline is a safe lateral distance most of the time . One can land needle more medial (1 cm) if we know the area between adjacent interlaminar space. Also note, that mid point between adjacent facet joints could be that ideal point on the vertical line for safe landing on the lamina even more medially if needed (this would be useful for US assisted technique). Also note if we use US for finding mid point between facets we no longer depend on less predictable relation of lamina and SP.
1 2 3

A schematic representation depicts the skin insertionsite (filled black circle) recommended for a paramedianapproach. It is 1.2 cm lateral to the superior tip of the T6 SP at T6-7 and 1.2 cm lateral to the inferior tip of the T9 SP at T9-10.
1.3 cm lateral to the superior tip of the L1 spinous process at T12-L1, and 1 cm below and 1.5 cm lateral to the superior tip of the L4 spinous process at L3-4. The arrow shows the direction of the epidural needle.
Suggested entry points at different levels in relation to SPs by author (Nagaro)
Note as we move down the spine we change from using superior edge of SP to using inferior edge of SP and in lumbar area we move from using upper SP (normal for thoracic spine) to lower SP in the interspace and again from upper edge to lower edge of SP.
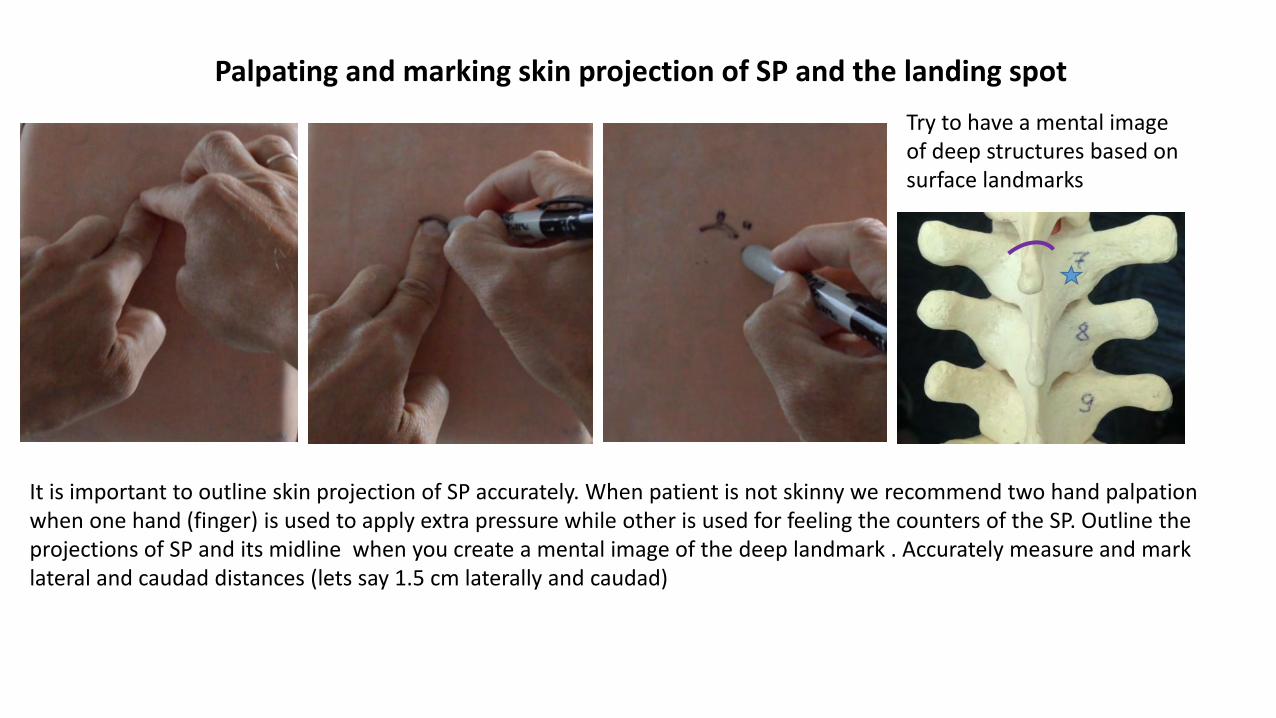
Palpating and marking skin projection of SP and the landing spot
It is important to outline skin projection of SP accurately. When patient is not skinny we recommend two hand palpation when one hand (finger) is used to apply extra pressure while other is used for feeling the counters of the SP. Outline the projections of SP and its midline when you create a mental image of the deep landmark . Accurately measure and mark lateral and caudad distances (lets say 1.5 cm laterally and caudad)
Try to have a mental image of deep structures based on surface landmarks

5
6
• If you do landmark based technique it is not a bad idea to outline the SPs above and below the required level
• By doing that and examining skin marks one may notice some important details:
• Here, for example, we can suspect that a significant increase in the distance between SP 5 and SP 6 is due to more significant angulation of SP 6 (see the skin marking and corresponding 3D anatomy on the right)
• If we need to do T6/T7 epidural, we will mark our projection for safe landing on the lamina of vertebrae 7 a bit different than above at T5/T6: do not mark 1cm caudad (as you would normally do at the level above), but only mark 1-1.5 cm lateral from the middle of upper edge of SP6
• Also note the lateral deviations of SPs from the midline (ex: T4 is pointed more to the right) This would affect our marking for T4/5 epidural – we may decrease our lateral distance on the right or better access this space from the left
Noticing some individual irregularities during palpation and marking adjacent SPs

Theoretical Ideal “landing spot” on the lamina
The spot on the lamina marked with the star is probably close to the ideal landing spot for paramedian thoracic epidural. It is not too medial so there is minimal risk of accidental entry into interlaminar space. Not too lateral to avoid accidental entry into paravertebral space or lung. There are other points besides the risk of entering into ILS or TPVS during attempt for safe landing (see next slide).The marked spot is also not too cranial or too caudad and should provide a predictable walk-off into the epidural space. We already discussed what would be the best distances from palpable surface land marks to mark the skin projection.
Interesting to note the resulting angulations of the needle from its entry level to the target, when the tip is in epidural space, would be somewhat close to the mentioned : 60-50 upward and 15 degrees inward.

Considering the degree of distance from the midline when choosing the landing spot
Another point to consider when choosing the ideal spot is related to the width of the base of SP compared to its tip that we palpate. In case of no significant differences, our main concern when we are choosing the distance from midline is the risk of accidental landing into ILS during attempt of safe landing. If we land below ILS then more medial landing will make the entry into ILS easier: just walk up with almost no medial angulation (2 dimensional alignment instead of 3 dimensional is easier for most). This is so called paraspinous approachOccasionally we deal with a situation when the base of SP is much wider (dash purple line on the picture above). In such case too medial landing on the lamina could be either impossible (red star) or if possible (green star) may actually not be optimal despite no risk of accidental entry into ILS during attempt of SL . The problem is that too medial landing spot on the lamina (green star) will increase the distance the needle would travel between SP above and lamina below in what could be a tight space. In case of more lateral entry (purple stars) needle will partially bypass that tight space between bones. On the other hand landing too laterally in any case may increase the chance of overshooting with inward angle and crossing midline or undershooting and landing to lateral in epidural space or struggling to get in it by missing it on lateral edge.

Because of many reasons (1. anatomical variations, 2. different positioning, 3. flaws in palpation and measurements, 4. flaws in needle angulations) your needle tip may not end up in ideal landing spot on the lamina despite your best intentions. It may be anywhere around it. What can we do about it?
If we know cross sections of the vertebrae we can “probe around” with the needle and build a mental image of underlying anatomy. We can even design an algorithm that simplifies the decision making based on the palpation feedback. This can give us a more or less reliable way of getting into the epidural space with ideal and even less ideal landing of the needle. That is one of the main reason why we prefer “walking over the lamina” approach compare to just preset angulation technique from the skin entry (feedback from needle palpation guide your next step instead of guessing). If we talk about angles, note that logically if the needle lands more caudad than ideal then the upward angulation is more and if needle lands more cranial then the upward angulation is less. If the needle lands more medial than ideal spot then the inward angulation is less and if more lateral then it is more.
Real “landing spot” on the lamina

Getting good at palpating bone with a needle and identifying the needle tip location based on knowledge of main axial and sagittal cross sections
of vertebrae
• By walking the needle tip “in baby steps” on the bony surface horizontally and vertically we can deduce our location (“ID the spot on the bone”) and figure out the best way into the interlaminar space.
Typical cross sections required to know

Review questions• What is the distance from midline to lateral edge of ILS? How about the
distance to lateral edge of lamina?
• What is the ideal landing spot on lamina? What may affect the actual landing spot?
• How we can use US to mark the projection of ideal landing spot based on the visualization/level of surrogate markers?
• How can we be successful in finding our way to ILS with ideal and less ideal SL?
• How can analyses of SPs skin marking above and below the required level help you?
• What are Nagaro’s recommendation on marking the skin projection for landing spot?

A
B
C
D
A upper edge of TPs lower edge of SAPB lower edge of TPs –midlaminaC lower lamina below TPs above heads of the ribs,D IAP level and level of heads of the ribs
Main axial cross-sections of thoracic vertebrae
As you walk your needle tip in baby steps medially or occasionally laterally you may deduce its location based on the feedback on the bony depth profile after several steps ( “staying flat or climbing up”, etc.)

A B C D
B
C
A
D
Main sagittal cross-sections
A-medially close to midline of SPsB- via the ILSC- via facet jointsD- via lateral edge of the lamina/IAP
As you walk your needle tip in baby steps vertically (up or occasionally down) you may deduce its location based on the feedback on the bony depth profile after several steps ( “staying flat or climbing up vs stepping down”, etc.) The feedback from the vertical walk greatly supplement data obtained from horizontal needle tip walk.

General outline of the “lamina palpation with the needle” algorithm
The goal is 1) to identify the underlying bony anatomy based on the stepwise palpation of the bone after landing and 2) to get into the interlaminar space from ideal and less ideal landing spots in the most efficient way.
If for any reason we land too far from the intended ideal spot we may need to do more “probing around” and may even have to change the entry spot after realizing initial suboptimal landing.
There are several steps in the approach: 1) horizontal walk of the needle tip, 2) vertical walk, 3) preliminary Dx regarding the point of our initial landing and current needle tip location. Then if needed we can 4) pivot the needle and change our inward and upward angulation or even 5) reinsert the needle and repeat “the walks” from a new entry.
When you walk the needle tip over the bone, use a seesaw principle (see next slide) and make baby steps. Each step should be about 2-5 mm (start bigger-5mm and reduce the step size -2 mm as continue). If needed one would take a step (horizontal or vertical ) back to a previous location after realizing that needle tip went too far.
Start from horizontal walk and then do a vertical one. If needed a small horizontal step is added during vertical walk. Horizontal walk is usually a one or two baby steps medially and vertical walk is usually a step or three in cranial direction, but if needed one may add an extra step medially or cranially or occasionally even lateral or caudad steps.

When you safely land on the lamina(1), move your fingers along the needle so they touch the skin (2) and keep your fingers on the needle as a depth marker of the initial landing. Then pull the needle almost all the way out and pivot the needle horizontally so your long finger on the needle move about 5 mm laterally-(3) and then advance the needle in (4)
This last shift of the long fingers 5 mm laterally will result in changing the needle trajectory about 5 mm medially at the resultant landing like a seesaw.According to the seesaw principal, the tip of the needle should end up somewhat about
3-5 mm medially in comparison to the initial landing position. If your initial landing was at mid lamina you should also appreciate a little bit of step up (the long fingers will not touch the skin this time if you kept them at the depth of initial landing). Same principle is used for vertical walk.
Seesaw Principal for predictable walking of the needle tip over the lamina
(medially and cranially)
skin
needlela
min
a

Possible algorithm of the “lamina palpation with the needle”
(part 1 horizontal walk)Start with a 5 mm horizontal medial step If you are at SAP you should feel no step up. If you are not at SAP level then you should feel a step up. This step up is steeper if you are more caudad from ideal landing spot, and the biggest at IAP (superior articular process level).Repeat another one or two (depend on how lateral was the original LS ) 5 mm medial step. At SAP level you may “fall into ILS” after second or third step.If your initial LS was not at SAP level and was too lateral (more than 1.5 cm from true midline) you would continue climbing up during 2nd and may be even a next 3rd step.If the original LS was too medial (less than 1 cm from midline) you may start approaching /crossing midline (feel a step down on other side past midline or start hitting/scraping side of SP above- in such case make a step or two back and start walking up or change the entry point). Most commonly you will need move a LS slightly down and lateral If LS was close to intended (red star) then you may feel “being to medial” on the third step and then return back and start vertical walk from a spot of your second medial step.If unsure where the needle tip is, you can return needle back to your initial LS and try a lateral walk; 1-2 steps laterally 5-2 mm each. If you are at TP level you will feel a climb up towards root of TP. If you are at the level just below TP - you will feel a step down on the first step and then may get off the lamina on the second step. At IAP level and occasionally at SAP level needle may get off the lateral edge and land deeper on the head of the rib (SAP/IAP level).When everything feels good but on the final steps you encounter a bone, do mini adjustment of the inward and upward angulation (mini seesaw)
SAP
IAP
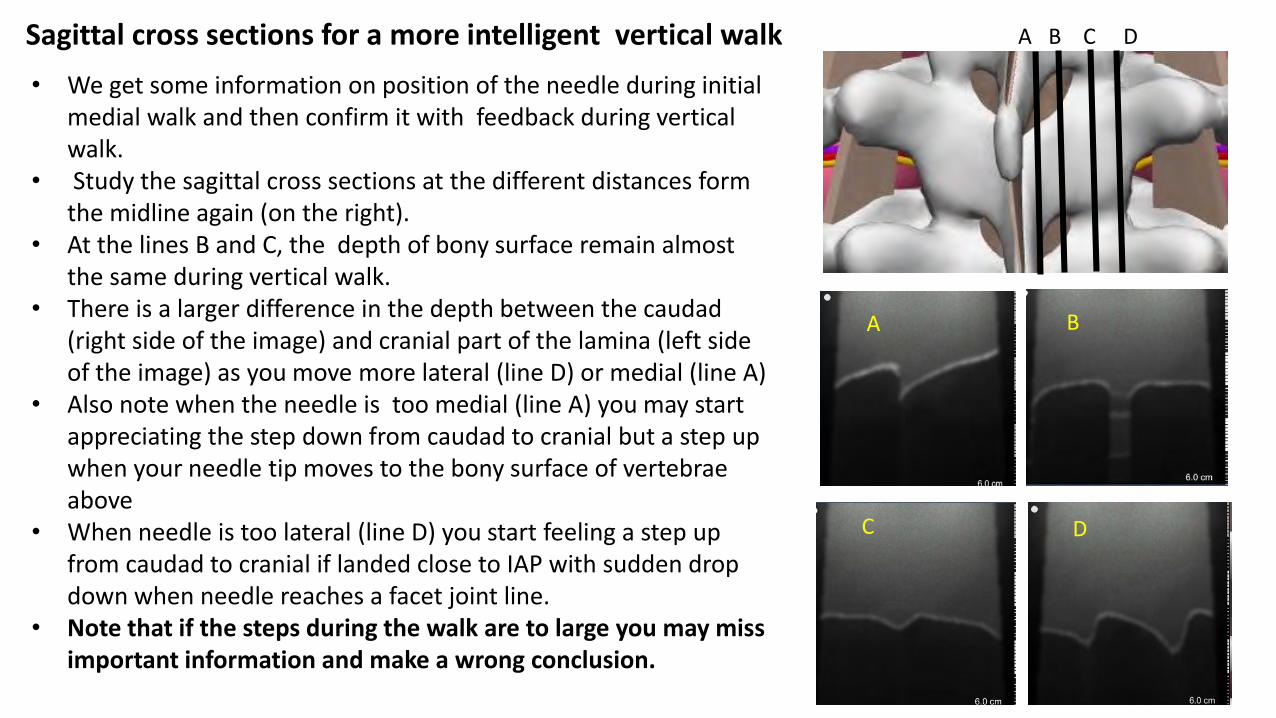
• We get some information on position of the needle during initial medial walk and then confirm it with feedback during vertical walk.
• Study the sagittal cross sections at the different distances form the midline again (on the right).
• At the lines B and C, the depth of bony surface remain almost the same during vertical walk.
• There is a larger difference in the depth between the caudad (right side of the image) and cranial part of the lamina (left side of the image) as you move more lateral (line D) or medial (line A)
• Also note when the needle is too medial (line A) you may start appreciating the step down from caudad to cranial but a step up when your needle tip moves to the bony surface of vertebrae above
• When needle is too lateral (line D) you start feeling a step up from caudad to cranial if landed close to IAP with sudden drop down when needle reaches a facet joint line.
• Note that if the steps during the walk are to large you may miss important information and make a wrong conclusion.
Sagittal cross sections for a more intelligent vertical walk A B C D
B
C
A
D

Axial view Lateral view View from above
Some geometry to point out some Important caveat of vertical walk after medial walk: Because spinous process depth increases from its tip to its base, when one performs a vertical walk while maintaining the same constant inward angulation to the skin, trajectory of needle tip landing on the bone will drift medially. The higher the inward angle and the further from the base of SP is first landing spot, the bigger the drift. Drift is 0 if inward angle is 0. One may occasionally need a slight pivot/step laterally at the end of the long walk to avoid crossing the midline (look at the view from above: brown needle with 0 inward angle has no deviation compare to purple needle with inward angle of close to 45 degree that eventually crosses over midline, despite the same skin entry point marked by * and maintaining inward angle constant).
*

Based on explanations of the previous slide the “foot prints of the needle” during vertical walk with constant inward angulation that started low and medial will look like one on the left image. At the same time foot prints of the needle tip during similar walk that is done quite lateral will look like one on the right image. The difference stems from the different depth of the bony surface caudad and cranially during walk more medial compare to more lateral. See cross-sections below.
One should appreciate this fact and be prepared to correct this with extra medial or lateral step at the end of the vertical walk. Keeping track of the needle depth during contact with the bone is helpful for this.
A C

Troubleshooting problems negotiating tight spaces when spinous process base is wide
When we deal with a patient who has a spinous process with a wide base, we may encounter problems if we land slightly too medial and too cephalad (that would be fine for a “skinny base spinal process”) As you can see on the illustration, a needle that lands perpendicular to all planes on green star will be “stuck between bones” and will not make it into ILS-red star. As we showed before, we need more inward and upward angulations to negotiate those tight spaces and that in turn will require us to change our landing spot more lateral and more caudad (purple and yellow stars). US scanning prior to needling can help to avoid second stick (Transition A to B shows a transition from skinny tip of SP that gets wider at the base)
A
B

Picture shows small steps in changing inward angulation in order to find an entry into ILSSame approach is used for upward angulation adjustmentIf needle tip is deep inside the tissues, make sure you pull needle back first before adjusting the trajectory (do not bend the needle trying to muscle it in)This small adjustment may be required during final steps of advancements. Frequently this is needed when the needle unexpectedly hits bone after what was thought to be a “promising” trajectory
Mini “seesaw moves” in both planes at the final steps of getting into ILS

Review questions• Explain the seesaw principle.
• Describe the expected events (lamina palpation) with optimal safe landing.
• If after “safe landing” you do not feel a step up after a first medial step and on the second medial step you feel as if you walk off the bone, what is likely your level of safe landing?
• What should you do If you feel a step up on the first and then again on the second medial step but on the third medial step you start feeling the spinous process of vertebrae above?
• What is incorrect on the image below that shows the foot prints of the needle tip during “walk” providing that needle’s inward angulation to the skin was constant?
• What is the role of the horizontal step after some vertical walk?

2 types of LOR – loss of resistance techniquesA. One handed continuous LOR technique
• Continuous check for LOR during continuous advancement• During slow continuous advancement, one hand continuosly checks for a change in
resistance while the other hand advances the needle.• The one handed technique is more advanced than the two handed technique
because there is more risk of losing control over the needle and advancing to deep during abrupt change in resistance. (some argue that it is more sensitive in detecting a change in resistance when we do not have a very discerning loss)

Advance 2 mm with 2 hands
Advance again 2 mm or lessIf you feel pop or give
Check for LOR
Check again
• After each incremental advancement, with two hands (1-2 mm at a time), check for a LOR.
• Using two hands is easier and provides better control of the needle.
• The two hand grip is a bit slower and looks less impressive but may work better for novice in our opinion
• For both technique one may use saline or air. Small volume of air (1-3 ml) are recommended. After detecting “loss” to air it is not a bad idea to confirm it with injection of 3-5 ml of saline
• On the simulator we use air only
2 types of LOR – loss of resistance techniquesB. Two hand grip intermittent LOR technique