Crossbow Plans
4
Make ' This Powerful P ISTOL CROSSBOW This article was taken from a 1960 era issl,IeojScience and Mechanics, which is no longer published This publication was very advancedf or its time and era. . B Edwin Love You' ll create quite a sensation at your next archery meet when you start banging away at the target with bolts from your own hand-crafted pistol crossbow. In fact, everyone will want to try his skill at shooting this rare one- of-a-kind weapon. This is no toy, either, and should be treated with the same respect due any weapon. For the wallop this baby packs makes it capable of driving a 6-in bolt through a bull's-eye at 150 ft. Its power is stored in a spring- steel bow which requires a .special cocking device ("goat's foot") to provide the leverage necessary to draw back the bowstring and set it in the notched wheel of the weapon's trigger mechanism. Your First Step in making the crossbow is to draw a 5-112 x 9- in . Grid of Y:z in . Squares on paper. Then copy the outline of the pistol stock (side view, Fig 3) using the 112-in squares to enlarge it. Also copy the outline of the cocking side plate and trigger guard. Use carbon paper to transfer the pistol-stock drawing to 1-1I4-in thick maple or walnut stock. After sawing the stock to shape drill a 1I2-in hole up through the center of the pistol grip and then insert a 1I2-in dowel, gluing it in place. This will prevent the grip from splitting with the grain. Making tbe Two Cocking Plates by first transferring your full-size drawing of each to 1I8-in- thick steel. A series of prick-punch ofihe stock grip to a thickness ofl- 118". Clamp the cocking plates to the sides of the grip so that they are positioned as shown in Fig 3 and drill rivet holes through the grip. Then mark the grip for mortising the plates into it by tracing around the plates with a sharp pencil. Remove the plates and cut around the mortise edge with a gouge or narrow chisel making it slightly undersize. Make several cut lines across the grain to break up chips and establish the 1I8-in. depth of the mortise. Hollow out the mortise by hand chiseling or with a router bit in a drill press. Replace the plates and hammer- tap them into the mortise edges so that an imprint is left; after Fig. 1. "G<rat '.t l crot" co< kl cro ,ukw"':hcokt 10 trimming to this imprint the " et' .ide., .1.""$ bowstting•• it I", plates will fit snugly. Before marks spaced about 1/8 in . Apart along the outline will serve as a dotted guide line to follow when cutting the steel. The latter is done by using a jigsaw or hand coping saw fitted with a fine-tooth metal- cutting blade. (In a pinch you can rough-cut these parts to size with a cold chisel, then file and grind them to the correct dimensions) Now clamp the two plates together and drill the holes for the rivets-made from the shanks of 16d (3-1I2-in) common nails. Countersink these holes so that the rivets set flush. Next rough-file down each side 51 replacing the plates, work the grip down to its rounded form with chisel and rasp. To aid in forming it symmetrically, ' make a couple of cardboard templates (fig 3B) to check the roundness of the grip. Fair off the grip toward the top and round the comers of the stock. Mortising for tbe Trigger can be done now or after the plates are riveted to the grip. In either case layout the size · of the mortise on top of the stock and bore it out, starting with the end holes and working toward the center with holes overlapping (Fig 3C). Set
-
Upload
superscribed -
Category
Documents
-
view
521 -
download
32
Transcript of Crossbow Plans
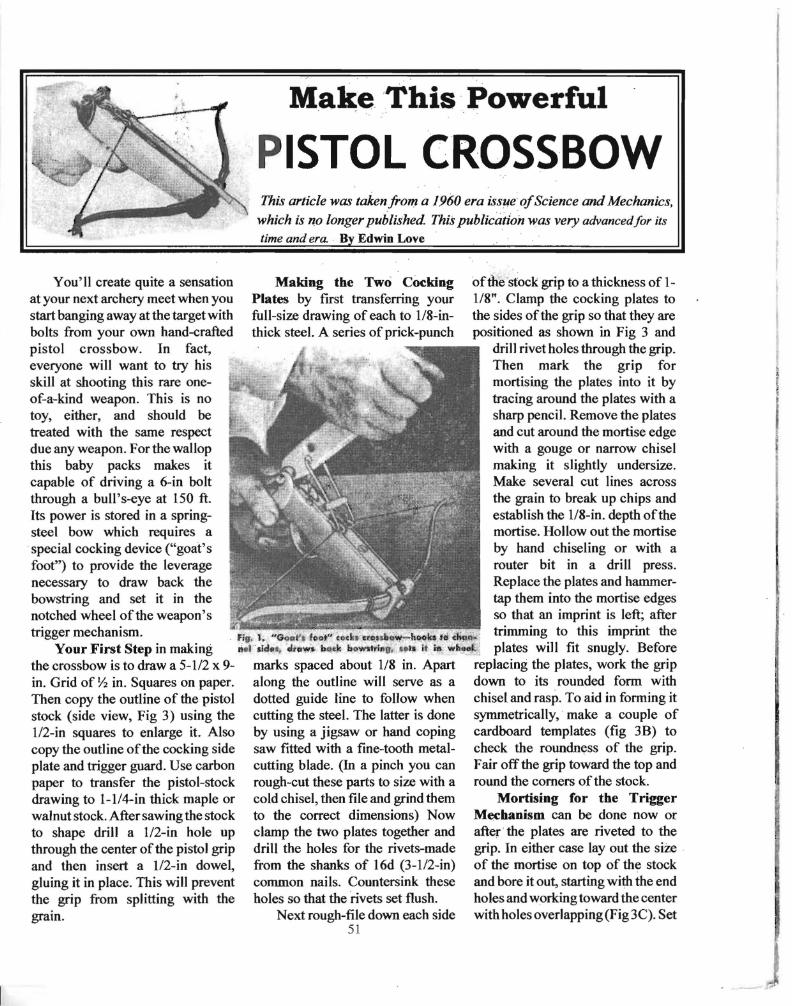
Make 'This Powerful
PISTOL CROSSBOW This article was taken from a 1960 era issl,IeojScience and Mechanics,
which is no longer published This publication was very advancedfor its
time and era . . B Edwin Love
You' ll create quite a sensation at your next archery meet when you start banging away at the target with bolts from your own hand-crafted pistol crossbow. In fact, everyone will want to try his skill at shooting this rare oneof-a-kind weapon. This is no toy, either, and should be treated with the same respect due any weapon. For the wallop this baby packs makes it capable of driving a 6-in bolt through a bull's-eye at 150 ft. Its power is stored in a spring-steel bow which requires a
. special cocking device ("goat's foot") to provide the leverage necessary to draw back the bowstring and set it in the notched wheel of the weapon's trigger mechanism.
Your First Step in making the crossbow is to draw a 5-112 x 9in. Grid of Y:z in. Squares on paper. Then copy the outline of the pistol stock (side view, Fig 3) using the 112-in squares to enlarge it. Also copy the outline ofthe cocking side plate and trigger guard . Use carbon paper to transfer the pistol-stock drawing to 1-1I4-in thick maple or walnut stock. After sawing the stock to shape drill a 1I2-in hole up through the center ofthe pistol grip and then insert a 1I2-in dowel, gluing it in place. This will prevent the grip from splitting with the grain.
Making tbe Two Cocking Plates by first transferring your full-size drawing of each to 1I8-inthick steel. A series of prick-punch
ofihe stock grip to a thickness ofl118". Clamp the cocking plates to the sides ofthe grip so that they are positioned as shown in Fig 3 and
drill rivet holes through the grip. Then mark the grip for mortising the plates into it by tracing around the plates with a sharp pencil. Remove the plates and cut around the mortise edge with a gouge or narrow chisel making it slightly undersize. Make several cut lines across the grain to break up chips and establish the 1I8-in. depth ofthe mortise. Hollow out the mortise by hand chiseling or with a router bit in a drill press. Replace the plates and hammer-tap them into the mortise edges so that an imprint is left; after
Fig. 1. "G<rat'.t l crot" co<kl cro,ukw"':hcokt 10 t~, trimming to this imprint the "et'.ide., .1.""$ b~tk bowstting••~ i t I", wh~ plates will fit snugly. Before
marks spaced about 1/8 in. Apart along the outline will serve as a dotted guide line to follow when cutting the steel. The latter is done by using a jigsaw or hand coping saw fitted with a fine-tooth metal-cutting blade. (In a pinch you can rough-cut these parts to size with a cold chisel, then file and grind them to the correct dimensions) Now clamp the two plates together and drill the holes for the rivets-made from the shanks of 16d (3-1I2-in) common nails. Countersink these holes so that the rivets set flush.
Next rough-file down each side 51
replacing the plates, work the grip down to its rounded form with chisel and rasp. To aid in forming it symmetrically, ' make a couple of cardboard templates (fig 3B) to check the roundness of the grip. Fair off the grip toward the top and round the comers of the stock.
Mortising for tbe Trigger M~banism can be done now or after the plates are riveted to the grip. In either case layout the size · of the mortise on top of the stock and bore it out, starting with the end holes and working toward the center with holes overlapping (Fig 3C). Set
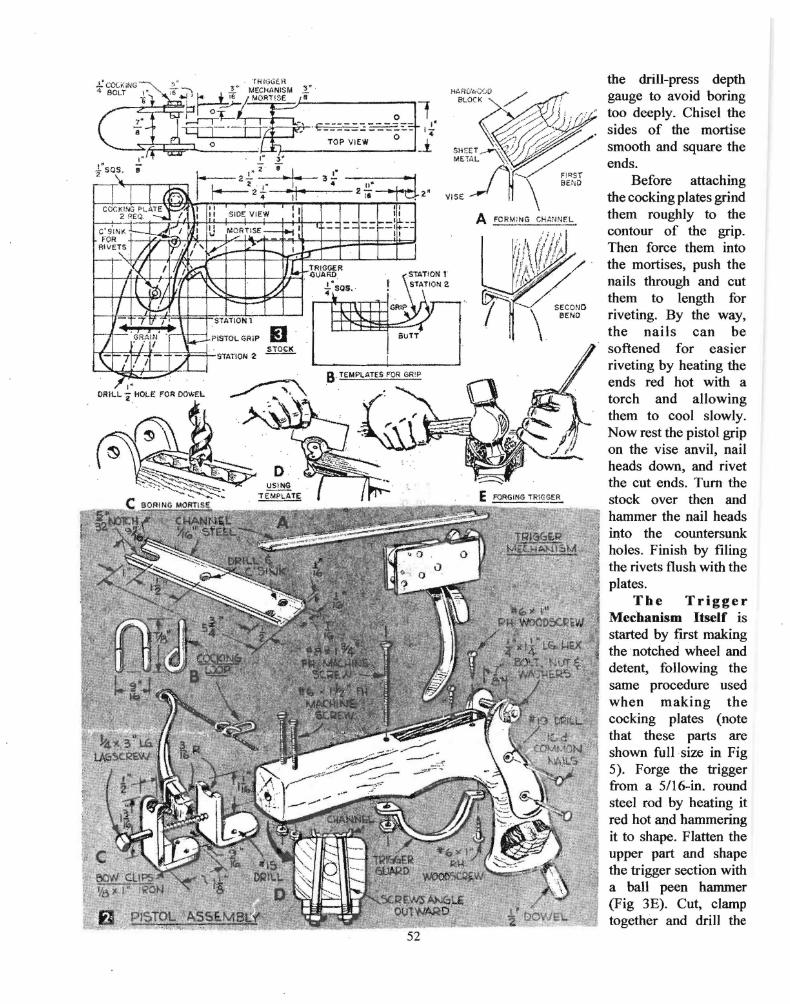
TOP VIEW
,"2: 50S. \.. z .. ... 3
4
~ 1----2
. I"z4 ",I" U'=i=d2ii . 2' VISE
COC KING l"U\~ I " : I ~_~:_Q I I II SIDE V IE't'
C 'S'INK ~ ' I " M;'R:~SE~~l..: FOR
RI VE~ /Y f'/i , ~ ~ II
K( I l~ II.
/ l [g)j ~ L6' if ~~.
7 " . STATIONl;-! . , , .• 1 11/ GRA(IJ ' , _, PISTOL GRiP .i' .!lQ.£!i.
"1'-7r7.~ ..lITSTATION ·2i
~I'
- == --~~
I-JRIGGERQI,/ARD
. t" " :j 50S.
1\ 1'-. "
• I \I
_I-."
!
--
S'tATION r ATION 25T
GRIP
aUTT
B TEMPLATES FOR GR!
"
the drill-press depth gauge to avoid boring too deeply. Chisel the sides of the mortise smooth and square the ends.
Before attaching the cocking plates grind them roughly to the contour of the grip. Then force them into the mortises, push the nails through and cut them to length for riveting. By the way, the nails can be softened for easier riveting by heating the ends red hot with a torch and allowing them to cool slowly. Now rest the pistol grip on the vise anvil, nail heads down, and rivet the cut ends. Turn the stock over then and hammer the nail heads into the countersunk holes. Finish by filing the rivets flush with the plates.
The Trigger Mechanism Itself is started by first making the ' notched wheel and detent, following the same procedure used when making the cocking plates (note that these parts are shown full size in Fig 5). Forge the trigger from a 5/16-in. round steel rod by heating it red hot and hammering it to shape. Flatten the upper part and shape the trigger section with a ball peen hammer (Fig 3E). Cut, clamp together and drill the
(
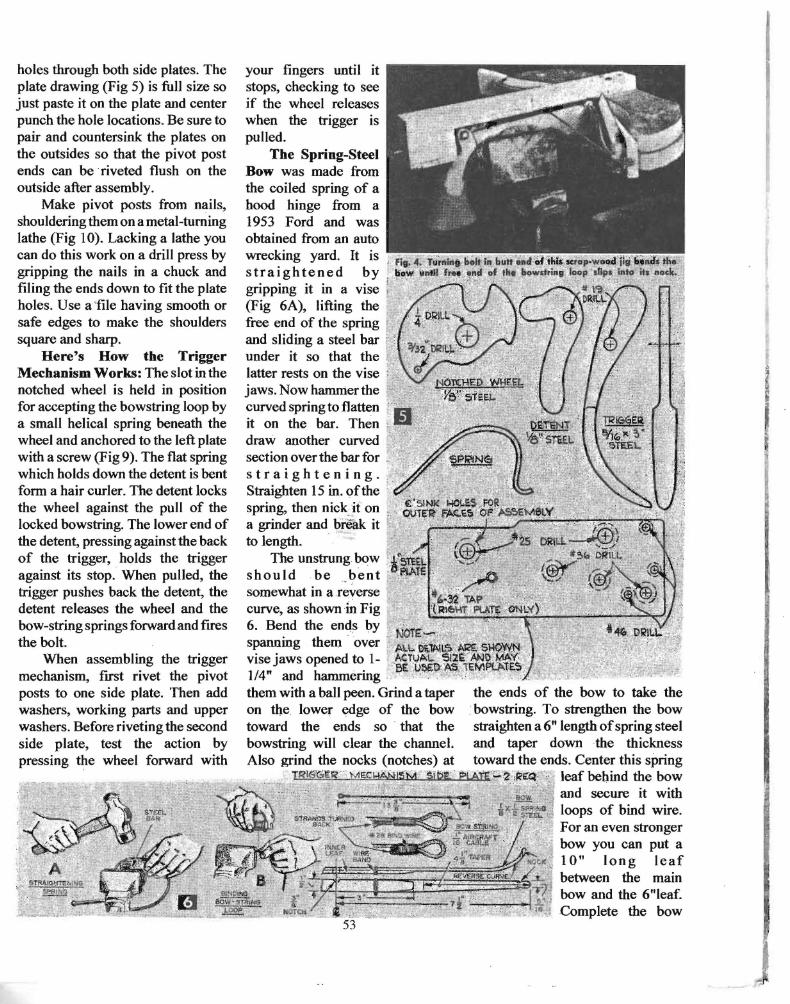
holes through both side plates. The plate drawing (Fig 5) is full size so just paste it on the plate and center punch the hole locations. Be sure to pair and countersink the plates on the outsides so that the pivot post ends can be riveted flush on the outside after assembly.
Make pivot posts from nails, shouldering them on a metal-turning lathe (Fig 10). Lacking a lathe you can do this work on a drill press by gripping the nails in a chuck and filing the ends down to fit the plate holes. Use a 'file having smooth or safe edges to make the shoulders square and sharp.
Here's How the Trigger Mechanism Works: The slot in the notched wheel is held in position for accepting the bowstring loop by a small helical spring beneath the wheel and anchored to the left plate with a screw (Fig 9). The flat spring which holds down the detent is bent form a hair curler. The detent locks the wheel against the pull of the locked bowstring. The lower end of the detent, pressing against the back of the trigger, holds the trigger against its stop. When pulled, the trigger pushes back the detent, the detent releases the wheel and the bow-string springs forward and fires the bolt.
When assembling the trigger mechanism, first rivet the pivot posts to one side plate. Then add washers, working parts and upper washers. Before riveting the second side plate, test the action by pressing the wheel forward with
your fingers until it stops, checking to see if the wheel releases when the trigger is pulled.
The Spring-Steel Bow was made from the coiled spring of a hood hinge from a 1953 Ford and was obtained from an auto wrecking yard. It is straightened by gripping it in a vise (Fig 6A), lifting the free end of the spring , and sliding a steel bar ' under it so that the latter rests on the vise jaws. Now hammer the curved spring to flatten it on the bar. Then ~
draw another curved section over the bar for :. straightening. " Straighten 15 in. ofthe . spring, then nick if on , a grinder and break it i~ to length. . -' ,- t,
The unstrung bow ~ should be ,btmt
. .
the ends of the bow to take the .' bowstring. To strengthen the bow straighten a 6" length ofspring steel and taper down the thickness
I
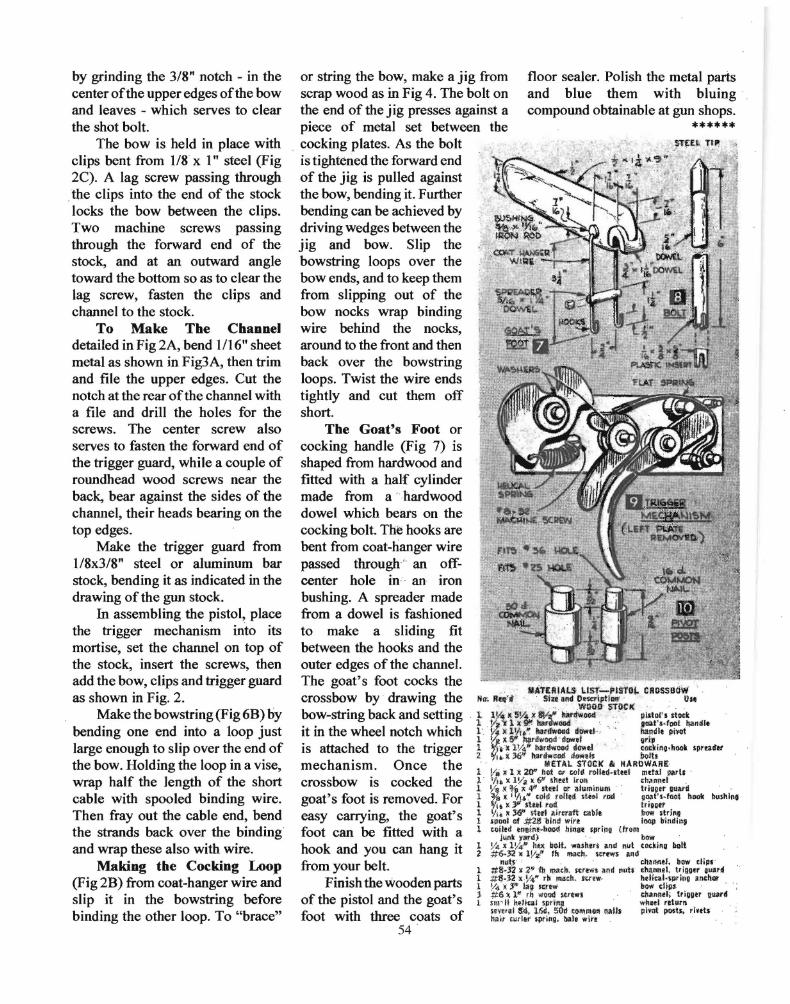
by grinding the 3/S" notch - in the center ofthe upper edges ofthe bow and leaves - which serves to clear the shot bolt.
The bow is held in place with clips bent from liS xl" steel (Fig 2C). A lag screw passing through
. the clips into the end of the stock locks the bow between the clips. Two machine screws passing through the forward end of the stock, and at an outward angle toward the bottom so as to clear the lag screw, fasten the clips and channel to the stock.
To Make The Channel detailed in Fig 2A, bend 1116" sheet metal as shown in Fig3A, then trim and file the upper edges. Cut the notch at the rear ofthe channel with a file and drill the holes for the screws. The center screw also serves to fasten the forward end of the trigger guard, while a couple of roundhead wood screws near the back, bear against the sides of the channel, their heads bearing on the top edges.
Make the trigger guard from lISx3/S" steel or aluminum bar stock, bending it as indicated in the drawing of the gun stock.
In assembling the pistol, place the trigger mechanism into its mortise, set the channel on top of the stock, insert the screws, then add the bow, clips and trigger guard as shown in Fig. 2.
Make the bowstring (Fig 6B) by bending one end into a loop just large enough to slip over the end of the bow. Holding the loop in a vise, wrap half the length of the short cable with spooled binding wire. Then fray out the cable end, bend the strands back over the binding and wrap these also with wire.
Making tbe Cocking Loop (Fig 2B) from coat-hanger wire and slip it in the bowstring before binding the other loop. To "brace"
or string the bow, make a jig from floor sealer. Polish the metal parts scrap wood as in Fig 4. The bolt on and blue them with bluing · the end of the jig presses against a compound obtainable at gun shops. piece of metal set between the ****** cocking plates. As the bolt is tightened the forward end of the jig is pulled against the bow, bending it. Further bending can be achieved by driving wedges between the jig and bow. Slip the bowstring loops over the bow ends, and to keep them from slipping out of the bow nocks wrap binding wire behind the nocks, around to the front and then back over the bowstring loops. Twist the wire ends tightly and cut them off short.
The Goat's Foot or cocking handle (Fig 7) is shaped from hardwood and fitted with a half cylinder made from a hardwood dowel which bears on the cocking bolt. The hooks are bent from coat-hanger wire passed through' an offcenter hole in an iron bushing. A spreader made from a dowel is fashioned to make a sliding fit between the hooks and the outer edges of the channe1. The goat's foot cocks the crossbow by · drawing the bow-string back and setting it in the wheel notch which is attached to the trigger mechanism. Once the crossbow is cocked the goat's foot is removed. For easy carrying, the goat's foot can be fitted with a hook and you can hang it from your belt.
Finish the wooden parts of the pistol and the goat's foot with three coats of
54 ·