F-Series Crossbow Owner’s Instruction Manual - Bear …manuals.beararchery.com/2004/Owner's...
12
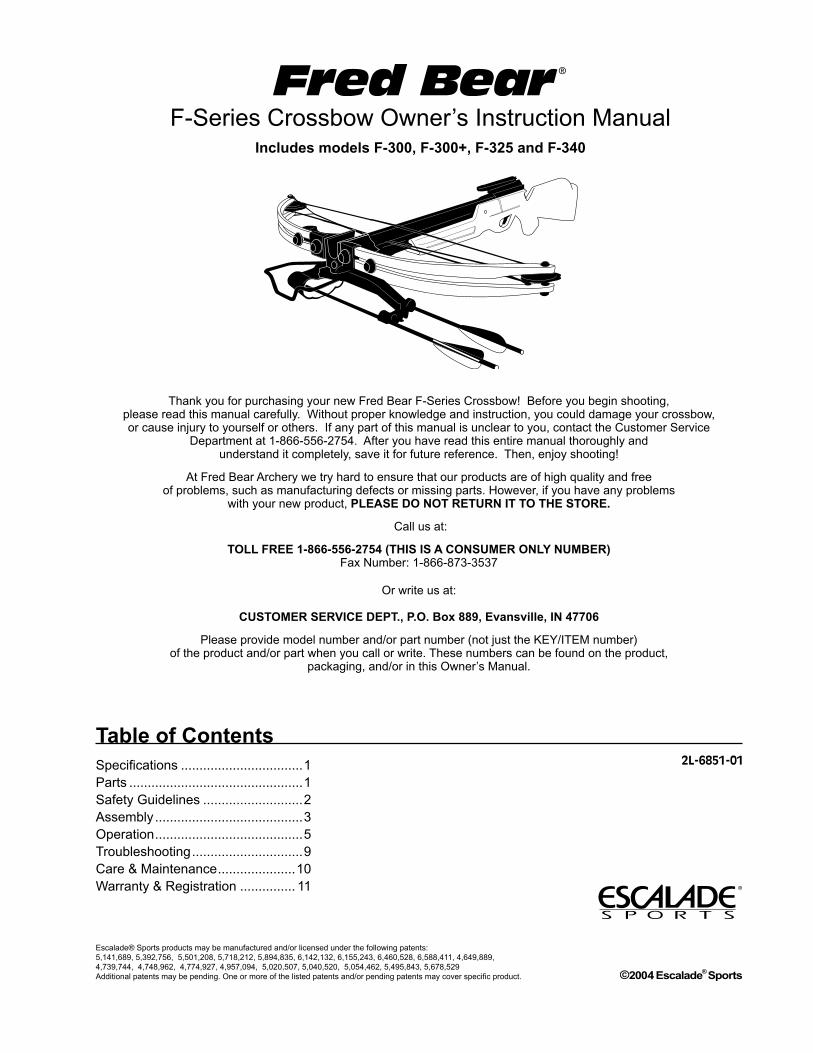
F-Series Crossbow Owner’s Instruction Manual Includes models F-300, F-300+, F-325 and F-340 Thank you for purchasing your new Fred Bear F-Series Crossbow! Before you begin shooting, please read this manual carefully. Without proper knowledge and instruction, you could damage your crossbow, or cause injury to yourself or others. If any part of this manual is unclear to you, contact the Customer Service Department at 1-866-556-2754. After you have read this entire manual thoroughly and understand it completely, save it for future reference. Then, enjoy shooting! At Fred Bear Archery we try hard to ensure that our products are of high quality and free of problems, such as manufacturing defects or missing parts. However, if you have any problems with your new product, PLEASE DO NOT RETURN IT TO THE STORE. Call us at: TOLL FREE 1-866-556-2754 (THIS IS A CONSUMER ONLY NUMBER) Fax Number: 1-866-873-3537 Or write us at: CUSTOMER SERVICE DEPT., P.O. Box 889, Evansville, IN 47706 Please provide model number and/or part number (not just the KEY/ITEM number) of the product and/or part when you call or write. These numbers can be found on the product, packaging, and/or in this Owner’s Manual. Table of Contents Specifications ................................. 1 Parts ............................................... 1 Safety Guidelines ........................... 2 Assembly ........................................ 3 Operation........................................ 5 Troubleshooting .............................. 9 Care & Maintenance..................... 10 Warranty & Registration ............... 11 Escalade® Sports products may be manufactured and/or licensed under the following patents: 5,141,689, 5,392,756, 5,501,208, 5,718,212, 5,894,835, 6,142,132, 6,155,243, 6,460,528, 6,588,411, 4,649,889, 4,739,744, 4,748,962, 4,774,927, 4,957,094, 5,020,507, 5,040,520, 5,054,462, 5,495,843, 5,678,529 Additional patents may be pending. One or more of the listed patents and/or pending patents may cover specific product. 2L-6851-01
Transcript of F-Series Crossbow Owner’s Instruction Manual - Bear …manuals.beararchery.com/2004/Owner's...
F-Series Crossbow Owner’s Instruction ManualIncludes models F-300, F-300+, F-325 and F-340
Thank you for purchasing your new Fred Bear F-Series Crossbow! Before you begin shooting, please read this manual carefully. Without proper knowledge and instruction, you could damage your crossbow, or cause injury to yourself or others. If any part of this manual is unclear to you, contact the Customer Service
Department at 1-866-556-2754. After you have read this entire manual thoroughly and understand it completely, save it for future reference. Then, enjoy shooting!
At Fred Bear Archery we try hard to ensure that our products are of high quality and free of problems, such as manufacturing defects or missing parts. However, if you have any problems
with your new product, PLEASE DO NOT RETURN IT TO THE STORE.
Call us at:
TOLL FREE 1-866-556-2754 (THIS IS A CONSUMER ONLY NUMBER)Fax Number: 1-866-873-3537
Or write us at:
CUSTOMER SERVICE DEPT., P.O. Box 889, Evansville, IN 47706
Please provide model number and/or part number (not just the KEY/ITEM number) of the product and/or part when you call or write. These numbers can be found on the product,
packaging, and/or in this Owner’s Manual.
Table of ContentsSpecifications .................................1Parts ...............................................1Safety Guidelines ...........................2Assembly ........................................3Operation........................................5Troubleshooting..............................9Care & Maintenance.....................10Warranty & Registration ............... 11
Escalade® Sports products may be manufactured and/or licensed under the following patents:5,141,689, 5,392,756, 5,501,208, 5,718,212, 5,894,835, 6,142,132, 6,155,243, 6,460,528, 6,588,411, 4,649,889, 4,739,744, 4,748,962, 4,774,927, 4,957,094, 5,020,507, 5,040,520, 5,054,462, 5,495,843, 5,678,529Additional patents may be pending. One or more of the listed patents and/or pending patents may cover specific product.
2L-6851-01
WARNING! FAILURE TO READ THIS MANUAL CAREFULLY AND FOLLOW ALL GUIDELINES STATED HEREIN COULD RESULT IN DAMAGE TO YOUR CROSSBOW, AND/OR INJURY OR EVEN DEATH TO YOURSELF OR OTHERS.
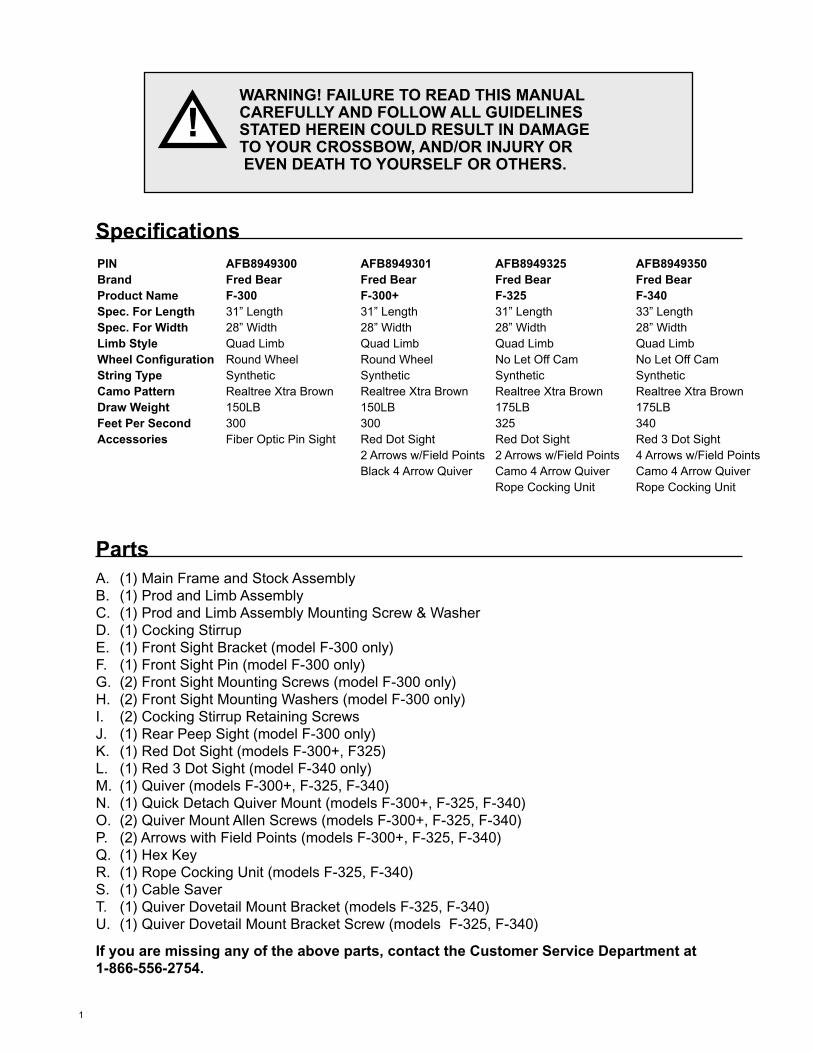
Specifications
PartsA. (1) Main Frame and Stock AssemblyB. (1) Prod and Limb AssemblyC. (1) Prod and Limb Assembly Mounting Screw & WasherD. (1) Cocking StirrupE. (1) Front Sight Bracket (model F-300 only)F. (1) Front Sight Pin (model F-300 only)G. (2) Front Sight Mounting Screws (model F-300 only)H. (2) Front Sight Mounting Washers (model F-300 only)I. (2) Cocking Stirrup Retaining ScrewsJ. (1) Rear Peep Sight (model F-300 only)K. (1) Red Dot Sight (models F-300+, F325)L. (1) Red 3 Dot Sight (model F-340 only)M. (1) Quiver (models F-300+, F-325, F-340)N. (1) Quick Detach Quiver Mount (models F-300+, F-325, F-340)O. (2) Quiver Mount Allen Screws (models F-300+, F-325, F-340)P. (2) Arrows with Field Points (models F-300+, F-325, F-340)Q. (1) Hex KeyR. (1) Rope Cocking Unit (models F-325, F-340)S. (1) Cable SaverT. (1) Quiver Dovetail Mount Bracket (models F-325, F-340)U. (1) Quiver Dovetail Mount Bracket Screw (models F-325, F-340)
If you are missing any of the above parts, contact the Customer Service Department at 1-866-556-2754.
!
1
PIN AFB8949300 AFB8949301 AFB8949325 AFB8949350Brand Fred Bear Fred Bear Fred Bear Fred BearProduct Name F-300 F-300+ F-325 F-340Spec. For Length 31” Length 31” Length 31” Length 33” LengthSpec. For Width 28” Width 28” Width 28” Width 28” Width Limb Style Quad Limb Quad Limb Quad Limb Quad LimbWheel Configuration Round Wheel Round Wheel No Let Off Cam No Let Off CamString Type Synthetic Synthetic Synthetic SyntheticCamo Pattern Realtree Xtra Brown Realtree Xtra Brown Realtree Xtra Brown Realtree Xtra BrownDraw Weight 150LB 150LB 175LB 175LBFeet Per Second 300 300 325 340Accessories Fiber Optic Pin Sight Red Dot Sight Red Dot Sight Red 3 Dot Sight 2 Arrows w/Field Points 2 Arrows w/Field Points 4 Arrows w/Field Points Black 4 Arrow Quiver Camo 4 Arrow Quiver Camo 4 Arrow Quiver Rope Cocking Unit Rope Cocking Unit
PIN AFB8949300 AFB8949301 AFB8949325 AFB8949350Brand Fred Bear Fred Bear Fred Bear Fred BearProduct Name F-300 F-300+ F-325 F-340Spec. For Length 31” Length 31” Length 31” Length 33” LengthSpec. For Width 28” Width 28” Width 28” Width 28” Width Limb Style Quad Limb Quad Limb Quad Limb Quad LimbWheel Configuration Round Wheel Round Wheel No Let Off Cam No Let Off CamString Type Synthetic Synthetic Synthetic SyntheticCamo Pattern Realtree Xtra Brown Realtree Xtra Brown Realtree Xtra Brown Realtree Xtra BrownDraw Weight 150LB 150LB 175LB 175LBFeet Per Second 300 300 325 340Accessories Fiber Optic Pin Sight Red Dot Sight Red Dot Sight Red 3 Dot Sight 2 Arrows w/Field Points 2 Arrows w/Field Points 4 Arrows w/Field Points Black 4 Arrow Quiver Camo 4 Arrow Quiver Camo 4 Arrow Quiver Rope Cocking Unit Rope Cocking Unit
Safety Guidelines
Safety Switch
Each F-Series Crossbow is equipped with an automatic, ambidextrous safety, which engages every time the crossbow is cocked. The safety must be released before each shot. This, as with any other mechanical device, does not guarantee total safety, as no safety device is a substitute for common sense and safe handling. The crossbow trigger is only to be pulled when the safety is in “fire” position and never when it is in the “safe” position or anywhere between “safe” and “fire.” Do not attempt to alter or modify the safety or the trigger mechanism. If the safety will not release, push the trigger pull forward, then release the safety catch.
General Safety Guidelines
The following guidelines should be followed at all times:
• Treat your F-Series Crossbow with the respect that is due any bow or sporting firearm. It can be dangerous if handled improperly.
• Before use and prior to loading an arrow, check your crossbow thoroughly for worn, loose, damaged or missing parts. This will help you avoid malfunctions and possible injury.
• Never point a crossbow at anything you do not intend to shoot. When in the field or hunting be especially aware of your target, and keep in mind that hunters wear camouflage clothing which makes them difficult to identify.
• Never “dry-fire” a crossbow (never pull the trigger without an arrow properly positioned on the string). This can result in damage to the crossbow’s limbs, strings or cables, and could possibly cause personal injury. Dry-firing your F-Series Crossbow will void the warranty.
• Never release the safety until you are ready to shoot.
• Never attempt to shoot any projectile other than arrows specifically designed for your F-Series Cross bow which have an overall length of 20” or more, a minimum mass weight of 400 grains, and a minimum outside diameter of .300”.
• Never expose your crossbow to extreme heat, such as in an enclosed automobile or trunk on a hot day. Excessive heat may damage the limbs and strings of your crossbow.
A
B
C
DE
F
J
G
H
I K,L
M
N
O
P
Q
R
S
2
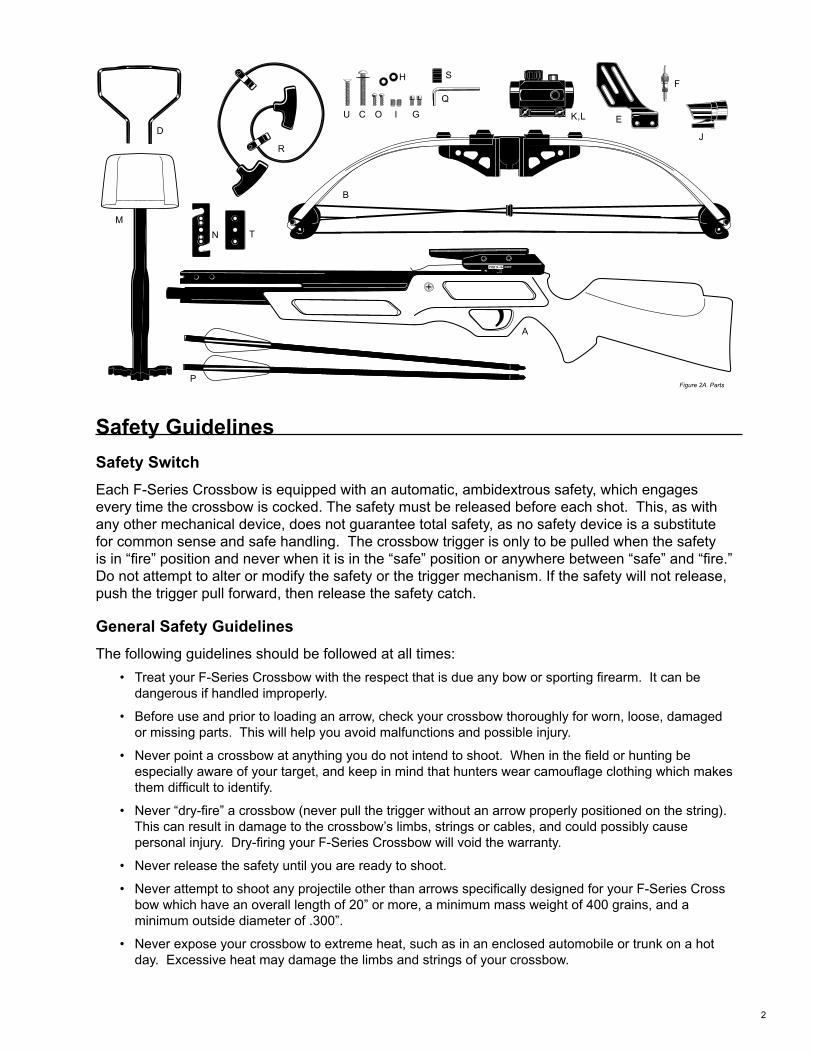
Figure 2A. Parts
U
T
• Have the bow string replaced by a professional at the first sign of significant wear.
• Do not attempt to modify the safety mechanism or other parts of your F-Series Crossbow in any way.
• Before shooting, make sure that when the limbs relax they will not strike a tree or other obstacle.
• Inspect your arrows regularly for signs of wear, splits, dents or anything that might weaken them. Tremendous stress is placed on crossbow arrows as they are released and damaged arrows could break causing damage to the crossbow or resulting in personal injury to the shooter.
• If you are carrying hunting broadheads, always carry them in such a way that the sharp edges do not cause a threat to the shooter. All sharp edges should be completely encased in a sturdy quiver when not shooting.
• Never place any part of the body into the path of the string or limb travel when your crossbow is cocked. Always keep your thumb and fingers below the Flight Deck and out of the path of cables and strings when firing the crossbow.
WARNING! EXTREME CAUTION SHOULD BE USED AT ALL TIMES WHEN HANDLING A CROSSBOW. FAILURE TO FOLLOW THESE RULES COULD RESULT IN SERIOUS INJURY OR DEATH.
AssemblyYour F-Series Crossbow should be assembled in the following order.
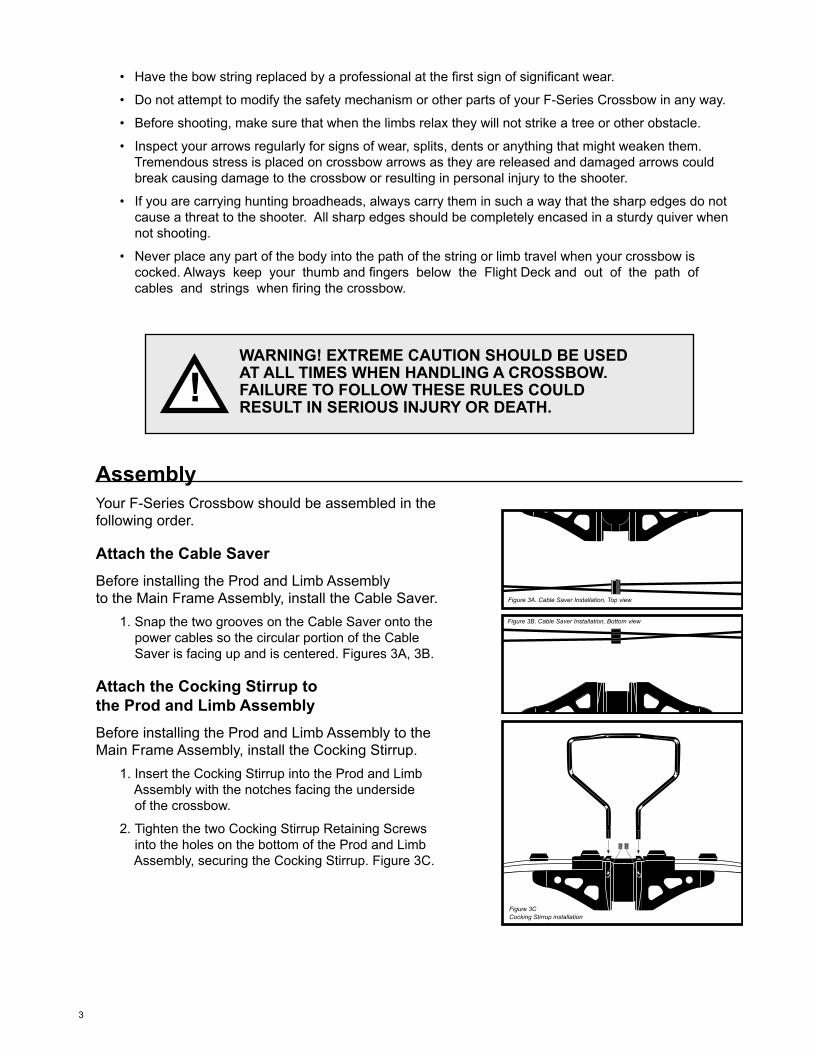
Attach the Cable Saver
Before installing the Prod and Limb Assembly to the Main Frame Assembly, install the Cable Saver.
1. Snap the two grooves on the Cable Saver onto the power cables so the circular portion of the Cable Saver is facing up and is centered. Figures 3A, 3B.
Attach the Cocking Stirrup to the Prod and Limb Assembly
Before installing the Prod and Limb Assembly to the Main Frame Assembly, install the Cocking Stirrup.
1. Insert the Cocking Stirrup into the Prod and Limb Assembly with the notches facing the underside of the crossbow.
2. Tighten the two Cocking Stirrup Retaining Screws into the holes on the bottom of the Prod and Limb Assembly, securing the Cocking Stirrup. Figure 3C.
3
Figure 3A. Cable Saver Installation, Top view
Figure 3B. Cable Saver Installation, Bottom view
Figure 3CCocking Stirrup installation
!
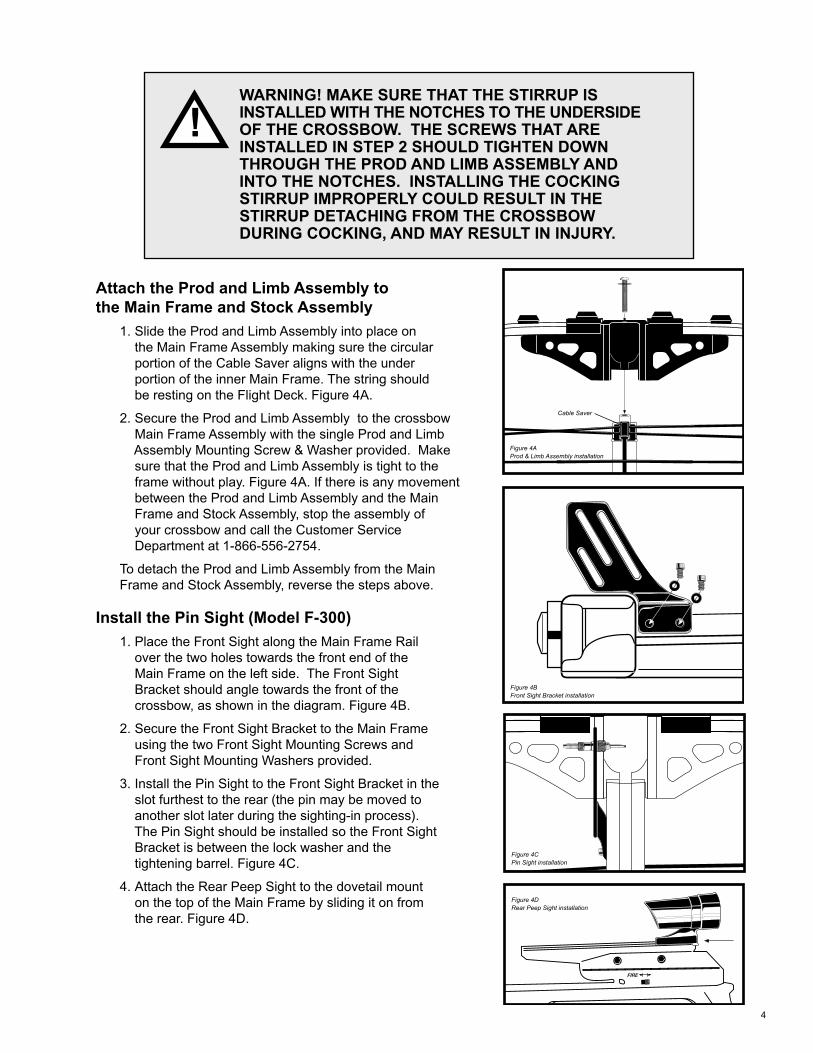
Attach the Prod and Limb Assembly to the Main Frame and Stock Assembly
1. Slide the Prod and Limb Assembly into place on the Main Frame Assembly making sure the circular portion of the Cable Saver aligns with the under portion of the inner Main Frame. The string should be resting on the Flight Deck. Figure 4A.
2. Secure the Prod and Limb Assembly to the crossbow Main Frame Assembly with the single Prod and Limb Assembly Mounting Screw & Washer provided. Make sure that the Prod and Limb Assembly is tight to the frame without play. Figure 4A. If there is any movement between the Prod and Limb Assembly and the Main Frame and Stock Assembly, stop the assembly of your crossbow and call the Customer Service Department at 1-866-556-2754.
To detach the Prod and Limb Assembly from the Main Frame and Stock Assembly, reverse the steps above.
Install the Pin Sight (Model F-300)
1. Place the Front Sight along the Main Frame Rail over the two holes towards the front end of the Main Frame on the left side. The Front Sight Bracket should angle towards the front of the crossbow, as shown in the diagram. Figure 4B.
2. Secure the Front Sight Bracket to the Main Frame using the two Front Sight Mounting Screws and Front Sight Mounting Washers provided.
3. Install the Pin Sight to the Front Sight Bracket in the slot furthest to the rear (the pin may be moved to another slot later during the sighting-in process). The Pin Sight should be installed so the Front Sight Bracket is between the lock washer and the tightening barrel. Figure 4C.
4. Attach the Rear Peep Sight to the dovetail mount on the top of the Main Frame by sliding it on from the rear. Figure 4D.
WARNING! MAKE SURE THAT THE STIRRUP IS INSTALLED WITH THE NOTCHES TO THE UNDERSIDE OF THE CROSSBOW. THE SCREWS THAT ARE INSTALLED IN STEP 2 SHOULD TIGHTEN DOWN THROUGH THE PROD AND LIMB ASSEMBLY AND INTO THE NOTCHES. INSTALLING THE COCKING STIRRUP IMPROPERLY COULD RESULT IN THE STIRRUP DETACHING FROM THE CROSSBOW DURING COCKING, AND MAY RESULT IN INJURY.
!
4
Figure 4AProd & Limb Assembly installation
Cable Saver
Figure 4B Front Sight Bracket installation
Figure 4C Pin Sight installation
Figure 4D Rear Peep Sight installation
Attach the Quiver (Steps 1 & 2 for models F-325 & F-340 only. For model F-300+ begin at step 3.)
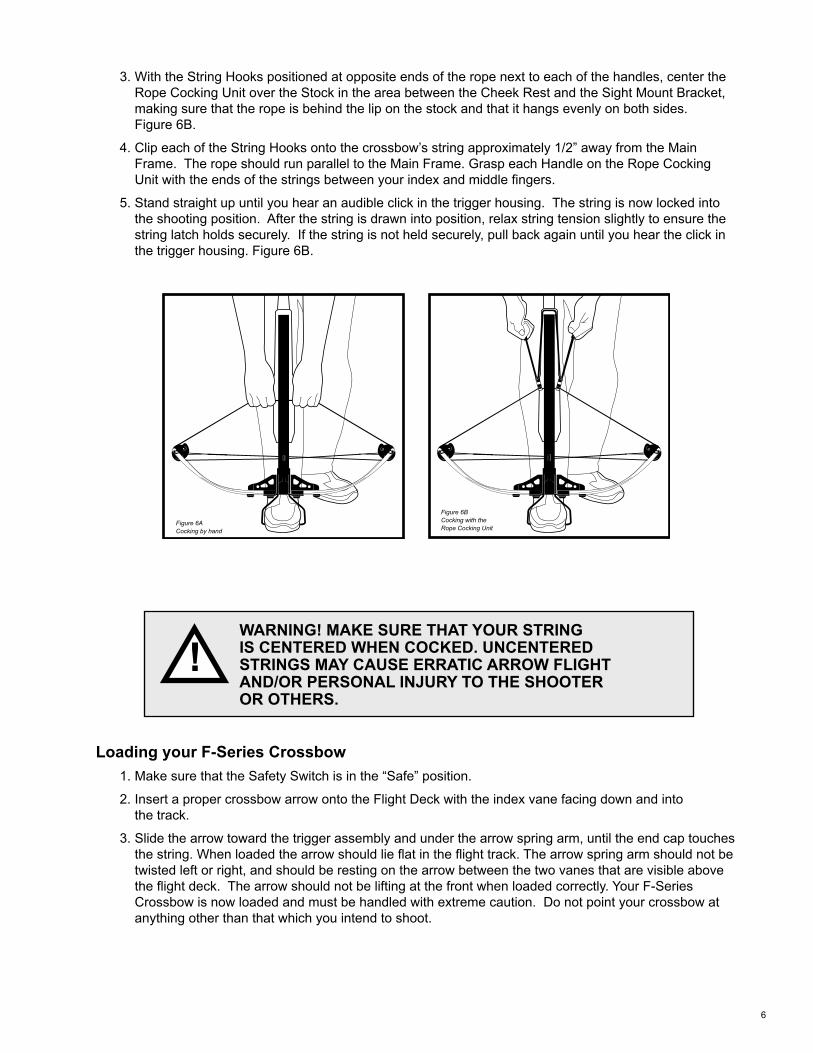
1. Remove and discard the front flat head screw in the underside of the Main Frame. Figure 5B.
2. Attach the Dovetail Mount Bracket using the 1” long flat head screw provided. Figure 5C.
3. Secure the Quick Detach Quiver Mount to the Dovetail Mount Bracket on the underside of the Main Frame, near the Prod and Limb Assembly, with the two Quiver Mount Allen Screwsprovided. Figure 5D.
4. With the underside of the crossbow facing you, and holding the quiver at a 45º angle to the installed Quick Detach Quiver Mount, insert the button on the quiver rail into the middle hole on the Mount, and twist the quiver clockwise until it snaps securely in place. Figure 5E.
Operation Follow the instructions below for safe and enjoyable operation of your new F-Series Crossbow.
Cocking by Hand
1. Move the Safety Switch to the “Fire” position.
2. With the crossbow facing down and resting on the Cocking Stirrup, place your foot completely through the Cocking Stirrup and grasp the string in each hand next to both sides of the stock. Use your hands as guides next to the stock while standing straight up until you hear an audible click in the trigger housing. The string is now locked into the shooting position. After the string is drawn into position, relax string tension slightly to ensure the string latch holds securely. If the string is not held securely, pull back again until you hear the click in the trigger housing. Figure 6A.
Cocking with the Rope Cocking Unit (Models F-325, F-340)
The effort required to cock your F-Series Crossbow by hand can be significantly reduced by using the F-Series Rope Cocking Unit (#7516-000). This accessory also enhances accuracy by ensuring perfect left-to-right string alignment every shot.
1. Move the Safety Switch to the “Fire” position.
2. With the crossbow facing down and resting on the Cocking Stirrup, place your foot completely through the Cocking Stirrup.
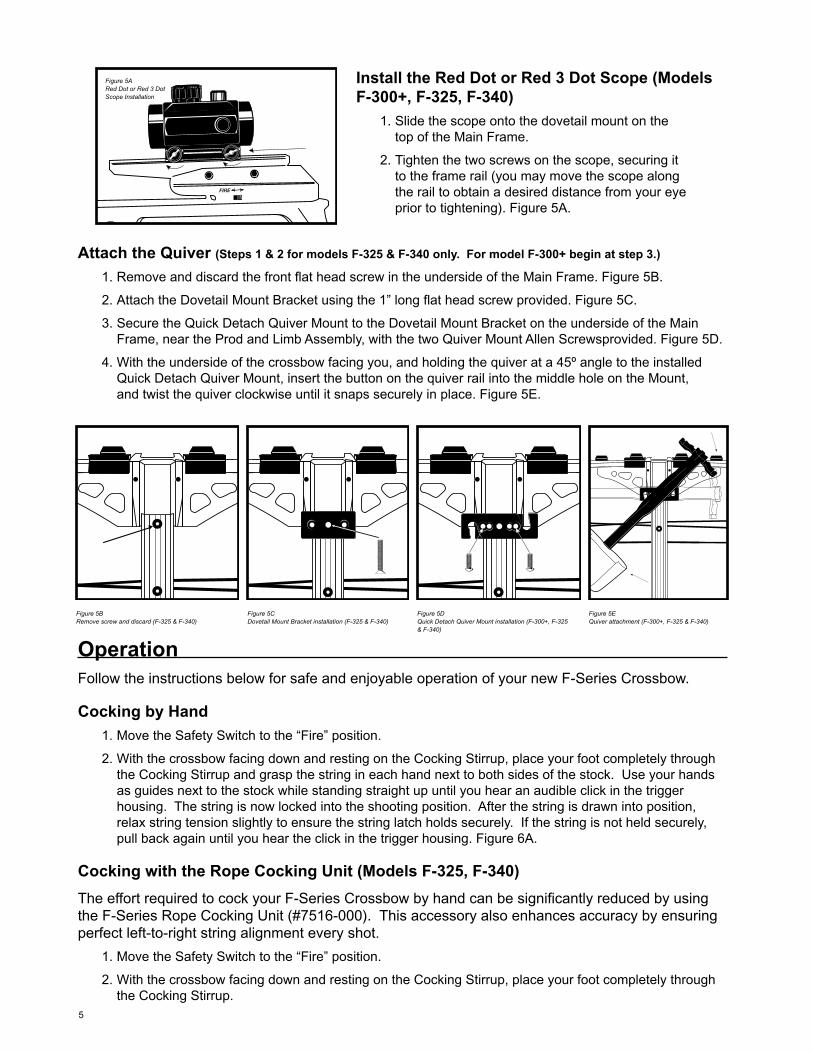
Install the Red Dot or Red 3 Dot Scope (Models F-300+, F-325, F-340)
1. Slide the scope onto the dovetail mount on the top of the Main Frame.
2. Tighten the two screws on the scope, securing it to the frame rail (you may move the scope along the rail to obtain a desired distance from your eye prior to tightening). Figure 5A.
5
Figure 5A Red Dot or Red 3 DotScope Installation
Figure 5B Remove screw and discard (F-325 & F-340)
Figure 5C Dovetail Mount Bracket installation (F-325 & F-340)
Figure 5D Quick Detach Quiver Mount installation (F-300+, F-325 & F-340)
Figure 5E Quiver attachment (F-300+, F-325 & F-340)
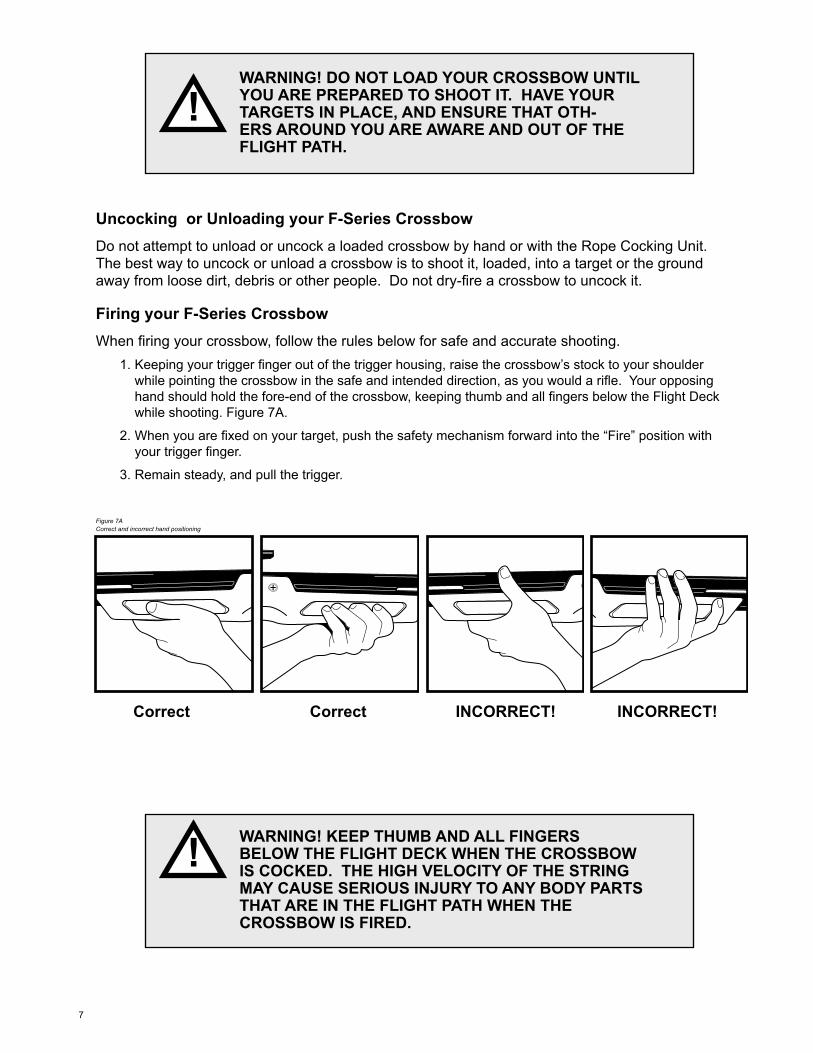
3. With the String Hooks positioned at opposite ends of the rope next to each of the handles, center the Rope Cocking Unit over the Stock in the area between the Cheek Rest and the Sight Mount Bracket, making sure that the rope is behind the lip on the stock and that it hangs evenly on both sides. Figure 6B.
4. Clip each of the String Hooks onto the crossbow’s string approximately 1/2” away from the Main Frame. The rope should run parallel to the Main Frame. Grasp each Handle on the Rope Cocking Unit with the ends of the strings between your index and middle fingers.
5. Stand straight up until you hear an audible click in the trigger housing. The string is now locked into the shooting position. After the string is drawn into position, relax string tension slightly to ensure the string latch holds securely. If the string is not held securely, pull back again until you hear the click in the trigger housing. Figure 6B.
WARNING! MAKE SURE THAT YOUR STRING IS CENTERED WHEN COCKED. UNCENTERED STRINGS MAY CAUSE ERRATIC ARROW FLIGHT AND/OR PERSONAL INJURY TO THE SHOOTER OR OTHERS.
Loading your F-Series Crossbow
1. Make sure that the Safety Switch is in the “Safe” position.
2. Insert a proper crossbow arrow onto the Flight Deck with the index vane facing down and into the track.
3. Slide the arrow toward the trigger assembly and under the arrow spring arm, until the end cap touches the string. When loaded the arrow should lie flat in the flight track. The arrow spring arm should not be twisted left or right, and should be resting on the arrow between the two vanes that are visible above the flight deck. The arrow should not be lifting at the front when loaded correctly. Your F-Series Crossbow is now loaded and must be handled with extreme caution. Do not point your crossbow at anything other than that which you intend to shoot.
!
6
Figure 6A Cocking by hand
Figure 6B Cocking with the Rope Cocking Unit
WARNING! DO NOT LOAD YOUR CROSSBOW UNTIL YOU ARE PREPARED TO SHOOT IT. HAVE YOUR TARGETS IN PLACE, AND ENSURE THAT OTH-ERS AROUND YOU ARE AWARE AND OUT OF THE FLIGHT PATH.
Uncocking or Unloading your F-Series Crossbow
Do not attempt to unload or uncock a loaded crossbow by hand or with the Rope Cocking Unit. The best way to uncock or unload a crossbow is to shoot it, loaded, into a target or the ground away from loose dirt, debris or other people. Do not dry-fire a crossbow to uncock it.
Firing your F-Series Crossbow
When firing your crossbow, follow the rules below for safe and accurate shooting.
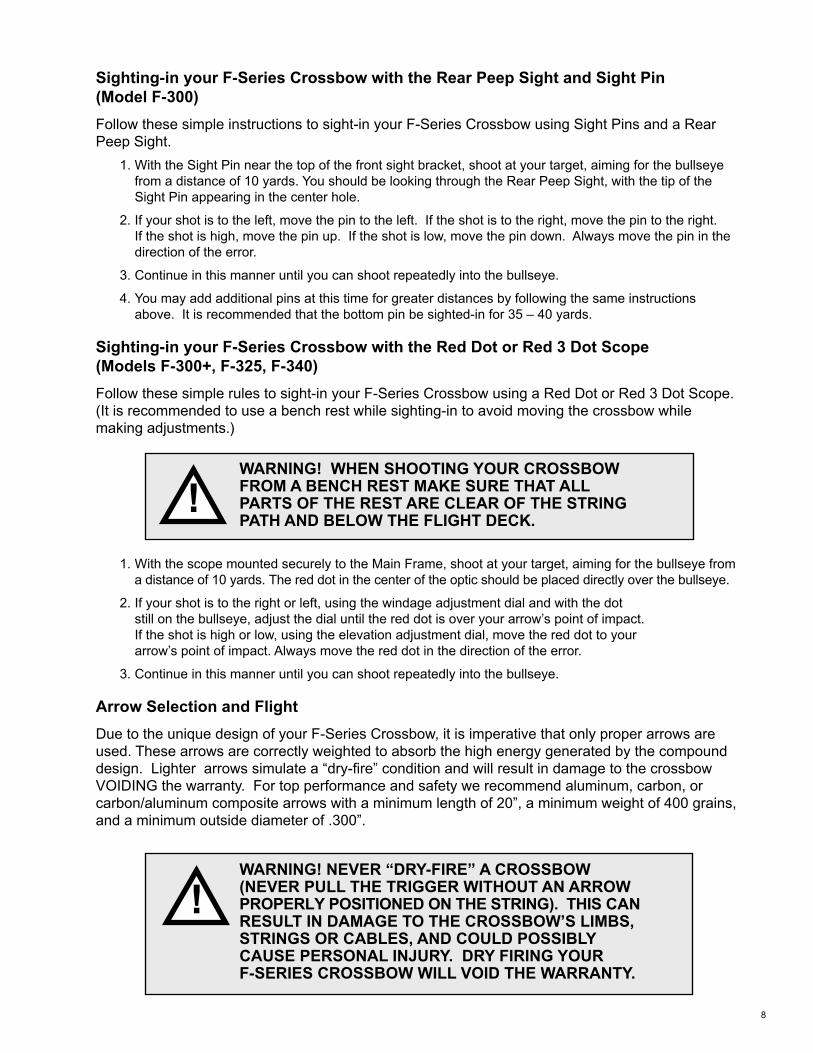
1. Keeping your trigger finger out of the trigger housing, raise the crossbow’s stock to your shoulder while pointing the crossbow in the safe and intended direction, as you would a rifle. Your opposing hand should hold the fore-end of the crossbow, keeping thumb and all fingers below the Flight Deck while shooting. Figure 7A.
2. When you are fixed on your target, push the safety mechanism forward into the “Fire” position with your trigger finger.
3. Remain steady, and pull the trigger.
Correct Correct INCORRECT! INCORRECT!
WARNING! KEEP THUMB AND ALL FINGERS BELOW THE FLIGHT DECK WHEN THE CROSSBOW IS COCKED. THE HIGH VELOCITY OF THE STRING MAY CAUSE SERIOUS INJURY TO ANY BODY PARTS THAT ARE IN THE FLIGHT PATH WHEN THE CROSSBOW IS FIRED.
!
!
7
Figure 7A Correct and incorrect hand positioning
Sighting-in your F-Series Crossbow with the Rear Peep Sight and Sight Pin (Model F-300)
Follow these simple instructions to sight-in your F-Series Crossbow using Sight Pins and a Rear Peep Sight.
1. With the Sight Pin near the top of the front sight bracket, shoot at your target, aiming for the bullseye from a distance of 10 yards. You should be looking through the Rear Peep Sight, with the tip of the Sight Pin appearing in the center hole.
2. If your shot is to the left, move the pin to the left. If the shot is to the right, move the pin to the right. If the shot is high, move the pin up. If the shot is low, move the pin down. Always move the pin in the direction of the error.
3. Continue in this manner until you can shoot repeatedly into the bullseye.
4. You may add additional pins at this time for greater distances by following the same instructions above. It is recommended that the bottom pin be sighted-in for 35 – 40 yards.
Sighting-in your F-Series Crossbow with the Red Dot or Red 3 Dot Scope (Models F-300+, F-325, F-340)
Follow these simple rules to sight-in your F-Series Crossbow using a Red Dot or Red 3 Dot Scope. (It is recommended to use a bench rest while sighting-in to avoid moving the crossbow while making adjustments.)
WARNING! WHEN SHOOTING YOUR CROSSBOW FROM A BENCH REST MAKE SURE THAT ALL PARTS OF THE REST ARE CLEAR OF THE STRING PATH AND BELOW THE FLIGHT DECK.
1. With the scope mounted securely to the Main Frame, shoot at your target, aiming for the bullseye from a distance of 10 yards. The red dot in the center of the optic should be placed directly over the bullseye.
2. If your shot is to the right or left, using the windage adjustment dial and with the dot still on the bullseye, adjust the dial until the red dot is over your arrow’s point of impact. If the shot is high or low, using the elevation adjustment dial, move the red dot to your arrow’s point of impact. Always move the red dot in the direction of the error.
3. Continue in this manner until you can shoot repeatedly into the bullseye.
Arrow Selection and Flight
Due to the unique design of your F-Series Crossbow, it is imperative that only proper arrows are used. These arrows are correctly weighted to absorb the high energy generated by the compound design. Lighter arrows simulate a “dry-fire” condition and will result in damage to the crossbow VOIDING the warranty. For top performance and safety we recommend aluminum, carbon, or carbon/aluminum composite arrows with a minimum length of 20”, a minimum weight of 400 grains, and a minimum outside diameter of .300”.
WARNING! NEVER “DRY-FIRE” A CROSSBOW (NEVER PULL THE TRIGGER WITHOUT AN ARROW PROPERLY POSITIONED ON THE STRING). THIS CAN RESULT IN DAMAGE TO THE CROSSBOW’S LIMBS, STRINGS OR CABLES, AND COULD POSSIBLY CAUSE PERSONAL INJURY. DRY FIRING YOUR F-SERIES CROSSBOW WILL VOID THE WARRANTY.
!
!
8
Troubleshooting
Arrow Flight
Possibly the greatest variable in shooting accuracy is the arrows used. Differences in materials, weights, production methods, fletching, and other factors greatly affect arrow flight. Generally speaking, target arrows are more accurate than hunting arrows. Because of the surface area of the fixed bladed broadheads used in hunting, there is a tendency for the arrows to “plane.” To help overcome this we suggest that practice be done well in advance of the hunting season with the type of arrows you will be using to achieve consistent groupings. Heavy, stiff-spined arrows with fletching hold more energy for hunting at reasonable ranges (15 – 35 yards). Lighter arrows are much faster, however they hold less energy. If you are having trouble with arrow flight, consider the following:
1. If the string has been changed, was it done by a Fred Bear authorized service technician?
2. Are the arrows straight and fletches (vanes) in good condition?
3. Does the arrow lie flat (true) on the flight groove? Is the arrow retainer too tight or twisted?
4. Does the arrow slide smoothly and evenly into the trigger mechanism?
5. When cocking your crossbow, are you pulling equally on each side of the string? You should mark your relaxed string on each side of the frame. After cocking the crossbow, make sure the marks are showing evenly on each side of the trigger mechanism.
6. When cocking your crossbow, make a conscious effort to hold the string on the Flight Deck so as not to lift over the arrow retainer.
7. Are you putting one fletching down in the flight groove?
8. When using broadheads, line up the blades with the fletches on the arrow (using o-ring).
String Fraying
1. Use a lube/wax on the center string serving and cables every 5 – 10 shots and on the Flight Deck when needed.
2. Keep the trigger mechanism and Flight Deck free of obstruction.
3. Check for metal burrs on the Flight Deck and arrow end caps.
WARNING! DO NOT USE WOODEN ARROWS. WOOD-EN ARROWS ARE NOT STRONG ENOUGH TO HANDLE THE ENORMOUS STRESS EXERTED BY YOUR F-SERIES CROSSBOW, AND MAY RESULT IN DAMAGE TO THE CROSSBOW OR PERSONAL INJURY TO YOURSELF OR OTHERS.
!
9
Care and Maintenance
Care of String
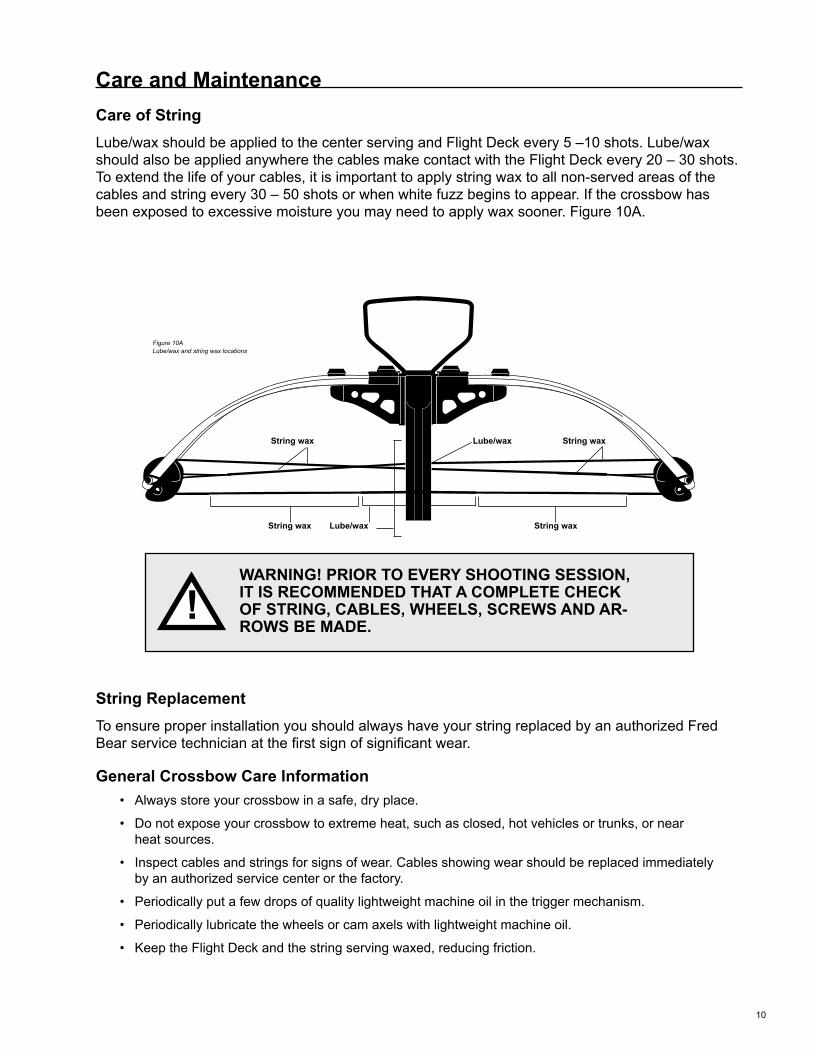
Lube/wax should be applied to the center serving and Flight Deck every 5 –10 shots. Lube/wax should also be applied anywhere the cables make contact with the Flight Deck every 20 – 30 shots. To extend the life of your cables, it is important to apply string wax to all non-served areas of the cables and string every 30 – 50 shots or when white fuzz begins to appear. If the crossbow has been exposed to excessive moisture you may need to apply wax sooner. Figure 10A.
WARNING! PRIOR TO EVERY SHOOTING SESSION, IT IS RECOMMENDED THAT A COMPLETE CHECK OF STRING, CABLES, WHEELS, SCREWS AND AR-ROWS BE MADE.
String Replacement
To ensure proper installation you should always have your string replaced by an authorized Fred Bear service technician at the first sign of significant wear.
General Crossbow Care Information
• Always store your crossbow in a safe, dry place.
• Do not expose your crossbow to extreme heat, such as closed, hot vehicles or trunks, or near heat sources.
• Inspect cables and strings for signs of wear. Cables showing wear should be replaced immediately by an authorized service center or the factory.
• Periodically put a few drops of quality lightweight machine oil in the trigger mechanism.
• Periodically lubricate the wheels or cam axels with lightweight machine oil.
• Keep the Flight Deck and the string serving waxed, reducing friction.
!
10
Figure 10A Lube/wax and string wax locations
Lube/wax
Lube/wax
String wax String wax
String wax String wax
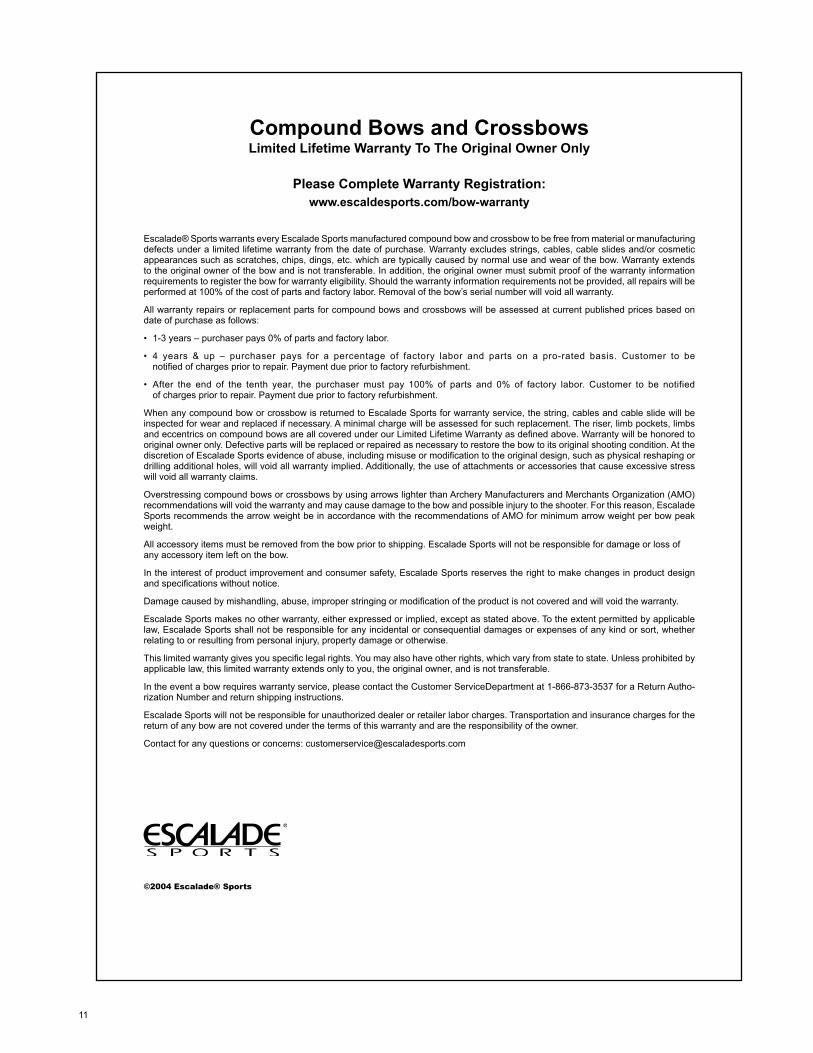
Compound Bows and CrossbowsLimited Lifetime Warranty To The Original Owner Only
Please Complete Warranty Registration: www.escaldesports.com/bow-warranty
Escalade® Sports warrants every Escalade Sports manufactured compound bow and crossbow to be free from material or manufacturing defects under a limited lifetime warranty from the date of purchase. Warranty excludes strings, cables, cable slides and/or cosmetic appearances such as scratches, chips, dings, etc. which are typically caused by normal use and wear of the bow. Warranty extends to the original owner of the bow and is not transferable. In addition, the original owner must submit proof of the warranty information requirements to register the bow for warranty eligibility. Should the warranty information requirements not be provided, all repairs will be performed at 100% of the cost of parts and factory labor. Removal of the bow’s serial number will void all warranty.
All warranty repairs or replacement parts for compound bows and crossbows will be assessed at current published prices based on date of purchase as follows:
• 1-3 years – purchaser pays 0% of parts and factory labor.
• 4 years & up – purchaser pays for a percentage of factory labor and parts on a pro-rated basis. Customer to be notified of charges prior to repair. Payment due prior to factory refurbishment.
• After the end of the tenth year, the purchaser must pay 100% of parts and 0% of factory labor. Customer to be notified of charges prior to repair. Payment due prior to factory refurbishment.
When any compound bow or crossbow is returned to Escalade Sports for warranty service, the string, cables and cable slide will be inspected for wear and replaced if necessary. A minimal charge will be assessed for such replacement. The riser, limb pockets, limbs and eccentrics on compound bows are all covered under our Limited Lifetime Warranty as defined above. Warranty will be honored to original owner only. Defective parts will be replaced or repaired as necessary to restore the bow to its original shooting condition. At the discretion of Escalade Sports evidence of abuse, including misuse or modification to the original design, such as physical reshaping or drilling additional holes, will void all warranty implied. Additionally, the use of attachments or accessories that cause excessive stress will void all warranty claims.
Overstressing compound bows or crossbows by using arrows lighter than Archery Manufacturers and Merchants Organization (AMO) recommendations will void the warranty and may cause damage to the bow and possible injury to the shooter. For this reason, Escalade Sports recommends the arrow weight be in accordance with the recommendations of AMO for minimum arrow weight per bow peak weight.
All accessory items must be removed from the bow prior to shipping. Escalade Sports will not be responsible for damage or loss of any accessory item left on the bow.
In the interest of product improvement and consumer safety, Escalade Sports reserves the right to make changes in product design and specifications without notice.
Damage caused by mishandling, abuse, improper stringing or modification of the product is not covered and will void the warranty.
Escalade Sports makes no other warranty, either expressed or implied, except as stated above. To the extent permitted by applicable law, Escalade Sports shall not be responsible for any incidental or consequential damages or expenses of any kind or sort, whether relating to or resulting from personal injury, property damage or otherwise.
This limited warranty gives you specific legal rights. You may also have other rights, which vary from state to state. Unless prohibited by applicable law, this limited warranty extends only to you, the original owner, and is not transferable.
In the event a bow requires warranty service, please contact the Customer ServiceDepartment at 1-866-873-3537 for a Return Autho-rization Number and return shipping instructions.
Escalade Sports will not be responsible for unauthorized dealer or retailer labor charges. Transportation and insurance charges for the return of any bow are not covered under the terms of this warranty and are the responsibility of the owner.
Contact for any questions or concerns: [email protected]
©2004 Escalade® Sports
11