CRM Fundamentals- II
302
© SAP AG CR580 0-1 THE BEST-RUN BUSINESSES RUN SAP © SAP AG 2008 TCRM20 CRM – Fundamentals II Part 2/2 SAP CRM 2007 (6.0) Version 81 Material number: 50090471
-
Upload
srini-vasan -
Category
Technology
-
view
446 -
download
13
Transcript of CRM Fundamentals- II
© SAP AG CR580 0-1
© SAP 2008
TCRM20 CRM – Fundamentals II, Part 2/2FS310 Inkasso/Exkasso
THE BEST-RUN BUSINESSES RUN SAP
© SAP AG 2008
TCRM20CRM – Fundamentals IIPart 2/2
SAP CRM 2007 (6.0)
Version 81
Material number: 50090471

© SAP AG CR580 0-2
© SAP AG CR580 0-3
Copyright 2008 SAP AG. All rights reserved.
Neither this training manual nor any part thereof maybe copied or reproduced in any form or by any means,or translated into another language, without the priorconsent of SAP AG. The information contained in thisdocument is subject to change and supplement without prior notice.
All rights reserved.
Copyright
Trademarks:
Microsoft ®, Windows ®, NT ®, PowerPoint ®, WinWord ®, Excel ®, Project ®, SQL-Server ®, Multimedia Viewer ®, Video for Windows ®, Internet Explorer ®, NetShow ®, and HTML Help ® are registered trademarks of Microsoft Corporation.
Lotus ScreenCam ® is a registered trademark of Lotus Development Corporation.
Vivo ® and VivoActive ® are registered trademarks of RealNetworks, Inc.
ARIS Toolset ® is a registered Trademark of IDS Prof. Scheer GmbH, Saarbrücken
Adobe ® and Acrobat ® are registered trademarks of Adobe Systems Inc.
TouchSend Index ® is a registered trademark of TouchSend Corporation.
Visio ® is a registered trademark of Visio Corporation.
IBM ®, OS/2 ®, DB2/6000 ® and AIX ® are a registered trademark of IBM Corporation.
Indeo ® is a registered trademark of Intel Corporation.
Netscape Navigator ®, and Netscape Communicator ® are registered trademarks of Netscape Communications, Inc.
OSF/Motif ® is a registered trademark of Open Software Foundation.
ORACLE ® is a registered trademark of ORACLE Corporation, California, USA.
INFORMIX ®-OnLine for SAP is a registered trademark of Informix Software Incorporated.
UNIX ® and X/Open ® are registered trademarks of SCO Santa Cruz Operation.
ADABAS ® is a registered trademark of Software AG
© SAP AG CR580 0-4
The following are trademarks or registered trademarks of SAP AG; ABAP/4, InterSAP, RIVA, R/2, R/3, R/3 Retail, SAP (Word), SAPaccess, SAPfile, SAPfind, SAPmail, SAPoffice, SAPscript, SAPtime, SAPtronic, SAP-EDI, SAP EarlyWatch, SAP ArchiveLink, SAP Business Workflow, and ALE/WEB. The SAP logo and all other SAP products, services, logos, or brand names included herein are also trademarks or registered trademarks of SAP AG.
Other products, services, logos, or brand names included herein are trademarks or registered trademarks of their respective owners.

© SAP AG CR580 1-1
© SAP 2008
Section: CRM WebClient UI
CRM WebClient UICRM WebClient UI

© SAP AG CR580 1-2
© SAP 2008
CRM WebClient UI – Section Outline
Units:
1. UI Concepts
2. Business Roles
3. Navigation Bar
4. Architecture
5. UI Configuration
6. Easy Enhancement Workbench
7. Component Enhancement Concept

© SAP AG CR580 2-1
© SAP 2008
UI Concepts
Contents:UI Concepts
© SAP AG CR580 2-2
© SAP 2008
UI Concepts: Unit Objectives
After completing this unit, you will be able to:Review the SAP CRM User Interface and its elementsList the terminology of the different screen areasState what functions the different UI elements havePersonalize the different UI elements

© SAP AG CR580 2-3
© SAP 2008
UI Concepts: Business Example
You want to get an overview of the SAP CRM User interface (CRM WebClient UI) with the terminology of the different screen areas and elements and be able to personalize it to your own needs

© SAP AG CR580 2-4
© SAP 2008© SAP 2007 / Page 1
The Continuous Focus on Usability: The SAP UI Roadmap
PCUI
IC Web
Client
SAPGUI
CRM Web Client

© SAP AG CR580 2-5
© SAP 2008© SAP 2007 / Page 1
Details of the SAP Approach to the New UI
SAP CRM WebClient UI Key goals to developing the new User Interface:Equal focus on:
New UI interaction and navigation conceptEasy and flexible UI configuration
Focus on hybrid deployment option: Similarity between SAP CRM On-Demand and SAP CRM 2007
SAP CRM WebClient UI is “as consistent as possible but at the same time as specific as necessary”(e.g., business use cases are main driver)
No changes have been made to the general architecture of the SAP CRM server or the business process customization
The UI layers have been completely changed; however, the basic UI technology has not changed, and is still based on Business Server Pages (BSP)
End-user focused functionality
… as the first step into a new era of SAP CRM
user interfaces and usability
SAP CRM 2007 offers only one web based user interface, the CRM WebClient UI. PCUI will not be supported any longer. The new UI concept is based on the proven IC Web Client technology and in contradiction to PCUI no portal is needed.
SAP GUI will still but only be used by Administrators, Developers and for Customizing tasks.
The look and feel is more like a known web application style. The navigation is clear and intuitive.
The new UI also delivers a higher productivity due to e.g. groupware integration, browser printing and the new flexible advanced search.
Also see OSS note 1118231 (Supported user interfaces for SAP CRM) and note 1114557 (SAP CRM 2007 Internet Browser Releases).

© SAP AG CR580 2-6
© SAP 2008© SAP 2007 / Page 1
SAP CRM WebClient UI: Introduced WithSAP CRM 2006s
SAPGUI for Windows
Interaction Center Web Client
Lessons learned from existing user interfacesSAP CRM On-Demandis the first step
Customer feedback(e.g., ASUG, DSAG, usability tests)Market analysis
SAP CRM WebClient UI
SAP harmonized the online SAP CRM User Interface with SAP CRM Web Client The CRM Web Client is designed for the business user, providing a role-based workspace that is easy to use and navigate
People-Centric User Interface
SAP GUI only for
administrative tasks!
© SAP AG CR580 2-7
© SAP 2008
New UI Concept – Screen Structure
Workarea
NavigationArea
Header
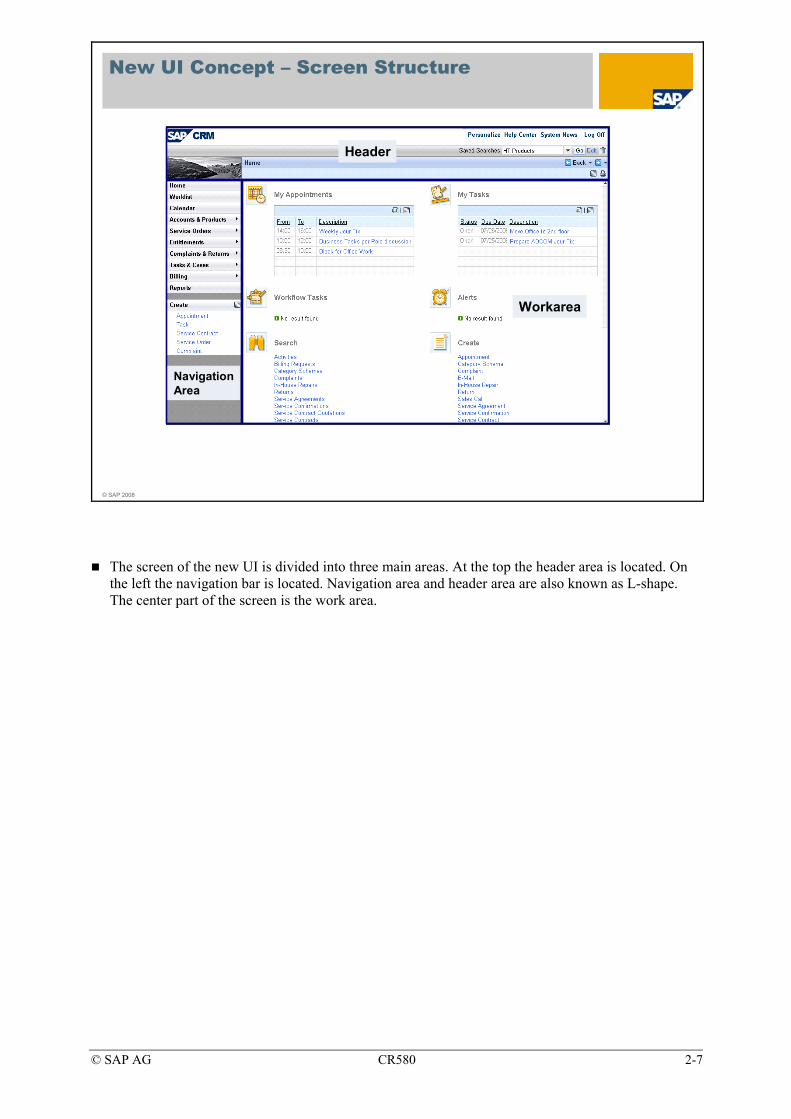
The screen of the new UI is divided into three main areas. At the top the header area is located. On the left the navigation bar is located. Navigation area and header area are also known as L-shape. The center part of the screen is the work area.

© SAP AG CR580 2-8
© SAP 2008
UI Element: L-Shape
54
3 2
1
6
1. System Links
2. Saved Searches
3. Work Area Title
4. History
5. Navigation Bar
6. Quick Create Links
The L-shape provides easy global navigation throughout the entire SAP CRM application. Generic shortcuts for fast data entry, access, and other information are also included. The L-shape consists of a header (top) and navigation (left-hand) area.
The L-shape provides easy global navigation throughout the entire SAP CRM application. Generic shortcuts for fast data entry, access, and other information are also included. The L-shape consists of a header (top) and navigation (left-hand) area.
The position and size of the L-shape is static and its content can be configured as business-role dependent.
L-shape characteristics
• Static position and size
• The specific content of the L-shape can be configured as role-dependent
© SAP AG CR580 2-9
© SAP 2008
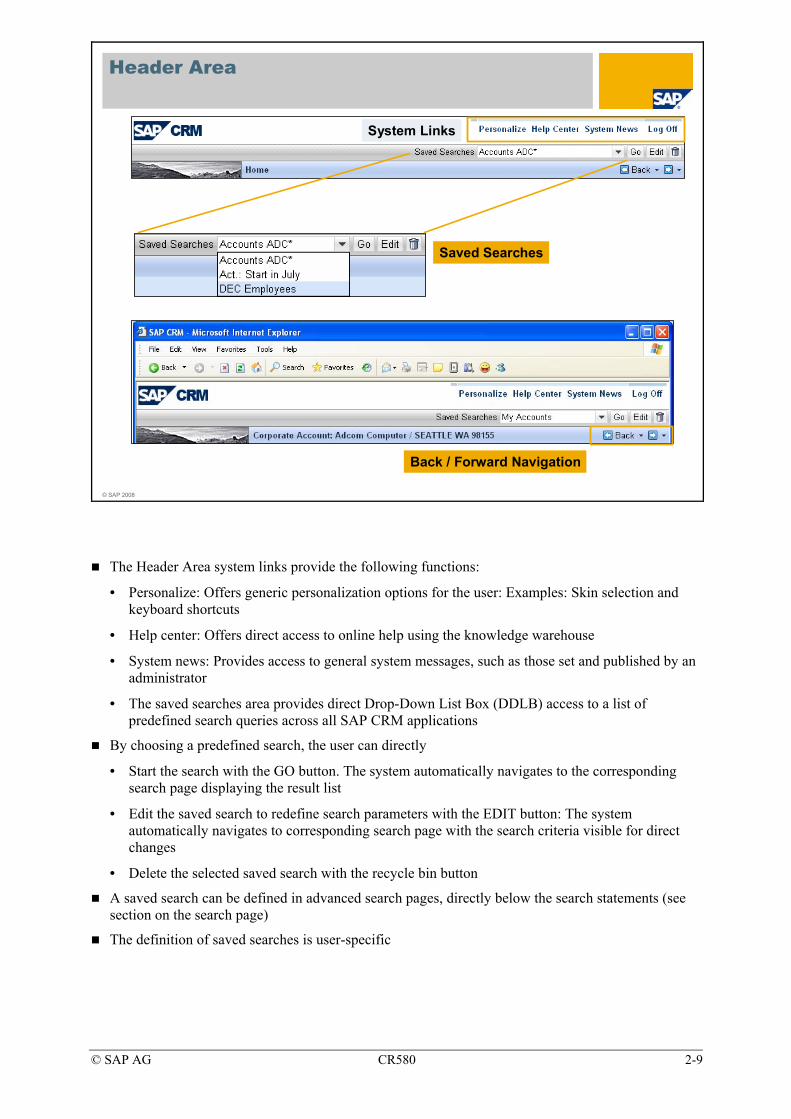
Header Area
System Links
Saved Searches
Back / Forward Navigation
The Header Area system links provide the following functions:
• Personalize: Offers generic personalization options for the user: Examples: Skin selection and keyboard shortcuts
• Help center: Offers direct access to online help using the knowledge warehouse
• System news: Provides access to general system messages, such as those set and published by an administrator
• The saved searches area provides direct Drop-Down List Box (DDLB) access to a list of predefined search queries across all SAP CRM applications
By choosing a predefined search, the user can directly
• Start the search with the GO button. The system automatically navigates to the corresponding search page displaying the result list
• Edit the saved search to redefine search parameters with the EDIT button: The system automatically navigates to corresponding search page with the search criteria visible for direct changes
• Delete the selected saved search with the recycle bin button
A saved search can be defined in advanced search pages, directly below the search statements (see section on the search page)
The definition of saved searches is user-specific
© SAP AG CR580 2-10
© SAP 2008
Work Center 2
Work Center 3
Work Center 4
Work Center 1
Work Center 6
Reports
Work Center 5
Entry 1
Entry 2
Entry 3
Entry 4
Entry 5
Entry 6
Worklist
Calendar
HOME
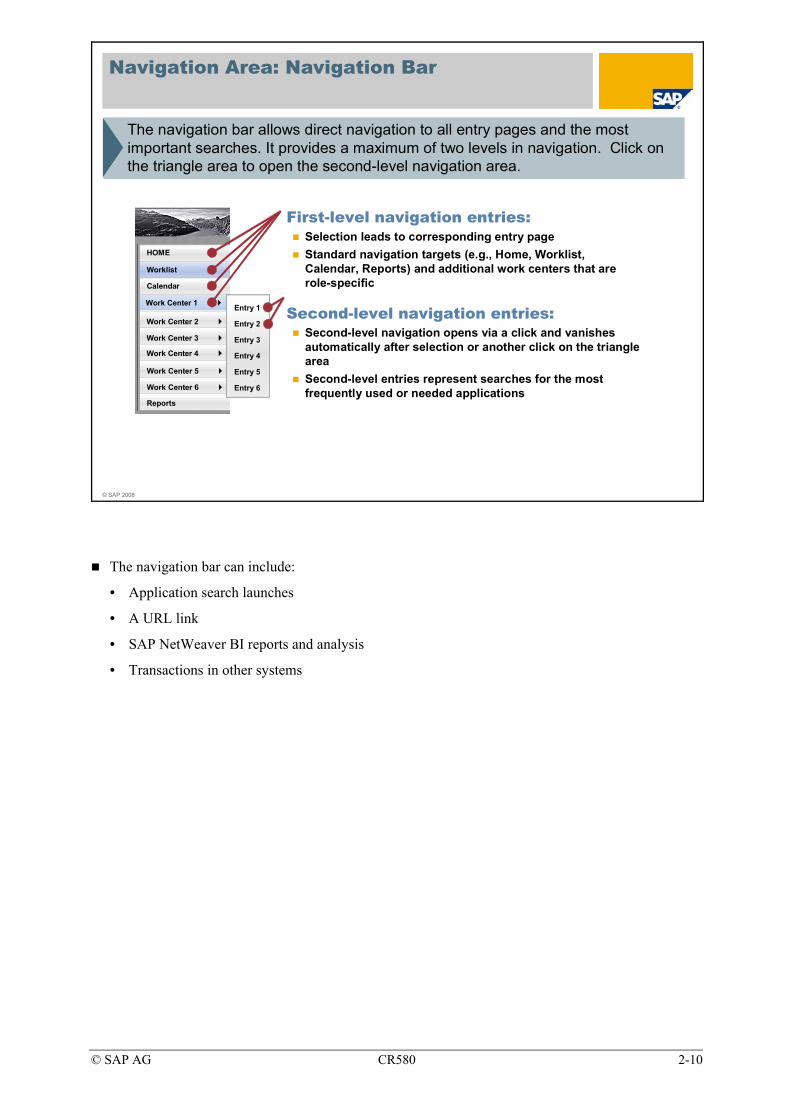
Navigation Area: Navigation Bar
First-level navigation entries:Selection leads to corresponding entry pageStandard navigation targets (e.g., Home, Worklist, Calendar, Reports) and additional work centers that are role-specific
Second-level navigation entries:Second-level navigation opens via a click and vanishes automatically after selection or another click on the triangle areaSecond-level entries represent searches for the most frequently used or needed applications
The navigation bar allows direct navigation to all entry pages and the most important searches. It provides a maximum of two levels in navigation. Click on the triangle area to open the second-level navigation area.
The navigation bar can include:
• Application search launches
• A URL link
• SAP NetWeaver BI reports and analysis
• Transactions in other systems

© SAP AG CR580 2-11
© SAP 2008
Navigation Area: Navigation Bar – Work Centers
Work center pageSearch
A Work Center is a flexible grouping of applications and information that logically belong to each other from the viewpoint of a business role
Work centers:
• Display a work center page or directly open a search
• Example: Various functions that sales employees need are grouped together under the Work Center Sales Operations
- In the second-level menu search pages can be accessed directly
- Additional application searches, direct creation options, and links to related reports are available on the work center page
• The grouping of work centers and the content of a work center page are configurable per business role.
© SAP AG CR580 2-12
© SAP 2008
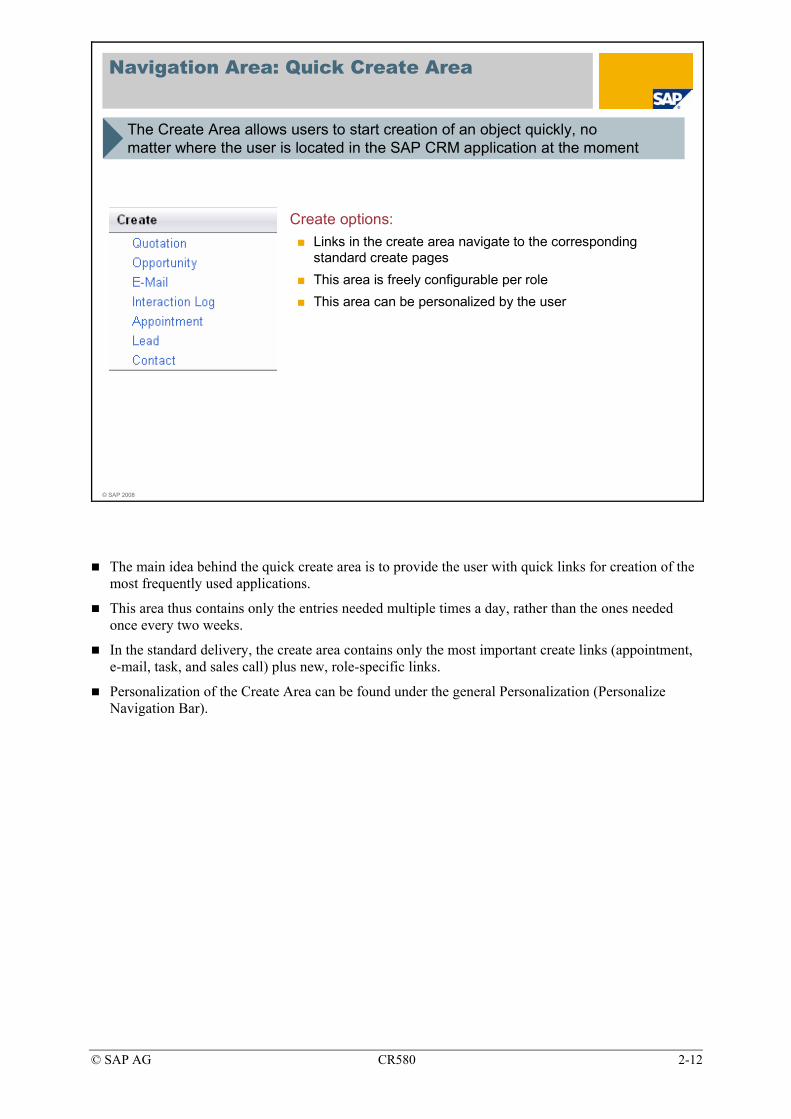
Navigation Area: Quick Create Area
Create options:Links in the create area navigate to the corresponding standard create pagesThis area is freely configurable per roleThis area can be personalized by the user
The Create Area allows users to start creation of an object quickly, no matter where the user is located in the SAP CRM application at the moment
The main idea behind the quick create area is to provide the user with quick links for creation of the most frequently used applications.
This area thus contains only the entries needed multiple times a day, rather than the ones needed once every two weeks.
In the standard delivery, the create area contains only the most important create links (appointment, e-mail, task, and sales call) plus new, role-specific links.
Personalization of the Create Area can be found under the general Personalization (Personalize Navigation Bar).

© SAP AG CR580 2-13
© SAP 2008
Entry Page: HOME
The HOME page is the starting point for every user in daily business. It contains the most important personal information and access to the most frequently used tools.
The HOME page provides:
• A quick, direct overview of the current day
• Hyperlinks to more detailed information
• Predefined content for
- My appointments today
- My tasks today
- Reports
- Alerts
- Workflow tasks
The HOME page:
• Can be configured per role
• Available content and screen structure can be personalized by the user, e.g. via Drag & Drop

© SAP AG CR580 2-14
© SAP 2008
Entry Page: Worklist
The Worklist provides a complete overview of information pushed to the user. It is divided into alerts and workflow tasks.
Alerts
Workflow Tasks
The Worklist:
• Contains information about alerts and workflow tasks pushed to the users
• Both types can be triggered manually or automatically by SAP CRM to inform users about an issue or asking them to take action
• Several predefined alerts and workflows are delivered with SAP CRM (campaign approval workflow, accept lead workflow, lost opportunity alert, and so on)
• Within a business role, smaller content areas for alerts and workflows can be embedded directly in the HOME page

© SAP AG CR580 2-15
© SAP 2008
Entry Page: Calendar
The Calendar page provides a graphical overview of appointments for today and of open tasks in an presentation similar to that of Outlook
The Calendar:
• allows a graphical overview of today’s appointments
• allows switching between daily, weekly, and monthly views
• allows switching to a colleague’s calendar
• provides an overview of the next two months
• provides a list of open tasks
• provides a option to directly create an appointment from the daily view
Client-based Groupware Integration allows to synchronize appointments with Groupware solutions.
© SAP AG CR580 2-16
© SAP 2008
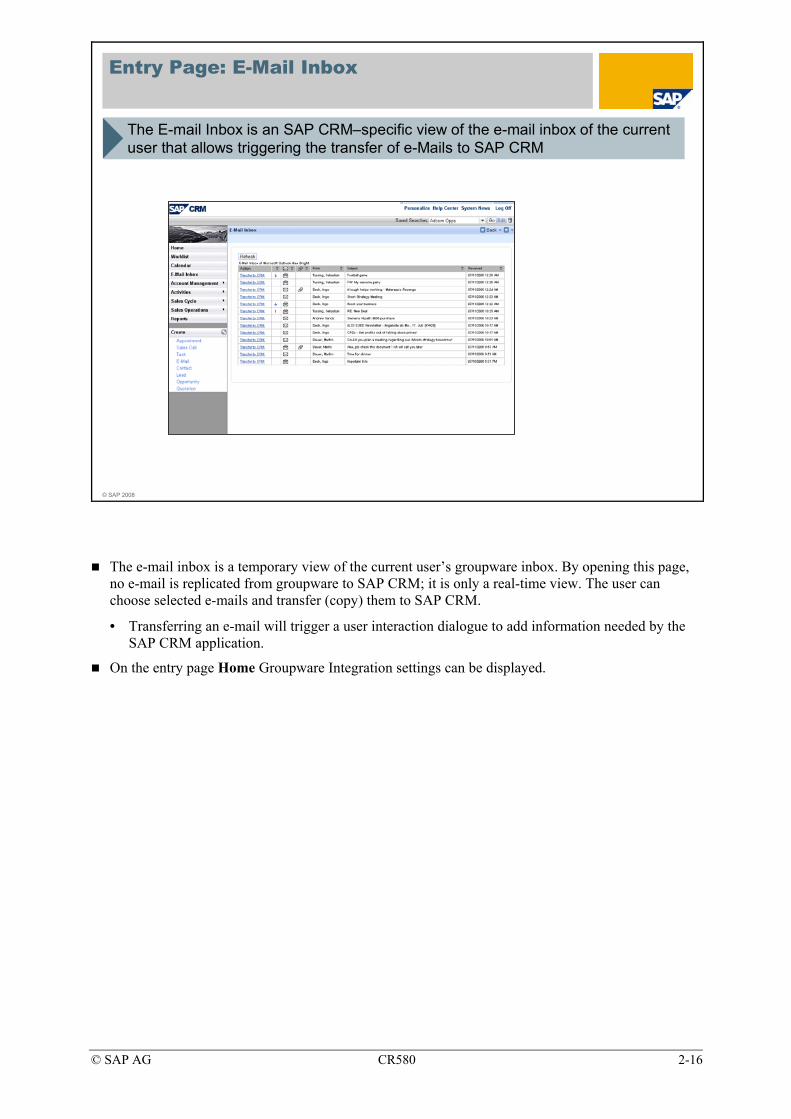
Entry Page: E-Mail Inbox
The E-mail Inbox is an SAP CRM–specific view of the e-mail inbox of the current user that allows triggering the transfer of e-Mails to SAP CRM
The e-mail inbox is a temporary view of the current user’s groupware inbox. By opening this page, no e-mail is replicated from groupware to SAP CRM; it is only a real-time view. The user can choose selected e-mails and transfer (copy) them to SAP CRM.
• Transferring an e-mail will trigger a user interaction dialogue to add information needed by the SAP CRM application.
On the entry page Home Groupware Integration settings can be displayed.
© SAP AG CR580 2-17
© SAP 2008
Entry Page: Work Center
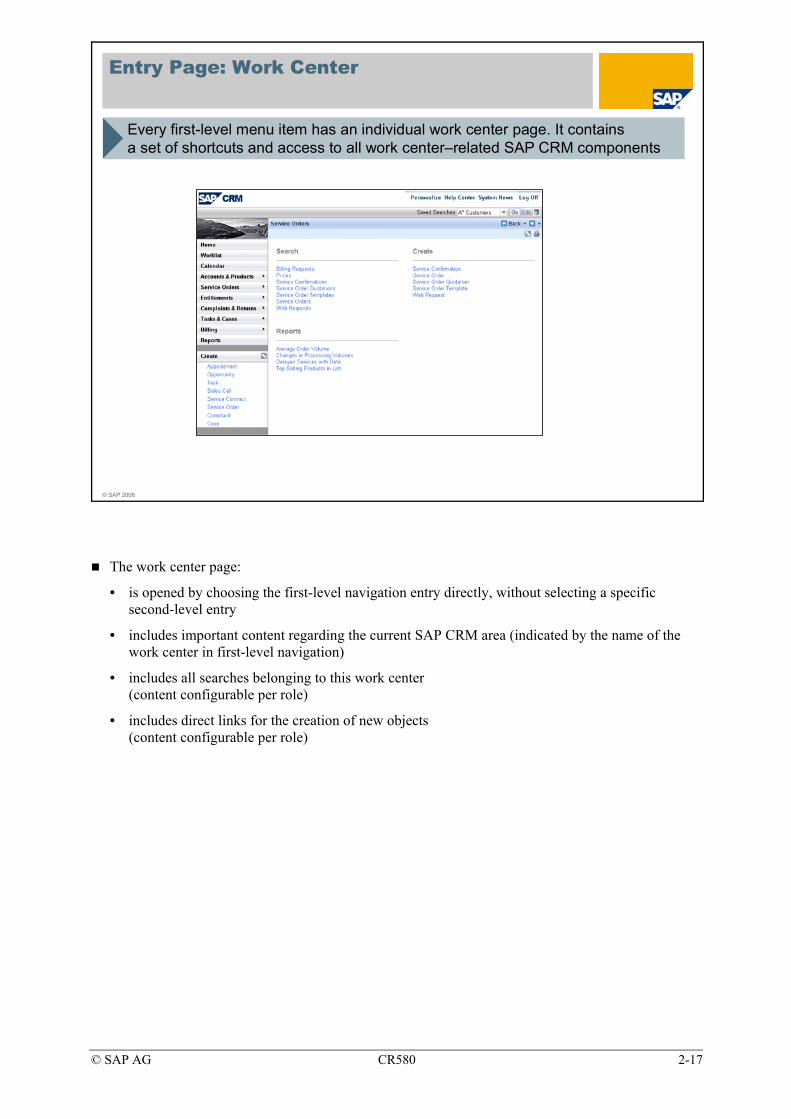
Every first-level menu item has an individual work center page. It contains a set of shortcuts and access to all work center–related SAP CRM components
The work center page:
• is opened by choosing the first-level navigation entry directly, without selecting a specific second-level entry
• includes important content regarding the current SAP CRM area (indicated by the name of the work center in first-level navigation)
• includes all searches belonging to this work center (content configurable per role)
• includes direct links for the creation of new objects (content configurable per role)
© SAP AG CR580 2-18
© SAP 2008
Entry Page: Reports
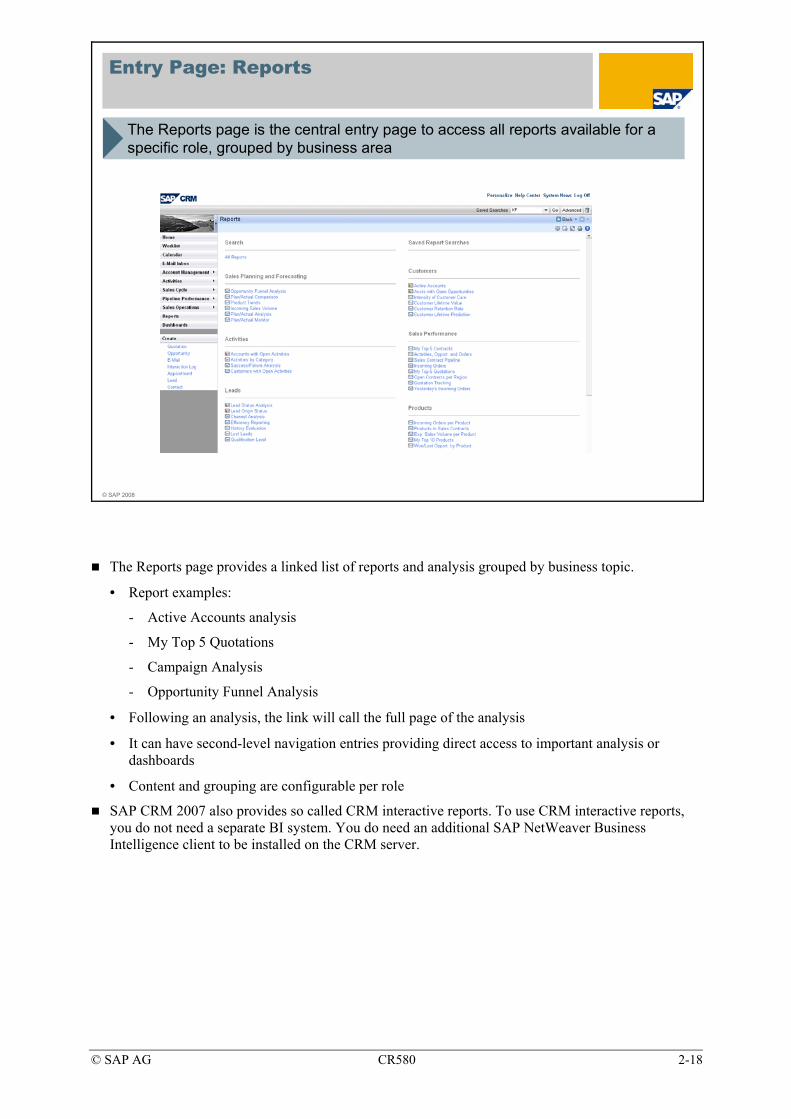
The Reports page is the central entry page to access all reports available for a specific role, grouped by business area
The Reports page provides a linked list of reports and analysis grouped by business topic.
• Report examples:
- Active Accounts analysis
- My Top 5 Quotations
- Campaign Analysis
- Opportunity Funnel Analysis
• Following an analysis, the link will call the full page of the analysis
• It can have second-level navigation entries providing direct access to important analysis or dashboards
• Content and grouping are configurable per role
SAP CRM 2007 also provides so called CRM interactive reports. To use CRM interactive reports, you do not need a separate BI system. You do need an additional SAP NetWeaver Business Intelligence client to be installed on the CRM server.

© SAP AG CR580 2-19
© SAP 2008
Personalization I – My data
With Personalization of “My Data” user can change several information of his master data in CRM system and can change his password
In section My Data users can provide their own master data and can change their password.
© SAP AG CR580 2-20
© SAP 2008
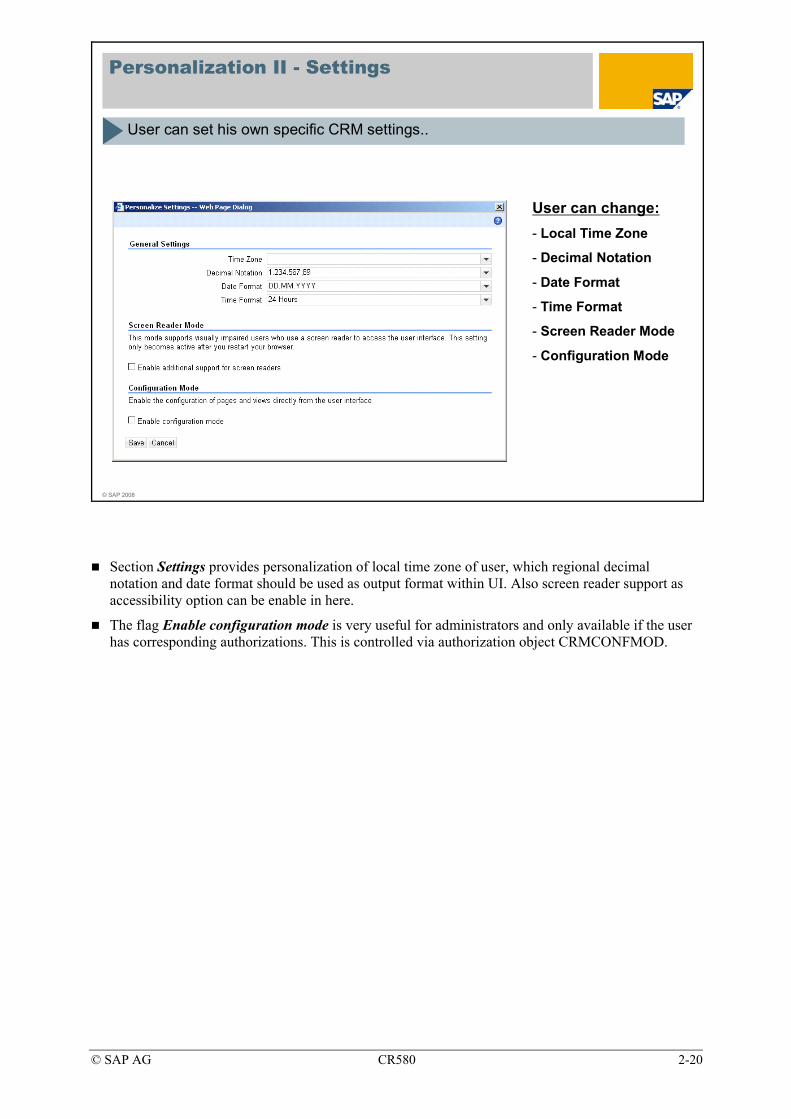
Personalization II - Settings
User can change:- Local Time Zone
- Decimal Notation
- Date Format
- Time Format
- Screen Reader Mode
- Configuration Mode
User can set his own specific CRM settings..
Section Settings provides personalization of local time zone of user, which regional decimal notation and date format should be used as output format within UI. Also screen reader support as accessibility option can be enable in here.
The flag Enable configuration mode is very useful for administrators and only available if the user has corresponding authorizations. This is controlled via authorization object CRMCONFMOD.
© SAP AG CR580 2-21
© SAP 2008
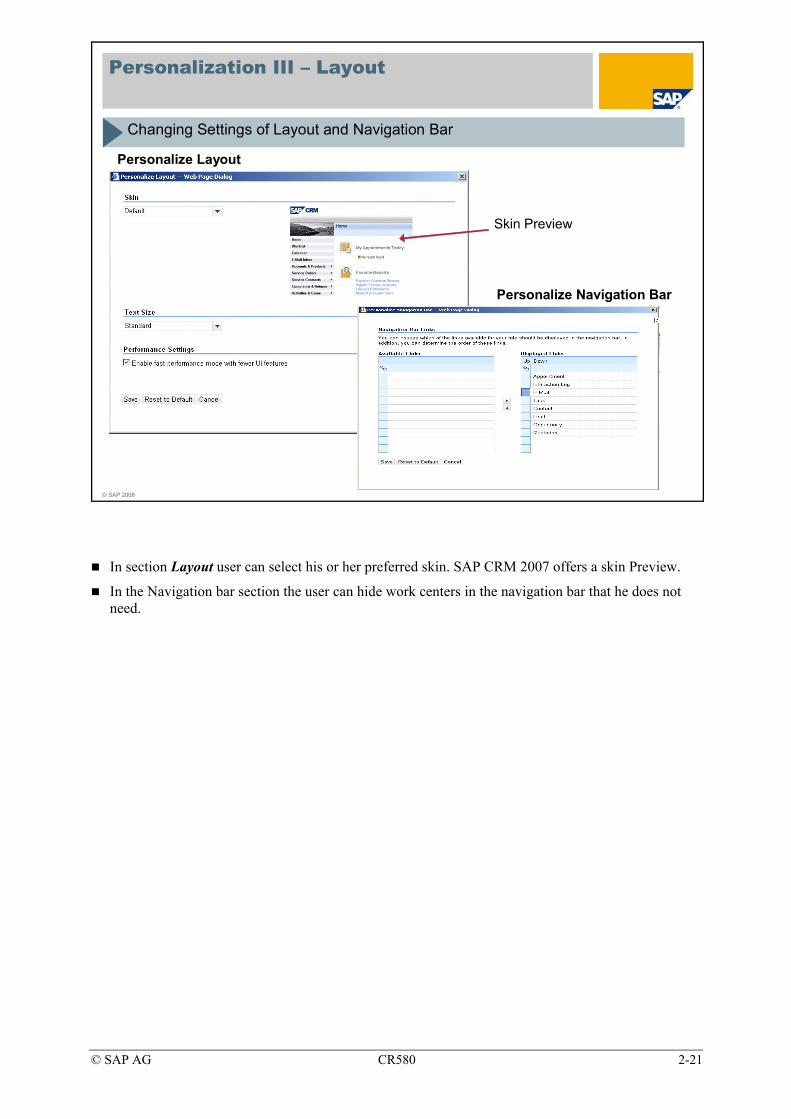
Personalization III – Layout
Skin Preview
Personalize Navigation Bar
Personalize Layout
Changing Settings of Layout and Navigation Bar
In section Layout user can select his or her preferred skin. SAP CRM 2007 offers a skin Preview.
In the Navigation bar section the user can hide work centers in the navigation bar that he does not need.
© SAP AG CR580 2-22
© SAP 2008
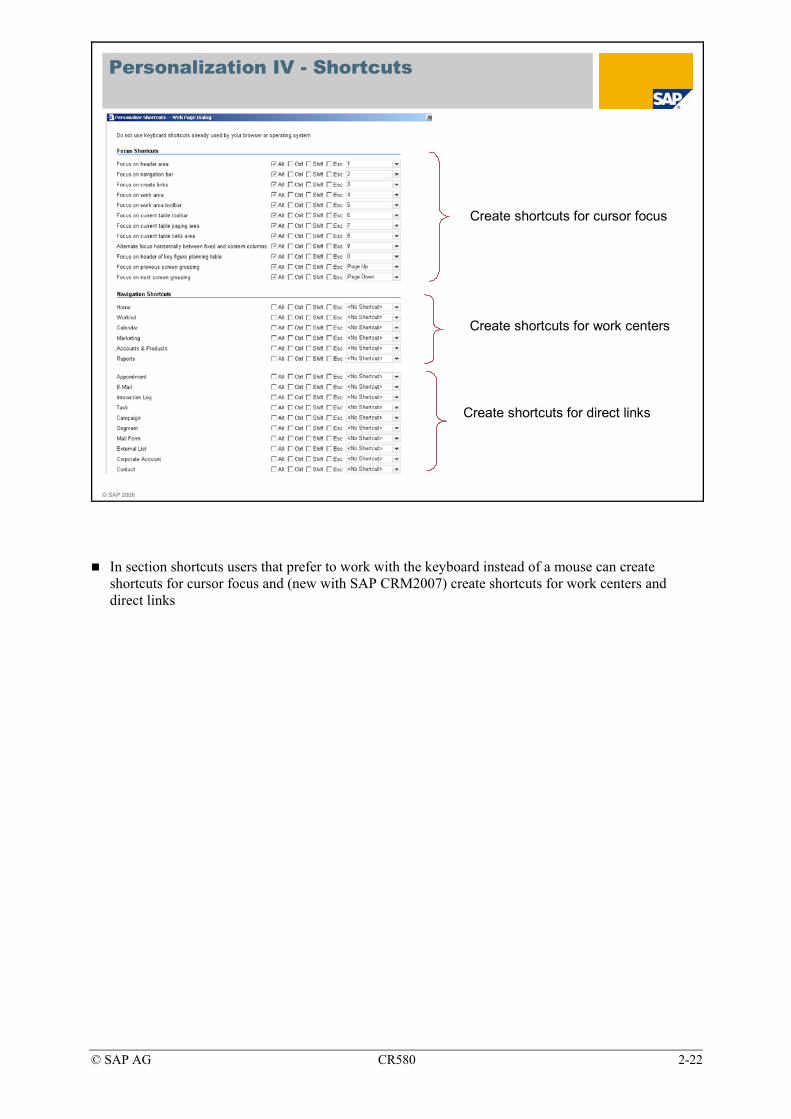
Personalization IV - Shortcuts
Create shortcuts for cursor focus
Create shortcuts for work centers
Create shortcuts for direct links
In section shortcuts users that prefer to work with the keyboard instead of a mouse can create shortcuts for cursor focus and (new with SAP CRM2007) create shortcuts for work centers and direct links

© SAP AG CR580 2-23
© SAP 2008
Personalization Options for Entry Pages
Personalization can always be triggered using the same icon in the top right-hand corner of an area.
Calendar and e-mail inbox cannot be personalized.
Work list provides only basic, overview page personalization options
HOME, work center pages, and Reports can be personalized in terms of the content shown on the page and the position of specific content on the screen.

© SAP AG CR580 2-24
© SAP 2008
Search Pages
Via work center page
Via navigation bar
Via saved searches
Search Pages provide the user with comprehensive, flexible, and easy-to-understand search capabilities individually for every SAP CRM application
The search pages allow the definition and saving of search models.
The search result list is optimized for quick overview and easy navigation to detailed information. It offers options such as create, delete, mass update, and XLS export.
The available search criteria as well as their arrangement can be predefined for all users via UI configuration means.
The layout of the result list can be predefined for all users via UI configuration means.
Saved Searches should have a unique name. Otherwise a saved search will be overwritten.
© SAP AG CR580 2-25
© SAP 2008
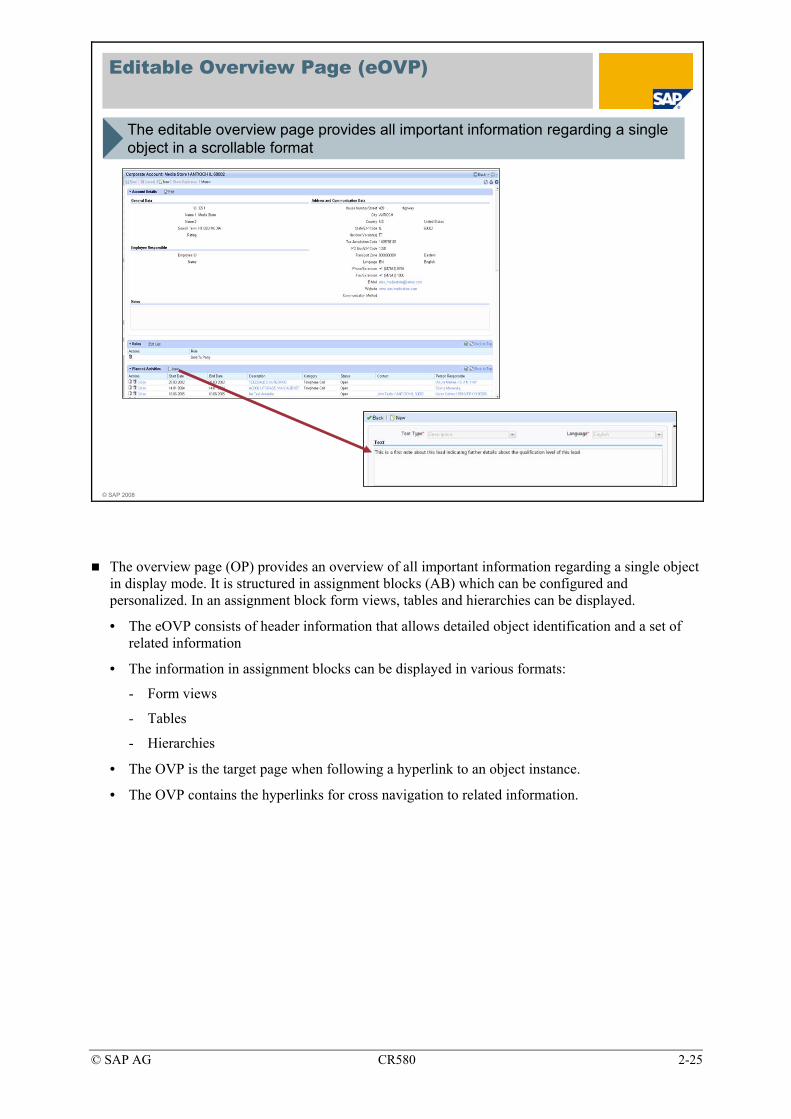
Editable Overview Page (eOVP)
The editable overview page provides all important information regarding a single object in a scrollable format
The overview page (OP) provides an overview of all important information regarding a single object in display mode. It is structured in assignment blocks (AB) which can be configured and personalized. In an assignment block form views, tables and hierarchies can be displayed.
• The eOVP consists of header information that allows detailed object identification and a set of related information
• The information in assignment blocks can be displayed in various formats:
- Form views
- Tables
- Hierarchies
• The OVP is the target page when following a hyperlink to an object instance.
• The OVP contains the hyperlinks for cross navigation to related information.
© SAP AG CR580 2-26
© SAP 2008
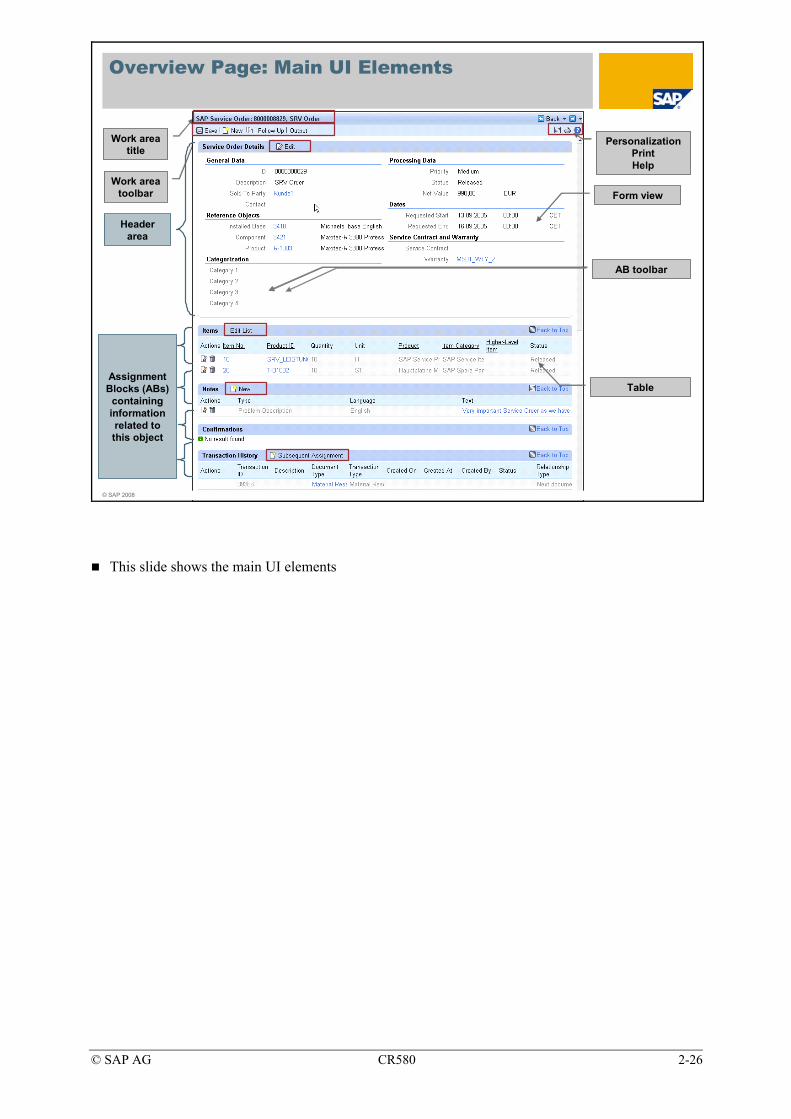
Overview Page: Main UI Elements
Work area toolbar
Work area title
AB toolbar
Header area
Assignment Blocks (ABs)
containing information related to this object
PersonalizationPrintHelp
Form view
Table
This slide shows the main UI elements

© SAP AG CR580 2-27
© SAP 2008
Capabilities:1) AB title – to identify the
content of the AB
2) Personalize icon (in table-based AB) and Back to Top link:
The visibility/ sequence of columns can be changed
Width of columns can be set
3) Column headers in tables are used for sorting
4) One-click actions for fast and easy deletion or editing of an object
5) Expand – appears if default number of visible rows is exceeded; opens up to 50, then it shows pages
6) Lazy load – less important ABs are first shown closed; the content is displayed on request
OVP Elements: Assignment Blocks (ABs)
1 2
3
4
5
6
Depending on the system settings, a user is allowed to personalize the number and arrangement of assignment blocks.
The maximum number of available Assignment Blocks for a Business User can be adapted in the UI Configuration Tool.
In the UI Configuration Tool it is possible to define whether an Assignment Block is displayed already opened up.
© SAP AG CR580 2-28
© SAP 2008
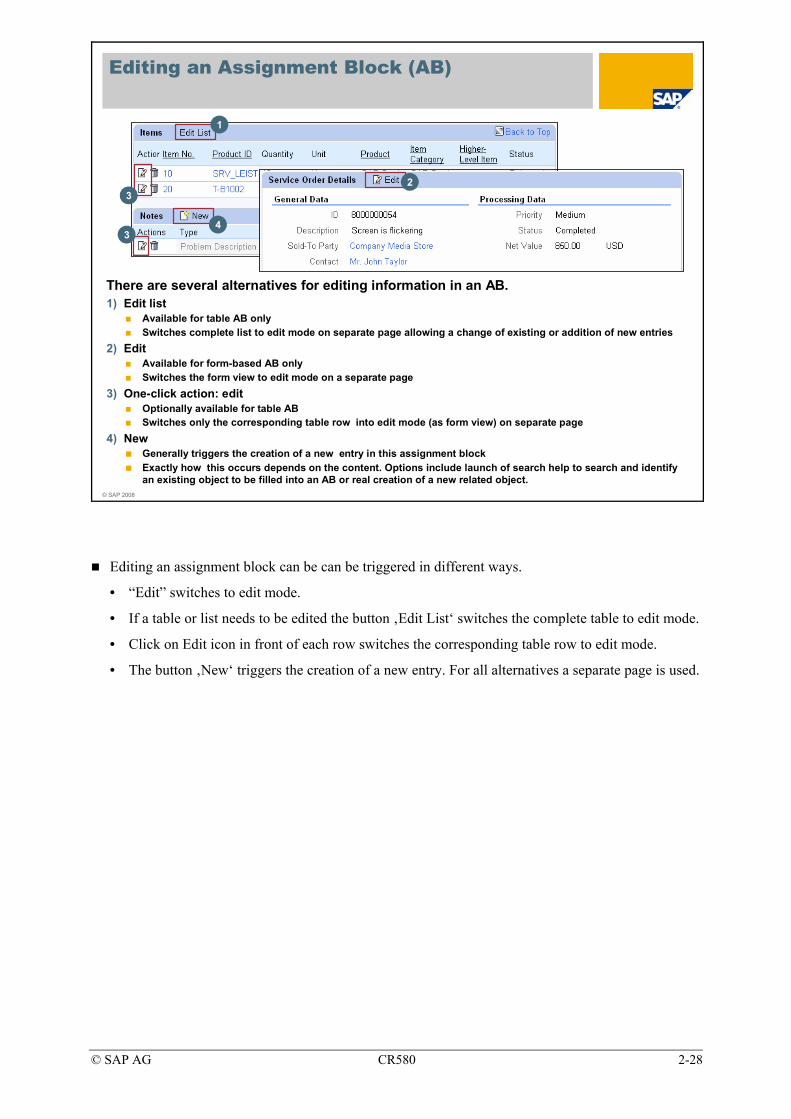
Editing an Assignment Block (AB)
There are several alternatives for editing information in an AB.1) Edit list
Available for table AB onlySwitches complete list to edit mode on separate page allowing a change of existing or addition of new entries
2) EditAvailable for form-based AB onlySwitches the form view to edit mode on a separate page
3) One-click action: editOptionally available for table ABSwitches only the corresponding table row into edit mode (as form view) on separate page
4) NewGenerally triggers the creation of a new entry in this assignment blockExactly how this occurs depends on the content. Options include launch of search help to search and identify an existing object to be filled into an AB or real creation of a new related object.
1
23
43
Editing an assignment block can be can be triggered in different ways.
• “Edit” switches to edit mode.
• If a table or list needs to be edited the button ‚Edit List‘ switches the complete table to edit mode.
• Click on Edit icon in front of each row switches the corresponding table row to edit mode.
• The button ‚New‘ triggers the creation of a new entry. For all alternatives a separate page is used.
© SAP AG CR580 2-29
© SAP 2008
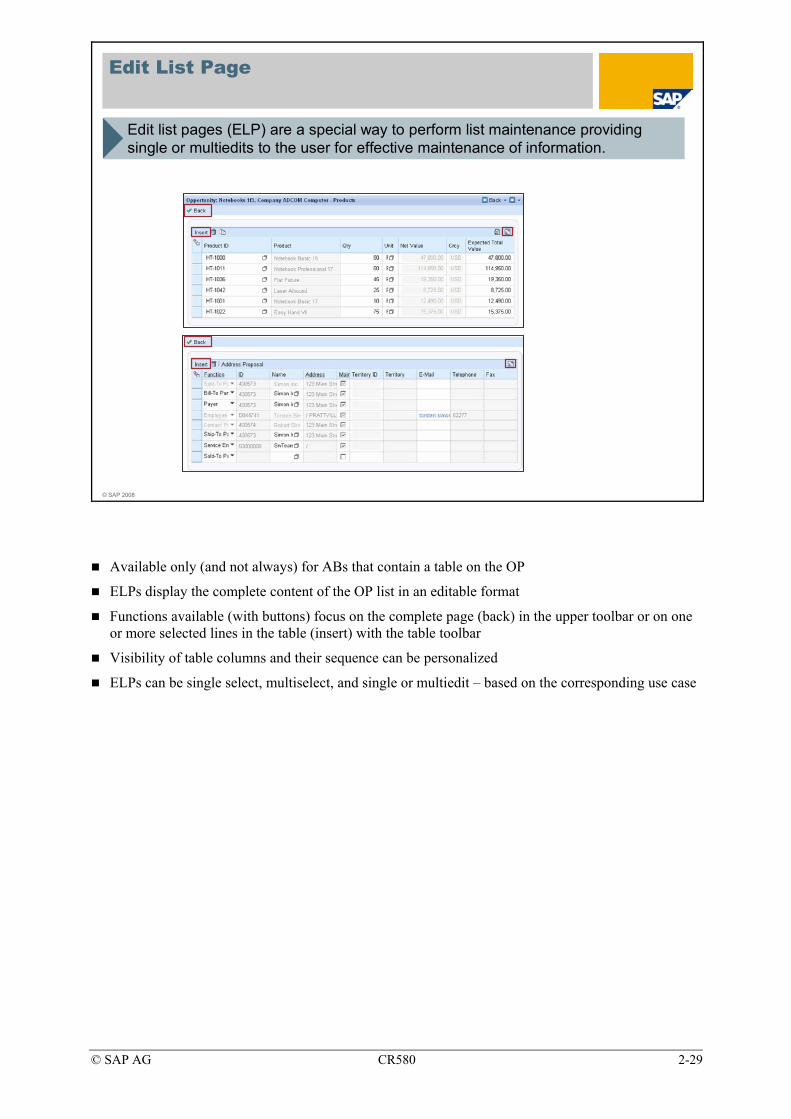
Edit List Page
Edit list pages (ELP) are a special way to perform list maintenance providing single or multiedits to the user for effective maintenance of information.
Available only (and not always) for ABs that contain a table on the OP
ELPs display the complete content of the OP list in an editable format
Functions available (with buttons) focus on the complete page (back) in the upper toolbar or on one or more selected lines in the table (insert) with the table toolbar
Visibility of table columns and their sequence can be personalized
ELPs can be single select, multiselect, and single or multiedit – based on the corresponding use case

© SAP AG CR580 2-30
© SAP 2008
Hierarchies
Hierarchies are used to visualize special “parent-child” relationships between different objects. With this UI element, the position of an object within a hierarchical structure can easily be displayed and understood.
Hierarchies are used for navigation or simply to display related information in a structured format
Available on search, overview and edit pages
Used in header area or in a related AB
Table-like behavior
Can be used differently and always follows business use case-specific needs
Examples for Hierarchies:
• Organizational Model
• Installed Base
• Product Hierarchies
• Business Partner Hierarchies

© SAP AG CR580 2-31
© SAP 2008
UI Concepts: Unit Summary
You should now be able to:Review the SAP CRM User Interface and its elementsList the terminology of the different screen areasState what functions the different UI elements havePersonalize the different UI elements

© SAP AG CR580 2-32
© SAP AG CR580 2-33
Exercises
Unit: UI Concept Topic: Starting the CRM Web UI
At the conclusion of this exercise, you will be able to:
• Launch the CRM WebClient UI using a standard business role.
• Use some personalization options within the CRM Web UI
You have to make yourself familiar with the CRM WebClient UI.
1-1 Log on to the SAP CRM system using SAP GUI and do some preparation steps which will allow you to start the CRM WebClient UI.
1-1-1 Add a Favorite to your SAP Easy Access Menu. Choose BSP Application CRM_UI_FRAME with Description CRM WebClient UI and choose Start Page default.htm.
1-1-2 Call the CRM WebClient UI with your newly created Favorite.
Use the same user / password combination than before.
Due to predefined and multiple assignments in the organizational model this user is assigned to several so-called Business Roles. The chapter Business Roles will give more information on this.
Choose Business Role SERVICEPRO.
© SAP AG CR580 2-34
It is also possible to use the user parameter CRM_UI_PROFILE and assign one Business Role directly.
Use transaction code /nsu3 or System → User Data → Own Data
Choose tab Parameters and set parameter CRM_UI_PROFILE to a value of an existing Business Role, e.g. SERVICEPRO.
Once the parameter is set, organizational assignments will not be taken into account when logging on to CRM Web UI.
2-1 Analyze the content of the Business Role Service Professional. Later on in the course you will get more details on how the customizing of a Business Role looks like. The information gathered in the following will be explained in detail.
2-1-1 How many navigation bar entries like Home are available?
2-1-2 Choose navigation bar entry Service Orders. How many hyperlinks are available in the Search, Create and Reports area?
2-1-3 Below the main navigation bar entries you find a Create area. It is possible to use those links to quickly create one of the listed elements.
How many entries are available here?
3-1 There are several personalization options available in the CRM WebClient UI. In the following you can try out some of the options.
3-1-1 Observe the general personalization options in the header area. E.g. keyboard shortcuts as well as default Layout/Skin can be personalized.
3-1-2 Most personalization options can be found, e.g. using the icon. The icon looks different when using other skins.
You can personalize the entries in the Create section (below the navigation bar entries) as well as the arrangement of the Search, Create and Reports areas on the Service Orders page.
The available columns in a result list as well as the displayed assignments blocks usually can be personalized.
Therefore search for any object, e.g. Service Orders for Business Partner 3271.
Navigate to any of the listed service orders.
© SAP AG CR580 2-35
UI Concept: Solutions
Unit: UI Concept Topic: Starting the CRM Web UI
1-1 Log on to the SAP CRM system using SAP GUI and do some preparation steps which will allow you to start the CRM WebClient UI.
1-1-1 Add a Favorite to your SAP Easy Access Menu. Choose BSP Application CRM_UI_FRAME with Description CRM WebClient UI and choose Start Page default.htm.
Choose Favorites → Add other objects.
Choose BSP Application.
BSP Applicat.: CRM_UI_FRAME
Description: CRM WebClient UI
Start Page: default.htm (F4-Help available)
1-1-2 Call the CRM WebClient UI with your newly created Favorite.
Double-click the Favorite CRM WebClient UI that you created before.
Use the same user / password combination than before.
Choose SERVICEPRO.
2-1 Analyze the content of the Business Role Service Professional. Later on in the course you will get more details on how the customizing of a Business Role looks like. The information gathered in the following will be explained in detail.
2-1-1 How many navigation bar entries like Home are available?
There are twelve navigation bar entries available: Home; Worklist; Calendar; E-Mail Inbox; Accounts & Products; Resource Planning, Service Orders, Service Contracts, Complaints & Returns, Billing, Service Operations , and Reports.
2-1-2 Choose navigation bar entry Service Orders. How many hyperlinks are available in the Search, Create and Reports area?
There are six Search, five Create and four Reports entries available.
2-1-3 Below the main navigation bar entries you find a Create area. It is possible to use those links to quickly create one of the listed elements.
How many entries are available here?
There are a maximum of nine links available. Due to personalization options (see next exercises) fewer entries are possible.
© SAP AG CR580 2-36
3-1 There are several personalization options available in the CRM WebClient UI. In the following you can try out some of the options.
3-1-1 Observe the general personalization options in the header area. E.g. keyboard shortcuts as well as default Skin can be personalized.
Choose
3-1-2 Most personalization options can be found, e.g. using the icon. The icon looks different when using other skins.
You can personalize the entries in the Create section (below the navigation bar entries) as well as the positioning of the Search, Create and Reports areas on the Service Orders page.
The available columns in a result list as well as the displayed assignments blocks usually can be personalized.
Choose Service Orders.
Choose Search → Service Orders.
Business Partner ID: 3271
Choose button Search.
Observe the personalization option in the Result List. It is possible to change the order and the number of displayed columns.
Click on any Service Order Id hyperlink. There are more personalization options available. The order and number of assignment blocks can be personalized.
Also within assignments blocks it is possible to personalize.

© SAP AG CR580 3-1
© SAP 2008
Business Roles
Contents:Business Roles and Authorizations

© SAP AG CR580 3-2
© SAP 2008
Business Roles: Unit Objectives
After completing this unit, you will be able to:Create and/or change business rolesAssign business roles to the organizational modelExplain the authorization concept

© SAP AG CR580 3-3
© SAP 2008
Business Roles: Business Example
You are responsible to adapt the existing Business Roles according to the different requirements of the user groups in your company
© SAP AG CR580 3-4
© SAP 2008
Business Role
Interaction Center Agent
Sales RepresentativeMarketing
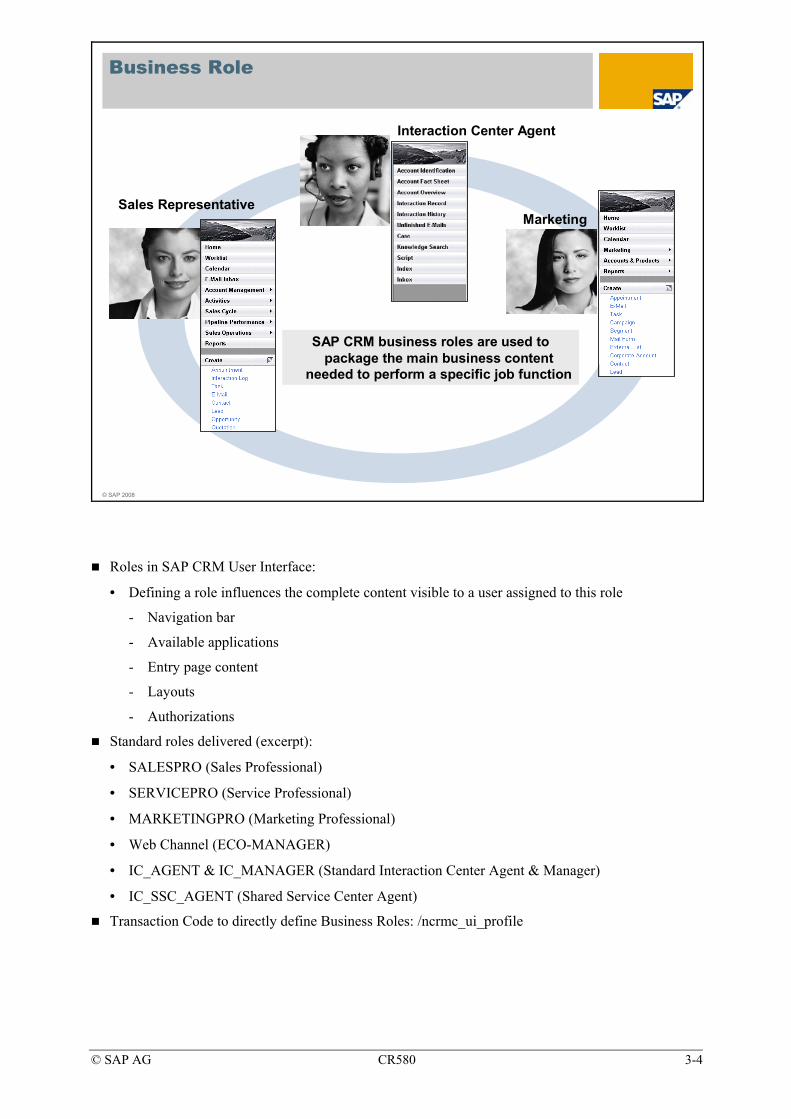
SAP CRM business roles are used to package the main business content
needed to perform a specific job function
Roles in SAP CRM User Interface:
• Defining a role influences the complete content visible to a user assigned to this role
- Navigation bar
- Available applications
- Entry page content
- Layouts
- Authorizations
Standard roles delivered (excerpt):
• SALESPRO (Sales Professional)
• SERVICEPRO (Service Professional)
• MARKETINGPRO (Marketing Professional)
• Web Channel (ECO-MANAGER)
• IC_AGENT & IC_MANAGER (Standard Interaction Center Agent & Manager)
• IC_SSC_AGENT (Shared Service Center Agent)
Transaction Code to directly define Business Roles: /ncrmc_ui_profile
© SAP AG CR580 3-5
© SAP 2008
Business Role Assignment
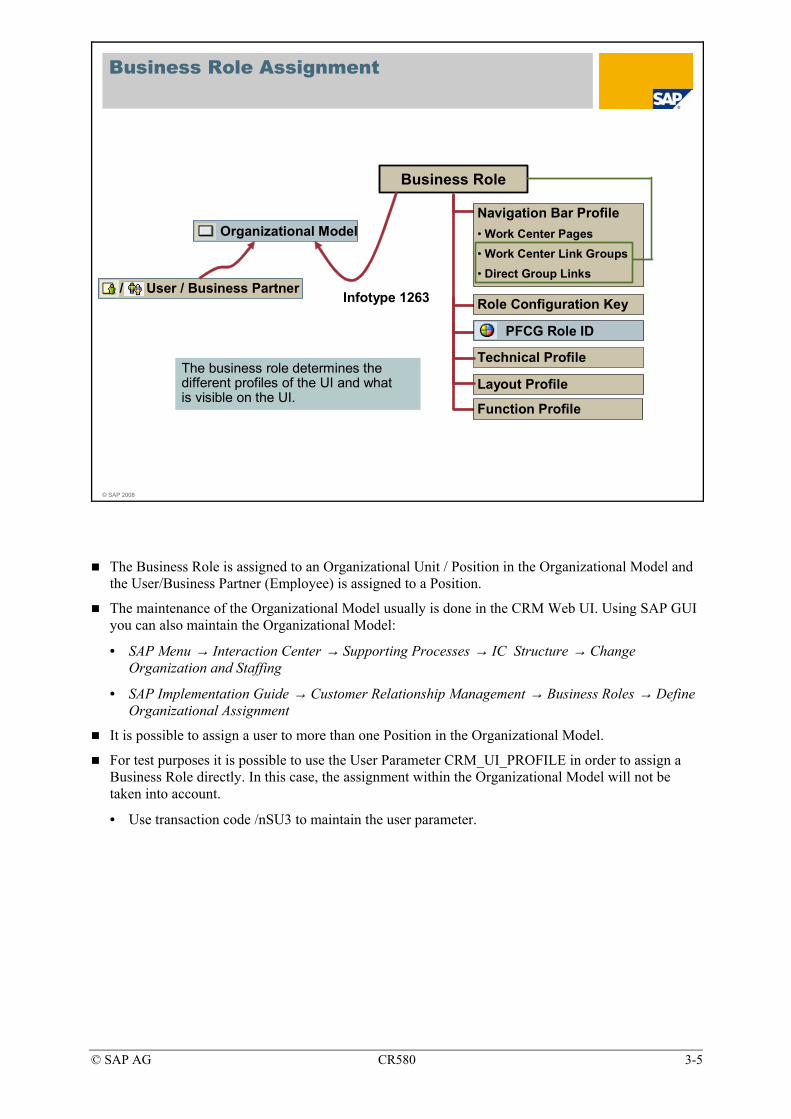
The business role determines the different profiles of the UI and what is visible on the UI.
Business Role
Navigation Bar Profile• Work Center Pages • Work Center Link Groups • Direct Group Links
Organizational Model
Layout Profile
Technical Profile
Role Configuration Key
PFCG Role ID
/ User / Business Partner
Function Profile
Infotype 1263
The Business Role is assigned to an Organizational Unit / Position in the Organizational Model and the User/Business Partner (Employee) is assigned to a Position.
The maintenance of the Organizational Model usually is done in the CRM Web UI. Using SAP GUI you can also maintain the Organizational Model:
• SAP Menu → Interaction Center → Supporting Processes → IC Structure → Change Organization and Staffing
• SAP Implementation Guide → Customer Relationship Management → Business Roles → Define Organizational Assignment
It is possible to assign a user to more than one Position in the Organizational Model.
For test purposes it is possible to use the User Parameter CRM_UI_PROFILE in order to assign a Business Role directly. In this case, the assignment within the Organizational Model will not be taken into account.
• Use transaction code /nSU3 to maintain the user parameter.

© SAP AG CR580 3-6
© SAP 2008
Business Role / Navigation Bar: Terminology
Work Center Page
Work Center Link Group
Work Centers
Direct Link Group
Logical Links
In the Business Role customizing you can hide the Work Center Pages or links that you do not need.
Additionally you can define which frequently used links should appear in the second level navigation.
If you need additional Work Centers that are not available in the navigation bar profile linked to the business role you have to change the navigation bar profile.
Within the navigation bar customizing you have access to shared lists of all logical links, work centers, work center link groups and direct link groups.
The navigation bar profiles are collections of logical links, work centers, work center link groups and direct link groups and is assigned to a business role.
Work center group links and direct group links can be activated and deactivated within the business role. So you can assign the same navigation bar profile to different business roles and have different screen appearances though.

© SAP AG CR580 3-7
© SAP 2008
Customizing Work Centers
Mark those entries as ‚Not Active‘ that you do not need in your navigation barNew entries need to be created in the navigation bar profile
In Business Role Customizing mark those Work Center entries as “Not Active” that you do not need in your navigation bar.
New entries need to be created in the Navigation Bar profile.
The order of entries in the navigation bar is maintained in the Navigation Bar profile and is not necessarily the order of entries in the customizing.

© SAP AG CR580 3-8
© SAP 2008
Customizing Work Center Group Links
Create
Corporate AccountIndividual AccountContact
Search
AccountsContacts
In Business Role Customizing mark those Work Center Group Link entries as “Visible” that you need as links in the specific Work Center Group
Entries marked as “In Menu” will appear in the second level navigation of the specific Work Center
New entries need to be created in the Navigation Bar profile.

© SAP AG CR580 3-9
© SAP 2008
Business Role & Authorization Concept - Overview
Authorization Objects
Business Logic
Authorization Profile B
CreateDisplay
Change
Authorization Profile A
Display
Change
Create
Unit
Position
User
Business Role Why is there an additional assignment of an authorization profile to the Business Role?
Authorizations assigned to user are used in CRM Business Logic
Business Partner Order Product Marketing
CRM Business Logic
Authorizations
• Security concepts for business objects such as SAP Business Partner or SAP Product focus on standard authorization objects and data storage security.
• Each authorization references an authorization object and defines one or more permissible values (e.g. display, change, create) for each authorization field contained in the authorization object.
• Authorizations are combined in profiles, which are entered in a user's master record.
• Transaction PFCG is used to maintain the authorization profiles.
• Authorizations are assigned to Users in the user master data (Transaction SU01)
PFCG Role
• For each Business Role SAP delivers a PFCG Role with the required authorization objects.
• These roles can be copied and adjusted to your needs.
• The standard SAP CRM Business Role names are SAP_CRM_UIU_*
The Authorizations assigned to the user are the ones that are checked during the processing of the business logic.
© SAP AG CR580 3-10
© SAP 2008
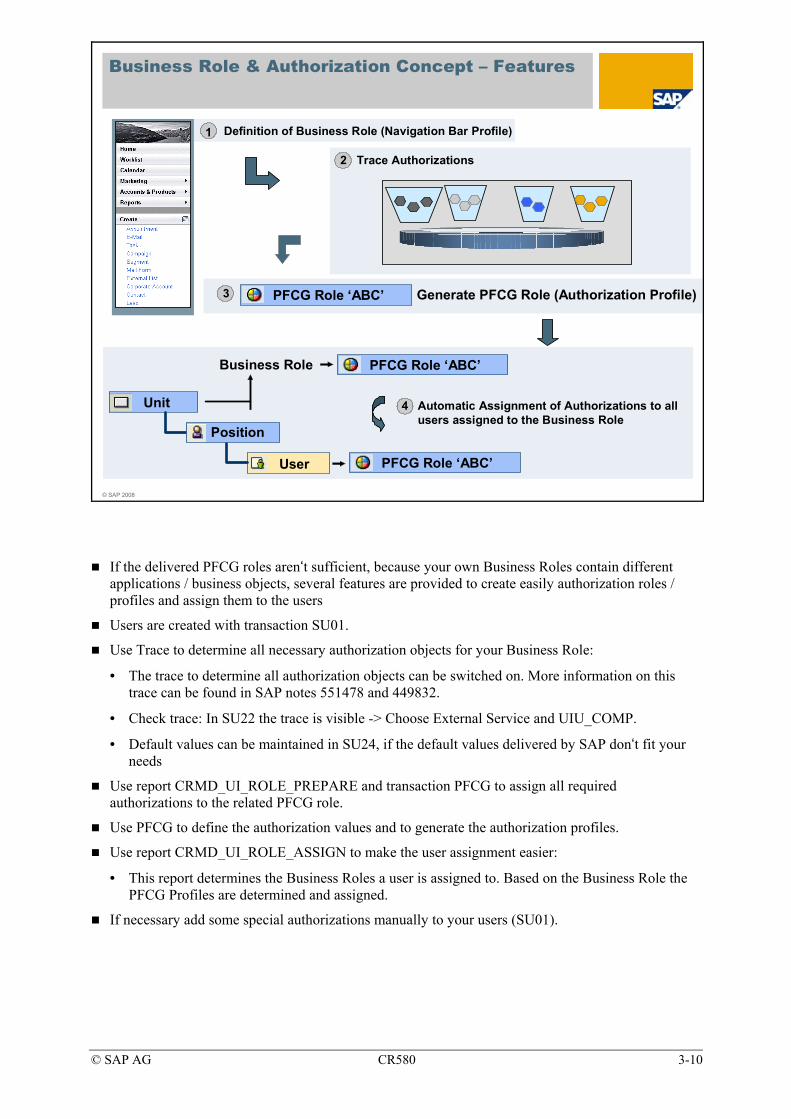
Definition of Business Role (Navigation Bar Profile)
Business Role & Authorization Concept – Features
Trace Authorizations
PFCG Role ‘ABC’
Unit
Position
User
Business Role
PFCG Role ‘ABC’
PFCG Role ‘ABC’
Automatic Assignment of Authorizations to all users assigned to the Business Role
2
1
3
4
Generate PFCG Role (Authorization Profile)
If the delivered PFCG roles aren‘t sufficient, because your own Business Roles contain different applications / business objects, several features are provided to create easily authorization roles / profiles and assign them to the users
Users are created with transaction SU01.
Use Trace to determine all necessary authorization objects for your Business Role:
• The trace to determine all authorization objects can be switched on. More information on this trace can be found in SAP notes 551478 and 449832.
• Check trace: In SU22 the trace is visible -> Choose External Service and UIU_COMP.
• Default values can be maintained in SU24, if the default values delivered by SAP don‘t fit your needs
Use report CRMD_UI_ROLE_PREPARE and transaction PFCG to assign all required authorizations to the related PFCG role.
Use PFCG to define the authorization values and to generate the authorization profiles.
Use report CRMD_UI_ROLE_ASSIGN to make the user assignment easier:
• This report determines the Business Roles a user is assigned to. Based on the Business Role the PFCG Profiles are determined and assigned.
If necessary add some special authorizations manually to your users (SU01).

© SAP AG CR580 3-11
© SAP 2008
Layout Profile
Logo Area Global Function Area
Work Area Header
Navigation Bar Subcomponents and position
The Layout Profile controls the assignment of Components (BSP Programs) to the static areas of the user interfaceThe layout profile does not control the logo itself or the picture in the navigation bar, this can be influenced in the skin configuration
SAP IMG Path: Customer Relationship Management → Business Roles → Define Navigation Frame
The header area is a static, non-scrolling area of the application that is only rendered once per session. It is located at the top of the screen and consists of different header components e.g. Logo area, Global function area and others.
This layout of header components is the default header implementation for the header frame.
The footer area is a non-scrolling area at the bottom of the screen that is only rendered once.
The work area has a work area header and a work area subheader. The work area header is a non-scrolling area that spans the width of the application. The work area subheader is a non-scrolling area that spans only the width of the work area.
The navigation bar contains sub areas or components defined in the layout profile. The navigation bar can consist of 1 to n subcomponents. The DEFAULT layout profile provides the following subareas:
• Picture area
• Menu area
• Shortcut area
SAP Implementation Guide → Customer Relationship Management → UI Framework → Technical Role Definition → Define Layout Components

© SAP AG CR580 3-12
© SAP 2008
Technical Profile
The Technical Profile contains some browser related settings and other technical informationExample:
When you log off from the CRM System the SAP Homepage http://www.sap.com is called per default You can change this setting by entering a different URL in the technical profile
SAP IMG Path: Customer Relationship Management -> UI Framework -> Technical Role Definition -> Define Technical Profile
The technical profile controls some browser related settings as:
• E nable or disable the following functions:
- Disable P-R-G (Post-Redirect-Get), which enables the use of the browser's Back button.
- Disable Frame Swap, which reduces noticeable screen flickering.
- Disable AJAX (Asynchronous JavaScript and XML), which reduces full screen server round-trips.
- Disable Server Optimization, which optimizes server performance.
Control the memory threshold that determines when a new session is started
• This value represents the server memory footprint in megabytes (MB). The restart mechanism checks if the current memory consumption is higher than the threshold specified in the technical profile of the business role. If the consumed memory is higher than the threshold, the current session is finished and a new session is started.
Specify the dialog delay in milliseconds
• With this value you define how long it takes until the Please wait... dialog is displayed if the Disable Fields checkbox is activated
Definition of a URL like http://company.com
© SAP AG CR580 3-13
© SAP 2008
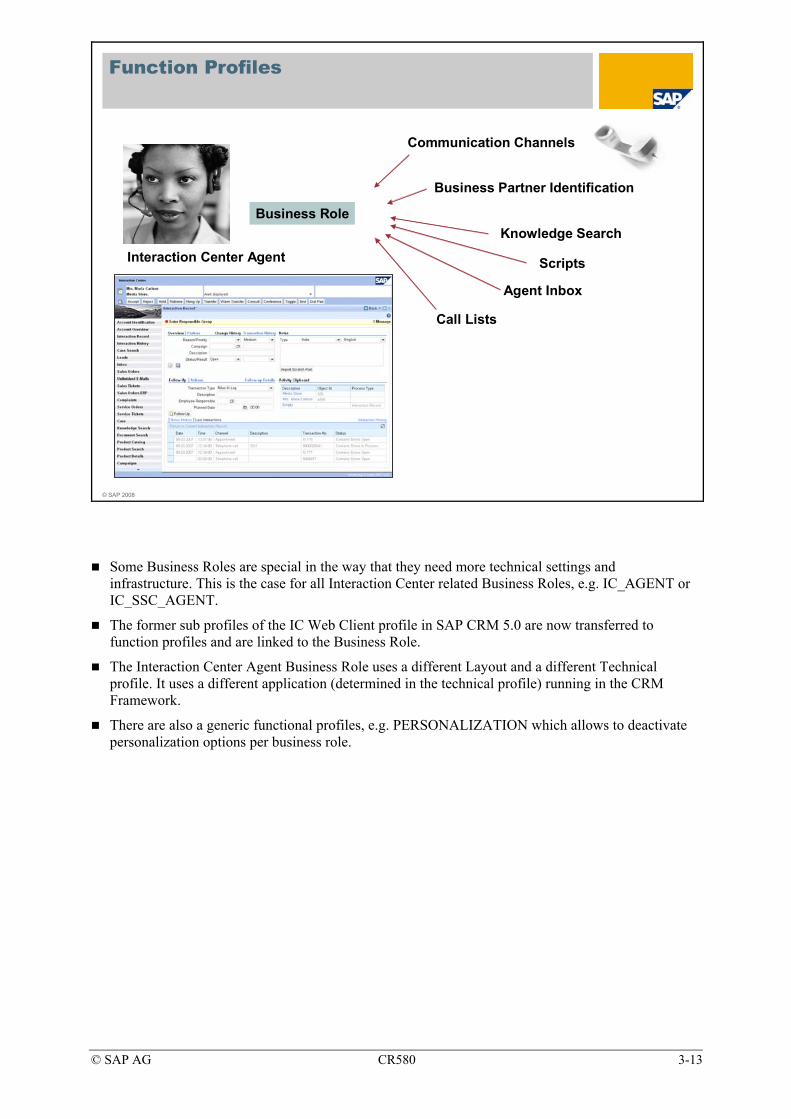
Function Profiles
Interaction Center Agent
Communication Channels
Business Partner Identification
Knowledge Search
Scripts
Call Lists
Agent Inbox
Business Role
Some Business Roles are special in the way that they need more technical settings and infrastructure. This is the case for all Interaction Center related Business Roles, e.g. IC_AGENT or IC_SSC_AGENT.
The former sub profiles of the IC Web Client profile in SAP CRM 5.0 are now transferred to function profiles and are linked to the Business Role.
The Interaction Center Agent Business Role uses a different Layout and a different Technical profile. It uses a different application (determined in the technical profile) running in the CRM Framework.
There are also a generic functional profiles, e.g. PERSONALIZATION which allows to deactivate personalization options per business role.
© SAP AG CR580 3-14
© SAP 2008
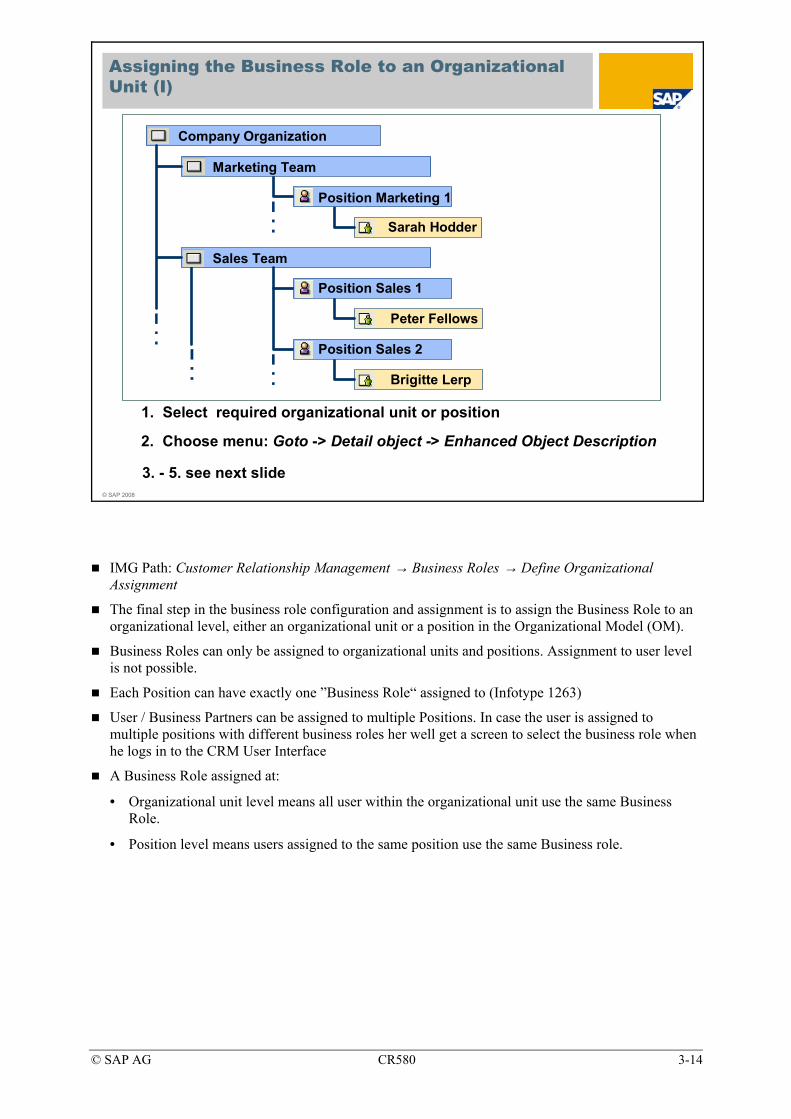
Company Organization
Marketing Team
Sales Team
Peter Fellows
Brigitte Lerp
1. Select required organizational unit or position
Sarah Hodder
Position Marketing 1
Position Sales 1
Position Sales 2
2. Choose menu: Goto -> Detail object -> Enhanced Object Description
3. - 5. see next slide
Assigning the Business Role to an Organizational Unit (I)
IMG Path: Customer Relationship Management → Business Roles → Define Organizational Assignment
The final step in the business role configuration and assignment is to assign the Business Role to an organizational level, either an organizational unit or a position in the Organizational Model (OM).
Business Roles can only be assigned to organizational units and positions. Assignment to user level is not possible.
Each Position can have exactly one ”Business Role“ assigned to (Infotype 1263)
User / Business Partners can be assigned to multiple Positions. In case the user is assigned to multiple positions with different business roles her well get a screen to select the business role when he logs in to the CRM User Interface
A Business Role assigned at:
• Organizational unit level means all user within the organizational unit use the same Business Role.
• Position level means users assigned to the same position use the same Business role.

© SAP AG CR580 3-15
© SAP 2008
Assigning the Business Role to an Organizational Unit (II)
Maintain Object
Object Edit Goto Utilities Settings System Help
Plan version 01Object type SObject ID 50000857Object abbr. Sales 1
Current planPosition
Sales 1
Planned Submitted
Infotype nameObjectIC WinClient ProfileBusiness Role
Approved RejectedActive
3. Select infotypeBusiness Role
5. Use F4 help to select the requiredBusiness Role
4. Choose icon Create/Change Infotype
Scroll down in the list of Infotypes and select Business Role.
Choose the
• Create icon in case no Business Role has been assigned (the Exists flag is not displayed!)
• Change icon in case a Business Role already has been assigned and should be changed (Exist flag is displayed).
In the next screen, use F4 for the field Business Role to display a list of available profiles.
Select the required Business Role and choose Enter/Save.
© SAP AG CR580 3-16
© SAP 2008
Business Roles: Unit Summary
You should now be able to:Create and/or change business rolesAssign business roles to the organizational modelExplain the authorization concept
© SAP AG CR580 3-17
Exercises
Unit: Business Roles Topic: Creating and Analyzing a Business Role
At the conclusion of this exercise, you will be able to:
• Create your own Business Role and assign it accordingly in the organizational model.
• Analyze the content of a Business Role.
The central customizing object controlling the User Interface of the CRM Web UI is the Business Role.
You make yourself familiar with details of the Business Role and learn basic methods how to influence the User Interface.
1-1 Create both a new user role in SAP CRM and a CRM WebClient UI Business Role. The Business Role refers to the user role.
1-1-1 Create a new user role in SAP CRM using SAP GUI.
SAP Menu → Architecture and Technology → System Administration → User Maintenance → Role Administration → Roles
Copy role: SAP_CRM_UIU_SRV_PROFESSIONAL to Z##_CRM_UIU_SRV_PROFESSIONAL
1-1-2 In customizing create a new Business Role Z##SRVPRO (## Service Professional) and assign the newly created user (PFCG) role to it. Copy the existing Business Role SERVICEPRO.
SAP Menu → Architecture and Technology → Configuration → Customizing (transaction code /nSPRO)
Choose SAP Reference IMG.
SAP Implementation Guide → Customer Relationship Management → Business Roles → Define Business Role
1-1-3 Assign both your CRM log on user CRM-## and the newly created business role Z##SRVPRO to the existing position ##Position in the organizational model.
Use the IMG activity Define Organizational Assignment right below IMG activity Define Business Role.
© SAP AG CR580 3-18
2-1 Analyze the newly created business role Z##SRVPRO in Customizing.
2-1-1 Which profiles are assigned to it on the first level ( )? Where in customizing are those profile defined?
2-1-2 How many Work Centers have been deactivated? How many are left for display?
You can compare the result with what you have analyzed in one of the exercises of the preceding unit (UI Concept).
In the next unit the Navigation Bar Profile will be introduced and explained in detail. This profile is the source of the work centers which can be deactivated.
2-1-3 How many Direct Group Links have been marked as visible?
You can compare the result with what you have analyzed in one of the exercises of the preceding unit (UI Concept).
Like in the exercise before the Navigation Bar Profile is the source of the available Direct Group Links. Please refer to the next unit for details.

© SAP AG CR580 3-19
Solutions
Unit: Business Roles Topic: Creating and Analyzing a Business Role
1-1 Create both a new user role in SAP CRM and a CRM WebClient UI Business Role. The Business Role refers to the user role.
1-1-1 Create a new user role in SAP CRM using SAP GUI.
SAP Menu → Architecture and Technology → System Administration → User Maintenance → Role Administration → Roles
Role: SAP_CRM_UIU_SRV_PROFESSIONAL
Choose
to role: Z##_CRM_UIU_SRV_PROFESSIONAL
Choose .
1-1-2 In customizing create a new business role Z##SRVPRO (## Service Professional) and assign the newly created user (PFCG) role to it. Copy the existing Business Role SERVICEPRO.
SAP Menu → Architecture and Technology → Configuration → Customizing (transaction code /nSPRO)
Choose SAP Reference IMG.
SAP Implementation Guide → Customer Relationship Management → Business Roles → Define Business Role
Mark entry SERVICEPRO.
Choose Copy As ( ).
Business Role: Z##SRVPRO
Description: ## Service Professional
PFCG Role ID: Z##_CRM_UIU_SRV_PROFESSIONAL
Choose ENTER
Choose copy all.
Confirm the next dialog and save your settings.

© SAP AG CR580 3-20
1-1-3 Assign both your CRM log on user CRM-## and the newly created business role Z##SRVPRO to the existing position ##Position in the organizational model.
SAP Implementation Guide → Customer Relationship Management → Business Roles → Define Organizational Assignment
Find Position ##Position using the Find by Search Term functionality.
In the Hit list double-Click ## Position.
Choose menu Goto → Detail object → Enhanced object description.
Scroll down, mark Infotype Business Role and choose Create Infotype ( ).
Business Role: Z##SRVPRO
Save your settings and navigate back to the organizational structure.
Assign user CRM-## to the position.
Use the right-mouse button and choose Assign
Choose Holder (User).
Search Term: CRM-##
Confirm and save your settings.
2-1 Analyze the newly created business role Z##SRVPRO in Customizing.
2-1-1 Which profiles are assigned to it on the first level ( )? Where in customizing are those profile defined?
SAP Menu → Architecture and Technology → Configuration → Customizing Choose button SAP Reference IMG.
Choose SAP Implementation Guide → Customer Relationship Management → Business Roles → Define Business Role
Find and mark your Business Role Z##SRVPRO.
Choose Details ( ).
There are three other profiles assigned to the Business Role:
1. Navigation Bar Profile
2. Layout Profile
3. Technical Profile.
You can define those profiles in the IMG:
1. SAP Implementation Guide → Customer Relationship Management → UI Framework → Technical Role Definition → Define Navigation Bar Profile
2. SAP Implementation Guide → Customer Relationship Management → Business Roles → Define Navigation Frame
3. SAP Implementation Guide → Customer Relationship Management → UI Framework → Technical Role Definition → Define Technical Profile

© SAP AG CR580 3-21
2-1-2 How many Work Centers have been deactivated? How many are left for display?
Mark your Business Role Z##SRVPRO and double-click Adjust Work Centers.
None, all Work Centers should be active. You can compare the result with what you have analyzed in one of the exercises of the preceding unit (UI Concept).
In the next unit the Navigation Bar Profile will be introduced and explained in detail. This profile is the source of the work centers which can be deactivated.
2-1-3 How many Direct Group Links have been marked as visible?
Mark your Business Role Z##SRVPRO and double-click Adjust Direct Link Groups. Mark Group-ID SRV-CREATE.
Double-Click Adjust Direct Links.
Nine Direct Group Links should be marked as visible. You can compare the result with what you have analyzed in one of the exercises of the preceding unit (UI Concept).
Like in the exercise before the Navigation Bar Profile is the source of the available Direct Link Groups. Please refer to the next unit for details.

© SAP AG CR580 3-22

© SAP AG CR580 4-1
© SAP 2008
Navigation Bar
Contents:Navigation BarTransaction Launcher

© SAP AG CR580 4-2
© SAP 2008
Navigation Bar: Unit Objectives
After completing this unit, you will be able to:Explain how the Navigation Bar is maintainedIntegrate other web based applications into the Navigation Bar of a CRM WebClient UI user.
© SAP AG CR580 4-3
© SAP 2008
Navigation Bar: Business Example
You need to understand the existing setup of the Navigation Bar and to add other applications to the Navigation Bar to integrate other external web based applications into the CRM WebClient UI.

© SAP AG CR580 4-4
© SAP 2008
Navigation Bar: Unit Overview Diagram
Navigation Bar
Lesson 1: Navigation Bar
Lesson 2: Transaction Launcher

© SAP AG CR580 4-5
© SAP 2008
Navigation Bar: Lesson Objectives
After completing this lesson, you will be able to:List the terminology used in the context of the navigation barMaintain the navigation bar with the different types of application links
© SAP AG CR580 4-6
© SAP 2008
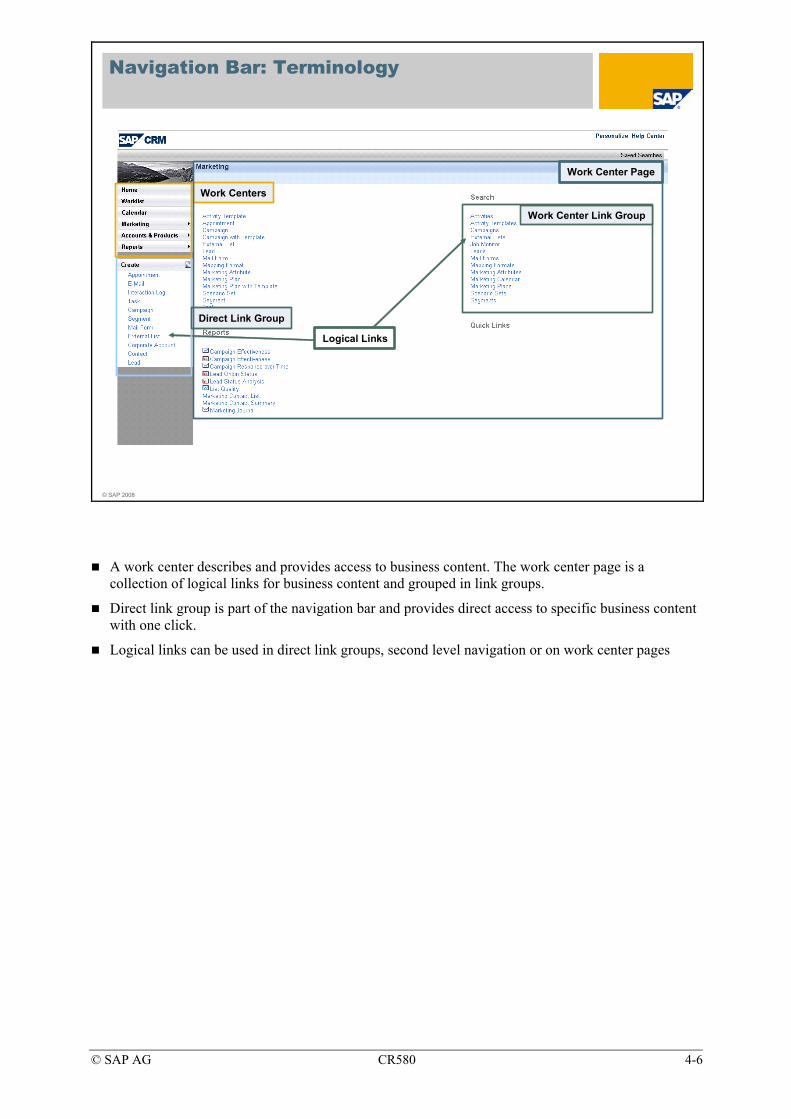
Navigation Bar: Terminology
Direct Link Group
Work Centers
Logical Links
Work Center Page
Work Center Link Group
A work center describes and provides access to business content. The work center page is a collection of logical links for business content and grouped in link groups.
Direct link group is part of the navigation bar and provides direct access to specific business content with one click.
Logical links can be used in direct link groups, second level navigation or on work center pages
© SAP AG CR580 4-7
© SAP 2008
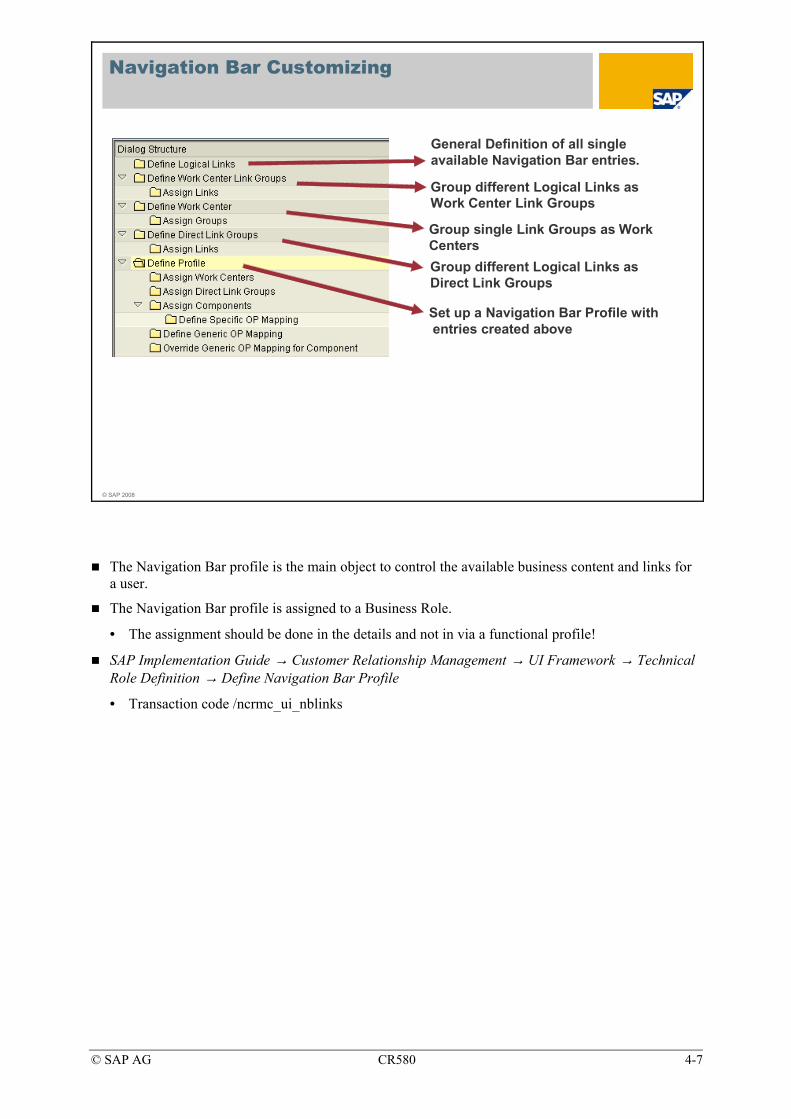
Navigation Bar Customizing
General Definition of all single available Navigation Bar entries.
Set up a Navigation Bar Profile withentries created above
Group different Logical Links as Work Center Link Groups
Group different Logical Links as Direct Link Groups
Group single Link Groups as Work Centers
The Navigation Bar profile is the main object to control the available business content and links for a user.
The Navigation Bar profile is assigned to a Business Role.
• The assignment should be done in the details and not in via a functional profile!
SAP Implementation Guide → Customer Relationship Management → UI Framework → Technical Role Definition → Define Navigation Bar Profile
• Transaction code /ncrmc_ui_nblinks

© SAP AG CR580 4-8
© SAP 2008
Logical Links
Type
Link ID SLS-ACT-CR
LinkWork CenterLaunch TransactionBI Report
There are four different types of links that can be integrated to the Navigation Bar
• Link: opens a CRM application, which can be a search or a creation page.
• Work Center: opens a work center page
• Launch transaction: Via the transaction launcher you can integrate other web based applications such as BSP’s, BOR Objects or any page that can be accessed via a URL
• BI Report: You can define logical links for any existing BI Report
© SAP AG CR580 4-9
© SAP 2008
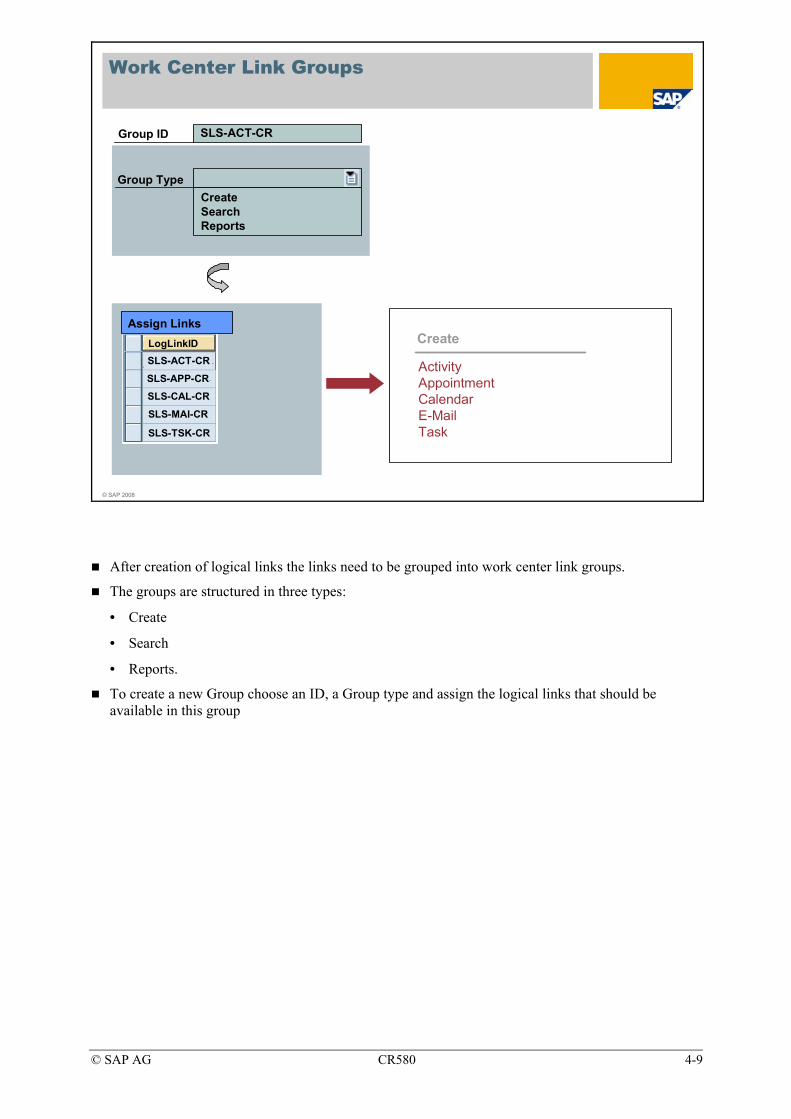
Work Center Link Groups
CreateSearchReports
Group Type
Group ID SLS-ACT-CR
Assign LinksLogLinkID
SLS-APP-CR
SLS-ACT-CR
SLS-MAI-CR
SLS-CAL-CR
SLS-TSK-CR
Create
ActivityAppointmentCalendarE-MailTask
After creation of logical links the links need to be grouped into work center link groups.
The groups are structured in three types:
• Create
• Search
• Reports.
To create a new Group choose an ID, a Group type and assign the logical links that should be available in this group

© SAP AG CR580 4-10
© SAP 2008
Work Center
Logical Link ID
Work Center ID SLS-ACT-CR
SLS-ACT-WC
Assign GroupsCreate
ActivityAppointmentCalendarE-MailTask
Search
ActivitiesAppointmentsVisit Plans
Reports
Activities by Category
Examples of Work Centers:
• Marketing
• Activities
• Sales Cycle
• Complaints & Returns
• Billing
Work Centers contain one or more Work Center Link Groups

© SAP AG CR580 4-11
© SAP 2008
Direct Link Groups
CreateSearchReports
Group Type
Group ID SLS-CREATE
Assign Links
Title Create
Create
AccountInd. AccountContact PersonLeadAppointment….
Direct Link Groups contain Logical Links.
Direct Link Groups can be used to provide
• Quick Create links
• Links that call external applications (e.g. via Transaction Launcher)

© SAP AG CR580 4-12
© SAP 2008
Navigation Bar Profile – Assign Work Centers
Home
Calendar
Sales Cycle
Pipeline Performance
Sales Operations
Reports
Worklist
E-Mail Inbox
Account Management
Activities
Navigation Bar Profile SLS-PRO
Description Sales Professional
Assign Work centersWork Center Position
CT-WORKLIST
SLS-HOME
SLS-EMAILCT-CALENDAR
SLS-ACC
SLS-PPM
SLS-ADMIN
SLS-REPORTS
SLS-CYCLE
1020
30
40
60
50
70
80
90
The position numbers determine
the order of the work centers.
Example: change “10” to “43” >> “HOME” would follow “EMAIL”
A Navigation Bar profile usually contains several Work Centers.
In Business Role Customizing it is possible to deactivate a number of Work Centers.

© SAP AG CR580 4-13
© SAP 2008
Navigation Bar Profile – Assign Direct Link Groups
Navigation Bar Profile SLS-PRO
Description Sales ProfessionalHome
Calendar
Sales CyclePipeline PerformanceSales OperationsReports
Worklist
E-Mail InboxAccount ManagementActivities
SLS-CREATE 10
Assign Direct Link Groups
The position numbers determinethe order of the Direct Link Groups. In this case there is only one direct link group so it is assigned pos. 10
Group Id Position
A Direct Link Group contains one or more Logical Links.
It is possible to define the order in which Direct Link Groups should be displayed.
© SAP AG CR580 4-14
© SAP 2008
Navigation Bar: Lesson Summary
You should now be able to:List the terminology used in the context of the navigation barMaintain the navigation bar with the different types of application links
© SAP AG CR580 4-15
© SAP 2008
Navigation Bar: Unit Overview Diagram
Navigation Bar
Lesson 1: Navigation Bar
Lesson 2: Transaction Launcher
© SAP AG CR580 4-16
© SAP 2008
Transaction Launcher: Lesson Objectives
After completing this lesson, you will be able to:Explain the function of the Transaction launcherUse the Transaction launcher to integrate web based applications into the CRM WebClient User Interface
© SAP AG CR580 4-17
© SAP 2008
Transaction Launcher
Via ITS
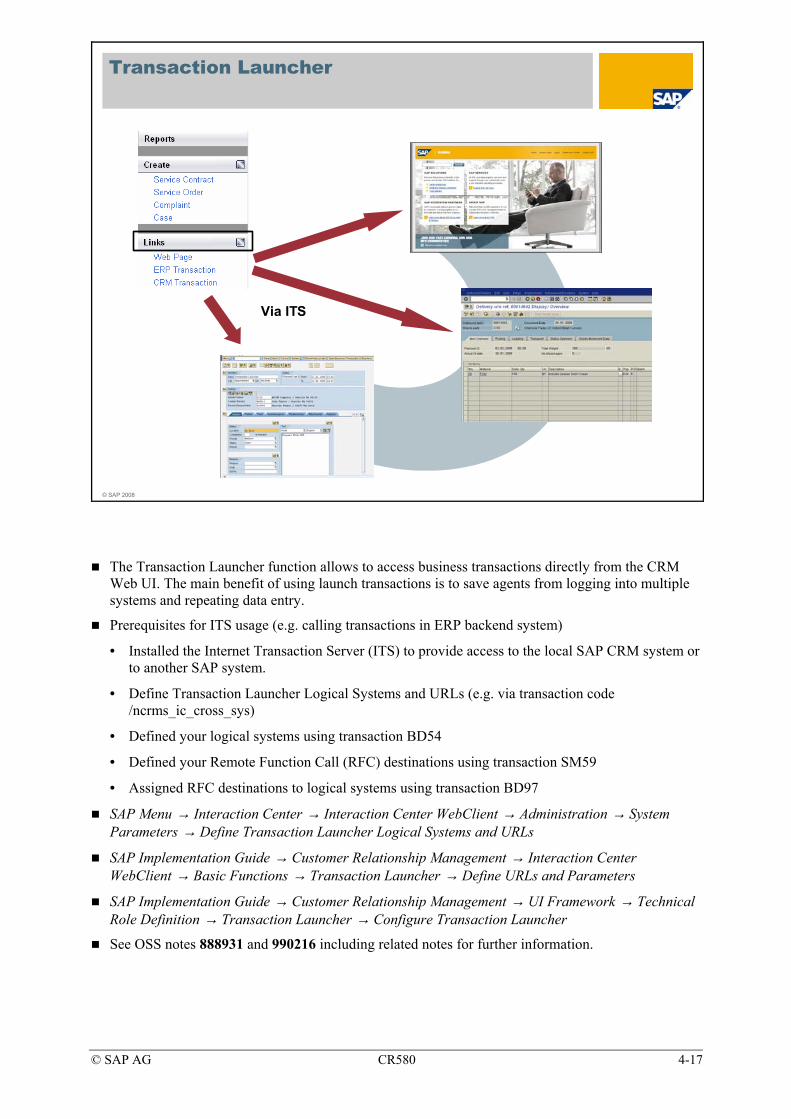
The Transaction Launcher function allows to access business transactions directly from the CRM Web UI. The main benefit of using launch transactions is to save agents from logging into multiple systems and repeating data entry.
Prerequisites for ITS usage (e.g. calling transactions in ERP backend system)
• Installed the Internet Transaction Server (ITS) to provide access to the local SAP CRM system or to another SAP system.
• Define Transaction Launcher Logical Systems and URLs (e.g. via transaction code /ncrms_ic_cross_sys)
• Defined your logical systems using transaction BD54
• Defined your Remote Function Call (RFC) destinations using transaction SM59
• Assigned RFC destinations to logical systems using transaction BD97
SAP Menu → Interaction Center → Interaction Center WebClient → Administration → System Parameters → Define Transaction Launcher Logical Systems and URLs
SAP Implementation Guide → Customer Relationship Management → Interaction Center WebClient → Basic Functions → Transaction Launcher → Define URLs and Parameters
SAP Implementation Guide → Customer Relationship Management → UI Framework → Technical Role Definition → Transaction Launcher → Configure Transaction Launcher
See OSS notes 888931 and 990216 including related notes for further information.
© SAP AG CR580 4-18
© SAP 2008
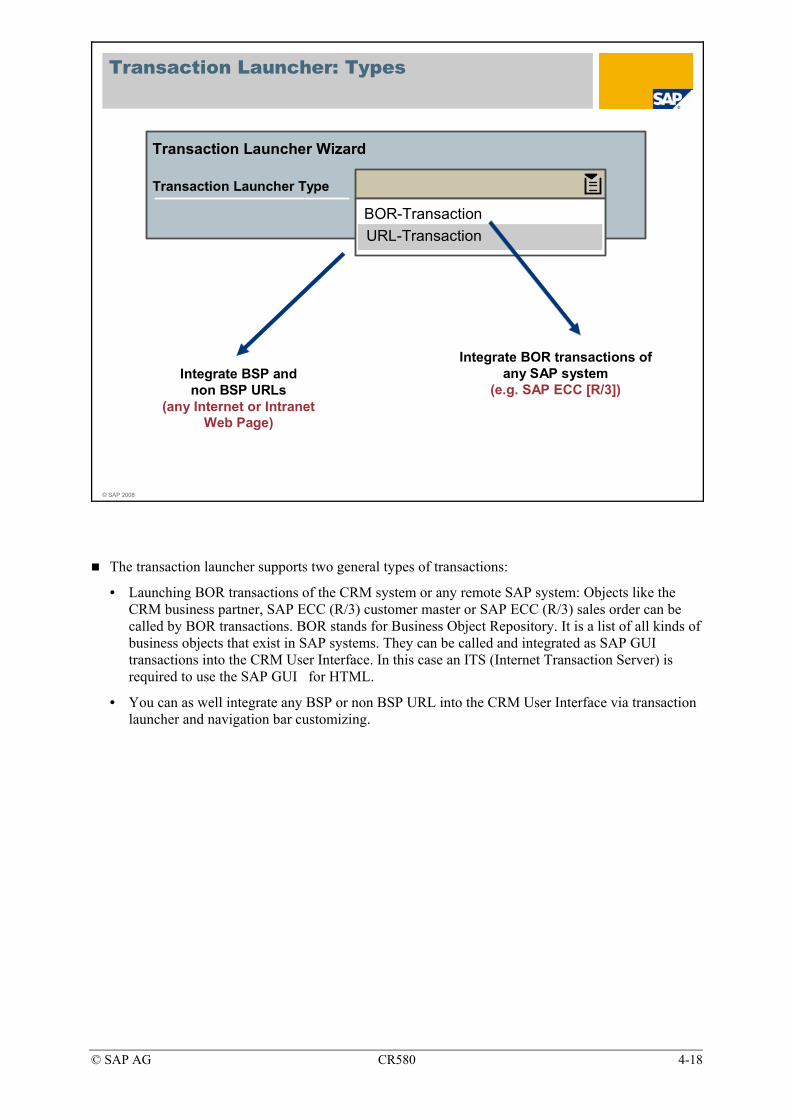
Transaction Launcher: Types
Transaction Launcher Type
BOR-Transaction
Integrate BOR transactions of any SAP system
(e.g. SAP ECC [R/3])
Transaction Launcher Wizard
URL-Transaction
Integrate BSP and non BSP URLs
(any Internet or Intranet Web Page)
The transaction launcher supports two general types of transactions:
• Launching BOR transactions of the CRM system or any remote SAP system: Objects like the CRM business partner, SAP ECC (R/3) customer master or SAP ECC (R/3) sales order can be called by BOR transactions. BOR stands for Business Object Repository. It is a list of all kinds of business objects that exist in SAP systems. They can be called and integrated as SAP GUI transactions into the CRM User Interface. In this case an ITS (Internet Transaction Server) is required to use the SAP GUI for HTML.
• You can as well integrate any BSP or non BSP URL into the CRM User Interface via transaction launcher and navigation bar customizing.

© SAP AG CR580 4-19
© SAP 2008
Create New Launch Transactions using the Wizard
Important Settings:
Handler Class: ABAP Class that executes the launch transactionTransaction Launcher Type: Type of launch transaction
BOR Transaction:Logical System:SAP GUI for HTML connection of remote system
BOR Object Type:Object Type to be called in remote system
Method:create, display, change
URL Transaction:URL ID:
Parameter: depends on selected object type or URL ID
Definition of URL and import and export parameters
New launch transactions do not only require IMG table entries but also some ABAP code: the so called Handler Class that controls most aspects of the launch transactions.
There is a wizard to create new launch transactions that allows you to make all required settings without having to manually implement the ABAP class coding.
Important settings when going through the wizard are:
• Handler Class: The handler class represents the ABAP Objects class that contains all WebClient specific code needed to execute a specific launch transaction. (Note: if you want to manually change the ABAP code of the classes you can access all handler classes in the Development Workbench [Transaction SE80] as sub-classes of super class CL_CRM_UI_LTX_ABSTRACT).
• Mapped Logical System: If you want to launch BOR objects you have to enter the mapped logical system connection that connects the remote SAP GUI transaction via SAP GUI for HTML to the CRM User Interface.
• (BOR) Object Type: Here you select the type of object you want to launch (for example, a CRM opportunity or an SAP ECC (R/3) sales order).
• Method: Methods can be create, change, display, and others depending on the chosen object
• Parameters: most object types allow you to pass parameters to the launched transaction like for example the ID of the identified account (Interaction Center specific).
In SAP CRM Business Object TSTC_UIF exists and can be used within the Transaction Launcher to call transaction codes.
© SAP AG CR580 4-20
© SAP 2008
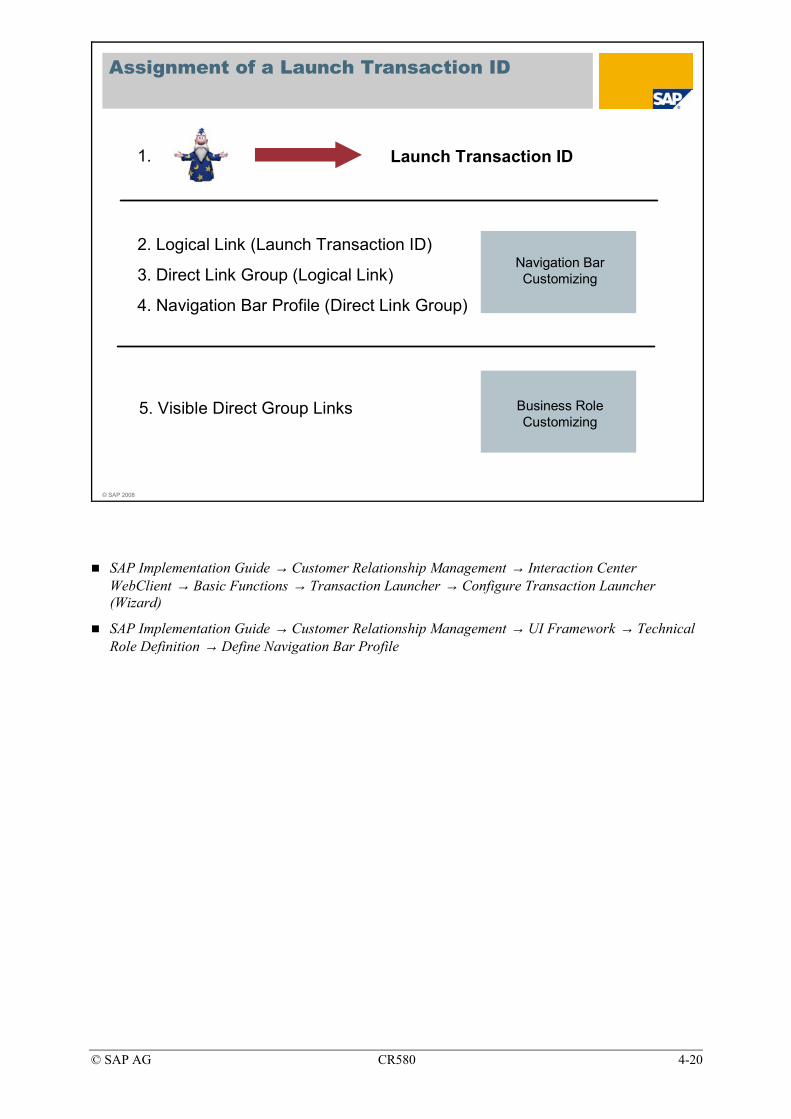
Assignment of a Launch Transaction ID
Launch Transaction ID
2. Logical Link (Launch Transaction ID)
3. Direct Link Group (Logical Link)
4. Navigation Bar Profile (Direct Link Group)
1.
5. Visible Direct Group Links Business RoleCustomizing
Navigation BarCustomizing
SAP Implementation Guide → Customer Relationship Management → Interaction Center WebClient → Basic Functions → Transaction Launcher → Configure Transaction Launcher (Wizard)
SAP Implementation Guide → Customer Relationship Management → UI Framework → Technical Role Definition → Define Navigation Bar Profile

© SAP AG CR580 4-21
© SAP 2008
Transaction Launcher: Lesson Summary
You should now be able to:Explain the function of the Transaction launcherUse the Transaction launcher to integrate web based applications into the CRM WebClient User Interface
© SAP AG CR580 4-22
© SAP 2008
Navigation Bar: Unit Summary
You should now be able to:Explain how the Navigation Bar is maintainedIntegrate other web based applications into the Navigation Bar of a CRM WebClient UI user.
© SAP AG CR580 4-23
Exercises
Unit: Navigation Bar and Transaction Launcher Topic: Navigation Bar
At the conclusion of this exercise, you will be able to:
• Understand the main options of the Business Role and Navigation Bar profile with respect to changing the UI.
• Create you own Navigation Bar profile and adapt it to your needs.
You would like to adapt the User Interface according to your needs.
Besides the Business Role, the Navigation Bar profile is the central object which is able to influence the appearance of the CRM application.
This Navigation Bar profile can be changed in several ways so that it matches your requirements.
1-1 Make some UI changes for the Business Role you created earlier. The changes include removal and adding of Navigation Bar entries. This can be accomplished both with changes in the Business Role but mainly with adapting the Navigation Bar profile.
1-1-1 In the Customizing of Business Roles select your Business Role Z##SRVPRO and deactivate work centers Calendar and E-Mail.
1-1-2 Although dealing with the Business Role Z##SRVPRO (Service Professional) you would like to add a work center typically belonging to a Marketing Professional.
In the following use the IMG activity Define Navigation Bar Profile. This activity can be found under UI Framework → Technical Role Definition.
a) Create your own Navigation Bar profile Z##NBPROF (## Service Professional) by copying the existing Navigation Bar profile SRV-PRO incl. all dependant objects.
b) Create your own Work Center ZWS_MK_## (## Marketing) by copying the existing Work Center MKT-MKT.
1-1-3 Add the newly created Work Center ZWS_MK_## to your newly created Navigation Bar profile Z##NBPROF.

© SAP AG CR580 4-24
1-1-4 In order to test your settings, you have to replace the original Navigation Bar profile with your newly created Navigation Bar profile within Business Role Customizing.
Go to the Customizing of your Business Role and exchange the Navigation Bar profiles
Restart the CRM WebClient UI using your SAP Menu Favorite, this time choose Business Role Z##SRVPRO and observe the changes.
Before you are able to use the links belonging to Work Center ZWS_MK_## (## Marketing), you need to change Business Role Customizing (Adjust Work Center Group Links).
This will be covered in one of the following exercises.
2-1 Change second level navigation of navigation bar for Work Center Complaints & Returns.
2-1-1 Log on to the CRM WebClient UI and choose your Business Role. Navigate to Complaints & Returns.
a) Click on the right part of the entry ( ). How many entries on second level do you observe? What kind of page is opened when selecting one of those entries?
b) Click the Complaints & Returns entry without using second level navigation. How many links are displayed on the following page?
Leave this browser session open.
2-1-2 In your Business Role analyze the details of the Work Center Complaints & Returns and make some changes.
a) Go to the Customizing of Business Roles, find your entry and check the Adjust Work Centers information. What is the (technical) ID of the Work Center Complaints & Returns?
b) Within Business Role Customizing navigate to the dialog Adjust Work Center Group Links and scroll to the first entry belonging to Work Center ID you found before.
How many Group Links belong to that Work Center ID?
How many Group Links are marked as In Menu?
How many Group Links are marked as Visible?
Deselect the checkbox Visible for the entry that allows you to create a Return document. Scroll to the right if necessary. Do the same for the report Complaint Ratio by Product.
Save your settings. Restart the CRM WebClient UI and observe the changes.
© SAP AG CR580 4-25
2-2 Change the appearance of the Quick Create area which can be found below the standard Navigation Bar entries.
2-2-1 How many quick create links can be found in the application when using business role Z##SRVPRO? If necessary log on to the CRM WebClient UI with your user and Business Role.
2-2-2 Go to the Customizing of your Navigation Bar profile Z##NBPROF.
How many Direct Link Groups are assigned to your Navigation Bar profile?
Note any technical ID (Group ID).
2-2-3 In the structure tree on the left navigate to the entry Define Direct Link Groups.
Find the Group ID and navigate to the dependant information Assign Links.
The number of quick-create links your found in the application should not be greater than the number of Logical Link ID’s you find here!
2-2-4 Go to the Customizing of Business Roles, find your entry and check the Adjust Direct Group Links information.
Here you have the possibility to deselect the checkbox Visible for a number of entries.
2-2-5 In the Navigation Bar profile Customizing create your own Direct Link Group Z##-CREATE (## Create). Therefore copy the existing entry SRV-CREATE with all dependant entries.
2-2-6 Assign your newly created Direct Link Group Z##-CREATE to your Navigation Bar profile Z##NBPROF. You also have the option to position Direct Link Groups. A higher position number means that the Direct Link Group is displayed lower!
Save your settings and check if the appearance of the CRM WebClient UI has changed when logging on again.
2-2-7 In the Customizing of Business Roles go to the Adjust Direct Group Links information.
Using the Visible checkbox for every single Logical Link ID you can decide which links should become available in the application.
Make settings so that four Logical Link ID’s belonging to Group-ID SRV-CREATE starting with SRV remain visible.
Choose a few Logical Link ID’s belonging to Group-ID Z##-CREATE as Visible.
Save your settings and check if the appearance of the CRM WebClient UI has changed when logging on again.

© SAP AG CR580 4-26
© SAP AG CR580 4-27
Solutions
Unit: Navigation Bar and Transaction Launcher Topic: Navigation Bar
1-1 Make some UI changes for the Business Role you created earlier. The changes include removal and adding of Navigation Bar entries. This can be accomplished both with changes in the Business Role but mainly with adapting the Navigation Bar profile.
1-1-1 In the Customizing of Business Roles select your Business Role Z##SRVPRO and deactivate work centers Calendar and E-Mail.
SAP Menu → Architecture and Technology → Configuration → Customizing (transaction code /nSPRO)
Choose SAP Reference IMG.
SAP Implementation Guide → Customer Relationship Management → Business Roles → Define Business Role
Mark entry Z##SRVPRO.
In the structure-tree on the left double-click Adjust Work Centers.
Mark both Work Centers CT-CALENDR (Calendar) and SRV-EMAIL (E-Mail Inbox) as Not Active.
1-1-2 Although dealing with the Business Role Z##SRVPRO (Service Professional) you would like to add a work center typically belonging to a Marketing Professional.
In the following use the IMG activity Define Navigation Bar Profile.
a) Create your own Navigation Bar profile Z##NBPROF by copying the existing Navigation Bar profile SRV-PRO incl. all dependant objects.
Customer Relationship Management → UI Framework → Technical Role Definition → Define Navigation Bar Profile.
You should be in the Define Profile dialog.
Mark profile SRV-PRO
Choose Copy ( ).
Nav Bar Profile: Z##NBPROF.
Description: ## Service Professional.
Choose ENTER and then copy all.
Confirm the information message and save your settings.
b) Create your own Work Center ZWS_MK_## (## Marketing) by copying the existing Work Center MKT-MKT.
In the dialog structure on the left double-click Define Work Center.
Mark Work Center MKT-MKT.
Choose Copy As ( )

© SAP AG CR580 4-28
Work Center ID: ZWS_MK_##
Title: ## Marketing.
Description: ## Marketing.
Choose ENTER and then copy all.
Confirm the information message and save your settings. 1-1-3 Add the newly created Work Center ZWS_MK_## to your newly created
Navigation Bar profile Z##NBPROF.
In the dialog structure on the left double-click Define Profile.
Mark Navigation Bar profile Z##NBPROF.
Double-click Assign Work Centers.
Choose New Entries.
Work Center ID: ZWS_MK_##
Position: 200.
Save your settings. 1-1-4 In order to test your settings, you have to replace the original Navigation Bar
profile with your newly created Navigation Bar profile within Business Role Customizing.
Go to the Customizing of your Business Role and exchange the Navigation Bar profiles.
SAP Implementation Guide → Customer Relationship Management → Business Roles → Define Business Role
Mark your Business Role Z##SRVPRO.
Choose Details ( ).
Nav Bar Profile: Z##NBPROF.
Save your settings.
Restart the CRM WebClient UI using your SAP Menu Favorite, this time choose Business Role Z##SRVPRO and observe the changes.
© SAP AG CR580 4-29
2-1 Change second level navigation of navigation bar for Work Center Complaints & Returns 2-1-1 Log on to the CRM WebClient UI and choose your Business Role. Navigate
to Complaints & Returns.
a) Click on the right part of the entry ( ). How many entries on second level do you observe? What kind of page is opened when selecting one of those entries?
Three entries are available: Complaints, Returns and In-House Repairs. When choosing one, the corresponding Search page is displayed.
b) Click the Complaints & Returns entry without using second level navigation. How many links are displayed on the following page?
There are three Search, three Create and two Report links available.
Leave this browser session open.
2-1-2 In your Business Role analyze the details of the Work Center Complaints & Returns and make some changes.
a) Go to the Customizing of Business Roles, find your entry and check the Adjust Work Centers information. What is the (technical) ID of the Work Center Complaints & Returns?
SAP Menu → Architecture and Technology → Configuration → Customizing (transaction code /nSPRO)
Choose SAP Reference IMG.
SAP Implementation Guide → Customer Relationship Management → Business Roles → Define Business Role
Mark Business Role Z##SRVPRO and double-click Adjust Work Centers.
The Work Center ID of Complaints & Returns is SRV-COMPL.
b) Within Business Role Customizing navigate to the dialog Adjust Work Center Group Links and scroll to the first entry belonging to Work Center ID you found before.
Double-click Adjust Work Center Group Links.
How many Group Links belong to that Work Center ID?
There are 8 Group Links that belong to Work Center ID SRV-COMPL.
How many Group Links are marked as In Menu?
Three: SRV-COM-SR (Service Complaints+Returns Search ) and SRV-IHR-SR (In-House Repair: Search ). SRV-RET-SR (Returns: Search)
How many SRV-COMPL Group Links are marked as Visible?
Eight links are marked as Visible.
Deselect the checkbox Visible for the entry that allows you to create a Return document. Scroll to the right if necessary. Do the same for the report Complaint Ratio by Product.
Work Center ID: SRV-COMPL
Group ID: SRV-CMP-CR
Logical Link: SRV-RET-CR
Visible: <unchecked>

© SAP AG CR580 4-30
Work Center ID: SRV-COMPL
Group ID: SRV-RC-RE
Logical Link: SRV-CRP-RE
Visible: <unchecked>
Save your settings.
Restart the CRM WebClient UI and observe the changes.
2-2 Change the appearance of the Quick Create area which can be found below the standard Navigation Bar entries.
2-2-1 How many quick create links can be found in the application when using business role Z##SRVPRO? If necessary log on to the CRM WebClient UI with your user and Business Role.
There are nine Quick Create links (Appointment … Case) available for the user.
2-2-2 Go to the Customizing of your Navigation Bar profile Z##NBPROF.
How many Direct Link Groups are assigned to your Navigation Bar profile?
SAP Implementation Guide → Customer Relationship Management → UI Framework → Technical Role Definition → Define Navigation Bar Profile
Mark the Navigation Bar Profile Z##NBPROF.
In the structure tree on the left double-click Assign Direct Link Groups.
There is only one entry assigned to the profile.
Note any technical ID (Group ID).
The technical ID is SRV-CREATE.
2-2-3 In the structure tree on the left navigate to the entry Define Direct Link Groups.
In the structure tree double-click Define Direct Link Groups.
Mark SRV-CREATE.
In the structure tree double-click Assign Links.
The number of quick-create links your found in the application should not be greater than the number of Logical Link ID’s you find here!
2-2-4 Go to the Customizing of Business Roles, find your entry and check the Adjust Direct Link Groups information.
Here you have the possibility to deselect the checkbox Visible for a number of entries.
SAP Implementation Guide → Customer Relationship Management → Business Roles → Define Business Role
Mark your business role and navigate to Adjust Direct Group Links.

© SAP AG CR580 4-31
2-2-5 In the Navigation Bar profile Customizing create your own Direct Link Group Z##-CREATE. Therefore copy the existing entry SRV-CREATE with all dependant entries and choose a name including your group number.
SAP Implementation Guide → Customer Relationship Management → UI Framework → Technical Role Definition → Define Navigation Bar Profile
In the structure-tree double-click Define Direct Link Groups.
Mark entry SRV-CREATE.
Choose Copy As ( ).
Group ID: Z##-CREATE.
Title: ## Create.
Description: ## Service Quick Create Links
Choose ENTER and then copy all.
Confirm and save the data.
2-2-6 Assign your newly created Direct Link Group Z##-CREATE to your Navigation Bar profile Z##NBPROF. You also have the option to position Direct Link Groups. A higher position number means that the Direct Link Group is displayed lower!
In the structure tree on the left double-click Define Profile.
Mark your Navigation Bar profile and navigate to Adjust Direct Link Groups.
Choose New Entries.
Group ID: Z##-CREATE
Position: 20
Save your settings and check if the appearance of the CRM WebClient UI has changed when logging on again.
Up to this point the User should not see any difference in the CRM Web UI with respect to quick create links. One important setting is missing.
2-2-7 In the Customizing of Business Roles go to the Adjust Direct Group Links information.
SAP Implementation Guide → Customer Relationship Management → Business Roles → Define Business Role
Mark your business role and double-click Adjust Direct Group Links.
Using the Visible checkbox for every single Logical Link ID you can decide which links should become available in the application.
Make settings so that four Logical Link ID’s belonging to Group-ID SRV-CREATE starting with SRV remain visible.
Choose a few Logical Link ID’s belonging to Group-ID Z##-CREATE as Visible.
Save your settings and check if the appearance of the CRM WebClient UI has changed when logging on again.

© SAP AG CR580 4-32
© SAP AG CR580 4-33
Exercises
Unit: Navigation Bar and Transaction Launcher Topic: Transaction Launcher
At the conclusion of this exercise, you will be able to:
• Create a link to a standard Internet Web page to the CRM WebClient UI.
• Create a link that calls a business transaction in one of your systems.
Users working with the CRM WebClient UI need to access both Internet pages and classical (SAP GUI based) transactions.
Since it is desired that the users don’t work with many different systems, it is easily possible to include “external” pages into the CRM WebClient UI.
1-1 You would like to integrate a link to an external Web page to the CRM WebClient UI application of some of your users. Therefore you will use the Transaction Launcher functionality.
1-1-1 First you have to define a URL ID in Customizing which will be user in a later step of the configuration process.
SAP Implementation Guide → Customer Relationship Management → UI Framework → Technical Role Definition → Transaction Launcher → Define URLs and Parameters
Depending on the CRM Release this IMG activity might be available using the following path:
SAP Implementation Guide → Customer Relationship Management → Interaction Center WebClient → Basic Functions → Transaction Launcher → Define URLs and Parameters
Create a URL ID Z##WEBPAGE (## Web Page), choose Request Method Get and make it a Non-BSP URL.
Enter any URL, e.g. www.cnn.com.
Save the URL ID.
© SAP AG CR580 4-34
1-1-2 Use the Transaction Launcher (Wizard) in order to generate information that can be integrated into the CRM Web UI.
SAP Implementation Guide → Customer Relationship Management → UI Framework → Technical Role Definition → Configure Transaction Launcher
Enter Z##WEBPAGE as Launch Trans. ID and ALL as Component Set.
Choose an appropriate Description (e.g. ## CNN) and enter class name Z##WEBPAGE.
Mark checkbox Stateful to show the URL in a new window.
Be sure that the checkbox Raise Veto is deactivated and continue.
Choose Transaction Type URL Transaction and enter the URL ID Z##WEBPAGE that you created before.
Continue and complete the wizard without further changes.
1-2 In the following you will integrate the Launch Transaction ID into the Navigation Bar profile of your users. Therefore you will create a new Logical Link, include it into a new Direct Link Group, assign this Direct Link Group to a Navigation Bar profile and make the link visible in Business Role Customizing.
1-2-1 Go to the customizing of Navigation Bar profiles and create a new Logical Link.
Customer Relationship Management → UI Framework → Technical Role Definition → Navigation Bar Profile.
In the structure-tree on the left double-click Define Logical Links.
Create a new logical link:
Logical Link ID: Z##WEBPAGE
Type: Launch Transaction
Target ID: EXECLTX
Parameter Z##WEBPAGE
Parameter Class: CL_CRM_UI_LTX_NAVBAR_PARAM
Title: ##CNN
Description: ## CNN
Save your changes.
1-2-2 Include this newly created Logical Link into a new Direct Link Group Z##LINKS.
Choose Define Direct Link Groups and create a new entry Z##LINKS with Title and Description ##Links.
Choose Assign Links in the dialog structure on the left and add the Logical Link Z##WEBPAGE with position 10.
Narrow the search since not all entries will be listed!
© SAP AG CR580 4-35
1-2-3 Include this newly created Direct Link Group into the Navigation Bar profile Z##NBPROF.
Choose Define Profile in the dialog structure on the left
Mark Z##NBPROF and assign Direct Link Group Z##LINKS with position 30 to it.
Save your changes.
1-2-4 Like in one of the exercises before you have to make this Direct Group Link visible in Customizing of Business Roles.
Go to the Customizing of Business Roles. Choose your role and change the settings under Adjust Direct Group Links.
Make your new link visible.
Save your settings and restart the CRM WebClient UI in order to test.
2-1 You would like to integrate a link to a business transaction to the CRM WebClient UI application of some of your users. Therefore you will again use the Transaction Launcher functionality. Please be aware that in this case it is necessary to use the Internet Transaction Server functionality that is able to integrate a classical SAP GUI based transactions into a web based application.
2-1-1 Check the definition of Logical Systems ID’s. In this training system an entry has already been made.
SAP Menu → Interaction Center → Interaction Center WebClient → Administration → System Parameters → Define Transaction Launcher Logical Systems and URLs
(optionally call transaction /ncrms_ic_cross_sys)
You should find an entry OWNLOGSYS and a corresponding URL pointing to the ITS.
What is the Logical System assigned to OWNLOGSYS?
This information will be needed in the next part of this exercise.
2-1-2 Start the Transaction Launcher (Wizard) .
Enter Z##TRANS1 as Launch Trans. ID and ALL as Component Set.
Choose an appropriate Description (e.g. ## Transaction 1) and enter class name Z##TRANS1.
Mark checkbox Stateful to show the URL in a new window.
Be sure that the checkbox Raise Veto is deactivated and continue.
In the next step of the wizard enter the following:
Transaction Type: BOR Transaction
Logical System: DTZ_800
BOR Object Type: ZCRTSTC
Method Name: EXECUTE
Continue and the choose Parameter Object Key with Value CRMM_BUPA_MAP.
Continue and complete the wizard without further changes.

© SAP AG CR580 4-36
2-2 In the following you will integrate the Launch Transaction ID into the Navigation Bar profile of your users. Therefore you will create a new Logical Link, include it into your Direct Link Group and make the link visible in Business Role Customizing.
2-2-1 Go to the customizing of Navigation Bar profiles and create a new Logical Link.
SAP Menu → Architecture and Technology → Configuration → Customizing (transaction code /nSPRO)
Choose SAP Reference IMG.
Customer Relationship Management → UI Framework → Technical Role Definition → Define Navigation Bar Profile
Choose Define Logical Links.
Create a new logical link:
Logical Link ID: Z##TRANS1
Type: Launch Transaction
Target ID: EXECLTX
Parameter Z##TRANS1
Parameter Class: CL_CRM_UI_LTX_NAVBAR_PARAM
Title: ##Transaction1
Description: ##Transaction 1
Save your changes.
2-2-2 Assign this newly created Logical Link into your Direct Link Group Z##LINKS.
Choose Define Direct Link Groups
Mark your entry (Z##LINKS) and choose Assign Links in the dialog structure on the left.
Add the Logical Link Z##TRANS1 with Position 40.
2-2-3 Like in one of the exercises before you have to make this Direct Group Link visible in Customizing of Business Roles.
Go to the Customizing of Business Roles. Choose your role and change the settings under Adjust Direct Group Links.
Make your new link visible.
Save your settings and restart the CRM WebClient UI in order to test.

© SAP AG CR580 4-37
Solutions
Unit: Navigation Bar and Transaction Launcher Topic: Transaction Launcher
1-1 You would like to integrate a link to an external Web page to the CRM WebClient UI application of some of your users. Therefore you will use the Transaction Launcher functionality.
1-1-1 First you have to define a URL ID in Customizing which will be user in a later step of the configuration process.
SAP Implementation Guide → Customer Relationship Management → UI Framework → Technical Role Definition → Transaction Launcher → Define URLs and Parameters Choose New Entries.
URL ID: Z##WEBPAGE
Description: ## Web Page
Request Method: Get
Radio button: Non-BSP URL
URL: www.cnn.com
Save your settings.
1-1-2 Use the Transaction Launcher (Wizard) in order to generate information that can be integrated into the CRM Web UI.
SAP Implementation Guide → Customer Relationship Management → UI Framework → Technical Role Definition → Transaction Launcher → Configure Transaction Launcher Choose Continue.
Launch Trans. ID: Z##WEBPAGE
Component Set: ALL
Choose Continue.
Description: ## CNN
Class Name: Z##WEBPAGE
Checkbox Stateful: checked
Checkbox Raise Veto: unchecked.
Choose Continue.
Transaction Type: URL Transaction
URL ID: Z##WEBPAGE
Choose Continue (three times).
Choose Complete.

© SAP AG CR580 4-38
1-2 In the following you will integrate the Launch Transaction ID into the Navigation Bar profile of your users. Therefore you will create a new Logical Link, include it into a new Direct Link Group, assign this Direct Link Group to a Navigation Bar profile and make the link visible in Business Role Customizing. 1-2-1 Go to the customizing of Navigation Bar profiles and create a new Logical
Link.
SAP Menu → Architecture and Technology → Configuration → Customizing (transaction code /nSPRO) Choose SAP Reference IMG.
Customer Relationship Management → UI Framework → Technical Role Definition → Define Navigation Bar Profile. In the structure-tree on the left double-click Define Logical Links. Create a new logical link: Logical Link ID: Z##WEBPAGE Type: Launch Transaction Target ID: EXECLTX Parameter Z##WEBPAGE Parameter Class: CL_CRM_UI_LTX_NAVBAR_PARAM Title: ##CNN Description: ## CNN Save your changes.
1-2-2 Include this newly created Logical Link into a new Direct Link Group Z##LINKS. Choose Define Direct Link Groups. Choose New Entries. Group ID: Z##LINKS Title: ##Links Description: ##Links Choose Assign Links in the dialog structure on the left. Choose New Entries. Logical Link ID: Z##WEBPAGE Position: 10. Save your settings.
1-2-3 Include this newly created Direct Link Group into the Navigation Bar profile Z##NBPROF. Choose Define Profile in the dialog structure on the left Mark Z##NBPROF and double-click Adjust Direct Link Groups. Choose New Entries. Group ID: Z##LINKS Position: 30 Save your settings.
© SAP AG CR580 4-39
1-2-4 Like in one of the exercises before you have to make this Direct Group Link visible in Customizing of Business Roles.
Go to the Customizing of Business Roles. Choose your role and change the settings under Adjust Direct Group Links.
Mark Z##SRVPRO and double-click Adjust Direct Group Links.
Mark the Logical Link Z##WEBPAGE belonging to Group ID Z##LINKS as visible. You should find this entry at the bottom.
Save your settings and restart the CRM WebClient UI in order to test.
2-1 You would like to integrate a link to a business transaction to the CRM WebClient UI application of some of your users. Therefore you will again use the Transaction Launcher functionality. Please be aware that in this case it is necessary to use the Internet Transaction Server functionality that is able to integrate a classical SAP GUI based transactions into a web based application.
2-1-1 Check the definition of Logical Systems ID’s. In this training system an entry has already been made.
SAP Menu → Interaction Center → Interaction Center WebClient → Administration → System Parameters → Define Transaction Launcher Logical Systems and URLs (Optionally call transaction /ncrms_ic_cross_sys)
You should find an entry OWNLOGSYS and a corresponding URL pointing to the ITS.
What is the Logical System assigned to OWNLOGSYS?
Logical System is DTZ_800.
2-1-2 Start the Transaction Launcher (Wizard).
SAP Implementation Guide → Customer Relationship Management → UI Framework → Technical Role Definition → Transaction Launcher → Configure Transaction Launcher
Choose Continue.
Launch Trans. ID: Z##TRANS1
Component Set: ALL
Choose Continue.
Description: ## Transaction 1
Class Name: Z##TRANS1
Checkbox Stateful: checked
Checkbox Raise Veto: unchecked.
Choose Continue.
Transaction Type: BOR Transaction
Logical System: DTZ_800
BOR Object Type: ZCRTSTC
Method Name: EXECUTE
Choose Continue.
© SAP AG CR580 4-40
Parameter: Object Key
Value: CRMM_BUPA_MAP.
Choose Continue (twice).
Choose Complete.
2-2 In the following you will integrate the Launch Transaction ID into the Navigation Bar profile of your users. Therefore you will create a new Logical Link, include it into your Direct Link Group and make the link visible in Business Role Customizing.
2-2-1 Go to the customizing of Navigation Bar profiles and create a new Logical Link.
SAP Menu → Architecture and Technology → Configuration → Customizing (transaction code /nSPRO) Choose SAP Reference IMG.
Customer Relationship Management → UI Framework → Technical Role Definition → Define Navigation Bar Profile.
Choose Define Logical Links.
Create a new logical link:
Logical Link ID: Z##TRANS1
Type: Launch Transaction
Target ID: EXECLTX
Parameter Z##TRANS1
Parameter Class: CL_CRM_UI_LTX_NAVBAR_PARAM
Title: ##Transaction1
Description: ##Transaction 1
Save your changes.
2-2-2 Assign this newly created Logical Link into your Direct Link Group Z##LINKS.
Choose Define Direct Link Groups
Mark your entry (Z##LINKS) and choose Assign Links in the dialog structure on the left.
Add the Logical Link Z##TRANS1 with Position 40.
Save. 2-2-3 Like in one of the exercises before you have to make this Direct Group Link
visible in Customizing of Business Roles.
Go to the Customizing of Business Roles. Choose your role and change the settings under Adjust Direct Group Links.
Make your new link visible.
Save your settings and restart the CRM WebClient UI in order to test.

© SAP AG CR580 5-1
© SAP 2008
Architecture
Contents:UI Components Generic Interaction Layer and Business Object Layer
© SAP AG CR580 5-2
© SAP 2008
Architecture: Unit Objectives
After completing this unit, you will be able to:Explain the technical architecture of the SAP CRM User InterfaceDescribe the functionality of the different framework componentsState the basics of the Model View Controller ConceptUse the Workbench to find out details of the UI ComponentsExplain the concept of the Business Object Layer (BOL) and the Generic Interaction Layer (GenIL)Work with the system tools: BOL Browser and GenIL Model Browser
© SAP AG CR580 5-3
© SAP 2008
Architecture: Business Example
You want to know more about the architecture of the framework as this knowledge is helpful when you need to configure or enhance the applications.
© SAP AG CR580 5-4
© SAP 2008
Architecture: Unit Overview Diagram
Architecture
Lesson 1: UI Components
Lesson 2: Generic Interaction Layer and Business Object Layer

© SAP AG CR580 5-5
© SAP 2008
UI Components: Lesson Objectives
After completing this lesson, you will be able to:Describe the role of the UI components in the frameworkGet a basic understanding of the Model View Controller conceptUse the UI Component Workbench to get information about the UI components
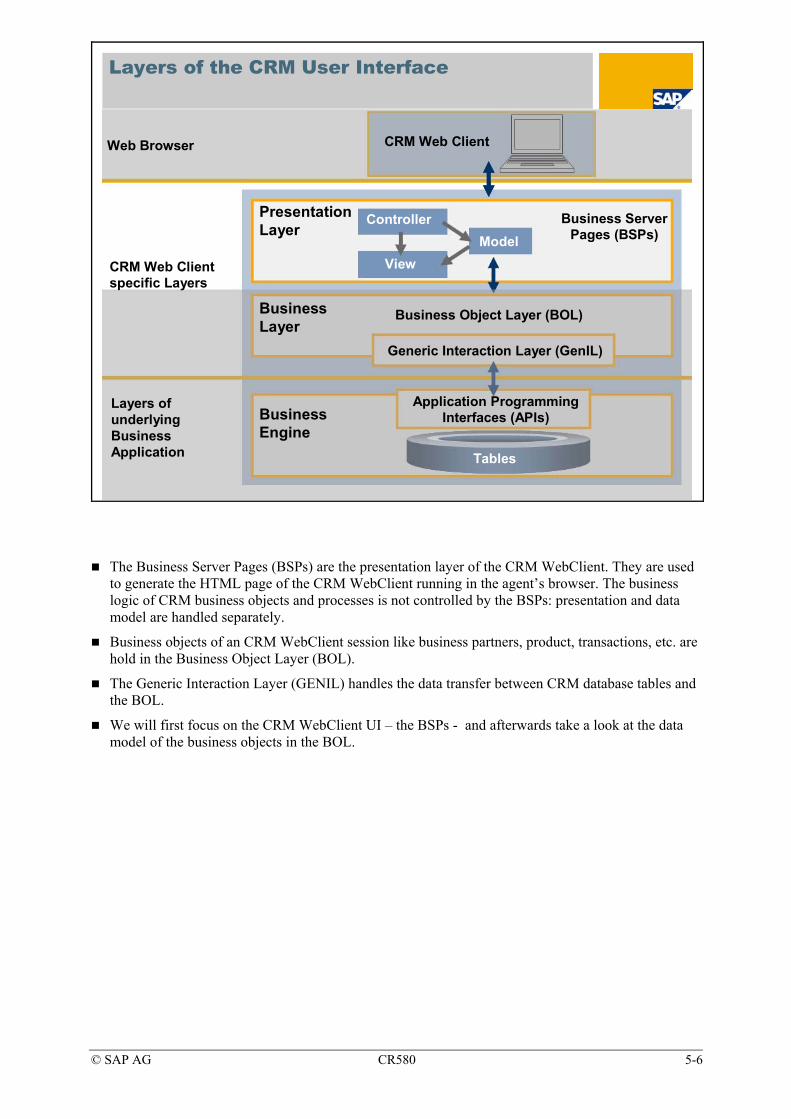
© SAP AG CR580 5-6
© SAP 2008
Layers of the CRM User Interface
CRM Web Client specific Layers
Layers of underlying Business Application
Web Browser CRM Web Client
Business Server Pages (BSPs)
Presentation Layer
ControllerModel
View
Generic Interaction Layer (GenIL)
Application Programming Interfaces (APIs)
Tables
Business Layer
Business Engine
Business Object Layer (BOL)
The Business Server Pages (BSPs) are the presentation layer of the CRM WebClient. They are used to generate the HTML page of the CRM WebClient running in the agent’s browser. The business logic of CRM business objects and processes is not controlled by the BSPs: presentation and data model are handled separately.
Business objects of an CRM WebClient session like business partners, product, transactions, etc. are hold in the Business Object Layer (BOL).
The Generic Interaction Layer (GENIL) handles the data transfer between CRM database tables and the BOL.
We will first focus on the CRM WebClient UI – the BSPs - and afterwards take a look at the data model of the business objects in the BOL.
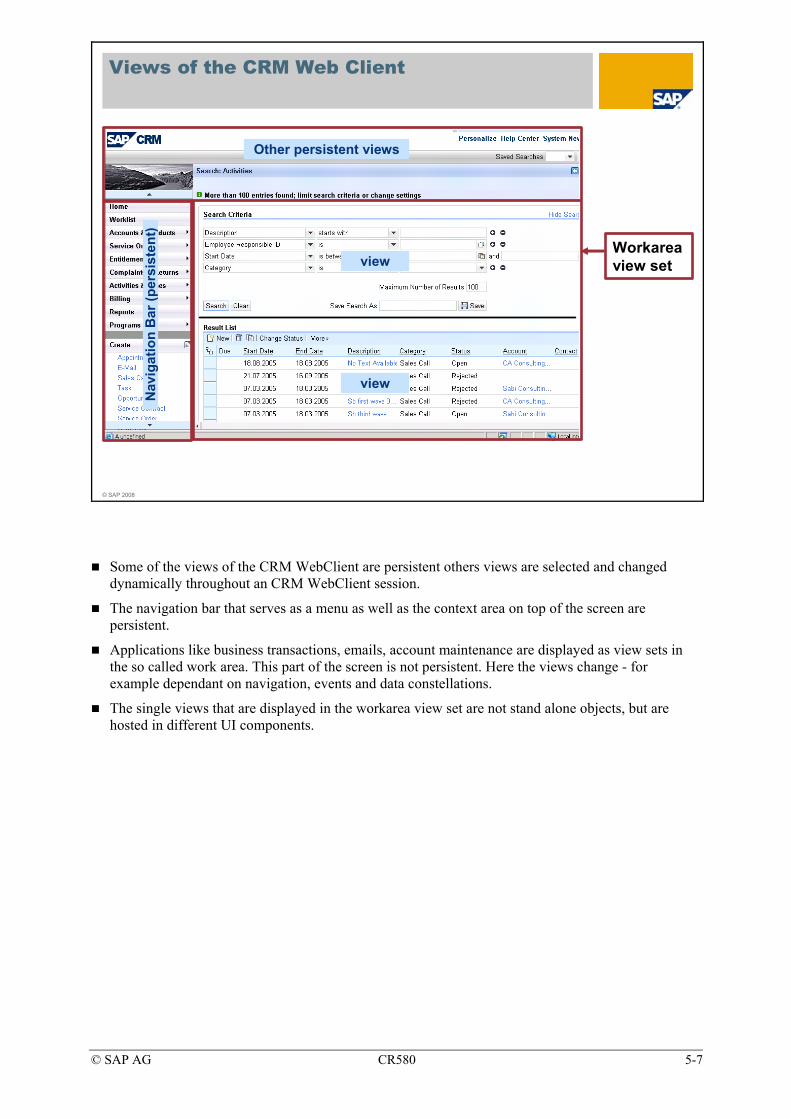
© SAP AG CR580 5-7
© SAP 2008
Views of the CRM Web Client
Other persistent viewsN
avig
atio
n B
ar (p
ersi
sten
t)
Workareaview setview
view
Some of the views of the CRM WebClient are persistent others views are selected and changed dynamically throughout an CRM WebClient session.
The navigation bar that serves as a menu as well as the context area on top of the screen are persistent.
Applications like business transactions, emails, account maintenance are displayed as view sets in the so called work area. This part of the screen is not persistent. Here the views change - for example dependant on navigation, events and data constellations.
The single views that are displayed in the workarea view set are not stand alone objects, but are hosted in different UI components.

© SAP AG CR580 5-8
© SAP 2008
Identify Component and View
Screenshot vom Popup
F2
To find out the name of the UI component and view place your cursor in an editable field and press F2
Component name, view name as well as Technical information about the current configuration will be displayed in popup window
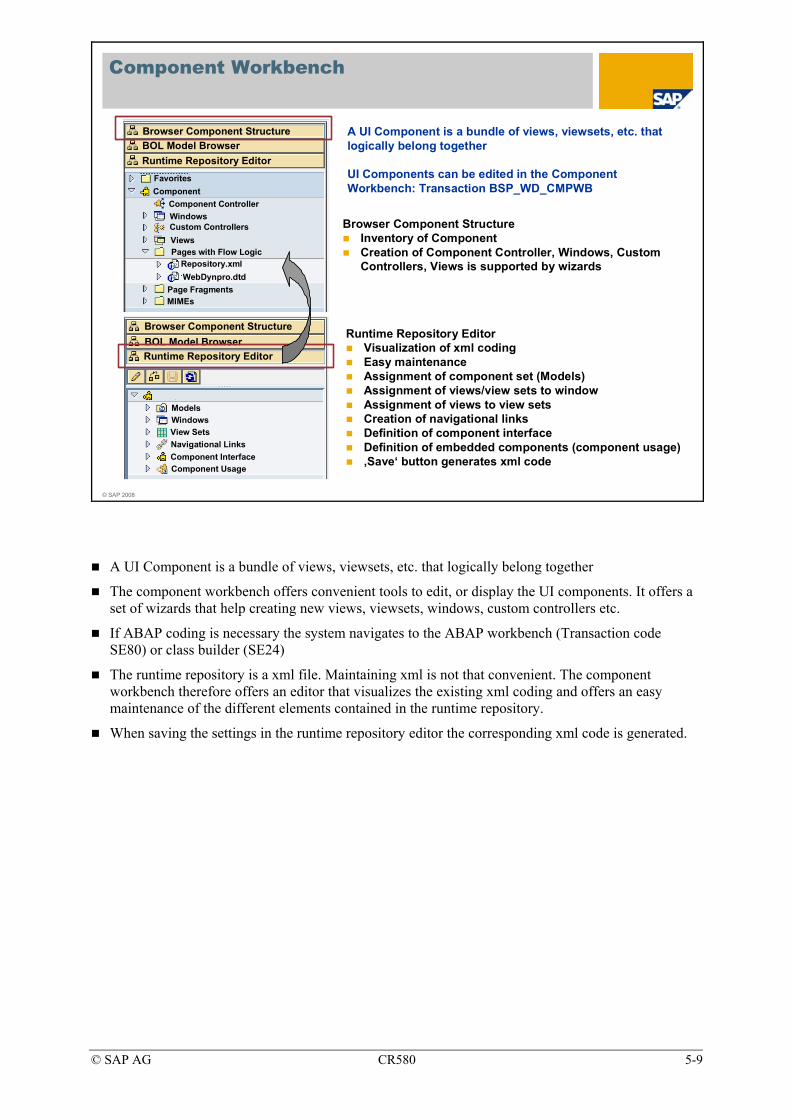
© SAP AG CR580 5-9
© SAP 2008
Component Workbench
A UI Component is a bundle of views, viewsets, etc. that logically belong together
UI Components can be edited in the Component Workbench: Transaction BSP_WD_CMPWB
Browser Component StructureBOL Model BrowserRuntime Repository Editor
FavoritesComponent
Component ControllerWindowsCustom ControllersViewsPages with Flow Logic
Repository.xmlWebDynpro.dtd
Page FragmentsMIMEs
Browser Component StructureBOL Model BrowserRuntime Repository Editor
WindowsView SetsNavigational Links
Models
Component InterfaceComponent Usage
Browser Component StructureInventory of ComponentCreation of Component Controller, Windows, Custom Controllers, Views is supported by wizards
Runtime Repository EditorVisualization of xml codingEasy maintenanceAssignment of component set (Models)Assignment of views/view sets to windowAssignment of views to view setsCreation of navigational linksDefinition of component interfaceDefinition of embedded components (component usage)‚Save‘ button generates xml code
A UI Component is a bundle of views, viewsets, etc. that logically belong together
The component workbench offers convenient tools to edit, or display the UI components. It offers a set of wizards that help creating new views, viewsets, windows, custom controllers etc.
If ABAP coding is necessary the system navigates to the ABAP workbench (Transaction code SE80) or class builder (SE24)
The runtime repository is a xml file. Maintaining xml is not that convenient. The component workbench therefore offers an editor that visualizes the existing xml coding and offers an easy maintenance of the different elements contained in the runtime repository.
When saving the settings in the runtime repository editor the corresponding xml code is generated.
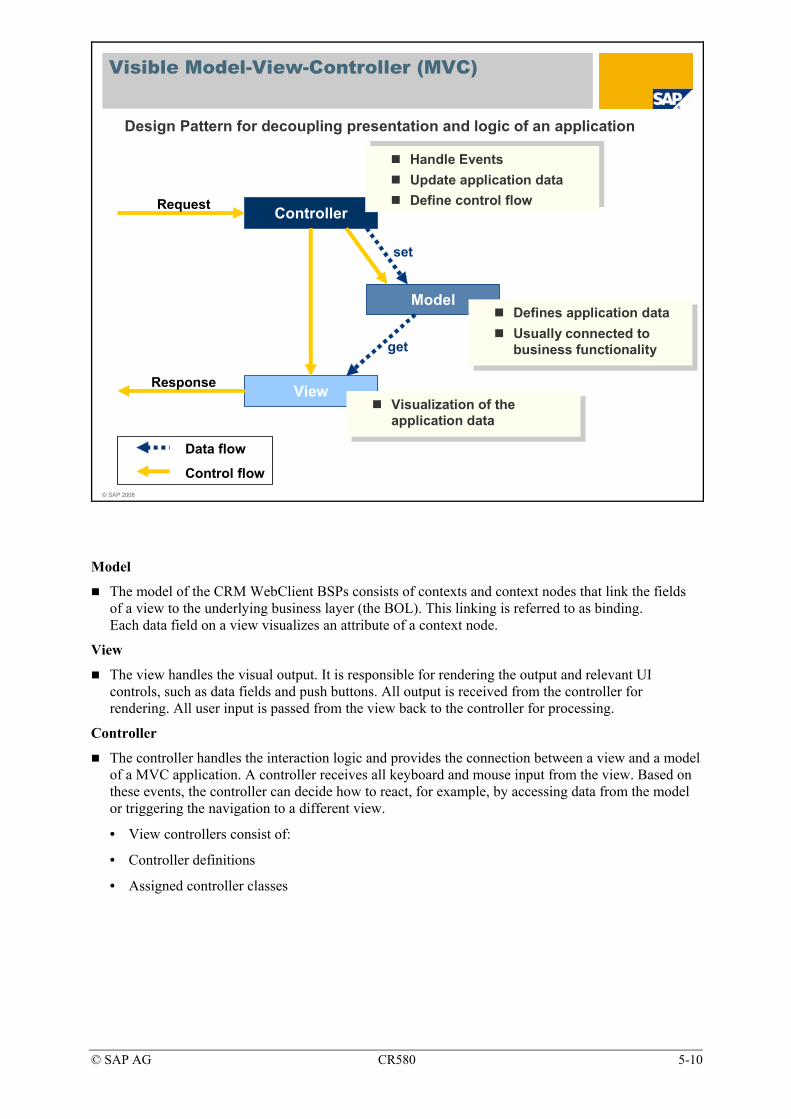
© SAP AG CR580 5-10
© SAP 2008
Design Pattern for decoupling presentation and logic of an application
ControllerRequest
ViewResponse
Model
Handle EventsUpdate application dataDefine control flow
Handle EventsUpdate application dataDefine control flow
Defines application dataUsually connected to business functionality
Defines application dataUsually connected to business functionality
Visualization of the application data
Visualization of the application data
Data flow
Control flow
set
get
Visible Model-View-Controller (MVC)
Model
The model of the CRM WebClient BSPs consists of contexts and context nodes that link the fields of a view to the underlying business layer (the BOL). This linking is referred to as binding. Each data field on a view visualizes an attribute of a context node.
View
The view handles the visual output. It is responsible for rendering the output and relevant UI controls, such as data fields and push buttons. All output is received from the controller for rendering. All user input is passed from the view back to the controller for processing.
Controller
The controller handles the interaction logic and provides the connection between a view and a model of a MVC application. A controller receives all keyboard and mouse input from the view. Based on these events, the controller can decide how to react, for example, by accessing data from the model or triggering the navigation to a different view.
• View controllers consist of:
• Controller definitions
• Assigned controller classes
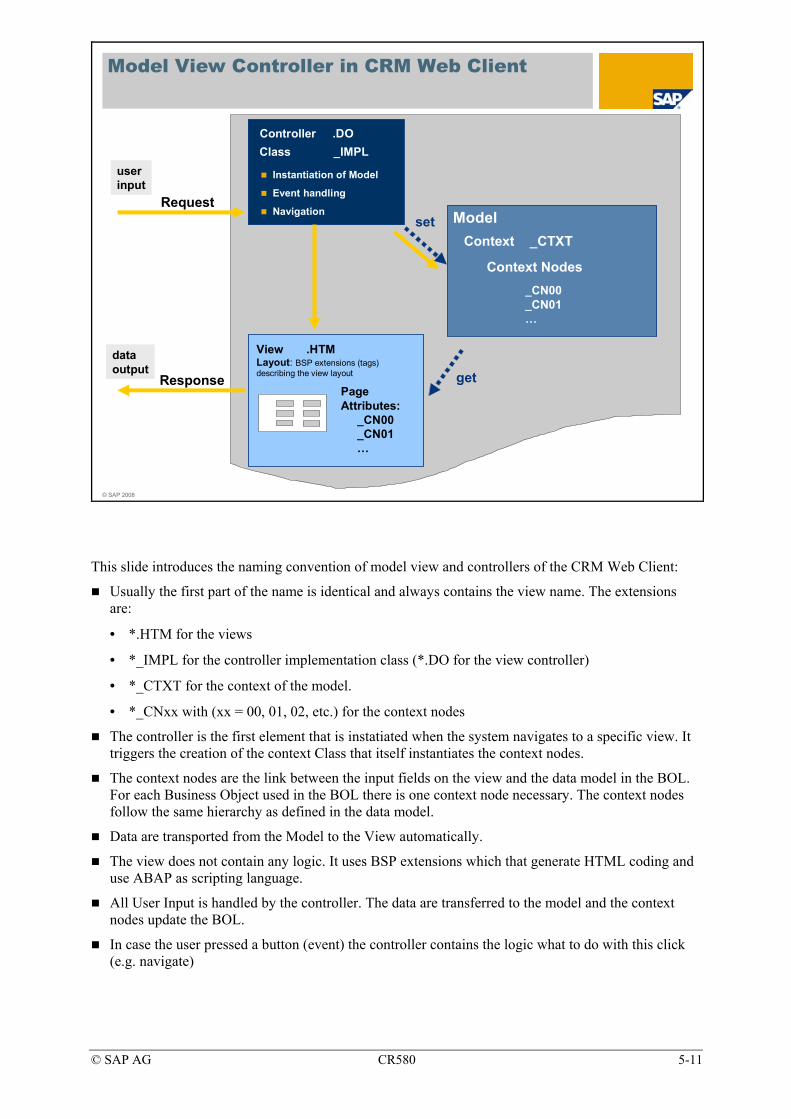
© SAP AG CR580 5-11
© SAP 2008
Model View Controller in CRM Web Client
Request
Response
set
get
Controller .DO
userinput
dataoutput
View .HTM
Class _IMPL
Layout: BSP extensions (tags) describing the view layout
ModelContext _CTXT
Context Nodes_CN00_CN01…
Page Attributes:
_CN00_CN01…
Instantiation of Model
Event handling
Navigation
This slide introduces the naming convention of model view and controllers of the CRM Web Client:
Usually the first part of the name is identical and always contains the view name. The extensions are:
• *.HTM for the views
• *_IMPL for the controller implementation class (*.DO for the view controller)
• *_CTXT for the context of the model.
• *_CNxx with (xx = 00, 01, 02, etc.) for the context nodes
The controller is the first element that is instatiated when the system navigates to a specific view. It triggers the creation of the context Class that itself instantiates the context nodes.
The context nodes are the link between the input fields on the view and the data model in the BOL. For each Business Object used in the BOL there is one context node necessary. The context nodes follow the same hierarchy as defined in the data model.
Data are transported from the Model to the View automatically.
The view does not contain any logic. It uses BSP extensions which that generate HTML coding and use ABAP as scripting language.
All User Input is handled by the controller. The data are transferred to the model and the context nodes update the BOL.
In case the user pressed a button (event) the controller contains the logic what to do with this click (e.g. navigate)

© SAP AG CR580 5-12
© SAP 2008
Component Workbench: View, Controller and Model
Controller
Model:Context and Context Nodes
View: Layout
Transaction BSP_WD_CMPWB displays all development objects of the CRM Web Client applications.

© SAP AG CR580 5-13
© SAP 2008
Context Nodes
Request
Response
set
get
Controlleruserinput
dataoutput
Layout
Model
Context Nodes
Page Attributes:
Input1
Input2Input3
BOL
Business Object with attributesData Binding
GenilAPI
CRM Business Logic
The context nodes are the link between the input fields on the view and the data model in the BOL. For each Business Object used in the BOL there is one context node necessary. The context nodes follow the same hierarchy as defined in the data model.
Data are transported from the Model to the View automatically.
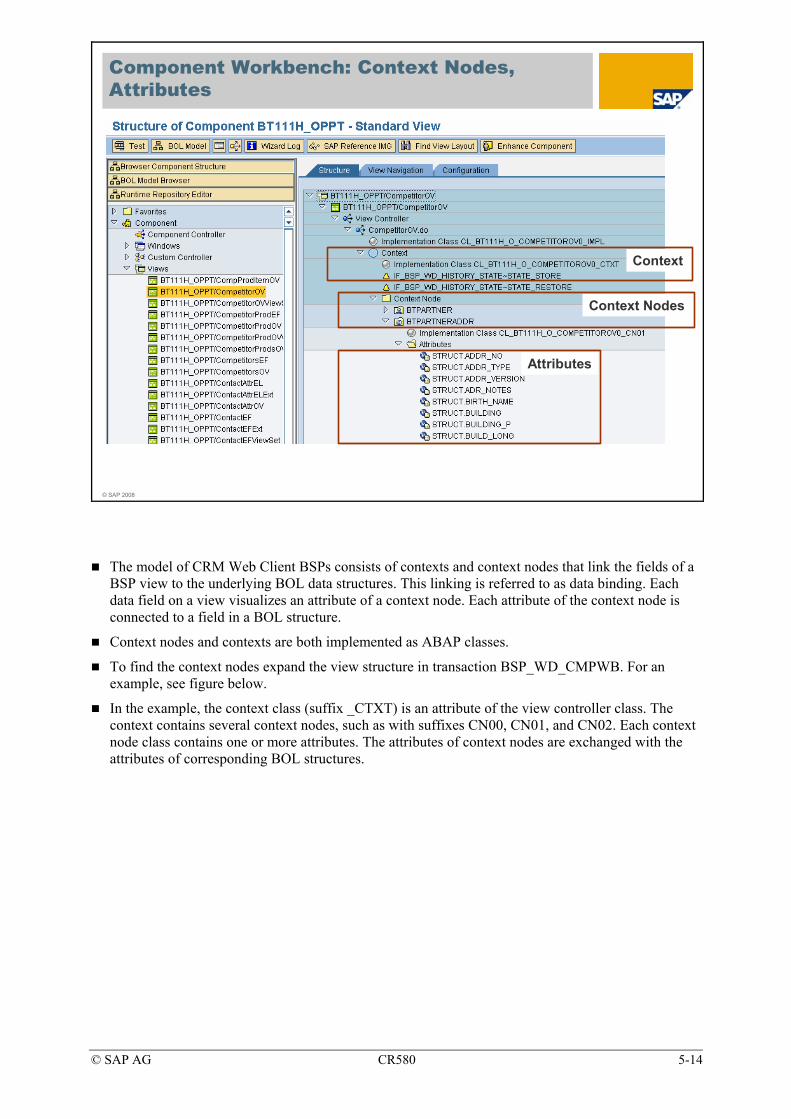
© SAP AG CR580 5-14
© SAP 2008
Component Workbench: Context Nodes, Attributes
Context
Context Nodes
Attributes
The model of CRM Web Client BSPs consists of contexts and context nodes that link the fields of a BSP view to the underlying BOL data structures. This linking is referred to as data binding. Each data field on a view visualizes an attribute of a context node. Each attribute of the context node is connected to a field in a BOL structure.
Context nodes and contexts are both implemented as ABAP classes.
To find the context nodes expand the view structure in transaction BSP_WD_CMPWB. For an example, see figure below.
In the example, the context class (suffix _CTXT) is an attribute of the view controller class. The context contains several context nodes, such as with suffixes CN00, CN01, and CN02. Each context node class contains one or more attributes. The attributes of context nodes are exchanged with the attributes of corresponding BOL structures.
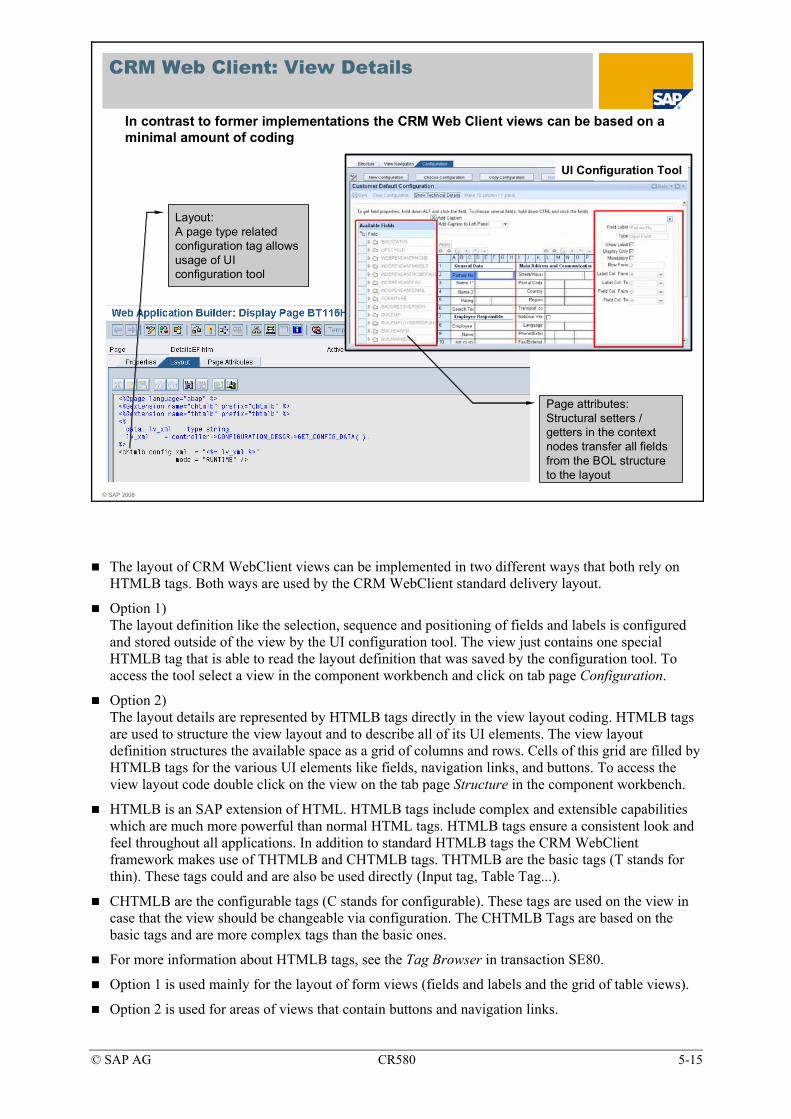
© SAP AG CR580 5-15
© SAP 2008
CRM Web Client: View Details
In contrast to former implementations the CRM Web Client views can be based on a minimal amount of coding
Layout:A page type related configuration tag allows usage of UI configuration tool
Page attributes:Structural setters / getters in the contextnodes transfer all fieldsfrom the BOL structureto the layout
UI Configuration Tool
The layout of CRM WebClient views can be implemented in two different ways that both rely on HTMLB tags. Both ways are used by the CRM WebClient standard delivery layout.
Option 1) The layout definition like the selection, sequence and positioning of fields and labels is configured and stored outside of the view by the UI configuration tool. The view just contains one special HTMLB tag that is able to read the layout definition that was saved by the configuration tool. To access the tool select a view in the component workbench and click on tab page Configuration.
Option 2) The layout details are represented by HTMLB tags directly in the view layout coding. HTMLB tags are used to structure the view layout and to describe all of its UI elements. The view layout definition structures the available space as a grid of columns and rows. Cells of this grid are filled by HTMLB tags for the various UI elements like fields, navigation links, and buttons. To access the view layout code double click on the view on the tab page Structure in the component workbench.
HTMLB is an SAP extension of HTML. HTMLB tags include complex and extensible capabilities which are much more powerful than normal HTML tags. HTMLB tags ensure a consistent look and feel throughout all applications. In addition to standard HTMLB tags the CRM WebClient framework makes use of THTMLB and CHTMLB tags. THTMLB are the basic tags (T stands for thin). These tags could and are also be used directly (Input tag, Table Tag...).
CHTMLB are the configurable tags (C stands for configurable). These tags are used on the view in case that the view should be changeable via configuration. The CHTMLB Tags are based on the basic tags and are more complex tags than the basic ones.
For more information about HTMLB tags, see the Tag Browser in transaction SE80.
Option 1 is used mainly for the layout of form views (fields and labels and the grid of table views).
Option 2 is used for areas of views that contain buttons and navigation links.
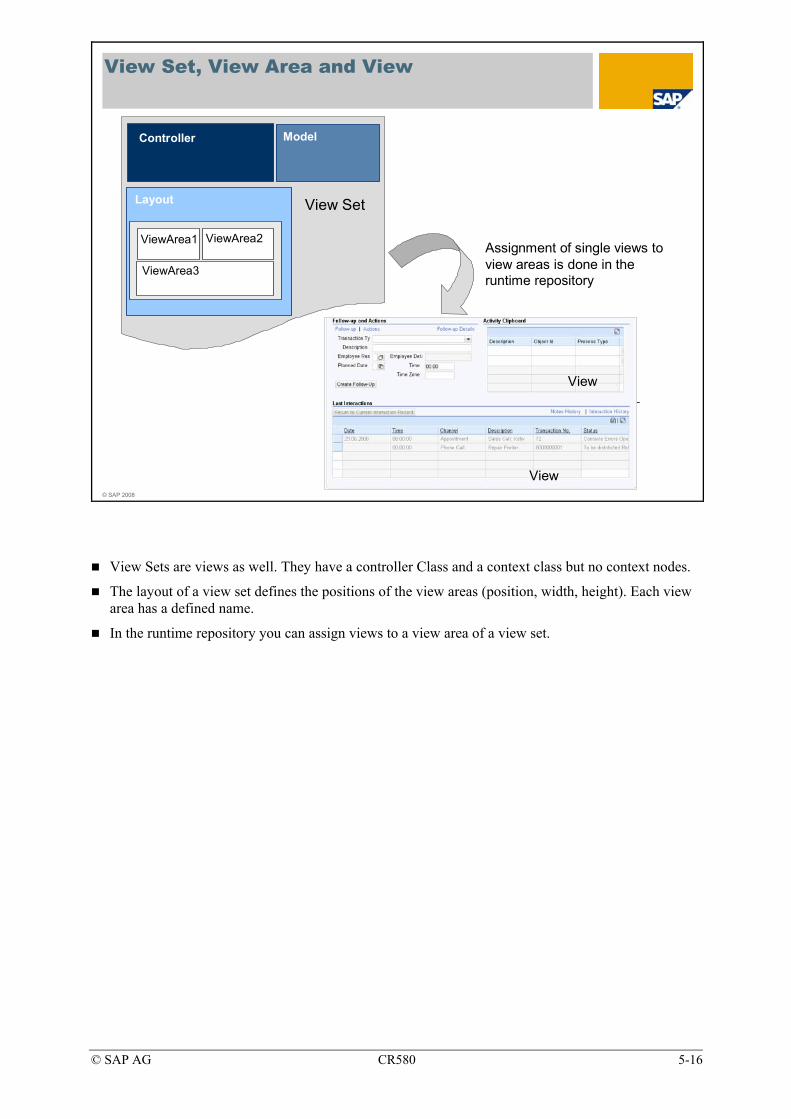
© SAP AG CR580 5-16
© SAP 2008
View Set, View Area and View
View Set
View
View
View
ViewArea2
ViewArea3
ViewArea1
Layout
Controller Model
Assignment of single views to view areas is done in the runtime repository
View Sets are views as well. They have a controller Class and a context class but no context nodes.
The layout of a view set defines the positions of the view areas (position, width, height). Each view area has a defined name.
In the runtime repository you can assign views to a view area of a view set.

© SAP AG CR580 5-17
© SAP 2008
Navigation between views (in same window)
Request
Controller User input: press button
Back*
Method: DO_HANDLE_EVENT
Method: EH_ONDONE
Method: OP_TODETAILSOV
DetailsEFDetailsOV
ToDetailsOV
Controller
Method: IP_FROMDETAILSEF
dataoutputResponse
Navigational Link ID
Inbound PlugOutbound Plug
*EventID: done
Buttons or links cause events. All events are handled by the view controller class in the method DO_HANDLE_EVENTS. Depending on the event that is triggered, event handling classes define the further logic. Each event defined in the layout (eventid) has a corresponding event handler. Event handler methods use the naming convention EH_ONeventid. These methods contain the logic how to react on the event. One possible reaction is the navigation to a new view.
In case a navigation is required, an outbound plug is called. An outbound plug corresponds with a method that mostly follows the naming convention OP_TOtargetviewname. Inbound plugs are methods defined in the source view and mostly follow the naming convention IP_FROMsourceviewname
In addition it is necessary to map the outbound and inbound plugs and thus the source views and the target view of the navigation.
This mapping can be done by navigational links. A navigational link consists of an identifier, source view, outbound plug, target view and inbound plug. Navigational links are stored in the runtime repository. As each component has its own runtime repository navigational links are mainly used when navigating between the views inside the same component or to views of reuse components.
The above navigation describes the case when navigation is done within one window. That can be views within one component or between views of a component and a window of an embedded component.
If the navigation target is an independent workarea component the navigation is mediated by mapping tables that are part of the navigation bar customizing and the workarea component repository. This example will be handled in a later slide.

© SAP AG CR580 5-18
© SAP 2008
Component Workbench: Controller, Event Hander and Navigation
Controller Class
Event Handler
Inbound Plugs
Outbound Plugs
Event Handler, Inbound and Outbound Plugs are methods of the Controller class.
The Tab ‚View Navigation‘ visualizes the runtime Repository information and gives an overview of all navigational links used in the selected view.
© SAP AG CR580 5-19
© SAP 2008
UI Components: Lesson Summary
You should now be able to:Describe the role of the UI components in the frameworkGet a basic understanding of the Model View Controller conceptUse the UI Component Workbench to get information about the UI components
© SAP AG CR580 5-20
© SAP 2008
Architecture: Unit Overview Diagram
Architecture
Lesson 1: UI Components
Lesson 2: Generic Interaction Layer and Business Object Layer

© SAP AG CR580 5-21
© SAP 2008
Generic Interaction Layer and Business Object Layer: Lesson Objectives
After completing this lesson, you will be able to:Describe the functionality of the Generic Interaction layerUse the GenIL Model Browser to get information about the data model of the applicationsExplain the classification of the Business ObjectsState the role of the Business Object Layer in the FrameworkWork with the system tool BOL Browser
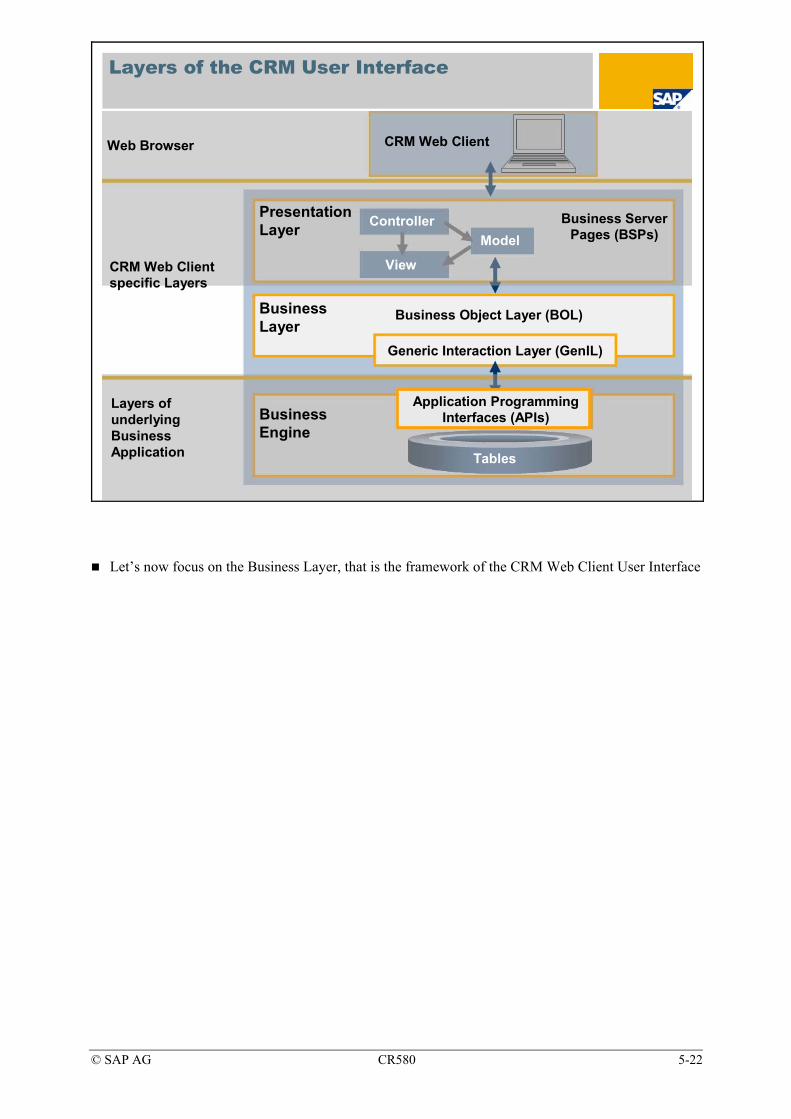
© SAP AG CR580 5-22
© SAP 2008
Layers of the CRM User Interface
CRM Web Client specific Layers
Layers of underlying Business Application
Web Browser
Business Layer
Business Engine
Business Server Pages (BSPs)
Presentation Layer Controller
Model
View
Business Object Layer (BOL)
Generic Interaction Layer (GenIL)
Application Programming Interfaces (APIs)
Tables
CRM Web Client
Let’s now focus on the Business Layer, that is the framework of the CRM Web Client User Interface

© SAP AG CR580 5-23
© SAP 2008
Business Layer
BOL BOL works with the data at runtime. Data that are changed in the user interface are first changed in the BOL and then transferred to the Generic Interaction LayerGeneric Interaction Layer contains mapping components to communicate with the existing APIs
CRM Business Logic
GenIL
User Interface
OrderAPI
Mapping Component for Order API
Mapping Component for Business Partner API
Business Partner
API Existing Business Logic has not been changed for the Web Client User Interface
The existing CRM Business Logic has not been changed with the introduction of the Web Client User Interface. The business logic for creation and update of different CRM objects as Business Partner, Orders, Marketing campaign etc. is still encapsulated in APIs (Application Programming Interfaces)
These APIs are object specific in terms of interfaces, data model and methods that they offer. In former releases developers and application consultants had to know the specific properties of these APIs very well in order to do any enhancements.
The generic interaction layer contains specific mapping components to communicate with the existing APIs. These Genil components map the data between the APIs and the Business Object Layer. Additionally they trigger the call of the APIs for execution of searches, creation and update.
The mapping is necessary as every CRM object needs to expose it‘s data model in a defined way in order to be handled by the Business Layer.
The business Layer does not contain any business Logic. The benefit of this framework is that the Business Layer can handle all data in the same way independent from the object that it belongs to.

© SAP AG CR580 5-24
© SAP 2008
GenIL Components
The GenIL Component is a class that acts as a link between the existing CRM Business Logic and the UI Framework.It communicates with the Generic Interaction Layer via a specific Interface.Each component defines a hierarchical data model that it publishes to the Generic Interaction Layer. These so called Business Objects are used within all layers of the framework and in the Presentation Layer. The Genil Component does the mapping between the data model that it has defined and the actual data interfaces of the APIsCRM Business Logic
GenIL Component
GenIL
sear
ch
mod
ify
save
crea
te
get m
odel Interface
Methods
BOL
map
Generic Interaction Layer (GenIL) Component:
A component is an ABAP class which implements the specific component interface to communicate with the framework. It exposes a set of CRM business objects to the Generic Interaction Layer which form a hierarchy.
Each component defines attribute properties for each attribute (technical, read-only, changeable, etc.)
Inside the components the existing business logic in form of APIs (Application Programming Interface) is still used. The data structures used in the APIs may not be the same structures that are exposed to the GenIL as data model. The component class does the transfer of data between the GenIL Data model and the APIs.
There is no further business logic in the Generic Interaction Layer or Presentation Layer.

© SAP AG CR580 5-25
© SAP 2008
Component Sets
Order BP Ibase
CRM Business Logic
GenIL
A component set is a collection of components that build a business context for a specific application that uses the business layer as its framework All components in the set are handled by the framework in the same way as each component communicates with the framework via the same methods.
BOL
Order BP Ibase
A component set is a collection of components that build a business context for a specific application that uses the business layer as its framework. A component set contains one or more Genil components. Example: In the Interaction Center application the agent needs access to different components within one session with the customer.
The framework is always started with a component set. When the framework is started, the data model of each component is requested and stored in the memory of the Generic Interaction Layer.
All components are handled by the framework in the same way as all components communicate with the framework via the same methods. The framework itself does not contain any business logic. It knows which components are registered and which Business objects belong to which component.
With the introduction of the new browser based User interface all existing CRM objetcs where transferred into Genil Components. Each CRM object uses the Genil Interface to communicate with the framework.
The list of component sets and components with the technical information which class is assigned can be found in the IMG:
Customer Relationship Management -> CRM Cross-Application Components -> Generic Interaction Layer/Object Layer -> Basic Settings

© SAP AG CR580 5-26
© SAP 2008
Business Objects and Data Model
The data model of a component set can be visualized in the BOL Model Browser
Business Object with unique name
Name of dictionary structureList of attributes in structure
Relations with unique IDs
Business Object (BO): Smallest unit of an object model. Each BO is assigned a unique name. The structure is either defined in the ABAP dictionary or directly in the Genil Component.
Relation: A relationship between two BOs that has a cross-component unique name. The relation has a cardinality for each BO. That means there can be 1:1 or 1:n relations.
Object model: Number of BOs and their relations.
Classification of Business Objects
Access Object: An access object is a special type of BO, whose ID can be used to determine both the attributes of the access object itself and those of its dependent objects.
Dependent Object: A dependent object is a special type of BO, whose attributes cannot be determined solely from the ID of this BO, but instead, only or together with the ID of the superior access object.
Root object: The root object is the only object within the hierarchical structure of a data model that is assigned as a superior object to all other objects. Each root object is also an access object.
Search-Object: A query object is a special type of BO whose attributes are the parameters of a search request.
Dynamic Search-Object: A dynamic query object is a type of BO whose attributes are the parameters of a search request. It is possible to create select options for these parameters.
Search Result Object: The result object of a search request has a dictionary structure assigned and displays data from different BOs as a result list. To link the search result object to the data model hierarchy the Search Result Object is associated with the root object of the same component.

© SAP AG CR580 5-27
© SAP 2008
Business Object Layer and Generic Interaction Layer
Order BP IBase
BOL BOL works with the data at runtime and communicates with the Generic Interaction Layer
Generic Interaction Layer dispatches requests to relevant component based on the name of the Business object
CRM Business Logic
GenIL
User Interface
The components call the APIs in the CRM system that read or update the database
BP IbaseOrder
The Business Object Layer is the layer that is linked to the User Interface. The BOL works with the data at runtime and keeps the information about what objects has been changed. It communicates with the Generic Interaction Layer with the same methods that are used in the GenIL component interface. The BOL does not know to which component a business object belongs. But the GenIL does and dispatches the request (lock, modify, save, etc.) to the relevant component.
For example: In the User Interface Order and Business Partner related business objects have been changed. The Generic Interaction Layer will check to which component the Business objects belong and in this case call the Order Component and the Business Partner component to update the data.

© SAP AG CR580 5-28
© SAP 2008
Layers of new UI Framework
Presentation Layer (BSP)
Layers of underlying Business Application
Tables
Business Engine API
Interaction Layer (GenIL)
Business Layer (BOL)
Model Browser: Visualizing BOL Model
BOL Browser: Testing Data retrieval from DB to BOL
BOL and GenIL: Tools
There are some tools that help you to investigate the model of BOL and GENIL.
The Data model of the GenIL Component sets can be visualized with the BOL Model Browser. Transaction GENIL_MODEL_BROWSER
The data retrieval from the data base to the BOL can be tested with the BOL Browser. Transaction GENIL_BOL_BROWSER.
The following slides will schematically explain how data is retrieved and in the framework and how you can navigate the data model.
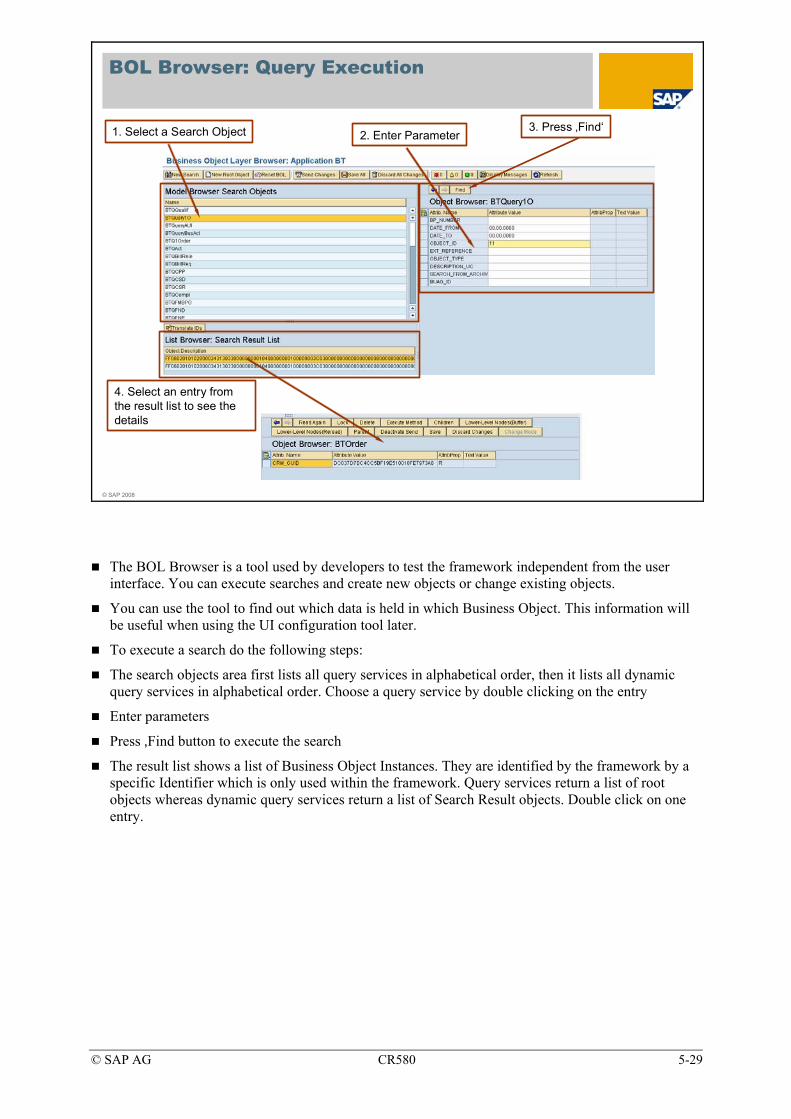
© SAP AG CR580 5-29
© SAP 2008
BOL Browser: Query Execution
1. Select a Search Object 2. Enter Parameter
4. Select an entry from the result list to see the details
3. Press ‚Find‘
The BOL Browser is a tool used by developers to test the framework independent from the user interface. You can execute searches and create new objects or change existing objects.
You can use the tool to find out which data is held in which Business Object. This information will be useful when using the UI configuration tool later.
To execute a search do the following steps:
The search objects area first lists all query services in alphabetical order, then it lists all dynamic query services in alphabetical order. Choose a query service by double clicking on the entry
Enter parameters
Press ‚Find button to execute the search
The result list shows a list of Business Object Instances. They are identified by the framework by a specific Identifier which is only used within the framework. Query services return a list of root objects whereas dynamic query services return a list of Search Result objects. Double click on one entry.

© SAP AG CR580 5-30
© SAP 2008
BOL Browser: Navigate Data Model
2. Select a relation by double click
3. Select an entry from the result list to see the details
4. Press ‚Children‘ to see next deeper hierarchy level
1. Press ‚Children‘ to see relations
To access the data of the single Business objects you need to navigate through the data hierarchy starting with the Root object (or access object).
• By pressing ‚Children‘ you see the list of relations linked to the current displayed Business Object.
• By Double clicking on a relation the BOL retrieves the list of dependent business objects.
• Selecting an entry from the result list displays the details of this entry
• You can continue the navigation by pressing ‚Children‘ to access other dependent data or you can press ‚Parent‘ to navigate to the next higher hierarchy level again.
© SAP AG CR580 5-31
© SAP 2008
Generic Interaction Layer and Business Object Layer: Lesson Summary
You should now be able to:Describe the functionality of the Generic Interaction layerUse the GenIL Model Browser to get information about the data model of the applicationsExplain the classification of the Business ObjectsState the role of the Business Object Layer in the FrameworkWork with the system tool BOL Browser
© SAP AG CR580 5-32
© SAP 2008
Architecture: Unit Summary
You should now be able to:Explain the technical architecture of the SAP CRM User InterfaceDescribe the functionality of the different framework componentsState the basics of the Model View Controller ConceptUse the Component Workbench to find out details of the UI ComponentsExplain the concept of the Business Object Layer (BOL) and the Generic Interaction Layer (GenIL)Work with the system tools: BOL Browser and GenIL Model Browser

© SAP AG CR580 5-33
Exercises
Unit: Architecture Topic: Model and BOL Browser
At the conclusion of this exercise, you will be able to:
• Navigate through the Model Browser of the Generic Interaction Layer.
• Navigate through the BOL Browser
You take a look at both the Model and the BOL Browser.
1-1 Take a look at the GenIL Model Browser.
1-1-1 Add the transaction GENIL_MODEL_BROWSER to your SAP GUI Favorites.
1-1-2 Start the transaction to call the GenIL Model Browser and take a look at the Component Set All.
The Component Sets and their corresponding Implementation Classes can be found in Customizing:
SAP Implementation Guide → Customer Relationship Management → CRM Cross-Application Components → Generic Interaction Layer/Object Layer → Basic Settings
Analyze the Root Object BuilHeader (this represents the CRM Business Partner).
What is the attribute structure associated to it?
Navigate to the Relation BuilStandardAddressRel (this represents the Standard Address of the Business Partner).
What is the attribute structure associated to it?
Navigate to the Relation BuilStandardAddressPhoneRel.
What is the attribute structure associated to it?
Are there more Relations available from here?

© SAP AG CR580 5-34
1-1-3 Observe that the Component Set All also contains other “Main” Objects, e.g. Search Objects.
Find Search Object BuilHeaderSearch.
What is the attribute structure associated to it?
What are the first three fields in the attribute structure?
You will use this information in the next exercise.
1-2 Take a look at the BOL Browser and compare your findings with the exercise before.
1-2-1 Add the transaction GENIL_BOL_BROWSER to your SAP GUI Favorites.
1-2-2 Use the Search Object BuilHeaderSearch to initiate a business partner search.
Find business partner with the Name (MC_NAME1) Media Store.
Check the details of this business partner. What BP number is assigned to it?
Navigate to the Children of this object. You should be able to find the Relation BuilStandardAddressRel.
What is the current address of the business partner Media Store?
Navigate to the Children of this object and find out the phone number of Media Store.
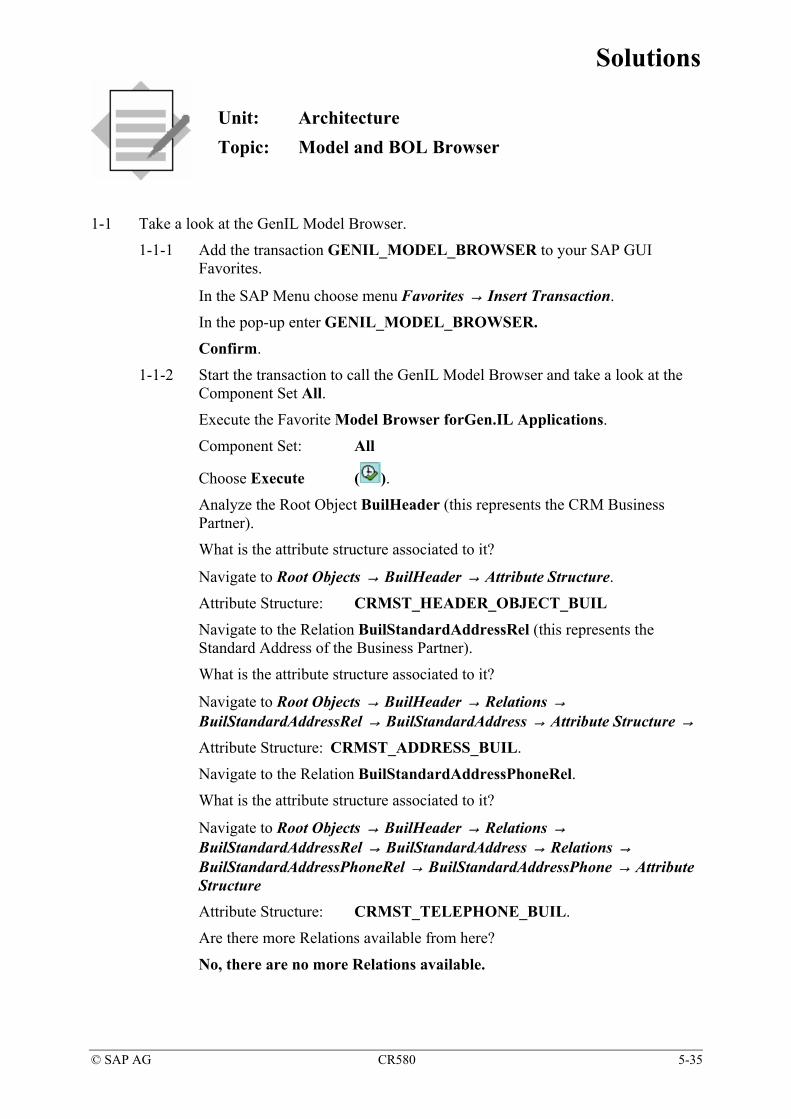
© SAP AG CR580 5-35
Solutions
Unit: Architecture Topic: Model and BOL Browser
1-1 Take a look at the GenIL Model Browser.
1-1-1 Add the transaction GENIL_MODEL_BROWSER to your SAP GUI Favorites.
In the SAP Menu choose menu Favorites → Insert Transaction.
In the pop-up enter GENIL_MODEL_BROWSER.
Confirm.
1-1-2 Start the transaction to call the GenIL Model Browser and take a look at the Component Set All.
Execute the Favorite Model Browser forGen.IL Applications.
Component Set: All
Choose Execute ( ).
Analyze the Root Object BuilHeader (this represents the CRM Business Partner).
What is the attribute structure associated to it?
Navigate to Root Objects → BuilHeader → Attribute Structure.
Attribute Structure: CRMST_HEADER_OBJECT_BUIL
Navigate to the Relation BuilStandardAddressRel (this represents the Standard Address of the Business Partner).
What is the attribute structure associated to it?
Navigate to Root Objects → BuilHeader → Relations → BuilStandardAddressRel → BuilStandardAddress → Attribute Structure →
Attribute Structure: CRMST_ADDRESS_BUIL.
Navigate to the Relation BuilStandardAddressPhoneRel.
What is the attribute structure associated to it?
Navigate to Root Objects → BuilHeader → Relations → BuilStandardAddressRel → BuilStandardAddress → Relations → BuilStandardAddressPhoneRel → BuilStandardAddressPhone → Attribute Structure Attribute Structure: CRMST_TELEPHONE_BUIL.
Are there more Relations available from here?
No, there are no more Relations available.
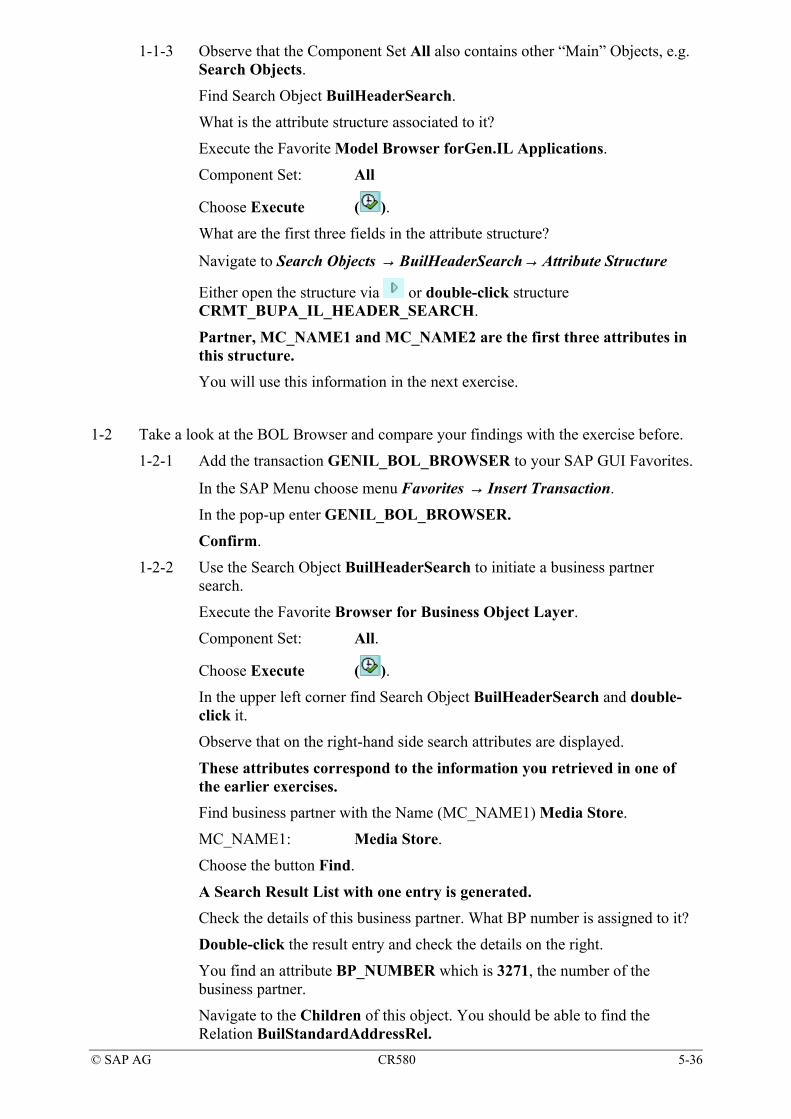
© SAP AG CR580 5-36
1-1-3 Observe that the Component Set All also contains other “Main” Objects, e.g. Search Objects.
Find Search Object BuilHeaderSearch.
What is the attribute structure associated to it?
Execute the Favorite Model Browser forGen.IL Applications.
Component Set: All
Choose Execute ( ).
What are the first three fields in the attribute structure?
Navigate to Search Objects → BuilHeaderSearch→ Attribute Structure
Either open the structure via or double-click structure CRMT_BUPA_IL_HEADER_SEARCH.
Partner, MC_NAME1 and MC_NAME2 are the first three attributes in this structure. You will use this information in the next exercise.
1-2 Take a look at the BOL Browser and compare your findings with the exercise before.
1-2-1 Add the transaction GENIL_BOL_BROWSER to your SAP GUI Favorites.
In the SAP Menu choose menu Favorites → Insert Transaction.
In the pop-up enter GENIL_BOL_BROWSER.
Confirm.
1-2-2 Use the Search Object BuilHeaderSearch to initiate a business partner search.
Execute the Favorite Browser for Business Object Layer.
Component Set: All.
Choose Execute ( ).
In the upper left corner find Search Object BuilHeaderSearch and double-click it.
Observe that on the right-hand side search attributes are displayed.
These attributes correspond to the information you retrieved in one of the earlier exercises. Find business partner with the Name (MC_NAME1) Media Store.
MC_NAME1: Media Store.
Choose the button Find.
A Search Result List with one entry is generated. Check the details of this business partner. What BP number is assigned to it?
Double-click the result entry and check the details on the right.
You find an attribute BP_NUMBER which is 3271, the number of the business partner.
Navigate to the Children of this object. You should be able to find the Relation BuilStandardAddressRel.
© SAP AG CR580 5-37
Choose the button Children.
The Relations on the left side change and your should be able to find BuilStandardAddressRel in the list of relations.
What is the current address of the business partner Media Store?
Double-click the relation.
City: Antioch
Postal code: 60002
Street: Highway
House number: 489.
Navigate to the Children of this object and find out the phone number of Media Store.
Choose the button Children.
The Relations on the left side change and your should be able to find BuilStandardAddressPhoneRel in the list of relations.
Double-click the relation.
Telephone number: 847643
Extension: 8765.

© SAP AG CR580 5-38
© SAP AG CR580 6-1
© SAP 2008
UI Configuration
Contents:UI ConfigurationDesign LayerFact Sheet

© SAP AG CR580 6-2
© SAP 2008
UI Configuration: Unit Objectives
After completing this unit, you will be able to:Review the functionalities of the new UI Configuration ToolExplain main concepts of UI ConfigurationUse the UI Configuration ToolExplain how the Design Layer influences the SAP CRM User InterfaceMaintain Design Layer CustomizingConfigure the Customer Fact Sheet

© SAP AG CR580 6-3
© SAP 2008
UI Configuration: Business Example
You want to change the layout of the user interface (e.g. by re-arranging fields, add or remove fields or change labels)

© SAP AG CR580 6-4
© SAP 2008
UI Configuration: Unit Overview Diagram
Lesson 3: Fact Sheet
UI Configuration
Lesson 1: UI Configuration
Lesson 2: Design Layer

© SAP AG CR580 6-5
© SAP 2008
UI Configuration: Lesson Objectives
After completing this lesson, you will be able to:Review the functionalities of the new UI Configuration ToolExplain main concepts of UI ConfigurationUse the UI Configuration Tool
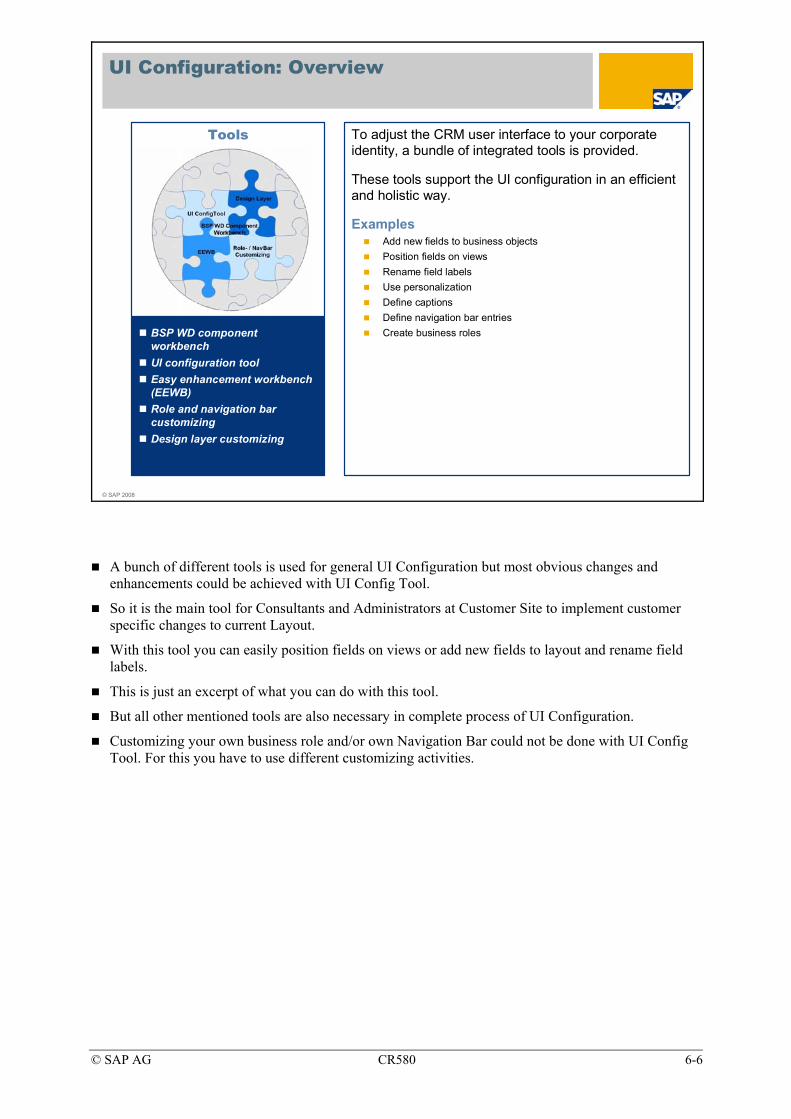
© SAP AG CR580 6-6
© SAP 2008
Tools
BSP WD component workbenchUI configuration toolEasy enhancement workbench (EEWB)Role and navigation bar customizingDesign layer customizing
Platzhalter für Bild
To adjust the CRM user interface to your corporate identity, a bundle of integrated tools is provided.
These tools support the UI configuration in an efficient and holistic way.
ExamplesAdd new fields to business objectsPosition fields on viewsRename field labelsUse personalizationDefine captionsDefine navigation bar entriesCreate business roles
UI Configuration: Overview
A bunch of different tools is used for general UI Configuration but most obvious changes and enhancements could be achieved with UI Config Tool.
So it is the main tool for Consultants and Administrators at Customer Site to implement customer specific changes to current Layout.
With this tool you can easily position fields on views or add new fields to layout and rename field labels.
This is just an excerpt of what you can do with this tool.
But all other mentioned tools are also necessary in complete process of UI Configuration.
Customizing your own business role and/or own Navigation Bar could not be done with UI Config Tool. For this you have to use different customizing activities.
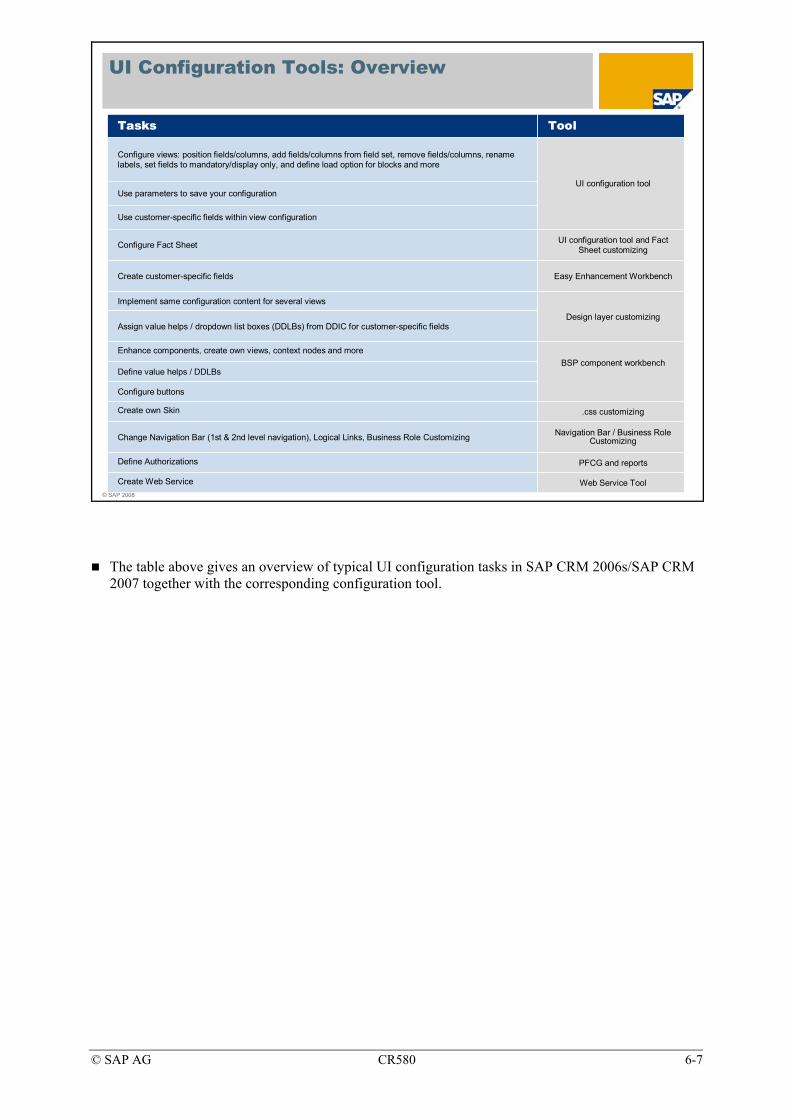
© SAP AG CR580 6-7
© SAP 2008
UI Configuration Tools: Overview
UI configuration tool
Use customer-specific fields within view configuration
PFCG and reportsDefine Authorizations
Define value helps / DDLBs
UI configuration tool and Fact Sheet customizing
Configure views: position fields/columns, add fields/columns from field set, remove fields/columns, rename labels, set fields to mandatory/display only, and define load option for blocks and more
Use parameters to save your configuration
Configure buttons
BSP component workbenchEnhance components, create own views, context nodes and more
Navigation Bar / Business Role CustomizingChange Navigation Bar (1st & 2nd level navigation), Logical Links, Business Role Customizing
.css customizingCreate own Skin
Assign value helps / dropdown list boxes (DDLBs) from DDIC for customer-specific fields
Easy Enhancement WorkbenchCreate customer-specific fields
Configure Fact Sheet
Web Service ToolCreate Web Service
Design layer customizing
Implement same configuration content for several views
ToolTasks
The table above gives an overview of typical UI configuration tasks in SAP CRM 2006s/SAP CRM 2007 together with the corresponding configuration tool.
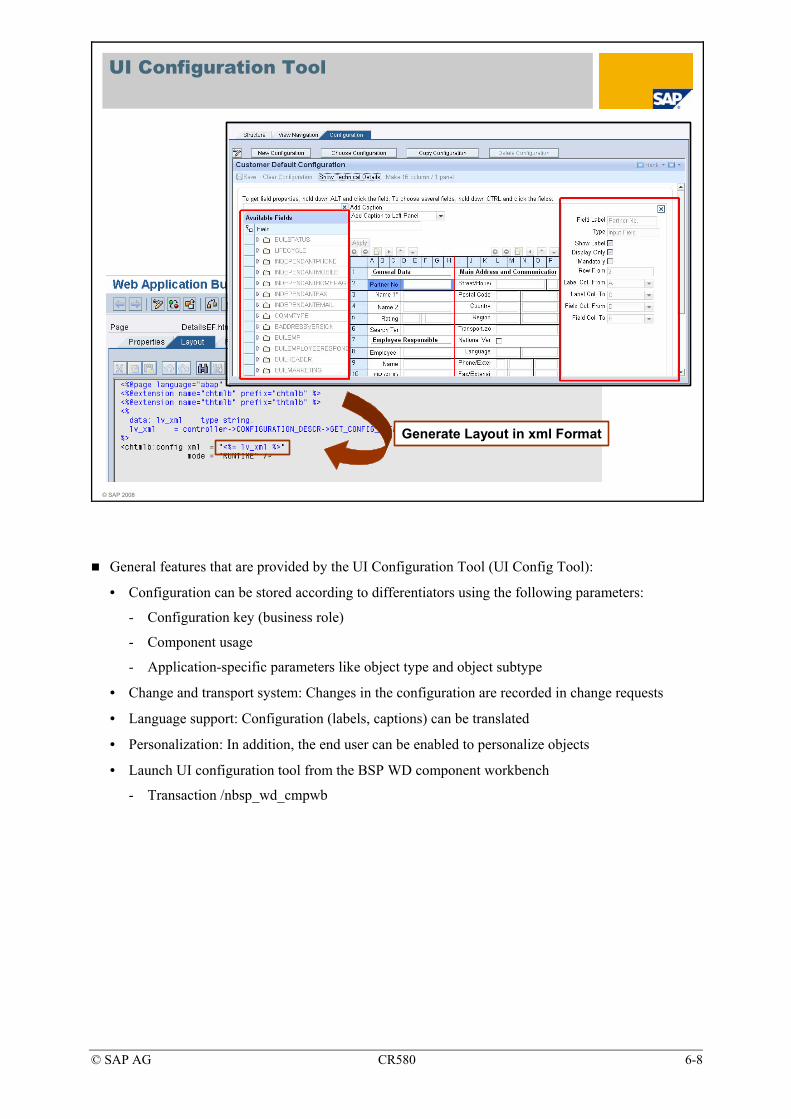
© SAP AG CR580 6-8
© SAP 2008
UI Configuration Tool
UI Configuration Tool
Generate Layout in xml Format
General features that are provided by the UI Configuration Tool (UI Config Tool):
• Configuration can be stored according to differentiators using the following parameters:
- Configuration key (business role)
- Component usage
- Application-specific parameters like object type and object subtype
• Change and transport system: Changes in the configuration are recorded in change requests
• Language support: Configuration (labels, captions) can be translated
• Personalization: In addition, the end user can be enabled to personalize objects
• Launch UI configuration tool from the BSP WD component workbench
- Transaction /nbsp_wd_cmpwb

© SAP AG CR580 6-9
© SAP 2008
Identify Component and View
Screenshot vom Popup
F2
To find out the name of the UI component and view place your cursor in an editable field and press F2.
Component name, view name as well as Technical information about the current configuration will be displayed in popup window.
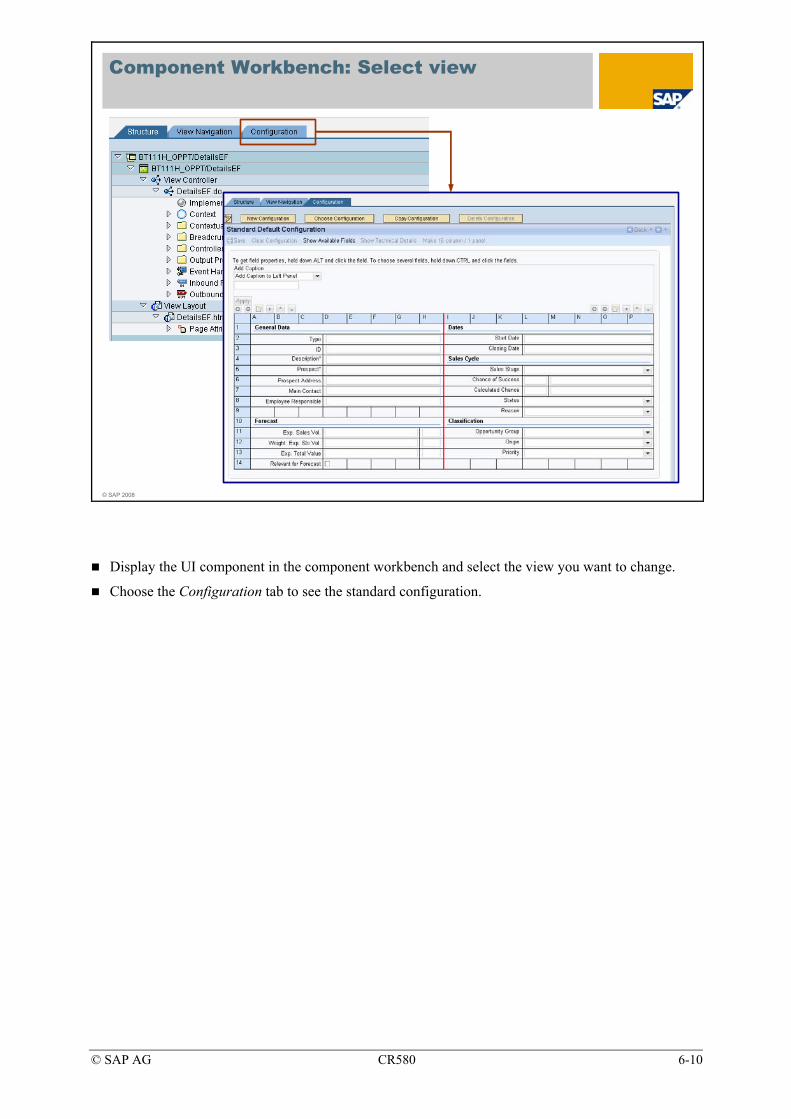
© SAP AG CR580 6-10
© SAP 2008
Component Workbench: Select view
Display the UI component in the component workbench and select the view you want to change.
Choose the Configuration tab to see the standard configuration.

© SAP AG CR580 6-11
© SAP 2008
Creation of your own configuration
Before you start with the creation of your own configuration you need to create your own Role Configuration Key.
IMG Path: Customer Relationship Management -> UI Framework -> UI Framework Definition -> Define Role Configuration Key
Your first step of configuration should always be to copy the standard configuration to a configuration including your Role Configuration Key.
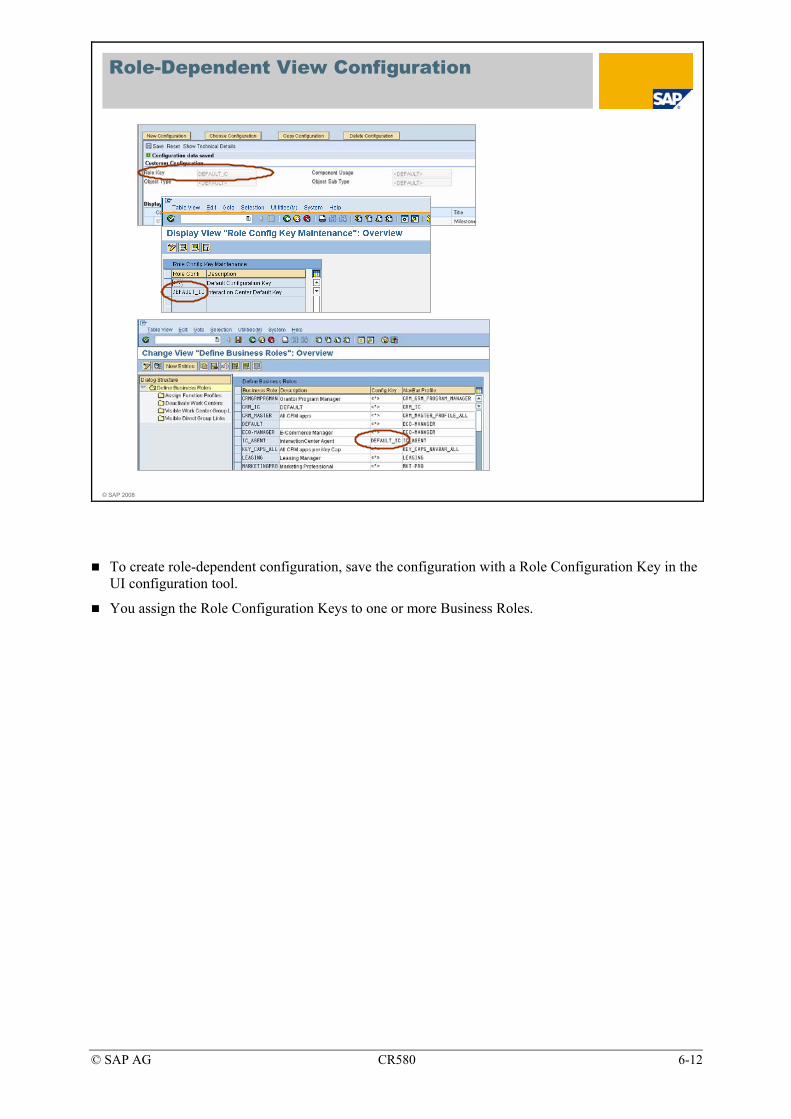
© SAP AG CR580 6-12
© SAP 2008
Role-Dependent View Configuration
To create role-dependent configuration, save the configuration with a Role Configuration Key in the UI configuration tool.
You assign the Role Configuration Keys to one or more Business Roles.

© SAP AG CR580 6-13
© SAP 2008
Configuration: Work Center Page
Add blocks from assignment set to visible work centercolumnsRemove blocks
Change Title of Block
Allow personalization
Assign whole width
Choose an Icon
Move blocks left/right
Move blocks up/down
A work center page represents all available links for an entry in the navigation bar.
If you don‘t you second level navigation of navigation bar in WebClient UI but just click directly on regarding entry in Navigation bar you will be lead to Work Center Page.
In here you can just configure the default layout of different shown link areas.
For Example work center page of account management offers links for creating, searching and reporting on accounts.
So there will be by default three different areas of this work center page to be configured.
In this configuration step with UI Config Tool you can define default layout which areas should be available in general and on which position each area gets rendered.
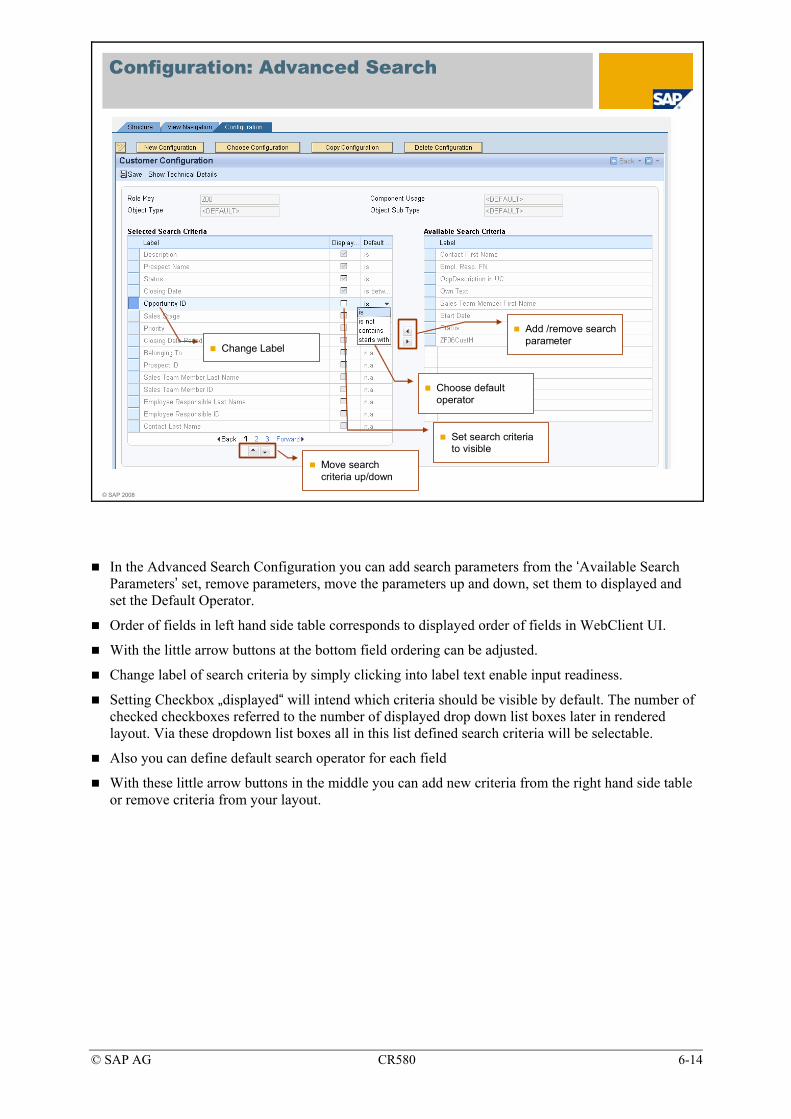
© SAP AG CR580 6-14
© SAP 2008
Configuration: Advanced Search
Add /remove search parameter
Choose default operator
Set search criteria to visible
Move search criteria up/down
Change Label
In the Advanced Search Configuration you can add search parameters from the ‘Available Search Parameters’ set, remove parameters, move the parameters up and down, set them to displayed and set the Default Operator.
Order of fields in left hand side table corresponds to displayed order of fields in WebClient UI.
With the little arrow buttons at the bottom field ordering can be adjusted.
Change label of search criteria by simply clicking into label text enable input readiness.
Setting Checkbox „displayed“ will intend which criteria should be visible by default. The number of checked checkboxes referred to the number of displayed drop down list boxes later in rendered layout. Via these dropdown list boxes all in this list defined search criteria will be selectable.
Also you can define default search operator for each field
With these little arrow buttons in the middle you can add new criteria from the right hand side table or remove criteria from your layout.
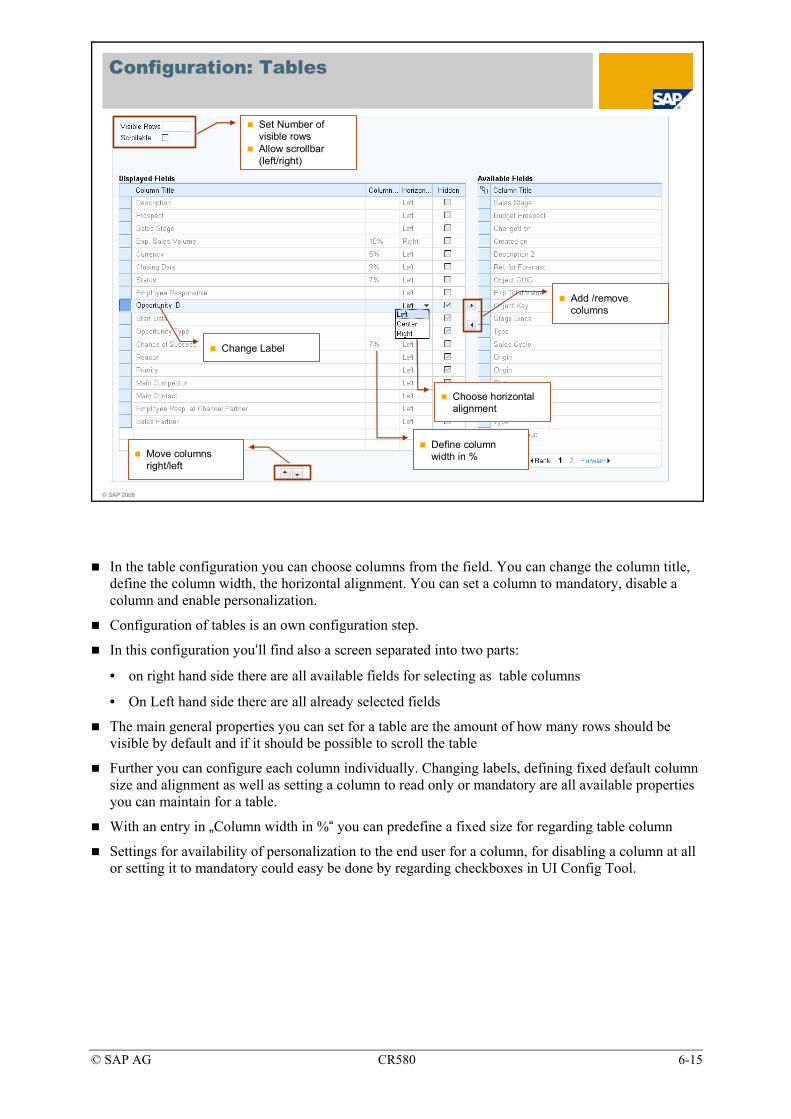
© SAP AG CR580 6-15
© SAP 2008
Configuration: Tables
Change Label
Add /remove columns
Move columns right/left
Set Number of visible rowsAllow scrollbar (left/right)
Choose horizontal alignment
Define column width in %
In the table configuration you can choose columns from the field. You can change the column title, define the column width, the horizontal alignment. You can set a column to mandatory, disable a column and enable personalization.
Configuration of tables is an own configuration step.
In this configuration you‘ll find also a screen separated into two parts:
• on right hand side there are all available fields for selecting as table columns
• On Left hand side there are all already selected fields
The main general properties you can set for a table are the amount of how many rows should be visible by default and if it should be possible to scroll the table
Further you can configure each column individually. Changing labels, defining fixed default column size and alignment as well as setting a column to read only or mandatory are all available properties you can maintain for a table.
With an entry in „Column width in %“ you can predefine a fixed size for regarding table column
Settings for availability of personalization to the end user for a column, for disabling a column at all or setting it to mandatory could easy be done by regarding checkboxes in UI Config Tool.

© SAP AG CR580 6-16
© SAP 2008
Configuration: Overview page
Change Title
Add /remove assignment blocks
Move assignment blocks up/down
Choose Load options
In the Overview Page Configuration you choose the Assignment Blocks from the set. You can move them up / down, change the title and define the load option. With load option ‘direct’ the blocks are loaded expanded, with ‘Lazy Load’, they aren’t get automatically expanded. The user can expand them. Hidden’
Configuration of Overview Pages looks a bit similar to configuration of search pages.
But you do not configure individual fields but so called assignment blocks
Each assignment block represents an own kind of view with a predefined field content
Configuration of overview pages is more or less just to define which assignment blocks should be available in general and how each assignment block gets rendered by initial launch of page.
Right hand side shows all available assignment blocks and left hand side shows all assignment selected for display.
As mentioned before there are 3 different so called load options: direct, lazy and hidden.
Direct loads assignment block fully opened, lazy loads it closed and with hidden assignment block isn‘t visible by default. User can display these hidden blocks by personalization.
Renaming of captions of assignment blocks is also possible from here.

© SAP AG CR580 6-17
© SAP 2008
Configuration: Edit Forms
Create Captions
Field properties of selected fieldTo get field properties press ‚ALT‘ and click the field in Grid area
List of available context nodesExpand the nodes to see the attribute descriptionsUse ‚Show technical details to see the technical names as well
Create and delete new rows and position them in grid
Grid AreaConfiguration of grid with labels, input fields and captions
The Edit Form Configuration is used to change the properties for each element in the configuration grid. Column, row, text label, input field width and other properties can be adjusted in the detailed page configuration. Note, that the changes you can make are based on the field type.
Detailed configuration supports the more technical oriented configuration of a view. It provides the user with additional information and field properties. Furthermore it enables a more exact positioning of fields.
By initial launch of detailed configuration just grid area is visible. This represents more in detail the structure of later rendered UI.
All fields and labels are aligned according cells of a grid. So you can define col- and rowspans to fit UI better to customer needs.
Within this grid view you can change field labeling and order as well as adding new rows to the grid. You can also add new captions.
If you want to have a more detailed view of a certain field configuration hold down ALT key on your keyboard and left click field of your choice.
On right hand side a screen area opens where all field properties get displayed.
Here you can maintain properties like mandatory, readonly and renaming of field labels. Also you can define in detail positioning of the field, with row- and colspan, if needed.
To add new fields first you have to display the Item Set by clicking button show item set on the most top of UI Config Screen
Item Set will be displayed on left hand side of grid area. There you‘ll find all fields sorted by their accordnig so called context node. Each of these context nodes represent a BOL Object. From there you can select one ore more fields to add them to the grid.
© SAP AG CR580 6-18
© SAP 2008
UI Configuration: Lesson Summary
You should now be able to:Review the functionalities of the new UI Configuration ToolExplain main concepts of UI ConfigurationUse the UI Configuration Tool
© SAP AG CR580 6-19
© SAP 2008
UI Configuration: Unit Overview Diagram
Lesson 3: Fact Sheet
UI Configuration
Lesson 1: UI Configuration
Lesson 2: Design Layer

© SAP AG CR580 6-20
© SAP 2008
Design Layer: Lesson Objectives
After completing this lesson, you will be able to:Explain how the Design Layer influences the SAP CRM User InterfaceMaintain Design Layer Customizing
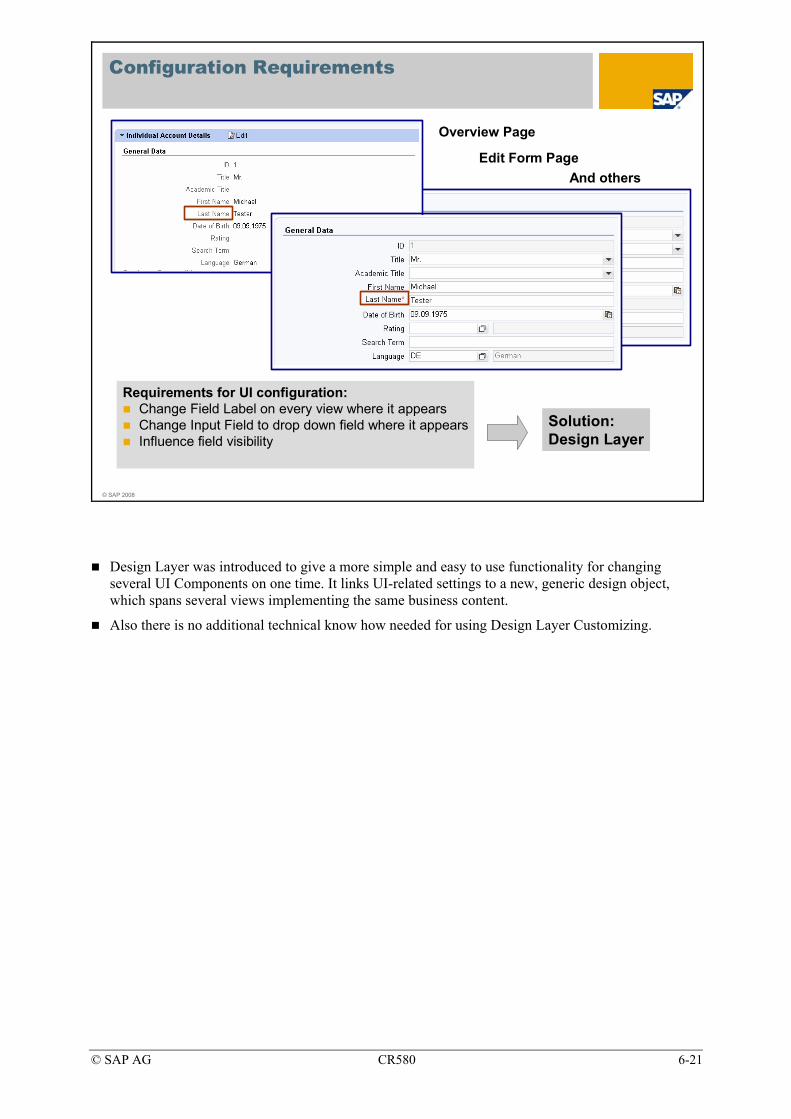
© SAP AG CR580 6-21
© SAP 2008
Configuration Requirements
Requirements for UI configuration:Change Field Label on every view where it appearsChange Input Field to drop down field where it appearsInfluence field visibility
Overview Page
Edit Form PageAnd others
Solution:Design Layer
Design Layer was introduced to give a more simple and easy to use functionality for changing several UI Components on one time. It links UI-related settings to a new, generic design object, which spans several views implementing the same business content.
Also there is no additional technical know how needed for using Design Layer Customizing.
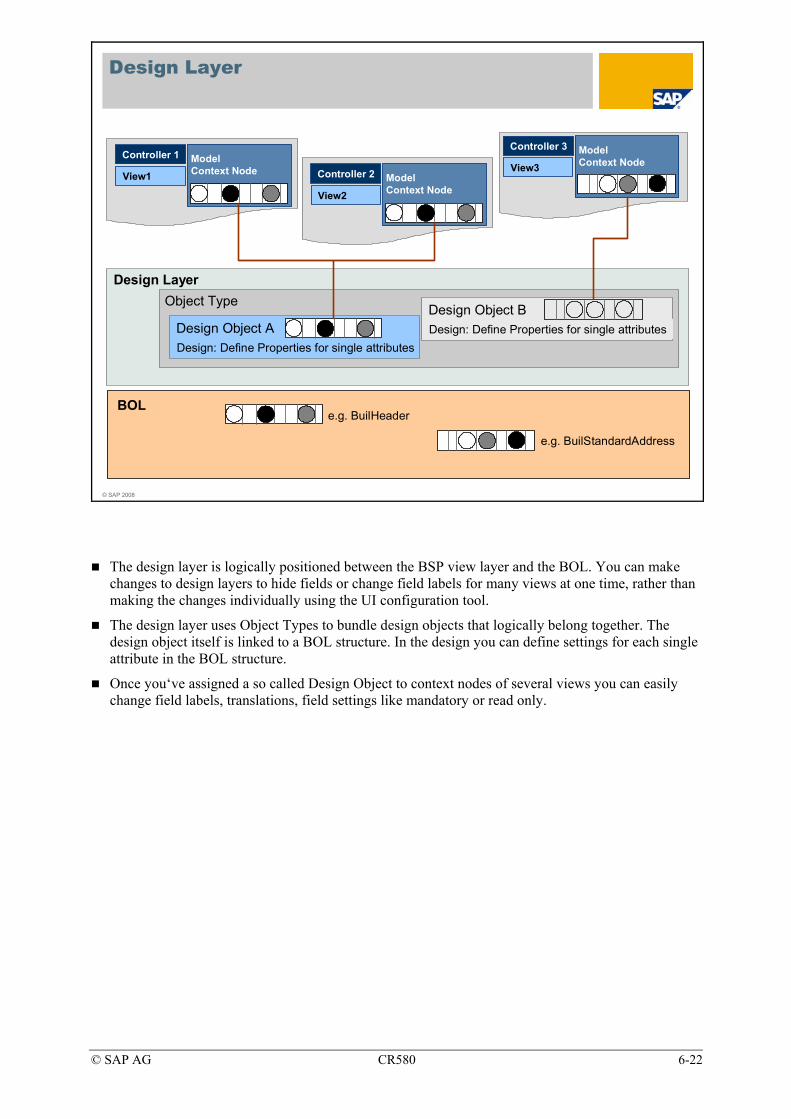
© SAP AG CR580 6-22
© SAP 2008
Design Layer
Controller 1
View1
ModelContext Node
BOL
Controller 2
View2
ModelContext Node
Design Layer
e.g. BuilHeader
Controller 3
View3
ModelContext Node
Design Object ADesign: Define Properties for single attributes
Design Object BDesign: Define Properties for single attributes
e.g. BuilStandardAddress
Object Type
The design layer is logically positioned between the BSP view layer and the BOL. You can make changes to design layers to hide fields or change field labels for many views at one time, rather than making the changes individually using the UI configuration tool.
The design layer uses Object Types to bundle design objects that logically belong together. The design object itself is linked to a BOL structure. In the design you can define settings for each single attribute in the BOL structure.
Once you‘ve assigned a so called Design Object to context nodes of several views you can easily change field labels, translations, field settings like mandatory or read only.
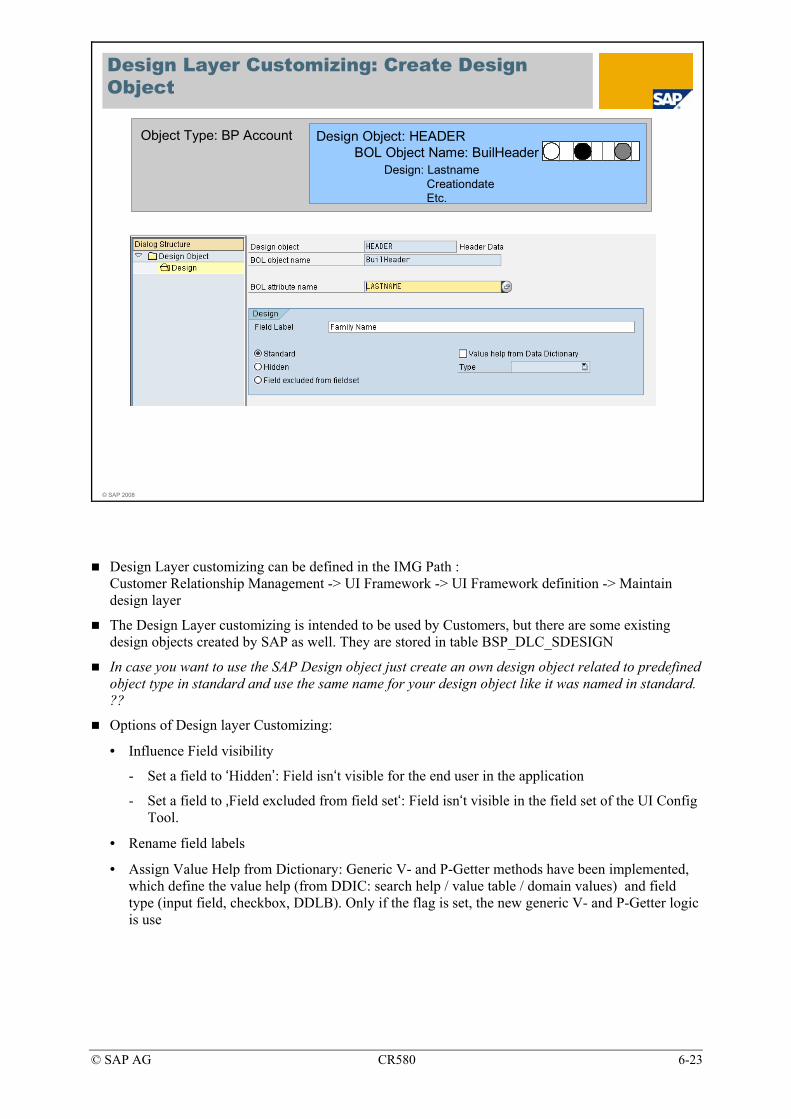
© SAP AG CR580 6-23
© SAP 2008
Design Layer Customizing: Create Design Object
Design: LastnameCreationdateEtc.
Object Type: BP Account Design Object: HEADERBOL Object Name: BuilHeader
Design Layer customizing can be defined in the IMG Path : Customer Relationship Management -> UI Framework -> UI Framework definition -> Maintain design layer
The Design Layer customizing is intended to be used by Customers, but there are some existing design objects created by SAP as well. They are stored in table BSP_DLC_SDESIGN
In case you want to use the SAP Design object just create an own design object related to predefined object type in standard and use the same name for your design object like it was named in standard. ??
Options of Design layer Customizing:
• Influence Field visibility
- Set a field to ‘Hidden’: Field isn‘t visible for the end user in the application
- Set a field to ‚Field excluded from field set‘: Field isn‘t visible in the field set of the UI Config Tool.
• Rename field labels
• Assign Value Help from Dictionary: Generic V- and P-Getter methods have been implemented, which define the value help (from DDIC: search help / value table / domain values) and field type (input field, checkbox, DDLB). Only if the flag is set, the new generic V- and P-Getter logic is use
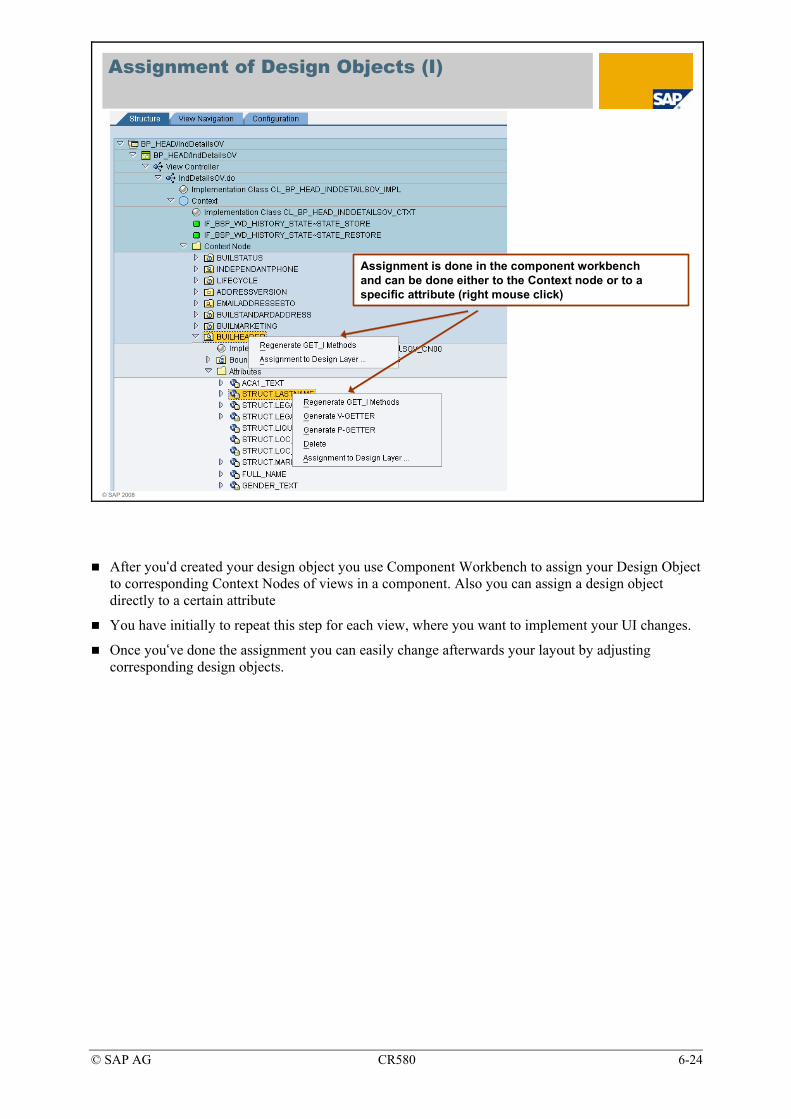
© SAP AG CR580 6-24
© SAP 2008
Assignment of Design Objects (I)
Assignment is done in the component workbench and can be done either to the Context node or to a specific attribute (right mouse click)
After you‘d created your design object you use Component Workbench to assign your Design Object to corresponding Context Nodes of views in a component. Also you can assign a design object directly to a certain attribute
You have initially to repeat this step for each view, where you want to implement your UI changes.
Once you‘ve done the assignment you can easily change afterwards your layout by adjusting corresponding design objects.
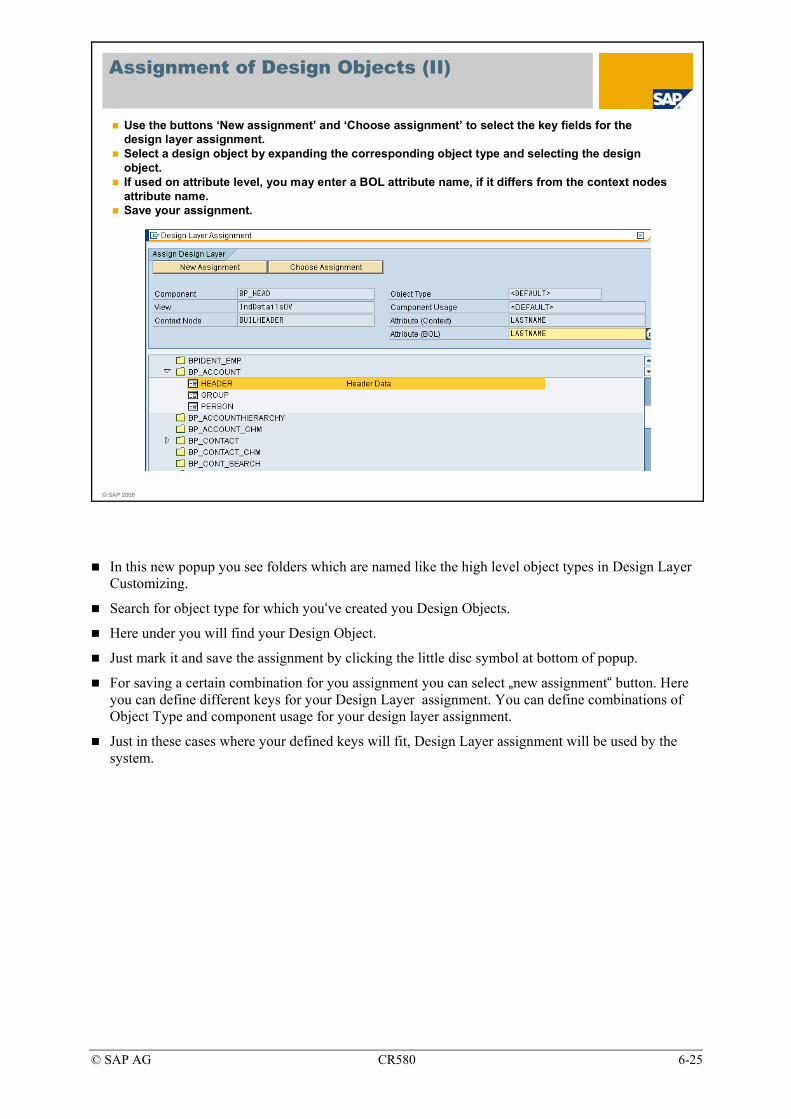
© SAP AG CR580 6-25
© SAP 2008
Assignment of Design Objects (II)
Use the buttons ‘New assignment’ and ‘Choose assignment’ to select the key fields for the design layer assignment.Select a design object by expanding the corresponding object type and selecting the design object.If used on attribute level, you may enter a BOL attribute name, if it differs from the context nodes attribute name.Save your assignment.
In this new popup you see folders which are named like the high level object types in Design Layer Customizing.
Search for object type for which you‘ve created you Design Objects.
Here under you will find your Design Object.
Just mark it and save the assignment by clicking the little disc symbol at bottom of popup.
For saving a certain combination for you assignment you can select „new assignment“ button. Here you can define different keys for your Design Layer assignment. You can define combinations of Object Type and component usage for your design layer assignment.
Just in these cases where your defined keys will fit, Design Layer assignment will be used by the system.
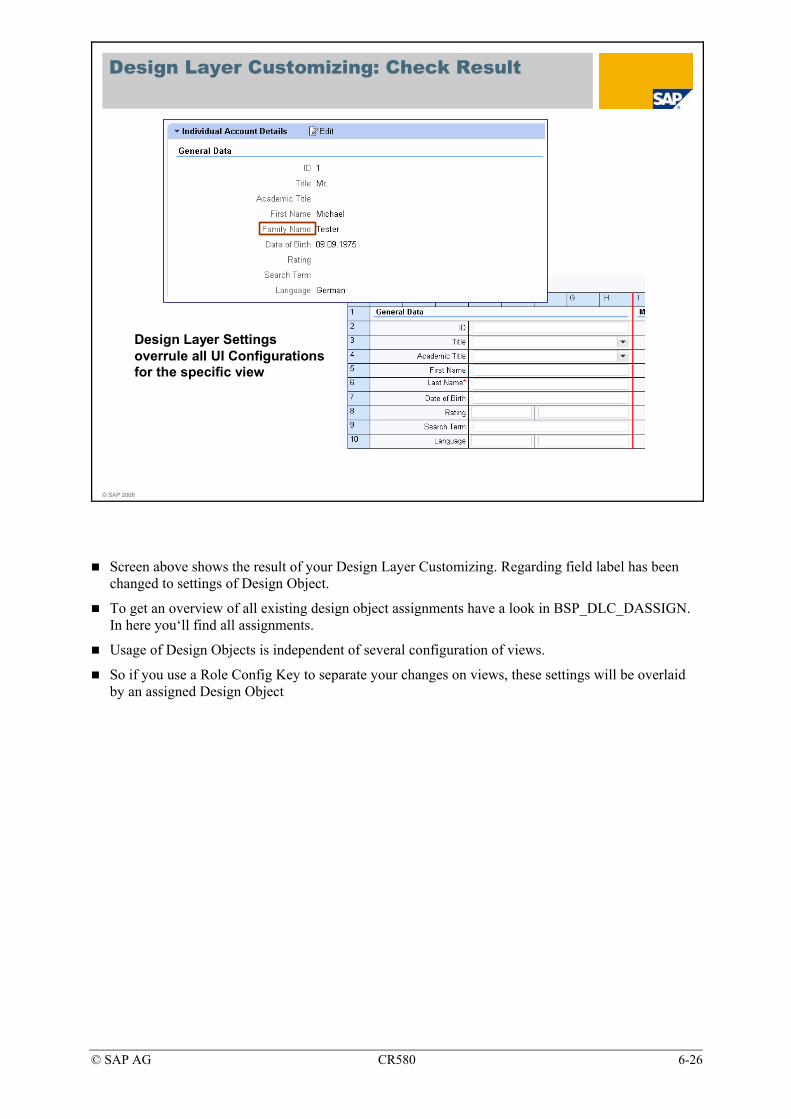
© SAP AG CR580 6-26
© SAP 2008
Design Layer Settings overrule all UI Configurations for the specific view
Design Layer Customizing: Check Result
Screen above shows the result of your Design Layer Customizing. Regarding field label has been changed to settings of Design Object.
To get an overview of all existing design object assignments have a look in BSP_DLC_DASSIGN. In here you‘ll find all assignments.
Usage of Design Objects is independent of several configuration of views.
So if you use a Role Config Key to separate your changes on views, these settings will be overlaid by an assigned Design Object

© SAP AG CR580 6-27
© SAP 2008
Design Layer: Lesson Summary
You should now be able to:Explain how the Design Layer influences the SAP CRM User InterfaceMaintain Design Layer Customizing
© SAP AG CR580 6-28
© SAP 2008
UI Configuration: Unit Overview Diagram
Lesson 3: Fact Sheet
UI Configuration
Lesson 1: UI Configuration
Lesson 2: Design Layer
© SAP AG CR580 6-29
© SAP 2008
Fact Sheet: Lesson Objectives
After completing this lesson, you will be able to:Configure the Customer Fact Sheet

© SAP AG CR580 6-30
© SAP 2008
Account Fact Sheet
Assignment Blocks can be added or removed in the personalization of the Account Fact Sheet
Fact SheetPDF Fact Sheet
More
The fact sheet provides you with an immediate and condensed overview of information about business partners taken from several sources such as business partner master data, statistical and transaction data, derived from SAP CRM, SAP ECC, and SAP NetWeaver BI. It enables you to see quickly and easily the most important details about your key customers.
Using the fact sheet, you can retrieve essential information quickly when, for example, interacting with customers on the phone or preparing to interact with customers in sales meetings.
An online version and Adobe version of the fact sheet are available from the Account page:
The online fact sheet offers all the assignment blocks available on the overview page, and in addition, assignment blocks with information integrated from SAP NetWeaver BI , SAP ECC, and SAP CRM. The fact sheet is delivered preconfigured but can be changed if necessary.
Standard personalization options are available from the online fact sheet page, enabling you to select which assignment blocks and columns are to be displayed.
The PDF fact sheet has a different content to the online version and incorporates information from SAP CRM and SAP ECC only.
You cannot personalize the PDF fact sheet. The assignment blocks available are determined by the role to which the fact sheet is assigned, this being the sales professional role in the standard delivery.
To customize the print version, see Note 1040229.

© SAP AG CR580 6-31
© SAP 2008
Available Assignment Blocks
Sales Organization SelectorAccount Billing DataAccount Sales DataAccount Shipping DataPartner FunctionsContactsInteraction HistoryActivitiesOpportunitiesOpen Leads
CasesCompetitor ProductsInstalled Base ComponentsInstalled BasesIndividual ObjectsLast Sales DocsMarketing CampaignsMarketing AttributesService ContractsService Orders
CRM
Credit InformationBackorders
SAP ECC
BI ReportsAccount RevenueSales PipelineService Overviewetc.
SAP BIAvailable assignment blocks need to be defined in customizing
The online fact sheet offers all the assignment blocks available on the overview page, and in addition, assignment blocks with information integrated from SAP NetWeaver BI , SAP ECC and SAP CRM.
The list of available assignment blocks can be found in customizing:
IMG path: Customer Relationship Management -> UI Framework → UI Framework Definition → Maintain Fact Sheet.
IMG path: Customer Relationship Management -> UI Framework → UI Framework Definition → Display SAP Netweaver BI Reports in CRM for calling BI informaiton
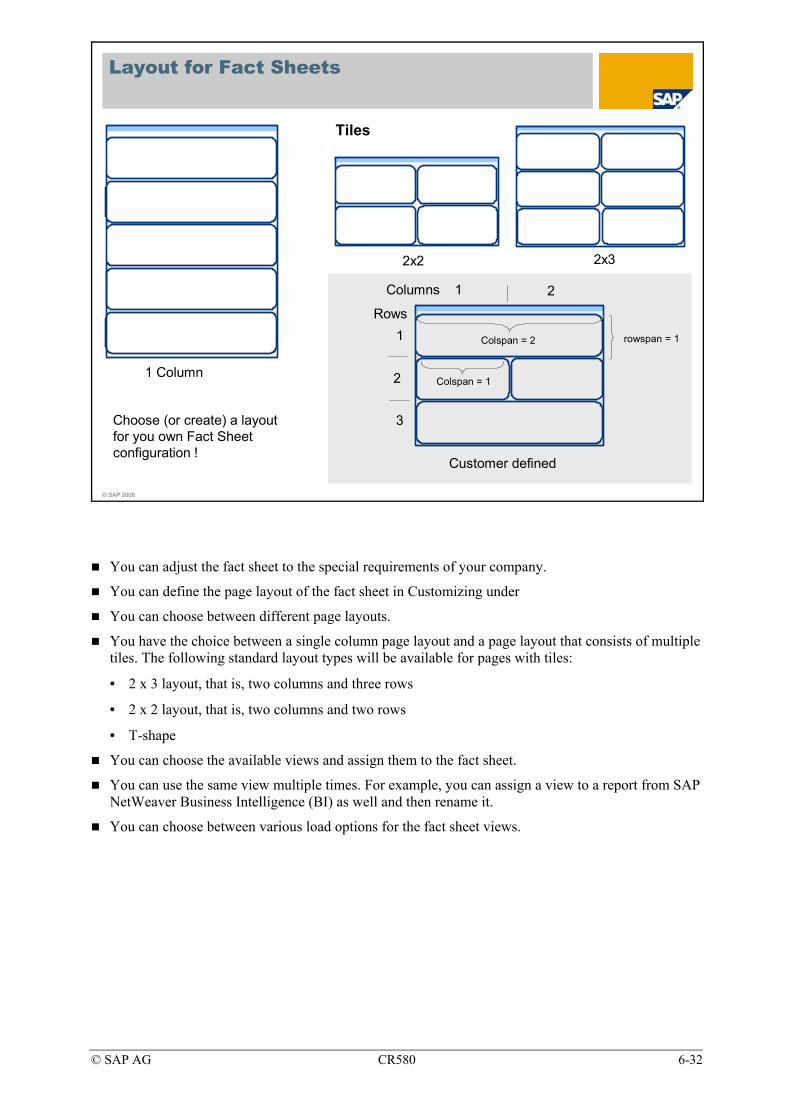
© SAP AG CR580 6-32
© SAP 2008
Layout for Fact Sheets
Rows
Columns 1 2
3
2
1 Colspan = 2
Colspan = 1
rowspan = 1
1 Column
2x2 2x3
Customer defined
Tiles
Choose (or create) a layout for you own Fact Sheet configuration !
You can adjust the fact sheet to the special requirements of your company.
You can define the page layout of the fact sheet in Customizing under
You can choose between different page layouts.
You have the choice between a single column page layout and a page layout that consists of multiple tiles. The following standard layout types will be available for pages with tiles:
• 2 x 3 layout, that is, two columns and three rows
• 2 x 2 layout, that is, two columns and two rows
• T-shape
You can choose the available views and assign them to the fact sheet.
You can use the same view multiple times. For example, you can assign a view to a report from SAP NetWeaver Business Intelligence (BI) as well and then rename it.
You can choose between various load options for the fact sheet views.
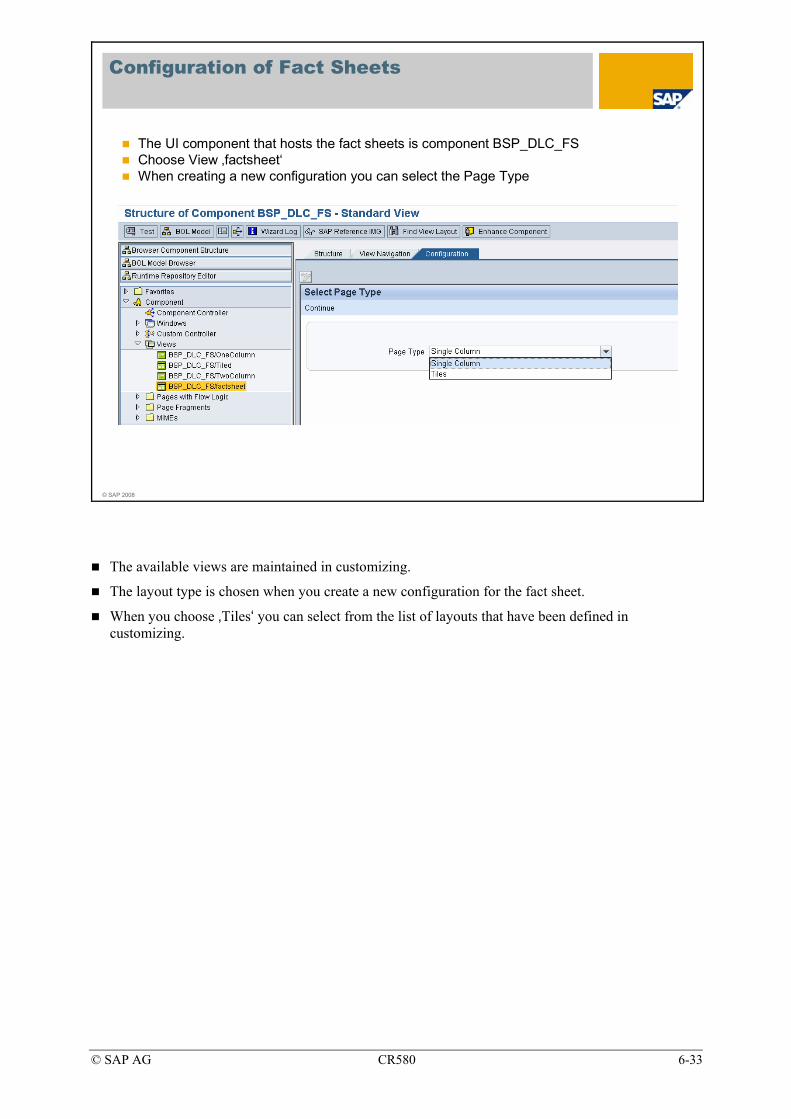
© SAP AG CR580 6-33
© SAP 2008
Configuration of Fact Sheets
The UI component that hosts the fact sheets is component BSP_DLC_FSChoose View ‚factsheet‘When creating a new configuration you can select the Page Type
The available views are maintained in customizing.
The layout type is chosen when you create a new configuration for the fact sheet.
When you choose ‚Tiles‘ you can select from the list of layouts that have been defined in customizing.
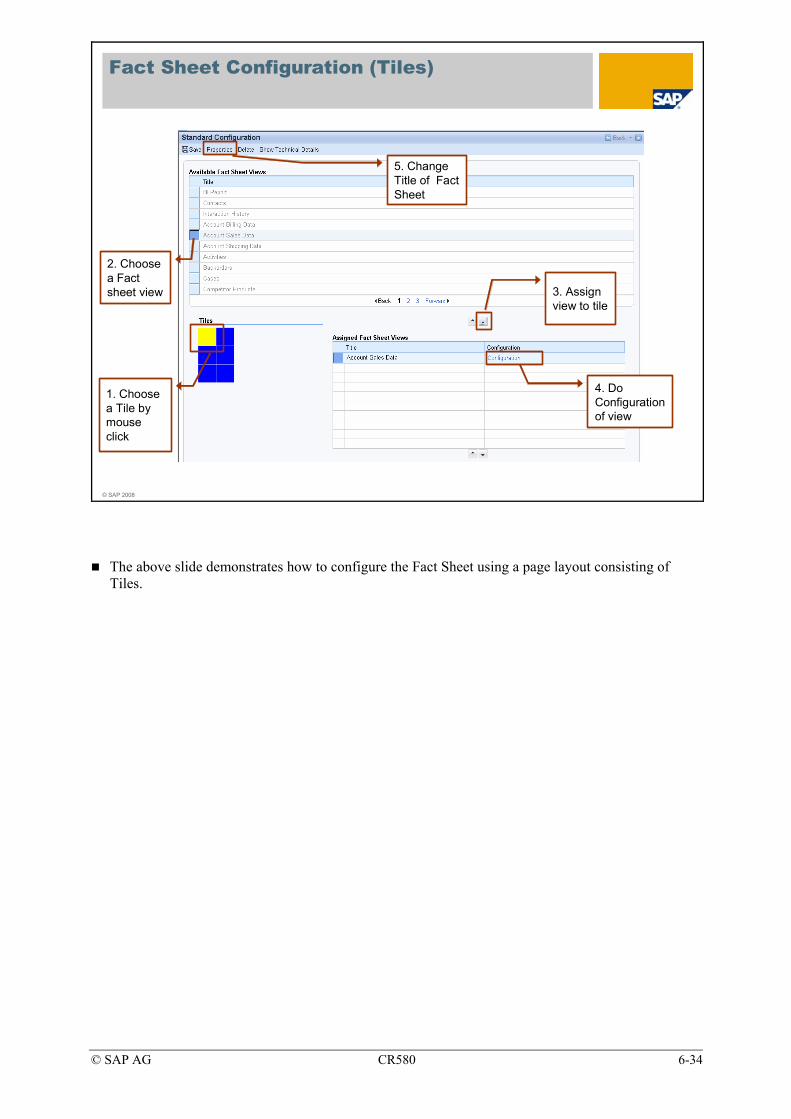
© SAP AG CR580 6-34
© SAP 2008
Fact Sheet Configuration (Tiles)
1. Choose a Tile by mouse click
2. Choose a Fact sheet view 3. Assign
view to tile
4. Do Configuration of view
5. Change Title of Fact Sheet
The above slide demonstrates how to configure the Fact Sheet using a page layout consisting of Tiles.

© SAP AG CR580 6-35
© SAP 2008
Fact Sheet Configuration (1 Column)
2. Assign view to Fact Sheet
3. Choose Load Option
1. Choose a Fact sheet view
4. Do Configuration of view
5.Change Title of Fact Sheet
The configuration of the fact sheet with 1 Column is exactly the same as vor an overview page.
You can define load options
• Expanded - Always open
• Collapsed - Can be opened by user
• Hidden- Not visible but available in personalization.

© SAP AG CR580 6-36
© SAP 2008
Activate Account Fact Sheet Buttons
Visibility of Account Fact Sheet buttons is linked to PFCG Role.When creating your own business role you have created as well a new PFCG Role.You must activate the Fact sheet buttons for your PFCG Role
Viewcluster CRMVC_BUIL_PRT (Transaction SM34)
Copy an existing entry (with related objects) to your own PFCG RoleSee note 1040229
Fact SheetPDF Fact Sheet
More
See note 1040229 for further details
Note that the SAP standard delivery customizing comprises only few entries (e.g. for the PFCG role SAP_CRM_UIU_SLS_PROFESSIONAL (corresponding to the business role SALESPRO of the CRM WebClient). If the PDF fact sheet is to be activated for further roles, the existing customizing must be copied. It is essential to copy not only the "Print object", but also the dependent entries, that is the "Related objects" of the dialog structure.
© SAP AG CR580 6-37
© SAP 2008
Fact Sheet: Lesson Summary
You should now be able to:Configure the Customer Fact Sheet
© SAP AG CR580 6-38
© SAP 2008
UI Configuration: Unit Summary
You should now be able to:Review the functionalities of the new UI Configuration ToolExplain main concepts of UI ConfigurationUse the UI Configuration ToolExplain how the Design Layer influences the SAP CRM User InterfaceMaintain Design Layer CustomizingConfigure the Customer Fact Sheet
© SAP AG CR580 6-39
Exercises
Unit: UI Configuration Topic: UI Configuration Tool
At the conclusion of this exercise, you will be able to:
• Change the User Interface of the CRM WebClient UI using the UI Configuration Tool.
You would like to adapt the User Interface according to your needs.
It is necessary to make detailed UI changes which include adding and/or removing fields, making fields mandatory and/or read-only.
In addition to that you would like to change a Search as well as a Result List page.
The UI Configuration Tool will be used to realize those changes.
1-1 Get technical information of the objects used within the WebClient UI. As an example use the application/object Account.
1-1-1 Log on to the Web Client UI and find the Account Media Store (Account ID 3271)
1-1-2 Navigate to the details of this Account and choose Edit.
1-1-3 Place your cursor in field Name 1 and get technical information using the F2 key.
Which Component, View, Context Node and Attribute are used in this case?
1-2 In the following you will change the UI Configuration of the Account Details view. This exercises will guide you through different configuration steps.
1-2-1 Before changing the UI configuration, create your own Role Configuration Key Z##RCK (## Role Configuration Key) in Customizing. The UI changes should always be customer specific. Later on this key has to be assigned to your Business Role.
SAP Implementation Guide → Customer Relationship Management → UI Framework → UI Framework Definition

© SAP AG CR580 6-40
1-2-2 Start the Component Workbench by using Customizing IMG activity Configure User Interface and enter the name of the Component representing Accounts and choose Display. Navigate to the view you identified earlier.
Make sure that you do not use the field Enhancement Set at this point.
If necessary use the icon to close the Enhancement Set field so that only the Component and Test Application fields are visible.
The Component Workbench can also be accessed using
SAP Menu → Architecture and Technology→ Configuration→ Access BSP WD Workbench
1-2-3 Copy the Standard Default Configuration to a new configuration using your Role Configuration Key Z##RCK. In the copy dialog only enter your configuration key and don’t change the other fields.
1-2-4 Change the UI Configuration of the above view:
a) Swap the row Search Term with the row Name 2.
b) Reduce the size of the Field Employee ID by one or two units.
c) Set the field Rating as Mandatory.
d) Set the field ID as Display Only.
1-2-5 Add the field Industry Sector below the field Rating.
You will find this field in HEADER (browse pages).
1-2-6 Save your settings with your own Role Configuration Key.
1-2-7 Assign the Role Configuration Key to your Business Role and restart the WebClient UI to test your settings.
© SAP AG CR580 6-41
1-3 Change the UI Configuration for the Account Search Page. At the end of this exercise you will be able to use more search fields than in the standard configuration.
1-3-1 Start the WebClient UI and navigate to Accounts & Products Accounts.
1-3-2 Select a search field, e.g. Name 1 and launch technical information using the F2 key. Note the Component and View name.
1-3-3 Start the Component Workbench, enter the component and select proper View for launching the UI Configuration Tool. Copy the configuration to your Role Configuration Key like you did in the exercise before.
1-3-4 Select the fields Created On and Created By from the Available Search Criteria and add them to the Selected Search Criteria.
Make sure to set the Displayed flags!
1-3-5 Hide the entry Role from Selected Search Criteria.
1-3-6 Save your settings with your own Role Configuration Key and test the changes.
1-4 Change the UI Configuration of BPHEADOverview view in the BP_HEAD component. This will allow you to change the layout and arrangement of the Assignment Blocks within the Account application.
1-4-1 Start the Component Workbench and choose Component BP_HEAD.
1-4-2 Navigate to View BPHEADOverview and launch the Configuration.
1-4-3 Copy standard Configuration to your own Role Config Key.
1-4-4 Change the Load Options of two Displayed Assignment Blocks.
Set the Assignment Block BP_ROLES (Title Roles) to Lazy.
Set the Assignment Block BP_DATA (Title Marketing Attributes) to Hidden.
You can also add or remove Assignment Blocks from the Displayed Assignment Blocks to Available Assignment Blocks.
You can also move Assignment Blocks up and down.
1-4-5 Save your settings with your own Role Configuration Key and test the changes.

© SAP AG CR580 6-42

© SAP AG CR580 6-43
Solutions
Unit: UI Configuration Topic: UI Configuration Tool
1-1 Get technical information of the objects used within the WebClient UI. As an example use the application/object Account.
1-1-1 Log on to the Web Client UI and find the Account Media Store (Account ID 3271).
Use your Favorite CRM WebClient UI to start the CRM application.
Navigate to Accounts & Products.
Choose Search → Accounts.
Name 1 / Last Name: Media Store.
Choose Search.
1-1-2 Navigate to the details of this Account and choose Edit.
Use the hyperlink (Name) to navigate to the Account details.
In the Account Details choose the button Edit.
1-1-3 Place your cursor in field Name 1 and get technical information using the F2 key.
Which Component, View, Context Node and Attribute are used in this case?
Component: BP_HEAD
View: AccountDetails
Context Node: HEADER
Attribute: STRUCT.NAME1.

© SAP AG CR580 6-44
1-2 In the following you will change the UI Configuration of the Account Details view. This exercises will guide you through different configuration steps.
1-2-1 Before changing the UI configuration, create your own Role Configuration Key Z##RCK (## Role Configuration Key) in Customizing. The UI changes should always be customer specific. Later on this key has to be assigned to your Business Role.
SAP Menu → Architecture and Technology → Configuration → Customizing Choose SAP Reference IMG.
SAP Implementation Guide → Customer Relationship Management → UI Framework → UI Framework Definition → Define Role Configuration Key
Choose New Entries.
Role Config Key: Z##RCK
Description: ## Role Configuration Key.
Save the data.
1-2-2 Start the Component Workbench by using Customizing IMG activity Configure User Interface and enter the name of the Component representing Accounts and choose Display. Navigate to the view you identified earlier.
SAP Implementation Guide → Customer Relationship Management → UI Framework → UI Framework Definition → Configure User Interface
Component: BP_HEAD.
Choose Display.
Navigate to Views → BP_HEAD/AccountDetails.
Double-click this view.
Choose tab Configuration.
If necessary log on with your CRM User / password.
1-2-3 Copy the Standard Default Configuration to a new configuration using your Role Configuration Key Z##RCK. In the copy dialog only enter your configuration key and don’t change the other fields.
Choose Copy Configuration.
Confirm the pop-up with Yes and on the next pop-up enter
Role Config Key: Z##RCK.
Choose ENTER.
If necessary go into change mode and create and save a transport request. You are in change mode when the change icon is greyed out.

© SAP AG CR580 6-45
1-2-4 Change the UI Configuration of the above view: a) Swap the row Search Term with the row Name 2.
Mark the row Search Term and choose the Move Up button in order to move the row. Choose Save.
b) Reduce the size of the Field Employee ID by one or two units. Hold down the ALT key and click into the input field Employee ID. Field Col. To: F Choose Apply.
c) Set the field Rating as Mandatory. Hold down the ALT key and click into the field Rating. Set the flag Mandatory. Choose Apply.
d) Set the field ID as Display Only. Hold down the ALT key and click into the field ID. Set the flag Display Only. Choose Apply. Close the field properties screen!
1-2-5 Add the field Industry Sector below the field Rating. Choose Show Available Fields. Open HEADER using the little triangle icon. Find the field Industry Sector by navigating through the first couple of pages. Before you place the field on the view, mark the existing field Rating.
Choose Add Field ( ). Move it to a proper place if necessary. Close the Available Fields section.
1-2-6 Save your settings with your own Role Configuration Key. Choose Save (within the Customer Configuration Window). If the Save icon is greyed out, close both the field properties and the Available Fields window!
1-2-7 Assign the Role Configuration Key to your Business Role and restart the Web Client UI to test your settings. SAP Implementation Guide → Customer Relationship Management → Business Roles → Define Business Role
Find your role and choose Details ( ). Use the F4 help to find your Role Configuration Key Z##RCK and assign it. Save your settings with your own Role Configuration Key and restart the WebClient UI to test your changes. Choose Save. Restart the CRM Web Client UI using your Business Role. Search for the Account 3271 again and go to the details of it.

© SAP AG CR580 6-46
1-3 Change the UI Configuration for the Account Search Page. At the end of this exercise you will be able to use more search fields than in the standard configuration.
1-3-1 Start the WebClient UI and navigate to Accounts & Products Accounts.
1-3-2 Select a search field, e.g. Name 1 and launch technical information using the F2 key. Note the Component and View name.
Component: BP_HEAD_SEARCH
View: MainSearch.
1-3-3 Start the Component Workbench, enter the component and select proper View for launching the UI Configuration Tool. Copy the configuration to your Role Configuration Key like you did in the exercise before.
If necessary see solution 1-2-2.
Component: BP_HEAD_SEARCH.
Choose Display.
Navigate to Views → BP_HEAD_SEARCH/MainSearch.
Double-click this view.
Choose tab Configuration.
Choose button Copy Configuration.
Choose your Role Configuration Key Z##RCK.
1-3-4 Select the fields Created On and Created By from the Available Search Criteria and add them to the Selected Search Criteria.
Find the fields using the page forward (alphabetically order!).
Mark the fields and choose the Move (to Right/Left) icon.
Once the fields are on the Selected Search Criteria side, click the field so that you can check the flag Displayed.
A field is moving up automatically once you set this flag.
1-3-5 Hide the entry Role from Selected Search Criteria.
Click the field and remove the Display flag.
1-3-6 Save your settings with your own Role Configuration Key and test the changes.
Choose Save.
Restart the WebClient UI to test your changes within Account search.
© SAP AG CR580 6-47
1-4 Change the UI Configuration of BPHEADOverview view BP_HEAD component. This will allow you to change the layout and arrangement of the Assignment Blocks within the Account application.
1-4-1 Start the Component Workbench and choose Component BP_HEAD.
1-4-2 Navigate to View BPHEADOverview and launch the Configuration.
1-4-3 Copy standard Configuration to your own Role Configuration Key.
1-4-4 Change the Load Options of two Displayed Assignment Blocks.
Set the Assignment Block BP_ROLES (Title Roles) to Lazy.
Set the Assignment Block BP_DATA (Title Marketing Attributes) to Hidden.
You can also add or remove Assignment Blocks from the Displayed Assignment Blocks to Available Assignment Blocks.
You can also move Assignment Blocks up and down.
1-4-5 Save your settings with your own Role Configuration Key and test the changes.

© SAP AG CR580 6-48

© SAP AG CR580 6-49
Exercises
Unit: UI Configuration Topic: Fact Sheet
At the conclusion of this exercise, you will be able to:
• Create a UI configuration for the Account Fact Sheet
• Activate the Account Fact Sheet for a certain Business Role
The fact sheet provides you with an immediate and condensed overview of information about business partners taken from several sources. It enables you to see quickly and easily the most important details about your key customers.
1-1 In this exercise the Account Fact Sheet will be adapted and made available within your Business Role.
1-1-1 Take a look at the Customizing of Fact Sheets and observe how many different Fact Sheets and Layouts are available.
SAP Implementation Guide → Customer Relationship Management → UI Framework → UI Framework Definition → Maintain Fact Sheet
In the following you will focus on the Standard Account Fact Sheet, typically available for Sales representatives.
How many Views have been assigned to the Standard Account Fact Sheets (BP_ACCOUNT_FS)? This number can be considered a maximum number of information blocks.
Do not change the View assignment. The UI Configuration Tool can be used to reduce the number of available views.
How many Layouts are available?
What is the technical name of the first Layout?
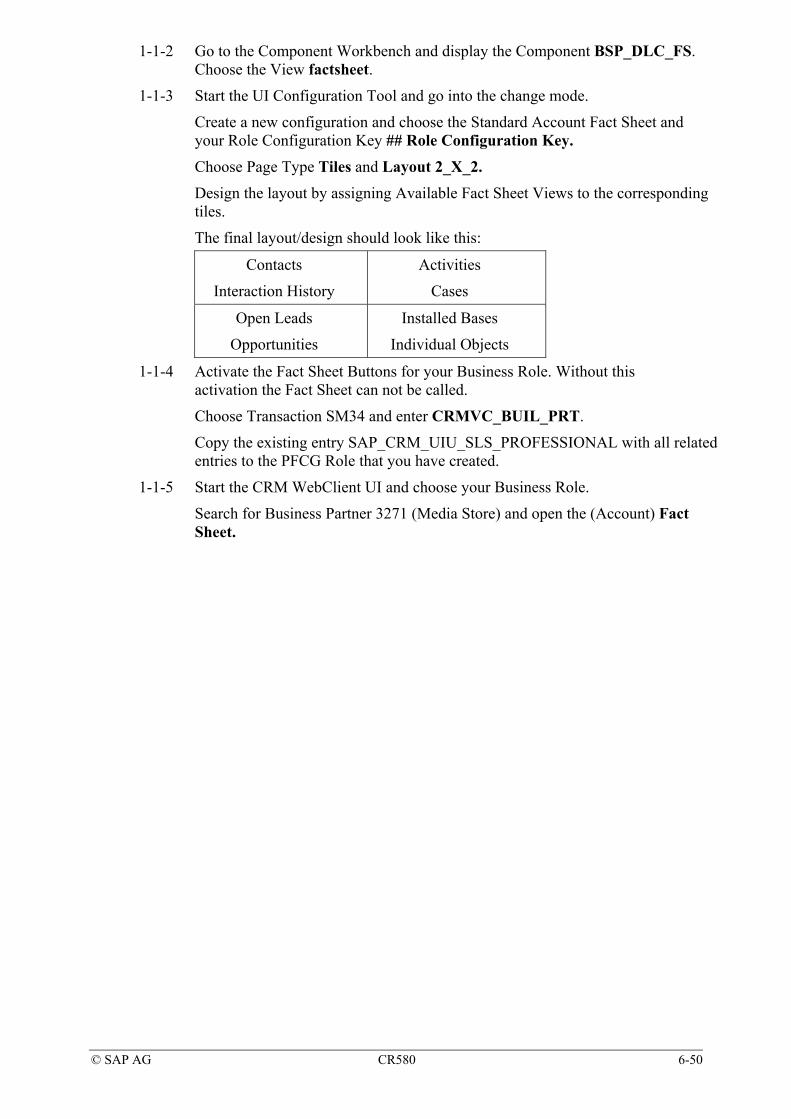
© SAP AG CR580 6-50
1-1-2 Go to the Component Workbench and display the Component BSP_DLC_FS. Choose the View factsheet.
1-1-3 Start the UI Configuration Tool and go into the change mode.
Create a new configuration and choose the Standard Account Fact Sheet and your Role Configuration Key ## Role Configuration Key.
Choose Page Type Tiles and Layout 2_X_2.
Design the layout by assigning Available Fact Sheet Views to the corresponding tiles.
The final layout/design should look like this:
Contacts
Interaction History
Activities
Cases
Open Leads
Opportunities
Installed Bases
Individual Objects
1-1-4 Activate the Fact Sheet Buttons for your Business Role. Without this activation the Fact Sheet can not be called.
Choose Transaction SM34 and enter CRMVC_BUIL_PRT.
Copy the existing entry SAP_CRM_UIU_SLS_PROFESSIONAL with all related entries to the PFCG Role that you have created.
1-1-5 Start the CRM WebClient UI and choose your Business Role.
Search for Business Partner 3271 (Media Store) and open the (Account) Fact Sheet.
© SAP AG CR580 6-51
Solutions
Unit: UI Configuration Topic: Fact Sheet
1-1 In this exercise the Account Fact Sheet will be adapted and made available within your Business Role.
1-1-1 Take a look at the Customizing of Fact Sheets and observe how many different Fact Sheets and Layouts are available.
In the following you will focus on the Standard Account Fact Sheet, typically available for Sales representatives.
How many Views have been assigned to the Standard Account Fact Sheets (BP_ACCOUNT_FS)? This number can be considered a maximum number of information blocks.
SAP Implementation Guide → Customer Relationship Management → UI Framework → UI Framework Definition → Maintain Fact Sheet
Choose Fact Sheet BP_ACCOUNT_FS.
In the structure-tree on the left double-click View Assignments.
There are about 23 Components/Views assigned. Do not change the View assignment. The UI Configuration Tool can be used to reduce the number of available views.
How many Layouts are available?
In the structure-tree on the left double-click Layout.
There are six Layouts defined for Fact Sheets. What is the technical name of the first Layout?
The first Layout has technical ID 2_X_2.
1-1-2 Go to the Component Workbench and display the Component BSP_DLC_FS. Choose the View factsheet.
SAP Implementation Guide → Customer Relationship Management → UI Framework → UI Framework Definition → Configure User Interface
Component: BSP_DLC_FS
Choose Display.
Go to Views → BSP_DLC_FS/factsheet and double-click this view.
© SAP AG CR580 6-52
1-1-3 Start the UI Configuration Tool and go into the change mode.
Create a new configuration and choose the Standard Account Fact Sheet and your Role Configuration Key ## Role Configuration Key.
Choose tab Configuration.
Choose Change ( ).
Choose .
Fact Sheet ID: Account Fact Sheet (BP_ACCOUNT_FS)
Role Key: ## Role Configuration Key
Choose Next.
Page Type: Tiles.
Choose Next.
Layout: 2_X_2.
Choose Next.
The upper-left tile should be highlighted.
From the Available Fact Sheet Views choose Contacts and add it to the Assigned Fact Sheet Views via ( ).
Repeat this step with Interaction History.
Click into one of the other tiles and arrange the design given in the exercise. When finished Save the Configuration.
1-1-4 Activate the Fact Sheet Buttons for your Business Role. Without this activation the Fact Sheet can not be called.
Choose Transaction SM34 and enter CRMVC_BUIL_PRT.
Choose Maintain.
Mark entry SAP_CRM_UIU_SLS_PROFESSIONAL.
Choose Copy As…
Role: Z##_CRM_UIU_SRV_PROFESSIONAL
Confirm and Save the data.
1-1-5 Start the CRM WebClient UI and choose your Business Role.
Search for Business Partner 3271 (Media Store) and open the (Account) Fact Sheet.
The Account Fact Sheet can be found in the details of the account using the More button!

© SAP AG CR580 7-1
© SAP 2008
Easy Enhancement Workbench
Contents:Easy Enhancement Workbench

© SAP AG CR580 7-2
© SAP 2008
Easy Enhancement Workbench: Unit Objectives
After completing this unit, you will be able to:Explain the concept of the Easy Enhancement WorkbenchUse the easy enhancement workbench to add customer specific fields to the CRM business applications
© SAP AG CR580 7-3
© SAP 2008
Easy Enhancement Workbench: Business Example
You want to add customer specific fields to the CRM business applications
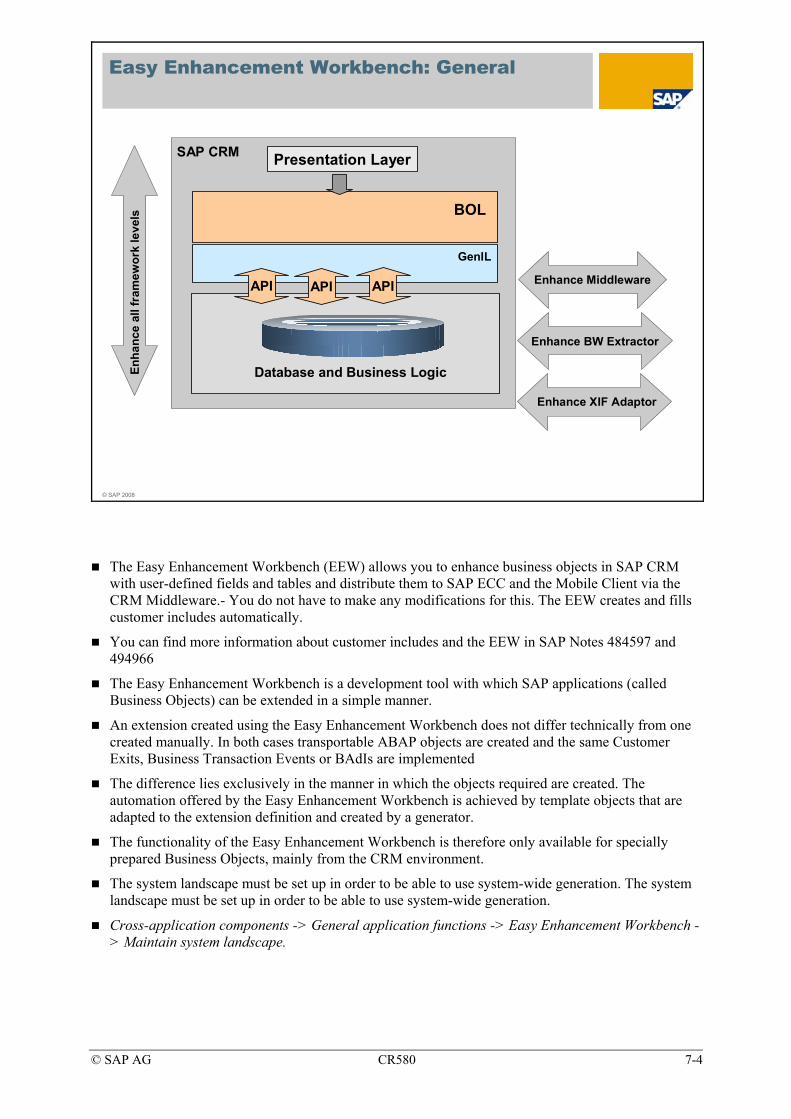
© SAP AG CR580 7-4
© SAP 2008
Easy Enhancement Workbench: General
BOL
GenIL
Presentation Layer
API API API
Database and Business Logic
Enhance Middleware
Enhance BW Extractor
SAP CRMEn
hanc
e al
l fra
mew
ork
leve
ls
Enhance XIF Adaptor
The Easy Enhancement Workbench (EEW) allows you to enhance business objects in SAP CRM with user-defined fields and tables and distribute them to SAP ECC and the Mobile Client via the CRM Middleware.- You do not have to make any modifications for this. The EEW creates and fills customer includes automatically.
You can find more information about customer includes and the EEW in SAP Notes 484597 and 494966
The Easy Enhancement Workbench is a development tool with which SAP applications (called Business Objects) can be extended in a simple manner.
An extension created using the Easy Enhancement Workbench does not differ technically from one created manually. In both cases transportable ABAP objects are created and the same Customer Exits, Business Transaction Events or BAdIs are implemented
The difference lies exclusively in the manner in which the objects required are created. The automation offered by the Easy Enhancement Workbench is achieved by template objects that are adapted to the extension definition and created by a generator.
The functionality of the Easy Enhancement Workbench is therefore only available for specially prepared Business Objects, mainly from the CRM environment.
The system landscape must be set up in order to be able to use system-wide generation. The system landscape must be set up in order to be able to use system-wide generation.
Cross-application components -> General application functions -> Easy Enhancement Workbench -> Maintain system landscape.
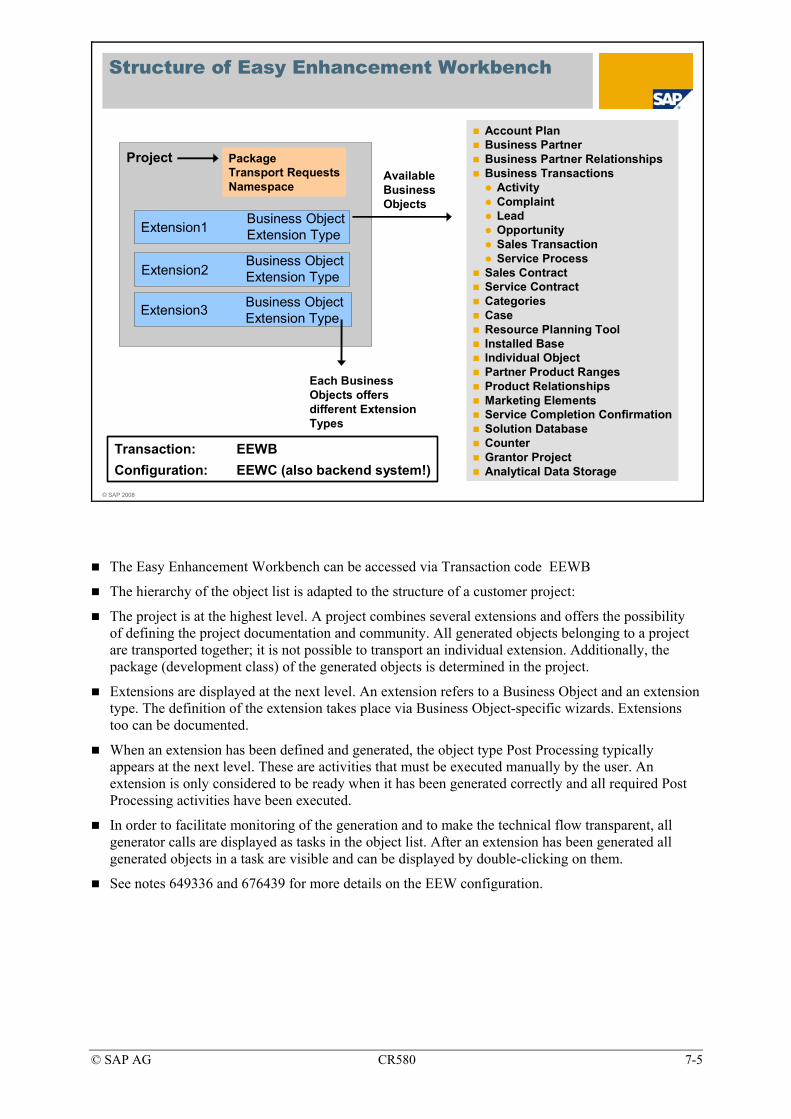
© SAP AG CR580 7-5
© SAP 2008
Structure of Easy Enhancement Workbench
Project
Extension1
PackageTransport RequestsNamespace
Extension3
Extension2
Business ObjectExtension Type
Business ObjectExtension Type
Business ObjectExtension Type
Account PlanBusiness PartnerBusiness Partner RelationshipsBusiness Transactions
ActivityComplaintLeadOpportunitySales TransactionService Process
Sales ContractService ContractCategoriesCaseResource Planning ToolInstalled BaseIndividual ObjectPartner Product RangesProduct RelationshipsMarketing ElementsService Completion ConfirmationSolution DatabaseCounterGrantor ProjectAnalytical Data Storage
Available Business Objects
Transaction: EEWBConfiguration: EEWC (also backend system!)
Each Business Objects offers different Extension Types
The Easy Enhancement Workbench can be accessed via Transaction code EEWB
The hierarchy of the object list is adapted to the structure of a customer project:
The project is at the highest level. A project combines several extensions and offers the possibility of defining the project documentation and community. All generated objects belonging to a project are transported together; it is not possible to transport an individual extension. Additionally, the package (development class) of the generated objects is determined in the project.
Extensions are displayed at the next level. An extension refers to a Business Object and an extension type. The definition of the extension takes place via Business Object-specific wizards. Extensions too can be documented.
When an extension has been defined and generated, the object type Post Processing typically appears at the next level. These are activities that must be executed manually by the user. An extension is only considered to be ready when it has been generated correctly and all required Post Processing activities have been executed.
In order to facilitate monitoring of the generation and to make the technical flow transparent, all generator calls are displayed as tasks in the object list. After an extension has been generated all generated objects in a task are visible and can be displayed by double-clicking on them.
See notes 649336 and 676439 for more details on the EEW configuration.
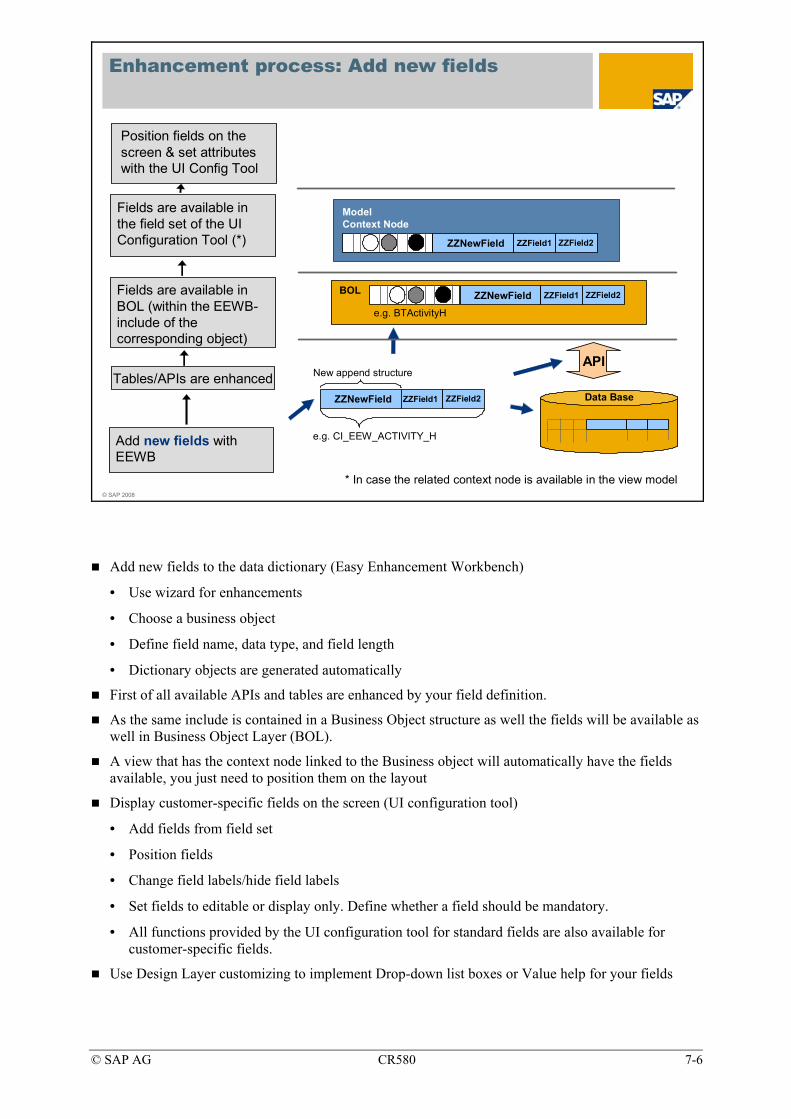
© SAP AG CR580 7-6
© SAP 2008
Enhancement process: Add new fields
Add new fields with EEWB
Fields are available in BOL (within the EEWB-include of the corresponding object)
Fields are available in the field set of the UI Configuration Tool (*)
Position fields on the screen & set attributes with the UI Config Tool
Tables/APIs are enhanced New append structure
e.g. CI_EEW_ACTIVITY_H
ZZNewField ZZField2 Data Base
BOL
API
ZZNewField ZZField1 ZZField2
ModelContext Node
ZZNewField ZZField1 ZZField2
e.g. BTActivityH
ZZField1
* In case the related context node is available in the view model
Add new fields to the data dictionary (Easy Enhancement Workbench)
• Use wizard for enhancements
• Choose a business object
• Define field name, data type, and field length
• Dictionary objects are generated automatically
First of all available APIs and tables are enhanced by your field definition.
As the same include is contained in a Business Object structure as well the fields will be available as well in Business Object Layer (BOL).
A view that has the context node linked to the Business object will automatically have the fields available, you just need to position them on the layout
Display customer-specific fields on the screen (UI configuration tool)
• Add fields from field set
• Position fields
• Change field labels/hide field labels
• Set fields to editable or display only. Define whether a field should be mandatory.
• All functions provided by the UI configuration tool for standard fields are also available for customer-specific fields.
Use Design Layer customizing to implement Drop-down list boxes or Value help for your fields
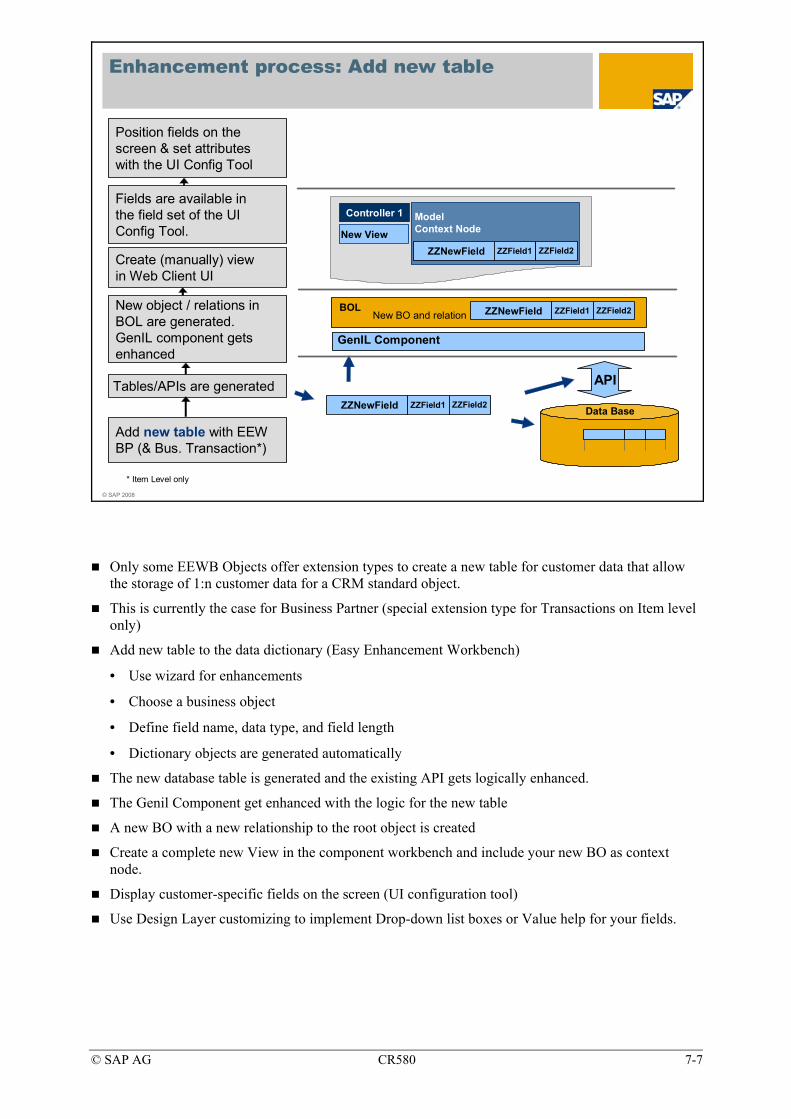
© SAP AG CR580 7-7
© SAP 2008
New object / relations in BOL are generated. GenIL component gets enhanced
Enhancement process: Add new table
Add new table with EEWBP (& Bus. Transaction*)
Create (manually) view in Web Client UI
Fields are available in the field set of the UI Config Tool.
Position fields on the screen & set attributes with the UI Config Tool
Tables/APIs are generated
Data Base
BOL
API
ZZNewField ZZField1 ZZField2New BO and relation
ZZNewField ZZField1 ZZField2
Controller 1
New View
ModelContext Node
ZZNewField ZZField1 ZZField2
GenIL Component
* Item Level only
Only some EEWB Objects offer extension types to create a new table for customer data that allow the storage of 1:n customer data for a CRM standard object.
This is currently the case for Business Partner (special extension type for Transactions on Item level only)
Add new table to the data dictionary (Easy Enhancement Workbench)
• Use wizard for enhancements
• Choose a business object
• Define field name, data type, and field length
• Dictionary objects are generated automatically
The new database table is generated and the existing API gets logically enhanced.
The Genil Component get enhanced with the logic for the new table
A new BO with a new relationship to the root object is created
Create a complete new View in the component workbench and include your new BO as context node.
Display customer-specific fields on the screen (UI configuration tool)
Use Design Layer customizing to implement Drop-down list boxes or Value help for your fields.

© SAP AG CR580 7-8
© SAP 2008
Enhancement of Business Transactions
User-defined item data
User-defined header data
Service item data
Schedule lines
Pricing result
Pricing data
Organizational data
Billing data
Shipping data
Sales data
Financing product data
Product data
Lead data
Opportunity data
Activity data
General item data
General header data
Subobject
CUSTOMER_I
CUSTOMER_H
SERVICE_I
SCHEDLIN
PRICING_I
PRICING
ORGMAN
BILLING
SHIPPING
SALES
FINPROD_I
PRODUCT_I
LEAD_H
OPPORT_H
ACTIVITY_H
ORDERADM_I
ORDERADM_H
Technical Name of Subobject
BTCustomerI
BTCustomerH
BTServiceI
BTSchedlin
BTPricingI
BTPricingSet
BTOrgSet
BTBillingSet
BTShippingSet
BTSales
BTFinProdI
BTProductI
BTLeadH
BTOpportH
BTActivityH
BTAdminI
BTAdminH
Enhancement in BOL
Depending on the business transaction categories,
• fields are not displayed on the interface for business transaction categories that have not been selected
• only Data Sources are enhanced for the selected business transaction categories
• subobjects are determined for the business transaction (for example, product data, pricing data) that can be enhanced
• the system determines whether a transfer to the CRM Mobile Client or to SAP ECC is relevant at all
Transfer of the fields to the Mobile Client is only an option if you have selected at least one of the following business transaction categories:
• Activity, Opportunities, Sales, Service Process, Service Confirmation
• Transfer of the fields to SAP ECC is only an option if you have selected business transaction categories Sales or Complaints.
The EEWB creates the following Repository Objects and table entries in accordance with your entries.
• A data element for each field
• Customer include structure CI_EEW_<subobject>, for each subobject to which fields will be added
• A dictionary structure with the new fields for each subobject This structure is included in the customer include structure.
• Additional tab page in the SAP GUI on which the enhancements can be found

© SAP AG CR580 7-9
• Enhancement of the synchronization BDoc for the Mobile Client, as well as a BAdI implementation for transferring fields to and from the Mobile Client.
• BAdI implementation that maps the fields to the sales fields in SAP ECC (and vice versa), as well as append structures in SAP ECC.
• Append structures for the relevant BW DataSources, a BAdI implementation that fills the fields, as well as the required Metadata
• Append structures for the structures of the XIF adapter

© SAP AG CR580 7-10
© SAP 2008
Transaction Category vs. Customer Data
CUSTOMER_HACTIVITY_H*
Customer fields are available for more than one transaction categoryRelated BO is never contained as context node Always component enhancement necessary
Customer fields are available for selected transaction category onlyRelated BO is normally available as context nodeOnly UI Configuration, no further enhancements necessary
Check ‚Subobject‘ field when creating an enhancement for Business Transactions!‚Customer Header Data‘ is always set as default
* the same is valid for other transaction categories such as Lead, Opportunity, etc.
There are different options where to add the customer specific fields when enhancing the Business Transaction.
You can either extend data that should be specific for a Transaction category or create data that should be valid for all types of Transaction categories.
For enhancing the CRM User interface it makes a difference in effort which type of enhancement you choose
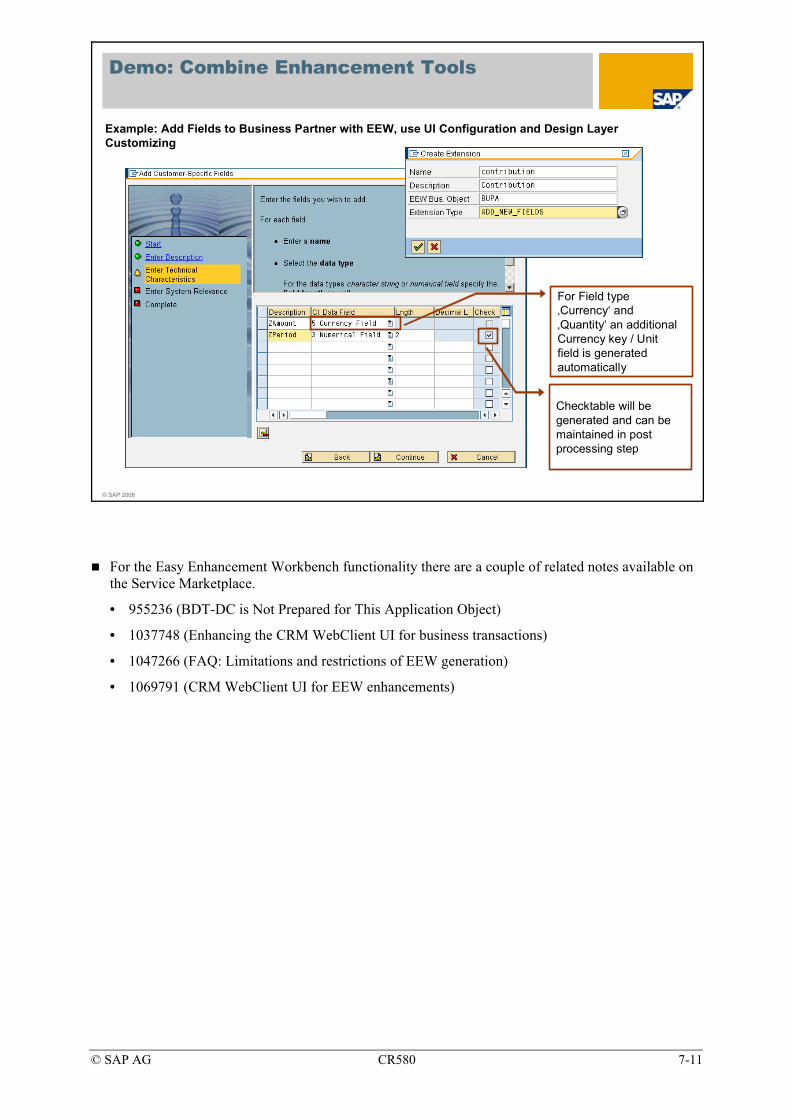
© SAP AG CR580 7-11
© SAP 2008
Demo: Combine Enhancement Tools
Example: Add Fields to Business Partner with EEW, use UI Configuration and Design Layer Customizing
For Field type ‚Currency‘ and ‚Quantity‘ an additional Currency key / Unit field is generated automatically
Checktable will be generated and can be maintained in post processing step
For the Easy Enhancement Workbench functionality there are a couple of related notes available on the Service Marketplace.
• 955236 (BDT-DC is Not Prepared for This Application Object)
• 1037748 (Enhancing the CRM WebClient UI for business transactions)
• 1047266 (FAQ: Limitations and restrictions of EEW generation)
• 1069791 (CRM WebClient UI for EEW enhancements)

© SAP AG CR580 7-12
© SAP 2008
Post Processing of Checktable
Right Mouse click ‚Execute‘
After the Easy Enhancement Workbench has generated several objects, post processing steps can be executed, e.g.
• to maintain check table entries
• to prepare data exchange of newly generated information with other systems, e.g. the ERP system.
• to create a default UI configuration

© SAP AG CR580 7-13
© SAP 2008
Generated Objects
Generated Currency Key field
Generated Check table
When extending objects with the Easy Enhancement Workbench, a log/protocol is created which contains the lists of objects that have been generated/extended.

© SAP AG CR580 7-14
© SAP 2008
Make fields visible with the UI Configuration Tool
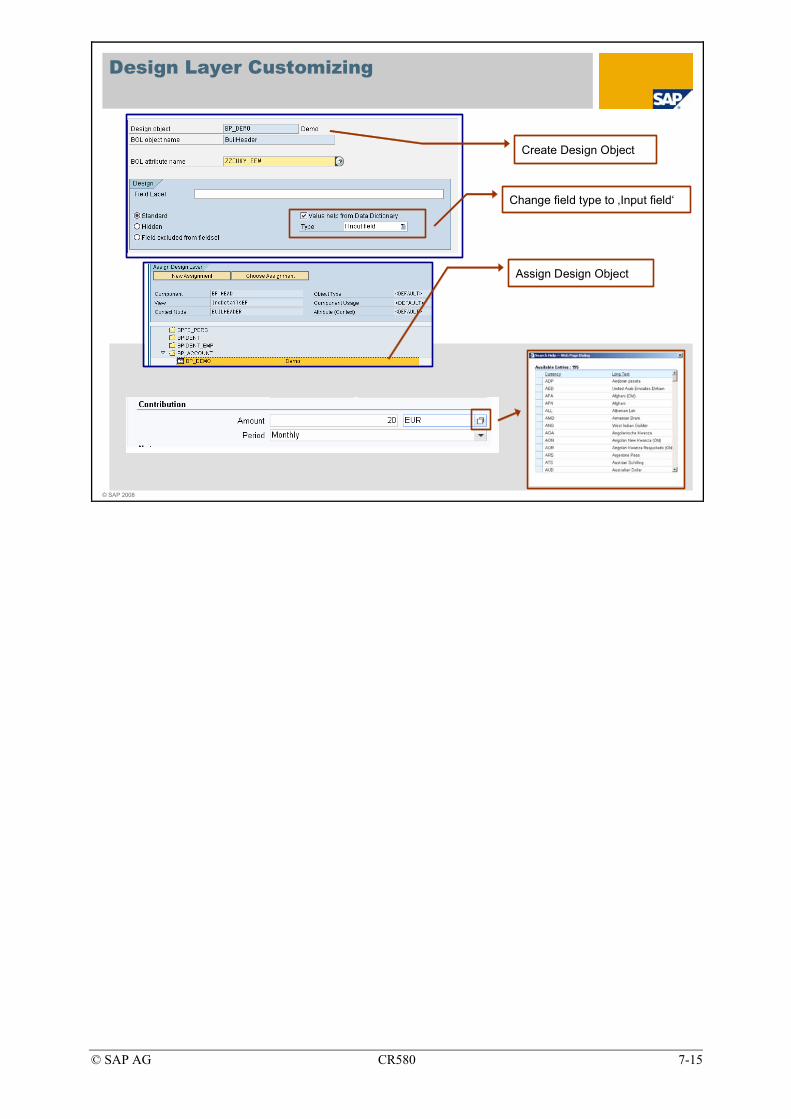
© SAP AG CR580 7-15
© SAP 2008
Design Layer Customizing
Change field type to ‚Input field‘
Assign Design Object
Create Design Object

© SAP AG CR580 7-16
© SAP 2008
Configuration Tools: Overview
UI configuration tool
Use customer-specific fields within view configuration
PFCG and reportsDefine Authorizations
Define value helps / DDLBs
UI configuration tool and Fact Sheet customizing
Configure views: position fields/columns, add fields/columns from field set, remove fields/columns, rename labels, set fields to mandatory/display only, and define load option for blocks and more
Use parameters to save your configuration
Configure buttons
BSP component workbenchEnhance components, create own views, context nodes and more
Navigation Bar / Business Role CustomizingChange Navigation Bar (1st & 2nd level navigation), Logical Links, Business Role Customizing
.css customizingCreate own Skin
Assign value helps / dropdown list boxes (DDLBs) from DDIC for customer-specific fields
Easy Enhancement WorkbenchCreate customer-specific fields
Configure Fact Sheet
Web Service ToolCreate Web Service
Design layer customizing
Implement same configuration content for several views
ToolTasks
When we talk about general Configuration Topics, then we think of a lot more tasks than covered only by UI configuration.
Shown table gives you an impression which tasks are counted under general topics of configuration for WebClient UI in CRM 2007 and with which tools tasks can be accomplished.
In here you can see that UI Configuration covers only some tasks of general Configuration, like positioning, adding, removing and/or re-labeling of fields on views. For other more sophisticated tasks you may use another tool provided within CRM 2007 system.

© SAP AG CR580 7-17
© SAP 2008
Easy Enhancement Workbench: Unit Summary
You should now be able to:Explain the concept of the Easy Enhancement WorkbenchUse the easy enhancement workbench to add customer specific fields to the CRM business applications

© SAP AG CR580 7-18

© SAP AG CR580 7-19
Exercises
Unit: Easy Enhancement Workbench Topic: Easy Enhancement Workbench
At the conclusion of this exercise, you will be able to:
• Use the Easy Enhancement Workbench (EEWB) in order to extend the Business Partner by a table including one or more fields.
Very often it is necessary to extend existing business objects by customer specific fields. Therefore it is required to extend the existing data model and – as a second step – include the new information on the User Interface.
The EEWB is a development tool that helps customers to extend CRM objects.
Due to the nature of the Easy Enhancement Workbench, this exercise might cause unwanted side effects, especially when many participants run the exercise at the same time.
1-1 In this exercise you will create a Business Partner extension via the Easy Enhancement Workbench (EEWB).
1-1-1 Start the Easy Enhancement Workbench transaction and create a new Project Z##EEWBPRO (## Extensions). Choose Package $TMP when the system prompts you to enter one.
1-1-2 Create an extension Z##Table (## Table extension) for the object Business Partner (BUPA) and choose the appropriate Extension Type (Table!).
After the Wizard has started enter the following information:
Cardinality: Multiple Instance
Time Dependency: checked
With Gaps: checked.
Continue.
Frame Title: ##Title
Field Label Sports
Type: Character String 15
Check Table: checked.
Field Label Level
Type: Character String 15
Check Table: checked.
Continue (twice). Complete.

© SAP AG CR580 7-20
1-1-3 Take a look at the ##TABLE object in the Easy Enhancement Workbench.
There are six objects listed below ##TABLE and you can execute some post processing steps using the right mouse button.
You will find help when you double-click the objects.
First you should maintain values for the two fields you created (including the check table flag).
Use the right mouse button on the VIEWMAINT objects, choose Execute and create a couple of meaningful values.
Use the right mouse button on the BP_EEW_CONFIG object and choose Execute.
Use the right mouse button on the BP_EEW_REPOSITORY object and choose Execute. Use Enhancement Set ZTRAINING.
Create a transport request when necessary.
Restart the Easy Enhancement Workbench.
Use the right mouse button on the BP_EEW_OV_CONFIG object and choose Execute. This will lead you into the UI Configuration Tool you have used already in one of the preceding exercises.
1-1-4 Add the newly generated table to the CRM WebClient UI using you Role Configuration Key Z##RCK.
1-1-5 Restart the CRM WebClient UI using your Business Role. Go to Accounts & Products, search for Account ##Megastore and check the Overview page for the new information.
Choose Edit List to add Sport, Validity and Level.

© SAP AG CR580 7-21
Solutions
Unit: Easy Enhancement Workbench Topic: Easy Enhancement Workbench
1-1 In this exercise you will create a Business Partner extension via the Easy Enhancement Workbench (EEWB).
1-1-1 Start the Easy Enhancement Workbench transaction and create a new Project Z##EEWBPRO (## Extensions). Choose Package $TMP when the system prompts you to enter one.
SAP Menu → Architecture and Technology → Configuration → Easy Enhancement Workbench
Choose Create Project ( ).
Project Name: Z##EEWBPRO
Description: ## Extensions
Package: $TMP
Choose Save and Exit.
1-1-2 Create an extension Z##Table (## Table extension) for the object Business Partner (BUPA) and choose the appropriate Extension Type (Table!).
Choose Create Extension ( ).
Name: Z##Table
Description: ## Table extension
EEW Bus. Object: BUPA
Extension Type: ADD_NEW_ATTRIBUTES_TABLE
Choose Continue (twice).
Cardinality: Multiple Instance
Time Dependency: checked
With Gaps: checked.
Continue.
Frame Title: ##Title
Choose Continue.
Field Label Sports
Type: Character String 15
Check Table: checked.
Choose Insert Row ( ).
Field Label Level
Type: Character String 15
© SAP AG CR580 7-22
Check Table: checked.
Choose Continue (twice).
Choose Complete.
1-1-3 Take a look at the ##TABLE object in the Easy Enhancement Workbench.
There are six objects listed below ##TABLE and you can execute some post processing steps using the right mouse button.
You will find help when you double-click the objects.
Double-click the first entry and observe the information on the right-hand side, especially the name of the maintenance view.
Use the right mouse button on the first VIEWMAINT object and choose Execute.
Choose New Entries.
Sports/Description Squash
Sports/Description: Soccer
Sports/Description: Swimming
Save the entries and go back to the Easy Enhancement Workbench.
Double-click the second entry and observe the information on the right-hand side, especially the name of the maintenance view.
Use the right mouse button on this VIEWMAINT object and choose Execute.
Choose New Entries.
Level/Description: Beginner
Level/Description: Advanced
Level/Description: Professional
Save the entries and go back to the Easy Enhancement Workbench.
Double-click the entry and note the information regarding data exchange with other systems.
Double-click the entry and note the information, especially the technical extension name ZZ….
Use the right mouse button on the BP_EEW_CONFIG object and choose Execute.
Confirm pop-ups if necessary.
Double-click the entry and note the information.
Use the right mouse button on the BP_EEW_REPOSITORY object and choose Execute.
Component Name: BP_HEAD
Enhancement Set: ZTRAINING
External Object Name: ZZ… (leave unchanged)
Choose Execute and confirm any pop-ups.
Restart the Easy Enhancement Workbench.
© SAP AG CR580 7-23
Double-click the entry and note the information.
Use the right mouse button on the BP_EEW_OV_CONFIG object and choose Execute. This will lead you into the UI Configuration Tool you have used already in one of the preceding exercises.
1-1-4 Add the newly generated table to the CRM WebClient UI using you Role Configuration Key Z##RCK.
Double-click Views → BP_HEAD/BPHEADOverview.
If necessary log on with your credentials.
Choose tab Configuration.
Choose Copy Configuration.
Role Config Key: Z##RCK.
Choose Show Technical Details.
The list of Available Assignment Blocks should include your extension.
Choose it and move it ( ) to the list of Displayed Assignment Blocks.
Choose Title ##Sports and Load Option Lazy for this assignment block.
Save the configuration.
1-1-5 Restart the CRM WebClient UI using your Business Role. Go to Accounts & Products, search for Account ##Megastore and check the Overview page for the new information.
Choose Edit List to add Sport, Validity and Level.

© SAP AG CR580 7-24
© SAP AG CR580 8-1
© SAP 2008
Component Enhancement Concept
Contents:Component Enhancement Concept
© SAP AG CR580 8-2
© SAP 2008
Component Enhancement Concept: Unit Objectives
After completing this unit, you will be able to:Describe the UI Component Enhancement conceptUse the Component Enhancement technique to enhance the UI Components

© SAP AG CR580 8-3
© SAP 2008
Component Enhancement Concept: Business Example
You would like to further extend the WebClient User Interface, e.g. include customer specific tables into the UI
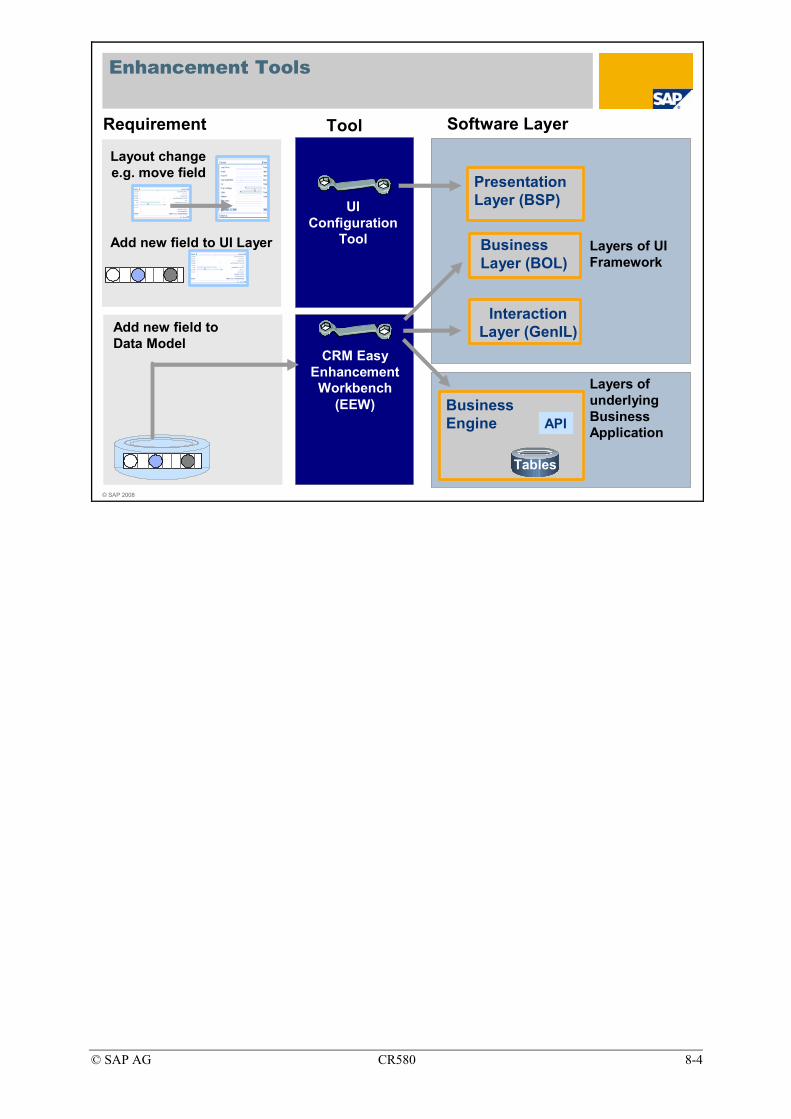
© SAP AG CR580 8-4
© SAP 2008
Layers of UI Framework
Presentation Layer (BSP)
Layers of underlying Business Application
Requirement Software LayerTool
Tables
Business Engine API
Interaction Layer (GenIL)
Business Layer (BOL)
Add new field to UI Layer
Layout changee.g. move field
CRM Easy Enhancement
Workbench(EEW)
Add new field to Data Model
UI Configuration
Tool
Enhancement Tools
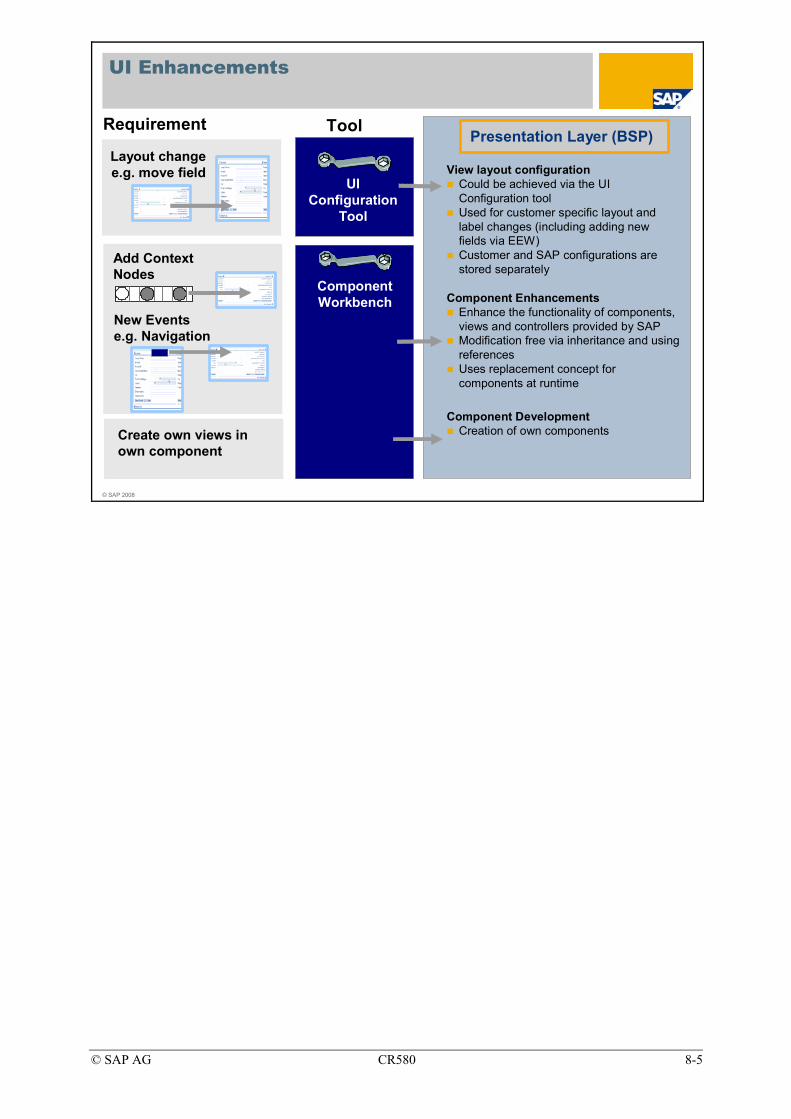
© SAP AG CR580 8-5
© SAP 2008
Presentation Layer (BSP)Requirement Tool
Layout changee.g. move field
Component Workbench
UI Configuration
Tool
Add Context Nodes
New Eventse.g. Navigation
Create own views in own component
View layout configurationCould be achieved via the UI Configuration tool Used for customer specific layout and label changes (including adding new fields via EEW)Customer and SAP configurations are stored separately
Component EnhancementsEnhance the functionality of components, views and controllers provided by SAPModification free via inheritance and using referencesUses replacement concept for components at runtime
Component DevelopmentCreation of own components
UI Enhancements
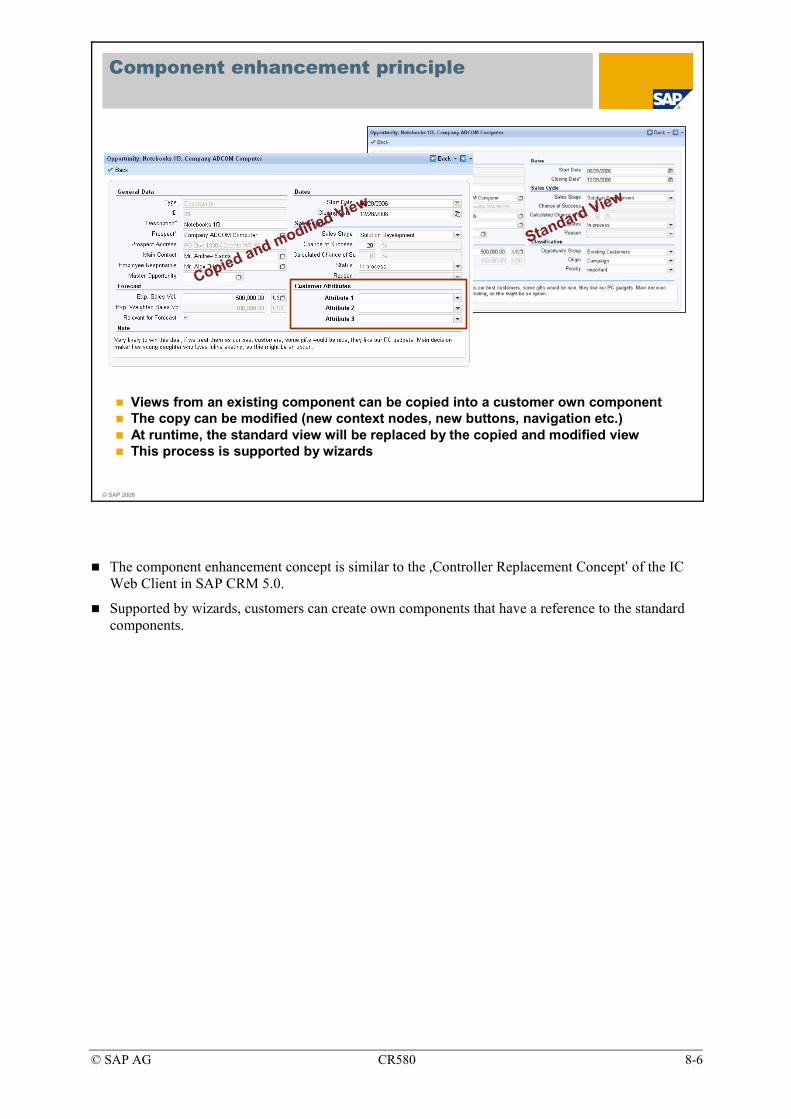
© SAP AG CR580 8-6
© SAP 2008
Component enhancement principle
Standard View
Copied and modified View
Views from an existing component can be copied into a customer own componentThe copy can be modified (new context nodes, new buttons, navigation etc.)At runtime, the standard view will be replaced by the copied and modified viewThis process is supported by wizards
The component enhancement concept is similar to the ‚Controller Replacement Concept‘ of the IC Web Client in SAP CRM 5.0.
Supported by wizards, customers can create own components that have a reference to the standard components.
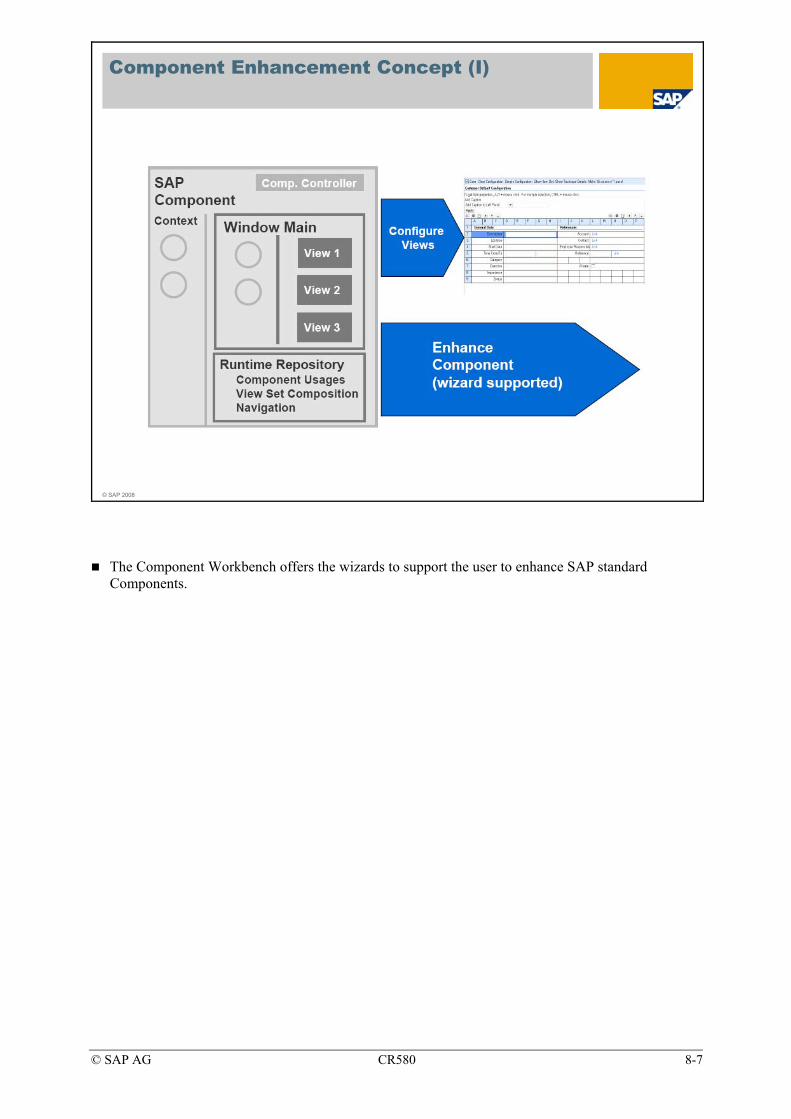
© SAP AG CR580 8-7
© SAP 2008
Component Enhancement Concept (I)
The Component Workbench offers the wizards to support the user to enhance SAP standard Components.

© SAP AG CR580 8-8
© SAP 2008
Component Enhancement Concept (II)
When doing a component enhancement. The system first creates a new UI Component and copies the runtime repository of the original component into the customer component. This new component (BSP application) will be the host for all other copied elements such as views, custom controllers, etc.
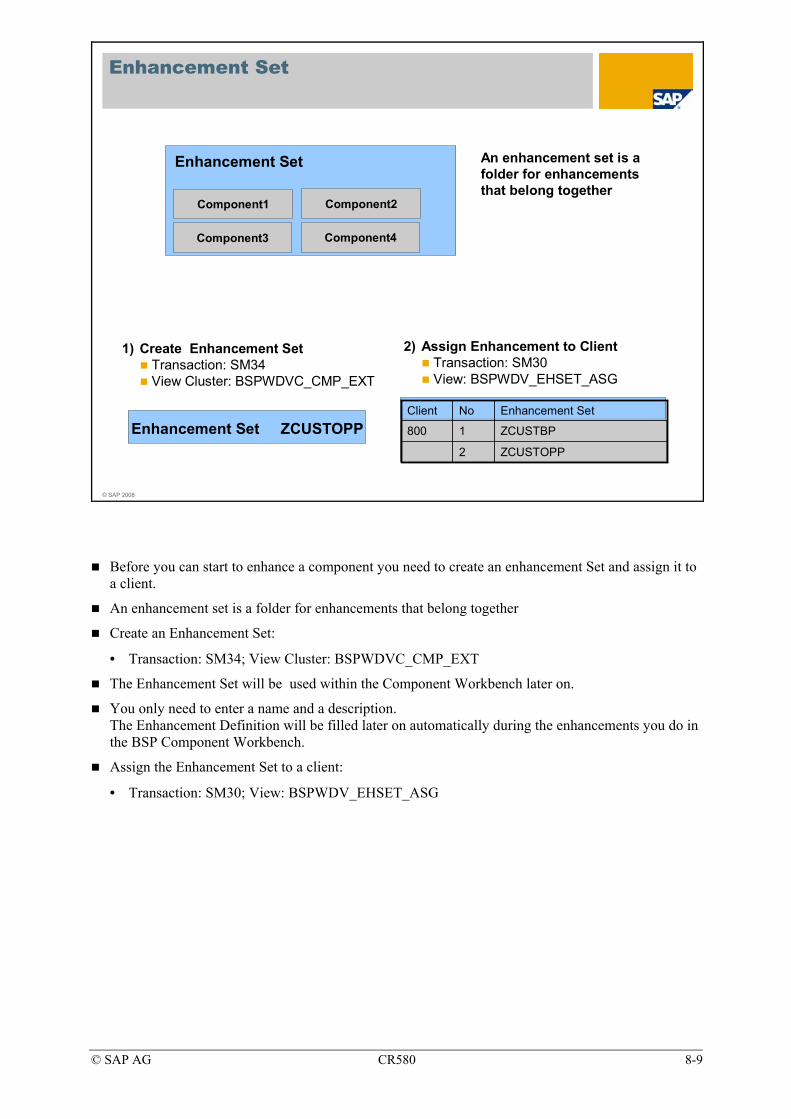
© SAP AG CR580 8-9
© SAP 2008
Enhancement Set ZCUSTOPPZCUSTOPP2
ZCUSTBP1800
Enhancement SetNoClient
1) Create Enhancement SetTransaction: SM34View Cluster: BSPWDVC_CMP_EXT
2) Assign Enhancement to ClientTransaction: SM30View: BSPWDV_EHSET_ASG
Component4
Enhancement Set
Component3
Component2Component1
An enhancement set is a folder for enhancements that belong together
Enhancement Set
Before you can start to enhance a component you need to create an enhancement Set and assign it to a client.
An enhancement set is a folder for enhancements that belong together
Create an Enhancement Set:
• Transaction: SM34; View Cluster: BSPWDVC_CMP_EXT
The Enhancement Set will be used within the Component Workbench later on.
You only need to enter a name and a description. The Enhancement Definition will be filled later on automatically during the enhancements you do in the BSP Component Workbench.
Assign the Enhancement Set to a client:
• Transaction: SM30; View: BSPWDV_EHSET_ASG

© SAP AG CR580 8-10
© SAP 2008
Create Enhancement
Open Input Field for Enhancement Set
Choose Enhancement Set and Component to be enhanced.Press ‚Display‘
Transaction: BSP_WD_CMPWB
Press ‚Enhance Component‘
Enter name of Customer BSP Application (will be created if not yet existing)Enter Package for Development
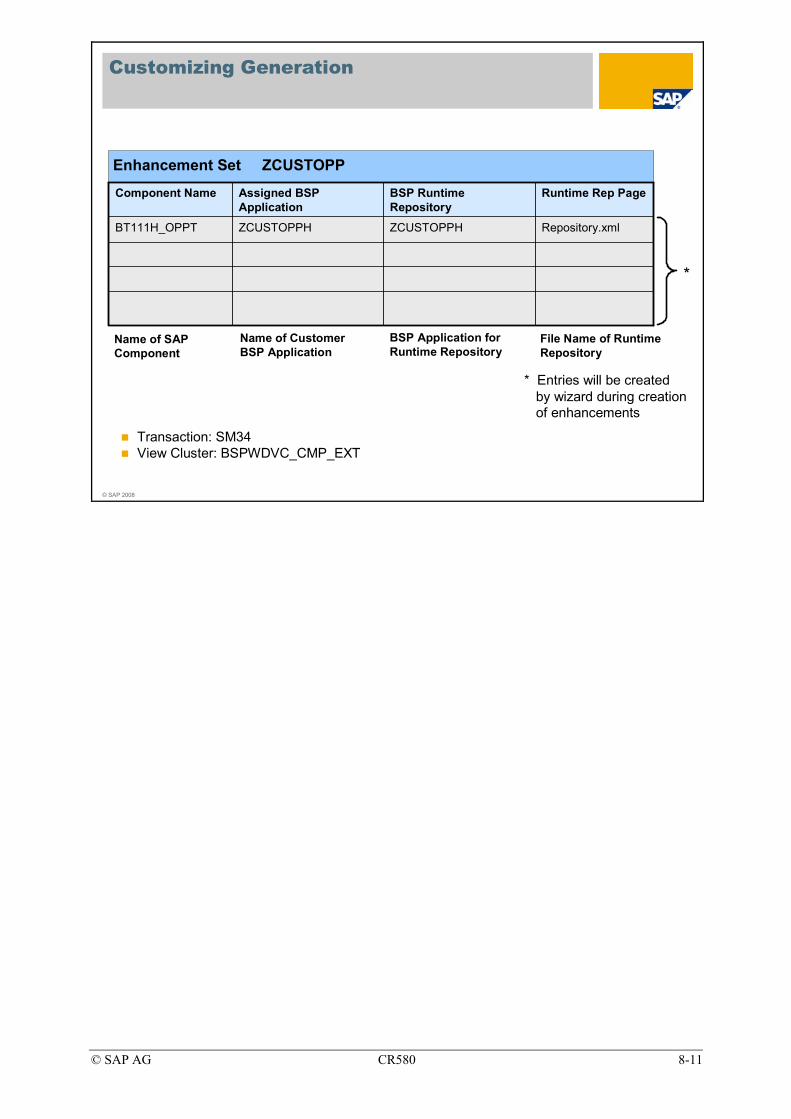
© SAP AG CR580 8-11
© SAP 2008
Repository.xmlZCUSTOPPHZCUSTOPPHBT111H_OPPT
Runtime Rep PageBSP Runtime Repository
Assigned BSP Application
Component Name
* Entries will be created by wizard during creation of enhancements
*
Enhancement Set ZCUSTOPP
Name of SAP Component
Name of Customer BSP Application
BSP Application for Runtime Repository
File Name of Runtime Repository
Transaction: SM34View Cluster: BSPWDVC_CMP_EXT
Customizing Generation
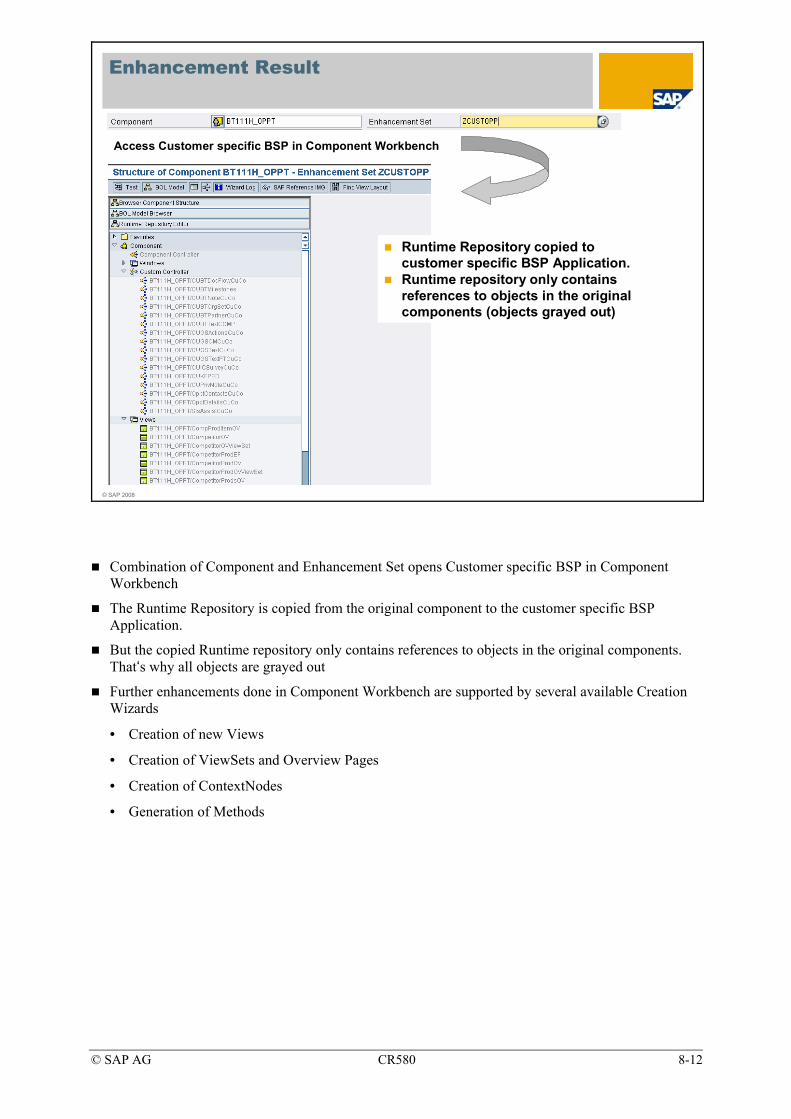
© SAP AG CR580 8-12
© SAP 2008
Enhancement Result
Runtime Repository copied to customer specific BSP Application.Runtime repository only contains references to objects in the original components (objects grayed out)
Access Customer specific BSP in Component Workbench
Combination of Component and Enhancement Set opens Customer specific BSP in Component Workbench
The Runtime Repository is copied from the original component to the customer specific BSP Application.
But the copied Runtime repository only contains references to objects in the original components. That‘s why all objects are grayed out
Further enhancements done in Component Workbench are supported by several available Creation Wizards
• Creation of new Views
• Creation of ViewSets and Overview Pages
• Creation of ContextNodes
• Generation of Methods
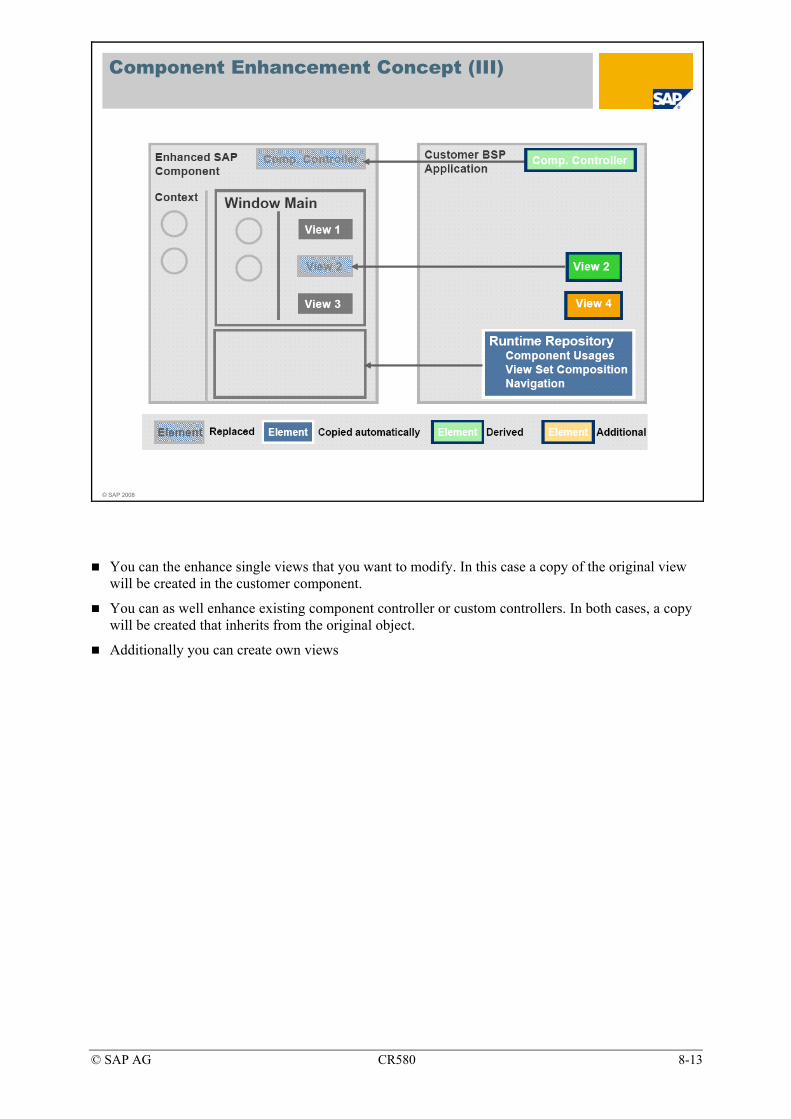
© SAP AG CR580 8-13
© SAP 2008
Component Enhancement Concept (III)
You can the enhance single views that you want to modify. In this case a copy of the original view will be created in the customer component.
You can as well enhance existing component controller or custom controllers. In both cases, a copy will be created that inherits from the original object.
Additionally you can create own views

© SAP AG CR580 8-14
© SAP 2008
Enhancement of Objects
Controller 1
View1
ModelContext Node
Controller 2
View2
Model2Context Node
BT111H_OPPT/DetailsEF ZCUSTOPPH/DetailsEF
Enhancement StepsCopy LayoutCopy ControllerCreate new controller class in customer namespace*Create new context class in customer namespace*Re-use context nodes
*classes inherit from standard classes
Enhancement with wizard
ViewsCustom ControllersComponent ControllersWindows
You need to enhance the view first before editing it.
Enter the component with your Enhancement Set again.
All objects that haven‘t yet been enhanced are marked in grey.
By right-clicking on an object, you can open a context menu and choose Enhance to enhance the object.
The object is created automatically in the customer namespace.
The process works for views as well as for custom controllers, component controller and windows as they all use controller classes.
Further enhancements done in Component Workbench are supported by several available Creation Wizards
• Creation of new Views
• Creation of ViewSets and Overview Pages
• Creation of ContextNodes
• Generation of Methods

© SAP AG CR580 8-15
© SAP 2008
Controller Substitution
DetailsEFZCUSTOPPHDetailsEFBT111H_OPPT
Replacement ControllerBSP ApplicationController to be replacedBSP Application
Enhancement Set ZCUSTOPPComponent BT111H_OPPT
Per object enhancement, en entry in customizing is generated by the wizard
Transaction: SM34View Cluster: BSPWDVC_CMP_EXT
Standard Component View that will be replaced at runtime
Customer Component View that will be used at runtime instead of standard view

© SAP AG CR580 8-16
© SAP 2008
Object changes
Creation of new context node completely supported by wizard
Creation of event handler, inbound and outbound plugs supported by wizard, additional coding needed
Re-definition of standard methods possible. Additional methods can be created
Besides the creation of context nodes which is completely supported by the wizard, all other changes require development skills and deeper knowledge of the UI component concept.
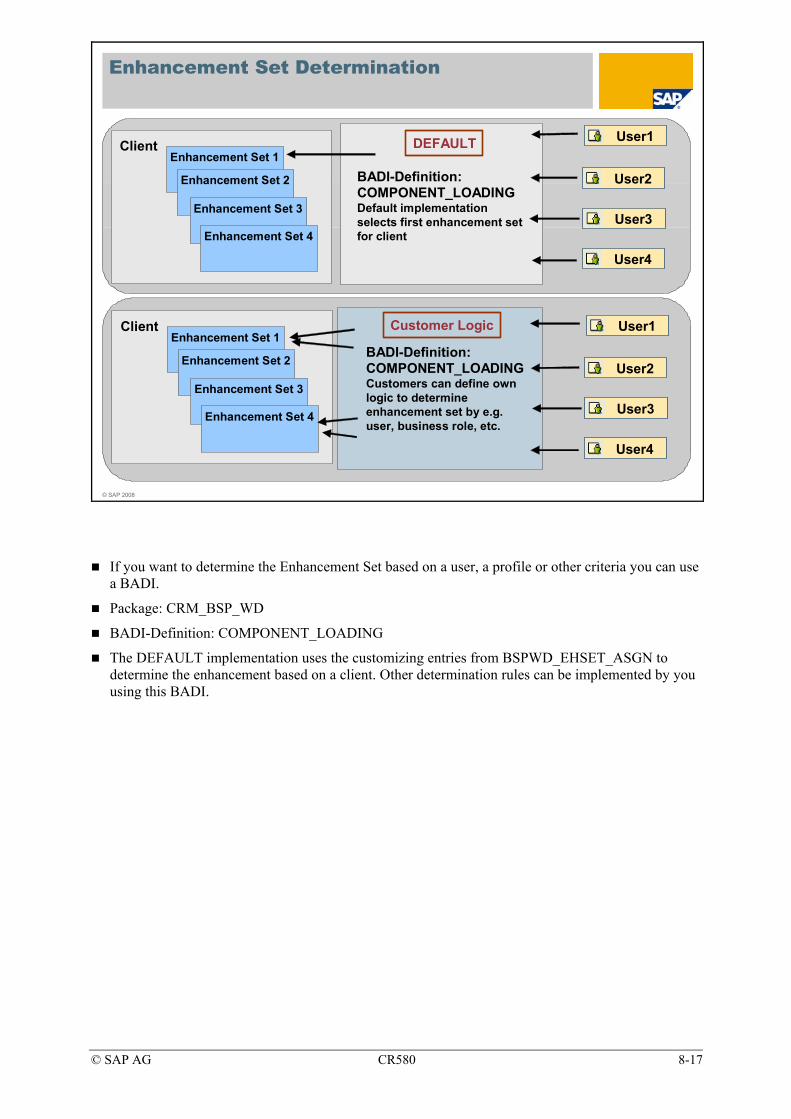
© SAP AG CR580 8-17
© SAP 2008
User1
User2
User3
User4
User1
User2
User3
User4
Enhancement Set 1
Enhancement Set 2
Enhancement Set 3
Enhancement Set 4
Client
BADI-Definition: COMPONENT_LOADINGDefault implementation selects first enhancement set for client
Enhancement Set 1
Enhancement Set 2
Enhancement Set 3
Enhancement Set 4
Client
BADI-Definition: COMPONENT_LOADINGCustomers can define own logic to determine enhancement set by e.g. user, business role, etc.
DEFAULT
Customer Logic
Enhancement Set Determination
If you want to determine the Enhancement Set based on a user, a profile or other criteria you can use a BADI.
Package: CRM_BSP_WD
BADI-Definition: COMPONENT_LOADING
The DEFAULT implementation uses the customizing entries from BSPWD_EHSET_ASGN to determine the enhancement based on a client. Other determination rules can be implemented by you using this BADI.
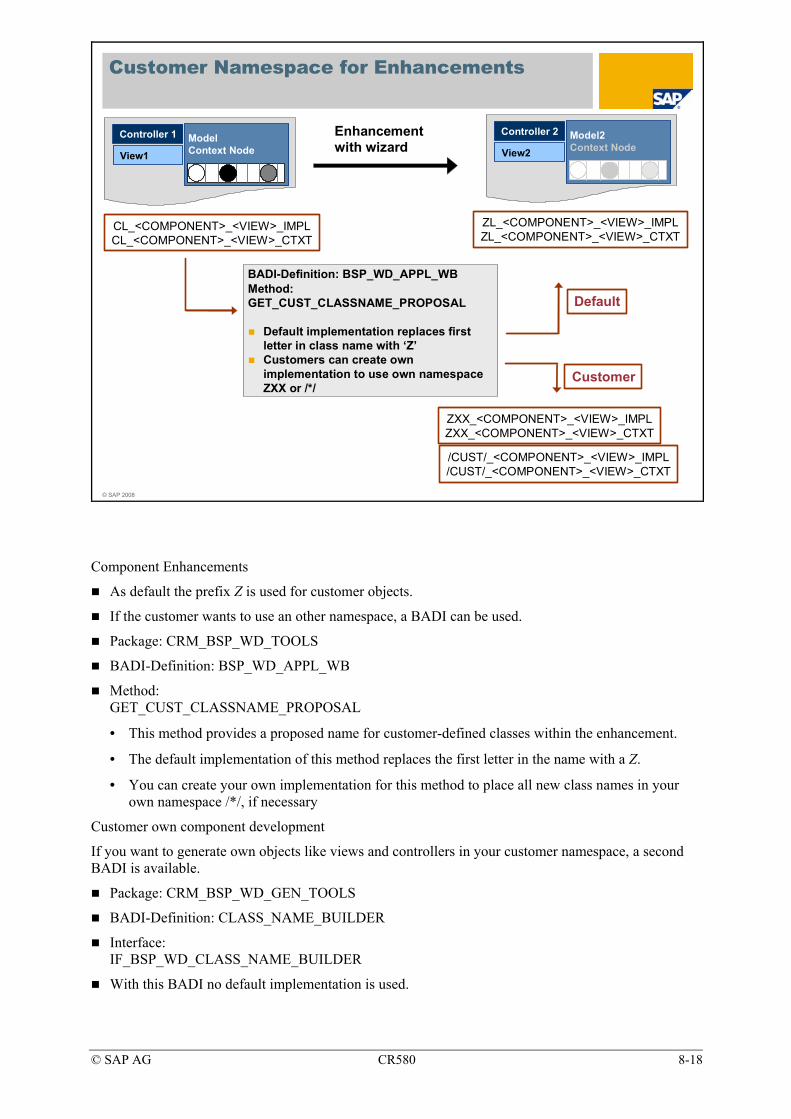
© SAP AG CR580 8-18
© SAP 2008
Customer Namespace for Enhancements
CL_<COMPONENT>_<VIEW>_IMPLCL_<COMPONENT>_<VIEW>_CTXT
Controller 1
View1
ModelContext Node
Controller 2
View2
Model2Context Node
Enhancement with wizard
ZL_<COMPONENT>_<VIEW>_IMPLZL_<COMPONENT>_<VIEW>_CTXT
BADI-Definition: BSP_WD_APPL_WBMethod: GET_CUST_CLASSNAME_PROPOSAL
Default implementation replaces first letter in class name with ‘Z’Customers can create own implementation to use own namespace ZXX or /*/
ZXX_<COMPONENT>_<VIEW>_IMPLZXX_<COMPONENT>_<VIEW>_CTXT
/CUST/_<COMPONENT>_<VIEW>_IMPL/CUST/_<COMPONENT>_<VIEW>_CTXT
Default
Customer
Component Enhancements
As default the prefix Z is used for customer objects.
If the customer wants to use an other namespace, a BADI can be used.
Package: CRM_BSP_WD_TOOLS
BADI-Definition: BSP_WD_APPL_WB
Method: GET_CUST_CLASSNAME_PROPOSAL
• This method provides a proposed name for customer-defined classes within the enhancement.
• The default implementation of this method replaces the first letter in the name with a Z.
• You can create your own implementation for this method to place all new class names in your own namespace /*/, if necessary
Customer own component development
If you want to generate own objects like views and controllers in your customer namespace, a second BADI is available.
Package: CRM_BSP_WD_GEN_TOOLS
BADI-Definition: CLASS_NAME_BUILDER
Interface: IF_BSP_WD_CLASS_NAME_BUILDER
With this BADI no default implementation is used.
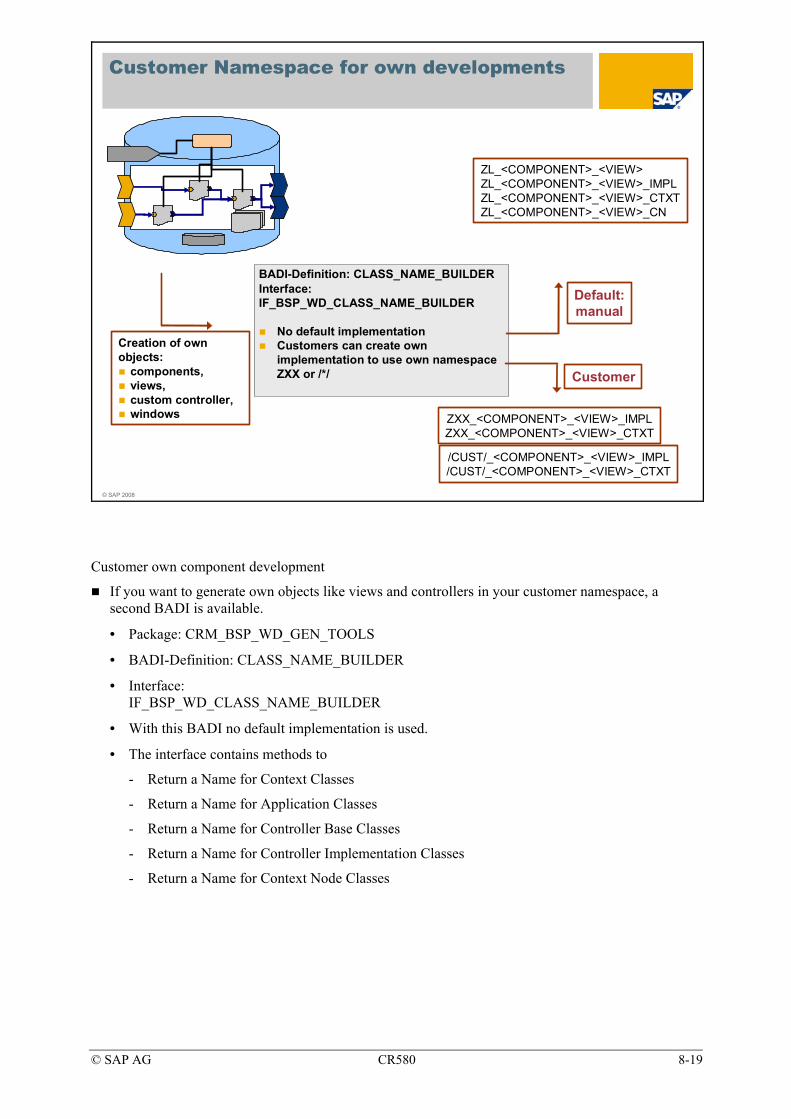
© SAP AG CR580 8-19
© SAP 2008
Customer Namespace for own developments
ZL_<COMPONENT>_<VIEW> ZL_<COMPONENT>_<VIEW>_IMPLZL_<COMPONENT>_<VIEW>_CTXTZL_<COMPONENT>_<VIEW>_CN
BADI-Definition: CLASS_NAME_BUILDERInterface: IF_BSP_WD_CLASS_NAME_BUILDER
No default implementationCustomers can create own implementation to use own namespace ZXX or /*/
ZXX_<COMPONENT>_<VIEW>_IMPLZXX_<COMPONENT>_<VIEW>_CTXT
/CUST/_<COMPONENT>_<VIEW>_IMPL/CUST/_<COMPONENT>_<VIEW>_CTXT
Default:manual
Customer
Sub componentSearch
Creation of own objects:
components, views, custom controller,windows
Customer own component development
If you want to generate own objects like views and controllers in your customer namespace, a second BADI is available.
• Package: CRM_BSP_WD_GEN_TOOLS
• BADI-Definition: CLASS_NAME_BUILDER
• Interface: IF_BSP_WD_CLASS_NAME_BUILDER
• With this BADI no default implementation is used.
• The interface contains methods to
- Return a Name for Context Classes
- Return a Name for Application Classes
- Return a Name for Controller Base Classes
- Return a Name for Controller Implementation Classes
- Return a Name for Context Node Classes
© SAP AG CR580 8-20
© SAP 2008
Component Enhancement Concept: Unit Summary
You should now be able to:Describe the UI Component Enhancement conceptUse the Component Enhancement technique to enhance the UI Components

© SAP AG CR580 8-21
Exercises
Unit: Component Enhancement Topic: Component Enhancement
At the conclusion of this exercise, you will be able to:
• Create an Enhancement Set
• Enhance a standard UI component to add a new context node to a view
The Easy Enhancement Workbench can be used to generate customer specific fields (Extension Type CUSTOMER_H).
You would like to add those customer specific fields which are not available in the standard context nodes (and therefore not in the UI Configuration) to the WebClient UI.
1-1 As a first step create an enhancement set Z##EHSET with description ## Enhancements.
1-1-1 Choose transaction code /nSM34, enter view cluster name BSPWDVC_CMP_EXT.
Enter a name for your enhancement set Z##EHSET.
1-1-2 Use the Table/View maintenance transaction (/nSM30) in order to correlate your CRM log on user with the newly defined Enhancement Set Z##EHSET. Enter Table ZCR580_USER.
Create a new entry and enter your user ID and your Enhancement set.
In the training system there is a BAdI-Implementation active to determine the Enhancement set for a User. This is necessary for a successful execution of the exercises.
In other systems you would not assign an Enhancement Set to a user but to a Client! (see 1-1-3)
1-1-3 Optional:
If no customer specific BAdI-Implementation is active the default determination is used. You can then only assign one enhancement set per client:
Therefore maintain table/view BSPWDV_EHSET_ASG.

© SAP AG CR580 8-22
1-1-4 Open the component workbench and create an enhancement for Component BT126H_APPT. Create a new BSP Application Z##_APPT. a) Start the Component Workbench and enter the component name BT126H_APPT. You should see your enhancement set ID in the second input field on the right side of the screen.
If you do not see the additional input field, press icon to display it and enter the ID of your Enhancement Set. Go into the details of this component. b) Enhance the component and call your new BSP Application Z##_APPT. The system will inform you in a separate popup that the application is not yet existing. Confirm the popup to create the application. The system will propose the name for the runtime repository file. Confirm the proposal. If necessary choose Local Object and create a transport request. c) After successfully extending the component you will find a new entry within your Enhancement Set definition. Optionally check the details of your Enhancement Set definition with /nSM34 and table BSPWDVC_CMP_EXT.
1-1-5 Enhance the view ApptDetails. Therefore open the Views, right-click the corresponding view ApptDetails and choose Enhance from the context menu. Adjust the pop-ups with respect to class names and change the proposed class names starting with ZL_* by inserting your group number Z##L_*. After successfully enhancing the view you will find a new entry within your Enhancement Set definition. Optionally check the details of your Enhancement Set definition with /nSM34 and table BSPWDVC_CMP_EXT.
1-1-6 Create a new context node for the customer header data so that the data will later be available in the UI Configuration Tool. Double click on the view name ApptDetails to see the details in the right section of the component workbench. Open the sections Context and Context Nodes. Right-click on Context Nodes and choose Create from the context menu. In the wizard do the following entries: Define Context Node: choose name BTCUSTOMERH Context Node Type: Model node, choose BOL entity BTCustomerH. Skip Step Add Model Attributes. Skip Step Add Value Attributes. Skip Step Create Links to Custom Controller. Define Dependency and choose Higher Level Context Node BTADMINH, choose Relationship BTHeaderCustExt and mark the checkbox Always create instance. Complete the wizard.
1-1-7 Do the UI configuration for the view ApptDetails. Copy the standard layout to your configuration key Z##RCK (## Role Configuration Key that you have already created. Make fields available within BTCUSTOMERH available on the layout.

© SAP AG CR580 8-23
Solutions
Unit: Component Enhancement Topic: Component Enhancement
1-1 As a first step create an enhancement set Z##EHSET with description ## Enhancements.
1-1-1 Choose transaction code /nSM34, enter view cluster name BSPWDVC_CMP_EXT.
In SAP GUI choose transaction code /nSM34.
View cluster: BSPWDVC_CMP_EXT
Choose Maintain and confirm the pop-up.
Choose New Entries.
Enhancement Set: Z##EHSET.
Description: ## Enhancements.
Choose Save.
1-1-2 Use the Table/View maintenance transaction (/nSM30) in order to correlate your CRM log on user with the newly defined Enhancement Set Z##EHSET. Enter Table ZCR580_USER.
In SAP GUI choose transaction code /nSM30.
Table/View: ZCR580_USER
Choose Maintain.
Choose New Entries.
User: CRM-##
Enhancement Set: Z##EHSET (F4-Help).
Choose Save.
In the training system there is a BAdI-Implementation active to determine the Enhancement set for a User. This is necessary for a successful execution of the exercises.
When you start the Component Workbench the user specific Enhancement Set should be visible once exercise 1-1-2 has be done.
In other systems you would not assign an Enhancement Set to a user but to a Client! (see 1-1-3)

© SAP AG CR580 8-24
1-1-3 Optional:
If no customer specific BAdI-Implementation is active the default determination is used. You can then only assign one enhancement set per client:
Therefore maintain table/view BSPWDV_EHSET_ASG using /nSM30.
1-1-4 Open the component workbench and create an enhancement for Component BT126H_APPT. Create a new BSP Application Z##_APPT.
a) Start the Component Workbench and enter the component name BT126H_APPT. You should see your enhancement set ID in the second input field on the right side of the screen.
If you do not see the additional input field, press icon to display it and enter the ID of your Enhancement Set. Go into the details of this component.
Choose Display.
b) Enhance the component and call your new BSP Application Z##_APPT.
Choose Enhance Component.
Application: Z##APPT
Choose Continue.
Choose Yes to create the BSP Application.
Confirm the next dialog (Repository.xml).
If necessary choose Local Object and create a transport request.
A success message will be displayed.
c) After successfully extending the component you will find a new entry within your Enhancement Set definition. Optionally check the details of your Enhancement Set definition with /nSM34 and table BSPWDVC_CMP_EXT.
Choose transaction /nSM34.
View cluster: BSPWDVC_CMP_EXT.
Choose Maintain and confirm the pop-up.
Mark your Enhancement Set Definition.
Double-click Enhancement Definition. You should see your newly created BSP Application Z##APPT!
© SAP AG CR580 8-25
1-1-5 Enhance the view ApptDetails.
Therefore open the Views, right-click the corresponding view ApptDetails and choose Enhance from the context menu.
ObjectTypeName: Z##_BT126H_A_APPTDETAILS_IMPL.
Choose Continue.
ObjectTypeName: Z##_BT126H_A_APPTDETAILS_CTXT.
Choose Continue.
In necessary choose Local Object twice.
After successfully enhancing the view you will find a new entry within your Enhancement Set definition. Optionally check the details of your Enhancement Set definition with /nSM34 and table BSPWDVC_CMP_EXT.
Choose transaction /nSM34.
View cluster: BSPWDVC_CMP_EXT.
Choose Maintain and confirm the pop-up.
Mark your Enhancement Set Definition.
Double-click Enhancement Definition.
Double-click Controller Substitutes.
You see a so-called controller replacement here! 1-1-6 Create a new context node for the customer header data so that the data will
later be available in the UI Configuration Tool.
Double click on the view name ApptDetails to see the details in the right section of the component workbench.
Open the sections Context and Context Node.
Right-click on Context Node and choose Create from the context menu. A Wizard starts.
Choose Continue.
Name: BTCUSTOMERH
Model Node/BOL Entity BTCustomerH.
Choose Continue.
Choose Continue.
Choose Continue.
Choose Continue.
Higher Level Context Node: BTADMINH
BOL-Relation: BTHeaderCustExt
AlwaysCreateInstance: Checked.
Choose Continue and than Complete. If necessary choose Local Object.
© SAP AG CR580 8-26
1-1-7 Do the UI configuration for the view ApptDetails.
Choose the Configuration tab for the view ApptDetails in order to start the UI Configuration Tool.
Copy the standard layout to your configuration key Z##RCK (## Role Configuration Key that you have already created.
Choose Show Available Fields.
Make fields available within BTCUSTOMERH available on the layout like you did in one of the preceding exercises.
© SAP AG CR580 9-1
© SAP 2008
Section: Case Study
Case StudyCase Study

© SAP AG CR580 9-2
© SAP AG CR580 9-3
Case Study Exercises
Unit: Case Study Topic: CRM Base Customizing
At the conclusion of this exercise, you will be able to:
• Customize SAP CRM and partially SAP ECC / SAP ERP according to a customer’s requirements.
• The Case Study is the final part of the TCRM20 Academy, where the participants have the opportunity to complete a short project on their own. The participants may work as a team of consultants to prepare a system according to customer requirements.
The organization Battery World, a big battery reseller wants to implement CRM including sales functionalities.
The goal is to prototype the customers CRM requirements. Due to integration aspects, some of the CRM functionalities influence backend (SAP ECC/ SAP R/3) system configuration.
Note: From now on the term SAP ERP is used. It stands for SAP ECC /
SAP R/3
Business background Battery World is a European-wide operating company which opens new sales departments in France. Besides selling standard batteries to trade companies they provide special batteries which are used for e.g. medical equipment to particular end customers. The sales team requires Opportunity Management for the Final Customer Sales channel as well as standard documents such as quotation and order documents.
Working with SAP GUI as well as SAP WebClient UI To set up your prototype and to configure it you will both require SAP GUI as well as the CRM WebClient UI. The customizing is mainly done in SAP GUI and the tests of the prototype and some other steps will be done using the SAP WebClient UI.
In each section you will find the information whether you need SAP GUI or SAP WebClient UI
Log on to the SAP CRM system using SAP GUI and do some preparation steps which will allow you to start the CRM WebClient UI: (This is only required if you have not done that in a previous part of the TCRM20 academy.)
Add a Favorite to your SAP Easy Access Menu. Choose BSP Application CRM_UI_FRAME with Description CRM WebClient UI and choose Start Page default.htm.
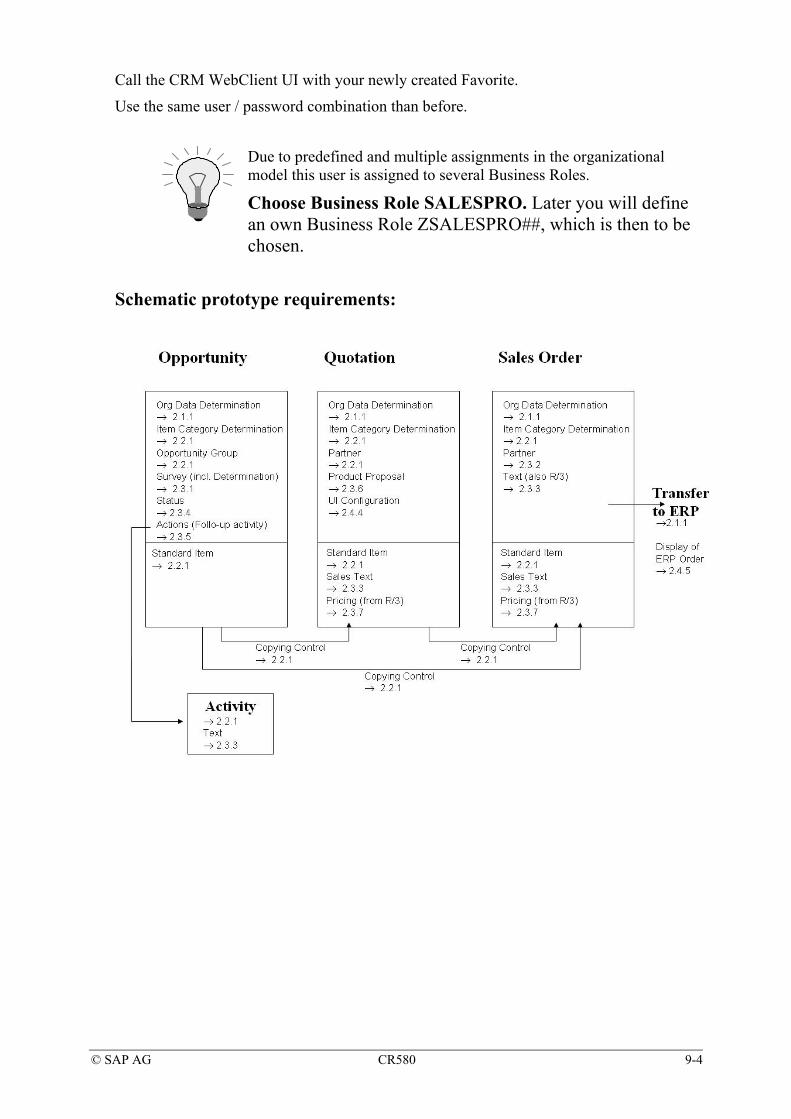
© SAP AG CR580 9-4
Call the CRM WebClient UI with your newly created Favorite.
Use the same user / password combination than before.
Due to predefined and multiple assignments in the organizational model this user is assigned to several Business Roles.
Choose Business Role SALESPRO. Later you will define an own Business Role ZSALESPRO##, which is then to be chosen.
Schematic prototype requirements:

© SAP AG CR580 9-5
Requirements:
1-1 The prototype should provide the following functionality in the area of master data:
1-1-1 You should create an organizational unit that belongs to a sales organization and that will be responsible organizational unit within business transactions.
1-1-2 It should be possible to create different types of accounts and relationships between them. It will be required that all buying accounts have been transferred to ERP before any sales documents are created.
1-1-3 It should be possible to create material master data in SAP ERP which will have to be loaded to SAP CRM.
1-1-4 You would like to use customer specific conditions, which will be taken into account in sales transactions. SAP ERP condition records of type Customer Discount need to be displayed in SAP CRM.
1-2 The prototype should provide the following functionality in the area of basic functions:
1-2-1 You would like to use a survey in order to store additional information with an opportunity.
1-2-2 It should be possible to determine the relevant accounts, contact persons and employees in your transactions.
1-2-3 Some textual information in your business transactions should be mandatory; some needs to be transferred to SAP ERP. Product information should be determined in your sales transactions on item level.
1-2-4 You would like to be able to use specific status information in your opportunities.
1-2-5 You would like to use different actions in order to accelerate follow-up processing.
1-2-6 You would like to be able see accessories of your products entered as product proposals in your sales transactions.
1-2-7 Due to special requirements in pricing you will create a specific pricing procedure. With respect to consistency this will be done in SAP ERP and then be transferred to SAP CRM.
1-3 The prototype should provide the following functionality in the area of business transactions:
1-3-1 You would like to implement a sales scenario and use transactions of type activity (task, business activity), opportunity and sales (quotation, order).
It should be possible to copy information from one business transaction to another and therefore appropriate copy control has to be maintained.
1-3-2 It should be possible to determine the relevant business partners in your transactions.
1-3-3 Some textual information in your business transactions should mandatory, some needs to be transferred to SAP ERP. Product information should be determined in your sales transactions on item level.

© SAP AG CR580 9-6
1-3-4 Some additional status information is required
1-3-5 You would like to use different actions in order to accelerate follow-up processing as well as printing documents.
1-3-6 You would like to see product proposals in your sales transactions
1-3-7 Due to special requirements in pricing you will create a specific pricing procedure. With respect to consistency this will be done in SAP ERP and then be transferred to SAP CRM.
1-4 The prototype should provide the following functionality in the area of UI Configuration:
1-4-1 In order to apply some UI changes for some users create your own business role, assign it to a PFCG role and your own Role Configuration Key as well as Navigation Bar Profile
1-4-2 Apply some UI changes to the Navigation Bar and some work centers.
1-4-3 Apply changes to the UI Configuration for the Account Details view
1-4-4 Apply changes to the UI Configuration for the Quotation Details view
1-4-5 Use the Transaction Launcher functionality to include a link to an ERP transaction in the Web Client UI

© SAP AG CR580 9-7
Detailed requirements:
2-1 Master Data
2-1-1 Set up the organizational structure of the company and create a determination rule ZRULE## (type Responsibilities) for organizational data determination and assign it to organizational data profile ZORGDATA##.
Create an organizational unit Sales Department ## below the root organization Battery World. The Sales Department ## should be responsible for customers within a postal code range from ##000 to ##999 in France.
The instructor or one student/group should create the root
organization.
For instructions how to do this, please go to the detailed solutions section.
Set up organizational data determination so that it directly finds the organizational unit Sales Department ## once a business transaction for customers from the above mentioned postal code interval is created.
When creating the determination rule of type Agent Determination: Responsibilities, use the following container elements:
Element
COUNTRY POSTCODE_1
Name Country Postal Code
Short Description Country Postal Code
ABAP Dict. Reference (Structure)
ADRC ADRC
ABAP Dict. Reference (Field)
COUNTRY POST_CODE1
When asked for a package name, choose $tmp or save as local object
T e s t y o u r d e t e r m i n a t i o n r u l e :
Simulate rule determination
© SAP AG CR580 9-8
2-1-2 Configuring CRM Accounts and Relationships.
Corporate accounts of role Sold-To Party as well as Contact Person and Employee Responsible relationships are to be created in the system.
You would like to use a new relationship category Goods used by ## which is to be used if the sold-to-party buying the goods is not the consumer or the account using the goods sold by Battery World in the end.
You want to check whether your account which is to be used in sales documents has been transferred to ERP.
Later on you also want to see in which ERP account group the account has been created in. For that reason you want to add the account group field to the CRM WebClient UI later in the UI configuration section of the case study.
Use transaction code /nbumr to call the BP Relationships Task Menu
Then choose SAP Menu → Relationship Control → Relationship Categories Copy Relationship Category CRME01 and choose appropriate names and settings, e.g. cardinality and
2-1-3 Company Battery World wants to introduce a new product EverLast 1.5 V. This product (a trading good) should be sold in pieces at a selling price of EUR 1.29, --. Special product master settings are not required.
A second product Fast Recharger is to be maintained as an accessory for EverLast 1.5 V.
Battery World is maintaining their materials in the ERP system.
The Accessory relation between both products has to be maintained in the CRM system.
T e s t y o u r p r o t o t y p e :
Create a material master.
Go to the test data section and create a material master.
© SAP AG CR580 9-9
2-1-4 Although in general condition records will be maintained in SAP ERP, you would like to be able to visualize condition records of type Customer Discount (K007) in SAP CRM. Make sure that condition maintenance group BUPADISCOU has all the necessary settings
Due to the fact that both condition types K007 (ERP) and 0K07 (CRM) have the same description Customer Discount, it will later on be difficult to differ between those condition types in the CRM WebClient UI condition maintenance application. In order to avoid confusion either the trainer or one student should go to SAP Implementation Guide → Customer Relationship Management →Basic Functions →Define Settings for Pricing → Create Condition Types The short text of condition type 0K07 should be: CustDisc CRM
2-2 Business transactions
2-2-1 a) Create a new activity of type activity (Task) and name it ZT##; Critical Opportunity ## [Short Description = Critical Opport. ##] Copy transaction type 1003. b) Create a new opportunity type ZO##; Sales Project ## (copy transaction type OPPT) and then make sure that Opportunity Group ZG##; New Customer ## is a default value once a transaction of this kind is created. The Sales Department ## should be the responsible organizational unit as long as the account is located in the corresponding postal code interval ##000 - ##999. Also you would like to be able to enter products of type material with item category group NORM (Standard items). Use the standard item category OPPT for opportunity items.
T e s t y o u r p r o t o t y p e : Create an account (role Sold-To Party). Go to the test data section and use customer pricing procedure Standard. Create a material master in ERP if you have not done it yet Create an opportunity of type ZO## and enter your account and material master. Check whether organizational data and item category determination works accurately. Ignore possible error messages regarding pricing (e.g. Pricing procedure could not be determined)

© SAP AG CR580 9-10
c) Create a new quotation type ZA##; Quotation ## (copy standard entry AG). It should be possible to enter standard items (item category AGN) using the standard item category (NORM).
It should be possible to copy header and item data from a preceding opportunity of type Sales Project ##.
Set up organizational data determination for your new transaction type
accordingly.
d) Create a new sales order type ZS##; Order ## (copy standard entry TA). It should be possible to enter standard items. Create a new item category ZI##; Order Item ## by copying the standard item category TAN.
Set up organizational data determination for your new transaction type accordingly.
e) You should be able to copy header and item data from either a preceding Sales Project ## or Quotation ## to the sales order. Therefore maintain copying control (several entries).
f) You would like to be able to transfer sales orders of type ZS##; Order ## to SAP ERP, hence you have to set up the same sales document type, item category and item category determination in SAP ERP.
In SAP ERP you have to copy sales document type OR (which is identical to transaction type TA in SAP CRM) once you are logged on with language EN.
2-3 Basic functions
2-3-1 Once the sales representatives see opportunities for selling products, they should create a corresponding business transaction in SAP CRM. In addition to standard information (e.g. expected sales volume, source), the sales representatives should be able to add extra information to the opportunity. Analytical aspects should be taken into account and therefore create a survey with the following questions and appropriate answers.
1. Do you think that follow-up opportunities are likely (radio buttons)?
2. Did the customer receive a quotation within the last 12 months (radio buttons, date field)?
3. Is the customer valuable for other departments/business units (radio buttons, text field)?
The survey should also contain a general text field with 10 lines and 40 columns.
Example of Survey:

© SAP AG CR580 9-11
a) Create a survey similar to the example using SAP GUI (The Survey Suite can be called via Customizing!)
b) Create a survey determination entry in CRM customizing.
2-3-2 When creating sales transactions you would like to determine at least one responsible person (Employee Responsible).
Additionally, you want to include a corresponding partner function Goods used by ## which corresponds to your newly created relationship category and is no mandatory partner function.
Copy the existing partner determination procedure 00000001 and give it an appropriate description. Create and assign an access sequence ZS## with an appropriate description that searches for the Employee Responsible in the following order: Business Partner Relationships by Sales Organization; Business Partner Relationships and Business Partner Assigned to the User.
© SAP AG CR580 9-12
Create and assign an access sequence ZT## with an appropriate description that searches for the partner of partner function Goods used by ## in the following order: Preceding Document and Business Partner Relationships.
2-3-3 a) You would like to use the special text type ZT##; Sales Info ## in your sales transactions on header level. Copy standard text determination procedure ORDER001 to ZORDER##, adapt it accordingly and make sure that the new text type will also be transferred to SAP ERP.
Assign the text determination procedure ZORDER## to transaction type ZA## and ZS##.
b) Create a text determination procedure ZITEM## for sales order items. You would like to determine the item Sales Text first from the product master sales text or second from the product master basic text (in case there is no sales text available!). Assign the text determination procedure ZITEM## to item category ZI##.
c) You would like to use a special text determination procedure ZTASK## for your task Lost Opportunity ##. Copy the standard text determination procedure for tasks ACT00002 and make the text type Description a mandatory text.
2-3-4 Create a new user status profile ZUS##, Opportunity Status ## by copying the standard user status profile for opportunities CRMOPPOR. Add an additional user status CRIT (Critical) before the status Lost in your status profile. The transaction status should be mapped to in process (INPR).
2-3-5 Create an action profile ZAP##; ##Action Profile for opportunities. When the opportunity is lost, you would like to create a follow-up activity Critical Opportunity ## when saving the document.
When maintaining Processing Types details, use F4-Help!
You could take a look at the details of action QUOTATION_FEEDBACK within action profile QUOTATION to get an idea of how your Processing Types settings should look like.
In action condition maintenance define a start condition checking for user status Critical.
2-3-6 You would like to see accessories of a certain product (item in your sales order) as product proposals in your sales transactions. You assign the existing method scheme Accessories to your sales transactions.
In the CRM Implementation Guide search for an IMG activity that allows you to assign a method schema to transaction types!
This activity can be found under Transaction settings.

© SAP AG CR580 9-13
2-3-7 You would like to avoid that your sales representatives change the standard price of a product within sales transactions. This feature should be dependent on the customer for whom the sales order is created.
In SAP ERP copy the standard pricing procedure RVCEU1 to YPP## and also create a new customer pricing procedure (this is a one-digit field hence. Choose a character between A and K or M and R), create a new condition type Basic Price ## (ZQ##) by copying the standard entry PR00.
Adapt the new condition type accordingly (changing not allowed) and include it into your new pricing procedure.
Set up the pricing procedure determination in SAP ERP using header division 00. Do not use a header division in SAP CRM.
Load parts of the pricing customizing to SAP CRM.
Start the initial download using Adapter Object DNL_CUST_CND. This will transfer the new condition type (and other objects).
Monitor the download either via the Monitor Objects transaction R3AM1 or using the Inbound Queue monitor via SMQ2 in the CRM system.
Once the first download is finished start another initial download using the Adapter Object ZCR300_CUST_PRC.
This will transfer pricing procedures with a technical ID starting with Y.
Starting the initial download might not be necessary if another student activated the initial download just before.
If the download is in the status running either go to the pricing customizing in CRM to check whether your entries have be transferred. If not you can start the initial download again once the other load is finished.
Check which settings still need to be done in CRM customizing and add the missing information.

© SAP AG CR580 9-14
2-4 SAP WebClient UI Configurations
2-4-1 Create a new CRM WebClient UI Business Role Z##SALESPRO, ## Sales Professional by copying the Business Role SALESPRO.
Assign the new UI Business Role to the already predefined user role in SAP CRM Z##_CRM_UIU_SLS_PROFESSIONAL as well as to a newly created Navigation Bar Profile Z##NBCASE, ## Navigation Bar Case Study (Copy the existing entry SLS-PRO) and a new Role Configuration Key ZCS##, ##Role Config Key Case Study. Assign both your CRM log on user CRM-## and the newly created business role Z##SALESPRO to a new position ##SalesPro under your organizational unit Sales Department ## in the organizational model.
You could proceed as follows.
a) Create a new Navigation Bar Profile.
b) Create a Role Configuration Key.
c) Create a Business Role.
d) Change the Organizational Model and create a new Position. Assign both User and Business Role to the Position.
2-4-2 Make some UI changes for the Business Role Z##SALESPRO you created in the previous section. The changes include removal of 2 works centers from the Navigation Bar, the E-Mail Inbox as well as the Billing work center.
On the Account Management work center the work center links Create Account Plans and Search Account Plans are to be removed.
On the work Center Sales Cycle you want to remove the following logical links from the Search work center link group: ERP Sales Orders, Sales Agreements, Sales Planning.
From the Create work center link group remove the following 2 logical links: Sales Agreement and Sales Planning.
2-4-3 Change the UI Configuration for the Account Details view.
a) In order to distinguish between accounts of ERP classification Prospect, Customer and Competitor you want to add these fields (Checkboxes) to the Account Details view. Moreover, you also want to see in which ERP Account Group, the accounts which are transferred to or from ERP are maintained for in ERP. Group these fields under a new caption ERP Classification. b) Add the classification fields Prospect and Customer to your Account Search.
Example of configured Account Details View:
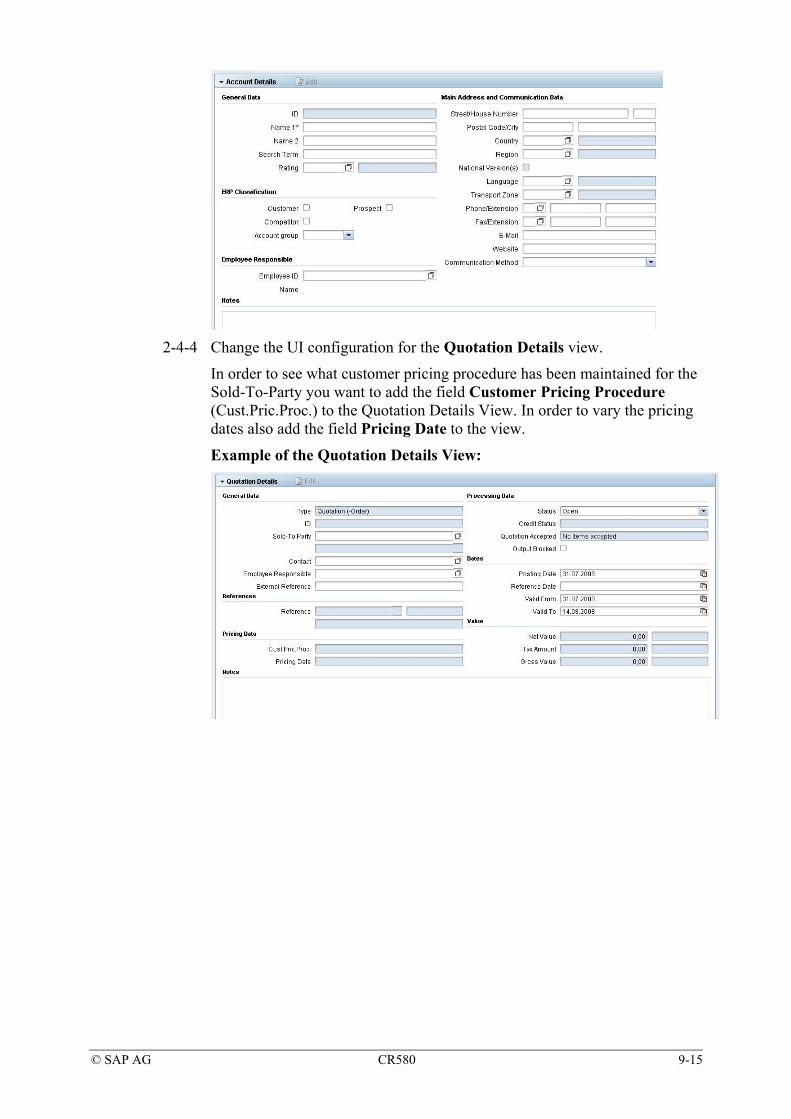
© SAP AG CR580 9-15
2-4-4 Change the UI configuration for the Quotation Details view.
In order to see what customer pricing procedure has been maintained for the Sold-To-Party you want to add the field Customer Pricing Procedure (Cust.Pric.Proc.) to the Quotation Details View. In order to vary the pricing dates also add the field Pricing Date to the view.
Example of the Quotation Details View:

© SAP AG CR580 9-16
2-4-5 You would like to integrate a link to a business transaction of the integrated ERP system to the CRM Web Client UI application of some of your users. The transaction (transaction code in ERP: VA03) allows the users to view replicated orders in the ERP system. For that you will use the Transaction Launcher functionality. Group these fields under a new caption Pricing Data.
When starting the transaction launcher use the following parameters:
Launch Transaction ID Z##ERP
Component Set ALL
Class name must be unique (choose name = Launch Transaction ID)
BOR Transaction (BOR Object ZTSTC; Method EXECUTE)
Parameter (Object Key) = VA03 (Capitel letter are important!)
Proceed as follows:
a) Check the definition of logical system IDs.
b) Create a launch transaction id.
c) Create a logical link
d) Include this link into the navigation bar profile by means of a new Direct Link Group.
e) Make this link visible using business role customizing.
© SAP AG CR580 9-17
Testing your prototype: Account Management One of your contacts at a trade fair is strongly interested in your products and you plan to create an opportunity in your CRM system. For that reason you create a new corporate account (Remote Control Stars ##) of partner role Sold-to-party with all available information in the system. Enter the following information in the corresponding fields on the necessary assignment blocks.
The system will automatically create an Account ID for your account. After having created your account you want to check in the WebClient UI whether this account has been transferred to the ERP system.
Assign the predefined employee which has been assigned to your user already to your new account on the Account Details view.
Maintain the contact person and assign it to your account as main contact person.
You also receive the information that Remote Control Stars would use the batteries from your company in their remote controls which are to be sold to a reseller called Media Giants ##. You decide to create another corporate account Media Giants ## and assign this account to the account Remote Control Stars ## using the newly created relationship category Goods used by ##.
You might need to add some assignment blocks using the personalization functionality
Enter the following account information:
Account Details
Name Remote Control Stars ##
Street/House number Rue ##
Postal Code/City ##000 to ##999 (choose any)
Country France
Transportation Zone F000050000 (Central France)
Language French
Click ENTER and in the assignment block Roles assign the role Sold-to-Party to your account.
Maintain tax classification data on the assignment block Tax Classification.

© SAP AG CR580 9-18
Create sales area dependent data for the sales area which consists of sales organization Battery World and distribution channel Final Customer Sales. Do not maintain an entry in the field Division.
Maintain the following shipping information:
Shipping
Incoterms CIF Paris
Delivery Priority Normal
Shipping Conditions Standard
Maintain the following billing information:
Billing
Customer Pricing Procedure <Your entry>
Use Standard if you have not
created your own entry yet.
Later on you have to change this value – don’t forget this!
Currency EUR
Terms of Payment 5 days 2%, 10 days net
On the WebClient UI you can later check whether your account has been transferred to the ERP system after having saved all data by using the assignment block “Identification Numbers”. Here you should find a corresponding entry with the identification number of the corresponding ERP customer.
Create a Contact Person relationship between your account and the contact person and mark that Ms. Roger## is the main contact person.
To do so go to assignment block Contacts and click .
Enter the following data:
Tax Classification
Country ID FR
Tax Type ID MWST
Tax Group ID FULL

© SAP AG CR580 9-19
Click Back and save the data.
Create a Goods used by relationship between your account Remote Control Stars## and the to be maintained account Media Giants ##
Click to create a new corporate account and enter the following data on the assignment block Account Details
Account Details
Name Media Giants ##
Street/House number Rue de Chagal ##
Postal Code/City 36215 Marseille
Country France
Transportation Zone F000020000 (Southern France)
Language French
Save the data.
Go to assignment block Relationships and click . and enter the following data:
Relationship: Receives goods from SP ##
Partner ID: <ID of you account Remote Control Stars ##>
(If you do not know the Partner ID click on in the field Partner ID to open the Account Search.)
Click Back and save the data.
Contact Person
Title Ms.
First Name Patricia
Last Name Roger##
Address Choose address from account
Language French
Main Contact <checked>
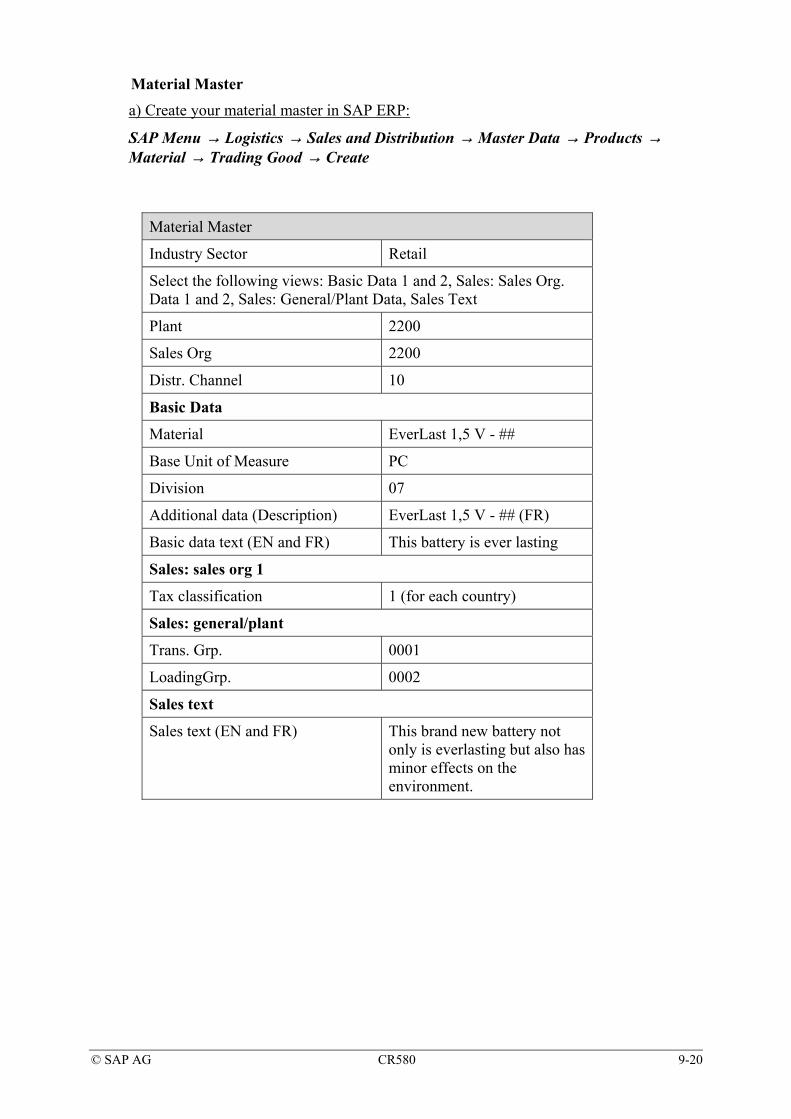
© SAP AG CR580 9-20
Material Master a) Create your material master in SAP ERP:
SAP Menu → Logistics → Sales and Distribution → Master Data → Products → Material → Trading Good → Create
Material Master
Industry Sector Retail
Select the following views: Basic Data 1 and 2, Sales: Sales Org. Data 1 and 2, Sales: General/Plant Data, Sales Text
Plant 2200
Sales Org 2200
Distr. Channel 10
Basic Data
Material EverLast 1,5 V - ##
Base Unit of Measure PC
Division 07
Additional data (Description) EverLast 1,5 V - ## (FR)
Basic data text (EN and FR) This battery is ever lasting
Sales: sales org 1
Tax classification 1 (for each country)
Sales: general/plant
Trans. Grp. 0001
LoadingGrp. 0002
Sales text
Sales text (EN and FR) This brand new battery not only is everlasting but also has minor effects on the environment.
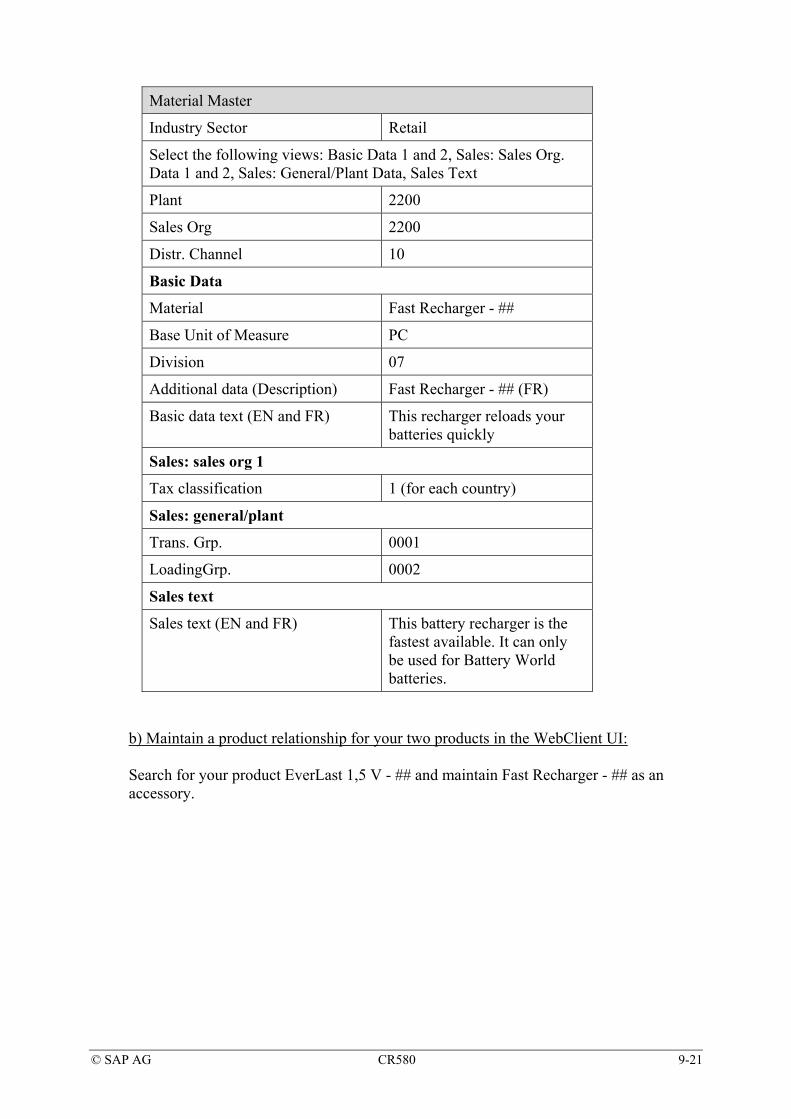
© SAP AG CR580 9-21
b) Maintain a product relationship for your two products in the WebClient UI: Search for your product EverLast 1,5 V - ## and maintain Fast Recharger - ## as an accessory.
Material Master
Industry Sector Retail
Select the following views: Basic Data 1 and 2, Sales: Sales Org. Data 1 and 2, Sales: General/Plant Data, Sales Text
Plant 2200
Sales Org 2200
Distr. Channel 10
Basic Data
Material Fast Recharger - ##
Base Unit of Measure PC
Division 07
Additional data (Description) Fast Recharger - ## (FR)
Basic data text (EN and FR) This recharger reloads your batteries quickly
Sales: sales org 1
Tax classification 1 (for each country)
Sales: general/plant
Trans. Grp. 0001
LoadingGrp. 0002
Sales text
Sales text (EN and FR) This battery recharger is the fastest available. It can only be used for Battery World batteries.

© SAP AG CR580 9-22
Maintain condition records in ERP SAP Menu → Logistics → Sales and Distribution → Master Data → Conditions → Select Using Condition Type → Create
Condition record
Condition Type ZQ##
Key Combination Material with release status
Sales Organization 2200
Distribution Channel 10
Material <your material number for material EverLast 1,5 V - ## >
Amount 1,29 EUR
Condition record
Condition Type ZQ##
Key Combination Material with release status
Sales Organization 2200
Distribution Channel 10
Material <your material number for material Fast Recharger - ## >
Amount 17,95 EUR
Condition record
Condition Type K007
Sales Organization 2200
Distribution Channel 10
Division 00
Customer <your account number>
Amount 5 %
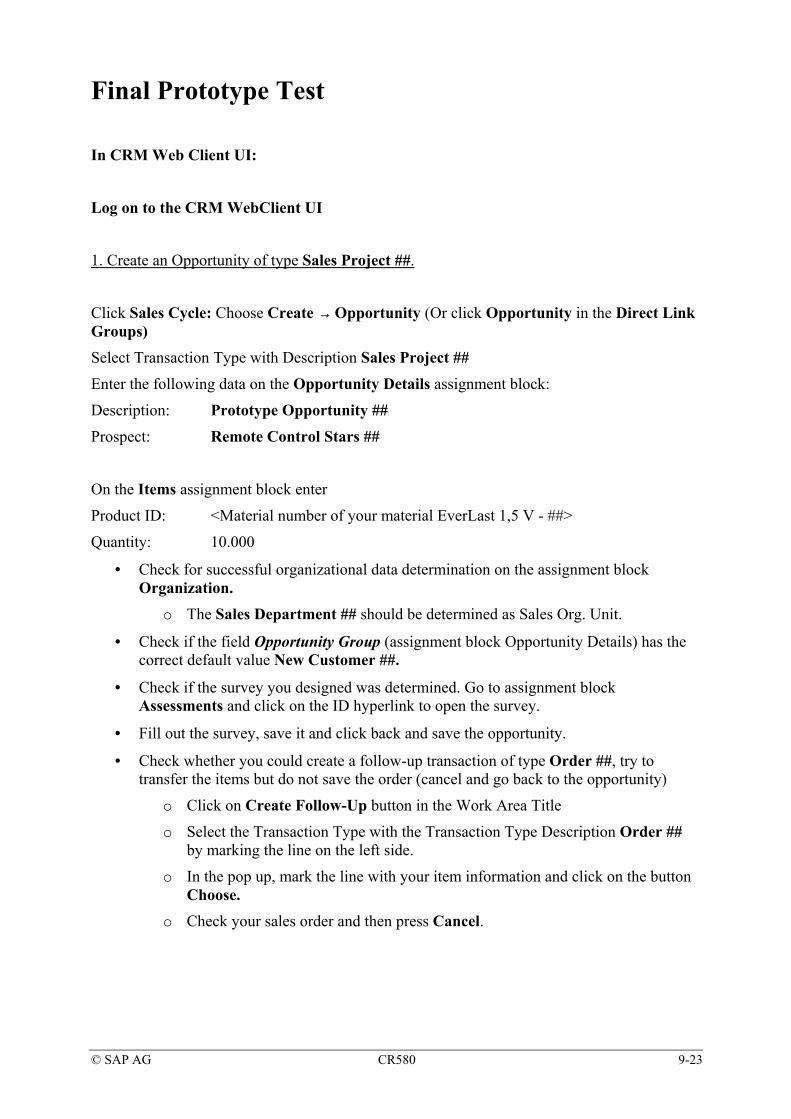
© SAP AG CR580 9-23
Final Prototype Test In CRM Web Client UI:
Log on to the CRM WebClient UI
1. Create an Opportunity of type Sales Project ##.
Click Sales Cycle: Choose Create → Opportunity (Or click Opportunity in the Direct Link Groups) Select Transaction Type with Description Sales Project ##
Enter the following data on the Opportunity Details assignment block:
Description: Prototype Opportunity ##
Prospect: Remote Control Stars ##
On the Items assignment block enter
Product ID: <Material number of your material EverLast 1,5 V - ##>
Quantity: 10.000
• Check for successful organizational data determination on the assignment block Organization.
o The Sales Department ## should be determined as Sales Org. Unit.
• Check if the field Opportunity Group (assignment block Opportunity Details) has the correct default value New Customer ##.
• Check if the survey you designed was determined. Go to assignment block Assessments and click on the ID hyperlink to open the survey.
• Fill out the survey, save it and click back and save the opportunity.
• Check whether you could create a follow-up transaction of type Order ##, try to transfer the items but do not save the order (cancel and go back to the opportunity)
o Click on Create Follow-Up button in the Work Area Title
o Select the Transaction Type with the Transaction Type Description Order ## by marking the line on the left side.
o In the pop up, mark the line with your item information and click on the button Choose.
o Check your sales order and then press Cancel.

© SAP AG CR580 9-24
2. Create a Quotation ## as follow up transaction of your opportunity.
• Click on Create Follow-Up button in the Work Area Title
• Select the Transaction Type with the Transaction Type Description Quotation ## by marking the line on the left side.
• In the pop up, mark the line with your item information and click on the button Choose.
• Check your Partner Determination: check whether all partners have been determined. The partners of partner function Sold-to-Party and Employee Responsible are shown on the assignment block Quotation Details. All partners including the one with partner function Goods used by ## can be found in the assignment block Partners Involved.
• Can you enter a Sales Info ## on header level? Check on assignment block Notes, click and select Text Type Sales Info ##.
• Check whether the correct item Sales Text was found.
o Click on in the Action column of your item.
o Check whether a Sales Text entry is available in the assignment block Notes. (The Sales Text is also displayed in the Notes field in the assignment block Details)
• Was your pricing procedure YPP## determined?
The pricing procedure is not shown on the CRM Web Client UI.
If you have already done the UI configuration part, you can see what Customer Pricing Procedure has been maintained for the account which is the Sold-To-Party.
Check whether your own Customer Pricing Procedure was found.
You can recheck whether all correct data was available to determine the correct pricing procedure:
Apart from the Customer Pricing Procedure the Sales Organization, Distribution Channel, Division and the Document Pricing Procedure is required:
a) You can check, which Sales Organization, Distribution Channel and possibly Division is used for the Pricing Procedure Determination on the Organizational Data assignment block of your quotation
b) Customer Pricing Procedure see your configured Quotation Details assignment block. (Otherwise you can check the details on the Sales Area Data assignment block of the Account.The Sales Area used should be Battery world/ Final Customer Sales.
Click on Edit Action ( ) and check Customer Pricing Procedure.) The Customer Pricing Procedure should be equivalent to the one you defined in section 2-3-7.
c) SAP Implementation Guide → Customer Relationship Management → Transactions → Basic Settings → Define Transaction Types
Mark the entry ZA## and double click to see Details.
In the dialog structure, double-click Assignment of Business Transaction Categories.
Select the Sales transaction category and double-click Customizing header in the dialog structure.

© SAP AG CR580 9-25
The document pricing procedure is Standard (A).
d) Now you are able to check, which Pricing Procedure was determined by the system:
SAP Reference IMG → Customer Relationship Management → Basic Functions → Pricing → Pricing in the Business Transaction →Determine Pricing Procedures Choose Position.
Sales Organization ID: Sales Organization Battery World (Use the input help to see corresponding ID)
Distribution Channel: 10
Division: < >
Document Pricing Procedure: A
Customer Pricing Procedure: <your own defined>
Choose ENTER.
The pricing procedure found should be YPP##.
• Check whether the correct material price ZQ## was found.
o Click on in the Action column of your item.
o Check whether a price type Product Price ## entry is available in the assignment block Prices and the price is 1.29 EUR per PC.

© SAP AG CR580 9-26
3. Create a follow-up document of type Order ## and copy one or two item(s).
• Click on Create Follow-Up button in the Work Area Title.
o Select the Transaction Type with the Transaction Type Description Order ## by marking the line on the left side.
o In the pop up, mark the line with your item information and click on the button Choose. (If you added the product proposal to your quotation, you can select both items to your sales order)
• Enter a Sales Info ## text on header level.
o Go to assignment block Notes and click and select Text Type Sales Info ## and enter a text. Click back and save.
• Check if the right partners (Employee Responsible) and texts are determined.
• Save the order and check whether it will be transferred to SAP ERP.
o Go to the Navigation Bar and check your logical link ERP Sales Order Display.
o Enter your CRM Order ID as Order ID in the field Order and press ENTER.
o In ERP sales order choose tab Texts and see if text has been transferred to ERP order as well.
4. Create a second opportunity of type Sales Project ##
• Click Sales Cycle: Choose Create → Opportunity (Or click Opportunity in the Direct Link Groups)
• Select Transaction Type with Description Sales Project ##
• Enter the following data on the Opportunity Details assignment block:
Description: Critical Opportunity ##
Prospect: Remote Control Stars ##
On the Items assignment block enter
Product ID: <Material number of your material EverLast 1,5 V - ##>
Quantity: 10.000
• Set the Status of your opportunity to Critical and save the data.
• To check whether a follow-up transaction Critical Opportunity ## has been created, you can either go to the assignment block Planned Activities or to the assignment block Scheduled Actions, where you need to click the Show Executed Actions.
• Click on the hyperlink in the assignment block Planned Activities to access this activity.
• Check if the text field Description is a mandatory text type.
o Click on Edit and try to save the activity with no entry in field Description
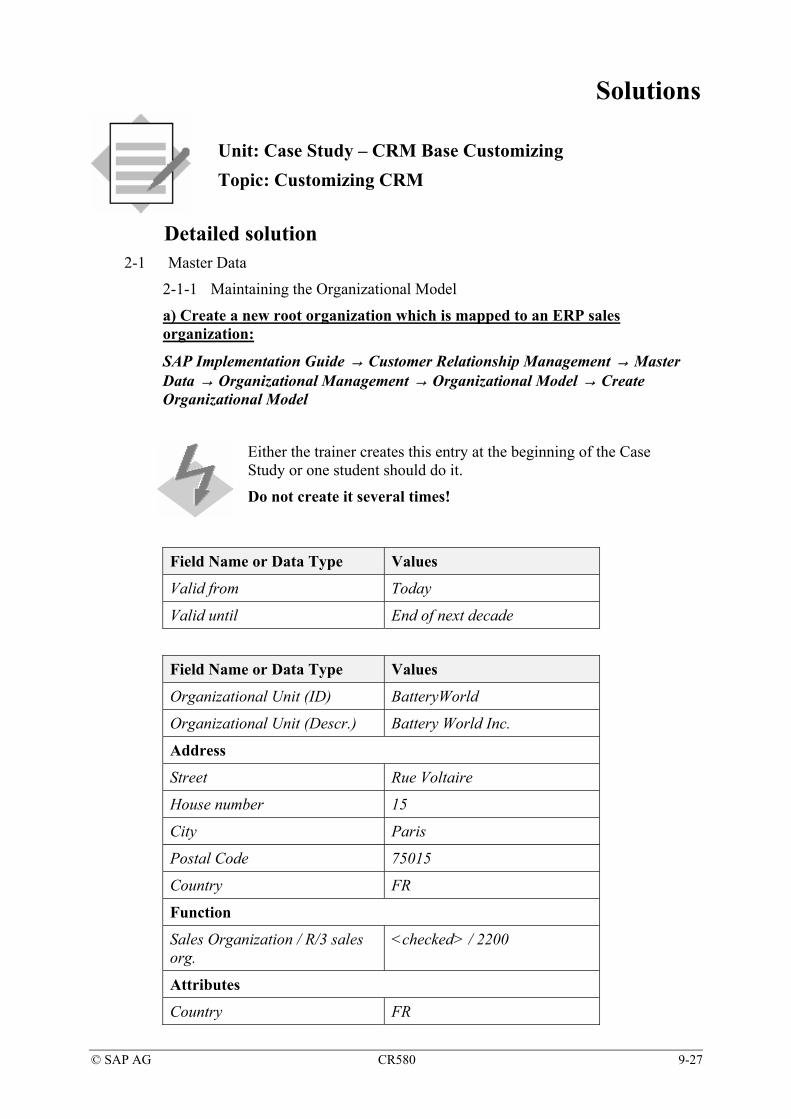
© SAP AG CR580 9-27
Case Study Solutions
Unit: Case Study – CRM Base Customizing Topic: Customizing CRM
Detailed solution 2-1 Master Data
2-1-1 Maintaining the Organizational Model
a) Create a new root organization which is mapped to an ERP sales organization:
SAP Implementation Guide → Customer Relationship Management → Master Data → Organizational Management → Organizational Model → Create Organizational Model
Either the trainer creates this entry at the beginning of the Case Study or one student should do it.
Do not create it several times!
Field Name or Data Type Values
Valid from Today
Valid until End of next decade
Field Name or Data Type Values
Organizational Unit (ID) BatteryWorld
Organizational Unit (Descr.) Battery World Inc.
Address
Street Rue Voltaire
House number 15
City Paris
Postal Code 75015
Country FR
Function
Sales Organization / R/3 sales org.
<checked> / 2200
Attributes
Country FR

© SAP AG CR580 9-28
Ref. currency for document EUR
Distribution Channel 10
Division 07
Save the data.
b) Maintain your sales organization using the WebClient UI: Search for organizational unit Battery World and create a subordinate organizational unit underneath this root organization. The maintenance of an address is optional. Make sure that your newly created organizational unit can be determined as responsible organizational unit when using the organizational data determination. The organizational unit you create will be responsible for the postal code area ##000 - ##999. Set up organizational data determination (rule and profile) so that it directly finds the organizational unit Sales Department ## once a business transaction for customers from the above mentioned postal code interval is created.
Choose Sales Operations in the Navigation Bar.
Click on Search → Organization Model
Find by: Organizational unit
Description: Battery World Inc.
Valid on: <Today >
Click on Search
If your search was successful navigate to the found organizational unit by using the hyperlink.
Although you want to create a new organizational unit do not use Create → Organizational Model. The reason for that is that you first search for the organizational structure of the company Battery World under which you want to create a subordinate organizational unit as a later assignment is not possible
In the assignment block Organizational Unit mark the top level organizational unit and click on the button Organizational Unit.
Description: Sales Department ##
Code: Sales##
It is up to you whether you want to maintain address data for your organizational unit in the assignment block Organization Unit: Details
You can see that this organizational unit belongs to the sales organization Battery World.
Go to the assignment block Attributes. You can see that the attributes Country, Ref. currency for document, Distribution Channel and Division already do have values. These values have been inherited from the root organization Battery World. In the personalization of the assignment block Attributes you can also add the field Inherited to the list.
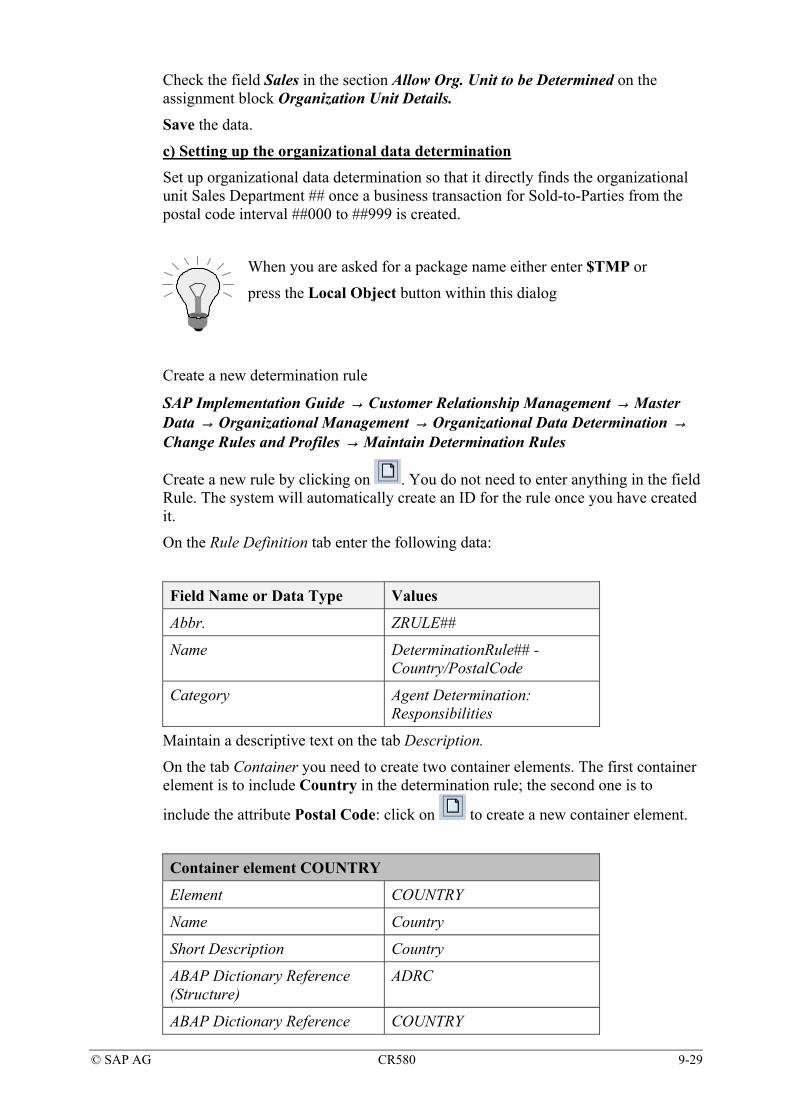
© SAP AG CR580 9-29
Check the field Sales in the section Allow Org. Unit to be Determined on the assignment block Organization Unit Details.
Save the data.
c) Setting up the organizational data determination Set up organizational data determination so that it directly finds the organizational unit Sales Department ## once a business transaction for Sold-to-Parties from the postal code interval ##000 to ##999 is created.
When you are asked for a package name either enter $TMP or
press the Local Object button within this dialog
Create a new determination rule
SAP Implementation Guide → Customer Relationship Management → Master Data → Organizational Management → Organizational Data Determination → Change Rules and Profiles → Maintain Determination Rules
Create a new rule by clicking on . You do not need to enter anything in the field Rule. The system will automatically create an ID for the rule once you have created it.
On the Rule Definition tab enter the following data:
Field Name or Data Type Values
Abbr. ZRULE##
Name DeterminationRule## - Country/PostalCode
Category Agent Determination: Responsibilities
Maintain a descriptive text on the tab Description.
On the tab Container you need to create two container elements. The first container element is to include Country in the determination rule; the second one is to
include the attribute Postal Code: click on to create a new container element.
Container element COUNTRY
Element COUNTRY
Name Country
Short Description Country
ABAP Dictionary Reference (Structure)
ADRC
ABAP Dictionary Reference COUNTRY
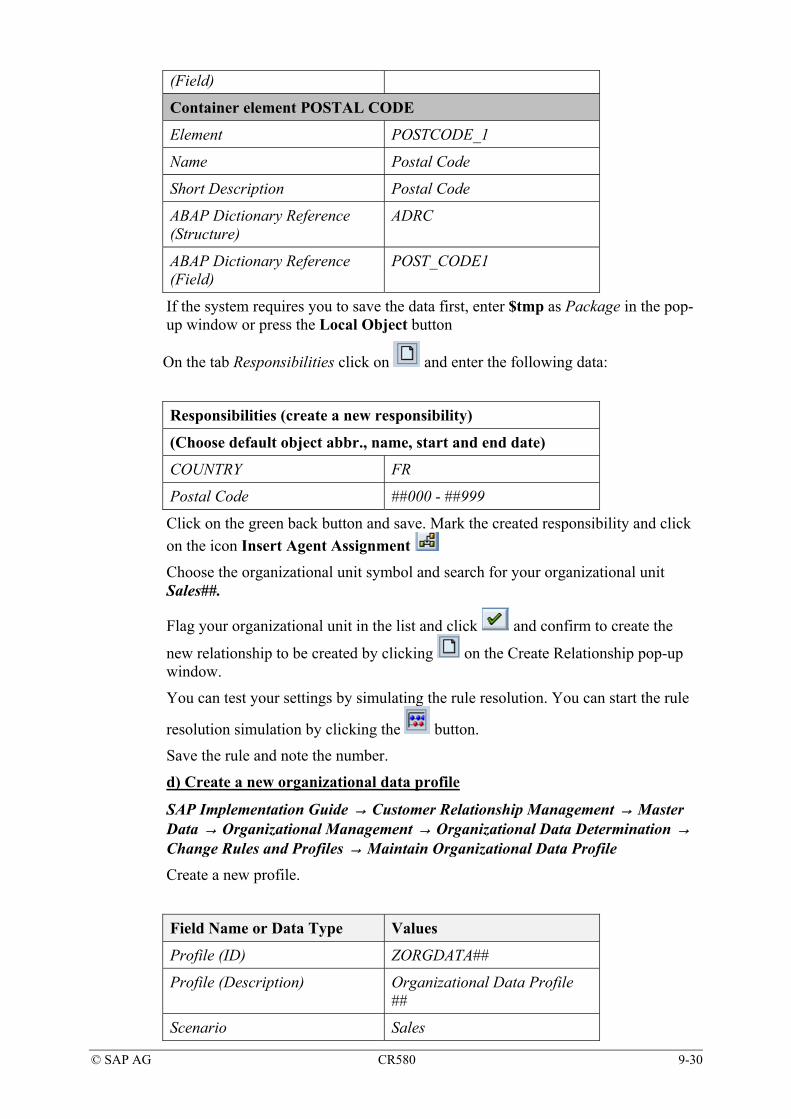
© SAP AG CR580 9-30
(Field)
Container element POSTAL CODE
Element POSTCODE_1
Name Postal Code
Short Description Postal Code
ABAP Dictionary Reference (Structure)
ADRC
ABAP Dictionary Reference (Field)
POST_CODE1
If the system requires you to save the data first, enter $tmp as Package in the pop-up window or press the Local Object button
On the tab Responsibilities click on and enter the following data:
Responsibilities (create a new responsibility)
(Choose default object abbr., name, start and end date)
COUNTRY FR
Postal Code ##000 - ##999
Click on the green back button and save. Mark the created responsibility and click on the icon Insert Agent Assignment
Choose the organizational unit symbol and search for your organizational unit Sales##.
Flag your organizational unit in the list and click and confirm to create the
new relationship to be created by clicking on the Create Relationship pop-up window.
You can test your settings by simulating the rule resolution. You can start the rule
resolution simulation by clicking the button.
Save the rule and note the number.
d) Create a new organizational data profile
SAP Implementation Guide → Customer Relationship Management → Master Data → Organizational Management → Organizational Data Determination → Change Rules and Profiles → Maintain Organizational Data Profile
Create a new profile.
Field Name or Data Type Values
Profile (ID) ZORGDATA##
Profile (Description) Organizational Data Profile ##
Scenario Sales
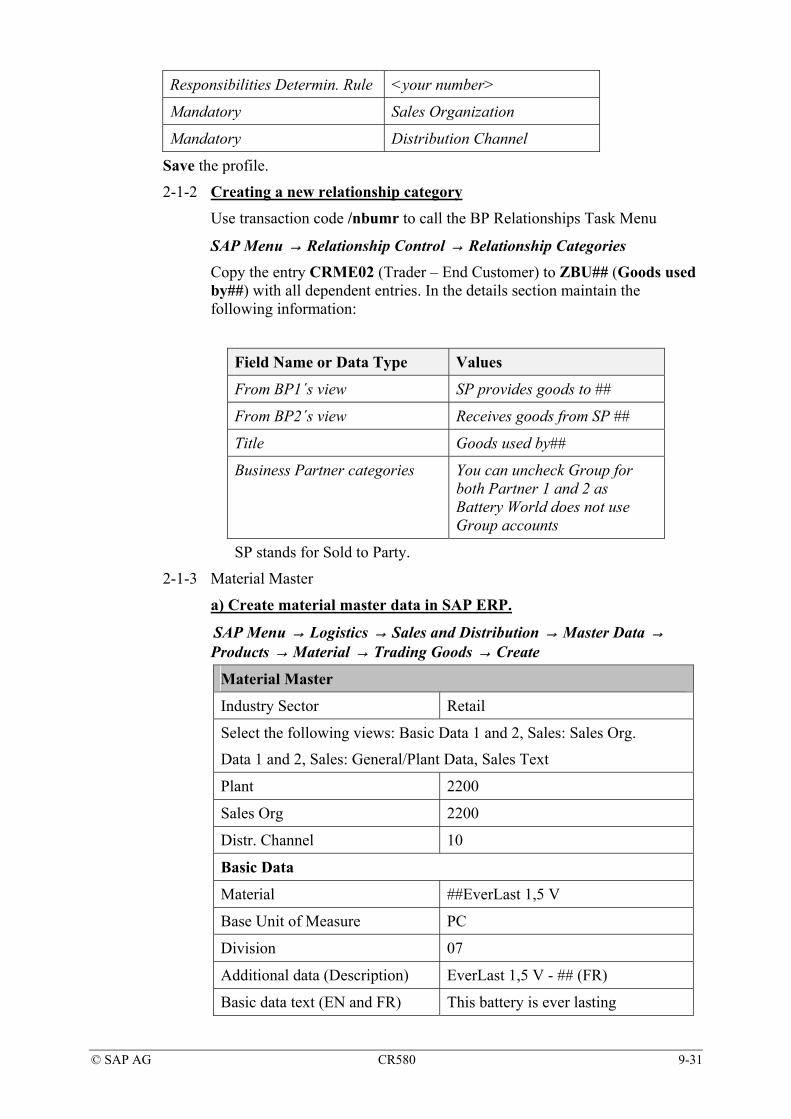
© SAP AG CR580 9-31
Responsibilities Determin. Rule <your number>
Mandatory Sales Organization
Mandatory Distribution Channel
Save the profile.
2-1-2 Creating a new relationship category
Use transaction code /nbumr to call the BP Relationships Task Menu
SAP Menu → Relationship Control → Relationship Categories
Copy the entry CRME02 (Trader – End Customer) to ZBU## (Goods used by##) with all dependent entries. In the details section maintain the following information:
Field Name or Data Type Values
From BP1´s view SP provides goods to ##
From BP2´s view Receives goods from SP ##
Title Goods used by##
Business Partner categories You can uncheck Group for both Partner 1 and 2 as Battery World does not use Group accounts
SP stands for Sold to Party.
2-1-3 Material Master
a) Create material master data in SAP ERP.
SAP Menu → Logistics → Sales and Distribution → Master Data → Products → Material → Trading Goods → Create
Material Master
Industry Sector Retail
Select the following views: Basic Data 1 and 2, Sales: Sales Org.
Data 1 and 2, Sales: General/Plant Data, Sales Text
Plant 2200
Sales Org 2200
Distr. Channel 10
Basic Data
Material ##EverLast 1,5 V
Base Unit of Measure PC
Division 07
Additional data (Description) EverLast 1,5 V - ## (FR)
Basic data text (EN and FR) This battery is ever lasting

© SAP AG CR580 9-32
Sales: sales org 1
Tax classification 1 (for each country)
Sales: general/plant
Trans. Grp. 0001
Loading Grp. 0002
Sales text
Sales text (EN and FR) This brand new battery not
only is everlasting but also has minor effects on the environment.
Material Master
Industry Sector Retail
Select the following views: Basic Data 1 and 2, Sales: Sales Org. Data 1 and 2, Sales: General/Plant Data, Sales Text
Plant 2200
Sales Org 2200
Distr. Channel 10
Basic Data
Material ##Fast Recharger
Base Unit of Measure PC
Division 07
Additional data (Description) Fast Recharger - ## (FR)
Basic data text (EN and FR) This recharger reloads your batteries quickly
Sales: sales org 1
Tax classification 1 (for each country)
Sales: general/plant
Trans. Grp. 0001
LoadingGrp. 0002
Sales text
Sales text (EN and FR) This battery recharger is the fastest available. It can only be used for Battery World batteries.

© SAP AG CR580 9-33
In case you have not selected all required views for material maintenance, go ahead as follows: Create a new material, but fill the field Material with the material number which the system has already assigned. Important to know is that you need the Create Transaction and not the Change-Transaction to add views.
b) Create a Product Relationship in SAP CRM WebClient UI Choose Sales Operations
Choose Search → Products.
Product-ID: <Number of material ##EverLast 1,5V>
Click Search (ENTER)
Click on the Product ID hyperlink in the Result List.
Go to Assignment Block Accessories and click Edit List.
Click on in the field Accessory ID to open the Product Search and repeat steps for your 2nd material or enter directly the material no. of your 2nd material (##FastRecharger) in the field Accessory ID.
Save the data.
2-1-4 In SAP CRM:
SAP Implementation Guide → Customer Relationship Management → Master Data → Conditions and Condition Technique → Condition Technique: Basics → Create Condition Maintenance
Check the details of condition maintenance group BUPADISCOU.
You should see or maintain the following entry:
Only one student can make the entry.
The others will only observe that the settings are available and correct.
Field Name or Data Type Values
Counter 9
Application CRM
Usages PR
Condition Table SAP007
Condition Type K007
Description Customer Discount
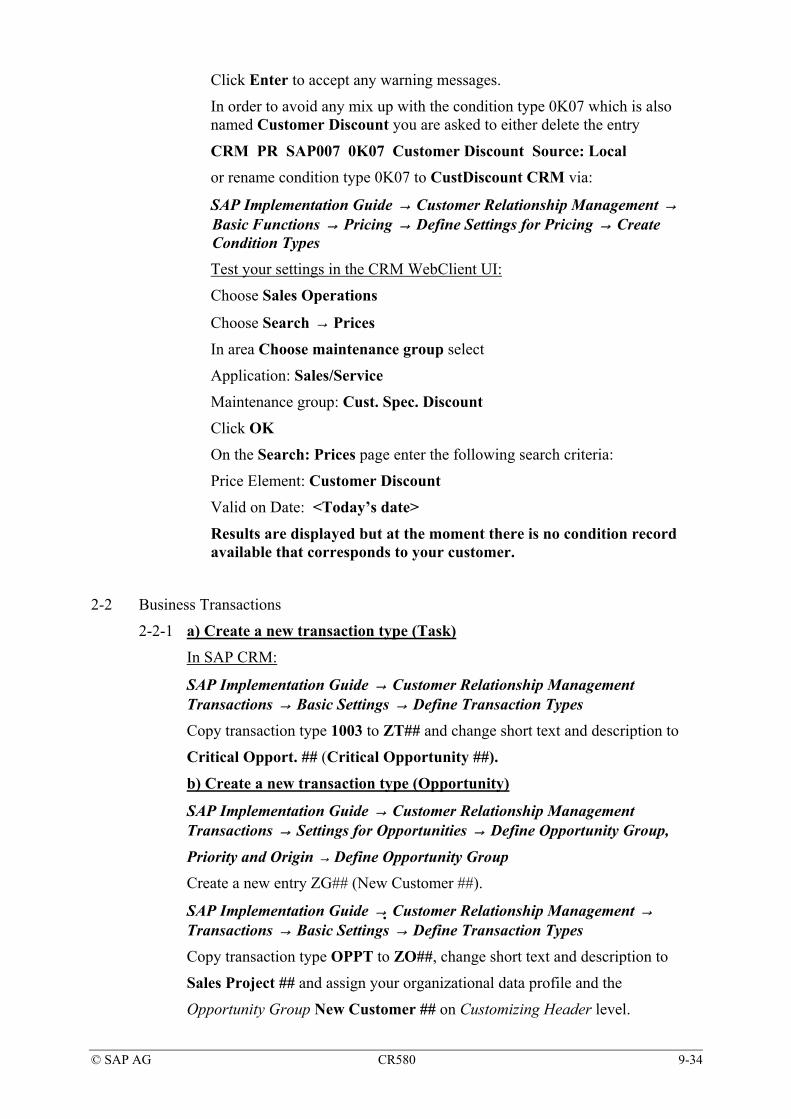
© SAP AG CR580 9-34
Click Enter to accept any warning messages.
In order to avoid any mix up with the condition type 0K07 which is also named Customer Discount you are asked to either delete the entry
CRM PR SAP007 0K07 Customer Discount Source: Local or rename condition type 0K07 to CustDiscount CRM via:
SAP Implementation Guide → Customer Relationship Management → Basic Functions → Pricing → Define Settings for Pricing → Create Condition Types Test your settings in the CRM WebClient UI:
Choose Sales Operations
Choose Search → Prices
In area Choose maintenance group select
Application: Sales/Service
Maintenance group: Cust. Spec. Discount
Click OK
On the Search: Prices page enter the following search criteria:
Price Element: Customer Discount
Valid on Date: <Today’s date>
Results are displayed but at the moment there is no condition record available that corresponds to your customer.
2-2 Business Transactions
2-2-1 a) Create a new transaction type (Task)
In SAP CRM:
SAP Implementation Guide → Customer Relationship Management Transactions → Basic Settings → Define Transaction Types
Copy transaction type 1003 to ZT## and change short text and description to
Critical Opport. ## (Critical Opportunity ##).
b) Create a new transaction type (Opportunity)
SAP Implementation Guide → Customer Relationship Management Transactions → Settings for Opportunities → Define Opportunity Group,
Priority and Origin → Define Opportunity Group Create a new entry ZG## (New Customer ##).
SAP Implementation Guide → Customer Relationship Management → Transactions → Basic Settings → Define Transaction Types
Copy transaction type OPPT to ZO##, change short text and description to
Sales Project ## and assign your organizational data profile and the
Opportunity Group New Customer ## on Customizing Header level.
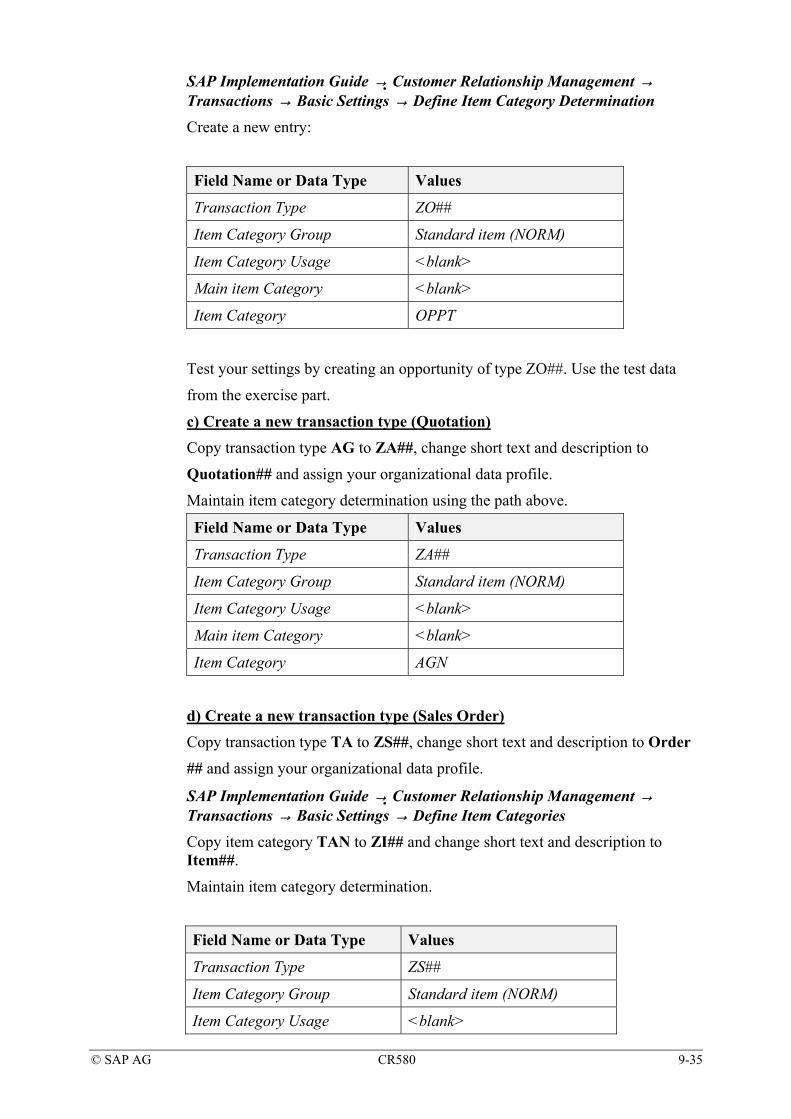
© SAP AG CR580 9-35
SAP Implementation Guide → Customer Relationship Management → Transactions → Basic Settings → Define Item Category Determination
Create a new entry:
Field Name or Data Type Values
Transaction Type ZO##
Item Category Group Standard item (NORM)
Item Category Usage <blank>
Main item Category <blank>
Item Category OPPT
Test your settings by creating an opportunity of type ZO##. Use the test data
from the exercise part.
c) Create a new transaction type (Quotation) Copy transaction type AG to ZA##, change short text and description to
Quotation## and assign your organizational data profile.
Maintain item category determination using the path above.
Field Name or Data Type Values
Transaction Type ZA##
Item Category Group Standard item (NORM)
Item Category Usage <blank>
Main item Category <blank>
Item Category AGN
d) Create a new transaction type (Sales Order) Copy transaction type TA to ZS##, change short text and description to Order
## and assign your organizational data profile.
SAP Implementation Guide → Customer Relationship Management → Transactions → Basic Settings → Define Item Categories
Copy item category TAN to ZI## and change short text and description to Item##.
Maintain item category determination.
Field Name or Data Type Values
Transaction Type ZS##
Item Category Group Standard item (NORM)
Item Category Usage <blank>
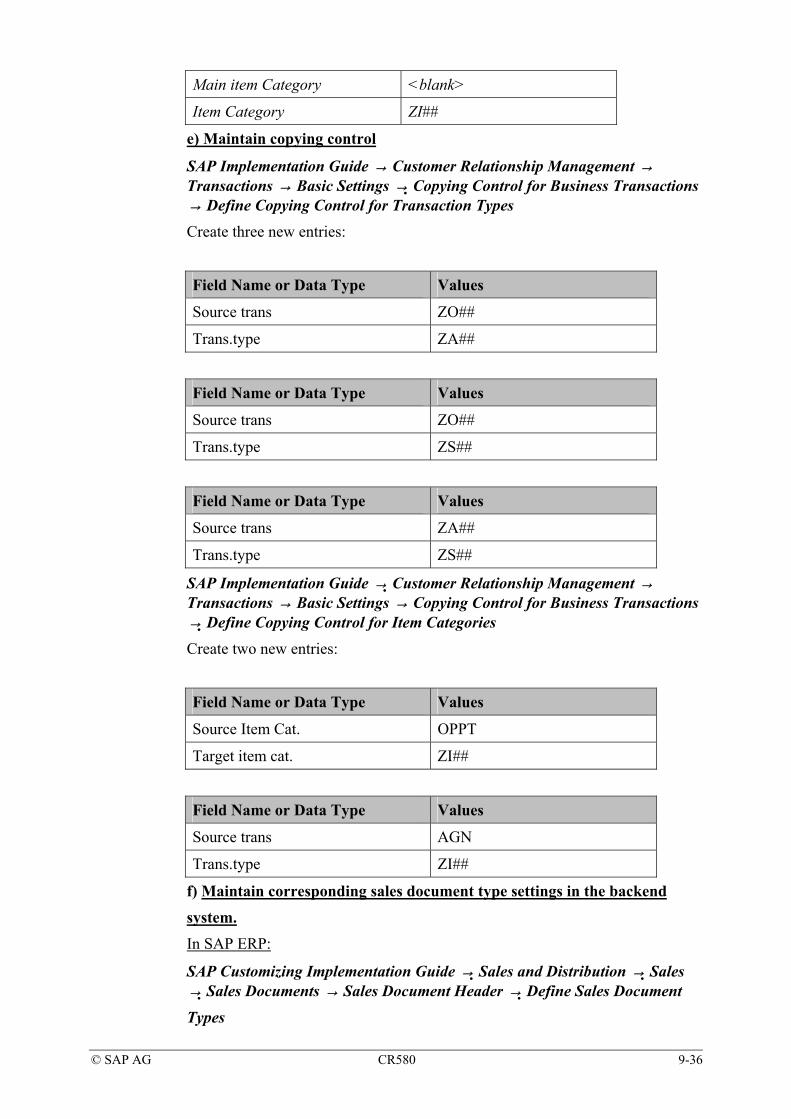
© SAP AG CR580 9-36
Main item Category <blank>
Item Category ZI##
e) Maintain copying control
SAP Implementation Guide → Customer Relationship Management → Transactions → Basic Settings → Copying Control for Business Transactions → Define Copying Control for Transaction Types
Create three new entries:
Field Name or Data Type Values
Source trans ZO##
Trans.type ZA##
Field Name or Data Type Values
Source trans ZO##
Trans.type ZS##
Field Name or Data Type Values
Source trans ZA##
Trans.type ZS##
SAP Implementation Guide → Customer Relationship Management → Transactions → Basic Settings → Copying Control for Business Transactions → Define Copying Control for Item Categories
Create two new entries:
Field Name or Data Type Values
Source Item Cat. OPPT
Target item cat. ZI##
Field Name or Data Type Values
Source trans AGN
Trans.type ZI##
f) Maintain corresponding sales document type settings in the backend
system. In SAP ERP:
SAP Customizing Implementation Guide → Sales and Distribution → Sales → Sales Documents → Sales Document Header → Define Sales Document
Types

© SAP AG CR580 9-37
Create a corresponding entry ZS## by copying sales document type OR (this
equals TA!). Answer the dialog Is this entry also relevant for copying control? with YES.
SAP Customizing Implementation Guide → Sales and Distribution → Sales→ Sales Documents → Sales Document Item → Define Item Categories
Create a corresponding entry ZI## by copying item category TAN. Answer the dialog Is this entry also relevant for copying control? with YES.
SAP Customizing Implementation Guide → Sales and Distribution → Sales → Sales Documents → Sales Document Item → Assign Item Categories
Change the existing entry: ZS## + NORM + <blank> + <blank> => TAN to ZS## + NORM + <blank> + <blank> => ZI##
2-3 Basic Functions
2-3-1 a) Create a new survey (for opportunities)
SAP Implementation Guide → Customer Relationship Management → Transactions → Settings for Opportunities → Sales Methodology → Questionnaire for Opportunities → Define Questionnaire
Create a new survey ZEXTRA## for the Application Opportunities.
In the hierarchy on the left use the right-mouse button in order to Insert / Edit Questions / Answers / Answer Options.
Example of Survey:
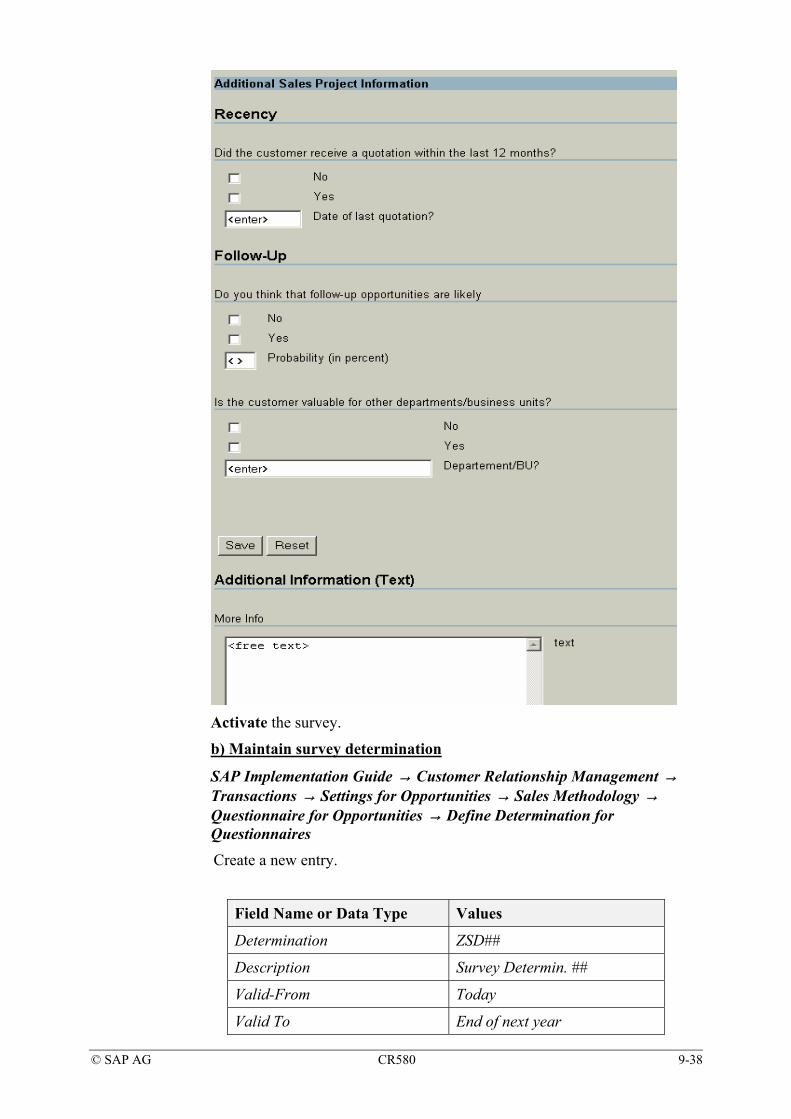
© SAP AG CR580 9-38
Activate the survey.
b) Maintain survey determination
SAP Implementation Guide → Customer Relationship Management → Transactions → Settings for Opportunities → Sales Methodology → Questionnaire for Opportunities → Define Determination for Questionnaires Create a new entry.
Field Name or Data Type Values
Determination ZSD##
Description Survey Determin. ##
Valid-From Today
Valid To End of next year

© SAP AG CR580 9-39
Transaction Type ZO##
Questionnaire ID ZEXTRA##
Active <checked>
Save the data.
2-3-2 Partner Processing
a) Create a new partner function “Goods used by##”
SAP Implementation Guide → Customer Relationship Management → Basic Functions → Partner Processing → Define Partner Functions
Create a new entry
Field Name or Data Type Values
Function ZUS##
Text Goods used by ##
Abbrev. ZU##
Function Category Undefined Partner
Usage Customer Relationship Mgmt
Relatship Cat. Receives goods from SP ##
Blocked checked
Save entry.
b) Create a new Partner Determination Procedure
SAP Implementation Guide → Customer Relationship Management → Basic Functions → Partner Processing → Define Partner Determination Procedure Copy partner determination procedure 00000001 with all dependant entries to ZPDP## (Partner Determination ##). Save entry.
c) Create two new Access Sequences for the determination of the partner functions Employee Responsible as well as Goods used by ##
SAP Implementation Guide → Customer Relationship Management → Basic Functions → Partner Processing → Define Access Sequences
Create a new access sequence ZS## (Access Sequence Employee Resp. ##).
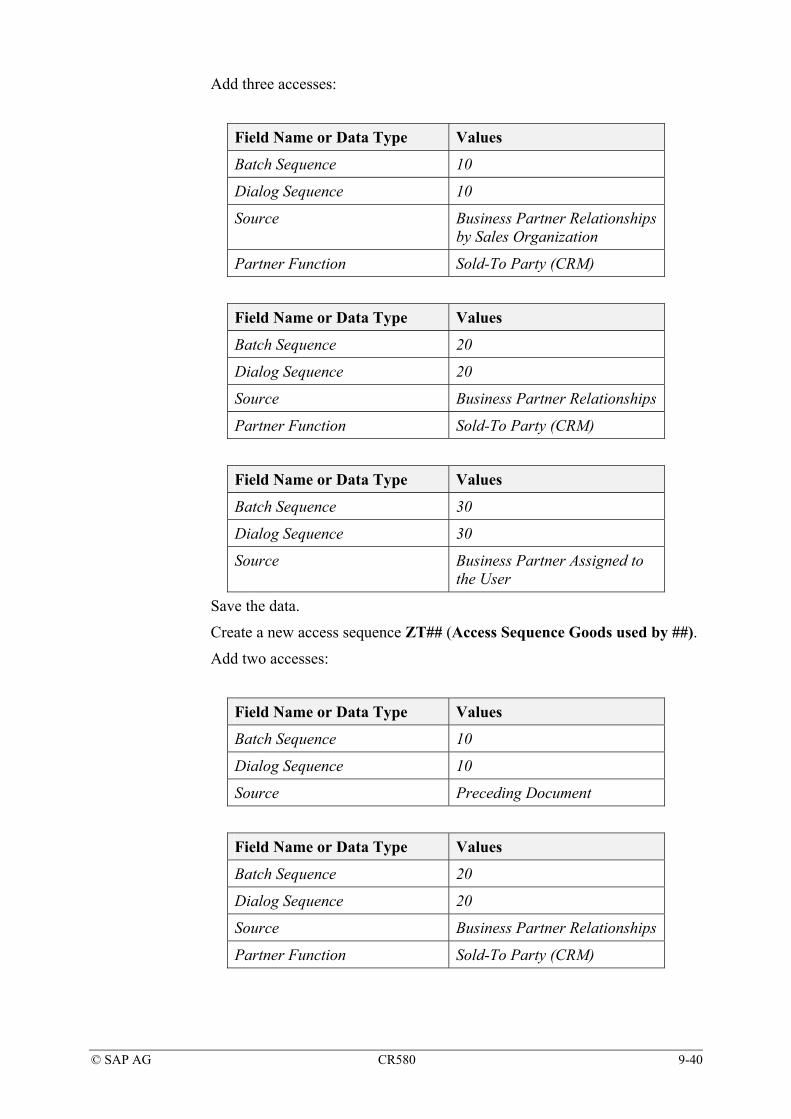
© SAP AG CR580 9-40
Add three accesses:
Field Name or Data Type Values
Batch Sequence 10
Dialog Sequence 10
Source Business Partner Relationships by Sales Organization
Partner Function Sold-To Party (CRM)
Field Name or Data Type Values
Batch Sequence 20
Dialog Sequence 20
Source Business Partner Relationships
Partner Function Sold-To Party (CRM)
Field Name or Data Type Values
Batch Sequence 30
Dialog Sequence 30
Source Business Partner Assigned to the User
Save the data.
Create a new access sequence ZT## (Access Sequence Goods used by ##).
Add two accesses:
Field Name or Data Type Values
Batch Sequence 10
Dialog Sequence 10
Source Preceding Document
Field Name or Data Type Values
Batch Sequence 20
Dialog Sequence 20
Source Business Partner Relationships
Partner Function Sold-To Party (CRM)

© SAP AG CR580 9-41
d) Add your new partner function Goods used by # to your new Partner Determination Procedure and assign your new access sequences to the corresponding partner functions
SAP Implementation Guide → Customer Relationship Management → Basic Functions → Partner Processing → Define Partner Determination Procedure Mark your newly created partner determination procedure.
Choose Partner Functions in Procedure.
Assign the access sequence Access Sequence Employee Resp. ## (ZS##) to the partner function Employee Responsible (CRM) in your newly created partner determination procedure.
Add the Partner Function Goods used by ## to your partner determination procedure and assign the access sequence Access Sequence Good used by ## (ZT##) to this partner function.
Assign the partner determination procedure ZPDP## to transaction type ZA## and ZS##.
2-3-3 Text Management
a) Create a new text determination procedure for order headers. In SAP CRM:
SAP Implementation Guide → Customer Relationship Management → Basic Functions → Text Management → Define Text Objects and Text Types Go into change mode and create a new Text Type ZT##; Sales Info ## for object CRM_ORDERH.
SAP Implementation Guide → Customer Relationship Management → Basic Functions → Text Management → Define Text Determination Procedure Copy text determination procedure ORDER001 with all dependant entries to ZORDER## (Sales Order ##)
In the Definition of Procedure assign the new text type ZT## to this newly created procedure.
Assign the text determination procedure ZORDER## to transaction type ZA## and ZS##.
Maintain corresponding settings in the backend system.
In SAP ERP:
SAP Customizing Implementation Guide → Sales and Distribution → Basic Functions → Text Control → Define Text Types
Choose Sales Document Header and press button Text types.
Add an entry ZT## (Sales Info ##). Save the data, go back one step and press the Change button.
Add Text ID ZT## for Textprocedure 01.
b) Create a new text determination procedure for order items.

© SAP AG CR580 9-42
In SAP CRM:
After copying the standard text determination procedure ORDER001 for order items with all dependant entries to ZITEM## (Sales order item ##), create a new access sequence ZA## (Access Sequence ##) with two accesses.
Field Name or Data Type Values
Sequence 0010
Ref. Object PROD_SALES
Ref. Text Type SALE
Assignment of fields
DISTR_CHAN DIS_CHANNEL
PRODUCT_GUID PRODUCT
SALES_ORG SALES_ORG
Field Name or Data Type Values
Sequence 0020
Ref. Object PRODUCT
Ref. Text Type BASE
Assignment of fields
PRODUCT_GUID PRODUCT
Save the data and assign the access sequence to text type 0001 (SalesText).
Assign the text determination procedure ZITEM## to item category ZI##.
c) Create text determination procedure for tasks After copying the standard text determination procedure ACT00002 with all dependant entries to ZTASK## (Task texts ##) for order headers, change the details of text type A001. Set the flag Obligatory Text.
Assign the text determination procedure ZTASK## to transaction type ZT##.
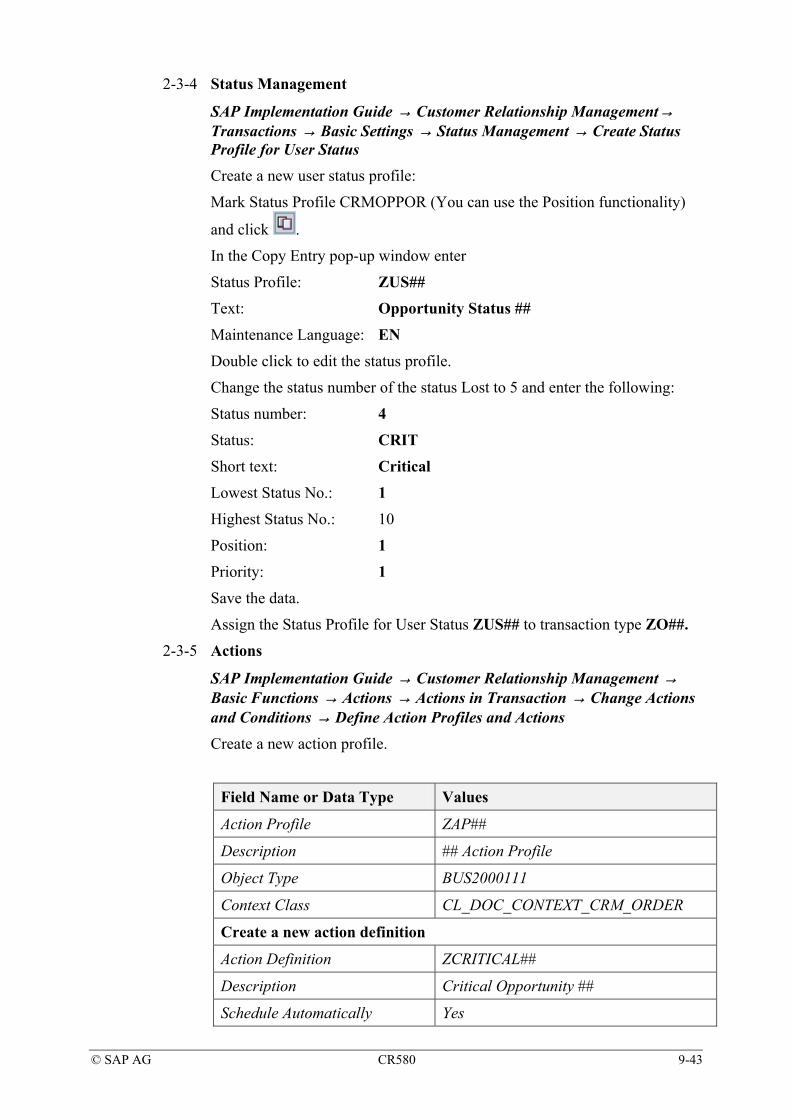
© SAP AG CR580 9-43
2-3-4 Status Management SAP Implementation Guide → Customer Relationship Management→ Transactions → Basic Settings → Status Management → Create Status Profile for User Status Create a new user status profile:
Mark Status Profile CRMOPPOR (You can use the Position functionality)
and click .
In the Copy Entry pop-up window enter
Status Profile: ZUS##
Text: Opportunity Status ##
Maintenance Language: EN
Double click to edit the status profile.
Change the status number of the status Lost to 5 and enter the following:
Status number: 4
Status: CRIT
Short text: Critical
Lowest Status No.: 1
Highest Status No.: 10
Position: 1
Priority: 1
Save the data.
Assign the Status Profile for User Status ZUS## to transaction type ZO##.
2-3-5 Actions
SAP Implementation Guide → Customer Relationship Management → Basic Functions → Actions → Actions in Transaction → Change Actions and Conditions → Define Action Profiles and Actions
Create a new action profile.
Field Name or Data Type Values
Action Profile ZAP##
Description ## Action Profile
Object Type BUS2000111
Context Class CL_DOC_CONTEXT_CRM_ORDER
Create a new action definition
Action Definition ZCRITICAL##
Description Critical Opportunity ##
Schedule Automatically Yes
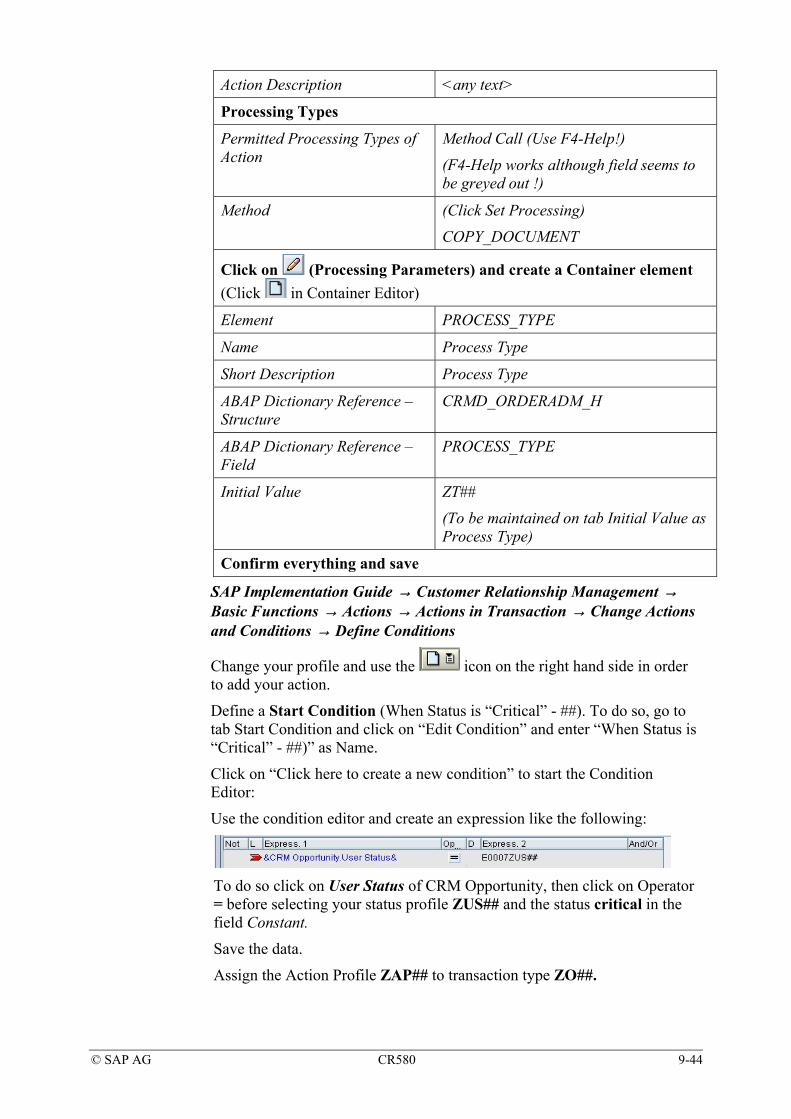
© SAP AG CR580 9-44
Action Description <any text>
Processing Types
Permitted Processing Types of Action
Method Call (Use F4-Help!)
(F4-Help works although field seems to be greyed out !)
Method (Click Set Processing)
COPY_DOCUMENT
Click on (Processing Parameters) and create a Container element (Click in Container Editor)
Element PROCESS_TYPE
Name Process Type
Short Description Process Type
ABAP Dictionary Reference – Structure
CRMD_ORDERADM_H
ABAP Dictionary Reference – Field
PROCESS_TYPE
Initial Value ZT##
(To be maintained on tab Initial Value as Process Type)
Confirm everything and save
SAP Implementation Guide → Customer Relationship Management → Basic Functions → Actions → Actions in Transaction → Change Actions and Conditions → Define Conditions
Change your profile and use the icon on the right hand side in order to add your action.
Define a Start Condition (When Status is “Critical” - ##). To do so, go to tab Start Condition and click on “Edit Condition” and enter “When Status is “Critical” - ##)” as Name.
Click on “Click here to create a new condition” to start the Condition Editor:
Use the condition editor and create an expression like the following:
To do so click on User Status of CRM Opportunity, then click on Operator = before selecting your status profile ZUS## and the status critical in the field Constant.
Save the data.
Assign the Action Profile ZAP## to transaction type ZO##.
© SAP AG CR580 9-45
2-3-6 Product Proposals
You would like to see accessories of a certain product (item in your sales order) as product proposals in your sales transactions.
SAP Implementation Guide → Customer Relationship Management → Transactions → Settings for Sales Transactions → Product Proposals in Quotations and Orders → Create Method Schema
Check that there is an existing method scheme Accessories available.
SAP Implementation Guide → Customer Relationship Management → Basic Settings → Settings for Sales Transactions → Product Proposals in Quotation and Order → Assign Method Schema to Transaction Type
Create the following two entries:
Sales Organization: <Select Sales Org. Battery World>
Transaction Type: ZA##
Method Schema: 000004 (Accessories)
Sales Organization: <Select Sales Org. Battery World>
Transaction Type: ZS##
Method Schema: 000004 (Accessories)
Save the data
2-3-7 Create new pricing customizing (condition type; pricing procedure;
customer pricing procedure) in the backend system.
Schematic overview of steps to be performed:
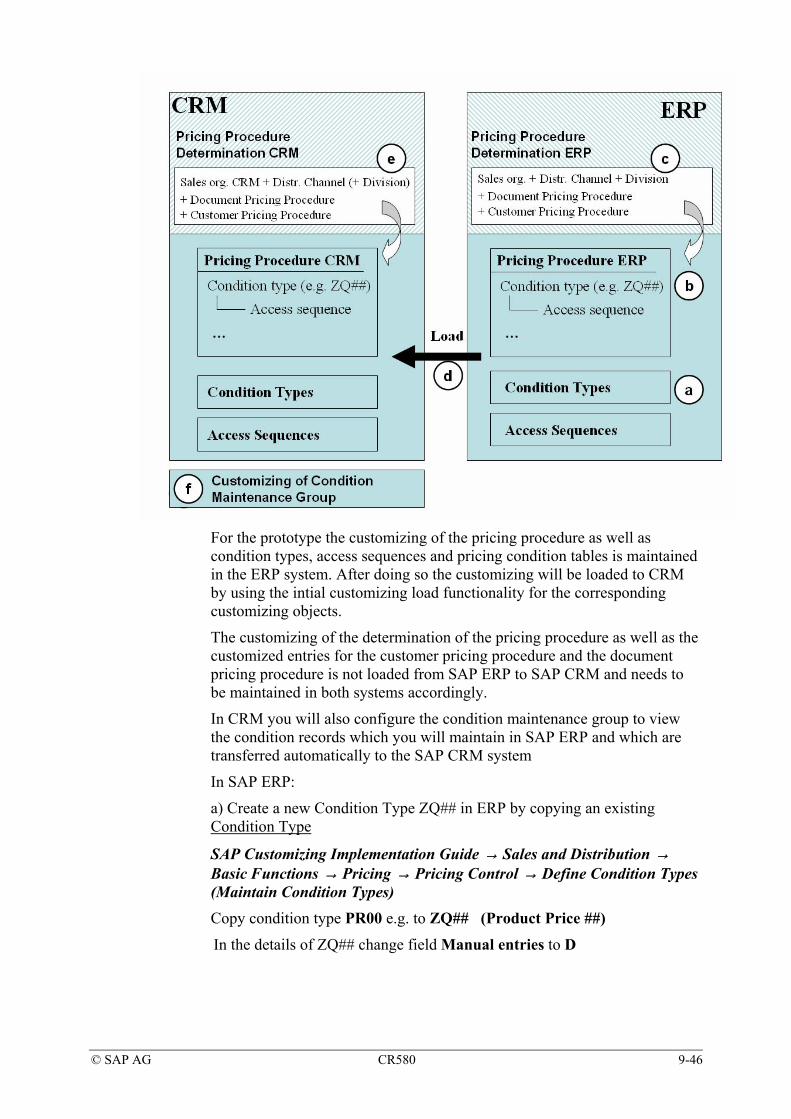
© SAP AG CR580 9-46
For the prototype the customizing of the pricing procedure as well as condition types, access sequences and pricing condition tables is maintained in the ERP system. After doing so the customizing will be loaded to CRM by using the intial customizing load functionality for the corresponding customizing objects.
The customizing of the determination of the pricing procedure as well as the customized entries for the customer pricing procedure and the document pricing procedure is not loaded from SAP ERP to SAP CRM and needs to be maintained in both systems accordingly.
In CRM you will also configure the condition maintenance group to view the condition records which you will maintain in SAP ERP and which are transferred automatically to the SAP CRM system
In SAP ERP:
a) Create a new Condition Type ZQ## in ERP by copying an existing Condition Type
SAP Customizing Implementation Guide → Sales and Distribution → Basic Functions → Pricing → Pricing Control → Define Condition Types (Maintain Condition Types)
Copy condition type PR00 e.g. to ZQ## (Product Price ##)
In the details of ZQ## change field Manual entries to D
© SAP AG CR580 9-47
b) Create a new Pricing Procedure in ERP by copying an existing Pricing Procedure
SAP Customizing Implementation Guide → Sales and Distribution → Basic Functions → Pricing → Pricing Control → Define And Assign Pricing Procedures (Maintain pricing procedures) Copy pricing procedure RVCEU1 with all dependant entries to YPP##
(confirm any warning messages with enter) and in the Control Data replace the condition type PR00 with your new condition type ZQ##.
c) Create a new Customer Pricing Procedure in ERP and maintain Pricing Procedure Determination for the ERP system
SAP Customizing Implementation Guide → Sales and Distribution → Basic Functions → Pricing → Pricing Control → Define And Assign Pricing Procedures (Define customer pricing procedure)
Create a new customer pricing procedure. Choose any free character between A and Z (! Some characters are already used!).
SAP Customizing Implementation Guide → Basic Functions → Pricing → Pricing Control → Define And Assign Pricing Procedures (Define PricingProcedure Determination)
Create a new entry
2200 + 10 + 00 + A + <your customer pricing procedure> = YPP##
d) Transfer pricing customizing from SAP ERP to SAP CRM.
In SAP CRM:
Architecture and Technology → iddleware → Data Exchange → Initial Load → Start
Enter DNL_CUST_CND and execute.
Repeat this step for object ZCR300_CUST_PRC.
This might not be necessary if another students activated the initial download just before.
If the download is running either go to the pricing customizing in CRM to check whether your entries have be transferred. If not you can start the initial download again once the other load is finished.

© SAP AG CR580 9-48
e) Create a new Customer Pricing Procedure in ERP and maintain Pricing Procedure Determination for the ERP system
In SAP CRM:
SAP Implementation Guide → Customer Relationship Management → Basic Functions → Pricing → Pricing in the Business Transaction → Define Customer Pricing Procedures Create a corresponding entry as the customer pricing procedures are not loaded to CRM. Choose the same letter as you did in SAP ERP
SAP Implementation Guide → Customer Relationship Management → Basic Functions → Pricing → Pricing in the Business Transaction → Determine Pricing Procedures Create a new entry:
< BatteryWorld> + 10 + __ + A + <your cust. pric. Proc.> = YPP##
You have to find out which ID represents <BatteryWorld>. The ID of the Sales Organization always starts with O.
Do so by clicking the F4 help in field “Sales Organization” and choosing the corresponding sales organization “BatteryWorld”
f) Visualize conditions of type ZQ## in CRM Product Master Maintenance:
In SAP CRM:
SAP Implementation Guide → Customer Relationship Management →
Master Data → Conditions and Condition Technique → Condition Technique: Basics → Condition Maintenance Group
Check the details of condition maintenance group PRODUCTCRM.
Add the following entry:
Field Name or Data Type Values
Counter Choose <200 + ##>, e.g .201
when you are group 01, 211 when you are group 11 etc.
Application CRM
Usage PR
Condition Table SAP304
Condition Type ZQ##
Description Basic Product Price ## (ERP)
© SAP AG CR580 9-49
2-4 UI Configuration
2-4-1 Create a new SAP CRM Web UI Business Role and assign it to a position in Organizational Model
In SAP CRM:
In the following all relevant objects for the definition of a Business Role are here all created in advance (Navigation Bar Profile, Role Configuration Key) before the new Business Role is created by copying.
a) Navigation Bar Profile
Create your own Navigation Bar profile Z##NBCASE by copying the existing Navigation Bar profile SRV-PRO incl. all dependant objects.
SAP Implementation Guide → Customer Relationship Management → UI Framework → Technical Role Definition → Define Navigation Bar Profile. You should be in the Define Profile dialog.
Mark profile SLS-PRO
Choose Copy ( ).
Nav Bar Profile: Z##NBCASE.
Description: ## Navigation Bar Case Study.
Choose ENTER and then copy all.
Save the data.
b) Role Configuration Key
SAP Implementation Guide → Customer Relationship Management → UI Framework → UI Framework Definition → Define Role Configuration Key Choose New Entries.
Role Config Key: ZCS##
Description: ## Role Config Key Case Study.
Save the data.

© SAP AG CR580 9-50
c) SAP CRM WebClient UI Business Role
In Customizing create a new business role Z##SALESPRO (## Sales Professional) by copying the existing Business Role SALESPRO.
Assign the new UI Business Role to the already predefined user role in SAP CRM Z##_CRM_UIU_SLS_PROFESSIONAL as well as to a newly created Navigation Bar Profile Z##NBCASE, ## Navigation Bar Case Study and the new Role Configuration Key ZCS##, ##Role Config Key Case Study
SAP Implementation Guide → Customer Relationship Management → Business Roles → Define Business Role Mark entry SALESPRO.
Choose Copy As ( )
Business Role: Z##SALESPRO
Description: ## Sales Professional
Role Configuration Key: ZCS##
Navigation Bar Profile: Z##NBCASE
(Blank the default entry before using F4-help)
PFCG Role ID: Z##_CRM_UIU_SRV_PROFESSIONAL
Choose ENTER
Choose copy all.
Confirm the next dialog and save your settings.
d) Assign both your CRM log on user and the business role Z##SALESPRO to a new position in the organizational model.
SAP Implementation Guide → Customer Relationship Management → Business Roles → Define Organizational Assignment
Find your Organizational Unit Sales Department ## using the Find by Search Term functionality.
In the Hit list double-Click Sales Department ##.
Click on and click on Incorporates Position.
Enter the following data:
Position: ##SalesPro
Description: Sales Professional ##
Save data
Choose menu Goto → Detail object → Enhanced object description.
Scroll down, mark Infotype Business Role and choose Create Infotype ( ).
Business Role: Z##SALESPRO
Save your settings and navigate back to the organizational structure.
Assign user CRM-## to the position.
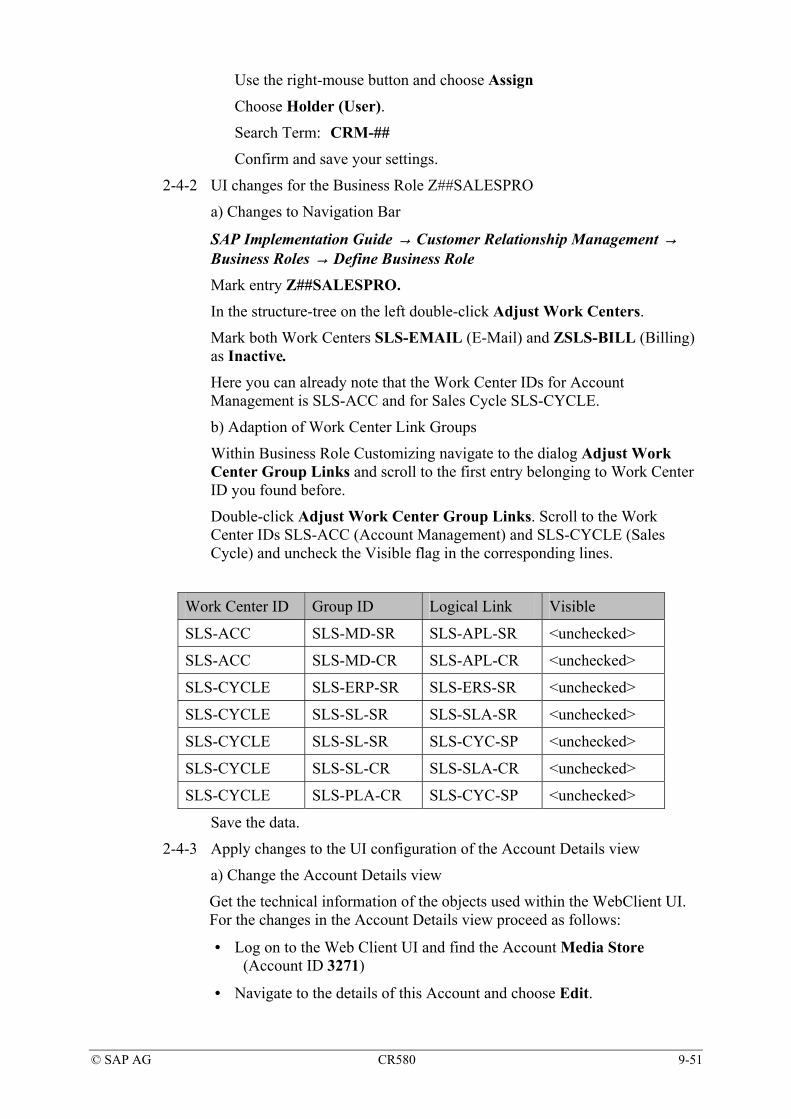
© SAP AG CR580 9-51
Use the right-mouse button and choose Assign
Choose Holder (User).
Search Term: CRM-##
Confirm and save your settings.
2-4-2 UI changes for the Business Role Z##SALESPRO
a) Changes to Navigation Bar
SAP Implementation Guide → Customer Relationship Management → Business Roles → Define Business Role
Mark entry Z##SALESPRO.
In the structure-tree on the left double-click Adjust Work Centers.
Mark both Work Centers SLS-EMAIL (E-Mail) and ZSLS-BILL (Billing) as Inactive.
Here you can already note that the Work Center IDs for Account Management is SLS-ACC and for Sales Cycle SLS-CYCLE.
b) Adaption of Work Center Link Groups
Within Business Role Customizing navigate to the dialog Adjust Work Center Group Links and scroll to the first entry belonging to Work Center ID you found before.
Double-click Adjust Work Center Group Links. Scroll to the Work Center IDs SLS-ACC (Account Management) and SLS-CYCLE (Sales Cycle) and uncheck the Visible flag in the corresponding lines.
Work Center ID Group ID Logical Link Visible
SLS-ACC SLS-MD-SR SLS-APL-SR <unchecked>
SLS-ACC SLS-MD-CR SLS-APL-CR <unchecked>
SLS-CYCLE SLS-ERP-SR SLS-ERS-SR <unchecked>
SLS-CYCLE SLS-SL-SR SLS-SLA-SR <unchecked>
SLS-CYCLE SLS-SL-SR SLS-CYC-SP <unchecked>
SLS-CYCLE SLS-SL-CR SLS-SLA-CR <unchecked>
SLS-CYCLE SLS-PLA-CR SLS-CYC-SP <unchecked>
Save the data.
2-4-3 Apply changes to the UI configuration of the Account Details view
a) Change the Account Details view
Get the technical information of the objects used within the WebClient UI. For the changes in the Account Details view proceed as follows:
• Log on to the Web Client UI and find the Account Media Store (Account ID 3271)
• Navigate to the details of this Account and choose Edit.

© SAP AG CR580 9-52
• Place your cursor in field Name 1 and get technical information using the F2 key.
Which Component, View, Context Node and Attribute are used in this case?
Component: BP_HEAD
View: AccountDetails
Context Node: HEADER
Attribute: STRUCT.NAME1
Start the Component Workbench and enter the name of the Component representing Accounts and choose Display. Navigate to the view you identified earlier.
SAP Implementation Guide → Customer Relationship Management → UI Framework → UI Framework Definition → Configure User Interface
Component: BP_HEAD.
Choose Display.
Navigate to Views → BP_HEAD/AccountDetails.
Double-click this view.
Choose tab Configuration.
If necessary log on with your CRM User / password
Copy the Standard Default Configuration to a new configuration using your Role Configuration Key ZCS##. In the copy dialog only enter your configuration key and don’t change the other fields.
Choose Copy Configuration.
Confirm the pop-up with Yes and on the next pop-up enter
Role Config Key: ZCS##.
Choose ENTER.
If necessary go into change mode and create and save a transport request. You are in change mode when the change icon is greyed out.
Set your configuration, so you will get to a configuration similar to the one shown:
Add a caption on the left side and name it ERP Classification and move it up or down underneath the field Rating.
Click on Show Available Fields and open the folder MARKETING.
Add the fields Account Group, Competitor, Customer and Prospect to the left side by clicking on the Add Fields button (+ symbol). Close the section of available fields.
Move the fields down or up underneath the new caption in the shown order.
You can resize the field Account Group by clicking on Show Field Properties and change the property of Field Col. To to E. Click apply and close the Field Properties section.
To have the fields Customer and Prospect in one row, mark the Customer field, click on Show Field Properties and note down the Row from
© SAP AG CR580 9-53
number. Change the Field Col. To. entry to D. Click Apply and close the field properties section. Mark the field Prospect, click on Show Field Properties and enter the following:
Row from: <Enter the row number as of field Customer>
Label Col. From: E
Label Col. To: F
Field Col. From: G
Label Col To: H
Click on Apply, close the Field Properties section and finally mark the Competitor field and move up to avoid any empty rows.
Save the data.
b) Changes to the Account Search View
Start the WebClient UI and navigate to Account Management Accounts.
Select a search field, e.g. Name 1 and launch technical information using the F2 key. Note the Component and View name.
Component: BP_HEAD_SEARCH
View: MainSearch.
Start the Component Workbench, enter the component and select proper View for launching the UI Configuration Tool. Copy the configuration to your Role Configuration Key like you did in the exercise before.
Component: BP_HEAD_SEARCH.
Choose Display.
Navigate to Views → BP_HEAD_SEARCH/MainSearch.
Double-click this view.
Choose tab Configuration.
Choose button Copy Configuration.
Choose your Role Configuration Key ZCS##.
Select the fields Customer, Prospect and Competitor from the Available Search Criteria and add them to the Selected Search Criteria.
Find the fields using the page forward (alphabetically order!).
Mark the fields and choose the Move (to Right/Left) icon.
Once the fields are on the Selected Search Criteria side, click the field so that you can check the flag Displayed. Do so for the fields Customer and Prospect.
A field is moving up automatically once you set this flag
© SAP AG CR580 9-54
2-4-4 Change the UI configuration of the Account Details view
Get the technical information of the objects used within the WebClient UI. For the changes in the Quotation Details view proceed as follows:
• Log on to the Web Client UI and click on Sales Cycle, Create → Quotation. Select your transaction type Quotation##.
• Navigate to the details of this Quotation and place your cursor in field Sold-to Party and get technical information using the F2 key.
Which Component, View, Context Node and Attribute are used in this case?
Component: BT115QH_SLSQ
View: Details
Context Node: BTPARTNERSET
Attribute: SOLDTO_NAME
Start the Component Workbench and enter the name of the Component representing Quotation and choose Display. Navigate to the view you identified earlier.
SAP Implementation Guide → Customer Relationship Management → UI Framework → UI Framework Definition → Configure User Interface
Component: BT115QH_SLSQ
Choose Display.
Navigate to Views → BT115QH_SLSQ/Details.
Double-click this view.
Choose tab Configuration.
If necessary log on with your CRM User / password
Copy the Standard Default Configuration to a new configuration using your Role Configuration Key Z##CS. In the copy dialog only enter your configuration key and don’t change the other fields.
Choose Copy Configuration.
Confirm the pop-up with Yes and on the next pop-up enter
Role Config Key: ZCS##
Object Type: BT115Q_SLSQ
Object Subtype: ZA## (which is the transaction type of your quotation)
Choose ENTER.
If necessary go into change mode and create and save a transport request. You are in change mode when the change icon is greyed out.
Set your configuration, so you will get to a configuration similar to the one shown:
Add a caption on the left side and name it Pricing Data and move it up or down underneath the section References.
Click on Show Available Fields and open the folder BTPRICINGSET.
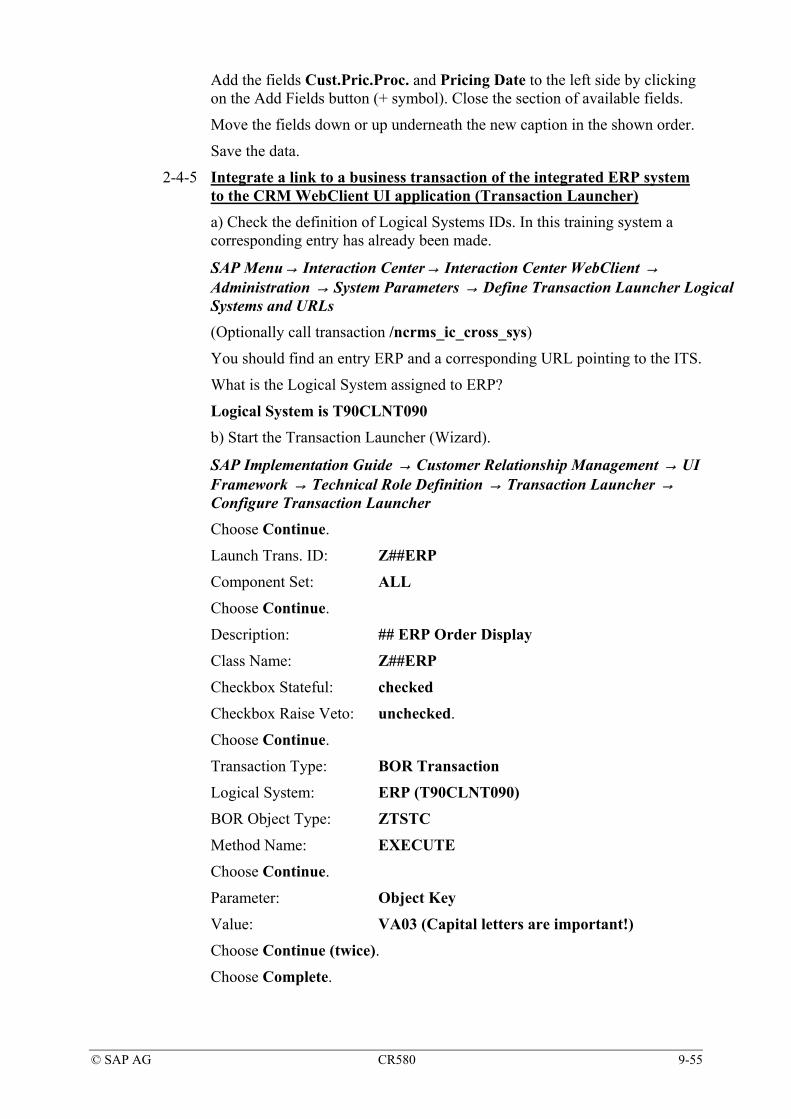
© SAP AG CR580 9-55
Add the fields Cust.Pric.Proc. and Pricing Date to the left side by clicking on the Add Fields button (+ symbol). Close the section of available fields.
Move the fields down or up underneath the new caption in the shown order.
Save the data.
2-4-5 Integrate a link to a business transaction of the integrated ERP system to the CRM WebClient UI application (Transaction Launcher) a) Check the definition of Logical Systems IDs. In this training system a corresponding entry has already been made.
SAP Menu→ Interaction Center→ Interaction Center WebClient → Administration → System Parameters → Define Transaction Launcher Logical Systems and URLs (Optionally call transaction /ncrms_ic_cross_sys)
You should find an entry ERP and a corresponding URL pointing to the ITS.
What is the Logical System assigned to ERP?
Logical System is T90CLNT090 b) Start the Transaction Launcher (Wizard).
SAP Implementation Guide → Customer Relationship Management → UI Framework → Technical Role Definition → Transaction Launcher → Configure Transaction Launcher Choose Continue.
Launch Trans. ID: Z##ERP
Component Set: ALL
Choose Continue.
Description: ## ERP Order Display
Class Name: Z##ERP
Checkbox Stateful: checked
Checkbox Raise Veto: unchecked.
Choose Continue.
Transaction Type: BOR Transaction
Logical System: ERP (T90CLNT090)
BOR Object Type: ZTSTC
Method Name: EXECUTE
Choose Continue.
Parameter: Object Key
Value: VA03 (Capital letters are important!)
Choose Continue (twice).
Choose Complete.
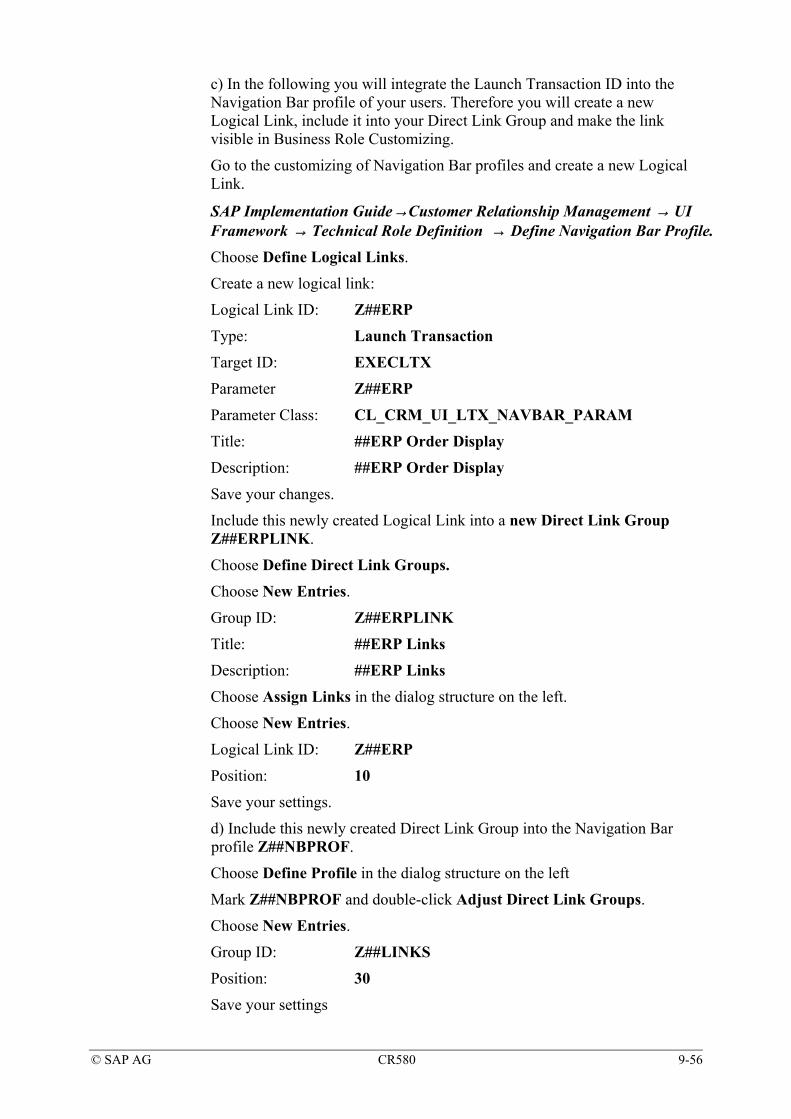
© SAP AG CR580 9-56
c) In the following you will integrate the Launch Transaction ID into the Navigation Bar profile of your users. Therefore you will create a new Logical Link, include it into your Direct Link Group and make the link visible in Business Role Customizing.
Go to the customizing of Navigation Bar profiles and create a new Logical Link.
SAP Implementation Guide→Customer Relationship Management → UI Framework → Technical Role Definition → Define Navigation Bar Profile.
Choose Define Logical Links.
Create a new logical link:
Logical Link ID: Z##ERP
Type: Launch Transaction
Target ID: EXECLTX
Parameter Z##ERP
Parameter Class: CL_CRM_UI_LTX_NAVBAR_PARAM
Title: ##ERP Order Display
Description: ##ERP Order Display
Save your changes.
Include this newly created Logical Link into a new Direct Link Group Z##ERPLINK.
Choose Define Direct Link Groups.
Choose New Entries.
Group ID: Z##ERPLINK
Title: ##ERP Links
Description: ##ERP Links
Choose Assign Links in the dialog structure on the left.
Choose New Entries.
Logical Link ID: Z##ERP
Position: 10
Save your settings.
d) Include this newly created Direct Link Group into the Navigation Bar profile Z##NBPROF.
Choose Define Profile in the dialog structure on the left
Mark Z##NBPROF and double-click Adjust Direct Link Groups.
Choose New Entries.
Group ID: Z##LINKS
Position: 30
Save your settings

© SAP AG CR580 9-57
e) You have to make this Direct Group Link visible in Customizing of Business Roles.
SAP Implementation Guide → Customer Relationship Management → Business Roles Choose your role Z##SALESPRO and change the settings under Adjust Direct Group Links.
Make your new link visible.

© SAP AG CR580 9-58