komplett 16... · bm bn LR, KN Ltr.h E PORSCHE MLS MLS MLS MLS MLS
ContactManager
HELPGUIDE
MLSPINCustomerSupport800‐695‐3000
Monday–Friday8am–7:30pm,Saturday9am–5pm,Sunday9am–1pm
Revised:June3,2014
Page | 1
MLS PIN Customer Support 800‐695‐3000
Monday‐Friday 8 am to 7:30 pm, Saturday 9 am to 5 pm, Sunday 9 am to 1 pm
TableofContentsManaging Contacts ....................................................................................................................................... 4
Create A New Contact ............................................................................................................................... 4
Contact Name(s) ....................................................................................................................................... 4
Email Addresses ........................................................................................................................................ 5
Phone Numbers ........................................................................................................................................ 6
Address(es)................................................................................................................................................ 7
Method of Contact .................................................................................................................................... 9
Unsubscribed Contacts ........................................................................................................................... 10
Additional Information ............................................................................................................................ 10
Events ...................................................................................................................................................... 11
Referral History ....................................................................................................................................... 11
Save a Contact ......................................................................................................................................... 12
Edit Existing Contacts .............................................................................................................................. 12
Settings.................................................................................................................................................... 13
History ......................................................................................................................................................... 14
History Time Frame ................................................................................................................................. 14
Sorting Features ...................................................................................................................................... 14
Detailed Information ............................................................................................................................... 14
Searches ...................................................................................................................................................... 15
New Search ............................................................................................................................................. 15
Search Features ....................................................................................................................................... 15
Clone Searches ........................................................................................................................................ 16
Deleting Searches .................................................................................................................................... 16
Editing Searches ...................................................................................................................................... 16
Renaming Searches ................................................................................................................................. 16
Notifications ............................................................................................................................................ 17
Page View Options .................................................................................................................................. 18
Summary View .................................................................................................................................... 18
Detail View .......................................................................................................................................... 18
Matches ...................................................................................................................................................... 19
Page | 2
MLS PIN Customer Support 800‐695‐3000
Monday‐Friday 8 am to 7:30 pm, Saturday 9 am to 5 pm, Sunday 9 am to 1 pm
Filtering Listing Results ........................................................................................................................... 19
Page Viewing Options ............................................................................................................................. 20
Report View Tab: ................................................................................................................................. 20
Listing Page View Types: ..................................................................................................................... 20
Map View Tab: .................................................................................................................................... 22
Mapping Features: .............................................................................................................................. 22
Listing Summary Preview: ................................................................................................................... 23
Viewing Listings ....................................................................................................................................... 23
Hide/Unhide Listings ............................................................................................................................... 24
Recommend ............................................................................................................................................ 25
Remove Showing ..................................................................................................................................... 25
Have Shown ............................................................................................................................................ 26
Driving Directions .................................................................................................................................... 26
Download Listings ................................................................................................................................... 27
Activity Tab ................................................................................................................................................. 28
Chart Time Frame ................................................................................................................................... 28
Listing Activity Chart ............................................................................................................................... 28
View Price Activity Chart ......................................................................................................................... 29
Contacts Page .............................................................................................................................................. 30
Filtering Your Contacts Using Categories ................................................................................................ 30
Contact Main Page Viewing Features ..................................................................................................... 31
Contact Info Tab .................................................................................................................................. 31
Activity View Tab ................................................................................................................................. 31
Contact Information Summary ........................................................................................................... 32
View Contact Details ........................................................................................................................... 32
Search for Contacts ................................................................................................................................. 33
Categories ................................................................................................................................................... 34
Create/Edit/Delete Categories ................................................................................................................ 34
Categorizing Contacts ............................................................................................................................. 34
Archive ........................................................................................................................................................ 35
Archive Contacts ..................................................................................................................................... 35
Email ............................................................................................................................................................ 36

Page | 3
MLS PIN Customer Support 800‐695‐3000
Monday‐Friday 8 am to 7:30 pm, Saturday 9 am to 5 pm, Sunday 9 am to 1 pm
Email Contacts ......................................................................................................................................... 36
Remind Contacts of Recent Matches ...................................................................................................... 36
Email Listings ........................................................................................................................................... 37
Settings.................................................................................................................................................... 38
Printing/PDF ................................................................................................................................................ 39
Contact Sheets ........................................................................................................................................ 39
History ..................................................................................................................................................... 39
Searches .................................................................................................................................................. 39
Listings..................................................................................................................................................... 39
Settings ....................................................................................................................................................... 40
Contact Defaults...................................................................................................................................... 40
Assign Contacts ........................................................................................................................................... 40
Assigned Leads ........................................................................................................................................ 42
Download .................................................................................................................................................... 43
Download Contacts ................................................................................................................................. 43
Export Contacts to Outlook or Google .................................................................................................... 43
Import to Outlook 2013 .......................................................................................................................... 43
Import to Google ..................................................................................................................................... 46

Page | 4
MLS PIN Customer Support 800‐695‐3000
Monday‐Friday 8 am to 7:30 pm, Saturday 9 am to 5 pm, Sunday 9 am to 1 pm
Managing Contacts Create A New Contact
To create a New Contact, click on the “New” button in the toolbar of the Contacts main page.
Contact Name(s)
Description – For each contact entered, with the exception of the main contact, you may choose
a label describing the relationship to the Main Contact. The labels available are: Spouse, Partner,
Family, Child, Investor, Sibling, Friend, Divorcee, and Other.
Detailed Name Entry – You have the ability to enter more than the person’s first and last names
by clicking the pencil icon.
Additional Names – You have the ability to enter up to six names within a contact record. To
add an additional name, click the “Add Additional Contact Name” link.
Remove a Name – To remove a name, simply click the “Remove” icon.
Page | 5
MLS PIN Customer Support 800‐695‐3000
Monday‐Friday 8 am to 7:30 pm, Saturday 9 am to 5 pm, Sunday 9 am to 1 pm
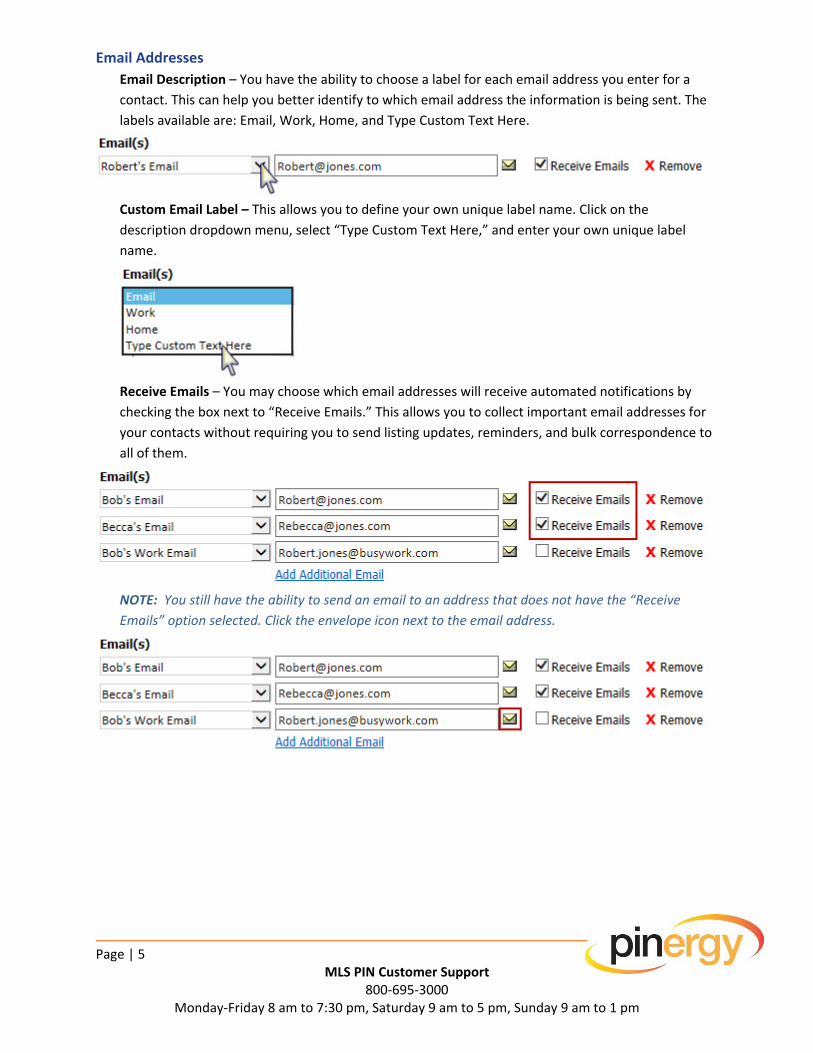
Email Addresses
Email Description – You have the ability to choose a label for each email address you enter for a
contact. This can help you better identify to which email address the information is being sent. The
labels available are: Email, Work, Home, and Type Custom Text Here.
Custom Email Label – This allows you to define your own unique label name. Click on the
description dropdown menu, select “Type Custom Text Here,” and enter your own unique label
name.
Receive Emails – You may choose which email addresses will receive automated notifications by
checking the box next to “Receive Emails.” This allows you to collect important email addresses for
your contacts without requiring you to send listing updates, reminders, and bulk correspondence to
all of them.
NOTE: You still have the ability to send an email to an address that does not have the “Receive
Emails” option selected. Click the envelope icon next to the email address.
Page | 6
MLS PIN Customer Support 800‐695‐3000
Monday‐Friday 8 am to 7:30 pm, Saturday 9 am to 5 pm, Sunday 9 am to 1 pm
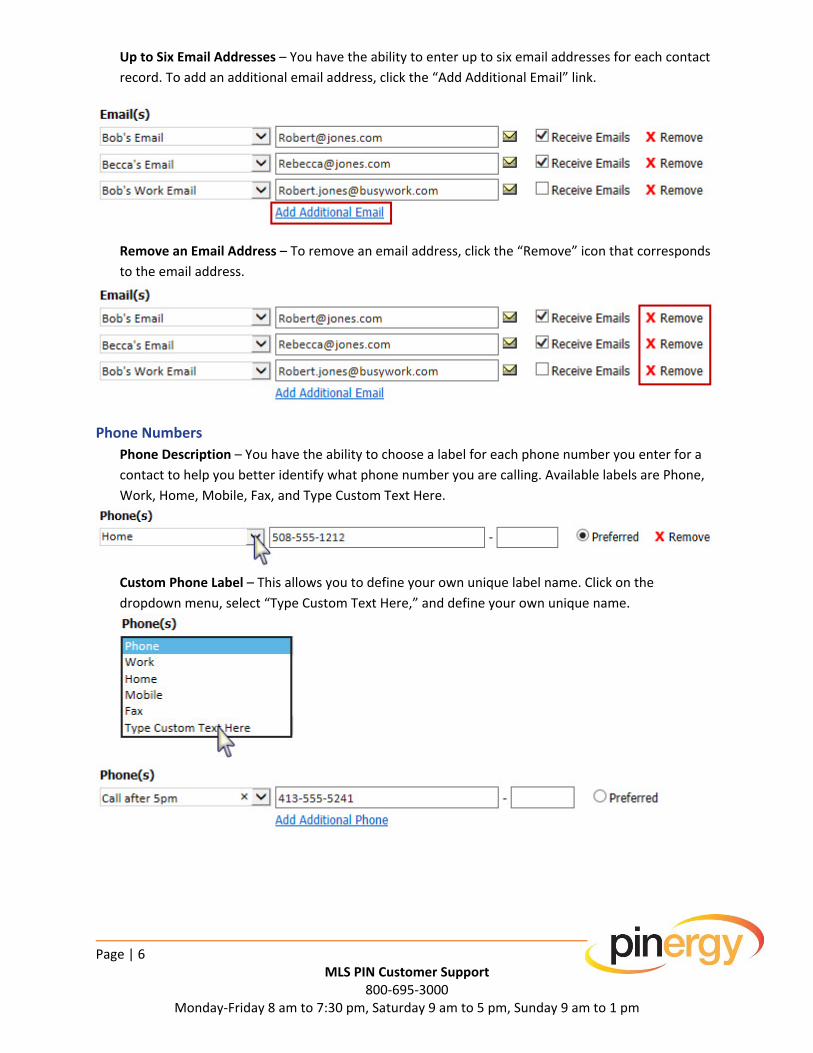
Up to Six Email Addresses – You have the ability to enter up to six email addresses for each contact
record. To add an additional email address, click the “Add Additional Email” link.
Remove an Email Address – To remove an email address, click the “Remove” icon that corresponds
to the email address.
Phone Numbers
Phone Description – You have the ability to choose a label for each phone number you enter for a
contact to help you better identify what phone number you are calling. Available labels are Phone,
Work, Home, Mobile, Fax, and Type Custom Text Here.
Custom Phone Label – This allows you to define your own unique label name. Click on the
dropdown menu, select “Type Custom Text Here,” and define your own unique name.
Page | 7
MLS PIN Customer Support 800‐695‐3000
Monday‐Friday 8 am to 7:30 pm, Saturday 9 am to 5 pm, Sunday 9 am to 1 pm
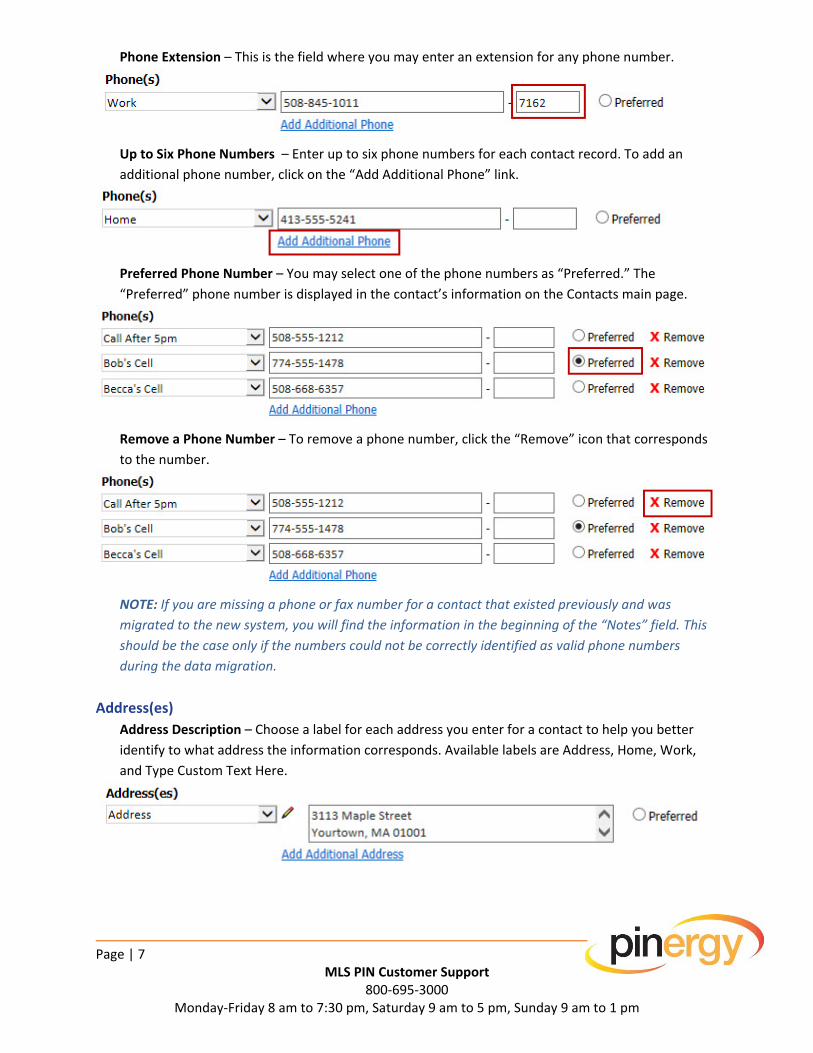
Phone Extension – This is the field where you may enter an extension for any phone number.
Up to Six Phone Numbers – Enter up to six phone numbers for each contact record. To add an
additional phone number, click on the “Add Additional Phone” link.
Preferred Phone Number – You may select one of the phone numbers as “Preferred.” The
“Preferred” phone number is displayed in the contact’s information on the Contacts main page.
Remove a Phone Number – To remove a phone number, click the “Remove” icon that corresponds
to the number.
NOTE: If you are missing a phone or fax number for a contact that existed previously and was
migrated to the new system, you will find the information in the beginning of the “Notes” field. This
should be the case only if the numbers could not be correctly identified as valid phone numbers
during the data migration.
Address(es)
Address Description – Choose a label for each address you enter for a contact to help you better
identify to what address the information corresponds. Available labels are Address, Home, Work,
and Type Custom Text Here.
Page | 8
MLS PIN Customer Support 800‐695‐3000
Monday‐Friday 8 am to 7:30 pm, Saturday 9 am to 5 pm, Sunday 9 am to 1 pm
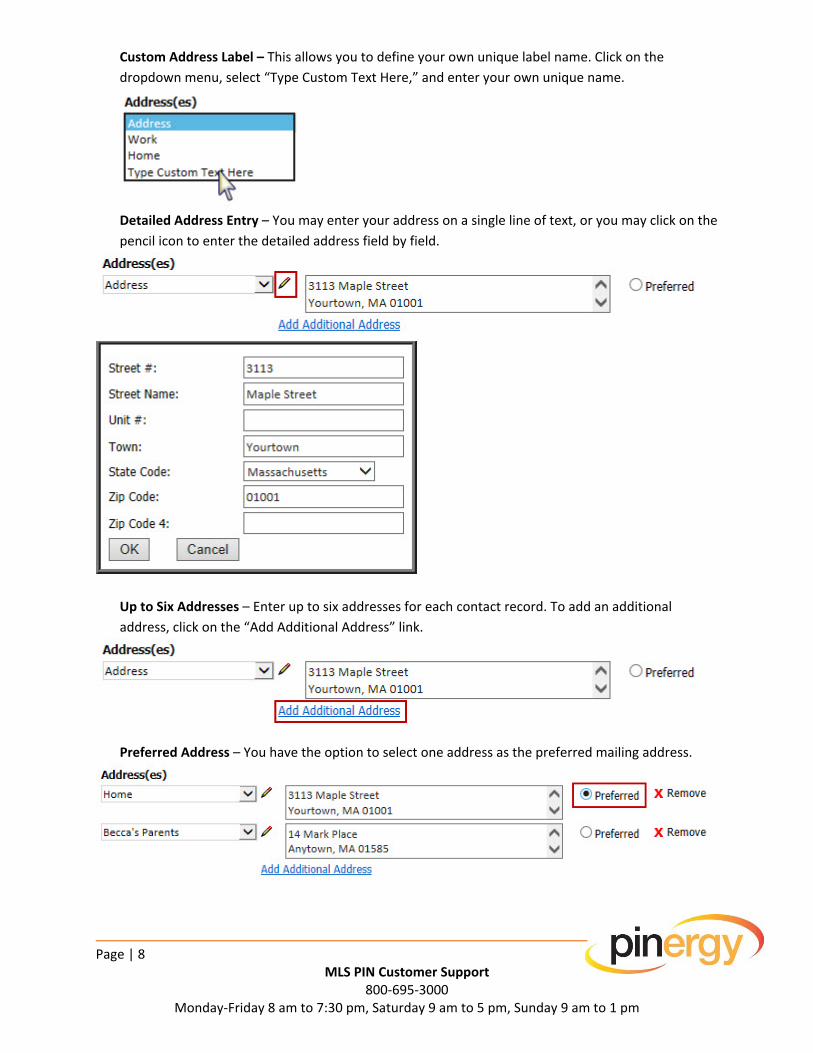
Custom Address Label – This allows you to define your own unique label name. Click on the
dropdown menu, select “Type Custom Text Here,” and enter your own unique name.
Detailed Address Entry – You may enter your address on a single line of text, or you may click on the
pencil icon to enter the detailed address field by field.
Up to Six Addresses – Enter up to six addresses for each contact record. To add an additional
address, click on the “Add Additional Address” link.
Preferred Address – You have the option to select one address as the preferred mailing address.
Page | 9
MLS PIN Customer Support 800‐695‐3000
Monday‐Friday 8 am to 7:30 pm, Saturday 9 am to 5 pm, Sunday 9 am to 1 pm
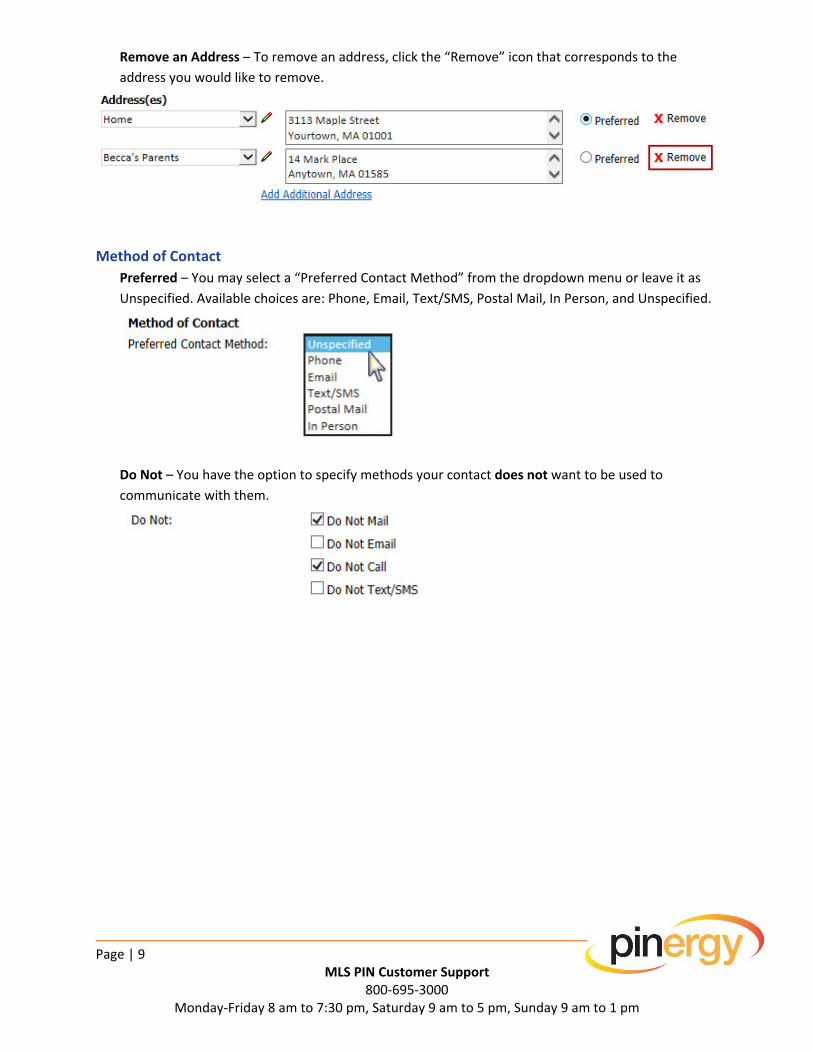
Remove an Address – To remove an address, click the “Remove” icon that corresponds to the
address you would like to remove.
Method of Contact
Preferred – You may select a “Preferred Contact Method” from the dropdown menu or leave it as
Unspecified. Available choices are: Phone, Email, Text/SMS, Postal Mail, In Person, and Unspecified.
Do Not – You have the option to specify methods your contact does not want to be used to
communicate with them.
Page | 10
MLS PIN Customer Support 800‐695‐3000
Monday‐Friday 8 am to 7:30 pm, Saturday 9 am to 5 pm, Sunday 9 am to 1 pm
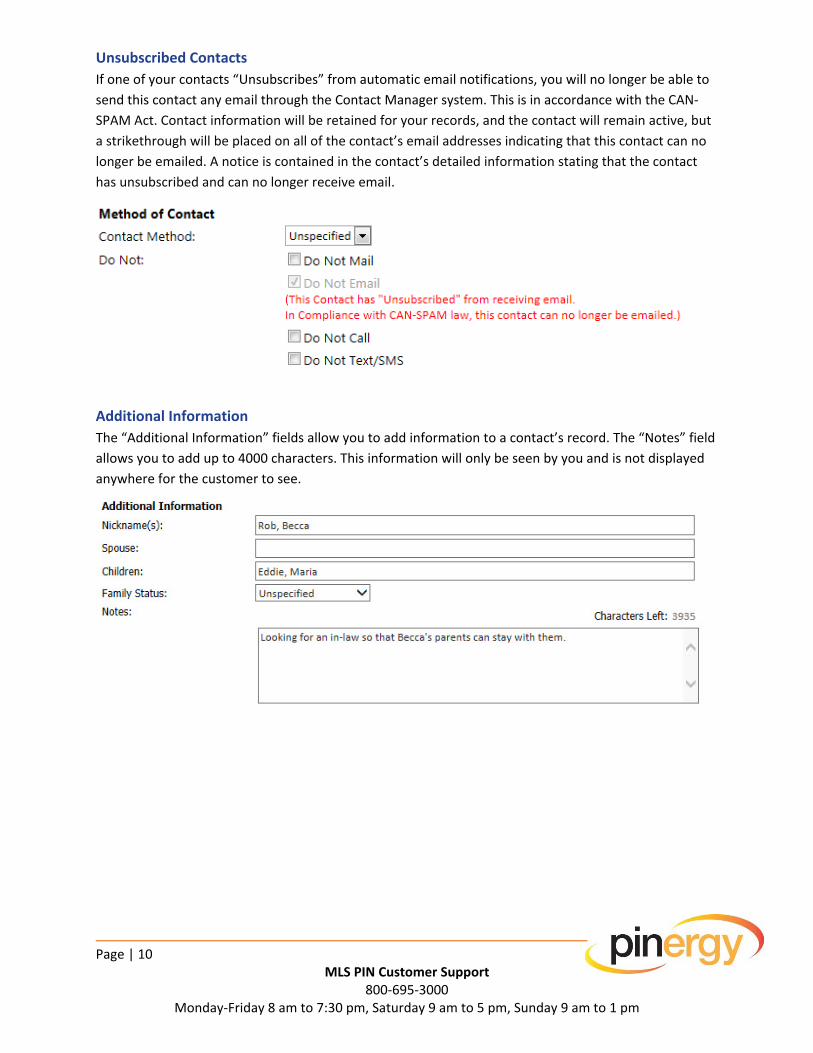
Unsubscribed Contacts
If one of your contacts “Unsubscribes” from automatic email notifications, you will no longer be able to
send this contact any email through the Contact Manager system. This is in accordance with the CAN‐
SPAM Act. Contact information will be retained for your records, and the contact will remain active, but
a strikethrough will be placed on all of the contact’s email addresses indicating that this contact can no
longer be emailed. A notice is contained in the contact’s detailed information stating that the contact
has unsubscribed and can no longer receive email.
Additional Information
The “Additional Information” fields allow you to add information to a contact’s record. The “Notes” field
allows you to add up to 4000 characters. This information will only be seen by you and is not displayed
anywhere for the customer to see.
Page | 11
MLS PIN Customer Support 800‐695‐3000
Monday‐Friday 8 am to 7:30 pm, Saturday 9 am to 5 pm, Sunday 9 am to 1 pm
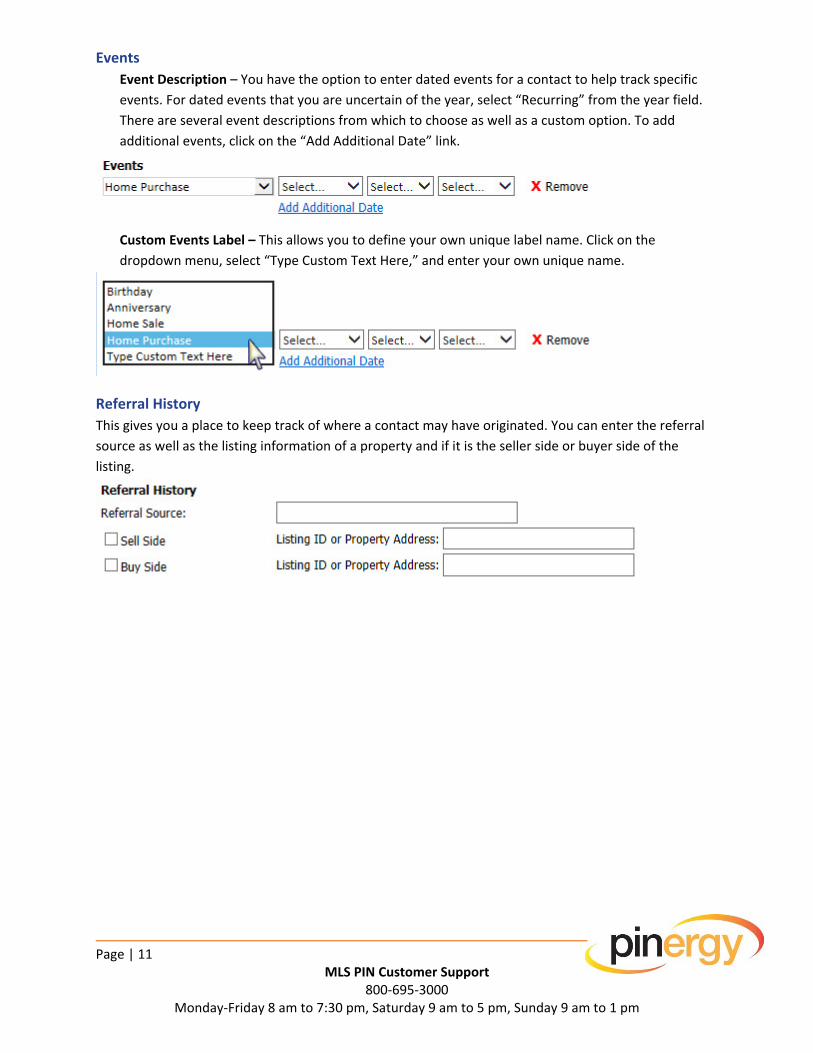
Events
Event Description – You have the option to enter dated events for a contact to help track specific
events. For dated events that you are uncertain of the year, select “Recurring” from the year field.
There are several event descriptions from which to choose as well as a custom option. To add
additional events, click on the “Add Additional Date” link.
Custom Events Label – This allows you to define your own unique label name. Click on the
dropdown menu, select “Type Custom Text Here,” and enter your own unique name.
Referral History
This gives you a place to keep track of where a contact may have originated. You can enter the referral
source as well as the listing information of a property and if it is the seller side or buyer side of the
listing.
Page | 12
MLS PIN Customer Support 800‐695‐3000
Monday‐Friday 8 am to 7:30 pm, Saturday 9 am to 5 pm, Sunday 9 am to 1 pm
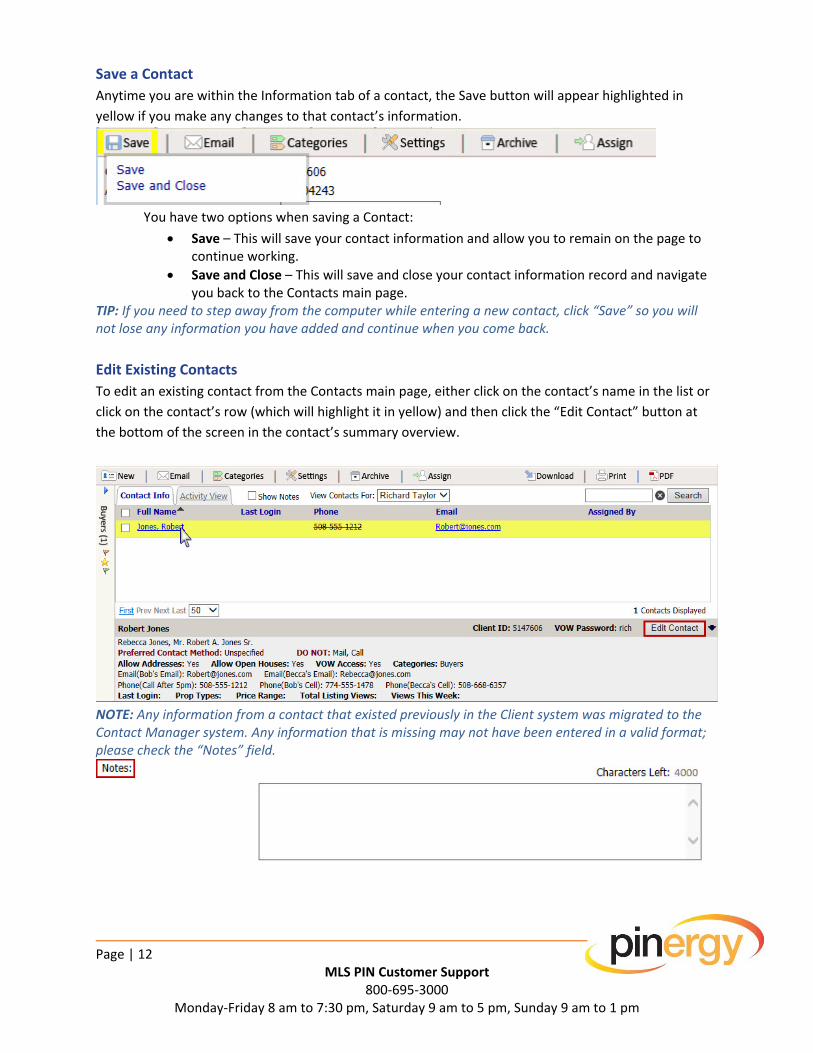
Save a Contact
Anytime you are within the Information tab of a contact, the Save button will appear highlighted in
yellow if you make any changes to that contact’s information.
You have two options when saving a Contact:
Save – This will save your contact information and allow you to remain on the page to continue working.
Save and Close – This will save and close your contact information record and navigate you back to the Contacts main page.
TIP: If you need to step away from the computer while entering a new contact, click “Save” so you will not lose any information you have added and continue when you come back.
Edit Existing Contacts
To edit an existing contact from the Contacts main page, either click on the contact’s name in the list or
click on the contact’s row (which will highlight it in yellow) and then click the “Edit Contact” button at
the bottom of the screen in the contact’s summary overview.
NOTE: Any information from a contact that existed previously in the Client system was migrated to the Contact Manager system. Any information that is missing may not have been entered in a valid format; please check the “Notes” field.
Page | 13
MLS PIN Customer Support 800‐695‐3000
Monday‐Friday 8 am to 7:30 pm, Saturday 9 am to 5 pm, Sunday 9 am to 1 pm
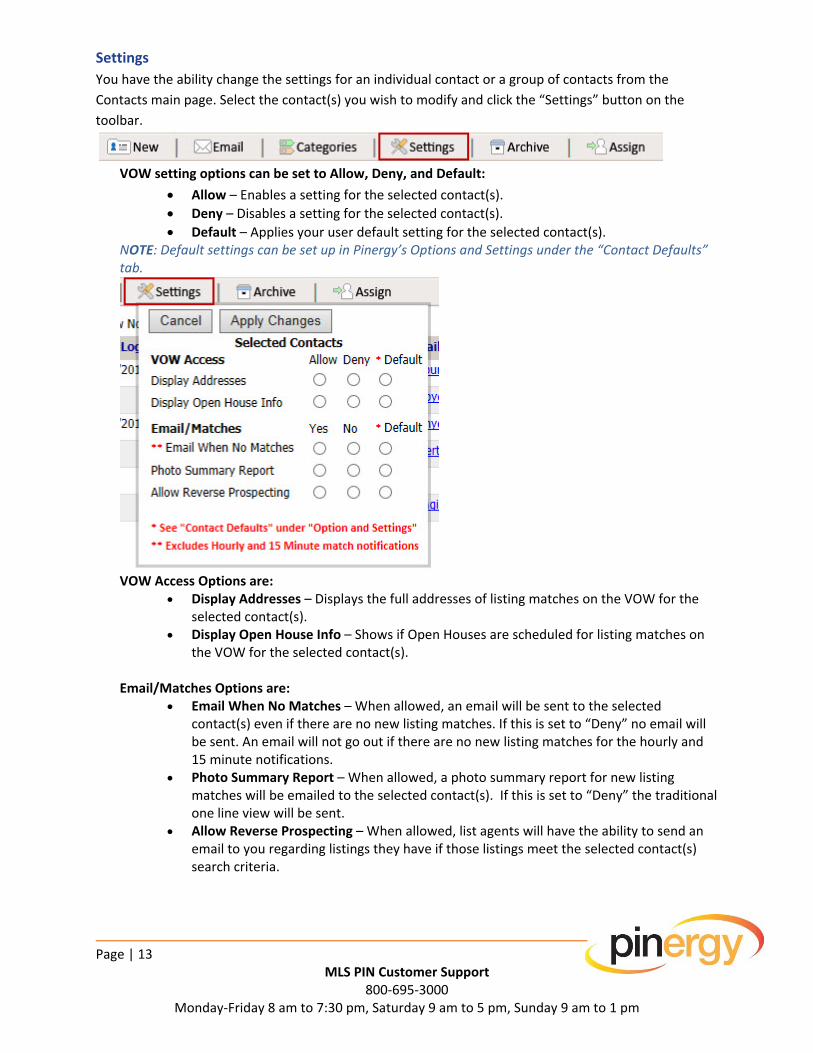
Settings
You have the ability change the settings for an individual contact or a group of contacts from the
Contacts main page. Select the contact(s) you wish to modify and click the “Settings” button on the
toolbar.
VOW setting options can be set to Allow, Deny, and Default:
Allow – Enables a setting for the selected contact(s).
Deny – Disables a setting for the selected contact(s).
Default – Applies your user default setting for the selected contact(s). NOTE: Default settings can be set up in Pinergy’s Options and Settings under the “Contact Defaults” tab.
VOW Access Options are:
Display Addresses – Displays the full addresses of listing matches on the VOW for the selected contact(s).
Display Open House Info – Shows if Open Houses are scheduled for listing matches on the VOW for the selected contact(s).
Email/Matches Options are: Email When No Matches – When allowed, an email will be sent to the selected
contact(s) even if there are no new listing matches. If this is set to “Deny” no email will be sent. An email will not go out if there are no new listing matches for the hourly and 15 minute notifications.
Photo Summary Report – When allowed, a photo summary report for new listing matches will be emailed to the selected contact(s). If this is set to “Deny” the traditional one line view will be sent.
Allow Reverse Prospecting – When allowed, list agents will have the ability to send an email to you regarding listings they have if those listings meet the selected contact(s) search criteria.
Page | 14
MLS PIN Customer Support 800‐695‐3000
Monday‐Friday 8 am to 7:30 pm, Saturday 9 am to 5 pm, Sunday 9 am to 1 pm
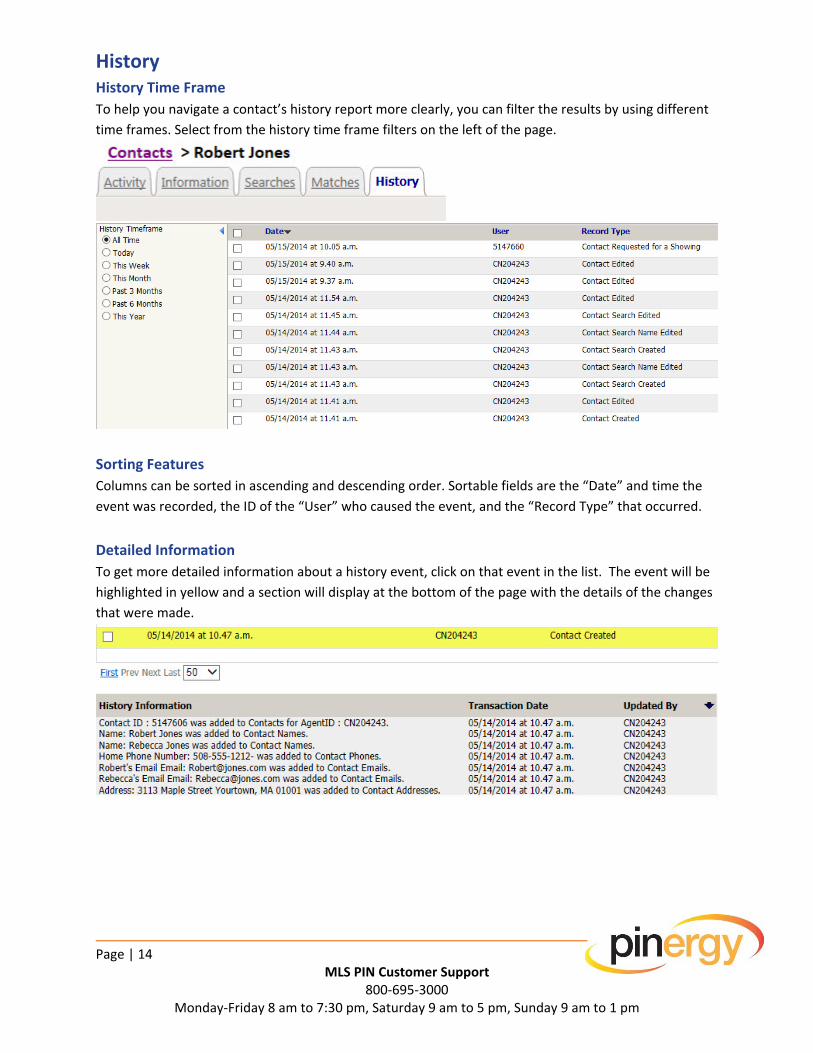
History History Time Frame
To help you navigate a contact’s history report more clearly, you can filter the results by using different
time frames. Select from the history time frame filters on the left of the page.
Sorting Features
Columns can be sorted in ascending and descending order. Sortable fields are the “Date” and time the
event was recorded, the ID of the “User” who caused the event, and the “Record Type” that occurred.
Detailed Information
To get more detailed information about a history event, click on that event in the list. The event will be
highlighted in yellow and a section will display at the bottom of the page with the details of the changes
that were made.
Page | 15
MLS PIN Customer Support 800‐695‐3000
Monday‐Friday 8 am to 7:30 pm, Saturday 9 am to 5 pm, Sunday 9 am to 1 pm
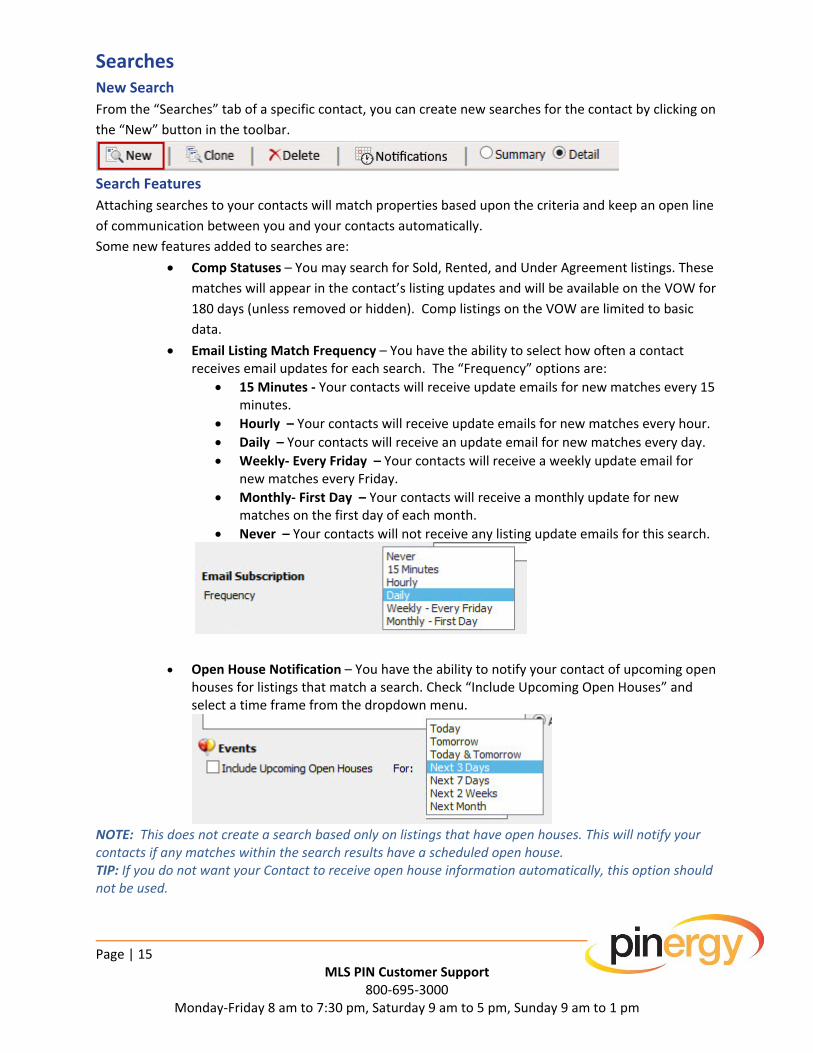
Searches New Search
From the “Searches” tab of a specific contact, you can create new searches for the contact by clicking on
the “New” button in the toolbar.
Search Features
Attaching searches to your contacts will match properties based upon the criteria and keep an open line
of communication between you and your contacts automatically.
Some new features added to searches are:
Comp Statuses – You may search for Sold, Rented, and Under Agreement listings. These
matches will appear in the contact’s listing updates and will be available on the VOW for
180 days (unless removed or hidden). Comp listings on the VOW are limited to basic
data.
Email Listing Match Frequency – You have the ability to select how often a contact receives email updates for each search. The “Frequency” options are:
15 Minutes ‐ Your contacts will receive update emails for new matches every 15 minutes.
Hourly – Your contacts will receive update emails for new matches every hour.
Daily – Your contacts will receive an update email for new matches every day.
Weekly‐ Every Friday – Your contacts will receive a weekly update email for new matches every Friday.
Monthly‐ First Day – Your contacts will receive a monthly update for new matches on the first day of each month.
Never – Your contacts will not receive any listing update emails for this search.
Open House Notification – You have the ability to notify your contact of upcoming open houses for listings that match a search. Check “Include Upcoming Open Houses” and select a time frame from the dropdown menu.
NOTE: This does not create a search based only on listings that have open houses. This will notify your contacts if any matches within the search results have a scheduled open house. TIP: If you do not want your Contact to receive open house information automatically, this option should not be used.
Page | 16
MLS PIN Customer Support 800‐695‐3000
Monday‐Friday 8 am to 7:30 pm, Saturday 9 am to 5 pm, Sunday 9 am to 1 pm
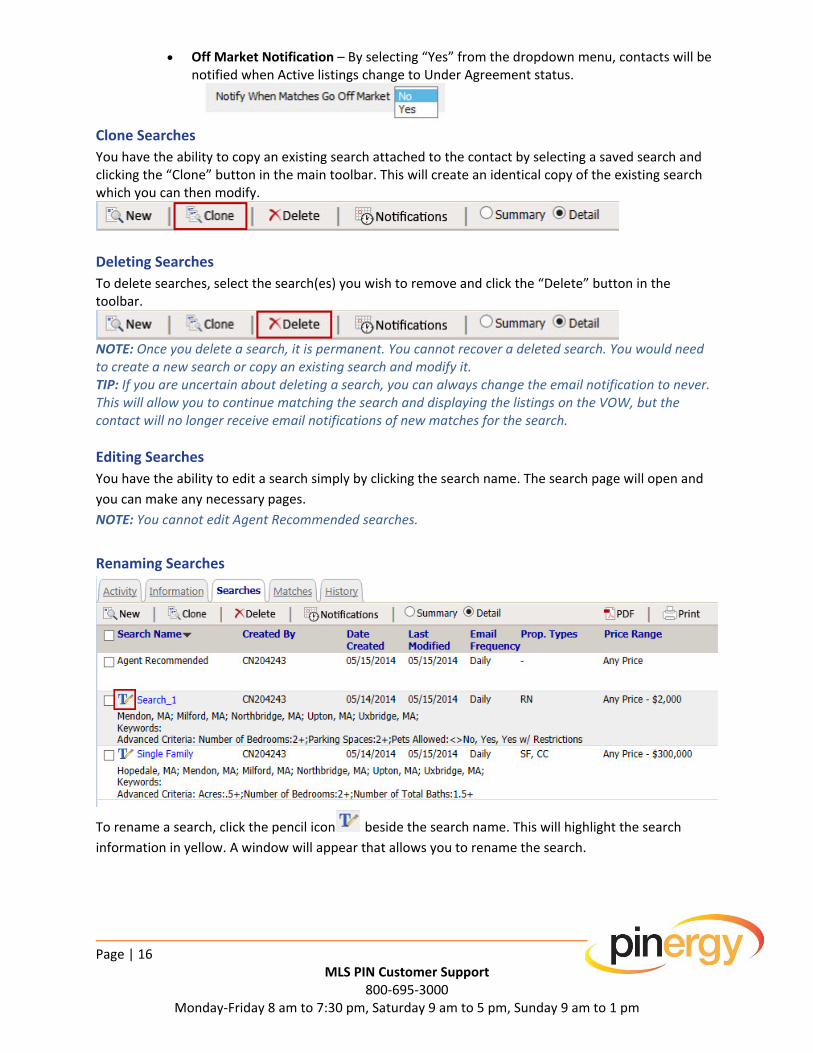
Off Market Notification – By selecting “Yes” from the dropdown menu, contacts will be notified when Active listings change to Under Agreement status.
Clone Searches
You have the ability to copy an existing search attached to the contact by selecting a saved search and clicking the “Clone” button in the main toolbar. This will create an identical copy of the existing search which you can then modify.
Deleting Searches
To delete searches, select the search(es) you wish to remove and click the “Delete” button in the toolbar.
NOTE: Once you delete a search, it is permanent. You cannot recover a deleted search. You would need to create a new search or copy an existing search and modify it. TIP: If you are uncertain about deleting a search, you can always change the email notification to never. This will allow you to continue matching the search and displaying the listings on the VOW, but the contact will no longer receive email notifications of new matches for the search.
Editing Searches
You have the ability to edit a search simply by clicking the search name. The search page will open and
you can make any necessary pages.
NOTE: You cannot edit Agent Recommended searches.
Renaming Searches
To rename a search, click the pencil icon beside the search name. This will highlight the search
information in yellow. A window will appear that allows you to rename the search.
Page | 17
MLS PIN Customer Support 800‐695‐3000
Monday‐Friday 8 am to 7:30 pm, Saturday 9 am to 5 pm, Sunday 9 am to 1 pm
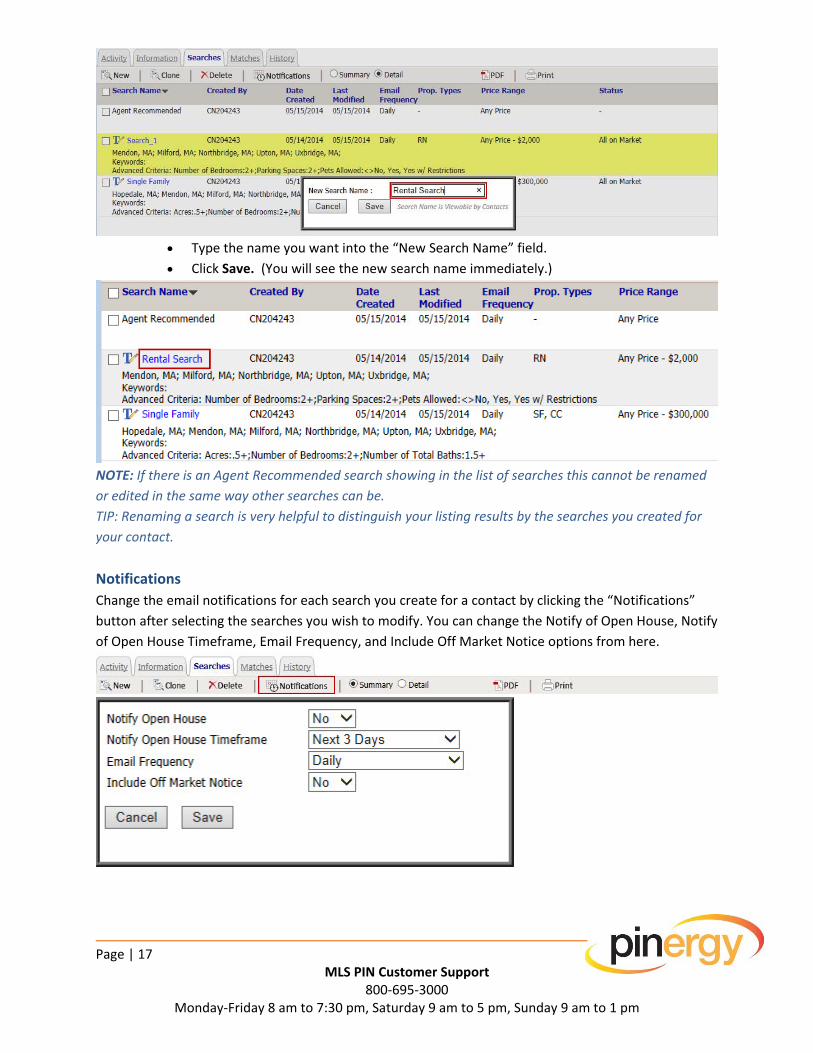
Type the name you want into the “New Search Name” field.
Click Save. (You will see the new search name immediately.)
NOTE: If there is an Agent Recommended search showing in the list of searches this cannot be renamed
or edited in the same way other searches can be.
TIP: Renaming a search is very helpful to distinguish your listing results by the searches you created for
your contact.
Notifications
Change the email notifications for each search you create for a contact by clicking the “Notifications”
button after selecting the searches you wish to modify. You can change the Notify of Open House, Notify
of Open House Timeframe, Email Frequency, and Include Off Market Notice options from here.
Page | 18
MLS PIN Customer Support 800‐695‐3000
Monday‐Friday 8 am to 7:30 pm, Saturday 9 am to 5 pm, Sunday 9 am to 1 pm
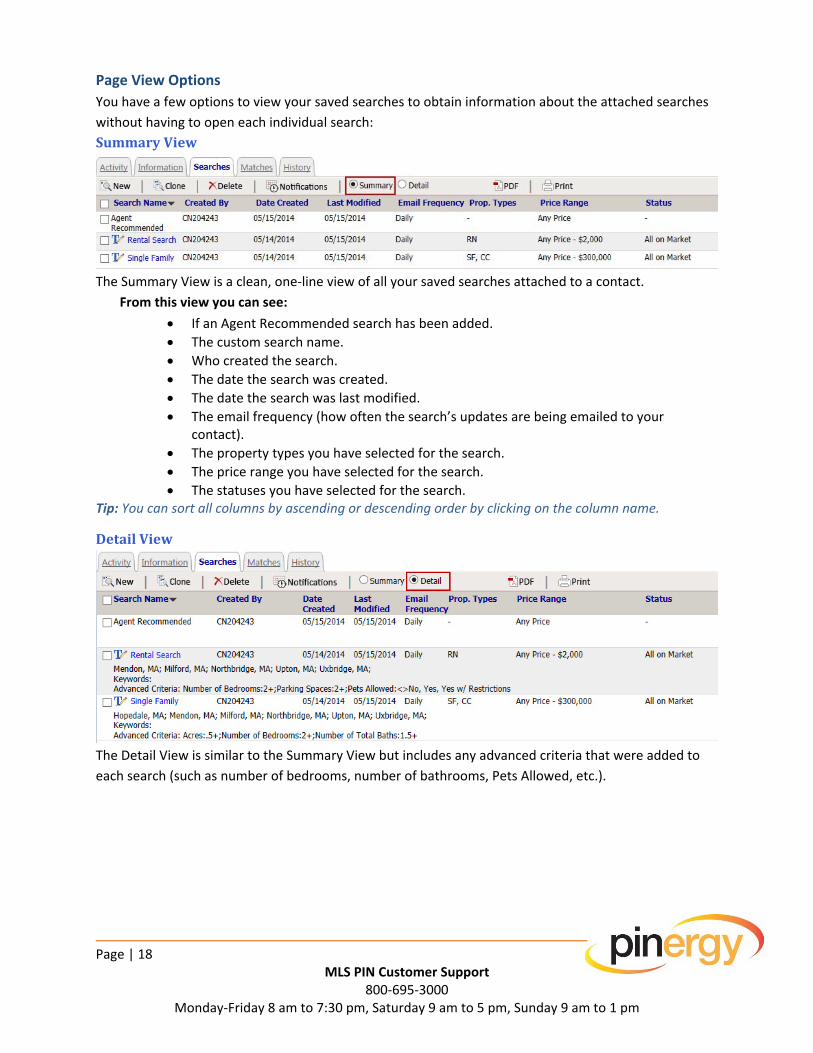
Page View Options You have a few options to view your saved searches to obtain information about the attached searches
without having to open each individual search:
SummaryView
The Summary View is a clean, one‐line view of all your saved searches attached to a contact.
From this view you can see:
If an Agent Recommended search has been added.
The custom search name.
Who created the search.
The date the search was created.
The date the search was last modified.
The email frequency (how often the search’s updates are being emailed to your contact).
The property types you have selected for the search.
The price range you have selected for the search.
The statuses you have selected for the search. Tip: You can sort all columns by ascending or descending order by clicking on the column name.
DetailView
The Detail View is similar to the Summary View but includes any advanced criteria that were added to
each search (such as number of bedrooms, number of bathrooms, Pets Allowed, etc.).

Page | 19
MLS PIN Customer Support 800‐695‐3000
Monday‐Friday 8 am to 7:30 pm, Saturday 9 am to 5 pm, Sunday 9 am to 1 pm
Matches Filtering Listing Results
Clear All Filters – Clears all selected filters.
Client Favorites – Displays only listings that have been flagged as a
favorite by the contact on the VOW.
Feedback – Displays only listings that have received feedback from the
contact on the VOW.
Have Shown – Displays only listings that you have marked as “Have
Shown."
Showing Requests – Displays only listings that have showing requests
from the contact through the VOW.
Searches – Displays only listings within a specific saved search.
TIP: If you manually added listings to a contact from an MLS search,
they will appear in a search named “Agent Recommended.”
Hidden Listings – Allows you to select from the dropdown menu to
view only listings that are “Hidden,” “Not Hidden,” or “All” listings.
Viewed – Allows you to select from the dropdown menu to view only
the listings that have been “Viewed by Client” on the VOW, “Unviewed
by Client,” or “All” of the listings.
Rated – Displays only listings that have been rated by the contact on
the VOW with the star rating(s) you select.
Status – Displays only listings based on the statuses you select from
the filters. You will only see statuses existing within the contact’s
search results.
Towns – Displays only listings within a selected town (or towns).
TIP: Towns displayed will include all towns that have matches from the
saved searches. If a town does not have a match, it will not display in
the filter.
Price Range – Displays only listings within a specific 3‐tier price range
of Low, Medium, and High list price.
NOTE: Price Ranges are calculated based on all listing matches from
saved searches regardless of filtering.
TIP: Filters can be combined to find specific results with matching filter
sets.

Page | 20
MLS PIN Customer Support 800‐695‐3000
Monday‐Friday 8 am to 7:30 pm, Saturday 9 am to 5 pm, Sunday 9 am to 1 pm
Page Viewing Options
ReportViewTab:Columns can be sorted by ascending or descending order by clicking a blue column name.
ListingPageViewTypes: Line View – A clean, text‐only view with minimal property information and sortable
column headers.
Photo Summary View – A brief listing summary with the main photo and sortable column headers.
CMA View – A clean view that groups listings into property types and listing statuses.
Open House View – A photo summary view displaying only listings with scheduled Open Houses. Open House details are displayed.
Showing Summary View – A photo summary view focusing on showing instructions for the listings.
Photo Summary Expanded View – Shows a more‐detailed listing summary, public remarks, and listing office information with the main photo.
Feedback – A special view displaying only listings with feedback and/or ratings from the contact through the VOW. Ratings and feedback are displayed.
Customize – You have the ability to create your own customized one‐line views and save them to your view list menu. To create a custom view:
Select “Customize” from the page view dropdown menu:
Page | 21
MLS PIN Customer Support 800‐695‐3000
Monday‐Friday 8 am to 7:30 pm, Saturday 9 am to 5 pm, Sunday 9 am to 1 pm
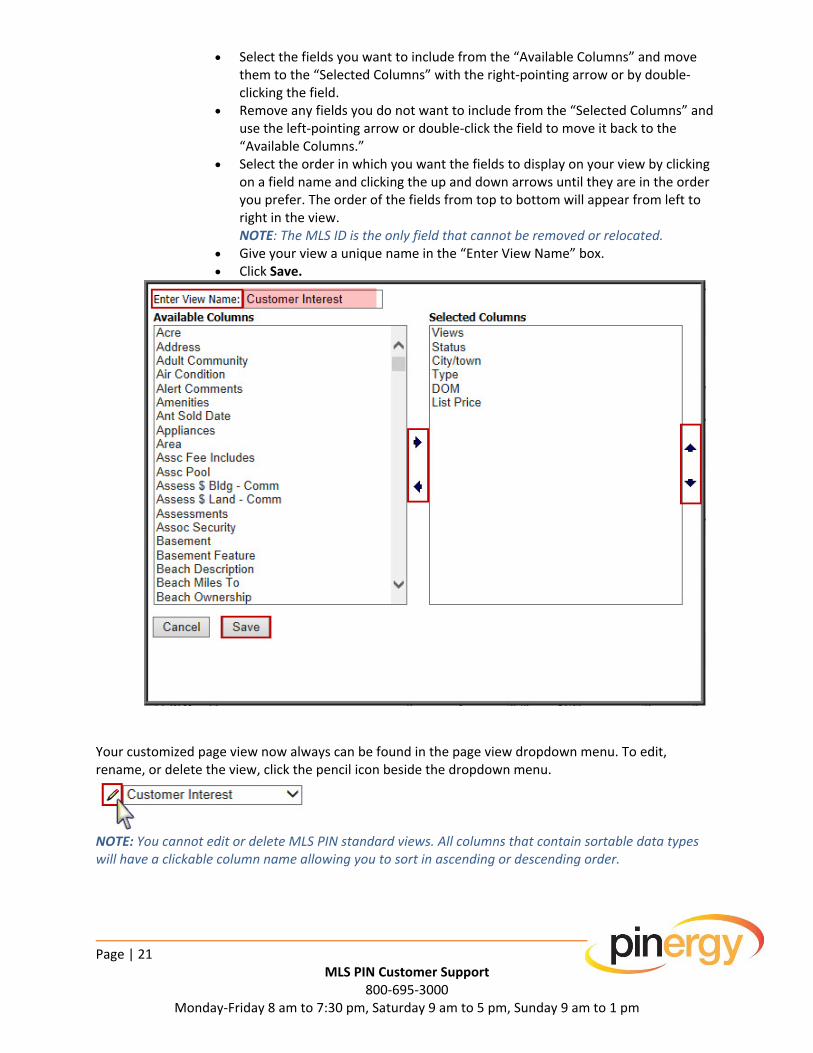
Select the fields you want to include from the “Available Columns” and move them to the “Selected Columns” with the right‐pointing arrow or by double‐clicking the field.
Remove any fields you do not want to include from the “Selected Columns” and use the left‐pointing arrow or double‐click the field to move it back to the “Available Columns.”
Select the order in which you want the fields to display on your view by clicking on a field name and clicking the up and down arrows until they are in the order you prefer. The order of the fields from top to bottom will appear from left to right in the view. NOTE: The MLS ID is the only field that cannot be removed or relocated.
Give your view a unique name in the “Enter View Name” box. Click Save.
Your customized page view now always can be found in the page view dropdown menu. To edit, rename, or delete the view, click the pencil icon beside the dropdown menu.
NOTE: You cannot edit or delete MLS PIN standard views. All columns that contain sortable data types will have a clickable column name allowing you to sort in ascending or descending order.
Page | 22
MLS PIN Customer Support 800‐695‐3000
Monday‐Friday 8 am to 7:30 pm, Saturday 9 am to 5 pm, Sunday 9 am to 1 pm
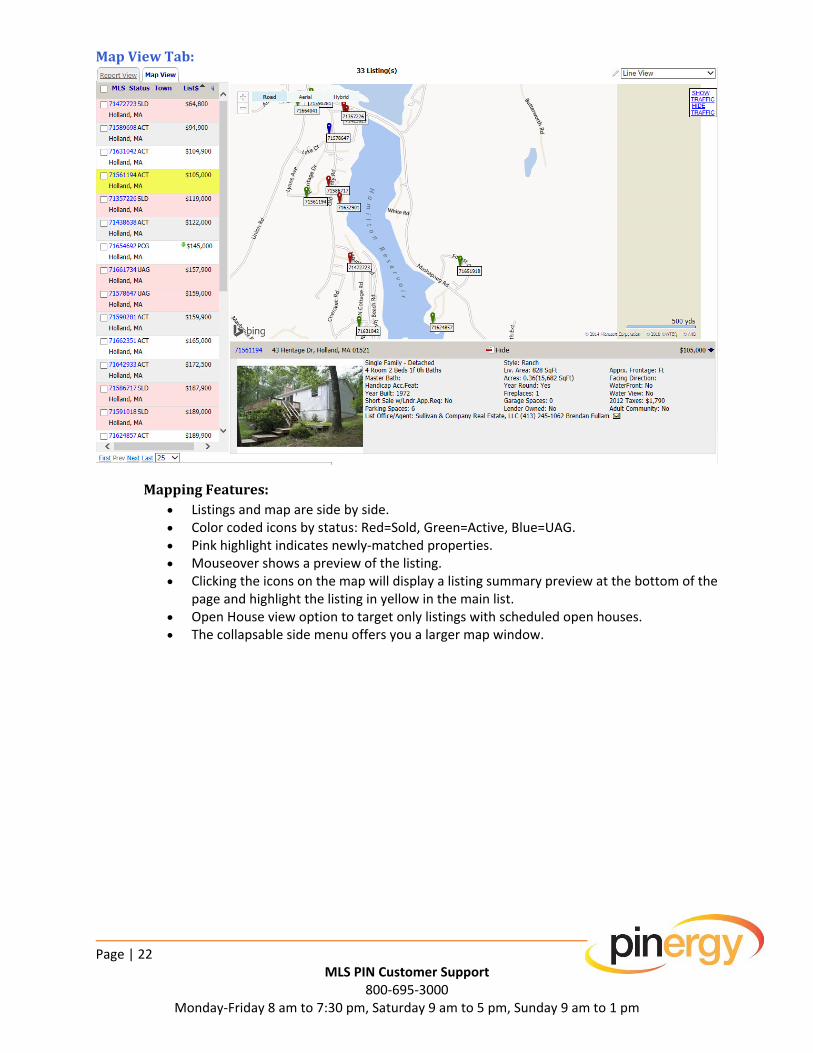
MapViewTab:
MappingFeatures: Listings and map are side by side. Color coded icons by status: Red=Sold, Green=Active, Blue=UAG. Pink highlight indicates newly‐matched properties. Mouseover shows a preview of the listing. Clicking the icons on the map will display a listing summary preview at the bottom of the
page and highlight the listing in yellow in the main list. Open House view option to target only listings with scheduled open houses. The collapsable side menu offers you a larger map window.
Page | 23
MLS PIN Customer Support 800‐695‐3000
Monday‐Friday 8 am to 7:30 pm, Saturday 9 am to 5 pm, Sunday 9 am to 1 pm
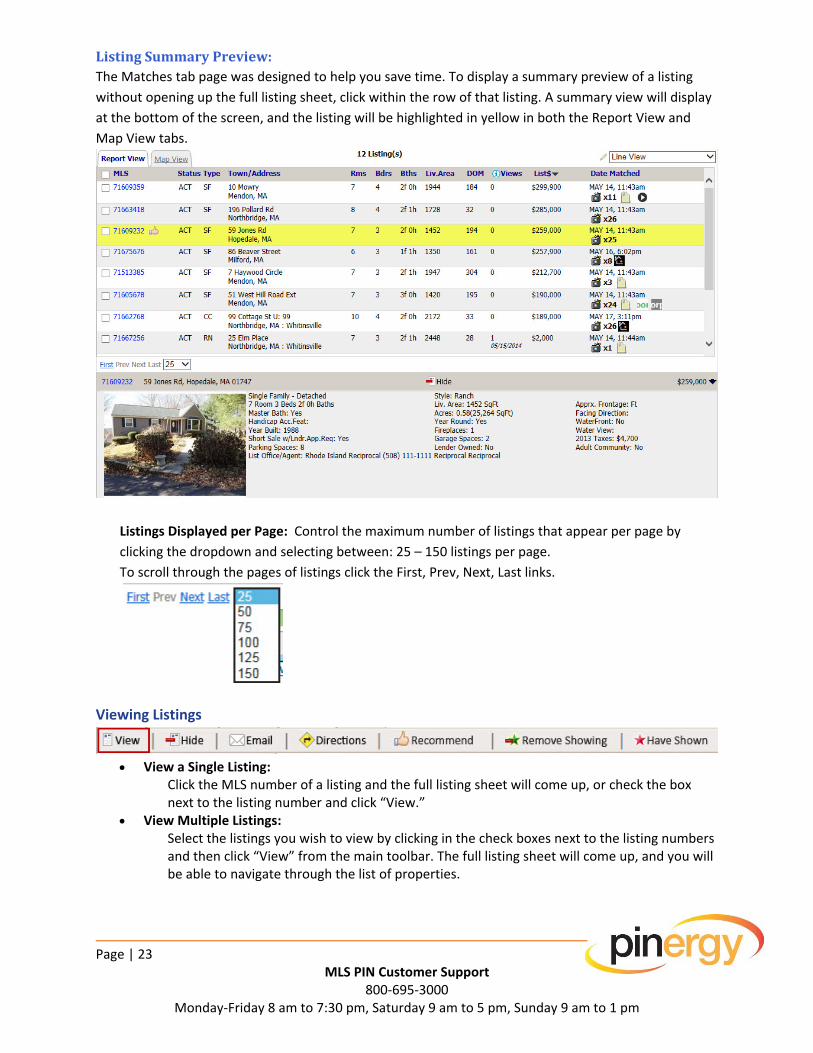
ListingSummaryPreview:The Matches tab page was designed to help you save time. To display a summary preview of a listing
without opening up the full listing sheet, click within the row of that listing. A summary view will display
at the bottom of the screen, and the listing will be highlighted in yellow in both the Report View and
Map View tabs.
Listings Displayed per Page: Control the maximum number of listings that appear per page by
clicking the dropdown and selecting between: 25 – 150 listings per page.
To scroll through the pages of listings click the First, Prev, Next, Last links.
Viewing Listings
View a Single Listing:
Click the MLS number of a listing and the full listing sheet will come up, or check the box next to the listing number and click “View.”
View Multiple Listings: Select the listings you wish to view by clicking in the check boxes next to the listing numbers and then click “View” from the main toolbar. The full listing sheet will come up, and you will be able to navigate through the list of properties.
Page | 24
MLS PIN Customer Support 800‐695‐3000
Monday‐Friday 8 am to 7:30 pm, Saturday 9 am to 5 pm, Sunday 9 am to 1 pm
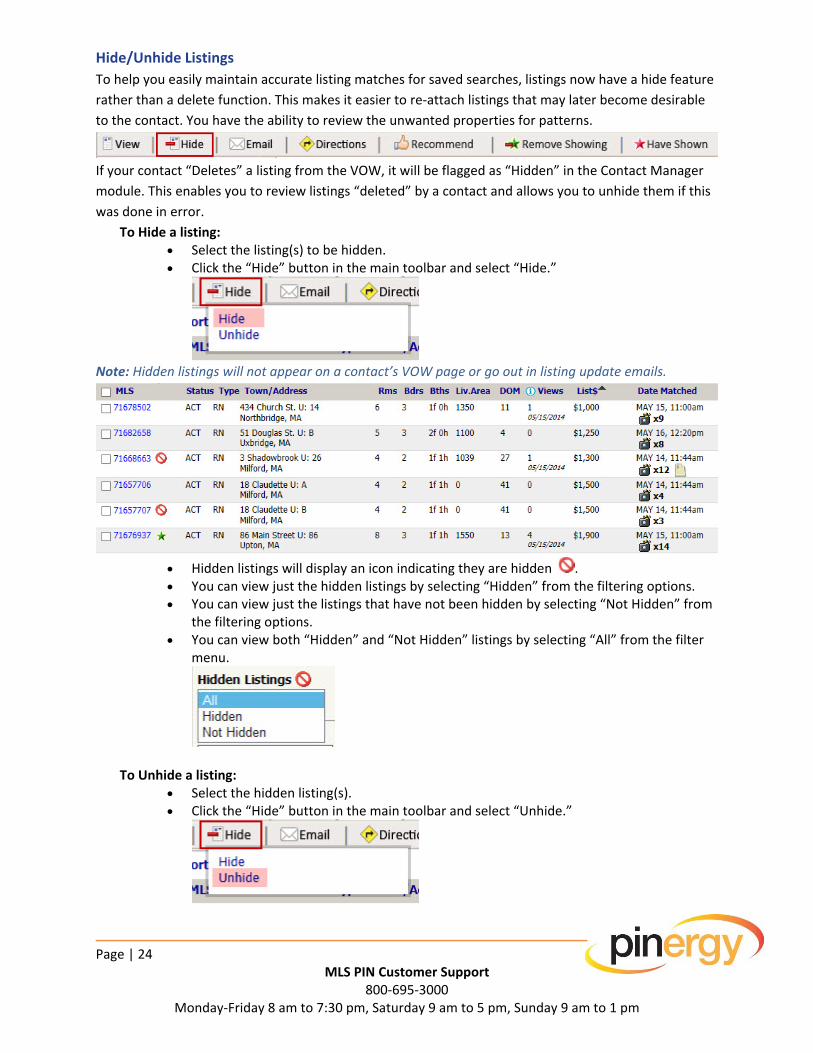
Hide/Unhide Listings
To help you easily maintain accurate listing matches for saved searches, listings now have a hide feature
rather than a delete function. This makes it easier to re‐attach listings that may later become desirable
to the contact. You have the ability to review the unwanted properties for patterns.
If your contact “Deletes” a listing from the VOW, it will be flagged as “Hidden” in the Contact Manager
module. This enables you to review listings “deleted” by a contact and allows you to unhide them if this
was done in error.
To Hide a listing: Select the listing(s) to be hidden. Click the “Hide” button in the main toolbar and select “Hide.”
Note: Hidden listings will not appear on a contact’s VOW page or go out in listing update emails.
Hidden listings will display an icon indicating they are hidden . You can view just the hidden listings by selecting “Hidden” from the filtering options. You can view just the listings that have not been hidden by selecting “Not Hidden” from
the filtering options. You can view both “Hidden” and “Not Hidden” listings by selecting “All” from the filter
menu.
To Unhide a listing:
Select the hidden listing(s). Click the “Hide” button in the main toolbar and select “Unhide.”

Page | 25
MLS PIN Customer Support 800‐695‐3000
Monday‐Friday 8 am to 7:30 pm, Saturday 9 am to 5 pm, Sunday 9 am to 1 pm
Recommend
The system allows you to “Recommend” matches to your contact. When you do this, a new search
named “Agent Recommended” is added to your Searches for the contact.
To Recommend Listings:
Select the listing(s) by checking the box(es) next to the listing(s).
Click the “Recommend” button.
Select Recommend. To Unrecommend Listings:
Select the recommended listing(s) by checking the box(es) next to the listing(s).
Click the “Recommend” button.
Select Unrecommend.
Remove Showing
When a contact requests a showing of a property, it is indicated within the Matches tab with a green
star next to the listing. You can use the “Remove Showing” button to remove the green stars from any
listings flagged with a showing request.
To Remove Showings:
Select the listing(s) with a Showing Request by checking the box(es) for the listing(s).
Click Remove Showing.
Page | 26
MLS PIN Customer Support 800‐695‐3000
Monday‐Friday 8 am to 7:30 pm, Saturday 9 am to 5 pm, Sunday 9 am to 1 pm
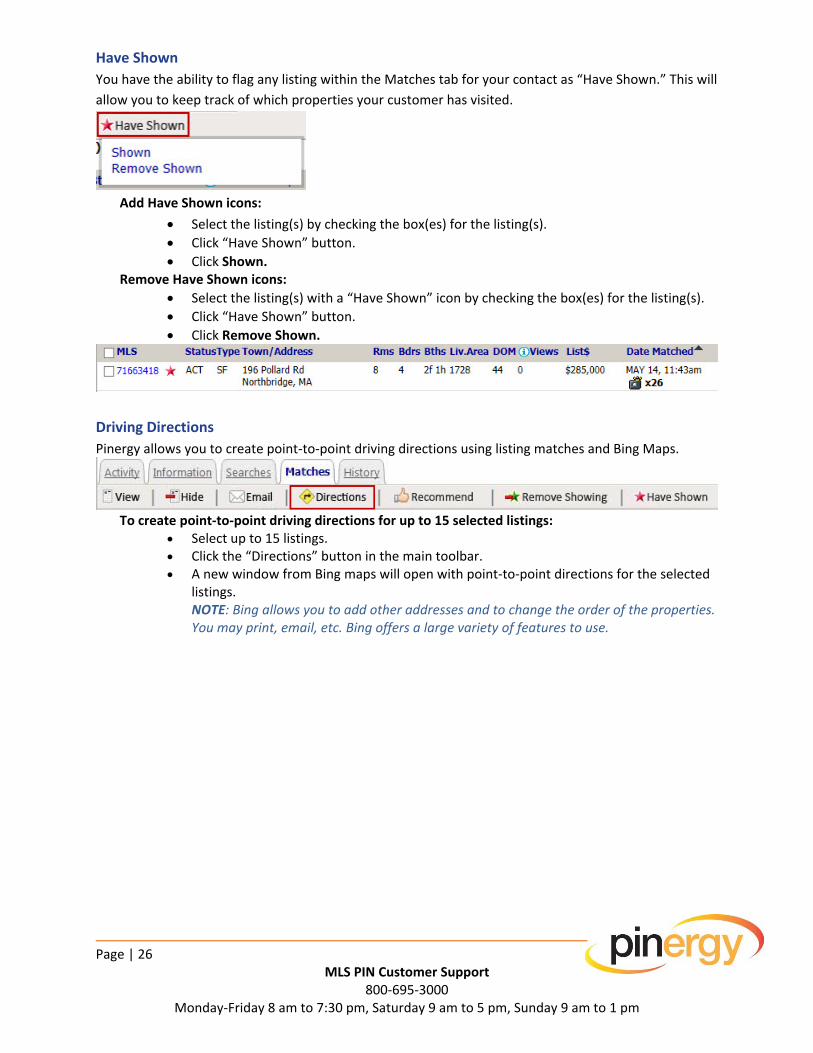
Have Shown
You have the ability to flag any listing within the Matches tab for your contact as “Have Shown.” This will
allow you to keep track of which properties your customer has visited.
Add Have Shown icons:
Select the listing(s) by checking the box(es) for the listing(s).
Click “Have Shown” button.
Click Shown. Remove Have Shown icons:
Select the listing(s) with a “Have Shown” icon by checking the box(es) for the listing(s).
Click “Have Shown” button.
Click Remove Shown.
Driving Directions
Pinergy allows you to create point‐to‐point driving directions using listing matches and Bing Maps.
To create point‐to‐point driving directions for up to 15 selected listings:
Select up to 15 listings. Click the “Directions” button in the main toolbar. A new window from Bing maps will open with point‐to‐point directions for the selected
listings. NOTE: Bing allows you to add other addresses and to change the order of the properties. You may print, email, etc. Bing offers a large variety of features to use.
Page | 27
MLS PIN Customer Support 800‐695‐3000
Monday‐Friday 8 am to 7:30 pm, Saturday 9 am to 5 pm, Sunday 9 am to 1 pm
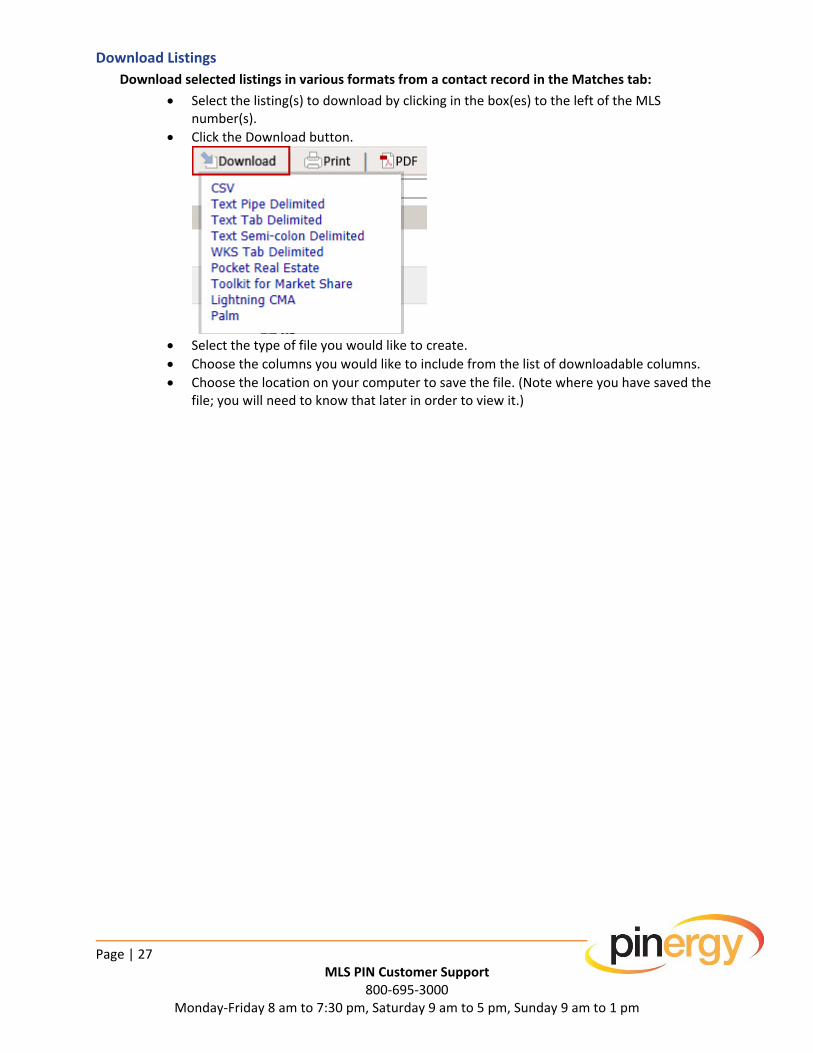
Download Listings
Download selected listings in various formats from a contact record in the Matches tab:
Select the listing(s) to download by clicking in the box(es) to the left of the MLS number(s).
Click the Download button.
Select the type of file you would like to create.
Choose the columns you would like to include from the list of downloadable columns.
Choose the location on your computer to save the file. (Note where you have saved the file; you will need to know that later in order to view it.)
Page | 28
MLS PIN Customer Support 800‐695‐3000
Monday‐Friday 8 am to 7:30 pm, Saturday 9 am to 5 pm, Sunday 9 am to 1 pm
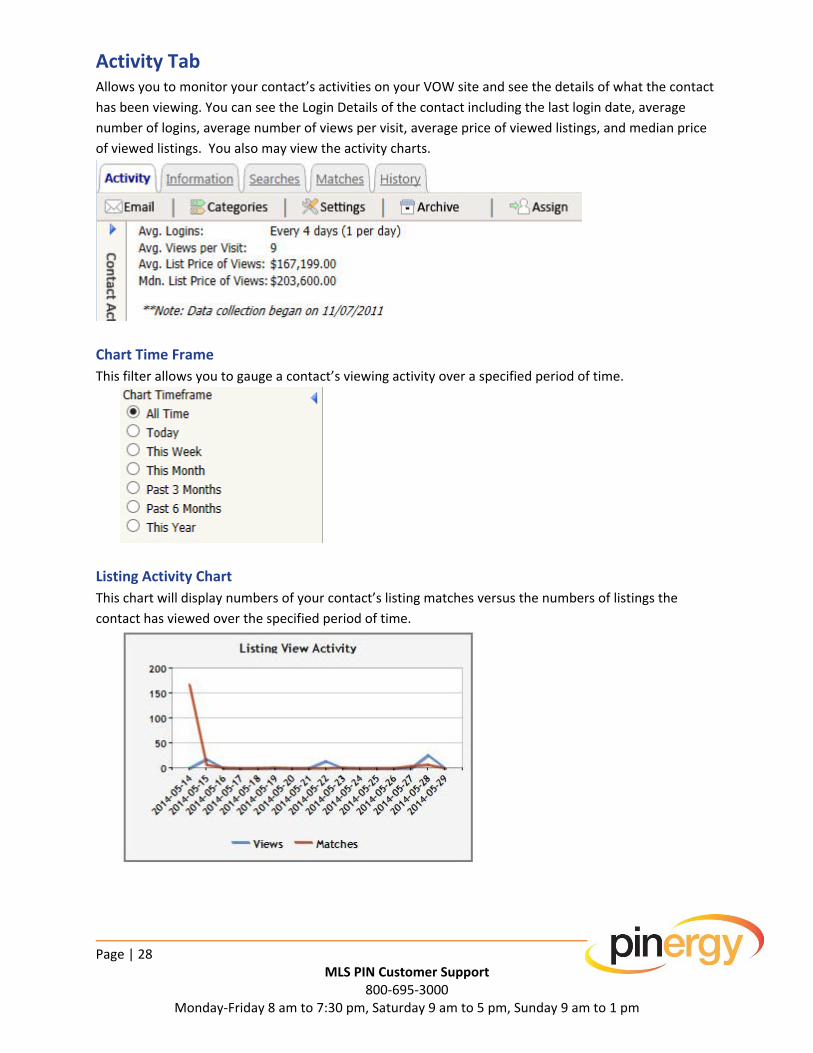
Activity Tab Allows you to monitor your contact’s activities on your VOW site and see the details of what the contact
has been viewing. You can see the Login Details of the contact including the last login date, average
number of logins, average number of views per visit, average price of viewed listings, and median price
of viewed listings. You also may view the activity charts.
Chart Time Frame
This filter allows you to gauge a contact’s viewing activity over a specified period of time.
Listing Activity Chart This chart will display numbers of your contact’s listing matches versus the numbers of listings the
contact has viewed over the specified period of time.
Page | 29
MLS PIN Customer Support 800‐695‐3000
Monday‐Friday 8 am to 7:30 pm, Saturday 9 am to 5 pm, Sunday 9 am to 1 pm
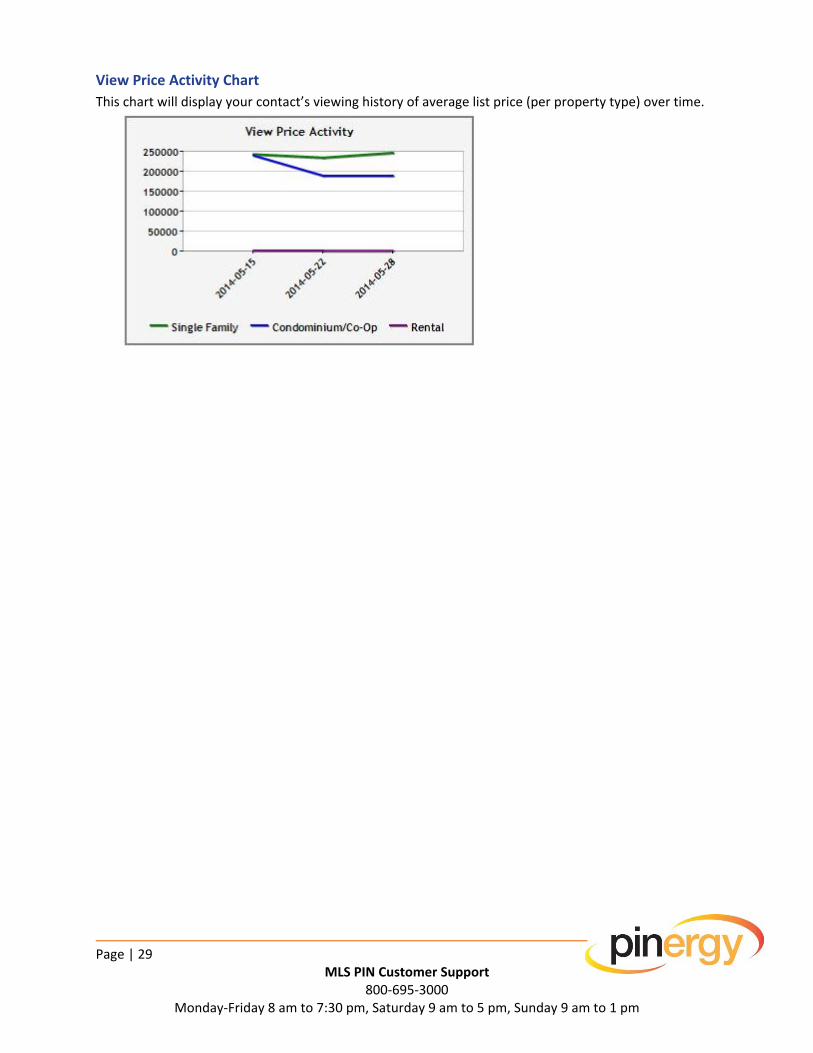
View Price Activity Chart This chart will display your contact’s viewing history of average list price (per property type) over time.
Page | 30
MLS PIN Customer Support 800‐695‐3000
Monday‐Friday 8 am to 7:30 pm, Saturday 9 am to 5 pm, Sunday 9 am to 1 pm
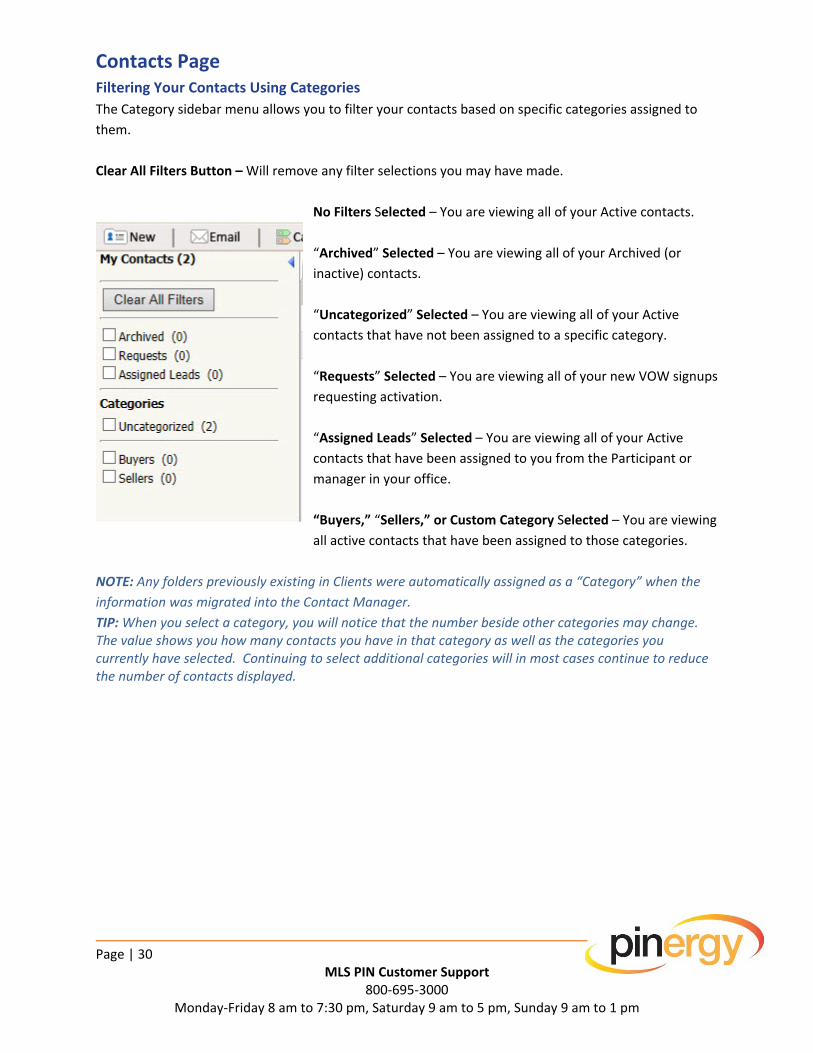
Contacts Page Filtering Your Contacts Using Categories
The Category sidebar menu allows you to filter your contacts based on specific categories assigned to
them.
Clear All Filters Button – Will remove any filter selections you may have made.
No Filters Selected – You are viewing all of your Active contacts.
“Archived” Selected – You are viewing all of your Archived (or
inactive) contacts.
“Uncategorized” Selected – You are viewing all of your Active
contacts that have not been assigned to a specific category.
“Requests” Selected – You are viewing all of your new VOW signups
requesting activation.
“Assigned Leads” Selected – You are viewing all of your Active
contacts that have been assigned to you from the Participant or
manager in your office.
“Buyers,” “Sellers,” or Custom Category Selected – You are viewing
all active contacts that have been assigned to those categories.
NOTE: Any folders previously existing in Clients were automatically assigned as a “Category” when the
information was migrated into the Contact Manager.
TIP: When you select a category, you will notice that the number beside other categories may change. The value shows you how many contacts you have in that category as well as the categories you currently have selected. Continuing to select additional categories will in most cases continue to reduce the number of contacts displayed.

Page | 31
MLS PIN Customer Support 800‐695‐3000
Monday‐Friday 8 am to 7:30 pm, Saturday 9 am to 5 pm, Sunday 9 am to 1 pm
Contact Main Page Viewing Features
The Contact Manager main page is designed to help you find important information about your contacts
without having to open each individual contact record.
ContactInfoTab
Displays the main contact’s name.
Displays the first phone number entered or the preferred phoned number if one is selected. (A strikethrough will indicate that you flagged them as preferring not to be contacted via phone.)
Displays the first email address set to receive emails. (A strikethrough will indicate that you flagged them as preferring not to be emailed or they have unsubscribed from the email reminders.)
Displays the name of the Participant or manager who assigned the contact to you (if it was assigned). It will also note whether or not the contact has been viewed.
ActivityViewTab
Displays your main contact’s name.
Displays the date the contact last logged in to your VOW.
Displays a blue pushpin if the contact is currently logged in to your VOW.
Displays some details of the searches associated with the contact.
Displays the listing types in the searches.
Displays the low and high list price ranges that are set up in the search criteria.
Displays the total number of visits made to your VOW.
Displays the number of visits made to your VOW this past week.
Displays the Participant or manager who assigned the contact to you (if the contact was assigned). It will also note whether or not the contact has been viewed.
Displays if a contact is a pending request for updates.
Page | 32
MLS PIN Customer Support 800‐695‐3000
Monday‐Friday 8 am to 7:30 pm, Saturday 9 am to 5 pm, Sunday 9 am to 1 pm
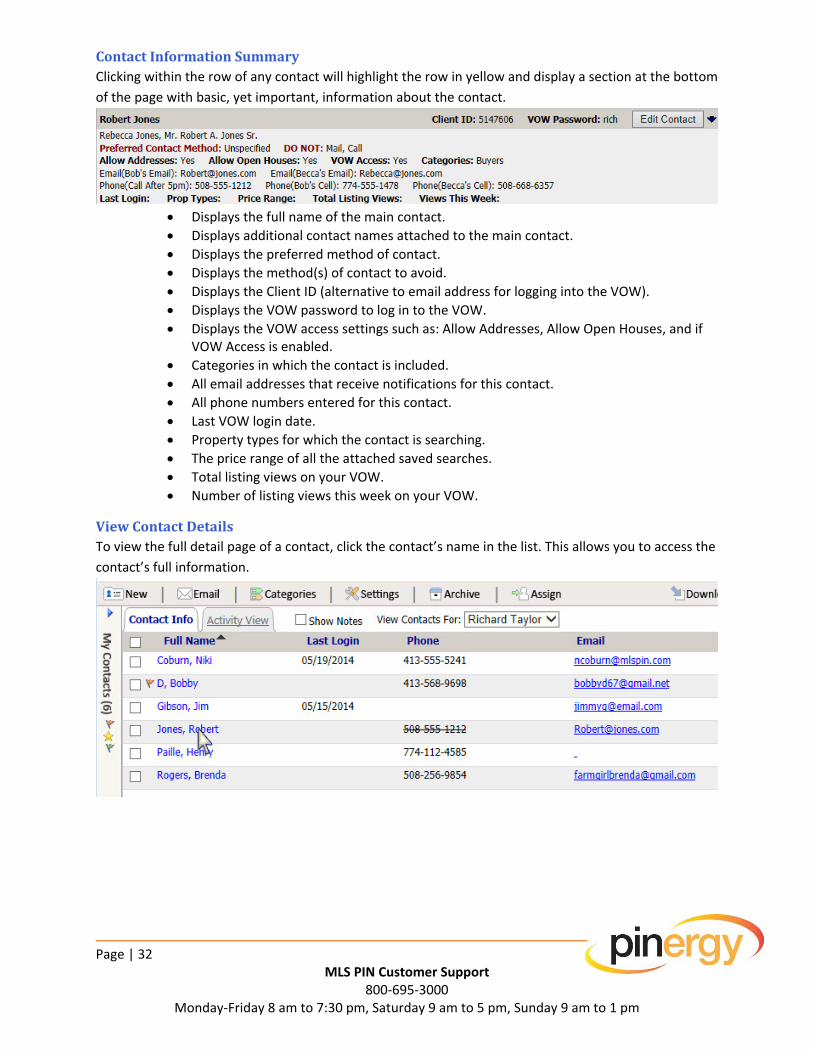
ContactInformationSummaryClicking within the row of any contact will highlight the row in yellow and display a section at the bottom
of the page with basic, yet important, information about the contact.
Displays the full name of the main contact.
Displays additional contact names attached to the main contact.
Displays the preferred method of contact.
Displays the method(s) of contact to avoid.
Displays the Client ID (alternative to email address for logging into the VOW).
Displays the VOW password to log in to the VOW.
Displays the VOW access settings such as: Allow Addresses, Allow Open Houses, and if VOW Access is enabled.
Categories in which the contact is included.
All email addresses that receive notifications for this contact.
All phone numbers entered for this contact.
Last VOW login date.
Property types for which the contact is searching.
The price range of all the attached saved searches.
Total listing views on your VOW.
Number of listing views this week on your VOW.
ViewContactDetailsTo view the full detail page of a contact, click the contact’s name in the list. This allows you to access the
contact’s full information.
Page | 33
MLS PIN Customer Support 800‐695‐3000
Monday‐Friday 8 am to 7:30 pm, Saturday 9 am to 5 pm, Sunday 9 am to 1 pm
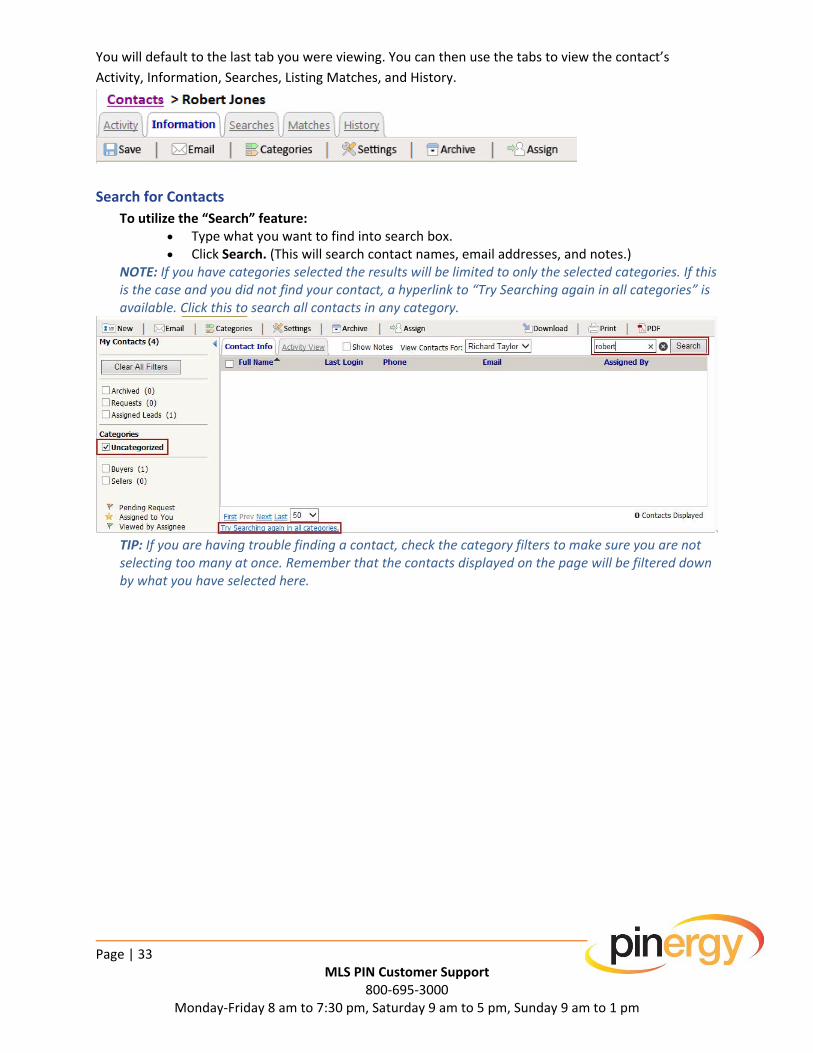
You will default to the last tab you were viewing. You can then use the tabs to view the contact’s
Activity, Information, Searches, Listing Matches, and History.
Search for Contacts
To utilize the “Search” feature: Type what you want to find into search box. Click Search. (This will search contact names, email addresses, and notes.)
NOTE: If you have categories selected the results will be limited to only the selected categories. If this is the case and you did not find your contact, a hyperlink to “Try Searching again in all categories” is available. Click this to search all contacts in any category.
TIP: If you are having trouble finding a contact, check the category filters to make sure you are not selecting too many at once. Remember that the contacts displayed on the page will be filtered down by what you have selected here.
Page | 34
MLS PIN Customer Support 800‐695‐3000
Monday‐Friday 8 am to 7:30 pm, Saturday 9 am to 5 pm, Sunday 9 am to 1 pm
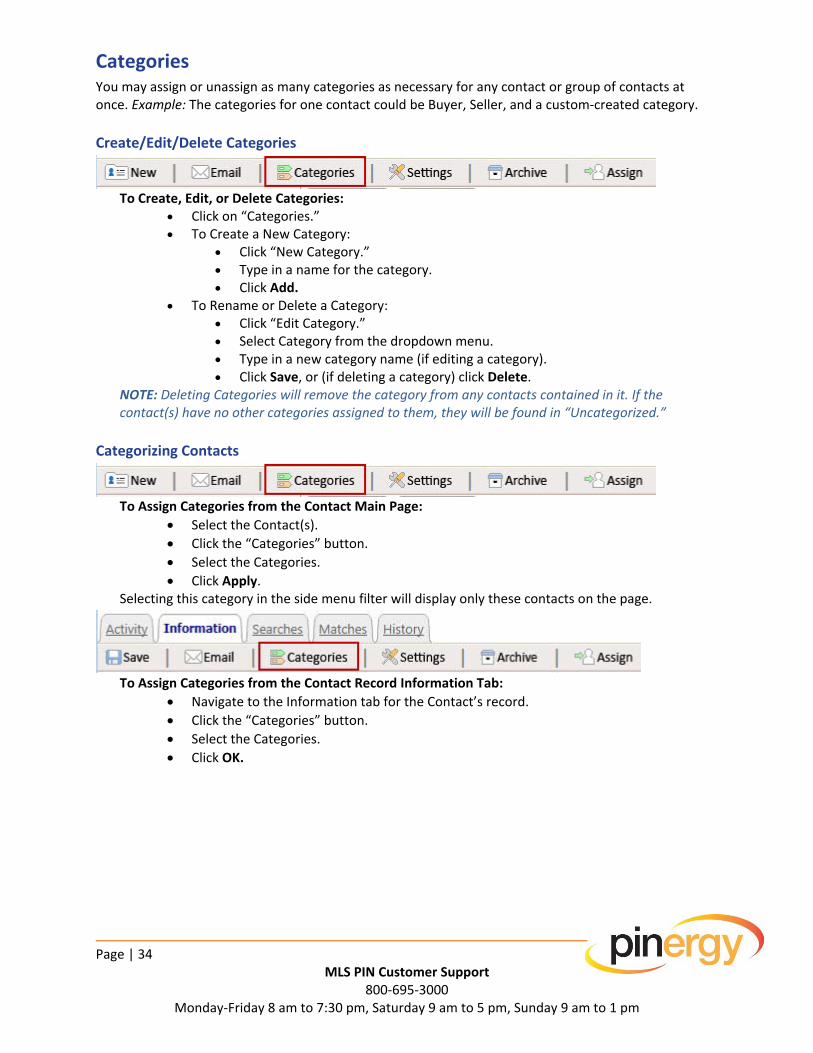
Categories You may assign or unassign as many categories as necessary for any contact or group of contacts at once. Example: The categories for one contact could be Buyer, Seller, and a custom‐created category.
Create/Edit/Delete Categories
To Create, Edit, or Delete Categories:
Click on “Categories.” To Create a New Category:
Click “New Category.” Type in a name for the category. Click Add.
To Rename or Delete a Category: Click “Edit Category.” Select Category from the dropdown menu. Type in a new category name (if editing a category). Click Save, or (if deleting a category) click Delete.
NOTE: Deleting Categories will remove the category from any contacts contained in it. If the contact(s) have no other categories assigned to them, they will be found in “Uncategorized.”
Categorizing Contacts
To Assign Categories from the Contact Main Page:
Select the Contact(s).
Click the “Categories” button.
Select the Categories.
Click Apply. Selecting this category in the side menu filter will display only these contacts on the page.
To Assign Categories from the Contact Record Information Tab:
Navigate to the Information tab for the Contact’s record.
Click the “Categories” button.
Select the Categories.
Click OK.
Page | 35
MLS PIN Customer Support 800‐695‐3000
Monday‐Friday 8 am to 7:30 pm, Saturday 9 am to 5 pm, Sunday 9 am to 1 pm
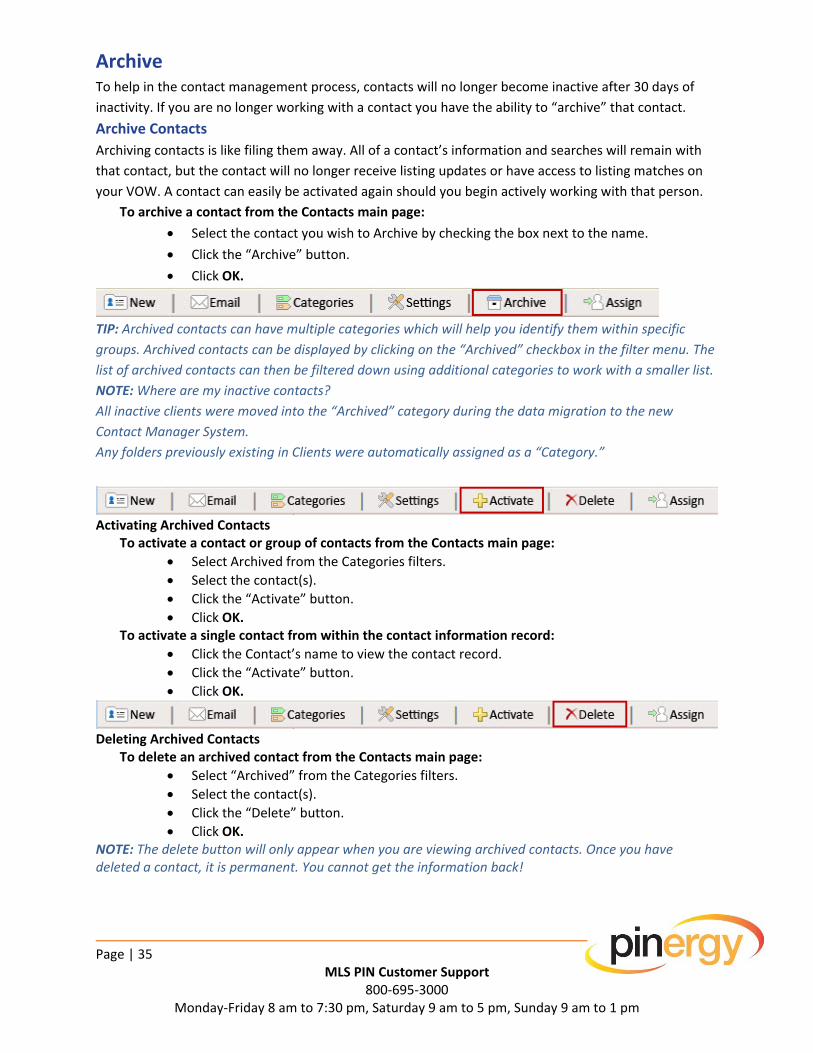
Archive To help in the contact management process, contacts will no longer become inactive after 30 days of
inactivity. If you are no longer working with a contact you have the ability to “archive” that contact.
Archive Contacts
Archiving contacts is like filing them away. All of a contact’s information and searches will remain with
that contact, but the contact will no longer receive listing updates or have access to listing matches on
your VOW. A contact can easily be activated again should you begin actively working with that person.
To archive a contact from the Contacts main page:
Select the contact you wish to Archive by checking the box next to the name.
Click the “Archive” button.
Click OK.
TIP: Archived contacts can have multiple categories which will help you identify them within specific
groups. Archived contacts can be displayed by clicking on the “Archived” checkbox in the filter menu. The
list of archived contacts can then be filtered down using additional categories to work with a smaller list.
NOTE: Where are my inactive contacts?
All inactive clients were moved into the “Archived” category during the data migration to the new
Contact Manager System.
Any folders previously existing in Clients were automatically assigned as a “Category.”
Activating Archived Contacts
To activate a contact or group of contacts from the Contacts main page:
Select Archived from the Categories filters.
Select the contact(s).
Click the “Activate” button.
Click OK. To activate a single contact from within the contact information record:
Click the Contact’s name to view the contact record.
Click the “Activate” button.
Click OK.
Deleting Archived Contacts
To delete an archived contact from the Contacts main page:
Select “Archived” from the Categories filters.
Select the contact(s).
Click the “Delete” button.
Click OK. NOTE: The delete button will only appear when you are viewing archived contacts. Once you have deleted a contact, it is permanent. You cannot get the information back!

Page | 36
MLS PIN Customer Support 800‐695‐3000
Monday‐Friday 8 am to 7:30 pm, Saturday 9 am to 5 pm, Sunday 9 am to 1 pm
Email Email Contacts
Contacts main page:
You can email one or more of your contacts from the Contacts main page with the “Email” button.
This action will send an email to each of the email addresses for the selected contact(s) where
“Receive Emails” is selected.
Information tab of a contact record:
Email the contact you are viewing by clicking the “Email” button. This action will send an email to
each of the email addresses where “Receive Emails” is selected. The email will not be sent to an
email address that does not have “Receive Emails” selected.
NOTE: If you want to send an email to an email address that does not have “Receive Emails” selected, click the envelope icon beside the email address.
Remind Contacts of Recent Matches Email a selected contact a reminder of recent listing matches by selecting “Send Reminder” under the
Email button.
Select the contact you wish to remind
Click “Email” from the Toolbar
Click “Send Reminder”
You can add a message to the email you are about to send and when done click Send Email
Page | 37
MLS PIN Customer Support 800‐695‐3000
Monday‐Friday 8 am to 7:30 pm, Saturday 9 am to 5 pm, Sunday 9 am to 1 pm
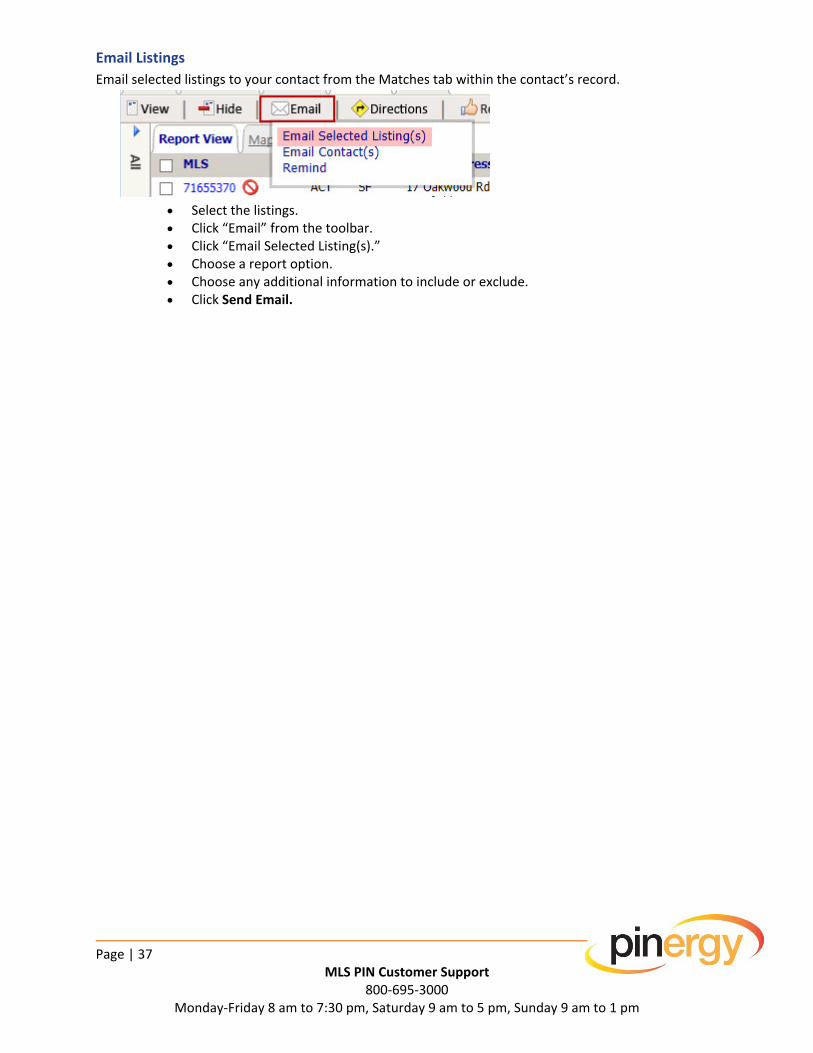
Email Listings
Email selected listings to your contact from the Matches tab within the contact’s record.
Select the listings. Click “Email” from the toolbar. Click “Email Selected Listing(s).” Choose a report option. Choose any additional information to include or exclude. Click Send Email.

Page | 38
MLS PIN Customer Support 800‐695‐3000
Monday‐Friday 8 am to 7:30 pm, Saturday 9 am to 5 pm, Sunday 9 am to 1 pm
Settings
You have the ability change the settings for an individual contact or a group of contacts from the
Contacts main page. Select the contact(s) you wish to modify and click the “Settings” button on the
toolbar.
VOW setting options can be set to Allow, Deny, and Default:
Allow – Enables a setting for the selected contact(s).
Deny – Disables a setting for the selected contact(s).
Default – Applies your user default setting for the selected contact(s). NOTE: Default settings can be set up in Pinergy’s Options and Settings under the “Contact Defaults” tab.
VOW Access Options are:
Display Addresses – Displays the full addresses of listing matches on the VOW for the selected contact(s).
Display Open House Info – Shows if Open Houses are scheduled for listing matches on the VOW for the selected contact(s).
Email/Matches Options are: Email When No Matches – When allowed, an email will be sent to the selected
contact(s) even if there are no new listing matches. If this is set to “Deny” no email will be sent. An email will not go out if there are no new listing matches for the hourly and 15 minute notifications.
Photo Summary Report – When allowed, a photo summary report for new listing matches will be emailed to the selected contact(s). If this is set to “Deny” the traditional one line view will be sent.
Allow Reverse Prospecting – When allowed, list agents will have the ability to send an email to you regarding listings they have if those listings meet the selected contact(s) search criteria.
Page | 39
MLS PIN Customer Support 800‐695‐3000
Monday‐Friday 8 am to 7:30 pm, Saturday 9 am to 5 pm, Sunday 9 am to 1 pm
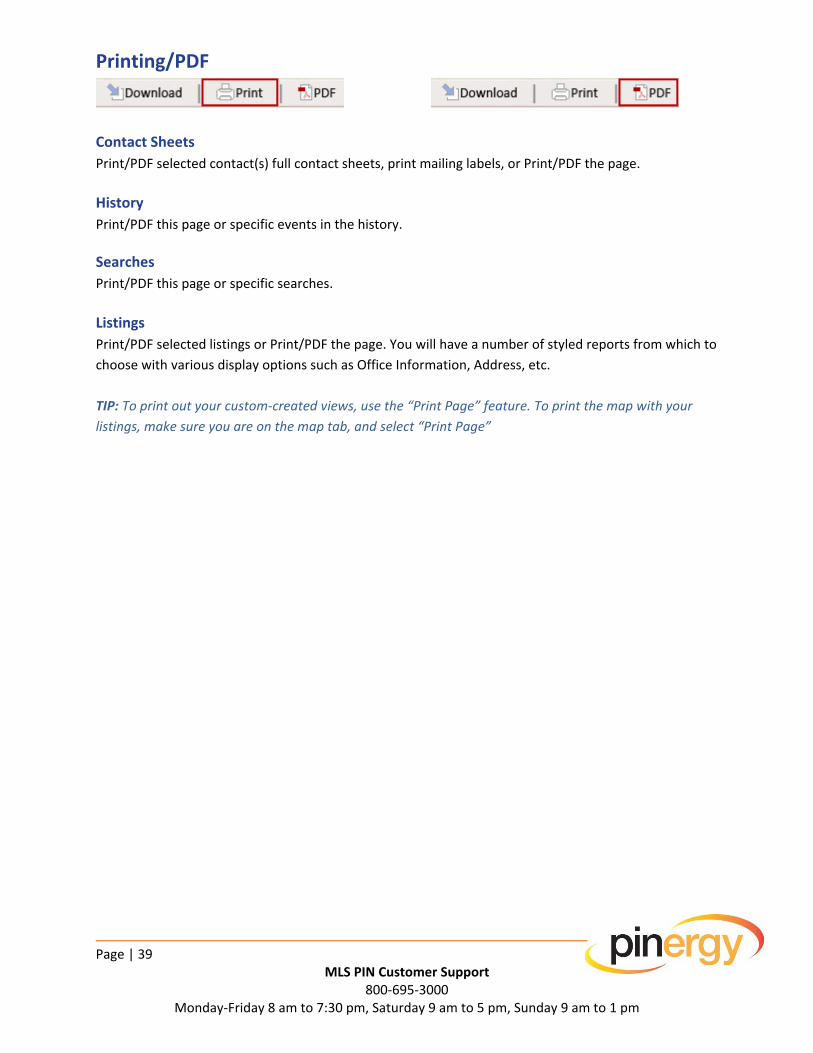
Printing/PDF
Contact Sheets
Print/PDF selected contact(s) full contact sheets, print mailing labels, or Print/PDF the page.
History
Print/PDF this page or specific events in the history.
Searches
Print/PDF this page or specific searches.
Listings
Print/PDF selected listings or Print/PDF the page. You will have a number of styled reports from which to
choose with various display options such as Office Information, Address, etc.
TIP: To print out your custom‐created views, use the “Print Page” feature. To print the map with your
listings, make sure you are on the map tab, and select “Print Page”
Page | 40
MLS PIN Customer Support 800‐695‐3000
Monday‐Friday 8 am to 7:30 pm, Saturday 9 am to 5 pm, Sunday 9 am to 1 pm
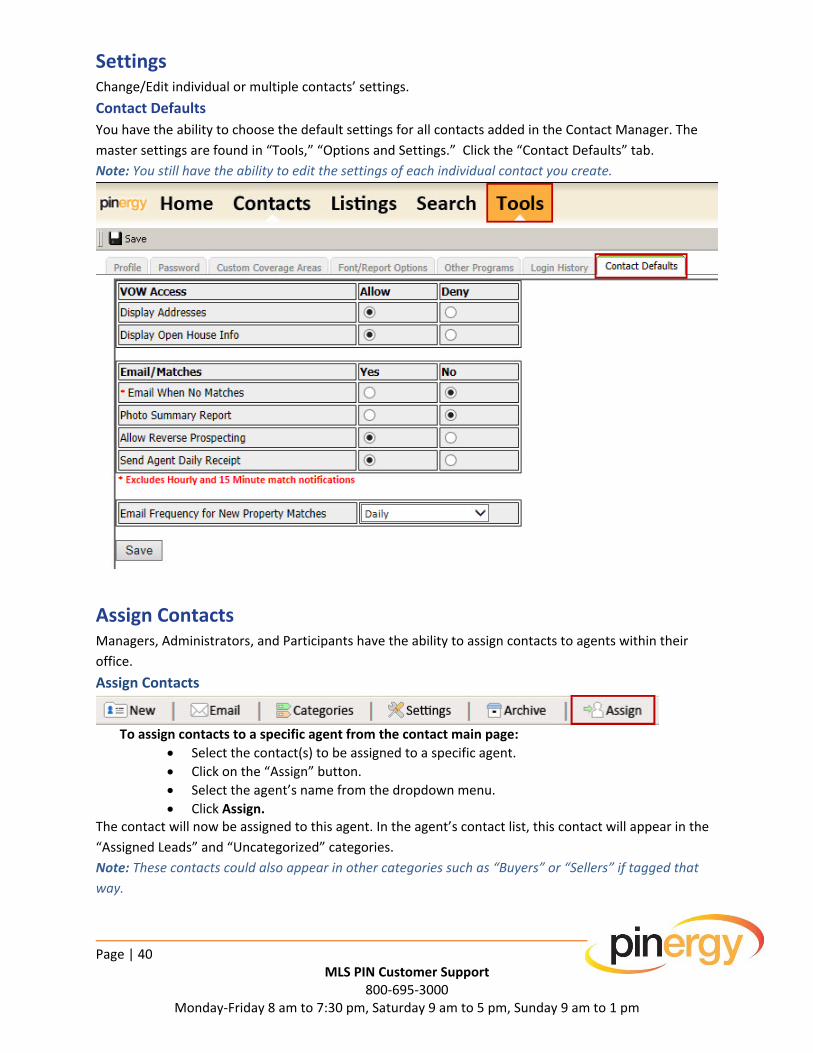
Settings Change/Edit individual or multiple contacts’ settings.
Contact Defaults
You have the ability to choose the default settings for all contacts added in the Contact Manager. The
master settings are found in “Tools,” “Options and Settings.” Click the “Contact Defaults” tab.
Note: You still have the ability to edit the settings of each individual contact you create.
Assign Contacts Managers, Administrators, and Participants have the ability to assign contacts to agents within their
office.
Assign Contacts
To assign contacts to a specific agent from the contact main page:
Select the contact(s) to be assigned to a specific agent.
Click on the “Assign” button.
Select the agent’s name from the dropdown menu.
Click Assign. The contact will now be assigned to this agent. In the agent’s contact list, this contact will appear in the
“Assigned Leads” and “Uncategorized” categories.
Note: These contacts could also appear in other categories such as “Buyers” or “Sellers” if tagged that
way.
Page | 41
MLS PIN Customer Support 800‐695‐3000
Monday‐Friday 8 am to 7:30 pm, Saturday 9 am to 5 pm, Sunday 9 am to 1 pm
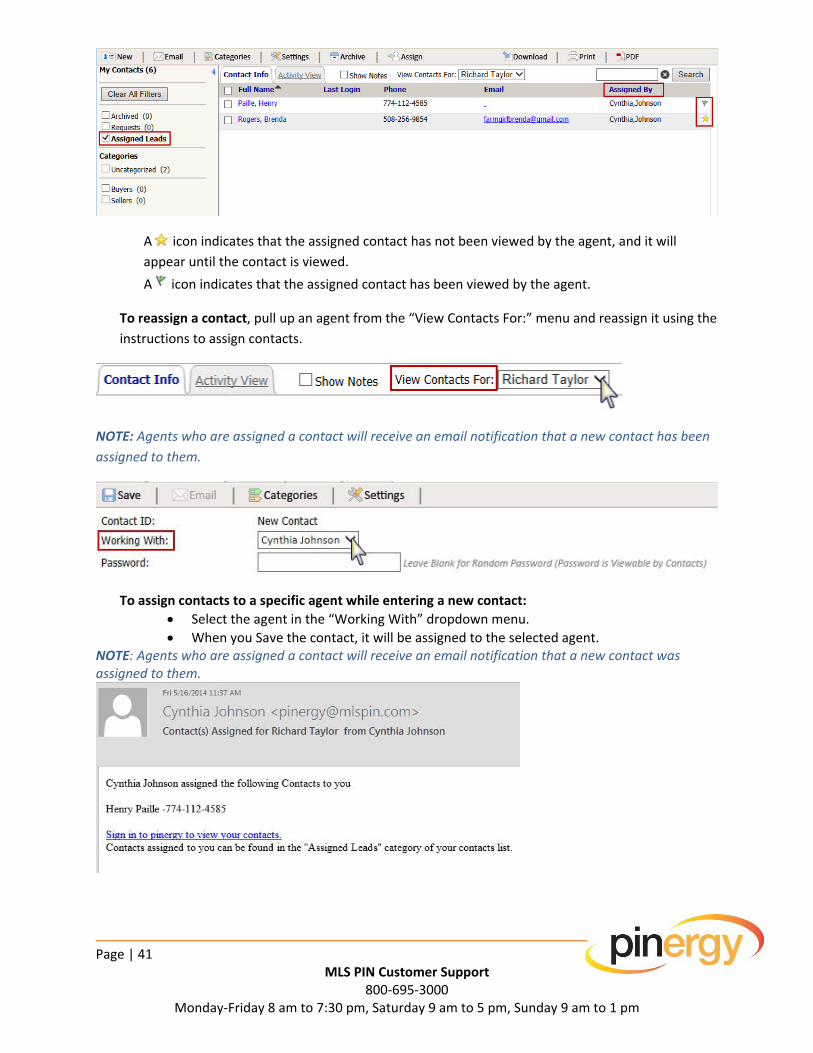
A icon indicates that the assigned contact has not been viewed by the agent, and it will
appear until the contact is viewed.
A icon indicates that the assigned contact has been viewed by the agent.
To reassign a contact, pull up an agent from the “View Contacts For:” menu and reassign it using the
instructions to assign contacts.
NOTE: Agents who are assigned a contact will receive an email notification that a new contact has been
assigned to them.
To assign contacts to a specific agent while entering a new contact:
Select the agent in the “Working With” dropdown menu.
When you Save the contact, it will be assigned to the selected agent. NOTE: Agents who are assigned a contact will receive an email notification that a new contact was assigned to them.
Page | 42
MLS PIN Customer Support 800‐695‐3000
Monday‐Friday 8 am to 7:30 pm, Saturday 9 am to 5 pm, Sunday 9 am to 1 pm
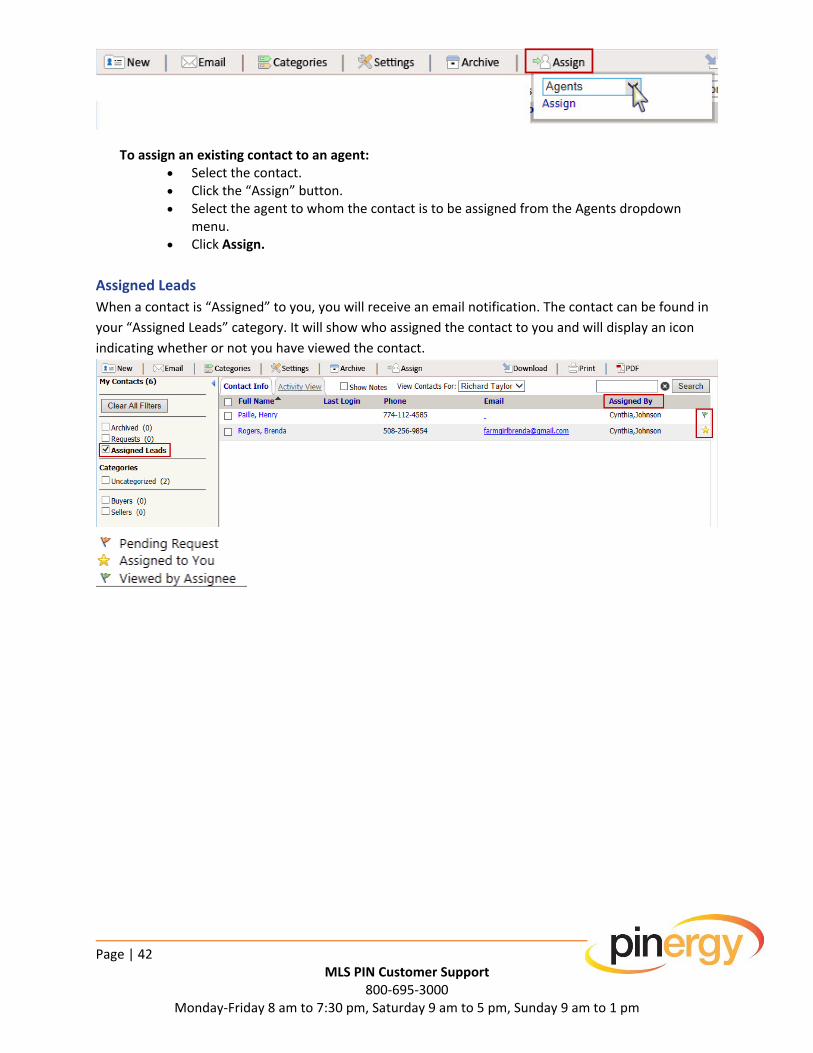
To assign an existing contact to an agent: Select the contact. Click the “Assign” button. Select the agent to whom the contact is to be assigned from the Agents dropdown
menu. Click Assign.
Assigned Leads
When a contact is “Assigned” to you, you will receive an email notification. The contact can be found in
your “Assigned Leads” category. It will show who assigned the contact to you and will display an icon
indicating whether or not you have viewed the contact.
Page | 43
MLS PIN Customer Support 800‐695‐3000
Monday‐Friday 8 am to 7:30 pm, Saturday 9 am to 5 pm, Sunday 9 am to 1 pm
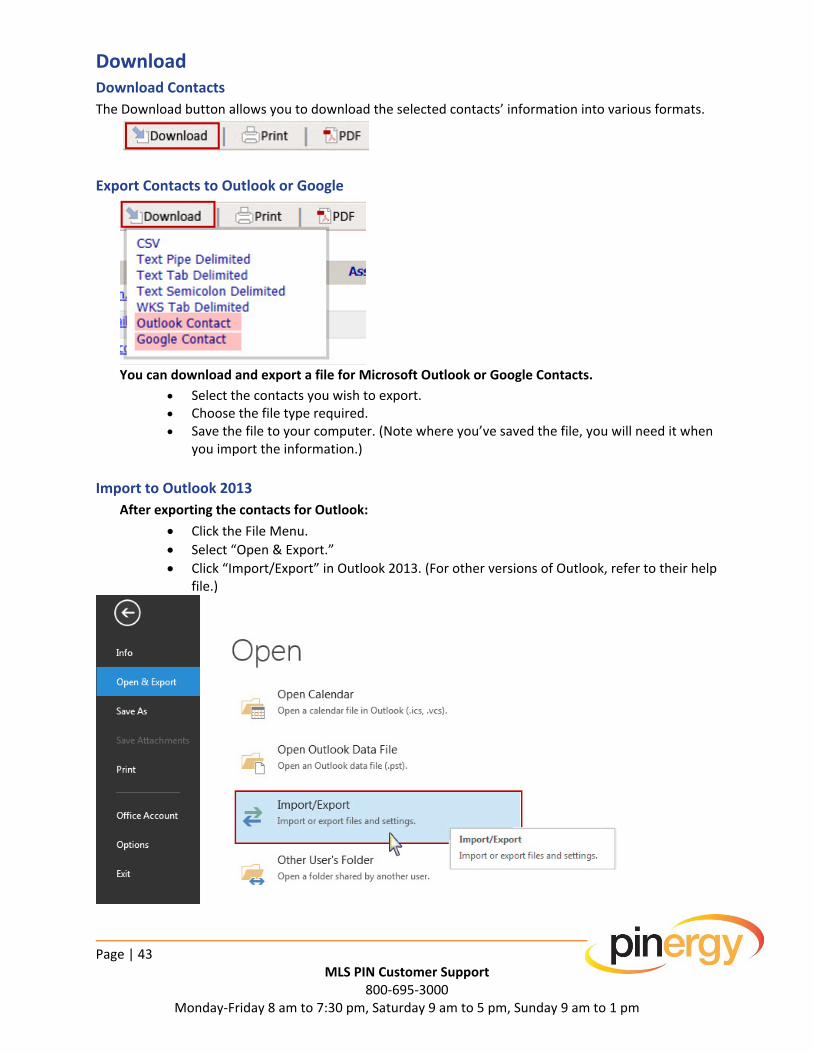
Download Download Contacts
The Download button allows you to download the selected contacts’ information into various formats.
Export Contacts to Outlook or Google
You can download and export a file for Microsoft Outlook or Google Contacts.
Select the contacts you wish to export. Choose the file type required. Save the file to your computer. (Note where you’ve saved the file, you will need it when
you import the information.)
Import to Outlook 2013
After exporting the contacts for Outlook:
Click the File Menu.
Select “Open & Export.”
Click “Import/Export” in Outlook 2013. (For other versions of Outlook, refer to their help file.)
Page | 44
MLS PIN Customer Support 800‐695‐3000
Monday‐Friday 8 am to 7:30 pm, Saturday 9 am to 5 pm, Sunday 9 am to 1 pm
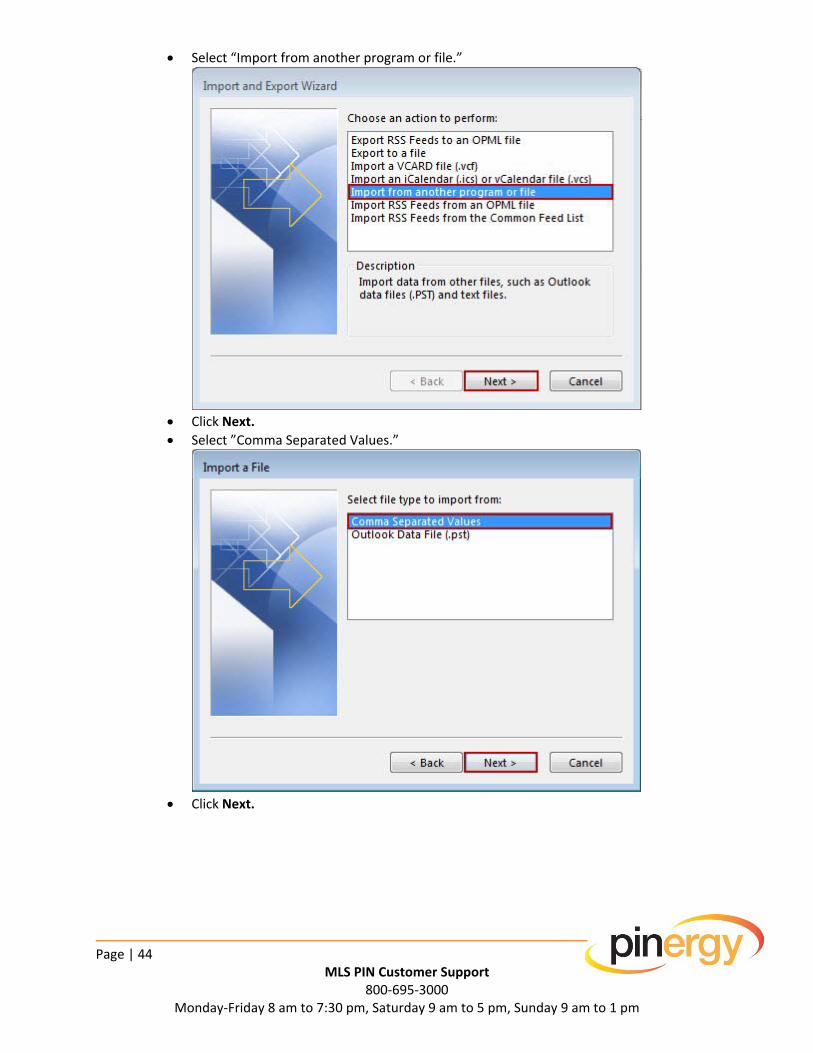
Select “Import from another program or file.”
Click Next.
Select ”Comma Separated Values.”
Click Next.

Page | 45
MLS PIN Customer Support 800‐695‐3000
Monday‐Friday 8 am to 7:30 pm, Saturday 9 am to 5 pm, Sunday 9 am to 1 pm
Click “Browse” and navigate to the file you exported and saved on your computer.
Click Next.
Select a destination folder such as “Contacts.”
Click Next.
Page | 46
MLS PIN Customer Support 800‐695‐3000
Monday‐Friday 8 am to 7:30 pm, Saturday 9 am to 5 pm, Sunday 9 am to 1 pm
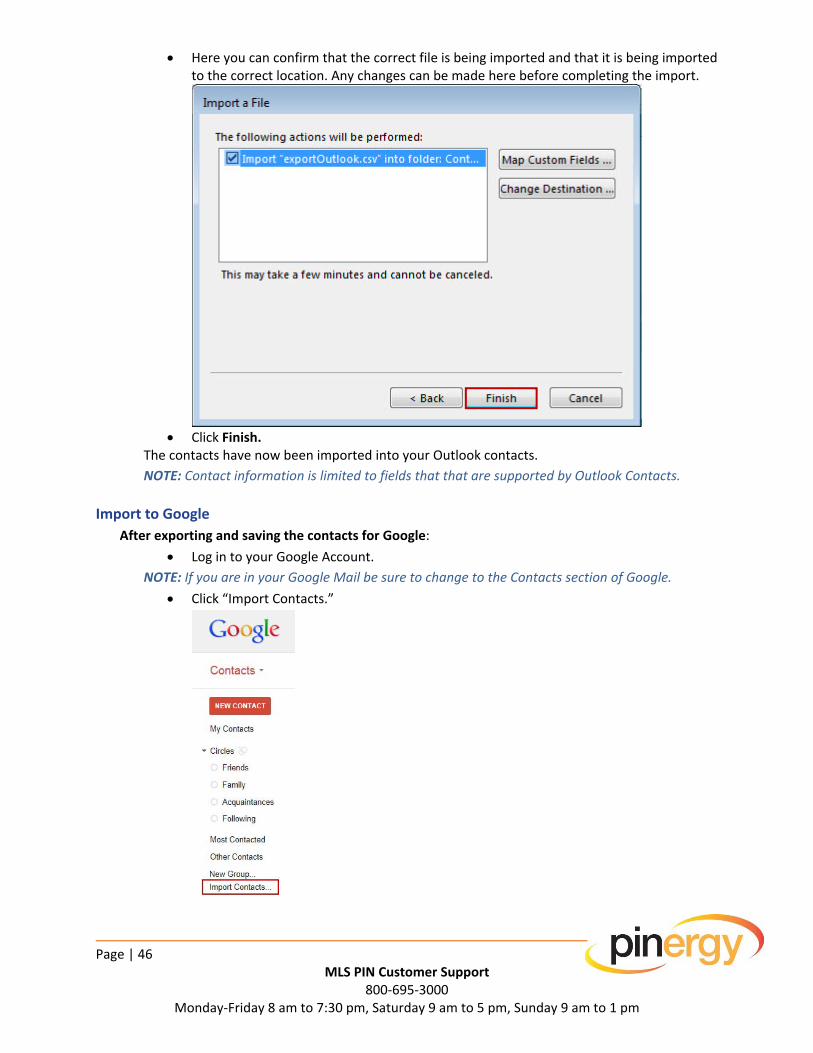
Here you can confirm that the correct file is being imported and that it is being imported to the correct location. Any changes can be made here before completing the import.
Click Finish.
The contacts have now been imported into your Outlook contacts.
NOTE: Contact information is limited to fields that that are supported by Outlook Contacts.
Import to Google
After exporting and saving the contacts for Google:
Log in to your Google Account.
NOTE: If you are in your Google Mail be sure to change to the Contacts section of Google.
Click “Import Contacts.”
Page | 47
MLS PIN Customer Support 800‐695‐3000
Monday‐Friday 8 am to 7:30 pm, Saturday 9 am to 5 pm, Sunday 9 am to 1 pm
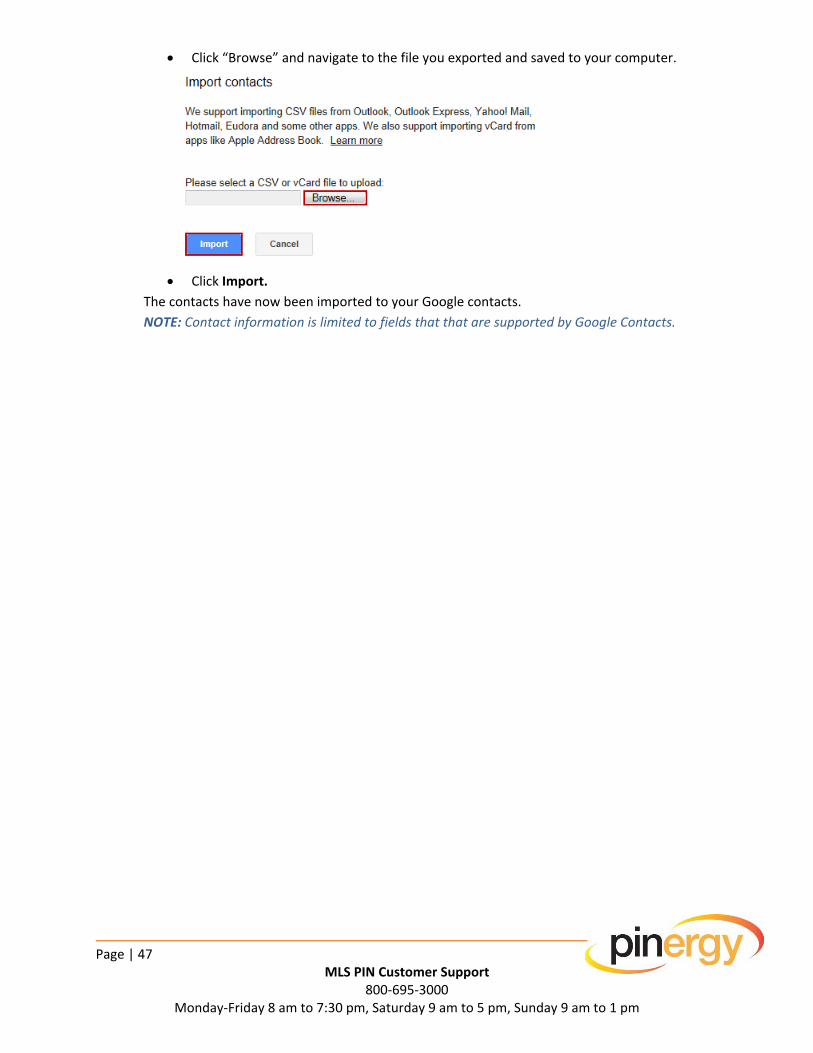
Click “Browse” and navigate to the file you exported and saved to your computer.
Click Import.
The contacts have now been imported to your Google contacts.
NOTE: Contact information is limited to fields that that are supported by Google Contacts.