Configuring SDL WorldServer - A...
36
Configuring SDL WorldServer - A Tutorial SDL WorldServer 10.2
Transcript of Configuring SDL WorldServer - A...
Configuring SDL WorldServer - A Tutorial
SDLWorldServer 10.2
Documentation Notice
This documentation and the data contained herein are the property of SDL Language Technologies, located at 69 Hickory Drive,
Waltham, MA 02451 USA, and its licensors. Any use, disclosure, reproduction, modification, display or transfer of the data and/or
documentation is prohibited, except by the express written authorization of SDL. This document contains proprietary SDL
Language Technologies information and is licensed for use pursuant to the SDL standard software license agreement.
If you are an entity of the U.S. government, you agree that the program(s) and data referred to in this document are Commercial
Computer Software, as defined in the F.A.R., and the DoD F.A.R. Suppl., and are delivered with only those rights set forth in the
SDL standard software license agreement.
The program(s) referred to in this document are not specifically developed, or licensed, for use in any nuclear, aviation, mass
transit, or medical application or in any other inherently dangerous applications, and any such use shall be construed as a misuse
of the program(s). SDL shall not be liable for any claims or damages arising from such use of the program(s) for any such
applications.
THE INFORMATION IN THIS DOCUMENT IS SUBJECT TO CHANGEWITHOUT NOTICE. SDLMAKES NO
WARRANTYOFANYKIND REGARDING THIS MATERIAL, ANDASSUMES NO RESPONSIBILITY FORANY ERRORS
THAT MAYAPPEAR IN THIS DOCUMENT.
Copyright © 1998-2012 by SDL plc. All rights reserved. IDIOM is a registered trademark, and WORLDSERVER is a trademark,
of SDL plc. Trados and MultiTerm are registered trademarks of SDL plc. All other company product or service names referenced
herein are properties of their respective owners.
This product includes software developed by the Apache Software Foundation (http://www.apache.org/). This product also
includes software developed by:
■ the W3C consortium (http://www.w3c.org)
■ the SAX project (http://www.saxproject.org)
Jaspersoft JasperReports is distributed under license from Jaspersoft, Inc.
SDL Language Technologies 69 Hickory Drive Waltham, MA 02451 USA
Publication date: June 2012
II Configuring SDL WorldServer - A Tutorial

Contents
1 About the SDL WorldServer Administrator Tutorial ...................... 1SDLWorldServer Documentation and Resources . . . . . . . . . . . . . . . . . . . . . . . . . . . . . . . . . . 1
2 Welcome ........................................................................ 5Preparing to Work with the Tutorial . . . . . . . . . . . . . . . . . . . . . . . . . . . . . . . . . . . . . . . . . . . . . . 5
3 Setting Up Locales ............................................................ 7Viewing Existing Locales . . . . . . . . . . . . . . . . . . . . . . . . . . . . . . . . . . . . . . . . . . . . . . . . . . . . . . . 7
Adding a Locale . . . . . . . . . . . . . . . . . . . . . . . . . . . . . . . . . . . . . . . . . . . . . . . . . . . . . . . . . . . . . . . 9
Quick Reference . . . . . . . . . . . . . . . . . . . . . . . . . . . . . . . . . . . . . . . . . . . . . . . . . . . . . . . . . 10
To Learn More . . . . . . . . . . . . . . . . . . . . . . . . . . . . . . . . . . . . . . . . . . . . . . . . . . . . . . . . . . . . . . . 11
4 Connecting to Content ...................................................... 13Creating a File System Mount . . . . . . . . . . . . . . . . . . . . . . . . . . . . . . . . . . . . . . . . . . . . . . . . . . 13
Creating a Folder Hierarchy in WorldServer . . . . . . . . . . . . . . . . . . . . . . . . . . . . . . . . . . . . . . 15
To Learn More . . . . . . . . . . . . . . . . . . . . . . . . . . . . . . . . . . . . . . . . . . . . . . . . . . . . . . . . . . . . . . . 17
5 Preparing to Translate Working with Locales and Linkage ............ 19Associating Folders with Locales . . . . . . . . . . . . . . . . . . . . . . . . . . . . . . . . . . . . . . . . . . . . . . . 19
Establishing Linkage . . . . . . . . . . . . . . . . . . . . . . . . . . . . . . . . . . . . . . . . . . . . . . . . . . . . . . . . . . 21
Quick Review Setting Up a New Locale . . . . . . . . . . . . . . . . . . . . . . . . . . . . . . . . . . . . . . . . . 22
To Learn More . . . . . . . . . . . . . . . . . . . . . . . . . . . . . . . . . . . . . . . . . . . . . . . . . . . . . . . . . . . . . . . 23
6 Working with Users .......................................................... 25Changing and Adding Users . . . . . . . . . . . . . . . . . . . . . . . . . . . . . . . . . . . . . . . . . . . . . . . . . . . 25
To Learn More . . . . . . . . . . . . . . . . . . . . . . . . . . . . . . . . . . . . . . . . . . . . . . . . . . . . . . . . . . . . . . . 27
7 Testing Your Work ............................................................ 29Copying Test Files to Your Computer . . . . . . . . . . . . . . . . . . . . . . . . . . . . . . . . . . . . . . . . . . . 29
Making Content Available to WorldServer . . . . . . . . . . . . . . . . . . . . . . . . . . . . . . . . . . . . . . . 29
Sanity Test Performing a Pseudo-Translation . . . . . . . . . . . . . . . . . . . . . . . . . . . . . . . . . . . . . 30
To Learn More . . . . . . . . . . . . . . . . . . . . . . . . . . . . . . . . . . . . . . . . . . . . . . . . . . . . . . . . . . . . . . . 32
Index ............................................................................. 0
IIIConfiguring SDL WorldServer - A Tutorial
IV Configuring SDL WorldServer - A Tutorial

Chapter 1
About the SDL WorldServerAdministrator Tutorial
Welcome to SDL Language Technologies and WorldServer™. SDLWorldServer is a
translation management system that provides advanced linguistic technology, process
automation, content repository integration and management services. Completely aligned
with SDL Studio™, WorldServer provides consistent analysis and reporting of translation
projects for localization managers, project managers, translators and reviewers.
ScopeThe SDL WorldServer Administrator Tutorial provides step-by-step instruction for
administrators, with sample data, for initial setup of WorldServer.
SDL WorldServer Documentation andResources
The SDLWorldServer documentation set includes 14 separate deliverables. Some of
these documents are installed with WorldServer.
The following publications are available from the SDL Knowledgebase, in the Product
Documentation/SDL_WorldServer folder.
Administrator Guide
Information on setting up and administering WorldServer in your environment.
Administrator Tutorial - Configuring SDLWorldServer
The process of performing an initial configuration of WorldServer.
Basic Operations Guide
Basic system administration and troubleshooting information for installed
WorldServer systems.
BrowserWorkbench User Guide
Information on embedded translation tool for brief reviews or edits.
1Configuring SDL WorldServer - A Tutorial

Installation and Upgrade Guide
Instructions for installing or upgrading WorldServer and its components in your
environment.
Planning and Prerequisites Guide
Conceptual information for planning a WorldServer installation or upgrade, including
environment requirements and options for the WorldServer platform, infrastructure,
and supported components.
SDKWeb Services Developer Guide
Reference guide for programmers who need to add Web Services to WorldServer.
Software Development Kit (SDK) User Guide
Reference guide for programmers to understand the APIs that extend WorldServer
functionality and integrate WorldServer with other custom or third-party applications.
Translation Memory Mode Concepts Guide
Information for project managers that need to understand the Studio-aligned
translation memory mode.
User Guide
Information for general WorldServer users: project managers, translators, and
reviewers.
WorldServer and Studio Integration Guide
Information for translators, reviewers, and project managers that use SDL Studio with
WorldServer.
The following WorldServer documentation resources are also available:
WorldServer Release Notes
Where: The Knowledgebase SDLWorldServer/Release Notes folder. Also available
from the WorldServer FTP site: Walthamftp.sdl.com/dist/product/worldserver/<releasenumber>/
Information on enhancements and changes in the most recent release. Also contains
late-breaking information about known issues and issues fixed in this release.
SDLGlossary
Where: http://producthelp.sdl.com/glossary/en/glossary.htm
An alphabetical list of terms related to WorldServer and other SDL products.
Transport Online Help
Context-sensitive help is available for most pages in TransPort from theMore Info...
link. A full web help system is available from the Help link at the top of each page.
All Language Technologies online help documentation is also available from the
following web page: http://www.sdl.com/en/language-technology/support/online-product-help/
About the SDL WorldServer Administrator Tutorial
2 Configuring SDL WorldServer - A Tutorial
WorldServer Online Help
Context-sensitive help is available for most pages in WorldServer from theMore
Info... link. A full web help system is available from the Help link at the top of each
page.
About the SDL WorldServer Administrator Tutorial
3Configuring SDL WorldServer - A Tutorial
About the SDL WorldServer Administrator Tutorial
4 Configuring SDL WorldServer - A Tutorial
Chapter 2
WelcomeWelcome to this tutorial, which leads you through the process of performing an initial
configuration of WorldServer. The tutorial is intended for WorldServer administrators.
The tutorial starts with the assumption that WorldServer has been installed successfully. It
ends with a short test to make sure that you have performed the configuration correctly.
When you have finished the tutorial, you will understand how to configure WorldServer
sufficiently that a localization or globalization project manager can start work.
In this tutorial, you perform the following activities:
■ Set up locales
■ Connect to content
■ Configure locales and linkage
■ Set up users
■ Perform a quick test of the configuration
The tutorial does not cover all aspects of configuring WorldServer, so there are references
throughout to more information.
We hope you find this tutorial useful as you learn more about WorldServer and how to
use it.
Preparing to Work with the TutorialTo prepare for working with this tutorial, perform each of the following steps:
■ Make sure that you or someone else has installed WorldServer.
■ Make sure that you know how to log on to WorldServer as a user withadministrative privileges. By default, the user name is admin and the password iswsadmin.
■ If you don’t have file creation privileges on the computer where WorldServer isinstalled, identify someone in your organization who does have that privilege. Inthis tutorial, you need to create one directory just before you create a file systemmount.
5Configuring SDL WorldServer - A Tutorial
Welcome
6 Configuring SDL WorldServer - A Tutorial
Chapter 3
Setting Up LocalesIn this section, you work with locales, which specify the language-related attributes of a
translation. In more detail:
A locale is a user defined combination of a language specific to a place (such as English
spoken in the United States) and a default encoding that is used to store content in this
language (such as ISO-8559 or UTF-8). A locale is treated as a group that can have zero
or more users.
An encoding determines a set of rules that provide a mechanism that dictate how to read
and write characters for a particular set of languages to and from a file. As long as the
encoding type supports the associated language, WorldServer can correctly read and write
data for this locale. For World Server to properly read and write data, users must specify
the appropriate encoding for an asset.
Defining locales is essential to the translation or editing process. If you have not defined
any locales (or assigned content to those locales), you cannot edit the source content. You
also cannot translate from one language to another.
Viewing Existing LocalesTo view any locales that have already been defined, log on to a WorldServer account that
has administrator privileges.
7Configuring SDL WorldServer - A Tutorial
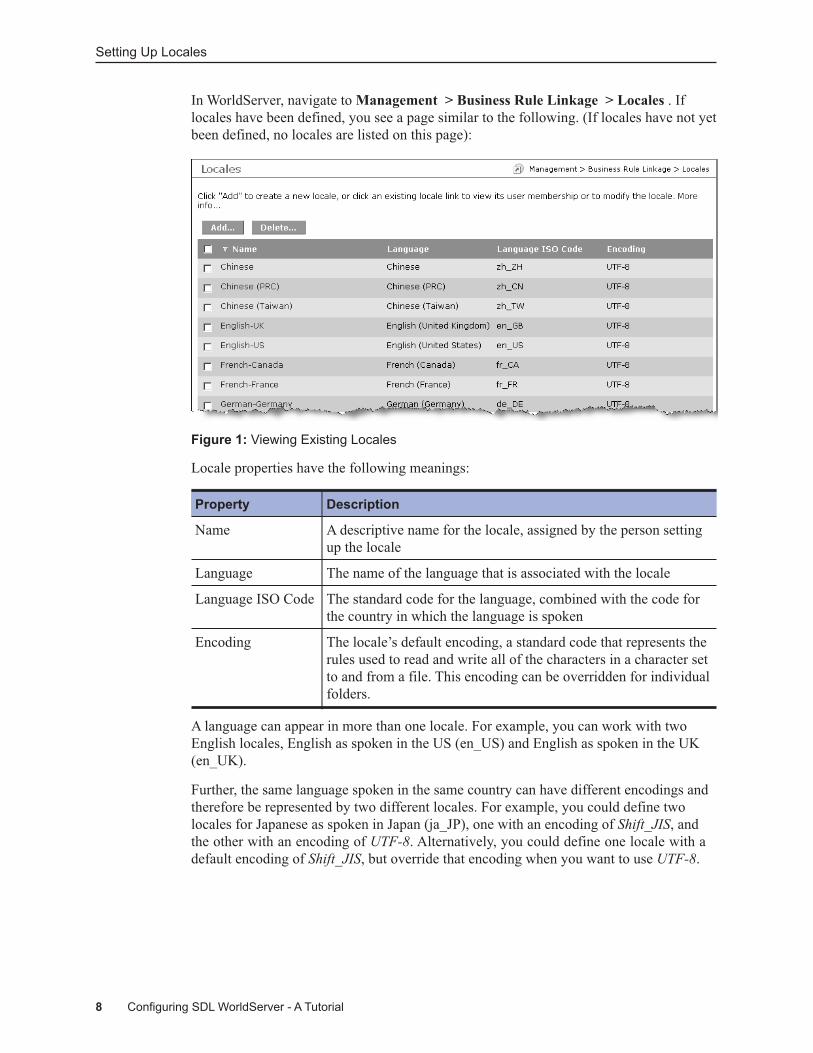
In WorldServer, navigate toManagement > Business Rule Linkage > Locales . If
locales have been defined, you see a page similar to the following. (If locales have not yet
been defined, no locales are listed on this page):
Figure 1: Viewing Existing Locales
Locale properties have the following meanings:
Property Description
Name A descriptive name for the locale, assigned by the person setting
up the locale
Language The name of the language that is associated with the locale
Language ISO Code The standard code for the language, combined with the code for
the country in which the language is spoken
Encoding The locale’s default encoding, a standard code that represents the
rules used to read and write all of the characters in a character set
to and from a file. This encoding can be overridden for individual
folders.
A language can appear in more than one locale. For example, you can work with two
English locales, English as spoken in the US (en_US) and English as spoken in the UK
(en_UK).
Further, the same language spoken in the same country can have different encodings and
therefore be represented by two different locales. For example, you could define two
locales for Japanese as spoken in Japan (ja_JP), one with an encoding of Shift_JIS, and
the other with an encoding of UTF-8. Alternatively, you could define one locale with a
default encoding of Shift_JIS, but override that encoding when you want to use UTF-8.
Setting Up Locales
8 Configuring SDL WorldServer - A Tutorial
Adding a Locale
About this task
Now add a new locale to the WorldServer configuration. For this tutorial, add German as
spoken in Germany, and English as spoken in the US, both with UTF-8 encoding.
Procedure
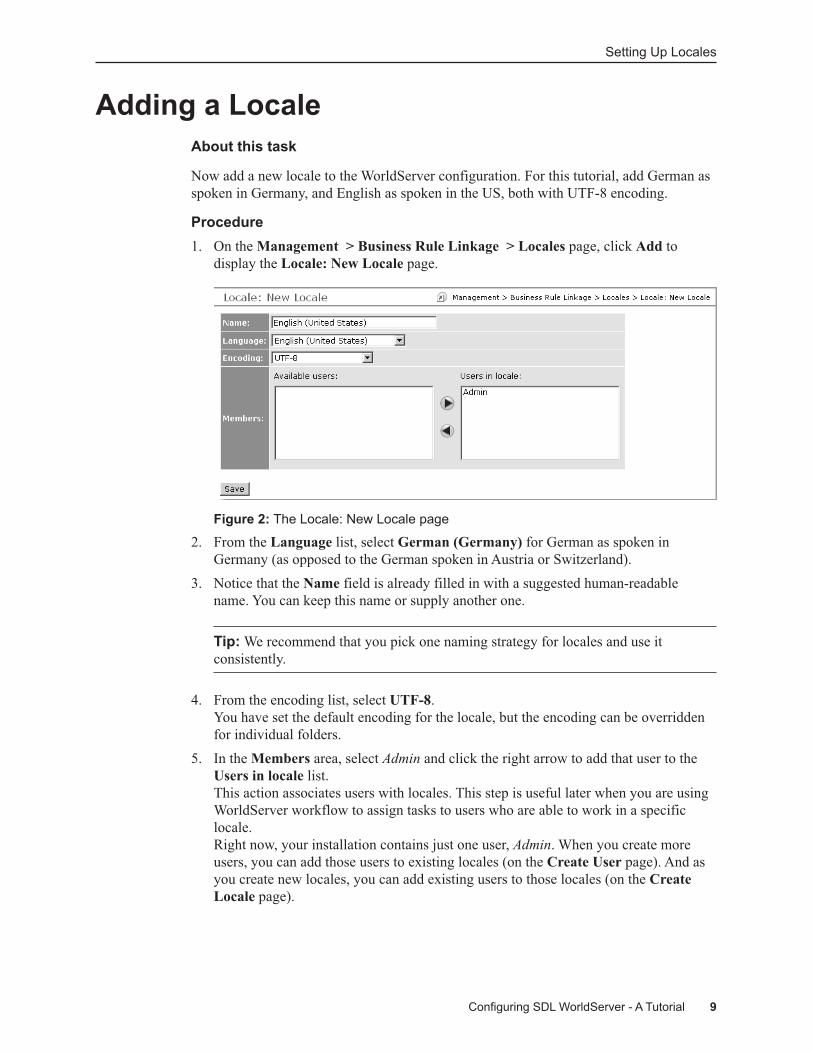
1. On theManagement > Business Rule Linkage > Locales page, click Add to
display the Locale: New Locale page.
Figure 2: The Locale: New Locale page
2. From the Language list, select German (Germany) for German as spoken in
Germany (as opposed to the German spoken in Austria or Switzerland).
3. Notice that the Name field is already filled in with a suggested human-readable
name. You can keep this name or supply another one.
Tip:We recommend that you pick one naming strategy for locales and use it
consistently.
4. From the encoding list, select UTF-8.
You have set the default encoding for the locale, but the encoding can be overridden
for individual folders.
5. In theMembers area, select Admin and click the right arrow to add that user to the
Users in locale list.
This action associates users with locales. This step is useful later when you are using
WorldServer workflow to assign tasks to users who are able to work in a specific
locale.
Right now, your installation contains just one user, Admin. When you create more
users, you can add those users to existing locales (on the Create User page). And as
you create new locales, you can add existing users to those locales (on the Create
Locale page).
Setting Up Locales
9Configuring SDL WorldServer - A Tutorial
6. Click Save.
This step is important! If you navigate away from this page without saving your
work, your changes are lost.
7. Create another locale for English as spoken in the US, with encoding of UTF-8 and
the Admin user as a member of the locale.
Results
Tip: Before you proceed to the next section, you may want to create other locales that
your team will work with.
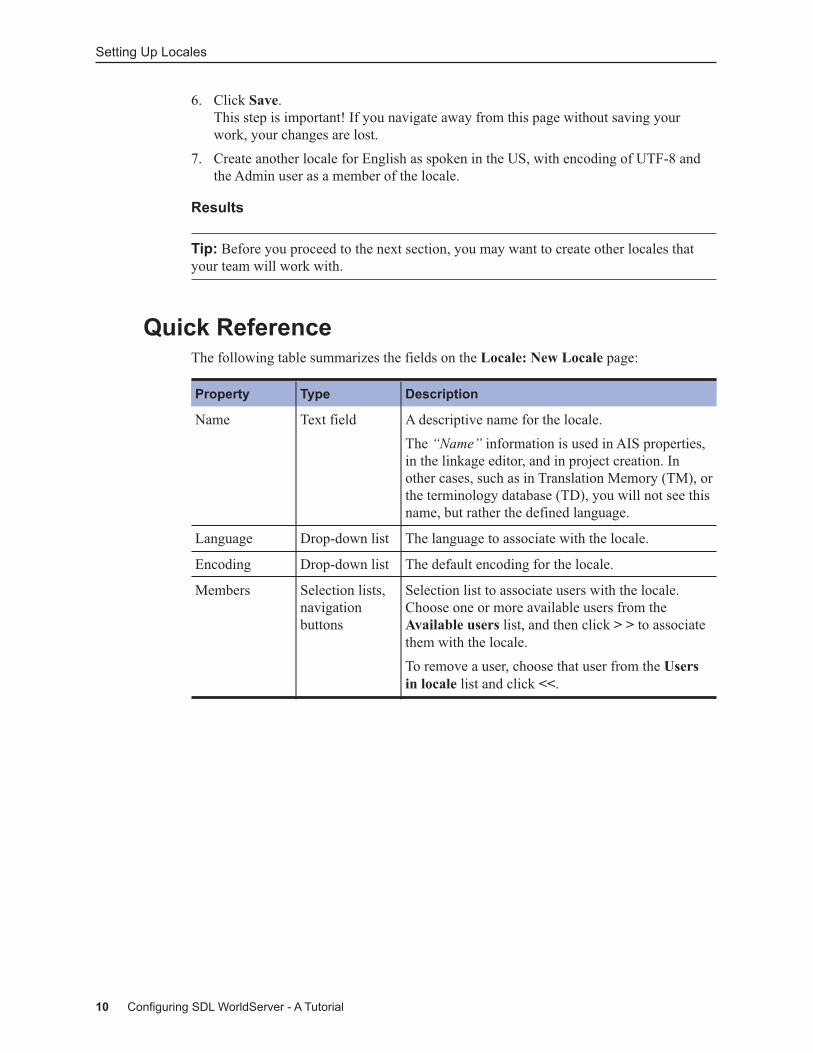
Quick ReferenceThe following table summarizes the fields on the Locale: New Locale page:
Property Type Description
Name Text field A descriptive name for the locale.
The “Name” information is used in AIS properties,
in the linkage editor, and in project creation. In
other cases, such as in Translation Memory (TM), or
the terminology database (TD), you will not see this
name, but rather the defined language.
Language Drop-down list The language to associate with the locale.
Encoding Drop-down list The default encoding for the locale.
Members Selection lists,
navigation
buttons
Selection list to associate users with the locale.
Choose one or more available users from the
Available users list, and then click > > to associate
them with the locale.
To remove a user, choose that user from the Users
in locale list and click <<.
Setting Up Locales
10 Configuring SDL WorldServer - A Tutorial
To Learn MoreTo learn more about locales, read about Setting Up Locales in the WorldServer
Administrator’s Guide.
Setting Up Locales
11Configuring SDL WorldServer - A Tutorial
Setting Up Locales
12 Configuring SDL WorldServer - A Tutorial
Chapter 4
Connecting to ContentIn this section, you set up WorldServer to work with content, such as the sample files that
you work with later in this tutorial. An important part of this process is to create a
connection point to the content, or a mount.
Amount is one of the top level folders in the asset interface system that results from
configuring a connector to point to a specific repository.
Amount is an important aspect of the asset interface system. The Asset Interface System,
or AIS, is the framework WorldServer uses to access content whether that content is in
a content management system, a file system, a database, or any other format.
Creating a File System Mount
About this task
Create a mount that connects to content on the file system.
13Configuring SDL WorldServer - A Tutorial
Procedure
1. On the server where WorldServer is installed, create an area on the file system where
WorldServer files will be stored.
In this tutorial, we assume that your dedicated area is named c:\wsfiles.
You are now ready to create the mount that connects to this area.
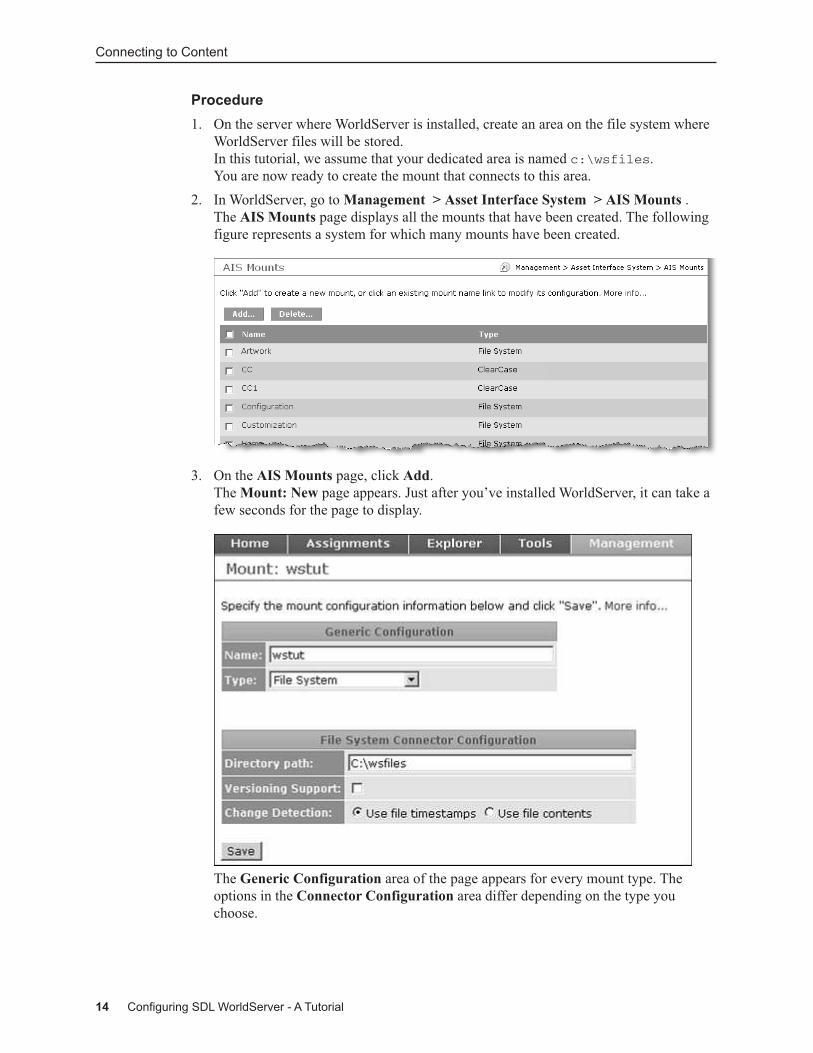
2. In WorldServer, go toManagement > Asset Interface System > AIS Mounts .
The AIS Mounts page displays all the mounts that have been created. The following
figure represents a system for which many mounts have been created.
3. On the AIS Mounts page, click Add.
TheMount: New page appears. Just after you’ve installed WorldServer, it can take a
few seconds for the page to display.
The Generic Configuration area of the page appears for every mount type. The
options in the Connector Configuration area differ depending on the type you
choose.
Connecting to Content
14 Configuring SDL WorldServer - A Tutorial
4. In the Generic Configuration area, in the Name field, type a name for the mount, for
example, wstut.
This name will appear in the WorldServer Explorer as the top level folder for this
collection of content.
5. Leave the Type field set to File System.
By default, WorldServer is configured so that you can create mounts of type File
System and SQL Server. You can create other mount types by enabling licenses for
those types – go toManagement > Administration > Licenses . WorldServer ships
with an unlimited number of licenses for each connector type.
6. In the File System Connector Configuration area, in the Directory path field, enter
the path to the directory that you created earlier, c:\wsfiles.
7. Make sure that the Versioning support field is cleared.
If you check the box, you add some versioning features to the file system mount. For
tutorial purposes, however, we suggest that you leave the check box cleared.
8. Click Save.
The AIS Mounts page appears, listing the mount you just created. You can click on
the mount’s name to review and change the mount configuration details.
Tip: At this point, you may want to create a file system mount to connect to your
own content.
Creating a Folder Hierarchy in WorldServer
About this task
Now that you have created a mount, you can create folders under the mount. We
recommend that you place the locale folders directly under the mount folder, as we do in
this tutorial, for the following reasons:
■ By default, a folder inherits the properties of its parent, so if you define a locale ata high level, lower levels of folders and assets inherit that locale.
■ It takes a little bit of setup to establish locale folders so establishing them at ahigher level can mean less setup work. We’ll work through those setup steps laterin this tutorial.
There may be good reasons to use a different organizational scheme. For example, you
may want to organize your directories by company division (such as education,
documentation, and marketing, with locale folders under each division folder. This
organization has the advantage of leading appropriate users to the right content, but may
involve a little more setup.
To set up the folder hierarchy for the tutorial:
Connecting to Content
15Configuring SDL WorldServer - A Tutorial
Procedure
1. In WorldServer, go to the Explorer by clicking the Explorer tab.
2. Double-click the mount you just created, wstut. Because you just created it, there are nofiles or folders in this mount.
3. Click Asset > New .
4. On the New Folder orAsset dialog box, select Filesystem Directory to create a new
folder.
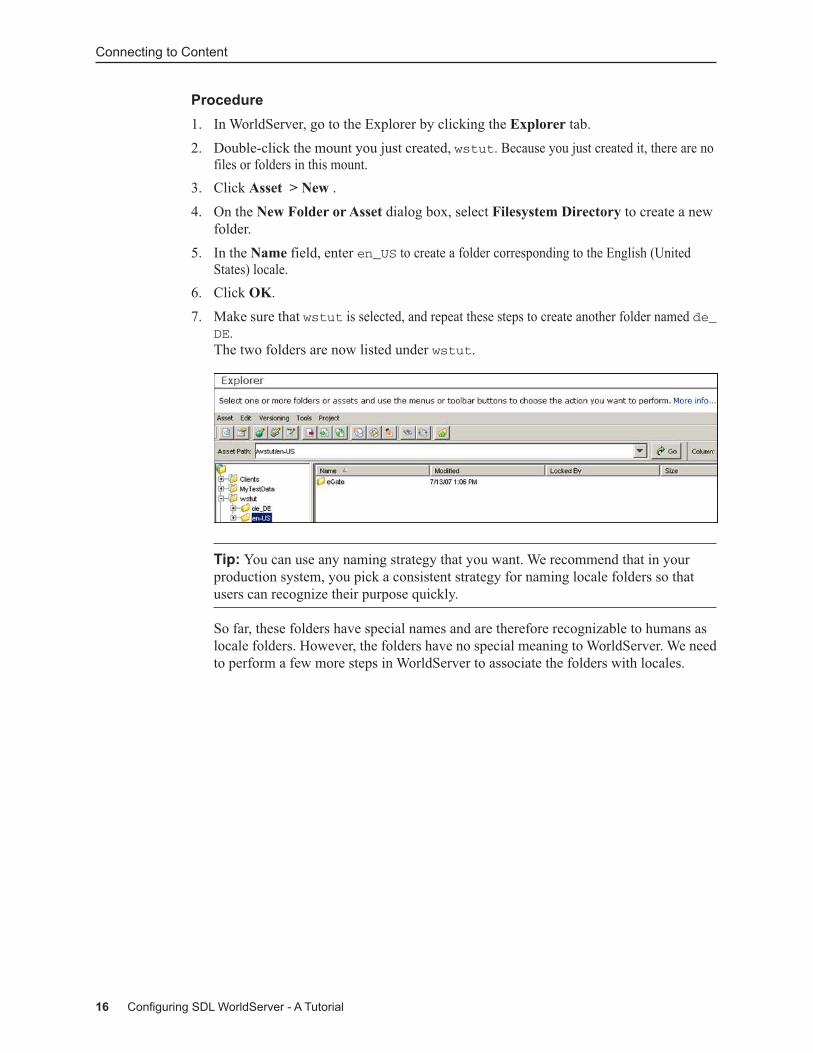
5. In the Name field, enter en_US to create a folder corresponding to the English (UnitedStates) locale.
6. Click OK.
7. Make sure that wstut is selected, and repeat these steps to create another folder named de_DE.The two folders are now listed under wstut.
Tip: You can use any naming strategy that you want. We recommend that in your
production system, you pick a consistent strategy for naming locale folders so that
users can recognize their purpose quickly.
So far, these folders have special names and are therefore recognizable to humans as
locale folders. However, the folders have no special meaning to WorldServer. We need
to perform a few more steps in WorldServer to associate the folders with locales.
Connecting to Content
16 Configuring SDL WorldServer - A Tutorial
To Learn MoreIn this section, you created a mount that connects to the file system. You can connect to
data in other repositories:
■ Version control systems: IBM Rational ClearCase, CVS
■ Databases: SQL, X-Hive/DB (an XML database)
■ Document management systems: EMC Documentum, Interwoven, Broadvision
To learn how to configure these other WorldServer mounts, read Connecting to Contentin the WorldServer Administrator Guide.
To learn about working with AIS, the WorldServer asset interface system, read about
Working with Assets in the WorldServer User Guide.
Connecting to Content
17Configuring SDL WorldServer - A Tutorial

Connecting to Content
18 Configuring SDL WorldServer - A Tutorial
Chapter 5
Preparing to Translate Working withLocales and Linkage
You have now created locales, established a mount, and created directories in
WorldServer. Before you can use WorldServer to translate content, you need to perform
these additional AIS configuration steps:
■ Associate the folders you created with WorldServer locales
■ Declare which folders contain source (original language) content and whichcontain target (translated) content by establishing linkage.
Associating Folders with Locales
About this task
Earlier, when you created locale folders, we mentioned that these folders are recognizable
to humans, but that they have no special meaning to WorldServer. In this set of steps,
you associate those folders with locales.
Procedure
1. In the WorldServer Explorer, select the folder, wstut\en_US. On the Explorer menu,
click Tools > Properties .
The Change Properties dialog box appears.
Tip: You can also get to this dialog box by going toManagement > Asset Interface
System > View and Change Properties , navigating to the directory, and clicking
Change.
2. On the Change Properties dialog box, in the Locale area, select Set value explicitly
for this asset.
The alternative value, the default, is to inherit the property from the parent folder. You
can selectively override the default for some properties and retain the default for
other properties.
The Value is list appears.
19Configuring SDL WorldServer - A Tutorial
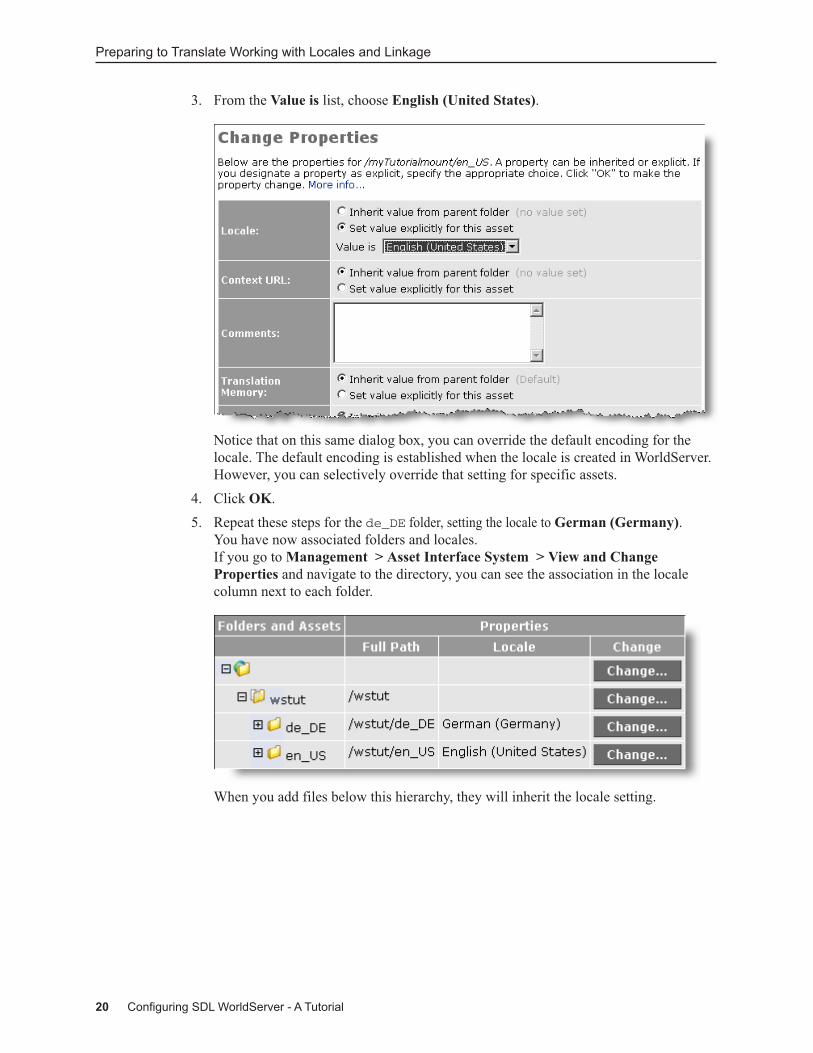
3. From the Value is list, choose English (United States).
Notice that on this same dialog box, you can override the default encoding for the
locale. The default encoding is established when the locale is created in WorldServer.
However, you can selectively override that setting for specific assets.
4. Click OK.
5. Repeat these steps for the de_DE folder, setting the locale to German (Germany).
You have now associated folders and locales.
If you go toManagement > Asset Interface System > View and Change
Properties and navigate to the directory, you can see the association in the locale
column next to each folder.
When you add files below this hierarchy, they will inherit the locale setting.
Preparing to Translate Working with Locales and Linkage
20 Configuring SDL WorldServer - A Tutorial
Establishing Linkage
About this task
In this set of steps you establish linkage between folders. Linkage defines the relationship
between source folders, which contain assets in the original language, and target folders,
which contain translated content for each target locale. This indicates where to save the
translated content.
To establish linkage:
Procedure
1. In the WorldServer Explorer, click Tools > Linkage Editor .
The Linkage Editor appears.
In the Linkage Editor, the left pane represents the source locale and the right pane
represents the target locale. Make sure that the Source locale list displays English
(United States).
Tip: You can also display the Linkage Editor by going toManagement > Business
Rule Linkage > Linkage and clicking Launch Linkage Editor.
2. From the Target Locale list, select German (Germany).
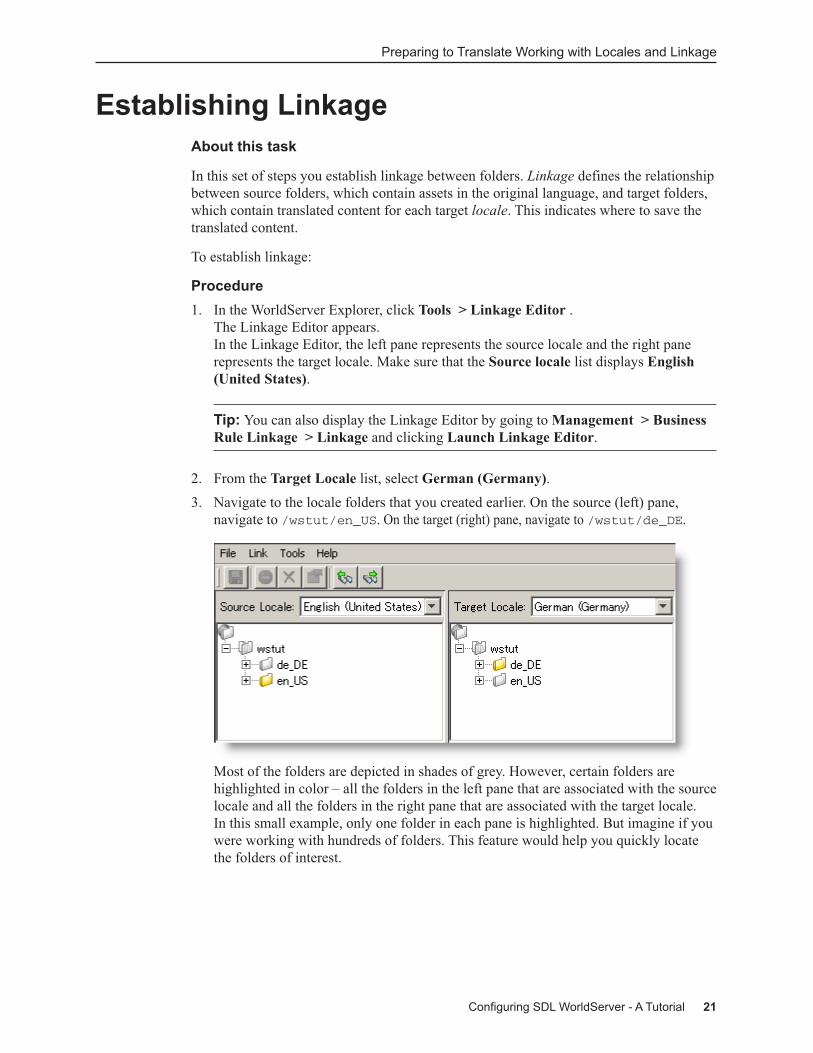
3. Navigate to the locale folders that you created earlier. On the source (left) pane,
navigate to /wstut/en_US. On the target (right) pane, navigate to /wstut/de_DE.
Most of the folders are depicted in shades of grey. However, certain folders are
highlighted in color – all the folders in the left pane that are associated with the source
locale and all the folders in the right pane that are associated with the target locale.
In this small example, only one folder in each pane is highlighted. But imagine if you
were working with hundreds of folders. This feature would help you quickly locate
the folders of interest.
Preparing to Translate Working with Locales and Linkage
21Configuring SDL WorldServer - A Tutorial

4. Use the left mouse button to drag from left to right, starting at en_US and ending atde_DE.As you drag, an arrow follows the cursor. You can drag only from one highlighted
folder on the left to another highlighted folder on the right. When you release the
mouse, the target folder in the right pane is selected and you see an arrow between the
two locales.
If you create the linkage incorrectly, the arrow disappears when you release the
mouse.
If you are translating into multiple languages, you can create linkage from one source
folder to many target folders.
5. Click File > Save and quit the Linkage Editor.
Tip: You can see a table of source folders and their corresponding target locales and
folders if you go toManagement > Business Rule Linkage > Linkage .
Quick Review Setting Up a New Locale
About this task
As a quick review, here are the steps to perform when you add a new locale to
WorldServer:
Procedure
1. Create the locale.
Management > Business Rule Linkage > Locales , click Add.
2. Add a locale folder to one or more mounts.
In the WorldServer Explorer, Asset > New
3. Associate the locale and folder.
Management > Asset Interface System > View and Change Properties
4. Establish linkage between the source and target folders.
Management > Business Rule Linkage > Linkage
Preparing to Translate Working with Locales and Linkage
22 Configuring SDL WorldServer - A Tutorial
To Learn MoreTo learn more about linkage and the Linkage Editor, refer to these resources:
■ To learn about linkage, read about Setting up Linkage in the WorldServerAdministrator Guide
■ To learn about the Linkage Editor, see the online help for the Linkage Editor.From the Editor, click Help > Help Contents .
Preparing to Translate Working with Locales and Linkage
23Configuring SDL WorldServer - A Tutorial
Preparing to Translate Working with Locales and Linkage
24 Configuring SDL WorldServer - A Tutorial
Chapter 6
Working with UsersA user is a person who will use WorldServer to perform tasks related to or supporting the
translation process. A user can be an administrator, project manager, author, editor,
translator, reviewer, or have some other role.
In WorldServer, a user configuration defines many properties of an individual user.
Another important concept is a user type, which defines the features of WorldServer that
are available to groups of users.
In this section, you work with user configurations. While it is important to be aware of
user types, we don’t work with them in this tutorial.
Changing and Adding Users
About this task
If you’ve just installed WorldServer, there is just one user defined, Admin. This user has
all privileges and its user type cannot be changed. However, you can change some aspects
of the Admin user configuration.
In the next few steps, you look at the definition for the Admin user and create two new
users.
25Configuring SDL WorldServer - A Tutorial
Procedure
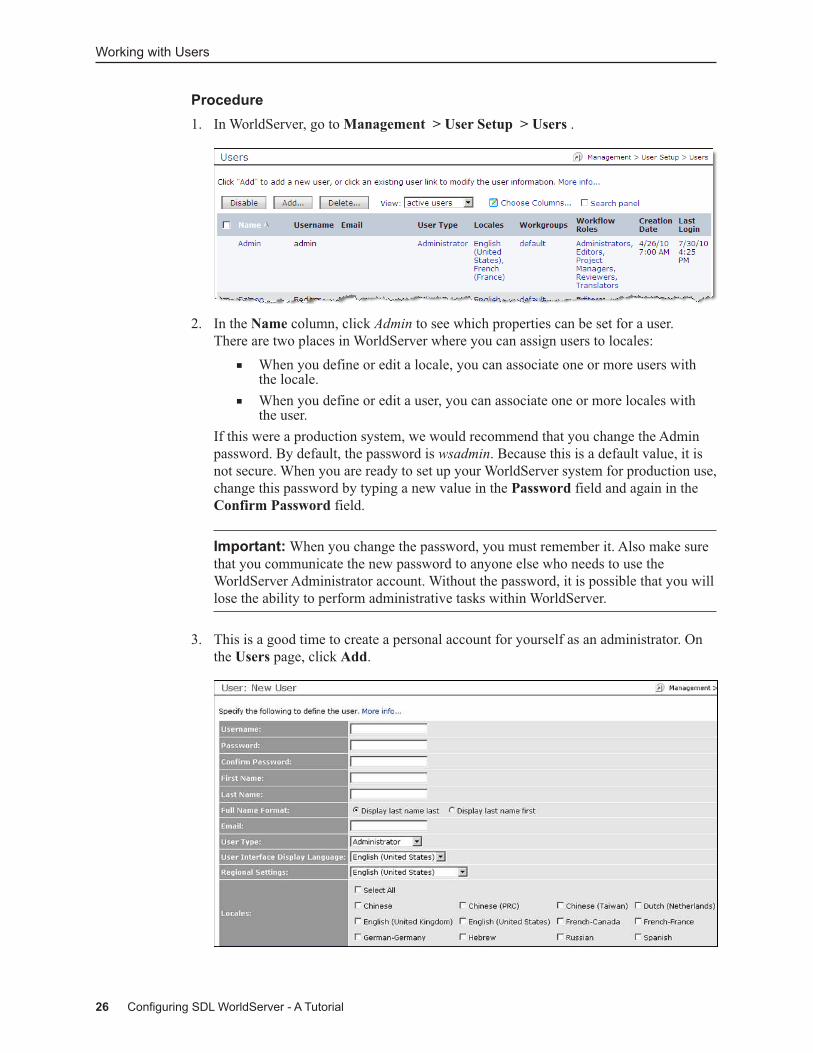
1. In WorldServer, go toManagement > User Setup > Users .
2. In the Name column, click Admin to see which properties can be set for a user.
There are two places in WorldServer where you can assign users to locales:
■ When you define or edit a locale, you can associate one or more users withthe locale.
■ When you define or edit a user, you can associate one or more locales withthe user.
If this were a production system, we would recommend that you change the Admin
password. By default, the password is wsadmin. Because this is a default value, it is
not secure. When you are ready to set up your WorldServer system for production use,
change this password by typing a new value in the Password field and again in the
Confirm Password field.
Important:When you change the password, you must remember it. Also make sure
that you communicate the new password to anyone else who needs to use the
WorldServer Administrator account. Without the password, it is possible that you will
lose the ability to perform administrative tasks within WorldServer.
3. This is a good time to create a personal account for yourself as an administrator. On
the Users page, click Add.
Working with Users
26 Configuring SDL WorldServer - A Tutorial
4. On the User: New User page, in the Username field, enter your WorldServer user
name, perhaps the combination of the first letter of your first name and your last name.
5. The next few fields are fairly self-evident. Enter your password twice, supply your
first and last names, and your email address.
6. From the User Type list, choose Administrator.
7. In the Locales area, click Select All to allow yourself to participate in all locales.
8. In theWorkgroups area, click default. In theWorkflow Roles area, click
Administrators.
These two fields are beyond the scope of this tutorial, but you can read about them
and the other fields on this page by clickingMore info (near the top of the page), and
then clicking User Properties.
9. Click Save.
10. Follow these steps again to create a translator whose full name is Tammy Translator.
Assign a user name, TammyT, a user type of Translator. Assign her to the German
locale and set her workflow role to Translators.
Note:WorldServer workflow actions can make assignments to targeted groups of
people based on their workflow role and locale. When you create users for whom you
have specified workflow roles and locales, you allow the automated processes to do
their work. For example, if Thomas Translator participates in the French locale and a
task is created to translate from English to German, then only Tammy would know
about the task; Thomas would not be notified, but would learn of tasks involving
translation to French.
After you add or edit a user and return to the Users page, you can review a list of
existing users and a synopsis of their properties.
To Learn MoreCreating and Managing Users in the WorldServer Administrator Guide provides
information about the following topics:
■ Creating Users – Setting up email and personal preferences
■ User Groupings – Definitions of and instructions for configuring the affiliations auser can have: user type, locales, workgroups, workflow roles, vendors
■ AIS Configuration – Restricting or allowing access to assets
■ Authentication – In this tutorial, we use the simplest authentication available. In aproduction environment, you may want to consider using one of the other types:Enhanced, OS, or LDAP
Working with Users
27Configuring SDL WorldServer - A Tutorial
Working with Users
28 Configuring SDL WorldServer - A Tutorial
Chapter 7
Testing Your WorkYou have finished the basic configuration of WorldServer. At this point, you are nearly
ready to make the system available to users so that they can start to work with the system.
Before you do, though, we recommend that you test your work to make sure that
everything is configured properly.
In this section, you load content into WorldServer and perform a quick pseudo translation.
Copying Test Files to Your Computer
About this task
Copy a zip file to a directory on your computer:
Procedure
1. On the WorldServer Home page, under Useful Links, clickWorldServer Product
Documentation.
2. On the Documentation page, click Tutorial: Sample Data.
3. On the File Download dialog box, click Save.
4. On the Save As dialog box, navigate to c:\temp and save the file,
en_us_source_content.zip, by clicking Save.
In this tutorial, we assume that you copied the file to c:\temp. If you copied the file toanother location, just remember where it is so that you can retrieve it later.
5. On the Download complete dialog box, click Close.
Making Content Available to WorldServer
About this task
You have created a mount, established a file hierarchy, and copied files to your computer.
Now, you can make the content in those files available to WorldServer so that you and
other members of your team can work with it. In this tutorial, you upload the content to
WorldServer.
29Configuring SDL WorldServer - A Tutorial
Conceptually, uploading involves copying assets from your computer to WorldServer. In
reality, the assets are copied to the repository (or file system) that the WorldServer mount
connects to. The companion process, downloading, involves copying assets from a
WorldServer mount to your file system.
In the previous section, you copied a ZIP archive file to your computer. For the next few
steps, we assume that you copied the file to c:\temp.
To upload the sample files to WorldServer:
Procedure
1. In the WorldServer Explorer, navigate to and select wstut\en_US. The right side ofthe Explorer should be empty, because there isn’t any content in the en_US folder.
2. Click Asset > Upload .
3. On the Upload Files dialog box, click Browse.
4. In the Choose file dialog box, navigate to the folder containing the tutorial zip files,
c:\temp, and select en_us_source_content.zip. ClickOpen.
5. On the Upload Files dialog box, the selected file appears in the Select a file field.
Click Upload.
When you see the success message, click OK.
6. Now verify that the content is indeed accessible from WorldServer. In the Explorer,
navigate into the en_US folder to see the source files, originally written in English.
The zip files have been extracted into a set of folders and files.
Sanity Test Performing a Pseudo-Translation
About this task
At this point, you’re ready to test the WorldServer configuration you’ve been working on.
In this test, you perform a quick pseudo-translation of some of the content you’ve
uploaded.
Procedure
1. If you have created users in addition to Admin, we recommend that you test one of
those users now. Select a user with administrator or translator privileges and log on to
WorldServer.
2. In the WorldServer Explorer, navigate into the content you uploaded, to: /wstut/en_US/eGate/news/thailand.
3. Select body.jsp and click Edit > In BrowserWorkbench .
Browser Workbench is an online editing tool. You can also use Desktop Workbench,
which allows you to work disconnected fromWorldServer.
4. On the Select Asset Version dialog box, select The German (Germany) version,
and then click Continue. Here’s what the choices mean:
■ If you want to edit the original asset, choose The selected asset.
■ If you want to translate the asset, choose one of the target locale versions, asyou did in this step.
Testing Your Work
30 Configuring SDL WorldServer - A Tutorial

These choices are available because of the setup work you have done in this tutorial –
setting up locales, associating the locales with the appropriate folders, and
establishing linkage.
The Browser Workbench appears.
The left panes contain the source text in small segments. The numbers inside curly
braces, for example, {1}, are called placeholders and contain non-translatable content
such as formatting information.
The right panes contain translations. In this test, the right panes are empty because
you have not associated a translation memory with the folder containing the content.
In a production environment, the product or localization manager typically assigns
translation memory to a set of assets.
5. Type text into some of the target segments.
The text does not have to contain a real translation, but for testing purposes, we
recommend that you make the “translated” text different from the source text.
6. Click Save.
Green vertical lines appear next to your “translations” to indicate that the translations
were done manually.
Testing Your Work
31Configuring SDL WorldServer - A Tutorial
Tip: For the meanings of all the color indications, click the question mark (?) near
the top of the page.
7. Quit the Browser Workbench.
8. Now you can see the results of your work. In the WorldServer Explorer, navigate to
/wstut/en_US/eGate/news/thailand and select body.jsp. Click Asset > View
, and then click Preview.
You should see a formatted version of your “translation”.
Congratulations! You have successfully configured WorldServer and tested that the
configuration was done correctly.
To Learn MoreTo learn about using the Asset Interface System, read aboutWorking with Assets in the
WorldServer User Guide.
To learn more about the WorldServer Desktop Workbench, see the online help for the
Desktop Workbench.
There are many other aspects of the system that you can configure. To learn more about
other configuration options, familiarize yourself with theWorldServer Administrator
Guide.
Thank you and good luck!
Testing Your Work
32 Configuring SDL WorldServer - A Tutorial