Combinacibn Microondas Campana de ULTRA WAVE TM Guia … · E L I T E ULTRA WAVETMMicrowave Hood...
69
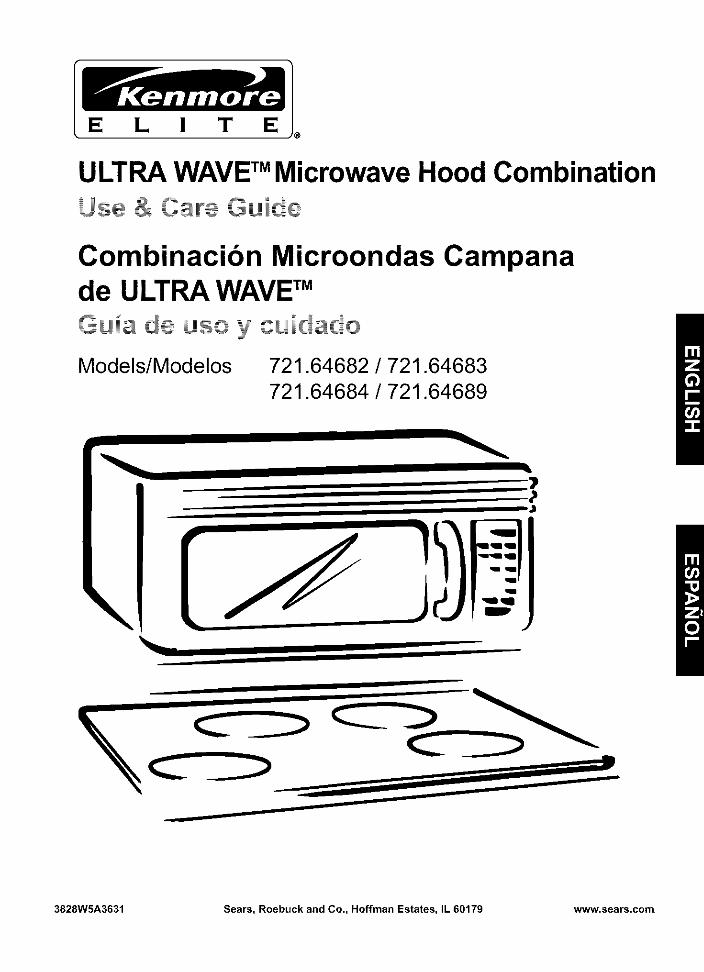
E L I T E ® ULTRA WAVETMMicrowave Hood Combination Use & Ca_°e Guide Combinacibn Microondas Campana de ULTRA WAVE TM Guia de uso y cuidado Models/Modelos 721.64682/721.64683 721.64684/721.64689 \ 3828W5A3631 Sears, Roebuck and Co., Hoffman Estates, IL 60179 www.sears.com
Transcript of Combinacibn Microondas Campana de ULTRA WAVE TM Guia … · E L I T E ULTRA WAVETMMicrowave Hood...
E L I T E®
ULTRA WAVETMMicrowave Hood CombinationUse & Ca_°e Guide
Combinacibn Microondas Campanade ULTRA WAVE TM
Guia de uso y cuidado
Models/Modelos 721.64682/721.64683721.64684/721.64689
\
3828W5A3631 Sears, Roebuck and Co., Hoffman Estates, IL 60179 www.sears.com
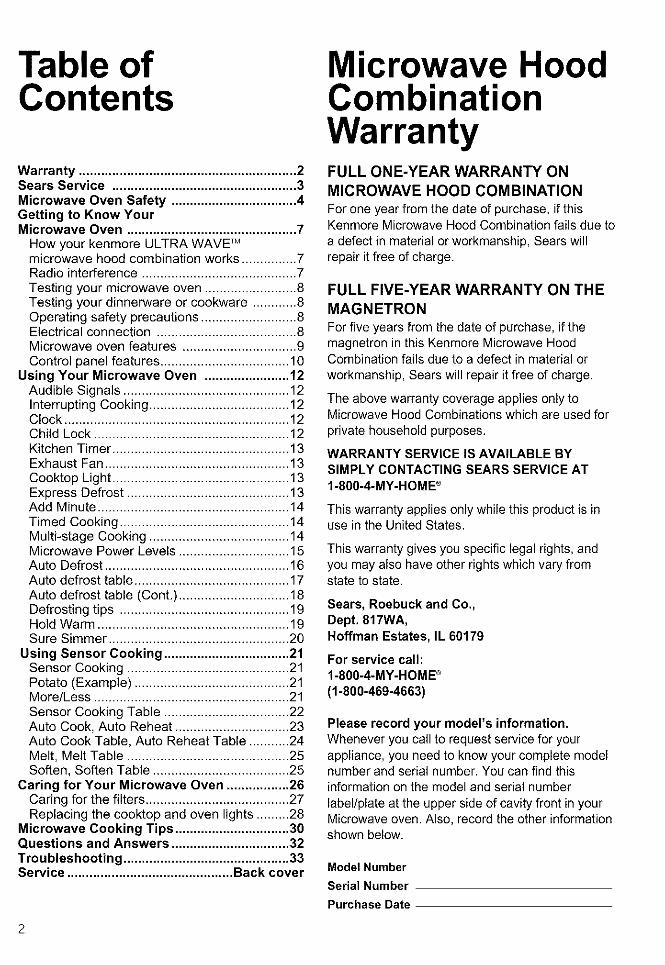
Table ofContents
Warranty ........................................................... 2Sears Service .................................................. 3Microwave Oven Safety .................................. 4Getting to Know YourMicrowave Oven .............................................. 7
How your kenmore ULTRA WAVE TM
microwave hood combination works ............... 7Radio interference .......................................... 7Testing your microwave oven ......................... 8Testing your dinnerware or cookware ............ 8Operating safety precautions .......................... 8Electrical connection ...................................... 8Microwave oven features ............................... 9Control panel features ................................... 10
Using Your Microwave Oven ....................... 12Audible Signals ............................................. 12Interrupting Cooking ...................................... 12Clock ............................................................. 12Child Lock ..................................................... 12Kitchen Timer ................................................ 13Exhaust Fan .................................................. 13Cooktop Light ................................................ 13Express Defrost ............................................ 13Add Minute .................................................... 14Timed Cooking .............................................. 14Multi-stage Cooking ...................................... 14Microwave Power Levels .............................. 15Auto Defrost .................................................. 16Auto defrost table .......................................... 17Auto defrost table (Cont.) .............................. 18Defrosting tips .............................................. 19Hold Warm .................................................... 19Sure Simmer ................................................. 20
Using Sensor Cooking .................................. 21Sensor Cooking ............................................ 21Potato (Example) .......................................... 21More/Less ..................................................... 21Sensor Cooking Table .................................. 22Auto Cook, Auto Reheat ............................... 23Auto Cook Table, Auto Reheat Table ........... 24Melt, Melt Table ............................................ 25Soften, Soften Table ..................................... 25
Caring for Your Microwave Oven ................. 26Caring for the filters ....................................... 27Replacing the cooktop and oven lights ......... 28
Microwave Cooking Tips ............................... 30Questions and Answers ................................ 32Troubleshooting ............................................. 33Service ............................................. Back cover
Microwave HoodCombinationWarrantyFULL ONE-YEAR WARRANTY ON
MICROWAVE HOOD COMBINATION
For one year from the date of purchase, if thisKenmore Microwave Hood Combination fails due to
a defect in material or workmanship, Sears willrepair it free of charge.
FULL FIVE-YEAR WARRANTY ON THE
MAGNETRON
For five years from the date of purchase, if themagnetron in this Kenmore Microwave HoodCombination fails due to a defect in material orworkmanship, Sears will repair it free of charge.
The above warranty coverage applies only toMicrowave Hood Combinations which are used for
private household purposes.
WARRANTY SERVICE IS AVAILABLE BYSIMPLY CONTACTING SEARS SERVICE ATI-8O0-4-MY-HOME ®
This warranty applies only while this product is inuse in the United States.
This warranty gives you specific legal rights, andyou may also have other rights which vary fromstate to state.
Sears, Roebuck and Co.,Dept. 817WA,Hoffman Estates, IL 60179
For service call:1-8O0-4-MY-HOME ®
(1-800-469-4663)
Please record your model's information.Whenever you call to request service for yourappliance, you need to know your complete modelnumber and serial number. You can find thisinformation on the model and serial number
label/plate at the upper side of cavity front in yourMicrowave oven. Also, record the other informationshown below.
Model Number
Serial Number
Purchase Date
2

Sears ServiceMaster Protection AgreementsCongratulations on making a smart purchase.Your new Kenmore _'product is designed and manufactured for years of dependable operation.But like all products, it may require preventive maintenance or repair from time to time.That's when having a Master Protection Agreement can save you money and aggravation.
Purchase a Master Protection Agreement now and protect yourself from unexpected hassleand expense.
The Master Protection Agreement also helps extend the life of your new product. Here'swhat's included in the Agreement:
Expert service by our 12,000 professional repair specialists[_ Unlimited service and no charge for parts and labor on all covered repairs_Y_ "No-lemon" guarantee - replacement of your covered product if four or more product failures
occur within twelve months[_ Product replacement if your covered product can't be fixed[_ Annual Preventive Maintenance Check at your request- no extra charge
Fast help by phone - phone support from a Sears technician on products requiring in-homerepair, plus convenient repair scheduling
[_ Power surge protection against electrical damage due to power fluctuations[_ Rental reimbursement if repair of your covered product takes longer than promised
Once you purchase the Agreement, a simple phone call is all that it takes for you to schedule service.You can call anytime day or night, or schedule a service appointment online.
Sears has over 12,000 professional repair specialists, who have access to over 4.5 million qualityparts and accessories. That's the kind of professionalism you can count on to help prolong the life ofyour new purchase for years to come. Purchase your Master Protection Agreement today!
Some limitations and exclusions apply. For prices and additional information call 1-800-827-6655.
Sears Installation Service
For Sears professional installation of home appliances, garage door openers, water heaters, andother major home items, in the U.S.A. call1-800-4-MY-HOME ®

Microwave Oven SafetyYour safety and the safety of others are very important.
We have provided many important safety messages in this manual and on your appliance.Always read and obey all safety messages.
This is the safety alert symbol.
This symbol alerts you to hazards that can kill or hurt you and others.
All safety messages will be preceded by the safety alert symbol and the word"DANGER" or "WARNING." These words mean:
You will be killed or seriously injuredif you don't follow immediately instructions.
You can be killed or seriously injuredif you don't follow instructions.
All safety messages will identify the hazard, tell you how to reduce the chance of injury, and tellyou what can happen if the instructions are not followed.
IMPORTANT SAFETY INSTRUCTIONSWhen using electrical appliances basic safety precautions should be followed, including thefollowing:
WARNING: To reduce the risk of burns,
electric shock, fire, injury to persons, orexposure to excessive microwave energy:
• Read all instructions before using themicrowave oven.
• Read and follow the specific"PRECAUTIONS TO AVOID POSSIBLEEXPOSURE TO EXCESSIVE MICROWAVEENERGY" found in this section.
• The microwave oven must be grounded.Connect only to properly grounded outlet.See "GROUNDING INSTRUCTIONS" foundat the end of this section.
• Install or locate the microwave oven only inaccordance with the provided installationinstructions.
• Some products such as whole eggs in theshell and sealed containers - for example,closed glass jars - are able to explode andshould not be heated in the microwave oven.
• Use the microwave oven only for its intendeduse as described in this manual. Do not use
corrosive chemicals or vapors in themicrowave oven. This type of oven isspecifically designed to heat, cook, or dryfood. It is not designed for industrial orlaboratory use.
• As with any appliance, close supervision isnecessary when used by children.
• Do not operate the microwave oven if it hasa damaged cord or plug, if it is not workingproperly, or if it has been damaged ordropped.
SAVE THESE INSTRUCTIONS
4

IMPORTANT SAFETY INSTRUCTIONS• The microwaveoven shouldbeservicedonly by
qualifiedservicepersonnel.Callan authorizedservicecompanyfor examination,repair,oradjustment.
• Seedoorsurfacecleaninginstructionsin the "Caringfor Your MicrowaveOven"section.
• To reducethe riskof fire in the oven cavity:- Do not overceokfood.Carefullyattendthe
microwaveoven when paper,plastic,or othercombustiblematerialsare placedinsidethe oven tofacilitatecooking.
- Removewire twist-tiesfrom paperor plasticbagsbefore plating bagsin oven.
- If materialsinsidethe oven ignite,keep ovendoorclosed,turn oven off,and disconnectthe powercord,or shutoff powerat the fuse orcircuit breakerpanel.
- Do not use the cavity for storagepurposes.Donotleave paperproducts,cookingutensils,or food inthe cavitywhen not in use.
• Suitablefor useabove both gasand electriccookingequipment.
• Intendedto be used aboverangeswith maximumwidthof 36 inches(91 cm).
• CleanVentilatingHoodsFrequently- Greaseshouldnot beallowedto accumulateon hoodor filter.
• Whenflamingfoodsunder the hood,turn the fan on.
• Usecare when cleaningthe vent-hoodfilter.Corrosivecleaningagents,suchas lye-basedovencleaners,may damagethefilter.
• Oversizedfoodsor oversizedmetal utensilsshouldnot beinserted in the microwaveoven as they maycreatea fire or riskof electricshock.
• Do not cleanwith metalscouringpads.Piecescanburnoff the padandtouchelectricalparts involvingariskof electricshock.
• Do not store anything directly on top of themicrowave oven when the microwave oven is in
operation.
• Do not cover or block any openings on themicrowave oven.
• Do not store this microwave oven outdoors. Do not
use the microwave oven near water for example,
near a kitchen sink, in a wet basement, near a
swimming pool, or similar location.
• Do not immerse cord or plug in water.
• Keep cord away from heated surfaces.
• Do not let cord hang over edge of table or counter.
• Do not mount over a sink.
• Do not cover racks or any other part of the oven with
metal foil. This will cause overheating of the oven.
• Liquids such as water, coffee, or tea are able to
be overheated beyond the boiling point without
appearing to be boiling due to surface tension of
the liquid. Visible bubbling or boiling when thecontainer is removed from the microwave oven is
not always present. This could result in very hot
liquids suddenly boiling over when a spoon or
other utensil is inserted into the liquid. To reduce
the risk of injury to persons.
1) Do not overheat the liquid.
2) Stir the liquid both before and halfway through
heating it.
3) Do not use straight-sided containers with
narrow necks.
4) After heating, allow the container to stand
in the microwave oven for a short time before
removing the container.
5) Use extreme care when inserting a spoon orother utensil into the container.
SAVE THESE INSTRUCTIONS

PRECAUTIONS TO AVOID POSSIBLE
EXPOSURE TO EXCESSIVE MICROWAVE
ENERGY
(a) Do not attempt to operate this oven with thedoor open since open - door operation canresult in harmful exposure to microwaveenergy. It is important not to defeat or tamperwith the safety interlocks.
(b) Do not place any object between the ovenfront face and the door or allow soil or cleaner
residue to accumulate on sealing surfaces.
(c) Do not operate the oven if it is damaged. It isparticularly important that the oven door closeproperly and that there is no damage to the:(1) Door (bent),(2) Hinges and latches (broken or loosened),(3) Door seals and sealing surfaces.
(d) The oven should not be adjusted or repairedby anyone except properly qualified servicepersonnel.
ElectricalrequirementsObserve all governing codes andordinances. A 120 Volt, 60 Hz, AC only,20 amp fused electrical supply isrequired. (A time-delay fuse is recommended.)It is recommended that a separate circuitserving only this appliance be provided.
Electrical Shock Hazard
Plug into a grounded 3-prongoutlet. Do not remove groundprong. Do not use an adapter.Do not use an extension cord.
Failure to follow these
instructions can result in death,fire, or electrical shock.
GROUNDING INSTRUCTIONS• For all cord connected appliances:The microwave oven must be grounded.In the event of an electrical short circuit,grounding reduces the risk of electricshock by providing an escape wire for theelectric current. The microwave oven isequipped with a cord having a groundingwire with a grounding plug. The plug mustbe plugged into an outlet that is properlyinstalled and grounded.
Ensure proper groundexists before use
WARNING: Improper use of thegrounding can result in a risk of electricshock.
Consult a qualified electrician orserviceman if the grounding instructionsare not completely understood, or if doubtexists as to whether the microwave ovenis properly grounded.Do not use an extension cord. If the powersupply cord is too short, have a qualifiedelectrician or serviceman install an outletnear the microwave oven.
• For a permanently connected appliance:The microwave oven must be connectedto a grounded, metallic, permanent wiringsystem, or an equipment groundingconductor should be run with the circuitconductors and connected to theequipment grounding terminal or leadon the microwave oven.
SAVE THESEINSTRUCTIONS
6
Gettingto Know YourMicrowaveOvenThis section discusses the concepts behind microwave cooking. It also shows you the basics you need to knowto operate your microwave oven. Please read this information before you use your oven.
HOW YOUR KENMORE ULTRA WAVE TM MICROWAVEHOOD COMBINATION WORKS
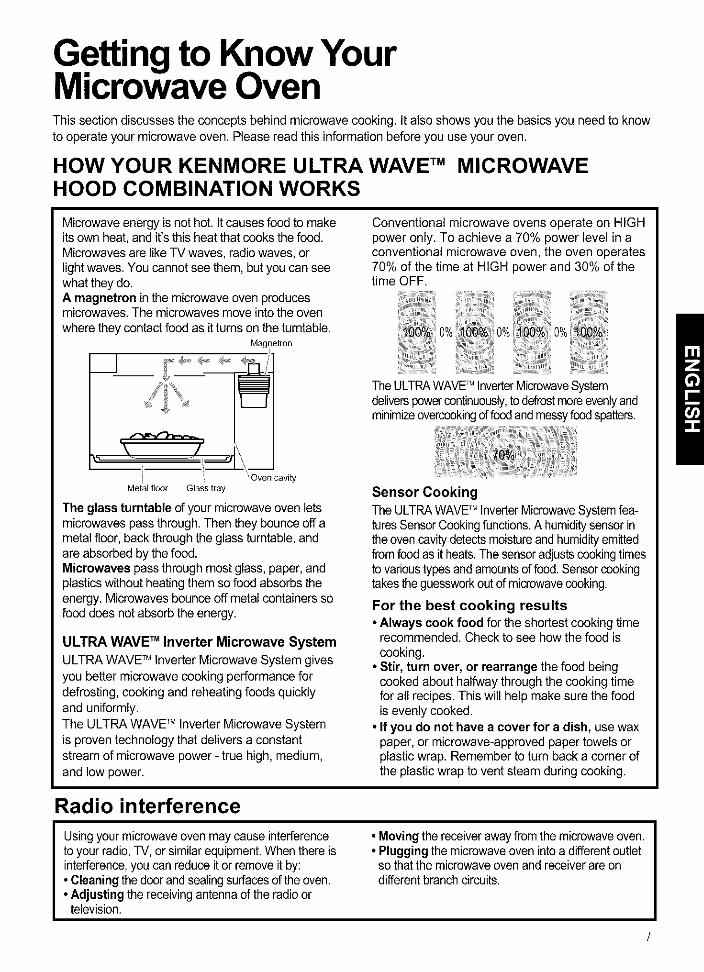
Microwave energy is not hot. It causes food to makeits own heat, and it's this heat that cooks the food.Microwaves are like TV waves, radio waves, orlight waves. You cannot see them, but you can seewhat they do.A magnetron in the microwave oven producesmicrowaves. The microwaves move into the ovenwhere they contact food as it turns on the turntable.
Magnetron
Conventional microwave ovens operate on HIGHpower only. To achieve a 70% power level in aconventional microwave oven, the oven operates70% of the time at HIGH power and 30% of thetime OFF.
TheULTRAWAVETM InverterMicrowaveSystemdeliverspowercontinuously,to defrostmoreevenlyandminimizeovercookingof foodandmessyfoodspatters.
Oven cavity
Metal floor Glass tray
The glass turntable of your microwave oven letsmicrowaves pass through. Then they bounce off ametal floor, back through the glass turntable, andare absorbed by the food.Microwaves pass through most glass, paper, andplasticswithout heating them so food absorbs theenergy. Microwaves bounce off metal containers sofood does not absorb the energy.
ULTRA WAVE TM Inverter Microwave SystemULTRA WAVE TM Inverter Microwave System givesyou better microwave cooking performance fordefrosting, cooking and reheating foods quicklyand uniformly.The ULTRA WAVETM Inverter Microwave Systemis proven technology that delivers a constantstream of microwave power - true high, medium,and low power.
Sensor CookingThe ULTRAWAVE MInverterMicrowaveSystemfea-turesSensor Cookingfunctions.A humiditysensor inthe oven cavitydetectsmoistureand humidityemittedfromfood as it heats.The sensoradjustscookingtimesto varioustypes andamountsof food. Sensorcookingtakes the guessworkout of microwavecooking.
For the best cooking results• Always cook food for the shortest cooking time
recommended. Check to see how the food iscooking.
• Stir, turn over, or rearrange the food beingcooked about halfway through the cooking timefor all recipes. This will help make sure the foodis evenly cooked.
• If you do not have a cover for a dish, use waxpaper, or microwave-approved paper towels orplastic wrap. Remember to turn back a corner ofthe plastic wrap to vent steam during cooking.
Radio interference
Usingyour microwaveoven may causeinterferenceto your radio,TV, or similarequipment.When there isinterference,you can reduce it or removeit by:• Cleaning the doorand sealingsurfacesof the oven.• Adjusting the receivingantenna of the radioortelevision.
• Movingthe receiverawayfrom the microwaveoven.• Pluggingthe microwaveoven into a different outletso that the microwaveoven and receiverare ondifferent branch circuits.

Testing your microwave oven
I To test the oven put about 1cup of coldwater ina Makesureit latches.Cookat 100%powerfor 1minute.glasscontainerin the oven.Closethe door. Whenthetimeis up,the watershouldbeheated.
Testing your dinnerware or cookware
Test dinnerware or cookware before using. Totest a dish for safe use, put it into the oven with acup of water beside it. Cook at 100% cook powerfor one minute. If the dish gets hot, do not use it.Some dishes (melamine, some ceramicdinnerware, etc.) absorb microwave energy,
becoming too hot to handle and slowing cookingtimes. Cooking in metal containers not designed formicrowave use could damage the oven, as couldcontainers with hidden metal (twist-ties, foil lining,staples, metallic glaze or trim).
Operating safety precautions
• Never lean on the door or allow a child to swingon it when the door is open.
• Use hot pads. Microwave energy does not heatcontainers, but the heat from the food can makethe container hot.
• Do not use newspaper or other printed paper inthe oven.
• Do not dry flowers, fruit, herbs, wood, paper,gourds, or clothes in the oven.
• Do not start a microwave oven when it is empty.Product life may be shortened. If you practiceprogramming the oven, put a containerof water inthe oven. It is normal for the oven door to look
wavy after the oven has been runningfor a while.• Do not try to melt paraffinwax in the oven.
Paraffinwax will not melt in a microwave oven
because it allows microwaves to pass through it.• Do not operate the microwave oven unless theglass turntable is securely in place and can movefreely. The turntable can move in either direction.Make sure the turntable is correct-side up in theoven. Handle your turntable with care whenremoving it from the oven to avoid possiblybreaking it. Ifyour turntable cracks or breaks,contact your dealer for a replacement.
• When you use a browning dish, the browningdish bottom must be at least 3A6 inch above theturntable. Follow the directions supplied with thebrowning dish.
• Never cook or reheat a whole egg inside the
shell. Steam buildup in whole eggs may causethem to burst, and possibly damage the oven.Slice hard-boiled eggs before heating. In rarecases, poached eggs have been known toexplode. Cover poached eggs and allow astanding time of one minute before cutting intothem.
• For best results, stir any liquid several timesduring heating or reheating. Liquids heated incertain containers (especially containers shapedlike cylinders) may become overheated. The liquidmay splash out with a loud noise during or afterheating or when adding ingredients (coffeegranules, tea bags, etc.). This can harm the oven.
• Microwaves may not reach the center of a roast.The heat spreads to the center from the outer,cooked areas just as in regular oven cooking. Thisis one of the reasons for lettingsome foods (forexample, roasts or baked potatoes) stand for awhile after cooking, or for stirring some foodsduring the cooking time.
• Do not deep fry in the oven. Microwavableutensils are not suitable and it is difficult to
maintain appropriate deep-fryingtemperatures.• Do not overcook potatoes. At the end of the
recommended cooking time, potatoes should beslightly firm because they will continue cookingduring standing time. After microwaving, letpotatoes stand for 5 minutes. They will finishcooking while standing.
I
Electrical connection
I Ifyour electric powerline or outlet voltage isless than 110 volts, cooking times may be longer.
8
Have a qualified electrician check your electricalsystem.

Microwave oven features
® ®® ®
®®®Your microwave oven is designed to make yourcooking experience as enjoyable and productiveas possible. To get you up and running quickly, thefollowing is a list of the oven's basic features:
1. Metal Shielded Window. The shield preventsmicrowaves from escaping. It is designed as ascreen to allow you to view food as it cooks.
2. Model and Serial Number Plate & CookingGuide Label
3. Charcoal Filter (behind Vent Grille)
® ®4. Vent Grille
5. Glass tray. The glass tray moves food as itcooks for more even cooking. It must be in theoven during operation for best cooking results.
6. Cooktop Light
7. Grease Filter. See "Caring for the filters"section.
8. Control Panel. Touch the pads on this panel toperform all functions.
9. Cooking Rack. Use for extra space whencooking in more than one container at thesame time.
1. Glass tray2. Support3. Hub
Defrost Plate
Use the DEFROST PLATE provided forcomplete defrosting.
The glass tray moves in both directions to help cook food moreevenly. Do not operate the microwave oven without the glasstray in place.
To Install:
1. Place the support on the oven cavity bottom.
2. Place the glass tray on the support.
Fit the raised, hollowed groove of the glass tray bottombetween the rollers of the hub. The rollers on the supportshould fit inside the glass tray bottom ridge.

!!!ii!i;i!i_iili___iiii̧!i;iiiiiiiiilli̧iiiii!iii_i_!!iii_;i_i!i!!!i!i!_!!iiii:iiiill_!iiiii!!iii!iil;iiiiii!iiiii¸i!!!iil;i!i_ii_iii:iliiii!!!i;iii!!iiii!iiiiii!!!;iiii!iiiii¸_iii_iii!!!!iilli!_!_i!!!ii!!_i_!_i_lili!!iliiiilli!_iii!!ili!!iiiiii_i_!i!:!!_ii!ii!iiii_'!iiiill!!!i;iii!!i;i!!_iiii_iii!!!iii!!!_!!iii_ililliiiiii!iiiii!;!i!ii!!i_il_i_iiii!!!!!iii!iliiiiiiii_i;i_!iii!i!_iiiiiX_iiii!ii!_!ili!i_iJ!J!i!i!i!ii!i!_!
Control panel featuresYour microwave oven control panel lets you select the desired cooking function quickly and easily.All you have to do is touch the necessary Command Pad. The following is a list of all the Commandand Number Pads located on the control panel. For more information on these features, see the"Using your microwave oven" section,
5m_ Trench5en,_;or
PLATE
1
4 5
.... TIME
AD#
3 ii
8 9 _J
0
,,J CLE_
VEetr V_rr LIGHT
1. Display. The display includesa clock and 2. Popcorn. Touch this pad to pop popcorn withindicatorsto tell you time of day, cooking time the sensor feature. The oven's sensor will tellsettings, cook powers, quantities, weights, and the oven how long to cook depending on thecooking functions selected, amount of humidity it detects from the popcom.
10

3. Pizza. Touch this pad to reheat one or severalslices of pizza without entering a cook time orpower.
4. Vegetable. Touch this pad to cook Vegetablewithout entering a cook time or power.
5. Potato. Touch this pad to cook potatoes withoutentering a cook time or power.
6. Frozen Entree. Touch this pad to cook a 10- to21- ounce frozen entree without entering a cooktime or power.
7. Dinner Plate. Touch this pad to cook withoutentering a cook time or power.
8. Sure Simmer. Touch this pad to simmer soups,casseroles, stews, and other liquid foods.
9. Number Pads. Touch number pads to entercooking times, cook powers, quantities, weights,or food categories.
10. Cook Time. Touch this pad followed byNumber Pads to set a cooking time.
11. Power. Touch this pad after the cook time hasbeen set, followed by a Number Pad to set theamount of microwave energy released to cookthe food. The higher the number, the higher themicrowave power or "cooking speed."
12. Add Minute. Touch this pad to cook for 1minute at 100% cook power, orto add extraminutes at the set cook power to your cookingcycle.
13. Less. Touch this pad to subtract 10 seconds ofcook time each time you press it.
14. More. Touch this pad to add 10 seconds ofcook time each time you press it.
15. Start. Touch this pad to start a function. If youopen the door after the oven begins to cook,retouch Start.
16. Stop/Clear. Touch this pad to erase anincorrect command, cancel a program duringcooking, or to clear the Display.
17. Auto Cook. Touch this pad to cookmicrowavable foods without entering a cooktime or power.
18. Auto Reheat. Touch this pad to reheatmicrowavable foods without entering a cooktime or power.
19. Hold Warm. Touch this pad to keep hot,cooked foods safely warm in your oven for upto 99 minutes, 99 seconds. Hold Warm can beused by itself, or it can automatically follow acooking cycle.
20. Clock. Touch this pad to enter the time of day.
21. Auto Defrost. Touch this pad followed byNumber Pads to thaw frozen meat by weight.
22. Express Defrost. Touch this pad to expressdefrost. "GROUND BEEF 1.0 LBS TOUCH
START" will appear in the display.
23. Kitchen Timer. Touch this pad to set theKitchen Timer.
24. Melt. Touch this pad to melt chocolate, cheese,butter, or marshmallows.
25. Soften. Touch this pad to soften ice cream,cream cheese, butter, or frozen juice.
26. Vent On/Off. Touch this button to turn the fanon or off.
27. Vent 5 Speed. Touch this button to chooseone of 5 fan speeds.
28. Light High/Night/Off. Touch this button to tumthe light on high, night, or off.
NOTE: If you try to enter incorrect instructions,you will not hear any tones. Touch STOP/CLEARand re-enter the instructions.
11

Using Your Microwaveven
This section gives you instructions for operatingeach function. Please read these instructions
carefully.
AUDIBLE SIGNALS
Audible signals are available to guide you whensetting and using your oven:• A programming tone will sound each time
you touch a pad.
• Seven tones signal the end of a Kitchen Timercountdown.
• Four tones signal the end of a cooking cycle.
CLOCK
When your microwave oven is first plugged in orafter a power failure, the Display will show "PLEASE
SET TIME OF DAY." If a time of day is not set,":" will show on the Display until you touch "Clock."
Example for 10:30(AM):
Touch: Display Shows:
1,
: EIfTERTitleOF#RY
3, I 0 3 0 '_'3D ,uuLHS,fl°_,
TI'H I_"P,_,_-H_
5. ( 1_ I1'-I • 13 Tl"ll IF"
5 TR°_T
6,
NOTE: You can switch between AM and PM bytouching 1 or 2 after step 4.
INTERRUPTING COOKING
You can stop the oven during a cycle by openingthe door. The oven stops heating and the fan
stops, but the light stays on.To restart cooking, close the door and touchSTART.
If you do not want to continue cooking,open the door and touch STOP/CLEAR.
CHILD LOCK
Use this safety feature to lock the control panelwhen you are cleaning the oven or so that childrencannot use the oven unsupervised.
To set CHILD LOCK:
Touch: Display Shows:
1, Time of day.
2, Touch and hold untilLOCKED appears inthe display(approximately4 seconds).
To cancel CHILD LOCK:
Touch: Display Shows:
1, Touch and hold untilLOCKEDdisappears in thedisplay(approximately4 seconds).
12

KITCHEN TIMER COOKTOP LIGHT
Your microwave oven can be used as a kitchen
timer. You can set up to 99 minutes, 99 seconds.
Example for 3 minutes:
Touch:
.
Display Shows:
Tim I_I ml_l: Eh'TER, ,,,E,,, ,,,,
R_,_5EL
• I-#-I Tl'l! ir T T2. 3 0 0 3.uu ,uuLHS,_R,
. .LILI
TIMER and timecounting down.
EXHAUST FAN
The bottom of the control panel controls the 5-speedexhaust fan.
Example for level 4:
Touch: Display Shows:
O I I,' I /1. _.Ef)EL,
V_r0_0_
This shows the last level until youselect the fan speed level.
O I I,' I2. _.Ef)EL
VENT5=S_EB
Touch until Level 4.
VERT0_0_
Turn off fan when desired.
NOTE: If the temperature from the range or cooktopbelow the oven gets too hot, the exhaust fan in thevent hood will automatically turn on at the LEVEL 5setting to protect the oven.
It may stay on up to an hour to cool the oven,When this occurs, the VENT button will not turn thefan off.
The pad on the bottom right of the control panelcontrols the cooktop light.
Example for HIGH:
Touch: Display Shows:
1. 0 HISH
once for HIGH lighttwice for NIGHT light
2. 0 EIFF
bG_HIGF_IN_fOFF
To turn off, touch button onceor twice depending on lightsetting.
EXPRESS DEFROST
One express defrost sequence is preset in the oven,The Express Defrost feature provides you with the quickdefrosting method for 1.0 pound "GROUND BEEF"only.
Example for IIb of Ground beef:
Touch: Display Shows:
5ROUI'IDBEEF/.LTLB51. TOUEH5 TRRT
.
Time counting down and
EXP°_E55DEF°_OSTscrolls across display.
13

ADD MINUTE
A time-saving pad, this simplified control letsyou quickly set and start microwave cooking at100% power without the need to touch START.
Example for 2 minutes:
Touch: Display Shows:
. Time of day.
2.Twice
Time counting downand POWER 100.
NOTE: Each time you touch ADD MINUTE, it willadd 1 minute up to 99 rain 59 seconds.
TIMED COOKING
This feature lets you program a specific cook timeand power. For best results, there are 10 powerlevel settings in addition to HIGH (100%) power.Refer to the "Microwave Power Levels Table" on
page 15 for more information.
NOTE: If you do not select a power level, the ovenwill automatically cook at HIGH (100%) power.
Example for 5 minutes, 30 seconds at 80%power:
Touch: Display Shows:
.
.
TFH IF T T5:30 ,uuLH S,RE,FI FII Iu_ PE_,EE
.
9E;E;,,EEPO_EEI II I ! TFIIF_
• 1'3 /31 I4. 5 ._gDPO_'E,9
80 ,_H S,RE,
5. Time counting downand POWER 80,
NOTE: After use of cook function, fan will run for 1minute to cool if it senses too much heat,
MULTI-STAGE COOKING
For best results, some recipes call for different cookpowers during different stages of a cook cycle. Youcan program your oven to switch from one powerlevel to another for up to 3 stages.
Example for 2-stage cook cycle:
Touch: Display Shows:
.
2. :3 0 ' 0
to set a 3-minute cooktime for the first stage.
TFI! IF T T
FI FII IJR PE_,EE
_9.uu"nn EMTEEPE,UEE3.
I It I ! TFIIF_LEVEL,,u,u
.
to set an 80% cookpower for the first stage.
FI, I F_
TFH IF,uu__H5TRET
.
.
•_ ,_H 5,RE,* _J_.l TFH IF T T
FI FI, IJR PO_,EEto set a 7-minute cooktime for the second stage.
• r_r_ hit FI, I._,_,E_, ,_ P_,_'E_, ,I , ! TFIIF__EJE", ,_,_
.
to set a 50% cook powerfor the second stage.
7 _ P_ER 50TFH IF",uuLH 5TRET
.Time counting downand POWER 80,
10. When the first stage is over, you will hear twoshort tones as the oven begins the secondcook stage.
14

MICROWAVE POWER LEVELS
For best results,some recipes call for different cookpowers. The lower the cook power, the slower thecooking. Each number from 1 to 9 stands for adifferent percentage of full cook power.
The following table gives the percentage of cook powereach number pad stands for, and the cook powername usually used.
It also tells you when to use each cook power.Follow recipe or food package instructions if available.
COOK POWER NAME WHEN TO USE IT
100% of full power High • Quick heating many convenience foods andfoods with high water content, such as soups and
beverages
• Cooking tender cuts of meat, ground meat
9 = 90% of full power * Heating cream soups
8 = 80% of full power • Heating rice, pasta, or casseroles
7 = 70% of full power Medium-High • Cooking and heating foods that need aCook Power lower than high (for example,
whole fish and meat loaf) or when food iscooking too fast
• Reheating a single serving of food
6 = 60% of full power • Cooking requiring special care, such as cheese
and egg dishes, pudding, and custards
• Finishing cooking casseroles
5 = 50% of full power Medium • Cooking ham, whole poultry, and pot roasts
• Simmering stews
4 = 40% of full power • Melting chocolate
• Heating pastries
3 = 30% of full power Medium-Low, • Manually defrosting foods, such as bread, fish,Defrost meats, poultry, and precooked foods
2 = 20% of full power • Softening butter, cheese, and ice cream
1 = 10% of full power Low • Keeping food warm
• Taking chill out of fruit
15

AUTO DEFROSTFour defrost sequences are preset in the oven,The auto defrost feature provides you with the bestdefrosting method for frozen foods. The cooking guidewill show you which defrost sequence is recommendedfor the food you are defrosting, For added convenience,the Auto Defrost includes a built-in beep mechanismthat reminds you to check, turn over, separate, orrearrange to get best defrost results.
1. MEAT
2. POULTRY
3. FISH
4. BREAD
This table shows you food type selections and theweights you can set for each type. For bestresults, loosen or remove covering on food.
WEIGHTS YOUTOUCH CAN SET
FOOD Auto Defrost (tenths of a pound)
Meat 1 .1 to 6.0 (45g to 2722g)
Poultry 2 .1 to 6.0 (45g to 2722g)
Fish 3 .1 to 6.0 (45g to 2722g)
Bread 4 .1 to 1.0 (45g to 450g)
Example for 1.2 Ibs of ground beef:
Touch: Display Shows:
1, NERTTOUEHIPOULTRYTOUEH2FISHTDUEH9BEER#TOUEH_/
2, O.OL_5El/TEEgEISHT
3, 1 and L2_5
to enter the weight TOUEH5TRET
4, Time counting downand DEFROST.
NOTE:
When you touch the START pad, the display changesto defrost time count down. The oven will beep duringthe DEFROST cycle. At this time, open the door andturn, separate, or rearrange the food. Remove anyportions that have thawed. Return frozen portions tothe oven and touch START to resume the defrost cycle.
Operating Tips• For best results, remove fish, shellfish, meat, and
poultry from its original closed paper or plasticpackage (wrapper). Otherwise, the wrap will holdsteam and juice close to the foods, which can causethe outer surface of the foods to cook,
• For best results, shape your ground meat into theform of a doughnut before freezing, When defrosting,scrape off thawed meat when the beep sounds andcontinue defrosting.
• Place foods in a shallow container or on a microwaveroasting rack to catch drippings.
Weight conversion tableYou are probably used to food weights as being inpounds and ounces that are fractions of a pound (forexample, 4 ounces equals 1/4 pound). However, in
order to enter food weight in Auto Defrost, you mustspecify pounds and tenths of a pound.
If the weight on the food package is in fractions d apound, you can use the following table to convert theweight to decimals.
EQUIVALENT WEIGHT
OUNCES
1.6
3.2
4.0
4.8
6.4
8.0
9.6
11.2
12.0
12.8
14.4
16.0
DECIMAL WEIGHT
.10
.20
.25 One-Quarter Pound
.30
.40
.50 One-Half Pound
.60
.70
.75 Three-Quarters Pound
.80
.90
1.00 One Pound
16

AUTO DEFROST TABLE
Meat setting
SETTING SPECIAL INSTRUCTIONS
MEAT
FOOD
BEEFGround Beef,Bulk
Ground Beef,Patties
Round S_ak
TenderloinSteak
Stew Beef
Pot Roast,Chuck Roast
Rib Roast
Roiled RumpRoast
LAMBCubes forStew
Chops(1 inch thick)
PORKChops(1/2 inch thick)
Hot Dogs
SpareribsCountry-styleRibs
Sausage,Links
Sausage,Bulk
Loin Roast,Boneless
MEAT
MEAT
MEAT
MEAT
MEAT
MEAT
MEAT
MEAT
MEAT
MEAT
MEAT
MEAT
MEAT
MEAT
MEAT
AT BEEP
Removethawedportionswith fork.Turnover. Returnremainderto oven.
Separate and rearrange.
Turn over. Cover warm areas withaluminum foil.
Turn over. Cover warm areas withaluminum foil.
Remove thawed portionswith fork.Separate remainder.Return remainder to oven.
Turn over. Cover warm areas withaluminum foil.
Turn over. Cover warm areas withaluminum foil.
Turn over. Cover warm areas withaluminum foil.
Remove thawed portionswith fork.Return remainder to oven.
Separate and rearrange.
Separate and rearrange.
Separate and rearrange.
Turn over. Cover warm areas withaluminum foil.
Separate and rearrange.
Removethawedportionswith fork.Turnover. Returnremainderto oven.
Turn over. Cover warm areas withaluminum foil.
Do not defrost less than 1/4lb.Freeze in doughnut shape.Place on the DEFROST PLATE.
Do not defrost less than 2 oz. patties.Depress center when freezing.
Place on the DEFROST PLATE.
Place on the DEFROST PLATE.
Place in a microwavable baking dish.
Place on the DEFROST PLATE.
Place on the DEFROST PLATE.
Place on the DEFROST PLATE.
Place in a microwavable baking dish.
Place on the DEFROST PLATE.
Place on the DEFROST PLATE.
Place on the DEFROST PLATE.
Place on the DEFROST PLATE.
Place on the DEFROST PLATE.
Place in a microwavable baking dish.
Place on the DEFROST PLATE.
17

AUTO DEFROST TABLE (CONT.)
Poultry setting
FOOD AT BEEP SPECIAL INSTRUCTIONS
CHICKENWhole(up to 6 Ibs)
Cut-up
SETTING
POULTRY Turn over (finish defrosting breast-side down). Cover warm areas withaluminum foil,
Separate pieces and rearrange.
Turn over. Cover warm areas withaluminum foil.
Place chicken breast-side up on theDEFROST PLATE. Finish defrosting byimmersing incold water. Remove giblets whenchicken is partially defrosted.
Placeonthe DEFROST PLATE.
Finish defrosting by immersing in coId water.
CORNISHHENSWhole POULTRY Turn over. Cover warm areas with Place on the DEFROST PLATE.
aluminum foil. Finish defrosting by immersing in coId water.
TURKEYBreast POULTRY Turn over. Cover warm areas with Place on the DEFROST PLATE.(up to 6 Ibs) aluminum foil. Finish defrosting by immersing in cold water.
Fish setting
SETTING SPECIAL INSTRUCTIONS
FISH
FOOD
FISHFillets
Steaks
Whole
SHELLFISH
Crabmeat
Lobster tails
Shrimp
Scallops
FISH
FISH
FISH
FISH
FISH
FISH
AT BEEP
Turn over. Separate fillets whenpartially thawed if possible.
Separate and rearrange.
Turn over.
Break apart. Turn over.
Turn over and rearrange.
Separate and rearrange.
Separate and rearrange.
Place in a microwavable baking dish.Carefully separate fillets under coldwater.
Place in a microwavable baking dish.Run cold water over to finish defrosting.
Place in a microwavable baking dish.Finish defrosting by immersing in coldwater.
Place in a microwavable baking dish.
Place in a microwavable baking dish.
Place in a microwavable baking dish.
Place in a microwavable baking dish.
Bread setting
FOOD SETTING
Bagel BREAD
Dinner RoII
Muffin
Hamburger
Hot Dog Bun
Slices of Bread
Loaf of Bread
AT BEEP SPECIAL INSTRUCTIONS
Turnoverandrearrange. Placeon 3sheetsof papertowel.
18

DEFROSTING TIPS
• When using Auto Defrost, the weight to be enteredis the net weight in pounds and tenths d pounds(the weight of the food minus the container).
• Before starting, make sure you have removed anyof the metal twist-ties which often come with frozenfood bags, and replace them with strings or elasticbands.
• Open containers such as cartons before they areplaced in the oven.
• Always slit or pierce plastic pouches or packaging.• If food is foil wrapped, remove foil and place it in esuitable container.
• Slit the skins, if any, of frozen food such assausage.
• Bend plastic pouches of food to ensure evendefrosting.
• Always underestimate defrosting time. If defrostedfood is still icy in the center, return it to themicrowave oven for more defrosting.
• The length of defrosting time varies according tohow solidly the food is frozen.
• The shape of the package affects how quickly foodwill defrost. Shallow packages will defrost morequickly than a deep block.
• As food begins to defrost, separate the pieces.Separated pieces defrost more easily.
• For better results, let food stand after defrosting.(For more information on standing time, see the"Microwave Cooking Tips" section.)
• Turn over food during defrosting or standing time.Break apart and remove food as required.
HOLD WARM
You can safely keep hot,cooked food warm in yourmicrowave oven for up to 99 minutes, 99 seconds(about 1 hour, 40 minutes). You can use Hold Warmby itself, or to automatically follow a cooking cycle.
Example for hold warm:
Touch: Display Shows:
F_I FI I I [it
1. WArMTOU[H5 TRET
F_I FI I I 1772. H,.&.,w'RE;,scrollsacross display.
At the end of the hold warm, "END" will bedisplayed and four tones will sound.
To make Hold Warmautomatically follow another cycle:
• While you are touching in cooking instructions,touch HOLD WARM before touching START.
• When the last cooking cycle is over, you will heartwo tones. "Hold Warm" will come on while the ovencontinues to run.
• You can set Hold Warm to follow Auto Defrost,Cook, or multi-cycle cooking.
NOTES:
• Hold Warm operates for upto 99 minutes, 99seconds.
• Opening the oven door cancels Hold Warm.Close the door and touch Hold Warm, then touchSTART if additional Hold Warm time is desired.
• Food cooked covered should be covered duringHold Warm.
• Pastry items (pies, turnovers, etc.) should beuncovered during Hold Warm.
• Complete meals kept warm on a dinner plateshould be covered during Hold Warm.
• Do not use more than one complete Hold Warmcycle (about 1 hour, 40 minutes). The quality ofsome foods will suffer with extended time.
19

!i!i_ii!i'iil!ii:_:!:!'?i!_iii_i_i!_iiiili_i_i_i!ii;;:ii!!:i'_iii'?i!ii!!::_ii!!i__¸!ii'iil!_;;;:!i!'_:ii_!_i!!_IIiii_i_ii!_'i;iii_Yiiii_i:iiiiiii:!_¸_!iii'll!ii!!_Ji_li!li'_;_!i:_!iii_ii_i:ii:i:ii_ii!_ii;ii_:iiii_iii_ii_!i_!i_!i_!i_!i_!i_!i_!i_!i_!i_!i_!i_!i_!i_!i_!i_!i_!i_!i_!i_!i_!i_!i_!i_ii
SURE SIMMER
Your microwave oven lets you simmer soups,casseroles, stews, and other liquid foods. All you dois set a simmer time and your oven will bring yourfood to a boil and then simmer it for the time youspecify.
NOTES:
• You cannot change the cook power or donenessfor Sure Simmer.
• This function uses the sensor. The sensor needs2 minutes 30 seconds to warm up after the ovenis connected to power or after a power failure.If you start Sure Simmer during the warm up,microwave energy will not be turned on until thesensor is warm.
• When cooking vegetables, increase amount ofwater to 1/4 to 1/2 cup (60 to 125ml).
• Cover dish with a hard lid, i.e., the lid that comeswith the dish or a dinner plate. Do not use plasticwrap.
Touch: Display Shows:
1. Place the food in the oven andclose the door.
, : EhlTEREB,EII_"I6T_",E
3, 3 0 0 0
Touch Number pads toenter the simmer time.Example for 30minutes.
3_1_* _J_J
TOU[HSTRUT
, E -_- -_-7SURE51fifiERscrolls across
display.The oven will bringthe food to a boil.
The food will then simmer for the time you set.
When simmering foods like pasta use a containerthat can hold enough water to cover the foodcompletely when cooking, such as a 3-quart (12 cup)casserole with a lid, When cooking pasta or noodles,add 1 tbsp (15ml) oil to the water before boiling.Use the following method:Place container with water in the oven and follow
steps 2-4, setting the simmer time at 1 second. Atthe end of the signal, place the food in the water andstir until completely covered by water. Cover, Repeatsteps 2-4, setting the simmer time you want,
Changing instructions you can change the simmeringtime while simmering by repeating steps 2, 3, and 4.
2O

Using Sensor CookingSENSOR COOKING
SENSOR OPERATING INSTRUCTIONS
Sensor Cook allows you to cook most of your favoritefoods without selecting cooking times and powerlevels. The oven automatically determines requiredcooking time for each food item. When the internalsensor detects a certain amount of humidity comingfrom the food, it will tell the oven how much longer toheat. The display will show the remaining heat time.For best results by Sensor, following theserecommendations.
• Food cooked with the sensor system should be atnormal storage temperature.
• Glass Tray and outside of container should be dryto assure best cooking results.
• Foods should always be covered loosely withmicrowavable plastic wrap, waxed paper or a lid.
• Do not open the door or touch the "STOPtCLEAR"key during the sensing time. When sensing time isover, the oven beeps twice and the remainingcooking time will appear in the display window. Atthis time you can open the door to stir, turn, orrearrange the food.
SENSOR COOKING GUIDE
Appropriate containers and coverings help assuregood Sensor cooking results.• Always use microwavablecontainers and cover
them with lids or vented plastic wrap.
• Never use tight-sealing plastic covers. They canpreventsteam from escaping and cause food toovercook.
• Match the amount to the size of the container.Fill containers at least half full for best results.
• Be sure the outside of the cooking container andthe inside of the microwave oven are dry beforeplacing food in the oven. Beads of moisture tuminginto steam can mislead the sensor.
POTATO (EXAMPLE)
Sensor cook allows you to cook most of yourfavorite foods without selecting cooking times andpower levels.
Example for Potato:
Touch: Display Shows:
1. Time of day.
2. E-_ -_-__qPOTRT8scrolls across display.
When the cook time is over, you will hear four beepsand COOK END will be displayed.
MORE/LESS
By usingthe MOREor LESSpads allof the sensorcookandtime cooksettingscan beadjustedto cookfood for a longeror shorter time.
PressingMOREwill add 10secondsof cookingtimeeach timeyou press it.
PressingLESSwill subtract10secondsof cookingtimeeach timeyou pressit.
21

SENSOR COOKING TABLE
CATEGORY DIRECTION AMOUNT
Popcorn Popcorn letsyou pop commercially packaged 3.0~3.5 oz.microwave popcorn. Pop only one package at a time. packageFor best results, use fresh bag of popcorn.Place bag of prepackaged microwave popcorn on the center of turntable.Before popping, remove the rackfrom the oven (refer to Page 31).
Pizza This is reheat function for a leftover pizza. 1~3 slices,Place on paper towel on a microwave-safe plate. (5 oz. each)
Frozen Entree Remove from outer display package. Slit cover. 10 to 21 oz.If not in microwave-safe container, place on a plate.Cover with plastic wrap and vent the plastic film by piercing with a fork(3 times). After cooking, allow to stand for 3 minutes.
Dinner Plate Place foods to be heated on dinner plate or similardish. 1~2 servingsCover with plastic wrap and vent.After cooking, allow to stand for 3 minutes.
Fresh Prepareas desired,wash,and leave residualwateronthe vegetables. 1~4 cupsVegetable Placein an appropriatelysizedmicrowavecontainer.
Addamountof wateraccordingto the quantity (1~2 cups : 2 tablespoons,3~4cups : 4 tablespoons).Coverwith plasticwrap and vent.Aftercooking,stirandallow to standfor 3 minutes.
e Frozen Removefrom package,rinseofffrost underrunningwater.-_ Vegetable Placein an appropriatelysizedmicrowavecontainer. 1~4 cups
Addamountof wateraccordingto the quantity (1~2 cups : 2 tablespoons,3~4 cups :4 tablespoons).Coverwith plasticwrap andvent.After cooking,
:_ stirandallow to standfor 3 minutes.
Canned Remove from the outer display can. 1~4 cupsVegetable Place in an appropriately sized microwave container,
cover with plastic wrap, and vent.After cooking, stir and allow to stand for 3 minutes.
Potato Pierce each potato with a fork and place the oven tray 1~4 mediumaround the edge, at least one inch apart. (approx.After cooking, allow to stand for 5 minutes. 8 to 10oz. each
22

AUTO COOK
Auto Cook lets you heat common microwave-preparedfoods without selecting cooking times andpower levels. Auto Cook has preset cook powers for4 food categories: Casserole, Rice, Bacon, end HotCereal.
Example for Rice:
Touch: Display Shows:
, 5ELEETfiEhlUI TOq
--SEEEEIBI_IhI65L,'DE
2. E -_-_- 2 RIEEscrolls across display.
Choose food category:
TOUCH PADCATEGORY NUMBER QUANTITY
Casserole (Sensor) 1 1 to 4 cups
Rice (Sensor) 2 1/2 to 2 cupsBacon 3 2 to 4 slices
Hot Cereal 4 1 to 6 serving.,
The oven will cook food automatically by sensor
system, except Bacon and Hot Cereal. When the
cook time is over, you will hear four beeps and
COOK END will be displayed.
AUTO REHEAT
Auto Reheat lets you heat foods without selectingcooking times and power levels. Auto Reheat has
preset cook powers for 3 categories: Casserole,RolltMuffin, and Beverage.
Example for Casserole.
Touch: Display Shows:
Au_b 5ELEETfiEflU I TO-7--SEE EBEIff_"I55bfDE
2. E---2 ER55E°_BLEscrolls across display.
Choose food category:
TOUCH PADCATEGORY NUMBER QUANTITY
Casserole (Sensor) 1 1 to 4 cups
Roll/Muffin 2 1 to 6 piecesBeverage 3 1 to 2 cups
The oven will reheat only Casserole automatically
by sensor system.When the cook time is over, you will hear four
beeps and COOK END will be displayed.
23

AUTO COOK TABLE
TOUCHCATEGORY NUMBER PAD DIRECTION AMOUNT
Casserole 1 Assemble the ingredients per the recipe 1~4 cups(Sensor) in a 1~2- quart casserole.
Cover with plastic wrap and vent.After cooking, stirand allow to stand for 3 minutes.
Rice 2(Sensor)
Place rice and twice as much liquid(water, chicken, or vegetable stock) in a 2- quartmicrowave dish.Cover with plastic wrap and vent.After cooking, allow to stand for 10 minutes.Stir for fluffier rice.
1/2~2cupsUse medium orlong grain rice.Cook instant riceaccording todirections onthe package.
Bacon 3 Place bacon strips on a microwave 2~4 slicesbacon rack for best results.(Use dinner plate lined with paper towelsif rack is not available)
Hot Cereal 4 Prepare as directed on package and cook. 1~6 servingsStir well before eating.Use only instant hot cereal.
AUTO REHEAT TABLE
TOUCHCATEGORY NUMBER PAD DIRECTION AMOUNT
Casserole 1 Cover dish containing the casserole 1~4 cups(Sensor) with plastic wrap, and vent.
After cooking, stirand allow to stand for 3 minutes.
Roll/Muffin 2 Remove from display package and place on a plate. 1~6 pieces(2~3 oz. each)fresh
Beverage 3 Use a wide-mouth mug. Do not cover. 1~2 cupsRemove from display package and place on a plate. (240 ml per cup)(Be careful! The beverage will be very hot! Sometimesliquids heated in cylindrical containers will splash outwhen the cup is moved.)
24

MELT
The oven uses low power to melt foods (butter ormargarine, chocolate, marshmallows, or processedcheese food). See the following table.
Example for 8 oz. Chocolate:
Touch: Display Shows:
1. Timeefday.
, 5ELEETfiEhIUI_V -
-SEEEOO_'h55bfDE
3. EflDEDLfl TE"rn/ If" I "rnIUULHI IU L"_
4. 2 8 oz once andCHOCOLATE
scrolls across display.Time counting down.
SOFTEN
The oven uses low power to soften foods (butter, icecream, cream cheese, and frozen juice)See the following table.
Example for quart of ice cream:
Touch: Display Shows:
, Time of day.
,
3.
4.
I FT ITI I_III ITFI5ELEr_, , TEhul ,u Y-
-SEEEOOKIh_5b'#E
k'-EEEER,_Tll_l IF / Tll_
IUUL-I_II IU "7
2 QUART once and ICECREAM
scrolls across display.Time counting down.
MELT TABLE SOFTEN TABLE
;ODE CATEGORY DIRECTION AMOUNT
1 Butter or Unwrap and place in 1, 2 or 3Margarine micrewavable container, sticks
No need to cover butter.Stir at the end of ceekin(
to complete melting.
2 Chocolate Chocolate chips or 4 or 8 ezsquares of bakingchocolate may be used.Unwrap squares and_lace in microwavablecontainer. Stir at the end
of cycle to completemelting.
3 Cheese Use processed cheese 8 or 16food only. Cut into cubes, oz.Place in a single layer inmicrowavable container.Stir at the end of cookin(
to complete melting.
4 Marshmallows Large or miniature 5 or 10
marshmallows may be oz.used. Place inmicrewavable container.
Stir at the end of cycle t(complete melting.
CODE %TEGORY DIRECTION AMOUNT
1 Butter Unwrap and place in 1,2 or 3microwavable container, sticksButter will be at room
temperature and readyfor use in recipe.
2 Ice Place container in oven. Pint,cream Ice cream will be soft Quart,
enough to make Halfscooping easier, gallon
3 Cream Unwrap and place in 3 or 8 oz.cheese microwavable Container.
Cream cheese will be atroom temperature andready for use in recipe.
4 Frozen Remove top. 6, 12 orjuice Place in oven. 16 oz.
Frozen juice will be softenough to easily mix withwater.
25

Caring for Your Microwave OvenTo make sure your microwave oven looks good and works well for a long time, you shouldmaintain it properly. For proper care, please follow these instructions carefully.
For interior surfaces: Wash often with warm, sudsywater and a sponge or
soft cloth. Use only mild,nonabrasive soaps or amild detergent. Be sure
to keep the areas cleanwhere the door andoven frame touch
when closed. Wipe wellwith clean cloth.
Over time, stains can
occur on the surfaces as the result of food particles
spattering during cooking. This is normal.
For stubborn soil, boil a cup of water in the oven for 2to 3 minutes. Steam will
soften the soil. To get ridof odors inside the oven,
boil a cup of water withsome lemon juice or
vinegar in it.
For exterior surfacesand control panel: Use a softcloth with spray glasscleaner. Apply the sprayglass cleaner to the softcloth; do not spraydirectly on the oven.NOTE: Abrasivecleansers, steel woolpads, gritty washcloths, some papertowels, etc.,can
damage the control panel and the interior and exterioroven surfaces.
To clean grass tray and support, wash in mild,
Glass tray
Support
Hub
sudsy water; for heavilysoiled areas use a mildcleanser and scouringsponge. The glass trayand support aredishwasher safe,
To use of the metal rack:
The metal rack gives you extra space when cookingin more than one container at the same time.
1. Place rack securely in the four plastic supports.• Rack must not touch metal walls or back of
microwave oven.2, Place equal amounts of food both above and
below rack.
To avoid risk of property damage:1. Do not cook with rack on floor of the oven.
2. Use the metal rack when cooking equal amountsof food at the same time.
3. Do not use rack to pop popcorn.4. Rack must be on the four plastic supports when
used.
26
CARING FOR THE FILTERS
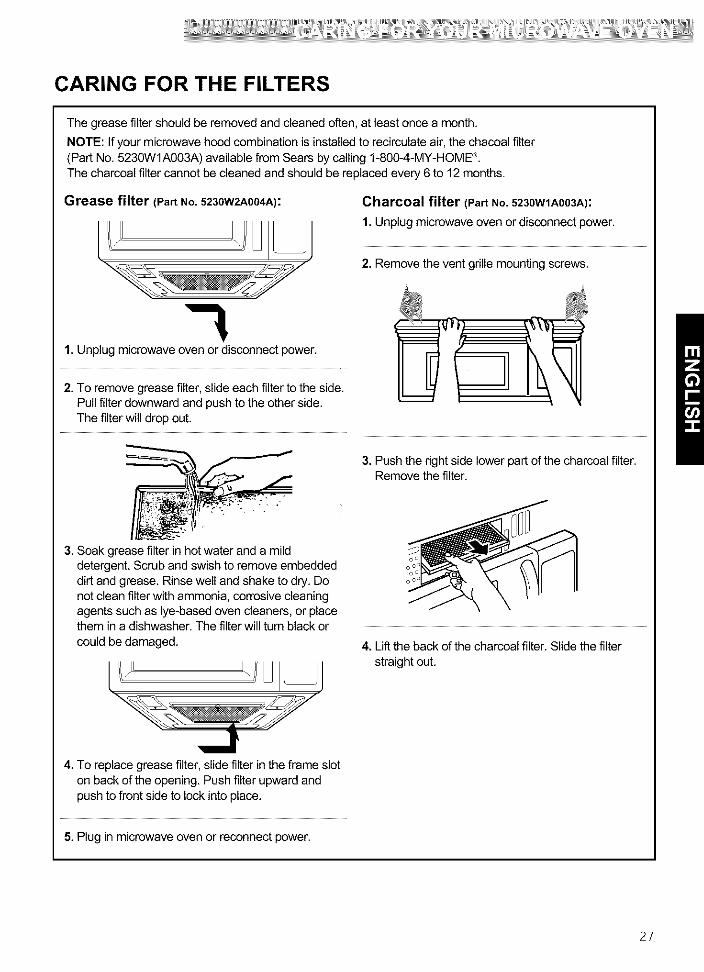
The grease filter should be removed and cleaned often, at least once a month.
NOTE: If your microwave hood combination is installed to recirculate air, the chaooal filter(Part No. 5230W1A003A) available from Sears by calling 1-800-4-MY-HOME"qThe charcoal filter cannot be cleaned and should be replaced every 6 to 12 months.
Grease filter (Part No. 5230W2A004A):
L
1. Unplug microwave oven or disconnect power.
2. To remove grease filter, slide each filter to the side.Pull filter downward and push to the other side.The filter will drop out.
Charcoal filter (Part No. 5230WIA003A):
1. Unplug microwave oven or disconnect power,
2. Remove the vent grille mounting screws.
3. Push the right side lower part of the charcoal filter.Remove the filter.
3. Soak grease filter in hot water and a milddetergent. Scrub and swish to remove embeddeddirt and grease. Rinse well and shake to dry. Donot clean filter with ammonia, corrosive cleaningagents such as lye-based oven cleaners, or placethem in a dishwasher. The filterwill turn black orcould be damaged. 4. Lift the back of the charcoal filter. Slide the filter
straight out.
4. To replace grease filter, slide filter in the frame sloton back of the opening. Push filter upward andpush to front side to lock into place.
5. Plug in microwave oven or reconnect power.
27

REPLACING THE COOKTOPAND OVEN LIGHTS
5. Slide a new charcoal filter into place. The filtershould rest at the angle shown.
6. Slide the bottom of the vent grille into place. Pushthe top until it snaps into place. Replace themounting screws.
7. Plug in microwave oven or reconnect power.
NOTE: Do not operate the hood without the greasefilters in place.
The cooktop light1. Unplug microwave oven or disconnect power.
2. Remove the bulb cover mounting screw.
3. Replace bulb with candelabra-base 20-watt bulb
(Part No. 6912A40002A) available from Sears by
calling 1-800-4-MY-HOME _.
4. Plug in microwave oven or reconnect power.
The oven light1. Unplug microwave oven or disconnect power.
2. Remove the vent grille mounting screws.
3. Tip the grille forward, then lift out to remove.
28

Bulb holder,
4. Lift up the bulb holder.
5. Replace the bulb with a cendelabra-base 30-watt
bulb (Part No. 3B70067A) available from Sears by
ceiling 1-800-4-MY-HOME _'.
6. Slide the top of the vent grille into place. Push thebottom until it snaps into place. Replace the
mounting screws.
7. Plug in microwave oven or reconnect power.
29

MICROWAVE COOKING TIPS
Amount of food• If you increase or decrease the amount of foodyou prepare, the time it takes to cook that food willalso change. For example, if you double a recipe,add a little more than half the original cooking time.Check for doneness and, if necessary, add moretime in small increments.
Starting temperature of food• The lower the temperature of the food beingputinto the microwave oven, the longer it takes to cook.Food at room temperature will be re-heated morequickly than food at refrigerator temperature.
Composition of food• Food with a lot of fat and sugar will be heatedfaster than food containing a lot of water. Fat andsugar will also reach a higher temperature thanwater in the cooking process.
• The more dense the food, the longer it takes toheat. "Very dense" food like meat takes longer toheat than lighter, more porous food like spongecakes.
Size and shape• Smaller pieces of food will cook faster than largerpieces. Also, same-shaped pieces cook moreevenly than different-shaped pieces.
• With foods that have differentthicknesses, thethinner partswill cook faster than the thicker parts.Place the thinner parts of chicken wings and legs inthe center of the dish.
Stirring, turning foods• Stirring and turning foods spreads heat quickly tothe center of the dish and avoids overoooking at theouter edges of the food.
Covering foodCover food to:• Reduce splattering• Shorten cooking times• Keep food moist
You can use any covering that lets microwaves passthrough. See "Getting to Know Your MicrowaveOven" for materials that microwaves will passthrough. If you are using the Sensor function, be sureto vent.
Releasing pressure in foods• Several foods (for example: baked potatoes,
sausages, egg yolks, and some fruits) are tightlycovered by a skin or membrane. Steam can build upunder the membrane during cooking, causing thefood to burst. To relieve the pressure and to preventbursting, pierce these foods before cooking with afork, cocktail pick, or toothpick.
Using standing time• Always allow food to stand after cooking.
Standing time after defrosting and cooking allowsthe temperature to evenly spread throughout thefood, improving the cooking results.
• The lengthof the standing time depends on howmuch food you are cooking and how dense it is.Sometimes it can be as short as the time it takesyou to remove the food from the oven and take it tothe serving table. However, with larger, denser food,the standing time may be as long as 10 minutes.
Arranging foodFor best results, place food evenly on the plate.Youcan do this in several ways:
• If you are cooking several items of the samefood, such as baked potatoes, place them in a ringpattern for uniform cooking.
• When cooking foods of uneven shapes orthickness, such as chicken breasts, place thesmaller or thinner area of the food towards thecenter of the dish where it will be heated last.
• Layer thin slices of meat on top of each other.
• When you cook or reheat whole fish, score theskin - this prevents cracking.
• Do not let food or a container touch the top or sidesof the oven. This will prevent possible arcing.
Using aluminum foilMetal containers should not be used in a microwaveoven. There are, however, some exceptions. Ifyouhave purchased food which is prepackaged in analuminum foil container, refer to the instructions onthe package. When using aluminum foil containers,cooking times may be longer because microwaveswill only penetrate the top of the food. Ifyou usealuminum containers without package instructions,follow these guidelines:
3O

MICROWAVE COOKING TIPS (CONT.)
Using aluminum foil (cont.)• Place the container in a glass bowl and add somewater so that it covers the bottom of the container,not more than 1/4in. (.64 cm) high. This ensureseven heating of the container bottom.
• Always remove the lid to avoid damage to theoven.
• Use only undamaged containers.
• Do not use containers taller than 3/4 in. (1.9 cm).• Container must be at least half filled.
• To avoid arcing, there must be a minimum 1/4in.(.64 cm) between the aluminum container and thewalls of the oven and also between two aluminumcontainers.
• Always place the container on the turntable.• Shield with small pieces of aluminum foil, parts offood that may cook quickly, such as wing tips andlegends of poultry.
• Heating food in aluminum foil containers usuallytakes up to double the time compared to reheatingin plastic,glass, china, or paper containers.The time when food is ready will vary dependinguponthe type of container you use.
• Let food stand for 2 to 3 minutes after heating sothat heat is spread evenly throughout container.
Cooking you should not do in yourmicrowave oven• Do not do canning of foods in the oven. Closedglass jars may explode, resulting in damage to theoven.
• Do not use the microwave oven to sterilize objects(baby bottles, etc.). It is difficult to keep the oven atthe high temperature needed for sterilization.
Removing the rack• When popping commercially packaged popcorn,
Remove the rack from the oven; Do not placethe bag of microwave popcorn on the rack or underthe rack.
• In the case of popping microwave popcorn withrack, that can cause the fire or damage to yourmicrowave oven.
31

Questions and AnswersQUESTIONS ANSWERS
Can I operate my microwave oven without the glass No. If you remove or move the glass tray, youtray or move the glass tray over to hold a largedish? will get poor cooking results. Dishes used in
your oven must fit on the glass tray.
Can I use either metal or aluminum pans in my You can use aluminum foil for shielding (usemicrowave oven? small, flat pieces), small skewers, and shallow
foil trays (if tray is not taller than 3/4 in. [1.9 cm]deep end is filled with food to absorb microwaveenergy). Never allow metal to touch walls ordoor.
Is it normal for the glass tray to move in either Yes. The glass tray moves from side to side,direction? depending on the rotation of the motor when the
cooking cycle begins.
Sometimes the door of my microwave oven appears This appearance is normal end does not affectwavy. Is this normal? the operation of your oven.
Why does the dish become hot when I microwave As the food becomes hot it will conduct the heatfood in it? I thought that this should not happen, to the dish. Be preparedto use hot pads to
remove food after cooking.
What does "standing time" mean? "Standing time" meansthat food should beremoved from the oven and covered foradditional time to allow it to finish cooking. Thisfrees the oven for other cooking.
Why does steam come out of the air exhaust vent? Steam is normally produced during cooking. Themicrowave oven has been designed to vent thissteam out the vents.
Can I pop popcorn in my microwave oven? Yes. Pop packaged microwave popcornHow do I get the best results? following manufacturer's guidelines. Do not use
regular paper bags.Do not repop unpopped kernels. Do not poppopcorn in glass ccokwere.
32

TroubleshootingMost cooking problems often are caused by little things you can find and fix without tools of any kind. Check thelists below and on the next page before ceiling for assistance or service. If you still need help, call Sears Serviceat 1-800-4-MY-HOME _.
MICROWAVE OVEN DOES NOT WORK
PROBLEM CAUSE
Nothing works. • The power supply cord is not plugged into a grounded 3 prong outlet. (See theElectrical Requirements" section on page 6 end the "Eiectricel connection"
section on Page 8.)
• A household fuse has blown or a circuit breaker has tripped.
• The electric company has had a power failure.
The microwave oven will • You are using the oven as e timer. Touch STOP/CLEAR to cancel the Kitchennot run. Timer.
• The door is not firmly closed end latched.
• You did not touch START.
• You did not follow directions exactly.
• An operation that you set earlier is still running. Touch STOP/CLEAR to cancelthat operation.
COOKING TIMES
PROBLEM CAUSE
Food is not cooked • The electric supply to your home or wall outlets is low or lower than normal. Yourenough, electric company can tell you if the line voltage is low. Your electrician or service
technician can tell you if the outlet voltage is low.
• The cook power is not at the recommended setting.Check the chert on Page 15.
The display shows a time • The oven door is not closed completely.
counting down but the oven • You have set the controls as a kitchen timer. Touch STOP/CLEAR to cancel theis not cooking. Kitchen Timer.
33

GLASS TRAY
PROBLEM CAUSE
The glass tray will not • The glass tray is not correctly in place. It should be correct-side up and sittingmove. firmly on the center hub.
• The support is not operating correctly. Remove the glass tray and restart the
oven. If the hub still does not move, call Sears Service at 1-800-4-MY-HOME _'.
Cooking without the glass tray can give you poor results.
TONES
PROBLEM CAUSE
You do not hear • You have not entered the correct command.
the programming or
end-of-cycle tone.
DISPLAY MESSAGES
I PROBLEM CAUSEThe display is flashing " : ." • There has been a power interruption. Reset the clock. (See the "Clock" section
on Page 12.)
If none of these items are causing your problem, call Sears Service at 1-800-4-MY-HOME _.
34

35

Contenidos
Garantia .......................................................... 36Servicio Sears ................................................ 37Seguridad del homo de microondas ........... 38Aprender a cortocer su homode microondas ............................................... 41C6mo funciona su combinaci6n microondascompana de kenmore ULTRA WAVE TM .......... 41Probar su homo de microondas ...................... 41Probar su vajilla o bateria de cocina ............... 42Precauciones de seguridad operativa ............ 42Conexi6n el6ctrica ......................................... 42Caracteristicas del homo de microondas ......43Funciones del panel de control ....................... 44
Usar su homo de microondas ...................... 46Se_ales audibles ........................................... 46Interrumpir la cocci6n ..................................... 46Reloj ................................................................ 46Protecci6n de seguridad para niSos ............... 46Cron6metro de cocina ..................................... 47Ventilador de extracci6n ................................. 47Luz superior de cocina .................................... 47Descongelamiento rapido ............................. 47Agregar minuto ............................................... 48Cocci6n cronometrada .................................... 48Cocci6n en etapas mQltiples ........................... 48Niveles de potencia de microonda .................. 49Descongelamiento automatico ...................... 50Tabla de Descongelamiento Automatico ........ 51Tabla de Descongelamiento Autom_tico (cont.).....52Sugerencias para descongelamiento .............. 53"Mantener caliente". ........................................ 53Segura a fuego rento ...................................... 54
Usar sensor de coccibn ................................ 55Sensor de cocci6n .......................................... 55Papas (Ejemplo) ............................................. 55Mas/Menos ..................................................... 55Cuadro de Cocci6n del sensor ........................ 56Cocci6n Automatica ........................................ 57Recalentamiento Automatico .......................... 57Cuadro de Cocci6n Automatica ...................... 58Cuadro de Recalentamiento Automatico ........ 58Fundir ............................................................. 59Tabla de indicaciones para fundir .................. 59Ablandar ......................................................... 59Tabla de indicaciones para ablandar .............. 59
Cuidar su homo de microondas .................. 60Cuidado de los filtros ..................................... 61Reemplazar las luces de la partesuperior y del homo ........................................ 63Sugerencias para la cocina ensu microonda ........................................... 65-66Preguntas y respuestas ............................... 67Solucibn de problemas ................................. 68Servicio ....................................... tapa posterior
Garantia en.Comb,nac,onGARANTiA TOTAL DE LA COMBINACION
EN LA CAM PANA DE SU MICROONDAPOR UN ANO COMPLETO
Durante un afio a partir de la fecha de compra, si estacombinaci6n en la campana de su microondaKenmore tiene un fallo debido a defecto en el materialo en la mano de obra, Sears Io repara sin cargo.
GARANTiA TOTAL DE C INCO ANOSSOBRE EL MAGNETRON
Durantecinco afiosa partirde la fechade compra,si e!magnetr6nde estacombinaci6nen la campanade sumicroondaKenmoretiene unfallo debidoa defectoen elmaterialo en la mano de obra,Sears la reparasin cargo.
La cobertura de la garantia mencionada arriba seaplica solamente a la combinaci6n en la campana desu microonda que se usa s61oen casas particulares.
EL SERVIClO DE GARANTiA ESTA DISPONIBLECONTACTANDO SIMPLEMENTE AL SERVICIOSEARS A 1-800-4-MY-HOME ®
Esta garantia se aplica s61omientras este productoesta en uso en los EE.UU.
Esta garantia le da a usted derechos legalesespecificos que varian de estado en estado.
Sears, Roebuck y Co.,Dept. 817WA,Hoffman Estates, IL 60179
Por Ilamado de servicio:1-800-4-MY-HOME ®
SM (1-800-469-4663)
Tenga a bien registrar la informacidn de sumodelo.En el momento en que usted flame para recibir unservicio para su producto, necesitara saber elnQmero del modelo y el n_mero serial completo.Puede encontrar esta informaci6n en la
placaletiqueta del nQmero serial y del modelo en ellado superior de la cavidad frontal en su horno demicroondas. Tambien, registre las otrasinformaciones mostradas abajo.
N_mero de modelo
N_mero de serie
Fecha de compra
36

Servicio SearsAcuerdos Maestros de proteccionFelicitaciones por haber hecho una compra inteligenteSu naevo producto Kenmore _'esta diseSado y fabricado para aSos de operaci6n segura.Pero como todo producto, puede necesitar mantenimiento preventivo o reparaciones cada ciertotiempo. Es alli cuando el tenet un Acuerdo Maestro de protecci6n le puede ahorrar dinero o evitarque la falla empeore.
Adquiera un Acuerdo Maestro de protecciSn ahora y resgu&rdese de cualquier molestia o gastosinesperados.
El Contrato de Protecci6n Maestro ayuda tambi6n extender la vida de su nuevo producto. Estas sonlos aspectos incluidos en el Contrato :
5( Servici_expert____evad_acab_p_rcua_quieradenuestr_s12____pr_fesi_na_esespecia_istasenreparaciones.
5( Servicio ilimitado y sin cargo alguno, por las piezas o pot el trabajo en toda las reparacionescubiertas por el Acuerdo.
5( Garantia de "No-Lemon" - cambio de su producto cubierto si ocurre mas de caatro o mas fallasal producto dentro de doce primeros meses.
5( Reemplazo del producto si su este asegurado no puede arreglarse.5( Control anual de mantenimiento preventivo a pedido suyo sin cargo extra.5( Ayuda r_pida via tel_fonico - Soporte telef6nico de un t6cnico de Sears sobre los productos que
se requiere de reparaci6n en casa, mas la programaci6n conveniente de servicio.5( Protecci6n contra sobrecarga el_ctrica, pot daSos el6ctricos causados pot fluctuaciones de
corriente.5( Reembolso de alquiler si la reparaci6n del producto asegurado toma mas tiempo de Io
prometido.
Una vez que ha comprado el Acuerdo, una simple Ilamada telefSnica es todo Io que le tomara paraagendar un servicio. Puede Ilamar a cualquier hora del dia o de la noche o hacer un compromiso deatenci6n por telefono.
Sears tiene mas de 12,000 profesionales especialistas en reparaciones que tienen acceso a mas de4.5 millones de piezas de calidad y accesorios. Esa es la clase de profesionalismo con la que puedeusted contar para ayudar a prolongar la vida de su nueva adquisici6n en los aSos por venir.iSuscriba ya un Acuerdo Maestro de protecci6n!
Se aplican algunas limitaciones y exclusiones. Pot precios e informacibn adicional Ilame al 1-800-827-6655.
Servicio de instalacibn Sears
Para la instalaci6n profesional de Sears de los aparatos del hogar, dispositivos de apertura de lapuerta del garaje, calentadores de agua, y otros items principales del hogar, Ilame en los EstadosUnidos a 1-800-4-MY-HOME ®.
37
Seguridad del horno demlcroondas
Su seguridad y la seguridad de los otros son muy importante.
Hemos dado muchos mensajes de seguridad en este manual yen su utensilio.Lea siempre y acate todos los meneajee de eeguridad.
Este es el simbolo de alerta de seguridad.
Este simbolo indica que hay peligro de muerte o de heridas graves para usted u otros.
Todos los mensajes de seguridad estaran precedidos por el simbolo de alerta de seguridady de la palabra "PELIGRO" o "ADVERTENCIA." Estas palabras significan:
Hay peligro de muerte o de heridas graves si nose siguen inmediatamente las instrucciones.
Hay peligro de muerte o de heridas graves si nose siguen las instrucciones.
To(los los mensajes de seguridad identifican el riesgo, le indican c6mo reducir los riesgos delesiones y le dicen Io que podria pasar si las instrucciones no se siguen.
INSTRUCCIONES IMPORTANTES DE SEGURIDADCuando se usan dispositivos electricos, deben seguirse las PRECAUCIONES basicas deseguridad incluyendo lae siguientee
ADVERTENCIA: Para reducir el riesgo dequemaduras, descarga electrica, incendio, lesionesalas personas o exposici6n a excesiva potencia demicroondas
• Lea todas las instrucciones antes de usar elhomo de microondas.
• Lea y siga las "PRECAUCIONES PARA EVITARPOSIBLE EXPOSICION A UNA EXCESIVA
POTENCIA DE MICROONDAS" especificas quese encuentran en esta secci6n.
•El homo de microondas debe ser conectado atierra. Conecte solo al tomacorrientescorrectamente conectado a tierra.Lea las "INSTRUCClONES PARA CONECTAR A
TERRA" que se encuentran al final de estasecci6n.
• Instale o ubique el homo de microondassolamente siguiendo las instrucciones deinstalaci6n provistas.
• AIgunos productos tales como huevos conc_scara completa y envases herm6ticos porejemplo, recipientes cerrados de vidrio, puedenexplotar y no deben set calentados en el homo demicroondas.
• Use el homo de microondas s61opara el finespecifico tal como est_ descrito en este manual.No use productos quimicos corrosives o vaporesen el homo de microondas. Este tipo de homoest_ especificamente diseSado para calentar,cocinar o secar alimentos. No est_ diseSado parauso industrial o de laboratorio.
•Como cualquier artefacto, es necesario un controlestricto cuando es usado por los nifios.
•No opere el homo de microondas si tiene daSadoel cable de alimentaci6n o el enchufe, si no estafuncionando correctamente o si ha sido daF_adoo
dejado caer.
GUARDE ESTAS INSTRUCCIONES
38

IMPORTANTES INSTRUCCIONES de SEGURIDAD• Elservicioal homo de microondasdebeser hecho
solo porpersonalcalificado.Uame a unacompafiiadeservido autorizadapara examinar,repararohacerajustes.
• Vealas instruccionespara la limpiezade lasuperficiede lapuertaen la secci6n"Cuidadodesu Homodemicroondas".
• Parareducirel riesgode incendioen el interiordelhomo:- No cocinede m_slos alimentos.Tengacuidadosi
se colocaparafadlitar la cocci6n,papel,pl_s%o uotrosmaterialescombustiblesdentro del homodemicroondas.
- Quite las atadurasdealambre retorcidodel papelobolsasde pl_sticoantesde colocarbalsasen elhomo.
- Si los materialesdentrodel homo se quemaran,mantengala puertadel homo corrada,apagueelhomo y desconecteel cable dealimentad6nocierreel paso de lacorrienteel_ctricaenel fusibleoen el paneldeldisyuntor.
- No use el interiordel homoparaalmacenamiento.No dejeelementosde papel,utensiliosde cocinaoalimentosenel interiordelhomocuandonoesteenuso.
• Adecuadoparasu uso sobreelementosde cocinadegas o electricos.
• Previstoparaser usadopor sobrelos rangos conunanchom&ximode 36 pulgadas(91cm).
• Limpieconfrecuencialas campanasde ventilad6n,nodebe permitirquese acumulegrasa en lacampanao en el filtro
• Cuandohayaalimentosque producenllamasbajo lacampana,enciendael extractor.
• Tengacuidadocuandolimpie el filtrodel extractor-campana.Losagentescorrosivosde limpieza,talescomo limpiahornosbasadosen lejia, puedendafiarel flltro.
• No debenser colocadosen el homo de microondasalimentoso utensiliosde metalde grantamafio yaquepuedenocasionarincendioo riesgode descargael@ctrica.
• No limpiesobre unalmohadillasasperasde metal.Las piezaspuedenquemarla almohadillay tocar laspares electricasocasionandoriesgodedescargael_ctdca.
• No almacenenadadirectamentesobreel homo demicroondascuandoest_en funcionamiento.
• No cubrao bloqueeningunaaberturaen el homo demicroondas.
• No dejeeste homode microondasa la intemperie.No Io usecercadel agua, porejemplo,cercade lapiletade lacocina,sobre una basehQmeda,o cercadeuna piletade nataci6no algo porel estilo.
• No sumerjael cable dealimentaci6no enchufeen elagua.
• Mantengael cablede alimentad6nlejosde lassuperficiescalientes.
• No dejeel cablede alimentaci6ncolgandodel bardedela mesao mostrador.oNo Io montesobre unapileta.
• No cubralas rejillaso cualquierotra partedel homocon laminasde metal. Estocausarasobrecalentamientodel homo.
• Los liquidostalescomoagua, caf6o t6,'puedensobrecalentarsemas all_del puntode hervorsi estaraparentementehirviendodebidoa su tensi6nsuperficial.No siemprese nota el burbujeooelhervoral retirarel recipientedel homo.Estopuedecausarque los liquidosmuy calienteshiervanrepentinamentecuandose introduceen el liquidounacucharaocualquierotro utensilio.
Parareducirel riesgo de producirlesionesalaspersonas;1) No recalienteliquidos.2) Revuelvael liquidoantesy mientrasse calienta.
3)No userecipientesde ladosrectoscon cuellosangostos.
4) Luegode calentar,permitaal contenedorpermanecoren el homode microondaspor untiempocortoantesdequitado.
5)Tenga muchocuidadocuandocoloqueunacucharau otro utensiliodentrodelcontenedor.
GUARDE ESTAS INSTRUCCIONES
39

PRECAUCIONES PARA EVITAR POSIBLEEXPOSICION A UNA EXCESIVA POTENCIA DEMICROONDAS(a) No intentehacerfuncionarestehomo con la puerta
abiertaya queel funcionamientocon puertaabiertapuedecausarexposici6nnocivaa la potenda demicroondas.Es importantenodescuidaruobstaculizarla seguridadde los enclavamientoselectricosde interbloqueo.
(b) No coloqueningt3nobjetoentre la carafrontaldelhomo y lapuerta o permitaque se acumulesuciedado residuosde limpiadorsobrelassuperficiede sellado.
(c) No hagafundonar el homo si estadafiado. Esparticularmenteimportanteque la puertadel homose cierrecorrectamentey que nohaya dafio en:(1)Puerta (torcida),(2)Bisagrasy cerraduras(rotaso sueltas),(3)Cerradurasdelas puertaso superficies
selladas.
(d) Nadie excepto el personal de serviciocalificado debe hacer ajustes o reparacionesen el homo.
Requisitos eldctricosObserve todos los c6digos y ordenanzas. Serequieren en el equipo 120 Volt, 60 Hz, CAsolamente, se requieren fusibles de 20 amp(Se recomienda fueiblee de retardo).Se recomienda que ee use un circuito separadoque alimente e61oa este dispositivo.
Peligro de descarga et_ctrica.Enchufe en un tomacorriente conectadoa tierra de 3 clavijas. No quite ta clavijade conexi6n a tierra.No use adaptador.No use extensi6n de cable dealimentacibn.
No seguir estas instrucciones puedeIlegar a causar muerte, incendio odescarga eldctrica.
INSTRUCCIONES PARA CONECTAR A TIERRA• Para todos los artefactos conectados con
cable de alimentaci6n :El homo de microondas debe ser conectado atierra. En caso de corto circuito el6ctrico, laconexi6n reduce el riesgo de descarga el6ctrica, yaque provee un alambre de escape para la corrienteelectrica. El homo de microondas esta equipadocon un cable de alimentaci6n que tiene un enchufecon un cable de conexi6n a tierra. El enchufe debeestar conectado a un tomacorrientes correctamenteinstalado y conectado a tierra.
Asegure que la tierraexista antes uso
ADVERTENCIA: El uso incorrecto de laconexiSna tierra puede ocasionar peligro deincendio o de descarga el_ctrica.
Coneulte a un electricista calificado o personal deservicio si las instrucciones no son completamentecomprendidas o si hay dudas sobre si el homo estaadecuadamente conectado a tierra.
No use una extensi6n de cable de alimentaci6n. Siel cable de alimentaci6n es demasiado corto, hagainstalar un tomacorriente per un t6cnico calificadocerca del homo de microondas.
• Para un artefacto permanentementeconectado:
El homo de microondas debe estar conectado a unsistema met_lico de cables, permanente, deconexi6n a tierra o un conductor de conexi6n atierra del equipo debe set accionado con losconductores del circuito y conectados a la terminala tierra del equipo o toma de alimentaci6n delhomo de microondas.
GUARDE ESTAS INSTRUCCIONES
4O

Aprender a conocer su hornode microondasEstasecci6n habla de los conceptos de cocci6n a microondas.Tambien le muestra los elementos basicos queusteddebe conocer paraoperar el homo de microondas. Por favor lea esta informaci6n antes de usar su homo.
COMO FUNCIONA SU COMBINACION MICROONDASCOMPANA DE KENMORE ULTRA WAVE TM
La energia de microondas no produce calor. Estaenergiahace que losalimentosgenerencalory esteasu vez hace que los alimentosse cocinen. Lasmicroondasson como las ondas de TV, radioo luz.Ustednolaspuedevet, peropuedever Ioquehacen.
Un magnetr6n de produce las microondas en unhomo de microondas.Las microondas se muevendentro del homo donde se ponenen contacto conlos alimentos cuando giransobre la bandejagiratoria.
Magnetr n
Los hornos convencionales a microondas operans61oen energia alta (HIGH). Para Iograr un nivel deenergia de 70% en un homo convencional amicroondas, el homo opera el 70% del tiempo enenergia alta y el 30% del tiempo apagado (OFF).
Elsistemadeinversorde microondasULTRAWAVETM
entregaenergiaalenformacontinua,paradescongelarmasuniformementey minimizarel excesodecocd6nde losalimentosy lassudassalpicaduras.
Cavidad_del homo
Piso de metal Bande]a giratona de vidrio
La bandeja giratoria de vidrio de su homo demicroondas permite que las microondas pasen.Luego, estas rebotan en el piso de metal, atraviesanla bandeja giratoria de vidrio y son absorbidas porlos alimentos.Las microondas pasan a traves de la mayoria delos tipos de vidrio, papel y plastico sin calentarlos,de manera que el alimento absorbe la energia. Lasmicroondas rebotan en los recipientes de metal, porIo tanto los alimentos no absorben la energia.
Sistema de inversor de microondasULTRA WAVE TM
El sistema de inversor de microondas ULTRAWAVE TM le ofrece mejor rendimiento de cocci6nen microondas para descongelar, cocinar yrecalentar alimentos rapida y uniformemente. Latecnologia probada del sistema de inversor demicroondas ULTRA WAVE TM entrega unacomente constante de energia de microondas -verdadera energia alta, media y baja, a la vez queusa menos potencia y ahorra tiempo.
Coccibn por sensorElsistemade inversordemicroondasULTRAWAVETM
cuentaconfuncionesdecocci6nporsensor.Un sensorde humedaden lacavidaddel homo detectalahumedademitidapor los alimentosalcalentarse.Elsensorajustael tiempoparadiversostiposycantidadesde alimentos.La cocci6npor sensoreliminala incertidumbreal cocinarcon hornosde microondas.
Cbmo obtener los bptimos resultadosde coccibn
• Siemprecocinelos alimentosperel tiempomascortorecomendado.Veriflquec6mo se estancocinandolos alimentos.
• Para ayudara asegurarsede que los alimentosestan cocinadosde formapareja,revuelva,roteo redistribuyalos alimentosquese est_ncocinandoa la mitaddel tiempode cocci6n.
• Si ustedno tieneunatapa para unplato,usepapelenceradootoallasde papelaprobadasparause con microondaso peliculade pl_stico.Recuerdedoblarunaesquinade la peliculadepl_sflceparaqueel vapor salgadurante lacocci6n.
Interferencia de radio
Usar su homo de microondas puede causar • Llevar el receptor lejos del homo de microondas.interferencia en su radio, TV o equipo similar. • Enchufar el homo de microondas en unCuando hay interferencia, puede reducirla o tomacerriente diferente de modo que el homo dequitarla de la siguiente forma: microondas y receptor est6n en diferentes ramas• Limpiar la puerta y sellar las superficie del homo. de cimuitos.• Ajustar la antena receptora de la radio o televisor.
41

Probar su horno de microondas
Para probar el homo ponga aproximadamente 1 Cierre la puerta. Asegt3reseque se cierra. Cocinetaza de agua fria en un recipiente de vidrio en el a1100% de potencia per 1 minuto. A su debidohomo. tiempo, el agua debe calentarse.
Probar su vajilla o bateria de cocina
PruebesuvajUlao bateriadecocina antesdeusar. energiadelasmicroondas,calentandosedemasladoParaprobarunplatoy tenerunuseseguro,colSqueloen paratomadoscon lamanoy demorandolostiemposdeelhomoconunatazadeaguaal ladedelmismo.Siel cocci6n.Cocinarenrecipientesde metalno disefiadosplatose calientademasiadoy el aguaquedafria,noIo parausedemicroondaspuedendafiarel homo,ya queuse.Si lavajilla se calienta,no Io use.AJgunosplatos podriancontenermetaloculto(atadurasretorcidas,(demelanina,a!gunavajillaceramica,etc.)absorbela laminasmetalicas,grapas,lustreorecortesmetalicos).
Precauciones de seguridad operativa
• Nunca se apoye en la puerta o permita a un nifioque se balancee en ella cuando la puerta estaabierta.
• Use protectores para objetos calientes. Lapotencia microonda no calienta los envases, peroel calor del alimento puede hacer que el recipientese caliente.
• No use papel de diarios u otto papel impreso en elhorno.
• No seque flores, frutas, hierbas, madera, papel,calabacines o ropas en el horno.
• No encienda el homo de microondas cuando estavacio. La vida atil del producto puede seracortada. Si realiza la programaci6n del homo,coloque un recipiente de agua en el homo. Esnormal que la puerta del homo se yea onduladadespues de que el homo ha estado funcionandopor un lapso.
• No trate de derretir cera de parafina en el homo.La cera de parafina no se derretira porque permitea las microondas pasar a traves de la misma.
• No opere el homo de microondas a menos que labandeja de vidrio giratoria este segura en su lugary pueda mueve libremente. La bandeja giratoriapuede mueve hacia cualquier direcci6n.Aseg_rese de que la bandeja giratoria estacorrectamente colocada en el homo. Tome subandeja giratoria con cuidado cuando la saque delhomo, para evitar la posibilidad de quebrada. Sisu bandeja giratoria se rompe o se quiebra,contacte a su proveedor para un reemplazo.
• Cuando use un plato dorador, el fondo del platodorador debe ser al menos de por Io menos 3 I16pulgadas por arriba de la bandeja giratoria. Sigalas directivas provistas con el plato dorador.
• Nunca cocine o recaliente un huevo entero concascara. La formaci6n de vapor en los huevosenteros puede causar que revienten yposiblemente darien el homo. Fraccione loshuevos duros hervidos antes de calentarlos. Enraras ocasiones, los huevos poche se hanreventado. Cubra los huevos poche y deje untiempo de un minute antes de cortarlos.
• Para obtener mejores resultados, revuelvamientras se calienta o recalienta. Los liquidoscalentados en ciertos recipientes (especialmenterecipientes de forma cilindrica) puedensobrecalentarse. El liquido puede saltar hacia conun fuerte sonido durante o despues de calentarseo cuando se agreguen los ingredientes (granulosde cafe, saquitos de te, etc.). Esto puede dariar elhomo.
• Las microondas pueden no Ilegaral centre de unasado. Elcalor se difunde desde el centro haciaafuera, areas cocidas, tal come un homo comL_n.Esta es una de las razones paradejar algunosalimentos (per ejemplo, asados o papas al homo)permanecer per un memento despues de lacocci6n o en otros alimentos, revolverlos duranteel tiempo de cocci6n.
• En el homo, no sumerja al freir. Los utensiliospara microondas no son adecuados para esto yes dificil mantener temperaturas correctas parafrituras sumergidas.
• No cocine demasiado las papas. AI final del tiempode cocci6n recomendado, las papas deberan estarligeramentefirmes porquecontinuaran la cocci6ndurante el tiempo de permanencia. Luegodecocinaren el homo de microondas,deje alaspapas permanecer darante 5 minutos. Seterminarande cocinarmientras reposan.
Conexibn El ctrica
I Si su linea de conexion electrica o voltaje desalida es de menos de 110 voltios, los tiempos de
42
cocci6n pueden ser m_s largos. Haga queunelectricista calificado controle su sistema electrico.

Caracteristicas del horno de microondas
0 ®® ®
m
i®®®
Su homode microondasestadiseSadopara hacersuexperienciade cocinaIo mas agradabley productivaposible.Pararesumiry explicarrapidamente,lasiguientees unalistade las caractedsticasbasicasdelhomo:
1. Ventana con pantallade metalevitaquelasmicroondasse escapen. Estadise_adacome unapantallaparapermitirlevisualizarlacomidamientrasse cocina.
2. Placade modeloy n0merode seriey etiquetadeguiade cocciSn
3. FUtrode carbbn (detrasde la rejillade ventilaci6n)
1. Bandeja de vidrio2. Soporte3. Cubo central
® ®
4, Rejillade ventUacibn.5. Bandejagiratoria.Labandejagiratoriahace girar los
alimentosmientrascocinaparaobtenerunacocd6nmaspareja.Debe estarenel homoduranteelfuncionamientoparaobtenermejoresresultadosdecocciSn.
6, Luz auxiliar(para la mesada)
7. FUtrode grasa. Vet la secciSn"Cuidadodel losfiltros".
8. Panelde control.Toque los padsen este panelpararealizartodaslas funciones
9. Parrillade coccibn. Utilicelapara obtenerespacioextracuando cocineenm_s de un recipientea la vez.
Q PLACA DE LADESCONGELACI6N
Utilice la PLACA DE LA DESCONGELACION
proporcionada para la descongelaci6n completa.
La bandeja de vidrio se mueve en ambas direccionespara ayudar a cocinar mas parejamente.No opere el homo de microondas sin la bandeja devidrio en su lugar.
Para instalar:
1. Coloque el soporte en la cavidad del piso del homo.2. Coloque la bandeja de vidrio en el soporte.
Acomode el pie acanalado del piso de la bandeja devidrio entre los rodillos del cubo central. Los rodillosdel soporte deben calzar dentro del reborde de labandeja de vidrio. 43

Funciones del panel de controlEl panel de control de su homo de microondas le permite sel_ ccionar rapida y facilmente la funci6nde cocci6n deseada. Todo Io que tiene que hacer es tocar el pad de comando. La siguiente es unalista de todos los pads de comando y nemeros ubicados en el panel de control. Para m_sinformacidn sobre estas caracteristicas, yea la seccidn "Usar su homo de microondas".
i
Tlfll_ 0
CLE_
©
1. Pantalla. La pantalla incluye un reloj eindicadores que le muestran la hera del dia, losprogramas de las horas cocinar los alimentos,las potencias de cocci6n, las cantidades, pesosy las funciones de cocci6n seleccionadas.
2. Palomitas de maiz. Toque este pad parapreparar las palomitas de maiz con lacaracteristica del sensor. El sensor del homo ledira al homo cuanto tiempo debera cocinarsegOn la cantidad de humedad que detecta(deserta) en las palomitas.
44

3.Pizza.Toqueestepadpararecalentarunaovariasporcionesdepizzasinintroducirunapotenciaotiempodecocci6n.
4.Verduras.Toqueestepadparacocinarsinintroducirunapotenciaotiempodecocci6n.
5.Papas(patatas)alhomo.Toqueestepadparacocinarpapassinintroducirunapotenciaotiempodecocci6n.
6.Entradacongelada.Toqueestepadparacocinarde10a21onzasdeentradacongeladasinintroducirunapotenciaotiempodecocci6n.
7.Platoprincipal.Toqueestepadparaprepararsinintroduciruntiempoopotenciadecocci6n.
8.Seguraafuegorento.Toqueestepadparahervirlentamentesopas,cazuelas,estofadosyotrosalimentosliquidos.
9. Pads num_ricos. Toque los pads numericospara introducir tiempos de cocci6n, potencias decocci6n, cantidades, pesos, o categorias decomidas.
10. Tiempo de cocci6n. Toque este pad seguidopor un pad numerico para determinar untiempo cocci6n.
11. Potencia. Toque este pad despu6s determinarel tiempo de cocci6n, seguido por un padnumerico para instalar la cantidad de potenciade microondas liberadas para cocinar losalimentos. Cuando mas alto el nemero masalto la potencia de microondas o "velocidad decocci6n."
12. Agregar minuto. Toque este pad para cocinarpor 1 minuto, al 100% de Potencia de cocci6no para agregar un minuto extra a la Potenciade cocci6n.
13. Menos. Toque este pad para restar 10segundos de cocci6n por cada vez que Iopresiona.
14. M_s. Toque este pad para agregar 10segundos de tiempo extra de cocci6n cadavez que Io presiona.
15. INIClAR. Toque este pad para iniciar unafunci6n. Si abre la puerta despu6s que el homocomienza a cocinar, vuelva a tocar INICIAR(START).
16. DETENER/Limpiar (STOP/Clear). Toque estepad para borrar un comando incorrecto,cancelar un programa durante la cocci6n,o limpiar la pantalla.
17. Cocci6n autom&tica. Toque este pad paracocinar alimentos aptos para homo demicroondas sin introducir una potencia otiempo de cocci6n.
18. Recalentamiento automatico. Toque estepad para recalentar alimentos aptos parahomo de microondas sin introducir unapotencia o tiempo de cocci6n.
19. "Mantener caliente". Toque este pad para"Mantener caliente" las comidas cocinadas ensu homo hasta 99 minutos, 99 segundos. Lafunci6n "Mantener caliente" puede ser usadapor si misma o puede seguir automaticamenteel ciclo de cocci6n.
20. Reloj. Toque este pad para introducir la horadel dia correcta.
21. Descongelamiento automatico. Toque estepad seguido por pads num6ricos paradescongelar came seg6n el peso.
22. Descongelamiento rapido. Toque este padpara descongelamiento rapido."GROUND BEEF 1.0 LBS TOUCH START"aparecera en la pantalla.
23. Cronbmetro de cocina. Toque este pad parainiciar el Cron6metro de cocina.
24. Fundir. Toque este pad para fundirchocolate, queso, mantequilla o malvavisco.
25. Ablandar. Toque este pad para ablandarhelados, cremas, queso, mantequilla o jugoshelados.
26. Ventilador On/Off. Toque este bot6n paraapagar o encender el ventilador.
27. Ventilador 5 Velocidades. Toque este bot6npara elegir una de las 5 velocidades delventilador.
28. Luz Alta/Nocturna/Apagarla. Toque estebot6n para encender la luz, ponefla en alta, ennoctuma o para apagafla.
NOTA: Si trata de introducir instruccionesincorrectas, no escuchara ningen tono. ToqueDETENER/Limpiar (STOP/Clear) y reintroduzcalas instrucciones.
45

Usar su horno demicroondasEsta secci6n contiene instrucciones para Ilevar acabo cada funci6n. Tenga a bien leercuidadosamente estas instrucciones.
;ENALES AUDITIVAS
Las seSales auditivas estan disponibles paraguiarlo cuando programa y usa su homo ;• Un tono de programacidn sonata cada vez
que usted toque un pad.• Siete tonos sefialan el final de un conteo del
cron6metro de cocina.• Cuatro tonos sei_alan la finalizaci6n de un ciclo
de cocci6n.
RELOJ
Luego de enchufar su homo de microondas porprimera vez o luego de una interrupci6n por falla
electdca, la pantalla mostrara el mensaje "PLEASESET TIME QF DAY". Si la hora del dia no esta
determinada, la pantalla mostrara ":" hasta queusted toque "Clock ".
Ejemplo para 10:30(AM):
Toque: La pantallamostrar_:
1,
2, : EI'ITERTitleDFDRY
I_' ÷ rl T_llf" T T3. 1 0 3 0 ,_.30 ,uuLflS,flR,
4,
5.
6.
I_' * rl T_I H- /ILl o _ RI_ ILILIL_I
Tt3! It-
T,'II I,e"_'_/0 : 30 ,uuLfl
5T[7RT
ILl
NOTA: Puede ir de A.M. y P.M. tocando 1 o 2 luegodel paso 4.
INTERRUMPIR LA COCCI(_N
Abriendo la puerta, puede detener el homodurante un ciclo. El homo deja de calentar y elventilador se detiene, pero la luz permaneceencendida.
Para retomar la coccibn, cierre la puerta ytoque STARTSi no desea continuar la coccibn, abra lapuerta y toque STOP/Clear.
PROTECCIt_N DE SEGURIDADPARA NINOS
Puede usar esta funci6n de seguridad para bloquearel panel de control cuando se halla limpiando elhomo o que los niSos no puedan utilizar el homo sinla supervisi6n.
Para determinar CHILD LOCK: (BIoqueo de
protecci6n)
Toque: La pantallamostrar_:
1, Hora del dia.
Toque y mantenga hastaque aparezca LOCKEDen la pantalla(aproximadamente4 segundos).
Para cancelar CHILD LOCK: (Bloqueo deprotecci6n)
Toque: La pantallamostrar_:
Toque y mantenga hastaque desaparezca LOCKEDen la pantalla(aproximadamente4 segundos).
46
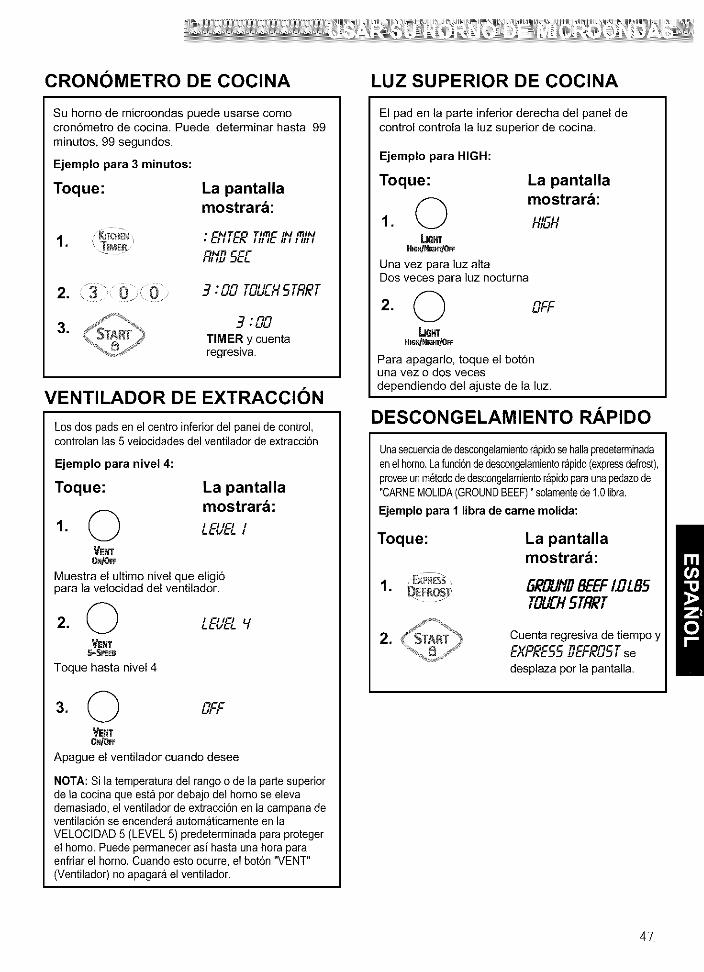
CRONOMETRO DECOCINA
Su homo de microondas puede usarse comocron6metro de cocina. Puede determinar haeta 99
minutes, 99 segundos.
Ejemple para 3 minutes:
Toque: La pantallamostrar_:
Tim I_I ml_l1. : EHTEE,,;E,,,,,,
R_,_5EL
• FIFI TF_! IF T T2. 3 0 0 3.uu ,uuLHS,RE,
*UU
TIMER y cuentaregresiva.
VENTILADOR DE EXTRACCION
Los dos pads en el centre inferior del panel de control,controlan las 5 velocidades del ventilador de extracci6n
Ejemplo para nivel 4:
Toque: La pantallamostrar_:
I II I I1. _Ef)EL,
ONIO_
Muestra el ultimo nivel que eligi6para la velocidad del ventilador.
i ,tl I2. _Ef)ELVVENT
5=5PEEB
Toque hastaniveI4
VENTONIO_F
Apague el ventilador cuando desee
NOTA: Si la temperatura del range o de la parte superiorde la cecina que esta por debajo del homo se elevademasiado, el ventilador de extracci6n en Ia campana deventilaci6n se encender_ automaticamente en laVELOCIDAD 5 (LEVEL 5) predeterminada para protegerel homo. Puede permanecer asi hasta una hora paraenfriar el homo. Cuando esto ocurre, eI bot6n "VENT"(Ventilador) no apagara el ventilador.
LUZ SUPERIOR DE COCINA
El pad en la parte inferior derecha del panel decontrol controla la luz superior de cocina.
Ejemplo para HIGH:
Toque: La pantalla
mostrar_:1. HISHbeNT
HIG_NERrIO_
Una vez para luz altaDos veces para luz nocturna
2. 0 8FF
bG_rHIGWNmm!O_
Para apagarlo, toque el bot6nuna vez o dos vecesdependiendo del ajuste de la luz,
DESCONGELAMIENTO RAPIDO
Unasecuenciadedescongetamientorapidosehallapredeterminadaenelhomo.Lafuncbndedescongelamientorapido(expressdefrost),proveeunm_tododedesosngelamientorapidoparaunapedazode"CARNEMOLIDA,GROUNDBEEF)"soiamentede1.0libra.
Ejemplo para I libra de came molida:
Toque: La pantallamostrar_:
1. 5EOUI'/#BEEF117LB5TOUEH5TRET
, Cuenta regresiva de tiempo yEXPEES5DEFE2,S'fsedesplaza per la pantalla.
47
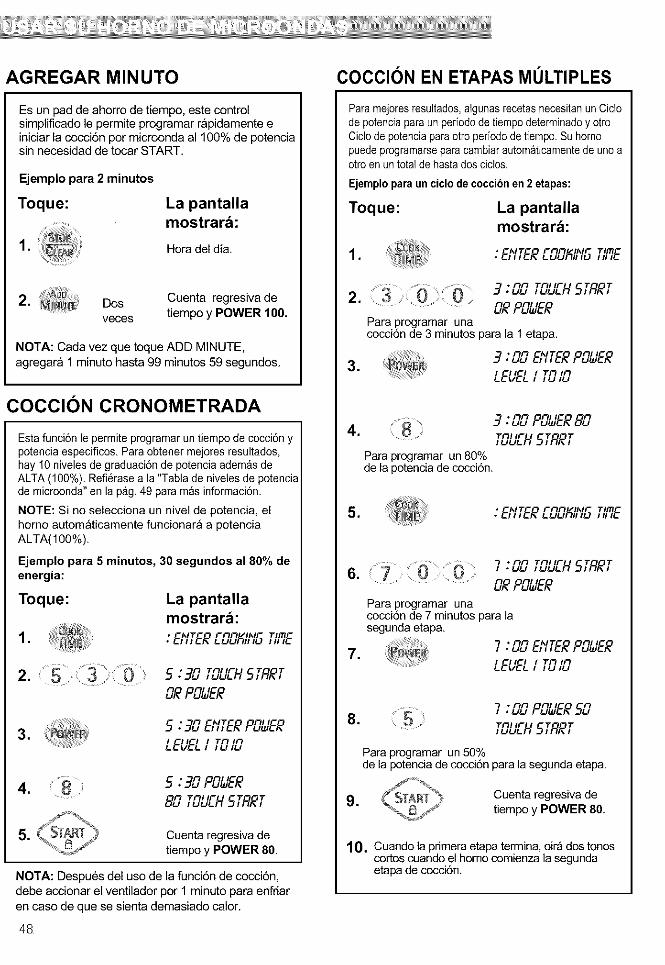
AGREGAR MINUTO
Es un pad de ahorro de tiempo, este controlsimplificado le permite programar rapidamenteeiniciar la cocci6n por microonda a1100% de potenciasin necesidad de tocar START.
Ejemplo para 2 minutos
Toque:
.
La pantallamostrar_:
Hora del dia.
2. Dosveces
Cuenta regresiva detiempo y POWER 100.
NOTA: Cada vez que toque ADD MINUTE,agregara 1minuto hasta 99 minutos 59 segundos.
COCCI()N CRONOMETRADA
Esta funci6n le permite programar un tiempo de cocci6n ypotencia especificos. Para obtener mejores resultados,hay 10 niveles de graduaci6n de potencia adem_s deALTA (100%). Refl@rasea la "Tabla de niveles de potenciade microonda" en la pag. 49 para m_s informaci@n.
NOTE: Si no selecciona un nivel de potencia, elhomo automAticamente funcionar_ a potenciaALTA(100%).
Ejemplo para 5 minutos, 30 segundos al 80% deenergia:
Toque: La pantallamostrar_:
1. • Eh,ER _.uu'_,,o TIRE
TF_! IF T T2. 5 0 5:30 ,uu_H5,_R,
FI FI//UEPEewEE
• _1 hit FIII5 .3_gEh,ERPB_ER3.
I It I ! TF_ I1-1LEVEL,i_,_
4. 8 ) 5 38 POr_ERTFll IF T T8,9 iu_LH51REi
5. Cuenta regresiva de
tiempo y POWER 80.
NOTA: Despu@s del uso de la funci6n de cocci@n,
debe accionar el ventilador por 1 minuto para enfriaren caso de que se sienta demasiado calor.
48
COCCIC)N EN ETAPAS MULTIPLES
Paramejoresresultados,algunas recetasnecesitanunCiclode potenciapara unperiodo de tiempodeterminadoy otroCiclo de potenciaparaotro periodo de tiempo. Su homopuede programarsepara cambiarautom_ticamentede unoaotro en un totalde hasta dosciclos.
Ejemplopara un ciclode coccibnen 2 etapas:
Toque: La pantallamostrar_:
.• hit rFl_l I_lr TIEE_
I-I1-1 TF_I IF T T2. 3 3 uu ,,-,-,,.H5IRE,
_2 PO_EEPara programar unacocci6n de 3 minutos para la 1 etapa.
• _1_1 hit FII I3 ._ E_,IEEPE_EE3.
_&,EL,,_,_
.
TOUEH5TRETPara programar un 80%de la potencia de cocci6n.
.• hit rFl_l I_lr TIEE_
*
*
• I-I1-1 TFH IF T T
F_ FII /dE P_ERPara programar unacocci6n de 7 minutos para lasegunda etapa.
• r_r_ hit F_I I7 ._ EhlEEPO_EEI II I ! TF_ I1-1
7 _ P_ER _8.
TFH IF T T,_H 5IRE,
Para programar un 50%de la potencia de cocd6n para la segunda etapa.
9. Cuenta regresiva detiempo y POWER 80.
10. Cuando la pfimera etapa termina, oir£ dos tonoscortos cuando el homo comienza la segundaetapa de cocci6n.

NIVELES DE POTENCIA MICROONDA
Paraobtenermejoresresultados,algunasrecetasrequierendiferentespotenciasdecocci6n.Cuantomasbajaesla potenciadecocci6n,masbajaeslacocci6n.Cadant]merodeI a9representaundiferenteporcentajedepotenciacompletadecocci6n.Lasiguientetablamuestraelporcentajedepotenciadecocci6nquecadant]merorepresentay elhombredepotenciadecocci6ngeneralmenteusado.
Tambien dice cuando usar cada potencia de cocci6n.
Siga las instrucciones de la receta del paquete de
comida si estan disponibles.
POTENCIA DE COCCION NOMBRE CUANDO USARLA
100% de potencia completa Alta • Calentado rapido de muchas alimentos preparadosy alimentos con un alto contenido de agua, tales
como sopas y bebidas.
• Cocci6n de cortes tiernos de cerne, came molida.
9 =90% de potencia total * Calentar sopas-crema.
8 =80% de potencia total * Calentar arroz, pasta o cecerolas
7 =70% de potencia total Medio alta * Cocinar y celentar comidas que necesitan unapotencia de cocci6n mas baja que alta (por ejemplo,pescado entero y una pieza de came) o cuando lacemida se cocina demasiado rapidamente.
• Recelentar una sola porci6n.
6 =60% de potencia total * La cocci6n que requiere cuidado especial, comoquesos y huevos y platos de huevos, budines yflanes.
• Terminar la cocci6n de cecerolas
5 =50% de potencia total Mediana * Cocinar jam6n, aves enteras, y asados a la olla.
• Cocer estofados a fuego lento.
4 =40% de potencia total * Derretir chocolate
• Calentar pasteleria
3 =30% de potencia total Medio baja, * Descengelar manualmente alimentos, tales como
descengelar pan, pescado, carnes, aves, y alimentos prececidos.
2 =20% de potencia total * Ablandar mantece, queso, y helados.
1 =10% de potencia total Baja * Mantener los alimentos celientes.
• Sacar el frio de las frutas.
49

DESCONGELAMIENTO AUTOMATICO
Tres secuencias de descongelamiento est_n predeterminadasen el horno. La funci6n de descongelamientoautom_tico leproporciona el rnejor rn6todode descongelarniento paraalmentos congeIados. La guia de cocina le mostrara cualsecuencia de descongeIarniento se recornienda para elalmento que desea descongelar.Para mayor conveniencia, el descongelarniento autom_ticoincluye un rnecanismo sonoro incorporado (bip)que Ie recuerdaque debe controlar. Darvuelta, separar, o volver a arreglarpara obtener el mejor resultadodel descongelarniento. Haytres diferentes nivelesde descongelarniento.
1CARNE2 AVES3 PESCADO4 PAN
Ejemplo para 1.2 libra de came molida:
Toque: La pantallamostrar_:
1, flERTTOU£HIPOULTRVTOUEH2FISHTOUEH3BRER#TOUEH
2, 1 O.LTLb5EI'ITER&/EISHT
3, Y /.2u_
para introducirel peso TOUEH5TRRT
4, Cuenta regresiva de tiempoy DEFROST.
NOTA:Cuando toque el pad START, la pantalla cambia para Iacuenta regresiva de descongelamiento. Sonata un bip en elhomo durante el ciclo de DESCONGELAMIENTO. En estemornento, abra la puerta y d_ vuela o vuelva a arreglar eIalimento. Quite cualquier porciSn que ya este descongelada.Vuelva a colocar en el horno las porciones congeladas ytoque START para retornar al ciclo de descongelamiento.
SUGERENCIAS PARA OPERAR• Paraobtener mejoresresultados,saque el pescado,marisco,carne o avesu paquete(envoltura)original. De otto modo laenvolturaguardar_el vapory el jugo cerca de los alimentos,esto puedecausarque la superficieexterna de losa/mentos secocine.
• Paraobtener mejoresresultados,dea la came molidala formade una rosca (dona)antesde congetarla.Cuando ladescongele,alsonar el bip raspe la came ya descongeladayconln0e el descongelamiento.
• Coloque los alimentosen un recipientepiano o sobre una rejillade asado paramicroondaspara recogerel goteo.
Estatablale muestralaselecci6ndel tipodealmentoy elpeso
quepuedeestablecerparacadalpo. Paraobtenermejoresresultados,aflojeo quiteta cubiertadel alimento.
ALIMENTO TOQUE PESOS QUE PUEDEDescong. DETERMINARAutomat, (en d_cimas de libra
Came 1 .1 a 6.0 (45ga 2722g)
Ayes 2 .1 a 6.0 (45ga 2722g)
Peseado 3 .1 a 6.0 (45ga 2722g)
Pan 4 .1 a 1.0 (45ga 450g)
Tabla de conversibn de pesoUsted probablemente no esta acostumbrado a rnedir los
pesos de los alimentos en libras y en onzas que sonfraociones de libra (por ejernplo, 4 onzas iguala 1/4 libra ).No obstante, para poder introduoir el peso del alimento en
"Descongelarniento autornatico", debe especificarlo en
Iibras y d_cimas de libra.Si el peso en el paquete del alirnento esta expresado en
fracciones de libra, puede usar la siguiente tabla paraconvertir el peso a fracciones decimales.
Peso equivalente
ONZAS
1.6
3.2
4.0
4.8
6.4
8.0
9.6
11.2
12.0
12.8
14.4
16.0
PESO DECIMAL
.10
.20
.25 un cuarto de libra
.30
.40
.50 media libra
.60
.70
.75 tres cuartos de libra
.80
.90
1.00 unalibra
5O
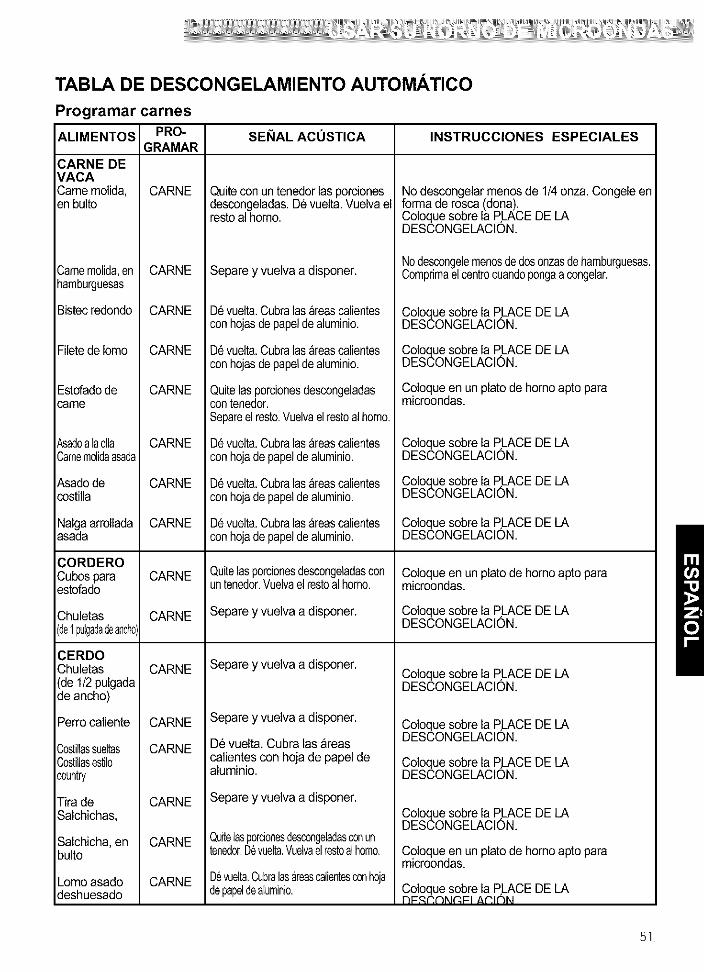
TABLA DE DESCONGELAMIENTO AUTOMATICO
SEI_IAL ACUSTICA INSTRUCCIONES ESPECIALES
Programar carnes
ALIMENTOS PRO-
CARNE DEVACACamemolida,en bulto
Camemolida,en CARNEhamburguesas
Bistecredondo CARNE
Filetede Iomo CARNE
Estofadode CARNEcame
Asadoalaoila CARNECamemelidaasada
Asadede CARNEcostilla
Nalgaarrollada CARNEasada
CORDEROCubospara CARNEestofado
Chuletas CARNE(de1pulgadadeanch0)
CERDOChuletas CARNE(de 1/2pulgadade ancho)
Perro caliente CARNE
Costiliassueitas CARNECostillasestilocountry
Tira de CARNESalchichas,
Salchicha, en CARNEbulto
Lomo asado CARNEdeshuesado
GRAMAR
CARNE Quitecon un tenedorlas porcionesdescongeladas.De vuelta.Vuelva elrestoal homo.
Separe y vuelva a disponer.
D6vuelta.CubralasareascaIientesconhojasdepapeldealuminio.
D6vuelta.CubralasareascaIientesconhojasdepapeldealuminio.
Quitelasporcionesdescongeladascontenedor.Separeel resto.Vuelvael restoalhomo.
D6vuelta.CubralasareascaIientesconhojadepapeldealuminio.
D6vuelta.CubralasareascaIientesconhojadepapeldealuminio.
D6vuelta.CubralasareascaIientesconhojadepapeldealuminio.
Quitelasporcionesdescongeladasconuntenedor.Vuelvael restoalhomo.
Separe y vuelva a disponer.
Separe y vuelva a disponer.
Separe y vuelva a disponer.
De vuelta. Cubra las areascalientes con hoja de papel dealuminio.
Separe y vuelva a disponer.
Quitelasporcionesdescongeladasconuntenedor.D6vuelta.VueNaelrestoalhomo.
D6vuelta.Cubralasareascalientesconhojadepapeldeatuminio.
No descongelarmenos de 1/4onza. Congele enforma de rosca (dona).Coloque sobre la PLACE DE LADESCONGELAClON.
Nodescongelemenosdedosonzasdehamburguesas.Comprimaelcentrocuandopongaacongelar.
Coloque sobre la PLACE DE LADESCONGELACION.
Coloque sobre la PLACE DE LADESCONGELAClON.
Coloque en un plato de homo apto paramicroondas.
Coloque sobre la PLACE DE LADESCONGELACION.
Coloque sobre la PLACE DE LADESCONGELACION.
Coloque sobre la PLACE DE LADESCONGELACION.
Coloque en un plato de homo apto paramicroondas.
Coloque sobre la PLACE DE LADESCONGELACION.
Coloque sobre la PLACE DE LADESCONGELACION.
Coloque sobre la PLACE DE LADESCONGELACION.
Coloque sobre la PLACE DE LADESCONGELAClON.
Coloque sobre la PLACE DE LADESCONGELAClON.
Coloque en un plato de homo apto paramicroondas.
Coloque sobre la PLACE DE LANFRNNNAFI ANINN
51
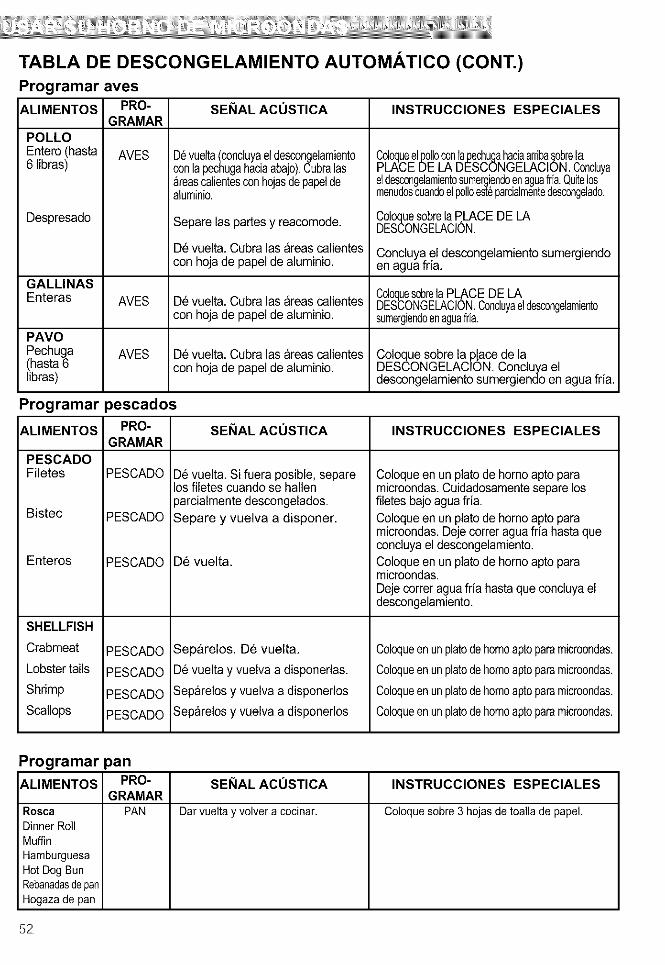
TABLA DE DESCONGELAMIENTO AUTOMATICO (CONT.)
SEI_IAL ACUSTICA INSTRUCCIONES ESPECIALES
Programar aves
ALIMENTOS PRO-GRAMAR
POLLOEntero (hasta AVES6 libras)
Despresado
GALLINASEnteras AVES
AVES
Devueita(concluyaeldescongelamientoconlapechugahaciaabajo).Cubralas_reascalientesconhojasdepapeldealuminio.
Separe las partes y reacomode.
De vuelta. Cubra las areas calientescon hoja de papel de aluminio.
Coloqueelpolioconlapechugahaciaarriba_obrelaPLACE DE LA DESCONGELACION. Concluyaeldescongelamientosumergiendoenaguafria,Quitelosmenudoscuandoelpolioest6parcialmentedescongelado,
ColoquesobrelaP,LACE DE LADESCONGELACION.
Concluya el descongelamiento sumergiendoen agua fria.
ColoquesobrelaPLACE DE LADe vuelta. Cubra las areas calientes DESCONGELACION.Conchyaeldescongelamientocon hoja de papel de aluminio, sumergiendoenaguafria.
PAVO
Pechuga De vuelta. Cubra las areas calientes Coloque sobre la p!ace de la(hasta 6 con hoja de papel de aluminio. DESCONGELACION. Concluya ellibras) descongelamiento sumergiendo en agua fria.
SEI_IAL ACUSTICA INSTRUCClONES ESPEClALES
Programar pescados
ALIMENTOS PRO-GRAMAR
PESCADOFiletes PESCADO
Bistec PESCADO
Enteros PESCADO
SHELLFISH
Crabmeat PESCADO
Lobster tails PESCADO
Shrimp PESCADO
Scallops PESCADO
D_ vuelta. Si fuera posible, separelos filetes cuando se hallen)arcialmente descongelados.Separe y vuelva a disponer.
D6 vuelta.
Separelos. De vuelta.
D_ vuelta y vuelva a disponerlas.
Separelos y vuelva a disponerlos
Separelos y vuelva a disponerlos
Coloque en un plato de homo apto paramicroondas.Cuidadosamentesepare losfiletes bajo aguafria,Coloque en un plato de homo apto paramicroondas.Deje correr aguafria hastaqueconcluya el descongelamiento.Coloque en un plato de homo apto paramicroondas,Dejecorrer agua fria hastaque concluya eldescongelamiento.
Coloqueenunplatodehomoaptoparamicroondas,
Coloqueenunplatodehomoaptoparamicroondas,
Coloqueenunplatodehomoaptoparamicroondas.
Coloqueenunplatodehomoaptoparamicroondas.
Programar panALIMENTOS PRO- SEI_IAL ACUSTICA INSTRUCCIONES ESPECIALES
GRAMARRosca PAN Darvueltay volvera cocinar. CoIoquesobre3 hojasde toalladepapel.DinnerRollMuffinHamburguesaHotDogBunRebanadasdepanHogazadepan
52

SUGERENCIASPARADESCONGELAMIENTOMANTENER CALIENTE
• Cuando use el Descongelamiento automatico, el
peso a ser introducido es el peso neto en libras ydecimas de libras (el peso del alimento menos el
envase).
• Antes de comenzar, asegL_rese de quitar cualquierade las hilos o ataduras de metal que a menudo
vienen con las bolsas de alimentos y reempl_icelascon hilos o bandas el_isticas.
• Abra los envases tales como cartones antes decolocados en el homo.
• Siempre rompa o perfore las bolsas pl_isticas oenvolturas.
• Si los alimentos estan envueltos, quite la hoja dealuminio y col6quelos en un envase adecuado.
• Rompa las cascaras si hubiera, de alimentos
congelados tales como salchichas.
• Doble los envases plasticos de alimentos paraasegurar un descongelamiento parejo.
• Siempre calcule en menos el tiempo de
descongelamiento. Si el alimento descongeladoesta aen helado en el centro, vuelva a colocado enel homo de microondas para mas
descongelamiento.
• El tiempo que toma el descongelamiento varia deacuerdo a la solidez de congelamiento del alimento.
• La forma del envase afecta a la velocidad con queel alimento se descongela, descongelar.
Los envases pianos se descongelan masrapidamente que un bloque profundo.
• Cuando el alimento comienza a descongelarse,
separare los pedazos. Los pedazos separados sedescongelan mas facilmente.
• Para obtener mejores resultados, permita
permanecer al alimento despues de descongelarse.(Para mas informaci6n sobre tiempo de
permanencia, vea la secci6n "Sugerencias decocci6n en microondas ")
• De vuelta el alimento durante el descongelamiento
o tiempo de permanencia. Separe y quite elalimento cuando sea necesario.
Puede mantener calientes y seguros los alimentoscocinados, calentados en su homo de microondashasta 99 minutos, 99 segundos (aproximadamente 1hora, 40 minutos). Puede usar "Mantener caliente"por si mismo, o seguir automaticamente un ciclo decocci6n.
Ejemplo de "mantener caliente":
Toque: La pantallamostrar_:
FIJ l't Jl m1. HOL__FIE_,TOU[H5Tfl_T
F_I FI I I [it2. H,.&.uw'RE;,se desliza a trav6s de la
pantalla.
AI final de la funci6n "Mantener caliente",
aparecera en la pantalla el mensaje "END "yse oiran cuatro tonos.
Para qae "Mantener caliente" sigaaatomaticamente a otro ciclo:
• Mientras esta tocando las instrucciones de cocina,toque Mantener caliente antes de tocar START.Cierre la puerta y toque Mantener Caliente, luegotoque START si se desea un tiempo adicional deMantener Caliente.
• Caando termina el t_ltimo ciclo de cocci6n, oirados tonos. "Mantener caliente" seguira mientras elhorno contint_a funcionando.
• Puede programar que "Mantener caliente" siga aldescongelamiento automatico, cocci6n o cocci6n enciclos meltiples.
NOTAS:
• "Mantener caliente" opera hasta un total de 99minutos, 99 segundos.
• Abrir el homo cancela "Mantener caliente".Cierre la puerta y toque "Mantener caliente", luegotoque START si se desea un tiempe adicional de"Mantener caliente"
• Los alimentos ya cocinados deben ser cubiertosdurante "Mantener caliente".
• Los platos de pasteleria (pasteles, empanadas, etc.)deben estar sin cubierta durante la funci6n"Mantener caliente".
• Las comidas completas que se desee mantenercalientes sobre un plato, deben cubrirse durante lafunci6n "Mantener caliente".
• No use mas de un ciclo completo de "Mantenercaliente" (aproximadamente 1 hora, 40 minutos).La calidad de algunos alimentos se desmejoraracon un tiempo muy extendido.
53

SEGURA A FUEGO RENTO
Su homo de microondas le permite hervir lentamentesopas, casuelas, estofados y otros almentosliquidos. Todo Io que debe hacer es determinar untiempo para hervir lentamente y su homo Ilevara a sucomida a romper el hervor y luego a continuarhirviendo durante el tiempo que usted especifique.
NOTAS:
• No puede cambiar la energia o grado de cocci6npara Segura a fuego rento.
• Esta funci6n usa el sensor. El sensor necesita 2
minutos 30 segundos para calentarse despuesque el homo se encienda o luego de un corte deenergia. Si inicia Segura a fuego rento durante
el calentamiento, la energia microondas no seencendera hasta que el sensor este caliente.
• Cuando cocine verduras, aumente la cantidad
de agua de 1/4 a 1/2 taza (60 a 125ml).
• Cubra el plato con una tapa dura, i.e., la tapaque esta disponible con el plato o plato de mesa.
No use envolturas plasticas.
Toque: La pantallamostrar_:
1. Coloque la comida en el horno ycierre la puerta.
, :EtffER E2,2,1@15fiRE
13. 13133. 3 0 0 0 3E .uuT_! Ir T T
Toque los pads _uuLH 5_°_num@icos para entrarSTART en el tiempo dehervor lento.Ejemplo para 30 minutes.
, C-_-_-II2 5b_E 51fifiE_El homo har& romper elhervor de la comida.
Los almentos herviran lentamente durante el tiempo
que determine.
AI cocer lentamente los alimentos come pastas useun envase que pueda contener suficiente agua paracubridos totalmente al cocinarse, (como 3-quarts -12tazas- cazuela) con una tapa. Cuando cocine pasta ofideos agregue 1 cucharada (15ml) de aceite al aguaantes de hervir. Use el siguiente m6todo: Coloque elrecipiente con agua en el homo y siga los pasos2-4, determinando el tiempo de cocci6n lenta enlsegundo. AI final, coloque los alimentos en el aguay remueva hasta que est6n completamente cubiertospor el agua.
Cubra, Repita los pasos 2-4, determinando eltiempo de cocci6n lenta que desea, Cambiando lasinstrucciones, puede cambiar el tiempo de hervorlento mientras hierve.
Para ello siga los pasos 2,3, y 4.
54

USAR SENSOR DE COCClONSENSOR DE COCCION PAPAS (EJEMPLO)
SENSOR OPERATIVA INSTRUCCIONES
El sensor de cocci6n le permite cocinar la mayoria desus comidas favoritas sin seleccionar los tiempos decocci6n y niveles de potencia. La pantalla indicara"round shape" (forma redonda) durante el periodoinicial del sensor. El homo automaticamentedetermina el tiempo de cocci6n requerido para cadaarticulo de cocina. Cuando el sensor interno detecta
una cierta cantidad de humedad proveniente de losalimentos, le indicara al homo cuanto le tomaracalentado. La pantalla mostrara el tiempo restante decalentamiento. Para obtener los mejores resultadoscon el sensor, siga estas recomendaciones:
• Los alimentos cocinados con el sistema de sensor
deben hallarse a temperatura normal dealmacenamiento.
• La bandeja de vidrio y la parte extema delrecipiente deben estar secos para asegurar losmejores resultados de cocci6n.
• Los alimentos siempre deben estar cubiertos demodo suelto con envoltura plastica apta paramicroondas, papel encerado o una tapa.
• No abra la puerta ni toque la tecla "STOP/CLEAR"durante el tiempo correspondiente al sensor.Cuando este tiempo termine, el homo emitira dosbips, y el tiempo restante para cocinar apareceraen la pantalla. En este momento podra abrir lapuerta para revolver, girar o redistribuir el alimento.
GUiA DE COCINA CON SENSOR
Envases apropiados y cubiertas aseguraran buenosresultados de cocoi6n por medio del sensor.
• Siempre use envases aptos para microondas yct_bralos con tapas o envolturas plasticasventiladas.
• Nunca use cubiertas plasticas ajustadas o selladas.Estas pueden evitar que el vapor escape y causarun exceso de cocci6n en los alimentos.
• Haga coincidir la cantidad con el tamafio delenvase. Llene los envases por Io menos hasta lamitad para obtener mejores resultados.
• Asegurese que el exterior del envase de homeado yel interior del homo de microondas se hallen secos
antes de colocar el alimento en el homo. Las gotasde humedad al transformarse en vapor puedenconfundir al sensor.
Cocci6n del sensor le permite cocinar sus alimentosfavoritos sin seleccionar los tiempos de cocoi6n yniveles de potencia.
Ejemplo para papas:
Toque: La pantallamostrar_:
Hora del dia.
2. C___3Pfi,R,uque se desplaza a trav6sde la pantalla.
Cuando haya concluido el tiempo de cocci6n oiracuatro bips y aparecera "COOK END" en lapantalla.
MAS/MENOS
Usandolas teclas Maso Menostodaslas cocciones
del sensory los tiemposde cocci6nprogramadospuedenser ajustadosporel alimentode cocci6nenuntiempolargoo corto.
PresionandoMasse agregara10segundosdeltiempode cocci6ncada vezque Iopresione.
PresionandoMenosse restara10segundosdeltiempode cocci6ncada vezque Iopresione.
55

CUADRO DE COCCI( N DEL SENSOR
CATEGORIA DIRECCIONES CANTIDAD
Palomitas de Popcorn le permite preparar las palomitas de maiz para horno de Paquete deMaiz microondas empacados comercialmente. Prepare Qnicamenteun 3.0-3.5 onzas
paquete cada vez. Para mejores resultados, use una bolsa fresca de)olomitas de maiz. Coloque el empaque de palomitas preempacado)ara homo de microondas.Antes de preparar las palomitas, remueva elseparador del homo (referir a la pagina 65).
Pizza Este es la funci6n de recalentamientopara una pizza sobrante. 1-3tajadasColoque en un papel de cocina sobre un plato de homo apto para (5onzascadaun_microondas.
Entrada Saque del empaque exterior. Dividalo. De 10a 21 onzasCongelada Si no esta en un plato de homo apto para microondas, col6quelo sobre
el plato, cobra con envoltura plastica y abra unos respiraderos.Despues de la cocoi6n, deje reposar unos 3 minutos.
Plato de Cena Coloque los alimentos para ser calentado en el plato de cena o vajilla 1-2 porcionessimilar. Cubra con el empaque plastico y abra un respiradero a lapelicula plastica perforando con un tenedor (3veces). Despues de lacocoi6n, deje reposar unos 3 minutos.
Verduras Saquedelempaque, lave laescarchabajoel aguacorriente. 1-4vasosCongeladas Coloqueen un platode homo aptopara microondasdel tamaio apropiado.
Agreguelacantidaddel aguade acuerdoa la cantidad(1-2vasos:2cucharadasde t_,34 vasos : 4 cucharadasde te)Cubracon envolturapl_stca y abraunos respiraderos.Despuesde la cocci6n,agitey dejereposarunos 3 minutos
Verdura Preparecomo Iodesee, limpiey quiteel agua residualsobre las 1-4vasos
i fresca verduras.Coloqueen plato dehomo apto paramicroondasdel tamaSoapropiado. Agreguelacantidaddelagua deacuerdoa la cantidad(1-2> vasos:2cucharadasdet_, 34 vasos : 4 cucharadasdete) Cubracon
envolturaplasticay abra unosrespiraderos.Despu_sde lacocci6n,agite ydejereposarunos 3 minutos
Verdura Saque de la lata externa. 1-4vasosEnlatada Coloque en un plato de homo a _topara microondas del tamaSo
apropiado, cobra con envoltura tastica y abra unos respiraderos.Despues de la cocoi6n, agite y ceje reposar unos 3 minutos.
Papas Perfore cada papa con un tenedor y coloque sobre la bandeja del 1-4 mediohomo al rededor del borde, apartada al menos una pulgada. Despues (aprox. De 8 a 10de la cocci6n, deje reposar unos 5 minutos, onzas cada una)
56

COCCI(_N AUTOMATICA
Cocci6n Automatica le permite calentar los alimentoscomunes preparados por microonda sin necesidad
de selecci6n de tiempos de cocci6n o niveles de
potencia. El programa "Auto Cook" tiene la potenciade cocci6n predeterminada para 4 categorias dealimentos: cacerola, arroz, tocino (bac6n) y Cerealcaliente.
Ejemplo para arroz:
Toque: La pantallamostrar_:
1,I f-T m _111 /5ELE_,,;E;,_,TO_'
--SEE_dH;,,oo_,.E
2, E---3 I_IEEque se desplaza a trav6sde la pantalla.
Elegir la categoria de alimento.
CATEGORiA TQCAR EL_AD NOMERO CANTIDAD
Cacerola (Sensor) 1 De1a4 vas0s
Arroz (Sensor) 2 De1/2a 2vas0sTocino (bac6n) 3 De2a4 tajadas
Cereal Caliente 4 De1a6 p0rci0ne_
El homo cocinara los alimentos automaticamente
por el sistema de sensor, excepto tocino (bac6n) y
Cereal caliente. Cuando haya concluido el tiempo
de cocci6n oira cuatro bips y aparecera"COOK END" en la pantalla.
RECALENTAMIENTO AUTOMATICO
Recalentamiento Automatico le permite calentar losalimentos sin necesidad de selecci6n de tiempos de
cocci6n o niveles de potencia.
El programa "Auto Reheat" tiene la potencia decocci6n predeterminada para 3 categorias dealimentos:
Cacerola, Rollos/Panecillos (muffins) y Bebidas.
Ejemplo para cazuela:
Toque: La pantallamostrar_:
1, BEH_ / f-T m _111 IT_5ELE£,,E;,_,,_3t-t'It'iJ_It- t-! lJi'_--SEE_dH;,,oo_,.E
2, E____7_55Ef_O_Eque se desplaza a trav6sde la pantalla.
Elija una categoria de alimento.
CATEGORiA TOCAREL3AD NOMERO CANTIDAD
Cacerola(Sensor) 1 De1a4 vasesRollos/Panecillos(muffins' 2 De1a 6pedaz0sBebidas 3 De1a 2vases
El homo volvera a calentar automaticamente s61o
"Cacerola" por sistema de sensor.
Cuando haya concluido el tiempo de cocci6n oira
cuatro bips y aparecera "COOK END" en lapantalla.
57
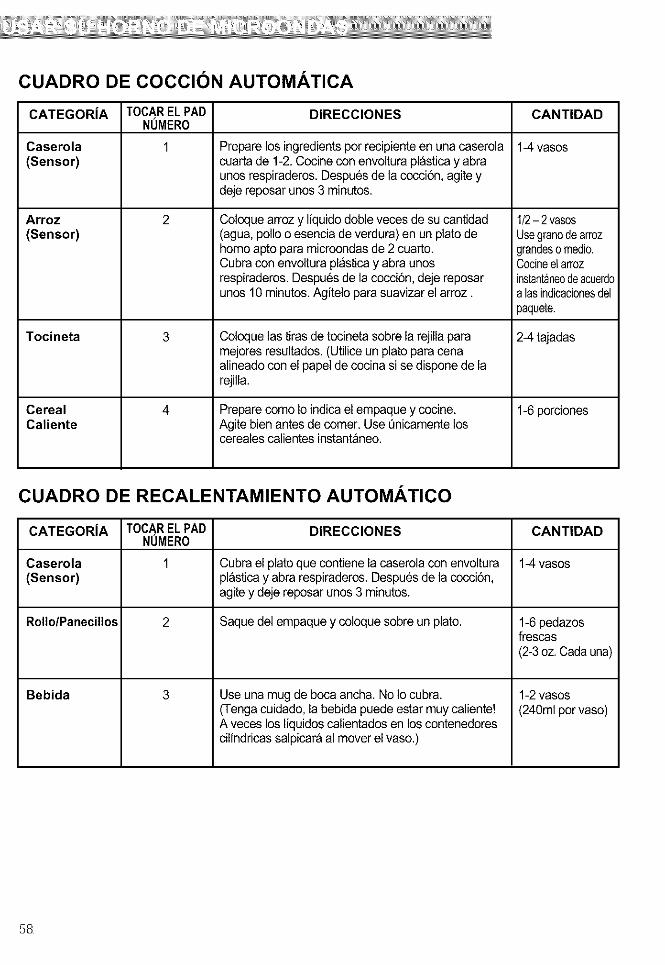
CUADRO DE COCCI()N AUTOMATICA
CATEGORIA TOCARELPAD DIRECCIONES CANTIDADNUMER0
Caserola 1 Prepare los ingredients por recipienteen una caserola 1-4 vases(Sensor) cuarta de 1-2. Cocine con envoltura plastica y abra
unos respiraderos. Despues de la cocci6n, agite ydeje reposar unos 3 minutos.
Arroz 2(Sensor)
Coloque arroz y liquido doble veces de su cantidad(agua, polo o esencia de verdura) en un plato dehomo apto para microondas de 2 cuarto.Cubra con envoltura plastica y abra unosrespiraderos. Despues de la cocci6n, deje reposarunos 10 minutos.Agitelo para suavizar el arroz.
1/2- 2 vasosUsegranodearrozgrandesomedio.Cocineelarrozinstantaneodeacuerdoalas indicacionesdelpaquete.
Tocineta 3 Coloque las tiras de tocineta sobre la rejila para 2-4 tajadasmejores resultados. (Utilice un plato para cenaalineado con el papel de cocina si se dispone de larejilla.
Cereal 4 Prepare como Io indica el empaque y cocine. 1-6 porcionesCaliente Agite bien antes de comer. Use _nicamente los
cereales calientes instantaneo.
CUADRO DE RECALENTAMIENTO AUTOMATICO
CATEGORIA TOCARELPAD DIRECClONES CANTIDADNUMERO
Caserola 1 Cubra el plato que contiene la caserola con envoltura 14-vasos(Sensor) plastica y abra respiraderos. Despues de la cocci6n,
agite y deje reposar unos 3 minutos.
Rollo/Panecillos 2 Saque del empaque y coloque sobre un plato. 1-6 pedazosfrescas(2-3oz. Cada una)
Bebida 3 Use una mug de boca ancha. No Io cubra. 1-2vasos(Tenga cuidado, la bebida puede estar muy caliente! (240ml per vaso)A veces los liquidos calientados en los contenedorescilindricas salpicara al mover el vaso.)
58
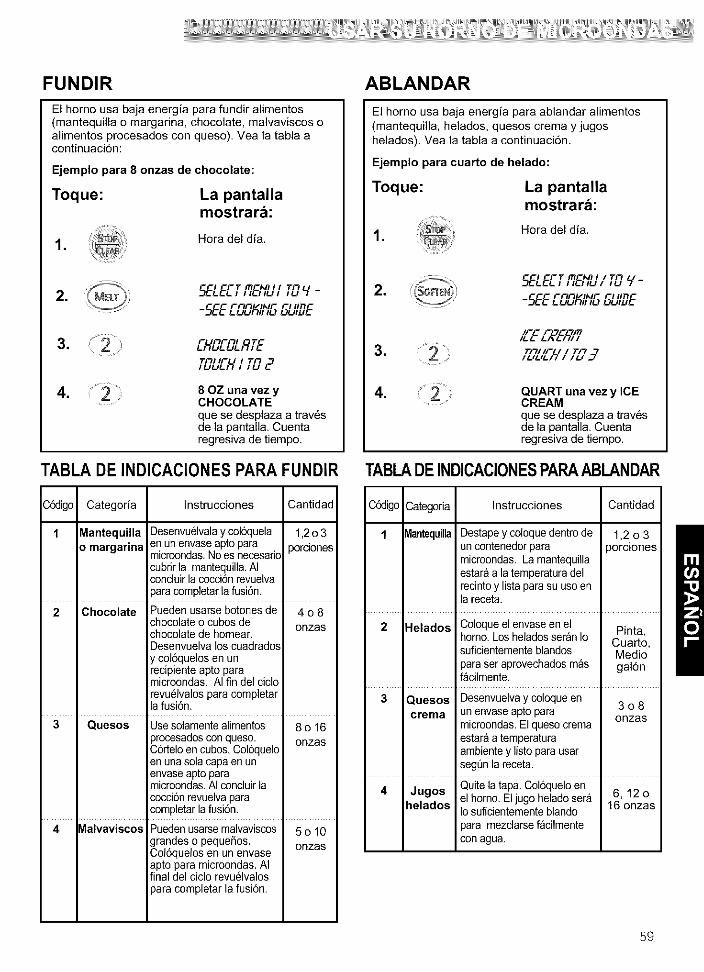
FUNDIR
El horno usa baja energia para fundir alimentos(mantequilla o margarina, chocolate, malvaviscos oalimentos procesados con queso). Vea la tabla acontinuaci6n:
Ejemplo para 8 onzas de chocolate:
Toque: La pantallamostrar_:
1,Hera del dia.
2,5ELEF_f fi6_IbI/ "fPV --SEEEOOK_%E_"DE
3, El-/BESt.fifETEll If" / TnIUULfll IU &'_
4, 80Z una vez yCHOCOLATEque se desplaza a trav6sde la pantalla. Cuentaregresiva de tiempo.
TABLADE INDICACIONESPARAFUNDIR
ABLANDAR
El horno usa baja energia para ablandar alimentos(mantequilla, helados, quesos crema y jugoshelados), Vea la tabla a continuaci6n.
Ejemplo para cuarto de helado:
Toque: La pantallamostrar_:
1, Hera del dia.
2,
I FTm &IIIITFJ5ELEf_,,,_,ul ,u q-
-SEEEOOff_"15E_"DE
3,
LrE EBER,Tll_l IF I Tll_
II..ll..ll..-I_ll II..I "7
4, QUART una vez y ICECREAMque se desplaza a trav6sde la pantalla. Cuentaregresiva de tiempo.
TABLADEINDICACIONESPARAABLANDAR
C6digc Categoria Instrucciones Cantidad
1 Mantequilla Desenvuelvalay cokXluela 1,2o3o margarina enun envase apto para pordones
microondas.No es necesadccubrir la mantequilla.AIconcluirla cocci6n revuelvaparacompietar la fusi6n.
2 Chocolate Pueden usarse botches de 4 o 8chocolate o cubes de onzaschocolate de hornear,Desenvuelva los cuadradosy col6quelos en unrecipiente apto paramicroondas. AI fin del ciclorevuelvalos para completarla fusi6n.
3 Quesos Usesolamentealimentos 8 o 16>rocesadosconqueso, onzasC6rtelo encubes, Col6queloenuna sola capaen unenvase apto paramicroondas.AI conduir Iacocci6nrevuelvaparacompletar lafusi6n.
4 _lalvaviscos Puedenusarsemalvaviscos 5 o 10grandes o pequefios, onzasCol6quelos en un envaseapto para microondas. AIfinal del ciclo revu61valospara completar la fusi6n.
C6digo Categoria Instrucciones Cantidad
1 _aatequilla Destape y coloque dentro de 1,2 o 3un contenedorpara )orcionesmicroondas. La mantequillaestara a la temperatura delrecintoy listapara su use enla receta.
2 Helados Coloque el envase en el Pinta,horno. Los heladosseran Io Cuarto,suficientementeblandos Medicparaser aprovechadosmas gal6nf_cilmente.
3 Quesos Desenvuelvay coloque en 3 o 8crema unenvase aptopara onzas
microondas. Elqueso cremaestara a temperaturaambientey listopara usarsegQnla receta.
Quite la tapa. Col6quelo en 6, 12 o4 heladosJUg°sel homo. El jugo helado sera 16 onzas
Io suficientementeblando
para mezclarsef_cilmentecon agua.
59

Cuidar su horno de microondasParaasegurarse de que su homo de microondas se vea bien y trabaje debidamente durante mucho tiempo,debe mantenedo adecuadamente. Para su cuidado correcto, siga cuidadosamente estas instrucciones.
Para las superficies interiores : Lave a menudo
con agua jabonosa tibiacon esponja o patiosuave.
Use solo jabonessuaves no abrasives o
un detergente suave.Asegt_rese demantener las areas
limpias donde se
tocan la puerta y elmarco del borne cuando se cierran,
Limpie bien con un pare limpio. Con el tiempo,pueden aparecer manchas en la superficie como
resultado de salpicaduras de particulas de alimentodurante la cocci6n. Esto es normal.
Para suciedad rebelde,hierva una taza de aguaen el homo durante 2 o
3 minutos. El vaporablandara la suciedad.
Para quitar oloresdentro del homo, hierva
una taza de agua conalgo de jugo de lim6n o
vinagre.
Para superficies exteriores y panel de control:Use un pare suave conlimpiador de vidrios enspray. Aplique ellimpiador de vidrios enspray al pare suave; noaplique el spraydirectamente en elhorno.
NOTA:
Los limpiadoresabrasives, las almohadillas de lana de acero, losparos limpiadores _speros, algunas toallas depapel, etc., pueden dafiar el panel de control y lassuperficies intedoreso exteriores del horno.
Para limpiar la bandeja giratoria y el soporte de la
Bandejade vidrio
Soporte
Cube cent_l
misma, lave las zonasmuy sucias con aguajabonosa templada. Useun limpiador suave yespoeja para fregar.El soporte y la bandeja devidrio pueden laverseenlavevajillas.
UTILISATION DE LAGRILLE METALLIQUELa grille metallique permeta I'utilisateur de disposerde plus d'espace et deplacer simultanement plus d'un
recipientdans lefour pour une cuisson.1. Placer la grille en ben appui sur les quatresupports
de plastique.• II NE FAUT PAS que la grille touche les paroismetalliques ou le fond de la cavite du four.
2. Placer des quantites egales d'aliments AU-DESSUS et AU-DESSOUS de la grille.• II faut que les quantites d'aliments soientapproximativement identiques, pour une bonnerepartition de I'energieabsorbee.
Pour _viter un risque de dommages materiels :1. Ne pas utiliser la grille pour uneoperation
d'ecletement de mars.2. Lots de I'utilisation,la grille dolt tou-jours reposer
sur les quatre supportsde plestique.3. Utiliser la grille uniquement pour feirecuire le
contenu de deux recipients d'aliments.4. Ne pas effectuer une cuisson alorsque la grille
repose sur la sole du four.
60

CUIDADO DE LOS FILTROS
Los filtro de grasa deben ser quitados y lavados a menudo, al menos una vez al mes.
NOTA: Si esta instalada la combinaci6n en la campana de su microonda para recircular el aire, el filtro de
carb6n (No. De Pedazo 5230W1A003A) disponible de Sears Ilamando a 1-800-4-MY-HOME _.
El filtro de carbon no puede ser limpiado y deberia ser reemplazado cada 6 a 12 meses.
Filtro de grasa (No. De Pedazo 5230W2A004A);
It;
1. Desenchufe el homo de microondas o desconectela energia electrica.
2. Para quitar los filtro de grasa, deslica cada filtro
hacia el costado. Tire de los filtro hacia abajo yempuje hacia el otro lado. El filtro caera.
3. Embeba el filtro de grasas en agua caliente y undetergente suave. Limpie y sacuda la suciedad
embebida y la grasa. Enjuague bien y sacuda parasecar. No limpie los filtro con amoniaco, agentescorrosivos de limpieza tales como limpiadores de
homo basados en lejia ni los coloque en ellavaplatos. Los filtro se volveran negros o puedendaRarse.
4. Para reemplazar los flltro de grasa. Deslice el filtroen la ranura del marco hacia apoye el lado de la
abertura. Empuje el filtro hacia arriba y empujehacia el lado anterior para bloquear en su lugar.
Filtro de carbbn (No.DePedazo5230WIA003A):
1. Desenchufe el homo de microondas o desconectela energia electrica.
2. Quite los tomillos de montaje de la rejilla delagujero de ventilaci6n.
3. Incline la rejilla hacia delante, luego levantela paraquitarla.
4. Levante la parte posterior del flltro de carb6n.Deslica el filtro directamente hacia fuera.
5. Enchufe el homo de microondas o reconecte lacorriente electrica.
61

REEMPLAZARLAS LUCES DE LAPARTESUPERIORY DEL HORNO
5. Deslice un Nuevoflltro de carb6n en su lugar.El filtro debe descansar en el angulo que semuestra.
6. Deslice el rondo de la rejilla del ventilador en sulugar. Empuje la parte superior hasta que calce ensu lugar. Reemplace los tomillos de montaje.
7, Enchufe el homo de microondas o reconecte laenergia electrica.
NOTA: No opere la campana sin el filtro de grasasen su lugar.
La luz de la parte superior para la cocina
(cooktop)1. Desenchufe el homo de microondas o desconecte
la energia electrica.
2. Quite el tomillo de montar de cubierta de bombilla.
3. Reemplace la bombilla con una bombilla de basecandelabra de 20 vatios. (No. De Pedazo6912A40002A) disponible de Sears Ilamando a1-800-4-MY-HOME_.
4. Enchufe el homo de microondas o reconecte laenergia electdca.
Luz del horno1. Desenchufe el homo de microondas o desconecte
la energia electrica.
2. Quite los tomillos de montaje de la rejilladelagujero de ventilaci6n.
3. Incline la rejilla hacia delante, luego levantela paraquitarla.
62
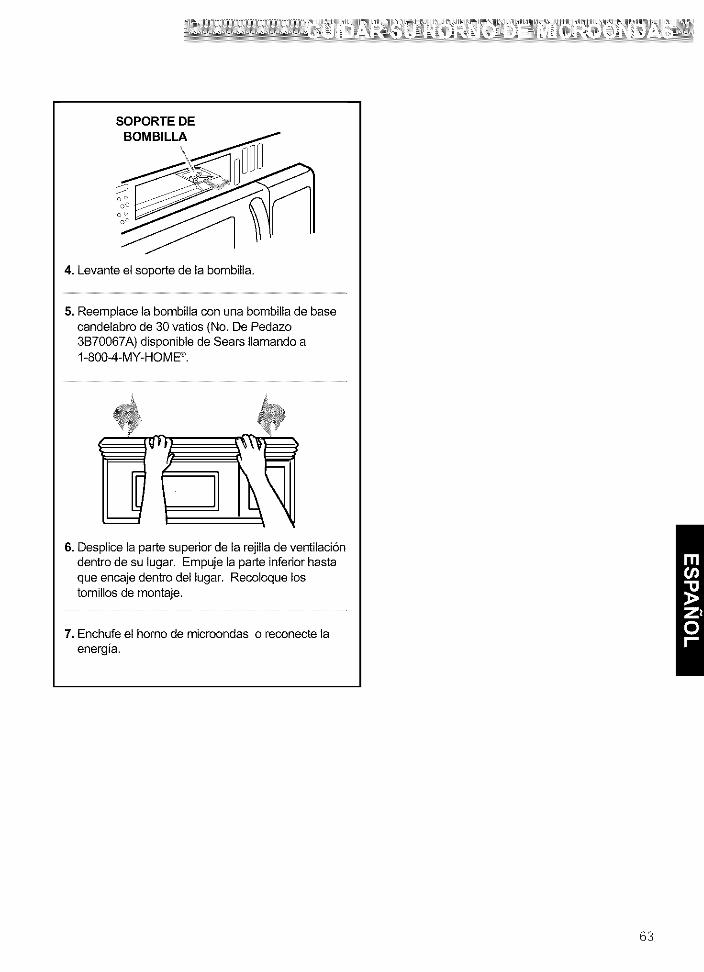
SOPORTE DE
BOMBILLA
4. Levante el soporte de la bombilla.
5. Reemplace la bombilla con una bombilla de basecandelabro de 30 vatios (No. De Pedazo3B70067A) disponible de Sears Ilamande a1-800-4-MY-HOME_.
6. Desplice la parte superior de la rejilla de ventilaci6edentre de su lugar. Empuje la parte inferior hasta
que encaje dentro del lugar. Recoloque lostemillos de montaje.
7. Enchufe el homo de microondas o reconecte laenergia.
63
SUGERENCIAS PARA LA COCINA EN SU MICROONDA
Cantidad de alimentos• Siaumentaodisminuyelacantidaddealimentosqueprepara,
eltiempoquetomaccoinaresealimentotambiencambiara.Porejemplo,si duplica{acantidadqueindicaunareceta,agregueunpocom_sdelamitaddeltiempooriginalindicadodecocci0n.Compruebeelgradodeterminacidny,sifueranecesaho,agreguem_stiempaenpequeSosincrementos.
Temperaturade iniciode la preparaci6n• Mientrasmbsbajalatemperaturadelosalimentosquese
colocanenelhomodemicroondas,mayorserae{tiempoquetomaraparacocinar.Losa{imentosatemperaturadelahabitacidnsepodranvolveracatentarm_sr_pidamentequetosalimentosa temperaturadelrefrigerador.
Composicibn de los alimentos• Losalimentosconmuchagrasay muchaaz0carsecalentaran
masrapidoquelosalimentosquecontienenmuchaagua.Lagrasay elaz0cartambienalcanzanunatemperaturamasaltaque{adelaguaenelprocesodecocci_n,
• Mientrasm_sdensosseanlosalimentos,mastiempotomar_paracalentarse.Losa{imentos"Muydensos"ta{escomo{acameromanmastiempoparavo{veracalentarseque{osm_slivianos,m_sporososcomopastelesesponjosos.
TamaSoy forma• Lospedazosmaspeque_osdealimentossecocinar_nmas
rapidoquelospedazosm_sgrandes.Tambi_nlospedazosdetamismaformasecocinanmasparejoquelospedazosdediferentesformas.
• Conlosalimentosquetienendiferenteespesor,{aspartesmasdelgadassecocinaranm_srapidamenteque{aspartesmasgruesas.Coloquelaspadesm_sde{gadasdelasalasdepolioylaspiernasypatasene{centrode{plato.
Revolver, dar vuelta los alimentos• Revolverydarvue{talosalimentosdisperseeIcalorrapidamente
haciae{centrodeIplatoy evitaquesecocinedem_senlosbordesexternosdelosalimentos.
Cubrir los alimentosCubra los alimentos para:• Reducir las salpicaduras• Acortar los tiernpos de cocci6n• Mantener la humedad de los alimentos
Puedeusarcua{quiercubier_aquepermitaseratravesadopor[asmicrcondas.Vea"Conocersuhomodemicrconda"paraconocerlosmatedalesquelasmicroondasatraviesan.SiestausandolafuncionSensor,asegure{aventilaci6n.
Liberar la presibn en los alimentos• Cortarlosa{imentos(potejemplo:papasalhomo,salchichas,yemasdehuevos,y algunasfrutas)estanajustadamentecubiertosporunapielomembrana,Elvaporpuedelevantarsebajodelamembranadurantelaccocidn,causandoquelosalimentosrevienten.Paraaliviar{apresi6nparaevitarquerevienten,perforelosalimentosantesdeconocerconuntenedor,pinchedecocktailoescarbadientes.
Usar el tiempo de permanencia• Permitasiemprequelosaiimentospermanezcanunmomentodespuesdelacoccion.E{tiempodepermanenciadespu_sdeldescongelamientoy cocoi6npermitequelatemperaturasedisperseenformaparejaatravesdetodoslosalimentos,mejorandolosresultadosdelacoccion.
• Laduracibnde{tiempodeperrnanenciadependede{acantidaddealimentosqueestacocinandoydeladensidaddelosmismos.Avecespuedesettancortocomoeltiempoque{etomasacarlosa{imentosdelhomoy Ilevarlosa lamesadondesesirven.Sinembargo,cuandosetratadea{imentosdemayortamaSoy masdensos,e{tiempodepermanenc_apuedesetm_somenosde10minutos.
Ordenar los alimentosParaobtenermejoresresuitados,coloquelosalimentosdemodopareioenelplato.Puedehacedodediferentesmaneras:
• Siestacoeinandovariosingredientesparaelmismoplato,potejemplopapas(patatas)horneadas,coldquelascomounani{{oparasucocimientouniforme.
• Cuandococineaiimentosdeformasodensidadesirregulares,porejemplopechugasdepo{{o,co{oque{aporcidnm_spequeSaom_sdelgadaenelcentrodetplatodondesecalentaraalfinal.
• Eneapasdealimentosfinos,coloqueunasobreotra,• Cuandococineovuelvaacalentarunpescadoentero,haga
cortessobre{apie{,estoprevieneeIresquebrajamiento.
• Nopermitaquelosenvasesdelosalimentostoquenlapartesuperioro{oscostadosdelhomo.Estoevitaralaposibleformaci0ndeunarcoel_ctrico.
Uso de la hoja de papel de aluminioLosenvasesdemetalnodebenusarseenunhomodemicroondas.Noobstantehayalgunasexcepciones.Sicompr5alimentosquevienenemba{adoenunahojadepapeldealuminio,guieseporlas instruccionesqueestanenel envase.Cuandouseenvasesde hojadepape{dealuminio,los tiemposdecocoi6npuedenserm_slargosyaquelasmicroondaspenetrarans61oIasuperficiede losalimentos.Siencuentraquenotieneinstruccionesenelpaquete,sigaestoslineamientosgenerales:
64

SUGERENCIAS PARA LA COCINA EN SU MICROONDA (Cont.
Uso de la hoja de papel dealuminio (cont.)• Coloque los envases en un cuenco de vidrio yagregue agua hasta cubrir la parte inferior de losenvases, no mas de 1/4 de pulgada (0.64 cm.) dealtura. Estoasegurara la distdbuci6n uniforme decalor en la parte inferior de los envases.
• Siempre quite la tapa para evitar daSo al homo.• Use solamente envases no daSados.
• No use envases mas altos que 3/4 de pulgada(1.9 cm).
• Los envases deben estar Ilenosal menos hasta lamitad.
• Para evitar la formaci6n de arco electrico debehaber una distancia minima de 1/4 de pulgada(0.64 cm) entre los envases de aluminio y lasparedes del homo y tambien entre dos envases dealuminio.
• Protecci6n con pedazos pequeSos de papel dealuminio, piezas de alimento que puede cocerrapidamente, tales como las puntas de ala, pemilesde ayes,
• Calentar alimento de los envases de papel dealuminio toma usualmente el doble del tiempocomparado con el recalmentamiento en envasesplasticas.Vidrio, china o papel. El tiempo que tomaparaque un alimento este listo vadara segun el tipode envases que use.
• Deje descansar a los alimentos de 2 a 3 minutosluegode calentados de modo que el calor sedistribuya uniformemente por los envases.
Lo que no se debe cocinar en suhorno de microondas• No enlate alimentos en el homo. Los frascoscerrados pueden explotar causando daRo al homo.
• No use el homo de microondas para esterilizarobjetos (biberones, etc.). Es dificil mantener alhomo en las altas temperaturas que se necesitanparaesterilizar.
Remover el separador• AI preparar las palomitas empacadascomercialmente, Remueva el separador delhomo; No coloque la bolsa de las palomitas parael homo microondas sobre el separador o debajodel separador.
• En el caso de preparar las palomitas para el homomicrcondas con el separador, puede causarincendio o daRo a su homo de microondas.
65
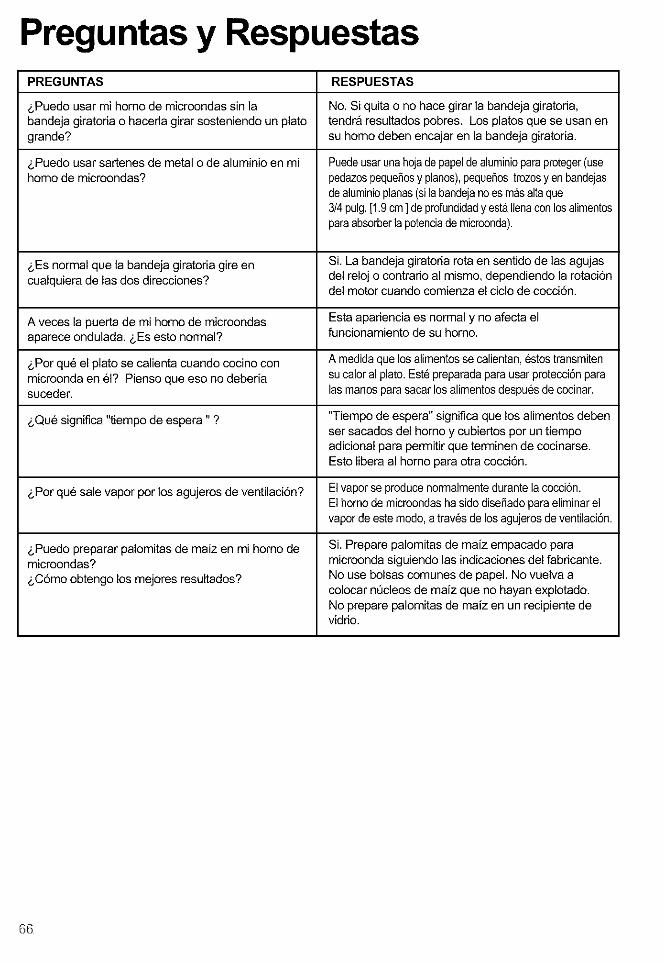
Preguntas y RespuestasPREGUNTAS RESPUESTAS
&Puedo usar mi homo de microondas sin la No. Si quita o no hace girar la bandeja giratoria,bandeja giratoria o hacerla girar sosteniendo un plato tendra resultados pobres. Los platos que se usan engrande? su homo deben encajar en la bandeja giratoria.
&Puedo usar sartenes de metal o de aluminio en mi Puedeusarunahojadepapeldealuminioparaproteger(usehomo de microondas? pedazospequeSosy pianos),pequeSostrozosyen bandejas
dealuminioplanas(silabandejanoesmasaltaque3/4pulg.[1.9cm] deprofundidady estaIlenaconlosalimentosparaabsorberlapotenciademicrconda).
&Es normal que la bandeja giratoria gire en Si. La bandeja giratoria rota en sentido de las agujascualquiera de las dos direcciones? del relojo contrario al mismo, dependiendo la rotaci6n
del motor cuando comienza el ciclo de cocci6n.
A veces la puerta de mi homo de microondas Estaapariencia es normal y no afecta elaparece ondulada. &Es esto normal? funcionamiento de su homo.
&Porque el plato se calienta cuando cocino con A medidaquelos alimentosse calientan,estostransmitenmicroonda en 61? Pienso que eso no deberia su caloral plato.Est_preparadaparausarprotecci6nparasuceder, lasmanosparasacarlos alimentosdespuesdecocinar.
&Que significa "tiempo de espera" ? "Tiempo de espera" significa que los alimentos debenser sacados del homo y cubiertos por un tiempoadicional para permitir que terminen de cocinarse.Esto liberaal homo para otra cocci6n.
&Porque sale vapor por los agujeros de ventilaci6n? Elvaporse producenormalmentedurantelacocciSn.ElhomodemicroondashasidodiseSadoparaeliminarelvapordeestemodo,atray,s de losagujerosdeventilaciSn.
&Puedo preparar palomitas de maiz en mi homo de Si. Prepare palomitas de maiz empacado paramicroondas? microondasiguiendo las indicaciones del fabricante.&C6moobtengo los mejores resultados? No use bolsas comunes de papel. No vuelva a
colocar nQcleosde maiz que no hayan explotado.No prepare palomitas de maiz en un recipiente devidrio.
66
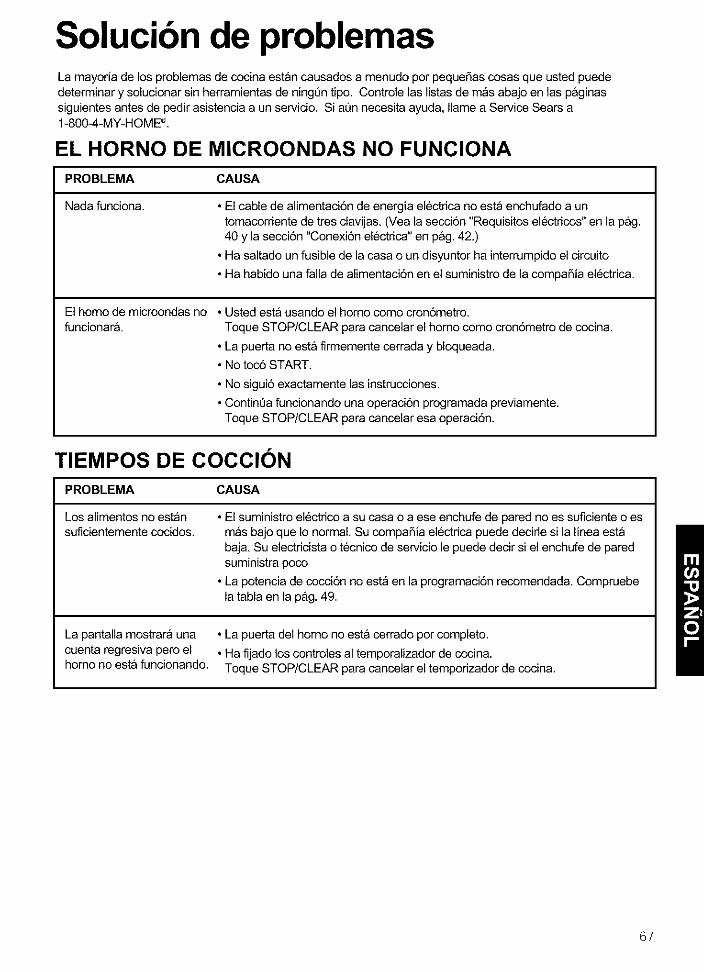
Solucibn de problemasLa mayoria de los problemas de cocina estan causados a menudo por peque£_ascosas que usted puededeterminar y solucionar sin herramientas de ningen tipo. Controle las listas de mas abajo en las paginassiguientes antes de pedir asistencia a un servicio. Si ann necesita ayuda, Ilamea Service Sears a1-800-4-MY-HOME_'.
EL HORNO DE MICROONDAS NO FUNCIONA
PROBLEMA CAUSA
Nada funciona. • El cable de alimentaci6n de energia electrica no esta enchufado a untomacorriente de tres clavijas. (Vea la secci6n "Requisitos electricos" en la pag.40 y la secci6n "Conexi6n electrica" en pag. 42.)
• Ha saltado un fusible de la casa o un disyuntor ha interrumpidoel circuito
• Ha habido una falla de alimentaci6n en el suministro de la compaSia electrica.
El homo de microondas no • Usted esta usando el homo como cron6metro.funcionara. Toque STOP/CLEAR para cancelar el homo como cron6metro de cocina.
• La puerta no esta firmemente cerrada y bloqueada.• No toc6 START.
• No sigui6 exactamente las instrucciones.
• Continea funcionando una operaci6n programada previamente.Toque STOP/CLEAR para cancelar esa operaci6n.
TIEMPOS DE COCClON
PROBLEMA CAUSA
Los alimentos no estansuficientemente cocidos.
• El suministro electdco a su casa o a ese enchufe de pared no es suficiente o esmas bajo que Io normal. Su compa_ia electrica puede decide si la linea estabaja. Su electricista o tecnico de servicio le puede decir si el enchufe de paredsuministra poco
• La potencia de coccidn no esta en la programaci6n recomendada. Compruebela tabla en la pag. 49.
La pantalla mostrara una • La puerta del homo no esta cerrado por completo.
cuenta regresiva pero el • Ha fijado los controles al temporalizador de cocina.homo no esta funcionando. Toque STOP/CLEAR para cancelar el tempodzador de cocina.
67
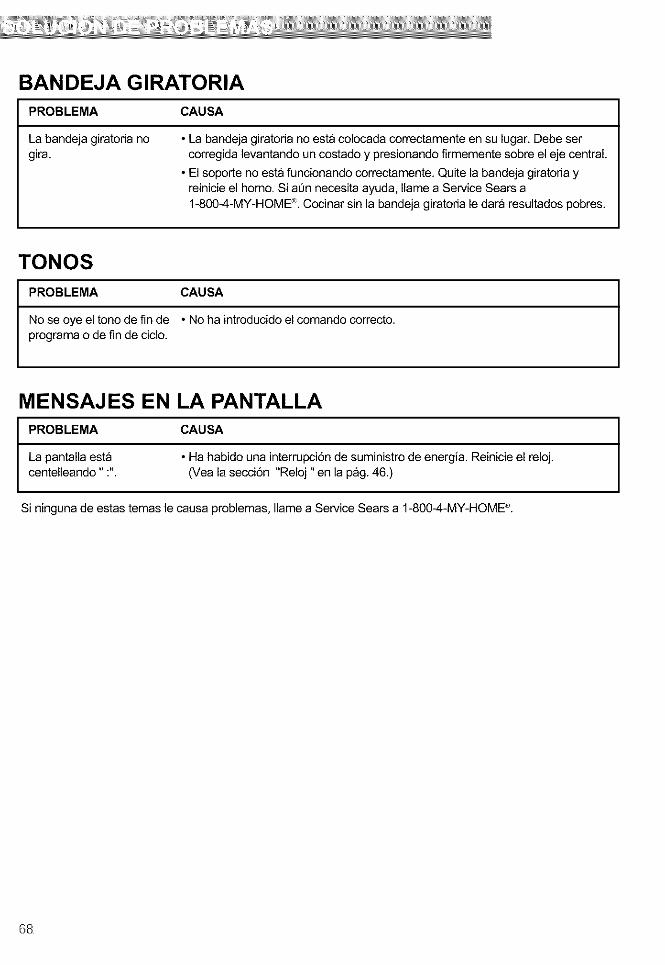
BANDEJA GIRATORIAPROBLEMA CAUSA
La bandeja giratoria no • La bandeja giratoria no esta colocada correctamente en su lugar. Debe sergira. corregida levantando un costado y presionando firmemente sabre el eje central.
• El soporte no esta funcionando correctamente. Quite la bandeja giratoda yreinicie el homo. Si aQnnecesita ayuda, Ilamea Service Sears a1-800-4-MY-HOME_. Cocinar sin la bandejagiratoria le dara resultados pobres.
TONOS
PROBLEMA CAUSA
No se aye el tono de fin de • No ha introducido el comando correcto.programa o de fin de ciclo.
MENSAJES EN LA PANTALLAPROBLEMA CAUSA
La pantalla esta • Ha habido una interrupci6n de suministro de energia. Reinicieel reloj.centelleando" :". (Vea la secci6n "Reloj "an la pag. 46.)
Si ninguna de estas temas le ceusa problemas, Ilame a Service Sears a 1-800-4-MY-HOME_.
68

Your Homeiiiiiiiiiiiiiiiiiiiiiiiiiiii
For repair-in your home-of all major brand appliances,lawn and garden equipment, or heating and coolingsystems,
no matter who made it, no matter who sold it!iiiiiiiiiiiiii
For the replacement parts, accessories andowner's manuals that you need to do-it-yourself.
iiiiiiiiiiiiii
For Sears professionalinstallationof home appliances
and items like garage door openers and water heaters.iiiiiiiiiiiiii
1-800-4-MY-HOME ® (1-800-46g-4663)
Call anytime, day or night (U.S.A. and Canada)iiiiiiiiiiiiii
WWW.Sears.con'l W'tr_W. sea rs. ca
ourHomeFor repairof carry-in items like vacuums, lawn equipment,
and electronics,call or go on-line for the locationof your nearestSears Parts & Repair Center.
1-800-488-1222
Call anytime, day or night (U.S.A. only)
WW'tr._. sea rs. co n'_
To purchase a protectionagreement (U.S.A.)
or maintenance agreement (Canada)on a productserviced by Sears:iiiiiiiiiiiiii
1-800-827-6655 (U.S.A.) 1-800-361-6665 (Canada)
Pare pedir servicio de reparacibn Au Canada pour service en frangais:
a dornicilio,y pare ordenar piezas: 1.800.LE.FOYERMC1-888-SU-HOGAR s" (1-800-533-6937)
(1-888-784-6427)
SEARS6MRegistered Trademark/_eTrademark / Service Mark of Seam, Roebuck and Co.
® Mama Registrade/'he Mama de F_hrica/SM Marca de Servicio de Sears, Roebuck and Co.
MCMarque de commerce/MD Marque d6pos6e de Sears, Roebuck and Co. @ Sears, Roebuck and Co.