Collector GPRS - Contronics System Requirements (for Contronics Collector GPRS Tools) Optional...
14
Collector GPRS User Manual
Transcript of Collector GPRS - Contronics System Requirements (for Contronics Collector GPRS Tools) Optional...

Collector GPRSUser Manual

Collector GPRSUser Manual
This manual is also available on the CD-ROM bundled with the product or at Contronics site
Introduction
Collector GPRS Components
Optional Accessories
System Requirements
Overview
Charging the Collector GPRS Battery
SIM Card chip Installation
Data Colleting
Collector GPRS Settings
GOL Business Settings
GOL Premium Settings
Collector GPRS data download
Signalling Interpretation
Technical Specifications
Recycling
Acknowledgements / declarations
4
4
5
5
5
6
6
7
8
9
9
10
12
13
13
13
Summary
4
Collector GPRS – User Manual
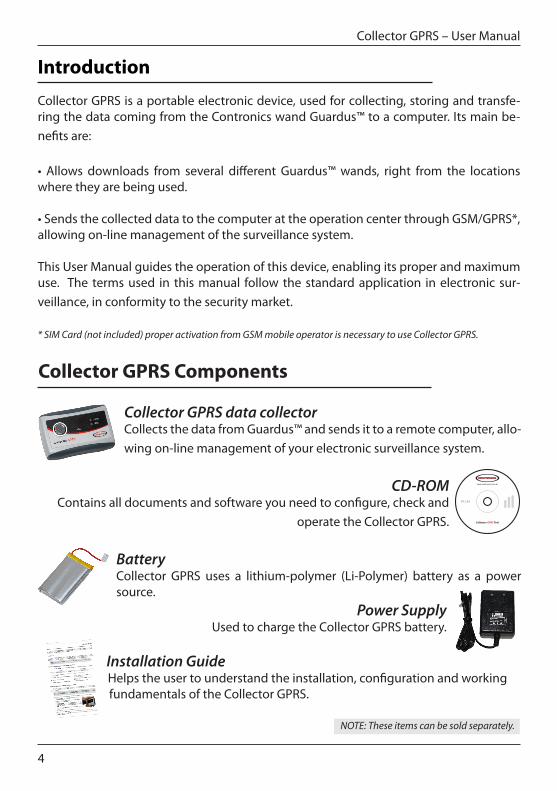
Collector GPRS is a portable electronic device, used for collecting, storing and transfe-ring the data coming from the Contronics wand Guardus™ to a computer. Its main be-nefits are:
• Allows downloads from several different Guardus™ wands, right from the locations where they are being used.
• Sends the collected data to the computer at the operation center through GSM/GPRS*, allowing on-line management of the surveillance system.
This User Manual guides the operation of this device, enabling its proper and maximum use. The terms used in this manual follow the standard application in electronic sur-veillance, in conformity to the security market.
* SIM Card (not included) proper activation from GSM mobile operator is necessary to use Collector GPRS.
Introduction
Collector GPRS data collectorCollects the data from Guardus™ and sends it to a remote computer, allo-wing on-line management of your electronic surveillance system.
CD-ROMContains all documents and software you need to configure, check and
operate the Collector GPRS.
BatteryCollector GPRS uses a lithium-polymer (Li-Polymer) battery as a power source.
Power SupplyUsed to charge the Collector GPRS battery.
Installation GuideHelps the user to understand the installation, configuration and working fundamentals of the Collector GPRS.
NOTE: These items can be sold separately.
Collector
GPRS Tool
V 1.1.0.1
Collector GPRS Components
5
Collector GPRS – User Manual
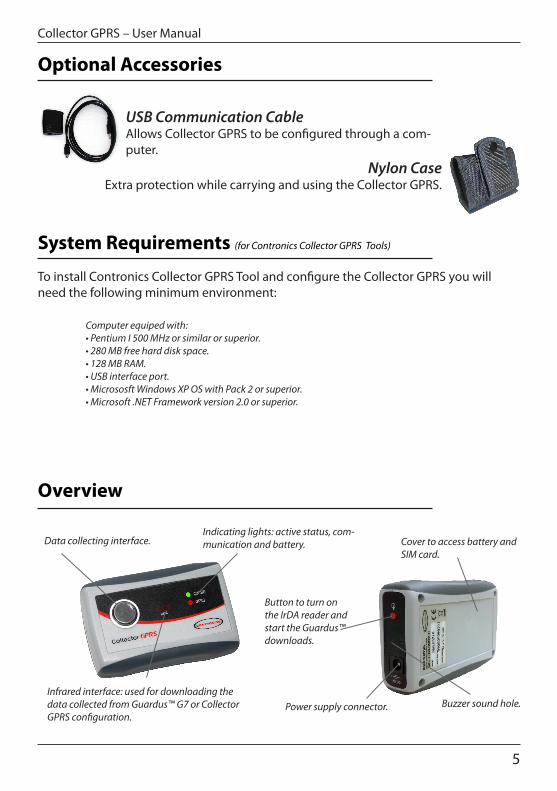
Cover to access battery and SIM card.
USB Communication CableAllows Collector GPRS to be configured through a com-puter.
Nylon CaseExtra protection while carrying and using the Collector GPRS.
To install Contronics Collector GPRS Tool and configure the Collector GPRS you will need the following minimum environment: Computer equiped with: • Pentium I 500 MHz or similar or superior. • 280 MB free hard disk space. • 128 MB RAM. • USB interface port. • Micrososft Windows XP OS with Pack 2 or superior. • Microsoft .NET Framework version 2.0 or superior.
Data collecting interface.Indicating lights: active status, com-munication and battery.
Infrared interface: used for downloading the data collected from Guardus™ G7 or Collector GPRS configuration.
Button to turn on the IrDA reader and start the Guardus™ downloads.
Power supply connector. Buzzer sound hole.
Overview
System Requirements (for Contronics Collector GPRS Tools)
Optional Accessories

6
Collector GPRS – User Manual
Collector GPRS is powered by a lithium-polymer (Li-Polymer) rechargeable battery, pla-ced on the backside of the device. This battery must be recharged when the Collector GPRS sounds a “beep” each 20 seconds (just like a cell phone does). A totally discharged battery takes aproximately 4h30min to fully charge. When recharging has finished the COMM green light and GPRS green light will blink simultaneously.
Power supply input, used for battery charging.
NOTE1: The battery status can be checked through the Con-tronics Collector GPRS Tool, at the status bar “Battery Status”.NOTE2: The Collector GPRS will not transmit the data while the charger is connected.
To insert a SIM Card chip on Collector GPRS execute the following steps:
1 - Open the Collector GPRS backside cover removing the screws and disconect the battery, holding and pulling the white connector.2 - Under the battery you will find the SIM Card slot. Slide the SIM Card into the slot to insert it.3 - Be sure that the SIM Card´s metalic contacts are turned to the board.4 - Slide the SIM Card support (as showed on the figure), until you feel it locks.5 - Put back the battery with its rubber support, oriented on the initial position and aligned with the cover lids.6 - Reconnect the battery.7 - Screw the cover back.
Warning: Scratches and folds may damage the SIM Card chip. Be careful when inserting, remov-ing or storing this chip. Be sure the battery is disconnected before insert or removal of the SIM Card chip. Check the battery and its rubber support position after openning the back cover, put-ting them back to the same position after SIM Card chip insertion.
Charging the Collector GPRS Battery
SIM Card chip Installation

7
Collector GPRS – User Manual
To download data, place Guardus™ G3 e G5 to the collector interface or put Guardus™ G7 close to the IrDA interface. The download will happen automatically. Downloading will be informed through sound and light signals.
Data transfering
Collector GPRS stores the collected data on its non-volatile memory, with the date and time of reading. Collector GPRS data transmission is made through its GSM/GPRS mobile phone system, through the USB Communication Cable interface or via IrDA interface.
Signalling sequence during Guardus™ download Communication between Guardus™ and Collector GPRS is confirmed by a sequence of sound and light signalling.
NOTE1: SIM Card (not included) proper activation from GSM mobile operator is necessary to use Collector GPRS.NOTE2: The Collector GPRS will not transmit the data while the charger is connected.
Collector GPRS active and no Guardus™ connected.
Guardus™ connected to Collector GPRS (data collect-ing interface for G3 and G5 or IrDA interface for G7).Guardus™ downloads data to Collector GPRS.
Guardus™ finishes the download.
Guardus™ is disconnected from Collector GPRS.
COMM turns on every 5 seconds.
COMM red light turns on.
Guardus™ sounds one time and COMM red light blinks.
COMM red light turns off and Guardus™ sounds three times.COMM green light and GPRS green light blink once.
Actions Signalling
Collector GPRS data collector sequence
Data collecting from a Guardus™ to a Collector GPRS is simple and quick, easily executed by the user. Collector GPRS is permanently on active status, without any on-off key.
NOTE: Be sure all Guardus™ to be downloaded on Collector GPRS were programmed with PROGuard 4.0 (or high-er) or with GOL. Former versions won´t be processed.
Data Colleting

8
Collector GPRS – User Manual
To download data from Guardus™ G3 and G5 to Collector GPRS, follow these steps:
1 - Attach Guardus™ on the data collector interface, to download the stored data. 2 - Wait for the COMM red light and SUCCESS sound signal (PLIM), inform-ing the communication beginning.3 - Keep Guardus™ in contact with the data collector interface, while the COMM red light blinks. It means the data is being transferred to Collector GPRS.4 - Wait for the sound ‘Restart’ (three BIPS), signalizing the download has finished.5 - Detach Guardus™ from Collector GPRS interface.6 - Wait until the COMM green light and GPRS green light blink once, be-fore downloading another device on Collector GPRS, repeating the cycle above, if needed.
To download data from Guardus™ G7 to Collector GPRS, follow these steps:
1 - Press the red button, on the side of Collector GPRS, to enable the IrDA interface.2 - Wait for the COMM red light to turn on. 3 - Put Guardus™ G7 close to the Collector GPRS, aligning the IrDA interface with the light on the reader interface of the wand, to download stored data.4 - Wait for the sound signal ‘Success’ (PLIM), informing the communication beginning.5 - Keep Guardus™ in this position, aligned with the Collector GPRS IrDA inter-face, while the COMM red light blinks. It means the data is being transferred to Collector GPRS. 6 - Wait for the sound ‘Restart’ (three BIPS), signalizing the download has finished.
Attention: Be sure you hear three BIPs from Guardus™ at the end of the communication. If you hear only one BIP, repeat the operation. If the maximum download store capacity has been reached, the IrDA and contact interfaces won´t be enabled until you transmit at least one of these downloads stored on Collector GPRS memory.
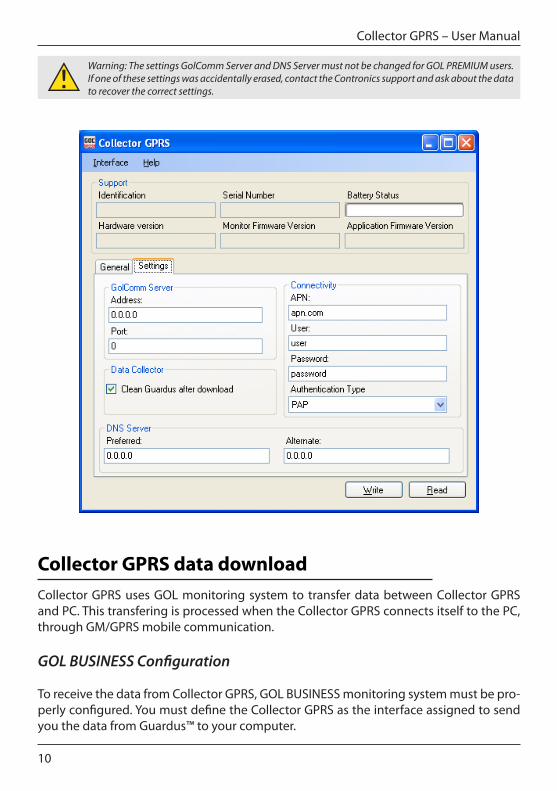
In order to receive the download stored on Collector GPRS it is necessary to set it up through the Contronics Collector GPRS Tool, assigning the GSM operator data and the address of the server in charge of receiving the downloads. Before using Contronics Col-lector GPRS Tool you need to install it on your PC. The installation process is simple and quick, easily guided through an installation wizard.
NOTE: Communication between PC and Collector GPRS is made by using USB Communication Cable with IrDA inter-face communication. This cable must be properly installed before using it, according to its user guide.
Collector GPRS Settings
9
Collector GPRS – User Manual
Contronics Collector GPRS Tool installing
To install Contronics Collector GPRS Tool, execute the following steps:
1 - Open Contronics CD-ROM and access the folder \applications.2 - Run file eng_collector_gprs_tool_10.exe.3 - When a welcome screen shows up, click on ‘Next’.4 - Check and confirm the user information, and click on ‘Next’.5 - You will be required to choose a folder to install the application. We suggest the path ‘C:\Program Files\Contron-ics\Common Files\Collector GPRS\’, already written on the destination folder field. Click on ‘Next’.6 - You will be asked to start. If everything is ok, click on ‘Next’. Contronics Collector GPRS Tool install will begin.7 - Wait for the install process to finish, and click on ‘Finish’.8 - A Contronics Collector GPRS Tool icon will be created on your desktop.9 - Contronics Collector GPRS Tool is ready for use.
Run the Contronics Collector GPRS Tool through its icon, created on your desktop (or select it and press ENTER). You can also find this application on the ´Start´ menu. The ap-plication will be placed in folder ´Contronics´. To set up the Collector GPRS, choose the right option for you (GOL Business or GOL Pre-mium) and execute the following steps, acording to your subscription:
GOL Business Settings1 - Run Contronics Collector GPRS Tool.2 - On the pull-down menu, click on the button ‘Interfaces’ and select the communication port on which your inter-face is installed. 3 - On the tab ‘Settings’, go to the left-sided table, insert the address and the port where your GOL BUSINESS server is installed and configured to receive the transmissions from Collector GPRS.4 - Right below, on ‘Data Collector’, you will find the option ‘Clean Guardus after download’. Check it if you want to clean up the downloaded data from Guardus™ to Collector GPRS. 5 - Still on tab ‘Settings’, on the right-sided table, insert connectivity information about your GSM operator (APN, User, Password and Authentication Type).6 - At bottom side, on ‘DNS Server’, fill the fields ‘Preferred’ and/or ‘Alternate’, if you need to use a specific DNS server.7 - Click on button ‘Write’ to send the configurations to Collector GPRS.
GOL Premium Settings
Contact Contronics Technical Support and ask about the configuration settings (address and port) for the GolComm server.
1 - Run Contronics Collector GPRS Tool.2 - On the pull-down menu, click on the button ‘Interfaces’ and select the communication port on which your inter-face is installed. 3 - Still on tab ‘Settings’, on the right-sided table, insert conectivity information about your GSM operator (APN, user, password and way of authentication).4 - On ‘Data Collector’, you will find the option ‘Clean Guardus after download’. Check it if you want to clean up the downloaded data from Guardus™ to Collector GPRS. 5 - Click on button ‘Write’ to send the configurations to Collector GPRS.
10
Collector GPRS – User Manual
Collector GPRS uses GOL monitoring system to transfer data between Collector GPRS and PC. This transfering is processed when the Collector GPRS connects itself to the PC, through GM/GPRS mobile communication.
GOL BUSINESS Configuration
To receive the data from Collector GPRS, GOL BUSINESS monitoring system must be pro-perly configured. You must define the Collector GPRS as the interface assigned to send you the data from Guardus™ to your computer.
Warning: The settings GolComm Server and DNS Server must not be changed for GOL PREMIUM users. If one of these settings was accidentally erased, contact the Contronics support and ask about the data to recover the correct settings.
Collector GPRS data download
11
Collector GPRS – User Manual
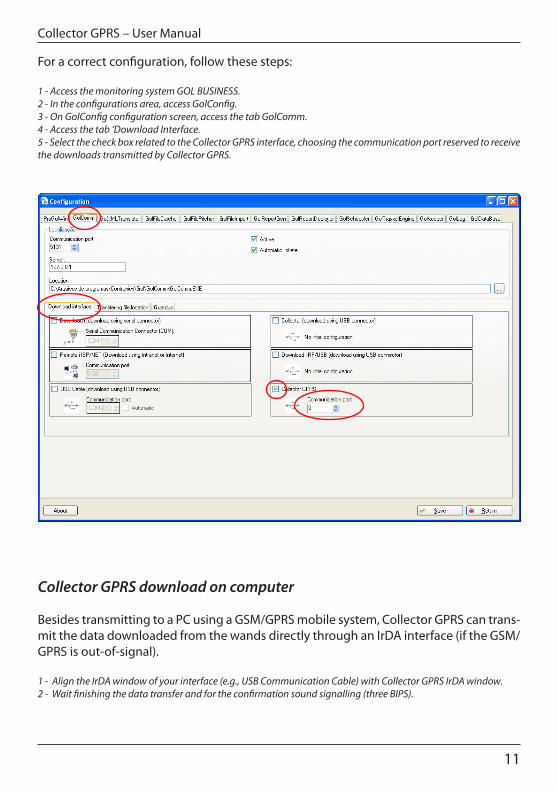
For a correct configuration, follow these steps:
1 - Access the monitoring system GOL BUSINESS.2 - In the configurations area, access GolConfig.3 - On GolConfig configuration screen, access the tab GolComm. 4 - Access the tab ‘Download Interface.5 - Select the check box related to the Collector GPRS interface, choosing the communication port reserved to receive the downloads transmitted by Collector GPRS.
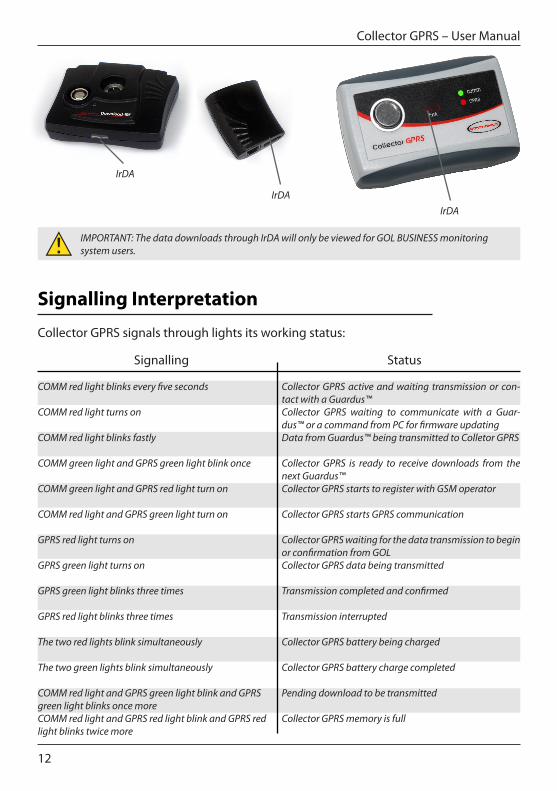
Collector GPRS download on computer
Besides transmitting to a PC using a GSM/GPRS mobile system, Collector GPRS can trans-mit the data downloaded from the wands directly through an IrDA interface (if the GSM/GPRS is out-of-signal).
1 - Align the IrDA window of your interface (e.g., USB Communication Cable) with Collector GPRS IrDA window. 2 - Wait finishing the data transfer and for the confirmation sound signalling (three BIPS).
12
Collector GPRS – User Manual
Collector GPRS signals through lights its working status:
COMM red light blinks every five seconds
COMM red light turns on
COMM red light blinks fastly
COMM green light and GPRS green light blink once
COMM green light and GPRS red light turn on
COMM red light and GPRS green light turn on
GPRS red light turns on
GPRS green light turns on
GPRS green light blinks three times
GPRS red light blinks three times
The two red lights blink simultaneously
The two green lights blink simultaneously
COMM red light and GPRS green light blink and GPRS green light blinks once moreCOMM red light and GPRS red light blink and GPRS red light blinks twice more
Collector GPRS active and waiting transmission or con-tact with a Guardus™Collector GPRS waiting to communicate with a Guar-dus™ or a command from PC for firmware updatingData from Guardus™ being transmitted to Colletor GPRS
Collector GPRS is ready to receive downloads from the next Guardus™Collector GPRS starts to register with GSM operator
Collector GPRS starts GPRS communication
Collector GPRS waiting for the data transmission to begin or confirmation from GOL Collector GPRS data being transmitted
Transmission completed and confirmed
Transmission interrupted
Collector GPRS battery being charged
Collector GPRS battery charge completed
Pending download to be transmitted
Collector GPRS memory is full
Signalling Status
IMPORTANT: The data downloads through IrDA will only be viewed for GOL BUSINESS monitoring system users.
IrDAIrDA
IrDA
Signalling Interpretation
13
Collector GPRS – User Manual
Power source
Capacity
Physical Characteristics
Signalling
Operating Temperature
Humidity Limit
Size
Weight
Li-Polymer 1800 mAh battery.
50 Guardus™ downloads.
High-resistance plastic box with 2 signalling leds, reading interface and IrDA ac-tivation key. GSM/GPRS Quadriband 850, 900, 1800, 1900 MHz.Hearable for start and end of downloads (emitted by Guardus™), and for data transmitting confirmation or interruption (emitted by Collector GPRS). Visual through LEDs, powered-up (COMM), transferring data (COMM and GPRS) and low battery (COMM+GPRS).-20ºC to 50ºC (-4ºF to 122ºF)
95% without condensation.
Width 64 mm x Depth 95 mm x Height 25 mm. (2.51” x 3.74” x 0.98”)
85 g (3 oz or 0.187 lbs)
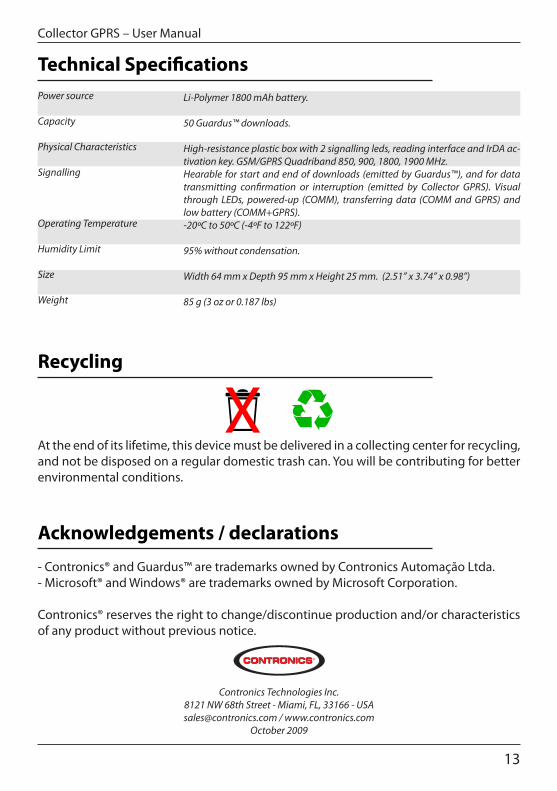
At the end of its lifetime, this device must be delivered in a collecting center for recycling, and not be disposed on a regular domestic trash can. You will be contributing for better environmental conditions.
- Contronics® and Guardus™ are trademarks owned by Contronics Automação Ltda.- Microsoft® and Windows® are trademarks owned by Microsoft Corporation.
Contronics® reserves the right to change/discontinue production and/or characteristics of any product without previous notice.
Contronics Technologies Inc.8121 NW 68th Street - Miami, FL, 33166 - [email protected] / www.contronics.com
October 2009
Technical Specifications
Recycling
Acknowledgements / declarations