
Citizen Access USER GUIDE - Fremont
28
CITY OF FREMONT Community Development Department Citizen Access USER GUIDE Direct link to the Citizen Access Portal: www.Fremont.gov/CitizenAccess Updated 7/19/2021
Transcript of Citizen Access USER GUIDE - Fremont

CITY OF FREMONT
Community Development Department
Citizen Access
USER GUIDE
Direct link to the Citizen Access Portal: www.Fremont.gov/CitizenAccess
Updated 7/19/2021

TABLE OF CONTENTS
INTRODUCTION .............................................................................................................. 3
SETUP AND COMPATIBILITY ......................................................................................... 5
REGISTER FOR AN ACCOUNT......................................................................................... 6
LOGIN ............................................................................................................................... 9
PROBLEMS LOGGING IN ................................................................................................. 9
RESETTING YOUR PASSWORD ................................................................................... 10
SEARCH FUNCTIONALITY ........................................................................................... 11
ADDING A CONTACT TO YOUR ACCOUNT ................................................................. 14
LINKING YOUR PERMIT RECORDS TO YOUR CITIZEN ACCESS ACCOUNT ............ 15
MY RECORDS AND MY COLLECTIONS ....................................................................... 15
RESUBMITTING PLANS REQUIRING CORRECTIONS ................................................ 20
SCHEDULING INSPECTIONS ....................................................................................... 21
NOTICES ON RECORDS ................................................................................................ 26

Citizen Access User Guide Updated 7/19/21
3
INTRODUCTION Citizen Access (www.Fremont.gov/CitizenAccess) is the City of Fremont’s online permitting
portal. Citizen Access allows residents, businesses, and visitors to submit permit
requests for Planning, Building, and Engineering permits, access permit records,
pay permit fees, check on the status of in-progress records, schedule building
inspections, and report a code enforcement violation online.
Any person who submits a permit request must have a Citizen Access account and an email
address. All communication with the applicant is done via email. At various stages in the
permitting process, the applicant is directed via email to log in to their Citizen Access
account to do various things (e.g., retrieve plan review comments, make a payment, access
issued/approved documents). You must register for an account and be a contact on the
record to schedule Building inspections in Citizen Access. To add persons to a record
after the permit has been issued/approved so they can schedule an inspection in Citizen
Access, the Inspection Scheduling Authorization Form needs to be completed by the
applicant of the permit. Any person listed on this form must also have a Citizen Access
account with the City of Fremont to schedule inspections in Citizen Access.
Important note: Commercial fire inspections (fire sprinkler, fire alarm, and fire code) must
be scheduled by sending a request to [email protected]. Information about fire
inspections is available at www.Fremont.gov/FirePermits. When requesting a commercial
fire inspection, provide the fire permit number (starting with FAP, FCP, or FSP), site
address, type of inspection, and your preferred inspection date and time. A fire inspector
will follow up to confirm the date and time of the inspection.

Citizen Access User Guide Updated 7/19/21
4
This user guide provides details on:
• Setup and Compatibility
• Registering for an Account
• Login
• Problems Logging in to Your Citizen Access Account
• Resetting Your Password
• Search Functionality
• How to Search Records
• Adding a Contact to Your Account and Permit Record
• Linking Your Permit Records to Your Citizen Access Account
• Using Your Dashboard and Accessing Your Records
• Setting Up Collections of Your Records
• Scheduling an Inspection
• Understanding Notices on Records and How to Resolve Them

Citizen Access User Guide Updated 7/19/21
5
SETUP AND COMPATIBILITY
Citizen Access Browser Requirements:
• Internet Explorer (IE) 9 & 10 • Firefox 23
• Google Chrome 31
• Safari 6
Note about Internet Explorer: If you use Internet Explorer and are having trouble viewing the Citizen Access webpage, please check your compatibility view settings. In Internet Explorer, click on “Tools” and select “Compatibility View Settings.” Add Fremont.gov under “Add this Website.”

Citizen Access User Guide Updated 7/19/21
6
REGISTER FOR AN ACCOUNT
1) Open your internet browser. Go to the link for the Fremont Citizen Access site at:
www.Fremont.gov/CitizenAccess.
2) Click on “Register” at the top of the page.
3) Review the General Disclaimer. Check the checkbox “I have read and accepted the above terms” and click the “Continue Registration” button to continue the registration process.
4) Input your account information. Fields marked with a red asterisk * are required and
must be entered to continue. Password must be 8-21 characters in length.

Citizen Access User Guide Updated 7/19/21
7
5) Click “Add New” to add your contact information. Click “Continue Registration.”
6) Complete the “Contact Information.” Fields marked with a red asterisk * are required and must be entered to continue. Click on “Continue” to continue with the registration. If you are setting up an account for your business, be sure to complete the “Organization Name” field and use an email address that any employee you add as a contact on your account will know.
Citizen Access User Guide Updated 7/19/21
8
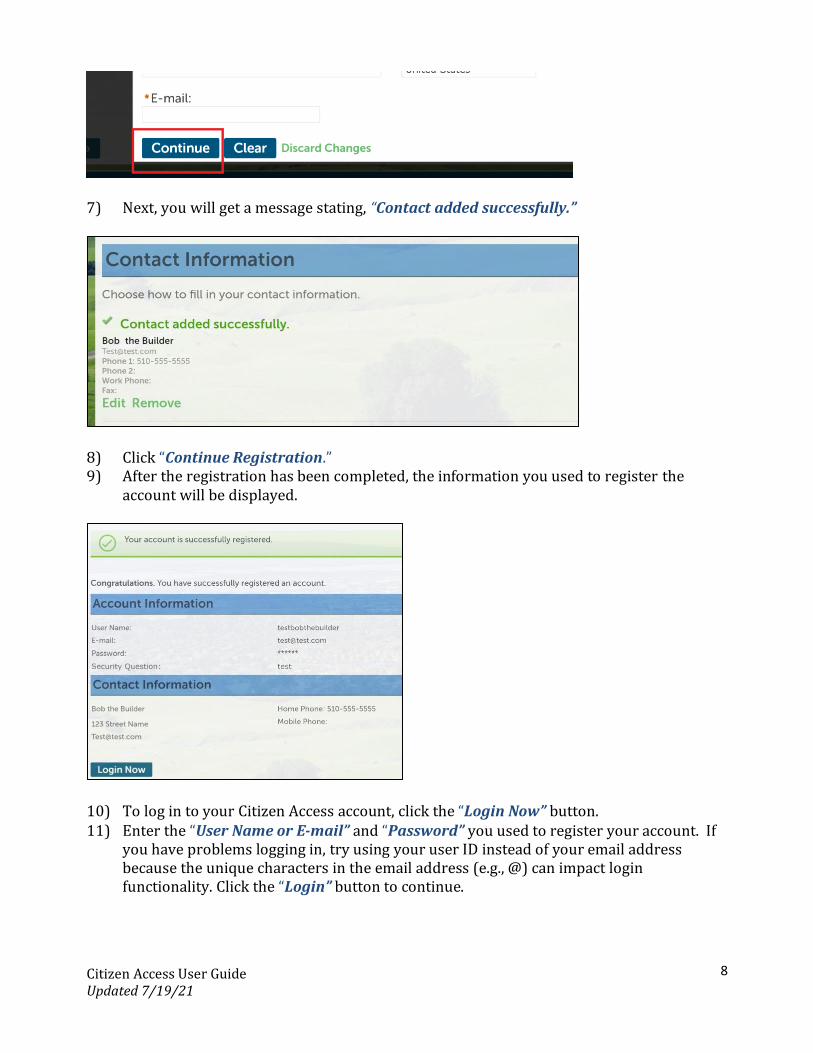
7) Next, you will get a message stating, “Contact added successfully.”
8) Click “Continue Registration.” 9) After the registration has been completed, the information you used to register the
account will be displayed.
10) To log in to your Citizen Access account, click the “Login Now” button. 11) Enter the “User Name or E-mail” and “Password” you used to register your account. If
you have problems logging in, try using your user ID instead of your email address because the unique characters in the email address (e.g., @) can impact login functionality. Click the “Login” button to continue.

Citizen Access User Guide Updated 7/19/21
9
LOGIN After you have set up your Citizen Access account, log in to access your records. 1) Open your internet browser and navigate to: www.Fremont.gov/CitizenAccess. 2) Enter the “User Name or E-mail” and “Password” you used to register your account.
Click the “Login” button to continue. To avoid login issues, always clear your browsing history/cache and reboot your device/computer.
PROBLEMS LOGGING IN If you have problems logging in to your Citizen Access account, send an email to [email protected]. City staff will follow up to assist you with your login problem. Most login issues can be resolved by clearing your browsing history and cache and rebooting your device/computer.

Citizen Access User Guide Updated 7/19/21
10
RESETTING YOUR PASSWORD 1) If you forget your password, click on “I’ve forgotten my password.”
2) Input the “E-mail Address” on your account (used to log in).
3) After your email address is entered, your security question will pop up. Provide your
“Security Answer.”
4) An email will be sent to the address you provided with the username on your account and a temporary password. The temporary password is only valid for 24-hours. If you do not see the email, please check your email “junk” box. Log in to Citizen Access with your temporary password. You will be prompted to select a new password. Passwords are case sensitive.

Citizen Access User Guide Updated 7/19/21
11
SEARCH FUNCTIONALITY
1) Searching Records: Searching can be done without logging into a Citizen Access account. Searches can be completed by record number, address, parcel number, or date range. To search without logging into a Citizen Access account, open your internet browser and navigate to: www.Fremont.gov/CitizenAccess. Once on the Fremont Citizen Access site, you can search for permit activity by record number, address, and date range. Note that the default date range for searching is five years. If your search does not yield the search results you were expecting, be sure to adjust the search range to capture a larger date range.
2) Click on “Search Records” at the top of the page and select your discipline from the drop-
down list.
Or click on the “Search Records” icon.
3) Select the type of permit (e.g., technical discipline) you need (Building, Planning, or Engineering). After selecting a technical discipline, you will be prompted to complete the online form.

Citizen Access User Guide Updated 7/19/21
12
4) General Search: If you’d like to do a general search, do so in the “General Search” section. In the “General Search” section, complete the search fields. Your search results will be best when the least amount of information is entered (e.g., partial street name). If you are looking for a specific record number or parcel number, enter it and the system will return a valid result. If you don’t see the result you expected, simplify the search information by abbreviating the search information (e.g., instead of BLD2018-00001, try BLD2018 or BLD2018-001).
Note about search dates: The search dates default back five years from the day the search is queried. Adjust the search dates for a smaller or larger search date range if you do not find the results you expected. Note about parcel numbers: Parcel numbers should be formatted as “### #########” (e.g., 525 164701301; there should be a space after the first three digits in the parcel number). The parcel number search will work with a partial number (e.g., 525 or 525 1647).
SEARCH TIP: Input a partial street name (e.g., Fremont should be searched as Fre or Fr). 5) Click the “Search” button when you have entered your search criteria.

Citizen Access User Guide Updated 7/19/21
13
6) View the permit record information by clicking on the permit number from the results list.
7) Specific permit record information will be displayed, including record number, type of record, record status , work location, and record details (e.g., applicant, project description, owner).

Citizen Access User Guide Updated 7/19/21
14
8) To view “More Details,” click on the next to each field to see details pertaining to
that specific field.
ADDING A CONTACT TO YOUR ACCOUNT
If you set up your Citizen Access account with the intent of having more than one person accessing it, including scheduling inspections on your various permit records, you will need to add these additional people as a “Contact” on your account. To add a contact, do the following: 1) Open your internet browser and navigate to: www.Fremont.gov/CitizenAccess. 2) Log in to your Citizen Access account. 3) Select “My Account.”

Citizen Access User Guide Updated 7/19/21
15
4) Select “Contact Information,” then “Add a Contact.”
5) Select a contact “Type” from the drop-down box and then “Continue.” All contacts with the type “Applicant” will receive the automatic email communication sent to the applicant at various points in the permit process.
6) Select “Continue” to complete the information for the new contact on your account. 7) The new contact will now have access to schedule inspections on your permit records by
logging in to your Citizen Access account with the username or email address and password you used to set up your account.
LINKING YOUR PERMIT RECORDS TO YOUR CITIZEN ACCESS
ACCOUNT In order to have access to specific records, an individual’s Citizen Access account must be linked to it. If you submitted the permit request in Citizen Access, the record is automatically linked to your Citizen Access account. If you submitted your permit request prior to July 2021, it’s possible the record is not yet linked. For these unlinked records, forward the record number and the email address on your Citizen Access account to [email protected]. City staff will contact you after reviewing your request to let you know the record has been linked or if additional information is needed to complete the request.
MY RECORDS AND MY COLLECTIONS
After logging in to your account, you’ll have the options shown above. To get to all of your records and transactions, select either: “My Records,” “My Collections,” “My Cart,” or “My

Citizen Access User Guide Updated 7/19/21
16
Account.” Each of these are specific to the account holders’ records with the City of Fremont. A summary of these functions is as follows: • “My Records:” A compilation of all records across all modules (Planning, Building, or
Engineering) that your Citizen Access account is linked to. • “My Collections:” A functionality that allows you to consolidate related records into
groups for easier tracking of all the records required to complete a project. • “My Cart”: Will include items when fees are due on one or more records. To pay fees,
select the “My Cart” icon. • “My Account”: Provides access to all of your account information. In “My Account,” you
can change your contact information and add people to your account. My Records: To access “My Records,” do the following: 1) Open your internet browser and navigate to: www.Fremont.gov/CitizenAccess. 2) Log in to your account. Your login will default to the Dashboard homepage. To see all of
your linked permit records without creating a collection, click on “My Records.”
3) Under the “Record #” column, click on the permit record (blue text) number you want to review. Your permit records will be separated by discipline (Building, Planning, or Engineering; below only Building records are shown).

Citizen Access User Guide Updated 7/19/21
17
4) Once in the permit record, it looks very similar to records when you are not logged in to your account. To see specific permit record information, click on “Record Info.” To schedule inspections, see the next section (“Scheduling Inspections”). To set up a collection, see below.
5) To navigate back to your account, click “My Records.”
6) Creating a New Collection: To assemble related permit records into a “Collection,” select
the records by clicking within the dialogue box for each record you want in your collection. Then click “Add to Collection” to create the collection.
Citizen Access User Guide Updated 7/19/21
18
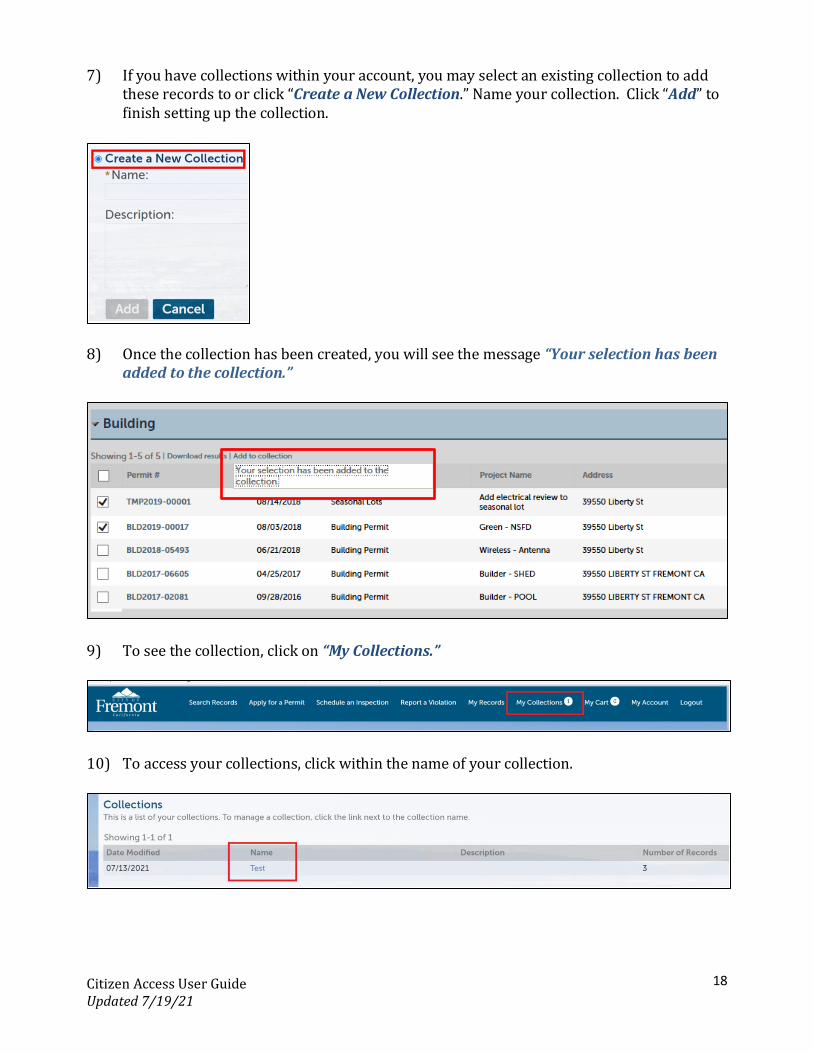
7) If you have collections within your account, you may select an existing collection to add these records to or click “Create a New Collection.” Name your collection. Click “Add” to finish setting up the collection.
8) Once the collection has been created, you will see the message “Your selection has been added to the collection.”
9) To see the collection, click on “My Collections.”
10) To access your collections, click within the name of your collection.

Citizen Access User Guide Updated 7/19/21
19
11) Each collection provides a summary of the combined records in it. You can rename and delete a collection, and move, copy, or remove records from the collection.
12) Adding a Record to an Existing Collection: If you want to add a record to an existing
collection, repeat Step 6 (Click on “My Records”). 13) Select the record you want to add to an existing collection. Click on “Add to Collection.” 14) Click on “Add to Existing Collection.” Use the pull down to find the desired collection.
Select the Collection you want to add the record to.

Citizen Access User Guide Updated 7/19/21
20
15) Click “Add” to add the record to the collection.
16) Once your record has been added to the collection, you will see the message “Your
selection has been added to the collection.”
RESUBMITTING PLANS REQUIRING CORRECTIONS If an applicant already has a project in process and needs to resubmit plans/documents, the
resubmittal will need to be made via Citizen Access. Existing records created at the
Development Services Center will need to be linked to an applicant’s Citizen Access account.
Once the record is linked to the Citizen Access account, the applicant will be able to resubmit
electronically.
To get an existing record linked to a Citizen Access account, an applicant should email their
Team Lead to make this request, providing the email address on the account to be linked and
the record number(s) to be linked to it. An applicant can also email this request to
[email protected]. Once the record(s) is linked with the Citizen Access
account, they will be found in the account under “My Records.”

Citizen Access User Guide Updated 7/19/21
21
Once the record is linked with a Citizen Access account, the resubmittal process is as follows:
1) Go to www.Fremont.gov/CitizenAccess. 2) Log in to your Citizen Access account. 3) Select “Home.” 4) Select “My Records.” 5) Select the record that needs to be resubmitted. 6) Select “Record Info.” 7) Select “Documents.”
8) Select “Resubmit” under Actions.
9) Upload the resubmittal document. 10) If it is a new document that has not been reviewed, select “New.” 11) Upload the new documents. 12) Select “Save.”
SCHEDULING INSPECTIONS Note about scheduling inspections: In order to schedule an inspection for a Building Permit in Citizen Access, your Citizen Access account must be linked to the permit record. Only City staff can link the account and record. Email City staff at [email protected] if you do not see your permit records under “My Records” in your Citizen Access account. See “Adding a Contact to Your Account and Permit Records” for more directions on how to complete these actions. 1) To schedule an inspection, open your internet browser and navigate to:
www.Fremont.gov/CitizenAccess. 2) Log in to your account.

Citizen Access User Guide Updated 7/19/21
22
3) Click on “Schedule an Inspection” either in the heading or in the middle of the page. If you have set up a Collection, open it to navigate to the permit you want to schedule an inspection for.
4) Select your record by clicking on the “Record #” (blue text). In order to schedule an
inspection, the permit must be in an “Issued” or “Issued – Revisions Pending” status. If the status of your permit is not “Issued” or “Issued – Revisions Pending” and it was your understanding that it should be, contact the City for assistance at [email protected].
5) Click on “Schedule or Request an Inspection” (green text).

Citizen Access User Guide Updated 7/19/21
23
6) Only inspections applicable to your particular permit will be available for selection. If there is a drop-down list, use it to find your required inspection.
7) If only a few inspections are available, you will not have a drop-down list. Select your inspection by clicking within the radio button. Click “Continue.”

Citizen Access User Guide Updated 7/19/21
24
8) Select one of the available inspection dates (shown in blue text).
9) Select “All Day” and then click “Continue.”
Note about your preferred inspection time: Inspections are generally scheduled from 7:00 a.m. – 4:00 p.m. Your assigned inspector will leave a recording on their voicemail the night before your scheduled inspection of their “route” for the next day. They will leave an estimated time slot of when your inspection is scheduled for.

Citizen Access User Guide Updated 7/19/21
25
10) Verify if the location and the contact are correct. If incorrect, select “Change Contact.”
11) Use the drop-down to select a contact on the record or enter a specific person (for inspection purposes only). Click “Submit.”
12) Verify that the inspection request information is now correct. If so, click “Continue.” If
not, click “Back” to correct the inaccurate information.
13) Click “Finish” to complete scheduling the inspection.

Citizen Access User Guide Updated 7/19/21
26
14) You will be redirected to “Inspections” in the permit record that the inspection was scheduled where you will see the scheduled inspection. If you need to modify this inspection (i.e., reschedule, cancel), you can do so by selecting “Actions” (green text) to the right of the inspection information.
Note about your assigned inspector: The assigned inspector may change depending on staffing availability and the number of inspections requested. By 7:30 a.m. on the day of your inspection, the assigned inspector will be finalized and shown on the above summary screen. 15) If you receive an error, please contact the City by email at
[email protected]. Please take a screenshot or picture to capture what the error is (that is, exactly what the error states), so staff can know how to best resolve the issue for you.
NOTICES ON RECORDS City staff may have placed a reminder on your permit record(s) to ensure permit conditions of approval are complied with. There are three types of conditions, being Notice, Lock, or Hold. Most conditions added to records are Notices. If there is a condition on your permit, you will see it as a green banner near the top of the screen. Click “View Condition” for further information about the notice and how to resolve it.

Citizen Access User Guide Updated 7/19/21
27
Below are a few examples of common conditions added to permit records. Example 1—Deferred Impact Fees Due What Condition Looks Like:
Remedy to Remove the Condition: Prior to scheduling a final inspection, the applicant needs to contact Maria Salinas at 510-494-4448 to schedule a time to visit the Development Services Center to pay the Deferred Impact Fee(s) that is due. Staff will need to invoice the impact fees due and provide an invoice so the Cashier can process the payment. Once paid, staff will remove the Deferred Impact Fee condition. Once removed, you can schedule the final inspection. Example 2—ENV – C&D Recycling Required What Condition Looks Like:
Remedy to Remove the Condition: Provide construction and debris waste handling receipts (recycle receipts) for approval to the City’s Environmental Services Division before scheduling a final inspection. Environmental Services staff will remove the condition once it is statisfied, which will enable you to schedule the final inspection. Example 3—Need Sub List What Condition Looks Like:

Citizen Access User Guide Updated 7/19/21
28
Remedy to Remove the Condition: Property owner and/or contractor needs to submit the sub-contractor list for their project to the Revenue Division at the Cashier counter at the Development Services Center before a final inspection can be scheduled. Revenue staff will remove the condition from the permit record once the sub-contractor list has been provided. Example 4 – Update Property Owner What Condition Looks like:
Remedy to Remove the Condition: Contact the Development Services Center by email at [email protected]. Include your permit number and the property owner’s information, along with proof of ownership. Staff will update the record and will remove the condition.