Cisco DNA Center Integration with ServiceNow...Beforeyoubegin...
16
Cisco DNA Center Integration with ServiceNow • About Cisco DNA Center Integration Use Cases, on page 1 • About Cisco DNA Center ITSM Support, on page 2 • Configuring Cisco DNA Center for ServiceNow Integration, on page 2 • Configure Bundles: Basic ITSM (ServiceNow) CMDB Synchronization, on page 3 • Configure Bundles: Network Issue Monitor and Enrichment for ITSM (ServiceNow), on page 7 • Configure Event Settings, on page 10 • Configure Bundles: Network Events for REST API Endpoint, on page 11 • Configure Bundles: SWIM Events for REST API Endpoint, on page 13 About Cisco DNA Center Integration Use Cases Cisco DNA Center supports the following types of integration use cases with other third-party applications: • Network management integrations: • IP Pool usage and allocation metrics • Bidirectional IP grid synchronization • Operation integrations: • ITSM event, problem, and incident management For this release, only ServiceNow ® operational integration is supported. Note • Approvals and schedule window information • Assistance in issue triage and association • Build your own dashboards and reports via select data sets Cisco DNA Center Integration with ServiceNow 1
Transcript of Cisco DNA Center Integration with ServiceNow...Beforeyoubegin...
Cisco DNA Center Integration with ServiceNow
• About Cisco DNA Center Integration Use Cases, on page 1• About Cisco DNA Center ITSM Support, on page 2• Configuring Cisco DNA Center for ServiceNow Integration, on page 2• Configure Bundles: Basic ITSM (ServiceNow) CMDB Synchronization, on page 3• Configure Bundles: Network Issue Monitor and Enrichment for ITSM (ServiceNow), on page 7• Configure Event Settings, on page 10• Configure Bundles: Network Events for REST API Endpoint, on page 11• Configure Bundles: SWIM Events for REST API Endpoint, on page 13
About Cisco DNA Center Integration Use CasesCisco DNA Center supports the following types of integration use cases with other third-party applications:
• Network management integrations:
• IP Pool usage and allocation metrics
• Bidirectional IP grid synchronization
• Operation integrations:
• ITSM event, problem, and incident management
For this release, only ServiceNow® operational integration is supported.Note
• Approvals and schedule window information
• Assistance in issue triage and association
• Build your own dashboards and reports via select data sets
Cisco DNA Center Integration with ServiceNow1
About Cisco DNA Center ITSM SupportCisco DNA Center supports the following capabilities:
• Integrating of Cisco DNA Center into ITSM processes of incident, event, and problem management.
• Integrating of Cisco DNA Center into ITSM approval and preapproval chains.
• Integrating of Cisco DNA Center with formal change and maintenance window schedules.
Cisco DNACenter bundles are prebuilt solutions that enable integration between DNA capabilities and specificIT domains. For the ServiceNow ITSM integration, the following bundles can be configured and used:
• Basic ITSM (ServiceNow) CMDB Synchronization
• Network Issue Monitor and Enrichment for ITSM (ServiceNow)
• Network Events for REST API Endpoint
• SWIM Events for REST API Endpoint
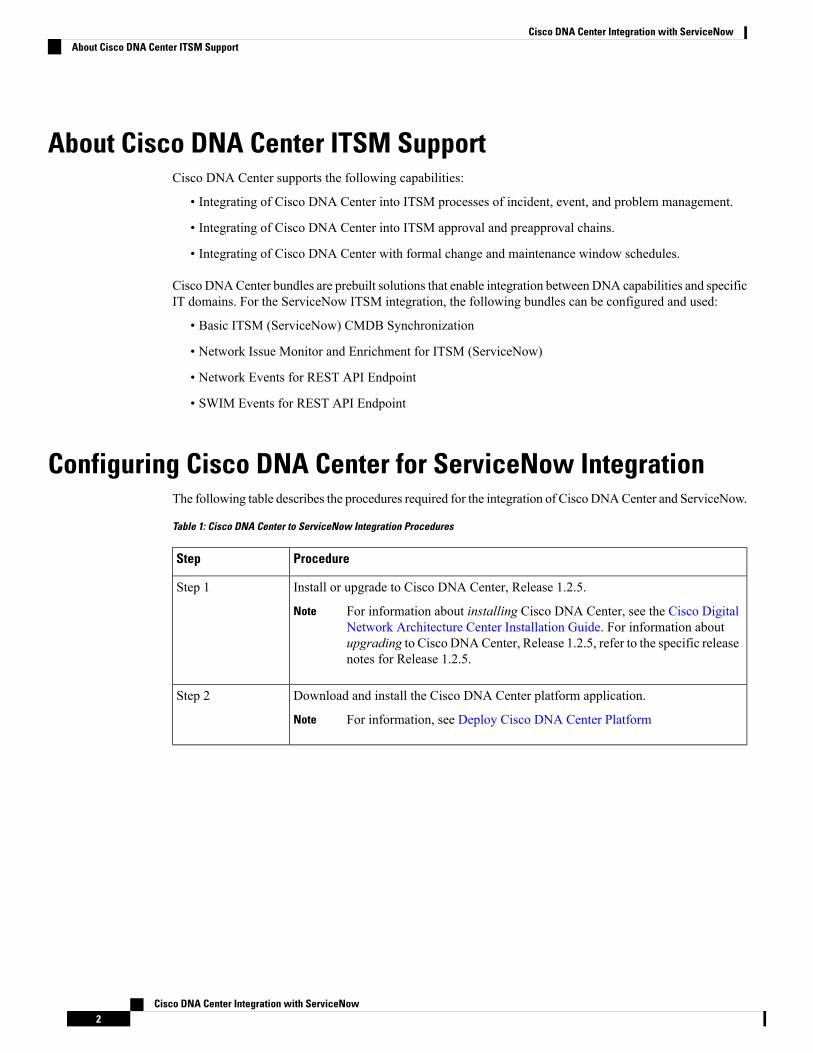
Configuring Cisco DNA Center for ServiceNow IntegrationThe following table describes the procedures required for the integration of Cisco DNACenter and ServiceNow.
Table 1: Cisco DNA Center to ServiceNow Integration Procedures
ProcedureStep
Install or upgrade to Cisco DNA Center, Release 1.2.5.
For information about installing Cisco DNA Center, see the Cisco DigitalNetwork Architecture Center Installation Guide. For information aboutupgrading to Cisco DNACenter, Release 1.2.5, refer to the specific releasenotes for Release 1.2.5.
Note
Step 1
Download and install the Cisco DNA Center platform application.
For information, see Deploy Cisco DNA Center PlatformNote
Step 2
Cisco DNA Center Integration with ServiceNow2
Cisco DNA Center Integration with ServiceNowAbout Cisco DNA Center ITSM Support
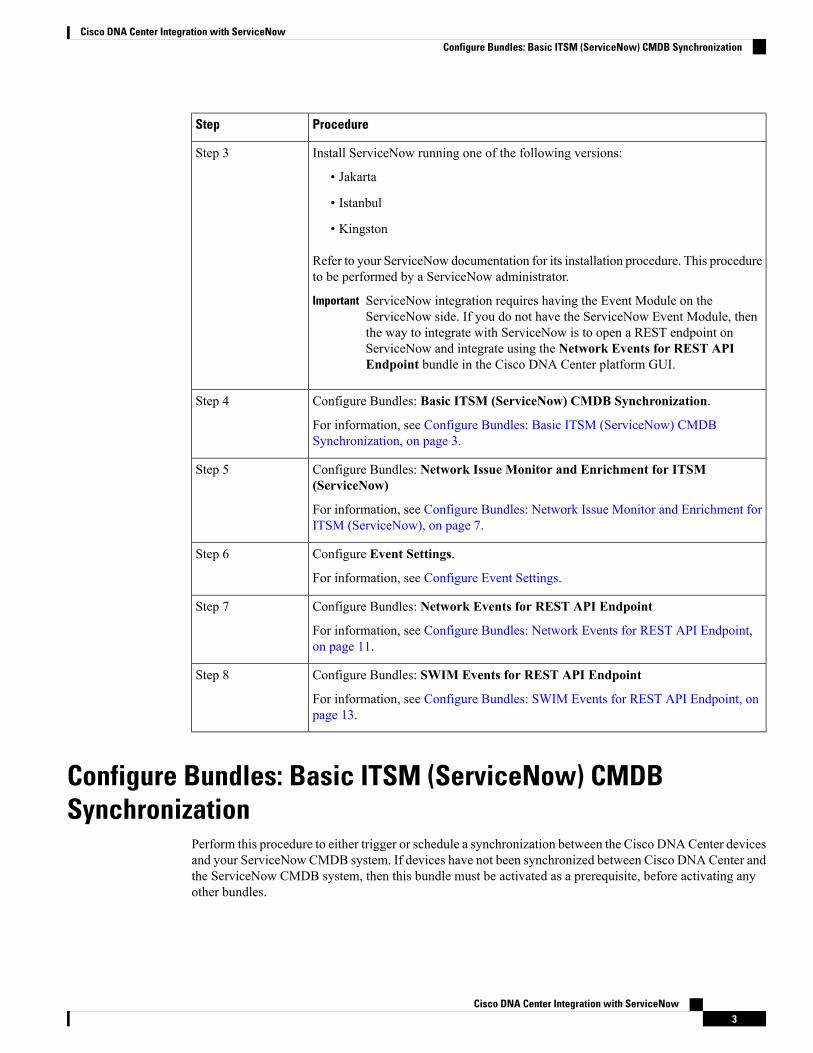
ProcedureStep
Install ServiceNow running one of the following versions:
• Jakarta
• Istanbul
• Kingston
Refer to your ServiceNow documentation for its installation procedure. This procedureto be performed by a ServiceNow administrator.
ServiceNow integration requires having the Event Module on theServiceNow side. If you do not have the ServiceNow Event Module, thenthe way to integrate with ServiceNow is to open a REST endpoint onServiceNow and integrate using the Network Events for REST APIEndpoint bundle in the Cisco DNA Center platform GUI.
Important
Step 3
Configure Bundles: Basic ITSM (ServiceNow) CMDB Synchronization.
For information, see Configure Bundles: Basic ITSM (ServiceNow) CMDBSynchronization, on page 3.
Step 4
Configure Bundles: Network Issue Monitor and Enrichment for ITSM(ServiceNow)
For information, see Configure Bundles: Network Issue Monitor and Enrichment forITSM (ServiceNow), on page 7.
Step 5
Configure Event Settings.
For information, see Configure Event Settings.
Step 6
Configure Bundles: Network Events for REST API Endpoint
For information, see Configure Bundles: Network Events for REST API Endpoint,on page 11.
Step 7
Configure Bundles: SWIM Events for REST API Endpoint
For information, see Configure Bundles: SWIM Events for REST API Endpoint, onpage 13.
Step 8
Configure Bundles: Basic ITSM (ServiceNow) CMDBSynchronization
Perform this procedure to either trigger or schedule a synchronization between the Cisco DNACenter devicesand your ServiceNow CMDB system. If devices have not been synchronized between Cisco DNA Center andthe ServiceNow CMDB system, then this bundle must be activated as a prerequisite, before activating anyother bundles.
Cisco DNA Center Integration with ServiceNow3
Cisco DNA Center Integration with ServiceNowConfigure Bundles: Basic ITSM (ServiceNow) CMDB Synchronization
Before you begin
• Ensure that you have installed or upgraded to Cisco DNACenter Release GA 1.2.5, and have downloadedand installed the Cisco DNA Center platform application. To review the status of the Cisco DNA Centerplatform application in the GUI, click the gear icon ( ) and choose System Settings > Software Updates> Installed Apps. For information about managing applications, see the Cisco Digital NetworkArchitecture Center Administrator Guide.
• Ensure that you have ServiceNow running on a system that you will integrate with Cisco DNA Centerplatform.
• Run a successful Discovery job in Cisco DNA Center. You can check whether a Discovery job issuccessful inDevice Inventory. From theHome page, clickProvision >Device Inventory > Inventoryto view the results.
Step 1 From the Cisco DNA Center home page, click Platform >Manage > Bundles.Step 2 Review the displayed bundles and their current status.
You can adjust the bundles that are displayed in the GUI by clicking the Filter icon and using the filter, or by enteringa keyword in the Find field.
Step 3 Click on the Basic ITSM (ServiceNow) CMDB synchronization bundle link or icon (colored square with initial) foradditional information about the bundle.
Additional information provided may include the following:
• General information—Vendor, version, platform, tags displayed under the square icon.
Tags indicate what the Cisco DNA Center component is used for or affected by the bundle.Note
• Information—Tab that displays general information (purpose of bundle and how bundle works in the network),sample schemas, configuration notes, and other data about the bundle.
• Contents—Tab that accesses the integration flows and APIs that make up the bundle.
• Release Notes—Tab that displays latest release information about the bundle, including its version.
Step 4 Review the bundle data in the Information tab.Step 5 Click the Contents tab.
Depending upon the bundle selected, either an Integration Flows or APIs header will appear.
Step 6 For this bundle, click the Integration Flows header.
Proceed to review the list of available integration flows under the header.
Step 7 Click the Enable button to activate the links.
An Information field appears in the window.
Step 8 In the Information field, click the Enable button to confirm enabling the bundle.
After clicking the Enable button to confirm, a success message appears.
Step 9 Click OK in the success message.Step 10 Click on the link for the individual integration flow to perform the tasks listed below:
Cisco DNA Center Integration with ServiceNow4
Cisco DNA Center Integration with ServiceNowCisco DNA Center Integration with ServiceNow
For Schedule-based integration flows, perform the following tasks:
• Review the description, tags, How to Use this Flow, and scheduler.
• Configure the repeat interval (daily or weekly), time (including AM or PM), time zone, and start and end dates.
• Click Schedule to enable.
Only enable a schedule, after you have finished configuring the bundle as described in the followingsteps.
Important
Step 11 Click the Configure button to configure instances at the bundle level.
A configuration side bar appears. You are then prompted to configure the following:
• Set Operational Limit and Source Identifier for ServiceNow—Go to steps 12 to 15 to configure this instancetype.
• ServiceNow Access Settings—Go to steps 16 to 19 to configure this instance type.
Step 12 In the configuration sidebar, Click Set Operational Limit and Source Identifier for ServiceNow to configure anInventory Sync Settings instance.
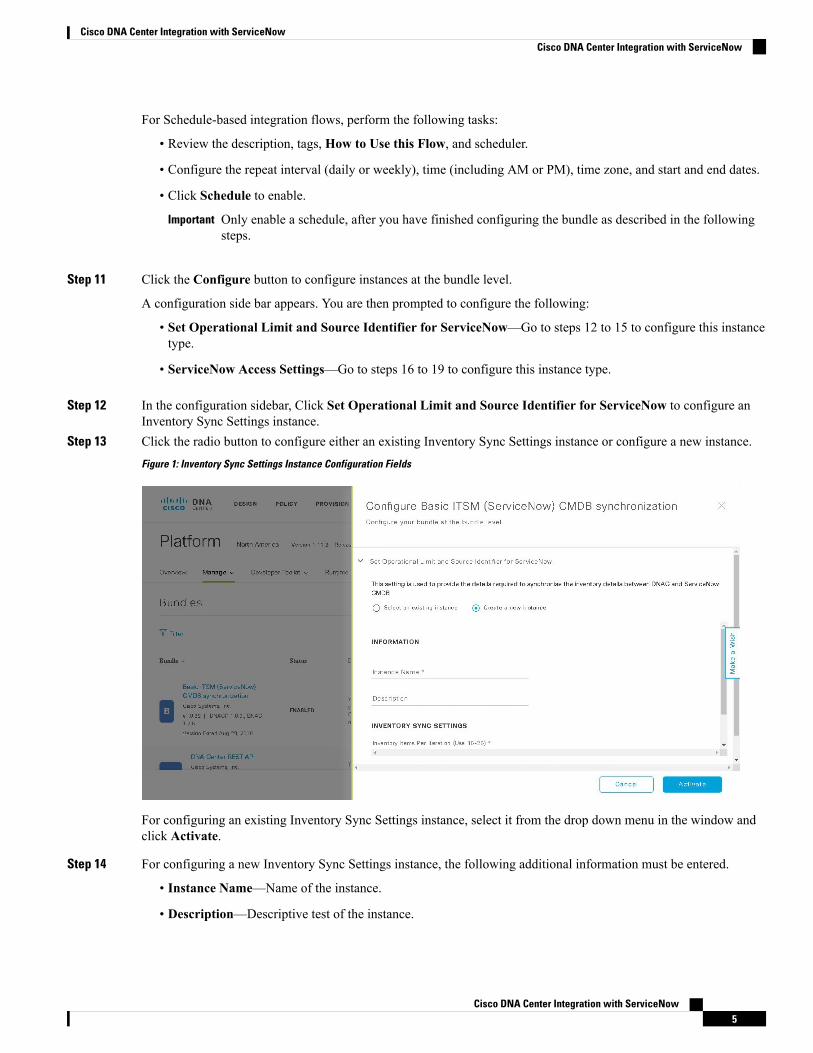
Step 13 Click the radio button to configure either an existing Inventory Sync Settings instance or configure a new instance.Figure 1: Inventory Sync Settings Instance Configuration Fields
For configuring an existing Inventory Sync Settings instance, select it from the drop down menu in the window andclick Activate.
Step 14 For configuring a new Inventory Sync Settings instance, the following additional information must be entered.
• Instance Name—Name of the instance.
• Description—Descriptive test of the instance.
Cisco DNA Center Integration with ServiceNow5
Cisco DNA Center Integration with ServiceNowCisco DNA Center Integration with ServiceNow
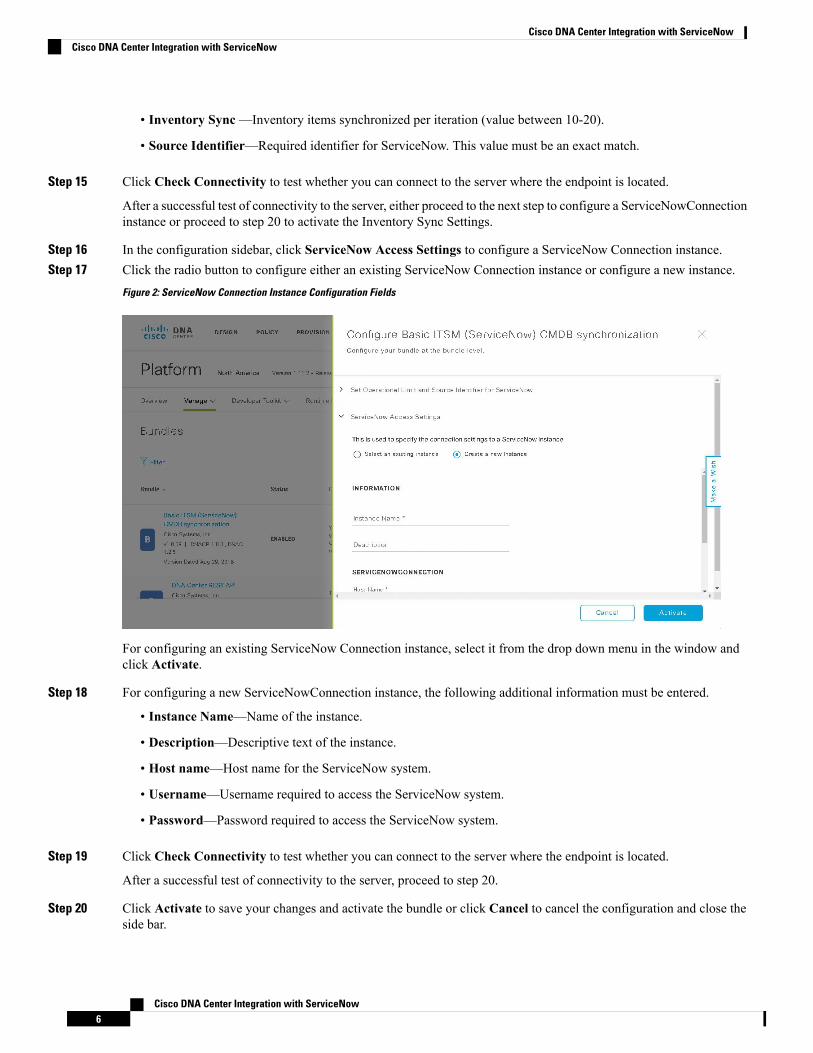
• Inventory Sync—Inventory items synchronized per iteration (value between 10-20).
• Source Identifier—Required identifier for ServiceNow. This value must be an exact match.
Step 15 Click Check Connectivity to test whether you can connect to the server where the endpoint is located.
After a successful test of connectivity to the server, either proceed to the next step to configure a ServiceNowConnectioninstance or proceed to step 20 to activate the Inventory Sync Settings.
Step 16 In the configuration sidebar, click ServiceNow Access Settings to configure a ServiceNow Connection instance.Step 17 Click the radio button to configure either an existing ServiceNow Connection instance or configure a new instance.
Figure 2: ServiceNow Connection Instance Configuration Fields
For configuring an existing ServiceNow Connection instance, select it from the drop down menu in the window andclick Activate.
Step 18 For configuring a new ServiceNowConnection instance, the following additional information must be entered.
• Instance Name—Name of the instance.
• Description—Descriptive text of the instance.
• Host name—Host name for the ServiceNow system.
• Username—Username required to access the ServiceNow system.
• Password—Password required to access the ServiceNow system.
Step 19 Click Check Connectivity to test whether you can connect to the server where the endpoint is located.
After a successful test of connectivity to the server, proceed to step 20.
Step 20 Click Activate to save your changes and activate the bundle or click Cancel to cancel the configuration and close theside bar.
Cisco DNA Center Integration with ServiceNow6
Cisco DNA Center Integration with ServiceNowCisco DNA Center Integration with ServiceNow

The changes made to the bundle begin to take effect immediately. Additionally, the bundle status changes fromENABLED to ACTIVE.
What to do next
Proceed to configure the bundle, Network Issue Monitor and Enrichment for ITSM (ServiceNow) for theServiceNow integration.
Configure Bundles: Network Issue Monitor and Enrichment forITSM (ServiceNow)
Perform this procedure to set up monitoring for network for assurance and maintenance issues, as well aspublishing event details to a ServiceNow system.
Before you begin
• Ensure that you have completed the preceding task, configure the Basic ITSM (ServiceNow) CMDBSynchronization bundle.
Step 1 From the Cisco DNA Center home page, click Platform > Bundles.Step 2 Review the displayed bundles and their current status.
You can adjust the bundles that are displayed in the GUI by clicking the Filter icon and using the filter, or by enteringa keyword in the Find field.
Step 3 Click on the Network Issue Monitor and Enrichment for ITSM (ServiceNow) bundle link or icon (colored squarewith initial) for additional information about the bundle.
Additional information provided may include the following:
• General information—Vendor, version, platform, tags displayed under the square icon.
Tags indicate what the Cisco DNA Center component is used for or affected by the bundle.Note
• Information—Tab that displays general information (purpose of bundle and how bundle works in the network),sample schemas, configuration notes, and other data about the bundle.
• Contents—Tab that accesses the integration flows and APIs that make up the bundle.
• Release Notes—Tab that displays latest release information about the bundle, including its version.
Step 4 Review the bundle data in the Information tab.Step 5 Click the Contents tab.
Depending upon the bundle selected, either an Integration Flows or APIs header will appear.
Step 6 For this bundle, click the Integration Flows header.
Proceed to review the list of available integration flows under the header.
Cisco DNA Center Integration with ServiceNow7
Cisco DNA Center Integration with ServiceNowConfigure Bundles: Network Issue Monitor and Enrichment for ITSM (ServiceNow)
Step 7 Click the Enable button to activate the links.
An Information field appears in the window.
Step 8 In the Information field, click the Enable button to confirm enabling the bundle.
After clicking the Enable button to confirm, a success message appears.
Step 9 Click OK in the success message.Step 10 Click on the links for the individual integration flows to perform the tasks listed below:
• For REST-based integration flows, perform the following tasks:
• Review the description, tags, parameters, responses, model schemas, policies.
• Click Code Preview and select a programming language to view a code sample snippet.
• Click Try It to send a request and see the response.
• For Schedule-based integration flows, perform the following tasks:
• Review the description, tags, How to Use this Flow, and scheduler.
• Configure the repeat interval (daily or weekly), time (including AM or PM), time zone, and start and enddates.
• Click Schedule to enable.
Only enable a schedule, after you have finished configuring the bundle as described in the followingsteps.
Important
Step 11 Click the Configure button to configure instances at the bundle level.
A configuration side bar appears.
Step 12 In the configuration sidebar, click ServiceNow Access Settings to configure a ServiceNow Connection instance.Step 13 Click the radio button to configure either an existing ServiceNow Connection instance or configure a new instance.
Cisco DNA Center Integration with ServiceNow8
Cisco DNA Center Integration with ServiceNowCisco DNA Center Integration with ServiceNow
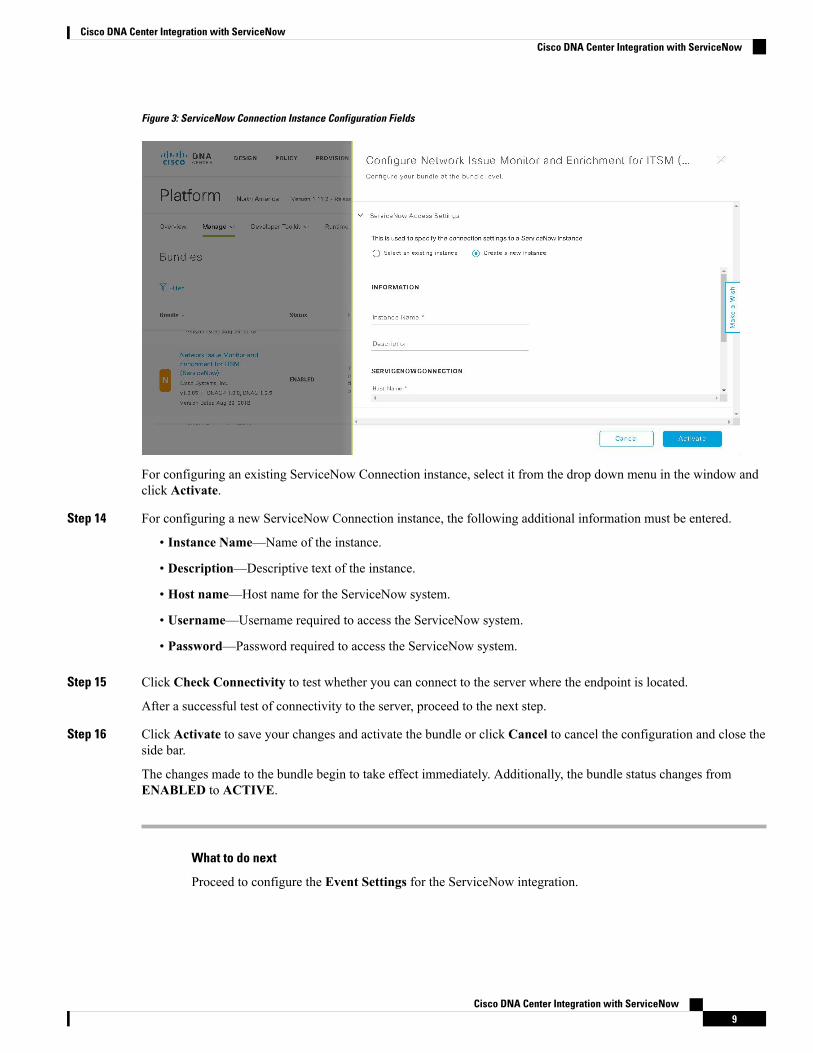
Figure 3: ServiceNow Connection Instance Configuration Fields
For configuring an existing ServiceNow Connection instance, select it from the drop down menu in the window andclick Activate.
Step 14 For configuring a new ServiceNow Connection instance, the following additional information must be entered.
• Instance Name—Name of the instance.
• Description—Descriptive text of the instance.
• Host name—Host name for the ServiceNow system.
• Username—Username required to access the ServiceNow system.
• Password—Password required to access the ServiceNow system.
Step 15 Click Check Connectivity to test whether you can connect to the server where the endpoint is located.
After a successful test of connectivity to the server, proceed to the next step.
Step 16 Click Activate to save your changes and activate the bundle or click Cancel to cancel the configuration and close theside bar.
The changes made to the bundle begin to take effect immediately. Additionally, the bundle status changes fromENABLED to ACTIVE.
What to do next
Proceed to configure the Event Settings for the ServiceNow integration.
Cisco DNA Center Integration with ServiceNow9
Cisco DNA Center Integration with ServiceNowCisco DNA Center Integration with ServiceNow
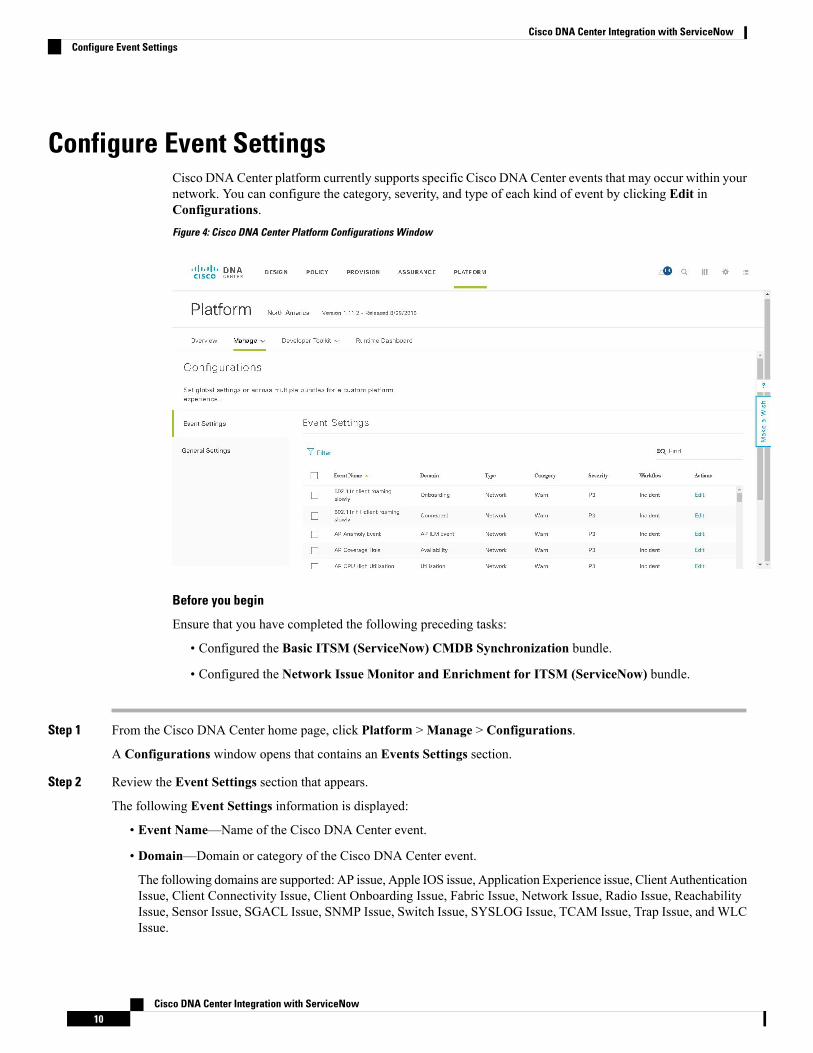
Configure Event SettingsCisco DNA Center platform currently supports specific Cisco DNA Center events that may occur within yournetwork. You can configure the category, severity, and type of each kind of event by clicking Edit inConfigurations.Figure 4: Cisco DNA Center Platform Configurations Window
Before you begin
Ensure that you have completed the following preceding tasks:
• Configured the Basic ITSM (ServiceNow) CMDB Synchronization bundle.
• Configured the Network Issue Monitor and Enrichment for ITSM (ServiceNow) bundle.
Step 1 From the Cisco DNA Center home page, click Platform >Manage > Configurations.
A Configurations window opens that contains an Events Settings section.
Step 2 Review the Event Settings section that appears.
The following Event Settings information is displayed:
• Event Name—Name of the Cisco DNA Center event.
• Domain—Domain or category of the Cisco DNA Center event.
The following domains are supported: AP issue, Apple IOS issue, Application Experience issue, Client AuthenticationIssue, Client Connectivity Issue, Client Onboarding Issue, Fabric Issue, Network Issue, Radio Issue, ReachabilityIssue, Sensor Issue, SGACL Issue, SNMP Issue, Switch Issue, SYSLOG Issue, TCAM Issue, Trap Issue, and WLCIssue.
Cisco DNA Center Integration with ServiceNow10
Cisco DNA Center Integration with ServiceNowConfigure Event Settings
• Type—Network, App, System, Security, Integrations type.
• Category—Error, Warn, Info, Alert, Task Progress, Task Complete
• Severity—P1 (Priority 1) through P5 (Priority 5).
Priority 1 is the most important or critical priority and should be assigned as such.Note
• Workflow—Incident, Problem, Event, or RFC (Request for Change)
• Actions—Edit
You can adjust what is displayed in the table by clicking the Filter icon and using the filter, or by typing a keyword inthe Find field. For example, to display all access point notifications, type 'AP' in the Find field. To view all networknotifications, type 'Network' in the Find field. To view all Priority 1 (P1) notifications, type 'P1' in the Find field.
Step 3 Click Edit in the Actions column to edit an event.
Select a setting by clicking on the downward pointing angle and adjust the value. For example, clickNetwork and adjustto App. This changes the event type from a network type to an application type. Click Severity and adjust to P1 fromP5. This raises the priority level from Priority 5 to Priority 1.
Step 4 Click the box next to the Event name to enable notifications.
This enables notifications through Cisco DNA Center when the event occurs in the future.
Step 5 Click Save to save your configuration.
What to do next
1. Configure the Network Events for REST API Endpoint bundle.
2. Configure the SWIM Events for REST API Endpoint bundle.
3. From the Cisco DNACenter home page, click Platform >Runtime Dashboard. Notifications for eventswill display in the Events Summary field.
4. Click View Details to view the notifications.
Configure Bundles: Network Events for REST API EndpointPerform this task to publish Cisco DNACenter events to any RESTAPI endpoint, as well as to receive updatesabout the event and its associated artifacts (incident , problem or request for change). The bundle then populatesthe Runtime Dashboard with this data.
Before you begin
Ensure that you have completed the following preceding tasks:
• Configured the Basic ITSM (ServiceNow) CMDB Synchronization bundle.
• Configure the Network Issue Monitor and Enrichment for ITSM (ServiceNow) bundle.
• Configured Event Settings.
Cisco DNA Center Integration with ServiceNow11
Cisco DNA Center Integration with ServiceNowConfigure Bundles: Network Events for REST API Endpoint
Step 1 From the Cisco DNA Center home page, click Platform >Manage > Bundles.Step 2 Review the displayed bundles and their current status.
You can adjust the bundles that are displayed in the GUI by clicking the Filter icon and using the filter, or by enteringa keyword in the Find field.
Step 3 Click on the Network Events for REST API Endpoint bundle link or icon (colored square with initial) for additionalinformation about the bundle.
Additional information provided may include the following:
• General information—Vendor, version, platform, tags displayed under the square icon.
Tags indicate what the Cisco DNA Center component is used for or affected by the bundle.Note
• Information—Tab that displays general information (purpose of bundle and how bundle works in the network),sample schemas, configuration notes, and other data about the bundle.
• Contents—Tab that accesses the integration flows and APIs that make up the bundle.
• Release Notes—Tab that displays latest release information about the bundle, including its version.
Step 4 Review the bundle data in the Information tab.Step 5 Click the Contents tab.
Depending upon the bundle selected, either an Integration Flows or APIs header will appear.
Step 6 For this bundle, click the Integration Flows header.Step 7 Click the Enable button to activate the links.
An Information field appears in the window.
Step 8 In the Information field, click the Enable button to confirm enabling the bundle.
After clicking the Enable button to confirm, a success message appears.
Step 9 Click OK in the success message.Step 10 Click on the link for the individual integration flow to perform the tasks listed below:
For Schedule-based integration flows, perform the following tasks:
• Review the description, tags, How to Use this Flow, and scheduler.
• Configure the repeat interval (daily or weekly), time (including AM or PM), time zone, and start and end dates.
• Click Schedule to enable.
Only enable a schedule, after you have finished configuring the bundle as described in the followingsteps.
Important
Step 11 Click the Configure button to configure instances at the bundle level.
A configuration side bar appears. You are then prompted to configure the REST Endpoint for Publishing Event.
Step 12 In the configuration side bar, click REST Endpoint for Publishing Event to configure a REST endpoint instance.Step 13 Click a radio button to configure either an existing REST endpoint instance or configure a new instance.
Cisco DNA Center Integration with ServiceNow12
Cisco DNA Center Integration with ServiceNowCisco DNA Center Integration with ServiceNow
Step 14 For configuring a new REST endpoint instance, the following additional information must be entered.
• Instance Name—Name of the instance.
• Description—Descriptive text of the instance.
• REST Endpoint—Host name or IP address of system for the REST endpoint.
• Username—Username required to access the system for the REST endpoint.
• Password—Password required to access the system for the REST endpoint.
Step 15 Click Check Connectivity to test whether you can connect to the server where the endpoint is located.
After a successful test of connectivity to the server, proceed to activate the bundle.
Step 16 Click Activate to save your changes and activate the bundle or click Cancel to cancel the configuration and close theside bar.
By clicking Activate, you enable the changes made to the bundle and the changes take effect immediately.Additionally, the bundle's status changes from ENABLED to ACTIVE.
Note
What to do next
Configure the SWIM Events for REST API Endpoint bundle.
Configure Bundles: SWIM Events for REST API EndpointPerform this task to monitor and publish events that require software image updates for compliance, securityor any other operational triggers, to any REST API end-point system, as well as to receive updates about theevent and its associated artifacts (incident, problem or request for change). The bundle then populates theRuntime Dashboard with this data.
Before you begin
Ensure that you have completed the following preceding tasks:
• Configured theBasic ITSM (ServiceNow) CMDB Synchronization bundle.
• Configure the Network Issue Monitor and Enrichment for ITSM (ServiceNow) bundle.
• Configured the Event Settings.
• Configured the Network Events for REST API Endpoint bundle.
Step 1 From the Cisco DNA Center home page, click Platform >Manage > Bundles.Step 2 Review the displayed bundles and their current status.
You can adjust the bundles that are displayed in the GUI by clicking the Filter icon and using the filter, or by enteringa keyword in the Find field.
Cisco DNA Center Integration with ServiceNow13
Cisco DNA Center Integration with ServiceNowConfigure Bundles: SWIM Events for REST API Endpoint
Step 3 Click on the SWIM Events for REST API Endpoint bundle link or icon (colored square with initial) for additionalinformation about the bundle.
Additional information provided may include the following:
• General information—Vendor, version, platform, tags displayed under the square icon.
Tags indicate what the Cisco DNA Center component is used for or affected by the bundle.Note
• Information—Tab that displays general information (purpose of bundle and how bundle works in the network),sample schemas, configuration notes, and other data about the bundle.
• Contents—Tab that accesses the integration flows and APIs that make up the bundle.
• Release Notes—Tab that displays latest release information about the bundle, including its version.
Step 4 Review the bundle data in the Information tab.Step 5 Click the Contents tab.
Depending upon the bundle selected, either an Integration Flows or APIs header will appear.
Step 6 For this bundle, click the Integration Flows header.Step 7 Click the Enable button to activate the links.
An Information field appears in the window.
Step 8 In the Information field, click the Enable button to confirm enabling the bundle.
After clicking the Enable button to confirm, a success message appears.
Step 9 Click OK in the success message.Step 10 Click on the link for the individual integration flow to perform the tasks listed below:
For Schedule-based integration flows, perform the following tasks:
• Review the description, tags, How to Use this Flow, and scheduler.
• Configure the repeat interval (daily or weekly), time (including AM or PM), time zone, and start and end dates.
• Click Schedule to enable.
Only enable a schedule, after you have finished configuring the bundle as described in the followingsteps.
Important
Step 11 Click the Configure button to configure instances at the bundle level.
A configuration side bar appears. You are then prompted to configure the REST Endpoint for Publishing Event.
Step 12 In the configuration side bar, click REST Endpoint for Publishing Event to configure a REST endpoint instance.Step 13 Click a radio button to configure either an existing REST endpoint instance or configure a new instance.Step 14 For configuring a new REST endpoint instance, the following additional information must be entered.
• Instance Name—Name of the instance.
• Description—Descriptive text of the instance.
• REST Endpoint—Host name or IP address of system for the REST endpoint.
Cisco DNA Center Integration with ServiceNow14
Cisco DNA Center Integration with ServiceNowCisco DNA Center Integration with ServiceNow
• Username—Username required to access the system for the REST endpoint.
• Password—Password required to access the system for the REST endpoint.
Step 15 Click Check Connectivity to test whether you can connect to the server where the endpoint is located.
After a successful test of connectivity to the server, proceed to activate the bundle.
Step 16 Click Activate to save your changes and activate the bundle or click Cancel to cancel the configuration and close theside bar.
By clicking Activate, you enable the changes made to the bundle and the changes take effect immediately.Additionally, the bundle's status changes from ENABLED to ACTIVE.
Note
What to do next
1. From the Cisco DNACenter home page, click Platform >Runtime Dashboard. Notifications for eventswill display in the Events Summary field.
2. Click View Details to view the notifications.
Cisco DNA Center Integration with ServiceNow15
Cisco DNA Center Integration with ServiceNowCisco DNA Center Integration with ServiceNow

Cisco DNA Center Integration with ServiceNow16
Cisco DNA Center Integration with ServiceNowCisco DNA Center Integration with ServiceNow