
Churrasco - jrmanufacturing.com · 1 CHURRASCO ROTISSERIES Churrasco cooking is actually a form of...
17
CHURRASCO ROTISSERIES OPERATIONS AND SERVICE MANUAL MANUFACTURED BY: J & R MANUFACTURING, INC. 820-B W. Kearney St. Mesquite, Texas 75149 972-285-4855 Rev. 05-08
Transcript of Churrasco - jrmanufacturing.com · 1 CHURRASCO ROTISSERIES Churrasco cooking is actually a form of...

CHURRASCO ROTISSERIES
OPERATIONS AND
SERVICE MANUAL
MANUFACTURED BY:
J & R MANUFACTURING, INC. 820-B W. Kearney St. Mesquite, Texas 75149
972-285-4855 Rev. 05-08


CONTENTS
CHURRASCO COOKING: PAGES: 1 – 2
INSTALLATION INSTRUCTIONS: PAGES: 3 – 4
OPERATION: PAGE: 5
TROUBLESHOOTING: PAGE: 6
PREVENTIVE MAINTENANCE: PAGE: 7
PARTS LIST: PAGE: 8
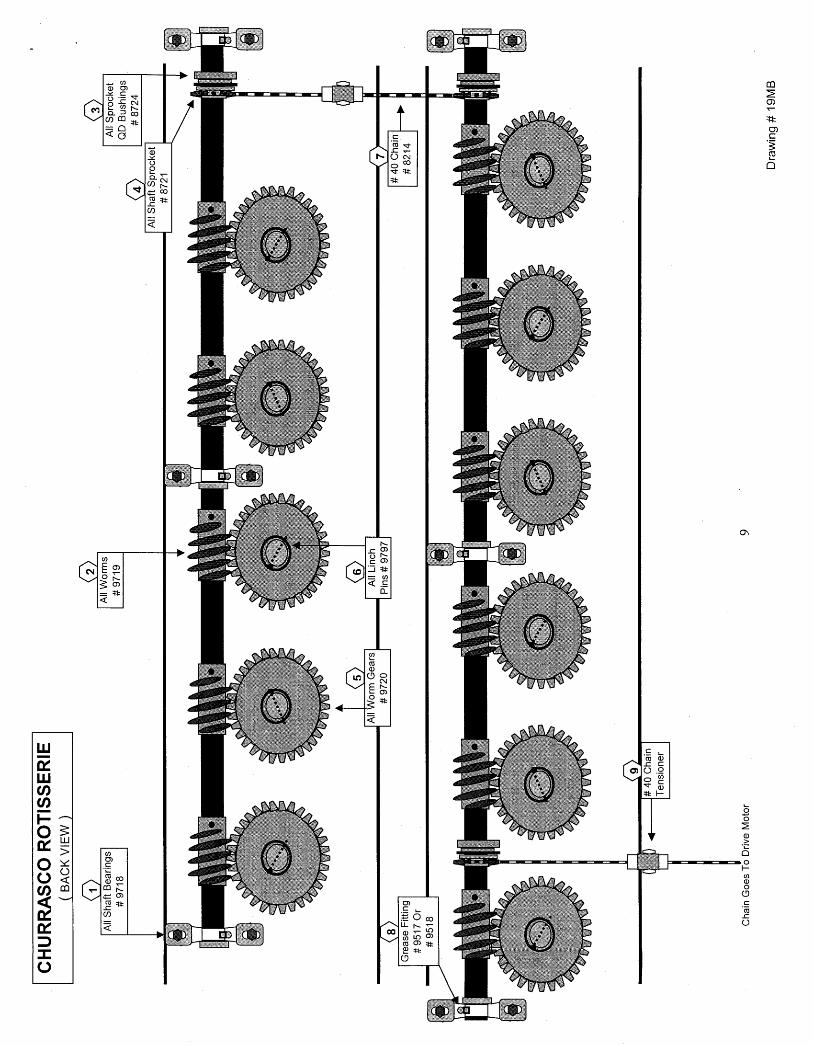
CHURRASCO DRAWING (BACK VIEW): PAGE: 11
CHURRASCO DRAWING (SIDE VIEW): PAGE: 12
WARRANTY: PAGE: 13


1
CHURRASCO ROTISSERIES
Churrasco cooking is actually a form of rotisserie cooking, however, it has become such an important segment of the food service industry that we felt it needed its own section. An import from Brazil brought to the states by enterprising restaurant men, these restaurants are commonly referred to as “churrascarias”. Churrasco cooking was born on the large grassy plains of the Pampas back in the early 1800’s. The settlers that had settled in this huge open area of bountiful grasses came to be known by the term “Gauchos”. Cattle ranchers they were, but they also raised bountiful crops of vegetables and fruits in that fertile country. The cowboys, Gauchos, away from their homes would dig pits and build a fire in the pit while turning huge pieces of freshly slaughtered beef on large spits. In the cities bordering the Pampas, churrascarias were opened to great success. That is happening here in the United States. It is a reflection of the carnivorous nature of man, because that is what it is all about…MEAT. The cooking device now used in the churrascarias is a large narrow, heavily insulated firebox built to withstand tremendous applications of heat. Special turning mechanisms keep the spitted meats turning constantly over the fire. These units, commonly called churrasco broilers, actually have the Brazilian name “Churrasqueira” pronounced “shoo raas kay da”. The foods served in the churrascarias are based around a variety of fire-cooked meats with a true and wonderful flavor. There is very little seasoning used other than large grain salt, such as Sea Salt or Kosher Salt. In order to present a wonderful culinary treat to their customers, only the finest and highest grade of meat is prepared. Beautiful tenderloin steaks Meat Buyers Guide #1190A, as well as sections of the full tenderloin are presented to the guests still speared on the sword-like spit. If the customer wants same, it is sliced off onto his plate by the Gaucho. One of the most favorite of all Churrasco meat offerings is Picanha, an outside muscle from the rump roast that is rolled like a cinnamon roll. This is placed onto the spit and then dipped into a plate of coarse salt. The spit is placed into the turning mechanism to roast over the incredibly hot fire to sear on the outside and allowed to cook for 5 to 6 minutes. The Gaucho serving the meats does the cooking and handles his own spit from the fire to the table. On larger pieces of meat the spit may be returned to the fire after slicing down to the “too-rare” stage. The large favored cuts of beef are Bottom Sirloin butts, Strip Loin, Boneless Ribeye Roll, and Full Tenderloins. Huge full beef ribs are cooked at a slower rate and for a longer time on a secondary fire (from the churrasco) on vertical spits. Note: A very special “Thank You!” to Jorge, Jair, Fernando, and all of the Gauchos at the famous Fogo de Chao Churrascarias in Dallas, Atlanta, Chicago, and Houston for their tutelage and insight into the art of this great Brazilian culinary concept.

2
CHURRASCO ROTISSERIES
The very select centers of pork spareribs trimmed down to about 4” in length are threaded onto the sword-spit and cooked quickly in 20 to 30 minutes. The other cut of pork that is popular is the tender eye of the loin. They also usually serve a special Brazilian style pork sausage that actually is rather bland and in fact, reminds me of the Texas German Bratwurst. Chicken thighs, breasts, legs, and yes chicken hearts are also generally served. Chicken will be seasoned with a mixture of salt, pepper, and a touch of garlic as a rule. Quite often, cutlets from the breast will be wrapped in a bacon slice before roasting. Of course, the chicken hearts require a very small and slender spit that is available as an option on special order from J & R. Leg of Lamb is also spitted and served. This cut is always from very small animals so that the meat is extra mild as well as tender. Lamb chops are tiny with the tender meat being about the size of a silver dollar – the finest of the fine. The Salad Bar is usually brimming with wonderful combinations such as a thick red slice of tomato with a ¼” thick slice of fresh mozzarella cheese on top with a fresh sweet basil leaf between. Tabouli is also a wonderful salad on the bar as well as a tossed Caesar Salad, mixed garden green salad, spinach salads, and Waldorf Salad. Roasted red peppers, huge finger size spears of white asparagus, dressings of all kinds, relishes, a large selection of olives and pickles, and a variety of cheeses. Often you will find a selection of one or two soups and, of course, bread sticks and crackers of all styles. Baked Bananas are regularly placed on the table on plates to be passed around as well as just-baked tiny cheese rolls that are a light as a feather. Rice and yes, mashed potatoes are also served family style. Polenta is also brought to the table for all to share. There are many wonderful drinks popular in Brazilian restaurants, but the most important one is Caipirinha, the National Drink of Brazil. This is a drink that is very simple and easy to make. The proper way to make this drink is very similar to making a mint julep in that you use a muddler. This is how:
Ingredients 1 Lime (fresh and quartered) 3 Tbsp. Granulated Sugar 2 oz. Cachaca Liquor
Directions: Place the lime quarters in a large Old Fashion glass with the pulp side up. Sprinkle the sugar over the limes. Muddle the sugar into the lime producing a sweet syrup. Strain into a glass filled with ice cubes and fill with Cachaca, stir, and serve with a fresh slice of lime on the rim. Note: Cachaca is a Brazilian liquor that is distilled from unrefined cane sugar. It differs from rum in that rum is distilled from sugar cane molasses.

3
INSTALLATION INSTRUCTIONS
SHIPPING:
The Custom Rotisserie will be shipped fully assembled. The spits will be packed inside the cooking compartment. Also, a grease gun and a tube of the recommended grease will be in a box inside the unit. HANDLING: The unit can be handled with a forklift with a 6000 pound capacity. The extra capacity is necessary due to the size of the unit. ELECTRICAL REQUIREMENTS: The unit requires a 115 volt, 1 phase, 15 amp electrical service. A switch or circuit breaker should be installed near the unit. It will be necessary during certain maintenance procedures to shut off the electrical supply. At these times, it is a good safety procedure to tag the switch to guard against someone inadvertently re-energizing the circuit. Your electrician should extend a conduit from the unit’s junction box to a 115 volt supply in your building using a grounded circuit. Please refer to your local electrical code for any other requirements. Connect at junction box only. CLEARANCE: The unit must be installed to conform to the following minimum clearances (in inches): From non-combustible walls:Back and sides: 0Front: 48 From combustible walls :Front: 48”Back and sides:With no upper enclosure panels: 48With upper enclosure panels: 2 Unit to be installed on a non-combustible floor. EXHAUST: This unit must be exhausted in accordance with all applicable building codes, fire codes, and sanitation code requirements. CLEANING: Prior to use wash and clean all spits and forks thoroughly. Wipe down the interior of the unit.

4
GAS REQUIREMENTS:
The unit requires 112, 000 BTU’s and a ¾” supply to a ¾” inlet. GAS PIPING: Connect the gas supply (including a gas line supply valve) to the gas connection on the unit. Use a UL approved pipe joint compound. Check for leaks with a soap solution. Do not use a flame. If there are no leaks light the standing pilot burners. Turn on the burners and check all piping connections for leaks.
VENTING INFORMATION A. Canopy hoods should be UL Listed, conform to NFPA 96 requirements and carry the NSF
label. B. For Canopy-type commercial cooking hoods the inside edge thereof shall overhang or
extend a horizontal distance of not less than six (6) inches beyond the edge of the cooking surface on all open sides, and the vertical distance between the lip of the hood and the cooking surface shall not exceed four (4) feet.
C. A grease duct serving a Type 1 Hood shall be constructed of at least 0.055 – inch thick
(No. 16 Manufacturer’s Standard Gauge Steel or at least 0.044- inch thick stainless steel duct enclosures for grease duct shall be constructed as the Building Code requires shaft enclosures to be constructed. Duct enclosures shall be of at least one-hour fire-resistive construction in all buildings and shall be of 2-hour fire-resistive construction in Types I and II fire resistive buildings.
D. Exhaust volume* in CFM should be calculated at minimum of 200 CFM per square foot of hood area when three sides or less of the canopy are exposed, and 300 CFM per square foot of hood area for an island or central hood. (*for hoods serving charcoal or wood fired broilers or rotisseries) UL Listed hoods may require air quantities based on their listing. For make-up air requirements, check manufacturer’s listing.

5
OPERATION
Prior to commencing cooking the following items should be checked: 1. If the unit is a gas unit verify that all pilots are lit. BUILDING A FIRE: (solid fuel units): Make sure that the exhaust hood is operating before building a fire. Building a fire in an open pit churrasco rotisserie is practically the same as in a fireplace. We recommend that kindling or safe (low volatility) solid fuel starting blocks be used with small chunks of wood or with charcoal. LOADING AND UNLOADING THE MEAT: Each spit has one end, which is pointed to skewer the meat and a handle at the other end. To install a spit, insert the pointed end in the rotating slot at the back of the unit and then lower the thimble at the handle end into the corresponding stainless steel half moon resting spot. To unload the spits the procedure is reversed. END OF THE DAY CLEANUP: At the end of the day the unit should be cleaned so as to remove all grease. If grease is allowed to build up in the unit a grease fire may occur. Wipe or wash down the upper works of the unit as needed and at the end of the day. The exhaust hood should operate at all times when the burners are in use or when wood is burning or smoldering. Ashes should be removed from the ash drawers. Remove the wood ashes from the unit. Place wood and coals into a tightly sealed metal container, which is stored in a safe location away from combustibles. Do not dump ashes into a dumpster until you are sure that no embers remain (sometimes they can remain live for several days).

6
TROUBLESHOOTING
1. Rotisserie Not Turning
Is the Motor Running? YES – Then check the chain connection between the motor sprocket and the upper sprocket on the rotisserie shaft. If the chain is broken, then either repair the chain (usually with a master link) or replace the chain. If the chain is OK, then check the connector between the upper sprocket and the shaft. The upper sprocket is connected or secured to the shaft with a key and a keyway with a set screw. NO – Check the electrical supply panel for a tripped circuit breaker. If tripped, then reset. Then check the motor overload contact assembly. This is located inside a gray electrical enclosure near the motor. Push the red and blue buttons simultaneously to reset the motor. If the motor still does not turn, call a service technician to troubleshoot the wiring and the motor.

7
PREVENTIVE MAINTENANCE
DAILY: Keep the unit clean. Wipe off after each use and clean thoroughly at the end of the day. Remove all ashes and place in a tightly sealed metal container away from all combustibles. Dispose of ashes only after you are certain that no live coals remain. Never use water or ice to put out the coals. Repeated thermal shock will cause the refractory to crack requiring replacement or repair. MONTHLY: Bearings: Lubricate the rotisserie pillow block bearings with a high temperature grease with a Teflon additive and a cartridge type automotive grease gun. Chain: Lubricate the chains with a high temperature grease and check their tension.

8
J AND R MANUFACTURING, INC. Churrasco Rotisserie Replacement Parts List
Item No. Item Description Group
9708 Hi Temp Bushing – For Spit Bolts Bearing 9791 Bronze Bushing – For Spits Shaft Bearing 9718 Shaft Bearing Bearing 9016 Castable Patch (Priced Per Ft.) Castable Insulation 8214 #40 Roller Chain (Priced Per Ft.) Chain 8216 #40 Offset Link Chain 9402 #40 Master Link Chain 9557 #40 Chain Tensioner Chain 9108 Grease Gun Grease 9161 Super Hi-Temp Grease Grease 9517 Grease Fitting ¼-28 Grease 9518 Grease Fitting ¼-28x45 Grease 9505 ¼ Turn Latch Handles & Latches 9569 Ribbed Black Spit Handle Handles & Latches 9792 Black Wooden Spit Handle Handles & Latches 9044 Swivel Caster w/Break Misc. Hardware 9047 Swivel Caster Misc. Hardware 9571 Stover Lock Nut Misc. Hardware 9572 Rotisserie Bolts Key 3/16 Sq. Misc. Hardware 9699 15/16” Combo Wrench Misc. Hardware 9707 Churrasco Spit Bolt Misc. Hardware 9780 30 RPM Rotisserie Gear Motor Motors 9554 Churrasco Spit Rotisserie Accessories 8721 #40 15 Tooth Sprocket 0 Main Shafts Sprockets & Gears 8724 QD Bushing JA 5/8 – For Main Shaft Sprockets & Gears
9422 #40 24 Tooth Sprocket – Motor Output Shaft Sprockets & Gears
9719 Worm – For Main Shaft (2) Sprockets & Gears 9720 Worm Gear - For Spit Bolt (2) Sprockets & Gears
9722 QD Bushing SH 5/8 – For Motor Output Shaft Sprockets & Gears
8320 Motor Contactor – 120v Switches 8331 NO Switch Contact w/Base Switches 8385 NO Switch Contact Block Switches 8763 Motor Overload 1.6-2.5 Amp Switches 9310 Overload Bracket 0 Dinrail Adapter Switches 9320 2 Pos. Black Switch Operator (On/Off) Switches 9536 Rotisserie On/Off Switch Complete Switches
9
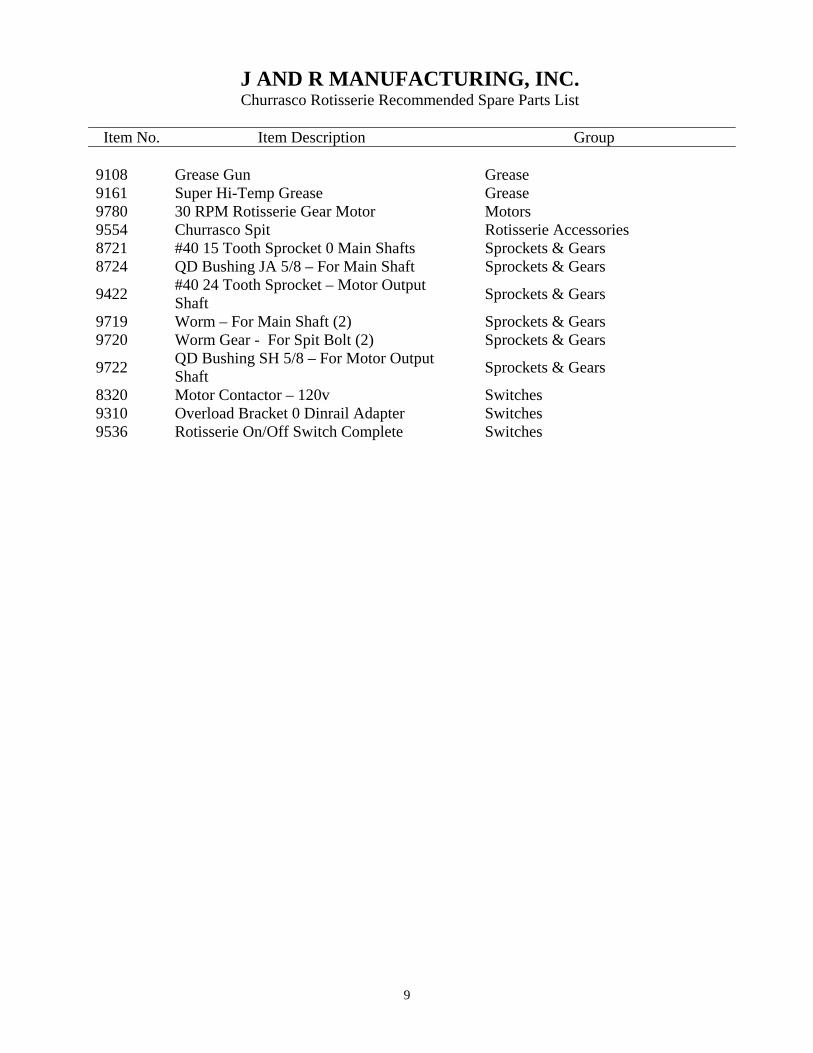
J AND R MANUFACTURING, INC. Churrasco Rotisserie Recommended Spare Parts List
Item No. Item Description Group
9108 Grease Gun Grease 9161 Super Hi-Temp Grease Grease 9780 30 RPM Rotisserie Gear Motor Motors 9554 Churrasco Spit Rotisserie Accessories 8721 #40 15 Tooth Sprocket 0 Main Shafts Sprockets & Gears 8724 QD Bushing JA 5/8 – For Main Shaft Sprockets & Gears
9422 #40 24 Tooth Sprocket – Motor Output Shaft Sprockets & Gears
9719 Worm – For Main Shaft (2) Sprockets & Gears 9720 Worm Gear - For Spit Bolt (2) Sprockets & Gears
9722 QD Bushing SH 5/8 – For Motor Output Shaft Sprockets & Gears
8320 Motor Contactor – 120v Switches 9310 Overload Bracket 0 Dinrail Adapter Switches 9536 Rotisserie On/Off Switch Complete Switches

arh
Text Box
10
arh
Rectangle
arh
Text Box
11

arh
Rectangle
arh
Text Box
12

WARRANTY J & R MANUFACTURING, INC. warrants its equipment against defective parts and workmanship under normal use and when installed in accordance with manufacturer’s recommendations for a period of six (6) months on parts and thirty (30) days on labor with the following provisions:
1. This warranty does not apply if problems or claims are the result of: (a) damage in transit (equipment becomes owner’s property upon shipment from factory and owner must file claim with transport company); (b) misuse, neglect, improper maintenance, and or unauthorized alterations to equipment; (c) improper installation of exhaust stacks, air supply, and extraneous exhaust systems; (d) improper voltage hook-up; (e) wind, rain, hail, fire and acts of God.
2. In-warranty replacement parts will be credited only upon receipt and
inspection of defective parts at the factory. All shipping charges are the responsibility of the owner.
3. Labor to remove, replace, or repair defects under this warranty must be
authorized by factory. Premium time (overtime) and travel time are not included in the warranty.
4. Sales, excise, and other taxes, food loss, and down-time are not covered
under this warranty.
5. The removal of manufacturer’s nameplate(s) voids the warranty. It is the aim of J & R Manufacturing, Inc. to build the finest equipment possible and to facilitate quick solutions to all problems that might arise with the lowest expense possible to the user(s). To help us achieve this goal, please follow these procedures:
1. Telephone our service department at 972-289-0801 at the first sign of a problem.
Have ready the Model and Serial Number of your equipment.
2. Cooperate with our Service Department by making certain visual checks as requested. Most problems are quick and easy to pinpoint and resolve.
3. In the event it is necessary to use a service company, the factory will contact its
authorized service agency. If no authorized service agency is available, please recommend a service company. The use of a service company not specifically authorized by our Service Department at factory headquarters may invalidate this warranty.


![Churrasco no Instagram [Infográfico]](https://static.fdocuments.us/doc/165x107/549c334cac7959bf2a8b46b5/churrasco-no-instagram-infografico.jpg)
