
CHAPTER 13 Creating a Workbook. Learning Objectives Understand spreadsheets and Excel Enter data in...
44
CHAPTER 13 Creating a Workbook
-
Upload
dontae-deveraux -
Category
Documents
-
view
230 -
download
0
Transcript of CHAPTER 13 Creating a Workbook. Learning Objectives Understand spreadsheets and Excel Enter data in...

CHAPTER 13Creating a Workbook

Learning Objectives• Understand spreadsheets and Excel• Enter data in cells• Edit cell content• Work with columns and rows• Work with cells and ranges• Work with formulas and functions• Preview and print a workbook

• Topics Covered:• Parts of the Excel Window• Moving the Active Cell• Switching Between Sheets• Inserting and Deleting a Sheet• Renaming a Sheet• Moving and Copying a Sheet
Understanding Spreadsheets and Excel
4
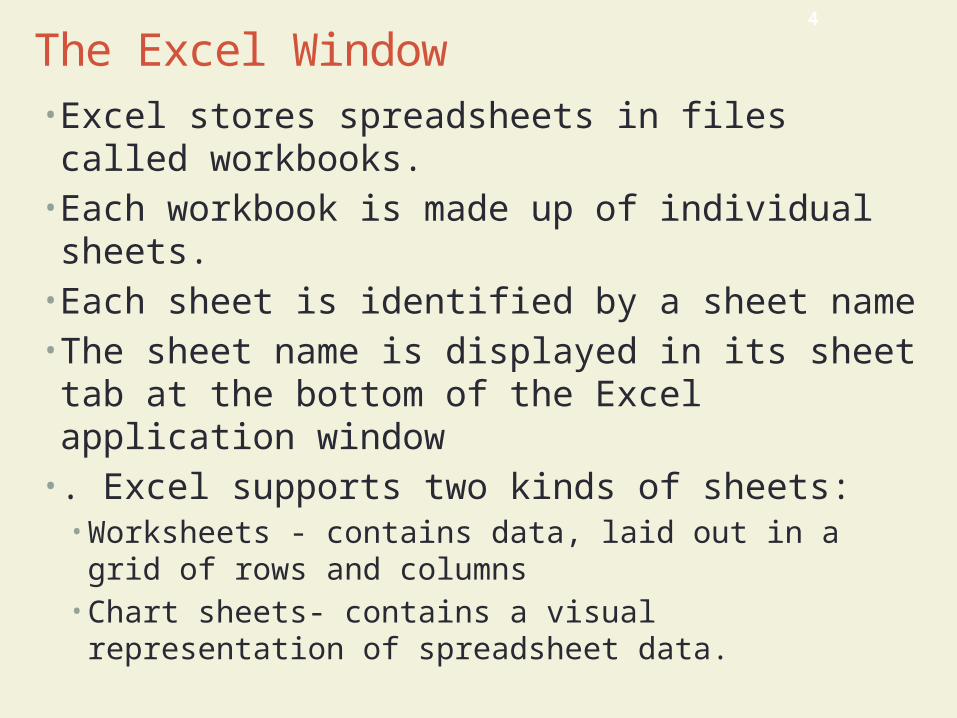
• Excel stores spreadsheets in files called workbooks.• Each workbook is made up of individual sheets. • Each sheet is identified by a sheet name• The sheet name is displayed in its sheet tab at the bottom of the Excel application window
• . Excel supports two kinds of sheets: • Worksheets - contains data, laid out in a grid of rows and
columns• Chart sheets- contains a visual representation of
spreadsheet data.
The Excel Window
5
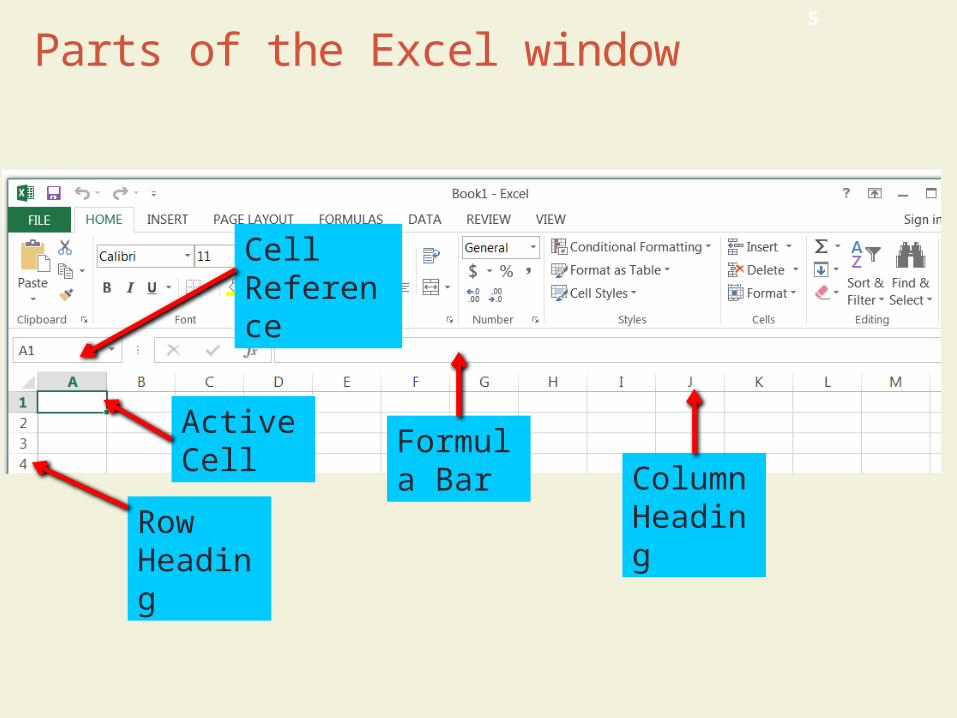
Parts of the Excel window
Column HeadingRow
Heading
Active Cell
Cell Reference
Formula Bar
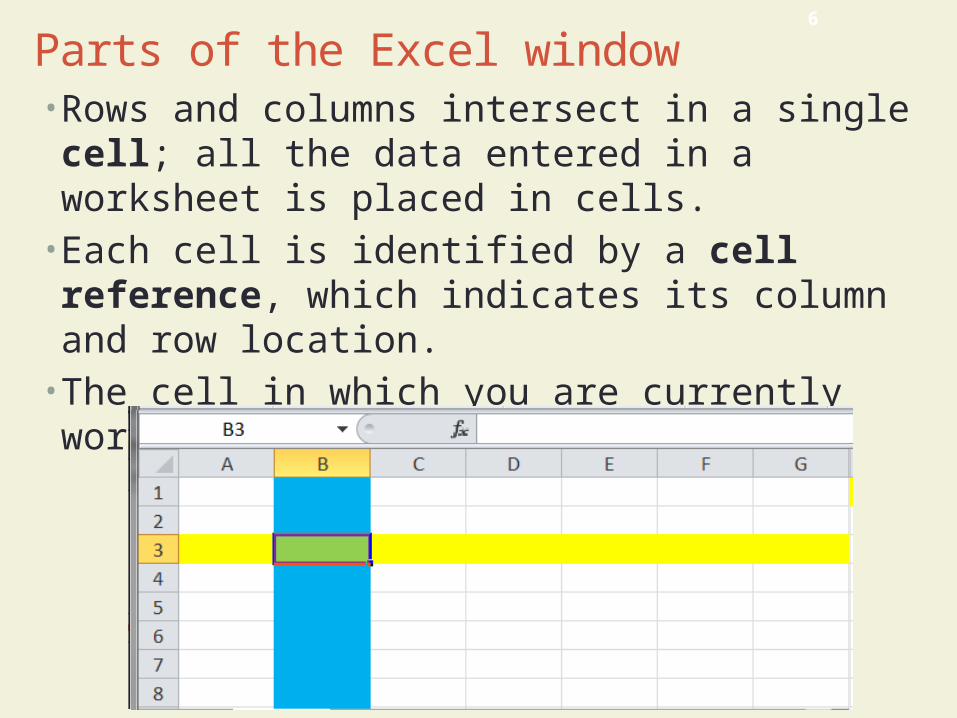
• Rows and columns intersect in a single cell; all the data entered in a worksheet is placed in cells.
• Each cell is identified by a cell reference, which indicates its column and row location.
• The cell in which you are currently working is the active cell.
6
Parts of the Excel window

• There are a number of ways that you can move (select) the active cell, they include;• Point at the cell and click on it.• Tab Key to move one cell left• Shift + Tab keys to move one cell right• Arrow keys to move up, down, right, left • Enter key to move down one cell. • Shift + Enter to move one cell up.
7
Moving (selecting) the Active Cell

• Each workbook includes starts with one worksheet, sometimes you will need more or fewer worksheets.
• To add worksheets click on the Plus button.
• To delete a worksheet right click on the worksheet and from the menu that appears select Delete
Inserting and Deleting a Sheet

• The sheet currently displayed in the workbook window is the active sheet, and its sheet tab is white.
• You can easily move from one sheet to another, by clicking on the sheet..
9
Switching Between Sheets

• You can rename sheets with more meaningful names so that you know what they contain.
• To rename a sheet double click on the sheet name and type a new name.
Renaming a Sheet

• You can change the placement of the sheets in a workbook.
• Select the sheet and drag it.• As you move by other sheets a small black triangle appears at the left edge of the of each sheet indicating the selected sheet will be positions after that sheet.
Moving and Copying a Sheet

• You enter data by typing it into the active cell.• The formula bar displays the contents of the active cell, which can be data or, as you’ll see later, the underlying formulas used to create a calculated value.
• Topics Covered:• Entering Text• Entering Dates and Times• Entering Numbers
Entering Data in Cells

• Text data is a combination of letters, numbers, and symbols that form words and sentences.
• Text data is often referred to as a text string because it contains a string of text characters.
• Number data is any numerical value that can be used in a mathematical calculation.
• If an integer is longer than its cell size, you see ###### in the cell instead of its value.
• Decimal values are rounded to fit the cell.
Entering Text and Numbers

• Date data and time data are commonly recognized formats for date and time values.
• Dates can be entered in any of the standard formats• Dates are actually numbers that are formatted to appear as text
• This allows you to perform calculations with dates, such as determining the elapsed time between two dates.
Entering Dates and Times

• You could simply make the cell active and type the new entry, or you could clear the value in the cell and then type the correct value.
• However, sometimes you need to edit only a portion of an entry rather than change the entire contents of a cell
• To directly edit cell contents:• Double-click the cell, or• Select the cell, click anywhere in the formula bar, and then
click in the cell, or • Select the cell, and then press the F2 key
• Doing any of the above will activate the formula bar and all you to edit part of the cell contents.
Editing Cell Content

• You can modify a worksheet to make it easier to read and include more data. To do this, you will need to• Selecting Columns and Rows• Changing Column Widths and Row Heights• Inserting a Column or Row• Clearing and Deleting a Row or Column
16
Working with Columns and Rows

• To select an entire column, you click its column heading.
• To select an entire row, you click its row heading.• You can drag across multiple column headings or row headings to select adjacent columns or rows.
• To select nonadjacent columns or rows, you press the Ctrl key as you click column or row headings.
• You can select all the columns and rows in a worksheet by clicking the Select All button in the upper-left corner of the worksheet.
Selecting Columns and Rows

• The default sizes of the columns and rows in a worksheet might not always accommodate the information you need to enter
• Excel displays only as much text as fits into the cell, cutting off, or truncating, the rest of the text entry.
• If the default column width is too narrow, you can widen it by dragging the column border. • Move the pointer over the right border until you see the double
headed arrow.• When you drag the column border, a ScreenTip appears
identifying the width of the column in characters, followed in parentheses by the width of the column in pixels.
Changing Column Widths and Row Heights

• AutoFitting eliminates any empty space by matching the column to the width of its longest cell entry.
• The simplest way to AutoFit a column is • Move the pointer over the right border until you see the double
headed arrow.• Double click when you see the double headed arrow appear.
Changing Column Widths and Row Heights

• When you insert a new column, the existing columns shift to the right and the new column has the same width as the column directly to its left.
• When you insert a new row, the existing rows shift down and the new row has the same height as the row above it.
• To insert a new row or column;• Select the row or column• Right click on the row or column• From the list that appears select Insert.
Inserting a Column or Row

• You can remove data in two ways:• Clearing—Removes data from a worksheet but leaves
the blank cells• Deleting—Removes both the data and the cells from the
worksheet
• Pressing the Del key removes the contents from the cell but does not remove the cell from the worksheet
Clearing and Deleting a Row or Column

• When you delete a column, the columns to the right shift left to fill the vacated space.
• Similarly, the rows below a deleted row shift up to fill the vacated space.
• Deleting a column or row has the opposite effect from inserting a column or row.
• To delete a new row or column;• Select the row or column• Right click on the row or column• From the list that appears select Insert
Clearing and Deleting a Row or Column

• Topics Covered:• Selecting a Range• Moving and Copying a Range• Inserting and Deleting a Range• Wrapping Text Within a Cell
Working with Cells and Ranges

• A group of cells is called a cell range or range. • Ranges can be either adjacent or nonadjacent. • An adjacent range is a single rectangular block of cells. • A nonadjacent range consists of two or more distinct
adjacent ranges.
Working with Cells and Ranges

• You select adjacent and nonadjacent ranges of cells with the pointer, just as you selected individual cells.
• To select adjacent cell ranges • Select the first cell in the range • Hold down the left mouse button • Drag the pointer to the last cell in the range
• To select adjacent cell ranges• Select the first cell in the first range • Hold down the left mouse button • Drag the pointer to the last cell in the first range• Click on the Ctrl Key and repeat the above procedure
for the other nonadjacent ranges.
Selecting a Range

• Methods for moving and copying a range:• Drag and drop• Some people find drag and drop a difficult and awkward way to
move or copy a selection, particularly if the worksheet is large and complex. In those situations, it is often more efficient to cut and paste the cell contents or to copy and paste them.
• Cut and paste (to move)• Copy and Paste (to copy)• When you cut or copy a range, the selected cells are surrounded
by a blinking border, indicating that the selection is stored on the Clipboard. The blinking border remains until you paste the range or start entering data in another cell.
Moving and Copying a Range

• Another use of selecting a range is to insert or delete cells within the worksheet.
• To insert or delete a range of cells do the following• Select the range of cells.• In Cell menu click on the arrow below Insert or delete• From the list that appears select Insert cells• The following dialog box appears• Select the option you want to perform
Inserting and Deleting a Range

• You can force text that extends beyond a cell’s border to fit within the cell.
• You do this by • Selecting the cell in which the text to be wrapped appears• Click the Wrap Text button in the Alignment group on the Home tab
• The text will wrap on as may lines as it takes depending on the cell width.
Wrapping Text Within a Cell

• Topics Covered:• Entering a Formula• Viewing Formula Results and Formulas• Copying and Pasting Formulas• Entering a Function• Using AutoSum
Entering Formulas and Functions

• A formula is a mathematical expression that returns a value.
• Every Excel formula begins with an equal sign (=) followed by an expression that describes the operation to be done.
• A formula is written using operators that combine different values, returning a single value that is then displayed in the cell. Operators include• Addition +• Subtraction -• Multiplication *• Division /• Exponentiation ^
Entering a Formula

• The order of precedence is a set of predefined rules to determine the sequence in which operators are applied in a calculation:
First Exponentiation (^)
Second Multiplication (*) and division (/)
Third Addition (+) and subtraction (-)
To change the order of operations, you can enclose parts of the formula within parentheses. Any expression within a set of parentheses is calculated before the rest of the formula.
Order of Precedence

• Examples of order of precedence• = 3+4*5
• result 23 • the 4 is multiplied by the 5 first equaling 20 then the 3 is added
• = (3+4)*5• result 35 • the 3 is added to the 4 first equaling 7 and then multiplied by the
5
• 50/10*5• result 25• 50 is divided by 10 first equaling 5 and then multiplied by 5
• 50/(10*5)• result 1• 5 is multiplied by 10 first equaling 50 and then divided into 50
Order of Precedence

CMPTR Chapter 13: Creating a Workbook 33
Entering a Formula• In many cases we are not entering numbers but working
with cells• Start the process by entering the equals sign in the
formula bar• Enter the first cell reference by either typing it in or
clicking on the cell. • Next enter the operator.• Enter the second cell reference by either typing it in or
clicking on the cell.• Hit the Enter Key

• After a formula has been entered into a cell, the cell displays the results of the formula and not the formula itself.
• You can view the formula by selecting the cell and reviewing the expression in the formula bar.
• You can also double-check that the formula references the correct cell by looking at which cells are color coded.
Viewing Formula Results and Formulas

• Creating Effective Formulas• Keep formulas simple. Use functions (explained in the
nest section) in place of long, complex formulas whenever possible.
• Do not place important data in formulas. Instead place them in a separate cell. An example would be a tax rate.
• Break up formulas to show intermediate results. Complex calculations should be split so that the different parts of the computation are easily distinguished and understood. Use separate cells to breakup complex functions.
Creating Effective Formulas
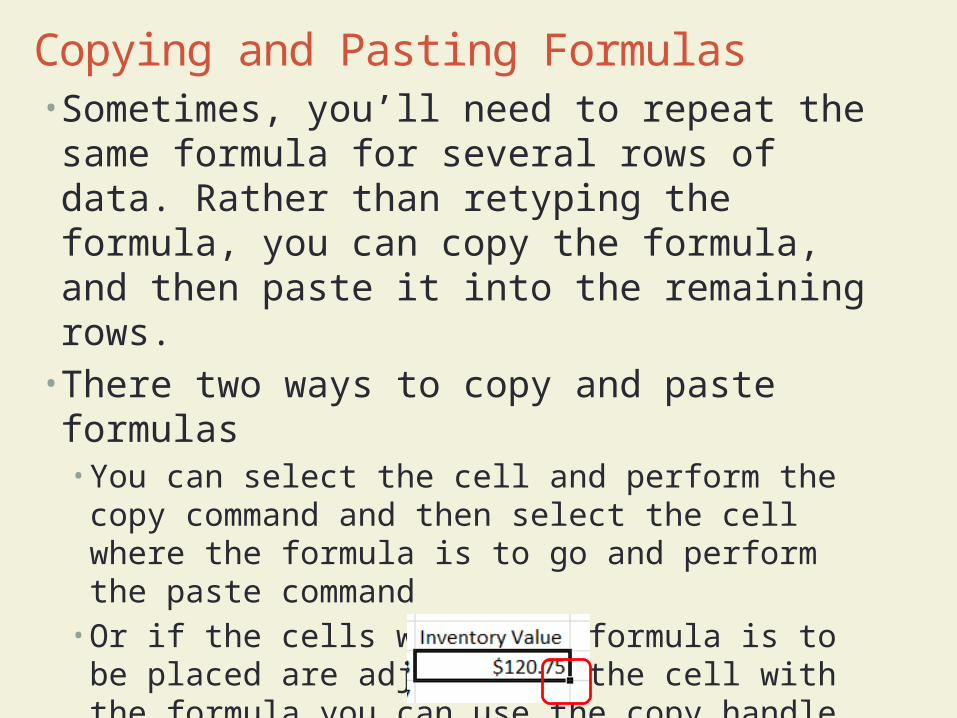
• Sometimes, you’ll need to repeat the same formula for several rows of data. Rather than retyping the formula, you can copy the formula, and then paste it into the remaining rows.
• There two ways to copy and paste formulas• You can select the cell and perform the copy command
and then select the cell where the formula is to go and perform the paste command
• Or if the cells where the formula is to be placed are adjacent to the cell with the formula you can use the copy handle found at the bottom of the cell.
• You move your mouse over the handle and drag it to the adjacent cells.
Copying and Pasting Formulas

• A function is a named operation that returns a value. • Functions are used to simplify formulas, reducing what
might be a long expression into a compact statement.• An example• To add the values in the range A1:A9, you could enter the
long formula: • =A1 +A2+A3+A4+A5+A6+A7+A8+A9
• Or, you could use the SUM function to accomplish the same thing using the function • =SUM(A1:A9)
Entering a Function

• Excel supports over 300 different functions from the fields of finance, business, science, and engineering.
• Excel provides some basic functions using the AutoSum down arrow on the Home tab.
Entering a Function

• The individual AutoSum functions are;• SUM - Sum of the values in the column or row• AVERAGE- Average value in the column or row• COUNT - Total count of numeric values in the column or
row• MIN - Minimum value in the column or row• MAX - Maximum value in the column or row
Entering a Function

• AutoSum inserts one of five common functions and a range reference that Excel determines by examining the layout of the data and choosing the most likely range.
• To use AutoSum• Select the sell you want the sum to appear in.• Click on the AutoSum button in the Editing panel of the
Home tag, the cell will display what is being summed• Click the enter key,.
Using AutoSum

• Topics Covered:• Changing Worksheet Views• Changing the Orientation• Previewing and Printing a Workbook• Viewing Worksheet Formulas• Scaling a Printout
Previewing and Printing a Workbook

• You can view a worksheet in three ways:• Normal View: shows the contents of the current slide• Page Layout View: shows how the current sheet will
look when printed• Page Break View: displays the location of page breaks
within the worksheet
Changing Worksheet Views

• You can adjust the worksheet so that it prints on a single page by changing the page orientation to landscape.
• You can print the contents of a workbook by using the Print tab in Backstage view.
Changing the Orientation and Printing

• You can view the formulas in a workbook by switching to formula view, which displays the formulas used in a worksheet instead of the resulting values.
• You can scale the worksheet to force the contents to fit on a single page.
Viewing Worksheet Formulas


